

Page 1

Oracle® Application Framework
Personalization Guide
Release 12.1
Part No. E12646-02
March 2009
Page 2

Oracle Application Framework Personalization Guide, Release 12.1
Part No. E12646-02
Copyright © 2000, 2009, Oracle and/or its affiliates. All rights reserved.
Primary Author: Siu Chang, Lauren Diana Cohn
Contributing Author: David Weld
Contributor: Jeremy Liu, Charu Chandra, Yuanjing Xu, Sara Woodhull
Oracle is a registered trademark of Oracle Corporation and/or its affiliates. Other names may be trademarks
of their respective owners.
This software and related documentation are provided under a license agreement containing restrictions on
use and disclosure and are protected by intellectual property laws. Except as expressly permitted in your
license agreement or allowed by law, you may not use, copy, reproduce, translate, broadcast, modify, license,
transmit, distribute, exhibit, perform, publish or display any part, in any form, or by any means. Reverse
engineering, disassembly, or decompilation of this software, unless required by law for interoperability, is
prohibited.
The information contained herein is subject to change without notice and is not warranted to be error-free. If
you find any errors, please report them to us in writing.
If this software or related documentation is delivered to the U.S. Government or anyone licensing it on behalf
of the U.S. Government, the following notice is applicable:
U.S. GOVERNMENT RIGHTS
Programs, software, databases, and related documentation and technical data delivered to U.S. Government
customers are "commercial computer software" or "commercial technical data" pursuant to the applicable
Federal Acquisition Regulation and agency-specific supplemental regulations. As such, the use, duplication,
disclosure, modification, and adaptation shall be subject to the restrictions and license terms set forth in the
applicable Government contract, and, to the extent applicable by the terms of the Government contract, the
additional rights set forth in FAR 52.227-19, Commercial Computer Software License (December 2007). Oracle
USA, Inc., 500 Oracle Parkway, Redwood City, CA 94065.
This software is developed for general use in a variety of information management applications. It is not
developed or intended for use in any inherently dangerous applications, including applications which may
create a risk of personal injury. If you use this software in dangerous applications, then you shall be
responsible to take all appropriate fail-safe, backup, redundancy and other measures to ensure the safe use of
this software. Oracle Corporation and its affiliates disclaim any liability for any damages caused by use of this
software in dangerous applications.
This software and documentation may provide access to or information on content, products and services
from third parties. Oracle Corporation and its affiliates are not responsible for and expressly disclaim all
warranties of any kind with respect to third party content, products and services. Oracle Corporation and its
affiliates will not be responsible for any loss, costs, or damages incurred due to your access to or use of third
party content, products or services.
Page 3

Send Us Your Comments
Preface
1 Customization Primer
Contents
Customization Overview
Configuration............................................................................................................................ 1-2
Personalization.......................................................................................................................... 1-4
Extensibility............................................................................................................................... 1-7
Interoperability......................................................................................................................... 1-9
.......................................................................................................... 1-1
2 Personalizing OA Framework Applications
Branding.................................................................................................................................... 2-1
Customizing Look-and-Feel (CLAF)......................................................................................... 2-4
......................................................................................................................................... 2-26
Icons
Responsibilities and Menus................................................................................................... 2-27
Messages
Lookup Codes.......................................................................................................................... 2-27
Style Sheets
.................................................................................................................................. 2-27
..............................................................................................................................2-28
3 Personalizing Your Pages and Portlets
Overview
Personalization Levels
OA Personalization Framework Features
Profile Options Used By OA Personalization Framework
................................................................................................................................... 3-1
...............................................................................................................3-2
................................................................................. 3-5
.......................................................3-8
iii
Page 4

4 Administrative-Level Personalizations
Overview................................................................................................................................... 4-1
Creating Admin-Level Personalizations................................................................................... 4-3
Using the Page Layout Personalization Page....................................................................... 4-6
Using the Page Hierarchy Personalization Page................................................................ 4-16
Examples: Creating New Items Using the Personalization UI........................................... 4-23
Function-Level Personalizations............................................................................................. 4-26
Known Issues.......................................................................................................................... 4-27
Related Information................................................................................................................ 4-28
5 Administrative-Level Personalization User Interface
Overview................................................................................................................................... 5-2
Focused Page Hierarchy Personalization Page......................................................................... 5-2
Choose Personalization Context Page.......................................................................................5-5
Personalize Page........................................................................................................................ 5-8
Create Query Page................................................................................................................... 5-16
Page Hierarchy Personalization Page: Expanded Search Region...........................................5-19
Update Layout Page................................................................................................................. 5-22
Reorder Contents Page
Add Content Page
Create Content Page
Create Item Page...................................................................................................................... 5-27
Update Item Page.................................................................................................................... 5-48
Manage Personalization Levels Page...................................................................................... 5-50
Extract Translation Files Page................................................................................................. 5-52
Upload Translations Page....................................................................................................... 5-53
Translate Page..........................................................................................................................5-54
Choose Languages Page
Personalize Views Page........................................................................................................... 5-56
Create View, Update View, and Duplicate View Pages
Rename Columns / Totaling Page
Setting the Record Set Size for nodeDefinition under a HGrid
Hiding the Save Search and Personalize Buttons
Change Display Size for Various TextInput fields
Adding Search Mappings
............................................................................................................ 5-23
.................................................................................................................... 5-25
................................................................................................................ 5-27
.......................................................................................................... 5-55
......................................................... 5-58
........................................................................................... 5-65
............................................ 5-67
.................................................................. 5-67
................................................................ 5-68
....................................................................................................... 5-68
6 User-Level Personalization User Interface
Overview
Personalizing the Views Panel of a Search Page
iv
................................................................................................................................... 6-1
...................................................................... 6-1
Page 5

Personalizing a Table Region at the User Level....................................................................... 6-2
Personalize Views Page............................................................................................................. 6-3
Create View, Update View, and Duplicate View Pages........................................................... 6-4
Rename Columns / Totaling Page............................................................................................. 6-8
Personalizing an LOV Choice List............................................................................................ 6-8
Known Issues............................................................................................................................ 6-9
7 Portlet-Level Personalization User Interface
Overview................................................................................................................................... 7-1
Personalizing a Portlet.............................................................................................................. 7-1
Create View and Update View Pages....................................................................................... 7-2
Rename Columns / Totaling......................................................................................................7-4
Known Issues............................................................................................................................ 7-4
8 Translating Personalizations
Overview................................................................................................................................... 8-1
Translating Personalizations Stored in MDS........................................................................... 8-1
OA Extension Translation Toolset............................................................................................ 8-7
XLIFF Extractor.................................................................................................................... 8-7
XLIFF Importer
Mapping a Language Code to a Language-Territory Code
Known Issues
Related Information................................................................................................................ 8-16
.................................................................................................................. 8-13
.................................................... 8-14
.......................................................................................................................... 8-15
9 Deploying Personalizations
Overview
Deploying Personalizations Using the Functional Administrator Responsibility................. 9-1
Deploying Personalizations Using the Import/Export Command Line Tools.........................9-4
Known Issues.......................................................................................................................... 9-15
Related Information
................................................................................................................................... 9-1
Export Tool.......................................................................................................................... 9-5
Import Tool
........................................................................................................................ 9-11
................................................................................................................ 9-15
10 Migrating AK Personalizations
Overview
Migrating Customer Personalizations.................................................................................... 10-2
Known Issues
Related Information
................................................................................................................................. 10-1
.......................................................................................................................... 10-4
................................................................................................................ 10-4
v
Page 6

A Personalization Considerations
Overview................................................................................................................................... A-2
Attachments.............................................................................................................................. A-2
Auto-Repeating Layout............................................................................................................. A-3
Bound Values............................................................................................................................ A-3
Branding ................................................................................................................................... A-3
Buttons (Global)........................................................................................................................ A-3
Charts and Graphs.................................................................................................................... A-4
Concurrent Processing.............................................................................................................. A-5
Configurable Pages................................................................................................................... A-5
Custom HTML.......................................................................................................................... A-6
Date Picker................................................................................................................................ A-6
Declarative Page Flow............................................................................................................... A-6
Dialog Pages.............................................................................................................................. A-6
Dynamic User Interface............................................................................................................ A-6
Flexfields
Forms / OA Framework Page Integration
formValue
HGrid........................................................................................................................................ A-7
Hide/Show................................................................................................................................. A-7
Images in Your Pages................................................................................................................ A-7
List of Values (LOV)................................................................................................................. A-7
Locator Element: Breadcrumbs................................................................................................. A-7
Mobile Applications................................................................................................................. A-7
Page Contents Bottom Line.......................................................................................................A-8
Page Footer................................................................................................................................ A-8
Printable Page
Processing Page......................................................................................................................... A-8
Rich Text Editor
Save Model (Warn About Changes)
Shuttle
Standard Web Widgets
SubTab Navigation................................................................................................................... A-9
Switchers (Application, Context and Table Content)
Tables - Advanced..................................................................................................................... A-9
Tables - Classic
Tree ......................................................................................................................................... A-14
Workflow Worklist
................................................................................................................................... A-6
.................................................................................A-6
................................................................................................................................. A-7
........................................................................................................................... A-8
.........................................................................................................................A-8
......................................................................................... A-8
....................................................................................................................................... A-8
............................................................................................................. A-9
............................................................. A-9
........................................................................................................................ A-12
................................................................................................................. A-14
vi
Page 7

B OA Framework Personalization and Customization Known Issues
Overview................................................................................................................................... B-1
Personalization/Extensibility.................................................................................................... B-1
Translation................................................................................................................................ B-2
Customizing Look-and-Feel (CLAF)........................................................................................ B-2
C OA Framework Personalization Caveats
Overview................................................................................................................................... C-1
Personalization Caveats - for Customers................................................................................. C-1
D Personalization FAQ
Overview
Customizing Look-and-Feel (CLAF)
................................................................................................................................... D-1
Index
........................................................................................ D-1
vii
Page 8

Page 9

Send Us Your Comments
Oracle Application Framework Personalization Guide, Release 12.1
Part No. E12646-02
Oracle welcomes customers' comments and suggestions on the quality and usefulness of this document.
Your feedback is important, and helps us to best meet your needs as a user of our products. For example:
• Are the implementation steps correct and complete?
• Did you understand the context of the procedures?
• Did you find any errors in the information?
• Does the structure of the information help you with your tasks?
• Do you need different information or graphics? If so, where, and in what format?
• Are the examples correct? Do you need more examples?
If you find any errors or have any other suggestions for improvement, then please tell us your name, the
name of the company who has licensed our products, the title and part number of the documentation and
the chapter, section, and page number (if available).
Note: Before sending us your comments, you might like to check that you have the latest version of the
document and if any concerns are already addressed. To do this, access the new Applications Release
Online Documentation CD available on My Oracle Support and www.oracle.com. It contains the most
current Documentation Library plus all documents revised or released recently.
Send your comments to us using the electronic mail address: appsdoc_us@oracle.com
Please give your name, address, electronic mail address, and telephone number (optional).
If you need assistance with Oracle software, then please contact your support representative or Oracle
Support Services.
If you require training or instruction in using Oracle software, then please contact your Oracle local office
and inquire about our Oracle University offerings. A list of Oracle offices is available on our Web site at
www.oracle.com.
ix
Page 10

Page 11

Intended Audience
Welcome to Release 12.1 of the Oracle Application Framework Personalization Guide.
This guide assumes you have a working knowledge of the following:
• The principles and customary practices of your business area.
• Computer desktop application usage and terminology.
This documentation assumes familiarity with Oracle Applications. It is written for the
consultants and administrators who oversee the functional requirements of these
applications and deploy the functionality to their users.
Preface
If you have never used Oracle Applications, we suggest you attend one or more of the
Oracle Applications training classes available through Oracle University.
Some of the screenshots used in this guide depict Oracle's default
Note:
corporate browser Look-and-Feel (LAF), while others depict an
alternative LAF. Although the colors and interface elements of these
images may vary, the underlying functionality they illustrate remains
the same, regardless of the LAF that you have implemented.
See Related Information Sources on page xiii for more Oracle Applications product
information.
Deaf/Hard of Hearing Access to Oracle Support Services
To reach Oracle Support Services, use a telecommunications relay service (TRS) to call
Oracle Support at 1.800.223.1711. An Oracle Support Services engineer will handle
technical issues and provide customer support according to the Oracle service request
process. Information about TRS is available at
xi
Page 12

http://www.fcc.gov/cgb/consumerfacts/trs.html, and a list of phone numbers is
available at http://www.fcc.gov/cgb/dro/trsphonebk.html.
Documentation Accessibility
Our goal is to make Oracle products, services, and supporting documentation accessible
to all users, including users that are disabled. To that end, our documentation includes
features that make information available to users of assistive technology. This
documentation is available in HTML format, and contains markup to facilitate access by
the disabled community. Accessibility standards will continue to evolve over time, and
Oracle is actively engaged with other market-leading technology vendors to address
technical obstacles so that our documentation can be accessible to all of our customers.
For more information, visit the Oracle Accessibility Program Web site at
http://www.oracle.com/accessibility/.
Accessibility of Code Examples in Documentation
Screen readers may not always correctly read the code examples in this document. The
conventions for writing code require that closing braces should appear on an otherwise
empty line; however, some screen readers may not always read a line of text that
consists solely of a bracket or brace.
Accessibility of Links to External Web Sites in Documentation
This documentation may contain links to Web sites of other companies or organizations
that Oracle does not own or control. Oracle neither evaluates nor makes any
representations regarding the accessibility of these Web sites.
Structure
1 Customization Primer
2 Personalizing OA Framework Applications
3 Personalizing Your Pages and Portlets
4 Administrative-Level Personalizations
5 Administrative-Level Personalization User Interface
6 User-Level Personalization User Interface
7 Portlet-Level Personalization User Interface
8 Translating Personalizations
9 Deploying Personalizations
10 Migrating AK Personalizations
A Personalization Considerations
B OA Framework Personalization and Customization Known Issues
C OA Framework Personalization Caveats
D Personalization FAQ
xii
Page 13

Related Information Sources
This book is included on the Oracle Applications Documentation Library, which is
supplied in the Release 12 Media Pack. You can download soft-copy documentation as
PDF files from the Oracle Technology Network at http://otn.oracle.com/documentation,
or you can purchase hard-copy documentation from the Oracle Store at
http://oraclestore.oracle.com. The Oracle Applications Release 12 Documentation
Library contains the latest information, including any documents that have changed
significantly between releases. If substantial changes to this book are necessary, a
revised version will be made available on the "virtual" documentation library on My
Oracle Support (formerly OracleMetaLink).
If this guide refers you to other Oracle Applications documentation, use only the latest
Release 12 versions of those guides.
Online Documentation
All Oracle Applications documentation is available online (HTML or PDF).
• Online Help - Online help patches (HTML) are available on My Oracle Support.
• PDF Documentation - See the Oracle Applications Documentation Library for
current PDF documentation for your product with each release. The Oracle
Applications Documentation Library is also available on My Oracle Support and is
updated frequently.
• Oracle Electronic Technical Reference Manual - The Oracle Electronic Technical
Reference Manual (eTRM) contains database diagrams and a detailed description of
database tables, forms, reports, and programs for each Oracle Applications product.
This information helps you convert data from your existing applications and
integrate Oracle Applications data with non-Oracle applications, and write custom
reports for Oracle Applications products. The Oracle eTRM is available on My
Oracle Support.
Related Guides
You should have the following related books on hand. Depending on the requirements
of your particular installation, you may also need additional manuals or guides.
Oracle Applications Concepts
This book is intended for all those planning to deploy Oracle E-Business Suite Release
12, or contemplating significant changes to a configuration. After describing the Oracle
Applications architecture and technology stack, it focuses on strategic topics, giving a
broad outline of the actions needed to achieve a particular goal, plus the installation and
configuration choices that may be available.
Oracle Applications Developer's Guide
This guide contains the coding standards followed by the Oracle Applications
xiii
Page 14

development staff. It describes the Oracle Application Object Library components
needed to implement the Oracle Applications user interface described in the Oracle
Applications User Interface Standards for Forms-Based Products. It provides information to
help you build your custom Oracle Forms Developer forms so that they integrate with
Oracle Applications. In addition, this guide has information for customizations in
features such as concurrent programs, flexfields, messages, and logging.
Oracle Applications Flexfields Guide
This guide provides flexfields planning, setup, and reference information for the Oracle
Applications implementation team, as well as for users responsible for the ongoing
maintenance of Oracle Applications product data. This guide also provides information
on creating custom reports on flexfields data.
Oracle Application Framework Developer's Guide
This guide contains the coding standards followed by the Oracle Applications
development staff to produce applications built with Oracle Application Framework.
This guide is available in PDF format on My Oracle Support and as online
documentation in JDeveloper 10g with Oracle Application Extension.
Oracle Applications Installation Guide: Using Rapid Install
This book is intended for use by anyone who is responsible for installing or upgrading
Oracle Applications. It provides instructions for running Rapid Install either to carry
out a fresh installation of Oracle Applications Release 12, or as part of an upgrade from
Release 11i to Release 12. The book also describes the steps needed to install the
technology stack components only, for the special situations where this is applicable.
Oracle Applications System Administrator's Guide Documentation Set
This documentation set provides planning and reference information for the Oracle
Applications System Administrator. Oracle Applications System Administrator's Guide -
Configuration contains information on system configuration steps, including defining
concurrent programs and managers, enabling Oracle Applications Manager features,
and setting up printers and online help. Oracle Applications System Administrator's Guide
- Maintenance provides information for frequent tasks such as monitoring your system
with Oracle Applications Manager, administering Oracle E-Business Suite Secure
Enterprise Search, managing concurrent managers and reports, using diagnostic
utilities including logging, managing profile options, and using alerts. Oracle
Applications System Administrator's Guide - Security describes User Management, data
security, function security, auditing, and security configurations.
Oracle Applications User's Guide
This guide explains how to navigate, enter data, query, and run reports using the user
interface (UI) of Oracle Applications. This guide also includes information on setting
user profiles, as well as running and reviewing concurrent requests.
Oracle E-Business Suite Diagnostics User's Guide
This manual contains information on implementing, administering, and developing
diagnostics tests in the Oracle E-Business Suite Diagnostics framework.
xiv
Page 15

Oracle E-Business Suite Integrated SOA Gateway User's Guide
This guide describes the high level service enablement process, explaining how users
can browse and view the integration interface definitions and services residing in
Oracle Integration Repository.
Oracle E-Business Suite Integrated SOA Gateway Implementation Guide
This guide explains how integration repository administrators can manage and
administer the service enablement process (based on the service-oriented architecture)
for both native packaged public integration interfaces and composite services (BPEL
type). It also describes how to invoke Web services from Oracle E-Business Suite by
employing the Oracle Workflow Business Event System; how to manage Web service
security; and how to monitor SOAP messages.
Oracle E-Business Suite Integrated SOA Gateway Developer's Guide
This guide describes how system integration developers can perform end-to-end service
integration activities. These include orchestrating discrete Web services into meaningful
end-to-end business processes using business process execution language (BPEL), and
deploying BPEL processes at run time.
It also explains in detail how to invoke Web services using the Service Invocation
Framework. This includes defining Web service invocation metadata, invoking Web
services, managing errors, and testing the Web service invocation.
Oracle Web Applications Desktop Integrator Implementation and Administration
Guide
Oracle Web ADI brings Oracle E-Business Suite functionality to a spreadsheet where
familiar data entry and modeling techniques can be used to complete Oracle E-Business
Suite tasks. You can create formatted spreadsheets on your desktop that allow you to
download, view, edit, and create Oracle E-Business Suite data that you can then upload.
Use this guide to implement Oracle Web ADI and for information on defining
mappings, layouts, style sheets, and other setup options.
Oracle Workflow Administrator's Guide
This guide explains how to complete the setup steps necessary for any product that
includes workflow-enabled processes. It also describes how to manage workflow
processes and business events using Oracle Applications Manager, how to monitor the
progress of runtime workflow processes, and how to administer notifications sent to
workflow users.
Oracle Workflow Developer's Guide
This guide explains how to define new workflow business processes and customize
existing Oracle Applications-embedded workflow processes. It also describes how to
define and customize business events and event subscriptions.
Oracle Workflow User's Guide
This guide describes how users can view and respond to workflow notifications and
monitor the progress of their workflow processes.
xv
Page 16

Oracle Workflow API Reference
This guide describes the APIs provided for developers and administrators to access
Oracle Workflow.
Oracle Workflow Client Installation Guide
This guide describes how to install the Oracle Workflow Builder and Oracle XML
Gateway Message Designer client components for Oracle E-Business Suite.
Integration Repository
The Oracle Integration Repository is a compilation of information about the service
endpoints exposed by the Oracle E-Business Suite of applications. It provides a
complete catalog of Oracle E-Business Suite's business service interfaces. The tool lets
users easily discover and deploy the appropriate business service interface for
integration with any system, application, or business partner.
The Oracle Integration Repository is shipped as part of the E-Business Suite. As your
instance is patched, the repository is automatically updated with content appropriate
for the precise revisions of interfaces in your environment.
Do Not Use Database Tools to Modify Oracle Applications Data
Oracle STRONGLY RECOMMENDS that you never use SQL*Plus, Oracle Data
Browser, database triggers, or any other tool to modify Oracle Applications data unless
otherwise instructed.
Oracle provides powerful tools you can use to create, store, change, retrieve, and
maintain information in an Oracle database. But if you use Oracle tools such as
SQL*Plus to modify Oracle Applications data, you risk destroying the integrity of your
data and you lose the ability to audit changes to your data.
Because Oracle Applications tables are interrelated, any change you make using an
Oracle Applications form can update many tables at once. But when you modify Oracle
Applications data using anything other than Oracle Applications, you may change a
row in one table without making corresponding changes in related tables. If your tables
get out of synchronization with each other, you risk retrieving erroneous information
and you risk unpredictable results throughout Oracle Applications.
When you use Oracle Applications to modify your data, Oracle Applications
automatically checks that your changes are valid. Oracle Applications also keeps track
of who changes information. If you enter information into database tables using
database tools, you may store invalid information. You also lose the ability to track who
has changed your information because SQL*Plus and other database tools do not keep a
record of changes.
xvi
Page 17

This chapter covers the following topics:
• Customization Overview
• Configuration
• Personalization
• Extensibility
• Interoperability
Customization Overview
Oracle Applications has a layered architecture, where each layer encapsulates the
maximum reusable set of features without creating dependencies on higher layers. Such
architecture enhances reusability of functionality and makes possible global
customizations. The task of customizing an Oracle Application can fall into one of a few
categories:
1
Customization Primer
• Configuration, page 1-2: using pre-built features to fine-tune the application to
match the business and deployment practices of a particular customer.
Configuration examples:
• Setup of a chart of accounts.
• Setup of business groups or organizations.
• Setup of logging and auditing profiles.
• Personalization, page 1-4: declaratively tailoring the user interface (UI)
look-and-feel, layout or visibility of page content to suite a business need or a user
preference. Personalization examples:
• Tailor the color scheme of the UI.
Customization Primer 1-1
Page 18

• Tailor the order in which table columns are displayed.
• Tailor a query result.
• Extensibility, page 1-7: extending the functionality of an application, beyond what
can be done through personalization. Extensibility examples:
• Add new functional flows.
• Extend or override existing functional flows.
• Extend or override existing business logic.
• Interoperability, page 1-9: interfacing Oracle Applications with third party
applications and service providers. Interoperability examples:
• Interface with a single sign on server.
• Interface with a credit rating service.
• Interface with a legacy application.
These customization categories aren't always clear cut. Certainly, in some cases,
customization tasks can even span a couple of categories. This book is designed to give
a high level perspective of the various customization categories, and discusses only
those categories that OA Framework facilitates. References to other resources are
provided, where other customization categories are discussed in more detail.
Configuration
Configurations exist almost in every layer and every application. Broadly,
configurations can be classified into three classes, as follows:
Deployment Topology Configurations
Deployment topology configurations map closely to the hardware topography of a
deployment and are mostly done through technology stack configuration parameters.
Examples:
• Setting up the number of Java Virtual Machines (VM) to run on each middle-tier
server.
• Setting up the number of database connections.
• Setting up the JServ parameters.
Configurations under this category are documented in greater detail in each technology
1-2 Oracle Application Framework Personalization Guide
Page 19

stack layer's respective administration manuals, which include the following:
• Oracle Applications Maintenance Procedures
• Oracle Applications Maintenance Utilities
• Oracle Applications Installation Guide: Using Rapid Install
• Oracle Applications Upgrade Guide
Global Functionality Configurations
Global functionality configurations cut across application families and are mostly done
through shared technologies such as AOL (Applications Object Library), TCA (Trading
Community Architecture), Tasks, Notes, and so on. Examples:
• Setting up the multi-org hierarchy.
• Setting up the various party business relationships.
• Setting up various Profiles and Responsibilities.
Configurations under this category are documented in greater detail in the respective
layer's implementation and administration manuals, which include the following:
• Oracle Applications Multiple Organizations Implementation Guide
• Oracle Applications Flexfields Guide
• Oracle Applications System Administrator's Guide Documentation Set
• Oracle Workflow Administrator's Guide
Application or Functional Area Configurations
Configurations associated with a particular functional area (such as accounting) or
application. Examples:
• Setting up General Ledger chart of accounts.
• Setting up employee benefit packages.
• Setting up an online catalog.
Configurations under this category are documented in a greater detail in a respective
application's implementation manual, grouped under:
• ERP product manuals
Customization Primer 1-3
Page 20

• CRM product manuals
Personalization
OA Framework was designed with durable personalization capabilities. Durability of
OA Framework personalization is largely attributed to the declarative architecture and
the object-oriented approach underlying the implementation. Declarative UI component
definitions are stored in the form of meta-data in a database repository.
Personalizations are translated into offsets from the base meta-data definition and
stored separately. At runtime, the applicable personalizations meta-data is uploaded
from the repository and layered over the base meta-data definition to produce the net
effect. Product upgrades and patches affect only the base meta-data definition, so
customer personalizations continue to function properly as applicable.
Personalization Levels
The built-in personalization UI facilitates a variety of personalization features at a
number of different levels within the following user groups:
Oracle's In-House E-Business Suite Developer
• Seeded Function Level - like the Function Level available to Administrators (see
the following section), but personalizations made at this level can only be changed
or deleted by Oracle.
• Seeded User Level - like the User Level available to End Users (see the following
section), but personalizations made at this level can only be changed or deleted by
Oracle. (Also referred to as "Oracle-seeded user-level" personalizations.)
• Other seeded levels - Oracle Applications Developers can create and ship
personalizations at any of the Administrator personalization levels discussed in the
following section, but these are not protected against change and deletion by
Administrators at the customer site.
For additional information, refer to Chapter 4: Implementing Specific UI Features:
Personalizable Pages in the OA Framework Developer's Guide.
Oracle Applications Administrator
• Function Level - the customer administrator can define functions and use them as
context for granular level personalizations. For example, you can create a
function-level personalization to "hide the salary field, if the user is updating an
employee record, but not when the user is creating a new employee".
• Industry Level - the customer administrator can use the delivered set of predefined
industry categories to define personalizations according to vertical market
1-4 Oracle Application Framework Personalization Guide
Page 21

distinctions.
Seeded personalizations may be provided at this level, but customer administrators
can also create their own admin-level Industry personalizations.
• Localization Level - the customer administrator can use locales as context for
personalizations such as "showing a different address field label based on country
settings".
• Site Level - the customer administrator can introduce global personalizations that
affect all users with access to the given application component, such as "setting the
number of rows shown in a table".
• Organization Level - the customer administrator can introduce personalizations
that affect all users belonging to a particular organization or business unit with
access to the application component. Example: "sort notifications by age for one
organization and by urgency for another".
• Responsibility Level - the customer administrator can introduce personalizations
that affect all users of a particular responsibility with access to the application
component. Example: "show a trend graph for the sales manager responsibility".
• Seeded User Level - like the User Level available to End Users (see below), but
personalizations made at this level are visible to all users and can only be changed
or deleted by the customer administrator. (Also referred to as "admin-seeded
user-level" personalizations.)
• Refer to Personalizing Your Pages and Portlets, page 3-1 for additional
information.
Oracle Applications User
• Application Users can save personalized views of a query results region and
retrieve them at a later time. User level personalizations aren't seen by other users.
• Refer to Personalizing Your Pages and Portlets, page 3-1 for additional
information.
Available Personalizations
The following administrator and end user personalizations are available:
Administrator Personalizations
• Change number of rows displayed in a table.
• Change product branding (image).
Customization Primer 1-5
Page 22

• Change region header icon.
• Hide or show regions and items.
• Change layout order of regions and items within the boundaries of the parent
region.
• Include or exclude descriptive flexfield segments.
• Define up to three sorting levels for tabulated data.
• Filter (restrict querying of) tabular data.
• Change item labels and region headers.
• Change required state of non-mandatory items.
• Update allowed state for updateable items.
• Enable totals for table columns, when applicable.
• Alter the item cascading style sheet (CSS) - to personalize the look and feel of an
item.
• Set a default value for an item.
• Define tips (in line instructions and usage help) for associated items.
• Add new items to an existing region. Typically, as part of an extensibility project,
where new items are limited to specific styles.
• All administrator personalizations are visible to the end user.
• System Personalizations - in addition to the above, the following are some cross
application personalizations facilitated by both OA Framework and Application
Object Library:
• Branding
• Style sheets
• Images
• Responsibilities
• Menus
• Messages
1-6 Oracle Application Framework Personalization Guide
Page 23

• Lookup Codes
• Pre-packaged Flexfields
• Customizing Look and Feel
End User Personalizations
Unlike Administrators, Users can create and save several personalized viewsthat can be
retrieved conveniently at a later time. That said, end-user personalized views are
limited in scope to Query regions with search results tables. For these regions,
end-users can personalize any of the following features:
• Change the number of rows displayed in a table.
• Hide or show regions and items (results table columns are a popular example).
• Change the layout order of regions and items within the boundaries of the parent
region (order of results table columns are a popular example).
• Define up to three sorting levels for tabulated data.
• Filter (restrict query) tabular data.
Extensibility
• Change item labels and region headers.
• Enable totals for table columns, when applicable.
OA Framework was designed with durable extensibility capabilities. Durability of OA
Framework extensibility is largely attributed to the declarative architecture and the
object-oriented approach underlying the implementation. The JDeveloper wizards and
built-in personalization UI make it easier to extend Oracle Applications. In addition,
Oracle customers can take advantage of the extensibility offered by Flexfields (Oracle
Applications Flexfields Guide) and Oracle Workflow (Oracle Workflow Administrator's
Guide).
OA Framework extensibility is geared to enable customers to add new functionality and
override or extend existing business logic beyond what can be accomplished via
personalization. This includes the following extensibility scenarios:
• Adding new pages or complete flows.
• Adding a new attribute (i.e. field) to a prepackaged page.
• Extending attribute defaulting logic.
Customization Primer 1-7
Page 24
• Extending validation logic.
To understand how extensibility works, one must understand how OA Framework
applications are built. Please refer to the following sections in the OA Framework
Developers Guide:
• Chapter 2: OA Framework Essentials: Anatomy of an OA Framework Page
• Chapter 3: Building an OA Framework Application: Implementing the Model
• Chapter 3: Building an OA Framework Application: Implementing the View
Extensibility is often observed in the UI, but implementation is mostly centered on the
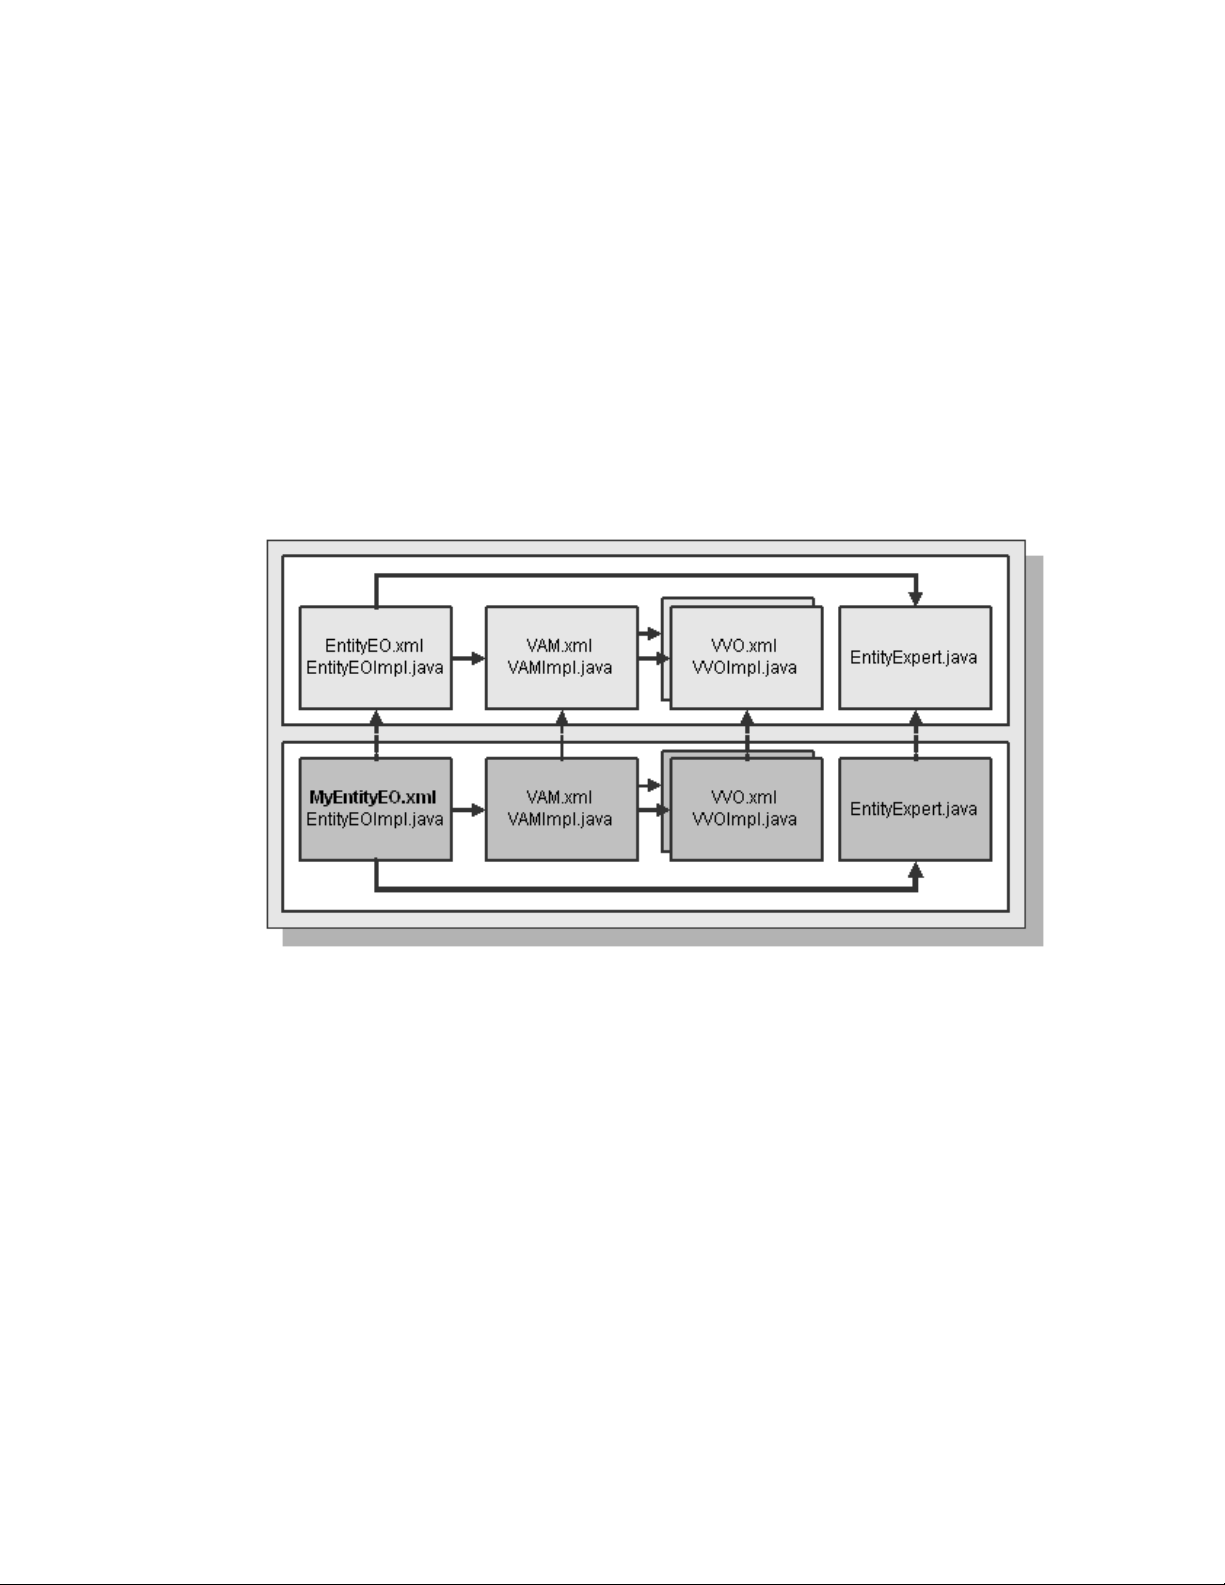
underlying business objects. The following diagram depicts the BC4J objects involved
when extending an OA Framework application.
The first row of the diagram represents an exhaustive list of all possible objects a
developer might create when creating an entity object. The first box illustrates that
when creating an entity object, two files are generated: the meta-data definition XML
file and the actual implementation Java class file. Entity Objects handle attribute level
and record level validations. These validations often need to use other View Objects,
called Validation View Objects (VVO). Validation View Objects are grouped under a
Validation Application Module (VAM). Like Entity Objects, creating a VVO and a VAM
generates a meta-data definition XML file and an implementation java class file for each
object.
Finally, the Entity Object sometimes relies on a helping class to offer, among other
services, a validation service optimized for usage by other Entity Objects. This helper
class is called the Entity Expert and is linked to the Entity Object through an Entity
Object property.
1-8 Oracle Application Framework Personalization Guide
Page 25

For example, you may be satisfied with extending the Entity Expert to override a
validation method such as isSupplierValid. In such a case, it is not wise to reference the
extended Entity Expert (MyEntityExpert) directly from the base Entity Object
(EntityEO.XML), as such an approach does not survive upgrades.
A durable approach requires extending the base Entity Object (using the JDeveloper
Wizards) and updating the entity expert property on the extended Entity Object to
point to the extended Entity Expert.
Interoperability
Implementing Oracle Applications for established customers sometimes involves
interfacing with legacy applications or third party services. Interoperability scenarios
can be classified into three levels:
Note: The diagram illustrates a case in which all objects are extended,
which is not always the case. In most of the situations, you may be
satisfied with extending just a portion of these objects.
Caution: Never edit the base definition of an object or make a copy of a
base object. Always extend the relevant object and use BC4J
substitutions to reference the extended object.
• Deployment Wide - these involve cross application services that can be interfaced
transparently from the application. Example: integration with a single-signon
server.
• Application Specific - these involve special interoperability features that the
application is directly aware of. Example: integration between Oracle iPayment and
credit card processors. These are documented in the respective application
implementation manuals.
• Function Specific - these involve industry standards for publishing a variety of
interfaces used to interoperate with third party applications and services. Such
industry standards include Web Services, Enterprise Java Beans, MIME, and so on.
In addition to the above, the Oracle Applications technology stack is consolidating
around the OA Framework technology stack. In the interim, some CRM applications are
not migrated from the JTT technology stack. Instead, OA Framework has created
interoperability solutions that allow for these technology stacks to coexist and facilitate
a smooth user experience upon transition between technology stacks.
Customization Primer 1-9
Page 26

Page 27

2
Personalizing OA Framework Applications
This chapter covers the following topics:
• Branding
• Customizing Look-and-Feel (CLAF)
• Icons
• Responsibilities and Menus
• Messages
• Lookup Codes
• Style Sheets
Branding
As described in the Browser Look-And-Feel (BLAF) guidelines for branding on the
Oracle Technology Network (OTN)
[http://otn.oracle.com/tech/blaf/specs/branding.html], every OA Framework page
reserves the upper left-hand corner for either of the following:
• Basic (Non-Contextual) Branding, page 2-1 - includes corporate ("Oracle") and
product brand names
• In-Context Branding, page 2-3 - includes user-selected contextual information in
addition to the corporate and product brand names
All OA Framework pages must provide basic branding support. In-context branding
may be used in select cases.
Basic (Non-Contextual) Branding
Basic branding includes the display of corporate ("Oracle") and product brand names. It
displays the product branding as text drawn from one of several possible sources. The
global buttons are displayed as text links only. It supports a regular layout style, as in
Personalizing OA Framework Applications 2-1
Page 28

the following example.
Basic branding (corresponds to BLAF "Regular" layout)
Personalizing the Corporate Branding Image
Every page contains a corporateBranding page element that has an Oracle corporate
image file assigned to it. That image file is /OA_MEDIA/FNDSSCORP.gif, which
contains the Oracle corporate image. You can change the corporate branding image that
appears on your pages in one of two ways:
• To globally override the Oracle corporate branding image with your own corporate
branding image, set the profile option Corporate Branding Image for Oracle
Applications (FND_CORPORATE_BRANDING_IMAGE) to the name of an image
file (GIF) that contains your corporate image. For example, MyCompanyImage.gif
. The image file MyCompanyImage.gif should be placed under the $OA_MEDIA
directory. This profile option should be set at the Site level and does not have a
default value.
• Or, create an administrative-level personalization, page 5-8 for a specific page by
setting the Image URI property on the corporateBranding page element to a
different image file. This updates the image only for the specific usage on that page.
Warning: Do not attempt to globally override the corporate branding
image by renaming your custom corporate branding image file as
/OA_MEDIA/FNDSSCORP.gif. This results in distortion of your
corporate image. When you render a page, OA Framework checks
whether a value is set for the profile option Corporate Branding Image
for Oracle Applications. If no value is set, it renders
/OA_MEDIA/FNDSSCORP.gif as the corporate branding image and
sets the image area size to 134 x 23 (which is the actual size of the image
in FNDSSCORP.gif). If this profile option has a value set, it renders the
content of the specified image file without specifying an image area size
since the image size is as yet, unknown.
Personalizing Product Branding
The product branding is derived in one of three possible ways:
• Default behavior - If your OA Framework page is launched from the Navigator in
the E-Business Suite Personal Home Page, OA Framework automatically sets the
2-2 Oracle Application Framework Personalization Guide
Page 29

branding text for you based on the current selected responsibility and page link.
This ensures consistency between the options presented in the Navigator and the
branding text displayed on the application page.
Note: The default branding is set only if the FND:Framework
Compatability Mode profile option value is set to 11.5.10.
• Declarative branding behavior - A developer may set the product branding
declaratively on the page itself and override the default branding behavior. If this is
the case, you can personalize the product branding text by creating an
administrative-level personalization, page 5-8 for the page which sets the Text
property on the productBranding: formattedText page element to the product
name you want to display.
• OAPB override behavior - A developer may also define a form function and call it
using the OAPB URL parameter with the page to specify the product branding text.
When a developer specifies an OAPB parameter programmatically, it overrides
both the default and the declarative branding behavior, if any. The only way to
personalize the product branding text in this case is by logging into Oracle
Applications and updating the User Function Name value for that branding
function, using the Form Functions screen.
In-Context Branding
The in-context brand includes the corporate and product brand images. Additionally,
contextual information renders below the corporate and product information, as shown
in the following example.
Example of In-Context Branding
To personalize in-context branding, create an administrative-level personalization, page
5-8 for the page that sets the Text property on the productBranding: formattedText
page element to the product name you want to display. Then set the Text property on
the inContextBranding: formattedText page element to the context you wish to
display. For example, the Text property of the inContextBranding: formattedText page
element displayed in the preceding example is "Customer <b>Sun Microsystems -
Note:
This style of branding is intended to be used only for cases where
the user makes a contextual selection when starting work that remains
unchanged for the life of the application or task.
Personalizing OA Framework Applications 2-3
Page 30

Menlo Park</b>".
Customizing Look-and-Feel (CLAF)
Oracle E-Business Suite applications are currently shipped with Oracle's corporate
Browser Look-and-Feel (BLAF), which supplies a rich set of components for web-based
applications. Although OA Personalization Framework provides you with the ability to
change the look of a page by changing user interface (UI) component properties, adding
UI components, and so on, it does not allow you to create and apply an entirely new
Look-and-Feel to an application.
The Customizing Look-and-Feel (CLAF) feature addresses this issue by providing a
self-service based UI to modify the Look-and-Feel of an application. The feature
enhances OA Personalization Framework by allowing personalization administrators
to:
• Create a new Look-and-Feel (LAF).
• Register the new LAF.
• Apply the LAF at the Application, Responsibility, Site, Organization or User levels.
• Update a custom LAF.
UIX currently provides OA Framework with the following LAFs, which can be used
directly in web applications:
• Browser Look-and-Feel (BLAF) - the default LAF that conforms to Oracle's
corporate UI guidelines.
• Minimal Look-and-Feel (MLAF) - a simplified version of BLAF with a lightweight
UI.
• Base Look-and-Feel - the root of all LAF implementations.
• Simple Look-and-Feel (SLAF) - a LAF built on top of Base Look-and-Feel to offer
more customization features, and to serve as an illustration of how to create LAF
extensions on top of a base LAF.
You can build custom LAFs by extending Base LAF, Simple LAF, or another custom
LAF.
Note:
You cannot extend BLAF or MLAF.
Infrastructure of a Look-and-Feel
A Look-and-Feel is defined by three major components: style sheets (XSS), page 2-5,
2-4 Oracle Application Framework Personalization Guide
Page 31

Style Sheets
Icons
Renderers
icons, page 2-5, and renderers, page 2-5.
A style sheet document (.xss extension) lists the styles for the Look-and-Feel. Styles
control the color and font of HTML components. For a complete discussion of style
sheets and styles, please refer to the Style Sheets topic, page 2-28 in this chapter. Style
sheets are located in /OA_HTML/cabo/styles.
See also the list of global styles, page 2-21 provided by UIX later in this chapter.
Some web beans are composed of one or more icons that control the web bean's
Look-and-Feel. Icons are identified by a name. For example, the Hide/Show web bean
consists of the "disclosed" icon. Icons are present in the LAF configuration file. For
additional information, refer to the Icons topic, page 2-26 in this chapter.
A renderer controls how a web bean lays out its children and generates HTML. If the
layout of the LAF you wish to create is different from the standard layout provided by
Oracle, you will have to write new renderers for those components that differ in their
layout. You define renderers declaratively as templates (.uit extension). Following is an
example template definition for a sidebar component:
<!-- Template used by sample LAF for side bar. -->
<templateDefinition
xmlns="http://xmlns.oracle.com/uix/ui"
xmlns:ui="http://xmlns.oracle.com/uix/ui"
xmlns:html="http://www.w3.org/TR/REC-html40"
targetNamespace="http://www.example.org/demo/templates"
localName="sidebar">
<content>
…
</content>
</templateDefinition>
You should have one template renderer for each component that has a custom layout.
The section between the <content> and </content> tags contains the desired UI layout
and any references to other UI components. The UI layout is represented in uiXML and
HTML.
Important:
You can use a template renderer to customize the layout of
some - but not all - components. Following is a list of the components
with customizable layouts:
• borderLayout
• breadCrumbs
Personalizing OA Framework Applications 2-5
Page 32

• bulletedList
• button
• contentContainer
• flowLayout
• footer
• globalButtonBar
• globalHeader
• header
• hideShow
• link
• messageComponentLayout
• pageButtonBar
• pageLayout
• printablePageLayout
• rowLayout
• sideBar
• sideNav
• stackLayout
• subTabBar
• subTabLayout
• tabBar
• tableLayout
• tip
• train
2-6 Oracle Application Framework Personalization Guide
Page 33

Look-and-Feel Extension (Custom Skins)
When you define a new Look-and-Feel, you can also alter the layout of its inherited
Look-and-Feel, thereby creating what is called a custom skin. To complete the creation
of a custom skin, you must register any custom renderers, page 2-20, custom facet
renders, page 2-7, and custom icons, page 2-20 for that skin, on your custom
Look-and-Feel using the Customizing Look-and-Feel UI.
Note: A facet is an optimized variation of a LAF, usually created for a
specific output medium. For example, a printable version of a page can
be implemented as a facet by excluding superfluous navigation and
personalization controls that are not necessary for printed output.
OA Framework will provide a set of skins or web page layout themes that extend the
base and simple LAFs from UIX. You can use these skins to change the way Oracle
E-Business Suite application pages lay out their content. These skins may be applied at
the Site, Responsibility, Application, Organization or User level by setting the profile
option Oracle Applications Look and Feel (APPS_LOOK_AND_FEEL). The skins that
OA Framework will provide are under development.
For more information, see Custom Renderer and Custom Icon Standards, page 2-20.
Example
The following code is an example of content in a LAF extension XML that defines a new
skin. This example represents a LAF identified by a family called customlaf. Since it
extends the simple.desktop LAF, it inherits all the styles from the UIX Simple
Look-and-Feel (SLAF). This custom LAF overrides the renderer for page layout by
providing its own template-based renderer for page layout. It also provides a custom
printable facet page layout renderer (which is initiated to render the page when you run
the page in printable page mode) and some custom icons.
Personalizing OA Framework Applications 2-7
Page 34

<lookAndFeel xmlns="http://xmlns.oracle.com/uix/ui/laf"
xmlns:ui="http://xmlns.oracle.com/uix/ui"
id="customlaf.desktop"
family="customlaf"
extends="simple.desktop"
styleSheetName="customlaf-desktop.xss">
<!-- Custom Renderers -->
<renderers>
<!-- Register a custom pageLayout Renderer -->
<renderer name="ui:pageLayout">
<template name="pageLayout.uit"/>
</renderer>
</renderers>
<!-- Facet custom Renderers -->
<renderers facets="printable">
<!-- Register a custom pageLayout Renderer -->
<renderer name="ui:pageLayout">
<template name="printablePageLayout.uit"/>
</renderer>
</renderers>
<!-- Custom Icons -->
<icons>
<!-- Provide some icon -->
<icon name="ui:tabBarStart">
<contextImage uri="images/laf/customlaf/tbs.gif"
width="8" height="26"/>
</icon>
</icons>
Customizing Look-and-Feel (CLAF) User Interface
The Customizing Look-and-Feel feature provides a self-service user interface that
allows you to create a new Look-and-Feel, as well as update an existing Look-and-Feel.
It does not, however, provide a user interface to create custom template renderers. You
must first create/write any custom template renderers that you require before you can
create the look and feel.
Prerequisites
• You should have a good knowledge of UIX web beans and be able to identify which
specific UIX component maps to a given component in your web site.
• You should have a good understanding of UIX XSS infrastructure and be able to
identify what color and font styles are associated with each component. Refer to the
Style Sheets topic, page 2-28 and the Global Styles table, page 2-21 for additional
information.
• You must ensure that you have write permission on the file system where OA
Personalization Framework is running. If write permission is not granted before
you attempt to create or update a Look-and-Feel, the UI will throw an exception.
• You need to write a template renderer only if a component has a layout and
2-8 Oracle Application Framework Personalization Guide
Page 35

children that are different from that of the Browser Look-and-Feel (BLAF). If you
need to register a new template renderer, follow these steps before proceeding to
the Accessing the CLAF UI section, page 2-9 following:
1. Name your custom template renderer file as <webBeanType>.uit. For example:
sideBar.uit, tabBar.uit, or pageLayout.uit.
2. Create a folder named <lookandFeelId> under $HTML_TOP/cabo/templates,
where <lookandFeelId> would be a LAF name, such as custom-desktop.
Place the <webBeanType>.uit file in the folder $HTML_TOP/cabo/templates/
3.
<lookandFeelId>. For example to register a new template renderer for tabBar,
move tabBar.uit so that resides as
$HTML_TOP/cabo/templates/custom-desktop/tabBar.uit, where
custom-desktop is the <lookandFeelId> folder.
Continue with the Accessing the CLAF UI, page 2-9 and Creating a New LAF,
4.
page 2-10 sections to create new LAF.
To update an already registered template renderer, first replace the old
<webBeanType>.uit file with your new modified version of the <webBeanType>.uit
file. Next, proceed to the Accessing the CLAF UI, page 2-9 and Updating a LAF,
page 2-18 sections. Make sure you replace <webBeanType>.uit in the appropriate
<lookandFeelId> folder.
Accessing the CLAF UI
The Customizing Look-and-Feel user interface can be accessed in one of two ways:
• Using the Oracle Applications Users window, add the responsibility
FND_CLAF_ADMINISTRATOR to the user who should be given permission to
create new LAFs. Make sure you bounce your web server after saving the change so
that the setting takes effect. A Customizing Look and Feel Administrator
responsibility should now be available for the user. After selecting that
responsibility, the user should then select Customizing Look and Feel
Administrator to navigate to the first page of the CLAF UI.
Important:
To ensure that your template renderer registers
properly, make sure the new LAF you create has the same LAF
name as the <lookandFeelId> folder you created in the second step.
• In the Page Hierarchy Personalization page, page 4-16 of the Admin
Personalization UI, the Page Hierarchy HGrid displays a column called Customize
Look and Feel. A Customize Look and Feel (pen) icon appears in the column if the
following two conditions are met:
Personalizing OA Framework Applications 2-9
Page 36

When you select the Customize Look and Feel icon in the HGrid for a specific page
element, you navigate to the second page of the CLAF UI (Customize Styles and Icons,
page 2-12 ) for that page element.
Creating a New LAF
Aside from creating custom template renderers yourself, the CLAF UI provides all the
other features needed to create a new look and feel. The UI allows you to:
• Specify the new Look-and-Feel identifier or name. The identifier must be unique, all
• The application page's current Look-and-Feel is customizable. For example if
the current Look-and-Feel is BLAF, an icon will never appear because BLAF is
not customizable.
• The component is LAF customizable, page 2-25. This means that only a
component associated with a style or icon can have the Customize Look and
Feel icon enabled. If a personalization administrator does not have access to the
Customizing Look and Feel Administrator responsibility when he or she selects
the icon, OA Framework returns an error.
lower case, and must follow the standard <lookAndFeelFamilyName>-<device> naming
convention, where <device> is either desktop or pda.
• Specify the family under which the Look-and-Feel belongs (in all lower case).
Multiple LAFs for different devices can exist under the same family. For example,
myclaf-desktop and myclaf-pda both exist under the myclaf family.
• Specify the base Look-and-Feel that your new custom Look-and-Feel shall extend.
All styles, icons, and renderers are inherited from this base look and feel, and can be
overridden.
• Modify the styles inherited from the base Look-and-Feel to suit the colors and fonts
of the new Look-and-Feel you want to create.
• Modify the icons inherited from the base Look-and-Feel to suit the new look and
feel you want to create.
• Get immediate feedback on the changes being made to styles and icons using the
preview page.
• Register any custom template renderers you define for any web beans.
The following steps outline how to create a new custom LAF or skin using the CLAF
user interface:
1.
Evaluate a good sampling of pages in the web site for which you want to create a
new Look-and-Feel or skin. Determine whether the overall layout and component
order as specified in BLAF is sufficient for the new skin. If it is, then you do not
2-10 Oracle Application Framework Personalization Guide
Page 37

need to create a new LAF, but simply need to modify certain styles or icons. If it is
not, that is, the layout and component order differs from that of BLAF, you will
need to define renderers for each of those components.
2. Log in as a user with access to the Customizing Look and Feel Administrator
responsibility. Select the menu option Customizing Look and Feel Administrator
to initiate the CLAF UI.
3. In the Look and Feel Configuration page, select the Create Look and Feel radio
button.
Creating a LAF in the Look and Feel Configuration page
4.
Specify values for the following parameters, then select Next:
• Name - (Required) A unique name for the LAF, in all lower case, following the
naming standard <lookAndFeelFamilyName>-<device>.
Caution:
The name of your new LAF must not contain upper
case letters. Although you can enter a name with upper case
letters, the OA Personalization Framework converts them to
lower case in the filename when saving the LAF. If you try to
update this LAF later, the system will not be able to find it, and
will generate an error.
OA Framework automatically generates an internal .xml file and an .xss file
using this name. For example, if you name your LAF custom-desktop, OA
Personalizing OA Framework Applications 2-11
Page 38

Framework automatically generates the Look-and-Feel configuration file
$HTML_TOP/cabo/lafs/custom-desktop.xml, and the stylesheet file
$HTML_TOP/cabo/styles/custom-desktop.xss.
• Family - (Required) The family under which this LAF is being created. Specify
the family as all lower case. For example, the custom LAF family can have two
LAFs named custom-desktop and custom-pda.
• Description - (Optional) Enter text to describe the LAF that you are creating.
• Base Look and Feel - (Required) The base LAF that the LAF you are creating
will extend. The set of existing LAFs in your environment is displayed in the
poplist.
Note: You cannot extend the Oracle corporate BLAF (Browser
Look-and-Feel) or the MLAF (Minimal Look-and-Feel).
In the Customize Styles and Icons page that appears, the set of global named styles
5.
is displayed by default. The Component poplist also displays global by default to
indicate that the page is currently displaying the global named styles, page 2-21
that affect more than one component. You can also choose the Selectors or Icons sub
tabs to display any global selectors or global icons.
2-12 Oracle Application Framework Personalization Guide
Page 39

Customize Styles and Icons page.
Personalizing OA Framework Applications 2-13
Page 40

6. Modify named styles or selectors - In the Named Styles or Selectors sub tabs,
identify the style you want to change. Styles control color or font properties. You
can add a new custom style by selecting Add Style or delete a custom style by
selecting the Delete icon.
Select Show to expand the detail region for a style or selector to make any of the
following modifications:
• Add a new property or included style to a style or selector by choosing Add
Property and using the Type poplist to specify the type of property to add.
• Change the value of any existing property.
• Delete any property or included style from a style or selector .
Note: You cannot directly update an included style. To replace an
included style, delete the existing one, then add a new one using
the Add Property button.
Expanded detail region of the DarkAccentBorder global named style.
7.
Modify icons (icons, page 2-20 may either be text-based or GIF image-based). Select
the Icons sub-tab and identify the icon you want to modify. Select Show to expand
the detail region for the icon to make any of the following modifications:
• Alter the icon's properties, such as height or width.
• Replace the existing icon with a different icon (such as replacing a text icon with
an image icon).
2-14 Oracle Application Framework Personalization Guide
Page 41

Expanded detail region of the global required icon.
Personalizing OA Framework Applications 2-15
Page 42

8. If you wish to add or modify named styles, selectors or icons that are specific to a
component, use the Component poplist to select the component you wish to
customize. Once you select a component, the page refreshes with a preview of the
component beneath the Component poplist.
2-16 Oracle Application Framework Personalization Guide
Page 43

Customize Styles and Icons page with a preview of the contentContainer component
Personalizing OA Framework Applications 2-17
Page 44

Repeat Step 6, page 2-14 if you wish to modify the component's named
styles/selectors or Step 7, page 2-14 to modify the components named icons. Repeat
this step for all the components you want to customize. Select Next when you are
done.
Note: Any custom template renderers you defined are registered
here.
9. In the Review and Submit page, select Go if you wish to preview your new custom
LAF against the Toolbox Tutorial Home Page that is shipped with OA Framework.
Alternatively, you may specify your own page to preview, using the format
OA.jsp?param1=value1¶m2=value2&... in the Page Preview URL field
and selecting Go.
Review and Submit page
10. If you are satisfied with the previewed changes, select Finish to save your changes
and create/register your new custom LAF, otherwise select Back to return to the
previous pages in the CLAF flow to make additional modifications.
11.
To run your Oracle E-Business Suite applications pages with your custom LAF, log
in to Oracle Applications and set the profile option Oracle Applications Look and
Feel (APPS_LOOK_AND_FEEL) to the custom LAF that you created, as it appears
in the poplist.
12.
Bounce your web server, then run your application pages to see the new LAF take
effect.
Updating a LAF
You can also use the CLAF UI to update an existing Look-and-Feel. The UI allows you
2-18 Oracle Application Framework Personalization Guide
Page 45

to:
• Modify any styles or icons defined in the Look-and-Feel.
• Change any renderers registered with the Look-and-Feel.
The following steps outline how to update a LAF or skin using the CLAF user interface:
1. Access the CLAF UI using one of these two methods:
• Log in as a user with access to the Customizing Look and Feel Administrator
responsibility, and select the menu option Customizing Look and Feel
Administrator to initiate the CLAF UI.
• In the Page Hierarchy Personalization page, page 4-16 of the Admin
Personalization UI, select the Customize Look and Feel (pen) icon in the
Customize Look and Feel column of the Page Hierarchy HGrid. You can access
the CLAF UI using this method if the appropriate conditions, page 2-9 are met.
In the Look and Feel Configuration page, select the Update Look and Feel radio
2.
button.
Updating a LAF in the Look and Feel Configuration page
3.
Specify the name of the Look-and-Feel that you want to update, then click Next.
4.
Refer to Steps 5 and on, page 2-12 in the Creating a New LAF section, page 2-10 for
the remaining steps that are also common to updating a LAF.
Personalizing OA Framework Applications 2-19
Page 46

Deleting a LAF
You can use the CLAF UI to delete an existing custom Look-and-Feel.
To delete a custom Look-and-Feel:
1. Access the CLAF UI using one of the following methods:
• Log in as a user with access to the Customizing Look and Feel Administrator
responsibility, and select the menu option Customizing Look and Feel
Administrator to initiate the CLAF UI.
• In the Page Hierarchy Personalization page of the Admin Personalization UI,
page 4-16, select the Customize Look and Feel (pen) icon in the Customize
Look and Feel column of the Page Hierarchy HGrid. You can access the CLAF
UI using this method if the appropriate conditions, page 2-9 are met.
2. On the Look and Feel Configuration page, select the Delete Look and Feel radio
button.
Deleting a LAF on the Look and Feel Configuration page
3. Select the name of the custom Look-and-Feel that you want to delete, then click
Delete.
4. On the Confirmation page that appears, click OK.
Custom Renderer and Custom Icon Standards
The following naming and directory standards must be followed:
• All custom template renderer files should be named as <webBeanType>.uit. For
example: sideBar.uit, tabBar.uit, or pageLayout.uit.
2-20 Oracle Application Framework Personalization Guide
Page 47

Global Styles
• All template renderer files should reside under $HTML_TOP/cabo/templates/
<lookandFeelId>/ where <lookandFeelId> would be a LAF name, such as
custom-desktop.
• All custom icon files should reside under $HTML_TOP/cabo/images/<lookandFeelId>
/ where <lookandFeelId> would be a LAF name, such as custom-desktop.
The following tables list description of the global styles that are provided by UIX.
Global alignment styles provided by UIX
Alignment Styles Description
CenterTextAlign Sets the text-align property to "center" regardless of the reading
direction.
RightTextAlign Sets the text-align property to "right" regardless of the reading
direction.
LeftTextAlign Sets the text-align property to "left" regardless of the reading
direction.
EndTextAlign Sets the text-align property to "right" for left-to-right reading
direction and "left" for right-to-left reading direction.
StartTextAlign Sets the text-align property to "left" for left-to-right reading
direction and "right" for right-to-left reading direction.
Global color styles provided by UIX
Color Style Description
LightAccentBorder The lightest border color in the accent color ramp.
MediumAccentBorder A slightly lighter border color in the accent color ramp.
VeryDarkAccentBorder The darkest border color in the accent color ramp.
DarkAccentBorder The primary border color in the accent color ramp.
Personalizing OA Framework Applications 2-21
Page 48

Color Style Description
LightBorder The lightest border color in the core color ramp.
MediumBorder A slightly lighter border color in the core color ramp.
VeryDarkBorder The darkest border color in the core color ramp.
DarkBorder The primary border color in the core color ramp.
DisabledLinkForeground The default foreground color for disabled links.
VisitedLinkForeground The default foreground color for visited links.
ActiveLinkForeground The default foreground color for active links.
LinkForeground The default foreground color for inactive, unvisited links.
ErrorTextForeground The foreground color for error text (red).
SelectedTextForeground The foreground color for selected/highlighted text, or text which is
drawn on a dark background.
TextForeground The default text foreground color (black). See the Color Styles
section, page 2-34 in the Style Sheets topic, page 2-28 for more
information.
LightAccentForeground The lightest foreground color in the accent color ramp. This value is
computed relative to the DarkAccentForeground color.
MediumAccentForegroundA slightly lighter foreground color in the accent color ramp. This
value is computed relative to the DarkAccentForeground color.
VeryDarkAccentForegro
und
DarkAccentForeground The primary foreground color in the accent color ramp.
LightForeground The lightest foreground color in the core color ramp. This value is
MediumForeground A slightly lighter foreground color in the core color ramp. This
The darkest foreground color in the accent color ramp. This value is
computed relative to the DarkAccentForeground color.
computed relative to the DarkForeground color.
value is computed relative to the DarkForeground color.
2-22 Oracle Application Framework Personalization Guide
Page 49

Color Style Description
VeryDarkForeground The darkest foreground color in the core color ramp. This value is
computed relative to the DarkForeground color.
DarkForeground The primary foreground color in the core color ramp.
TextBackground The default text background color (white). See the Color Styles
section, page 2-34 in the Style Sheets topic, page 2-28 for more
information.
LightAccentBackground The lightest background color in the accent color ramp. This value
is computed relative to the DarkAccentBackground color.
MediumAccentBackgroundA slightly lighter background color in the accent color ramp. This
value is computed relative to the DarkAccentBackground color.
VeryDarkAccentBackgro
und
DarkAccentBackground The primary background color in the accent color ramp. Also
LightBackground The lightest background color in the core color ramp. This value is
MediumBackground A slightly lighter background color in the core color ramp. This
VeryDarkBackground The darkest background color in the core color ramp. This value is
DarkBackground The primary background color in the core color ramp. Also known
The darkest background color in the accent color ramp. This value
is computed relative to the DarkAccentBackground color.
known as the Accent background color. See the Color Styles
section, page 2-34 in the Style Sheets topic, page 2-28 for more
information.
computed relative to the DarkBackground color.
value is computed relative to the DarkBackground color.
computed relative to the DarkBackground color.
as the Core background color. See the Color Styles section, page 234 in the Style Sheets topic, page 2-28 for more information.
Personalizing OA Framework Applications 2-23
Page 50

Global font styles provided by UIX
Font Style Description
VeryLargeFont A very large version of the default font.
See the Font Size Styles section, page 2-32 and the Font Size Styles
for Microsoft Windows Explorer section, page 2-33 in the Style
Sheets topic, page 2-28 for more information.
LargeFont A large version of the default font.
See the Font Size Styles section, page 2-32 and the Font Size Styles
for Microsoft Windows Explorer section, page 2-33 in the Style
Sheets topic, page 2-28 for more information.
MediumFont A version of the default font which is slightly larger than the
default size. This is used for medium sized text, such as level 2
headers.
See the Font Size Styles section, page 2-32 and the Font Size Styles
for Microsoft Windows Explorer section, page 2-33 in the Style
Sheets topic, page 2-28 for more information.
SmallFont A small version of the default font. This style is used for text which
is slightly smaller than the default, such as breadCrumb links.
See the Font Size Styles section, page 2-32 and the Font Size Styles
for Microsoft Windows Explorer section, page 2-33 in the Style
Sheets topic, page 2-28 for more information.
VerySmallFont A very small version of the default font. This style is used for very
small text such as inline messages, and copyright and privacy
messages.
See the Font Size Styles section, page 2-32 and the Font Size Styles
for Microsoft Windows Explorer section, page 2-33 in the Style
Sheets topic, page 2-28 for more information.
DefaultBoldFont A bold version of the default font.
DefaultFont Specifies the default font for the Look-and-Feel. This style defines
both the default font family (as specified by the DefaultFontFamily
named style) and the default font size.
See the Font Size Styles section, page 2-32 and the Font Size Styles
for Microsoft Windows Explorer section, page 2-33 in the Style
Sheets topic, page 2-28 for more information.
2-24 Oracle Application Framework Personalization Guide
Page 51

Font Style Description
DefaultFontFamily Specifies the default font family list ("font-family" property) for the
Customizable Components
The following is a list of components whose Look-and-Feel may be customized using
the CLAF UI:
• applicationSwitcher
• breadCrumbs x train
• button
• colorField
• contentContainer
• dateField
Look-and-Feel. See the Font Styles section, page 2-31 in the Style
Sheets topic, page 2-28 for more information.
• footer
• globalButton
• globalHeader
• hGrid
• header
• hideShow
• lovInput
• messageBox
• separator
• sidebar
• sortableHeader
• tabBar
Personalizing OA Framework Applications 2-25
Page 52

• table
• train
Known Issues
See a summary of key CLAF issues, page B-2 with suggested workarounds if
available.
Personalization FAQ
The Personalization FAQ includes a number of entries that cover Customizing
Look-and-Feel, page D-1 issues.
Note: If a side navigation menu is created by adding functions with
prompts to an HTML Sub Tab menu instead of an HTML sideBar
menu, any look-and-feel changes using the CLAF tool on the sideBar
component will not be supported on the menu.
Icons
For a detailed discussion of icons, refer to the BLAF Icon Specifications
[http://otn.oracle.com/tech/blaf/specs/icons.html] on the Oracle Technology Network
(OTN).
If you need to develop new icons to support your customizations, refer to Icons in
BLAF Applications [http://otn.oracle.com/tech/blaf/specs/icons.html] and the BLAF Icon
Naming Strategy
[http://otn.oracle.com/tech/blaf/specs/icons/blaficon_namingstrategy.html] on OTN.
You may also want to look at the Icon Repository for BLAF
[http://otn.oracle.com/tech/blaf/specs/iconList.html] on OTN to find the base templates
that were used to create icons.
Icons are stored as gif image files in the OA_MEDIA directory. You can change the
image of an icon in one of two ways:
• You can replace the appropriate image file with a file of the same name that
contains an updated icon. This updates all instances of that icon globally.
• You can create an administrative-level personalization, page 5-8 for the page by
setting the Image URI property on the image page element to a different image file.
This updates the image for that specific usage of the icon.
2-26 Oracle Application Framework Personalization Guide
Page 53

Responsibilities and Menus
For a detailed discussion of menus, responsibilities and other Applications security
issues, refer to the "Managing Oracle Applications Security" chapter of the Oracle
Applications System Administrator's Guide.
For a detailed discussion of menus in OA Framework pages, refer to "Menus" in the
"Implementing the View" section of the OA Framework Developer's Guide.
Using the Oracle Applications Responsibilities screen, you can modify seeded
responsibilities or define new ones to create the menu structure and business flows that
match your business roles and requirements.
Menus serve two major purposes in Oracle Applications:
• Oracle Applications menus are a navigation tool for the user.
The menus are fully independent of the underlying code, whether it is OA
Framework-based or Forms-based. In fact, the same page can be available from
multiple menus, where the navigation paths can all vary substantially. You can use
the Oracle Applications Menus screen to modify or define new menus.
• Oracle Applications menus are part of the Oracle Applications security model.
A menu must be assigned to a responsibility using the Oracle Applications
Responsibilities screen, and a responsibility must be assigned to a valid user using
the Oracle Applications Users screen. To see a given menu, you must be logged into
Oracle Applications as the appropriate user.
Messages
For a detailed discussion of the Message Dictionary, refer to the Oracle Applications
Developer's Guide. Also, the Oracle Applications User Interface Standards for Forms-Based
Products guide has a nice summary of using messages, and contains useful general
rules.
You can change messages for OA Framework-based applications in the same way that
you change messages for Forms-based applications. If you wish to personalize an error
message or other long text, such as a long tip message, you can edit the message in
which the error message or long text is stored. To identify the name of the message used
for a long tip on a given page, navigate to the Personalize page, page 5-8 in the
Admin-level Personalization UI, page 4-1 to identify the values set for the Tip
Message Name and Tip Message Appl Short Name properties.
Lookup Codes
Lookup codes which define the display values primarily seen in poplists are handled in
OA Framework-based applications the same way that they are handled in Forms-based
Personalizing OA Framework Applications 2-27
Page 54

Style Sheets
applications. You can use the Oracle Applications Lookups page to update or define
new lookups and lookup codes. For further information, refer to the online help for the
Lookups page. The lookups data is stored in the FND_LOOKUPS table, and you may
extract the lookups from there.
OA Personalization Framework uses custom style sheets (.xss files) to specify and
manage the visual styles of the Look-and-Feel of applications built with OA
Framework. One of the goals of custom style sheets is to allow presentation styles, such
as fonts and colors, to be separated from the HTML content to which the styles are
applied. This enables you to maintain a consistent Look-and-Feel for the application, yet
manage the customizations of styles for different target audiences.
The custom style sheets employ XML Style Sheets (XSS) language, a language that is
based on Cascading Style Sheets (CSS), but is designed for easy extraction of style
information.
Style sheets are associated with a specific Look-and-Feel that you can create or update
using the Customizing Look-and-Feel (CLAF) user interface, page 2-4. Creating a
custom Look-and-Feel is also referred to as creating a new skin. With the CLAF UI, you
do not need to create or modify custom style sheets directly to alter the styles in your
Look-and-Feel. Instead, you use the CLAF UI to create or modify a custom
Look-and-Feel (LAF) and modify the styles for that custom LAF.
Some of the benefits of the CLAF UI include:
• Applicable over any LAF (other than BLAF and minimal).
• Allows stylesheet, icon and layout (renderer) customization.
• Can define a new skin.
• One Look-and-Feel can extend another Look-and-Feel.
• Supported by UIX.
Although you do not have to work with XSS style sheets directly, the content of this
document provides important information about the concepts of XSS that you should
know before you start modifying styles in the CLAF UI.
The BLAF (Browser Look-and-Feel) style sheet (blaf.xss) defines Oracle's corporate
Look-and-Feel for HTML applications.
Note:
You cannot extend BLAF or MLAF.
2-28 Oracle Application Framework Personalization Guide
Page 55

Introduction to XSS
An XSS (stylesheet) document consists of a set of style sheets, each of which defines a
set of visual styles to be applied to the Look-and-Feel of a web page. Styles control two
key aspects of HTML components - color and font. Following is an example of a base
style sheet document:
<styleSheetDocument xmlns="http://xmlns.oracle.com/uix/style"
version="2.0">
<!-- Style sheet for our Custom UI -->
<styleSheet>
<!-- Change the dark color ramp to blue -->
<style name="DarkBackground">
<property name="background-color">#00619C</property>
</style>
<!-- Override global button text color/font -->
<style selector=".OraGlobalButtonText">
<property name="color">black</property>
<property name="font-weight">bold</property>
<property name="font-size">80%</property>
<property name="text-decoration">none</property>
</style>
</styleSheet>
</styleSheetDocument>
Style Sheets
Each style sheet is defined with a <styleSheet> element. You can designate which
end-user environment to apply a style sheet to by assigning attributes, also called
"variants", to the <styleSheet> element. XSS supports the following five variants:
Styles
• Locale (e.g. locales="ja" or "en_US")
• Reading direction (e.g. direction="rtl" or "ltr")
• Browser (e.g. browsers="Netscape" or "Internet Explorer")
• Browser major version (e.g. versions="4" or "5")
• Operating system (e.g. platforms="Windows" or "Linux")
A style sheet that contains no variant attributes is known as a base style sheet. The
following example shows a style sheet that defines styles for Internet Explorer users in
the Japanese locale:
<stylesheet locales="JA" browsers="ie">...
</styleSheet>
Each <styleSheet> element contains one or more <style> elements. In general, a style
element is identified by a name and a set of one or more properties as shown below:
Personalizing OA Framework Applications 2-29
Page 56

Named Styles
<style name="styleA">
<property name="prop1" value="value1" />
<property name="prop2" />
</style>
A property is identified by a name and a value. It defines a facet for the style (for
example, font size for a particular font style) and is a CSS property. Generally, an XSS
document would have about 100-250 style definitions. Each XSS style definition can use
from 1 to 5 CSS properties. There are about 100 valid CSS properties available in all.
These properties are listed in the W3C CSS Reference
[http://www.w3schools.com/css/css_reference.asp].
Styles are classified into two types:
• Named styles, page 2-30 - which are named bundles of properties that may also
include other named styles and is used to define some of the basic units of
reusability for the Look-and-Feel.
• Selectors, page 2-30 - which include properties, and/or named styles and is used by
a specific web bean to control its Look-and-Feel.
Often, many style definitions share common properties, such as a base font or standard
background color. In XSS, you can define a named style for such common properties,
which can then be referenced by other named styles or selectors in the XSS document.
This ability to include a named style allows you to make and maintain simple and
concise customizations to the style sheets.
Selectors
For example, the "DefaultFont" named style below defines the font and font size for two
other styles, each of which reference the "DefaultFont" using the <includeStyle>
element.
<stylesheet><style name="DefaultFont">
<property name="font-family">Arial</property>
<property name="font-size">10pt</property>
</style>
<style selector=".OraFieldText"><includeStyle name="DefaultFont">
<property name="color">#000000</property>
</style>
<style name="LinkFont"><includeStyle name="DefaultFont">
<property name="color">#663300</property>
</style>
</styleSheet>
A <style> element can also be identified by a selector, which associates the style with a
particular web bean or set of web beans in a HTML document. Selectors are defined by
a list of properties and can also reference other named styles using the <includeStyle>
element. The following example shows the style definition for the HTML OraFieldText
element:
2-30 Oracle Application Framework Personalization Guide
Page 57

<stylesheet><style selector=".OraFieldText">
<includeStyle name="DefaultFont">
<property name="color">#000000</property>
</style>
</styleSheet>
In this example, the selector ".OraFieldText" indicates that the properties defined
by this style should be applied to any HTML element with a class attribute value of
OraFieldText. The style itself is a black Default Font (Arial 10pt) text.
Reusing Styles and Properties
As mentioned above, you can use the <includeStyle> element in your style definition to
include all the properties from another style in your style definition. You can also use
the <includeProperty> element to include only a specific property of another style in your
style definition. For example, the following styleA is defined by a property called
prop1, all the properties from styleB, and a property called prop3, which is derived
from property prop2 of styleC.
<style name="styleA">
<property name="prop1" value="value1" />
<includeStyle name="styleB" />
<includeProperty name ="styleC" propertyName="prop2"
localPropertyName?="prop3 />
</style>
Global Versus Component-Specific Styles
All styles and selectors can be further grouped as global styles or component-specific
styles:
• Global styles - affect more than one component. Examples of global styles include
DefaultFont and LightBackground.
• Component-specific styles - affect only one component. An example of a
component-specific style is OraContentContainerHeaderText which controls the
font properties of the header text of the content container web bean. A set of
twenty-one web beans in OA Framework have custom styles defined for them that
can be further customized.
Most customizations that you make to a style sheet involve the set of forty-five Global
named styles that control about ninety percent of the Look-and-Feel of the application.
Font Styles
One of the most common customizations you may wish to make to the look and feel of
the Oracle Applications user interface is to modify the default font. Although a
stylesheet may define many different styles that affect font properties, all these styles
refer to a single named style that defines the default font family. As a result, if you wish
to change the font family properties for all the styles defined in a style sheet, you need
to make only a single style override to the DefaultFontFamily style.
Personalizing OA Framework Applications 2-31
Page 58

Style Properties Description
Font Size Styles
DefaultFontFamily font-family = Arial,
Helvetica, Geneva, and
sans-serif
Specifies the default font family list for
the Look-and-Feel.
For example, suppose you want to change the default font family for all styles to
include only the CSS "serif" font family. In the Customizing Look and Feel UI, page 2-4,
you would update your Look-and-Feel by modifying the global DefaultFontFamily
style such that the value of its font-family property is changed to serif.
Another common customization you may wish to make to the Look-and-Feel of the user
interface is to alter the default font size. Almost all the font size styles defined in a style
sheet reference a common named style that defines the default font size:
Style Properties Description
DefaultFont includeStyle =
DefaultFontFamily
font-size = 10pt
Specifies the default font and default
font size for the Look-and-Feel.
To change the default font size, in the Customizing Look-and-Feel UI, page 2-4 , you
would modifying the DefaultFont style such that the value of its font-size property is
changed to something like 12pt.
Style sheets may also make use of several other font sizes. A smaller font size may be
used for in line messages, while a larger font size is used for headers, and so on. Each of
the different font sizes may be defined in style sheet, as shown:
Style Properties Description
VerySmallFont includeStyle =
DefaultFont
font-size = -2pt
SmallFont includeStyle =
DefaultFont
font-size = -1pt
A very small version of the default
font. This style is used for very small
text such as inline messages, and
copyright and privacy messages.
A small version of the default font. This
style is used for text which is slightly
smaller than the default, such as
breadCrumb links.
2-32 Oracle Application Framework Personalization Guide
Page 59

Style Properties Description
MediumFont includeStyle =
DefaultFont
font-size = +1pt
LargeFont includeStyle =
DefaultFont
font-size = +3pt
VeryLargeFont includeStyle =
DefaultFont
font-size = +6pt
Each of these font size definitions includes the DefaultFont, using the <includeStyle>
element, and then specifies a point size increment or decrement relative to the default
font size. By using this XML Style Sheet Language technique, it is possible for you to
change all font sizes defined in blaf.xss with a single override of the DefaultFont style.
Font Size Styles for Microsoft Internet Explorer
The DefaultFont style may be defined twice, once in a generic style sheet as described
previously, and once in an environment-specific style sheet. The latter style sheet
overrides the default font size specifically for the Microsoft Internet Explorer (IE)
browser, to take advantage of some IE-specific functionality.
A version of the default font which is
slightly larger than the default size.
This is used for medium sized text,
such as level 2 headers.
A large version of the default font. This
is used for large text, such as level 1
headers.
A very large version of the default font.
In particular, IE provides a text zooming feature that allows you to scale text to a larger
or smaller size, via the View > Text Size menu. This functionality does not work with
sizes specified in point units, but does work with sizes specified using the CSS "absolute
size" keywords. Hence, the IE-specific style sheet uses the "x-small" keyword for its
default font size, which is rendered as 10 point text by default. The size is scalable, so
the other font sizes defined for IE are specified as a percentage of the default font size.
Style Properties Description
DefaultFont font-size = x-small Overrides the default font size
specifically for the Microsoft Internet
Explorer (IE) browser.
VerySmallFont font-size = 67% A very small version of the default font
specifically for IE.
Personalizing OA Framework Applications 2-33
Page 60

Color Styles
To change the default font size for IE, use the Customize Look-and-Feel UI, page 2-4 to
update the Look-and-Feel for the IE browser. Modify the DefaultFont style such that
the value of its font-size property is changed to something like small.
The Browser Look-and-Feel makes use of four colors that you may potentially want to
change:
• Text foreground color - Color used for almost all text. The default is black.
• Text background color - Color used for almost all content. The default is white.
• Core background color - This is the default blue color that appears throughout the
user interface. For example, the color is used as the background color for the
selected link in the level one tab bar, as well as the background color of the global
header and footer. A style sheet may derive a color ramp that includes lighter and
darker shades based on the core background color. For example, a Look-and-Feel
may have a light blue foreground color for a selected link in a level one tab bar.
• Accent background color - This is the default tan color that appears through the
user interface. For example, the color is used as the background color for the
unselected links in the level one tab bar. As with the core background color, style
sheets may derive a color ramp based on the accent background color. For example,
the dark brown foreground color used for hypertext links, as well as the lighter
yellow colors used for action button backgrounds may be variations of the accent
background color.
As is the case with fonts, style sheets may use the <includeStyle> element to share the
set of color-related named styles with other defined styles. So if you wish to change the
colors in the user interface, you need only override these four named styles using the
Customize Look-and-Feel UI, page 2-4. These four color styles are defined as follows:
Style Properties Description
TextForeground color = #000000 The default text foreground color
(black).
TextBackground background-color =
#ffffff
DarkBackground background-color =
#336699
The default text background color
(white).
The primary background color in the
core color ramp. Also known as the
Core background color.
2-34 Oracle Application Framework Personalization Guide
Page 61

Style Properties Description
DarkAccentBackground background-color =
#cccc99
The primary background color in the
accent color ramp. Also known as the
Accent background color.
The "DarkBackground" and "DarkAccentBackground" styles define the primary colors
in the core and accent background color ramps respectively.
If you decide to customize the colors for the user interface, you should try to maintain
the contrasts between the text foreground and background colors, as well as between
the core and accent colors.
In general, try to select colors from the web safe color palette, as these colors have the
most consistent results across the widest range of browsers and platforms. The web safe
color palette is a set of 216 colors, where each red, green, or blue component of that
color is a multiple of 51 in decimal (0, 51, 102, 153, 204, or 255) or #33 for hexadecimal
values (#00, #33, #66, #99, #cc, or #ff).
Also consider, that when you select a new core or accent background color, blaf.xss
derives a ramp of lighter and darker shades from that color. As a result, selecting very
dark or very light color values may result in less distinction between various darker or
lighter shades in the color ramp.
CSS Style Lookup
You can use an interactive user interface called the Item Style and Style Type Selection
page to preview a specific item style with a selected CSS Style applied to it. You should
use this feature to simulate the Look-and-Feel of an item style before making the actual
CSS style change to your pages with OA Personalization Framework, page 4-1.
Personalizing OA Framework Applications 2-35
Page 62

Item Style and Style Type Selection page
To access the Item Style and Style Type Selection page:
1. Sign on to Oracle Applications and select the System Administration responsibility.
Use the Oracle Applications Menus form to add the function FWK_CSS_LOOKUP
2.
to your System Administration menu.
To preview an Item Style with different CSS styles applied to it:
1. Sign on to Oracle E-Business Suite and select the System Administration
responsibility.
2. Select CSS Style Lookup from the menu.
3. In the Item Style and Style Type Selection page, there is a required Item Style
poplist and a Style Type poplist. Use the Item Style poplist to select an item style
for which a CSS Style may be applied. Use the Style Type poplist to select a CSS
Style to apply. The Style Type poplist lets you select from all the CSS styles that
have a selector defined in custom.xss. If you select All Styles, the selected item
renders with all the available CSS styles applied.
4.
Choose Go to apply the CSS style(s). The results are displayed in a table with two
columns. The first column lists the name of the CSS style that has been applied and
the second column renders the item style with the CSS style applied to it.
Note:
If the selected Item Style is Text Input or Static Styled Text, the
results table displays three columns. The first column always lists the
2-36 Oracle Application Framework Personalization Guide
Page 63

name of the CSS style that has been applied. For Text Input, the second
column renders the Text Input with the applied CSS style, and the third
column renders the Text Input as a multi-line Text Area with the
applied CSS style. For Static Styled Text, the second column renders the
Static Styled Text with the applied CSS style, and the third column
renders the Static Styled Text as a URL with the applied CSS style.
Personalizing OA Framework Applications 2-37
Page 64

Page 65

Overview
3
Personalizing Your Pages and Portlets
This chapter covers the following topics:
• Overview
• Personalization Levels
• OA Personalization Framework Features
• Profile Options Used By OA Personalization Framework
OA Framework includes the OA Personalization Framework which allows you to
personalize an Oracle E-Business Suite application page without modifying any
underlying code. Personalizing the appearance of or the data displayed in an OA
Framework-based page is easy and straightforward.
Important:
recommend and support only the use of OA Personalization
Framework.
Dynamically created pages without OA Extension metadata behind
them are not personalizable with the OA Personalization Framework.
Caution:
that you personalize. To avoid unintended consequences, you should
always familiarize yourself with the page's logic and thoroughly test
your personalization before deploying it to a production environment.
All personalizations you make through the OA Personalization Framework are added
on top of the base product meta data at runtime. These personalizations never
overwrite the existing base product UI and are therefore preserved during upgrades
and patches, and can also be translated. This means you can create your
To personalize your OA Framework-based applications,we
A page may contain logic that depends on the regions or items
Personalizing Your Pages and Portlets 3-1
Page 66

personalizations on a test system first, extract your personalizations to a flat file, page 91 , then load your finalized personalizations to your production system with little
interruption.
With OA Personalization Framework, your personalizations are reflected immediately
on the page.
To begin personalizing your pages and portlets, refer to the instructions in these
chapters:
• Administrative-Level Personalizations, page 4-1
• User-Level Personalization User Interface, page 6-1
• Portlet-Level Personalization User Interface, page 7-1
Personalization Levels
OA Personalization Framework supports end-users as well as localization and
customization teams in their efforts to tailor OA Framework-based applications to
different users. OA Personalization Framework accomplishes this by allowing you to
make personalizations at distinct levels so that you may target those personalizations to
specific audiences.
Function Level
There are different personalization levels available from the system administrative
standpoint: Function, Industry, Localization, Site, Organization, Responsibility, and
Admin-Seeded User. When you make personalizations at any of these levels, the
personalizations are available only to the audience defined by that level. Since
personalizations should only be made at these levels by a system administrator, these
are collectively referred to as administrative-level (or admin-level) personalizations.
Admin-level personalizations can be performed on any component in a page, including
shared (extended) regions. Except for the Admin-Seeded User level, you can only have
one set of personalizations per region per admin-level.
User-level or portlet-level personalizations, on the other hand, can be made only to certain
tables in query regions or portlets. User or portlet-level personalizations can be made
directly by an end-user and are visible only to that end-user, hence they are collectively
referred to as end user-level personalizations.
All personalization levels are described in the following sections.
A function in Oracle Applications is a token that is registered under a unique name for
the purpose of assigning it to, or excluding it from, a responsibility. The OA
Personalization Framework leverages the same infrastructure to drive the
Personalization context at a feature or flow level. You can create personalizations for a
region at the Function level, such that the personalizations are visible only when you
display the region while the specific function is in context. For example, suppose you
3-2 Oracle Application Framework Personalization Guide
Page 67

Industry Level
have an updatable region and you want that region to be updatable when accessed
from FunctionA in the menu, but to be read-only when accessed from FunctionB in the
menu. To accomplish this, you create a Function level personalization that makes all the
fields read-only for FunctionB.
You can have only one set of personalizations per region per function; however, you
can have as many functions as personalizations are needed, provided that these
functions can be brought into context at runtime, such as by linking them to menus or
passing them as parameters on the URL.
With the Industry personalization level, the OA Personalization Framework provides a
way to tailor an application's user interface to suit a particular industry segment.
The Industry level includes a predefined list of vertical market categories, such as
Healthcare - Provider and Utilities - Electricity. For each category,
you can personalize the application interface to incorporate a unique combination of
industry-specific terminology. For example, where one type of business might use the
term "business unit," another might use the term "store," and another might use
"location" or "franchise."
Localization Level
Suppose you need to distribute your applications to a particular locale of users, where
certain fields or buttons are hidden and labels need to be changed to accommodate that
locale. You can do that by creating Localization level personalizations in the relevant
regions before delivering your applications. All end-users for the specific locale will see
the applied localization personalizations. For example, Oracle's localization teams
would make country-specific localization-level personalizations in HR applications
before delivering the applications to customers in a given country.
Site Level
A site refers to an installation of Oracle Framework-based applications. Personalizations
that you make at the site level affect all users of the current installation. For example, as
a system administrator, you might want to make a site level personalization where you
change the table column labels to match your corporate standards.
Organization Level
An Org is an Organization or a business unit. Depending on the context, an Org can be
a plant, a warehouse, a department, a division within a company or even a complete
company. Personalizations that you make at the Org level affect all users of that Org.
For example, you might make a personalization at the Org level to hide certain fields
because they are not pertinent to the context of a particular Org.
Personalizing Your Pages and Portlets 3-3
Page 68

Responsibility Level
A responsibility represents a specific level of authority within an application. Each
responsibility lets you access specific functions or a set of product pages, menus, reports
and data to fulfill your role in an application. When you make personalizations at the
responsibility level, the changes are effective only for the users of a given responsibility.
For example, you can personalize the Open Requisitions Line page for the "Office
Supplies Purchasing Manager" responsibility to display only open requisition lines
from a particular supplier.
Admin-Seeded User-Level
As an administrator you may want to create some personalizations that are available to
all your users and allow your users to choose whether they want to use those
personalizations. You can accomplish this by creating an "admin-seeded user-level"
personalization, also known as an "admin-seeded" end user view. For example, you can
create two personalized views of the Oracle Workflow Worklist. One view shows open
workflow notifications and the other view shows FYI notifications. Each user can have
access to both of these views.
You can only create "admin-seeded user-level" personalizations on tables (including
hierarchy tables) in a Query region. You can also secure "admin-seeded user-level" to a
specific function so that is is published only to a specific group of users. These
personalizations then get seeded into the appropriate users' Personal Table Views page,
so that individual users can choose which views to display. You can have more than
one "admin-seeded user-level" personalization per region.
Note: Although both "admin-seeded user-level" personalizations and
site-level personalizations are propagated to all users, the two
personalization levels are different. An "admin-seeded user-level"
personalization is saved as a personalized view that a user can choose
to display from the Personal Table Views page, whereas a site-level
personalization is a change that is made across the entire site that all
users see automatically.
Both Oracle-internal developers and customers are able to create seeded user-level
customizations. To distinguish between seeded user-level personalizations that are
shipped by Oracle and those that are defined by administrators at a customer site, the
two types of personalizations are referred to as "Oracle-seeded user-level"
personalizations (seeded by Oracle) and "admin-seeded user-level" personalizations
(seeded by administrators at the customer site), respectively.
Note: An "Oracle-seeded user-level" personalization cannot be updated
or deleted at the customer site; however, an administrator at a customer
site who creates an "admin-seeded user-level" personalization can edit
3-4 Oracle Application Framework Personalization Guide
Page 69

Portlet Level
or delete that personalization.
Note: You can mark a seeded user-level personalization as a default
view. End-user personalized views take highest precedence, followed
by "admin-seeded user-level" personalizations, then "Oracle-seeded
user-level" personalizations.
Oracle Portal provides users with corporate and customized personal home pages
accessible via web browsers. These home pages may contain corporate announcements,
stock tickers, news headlines, and links to other web-based services. Oracle Portal may
also connect to partner applications that share their user authorization and session
management models with Oracle Portal. Oracle Applications is a partner application to
Oracle Portal. Oracle Portal users can add links to their home pages to access Oracle
Applications modules, and can display Applications information, such as Oracle
Workflow notifications, directly on their home pages. These links are called portlets.
You can personalize these portlets just as you can personalize the tables of a query
region in an application. Any personalizations you make at the portlet level affect only
the portlet used to display the region. You can have only one set of personalizations per
region per portlet.
User Level
As an end-user, you can personalize certain tables in query regions and the
personalizations would affect no one else. For example you can personalize the
Requisitions History page to display only requisitions prepared by you. Each user can
save multiple sets of personalizations per page region. A saved set of personalizations is
also known as a personalized "view" and can be selected and applied from the "View
Personalizations" list.
OA Personalization Framework Features
Cumulative Personalizations
The personalizations you make at the various levels are cumulative. Personalizations at
the higher levels typically apply to broadly defined user populations, and those at
lower levels apply to more narrowly defined groups. Personalizations made at lower
levels are applied after those made at higher levels. The personalization levels are
ordered as follows, from highest to lowest:
• Function (highest)
Personalizing Your Pages and Portlets 3-5
Page 70

• Industry
• Localization
• Site
• Organization
• Responsibility
• Seeded-User
• Portlet (lowest)
• User (lowest)
For example, the personalizations made at the Portlet and User levels always overlay
personalizations made at the Organization level.
Note: Personalizations made at the Portlet and User levels are mutually
exclusive.
For Oracle-internal developers, Function is the highest level at which you can
personalize, followed by Industry, Localization, Site, and so on.
The granular nature of each personalization is maintained throughout the layering of
personalizations for the different levels. For example, suppose you make a set of Site
level personalizations to a region by changing the label of four fields from a, b, c and d
to w, x, y, and z. Now suppose you want to make additional changes to that same
region, where those changes are available only for users of Org 2. The
Organization-level change for Org 2 that you make includes hiding the second and
third fields and changing the label of the last field to zz. A user of Org 2 would see, as a
result of the cumulative personalizations, a region with two fields labeled w and zz.
Personalization Ownership
Personalizations made at an Admin level can only be modified, viewed, or deleted by
an administrator at that respective level. Similarly, a personalized view made at the
Portlet or User level can only be modified, viewed, or deleted from the portlet where
the view was created or by the user who created the view.
Multiple Personalizations
At the User level, a particular region of an HTML page may have one or more sets of
personalizations associated with it. Each set of personalizations is referred to as a
personalized view of the region. You can identify a personalized view by assigning a
view name to it. OA Personalization Framework also identifies each personalized view
3-6 Oracle Application Framework Personalization Guide
Page 71

Default Views
by assigning a unique ID to it.
Since you may define more than one personalized view at the User level, OA
Personalization Framework lets you mark a specific view as the default view to apply to
the region when you run the application.
Note: In the case of seeded personalized views, OA Personalization
Framework applies a precedence rule to determine the default, if
multiple defaults are defined (for example, if defaults exist at the User
level, "Admin-seeded user level" and "Oracle-seeded user level"). The
User-level default overrides any default set at any level. If no user-level
view is marked as a default, then the "admin-seeded" default view
takes precedence. Similary, if no user-level or "admin-seeded
user-level" views are marked as defaults, the "Oracle-seeded" view
becomes the default.
In the case where personalizations are made on a region that extends another region, at
the User, "Admin-seeded user" or "Oracle-seeded user" levels, the default is resolved
horizontally across the layers of the region. All of the default User views take
precedence, followed by the default admin-seeded views, then the default
Oracle-seeded views.
Example
Suppose you have region A, which extends region B, which in turn extends region C,
and the following views have been created and marked as "Default":
Region Views Defined
A (extends B) A.UserView - default
A.Admin-seededUserView - default
A.Oracle-seededUserView - default
B (extends C) B.UserView - default
B.Admin-seededUserView - default
B.Oracle-seededUserView - default
C C.UserView - default
C.Admin-seededUserView - default
C.Oracle-seededUserView - default
Personalizing Your Pages and Portlets 3-7
Page 72

The final default view is resolved based on the following order of precedence:
A.UserView >
B.UserView >
C.UserView >
A.Admin-seededUserView >
B.Admin-seededUserView >
C.Admin-seededUserView >
A.Oracle-seededUserView >
B.Oracle-seededUserView >
C.Oracle-seededUserView
Personalization Caching
The personalizations that you make to a region do not cause any performance
degradation in your application. Admin-level personalizations for a region are statically
cached on the JVM (Java Virtual Machine) and user-level personalizations are cached on
the session.
Profile Options Used By OA Personalization Framework
The following system profile options affect the behavior of the OA Personalization
Framework.
Disable Self-service Personal (FND_DISABLE_OA_CUSTOMIZATIONS)
This is a system profile option specifically created for use by Oracle Support. You can
set this profile option to Yes at the site or application level. If this system profile option
is set to Yes, any personalizations you make, regardless of the level at which you make
the personalizations, will not be applied. Only the original base definition of each OA
Framework-based application page is ever displayed. Use this profile option to help
Oracle support staff determine whether a problem arises from applied personalizations
or from the base application. The default is No.
FND: Personalization Region Link Enabled (FND_PERSONALIZATION_REGION_LINK_ENABLED)
When you set this profile option to Yes, Personalize Region links appear above each
region in a page. Each link takes the user first to the Choose Personalization Context
page, page 5-5, then to the Page Hierarchy Personalization page, page 4-16 with focus
on the region from which you selected the Personalize Region link. The default is null
(not set).
Note:
Note that enabling the Personalize Region links allows
administrators to also personalize regions that are dynamically added
to the page from custom code in the controller.
3-8 Oracle Application Framework Personalization Guide
Page 73

Personalize Self-service Defn (FND_CUSTOM_OA_DEFINTION)
You should set this profile option to Yes at the user level for an administrator. If you set
this profile option to Yes, then when you log on as the Administrator, a global
Personalize Page button appears on each OA Framework-based application page.
When you select the global Personalize Page button on any page, the personalization
user interface prompts you for the scope and administrative level at which you wish to
create your personalizations before displaying the OA Personalization Framework UI.
The default is No.
Xliff Export Root Path (FND_XLIFF_EXPORT_ROOT_PATH)
Use this profile option to specify the root path for extracting translated personalizations.
The Xliff Export root path is used to generate the full path where the Xliff files are
exported when administrators extract their translated personalizations from the Extract
Translation Files page, page 5-52 in OA Personalization Framework. The default is null
(no root path is set).
Xliff Import Root Path (FND_XLIFF_IMPORT_ROOT_PATH)
Use this profile option to set the root path for uploading translated personalizations.
The Xliff Import root path is used to derive the full path from where the Xliff files are
uploaded when administrators use the Upload Translations page, page 5-53 in OA
Personalization Framework to upload translated personalizations. The default is null
(no root path is set).
Personalizing Your Pages and Portlets 3-9
Page 74

Page 75

Overview
4
Administrative-Level Personalizations
This chapter covers the following topics:
• Overview
• Creating Admin-Level Personalizations
• Function-Level Personalizations
• Known Issues
• Related Information
Administrative-level (admin-level) personalizations are performed by Oracle
Application administrators who are often department-level functional consultants or
administrators who understand, design and tailor the functional business flows of their
organization. As an Oracle Applications Administrator, you can use OA Personalization
Framework to personalize the pages of OA Framework-based applications at various
personalization levels, page 1-4 without modifying any code. Refer to the
Customization Primer, page 1-1 and the discussions of Personalization Levels, page 3-2
and OA Personalization Framework Features, page 3-5 for an overview of what you can
accomplish.
Note: The term "Administrator" used throughout this document refers
to the Oracle Applications Administrator described above and not to
the System Administrator who configures and maintains the
application system.
Note:
If you use Netscape 4.7 or earlier or if you turn Partial Page
Rendering (PPR) off by setting the FND: Disable Partial Page
Rendering profile value to Yes, you may see additional Go buttons
rendered throughout the OA Personalization Framework user interface.
Administrative-Level Personalizations 4-1
Page 76

These Go buttons allow you to refresh parts of the page with changes
that PPR would have otherwise taken care of.
Personalization Profile Options
Before you can personalize a region at a personalization level, you must set the
Personalize Self-service Defn (FND_CUSTOM_OA_DEFINTION) profile option to
Yes for the user you are signing in as. Every OA Framework-based application page
contains a global Personalize Page link. This profile option enables the global
Personalize Page link on every page so that you can personalize any page or region.
The Personalize Page link first navigates to the Choose Personalization Context page,
page 5-5, then to the Page Hierarchy Personalization page, page 4-16 or to the Page
Layout Personalization page, page 4-6, where you can drill down to the region you
wish to personalize.
Additionally, you may set the FND: Personalization Region Link Enabled (
FND_PERSONALIZATION_REGION_LINK_ENABLED) profile option to Yes or
Minimal, to enable Personalize Region links for each region in a page. When this
profile is enabled, Personalize Region links appear above each region, unless the region
is a table, hierarchy grid, or table layout region, in which case the link appears below
that region. Rather than use the global Personalize Page link on every page, you can
use any of the Personalize Region links to first navigate to the Choose Personalization
Context page, page 5-5, then to the Page Hierarchy Personalization page, page 4-16
with immediate focus on the region from which you selected the Personalize Region
link.
Enabling the "Personalize Region" links allows users to also
Note:
personalize regions that are dynamically added to the page from
custom code in the controller.
For more information about the FND: Personalization Region Link Enabled profile
option, refer to the Personalization section in the OA Framework Profile Options
appendix of the Oracle Application Framework Developer's Guide.
Tip:
You may also want to set the FND: Diagnostics
(FND_DIAGNOSTICS) profile option to Yes to render the "About this
page" link at the bottom of each OA Framework-based page. The About
this page link takes you to the "About" page which displays
information about the current page, the page's context, and the
environment. The Personalization subtab on the "About" page also
identifies personalizations that are in effect on the current page for the
current personalization context and provides a Manage
Personalization Level button that lets you navigate to the Manage
Personalization Levels page, page 5-50 directly to recover from errors
4-2 Oracle Application Framework Personalization Guide
Page 77

that result from a personalization.
For more information about the FND: Diagnostics profile option, refer to the Logging /
Diagnostics section in the OA Framework Profile Options appendix of the Oracle
Application Framework Developer's Guide.
For more information about the "About" Page, refer to the Discovering Page,
Technology Stack and Session Information section in the Testing and Debugging
chapter of the Oracle Application Framework Developer's Guide.
Creating Admin-Level Personalizations
As an administrator, there are two ways in which you can initiate Admin-level
personalizations. You can either search for the page using the Functional Administrator
Home page, page 4-3 and personalize the page without running it, or run the actual
page in Oracle E-Business Suite and initiate the Personalization UI from the Personalize
Page global link on the rendered page, page 4-5.
Important: PERSONALIZING PROGRAMMATICALLY INSERTED
REGIONS - A region that is programmatically inserted into a page by a
page controller is not available for personalization when you initiate
the OA Personalization Framework from the Functional Administrator
responsibility or by clicking the Personalize Page global link.
The page's metadata does not include a reference to the metadata of the
dynamic region because the region is not a part of the page until
runtime, when the controller is executed. As a result, the page is not
aware of the dynamic region and cannot reference it for personalization
from the Functional Administrator responsibility or from the
Personalize Page global link. Instead, to personalize a dynamic region,
you must set the FND: Personalization Region Link Enabled profile
option to Yes or Minimal to render Personalize Region links for each
region in the page. Since the Personalize Region links are displayed
based on the page's current run-time status, you can then select the
Personalize Region link for that dynamic region to personalize it.
From the Functional Administrator Responsibility
To initiate OA Personalization Framework from the Functional Administrator tool in
Oracle E-Business Suite:
1. Sign on to Oracle E-Business Suite and under the Functional Administrator
responsibility, select the Functional Administration Home page. Refer to the Oracle
Applications System Administrator's Guide for additional information about the
Functional Administrator feature.
Administrative-Level Personalizations 4-3
Page 78

2. Select the Personalization tab to display the Application Catalog.
3. Specify an Application and optionally, a Document Path, to search for the page or
pages you wish to personalize.
Note: This search does not use a standard Query region -
• The Document Path field has no support for wildcards.
• If you specify a package in the Document Path field, the results
will list all of the documents in the repository under that
package and its subpackages.
4.
Select the pen icon in the Personalize Page column for the page you want to
personalize. This icon directs you to one of the following two personalization
launch pages, depending on the page you are personalizing:
• Page Layout Personalization - if the page you are personalizing is a
configurable page, you navigate to this page.
Warning:
You should not personalize a configurable page by
accessing it from the Functional Administrator responsibility.
Your configurable page might contain controller code that is
dependent on certain parameters that are available only when
the page itself is launched from its intended flow, and the page
might fail with unexpected errors. You can safely personalize
your configurable page by accessing the Page Layout
Personalization page using the global Personalize Page link,
page 4-5 on the rendered configurable page.
For additional information, refer to the section on Configurable
Pages, page A-5 in the Personalization Considerations
appendix.
• Page Hierarchy Personalization - if the page you are personalizing is not a
configurable page, you navigate to this page. Like the Page Layout
Personalization page, the Page Hierarchy Personalization is also a launch pad
for personalization options, but it displays the entire structure of the page in a
Hierarchy table (HGrid) rather than as a visual boxed layout. Refer to the Page
Hierarchy Personalization page, page 4-16 for an example of this page and to
the Page Hierarchy Task Flows section, page 4-18 for a list of the tasks that you
can launch from this page.
5.
Select the pen icon in the Manage Personalizations column to navigate to the
Manage Personalization Levels page, page 5-50 where you can
4-4 Oracle Application Framework Personalization Guide
Page 79

activate/inactive/delete specific personalizations or manage the translation of the
personalizations made for the page in question.
6. If you wish to personalize the Standard Footer that appears in OA
Framework-based pages, select the Standard Footer link under the
Personalizations Shortcuts. This link takes you to the Choose Personalization
Context page, page 5-5, where the Scope is set to Region: Standard Footer. When
you choose Apply on this page, you navigate to the Page Hierarchy Personalization
page, where you can personalize the Standard Footer.
From the Personalize Page Global Link
To initiate OA Personalization Framework from the global Personalize Page link:
Sign on to Oracle E-Business Suite as an administrator and navigate to the
1.
application page that you wish to personalize.
2. Choose the Personalize Page global link.
3. This link defaults to the current personalization context and takes you directly to
one of the following two personalization launch pages, depending on your page of
origin or your Accessibility mode:
• Page Layout Personalization - if the page you are personalizing is a
configurable page, you navigate to this page. A configurable page is a page
designed with personalizable layout components called flexible layout regions
and self-contained content components called flexible content regions. These
flexible regions support a more graphical approach to rearranging the layout
and visibility of page content.
The Page Layout Personalization page is a visual launch pad from which you
can personalize a configurable page. It provides a boxed preview of the flexible
layout structure within your page and displays controls that take you to
different pages or flows where you specify and apply your actual
personalizations. Refer to the Page Layout Personalization page, page 4-6 for
an example of this page and to the Page Layout Task Flows section, page 4-7
for a list of the tasks that you can launch from this page.
• Page Hierarchy Personalization - if the page you are personalizing is not a
configurable page or if you are running Oracle Applications in Accessibility
mode (that is, the profile option Self Service Accessibility Features
(ICX_ACCESSIBILITY_FEATURES) is set to Standard Accessibility), you
navigate to this page. Like the Page Layout Personalization page, the Page
Hierarchy Personalization is also a launch pad for personalization options, but
it displays the entire structure of the page in a Hierarchy table (HGrid) rather
than as a visual boxed layout. Refer to the Page Hierarchy Personalization page,
page 4-16 for an example of this page and to the Page Hierarchy Task Flows
Administrative-Level Personalizations 4-5
Page 80

section, page 4-18 for a list of the tasks that you can launch from this page.
Note: If there is an problem with the current personalization
context, OA Personalization Framework will display the Choose
Personalization Context page, page 5-5, showing the error
message above the page.
From a Personalize Region Link
To initiate OA Personalization Framework from a Personalize Region link, page 4-2:
1. Select the Personalize Region link for the region you wish to personalize.
2. This button defaults to the current personalization context and takes you directly to
the "complete" view of the Page Hierarchy Personalization page, page 4-16 with
immediate focus on the region from which you selected the Personalize Region
link.
Note: If there is a problem with the current personalization context, OA
Personalization Framework will display the Choose Personalization
Context page, showing the error message above the page.
Using the Page Layout Personalization Page
The Page Layout Personalization page provides a WYSIWYG user interface for
personalizing a configurable page or region.
Note: If you personalize a non-configurable page (a page that does not
have the necessary metadata to personalize its layout) or when you run
your application in Accessibility mode (profile option Self Service
Accessibility Features (ICX_ACCESSIBILITY_FEATURES) is set to
Standard Accessibility), you will not see the Page Layout
Personalization page, as shown below. Instead, you will see the Page
Hierarchy Personalization page, page 4-16, where you can perform the
same personalization functions, using a descriptive tabular user
interface.
Note:
With the Page Layout Personalization page, you can launch most
of the personalization operations from the Layout mode or Content
mode of the page. You can also personalize individual properties of a
page element through the focused version of the Page Hierarchy
Personalization page, page 5-2 that you navigate to by selecting the
4-6 Oracle Application Framework Personalization Guide
Page 81

Layout Mode
Personalize icon on a boxed region in the Page Layout Personalization
page.
The Page Layout Personalization page has two modes, Layout, page 4-7 and Contents,
page 4-11, which you can access from the subtabs on the page. These modes organize
the personalization tasks that you can perform so that they correlate directly to the
flexible layout or flexible content regions on the page.
The View Level poplist that appears for both Layout and Contents mode, allows you to
select a single personalization level from your specified context for which you wish to
personalize the layout. Note that even though you can choose more than one
personalization level in the Choose Personalization Context page, OA Personalization
Framework only allows you to save a configurable page personalization at one level.
The default value of the View Level poplist is the lowest applicable level specified in
your context.
The Layout mode of the Page Layout Personalization page renders boxes around each
region on the page regardless of whether the region is a flexible layout or not. Control
icons that allow you to configure a region, however, are displayed only for boxed
flexible layout regions. The actual content of a boxed flexible layout region is not
displayed. Note that in this particular example, the instruction text and region
immediately below the Update Customer header is not a flexible layout region,
therefore its content is fully displayed.
In the Layout mode, flexible layout content is simply represented as a header title
within each flexible layout box. This frees up screen space so that all nested levels of
flexible layout regions can be represented on the page without further drilling.
The Layout Mode Task Flows section, page 4-8 below describes the personalizations
you can accomplish in the Layout Mode.
If you wish to exit from the Page Layout Personalization page, select the Return to
Application link at the bottom of the page to return to the original page.
Administrative-Level Personalizations 4-7
Page 82

Layout Mode of the Page Layout Personalization page for the Update Customer page.
Layout Mode Task Flows
The following table lists the personalization tasks you can accomplish from the Layout
Mode of the Page Layout Personalization page.
4-8 Oracle Application Framework Personalization Guide
Page 83

Task Launch Point from
Layout Mode
Description
Personalize the
properties (such as
Prompt name,
default value, and
so on) of a specific
page element
1.
Launches a focused version of the
Page Hierarchy Personalization page,
page 5-2 for the selected region. The
Personalization Context shown at the
top of the page lists the
personalization context for the
top-level object, which in the case of
Oracle Applications, is the page
layout.
2.
Select the pen icon from the
Personalize column to navigate to the
Personalize page, page 5-8 for the
page element.
3.
In the Personalize page, you can edit
the personalizable properties of the
element at the personalization levels
specified for the current context.
4.
When you are done, select Apply to
save your personalization or select
Apply and Personalize Another to
save your personalization and return
to the focused Page Hierarchy
Personalization page where you can
select another element to personalize.
Alter the layout of a
boxed region
Alter the layout of a
boxed region
Alter the layout of a
boxed region
Splits the current flexible layout region
vertically into two peer layout regions,
displayed as rows. This change is
automatically committed.
Splits the current flexible layout region
horizontally into two peer layout regions,
displayed as columns. This change is
automatically committed.
Changes the flexible content to a horizontal
layout. Icon also updates to "Change to
Vertical Layout". This change is
automatically committed.
Administrative-Level Personalizations 4-9
Page 84

Task Launch Point from
Layout Mode
Description
Alter the layout of a
boxed region
Reorder the
children of a boxed
region
Remove a row or
column
Changes the flexible content to a
verticallayout. Icon also updates to
"Change to Horizontal Layout". This
change is automatically committed.
Launches the Reorder Contents page, page
5-23 where you can reorder the children of
the current boxed region. Choose "Apply"
from the Reorder Contents page to save
your changes.
Note: Use this control for reordering
only the immediate children of this
region. To reorder contents below that
level, select the region's Personalize
icon, page 4-9 to access the focused
version of the Page Hierarchy
Personalization page, which contains a
Reorder icon for each applicable item
within the region.
Removes a row or a column from the page.
The Remove Column icon appears on the
right, above each column. The Remove
Row icon appears to the left of the each
row. Both Remove icons direct you to a
warning page that asks you to confirm
whether you really want to remove the
row or column.
Change the
personalization
context
Activate, Inactivate,
or Delete existing
personalizations
4-10 Oracle Application Framework Personalization Guide
Choose Context button Launches the Choose Personalization
Manage Levels button Launches the Manage Personalization
Context page, page 5-5. Choose Apply
from the Choose Personalization Context
page to save your changes.
Levels page, page 5-50 where you can
select existing personalizations to activate,
inactive or delete.
Page 85

Task Launch Point from
Layout Mode
Description
Contents Mode
Translate
personalizations
Extract or Upload
translations of a
personalization
Manage Levels button Launches the Manage Personalization
Levels page, page 5-50 where you can
select the Translate icon for a specific
personalization to translate it to another
language in the Translate page, page 5-54.
Choose Apply from the Translate page to
save your changes.
Manage Levels button Launches the Manage Personalization
Levels page, page 5-50 where you can
choose the Upload Translation button,
page 5-53 or Extract Translation File
button, page 5-52 to upload or extract the
translations for a specific personalization,
respectively. Choose Apply from the
Upload Translations page or Extract
Translation Files page to save your
changes.
The Contents mode of the Page Layout Personalization page displays all content in the
page, including the content attached to flexible layout regions.
The Contents Mode Task Flows section, page 4-13 below describes the personalizations
you can accomplish in the Contents Mode. You can add new content to the layout,
create new items in an existing boxed content region, as well as update the
personalizable properties of specific elements in the page. You can also remove or
reorder contents from different regions on the page. To rearrange contents across
different regions, you must first remove them from their current location and then add
them to the new destination region.
If you wish to exit from the Page Layout Personalization page, select the Return to
Application link at the bottom of the page to return to the original page.
Administrative-Level Personalizations 4-11
Page 86

Contents Mode of the Page Layout Personalization page for the Update Customer page.
4-12 Oracle Application Framework Personalization Guide
Page 87

Contents Mode Task Flows
The following table lists the personalization tasks you can accomplish from the
Contents Mode of the Page Layout Personalization page.
Task Launch Point from
Contents Mode
Personalize the
properties (such as
Prompt name,
default value, and
so on) of a specific
page element
Flow Description
1.
Launches a focused version of the
Page Hierarchy Personalization page,
page 5-2 for the selected region. The
Personalization Context shown at the
top of the page lists the
personalization context for the
top-level object, which in the case of
Oracle Applications, is the page
layout.
2.
Select the pen icon from the
Personalize column to navigate to the
Personalize page, page 5-8 for the
page element.
3.
In the Personalize page, you can edit
the personalizable properties of the
element at the personalization levels
specified for the current context.
4.
When you are done, select Apply to
save your personalization or select
Apply and Personalize Another to
save your personalization and return
to the focused Page Hierarchy
Personalization page where you can
select another element to personalize.
Add content to a
boxed region
Launches the Add Content page, page 525, allowing you to select predefined
resource content from a catalog in the
database. Select "Apply" to save your
changes when you are done. The new
content is added as the last child of the
current layout.
Administrative-Level Personalizations 4-13
Page 88

Task Launch Point from
Contents Mode
Flow Description
Create a new item
in a boxed region
Reorder the
children of a boxed
region
Launches the Create Item page, page 5-27
where you can create a new item for the
content region. Select "Apply" to save your
changes when you are done. The new item
appears as the last item in the region. Use
the Reorder Content icon to reorder the
layout sequence of the new item. You can
only create new items in boxed content
regions or in the top page layout region.
Note: Use this control only for creating
immediate children of a given region.
To create items below that level, select
the region's Personalize icon, page 4-13
to access the focused version of the
Page Hierarchy Personalization page,
which contains a Create icon for each
applicable item within the region.
Launches the Reorder Contents page ,
page 5-23 where you can reorder the
children of the boxed region. Select
"Apply" to save your changes when you
are done.
Note: Use this control for reordering
only the immediate children of this
region. To reorder contents below that
level, select the region's Personalize
icon, page 4-13 to access the focused
version of the Page Hierarchy
Personalization page, which contains a
Reorder icon for each applicable item
within the region.
4-14 Oracle Application Framework Personalization Guide
Page 89

Task Launch Point from
Contents Mode
Flow Description
Remove a boxed
region
Create, Duplicate,
Update or Delete an
"admin-seeded
user-level"
personalization
Removes the boxed content. Directs you to
warning page that asks you to confirm
whether you really want to remove the
flexible content. Although a removed
content no longer renders in the
configurable page, page 4-5, you can add it
back using the Add Content icon, page 4-
13.
1.
Select the Personalize pen icon to
launch a focused version of the Page
Hierarchy Personalization page, page
5-2 for a selected boxed region.
2.
Use the Hierarchy Page HGrid to
identify the query region for which
you wish to create an "admin-seeded
user-level" personalization. (You can
create seeded user-level
personalizations only for a table or a
HGrid in a query region.)
3.
Select the Seeded User Views icon to
launch the Personalize Views page,
page 5-56 where you can create,
update, duplicate or delete
"Admin-seeded user level"
personalizations.
Change the
personalization
context
4.
When you create, duplicate or update
a seeded view, you navigate to the
respective Create/Duplicate/Update
Views page, page 5-58. Select Apply
to save your changes when you are
done.
Choose Context button Launches the Choose Personalization
Context page, page 5-5. Choose "Apply"
from the Choose Personalization Context
page to save your changes.
Administrative-Level Personalizations 4-15
Page 90

Task Launch Point from
Contents Mode
Flow Description
Activate, Inactivate,
or Delete existing
personalizations
Translate
personalizations
Extract or Upload
translations of a
personalization
Manage Levels button Launches the Manage Personalization
Levels page, page 5-50 where you can
select existing personalizations to activate,
inactive or delete.
Manage Levels button Launches the Manage Personalization
Levels page, page 5-50 where you can
select the Translate icon for a specific
personalization to translate it to another
language in the Translate page, page 5-54.
Choose Apply from the Translate page to
save your changes.
Manage Levels button Launches the Manage Personalization
Levels page, page 5-50 where you can
choose the Upload Translation button,
page 5-53 or Extract Translation File
button, page 5-52 to upload or extract the
translations for a specific personalization,
respectively. Choose Apply from the
Upload Translations page or Extract
Translation Files page to save your
changes.
Using the Page Hierarchy Personalization Page
In the Page Hierarchy Personalization user interface, the entire layout of a configurable
page is displayed in a hierarchy table (HGrid). The Page Hierarchy HGrid displays
nodes for all the structures that make up the page. The initial focus of the Page
Hierarchy is at the page layout level. As in all HGrids, you can change the focus of the
Page Hierarchy HGrid, as well as drill in or out of the various page structure nodes. The
HGrid location indicator keeps track of where you are within the page structure.
Note:
If the page you personalize is a configurable page, page 4-5 (a
page that contains metadata to personalize its layout) and you are not
running your page in Accessibility mode (profile option Self Service
Accessibility Features (ICX_ACCESSIBILITY_FEATURES) is set to
None), you will not see the Page Hierarchy Personalization page, as
shown below. Instead, you will see the Page Layout Personalization
page, page 4-6, where you can perform the same personalization
operations, using a more graphical user interface.
4-16 Oracle Application Framework Personalization Guide
Page 91

Page Hierarchy Personalization page for the Update Customer page in Accessibility mode
Personalization Context
The Personalization Context shown at the top of the page lists the context for the
top-level object, which in the case of Oracle Applications, is the page layout. It identifies
the scope of the personalizations you are about to make, as well as to what
personalization level(s) and value(s) these personalizations apply.
Personalization Structure
The Simple View and Complete View radio buttons in the Personalization Structure
region allow you to toggle between a Simple or Complete view of the page structure in
the HGrid below. When you select the global Personalize Page button, you
automatically navigate to the Simple view of the page structure hierarchy. The Simple
view does not show some of the layout elements that create unnecessarily complex
nesting within the page structure hierarchy. This simplified structure allows you to
quickly locate the region or item you wish to personalize.
If you initiate personalizations by selecting a Personalize Region link, you always
navigate to a Complete view of the page hierarchy, with focus on the region from which
you selected the Personalize Region link.
Both Simple and Complete views remember their status when you switch from one
Administrative-Level Personalizations 4-17
Page 92

type of view to another. For example, if you focus on a particular page element node in
the Complete view, then switch to the Simple View, and finally return to the Complete
view, the focus will be on the same node from which you first left the Complete view.
There are, however, exceptions:
• When you navigate to the Choose Context page, then select Apply to return to the
Page Hierarchy Personalization page, the view is reset to Simple and the focus of
the HGrid is also reset.
• When you navigate to the Choose Context page, then select Cancel to return to the
Page Hierarchy Personalization page, you always return back to the same view and
focus.
• When you navigate to the Manage Levels page, then select Return to
Personalization Structure to return to the Page Hierarchy Personalization page, the
view is reset to Simple and the focus of the HGrid is also reset.
When you display the Simple view of the Page Hierarchy Personalization page, a
column called Show in Complete View is displayed in the HGrid. If you select the icon
in this column for a page element node, the page switches to the Complete view, with
the focus on that page element node.
If the Page Hierarchy Personalization page is in the Simple view, and the children of a
node do not reflect the actual hierarchy structure of the children (because some layout
elements are not shown), the Reorder and Create icons will be disabled. To enable the
Reorder and Create icons for the children of that node, select the Show in Complete
View icon for that node, so that the correct hierarchy of the children is shown in the
Complete view.
Personalization Structure HGrid
The Shown column in the HGrid indicates whether the page element is rendered after
applying all existing personalizations for the current context. The User Personalizable
column indicates whether the page element is user personalizable.
The Page Hierarchy Task Flows section, page 4-18 describes how to accomplish your
personalization needs using the various launch controls on this HGrid.
If you wish to exit from the Page Hierarchy Personalization page, select the Return to
<Page_Title> link at the bottom of the page to return to the original page.
Page Hierarchy Task Flows
The following table lists the personalization tasks you can accomplish from the Page
Hierarchy Personalization page. Each task starts from a single launch point on the page.
Note that all tasks take you to different pages within the Personalization user interface.
From these launched pages, you specify and save your personalization changes. No
changes are ever committed on the Page Hierarchy Personalization page itself.
4-18 Oracle Application Framework Personalization Guide
Page 93

Task Launch Point from Page
Hierarchy
Personalization page
Flow Description
Search the Page
Hierarchy HGrid
for specific page
elements
Search
1.
Expand the Search region, page 5-19.
2.
Specify criteria to search for specific
nodes based on a particular style or a
particular title, prompt, or text and
display these nodes in a flat table.
3.
Separately or additionally, check
Personalized Only, to filter the
hierarchy to display
already-personalized nodes in a flat
table.
Administrative-Level Personalizations 4-19
Page 94

Task Launch Point from Page
Hierarchy
Personalization page
Flow Description
Personalize the
properties (such as
Prompt name,
default value, and
so on) of a specific
page element
1.
Locate the page element you wish to
personalize in the Page Hierarchy
HGrid.
2.
Select the pen icon from the
Personalize column to navigate to the
Personalize page, page 5-8 for the
element.
3.
In the Personalize page, you can edit
the personalizable properties of the
element at the different
personalization levels specified for the
current context.
4.
When you are done, select "Apply" to
save your personalization and return
to the previous page.
Note: Although a region may be
personalizable, not all region items in a
region are personalizable. Each region
item in a region has an
ADMIN_CUSTOMIZABLE property
associated with it. If the property is set
to false by the developer of the region,
the region item is not personalizable at
the personalization level. For example,
a developer would very likely set
ADMIN_CUSTOMIZABLE to false for
the vertical spacer item in a table layout
region to prevent disruption of the
spacing in a table.
Reorder the
children of a region
4-20 Oracle Application Framework Personalization Guide
Launches the Reorder Contents page, page
5-23 where you can reorder the children
of the current region.
Page 95

Task Launch Point from Page
Hierarchy
Personalization page
Flow Description
Add content to a
layout region
Remove content
from a layout
region
Launches the Add Content page, page 525, allowing you to select predefined
resource content from a catalog. The new
content is added as the last child of the
current layout region. You can add content
to a layout region only if the layout has no
other layout children.
Note: Add Content is available only if
the page you are personalizing is a
configurable page, page 4-5.
Directs you to warning page that asks you
to confirm whether you really want to
remove the current region. Although a
removed region no longer renders in the
page, you can add it back using the Add
Content icon.
Note: Remove Content is available
only if the page you are personalizing is
a configurable page.
Create a new item
in a region
Launches the Create Item page, page 5-27
where you can create a new child item in a
region. The new item appears as the last
item in the region. Use the Reorder
Content icon to reorder the layout
sequence of the new item. You can only
create new items in boxed content regions
or in the top page layout region.
Note: You can only create a new item if
you have your personalization context
set to include the Site level.
Administrative-Level Personalizations 4-21
Page 96

Task Launch Point from Page
Hierarchy
Personalization page
Flow Description
Update an item
created with the
Create Item page
Delete an item from
a region
Create, Duplicate,
Update or Delete an
"admin-seeded
user-level"
personalization
Launches the Update Item page, page 5-48
where you can update an item for the
region. Note that you may only update an
item that was previously created with the
Create Item page, page 5-27.
Directs you to warning page that asks you
to confirm whether you really want to
delete the current item. Deleted items are
non-recoverable.
Note: Delete Item is available only if
the page element is an item that was
created at the Site level using the Create
Item page, page 5-27.
1.
Use the Hierarchy Page HGrid to
identify the query region for which
you wish to create an "admin-seeded
user-level" personalization. (You can
create seeded user-level
personalizations only a table or HGrid
in a query region.)
Customize Look
and Feel
Change the
personalization
context
2.
Select the Seeded User Views icon to
launch the Personalize Views page,
page 5-56.
3.
In the Personalize Views page, where
you select different buttons or icons to
create, duplicate or update a seeded
view, you navigate to the respective
Create/Duplicate/Update Views page,
page 5-58.
Launches the Customizing Look-and-Feel
user interface, page 2-9.
Choose Context button Launches the Choose Personalization
Context page, page 5-5.
4-22 Oracle Application Framework Personalization Guide
Page 97

Task Launch Point from Page
Hierarchy
Personalization page
Flow Description
Activate, Inactivate
or Delete existing
personalizations
Translate
personalizations
Extract or Upload
translations of a
personalization
Manage Levels button Launches the Manage Personalization
Levels page, page 5-50, where you can
select existing personalizations to activate,
inactive or delete.
Manage Levels button Launches the Manage Personalization
Levels page, page 5-50, where you can
select the Translate icon, page 5-54 for a
specific personalization to translate it to
another language.
Manage Levels button Launches the Manage Personalization
Levels page, page 5-50, where you can
choose the Upload Translation button,
page 5-53 or Extract Translation File
button, page 5-52 to upload or extract the
translations for a specific personalization,
respectively.
Examples: Creating New Items Using the Personalization UI
You can declaratively add new items or fields to regions using the Personalization UI.
Since you can only add new items to an OA Framework application page at the
Admin-level, you need to first enable Admin-Level personalizations, page 4-1 for your
application by setting the Personalize Self-Service Defn
(FND_CUSTOM_OA_DEFINTION) profile option to Yes. From the Functional
Administrator responsibility, page 4-3, or in the page you wish to personalize, select the
Personalize Page global link, page 4-5 to navigate to the Create Item page, page 5-27 in
the Personalization UI.
Example: Adding a URL Link to the Advanced Worklist Page
The Personalization UI provides you with the ability to add new items as well as
include other sources of information to a personalizable region. This example illustrates
how to create a URL link in the Advanced Worklist page for all users of the site that
displays additional information. This example creates the URL link within the page
layout level
Important:
URL link back to the source page.
Be sure that in the page you wish to link to, you also create a
Administrative-Level Personalizations 4-23
Page 98

1. Enable Admin-Level personalizations for your application by setting the
Personalize Self-service Defn (FND_CUSTOM_OA_DEFINTION) profile option to
Yes at the user level for the user who has access to the Workflow User Web
Applications responsibility.
2. Log in to the Personal Home Page as that user and select the Workflow User Web
Applications responsibility. Navigate to the Advanced Worklist.
3. Select the Personalize Page global link.
In the Choose Personalization Context page, page 5-5, set the Scope to the current
4.
page and check Include for Site. Leave all other fields blank. Choose Apply.
5. In the Personalize page, page 5-8, select the Create Item icon for the Page Layout:
(WFNTFWORKLISTFNPAGE) page element.
6. In the Create Item page, page 5-27 that appears, set the Item Style as Static
Styled Text. Set the following properties for the new Static Styled Text item as
indicated:
• ID - NtfAddInfo
• Prompt - Additional Information
7. If you want to navigate to some arbitrary URL from this region item, you should
specify the Destination URI property as: protocol>://<machine>:<port>
/..., such as http://www.abcompany.com/home/page1.htm.
If you want to call an Oracle Applications function, set the Destination Function
property to the function name, for example to call the PL/SQL General Preferences
page, you would enter ICX_USER_PREFERENCES for the Destination Function.
Note: If you wish to call a secured function, please refer to the
Oracle Applications System Administrator's Guide - Security for
additional information.
8.
Choose Apply on the Create Item page when you are satisfied with the changes.
The new item, Static Styled Text: Additional Information is created after the Stack
Layout: Notifications Worklist Function page element within the Page Layout
level. If you choose Return to Application, the new Additional Information link
renders after all the content for the Notifications Worklist Function.
9. If you wish to move the Additional Information link so that it renders above the
Notifications Worklist Function content, choose the Personalize Page link to return
to the Personalization UI and navigate back to the Personalize page. Select the
Reorder icon for Page Layout: (WFNTFWORKLISTFNPAGE). In the Reorder
4-24 Oracle Application Framework Personalization Guide
Page 99

Contents page, select Additional Information from the Site list and select the up
arrow to move the Additional Information page element so that it appears before
Notifications Worklist Function. Choose Apply on this page. Then choose Return to
Application on the Personalize page to see the change.
10. When you select the new Additional Information link that appears in the Advanced
Worklist, you navigate to the URL or function that you specified in the Create Item
Page.
If you add a new item to a region and it does not appear on the
Note:
page, it is likely that the region you added the item to does not have the
Add Indexed Children property in OA Extension set to True in by the
developer. If this occurs and adding the new item to a different region
within the region hierarchy is not an option, contact Oracle Support for
assistance.
If you make a mistake when you create a new item, such that it
Tip:
causes the base page to display an error, you can sign on to Oracle
Applications as the Functional Administrator responsibility, page 4-3
and remove the personalization using the Manage Personalization
Levels page, page 5-50.
Example: Adding New Instruction Text to a Page
You can use OA Personalization Framework to add additional instructional text for
your users in the form of tips. This example illustrates how to add a new tip to a page at
the Site level.
Enable Admin-Level personalizations for your application by setting the
1.
Personalize Self-service Defn (FND_CUSTOM_OA_DEFINTION) profile option to
Yes at the user level.
2.
Log in to the Personal Home Page as that user and navigate to the page you wish to
personalize.
3. Select the Personalize Page global link.
4.
In the Choose Personalization Context page, page 5-5, set the Scope to the current
page and check Include for Site. Leave all other fields blank. Choose Apply.
5.
In the Personalize page, page 5-8, select the Create Item icon for the region or
page element where you want to add the tip.
6.
In the Create Item page that appears, set the Item Style as Tip, and set the
following properties:
Administrative-Level Personalizations 4-25
Page 100

• ID - specify an ID, such as HRPageTip.
• Text - set the text that you want to display on the page, next to the tip. For
example: HR Page Tip.
• Tip Message Appl Short Name - specify the application short name of the tip.
For example, HR.
• Tip Message Name - specify a message name. For example, HR_BIS_PERIOD.
Choose Apply when you are done. Then choose Return to Application on the
Personalize page to see the change.
7. The new tip is added to the end of the region in which you created the new item. If
you wish to move the tip so that it renders elsewhere within the region, choose the
Personalize Page link to return to the Personalization UI and navigate to the
Personalize page. Select the Reorder icon for the page element under which the tip
resides. In the Reorder Contents page, select the tip from the Site list and select the
up or down arrow to reorder its position within the page element. Choose Apply
on this page. Then choose Return to Application on the Personalize page to see the
change.
Note: If you add a new item to a region and it does not appear on the
page, it is likely that the region you added the item to does not have the
Add Indexed Children property in OA Extension set to True in by the
developer. If this occurs and adding the new item to a different region
within the region hierarchy is not an option, contact Oracle Support for
assistance.
Tip: If you make a mistake when you create a new item, such that it
causes the base page to display an error, you can sign on to Oracle
Applications as the Functional Administrator responsibility, page 4-3
and remove the personalization using the Manage Personalization
Levels page, page 5-50.
Function-Level Personalizations
A function in Oracle Applications is a piece of application logic or functionality that is
registered under a unique name for the purpose of assigning it to, or excluding it from,
a responsibility. You can create standard personalizations for a region at the Function
level so that the personalizations are effective only for users of a specific function. Once
you create a function-level personalization, you can update it or delete it.
4-26 Oracle Application Framework Personalization Guide
 Loading...