

Page 1

Optus Satellite
Set-top box
Generation 2
User Guide
DHR 4901 OPT
Satellite
.
Page 2

Contents
1 Warranty and safety / warnings 3
2 Welcome 6
3 Main features 7
4 What’s in the box 8
5 Hardware 9
5.1 Front panel 9
5.2 Rear panel 10
5.3 Remote control unit RCU) 11
6 How to connect your set top box 14
6.1 Quick start guide for existing installations 14
6.2 Quick start guide for new installations 14
6.3 Additional information 16
7 First time start- up of the set top box 17
8 General functions 20
9 Main menu screen 24
9.1 TV portal 25
9.2 Timers 25
9.3 Record 27
9.4 Electronic program guide (EPG) 27
9.5 Media 34
9.6 Settings 35
10 Troubleshooting 44
11 Legal matters 45
The DHR 4901 OPT Basic Viewer’s Guide is the subject of intellectual
property rights, including copyright, under domestic law and
international conventions.
All rights are reserved. The DHR 4901 OPT Basic Viewer’s Guide
supplements the information supplied with the packaging of the
Set Top Box as well as the detailed information available on our website.
Due to software upgrades, the features and functionalities in this Basic
Viewer’s Guide may differ from those on your Set Top Box. Please visit
www.optus.com.au/support/satellite for the latest Viewer’s Guide.
Please Note: The Network Operator requires the use of a 10.7 GHz (10700)
LNB to receive all available TV services.
!
!
Page 3

3
1 Warranty and
safety / warnings
This product has been manufactured to comply with all the relevant Australian safety
standards. Please read the following safety precautions and warnings carefully,
adhered to all safety and warnings notes.
Warranty
The Warranty period begins with the date of purchase of the product. As evidence
of the date of purchase please present the according document (sales check,
invoice, delivery note, or similar). Please keep these documents in a safe place, as our
guarantee service is based on the time of purchase and the warranty conditions.
If the product is faulty and requires repair please contact Optus.
This product carries the RCM – Logo and is compliant with AS/NZS 4417.2; Radio
communications (Low Interference Potential Devices) Class Licence 2015; and
Greenhouse and Energy Minimum Standards (Digital Television Set-top Boxes)
Determination 2012.
Mains Supply: 100-240V AC 50-60Hz
The power pack is supplied with this Set Top Box. It operates within the range
100-240 V AC 50-60 Hz mains supply only. Connect the power cable to the
Set Top Box before connecting the other end to the power outlet. Disconnect the
Set Top Box from the power outlet before connecting or disconnecting the
Set Top Box from any other equipment.
A well-regulated 12V DC supply is essential for this unit to operate efficiently;
contact Optus for the recommended DC regulators.
Overloading: Do not overload a wall outlet, extension cord or adapter as this may
result in electric fire or shock.
Liquid: Do not expose this product to liquid of any kind. In addition, do not place
objects filled with liquid on near the unit.
Cleaning: Disconnect the product from the wall outlet before cleaning.
Use a light damp cloth (no solvents) to dust the product.
Page 4

4
Ventilation: Never cover the ventilation slots in this product as these slots allow for a
proper airflow through the unit. Covering them may result in the unit overheating and
may not function properly.
• Never stand the product on soft furnishings or carpets.
• Never stack electronic equipment on top of the product.
Attachments: Do not use any unsupported attachments, as these may be hazardous
or cause damage to the product.
Connection to the lnb or antenna: Disconnect the product from the mains outlet
before connecting or disconnecting the cable from the LNB or antenna. Failure to do
so can result in damage to the LNB or antenna.
Connection to the TV: Disconnect the product from the mains outlet before
connecting or disconnecting the cable from the TV. Failure to do so can result in
damage to the TV.
Location: To avoid exposing the unit to lightning, rain or sunshine, place the product
indoors.
• Never place the unit on or near a radiator or heat register.
• Do not block the openings with any object, and do not place the product on a bed,
sofa, rug, or other similar surface.
• If you place the product on a rack or a bookcase, ensure that there is adequate
space and ventilation and that you have followed the manufacturers mounting
instructions.
• Do not place the product on an unstable shelf, stand, tripod, bracket, or table
where it can fall off. A falling product can cause serious injury to a child or adult and
serious damage to the appliance.
Lightning, storm or not in use: Unplug the unit from the wall outlet and disconnect the
LNB or antenna during a thunderstorm or when left unattended and unused for long
periods. This will prevent damage to the unit due to lightning and power-surges.
Extraneous objects: Do not insert any type of object through the openings in the unit,
where they can touch dangerous voltage points, damage electronic components or
other parts of the unit.
Replacement of parts: Only an authorised service technician specified by the
manufacturer can perform the replacement of parts.
Page 5

5
Warnings!
To avoid damaging the mains power cord and plug:
• Do not modify the unit’s power cord or plug in anyway.
• Do not bend or twist the power cord.
• Make sure to disconnect the power cord at the mains plug outlet when servicing or
away for long periods.
• Always keep heating appliances as far as possible from the mains power cord to
prevent the protective plastic cover from melting.
To avoid electrical shock:
• Never open the main body of the unit.
• Do not insert metal or inflammable material inside the product.
• Never touch the mains power plug with wet hands.
• Disconnect the mains power cord in case of lightning.
To avoid damaging the product:
• Do not use the product when it is faulty. If you continue to use the defective
product, serious damage may occur. Make sure to contact your authorised local
product distributor for repairs to the unit.
• Do not insert metal or alien substance into the smartcard slot.
• Ensure that the unit is placed near an accessible mains socket.
Correct Handling of Batteries:
• Never subject batteries to heat such as extreme sunlight, fire or anything similar.
• Batteries can contain toxic substances. Please keep batteries well out of reach from
children as they may put batteries into their mouth and/or swallow them.
• Leaking batteries can cause damage to the remote control. Extract the batteries
from the remote control when the Set Top Box is not in use for a long time.
• Batteries can contain toxic substances that can damage the environment.
Please make sure that you dispose of batteries in accordance with statutory law.
Never throw batteries in your regular household waste.
• Normal batteries may not be charged. Never heat or thrown normal and
rechargeable batteries into open fire (danger of explosion!).
Disposal
In any case, never dispose of your Set Top Box and the batteries in your
regular household waste.
Please contact Optus to arrange the return of your set top box.
Intended use
The purpose of this Set Top Box is for the reception of Digital Satellite and terrestrial
private use only.
• This involves also following all Information contained in this user manual, especially
the safety notes. Any other use is considered as not intended and can lead to
damage or even personal injury. This also implies immediate loss of warranty.
The manufacturer takes no liability for damages caused by unintended use.
Page 6
6
2 Welcome
Welcome to the DHR 4901 OPT Optus Set Top Box designed for receiving digital
television services. This Set Top Box features Ultra High Definition (UHD), High
Definition (HD) and Standard Definition (SD) capabilities.
Please read and follow all the instructions in this User Manual before using one of the
various installation options provided in this manual, as well as becoming familiar with
the Front Panel and Remote Control Unit keys.
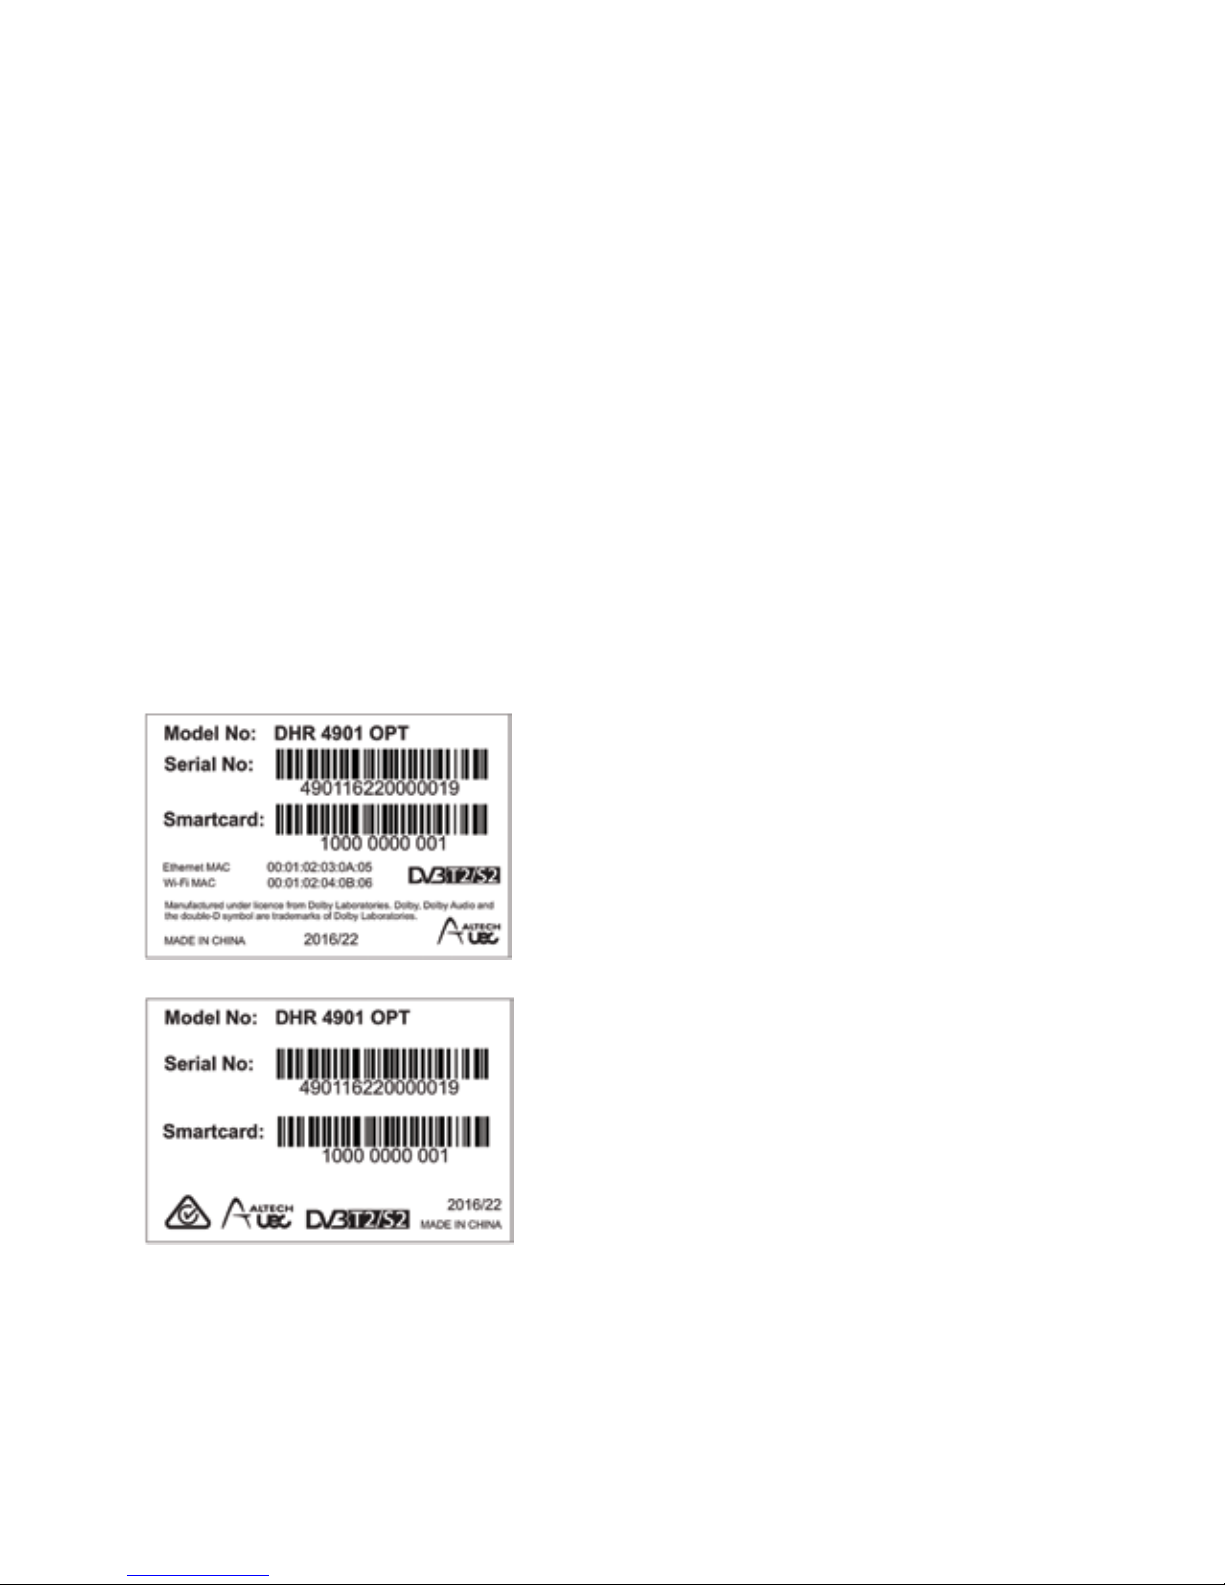
Identifying your Set Top Box
To identify the Set Top Box, look for a bar code sticker on the underside of your Set
Top Box or on the packaging which has a label attached displaying the product serial
number and the smart card number respectively.
Keep these numbers in a safe place, as your network provider requires them for
troubleshooting purposes.
Example: Bar code sticker on the
underside - base of your Set Top Box
Example: Gift box label
Page 7
7
3 Main features
• Supports SD / HD (MPEG2, MPEG4, HEVC) /4k-UHD
• Conditional Access – Irdeto CA
• One smartcard Slot
• 16-Digit Vacuum Fluorescent Display
• Two USB 2.0 ports on rear
• One USB 2.0 port on front
• Ultra HD video output via the HDMI port
• Gigabit Ethernet port
• Wi-Fi (AC 2x2) – Future Support
• Internal 2TB HDD
• 16x DVB-S/S2 Satellite Tuners
• 4x DVB-T/T2 Terrestrial Tuners – Future Support
• Digital Audio Output on coax and optical
• On-Screen Display (OSD)
• On-Screen user installation assistance
• View Electronic Program Guide (EPG) “Now” and “Next” 7 days
• Parental control for all channels
• Recording functionality on Internal HDD. 1.5TB
• Records up to 10 simultaneous programs
• USB Multimedia for personal media playback – Future Support
• Multi-video output resolutions: 576i50 up to UHD 4K (2160p50)
• Various channel edit functions – Favourite Editing, Parental Lock Channel Rename,
Move and Delete etc.
• Software Upgrade support via OTA and USB
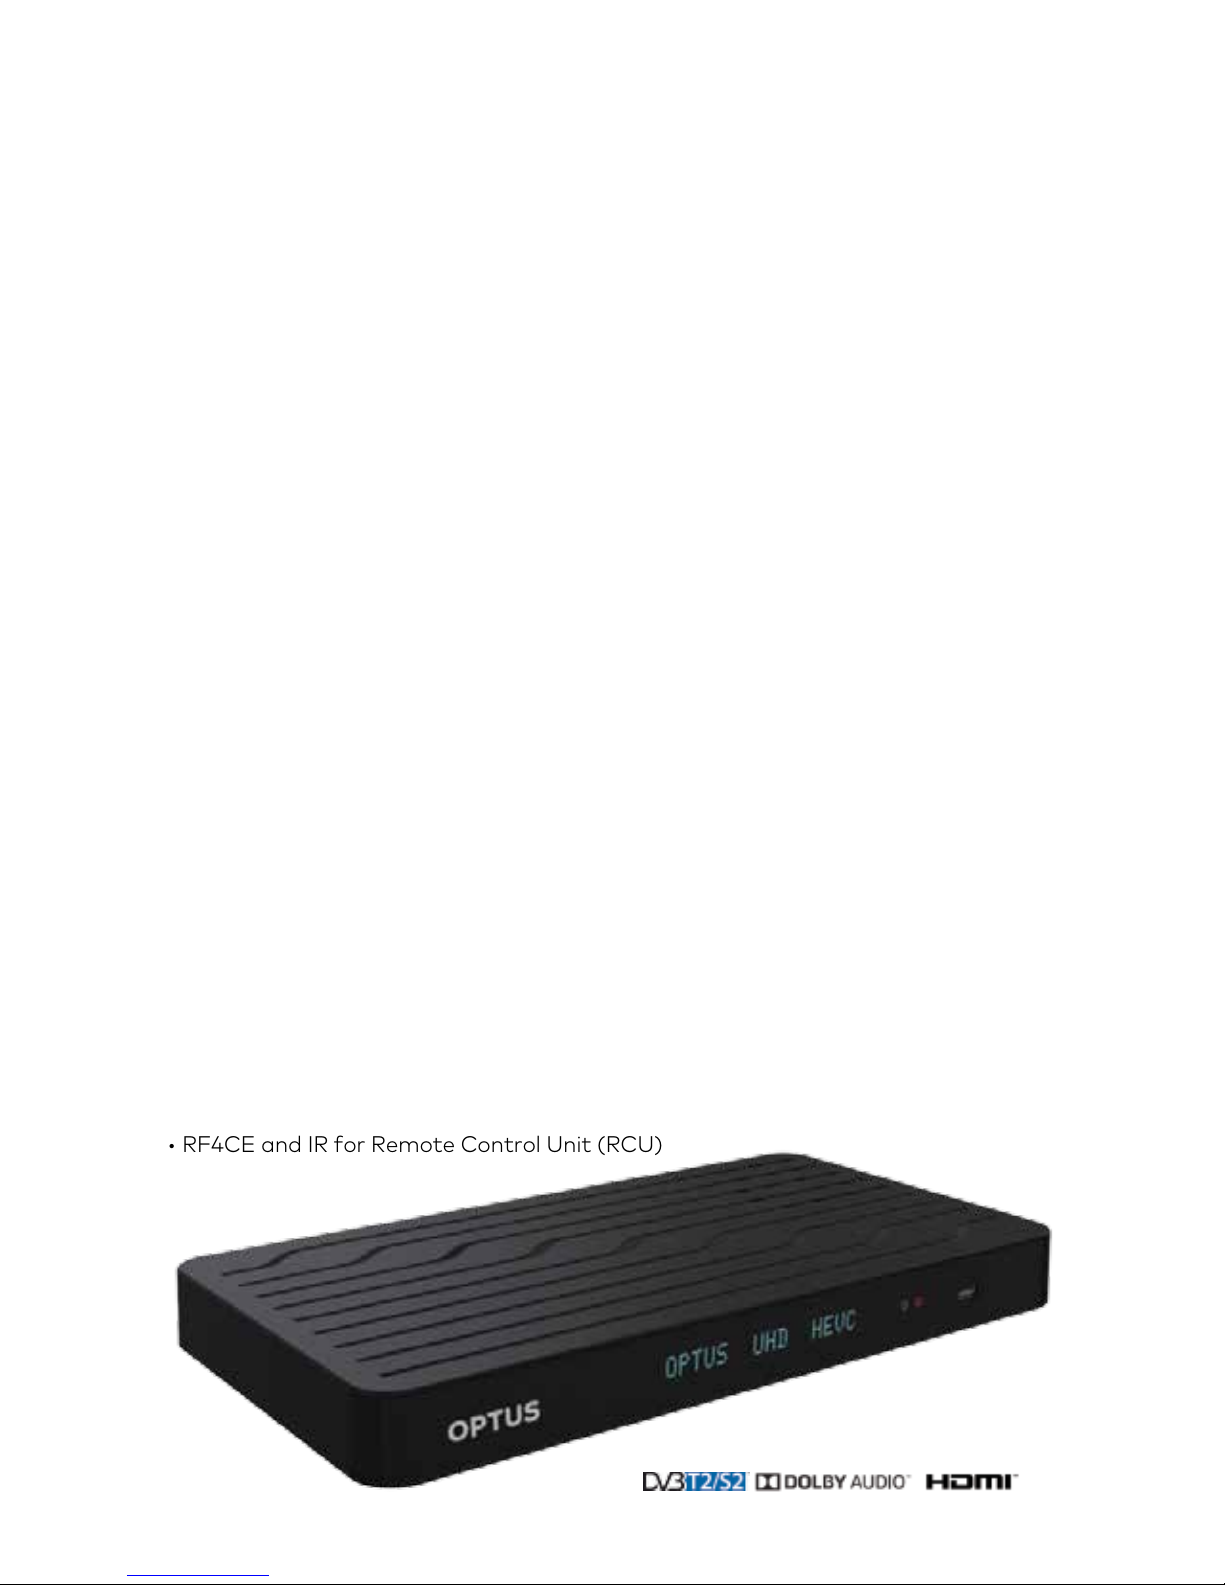
• RF4CE and IR for Remote Control Unit (RCU)
DHR 4901 OPT
Page 8
8
4 What’s in the box
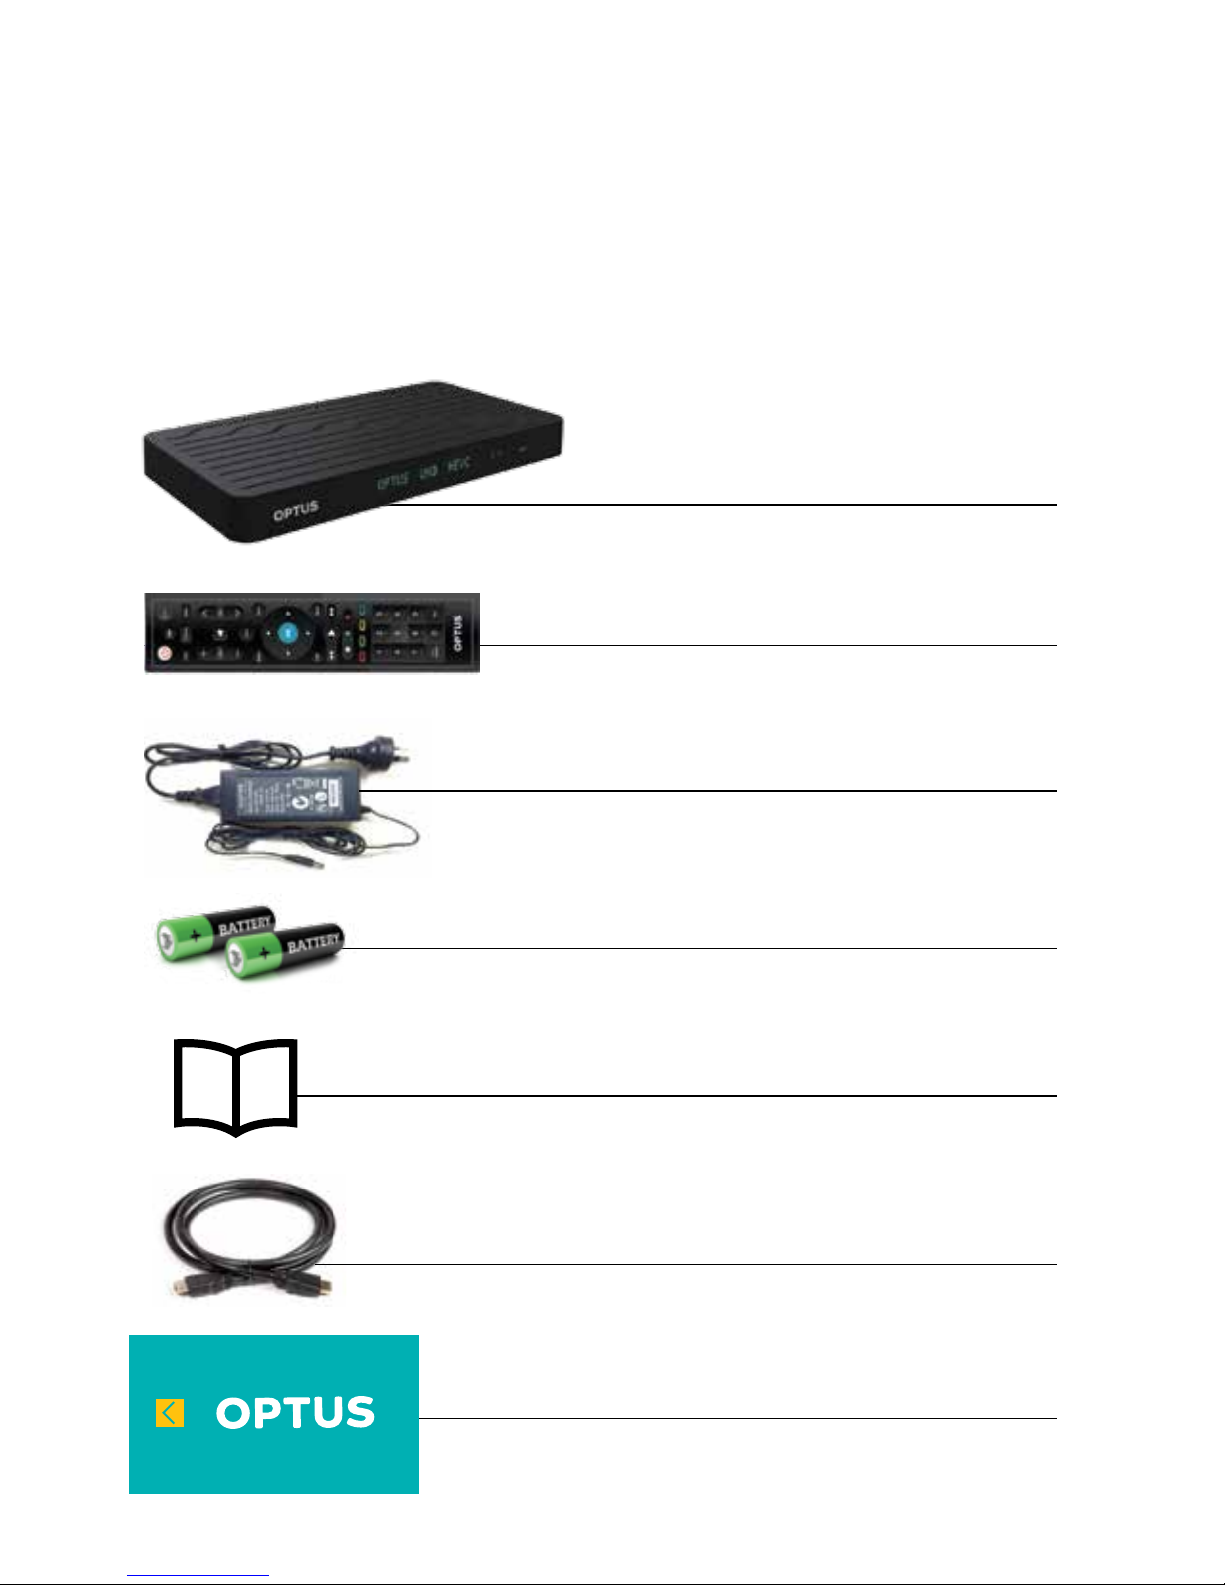
Check that all the following items displayed below are in the box and no damaged
occurred. If any items are missing or damaged, contact Optus.
1 x Set Top Box
1 x Remote Control Unit (RCU)
1 x 12V DC Power supply adapter
with power lead (PSU)
2 x 1.5V AAA Batteries
1 x User Manual
1 x HDMI Cable
1 x Optus Smart Card
Page 9
9
5 Hardware
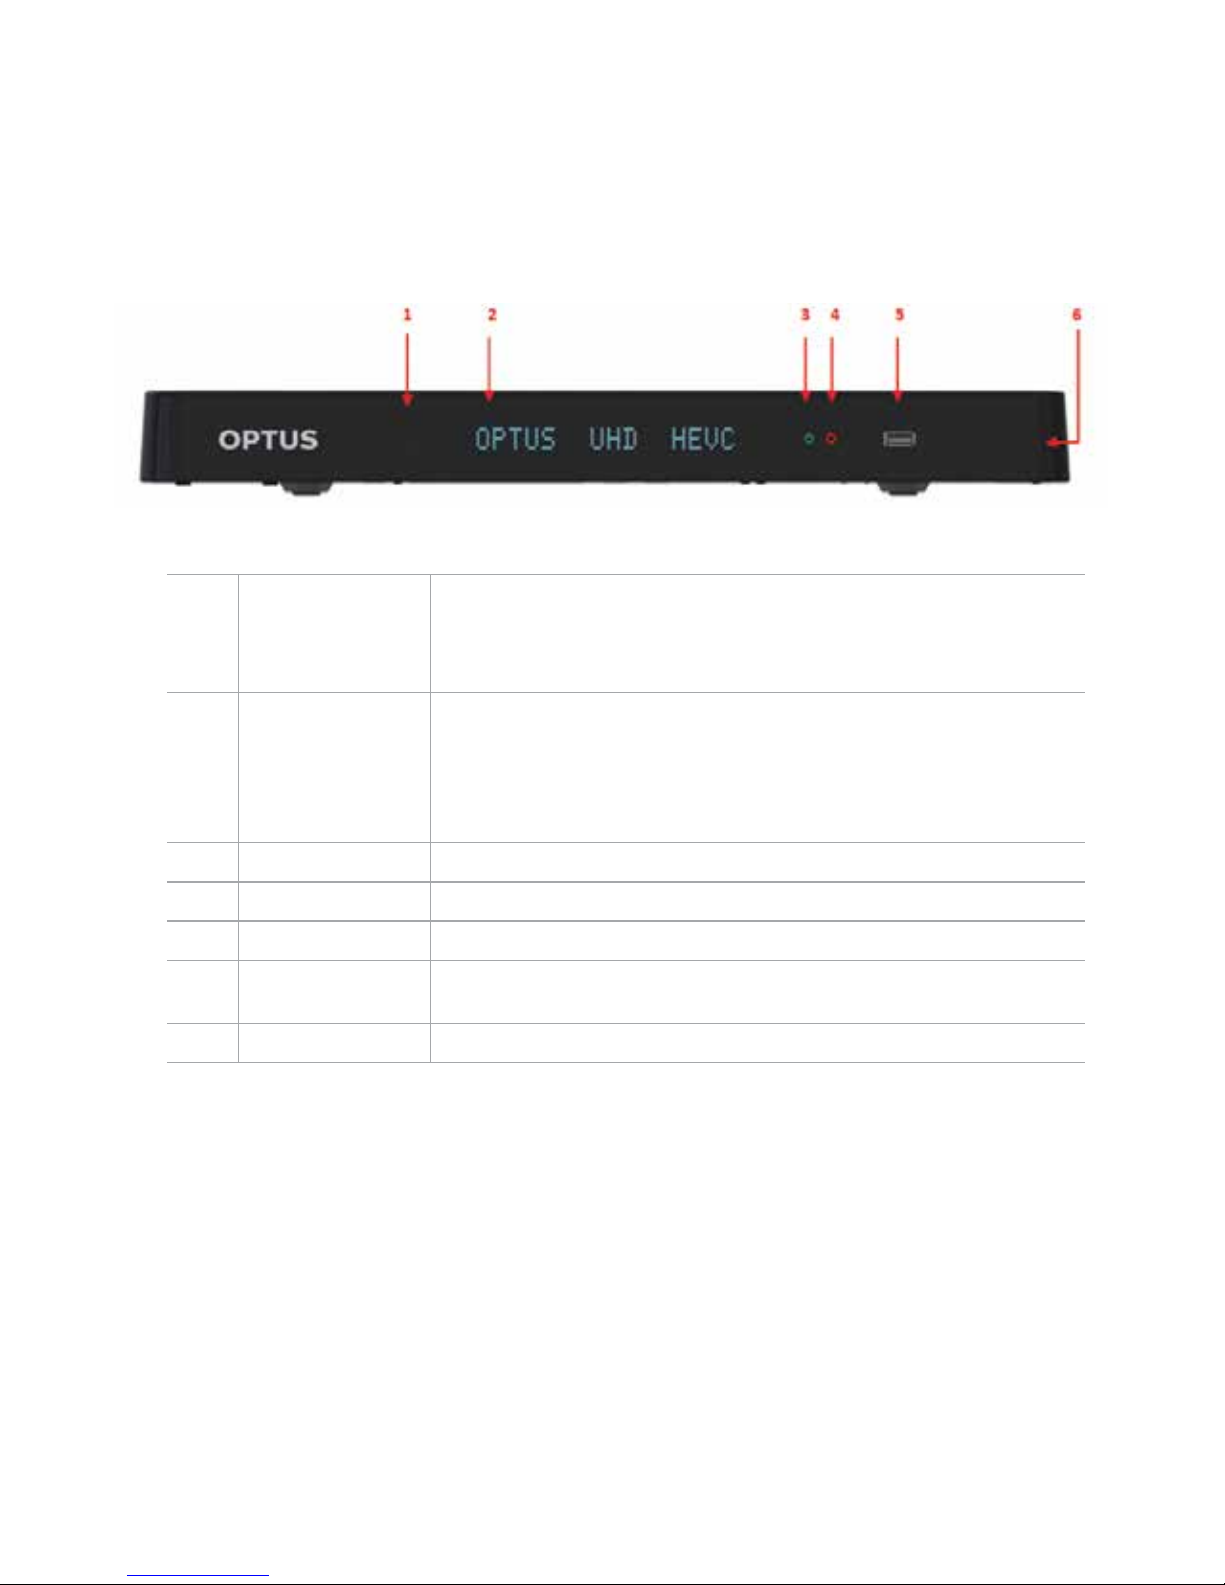
5.1 Front panel
1 IR Receiver IR Receiver for the Remote control unit.
The Remote Control Unit (RCU) operates the receiver by sending a beam, which is
received by the infra-red window. Do not block the path between remote control
and this window.
2 Front Panel Display
Vacuum Fluorescent
Display status
indicators
The following information could be displayed:
• Displays the time (when in Standby Mode)
• Displays the selected TV channel number being viewed.
• Displays any error code numbers when an error occurs.
3 Standby Indicator RED / GREEN indicates if the Set Top Box is ON or in STANDBY mode.
4 Record Indicator RED Record Indicator
5 USB USB port provision for External Hard Drive / USB upgrade and/or future use
6 Smart card The smart card slot is on the right hand side of the device. Insert a Smart card into
this slot for pay TV channels.
6 Standby Button Switches the Set Top Box between ON and STANDBY
Page 10
10
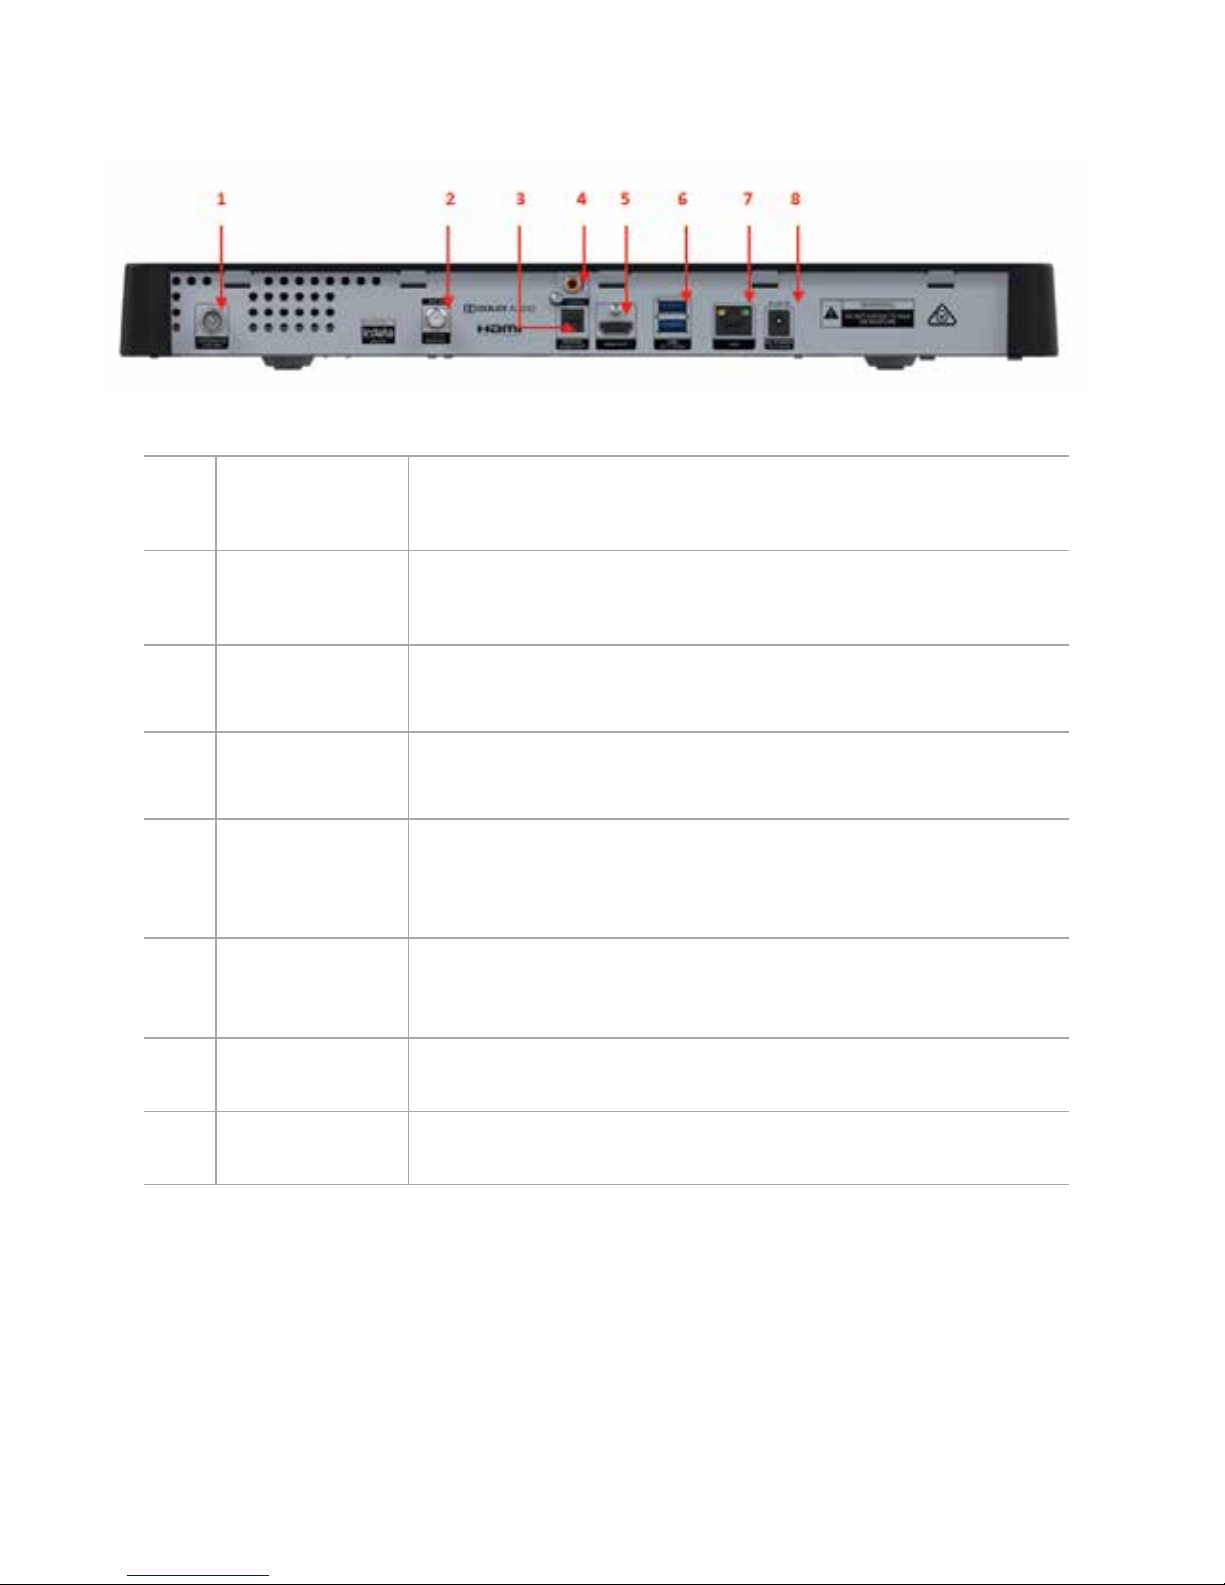
1 ANTENNA IN VHF/
UHF
(future functionality)
Connects to the TV terrestrial antenna.
Connect the terrestrial antenna coaxial connector to the to the ANTENNA IN socket
on the Set Top Box.
2 SAT IN Connects to the TV satellite antenna.
Connect the satellite antenna coaxial connector to the SAT IN socket on the
Set Top Box.
3 DIGITAL AUDIO –
OPTICAL
Connects to the Digital Audio Optical (TOSLINK) input on your AV Home Theatre
System for Dolby Digital surround sound (if available in the program, and as
conigured in Setup).
4 DIGITAL AUDIO –
COAXIAL
Connects to the Digital Audio Coaxial (SPDIF) input on your AV Home Theatre
System for Dolby Digital surround sound (if available in the program, and as
conigured in Setup).
5 HDMI Connects to the high deinition (HDMI) input on TV or AV Home Theatre System.
Use the supplied HDMI cable to connect the HDMI output on the Set Top Box to
one of the HDMI inputs on the TV or AV Home Theatre System. Provides both high
deinition video, and Dolby Digital surround sound (when available).
6 USB ports (2) USB port provision for External Hard Drive / USB upgrade and/or future use.
Connect to external equipment approved by your service provider i.e. external Hard
Disk Drive.
7 LAN
(future functionality)
Ethernet port for internet connectivity.
Connect to external equipment approved by your service provider and to the Internet.
8 DC POWER
12V ---5A MAX
12V DC input from the supplied power pack.
Connect the external power supply to the 12 V DC socket on the Set Top Box.
5.2 Rear panel
Page 11
11
5.3 Remote control unit (RCU)
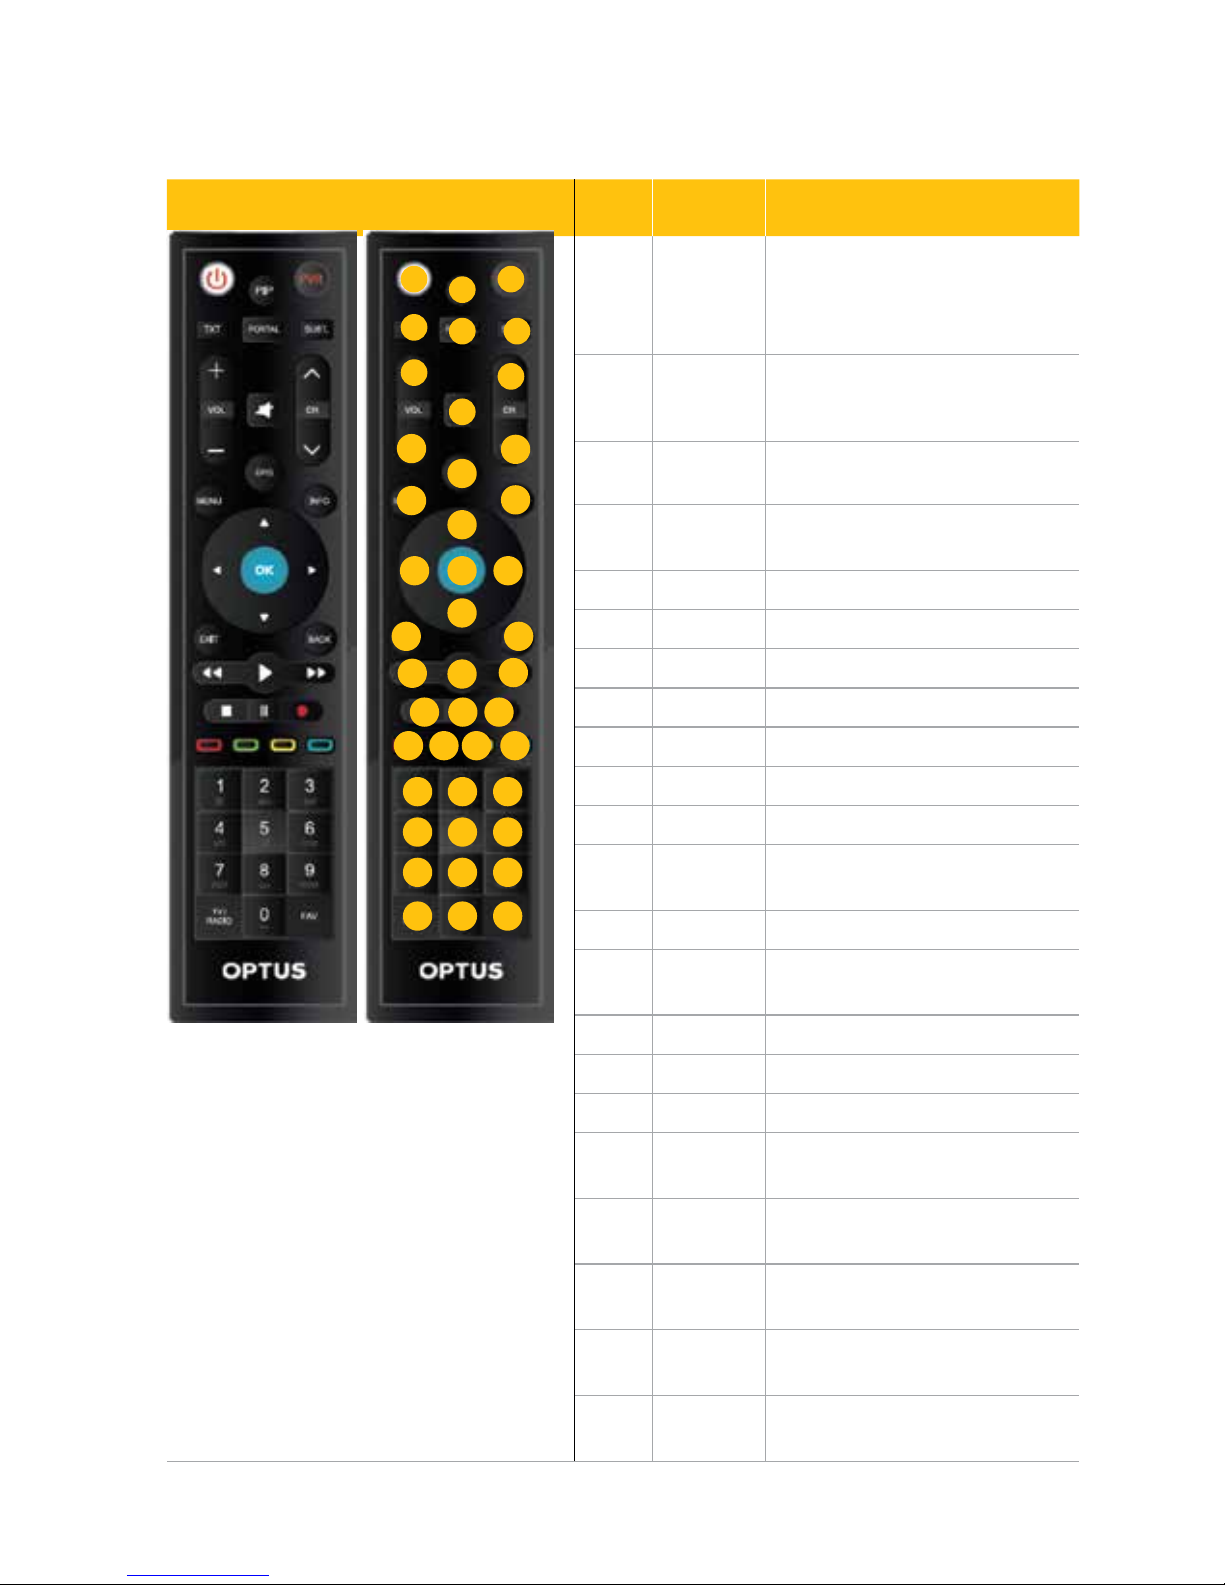
REMOTE CONTROL KEY
BUTTON
NAME
FUNCTION
1 Standby Switches the set top box between ON
and STANDBY
Flashes red for IR mode, green for
RF mode
2 PIP Picture in Picture. Allows for a second
viewing environment displayed in the
bottom right hand or the screen
3 PVR Short cut key to all your recording
options
4 TXT Functions as required by application
or context
5 PORTAL Short cut key to launch Portal system
6 SUBT Launches subtitles
7 V OL+ Increases the volume
8 CH+ Allows channel up navigation
9 MUTE Turns the sound ON/OFF
10 V OL- Decreases the volume
11 CH- Allows channel down navigation
12 EPG Short cut key to launch Electronic
Program Guide (EPG)
13 MENU Short cut key to launch Menu system
14 INFO Display information about the current
program
15 Up Arrow Menu navigation and selection - Up
16 Left Arrow Menu navigation and selection - Left
17 OK Menu navigation and selection - OK
18 Right Arrow Menu navigation and selection
- Right
19 Down
Arrow
Menu navigation and selection
- Down
20 EXIT To exit from the info bar or go one step
back in the menu structure
21 BACK Navigates back to previous menu or
channel
22 Rewind Rewinds a recorded program or when
time-shifting
10
20
30
40
13
16
26
36
11
21
31
41
14
24
34
17
27
37
12
22
32
42
23
33
43
15
25
35
18
28
38
19
29
39
1
2
3
4
5 6
7
8
9
Page 12
12
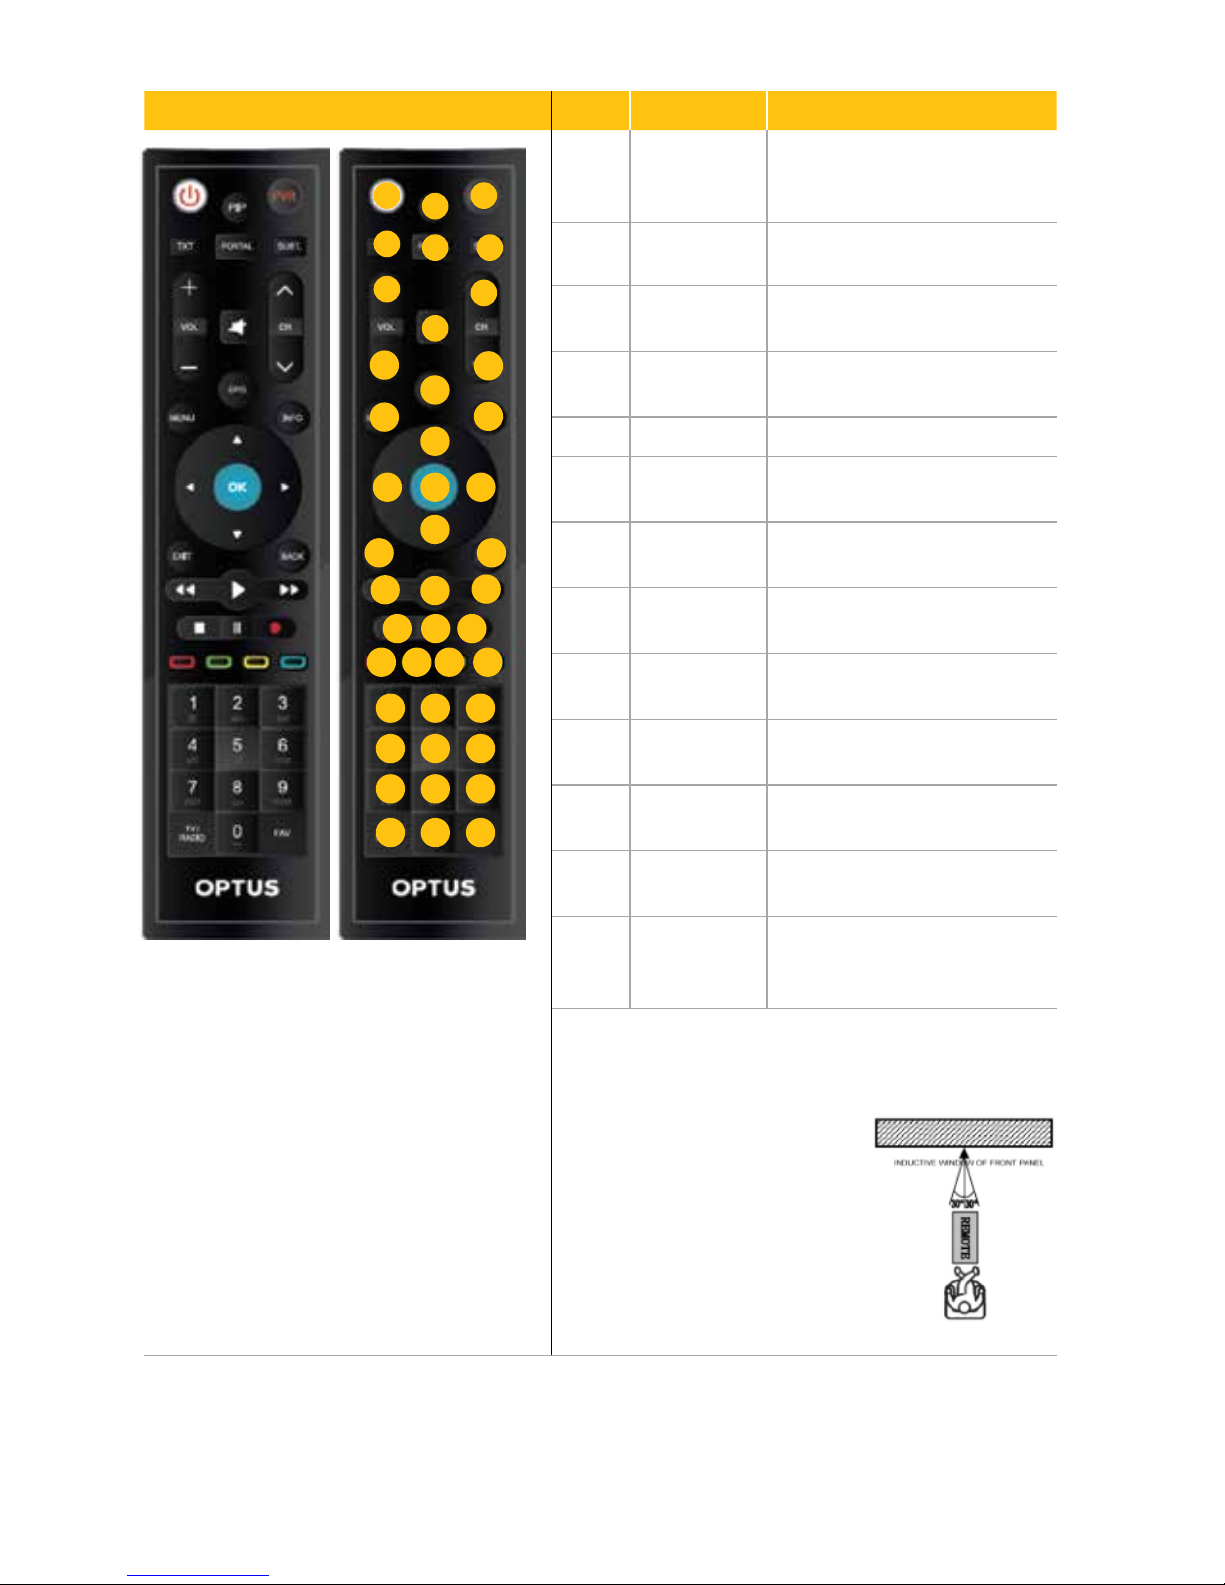
REMOTE CONTROL KEY BUTTON NAME FUNCTION
w 23 Play Starts playing recorded program
or resumes playing back behind live
TV program
24 Forward Fast forward a recorded program
or when time-shifting
25 Stop Stops the recorded program and
jumps to live TV
26 Pause Pauses live TV of the current
channel or recorded program
27 Record Records selected program
28 Red Functions as required by application
or to select various menu options
29 Green Functions as required by application
or to select various menu options
30 Yellow Functions as required by application
or to select various menu options
31 Blue Functions as required by application
or to select various menu options
32-40 1, 2, 3, 4, 5, 6,
7, 8, 9
Numerical data entry of channel
number, PIN, etc.
41 TV / RADIO Tunes to TV channels / Tunes to
RADIO channels
42 0 Numerical data entry of channel
number, PIN, etc.
43 FAV Displays the “Favourites” menu,
for adding or removing your most
viewed programs
The Remote Control Unit (RCU) might not operate properly if
the RCU is operated beyond the following conditions.
RF Mode:
Working distance – 10 Metres
IR Mode:
Working Distance – Up to 8 metres
directly in front of Set Top Box.
Angle – up to 45 degrees to the left or
right from the centre of the decoder
(Viewing distance 2 – 5 metres)
10
20
30
40
13
16
26
36
11
21
31
41
14
24
34
17
27
37
12
22
32
42
23
33
43
15
25
35
18
28
38
19
29
39
1
2
3
4
5 6
7
8
9
Page 13

13
Installing the Remote Control Batteries
Load the batteries as follows:
• Insert small flat screwdriver or similar to remove the cover
• Insert the batteries with their polarities aligned, as indicated inside the battery
compartment and replace plastic cover.
Battery Life
Your remote control batteries under normal everyday use may last a period of
six months, though it depends on how often the remote control is used.
Replace the batteries if you have to move closer to the Set Top Box before it
functions.
Use good quality batteries and never try to recharge them, short, disassemble, and
expose to heat or place them in fire.
Do not drop the remote control and avoid hard impacts, otherwise, parts of the
Remote may be damaged which can lead to a malfunctioning Remote Control.
Do not use new and old batteries together.
Please remove the batteries if the remote control is not used for a long periods.
This may lead to electrolyte leaking into the battery compartment, resulting in a
malfunction or may even cause complete failure. Wipe the electrolyte carefully
from the battery compartment of the remote control and install new batteries.
Wash skin with clean water if exposed to any electrolyte.
Remote Control unit modes
The remote control unit has two modes:
• IR mode (Default Mode - Red flash).
• RF4CE mode. (Once paired to the Set Top Box - Green flash).
Pairing / Un-pairing the Remote Control unit to the Set Top Box
Your remote control unit will require synchronisation with the Set Top Box. Follow the
instructions in Section 7 of this User Manual – "First time start-up of the Set Top Box"
Page 14
14
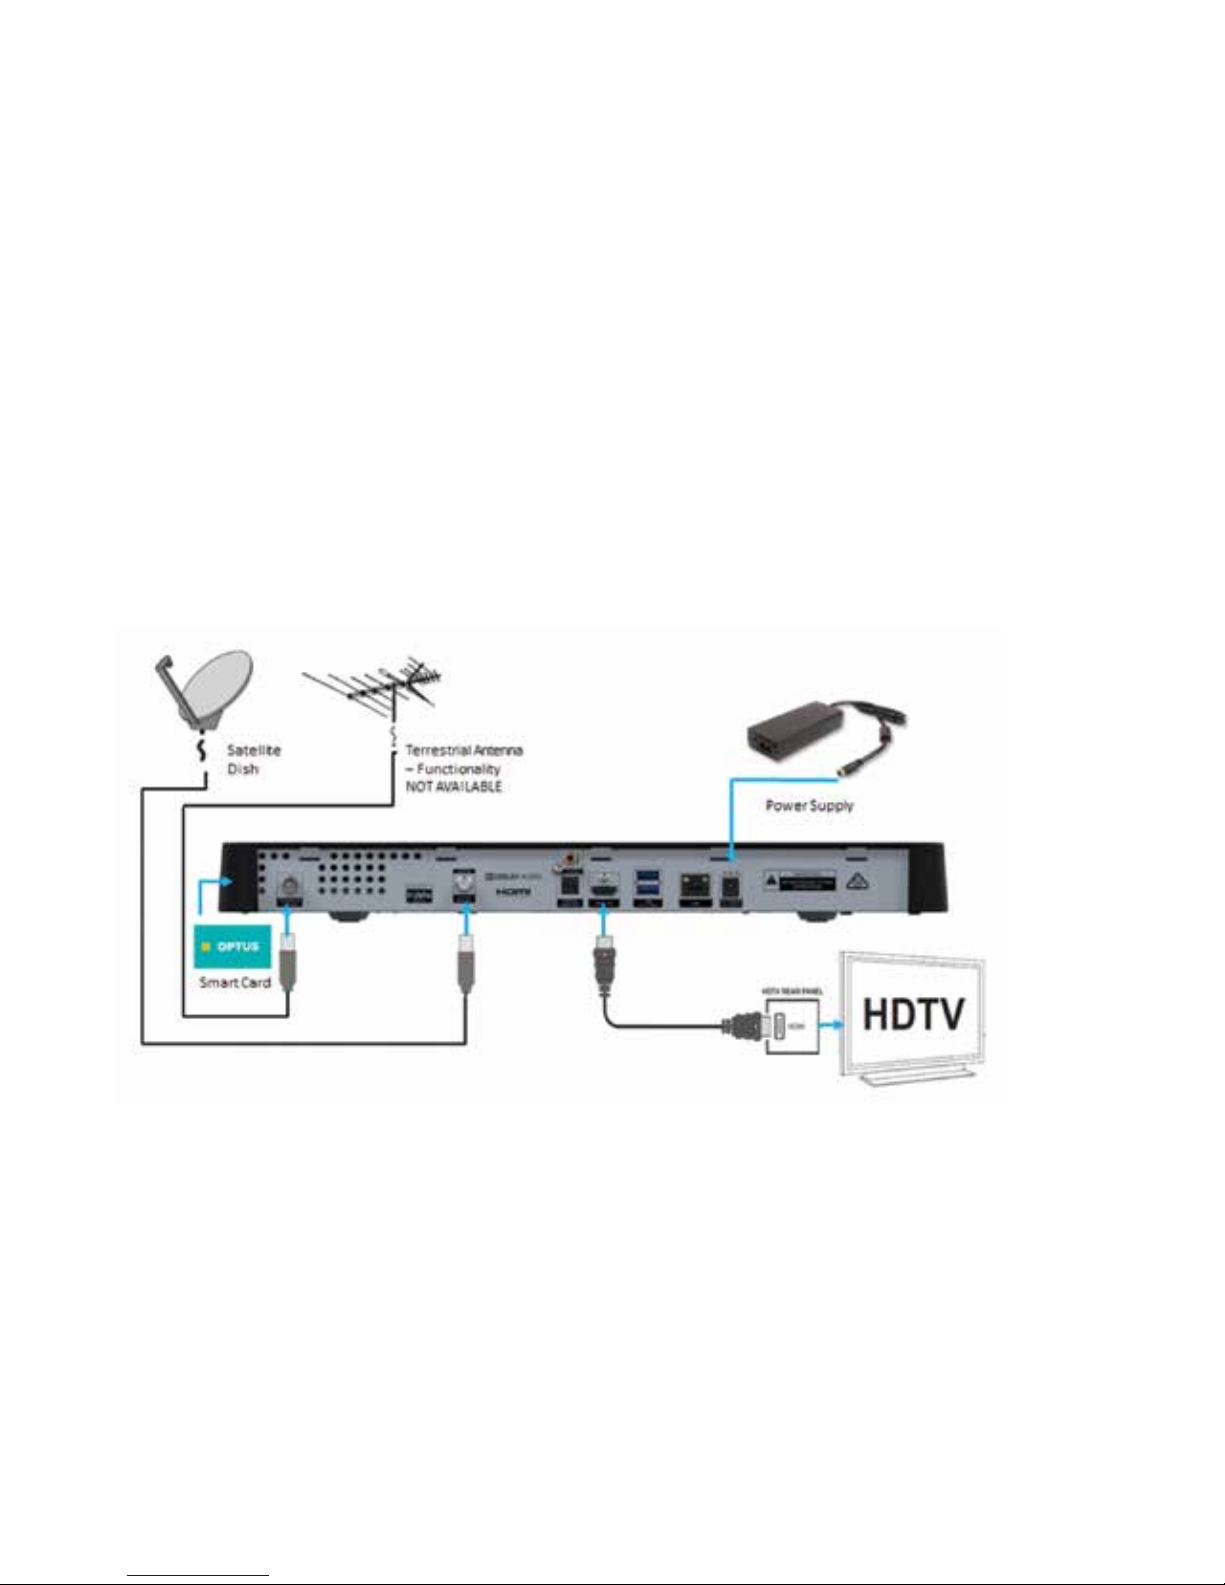
6.1 Quick start guide for existing installations
Remove Set Top Box from packaging. Insert supplied batteries into the remote
control. Pair the remote control to the Set Top Box. Connect to existing TV and dish
installation and re-scan if necessary. The Set Top Box should lock to service and
present video.
6.2 Quick start guide for new installations
Option 1: HDMI Connector (High Definition TV)
1. Connect the satellite feed (Cable from your Satellite Dish) to the connector marked
“SAT IN” on the rear panel of the Set Top Box.
2. Connect the terrestrial feed (Cable from your Terrestrial Antenna) to the
connector marked “ANTENNA IN VHF/UHF” on the rear panel of the Set Top Box.
(Terrestrial functionality is planned for future support. New user manuals will be
available on the website when this feature is available. )
3. Connect an HDMI cable between the HDMI-ports of your HDTV and your
Set Top Box.
4. Insert the Smart Card into the slot in the right side of the Set Top Box.
5. Connect the power supply cable from the external PSU to 12V DC socket to your
Set Top Box.
6. Once all the relevant cable connections to the equipment are complete, the external
Power Supply Unit (PSU) cable can be plugged into your AC wall socket outlet.
6 How to connect
your Set Top Box
Page 15

15
Option 2: HDMI Connector (AV Home Theatre system and High Definition TV)
1. Connect the satellite feed (Cable from your Satellite Dish) to the connector marked
“SAT IN” on the rear panel of the Set Top Box.
2. Connect the high quality coaxial cable (Cable from your Terrestrial Antenna) to the
connector marked “ANTENNA VHF/UHF” on the rear panel of the Set Top Box.
(Terrestrial functionality is planned for future support. New user manuals will be
available on the website when this feature is available.)
3. Connect an HDMI cable between the HDMI-ports of your HDTV and your
Set Top Box.
4. Depending on your AV home theatre system / amplifier, choose to use either the
digital audio coaxial (SPDIF) connector or use the digital audio optical (TOSLINK)
connector. The necessary cable can be obtained from your local AV equipment
retailer. Install the cable between one of the digital audio ports on the Set Top Box
and one of the digital audio inputs on your amplifier.
5. Insert the Smart Card into the slot in the right side of the Set Top Box.
6. Using the USB ports, connect the following devices as required:
6.1. External Hard Disk Drive (not supplied)
6.2. USB Thumb drive for personal media or software upgrades (not supplied)
7. Ethernet Port for connection to the internet. This functionality is planned for future
support. New user manuals will be available on the website when this feature is
available.
8. Connect the power supply cable from the external PSU to 12V DC socket to your
Set Top Box.
9. Once all the relevant cable connections to the equipment are complete, the external
Power Supply Unit (PSU) cable can be plugged into your AC wall socket outlet.
Page 16

16
6.3 Additional information
Restoring Factory Defaults
Resetting to factory defaults can be useful if you have changed some settings
and lost some functions. Resetting will restore the decoder back to its original
configuration and you will lose all personalized settings.
To restore factory defaults:
1. Launch the Main Menu press the “MENU” key.
2. Use the arrow buttons to highlight Settings icon, press “OK”.
3. Navigate to Installation, press “OK”.
4. Enter your Installation PIN of 1234
5. Navigate to Factory Reset - Restore Default Settings press “OK” and select “YES”
to start the restore factory settings process.
Smart Card
The smart card is paired to this Set Top Box which means that the smart card
provided with your Set Top Box cannot be used in any other Set Top Box. Similarly you
will not be able to use any other card in your Set Top Box.
Reset Button
Reset function is provided by pressing the standby button on the side and holding it
for 4 seconds. This can be used to reset your Set Top Box in the case of a video freeze
for example. The Set Top Box will reboot after a few seconds and display “boot” on
the front panel while it starts up.
Analogue Interfaces
This STB does not support Analogue Video or Audio outputs, if your TV does not have
a digital HDMI interface an external converter will be required at an additional cost.
The type of converter required will depend on the analogue interfaces available on
your TV.
Page 17

17
7 First time
start-up of the
Set Top Box
After installing all the cables correctly between the Satellite Dish, Set Top Box and the
TV, there are six easy steps to perform before you can activate the Set Top Box with
your network provider.
See the following list below for the initial set-up procedures:
• Remote Pairing
• Resolution
• Display Format
• Time Zone
• Satellite Channels Search
• Check the quality of your Dish Installation
Setup Procedures
Switch ON the TV and set it to the correct TV channel and then switch ON the
Set Top Box, after a few seconds the splash screen will appear followed by the first
installation screen.
Note:
IR Mode: The remote will operate in in IR mode (Default Mode) before pairing.
The remote shall require direct visual access between remote and Set Top Box.
When in IR Mode the remote red LED will light up when a key is pressed.
RF Mode: The remote will operate in RF4CE mode after pairing. The remote shall
operate without direct visual access between remote and Set Top Box.
When in RF Mode the remote green LED will light up when a key is pressed.
Page 18
18
Step 2
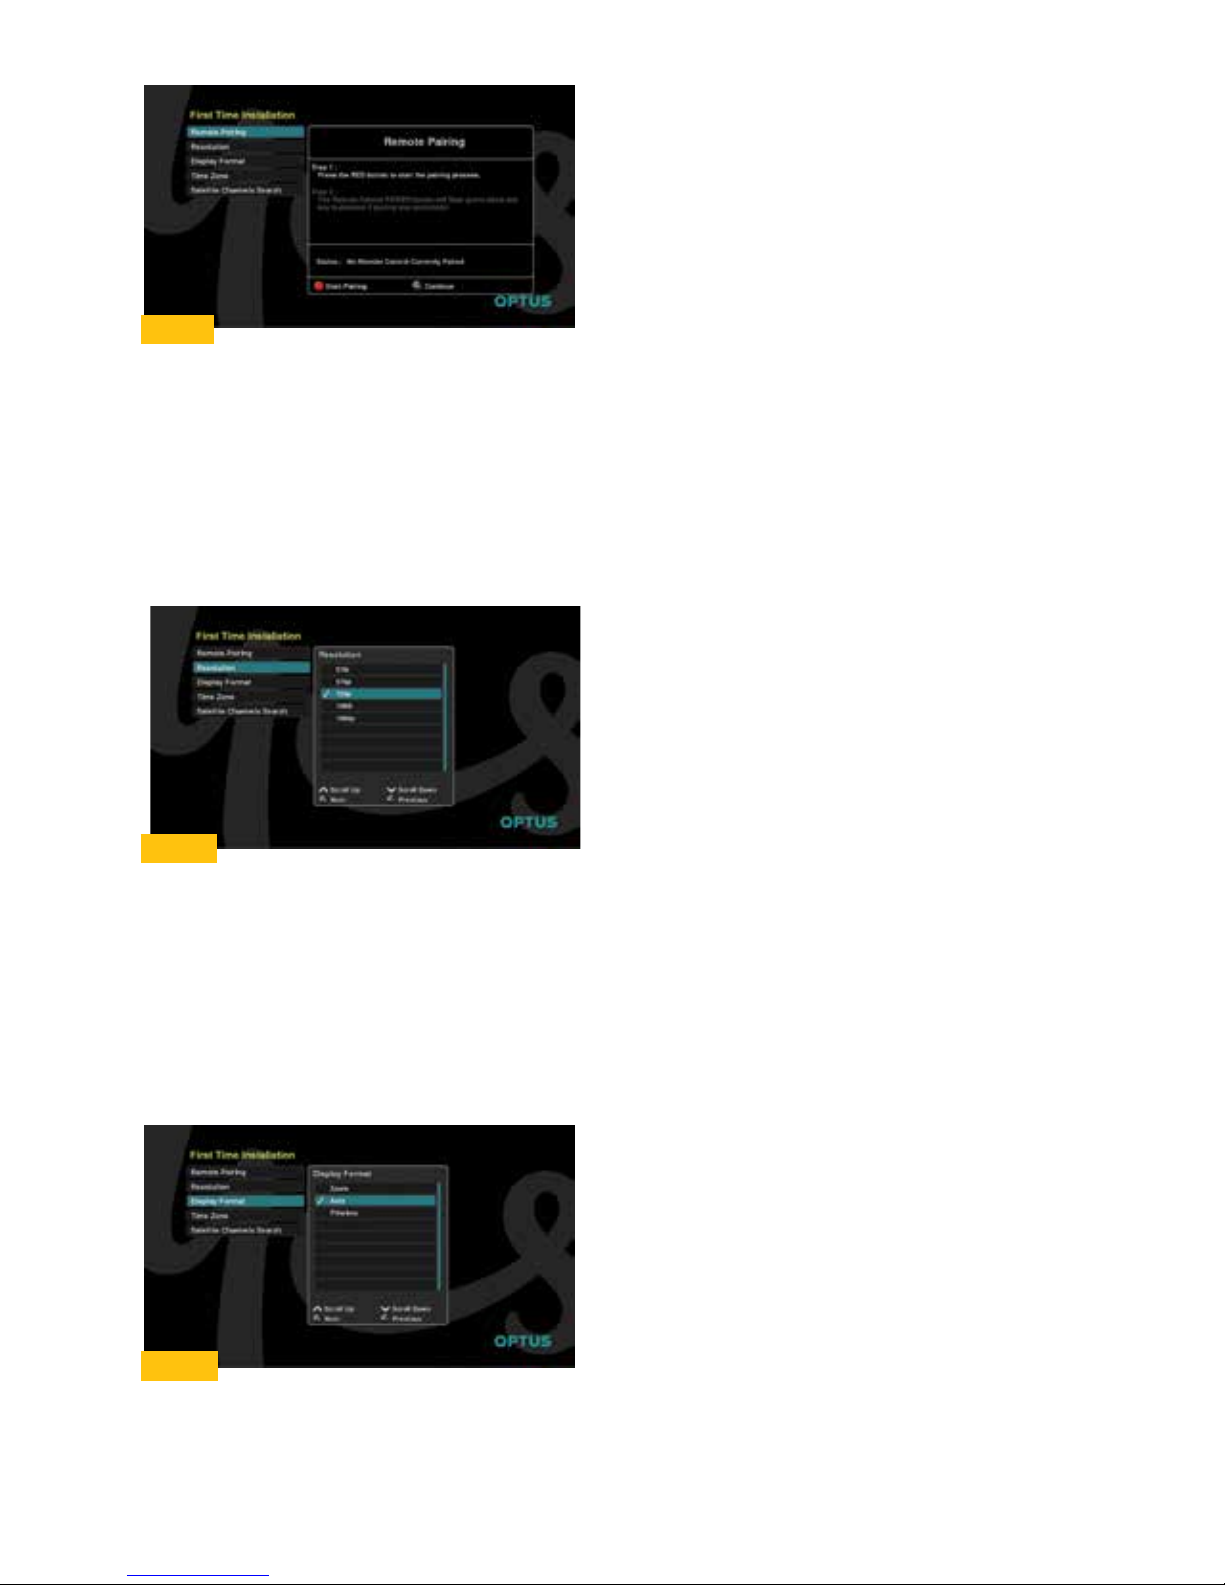
The next setting is the “Resolution”.
Press “OK”, then use the “▲▼” keys to select your relevant resolution for your TV,
and press “OK” to accept and proceed to next screen.
Standard Definition – 576
HD Ready – 720
High Definition – 1080
Step 3
The next setting is the “Display Format”.
Press “OK”, then use the “▲▼” keys to select your preferred display format for your
TV, press “OK” to accept and proceed to next screen.
Step 1
The “Remote Pairing” option automatically appears.
1. To start the pairing process press “OK” on the remote.
2. Initiate pairing by pressing and holding down the “Red” button.
3. The Pairing success status shall be displayed (Pass / Fail)
4. To Un-Pair Remote Control: Initiate un-pairing by pressing and holding down holding
down the “Blue” and “Pause” Buttons simultaneously for a period of approximately
3 to 8 seconds. The Remote control will return to the default IR mode.
Page 19
19
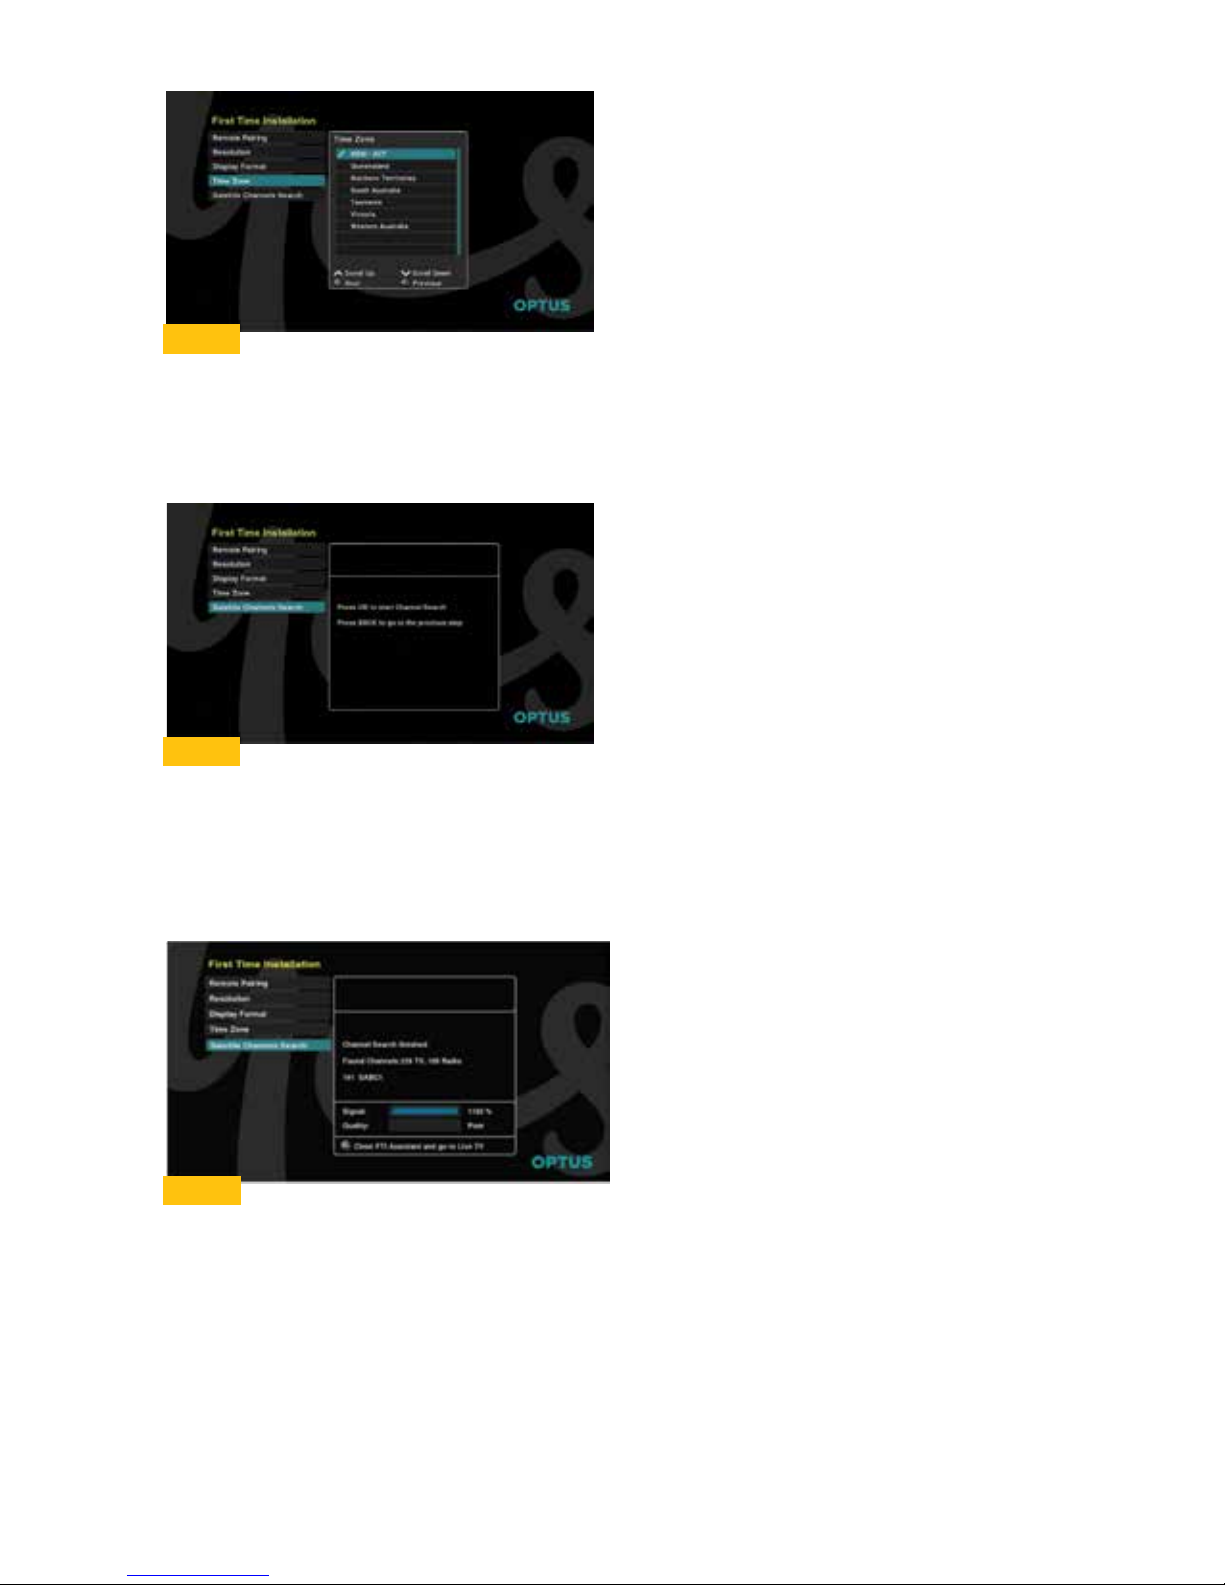
Step 5
The final setting is the “Satellite Channels Search”.
Note: To continue your Satellite Dish must have been installed correctly
Press “OK” to begin searching for all the available channels, this may take a few
minutes to complete.
Step 4
The next setting is the “Time Zone”.
Press “OK”, then use the “▲▼” keys to select your preferred Australian time zone,
press “OK” to accept and proceed to next screen.
Step 6
Note: Signal information will be displayed and provide an indication as to the quality
of your Dish Installation.
Once the search is finished, the number of channels and radio services found
are shown.
Press “OK” to Close First Time installation and go to live TV.
If no channels or radio services are found, retry the channel search.
Page 20
20
Standby/Power On
The “Standby/Power On” button
key places your Set Top Box into standby or
powers up the Set Top Box so you resume watching TV (ensure your TV is also ON).
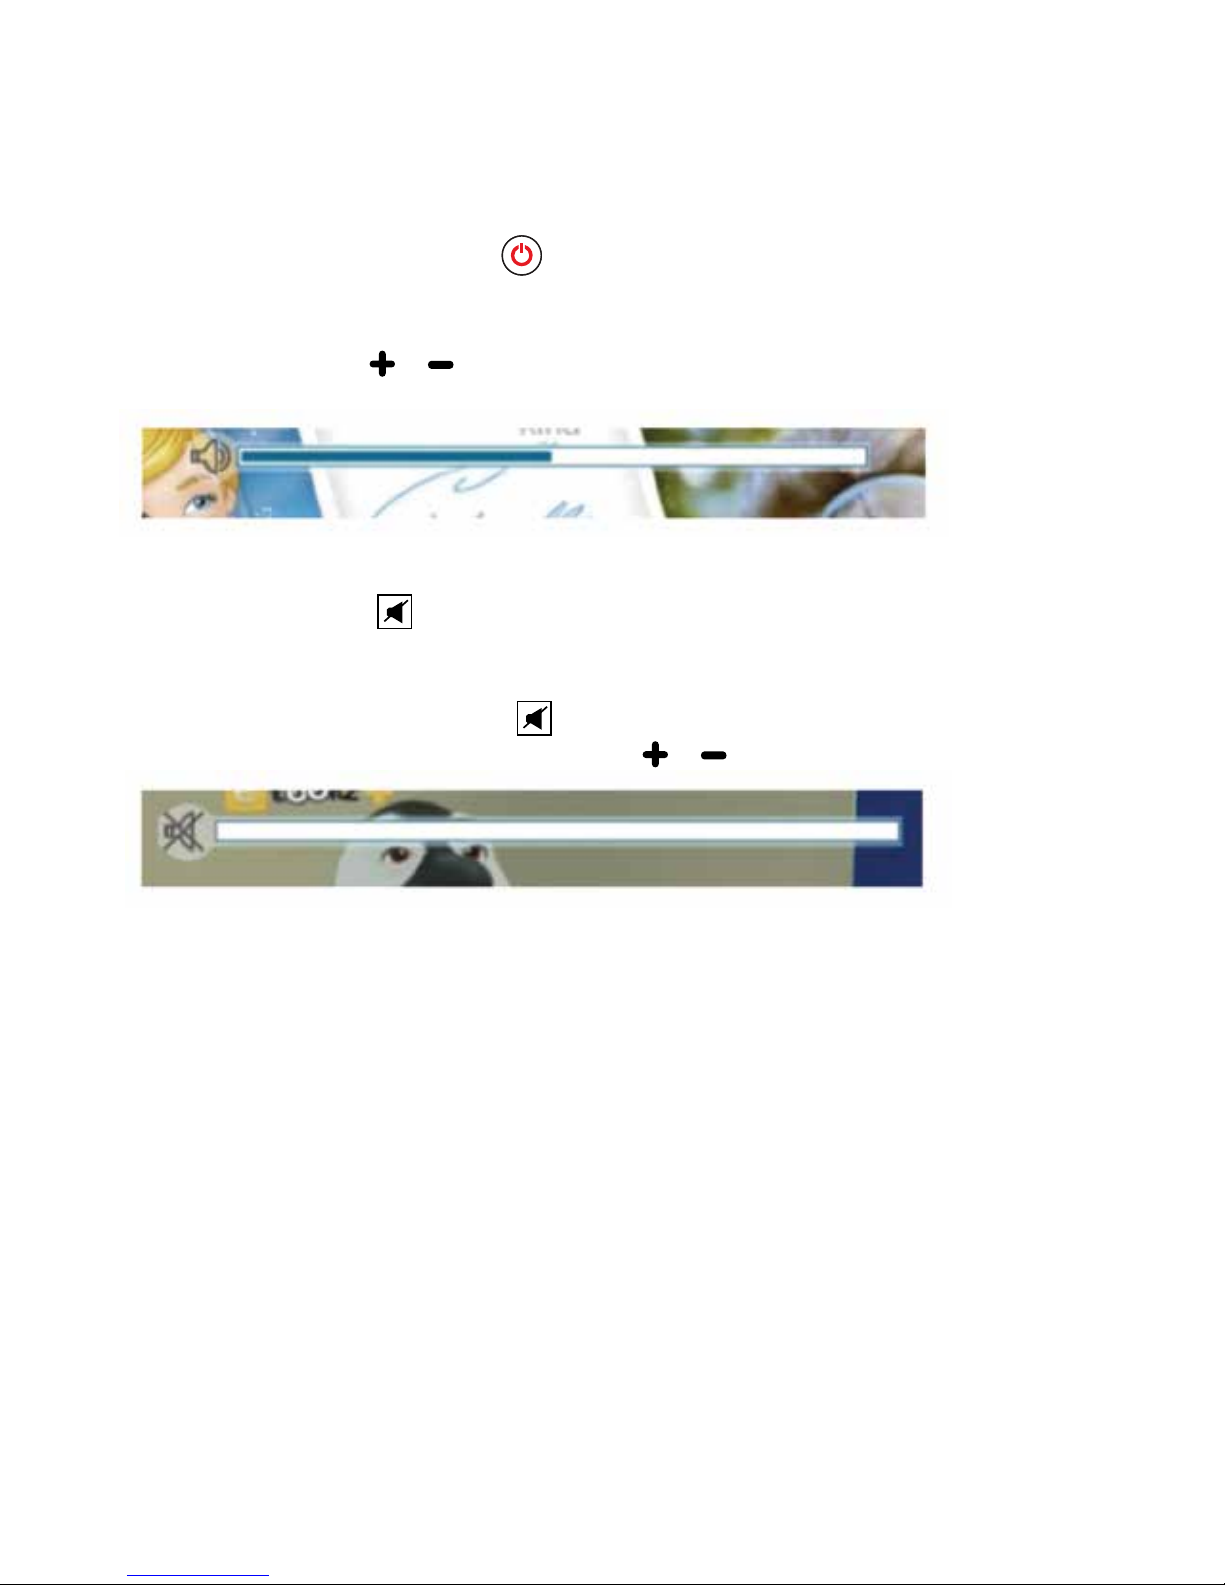
Volume Control
Press “VOL” buttons
or
to increase or decrease the volume. A volume bar shown
on-screen indicates the volume level.
Switching between TV and Radio Channels
(please note: not all customers will be able to receive Radio channels)
Use the “TV/RADIO” key to change between the TV Channels and radio stations.
The radio screens and procedures are similar to your TV procedures in this User
Manual.
Error Banners
An error banner is displayed when there is a network error or input error from the user
or in the instance where signal is lost.
8 General functions
Mute Key
Press “MUTE” button
will mute the audio. A volume mute bar as shown on-screen
indicating the volume is in mute mode.
There are two ways to regain the volume:
1. If the volume is muted, press the
key again to regain volume.
2. If the volume is muted, press either the VOL
or
keys to regain volume.
Page 21
21
OK Key
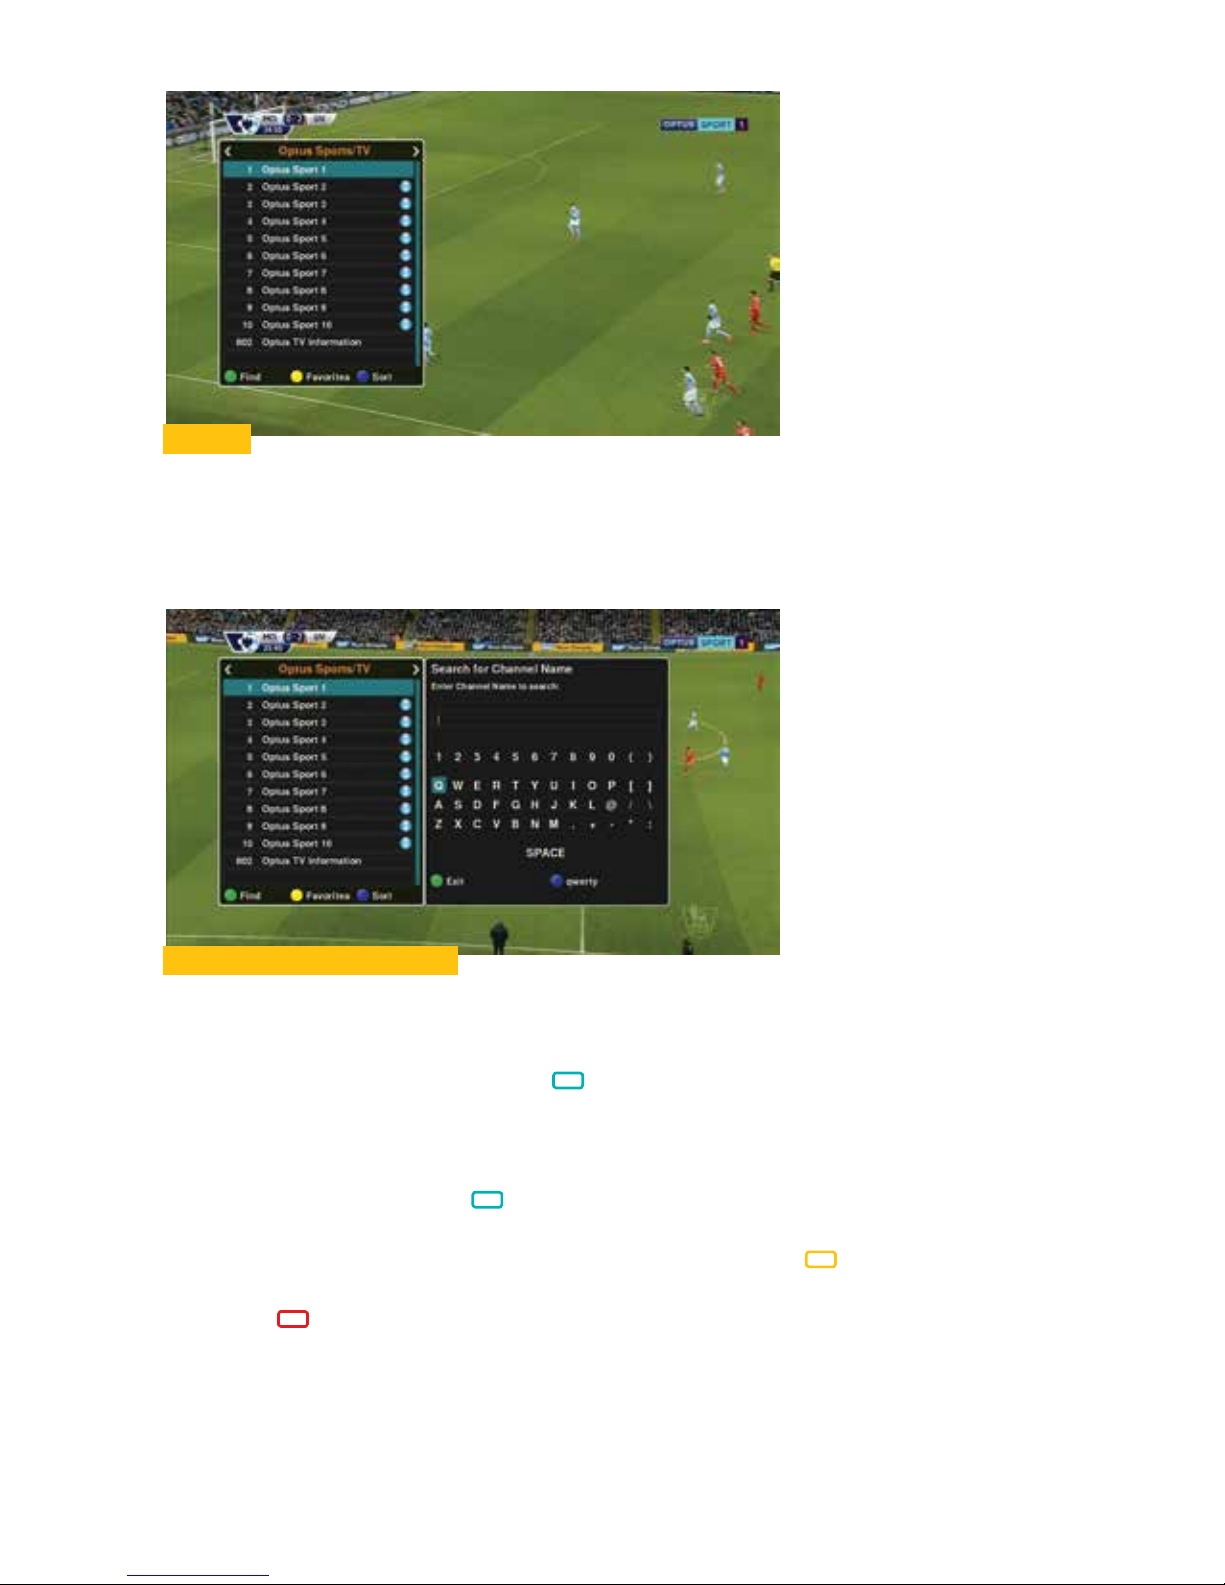
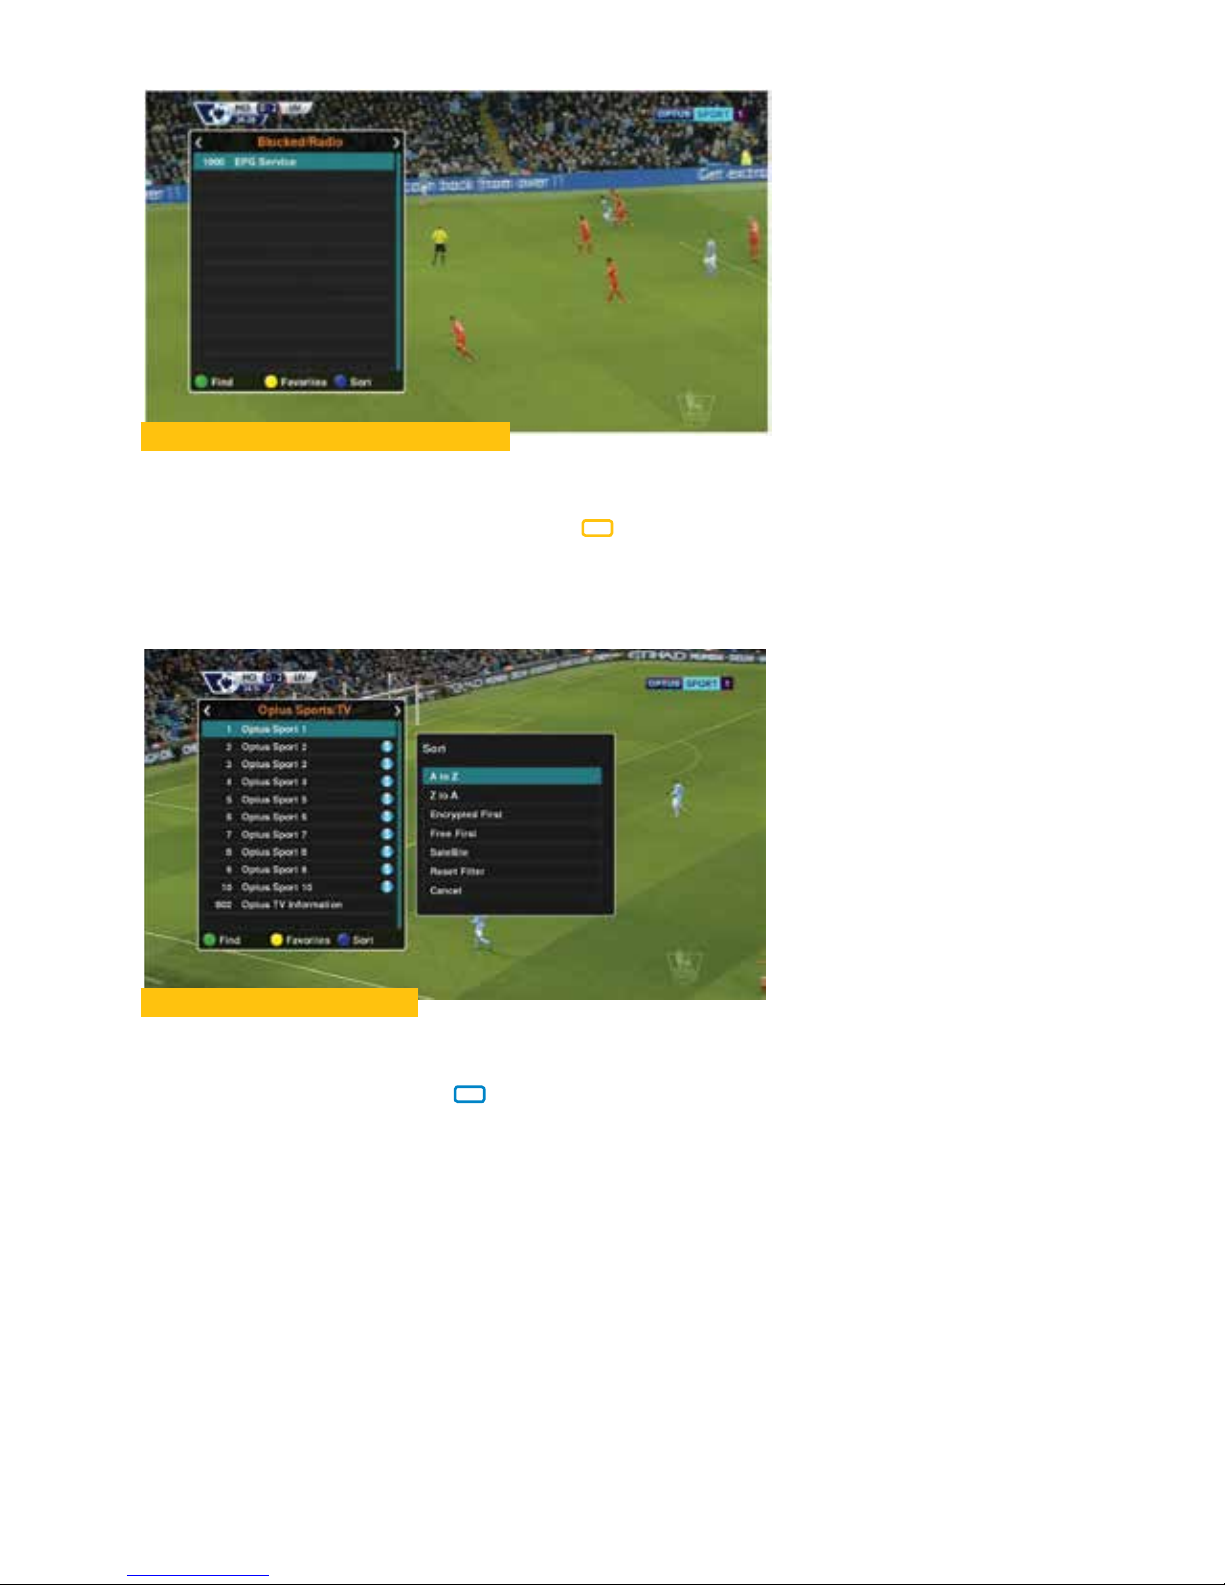
While viewing a full screen program, if you press “OK” a list shows all the TV channels
available to you. This list does not show any program information. You can scroll
through the list or use the colour icons below the TV channels to Find or Sort channels.
Remote - Green (Find) Icon
Use this option to search for channel or other content. Use the colour keys on the
Remote Control to perform these functions.
1. To search for a channel, press the
key. This presents you with another window
where you enter the channel or program title.
2. To select the letters, numbers or symbols use the “
◂▸
▲▼” keys; press “OK” to
accept each letter until title is complete.
3. To begin the search, press
. If found the channel or program title results are
shown.
4. To delete the name of the channel or program title, press
. The name will be
removed from the search area, or.
5. Use the
to backspace a single letter at a time.
6. You can close these screens at any time, press “EXIT” until clear.
Page 22
22
Remote - Blue (Sort) Icon
From this TV Channel list, you also have the option to sort your channels.
1. To sort channels, press the
key. Another window is opened where you can select
how you want the channels sorted.
2. To select an option of what you want sorted, use the “▲▼” keys to highlight your
option, press “OK”.
3. You can close these screens at any time, press “EXIT” until clear.
Remote - Yellow (Favourites) Icon
You can use this option to go to Favourites list.
1. To go the Favourites channel list, press
key for the lists you created to appear.
2. To select the channel from list, use the “▲▼“ keys to highlight your selection, press
“OK” to tune to that channel.
Page 23
23
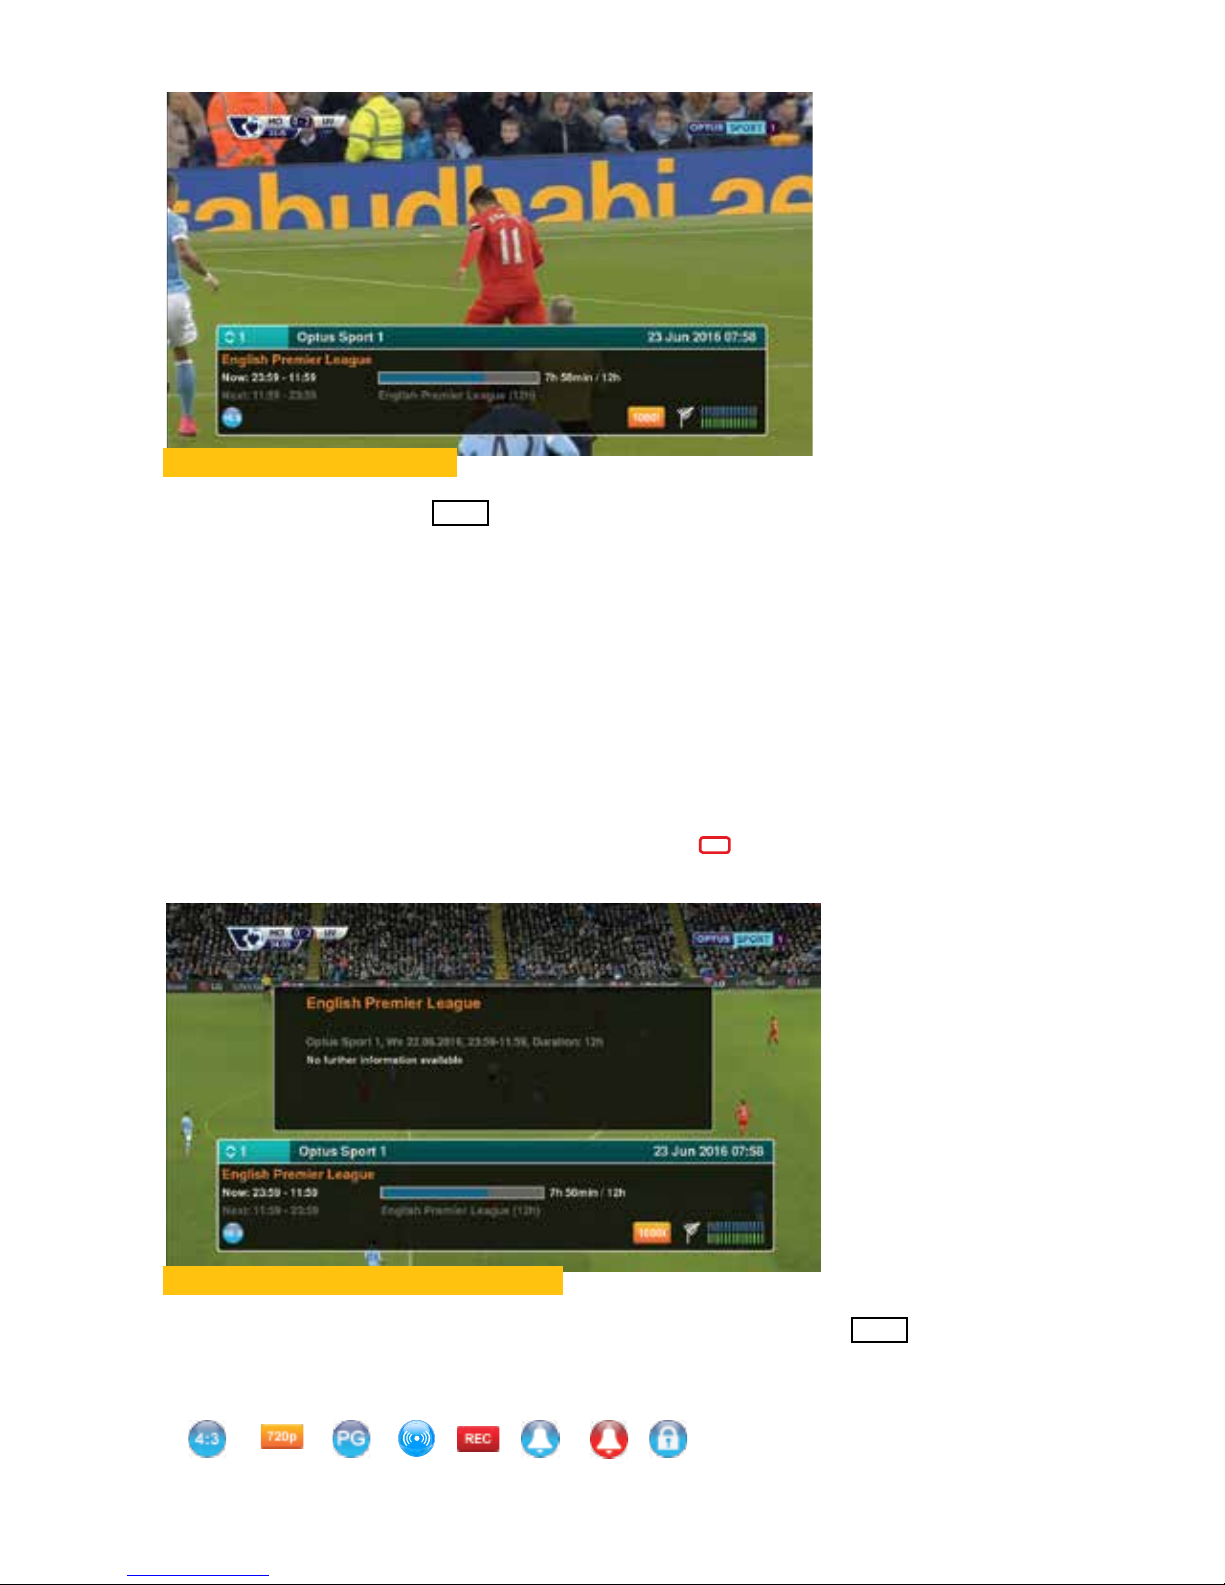
I-Plate Information Banner
Press the “INFO” button
INFO
at any time to see more information about the current
program you are watching, as well as get schedules on what is coming up next and for
the next 24 hours.
1. Press the “^ CH v” buttons on the remote to change the channel to the next/
previous channel respectively, or
2. When the I-Plate is open, press the “LEFT/RIGHT” arrow buttons on the remote.
This allows you to browse the programme information of the other channels
without changing the channel you are presently viewing.
3. When the I-Plate is displayed, press the “
◂▸
”arrow buttons on the remote.
This allows you to browse between the Current and Next event of the channel you
are presently viewing.
4. When the I-Plate channel is displayed, Press the
button on the remote to launch
the recording menu. Follow the on screen prompt for various recording options.
I-Plate Extended information Banner
With the Information Banner displayed press the “INFO” button
INFO
again to view
more information on the current program you are watching.
I-Plate Icons
Display Format PG Rating RecordResolution Stereo Reminder CH Change Lock
Page 24
24
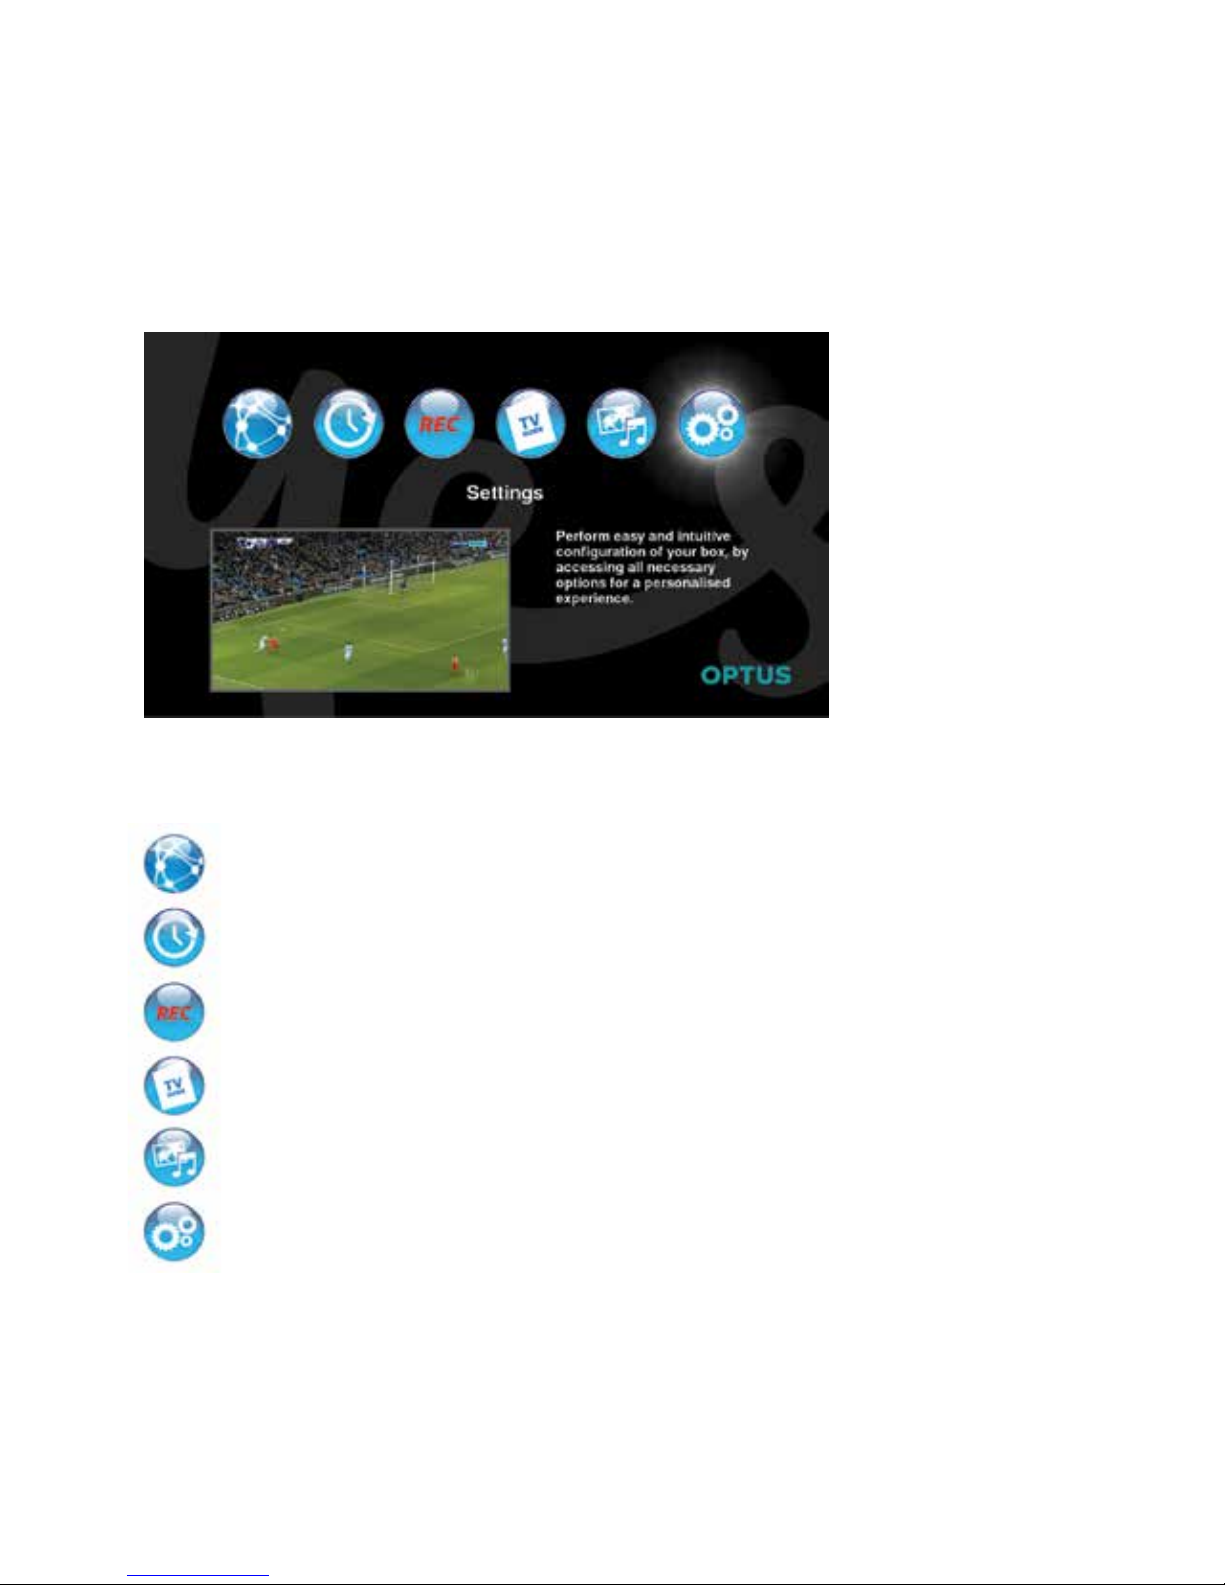
The Main Menu provides access to the most important features of the Set Top Box.
These features are divided into following Menus. Each Menu contains corresponding
sub-menus. See main menu icons below for a brief description on each of them.
9 Main menu screen
TV Portal: Your ultimate guide to interactivity with a collection of popular
and highly useful applications right on your fingertips.
Timers: Discover all of your programmed and scheduled events, by creating
new or editing saved reminders, fast and easy.
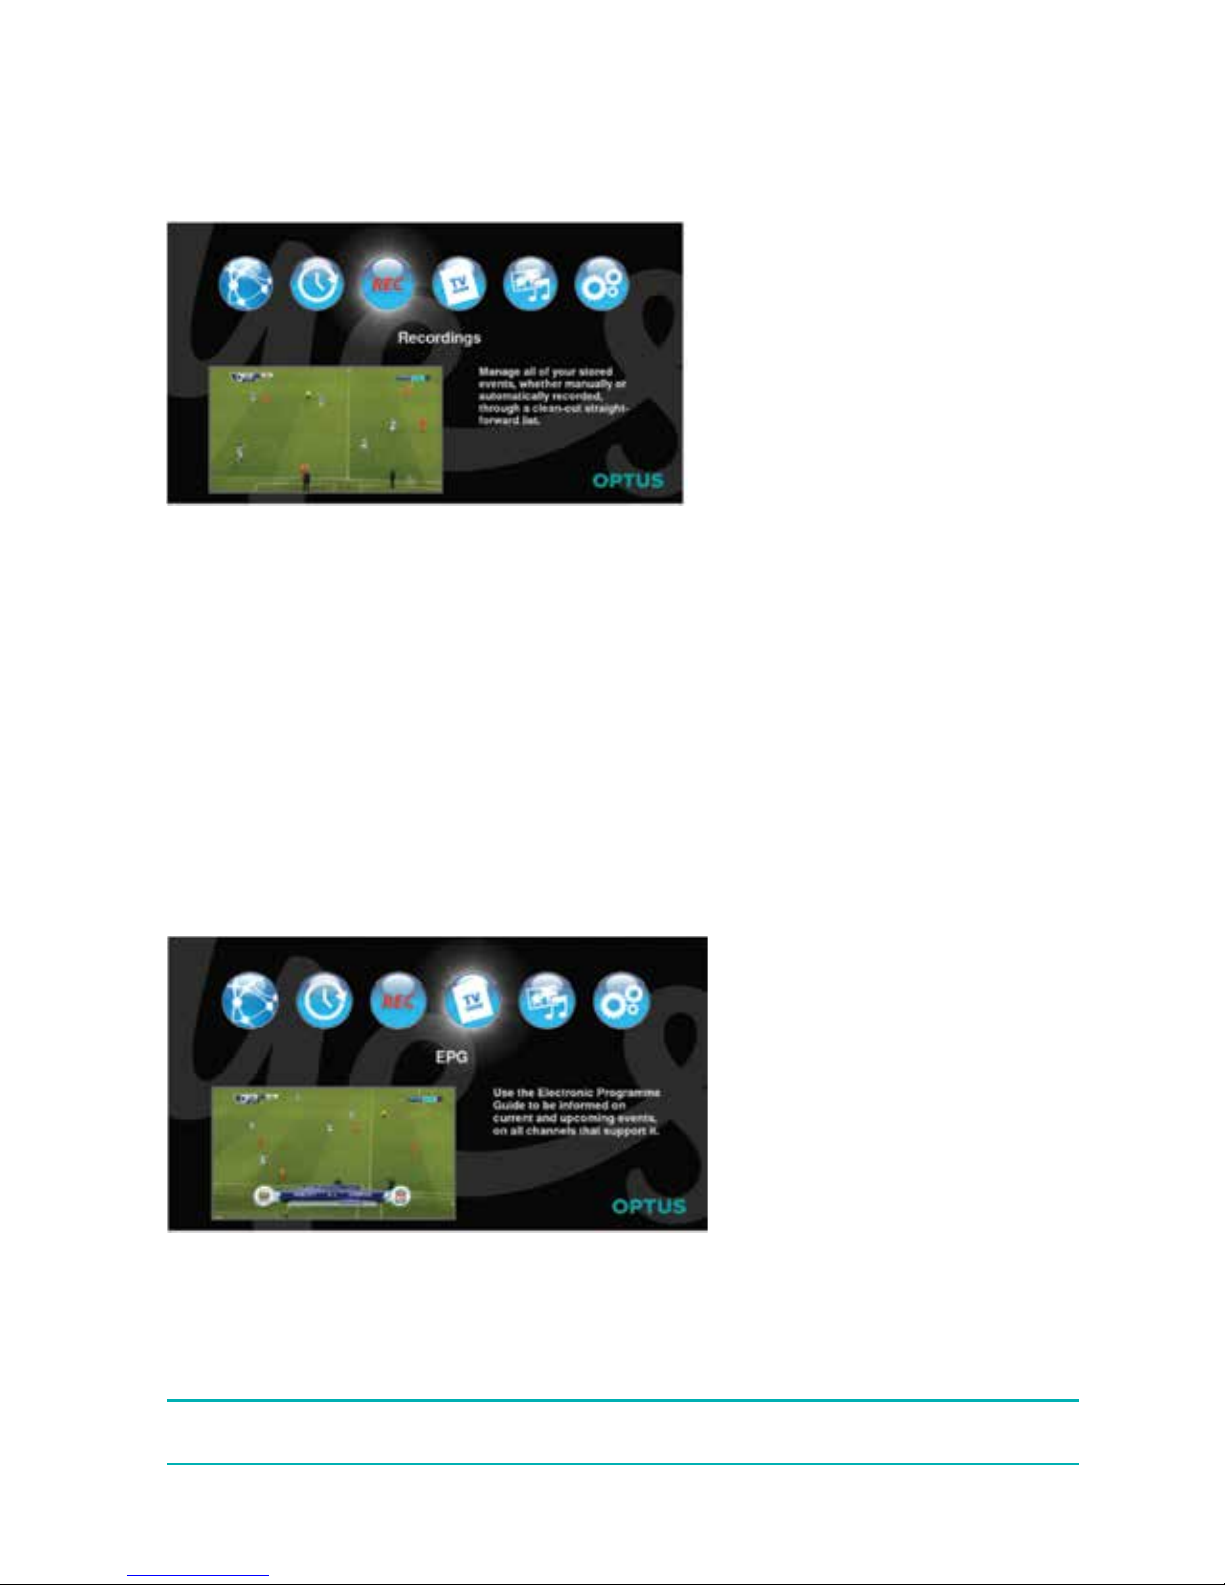
Recordings: Manage all of your stored events, whether manually or
automatically recorded, through a clean-cut straight-forward list.
EPG: Use the Electronic Program Guide to be informed on current and
upcoming events, on all channels that support it.
Media: Plug your storage device in the USB port and playback any
supported media file of your choice on your big screen.
Settings: Perform configuration of your Set Top Box by accessing all
necessary settings options.
To launch the Main Menu press the “MENU” key.
Page 25
25
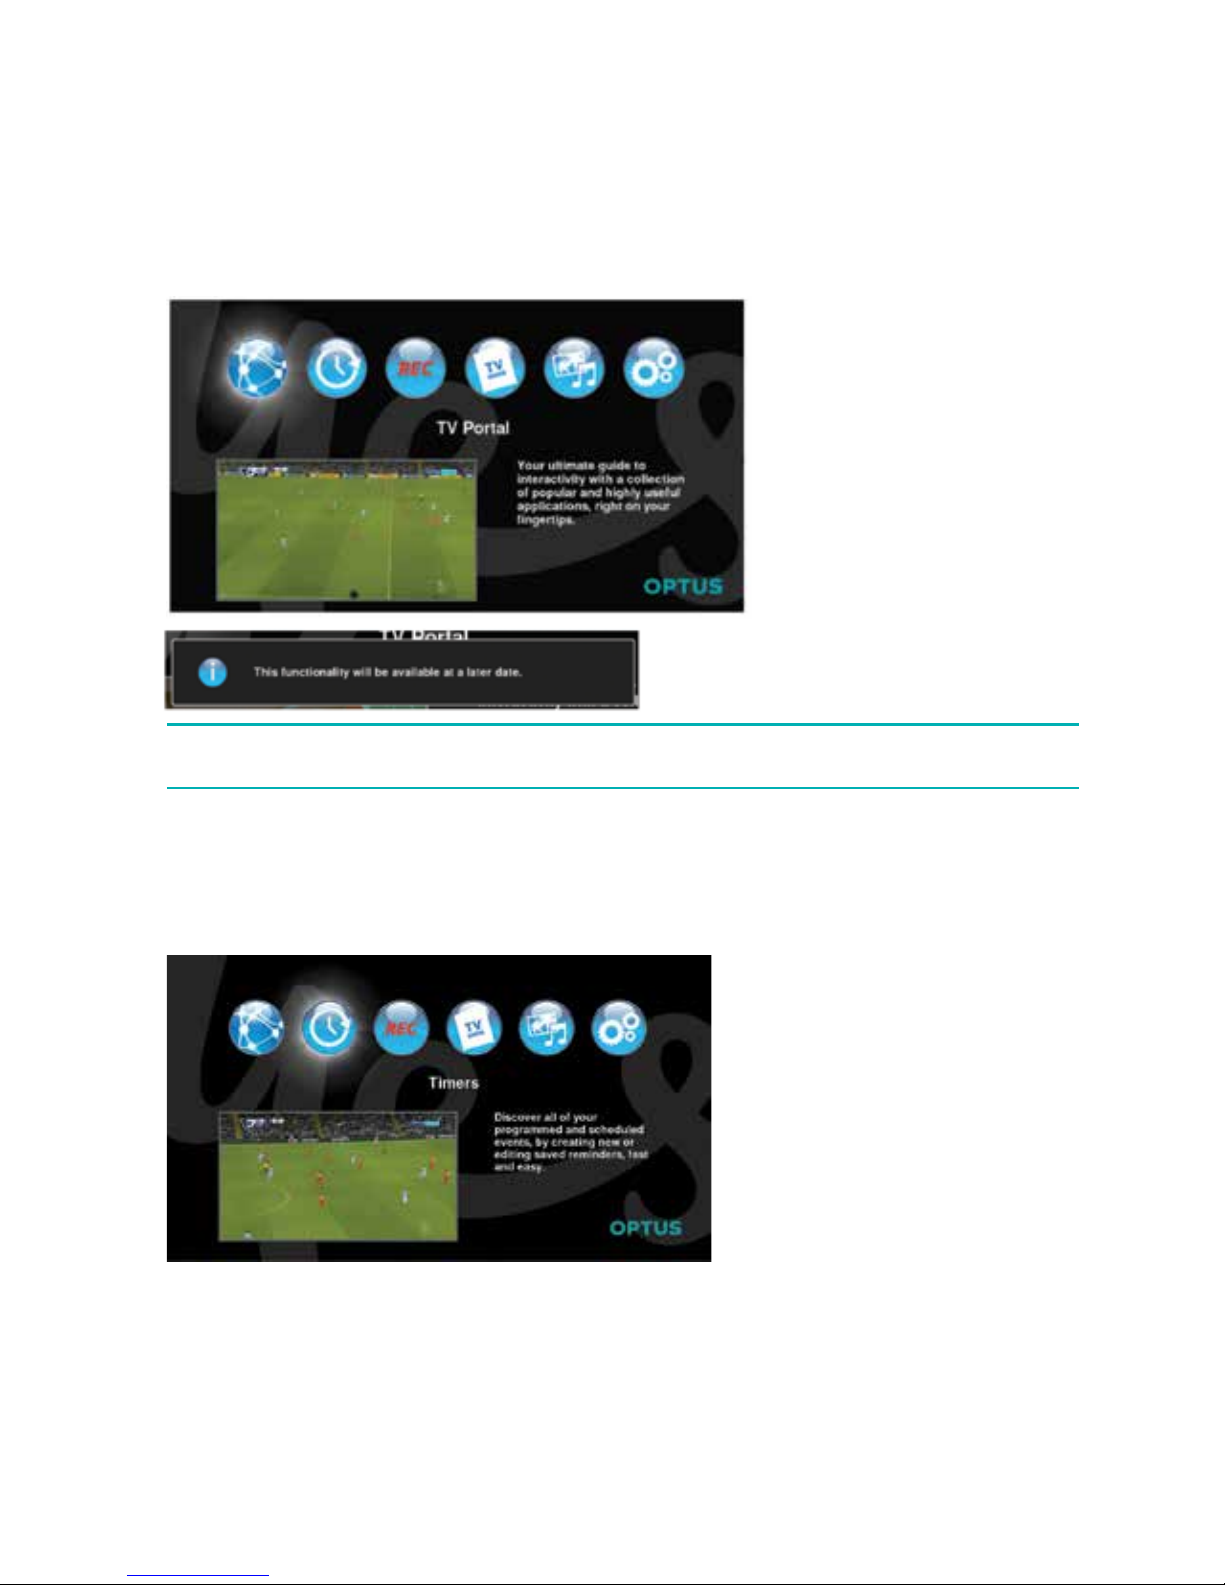
9.1 TV Portal
The TV Portal menu provides access to online or interactive applications.
1. To launch the Main Menu press the “MENU” key.
2. Use the arrow buttons to highlight TV Portal icon.
3. To access the TV Portal content, press “OK”.
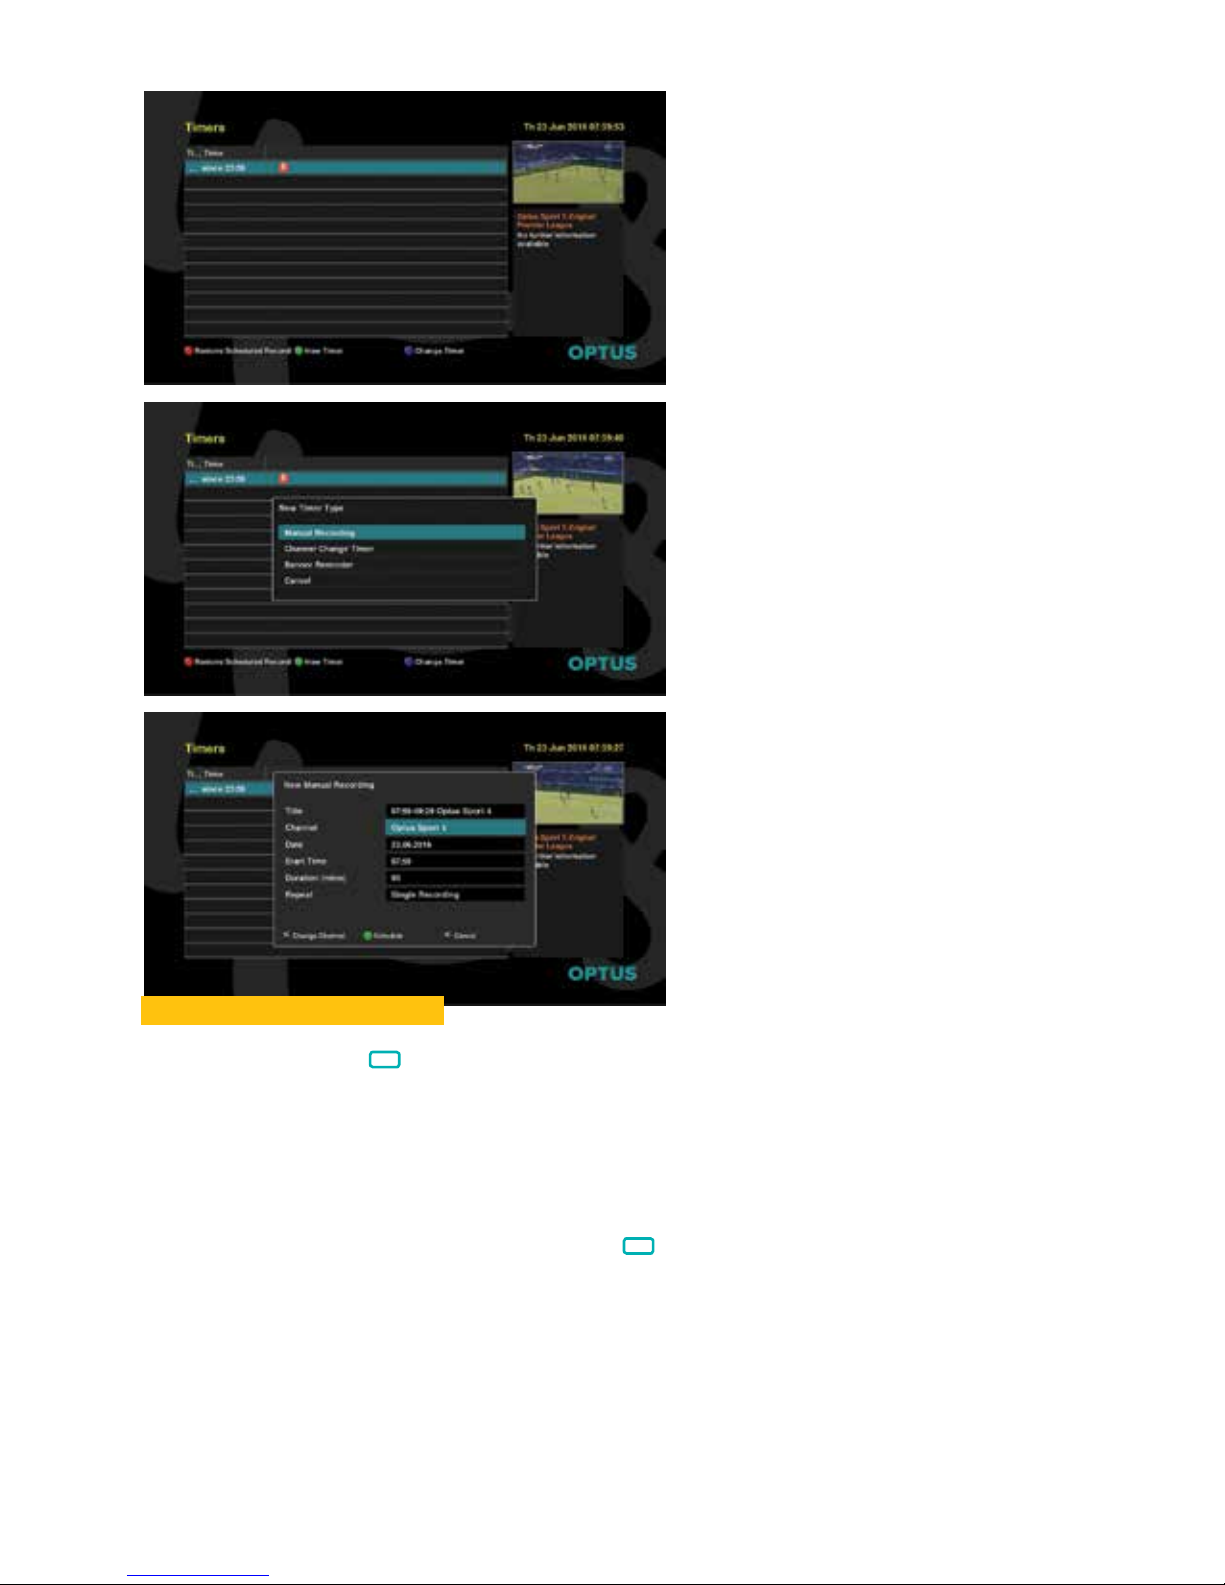
9.2 Timers
The Timers menu provides functionality for the user to set up and manage scheduled
timers either set from EPG, I-plate or custom schedules/recordings.
This is an easy and quick way to view all your scheduled content. Using this application
allows you to edit existing or create new schedules, this screen shows you start times
and program titles.
1. To launch the Main Menu press the “MENU” key.
2. Use the use the “
◂▸
” keys to highlight Timers icon.
3. To access the Timers content, press “OK”.
Once this list is populated, you can then edit the list.
NOTE: This functionality will be available at a later date.
Page 26
26
Setting a Manual Recording
1. After pressing, the
the “New Timer” banner shows you the various options.
2. To confirm the Manual Recording, press “OK”.
3. The following banner appears showing the information about that channel.
4. To change the duration, press “OK”. The duration (mins) row is highlighted.
5. The duration time increments in 5-minute segments i.e. 60 to 65 up or down, use
the “
◂▸
” to change the minutes.
6. To re-schedule the current program, press
.
7. To Cancel and close this function, press the “EXIT” key.
8. Once you have programs saved into the list, three coloured icons at the bottom
appear where you can perform various functions; use the red icon to remove a
channel from the list, green icon to set new timer, yellow icon to lock a channel or
blue to edit a timer.
The procedures for “Channel Change Timer” and “Schedule Reminder” are same or
similar to those of Manual Recording above.
Page 27
27
9.3 Record
The Recordings menu presents a playlist which provides information about the
recorded content as well as functions to lock and protect recordings from deletion.
1. To launch the Main Menu press the “MENU” key.
2. Use the “
◂▸
” keys to highlight EPG icon.
3. To access the EPG content, press “OK”.
NOTE: Available options may vary, depending on what material is being broadcast.
1. To launch the Main Menu press the “MENU” key.
2. Use the “
◂▸
” keys to highlight the Record icon.
3. To access the Record content, press “OK”.
4. The system shall display the recording information.
9.4 Electronic program guide EPG
This chapter describes how to use the EPG while watching TV and how to change to
and from the Radio services. One of the great advantages of Digital TV transmissions
is to add extra features to the broadcast, such as information about the current and
next programs and extra options such as the ability to choose between different
languages for Audio and Subtitling.
Page 28
28
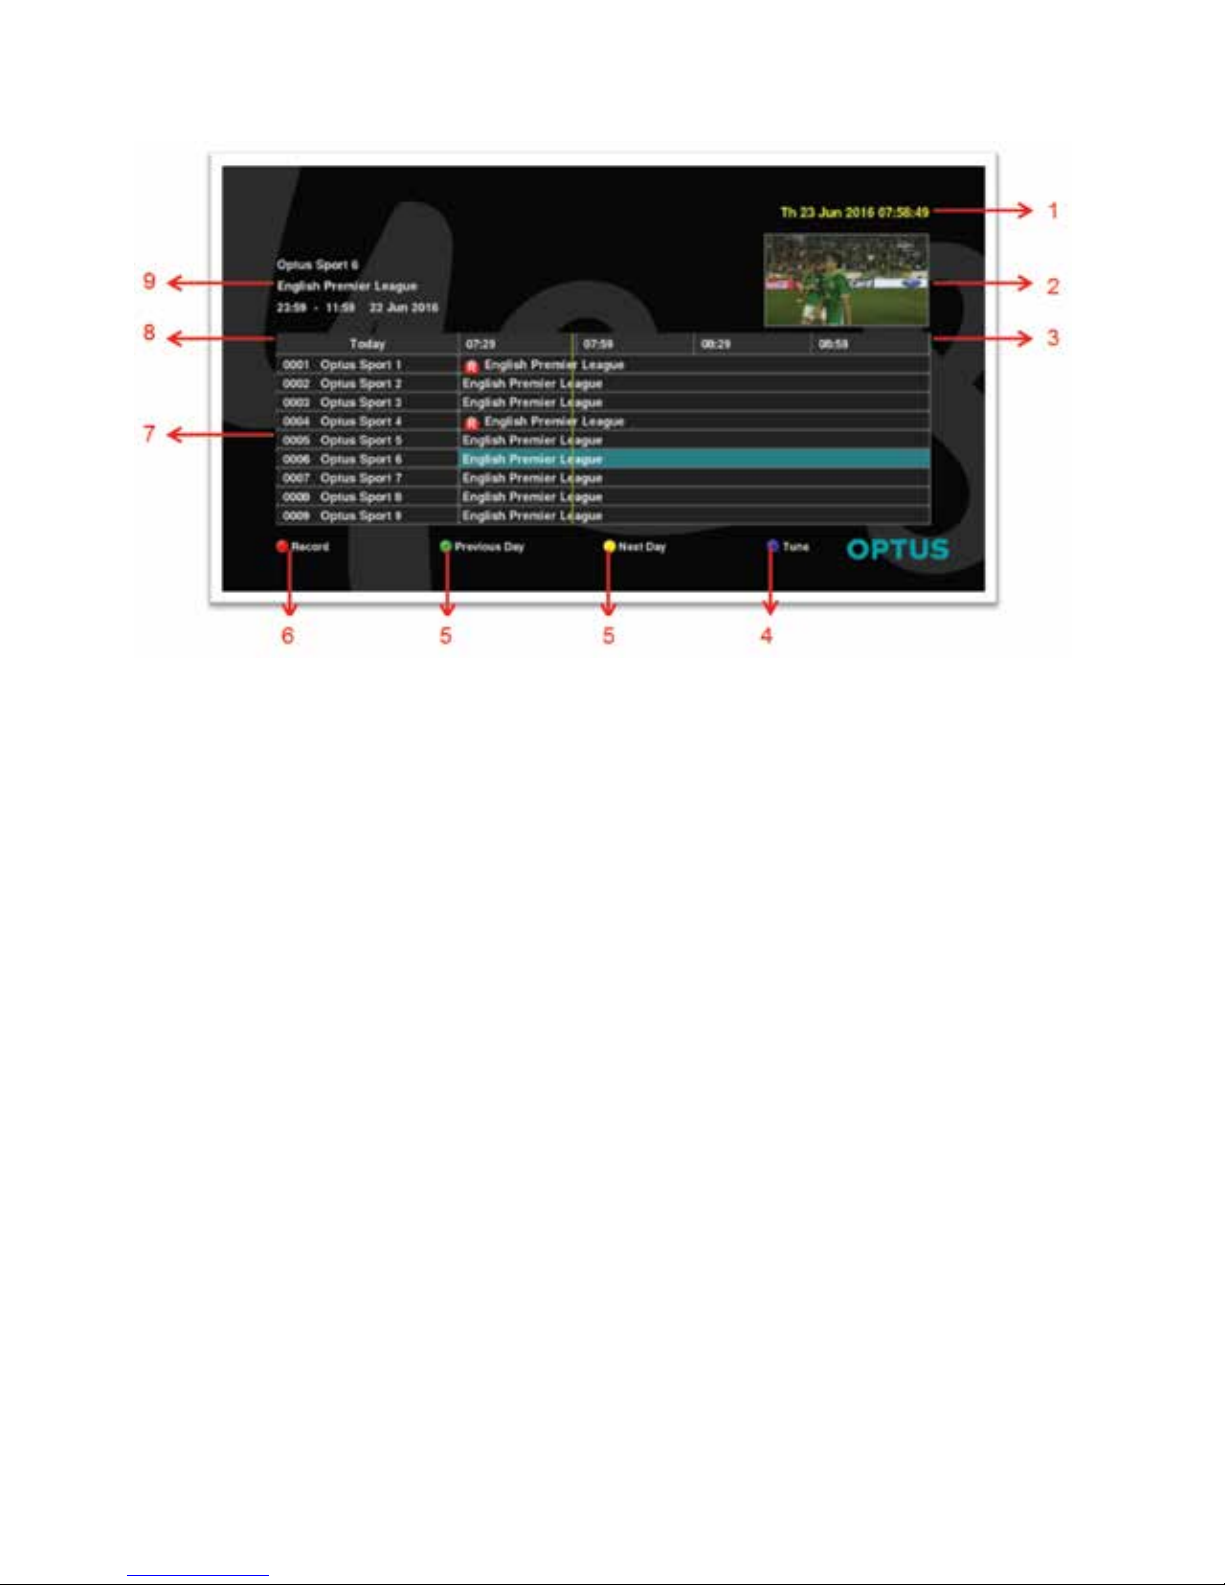
EPG Layout
1. Year/date & time
Display the current time, you will know when the next program, series and sport
begins.
2. Mini screen
The mini screen will always keep you in the action, while looking at other programs or
setting your parental control level.
3. Program schedule
Displays the start and end time of all programs.
4. Tune icon
Allows you tune to a different channel that is currently on air.
5. Navigation icons
Allows you to navigate forward to view what programs are coming up and again to
the present day.
6. Record/ remind icon
Allows you record a program from within EPG or set a reminder when it begins.
7. Channel & programs
Displays all the available channels and programs.
8. Week day
Allows you to see what day of the week you are looking, while navigating through the
seven day schedule.
9. Currently showing
Displays basic information on your current content you are viewing.
Page 29
29
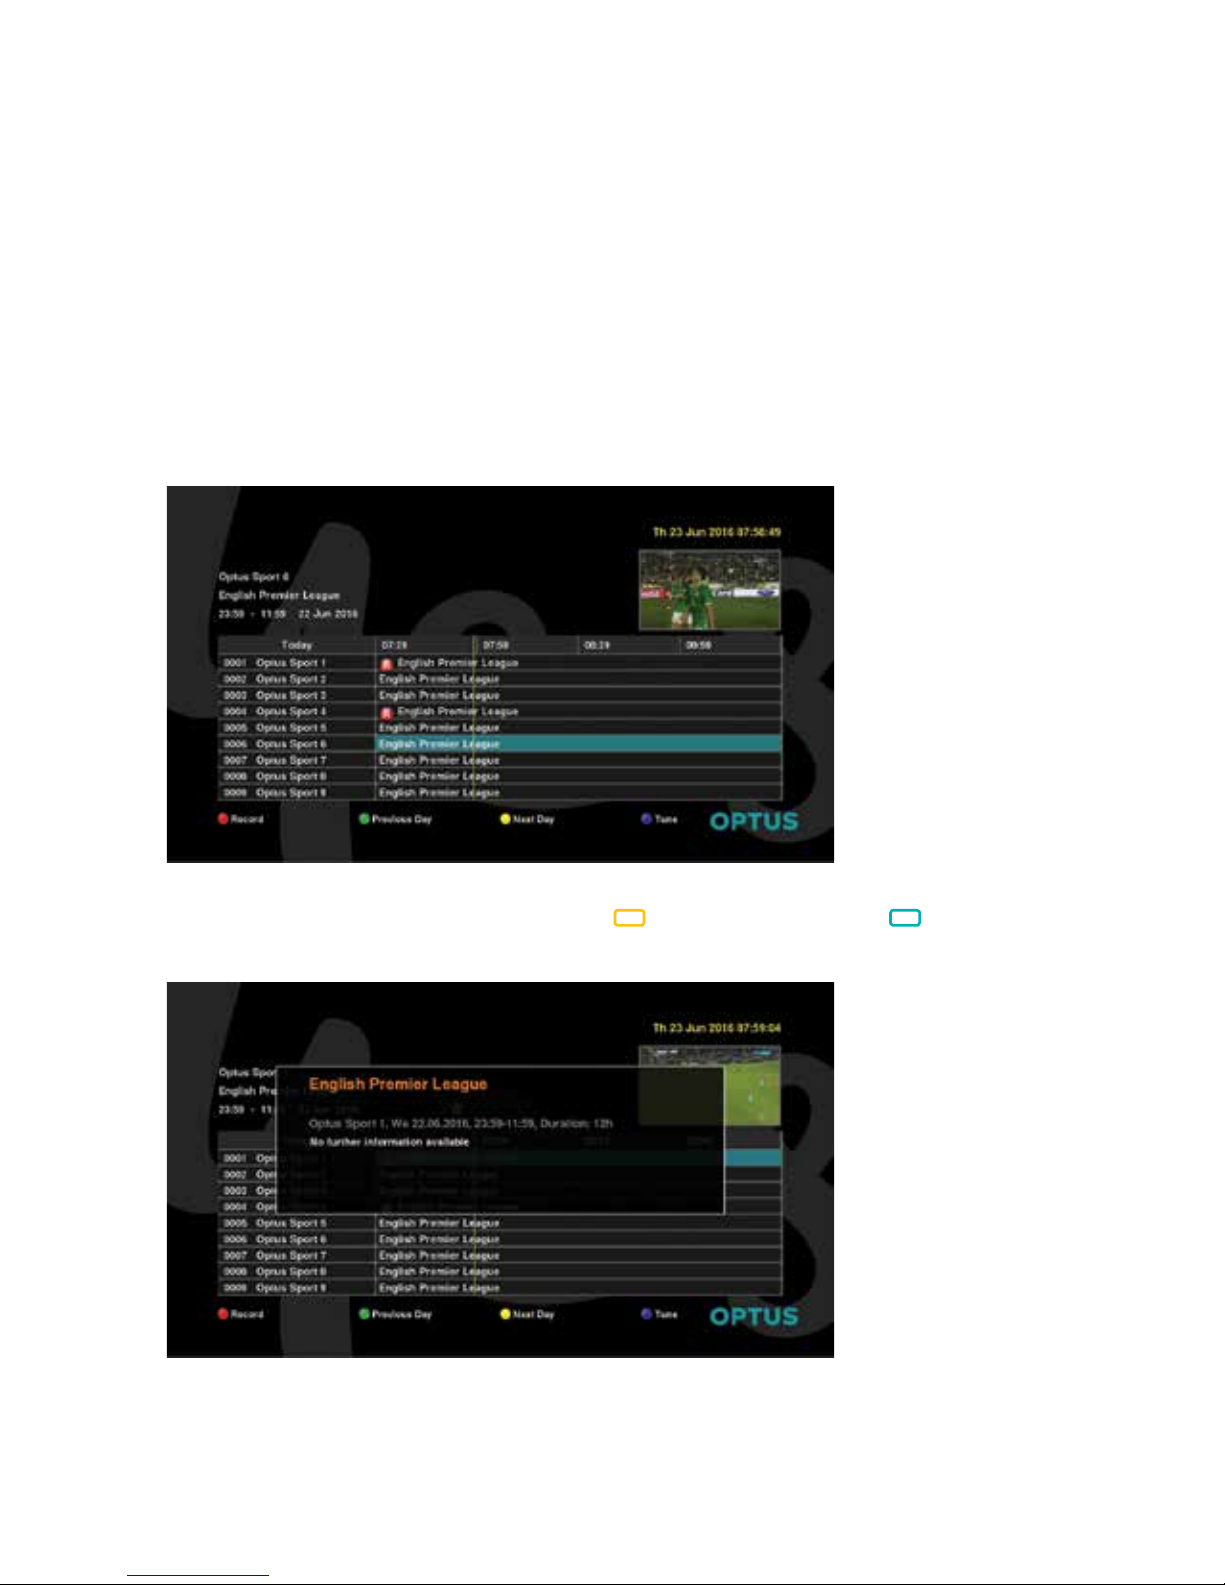
Electronic Program Guide (EPG)
View program information for Now and the Next 8 days.
To activate the EPG application, press the EPG key while watching a TV program or
listening to a Radio Channel. You can still watch your program while looking at other
program schedules and information on the mini screen.
Pressing the EPG key again will toggle various views of the EPG.
EPG application shows seven channels per page giving you an overview of channels
with information about present and forthcoming programs.
As you scroll through the guide, information of all available events for the selected
channel for the next 7 days appears. The availability of Program information data is
dependent on the individual broadcaster.
1. To scroll through schedule, use the “
◂▸
” and “▲▼” keys.
2. To scroll through to the Next Day, press
or Previous Day press keys.
3. To close the EPG, press “EXIT”.
As you scroll through the guide, you can also view a short description of the
highlighted program.
1. Press the “INFO” key launch the information Banner.
2. If required use “▲▼” keys to scroll down.
Page 30
30
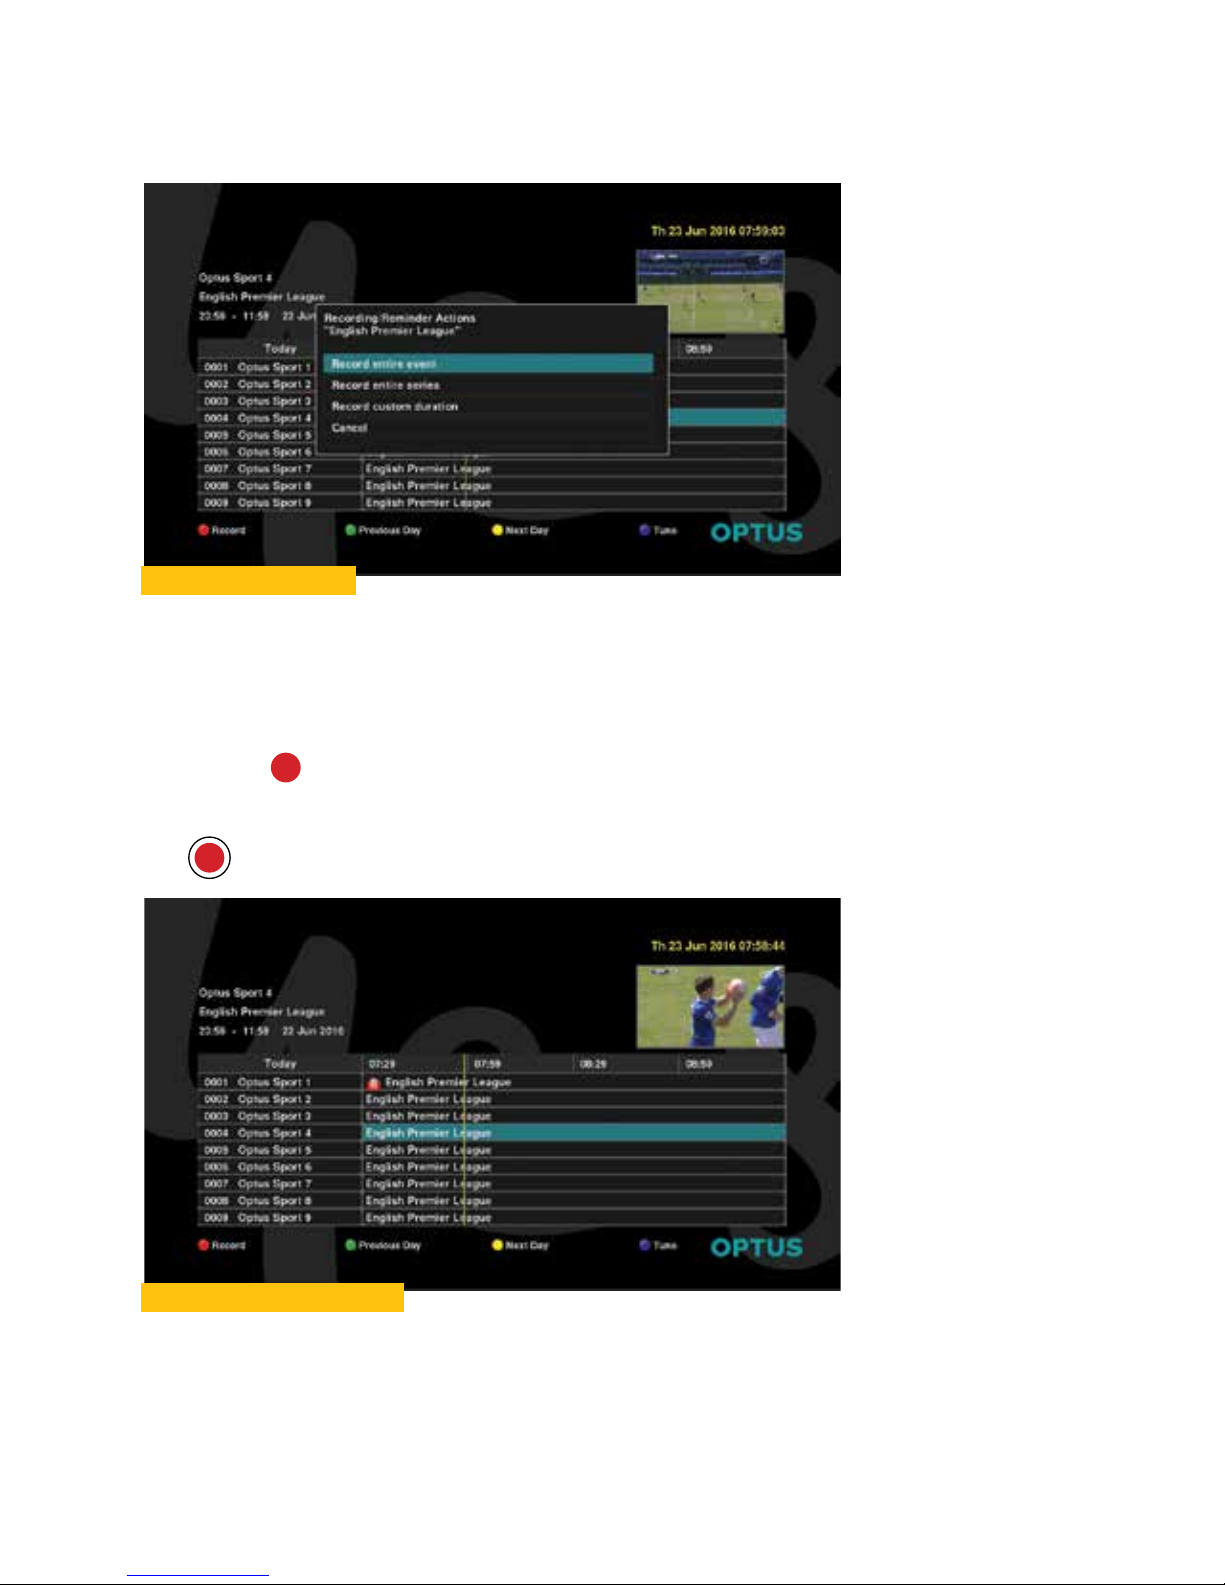
Recording from the EPG
A Recording/Reminder opens a banner displaying three timer options.
Record entire event
The first option is to record the show according to broadcaster time schedule, with a
few minutes of overlap on each end of the time slot.
1. To select your program, use the “▲▼” or “
◂▸
” keys to highlight the desired
program.
2. Press the
Record to set the timer.
3. To select Record Entire Event, press “OK”
4. A
R
icon is placed next the programme you want to record.
Record custom duration
The Record custom duration allows you to set your own time duration. The duration is
set in minutes; the allocation for this function is a maximum 120 minutes.
If timer settings for the program overlap, an error message is displayed. You have to
either change or delete one or the other timer settings, or look at re-setting it later.
Page 31
31
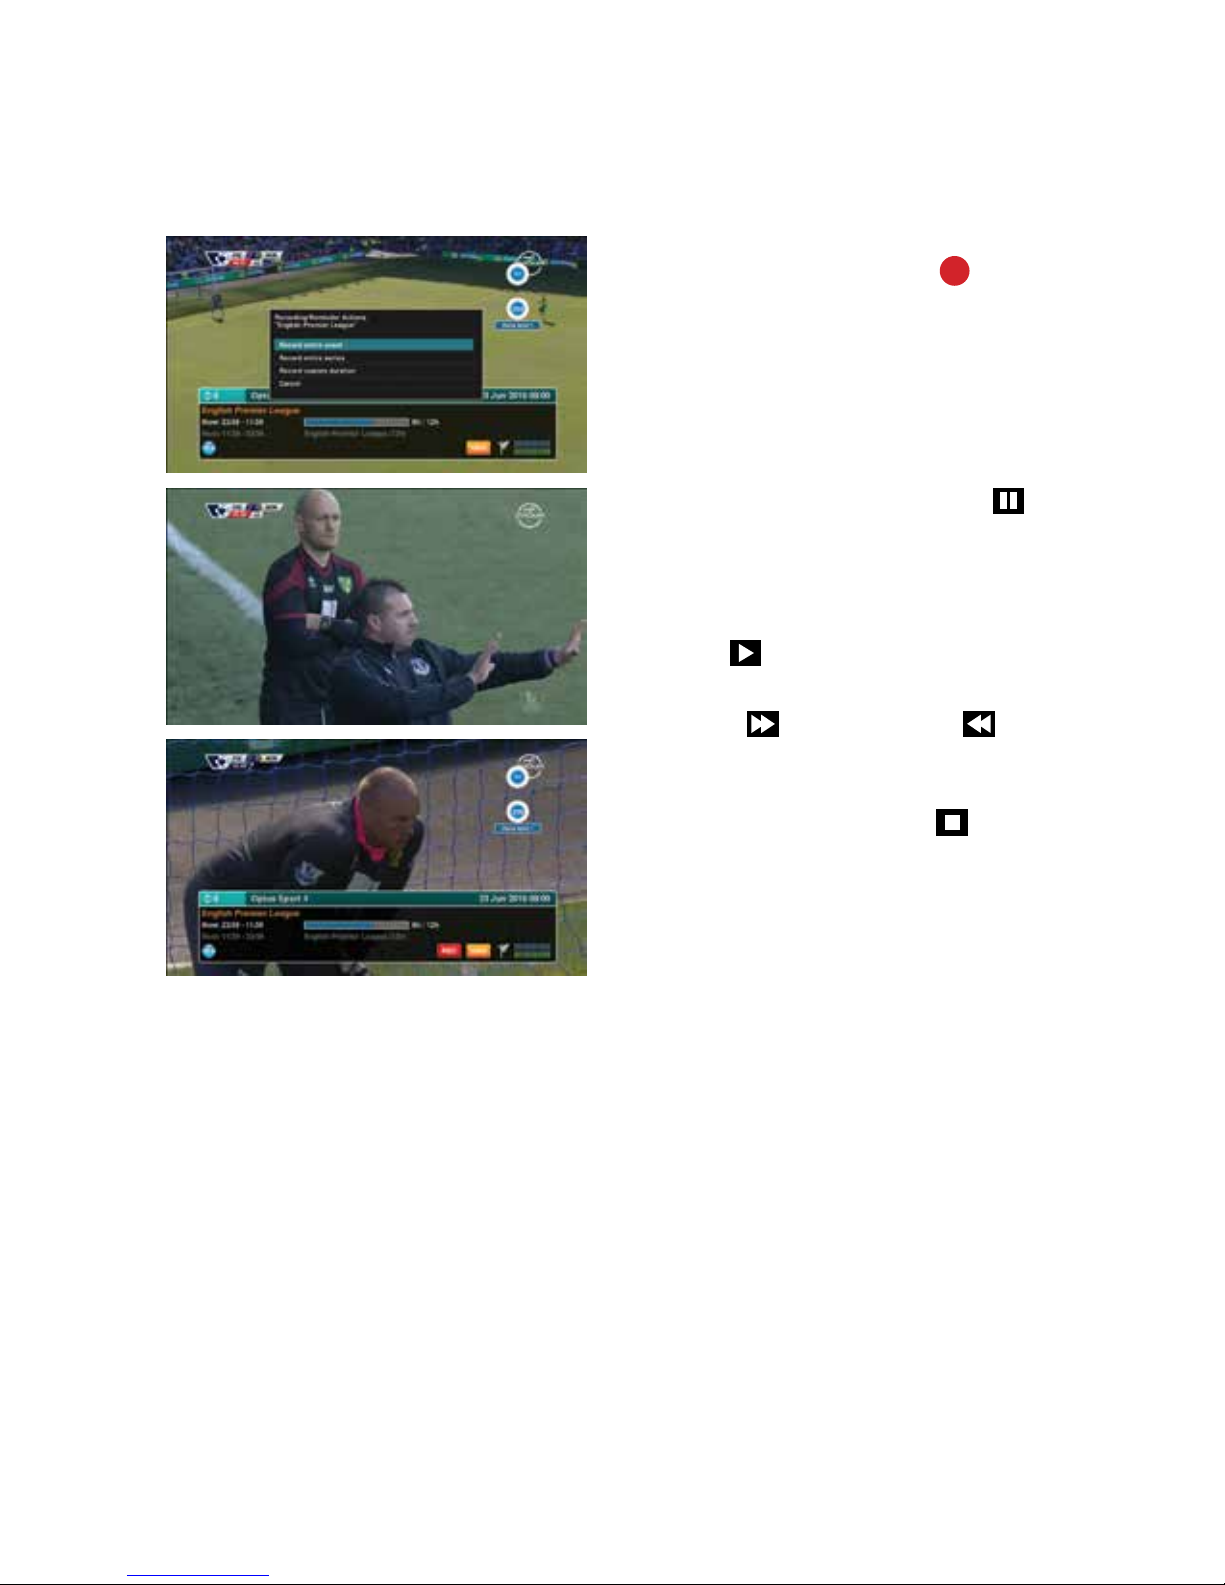
PVR Function
The Set Top Box has PVR (Digital Video Recorder) capabilities. Whilst recording, you
can watch any other channel you wish.
Direct recording
To start a recording press the
record
key, choose a recording option with the
“▲▼” keys and confirm with the “OK” key.
EPG Recording
You can programme a Timer options from
the EPG.
Time-shift-Function
1. During Live TV you can press the
pause key to activate the Time-Shift
function. The Set Top Box pause’s the
program until you want to continue
watching.
2. Use the
play key to continue watching
the time-shifted program.
3. Press the
Fast Forward or Rewind
keys to increase the playback speed to
2 to 256x in both directions.
4. To stop playback, press the
stop key
5. To return to live TV, press the “EXIT” key.
6. The Time-Shift function de-activates
after changing to another channel.
Page 32
32
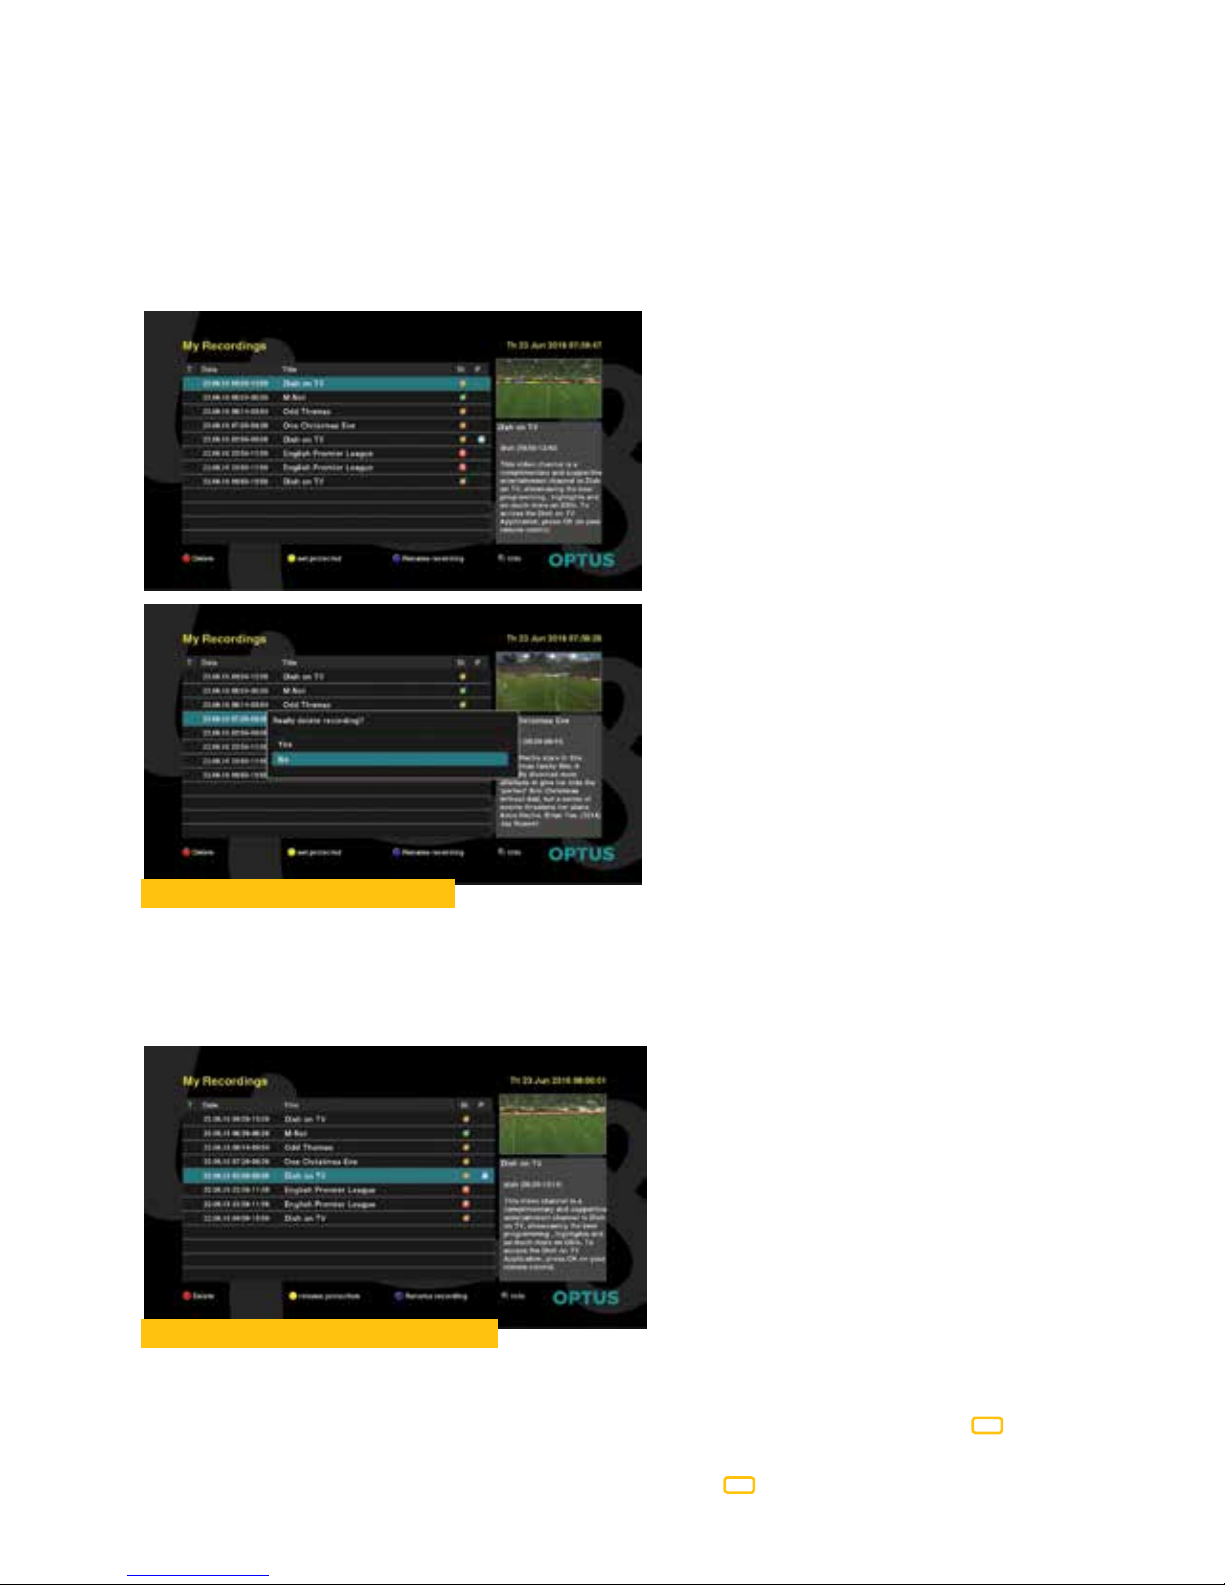
Playback List
The playback list is where you will find all recorded programs. Pressing the “PVR” key
displays a list of all the recorded programs on your HDD.
To select a program use the “▲▼” keys to highlight the desired program and to start
the playback press the “OK” key. If supported by the Channel operator, press the
“INFO” key for brief details about the recorded program.
Deleting a recorded program
1. Use the “▲▼” keys to highlight the program you want to delete, press “OK”.
2. A confirmation banner appears, “Yes” to delete or “No” to cancel.
3. To accept, press “OK”.
Locking and unlocking a program
Programs that are locked can’t be viewed until a password has been entered.
1. Use the “▲▼” keys to highlight the movie/series you want to lock then press
key,
a lock icon appears at the end of the selected program.
2. Removing the lock icon, highlight the program, press
to unlock.
Page 33
33
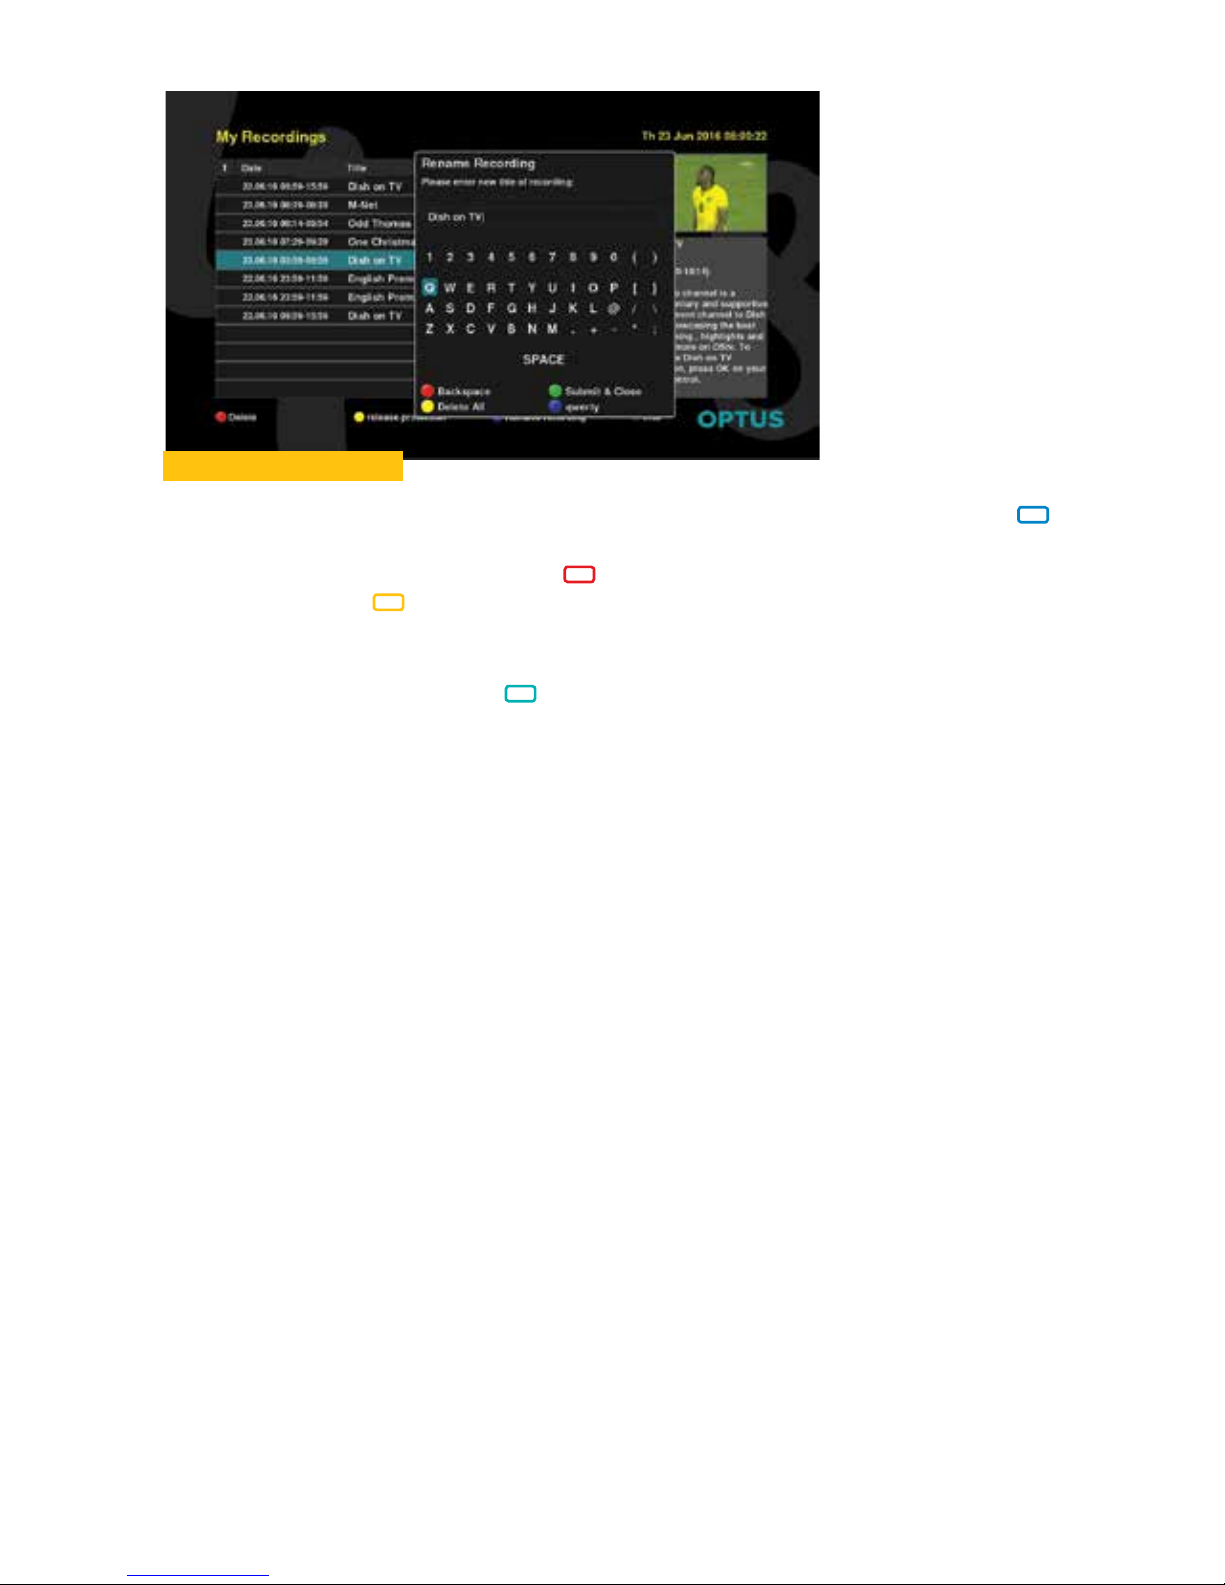
Renaming a recording
1. To rename a program use the “▲▼” keys and highlight the movie/series, press
this opens the renaming banner.
2. To delete part of the name use the
backspace key or delete the name
completely press
delete all key.
3. To type in a new name use “▲▼” keys to select the letters then press “OK” to
accept, do this procedure until you have entered the name.
4. Once the name is done, press
to submit and close.
Page 34
34
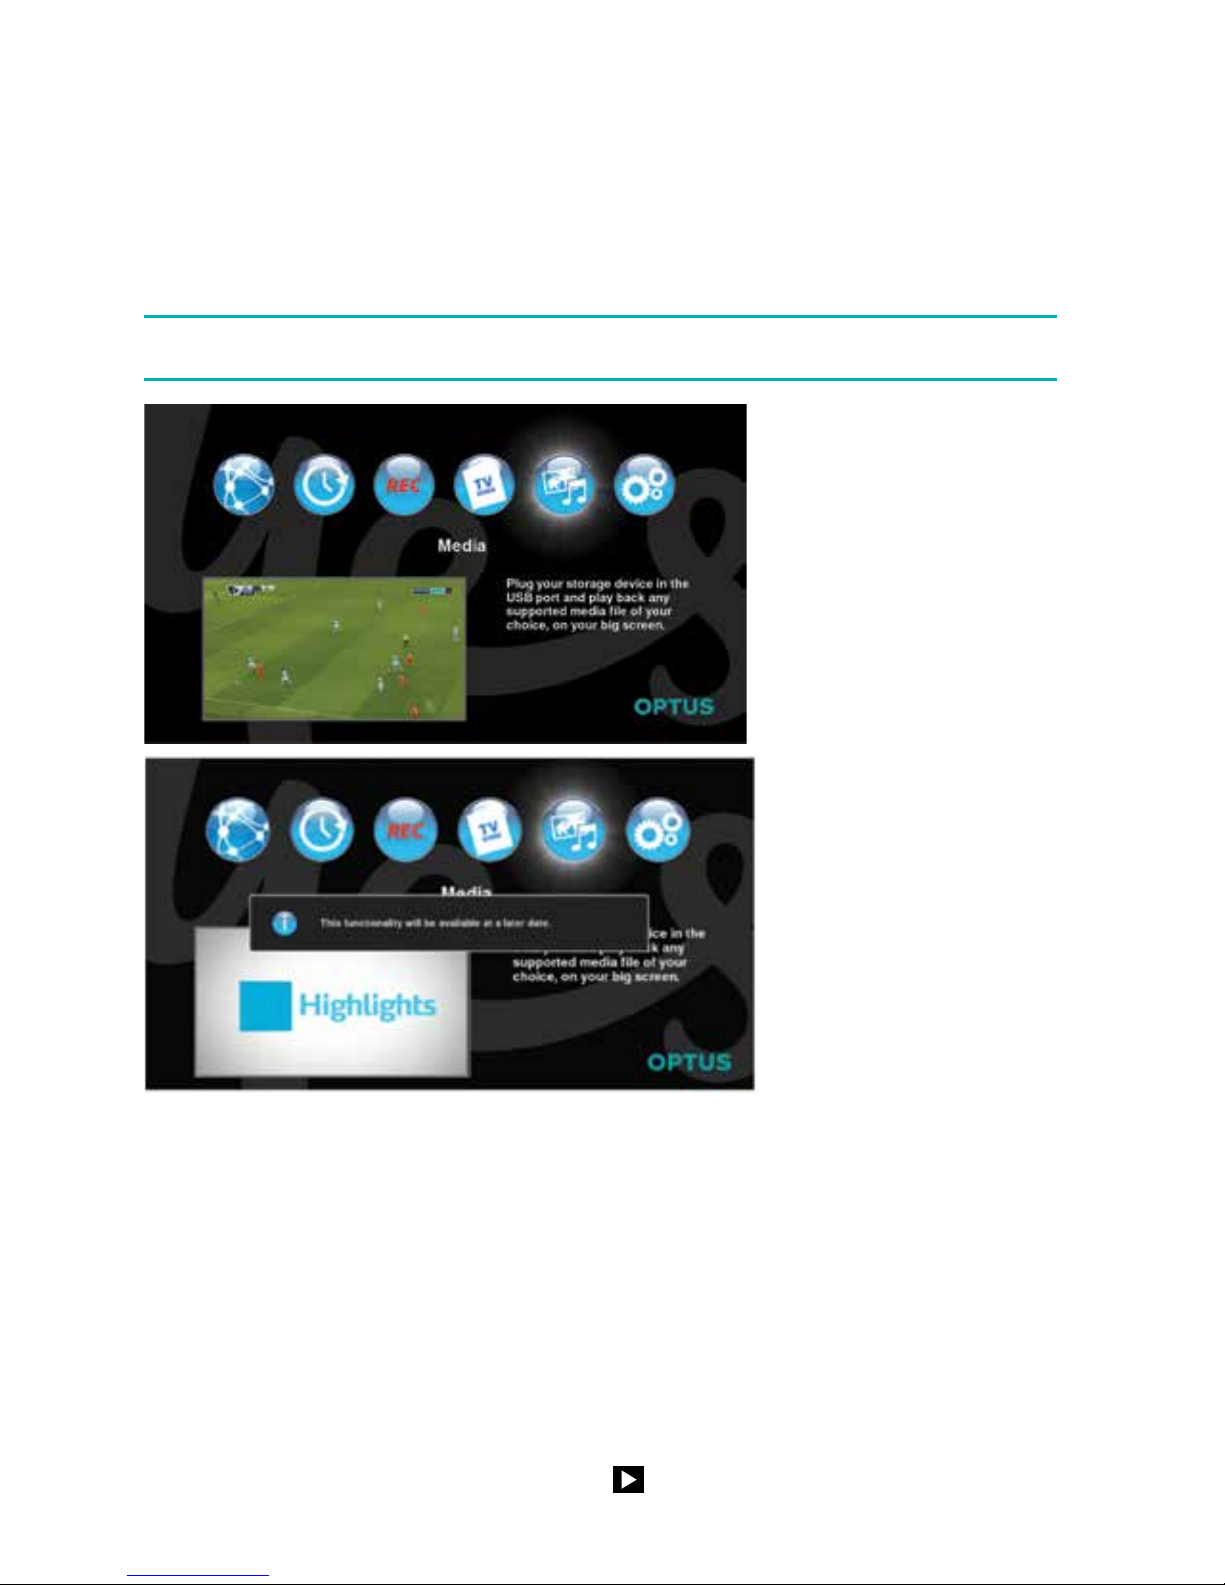
9.5 Media
The Media menu provides functionality for personal media playback of Pictures, Music
and Videos.
Use this application to plug-in your storage device into the USB port and playback any
supported media file of your choice on your big screen.
NOTE: This functionality will be available at a later date.
1. To launch the Main Menu press the “MENU” key.
2. Use the “
◂▸
” buttons to highlight Media icon.
3. To access the Media content, press “OK”.
4. If the media list is blank, insert your storage device into the USB port.
5. After a few seconds, your folders and files will appear.
6. If required use “▲▼” keys to scroll up/down to select the folder.
7. To enter a folder, press “OK”.
8. You can cancel and close this list at any time, press “Back”.
9. To play a single file, use the “▲▼” keys to highlight the file and then press “OK”.
10. You can play the complete playlist, press
to start playing.
Page 35
35
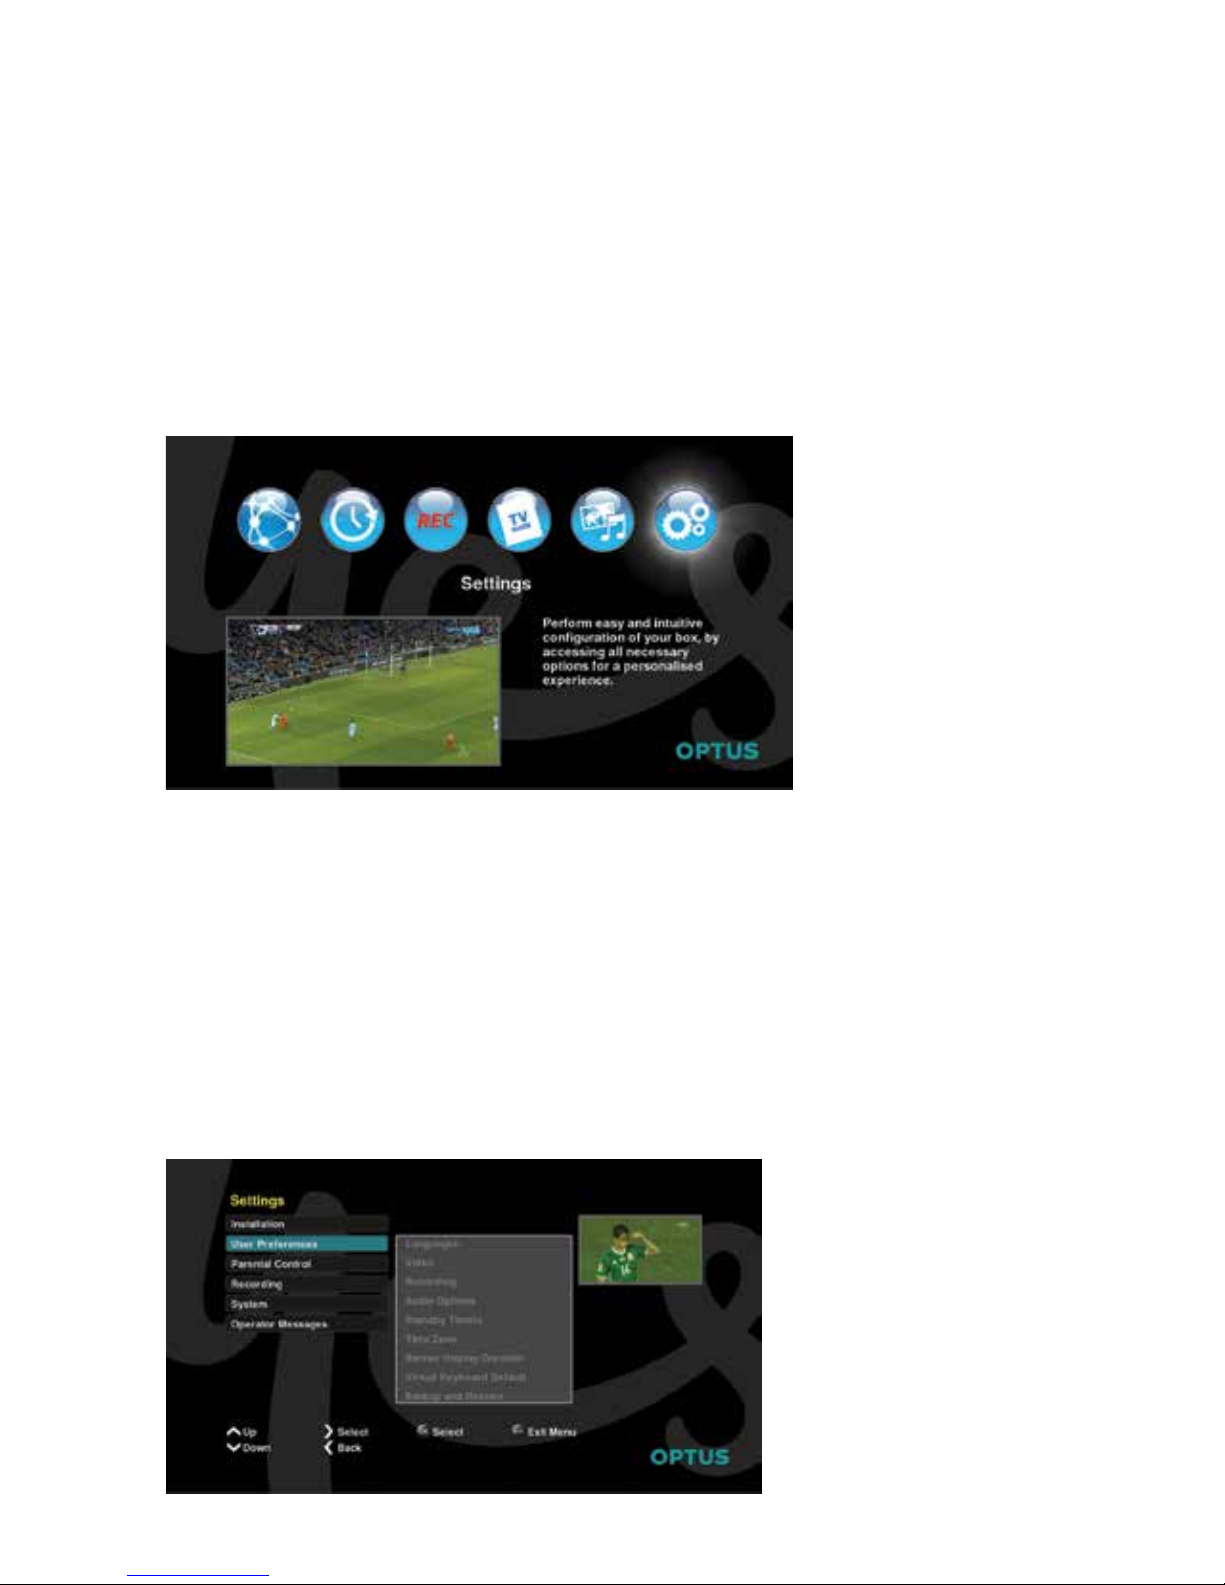
9.6 Settings
The Settings menu provides functionality for the user to set up and manage the
Set Top Box.
The Settings Menu includes the following functional sub menus:
• Installation
• User preferences
• Parental Control
• Recording
• System
• Operator Messages
1. To launch the Main Menu press the “MENU” key.
2. Use the “
◂▸
” keys to highlight Settings icon.
3. To access the Settings content, press “OK”.
4. To close the menu and return to live TV, press “EXIT”.
All settings menus can be navigated in the following way:
1. To view the selected menu, use the “▲▼” key to highlight “Selected menu”,
press “OK” to select.
2. From this list, you can choose the relevant option you want to change.
3. To navigate through the options, press “OK”, scroll through options using the “▲▼”
keys, select the required option using the “OK”, remote bottom.
Page 36
36
Settings - Installation
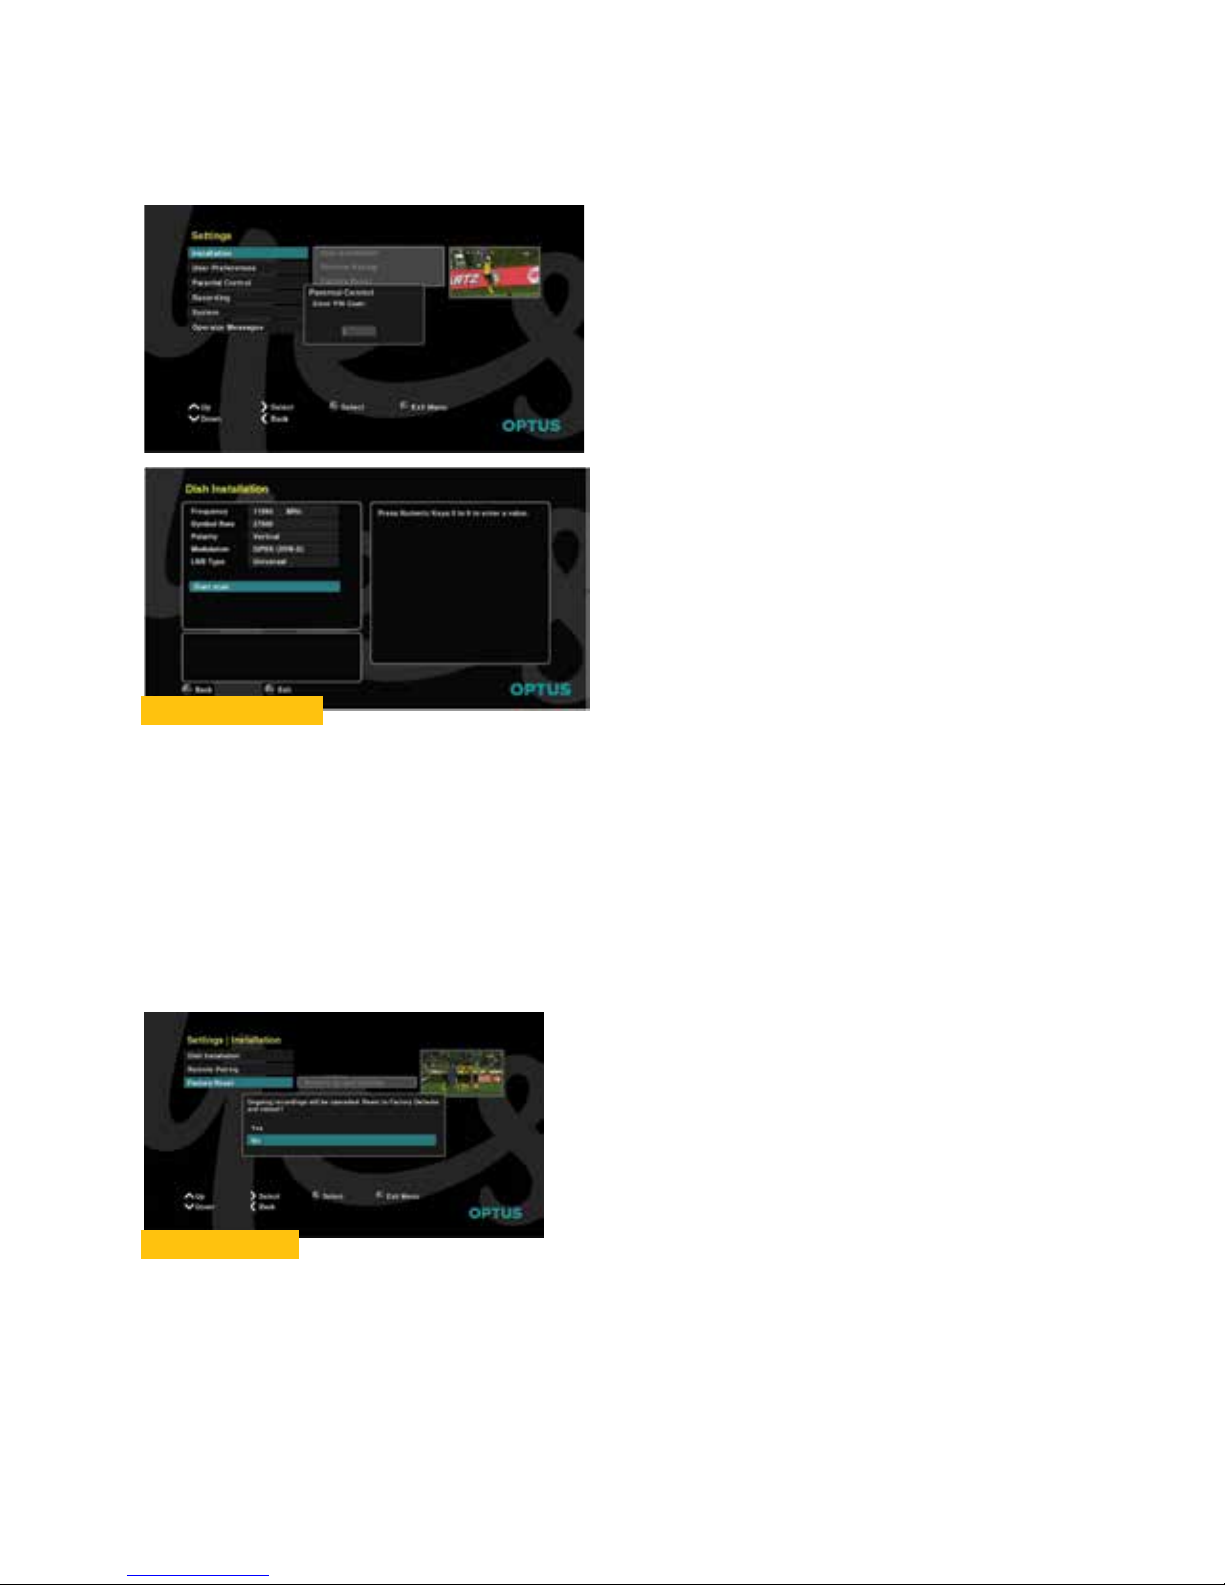
To perform any of the functions under “Installation” the user is required to enter their
PIN code before gaining access to these options.
Factory Reset
Performing a Factory Reset will erase any personal settings and/or data.
The parental PIN code will change to the default of “1234".
To reset your decoder back to the factory defaults, carryout the following procedures.
1. Use the “▲▼” keys to scroll to Factory Reset.
To open, press “OK”.
2. A confirmation banner appears with two options: “Yes” to reset to factory defaults
and reboot, or “No” to cancel this function.
Dish Installation
1. Dish Installation is the default-highlighted option when the entering Installation
sub-menu.
2. Press “OK” to open, the Dish Installation screen.
3. Select the correct Frequency, Symbol Rate, Polarity, Modulation and LNB type.
4. On completion of settings, press “Start scan”.
5. The system starts the scan. Once the rescan has completed the results of all the
channels appear.
6. To go to previous menu, press "BACK" key or “EXIT” to go back full screen.
Page 37
37
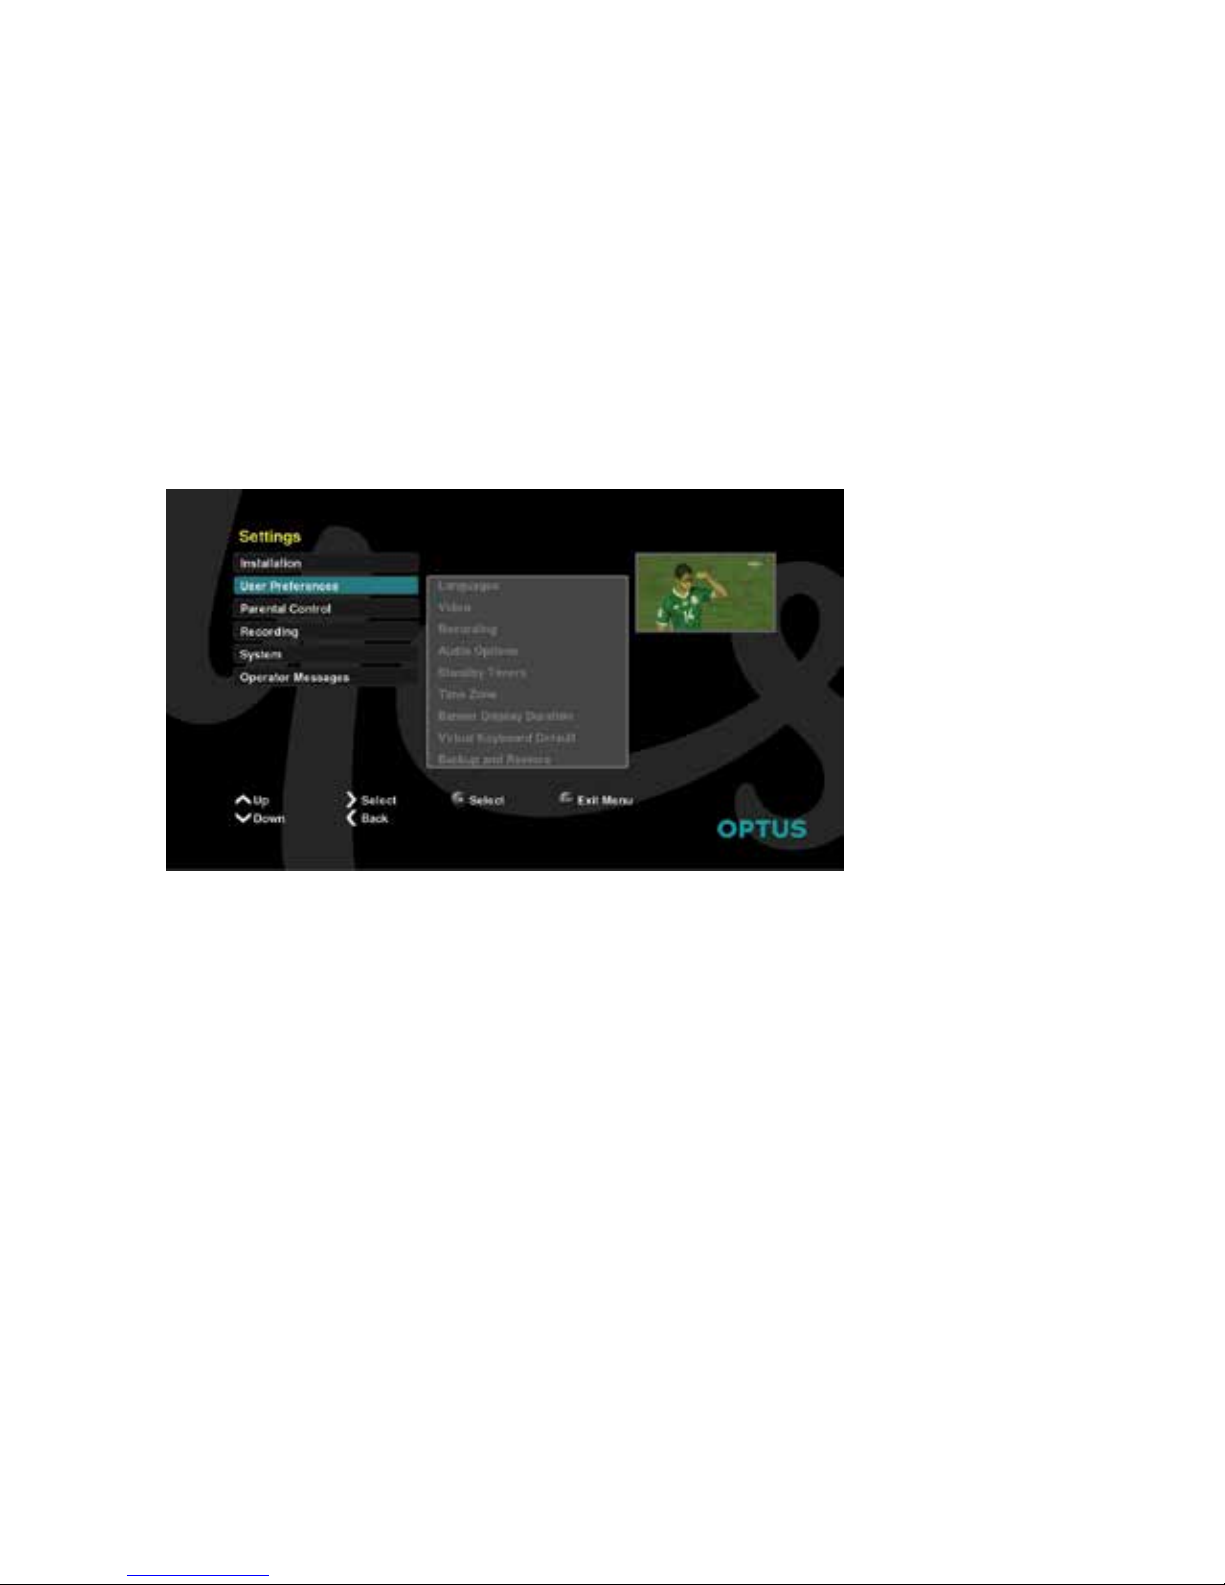
Settings - User Preferences
The Settings - User Preference sub-menu includes the following functional sub menus:
• Language
• Video
• Recording
• Audio Options
• Standby Timers
• Time Zone
• Banner Display Duration
• Virtual Keyboard Default
• Backup and Restore
Languages
The Language menu allows you to select your preferred languages for menus, audio
and subtitles. Sometimes TV programs send out multiple audio tracks in two or three
different languages. If there are no audio tracks available that match your settings,
it defaults to another language. You can also select subtitling if no audio exists for a
program.
Selectable Language settings include:
• Audio Language
• Subtitle languag
Video
In the Video menu, you can modify the properties of the video signals to suit your TV
and theatre equipment.
Selectable Video settings include:
• Resolution
• Display Format
Recording
For more information on the Recording function, go to Recording section for all the
options and procedures.
Page 38

38
Audio Options
Use the Audio options in the Settings menu to identify the type of audio connection to
the TV. Choose an option that your TV can output.
Depending on the broadcast content and the Set Top Box audio capabilities, you may
not hear the sound effects when selecting Dolby Digital as the audio output mode.
Selectable Audio settings include:
• SPDIF Digital Audio Output
• HDMI Digital Audio Output
Subtitle On/OFF
Use the Subtitle setting to select whether you want Subtitles On or OFF by default.
Standby Timers
Use the Standby Timers to set preferred Sleep timer duration and Set Top Box Auto
standby Timers.
Selectable Standby Timers settings include:
• Sleep Timer
• Auto Standby Timer
Time Zone Settings
Use the Time Zone setting to select your Australian region, the system shall adjust to
the region time zone.
Banner Display Duration
The Banner Display Duration setting is selectable between 1 and 29 seconds.
Virtual Keyboard Default
The Virtual Keyboard Default setting is selectable between ON / OFF.
Backup and Restore
System settings can be backed up to USB or restored back to factory settings.
Settings - Parental Control
Your PIN code enables you to control the programs viewed in your home.
The default Parental PIN is 1234 - This PIN maybe changed.
Keep your PIN secret and choose a PIN you can remember. If you forget your PIN,
use the FACTORY RESET to reset the Set Top Box back to the default. To find
customer service numbers, go to Manufacturer Information for telephone numbers.
If you start changing your PIN code but decide keep the same code, press “EXIT”, to
keep your same PIN code.
When using the Parental Control function you will always have to enter the PIN code
to gain access.
Page 39
39
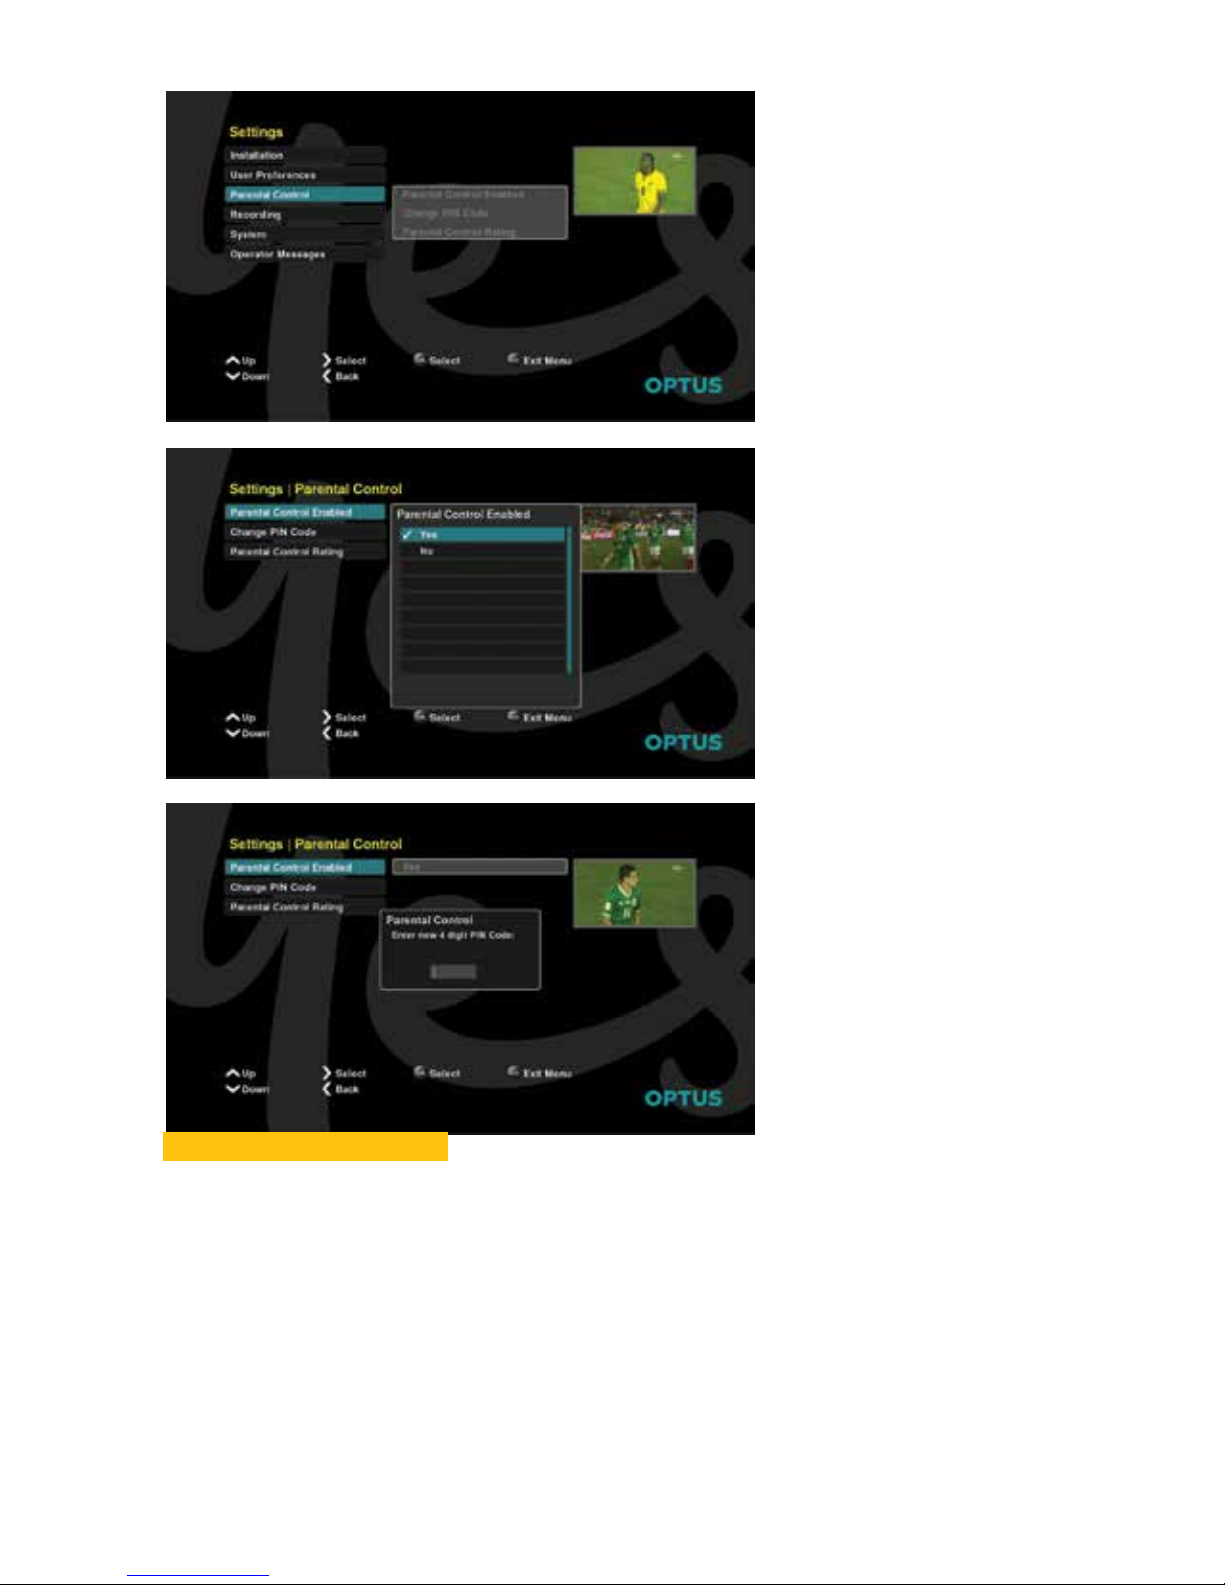
Enabling Parental Control
1. To view the Parental Control screen, use the “▲▼ “ keys to highlight
“Parental Control”, press “OK” to open. This displays various options for you to
restrict the viewing.
2. Upon entry to “Parental Control Enabled” which is the first option, press “OK” key.
3. From the Parental Control Enabled menu, choose either “Yes” or “No” using the “
◂▸
” arrows.
4. To accept the highlighted option, press “OK”.
5. Use the numeric keys on the remote control to enter your PIN code, press “OK”.
Page 40
40
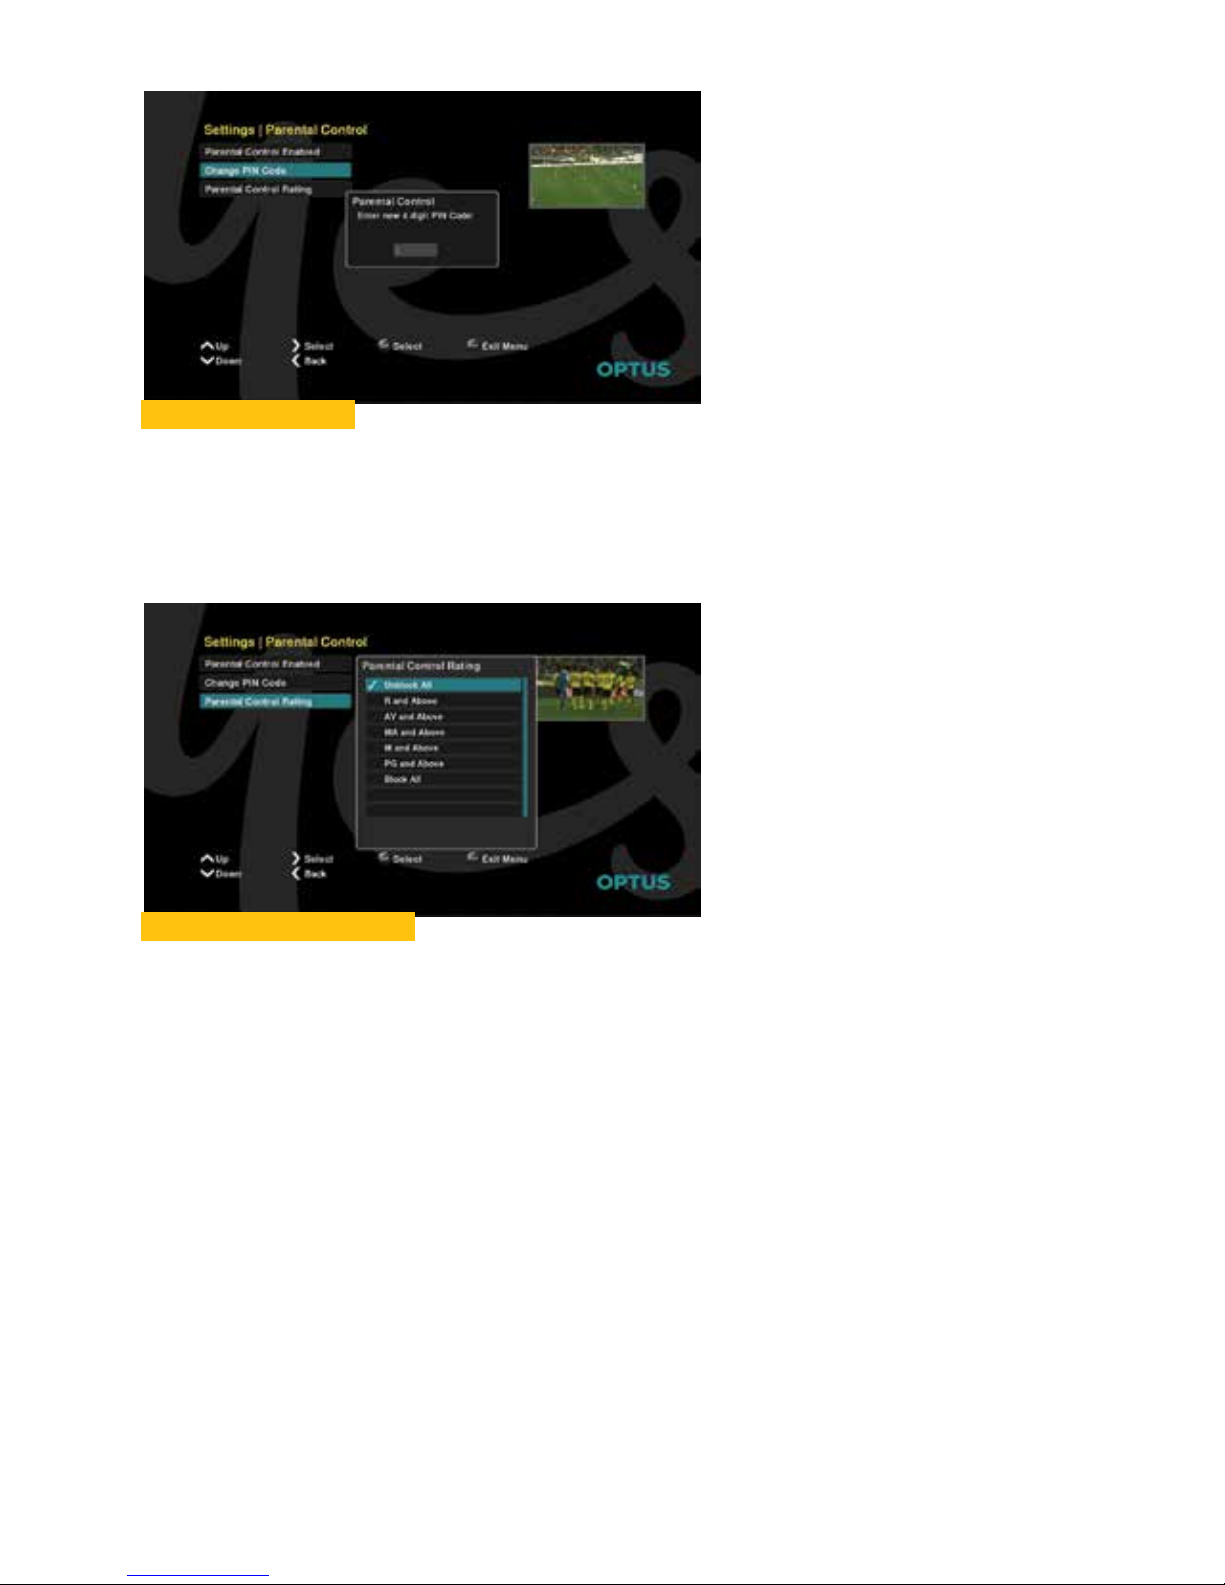
Changing PIN Code
Use the “▲▼”to highlight “Change Pin Code” from the Parental Control menu, press
“OK” to display the PIN code window.
You may change your PIN at any time. To change your PIN you must type in your new
PIN twice.
Parental Control Ratings
To view the Parental Control, move to the “Settings” icon and press “OK”.
1. To see the Parental Control Rating menu, use the “▲▼” keys to highlight
“Parental Control Rating”, press “OK”. The Parental Control Rating window allows
you to specify the age categories that are inappropriate for viewing, unless you
first enter your PIN code.
2. To block the age category of program, use the “▲▼” keys to highlight it and
then press “OK”. This places a tick next to the category you have blocked.
3. To remove an age restriction, highlight the category and then press “OK”.
This removes the tick and the restriction. When you have finished changing viewing
restrictions, press “EXIT”. You can watch blocked programmes, but first you must
enter your PIN number.
Page 41
41
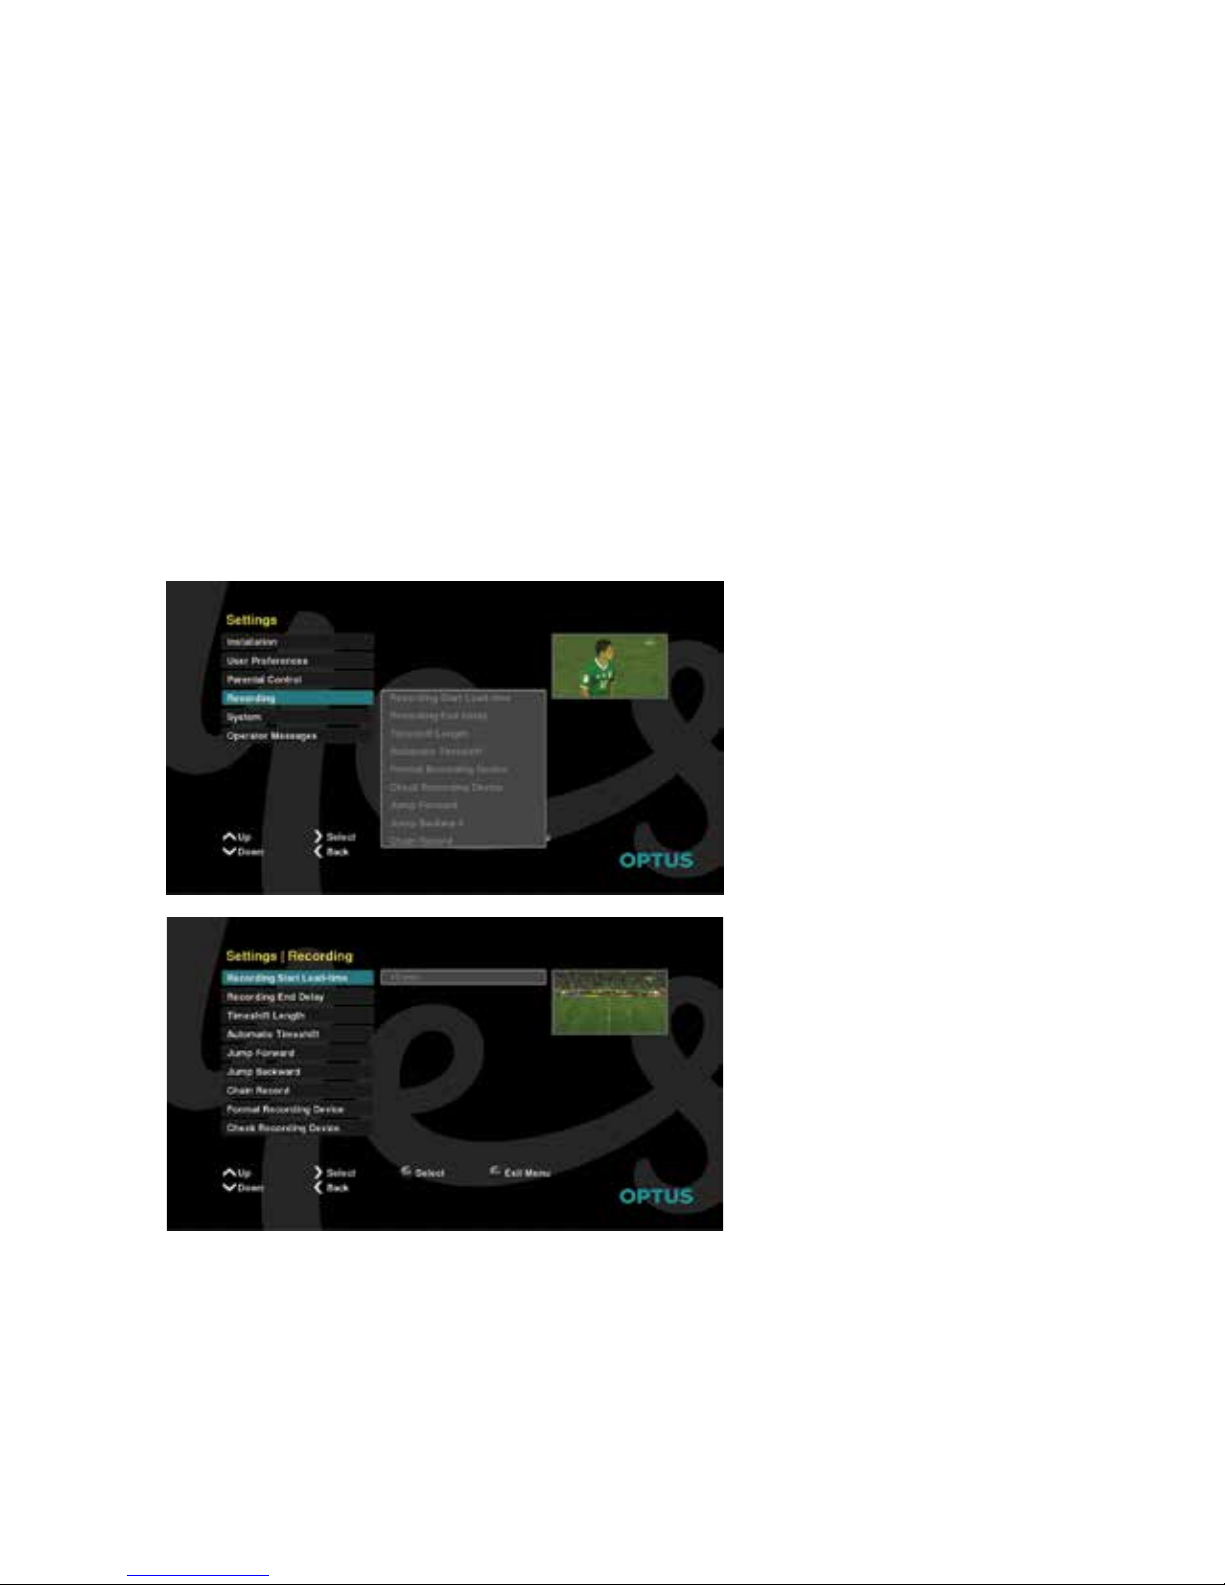
Settings - Recording
In the Sub-menu “Recording”, you have various options to change the settings of your
connected Hard Disk Drive (HDD). Some of the PVR functions are select recording
time, setup devices and format the HDD.
This Sub Menu includes the following functions:
• Recording Start Lead -time
• Recording end delay
• Time-shift length
• Automatic time-shift
• Setup USB storage device
• Format storage device
• Check recording device
• Jump Forward
• Jump Backward
• Chain Record
Page 42

42
Select USB Storage Device
For these functions to be available, your Set Top Box must have an external Hard
Disk Drive connected to the USB port located on rear or side panels. If no HDD is
connected, all functions will be grey and not selectable. You can select the following
device options:
• Device not connected
• Safely eject recording device
• Remount recording device
• Device 1
• Device 2
Recording Start Lead-time
The Recording Start Lead-time can be set between 0 and 29 minutes
Recording End Delay
The Recording End Delay can be set between 0 and 29 minutes
Time-shift length
The Time-shift length can be set between 5 and 120 minutes
Automatic time-shift
The Automatic time-shift can be activated or deactivated, ON / OFF.
Setup USB storage device
The USB storage device can be setup by selecting a connected storage device and
selecting a file format.
Format storage device
In this Sub-menu, you can see all information about your connected Hard-Disk-Drive
as well as an option to format the HDD. Information includes details about the HDD
Information file system, the total and the used capacity.
NOTE: By performing this task, when the formatting is complete, you will lose all
existing content on the Hard-Disk-Drive.
Check recording device
Connected Recording devices are checked for compatible formats.
Jump Forward
The Jump Forward time can be set 10, 20 or 30 minutes.
Jump Back
The Jump Back time can be set 10, 20 or 30 minutes.
Chain Record
Chain recording can be selected to record the current channel or all channels.
Page 43
43
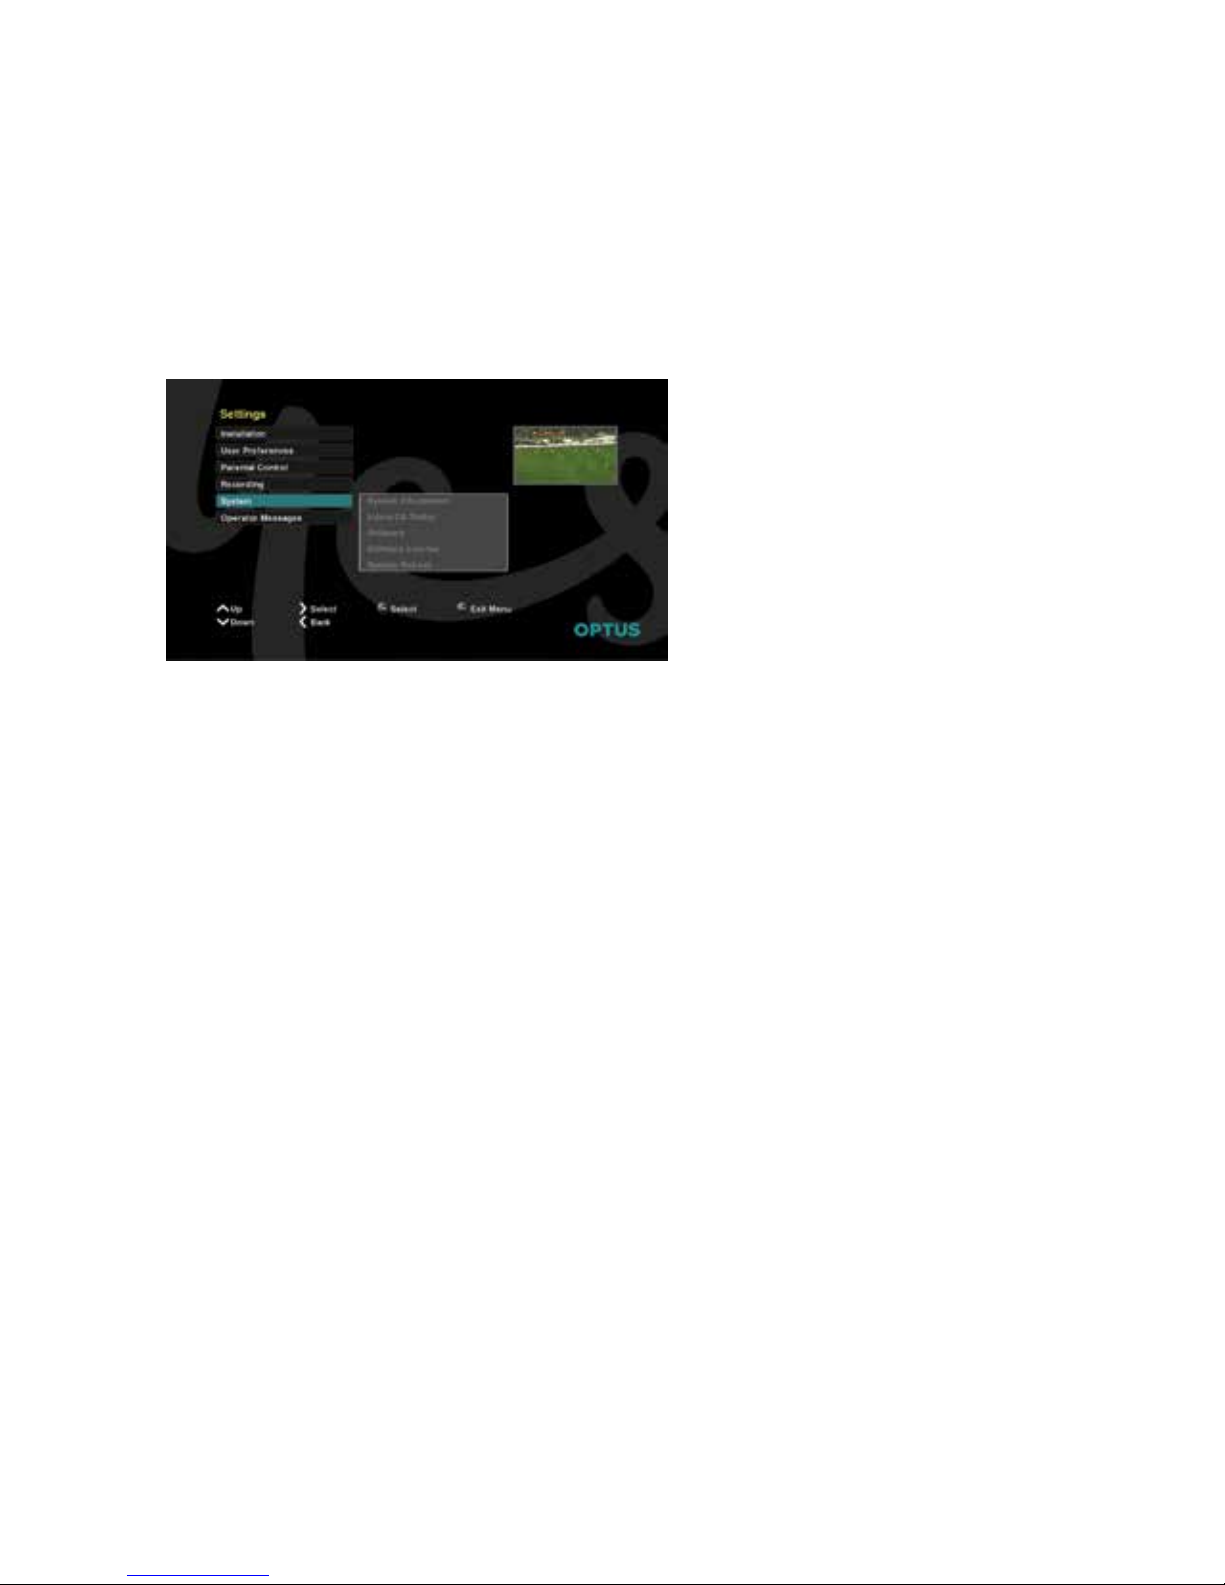
Settings - System
In the Sub-menu “System”, you have various options to view the system information.
This sub menu includes the following functions:
• System Information
• Irdeto CA Status
• Software
• Software licence
• System Reboot
System Information
This system information option gives you statistics about the Set Top Box’s system
and attached peripherals.
Irdeto CA Status
The Irdeto CA Status provides information which may be required by your service
provider. The following information screens are available:
• Smart Card Status
• Softcell Service Status
• Loader Status
Software
The Software settings provide access for you to update your Software from a USB
device or over the air.
• USB Software Update
• Software Update Over the Air
Software License
The software licence information can be viewed.
System Reboot
If the need arises and the Set Top Box requires rebooting, due to some minor
problems, a system Reboot can be performed.
Settings - Operator Messages
In the Sub-menu “Operator Messages”, you have options to view the operator
messages, which could be sent from your service provider to your Set Top Box.
Page 44

44
10 Troubleshooting
PROBLEM WHAT TO DO
The Set Top Box will not switch ON.
None of the LEDs are ON.
Check the connection of the external power supply unit at the wall
socket and ensure it is switched ON. If it is connected correctly the
Green power LED on the power supply should be lit.
Check if the power connector on the Set Top Box’s rear panel is
securely connected.
No picture Check if TV and Set Top Box are “ON” (not in standby mode).
Check that all the cables connections to the Set Top Box and
TV are secure.
Check and adjust the direction of antenna if necessary.
Check that the TV has the correct input source selected
(TV, PC, AV1, AV2, HDMI1 and HDMI2 etc.)
No sound Check the mute button on the TV or Set Top Box, to restore the
sound press the mute button again.
Check the volume is not turned all the way down. To increase the
volume, press the “Vol+” button.
Check connection of the Audio cables to the Set Top Box and TV.
Remote control does not work Check if TV and Set Top Box are “ON” (not in standby mode).
Check that your RCU Standby Key lights up when a key is pressed,
if not change your batteries
If the RCU Standby Key lights up RED:
Check that there are no obstructions between you and the
Set Top Box, aim directly at the Set Top Box and not the TV and
then try again.
If the RCU Standby Key lights up Green:
Un-pair the remote (see instructions in Section 7 of this User
Manual - "First time start-up of the Set Top Box"). Thereafter the
RCU should light up RED when a key is pressed and then the
RCU is now in IR mode and requires direct line of sight to the
STB when pressing keys. See above procedure to troubleshoot
(Go back to your Menu Setting and re-pair your remote after it
starts working ine).
Distorted menu screen Check and adjust brightness and contrast to a lower level.
Page 45

45
11 Legal matters
Important NOTICE to all purchasers of a DHR 4901 OPT Set Top Box.
The DHR 4901 OPT Set Top Box is designed, manufactured and sold to receive
selected network services only. It will therefore not be fully functional unless it is used
with the network operator’s enabled Smartcard supplied with the DHR 4901 OPT
Set Top Box, deployed within the Australian broadcast footprint, and installed so as
to receive the network specific signal.
The smartcard is unique to each decoder and cannot be replaced or changed
with another decoder without first contacting the call centre.
The network operator is entitled to upgrade the software by downloads to your
decoder, to ensure that only approved services are being received, and that the
decoder remains compatible with the networks platform.
Obsolescence Disclaimer
Digital Satellite Technology is rapidly evolving. As a result of this, it is not possible
to predict what the requirements will be in a few years’ time. The manufacturer
cannot guarantee that this DHR 4901 OPT Set Top Box will be able to run all available
services in future.
DIY Installations Disclaimer
Due to the many potential configurations in each home and the variety of equipment
available, it is not possible to cover every potential installation scenario in this
Viewer’s Guide. An Accredited Installer or the supplier / manufacturer of the specific
equipment should be consulted if any doubt exists when doing an installation.
!
!
Page 46

46
Dolby Audio Logo
Manufactured under license from Dolby Laboratories, Dolby, Dolby Audio and the
double-D symbol are trademarks of Dolby Laboratories.
HDMI Logo
HDMI and HDMI Logo, and High-definition Multimedia Interface are trademarks
or registered trademarks of HDMI Licensing LLC in the United States and other
countries.
DVB T2/S2 (Digital Video Broadcasting)
DVB is a registered trademark of the DVB Project.
RCM
The RCM Logo is a visible indication of a product's compliance with all applicable
ACMA regulatory arrangements, including all technical and record-keeping
requirements.
UEC
Altech UEC is a registered trademark of Altech UEC South Africa (Pty) Ltd.
Page 47

47
Intellectual Property
The whole of the DHR 4901 OPT Set Top Box Basic Viewer’s Guide, including the
graphics, menus and information contained herein are the subject of intellectual
property rights, including copyright, under domestic law and international conventions.
All rights are reserved.
All intellectual property rights of the DHR 4901 OPT Set Top Box are owned by Altech
Multimedia (Pty) Ltd.
Hacking of the conditional access system or facilitating anyone else doing so is
STRICTLY PROHIBITED. Failure to adhere to this prohibition is a criminal offence.
Some components are licensed under GPL and LGPL licenses. For further information
regarding the licenses and which components are licensed under these licenses please
visit www.altech-multimedia.com
Support Information – Optus
Online Website: www.optus.com.au/support/satellite
Page 48

IMM02870 (07/16)
 Loading...