

Page 1
Page 2

Page 3

Inhalt aDe
Funktionsweise 2
Lieferumfang 2
Einsatzgebiete 3
Wichtige Hinweise 3
Bedienelemente 4
Anzeige 4
Optik 5
Einsetzen der Batterie 6
Verwenden der Tasche [MSPlus/ MSPro] 6
Schutzhülle [MSPlus/ MSPro] 6
Grundlegende Bedienung 7
Geräteeinstellungen 8
Resetfunktion 11
Datenspeicher [MSPro] 11
OptrisConnect Report Software 12
Technische Daten 16
Fehlermeldungen 17
Emissionsgradtabelle Metalle 18
Emissionsgradtabelle Nichtmetalle 19
Gewährleistung 20
Content aEe
Introduction 22
Scope of Supply 22
Applications 23
Important Notes 23
Functional Elements 24
Display 24
Optics 25
Insertion of Batteries 26
Usage of the Pouch [MSPlus/ MSPro] 26
Protection Boot [MSPlus/ MSPro] 26
Basic Operation 27
Unit Settings 28
Reset Function 30
Data Logger [MSPro] 31
OptrisConnect Report software 32
Technical Data 36
Emissivity Table Metals 38
Emissivity Table Non-Metals 39
Warranty 40
optris MS – DE2011-04-A
1
Page 4

Funktionsweise
Wir freuen uns, dass Sie sich für das
optris MS entschieden haben!
Infrarotthermometer messen berührungslos. Sie
ermitteln die von einem Körper abgegebene
Infrarotstrahlung und berechnen auf dieser
Grundlage die Oberflächentemperatur. So lässt
sich die Temperatur schwer zugänglicher oder
sich bewegender Objekte ohne Schwierigkeiten
bestimmen.
Bitte lesen Sie diese Bedienungsanleitung vor
der ersten Inbetriebnahme aufmerksam durch.
Lieferumfang
Gerät
9V Alkaline-Batterie
Bedienungsanleitung
Die Modelle MSPlus und MSPro enthalten
zusätzlich:
Handschlaufe
Tragetasche
Geräteschutzhülle
Adapter für Fotostativ
USB-Schnittstellenkabel
OptrisConnect Report Software
Das Modell MSPro enthält zusätzlich:
Thermoelement-Einstechfühler Typ K
Optional:
Werksprüfschein
Software-Kit für MS, bestehend aus:
OptrisConnect Report Software
USB-Schnittstellenkabel
Adapter für Fotostativ
optris MS – DE2011-04-A
2
Page 5

Einsatzgebie
te
Instandhaltung elektrischer
Anlagen
Aufspüren heißer Stellen an
Lagern, Getrieben und Motoren
Messung an sich bewegenden
Objekten in Fertigungsprozessen
Aufspüren von Energieverlusten
an Wärmeisolierungen
Kontrolle von kritischen Bauteilen
an Fahrzeugen
Wichtige Hinweise
Das MS enthält zur Messfleckmarkierung einen
Laser der Klasse 2.
Zielen Sie mit dem
Laser nie (weder direkt
noch indirekt) in die
Augen, da dadurch
ernsthafte Schäden
hervorgerufen werden
können.
Schützen Sie das Gerät vor folgenden
Einflüssen:
Elektromagnetische Felder
statische Elektrizität
abrupte Änderungen der
Umgebungstemperatur
Infrarotthermometer messen nur die Oberfläche
von Objekten. Das MS kann nicht durch
durchsichtige Materialien wie Glas und Plastik
hindurch messen.
Halten Sie die Linse frei von Verschmutzungen
(Reinigung mit einem weichen, feuchten Tuch
oder einem wasserbasierten Glasreiniger).
optris MS – DE2011-04-A
3
Page 6

Bedien
elemente
1 Präzisionsglasoptik
2 LCD-Display
3 Ab-Taste/ Beleuchtung
4 Mode-Taste
5 Messtaste
6 Thermoelement-Eingang [MSPro]
7 USB-Schnittstelle
8 Batteriefach
9 Auf-Taste/ Laser
Anzeige [MS]
A Displaybeleuchtung
B Batteriesymbol
C Lasersymbol
D MAX- bzw. MIN-Wert
E aktueller Temperaturwert
F HOLD-Funktion
G Emissionsgrad
optris MS – DE2011-04-A
4
Page 7

eige [MSPlus/ MSPro]
Anz
A Displaybeleuchtung
B MAX- bzw. MIN-Wert
C Lasersymbol
D HIGH- und LOW-Alarmanzeige
E Messfühlerwert [Pro]
F aktueller Temperaturwert
G Emissionsgrad
H HOLD-Funktion
Optik
Die Präzisionsglasoptik ermöglicht einen
Messstrahl mit einem Durchmesser von 13 mm
innerhalb der ersten 140 mm (260 mm beim
Modell Pro). Achten Sie darauf, dass das
Messobjekt mindestens gleich groß wie der
Messfleck ist.
Das Diagramm zeigt das Verhältnis Entfernung
(D) zu Messfleckgröße (S).
D:S = 20:1 [MS/ MSPlus]/ 40:1 [MSPro]
optris MS – DE2011-04-A
5
Page 8
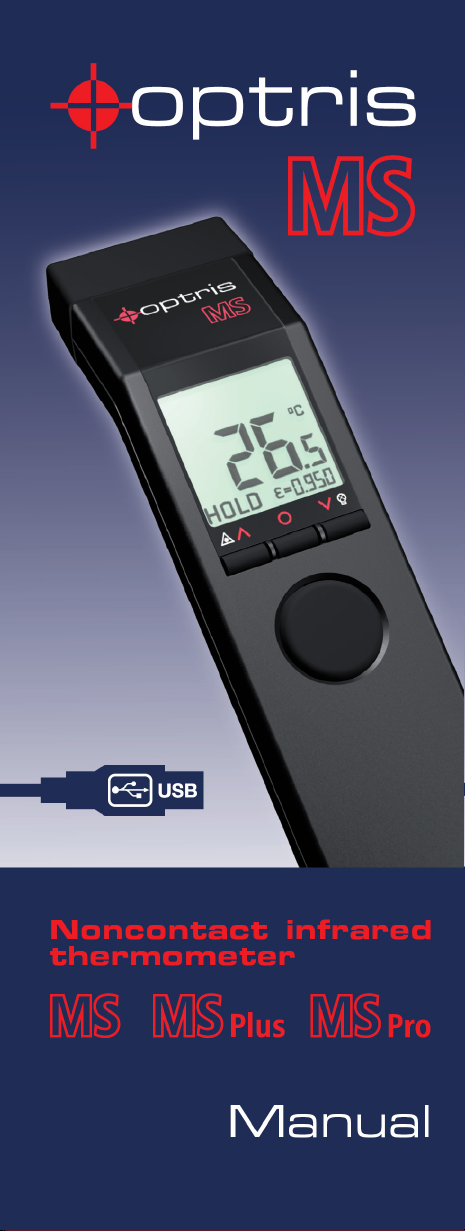
Einsetzen de
Um die Batterie zu wechseln,
schieben Sie den Deckel des
Batteriefaches mit leichtem
Druck nach unten. Achten Sie
beim Einsetzen auf die richtige
Polung.
Ersetzen Sie d
sobald das Warnsymbol für
niedrigen Batteriestand im
Display erscheint.
r Batterie
ie Batterie,
Verwenden der Tasche [MSPlus/ MSPro]
Bitte schieben Sie das
Gerät wie abgebildet in
die Tasche, um eine
unbeabsichtigte
Aktivierung zu
vermeiden.
Schutzhülle [MSPlus/
Die Gummi-Schutzhülle schützt Ihr MS
wirkungsvoll gegen Verschmutzung beim
Einsatz in rauer industrieller Umgebung.
optris MS – DE2011-04-A
MSPro]
6
Page 9

Schieben Sie das MS wie abgebildet in die
Schutzhülle und ziehen Sie anschließend das
Vorderteil vorsichtig über die Optik.
Alle Bedienelemente und Anschlüsse sind bei
Verwendung der Schutzhülle weiterhin
zugänglich.
Grundlegende Bedienung
TEMPERATURMESSUNG
Zielen Sie mit dem Gerät auf das Messobjekt
und betätigen Sie die M
HOLD-Funktion: Nach Freigabe der
MESSTASTE werden alle Werte noch 7 Sekunden
angezeigt.
Abschalten: Werden während der HOLDFunktion keine Tasten betätigt, schaltet sich das
Gerät nach den 7 Sekunden automatisch ab.
DISPLAYBELEUCHTUNG
Betätigen Sie bei gedrückter M
T
ASTE, um die Displaybeleuchtung ein- bzw.
auszuschalten.
L
ASER
Betätigen Sie bei gedrückter M
UF-TASTE zur Aktivierung/ Deaktivierung. Ein
A
Symbol im Display zeigt den jeweiligen Status
an.
ESSTASTE.
ESSTASTE die AB-
ESSTASTE die
optris MS – DE2011-04-A
7
Page 10

Geräteeinstellungen [MS]
MAX/ MIN
Mit dieser Funktion können Sie festlegen, ob
der Maximal- oder Minimalwert permanent im
oberen Teil des Displays angezeigt werden soll.
Betätigen Sie dazu entweder im HOLD-Modus
oder auch während der Messung (bei
gedrückter MESSTASTE) die MODE-TASTE. Die
vorgenommene Einstellung bleibt auch nach
Ausschalten des Gerätes gespeichert.
Wird nach Beendigung einer Messung im
HOLD-Modus die
während der Messung ermittelte Maximal- und
Minimalwert angezeigt.
EMISSIONSGRAD
Die Intensität der Infrarotstrahlung, die von
jedem Körper ausgesendet wird, hängt von der
Temperatur und vom Strahlungsvermögen der
Messobjektoberfläche ab.
Der Emissionsgrad ( = Epsilon) ist eine
Materialkonstante, mit dem die Fähigkeit eines
Körpers, Infrarotenergie abzustrahlen,
beschrieben wird.
Ist der gewählte Emissionsgrad zu hoch, wird
ein gegenüber der tatsächlichen Temperatur zu
niedriger Wert angezeigt.
Das Gerät wird mit einem fest eingestellten
Emissionsgrad von 0,95 geliefert. Die meisten
organischen Materialien und eingefärbte oder
oxidierte Oberflächen haben einen
Emissionsgrad von 0,95.
Metallische oder glänzende Oberflächen
verfälschen das Messergebnis aufgrund von
Reflexionen. Um hierbei genaue und
reproduzierbare Messergebnisse zu erzielen,
sollte die Objektoberfläche entweder mit
mattschwarzer Farbe beschichtet werden oder
ein geeigneter Kunststoffaufkleber aufgebracht
werden.
°F-UMSCHALTUNG
°C/
Zum Einstellen der Temperatureinheit auf °F
betätigen Sie im ausgeschalteten Zustand
zunächst die A
dann die M
MODE-TASTE betätigt, wird der
B-TASTE (gedrückt halten) und
ESSTASTE.
optris MS – DE2011-04-A
8
Page 11

Zum Einstellen der Temperatureinheit auf °C
betätigen Sie im ausgeschalteten Zustand
zunächst die A
dann die M
UF-TASTE (gedrückt halten) und
ESSTASTE.
Geräteeinstellungen [MSPlus/ MSPro]
Mit der MODE-TASTE können die einzelnen
Einstellfunktionen aufgerufen werden. Das
Gerät muss sich dazu im HOLD-Modus
befinden. Die jeweils aktivierte Funktion blinkt in
der Anzeige.
Mit den Tasten A
verändert bzw. Funktionen aktiviert und
deaktiviert werden.
Die vorgenommenen Einstellungen werden
durch erneutes Betätigen der MODE-TASTE (führt
zur nächsten Funktion) bzw. der M
gespeichert.
Wird innerhalb von 7 Sekunden keine Taste
betätigt, erfolgt keine Speicherung und das
Gerät schaltet sich ab.
UF und AB können Parameter
ESSTASTE
MISSIONSGRAD
E
Definition ► siehe Geräteeinstellungen MS
Insbesondere die Messung metallischer
Oberflächen erfordert eine sorgfältige
Emissionsgradeinstellung. Eine Materialtabelle
finden Sie im Abschnitt Emissionsgrad-
tabellen.
optris MS – DE2011-04-A
9
Page 12

Einstellen von Epsilon: Betätigen von MODE
(im HOLD-Modus) – mit A
der Wert verändert werden.
Der angezeigte Temperaturwert wird angepasst,
d.h. es kann auch nach einer Messung eine
Korrektur von vorgenommen werden.
AX/ MIN/ MESSFÜHLER [MSPRO]
M
Mit dieser Funktion können Sie festlegen, ob
der Maximal-, Minimalwert oder Messfühlerwert
[MSPro] permanent im oberen Teil des Displays
angezeigt werden soll.
Nach einer Messung kann man im HOLDModus durch Betätigen der AUF-TASTE auch die
jeweils nicht dargestellten Werte aufrufen.
Der Messfühlerwert erscheint nur bei
angeschlossenem Thermoelementfühler und
wird im HOLD-Modus ebenfalls eingefroren.
LARMFUNKTIONEN
A
Zur Aktivierung/ Deaktivierung betätigen Sie bei
Anzeige von H bzw. L die A
Die Alarmfunktion ist aktiviert, sobald das
Symbol
in der Anzeige erscheint.
Nach erneutem Betätigen von M
Alarmwerte mit der A
eingestellt werden.
Bei Überschreiten des eingestellten High-
Wertes erfolgt eine akustische Alarmierung und
die Displaybeleuchtung wechselt zu ROT.
Bei Unterschreiten des eingestellten Low-
Wertes erfolgt eine akustische Alarmierung und
die Displaybeleuchtung wechselt zu BLAU.
°C/
°F-UMSCHALTUNG
Einstellen der Temperatureinheit.
O
FFSET
Mit dieser Funktion kann ein linearer Offset (+/-)
zur Temperaturanzeige eingestellt werden.
Dadurch lassen sich z.B. mehrere Geräte
aufeinander exakt abstimmen.
UF und AB kann nun
UF- bzw. AB-TASTE.
ODE können die
UF- und AB-TASTE
optris MS – DE2011-04-A
10
Page 13

Resetfunktion
Durch gleichzeitiges Betätigen der MODE- und
der A
UF-TASTE (im HOLD-Modus) kann man
das Gerät auf die Werksvoreinstellung
zurücksetzen. Der Datenspeicher [MSPro] wird
dadurch nicht gelöscht.
Datenspeicher [MSPro]
Das MSPro verfügt über einen Datenspeicher
für 20 Messwerte.
SPEICHERN
Nach Durchführung der Messung geben Sie die
MESSTASTE frei – das Gerät befindet sich im
HOLD-Modus. Durch Betätigen der A
werden der nächste freie Speicherplatz (blinkt)
und ein Diskettensymbol angezeigt. Mit A
B kann man manuell die Speicherplatzposition
A
ändern. Durch Betätigen der M
(zweifaches akustisches Signal) wird der Wert
gespeichert.
A
UFRUFEN VON GESPEICHERTEN MESSWERTEN
Betätigen Sie die M
ASTE gleichzeitig. Der nächste freie
T
ESSTASTE und die MODE-
Speicherplatz und ein Diskettensymbol (blinkt)
werden angezeigt. Mit AUF und AB können
sämtliche Speicherpositionen aufgerufen
werden. Durch Betätigen der M
zwischen IR-Temperaturwert und
Messfühlerwert gewechselt werden
L
ÖSCHEN DES SPEICHERS
Betätigen Sie die A
B-TASTE, während sich das
Gerät im HOLD-Modus befindet. Wählen Sie
Speicherplatz 0 und betätigen Sie dann die
ODE-TASTE erneut. Ein dreimaliges
M
akustisches Signal bestätigt das Löschen des
kompletten Datenspeichers.
B-TASTE
UF und
ODE-TASTE
ODE-TASTE kann
optris MS – DE2011-04-A
11
Page 14

Connect Report Software
Optris
Die Software ist im MSPlus- und MSPro-Paket
bereits enthalten. Für das Basismodell MS ist
ein Upgrade-Kit verfügbar.
Minimale Systemanforderungen
Windows XP
USB-Schnittstelle
Festplatte mit mind. 30 MB freiem Speicher
Mind. 128 MByte RAM
CD-ROM Laufwerk
AUPTFUNKTIONEN DER SOFTWARE
H
Ändern von Geräteeinstellungen
Darstellen und Aufzeichnen von
Temperatur-Zeit-Verläufen
Einfaches Erstellen von bildbasierten
Temperaturreporten
Herunterladen von Loggerdaten
NSTALLATION
I
Sollte die Installation auf Ihrem PC nach
Einlegen der CD-ROM nicht automatisch
erfolgen (über aktivierte Autorun-Option),
starten Sie bitte setup.exe. Folgen Sie den
Anweisungen des Assistenten bis zum
Abschluss der Installation.
ERBINDUNG ZUM PC
V
Verbinden Sie das Gerät über das mitgelieferte
spezielle USB-Adapterkabel mit Ihrem PC. Die
Installation der Treiber erfolgt automatisch von
der Software-CD.
HINWEIS: Die Treiberinstallation erfolgt
zweimal (USB-Adapter und COM-Port).
START DER SOFTWARE
Nach dem Start des Programms wird bei
angeschlossenem Gerät die erfolgreiche
Kommunikation in der unteren Statuszeile des
Softwarefensters angezeigt.
optris MS – DE2011-04-A
12
Page 15

Sollte keine Verbindung zwischen Gerät und PC
zustande kommen, wählen Sie bitte unter
[Menü: Einstellungen\ Interface] den richtigen
COM-Port aus. Bei angeschlossenem USBAdapterkabel wird dieser angezeigt als:
[Infrared Thermometer Adapter].
ERÄTEEINSTELLUNGEN
G
Über [Menü: Gerät\ Einstellungen] können
folgende Geräteparameter eingestellt werden:
Emissionsgrad, Alarm, Temperatureinheit,
Displaybeleuchtung, Laser, Signalton.
ESSUNG STARTEN
M
Durch Betätigen der S
TART-Schaltfläche in der
Werkzeugleiste wird die Messung gestartet
[Menü: Messung\ Start].
M
ESSUNG BEENDEN/ SPEICHERN
Die S
TOP-Schaltfläche [Menü: Messung\ Stop]
beendet die laufende Messung.
optris MS – DE2011-04-A
13
Page 16

Mit der Schaltfläche SPEICHERN [Menü: Datei\
Sichern als] wird ein Explorerfenster zur
Auswahl von Speicherort und Dateinamen
geöffnet.
Unter dem Menüeintrag Optionen [Menü:
Einstellungen\ Optionen] können Parameter
zur Datensicherung verändert werden.
B
ILDBASIERTE TEMPERATURREPORTE
Diese Funktion ermöglicht ein einfaches
Erstellen von Berichten, welche
Temperaturpunkte in einem Digitalfoto zeigen.
Machen Sie zunächst ein Foto mit einer
Digitalkamera (nicht im Lieferumfang enthalten)
von dem gewünschten Messobjekt/ der
Szenerie.
Um einen Bericht zu erstellen, führen Sie
nacheinander die folgenden Schritte aus:
Speichern Sie das Foto auf dem PC
Öffnen Sie das Bild innerhalb der
OptrisConnect Software mit Hilfe der
Report-Funktion [Menü: Datei\ Report].
Verbinden Sie Ihr MS mit dem PC
Visieren Sie das gewünschte Objekt an
Bringen Sie nun den Cursor im Bild auf die
gleiche Position, die der Laser des MS
markiert
Betätigen Sie die linke Maustaste
Ein Pfeil markiert nun den Messort im Bild mit
zugehöriger Temperatur.
optris MS – DE2011-04-A
14
Page 17

D
ATENLOGGERFUNKTIONEN [MSPRO]
Zum Herunterladen der im Gerät gespeicherten
Logger-Daten betätigen Sie die LOGGER-
S
CHALTFLÄCHE bzw. [Menü: Messung\
Loggerdaten herunterladen]. In einem
Extrafenster werden alle im Gerät
gespeicherten Daten tabellarisch dargestellt.
Datum und Uhrzeit entsprechen dem Zeitpunkt
des Herunterladens.
Eine ausführliche Softwarebeschreibung
finden Sie nach Start des Programms unter:
[Menü: ?\ Hilfe].
optris MS – DE2011-04-A
15
Page 18

(
)
-
Technis
Temperaturbereich
Genauigkeit
(bei T
Reprod uzierbarkeit
Optische Auflösung
Auflösung (D isplay) 0,2°C (0,5°F)
Einstellzeit (95%) 300 ms
Umgebungstemper atur 0...50°C
Lag ertem per atu r -20... 60° C (o hne Batt eri e)
Spektralber eich 8...14µm
Em issi on sg rad
Funktionen
Las er
PC -Sc hni tts te ll e
Gewicht/ Abmessungen
Bat ter ie
Batterielebensdauer
Relative Luftfeuchte
che Daten [MS]
= 23 ±5°C)
Um g
-32...420°C (-20...788°F)
± 1% oder ± 1°C (20...420°C)
± 1,5°C (19,9...0°C)
± 2,5°C (-0,1...-20°C)
± 3°C (-20,1...-32°C)
± 0,5% oder ± 0,7°C (20...420°C)
20: 1/ 13 mm Me ssfle ck in 140mm
Messabstand
0,9 5
MIN, MAX, H OLD, °C/°F
< 1mW Laser Klasse IIa, Laserstrahl mit
9mm Offse t
USB
150g, 190x38x45 mm
9V A lka li ne-B at ter ie
20h (Laser und Displaybel. 50% an)/ 40h
(Laser und Di spl ayb el. a us)
10-95% RH, nicht kondensierend, bei
Umgebungstemperatur < 30°C
Technische Daten [MSPlus]
Temperaturbereich
Genauigkeit
= 23 ±5°C)
(bei T
Um g
Reprod uzierbarkeit
Optische Auflösung
Auflösung (D isplay)
Einstellzeit (95%) 300 ms
Umgebungstemper atur 0...50°C
Lag ertem per atu r -20... 60° C (o hne Ba tter ie)
Spektralber eich 8...14µm
Emissionsgrad/ Verst. 0,100...1,100 einstellbar
Funktionen
Alarmfunkti onen
Laser < 1mW Laser Klasse IIa, Laserstrahl mit
PC -Sc hni tts te ll e
Software OptrisConnect Report Software
Gewicht/ Abmessungen 150g, 190x38x45 mm
Bat ter ie 9V A lka li ne-B at ter ie
Batterielebensdauer 20h (Las er und Displaybel. 50% an)/ 40h
Relative Luftfeuchte
-32...530°C (-20...980°F)
± 1% oder ± 1°C (20...530°C)
± 1,5°C (19,9...0°C)
± 2,5°C (-0,1...-20°C)
± 3°C (-20,1...-32°C)
± 0,5% oder ± 0,7°C (20...530°C)
20: 1/ 13 mm Me ssfle ck in 140mm
0,1 °F
0,1 °C
MIN, MAX, HOLD, °C/°F, Offset
Visueller und akustischer HIGH- und LOW
Al arm
9mm Offse t
USB
(Laser und Di spl ayb el. a us)
10-95% RH, nicht kondensierend, bei
Umgebungstemperatur < 30°C
optris MS – DE2011-04-A
16
Page 19

(
)
Technis
Temperaturbereich
Genauigkeit
(bei T
Reproduzierbarkeit
Optische Auflösung
Auflösung (Display)
Einstellzeit (95%) 300 ms
Umgebungstemperatur 0...50°C
Lagertemperatur -20...60°C (ohne Batter ie)
Spektralbereich 8...14µm
Emissionsgrad/ Verst. 0,100...1,10 0 einstellbar
Funktionen
Alarmfunktionen
Las er
PC -Sc hni tts tel le
Sof tw are
Datenspeicher
Ei nga ng
Gewicht/ Abmessungen
Bat ter ie
Batterielebensdauer
Relative Luftfeuchte
che Daten [MSPro]
-32...760°C (-20...1440 °F)
= 23 ±5°C)
Um g
± 1% oder ± 1°C ( 20...760°C)
± 1, 5°C (19, 9. ..0°C)
± 2,5°C (-0,1...-20°C)
± 3°C (-20,1...- 32°C)
± 0,75% oder ± 0,75°C (20...760°C)
40:1/ 13mm Messfleck in 260mm
0,1 °C
MIN, MAX, HOLD, °C/°F, Offset
Visueller und akustischer HIGH- und
LOW -A larm
< 1mW Laser Klasse IIa, Laserstrahl mit
9mm Offset
USB
OptrisConnect Report Softw are
für 20 Messprotokoll e
für T herm oel emen t Typ K
180g, 190x38x45 mm
9V A lka li ne-B at ter ie
20h (Laser und Displaybel. 50% an)/ 40h
(Laser und Displayb el. au s)
10-95% RH, nicht kondensierend, bei
Umgebungstemperatur < 30°C
0,1 °F
Fehlermeldungen
Fehler/ Code
HHH
LLL
Problem Aktion
Objekttemperatur
oberhalb
Bereichsgrenze
Objekttemperatur
unterhalb
Bereichsgrenze
Objekt innerhalb des
Messbereiches
wählen
Objekt innerhalb des
Messbereiches
wählen
Batteriesymbol Batterie verbraucht Batterie wechseln
keine Anzeige Batterie verbraucht Batterie wechseln
kein Laser
Batterie verbraucht Batterie wechseln
Laser ist
ausgeschaltet
Laser aktivieren
optris MS – DE2011-04-A
17
Page 20

Emissionsgradtabelle Metalle
Material
Aluminium nicht oxidiert 0,02-0,1
poliert 0,02-0,1
aufgeraut 0,1-0,3
oxidiert 0,2-0,4
Blei poliert 0,05-0,1
aufgeraut 0,4
oxidiert 0,2-0,6
Chrom 0,02-0,2
Eisen nicht oxidiert 0,05-0,2
verrostet 0,5-0,7
oxidiert 0,5-0,9
geschmiedet, stumpf 0,9
Eisen, gegossen nicht oxidiert 0,2
oxidiert 0,6-0,95
Gold 0,01-0,1
Haynes Legierung 0,3-0,8
Inconel elektropoliert 0,15
sandgestrahlt 0,3-0,6
oxidiert 0,7-0,95
Kupfer poliert 0,03
aufgeraut 0,05-0,1
oxidiert 0,4-0,8
Magnesium 0,02-0,1
Material
Messing poliert 0,01-0,05
rau 0,3
oxidiert 0,5
Molybdän nicht oxidiert 0,1
oxidiert 0,2-0,6
Monel (Ni-Cu) 0,1-0,14
Nickel elektrolytisch 0,05-0,15
oxidiert 0,2-0,5
Platin schwarz 0,9
Quecksilber 0,05-0,15
Silber 0,02
Stahl poliertes Blech 0,1
rostfrei 0,1-0,8
Grobblech 0,4-0,6
kaltgewalzt 0,7-0,9
oxidiert 0,7-0,9
Titan poliert 0,05-0,2
oxidiert 0,5-0,6
Wolfram poliert 0,03-0,1
Zink poliert 0,02
oxidiert 0,1
Zinn nicht oxidiert 0,05
typischer
Emissionsgrad
typischer
Emissionsgrad
optris MS – DE2011-04-A
18
Page 21

Emissionsgr
Asbest 0,95
Asphalt 0,95
Basalt 0,7
Beton 0,95
Eis 0,98
Erde 0,9-0,98
Farbe nicht alkalisch 0,9-0,95
Gips 0,8-0,95
Glas 0,85
Gummi 0,95
Holz natürlich 0,9-0,95
Kalkstein 0,98
Karborund 0,9
Keramik 0,95
Kies 0,95
Kohlenstoff nicht oxidiert 0,8-0,9
Kunststoff >50 μm lichtundurchlässig 0,95
Papier jede Farbe 0,95
Sand 0,9
Schnee 0,9
Textilien 0,95
Wasser 0,93
adtabelle Nichtmetalle
Material
Graphit 0,7-0,8
typischer
Emissionsgrad
optris MS – DE2011-04-A
19
Page 22

währleistung
Ge
Sollten trotz sorgfältiger Qualitätskontrolle
Gerätedefekte auftreten, bitten wir Sie, sich
umgehend mit unserem Kundendienst in
Verbindung zu setzen. Die Gewährleistungsfrist
beträgt 24 Monate ab Lieferdatum. Nach
diesem Zeitraum gibt der Hersteller im
Reparaturfall eine 6-monatige Gewährleistung
auf alle reparierten oder ausgetauschten
Gerätekomponenten.
Nicht unter die Gewährleistung fallen elektrische
Sicherungen, Primärbatterien und Schäden, die
durch unsachgemäße Behandlung, Öffnung des
Gerätes oder Gewalteinwirkung entstanden
sind. Der Hersteller haftet nicht für etwaige
Folgeschäden. Im Falle eines Gerätefehlers
während der Gewährleistungszeit erfolgt eine
kostenlose Instandsetzung bzw. Kalibrierung
des Gerätes. Die Frachtkosten werden vom
jeweiligen Absender getragen. Der Hersteller
behält sich den Umtausch des Gerätes oder von
Teilen des Gerätes anstelle einer Reparatur vor.
Ist der Fehler auf eine missbräuchliche
Verwendung oder auf Gewalteinwirkung
zurückzuführen, werden die Kosten vom
Hersteller in Rechnung gestellt. In diesem Fall
wird vor Beginn der Reparatur auf Wunsch ein
Kostenvoranschlag erstellt.
Das Gerät entspricht den folgenden
Standards:
EMV: EN 61326-1:2006
(Grundlegende Prüfanforderungen)
EN 61326-2-3:2006
Gerätesicherheit: EN 61010-1:2001
Lasersicherheit: EN 60825-1:2007
Das Produkt erfüllt die Anforderungen der EMVRichtlinie 2004/108/EG und der
Niederspannungsrichtlinie 2006/95/EG.
optris MS – DE2011-04-A
20
Page 23

Entsorg
elektronischen Geräten
Dieses Symbol auf dem Gerät
weist darauf hin, dass dieses
Produkt nicht als normaler
Haushaltsabfall zu behandeln ist,
sondern an einer Annahmestelle
für das Recycling von elektrischen
und elektronischen Geräten abgegeben werden
muss. Für weitere Informationen kontaktieren
Sie bitte Ihren Händler.
ung von gebrauchten
optris MS – DE2011-04-A
21
Page 24

Introduction
Thank you for choosing the optris MS!
Infrared thermometers measure contactless.
They determine the temperature on the basis of
the emitted infrared radiation from an object.
These thermometers enable the user to detect
the temperature of inaccessible or moving
objects without difficulties.
Please read this manual completely before the
initial operation.
Scope of Supply
Infrared Thermometer
9 V alkaline battery
Operators manual
The models MSPlus and MSPro include in
addition:
Wrist strap
Pouch
Protection boot
Adapter for photo tripod
USB interface cable
OptrisConnect Report software
The model MSPro includes in addition:
Thermocouple insertion probe type K
Optional:
Certificate of calibration
Software Kit for MS, containing:
OptrisConnect Report software
USB interface cable
Adapter for photo tripod
optris MS – DE2011-04-A
22
Page 25

Applica
tions
Maintenance of electrical
equipment
Hot spot detection on bearings,
transmission and motors
Measurement of moving objects
in manufacturing processes
Detection of energy losses on
heat insulations
Inspection of critical components
on vehicles
Important Notes
The MS contains a laser class 2 for marking the
measurement spot.
Do not point the laser
directly at the eye or
indirectly off reflective
surfaces as this may
cause serious
damages!
Please protect the instrument from the following:
Electromagnetic fields (EMF)
Static electricity
Abrupt changes of the ambient temperature
Infrared thermometers measure the surface
temperature of objects only. The MS cannot
measure through transparent material such as
glass or plastic.
Keep the optics clean of dirt (cleaning with a
humid tissue or a mild commercial cleaner).
optris MS – DE2011-04-A
23
Page 26

Function
al Elements
1 Precision glass optics
2 LCD display
3 Down button/ LCD backlight
4 Mode button
5 Trigger
6 Thermocouple input [Pro]
7 USB interface
8 Battery chamber
9 Up button/ Laser
Display [MS]
A Display backlight
B Battery symbol
C Laser symbol
D MAX or MIN value
E Current temperature value
F HOLD function
G Emissivity
optris MS – DE2011-04-A
24
Page 27

y [MSPlus/ MSPro]
Displa
A Display backlight
B MAX or MIN value
C Laser symbol
D HIGH and LOW alarm indication
E t/c value [Pro]
F Current temperature value
G Emissivity
H HOLD function
Optics
Due to the precision glass optics the measuring
beam of the instrument has a diameter of
13 mm at any distance within the first 140 mm
(260 mm at model MSPro).
The object must be at least as large as the spot
size.
The diagram shows the distance (D) to spot (S)
ratio.
D:S = 20:1 [MS/ MSPlus]/ 40:1 [MSPro]
optris MS – DE2011-04-A
25
Page 28

Insertion o
In order to exchange the battery
just press the cover lid on the
bottom side of the unit
downwards.
Please make sure to insert the
battery in the correct direction.
Pleas
if the low battery symbol is
shown in the display.
Usage of the Pouch [MSPlus/ MSPro]
f Batteries
e exchange the battery
Make sure to insert the
unit into the pouch as
shown to avoid
unintended operation.
Protection Boot [MSPlus/ MSPro]
The rubber protection boot protects your MS
efficiently against dirt and contamination in
harsh industrial environment.
optris MS – DE2011-04-A
26
Page 29

Slide the MS into the boot as shown in the
picture. Then pull the front part of the boot
carefully over the optics of the MS.
All operating elements and connections are still
accessible if the protection boot is used.
Basic Operation
TEMPERATURE MEASUREMENT
Please aim with the unit at the target and press
RIGGER.
the T
HOLD function: After release of the T
RIGGER all
display values will be shown for 7 seconds.
Shut down: If you do not press any button
during the HOLD mode the unit shuts down
automatically after 7 seconds.
DISPLAY BACKLIGHT
Please press the D
T
RIGGER is pressed to switch the display
OWN button while the
backlight on or off.
L
ASER
Please press the U
P button while the TRIGGER is
pressed to activate/ deactivate. The current
status will be shown in the display.
optris MS – DE2011-04-A
27
Page 30

Unit Settings [MS]
MAX/ MIN
With this function you can select if the maximum
or minimum value will be shown permanently in
the upper part of the display.
To switch between both please press the MODE
button, either during the HOLD mode or during
a measurement (while the TRIGGER is pressed).
The made setting will be saved, also after the
unit switched off.
If you press the MODE button after you made a
measurement (during the HOLD mode) the
determined maximum and minimum value taken
during that measurement will be displayed.
MISSIVITY
E
The intensity of infrared radiation, which is
emitted by each body, depends on the
temperature as well as on the radiation features
of the surface of the measuring object.
The emissivity ( = Epsilon) is used as a stable
factor of the material, with which to describe the
ability of the body to emit infrared energy. If the
emissivity chosen is too high, the infrared
thermometer may display a temperature value
which is much lower than the real temperature.
The unit will be delivered with a preset fixed
emissivity of 0,95. This emissivity value is very
common for most organic materials and painted
or oxidized surfaces.
Shiny or metallic surfaces may result in
inaccurate reading due to reflexions. To prevent
this, cover the measuring surface with either flat
black paint or with plastic labels.
°F SETTING
°C/
To setup the temperature unit to °F please
press the DOWN button (keep pressed) and then
RIGGER.
the T
To setup the temperature unit to °C please
press the U
the T
P button (keep pressed) and then
RIGGER.
optris MS – DE2011-04-A
28
Page 31

Unit Settings [MSPlus/ MSPro]
With the MODE button you can select the
different setting functions. The unit must be in
the HOLD mode. The respective function will be
flashing in the display. With the U
buttons you can change parameters or activate/
deactivate functions.
To save the settings you have to press the
MODE button again (will also switch to the next
function) or the T
RIGGER.
If you have not activated any button for 7
seconds, the instrument will not save the current
modification and shut down.
P and DOWN
MISSIVITY
E
Definition ► see Unit Setting MS
The measurement of metallic surfaces, in
particular, requires a careful emissivity
adjustment. You will find a material table in
chapter Emissivity Tables.
Setting the emissivity: Press the MODE button
(during HOLD mode) – with U
P and DOWN you
can adjust the value. The shown temperature
value corresponds to the emissivity adjustment.
This allows a correction of even after the
measurement has been done.
optris MS – DE2011-04-A
29
Page 32

MAX/ MIN/ T/C PROBE [MSPRO]
With this function you can select if the
maximum, minimum or t/c probe value [MSPro]
will be shown permanently in the upper part of
the display. After a measurement (during the
HOLD mode) you can also recall the
respectively non shown values by pressing the
P button.
U
The t/c probe value will be displayed only if a
probe is connected. During the HOLD mode this
value will also be frozen.
LARM FUNCTIONS
A
To activate/ deactivate please press the U
D
OWN button if the H or L is shown in the
P or
display. The alarm function is activated as soon
as the display shows the sign
After pressing M
be adjusted using the U
ODE again the alarm values can
P and DOWN button.
.
If the temperature exceeds the selected High
value an acoustic signal will appear and the
display color will change to RED.
If the temperature falls below the selected Low
value an acoustic signal will appear and the
display color will change to BLUE.
°F SETTING
°C/
Selection of the temperature unit.
O
FFSET
With this function you can set a linear offset
(+/-) to the temperature reading. It allows a field
calibration of several units showing exactly the
same values.
Reset Function
The unit can be reset to the factory default
values by pressing the M
simultaneously (during HOLD mode). The Data
logger [MSPro] will not be deleted by this
procedure.
ODE and UP button
optris MS – DE2011-04-A
30
Page 33

Data Logger [MSPro]
The MSPro has an internal data logger for 20
values.
STORING DATA
Please make your measurement and release
the TRIGGER – the unit is in the HOLD mode.
Pressing the D
OWN button will show the next
free data logger position (flashing) and a disc
icon in the display. With UP and DOWN you can
change the data logger position manually.
Pressing M
ODE will store the data into the logger
(confirmed by a twofold acoustic signal).
ECALL OF DATA
R
Please press the T
RIGGER and MODE
simultaneously. The next free data logger
position and a disc icon (flashing) will be shown
in the display. With U
P and DOWN you can
select any data logger position. To switch
between IR temperature value and t/c probe
value please press the M
ODE button.
RESET OF THE DATA LOGGER
Please press the D
mode. Select logger position 0 and press M
OWN button during the HOLD
ODE
again. A threefold acoustic signal confirms the
successful reset.
optris MS – DE2011-04-A
31
Page 34

Connect Report software
Optris
The software is included in the MSPlus and
MSPro package. For the basic model MS an
upgrade kit is available.
Minimum system requirements
Windows XP
USB interface
Hard disc with at least 30 MByte free space
At least 128 MByte RAM
CD-ROM drive
AIN FUNCTIONS OF THE SOFTWARE
M
Setup of unit parameters
Display and record of temperature trends
Easy creating of image based temperature
reports
Download of logger data
NSTALLATION
I
If the auto run option on your computer is
activated the installation wizard will start
automatically. Otherwise please start setup.exe
on the CD-ROM. Follow the instructions of the
wizard until the installation is finished.
C
ONNECTION TO THE PC
Please connect the unit via the special USB
adapter cable. The installation of the driver
software from the CD-ROM will start
automatically.
NOTE: The driver installation process will start
two times (USB adapter and COM port).
S
TARTING THE SOFTWARE
After you have started the software and
connected the unit the successful
communication will be shown in the status line
(below the time axis).
If you cannot establish a communication in spite
of correct connection between unit and
computer please choose the correct COM port
under [Menu: Setup\ Interface].
optris MS – DE2011-04-A
32
Page 35

If the USB adapter cable is connected this port
is marked as [Infrared Thermometer Adapter].
EVICE SETUP
D
The menu item [Menu: Device\ Setup] opens a
dialog window for setup of the following
parameters: Emissivity, Alarm, Temperature
unit, Display backlight, Laser, Buzzer.
TARTING A MEASUREMENT
S
You can start a measurement by pressing the
START button in the tool bar:
[Menu: Measurement\ Start].
TOP MEASUREMENT/ SAVE
S
TOP button will finish the current
The S
measurement [Menu: Measurement\ Stop].
optris MS – DE2011-04-A
33
Page 36

The SAVE button [Menu: File\ Save as] opens
an explorer window for selection of file name
and location.
The menu item options [Menu: Setup\
Options] enables settings for data protection.
MAGE BASED REPORTS
I
This feature allows an easy creating of reports
showing temperature points inside a digital
picture.
At first you have to make a picture of the
desired object/ scenery using a digital photo
camera (not included in scope of supply).
To create a report you have to do the following
steps:
Save the picture on your PC
Open the picture inside the OptrisConnect
software using the Report function
[Menu: File\ Report].
Connect the MS unit to the PC
Point to the desired object
Align the cursor on the picture to the same
location the laser of the MS is showing
Press the left mouse button
An arrow will now show the location inside the
picture and the measured value.
optris MS – DE2011-04-A
34
Page 37

D
ATA LOGGER FUNCTIONS [MSPRO]
To download the logger data from the unit
please press the LOGGER button [Menu:
Measurement\ Download logger data]. All
data from the logger will be displayed in an
extra window as a table. Date and time
correspond to the time of the download.
You will find a detailed software description
after start of the program under [Menu: ?\
Help].
optris MS – DE2011-04-A
35
Page 38

g
(
)
Technic
Temperature range
Accuracy
(at T
Repeatabili ty
Optical resolution
Resolution (display)
Response time (95%)
Ambient temperature
Storage temperature
Spectral range
Em issi vi ty
Functions MIN, MAX, HOLD, °C/°F
Laser < 1mW laser class IIa, laser be am with
PC inte rfa ce
Weight/ Dimensions
Battery 9V alkaline battery
Battery life time
Rela tive hu midity
Technical Data [MSPlus]
Temperature range
Accuracy
(at T
Repeatabili ty
Optical resolution
Resolution (display)
Response time (95%) 300 ms
Ambient temperature 0...50°C
Storage temperature -20...60°C (without battery)
Spectral range 8...14µm
Emissivity/ Gain 0,100...1,100 adjustable
Functions
Alarm f uncti ons
Laser < 1mW laser class IIa, laser be am with
PC inte rfa ce
Software OptrisConnect Report software
Weight/ Dimensions 150g, 190x38x45 mm
Battery 9V alkaline battery
Battery life time 20h (laser and backlight on 50%)/ 40h
Rela tive hu midity
al Data [MS]
= 23 ±5°C)
amb
= 23 ±5°C)
amb
-32...420°C (-20...788°F)
± 1% or ± 1°C (20...420°C)
± 1,5°C (19,9...0°C)
± 2,5°C (-0,1...-20°C)
± 3°C (-20,1...-32°C)
± 0,5% or ± 0,7°C (20...420°C)
20:1/ 13mm spot size in 140mm distance
0,2 °C ( 0,5° F)
300 ms
0...50°C
-20...60°C (without battery)
8...14µm
0,9 5
9mm of fse t
USB
150
, 190x38x45 mm
20h (laser and backlight on 50%)/ 40h
(laser and backlight off)
10-95% RH, non condensing at ambient
temperature < 30°C
-32...530°C (-20...980°F)
± 1% or ± 1°C (20...530°C)
± 1,5°C (19,9...0°C)
± 2,5°C (-0,1...-20°C)
± 3°C (-20,1...-32°C)
± 0,5% or ± 0,7°C (20...530°C)
20:1/ 13mm spot size in 140mm
0,1 °F
0,1 °C
MIN, MAX, HOLD, °C/°F, Offset
Visual and acoustic HIGH- and LOWal arm
9mm of fse t
USB
(laser and backlight off)
10-95% RH, non condensing at ambient
temperature < 30°C
optris MS – DE2011-04-A
36
Page 39

(
)
g
Technic
Tem per atu re ra nge
Accuracy
(at T
Re peat abili ty
Optical resolu tion
Resolution (display)
Response time (95%) 30 0 ms
Ambient temperature 0...50°C
Storage temperature -20...60°C (without battery)
Spectral range 8...14µm
Emissivity/ Gai n 0,100...1,100 adjustable
Functions
Alarm f unc ti ons
Las er
PC interf ac e
So ftw are
Data lo gger
Input
Weight/ Dimensions
Battery 9V alkaline battery
Battery life time
Relative humidity
al Data [MSPro]
= 23 ±5°C)
amb
-32...760°C (-20...1440 °F)
± 1% or ± 1°C (20...760°C)
± 1, 5°C (19, 9...0°C)
± 2,5°C (-0,1...-20°C)
± 3°C (-20,1...-32°C)
± 0,75% or ± 0,75°C (20...760°C)
40:1/ 13mm spot size in 260mm
0,1 °F
0,1 °C
MIN, MAX, H OLD, °C/°F, Offset
Visual and acoustic HIGH- and LOW-
al arm
< 1mW laser class IIa, laser beam with
9m m of fset
USB
OptrisConnect Report software
for 20 values
for t/c probe type K
, 190x38x45 mm
180
20h (laser and backlight on 50%)/ 40h
(laser and backlight off)
10-95% RH, non condensing at ambient
temperature < 30°C
Troubleshooting
Error/ Code
HHH
LLL
battery indicator
Problem Action
object temperature
above range limit
object temperature
below range limit
choose object within
measuring range
choose object within
measuring range
low battery replace battery
no display low battery replace battery
laser does not
work
low battery replace battery
laser deactivated activate laser
optris MS – DE2011-04-A
37
Page 40

Emissiv
Aluminium non oxidized 0,02-0,1
Brass polished 0,01-0,05
Copper polished 0,03
Chrome 0,02-0,2
Gold 0,01-0,1
Haynes alloy 0,3-0,8
Inconel electro polished 0,15
Iron non oxidized 0,05-0,2
Iron, casted non oxidized 0,2
Lead polished 0,05-0,1
Lead roughened 0,4
Magnesium 0,02-0,1
Mercury 0,05-0,15
Molybdenum non oxidized 0,1
Monel (Ni-Cu) 0,1-0,14
Nickel electroly tic 0,05-0,15
Platinum black 0,9
Silver 0,02
Steel polished plate 0,1
Tin non oxidized 0,05
Titanium polished 0,05-0,2
Wolfram polished 0,03-0,1
Zinc polished 0,02
ity Table Metals
Material
polished 0,02-0,1
roughened 0,1-0,3
oxidized 0,2-0,4
roughened 0,3
oxidized 0,5
roughened 0,05-0,1
oxidized 0,4-0,8
sandblast 0,3-0,6
oxidized 0,7-0,95
rusted 0,5-0,7
oxidized 0,5-0,9
forged, blunt 0,9
oxidized 0,6-0,95
Material
oxidized 0,2-0,6
oxidized 0,2-0,6
oxidized 0,2-0,5
rustless 0,1-0,8
heavy plate 0,4-0,6
cold-rolled 0,7-0,9
oxidized 0,7-0,9
oxidized 0,5-0,6
oxidized 0,1
typical
Emissivity
typical
Emissivity
optris MS – DE2011-04-A
38
Page 41

Emissiv
Asbestos 0,95
Asphalt 0,95
Basalt 0,7
Carbon non oxidized 0,8-0,9
Carborundum 0,9
Ceramic 0,95
Concrete 0,95
Glass 0,85
Grit 0,95
Gypsum 0,8-0,95
Ice 0,98
Limestone 0,98
Paint non alkaline 0,9-0,95
Paper any color 0,95
Plastic >50 μm non transparent 0,95
Rubber 0,95
Sand 0,9
Snow 0,9
Soil 0,9-0,98
Textiles 0,95
Water 0,93
Wood natural 0,9-0,95
ity Table Non-Metals
Material
graphite 0,7-0,8
typical
Emissivity
optris MS – DE2011-04-A
39
Page 42

anty
Warr
Each single product passes through a quality process.
Nevertheless, if failures occur please contact the
customer service at once. The warranty period covers
24 months starting on the delivery date. After the
warranty is expired the manufacturer guarantees
additional 6 months warranty for all repaired or
substituted product components. Warranty does not
apply to electrical circuit breakers, primary batteries
and damages, which result from misuse or neglect.
The warranty also expires if you open the product.
The manufacturer offers a 3 months warranty for
rechargeable batteries. The manufacturer is not liable
for consequential damage. If a failure occurs during
the warranty period the product will be replaced,
calibrated or repaired without further charges. The
freight costs will be paid by the sender. The
manufacturer reserves the right to exchange
components of the product instead of repairing it. If
the failure results from misuse or neglect the user has
to pay for the repair. In that case you may ask for a
cost estimate beforehand.
The product complies with the following
standards:
EMC: EN 61326-1:2006
(Basic requirements)
EN 61326-2-3:2006
Device safety: EN 61010-1:2001
Laser safety: EN 60825-1:2007
The product accomplishes the requirements of the
EMC Directive 2004/108/EG and of the Low-Voltage
Directive 2006/95/EG.
Disposal of old electrical and electronic
equipment
This symbol on the unit indicates that
this product shall not be treated as
household waste. Instead it should be
handed over to the applicable
collection point for the recycling of
electrical and electronic equipment.
For more information please contact
your distributor.
optris MS – DE2011-04-A
40
Page 43

Page 44

 Loading...