

Page 1
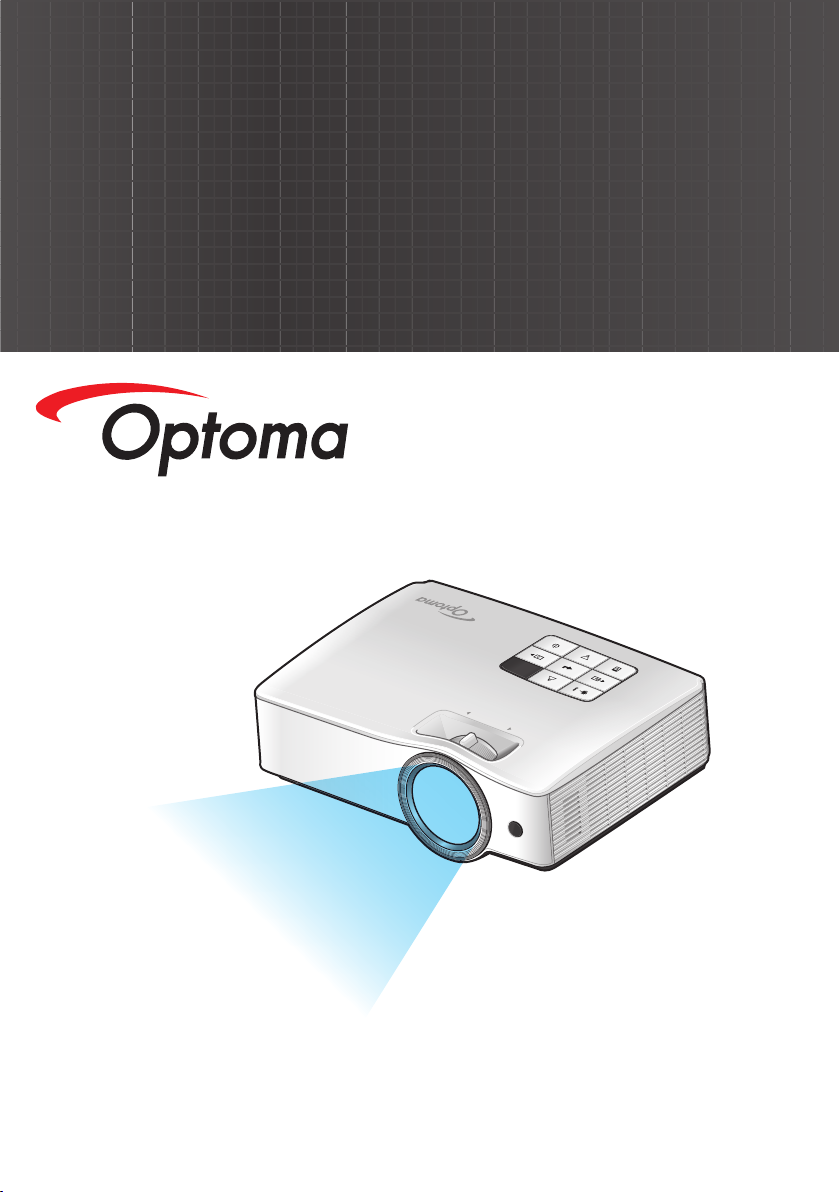
®
User's Manual
FOCUS
Data Projector
Page 2

Table of Contents
Usage Notice ..................................4
Safety Information ..........................4
Eye Safety Warnings
Precautions
....................................5
Product Features
.....................5
...........................7
Introduction .....................................8
Package Overview .........................8
Product Overview
Main Unit .........................................9
Connectors View
Control Panel
Remote Control
..........................9
...........................10
................................ 11
.............................12
Connecting the Projector ..............14
Connect to Computer/Notebook ..14
Connect to Memory Drive
Connect to Network
Connect to Video Sources
............15
.....................16
...........17
Using the Projector .......................18
Powering the projector On / Off ...18
Powering On the Projector ............18
Powering Off the Projector
Warning Indicator
..........................19
............19
Adjusting the Projected Image .....20
Adjusting the Projector’s Height ...20
Adjusting the Projector’s Focus
Adjusting Projection Image Size
....21
...21
Projecting Image ..........................23
Switch Input Source ......................23
Refresh Input Source
....................23
Adjusting the Settings ...................24
On-screen Display Menu .............24
How to operate ............................24
Menu Tree
.....................................25
IMAGE ..........................................28
IMAGE | Advanced
DISPLAY
DISPLAY | 3D
SETUP
SETUP | Advanced
SETUP | Signal
SETUP | Security
SETUP | Network
OPTIONS
OPTIONS |
Advanced
.......................................32
..........................................36
......................................44
......................................46
.......................30
..............................35
.......................38
.............................39
..........................40
..........................42
Memory Drive Display ..................47
Multimedia Menu .........................47
How to operate .............................47
How to exit the Multimedia
.............................................47
menu
How to play videos
How to play music
How to play a slideshow
How to view documents
Multimedia Setup Menu
Video Setting
Music Setting
Slideshow Setting
Information
........................48
.........................50
...............52
................54
................56
................................58
................................59
.........................60
....................................61
USB Display .................................62
USB Display mode .......................62
Minimum System Requirements ...63
Network Display ...........................64
For Windows Systems .................64
For MAC-OS Systems
Network Display mode
Activating Network Display Mode .66
Open Optoma Web Utility
.................65
.................66
.............67
English
2
Page 3

Table of Contents
Optoma Presentation Software
Downloading the Software ............68
.............................................70
Login
How to Project Image?
Using the OPS Menu
Using Remote Desktop
....................73
....68
.................71
.................75
Web Utility: Conference Control...76
Web Utility: Admin Settings
ADMIN |
Cong ..........................................79
ADMIN |
Video Output Setup
ADMIN |
Change Passwords
ADMIN |
Projector Control Panel
ADMIN |
Alert Setting
ADMIN |
Reset to Default
ADMIN |
Crestron RoomView
ADMIN |
Reboot System
..................................82
............................83
.............................83
..........78
......................79
.......................80
.................81
......................83
Crestron RoomView .....................84
Using Crestron RoomView ...........84
Smart Phone Display ...................86
MobiShow .....................................86
WiFi Doc
.......................................93
Compatibility Modes
Computer Compatibility ..............105
Computer Compatibility
Video Compatibility
..................105
..............106
.....................106
Supported Multimedia Format ...107
Video ..........................................107
..........................................107
Photo
...........................................107
Audio
Microsoft Ofce Viewer
...............107
RS232 Commands and Protocol
Function List
RS232 Pin Assignments .............108
RS232 Protocol Function List
..............................108
.....109
Ceiling Mount Installation ........... 113
Optoma Global Ofces
Regulation & Safety Notices
Class 1 Laser Product
.............. 114
...... 116
............... 117
Appendices ...................................98
PtG2 Converter ............................98
Using PtG2 Converter ...................98
Supported PowerPoint File
Format
..........................................98
System Requirements
Limitations:
....................................99
Troubleshooting .........................100
..................99
3
English
Page 4
Usage Notice
Safety Information
The lightning ash with arrow head within an equilateral triangle is
intended to alert the user to the presence of uninsulated “dangerous
voltage” within the product’s enclosure that may be of sufcient
magnitude to constitute a risk of electric shock to persons.
The exclamation point within an equilateral triangle is intended to alert
the user to the presence of important operating and maintenance
(servicing) instructions in the literature accompanying the appliance.
WARNING: TO REDUCE THE RISK OF FIRE OR ELECTRIC SHOCK, DO NOT
EXPOSE THIS APPLIANCE TO RAIN OR MOISTURE. DANGEROUS HIGH
VOLTAGES ARE PRESENT INSIDE THE ENCLOSURE. DO NOT OPEN THE
CABINET. REFER SERVICING TO QUALIFIED PERSONNEL ONLY.
Class B emissions limits
This Class B digital apparatus meets all requirements of the Canadian
Interference-Causing Equipment Regulations.
Important Safety Instruction
1. Do not block any ventilation openings. To ensure reliable operation of
the projector and to protect from over heating, it is recommended to
install the projector in a location that does not block ventilation. As an
example, do not place the projector on a crowded coffee table, sofa,
bed, etc. Do not put the projector in an enclosure such as a book case
or a cabinet that restricts air ow.
2. Do not use the projector near water or moisture. To reduce the risk
of re and/or electric shock, do not expose the projector to rain or
moisture.
3. Do not install near heat sources such as radiators, heaters, stoves or
any other apparatus such as ampliers that emits heat.
4. Clean only with dry cloth.
5. Only use attachments/accessories specied by the manufacturer.
6. Do not use the unit if it has been physically damaged or abused.
Physical damage/abuse would be (but not limited to):
Unit has been dropped.
Power supply cord or plug has been damaged.
Liquid has been spilled on to the projector.
Projector has been exposed to rain or moisture.
Something has fallen in the projector or something is loose inside.
Do not attempt to service the unit yourself. Opening or removing covers
may expose you to dangerous voltages or other hazards. Please call
Optoma before you send the unit for repair.
7. Do not let objects or liquids enter the projector. They may touch
dangerous voltage points and short out parts that could result in re or
electric shock.
8. See projector enclosure for safety related markings.
9. The unit should only be repaired by appropriate service personnel.
10. The product is not suitable for use at visual display workplaces.
11. This device must not be placed in direct view.
English
4
Page 5
Usage Notice
Eye Safety Warnings
▀■ Avoid staring/facing directly into the projector beam at all
times. Keep your back to the beam as much as possible.
▀■ When projector is used in a classroom, adequately supervise
students when they are asked to point out something on the
screen.
Precautions
Please follow all warnings, precautions and
maintenance as recommended in this user’s
guide.
▀■ Warning- Do not look into the projector’s lens when powered
on. The bright light may hurt and damage your eyes.
When the light
reaches the end
of its life, the projector will not turn
back on until the
light module has
been replaced.
▀■ Warning- To reduce the risk of re or electric shock, do not
expose this projector to rain or moisture.
▀■ Warning- Please do not open or disassemble the projector as
this may cause electric shock.
▀■ Warning- Do not use lens cap when projector is in operation.
▀■ Warning- When the light is approaching the end of its lifetime,
the message “Light Warning: Light life exceeded.”
will show on the screen. Please contact your local
reseller or service center to change the light as soon
as possible.
▀■ Warning- Do not look into or point the laser pointer on your
remote control into your or someone’s eyes. Laser
pointer can cause permanent damage to eyesight.
5
English
Page 6

Usage Notice
Do:
Turn off and unplug the power plug from the AC outlet before
cleaning the product.
Use a soft dry cloth with mild detergent to clean the display
housing.
Disconnect the power plug from AC outlet if the product is
not being used for a long period of time.
Do not:
Block the slots and openings on the unit provided for
ventilation.
Use abrasive cleaners, waxes or solvents to clean the unit.
Use under the following conditions:
- In extremely hot, cold or humid environments.
Ensure that the ambient room temperature is within
5 - 40°C.
Relative Humidity is 5 - 40°C, 80% (Max.),
non-condensing.
- In areas susceptible to excessive dust and dirt.
- Near any appliance generating a strong magnetic eld.
- In direct sunlight.
English
6
Page 7
Usage Notice
Product Features
▀■ XGA (1024x768) Native resolution /
WXGA (1280x800) Native resolution
HD compatible – 1080p supported
▀■
VGA monitor loop through
▀■
(works on standby mode > 0.5W)
BrilliantColorTM Technology
▀■
Security Bar and Kensington Lock
▀■
RS232 control
▀■
Rapid shutdown
▀■
Built-in speakers
▀■
▀■ Network support
Monitor loop
through only
support in
VGA1-In.
▀■ Instant On/Off
▀■ 3D Image Projection support
▀■ Mercury-free Hybrid Light Source
▀■ USB Memory or Memory Card Reader Without
Computer
Wireless Projection Support from MobiShow
▀■
▀■ Network Control (via wired or wireless LAN)
▀■ Network Display (via wired or wireless LAN)
7
English
Page 8

Introduction
Package Overview
Unpack and inspect the box contents to ensure
all parts listed below are in the box. If something
is missing, contact your nearest customer service
center.
FOCUS
Due to different
applications in
each Country,
some regions
may have
different
accessories.
Projector
2 × AAA Batteries
Documentation :
User’s Manual
Warranty Card
Quick Start Card
WEEE Card
(for EMEA only)
Power Cord
Power Switch
Source
Re-Sync
L
R
Enter
Mode
Page-Page+
Keystone Volume
-+-
+
Brightness1Menu2Zoom
3
HDMI4Freeze5AV mute
6
S-Video7VGA8Video
9
Contrast USB03D
IR Remote Control
VGA Cable
CD with User Manual
English
8
Page 9
Product Overview
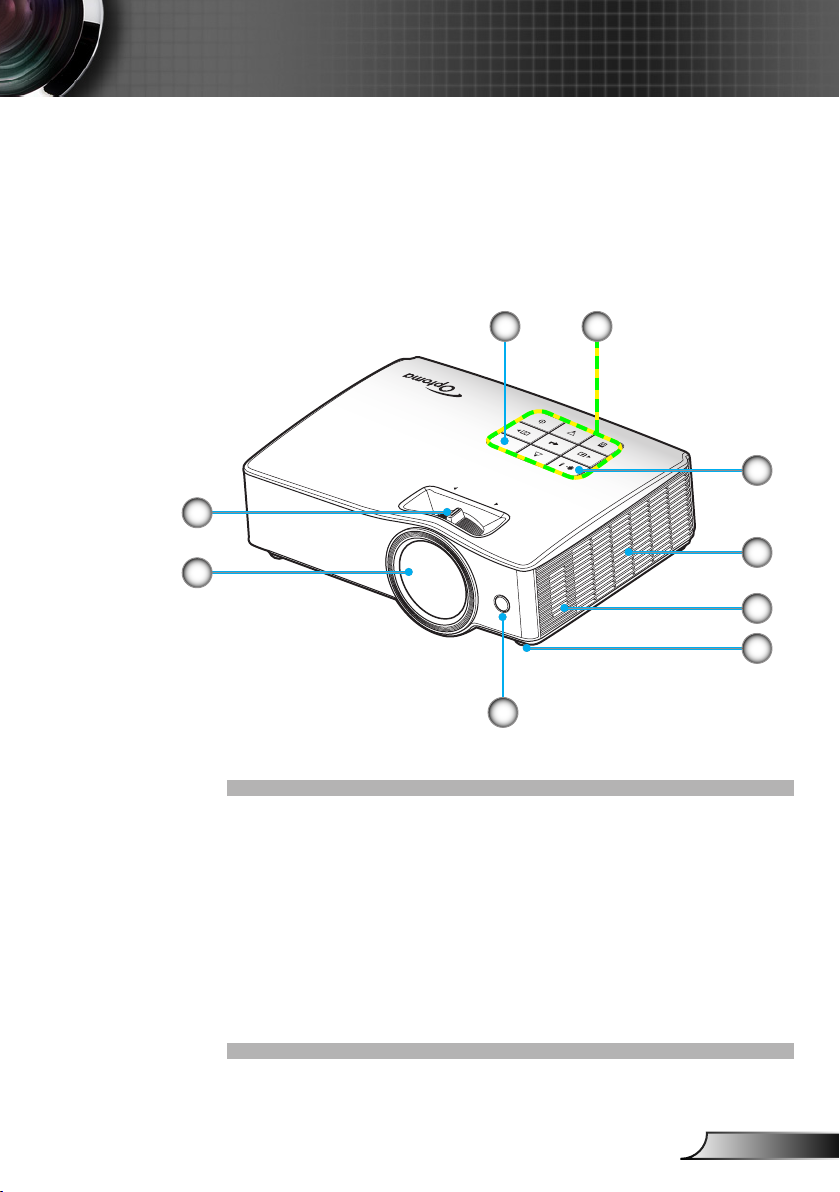
Main Unit
3
4
Introduction
12
9
FOCUS
8
7
6
1. Control Panel
2. IR Receiver
3. Focus Ring
4. Lens
5. IR Receiver
6. Tilt-Adjustment Feet
7. Speaker
8. Ventilation
9. LED Indicator
5
9
English
Page 10
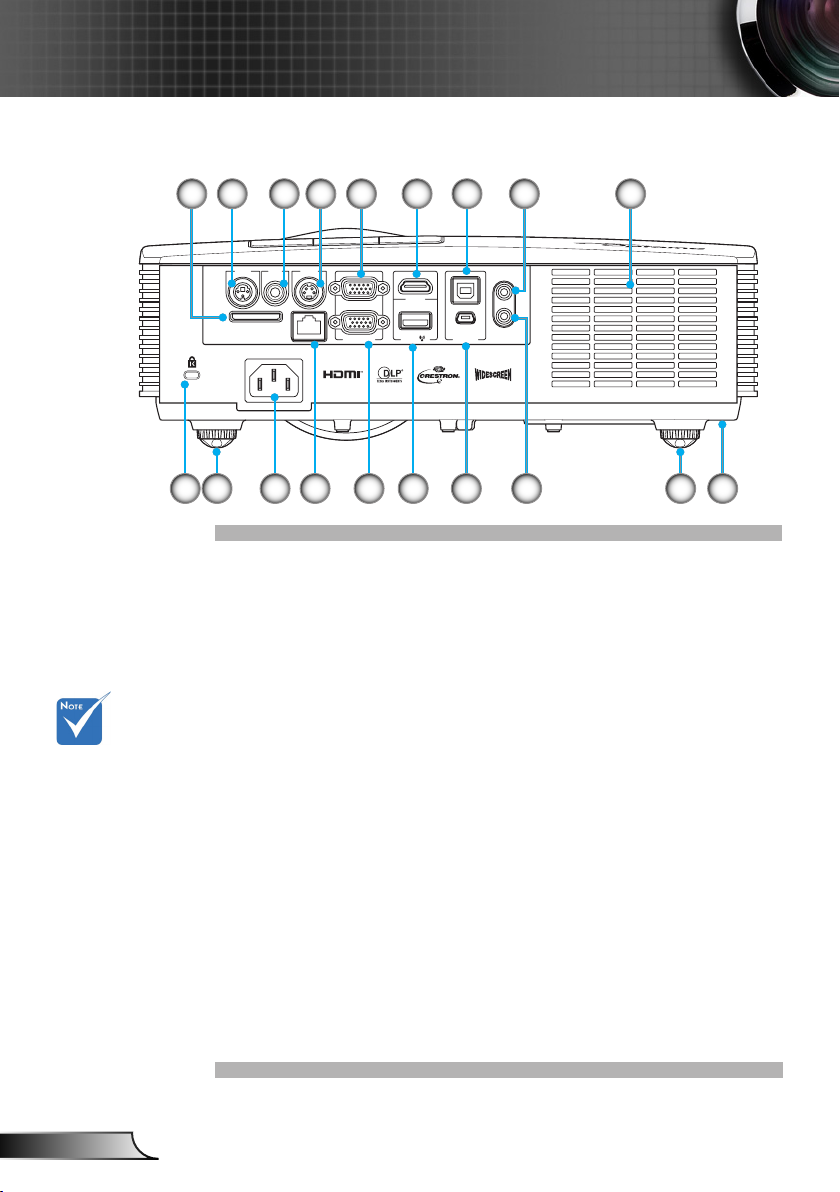
Introduction
Connectors View
Monitor loop
through only
support in
VGA-In.
HDMI
MOUSE/SERVICE
USB / DISPLAY
14 1219118 13
7653
AUDIO-IN
AUDIO-OUT
4 8 9
RS232C VIDEO S-VIDEO
VGA-IN/YPbPr
SD Card
RJ-45
17216 15 11 10
VGA-OUT
PICTURE BY
1. SD Card Slot
2. RS-232 Connector
(3-pin DIN Type)
3. Composite Video Input Connector
4. S-Video Input Connector
5. VGA-In/YPbPr Connector
(PC Analog Signal/Component Video Input/HDTV/YPbPr)
6. HDMI Connector
7. USB Type B Port
8. Audio Input Connector
for interactive function and rmware upgrade
(3.5mm mini jack)
9. Ventilator
10. Security Bar
11. Tilt-Adjustment Feet
12. Audio Output Connector
(3.5mm mini jack)
13. Mini USB Port
14. USB for Wireless Dongle & Thumb Drive
15. VGA-Out Connector (Monitor Loop-through Output)
16. RJ-45 Network Connector
17. Power Socket
18. Tilt-Adjustment Feet
19. KensingtonTM Lock Port
English
10
Page 11
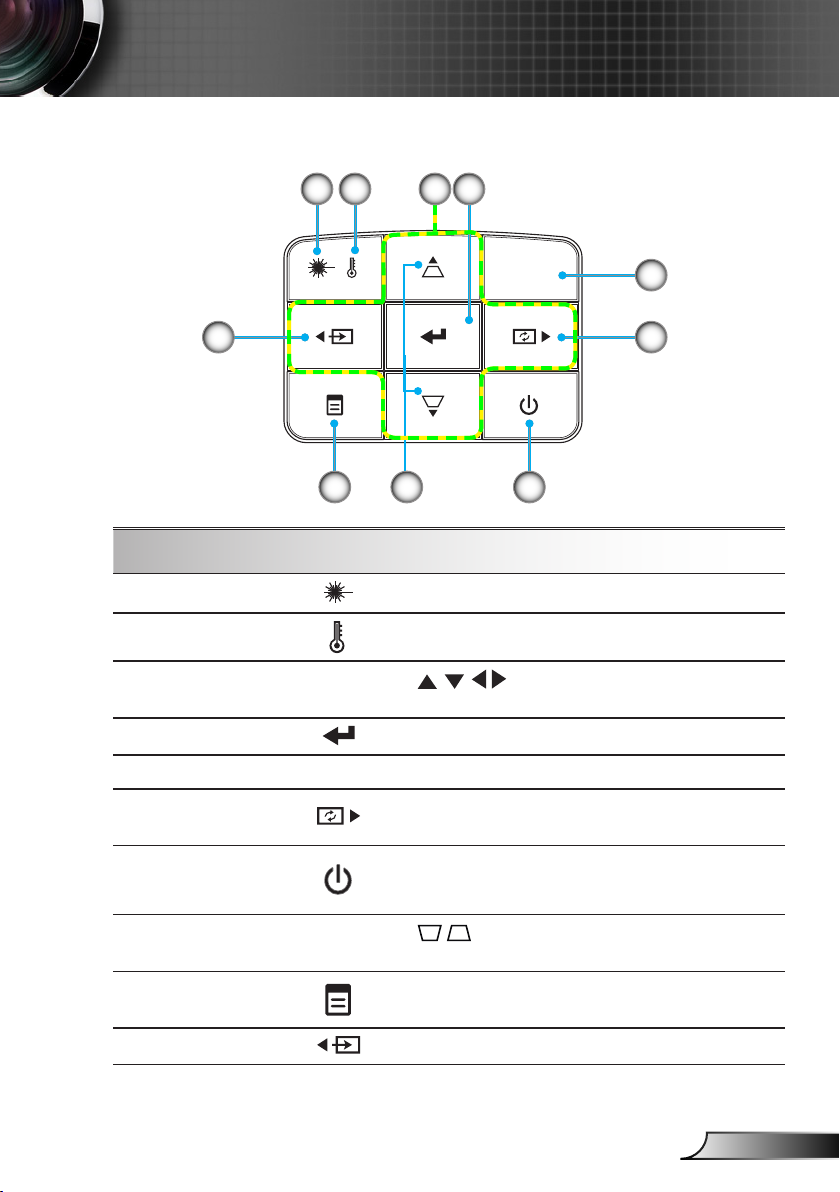
Control Panel
Introduction
1
9
Using the Control Panel
1 Light LED
2 Temp LED
Four Directional
3
Select Keys
4 Enter
3 42
5
610
8
Indicate the projector light status.
Indicate the projector temperature status.
Use to select items or make
adjustments to your selection.
Conrm your item selection.
7
5 IR Receiver
6 Re-Sync
Power /
7
Standy LED
8 Keystone
9 Menu
10 Source
Receive the remote control signal.
Automatically synchronize the projector to the
input source.
Press to turn the projector on or off (see “Power
On/Off the Projector” section on pages 14-15).
Indicate the projector power status.
Use to adjust image distortion caused by
tilting the projector. (±40 degrees)
Press to launch the on-screen display (OSD)
menu. To exit OSD, press the key again.
Press to select an input signal.
11
English
Page 12
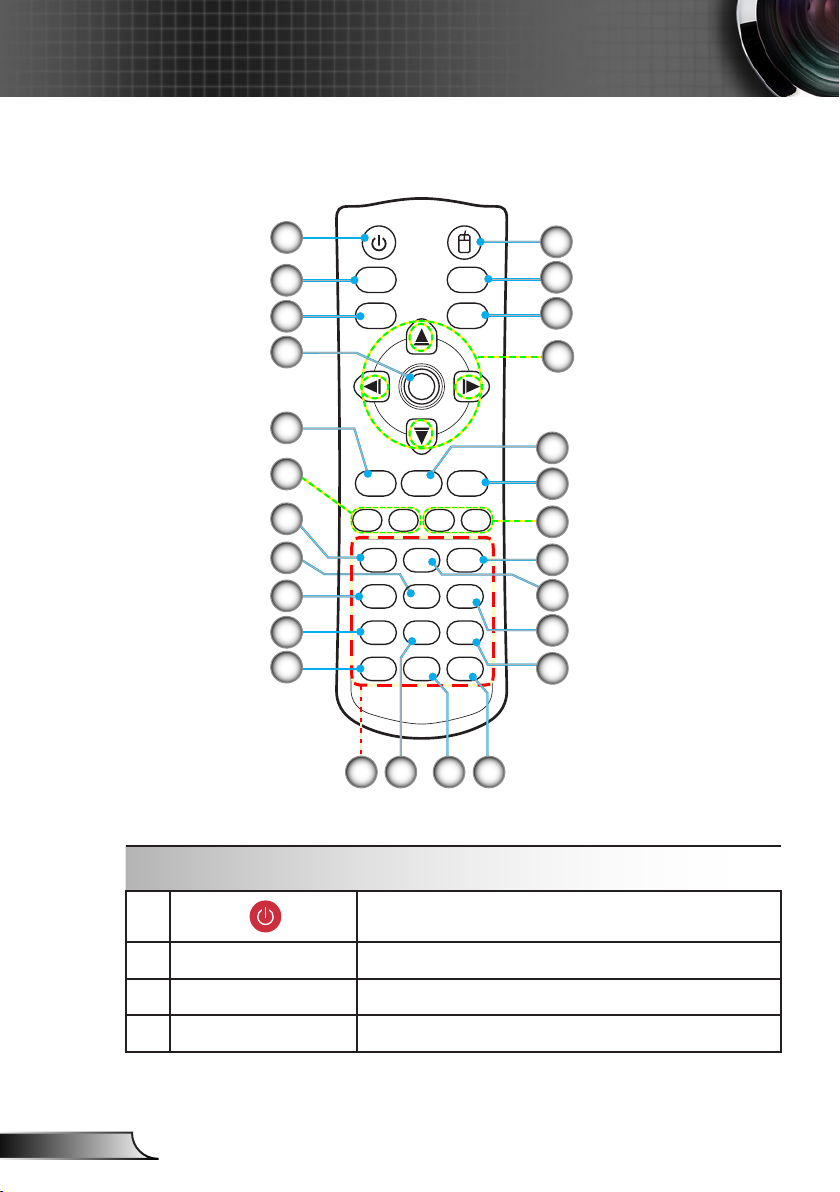
Introduction
Remote Control
1
Power Switch
26
10
11
2
3
Source
L
Re-Sync
R
4
Enter
25
24
23
5
22
6
7
8
9
Mode
Keystone Volume
-
Brightness1Menu2Zoom
HDMI4Freeze5AV mute
S-Video7VGA8Video
Contrast USB03D
Page+
+
Page
-
-
+
3
6
9
21
20
19
18
17
16
12
1413
15
English
Using the Remote Control
Power
1
2 Source
3 L Button
4 Enter
12
Refer to the “Power On/Off the Projector” section
on pages 14-15.
Press Source to select an input signal.
Mouse left click.
Conrm your item selection.
Page 13
Introduction
Mode or Laser
5
(Button varies on
model)
6 Keystone +/-
7 Brightness
8 Freeze
9 HDMI
10 S-Video
11 Contrast
12 Number Keys
13 VGA
14 USB
15 3D
16 Video
17 AV mute
18 Menu
19 Zoom
20 Volume +/-
With Laser version: Press to use the laser pointer.
Without Laser version: Press Mode to change
modes.
Adjust image distortion caused by tilting the
projector.
Adjust the brightness of the image.
Pause the screen image.
Press this button again to unlock.
Choose HDMI as the source.
Choose S-Video as the source.
Adjust image contrast.
Press the keys to enter numbers.
Choose VGA as the source.
Choose USB ash drive as the source.
Turn the 3D OSD menu on/off.
Choose Composite video as the source.
Momentarily turns off/on the audio and video.
Launch the on-screen display (OSD) menu. To exit
OSD, press “Menu” again.
To magnify or reduce the size of the projected
screen.
Adjust to increase / decrease the volume.
21 Page -
22 Page +
Four Directional
23
Keys
24 R Button
25 Re-Sync
26 Switch
Use this button to page down.
Use this button to page up.
Use to select items, make adjustments
to your selection, or mouse emulation via USB.
Mouse right click.
Automatically synchronizes the projector to the
input source.
Switch the function of the four directional keys.
13
English
Page 14
Connecting the Projector
Connect to Computer/Notebook
2
RS232C VIDEO S-VIDEO
1
Due to the
difference in
applications
for each
country, some
regions may
have different
accessories.
(*) Optional
accessory
SD Card
RJ-45
R
E62405SP
MOLEX MOLEX
6
4
3
5
molex
AUDIO-IN
HDMI
VGA-IN/YPbPr
MOUSE/SERVICE
USB / DISPLAY
PICTURE BY
AUDIO-OUT
7
VGA-OUT
8
English
14
1. Power Cord
2. RS-232 Cable*
3. VGA Cable
4. HDMI Cable*
5. USB Type B Cable*
6. Audio Input Cable*
7. Audio Output Cable*
8. VGA Output Cable*
Page 15
Connecting the Projector
Connect to Memory Drive
(*) Optional
accessory
2
1
1. Power Cord
2. SD Card*
3. USB ash drive*
RS232C VIDEO S-VIDEO
SD Card
RJ-45
E62405SP
R
VGA-IN/YPbPr
VGA-OUT
HDMI
MOUSE/SERVICE
USB / DISPLAY
3
AUDIO-IN
AUDIO-OUT
15
English
Page 16
Connecting the Projector
Connect to Network
(*) Optional
accessory
RS232C VIDEO S-VIDEO
1
SD Card
R
E62405SP
VGA-IN/YPbPr
RJ-45
VGA-OUT
PICTURE BY
2
HDMI
USB / DISPLAY
3
AUDIO-IN
MOUSE/SERVICE
AUDIO-OUT
1. Power Cord
2. Network Cable*
3. Wi-Fi Dongle* (for wireless network functionality)
English
16
Page 17
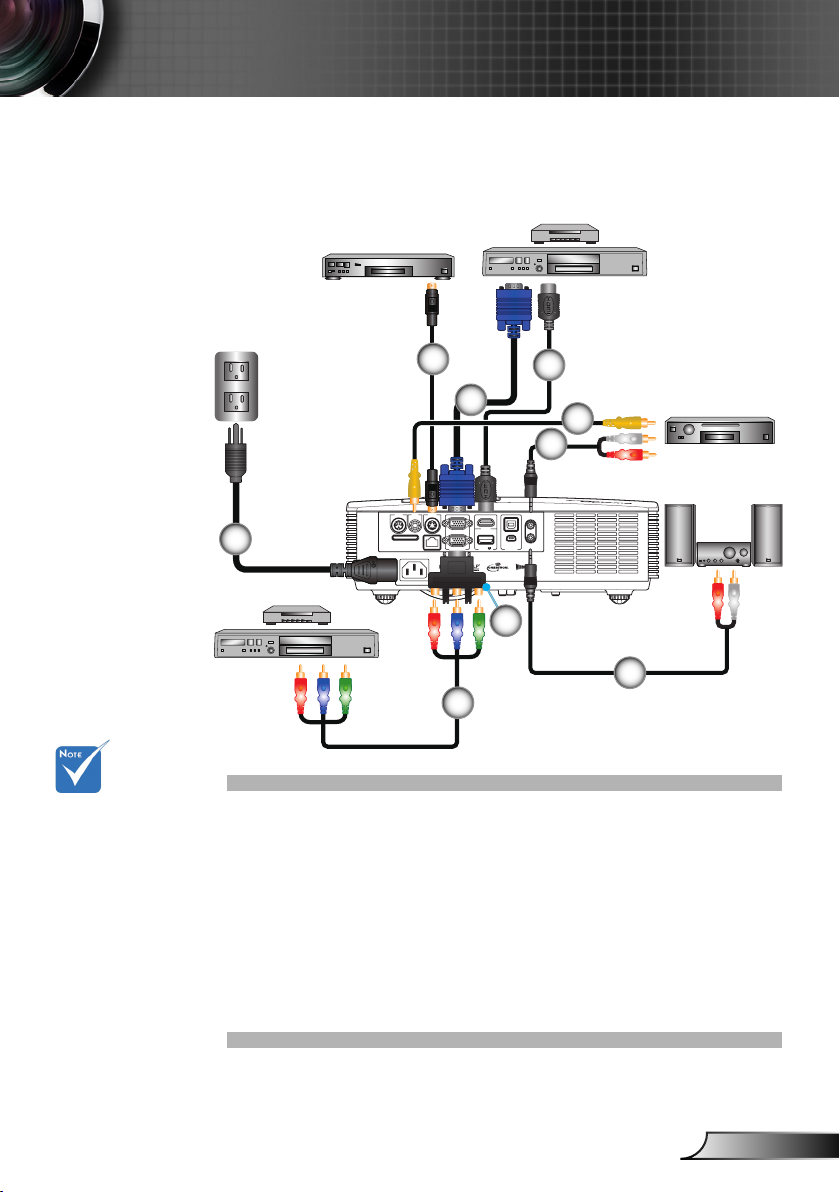
Connecting the Projector
Connect to Video Sources
DVD Player, Set-top Box,
HDTV receiver
S-Video Output
Due to the
difference in
applications
for each
country, some
regions may
have different
accessories.
(*) Optional
accessory
2
4
3
5
6
RS232C VIDEO S-VIDEO
VGA-IN/YPbPr
1
SD Card
RJ-45
R
E62405SP
VGA-OUT
HDMI
USB / DISPLAY
PICTURE BY
MOUSE/SERVICE
AUDIO-IN
AUDIO-OUT
8
7
9
1. Power Cord
2. S-Video Cable*
3. VGA Cable
4. HDMI Cable
5. Composite Video Cable*
6. Audio Cable/RCA*
7. Audio Cable/RCA*
8. 15-Pin to 3 RCA Component/ HDTV Adaptor*
9. 3 RCA Component Cable*
Composite Video
Output
Audio Output
17
English
Page 18
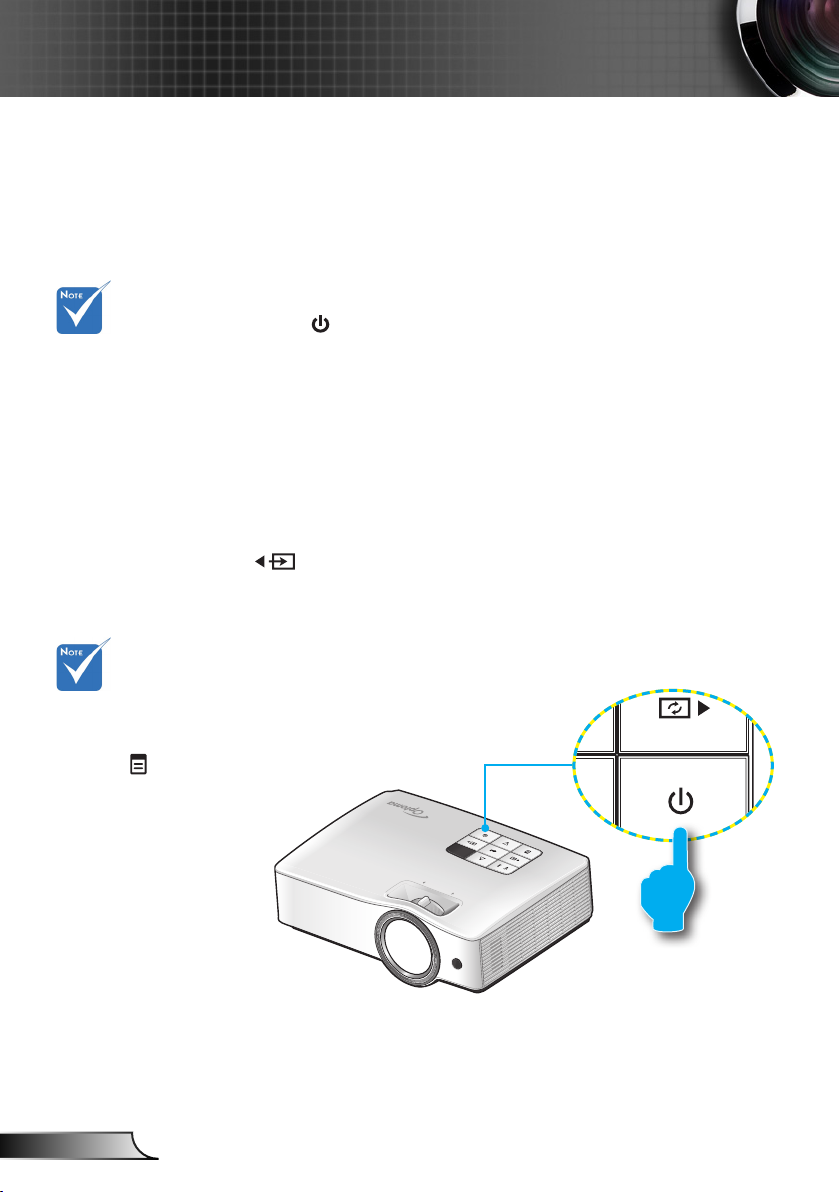
Using the Projector
Powering the projector On / Off
Powering On the Projector
1. Connect the power cord to the projector and to the power
source. When connected, the POWER/STANDBY LED
lights Amber.
2. Press on the control panel or on the remote control. The
When Power mode
(Standby) is set to
Eco (> 0.5W) and
the projector is in
standby mode,
VGA output, Audio
pass-through
and RJ45 are
deactivated.
POWER/STANDBY LED lights Blue.
The startup screen displays in approximately 3 seconds.
The rst time you use the projector, you may be asked to
select the preferred language and power saving mode.
3. Turn on and connect the source signal that you want to
display on the screen (computer, notebook, video player,
etc). The projector detects the source automatically.
4. If you connect multiple sources at the same time, press
on the control panel or the direct source key on the
remote control to switch between inputs.
If the projector does
not automatically
search for source,
press on the
control panel or the
Menu button on the
remote control. Go
to “OPTIONS” and
set “Source Lock”
to “Off”. See page
42.
English
18
POWER/STANDBY
FOCUS
Page 19
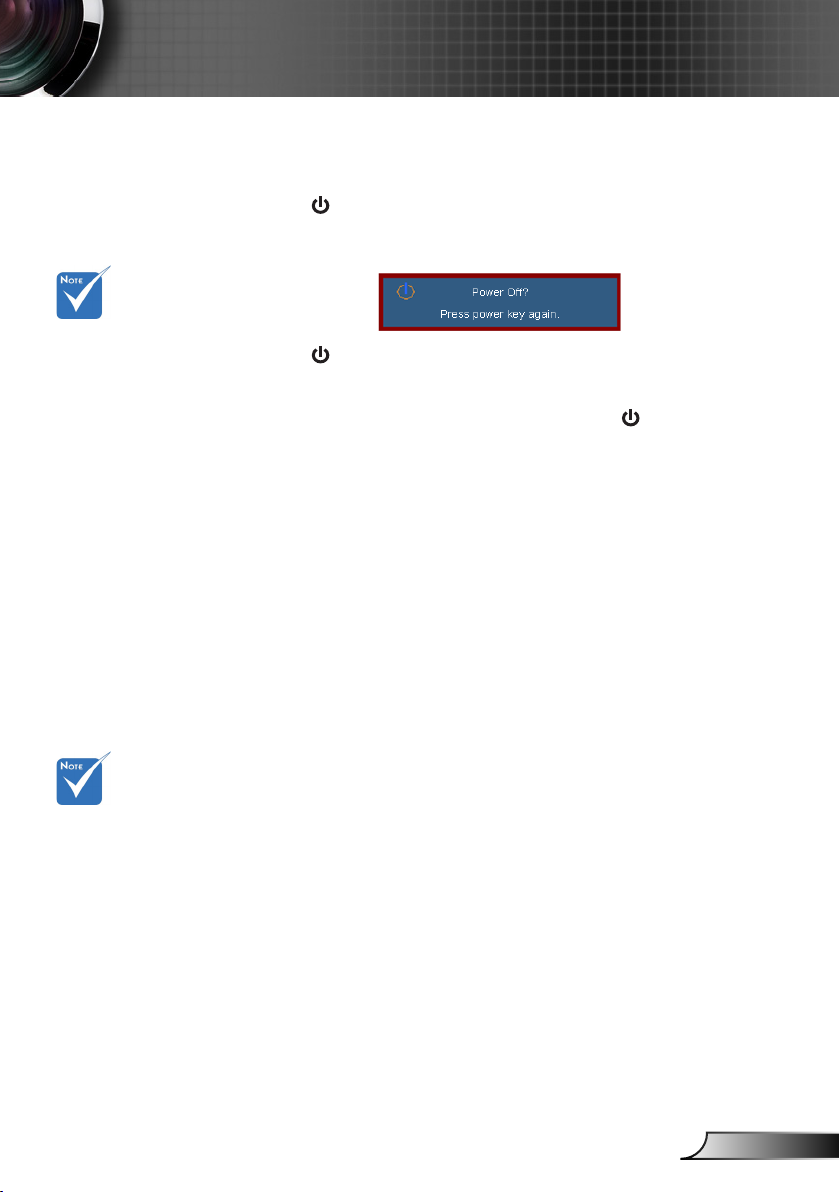
The “Power
Off” message
disappears if no
button is pressed
after 15 seconds.
Using the Projector
Powering Off the Projector
1. Press on the control panel or the remote control to turn
off the projector. The following message is displayed on
the screen.
2. Press again to conrm. The projector goes to standby
mode and the POWER/STANDBY LED lights Amber.
If you wish to turn the projector on, press to restart the
projector.
3. To completely turn the projector off, disconnect the power
cord from the electrical outlet.
Contact the
nearest service
center if the
projector displays
these symptoms.
See pages
68-69 for more
information.
Warning Indicator
Warning indicators light up and the projector automatically shuts
down in the following conditions:
“Light” LED indicator is lit amber and the “POWER/
STANDBY” indicator ashes red.
“TEMP” LED indicator is lit yellow green and the “POWER/
STANDBY” indicator ashes red. This indicates the projector
has overheated. Under normal conditions, the projector can
be switched back on.
“TEMP” LED indicator ashes yellow green and the
“POWER/STANDBY” indicator ashes red.
Unplug the power cord from the projector, wait for 30 seconds
and try again. If the warning indicator lights up again, contact
your nearest service center for assistance.
19
English
Page 20
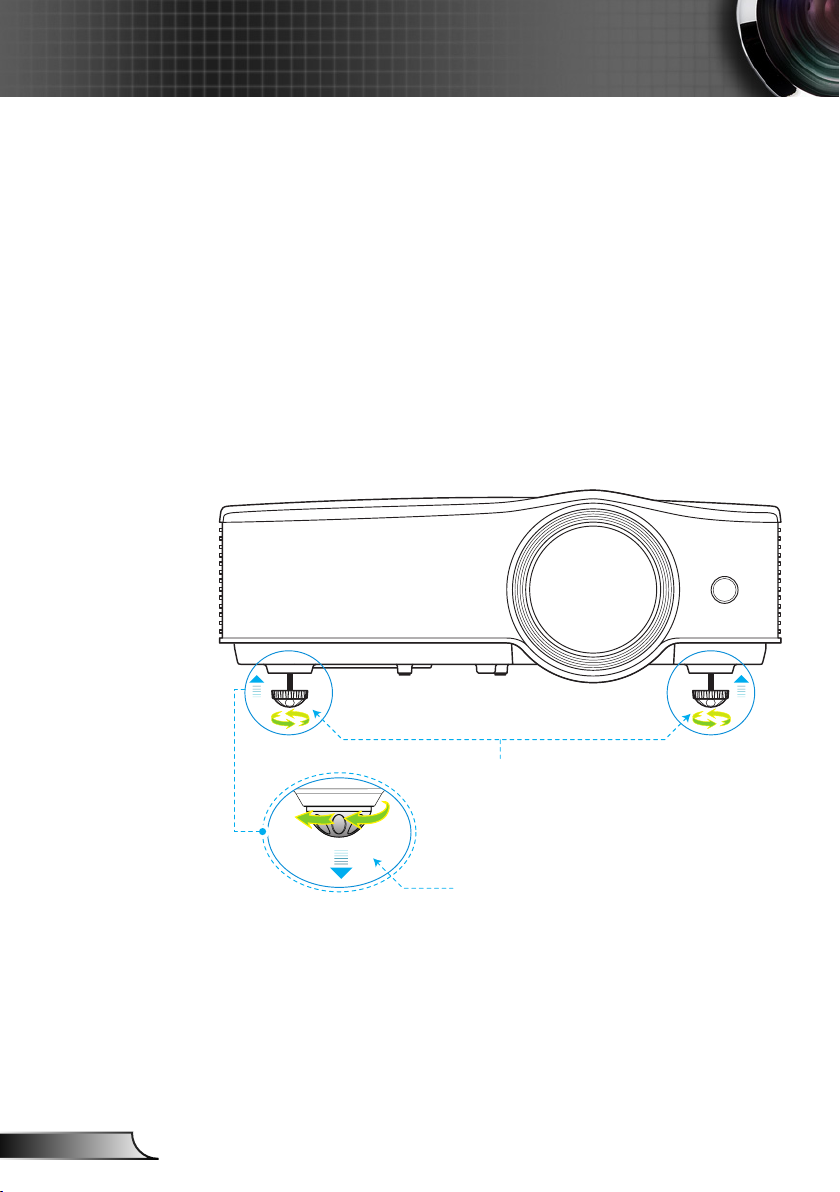
Using the Projector
Adjusting the Projected Image
Adjusting the Projector’s Height
The projector is equipped with elevator feet for adjusting the
image height.
1. Locate the adjustable foot you wish to modify on the
underside of the projector.
2. Rotate the adjustable ring clockwise to raise the projector
or counter clockwise to lower it. Repeat with the remaining
feet as needed.
English
Tilt-Adjustment Feet
Tilt-Adjustment Ring
20
Page 21
Using the Projector
FOCUS
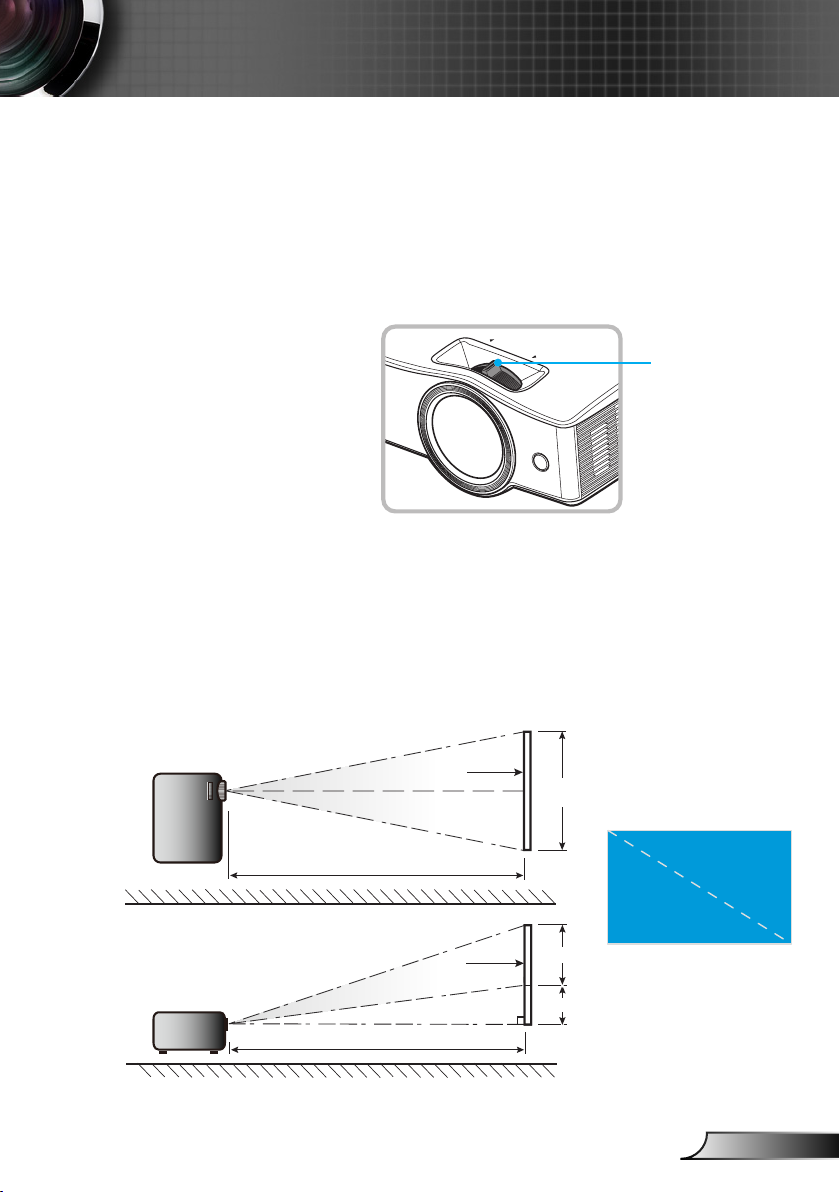
Adjusting the Projector’s Focus
To focus the image, rotate the focus ring until the image is clear.
XGA series: The projector will focus at distances from
1.64 to 8.2 feet (0.5 to 2.5 meters).
WXGA series: The projector will focus at distances from
1.64 to 8.2 feet (0.5 to 2.5 meters).
Focus Ring
Adjusting Projection Image Size
XGA series: Projection Image Size from 39.3” to 196.5”
(1.0 to 4.99 meters).
Side View
Top View
WXGA series: Projection Image Size from 44.6” to 222.8”
(1.1 to meters).
Screen
Screen (W)
Projection Distance (D)
Projection Distance (D)
Screen
Height
Screen (H)
Offset (Hd)
Diagonal
Width
21
English
Page 22
Using the Projector
XGA
Diagonal length
(inch) size of
4:3 Screen
40.00 0.81 0.61 31.89 24.02 0.50 0.50 1.64 1.64 0.09 0.30
60.00 1.22 0.91 48.03 35.83 0.80 0.80 2.62 2.62 0.14 0.45
70.00 1.42 1.07 55.91 42.13 0.90 0.90 2.95 2.95 0.16 0.53
80.00 1.63 1.22 64.17 48.03 1.00 1.00 3.28 3.28 0.18 0.60
90.00 1.83 1.37 72.05 53.94 1.10 1.10 3.61 3.61 0.21 0.67
100.00 2.03 1.52 79.92 59.84 1.30 1.30 4.26 4.26 0.23 0.75
120.00 2.44 1.83 96.06 72.05 1.50 1.50 4.92 4.92 0.27 0.90
150.00 3.05 2.29 120.08 90.16 1.90 1.90 6.23 6.23 0.34 1.13
180.00 3.66 2.74 144.09 107.87 2.30 2.30 7.54 7.54 0.41 1.35
250.00 5.08 3.81 200.00 150.00 3.20 3.20 10.50 10.50 0.57 1.87
300.00 6.10 4.57 240.16
Screen Size W x H Projection Distance (D)
(m) (inch) (m) (feet)
Width Height Width Height wide tele wide tele (m) (feet)
179.92 3.66 3.66 12.01 12.01 0.69 2.25
This table is for user’s reference only.
WXGA
Diagonal length
(inch) size of
16:10 Screen
40.00 0.86 0.54 33.86 21.26 0.40 0.40 1.31 1.31 0.07 0.22
60.00 1.29 0.81 50.79 31.89 0.70 0.70 2.30 2.30 0.10 0.33
70.00 1.51 0.94 59.45 37.01 0.80 0.80 2.62 2.62 0.12 0.38
80.00 1.72 1.08 67.72 42.52 0.90 0.90 2.95 2.95 0.13 0.44
90.00 1.94 1.21 76.38 47.64 1.00 1.00 3.28 3.28 0.15 0.49
100.00 2.15 1.35 84.65 53.15 1.10 1.10 3.61 3.61 0.17 0.55
120.00 2.58 1.62 101.57 63.78 1.30 1.30 4.26 4.26 0.20 0.66
150.00 3.23 2.02 127.17 79.53 1.70 1.70 5.58 5.58 0.25 0.82
180.00 3.88 2.42 152.76 95.28 2.00 2.00 6.56 6.56 0.30 0.98
250.00 5.38 3.37 211.81 132.68 2.80 2.80 9.18 9.18 0.42 1.37
300.00 6.46 4.04 254.33
Screen Size W x H Projection Distance (D)
(m) (inch) (m) (feet)
Width Height Width Height wide tele wide tele (m) (feet)
159.05 3.36 3.36 11.03 11.03 0.50 1.64
This table is for user’s reference only.
Offset (Hd)
Offset (Hd)
English
22
Page 23
Only input
sources selected
in the Input
Source menu
(see *) will be
auto searched
by the projector.
The number of
input sources
to auto search
may affect the
length of time
for the projector
to nish the
search.
Using the Projector
Projecting Image
When the projector is turned on, it automatically searches for
connected devices.
Once a device is detected, the projector projects the image or
the menu of the input source, such as in:
► Network Display: When a local area network or
wireless network is detected (see "Connect to Network"
on page 16).
► USB Display: When a computer is connected through
the mini USB port of the projector (see "USB Display
mode" on page 62).
► Memory Drive Display: When a ash drive or SD
card is detected (see "Memory Drive Display" on page
47).
Switch Input Source
If the desired input source is not included in the auto search
function (see Input Source menu) or more than one input
source devices are connected, you can switch the input source
manually by doing one of the following:
► Press the direct input source key on the remote control.
► Press on the control panel repeatedly to scroll
through the options.
► Press the Source key on the remote control repeatedly
to scroll through the options.
Refresh Input Source
While the projector is operating and a new input source device
is connected, press on the control panel or the Re-Sync
key on the remote control to refresh and synchronize the
projector with the input sources.
23
English
Page 24
Adjusting the Settings
On-screen Display Menu
The Projector has a multilingual On-screen Display menu
that allows you to make image adjustments and change your
projector settings.
How to operate
1. To open the OSD menu, press on the control panel or
Menu on the remote control.
2. When the OSD menu is displayed, use keys to select
an item on the main menu.
3. While a menu item is highlighted, press or Enter to
enter the sub menu.
4. Use the keys to select the desired item and adjust
the settings using the keys.
5. Press or Enter to conrm. The screen returns to the
main menu.
6. To exit, press or Menu again. The OSD menu closes and
the projector automatically saves the new settings.
English
24
Main Menu
Sub Menu
Settings
Page 25
Adjusting the Settings
Menu Tree
Main Menu Sub Menu Settings
Presentation / Bright /
Display Mode
Brightness -50 ~ 50
Contrast -50 ~ 50
Sharpness 1 ~ 15
1
Color -50 ~ 50
1
Tint -50 ~ 50
Gamma Film / Video / Graphics / PC
Movie / sRGB / Blackboard /
Classroom / User / 3D
Image
Display
BrilliantColor™ 0 ~ 10
Red Gain / Green Gain / Blue
Color
Advanced
Format
Edge Mask 0~10
Zoom -5~25
H Image Shift -50~50
V Image Shift -50~50
V Keystone -40~40
3D
Color Space Auto / RGB / YUV
Input Source
Exit
3D Mode Off / DLP-Link / IR
3
3D Sync Invert On / Off
Gain / Red Bias / Green Bias
/ Blue Bias / Cyan / Magenta /
Yellow / Reset
Auto / RGB (0~255) / RGB
(16~235) / YUV
VGA / S-Video / Video /
HDMI / Flash Drive / Network
Display / USB Display
4:3 / 16:9-I / 16:9-II or 16:10
(ZW210ST) / LBX (ZW210ST)
/ Native / Auto
25
English
Page 26
Adjusting the Settings
Main Menu Sub Menu Settings
English / Deutsch / Français /
Italiano / Español / Português
/ Svenska / Nederlands
/ Norsk/Dansk / Polski /
Русский / Suomi / ελληνικά /
Magyar / Čeština / عربي / 繁
體中文 / 簡体中文 / 日本語 /
한국어 / ไทย / Türkçe / Farsi
Front / Front-Ceiling / Rear /
Rear-Ceiling
Top-Left / Top-Right / Center /
Bottom-Left / Bottom-Right
Setup
Language
Projection
Menu
Location
2
Screen Type 16:10 / 16:9 (WXGA only)
Network State Read-Only
DHCP Read-Only
IP Address Read-Only
Network
4
Signal
Security
Projector ID 0~99
Mute On / Off
Subnet Mask Read-Only
Gateway Read-Only
DNS Read-Only
Apply Yes / No
Exit
Automatic On / Off
Phase 0~31
Frequency -5~5
H. Position -5~5
V. Position -5~5
Exit
Security On / Off
Change
Password
Exit
English
26
Page 27
Adjusting the Settings
Main Menu Sub Menu Settings
Volume 0~100
Advanced Logo Optoma / Neutral / User
Setup
Options
Source Lock On / Off
High Altitude On / Off
Information
Hide
Keypad Lock On / Off
Background
Color
Test Pattern None / Grid / White Pattern
Advanced Direct Power On On / Off
Exit
Reset
Logo Capture
Closed
Captioning
Off / CC1 / CC2
On / Off
Red / Blue / Green / Cyan
Auto Power Off 0 ~ 100
Sleep Timer 0 ~ 100
Power Mode ECO / Active
Brightness
Mode
Bright / ECO / Image AI
Please note that the on-screen display (OSD) menus vary according to the signal type
selected and the projector model you are using.
(
1) “Color” and “Tint” are only supported in Video mode.
(
2) 16:9 or 16:10 depend on “Screen Type” setting (Available only in WXGA model).
(
3) “3D Sync Invert” is only available when 3D is enabled.
(
4) “Signal” is only supported in Analog VGA (RGB) signal.
27
English
Page 28
Adjusting the Settings
IMAGE
Display Mode
The projector comes with factory presets designed for
various types of images. Select an appropriate display
mode for your source.
► Presentation: Good color and brightness suitable for
PC input.
► Bright: Maximum brightness suitable for PC input.
English
► Movie: For home theater.
► sRGB: Standardised accurate color.
► Blackboard: Select this mode to achieve optimum color
settings when projecting onto a green blackboard.
► Classroom: This mode is recommended for projecting
in a classroom.
► User: User’s settings.
► 3D: Recommended setting if 3D mode is enabled.
Adjustments made by the user in 3D will be saved in
this mode for further use.
28
Page 29
“Saturation” and
“Tint” functions are only
supported under
Video mode.
Adjusting the Settings
Brightness
Adjust the brightness of the image.
► Press the to darken image.
► Press the to lighten the image.
Contrast
Contrast controls the degree of difference between the
lightest and darkest parts of the picture.
► Press the to decrease the contrast.
► Press the to increase the contrast.
Sharpness
Adjust the sharpness of the image.
► Press the to decrease the sharpness.
► Press the to increase the sharpness.
Color
Adjust the image color.
► Press the to decrease the color of the image.
► Press the to increase the color of the image.
Tint
Adjust the color balance of red and green.
► Press the to increase the amount of green in the
image.
► Press the to increase the amount of red in the image.
29
English
Page 30
Adjusting the Settings
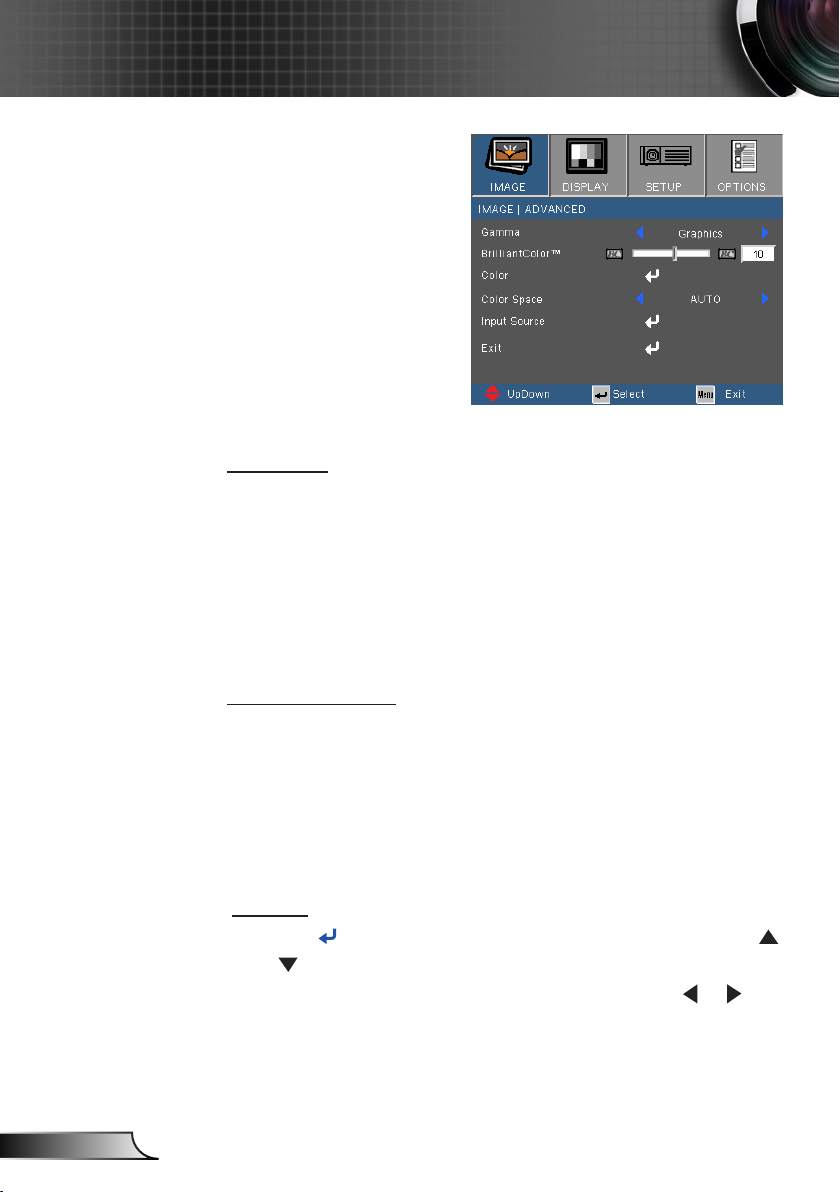
IMAGE | Advanced
Gamma
This allows you to choose a gamma table that has been
ne-tuned to bring out the best image quality for the input.
► Film: for home theater.
► Video: for video or TV source.
► Graphics: for image source.
English
30
► PC: for PC or computer source.
BrilliantColor™
This adjustable item utilizes a new color-processing
algorithm and system level enhancements to enable
higher brightness while providing true, more vibrant colors
in picture. The range is from “0” to “10”. If you prefer a
stronger enhanced image, adjust toward the maximum
setting. For a smoother, more natural image, adjust toward
the minimum setting.
Color
Select to go to the Color Settings menu and then use
or to select an item.
► Red/Green/Blue/Cyan/Magenta/Yellow: Use or to
select Red, Green, Blue, Cyan, Magenta and Yellow
Colors.
Page 31

Adjusting the Settings
► Reset: Choose to return the factory default settings
for color adjustments.
Color Space
Select an appropriate color matrix type:
► AUTO: Automatically selects the color matrix.
► RGB: Sets the color matrix to RGB.
► YUV: Sets the color matrix to YCbCr or YPbPr.
Input Source
Use this option to enable / disable input sources. Press
to enter the sub menu and select which sources you require.
Press Enter to nalize the selection. The projector will not
search for inputs that are not selected.
31
English
Page 32

Adjusting the Settings
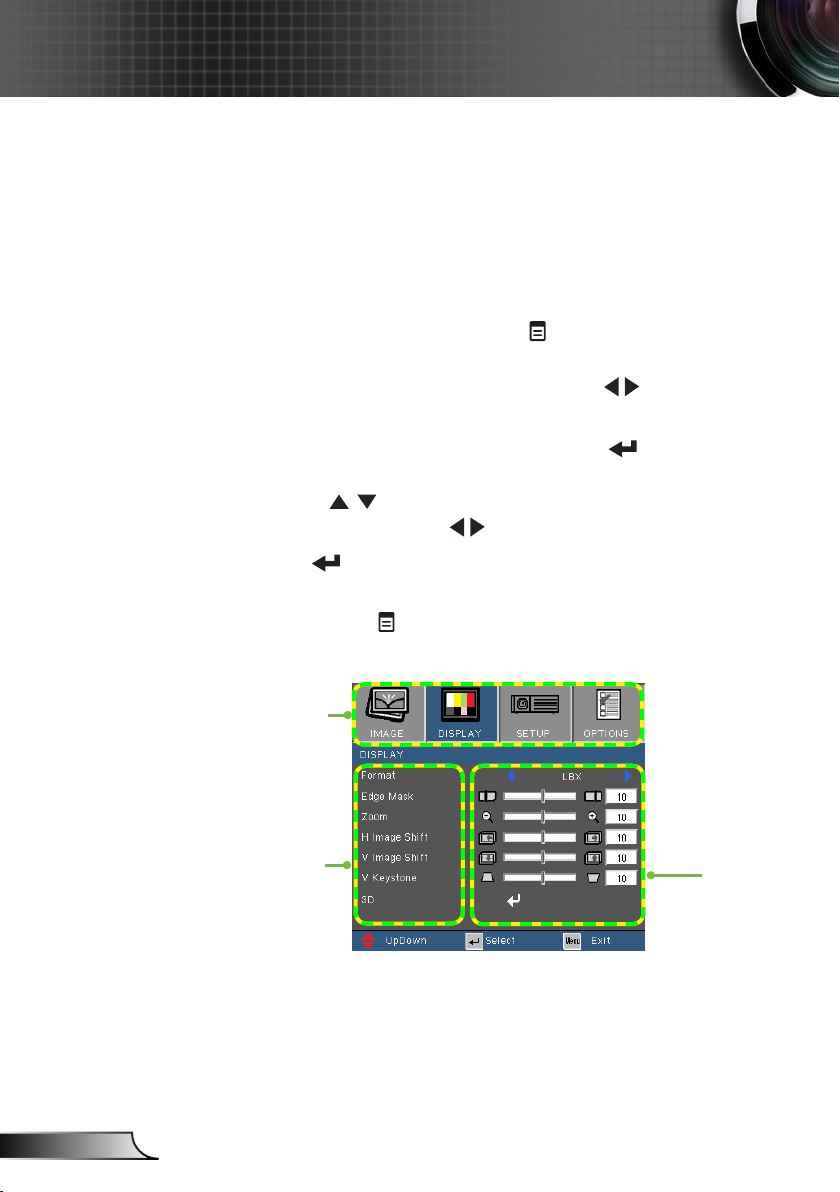
DISPLAY
Format
Use this function to choose your desired aspect ratio.
XGA
► 4:3: This format is for 4×3 input sources.
► 16:9-I: This format is for 16×9 input sources, like HDTV
and DVD enhanced for Wide screen TV. (576i/p)
English
► 16:9-II: This format is for 16×9 input sources, like HDTV
and DVD enhanced for Wide screen TV. (480i/p)
► Native: This format displays the original image without
any scaling.
► AUTO: Automatically selects the appropriate display
format. When input is 4:3, the image is displayed as
4:3. When input is 16:9 above, the image is displayed
as 16:9- I
WXGA
► 4:3: This format is for 4×3 input sources.
► 16:9: This format is for 16×9 input sources, like HDTV
and DVD enhanced for Wide screen TV.
► 16:10: This format is for 16×10 input sources, like
32
Page 33

16:9 or 16:10
depend on
“Screen Type”
setting. The
adjustment is only
for WXGA model.
Adjusting the Settings
widescreen laptops.
► LBX: This format is for non-16x9, letterbox source and
for users who use external 16x9 lens to display 2.35:1
aspect ratio using full resolution.
► Native: This format displays the original image without
any scaling.
► AUTO: Automatically selects the appropriate display
format.
16:10 Screen 480i/p 576i/p 1080i/p 720p PC
4:3 1066 x 800 center
16:10 1280 x 800 center
LBX
Native
16:9 Screen 480i/p 576i/p 1080i/p 720p PC
4:3 960 x 720 center
16:9 1280 x 720 center
LBX
Native
then get the central 1280 x 800 image to display
1:1 mapping
centered.
then get the central 1280 x 720 image to display
1:1 mapping
centered
Scale to 1280 x 960,
1:1
mapping
display
1280 x 800
Scale to 1280 x 960,
1:1
mapping
display
1280 x 720
1280 x 720
centered
1280 x 720
centered
1:1
mapping
centered
1:1
mapping
centered
Edge Mask
► Press the to reduce the edge mask of an image.
► Press the to increase the edge mask of an image.
33
English
Page 34

Adjusting the Settings
Zoom
► Press the to reduce the size of an image.
► Press the to magnify an image on the projection
screen.
H Image Shift
Shift the projected image position horizontally.
V Image Shift
Shift the projected image position vertically.
V Keystone
Press or to adjust image distortion vertically. If the
image looks trapezoidal, this option can help make the
image rectangular.
English
34
Page 35

3D Mode is
automatically
enabled when the
input source is
120Hz.
“3D Sync Invert”
only available
when 3D is enabled.
Compatible
3D source, 3D
content and
active shutter
glasses are
required for 3D
viewing.
Adjusting the Settings
DISPLAY | 3D
3D
Use this function to enable 3D display.
► Off: Disable 3D display.
► DLP-Link: Enables 3D display in DLP mode.
► IR: Select "IR" to use optimized settings for IR-based
3D images.
3D Sync. Invert
► Select “On” to invert left and right frame contents.
► Select “Off” for default frame contents.
35
English
Page 36

Adjusting the Settings
SETUP
Language
Choose the OSD menu language. Press or to enter
the sub menu and then press or to select your
preferred language. Press “Enter” to nalize the selection.
Rear-Desktop
and Rear-Ceiling
are to be used
with a translucent
screen.
English
Projection
► Front-Desktop
This is the default selection. The image is projected straight
on the screen.
► Rear-Desktop
When selected, the image will appear reversed.
► Front-Ceiling
36
Page 37

Adjusting the Settings
When selected, the image will turn upside down.
“Screen Type” is
for WXGA only.
►
When selected, the image will appear reversed in upside
down position.
Rear-Ceiling
Menu Location
Choose the menu location on the display screen.
Screen Type
Choose the screen type: 16:10 or 16:9.
Network
See page 40.
Signal
See page 37.
Security
See page 38.
Projector ID
Use this function to set the ID denition of the projector.
This ID is used to identify and control an individual
projector when more than one projectors are connected via
RS-232. The projector ID may range from 0 to 99. Refer to
page 72~76 for the complete list of RS232 commands.
Mute
► Choose “On” to turn mute on.
► Choose “Off” to turn mute off.
Volume
► Press the to decrease the volume.
► Press the to increase the volume.
37
English
Page 38

Adjusting the Settings
SETUP | Advanced
Logo
Use this function to set the desired startup screen. If
changes are made, the setting takes effect the next time
the projector is turned on.
► Optoma: The default startup screen.
► User: Use the saved picture from “Logo Capture”
For a successful
logo capture,
ensure that the
on-screen image
does not exceed
the projector
native resolution.
(XGA:1024x768 or
WXGA:1280x800).
Logo Capture
Choose to capture the image currently displayed on the
Closed Caption
Use this function to enable or disable closed captions. The
function.
screen and save the image to “User” logo.
connected source must support closed caption to use this
feature.
► Off: select “off” to turn off the closed caption feature.
English
► CC1:CC1 language: American English.
► CC2:CC2 language (depending on the TV channel
of the user):Spanish, French, Portuguese, German,
Danish.
38
Page 39

SETUP | Signal
“Signal” is only
supported in
Analog VGA
(RGB) signal.
Adjusting the Settings
Automatic
Automatically selects the signal. If you use this function,
Phase and the frequency items are grayed out. If Signal is
not automatic, Phase and the frequency items are enabled
for user to manually set the settings. Signal settings will
take effect the next time the projector is powered on.
Phase
Synchronize the signal timing of the display with the
graphic card. If the image appears to be unstable or
ickers, use this function to correct it.
Frequency
Change the display data frequency to match the frequency
of your computer’s graphic card. Use this function only if
the image appears to icker vertically.
H. Position
► Press the to move the image left.
► Press the to move the image right.
V. Position
► Press the to move the image down.
► Press the to move the image up.
39
English
Page 40

Adjusting the Settings
SETUP | Security
Security
► On: Choose “On” to prompt for security verication
when the projector is turned on.
► Off: Choose “Off” to turn on the projector without
password verication.
The password must
be 4 digits.
English
40
Security Timer
Use this function to set how long (Month/Day/Hour) the
projector can be used. Once the specied time has elapsed
you will be prompted to enter the password again.
Change Password
The default password is “1234”. To change the password,
choose to display the “Enter Security Code” screen.
Page 41

Adjusting the Settings
1. Use the number buttons on the remote
control to enter the current password,
and then press Enter.
2. Enter the desired password, and then
press Enter.
3. Re-enter the password to conrm.
4. Press Enter. A message “Security
code successfully change” appears.
The “Security Code” screen disappears
automatically after a few seconds.
► If the incorrect password is entered 3 times, the
projector automatically shuts down.
► If you have forgotten your password, please contact
your local ofce for support.
41
English
Page 42

Adjusting the Settings
SETUP | Network
Network State
Display the network connection status. When connected,
you can access and control the projector through a web
browser.
DHCP
When IP settings
are changed,
multimedia
modules (including
USB Display,
Network Display
and Flash Drive
functions) will
restart, and the
process will take
60~90 seconds.
Use this function to set the projector network connection.
► On: Automatically assign an IP address to the projector
from a DHCP server.
► Off: Assign an IP address manually.
IP Address
If DHCP is “Off”, use this function to enter an IP address.
Press
adjust the value.
or to move between elds and press or to
English
42
Subnet Mask
If DHCP is “Off”, enter the subnet mask number. Press or
to move between elds and press or to adjust the
value.
Gateway
If DHCP is “Off”, enter the default gateway of the network
connection. Press
or to adjust the value.
or to move between elds and press
Page 43

See “How to use
web browser to
control your
projector” on page
61.
Adjusting the Settings
DNS
If DHCP is “Off”, enter a DNS number. Press or to
move between elds and press or to adjust the value.
Apply
Press “ ” and then choose “Yes” to apply the selection.
43
English
Page 44

Adjusting the Settings
OPTIONS
Source Lock
► On: The projector is locked to the current source.
With dust lter
installed, High
Altitude mode must
be turned on. Dust
lter is Optional and
may not be required
in some regions.
High Altitude
When the projector is turned on, the projector will not
automatically search for other input sources even if the
current source is disconnected.
► Off: When turned on, the projector automatically
searches for connected signals.
When High Altitude is “On”, the fans spin faster. This
feature is useful in high altitude areas where air is thinner.
To turn off the
keypad lock, press
and hold on
the control panel
for 5 seconds.
English
Information Hide
► On: Choose “On” to hide status messages.
► Off: Choose “Off” to display status messages.
Keypad Lock
When the keypad lock function is “On”, the control panel is
locked. However, the projector can still be operated by the
remote control. To use the control panel, set Keypad Lock
to "Off”.
Background Color
Use this feature to select a background color to display
44
Page 45

Adjusting the Settings
when no signal is available.
Test Pattern
Use this function to run a test pattern.
► None: Disable test pattern.
► Grid: To run a grid test pattern.
► White Pattern: To run a test pattern wherein the screen
turns white.
Reset
Use this function to reset the projector settings to factory
default settings.
45
English
Page 46

Adjusting the Settings
OPTIONS |
Advanced
Direct Power On
Choose “On” to activate Direct Power mode. The projector
automatically turns on once the AC power is connected to
the power source even without pressing the “ ” key.
Auto Power Off (min)
Use this function to set the countdown timer (in minutes) to
automatically turn off the projector when no source signal is
received.
When Power mode
(Standby) is set to
Eco (> 0.5W), the
VGA output, Audio
pass-through
and RJ45 are
deactivated.
English
46
Sleep Timer (min)
Use this function to set the countdown timer to
automatically turn off the projector. When the timer elapsed,
the projector automatically turns off regardless of receiving
or not receiving any signal.
Power Mode (Standby)
► ECO: Choose “ECO” to save power dissipation > 0.5W.
► Active: Choose “Active” to return to normal standby
mode.
Brightness Mode
► BRIGHT: Choose “BRIGHT” to increase brightness.
► ECO: Choose “ECO” to dim the projector light which in
turn lowers power consumption with lower noise level.
► Image AI: Choose "Image AI" to automatically detect
the contrast ratio of the displayed image.
Page 47

When you select
Quit to exit the
multimedia home
menu, source
searching will start
from VGA signal.
Memory Drive Display
Multimedia Menu
The projector displays les saved in memory devices such
as SD cards and USB ash drives.
When the projector detects the memory device as its
current source, the multimedia home menu is displayed.
How to operate
1. Press or to select items on the multimedia home
menu.
2. Press on the control panel or Enter on the remote
control to enter a sub menu.
3. Press or to highlight items on the sub menu.
4. Press on the control panel or Enter on the remote
control to conrm a selection.
5. Press on the control panel or Menu on the remote
control to return to the multimedia home menu.
How to exit the Multimedia menu
1. Press or to highlight Quit on the multimedia
home menu.
2. Press on the control panel or Enter on the remote
control. The projector starts searching for connected input
source.
47
English
Page 48

Memory Drive Display
How to play videos
1. Press or to highlight Video on the multimedia
home menu.
2. Press on the control panel or Enter on the remote
control to enter the Video sub menu.
3. If an SD card and a USB ash drive are connected to the
projector at the same time, press
memory device icon and press on the control panel or
Enter on the remote control to switch between devices.
SD
►
: Indicates that the current memory device source is
SD card.
or to highlight the
English
Memory device icon
4. Press to highlight the le that you want to play.
5. Press on the control panel or Enter on the remote
control to play the le.
48
► : Indicates that the current memory device source is
USB ash drive.
Travel
runner.avi
summer.avi
runner.avi
SD
unfair.avi
Select
desired le
Page 49

The Play from
Start option can
be enabled or
disabled in the
Video settings,
see page 56.
Memory Drive Display
6. If the selected le is unnished from a previous playback,
the screen below appears. Otherwise, skip to step 7.
Play from start?
► Select "O" to play the le from the start.
► Select "X" to play the le from where it stopped playing
during the last playback.
7. The Playback screen appears.
Playback Controls
The playback controls disappear when no key is pressed
for 3 seconds. Press any key on the control panel or the
remote control to display the playback controls.
8. Press or to highlight the icons on the playback control
and press on the control panel or Enter on the remote
control to perform the operation.
Return to previous screen
Go to the previous video
Rewind (x2/x4/x8/x16)
Go to the next video
Fast forward (x2/x4/x8/x16)
Pause / Play video
9. Press or to adjust the playback volume.
49
English
Page 50

Memory Drive Display
How to play music
1. Press or to highlight Music on the multimedia
home menu.
2. Press on the control panel or Enter on the remote
control to enter the Music sub menu.
3. If an SD card and a USB ash drive are connected to the
projector at the same time, press
memory device icon and press on the control panel or
Enter on the remote control to switch between devices.
SD
►
: Indicates that the current memory device source is
SD card.
or to highlight the
English
Memory device icon
4. Press or to highlight the le that you want to play.
5. Press on the control panel or Enter on the remote
control to play the le.
50
► : Indicates that the current memory device source is
USB ash drive.
Love song.mp3
Select
Goodbye.mp3
SD
desired le
Page 51

6. The Music Playback screen appears.
Press or to highlight the icons on the playback control
Displays playback
status and time
Return to previous
screen
Go to the previous song
7. Press or to adjust the playback volume.
Memory Drive Display
and press on the control panel or Enter on the remote
control to perform the operation.
Go to the next song
Repeat and Shufe
indicator
Fast forward
Rewind
Pause / Play song
Repeat and shufe
properties can be
changed in the
Music settings, see
page 57.
51
English
Page 52

Memory Drive Display
How to play a slideshow
1. Press or to highlight Photo on the multimedia
home menu.
2. Press on the control panel or Enter on the remote
control to enter the Photo sub menu.
3. If an SD card and a USB ash drive are connected to the
projector at the same time, press
memory device icon and press on the control panel or
Enter on the remote control to switch between devices.
SD
►
: Indicates that the current memory device source is
SD card.
or to highlight the
English
► : Indicates that the current memory device source is
USB ash drive.
1/2
Select
desired le
Memory device icon
SD
4. Press or to highlight the le that you want to
view rst.
52
Page 53

Memory Drive Display
5. Press on the control panel or Enter on the remote
control to start slideshow.
6. The Slideshow screen appears.
Slideshow Controls
The slideshow controls disappear when no key is pressed
for 3 seconds. Press any key on the control panel or the
remote control to display the slideshow controls.
7. Press or to highlight the slideshow icon and press
on the control panel or Enter on the remote control to
toggle slideshow on or off:
► : Slideshow On
The slideshow
interval can be
changed in the
Slideshow settings
page. See page *.
► : Slideshow Off
8. Press or to adjust the playback volume.
53
English
Page 54

Memory Drive Display
How to view documents
The projector supports viewing of Word documents (*.doc)
and PDF les saved in a memory device.
1. Press or to highlight Ofce Viewer on the
multimedia home menu.
2. Press on the control panel or Enter on the remote
control to enter the Ofce Viewer sub menu.
3. If an SD card and a USB ash drive are connected to the
projector at the same time, press
memory device icon and press on the control panel or
Enter on the remote control to switch between devices.
or to highlight the
English
Memory device icon
4. Press or to highlight the le that you want to view.
54
SD
►
: Indicates that the current memory device source is
SD card.
► : Indicates that the current memory device source is
USB ash drive.
..
travel.doc 128 KB
SD
1,211 KB
143 KB
165 KB
Select
desired le
Page 55

Memory Drive Display
5. Press on the control panel or Enter on the remote
control to open the le.
6. The Ofce Viewer screen appears.
Report
Viewing Controls
The viewing controls disappear when no key is pressed
for 3 seconds. Press any key on the control panel or the
remote control to display the viewing controls.
How to use the viewing controls
► Press to go to the previous page.
► Press to go to the next page.
► Press to return to the document list screen.
► Press to zoom the image.
► Press on the control panel or Enter on the remote
control to enter pan mode. In pan mode, press
or to pan the document.
Report
Pan Mode Controls
► To exit pan mode, press on the control panel or
Enter on the remote control.
55
English
Page 56

Memory Drive Display
Multimedia Setup Menu
Use the Multimedia Setup menu to adjust the multimedia
settings.
1. Press or to highlight Setup on the multimedia
home menu.
2. Press on the control panel or Enter on the remote
control to enter Setup.
3. Press or to select a sub menu, and then press
on the control panel or Enter on the remote control.
English
4. To adjust a setting, use or to highlight an item
and then press on the control panel or Enter on the
remote control to toggle the settings.
5. Press on the control panel or Menu on the remote
control to return to the Multimedia home menu.
56
Page 57

Memory Drive Display
Multimedia Setup Menu Tree
Setup Menu Sub Menu Settings
Repeat
Video Setting
Music Setting
Slideshow Timer -50 ~ 50
Information Displays projector information
Browsing Type Thumbnail / List
Timer On / Off
Repeat
Shufe On / Off
Repeat All / Repeat One / Repeat
Off
Repeat All / Repeat One / Repeat
Off
57
English
Page 58

Memory Drive Display
Video Setting
Repeat
Use this function to enable continuous video playback.
► : Repeat all video les.
► : Repeat one video le.
► : Repeat off.
Browsing Type
► : Display les as thumbnails.
English
► : Display les on a list.
Timer
► : Display the "Play from start?" message before
playing a video that is unnished from a previous
playback.
► : Disable the "Play from start?" message.
58
Page 59

Memory Drive Display
Music Setting
Repeat
Use this function to enable continuous music playback.
► : Repeat all music les.
► : Repeat one music le.
► : Repeat off.
Shufe
► : Shufe on.
► : Shufe off.
59
English
Page 60

Memory Drive Display
Slideshow
Setting
Timer
Use this function to set the slideshow interval.
► : 2-second interval between slides.
► : 5-second interval between slides.
► : 10-second interval between slides.
English
60
Page 61

Memory Drive Display
Information
Displays the projector model name, software version, and
the memory device information.
61
English
Page 62

USB Display
USB Display
USB Display
USB Display
How to use USB Display
Ensure USB cable is well connected to "DISPLAY" mini USB port
Computer will automatic execute the program "dlusb_launcher.exe" in the virtual CD-ROM
If the above does not happen, please execute the dlusb_launcher.exe manually
from the virtual CD-ROM.
USB Display mode
When the projector detects that a computer is connected
through the mini USB port, the projector enters USB
display mode and displays the following screen:
Follow the instructions on the screen to establish the USB
connection and project the computer screen through the
projector.
English
62
► To change the source signal, press on the
control panel or the direct source signal key on the
remote control.
Page 63

USB Display
Minimum System Requirements
System Requirements
► CPU: Intel Dual Core 1.4GHz or better
► Memory: 1GB of RAM
► Disk: 10MB of free disk space
► Graphic Card: nVIDIA or ATI graphic card with 64MB
VRAM or above
1. While the DSCP engine is active, the hardware acceleration level of
the PC’s display card will be turned to “None” temporarily for best
performance.
2. If the Auto Play has been disabled on the current PC/Laptop, users
need to nd the CD-ROM and execute the DLUSB application
manually.
3. The administrator right is required to execute the DLUSB through USB.
4. If the PC/Laptop is entering sleep or hibernation status (S3/S4/S5),
users have to run the DLUSB application again from the CD-ROM to
resume the Display over USB.
5. The screen projection performance varies depending on the PC
computing power and could be up to 30FPS at SVGA resolution,
20FPS at XGA resolution and 15FPS at WXGA(800) resolution.
6. Need to enable EmulationOnly=1 to solve the overlay problem.
7. Known issue:
Can’t capture DirectDraw/Direct3D overlay.
Can’t capture OpenGL/DirectDraw Full Screen
Can’t capture Windows login window, UAC secure desktop
Will cause Media Player black screen due to enable the
EmulationOnly=1
63
English
Page 64

Network Display
For Windows Systems
Features
1. Support Driverless Screen Capture
2. Support Screen Monitoring feature
3. Support Windows XP, Vista, 7 (32 bits, 64 bits)
4. Support Audio Projection feature
5. Support remote desktop feature
System Requirements
► CPU: Intel Dual Core 1.4GHz or better
(PowerPC not supported)
► Memory: 1GB of RAM
► Disk: 10MB of free disk space
► Graphic Adaptor: nVIDIA or ATI graphic card with 64MB
VRAM or above
► Operating System: Windows XP SP2/SP3 (32 and 64-
bit) / Vista (32 and 64-bit) / Windows 7 (32 and 64-bit)
► WiFi: 802.11n
English
64
Page 65

Network Display
For MAC-OS Systems
Features
1. Support Screen Mirroring
2. Support MAC OS 10.5, 10.6, 10.7
3. Support Audio Projection
(Optional, if connected receiver supported)
4. Support remote desktop feature
(Optional, if connected receiver supported)
System Requirements
► CPU: Intel Dual Core 1.4GHz or better
(PowerPC not supported)
► Memory: 1GB of RAM
► Disk: 10MB of free disk space
► Graphic Card: nVIDIA or ATI graphic card with 64MB
VRAM or above
► Operating System: MAC OS X 10.5, 10.6
(Not including 10.7)
► WiFi: 802.11n
► Recommended Models: MacBook after 2009-01-21
All series of MacBook Pro
Mac Book Air after 2010-06-08
65
English
Page 66

Network Display
Network Display mode
In Network Display mode, the projector supports remote
projection from computers, tablets, and mobile phones when
connected to an Ethernet or wireless network. Alternatively,
you can control the computer remotely through the projector.
You can connect to the Optoma Web Utility page for
conference projection using a web browser or download the
Optoma Presenter Software for wireless projection right on
your computer desktop.
You can also control and adjust the projection settings using
the Crestron RoomView.
Activating Network Display Mode
1. Connect to the network (see “Connect to Network” on page
16).
2. The projector automatically detects the connection. If not,
repeatedly press on the control panel or the Source
key on the remote control to switch the input source.
3. Once the projector detects the connection, the Network
Display screen appears.
The IP address
generated by the
projector varies
depending on your
local area network
connection
settings.
English
66
LOGIN CODE:
Server IP:
Resolution: 1024x768
Version: 0.0.1.2
7272
Optoma Presentation System
Optoma Presentation System
Quick Guide
Quick Guide
Quick Guide
1. Make sure your WLAN is enabled, and connect to Optoma Presentation System.
2. Open your browser, or enter the IP address (refer to below server IP address)
3. Click on "Download", and execute the installation program.
4. Make sure your personal firewall allows OPS software to pass through!
5. Enter the LOGIN CODE to start projection!
192.168.100.10
SSID:
Network Display
Channel: 8
Security: OFF
4. Take note of the Login Code and IP Address. You will
need them to connect to Optoma Web Utility page (see
“Open Optoma Web Utility” on page 67).
Page 67

Network Display
Open Optoma Web Utility
1. Connect your computer to the same network where the
projector is connected.
2. Launch your web browser application (e.g. Internet
Explorer, Safari, Firefox, etc).
3. On the address bar, type the IP address noted from the
Network Display screen.
4. The Optoma Web Utility screen opens.
► To use Optoma Presentation Software, click the
operating system of your computer to download the
software (see "Downloading the Software" on page
68).
► To use Crestron RoomView, click Crestron on the left
panel menu (see "Crestron RoomView" on page 74 ).
► To project images from up to four computer
simultaneously, click Conference Control on the left
panel menu (see "Web Utility: Conference Control" on
page 76).
► To change the projector settings by web utility, click
Admin on the left panel menu. See "Web Utility: Admin
Settings" on page 78 for more instructions.
67
English
Page 68

Network Display
Optoma Presentation Software
The Optoma Presentation Software (OPS) supports remote
projection from up to four computers simultaneously. The
computer must be connected in the same local area network
as the projector and have OPS installed. You can also control
the connected computer remotely using the projector.
For rst time use, download OPS from the Optoma web utility.
Downloading the Software
1. Activate Network Display and open Optoma Web Utility
(see “Network Display mode” on page 66).
2. On the Optoma Web Utility screen, click the operating
Depending on
your computer
system, you may
need to download
the audio driver.
Click the operating
system of your
computer and
follow instructions
on the screen.
The audio driver
applies only if
“Projection Quality”
is “Normal”.
The following
download
procedures are
based on Windows
XP, similar steps
apply to other
operating systems.
system of your computer to start the download.
3. Click Run.
English
68
Page 69

Network Display
4. The following message may appear, click Run to continue.
5. Click Next to continue.
6. Follow the on-screen instructions to complete the setup.
Once the installation is complete, the Optoma Presentation
Software (OPS) automatically launches and searches for
the projector. After the projector is detected, the login screen
appears.
69
English
Page 70

Network Display
Login
The Server IP
and User Name
are automatically
detected by the
software.
1. On your computer, click Start > Programs > Optoma >
OPS. Or, double-click the OPS icon on your desktop to
launch the application.
2. Enter the Login Code provided for in the Network Display
screen (see step 3 of “Activating Network Display Mode” on
page 66).
English
3. Click OK.
70
Page 71

Network Display
How to Project Image?
Using OPS
1 Login Code
2 Menu
3 Minimize
4 Close
5
Control Panel
Full Screen
Window 1
1
5
Displays the login code.
Click to display the application menu.
Click to minimize the application screen.
Click to close the application.
Click to project the image in full screen.
Click to project the image in the upper left corner
of the screen.
6 7
3
2
4
8
Window 2
Window 3
Window 4
6 Stop
7 Pause
8 Signal
Click to project the image in the upper right
corner of the screen.
Click to project the image in the lower left corner
of the screen.
Click to project the image in the lower right corner
of the screen.
Click to stop projection.
Click to pause projection.
Blinks when projection is in progress.
71
English
Page 72

Network Display
On using the 4-to-1 split screen projection:
Support Windows XP/Vista/7 and MacBook OS 10.5 and above.
While using the 4-to-1 split screen projection function, the CPU consumption
will be higher than the Full screen mode.
Does not support audio projection and remote desktop feature on 4-to-1 split
screen projection mode.
Resolution
800 * 600 30 FPS
1024 * 768
1280 * 720
1280 * 800
Target Updated Frame Rate (FPS)
20~30 FPS
// depending on SoC’s capability
20~30 FPS
// depending on SoC’s capability
20~30 FPS
// depending on SoC’s capability
English
72
Page 73

Network Display
Using the OPS Menu
Click to display the application
menu.
► Show Login Code: Click to display the login code of
the projector on the upper left corner of the screen for
10 seconds.
► Web Admin: Opens Optoma web utility (see "Open
Optoma Web Utility" on page 67.
► Search Server: Click to search and connect to the
projector.
To use the “Virtual
Extended Screen”,
download the driver
rst from open the
Optoma Web Utility
page. Click your
computer operating
system to start the
download.
► Projection Quality: Select the projection quality:
"Normal" for faster projection or "Best" for better quality
but slower speed.
► Projection Source: Select "Main Screen" to project the
computer desktop or the "Virtual Extended Screen".
► Send Audio to Display: Select "Yes" to route the
audio output to the projetor. The audio driver must be
installed to use this feature.
► Connection Prole: Select "Save current as" to save
the current connection settings as a prole for later use
or select "Manage prole" to use or edit an existing
prole.
► Auto WiFi Connect: Check to enable auto WiFi
discovery and connection to the projector.
73
English
Page 74

Network Display
► Auto Power Manager: Check to allow the projector to
change your computer power scheme to the "highest
performance" for better projection quality.
► Hide UI: Check to hide the OPS control panel on the
projected screen.
► Advanced Screen Capture: Check to display the
operating system tip or pop-up windows on the
projected screen.
► Make OPS Token: Click to make an OPS application
token. A setup wizard appears, follow the instructions
on the screen to make the OPS token.
1 2
3
English
► Copy Application to Desktop: Click to create an OPS
shortcut icon on your desktop.
► About: Click to display the software and network
information.
► Exit: Click to stop the connection and close the
application.
74
Page 75

Network Display
Using Remote Desktop
When the projector and the computer are connected through
OPS, plug a standard USB keyboard or USB mouse into the
USB port of the projector and remotely control the computer.
75
English
Page 76

Network Display
Web Utility: Conference Control
The Conference Control function allows you to control how you
want to project images from up to four computers using the
Optoma Web Utility.
1. Activate Network Display and open the Optoma Web Utility
page (see “Network Display mode” on page 66).
2. On the left panel menu, click Conference Control. The
Conference screen appears.
English
3. Enter the password (default=”admin”).
4. Click Login.
Supports up to 32 users connected to the system at the same time.
To manage the conference, users need to login to the conference control
page.
If there is a proxy server being congured in the Internet setting of the
client PC, users may not be able to access the web server.
76
Page 77

The Conference Control screen appears.
Using Conference Control
Network Display
1 2
3
1 Computer Name
2
Play Controls
Full Screen
Window 1
Window 2
Window 3
Window 4
3 Stop
4 IP Address
Lists the network computers connected through
the Optoma Presentation Software (OPS).
Click to project the image in full screen.
Click to project the image in the upper left corner
of the screen.
Note: A highlighted button indicates the current
window position of the projected image.
Click to project the image in the upper right
corner of the screen.
Click to project the image in the lower left corner
of the screen.
Click to project the image in the lower right corner
of the screen.
Click to stop projection.
Displays the IP address of the connected
computer.
77
English
Page 78

Network Display
Web Utility: Admin Settings
Use the Admin function of the Optoma Web Utility to remotely
view and modify the projector settings. An administrator
password is required to login.
1. Activate Network Display and open the Optoma Web Utility
page (see “Network Display mode” on page 66).
2. On the left panel menu, click Admin.
English
3. Enter the administrator login password (default=”admin”).
4. Click Login. The System Status screen appears.
5. Click a menu on the left panel to display the screen.
78
Page 79

ADMIN |
Cong
See “SETUP
| Network” on
page 42.
When IP settings
are changed,
multimedia
modules
(including USB
Display, Network
Display and
Flash Drive
functions) will
restart, and the
process will take
60~90 seconds.
Network Display
The Network Setup screen displays and allows you to change
the network settings of the projector, such as the IP Setup,
DHCP Server Setup, Wireless Setup, and GateKeeper.
When changes are made, click Apply to save and apply the
settings.
ADMIN |
Video Output
Setup
Use the Video Ouput Setup screen to select the Login Code
option and congure the Projector Name.
When changes are made, click Apply to save and apply the
settings.
79
English
Page 80

Network Display
ADMIN |
Change
Passwords
Use the Change Passwords screen to change the login
password for Conference Control and Admin access. Only
one type of password can be changed at a time.
1. Type the password in Enter New Password.
2. Re-type the same password in Conrm New Password.
3. Click Apply to save the apply the changes.
4. A “Password has been changed” message appears, click
OK to close the message.
To change the other type of password, access the Change
Passwords screen again and perform the above steps.
English
80
Page 81

ADMIN |
Projector
Control Panel
Use the Projector Control Panel screen to remotely modify
the projector settings, such as Brightness, Keystone,
Display Mode, Background Color, and others.
See “On-screen Display Menu” on page 24 for more
information.
Network Display
81
English
Page 82

Network Display
ADMIN |
Alert Setting
Use the Alert Setting screen to congure the projector to send
out email alerts when errors occur, such as fan failure, high
temperature, or light source failure.
1. Select Enable to enable the email alert feature.
2. In the Email Alert section, enter the following information:
► To: Email address where you want to send the email
alert.
Obtain the SMTP
information from
your network
administrator.
Click the Email
Alert Test button
to test the email
alert settings.
English
► Cc: Second email address where you want to send the
email alert.
► From: Email address from where the email alert is sent.
► Subject: Subject title of the email alerts.
3. In the SMTP Setting section, enter the following
information:
► Outgoing SMTP Server: The SMTP server of the email
address from where email alerts are sent.
► Username: User name of the SMTP server.
► Password: Password of the SMTP server.
4. In the Alert Condition section, check the type of email
notication that you want to receive. You may select more
than one condition.
5. When done, click Save to save and apply the settings.
82
Page 83

ADMIN |
Reset to Default
Use the Reset to Default screen to restore the network
settings to its default factory settings. Click Apply to proceed
with the reset.
ADMIN |
Crestron RoomView
Click Crestron RoomView to access Crestron from the Admin
settings screen (see “Crestron RoomView” on page 84 for
more information).
Network Display
ADMIN |
Reboot System
Click Reboot System to logout and reboot the Optoma Web
Utility page.
83
English
Page 84

Network Display
Crestron RoomView
Crestron RoomView works as a remote control station of your
projector when connected over a network. Crestron allows
you to change and re-sync input sources, show the on-screen
display menu, and adjust the projector settings right on your
computer.
Using Crestron RoomView
1. Activate Network Display and open the Optoma Web Utility
page (see “Network Display mode” on page 66).
2. On the left panel menu, click Crestron. The Crestron
RoomView screen appears.
4
English
1
2
3
Using Crestron RoomView
1 Login Code
2 Source List
Freeze / Contrast /
3
Brightness / Color
84
Click to turn on or turn off Crestron.
Displays the input sources connected to the
projector.
Click a setting button and drag the slider to adjust
the setting.
5
6
7
8
9
10
Page 85

4
Network Display
Menu
Tools
Info
Help
5 Volume Controls
6 Menu
7 Re-Sync
Arrow Keys and
8
Enter
9 Source
10 A/V Mute
When IP settings
are changed,
multimedia
modules (including
USB Display,
Network Display
and Flash Drive
functions) will
restart, and the
process will take
60~90 seconds.
Click to customize the projector settings.
Click to view the projector information.
Click to view help.
► Click “Mute” to mute the audio.
► Click “Vol+” or “Vol-” to adjust the volume.
Click to project the projector main menu.
Click to re-sync the input sources on the
projector.
► Click the arrow keys to move in the main
menu, adjust the settings or make selections.
► Click “Enter” to conrm a selection.
Click to switch the input source.
Click to mute the source device audio.
85
English
Page 86

Network Display
Smart Phone Display
You can project multimedia les, documents and presentations
MobiShow
supports iOS,
Android, and
Blackberry phones.
from your iPhone or Android phones.
Use MobiShow to play video and audio les, Presentation-to-
Go documents, and play slideshow of photos stored in your
phone.,
Use WiFiDoc to view project documents such as Word, PDF,
Excel, and PowerPoint les from your phone.
MobiShow
Download MobiShow in iPhone
1. Turn on WiFi on your phone.
Alternatively, you
can download
MobiShow using
iTunes. See iTunes
user manual for
download and sync
instructions.
2. Connect your phone to the Internet.
3. Open App Store and search for
“mobishow”.
4. Follow the instructions to nish the
installation.
Using MobiShow in iPhone
1. On your projector, activate Network Display mode (see
“Network Display mode” on page 66).
2. On iPhone, turn on WiFi and connect to the network or
access point where your projector is connected.
3. Touch to launch MobiShow.
MobiShow searches for compatible
devices.
4. Touch Network Display to connect
to the projector.
English
86
Page 87

Network Display
5. When the Login screen appears,
type the login code from the
Network Display screen of your
projector. Then, click Login.
A tab is disabled
if no related le
is stored in your
phone.
To use PtG, convert
your Powerpoint
presentations to
PtG le format
rst (see “PtG2
Converter” on page
98).
6. Touch one of the following tabs:
► PtG: To display
Presentation-to-Go les.
► MediaCenter: To play video
or audio les.
► PhotoSender: To dislay
photo les.
7. Select the le you want to display.
or or
87
English
Page 88

Network Display
8. Touch the playback buttons to control or adjust the
projection options.
or or
Displayed playback
control buttons vary
depending on the
type of les that you
want to project.
For multimedia
format compatibility,
see “Supported
Multimedia Format”
on page 107.
English
88
Page 89

Network Display
Download MobiShow in Android
1. Turn on WiFi on your phone.
2. Connect your phone to the Internet.
3. Open Market and search for
“mobishow”.
4. Follow the instructions to nish the
installation.
Using MobiShow in Android
1. On your projector, activate Network Display mode (see
“Network Display mode” on page 66).
2. On your Android Phone, turn on WiFi and connect to the
network or access point where your projector is connected.
3. Touch to launch MobiShow.
MobiShow searches for compatible
devices.
4. Touch Network Display to connect
to the projector.
89
English
Page 90

Network Display
5. When the Login screen appears,
type the login code from the
Network Display screen of your
projector. Then, click Login.
6. Touch one of the following le buttons:
A le button is not
displayed if no
related le is stored
in your phone
memory.
To use PtG, convert
your Powerpoint
presentations to
PtG le format
rst (see “PtG2
Converter” on page
98).
► Media: To play video/audio les.
► Photo: To dislay photo les.
► PtG: To display Presentation-to-Go
les
English
7. Browse for the le that you want to
display.
90
Page 91

Network Display
8. Touch the playback buttons to control or adjust the
projection options.
Displayed playback
control buttons vary
depending on the
type of les that you
want to project.
For multimedia
format compatibility,
see “Supported
Multimedia Format”
on page 107.
or
or
91
English
Page 92

Network Display
Platform iOS Android Blackbery
Client Software MobiShow Lite MobiShow MobiShow
System Requirements (HW)
System Requirements (SW)
PtG
Functions
Photo
Movie
Currently available at
iPad/iPad2
iPhone 3/4(s)
iPod Touch
Free Memory:
20MB
iOS 3.2 or
higher
Yes
(Only support
800*600,
1024*768
PtG le)
* Support
PtG2 by 2011
Q4.
No
* Plan to add
the feature by
2011 Q2
Yes
(Depending
on projected
device
capability)
iPhone App
Store
Display:
16bpp/32bpp
CPU: 600 MHz
or higher
Free Memory:
20MB
Android 1.5 or
higher
Yes
(Only support
800*600,
1024*768
PtG le)
* Support
PtG2 by 2011
Q4.
Yes Yes
Yes
(Depending
on projected
device
capability)
Android
Market Place
Display:
16bpp/32bpp
CPU: 600 MHz
or higher
Free Memory:
20MB
WiFi: 802.11n
BlackBerry OS
5.0/6.0
Yes
(Only support
800*600,
1024*768
PtG le)
* Support
PtG2 by 2011
Q4.
No
BlackBerry
App World
English
92
Page 93

Network Display
WiFi Doc
WiFi-Doc allows your Android/iOS device to show the native
ofce le to big screens (projectors, TVs, etc.) through Wi-Fi
connection. It leverage Picsel’s ofce engine to read the native
ofce les (including word, excel, powerpoint, pdf, txt) then
display on local display and big screen.
Features
1. Support word, excel, powerpoint, pdf, txt (Refer to Picsel’s
specs for details.)
2. Support Play, Pause, Previous/Next Page, Open File
3. Support GoToPage, Thumbnail
4. Support Zoom-in, Zoom-out
5. Support Android (V2.2 and higher), iOS(V3.2 and higher)
Minimum System Requirement
1. iOS: iPad/iPad2, iPhone 3/4, iPod Touch
► OS: V3.2 and higher
► Free Memory: 20MB
2. Android: CPU: 600 MHz or higher
(1G Duo-Core is recommended for best performance)
► OS:V2.2 and higher
► Free Memory: 20MB
93
English
Page 94

Network Display
Download WiFi Doc in iPhone
1. Turn on WiFi on your phone.
2. Connect your phone to the Internet.
Alternatively, you
can download
MobiShow using
iTunes. See iTunes
user manual for
download and sync
instructions.
3. Open App Store and search for “wi
doc”.
4. Follow the instructions to nish the
installation.
Using WiFi Doc in iPhone
1. On your projector, activate Network Display mode (see
“Network Display mode” on page 66).
2. On iPhone, turn on WiFi and connect to the network or
access point where your projector is connected.
3. Touch to launch WiFi Doc. WiFi Doc searches for
compatible devices.
After login, the
phone orientation
automatically
switches to
landscape mode.
English
4. Touch Network Display to connect to the projector.
94
Page 95

Network Display
5. When the Login screen appears, type the login code from
the Network Display screen of your projector. Then, click
Login.
6. Select the le you want to display.
7. The le is displayed on your phone and projected through
the projector.
► Touch the on-screen controls to go to the next or
previous page.
► To go to a page directly, scroll and touch a page icon at
the bottom of the screen.
► To zoom in a page, bring two ngers apart on the
phone screen or to zoom out, pinch two ngers
together.
95
English
Page 96

Network Display
Download WiFi Doc in Android
1. Turn on WiFi on your phone.
2. Connect your phone to the Internet.
Alternatively, you
can download
MobiShow using
iTunes. See iTunes
user manual for
download and sync
instructions.
After login, the
phone orientation
automatically
switches to
landscape mode.
3. Open App Store and search for “wi
doc”.
4. Follow the instructions to nish the
installation.
Using WiFi Doc in Android
1. On your projector, activate Network Display mode (see
“Network Display mode” on page 66).
2. On your Android phone, turn on WiFi and connect to the
network or access point where your projector is connected.
3. Touch to launch WiFi Doc. WiFi Doc searches for
compatible devices.
4. Touch Network Display to connect to the projector.
English
5. When the Login screen appears, type the login code from
96
Page 97

Network Display
the Network Display screen of your projector. Then, click
Login.
6. Select the le you want to display.
7. The le is displayed on your phone and projected through
the projector.
► Touch the on-screen controls to go to the next or
previous page.
► To go to a page directly, scroll and touch a page icon at
the bottom of the screen.
► To zoom in a page, bring two ngers apart on the
phone screen or to zoom out, pinch two ngers
together.
97
English
Page 98

Appendices
PtG2 Converter
PtG2 Converter is a computer software that allows you to
convert PowerPoint (*.ppt) les to PtG2 format playable on PtG
supported phones without loss of original slide transitionand
animation effects.
Using PtG2 Converter
1. On the supplied User Manual CD, browse and install the
PtG Converter le.
2. After installation, go to Start > Programs > PtG2
Converter > PtG2 Converter. The PtG panel appears.
► Click to select a PowerPoint le and start
conversion. Conversion progress is displayed on the
desktop.
English
► Click to expand or collapse the preview pane.
► Click to playback the PtG2 le.
► Click to open a PtG2 le.
Supported PowerPoint File Format
► *.ppt
► *.pps
► *.pptx
► *.ppsx
98
Page 99

Network Display
System Requirements
► CPU: Pentium P4-M 1.5G and above
► Memory: 256M and above
► OS: Windows 2K SP4, Windows XP SP2 or SP3,
Windows Vista or Vista SP1, Windows 7 or 7 SPI
► Ofce: Ofce XP, 2003, 2007, 2010
Limitations:
PtG supports all animation effects that can be displayed on
the desktop screen. However, PtG CANNOT/DOES NOT
support the following conditions:
1. PtG does not support animation effect that is using
timer or repeat function to playback automatically.
2. PtG does not support single animation effect that
is longer than 60 seconds. If there is a recycling
animation effect, PtG will record it for up to 60
second.
3. If the PPT screen stops to change for 3 seconds,
the system will distinguish it as the end of the
current animation and will prompt for the “Enter”
key to ask PPT for next step.
4. PtG does not support embedded VBA object.
5. PtG does not support OLE object.
Supports USB Flash drive format: FAT32.
Supports only one logical partition in USB Flash drive.
Supports USB device: Standard USB mass storage device with power
consumption less than 5V / 500ma
Supports content: PtG / JPG
JPG previews limitation: Support preview feature with EXIF info.
JPG le: support le size < 10MB, pixel < 40 megapixel, dimension <
8192*6144
99
English
Page 100

Appendices
Troubleshooting
If you experience a problem with your projector,
refer to the following information. If a problem
persists, contact your local reseller or service
center.
No image appears on-screen
► Ensure all the cables and power connections are correctly and
securely connected as described in the “Installation” section.
► Ensure all the pins of the connectors are not bent or broken.
► Make sure the projector is turned on.
► Ensure that the “AV mute” feature is not turned on.
Partial, scrolling or incorrectly displayed image
► Press on the control panel or Re-Sync on the remote control.
► If you are using a PC:
For Windows 95, 98, 2000, XP, Windows 7:
1. Open “My Computer”, the “Control Panel” folder, and then
double click on the “Display” icon.
2. Select the “Settings” tab.
3. Verify that your display resolution setting is lower than or equal
to UXGA (1600 × 1200).
4. Click on the “Advanced Properties” button.
English
If the projector is still not projecting the whole image, you need to
change the monitor display you are using. Refer to the following
steps.
1. Verify the resolution setting is lower than or equal to UXGA
(1600 × 1200).
2. Select the “Change” button under the “Monitor” tab.
3. Click on “Show all devices”. Next, select “Standard monitor
types” under the SP box; choose the resolution mode you need
under the “Models” box.
100
 Loading...