

Page 1

目录
目录 ........................................................................................................1
使用注意事项 ..........................................................................................2
安全信息 ........................................................................................................2
预防措施 ........................................................................................................3
眼睛安全警告 .................................................................................................5
产品特性 ........................................................................................................5
简介 ........................................................................................................6
包装概览 ........................................................................................................6
产品概览 ........................................................................................................7
主机 ........................................................................................................................ 7
控制面板 ................................................................................................................. 8
输入/输出连接 ........................................................................................................9
遥控器 .................................................................................................................. 11
安装 ......................................................................................................12
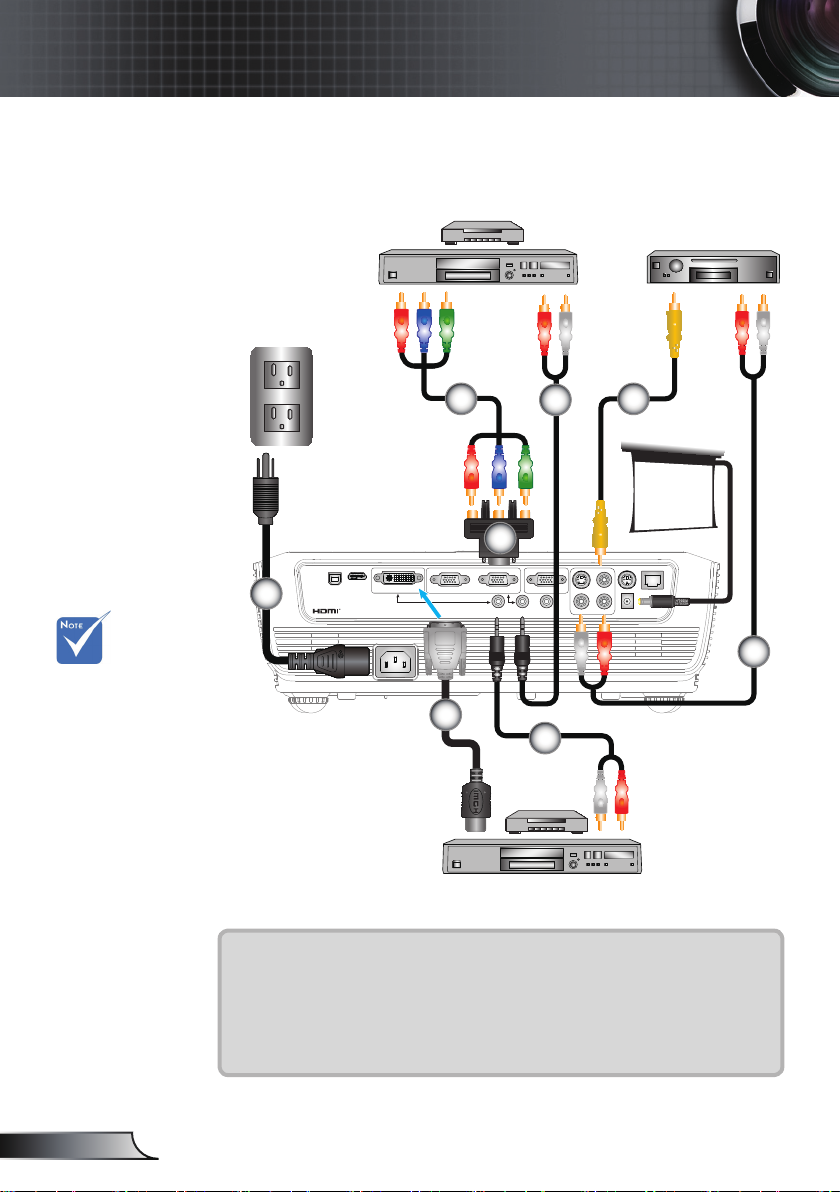
连接投影机 ...................................................................................................12
连接计算机/笔记本电脑 ........................................................................................ 12
连接到视频/VGA1-IN/SCART/HDMI .................................................................... 13
打开/关闭投影机电源 ...................................................................................15
打开投影机电源 .................................................................................................... 15
关闭投影机电源 .................................................................................................... 16
警告指示灯 ........................................................................................................... 16
调整投影图像 ...............................................................................................17
调整投影机高度 .................................................................................................... 17
投影机的变焦/聚焦调整 ........................................................................................ 18
调整投影图像尺寸 ................................................................................................ 18
使用PureShift调整投影图像的位置 ....................................................................... 19
用户控制 ............................................................................................... 21
控制面板和遥控器 ........................................................................................21
控制面板 ............................................................................................................... 21
遥控器 .................................................................................................................. 22
使用USB遥控鼠标 ................................................................................................ 24
使用确定/帮助按钮 ............................................................................................... 24
屏幕显示菜单 ...............................................................................................27
操作方法 .............................................................................................................. 27
菜单树 .................................................................................................................. 28
图像 ...................................................................................................................... 29
显示设定 ............................................................................................................... 32
设置 ...................................................................................................................... 37
选项 ...................................................................................................................... 49
附录 ......................................................................................................52
故障处理 ......................................................................................................52
图像问题 .............................................................................................................. 52
其它问题 .............................................................................................................. 55
投影机状态指示 ................................................................................................... 55
遥控器问题 .......................................................................................................... 56
更换灯泡 ......................................................................................................57
兼容模式 ......................................................................................................59
RS232命令 ..................................................................................................60
吊顶安装 ......................................................................................................63
Optoma全球办事机构 ..................................................................................64
管制和安全注意事项 ................................................................................ 64
无线 ......................................................................................................68
1
简体中文
Page 2

2
简体中文
使用注意事项
安全信息
等边三角形内带箭头的电闪符号旨在警示用户:产品内部有未绝缘
的“危险电压”,存在人员触电危险。
等边三角形内的惊叹号符号旨在警示用户:注意设备上标注的重要操作和
维护(维修)文字说明。
警告:为降低火灾或电击风险,不要让本设备遭受雨淋或受潮。 机壳内存在危险
高电压。 不要打开机壳。 应委托专业人士进行维修。
B级辐射限制
此B级数字设备符合“加拿大干扰成因设备条例”的所有要求。
重要安全事项
1. 不要阻塞任何通风口。 为防止投影机过热以保证其可靠进行,建议将
投影机安装在通风良好的位置。 例如,不要将投影机放置在杂乱的咖
啡桌、沙发、床等上面。不要将投影机放置在空气流通不畅的狭小空间
内,如书柜或壁橱中。
2. 不要在靠近水的地方或潮湿的地方使用本投影机。 为降低火灾和/或触电
危险,切勿使本投影机遭受雨淋或受潮。
3. 不要安装在热源附近,如散热器、加热器、火炉或其它产生热量的设备
(如放大器)。
4. 清洁时使用干布。
5. 仅使用制造商指定的连接件/附件。
6. 如果本机已物理损坏或者使用不慎,请勿继续使用本机。
物理损坏/使用不慎包括(但不限于):
本机掉落。
电源线或插头损坏。
液体溅落到投影机上。
投影机遭受雨淋或受潮。
异物掉入投影机内或者内部元件松动。
不要尝试自行维修本机。 打开或卸下机壳时存在危险电压或其它危险。
在送修本机前,请先与Optoma联系。
7. 不要让物品或液体进入投影机。 否则,可能接触到危险电压点和短路部
件,导致火灾或电击。
8. 留意投影机外壳上的安全标志。
9. 本机只应由相关服务人员进行修理。
Page 3
使用注意事项
预防措施
请遵循本用户指南中的所有警告、预防措施以及
所推荐的维护事项。
▀■ 警告─ 灯泡点亮时切勿直视投影机镜头。 亮光可能会伤害您
的眼睛。
▀■ 警告─ 为降低火灾或电击危险,切勿使本投影机遭受雨淋或
受潮。
▀■ 警告─ 请勿打开或者拆卸本投影机,以免发生触电。
▀■ 警告─ 在更换灯泡前,请使本机完全冷却。 按照第57-58页
介绍的说明进行操作。
▀■ 警告─ 本投影机将自行检测其灯泡使用寿命。 投影机显示警
告消息时一定要更换灯泡。
▀■ 警告─ 更换灯泡模块后,在屏幕显示的“选项|灯泡设定” 菜
单中重设“灯泡时数重置”功能(参见第51页)。
▀■ 警告─ 关闭投影机时,请确保先完成散热过程,然后再
拔掉电源线。 投影机需要90秒钟散热时间。
当灯泡达到使
用寿命时,必须
更换灯泡模块,
否则投影机无法
开机。 更换灯
泡时,请按照第
57-58页“更换
灯泡”中列出的
步骤进行操作。
▀■ 警告─ 在投影机工作过程中,不用使用镜头盖。
▀■ 警告─ 当灯泡接近使用寿命时,屏幕上会显示消息“建议更
换灯泡”。 请与当地经销商或服务中心联系,尽快更
换灯泡。
▀■ 警告─ 为降低眼睛受伤风险,请勿直视遥控器上的激光束,
也不要将激光束照射任何人的眼睛。 此遥控器配备具
有辐射的II类激光。
3
简体中文
Page 4

4
简体中文
使用注意事项
务必:
在清洁产品前,关闭电源并从交流电源插座上拔掉电源线。
使用蘸有中性洗涤剂的柔软干布擦拭主机外壳。
如果本产品长期不用,应从交流插座中拔下电源插头。
切勿:
阻塞设备上用于通风的狭缝和开口。
使用擦洗剂、石蜡或者溶剂擦拭设备。
在如下条件下使用:
- 极端炎热、寒冷或者潮湿的环境。
确保室内环境温度在5 - 35°C 之间。
相对湿度是5 - 35°C 时80%(最大),无凝结。
- 易受大量灰尘和泥土侵袭的区域。
- 任何产生强磁场的设备附近。
- 阳光直接照射。
Page 5

使用注意事项
眼睛安全警告
▀■ 切勿直视/面对投影机光束。 尽可能背对光束。
▀■ 在教室中使用投影机时,如果学生回答问题时需要指向屏幕上
的某个位置,务必提醒学生不要注视光束。
▀■ 为尽量减小灯泡功耗,应保持房间黑暗以降低周围光线亮度。
产品特性
▀■ XGA (1024x768) / WXGA (1280x800)本机分辨率
▀■ 大变焦范围
▀■ 手动镜头移位操作
▀■ 无线局域网(仅限于无线型号)
5
简体中文
Page 6
6
简体中文
简介
S
O
U
R
C
E
R
E
-
S
Y
N
C
?
/
L
A
M
P
T
E
M
P
M
E
N
U
P
O
W
E
R S
T
A
N
D
B
Y
E
N
T
E
R H
E
L
P
/
/
RE-SYNCSOURCE
KEYSTONE VOLUME
POWER
LASER
L
E
F
T
R
I
G
H
T
U
P
D
O
W
N
PAGE+
PAGE-
AV MUTE MENU
DVI-D
S-VIDEO
VGA-1
VIDEO
VGA-2
HDMI
?
ZOOM
包装概览
打开包装箱并检查其中的物品,确保下面列出的所有
部件齐全。 如有任何物品缺失,请立即与最近的客户
服务中心联系。
由于各国家/地区应用
不同,有些地区可能
有不同的附件。
投影机(带镜头盖)
1.8米USB线
电源线3.0米
1.8米RS232线
1.8米VGA线
红外线遥控器
文档:
用户手册
保修卡
快速入门卡
WEEE卡
(仅适用于欧洲中
东非洲)
2节AAA电池
Page 7
产品概览
S
O
U
R
C
E
R
E
-
S
Y
N
C
?
/
L
A
M
P
T
E
M
P
M
E
N
U
P
O
W
E
R S
T
A
N
D
B
Y
EN
T
E
R H
E
L
P
/
/
AUDIO1
AUDIO2
AUDIO3
AUDIO
OUT
+12V
RJ
45
RS
232
S
VIDEO
VIDEO
VGA-OUT
VGA2-IN
VGA1-IN/SCART
DVI-D
HDMI
USB
L
R
S
O
U
R
C
E
R
E
-
S
YN
C
?
/
L
A
M
P
T
E
M
P
M
E
N
U
P
O
W
E
R S
T
A
N
D
B
Y
E
N
T
E
R H
E
L
P
/
/
主机
2
3
简介
1
5
5
4
6
7
2
1
8
9
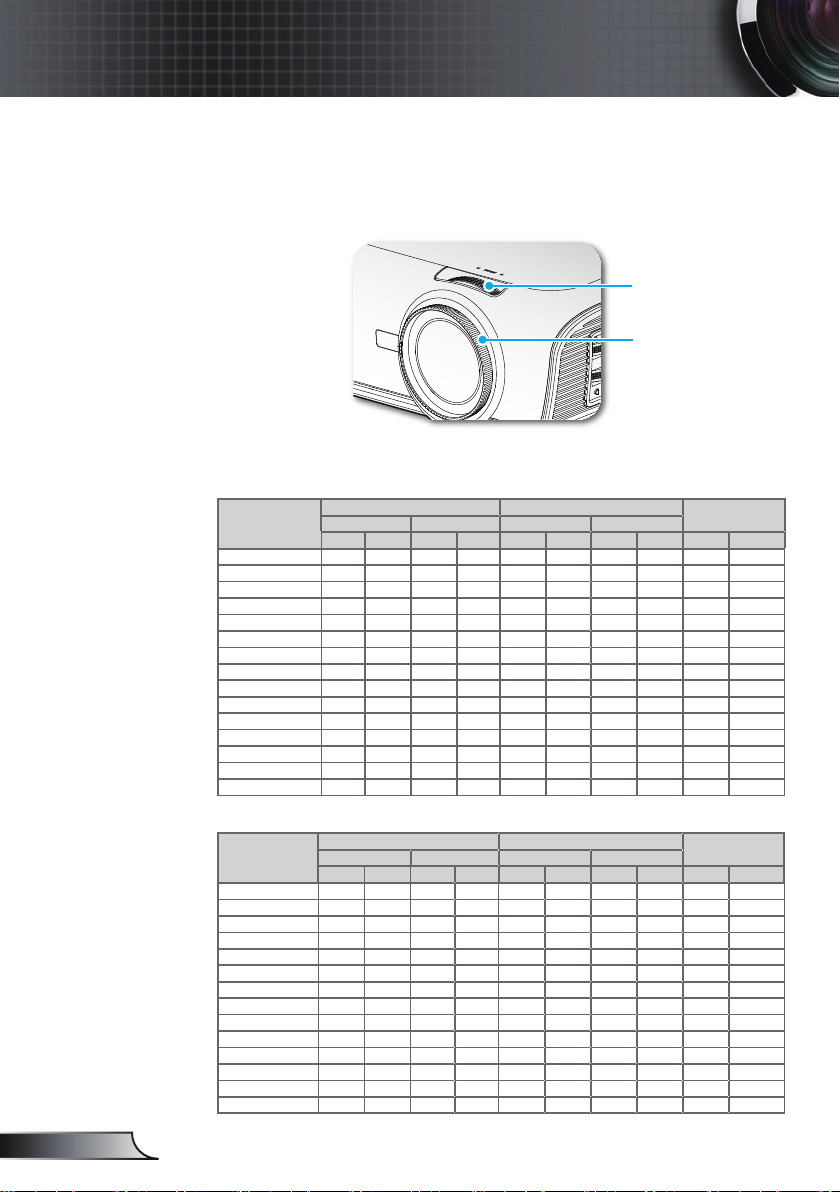
1. 控制面板
2. 变焦环
3. 调焦环
4. 变焦镜头
5. 红外线接收器
6. 倾斜度调整底脚
7. 镜头移位调整
8. 输入/输出连接
9. 电源插口
7
6
简体中文
Page 8

8
简体中文
简介
SOU RCE
RE- SYNC
?
/
LAM P TEM P
MEN U
POW ER STAND BY
ENT ER HELP
/
/
控制面板
4
5
3
6
1. 电源/待机和电源LED
2. 确定/帮助
3. 重新同步
4. 梯形修正调节
5. 信号源
6. 菜单
7. 四向选择键
8. 灯泡故障LED
9. 温度LED
10. 红外线接收器
2
1
8710
9
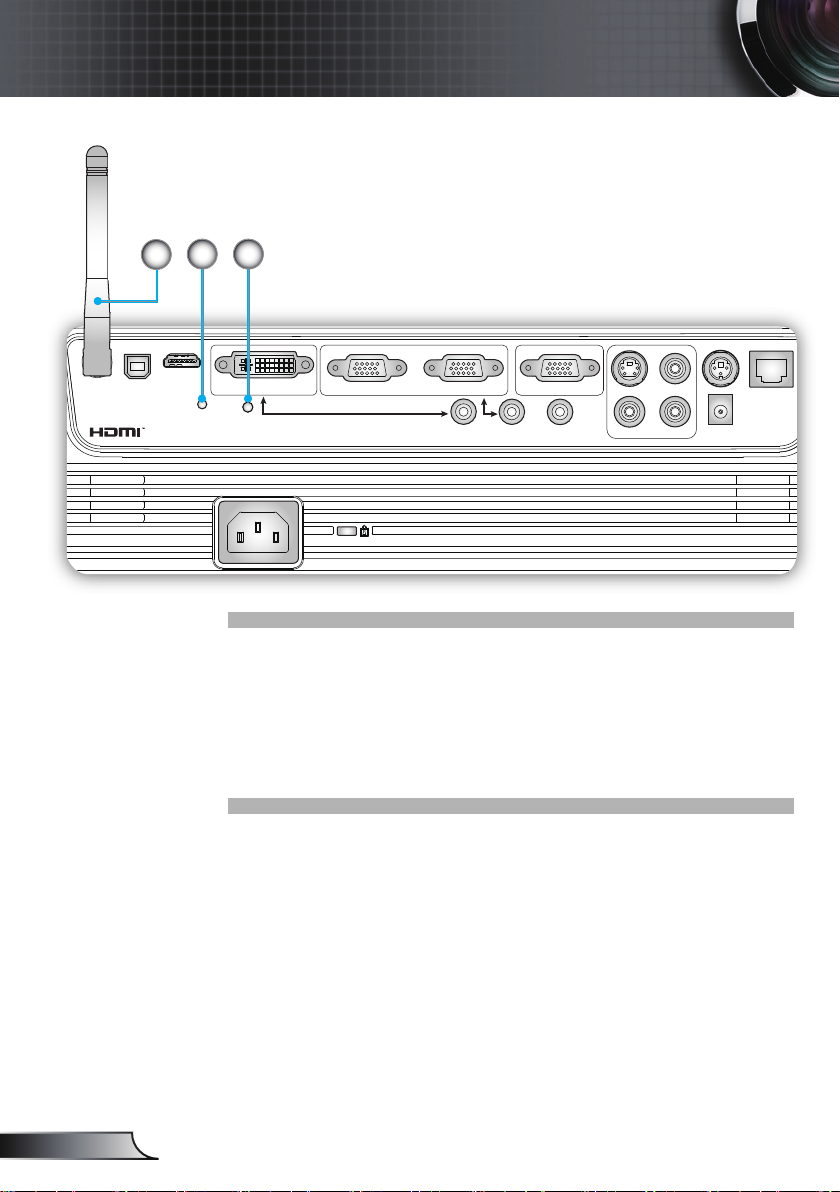
Page 9
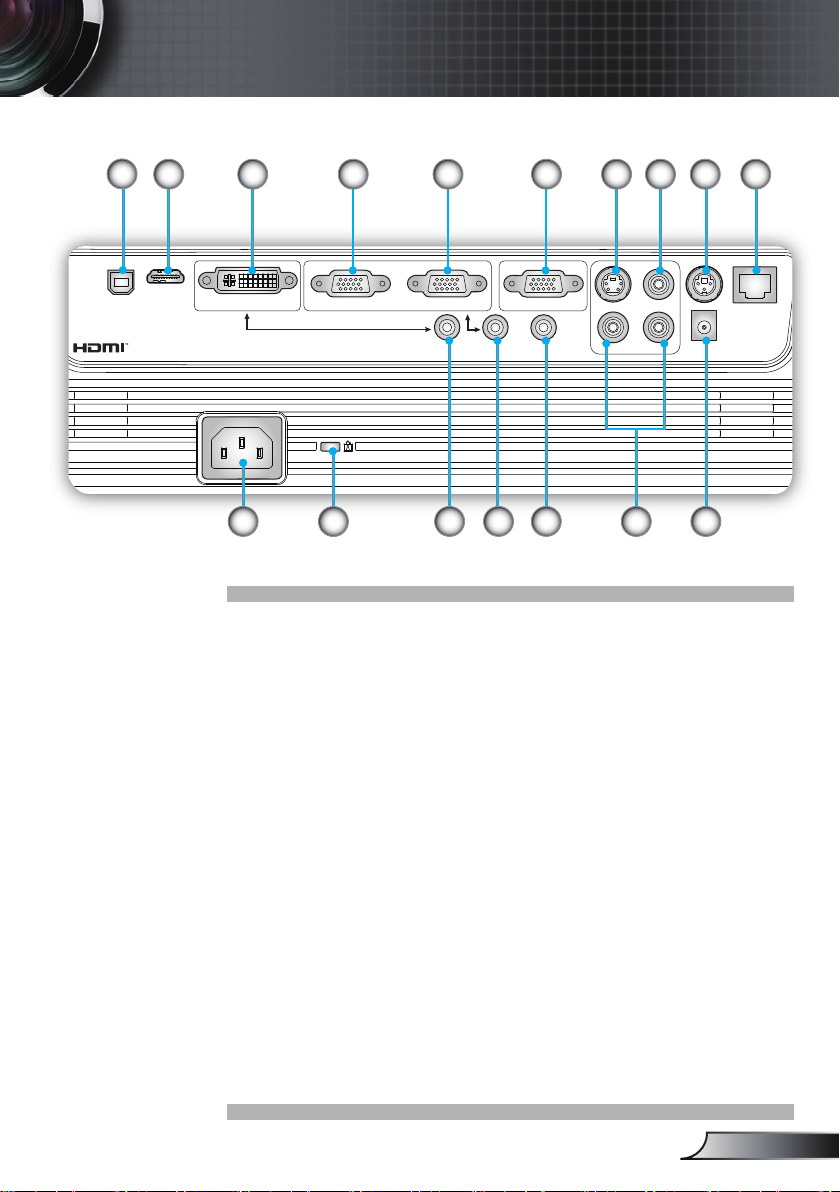
输入/输出连接
AUDIO1 AUDIO2 AUDIO3
AUDIO- OUT
+12V
RJ
-45
RS
-232
S
-VIDEO
VIDEO
VGA-OUT
VGA2-IN
VGA1-IN/SCART
DVI-D
HDMI
USB
L R
简介
1
2
12
6 8 9 107543
14 151311
16
17
1. USB接口(连接到PC以实现远程鼠标功能)
2. HDMI接口
3. DVI-D接口(PC数字(HDCP))
4. VGA1-In/SCART接口
(PC模拟信号/分量视频输入/HDTV/SCART)
5. VGA2-In接口
(PC模拟信号/分量视频输入/HDTV)
6. VGA-Out接口(显示器环路通过输出)
7. S-Video输入接口
8. 复合视频输入接口
9. RS-232接口(3针)
10. RJ45网络接口
11. 电源插口
12. Kensington
TM
锁端口
13. 音频输入1(3.5mm Mini插孔)(在默认情况下用于DVID)
14. 音频输入2(3.5mm Mini插孔)(在默认情况下用于VGA)
15. 音频输出接口(3.5mm Mini插孔)
16. 音频输入3 (L/R RCA)(在默认情况下用于S-video和复合视
频)
17. 12V触发器中继接口
9
简体中文
Page 10
10
简体中文
简介
RESET
AUDIO1 AUDIO2 AUDIO3
AUDIO- OUT
12V- RELAY
RJ
-45
RS
-232
S
-VIDEO
VIDEO
VGA-OUT
VGA2-IN
VGA1-IN/SCART
DVI-D
HDMI
USB
L R
18
19 20
下列物品适用于具有无线功能的型号:
18. 天线
19. 状态指示灯LED
20. 复位按钮
Page 11
RE-SYNCSOURCE
KEYSTONE VOLUME
POWER
LASER
L
E
F
T
R
I
G
H
T
U
P
D
O
W
N
PAGE+
PAGE-
AV MUTE MENU
DVI-D
S-VIDEO
VGA-1
VIDEO
VGA-2
HDMI
?
ZOOM
RE-SYNCSOURCE
KEYSTONE VOLUME
POWER
LASER
L
E
F
T
R
I
G
H
T
U
P
D
O
W
N
PAGE+
PAGE-
AV MUTE MENU
DVI-D
S-VIDEO
VGA-1
VIDEO
VGA-2
HDMI
?
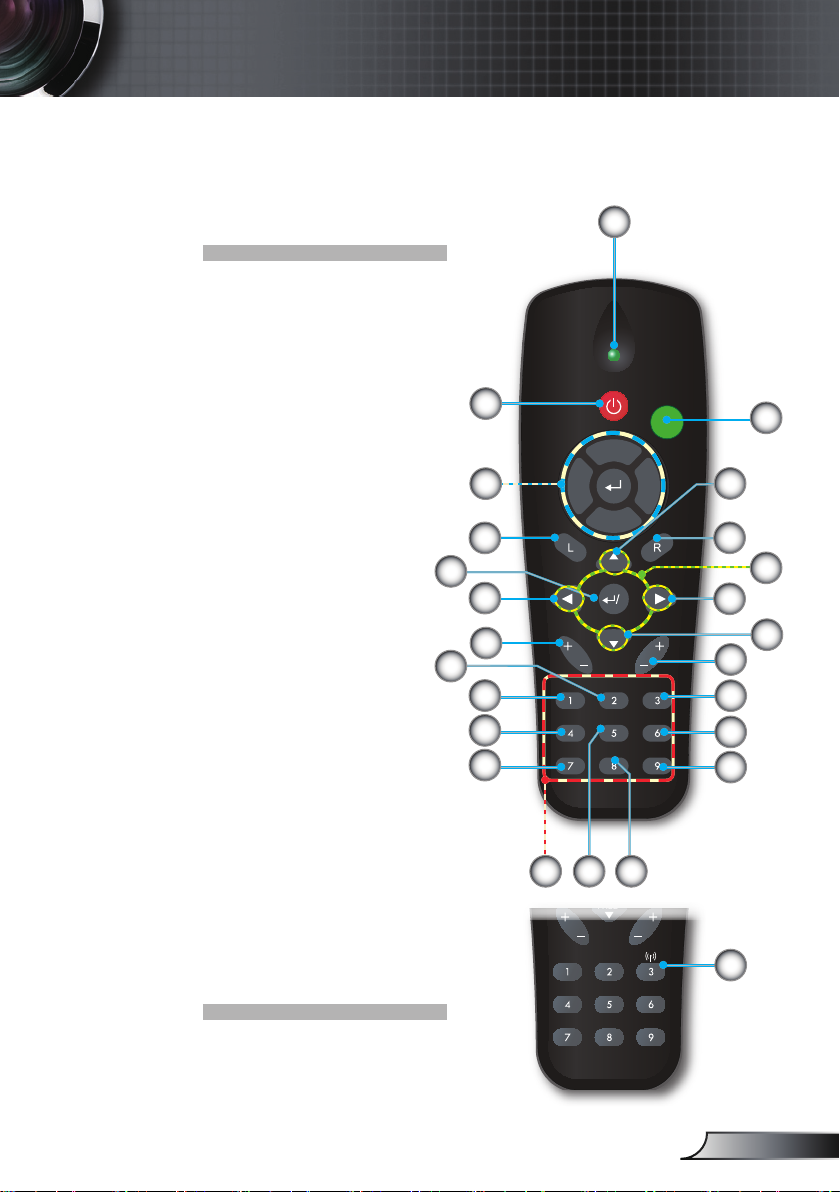
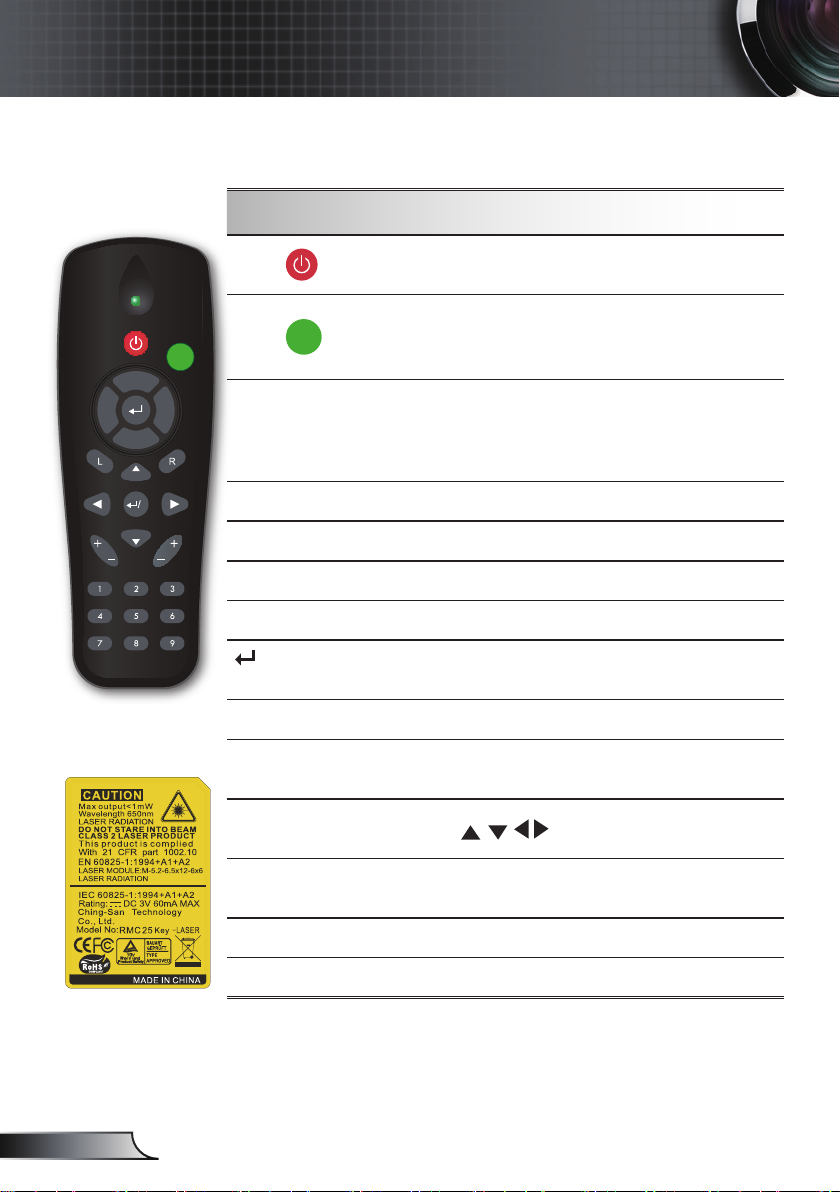
遥控器
1. 指示灯LED
2. 电源开关
3. 激光笔
4. 向上翻页
5. 鼠标右击
6. 四方向选择键
7. 重新同步
8. 向下翻页
9. 音量+/-
10. 缩放
11. HDMI
12. 视频
13. VGA-2
14. VGA-1
15. S-Video
16. DVI-D
17. AV静音
18. 菜单
19. 梯形修正+/-
20. 信号源
21. 确定/帮助
22. 鼠标左击
23. PC/鼠标控制
24. 数字键盘
(在输入密码时使用)
25. 无线按钮
(仅限于无线型号)
21
18
22
20
17
16
15
23
19
简介
1
2
24
1314
3
4
5
6
7
8
9
10
11
12
25
11
简体中文
Page 12
12
简体中文
安装
AUDIO1 AUDIO2 AUDIO3
AUDIO-OUT
+12V
RJ
-45
RS
-232
S
-VIDEO
VIDEO
VGA-OUT
VGA2-IN
VGA1-IN/SCART
DVI-D
HDMI
USB
L R
molex
MOLEX
E62405SP
R
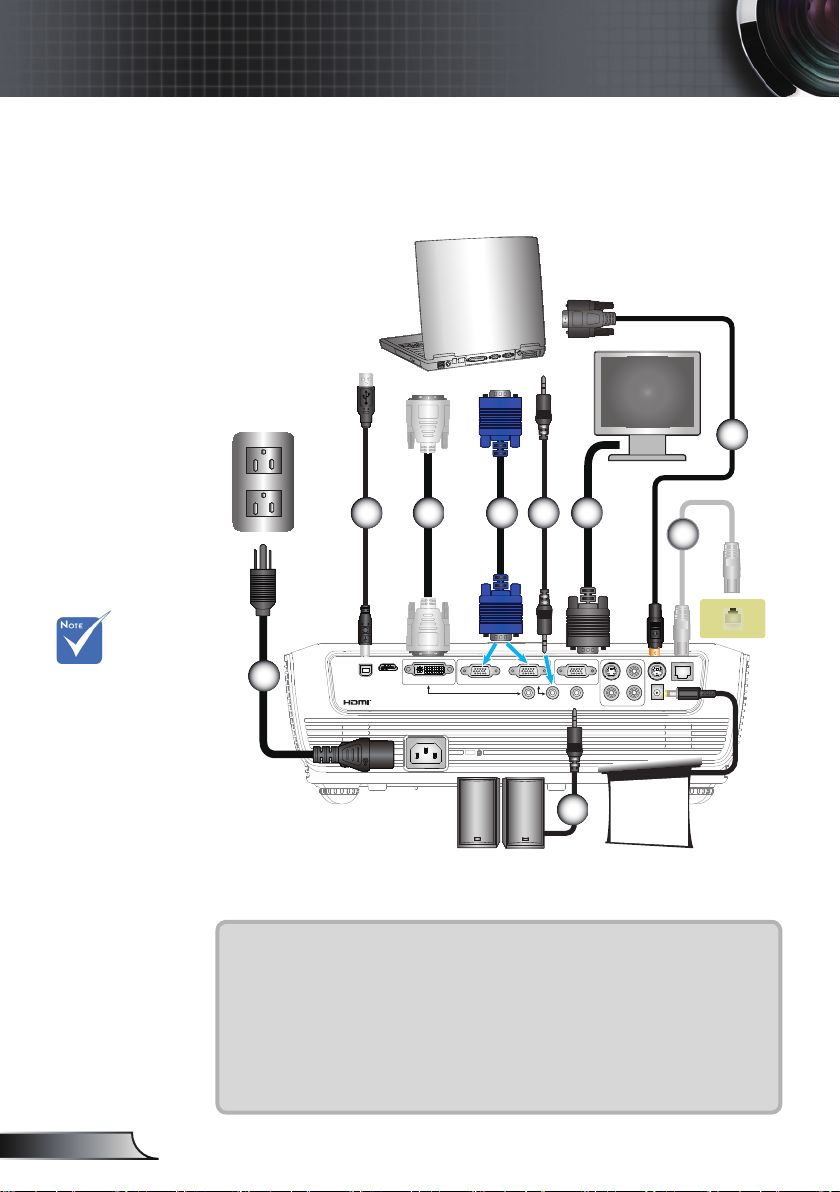
连接投影机
连接计算机/笔记本电脑
5
由于各国家/地区的应
用不同,有些地区可
能有不同的附件。
(*) 选件
2
4
3
8
6
7
1
9
+12V输出
1............................................................................................................电源线
2............................................................................................................USB线
3............................................................................................................VGA线
4............................................................................................................*DVI线
5........................................................................................................ RS232线
6................................................................................................... *音频输入线
7.............................................................................................................. *网线
8...................................................................................................*VGA输出线
9................................................................................................... *音频输出线
Page 13
安装
AUDIO1 AUDIO2 AUDIO3
AUDIO-OUT
12V-RELAY
RJ
-45
RS
-232
S
-VIDEO
VIDEO
VGA-OUT
VGA2-IN
VGA1-IN/SCART
DVI-D
HDMI
USB
L R
E62405SP
R
连接到视频/VGA1-IN/SCART/HDMI
DVD播放机、机顶盒、
HDTV接收机
S-Video输出
3
5
由于各国家/地区的应
用不同,有些地区可
能有不同的附件。
(*) 选件
4
4
+12V输出
2
6
1
DVD播放机、机顶盒、
HDTV接收机
1............................................................................................................电源线
2............................................................................................................VGA线
3......................................................................................*SCART/VGA适配器
4...........................................................................................*音频线插孔/RCA
5.....................................................................................................*S-Video线
6.........................................................................................................*HDMI线
13
简体中文
Page 14
14
简体中文
安装
AUDIO1 AUDIO2 AUDIO3
AUDIO-OUT
12V-RELAY
RJ
-45
RS
-232
S
-VIDEO
VIDEO
VGA-OUT
VGA2-IN
VGA1-IN/SCART
DVI-D
HDMI
USB
L R
E62405SP
R
连接到视频/VGA1-IN/SCART/HDMI
由于各国家/地区的应
用不同,有些地区可
能有不同的附件。
(*) 选件
DVD播放机、机顶盒、
HDTV接收机
1
复合视频输出
2
4
5
+12V输出
3
4
6
4
DVD播放机、机顶盒、
HDTV接收机
1............................................................................................................电源线
2................................................................................................*3 RCA分量线
3.......................................................... *15-针至3 RCA分量视频/HDTV适配器
4...........................................................................................*音频线插孔/RCA
5................................................................................................... *复合视频线
6................................................................................................ DVI至HDMI线
Page 15
安装
S
O
U
R
C
E
R
E
-
S
Y
N
C
?
/
L
A
M
P
T
E
M
P
M
E
N
U
P
O
W
E
R S
T
A
N
D
B
Y
E
N
T
E
R H
E
L
P
/
/
POW ER STAND BY
ENT ER HELP
/
/
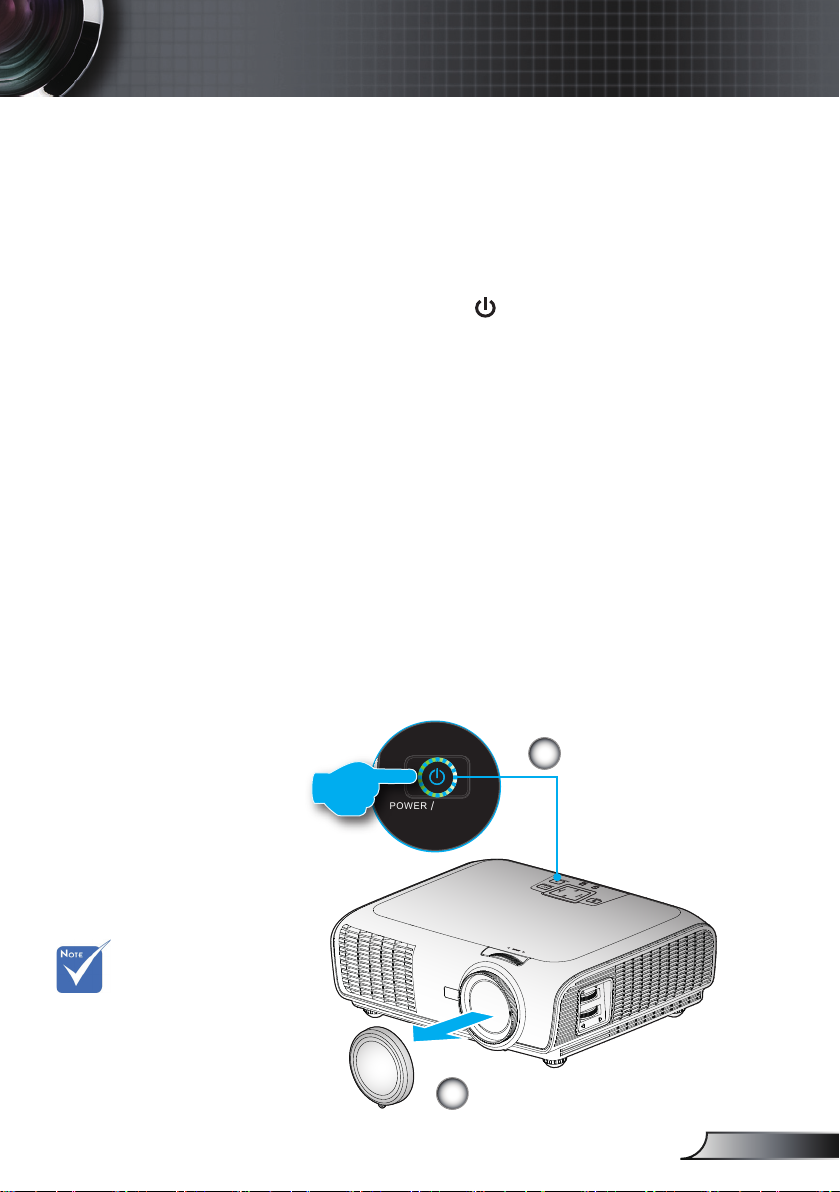
打开/关闭投影机电源
打开投影机电源
1. 取下镜头盖。
2. 安全连接电源线和信号线。 连接后,电源LED变成红色。
3. 按投影机或遥控器上的“ ”按钮打开灯泡电源。 电源
LED此时闪烁蓝色。
开机画面显示约10秒钟。 第一次使用投影机时,您可以在
开机画面之后显示的快速菜单中选择自己喜欢使用的语言。
4. 打开和连接您希望在屏幕上显示的信号源的电源(计算机、
笔记本电脑、视频播放机等)。 投影机将自动检测信号源。
否则,按菜单按钮,转到“选项”。
确保“信号源锁定”已设成“关”。
如果同时连接了多个信号源,可以按控制面板上的“信号
源”按钮或遥控器上的直接信号源键切换输入。
首先打开投影机
电源,然后选择
信号源。
电源/待机
2
电源LED
1
镜头盖
15
简体中文
Page 16
16
简体中文
安装
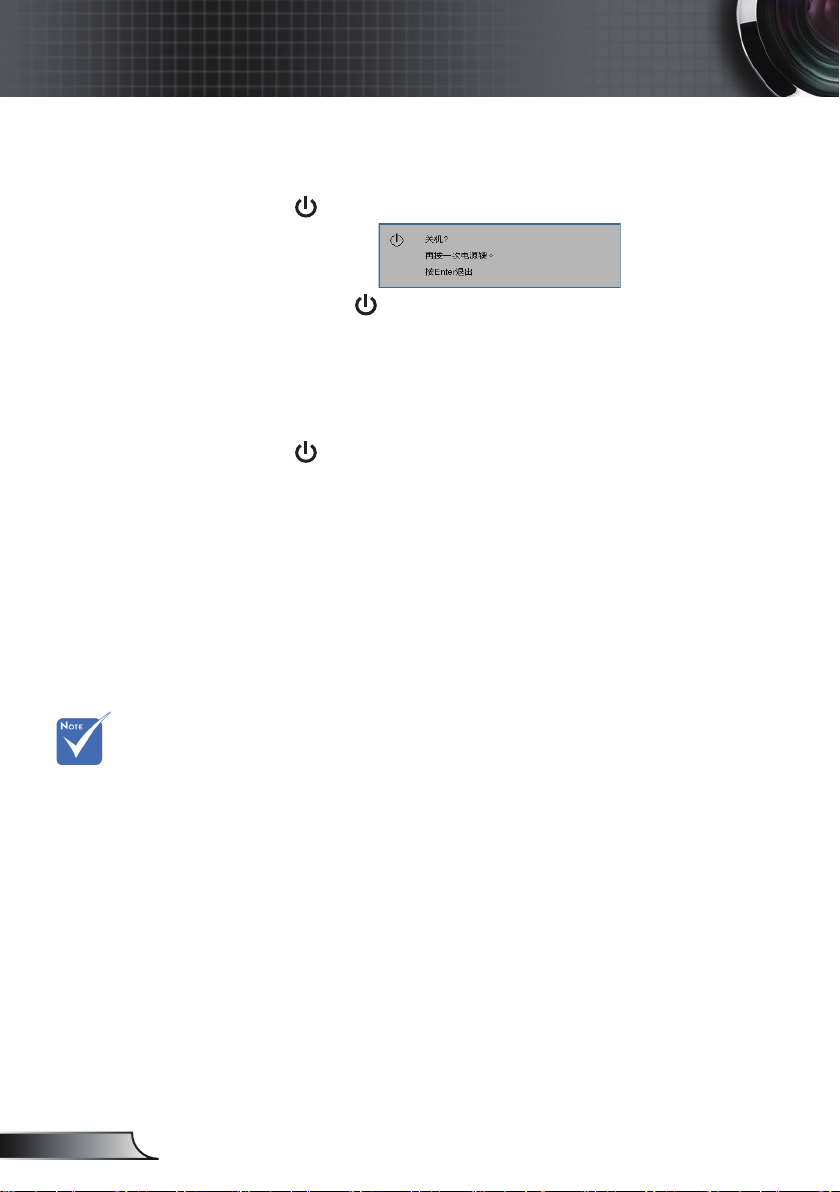
关闭投影机电源
1. 按“ ”按钮关闭投影机灯泡。 屏幕上显示下面的消息。
再按一次“ ”按钮以确认关机。 如果不按该按钮,此消
息将在5秒后消失。
2. 散热风扇继续转动约10秒以进行散热。 当电源LED变成红
色时,表明投影机进入了待机模式。
如果希望使投影机重新返回工作状态,必须等待投影机完
成散热过程并已进入待机模式。 一旦进入待机模式,只需
按“ ”按钮即可重新启动投影机。
3. 从电源插座和投影机上拔掉电源线。
4. 切勿在电源关闭过程完成之后立即打开投影机电源。
如果投影机出现这
些现象,请与附近
的服务中心联系。
有关的详细信息,
请参见第64-65页。
警告指示灯
当“灯泡”指示灯显示红色时,投影机将自动关机。 请与附
近的服务中心联系以寻求帮助。
当“温度”指示灯显示红色时,表示投影机过热。 投影机将
自动关机。
在正常情况下,投影机可以在冷却之后重新开机。
当“温度”指示灯闪烁红色时,表示风扇不起作用。
Page 17
安装
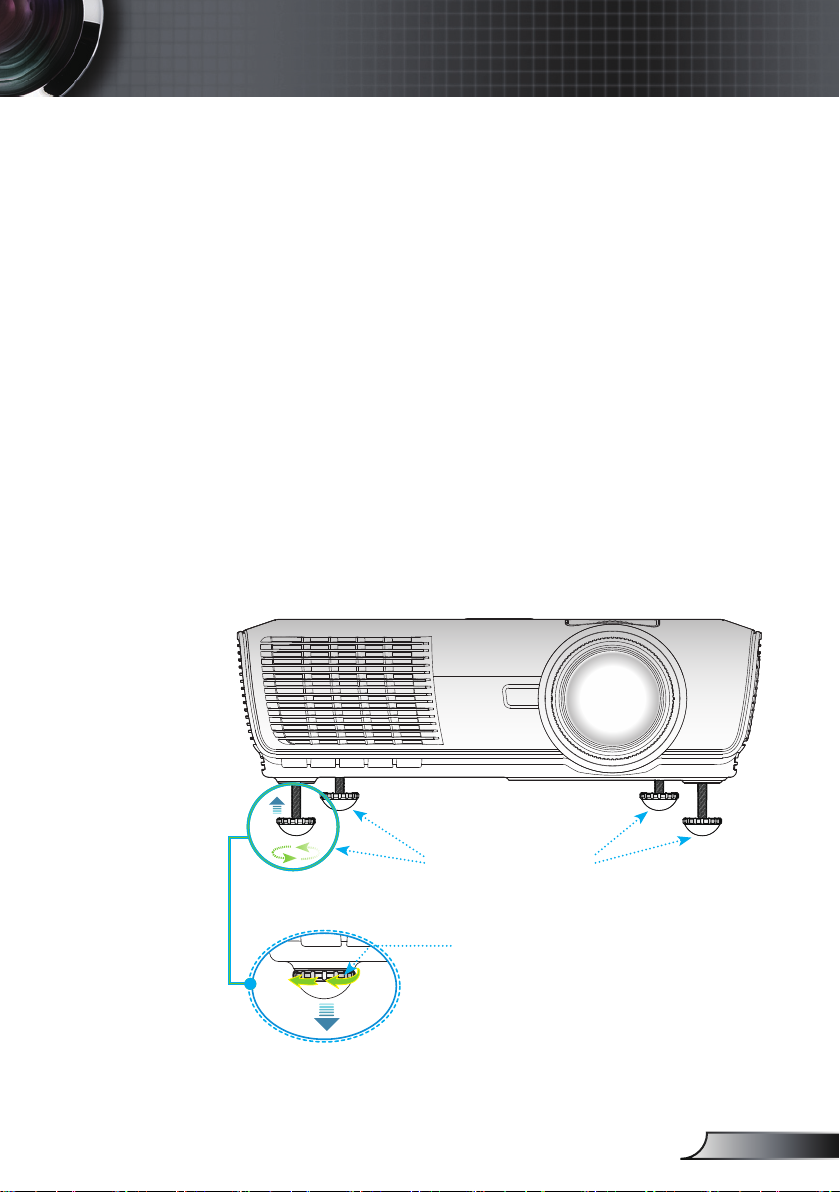
调整投影图像
调整投影机高度
本投影机配有升降支脚,用于调整图像高度。
1. 找到您想要修正高度的投影机下面的可调节支脚。
2. 逆时针转动可调节环以升高投影机或顺时针以降低它。
根据需要重复其余支脚。
倾斜度调整底脚
倾斜调整环
17
简体中文
Page 18
18
简体中文
安装
S
O
U
R
C
E
R
E
-
S
Y
N
C
?
/
L
A
M
P
T
E
M
P
M
E
N
U
P
O
W
E
R S
T
A
N
D
B
Y
E
N
T
E
R H
E
L
P
/
/
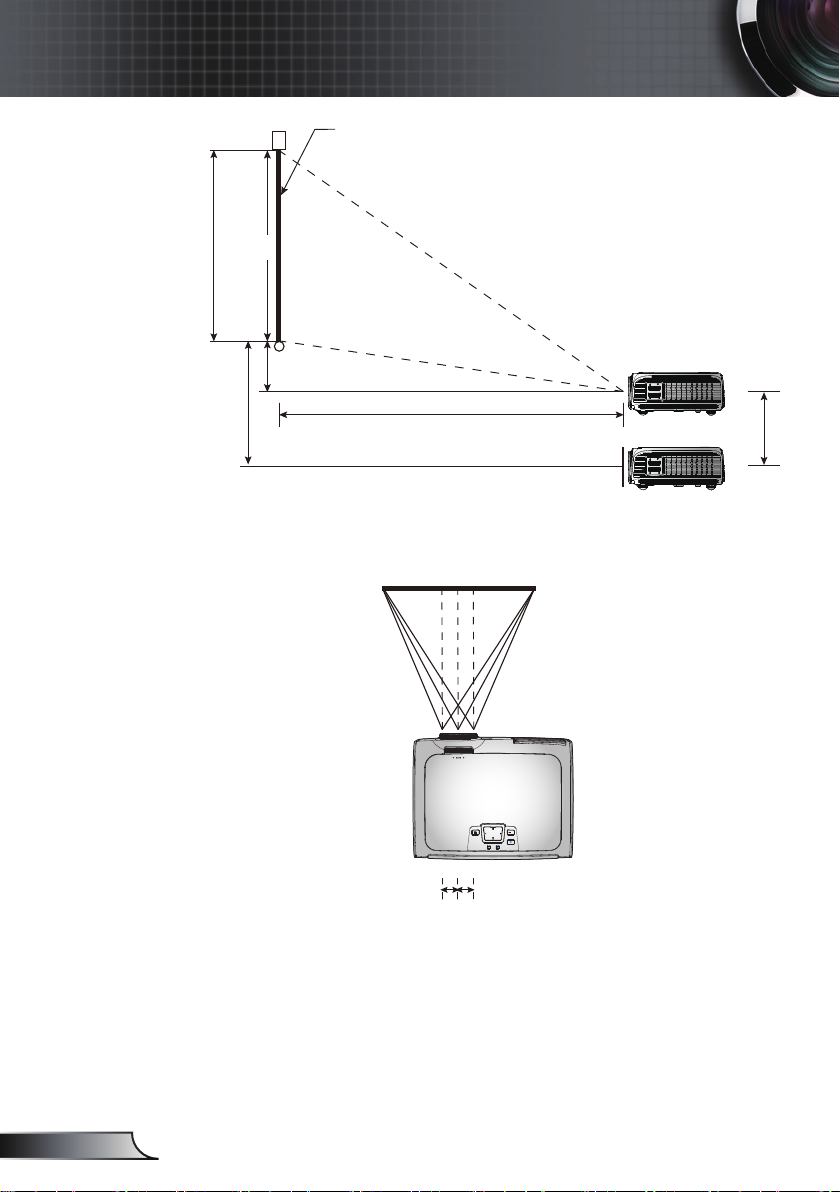
投影机的变焦/聚焦调整
您可以调节变焦环以放大/缩小图像。 如要将图像聚焦,请旋转
调焦环直到图像清晰。
本投影机的聚焦范围是3.28到32.81英尺(1.0到10.0米)。
变焦环
调焦环
调整投影图像尺寸
WXGA型号
对角线
16:10屏幕的长度
(英寸)
30 0.65 0.40 2.12 1.32 0.97 1.47 3.17 4.83 0.10 0.33
40 0.86 0.54 2.83 2.77 1.29 1.96 4.22 6.44 0.13 0.44
50 1.08 0.67 3.53 2.21 1.61 2.54 5.28 8.05 0.17 0.55
60 1.29 0.81 4.24 2.65 1.93 2.95 6.33 9.66 0.20 0.66
70 1.51 1.94 4.95 3.09 2.25 3.44 7.39 11.27 0.24 0.77
80 1.72 1.08 5.65 3.53 2.57 3.93 8.45 12.88 0.27 0.88
90 1.94 1.21 6.36 3.97 2.90 4.42 9.50 14.49 0.30 0.99
100 2.15 1.35 7.07 4.42 3.22 4.91 10.56 16.10 0.34 1.10
110 2.37 1.48 7.77 4.86 3.54 5.40 11.61 17.72 0.37 1.21
130 2.80 1.75 9.19 5.74 4.18 6.38 13.72 20.94 0.44 1.44
150 3.23 2.02 10.60 6.62 4.83 7.36 15.84 24.16 0.50 1.66
180 3.88 2.42 12.72 7.95 5.79 8.84 19.00 28.99 0.61 1.99
200 4.31 2.69 14.13 8.83 6.44 9.82 21.12 32.21 0.67 2.21
250 5.38 3.37 17.67 11.04 8.04 12.27 26.39 40.26 0.84 2.76
300 6.46 4.04 20.20 13.25 9.65 - 31.67 - 1.01 3.31
屏幕尺寸W×H (16:10) 投影距离(D)
(m) (英尺) (m) (英尺)
宽度 高度 宽度 高度 宽幅 远距 宽幅 远距 (m) (英尺)
偏移
(Hd)
XGA型号
对角线
4:3屏幕的长度
(英寸)
30 0.65 0.4 2.13 1.31 1.0 1.6 3.28 5.25 0.12 0.39
40 0.86 0.54 2.82 1.77 1.3 2.1 4.27 6.89 0.16 0.53
50 1.08 0.67 3.54 2.20 1.6 2.7 5.25 8.86 0.20 0.66
60 1.29 0.81 4.23 2.66 2.0 3.2 6.56 10.50 0.24 0.80
70 1.51 0.94 4.95 3.08 2.3 3.8 7.55 12.47 0.28 0.93
80 1.72 1.08 5.64 3.54 2.6 4.3 8.53 14.11 0.32 1.06
90 1.94 1.21 6.36 3.97 3.0 4.8 9.84 15.75 0.36 1.19
100 2.15 1.35 7.05 4.43 3.3 5.4 10.83 17.72 0.41 1.33
120 2.58 1.62 8.46 5.31 4.0 6.4 13.12 21.00 0.49 1.59
150 3.23 2.02 10.60 6.63 4.9 8.0 16.08 26.25 0.61 1.99
180 3.88 2.42 12.73 7.94 5.9 9.7 19.36 31.82 0.73 2.38
200 4.31 2.69 14.14 8.83 6.6 10.7 21.65 35.10 0.81 2.65
250 5.38 3.37 17.65 11.06 8.2 13.4 26.90 43.96 1.01 3.32
300 6.46 4.04 21.19 13.25 9.9 - 32.48 - 1.21 3.98
本表仅供用户参考。
屏幕尺寸W×H (4:3) 投影距离(D)
(m) (英尺) (m) (英尺)
偏移
(Hd)
宽度 高度 宽度 高度 宽幅 远距 宽幅 远距 (m) (英尺)
Page 19
安装
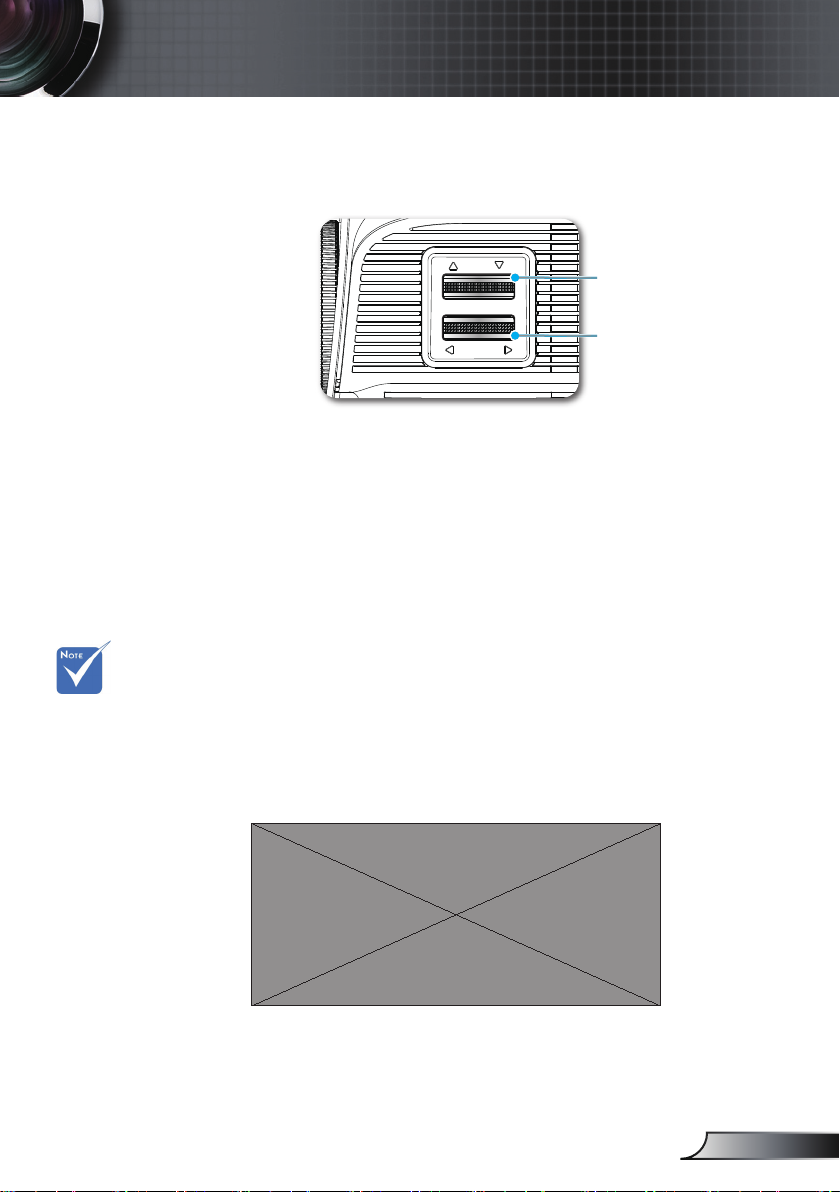
使用PureShift调整投影图像的位置
垂直镜头移位控
制杆
水平镜头移位控
制杆
PureShift提供镜头移位功能,可在水平或垂直方向上调整投影图
像的位置,具体范围在下面详细介绍。 PureShift是一个独特的
系统,与传统的镜头移位系统相比,可在保持更高ANSI对比度的
情况下提供镜头移位。
垂直和水平调整范
围的限制如
PureShift范围图
所示。
调整图像位置
图像最多可以向左或向右扩展其本身宽度的30%,即提供60%的
调整范围。
垂直偏移可为屏幕高度的105% - 130%,即提供25%的调整范
围。
19
简体中文
Page 20
20
简体中文
安装
屏幕高度
(H)
100%
5%
30%
屏幕
(L)
屏幕
最大位移
25%
30%W 30%W
左侧 右侧
屏幕宽度
(W)
SOURCE
RE-SYNC
?
/
LAMP TEMP
MENU
POWER STANDBY
ENTER HELP
/
/
Page 21
用户控制
SOU RCE
RE- SYNC
?
/
LAM P TEM P
MEN U
POW ER STAND BY
ENT ER HELP
/
/
控制面板和遥控器
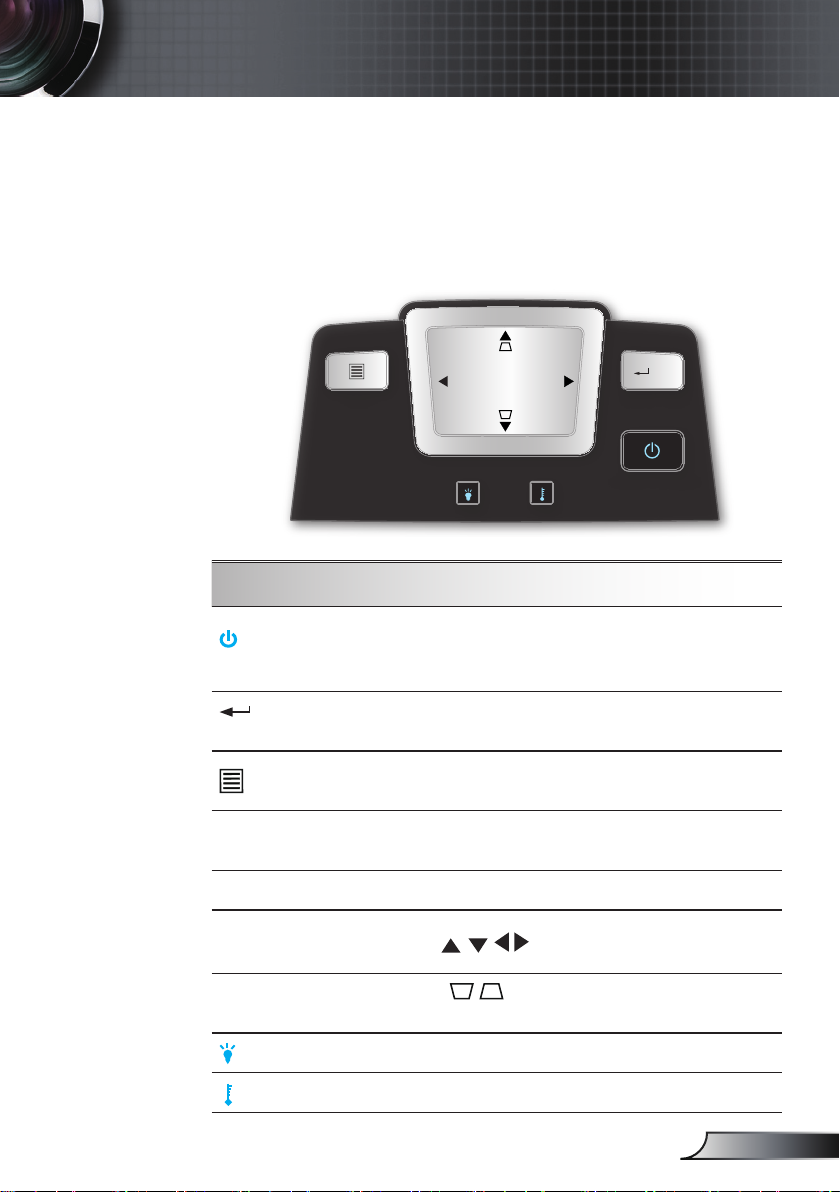
您可以通过两种方式控制各项功能:
控制面板和遥控器。
控制面板
使用控制面板
电源 / 待机 待机待机电源
LED
/ ?
确定 / 帮助
菜单
重新同步
信号源
四向选择键
梯形修正调节
灯泡LED
温度LED
参见第15-16页的“打开/关闭投影机电源”部
分。
指明投影机的状态。
确认您选择的项目。
帮助菜单(参见第24页)。
按下“菜单”可以启动屏幕显示(OSD)菜单。
如要退出OSD,请再按一次“菜单”。
根据输入源自动同步投影机。
按“信号源”选择输入信号。
使用 选择项目或调整选择内容。
使用 调整由于倾斜投影机而造成的
图像失真。 (
±
16度)
指明投影机的灯泡状态。
指明投影机的温度状态。
21
简体中文
Page 22
22
简体中文
用户控制
RE-SYNCSOURCE
KEYSTONE VOLUME
POWER
LASER
L
E
F
T
R
I
G
H
T
U
P
D
O
W
N
PAGE+
PAGE-
AV MUTE MENU
DVI-D
S-VIDEO
VGA-1
VIDEO
VGA-2
HDMI
?
ZOOM
遥控器
使用遥控器
电源
激光
PC/鼠标控制
L按钮
R按钮
页+
页-
/ ?
确定/帮助
信号源
重新同步
四向选择键
参见第15-16页的“打开/关闭投影机电
源”部分。
将遥控器对准屏幕,按住此按钮激活激光指
针。
PC/鼠标控制可以用于控制鼠标移动。 使用
USB线连接计算机和投影机时,启用鼠标功
能。
单击鼠标左键。
单击鼠标右键。
使用此按扭向上翻页。
使用此按扭向下翻页。
确认您选择的项目。/
帮助菜单(参见第24页)。
按信号源选择输入信号。
根据输入源自动同步投影机。
使用 选择项目或调整选择内容。
梯形修正 +/-
音量 +/-
亮度
调整因投影机倾斜而导致的图像失真。
增大/减小音量。
调整图像的亮度。
Page 23
遥控器
RE-SYNCSOURCE
KEYSTONE VOLUME
POWER
LASER
L
E
F
T
R
I
G
H
T
U
P
D
O
W
N
PAGE+
PAGE-
AV MUTE MENU
DVI-D
S-VIDEO
VGA-1
VIDEO
VGA-2
HDMI
?
RE-SYNCSOURCE
KEYSTONE VOLUME
POWER
LASER
L
E
F
T
R
I
G
H
T
U
P
D
O
W
N
PAGE+
PAGE-
AV MUTE MENU
DVI-D
S-VIDEO
VGA-1
VIDEO
VGA-2
HDMI
?
ZOOM
用户控制
使用遥控器
菜单
缩放
DVI-D
VGA-1
AV静音
S-VIDEO
VGA-2
VIDEO
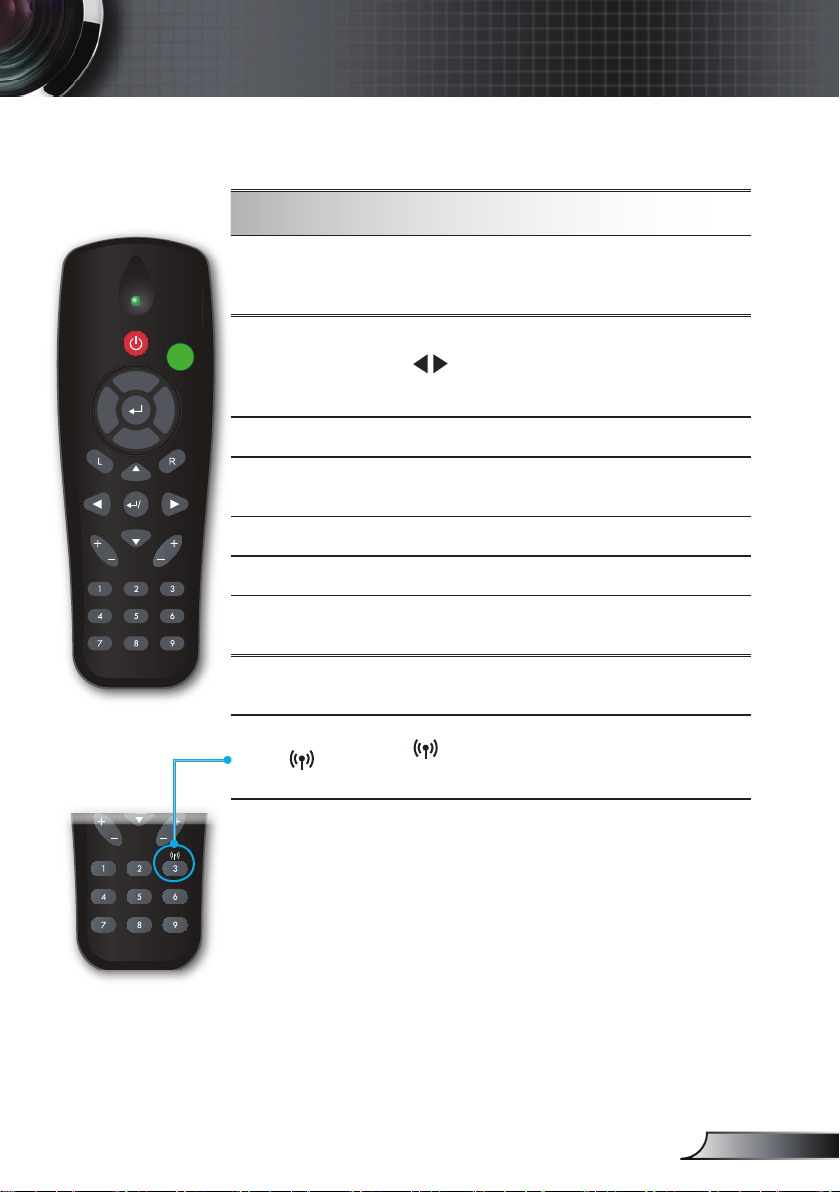
无线
按下“菜单”可以启动屏幕显示(OSD)菜
单。 如要退出OSD,请再次按下菜单。
放大图像。
按 按钮更改缩放比例。
(此按钮在无线型号上执行其他功能。)
按“DVI-D”可以选择DVI-D信号源。
按“VGA-1”可以选择来自VGA1-IN/
SCART接口的信号源。
暂时关闭/开启音频和视频。
按“S-VIDEO”可以选择S-Video信号源。
按“VGA-2”可以选择来自VGA2-In接口的
信号源。
按“VIDEO”可以选择复合视频信号源。
按 可以选择无线信号源。(此按钮在非
无线型号上执行其他功能。)
23
简体中文
Page 24
24
简体中文
用户控制
UU SSBB
USB线
连接到USB端口连接到USB端口
S
O
U
R
C
E
R
E
-
S
Y
N
C
?
/
L
A
M
P
T
E
M
P
M
E
N
U
P
O
W
E
R S
T
A
N
D
B
Y
E
N
T
E
R H
E
L
P
/
/
?
/
ENT ER HELP
/
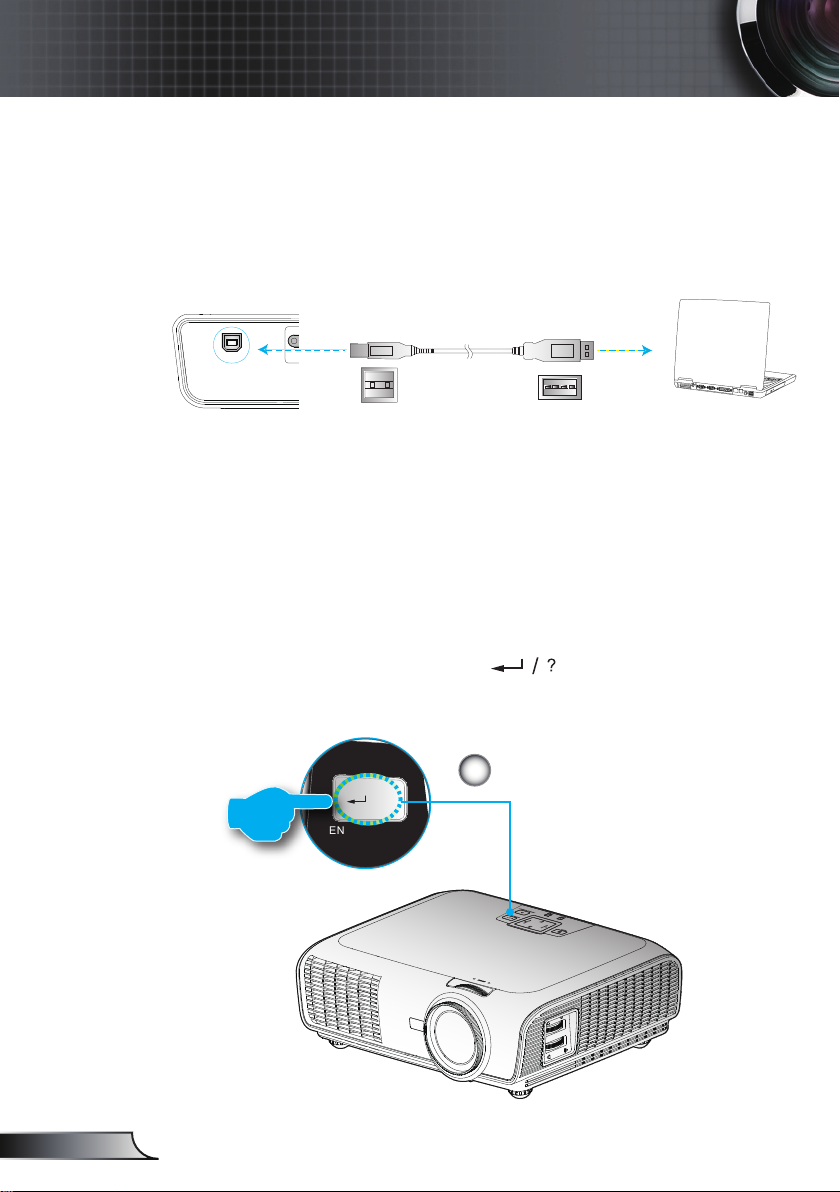
使用USB遥控鼠标
通过USB线将投影机连接到计算机时,遥控器可以用作遥
控鼠标。
使用确定/帮助按钮
按控制面板或遥控器上的“ ” 按钮以打开“帮
助”菜单。
确定/帮助
1
Page 25
用户控制
如果在没有检测到输入源时按下帮助按钮:
如果在检测到输入源时按下帮助按钮,会显示下面的页面以帮
助您诊断问题。
25
简体中文
Page 26
26
简体中文
用户控制
Page 27
用户控制
屏幕显示菜单
本投影机具有一个多语言屏幕显示(OSD)菜单,可以调整图
像并更改多种设置。 投影机将自动检测信号源。
操作方法
1. 如要打开OSD“菜单”,请按控制面板或投影机键盘上的菜单。
2 当显示OSD时,使用
行选择时,按 或“确定” 键进入子菜单。
3. 使用
4. 在子菜单中选择下一个要调整的项目,并按照如上所述进行调整。
5. 按 “确定” 进行确认,屏幕将返回主菜单。
6. 如要退出,请再次按“菜单”。 OSD菜单将关闭,投影机自动保
存新的设置。
键选择所需的项目,使用 键调整设置。
键选择主菜单中的项目。 在特定页上进
主菜单
子菜单
27
设置
简体中文
Page 28
28
简体中文
用户控制
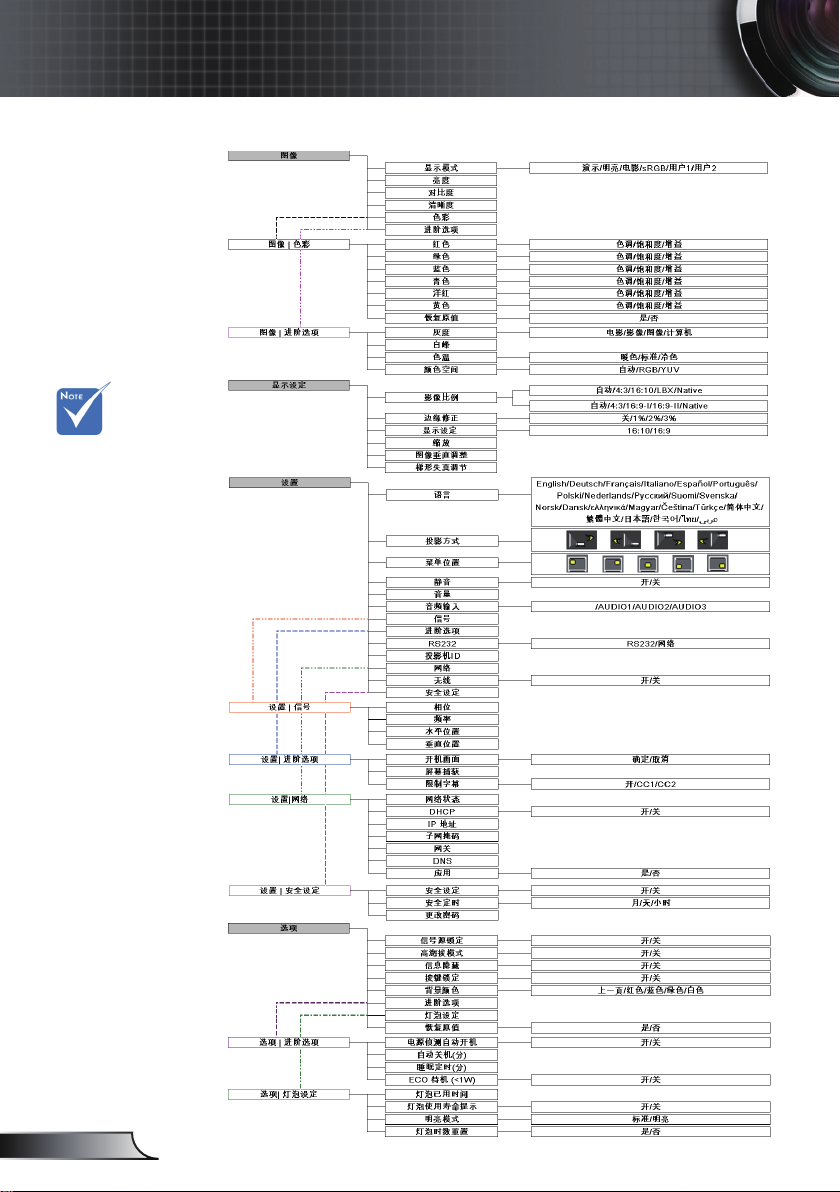
菜单树
(*) 仅WXGA型号支
持。
(**) 仅XGA型号支
持。
(#) “显示类型”仅
适用于WXGA型号。
(##) “信号”仅
适用于模拟VGA
(RGB)信号。
(###) “无线”功能
仅适用于选购的无线
型号。
*
**
#
##
###
(WXGA)
(XGA)
Page 29
用户控制
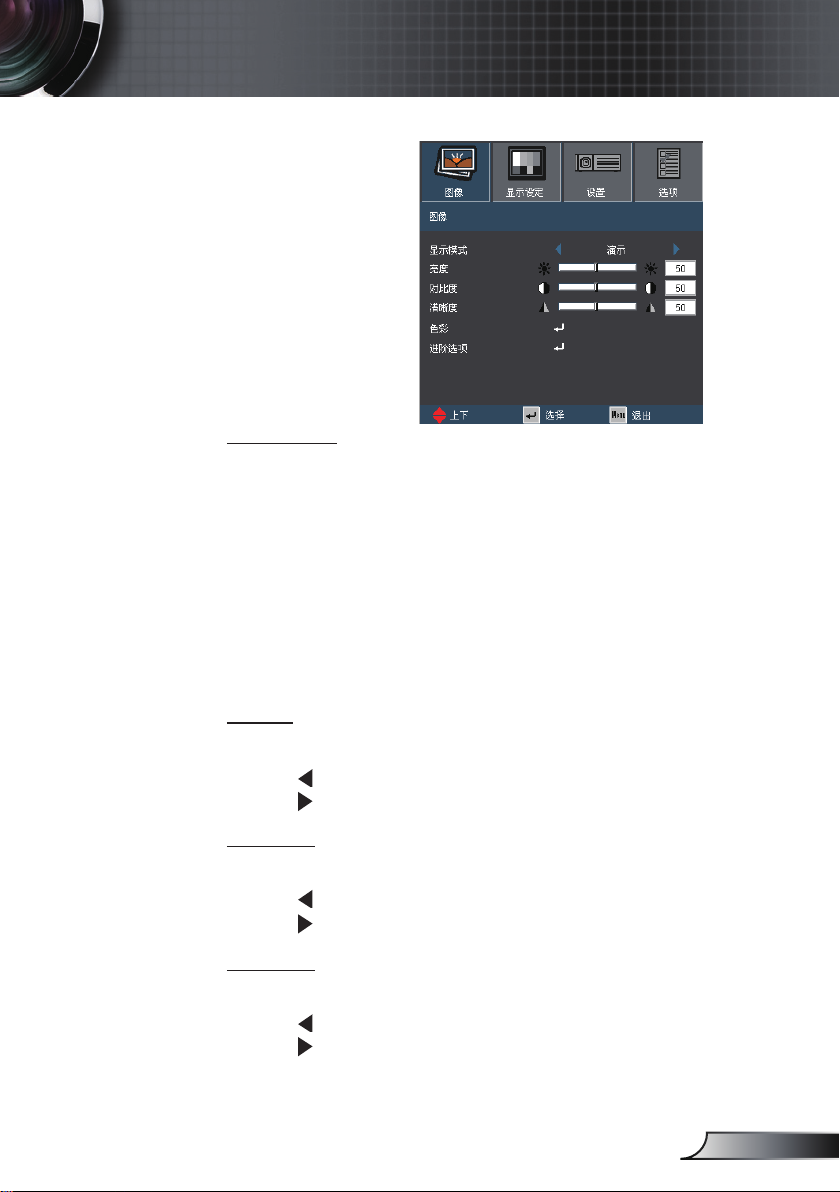
图像
显示模式
对于许多类型的图像,投影机里有很多已经优化了的出厂预置。
演示: 来自PC输入的良好色彩和亮度。
亮度: 来自PC输入的最大亮度。
电影: 用于家庭影院。
sRGB: 标准化精确色彩。
用户1: 用户的设置。
用户2: 此模式的初始默认设置来自“电影”模式。 用户2中用户
的任何进一步调整将保存在此模式中以备将来使用。
亮度
调整图像的亮度。
按 使图像变暗。
按 使图像变亮。
对比度
对比度控制图片最亮和最暗部分之间的差异程度。
按 降低对比度。
按 提高对比度。
清晰度
调整图像清晰度。
按 降低清晰度。
按 提高清晰度。
29
简体中文
Page 30
30
简体中文
用户控制
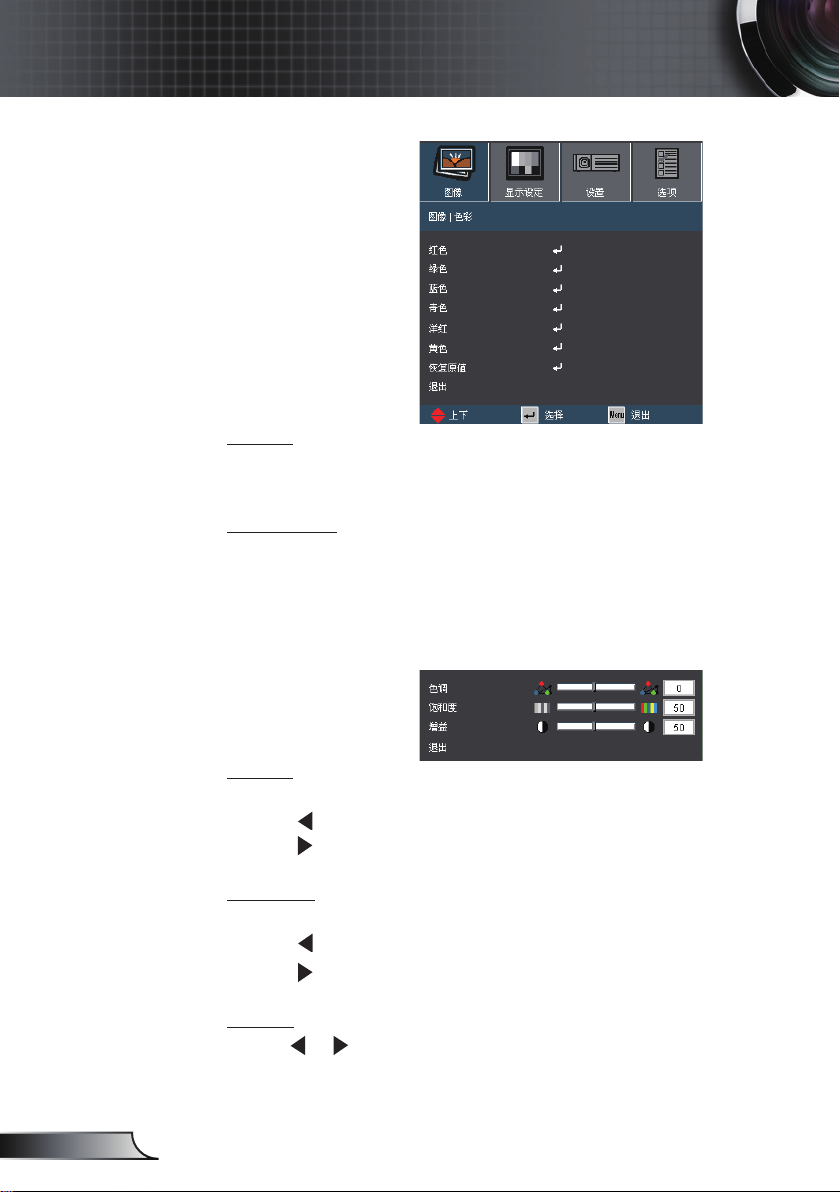
图像|色彩
色彩
使用这些设置可对红色、绿色、蓝色、青色、洋红和黄色进行个别
高级调整。
恢复原值
选择“是”恢复颜色调整的出厂默认值
。
色调
调整红绿色平衡。
按 增加图像中的绿色数量。
按 增加图像中的红色数量。
饱和度
将视频图像从黑白调整为完全饱和的颜色。
按 减小图像的饱和度。
按 增大图像的饱和度。
增益
使用 或 调整红色、绿色、蓝色、青色、洋红和黄色的亮度(
增益)。
Page 31

图像 | 进阶选项
灰度
这使您可以选择经过微调的degamma表,以便根据输入信号源提供
最佳图像质量。
电影: 用于家庭影院。
影像: 用于视频或TV信号源。
图像: 用于图像信号源。
计算机: 用于计算机信号源。
BrilliantColor™
此可调项目采用新的色彩处理算法和系统级增强功能,可以在提供
逼真、震撼图片色彩的同时使图片更亮。 范围是“0”到“10”。
如果希望图像更强烈一些,可以向最高设置方向调整。 如果要让图
像平缓自然一些,可以向最低设置方向调整。
用户控制
色温
设成低色温时,图像偏蓝 (冷色图像)。
设成高色温时,图像偏红 (暖色图像)。
颜色空间
从自动、RGB或YUV中选择相应的颜色矩阵类型。
31
简体中文
Page 32

32
简体中文
用户控制
显示设定
“16:9”和“LBX”
仅适用于WXGA型
号。
“16:9-I”和
“16:9-II”仅适用
于XGA型号。
WXGA型号: 支持
16:9和16:10两种显
示类型。
在16:9时,可用的影
像比例包括:自动、
4:3、16:9、LBX和
Native。
在16:10时,可用的
影像比例包括:自
动、4:3、16:10、
LBX和Native。
(参见第36页)
影像比例
可以使用此功能选择所需的宽高比。
自动: 自动选择合适的显示影像比例。
4:3:此影像比例适合4×3输入源。
16:9:此影像比例适合16×9输入源。
16:10:此影像比例适合16×10输入源。
16:9-I: 此影像比例适合16x9输入源,如针对宽屏电视的
HDTV和增强的DVD。 (576i/p)
16:9-II: 此影像比例适合16x9输入源,如针对宽屏电视的
HDTV和增强的DVD。 (480i/p)
信箱形状: 此影像比例适合非16x9、宽屏信号源以及利用外部
16x9镜头以全分辨率显示2.35:1宽高比的用户。
Native: 此影像比例显示原始图像而没有任何缩放。
Page 33

用户控制
LBX 影像比例
16 : 9 影像比例
或
16 : 10 影像比例
或
4 : 3 影像比例
关于LBX模式的详细信息:
1) 一些宽屏DVD未针对16x9电视进行增强。 因此,图像以16:9模式
显示时看起来不正确。
在这种情况下,请尝试使用4:3模式观看DVD。
如果内容本身不是4:3,在16:9显示屏上图像四周会出现黑条。 对
于此类型的内容,可以使用LBX模式使图像占满16:9显示屏。
2) 如果使用外部变形镜头,您可以使用这种LBX模式来观看2.35:1内
容,屏幕上部和下部不会出现黑条。 在此情况下,可完全利用灯泡
功率和分辨率。
显示区域
图片区域
输入信号
屏幕上的显示
33
简体中文
Page 34

34
简体中文
用户控制
WXGA型号:
选择此影像比例时,显示类型自动变成16:10 (1280x800)
显示类型: 16×10(尺寸调整至1280×800居中)
信号源 480i/p 576i/p 720p 1080i/p 计算机
4:3 尺寸调整至1066×800居中
16:10 尺寸调整至1280×800居中
LBX 尺寸调整至1280×800居中
Native 1:1映射居中
显示类型: 16×9 (1280 × 720)
信号源 480i/p 576i/p 720p 1080i/p 计算机
4:3 尺寸调整至960×720居中
16:9 尺寸调整至1280×720居中
LBX 尺寸调整至1280×720居中
Native 1:1映射居中
XGA型号: (
1024 × 768)
信号源 480i/p 576i/p 720p 1080i 计算机
4:3 尺寸调整至1024×768居中
16:9-l 尺寸调整至1024×576居中
16:9-ll 尺寸调整至854×480居中
Native 1:1映射居中
Page 35

用户控制
显示设定
边缘修正
对图像进行边缘修正以去除视频信号源边缘上的视频编码噪点。
缩放
按 减小图像的尺寸。
按 放大投影屏幕上的图像。
图像垂直调整
垂直移动投影图像的位置。
梯形失真调节
按 或 调整图像垂直失真。 如果图像看起来是梯形,此选项有
助于使图像变矩形。
35
简体中文
Page 36

36
简体中文
用户控制
“显示设定”仅适用
于WXGA型号。
当“显示设定”设
成16:9时,默认影
像比例变成“4:3、
16:9、LBX、
Native、自动”,
取代原始影像比
例“4:3、16:10、
LBX、Native、自
动”。
(参见第32页)
显示设定
显示设定
选择显示类型:16:10 (1280 x 800)或
16:9 (1280 x 720)。
16:10屏幕
信号源 480i/p 576i/p 720p 1080i/p 计算机
自动
4:3 调整至1066 x 800
16:10
LBX
Native
16:9屏幕
信号源 480i/p 576i/p 720p 1080i/p 计算机
自动
4:3 调整至960 x 720
16:9 调整至1280 x 720
LBX
Native
选择此影像比例时,屏幕类型自动变成16:10 (1280 x 800)。
调整至1280 x 800
调整至1280 × 960,
然后显示1280 × 800居中图像。
1:1映射居中 1280 ×
720居中
选择此影像比例时,屏幕类型自动变成16:10 (1280 x 800)。
调整至1280 × 960,
然后显示1280 × 720居中图像。
1:1映射居中 1280 ×
720居中
1:1映射
居中显示1280 ×
800
1:1映射
居中显示1280 ×
720
1:1
映射居中
1:1
映射居中
Page 37

用户控制
设置|语言
语言
选择多语种OSD菜单。 按 或 进入子菜单,然后使用 或
键选择所需的语言。 按 “确定” 完成选择。
37
简体中文
Page 38

38
简体中文
用户控制
背投-桌面和背投-吊
装时使用透明屏幕。
设置
投影方式
正投-桌面
这是默认选择。 图像直线投影到屏幕上。
背投-桌面
当选择时,图像反转。
正投-吊装
当选择时,图像上下颠倒。
背投-吊装
当选择时,图像反转并上下颠倒。
Page 39

设置
菜单位置
选择显示屏上的菜单位置。
静音
选择“开”以开启静音。
选择“关”以关闭静音。
音量
按 减小音量。
按 增大音量。
用户控制
音频输入
默认的音频设置位于投影机后面板上。 使用此选项为当前图像
信号源重新指派音频输入(1、2或3)。 每个音频输入都可指派
给多个视频信号源。
AUDIO1: VGA1、S-VIDEO
AUDIO2: VGA2、HDMI
AUDIO3: DVI、VIDEO
39
简体中文
Page 40

40
简体中文
用户控制
“信号”仅适用于
模拟VGA (RGB)信
号。
设置|信号
相位
同步显示和图形卡两者的信号时序。 如果图像不稳定或闪烁,可以
使用此功能进行修正。
频率
更改显示数据的频率,使其与计算机图形卡的频率匹配。 仅当图像
看起来垂直闪烁时,使用此功能。
水平位置
按 将图像左移。
按 将图像右移。
垂直位置
按 将图像下移。
按 将图像上移。
Page 41

设置 | 进阶选项
开机画面
可以使用此功能选择所需的开机画面。 如果进行过更改,则在投影
机下次开机时更改会生效。
Optoma: 默认开机画面。
用户: 使用“屏幕捕获“功能保存的图片。
屏幕捕获
按“ ”立即捕获屏幕上目前显示的图片图像。
用户控制
限制字幕
关: 选择“关”时关闭字幕功能。
CC1: CC1语言: 美国英语。
CC2: CC2语言(取决于用户的电视频道):
西班牙语、法语、葡萄牙语、德语、丹麦语。
41
简体中文
Page 42

42
简体中文
用户控制
RS232
RS232: 允许通过RS232对各个投影机进行控制。
网络: 允许使用Web浏览器(Internet Explorer)通过网络LAN控
投影机ID
ID定义可以通过菜单进行设置(范围0~99),用户可通过RS232控
制单个投影机。 有关RS232命令的完整列表,请参见第61页。
设置
制投影机。
“无线”仅适用于
无线型号。
无线
选择“开”时开启无线模式。
Page 43

用户控制
设置|网络
网络状态
显示网络信息。
DHCP
开: 自动从外部DHCP服务器为投影机分配IP地址。
关: 手动分配IP地址。
IP地址
选择IP地址。
子网掩码
选择子网掩码。
网关
选择投影机所连网络的默认网关。
DNS
选择DNS地址。
应用
按“ ”,然后选择“是”以应用所作的选择。
43
简体中文
Page 44

44
简体中文
用户控制
如何使用Web浏览器控制投影机
如要通过Web浏览器控制投影机,投影机必须有IP地址并且必须连接
到局域网。(*)
(*) 强烈建议您在网
络中安装投影机
之前向网络管理
员咨询相关事
宜。
(**)如果计算机已经
配置成以无线方式
连接到网络,则不
需要将计算机连接
到路由器、集线器
或交换机。
(***)使用的IP地址、
子网掩码、网关和
DNS值仅为参考
示例。 IP子网必
须在您的网络范
围内。
DHCP开启:
1) 如果您的网络中已有DHCP服务器,请使用RJ45连接通过直通
网线将投影机连接到路由器、集线器或交换机。(**)
2) 显示投影机菜单,转到“设置|网络”查看所分配的IP地址。 下
面是OSD示例。
在此假设您的计算机已连接到网络并进行了正确的配置。 转到
第45页查看如何使用Web浏览器访问投影机。
3) 按“菜单”关闭OSD
DHCP关:
1) 使用直通网线通过RJ45连接将投影机和计算机连接到集线器或
交换机。
2) 按MENU(菜单)按钮,转到“设置|网络”,在对话框中指派
IP地址、子网掩码、网关和DNS。
3) 选择应用,按“确定”按钮应用所作的更改,然后按菜单关闭
OSD。(***)
Page 45

用户控制
通过Web浏览器访问投影机
(如MicrosoftTM Internet Explorer)
1) 确保PC成功连接到无线投影机。
2) 打开浏览器,它将自动加载无线投影机的主页。
3) 否则,请在浏览器中输入投影机的IP地址。您可以在投影机无线启
动画面或OSD中找到该地址。 (默认IP是192.168.100.10)
4) 单击[Admin],然后输入密码。
NB.默认密码是“admin”。
5) 单击[投影机控制面板]以访问投影机控制。
高级无线功能
有关如何使用这些功能的说明,请参阅“无线/联网用户手册”(在用
户手册光盘中)。
(*) 建议您在变更之
前,用笔记下
计算机中目前设置
的值。
如果通过网络连接访问投影机控制时存在问题。
1) 执行第44页介绍的“DHCP关闭”的步骤1~3。(*)
2) 在计算机中,依次单击“开始”、“控制面板”、“网络和
Internet连接”、“网络连接”,单击要配置的网络连接(这是您
的网卡),再依次单击“属性”、“Internet协议”、“属性”。
45
简体中文
Page 46

46
简体中文
用户控制
3) 选择“使用下面的IP地址”,然后键入如下内容:
单击“确定”,然后再次单击“确定”。 关闭打开的所有窗口。
4) 在计算机中,依次单击“开始”、“控制面板”、“网络和
Internet连接”、“Internet选项”、“连接”、“局域网设置”,
确保所有字段均不选中。
单击“确定”,然后再次单击“确定”。 关闭打开的所有窗口。
5) 打开Internet Explorer,键入投影机的IP地址(192.168100.10),然
后按Enter键。 此时,应能访问投影机Web界面。
Page 47

设置|安全设定
安全设定
开: 选择“开”时可以在打开投影机电源时启用安全验证。
关:如果选择“关”,则在打开投影机电源时不需要进行密码验
安全定时
此功能用于选择投影机可使用的小时数(月/天/小时)。 达到限值天/小时)。 达到限值/小时)。 达到限值小时)。 达到限值时)。 达到限值
时,会要求您再次输入密码。
证。
用户控制
47
简体中文
Page 48

48
简体中文
用户控制
设置|安全设定
密码默认值
是“1234”
(初次使用时)。
更改密码
第一次:
1. 按“ ”设置密码。
2. 密码必须是4位。
3. 使用遥控器上的数字按钮输入新密码,然后按“ ”键确认密
码。
更改密码:
1. 按“ ”输入旧密码。
2. 使用数字按钮输入当前密码,然后按“ ”进行确认。
3. 使用遥控器上的数字按钮输入新密码(4位),然后按“ ”进
行确认。
4. 再次输入新密码,然后按“ ”进行确认。
如果连续3次输入错误密码,投影机将自动关机。
如果您忘记密码,请联系当地办事机构寻求支持。
Page 49

用户控制
选项
信号源锁定
开: 投影机只搜索当前输入连接。
关: 当前输入信号中断时,投影机搜索其它信号。
高海拔模式
选择“开”时,风扇转速加快。 此功能在空气稀薄的高海拔区域非
常有用。
信息隐藏
开: 选择“开”时隐藏信息。
关: 选择“关“时显示信息。
如要关闭按键锁,
请按住投影机顶部
的“Enter”键5秒
钟。
按键锁定
当按键锁定功能设成“开”时,控制面板将被锁定,但仍可通过遥
控器操作投影机。 通过选择“关“,可以重新使用控制面板。
背景顏色
使用此功能时,在没有信号的情况下将显示黑色、红色、蓝色、绿
色或白色屏幕。
恢复原值
选择“是”将所有菜单上的显示参数恢复至出厂默认设置。
49
简体中文
Page 50

50
简体中文
用户控制
选项|进阶选项
电源侦测自动开机
选择“开”可以开启电源直接开机模式。 当接通了交流电源时,投
影机将自动开机,而不用按投影机控制面板上的电源/待机键或遥控
器上的电源键。
自动关机(分)
以分钟为单位设置倒计时。当没有信号输入到投影机时,开始倒计
时。 倒计时(以分钟为单位)结束时,投影机自动关机。
当投影机处于待机
模式(<1W) 时,它
禁用VGA输出和
RJ45控制。
睡眠定时(分)
以分钟为单位设置倒计时。当没有信号输入到投影机时,开始倒计
时。 倒计时(以分钟为单位)结束时,投影机自动关机。
ECO 待机(<1W)
开: 选择“开”时进一步节省能耗(<1W)。
关: 选择“关”以返回正常待机模式,VGA输出端口将被启
用。
Page 51

选项|灯泡设定
灯泡已用时间
显示灯泡总计时数。
灯泡使用寿命提示
若开启,在到达建议的更换灯泡时数前30小时显示一条消息。
明亮模式
标准: 选择“标准”可以调暗投影机灯泡,从而降低功耗,延长
灯泡的寿命(最多130%)。
明亮: 选择“明亮”可以提高亮度。
用户控制
灯泡时数重置
更换灯泡后使灯泡寿命倒计时归零。
51
简体中文
Page 52

52
简体中文
附录
故障处理
如果在使用投影机过程中遇到问题,请参阅以下信
息。 若问题无法解决,请与当地经销商或服务中心
联系。
图像问题
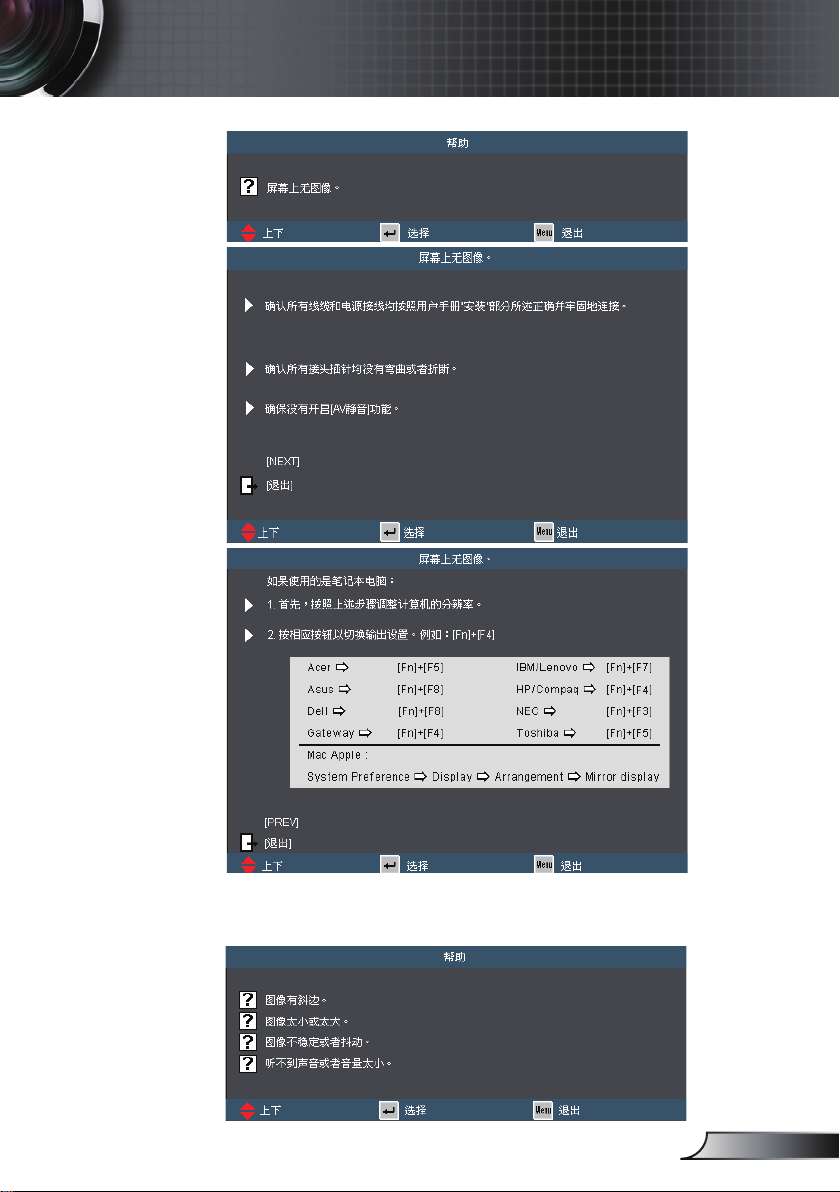
屏幕上没有图像
确认所有线缆和电源接线均按照“安装”部分所述正确并牢固地连
接。
确认所有接头插针均没有弯曲或者折断。
检查投影灯泡是否牢固安装。 请参阅“更换灯泡”部分。
确认已经取下了镜头盖并且投影机电源已经打开。
确保没有开启“AV静音”功能。
图像残缺、滚动或者显示不正确。
按遥控器上的RE-SYNC(重新同步)。
如果使用的是计算机:
对于Windows 95、98、2000、XP:
1. 打开“我的电脑”图标、“控制面板”文件夹,然后双击“显
示”图标。
2. 选择“设置”选项卡。
3. 确保显示分辨率设置低于或者等于UXGA (1600 × 1200)。
4. 单击“高级属性”按钮。
如果投影机仍然无法显示整幅图像,则还需要更改所使用的监视器
显示。 参考如下步骤。
5. 确保分辨率设置低于或者等于UXGA (1600 × 1200)。
6. 选择“监视器”选项卡下面的“更改”按钮。
Page 53

附录
7. 单击“显示所有设备”。 在SP框内选择“标准监视器类型”;
在“型号”框内选择所需的分辨率模式。
8. 确保显示器的显示分辨率设置低于或等于UXGA (1600 ×
1200)。
如果使用的是笔记本电脑:
1. 首先,按照上述步骤调整计算机的分辨率。
2. 按下您的笔记本制造商设定的下列合适的键,从笔记本向投影机
发送信号。 例如: [Fn]+[F4]
Acer [Fn]+[F5]
Asus [Fn]+[F8]
Dell [Fn]+[F8]
Gateway [Fn]+[F4]
Mac Apple:
系统参数 显示设定 排列 镜像显示
如果更改分辨率时遇到困难或者显示器画面停止不动,请重新启动
所有设备,包括投影机。
笔记本电脑或者PowerBook电脑不显示演示文档
如果使用的是笔记本电脑
一些笔记本电脑在使用第二个显示设备时会禁用其自身的显示器。
它们分别具有不同的重新激活方式。
有关的详细信息,请参阅计算机的手册。
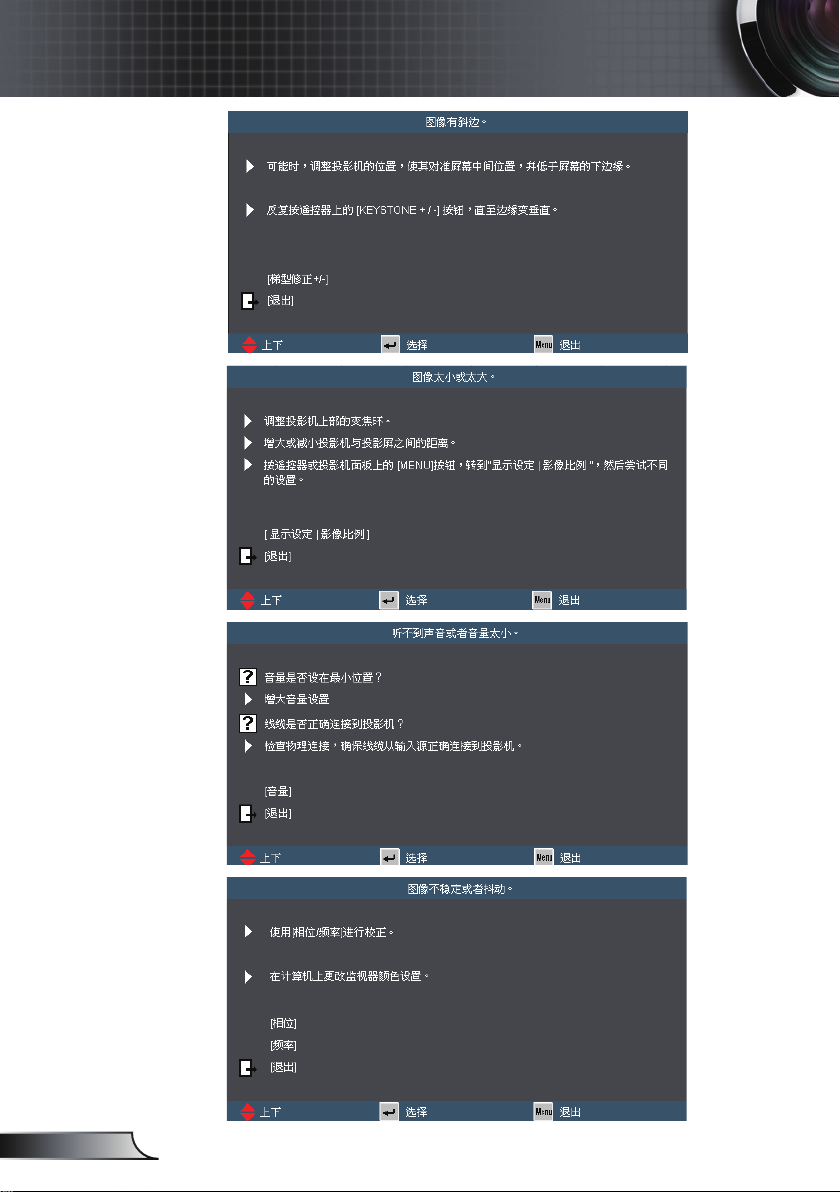
图像不稳定或者抖动
使用“相位”进行校正。 有关的详细信息,请参见第40页。
在计算机上更改监视器颜色设置。
图像出现闪烁竖条
使用“频率”进行调整。 有关的详细信息,请参见第40页。
检查并且重新配置图形卡的显示模式,使其与本投影机兼容。
IBM/Lenovo [Fn]+[F7]
HP/Compaq [Fn]+[F4]
NEC [Fn]+[F3]
Toshiba [Fn]+[F5]
53
简体中文
Page 54

54
简体中文
附录
图像聚焦不准
确保已取下镜头盖。
调整投影机镜头上的调焦环。
确保投影屏与投影机之间的距离介于要求的距离3.28到32.81英尺
(1.0到10.0米)之间。
参见第18页。
显示16:9 DVD盘时图像被拉伸
当播放变形DVD或16:9 DVD时,若在OSD中将投影机显示模式设
成16:9,则能显示最佳图像。
如果播放LBX影像比例的DVD盘,请在投影机OSD中将影像比例改
成LBX。
如果播放4:3影像比例的DVD盘,请在投影机OSD中将影像比例改
成4:3。
如果图像仍被拉伸,则还需要按照如下步骤调整宽高比:
在DVD播放机上将显示影像比例设成16:9(宽)宽高比类型。
图像太小或太大
调整投影机上部的变焦环。
增大或减小投影机与投影屏之间的距离。
按遥控器或投影机面板上的菜单按钮,转到“显示设定影像比
例”,然后尝试不同的设置。
不推荐使用梯形校
正。
图像有斜边
可能时,调整投影机的位置,使其对准屏幕中间位置,并低于屏幕
的下边缘。
按遥控器上的梯形修正 +/-按钮或按投影机面板上的“ / ”,
直至两侧垂直。
图像反转
在OSD中选择“设置 投影方式”,调整
投影方向。
Page 55

附录
其它问题
投影机对所有控制均停止响应。
如果可能,关闭投影机电源,拔掉电源线,等待至少60秒后重新连
接电源。
尝试用遥控器操作一下投影机,确认“按键锁定”未被启用。
灯泡不亮或者发出喀啦声
灯泡达到使用寿命时,可能无法点亮并发出喀啦响声。 如果出现这
种情况,则只有更换了灯泡模块之后投影机方可恢复工作。 更换灯
泡时,请按照第57-58页“更换灯泡”中的步骤进行操作。
投影机状态指示
LED点亮信息
稳定点亮
不亮
信息
待机状态
(输入电源线)
开机(预热)
灯泡点亮 蓝色
电源关闭(散热)
错误(温度过高)
错误(风扇故障)
错误(灯泡故障)
* 当显示OSD时ON/STANDBY LED点亮,当OSD消失时熄灭。
电源LED 温度LED 灯泡LED
(蓝色/红色) (红色) (红色)
红色
闪烁
蓝色
闪烁
红色
(0.5s亮,0.5s灭)
闪亮
55
简体中文
Page 56

56
简体中文
附录
屏幕上信息
温度警告:
风扇故障:
灯泡警告:
更换灯泡:
状态信息:
遥控器问题
如果遥控器不工作
检查遥控器的操作角度对于投影机的红外线接收器在水平和垂直方
向均处于±15°以内。
确保遥控器和投影机之间没有障碍物。 移到距离投影机7m(±0°) 以
内。
确保电池装入正确。
更换电池(若电池没电了)。
Page 57

附录
HIGH TEMPERATURE COOL FOR 30 MINUTES.
HIGH PRESSURE LAMP MAY EXPLODE IF IMPROPERLY HANDED.
REFER TO LAMP REPLACEMENT INSTRUCTIONS.DISCONNECT
POWER BEFORE CHANGING LAMP.
ATTENTION:
A HAUTES TEMPERATURES REFROIDISSEZ PENDANT 30 MINUTES.
Les lampes a haute pression peuvent exploser si elles sont mal utilisees.
Confier l entretien a une personne qualifiee.
COUPERLE COURANT AVANT DEREMPLACERLE LAMPES.
CA UTION!
H
g
更换灯泡
投影机自行检测灯泡寿命。 当灯泡接近使用寿命时,会显示一
条警告信息。
当看到此信息时,请与当地经销商或服务中心联系,尽快更换
灯泡。 在更换灯泡前,请确保投影机已经冷却至少约30分钟。
警告: 在吊顶安装情况下,打开灯泡拆卸面板时请小心操作。
建议您在吊顶安装情况下更换灯泡时戴上安全眼镜。 “务必小
心操作以防任何松动的部件从投影机上掉落。”
警告: 灯泡室可能高温! 待其冷却之后再更换灯泡!
警告: 为降低人身伤害危险,请避免灯泡模块坠落或者触摸灯
泡。 灯泡如果坠落可能会被摔碎并导致伤害。
57
简体中文
Page 58

58
简体中文
附录
1
2
3
灯罩和灯泡上的螺丝
都不能卸下。
如果灯罩尚未装回
投影机,则投影机
无法开机。
不要触摸灯泡的玻璃
区域。 手上油脂可
能会造成灯泡粉碎。
如果意外触摸了灯泡
模块,请使用干布进
行清洁。
灯泡更换步骤:
1. 按“ ”按钮,关闭投影机电源。
2. 让投影机冷却至少30分钟。
3. 拔下电源线。
4. 向上提起并取下灯罩。 1
5. 拧下灯泡模块上的3个螺丝。 2
6. 向上提起灯泡手柄,小心地卸下灯泡模块。 3
以相反的顺序执行上述步骤装上灯泡模块。
7. 更换完灯泡模块后,打开投影机电源,并执行“灯泡时数重置”。
灯泡时数重置: (i) 按“菜单” (ii) 选择“选项” (iii) 选择
“灯泡设定” (iv) 选择“灯泡时数重置” (v) 选择“是”。
Page 59

对于宽屏分辨
率(WXGA),
兼容性支持取决于笔
记本电脑/PC的型
号。
附录
兼容模式
计算机兼容性
模式 分辨率
VGA 640 × 350 70, 85 70
VGA 640 × 400 85 ***
VGA 640 × 480 60, 72, 75, 85 60, 72, 75
VGA 720 × 400 70, 85 70
SVGA 800 × 600 56, 60, 72, 75, 85 56, 60, 72, 75
XGA 1024 × 768 60, 70, 75, 85 60, 70, 75
SXGA 1152 × 864 70, 75, 85 70, 75, 85
SXGA 1280 × 1024 60, 75, 85 60, 75, 85
SXGA+ 1400 × 1050 60 60
UXGA 1600 × 1200 60 60
MAC LC 13” 640 × 480 66.66 ***
MAC II 13” 640 × 480 66.68 ***
MAC 16” 832 × 624 74.55 ***
MAC 19” 1024 × 768 75 ***
MAC 1152 × 870 75.06 ***
MAC G4 640 × 480 60 ***
i MAC DV 1024 × 768 75 ***
i MAC DV 1152 × 870 75 ***
i MAC DV 1280 × 960 60 ***
WXGA 1280 × 720 60 60, 75, 85
WXGA 1280 × 768 60 60, 75, 85
WXGA 1280 × 800 60 60, 75, 85
垂直同步(Hz)
模拟 数字
视频兼容性
NTSC M (3.58MHz), 4.43 MHz, 480i/p @60Hz
PAL B, D, G, H, I, M, N, 576i/p @50Hz
SECAM B, D, G, K, K1, L
SDTV/HDTV 480i/p, 576i/p, 720p@50Hz/60Hz, 1080i/p@50Hz/60Hz
59
简体中文
Page 60

60
简体中文
附录
12345
6789
1
2
3
RS232命令
RS232针脚分配
插针编
号
1 TXD OUT
2 RXD IN
3 GND GND
名称
I/O(从
投影机端)
插针编
号
1 无
2 RXD
3 TXD
4 无
5 GND
6 无
7 无
8 无
9 无
规格
Page 61

附录
SEND to projector
---------------------------------------------------------------------------------------------------------------------------------------------------------------------------------------------------------------------------
232 ASCII Code HEX Code
Function Description
---------------------------------------------------------------------------------------------------------------------------------------------------------------------------------------------------------------------------
~XX00 1 7E 30 30 30 30 20 31 0D Power ON
~XX00 0 7E 30 30 30 30 20 30 0D Power OFF
----------------------------------------------------------------------------------------------------------------------------------------------------------------------------------------- ----------------------------------
~XX01 1 7E 30 30 30 31 20 31 0D Resync
~XX02 1 7E 30 30 30 32 20 31 0D AV Mute On
~XX02 0 7E 30 30 30 32 20 30 0D Off
~XX03 1 7E 30 30 30 33 20 31 0D Mute On
~XX03 0 7E 30 30 30 33 20 30 0D Off
~XX04 1 7E 30 30 30 34 20 31 0D Freeze
~XX04 0 7E 30 30 30 34 20 30 0D Unfreeze
~XX05 1 7E 30 30 30 35 20 31 0D Zoom Plus
~XX06 1 7E 30 30 30 36 20 31 0D Zoom Minus
~XX07 1 7E 30 30 30 37 20 31 0D Up (Pan under zoom)
~XX08 1 7E 30 30 30 38 20 31 0D Down (Pan under zoom)
~XX09 1 7E 30 30 30 39 20 31 0D Left (Pan under zoom)
~XX10 1 7E 30 30 31 30 20 31 0D Right (Pan under zoom)
~XX12 1 7E 30 30 31 32 20 31 0D Direct Source Commands HDMI
~XX12 2 7E 30 30 31 32 20 32 0D DVI-D
~XX12 5 7E 30 30 31 32 20 35 0D VGA 1
~XX12 6 7E 30 30 31 32 20 36 0D VGA 2
~XX12 7 7E 30 30 31 32 20 37 0D VGA 1 SCART
~XX12 8 7E 30 30 31 32 20 38 0D VGA 1 Component
~XX12 9 7E 30 30 31 32 20 39 0D S-Video
~XX12 10 7E 30 30 31 32 20 31 30 0D Video
~XX12 11 7E 30 30 31 32 20 31 31 0D Wireless * For EX765W / EW766W only
~XX12 13 7E 30 30 31 32 20 31 33 0D VGA 2 Component
----------------------------------------------------------------------------------------------------------------------------------------------------------------------------------------- ----------------------------------
~XX20 1 7E 30 30 32 30 20 31 0D Display Mode Presentation
~XX20 2 7E 30 30 32 30 20 32 0D Bright
~XX20 3 7E 30 30 32 30 20 33 0D Movie
~XX20 4 7E 30 30 32 30 20 34 0D sRGB
~XX20 5 7E 30 30 32 30 20 35 0D User1
~XX20 6 7E 30 30 32 30 20 36 0D User2
----------------------------------------------------------------------------------------------------------------------------------------------------------------------------------------- ----------------------------------
~XX21 n 7E 30 30 32 31 20 a 0D Brightness n = 0 (a=30) ~ 100 (a=31 30 30)
~XX22 n 7E 30 30 32 32 20 a 0D Contrast n = 0 (a=30) ~ 100 (a=31 30 30)
~XX23 n 7E 30 30 32 33 20 a 0D Sharpness n = 0 (a=30) ~ 31 (a=33 31)
---------------------------------------------------------------------------------------------------------------------------------------------------------------------------------------------------------------------------
~XX170 n 7E 30 30 31 37 30 20 a 0D Color Red Hue n = -50 (a=2D 35 30) ~ 50 (a=35 30)
~XX171 n 7E 30 30 31 37 31 20 a 0D Red Saturation n = 0 (a=30) ~ 100 (a=31 30 30)
~XX27 n 7E 30 30 32 37 20 a 0D Red Gain n = 0 (a=30) ~ 100 (a=31 30 30)
~XX172 n 7E 30 30 31 37 32 20 a 0D Green Hue n = -50 (a=2D 35 30) ~ 50 (a=35 30)
~XX173 n 7E 30 30 31 37 33 20 a 0D Green Saturation n = 0 (a=30) ~ 100 (a=31 30 30)
~XX28 n 7E 30 30 32 38 20 a 0D Green Gain n = 0 (a=30) ~ 100 (a=31 30 30)
~XX174 n 7E 30 30 31 37 34 20 a 0D Blue Hue n = -50 (a=2D 35 30) ~ 50 (a=35 30)
~XX175 n 7E 30 30 31 37 35 20 a 0D Blue Saturation n = 0 (a=30) ~ 100 (a=31 30 30)
~XX29 n 7E 30 30 32 39 20 a 0D Blue Gain n = 0 (a=30) ~ 100 (a=31 30 30)
~XX176 n 7E 30 30 31 37 36 20 a 0D Cyan Hue n = -50 (a=2D 35 30) ~ 50 (a=35 30)
~XX177 n 7E 30 30 31 37 37 20 a 0D Cyan Saturation n = 0 (a=30) ~ 100 (a=31 30 30)
~XX30 n 7E 30 30 33 30 20 a 0D Cyan Gain n = 0 (a=30) ~ 100 (a=31 30 30)
~XX178 n 7E 30 30 31 37 38 20 a 0D Yellow Hue n = -50 (a=2D 35 30) ~ 50 (a=35 30)
~XX179 n 7E 30 30 31 37 39 20 a 0D Yellow Saturation n = 0 (a=30) ~ 100 (a=31 30 30)
~XX31 n 7E 30 30 33 31 20 a 0D Yellow Gain n = 0 (a=30) ~ 100 (a=31 30 30)
~XX180 n 7E 30 30 31 38 30 20 a 0D Magenta Hue n = -50 (a=2D 35 30) ~ 50 (a=35 30)
~XX181 n 7E 30 30 31 38 31 20 a 0D Magenta Saturation n = 0 (a=30) ~ 100 (a=31 30 30)
~XX32 n 7E 30 30 33 32 20 a 0D Magenta Gain n = 0 (a=30) ~ 100 (a=31 30 30)
~XX33 1 7E 30 30 33 33 20 31 0D Reset
----------------------------------------------------------------------------------------------------------------------------------------------------------------------------------------- ----------------------------------
~XX34 n 7E 30 30 33 34 20 a 0D BrilliantColor
TM
n = 0 (a=30) ~ 10 (a=31 30)
~XX35 1 7E 30 30 33 35 20 31 0D Degamma Film
~XX35 2 7E 30 30 33 35 20 32 0D Video
~XX35 3 7E 30 30 33 35 20 33 0D Graphics
~XX35 4 7E 30 30 33 35 20 34 0D PC
----------------------------------------------------------------------------------------------------------------------------------------------------------------------------------------- ----------------------------------
~XX36 1 7E 30 30 33 36 20 31 0D Color Temp. Warm
~XX36 2 7E 30 30 33 36 20 32 0D Medium
~XX36 3 7E 30 30 33 36 20 33 0D Cold
~XX37 1 7E 30 30 33 37 20 31 0D Color Space Auto
~XX37 2 7E 30 30 33 37 20 32 0D RGB
~XX37 3 7E 30 30 33 37 20 33 0D YUV
~XX44 n 7E 30 30 34 34 20 a 0D Saturation n = 0 (a=30) ~ 100 (a=31 30 30)
~XX45 n 7E 30 30 34 35 20 a 0D Tint n = 0 (a=30) ~ 100 (a=31 30 30)
---------------------------------------------------------------------------------------------------------------------------------------------------------------------------------------------------------------------------
~XX60 1 7E 30 30 36 30 20 31 0D Format 4:3
~XX60 2 7E 30 30 36 30 20 32 0D 16:9-l
~XX60 3 7E 30 30 36 30 20 33 0D 16:9-ll/ 16 :10 (WXGA)
~XX60 5 7E 30 30 36 30 20 35 0D LBX (WXGA projector only)
~XX60 6 7E 30 30 36 30 20 36 0D Native
~XX60 7 7E 30 30 36 30 20 37 0D Auto
---------------------------------------------------------------------------------------------------------------------------------------------------------------------------------------------------------------------------
~XX61 n 7E 30 30 36 31 20 a 0D Overscan n = 0 (a=30) ~ 3 (a=33)
~XX62 n 7E 30 30 36 32 20 a 0D Zoom n = -7 (a=2D 37) ~ 25 (a=32 35)
~XX64 n 7E 30 30 36 34 20 a 0D V Image Shift n = 0 (a=30) ~ 100 (a=31 30 30)
~XX66 n 7E 30 30 36 36 20 a 0D V Keystone n = -40 (a=2D 34 30) ~ 40 (a=34 30)
---------------------------------------------------------------------------------------------------------------------------------------------------------------------------------------------------------------------------
~XX70 1 7E 30 30 37 30 20 31 0D Language English
~XX70 2 7E 30 30 37 30 20 32 0D German
~XX70 3 7E 30 30 37 30 20 33 0D French
~XX70 4 7E 30 30 37 30 20 34 0D Italian
~XX70 5 7E 30 30 37 30 20 35 0D Spanish
~XX70 6 7E 30 30 37 30 20 36 0D Portuguese
~XX70 7 7E 30 30 37 30 20 37 0D Polish
~XX70 8 7E 30 30 37 30 20 38 0D Dutch
~XX70 9 7E 30 30 37 30 20 39 0D Swedish
~XX70 10 7E 30 30 37 30 20 31 30 0D Norwegian/Danish
~XX70 11 7E 30 30 37 30 20 31 31 0D Finnish
~XX70 12 7E 30 30 37 30 20 31 32 0D Greek
~XX70 13 7E 30 30 37 30 20 31 33 0D Traditional Chinese
~XX70 14 7E 30 30 37 30 20 31 34 0D Simplified Chinese
~XX70 15 7E 30 30 37 30 20 31 35 0D Japanese
~XX70 16 7E 30 30 37 30 20 31 36 0D Korean
~XX70 17 7E 30 30 37 30 20 31 37 0D Russian
~XX70 18 7E 30 30 37 30 20 31 38 0D Hungarian
~XX70 19 7E 30 30 37 30 20 31 39 0D Czechoslovak
~XX70 20 7E 30 30 37 30 20 32 30 0D Arabic
~XX70 21 7E 30 30 37 30 20 32 31 0D Thai
---------------------------------------------------------------------------------------------------------------------------------------------------------------------------------------------------------------------------
~XX71 1 7E 30 30 37 31 20 31 0D Projection Front-Desktop
~XX71 2 7E 30 30 37 31 20 32 0D Rear-Desktop
~XX71 3 7E 30 30 37 31 20 33 0D Front-Ceiling
~XX71 4 7E 30 30 37 31 20 34 0D Rear-Ceiling
---------------------------------------------------------------------------------------------------------------------------------------------------------------------------------------------------------------------------
RS232协议功能列表
RS232命令
波特率: 9600
数据位: 8
奇偶校验: 无
停止位: 1
流控制: 无
UART16550 FIFO: 禁用
投影机返回(通过): P
投影机返回(失败): F
XX=00-99,投影机ID,
XX=00适合所有投影机
1. 所有ASCII指令后都带
有一个<CR>。
2. 0D是ASCII代码中
<CR>的HEX代码。
61
简体中文
Page 62

62
简体中文
附录
SEND to projector
---------------------------------------------------------------------------------------------------------------------------------------------------------------------------------------------------------------------------
232 ASCII Code HEX Code
Function Description
--------------------------------------------------------------------------------------------------------------------------------------------------------------------------------------------------------------------------~XX72 1 7E 30 30 37 32 20 31 0D Menu Location Top Left
~XX72 2 7E 30 30 37 32 20 32 0D Top Right
~XX72 3 7E 30 30 37 32 20 33 0D Centre
~XX72 4 7E 30 30 37 32 20 34 0D Bottom Left
~XX72 5 7E 30 30 37 32 20 35 0D Bottom Right
--------------------------------------------------------------------------------------------------------------------------------------------------------------------------------------------------------------------------~XX73 n 7E 30 30 37 33 20 a 0D Signal Frequency n = -100 (a=2D 31 30 30) ~ 100 (a=31 30 30)
~XX74 n 7E 30 30 37 34 20 a 0D Phase n = 0 (a=30) ~ 63 (a=36 33)
~XX75 n 7E 30 30 37 35 20 a 0D H. Position n = -100 (a=2D 31 30 30) ~ 100 (a=31 30 30)
~XX76 n 7E 30 30 37 36 20 a 0D V. Position n = -100 (a=2D 31 30 30) ~ 100 (a=31 30 30)
--------------------------------------------------------------------------------------------------------------------------------------------------------------------------------------------------------------------------~XX77 n 7E 30 30 37 37 20 aabbcc 0D Security Security Timer Month/Day/Hour n = mm/dd/hh
mm = 00 (aa=30 30) ~ 99 (aa=39 39)
dd = 00 (bb=30 30) ~ 29 (bb=32 39)
hh = 00 (cc=30 30) ~ 23 (cc=32 33)
~XX78 1 7E 30 30 37 38 20 31 0D Security Settings Enable
~XX78 2 7E 30 30 37 38 20 32 0D Disable
--------------------------------------------------------------------------------------------------------------------------------------------------------------------------------------------------------------------------~XX79 n 7E 30 30 37 39 20 a 0D Projector ID n = 00 (a=30 30) ~ 99 (a=39 39)
--------------------------------------------------------------------------------------------------------------------------------------------------------------------------------------------------------------------------~XX80 1 7E 30 30 38 30 20 31 0D Mute On
~XX80 0 7E 30 30 38 30 20 30 0D Off
~XX81 n 7E 30 30 38 31 20 a 0D Volume n = 0 (a=30) ~ 20 (a=32 30)
--------------------------------------------------------------------------------------------------------------------------------------------------------------------------------------------------------------------------~XX82 1 7E 30 30 38 32 20 31 0D Logo Optoma
~XX82 2 7E 30 30 38 32 20 32 0D User
~XX83 1 7E 30 30 38 33 20 31 0D Logo Capture
--------------------------------------------------------------------------------------------------------------------------------------------------------------------------------------------------------------------------~XX86 1 7E 30 30 38 36 20 31 0D RS232 Port RS232
~XX86 2 7E 30 30 38 36 20 32 0D Network
--------------------------------------------------------------------------------------------------------------------------------------------------------------------------------------------------------------------------~XX88 0 7E 30 30 38 38 20 30 0D Closed Captioning Off
~XX88 1 7E 30 30 38 38 20 31 0D Closed Captioning CC1
~XX88 2 7E 30 30 38 38 20 32 0D Closed Captioning CC2
--------------------------------------------------------------------------------------------------------------------------------------------------------------------------------------------------------------------------~XX89 1 7E 30 30 38 39 20 31 0D Audio Input Default
~XX89 2 7E 30 30 38 39 20 32 0D AUDIO1
~XX89 3 7E 30 30 38 39 20 33 0D AUDIO2
~XX89 4 7E 30 30 38 39 20 34 0D AUDIO3
--------------------------------------------------------------------------------------------------------------------------------------------------------------------------------------------------------------------------~XX100 1 7E 30 30 31 30 30 20 31 0D Source Lock On
~XX100 0 7E 30 30 31 30 30 20 30 0D Off
~XX100 3 7E 30 30 31 30 30 20 33 0D Next Source
~XX101 1 7E 30 30 31 30 31 20 31 0D High Altitude On
~XX101 0 7E 30 30 31 30 31 20 30 0D Off
~XX102 1 7E 30 30 31 30 32 20 31 0D Information Hide On
~XX102 0 7E 30 30 31 30 32 20 30 0D Off
~XX103 1 7E 30 30 31 30 33 20 31 0D Keypad Lock On
~XX103 0 7E 30 30 31 30 33 20 30 0D Off
--------------------------------------------------------------------------------------------------------------------------------------------------------------------------------------------------------------------------~XX104 1 7E 30 30 31 30 34 20 31 0D Background Color Blue
~XX104 2 7E 30 30 31 30 34 20 32 0D Black
~XX104 3 7E 30 30 31 30 34 20 33 0D Red
~XX104 4 7E 30 30 31 30 34 20 34 0D Green
~XX104 5 7E 30 30 31 30 34 20 35 0D White
--------------------------------------------------------------------------------------------------------------------------------------------------------------------------------------------------------------------------~XX105 1 7E 30 30 31 30 35 20 31 0D Advanced Direct Power On On
~XX105 0 7E 30 30 31 30 35 20 30 0D Off
~XX113 1 7E 30 30 31 31 33 20 31 0D Signal Power On On
~XX113 0 7E 30 30 31 31 33 20 30 0D Off
~XX106 n 7E 30 30 31 30 36 20 a 0D Auto Power Off (min) n = 0 (a=30) ~ 180 (a=31 39 39)
~XX107 n 7E 30 30 31 30 37 20 a 0D Sleep Timer (min) n = 0 (a=30) ~ 995 (a=39 39 39) , step +/-5
~XX114 1 7E 30 30 31 31 34 20 31 0D Eco. Standby(1W) On
~XX114 0 7E 30 30 31 31 34 20 30 0D Off
--------------------------------------------------------------------------------------------------------------------------------------------------------------------------------------------------------------------------~XX108 1 7E 30 30 31 30 38 20 31 0D Lamp Setting Lamp Hours
~XX109 1 7E 30 30 31 30 39 20 31 0D Lamp Reminder On
~XX109 0 7E 30 30 31 30 39 20 30 0D Off
~XX110 1 7E 30 30 31 31 30 20 31 0D Brightness Mode Bright
~XX110 0 7E 30 30 31 31 30 20 30 0D STD
~XX111 1 7E 30 30 31 31 31 20 31 0D Lamp Reset Yes
~XX111 0 7E 30 30 31 31 31 20 30 0D No
--------------------------------------------------------------------------------------------------------------------------------------------------------------------------------------------------------------------------~XX112 1 7E 30 30 31 31 32 20 31 0D Reset Yes
~XX112 0 7E 30 30 31 31 32 20 30 0D No
~XX210 n 7E 30 30 32 31 30 20 a 0D Message n : characters (max length is 30)
---------------------------------------------------------------------------------------------------------------------------------------------------------------------------------------------------------------------------
SEND to Remote
--------------------------------------------------------------------------------------------------------------------------------------------------------------------------------------------------------------------------~XX140 1 7E 30 30 31 34 30 20 31 0D Power
~XX140 2 7E 30 30 31 34 30 20 32 0D Re-sync
~XX140 3 7E 30 30 31 34 30 20 33 0D Keystone +
~XX140 4 7E 30 30 31 34 30 20 33 0D Keystone -
~XX140 5 7E 30 30 31 34 30 20 34 0D AV Mute
~XX140 7 7E 30 30 31 34 30 20 37 0D Zoom * EX765 / EW766 Only
~XX140 9 7E 30 30 31 34 30 20 39 0D Volume +
~XX140 10 7E 30 30 31 34 30 20 31 30 0D Volume -
~XX140 11 7E 30 30 31 34 30 20 31 31 0D Enter
~XX140 12 7E 30 30 31 34 30 20 31 32 0D Menu
~XX140 13 7E 30 30 31 34 30 20 31 33 0D Left
~XX140 14 7E 30 30 31 34 30 20 31 34 0D Up
~XX140 15 7E 30 30 31 34 30 20 31 35 0D Right
~XX140 16 7E 30 30 31 34 30 20 31 36 0D Down
~XX140 18 7E 30 30 31 34 30 20 31 38 0D 1 * Security Code
~XX140 19 7E 30 30 31 34 30 20 31 39 0D 2
~XX140 20 7E 30 30 31 34 30 20 32 30 0D 3
~XX140 21 7E 30 30 31 34 30 20 32 31 0D 4
~XX140 22 7E 30 30 31 34 30 20 32 32 0D 5
~XX140 23 7E 30 30 31 34 30 20 32 33 0D 6
~XX140 24 7E 30 30 31 34 30 20 32 34 0D 7
~XX140 25 7E 30 30 31 34 30 20 32 35 0D 8
~XX140 26 7E 30 30 31 34 30 20 32 36 0D 9
---------------------------------------------------------------------------------------------------------------------------------------------------------------------------------------------------------------------------
SEND from projector automatically
---------------------------------------------------------------------------------------------------------------------------------------------------------------------------------------------------------------------------
232 ASCII Code HEX Code
Function Projector Return Description
--------------------------------------------------------------------------------------------------------------------------------------------------------------------------------------------------------------------------when standby/warming/cooling/out of range INFOn n : 0/1/2/3/4/6/7/8 = Standby/Warming/Cooling/Out of Range/
Lamp fail/Fan Lock/Over Temperature/Lamp Hours Running Out
---------------------------------------------------------------------------------------------------------------------------------------------------------------------------------------------------------------------------
READ from projector
---------------------------------------------------------------------------------------------------------------------------------------------------------------------------------------------------------------------------
232 ASCII Code HEX Code
Function Projector Return Description
--------------------------------------------------------------------------------------------------------------------------------------------------------------------------------------------------------------------------~XX121 1 7E 30 30 31 32 31 20 31 0D Input Source Commands OKn n : 0/1/2/3/4/5/6/7 =
None/DVI/VGA1/VGA2/S-Video/Video/HDMI/Wireless
~XX122 1 7E 30 30 31 32 32 20 31 0D Sofware Version OKdd
~XX123 1 7E 30 30 31 32 33 20 31 0D Display Mode OKn n : 0/1/2/3/4/5 = Presentation/Bright/Movie/sRGB/User1/User2
~XX124 1 7E 30 30 31 32 34 20 31 0D Power State OKn n : 0/1 = Off/On
~XX125 1 7E 30 30 31 32 35 20 31 0D Brightness OKn
~XX126 1 7E 30 30 31 32 36 20 31 0D Contrast OKn
~XX127 1 7E 30 30 31 32 37 20 31 0D Aspect Ratio OKn n : 0/1/2/3 = 4:3/16:9-l/16:9-ll/Window
~XX128 1 7E 30 30 31 32 38 20 31 0D Color Temperature OKn n : 0/1/2 = Warm/Medium/Cold
~XX129 1 7E 30 30 31 32 39 20 31 0D Projection Mode OKn n : 0/1/2/3 = Front-Desktop/ Rear-Desktop/ Front-Ceiling/ Rear-Ceiling
~XX150 1 7E 30 30 31 35 30 20 31 0D Information OKabbbbccdddde
a : 0/1 = Off/On
bbbb: LampHour
cc: source 00/01/02/03/04/05/06/07 =
None/DVI/VGA1/VGA2/S-Video/Video/HDMI/Wireless
dddd: FW version
e : Display mode 0/1/2/3/4/5/6
None/Presentation/Bright/Movie/sRGB/User1/User2
~XX151 1 7E 30 30 31 35 31 20 31 0D Model name OKn n :1/2 = EX765/EW766
Page 63

210.30mm (8.28”)
210.30mm (8.28”)
200.00mm (7.87”)
285.31mm (11.23”)
366.70mm (14.44”)
104.10mm (4.10”)
85.59mm (3.37”)
请注意,因安装不
当而导致的损坏不
在保修范围之内。
警告:
1. 若从其它公司购买吊
装架,请务必使用正
确大小的螺丝。 螺丝
大小将视安装板的厚
度而定。
2. 务必在天花板和投影
机底部之间留出至少
10cm间隙。
3. 不要将投影机安装在
热源附近。
附录
吊顶安装
1. 为防止损坏投影机,请使用吊装套件进行安装。
2. 如果希望使用第三方吊装套件,请确保将投影机固定到吊
架上时使用的螺丝满足下列规格:
螺丝类型: M4
螺丝长度: 8mm
变焦镜头
63
简体中文
Page 64

64
简体中文
附录
Optoma全球办事机构
如需服务或支持,请与当地办事机构联系。
美国
715 Sycamore Drive 电话: 408-383-3700
Milpitas, CA 95035, USA 传真: 408-383-3702
www.optomausa.com 服务: services@optoma.com
加拿大
5630 Kennedy Road, Mississauga, 电话: 905-361-2582
ON, L4Z 2A9, Canada 传真: 905-361-2581
www.optoma.ca 服务: canadacsragent@optoma.com
欧洲
42 Caxton Way, The Watford Business Park
Watford, Hertfordshire,
WD18 8QZ, UK 电话: +44 (0) 1923 691 800
www.optoma.eu 传真: +44 (0) 1923 691 888
服务电话: +44 (0)1923 691865 服务: service@tsc-europe.com
法国
Bâtiment E 电话: +33 1 41 46 12 20
81-83 avenue Edouard Vaillant 传真: +33 1 41 46 94 35
92100 Boulogne Billancourt, France 服务: savoptoma@optoma.fr
西班牙
C/ José Hierro,36 Of. 1C 电话: +34 91 499 06 06
28529 Rivas VaciaMadrid, 传真: +34 91 670 08 32
西班牙
德国
Werftstrasse 25 电话: +49 (0) 211 506 6670
D40549 Düsseldorf, 传真: +49 (0) 211 506 66799
德国 服务: info@optoma.de
斯堪的纳维亚
Grev Wedels Plass 2 电话: +47 32 26 89 90
3015 Drammen 传真: +47 32 83 78 98
挪威 服务: info@optoma.no
拉丁美洲
715 Sycamore Drive 电话: 408-383-3700
Milpitas, CA 95035, USA 传真: 408-383-3702
www.optoma.com.br www.optoma.com.mx
Page 65

附录
韩国
WOOMI TECH.CO.,LTD.
4F,Minu Bldg.33-14, Kangnam-Ku, 电话: +82+2+34430004
seoul,135-815, KOREA 传真: +82+2+34430005
日本
東京都足立区綾瀬3-25-18
株式会社オーエスエム 电子邮件: info@osscreen.com
サポートセンター:0120-46-5040 www.os-worldwide.com
台湾
5F., No. 108, Minchiuan Rd. 电话: +886-2-2218-2360
Shindian City, 传真: +886-2-2218-2313
Taipei Taiwan 231 服务: services@optoma.com.tw
www.optoma.com.tw asia.optoma.com
香港
Unit A, 27/F Dragon Centre,
79 Wing Hong Street, 电话: +852-2396-8968
Cheung Sha Wan, 传真: +852-2370-1222
Kowloon, Hong Kong www.optoma.com.hk
中国
中国 上海市 电话: +86-21-62947376
长宁区凯旋路 1205 号 5 层 传真: +86-21-62947375
邮政编码 200052 www.optoma.com.cn
65
简体中文
Page 66

66
简体中文
附录
管制和安全注意事项
本附录列出了与此投影机有关的一般注意事项。
FCC
声明
本设备经检测,符合FCC规则第15部分中关于B级数字设备的
限制规定。 这些限制旨在为居民区安装提供防止有害干扰的合
理保护。 本设备会产生、使用和辐射无线电频率能量,如果
不遵照说明进行安装和使用,可能会对无线电通信产生有害干
扰。
但是,不能保证在特定安装条件下不会出现干扰。 如果本设备
确实对无线电或电视接收造成了有害干扰(可通过关闭和打开
设备电源来确定),建议用户采取以下一项或多项措施来消除
干扰:
• 调整接收天线的方向或位置。
• 增大设备与接收器之间的距离。
• 将此设备和接收设备连接到不同电路的电源插座上。
• 向代理商或有经验的无线电/电视技术人员咨询以获得帮
助。
注意事项: 屏蔽线缆
连接其它计算设备时必须使用屏蔽线缆,以确保符合
FCC管制要求。
小心
如果未经制造商明确许可进行任何变更或修改,会导致
用户失去由联邦通信委员会授予的使用此设备的资格。
Page 67

附录
运行条件
本设备符合FCC规则第15部分的要求。 本设备在运行时符合下
面两个条件:
1. 本设备不会产生有害干扰。
2. 本设备必须承受接收到的任何干扰,包括可能导致异常
注意事项: 加拿大用户
此B级数字设备符合加拿大ICES-003的要求。
操作的干扰。
Remarque à l’intention des utilisateurs
canadiens
Cet appareil numerique de la classe B est conforme a la
norme
NMB-003 du Canada.
针对欧盟国家的符合性声明
• EMC指令2004/108/EC(包含修正内容)
• 低压指令2006/95/EC
• R & TTE指令1999/5/EC(如果产品具备RF功能)
废弃说明
废弃时不要将此电子设备作为普通垃圾处理。 为
减少污染和在最大程度上保护地球环境,请将其
回收利用。
67
简体中文
Page 68

Optoma Wireless and Network
control module
User’s Manual
1. Overview..................................................................................................2
2. Quick Start...............................................................................................2
3. Client Utility.............................................................................................5
3.1 Button Descriptions ...........................................................................5
3.2 Start/Stop Presentation......................................................................6
3.3 Start / Stop Playing Video/Music........................................................7
3.4 Open Admin Web Page .....................................................................8
3.5 Repeat ...............................................................................................9
3.6 Searching Server...............................................................................9
3.7 Magnifier Option ................................................................................9
3.8 System Information..........................................................................10
3.9 Exit Program....................................................................................10
4. WPS for Mac Client...............................................................................11
5. Web Management .................................................................................13
5.1 Home Page......................................................................................13
5.2 System Status..................................................................................14
5.3 Network Setup ................................................................................. 14
5.4 Projection Setup ..............................................................................17
5.5 Change Passwords .........................................................................18
5.6 Reset to Default...............................................................................18
5.7 Firmware Upgrade...........................................................................19
5.8 Projection Control Panel ..................................................................21
5.9 Alert Setting .....................................................................................21
5.10 Reboot System ................................................................................ 22
5.11 Logout..............................................................................................22
6. Mobishow ..............................................................................................23
6.1 Install from CD.................................................................................23
6.2 Using MobiShow with a Smartphone...............................................23
6.3 PtG Converter..................................................................................30
Page 69

1. Overview
Cable-free presenting with the Optoma wireless projector. Project
presentations and video from a windows or Mac based PC device.
4-to-1 Split Screen Projection
With this 4-to-1 split screen feature, up to four PC screens can be projected
on one projector screen at the same time. Allowing easy side-by-side
comparison from four PCs to increase meeting productivity!
Magnifier feature
Wireless projector supports Magnifier feature for a codec-free video clip
watching experience. By resizing the video into the magnifier capture region,
you will be able to watch any video on the big screen.
Macintosh wireless Projection
Wireless Projector supports Mac client connections projecting wirelessly. By
launching the Mac client software, which is stored on the User manual CD,
wireless projector provides the same experience for Mac users to utilize the
Wireless presentation features. Support Macintosh version 10.4 and above.
Features
■ Supports Windows Vista, XP & 2000.
■ 4-to-1 split screen projection! Turn one projector into four, increase
meeting productivity instantly.
■ Provides session security login, wireless WEP key and Gatekeeper
function to protect presentation contents and maintain effective security
within office networks.
■ Provides magnifier feature to enlarge small region for full-screen video
playback.
■ Provides a media playback feature, supporting both music and video
streaming.
2
Page 70

2. Quick Start
1) Firstly, plug in the wireless antenna and point it towards an unobstructed
position, away from the projector. Check the LED light on the wireless
module turns to green when AC power is supplied to the projector.
2) Press Wireless button on remote control, or select from On-Screen-
Display (OSD) in Projector menu
3) When Projector shows the default screen, as below, it indicates the
Wireless function is ready.
3
Page 71

4) Make sure your PC/laptop WLAN is enabled and connected to the “wireless
projector” network. Use the “Server IP” address to access the web-
interface home page via a web browser. (default IP address is
192.168.100.10 )
5) Download the client software, and install the program. Click on the
wireless icon to execute the program. When Wireless Projector IP is found,
enter the “Login Code” (shown in the top-left corner of the projector screen)
to start projecting wirelessly.
4
Page 72

3. Client Utility
3.1 Button Descriptions
1) After successful login, you will see the main GUI of Wireless Projector
application.
2) Use following buttons to operate Wireless Projector Application.
Presentation Mode
Video Mode
4-1 split-screen controls
Full Screen projection
Project to Split #1
Project to Split #2
Project to Split #3
Project to Split #4
Pause projecting
5
Page 73

Stop projecting
Magnifier
Server Login Code
While projecting is in progress, this icon will blink
Start Playing Video
Stop Playing Video
Open Video File
Mute Audio
Audio volume bar
Video transport bar
While playing video, this icon will blink
Function menu
Minimize the program
Exit the program
3.2 Start/Stop Presentation
Click to project desktop (Full screen or split screen)
Click to stop presentation.
Click to pause presentation, which will hide any intermediate activities
of your PC screen.
6
Page 74

Click to enable the magnifier feature. The software will enlarge and
playback the image within the red rectangle to playback full screen, ie. You
will need to resize the video window to fit into this rectangle.
NB. To enable this feature, you need to install Magnifier component
and audio driver which are on the User Manual CD.
3.3 Start / Stop Playing Video/Music
Click to switch to Video Mode.
Click to browse for a video file to playback.
Supported Video Format: MPG, MPEG, DAT, VOB, WMV9, ASF, MP3,
WAV.
7
Page 75

3.4 Open Admin Web Page
Click to open function menu and select “Web Admin” management to
link to the web interface home page. The web page functions are described in
more detail in Chapter 5.
8
Page 76

3.5 Repeat
Click “Repeat” to enable/disable video repeat capability.
3.6 Searching Server
Click “Search Server” to search for Wireless Projectors again.
3.7 Magnifier Option
Use “Magnifier option” to change the aspect ratio of captured video region
when using magnifier feature.
9
Page 77

3.8 System Information
Click “Info” to show system information. It includes product model name, IP
address and log-in code.
3.9 Exit Program
Click to exit the program.
10
Page 78

4. WPS for Mac Client
To project your Mac screen with Wireless Projector, please follow the
steps:
1) Enable your WiFi and connect to Wireless Projector device.
2) Install Wireless Projector client software for Mac. (On User Manual CD)
3) Launch Wireless Projector software and enter the login code. (shown in
the top-left corner of the projector screen)
11
Page 79

4) Start Projection.
12
Page 80

5. Web Management
5.1 Home Page
1.Make sure your PC connects to the Wireless Projector successfully.
2.Open your browser, it will load the Wireless Projector home page
automatically.
3.If not, enter your IP address on the browser, you can see the IP on the
projector screen. (The default IP is 192.168.100.10)
13
Page 81

5.2 System Status
Click [System Status] to shows current system status.
Model Name: Product model name
Versions:
1. Firmware version no.: Wireless module firmware version number.
Network Status:
1. IP address: IP address of Wireless module.
2. Subnet Mask: subnet mask
3. Default Gateway: IP address of default gateway
4. Wireless MAC address: wireless MAC address
Connection Status:
1. Projecting status: either “Waiting for projecting” or “Projecting”
2. T otal Users
: It shows how many users login into Wireless Projector box.
5.3 Network Setup
There are many kinds of operating configurations as below.
14
Page 82

Auto-Configuration Network Setup>
<
The default setting of the Wireless Projector box is DHCP client. When the
Wireless Projector box is connected to a LAN that already has a DHCP server
present, the Wireless Projector box takes an IP address assigned to it by the
server. When the Wireless Projector box is connected to a LAN that does not
have a DHCP server, the
the network.
Wireless Projector box becomes the DHCP server in
< IP Setup>
You can select “obtain IP address automatically” or “Use the following IP
address”
IP Address: The default value is 192.168.100.10.
Subnet Mask: The default value is 255.255.255.0
Default Gateway: The default value is 192.168.100.10
<DHCP Server Setup>
You can select “auto(Enable/Disable DHCP Server” or “Disable”)
Start IP: The start IP address of DHCP Server.
15
Page 83

End IP: The end IP address of DHCP Server.
< Wireless Setup>
Region: default value is “Worldwide”.
SSID: SSID string, max. Length is 32 bytes.
Channel: to set fixed channel or Auto. The “Auto” means after power
on Wireless Projector, it will scan all of wireless channel and select
clear one channel automatically.
WEP: you can Disable WEP key or select one of 64bit or 128bit in
ASCII or HEX string.
Key: If WEP is enabled, you have to set key value according to WEP
mode you selected.
< Gatekeeper>
Gatekeeper is designed for ensuring the enterprise network security within
Wireless Projector box
All Block can block Guest Users(through wireless) to access all office
network(LAN),
All Allow can pass Guest Users(through wireless) to access all office
network
Internet Only can block Guest Users (through wireless) from office
network (LAN) but still reserve internet connection capability.
<Apply >: press button to select this mode
<Cancel>: press button to abort action.
<Back>: Back to Operating mode main menu
16
Page 84

5.4 Projection Setup
Click [Projection Setup] button
<Resolution>: 1024*768, 1280x768 and 800*600.
<Color Depth>: provide Wireless Projector output with 16bit or 32
bit color depth. It depends on your PC settings.
<Screen Refresh Rate>: This is VGA output refresh rate, provides
both 60 Hz and 75Hz.
<Login Code>: You can select “Disable”, “Random”, or “Use the
following code” to set a specific 4-digit number.
<Apply>:Confirm and Save modifications
<Cancel>: Cancel all the modifications
17
Page 85

5.5 Change Passwords
Click [Change Password] button, to change password.
<Enter New Password>: enter new password you want to change
for each category.
<Confirm New Password>: double check new password.
<Apply>: Confirm and Save modifications.
5.6 Reset to Default
Click [Reset to Default] button to restore factory default settings.
<Apply>: Confirm reset.
18
Page 86

*** Another way to restore Factory Default Settings, follow the procedure
below:
1) Press [Reset] button and Hold.
2) Turn on Wireless Projector box.
3) Wait for over 10 seconds and release [Reset] button.
4) It will take effect to restore factory default settings.
5.7 Firmware Upgrade
Click [Firmware Upgrade] button to upgrade firmware.
19
Page 87

1) Ensure you have acquired the latest firmware to download.
2) Click <Browse> to specify file name you want to upgrade.
3) Click <Upgrade> button to upgrade the firmware.
4) A warning message with the estimated time for completion will appear
on the screen.
5) After a few minutes, a “complete” message will be shown on the
screen.
6) Upon the completion of firmware upgrade, manually power off the
projector and on again.
Warning: DO NOT power off Wireless Projector while firmware upgrade
is in progress. This will cause the wireless projector to fail and recovery
process cannot be performed.
20
Page 88

5.8 Projection Control Panel
5.9 Alert Setting
This option can be used to automatically send email alerts regarding various
warning functions of the projector, including email alerts.
21
Page 89

5.10 Reboot System
Click [Reboot System] button to restart system
<Reboot>: Restarts the system automatically.
5.11 Logout
Click [logout] to return back to the Web homepage.
22
Page 90

6. Mobishow
6.1 Install from CD
1) Connect your personal portable device to PC. For example, if the
operating system is Windows Mobile (v5.1 or above), please ensure it is
connected in ActiveSync.
2) Copy the Mobishow *.CAB installation file from the User manual CD to
your mobile device.
3) Run the installation file from your device operating system using “File
explorer” and follow the on-screen instructions.
4) When prompted, check the screen of your device to finish installation on
your portable device.
6.2 Using MobiShow with a Personal Portable
Device/Smart phone
1) Open “Programs” on your device and find “MobiShow” application.
2) Select “MobiShow” icon to launch the client software.
3) MobiShow will turn on Wi-Fi on your device and list available access
points for you to choose.
23
Page 91

4) Select the Mobishow enabled Wireless Projector you wish to connect to
(Default SSID is “Wireless Projector”)
5) MobiShow client will connect to that access point and search for
MobiShow devices automatically. When a MobiShow device is found, you
will need to enter the 4-digit login code from the projector’s wireless start-
up screen.
24
Page 92

If more than one MobiShow devices are found, the following list will be
displayed for selection.
25
Page 93

6) Select which feature to use. To project the screen of your phone, click on
the “Screen” icon. To do a PC-less presentation with Presentation-to-Go
(PtG), select the “PtG” icon. To show a slideshow of images or photos,
select “Photo” icon. To play a video or MP3 from your device, select the
“Media” icon.
Screen Projection:
MobiShow will project anything displayed on your screen. You may launch
another application (such PowerPoint Viewer) or open any file (such as
Word document or JPG image) and it will be projected to the projector.
Note: Do not exit MobiShow application while opening other applications to
keep screen projected.
Click the “Stop” icon to stop projection.
Click the “Pause” icon to pause projection. Click “Pause” again to
resume projection.
Click the “Zoom” icon to zoom the projected screen to extend the longest
26
Page 94

side of your screen to fill the screen.
Click the “Play” icon to start projection again if it is stopped.
Click the “OK” button or “Back” to return to main menu.
Wireless PtG:
When you select PtG function, MobiShow client will automatically open
Explorer for you to select a PtG file. Select the file to open for your
presentation. When the file is open, the PtG slides will be projected, and
the following screen is displayed on your phone for you to control your PtG
presentation.
Click “Prev” or “Next” to go to the previous or next item in the slide.
Click “PgUp” or “PgDn” to go to previous or next slide.
Click “Stop” to stop projecting the file. The icon will become “Play” if the
file is not played. Click “Play” again to play the file if it is stopped.
27
Page 95

Click “Home” to go to the first slide.
Click “Jump” and MobiShow client will show every slide on the phone.
You can select any page to go to, then click “ok”.
Click “Open” to select another PtG file.
Photo Slideshow:
You can use MobiShow to project photos stored on your portable device to
big screen. The photos will be prepared for playback on big screens rather
than for the tiny screens of your device.
To open a single photo, select one photo and click the OK button. The
photo will be displayed on the display connected to MobiShow device.
Click “Prev” or “Next” to go to the previous or next photo in the same
folder.
Click “Play” to start photo slideshow with photos in the same folder. The
button will be changed to “Pause” during slideshow. Click “Pause” to
28
Page 96

stop slideshow.
Media Sender:
When you select Media Sender function, MobiShow client will
automatically open Explorer for you to select a media file. Select a file
(videos in mpeg or wmv9 format, or MP3 music files) to play. The file will
be streamed to MobiShow device. It may take a few seconds to buffer
before the playback begins, depending on the wireless signal and media
bit rate.
29
Page 97

When the file is open, the media will be projected, and the following screen
is displayed on the device for you to control your media playback.
Click “FR” or “FF” to seek backward or forward.
Click “Vol-“ or “Vol+” to adjust volume for playback.
Click “Stop” to stop playing the file. The icon will become “Play” if the file
is not played. Click “Play” again to play the file if it is stopped.
Click “Mute” to mute the audio. Click “Mute” again to bring audio back.
Click “Open” to select another media file.
7) When you are in the main menu, click the “OK” button or “Back” again to
close the application.
6.3 PtG Converter
Use this software to convert MicrosoftTM Powerpoint presentations into
30
Page 98

“Presentation-to-Go” (*.PtG) files for use on mobile devices. The
installation wizard can be found on the User Manual CD.
1) Once installed, launch the application and the following GUI will appear
2) Click to set the maximum duration of animations in the slideshow
(between 10 and 60 seconds), find out more about the software, or exit.
3) Click to select the PPt file you wish to convert to PtG.
4) Enter or browse for the desired output directory and filename, then
click OK.
5) The software will then convert your presentation into a single PtG file -
a progress bar is shown at the top of the screen. Once complete, the following
message will appear:
31
Page 99

6) Once created, use the following controls to Open and Preview your
PtG files.
7) While previewing the slideshow, use the following controls to move
through the presentation.
Previous slide Options Exit Slideshow
Next Slide Presentation Progress
32
 Loading...