

Page 1

Table of Contents
Usage Notice ...................................................................................................................... 2
Safety Information ........................................................................................................................2
Class B emissions limits ................................................................................................................................................................ 2
Important Safety Instruction
Precautions .....................................................................................................................................4
Eye Safety Warnings .....................................................................................................................6
Product Features ...........................................................................................................................7
Introduction ....................................................................................................................... 8
Package Overview ........................................................................................................................8
Product Overview .........................................................................................................................................................................9
........................................................................................................................................................................................9
Main Unit
Control Panel
Rear View
Remote Control
................................................................................................................................................................................ 10
......................................................................................................................................................................................11
............................................................................................................................................................................12
Installation ........................................................................................................................ 13
Connecting the Projector ............................................................................................................13
Connect to Computer / Notebook ............................................................................................................................................ 13
Connect to Video Sources
Powering On/Off the Projector ................................................................................................15
Powering On the Projector .........................................................................................................................................................15
Powering Off the Projector
Warning Indicator........................................................................................................................................................................16
Adjusting the Projected Image ..................................................................................................17
Adjusting the Projector’s Height ...............................................................................................................................................17
Adjusting the Focus
Adjusting Projection Image Size
User Controls ................................................................................................................... 19
Control Panel ...............................................................................................................................19
Remote Control ...........................................................................................................................20
On-screen Display Menus ..........................................................................................................21
How to operate .............................................................................................................................................................................21
..................................................................................................................................................................................... 22
Menu Tree
Image ............................................................................................................................................23
Display ..........................................................................................................................................28
Setup .............................................................................................................................................30
Options .........................................................................................................................................39
Appendices ...................................................................................................................... 43
Troubleshooting ..........................................................................................................................44
Image .............................................................................................................................................................................................44
.............................................................................................................................................................................................. 47
Other
Projector LED Status Indicatior
Remote Control
Audio Problems
Replacing the Lamp
Cleaning the Projector ................................................................................................................52
Cleaning the Lens ........................................................................................................................................................................52
Cleaning the Case
Compatibility Modes ..................................................................................................................53
RS232 Commands .......................................................................................................................55
RS232 Protocol Function List .....................................................................................................56
Ceiling Installation ......................................................................................................................63
Optoma Global Ofces ...............................................................................................................64
Regulation & Safety notices .......................................................................................................66
Operation conditions ..................................................................................................................67
............................................................................................................................................................................49
...........................................................................................................................................................................49
........................................................................................................................................................ 2
........................................................................................................................................................... 14
......................................................................................................................................................... 16
.....................................................................................................................................................................17
.....................................................................................................................................................................50
........................................................................................................................................................................52
................................................................................................................................................18
.................................................................................................................................................48
Page 2
English
Usage Notice
Safety Information
WARNING: TO REDUCE THE RISK OF FIRE OR ELECTRIC SHOCK, DO NOT EXPOSE
THE PROJECTOR TO RAIN OR MOISTURE. DANGEROUS HIGH VOLTAGES ARE
PRESENT INSIDE THE ENCLOSURE. DO NOT OPEN THE CABINET.
REFER SERVICING TO QUALIFIED PERSONNEL ONLY.
Class B emissions limits
This Class B digital apparatus meets all requirements of the
Canadian Interference-Causing Equipment Regulations.
Important Safety Instruction
. Read these instructions –before using this projector.
. Keep these instructions –for future reference.
3. Follow all instructions.
4. Install in accordance with the manufacturer’s instructions :
A.
operation of the projector and to protect it from overheating,
put the projector in a position and location that will not
interfere with its proper ventilation. For example, do not
place the projector on a bed, sofa, carpet, or similar surface
that may block the ventilation openings. Do not put it in an
enclosure, such as a bookcase or a cabinet that may keep air
from owing through its ventilation openings.
B.
the risk of re or electric shock, do not expose the projector to
rain or moisture.
C.
stoves or other apparatus (including ampliers) that produce heat.
5. Clean only with a dry cloth.
6. Only use attachments/accessories specied by the
manufacturer.
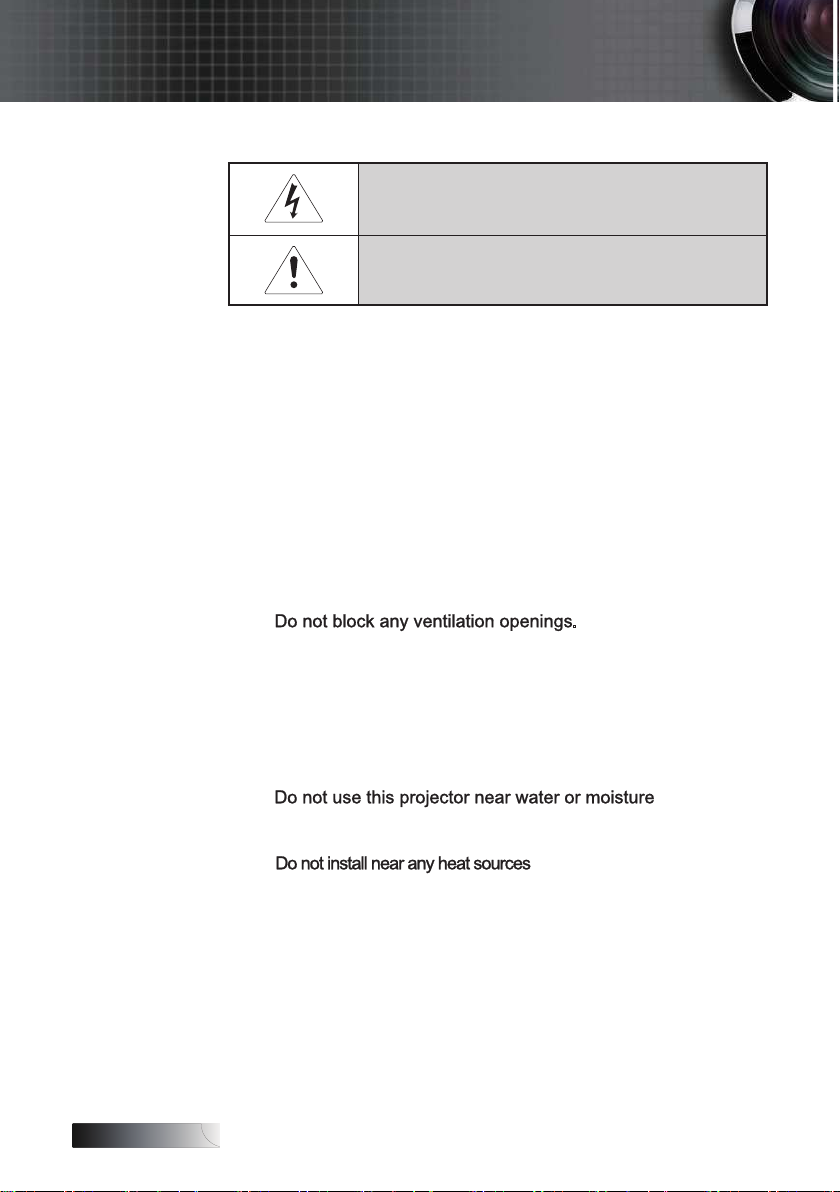
The lightning ash with arrow head within an equilateral triangle is
intended to alert the user to the presence of uninsulated “dangerous
voltage” within the product’s enclosure that may be of sucient
magnitude to constitute a risk of electric shock to persons.
The exclamation point within an equilateral triangle is intended to alert
the user to the presence of import operating and maintenance (servicing)
instructions in the literature accompanying the appliance.
. To ensure reliable
. To reduce
, such as radiators, heaters,
Page 3

English
Usage Notice
7. Refer all servicing to qualied service personnel. Servicing is
required when the projector has been damaged in any way, such as:
r Power supply cord or plug is damaged.
r Liquids have spilled or objects have fallen into the apparatus.
r The projector has been exposed to rain or moisture, does not
operate normally, or has been dropped.
Do not attempt to service this projector yourself. Opening or
removing covers may expose you to dangerous voltages or
other hazards. Please call Optoma to be referred to an
authorized service center near you.
8. Do not let objects or liquids enter the projector as they may touch
dangerous voltage points or short-out parts that could result in a
re or electric shock.
9. See projector enclosure for safety related markings.
0.The projector should not
except properly qualied service personnel.
be adjusted or repaired by anyone
3
Page 4

English
Usage Notice
Precautions
▀■ Warning - Do not look into the projector’s lens when the lamp is
▀■ Warning - To reduce the risk of re or electric shock, do not
▀■ Warning - Please do not open or disassemble the projector as
▀■ Warning - When replacing the lamp, please allow unit to cool down,
Please follow all warnings, precautions and
maintenance as recommended in this user’s
guide.
on. The bright light may damage your eyes.
expose this projector to rain or moisture.
this may cause electric shock.
and follow all replacement instructions. See page 50.
When the
v
lamp reaches
the end of its
life, the
projector will
not turn back
on until the
lamp
module
has been
replaced. To
replace the
lamp, follow
the procedures
listed under
“Replacing the
Lamp” section
on page 50.
▀■ Warning - This projector will detect the life of the lamp itself. Please
be sure to change the lamp when it shows warning
messages.
▀■ Warning - Use the “Lamp Reset” function from the on-screen display
“Options | Lamp Settings” menu after replacing the lamp
m
odul
e (see page 4).
▀■ Warning - When switching the projector o, please ensure the
cooling cycle has been completed before disconnecting
the power. Allow 90 seconds for the projector to cool
down.
▀■ Warning - When the lamp is approaching the end of its life, the
message “Lamp is approaching the end of its useful
life” displays on the screen. Please contact your
local reseller or service center to change the lamp
as soon as possible.
▀■ Warning - To reduce the risk of injury to the eyes, do not look
directly into the laser beam on the remote control and
do not point the laser beam into anyone’s eyes. This
remote control is equipped with a Class II laser that emits
radiation.
4
Page 5

English
Usage Notice
Do:
v Turn o the product before cleaning.
v Use a soft cloth moistened with a mild detergent to clean the
display housing.
v Disconnect the power plug from the AC outlet if the product
is not being used for a long period of time.
Do not:
v Block the ventilation slots and openings on the unit.
v Use abrasive cleaners, waxes or solvents to clean the unit.
v Use under the following conditions:
- In extremely hot, cold or humid environments. Ensure that
the ambient room temperature is within 5-40 °C and relative
h
umid
ity is 0-85% (max.), non-condensing.
- In areas susceptible to excessive dust and dirt.
- Near any appliance that generates a strong magnetic eld.
- In direct sunlight.
5
Page 6

English
Usage Notice
Eye Safety Warnings
▀■ Avoid staring directly into the projector’s beam of light at all times.
▀■ Minimize standing facing into the beam. Keep your back to the
beam as much as possible.
▀■ Using a stick or laser pointer is recommended to avoid the need
for the presenter to enter the beam.
▀■ Ensure that projectors are located out of the line of sight from
the screen to the audience; this ensures that, when presenters
look at the audience, they do not also have to stare at the
projector lamp. The best way to achieve this is by ceilingmounting the projector rather than placing it on oor or table
top.
▀■ When projector is used in a classroom, adequately supervise
students when they are asked to point out something on the
screen.
▀■ In order to minimize the lamp power needed, use room blinds to
reduce ambient light levels.
6
Page 7

English
Usage Notice
Product Features
This product is a single chip 0.55” SVGA DLP® projector.
Outstanding features include:
®
u Texas Instruments Single chip DLP
u Computer Compatibility:
Apple Macintosh, iMac, and VESA Standards:
UXGA, SXGA+, SXGA, WXGA, XGA, SVGA, VGA
u Video Compatibility:
■ NTSC, NTSC4.43
■ PAL/PAL-M/PAL-N/SECAM
■ SDTV and EDTV compatible
■ HDTV compatible (70p, 080i, 080p)
u Auto source detection with user denable settings
u Fully featured IR remote control
u User friendly multilingual On Screen Menu
u Advanced digital keystone correction and high
quality full screen image re-scaling
u One built-in speaker Watt amplier
u Macintosh and PC compatible
u Closed Captioning equipped
Technology
7
Page 8
English
3
V
O
L
T
S
CR2025
Introduction
Package Overview
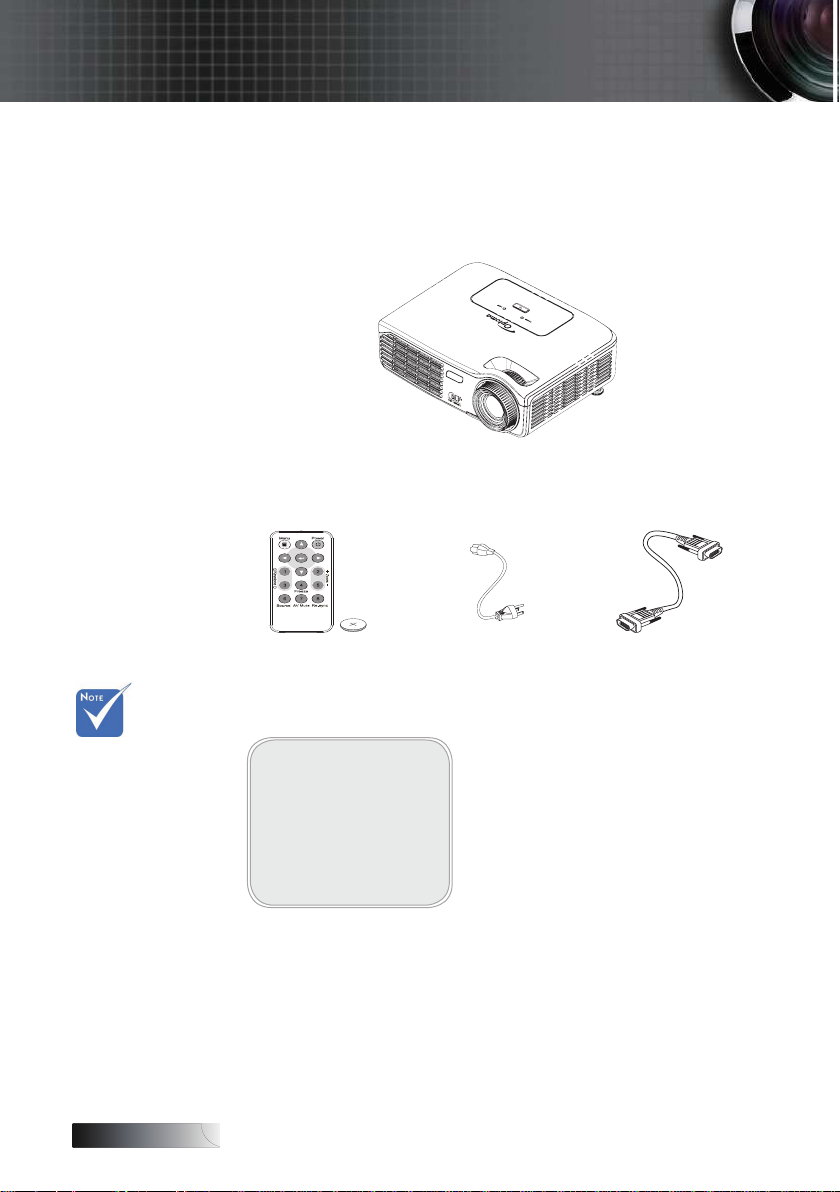
This projector comes with all the items shown below. Check to
make sure your unit is complete. Contact your dealer immediately if
anything is missing.
Projector
Due to the
v
dierence in
applications
for each
country, some
regions may
have dierent
accessories.
IR Remote Control
(with 3V Battery)
Documentation:
User’s Manual
þ
Warranty Card
þ
Quick Start Card
þ
WEEE Card
þ
Power Cord 1.m VGA Cable 1.m
Page 9
English
2
1
3
4
5
6
VIDEO
RS−232
AUDIO IN
VGA
89
7
Due to the
v
dierence
application for
each model.
Function is
dependent
on the model
purchased.
Introduction
Product Overview
Main Unit
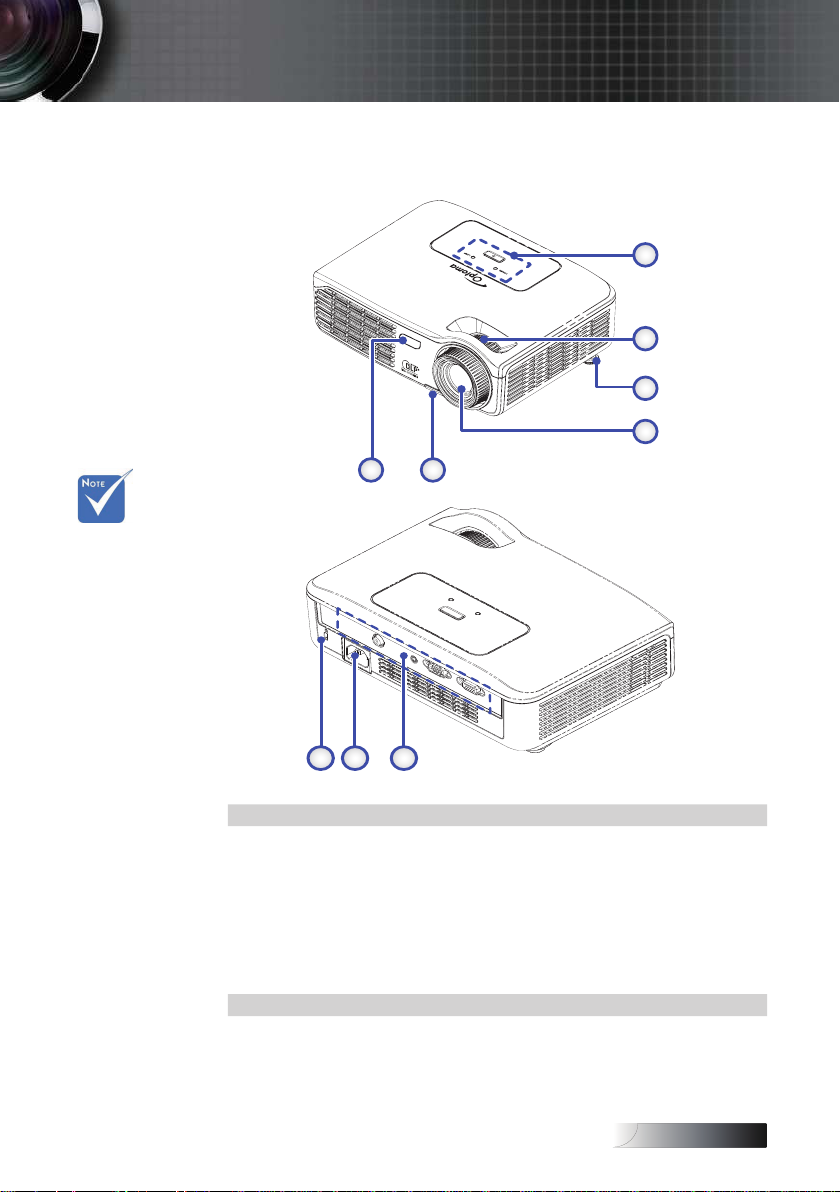
. Control Panel 6. Front IR Receiver
. Focus
7. Input/Output Connections
3. Tilt-Adjustment Foot 8. Power Socket
4. Lens 9. Kensington™ Lock
5. Elevator foot
9
Page 10
English
1
3
2
Introduction
Control Panel
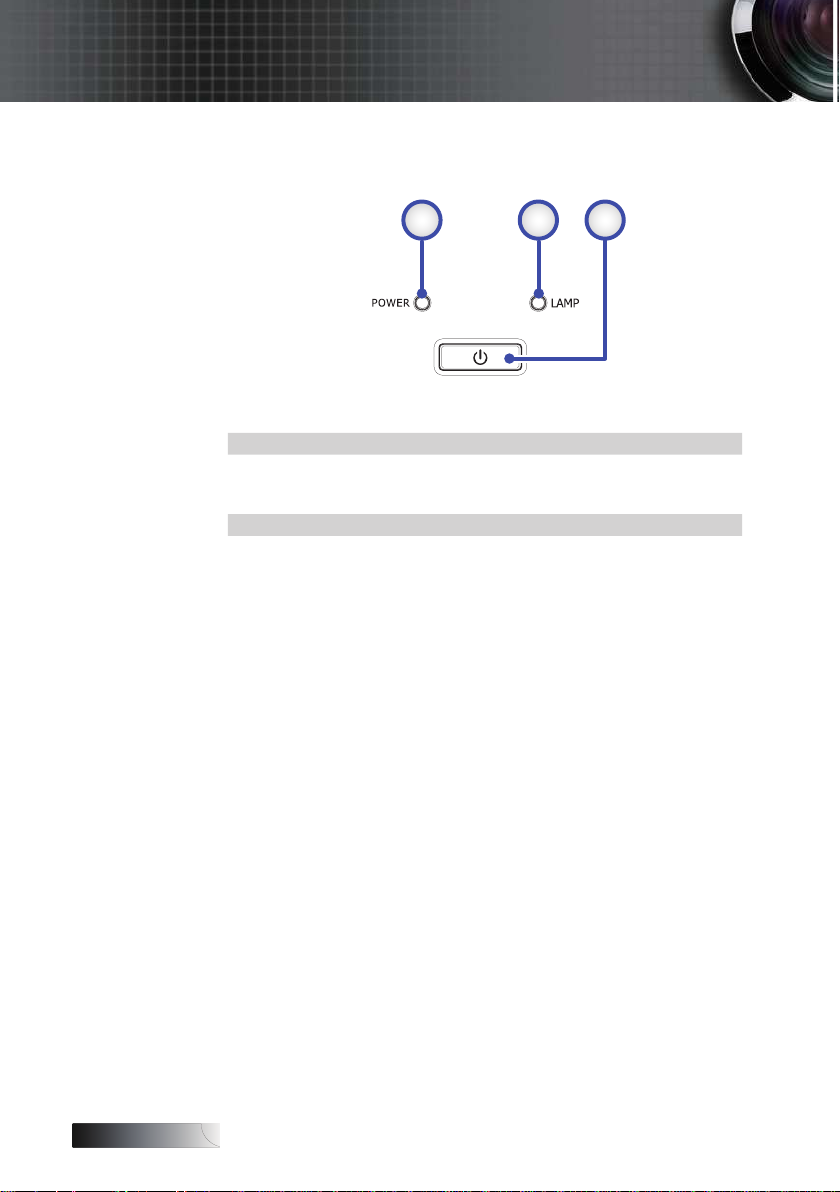
. Power LED 3. POWER Button
. Lamp LED
0
Page 11
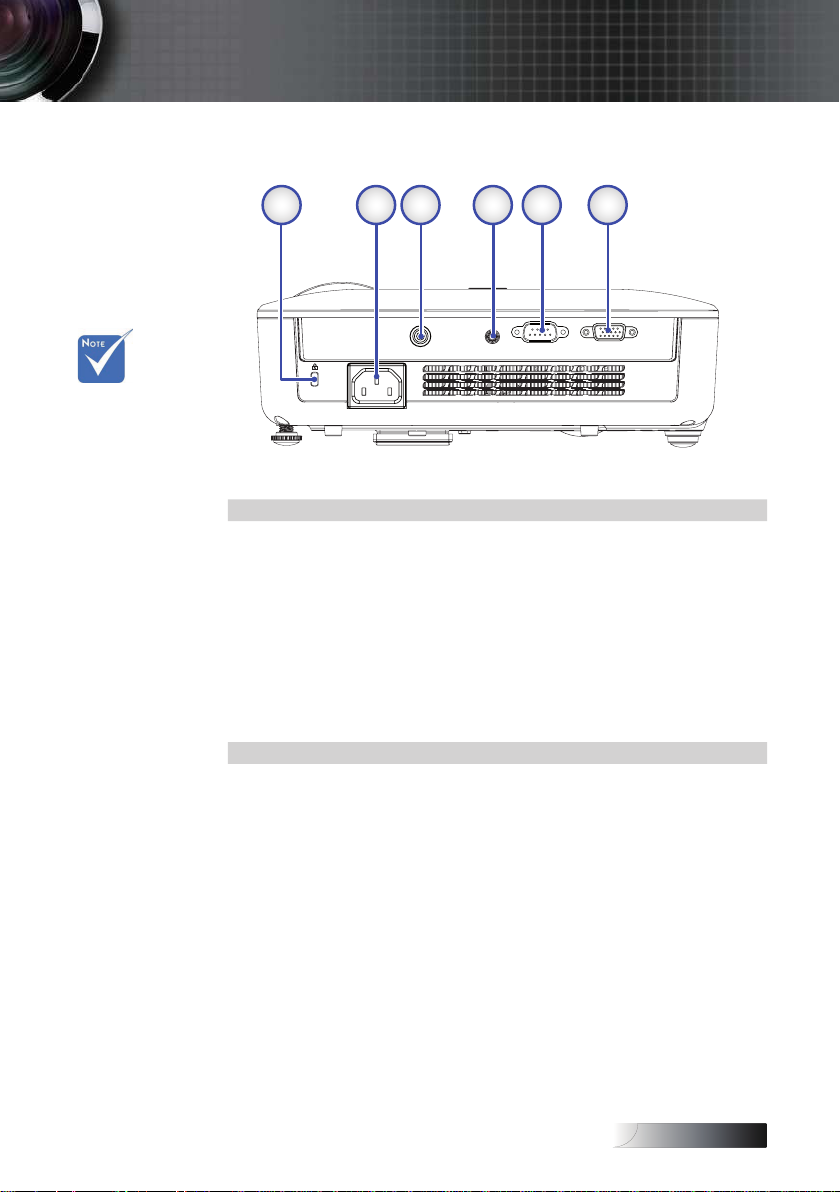
English
VIDEO
RS−232AUDIO IN VGA
2 3 64 51
Due to the
v
dierence
application for
each model.
Function is
dependent
on the model
purchased.
Rear View
. KensingtonTM Lock Port
. Power Socket
3. Video Connector
4. AUDIO IN Connector
5.
RS-
3 Connector
Introduction
VGA Connector
6.
Page 12
English
2
4
6
7
89
1
3
13
12
11
10
14
15
5
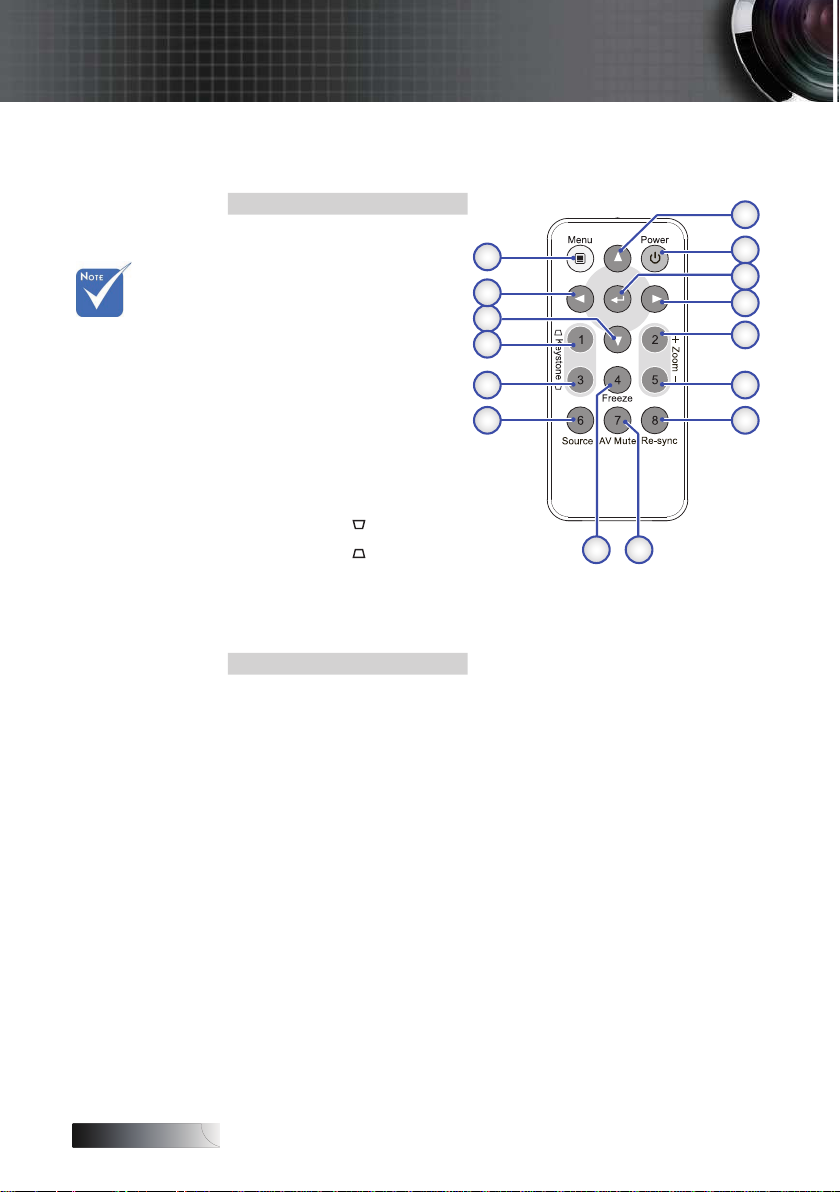
Introduction
Remote Control
. Up
. Power On/O
3. Enter
Due to the
v
dierence in
applications
for each
country, some
regions may
have dierent
accessories.
4. Right
5. Zoom + /
6. Zoom - / 5
7. Re-Sync / 8
8. AV mute / 7
Freeze / 4
9.
0. Source / 6
. Keystone
. Keystone
3. Down
4. Left
5. Menu
/ 3
/
Page 13
English
v Due to the
1
32
4
dierence in
applications
for each
country, some
regions may
have dierent
accessories.
Installation
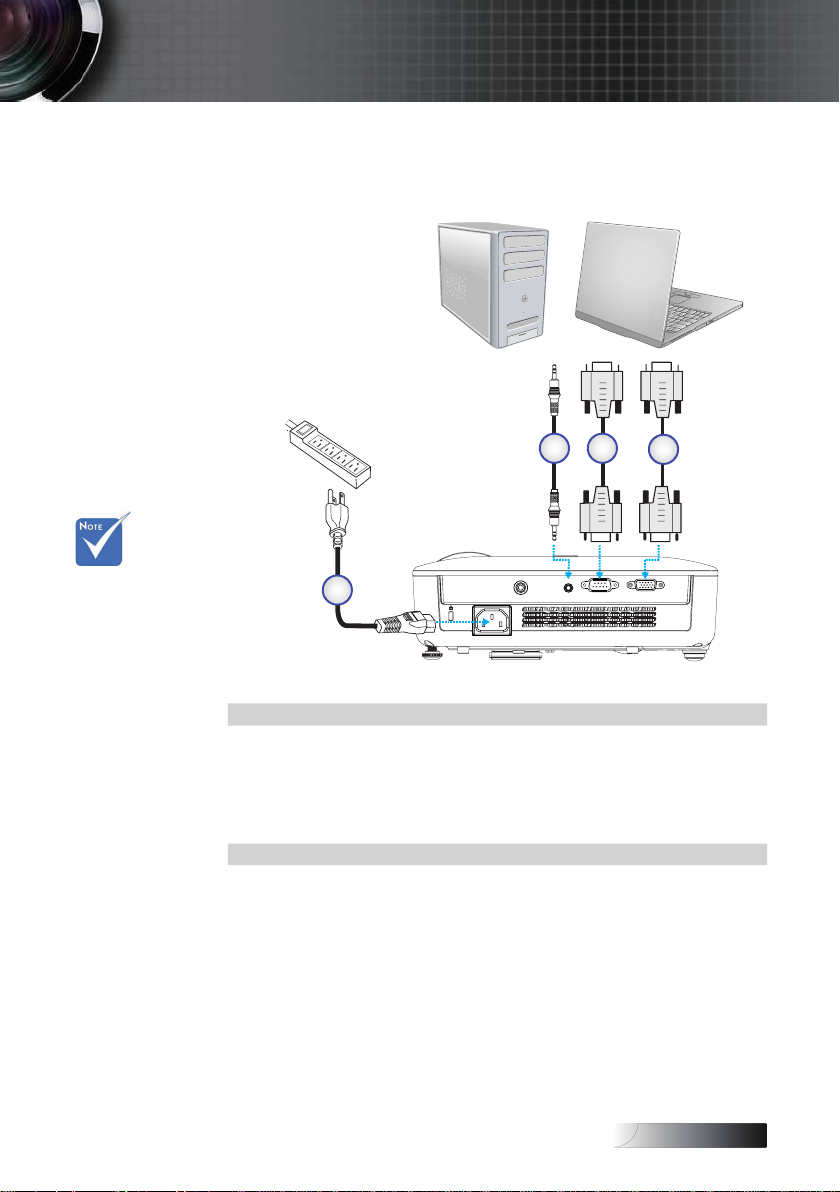
Connecting the Projector
Connect to Computer / Notebook
. Power Cord
. Audio-in (Optional 3.5mm jack cable)
3. RS-
4.
3 Cable (Optional)
VGA Cable
3
Page 14
English
4
DVD Player, Set-top Box,
HDTV receiver
Video Output
5
3
4
6
1
8
Audio Out
L R
Audio In
7
Audio - Out
2
Installation
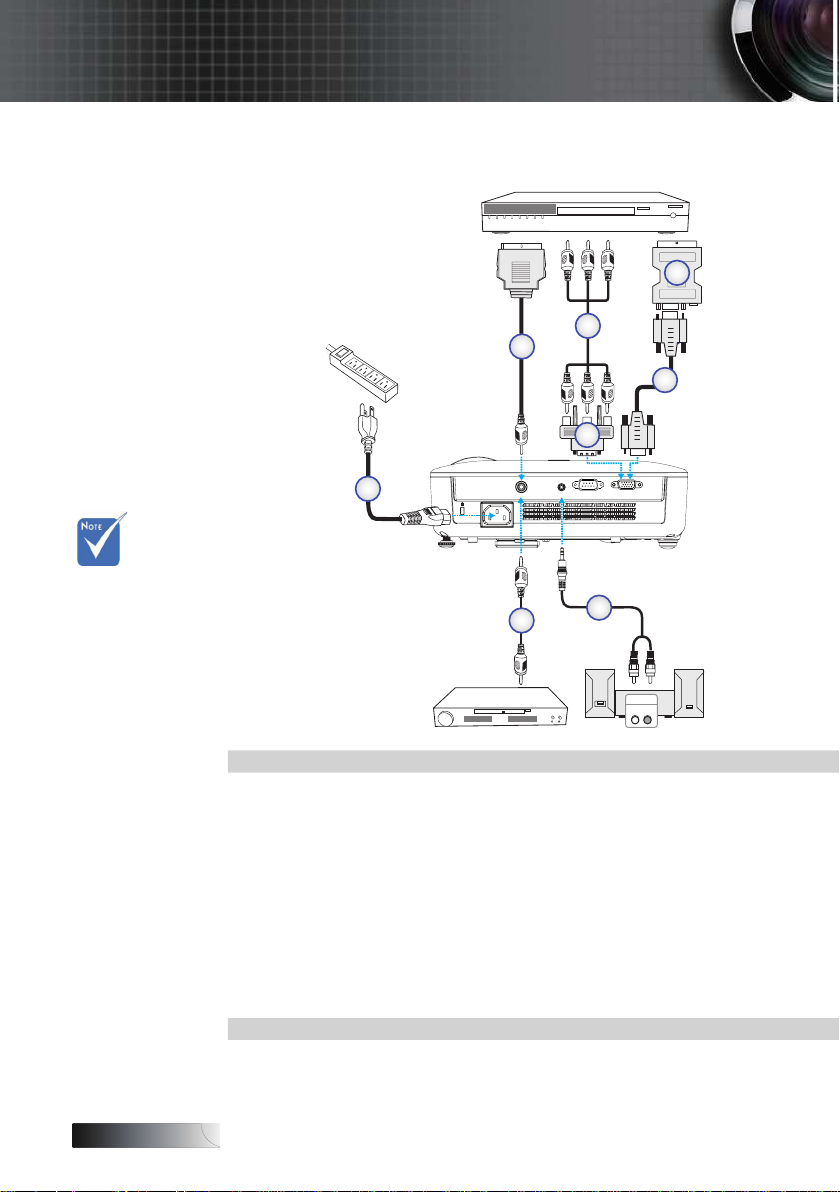
Connect to Video Sources
v Due to the
dierence in
applications
for each
country, some
regions may
have dierent
accessories.
. Power Cord
. SCART to video cable (Optional)
3. Component Cable (Optional)
4. RGB to Component Adapter (Optional)
5. SCART to RGB & S-Video Adapter (Optional)
6. VGA Cable
7. Audio-in (Optional RCA to 3.5mm jack cable)
8. Composite Video Cable (Optional)
4
Page 15
English
v Turn on the
projector rst
and then
select the
signal sources.
Installation
Powering On/O the Projector
Powering On the Projector
. Connect the power cord to the projector.
. Turn On the connected devices.
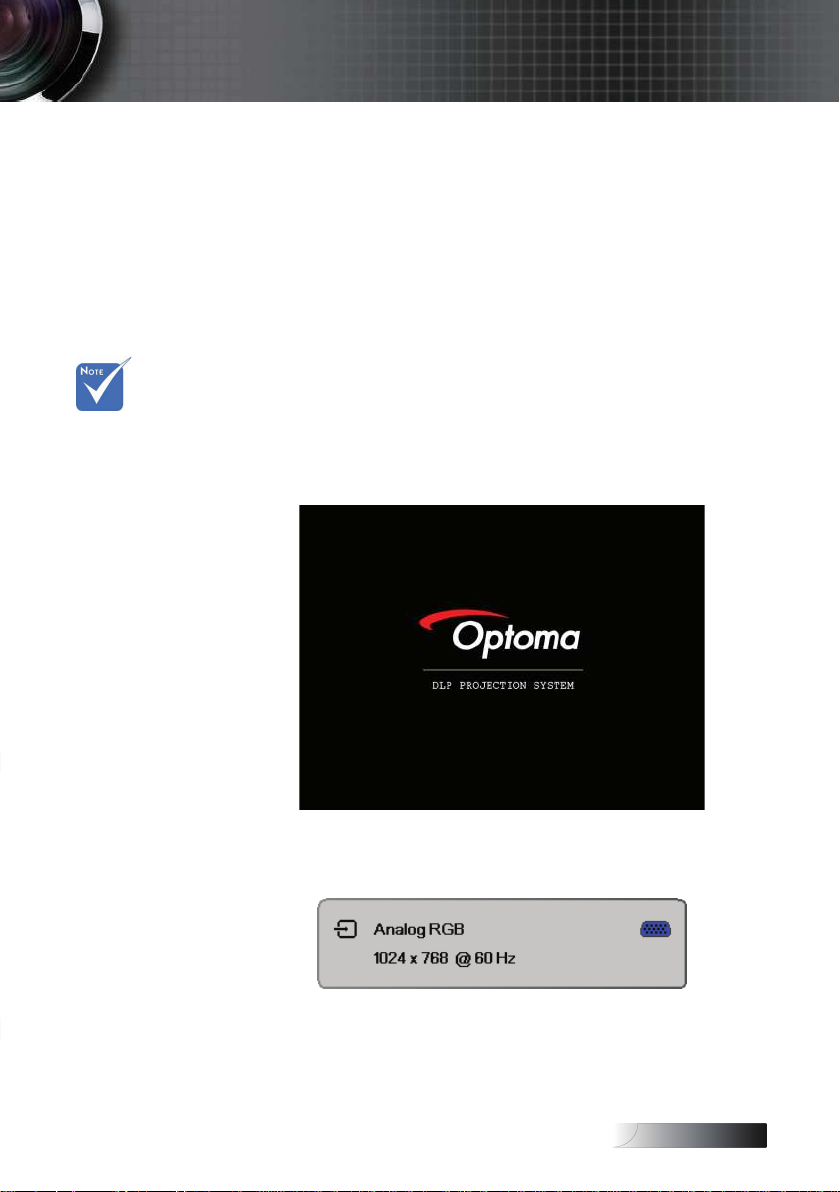
3. Ensure the Power LED is ashing and then press the POWER
button to turn On the projector.
The projector’s startup logo screen displays and connected
devices are detected. If the connected device is a PC, press the
appropriate keys on the computer keyboard to switch the
display output to the projector. (Check the user manual of the
PC to determine the appropriate Fn key combination to change
display output.)
See Security Settings on page 36 if security lock is enabled.
4. If more than one input device is connected, press the “Source”
button sequentially to switch between devices.
(DVD and HDTV are supported through the VGA connector)
5
Page 16
English
Installation
Powering O the Projector
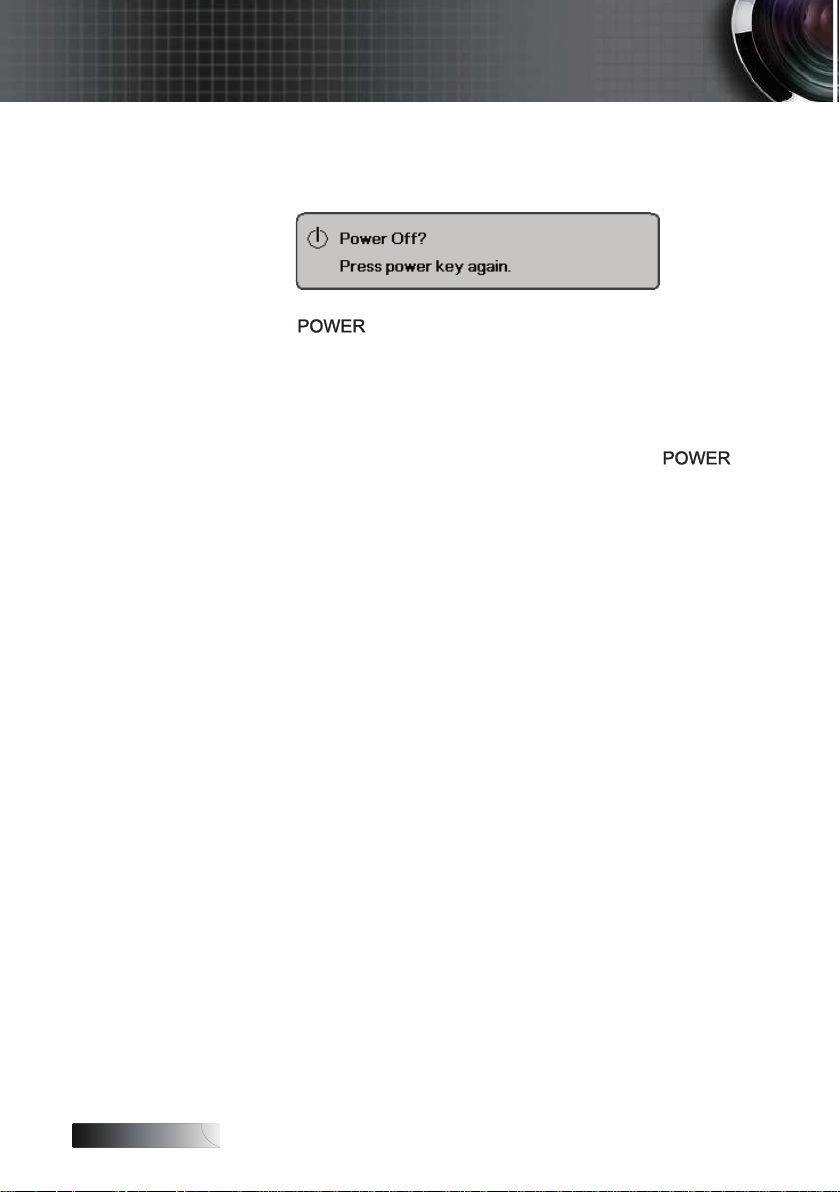
. Press POWER to turn o the projector lamp, a message displays
on the projector’s screen.
. Press
disappears after 5 seconds.
3. The cooling fans continue to operate for about 0 seconds for
cooling cycle.
(If you wish to turn the projector back on, you must wait until
the projector has completed the cooling cycle and has entered
standby mode. Once in standby mode, simply press
restart the projector.)
4. Disconnect the power cord from the electrical outlet and the
projector.
5. Do not turn on the projector immediately following a power o
procedure.
again to conrm, otherwise the message
Warning Indicator
v When the LAMP LED indicator lights red, the projector will
automatically shut itself down. Please contact your local reseller
or service center. See page 48.
v When the POWER LED repeatedly blinks six (6) times in
conjunction with the LAMP LED blinking a single time, it
indicates the fan has failed. Please contact your local dealer or
our service center. See page 48.
to
6
Page 17
English
1
2
3
Installation
Adjusting the Projected Image
Adjusting the Projector’s Height
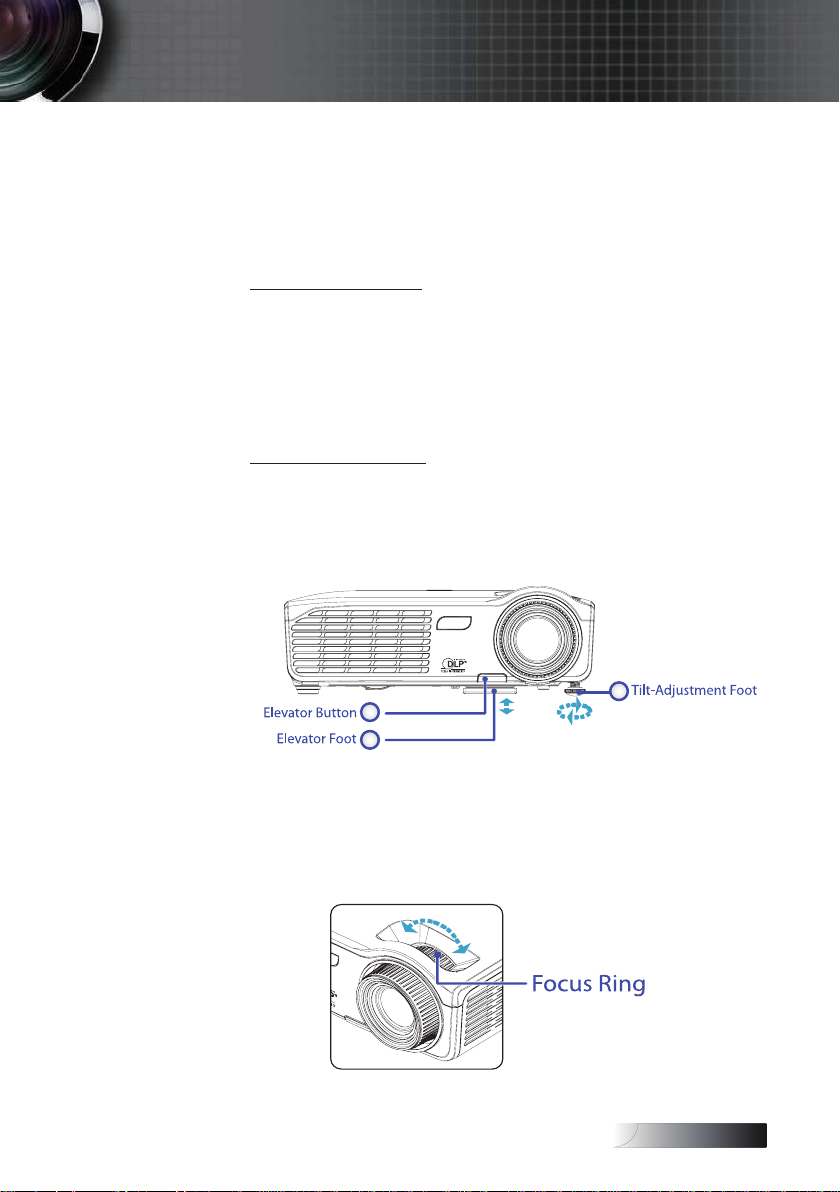
The projector is equipped with elevator foot for adjusting the image
height.
To raise the image:
. Press the elevator button u.
. Raise the projector to the desired height using the Elevator
Foot v, then release the button to lock the elevator foot into
position.
3. Use the Tilt-Adjustment Foot w to ne-tune the display angle.
To lower the image:
. Press the elevator button.
. Lower the image, then release the button to lock the elevator
feet into position.
3. Use Tilt-Adjustment Foot w to ne-tune the display angle.
Adjusting the Focus
To focus the image, rotate the focus ring until the image is clear.
The projector will focus at distances from 3.3 to 3.8 feet (.0 to
0 meters).
7
Page 18
English
Height
Diagonal
Width
80''
(203.2 cm)
25''
(63.5 cm)
100''
(254 cm)
150''
(381cm)
200''
(508 cm)
248.55''
(631.31cm)
Hd
3.3'(1.01m)
10.56'(3.22m)
13.2'(4.02m)
19.8'(6.04m)
26.4'(8.05m)
32.81'(10m
Installation
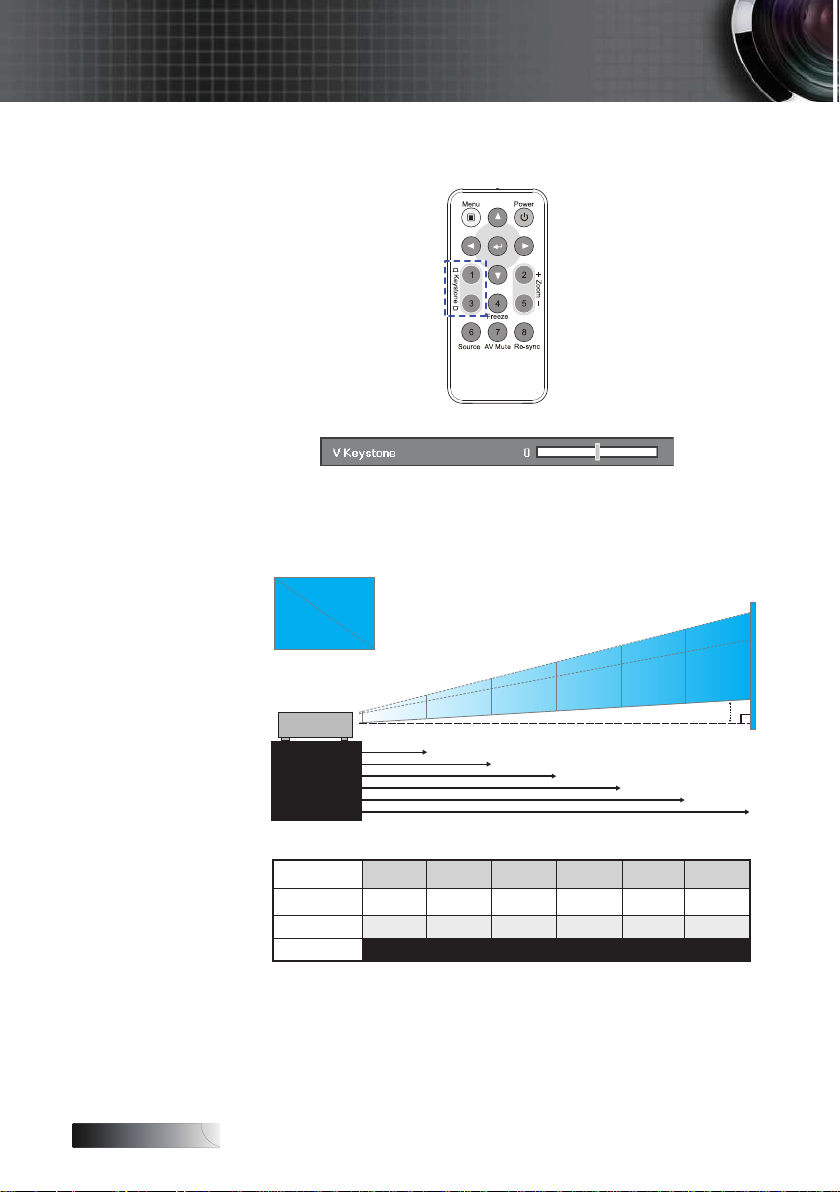
Use the keystone buttons to correct image distortion. They can be
found on the remote control.
Adjusting Projection Image Size
Screen
(Diagonal)
Screen size
Hd
Distance
5”
(63.5cm)
0”x5”
5x38cm
.” / 5cm 6.7” / 7cm 8.4” / cm .6” / 3cm 6.8” / 43cm 0.88” / 53.03cm
3.3’ / .0m 0.56’ / 3.m 3.’ / 4.0m 9.8’ / 6.04m 6.4’ / 8.05m 3.8’ / 0m
80”
(03.cm)
64”x48”
63xcm
00”
(54cm)
80”x60”
03x5cm
50”
(38cm)
0”x90”
305x9cm
00”
(508cm)
60”x0”
406x305cm
48.55”
(63.3
cm)
98.84
”x49.3”
505.05x378.79cm
8
Page 19
English
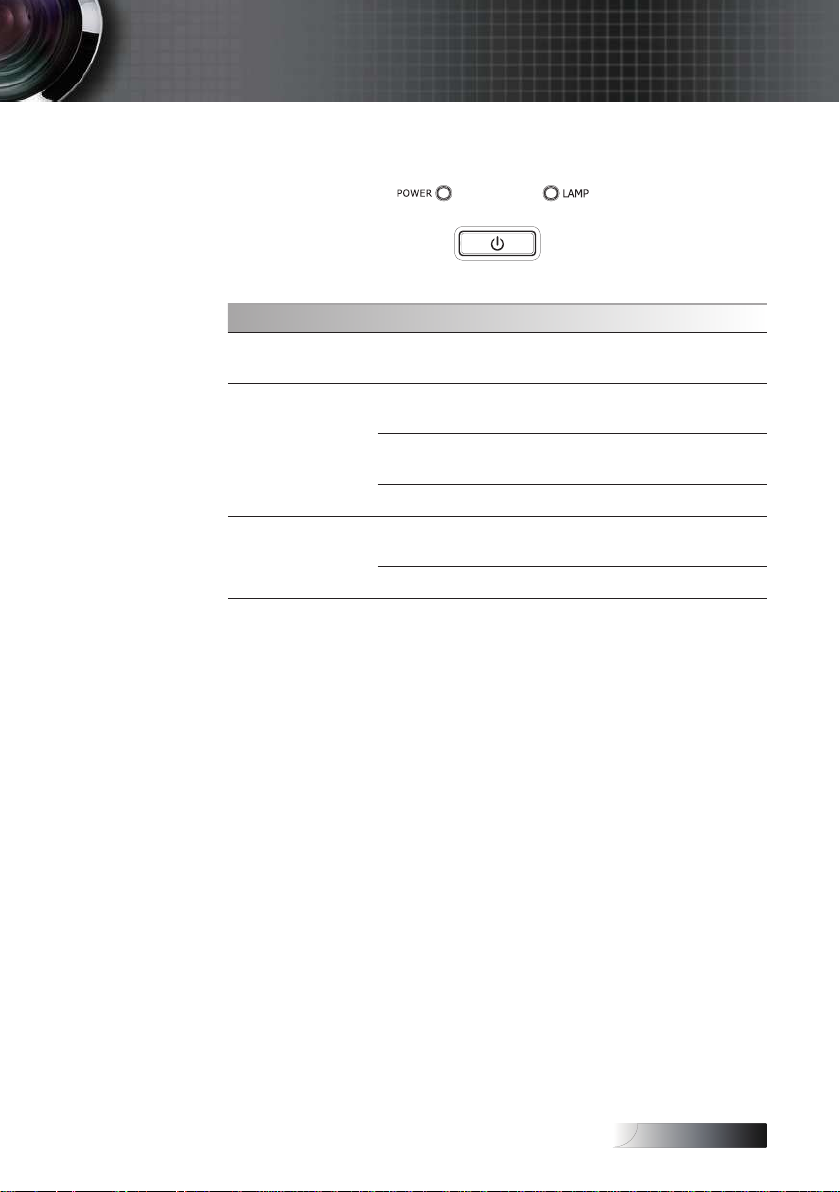
Control Panel
Using the Control Panel
Power
Power LED
Lamp LED
Refer to the “Powering On/O the Projector”
section on page 5.
Green
Flashing
Green
O Unit is powered o.
On
O Lamp is in normal state.
User Controls
Unit is powered on and working
correctly
Unit is on stand-by/warm up/
cooling down.
Lamp not ready—do not press the
power button.
.
9
Page 20
English
User Controls
Remote Control
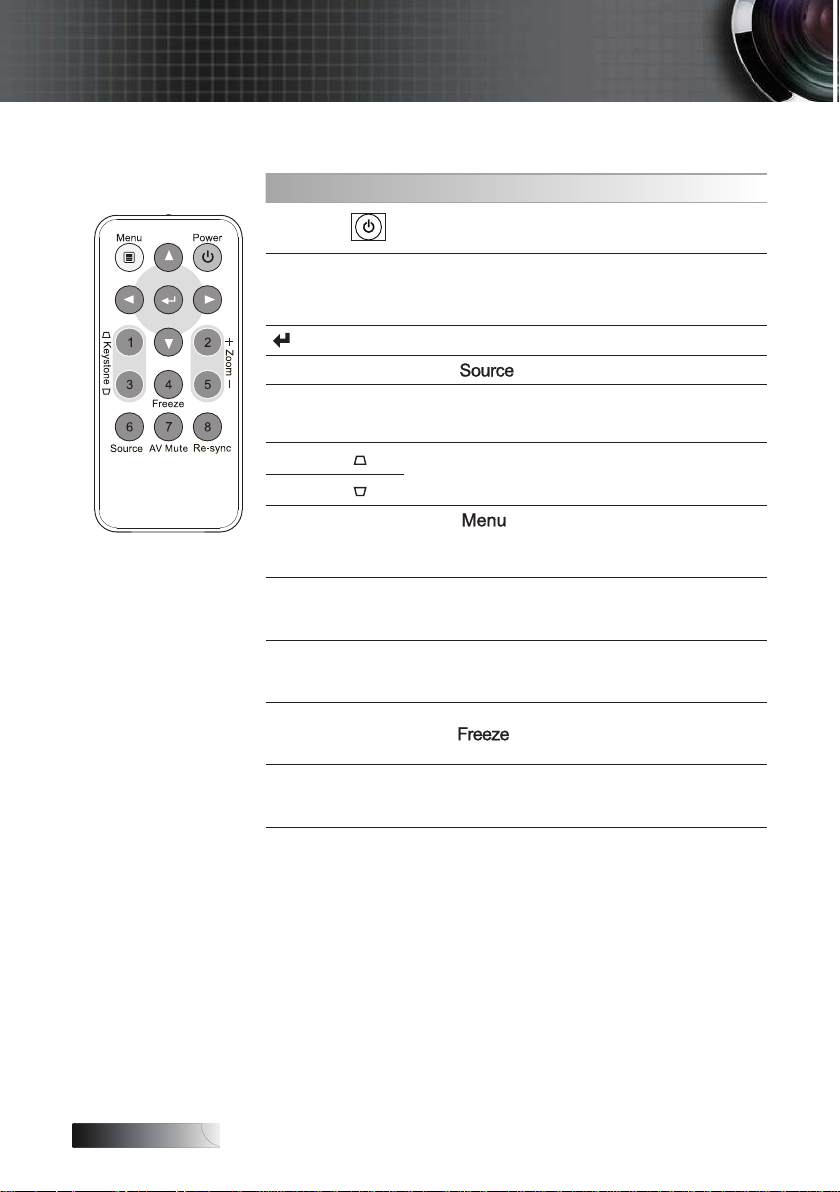
Using the Remote Control
Power
Four
Directional
Select Keys
8
Source / 6
Re-Sync / 8
Keystone
Keystone
Menu
Zoom + / Press + to zoom in to an image.
Refer to the “Powering On/O the
Projector” section on page 5.
Use pqtu to select items or make
adjustments to your selection.
Conrm your item selection.
Press
Automatically synchronizes the projector to
the input source.
/
Adjusts image distortion caused by tilting
the projector. (±30 degrees)
/ 3
Press
display (OSD) menu. To exit OSD, Press
Menu again.
to select an input signal.
to launch the on-screen
0
Zoom - / 5 Press - to zoom out of an image.
Freeze / 4
AV Mute / 7
Press
Momentarily turns o/on the audio and
video.
to pause the screen image.
Page 21
English
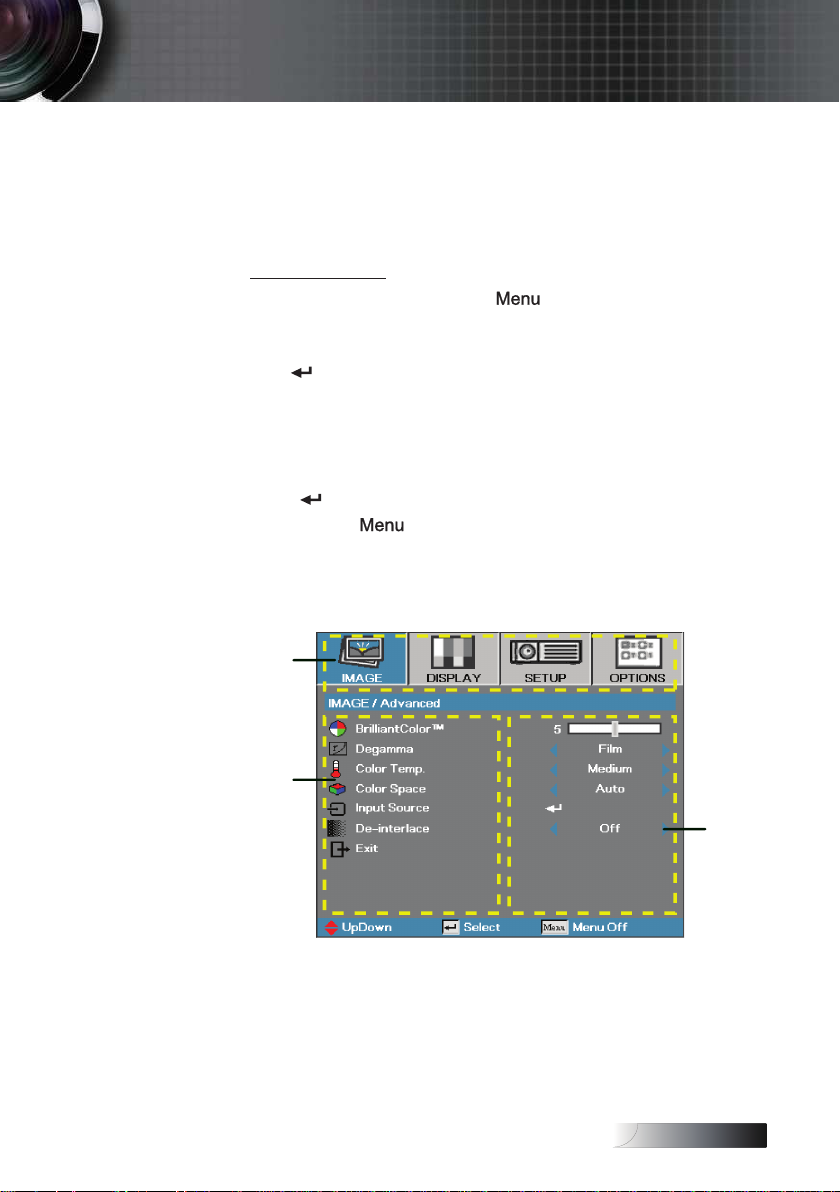
Main Menu
Sub Menu
Settings
User Controls
On-screen Display Menus
The Projector has multilingual On-screen Display menus that allow
you to make image adjustments and change a variety of settings.
The projector will automatically detect the source.
How to operate
. To open the OSD menu, press on the Remote Control.
. When OSD is displayed, use tu keys to select any item in the
main menu. While making a selection on a particular page, press
q or
3. Use pq keys to select the desired item and adjust the settings
by tu key.
4. Select the next item to be adjusted in the sub menu and adjust
as described above.
5. Press
6. To exit, press
projector will automatically save the new settings.
to enter sub menu.
to conrm, and the screen will return to the main menu.
again. The OSD menu back to last level
Page 22
English
User Controls
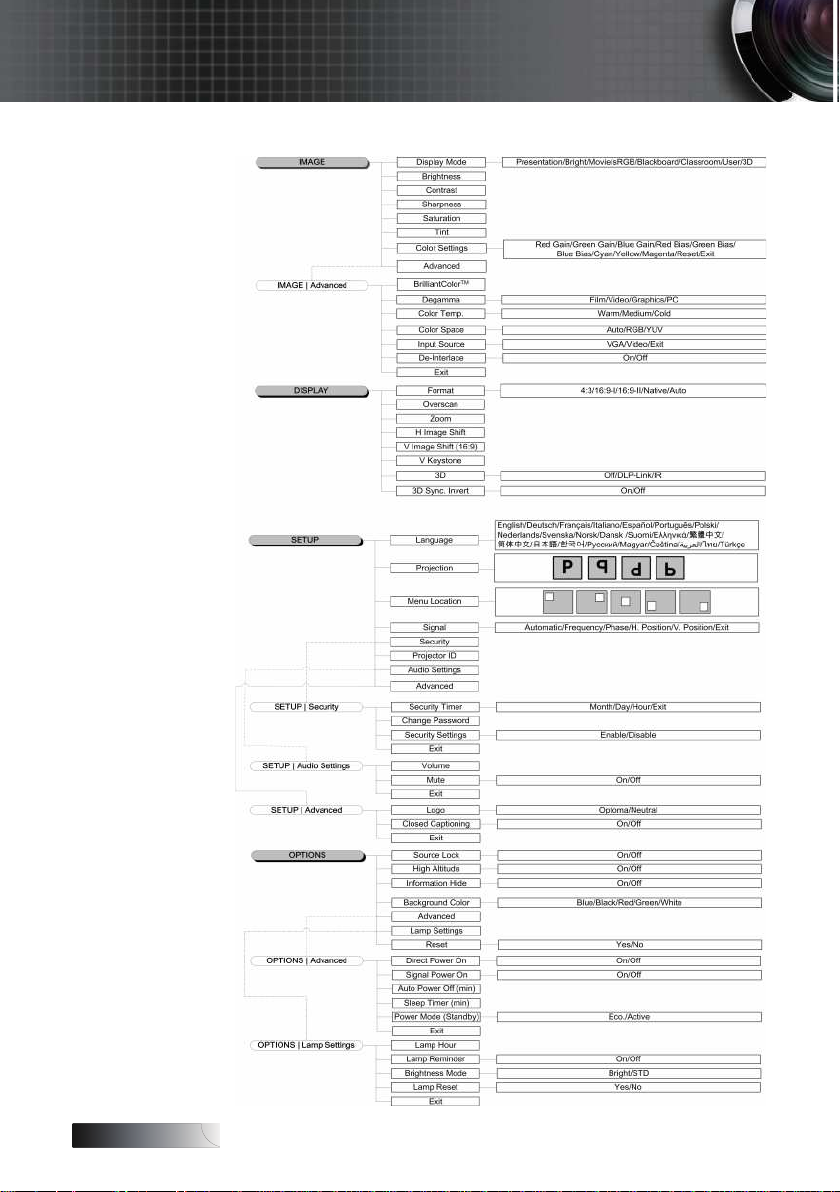
Menu Tree
Page 23
English
User Controls
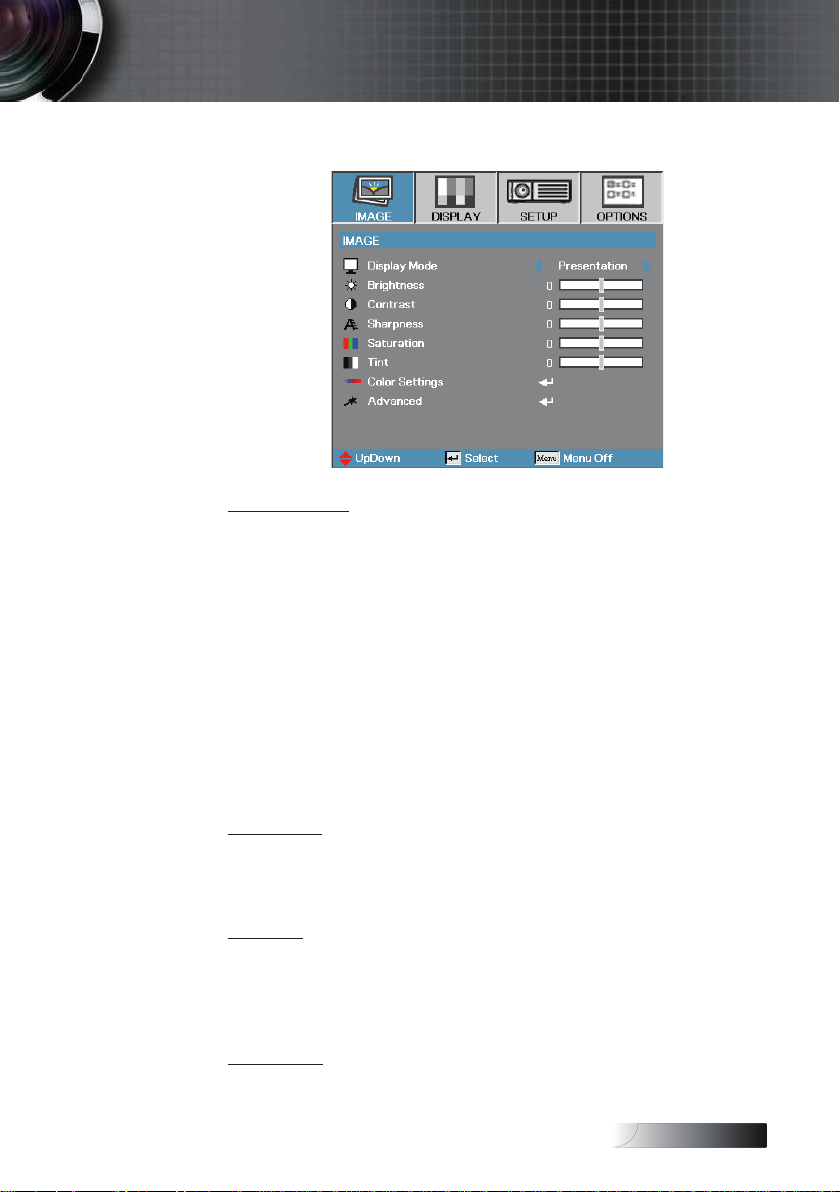
Image
Display Mode
There are many factory presets optimized for various types of
images.
Presentation: Good color and brightness from PC input.
4
Bright: Maximum brightness from PC input.
4
Movie: For home theater.
4
sRGB: Standardised accurate color.
4
Blackboard: Tuned for blackboard usage.
4
Classroom: Recommended settings for classroom.
4
User: User’s own settings.
4
The initial default settings of this mode is from Presentation/
Movie mode. Any further adjustments by the user will be
saved in this mode for future use.
3D: Recommend setting for 3D mode enable (DLP-Link / IR).
4
Brightness
Adjust the brightness of the image.
4 Press t to darken image.
4 Press u to lighten the image.
Contrast
The contrast controls the degree of dierence between the
lightest and darkest parts of the picture.
4 Press t to decrease the contrast.
4 Press u to increase the contrast.
Sharpness
Adjusts the sharpness of the image.
4 Press t to decrease the sharpness.
4 Press u to increase the sharpness.
3
Page 24
English
User Controls
Image
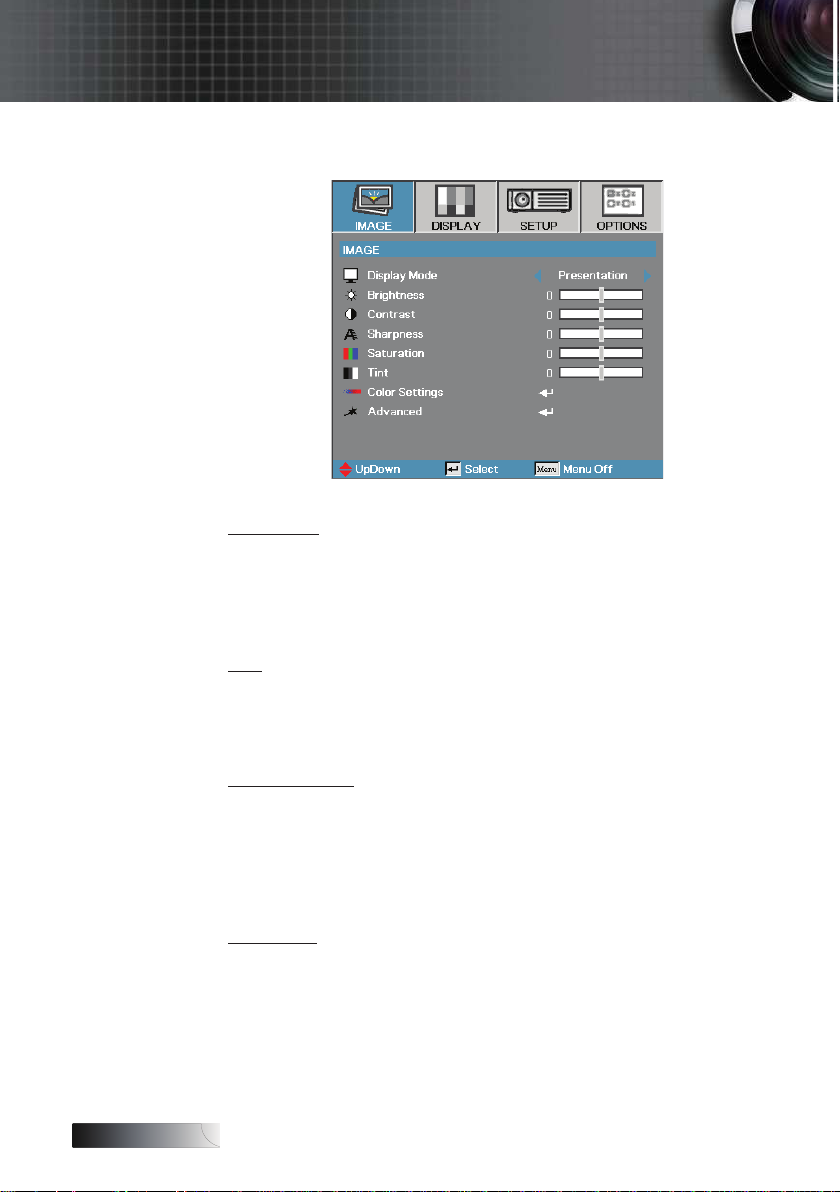
Saturation
Adjusts a video image from black and white to full color
saturation.
4 Press t to decrease the amount of saturation in the image.
4 Press u to increase the amount of saturation in the image.
Tint
Adjusts the color balance of red and green.
4 Press t to increase the amount of green in the image.
4 Press u to increase the amount of red in the image.
Color Settings
Enter the Color Settings menu. Select the Red/Green/Blue Gain
for brightness adjustments and Bias for contrast adjustments
for the whole picture. Individual color adjustments for Cyan,
Magenta, Yellow can also be adjusted. See page 5 for more
details.
Advanced
Enter the Advanced menu. Select advanced display options
such as BrilliantColor
Input Source, De-Interlace, and Exit. See page 6 for more
information.
4
TM
, Degamma, Color Temp., Color Space,
Page 25
English
User Controls
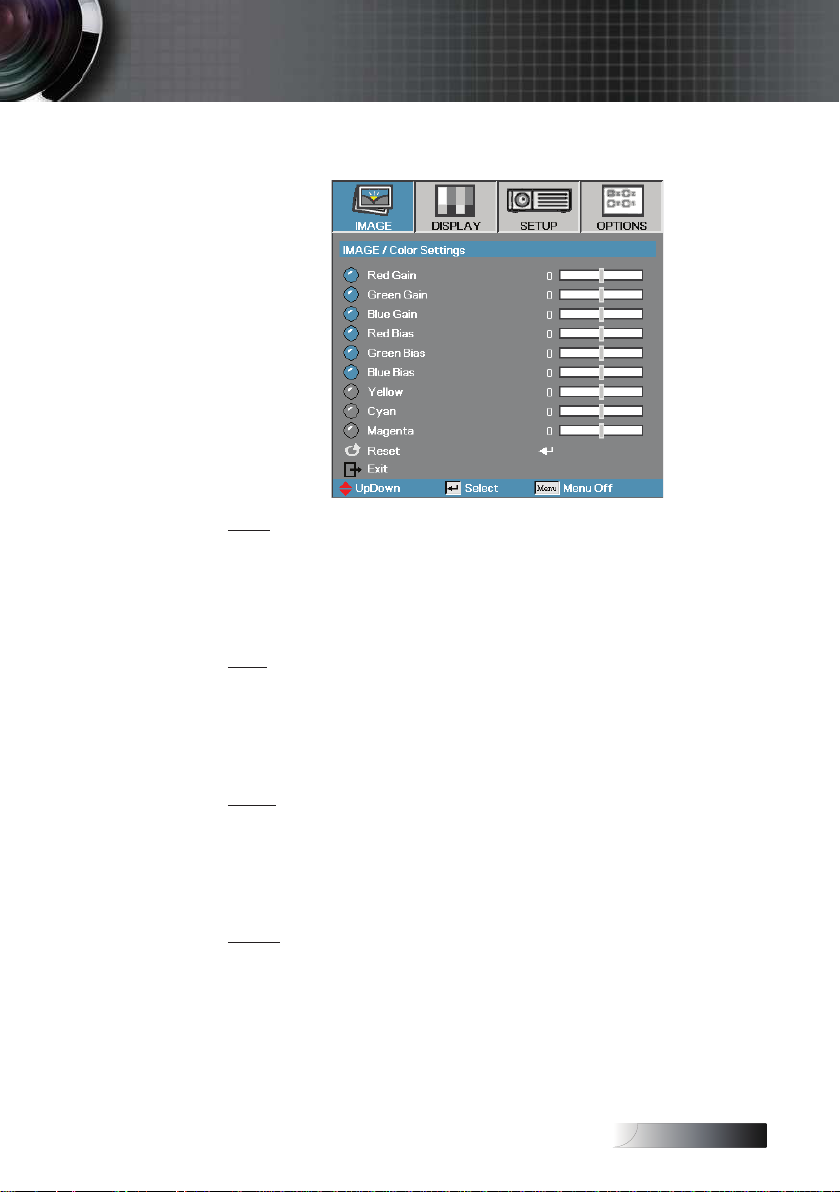
Image | Color Settings
Gain
Set RGB Gain to adjust the Brightness of the following Colors:
4 Red—increase or decrease the gain value for red.
4 Green—increase or decrease the gain value for green.
4 Blue—increase or decrease the gain value for blue.
Bias
Set RGB Bias to adjust the Contrast of the following Colors:
4 Red—increase or decrease the bias value for red.
4 Green—increase or decrease the bias value for green.
4 Blue—increase or decrease the bias value for blue.
Color
Set values to adjust the level of the following colors:
4 Yellow—increase or decrease the color value for yellow.
4 Cyan—increase or decrease the color value for cyan.
4 Magenta—increase or decrease the color value for magenta.
Reset
Reset all Color Setting values to the factory default.
5
Page 26
English
User Controls
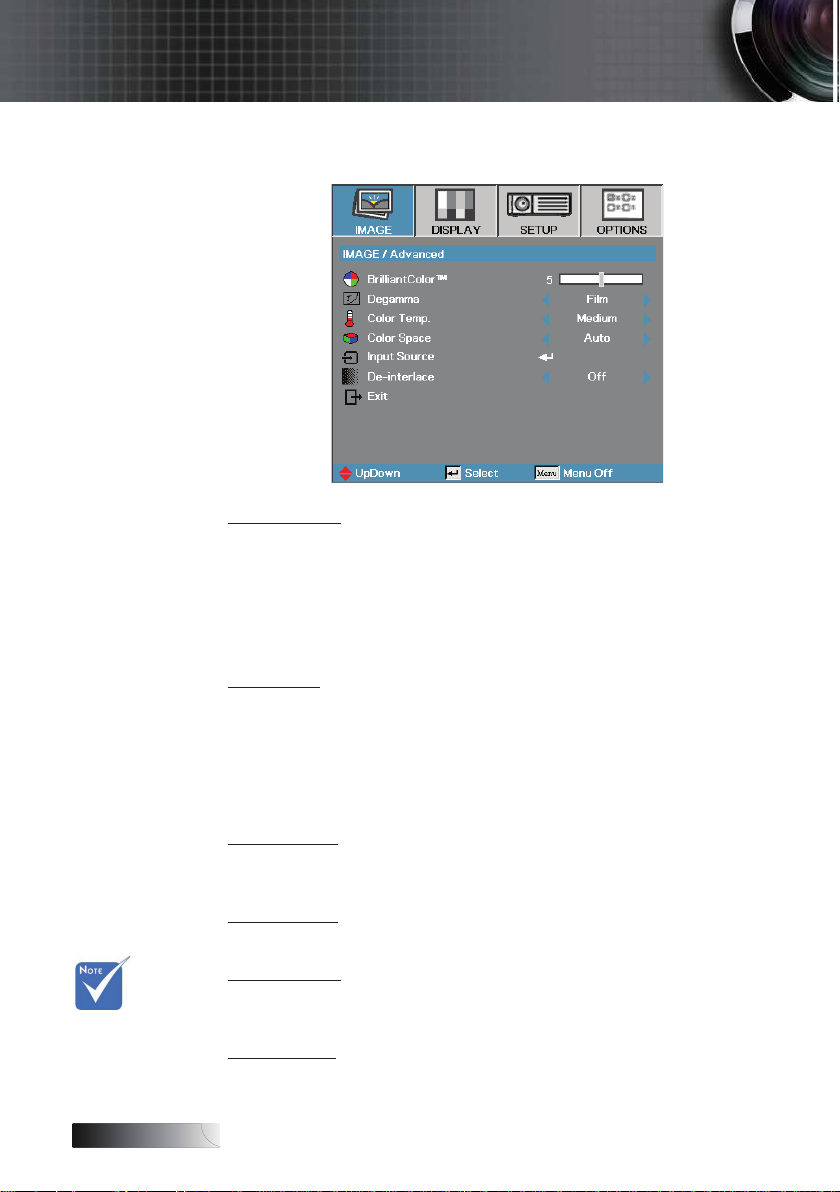
Image | Advanced
v De-interlace
only supports
480i/576i signal
via Video.
BrilliantColor
This adjustable item utilizes a new color-processing algorithm
and system level enhancements to enable higher brightness
while providing true, more vibrant colors in picture. The range
is from 0 to 0. If you prefer a stronger enhanced image, adjust
toward the maximum setting. For a smoother, more natural
image, adjust toward the minimum setting.
TM
Degamma
This allows you to choose a degamma table that has been netuned to bring out the best image quality for the input.
Film—for home theater.
4
Video—for video or TV source.
4
Graphics—for image source.
4
PC—for PC or computer source.
4
Color Temp.
Adjust the color temperature. Cold temperature, the screen looks
colder; with Warm temperature, the screen looks warmer.
Color Space
Select an appropriate color matrix type from AUTO, RGB, YUV.
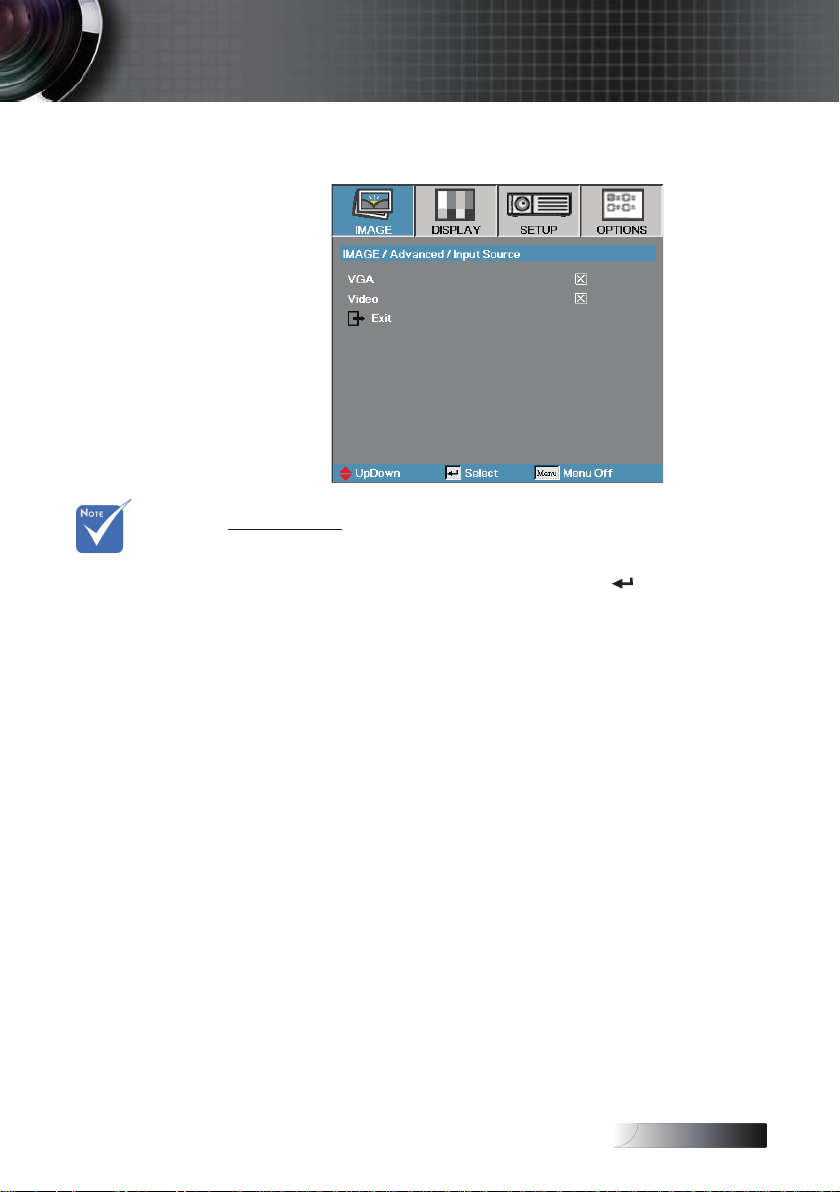
Input Source
Enter the Input Source submenu. Select the sources to scan for
at startup. See page 7 for more information.
De-interlace
Press the cursor t or u button to select dierent De-interlace
modes. This function converts an interlaced video signal into
progressive signal.
6
On: Use this mode for Films.
4
O: Use this mode for Video or TV sources.
4
Page 27
English
v If all sources are
deselected, the
projector cannot
display any
images. Always
leave at least one
source selected.
User Controls
Image | Advanced | Input Source
Input Source
Use this option to enable / disable input sources.
p or q to select a source, then press to enable /
Press
disable it. The projector will not search inputs that are
de-selected.
7
Page 28
English
User Controls
Display
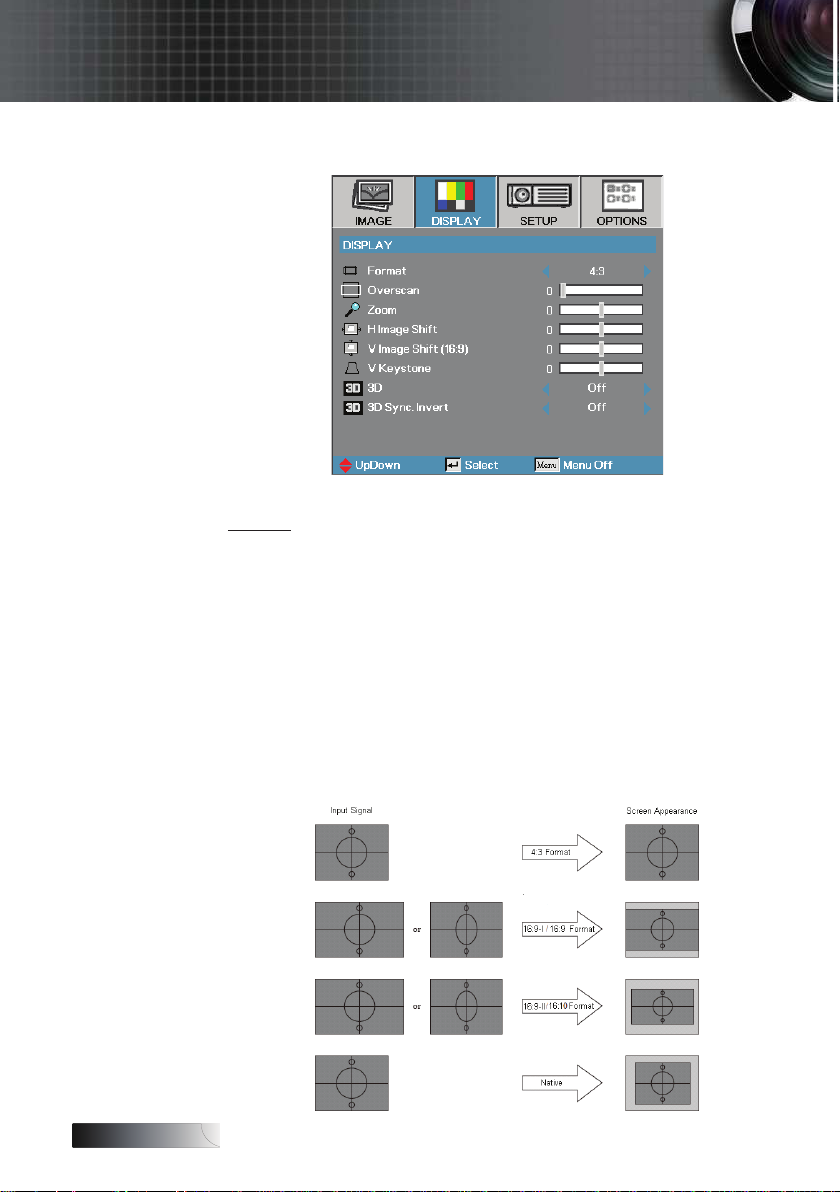
Format
Use this function to choose your desired aspect ratio.
4:3: This format is for 4x3 input sources not enhanced for
4
Wide screen TV.
6:9 I: This format is for 6x9 input sources, like HDTV and
4
DVD enhanced for Wide screen TV.
6:9 II: The non-standard wide-screen display format of the
4
projector. Part of the original image will be cut if the image
aspect ratio is less than
Native: Depends on the resolution of the input source – No
4
scaling is performed.
Auto: Automatically selects the appropriate format.
4
.67:.
8
Page 29
English
User Controls
Display
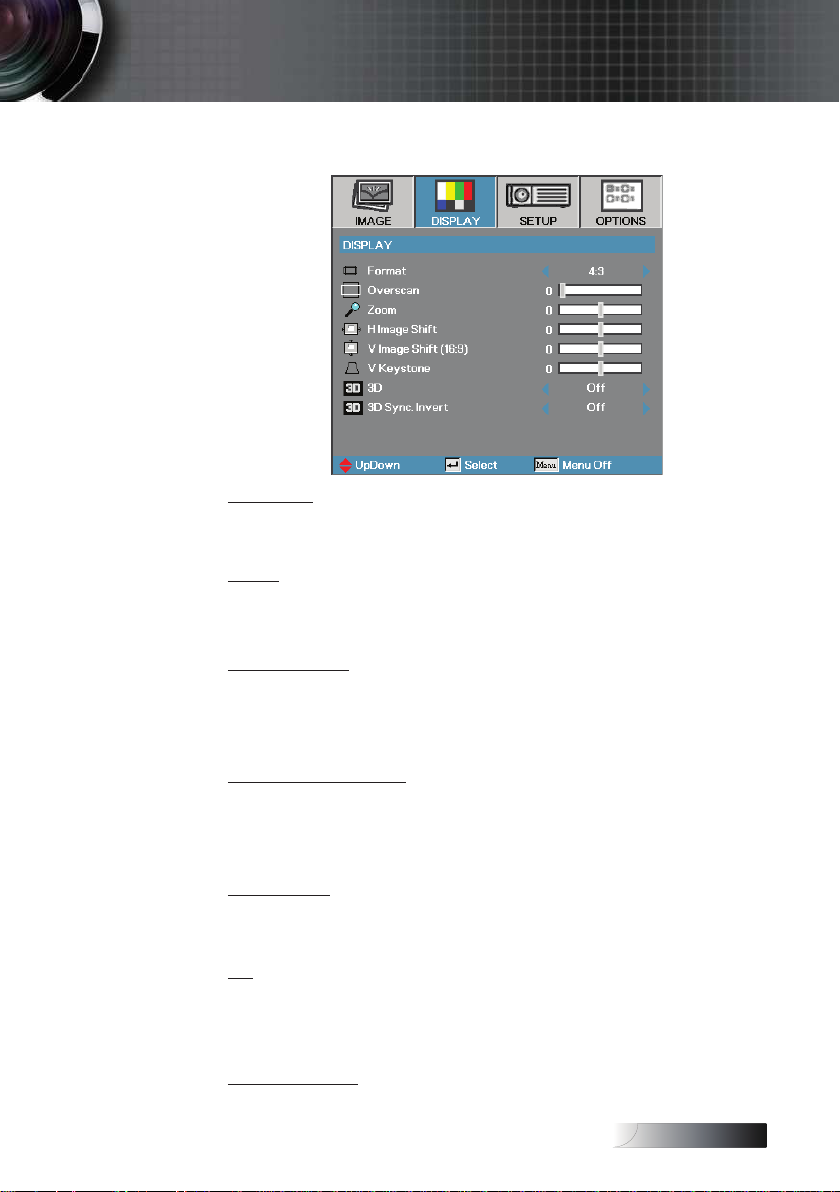
Overscan
Overscan function removes the noise in a video image. Overscan the
image to remove video encoding noise on the edge of video source.
Zoom
t to reduce the size of the image.
Press
4
u to magnify an image on the projected screen.
Press
4
H Image Shift
Shifts the projected image position horizontally.
t to move the image left on the projected screen.
Press
4
u to move the image right on the projected screen.
Press
4
V Image Shift (6:9)
Shifts the projected image position vertically (in 6:9 format).
p to move the image up on the projected screen.
Press
4
q to move the image down on the projected screen.
Press
4
V Keystone
Press t or u to compensate for vertical image distortion when
the projector is positioned at an angle to the screen.
3D
Press t or u to enable or disable the 3D function. When the 3D
function is enabled, the current picture mode adjustment will be
disabled.
3D Sync invert
Press t or u to enable or disable the 3D Sync invert function to
invert images.
9
Page 30
English
User Controls
Setup
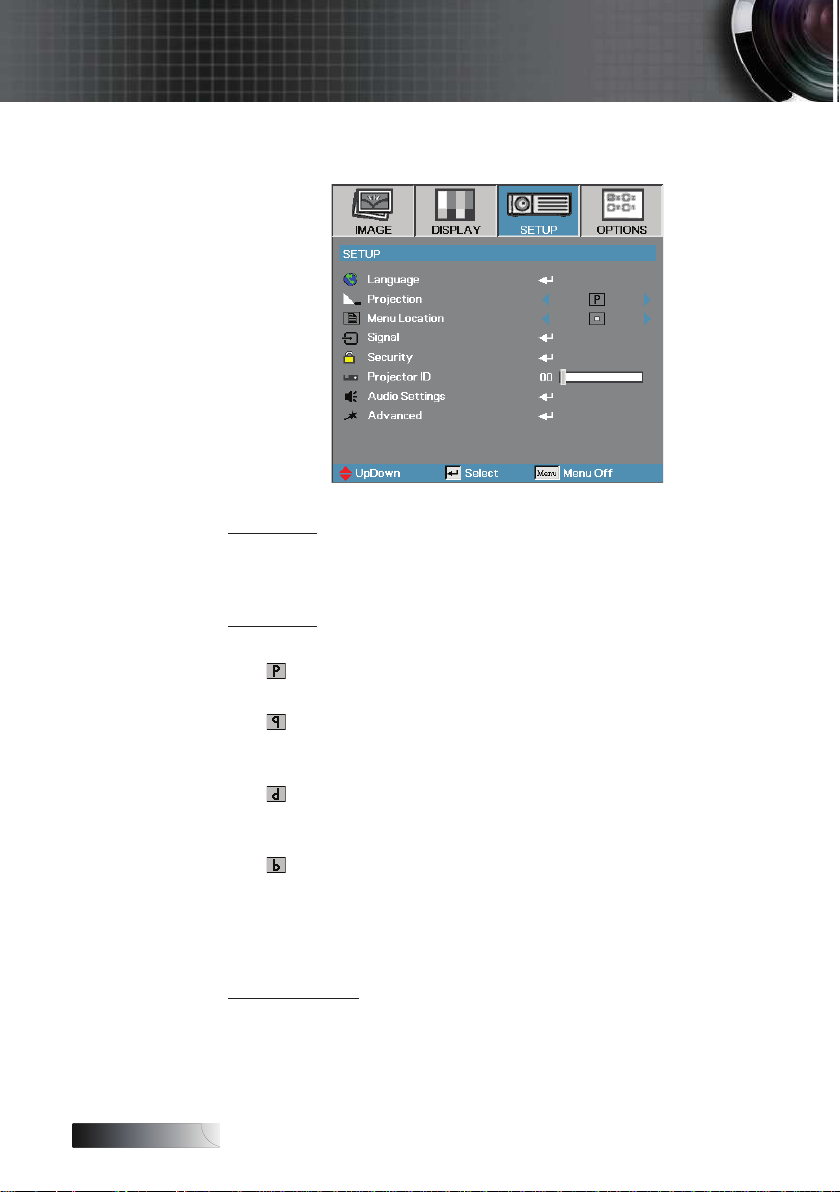
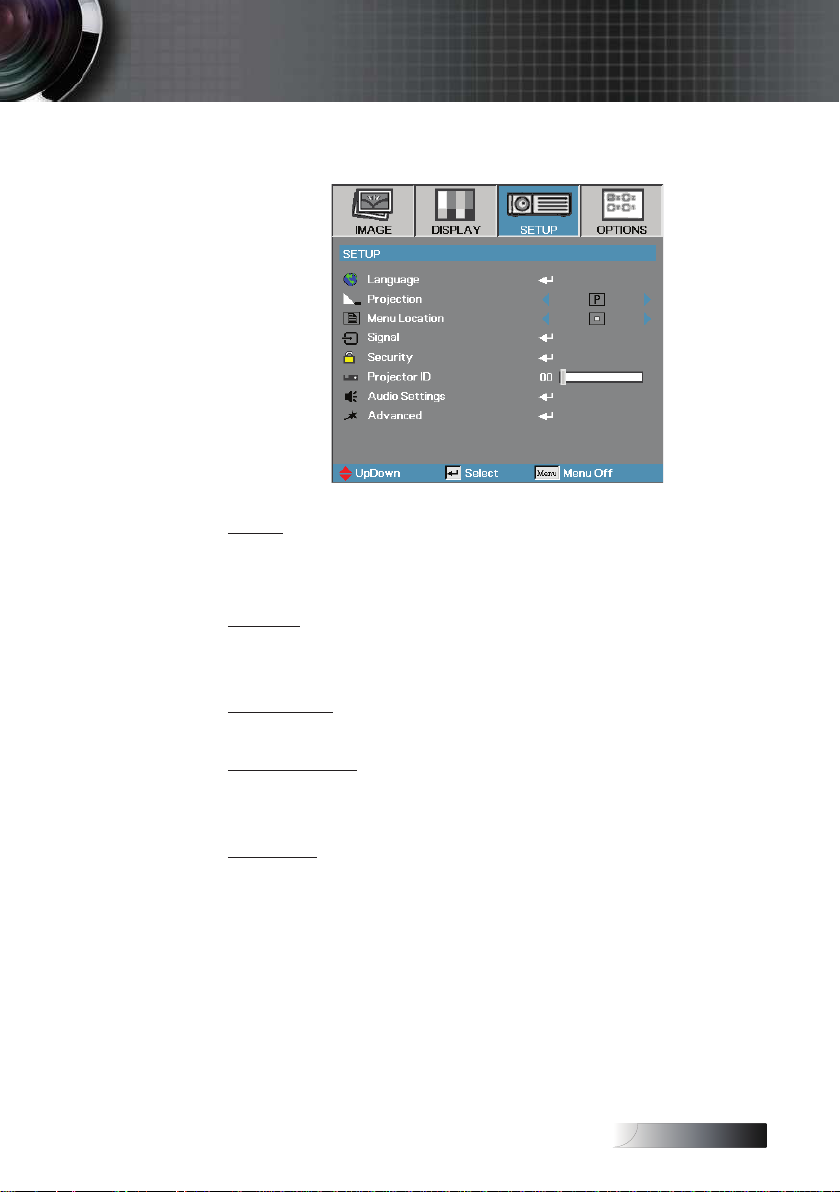
Language
Enter the Language menu. Select the multilingual OSD menu.
See page 3 for more information.
Projection
Select projection method:
Front Desktop
4
The factory default setting.
Rear Desktop
4
When you select this function, the projector reverses the
image so you can project from behind a translucent screen.
Front Ceiling
4
When you select this function, the projector turns the image
upside down for ceiling-mounted projection.
Rear Ceiling
4
When you select this function, the projector reverses and
turns the image upside down at same time. You can project
from behind a translucent screen with ceiling mounted
projection.
Menu Location
Choose the menu location on the display screen.
30
Page 31
English
User Controls
Setup
Signal
Enter the Signal menu. Set projector signal properties. See page
33 for more information.
Security
Enter the Security menu. Access the projector’s security features.
See page 34 for more information.
Projector ID
Select a two digit projector ID from 00 through 99.
Audio Settings
Enter the Audio Settings menu. Set audio level properties.
See page 37 for more information.
Advanced
Enter the Advanced menu. Select the screen display during
startup. See page 38 for more information.
3
Page 32
English
User Controls
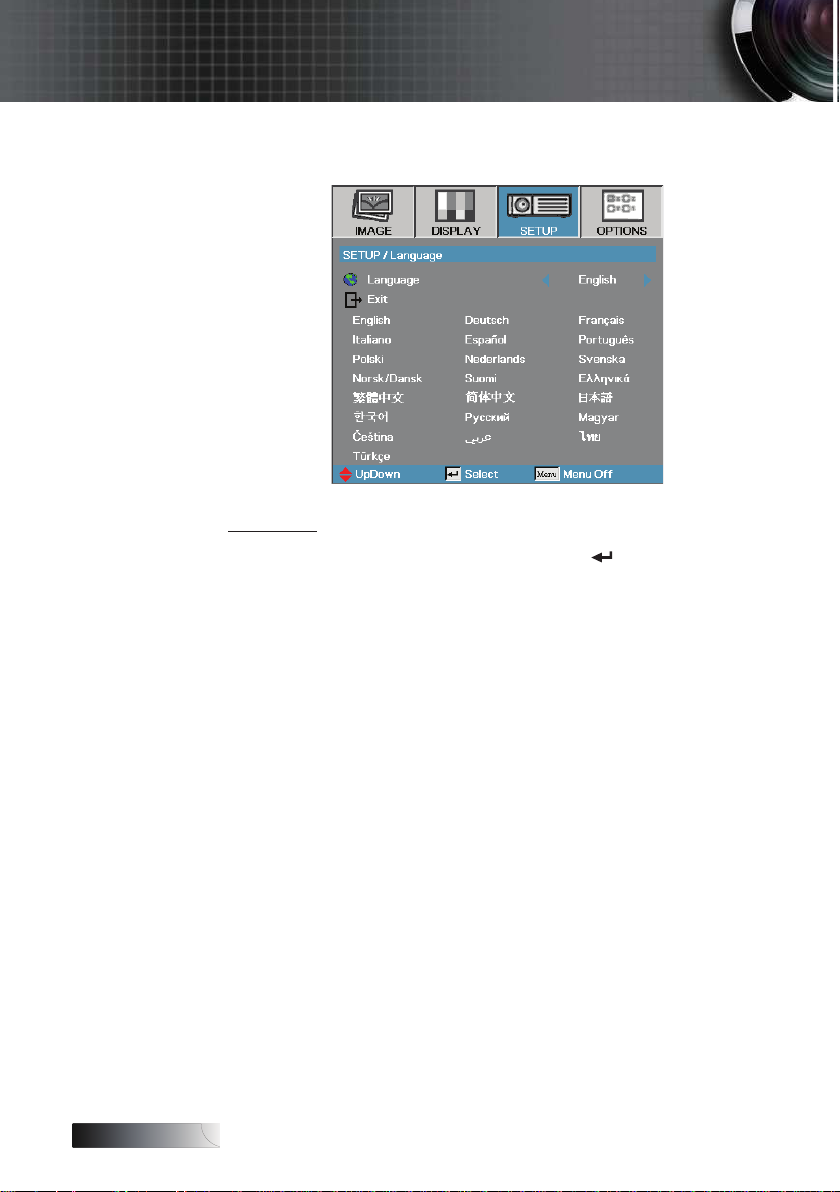
Setup | Language
Language
Choose the multilingual OSD menu. Press into the sub
menu and then use the Left (
preferred language.
t) or Right (u) key to select your
3
Page 33
English
User Controls
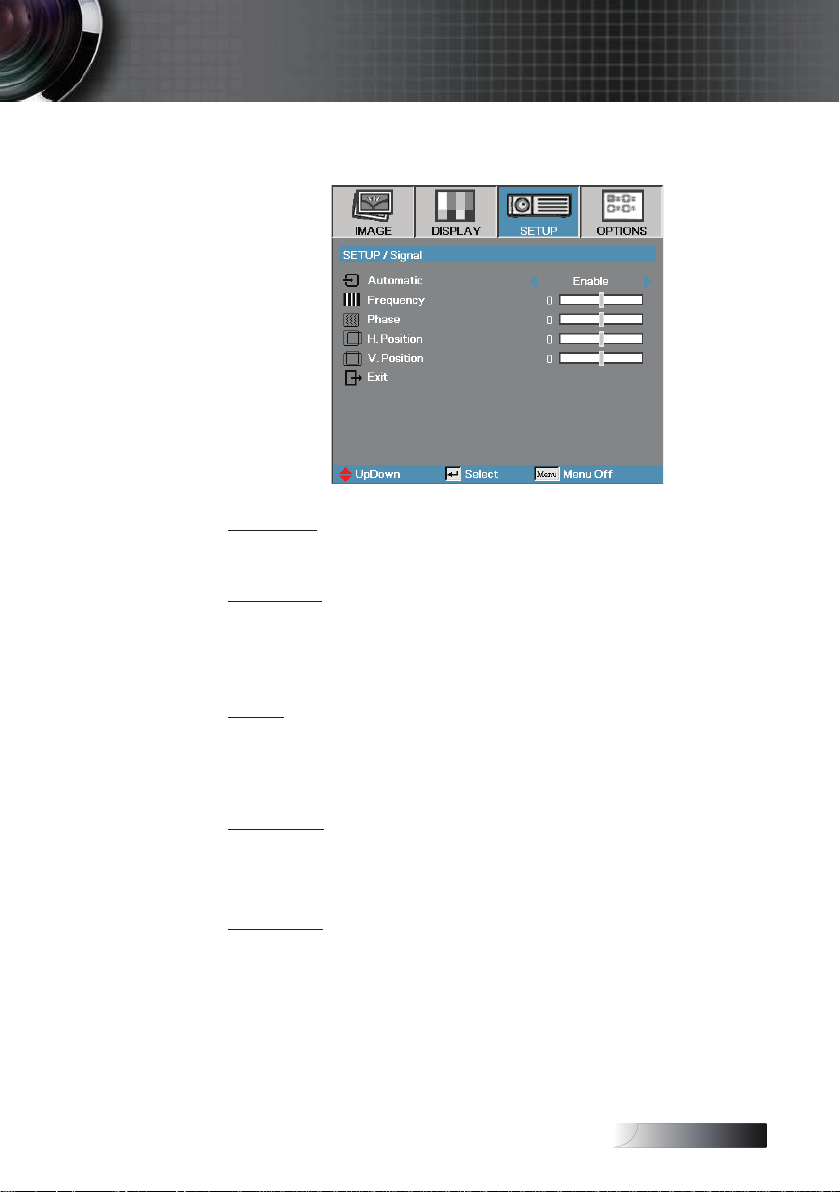
Setup | Signal
Automatic
Enable or disable automatically selects the appropriate settings.
Frequency
Change the display data frequency to match the frequency
of your computer’s graphics card. If you experience a vertical
ickering bar, use this function to make an adjustment.
Phase
Phase synchronizes the signal timing of the display with the
graphics card. If you experience an unstable or ickering image,
use this function to correct it.
H. Position
t to move the image left.
Press
4
u to move the image right.
Press
4
V. Position
t to move the image down.
Press
4
u to move the image up.
Press
4
33
Page 34
English
User Controls
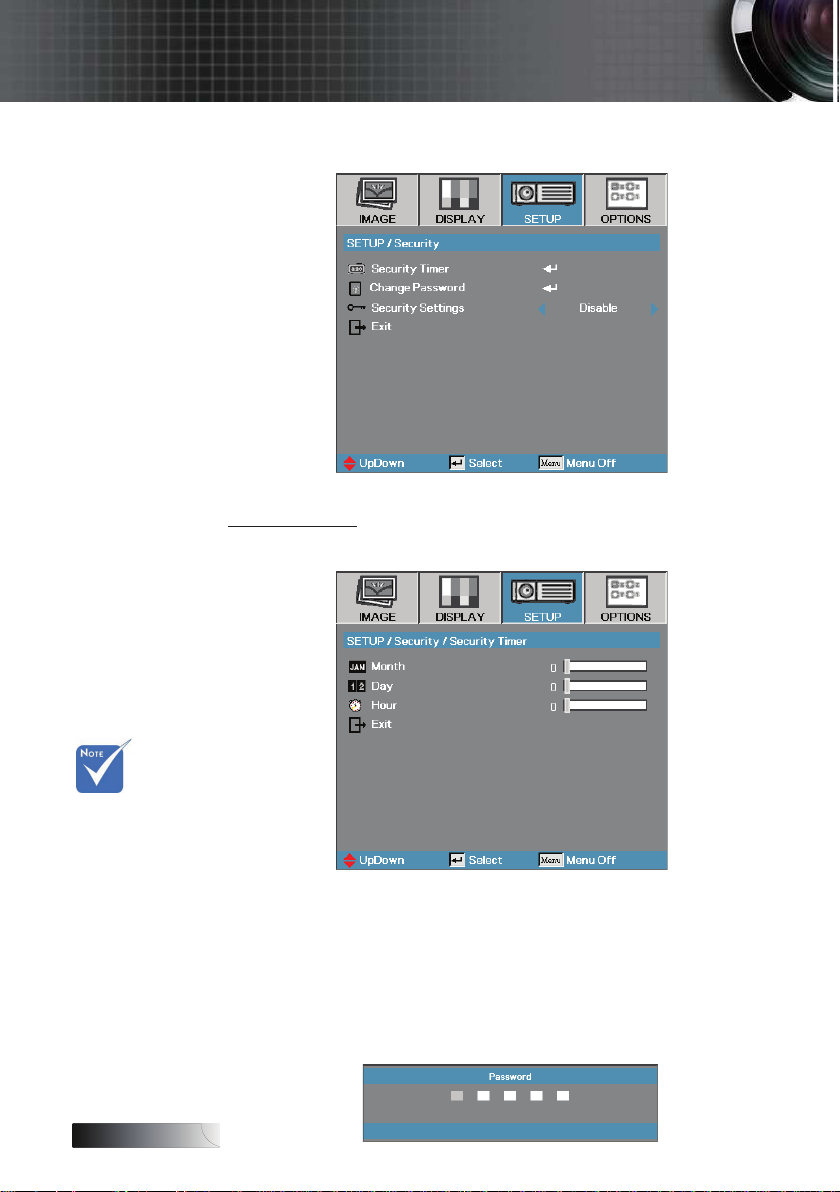
Setup | Security
Security Timer
Enter the Security Timer sub menu.
v No password
is required to
access Setup |
Security unless
the Security
Timer or
Security Setting
are enabled.
Enter the Months, Days, and Hours that the projector can be
used without entering the password. Exiting to the Setup menu
activates the Security Timer.
Once activated, the projector requires a password on the
specied dates and times to allow power on and access to the
security menu.
If the projector is in use and the Security Timer is active, the
following screen displays 60 seconds before the password is
required.
34
Page 35
English
v If the incorrect
password is
entered three
times, the device
auto shutdowns
after 0 seconds.
User Controls
Setup | Security
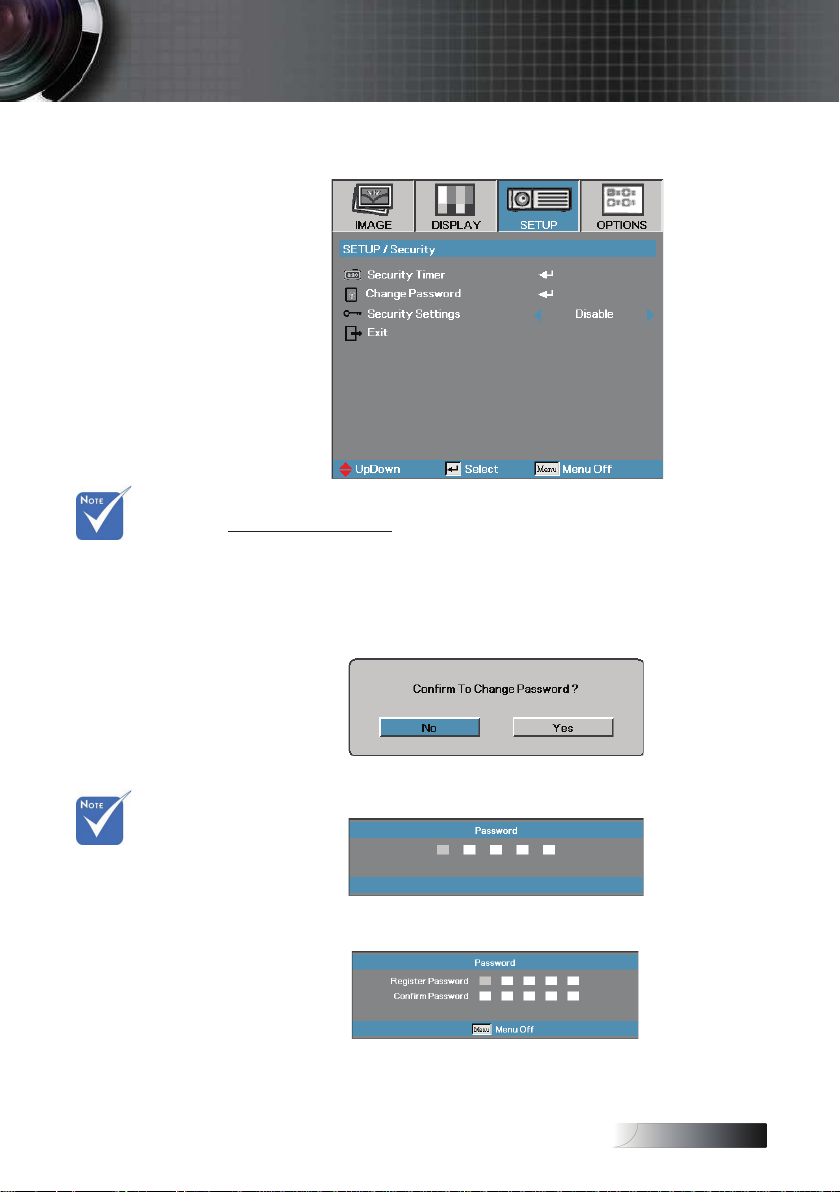
Change Password
Use this submenu to change the security password for the
projector.
. Select Change Password from the Security submenu. The
Conrm Change Password dialog box displays.
. Select Yes.
v If the new
passwords do
not match, the
password screen
redisplays.
3. Enter the default password <
A second password screen displays.
4. Enter the new password twice for verication.
> <3> <4> <5>.
> <
35
Page 36
English
User Controls
Setup | Security
Security Settings
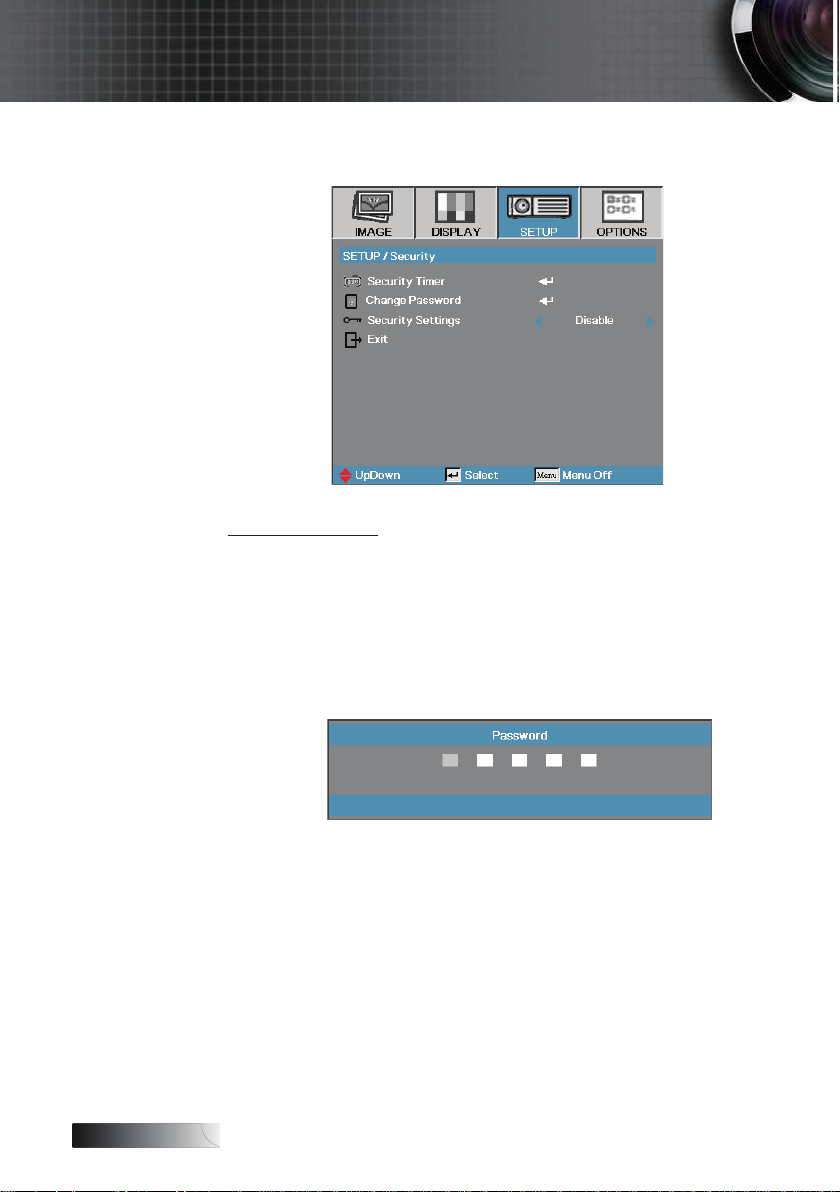
Enable or disable the security password.
Enabled—the current password is required to power on the
4
projector and access the Security menu.
Disabled—no password is required for any function.
4
When security is enabled, the following screen displays at startup
and before access to the Security menu is allowed:
36
Page 37
English
User Controls
Setup | Audio Settings
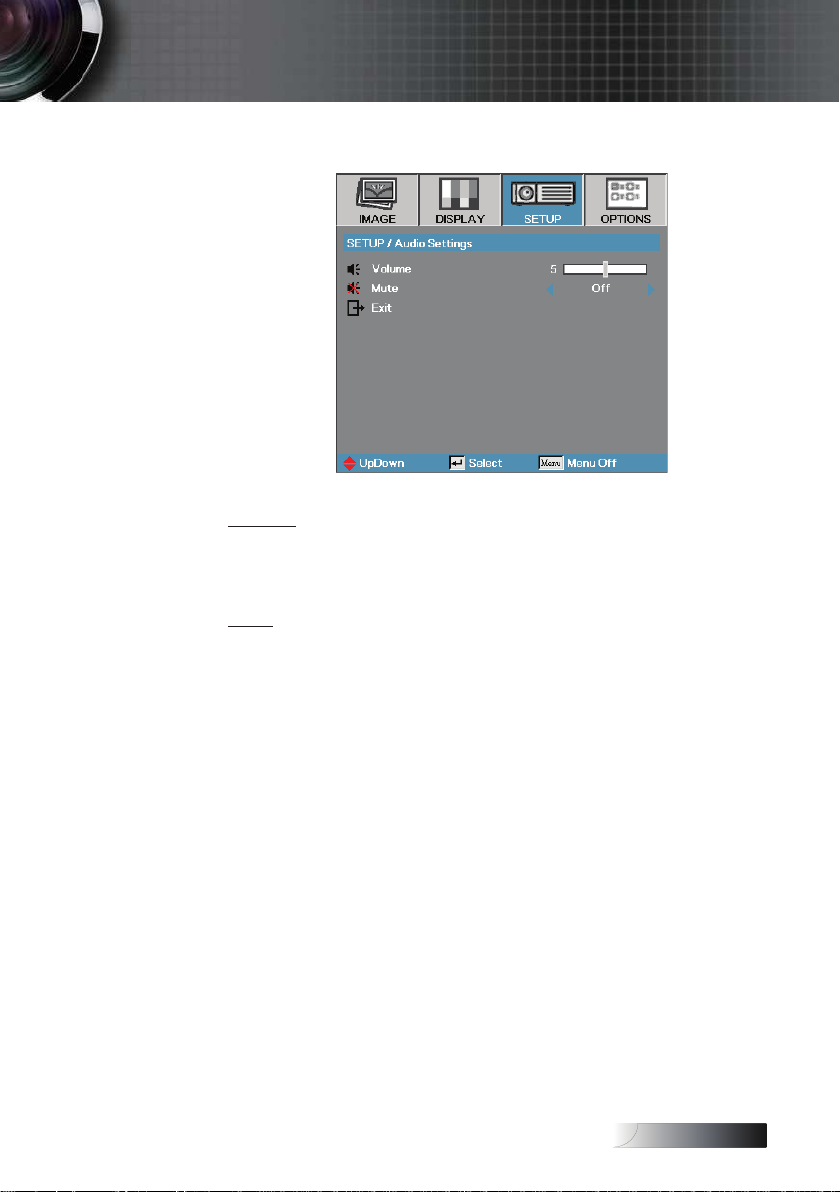
Volume
Press t to decrease the volume of voice.
u to increase the volume of voice.
Press
Mute
Toggle the audio on or o.
O—the speaker volume is turned on.
4
On–the speaker volume is turned o.
4
37
Page 38
English
User Controls
Setup | Advanced
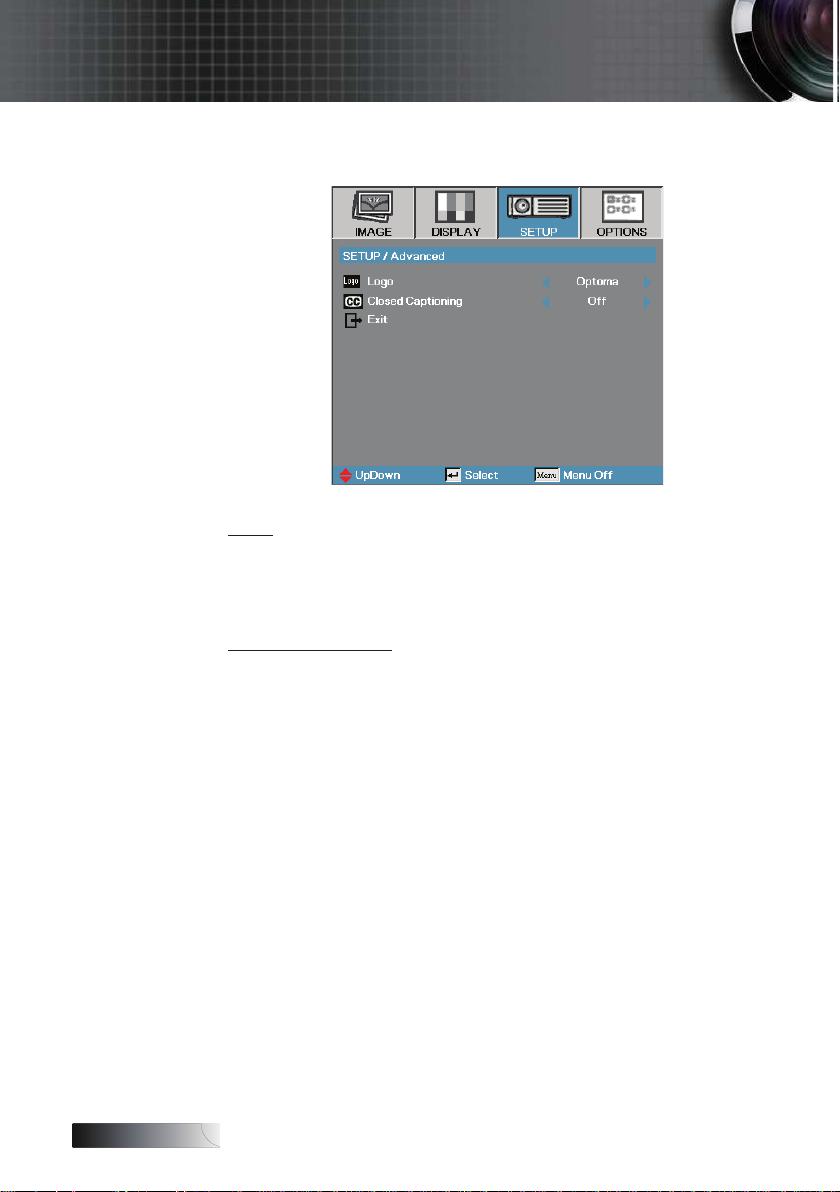
Logo
Select the screen to display during startup.
Optoma—the supplied default startup screen.
4
Neutral—Screen with black color.
4
Closed Captioning
Select the screen to display closed captioning
O–the supplied default setting.
4
On–closed captioning text is displayed if available.
4
38
Page 39
English
User Controls
Options
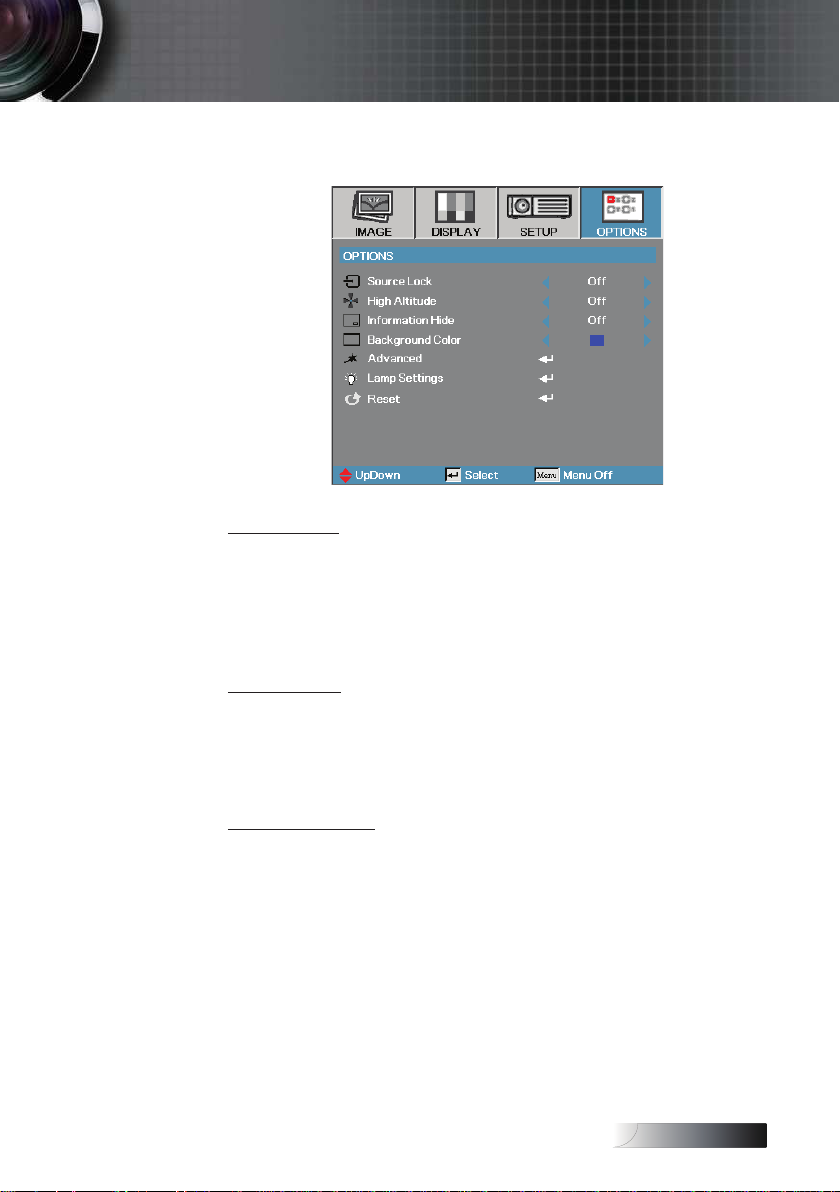
Source Lock
Lock the current source as the only available source, even if the
cable is unplugged.
On—only the current source is recognized as an input source.
4
O—all sources selected in Image | Advanced | Input Source
4
are recognized as an input source.
High Altitude
Adjust the fan speed to reect the environment.
On—increases fan speed for high temperature, humidity, or
4
altitude.
O—regular fan speed for normal conditions.
4
Information Hide
Suppress informational messages on the projected screen.
On—no status messages appear on screen during operation.
4
O— status messages appear as normal on screen during
4
operation.
39
Page 40
English
User Controls
Options
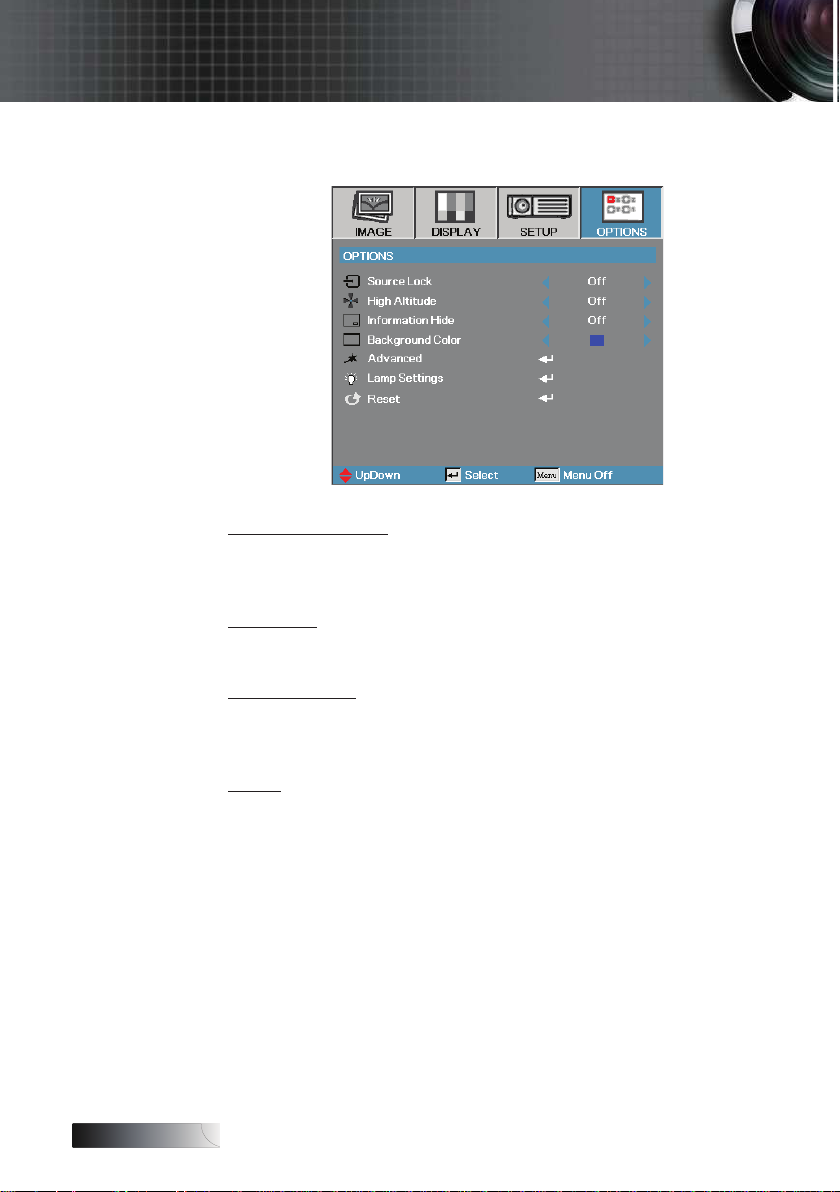
Background Color
Select the desired background color for the projected image
when no source is detected.
Advanced
Enter the Advanced menu. See page 4 for more details.
Lamp Settings
Enter the Lamp Settings menu. See pages 4-43 for more
details.
Reset
Reset all Options to default factory settings.
40
Page 41
English
User Controls
Options | Advanced
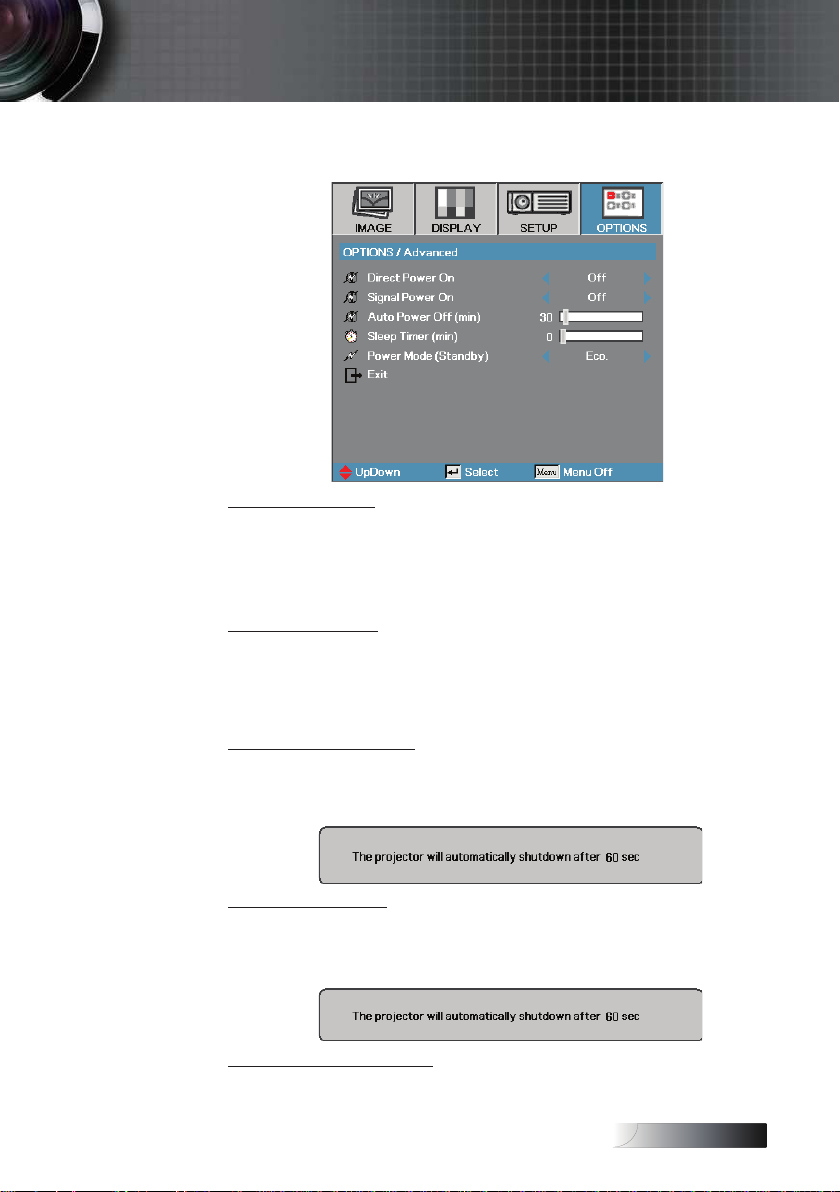
Direct Power On
Enable or disable Direct Power On.
On—the projector powers on automatically when AC power is
4
supplied.
O— the projector must be powered on as normal.
4
Signal Power On
Enable or disable Signal Power On.
On—the projector turns on automatically when an active signal
4
is detected.
O— the projector can be turned on by pressing the “Power” button.
4
Auto Power O (min)
Set the Auto Power O interval. The projector powers o the
lamp after 30 minutes of no signal by default. The following
warning is displayed 60 seconds before power o.
Sleep Timer (min)
Set the Sleep Timer interval. The projector powers o after the
specied time period of inactivity (regardless of signal). The
following warning is displayed 60 seconds before power o.
Power Mode (Standby)
Eco.: Choose “Eco.” to save power dissapation further <W.
4
Active: Choose “Active” to return to normal standby.
4
4
Page 42
English
User Controls
Options | Lamp Settings
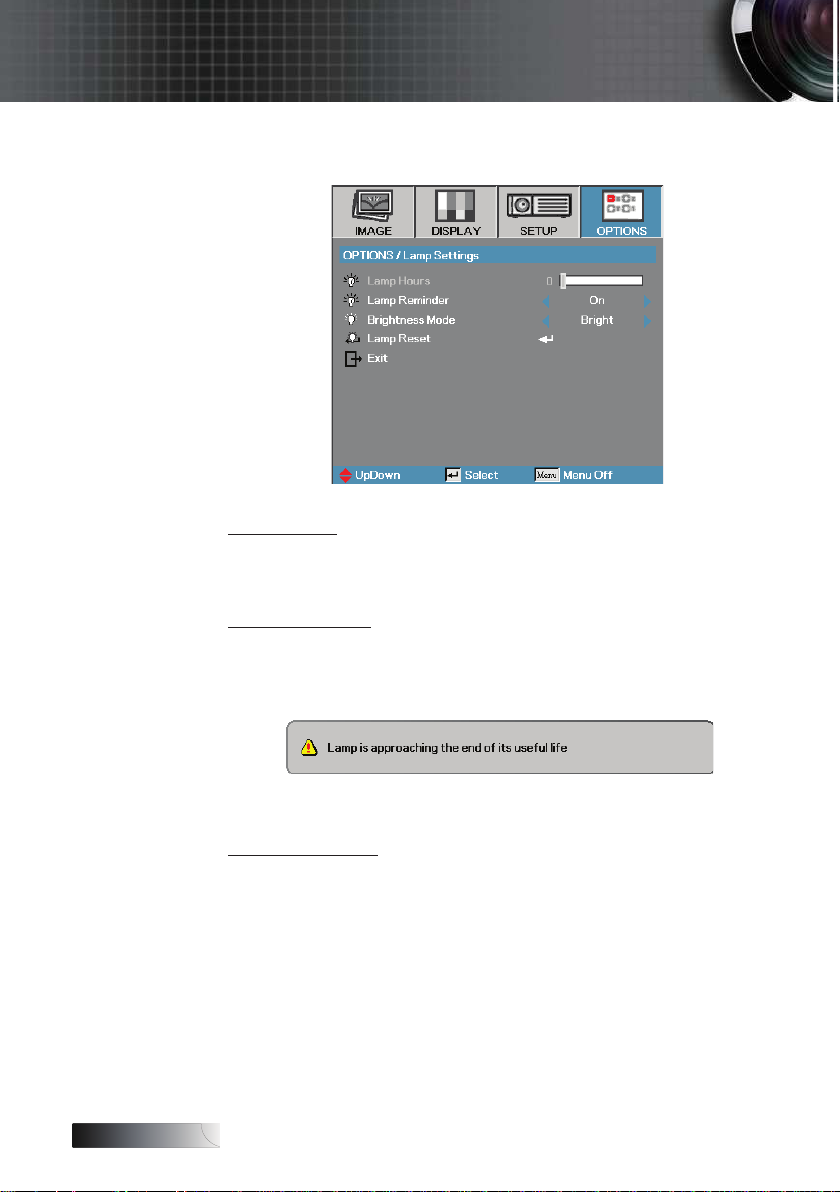
Lamp Hours
Displays the number of hours the lamp has been active. This
item is for display only.
Lamp Reminder
Enable or disable the lamp life span reminder.
On—a warning message displays when remaining lamp life is
4
less than 30 hours.
O—no warning message displays.
4
Brightness Mode
Select the lamp brightness mode.
Bright—the default setting.
4
STD—lower brightness setting to conserve lamp life.
4
4
Page 43
English
User Controls
Options | Lamp Settings
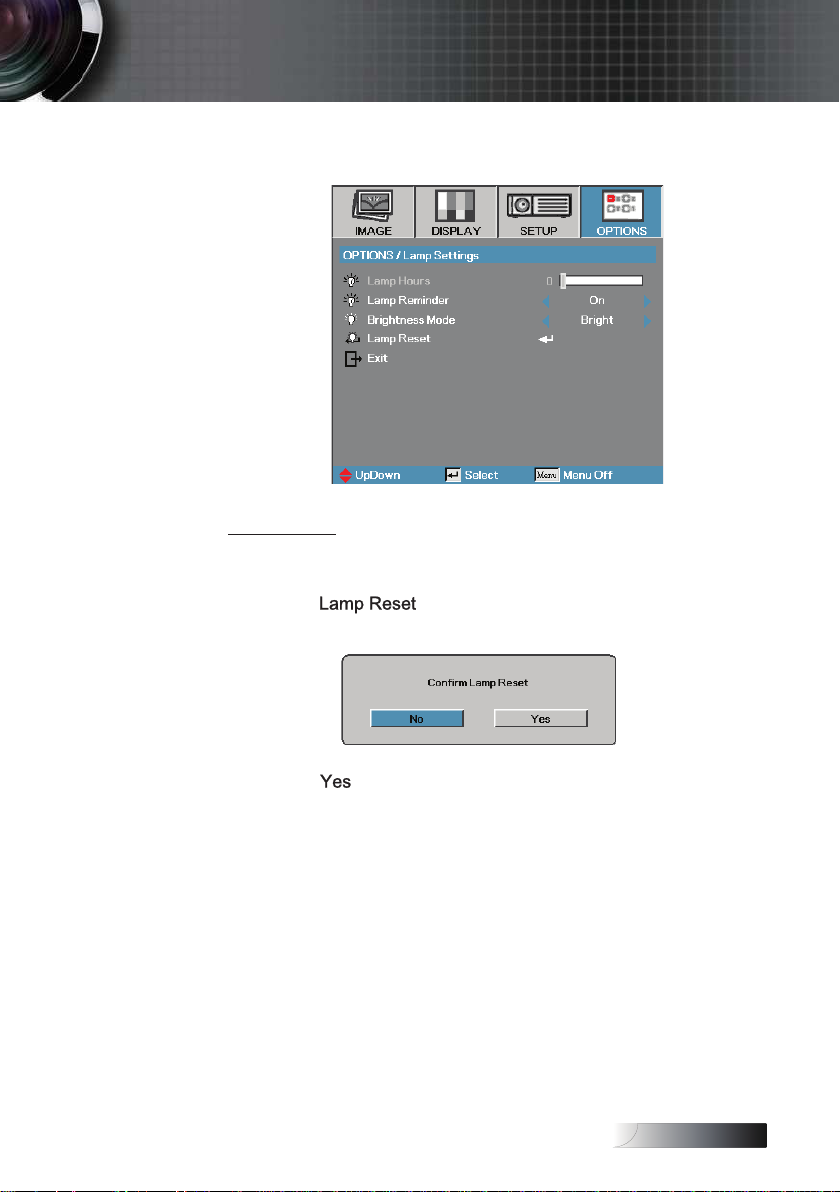
Lamp Reset
After replacing the lamp, reset the lamp counter to accurately
reect the new lamp’s life span.
. Select
A conrmation screen displays.
.
. Select
to reset the lamp counter to zero.
43
Page 44
English
Appendices
Troubleshooting
If you experience a problem with your projector, please refer to the
following information. If a problem persists, please contact your local
reseller or service center.
Image
4
4
4
4
4
Ensure all the cables and power connections are correctly and
securely connected as described in the
Ensure all the pins of connectors are not bent or broken.
Check if the projection lamp has been securely installed.
Please refer to the
Press “Re-Sync” on the remote.
If you are using a PC:
For Windows 95, 98,
. Open the
then double click on the
. Select the
3. Verify that your display resolution setting is lower than or
equal to UXGA (600 x 00).
4. Click on the
If the projector is still not projecting the whole image, you
will also need to change the monitor display you are using.
Refer to the following steps.
5. Verify the resolution setting is lower than or equal to UXGA
(
600 x 00).
6. Select the Change button under the
7. Click on
under the SP box; choose the resolution mode you
need under the “Models” box.
8. Verify that the resolution setting of the monitor display is
lower than or equal to UXGA (600 x 00). (*)
000, XP:
icon, the folder, and
tab.
. Next, select
section.
icon.
button.
section.
tab.
44
Page 45
English
Acer
�
[Fn]+[F5]
Asus � [Fn]+[F8]
Dell
�
[Fn]+[F8]
Gateway � [Fn]+[F4]
Mac Apple:
System Preference � Display � Arrangement � Mirror
display
IBM/Lenovo �[Fn]+[F7]
[Fn]+[F4]
HP/Compaq
NEC �� [Fn]+[F3]
Toshiba � [Fn]+[F5]
Appendices
If you are using a Notebook:
4
. First, follow the steps above to adjust resolution of the
computer.
. Press the toggle output settings. Example: [Fn]+[F4]
If you experience diculty changing resolutions or your
monitor freezes, restart all equipment including the projector.
45
Page 46
English
Appendices
4
If you are using a Notebook:
Some Notebooks may deactivate their own screens when a
second display device is in use. Each has a dierent way to
be reactivated. Refer to your computer’s manual for detailed
information.
Use
4
Change the monitor color setting on your computer.
4
Use
4
information.
Check and recongure the display mode of your graphic card
4
to make it compatible with the projector.
Adjusts the Focus Ring on the projector lens.
4
Make sure the projection screen is between the required
4
distances from the projector. See page
information.
When you play anamorphic DVD or 6:9 DVD, the projector will
show the best image in 6:9 format in OSD. If you play 4:3 format
DVD title, please change the format as 4:3 in projector OSD. If the
image is still stretched, you will also need to adjust the aspect ratio
by referring to the following:
Please setup the display format as 6:9 (wide) aspect ratio
4
type on your DVD player.
Move the projector closer to or further from the screen.
4
Press [Menu] button on the remote control or projector panel,
4
go to
to correct it. See page 33 for more information.
to make an adjustment. See page 33 for more
8 for more
and try the dierent settings.
46
Page 47
English
v Use of Keystone
is not
recommended.
Appendices
If possible, reposition the projector so that it is centered on the
4
screen and below the bottom of the screen.
Press [Keystone +/-] on the remote control until the sides are
4
vertical.
Select
4
projection direction.
Other
If possible, turn o the projector, then unplug the power cord
4
and wait at least 60 seconds before reconnecting power.
When the lamp reaches its end of life, it will burn out and may
4
make a loud popping sound. If this happens, the
projector will not turn on until the lamp module has been
replaced. To replace the lamp, follow the procedures in
Replacing the Lamp on page 49.
from the OSD and adjust the
47
Page 48
English
Steady light
�
No light
�
Appendices
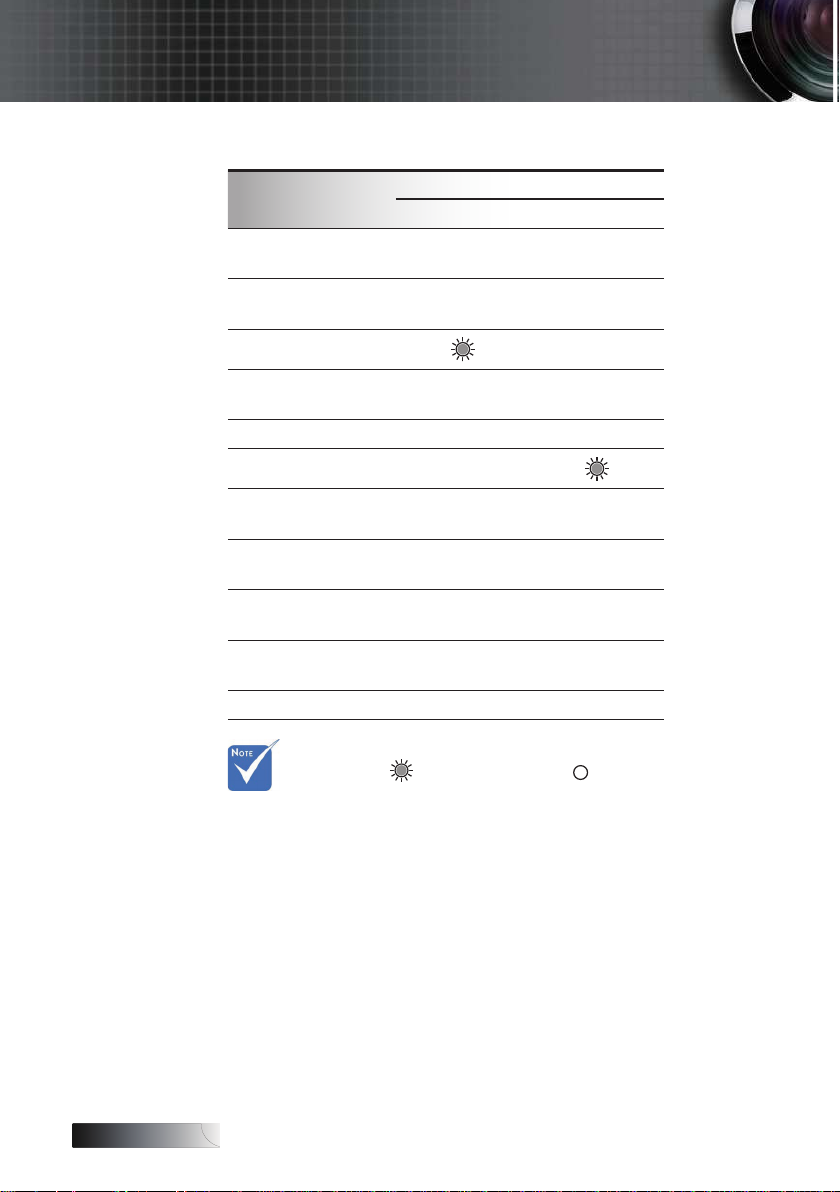
Projector LED Status Indicatior
Message
Standby
Warm up
Operating
Cooling down
Over Temp 3 O
Lamp Fail O
Thermal Break
Status Error
Lamp Door Sensor
Detect High
Fan error
(Lamp Fan)
Fan error
(Power Fan)
Color Wheel Error
Power LED Lamp LED
(Green) (Red)
.5 sec dark
sec light
0.5 sec dark
0.5 sec light
.0 sec dark
.0 sec light
4 O
7 O
6
6
9 O
O
O
O
O
The digit represents the number of led blinks.
48
Page 49
English
Appendices
Message Reminders
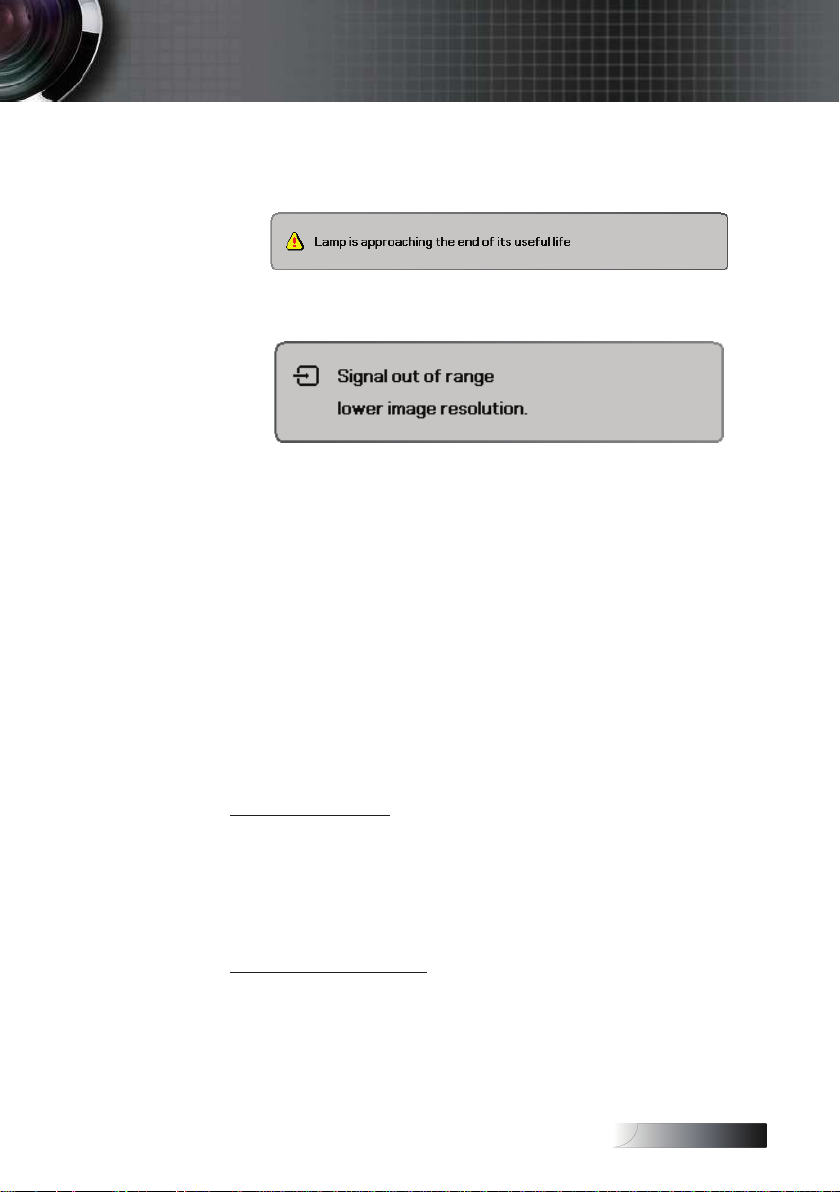
Replacing the lamp:
4
Out of range: (see the following for more information)
4
Remote Control
If the remote control does not work
Check the operating angle for the remote control is
4
approximately ±
Make sure there are no obstructions between the remote
4
control and the projector. Move to within 7m (
projector.
Make sure the batteries are inserted correctly.
4
Replace weak batteries in the remote control.
4
5°.
3 ft) of the
Audio Problems
There is no sound
Adjust the volume on the remote control.
4
Adjust the volume of the audio source.
4
Check the audio cable connection.
4
Test the source audio output with other speakers.
4
Have the projector serviced.
4
The sound is distorted
Check the audio cable connection.
4
Test the source audio output with other speakers.
4
Have the projector serviced.
4
49
Page 50
English
1
4
6
5
3
2
Appendices
Replacing the Lamp
The projection lamp should be replaced when it burns out. It should
only be replaced with a certied replacement part, which you can
order from your local dealer.
Important:
4
4
4
The lamp contains a certain amount of mercury and should be
disposed of according to local ordinance regulations.
Avoid touching the glass surface of the new lamp, doing so
may shorten its operation life.
Warning:
Be sure to turn o and unplug the projector at least an hour
before replacing the lamp. Failure to do so could result in a
severe burn.
50
Page 51
English
Correct
Incorrect
GapNo Gap
Appendices
Replacing the Lamp
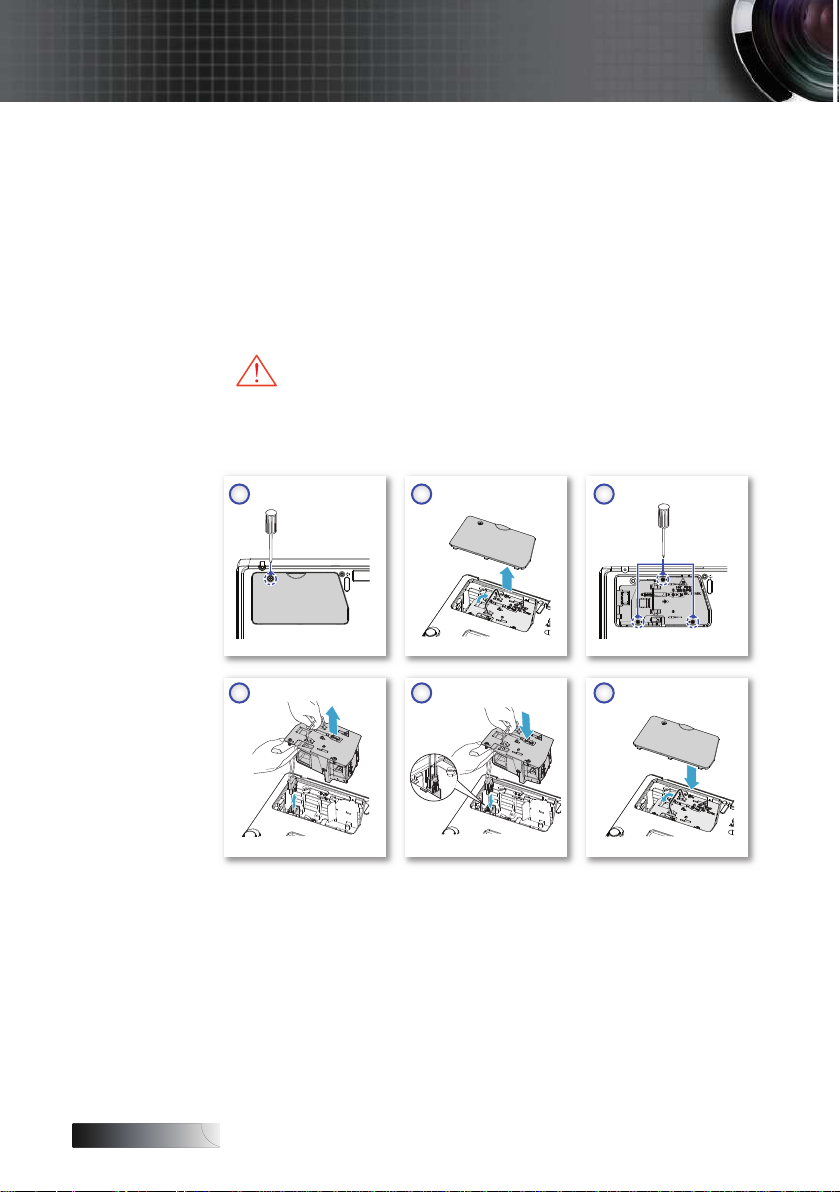
. Loosen the captive screws on the lamp compartment cover.
. Remove the lamp compartment cover.
3. Remove the three screws from the lamp module.
4. Lift the module handle up and disconnect the lamp connector
then pull rmly on the module handle to remove the lamp
module.
5. Reverse steps
installing, align the lamp module with the connector and ensure it
is level to avoid damage.
The lamp module must sit securely in place and the lamp
connector must be connected properly before tightening the
screws.
6. Replace the lamp compartment lid and tighten the captive screw.
After replacing the lamp, the lamp hours counter must be reset.
See page 4
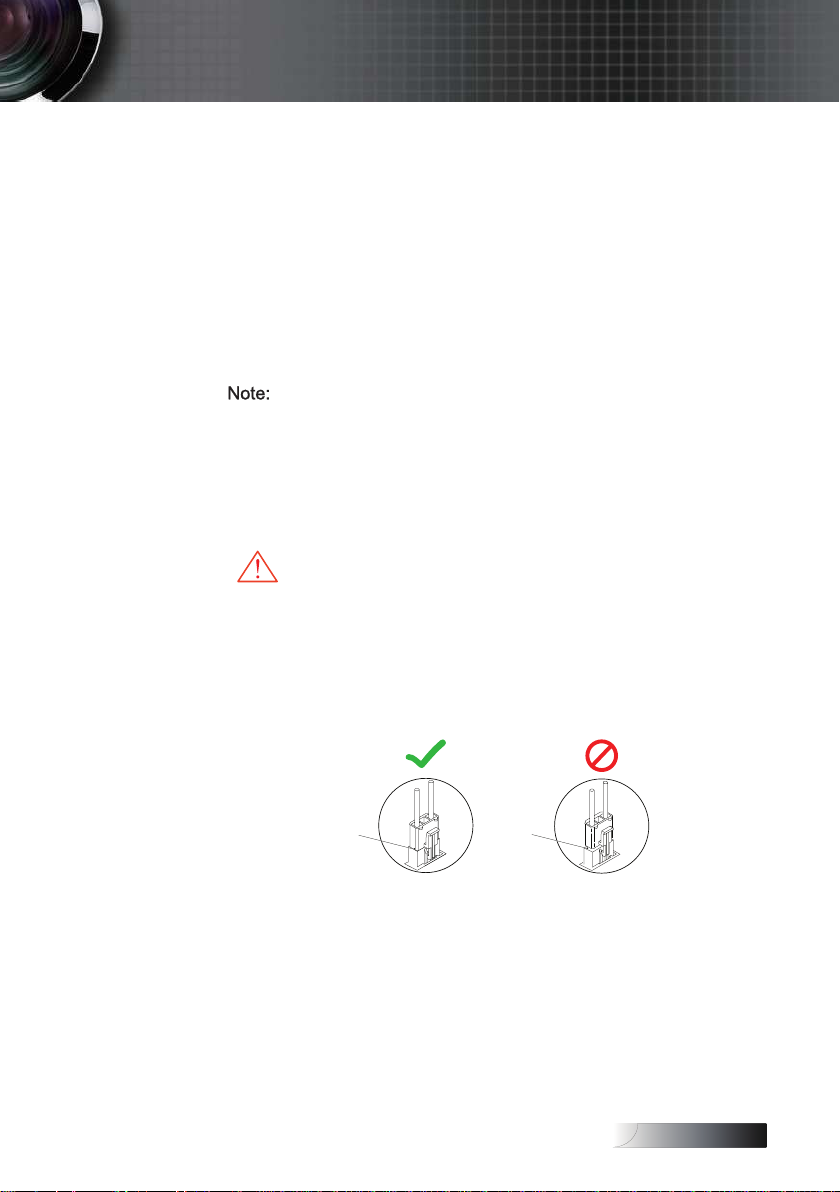
Warning:
Lamp Connector must be installed ush with the connector
4
base as shown in the image below. A gap between the Lamp
Connector and the connector base will cause damage to the
projector.
The following images illustrate correct and incorrect Lamp
Connector installations.
to 4 to install the new lamp module. While
for more information.
5
Page 52

English
Appendices
Cleaning the Projector
Cleaning the projector to remove dust and grime will help ensure
trouble-free operation.
Warning:
4
4
4
4
Cleaning the Lens
You can purchase optic lens cleaner from most camera stores.
Refer to the following to clean the projector lens.
. Apply a little optic lens cleaner to a clean soft cloth.
(Do not apply the cleaner directly to the lens.)
. Lightly wipe the lens in a circular motion.
Caution:
4
4
Be sure to turn o and unplug the projector at least an hour
before cleaning. Failure to do so could result in a severe burn.
Use only a dampened cloth when cleaning. Do not allow water
to enter the ventilation openings on the projector.
If a little water gets into the projector interior while cleaning, leave
unplugged in a well-ventilated room for several hours before using.
If a lot of water gets into the projector interior when cleaning, have
the projector serviced.
Do not use abrasive cleaners or solvents.
To prevent discoloration or fading, avoid getting cleaner on the
projector case.
Cleaning the Case
Refer to the following to clean the projector case.
. Wipe o dust with a clean dampened cloth.
. Moisten the cloth with warm water and mild detergent (such as
used to wash dishes), and then wipe the case.
3. Rinse all detergent from the cloth and wipe the projector again.
Caution:
To prevent discoloration or fading of the case, do not use abrasive
alcohol-based cleaners.
5
Page 53
English
v For wide screen
resolution
(WXGA), the
compatibility
support is
dependent on
Notebook/PC
models.
Please note that
using resolutions
other than native
(800 x 600) may
result in some
loss of image
clarity.
Appendices
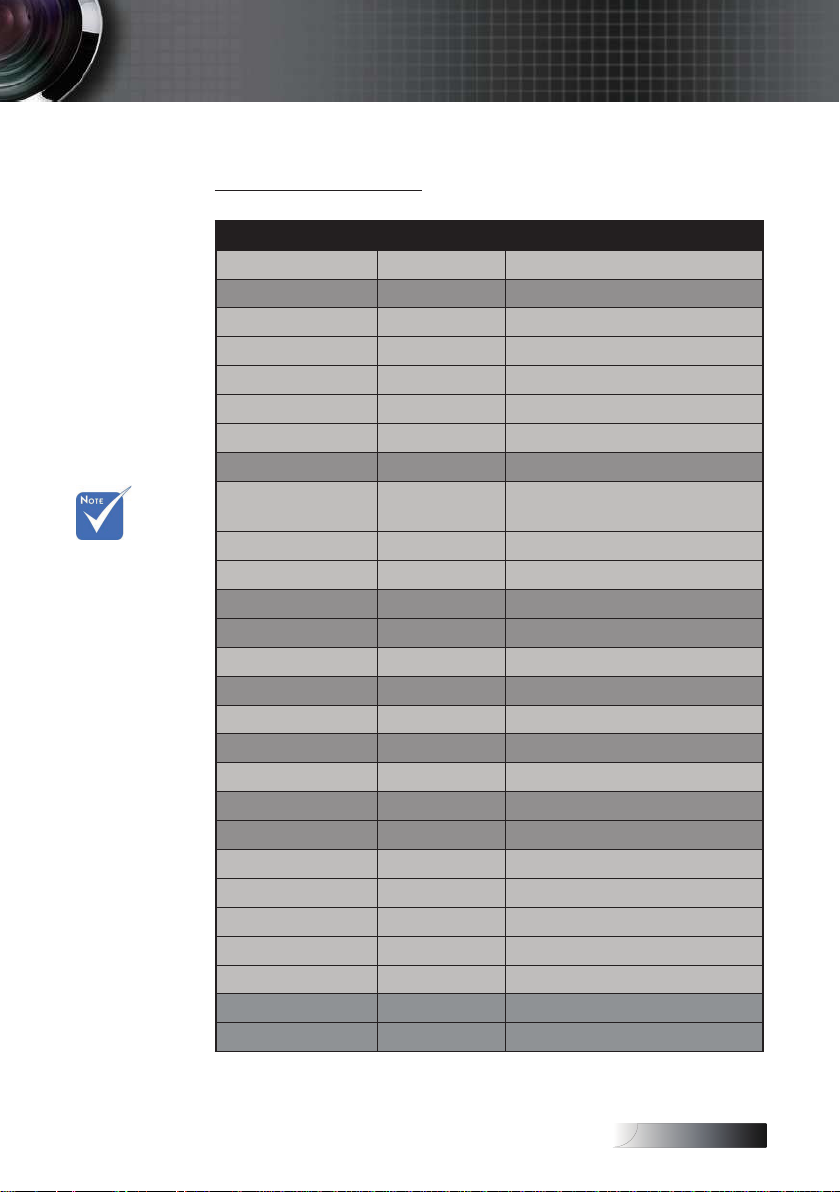
Compatibility Modes
Computer Compatibility
Signal Resolution Refresh Rate (Hz)
NTSC - 60
PAL/SECAM - 50
VESA 640 x 350 70./ 85.
640 x 400 70.
0 x 350 70
7
70 x 400 70/ 85
70 x 576 50/ 60
VGA
SVGA 800 x 600
XGA 04 x 768 60/ 70.
HD70 80 x 7
WXGA 80 x 768 60/ 70/ 75/ 85
WXGA-800 80 x 800 60
SXGA 80 x 0
SXGA+ 400 x 050 60
UXGA 600 x 00 60
HDTV
SDTV 7
640 x 480 60/ 67/ 7
56.3/ 60.3/ 75/ 7
83 x 64 7/ 75
04 x 576
5 x 864 60/ 70/ 75/85
0 50/ 60/ 75/ 85/ 0
4 60/ 75/85
600 x
050 60
90 x
080 5/30
90 x 080i 50/ 60
90 x
80 x 70p 50/ 60
080p 4/5/30/50/ 60
80 x 70
0 x 576 50
70 x 576i 50
/ 85.
.8/ 75/ 85
./
/ 0
80/ 85.
50/ 60
/ 7/ 75/ 85/ 0
60
53
Page 54
English
Appendices
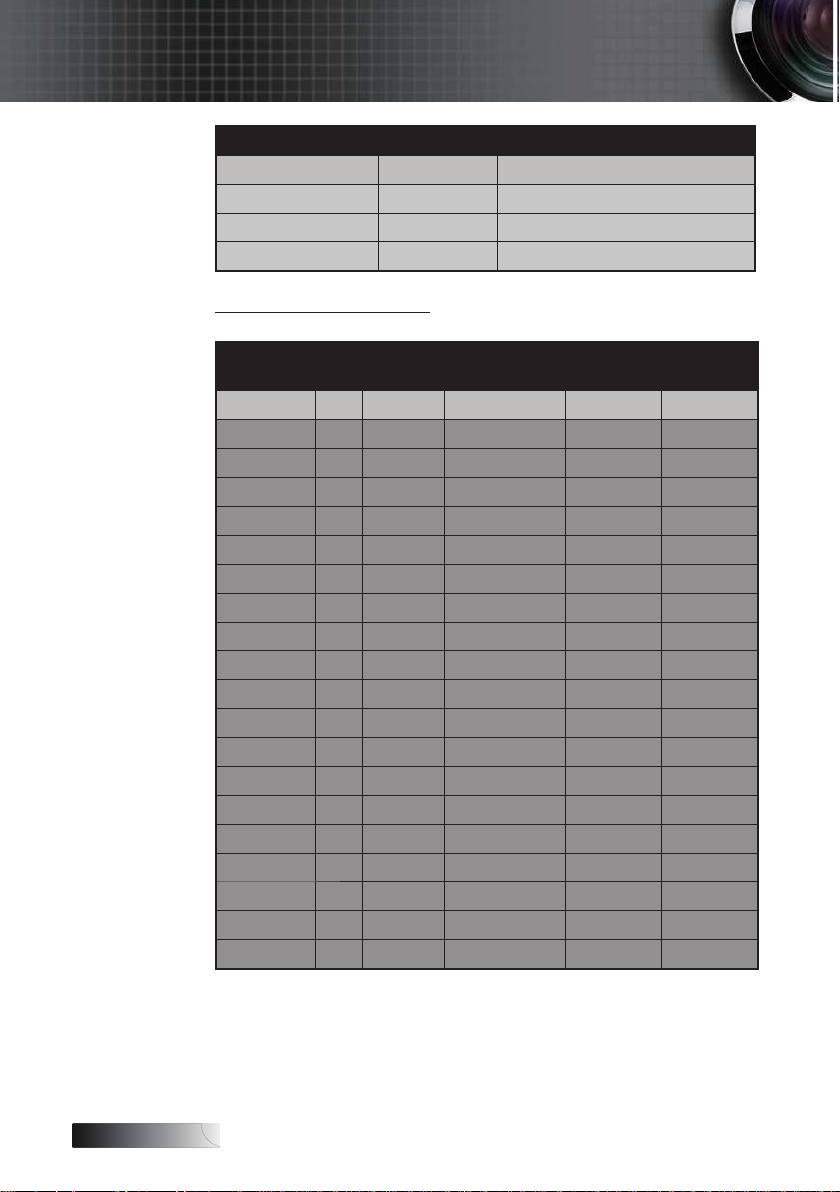
Apple Mac Compatibility
Signal Resolution Refresh Rate (Hz)
70 x 576p 50
70 x 480 60
70 x 480i 60
70 x 480p 60
Resolution Macbook
Hz- Analog Analog Analog Analog
800x600 60 o o - 800x600 7 o o o o
800x600 75 o o o
800x600 85 o o o o
04x768 60
04x768 70
04x768 75
04x768 85
80x70 60
80x70 75
80x70 85
80x768 60 o o - o
80x768
80x768
80x800
80x04
80x04
680x050
90x00
75 o o o o
85 o o - o
60 o o o o
60 - o o o
75 - o o 60 o o - 60 o o - -
o o o o
o o o o
o o o o
o o o o
o o o o
o o - o
o o - o
Macbook Pro
(Intel)
Power Mac G5Power Mac
G4
o
54
Page 55
English
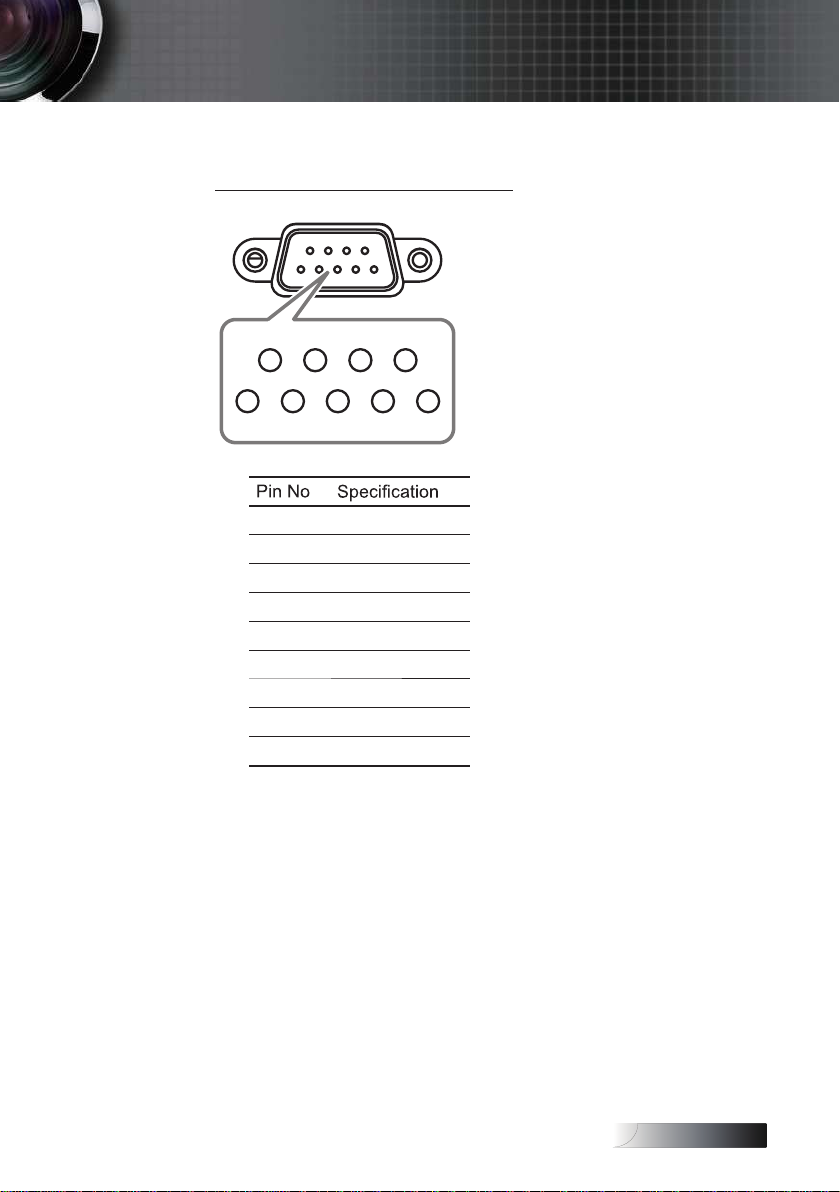
RS3 Commands
9 8 7 6
5 4 3 2 1
RS3 Connector (projector side)
N/A
RXD
3 TXD
4 DTR
5 GND
6 DSR
7 RTS
8 CTS
9 N/A
Appendices
55
Page 56
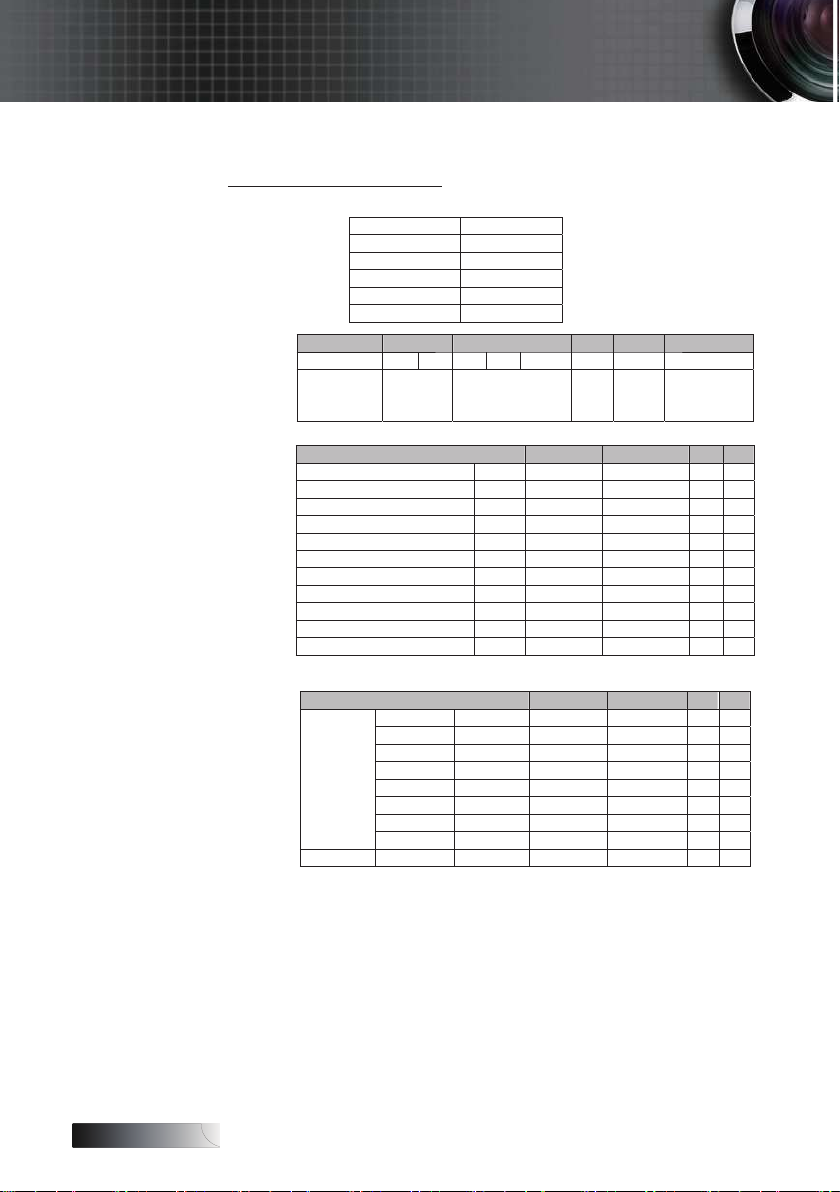
English
Baud Rate 9600
Data Bits 8
Parity Check None
Stop Bits 1
Flow Control None
UART16550 FIFO Disable
Lead Code Projector ID Command ID space variable carriage return
~ X X X X X n CR
Fix code
One Digit
Set in OSD
00~99
Two Digit
Defined by Optoma
2 or 3 Digit
See the Follow content
One
Digit
Per item
Definition
Fix code
One digit
Keypad Command
Function ASCII Pass Fail
Power On/Off n=1/n=0 & n=2 ~XX00 n P F
Power On with Password ~XX00 1 ~nnnnn P F
Resync n=1 ~XX01 n P F
AV Mute On/Off n=1/n=0 & n=2 ~XX02 n P F
Mute On/Off n=1/n=0 & n=2 ~XX03 n P F
Freeze/Unfreeze n=1/n=2 ~XX04 n P F
Direct Source Selection ~XX12 n P F
VGA 1 n=5
VGA 1 SCART n=7
VGA 1 Component n=8
Video n=10
OSD/Image
Function ASCII Pass Fail
Presentation ʳ n=1 ~XX20 n P F
Bright ʳ n=2 ʳ
Movie ʳ n=3 ʳ
sRGB ʳ n=4 ʳ
Classroom ʳ n=7 ʳ
Blackboard ʳ n=8 ʳ
User n=5
Display Mode
3D n=11
Brightness ʳ ʳ n= -50 - +50 ~XX21 n P F
Appendices
RS3 Protocol Function List
RS3 Command Table
56
Page 57
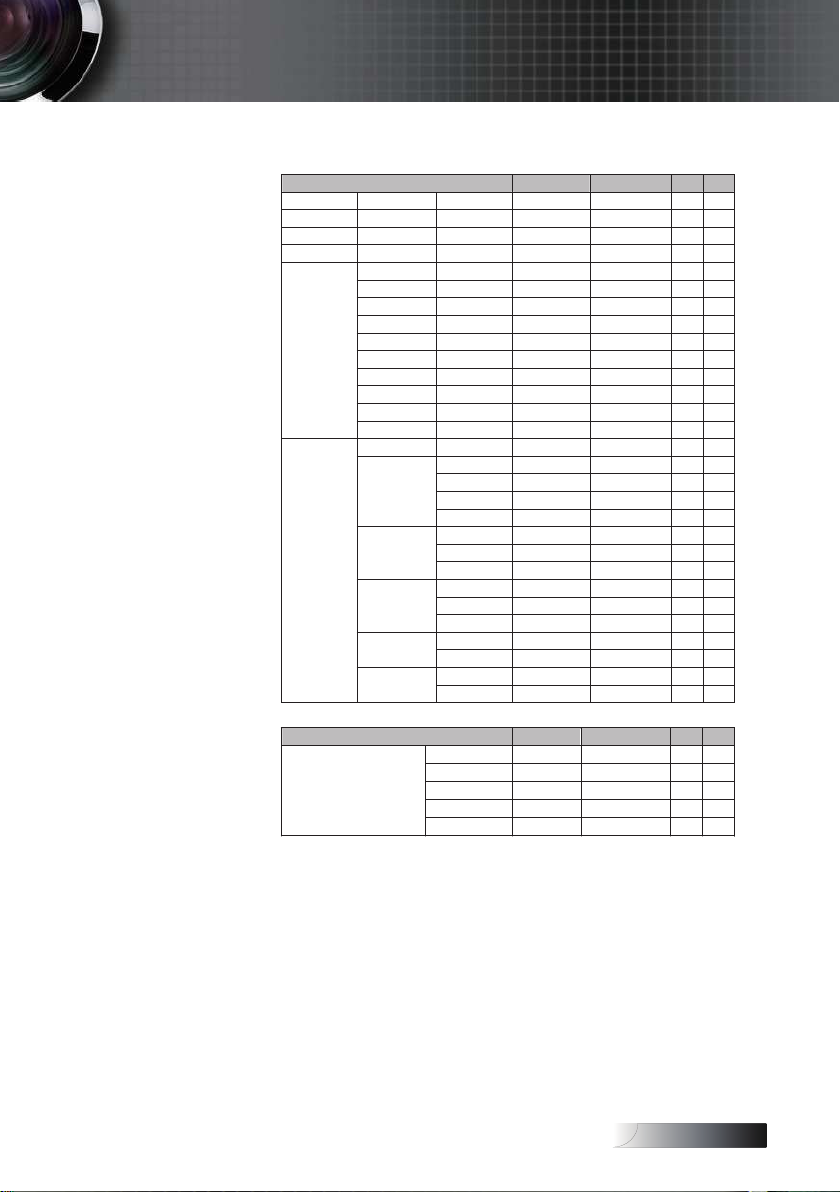
English
Function ASCII Pass Fail
Contrast ʳ ʳ n= -50 - +50 ~XX22 n P F
Sharpness ʳ ʳ n= -15 - +15 ~XX23 n P F
Saturation n= -50 - +50 ~XX45 n P F
Tint n= -50 - +50 ~XX44 n P F
Red Gain ʳ n= -50 - +50 ~XX24 n P F
Green Gain ʳ n= -50 - +50 ~XX25 n P F
Blue Gain ʳ n= -50 - +50 ~XX26 n P F
Red Bias n= -50 - +50 ~XX27 n P F
Green Bias n= -50 - +50 ~XX28 n P F
Blue Bias n= -50 - +50 ~XX29 n P F
Cyan n= -50 - +50 ~XX30 n P F
Yellow n= -50 - +50 ~XX31 n P F
Magenta n= -50 - +50 ~XX32 n P F
Color Setting
Reset ʳ n=1 ~X
X33 n P F
BrilliantColorTMʳ n= 0 - 10 ~XX34 n P F
Film n=1 ~XX35 n P F
Video n=2
Graphics n=3 ʳ
Degamma
PC n=4 ʳ
Warm n=1 ~XX36 n P F
Medium n=2 ʳ
Color Temp.
Cold n=3 ʳ
Auto n=1 ~XX37 n P F
RGB n=2 ʳ
Color Space
YUV n=3 ʳ
VGA 1 n=5 ~XX39 n P F
Input Source
Video n=10 ʳ
On n=1 ~XX40 n P F
IMAGE
/Advanced
De-Interlace
Off n=2 ʳ
OSD/Display
Function ASCII Pass Fail
4:3 n=1 ~XX60 n P F
16:9-I n=2 ʳ
16:9-II n=3
Native n=6
Format
Auto n=7 ʳ
Appendices
57
Page 58
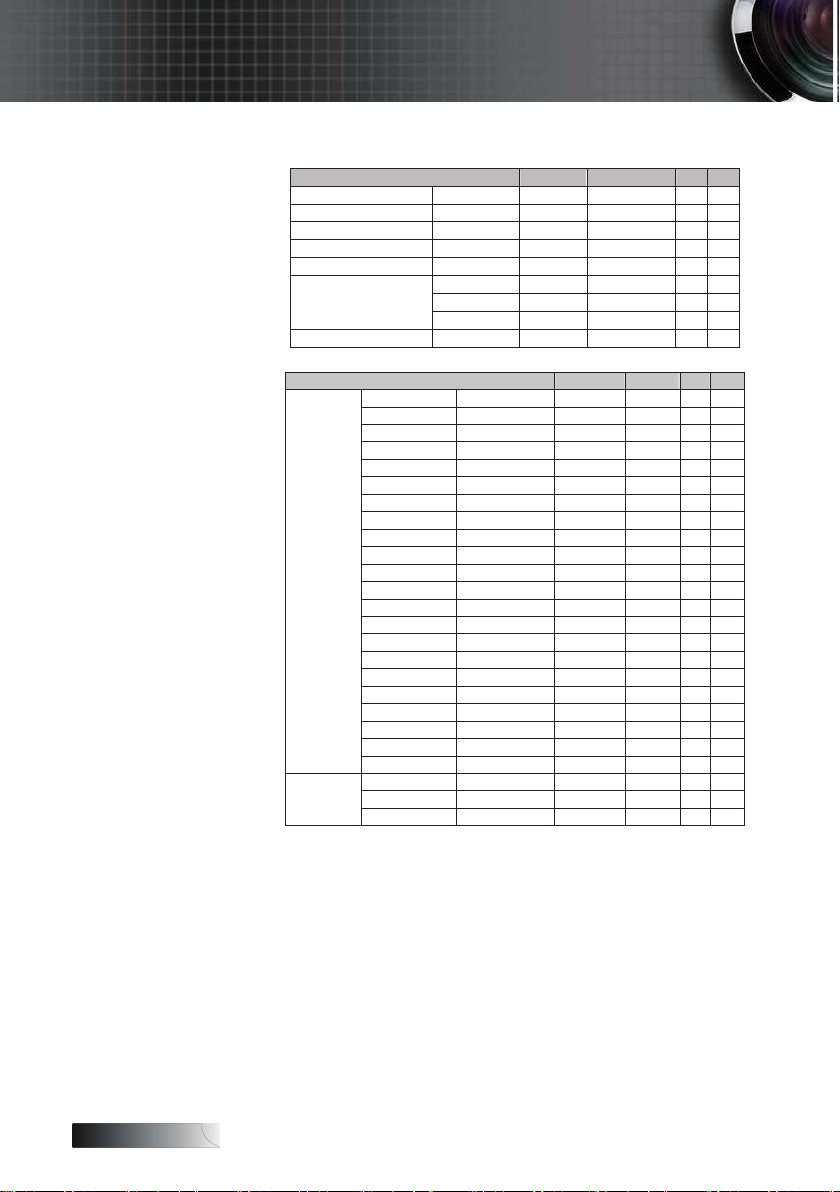
English
Function ASCII Pass Fail
Overscan ʳ n=0-10 ~XX61 n P F
Zoom ʳ n= -30~+50 ~XX62 n P F
H Image Shift ʳ n= -50 - +50 ~XX63 n P F
V Image Shift (16:9) ʳ n= -24 - +24 ~XX64 n P F
V Keystone ʳ n= -30 - +30 ~XX66 n P F
Off n=1 ~XX230 n P F
DLP Link n=2 P F
3D
IR n=3 P
F
3D Sync Invert On/Off n=1/n=2 &0 ~XX231 n P F
OSD/Setup
Function ASCII Pass Fail
English ʳ n=1 ~XX70 n P F
German ʳ n=2 ʳ
French ʳ n=3
Italian ʳ n=4 ʳ
Spanish ʳ n=5 ʳ
Portuguese ʳ n=6
Polish n=7
Dutch n=8
Swedish n=9
Norwegian/Danish n=10
Finnish n=11
Greek n=12
Traditional Chinese n=13
Simplified Chinese n=14
Japanese n=15
Korean n=16
Russian n=17
Hungarian n=18
Czechoslovak n=19
Arabic n=20
Thai n=21
Language
Turkish n=22
Front-Desktop ʳ n=1 ~XX71 n P F
Rear-Desktop ʳ n=2 ʳ
Projection
Front-Ceiling ʳ n=3 ʳ
Appendices
58
Page 59
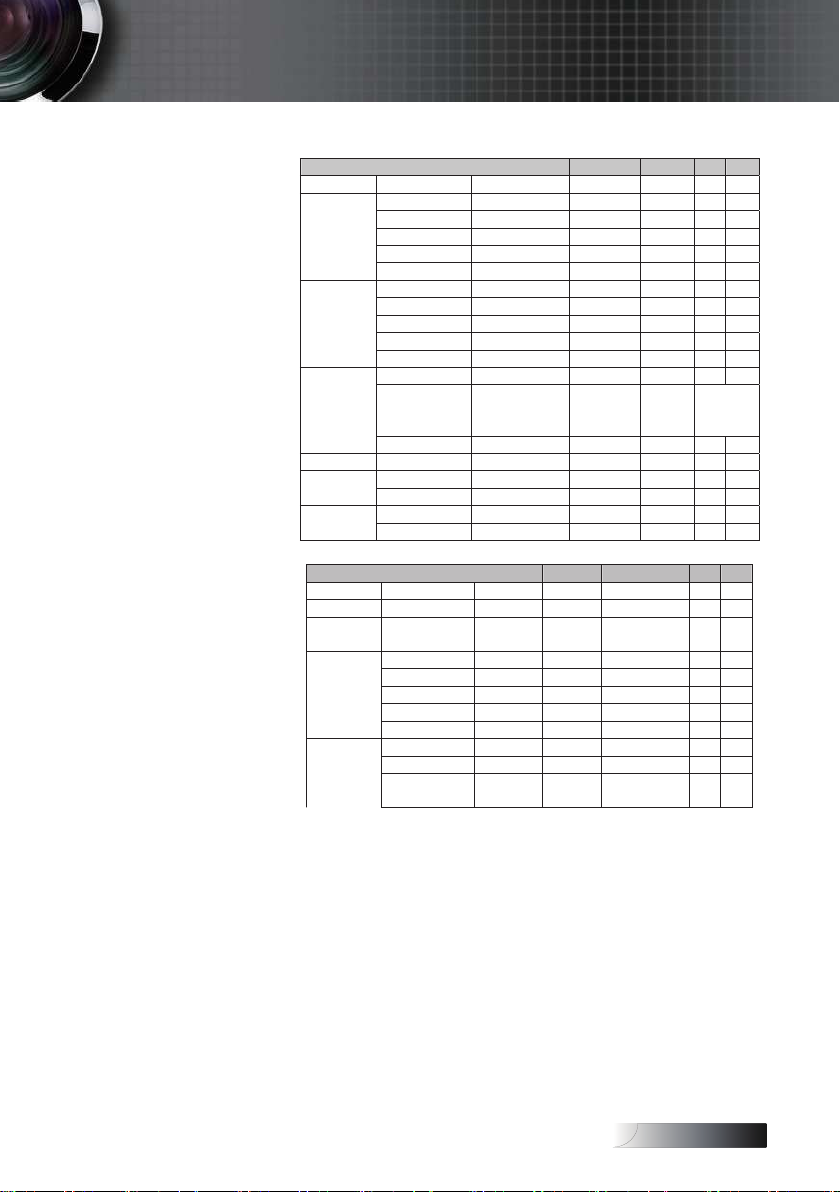
English
Function ASCII Pass Fail
Rear-Ceiling ʳ n=4 ʳ
Top Left ʳ n=1 ~XX72 n P F
Top Right ʳ n=2 ʳ
Center ʳ n=3 ʳ
Bottom Left ʳ n=4 ʳ
Menu Location
Bottom Right ʳ n=5 ʳ
Automatic Enable/Disable n=1/n=0 & n=2 ~XX91 n P F
Frequency ʳ n= 0~31 ~XX73 n P F
Phase ʳ n= -5 - +5 ~XX74 n P F
H. Position ʳ n= -5 - +5 ~XX75 n P F
Signal
V. Position ʳ n= -5
- +5 ~XX76 n P F
Security Timer Hour/Day/Month nnnnnn ~XX77 n P F
Change
Password
ʳ ʳ
send back
the password
to confirm
Security
Security Settings On/Off n=1/n
=0 & n=2 ~XX78 n P F
Projector ID ʳ ʳ n=00-99 ~XX79 n P F
Mute On/Off n=1/n=2 &0 ~XX80 n P F
Audio Settings
Volume ʳ n=0-1
0 ~XX81 n P F
Logo Optoma/Neutral n=1/n=2 ~XX82 n P F
Advanced
Closed Captioning On/Off n=1/n=0 & n=2 ~XX88 n P F
OSD/Option
Function ASCII Pass Fail
Source Lock ʳ On/Off n=1/n=2 &0 ~XX100 n P F
High Altitude ʳ On/Off n=1/n=2 &0 ~XX101 n P F
Information
Hide ʳ
On/Off n=1/n=2 &0 ~XX102 n P F
Blue ʳ n=1 ~XX104 n P F
Black ʳ n=2 ʳ
Red ʳ n=3 ʳ
Green ʳ n=4 ʳ
Background
Color
White ʳ n=5 ʳ
Direct Power On On/Off n=1/n=2 &0 ~XX105 n P F
Signal Power On On/Off n=1/n=2 &0 ~XX113 n P F
Advanced
Auto Power Off
(min) ʳ
n=0-180 ~XX106 n P F
Appendices
59
Page 60
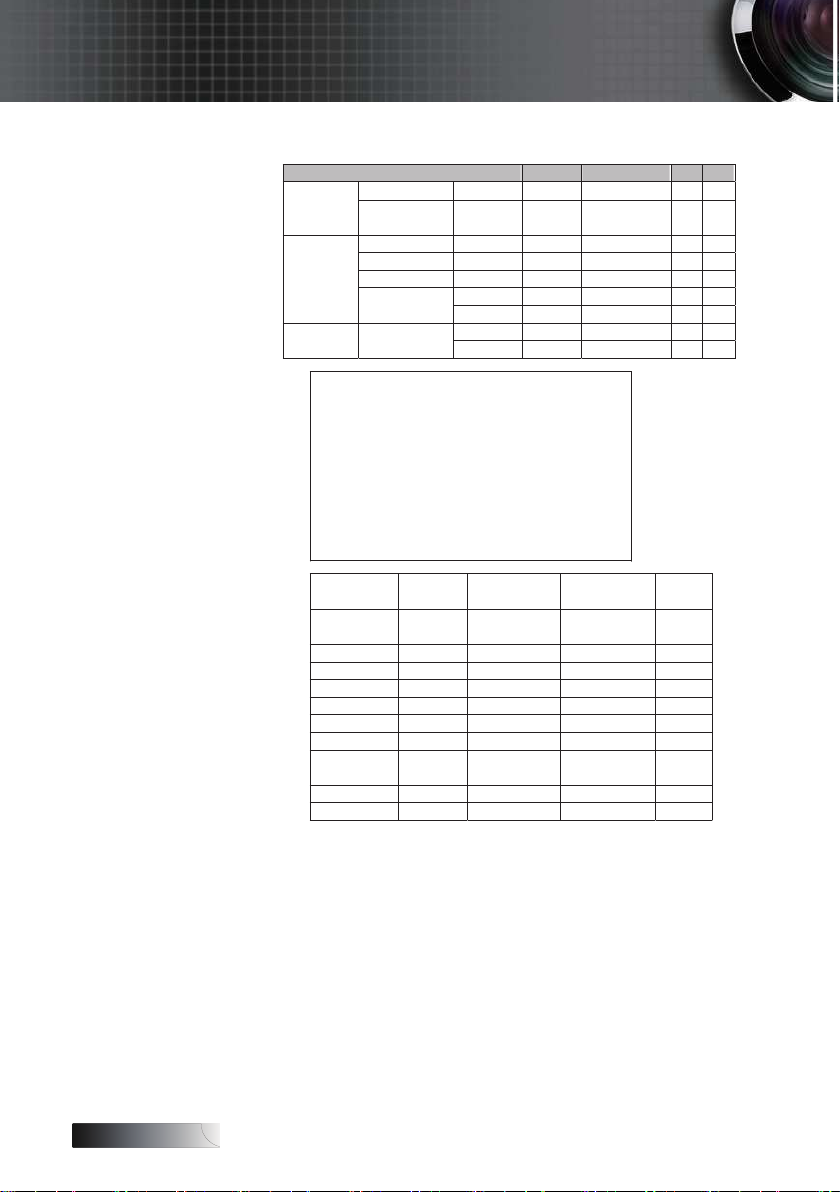
English
Function ASCII Pass Fail
Sleep Timer (min) ʳ n=000-995
~XX107 n P F
Power
Mode(Standby)
ECO/Active n=1/n=2 &0
~XX114 n P F
Lamp Hour ʳ n=1 ~XX108 n nnnn F
Lamp Reminder On/Off n=1/n=2 &0 ~XX109 n P F
Brightness Mode Bright/STD n=1/n=2 ~XX110 n P F
Yes n=1 ~XX111 n P F
Lamp Setting
Lamp Reset
No n=2 ʳ
Yes n=1 ~XX112 n P F
Reset ʳ
No n=2 ʳ
Information Format:
INFOa Standby Mode a=0
ʳ Warming up a=1
ʳ Cooling Down a=2
ʳ Out of Range a=3
ʳ Lamp Fail a=4
ʳ Thermal Switch Error a=5
ʳ Fan Lock a=6
ʳ Over Temperature a=7
ʳ
Lamp Hours Running
Out a=8
Function
RS232
command Response ʳ ʳ
Information
display ~XX150 1 Okabbbbccdddde ʳ ʳ
ʳ ʳ a = Power State On a=1
ʳ ʳ ʳ Off a=0
ʳ ʳ b = Lamp Hour ʳ bbbb
ʳ ʳ c = Input Source None c=0
ʳ ʳ ʳ VGA c=1
ʳ ʳ ʳ Video c=2
ʳ ʳ
d = Firmware
Version ʳ dddd
ʳ ʳ e = Display mode None e=0
ʳ ʳ ʳ Presentation e=1
Appendices
60
Page 61
English
Appendices
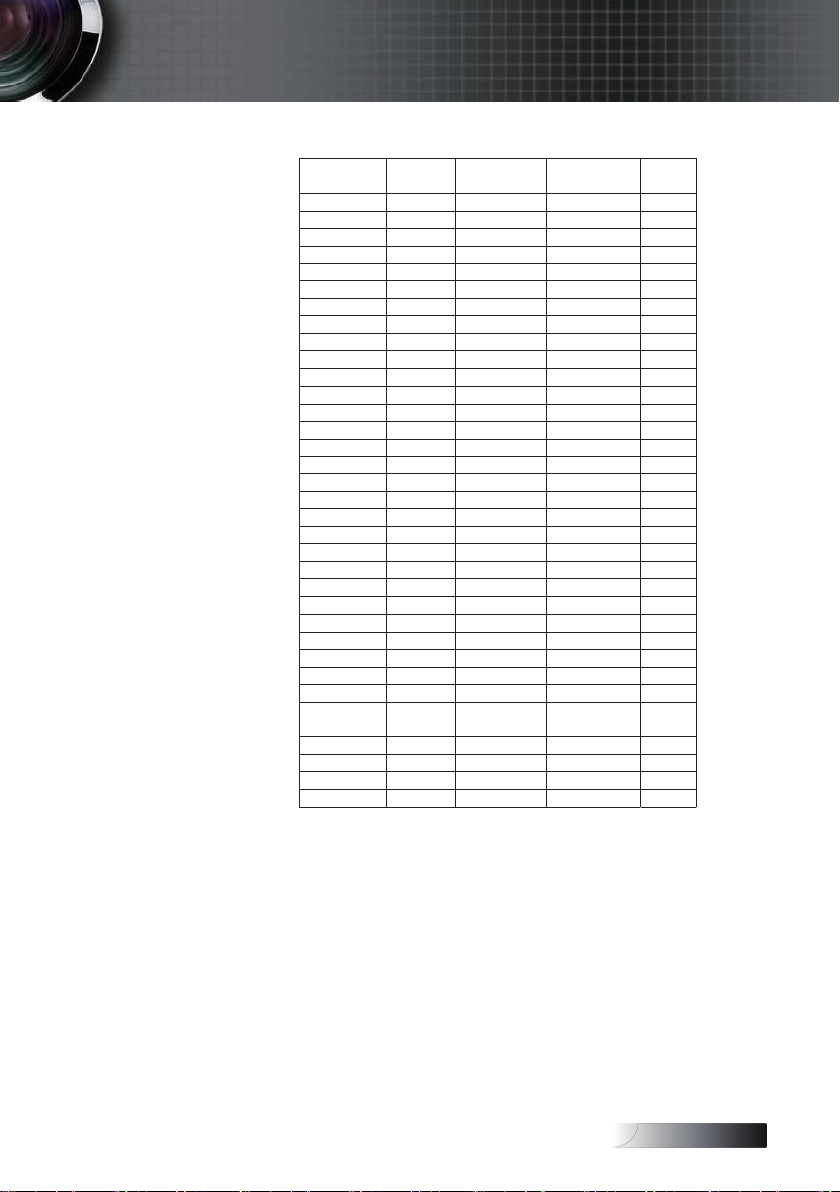
Function
RS232
command Response ʳ ʳ
ʳ ʳ ʳ Bright e=2
ʳ ʳ ʳ Movie e=3
ʳ ʳ ʳ sRGB e=4
ʳ ʳ ʳ Blackboard e=5
ʳ ʳ ʳ Classroom e=6
ʳ ʳ ʳ User e=7
ʳ ʳ ʳ 3D e=8
Input Source ~XX121 1 Oka None a=0
ʳ ʳ VGA a=1
ʳ ʳ Video a=2
Software Version ~XX122 1 Okdddd ʳ ʳ
Display Mode ~XX123 1 Oka None a=0
ʳ ʳ ʳ Presentation a=1
ʳ ʳ ʳ Bright a=2
ʳ ʳ ʳ Movie a=3
ʳ ʳ ʳ sRGB a=4
ʳ ʳ ʳ Blackboard a=5
ʳ ʳ ʳ Classroom a=6
ʳ ʳ ʳ User a=7
ʳ ʳ ʳ 3D a=8
Power State ~XX124 1 Oka On a=1
ʳ ʳ ʳ Off a=0
Brightness ~XX125 1 Oka ʳ ʳ
Contrast ~XX126 1 Oka ʳ ʳ
Aspect Ratio ~XX127 1 Oka 4:3 a=0
ʳ ʳ ʳ 16:9-I a=1
ʳ ʳ ʳ 16:9-II a=2
ʳ ʳ ʳ Native a=3
Auto a=4
Color
Temperature ~XX128 1 Oka Warm
a=0
ʳ ʳ ʳ Medium a=1
ʳ ʳ ʳ Cold a=2
Projection Mode ~XX129 1 Oka Front-Desktop a=0
ʳ ʳ ʳ Rear-Desktop a=1
6
Page 62
English
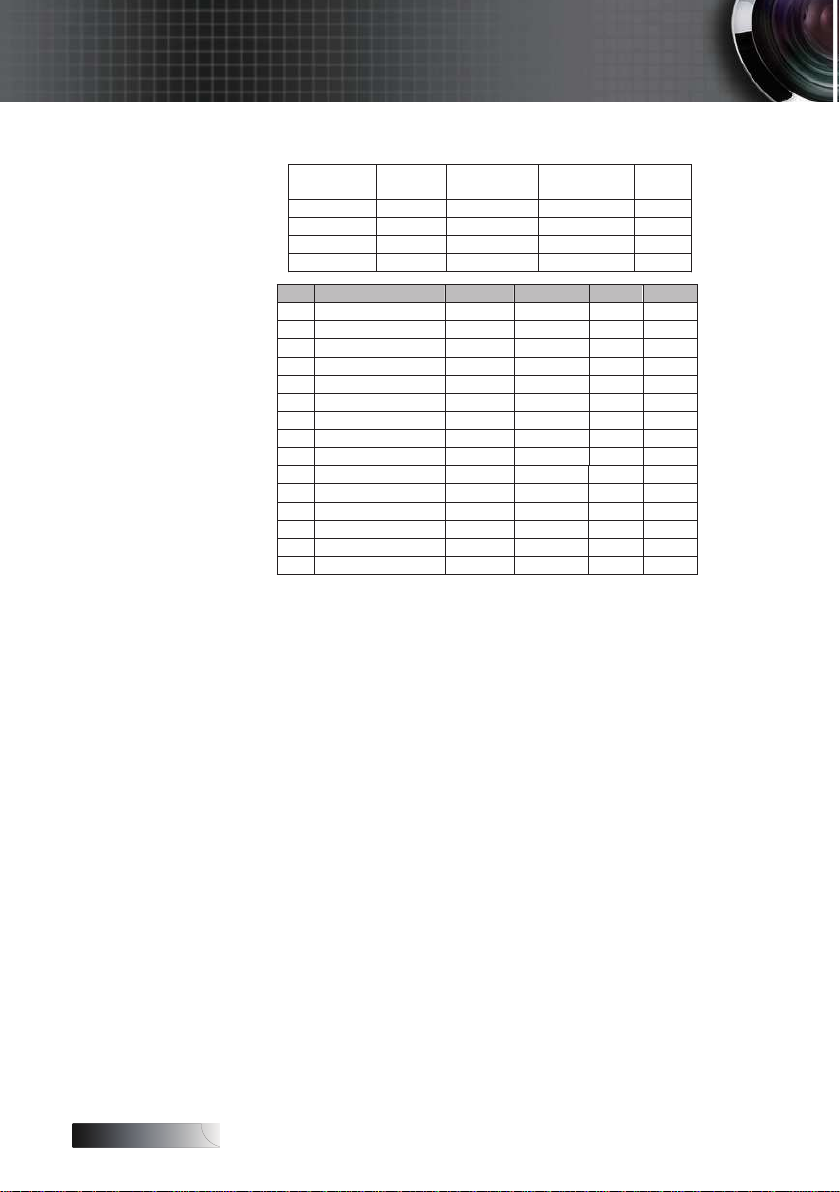
Function
RS232
command Response ʳ ʳ
ʳ ʳ ʳ Front-Ceiling a=2
ʳ ʳ ʳ Rear-Ceiling a=3
Model Name ~XX151 1 Oka ES515 a=1
RS232 Version No ~XX152 1 Oka ʳ ʳ
Item Key Definition ASCII Pass Fail
1 Power n=1 ~XX140 n P F
2 Left n=11 ʳ P F
3 Enter n=12 ʳ P F
4 Right n=13 ʳ P F
5 Down n=14 ʳ P F
6 Keystone +/1 n=15 ʳ P F
7 Keystone -/3 n=16 ʳ P F
8 Zoom +/2 n=28 ʳ P F
9 Zoom -/5 n=29 ʳ P F
10 Freeze/4 n=23 ʳ P F
11 Source/6 n=30 ʳ P F
12 AV-Mute/7 n=24 ʳ P F
13 Resync/8 n=31 ʳ P F
14 Menu n=20 P F
15 Up n=10 P F
Appendices
6
Page 63
English
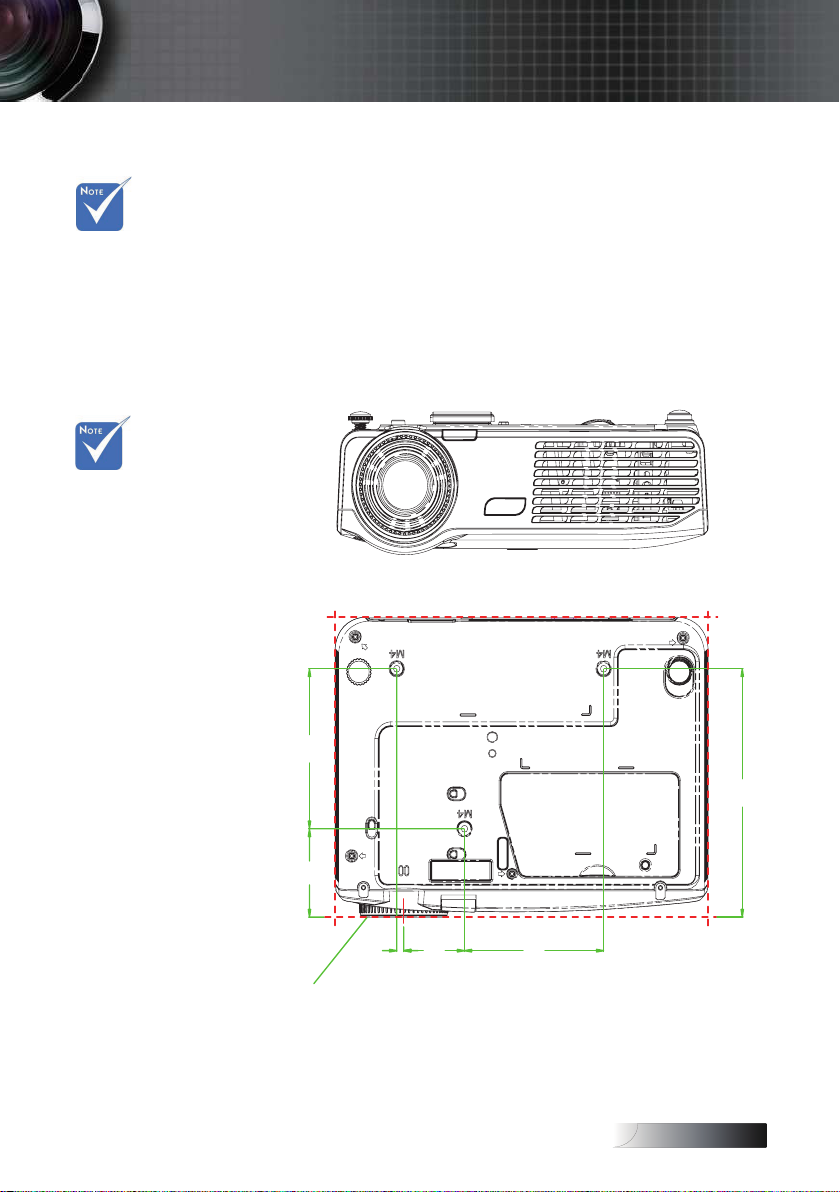
42.50
103.0056.90
5.00
LENS
159.90
97.50
Appendices
Ceiling Installation
To prevent damage to your projector please use the recommended
mounting package for installation.
v Damage to the
projector as a
result of incorrect
installation voids
the warranty.
v Ensure at least
0cm clearance
between the
ceiling and the
underside of the
projector.
v Avoid locating the
projector near
heat sources
such as air
conditioning and
heaters. Excess
heat may cause
the projector to
power o.
To ensure compliance, only use a UL Listed ceiling mount and
screws that meet the following specications:
Screw Type: M4
4
Maximum screw length: 8 mm
4
Minimum screw length: 6 mm
4
Refer to the following diagram to ceiling mount the projector.
63
Page 64
English
Appendices
Optoma Global Oces
For service or support please contact your local oce.
USA
75 Sycamore Drive Tel : 408-383-3700
Milpitas, CA 95035, USA Fax : 408-383-370
www.optomausa.com
Canada
5630 Kennedy Road, Mississauga, Tel : 905-36-58
ON, L4Z A9, Canada Fax : 905-36-58
www.optoma.ca
Europe
4 Caxton Way, The Watford Business Park
Watford, Hertfordshire,
WD8 8QZ, UK Tel : +44 (0) 9
www.optoma.eu Fax : +44 (0) 93 69 888
Service Tel : +44 (0)93 69
865
France
Bâtiment E Tel : +33 4 46 0
8-83 avenue Edouard Vaillant Fax : +33 4 46 94 35
900 Boulogne Billancourt, France
Spain
C/ José Hierro,36 Of. C Tel : +34 9 499 06 06
85 Rivas VaciaMadrid, Fax : +34 9 670 08 3
Spain
Deutschland
Werftstrasse 5 Tel : +49 (0) 506 6670
D40549 Düsseldorf, Fax : +49 (0) 506 66799
Germany
Optoma Scandinavia AS
Lerpeveien 5 Tel : +473988990
3040 Drammen FAX : +473988999
Norway Service : [email protected]
PO.BOX 955
3038 Drammen
Norway
Service : [email protected]
Service :
Service : [email protected]
Service : [email protected]
Service : [email protected]
3 69 800
64
Page 65
English
Appendices
Latin America
75 Sycamore Drive Tel : 408-383-3700
Milpitas, CA 95035, USA Fax: 408-383-370
www.optoma.com.br www.optoma.com.mx
Taiwan
3,台北縣新店市民權路08號5樓
電話:+886--8-
服務處:[email protected] www.optoma.com.tw
Hong Kong
Unit A, 7/F Dragon Centre, 79 Wing Hong Street,
Cheung Sha Wan Kowloon, Hong Kong
Tel : +85-396-8968 Fax: +85
www.optoma.com.hk
China
上海市长宁区凯旋路05号5楼 电话:+86--6947376
邮编: 0005 传真:+86-
www.optoma.com.cn
Japan
東京都足立区綾瀬 3-25-18 サポートセンター: 0120-46-5040
株式会社オーエスエム
E-Mail: [email protected] http://www.os-worldwide.com/
Korea
WOOMI TECH.CO.,LTD.
4F, Minu Bldg.33-4, Nonhyun-Dong, Tel : +8++34430004
Kangnam-Ku, seoul, 35-85,
KOREA
360 傳真:+886--8-33
asia.optoma.com
-370-
-6947375
Fax: +8++34430005
65
Page 66

English
Notice: Shielded cables
$OOFRQQHFWLRQV WR RWKHU FRPSXWLQJ GHYLFHV PXVW EH
PDGH XVLQJ VKLHOGHG FDEOHV WR PDLQWDLQ FRPSOLDQFH
ZLWK)&&UHJXODWLRQV
Caution
&KDQJHVRUPRGLᚏFDWLRQVQRWH[SUHVVO\DSSURYHGE\WKH
PDQXIDFWXUHU FRXOGYRLG WKH XVHUಬVDXWKRULW\ ZKLFKLV
JUDQWHGE\ WKH)HGHUDO &RPPXQLFDWLRQV&RPPLVVLRQ
WRRSHUDWHWKLVSURMHFWRU
Appendices
Regulation & Safety notices
This appendix lists the general notices of your projector.
FCC notice
This device has been tested and found to comply with the limits
for a Class B digital device pursuant to Part
These limits are designed to provide reasonable protection against
harmful interference in a residential installation. This device
generates, uses, and can radiate radio frequency energy and, if not
installed and used in accordance with the instructions, may cause
harmful interference to radio communications.
However, there is no guarantee that interference will not occur in a
particular installation. If this device does cause harmful interference
to radio or television reception, which can be determined by turning
the device o and on, the user is encouraged to try to correct the
interference by one or more of the following measures:
Reorient or relocate the receiving antenna.
4
Increase the separation between the device and receiver.
4
Connect the device into an outlet on a circuit dierent from that
4
to which the receiver is connected.
5 of the FCC rules.
Consult the dealer or an experienced radio/television technician
4
for help.
66
Page 67
English
Appendices
Operation conditions
This device complies with Part 5 of the FCC Rules. Operation is
subject to the following two conditions:
. This device may not cause harmful interference, and
. This device must accept any interference received, including
interference that may cause undesired operation.
Notice: Canadian users
This Class B digital apparatus complies with Canadian ICES-003.
Remarque à l’intention des utilisateurs canadiens
Cet appareil numerique de la classe B est conforme a la norme
NMB-003 du Canada.
Declaration of Conformity for EU countries
EMC Directive 004/08/EC (including amendments)
4
Low Voltage Directive 006/95/EC
4
R & TTE Directive 999/5/EC (if product has RF function)
4
67
 Loading...