

Page 1
DLP® Projector
User manual
Page 2

TABLE OF CONTENTS
SAFETY ............................................................................................... 4
Important Safety Instruction....................................................................................................... 4
Laser Radiation Safety Information ........................................................................................... 6
Laser Notice .............................................................................................................................. 6
Copyright ................................................................................................................................... 7
Disclaimer .................................................................................................................................. 7
Trademark Recognition ............................................................................................................. 7
FCC ........................................................................................................................................... 7
Declaration of Conformity for EU countries ............................................................................... 8
WEEE ........................................................................................................................................ 8
Speci�cations and Warning labels ............................................................................................. 8
cTUVus ...................................................................................................................................... 9
Cleaning the Lens...................................................................................................................... 9
INTRODUCTION ............................................................................... 10
Package Overview.................................................................................................................... 10
Standard accessories ............................................................................................................... 10
Product Overview ..................................................................................................................... 11
Connections.............................................................................................................................. 12
Keypad ..................................................................................................................................... 13
Remote control ......................................................................................................................... 14
SETUP AND INSTALLATION ........................................................... 15
Installing the projector .............................................................................................................. 15
Connecting sources to the projector ......................................................................................... 17
Adjusting the projector image ................................................................................................... 18
Remote setup ........................................................................................................................... 19
USING THE PROJECTOR ............................................................... 21
Powering on / o⿿ the projector .................................................................................................. 21
Selecting an input source ......................................................................................................... 22
Menu navigation and features .................................................................................................. 23
OSD Menu tree......................................................................................................................... 24
Image picture mode menu ........................................................................................................ 31
Image dynamic range menu ..................................................................................................... 31
Image brightness menu ............................................................................................................ 32
Image contrast menu ................................................................................................................ 32
Image sharpness menu ............................................................................................................ 32
Image gamma menu................................................................................................................. 32
Image color settings menu ....................................................................................................... 32
Image wall color menu.............................................................................................................. 33
Image 3D menu ........................................................................................................................ 33
Image reset menu..................................................................................................................... 33
2
English
Page 3

Display projection orientation menu ......................................................................................... 34
Display light source mode menu .............................................................................................. 34
Display dynamic black menu .................................................................................................... 34
Display low latency mode menu ............................................................................................... 34
Display aspect ratio menu ........................................................................................................ 35
Display geometric correction menu .......................................................................................... 36
Display digital zoom menu........................................................................................................ 36
Display image shift menu ......................................................................................................... 36
Display reset menu ................................................................................................................... 36
Setup test pattern menu ........................................................................................................... 37
Setup language menu .............................................................................................................. 37
Setup menu settings menu ....................................................................................................... 37
Setup high altitude menu .......................................................................................................... 37
Setup power settings menu ...................................................................................................... 37
Setup security menu ................................................................................................................. 38
Setup startup logo menu .......................................................................................................... 38
Setup background color menu.................................................................................................. 38
Setup reset menu ..................................................................................................................... 39
Input auto source menu ............................................................................................................ 40
Input auto input switch menu .................................................................................................... 40
Input HDMI CEC settings menu ............................................................................................... 40
Input reset menu....................................................................................................................... 40
Audio volume menu .................................................................................................................. 41
Audio mute menu ..................................................................................................................... 41
Audio mode menu .................................................................................................................... 41
Audio reset menu ..................................................................................................................... 41
Control device ID menu ............................................................................................................ 42
Control remote settings menu .................................................................................................. 42
Control keypad settings menu .................................................................................................. 42
Control LAN menu .................................................................................................................... 42
Control control menu ................................................................................................................ 44
Setup network control settings menu ....................................................................................... 45
Control HDBaseT control menu................................................................................................ 53
Control reset menu ................................................................................................................... 53
Information menu...................................................................................................................... 53
ADDITIONAL INFORMATION .......................................................... 54
Compatible resolutions ............................................................................................................. 54
Image size and projection distance .......................................................................................... 57
Projector dimensions and ceiling mount installation ................................................................. 58
IR remote control codes ........................................................................................................... 60
Troubleshooting ........................................................................................................................ 63
Warning indicators .................................................................................................................... 65
Speci�cations ........................................................................................................................... 66
Optoma global o㿿ces ............................................................................................................... 67
English
3
Page 4

SAFETY
The lightning 㿿ash with arrow head within an equilateral triangle is
intended to alert the user to the presence of uninsulated "dangerous
voltage" within the product's enclosure that may be of sucient
magnitude to constitute a risk of electric shock to persons.
The exclamation point within an equilateral triangle is intended to alert
the user to the presence of important operating and maintenance
(servicing) instructions in the literature accompanying the appliance.
Please follow all warnings, precautions and maintenance as recommended in this user’s guide.
Important Safety Instruction
• Do not block any ventilation openings. To ensure reliable operation of the projector and to protect from
over heating, it is recommended to install the projector in a location that does not block ventilation.
As an example, do not place the projector on a crowded co�ee table, sofa, bed, etc. Do not put the
projector in an enclosure such as a book case or a cabinet that restricts air 㿿ow.
• To reduce the risk of ⿿re and/or electric shock, do not expose the projector to rain or moisture. Do not
install near heat sources such as radiators, heaters, stoves or any other apparatus such as ampli⿿ers
that emits heat.
• Do not let objects or liquids enter the projector. They may touch dangerous voltage points and short
out parts that could result in ⿿re or electric shock.
• Do not use under the following conditions:
± In extremely hot, cold or humid environments.
(i) Ensure that the ambient room temperature is within 0°C ~ 40°C
(ii) Relative humidity is up to 80%
± In areas susceptible to excessive dust and dirt.
± Near any appliance generating a strong magnetic ⿿eld.
± In direct sunlight.
• Do not use the unit if it has been physically damaged or abused. Physical damage/abuse would be
(but not limited to):
± Unit has been dropped.
± Power supply cord or plug has been damaged.
± Liquid has been spilled on to the projector.
± Projector has been exposed to rain or moisture.
± Something has fallen in the projector or something is loose inside.
• Do not place the projector on an unstable surface. The projector may fall over resulting in injury or the
projector may become damaged.
4
• Do not block the light coming out of the projector lens when in operation. The light will heat the object
and may melt, cause burns or start a ⿿re.
• Please do not open or disassemble the projector as this may cause electric shock.
• Do not attempt to service the unit yourself. Opening or removing covers may expose you to dangerous
voltages or other hazards. Please call Optoma before you send the unit for repair.
• See projector enclosure for safety related markings.
• The unit should only be repaired by authorized service personnel.
• Only use attachments/accessories speci⿿ed by the manufacturer.
English
Page 5

• Do not look into straight into the projector lens during operation. The bright light may harm your eyes.
• This projector will detect the life of the light source itself.
• When switching the projector o�, please ensure the cooling cycle has been completed before
disconnecting power. Allow 90 seconds for the projector to cool down.
• Turn o� and unplug the power plug from the AC outlet before cleaning the product.
• Use a soft dry cloth with mild detergent to clean the display housing. Do not use abrasive cleaners,
waxes or solvents to clean the unit.
• Disconnect the power plug from AC outlet if the product is not being used for a long period of time.
• Do not setup the projector in places where it might be subjected to vibration or shock.
• Do not touch the lens with bare hands.
• Remove battery/batteries from remote control before storage. If the battery/batteries are left in the
remote for long periods, they may leak.
• Do not use or store the projector in places where smoke from oil or cigarettes may be present, as it
can adversely a�ect the quality of the projector performance.
• Please follow the correct projector orientation installation as non standard installation may a�ect the
projector performance.
• Use a power strip and or surge protector. As power outages and brown-outs can KILL devices.
English
5
Page 6
Laser Radiation Safety Information
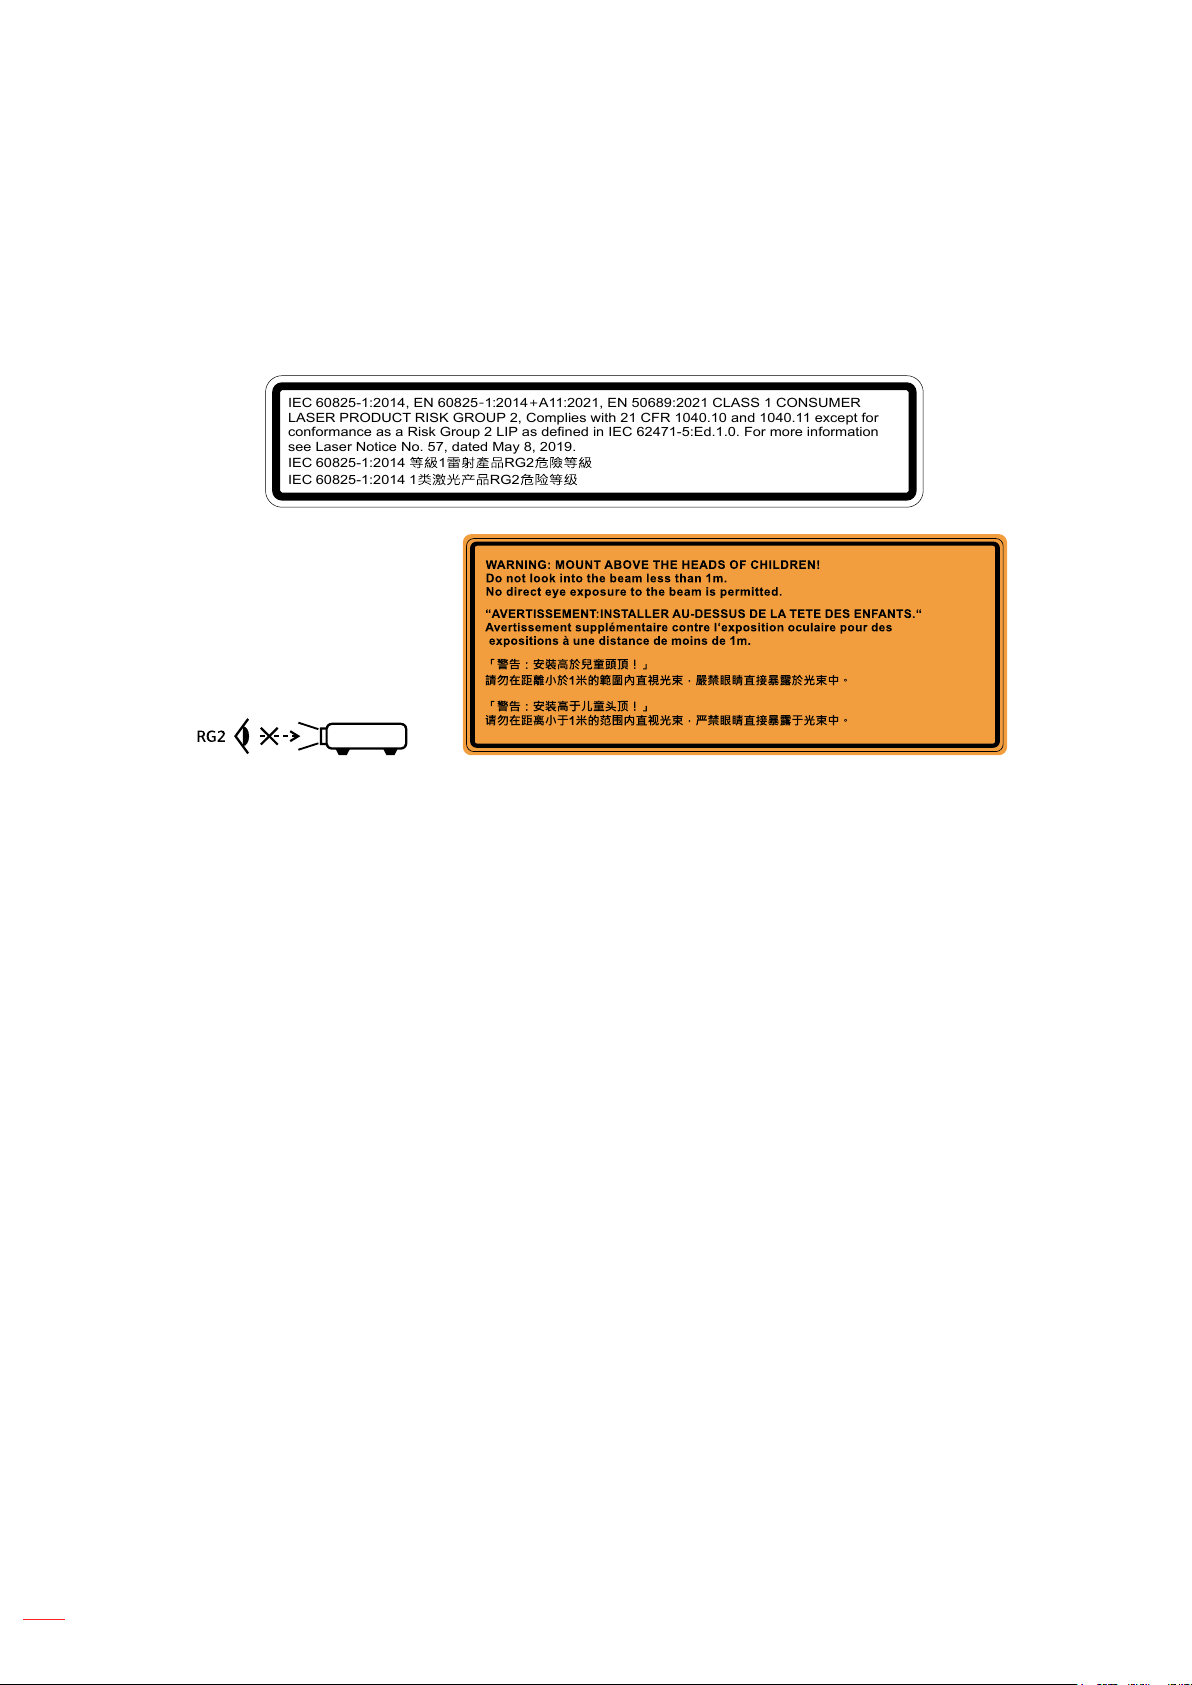
• This product is classi⿿ed as CLASS 1 LASER PRODUCT - RISK GROUP 2 of IEC60825-1 : 2014 and
also complies with 21 CFR 1040.10 and 1040.11 as a Risk Group 2, LIP (Laser Illuminated Projector)
as de⿿ned in IEC 62471:5:Ed. 1.0. For more information see Laser Notice No. 57, dated May 8, 2019.
• Complies with 21 CFR 1040.10 and 1040.11 except for conformance as a Risk Group 2 LIP as de⿿ned
in IEC 62471-5:Ed. 1.0. For more information see Laser Notice No. 57, dated May 8, 2019.
• IEC 60825-1:2014/EN 60825-1+A11/EN50689:2021 CLASS 1 CONSUMER LASER PRODUCT RISK
GROUP 2
• IEC 62471-5:2015 RISK GROUP 2
IEC 60825-1:2014, EN 60825 1 2014 A11 2021, EN 50689:2021 CLASS 1 CONSUMER-: + :
LASER PRODUCT RISK GROUP 2, Complies with 21 CFR 1040.10 and 1040.11 except for
conformance as a Risk Group 2 LIP as de⿿ned in IEC 62471-5:Ed.1.0. For more information
see Laser Notice No. 57, dated May 8, 2019.
IEC 60825-1:2014 1 RG2
IEC 60825-1:2014 1 RG2
• Additional instructions to supervise children, no staring, and not use optical aids.
• Additional instructions to install above the reach of children.
• Notice is given to supervise children and to never allow them to stare into the projector beam at any
distance from the projector.
• Notice is given to use caution when using the remote control for starting the projector while in front of
the projection lens.
• Notice is given to the user to avoid the use of optical aids such as binoculars or telescopes inside the
beam.
• As with any bright source, do not stare into the direct beam, RG2 IEC 62471-5:2015.
• WARNING: MOUNT ABOVE THE HEADS OF CHILDREN. The use of a ceiling mount is
recommended with this product to place it above the eyes of children.
• Caution - use of controls or adjustments or performance of procedures other than those speci⿿ed
herein may result in hazardous radiation exposure.
• Do not open or disassemble the projector as this may cause damage by the exposure of laser
radiation.
• Do not stare into beam when the projector is on. The bright light may result in permanent eye damage.
Not following the control, adjustment or operation procedure may cause damage by the the exposure of laser
radiation.
Laser Notice
IEC 60825-1:2014/EN 60825-1+A11/EN50689:2021 CLASS 1 CONSUMER LASER PRODUCT RISK GROUP 2.
The product’s intended use as a consumer laser product and compliant with EN 50689:2021.
CLASS 1 CONSUMER LASER PRODUCT
EN 50689:2021
English
6
Page 7

Copyright
This publication, including all photographs, illustrations and software, is protected under international copyright
laws, with all rights reserved. Neither this manual, nor any of the material contained herein, may be reproduced
without written consent of the author.
© Copyright 2024
Disclaimer
The information in this document is subject to change without notice. The manufacturer makes no representations
or warranties with respect to the contents hereof and speci⿿cally disclaims any implied warranties of
merchantability or ⿿tness for any particular purpose. The manufacturer reserves the right to revise this publication
and to make changes from time to time in the content hereof without obligation of the manufacturer to notify any
person of such revision or changes.
Trademark Recognition
Kensington is a U.S. registered trademark of ACCO Brand Corporation with issued registrations and pending
applications in other countries throughout the world.
HDMI, the HDMI Logo, and High-De⿿nition Multimedia Interface are trademarks or registered trademarks of HDMI
Licensing LLC in the United States and other countries.
DLP®, DLP Link and the DLP logo are registered trademarks of Texas Instruments and BrilliantColorTM is a
trademark of Texas Instruments.
All other product names used in this manual are the properties of their respective owners and are Acknowledged.
FCC
This device has been tested and found to comply with the limits for a Class B digital device pursuant to Part 15
of the FCC rules. These limits are designed to provide reasonable protection against harmful interference in a
residential installation. This device generates, uses and can radiate radio frequency energy and, if not installed and
used in accordance with the instructions, may cause harmful interference to radio communications.
However, there is no guarantee that interference will not occur in a particular installation. If this device does cause
harmful interference to radio or television reception, which can be determined by turning the device o� and on is
encouraged to try to correct the interference by one or more of the following measures:
• Reorient or relocate the receiving antenna.
• Increase the separation between the device and receiver.
• Connect the device into an outlet on a circuit di�erent from that to which the receiver is connected.
• Consult the dealer or an experienced radio/television technician for help.
Notice: Shielded cables
All connections to other computing devices must be made using shielded cables to maintain compliance with FCC
regulations.
Caution
Changes or modi⿿cations not expressly approved by the manufacturer could void the user's authority, which is
granted by the Federal Communications Commission, to operate this projector.
English
7
Page 8
Operation Conditions
This device complies with Part 15 of the FCC Rules. Operation is subject to the following two conditions:
1. This device may not cause harmful interference and
2. This device must accept any interference received, including interference that may cause undesired operation.
Notice: Canadian users
This Class B digital apparatus complies with Canadian ICES-003.
Remarque à l'intention des utilisateurs canadiens
Cet appareil numerique de la classe B est conforme a la norme NMB-003 du Canada.
Declaration of Conformity for EU countries
• EMC Directive 2014/30/EU (including amendments)
• Low Voltage Directive 2014/35/EU
• RED 2014/53/EU (if product has RF function)
WEEE
Disposal instructions
Do not throw this electronic device into the trash when discarding. To minimize pollution and ensure
utmost protection of the global environment, please recycle it.
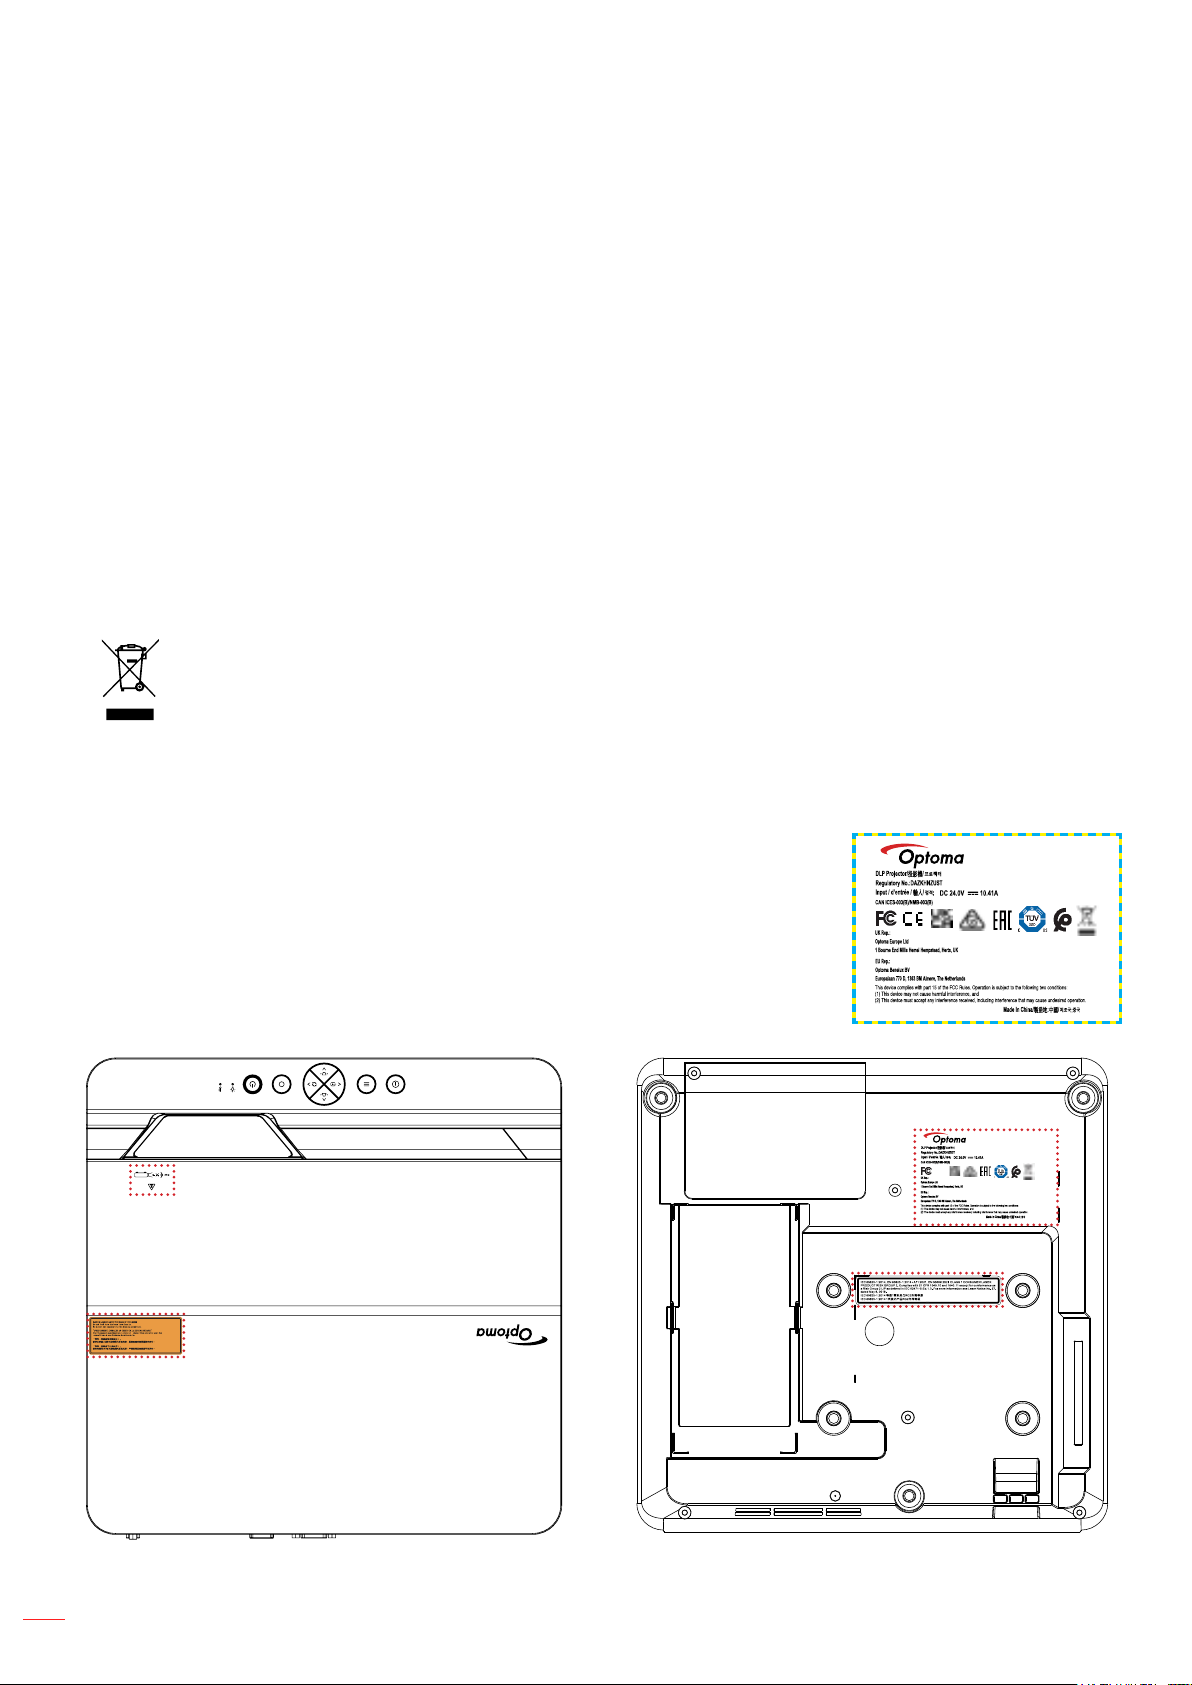
Speci⿿cations and Warning labels
Speci⿿cations and Warning labels are placed at the following location:
Note: For power supply, power ratings, and product information, please refer to the label on the bottom of the
product.
English
8
Page 9
cTUVus
Cleaning the Lens
• Before cleaning the lens, be sure to turn o� the projector and unplug the power cord to allow it to
completely cool down.
• Use a compressed air tank to remove the dust.
• Use a special cloth for cleaning lens and gently wipe the lens. Do not touch the lens with your ⿿ngers.
• Do not use alkaline/acid detergents or volatile solvents such as alcohol for cleaning lens. If the lens is
damaged due to the cleaning process, it is not covered by the warranty.
• Do not touch the lens with bare hands.
CAUTION!
Hot surface, Do not touch
• Do not place your hands, face, or other objects in front of the projector lens while the projector
is operating. Doing so can cause the object to get extremely hot, and possibly resulting in a ⿿re
or damage due to the heat emitted from the light output. Things placed in front of the lens may
overheat and burn or start a ⿿re.
• Do not spray 㿿ammable gas to get rid of dust and dirt that accumulate in the lens. Doing so could
cause a ⿿re.
Warning: Do not use a spray containing 㿿ammable gases to remove dust or dirt from the lens. This
may cause a ⿿re due to excessive heat inside the projector.
Warning: Do not clean the lens if the projector is warming up as this may cause the lens’ surface ⿿lm
to peel o�.
Warning: Do not wipe or tap the lens with a hard object.
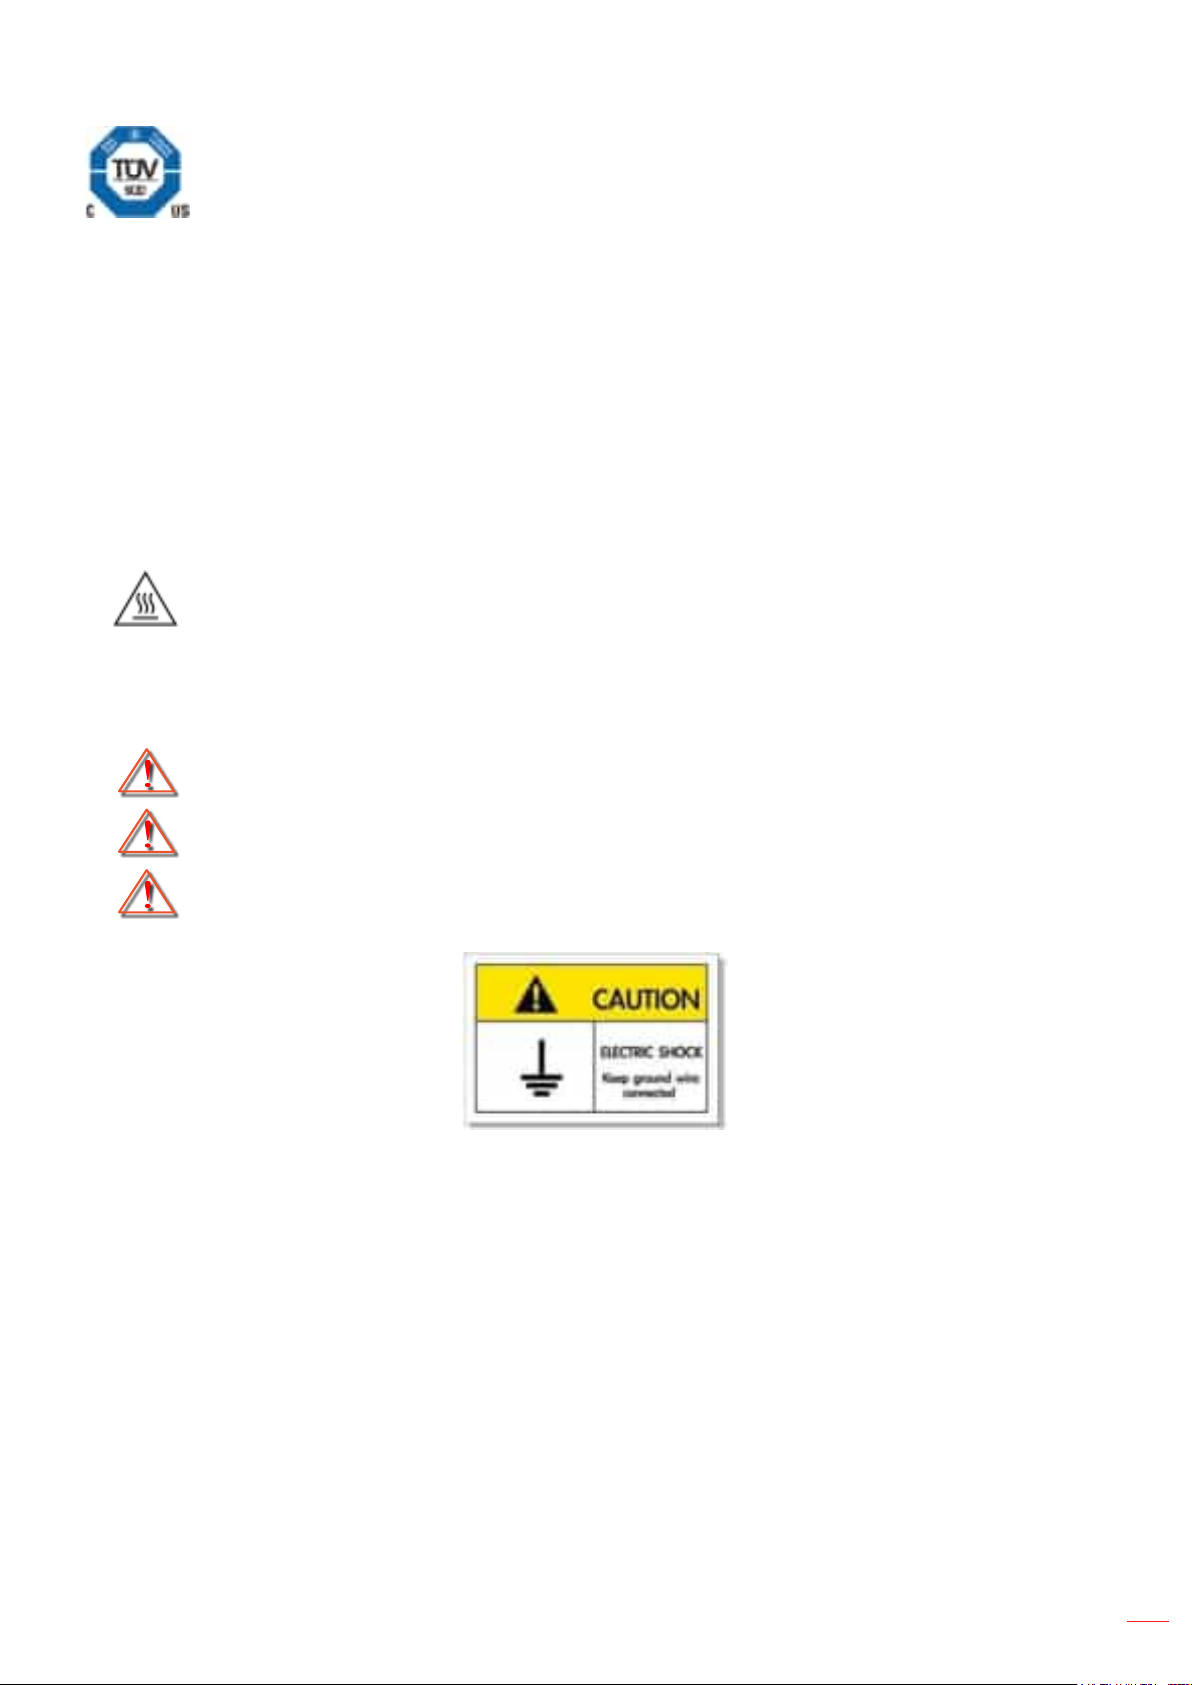
• To avoid electric shock, the unit and its peripherals must be properly grounded (earthed).
• This equipment is equipped with a three-pin grounding-type power plug.
• Do not remove the grounding pin on the power plug.
• This is a safety feature. If you are unable to insert the plug into the outlet, contact an electrician.
• Do not defeat the purpose of the grounding plug.
Ground the power cord
This device is designed to function when the power cord is grounded. If the power cord is not grounded, it
may cause an electric shock. Please ensure that the power cord is directly connected to the wall socket and
properly grounded.
Do not use the 2-pin plug adapter for conversion.
English
9
Page 10
INTRODUCTION
Thank you for purchasing an Optoma laser projector. For full list of features please visit the product page on our
website, where you will also ⿿nd additional information and documentation such as FAQs.
Package Overview
Carefully unpack and verify that you have the items listed below under standard accessories. Some of the items
under optional accessories may not be available depending on the model, speci⿿cation and your region of
purchase. Please check with your place of purchase. Some accessories may vary from region to region.
The warranty card is only supplied in some speci⿿c regions. Please consult your dealer for detailed information.
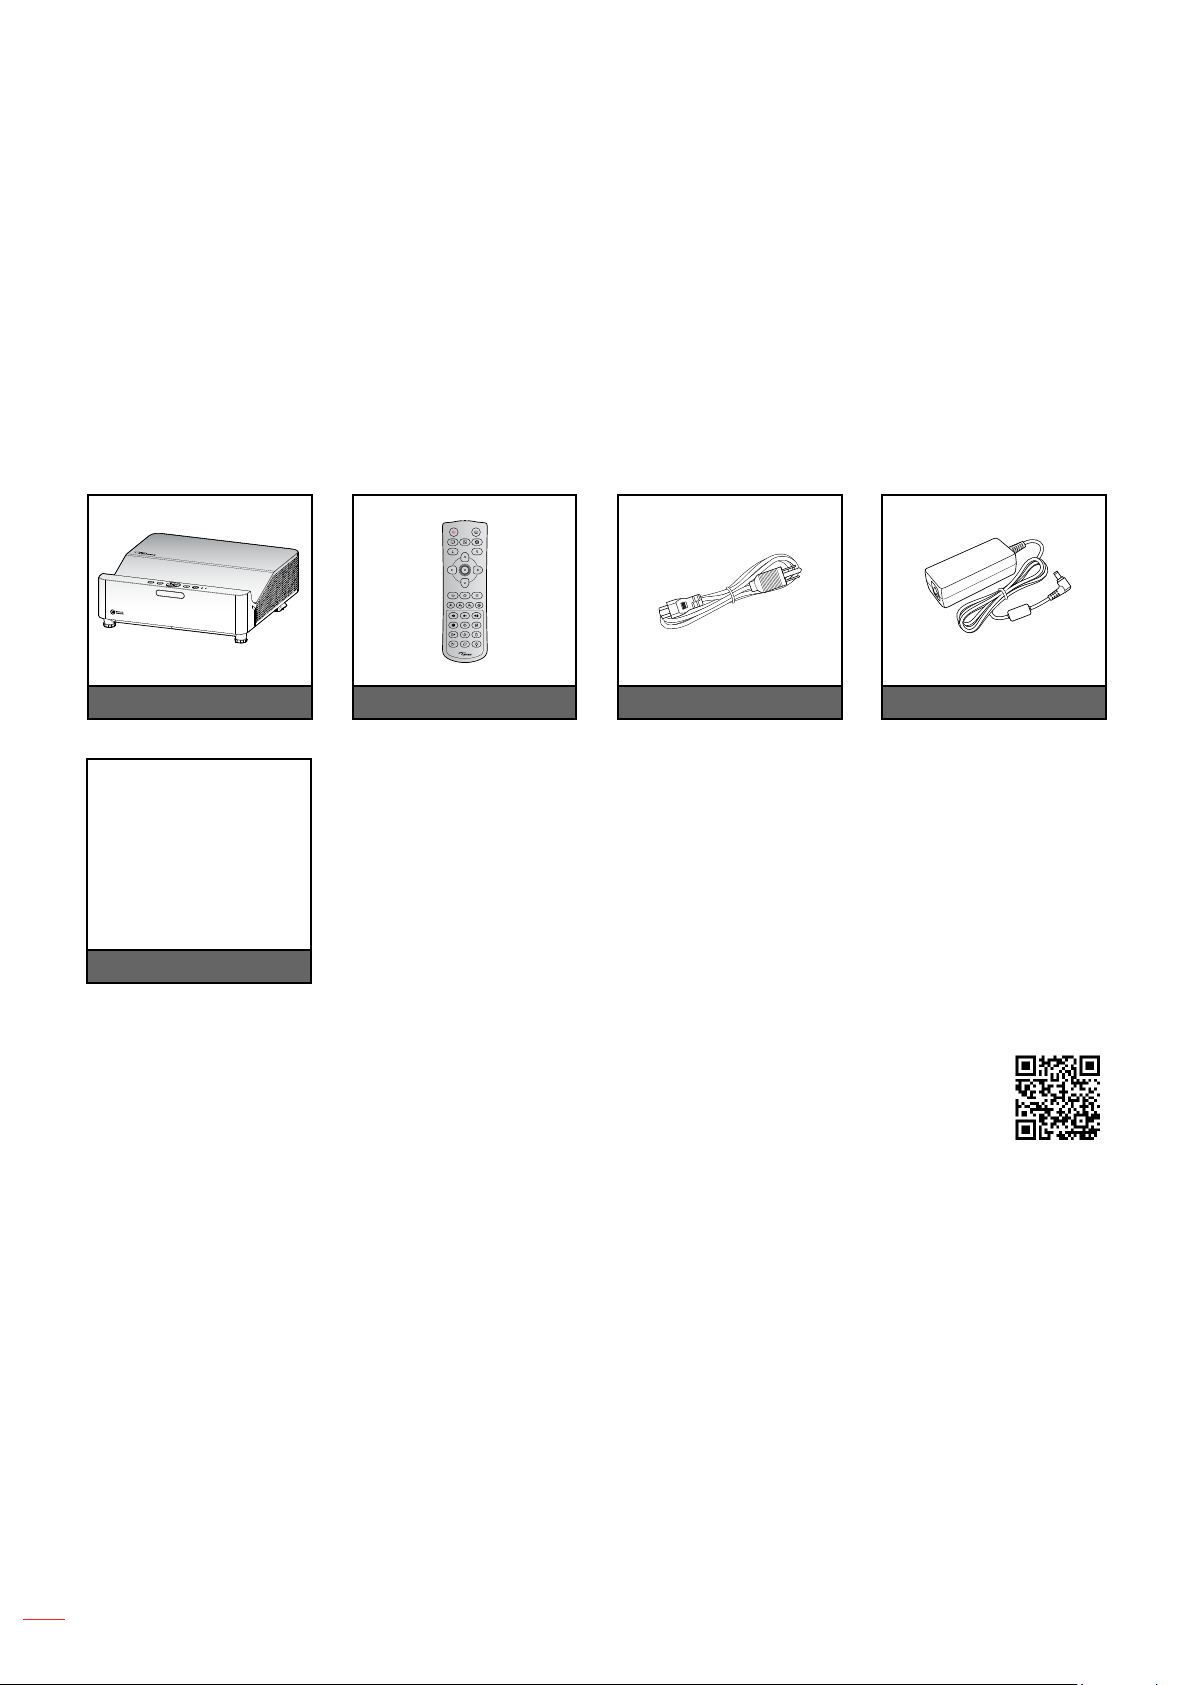
Standard accessories
Projector Remote control Power cable
Quick start user manual
Documentation
Note:
• For access to the setup information, user manual, warranty information, and product updates
– please scan the QR Code or visit the following URL:
https://www.optoma.com/support/download
Power adapter
10
English
Page 11
INTRODUCTION
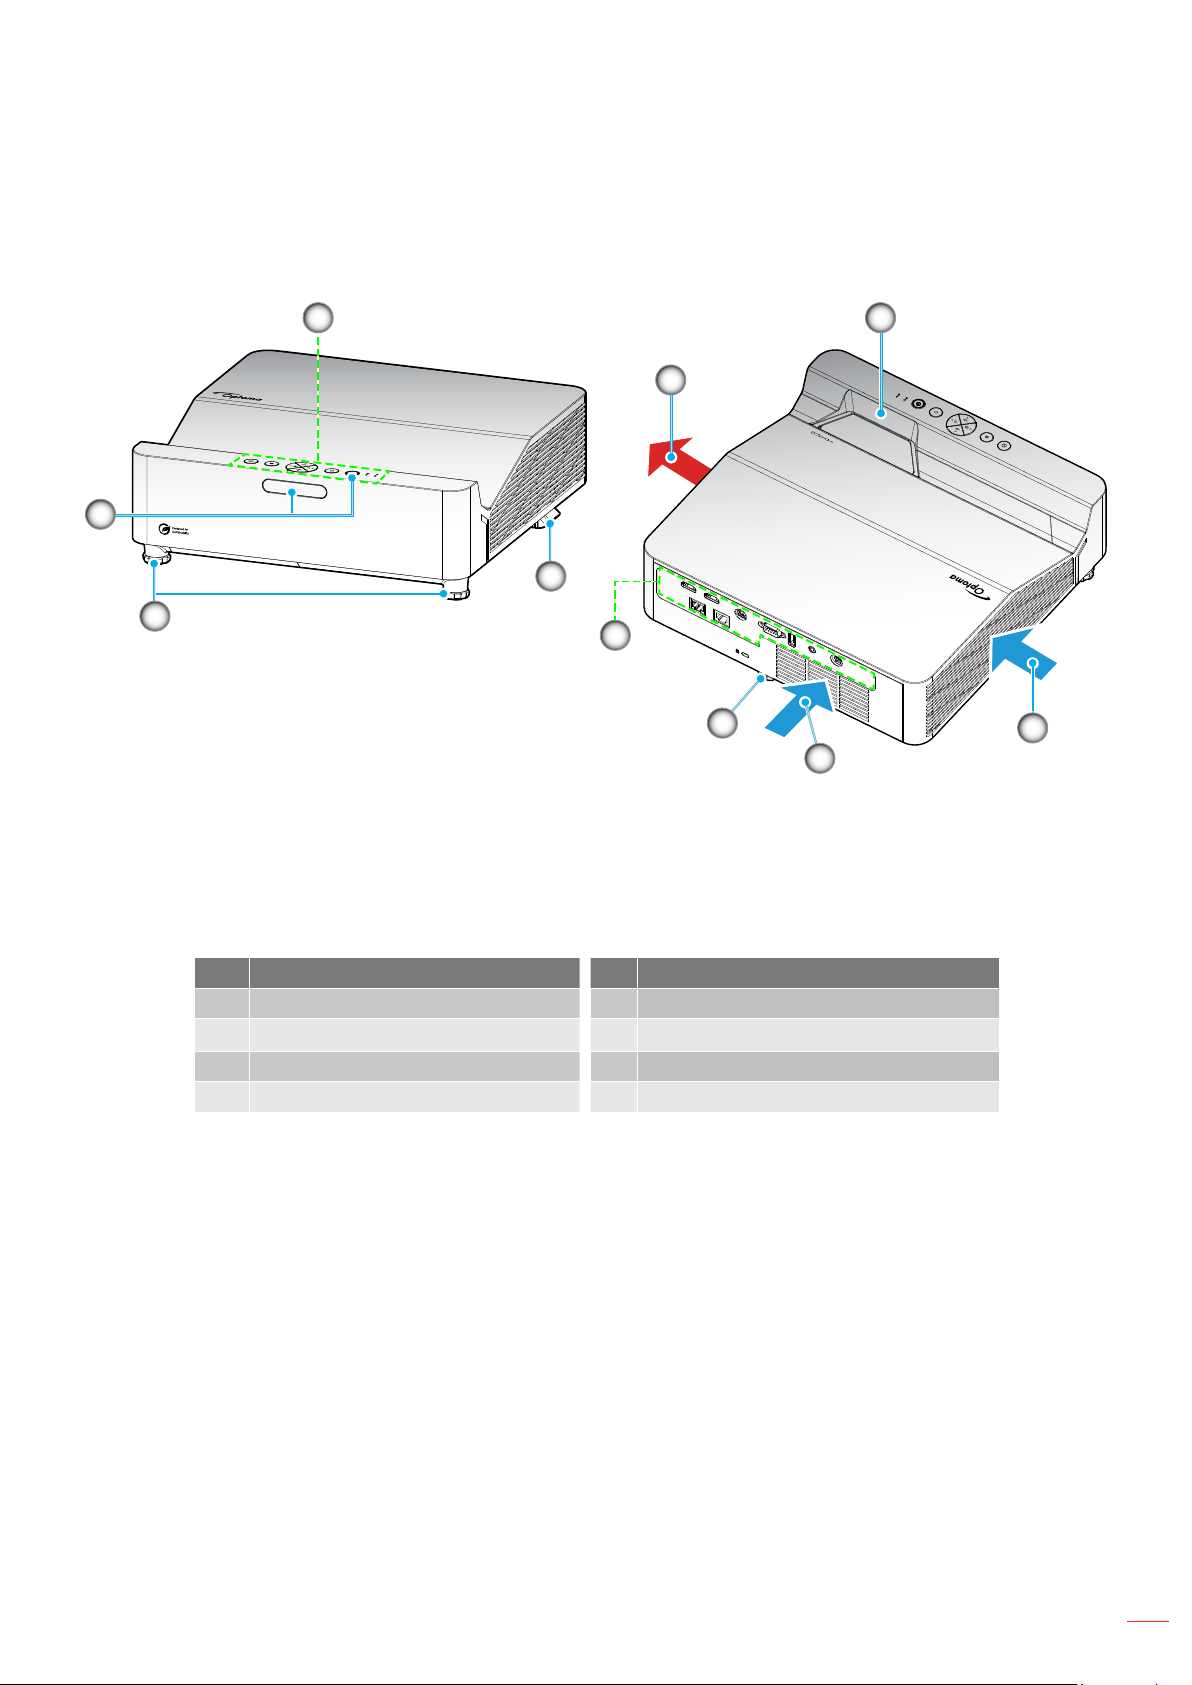
Product Overview
2
5
1
3
4
8
4
7
6
Note:
• Do not block projector intake and exhaust vents.
• When operating the projector in an enclosed space, allow at least 30 cm clearance around the intake
and exhaust vents.
7
No Item No Item
1. IR Receivers 5. Ventilation (outlet)
2.
Keypad
6.
Lens
3. Focus Lever 7. Ventilation (inlet)
4. Tilt-Adjustment Feet 8. Input / Output
English
11
Page 12
INTRODUCTION
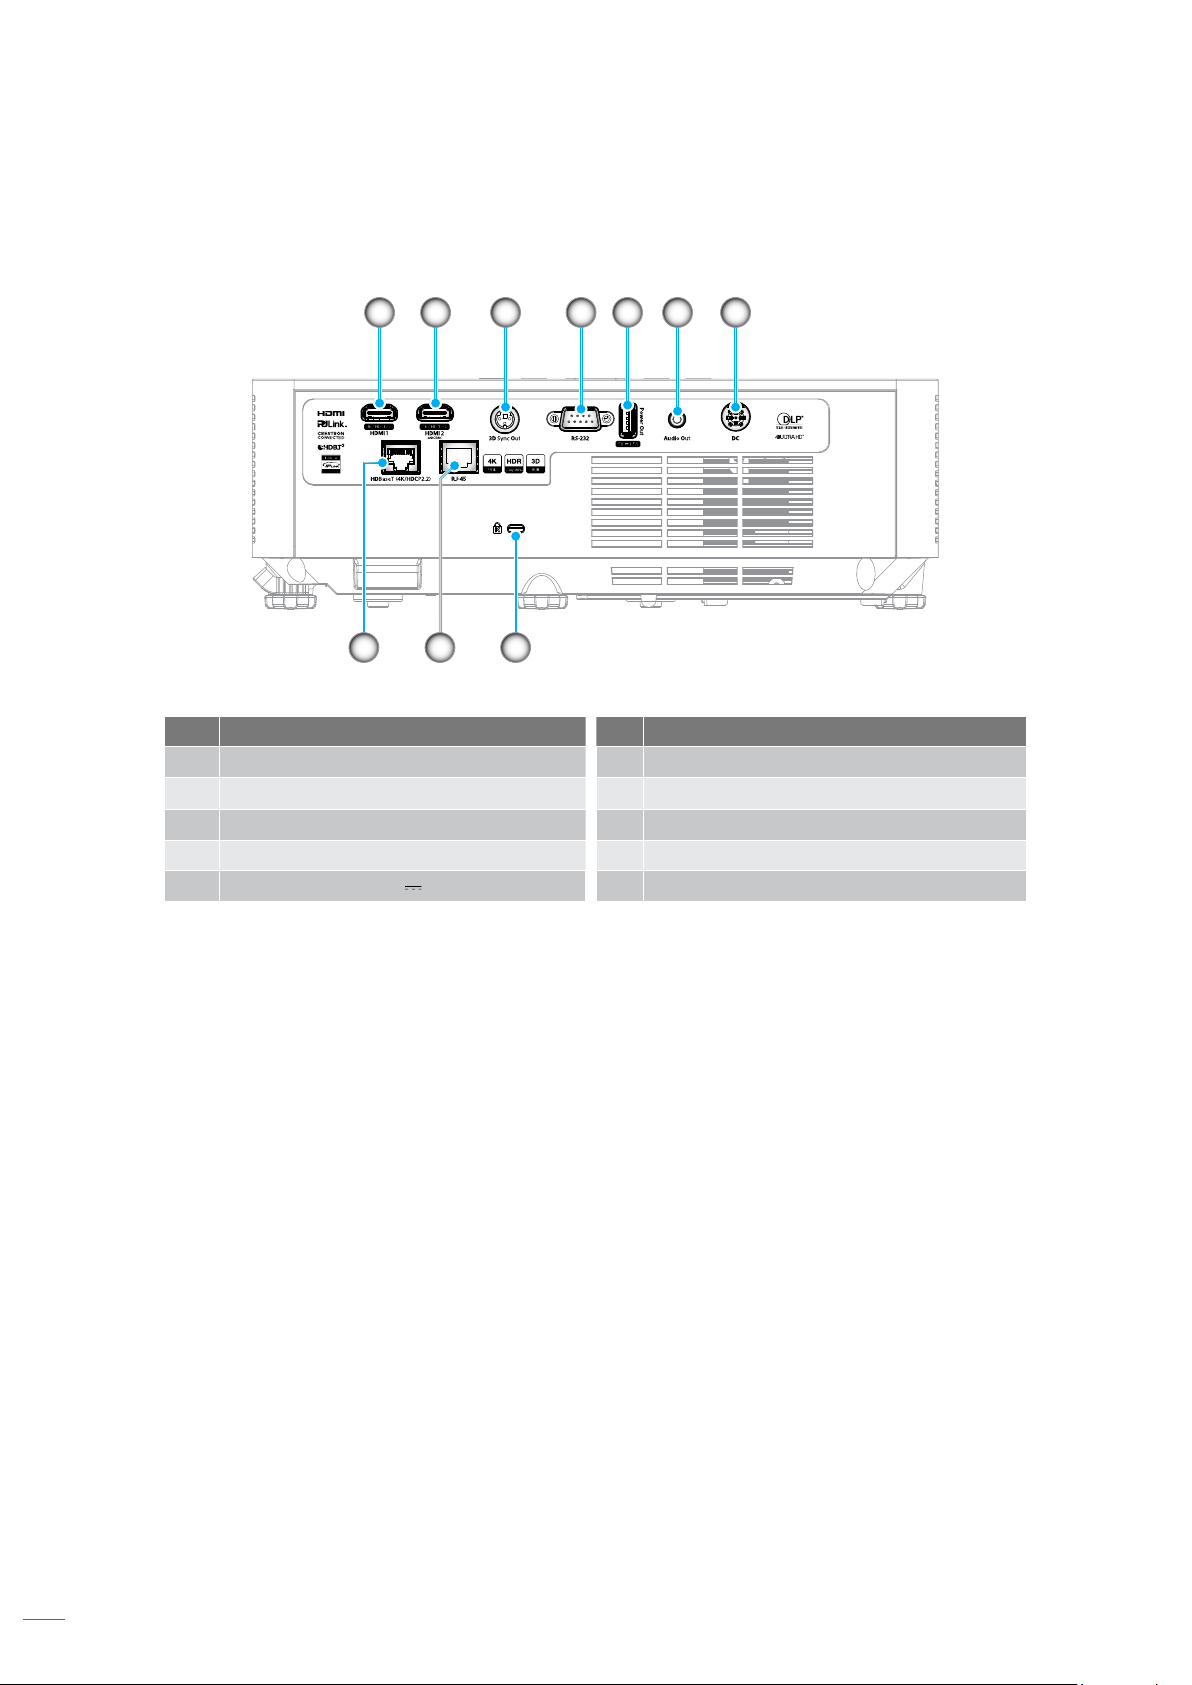
Connections
6 73
10
21 54
9
8
No Item No Item
1. HDMI 1 Connector 6. Audio Out Connector
HDMI 2 Connector
2.
7.
DC Jack
3. 3D SYNC Out (5V, 0.75A) Connector 8. KensingtonTM Lock Port
4. RS-232 Connector 9. RJ-45 Connector
5. USB Power Out (5V 1.5A) Connector 10. HDBaseT (4K/HDCP2.2) Connector
12
English
Page 13
INTRODUCTION
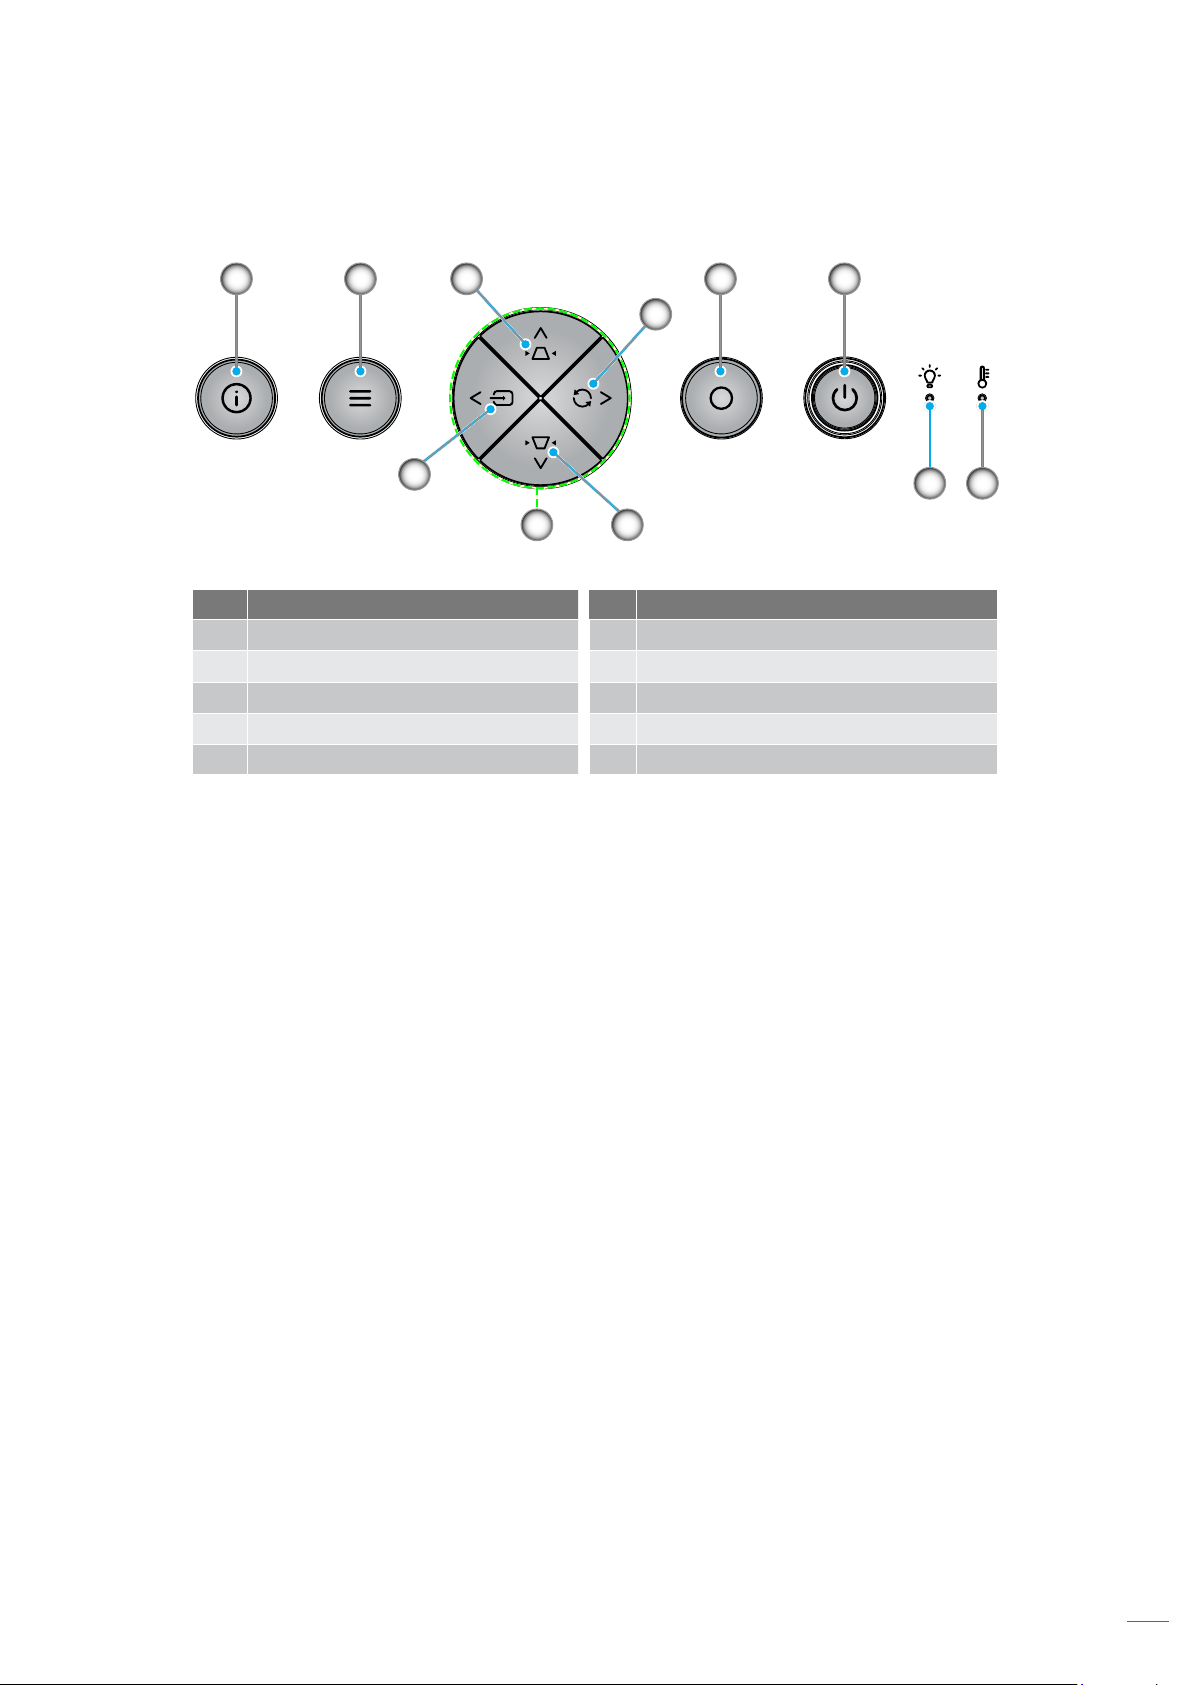
Keypad
10
3
4
9
3
1 6
2 5
No Item No Item
1. Information 6. Power, Power LED, and IR Receiver
2.
Menu
7.
Temp LED
3. Keystone Correction 8. Lamp LED
4. Re-Sync 9. Four Directional Select Keys
5. Enter 10. Source
78
English
13
Page 14
INTRODUCTION
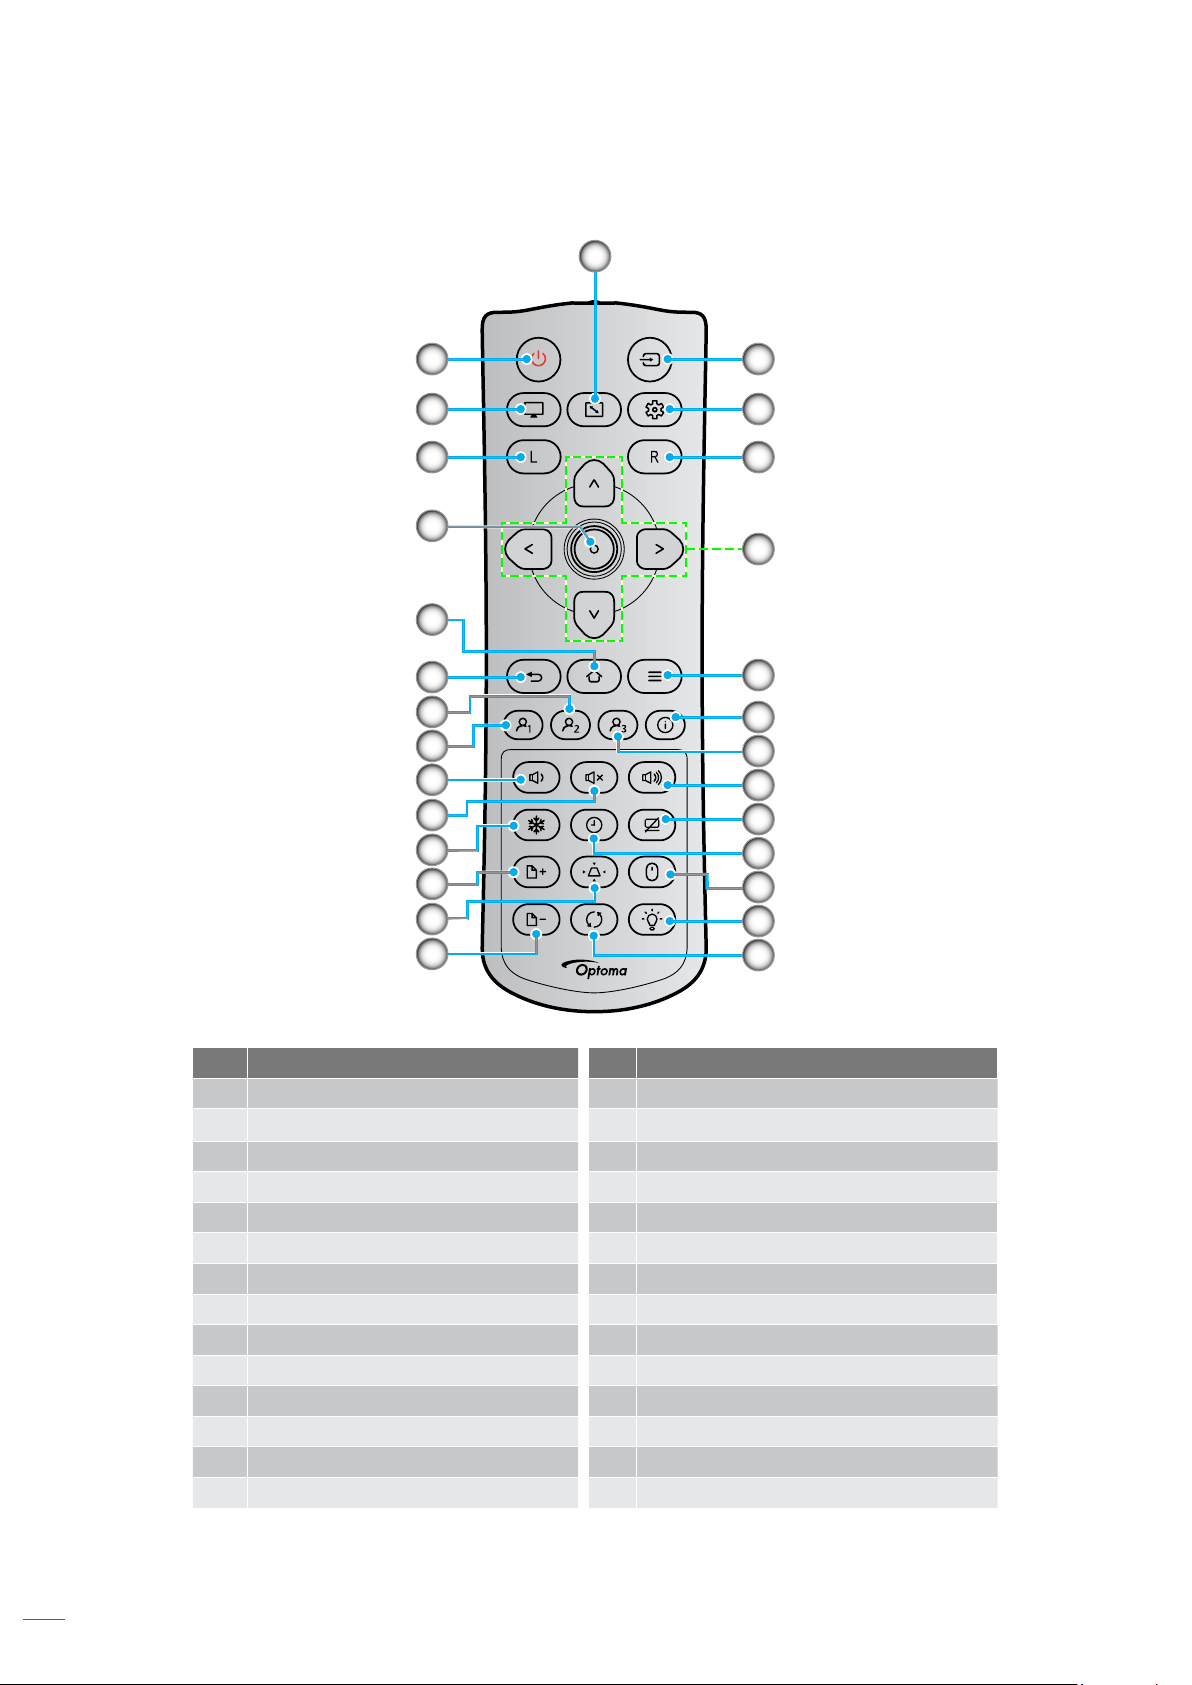
Remote control
28
1 27
10
11
12
13
14
2
3
4
5
6
7
8
9
26
25
24
23
22
21
20
19
18
17
16
15
No Item No Item
1. Power 15. Resync
Display Mode 16. Light Source Mode
2.
3. Mouse Left Click 17. Mouse
4. Enter 18. Sleep Timer
5. Home 19. AV Mute
6. Return 20. Volume +
7. User 2 (Assignable) 21. User 3 (Assignable)
8. User 1 (Assignable) 22. Information
9. Volume - 23. Menu
10. Mute 24. Four Directional Select Keys
11. Freeze 25. Mouse Right Click
12. Page Up 26. Setup Menu
13. Keystone 27. Source
14. Page Down 28. Aspect Ratio
Note: Some keys may have no function for models that do not support these features.
14
English
Page 15
SETUP AND INSTALLATION
Installing the projector
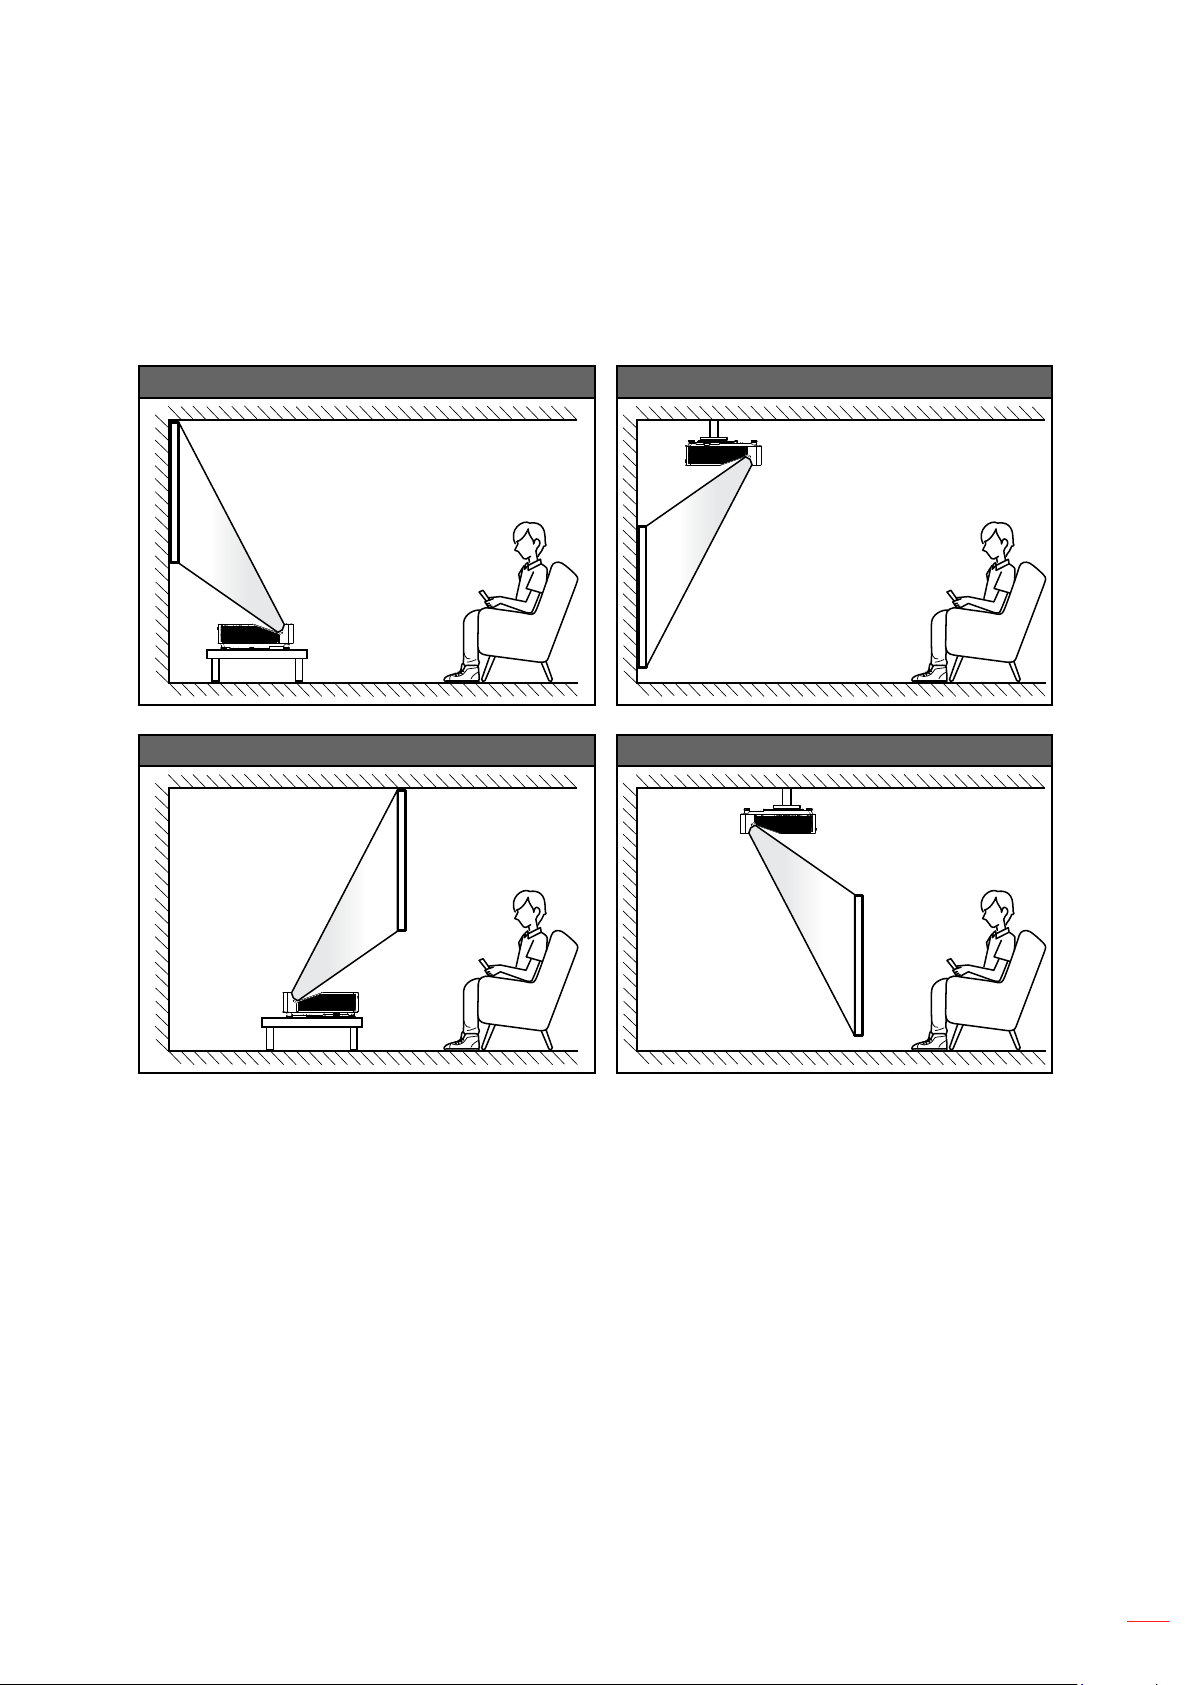
Your projector is designed to be installed in one of four possible positions.
Your room layout or personal preference will dictate which installation location you select. Take into consideration
the size and position of your screen, the location of a suitable power outlet, as well as the location and distance
between the projector and the rest of your equipment.
Table mount front Ceiling mount front
Table mount rear Ceiling mount rear
Projector should be placed 㿿at on a surface and 90 degrees / perpendicular to the screen.
• To determine projector location for a given screen size, please refer to distance table on page 57.
• To determine screen size for a given distance, please refer to distance table on page 57.
Note: Placing the projector further from the screen or projection surface will proportionally increase the image size
and o⿿set.
English
15
Page 16
SETUP AND INSTALLATION
Projector installation notice
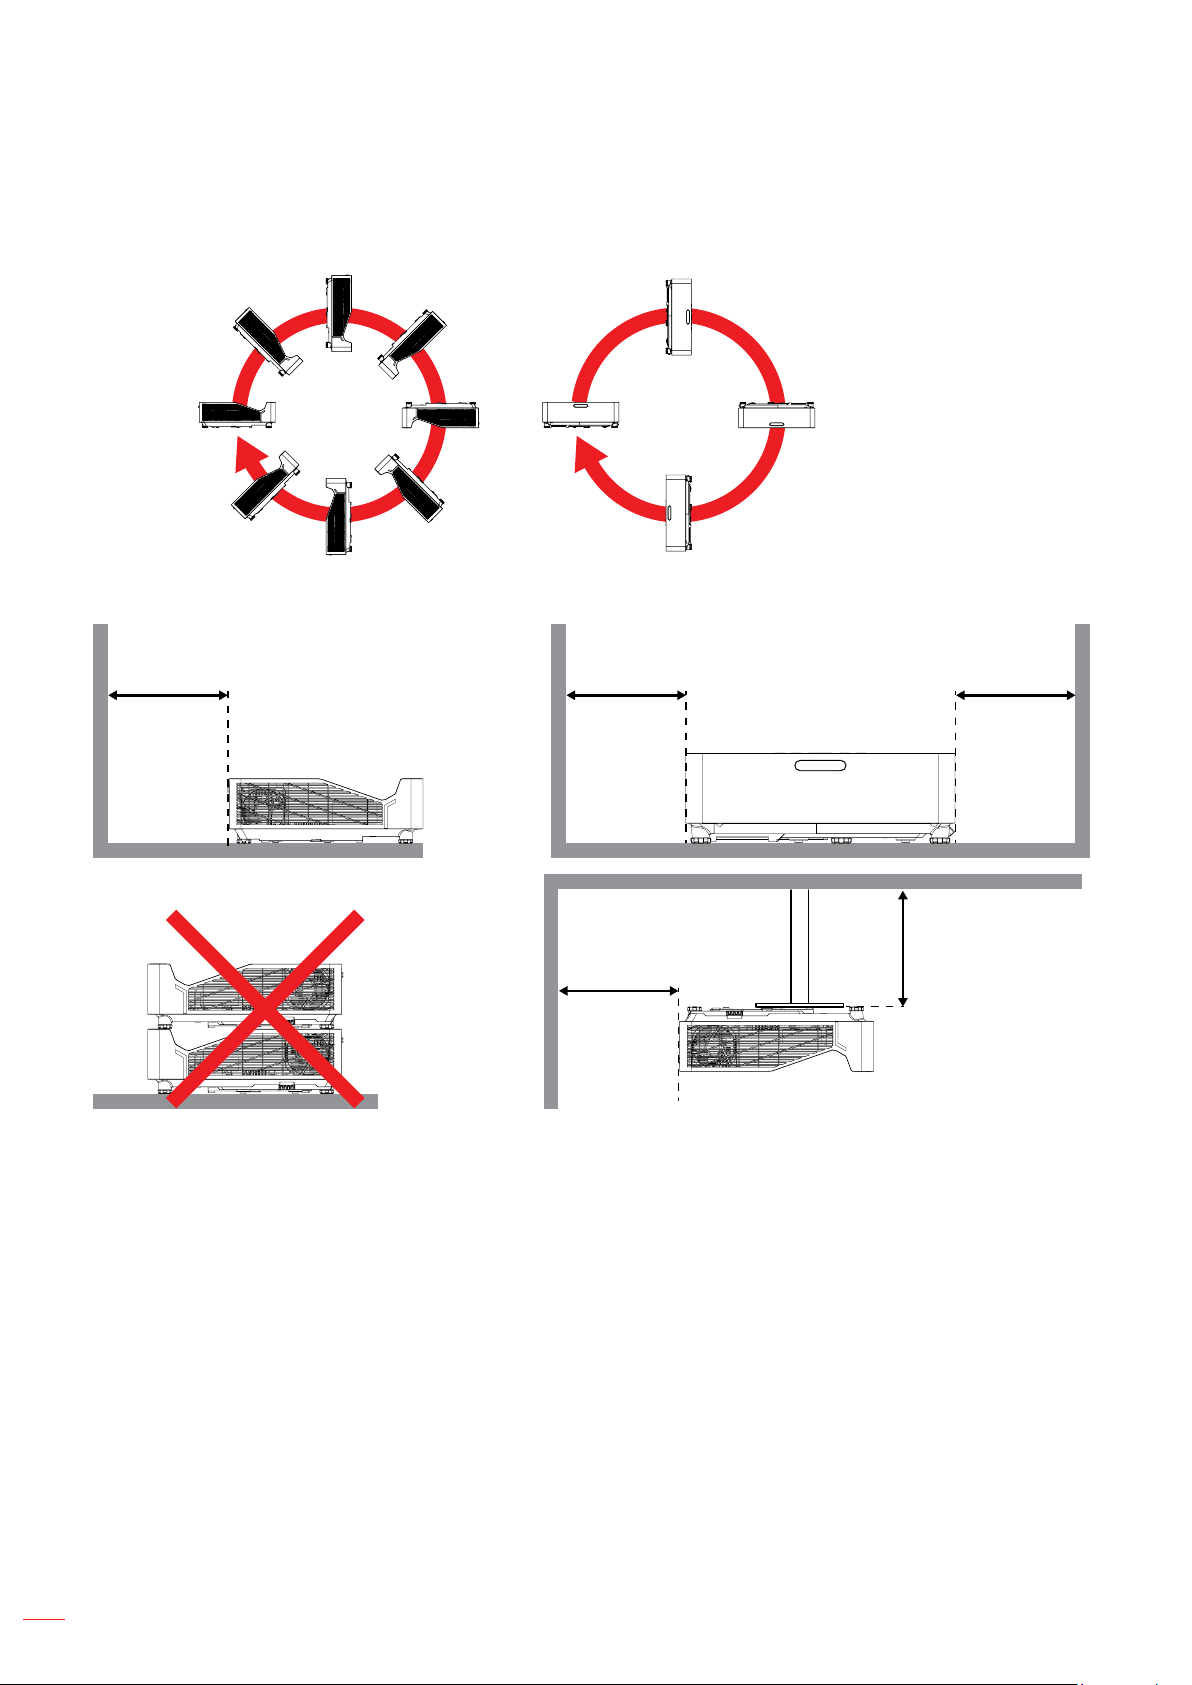
• 360° free orientation operation
• Allow at least 30 cm clearance around the exhaust vent.
Minimum 100mm
(3.94 inches)
• Ensure that the intake vents do not recycle hot air from the exhaust vent.
• When operating the projector in an enclosed space, ensure that the surrounding air temperature within
the enclosure does not exceed operation temperature while the projector is running, and the air intake
and exhaust vents are unobstructed.
• All enclosures should pass a certi⿿ed thermal evaluation to ensure that the projector does not recycle
exhaust air, as this may cause the device to shutdown even if the enclosure temperature is with the
acceptable operation temperature range.
Minimum 300mm
(11.81 inches)
Minimum 100mm
(3.94 inches)
Minimum 300mm
(11.81 inches)
Minimum 100mm
(3.94 inches)
16
English
Page 17
SETUP AND INSTALLATION
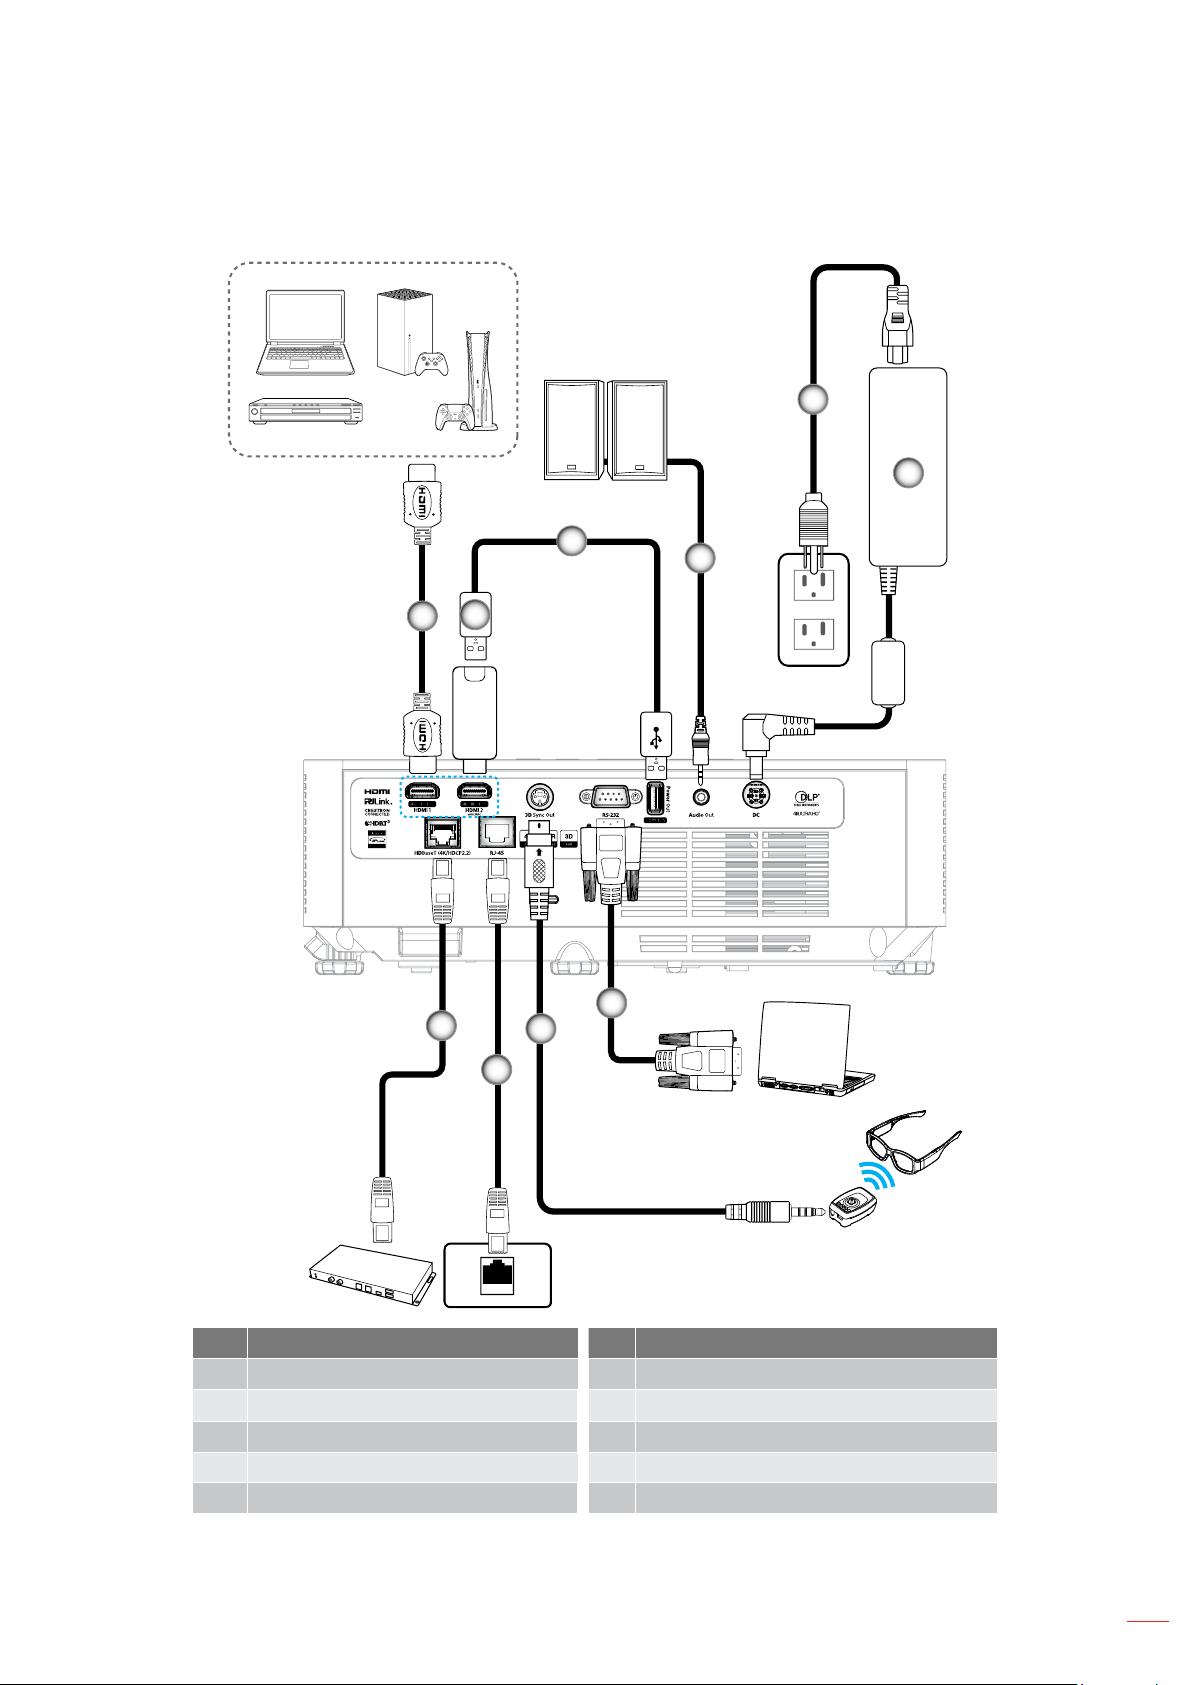
Connecting sources to the projector
6
5
3
2
1
7
10
8
9
4
No Item No Item
1. HDMI Cable 6. Power Cable
HDMI Dongle
2.
RS232 Cable
7.
3. USB Power Cable 8. 3D Emitter Cable
4. Audio Out Cable 9. RJ-45 Cable
5. Power Adapter 10. RJ-45 Cable
Note: To ensure the best image quality and avoid connection errors, we recommend the use of High Speed or
Premium Certi�ed HDMI cables up to 5 meters.
English
17
Page 18
SETUP AND INSTALLATION
Adjusting the projector image
Image height
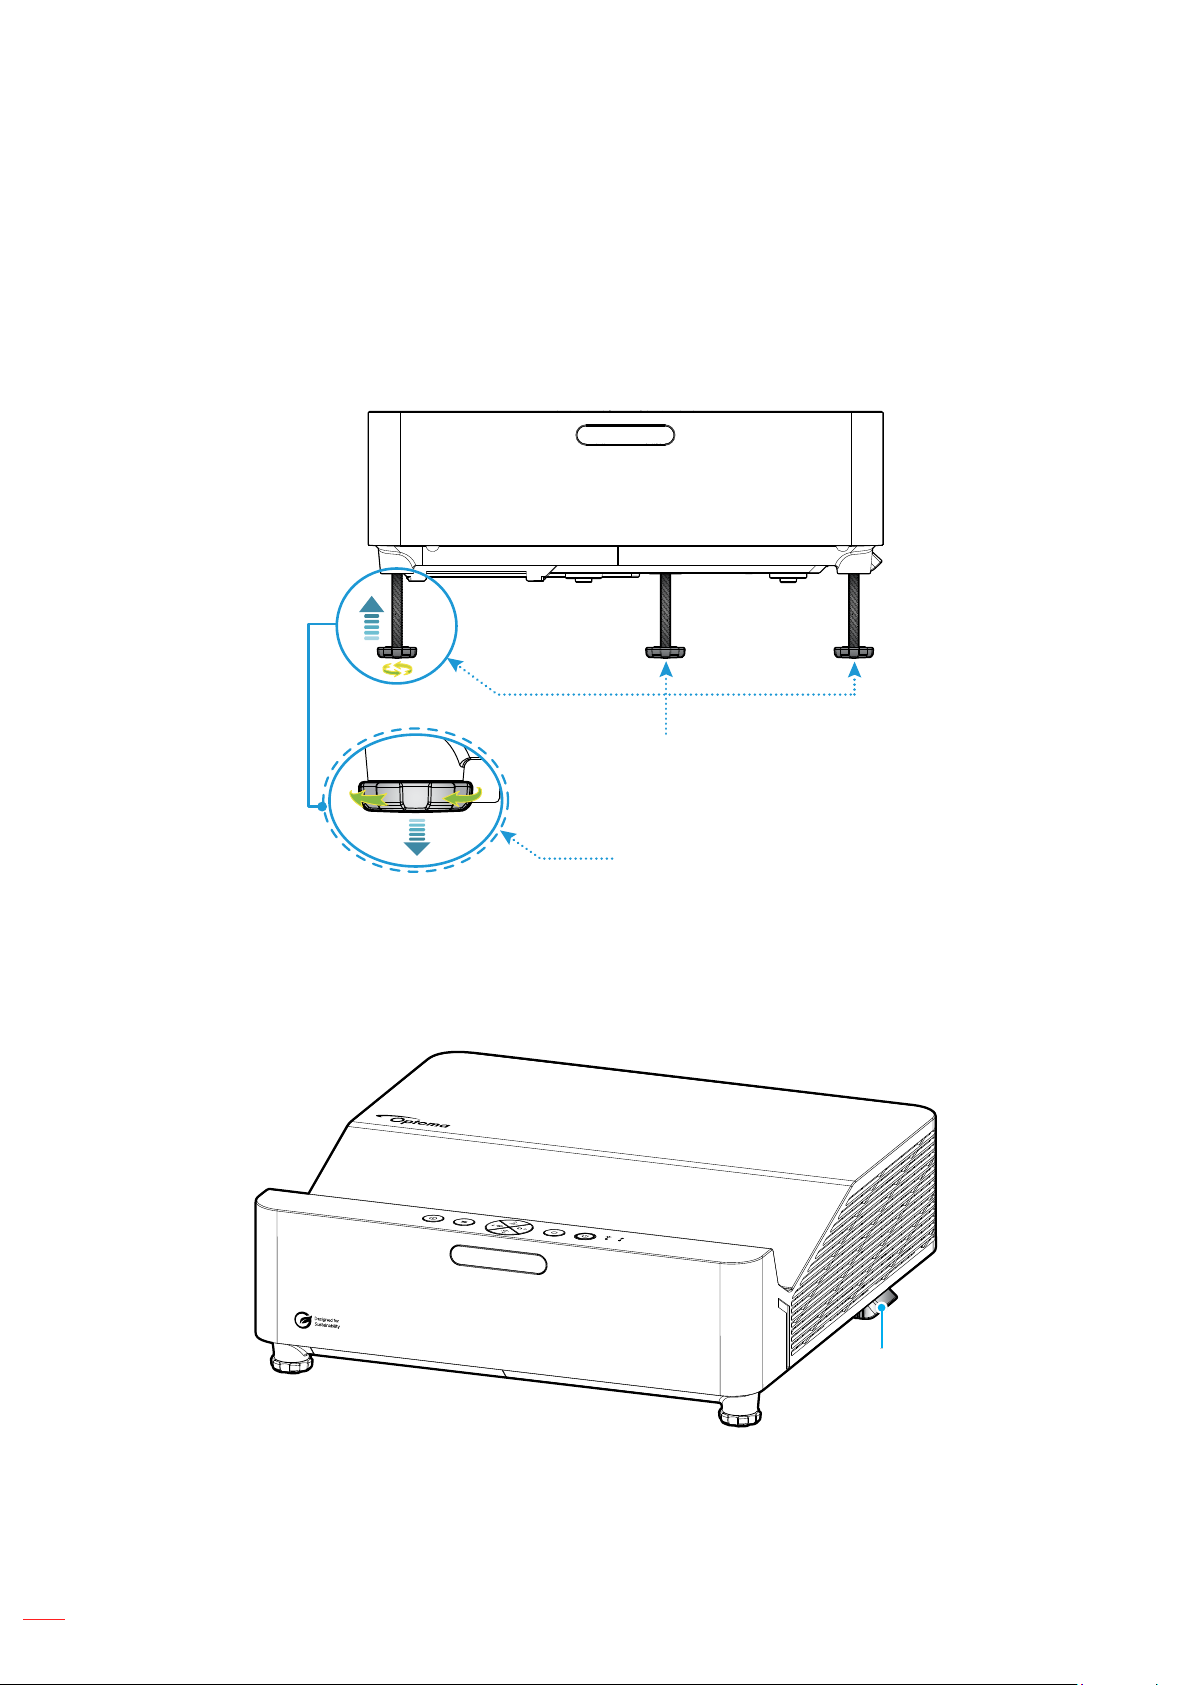
The projector is equipped with elevator feet for adjusting the image height.
1. Locate the adjustable foot you wish to adjust on the underside of the projector.
2. Rotate the adjustable foot clockwise or counterclockwise to raise or lower the projector.
Tilt-Adjustment Feet
Tilt-Adjustment Ring
Focus
To adjust the focus, slide the focus lever up or down until the image is sharp and legible.
18
Focus Lever
English
Page 19
SETUP AND INSTALLATION
Remote setup
Installing / replacing the batteries
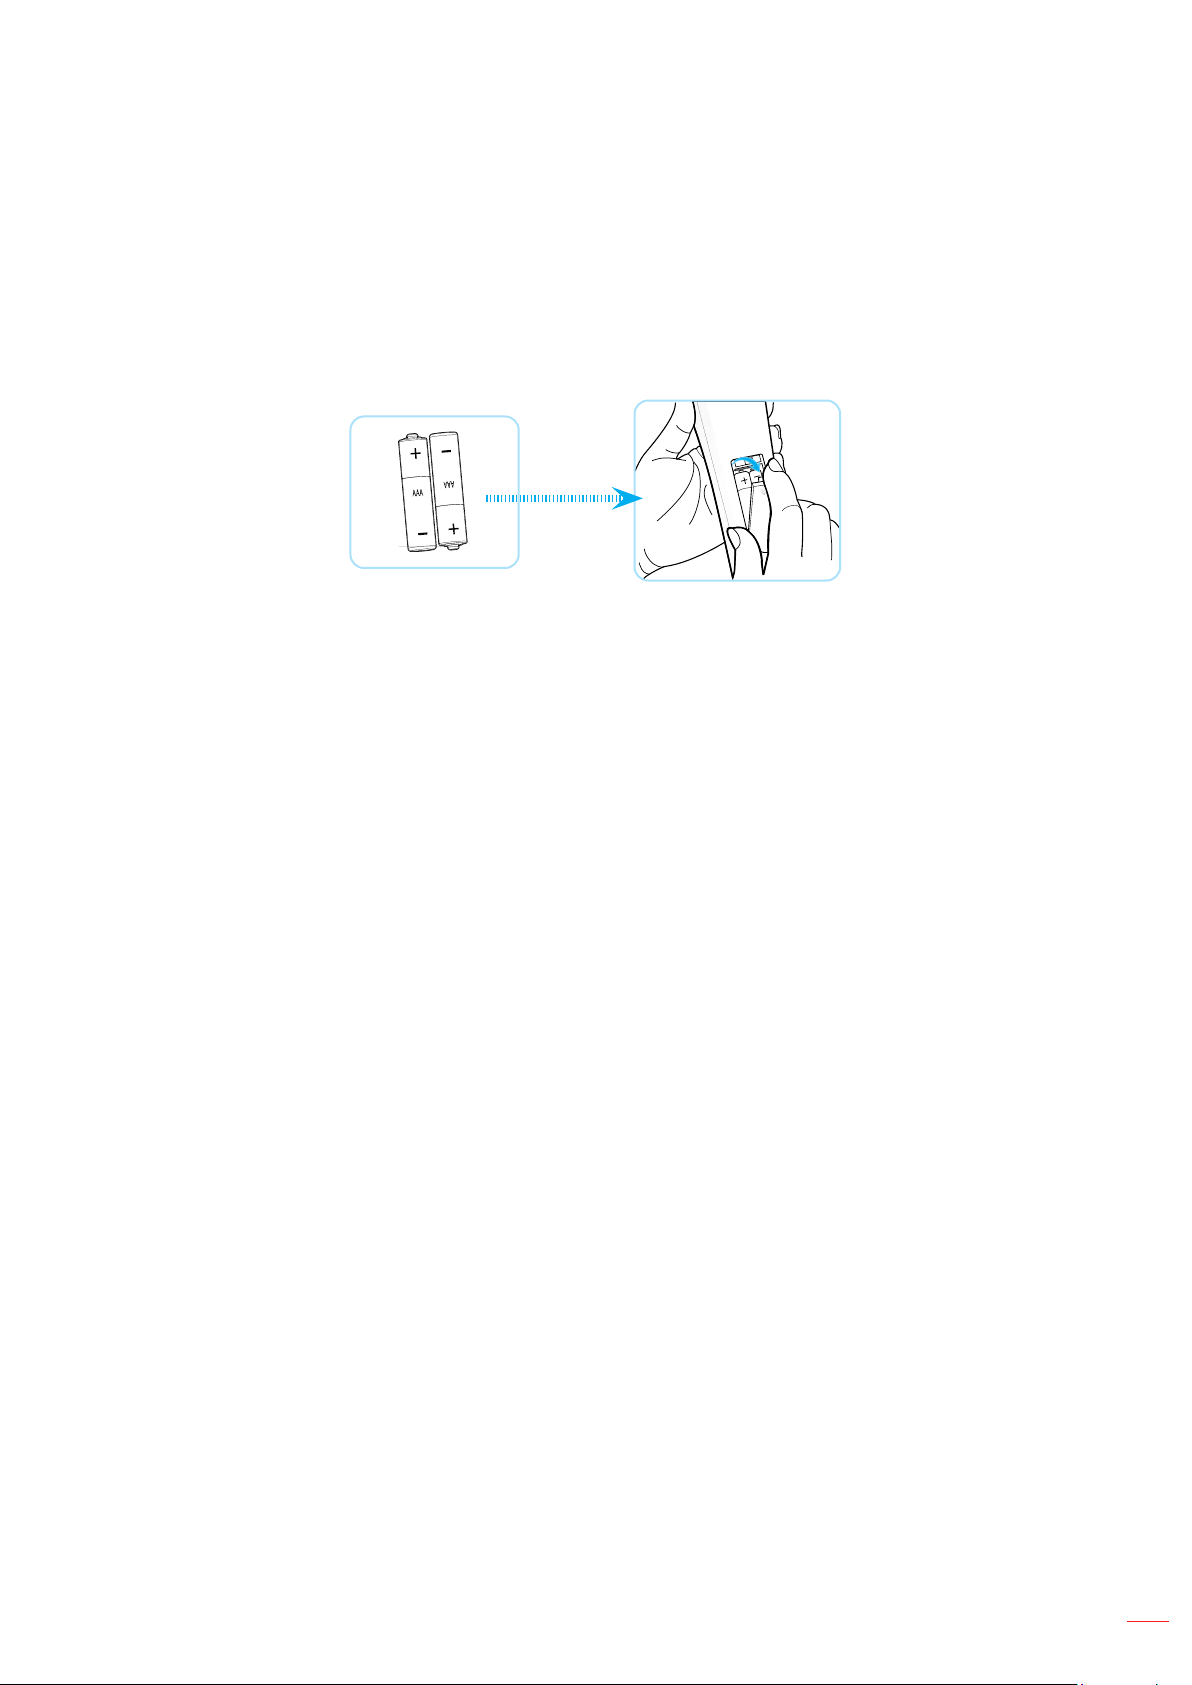
Two AAA size batteries are supplied for the remote control.
1. Remove the battery cover on the back of the remote control.
2. Insert AAA batteries in the battery compartment as illustrated.
3. Replace back cover on remote control.
Note: Replace only with the same or equivalent type batteries.
CAUTION: To ensure safe operation, please observe the following precautions:
• Replacement of a battery with an incorrect type that can defeat a safeguard (AAA size battery type).
• Disposal of a battery into a ⿿re, hot oven, mechanically crushing or cutting of a battery, may result in
an explosion.
• Leaving a battery in an extremely high temperature surrounding environment that can result in an
explosion or the leakage of 㿿ammable liquid or gas.
• A battery subjected to extremely low air pressure that may result in an explosion or the leakage of
㿿ammable liquid or gas.
• Do not mix old and new batteries. Mixing old and new batteries can shorten the life of new batteries or
cause a chemical leak in the old batteries.
• Remove batteries as soon as they are depleted. Chemicals that leak from a battery which comes into
contact with your skin can cause a rash. If you ⿿nd any chemical leakage, wipe thoroughly with a cloth.
• The batteries supplied with this product may have a shorter life expectancy due to storage conditions.
• If you are not using the remote control for an extended period of time, please remove the batteries to
reduce risk of chemical leak.
English
19
Page 20
SETUP AND INSTALLATION
E�ective range
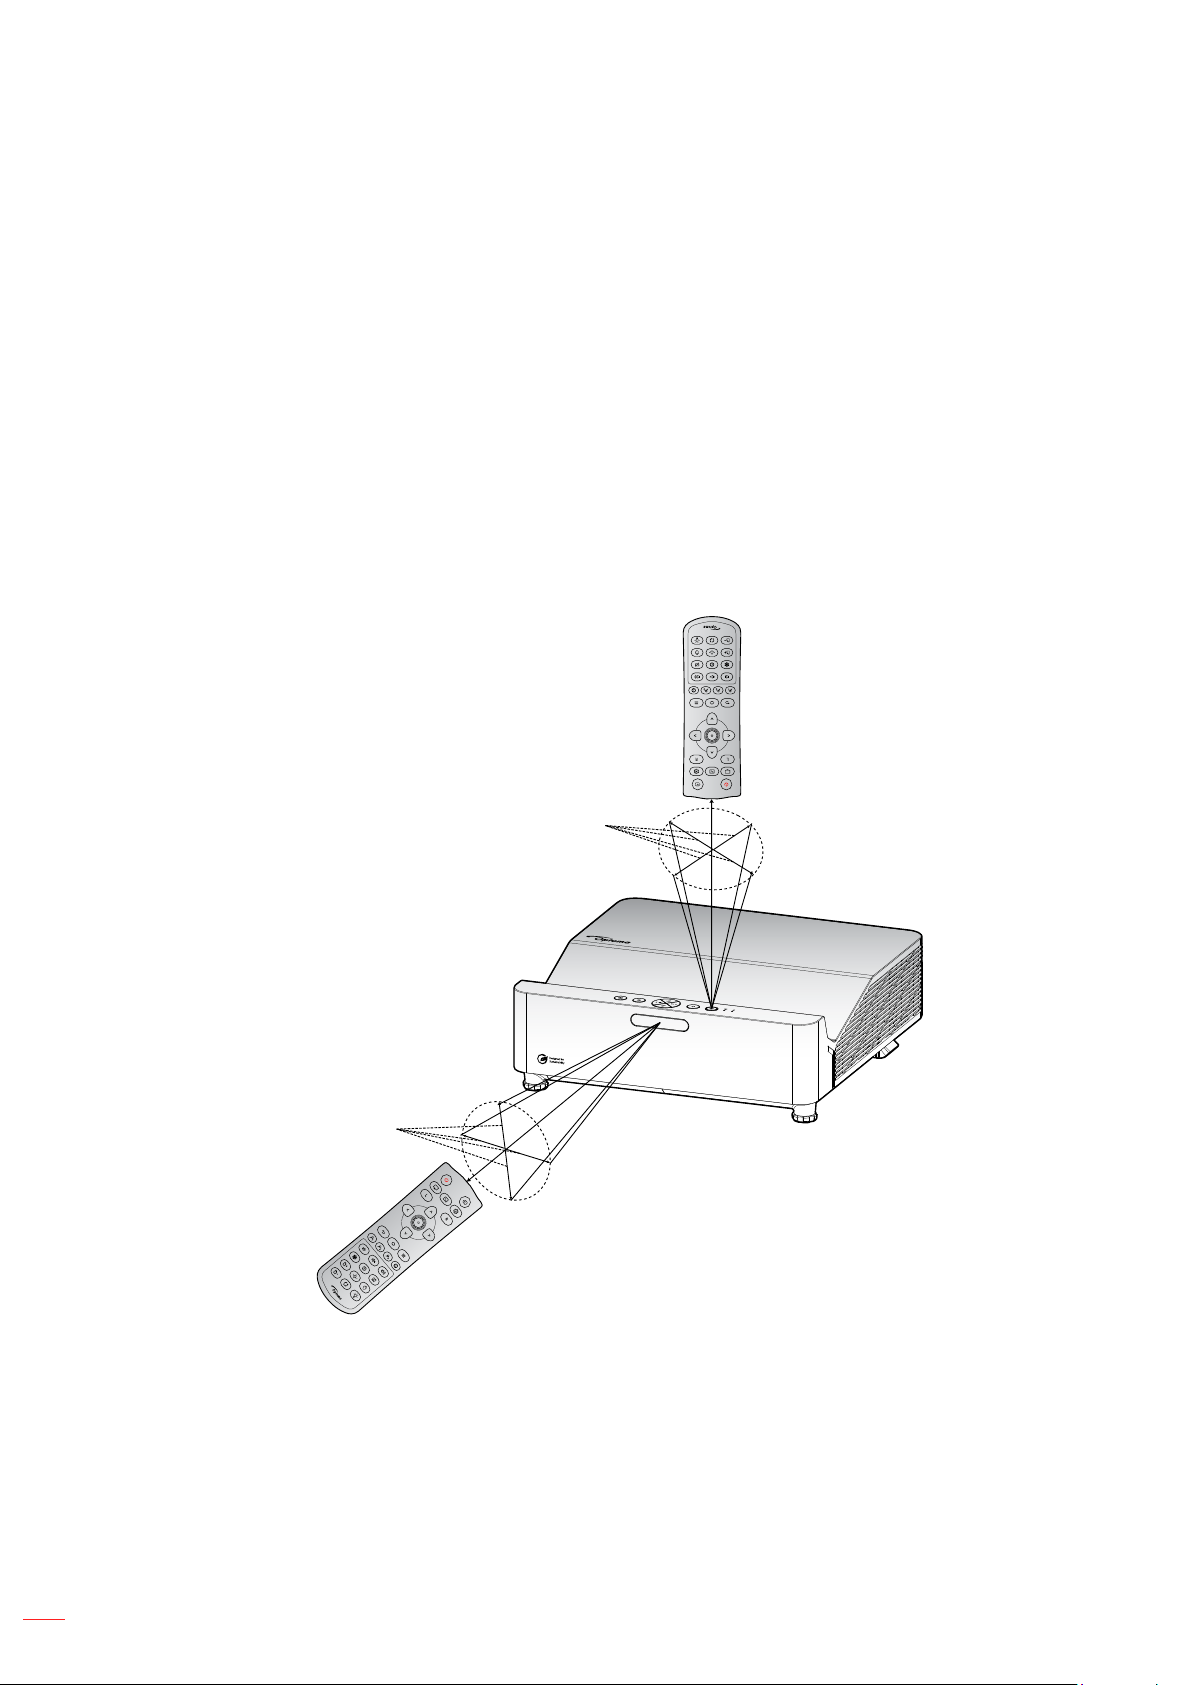
Infra-Red (IR) remote control sensor is located on the top and front sides of the projector. Ensure that the remote
control is held at an angle 30 degrees perpendicular to the projector’s IR remote control sensor to ensure correct
functionality. The distance between the remote control and the sensor should not be longer than 6 meters (19.7 feet).
• Make sure that there are no obstacles between the remote control and the IR sensor on the projector
that might obstruct the infra-red beam.
• Make sure the IR transmitter of the remote control is not being directly shined on by sunlight or
㿿uorescent lamps.
• Please keep the remote controller away from 㿿uorescent lamps for over 2 m or the remote controller
may malfunction.
• If the remote control is close to Inverter-Type 㿿uorescent lamps, it might become ine�ective from time
to time.
• If the remote control and the projector are within a very short distance of one another, the remote
control might become ine�ective.
Approx. ± 15°
Approx. ± 15°
20
English
Page 21
USING THE PROJECTOR
Powering on / o� the projector
or
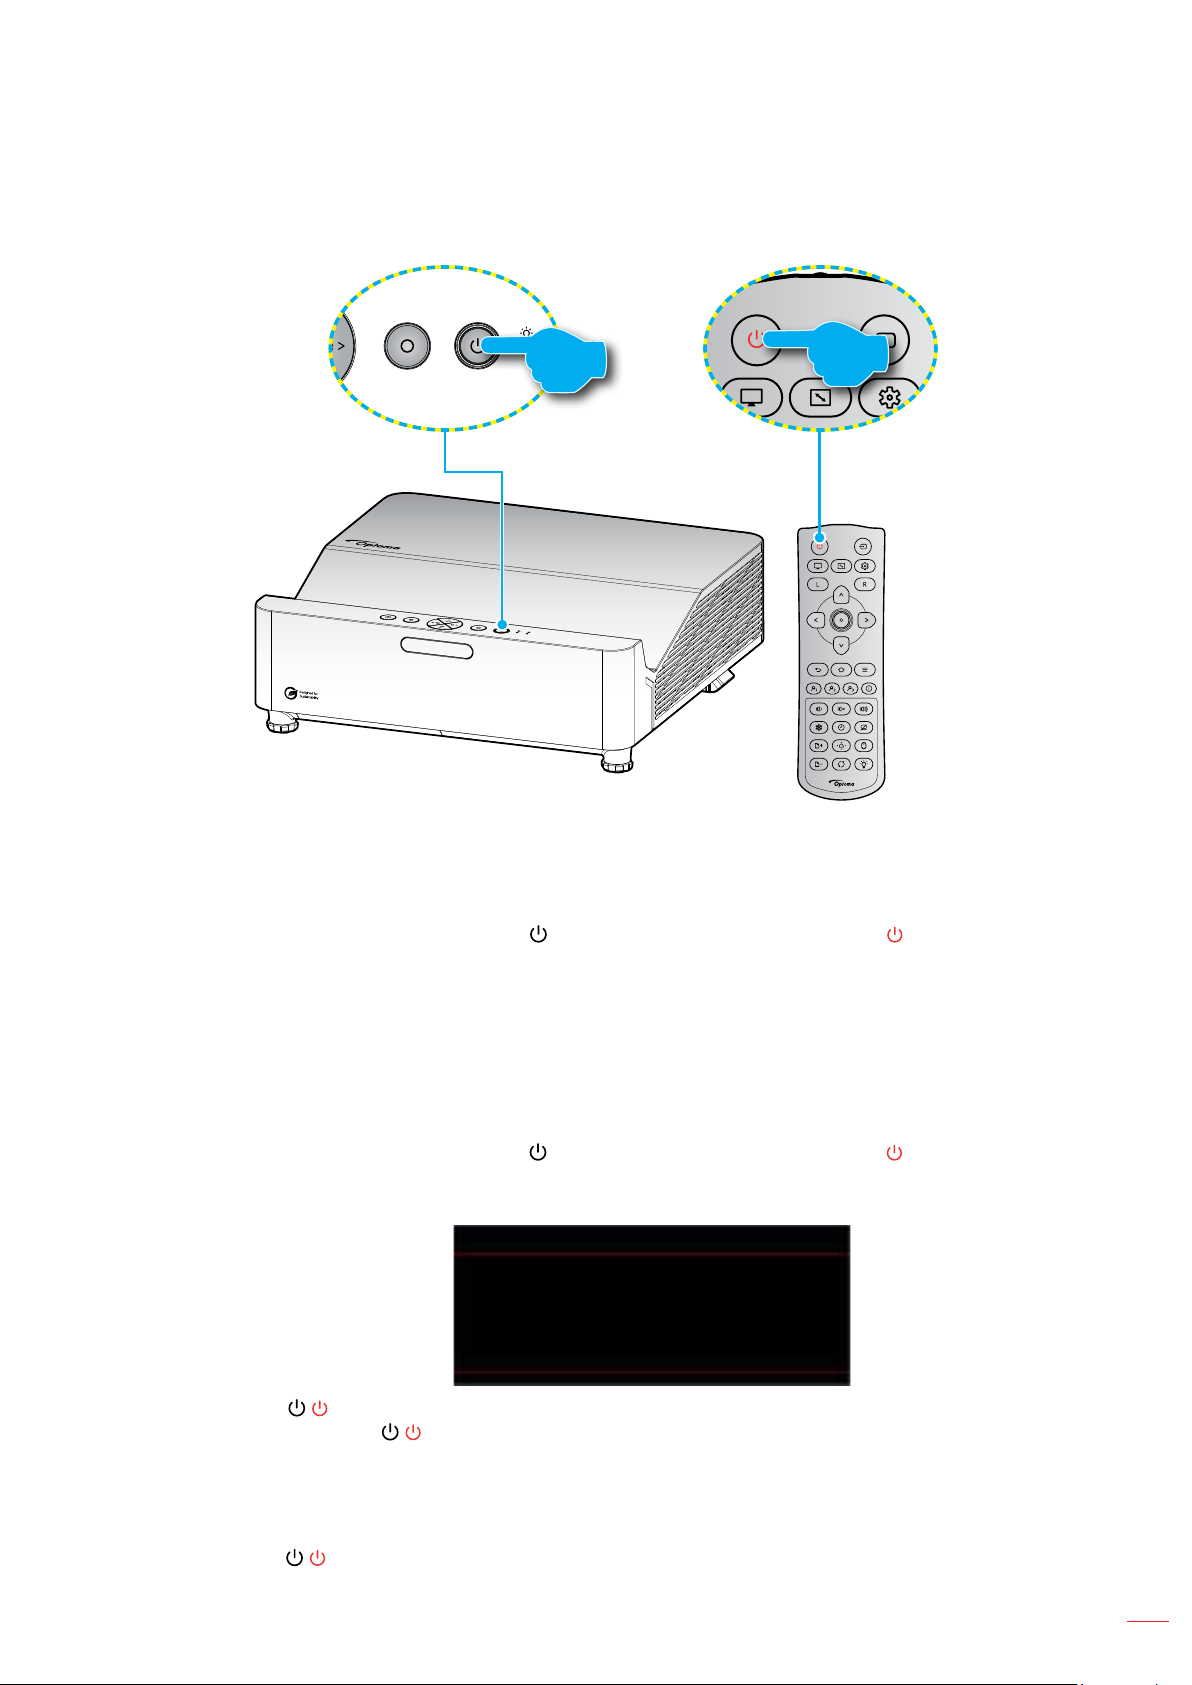
Powering on
1. Securely connect the power lead and signal/source cable. When connected, the Power LED starts
breathing red.
2. Turn on the projector by pressing the button on the projector keypad or the button on the remote
control.
3. A start up screen will display in approximately 10 seconds and the Power LED will be 㿿ashing blue.
Note: The �rst time the projector is turned on, you will be prompted to select the preferred language, projection
orientation, and other settings.
Powering o�
1. Turn o� the projector by pressing the button on the projector keypad or the button on the remote
control.
2. The following message will be displayed:
Power O�
Press power key again.
3. Press the / button again to con⿿rm, otherwise the message will disappear after 15 seconds.
When you press the / button for the second time, the projector will shut down.
4. The cooling fans will continue to operate for about 10 seconds for the cooling cycle and the Power
LED will 㿿ash blue. When the Power LED turns solid red, this indicates the projector has entered
standby mode. If you wish to turn the projector back on, you must wait until the cooling cycle has
⿿nished and the projector has entered standby mode. When the projector is in standby mode, simply
press the / button again to turn on the projector.
5. Disconnect the power lead from the electrical outlet and the projector.
Note: It is not recommended that the projector is turned on immediately, right after a power o⿿ procedure.
English
21
Page 22
USING THE PROJECTOR
Selecting an input source
Turn on the connected source that you want to display on the screen, such as computer, notebook, video player,
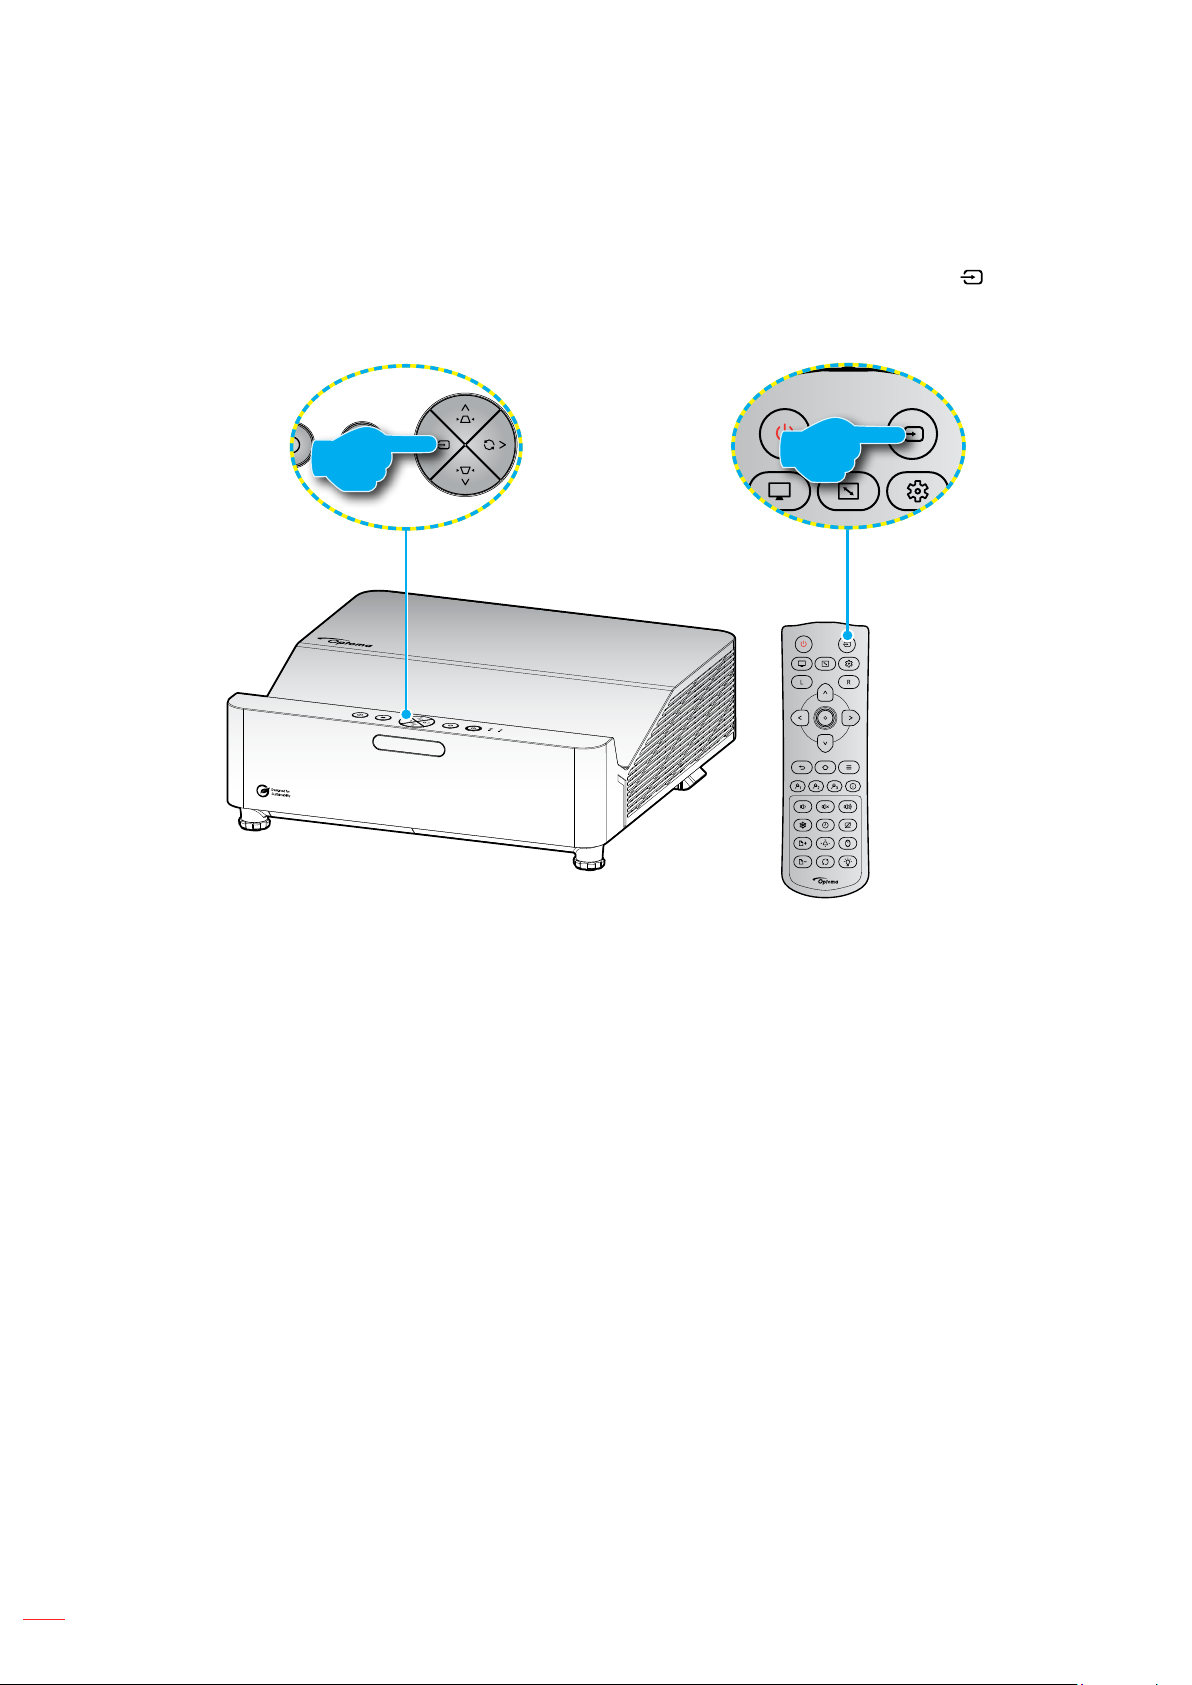
etc. The projector will automatically detect the source. If multiple sources are connected, press the button on
the projector keypad or remote control to select the desired input.
or
22
English
Page 23
USING THE PROJECTOR
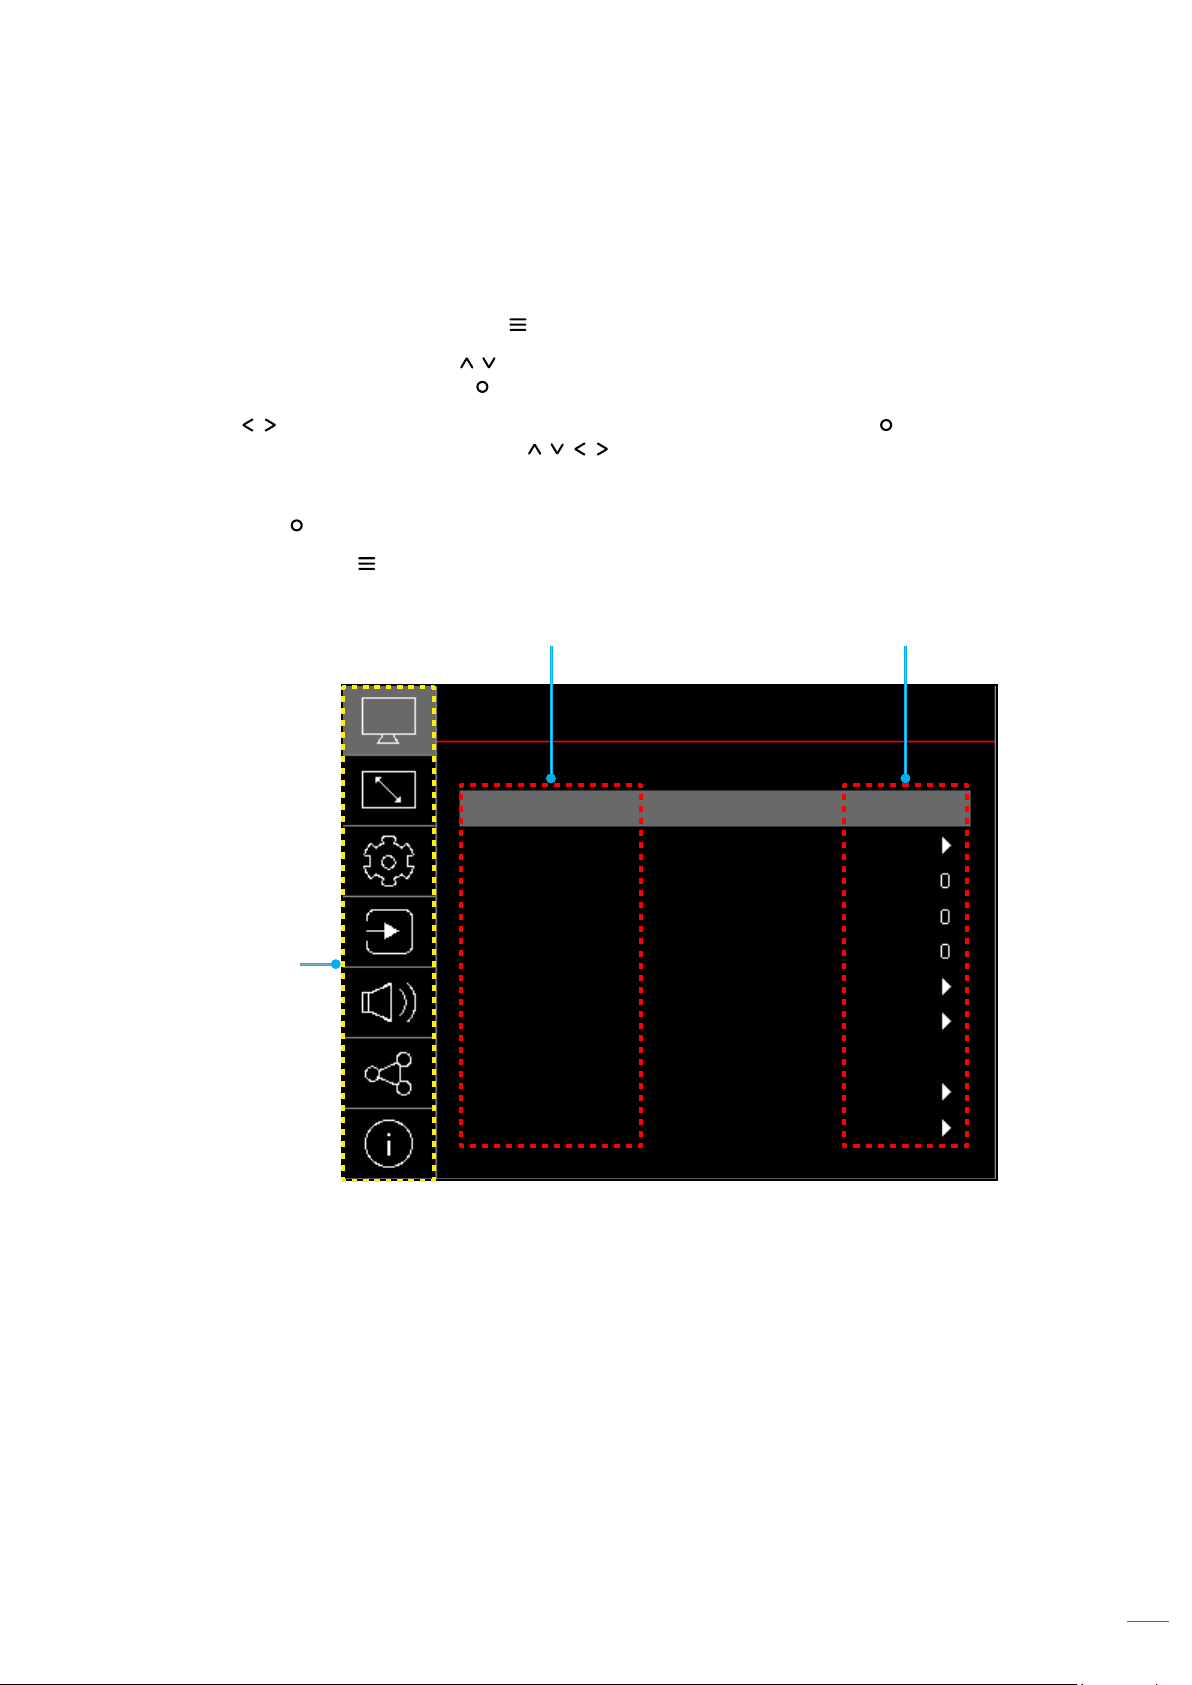
Menu navigation and features
The projector has multilingual on-screen display menus that allow you to make image adjustments and change a
variety of settings. The projector will automatically detect the source.
1. To open the OSD menu, press the button on the projector keypad or remote control.
2. When OSD is displayed, use / keys to select any item in the main menu. While making a selection
on a particular page, press the button on the projector keypad or remote control to enter sub menu.
3. Use / keys to select the desired item in the sub menu and then press the button to view further
settings. Adjust the settings by using / / / keys.
4. Select the next item to be adjusted in the sub menu and adjust as described above.
5. Press the button to con⿿rm, and the screen will return to the main menu.
6. To exit, press the button again. The OSD menu will close and the projector will automatically save
the new settings.
Submenus Settings
Main Menu
Picture Mode
Dynamic Range
Brightness
Contrast
Sharpness
Gamma
Color Settings
Wall Color
3D
Reset
Image
Bright
O�
English
23
Page 24
USING THE PROJECTOR
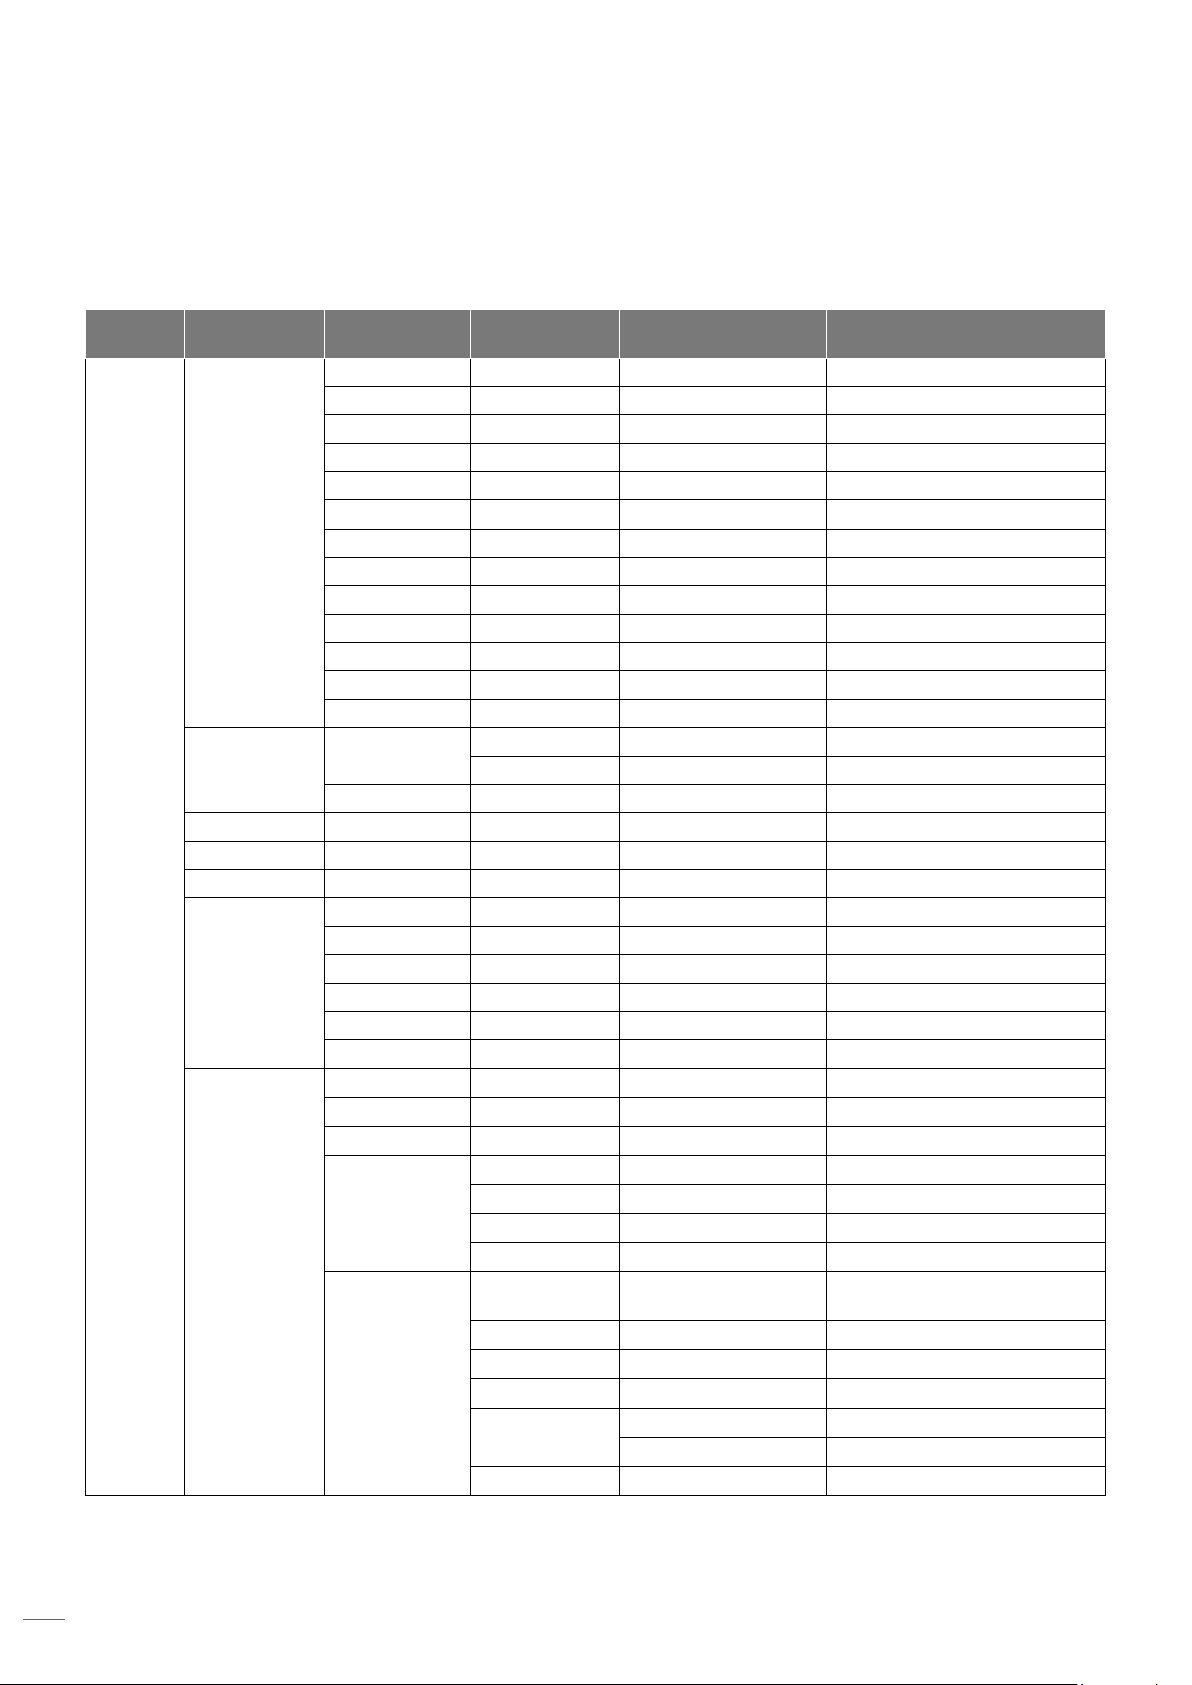
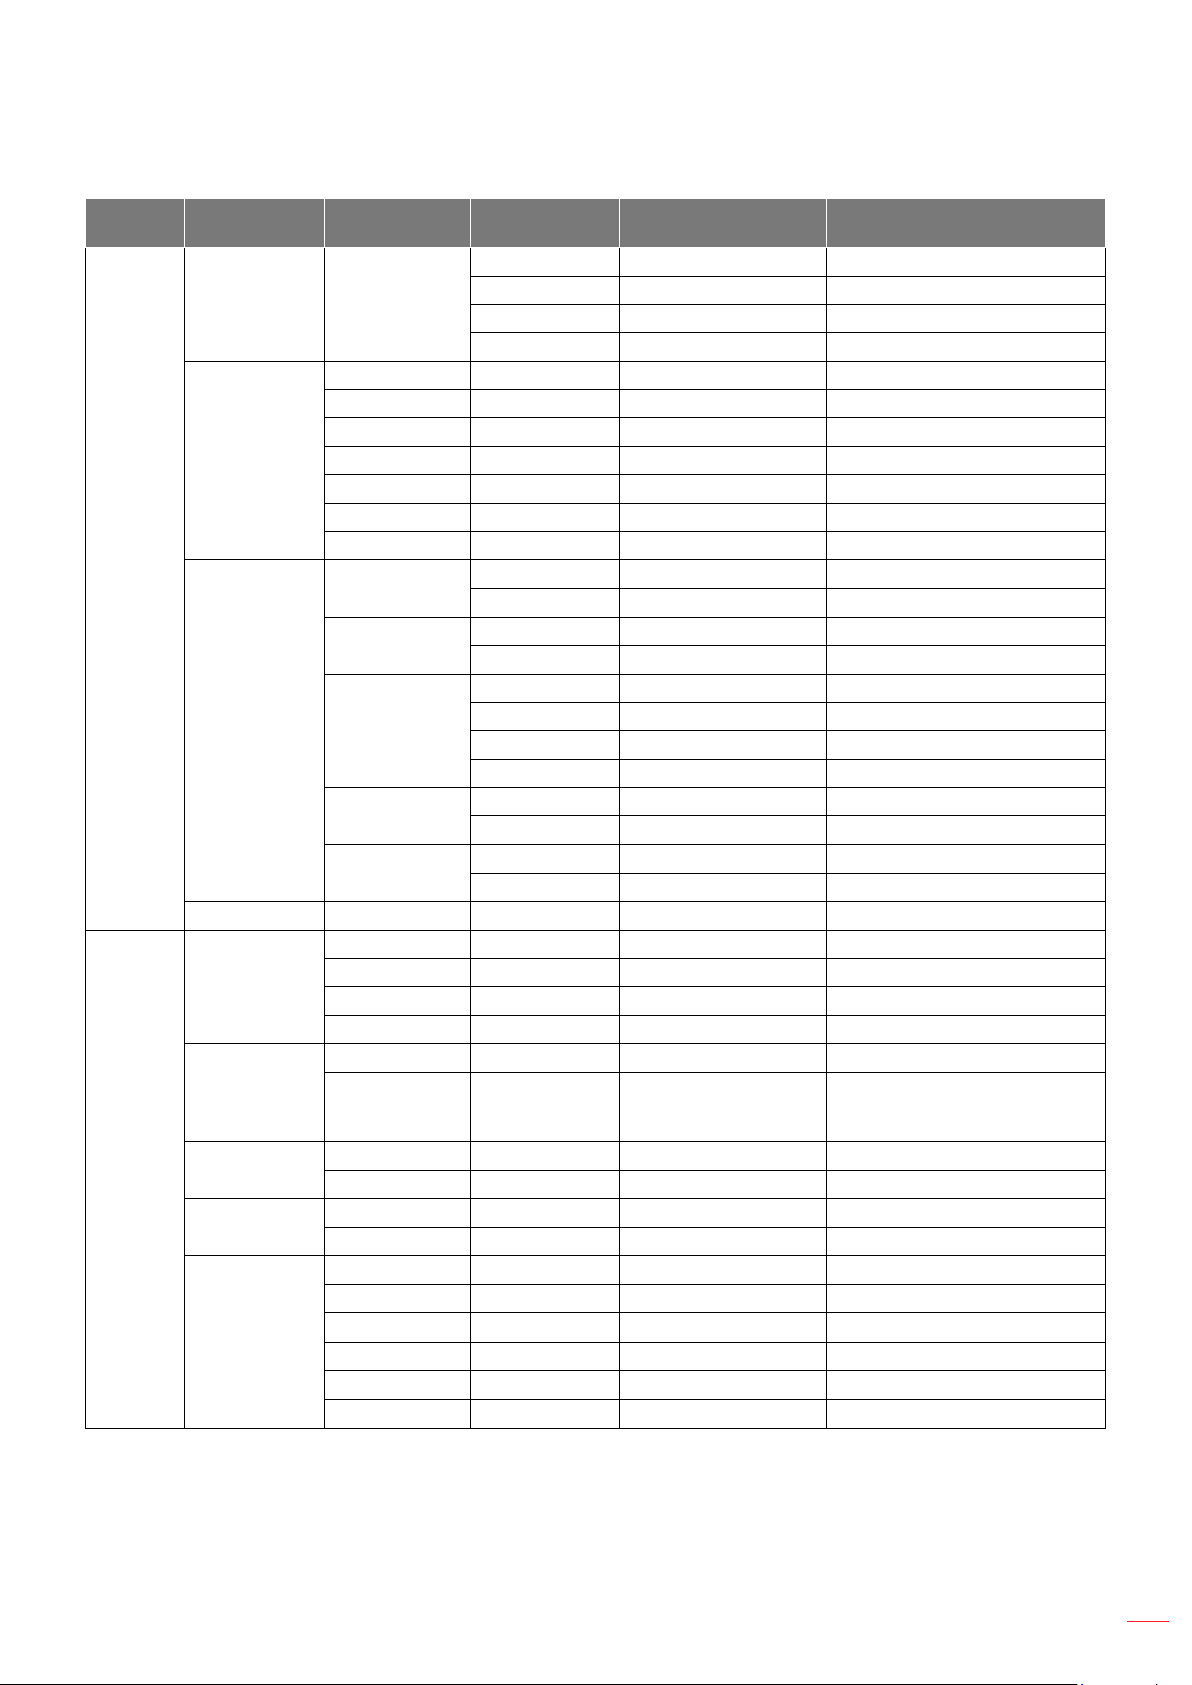
OSD Menu tree
Note: The OSD menu tree items and features are subject to models and region. Optoma reserve the right to add
or remove items to improve product performance without notice.
Main
Menu
Image
Sub Menu Sub Menu 2 Sub Menu 3 Sub Menu 4 Values
Vivid
HDR
HLG
Cinema
Game
Sport
Picture Mode
Dynamic Range
Brightness -50 ~ 50
Contrast -50 ~ 50
Sharpness 1 ~ 15
Gamma
Color Settings
HDR
HDR Brightness 0 ~ 10
Color
Tint
BrilliantColor™
Color
Temperature
Color
Hue
CMS
Saturation
Gain
Reset
Exit
Reference
Bright
DICOM SIM.
ISF Day
ISF Night
ISF 3D
3D
Auto
O�
Film
Graphics
1.8
2.0
2.2
2.4
-50 ~ 50
-50 ~ 50
1 ~ 10
Warm
Standard
Cool
Cold
White / Red / Green / Blue / Cyan /
Magenta / Yellow
-50 ~ 50
-50 ~ 50
-50 ~ 50
No
Yes
24
English
Page 25
USING THE PROJECTOR
Main
Menu
Image
Display
Sub Menu Sub Menu 2 Sub Menu 3 Sub Menu 4 Values
Auto
Color Settings Color Space
Wall Color
3D Mode
3D Sync Type
3D
Reset
Projection
Orientation
Light Source
Mode
Dynamic Black
Low Latency
Mode
Aspect Ratio
3D Format
3D Sync Invert
Reset
RGB(0~255)
RGB(16~235)
YUV
O�
Blackboard
Light Yellow
Light Green
Light Blue
Pink
Gray
O�
On
DLP-Link
3D Sync
Auto
SBS
Top and Bottom
Frame Sequential
O�
On
No
Yes
Front
Rear
Ceiling-Top
Rear-Top
Eco.
Power: 100% / 95% / 90% / 85%
/ 80% / 75% / 70% / 65% / 60% /
55% / 50%
O�
On
O�
On
4:3
16:9
21:9
LBX
Native
Auto
English
25
Page 26
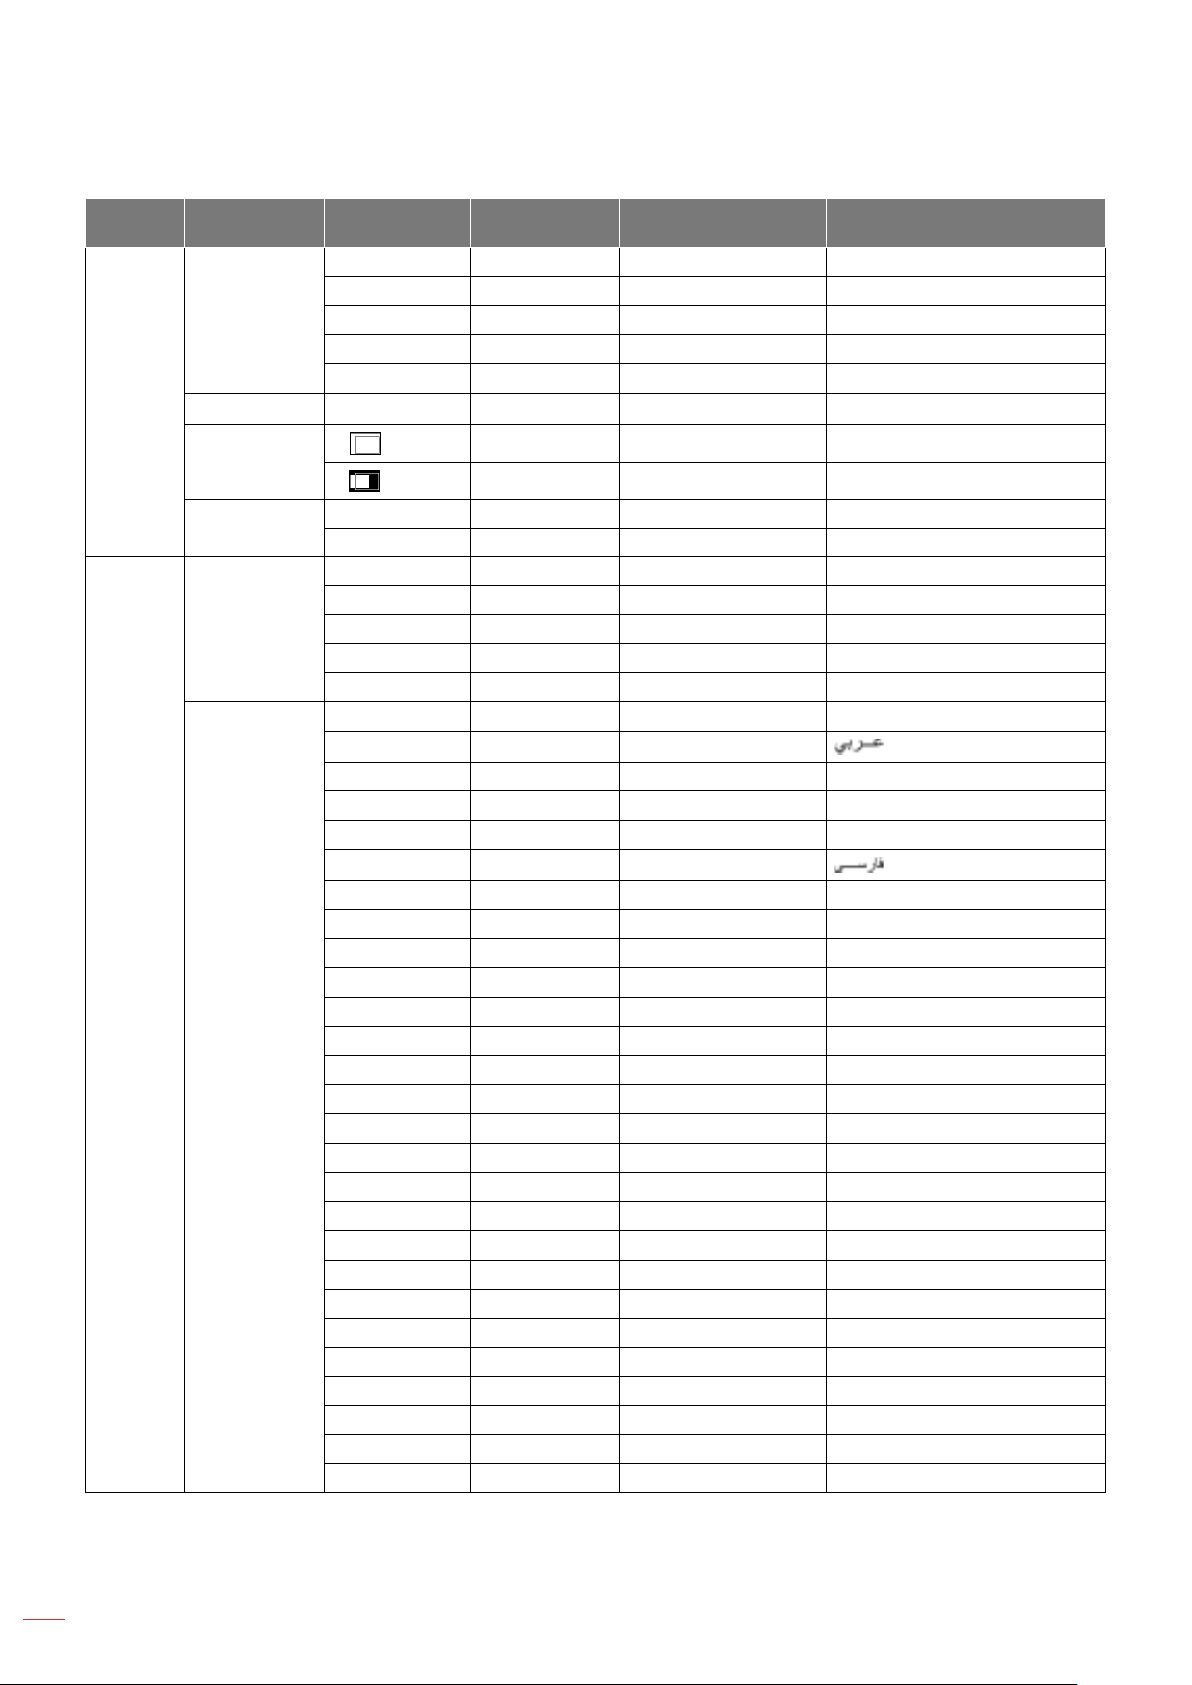
USING THE PROJECTOR
Main
Menu
Display
Sub Menu Sub Menu 2 Sub Menu 3 Sub Menu 4 Values
V Keystone
Geometric
Correction
Digital Zoom Zoom
Image Shift
Reset
Test Pattern
H Keystone -5 ~ 5
Four Corners
5 x 3 Warp
Reset
H
V
-5 ~ 5
-5 ~ 25
-100 ~ 100
-100 ~ 100
No
Yes
O�
Green Grid
Magenta Grid
White Grid
White
English
Čeština
Dansk
Nederlands
Setup
Language
Suomi
Français
Deutsch
ελληνικά
Magyar
Bahasa Indonesia
Italiano
日本語
한국어
Norsk
Polski
Português
Română
Русский
簡体中文
Español
Svenska
ไทย
繁體中文
Türkçe
Tiếng Việt
26
English
Page 27
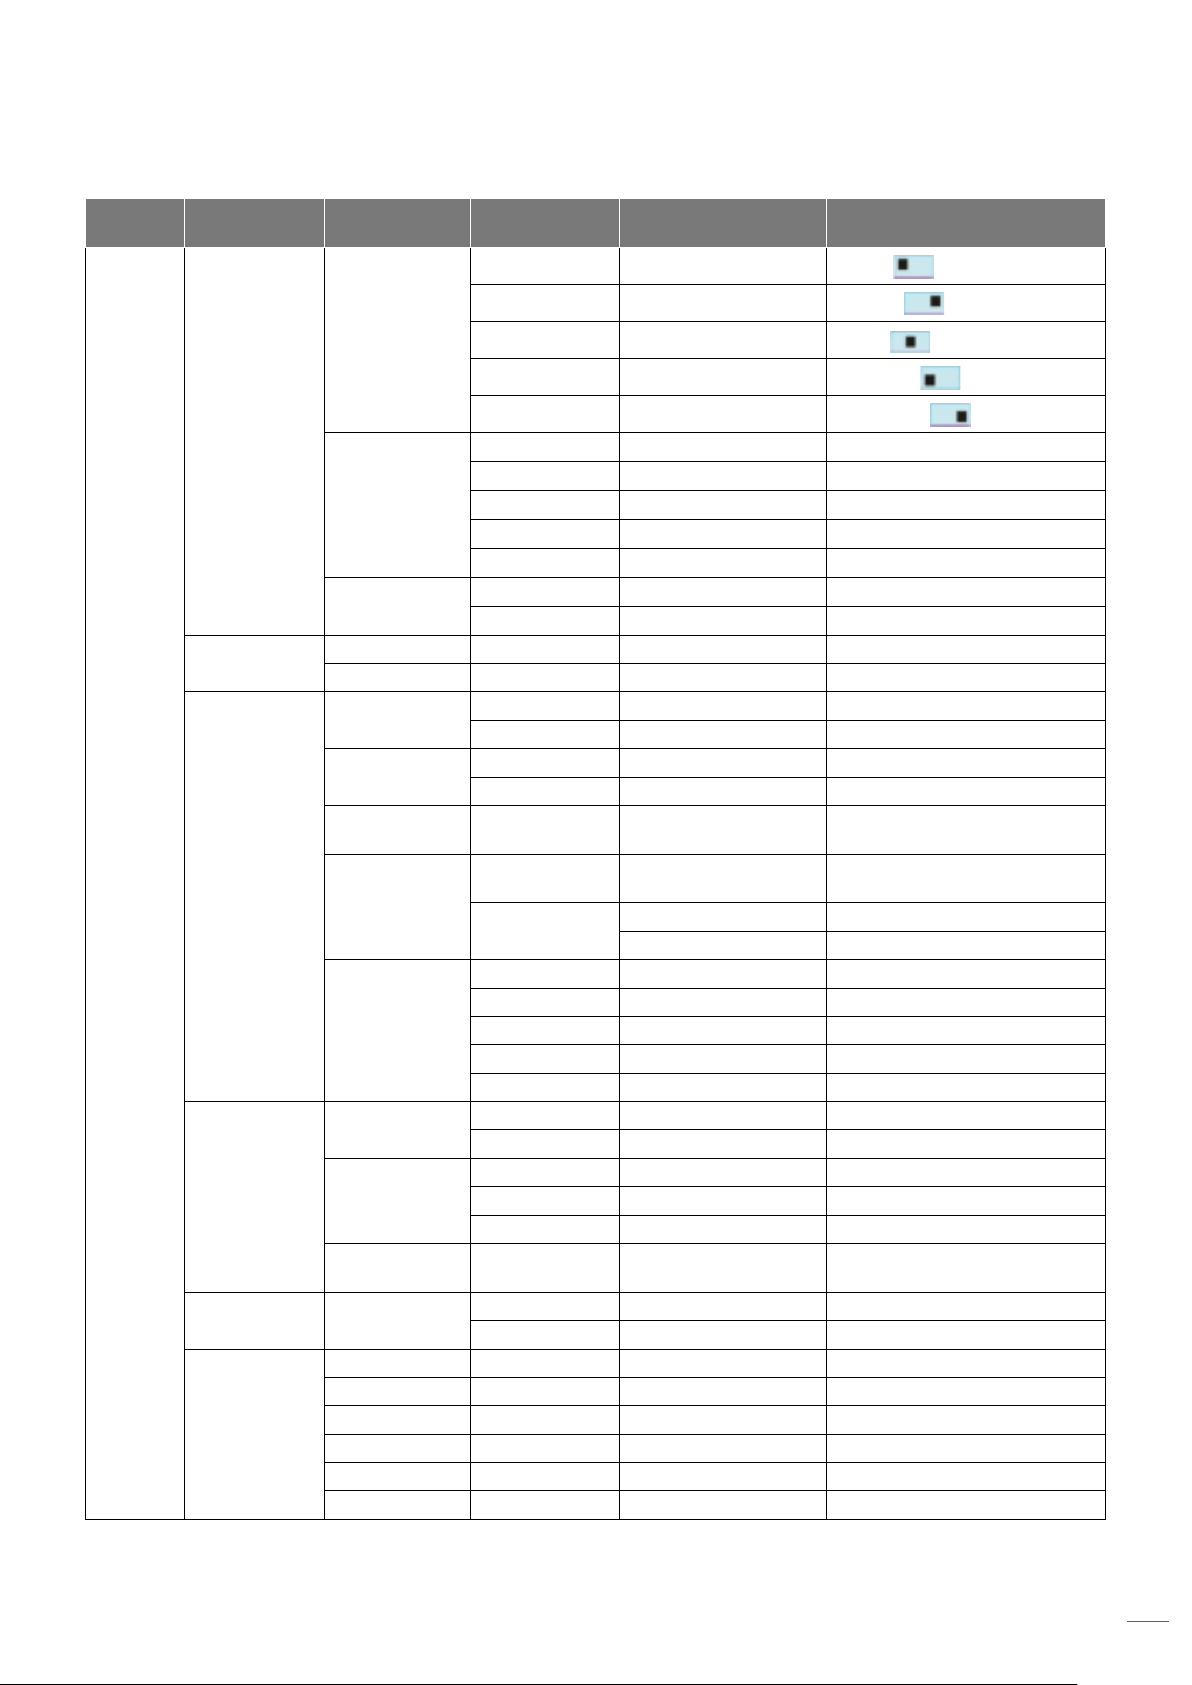
USING THE PROJECTOR
Main
Menu
Setup
Sub Menu Sub Menu 2 Sub Menu 3 Sub Menu 4 Values
Top left
Top right
Menu Settings
High Altitude
Power Settings
Security
Startup Logo
Background
Color
Menu Location
Menu Timer
Information Hide
Direct Power On
Signal Power On
Auto Power O�
(min.)
Sleep Timer
(min.)
Power Mode
(Standby)
Security
Security Timer
Change
Password
Sleep Timer
(min.)
Always On No
Month
Day
Hour
Center
Bottom left
Bottom right
O�
5s
10s
20s
30s
O�
On
O�
On
O�
On
O�
On
0 ~ 180 (1 min increments)
0 ~ 990 (30 min increments)
Yes
Eco
Active
Active (20 mins)
Communication
Communication (20 mins)
O�
On
Default
Neutral
None
Blue
Red
Green
Gray
Logo
English
27
Page 28
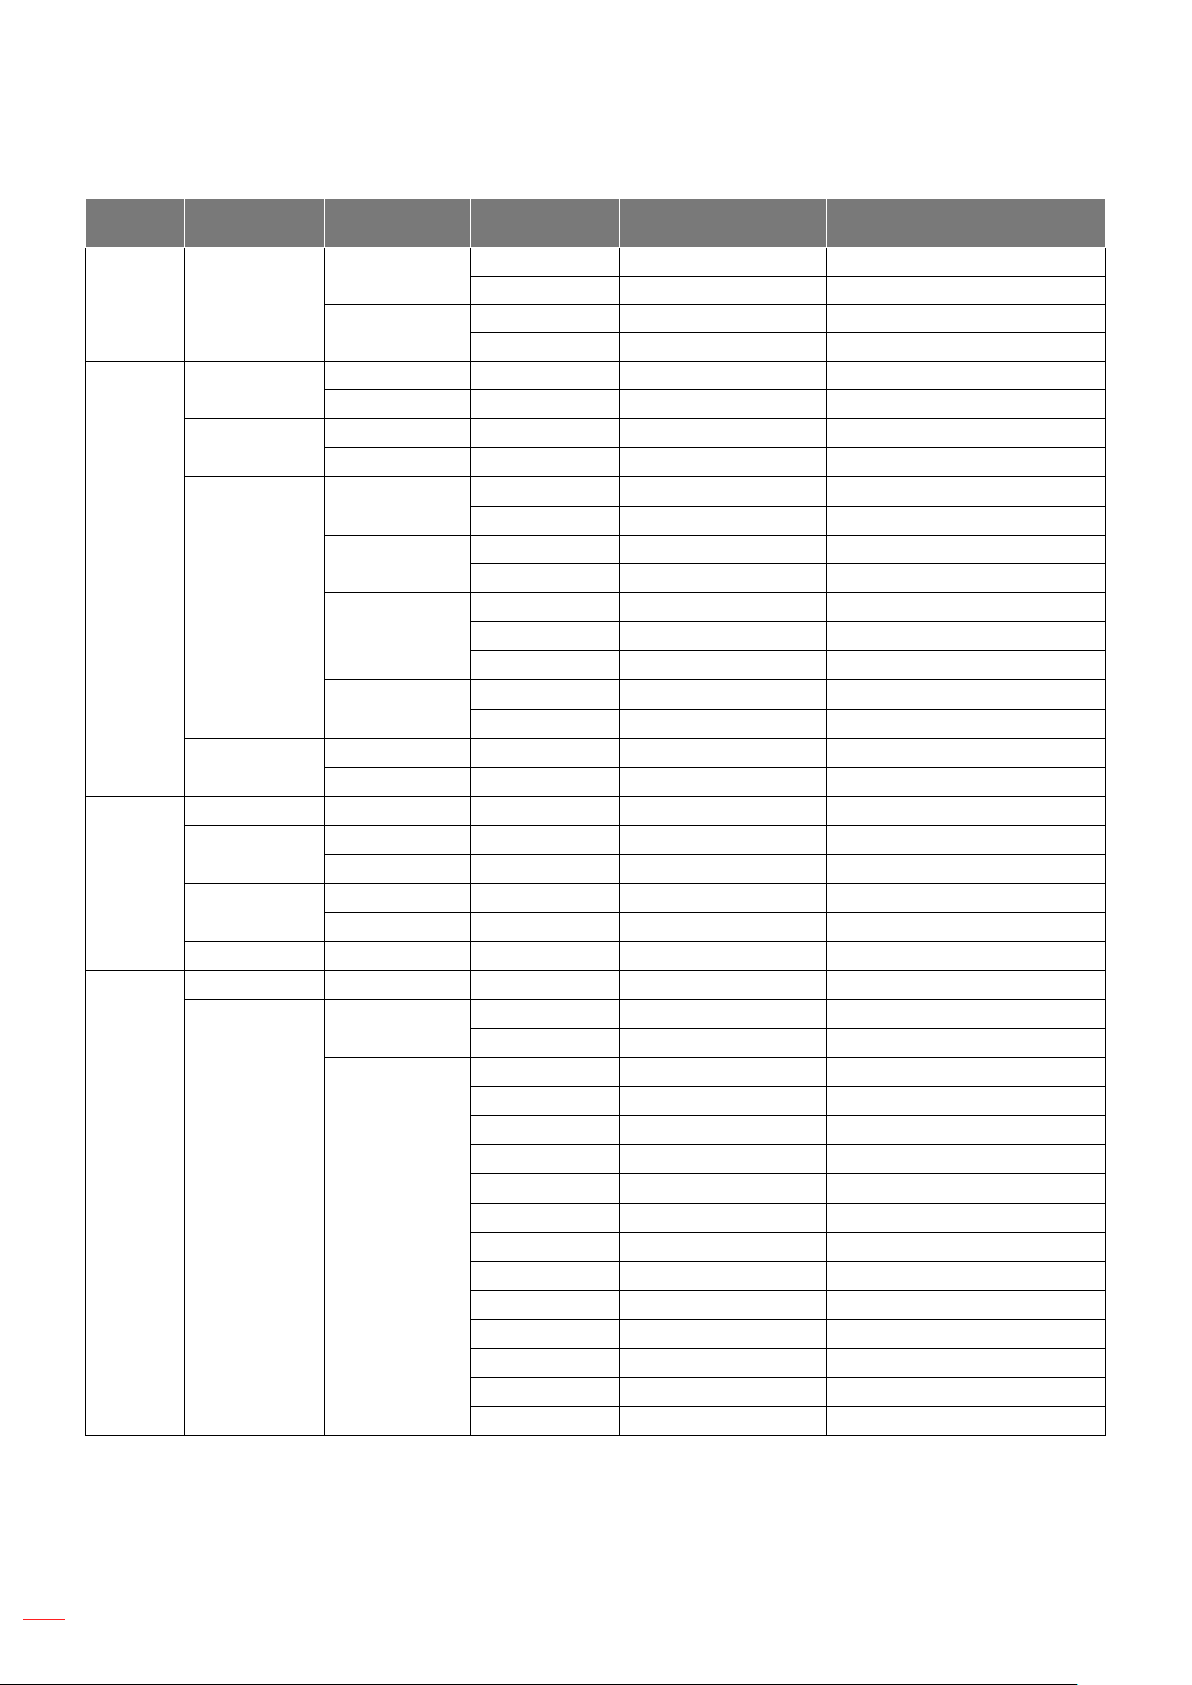
USING THE PROJECTOR
Main
Menu
Setup Reset
Input
Audio
Control
Sub Menu Sub Menu 2 Sub Menu 3 Sub Menu 4 Values
Auto Source
Auto Input
Switch
HDMI CEC
Settings
Reset
Volume
Mute
Audio Mode
Reset
Device ID
Remote Settings
Reset OSD
Reset to Default
HDMI Link
Inclusive of TV
Power On Link
Power O� Link
IR Function
User 1
Cancel
OK
Cancel
OK
O�
On
O�
On
O�
On
No
Yes
Mutual
PJ Device
Device PJ
O�
On
No
Yes
0 ~ 100
O�
On
Bitstream
PCM
0~99
On
O�
HDMI 1
HDMI 2
Test Pattern
Brightness
Contrast
Sleep Timer
Color Matching
Color Temp
Gamma
Projection
Light Source Settings
Zoom
Freeze
28
English
Page 29
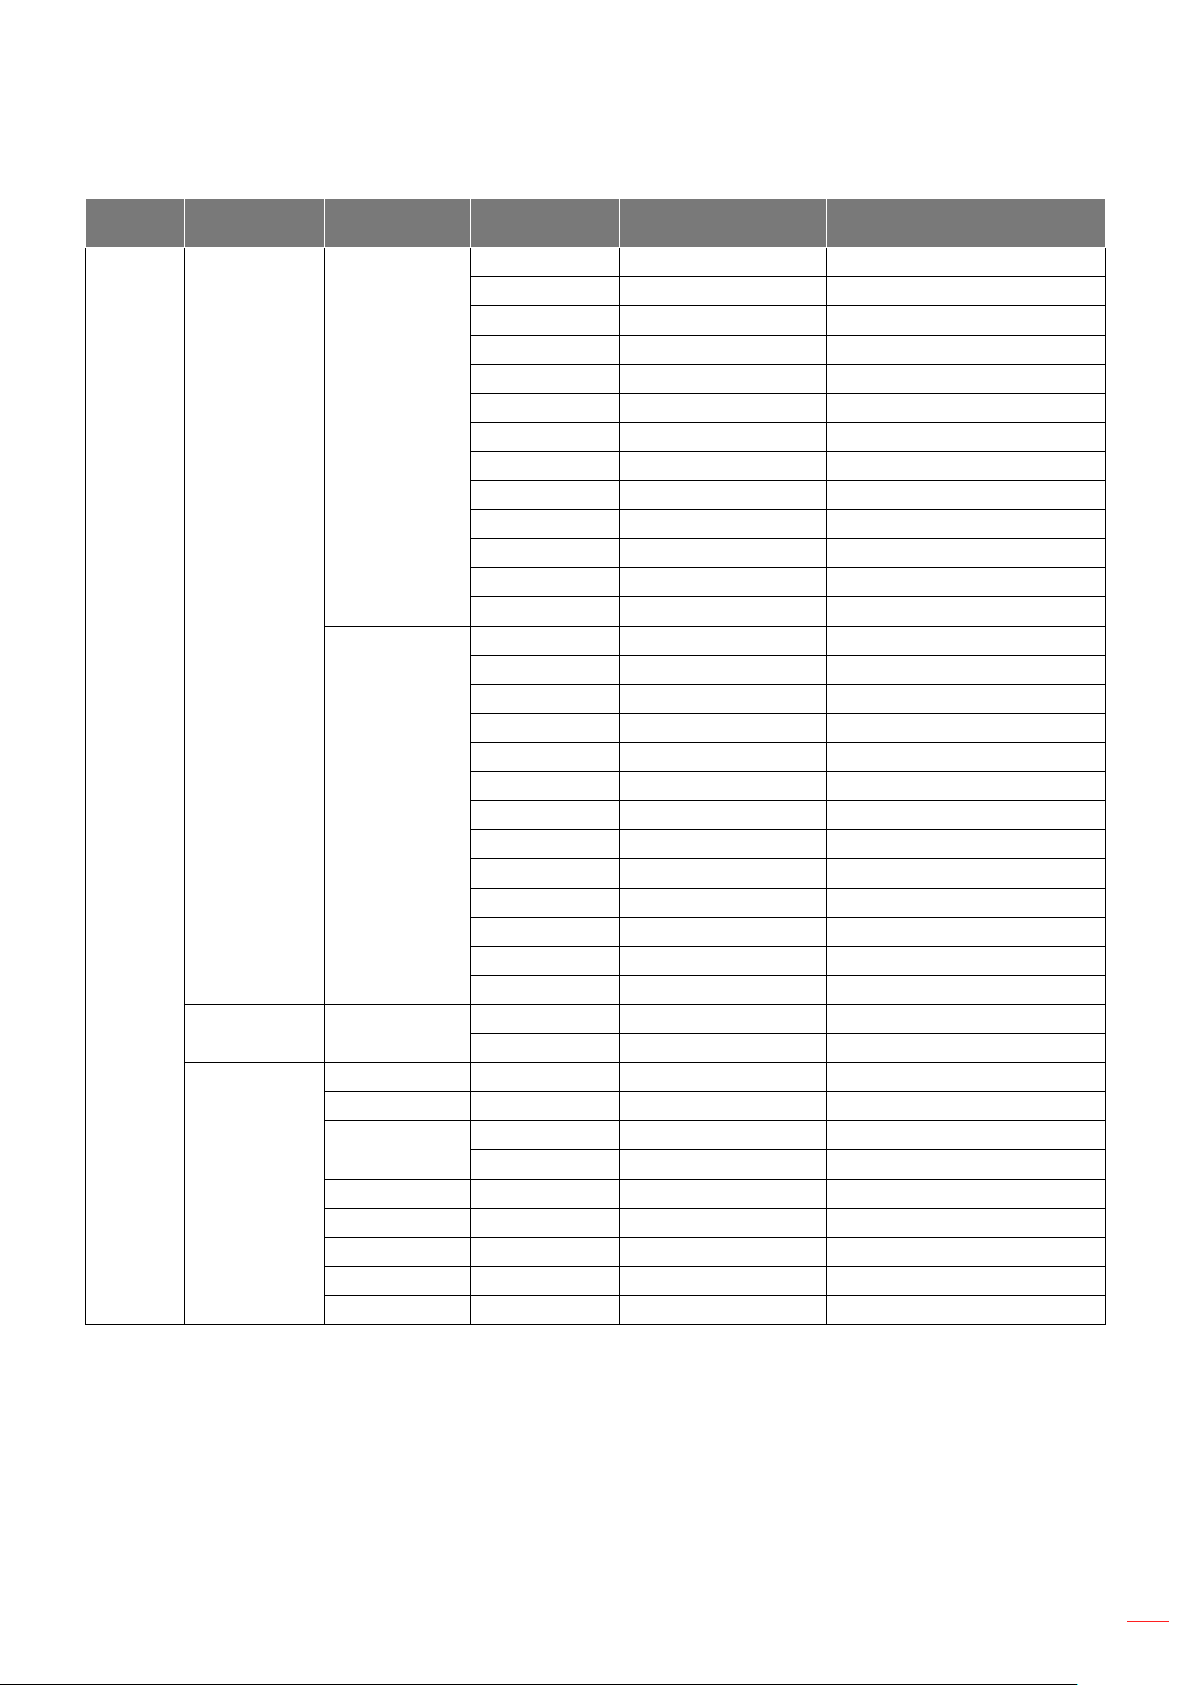
USING THE PROJECTOR
Main
Menu
Control
Sub Menu Sub Menu 2 Sub Menu 3 Sub Menu 4 Values
HDMI 1
HDMI 2
Test Pattern
Brightness
Contrast
Sleep Timer
User 2
Remote Settings
User 3
Keypad Settings Keypad Lock
Network Status (read only)
MAC Address (read only)
DHCP
LAN
IP Address 192.168.0.100
Subnet Mask 255.255.255.0
Gateway 192.168.0.254
DNS 192.168.0.51
Reset
Color Matching
Color Temp
Gamma
Projection
Light Source Settings
Zoom
Freeze
HDMI 1
HDMI 2
Test Pattern
Brightness
Contrast
Sleep Timer
Color Matching
Color Temp
Gamma
Projection
Light Source Settings
Zoom
Freeze
O�
On
O�
On
English
29
Page 30
USING THE PROJECTOR
Main
Menu
Control
Information
Sub Menu Sub Menu 2 Sub Menu 3 Sub Menu 4 Values
O�
On
O�
On
O�
On
O�
On
O�
On
O�
On
O�
On
O�
On
Control
HDBaseT
Control
Reset
Regulatory
Serial Number
Source
Color Info
Light Source
Hours
Picture Mode
Device ID
Light Source
Mode
FW Version
Crestron
(Port 41794)
Extron
(Port 2023)
PJ Link
(Port 4352)
AMX Device
Discovery
(Port 9131)
Telnet (Port 23)
HTTP (Port 80)
Ethernet
RS232
DDP
MCU
LAN
HDBaseT
30
English
Page 31

USING THE PROJECTOR
Image menu
Image picture mode menu
There are several prede⿿ned display modes that you can choose from to suit your viewing preference. Each mode
has been ⿿ne-tuned by our expert colour team to ensure superior colour performance for wide range of content.
• Vivid: Selecting this mode balances colour saturation and brightness for a brighter display. Choose
this mode for setups with ambient lighting, or where brighter images/presentations are necessary.
• HDR / HLG: Decodes and displays High Dynamic Range (HDR) / Hybrid Log Gamma (HLG) content
for the deepest blacks, brightest whites, and vivid cinematic color using REC.2020 color gamut.
This mode will be automatically enabled if HDR/HLG is set to Auto (and HDR/HLG Content is sent
to projector – 4K UHD Blu-ray, 1080p/4K UHD HDR/HLG Games, 4K UHD Streaming Video). While
HDR/HLG mode is active, other display modes (Cinema, Reference, etc.) cannot be selected as
HDR/HLG delivers color that is highly accurate, exceeding the color performance of the other display
modes.
• Cinema: Provides the best balance of detail and colors for watching movies.
• Game: Optimises your projector for maximum contrast and vivid colours allowing you to see shadow
detail when playing video games.
• Sport: Optimises your projector for watching sports playback or playing sports games.
• Reference: This mode reproduces colours as close as possible the image the way the movie director
intended. Color, color temperature, brightness, contrast and gamma settings are all con⿿gured to
Rec.709 color gamut. Select this mode for the most accurate colour reproduction when watching
movies.
• Bright: This mode is suitable for environments where extra-high brightness is required, such as using
the projector in well-lit rooms.
• DICOM SIM.: This mode has been created for viewing greyscale images, perfect for viewing X-rays
and scans during medical training*.
Note: *This projector is not suitable for use in medical diagnosis.
• ISF Day: Optimize the image with the ISF Day mode to be perfectly calibrated and high picture quality.
• ISF Night: Optimize the image with the ISF Night mode to be perfectly calibrated and high picture
quality.
• ISF 3D: Optimize the image with the ISF 3D mode to be perfectly calibrated and high picture quality.
• 3D: Optimized settings for watching 3D content.
Note: To experience the 3D e⿿ect, you will need to have compatible DLP Link 3D glasses. See 3D
section for more information.
Image dynamic range menu
HDR
Con⿿gure the High Dynamic Range (HDR) setting and its e�ect when displaying video from 4K Blu-ray players and
streaming devices.
• Auto: Auto detect HDR signal.
• O�: Turn o� HDR Processing. When set to O�, the projector will NOT decode HDR content.
HDR Brightness
Adjust the brightness of HDR Content. The impact of this setting varies based on content. Adjusting the setting to
near maximum or maximum can result in a loss of image detail (content dependant).
English
31
Page 32

USING THE PROJECTOR
Image brightness menu
Adjust the brightness of the image.
Image contrast menu
The contrast controls the degree of di�erence between the lightest and darkest parts of the picture.
Image sharpness menu
Adjust the sharpness of the image.
Image gamma menu
Set up gamma curve type. After the initial setup and ⿿ne tuning is completed, utilize the Gamma Adjustment steps
to optimize your image output.
• Film: For home theater.
• Graphics: For PC / Photo source.
• 1.8 / 2.0 / 2.2 / 2.4: For speci⿿c PC / Photo source.
Image color settings menu
Color
Adjust a video image from black and white to fully saturated color.
Tint
Adjust the color balance of red and green.
BrilliantColor™
This adjustable item utilizes a new color-processing algorithm and enhancements to enable higher brightness while
providing true, more vibrant colors in picture.
Color Temperature
Select a color temperature from Warm, Standard, Cool, or Cold.
CMS
Select the following options:
• Color: Adjust the red, green, blue, cyan, yellow, magenta, and white level of the image.
• Hue: Adjust the color balance of red and green.
• Saturation: Adjust a video image from black and white to fully saturated color.
• Gain: Adjust the color of the image’s bright areas.
• Reset: Return the factory default settings for color adjustment.
• Exit: Exit the “CMS” menu.
Color Space
Select an appropriate color matrix type from the following: Auto, RGB(0-255), RGB(16-235), and YUV.
English
32
Page 33

USING THE PROJECTOR
Image wall color menu
Designed to adjust the colors of the projected image when projecting on to a wall without a screen. Each mode has
been ⿿ne-tuned by our expert colour team to ensure superior color performance.
There are several prede⿿ned modes that you can choose from to suit the colour of your wall. Select between o�,
blackboard, light yellow, light green, light blue, pink, and gray.
Note: For accurate color reproduction, we recommend using a screen.
Image 3D menu
Note:
• This projector is a 3D ready projector with DLP-Link 3D solution.
• Please ensure that 3D glasses are in use for DLP-Link 3D content before enjoying your video.
• This projector supports frame sequential (page-ip) 3D via HDMI1/HDMI2 ports.
• To enable 3D mode, the input frame rate should be set to 60Hz only, lower or higher frame rate is not
supported.
• To reach the best performance, resolution 1920x1080 is recommended, please note that 4K (3840x2160)
resolution is not supported in 3D mode.
3D Mode
Use this option to disable or enable the 3D function.
• O�: Select “O�” to turn o� 3D mode.
• On: Select “On” to turn on 3D mode.
3D Sync Type
Use this option to select 3D technology.
• DLP-Link: Select to use optimized settings for DLP 3D Glasses.
• 3D Sync: Select to use optimized settings for IR, RF or polarized 3D Glasses.
3D Format
Use this option to select the appropriate 3D format content.
• Auto: When a 3D identi⿿cation signal is detected, the 3D format is selected automatically.
• Side by Side: Display 3D signal in “Side-by-Side” format.
• Top and Bottom: Display 3D signal in “Top and Bottom” format.
• Frame Sequential: Display 3D signal in “Frame Sequential” format.
3D Sync Invert
Use this option to enable/disable the 3D sync invert function.
Reset
Return the factory default setting for 3D settings.
• No: Select to cancel Reset.
• Yes: Select to return the factory default settings for 3D.
Image reset menu
Return the factory default settings for image settings.
English
33
Page 34

USING THE PROJECTOR
Display menu
Display projection orientation menu
Select the preferred projection between front, rear, ceiling-top, and rear-top.
Display light source mode menu
Select a light source mode depending on the installation requirements.
Display dynamic black menu
Use to automatically adjust the picture brightness in order to give optimum contrast performance.
Display low latency mode menu
Enable this feature to reduce response times (input latency) during gaming to 8.6ms (1080p@120Hz). All geometry
settings (example: Keystone, Four Corners) will be disabled when Low Latency Mode is enabled. For more
information is below.
Note:
• The input lag by signals is described in the following table:
• The values in the table can vary slightly.
Source Timing Gaming Mode Output Timing Output Resolution Input Lag
1080p60 On 1080p60Hz 1080p 17ms
1080p120 On 1080p120Hz 1080p 8.6ms*
4K60 On 1080p60Hz 1080p 17ms*
1080p60 O� 1080p60Hz 1080p 49.5ms
1080p120 O� 1080p120Hz 1080p 25ms*
4K60 O� 1080P60Hz 1080p 49.6ms*
34
English
Page 35
USING THE PROJECTOR
Display aspect ratio menu
Select the aspect ratio of the displayed image between the following options:
• 4:3: This format is for 4:3 input sources.
• 16:9: This format is for 16:9 input sources, like HDTV and DVD enhanced for Wide screen TV.
• 21:9: This format is for 21:9 input sources.
• LBX: This format is for non-16x9, letterbox source and if you use external 16x9 lens to display 2.35:1
aspect ratio in full resolution.
• Native: This format displays the original image without any scaling.
• Auto: Automatically selects the appropriate display format.
4K UHD scaling table:
16 : 9 screen 480i/p 576i/p 720p 1080i/p 2160p
4x3 Scale to 2880 x 2160.
16x9 Scale to 3840 x 2160.
LBX Get the central 3840 x 1620 image, and then scale to 3840 x 2160 for display.
Native mode 1:1 mapping centered.
No scaling will be made; the displayed resolution depends on the input source.
Auto -If source is 4:3, the screen type will be scaled to 2880 x 2160.
-If source is 16:9, the screen type will be scaled to 3840 x 2160.
-If source is 15:9, the screen type will be scaled to 3600 x 2160.
-If source is 16:10, the screen type will be scaled to 3456 x 2160.
Auto mapping rule:
Input resolution Auto/Scale
H-resolution V-resolution 3840 2160
800 600 2880 2160
1024 768 2880 2160
4:3
Wide Laptop
SDTV
HDTV
1280 1024 2880 2160
1400 1050 2880 2160
1600 1200 2880 2160
1280 720 3840 2160
1280 768 3600 2160
1280 800 3456 2160
720 576 2700 2160
720 480 3240 2160
1280 720 3840 2160
1920 1080 3840 2160
English
35
Page 36
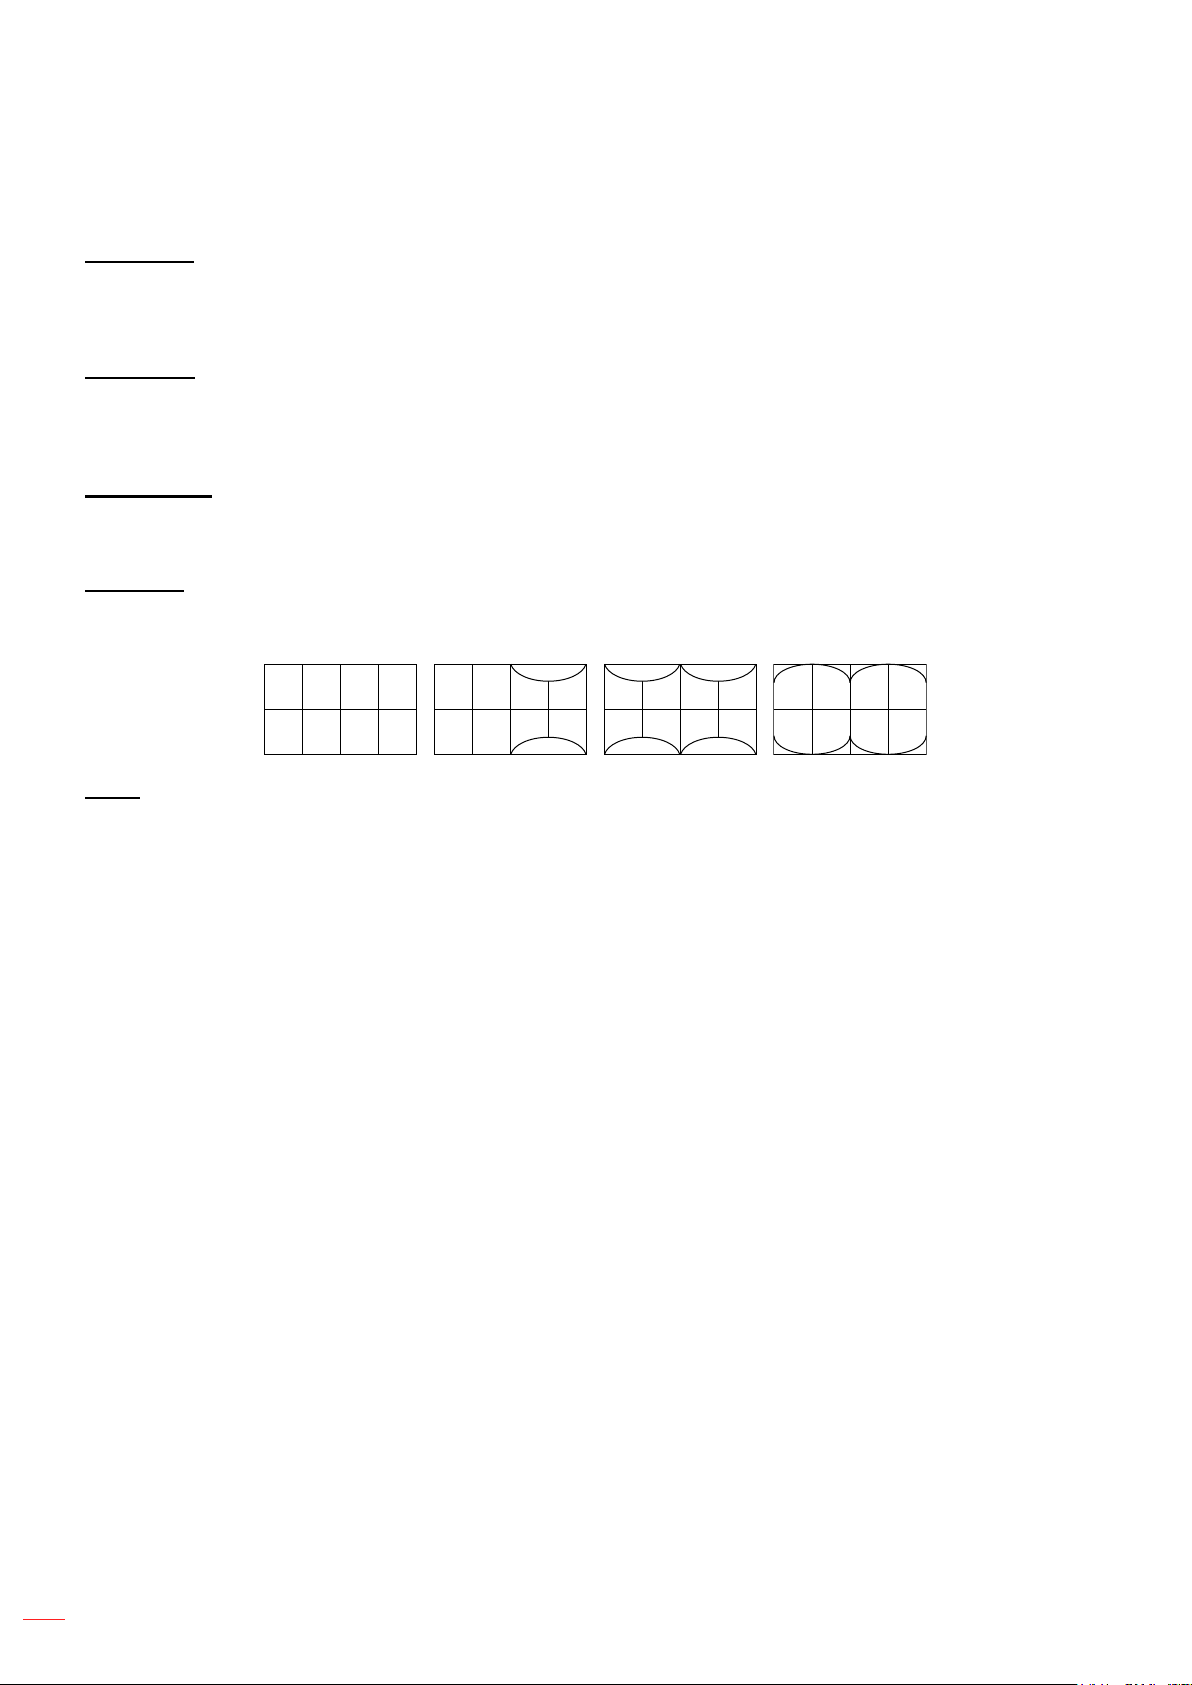
USING THE PROJECTOR
Display geometric correction menu
V Keystone
Adjust image distortion vertically and make a squarer image. Vertical keystone is used to correct a keystoned
image shape in which the top and bottom are slanted to one of the sides. This is intended for use with vertically
on-axis applications.
H Keystone
Adjust image distortion horizontally and make a squarer image. Horizontal keystone is used to correct a keystoned
image shape in which the left and right borders of the image are unequal in length. This is intended for use with
horizontally on-axis applications.
Four Corners
This setting allows the projected image to be adjusted from each corner to make a square image when the
projection surface is not level.
5 x 3 Warp
Use warping to adjust the image to align with the border of the projection surface (screen) or to eliminate image
distortion (cause by and uneven surface).
Reset
Return the factory default setting for geometric correction settings.
Display digital zoom menu
Use to reduce or magnify an image on the projection screen. Digital Zoom is not the same as optical zoom and can
result in degradation of image quality.
Note: Zoom settings are retained on power cycle of the projector.
Display image shift menu
Adjust the projected image position horizontally (H) or vertically (V).
Display reset menu
Return the factory default settings for display settings.
36
English
Page 37

USING THE PROJECTOR
Setup menu
Setup test pattern menu
Select the test pattern from green grid, magenta grid, white grid, white, or disable this function (o�).
Setup language menu
Select the multilingual OSD menu between English, Arabic, Czech, Danish, Dutch, Farsi, Finnish, French, German,
Greek, Hungarian, Indonesian, Italian, Japanese, Korean, Norwegian, Polish, Portuguese, Romania, Russian,
Simpli⿿ed Chinese, Spanish, Swedish, Thai, Traditional Chinese, Turkish, and Vietnam.
Setup menu settings menu
Menu Location
Select the menu location on the display screen.
Menu Timer
Set the duration where the OSD menu stays visible on the screen.
Information Hide
Enable this function to hide the information message.
Setup high altitude menu
When “On” is selected, the fans will spin faster. This feature is useful in high altitude areas where the air is thin.
Setup power settings menu
Direct Power On
Choose “On” to activate Direct Power mode. The projector will automatically power on when AC power is supplied,
without pressing the “Power” key on the projector keypad or on the remote control.
Signal Power On
Choose “On” to activate Signal Power mode. The projector will automatically power on when a signal is detected,
without pressing the “Power” key on the projector Keypad or on the remote control.
Note:
• If the “Signal Power On” option is turned “On”, the power consumption of the projector in standby
mode will be over 3W.
• This function is applicable with HDMI source.
Auto Power O� (min.)
Sets the countdown timer interval. The countdown timer will start, when there is no signal being sent to the
projector. The projector will automatically power o� when the countdown has ⿿nished (in minutes).
English
37
Page 38

USING THE PROJECTOR
Sleep Timer (min.)
Con⿿gure the sleep timer.
• Sleep Timer (min.): Sets the countdown timer interval. The countdown timer will start, with or without
a signal being sent to the projector. The projector will automatically power o� when the countdown has
⿿nished (in minutes).
Note: The Sleep Timer is reset every time when the projector is powered o⿿.
• Always On: Check to set the sleep timer always on.
Power Mode (Standby)
Set the power mode setting.
• Eco: Choose “Eco.” to save power dissipation further < 0.5W.
• Active: Choose “Active” to return to normal standby.
• Active (20 mins): Choose “Active (20 mins)” to let the power will decrease to less than 0.5W after 20
minutes.
• Communication: More power consumption that allows controlling the projector over the network.
• Communication (20 mins): Choose “Communication (20 mins)” to let the power will decrease to less
than 0.5W after 20 minutes.
Setup security menu
Security
Enable this function to prompt for a password before using the projector.
• On: Choose “On” to use security veri⿿cation when the turning on the projector.
• O�: Choose “O�” to be able to switch on the projector without password veri⿿cation.
Security Timer
Select the time (Month/Day/Hour) function to set the number of hours the projector can be used. Once this time has
elapsed you will be requested to enter your password again.
Change Password
Use to set or modify the password that is prompted when turning the projector on.
Setup startup logo menu
Use this function to set the desired startup screen. If changes are made, they will take e�ect the next time the
projector is powered on.
• Default: The default startup screen.
• Neutral: Logo is not displayed on startup screen.
Setup background color menu
Use this function to display a blue, red, green, gray color, none, or logo screen when no signal is available.
Note: If the background color is set to “None”, then the background color is black.
English
38
Page 39

USING THE PROJECTOR
Setup reset menu
Reset OSD
Return the factory default settings for OSD menu settings.
Reset to Default
Return the factory default settings for all settings.
English
39
Page 40
USING THE PROJECTOR
Input menu
Input auto source menu
Choose this option to let the projector automatically ⿿nd an available input source.
Input auto input switch menu
When HDMI input signal is detected, the projector will automatically switch the input source.
Input HDMI CEC settings menu
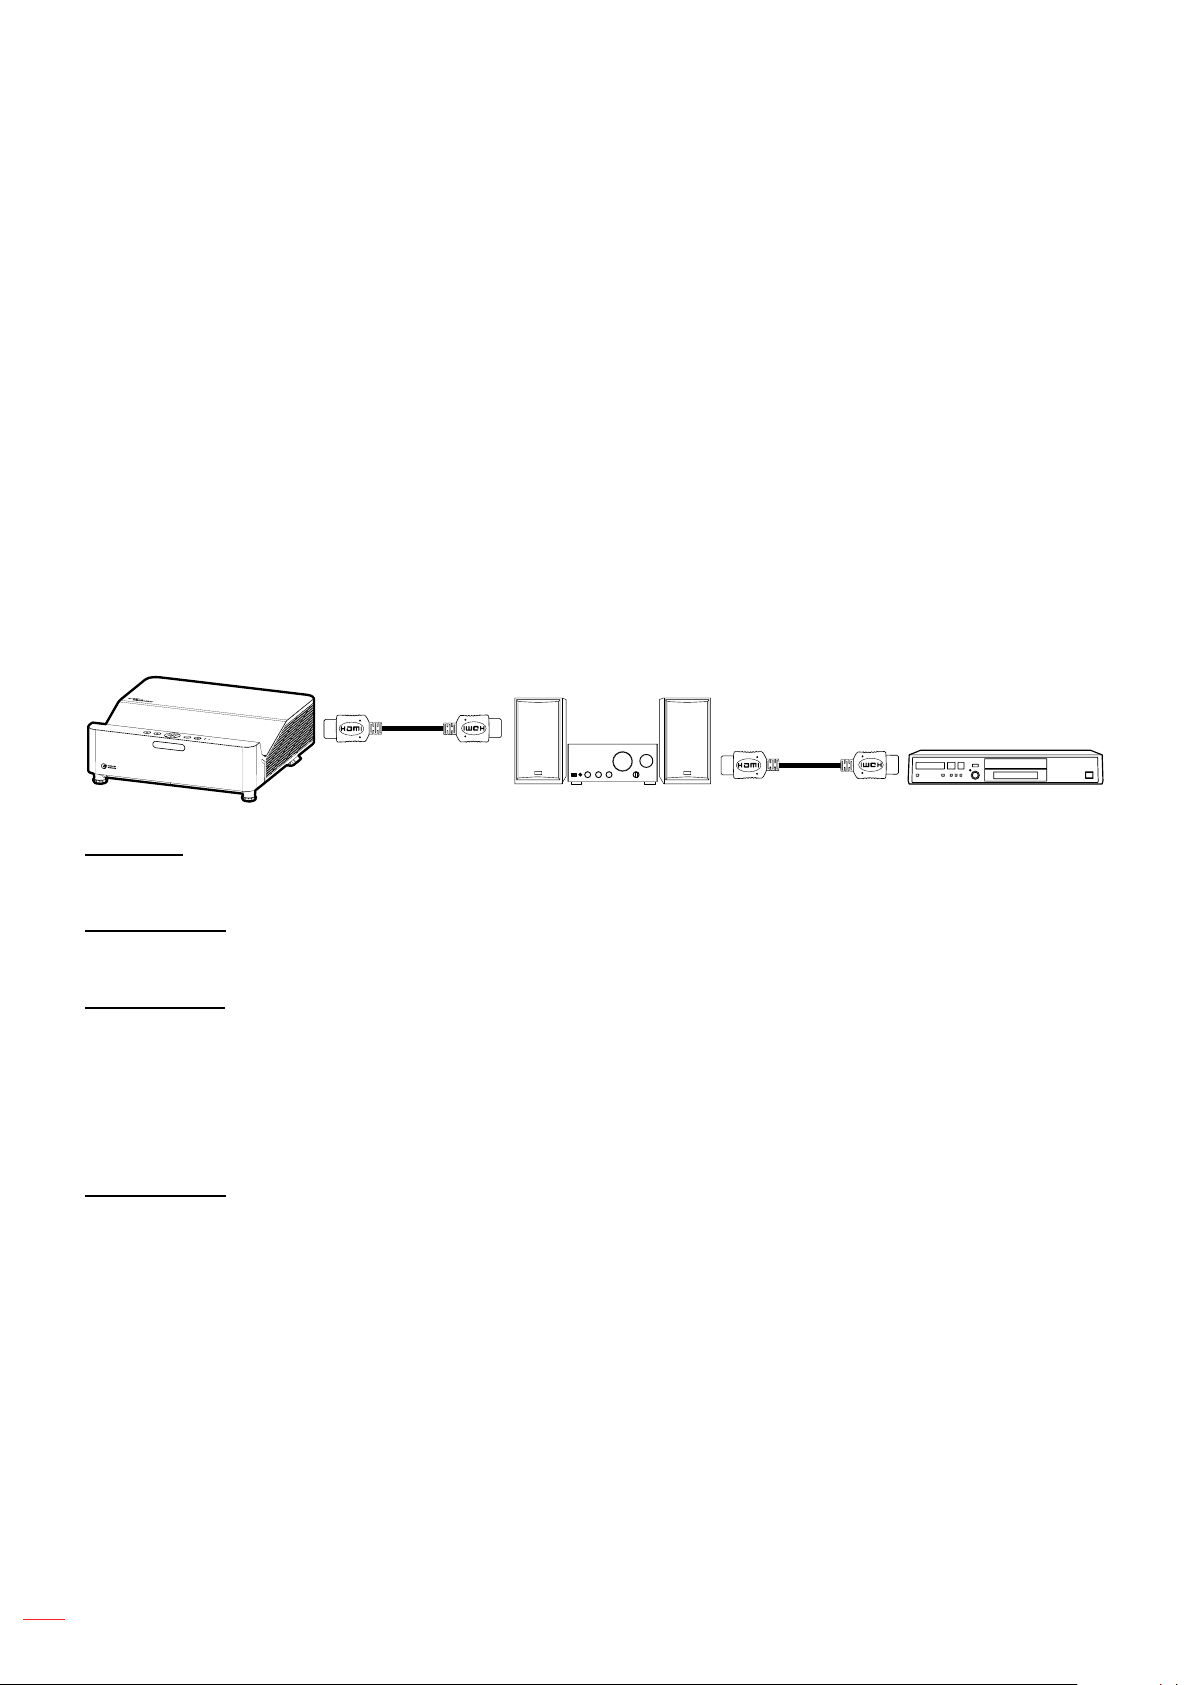
Note: When you connect HDMI CEC-compatible devices to the projector with HDMI cables, you can control them
on the same power on or power o⿿ status using the HDMI Link control feature in the projector’s OSD. This
lets one device or multiple devices in a group power on or power o⿿ via HDMI Link Feature in a typical
con�guration, your DVD player may be connected to the projector through an ampli�er or home theater
system.
HDMI
Ampli⿿er
HDMI Link
Enable/disable the HDMI Link function.
Inclusive of TV
If the settings is set to “Yes” then the power on and power o� link options are available.
Power On Link
CEC power on command.
• Mutual: Both projector and CEC device will be turned on simultaneously.
• PJ Device: The CEC device will be turned on only after the projector is switched on.
• Device PJ: The projector will be switched on only after the CEC device is turned on.
Power O� Link
Enable this function to let both HDMI Link and projector to be automatically turned o� at the same time.
HDMI
DVD Player
Input reset menu
Return the factory default settings for input settings.
English
40
Page 41

USING THE PROJECTOR
Audio menu
Audio volume menu
Adjust the volume level.
Audio mute menu
Use this option to temporarily turn o� the sound.
• On: Choose “On” to turn mute on.
• O�: Choose “O�” to turn mute o�.
Note: “Mute” function a⿿ects both internal and external speaker volume.
Audio mode menu
Select the appropriate audio mode from Bitstream and PCM.
Audio reset menu
Return the factory default settings for audio settings.
English
41
Page 42

USING THE PROJECTOR
Control menu
Control device ID menu
ID de⿿nition can be set up by menu (range 0-99), and allow user control an individual projector by using RS232
command.
Note: For a full list of RS232 commands, please refer to the RS232 user manual on our website.
Control remote settings menu
IR Function
Set the IR function setting.
• On: Choose “On”, the projector can be operated by the remote control from the top and front IR
receivers.
• O�: Choose “O�”, the projector can’t be operated by the remote control. By selecting “O�”, you will be
able to use the Keypad keys.
User 1 / User 2 / User 3
Assign the default function for User 1, User 2, or User 3 between HDMI 1, HDMI 2, Test Pattern, Brightness,
Contrast, Sleep Timer, Color Matching, Color Temp, Gamma, Projection, Light Source Settings, Zoom, and Freeze.
Control keypad settings menu
Keypad Lock
When the keypad lock function is “On”, the Keypad will be locked. However, the projector can be operated by the
remote control. By selecting “O�”, you will be able to reuse the Keypad.
Control LAN menu
Con⿿gure the projector’s network settings.
Network Status
Display the network connection status. (Read only)
MAC Address
Display the MAC address. (Read only)
DHCP
Turn on DHCP to automatically acquire IP address, subnet mask, gateway, and DNS.
IP Address
Assign the projector’s IP address.
Subnet Mask
Assign the projector’s subnet mask.
Gateway
Assign the projector’s gateway.
DNS
Assign the projector’s DNS.
English
42
Page 43
How to use web browser to control
your projector
USING THE PROJECTOR
How to use web browser to control your projector
1. Turn “On” the DHCP option on projector to allow a DHCP server to automatically assign an IP address.
2. Open the web browser in your PC and type in the projector’s IP address
(“Control > LAN > IP Address”).
3. Enter the user name and password, and click “Login”.
The projector’s con⿿guration web interface opens.
Note:
• The default user name and password is “admin”.
• The steps in this section is based on Windows 10 operating system.
Making a direct connection from your computer to the projector*
1. Turn “O�” the DHCP option on the projector.
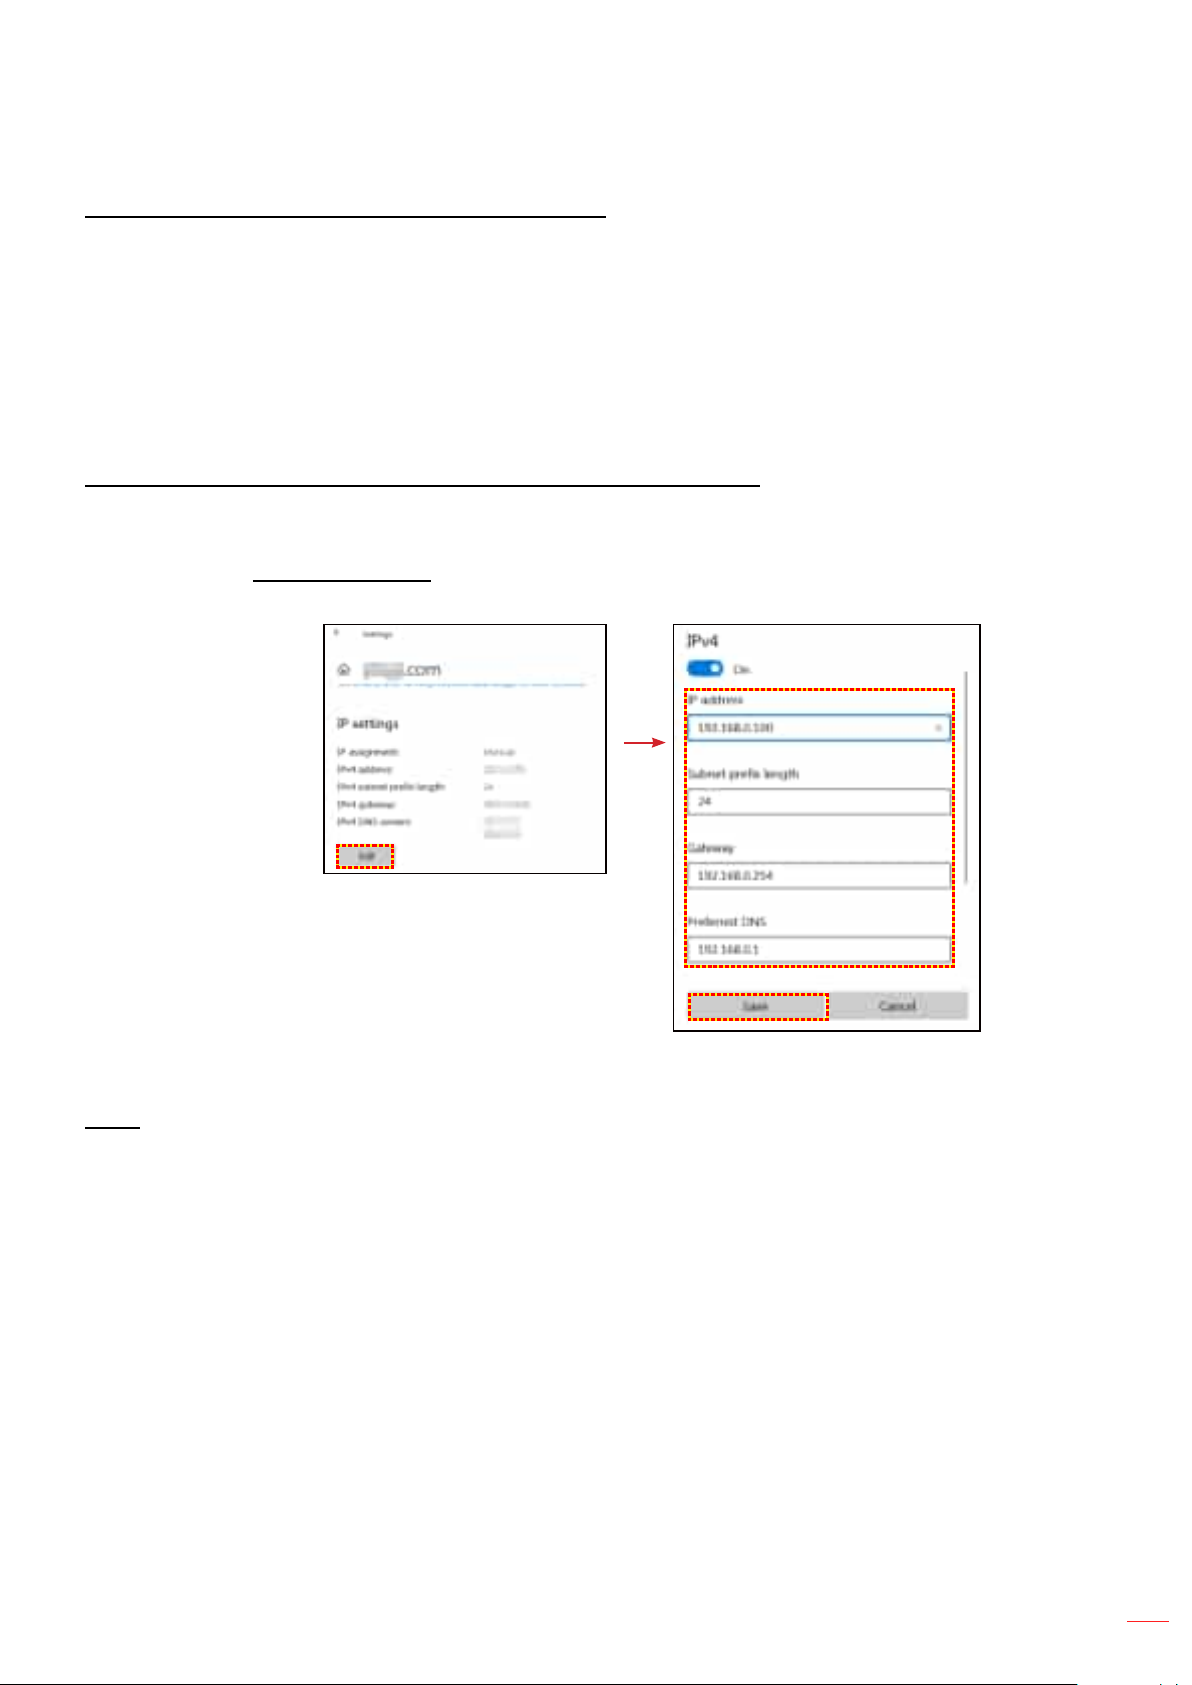
2. Con⿿gure the IP address, Subnet Mask, Gateway, and DNS on projector (“Control > LAN”).
3. Open Network & Internet page on your PC, and assign the identical network parameters to your PC
as set on projector. Click “OK” to save the parameters.
4. Open the web browser on your PC and type in to the URL ⿿eld the IP address, assigned in step 3.
Then press “Enter” key.
Reset
Reset the network settings to default factory values.
English
43
Page 44

USING THE PROJECTOR
Control control menu
This projector can be controlled remotely by a computer or other external devices through the wired network
connection. It allows the user to control one or more projectors from a remote control center, such as powering the
projector on or o�, and adjusting the image brightness or contrast.
Use the Control submenu to select a control device for the projector.
Crestron
Control the projector with Crestron controller and related software. (Port: 41794)
For more information, please visit http://www.crestron.com.
Extron
Control the projector with Extron devices. (Port: 2023)
For more information, please visit http://www.extron.com.
PJ Link
Control the projector with PJLink v2.0 commands. (Port: 4352)
For more information, please visit http://pjlink.jbmia.or.jp/english.
AMX Device Discovery
Control the projector with AMX devices. (Port: 9131)
For more information, please visit http://www.amx.com.
Telnet
Control the projector using RS232 commands though Telnet connection. (Port: 23)
For more information, refer to “RS232 by Telnet Function” on page 52.
HTTP
Control the projector with web browser. (Port: 80)
For more information, refer to “How to use web browser to control your projector” on page 43.
Note:
• Crestron is a registered trademark of Crestron Electronics, Inc. of the United States.
• Extron is a registered trademark of Extron Electronics, Inc. of the United States.
• AMX is a registered trademark of AMX LLC of the United States.
• PJLink applied for trademark and logo registration in Japan, the United States of America, and other
countries by JBMIA.
• For more information about the various types of external devices which can be connected to the LAN
/ RJ45 port and remotely control the projector, as well as the supported commands for these external
devices, please contact the Support-Service directly.
44
English
Page 45
USING THE PROJECTOR
Setup network control settings menu
LAN_RJ45 function
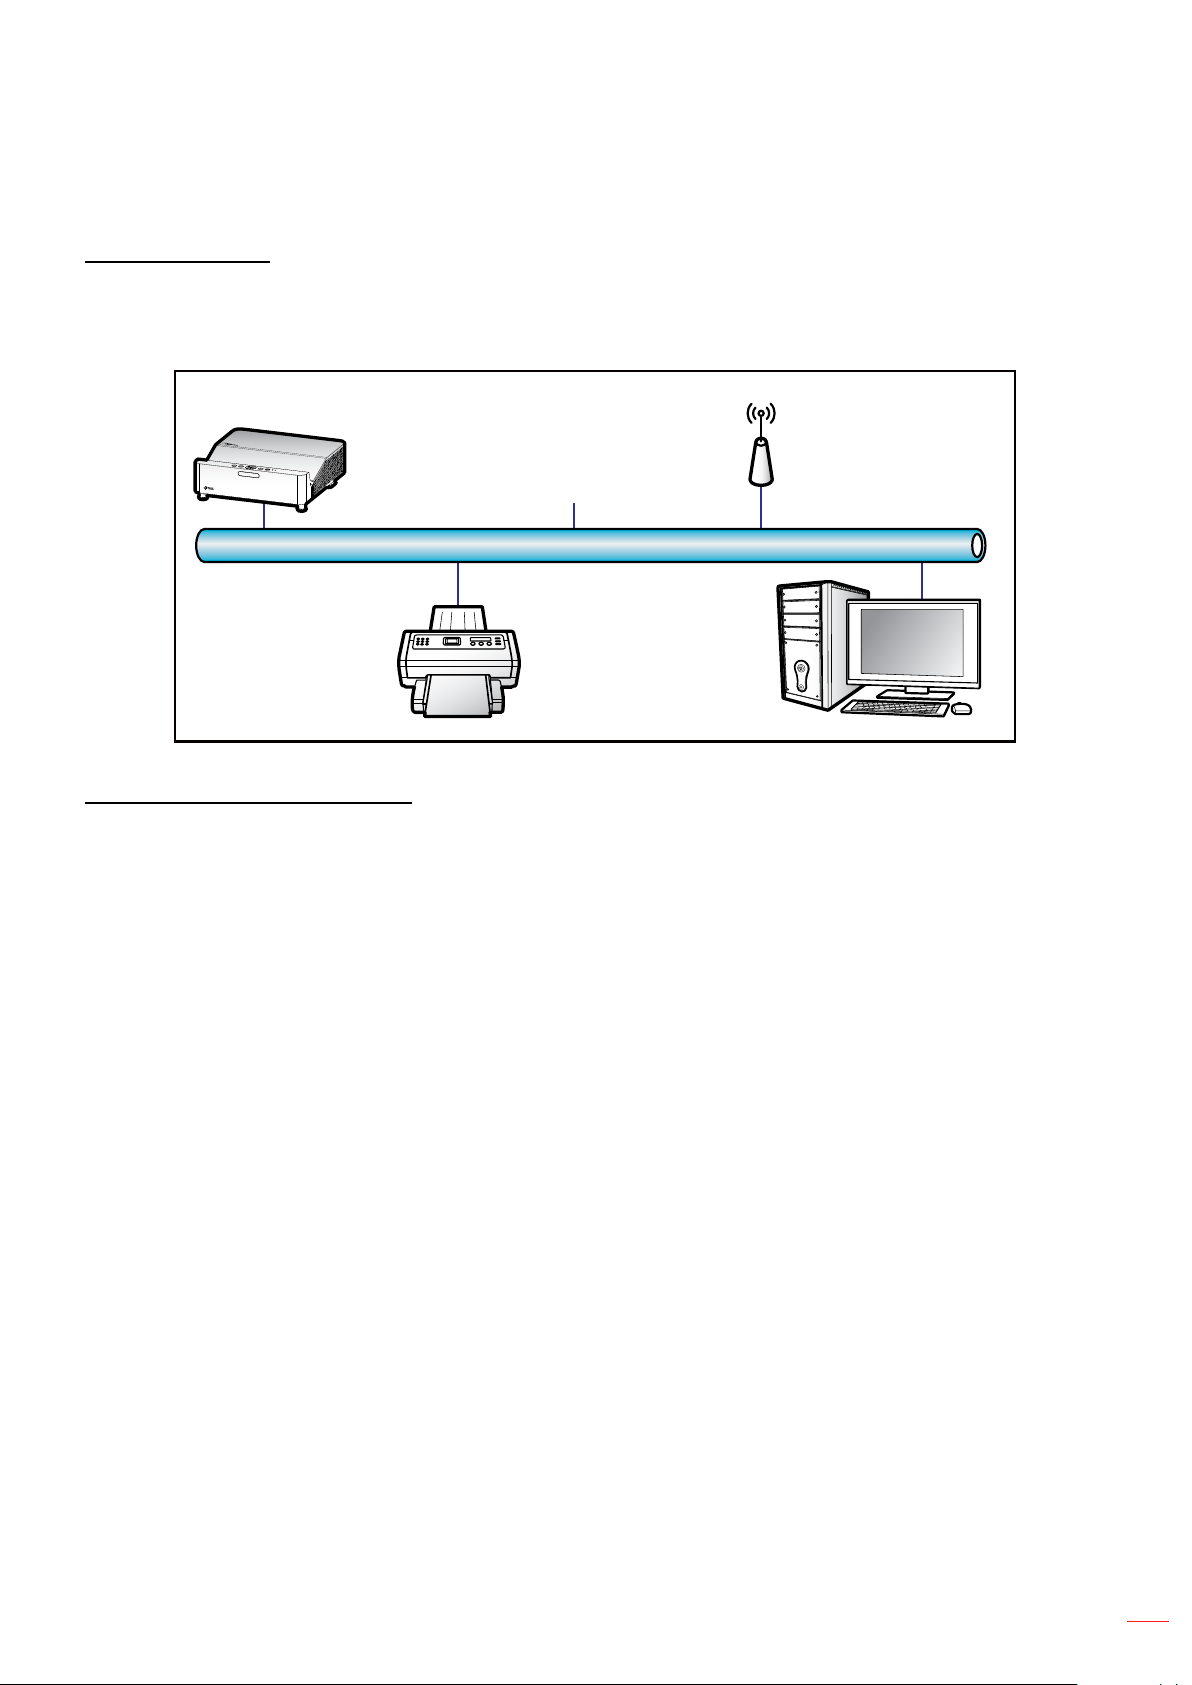
For simplicity and ease of operation, the projector provides diverse networking and remote management features.
The LAN / RJ45 function of the projector through a network, such as remotely manage: Power On / O�, brightness,
and contrast settings. Also, you can view the projector status information, such as: Video- Source, Sound-Mute, etc.
Projector
(Ethernet)
Wired LAN terminal functionalities
This projector can be controlled by using a PC (laptop) or other external device via LAN / RJ45 port and compatible
with Crestron / Extron / AMX (Device -Discovery) / PJLink.
• Crestron is a registered trademark of Crestron Electronics, Inc. of the United States.
• Extron is a registered trademark of Extron Electronics, Inc. of the United States.
• AMX is a registered trademark of AMX LLC of the United States.
• PJLink applied for trademark and logo registration in Japan, the United States of America, and other
countries by JBMIA.
The projector is supported by the speci⿿ed commands of the Crestron Electronics controller and related software,
for example RoomView®.
http://www.crestron.com/
This projector is compliant to support Extron device(s) for reference.
http://www.extron.com/
This projector is supported by AMX ( Device Discovery ).
http://www.amx.com/
This projector supports all commands of PJLink Class1 (Version 1.00).
http://pjlink.jbmia.or.jp/english/
For more detailed information about the various types of external devices which can be connected to the LAN /
RJ45 port and remote control the projector, as well as the supported commands for these external devices, please
contact the Support-Service directly.
English
45
Page 46
USING THE PROJECTOR
LAN RJ45
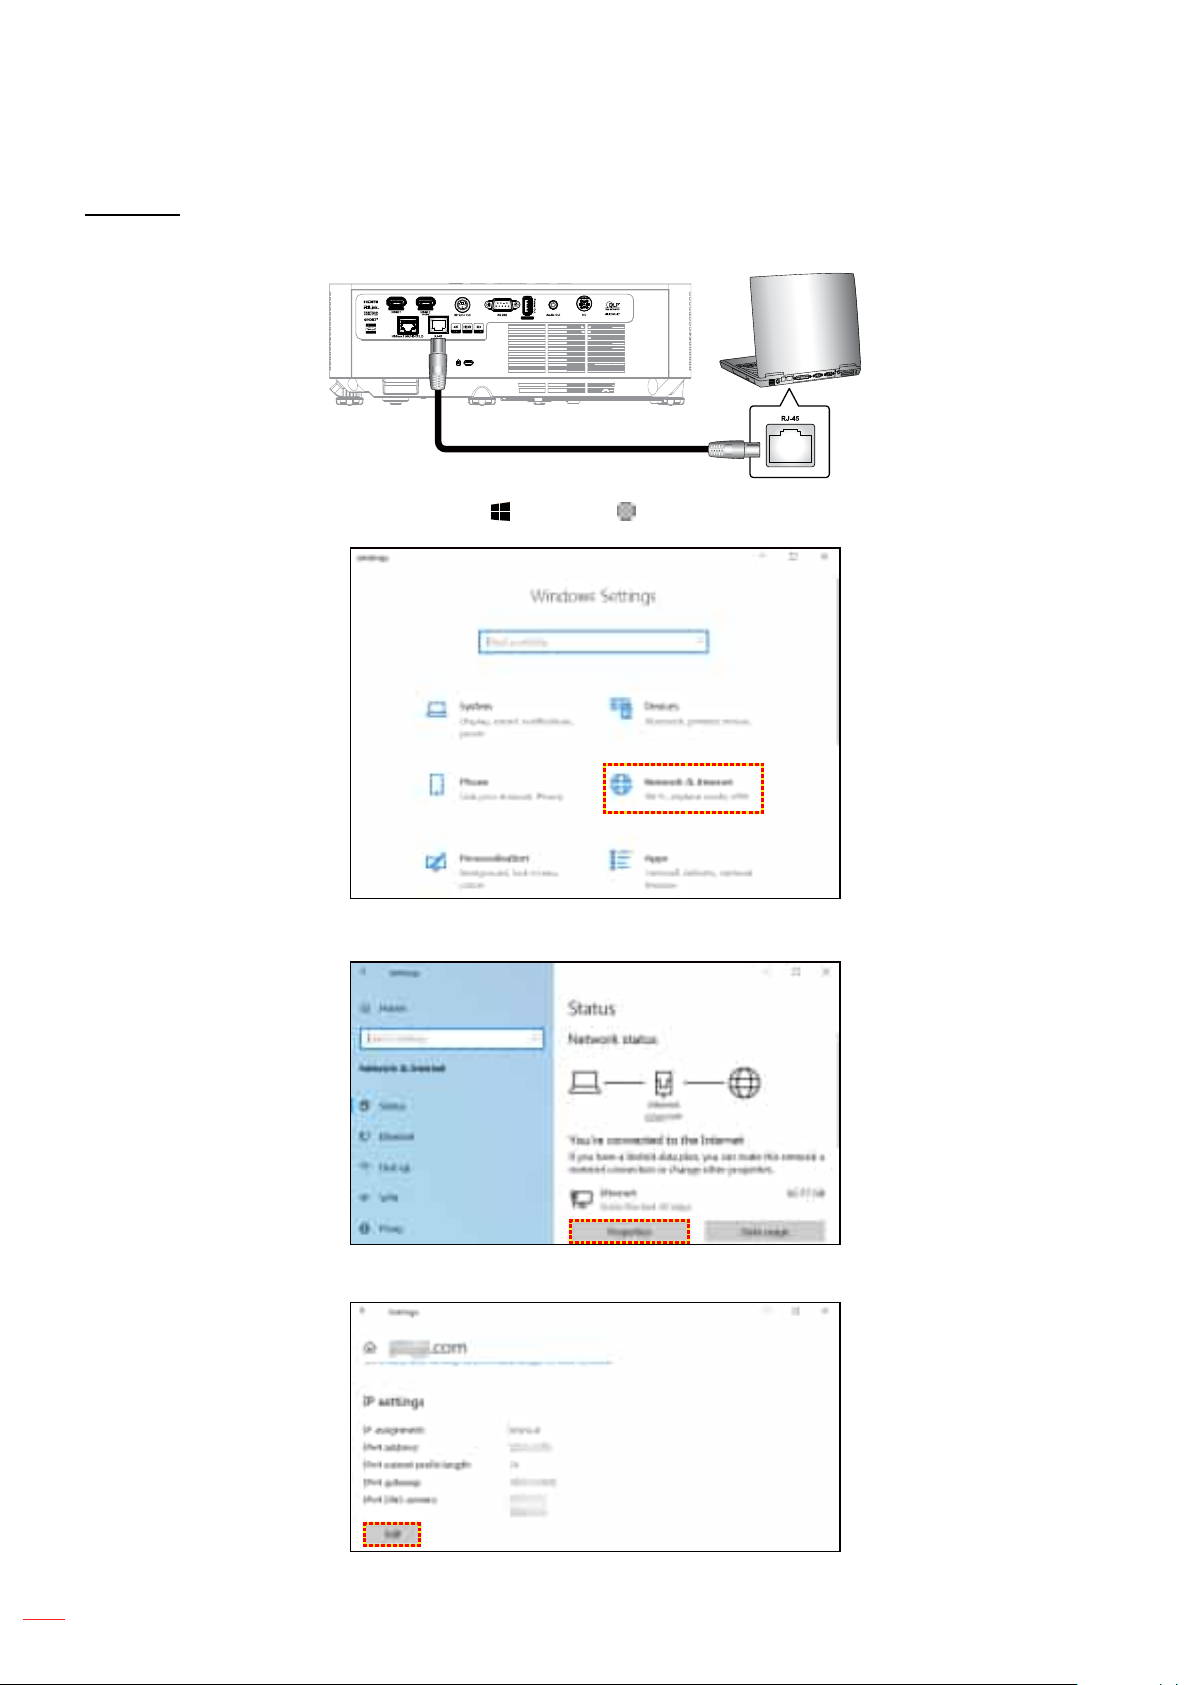
1. Connect an RJ45 cable to RJ45 ports on the projector and the PC (laptop).
2. On the PC (Laptop), select Start > Settings > Network & Internet.
3. In the Ethernet section, select Properties.
4. In the IP settings section, select Edit.
46
English
Page 47
USING THE PROJECTOR
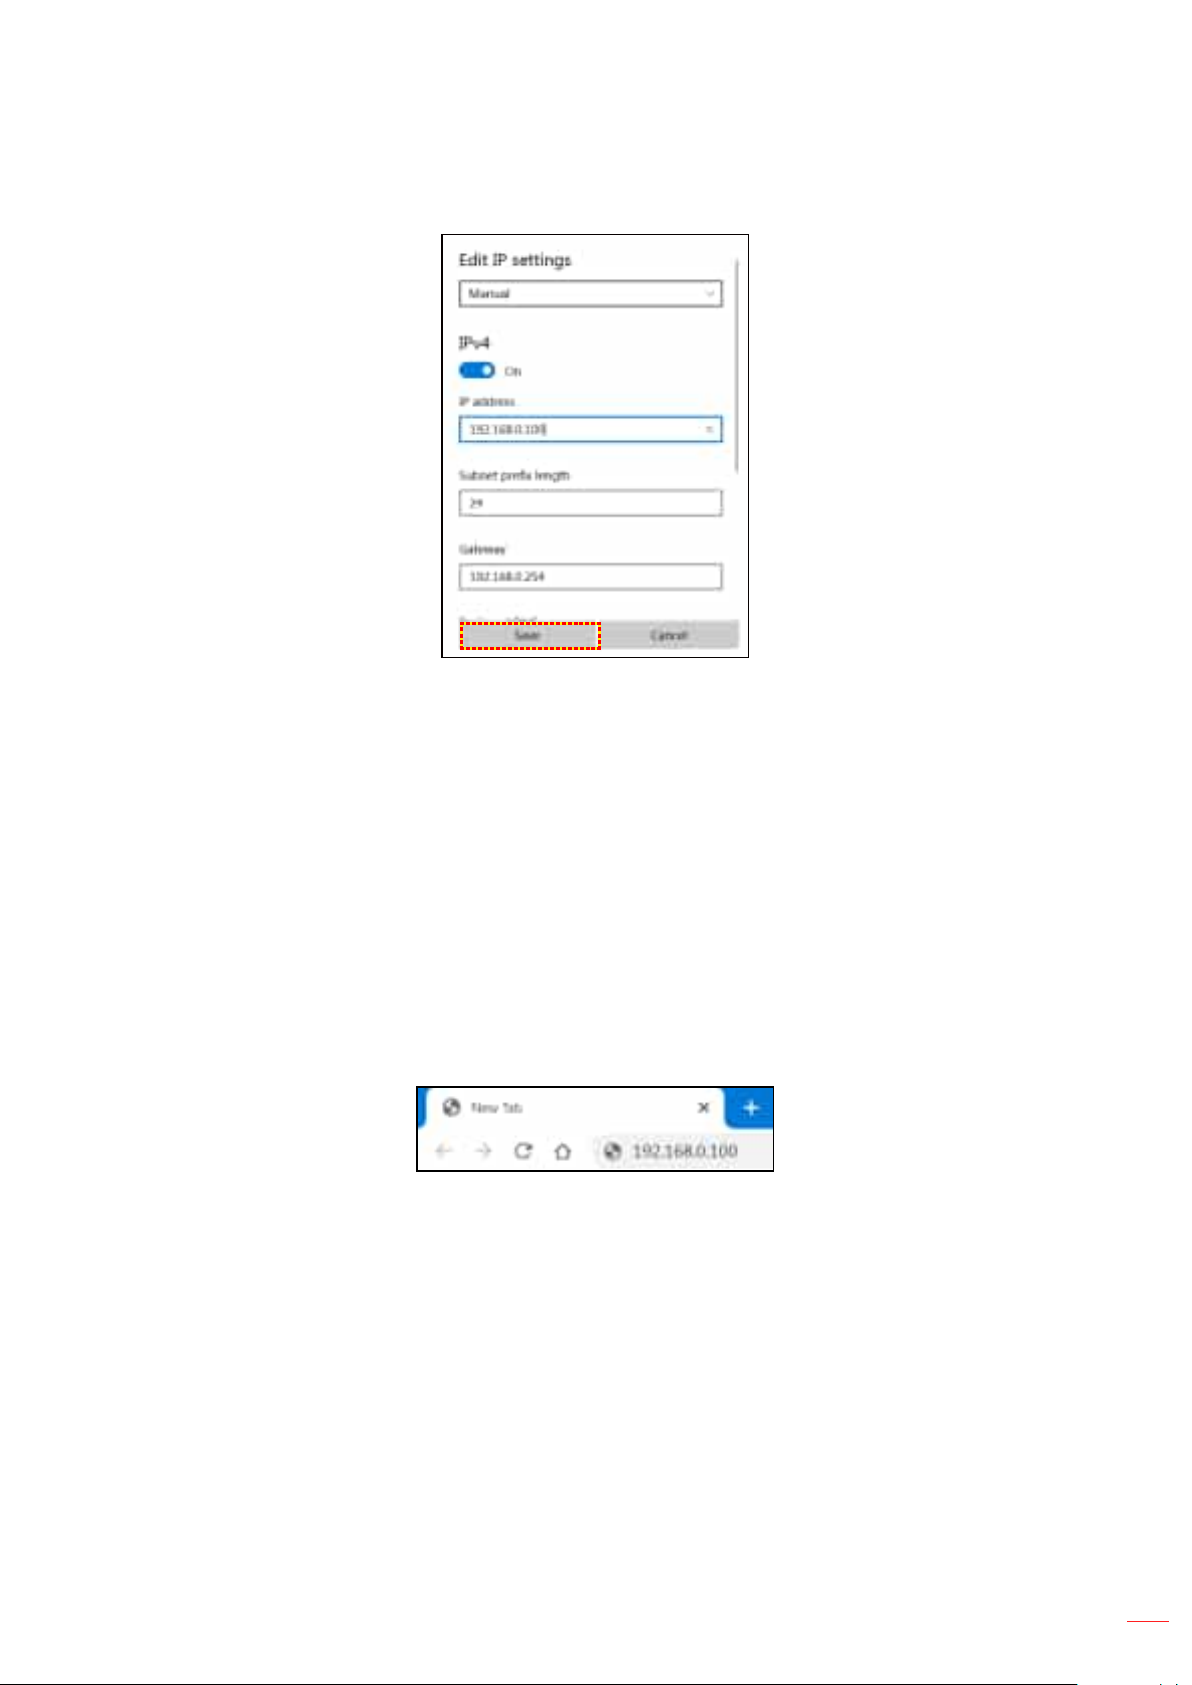
5. Type in the IP address and Gateway, then select “Save”.
6. Press the “Menu” button on the projector.
7. Open on projector Control > LAN.
8. Enter the following connection parameters:
± DHCP: O�
± IP Address: 192.168.0.100
± Subnet Mask: 255.255.255.0
± Gateway: 192.168.0.254
± DNS: 192.168.0.51
9. Press “Enter” to con⿿rm settings.
10. Open a web browser, for example Microsoft Edge or Chrome with Adobe Flash Player 9.0 or higher
installed.
11. In the Address bar, input the projector’s IP address: 192.168.0.100.
12. Press “Enter”.
English
47
Page 48
USING THE PROJECTOR
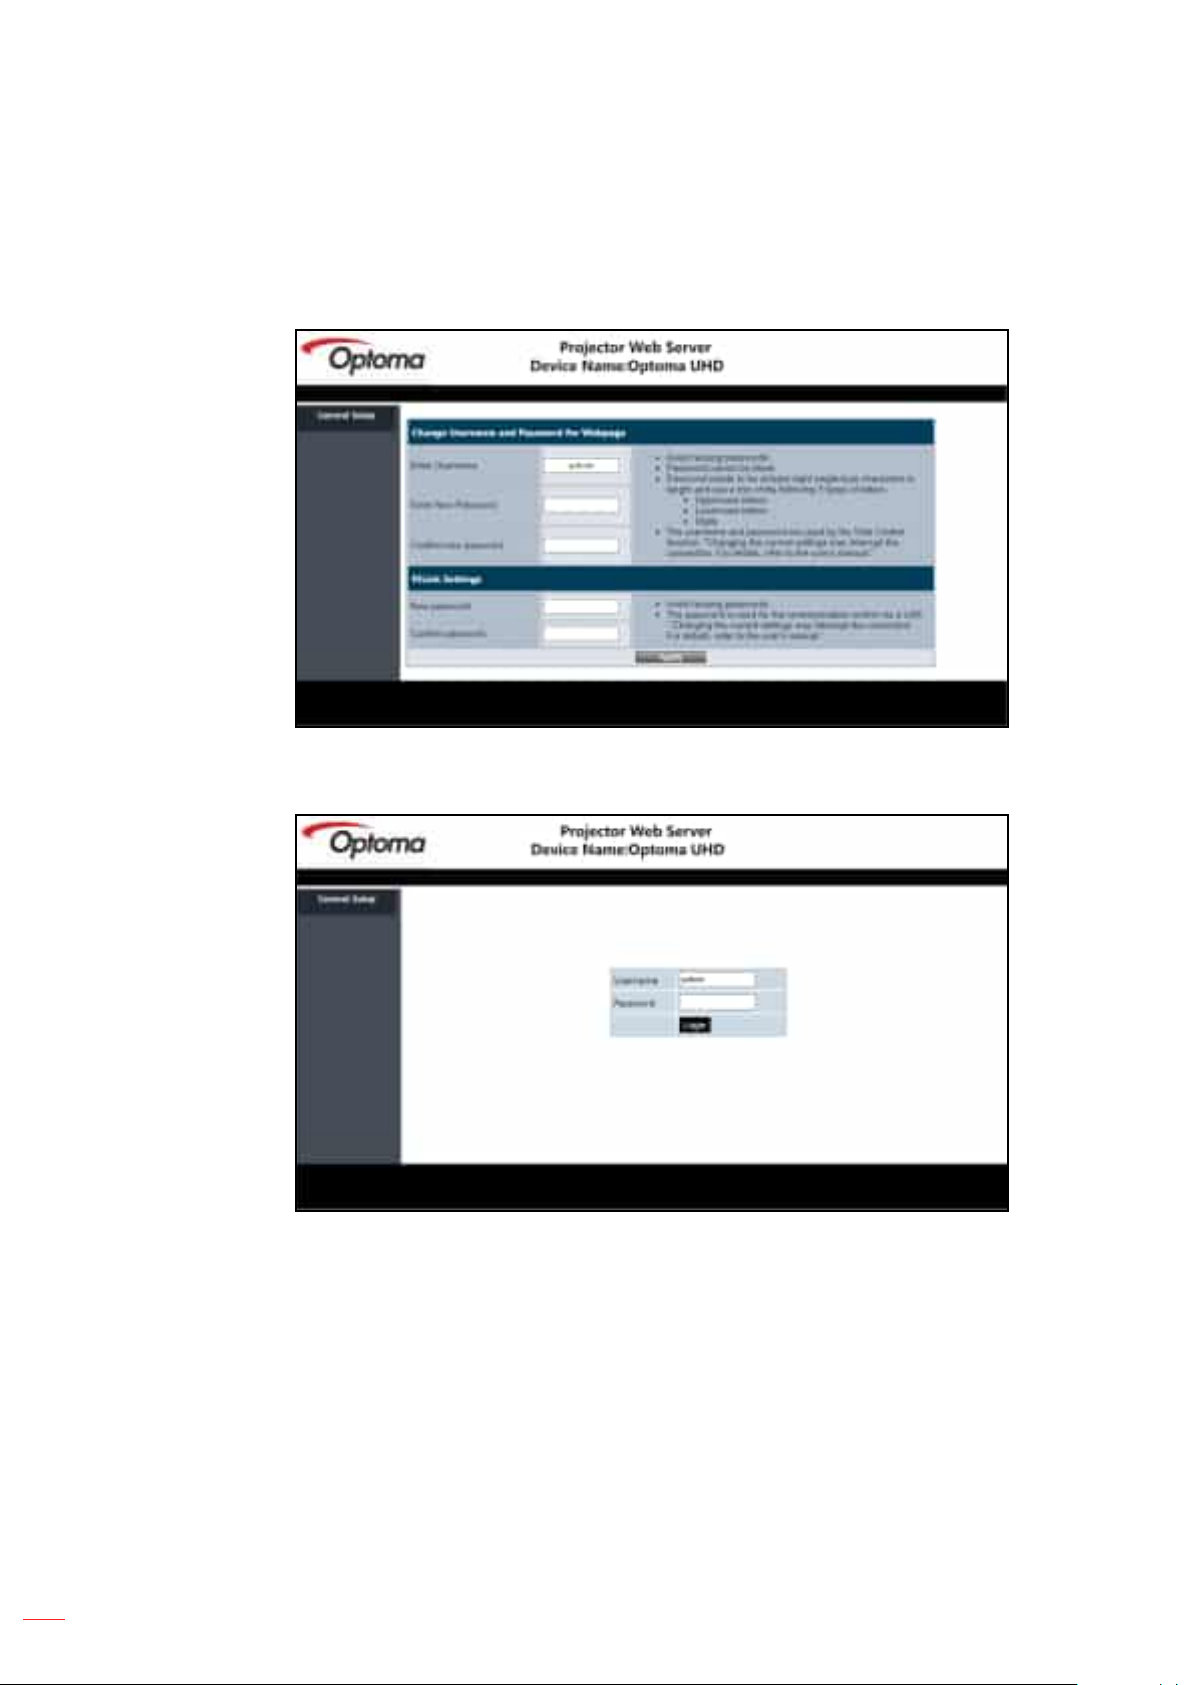
The projector is setup for remote management. The LAN / RJ45 function displays as follows:
Log in
When you open the web page for the ⿿rst time, you will see a screen like the one below.
Please enter valid user password.
When you open the web page after entering a valid password, you will see a screen like the one
below. Enter the password in the “Password” ⿿eld.
48
English
Page 49
USING THE PROJECTOR
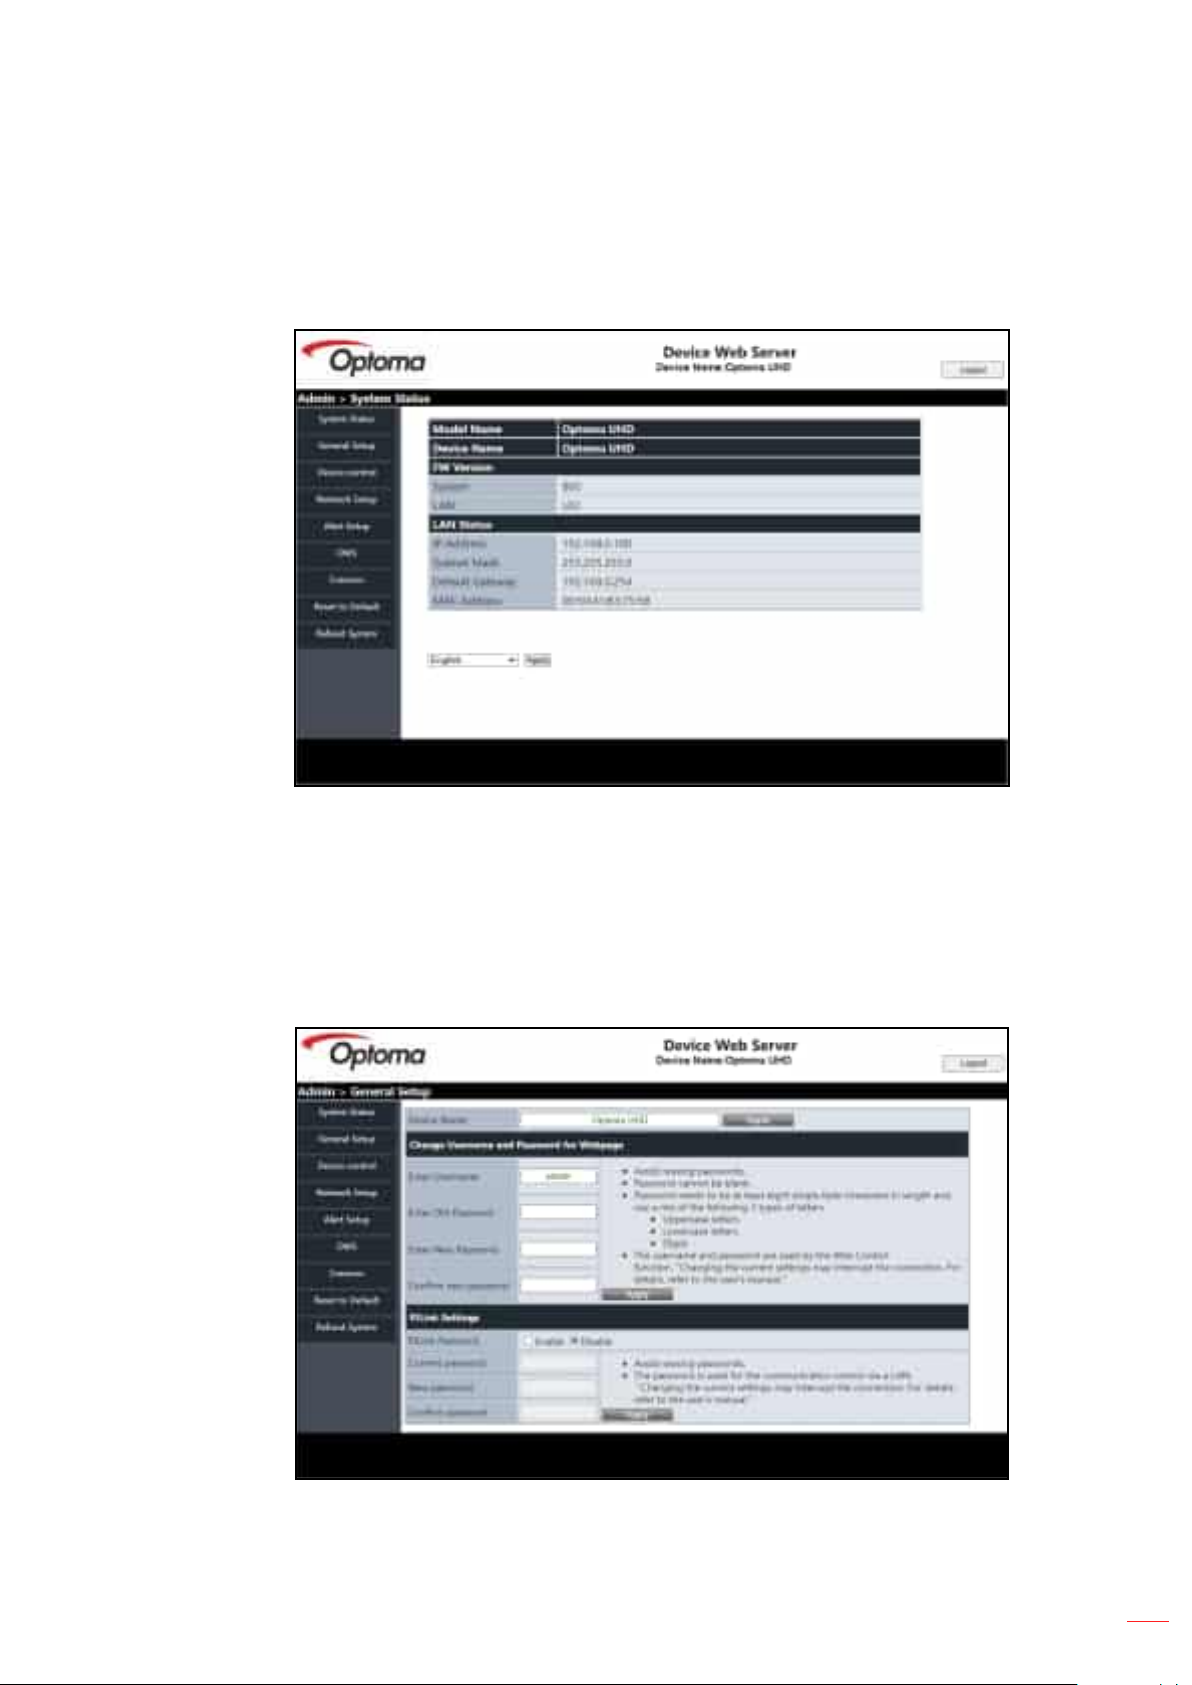
System Status
The current status of the projector is displayed.You can check projector model name, ⿿rmware version,
current LAN con⿿guration, and change the interface language if needed.
The version name displayed on the web page in the diagram may di�er from the actual display.
General Setup
The projector name set here is also used in PJLink control.Only alphanumeric characters can be used
as projector name. The maximum number of characters is 32.
You can use only alphanumeric characters in the password. The minimum number of characters is 8. If
you enter an invalid character, “Invalid Character” warning is displayed.
If the characters of new password and the characters of con⿿rm (new) password do not match, error
message will be displayed. In this case, re-enter the password.
English
49
Page 50
USING THE PROJECTOR
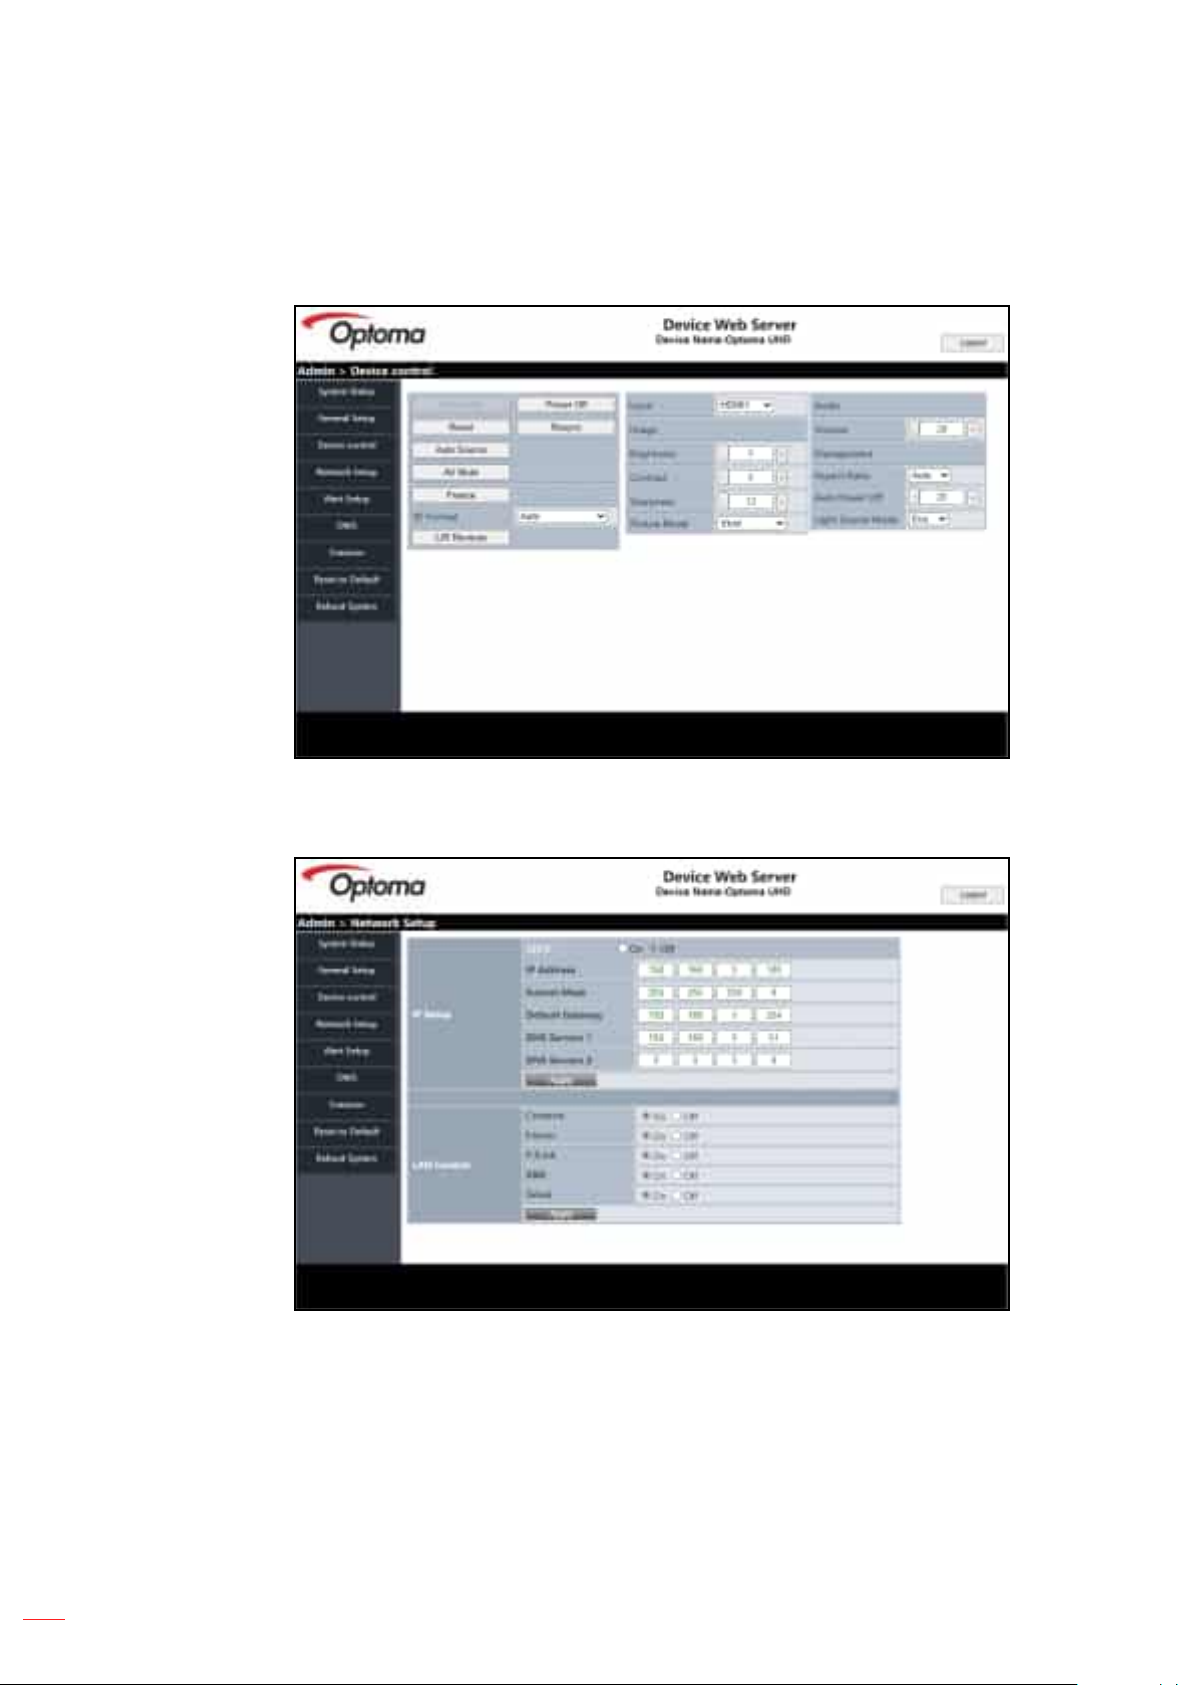
Device Control
You can control the projector with this item. The items for control are described in this section.
Control button: When you click a button, the corresponding function will be performed.
Network Setup
Set the network of the projector.
50
English
Page 51
USING THE PROJECTOR
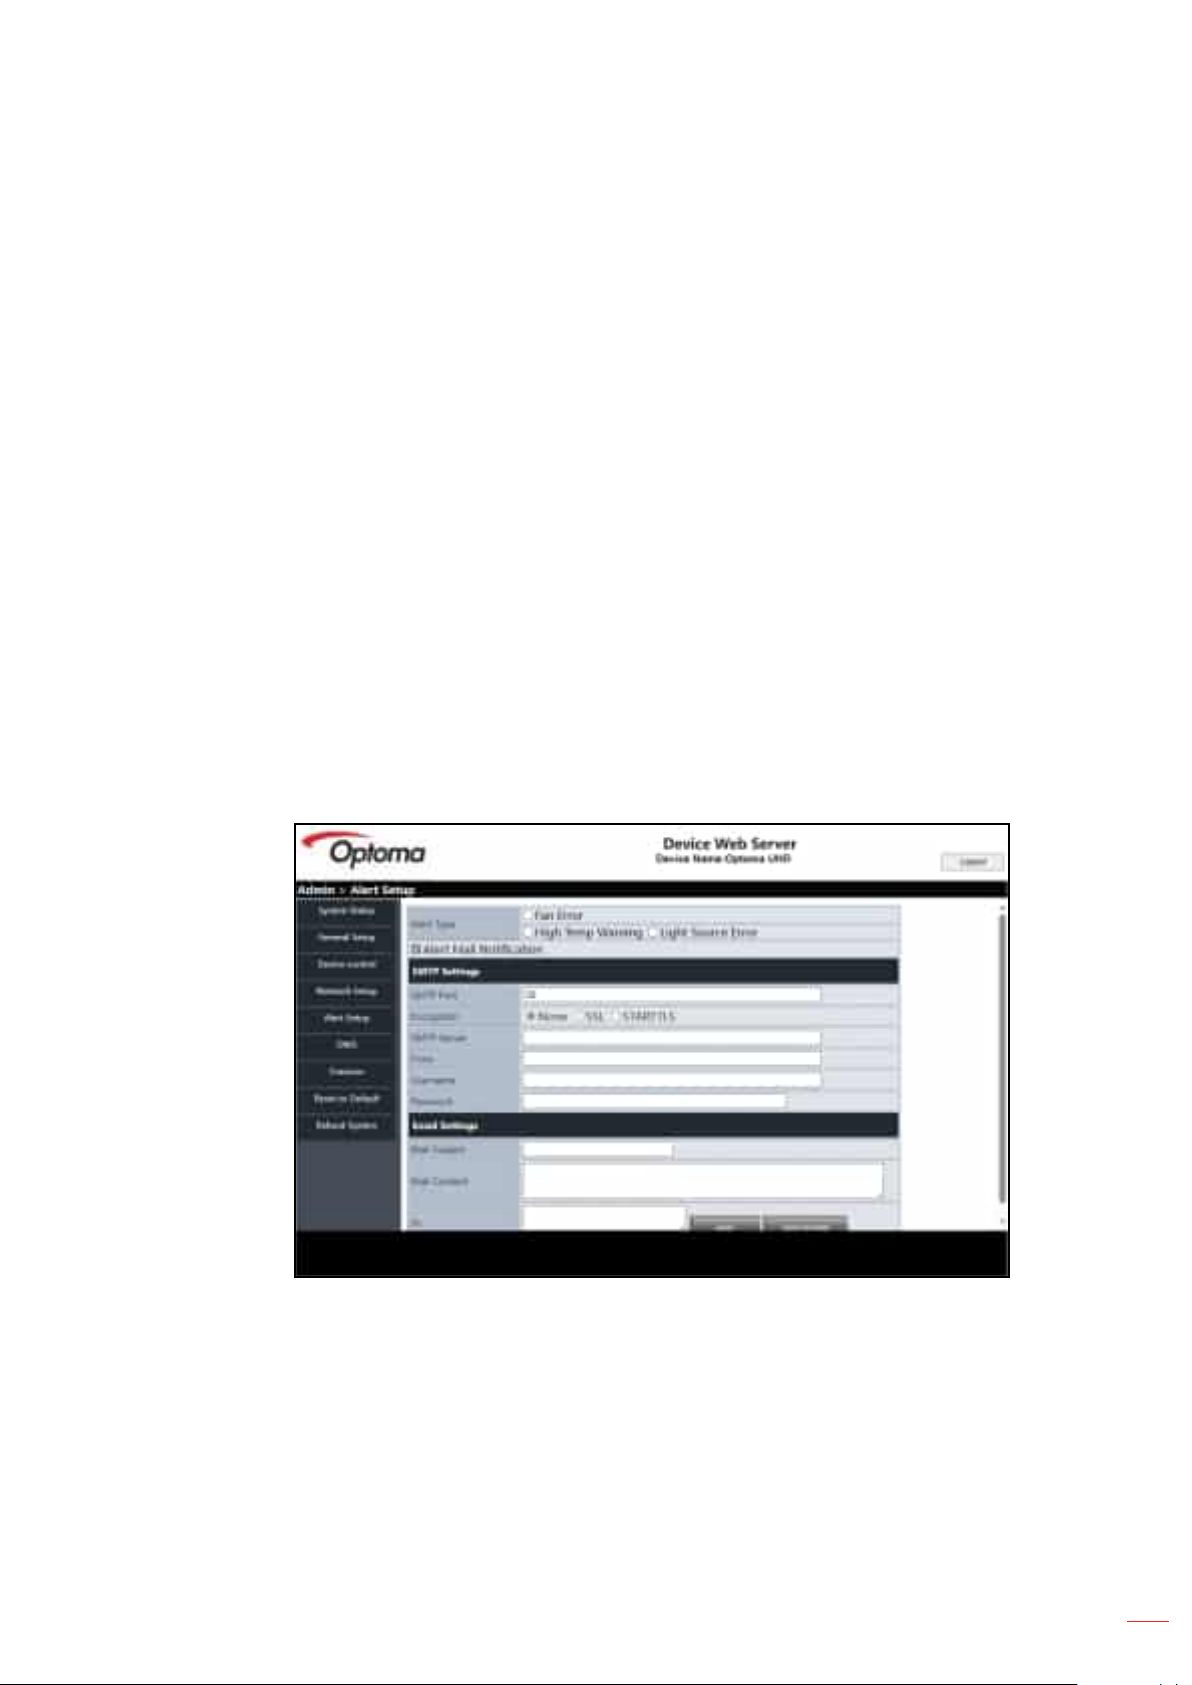
Alert Setup
You can send email alerts when an error occurs. You can carry out settings for alert mail in this
section.
1. Alert types: Check the type of error for which you want to send alert mail.
2. Alert mail noti⿿cation: Check and perform the following settings:
- SMTP Setting: Set the following:
a) SMTP Server: Server address (server name) (SMTP server)
b) From: e-mail address of the sender
c) User Name: User name of the mail server
d) Password: Mail server password.
- Email Setting: Set the following:
a) Mail Subject
b) Mail Content
c) To: Enter the e-mail address of the sender.
3. Click “Apply” to ⿿x the value.
4. Enter the IP address of projector in *xxx.xxx.xxx.xxx.
5. Send Test Mail.
When you click [Send Test Mail], test email will be sent. The text will be “Email Test xxx.xxx.xxx.xxx *”.
English
51
Page 52
USING THE PROJECTOR
RS232 by Telnet Function
RS232 by Telnet Function
As an alternative method of control, this projector has RS232 command control by TELNET for LAN / RJ45
interface.
Quick Start-Guide for “RS232 by Telnet”
• Check and get the IP address on OSD of the projector.
• Make sure that the PC / laptop can access the web-page of the projector.
• Make sure that “Windows Firewall” setting is set to disabled in case of “TELNET” function ⿿ltering out
by PC / laptop.
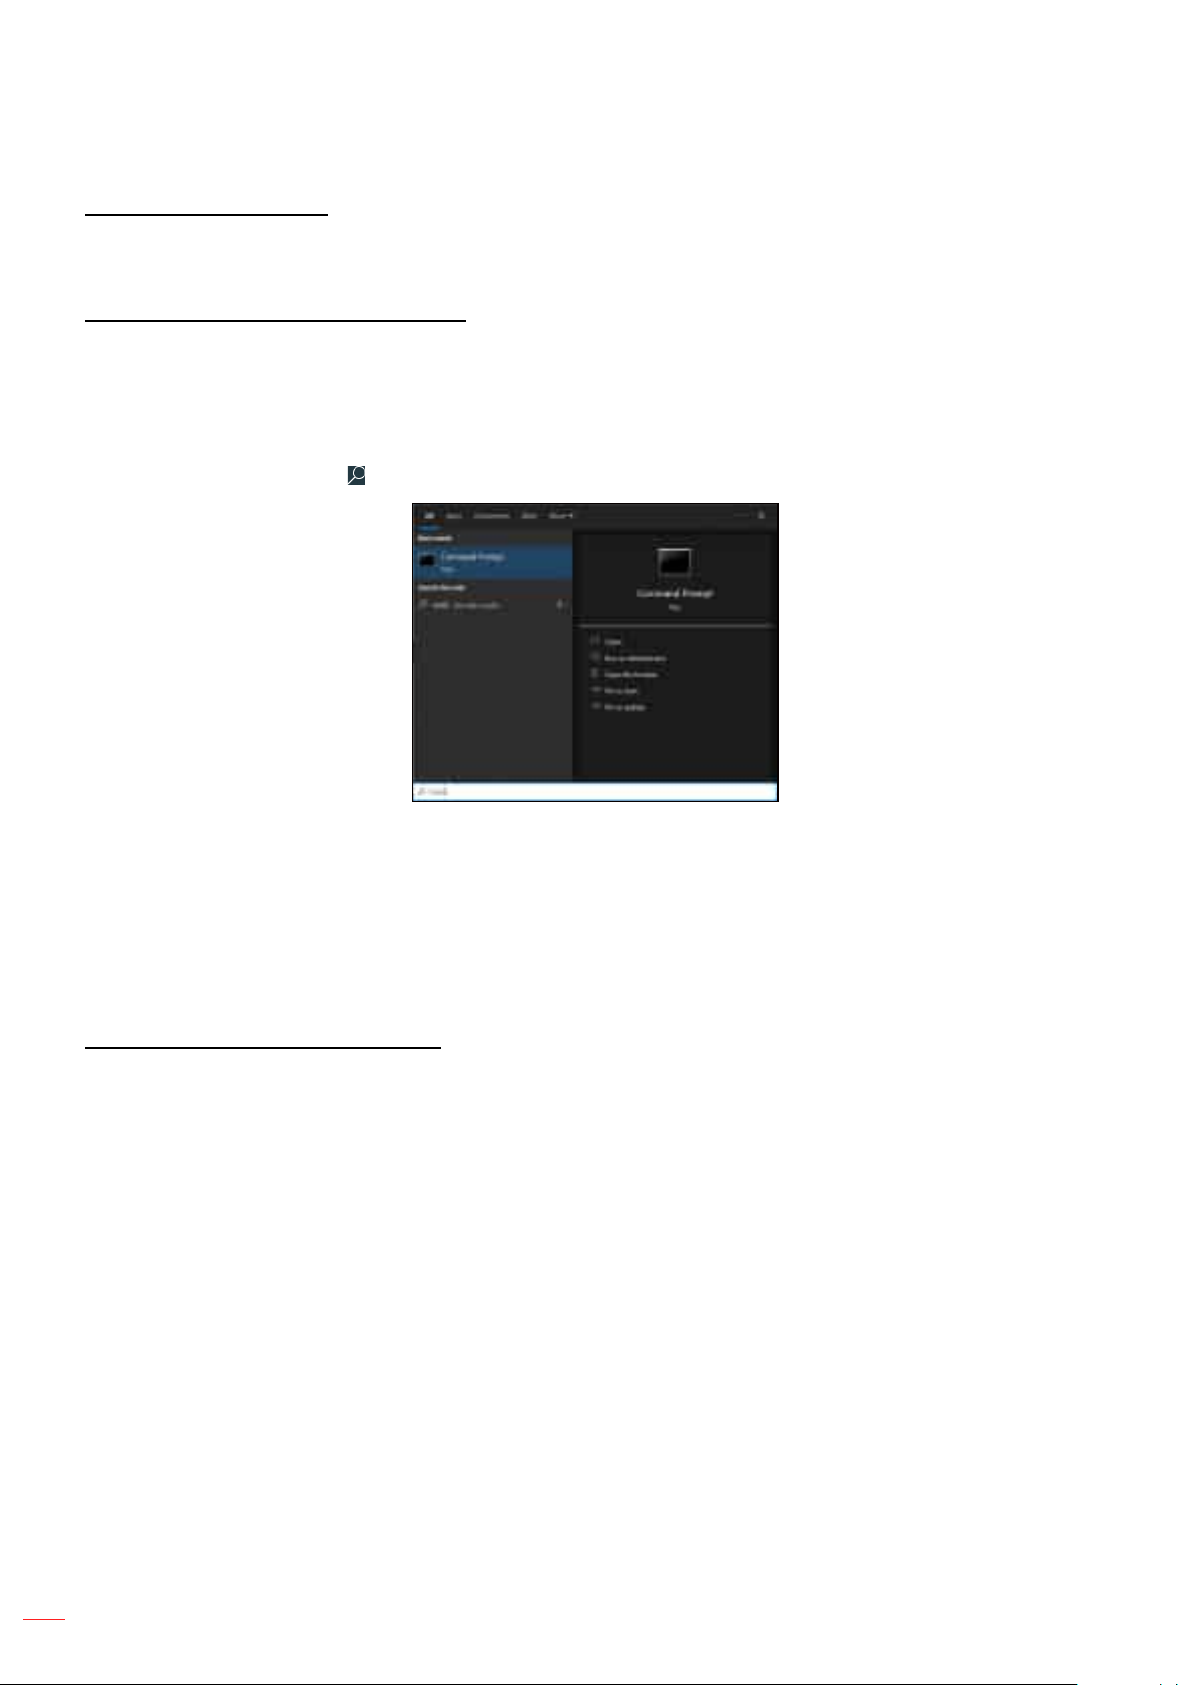
1. Click on Search and then enter “cmd” as a search word. Press the “Enter” key.
2. Open the Command Prompt app.
3. Input the command format as follows:
± telnet ttt.xxx.yyy.zzz 23 (“Enter” key pressed)
± (ttt.xxx.yyy.zzz: IP-Address of the projector)
4. If Telnet-Connection ready, and user can have RS232 command input, then press the “Enter” key and
Telnet connection should be ready for RS232 command control.
Speci⿿cation for “RS232 by TELNET”:
1. Telnet: TCP.
2. Telnet port: 23 (for further details, please contact the Optoma service team).
3. Telnet utility: Windows “TELNET.exe” (console mode).
4. To end the Telnet session, just close the Command Prompt app window.
5. Windows Telnet utility directly after TELNET connection ready.
± Limitation 1 for Telnet-Control: There cannot be more than 50 bytes for successive network
payload for Telnet-Control application.
± Limitation 2 for Telnet-Control: There cannot be more than 26 bytes for successive RS232
command for Telnet-Control.
± Limitation 3 for Telnet-Control: Minimum delay for next command must be more than 200 (ms).
52
English
Page 53

USING THE PROJECTOR
Control HDBaseT control menu
Ethernet/RS232
The projector can automatically detect the Ethernet or RS232 signal from the HDBaseT transmitter supplied. For an
automatic detection, make sure the respective signal is enabled.
Control reset menu
Return the factory default settings for control settings.
Information menu
Information menu
View the projector information as listed below:
• Regulatory
• Serial Number
• Source
• Color Info
• Light Source Hours
• Picture Mode
• Device ID
• Light Source Mode
• FW Version
English
53
Page 54

ADDITIONAL INFORMATION
Compatible resolutions
Input Signal for HDMI/HDBaseT
Signal Resolution Refresh Rate (Hz) Notes for Mac
VGA
SVGA
XGA 1024x768 60/70/75/120 Mac 60/70/75
SDTV(480P) 720x480 60
SDTV(576P) 720x576 50
HDTV(720P) 1280x720 50/60/120 Mac 60
WXGA 1280x800 60 Mac 60
SXGA
SXGA+ 1400x1050 60
UXGA 1600x1200 60
HDTV(1080I) 1920x1080 50/60
HDTV(1080p) 1920x1080 24/50/60/120/240Hz Mac 60
WQHD 2560x1440 120
UHD(2160p)
640x480 60/67/72/75 Mac 60/75
720x400 70
800x600 56/60/72/75 Mac 60/75
832x624 75 Mac 75
1280x1024 60/75 Mac 60/75
1440x900 60
3840x2160 24/30/50/60
4096x2160 24/60
54
English
Page 55

ADDITIONAL INFORMATION
True 3D Video Compatibility
Input timing
1280 x 720P @ 50Hz Top-and-Bottom
1280 x 720P @ 60Hz Top-and-Bottom
HDMI 1.4a
3D Input
Input
resolutions
HDMI 1.3
Note:
1280 x 720P @ 50Hz Frame packing
1280 x 720P @ 60Hz Frame packing
1920 x 1080i @ 50Hz Side-by-Side(Half)
1920 x 1080i @ 60Hz Side-by-Side(Half)
1920 x 1080P @ 24Hz Top-and-Bottom
1920 x 1080P @ 24Hz Frame packing
1920 x 1080i @ 50Hz
1920 x 1080i @ 60Hz
1280 x 720P @ 50Hz
1280 x 720P @ 60Hz
800 x 600 @ 60Hz
1024 x 768 @ 60Hz
1280 x 800 @ 60Hz
1920 x 1080i @ 50Hz
1920 x 1080i @ 60Hz
1280 x 720P @ 50Hz
1280 x 720P @ 60Hz
800 x 600 @ 60Hz
1024 x 768 @ 60Hz
1280 x 800 @ 60Hz
1024 x 768 @ 120Hz
1280x 720 @ 120Hz
Side-by-Side(Half) SBS mode is on
Top-and-Bottom TAB mode is on
Frame Sequential 3D format is Frame sequential
• If 3D input is 1080p@24Hz, the DMD should replay with integral multiple with 3D mode
• 1080i@25Hz and 720p@50Hz will run in 100Hz; other 3D timing will run in 120Hz.
• 1080p@24Hz will run 144Hz.
English
55
Page 56
ADDITIONAL INFORMATION
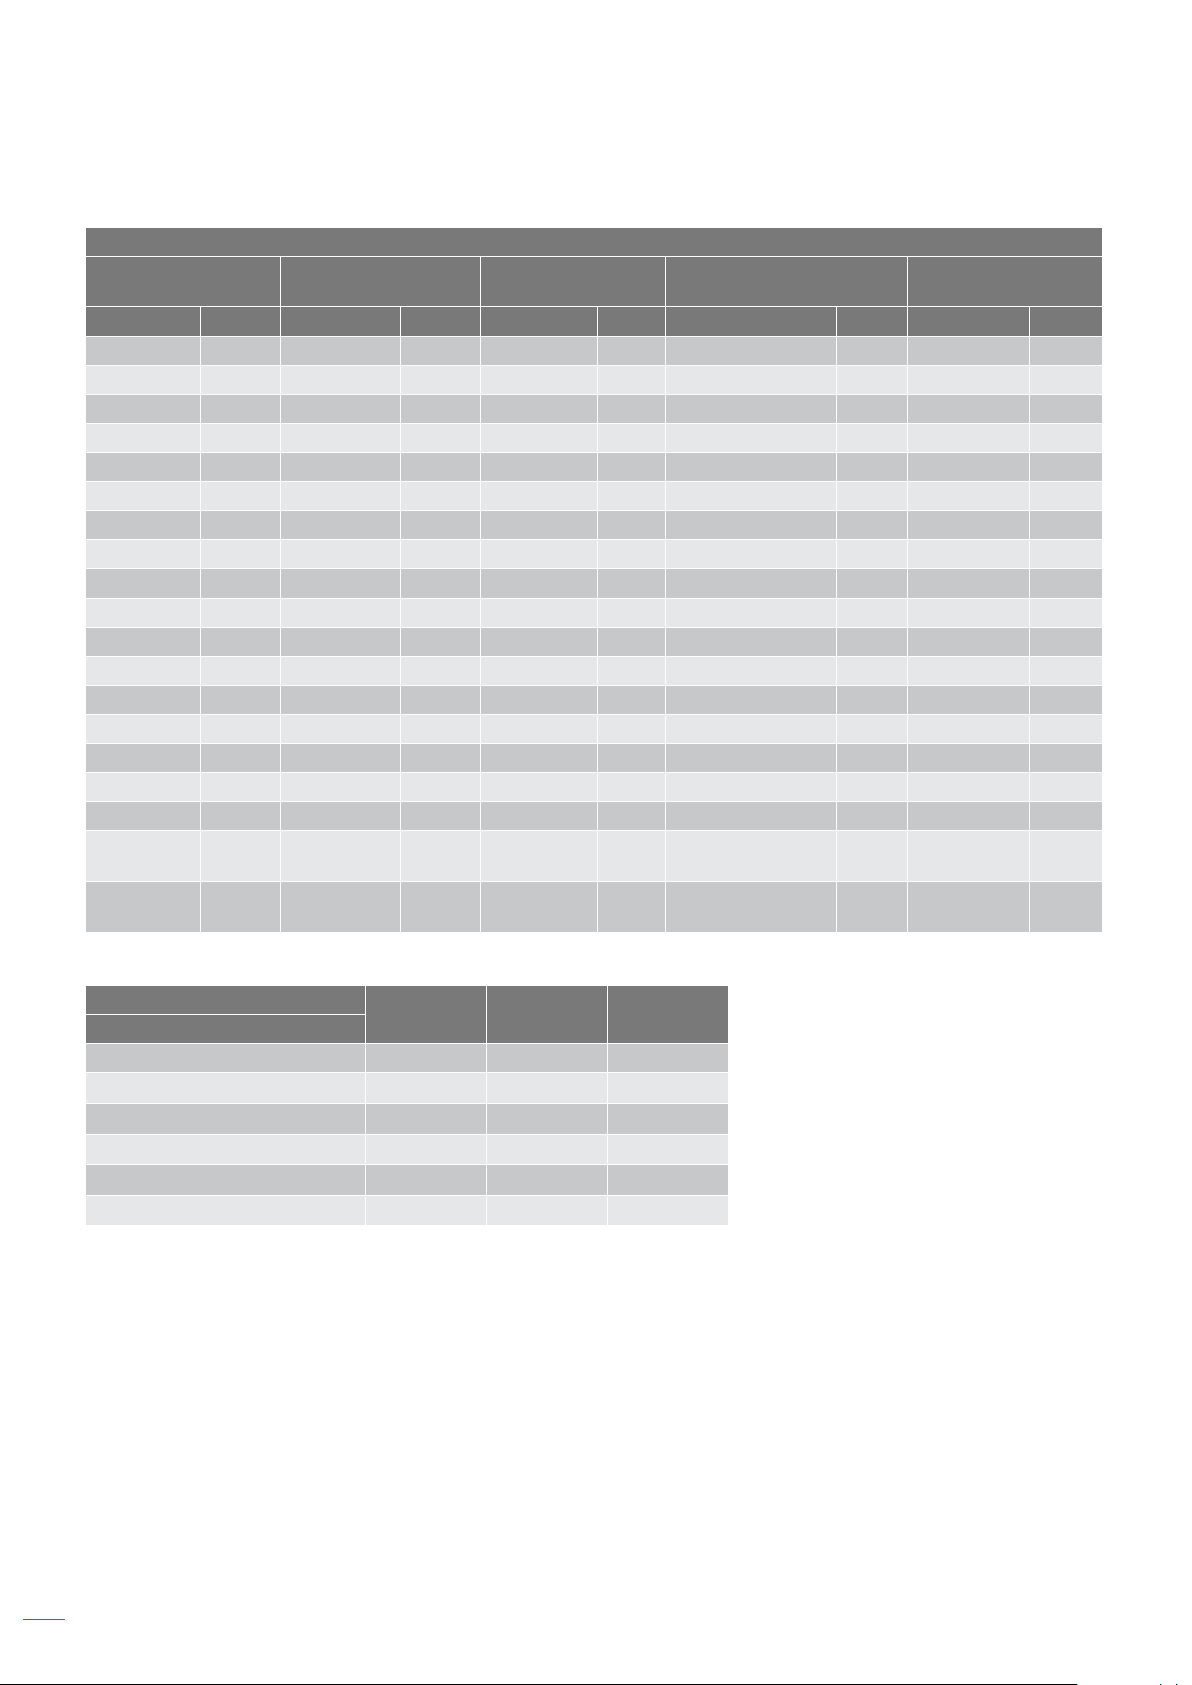
EDID (Digital)
HDMI 1/2 & HDBaseT for 2.0
B0 /
Established Timing
Resolution V [Hz] Resolution V [Hz] Resolution V [Hz] Resolution V [Hz] Resolution V [Hz]
720x400 70.0 1024x768 120.0 3840x2160 60.0 640x480p 4:3 60.0 2560x1440 120.00
640x480 60.0 1280x720 60.0 720x576p 16:9 50.0 1920x1080 240.00
640x480 66.6(67) 1280x720 120.0 720x480p 16:9 60.0
640x480 72.0 1280x800 60.0 1280x720p 16:9 50.0
640x480 75.0 1280x1024 60.0 1280x720p 16:9 60.0
800x600 56.0 1440x900 60.0 1920x1080i 16:9 60.0
800x600 60.0 1400x1050 60.0 1920x1080i 16:9 50.0
800x600 72.0 1600x1200 60.0 1920x1080p 16:9 24.0
800x600 75.0 1920x1080p 16:9 50.0
832x624 75.0 1920x1080p 16:9 60.0
1024x768 60.0 1920x1080p 16:9 120.0
1024x768 70.0 2560x1080p 64:27 50.0
1024x768 75.0 2560x1080p 64:27 60.0
1280x1024 75.0 3840x2160p 16:9 24.0
1152x870 75.0 3840x2160p 16:9 30.0
B0 /
Standard Timing
B0 /
Detail Timing
B1 /
Video Mode
3840x2160p 16:9 50.0
3840x2160p 16:9 60.0
4096x2160p
256:135
4096x2160p
256:135
24.0
60.0
B1 /
Detail Timing
Audio Data
Format
LPCM(IEC 60958 PCM[30,31] V V V
Dolby Digital V V
DTS V
Dolby Digital Plus V V
DTS-HD V
Dolby TrueHD/MAT V
eARC ARC LPCM
56
English
Page 57
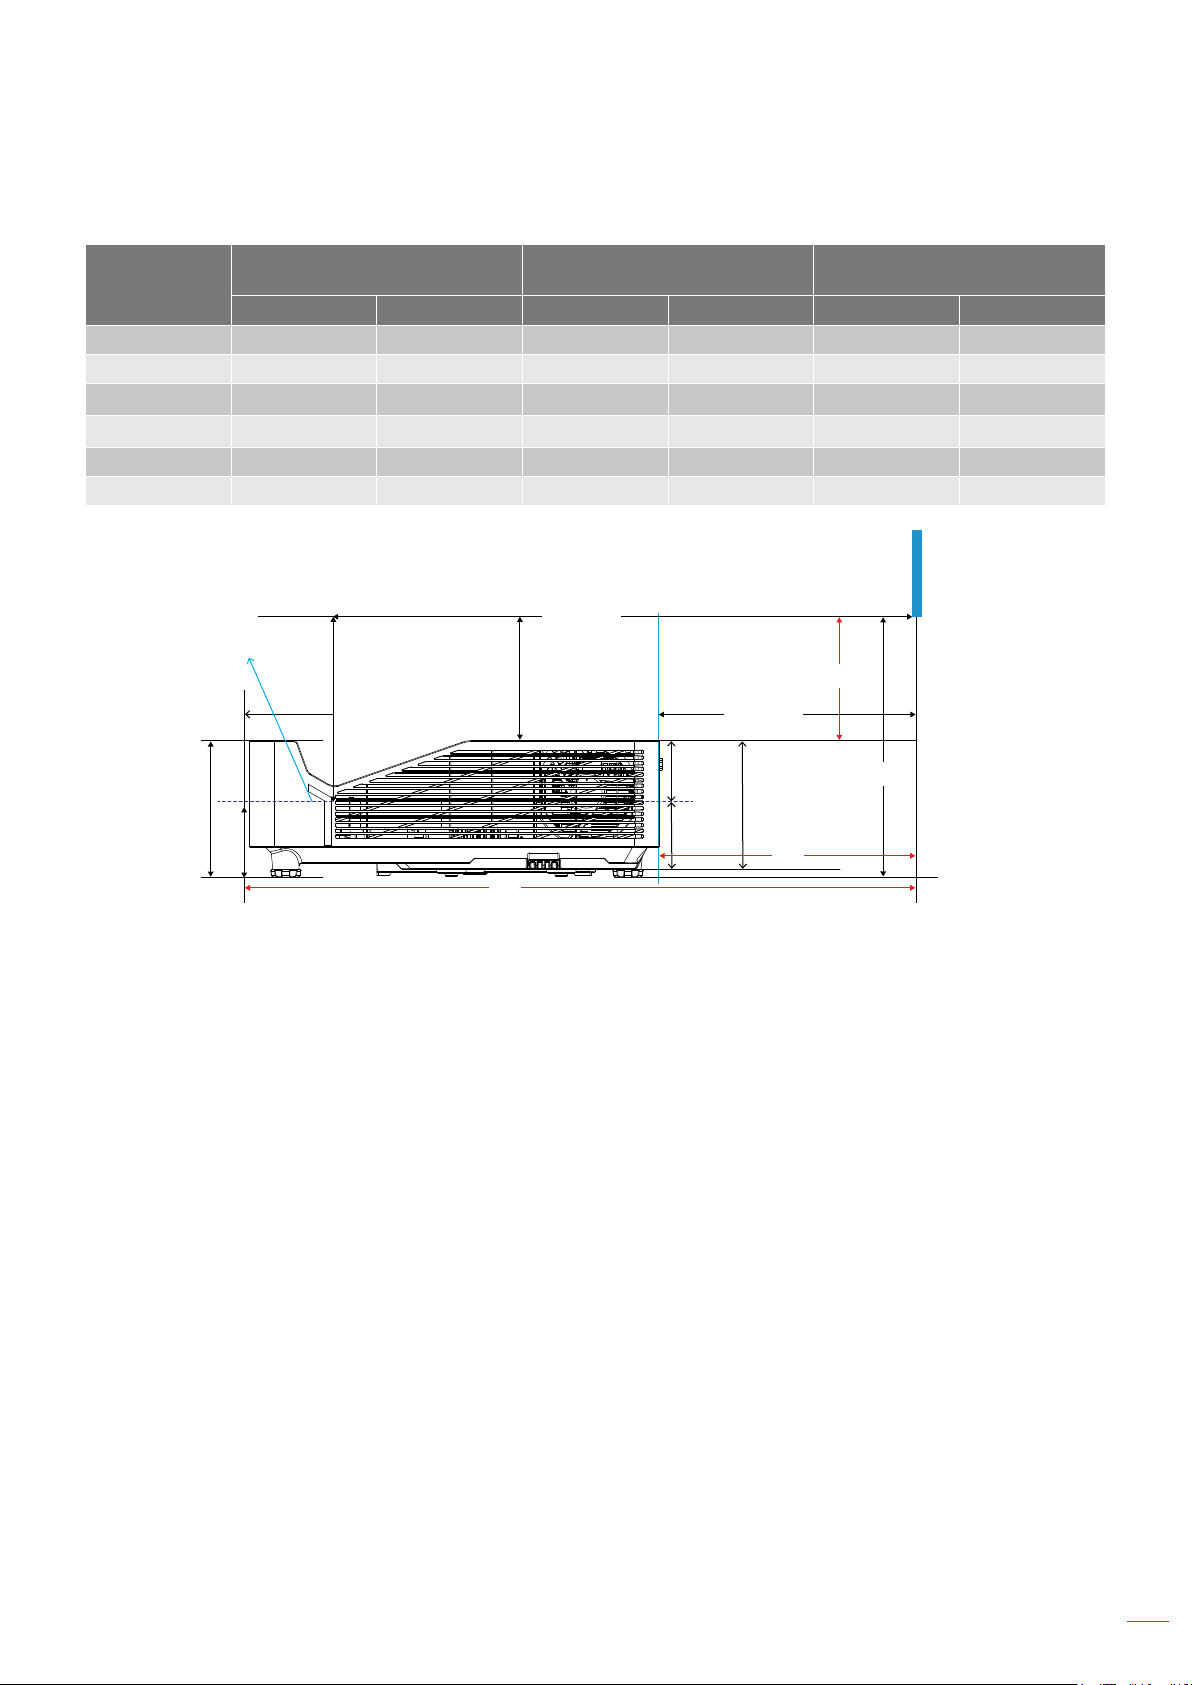
ADDITIONAL INFORMATION
Image size and projection distance
Image Size
(inch)
100 0.614 24.177 0.286 11.271 0.133 ~ 0.257 5.228 ~ 10.131
110 0.670 26.382 0.342 13.476 0.151 ~ 0.288 5.963 ~ 11.356
120 0.726 28.587 0.398 15.682 0.17 ~ 0.32 6.699 ~ 12.582
130 0.782 30.792 0.454 17.887 0.189 ~ 0.351 7.434 ~ 13.808
140 0.838 32.997 0.510 20.092 0.208 ~ 0.436 8.17 ~ 17.159
150 0.894 35.202 0.566 22.297 0.226 ~ 0.467 8.905 ~ 18.385
Mirror center
109.6mm
55.6mm
m inch m inch m inch
54mm
DF DR
784.1mm
348.7mm
294.7mm
510.3mm
54.00mm
103.1mm
O�set=115% ~ 125%
H
397.8mm
H
Screen
Distance
DF
49.10mm
DR
English
57
Page 58
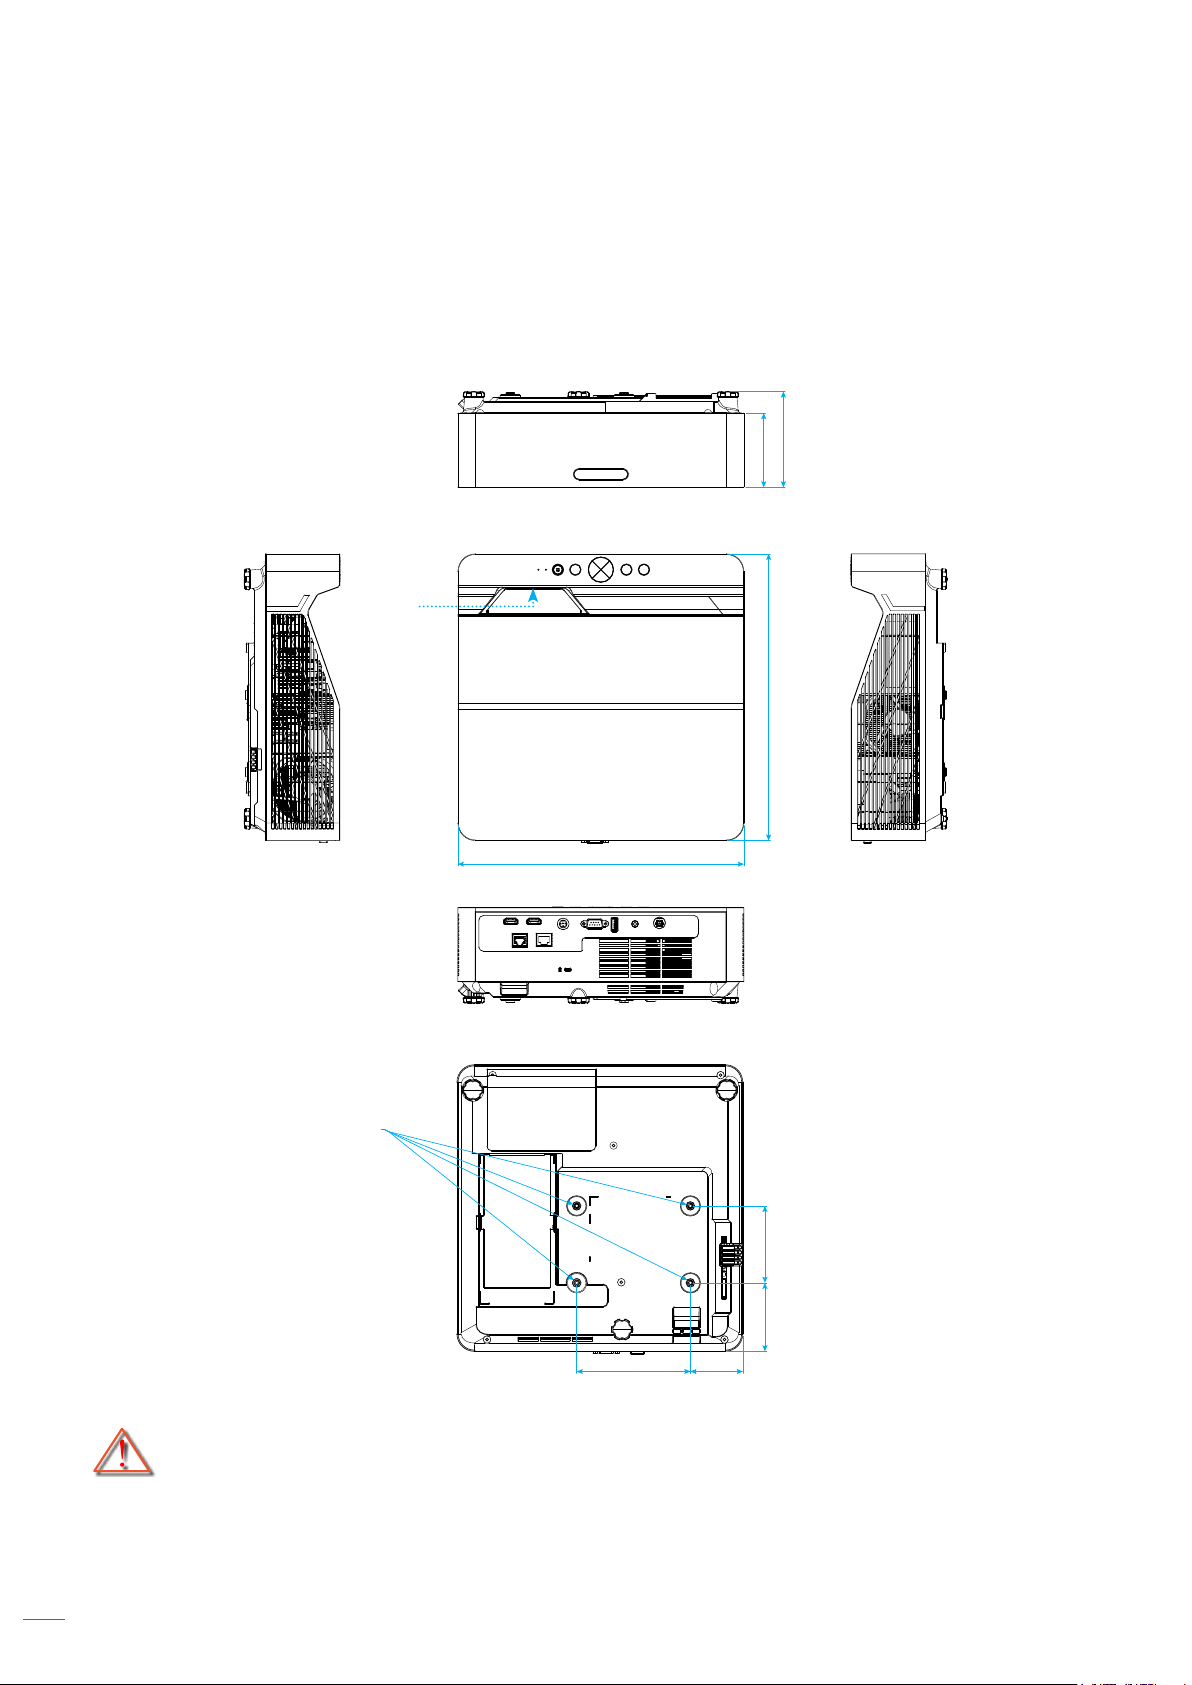
ADDITIONAL INFORMATION
Projector dimensions and ceiling mount installation
1. To prevent damage to your projector, please use the Optoma ceiling mount.
2. If you wish to use a third party ceiling mount kit, please ensure the screws used to attach a mount to
the projector meet the following speci⿿cations:
• Screw type: M4*10mm
• Minimum screw length: 10mm
109.60
85.00
Lens
SCREW SPEC M4*10mm
(INCLUDE WALL MOUNT METAL)
327.80
327.00
88.0078.31
130.00 60.00
Note: Please note that damage resulting from incorrect installation will void the warranty.
Warning:
• If you buy a ceiling mount from another company, please be sure to use the correct screw size.
Screw size will vary depending on the thickness of the mounting plate.
• Be sure to keep at least 10 cm gap between the ceiling and the bottom of the projector.
• Avoid installing the projector near a heat source.
English
58
Unit: mm
Page 59
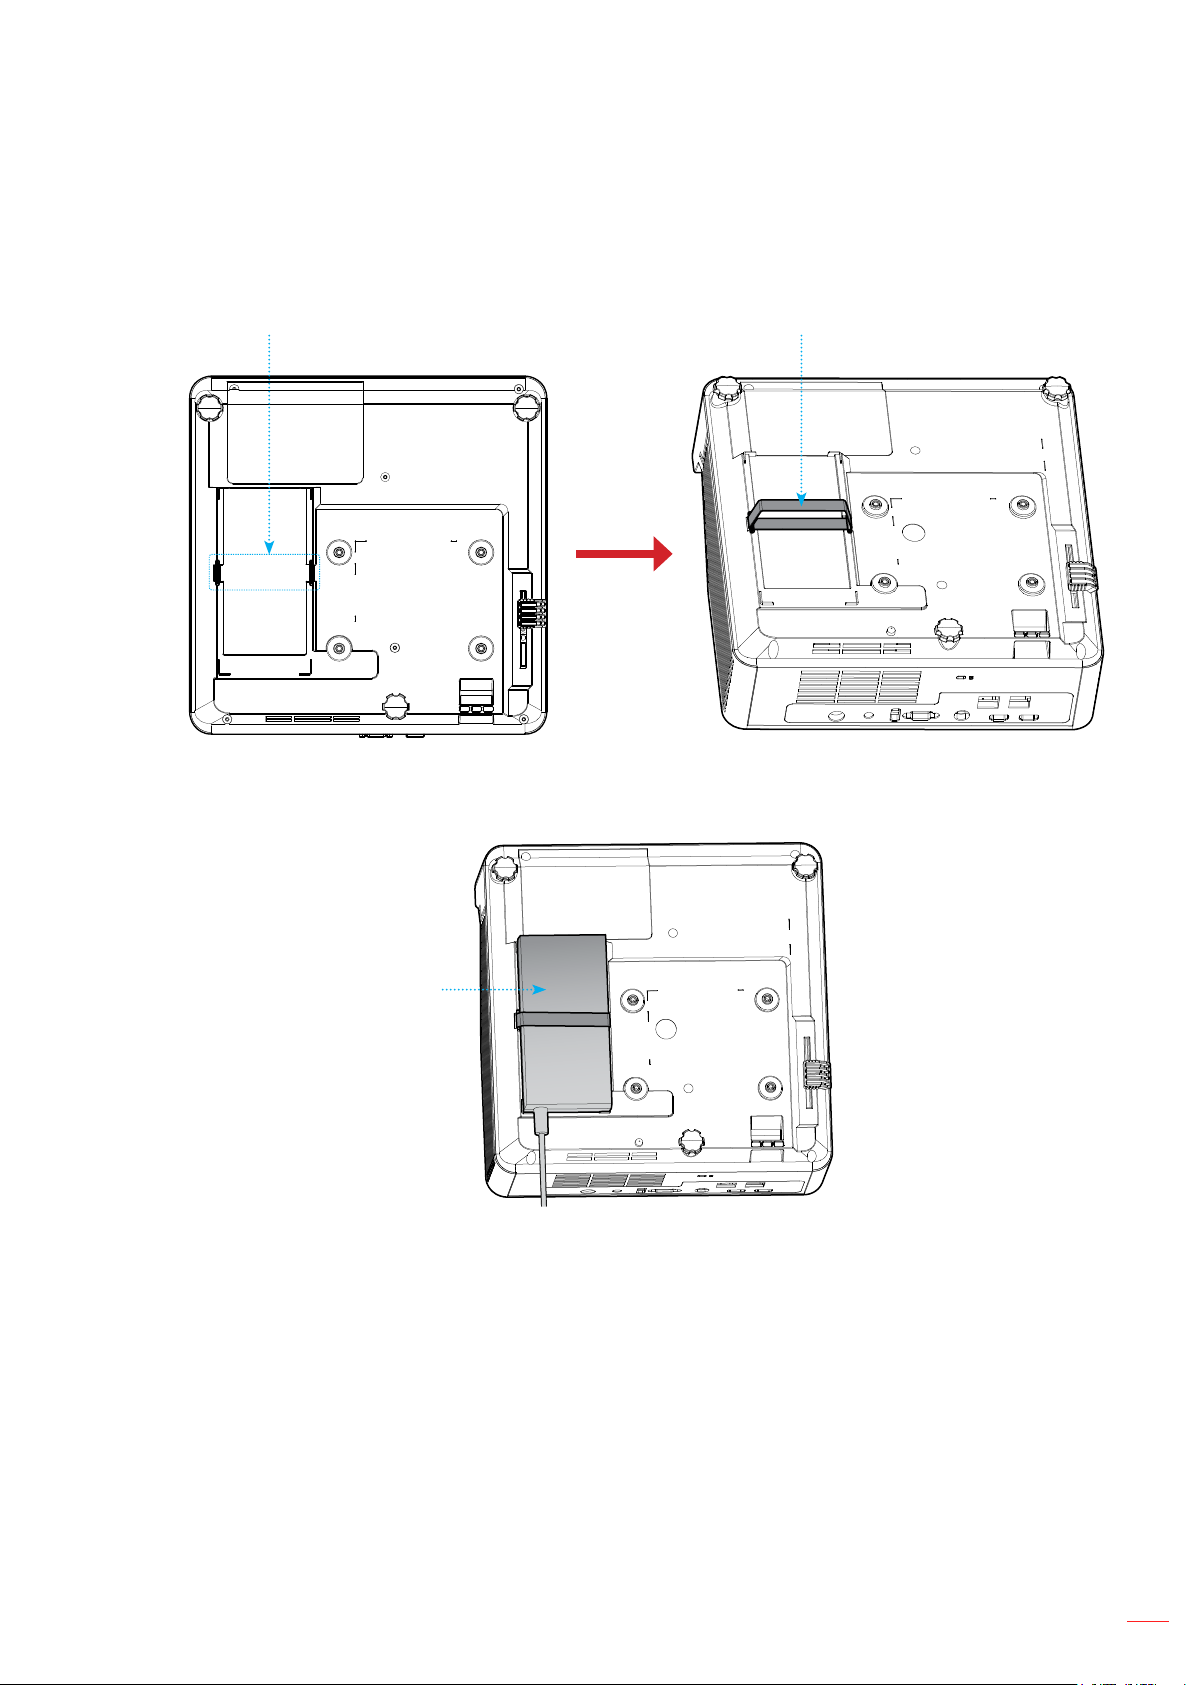
ADDITIONAL INFORMATION
For ceiling mounting, you could purchase a cable tie whose length is over 350mm to ⿿x the AC adapter if needed.
1. Install the cable tie to the designated holes on the bottom of the projector. Then place the AC adapter
onto its slot.
Holes for
Hook & Loop
2. Place the AC adapter onto its slot, then secure it with the cable tie.
Hook & Loop
Adapter
English
59
Page 60
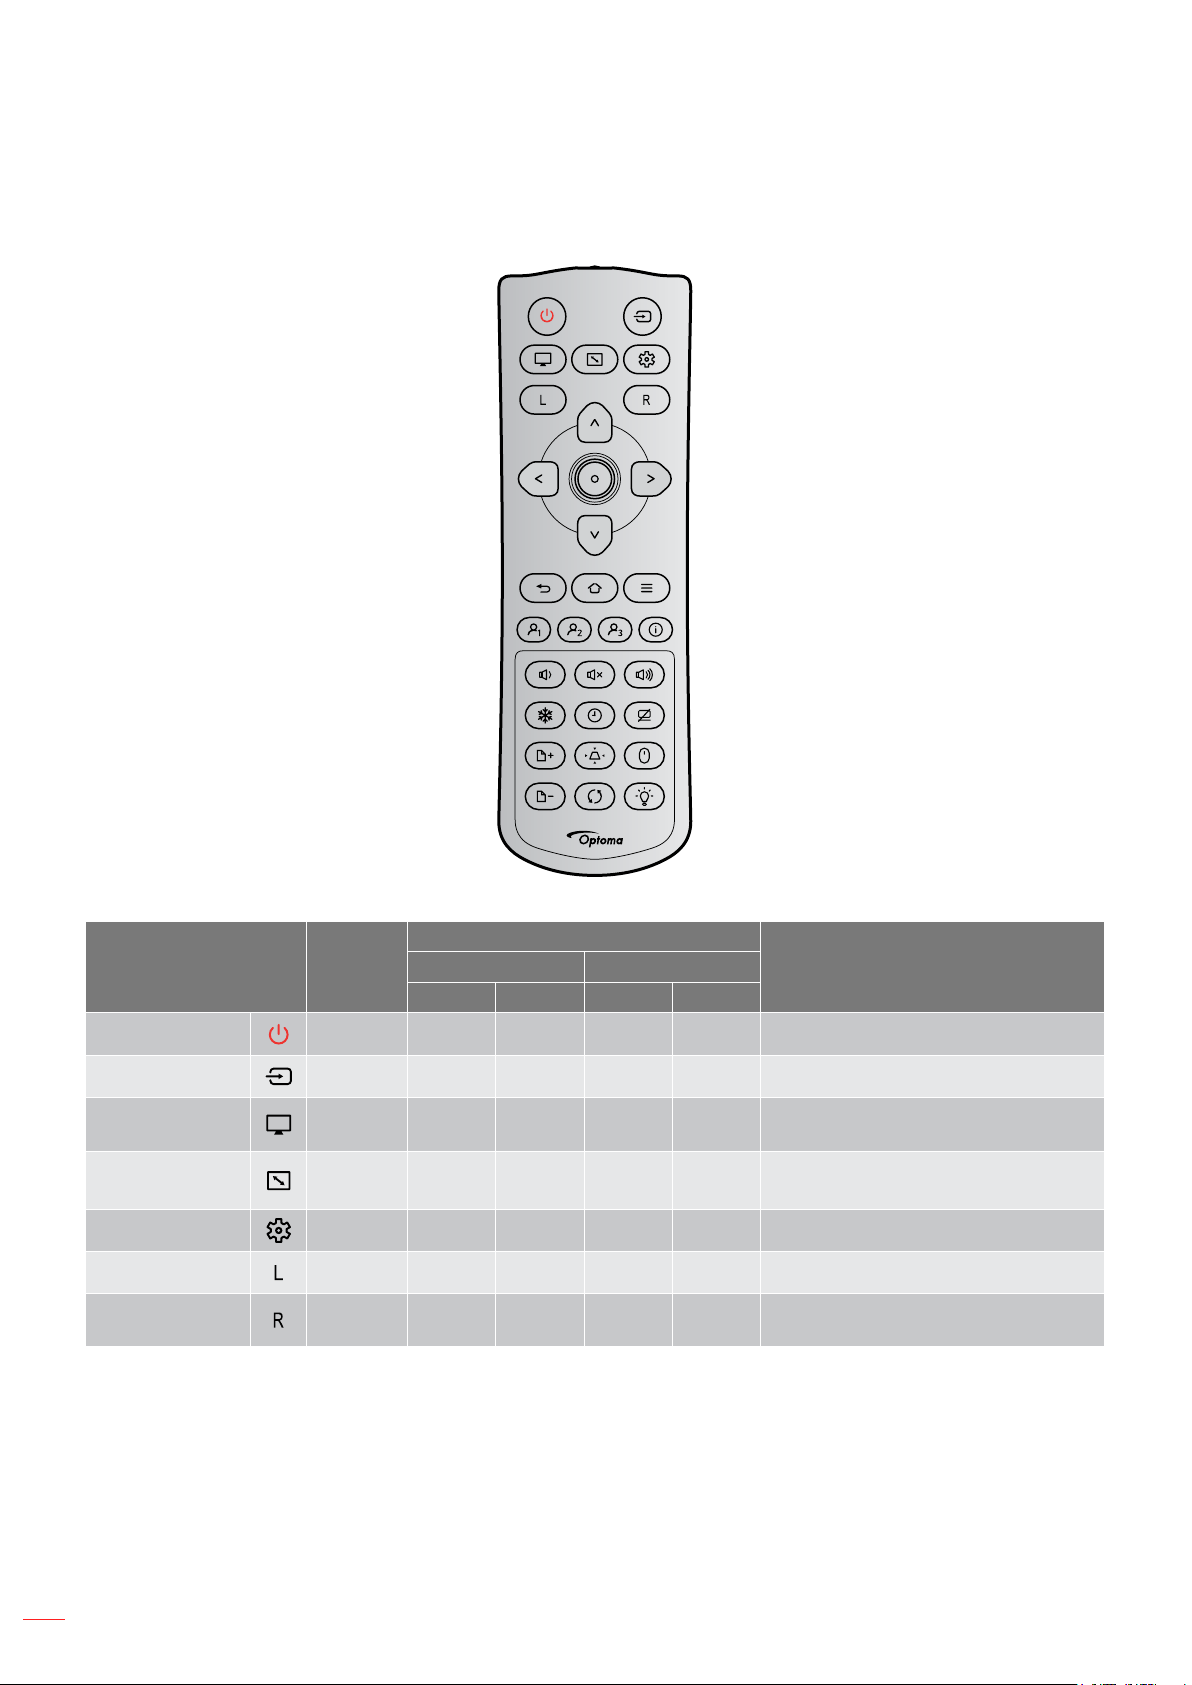
ADDITIONAL INFORMATION
IR remote control codes
Key
Power F1 32 CD 02 FD Press to turn on / o� the projector.
Source F1 32 CD C3 3C Press to select an input signal.
Display Mode F1 32 CD 5 FA
Aspect Ratio F1 32 CD 64 9B
Setup Menu F1 32 CD A8 57 Press to enter the Setup menu.
Mouse Left Click F1 32 CD CB 34 Left Mouse Button
Mouse Right
Click
Repeat
Format
Byte 1 Byte 2 Byte 3 Byte 4
F1 32 CD CC 33 Right Mouse Button
NEC Code
DescriptionCustom Code Data
Press to change the Display mode of
a displayed image.
Press to change the aspect ratio of a
displayed image.
60
English
Page 61
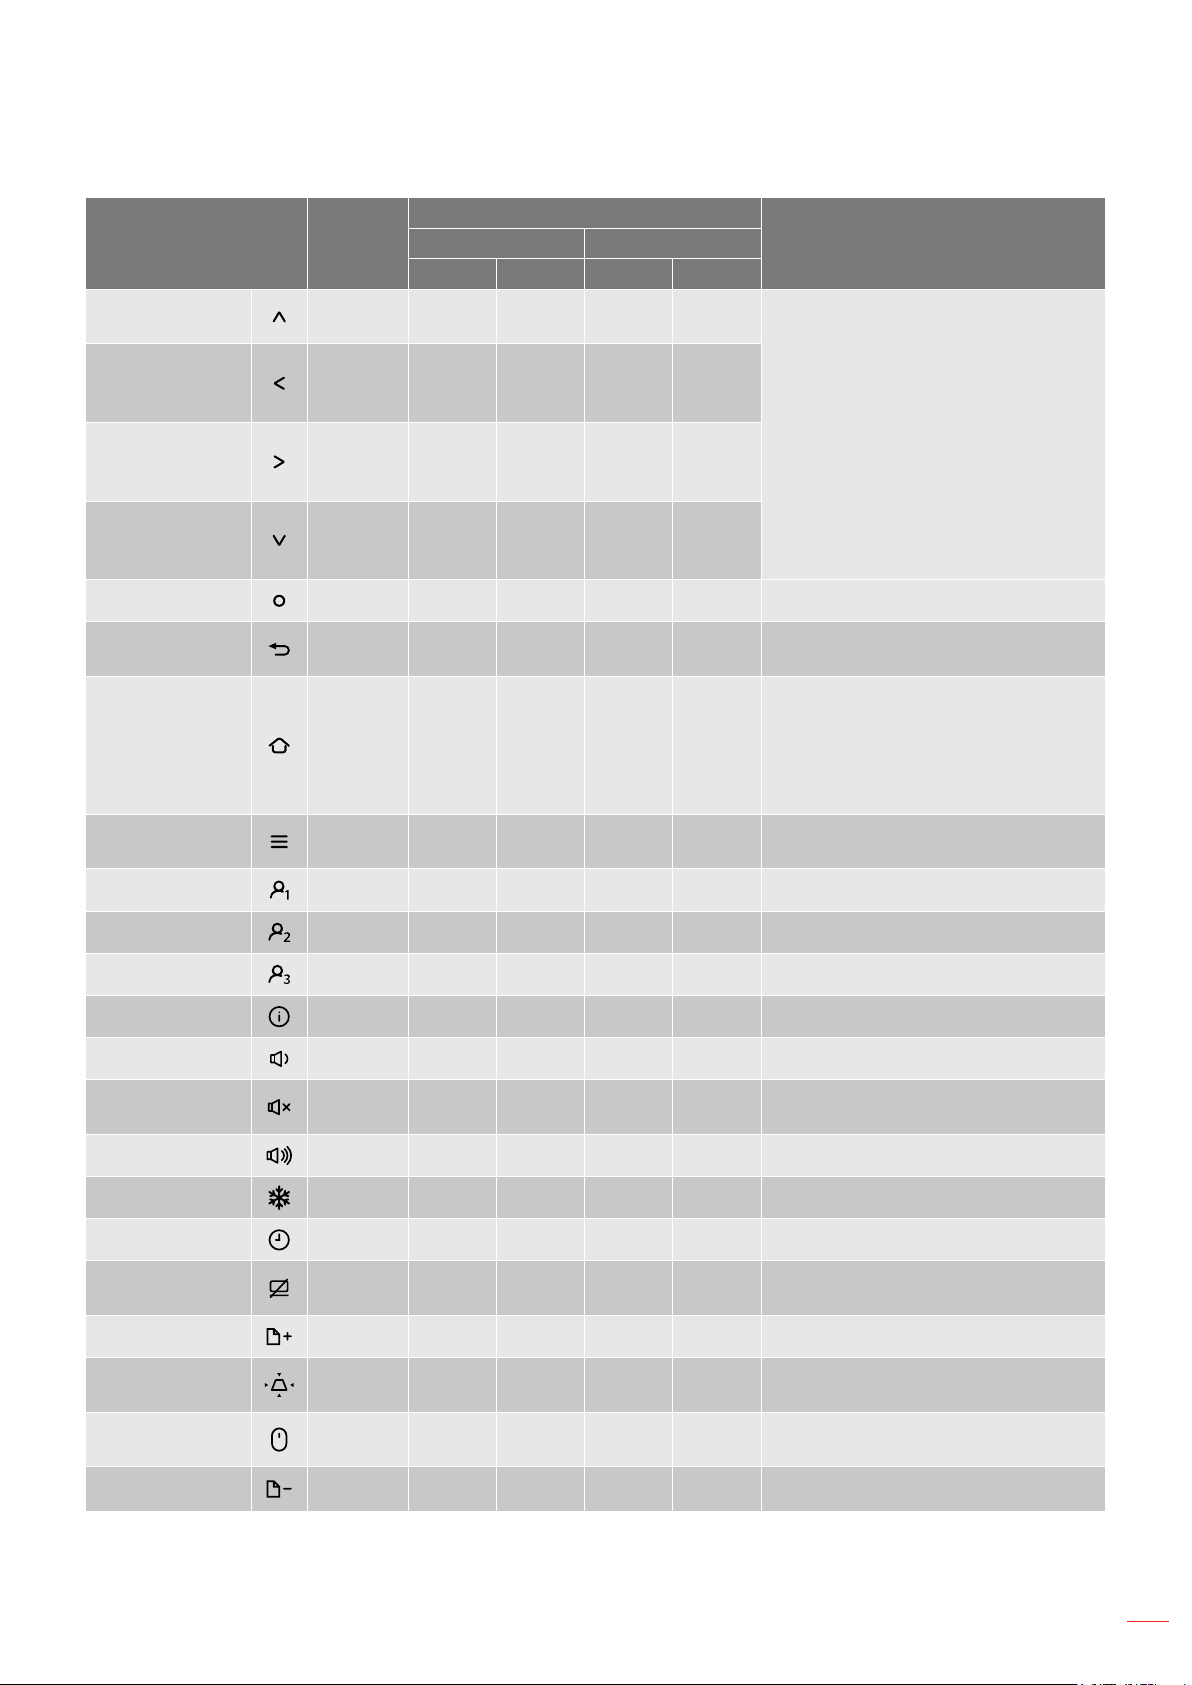
ADDITIONAL INFORMATION
Key
Four directional
select keys (Up)
Four directional
select keys
(Left)
Four directional
select keys
(Right)
Four directional
select keys
(Down)
Enter F1 32 CD 0F F0 Con⿿rm your item selection.
Return F1 32 CD 0D F2
Home F1 32 CD A0 5F
Menu F1 32 CD 0E F1
Repeat
Format
Byte 1 Byte 2 Byte 3 Byte 4
F2 32 CD 11 EE
F2 32 CD 10 EF
F2 32 CD 12 ED
F2 32 CD 14 EB
NEC Code
DescriptionCustom Code Data
Press to select items or make
adjustments to your selection.
Press to return to the previous
menu.
Press to return to the main menu
when OSD in sub menu.
- No function when no OSD display.
- No function when shortcut menu is
displayed.
Press to display or exit the
on-screen display menus.
User 1 F1 32 CD 36 C9 Press to enter the assigned function.
User 2 F1 32 CD 65 9A Press to enter the assigned function.
User 3 F1 32 CD 66 99 Press to enter the assigned function.
Information F1 32 CD 25 DA Press to enter the Information menu.
Volume - F2 32 CD 8F 70 Press to decrease the volume.
Mute F1 32 CD 52 AD
Volume + F2 32 CD 8C 73 Press to increase the volume.
Freeze F1 32 CD 6 F9 Press to freeze the projector image.
Sleep Timer F1 32 CD 63 9C Press to set the countdown timer.
AV Mute F1 32 CD 3 FC
Page Up F2 32 CD C1 3E Press to page up.
Keystone F1 32 CD 7 F8
Mouse F1 32 CD 3E C1
Press to momentarily turn o� / on the
audio.
Press to hide / unhide the screen
picture and turn o� / on audio.
Press to adjust image distortion
caused by tilting the projector.
Press to On / O� the USB mouse
function.
Page Down F2 32 CD C2 3D Press to page down.
English
61
Page 62
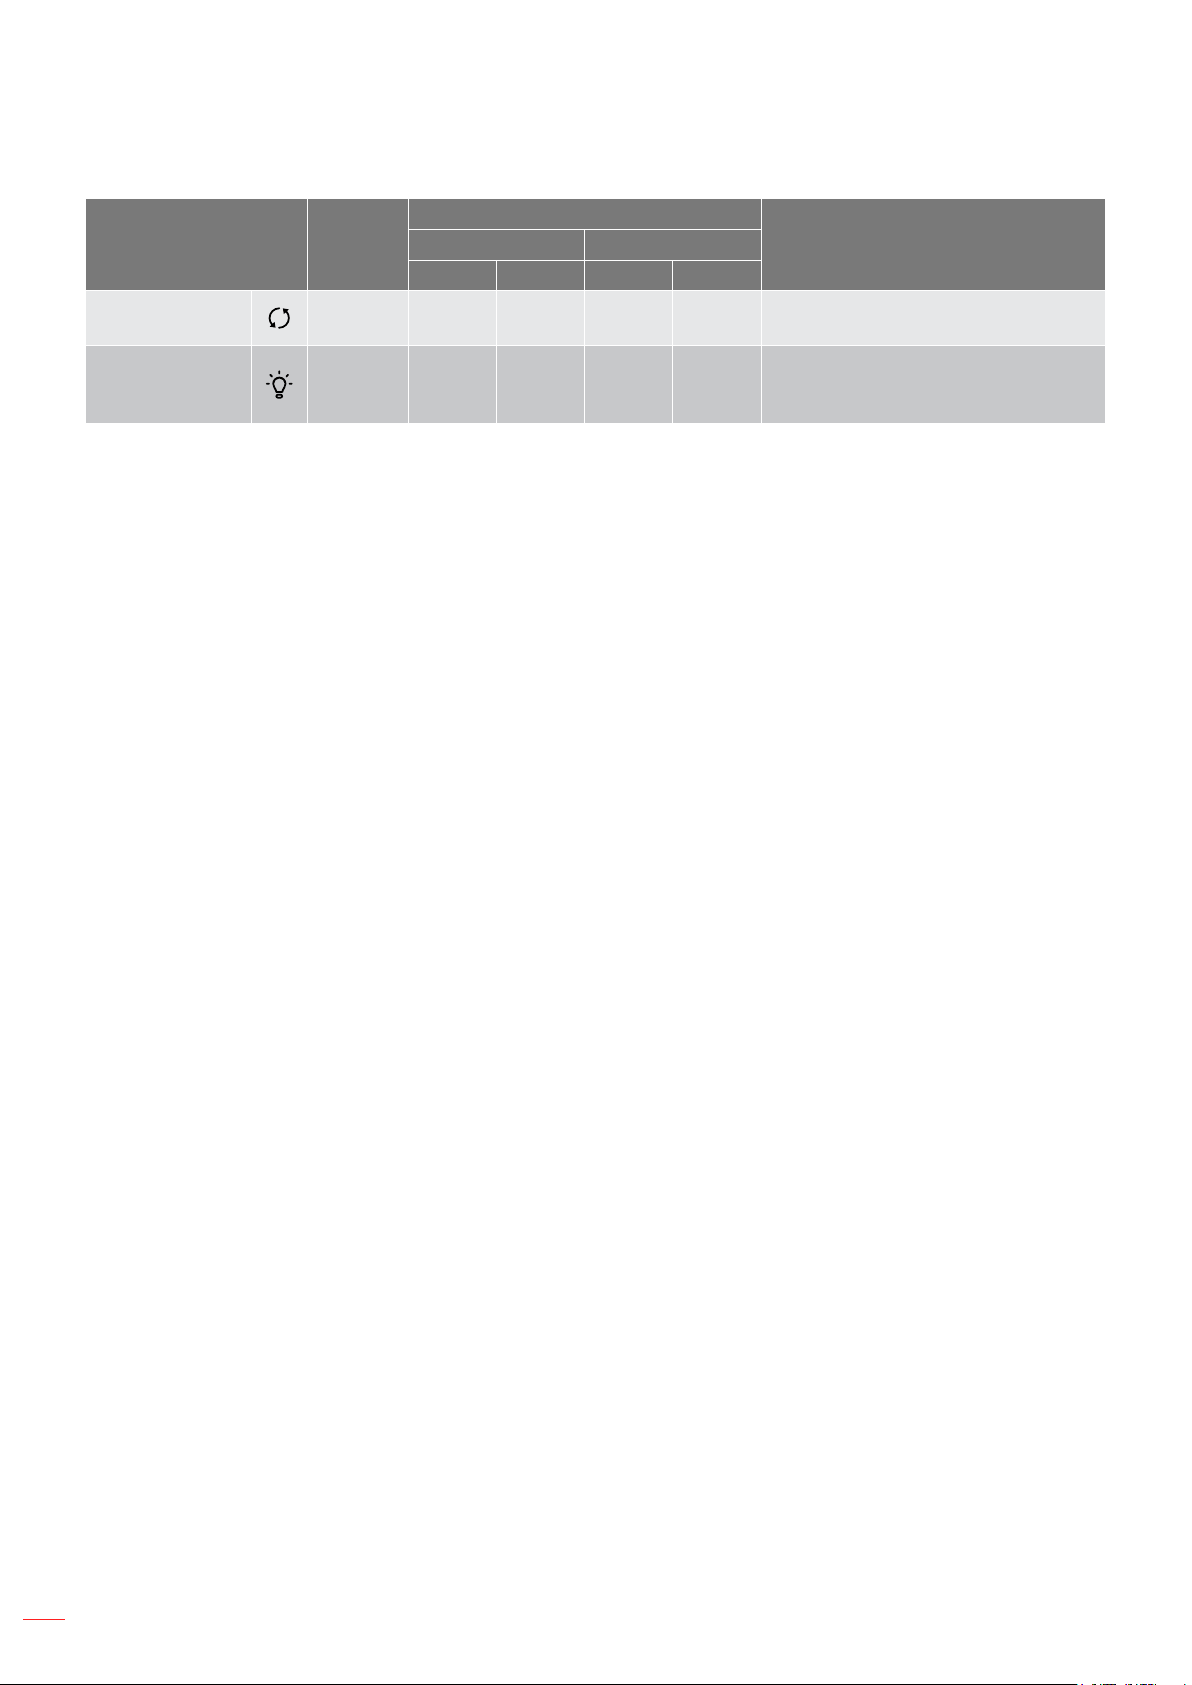
ADDITIONAL INFORMATION
Key
Resync F1 32 CD C4 3B
Light Source
Mode
Repeat
Format
Byte 1 Byte 2 Byte 3 Byte 4
F1 32 CD 0A F5
NEC Code
DescriptionCustom Code Data
Press to automatically synchronize
the projector to the input source.
Press to automatically adjust
the picture brightness to give an
optimum contrast performance.
62
English
Page 63

ADDITIONAL INFORMATION
Troubleshooting
If you experience a problem with your projector, please refer to the following information. If a problem persists,
please contact your local reseller or service center.
Image problems
No image appears on-screen
• Ensure all the cables and power connections are correctly and securely connected as described in the
"Installation" section.
• Ensure the pins of connectors are not crooked or broken.
• Ensure that the "Mute" feature is not turned on.
Image is out of focus
• Slide the focus lever up or down until the image is sharp and legible. (Please see page 18).
• Make sure the projection screen is between the required distance from the projector. (Please refer to
page 57).
The image is stretched when displaying 16:9 DVD title
• When you play anamorphic DVD or 16:9 DVD, the projector will show the best image in 16: 9 format
on projector side.
• If you play 4:3 format DVD title, please change the format as 4:3 in projector OSD.
• Please setup the display format as 16:9 (wide) aspect ratio type on your DVD player.
Image is too small or too large
• Move the projector closer to or further from the screen.
• Press "Menu" on the projector panel, go to "Display → Aspect Ratio". Try the di�erent settings.
Image has slanted sides:
• If possible, reposition the projector so that it is centered on the screen and below the bottom of the
screen.
Image is reversed
• Select "Display Projection Orientation" from the OSD and adjust the projection direction.
English
63
Page 64

ADDITIONAL INFORMATION
Other problems
The projector stops responding to all controls
• If possible, turn o� the projector, then unplug the power cord and wait at least 20 seconds before
reconnecting power.
Remote control problems
If the remote control does not work
• Check the operating angle of the remote control is pointed within ±15° to the IR receiver on the
projector.
• Make sure there are not any obstructions between the remote control and the projector. Move to within
6 m (19.7 ft) of the projector.
• Make sure batteries are inserted correctly.
• Replace batteries if they are exhausted.
64
English
Page 65

ADDITIONAL INFORMATION
Warning indicators
When the warning indicators (see below) light up or 㿿ash, the projector will automatically shutdown:
• “Lamp” LED indicator is lit red and if “Power” indicator 㿿ashes red.
• “Temp” LED indicator is lit red and if “Power” indicator 㿿ashes red. This indicates the projector has
overheated. Under normal conditions, the project can be switched back on.
• “Temp” LED indicator 㿿ashes red and if “Power” indicator 㿿ashes red.
Unplug the power cord from the projector, wait for 30 seconds and try again. If the warning indicator lights up or
㿿ashes, please contact your nearest service center for assistance.
LED lightning messages
Message
Standby state
(Input power cord)
Power on (Warming)
Power on and Lamp lighting Steady light
Power o� (Cooling)
Error (Lamp failure) Flashing Steady light
Error (Fan failure) Flashing Flashing
Error (Over temp.) Flashing Steady light
(Red) (Blue) (Red) (Red)
Breathing light
Power LED Temp LED Lamp LED
Flashing
(0.5 sec o� /
0.5 sec on)
Flashing
(0.5 sec o� /
0.5 sec on). Back to
red steady light when
cooling fan turns o�.
• Power o�:
Power O�
Press power key again.
• Temperature warning:
TEMPERATURE TOO HIGH
Please:
1. Make sure air in and outlets are not blocked.
2. Make sure the environment temperature is under 45 degree C.
If the problem persists in spite of the above.
Please contact a service center for repair.
Warning
English
65
Page 66

ADDITIONAL INFORMATION
Speci⿿cations
Item Description
Output Resolution 3840x2160 (with 4-Way Actuator)
Maximum Resolution HDMI(HDMI 2.0): 3840x2160@60Hz
Throw ratio 0.253
Lens
Image size
Projection distance 510mm± 5% @140’’
I/Os
Colour 1073.4 Million color
Scan rate
Speaker 15W x1, output power 8W ±10%
Power consumption
Input current DC 24V, 10.41A
Installation orientations 360° projection + portrait
Dimensions (W x D x H)
Weight
Environmental Operating in 0°~40°C, 10% to 85% humidity (non-condensing)
F-stop 2.44
Focal length -3.7mm
Zoom range Fixed zoom
100” ~ 150” optimized @140”
• HDMI In 2.0 x2
• USB Type-A x1 (5V/1.5A, dedicated for power out/TI FW upgraded)
• 3D Sync Out x1 (Mini DIN 3-pin connector)
• LAN Control In/Out x1 (RJ-45 connector)
• HDBaseT In x1 (RJ-45 connector)
• Audio Out x1 (ø3.5mm Phone jack)
• RS232 x1 (D-sub 9-pin)
• DC-In jack
• Horizontal scan rate: 15KHz ~ 150KHz
• Vertical scan rate: 24Hz ~240Hz
• Typical: (Spoke mode)
255W ±15% @110VAC
250W ±15% @220VAC
• Typical: (ECO mode)
180W ±15% @110VAC
178W ±15% @220VAC
• Without feet: 327 x 327.8 x 85 mm
• With feet: 327 x 327.8 x 109.6 mm
• 4.2 ±0.5 kg (net)
• 6.7 ±0.5 kg (gross)
Note: All speci�cations are subject to change without notice.
English
66
Page 67
ADDITIONAL INFORMATION
Optoma global oces
For service or support, please contact your local oce.
USA
Optoma Technology, Inc. 888-289-6786
47697 Westinghouse Drive. 510-996-4794
Fremont, Ca 94539 [email protected]
Canada
Optoma Technology, Inc. 888-289-6786
47697 Westinghouse Drive. 510-996-4794
Fremont, Ca 94539 [email protected]
Latin America
Optoma Technology, Inc. 888-289-6786
47697 Westinghouse Drive. 510-996-4794
Fremont, Ca 94539 [email protected]
Europe
1 Bourne End Mills
Hemel Hempstead
Hertfordshire +44 (0) 1923 691 800
HP1 2UJ +44 (0) 1923 691 888
United Kingdom [email protected]
www.optoma.eu
Service Tel : +44 (0)1923 691865
Benelux BV
Optoma Benelux BV +31 (0) 36 8200 250
Europalaan 770 D +31 (0) 36 548 9052
1363BM Almere
The Netherlands
www.optoma.nl
Japan
https://www.optoma.com/jp/
Taiwan
https://www.optoma.com/tw/
China
Room 2001, 20F, Building 4, +86-21-62947376
No.1398 Kaixuan Road, +86-21-62947375
Changning District www.optoma.com.cn
Shanghai, 200052, China
Australia
https://www.optoma.com/au/
France
Bâtiment E +33 1 41 46 12 20
81-83 avenue Edouard Vaillant +33 1 41 46 94 35
92100 Boulogne Billancourt, France [email protected]
Spain
C/ José Hierro, 36 Of. 1C 28529 Rivas +34 91 499 06 06
VaciaMadrid, Spain +34 91 670 08 32
Deutschland
Optoma Deutschland GmbH +49 (0) 2161 68643 0
Am Nordpark 3 +49 (0) 2161 68643 99
41069 Mönchengladbach [email protected]
Deutschland
Scandinavia
Postboks 9515 Åskollen +47 32 98 89 90
Kniveveien 29 +47 32 98 89 99
Drammen [email protected]
3036
Norway
Korea
https://www.optoma.com/kr/
English
67
Page 68

www.optoma.com
 Loading...