

Page 1

Form 2077
GROOV BOX
USER’S GUIDE FOR
GROOV-AT1
Page 2

GROOV BOX USER’S GUIDE FOR
GROOV-AT1
Form 2077-160331—March 2016
43044 Business Park Drive • Temecula • CA 92590-3614
Phone: 800-321-OPTO (6786) or 951-695-3000
Fax: 800-832-OPTO (6786) or 951-695-2712
www.opto22.com
Product Support Services
800-TEK-OPTO (835-6786) or 951-695-3080
Fax: 951-695-3017
Email: [email protected]
Web: support.opto22.com
Page 3

groov Box User’s Guide for GROOV AT1
Form 2077-160331—March 2016
Copyright © 2013-2016 Opto 22.
All rights reserved.
Printed in the United States of America.
The information in this manual has been checked carefully and is believed to be accurate; however, Opto 22 assumes no
responsibility for possible inaccuracies or omissions. Specifications are subject to change without notice.
Opto 22 warrants all of its products to be free from defects in material or workmanship for 30 months from the
manufacturing date code. This warranty is limited to the original cost of the unit only and does not cover installation, labor,
or any other contingent costs. Opto 22 I/O modules and solid-state relays with date codes of 1/96 or newer are guaranteed
for life. This lifetime warranty excludes reed relay, SNAP serial communication modules, SNAP PID modules, and modules
that contain mechanical contacts or switches. Opto 22 does not warrant any product, components, or parts not
manufactured by Opto 22; for these items, the warranty from the original manufacturer applies. Refer to Opto 22 form
1042 for complete warranty information.
Wired+Wireless controllers and brains are licensed under one or more of the following patents: U.S. Patent No(s). 5282222,
RE37802, 6963617; Canadian Patent No. 2064975; European Patent No. 1142245; French Patent No. 1142245; British Patent
No. 1142245; Japanese Patent No. 2002535925A; German Patent No. 60011224.
Opto 22 FactoryFloor, groov, Optomux, and Pamux are registered trademarks of Opto 22. Generation 4, groov Server,
ioControl, ioDisplay, ioManager, ioProject, ioUtilities, mistic, Nvio, Nvio.net Web Portal, OptoConnect, OptoControl,
OptoDataLink, OptoDisplay, OptoEMU, OptoEMU Sensor, OptoEMU Server, OptoOPCServer, OptoScript, OptoServer,
OptoTerminal, OptoUtilities, PAC Control, PAC Display, PAC Manager, PAC Project, SNAP Ethernet I/O, SNAP I/O, SNAP OEM
I/O, SNAP PAC System, SNAP Simple I/O, SNAP Ultimate I/O, and Wired+Wireless are trademarks of Opto 22.
ActiveX, JScript, Microsoft, MS-DOS, VBScript, Visual Basic, Visual C++, Windows, and Windows Vista are either registered
trademarks or trademarks of Microsoft Corporation in the United States and other countries. Linux is a registered
trademark of Linus Torvalds. ARCNET is a registered trademark of Datapoint Corporation. Modbus is a registered trademark
of Schneider Electric, licensed to the Modbus Organization, Inc. Wiegand is a registered trademark of Sensor Engineering
Corporation. Allen-Bradley, CompactLogix, ControlLogix, MicroLogix, SLC, and RSLogix are either registered trademarks or
trademarks of Rockwell Automation. CIP and EtherNet/IP are trademarks of ODVA.
groov includes software developed by the OpenSSL Project for use in the OpenSSL Toolkit. (http://www.openssl.org)
All other brand or product names are trademarks or registered trademarks of their respective companies or organizations.
Opto 22
Automation Made Simple.
ii
groov Box User’s Guide for GROOV AT1
Page 4
Table of Contents
Chapter 1: Welcome . . . . . . . . . . . . . . . . . . . . . . . . . . . . . . . . . . . . . . . . . . . . . . . . . . . . .1
Choose Your groov . . . . . . . . . . . . . . . . . . . . . . . . . . . . . . . . . . . . . . . . . . . . . . . . . . . . . . . . . . . . . . . . . . . . . . 2
About this Guide. . . . . . . . . . . . . . . . . . . . . . . . . . . . . . . . . . . . . . . . . . . . . . . . . . . . . . . . . . . . . . . . . . . . . . . . . 3
System Requirements . . . . . . . . . . . . . . . . . . . . . . . . . . . . . . . . . . . . . . . . . . . . . . . . . . . . . . . . . . . . . . . . . . . . 3
A Note on Browsers . . . . . . . . . . . . . . . . . . . . . . . . . . . . . . . . . . . . . . . . . . . . . . . . . . . . . . . . . . . . . . . . . . 3
groov Box Communications . . . . . . . . . . . . . . . . . . . . . . . . . . . . . . . . . . . . . . . . . . . . . . . . . . . . . . . . . . . . . . 4
System Architecture. . . . . . . . . . . . . . . . . . . . . . . . . . . . . . . . . . . . . . . . . . . . . . . . . . . . . . . . . . . . . . . . . . . . . . 5
What’s In This Guide . . . . . . . . . . . . . . . . . . . . . . . . . . . . . . . . . . . . . . . . . . . . . . . . . . . . . . . . . . . . . . . . . . . . . 6
Product Support . . . . . . . . . . . . . . . . . . . . . . . . . . . . . . . . . . . . . . . . . . . . . . . . . . . . . . . . . . . . . . . . . . . . . . . . . 6
Chapter 2: Getting Started . . . . . . . . . . . . . . . . . . . . . . . . . . . . . . . . . . . . . . . . . . . . . . . 7
What You Will Need. . . . . . . . . . . . . . . . . . . . . . . . . . . . . . . . . . . . . . . . . . . . . . . . . . . . . . . . . . . . . . . . . . . . . . 7
In the Box . . . . . . . . . . . . . . . . . . . . . . . . . . . . . . . . . . . . . . . . . . . . . . . . . . . . . . . . . . . . . . . . . . . . . . . . . . . . . . . 7
Step 1: Get To Know the groov Box . . . . . . . . . . . . . . . . . . . . . . . . . . . . . . . . . . . . . . . . . . . . . . . . . . . . . . . 8
Step 2: Choose a Location . . . . . . . . . . . . . . . . . . . . . . . . . . . . . . . . . . . . . . . . . . . . . . . . . . . . . . . . . . . . . . . . 9
Step 3: Mount the groov Box . . . . . . . . . . . . . . . . . . . . . . . . . . . . . . . . . . . . . . . . . . . . . . . . . . . . . . . . . . . . . 9
Step 4: Connect to the Network. . . . . . . . . . . . . . . . . . . . . . . . . . . . . . . . . . . . . . . . . . . . . . . . . . . . . . . . . . . 9
Step 5: Connect the Power Supply . . . . . . . . . . . . . . . . . . . . . . . . . . . . . . . . . . . . . . . . . . . . . . . . . . . . . . . 10
Step 6: Turn on the groov Box . . . . . . . . . . . . . . . . . . . . . . . . . . . . . . . . . . . . . . . . . . . . . . . . . . . . . . . . . . . 11
Step 7: Activate the groov Box and Get the License File . . . . . . . . . . . . . . . . . . . . . . . . . . . . . . . . . . . 11
Step 8: Open groov . . . . . . . . . . . . . . . . . . . . . . . . . . . . . . . . . . . . . . . . . . . . . . . . . . . . . . . . . . . . . . . . . . . . . 12
Step 9: Install the License File. . . . . . . . . . . . . . . . . . . . . . . . . . . . . . . . . . . . . . . . . . . . . . . . . . . . . . . . . . . . 14
Step 10: Create New Usernames and Passwords . . . . . . . . . . . . . . . . . . . . . . . . . . . . . . . . . . . . . . . . . . 15
Chapter 3: Using groov Admin . . . . . . . . . . . . . . . . . . . . . . . . . . . . . . . . . . . . . . . . . .17
Opening groov Admin. . . . . . . . . . . . . . . . . . . . . . . . . . . . . . . . . . . . . . . . . . . . . . . . . . . . . . . . . . . . . . . . . . . 17
Open groov Admin from groov Build . . . . . . . . . . . . . . . . . . . . . . . . . . . . . . . . . . . . . . . . . . . . . . . . . . 17
Open groov Admin using the URL . . . . . . . . . . . . . . . . . . . . . . . . . . . . . . . . . . . . . . . . . . . . . . . . . . . .17
Open groov Admin using groov Find (Windows only) . . . . . . . . . . . . . . . . . . . . . . . . . . . . . . . . . .18
Accepting the Security Warning . . . . . . . . . . . . . . . . . . . . . . . . . . . . . . . . . . . . . . . . . . . . . . . . . . . . . .19
For Chrome . . . . . . . . . . . . . . . . . . . . . . . . . . . . . . . . . . . . . . . . . . . . . . . . . . . . . . . . . . . . . . . . . . . . .20
For Firefox . . . . . . . . . . . . . . . . . . . . . . . . . . . . . . . . . . . . . . . . . . . . . . . . . . . . . . . . . . . . . . . . . . . . . .20
groov Box User’s Guide for GROOV AT1 iii
iii
Page 5

For Safari . . . . . . . . . . . . . . . . . . . . . . . . . . . . . . . . . . . . . . . . . . . . . . . . . . . . . . . . . . . . . . . . . . . . . . . 20
For Internet Explorer . . . . . . . . . . . . . . . . . . . . . . . . . . . . . . . . . . . . . . . . . . . . . . . . . . . . . . . . . . . . 20
Logging in . . . . . . . . . . . . . . . . . . . . . . . . . . . . . . . . . . . . . . . . . . . . . . . . . . . . . . . . . . . . . . . . . . . . . . . . . . 20
Quick Start menu. . . . . . . . . . . . . . . . . . . . . . . . . . . . . . . . . . . . . . . . . . . . . . . . . . . . . . . . . . . . . . . . . . . . . . . . 21
Opening groov View and Build from groov Admin. . . . . . . . . . . . . . . . . . . . . . . . . . . . . . . . . . . . . . . . . 21
Configuring Network Connections . . . . . . . . . . . . . . . . . . . . . . . . . . . . . . . . . . . . . . . . . . . . . . . . . . . . . . . 22
Assigning a Static IP Address . . . . . . . . . . . . . . . . . . . . . . . . . . . . . . . . . . . . . . . . . . . . . . . . . . . . . . . . 22
Changing the Hostname, DNS Servers, or IPv4 Gateway . . . . . . . . . . . . . . . . . . . . . . . . . . . . . . . 23
Configuring ETH1 for the Control Network . . . . . . . . . . . . . . . . . . . . . . . . . . . . . . . . . . . . . . . . . . . 24
Configuring Wireless Communications . . . . . . . . . . . . . . . . . . . . . . . . . . . . . . . . . . . . . . . . . . . . . . . 25
Updating groov App (Build and View) . . . . . . . . . . . . . . . . . . . . . . . . . . . . . . . . . . . . . . . . . . . . . . . . . . . . 28
Backing Up groov . . . . . . . . . . . . . . . . . . . . . . . . . . . . . . . . . . . . . . . . . . . . . . . . . . . . . . . . . . . . . . . . . . . . . . . 29
Restoring groov . . . . . . . . . . . . . . . . . . . . . . . . . . . . . . . . . . . . . . . . . . . . . . . . . . . . . . . . . . . . . . . . . . . . . . . . . 31
Updating groov Admin . . . . . . . . . . . . . . . . . . . . . . . . . . . . . . . . . . . . . . . . . . . . . . . . . . . . . . . . . . . . . . . . . . 32
Restarting the groov Box. . . . . . . . . . . . . . . . . . . . . . . . . . . . . . . . . . . . . . . . . . . . . . . . . . . . . . . . . . . . . . . . . 33
Changing Username and Password . . . . . . . . . . . . . . . . . . . . . . . . . . . . . . . . . . . . . . . . . . . . . . . . . . . . . . 35
Checking System Information. . . . . . . . . . . . . . . . . . . . . . . . . . . . . . . . . . . . . . . . . . . . . . . . . . . . . . . . . . . . 36
Checking Hardware Status . . . . . . . . . . . . . . . . . . . . . . . . . . . . . . . . . . . . . . . . . . . . . . . . . . . . . . . . . . . . . . . 36
Setting the System Time. . . . . . . . . . . . . . . . . . . . . . . . . . . . . . . . . . . . . . . . . . . . . . . . . . . . . . . . . . . . . . . . . 38
Chapter 4: Using an SSL Certificate . . . . . . . . . . . . . . . . . . . . . . . . . . . . . . . . . . . . . 41
Using a Self-Signed Certificate . . . . . . . . . . . . . . . . . . . . . . . . . . . . . . . . . . . . . . . . . . . . . . . . . . . . . . . . . . . 42
Step 1: Create a Self-Signed Certificate and Private Key . . . . . . . . . . . . . . . . . . . . . . . . . . . . . . . 42
Step 2: Add the Self-Signed Certificate to a Browser Trust Store on a Computer . . . . . . . . 46
Windows . . . . . . . . . . . . . . . . . . . . . . . . . . . . . . . . . . . . . . . . . . . . . . . . . . . . . . . . . . . . . . . . . . . . . . 46
OS X . . . . . . . . . . . . . . . . . . . . . . . . . . . . . . . . . . . . . . . . . . . . . . . . . . . . . . . . . . . . . . . . . . . . . . . . . . . 48
Step 3: Install an SSL Certificate on Mobile Devices . . . . . . . . . . . . . . . . . . . . . . . . . . . . . . . . . . . 49
iOS Devices . . . . . . . . . . . . . . . . . . . . . . . . . . . . . . . . . . . . . . . . . . . . . . . . . . . . . . . . . . . . . . . . . . . . 49
Android Devices . . . . . . . . . . . . . . . . . . . . . . . . . . . . . . . . . . . . . . . . . . . . . . . . . . . . . . . . . . . . . . . . 50
Using a CA-Signed Certificate on groov Box . . . . . . . . . . . . . . . . . . . . . . . . . . . . . . . . . . . . . . . . . . . . . . . 50
Step 1: Create a CSR . . . . . . . . . . . . . . . . . . . . . . . . . . . . . . . . . . . . . . . . . . . . . . . . . . . . . . . . . . . . . . . . . 50
Step 2: Obtain a CA-Signed Certificate . . . . . . . . . . . . . . . . . . . . . . . . . . . . . . . . . . . . . . . . . . . . . . . 52
Step 3: Install the CA-Signed Certificate on groov Box . . . . . . . . . . . . . . . . . . . . . . . . . . . . . . . . . 53
Chapter 5: Maintenance and Troubleshooting . . . . . . . . . . . . . . . . . . . . . . . . . . . 55
Maintenance. . . . . . . . . . . . . . . . . . . . . . . . . . . . . . . . . . . . . . . . . . . . . . . . . . . . . . . . . . . . . . . . . . . . . . . . . . . . 55
Turning the groov Box On and Off . . . . . . . . . . . . . . . . . . . . . . . . . . . . . . . . . . . . . . . . . . . . . . . . . . . 55
Resetting the groov Box to factory defaults . . . . . . . . . . . . . . . . . . . . . . . . . . . . . . . . . . . . . . . . . . . 56
Maintaining the fan filters . . . . . . . . . . . . . . . . . . . . . . . . . . . . . . . . . . . . . . . . . . . . . . . . . . . . . . . . . . . 56
Troubleshooting . . . . . . . . . . . . . . . . . . . . . . . . . . . . . . . . . . . . . . . . . . . . . . . . . . . . . . . . . . . . . . . . . . . . . . . . 57
The groov Box is not receiving power . . . . . . . . . . . . . . . . . . . . . . . . . . . . . . . . . . . . . . . . . . . . . . . . 57
The groov Box is connected to the Ethernet network but not working . . . . . . . . . . . . . . . . . 57
DHCP (dynamic host configuration protocol) server . . . . . . . . . . . . . . . . . . . . . . . . . . . . . . 57
DNS (domain name server) . . . . . . . . . . . . . . . . . . . . . . . . . . . . . . . . . . . . . . . . . . . . . . . . . . . . . 58
Computer with more than one NIC . . . . . . . . . . . . . . . . . . . . . . . . . . . . . . . . . . . . . . . . . . . . . . 58
Controller, Modbus device, or OPC UA server can’t be found . . . . . . . . . . . . . . . . . . . . . . . . . . 58
iv
groov Box User’s Guide for GROOV AT1
Page 6

Cannot log into the groov Box using the hostname . . . . . . . . . . . . . . . . . . . . . . . . . . . . . . . . . . . 58
Considerations for locating the groov Box . . . . . . . . . . . . . . . . . . . . . . . . . . . . . . . . . . . . . . . . . . . . 59
Using external Wi-Fi antennas . . . . . . . . . . . . . . . . . . . . . . . . . . . . . . . . . . . . . . . . . . . . . . . . . . . . . . . .59
A: Specifications and Dimensions . . . . . . . . . . . . . . . . . . . . . . . . . . . . . . . . . . . . . . .61
Specifications. . . . . . . . . . . . . . . . . . . . . . . . . . . . . . . . . . . . . . . . . . . . . . . . . . . . . . . . . . . . . . . . . . . . . . . . . . . 61
Dimensions. . . . . . . . . . . . . . . . . . . . . . . . . . . . . . . . . . . . . . . . . . . . . . . . . . . . . . . . . . . . . . . . . . . . . . . . . . . . . 62
B: Connectors, Indicators, and LEDs . . . . . . . . . . . . . . . . . . . . . . . . . . . . . . . . . . . . .63
Connectors and Indicators. . . . . . . . . . . . . . . . . . . . . . . . . . . . . . . . . . . . . . . . . . . . . . . . . . . . . . . . . . . . . . . 63
LEDs . . . . . . . . . . . . . . . . . . . . . . . . . . . . . . . . . . . . . . . . . . . . . . . . . . . . . . . . . . . . . . . . . . . . . . . . . . . . . . . . . . . 64
groov Box User’s Guide for GROOV AT1
v
v
Page 7

vi
groov Box User’s Guide for GROOV AT1
Page 8

1: Chapter 1
1: Welcome
groov is Opto 22’s web-based operator interface system that is simple, mobile, and connects easily to
almost any automation system or device.
Simple: groov requires only a web browser to build mobile interfaces. It puts ready-made gadgets at
your fingertips and requires no programming. Using tags from the built-in Data Simulator, you can
test project ideas without connecting to a live machine or system. groov makes it simple to build,
deploy, and view effective, scalable operator interfaces.
Mobile: Get the free groov View app for Android or iOS to view your groov interface on your iPhone,
iPad, or Android phone or tablet. If you want to use a different brand device, from a smartphone to a
web-enabled big-screen TV, just view your groov interface using a web browser. groov can augment
existing human-machine interfaces (HMIs) and SCADA systems by making specific data available to
authorized users at any time and in any location. Using event notification, selected personnel can be
alerted anywhere by email or text message about system events based on one or more conditions.
Connects easily: You can connect groov to Modbus/TCP devices and Opto 22 SNAP PAC controllers
directly, or to devices from other manufacturers through an OPC UA (Unified Architecture) server.
groov brings key data from process control, OEM machines, manufacturing and building systems,
and the Internet of Things (IoT) into the hands of those who need it.
groov Box User’s Guide for GROOV AT1 1
1
Page 9

CHOOSE YOUR GROOV
groov Box
Internet
groov Build
groov View
Assets
Another company’s
automation system
groov Server for
Windows
Opto 22 SNAP
PAC co n trol l er
OPC-UA tag server (only needed
if using another company’s
automation system)
When connected to an OPC UA server, you can monitor and control PLCs and PACs such as
Allen-Bradley ControlLogix and CompactLogix, Siemens SIMATIC S7, Schneider Electric Modicon, GE
PACSystems, and many more. In addition you can use groov with databases, SNMP devices, weather
stations, OPC DA servers, or any device or system supported by your OPC UA server. The
KEPServerEX communication platform from Kepware Technolgies is recommended by Opto 22 and
tested to work with groov. (For more information about OPC UA, go to opcfoundation.org/UA.)
Choose Your groov
groov is available as either the standalone groov Box hardware
appliance or the PC-based groov Server for Windows
software.
groov Box is an industrially hardened appliance that comes
preloaded with groov software, including groov Build for
building operator interfaces, groov View for using the
interfaces you’ve built, and groov Admin for administering the
Box itself. The groov Box communicates over a standard
Ethernet network or wireless LAN (local area network), or both.
groov Server for Windows includes groov software (groov Build for building operator interfaces
and groov View for using them) and is ready for installation on a Microsoft® Windows® PC. Once
installed, groov Server runs as a service on your computer. For more information on groov Server, see
form 2078, the groov Server for Windows User’s Guide.
2
groov Box User’s Guide for GROOV AT1
Page 10

Whether you store and serve groov software on a groov Box or on a computer using groov Server for
Windows, an operator interface you develop with groov can be viewed on almost any mobile device
or computer.
About this Guide
This user’s guide shows you how to install and set up your groov Box, part number GROOV-AT1.
(If your groov Box is the newer model with part number GROOV-AR1, see form 2104, the groov Box
User’s Guide for GROOV-AR1, instead of this guide.)
This guide also shows you how to use the groov Admin software. groov Admin provides the tools to
update groov, set up wired and wireless networking, and more.
For information about building and viewing groov interfaces, see form 2027, the groov User’s Guide.
Additional resources for groov are available on groov.com.
System Requirements
CHAPTER 1: WELCOME
To build operator interfaces with groov you’ll need:
• Any computer with a modern web browser. This does not have to be a Windows PC.
• One or more of the following:
– A Modbus device that communicates over Ethernet
– An Opto 22 SNAP PAC System (SNAP PAC S-series, R-series, with firmware R9.2a or newer or
So f tPA C , r unn in g a PA C Con tro l s t ra t eg y )
– Any OPC UA-compatible automation system or equipment, plus an OPC UA server and
drivers for your equipment.
groov and KEPServerEX: If you are building a groov interface for an OPC UA-compatible system and
don’t already have an OPC UA server installed, the KEPServerEX communication platform from
Kepware Technologies is recommended by Opto 22 and tested to work with groov. For more
information, see www.kepware.com/Products/products_OPCServers.asp and
www.kepware.com/Support_Center/doc_auto_tag.asp
A Note on Browsers
Thanks to technologies such as HTML5, SVG, and CSS3, web browsers are now fairly similar. Our
browser-based groov View and groov Build work reliably on a large number of device/OS/browser
combinations, including HDTVs, smartphones and tablets of many shapes and sizes, and computers.
We’ve found Firefox, Chrome, Safari, and Internet Explorer 10 or newer to be generally reliable. If one
browser is causing problems for you, however, try another one and let us know what issues you’ve
seen. For Product Support, see page 6.
groov Box User’s Guide for GROOV AT1
3
3
Page 11
GROOV BOX COMMUNICATIONS
Ethernet connectors
Wireless antenna
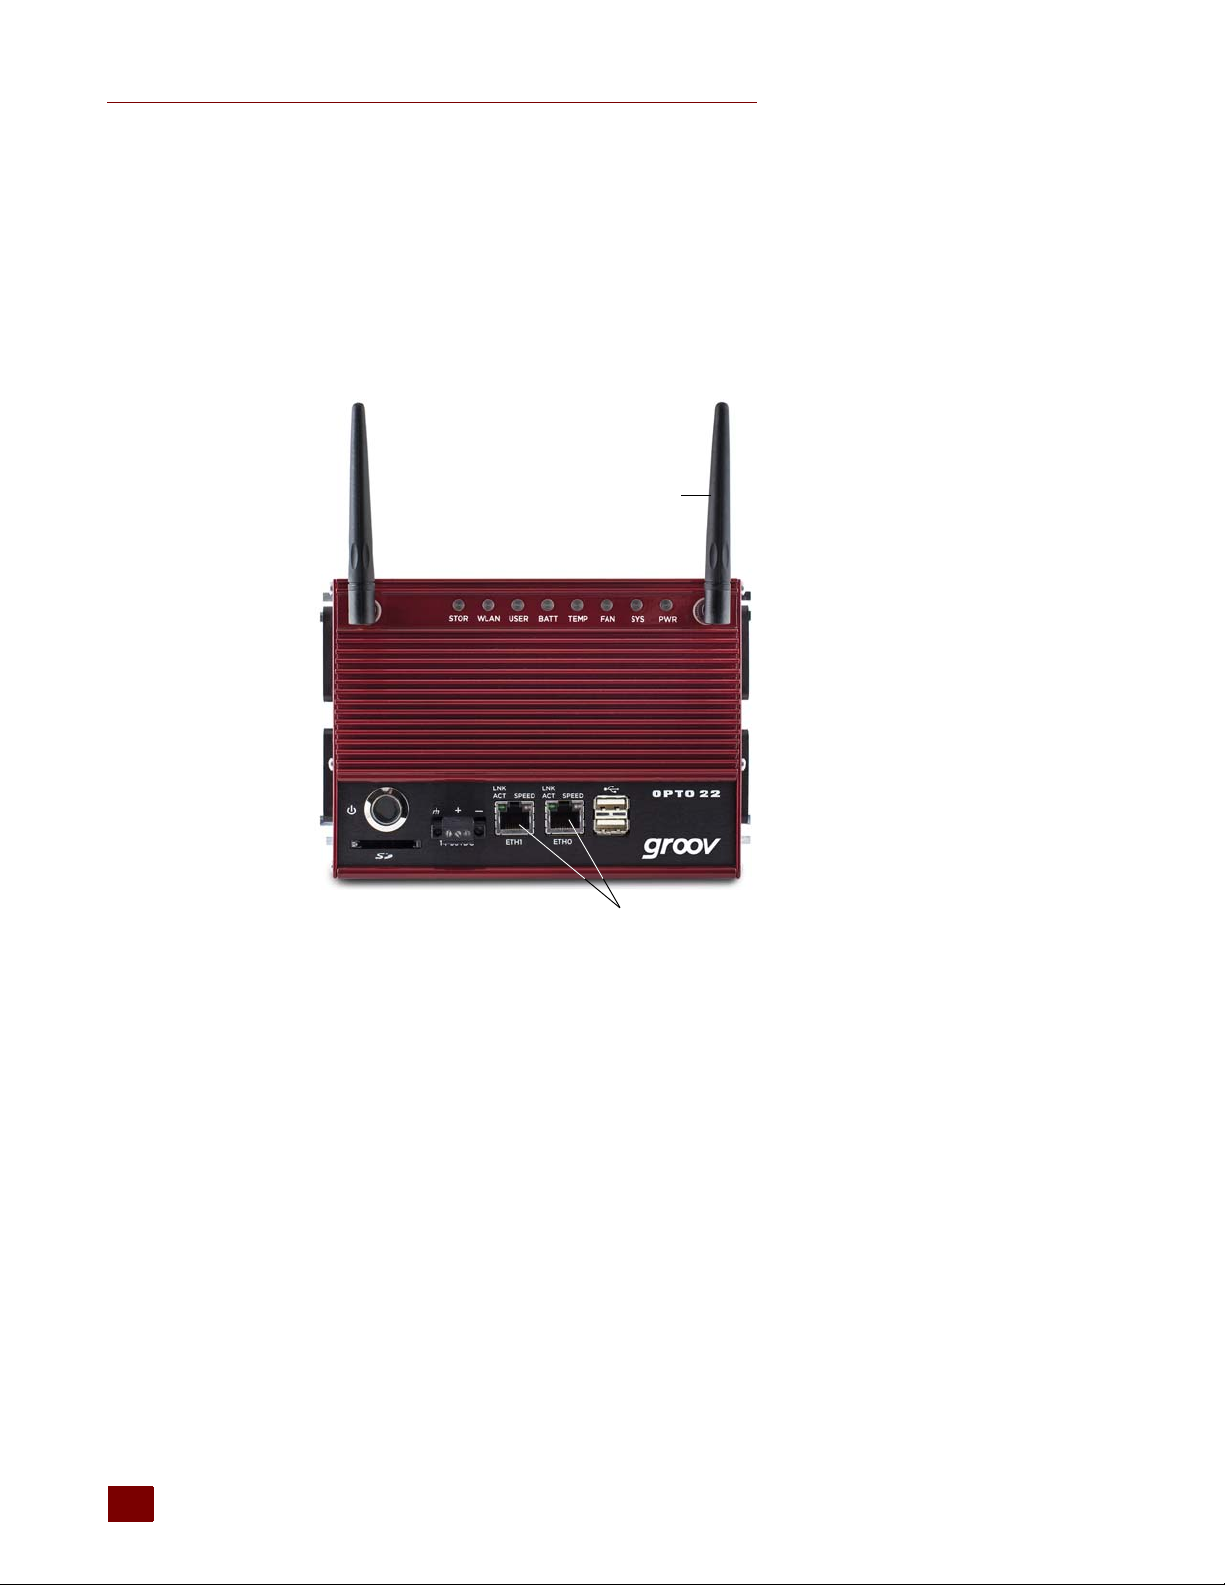
groov Box Communications
groov uses standard computer networks and protocols. The unit communicates with computer
networks over a standard 10/100/1000 Mbps Ethernet network or over an 802.11b, g, or n wireless
LAN (local area network), or over both.
With two independent wired Ethernet network interfaces plus an independent wireless interface,
the unit gives you the flexibility to monitor devices in hard-to-reach areas and to set up networking
suited to your business.
4
groov Box User’s Guide for GROOV AT1
Page 12
System Architecture
groov Box
Internet
PC running groov
View in a web
browser
SNAP PAC controller
Assets
Control
Network
Smartphone with groov View
Enterprise
Network
VPN server
Modbus/TCP devices and
controllers from multiple
manufacturers
OPC UA server
(Only needed if using
another company’s
automation system. Not
needed for Opto 22 or
Modbus/TCP devices.)
CHAPTER 1: WELCOME
When you first set up
groov
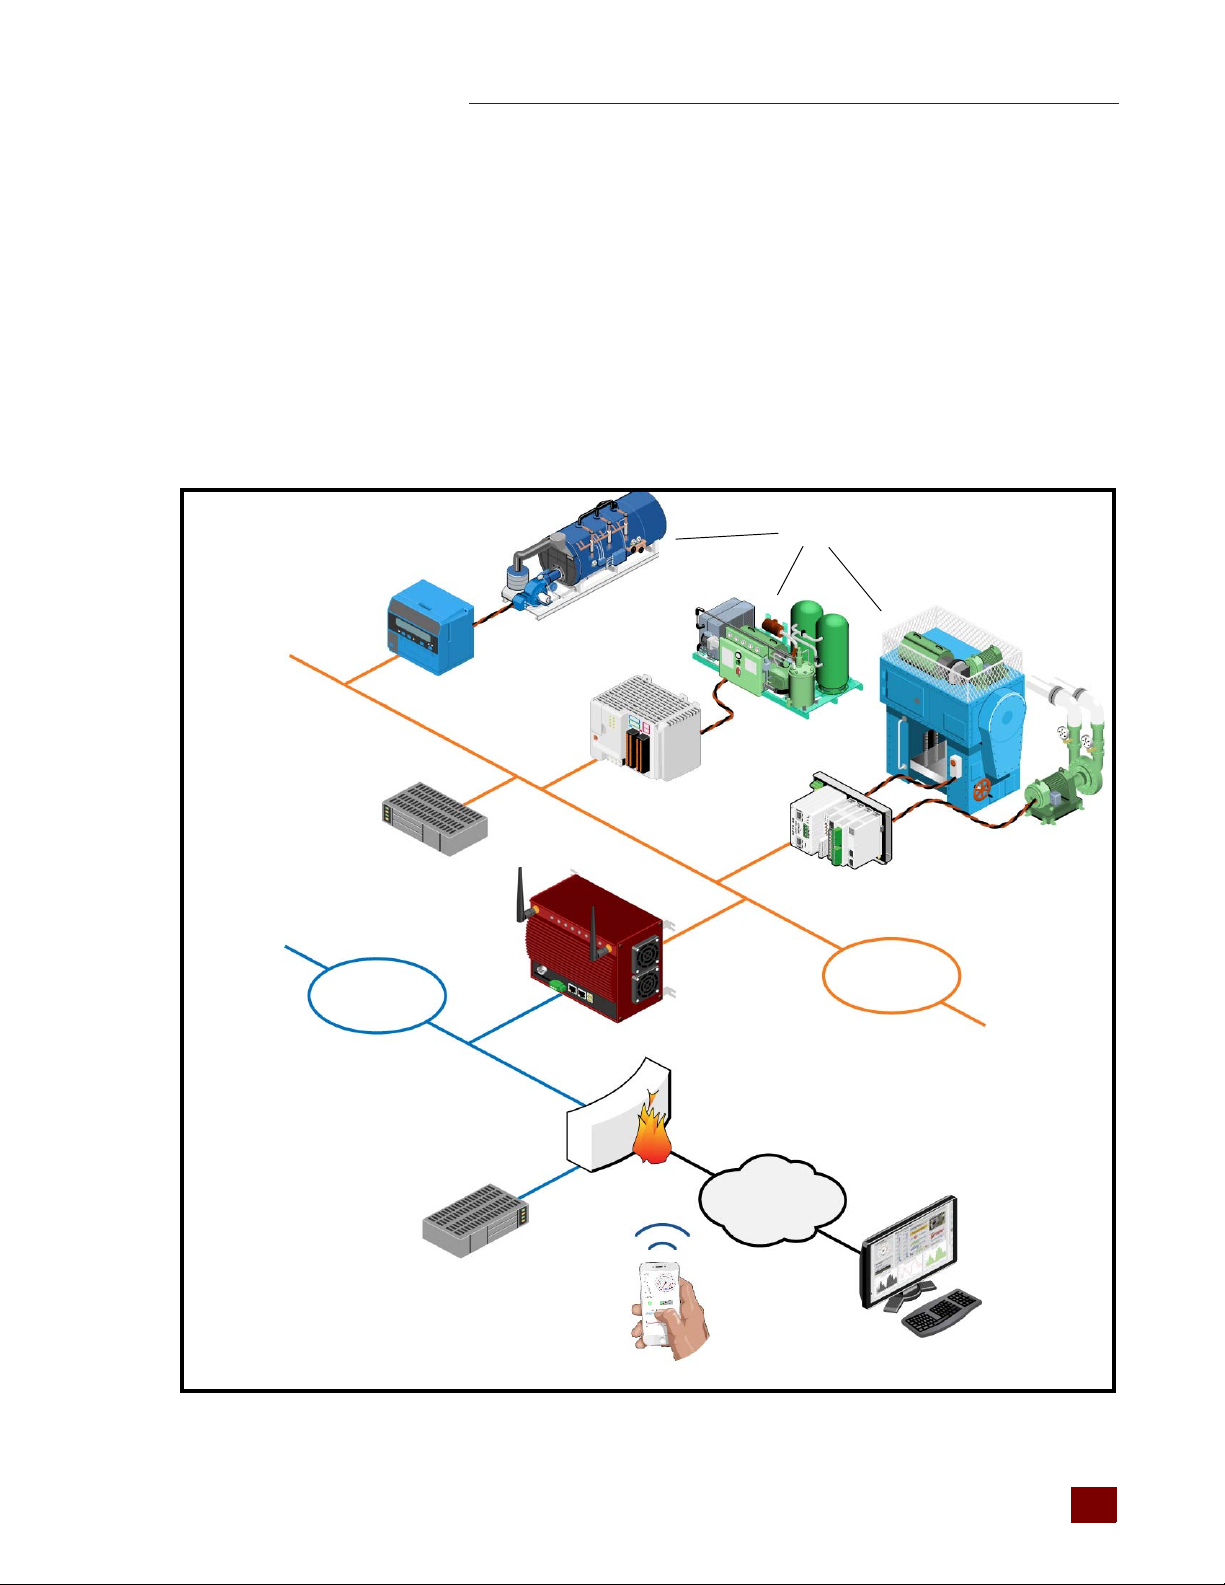
Box. In a quick and easy setup, the development PC and smartphone or tablet running View all
reside within the same domain as
separate control network as shown here. For more information, see form 2161, the
.
groov
The following illustration shows
well as a SNAP PAC controller. When accessing
groov
, the PC you use must reside on the same network (broadcast domain) as the
groov
. The controller can also be on the same network, or it can be on a
Guide to Networking
groov
connected to control systems from other manufacturers as
groov
outside
groov
’s network on the Internet, a VPN
(Virtual Private Network) connection is recommended for security. The HTTPS (HTTP plus TLS/SSL) in
your browser shows that all data exchanged between your browser and groov is encrypted.
groov Box User’s Guide for GROOV AT1
5
5
Page 13

WHAT’S IN THIS GUIDE
NOTE: Email messages and phone
calls to Opto 22 Product Support
are grouped together and
answered in the order received.
What’s In This Guide
Here’s what is in this user’s guide:
Chapter 1: Welcome introduces this user’s guide and groov.
Chapter 2: Getting Started describes how to get groov up and running quickly.
Chapter 3: Using groov Admin describes how to use groov Admin to back up and restore groov,
manage the network connections, access system information, and more.
Chapter 4: Using an SSL Certificate describes using an SSL certificate that is digitally signed either
by a certificate authority (CA) or self-signed.
Chapter 5: Maintenance and Troubleshooting provides troubleshooting information and
answers questions you might have about groov.
Appendix A: Specifications and Dimensions provides technical specifications and groov Box
dimensions.
Appendix B: Connectors, Indicators, and LEDs describes connector names and what the status
and activity LEDs mean.
Product Support
If you have any questions about groov, you can call, fax, or e-mail Opto 22 Product Support.
Phone: 800-TEK-OPTO (800-835-6786
Fax: 951-695-3017
Email: [email protected]
Opto 22 website: www.opto22.com
When calling for technical support, be prepared to provide the following information about your
system to the Product Support engineer:
• groov version and groov Admin version. Click the System Information icon (see page 36).
• A description of your system equipment:
– Computer type, speed, memory, and operating system
– If used, Modbus/TCP device manufacturer and model
– If used, SNAP PAC controller model and firmware version
– If used, OPC UA server type and configuration
• A description of the network
toll-free in the U.S. and Canada)
951-695-3080
Monday through Friday,
7 a.m. to 5 p.m. Pacific Time
6
groov Box User’s Guide for GROOV AT1
• Specific error messages or other diagnostic indications
Page 14
2: Chapter 2
2: Getting Started
In this chapter you’ll find instructions on how to install the groov Box and set up the groov Admin
software.
In this chapter:
What You Will Need ..................................................................................7
Step 1: Get To Know the groov Box ...................................................8
Step 2: Choose a Location .....................................................................9
Step 3: Mount the groov Box ...............................................................9
Step 4: Connect to the Network.........................................................9
Step 5: Connect the Power Supply.................................................10
Step 6: Turn on the groov Box........................................................... 11
Step 7: Activate the groov Box and Get the License File.......11
Step 8: Open groov................................................................................12
Step 9: Install the License File ...........................................................14
Step 10: Create New Usernames and Passwords ..................... 15
What You Will Need
In order to set up your groov Box and do the activities in this chapter you will need a computer with
a web browser on the same network you’ll use for the groov Box. For the best experience, we
recommend Chrome, Firefox, or Internet Explorer 10 or newer.
In the Box
These items are included in the box:
• groov Quick Start, form 2063
• groov Box
• 2 extra fan filters
• groov Box wireless antennas
groov Box User’s Guide for GROOV AT1 7
7
Page 15

STEP 1: GET TO KNOW THE GROOV BOX
Ethernet cable
CD
groov Box
Antennas
(attach before use)
Spare fan filters
Power supply
Activation key
certificate
On/Off button
LEDs
ETH0
Airflow
Power terminal
Mounting tab
Affix the Activation
Key label here.
• groov CD that includes the groov User’s Guide (form 2027), the groov Quick Start (form 2063),
groov Box User’s Guide (form 2077), and the groov Find utility
• Ethernet cable
• Power supply unit
• Activation key certificate
Step 1: Get To Know the groov Box
To set up the groov Box, you’ll use the groov Box components shown below. Make sure to peel the
label from the Activation Key certificate and affix it to the top of the groov Box.
8
groov Box User’s Guide for GROOV AT1
Page 16
Step 2: Choose a Location
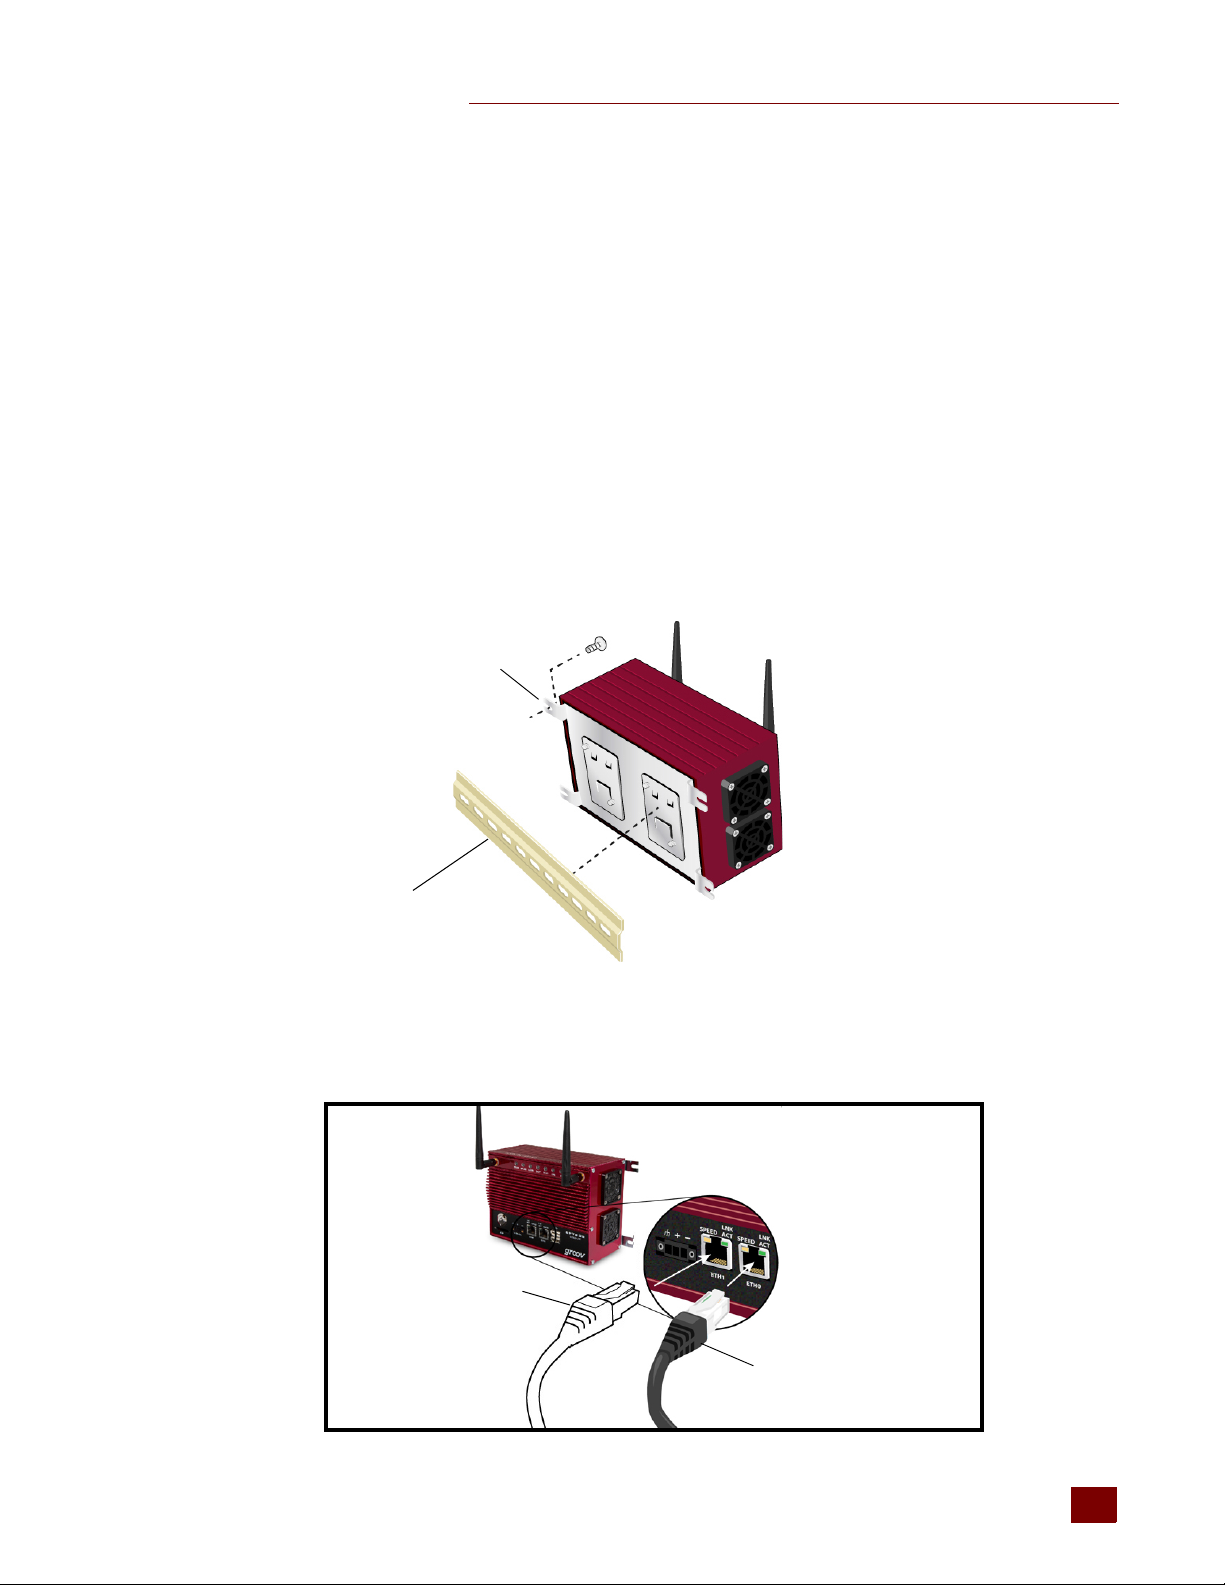
Method 1:
Mount to a flat surface
using the mounting tabs
Method 2:
Mount to a DIN rail
ETH0 to computer network
ETH1 to control network
(if on a separate subnet)
Locate a suitable wall or panel near a standard 120VAC or 240VAC wall outlet and the wired Ethernet
network(s) your computer is on. If your controller, Modbus/TCP device, or OPC UA server is on a
different network than your computer, connect ETH0 to your computer's network and ETH1 to the
other network. (Also see page 59.)
Allow room around the front, top, and sides of the groov Box. Air needs to flow freely though the
fans on the sides, and you need to be able to see the information on the top.
Step 3: Mount the groov Box
You can mount the groov Box on a flat surface using the four mounting tabs, or you can mount it on
a DIN rail using the DIN rail clips provided on the back of the groov Box. Use #8 screws with the
mounting tabs. If there will be vibration at the groov Box installation site, make sure to use the
mounting tabs for a secure installation.
CHAPTER 2: GETTING STARTED
Step 4: Connect to the Network
groov Box User’s Guide for GROOV AT1
9
9
Page 17
STEP 5: CONNECT THE POWER SUPPLY
a. Connect an Ethernet cable from ETH0 to your computer’s network.
NOTE: Opto 22 recommends connecting ETH0 to a network with DHCP and DNS services. If you do not
hav
e these services, you’ll need to manually configure networking. See “Troubleshooting” on page 57.
b. The two independent Ethernet connectors (ETH0 and ETH1) have separate IP addresses that
can be used to segment a control system’s network from the enterprise LAN. If your controller,
ModbusTCP device, or OPC UA server is on a different network than your computer, connect
ETH0 to your computer's network and ETH1 to the other network.
If you are using both ETH0 and ETH1, make sure they have IP addresses on different subnets. In
some situations, this may require configuring a static IP address. Otherwise there may be
communication errors. For more information, see “Assigning a Static IP Address” on page 22.
For detailed information on setting up your network and setting up communications over the
Internet, see form 1796, the Guide to Networking Opto 22 Products.
Step 5: Connect the Power Supply
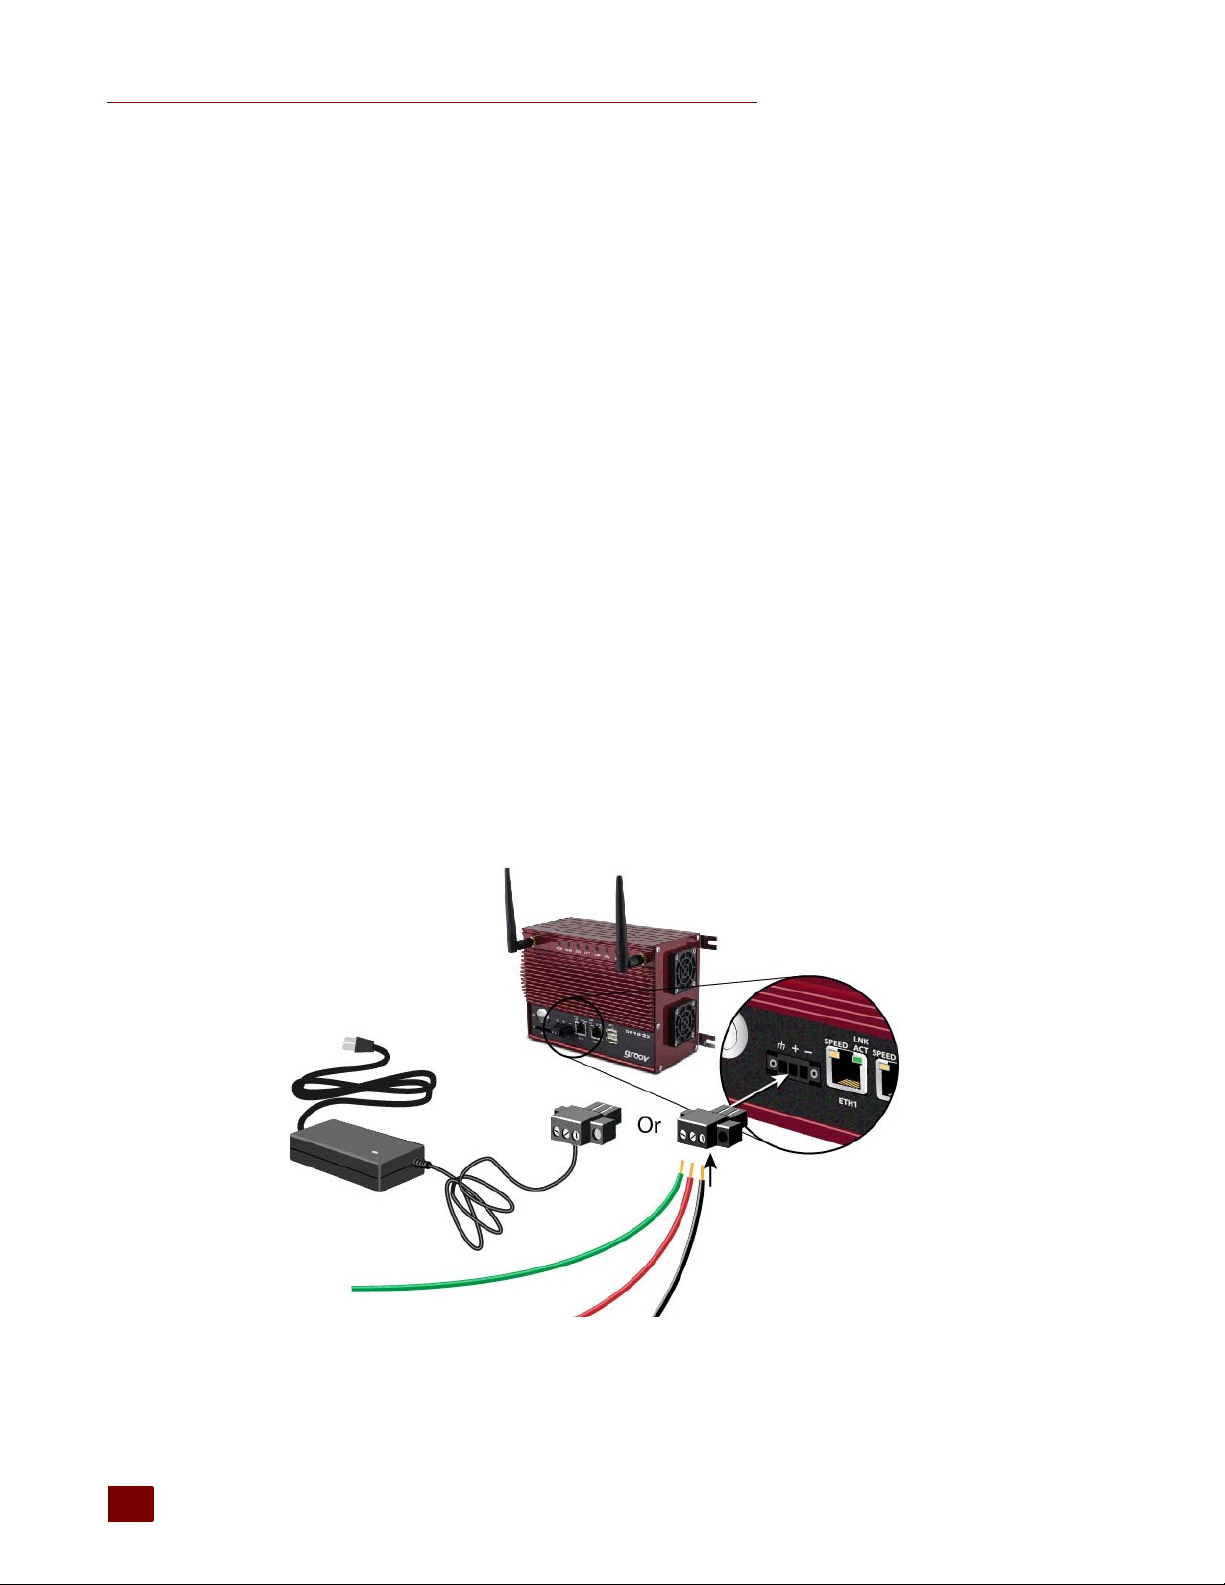
You r groov Box requires a power supply with an output of 14-36 VDC, 24 VDC @ 1 amp. You can use
the power supply that comes with the groov Box, or provide your own. In either case, we
recommend using a UPS (uninterruptible power supply) for backup power and surge protection.
If you are using the power supply that came with the groov Box, do the following:
Plug the small connector on the power supply into the terminal marked 14–36 VDC, tighten the
screws. Plug the other end into a standard 120 or 240 VAC outlet. The LED marked PWR will light
solid green.
10
If you are using your own power supply, do the following:
a. With the power supply off or unplugged, connect the + (positive) lead from the power supply
(normally red) to the + (positive) terminal on the power connector.
groov Box User’s Guide for GROOV AT1
Page 18

CAUTION: Reversing wire polarity may cause damage to your groov Box. This damage is not
covered by Opto 22’s warranty. If you are not certain about the polarity of the wires on your power
supply, check with a meter.
b. Connect the COM wire from the power supply (normally black) to the – (negative) terminal on
the power connector.
c. Connect a lead from a known earth/chassis ground to the (ground) terminal on the power
connector.
Step 6: Turn on the groov Box
Briefly press and release the On/Off button. Wait until the SYS LED has stopped blinking and is solid
green. Also, take a look at the LNK ACT light for ETH0. If the cable is properly connected, the LNK ACT
light should be on or blinking.
CHAPTER 2: GETTING STARTED
NOTE: Always wait until the SYS LED has stopped blinking befor
may not be able to use the hostname to log in. If this happens, see page 58.
e you try to log into groov. Otherwise, you
Step 7: Activate the groov Box and Get the License File
You’ll need the activation key printed on the certificate included with your groov Box.
a. Open a web browser (Firefox or Chrome recommended). Go to activate.groov.com.
b. Log in using your email address and your My.Opto22 password.
You may have set up your free My.Opto22 account when you purchased your groov Box. If you
don’t have a My.Opto22 account, enter your email address and other information, and the
account will be created.
c. Follow the on-screen instructions to activate your groov Box and download the license file.
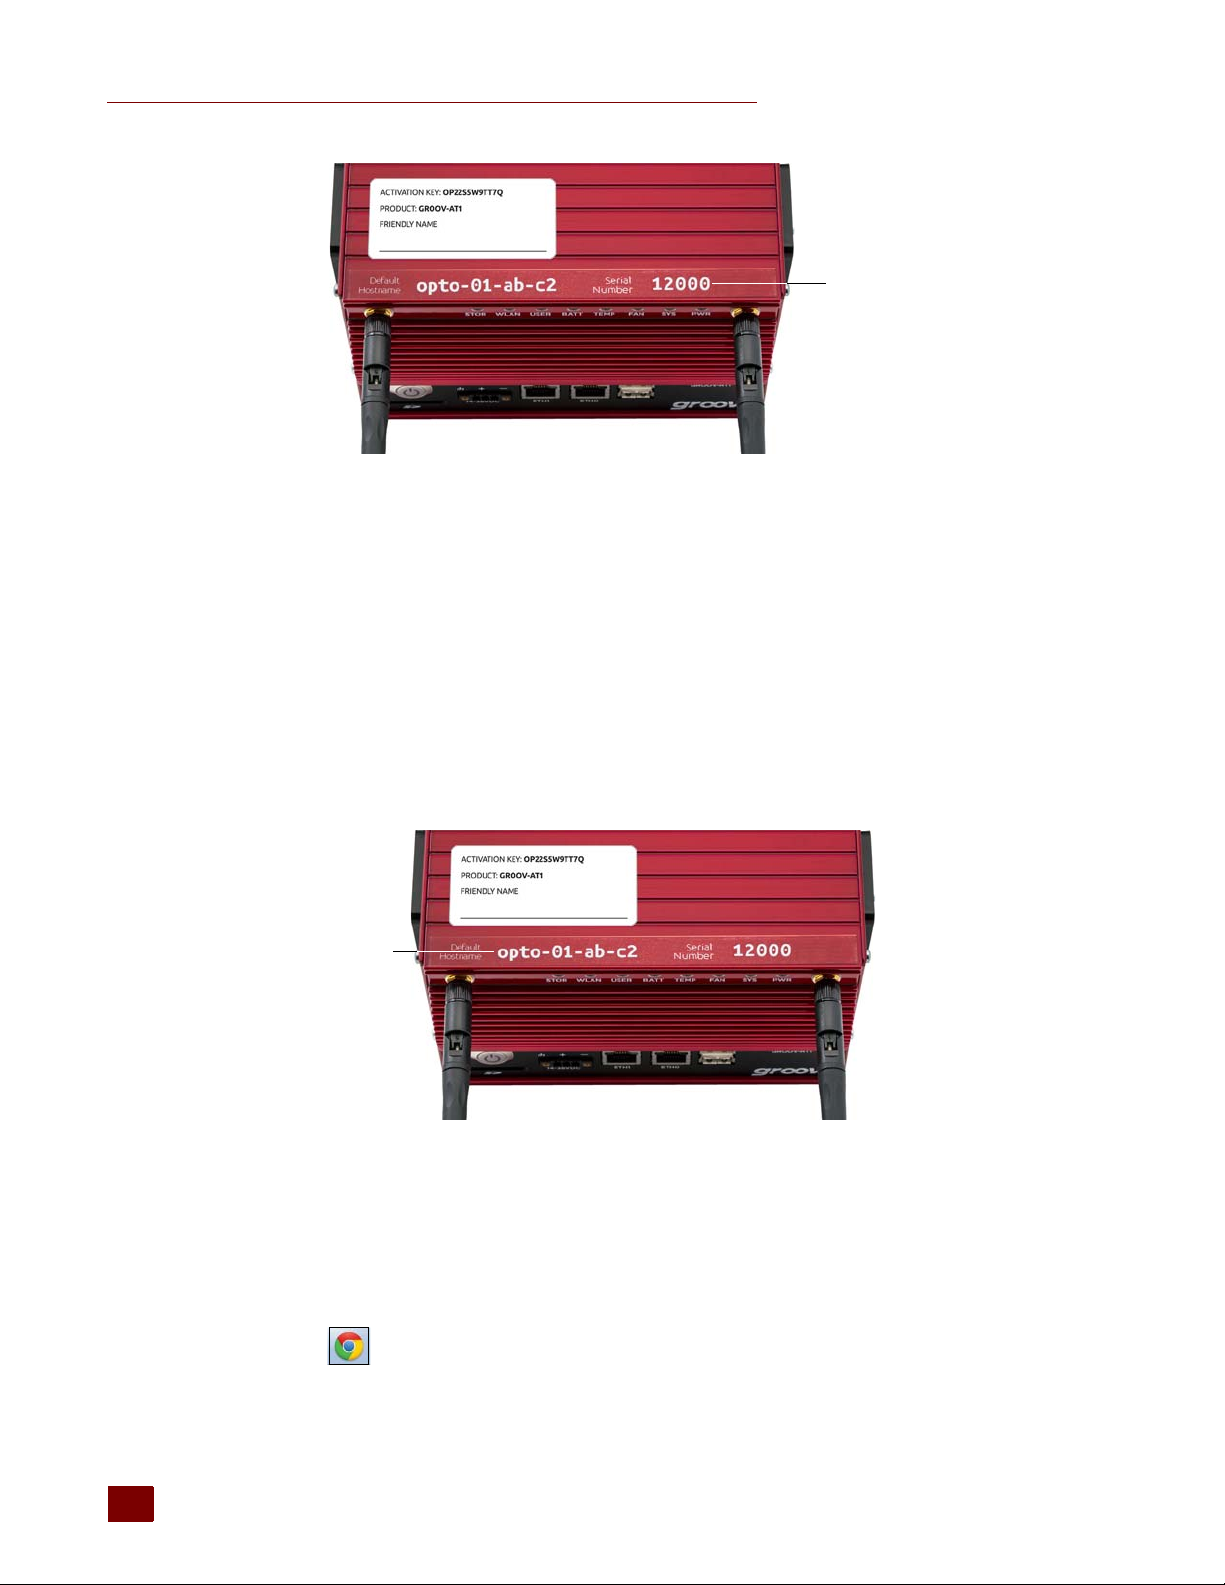
When asked to enter the serial number, you’ll find it on the label on the top of the device.
groov Box User’s Guide for GROOV AT1
11
11
Page 19
STEP 8: OPEN GROOV
Serial number
Default
hostname
Step 8: Open groov
You can open groov using just your web browser. Or, if you have a Windows computer, you can use
groov Find (see below). If your network does not have DNS, use groov Find.
Using your web browser:
a. On your computer, open Firefox or Chrome, or Internet Explorer 10 or newer.
b. Enter https:// and your groov Box’s hostname as the URL. The hostname is printed on top of the
groov Box.
For example, if the hostname is opto-01-ab-c2, you type
https://opto-01-ab-c2
Make sure you type https. The s indicates it is a secure connection.
NOTE: If you’ve assigned a static IP address to the gr
hostname to open groov.
oov Box, use the IP address instead of the
c. Accept the security warning. Your groov data is protected by the Secure Socket Layer 256-bit
encryption, so you can safely accept the warning.
12
For Chrome:
– Click “Advanced” to expand the initial screen.
– Click “Proceed to <hostname> (unsafe).”
groov Box User’s Guide for GROOV AT1
Page 20

CHAPTER 2: GETTING STARTED
Serial number
For Firefox:
– Expand “I Understand the Risks.”
– Click Add Exception to open the Add Security Exception dialog box.
– Select “Permanently store this exception.”
– Click Confirm Security Exception.
For Internet Explorer 10: Click “Continue to this website (not recommended).”
For Safari: Click Continue.
The Welcome to groov window opens in your web browser. Now go to “Step 9: Install the License
File” on page 14
Using
groov Find:
If you are using a Windows computer, you can use groov Find to locate the groov Boxes on your
network. If your network does not have DNS, you must use groov Find.
a. Insert the groov CD in your CD-ROM drive, then click the link to copy the Find application file to
your computer.
b. Open the Find application file.
A message might appear asking if you want Find to be allowed to make changes to your
computer. If it does, click Yes.
NOTE: If you are using a Windows account that does not have A
Guest), a User Account Control dialog box will appear asking for the credentials of an administrator
account. To proceed, enter the Administrator User Name and Password. If you do not have this
information, contact your IT department.
groov
Find opens and automatically searches for groov Boxes on the network.
dministrator privileges (such as
c. Find the serial number on the top of the groov Box.
groov Box User’s Guide for GROOV AT1
13
13
Page 21

STEP 9: INSTALL THE LICENSE FILE
Link
Serial number
d. Locate the matching serial number in Find.
If you do not see the serial number right away, wait 60 seconds and click Search for Devices
again.
e. Click the link “Click to start groov.”
When your browser connects to groov for the first time, the browser will display a security
warning.
f. Accept the security warning. Your groov data is protected by the Secure Socket Layer 256-bit
encryption, so you can safely accept the warning.
For Chrome: Click “Proceed anyway.”
For Firefox:
– Expand “I Understand the Risks.”
– Click Add Exception to open the Add Security Exception dialog box.
– Select “Permanently store this exception.”
– Click Confirm Security Exception.
For Internet Explorer 10: Click “Continue to this website (not recommended).”
For Safari: Click Continue.
The Welcome to groov window opens in your web browser.
Step 9: Install the License File
Make sure to install your license file. Without an installed license, groov will only work for two hours.
14
groov Box User’s Guide for GROOV AT1
Page 22
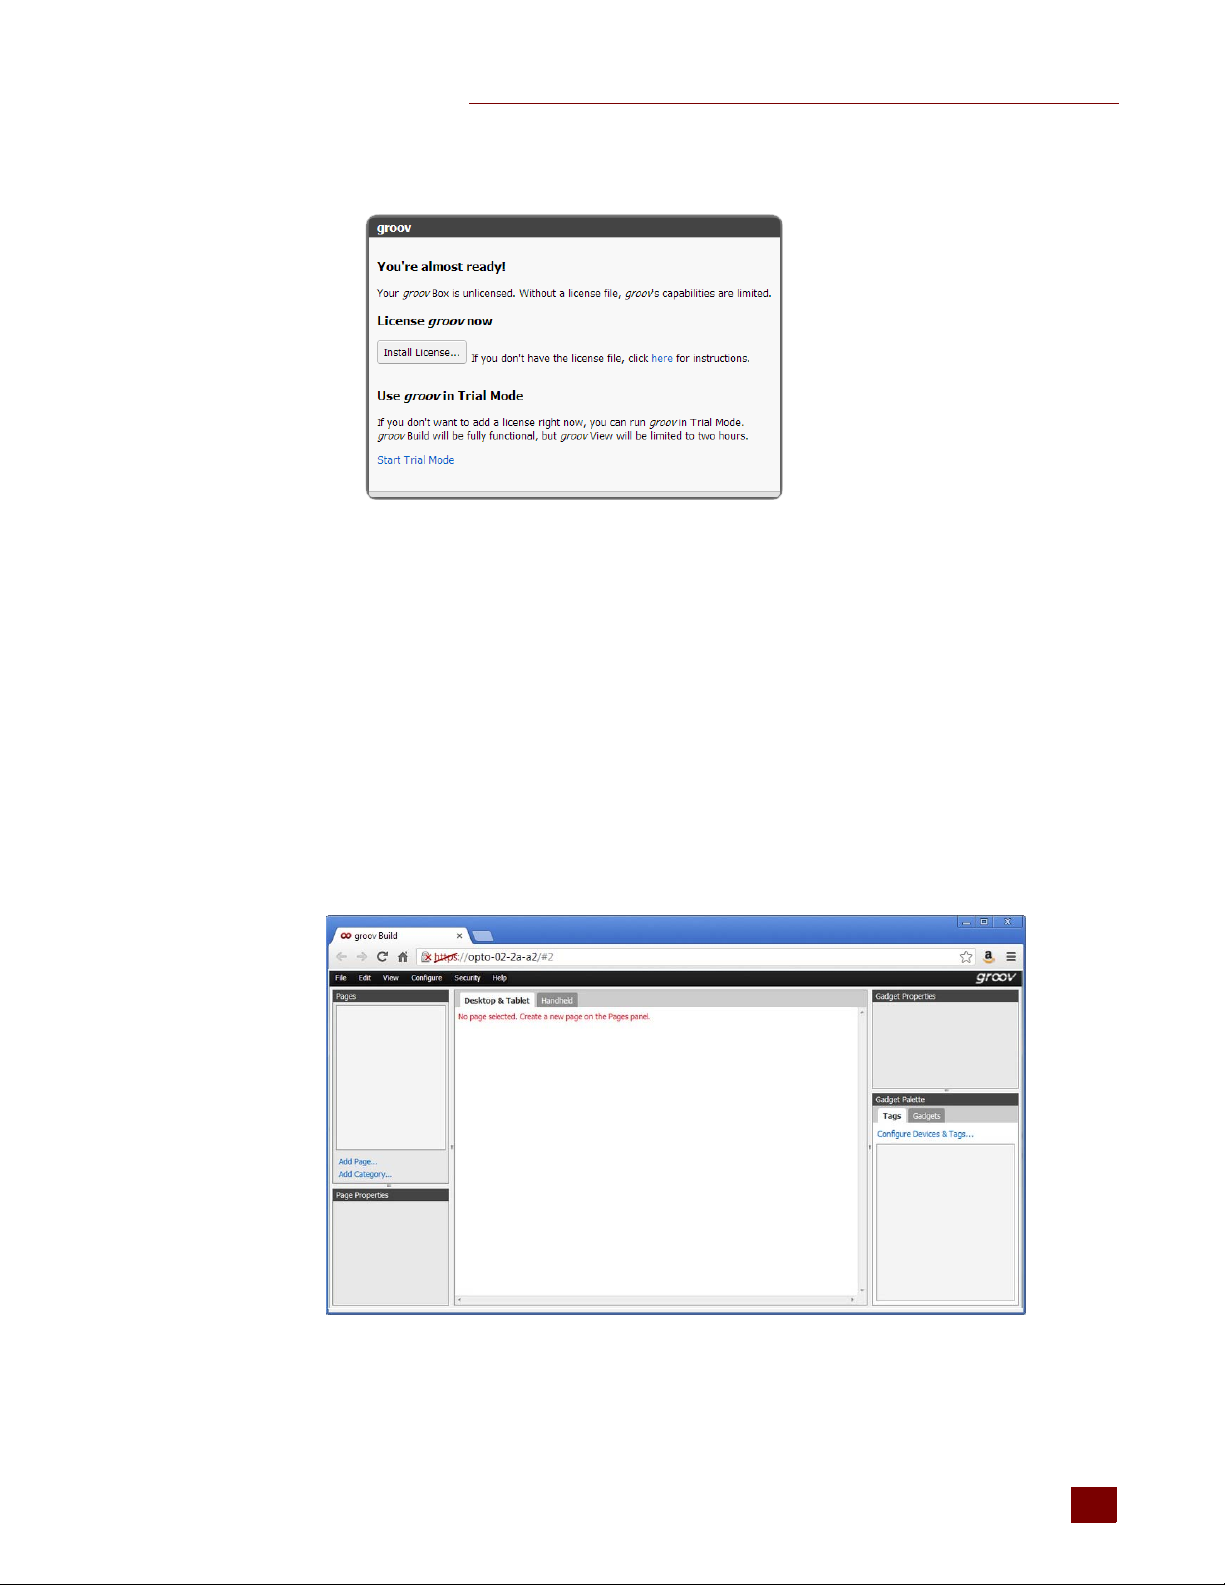
a. When prompted to add a license file to groov, click Install License.
b. Browse to the license file, then click Open.
Step 10: Create New Usernames and Passwords
CHAPTER 2: GETTING STARTED
Follow the on-screen instructions to create usernames and passwords for groov Admin and for
groov Build. If the security warning appears once more, accept the warning again.
CAUTION: The
keep it in a safe place. You will need this information each time you log in. If you lose your login
information, you will have to reset the groov Box back to factory defaults, which will erase your project.
After you have completed the instructions in wel
web browser. For information on using groov Build, see form 2027, the groov User’s Guide.
re is no password recovery option. Write down your Username and Password, and
come to groov, groov Build opens in your
groov Box User’s Guide for GROOV AT1
15
15
Page 23

STEP 10: CREATE NEW USERNAMES AND PASSWORDS
16
groov Box User’s Guide for GROOV AT1
Page 24
2104_Using_Admin.fm: Chapter 3
3: Using groov Admin
Using groov Admin you can back up and restore your projects and project settings, update firmware,
set up wired and wireless networking, and more.
In this chapter:
Opening groov Admin..................................................................17
Quick Start menu...........................................................................21
Configuring Network Connections........................................ 22
Updating groov App (Build and View).................................28
Backing Up groov.......................................................................... 29
Restoring groov.............................................................................. 31
Updating groov Admin............................................................... 32
Restarting the groov Box............................................................ 33
Changing Username and Password...................................... 35
Checking System Information .................................................36
Checking Hardware Status ........................................................36
Setting the System Time ............................................................38
Opening groov Admin
You can open groov Admin in three ways:
• From groov Build—see below
• Using the groov Admin URL—page 17
• From groov Find (only on a Windows computer)—page 18
Open groov Admin from groov Build
In groov Build, choose Configure > groov Admin. To log in, see page 20.
Open groov Admin using the URL
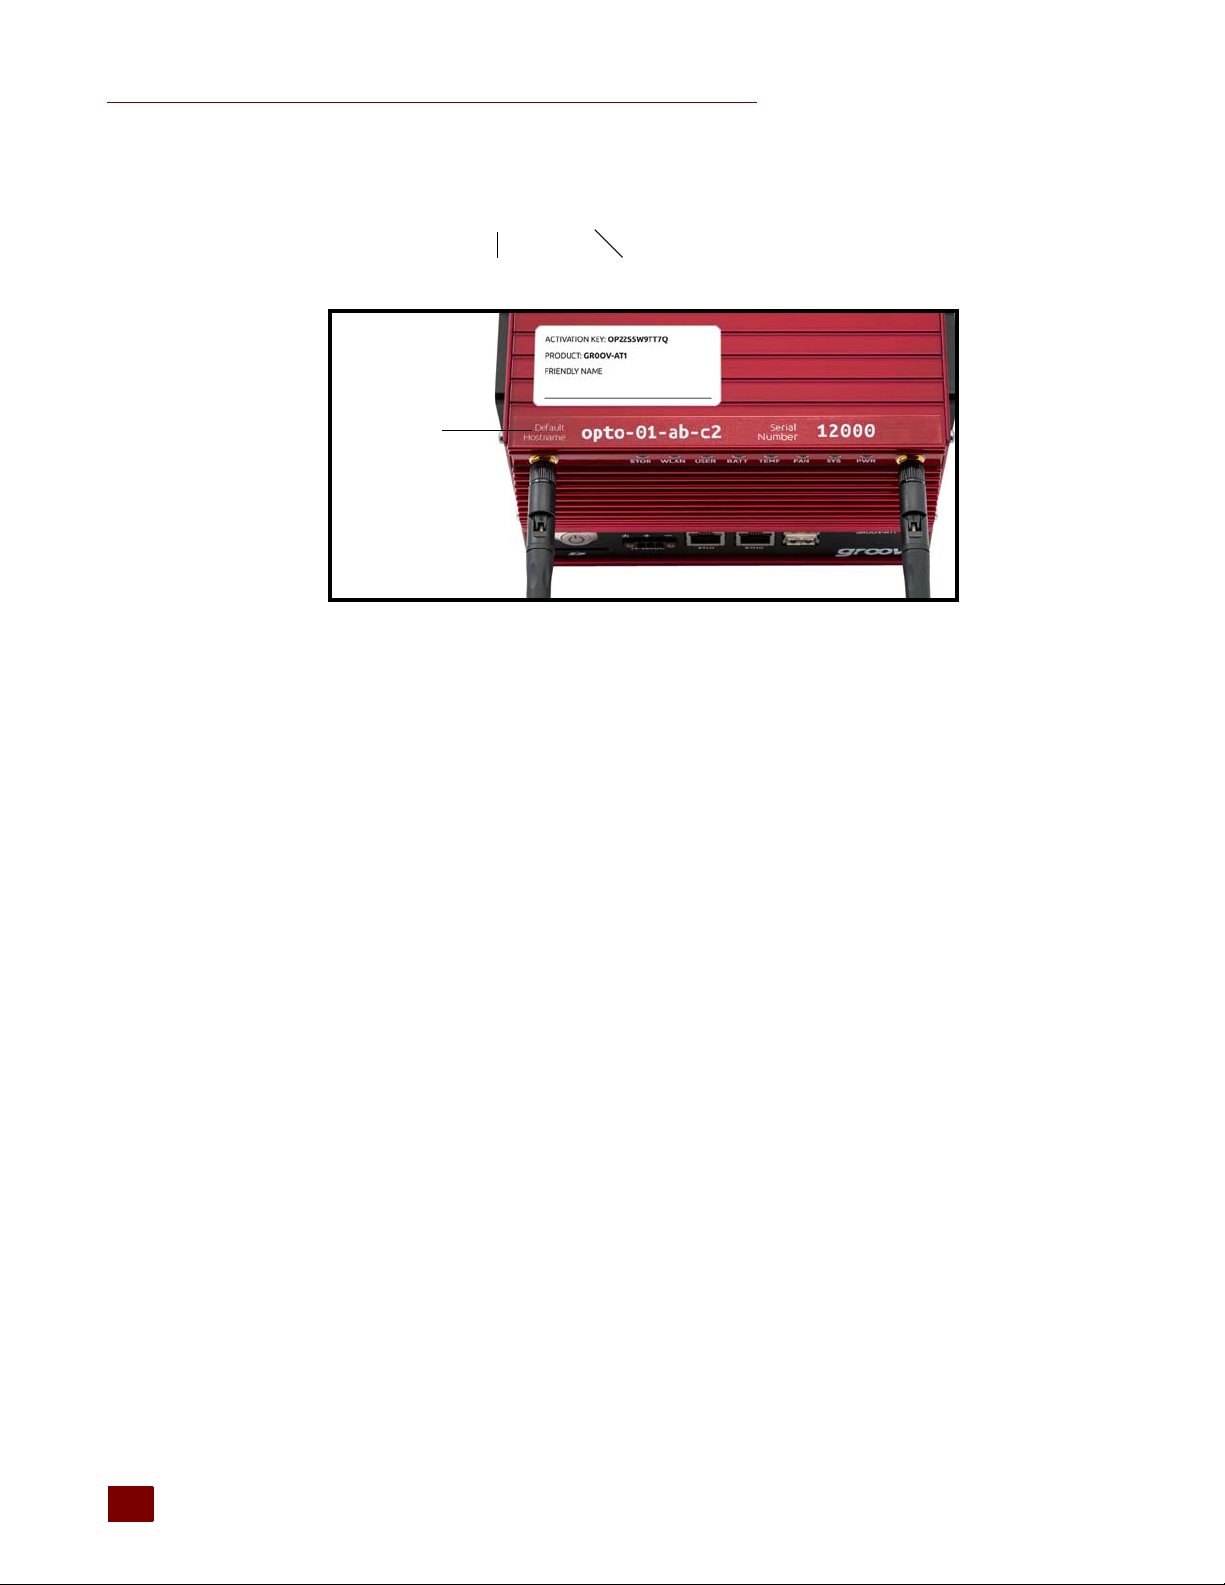
1. In your web browser, enter https://hostname:10000
groov Box User’s Guide 17
17
Page 25
OPENING GROOV ADMIN
https://opto-00-d2-dc:10000/
hostname port 10000
Hostname
2. When groov Admin opens, log in (see page 20).
For example:
Open groov Admin using groov Find (Windows only)
groov Find is a utility included on the groov CD that locates your groov Box on the network and
provides a link so that you can access the groov applications. It is useful if you have multiple groov
Boxes, because it finds and lists them all. You can easily switch from one Box to another, for example
when updating groov.
NOTE: You need to have Administrator privileges on you
have this information, contact your IT department.
1. Open groov Find. If a message appears asking if you want Find to be allowed to make changes
to your computer, click Yes.
NOTE: Clicking Yes permits Find to have temporary administrative privileges to create an additional
emporary link-local IP address for each network interface on the computer. This enables Find to
t
locate a groov Box on a network that does not have DNS and DHCP.
If the network does not have DNS and DHCP, you will need to assign a static IP address to the groov
Box in order to maintain communication. (See “Assigning a Static IP Address” on page 22.) If the
work does have DNS and DHCP, the temporary IP address is not used and is removed when you exit
net
Find.
groov
Find opens and automatically searches for groov Boxes on the network.
r Windows account to use groov Find. If you do not
18
groov Box User’s Guide
Page 26
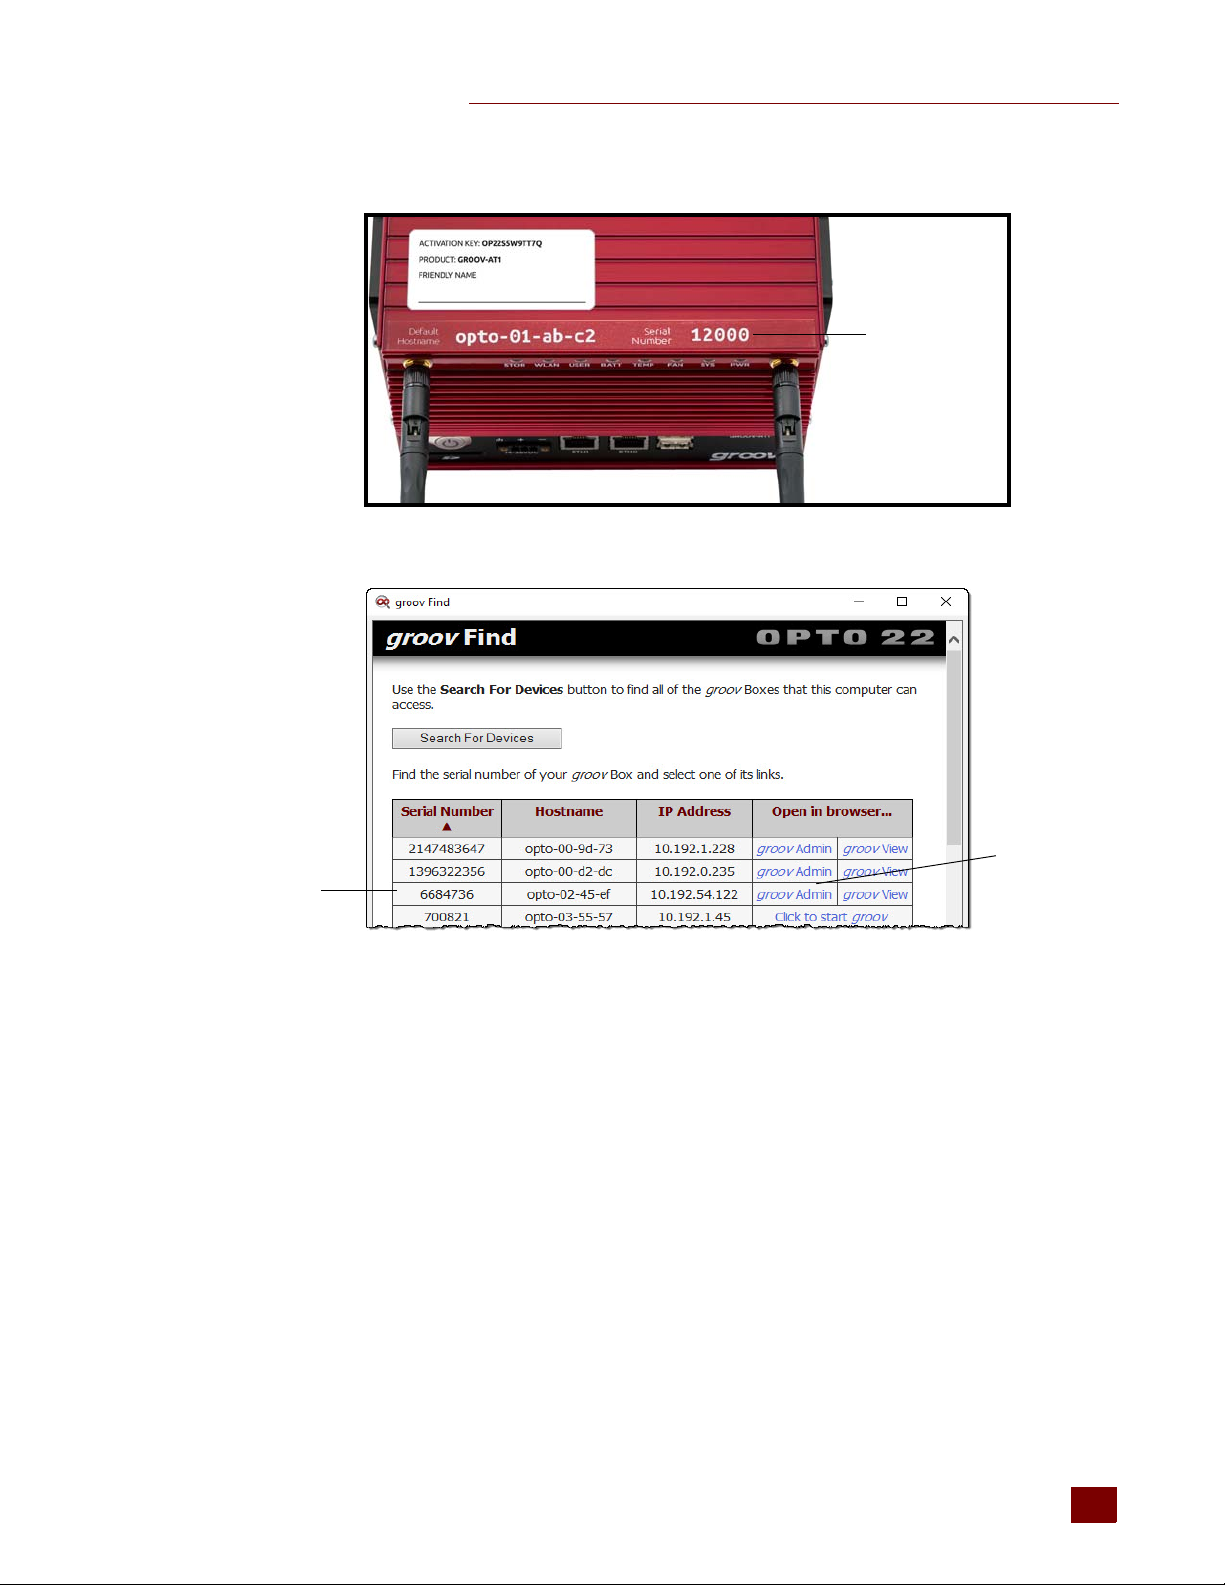
2. Locate the serial number on the bottom of the groov Box.
Serial number
Link
Serial number
3. Locate the matching serial number in Find.
CHAPTER 3: USING GROOV ADMIN
groov Box User’s Guide
4. Click the groov Admin link. (If it isn’t there, click the link “Click to start groov” to start the initial
setup on the groov Box. See “Step 8. Open groov” on page 14.)
A security warning appears in your web browser.
5. Accept the security warning (if you need help, see the next section).
6. Log in (see page 20).
Accepting the Security Warning
groov uses the TLS/SSL (Transport Layer Security/Secure Sockets Layer) to protect your data by
encrypting data exchanged between your browser and the groov Box. When a device attempts to
access groov, your browser will issue a security warning unless the appropriate SSL security
certificate is installed on the device.
If your computer resides in the same domain as the groov Box, you can safely accept the warning
because your data is protected by the 256-bit encryption. However, if you want to avoid seeing the
security warning, you can install the self-signed certificate on your computer and other devices that
access groov. See “Using a Self-Signed Certificate” on page 42.
19
19
Page 27

OPENING GROOV ADMIN
If your computer or other device will access groov from outside groov’s network or over the Internet,
Opto 22 strongly recommends you obtain an SSL Certificate from a third-party company that is
authorized to confirm your user’s ID. See “Using a CA-Signed Certificate on groov Box” on page 50.
To accept the security warning, see the section below for your browser.
For Chrome
For Firefox
1. Expand “I Understand the Risks.”
2. Click Add Exception to open the Add Security Exception dialog box.
3. Select Permanently store this exception.
4. Click Confirm Security Exception.
For Safari
Click Continue.
– Click “Advanced” to expand the initial screen.
– Click “Proceed to <hostname> (unsafe).”
For Internet Explorer
Click “Continue to this website (not recommended).”
Logging in
CAUTION: There is no password recovery option. Write down your Username and Password, and
keep it in a safe place. You will need this information each time you log in. If you lose your login
information, you will have to reset the groov Box back to factory defaults, which will erase your project.
1. Enter the groov Admin account Username and Password.
2. Click Sign in to open groov Admin.
20
NOTE: There is a session timer of 10 minutes. If you don’t do anything for 10 minutes, you will be logged out
and hav
groov Box User’s Guide
e to log in again.
Page 28
Quick Start menu
You r groov project opens in groov View. For groov Build, in View
click the gear icon in the upper right and choose Switch to
groov Build.
For information on using groov Build and View, see form 2027,
the groov User’s Guide.
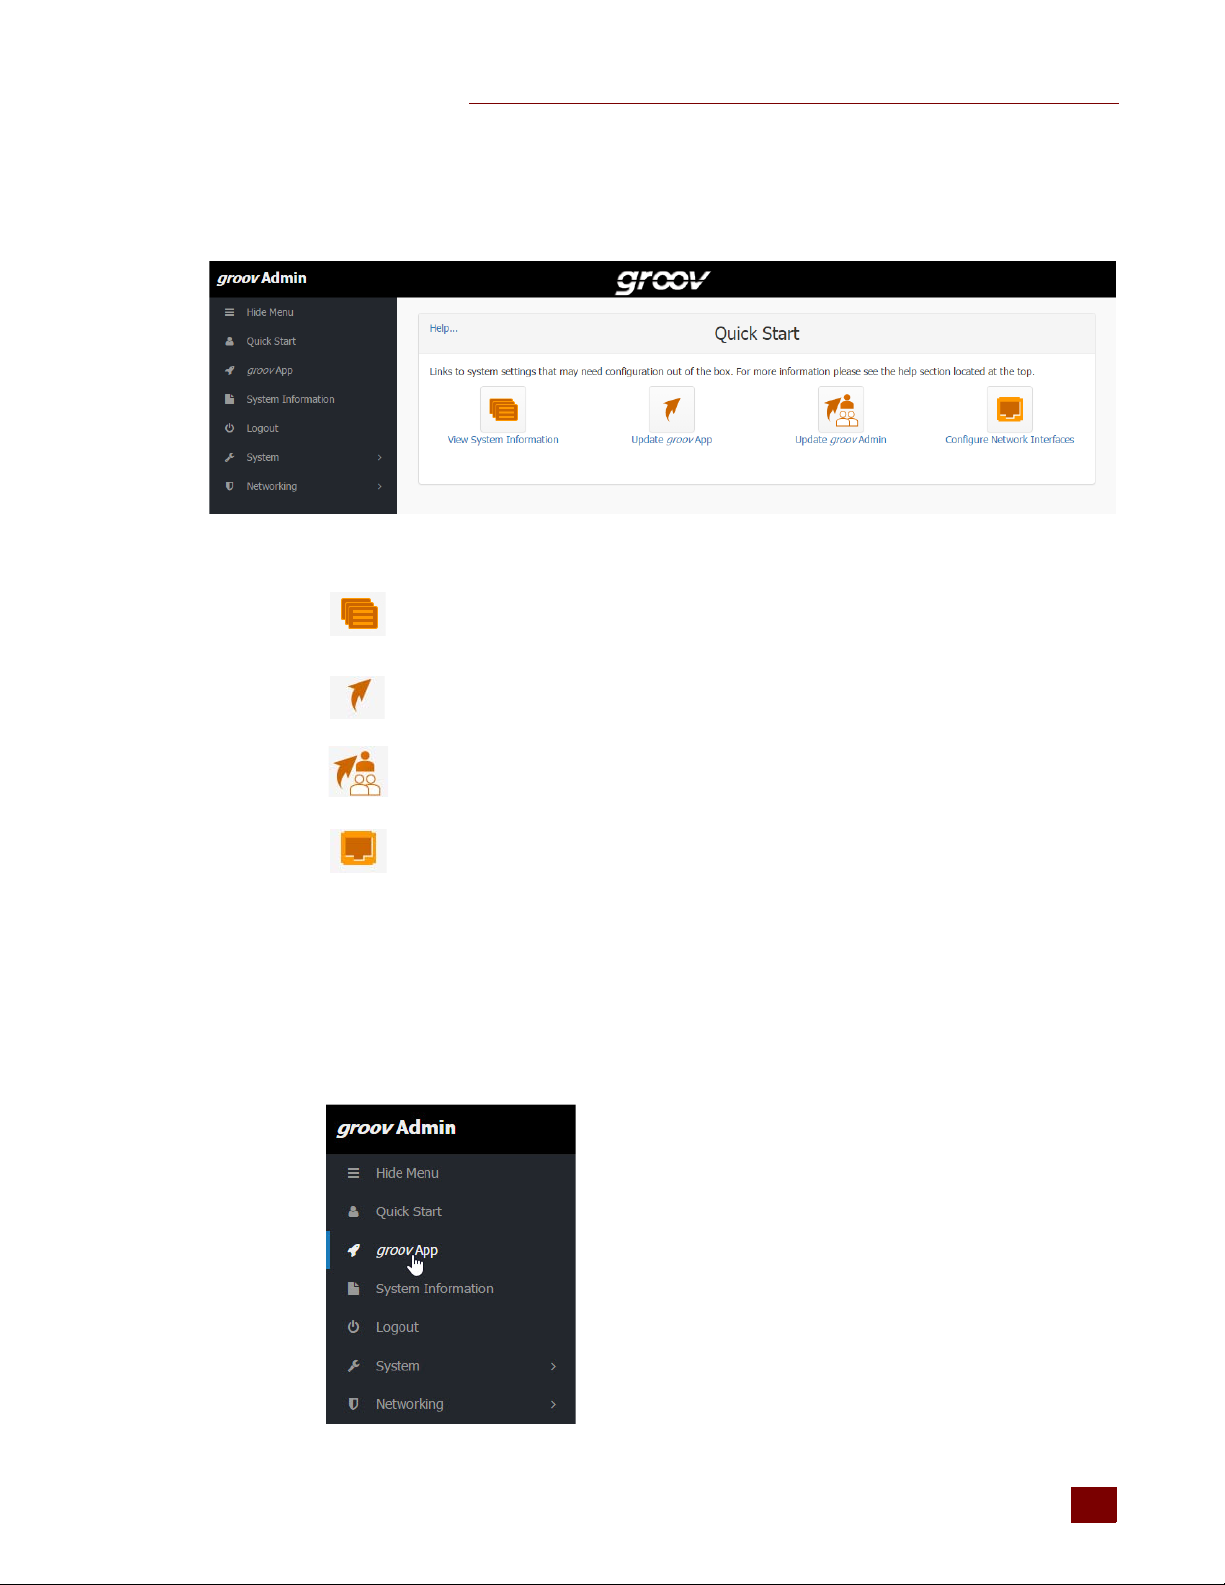
groov Admin opens at the Quick Start menu.
The quick start buttons take you directly to some of the more common actions in groov Admin.
CHAPTER 3: USING GROOV ADMIN
View System Information
Check system information and see usage statistics. “Checking System Information” on page 36.
Update groov App
Update groov Build and View. See “Updating groov App (Build and View)” on page 28.
Update groov Admin
Update groov Admin itself with the latest version. See “Updating groov Admin” on page 32.
Configure Network Interfaces
Configure IP settings for the wired and optional wireless Ethernet interfaces: ETH0, ETH1, and
WLAN0. See “Configuring Network Connections” on page 22.
To return to the Quick Start menu, in the left navigation bar, click Quick Start.
Opening groov View and Build from groov Admin
To go to groov View or groov Build, in the left navigation bar, click groov App.
groov Box User’s Guide
21
21
Page 29
CONFIGURING NETWORK CONNECTIONS
OR:
Configuring Network Connections
groov is designed to work with a network that has a Dynamic Host Configuration Protocol (DHCP)
server and a Domain Name Server (DNS). If your network has DHCP and DNS, you do not need to
assign an IP address to the groov Box; you just plug it in and the IP address is assigned automatically.
This is the recommended method for setting up the groov Box.
However, if you need to customize your network connections for groov after the initial setup, groov
Admin provides the tools to do that.
This section includes the following topics:
• “Assigning a Static IP Address” on page 22
• “Changing the Hostname, DNS Servers, or IPv4 Gateway” on page 23
• “Configuring ETH1 for the Control Network” on page 24
• “Configuring Wireless Communications” on page 25
To set up your network, see form 2161, the Guide to Networking groov. This guide provides detailed
information on how to make your groov network more secure. It also describes how to directly
communicate with groov over the Internet using a virtual private network (VPN) or with port
forwarding (PF). A VPN is recommended because it is more secure.
Assigning a Static IP Address
If you do not have a DHCP server, you’ll need to configure a static address to either ETH0 or ETH1.
Otherwise there may be communication errors.
NOTE: If you are using a laptop computer to assign a static
Internet Connection Sharing (ICS). If you don’t, the laptop will act like a DHCP server and assign a dynamic
address.
You’ll need to get the following networking
• IPv4 address—A unique, fixed (static) IP address.
For example: 172.18.234.1
• Netmask—Identifies the subnetwork.
For example: 255.255.225.0
• Gateway (optional)— Identifies the route to the Internet.
For example: 172.18.1.1
information from your IT department:
1. In the left navigation bar choose Networking > Network Configuration, or click the Configure
Network Interfaces button in Quick Start.
IP address, make sure you disable Windows’
22
groov Box User’s Guide
Page 30
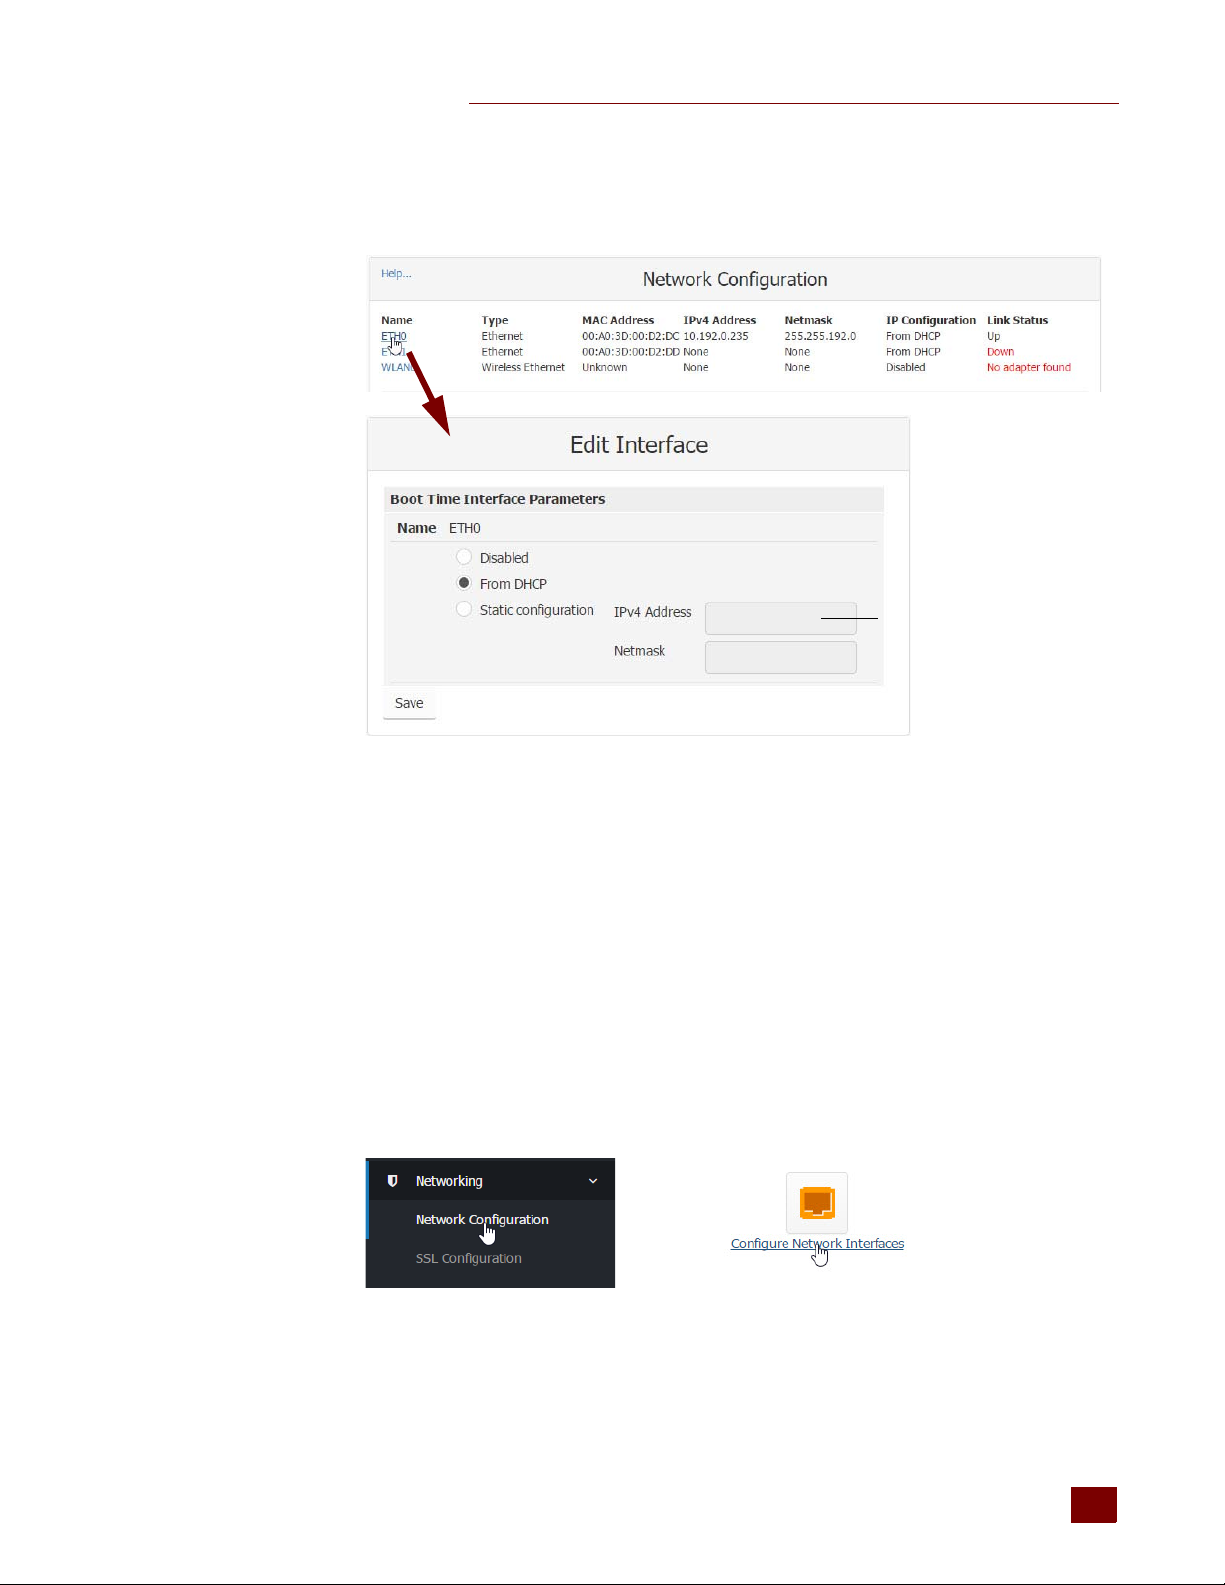
2. Click the wired Ethernet connection you want to configure.
Static IP address
OR:
CHAPTER 3: USING GROOV ADMIN
NOTE: Use ETH0 as the main network connection. O
nly use ETH1 if you have segmented networks.
3. Select Static configuration. Enter the static IP Address and Netmask.
4. Click Save.
Changing the Hostname, DNS Servers, or IPv4 Gateway
In order to identify the groov Box more easily on the network, you might want to change the
hostname from the default. And, depending on your network setup, you might need to change the
DNS Servers or IPv4 Gateway.
NOTE: Keep in mind that any changes to this interface may make your system inaccessible via your current
wir
ed or wireless connection. Be sure to write down the new hostname or other changes.
1. In the left navigation bar choose Networking > Network Configuration, or click the Configure
Network Interfaces button in Quick Start.
The Network Configuration page opens.
groov Box User’s Guide
23
23
Page 31
CONFIGURING NETWORK CONNECTIONS
OR:
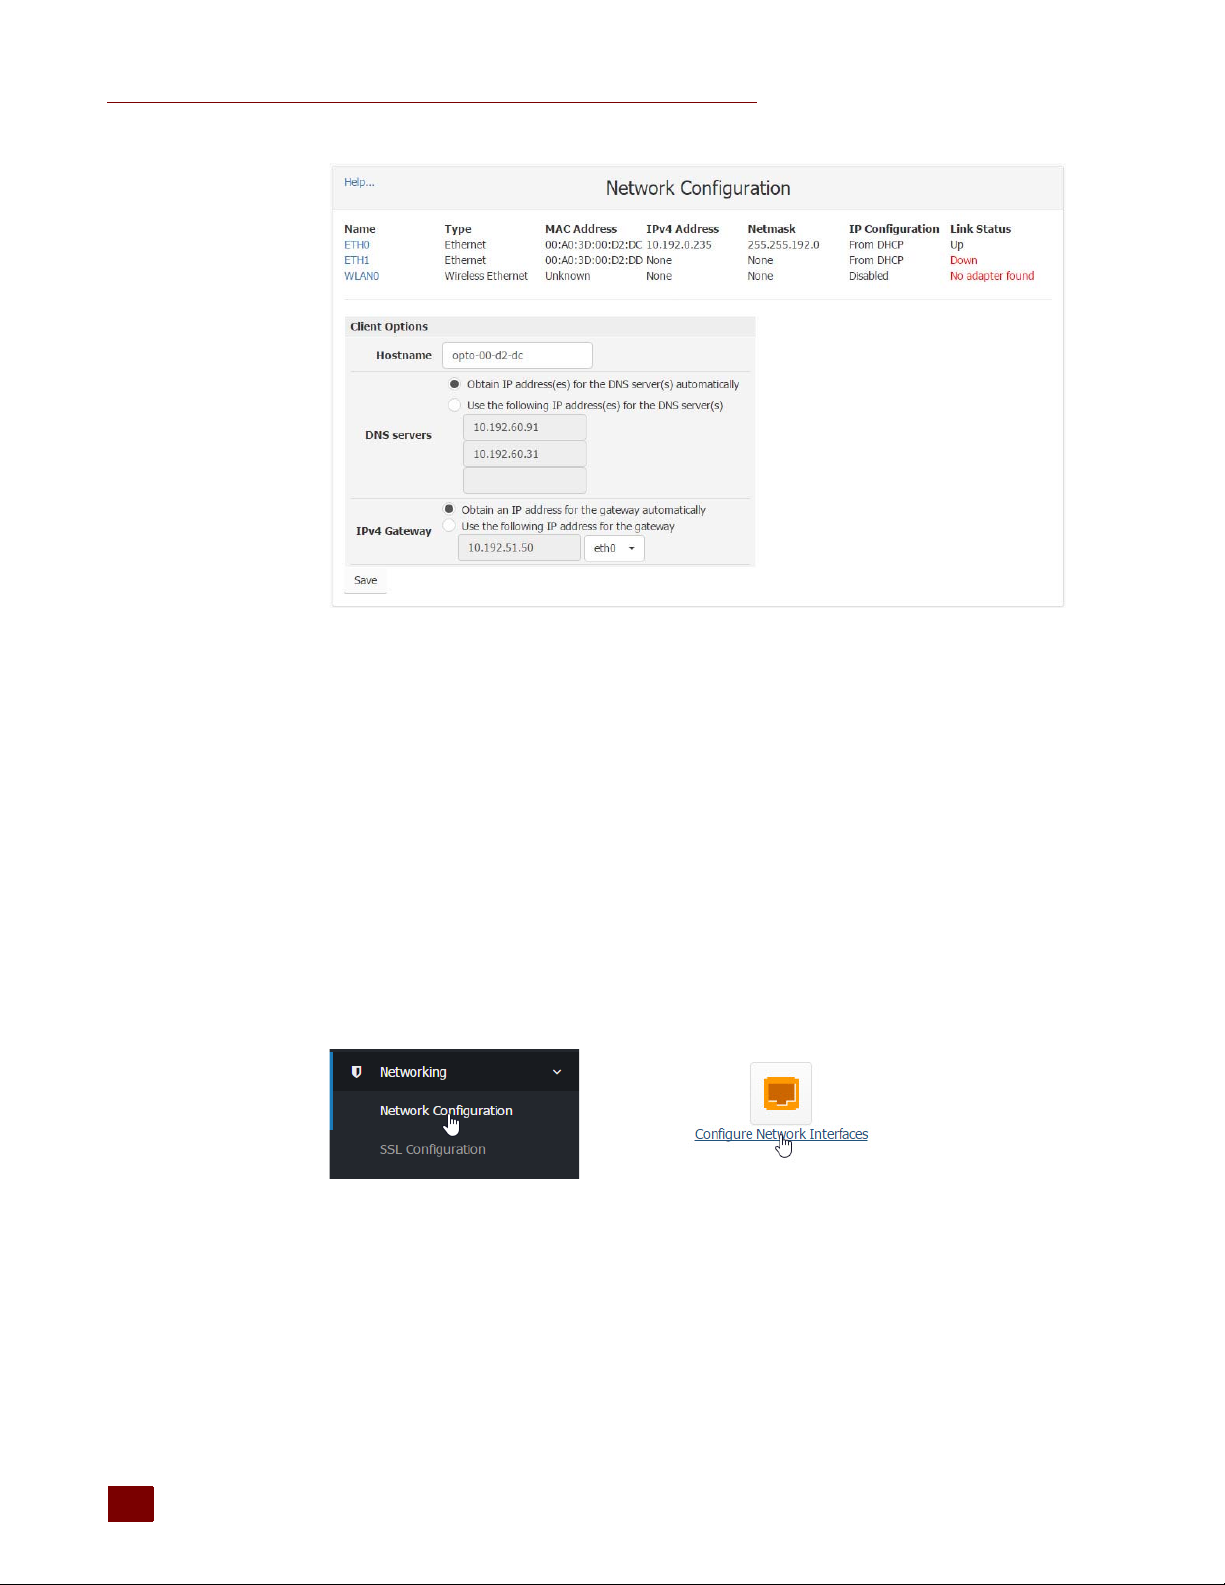
2. In the Client Options are, change the hostname, DNS servers, or IPv4 Gateway as necessary.
NOTE 1: A hostname cannot have spaces or special characters.
NO
TE 2: Any changes to this interface may make your system inaccessible via your current wired or
wireless connection. Be sure to write down the new hostname or other changes.
3. Click Save.
Configuring ETH1 for the Control Network
If your computer is on a different network than the control network, you need to configure ETH1 by
assigning it an IP address and subnet appropriate for the control network.
1. In the left navigation bar choose Networking > Network Configuration, or click the Configure
Network Interfaces button in Quick Start.
24
groov Box User’s Guide
Page 32
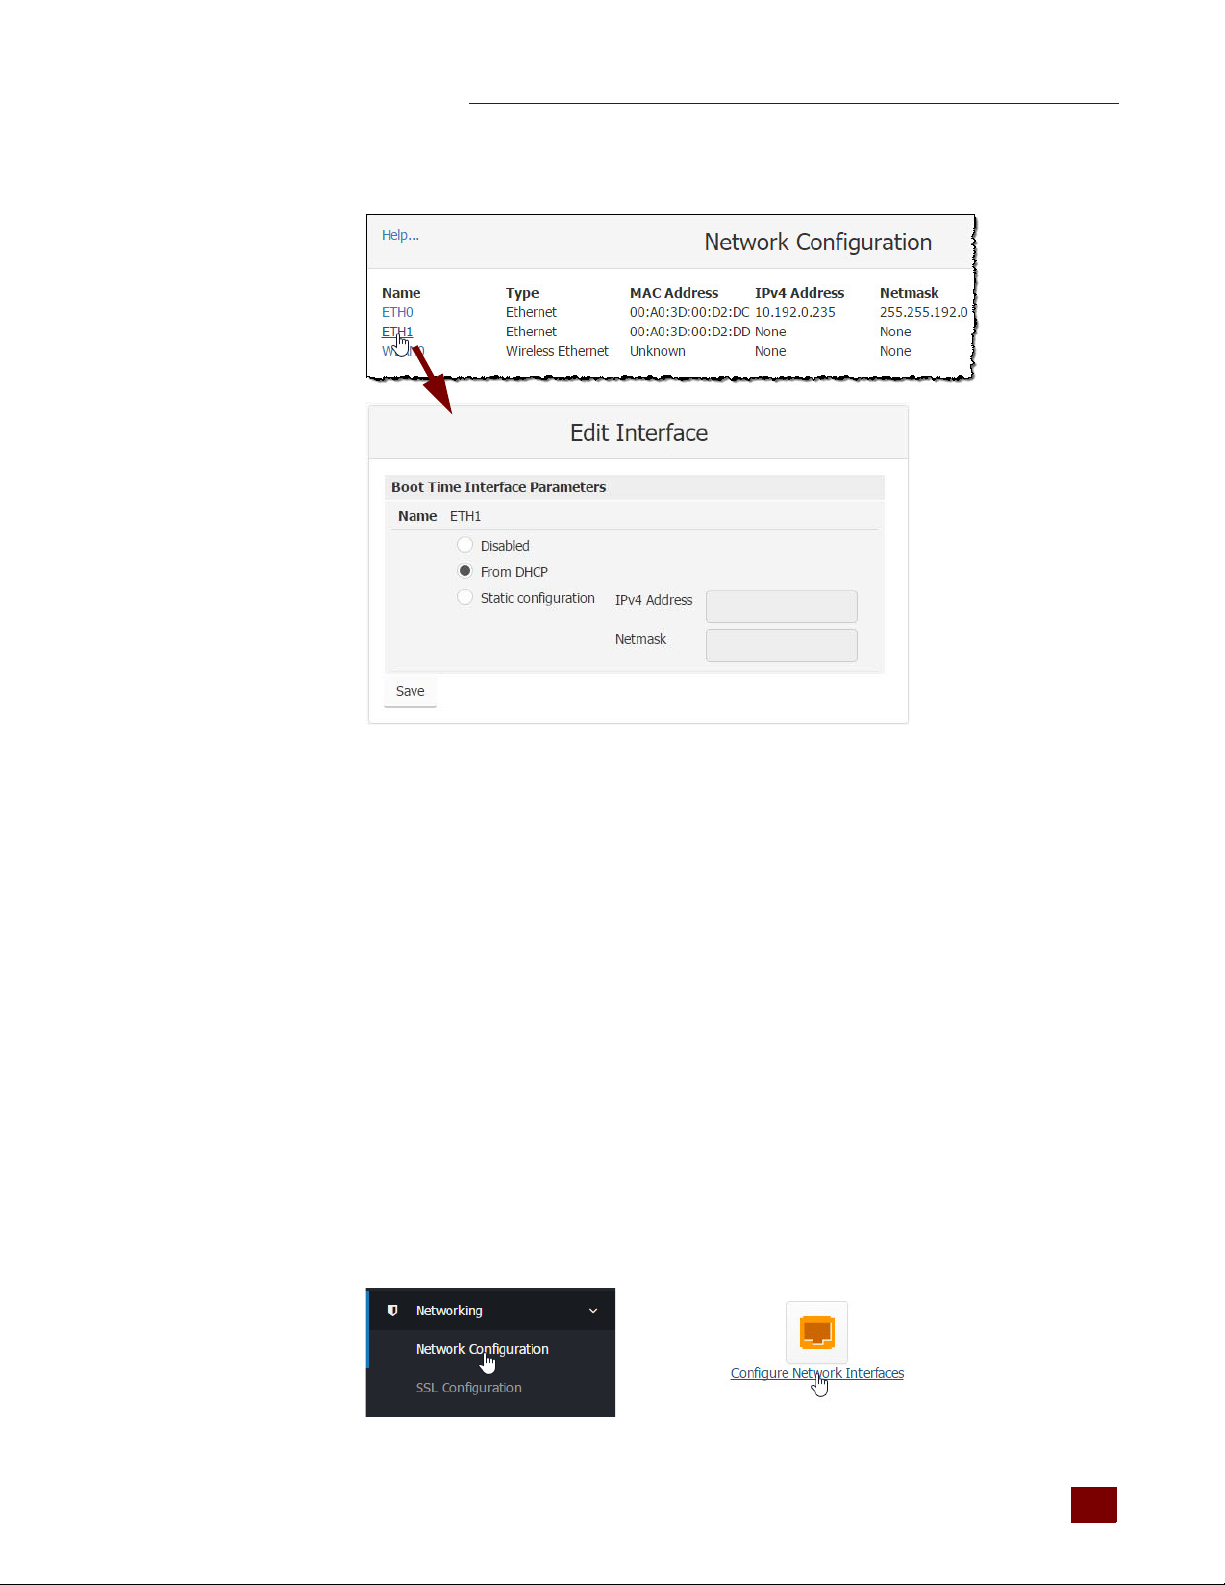
2. Click ETH1.
OR:
CHAPTER 3: USING GROOV ADMIN
3. If the network has DNS and DHCP, select “From DHCP.” If it doesn’t, enter a static IP Address and
Netmask.
NOTE: If you are using static addresses, ETH1 must be on a different subnet than ETH0.
4. Click Save.
Configuring Wireless Communications
You can configure the groov Box to connect to a wireless network through an access point using the
802.11b, 802.11g, and 802.11n protocols.
Before you begin, get the following information from your IT Department:
SSID—Name of the wireless network access point you want the groov Box to join
Security—Encryption type (WPA or WPA2), network key input type (hex or ASCII), and password
Password—To access the wireless network
1. With the groov Box connected via ETH0, in groov Admin’s left navigation bar choose
Networking > Network Configuration, or click the Configure Network Interfaces button in
Quick Start.
groov Box User’s Guide
25
25
Page 33
CONFIGURING NETWORK CONNECTIONS
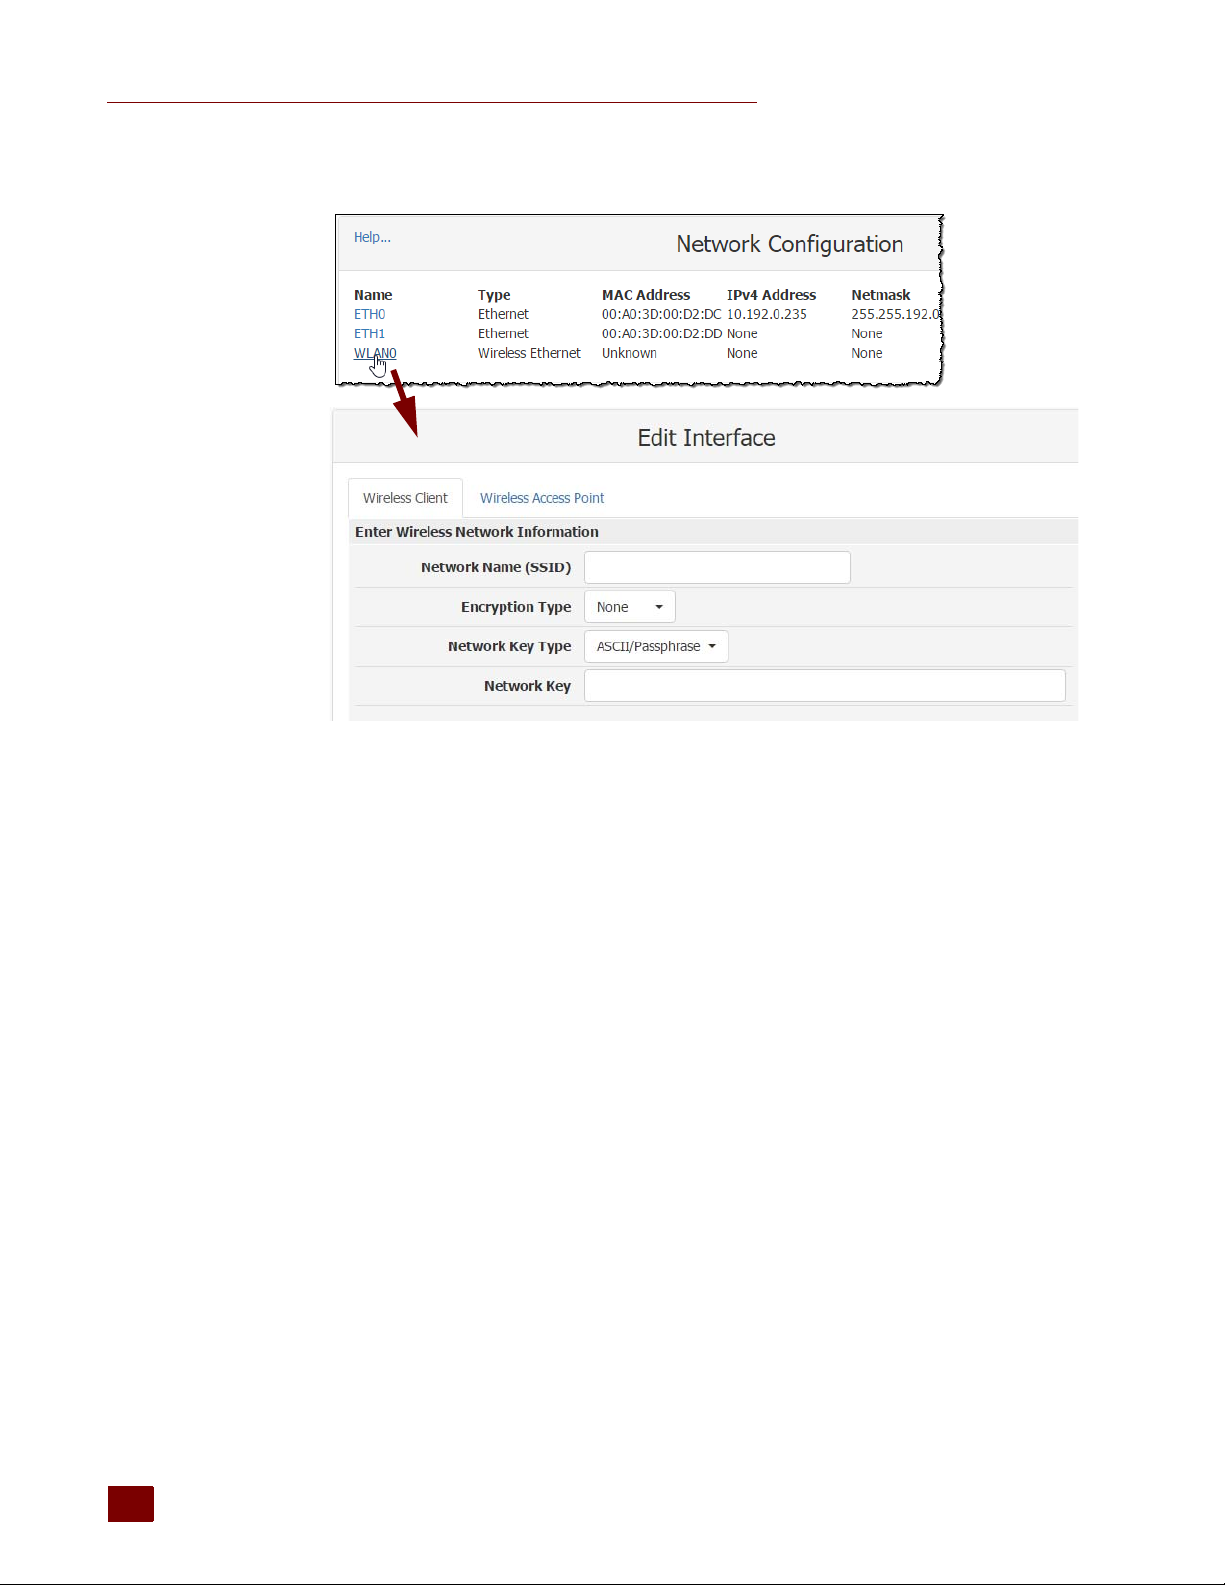
2. Click WLAN0.
3. Enter the Network Name (SSID).
The SSID is a text string from 1 to 32 characters used to uniquely identify the wireless network.
This should match the SSID of the access point you want to connect to.
NOTE: If the SSID contains one or more spaces, enclose
enter “Opto 22” instead of Opto 22.
the SSID with quotation marks. For example,
4. Select the Encryption Type.
This is the type of encryption used to encrypt any packet sent or received between the access
point and the groov Box.
– None—No encryption used.
– WEP64—Use WEP encryption with a 5 digit ASCII or 10 digit hexadecimal key. WEP has
been deprecated by IEEE and should not be used in new installations.
– WEP128—Use WEP encryption with a 13 digit ASCII or 26 digit hexadecimal key.
NOTE: WEP is not secure and has been deprecated by th
Engineers (IEEE). Do not use WEP in new installations unless it is the only option available.Use WPA
or WPA2 instead.
– WPA—U
– WPA2—Use CCMP encryption (AES) with an 8 to 63 digit ASCII or 64 digit hexadecimal
key.
se TKIP encryption (RC4) with an 8 to 63 digit ASCII or 64 digit hexadecimal key.
e Institute of Electrical and Electronics
5. Choose the Network Key Type.
26
Select ASCII or Hexadecimal keys. Typically, WEP uses hexadecimal keys and WPA uses ASCII
keys.
groov Box User’s Guide
Page 34
CHAPTER 3: USING GROOV ADMIN
6. Enter the Network Key.
Use the key for the Encryption Type selected above. This is a write-only field.
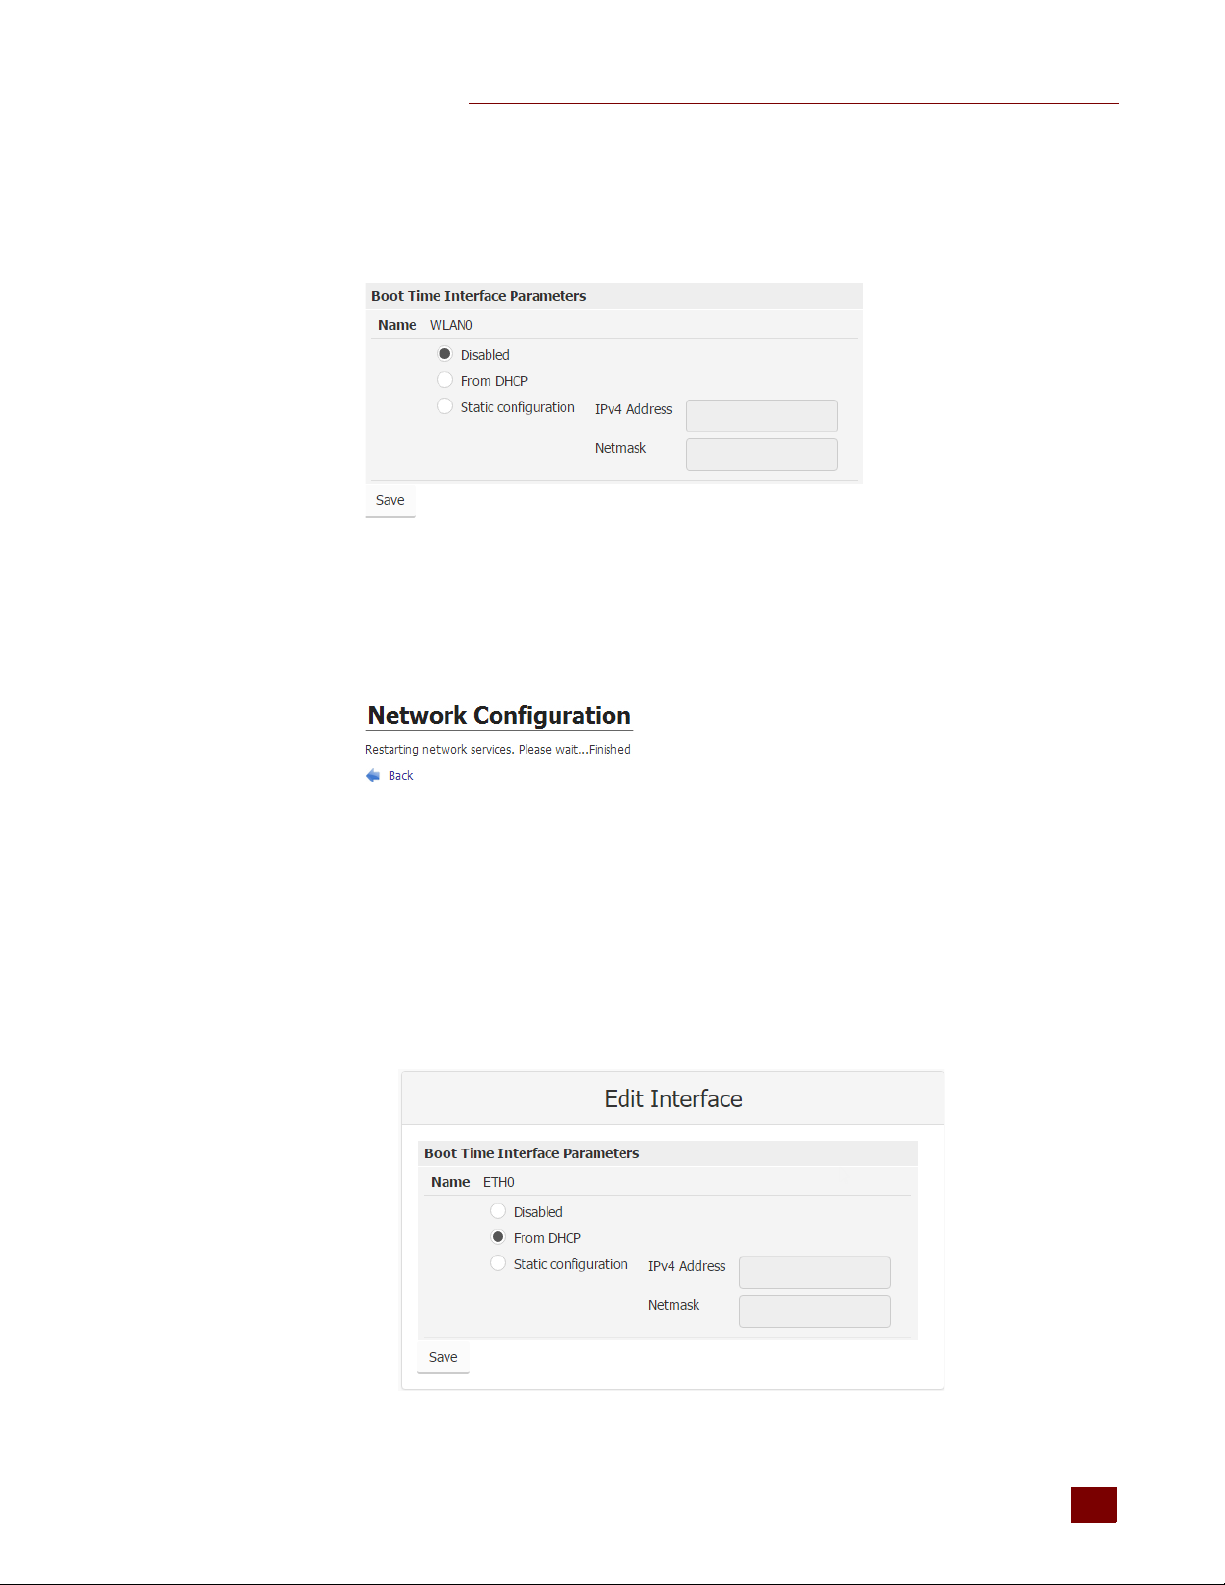
7. Scroll down to the Boot Time Interface Parameters section.
8. Select From DHCP.
If the wireless network does not have a DHCP server, assign a static IP address and netmask.
9. Click Save.
Wait till you see the following message.
Congratulations. You’re connected!
10. If ETH0 and WLAN are on the same subnet, disconnect the cable from ETH0.
You need to disable ETH0 because the groov Box will continue to communicate over ETH0 as
long as it is connected on the same subnet and enabled.
NOTE: If you are using a control network and an enterprise network, and ETH0 is on a different subnet,
ou can leave it connected.
y
a. In the Network Configuration page, click ETH0.
groov Box User’s Guide
27
27
Page 35
UPDATING GROOV APP (BUILD AND VIEW)
b. Select Disabled, then click Save.
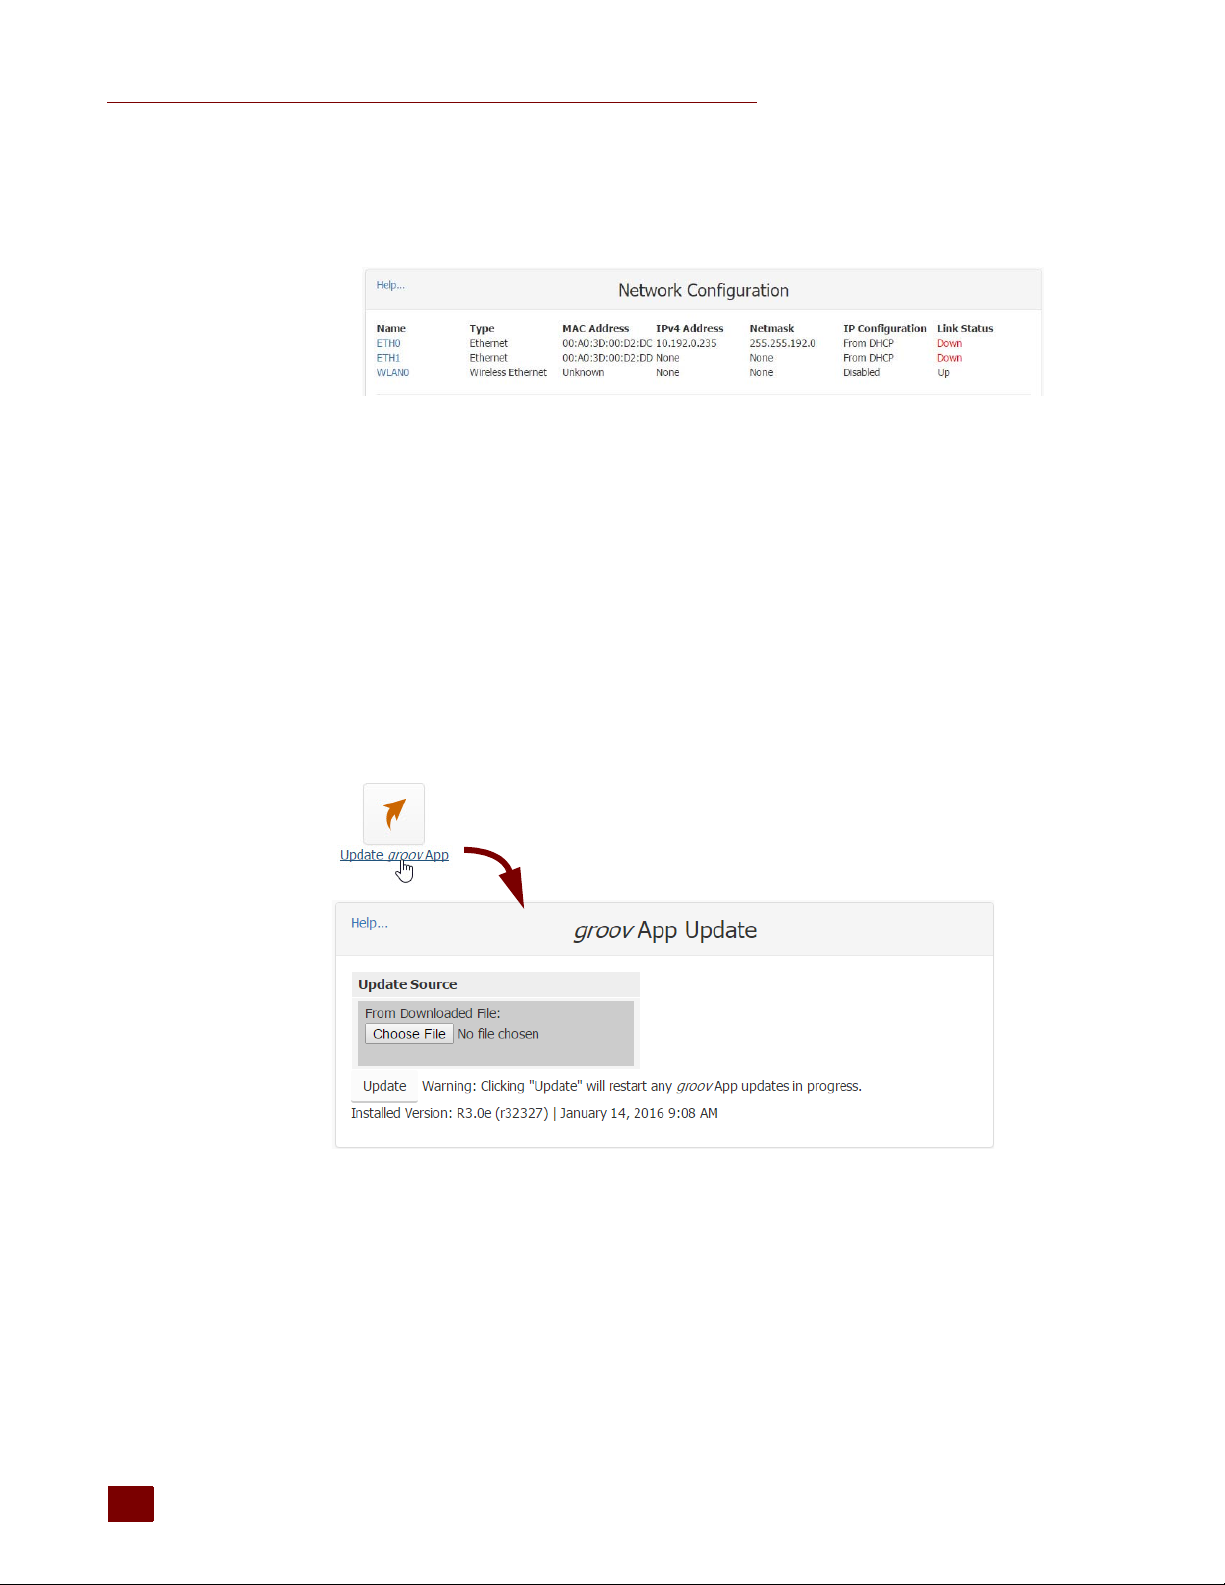
c. Click the Back button, and notice that in the Network Configuration page, ETH0 is disabled
(Down) and WLAN0 is enabled (Up).
Updating groov App (Build and View)
1. Before updating groov, back up your project using groov Build (see form 2027, the groov User’s
Guide) or groov Admin (see page 29).
2. Make sure the groov Box is activated. See “Step 7: Activate the groov Box and Get the License
File” on page 11.
3. Go to manage.groov.com and follow directions to download the latest groovApp update file
and save it to your computer.
4. Open groov Admin.
5. Click Quick Start and then the Update groov App button.
6. Click Choose File, navigate to the update file you downloaded, and then click Open.
7. Click Update.
Wait while the application is installed and restarted automatically, which may take several
minutes. When the operation is complete, a success message appears.
28
groov Box User’s Guide
Page 36

Backing Up groov
During backup, project components are saved to a file on your computer or a USB flash drive. You
should back up groov frequently. There is no automatic backup.
To restore groov from the backup file, see “Restoring groov” on page 31.
CHAPTER 3: USING GROOV ADMIN
IMPORTANT: Your groov project files are not encrypted or masked in any way. This means that most of
the pr
oject information in them (except for the groov User passwords) can be read, including the following:
• SMTP account info (including password)
• User email accounts (does not include the groov User passwords, which are securely encrypted
before being stored)
• Device addresses
• Tag address information (PAC tag names, Modbus addresses, OPC node-id, etc.)
Opto 22 recommends that you secure your backup files using file- or disk-based encryption provided either
by the operating system or other software/hardware.
Also, be aware that if you send project files to Opto 22, our personnel will have access to the information
listed above.
Follow these steps to back up groov:
1. In the left navigation bar, choose System > Backup and Restore.
groov Box User’s Guide
29
29
Page 37

BACKING UP GROOV
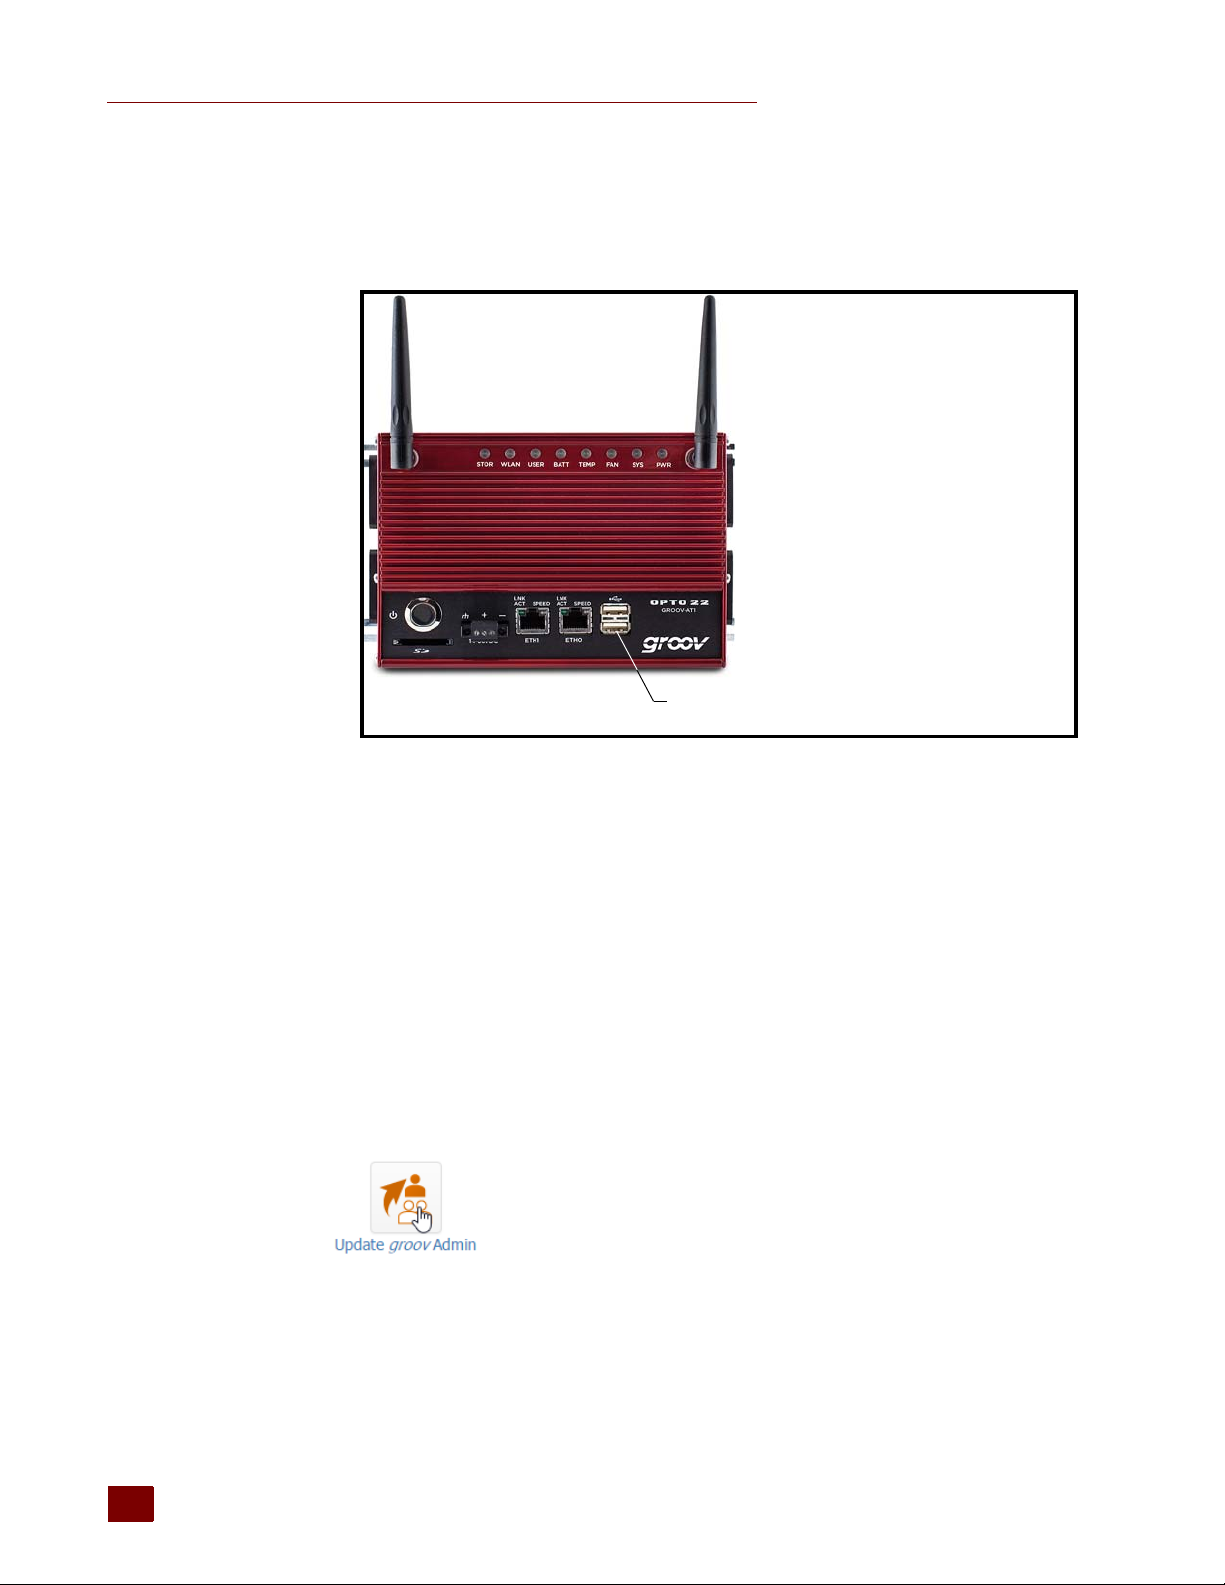
USB connectors for
backing up and restoring
2. Click the Backup tab.
3. Select the components you want to back up.
groov (Build, View, projects) saves the groov App (Build and View) and your project.
Ethernet/Wireless Settings saves any settings you’ve configured for ETH0, ETH1, and the
wireless network, including IP, Subnet, Gateway, Hostname, SSID, Wireless Network Key, etc.
4. Do one of the following:
– Select Download to PC.
– Insert a USB drive into a USB slot on the front of the groov Box. (The option is not available
until you insert the USB drive. If necessary, refresh the page.) Select Save to USB Flash Drive.
Click Backup.
30
5. If saving to the PC, save the file (don’t open it). The backup file is downloaded to the
Downloads directory on your PC.
If saving to a USB flash drive, the file is downloaded to your USB drive. Wait for it to finish before
removing the USB drive.
groov Box User’s Guide
Page 38
Restoring groov
Use the following instructions to restore groov components from a backup file saved on a computer
or USB flash drive (see “Backing Up groov” on page 29).
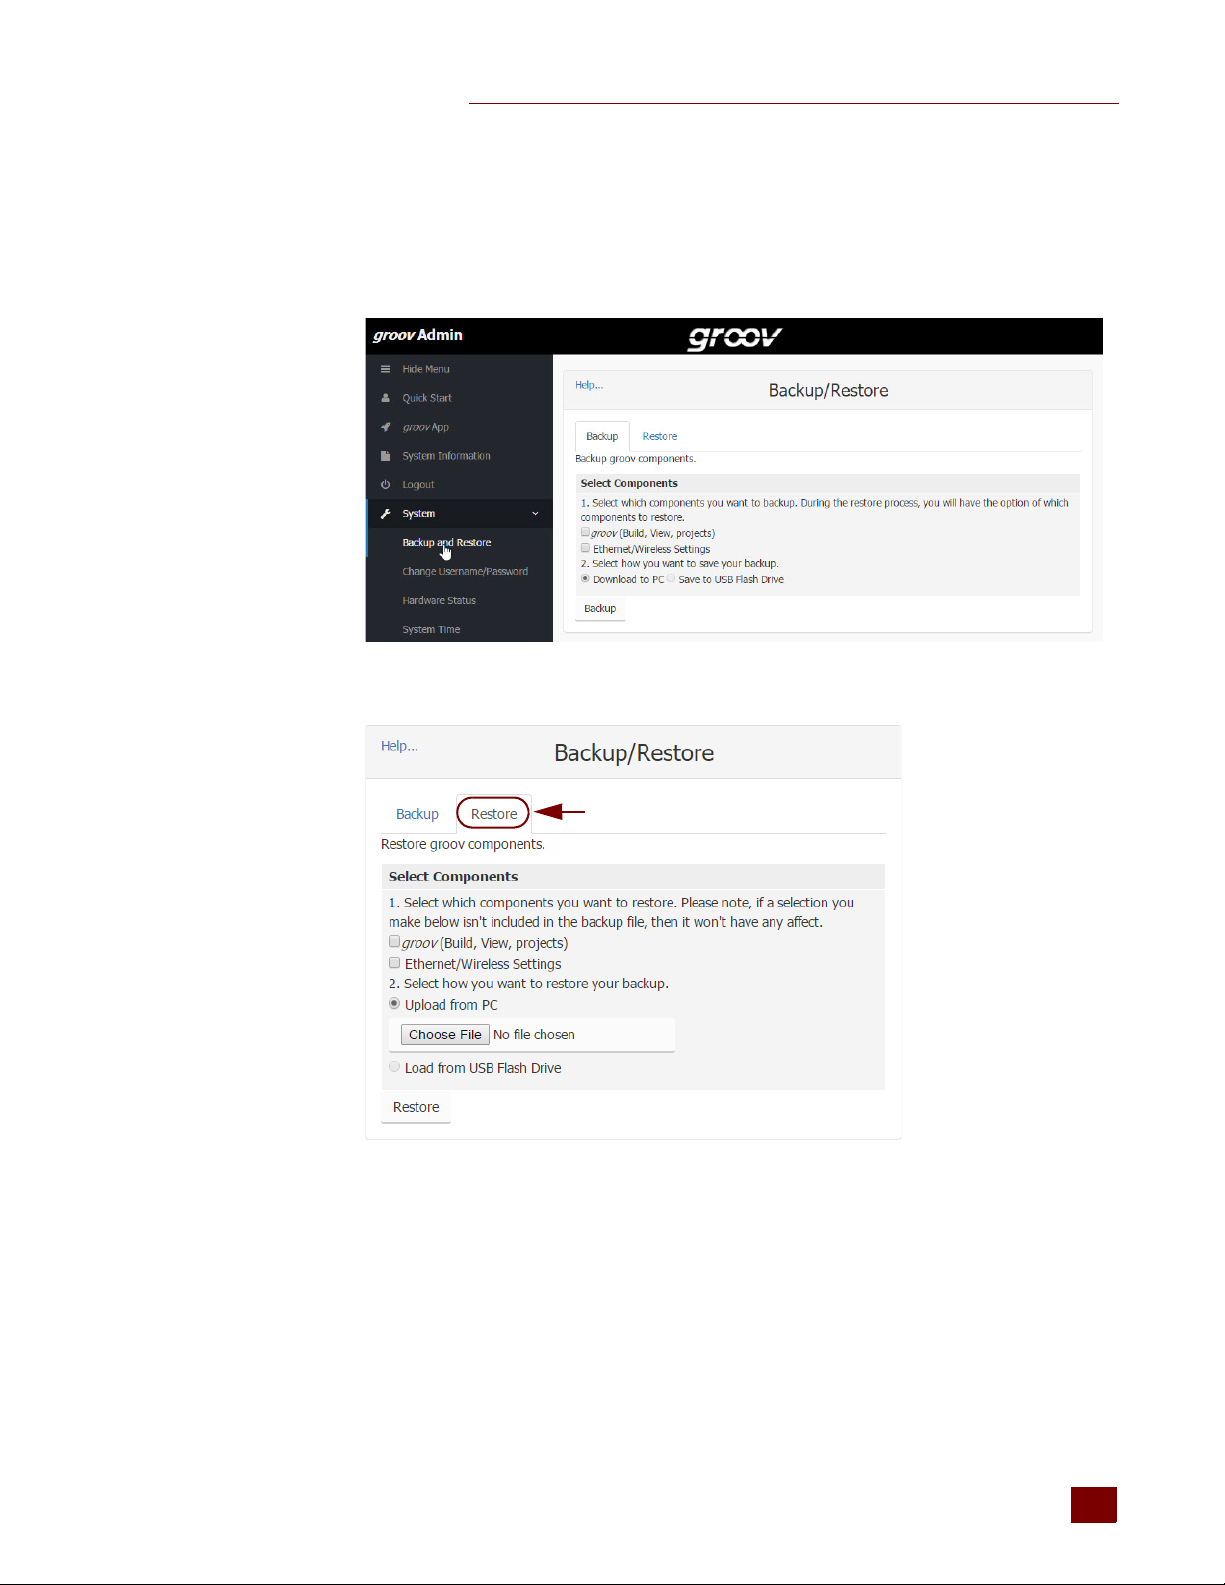
1. In the menu tree, click System, and then click Backup and Restore.
CHAPTER 3: USING GROOV ADMIN
2. Click the Restore tab.
3. Select the components you want to restore. If you choose a component that isn't included in
the backup file, it won’t be restored.
groov (Build, View, projects) restores the groov software and the project you built in groov.
Ethernet/Wireless Settings restores any settings you’ve configured for ETH0, ETH1, and the
wireless network, including IP, Subnet, Gateway, Hostname, SSID, Wireless Network Key, etc.
groov Box User’s Guide
4. Do one of the following:
– To restore from your PC, select Upload from PC, then click Choose File and locate your
backup file.
31
31
Page 39
UPDATING GROOV ADMIN
USB connectors for backing
up and restoring
– To restore from a USB flash drive, insert the drive with the backup file into a slot on the front
of the groov Box. (The option is not available until you insert the USB drive. If necessary,
refresh the page.) Click Load from USB Flash Drive, then click the browse button and select
your backup file.
5. Click Restore, and then wait while the files are uploaded.
Updating groov Admin
When you update groov Admin, all of your configuration settings are kept.
1. Go to manage.groov.com and follow directions to download and save the latest groov Admin
update file to your computer.
IMPORTANT: If you have a GROOV-AT1 or GROOV-AT1-SNAP groov Box running groov Admin
R1.570.40 or low
can download and install the most recent version.
2. If the Quick Start menu is not open, in the left navigation bar, click Quick Start.
3. Click Update groov Admin.
er, first download and install groov Admin version R1.570.41. After you install 41, you
32
groov Box User’s Guide
Page 40

CHAPTER 3: USING GROOV ADMIN
4. Click Choose File and locate the update file you downloaded. Highlight the file, and click Open.
5. Click Update.
The application file is downloaded and installed. The update process may take several
minutes. It may not look like anything is happening, but it is. Be patient and don’t click away
from this page until you see the success message:
NOTE: Your groov Box must be restarted for the update to take effect. While the groov Box is restarting,
our users will be disconnected, and you will not be able to continue working in groov.
all of y
6. When the success message appears, click “Click here to restart now” or click Back to restart later.
(To restart later, see “Restarting the groov Box,” below.)
During the restart, you’ll notice the LED lights on the groov Box go off and then come back on.
You and your users will be able to use groov View and groov Build once the groov Box has fully
restarted and the SYS LED has stopped flashing.
Restarting the groov Box
While the groov Box is restarting, all users are disconnected, and you won’t be able to continue
working in groov Build. The groov Box must be restarted in order for updates to take effect.
To restart the groov Box, do one of the following:
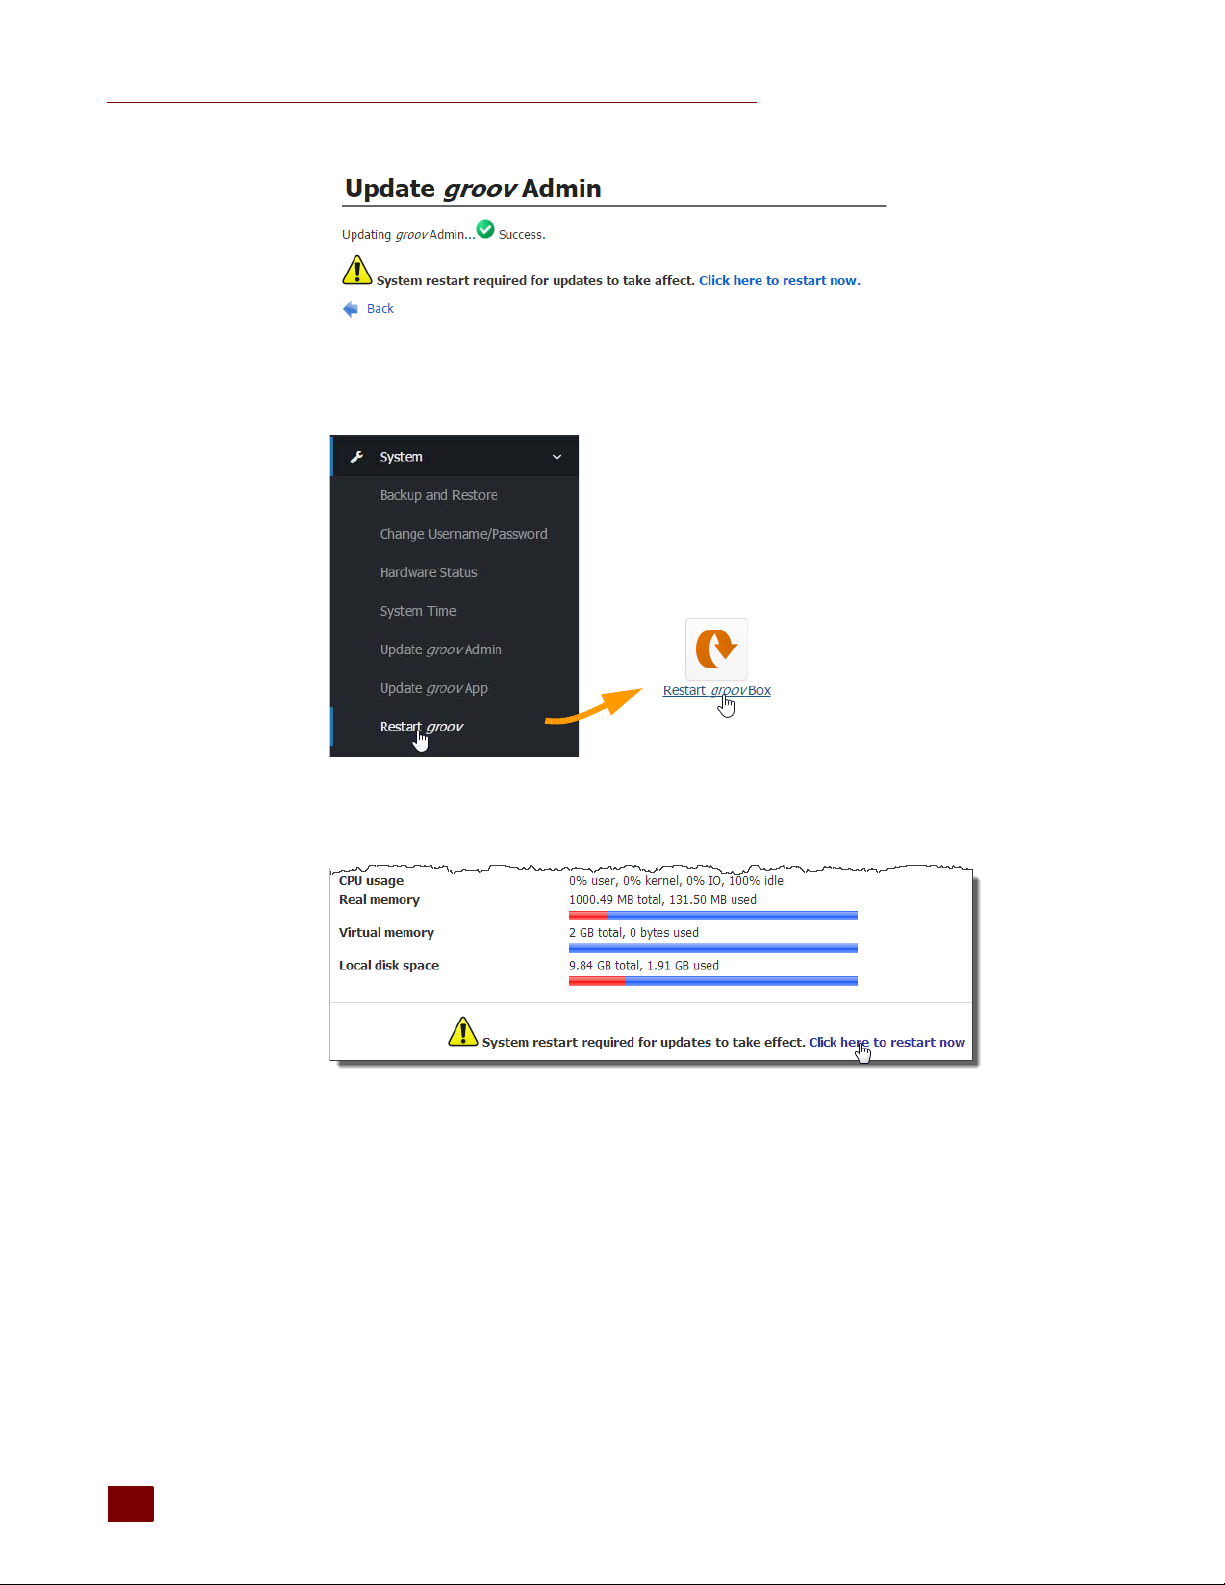
After updating groov Admin, click the message “Click here to restart now.”
groov Box User’s Guide
33
33
Page 41
RESTARTING THE GROOV BOX
In the left navigation bar, choose System > Restart groov and then click the Restart groov Box
button.
If you’ve updated but not restarted the Box, click System Information, and then click “Click here
to restart now.”
Hardware restart: Press the On/Off button briefly and wait for the groov Box to turn off. Then
briefly press the On/Off button again to power it back up.
During a restart, you’ll notice that the LED lights on the groov Box go off and then come back on. You
and your users will be able to use groov View and groov Build once the groov Box has fully restarted
and the SYS LED has stopped flashing.
34
groov Box User’s Guide
Page 42
Changing Username and Password
For groov Admin there is only one user; you cannot add more than one username. However, you can
change the username or password for the groov Admin user. This change does not affect any
usernames or passwords in groov Build.
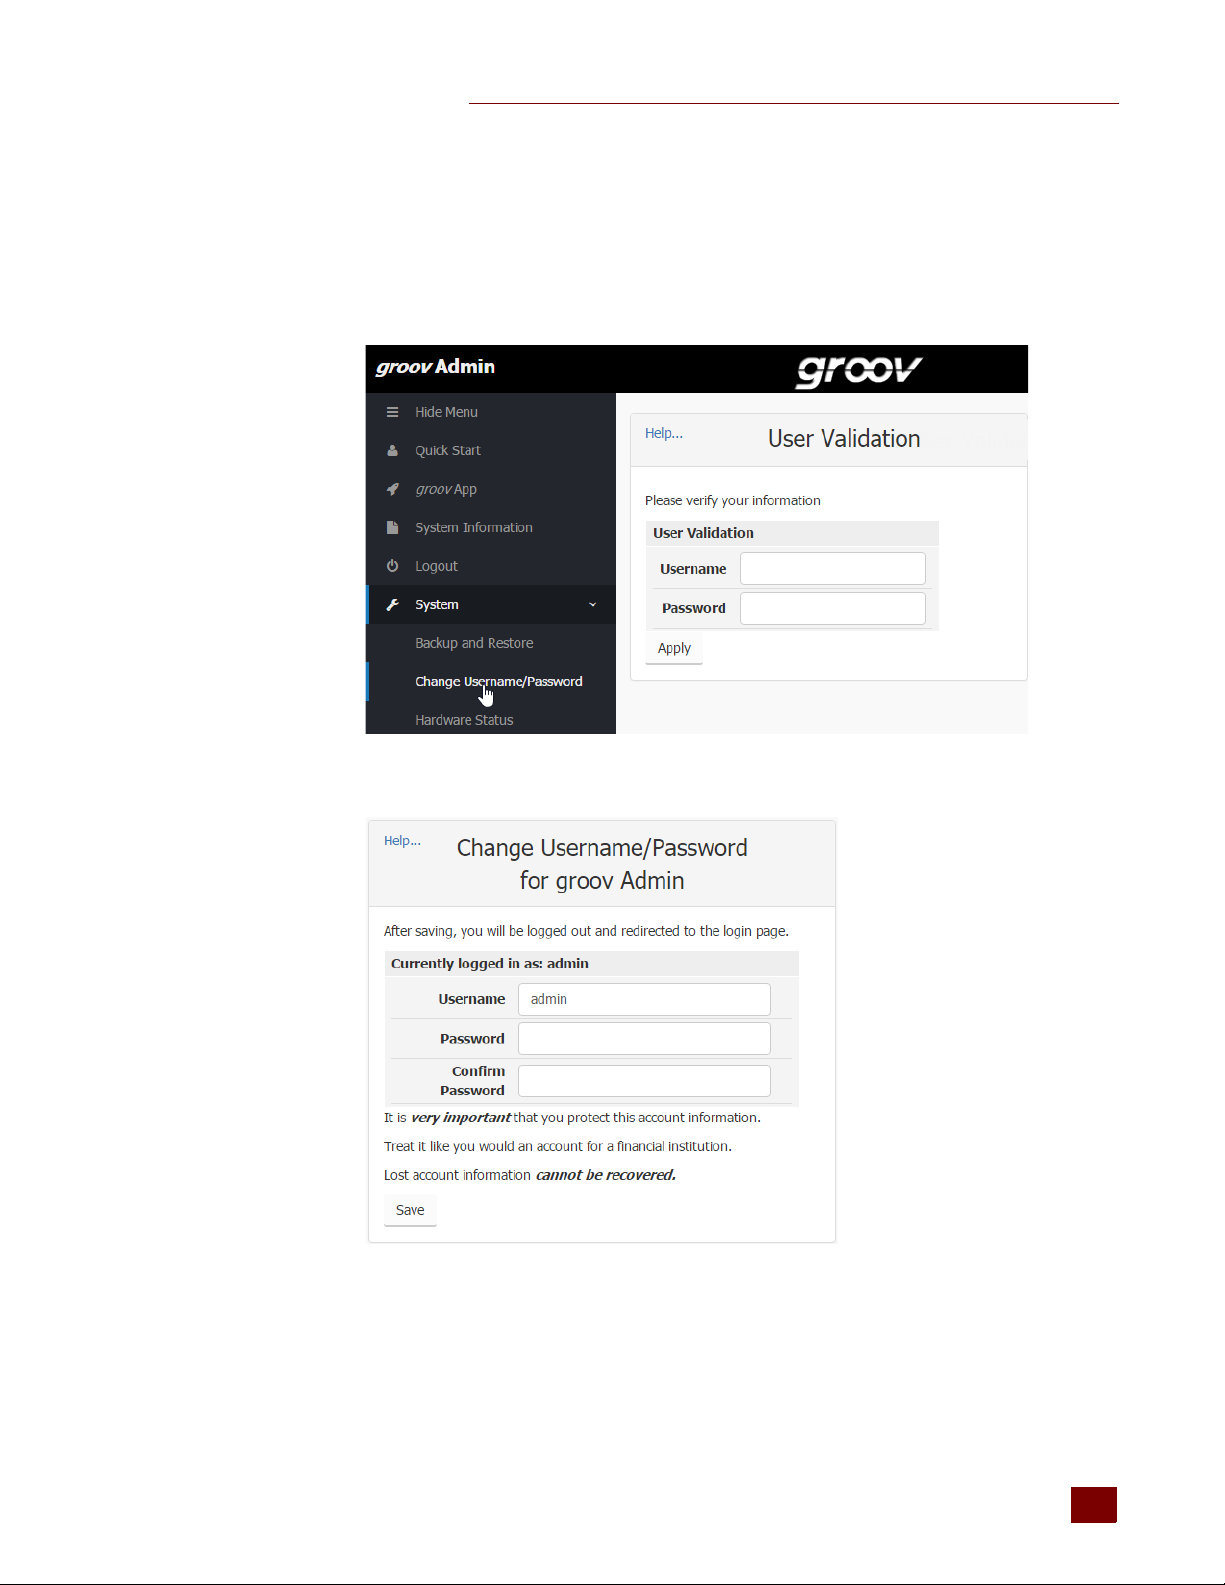
1. In the left navigation bar, choose System > Change Username/Password.
CHAPTER 3: USING GROOV ADMIN
2. Enter your current username and password to verify your identity and click Apply.
3. Enter the new username and the password in both boxes.
CAUTION: Write down your new Username and Password, and keep it in a safe place. You will need
this information each time you log in. If you lose your login information, you will have to restore the
groov Box back to factory defaults, erasing your project. There is no password recovery option.
groov Box User’s Guide
4. Click Save.
35
35
Page 43
CHECKING SYSTEM INFORMATION
OR
The login dialog box appears.
5. Log in using the new username and password.
Checking System Information
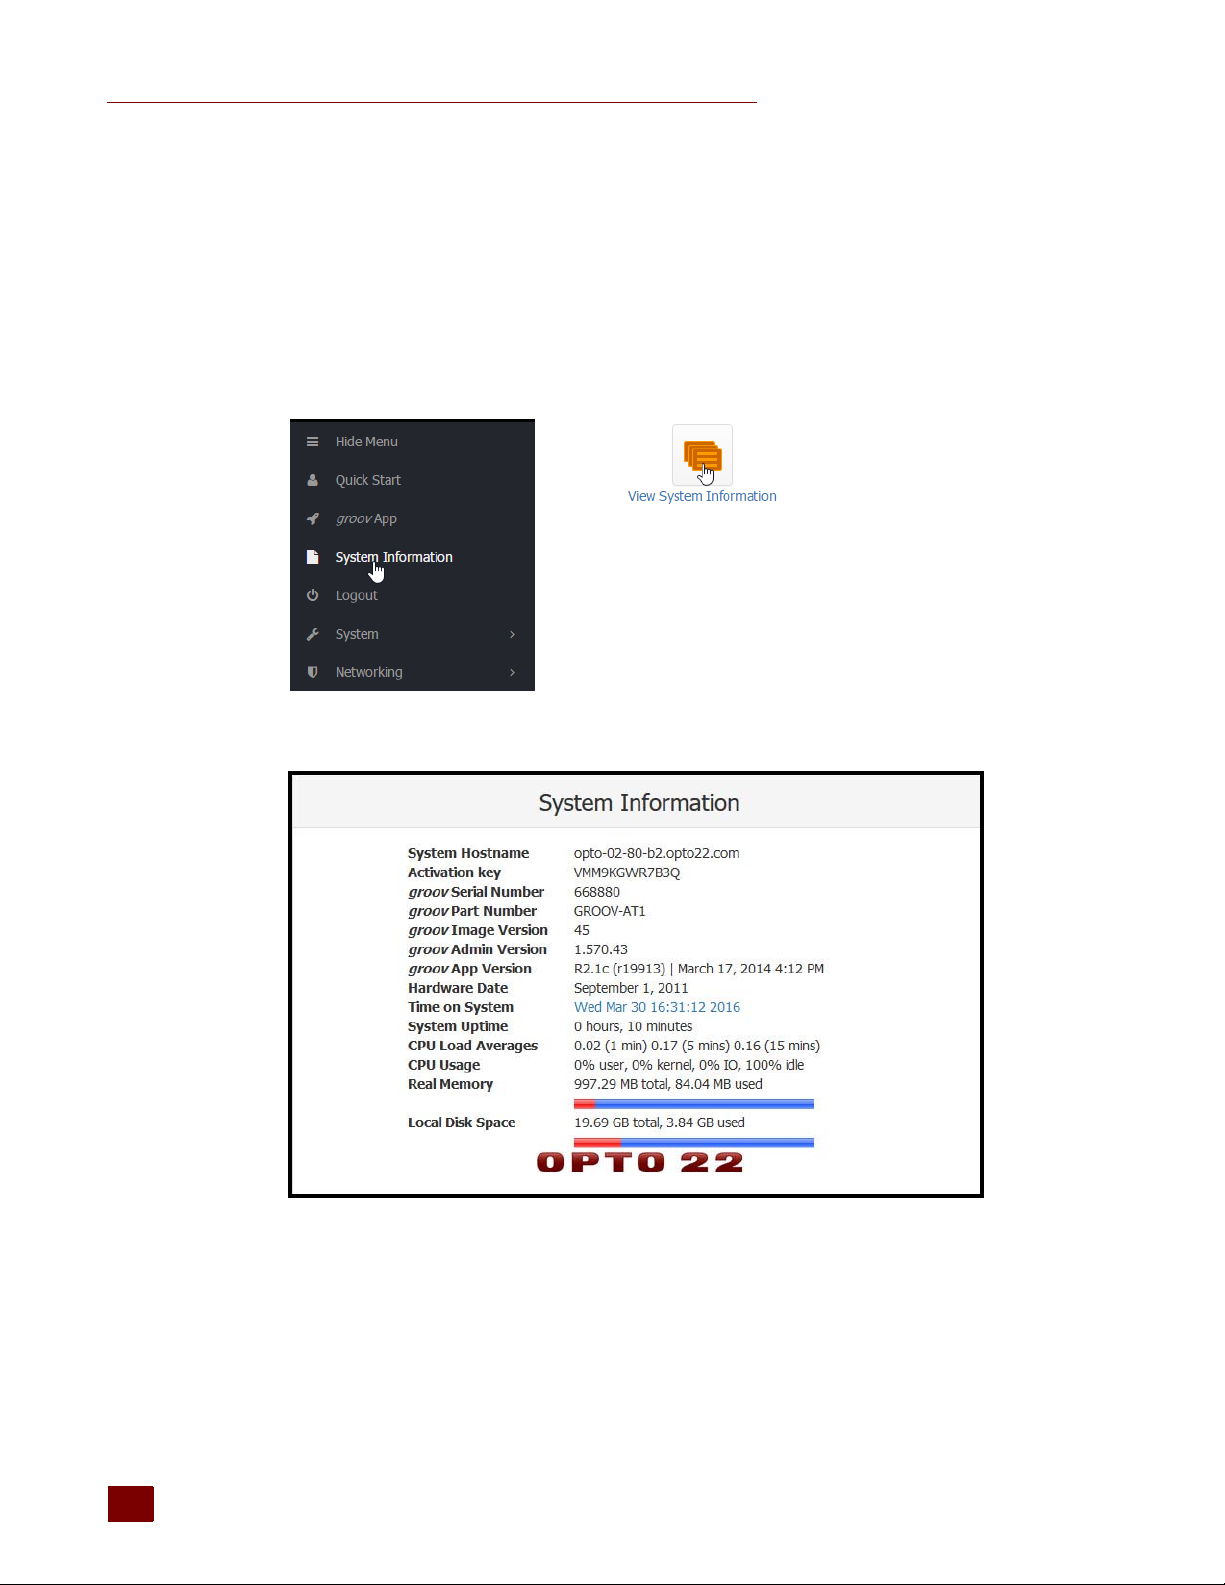
In the left navigation bar, choose System Information in the menu tree, or click the System
Information icon in Quick Start.
The following information is provided.
Checking Hardware Status
36
1. To check the status of the internal components in the groov Box, in the left navigation bar,
choose System > Hardware Status.
groov Box User’s Guide
Page 44
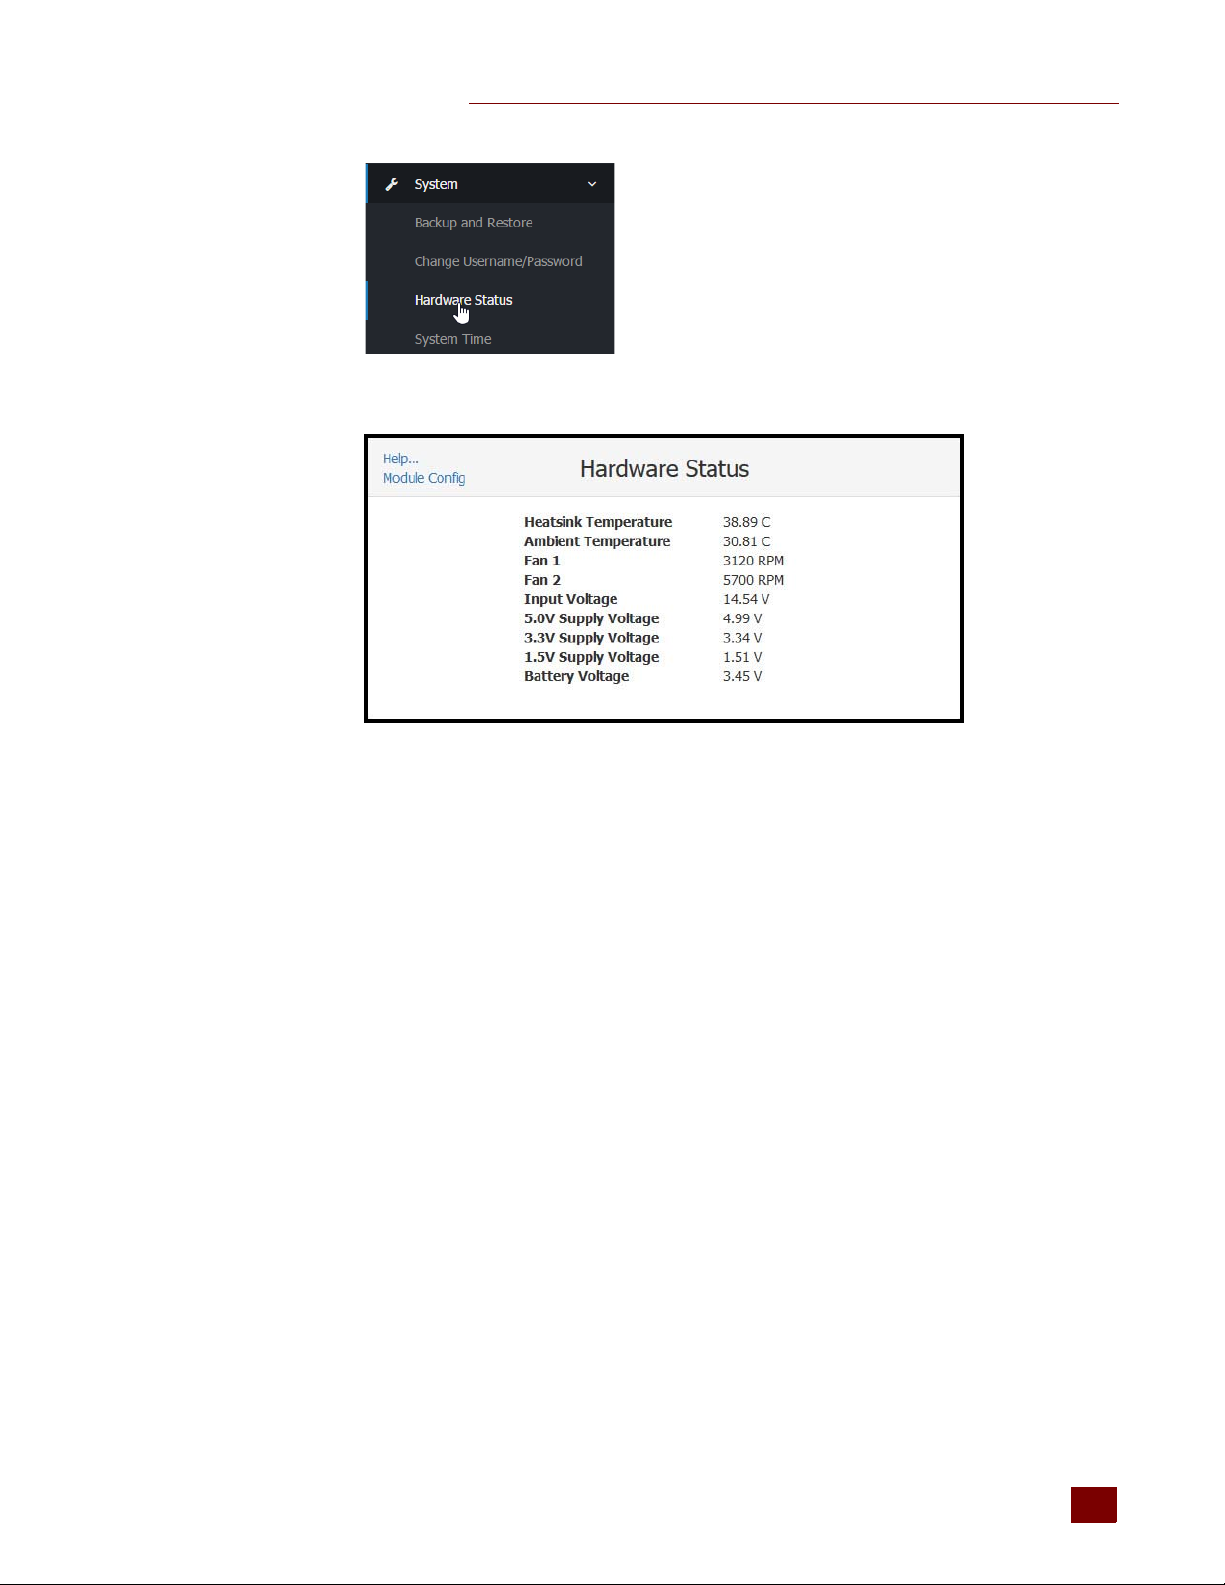
The following information is provided:
CHAPTER 3: USING GROOV ADMIN
If any value is out of range, it is displayed in red and a message appears. Here are the values:
Heatsink Temperature: Temperature of the internal PCB located near the battery
Ambient Temperature: Temperature of the internal PCB located near the power supply
Fan 1:
Fan 2:
Input Voltage: Main power supply for the groov Box
5.0V Supply Voltage:
3.3V Supply Voltage:
1.5V Supply Voltage:
Battery Voltage: Voltage of the battery that maintains the date and time
Fan speed in revolutions per minute. If either of these values
is 0, call Opto 22 for a fan replacement.
Internal power supplies
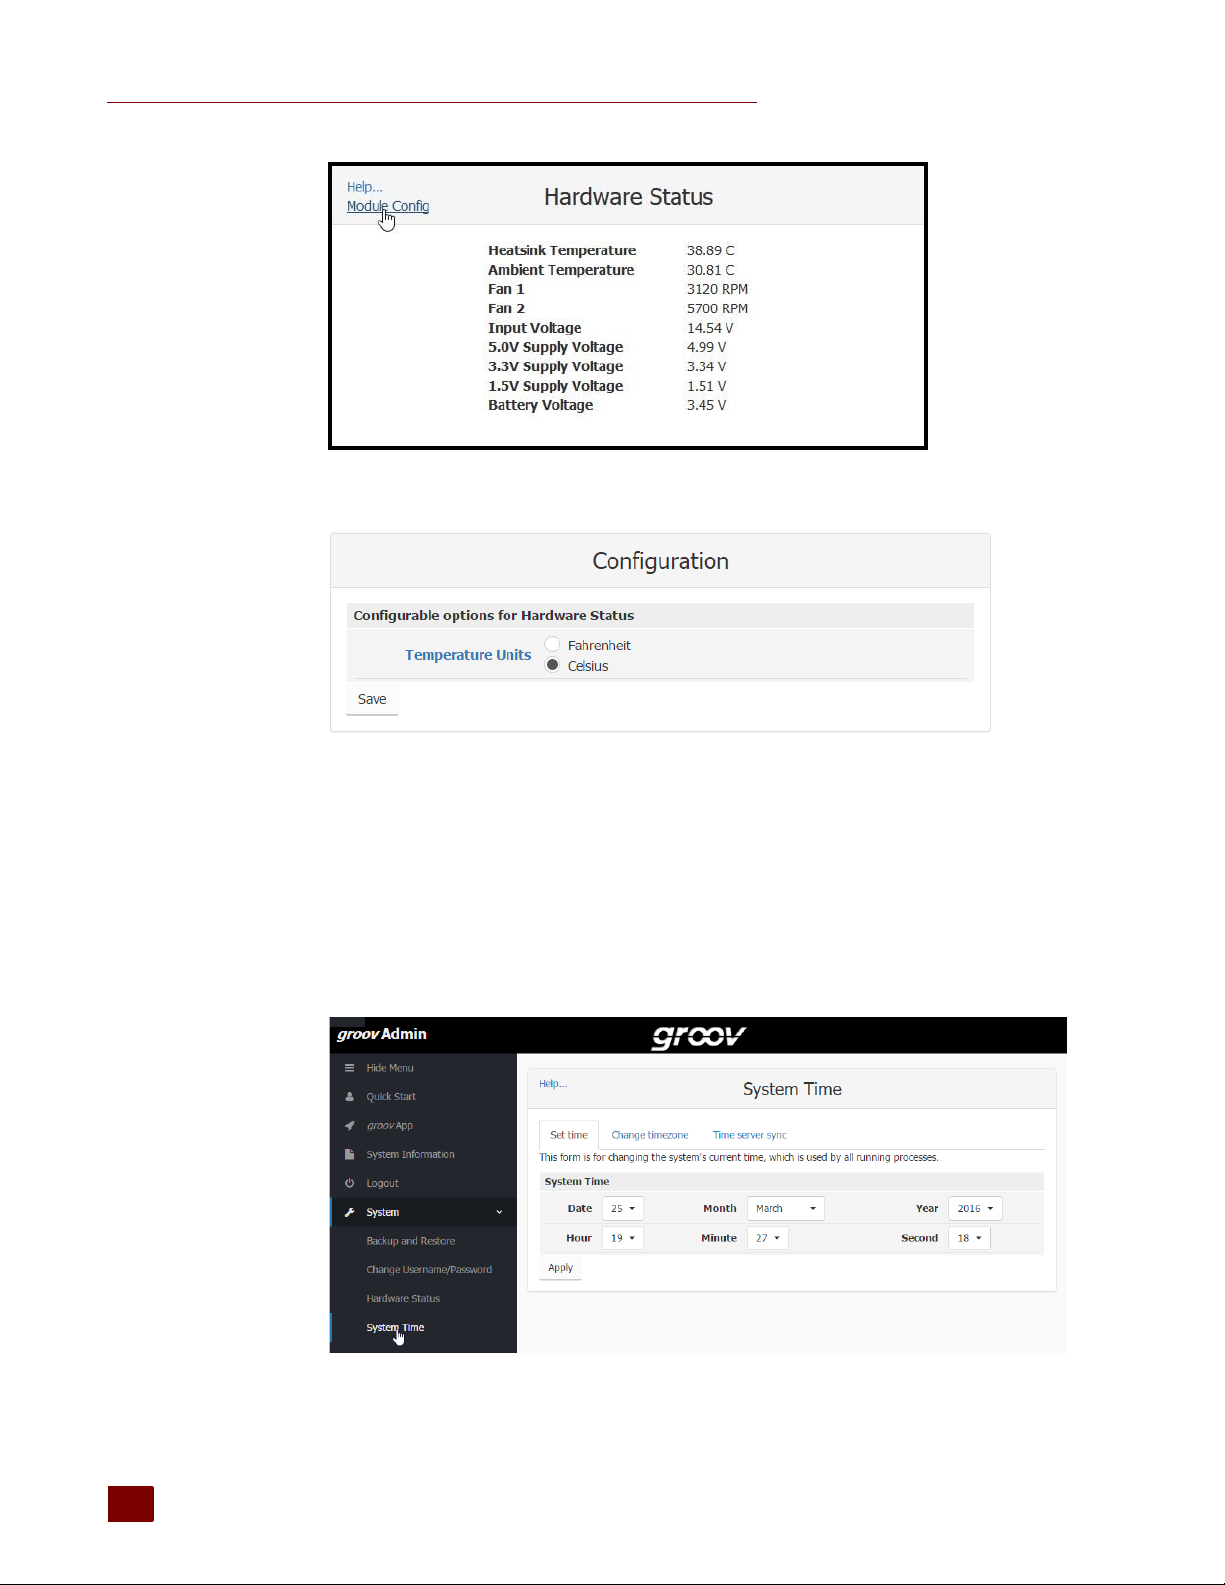
2. To change the temperature units (Fahrenheit or Celsius) shown in Hardware Status, click
Module Config under Help on the left-hand side.
groov Box User’s Guide
37
37
Page 45
SETTING THE SYSTEM TIME
3. Select either Fahrenheit or Celsius.
4. Click Save.
Setting the System Time
You can set the time and time zone used by the groov Box. You can also set the Box to synchronize
with a specific time server.
1. In the left navigation bar, choose System > System Time.
38
2. Set the time and date and then click Apply.
groov Box User’s Guide
Page 46
CHAPTER 3: USING GROOV ADMIN
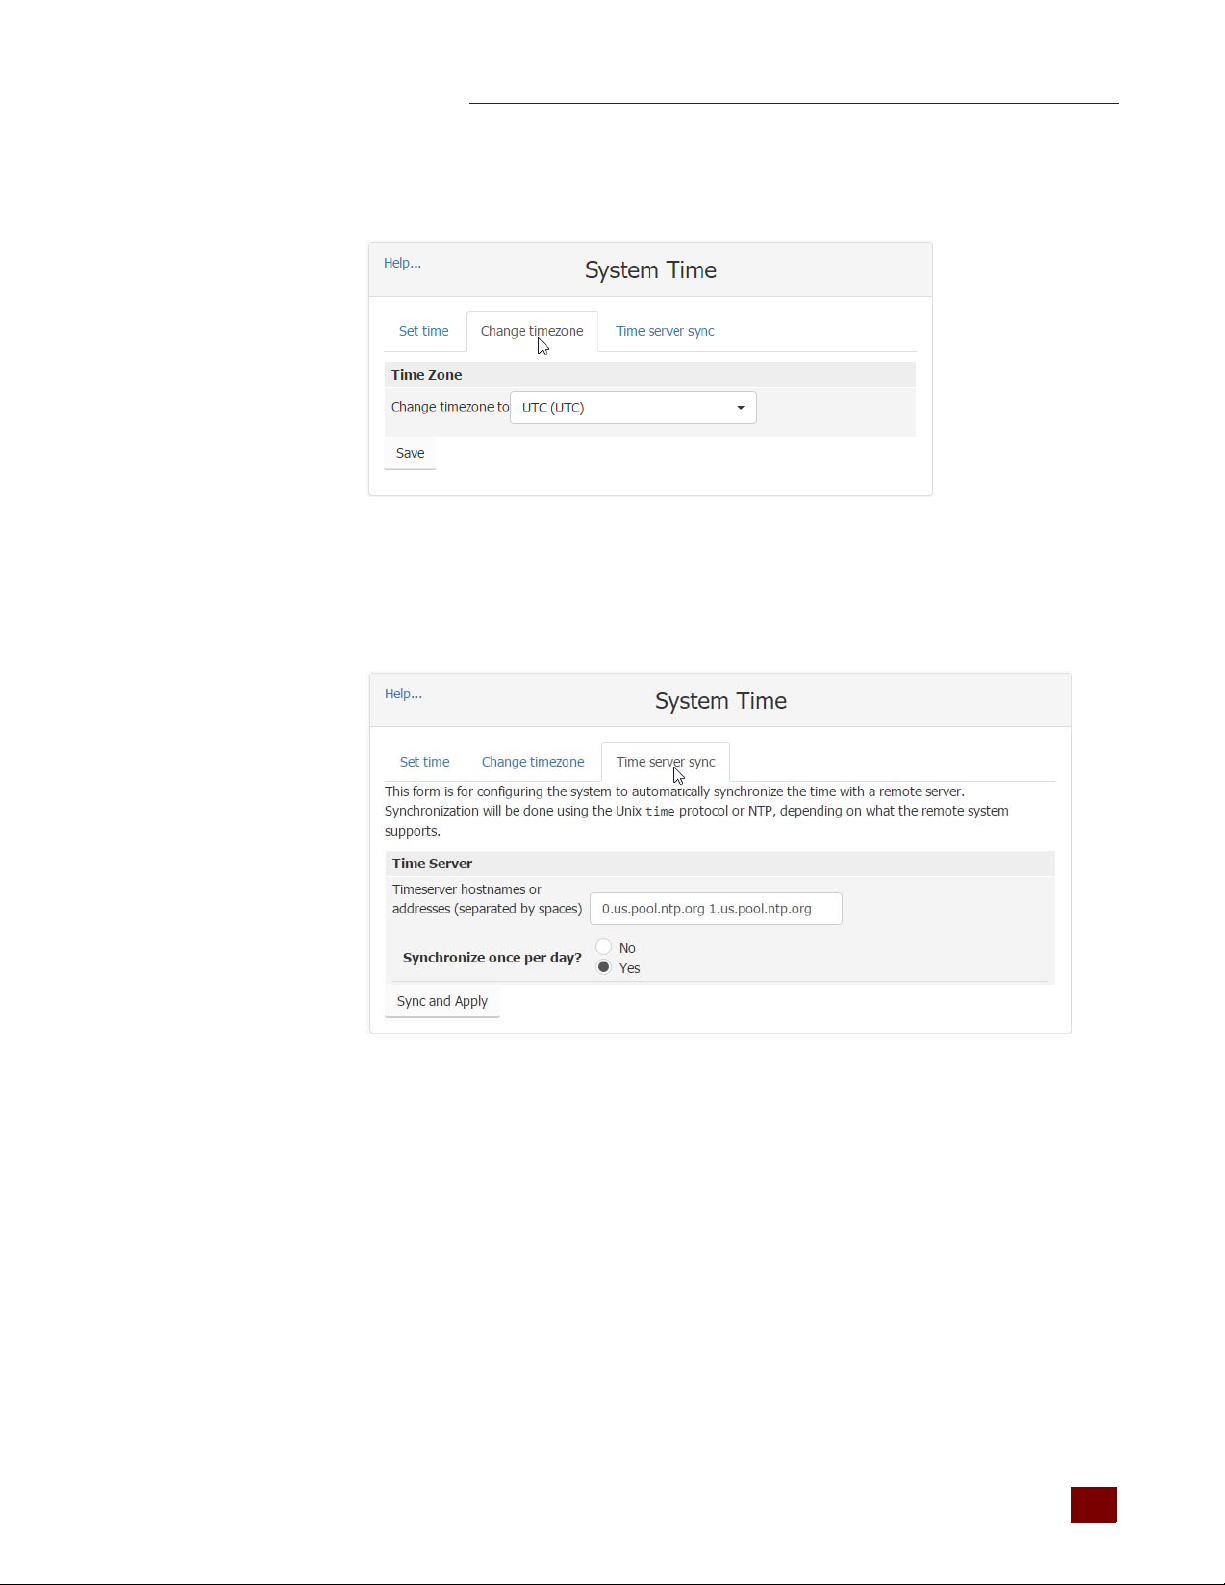
3. To change the time zone from the default of UTC (Coordinated Universal Time), click the
Change timezone tab.
4. In the drop-down list, select a time zone, and then click Save.
5. To set up the groov Box to automatically synchronize the time with a remote server, click the
Time server sync tab.
Synchronization uses the Unix time protocol or NTP, depending on the remote system.
groov Box User’s Guide
6. Enter the hostnames or addresses of the time server(s). Separate servers by a space.
7. Click Yes next to “Synchronize once per day.”
8. Click Sync and Apply.
39
39
Page 47

SETTING THE SYSTEM TIME
40
groov Box User’s Guide
Page 48
2104_Using_SSL_Certificate.fm: Chapter 4
4: Using an SSL Certificate
groov uses an SSL certificate to encrypt communications and prove groov’s identity to client
browsers. An SSL certificate contains the server name, the name of the organization that controls
the server, and digital signatures of organizations that vouch for the authenticity of the certificate.
The certificate is digitally signed either by a certificate authority (CA) or it is self-signed.
The default certificate type (a self-signed certificate) and configuration will cause your web browser
to issue an untrusted site warning when accessing groov. To avoid the warning you can install the
self-signed certificate in all the browser certificate stores used to access groov. However, whether or
not the certificate is installed in the certificate stores, communication is always encrypted.
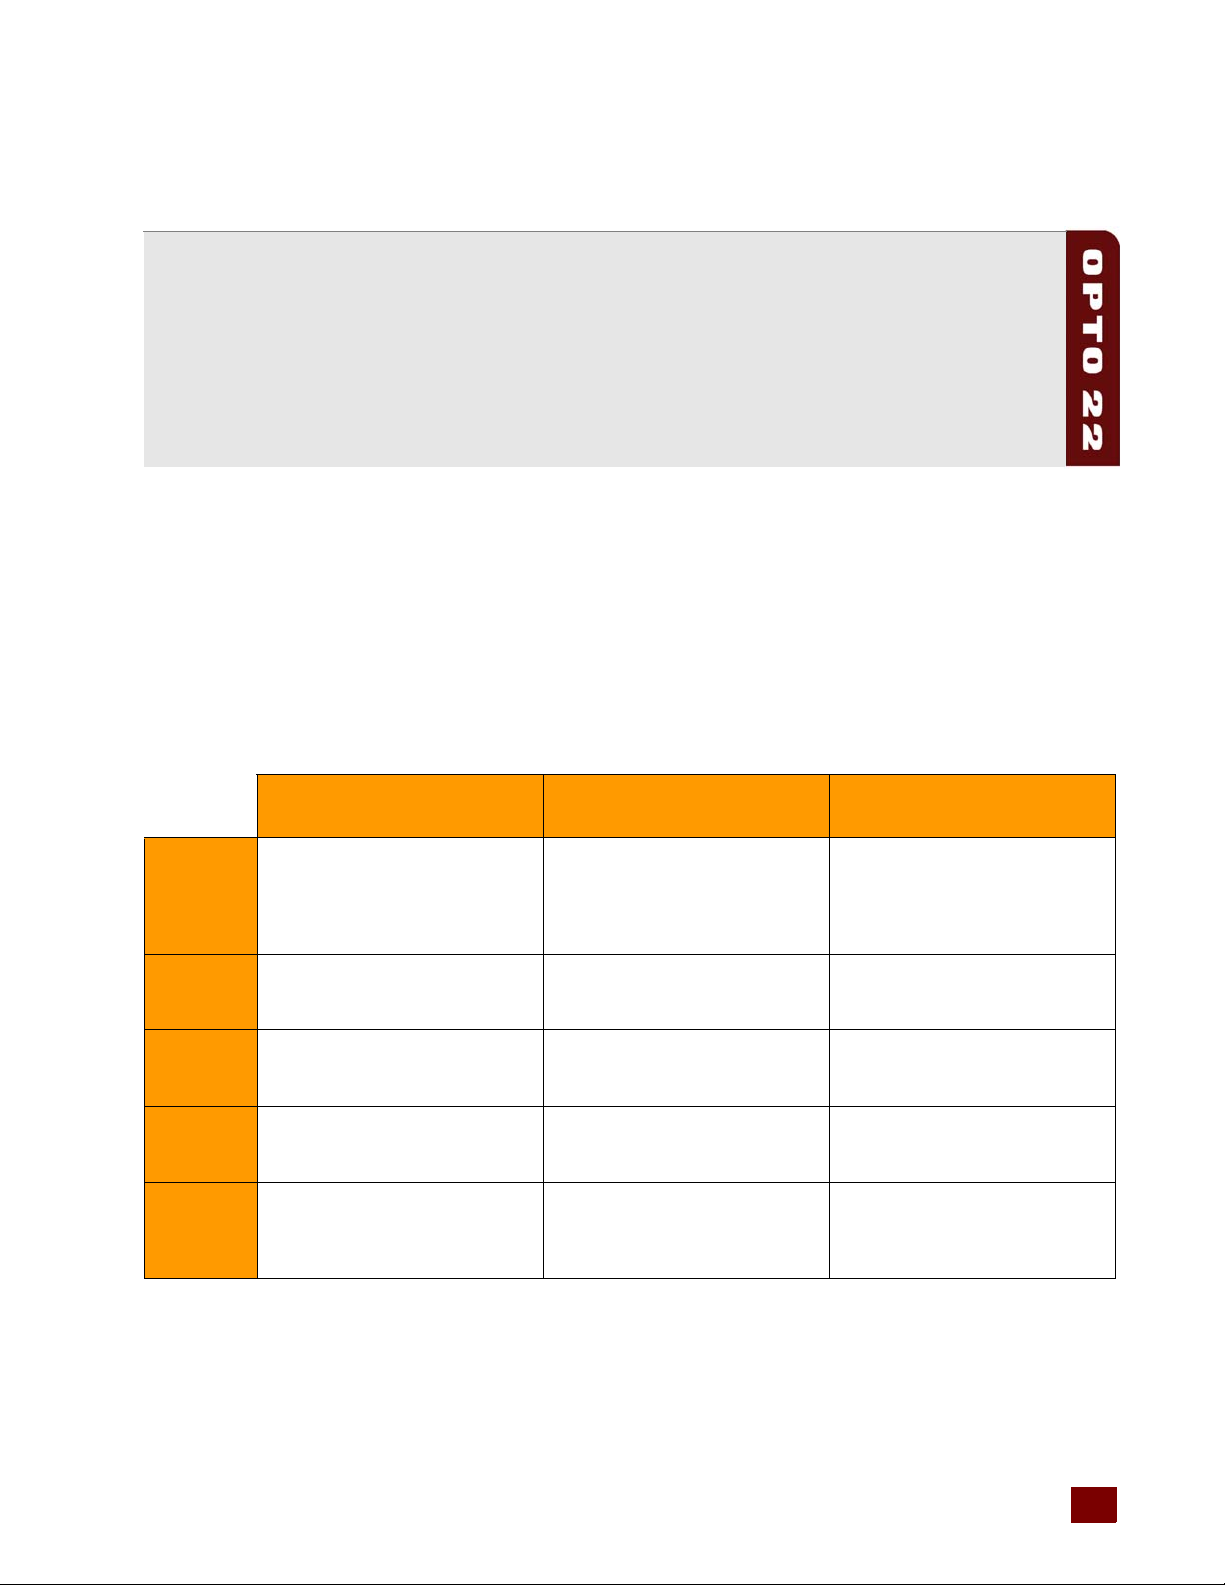
Here’s a comparison of the certificate types:
Self-Signed Certificate (default)
For one or two groovs and a small set
Best Use
Cost Free Free
Ease of
Configuration
Untrusted
Site Warning
Trust Level
of client browsers that remain pretty
much the same, and users who trust
that your certificate is valid
Easiest configuration
Browser raises untrusted site warning.
(But communication is still encrypted.)
Trusted by those to whom the groov
administrator has demonstrated the
validity of the certificate (e.g. by providing the certificate thumbprints).
If you are using a self-signed certificate, see “Using a Self-Signed Certificate” on page 42.
If you are using a CA-signed certificate, see “Using a CA-Signed Certificate on groov Box” on
page 50.
Self-Signed Certificate installed on
all browser certificate stores
Same as default, plus it avoids seeing
the untrusted site warning from the
browser
Must install in the browser certificate
store for every browser that accesses
the server
No untrusted site warning from
browser
Trusted by those who trust the groov
administrator enough to install or let
him or her install the certificate in their
browser certificate store
CA-Signed Certificate
Use with a system with many groovs,
or the set of browsers that will access
groovs is unknown or changes frequently, or users who will not trust
your self-signed certificate
Public CA-signed certificates cost
anywhere from $9 to $100 or more per
year
More complex initial configuration
because a certificate authority signature must be obtained
No untrusted site warning from
browser. Trusted by all major browsers.
Trusted by everyone
groov Box User’s Guide 41
41
Page 49

USING A SELF-SIGNED CERTIFICATE
Using a Self-Signed Certificate
A self-signed certificate encrypts communications, but does not include a digital signature from a
commercial CA. It is free and easy to configure, but if you want to avoid having your users see an
untrusted site warning every time they use groov, you must install the self-signed certificate in the
browser certificate store for every browser that will access groov. This type of certificate is a good
solution for a small set of groovs and a small set of client browsers that you can configure.
Follow these steps to create and install a self-signed certificate:
“Step 1: Create a Self-Signed Certificate and Private Key” on page 42
“Step 2: Add the Self-Signed Certificate to a Browser Trust Store on a Computer” on page 46
“Step 3: Install an SSL Certificate on Mobile Devices” on page 49
Step 1: Create a Self-Signed Certificate and Private Key
Follow the steps below to generate the following components required to configure self-signed
certificate SSL communication. The self-signed certificate is automatically installed on the groov Box.
• Private Key: This must be kept secret and never shared. Keep a copy of it in a safe and secure
place. There is also a Public Key included in the signed certificate. You will not handle the
public key using groov Admin.
• Signed Certificate: Contains identification information, the public key, and a digital signature.
Identification information includes the server name and the name of the organization that
controls the server. The self-signed certificate is digitally signed by the Private Key to establish
authenticity. The Certificate is automatically installed on the groov Box.
To generate a private key and self-signed certificate:
1. In groov Admin, select Networking > SSL Configuration.
42
2. Click the Create certificate tab.
3. Fill in the Create SSL key form as follows:
Server name: Enter the fully qualified domain name (or hostname) of this groov Box that client
browsers will use to access groov. (See also, “Changing the Hostname, DNS Servers, or IPv4
Gateway” on page 23.) The server name may contain letters a–z (case insensitive), digits 0–9, or
a hyphen (-). No other characters are allowed. The server name must not start with a hyphen.
For example, if the URL you will use to access groov in client browsers is
https://process1.acme.com
If you have multiple groovs with fully qualified hostnames all with the same domain, another
option is to create a self-signed wildcard certificate. For example, if you have two groovs with
the hostnames groov1.foo.com and groov2.foo.com, you can create a certificate that has the
hostname *.foo.com. The same private key and certificate are then installed on all the groovs.
groov Box User’s Guide
, then you enter process1.acme.com
Page 50

CHAPTER 4: USING AN SSL CERTIFICATE
Server name: Enter the hostname of this groov Box that client browsers will use to access
groov. (See also, “Changing the Hostname, DNS Servers, or IPv4 Gateway” on page 23.) The
server name may contain letters a–z (case insensitive), digits 0–9, or a hyphen (-). No other
characters are allowed. The server name must not start with a hyphen.
For example, if the URL client browsers will use to access this groov Box is:
https://process1.acme.com
If the URL client browsers will use to access this groov Box is:
https://mobilehmi
Email address: (optional) Enter the email address of the person responsible for administering
this certificate.
Department: Use this field to differentiate between divisions within an organization. For
example, you might enter “Engineering” or “Manufacturing.” If applicable, you can enter the
DBA (doing business as) name in this field.
Organization: The legally registered name of your business. This business must be the legally
registered owner of the domain name.
City or Locality: Name of the city or locality where your organization is located. Spell out the
name of the city or locality. Do not abbreviate.
State: Full name of the state, province, region, territory where your organization is located. Do
not abbreviate.
Country code: The two-letter International Organization for Standardization (ISO-) format
country code for the country in which your organization is legally registered. Click here for a
complete list of ISO country codes.
RSA key size: Both the public key and the private key. The recommended key size is 2048 bits.
Avoid key sizes smaller than 2048 bits.
Days before expiry: Enter the number of days before the self-signed certificate is expired and
has to be replaced. It’s up to the groov Administrator how many days to enter. For example, if
you want the certificate to be valid for 10 years, enter 3650.
, enter mobilehmi
, enter process1.acme.com
4. Click Create Now.
groov Admin creates the new private key and self-signed certificate. groov Admin also creates a
certificate signing request (CSR) to use if you want to obtain a CA-signed certificate (see “Using
a CA-Signed Certificate on groov Box” on page 50).
groov Box User’s Guide
43
43
Page 51
USING A SELF-SIGNED CERTIFICATE
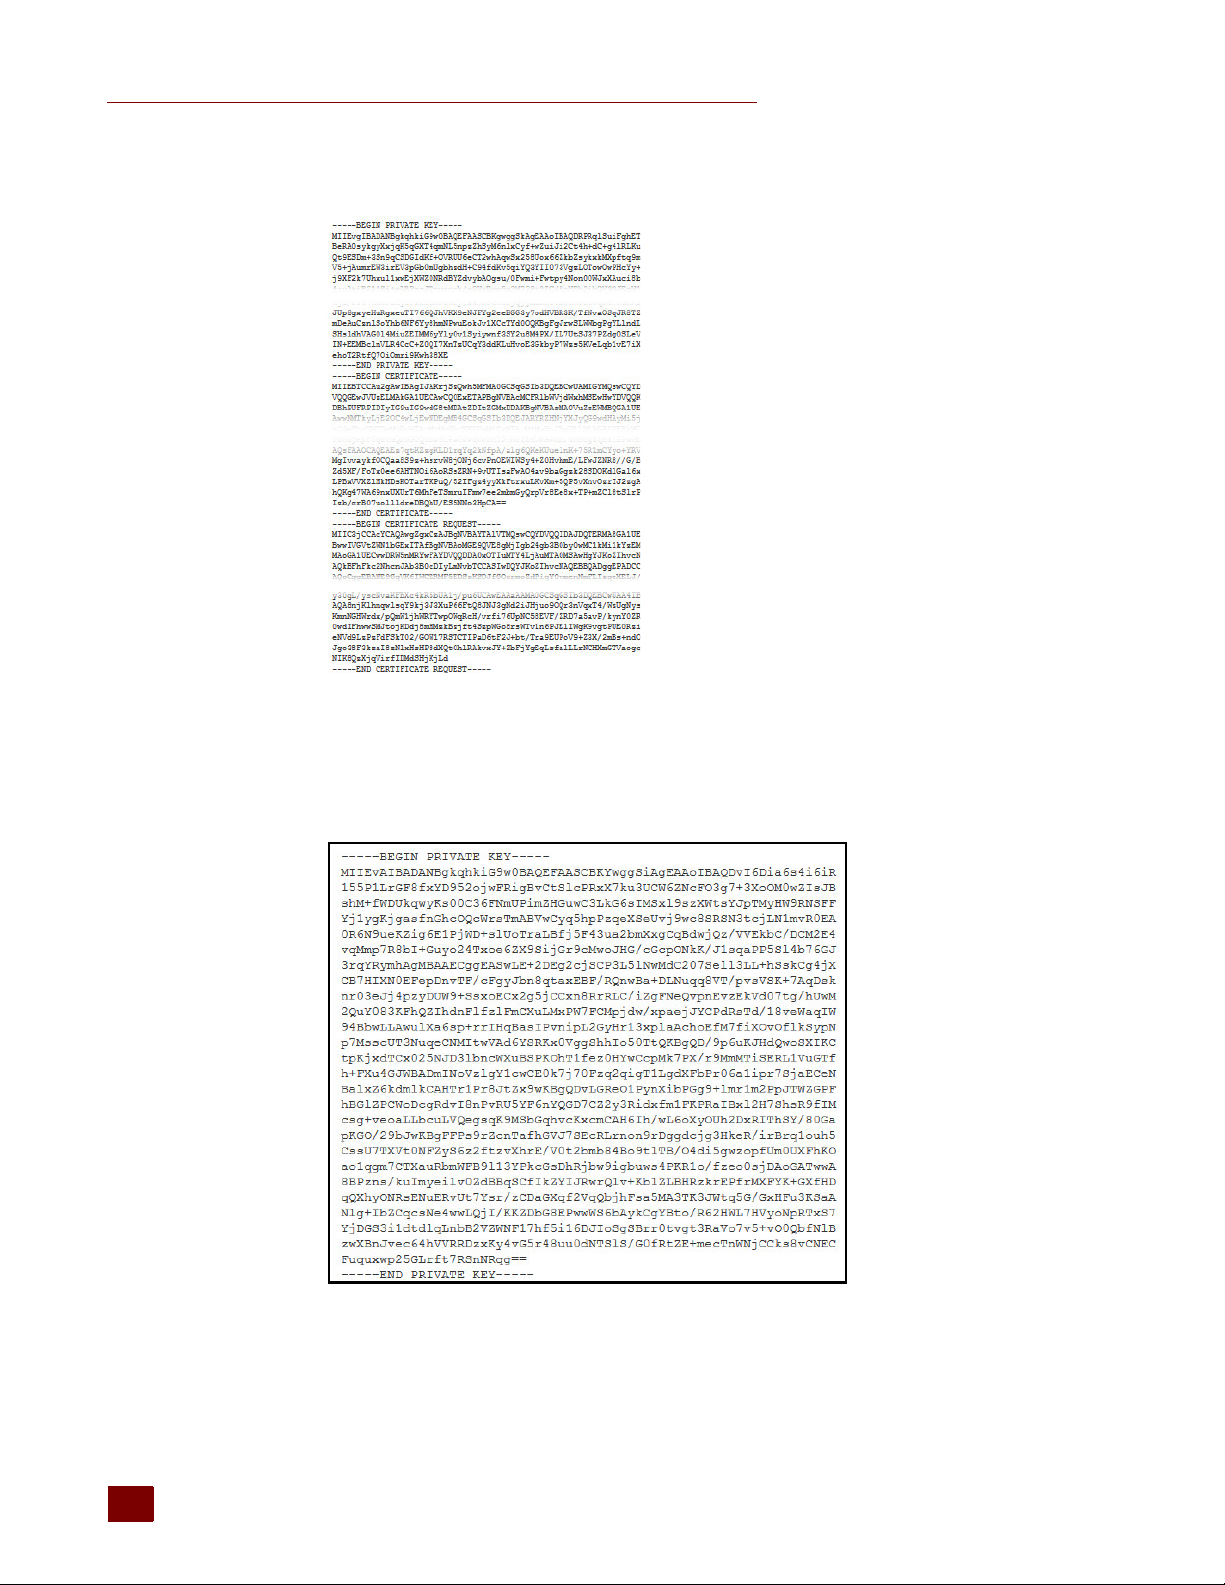
groov Admin displays all of these together.
At this point, the new certificate is installed on the groov Box and network services restarts.
5. Copy the private key portion of text and paste it to a file named <server name>-key.pem
(where <server name> is replaced by the server name value you entered on the Create SSL key
form.) This is the private key that was installed on the groov Box in the previous step.
44
NOTE: Do not lose the private key. You must keep a copy of it to restore later in case you commission a
eplacement groov Box or have to restore the Box to factory defaults.
r
6. IMPORTANT: Before proceeding, wait for the SYS LED on the groov Box to stop blinking green,
then make sure to refresh your browser.
groov Box User’s Guide
Page 52
CHAPTER 4: USING AN SSL CERTIFICATE
It might take some time, but eventually you should see the security warning. (The security
warning appears because the new certificate that was just installed on the groov Box is not
trusted by the browser.)
7. Accept the security warning as described below.
For Chrome: Click “Proceed anyway.”
For Firefox:
– Expand “I Understand the Risks.”
– Click Add Exception to open the Add Security Exception dialog box.
– Select “Permanently store this exception.”
– Click Confirm Security Exception.
For Internet Explorer 10: Click “Continue to this website (not recommended).”
For Safari: Click Continue.
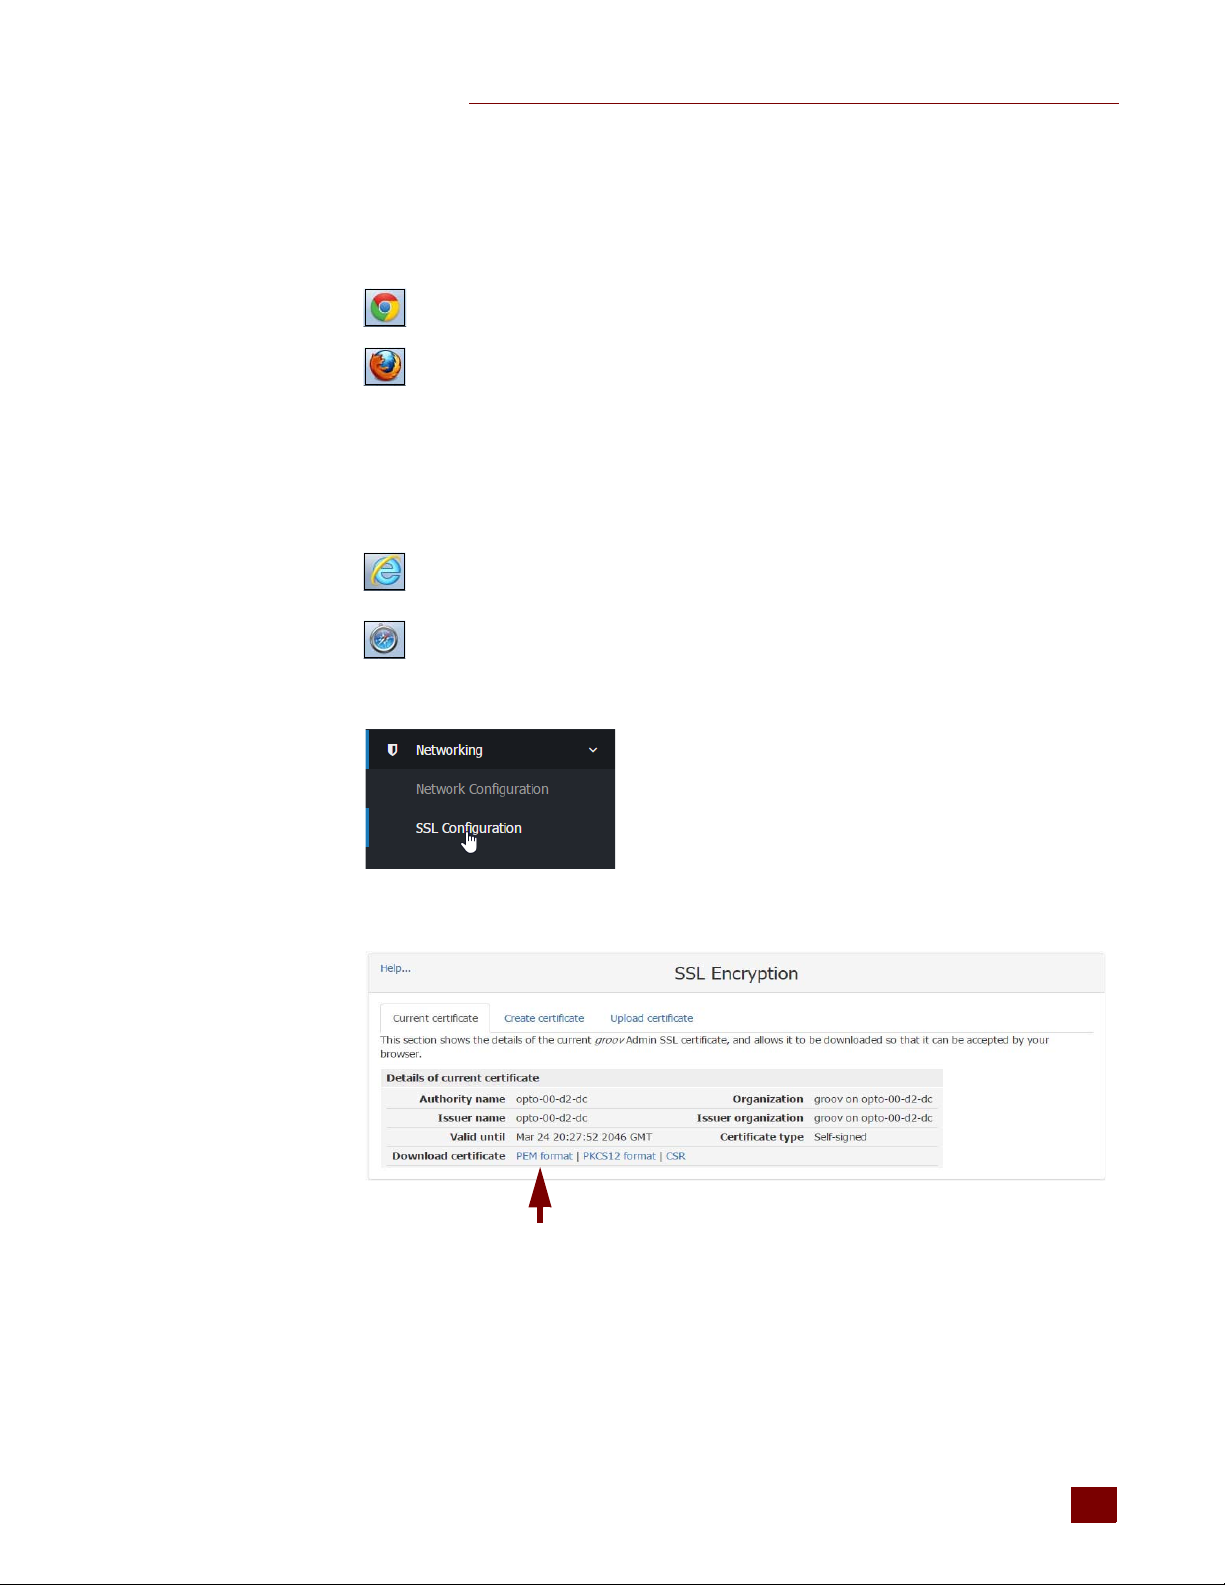
8. When groov Admin returns, select Networking> SSL Configuration.
9. Click the Current Certificate tab, then select “PEM format.”
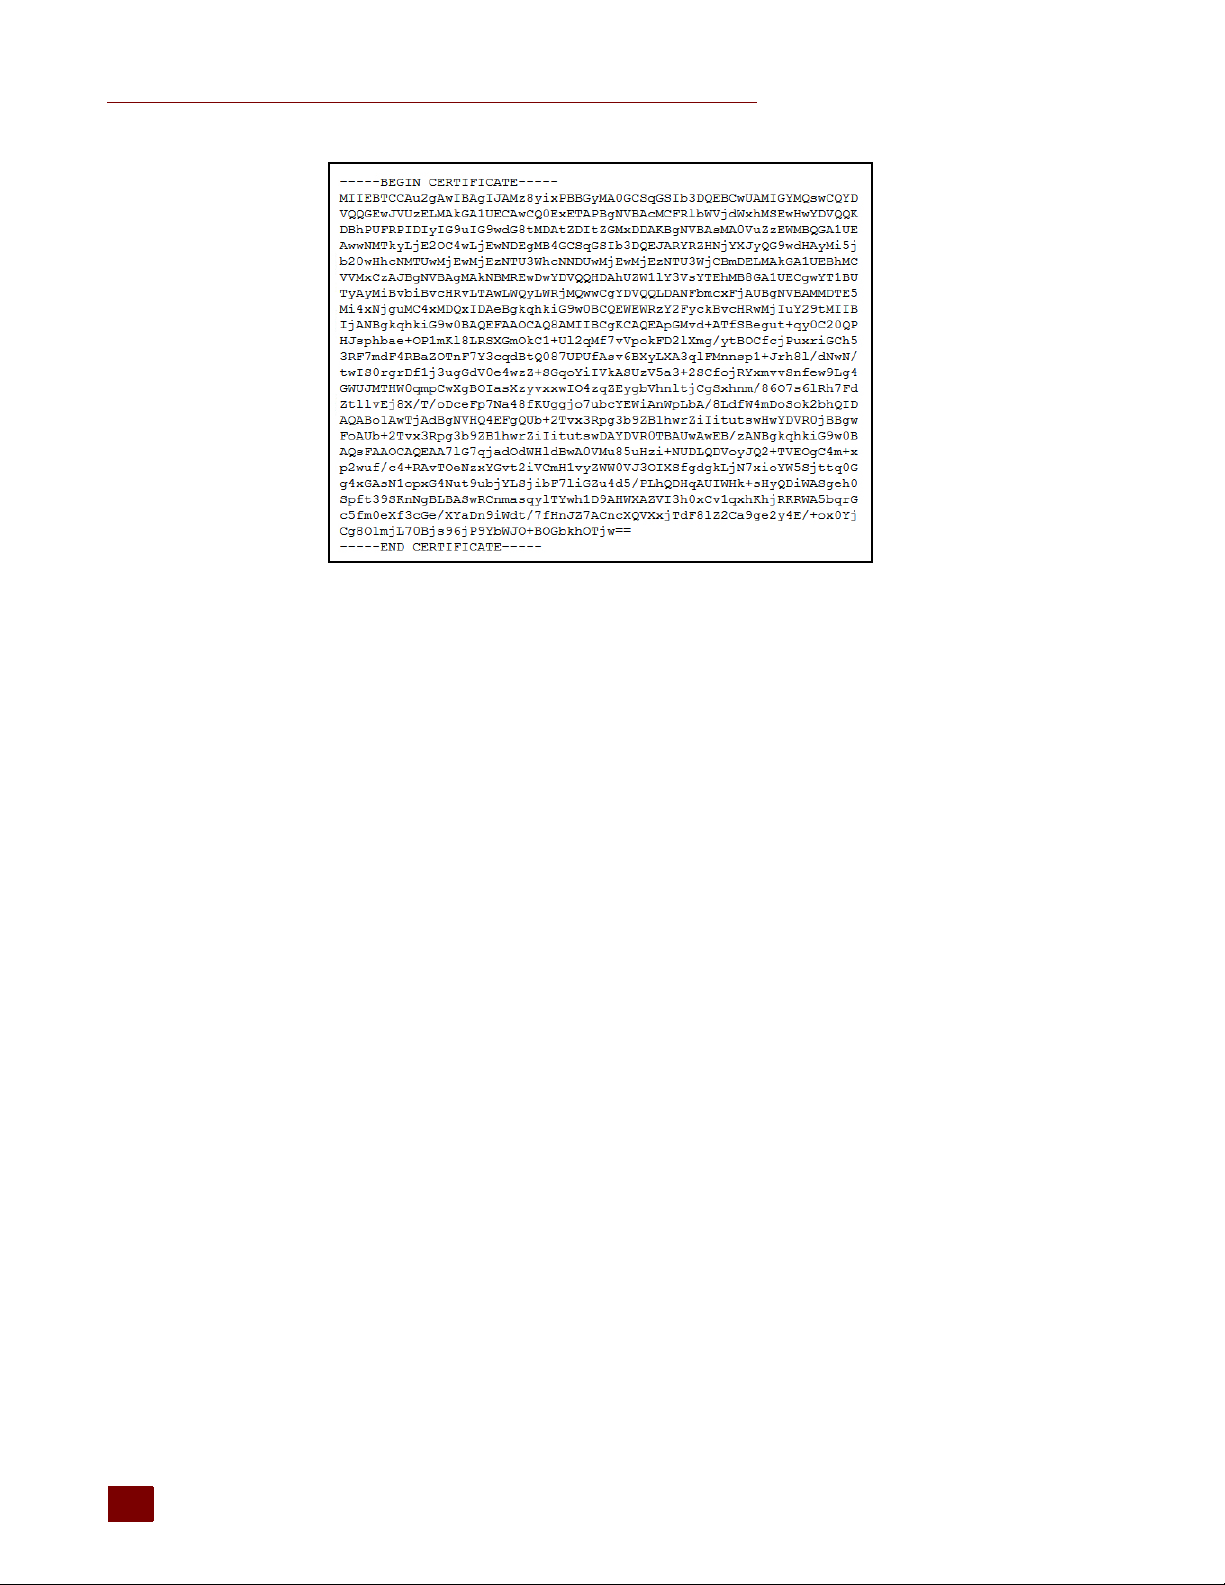
The certificate’s text appears.
groov Box User’s Guide
45
45
Page 53
USING A SELF-SIGNED CERTIFICATE
10. Copy the certificate text and paste it to a file named <server name>.cer (where <server name>
is replaced by the server name value you entered on the Create SSL key form.)
Step 2: Add the Self-Signed Certificate to a Browser Trust Store on a Computer
To prevent the untrusted site warning in browsers, the self-signed certificate must be added to the
trust store for each browser used to access groov. This section describes how to add a self-signed
certificate on a computer. Step 3 describes how add a self-signed certificate on a mobile device.
See the section below for the client computer’s operating system.
“Windows” on page 46
“OS X” on page 48
Windows
Internet Explorer & Chrome
1. In Windows file explorer, locate the <server name>.cer file you created in the previous step.
2. Right-click on the file and choose Install Certificate.
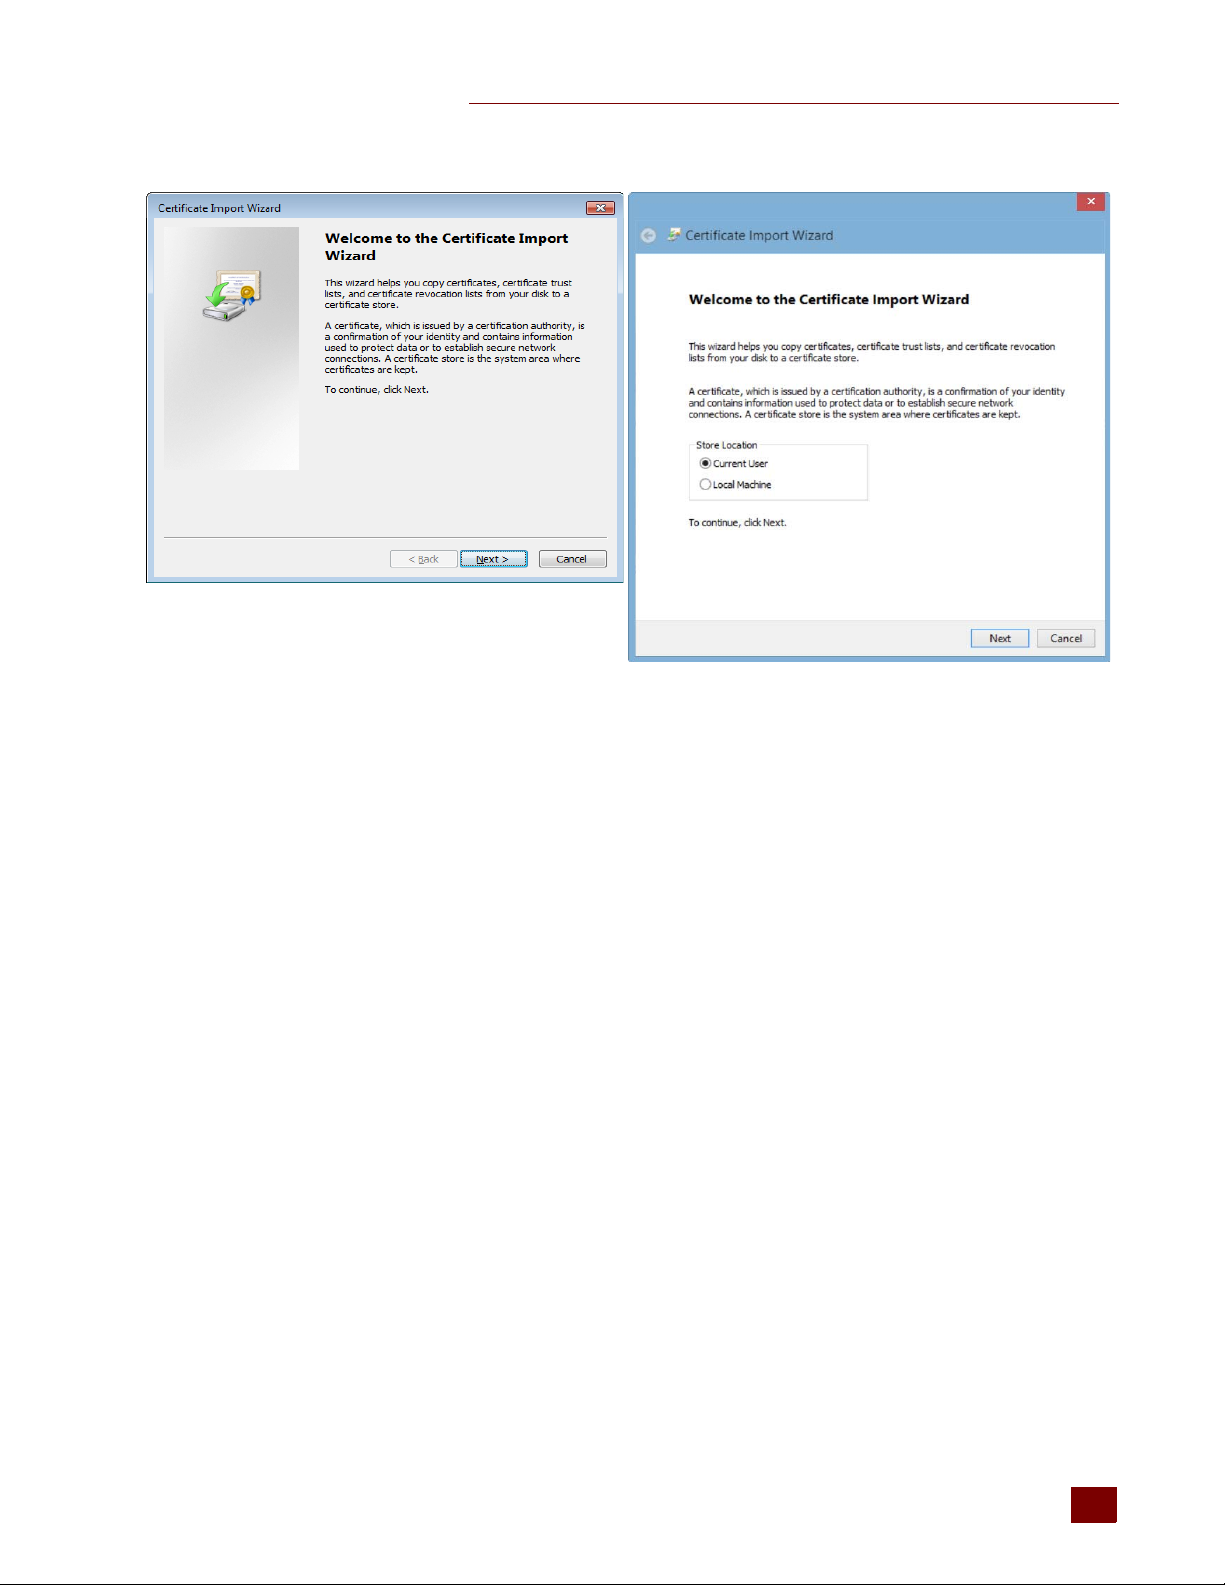
The Certificate Import Wizard appears.
46
groov Box User’s Guide
Page 54
CHAPTER 4: USING AN SSL CERTIFICATE
Windows 7 Windows 8
3. (Windows 8 only) If you are administrator of local machine, choose the Local Machine certificate
store so this certificate will be trusted by all user accounts. Otherwise it will only be trusted by
the current user account.
4. Click Next.
5. Select “Place all certificates in the following store.”
6. Click Browse to open the Select Certificate Store dialog box.
7. Select Trusted Root Certification Authorities, and then click OK.
8. Click Next.
9. Click Finish.
10. A security warning alerts you that certificate installation is a risk if you don’t trust the certificate.
11. Click Yes to affirm that you trust the self-signed certificate.
12. To verify the certificate was installed correctly, open Internet Explorer or Chrome and enter the
hostname specified on the certificate. If the browser does not generate an untrusted site
warning, the certificate was installed correctly.
Firefox
The self-signed certificate is added to the certificate store by adding a security exception. Firefox will
present several warnings about creating a security exception for a self-signed certificate, but
because you created and control the private key and certificate and installed the private key on the
server, you can trust the certificate identifies your server.
1. Open Firefox and enter https://<server name>
A warning appears that says, “This Connection is Untrusted.”
2. Expand “I Understand the Risks.”
3. Click Add Exception to open the Add Security Exception dialog box.
4. Select “Permanently store this exception.”
groov Box User’s Guide
47
47
Page 55

USING A SELF-SIGNED CERTIFICATE
Expand this
Click here
Click here
5. Click Confirm Security Exception.
6. To verify the certificate was installed correctly, open Firefox and enter the hostname specified
on the certificate. If the browser does not generate an untrusted site warning, the certificate
was installed correctly.
OS X
Safari and Chrome
1. Open Safari and enter https://<server name> to open this dialog box:
2. Click Show Certificate to reveal the full details:
48
groov Box User’s Guide
Page 56

CHAPTER 4: USING AN SSL CERTIFICATE
3. If the certificate looks good to you, check the “Always trust <server name> when connecting to
<server name>” and click Continue. You will be asked to provide your password to authorize
the addition of this certificate to your keychain, after which the browser and the Hosted
Projects window will accept the SSL certificate as valid.
4. To verify the certificate was installed correctly, open a browser and enter the hostname
specified on the certificate. If the browser does not generate an untrusted site warning, the
certificate was installed correctly.
Step 3: Install an SSL Certificate on Mobile Devices
When you open the operator interface in a browser on a smart phone or tablet a security warning
will appear unless you have installed a self-signed SSL certificate. See the section below for the
device’s operating system.
• “iOS Devices” on page 49
• “Android Devices” on page 50
iOS Devices
1. Email the <server name>.cer file you created previously (see “Step 1: Create a Self-Signed
Certificate and Private Key” on page 42) to an email account accessible from iOS.
2. On the iOS device, open the email message containing <server name>.cer.
3. Tap on <server name>.cer
4. A message appears, “The authenticity of <server name> cannot be verified...”
5. Click Install.
6. Click Install Now.
7. Click Done.
8. To verify the certificate was installed correctly, open a browser and enter the hostname
specified on the certificate. If the browser does not generate an untrusted site warning, the
certificate was installed correctly.
groov Box User’s Guide
49
49
Page 57
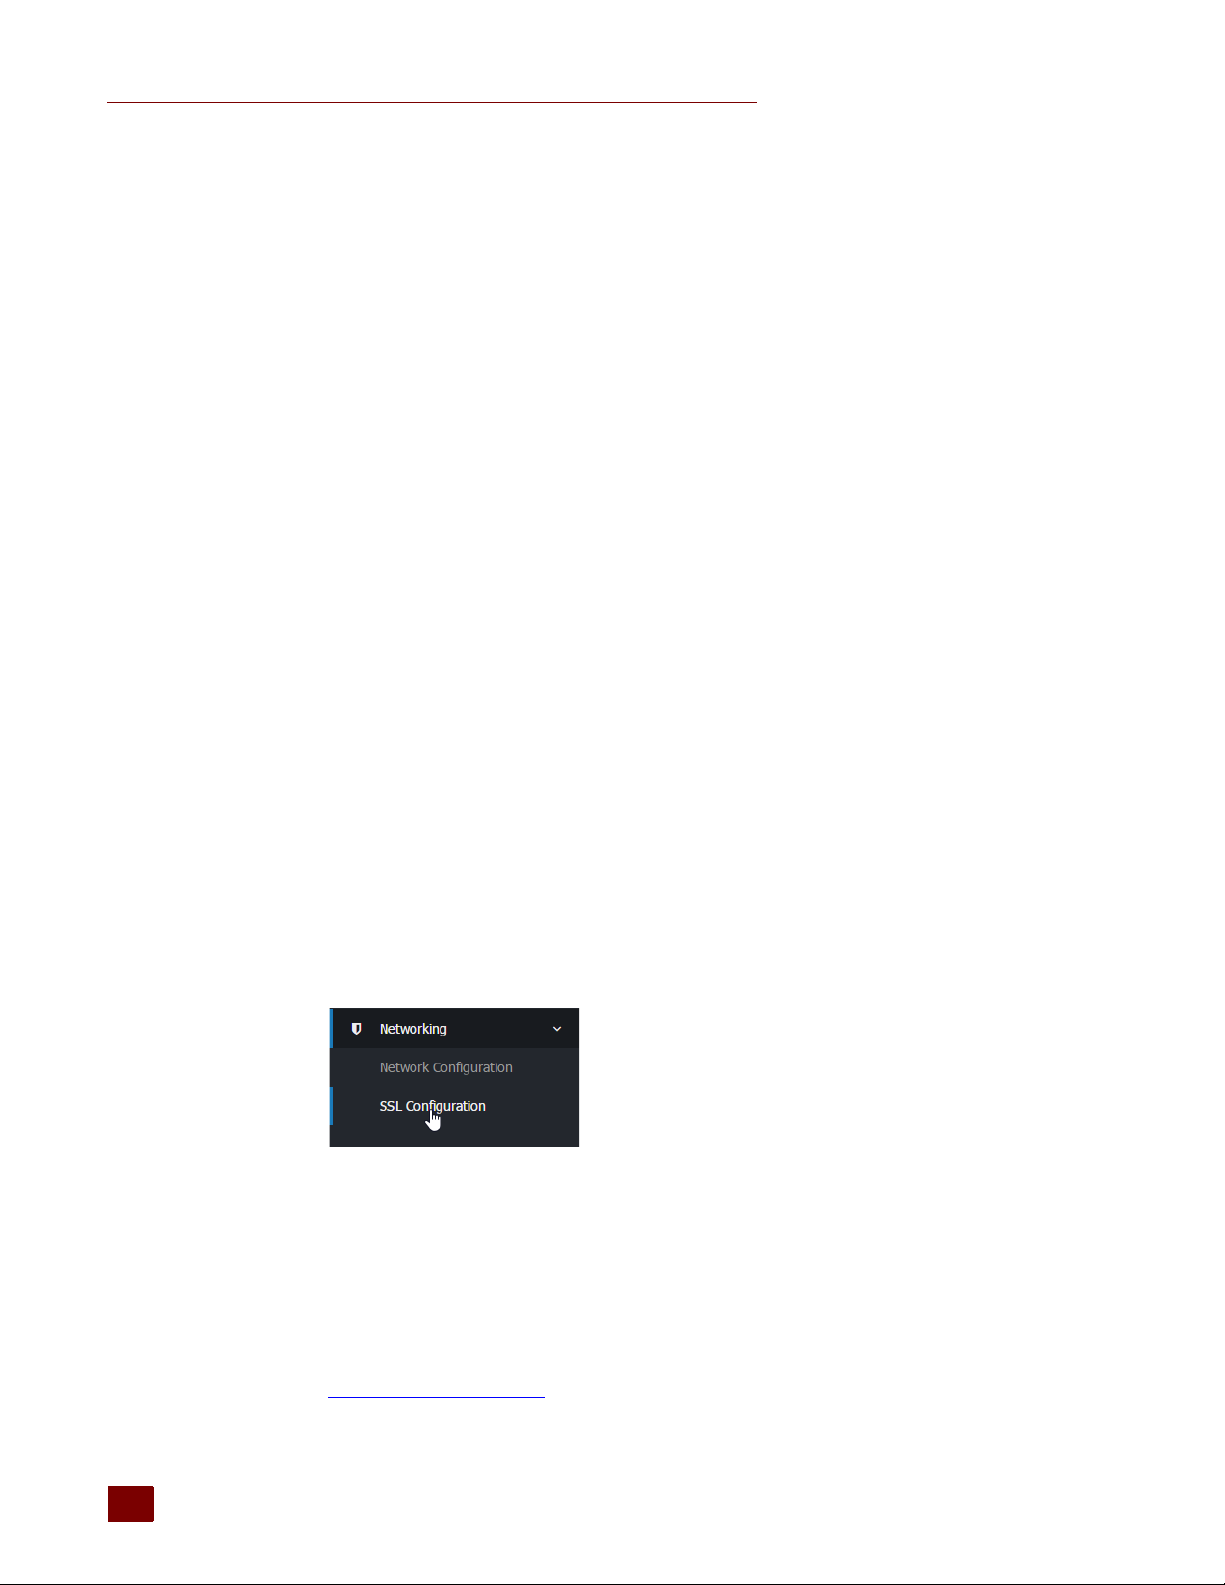
USING A CA-SIGNED CERTIFICATE ON GROOV BOX
Android Devices
1. Email the <server name>.cer file you created previously (see “Step 1: Create a Self-Signed
Certificate and Private Key” on page 42) to an email account accessible from Android.
2. On the Android device, open the email and click the <server name>.cer file to install the
certificate.
3. When prompted for a certificate name, type in a name. Make sure “Credential use:” is set to
“VPN and apps.”
4. Click OK.
5. To verify the certificate was installed correctly, open a browser and enter the hostname
specified on the certificate. If the browser does not generate an untrusted site warning, the
certificate was installed correctly.
Using a CA-Signed Certificate on groov Box
Follow these steps to create a certificate signing request (CSR) and install a CA-signed certificate:
“Step 1: Create a CSR” (see page 50)
“Step 2: Obtain a CA-Signed Certificate” (see page 52)
“Step 3: Install the CA-Signed Certificate on groov Box” (see page 53)
Step 1: Create a CSR
IMPORTANT: This procedure will create and install a new private key on the groov box.
Follow the steps below to generate a certificate signing request (CSR).
Y
ou will send the CSR to the Certificate Authority (CA) of your choice. The CA verifies the
identification information and signs the CSR, which then becomes a CA-signed Certificate.
1. In groov Admin, select Networking > SSL Configuration.
2. Click the Create certificate tab.
3. Fill in the Create SSL key form as follows:
Server name: Enter the fully qualified hostname of this groov Box that client browsers will use
to access groov (i.e. the hostname and domain name, such as mobilehmi.mydomain.com.) The
server name may contain letters a–z (case insensitive), digits 0–9, or a hyphen (-). No other
characters are allowed. The server name must not start with a hyphen.
For example, if the URL you will use to access groov in client browsers is
https://process1.acme.com
If the URL client browsers will use to access this groov Box is:
, then you enter process1.acme.com
50
groov Box User’s Guide
Page 58
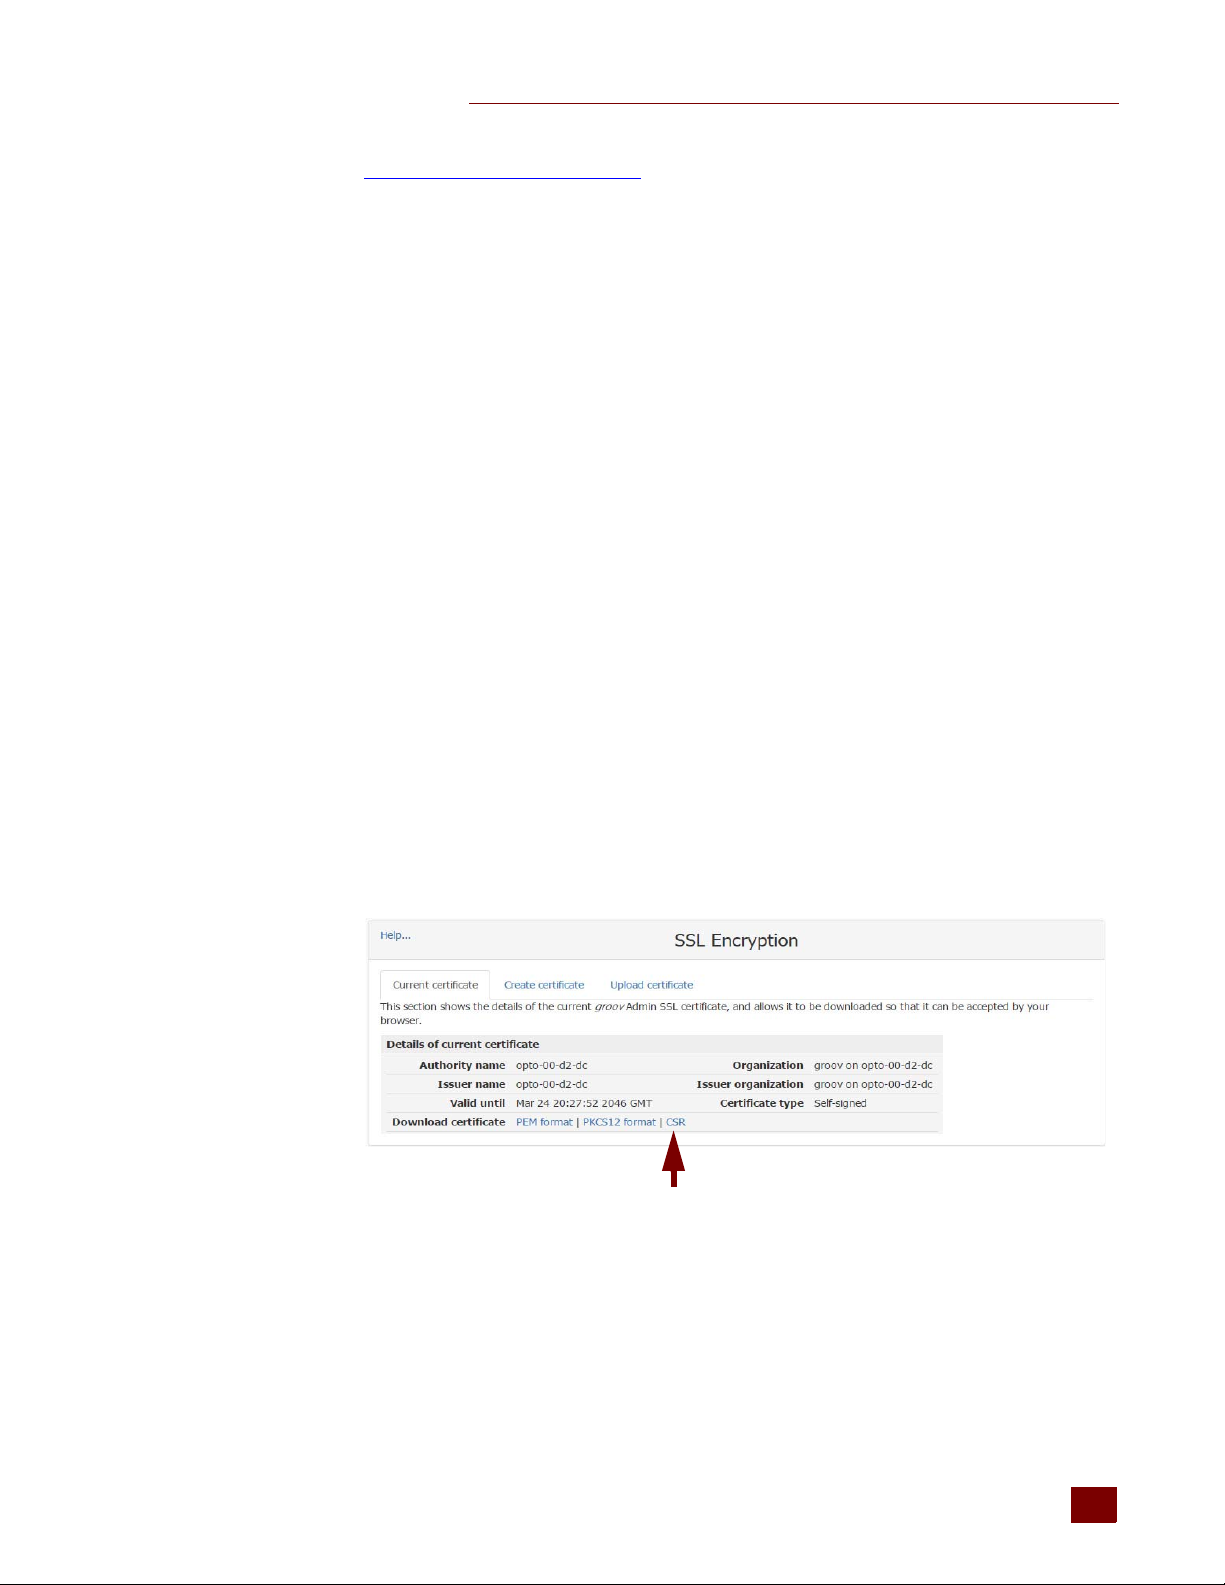
CHAPTER 4: USING AN SSL CERTIFICATE
https://mobilehmi.mydomain.com
See also, “Changing the Hostname, DNS Servers, or IPv4 Gateway” on page 23.
Email address: (optional) Enter the email address of the person responsible for administering
this certificate.
Department: Use this field to differentiate between divisions within an organization. For
example, you might enter “Engineering” or “Manufacturing.” If applicable, you can enter the
DBA (doing business as) name in this field.
Organization: The legally registered name of your business. This business must be the legally
registered owner of the domain name.
City or Locality: Name of the city/locality in which your organization is registered/located.
Spell out the name of the city/locality. Do not abbreviate.
State: Full name of the state, province, region, territory where your organization is located. Do
not abbreviate.
Country code: The two-letter International Organization for Standardization (ISO-) format
country code for the country in which your organization is legally registered. Click here for a
complete list of ISO country codes.
RSA key size: Both the public key and the private key. The recommended key size is 2048 bits.
Avoid key sizes smaller than 2048 bits.
Days before expiry: This does not affect a CA-signed certificate, so you can leave this blank.
, enter mobilehmi.mydomain.com
4. Click Create Now.
groov Admin creates a certificate signing request in addition to a new private key and
self-signed certificate (which is automatically installed).
groov Admin initially displays all of these together.
5. Select the Current Certificate tab, then click the CSR hyperlink at the bottom of the dialog box.
groov Box User’s Guide
51
51
Page 59
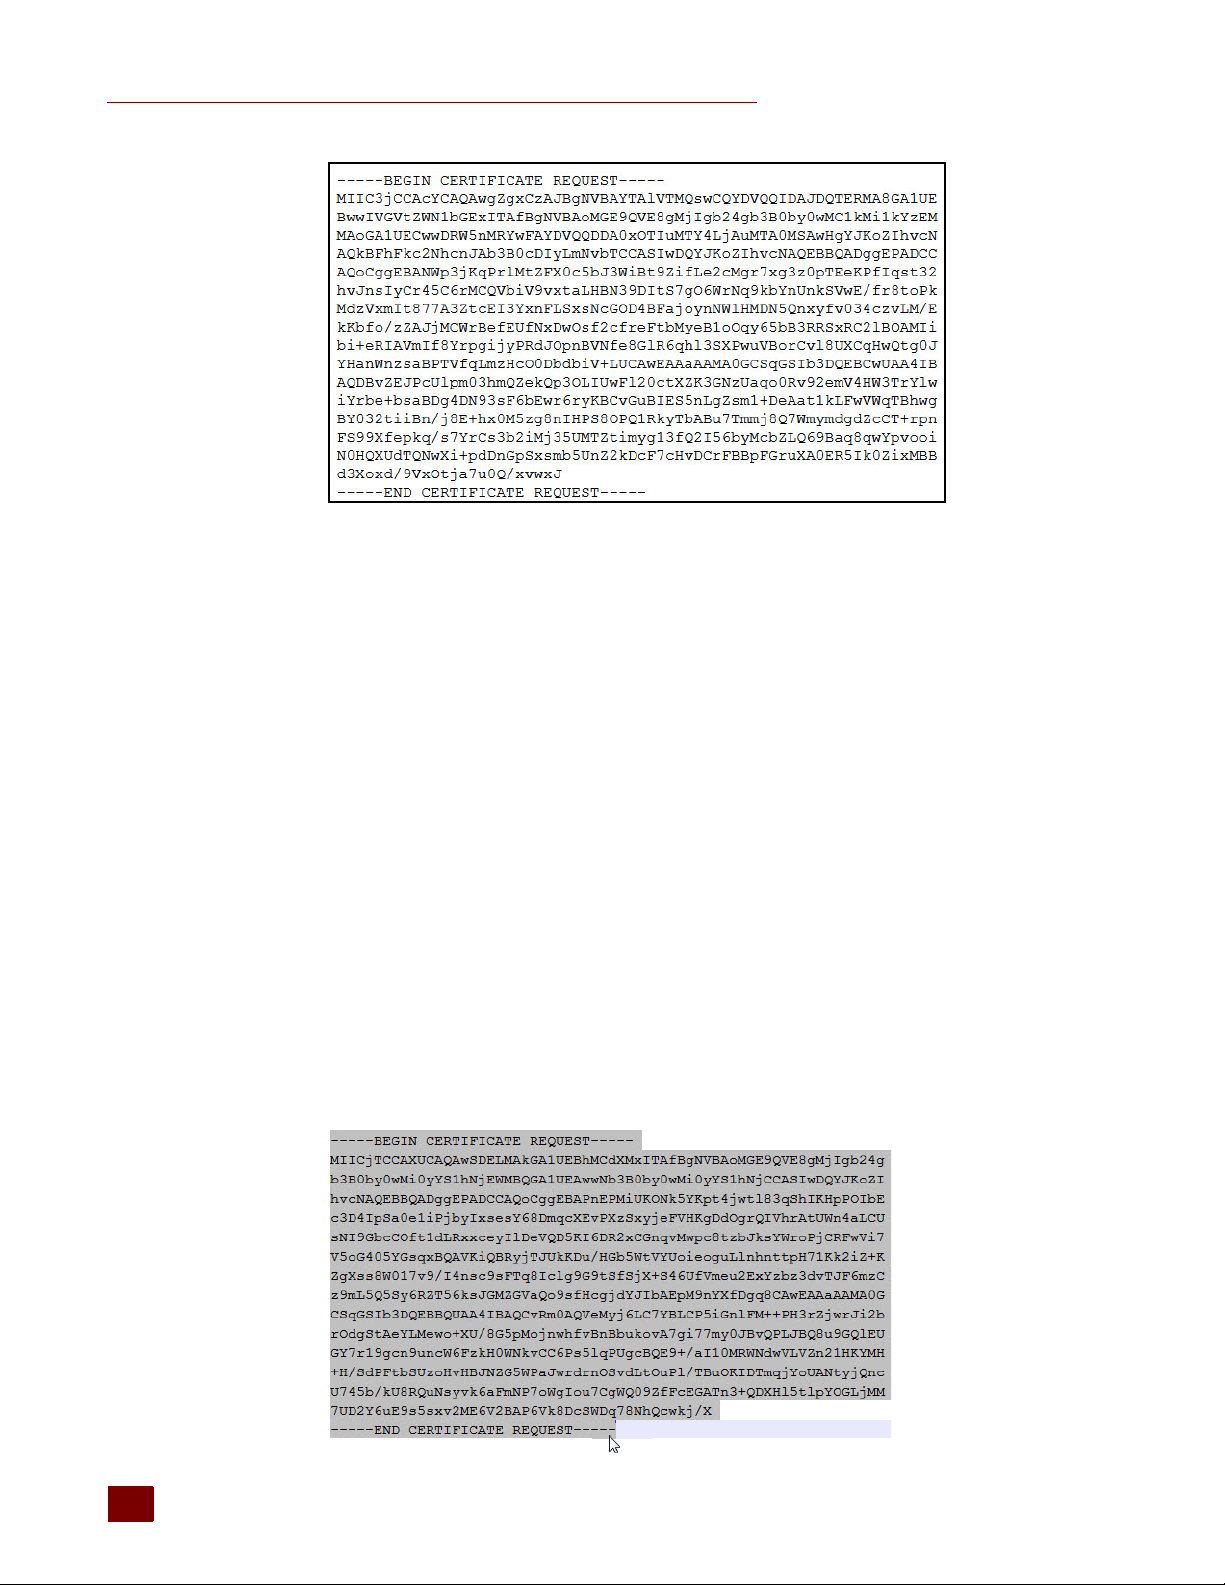
USING A CA-SIGNED CERTIFICATE ON GROOV BOX
6. Copy and paste the entire text to a file named <server name>.csr (where <server name> is
replaced by the server name value you entered on the Create SSL key form in step 3.)
Step 2: Obtain a CA-Signed Certificate
A CA-signed certificate contains identification information, the public key, and a digital signature.
Identification information includes the server name and the name of the organization that controls
the server. The certificate is digitally signed by a CA to establish authenticity. The Certificate is
installed on the groov Box or Server.
When you apply for an SSL certificate from a certificate authority, you will need to send them the
information captured in a Certificate Signing Request (CSR). If you have not yet created a CSR file, see
“Step 1: Create a CSR” on page 50.
When filling out a form for a certificate authority, keep in mind that an SSL certificate can be used
with any operating system. If you are asked to select an operating system, you can select “other” if
that is an option, but it’s OK to select some other operating system.
1. Open the .csr file you created previously in “Step 1: Create a CSR” on page 50.
2. Provide the text of the CSR to the certificate authority in whatever form they require, whether
it’s a text file or just text pasted into a text field.
To paste the text into a text field on the CA’s website, open your .csr file in a text editor such as
Notepad, select all of the text and press
CTRL+C to copy the text to the clipboard.
52
groov Box User’s Guide
Page 60
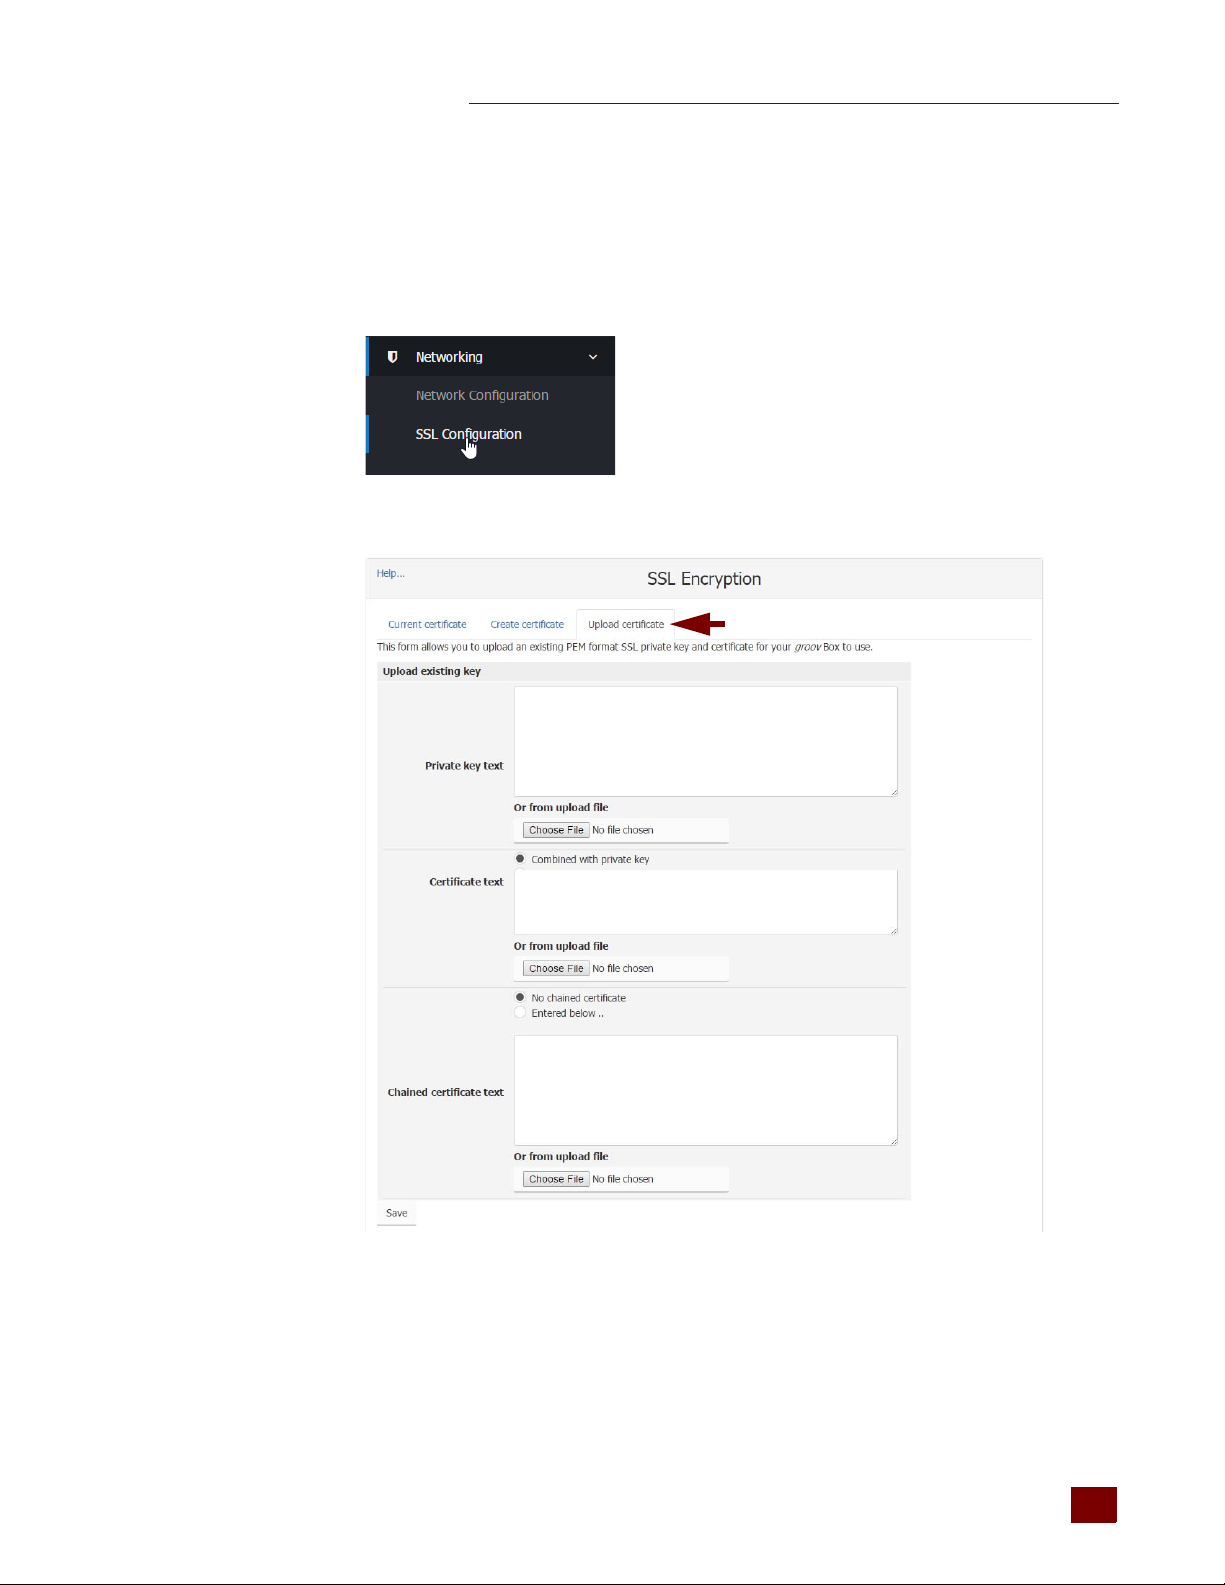
CHAPTER 4: USING AN SSL CERTIFICATE
3. Finish the transaction with the certificate authority and receive your new SSL certificate.
Step 3: Install the CA-Signed Certificate on groov Box
1. In groov Admin, select Networking > SSL Configuration.
2. Click the Upload certificate tab on the SSL Encryption page.
3. Under “Private key text” click Browse and specify the <server name>.key file created previously.
See “Step 1: Create a Self-Signed Certificate and Private Key” on page 42.
IMPORTANT: Mak
guaranteed.
e sure you keep the Private Key private. If it is compromised, security is no longer
groov Box User’s Guide
53
53
Page 61

USING A CA-SIGNED CERTIFICATE ON GROOV BOX
4. Under “Certificate text” click “Entered below,” then click Browse and specify the file containing
the signed certificate that was obtained from the CA.
5. If your CA used intermediate CA certificates, they should all be contained in a single file. (If you
are not sure if your CA used intermediate CA certificates, ask your CA.)
For example, if you obtained your signed certificate from StartSSL™, the certificate was
downloaded to a file named sub.class1.server.ca.pem.
a. Under “Chained certificate text,” select “Entered below.”
b. Click Browse and specify the file containing all the intermediate CA certificates in the
certificate chain between your certificate and the root CA certificate. For a StartSSL class 1
free certificate this is sub.class1.server.ca.pem.
6. Click Save to complete the process.
The browser pauses for a few seconds while the certificates are applied to the groov box. When
the certificates have been installed successfully, a confirmation message appears.
7. To verify the certificate was installed correctly, use a browser to access the groov Box using the
hostname specified on the certificate. If the browser does not generate an untrusted site
warning, the certificate was installed correctly.
54
groov Box User’s Guide
Page 62
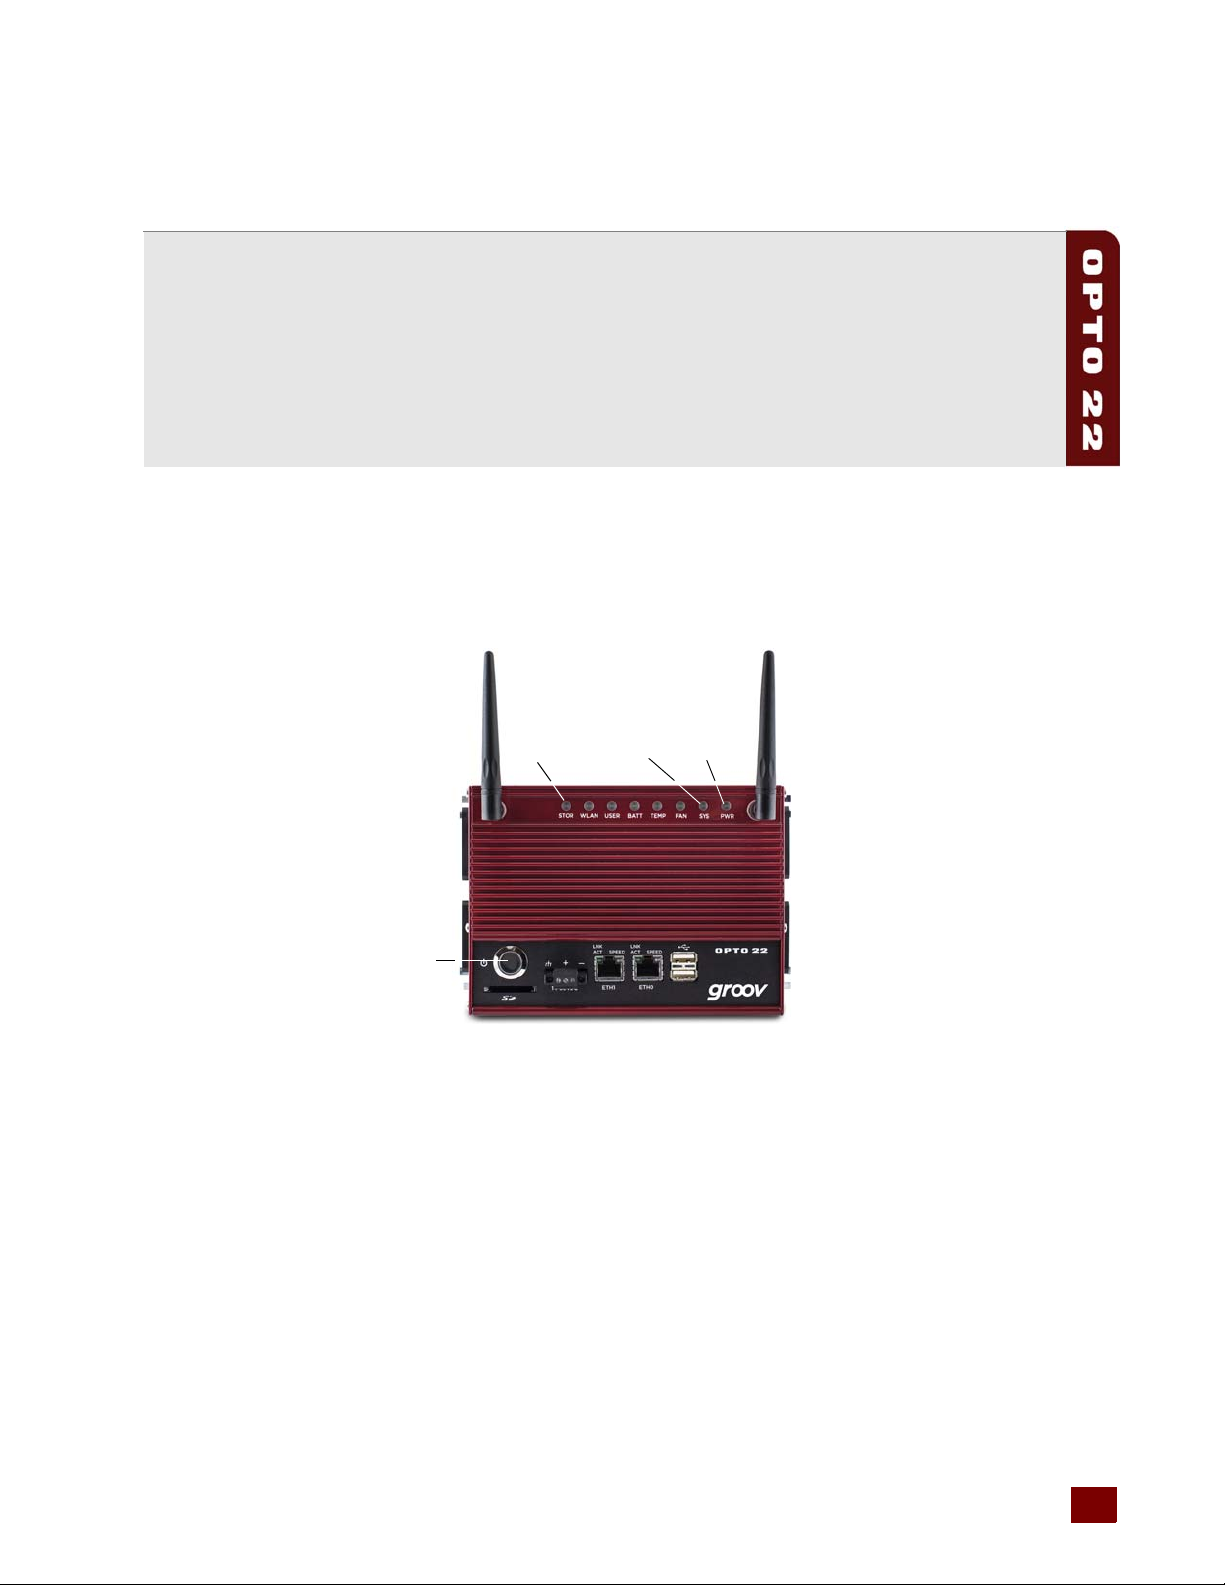
5: Chapter 5
On/Off button
SYS LED
PWR LED
STOR LED
5: Maintenance and Troubleshooting
Maintenance
Turning the groov Box On and Off
Turning the Box on
1. Check to make sure the PWR LED is on. This means that the groov Box is receiving power.
2. Briefly press the On/Off button. Wait until the SYS LED has stopped blinking and is solid green.
CAUTION:
settings. Your project will be erased.
NOTE: Always wait until the SYS LED has stopped blinking before you try to log into groov. Otherwise, you
may not be able to use the hostname to log in. If this happens, see page 58.
Turning the Box off
W
ith the groov Box on, briefly press the On/Off button. The SYS LED will blink orange and then turn
off. The PWR button will remain on as long as there is power from the power supply. Always allow
the groov Box to turn off completely before removing power.
CAUTION:
settings. Your project will be erased.
If you press the button for longer than four seconds, the groov Box will be restored to default
If you press the button for longer than four seconds, the groov Box will be restored to default
groov Box User’s Guide for GROOV AT1 55
55
Page 63

MAINTENANCE
Resetting the groov Box to factory defaults
Restoring the groov Box restores the default network settings and erases all user data, including your
project. When the process is complete, the Box will send out a DHCP request on ETH0, and you will
be able to connect using the default hostname.
CAUTION: Whe
n the groov Box is restored to factory default settings, your project will be erased.
1. Check to see that the groov Box is turned off, but the PWR LED is on.
2. Press and hold the On/Off button for at least four seconds and until the STOR LED is blinking
orange. Then release the button.
Both the SYS LED and STOR LED will be blinking orange at this point. When both the SYS LED
and STOR LED stop blinking orange, the procedure is finished.
3. Briefly press the On/Off button to turn off the groov Box, then briefly press it again to turn the
groov Box back on so that you can log in.
Maintaining the fan filters
Be sure you check and clean the fan filters periodically and replace them when necessary. How often
you do this will depend on the installation environment. If the fan filters on the groov Box become
clogged, they can be re-used. A pair of extra filters is also provided.
1. Pry off the outer cover using a small utensil around the outer edge.
2. Remove the old filter.
3. Rinse and pat dry the old filter, or replace it with a new one.
4. Using your fingers, snap the outer cover back into place.
56
groov Box User’s Guide for GROOV AT1
Page 64

Troubleshooting
The groov Box is not receiving power
• Make sure you are using either the power supply that came with groov Box or else a power
supply with the appropriate specifications. See "Appendix A: Specifications and Dimensions” on
page 61.
• Check that the power supply is securely attached to the groov Box and the power supply is
receiving power.
The groov Box is connected to the Ethernet network but not working
• Make sure the groov Box has been turned on, the PWR LED is lit and not blinking, and the LNK
ACT LED for the connected Ethernet interfaces are lit. (See “LEDs” on page 64.)
• Make sure you’ve typed the URL accurately and included the “s”: https:// plus the groov Box
hostname or IP address. Check the label on the top of the groov Box, where the hostname
should be written.
URL examples:
– https://Opto-06-51-f2
CHAPTER 5: MAINTENANCE AND TROUBLESHOOTING
– https://192.168.11.2
• If you cannot connect to groov on the network, make sure the Ethernet cable is connected to
ETH0, which must be used for initial setup and configuration. After that, either ETH0 or ETH1
may be used.
• Make sure that the groov Box and the computer are connected to the same network. If you still
can’t reach the Box, your network is set up differently. That’s OK. Find out the following
information about your network and your computer:
– Does your network have a DHCP server?
– Does your network have a DNS server?
– Does your computer have more than one network interface card (NIC)?
See the next questions for more answers.
DHCP (dynamic host configuration protocol) server
A DHCP server automatically assigns IP addresses to devices on the network, which is what the
groov Box expects. If you have no DHCP, work with your IT Department to choose a static IPv4
address for the groov Box. To assign the fixed IP address, you’ll need:
• a Windows PC on the same network subnet as the groov Box
• groov Find utility (on the CD that came with the groov Box)
• to assign the static IP address to the Box. See “Assigning a Static IP Address” on page 22.
Once you’ve assigned the static IP address, open your web browser and for the URL enter https://
plus the IP address you assigned to groov. For example: https://182.154.1.68
groov Box User’s Guide for GROOV AT1
57
57
Page 65

TROUBLESHOOTING
DNS (domain name server)
A DNS (domain name server) keeps track of the unique hostname for each device on the network,
so you can find it by name even if its IP address changes. If your network has no DNS, you won’t be
able to access the groov Box using its hostname, but you can access it using its IP address.
To determine the IP address, you’ll need:
• a Windows PC on the same network subnet as the groov Box
• groov Find utility (on the CD that came with the groov Box). See “Open groov Admin using groov
Find (Windows only)” on page 18.
Once you’ve found your groov Box in groov Find, click the link to set up the Box. Also make a note of
the IP address shown, so later you can use it in your web browser instead of the hostname: for the
URL enter https:// plus the Box’s IP address. For example: https://192.168.1.54
Computer with more than one NIC
A: More than one NIC can cause a problem when you’re trying to communicate with groov using
your browser and the groov Box’s hostname.
Each NIC communicates on a separate network subnet. You may have one network subnet set up
for your computers and a second one set up for your control system, for example (this is a pretty
common scenario, and in fact we recommend it for security).
Make sure you’re trying to reach the groov Box using the NIC for the network subnet it is on. You
could unplug the Ethernet cable from your controller network NIC to force the PC to look for the
groov Box on the computer network. Then try again using your browser and the groov Box’s
hostname.
If your control system and your computers are on separate network subnets, you’ll need to set up
ETH1 on the groov Box in order to reach your control system. See the next question.
Controller, Modbus device, or OPC UA server can’t be found
Are your control system and your computers on separate network subnets? We recommend this
setup for security reasons, and the groov Box is designed to work this way. Here’s what to do so groov
can find your controller:
1. Plug the control network into ETH1 on the groov Box. (Remember, your computer network is
plugged into ETH0. The two Ethernet network interfaces on the Box are independent, so that
keeps the two network subnets separate.)
2. Follow the steps in “Configuring ETH1 for the Control Network” on page 24 to configure the
ETH1 connection.
3. Now try configuring your controller or tag server again. This time groov should be able to find
it.
Cannot log into the groov Box using the hostname
When starting a groov Box, always wait until the SYS LED has stopped blinking before you try to
access groov. Otherwise, you might not be able to log in using the hostname. If this happens, try one
of the following methods to log in:
58
groov Box User’s Guide for GROOV AT1
Page 66

CHAPTER 5: MAINTENANCE AND TROUBLESHOOTING
Method 1: Open groov Find and locate the IP address of the groov you want to log into. Log into
groov using the IP address. After some time passes, you should be able to log in again using the
hostname.
Method 2: Open a command prompt and enter
using the hostname.
ipconfig /flushdns. Then log into groov
Considerations for locating the groov Box
The groov Box is an industrial appliance made to operate in tough environments, so it doesn’t have
to be pampered. Make sure you check the specs for temperature and humidity, and then place it
where you can connect it to both your company computer network and your control network. (You
will use separate connectors on the groov Box for these two networks to keep them physically
separated—better for security.)
If you’re using the wireless LAN, choose a location where the signal is constant and strong. Wireless
networks can be unreliable unless carefully designed and periodically checked.
The Box can be DIN-rail mounted (DIN clips are built into the back) or mounted on a wall or
equipment using the four exterior mounting tabs. Make sure there’s space on both sides of the box
so air can flow freely through the fans.
If you’re a machine builder or OEM and including groov in your machine, the same basic ideas apply:
check specs, check security, and mount where there’s room for the Box to breathe. Also, make sure
you have network access to the Box for updates.
Using external Wi-Fi antennas
If you want, you can use external wireless antennas instead of the two that are provided. The
connector is a reverse SMA.
groov Box User’s Guide for GROOV AT1
59
59
Page 67

TROUBLESHOOTING
60
groov Box User’s Guide for GROOV AT1
Page 68
Appendix A
A: Specifications and Dimensions
Specifications
Ethernet Communication (wired)
Ethernet Comm (wireless) 802.11 b/g/n
Security (wireless)
Antenna Connector Reverse polarity SMA (RP-SMA or RSMA)
Power Consumption
Enclosure Sturdy metal case
USB USB 2.0 (two)
Indicators
Operating Temperature 0 to 50 °C (32 to 122° F)
Storage Temperature -20 to 60 °C (-4 to 140° F)
Operating Humidity 10% to 90% relative humidity, non-condensing
Storage Humidity 5% to 95% relative humidity, non-condensing
Agency Approvals
Warranty 30 months
Two independent 10/100/1000 Mbps RJ-45 connectors, each with a separate
IP address (separate subnets)
WEP (64-bit and 128-bit)
WPA PSK (also known as WPA Personal)
WPA2 PSK (also known as WPA2 Personal)
14-36 VDC, 24 VDC @ 1 amp (Power supply included; input 100-240 VAC.
Use international adapter if needed.)
Ethernet interfaces (2): Link/Activity and Speed
System: STOR, WLAN, USER, BATT, TEMP, FAN, SYS, & PWR
CE, RoHS, DFARS
Wireless: U.S., FCC Part 15 Subpart C; Canada, IC RSS-210
groov Box User’s Guide for GROOV AT1 61
61
Page 69

DIMENSIONS
Dimensions
62
groov Box User’s Guide for GROOV AT1
Page 70
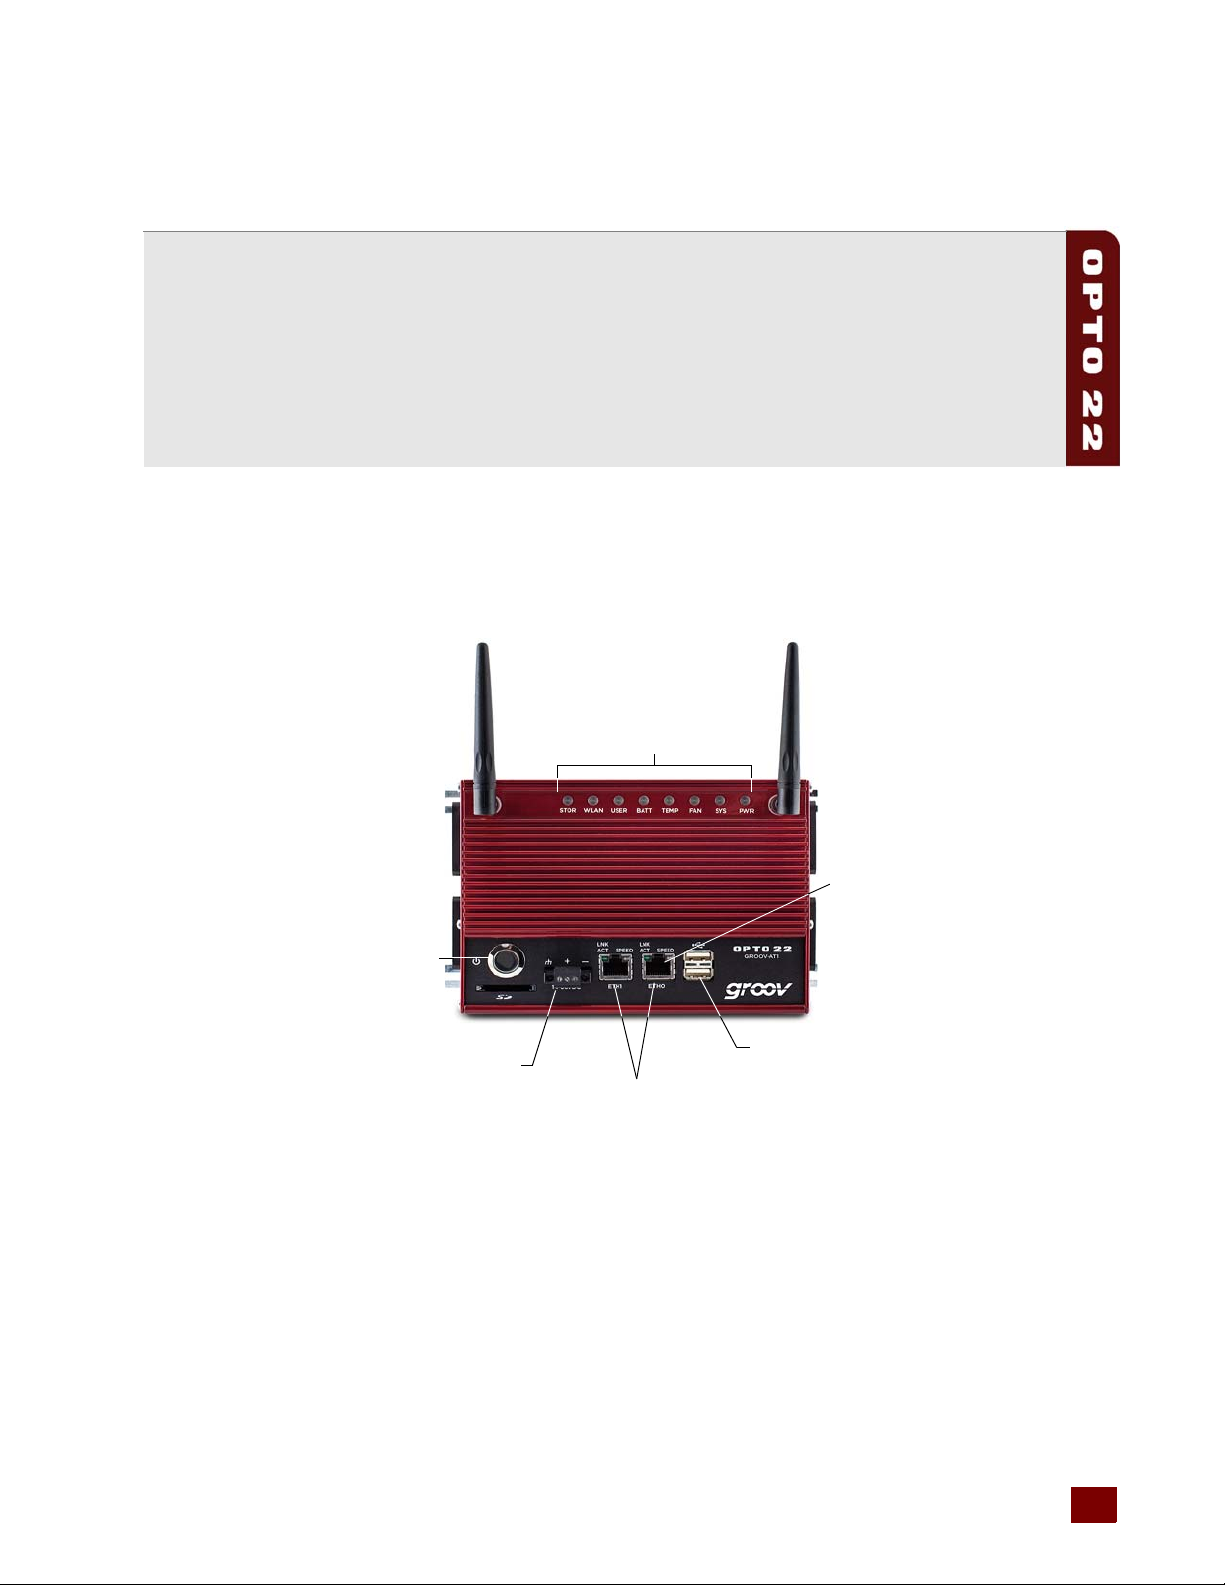
Appendix B
Status and activity LEDs
Independent 10/100/1000 Mbps
Ethernet interfaces (RJ-45 connectors)
On/Off button
Power connector
USB connectors for backing
up and restoring
Ethernet LEDs
B: Connectors, Indicators, and LEDs
Connectors and Indicators
groov Box User’s Guide for GROOV AT1 63
63
Page 71
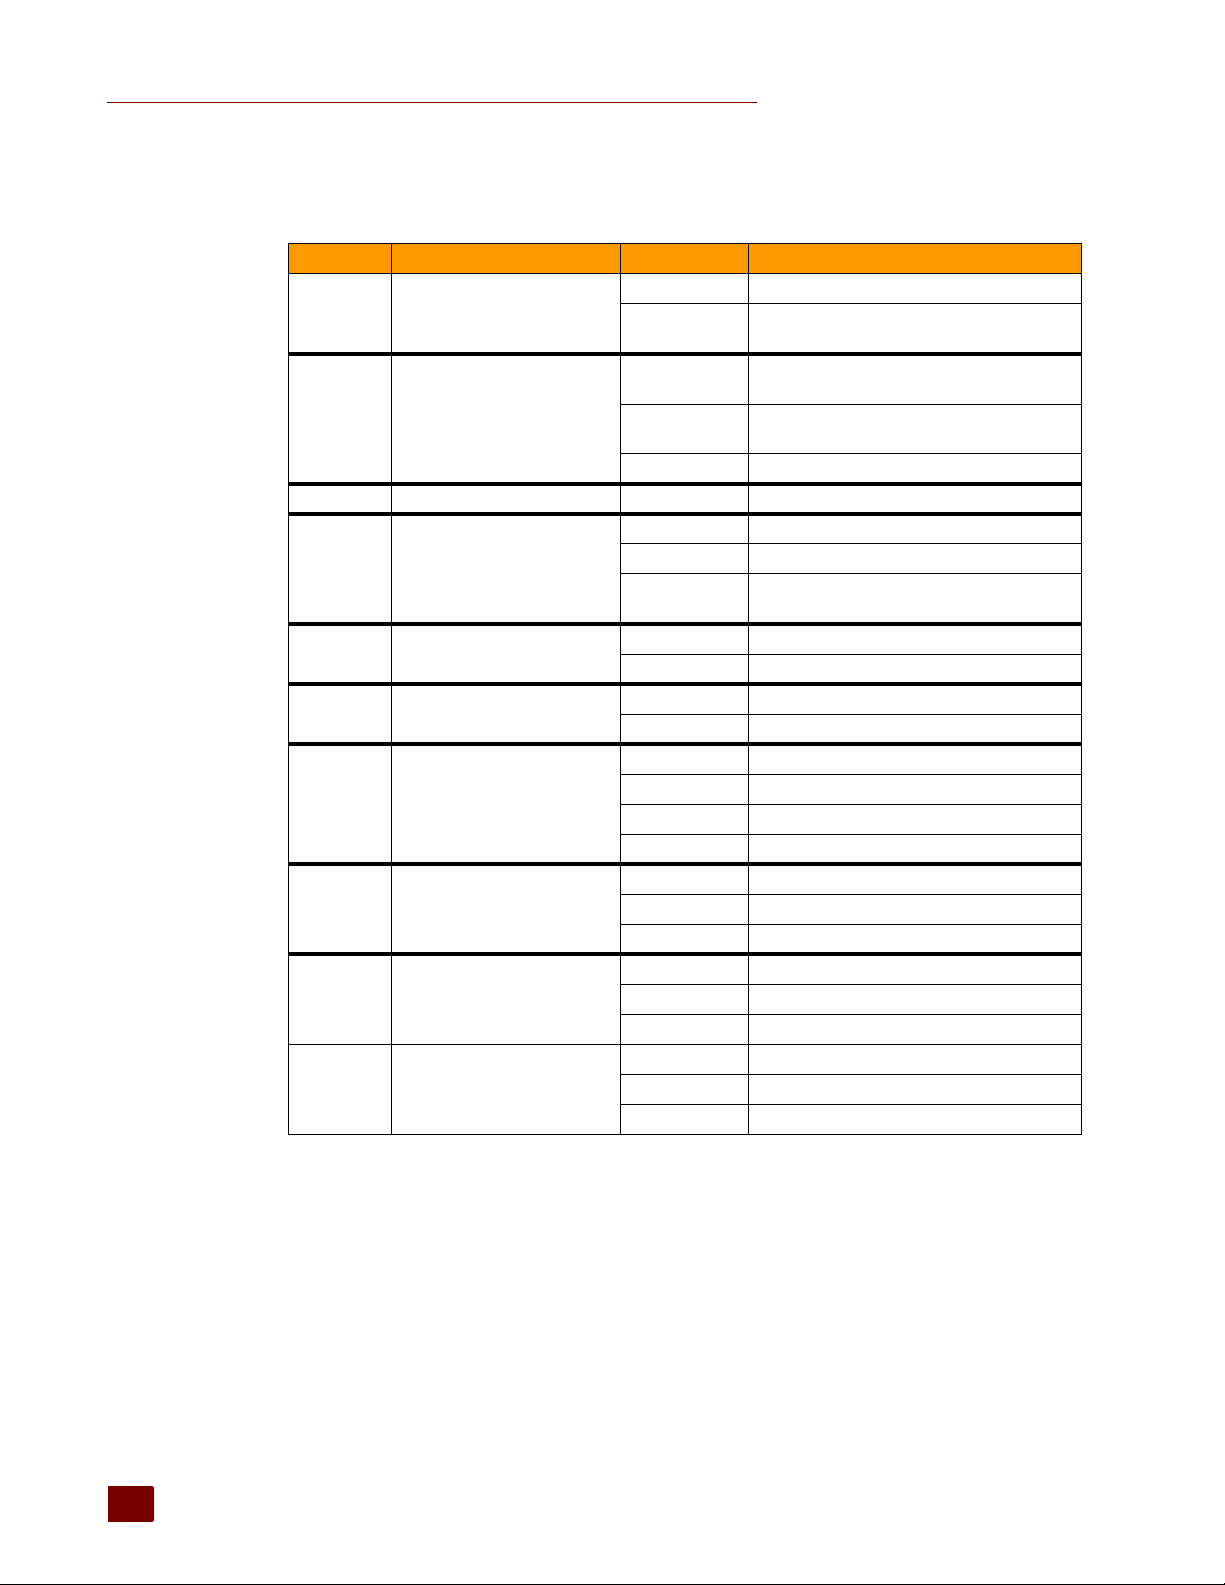
LEDS
LEDs
The groov Box’s LEDs use color and blinking to show status information.
LED What it shows Color What it means
Blinking green Activity on hard drive
STOR Hard drive activity
WLAN
USER Not used n/a n/a
BATT Battery status
TEMP Temperature status
FAN Fan status
SYS groov Box status
PWR Power to Box
SPEED Ethernet link speed
LINK ACT Ethernet network activity
Wireless network connection
status and network activity
Blinking orange
Off
Green
Blinking green Wireless LAN activity
Green Battery 90% Charged
Blinking green Battery charging
Red
Green Temperature OK
Red Temperature outside operating range
Green Fans are operating properly
Red One or both fans have failed
Off groov Box is turned off
Green groov Box is turned on
Blinking green groov Box is booting up
Blinking orange groov Box is shutting down
Off No input power
Green Good input power
Red Input power outside normal range
Off 10 Mbps
Green 100 Mbps
Orange 1000 Mbps
Off No Ethernet link
Green There is an Ethernet link, but no activity
Blinking green There is a link and activity
Hard drive is being restored to factory
defaults
groov Box is disconnected from the wireless
LAN.
groov Box is connected to the wireless network
Outside voltage range. BIOS may be corrupted. Contact Product Support.
64
groov Box User’s Guide for GROOV AT1
Page 72
Index
A
access point, wireless, 25
activate groov Box, 11
airflow, 9
antennas, 59
architecture, system, 5
B
backing up groov, 29
blink codes, 64
browsers, 3, 7, 12, 19
C
CCMP, 26
certificate
CA-signed
self-signed, 42
changing
fan filters
groov Admin password or username, 35
network configuration, 22
Chrome, 20
cleaning fan filters, 56
Client Options dialog, 24
colors, LEDs, 64
communications, 4
troubleshooting, 58
control network, 5
creating username and password, 15
CSS3, 3
, 50
, 56
D
default factory settings, 56
default network settings, 56
DHCP, 22, 56, 57
dimensions, 62
DIN rail clips, 9
DNS, 12, 22, 24, 58
E
encryption, 26
enterprise network, 5
environmental requirements, 61
ETH0, 10
Ethernet connectors, 4, 10, 11, 56
F
fans, 9, 56
filter, 56
Find, 13
Firefox, 20
fixed IP address, 57
G
groov
backing up
restoring project from backup, 31
groov Admin
opening
quick start, 21
updating, 21
groov Box dimensions, 62
groov Build and View
opening from groov Admin
updating, 28
groov Find, 13, 18
, 29
, 17
, 21
H
hardware status, 36
groov Box User’s Guide for GROOV AT1 65
65
Page 73

help
Opto 22 Product Support
Product Support, 6
hostname
changing
troubleshooting, 58
HTML5, 3
, 24
I
installing, 9
location considerations, 9, 59
Internet Explorer, 20
IP address, 10
static, 22, 57
IPv4 Gateway, 24
L
launching groov, 12
LED
, 10, 55
PWR
STOR, 55
SYS, 11, 55
LEDs
blink codes
location, 63
license file, 11, 14
, 64
M
memory, 61
mounting, 9
N
network
configuring
connectors, 63
control, 5
enterprise, 5
interface card, 57, 58
key, 26
NIC, 58
, 22
O
off, 55
on, 55
On/Off button, 11
opening groov, 12
operating temperature, 61
, 6
Opto 22 Product Support, contacting, 6
P
password
changing, for groov Admin
creating, 15
power
requirements
supply, 10
troubleshooting, 57
turning on and off, 55
private key, 53
processor, 61
project
backing up
restoring from backup, 31
PWR LED, 10, 55
, 9, 61
, 29
, 35
Q
quick start, Admin, 21
R
replacing fan filters, 56
resetting groov Box, 56
restarting groov Box, 33
restoring factory defaults, 56
restoring groov project, 31
S
Safari, 20
security
CA-signed certificate
certificate, 50
self-signed certificate, 42
warning, 12, 19
self-signed certificate, 42
serial number, 12
server, synchronize time with, 39
session timer, 20
setting system time, 38
specifications, 61
SSID, 26
SSL, 12
SSL certificate, 50
buying CA-signed, 52
static IP address, 12, 57
assigning, 22
STOR LED, 55
, 52
66
groov Box User’s Guide for GROOV AT1
Page 74

storage temperature, 61
SVG, 3
synchronize time with remote server, 39
SYS LED, 11, 55
system
architecture
information, 21, 36
time, setting, 38
, 5
T
Technical Support. See Opto 22 Product Support, 6
temperature and humidity, 61
time
, 38
server
setting, 38
zones, 38
TKIP, 26
troubleshooting
communications
hostname, 58
network interface card, 58
Opto 22 Product Support, 6
power, 57
turning groov Box on and off, 55
, 58
U
updating
groov Admin
groov App, 28
USB connectors, 63
USB flash drive
back up to
restore from, 31
username, changing, for groov Admin, 35
, 32
, 29
W
WEP, 26
Wi-Fi, 59
wired network, 4, 9
wireless
access point
communications, 25, 59
LAN, 4
LAN specifications, 61
WPA, 26
, 25
groov Box User’s Guide for GROOV AT1 67
67
Page 75

68
groov Box User’s Guide for GROOV AT1
 Loading...