

Page 1
Cat. No. 42-4038
OWNER’S MANUAL
Please read before using this equipment.
Concertmate® 980
42-403 8.fm Page 1 Thursday, August 12, 1999 8:50 AM
Page 2
2
FEATURES
© 1998 Tandy Corporation.
All Rights Reserved.
Concertmate, Optimus, and RadioShack are registered trademarks used by Tandy Corporation.
Your Optimus Concertmate 980 is a
state-of-the-art keyboard with many
exciting features. You can set the keyboard to sound like 100 different musical
instrument s or sound effe cts. To accompany your music, the keyboard has 100
rhythms, as well as auto accompaniments and percussion sounds.
Your keyboard also includes a MIDI
(Musical Instrument Digital Interface)
feature, which lets you connect it to other
MIDI-equipped musical instruments or
devices, even your personal computer.
This versatile keyboard can provide
hours of fun and is ideal for anyone who
wants to make mus ic, from the begi nner
to the experienced musician.
Note:
The Concertmate 980 conforms
to most, but not all, General MIDI specifications. Because of this, you m ight experience some incompatibility when
using the Concertmate 980 with another
General MIDI device. For more information, see “Using MIDI” on Page 25.
Your keyboard’s features include:
100 Prerecorded Tunes
— let you hear
a sample of what you and the keyboard
can do. You can play the tunes either
one at a time or consecutively, and you
can turn off the melody or accompaniment portion so you can pl ay along with
the tunes.
100 Tones
— you can set your keyboard to sound like anything from a
harpsichord to a honky-tonk piano.
12-Note Pol
y
phonic Sound
— lets you
play and hear up to 12 notes at the
same time so you can play or create almost any type of music.
Tempo Control
— lets you speed up or
slow down the tempo of any selected
music pattern.
100 Auto-Rh
y
thms
— give you a
steady beat for many styles of music,
from rhumba to slow rock.
Fill-In Rh
y
thm
— lets you insert a short
variation into any auto-rhythm.
Auto Accompaniment
— lets you automatically play a preset harmonic pattern to match the selected auto-rhythm.
Tune Control
— lets you adjust the
pitch of your keyboard s o you can play
in tune with other instruments.
Transpose Function
— lets you instantly change the key of the music,
even while you are playing.
Chord Book
— lets you easily see
which keys to press and which fingers to
use to form a chord, as well as a chord’s
name.
Two Built-In Speakers
— provide excellent sound to help make your music
come alive.
42-403 8.fm Page 2 Thursday, August 12, 1999 8:50 AM
Page 3
3
Headphones/Output Jack — lets you
connect headphones so you can play
without disturbing others, or an external
amplifier so you can play for a crowd.
Sustain Jack — lets you connect a sustain pedal (not supplied) to the Concertmate 980 so you can sustain your
keyboard’s sound.
Three Pow e r O pti ons — let you power
the keyboard from internal batteries (not
supplied), standard AC power (with an
optional adapter), or your vehicle’s cigarette-lighter socket (with an optional
adapter) so you can make music almos t
anywhere.
To fully enjoy the features and functions
of this electronic key board, please read
this manual carefully and completely.
Notes:
• If the keyboard is left in one place
for a very long time, its feet could
mar your furniture’s finish. We recommend you place the feet on felt
cloth pads to protect your furniture
or use an optional keyboard stand
such as RadioShack Cat. No. 42-
4050.
• This owner’s manual explains how
to use this electronic keyboard. It
does not teach music.
We recommend you record your keyboard’s serial number here. The number
is in the battery compartment of the keyboard.
Serial Number _________________
THE FCC WANTS YOU TO
KNOW
This keyboard complies with the limits
for a Class B digital device as specified
in Part 15 of
FCC Rules
. These limits
provide reasonable protection against
radio and TV interference in a residential
area. However, your keyboard might
cause TV or radio interference even
when it is operating properly. To eliminate interference, you can try one or
more of the following corrective measures:
• Reorient or relocate the receiving
antenna.
• Increase the distance between the
keyboard and the radio or TV.
• Use outlets on different electrical circuits for the keyboard and the radio
or TV .
Consult your local RadioShack store if
the problem still exists.
You must use shielded i nterface cables
with this equipment.
42-403 8.fm Page 3 Thursday, August 12, 1999 8:50 AM
Page 4
4
CONTENTS
Preparation ...... ........................ ................ ........................ ........................ ................ 6
Connecting Power .............................................................................................. 6
Using Batteries ............................................................................................. 6
Using AC Power ........................................................................................... 7
Using Vehicle Battery Power ........................................................................ 7
Connecting Headphones .................................................................................... 8
Listening Safely ............................................................................................ 8
Connecting an External Amplifier ....................................................................... 8
Using the Sheet Music Stand ............................................................................. 9
Control Locations ................................................................................................. 10
Operation ....................... ........................ ........................ ................ ........................ 11
Basic Operat io n .................. ........................ ....................... ................. .............. 11
Cancelling Auto Power Off ......................................................................... 11
Playing the Prerecorded Tunes ........................................................................ 12
Playing Back a Prere corded Tune ............................................................. 12
Playing Along with a Prerecorded Tune ..................................................... 14
Turning Applause Off/On ........................................................................... 14
Consecutively Playing Back the Tunes ...................................................... 14
Using the Preset Tones ............................................................ ....... .......... .. ..... 15
Selecting/Playing a Preset Tone ................................................................ 15
Keyboard Split Tones ................................................................................. 16
Layered Tones ........................................................................................... 16
Percussion Sounds .................................................................................... 16
Using the Preset Auto-Rhythms ....................................................................... 17
Selecting/Playing an Auto-Rhythm ............................................................ 17
Using SYNCHRO ....................................................................................... 18
Using FILL-IN ............................................................................................. 18
Using Auto Accompaniment ............................................................................. 18
Adjusting the Accompaniment Volume ...................................................... 19
Concert Chord ............................................................................................ 19
Standard Fingering .................................................................................... 20
Using the Cho rd Book ...................................................................................... 21
Special Features ................................................................................................... 23
Changing Keys ................................................................................................. 23
Tuning the Keyboard ........................................................................................ 24
Using a Sustain Pedal ...................................................................................... 24
42-403 8.fm Page 4 Thursday, August 12, 1999 8:50 AM
Page 5
5
Using MIDI ............................................................................................................. 25
About MIDI ....................................................................................................... 25
Making the MIDI Connections .......................................................................... 25
MIDI Data ......................................................................................................... 26
Changing MIDI Settings ................................................................................... 27
Notes About the MIDI Implementation Chart .................................................... 27
Troubleshooting .................................................................................................... 29
Standard Fin gering Chord Charts ....................................................................... 31
Note Table .............................................................................................................. 34
MIDI Implementation Chart .................................................................................. 36
Care and Main tenance .......................................................................................... 38
Specifications ....................................................................................................... 39
42-403 8.fm Page 5 Thursday, August 12, 1999 8:50 AM
Page 6
6
PREPARATION
Note:
To co nnect a MIDI device to your
keyboard, see “Making the MIDI Connections” on Page 25.
CONNECTING POWER
You can pow er your keyboard in any of
these ways:
• internal batteries
• standard AC power using an
optional AC adapter
• a vehicle’s cigarette-lighter socket
using an optional DC adapter
Notes
:
• Connecting an AC or DC adapter
automatically disconnects any internal batteries.
• Always disconnect the AC or DC
adapter when you finish using the
keyboard.
Using Batte ries
Your keyboard can use six D batteries
(not supplied) for power. For the best
performance, we recommend alkaline
batteries, such as RadioShack Cat. No.
23-550.
Cautions:
• Use only fresh batteries of the
required size and recommended
type.
• Do not mix old and new batteries,
different types of batteries (standard, alkaline, or rechargeable), or
rechargeable batteries of different
capacities.
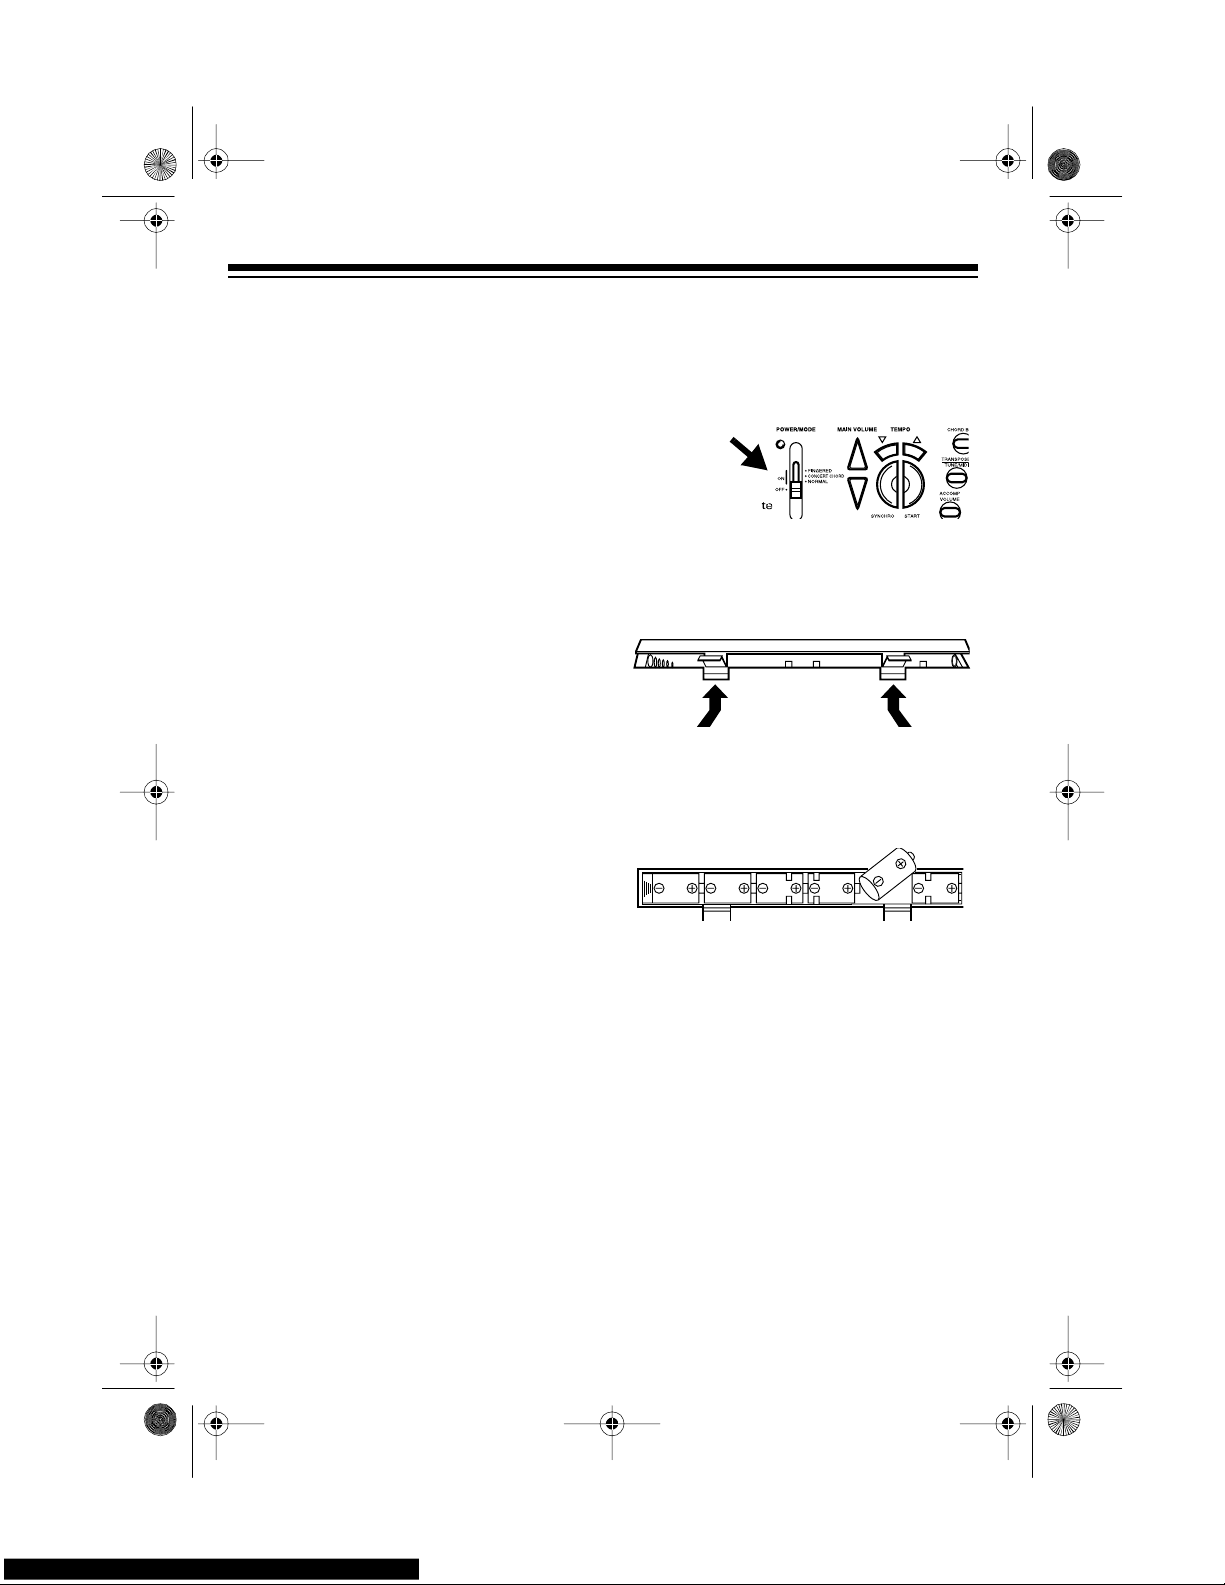
1. Set
POWER/MODE
to
OFF
.
2. While pressing both tabs on the battery compartment cover on the bottom of the keyboard, pull the cover
up to remove it.
3. Put six D b atteries into the compartment as indicated by the polarity
symbols (+ and –) marked below the
compartment.
4. Replace the cover.
When the keyboard stops operating
properly, replace all six batteries.
Cautions
:
• If you do not plan to use the keyboard for a week or more, or if you
plan to use only an AC or DC
adapter, remove the batteries. Batteries can leak chemicals that can
destroy electronic parts.
• Dispose of old batteries promptly
and properly. Do not burn or bury
them.
42-403 8.fm Page 6 Thursday, August 12, 1999 8:50 AM
Page 7
7
Using AC Power
You can power your keyboard from
standard AC po wer using an optional 9volt AC adapter (such as RadioShack
Cat. No. 273-1656).
Cautions
:
• You must use an AC adapter that
supplies 9 volts and delivers at least
800 mA. Its center tip must be set to
negative and its plug must fit the
keyboard’s
DC 9V
jack. The recommended adapte r m eet s t hese s pe cifications. Using an adapter that
does not meet these specifications
could damage the keyboard or the
adapter.
• Always plug the AC adapter into the
keyboard before you plug it into the
AC outlet. Always unplug the AC
adapter from the AC outlet before
you unplug it from the keyboard.
•Be sure
POWER/MODE
is set to
OFF
before you connect or disconnect
the adapter.
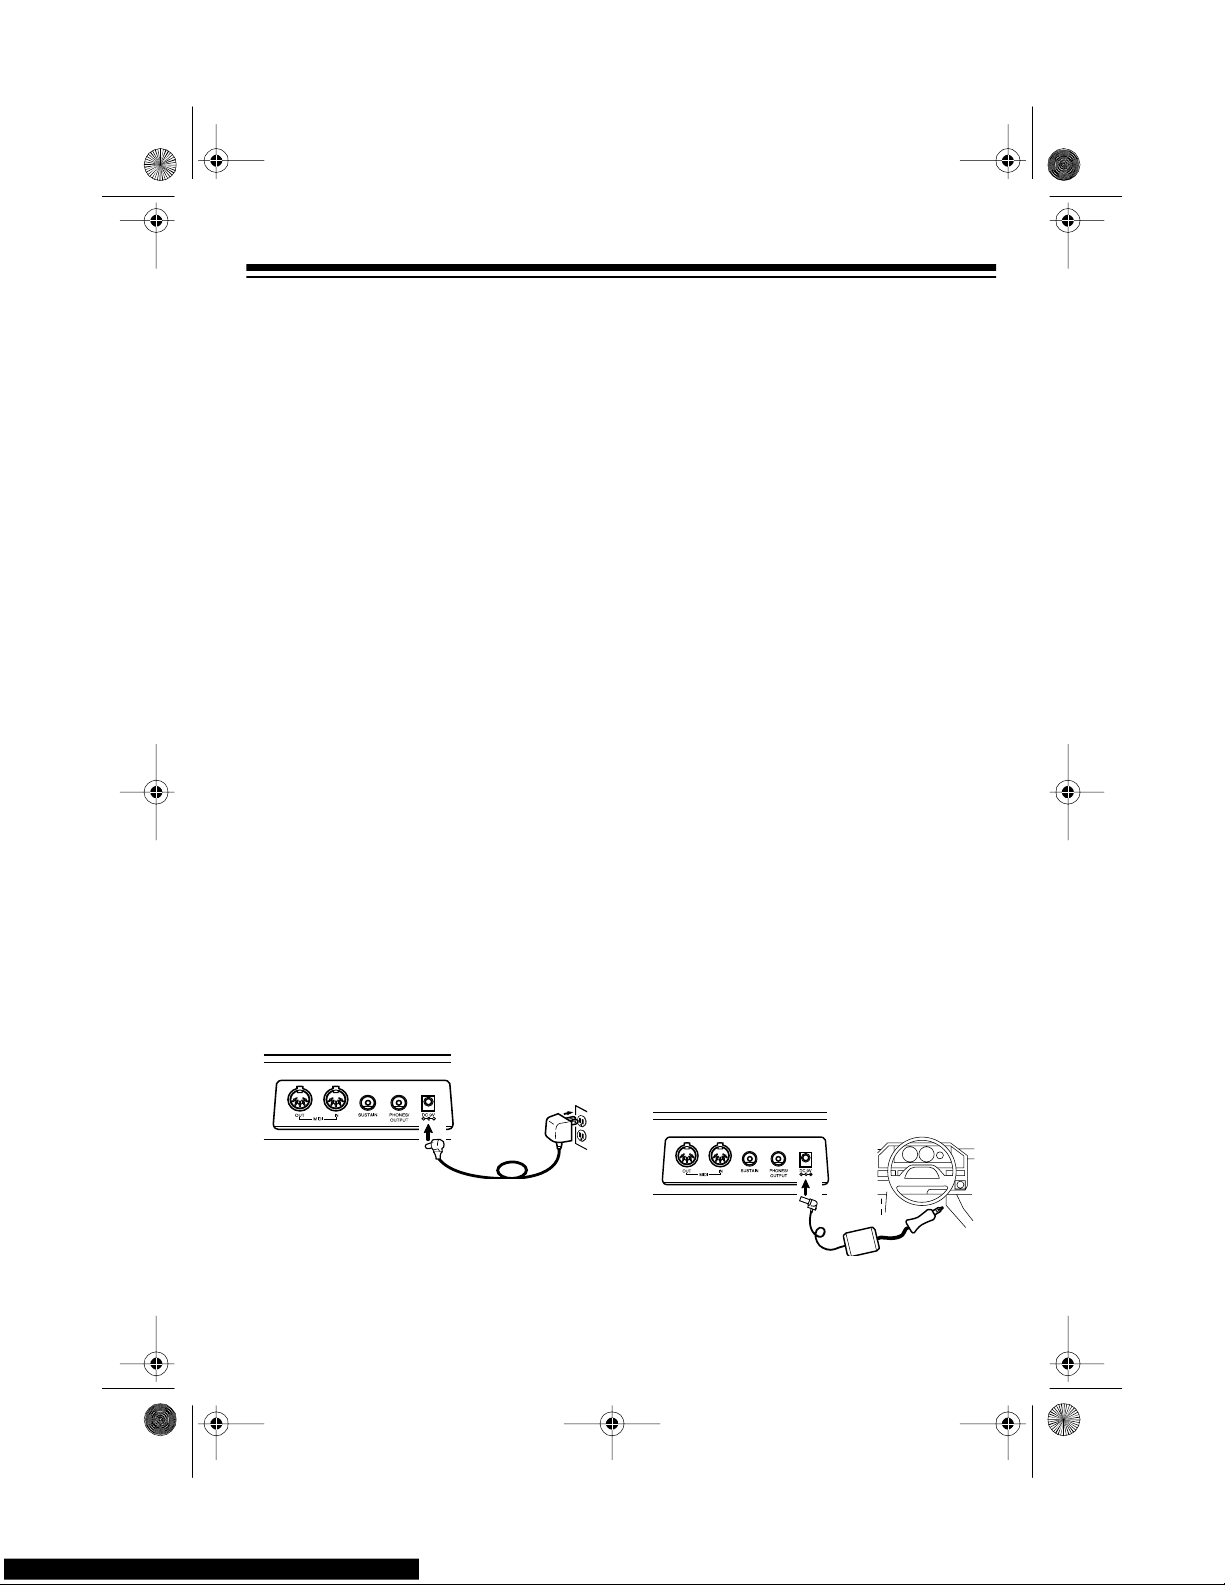
Follow these steps to connect an AC
adapter to the keyboard.
1. Connect the AC adapter’s 5.5 mm
outer diameter/2.1 mm inner di ameter barrel plug to the
DC 9V
jack on
the back of the keyboard.
2. Plug the AC adapter’s other end into
a standard AC outlet.
Using Vehicl e Battery Power
You can power your keyboard from your
vehicle’s cigarette-lighter socket using
an optional 9-volt DC adapter (such as
RadioShack Cat. No. 273-1815).
Cautions:
• You must use a DC adapter that
supplies 9 volts and delivers at least
800 mA. Its center tip must be set to
negative and its plug must fit the
keyboard’s
DC 9V
jack. Using an
adapter that does not meet these
specifications could damage the
keyboard or the adapter.
• Always plug the DC adapter into
the keyboard before you plug it into
the ci ga ret te -li g hter so c ke t. A lw ays
unplug the DC adapter from the
cigarette-lighter socket before you
unplug it from the keyboard.
•Be sure
POWER/MODE
is set to
OFF
before you connect or disconnect
the adapter.
Follow these steps to connect a DC
adapter to the keyboard.
42-403 8.fm Page 7 Thursday, August 12, 1999 8:50 AM
Page 8
8
1. Plug the DC adapter ’s 5.5 mm out er
diameter/2.1 mm inner diameter
barrel plug into the cable so it reads
– TIP.
2. Set the DC adapter ’s voltage switc h
to 9 vo lts.
3. Connect the DC adapter’s barrel
plug to the
DC 9V
jack on the back of
the keyboard.
4. Plug the DC adapter’s other end into
your vehicle’s cigarette-lighter
socket.
Note:
If the keyboard does not operate
when you use the DC adapter, unplug
the cord from the cigarette-lighter socket
and clean any ashes or debris from the
socket. If your keyboard still does not
work, check the fuse in the DC adapter
and replace it if necessary.
CONNECTING
HEADPHONES
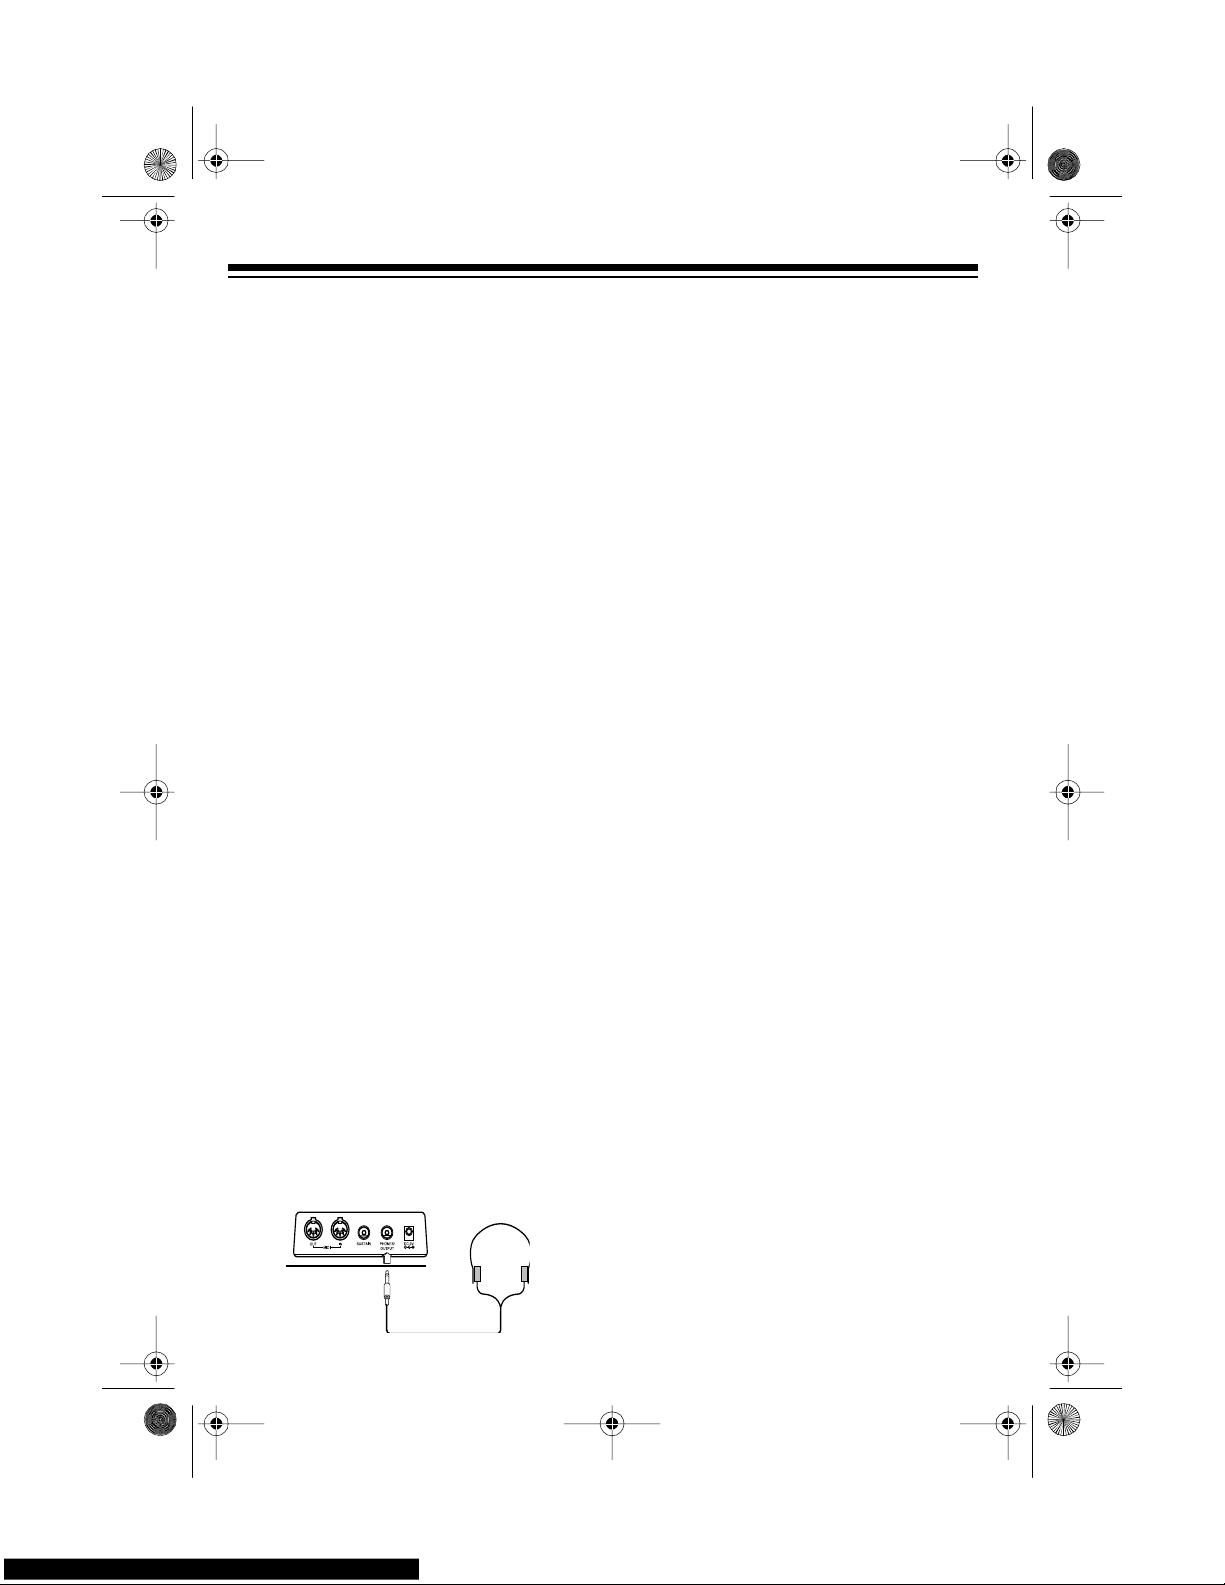
To listen to your keyboard without disturbing others, you can connect an optional pair of stereo headphone s with a
1
/4-inch (6.4-mm) plug. Your local RadioShack store sells a wide selection of
headphones.
Insert the headphones’ plug into the
PHONES/OUTPUT
jack on the back of
the keyboard.
Note
: Connecting headphones discon-
nects the keyboard’s built-in speakers.
Listening Safely
To protect your hearing, follow these
guidelines when you use headphones.
• Set the volume to t he lowest se tting
before you begin li stening. A fter you
begin listening, adjust the volume to
a comfortable level.
• Do not listen at extremely high volume levels. Extended high-volume
listening can lead to permanent
hearing loss.
• Once you set the volume, do not
increase it. Over time, your ears
adapt to the volume level, so a volume level that does not cause discomfort might still damage your
hearing.
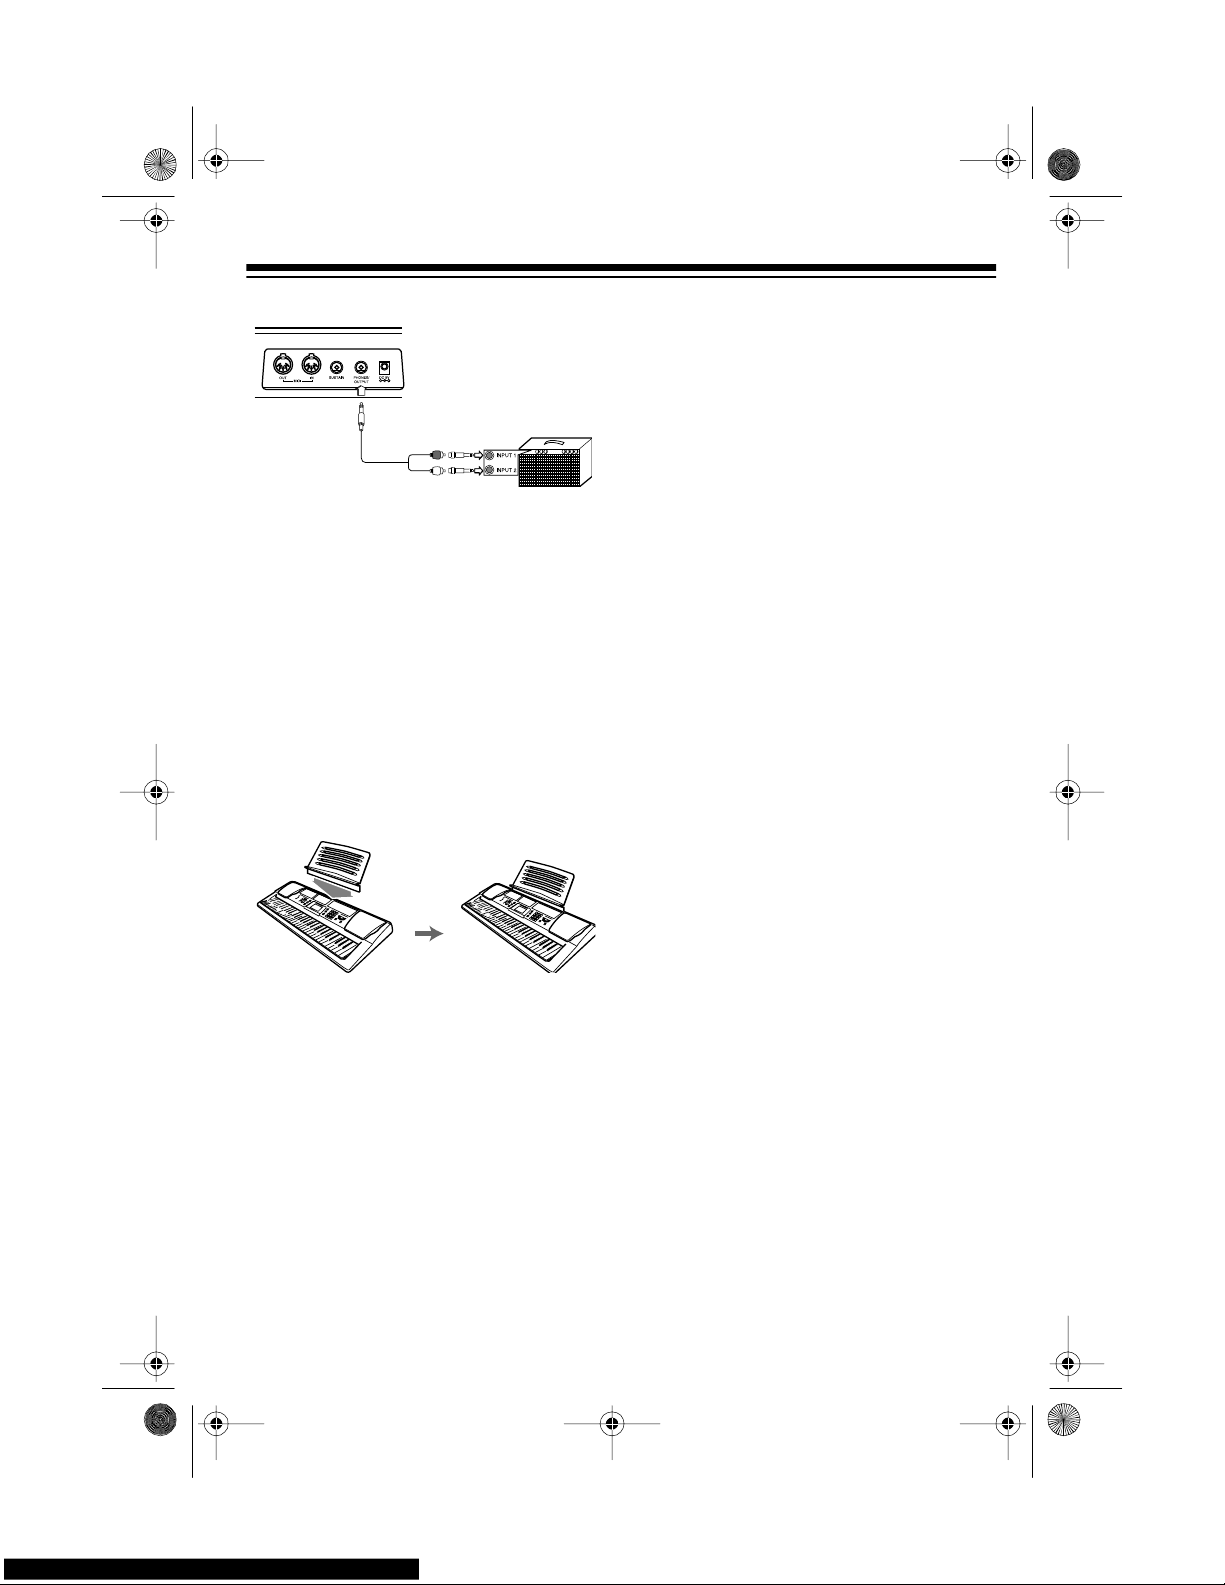
CONNECTING AN
EXTERNAL AMPLIFIER
To amplify your key board’s sound, you
can connect it to an optional external
amplifier using an audio cable with a
1
/4-
inch (6.4-mm) plug (not supplied).
To connect an e xternal am plifier to y our
keyboard, insert the cable’s plug into the
PHONES/OUTPUT
jack on the back of
the keyboard, and connect the cable’s
other end to the a mplifier’s input jack(s)
(such as AUX IN or TAPE IN).
42-403 8.fm Page 8 Thursday, August 12, 1999 8:50 AM
Page 9
9
Your local RadioShack store sells a full
line of amplifiers, speakers, and connection cables.
USING THE SHEET MUSIC
STAND
To easily view sheet music while playing
your keyboard, insert the supplied sheet
music stand into the slot on the top back
panel.
42-403 8.fm Page 9 Thursday, August 12, 1999 8:50 AM
Page 10
10
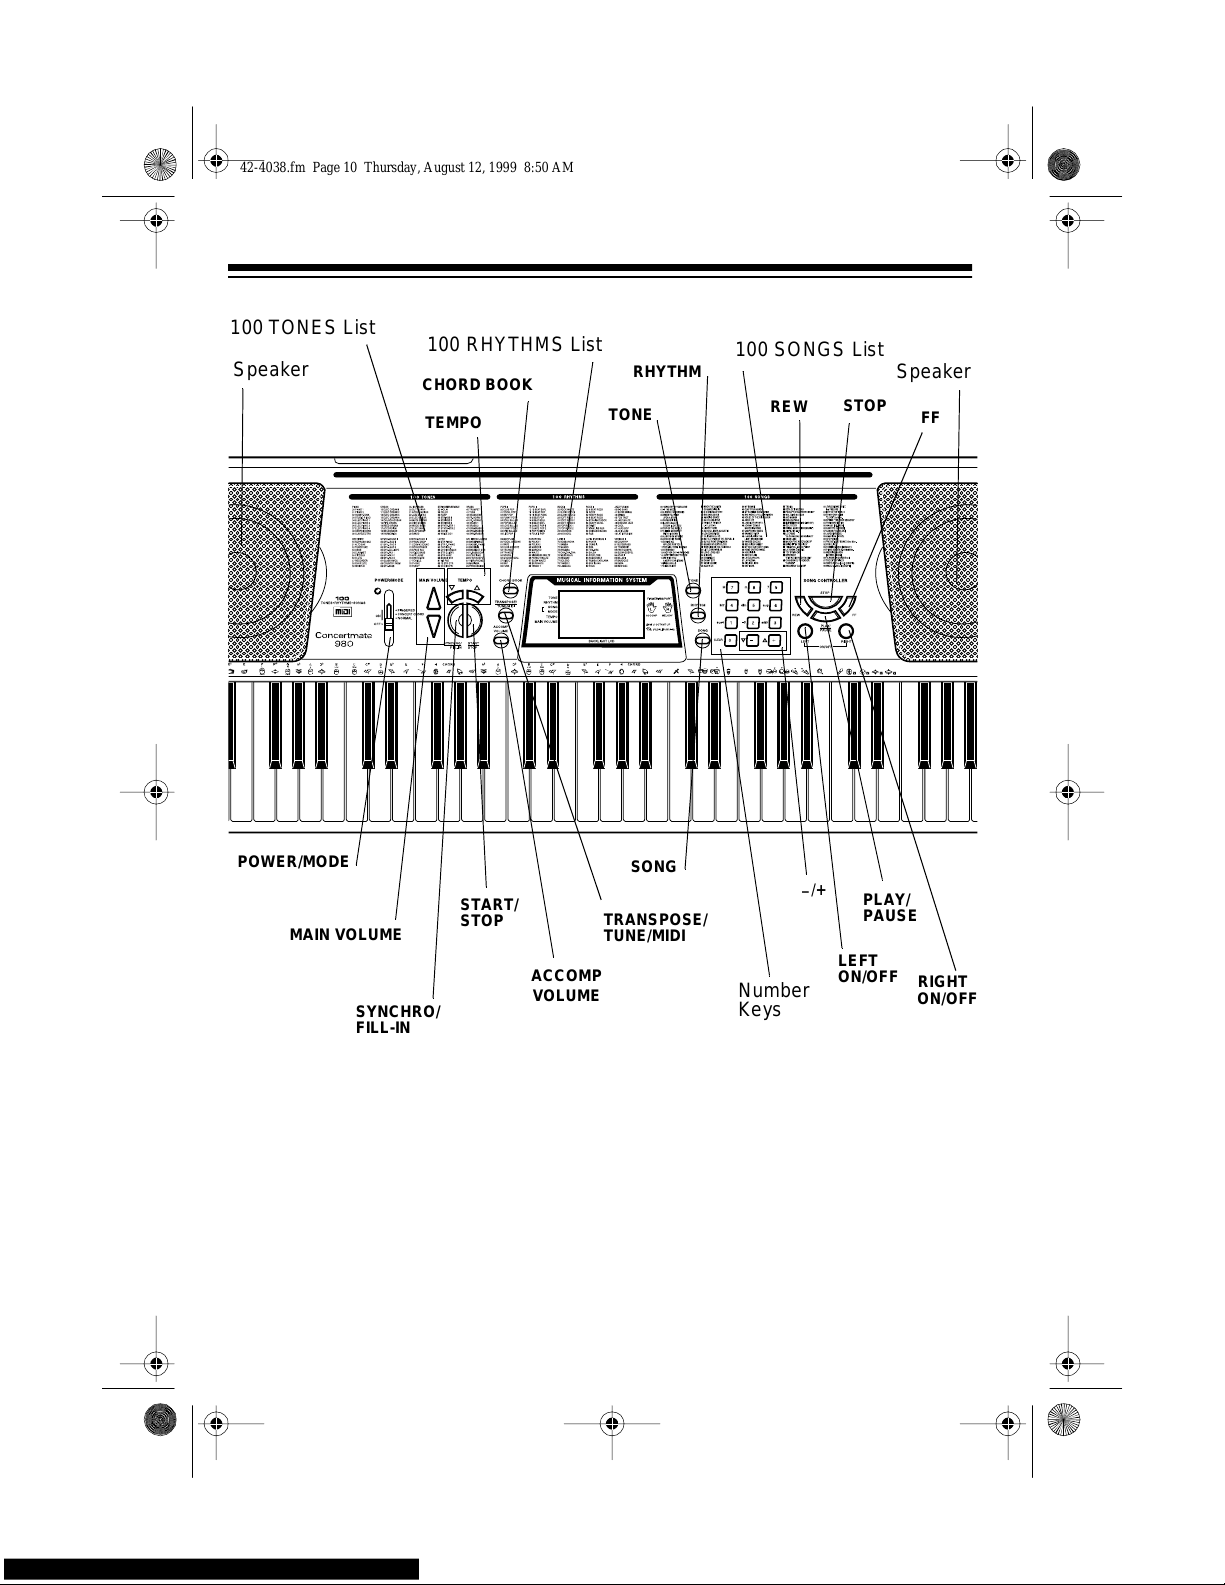
CONTROL LOCATIONS
Speaker
Speaker
PLAY/
STOP
TRANSPOSE/
TUNE/MIDI
RHYTHM
TEMPO
START/
SYNCHRO/
MAIN VOLUME
POWER/MODE
Number
_
/
+
TONE
SONG
100 TONES List
Keys
PAUSE
100 SONGS List
100 RHYTHMS List
LEFT
ON/OF
F
ON/OFF
RIGHT
CHORD BOOK
ACCOMP
VOLUME
REW
FF
STOP
FILL-IN
42-403 8.fm Page 10 Thursday, August 12, 1999 8:50 AM
Page 11
11
OPERATION
BASIC OPERATION
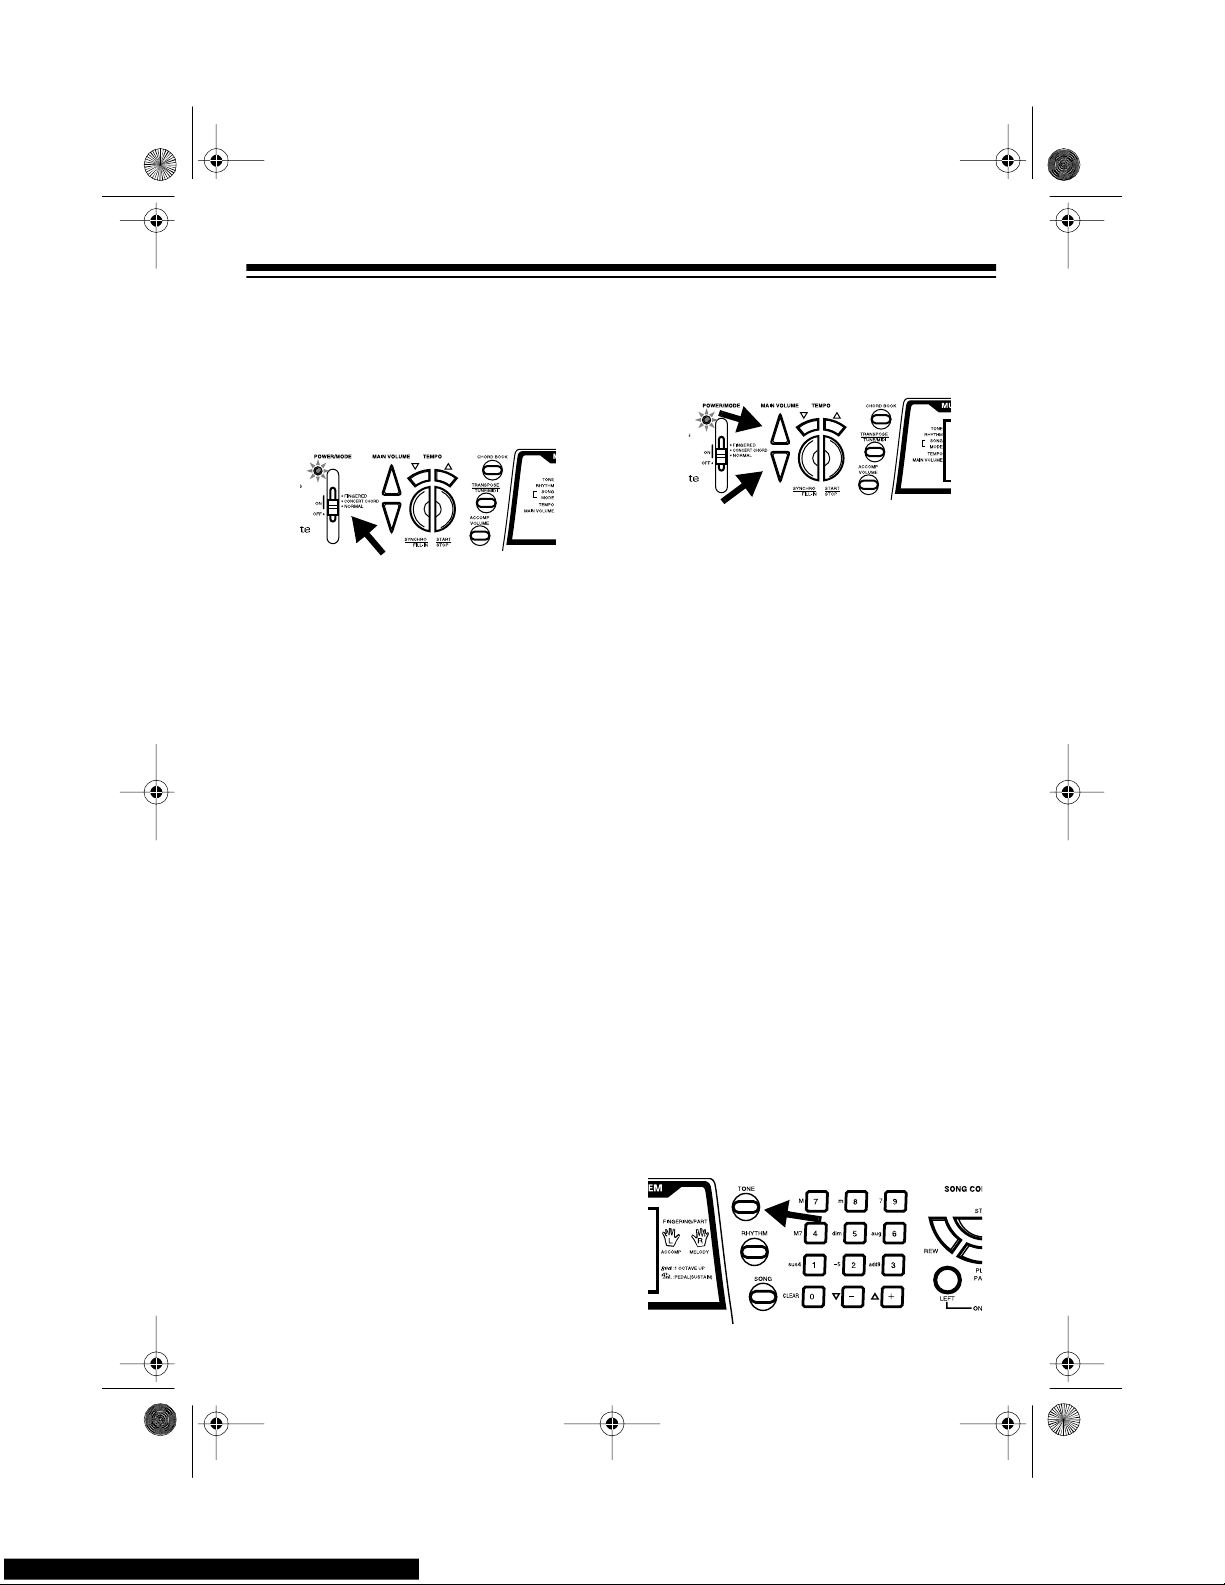
1. To turn on the keyboard, set
POWER/MODE
to
NORMAL.
The
POWER/MODE indicator lights.
Note:
To save power when operating on batteries, the key board automatically turns off after about 6
minutes if you do not press a key. To
turn on the keyboard again, set
POWER/MODE
to
OFF
then back to
NORMAL
.
2. To hear a sample of the Concertmate 980’s many sounds, play a
prerecorded tune (see “Playing the
Prerecorded Tunes” on Page 12).
To make your own music, simply
begin playing the keyboard.
Notes:
• The keyboard automatically
selects the tone PIANO 1 (No. 00)
when you turn the power on. To
select a different tone, see
“Selecting/Playing a Pres et Tone”
on Page 15.
• To select an auto-rhythm, see
“Using the Preset Auto-Rhythms”
on Page 17.
• To play auto accompaniment , see
“Using Auto Accompaniment” on
Page 18.
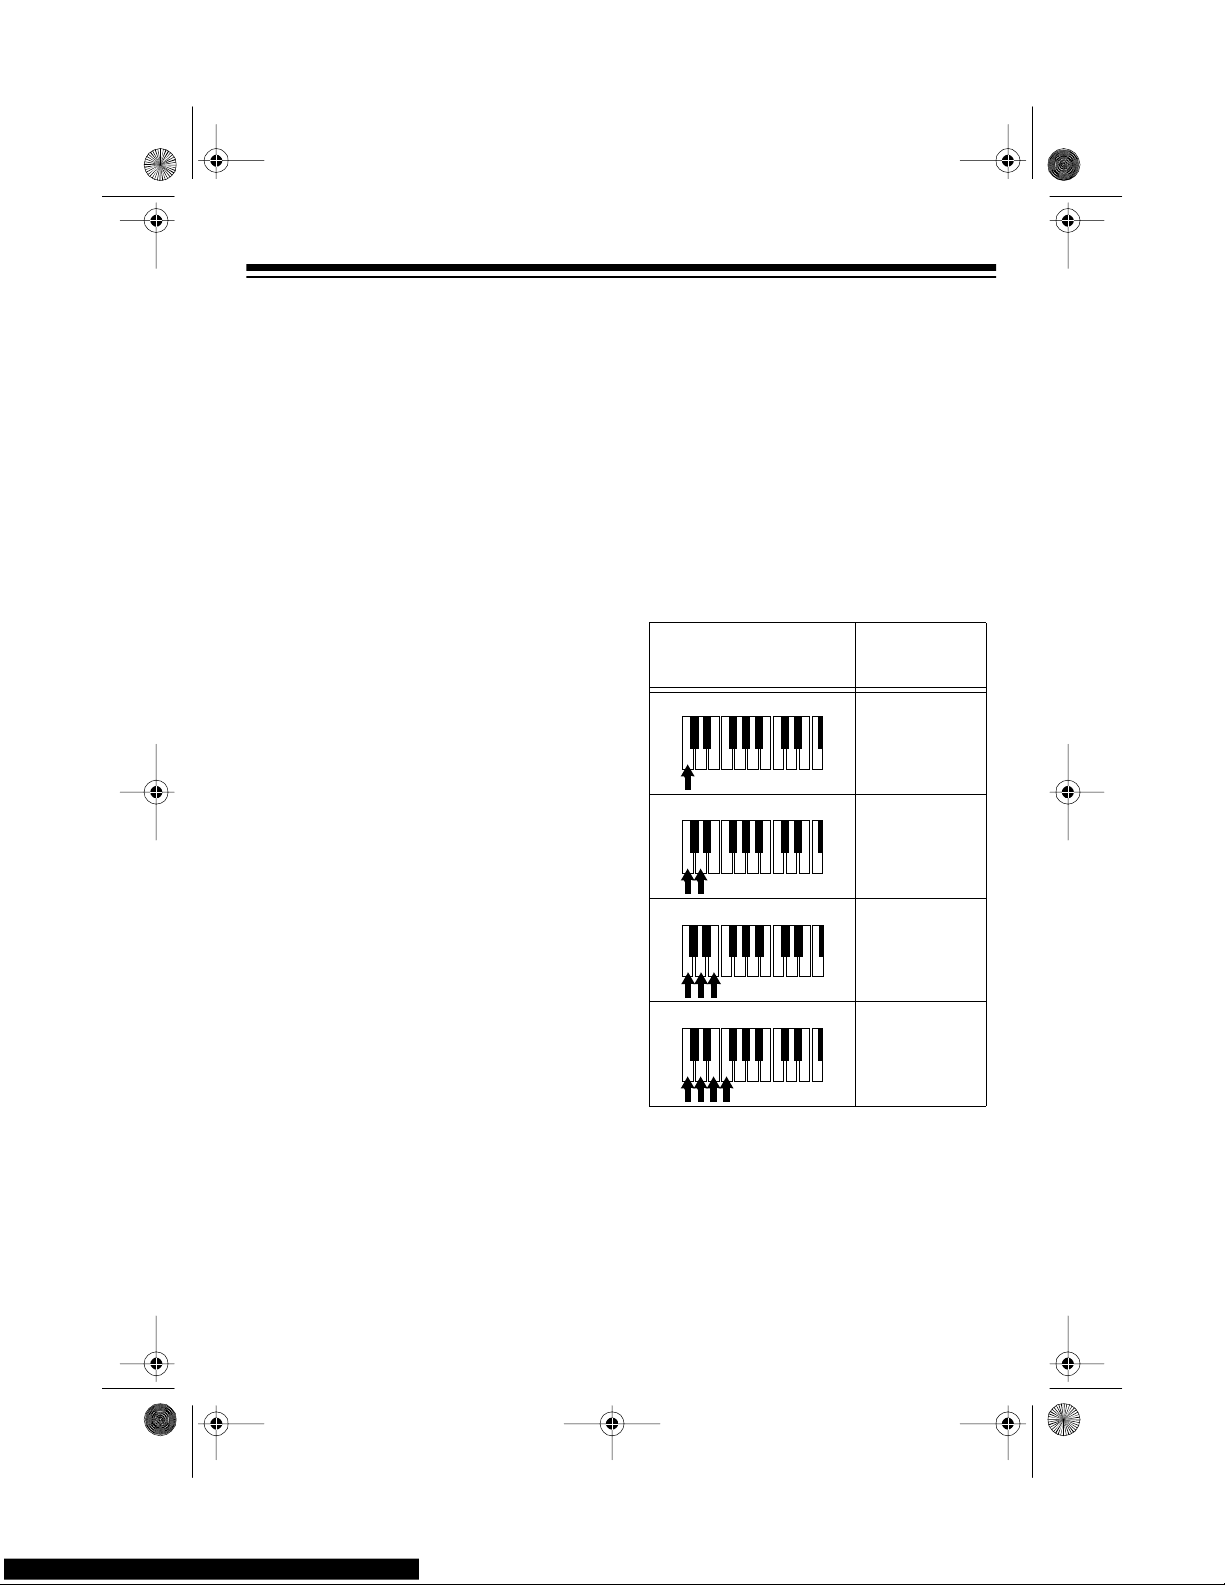
3. Repeatedly press
MAIN VOLUME
s
or t to increase or dec rease the volume. The current setting ap-pears.
Notes:
• The keyboard’s volume ranges
from 0 (no sound) to 9 (maximum). Each time you turn on the
keyboard, the volume is set to 7.
• To quickly change the volume set-
ting, hold down
MAIN VOLUME
s
or t.
• To quickly return to the default
volume setting of 7, press both
MAIN VOLUME
buttons at the
same time.
• The volume level differs depend-
ing on the tone, accom paniment,
or song you selected.
4. To turn off the keyboard, set
POWER/MODE
to
OFF
. The POWER/
MODE indicator turns off.
Cancelling Auto Power Off
To have the keyboard not automatica lly
turn off during a session, turn on the
keyboard while holding down
TONE
.
42-403 8.fm Page 11 Thursday, August 12, 1999 8:50 AM
Page 12
12
The next time you t urn the keyboard off
then back on again, it will automatically
turn off after about 6 minutes.
PLAYING THE
PRERECORDED TUNES
You can sit back and listen to the 100
tunes that come prerecorded in the keyboard, or you can turn of f a tun e’s m elody or accompaniment and play along on
the keyboard.
Playing Back a Prerecor d ed
Tune
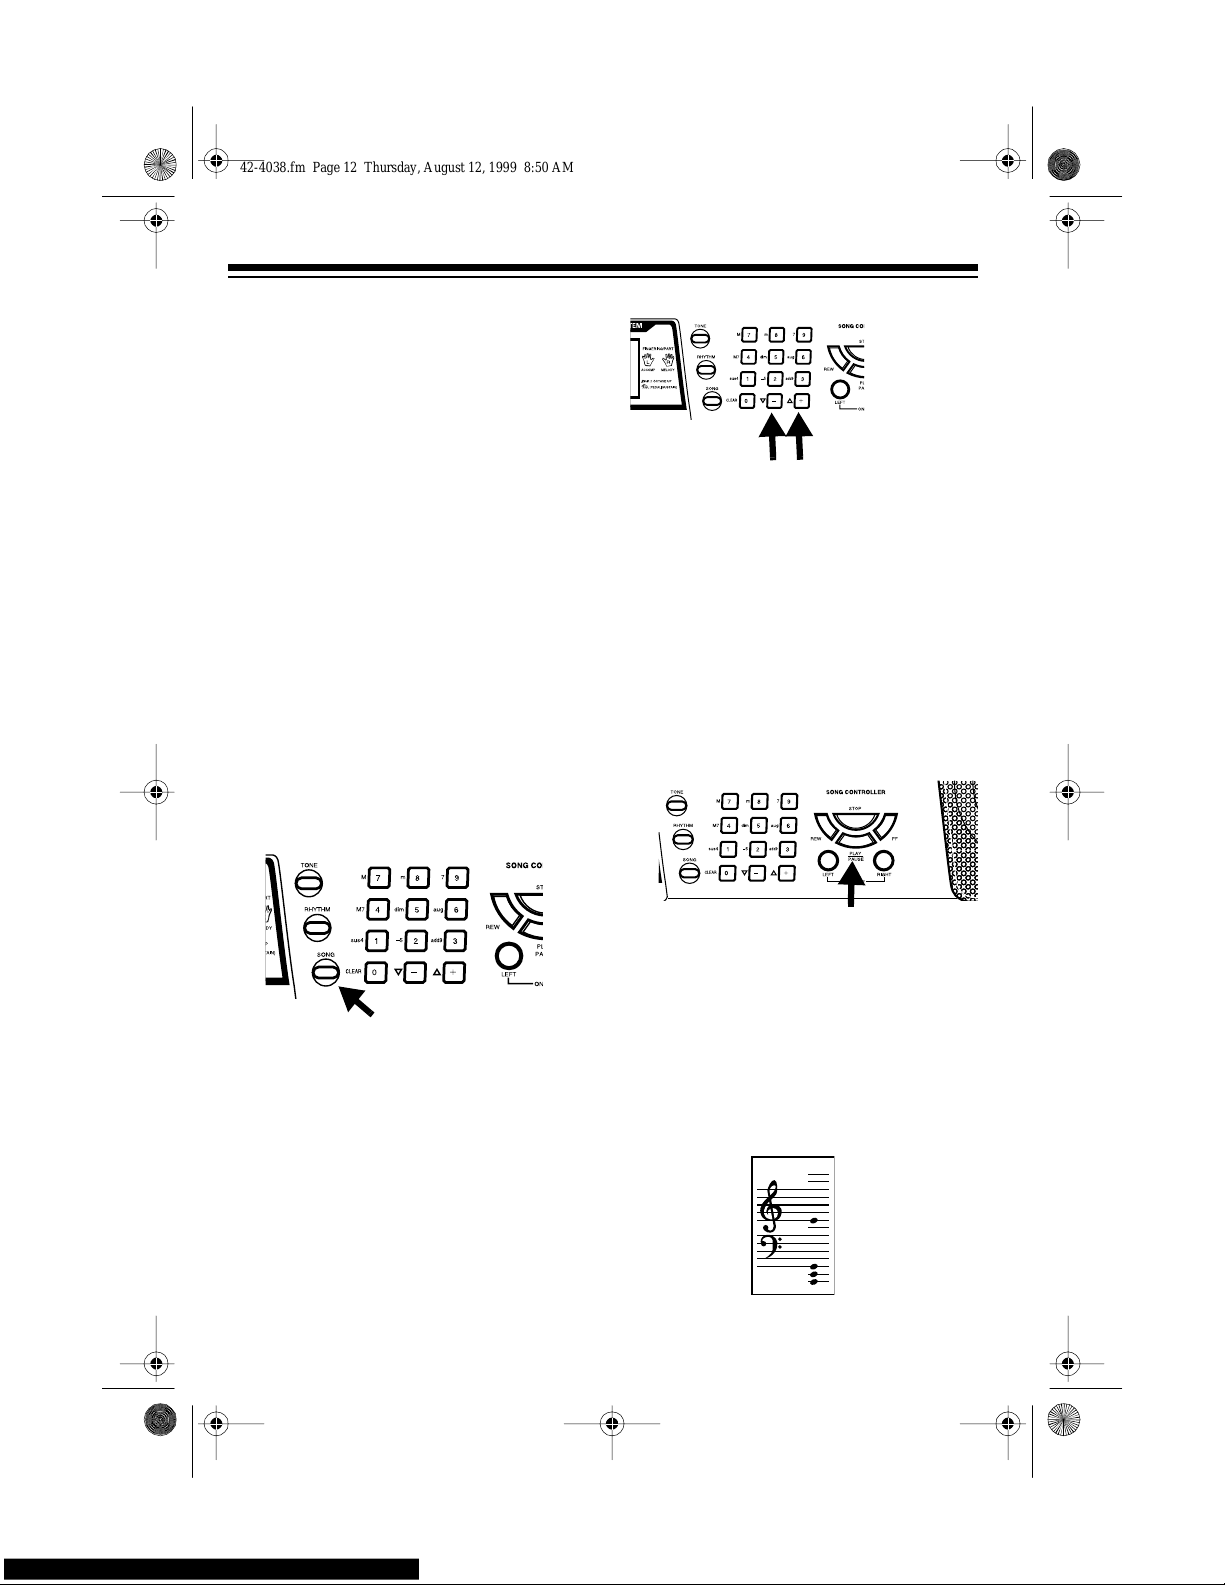
1. Press
SONG
. An indicator appears
next to
SONG
on the display and
the number of the current tune
appears.
Note:
The keyboard always selects
the tune “How Deep is Your Love”
(No. 00) the first time you press
SONG
after turning the power on.
2. Choose a tune from the 100
SONGS list and enter its two-digit
number on the keypad.
Or, you can press
– or +
to move to
the next higher or lower numbered
tune.
Notes:
• Precede a single-digit number
with a 0. For example, to select
07 (“Killing Me Softly with His
Song”) press
0 7
.
• If you enter an incorrect first d igit,
press
SONG
to clear your entry,
then enter the correct digit.
3. Press
PLAY/PAUSE
to start playing
the tune.
You can change the tune by repeating Step 2 even while a tune is playing. The new tune immediately
begins to play.
As a tune plays, the display shows:
• a “score” to show you the notes
that are playing (right side of the
display)
42-403 8.fm Page 12 Thursday, August 12, 1999 8:50 AM
Page 13
13
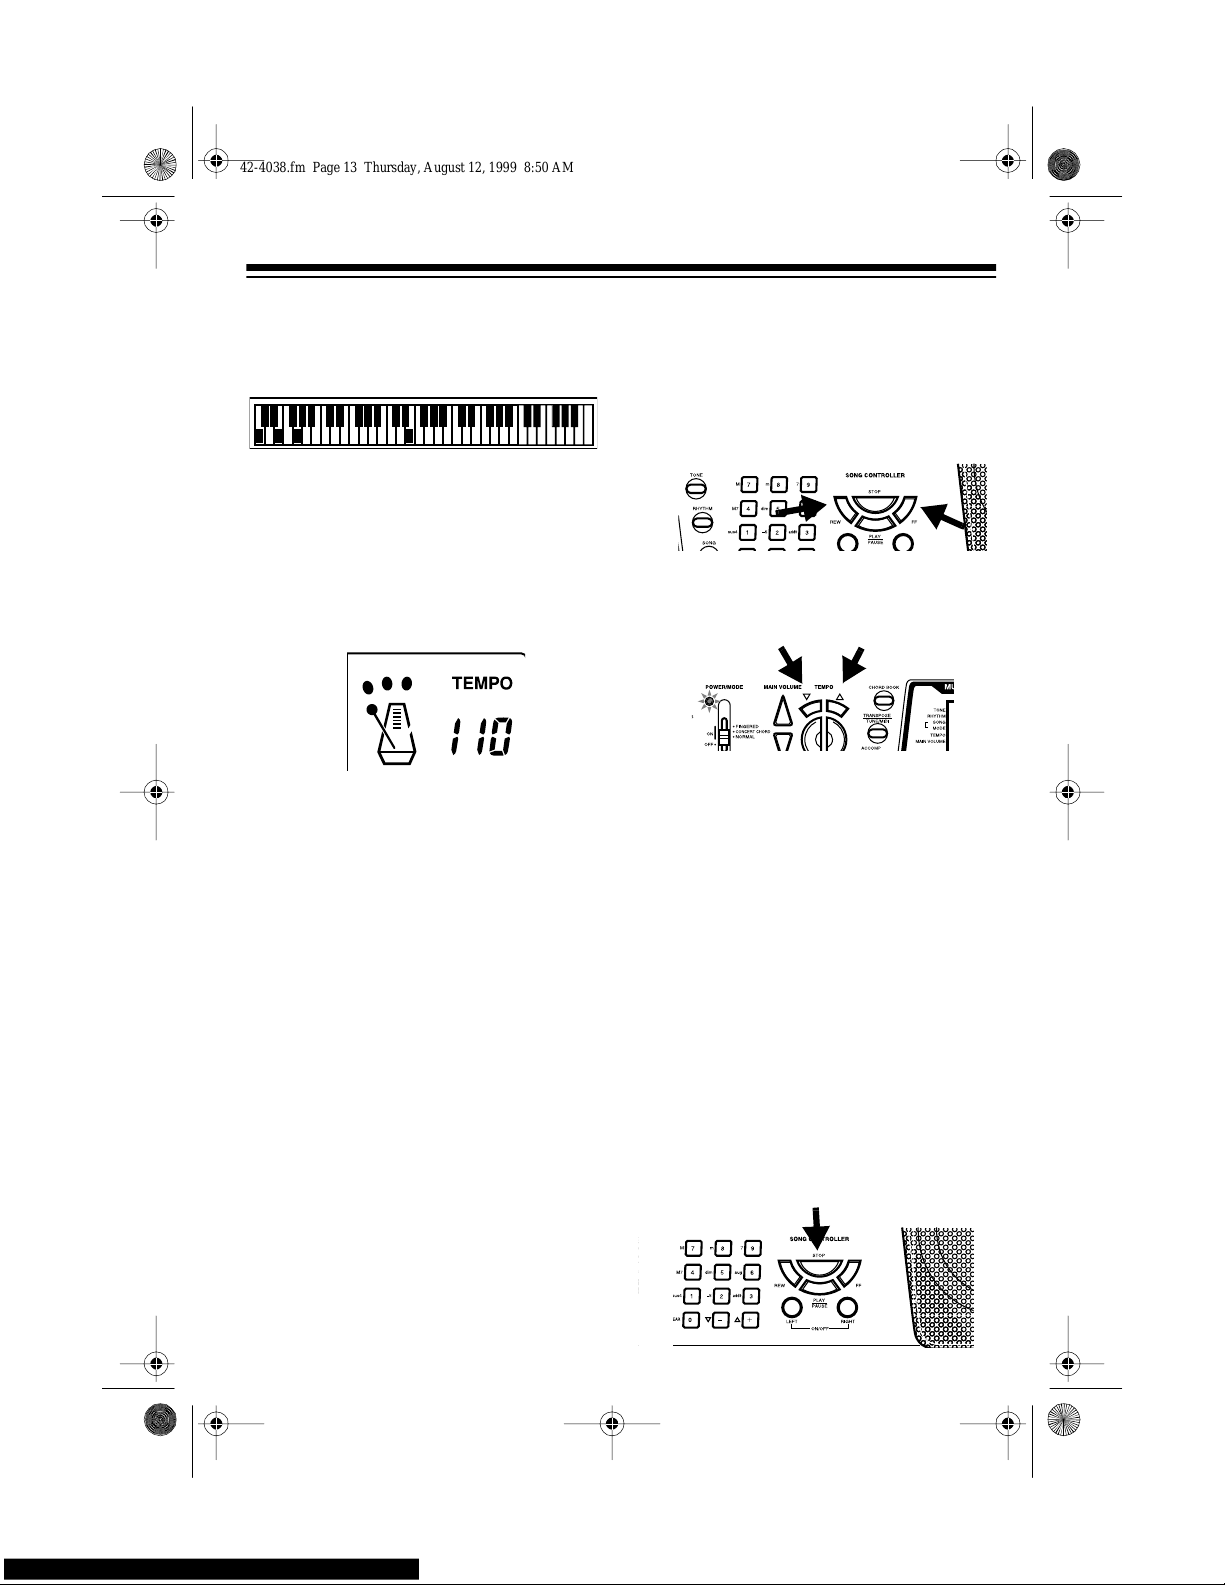
• a “keyboard” to show you the fingering and which keys are
pressed (bottom of the display)
• a “metronome” to show you the
selected tempo — the metronome’s bar swings al ong with the
tempo you selected, and the
black dots above the metronome
show the beat count in the measure
• the chord name (except for tunes
85 to 99, center right of the display)
Note: Each tune plays a different
preset tone for the melo dy, but you
can change to another tone even
while the tune is playing. Follow the
steps under “Selecting/Playing a
Preset Tone” on Page 15 to select a
different tone.
4. Use
MAIN VOLUME
to adjust the
overall volume as desired.
To adjust only the accompaniment
volume (except tunes 85 to 99),
press
ACCOMP VOLUME
then enter
the desired volume level using the
number keys (between
0
and 9) or
press
+
or – within 5 seconds.
5. To move to a particular section of a
tune, hold down
REW
or FF during
play. The keyboard rapidly plays the
tune either backward or forward (like
a cassette player does when you
review or cue a cassette tape).
When you hear the section you
want, release
REW
or FF to resume
normal play.
6. To change the tempo, press
TEMPO
t or s. The current tempo setting
appears.
Notes:
• To quickly slow down or s peed up
the tempo, hold down
TEMPO
t or
s.
• To reset the tempo to its default
(original) speed, press
TEMPO
s
and t at the same time.
• Tunes 85 to 99 are arranged so
the tempo changes during play.
However, if you select a tempo
other than the one you previous ly
selected, those tunes play i n the
newest tempo.
7. To temporarily stop playing the tune,
press
PLAY/PAUSE
again. To stop
the tune completely, press
STOP
.
42-403 8.fm Page 13 Thursday, August 12, 1999 8:50 AM
Page 14
14
Playing Along with a
Prerecorded Tune
Follow these steps to have the keyboard
not play the melody of a prerecorded
tune, so you can!
Note:
You can find the scores for most
of the prerecorded tunes in the
Sheet
Music and Play Guide for the Prerecorded Tunes
, supplied with your Concert-
mate 980.
1. Select and enter the tune you want
to pla y.
2. Press
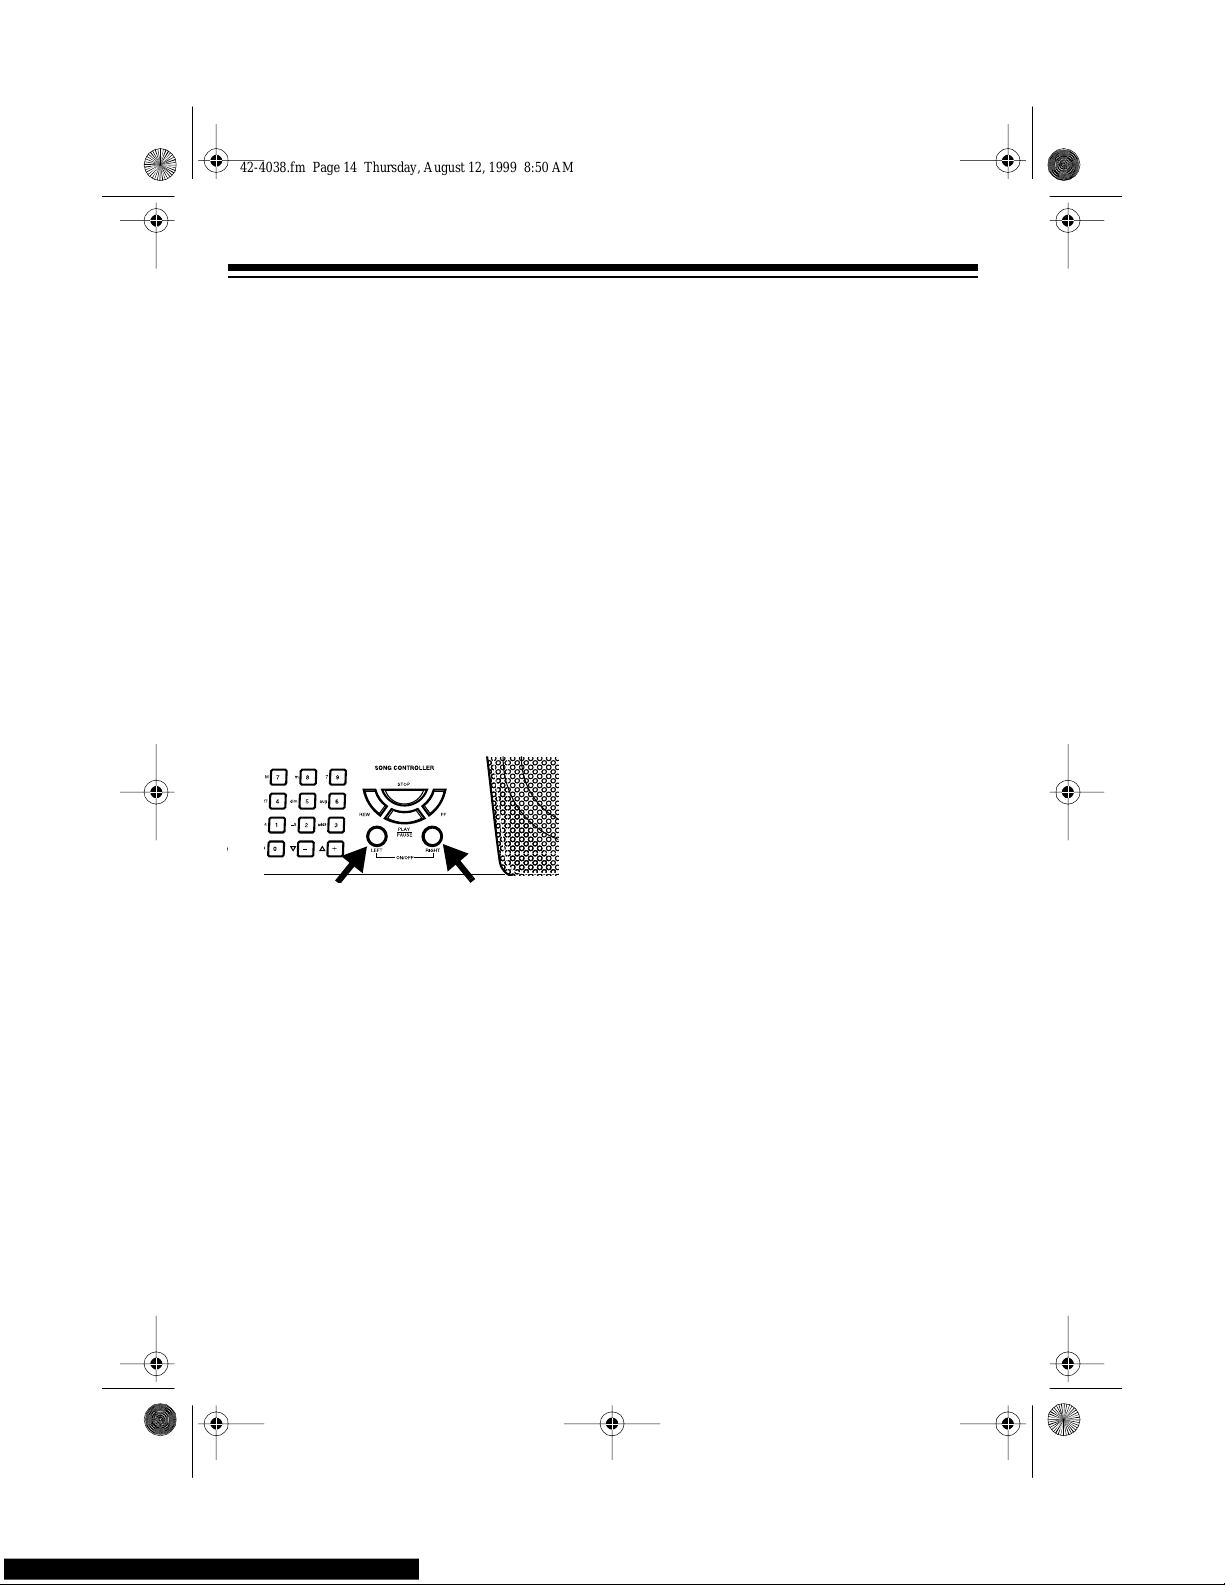
ON/OFF RIGHT
to turn off the
melody. Press
ON/OFF LEFT
to tu rn
off the accompaniment.
Notes:
• Tunes 85 to 99 are piano solo
tunes. You can turn off either the
right-hand or left-hand portion,
but not both.
• If you select tunes 00 through 84
and turn off both t he melody and
accompaniment, the keyboard
plays an obliggato accompaniment (a simple background
accompaniment).
3. Press
PLAY/PAUSE
to start play.
4. Adjust the tempo and volume as
desired.
5. Play along with the tune on the keyboard.
Note:
You can turn the melody on or
off by repeating Step 2 even while
the current tune is playing.
6. To temporarily stop playing the tune,
press
PLAY/PAUSE
again. To stop
the tune completely, press
STOP
.
Turning Applause Off/On
When you turn o ff either the melody or
accompaniment and then play a tune,
applause automatically sounds at the
end of the tune. To turn off the applause,
hold down
STOP
and press either
ON/
OFF LEF T
or
ON/OFF RIGHT
.
Apls=Off
appears. To turn the appl aus e on agai n,
press the same bu ttons.
Apls=On
ap-
pears.
Consecutively Playing Back
the Tunes
Normally, the tune you selected plays
continuously until you press
STOP
. To
play all 100 prerecorded tunes cons ecutively, press either
TONE
or
RHYTHM
,
then press
PLAY/PAUSE
. The keyboard
plays the tunes in sequence starting with
Tune 00.
To stop consecutive playback, press
STOP
or
START/STOP
.
42-403 8.fm Page 14 Thursday, August 12, 1999 8:50 AM
Page 15
15
USING THE PRESET
TONES
Your keyboard can sound like 100 different musical instruments or sound effects. The name and two-digit number
for each preset tone i s listed on the 100
TONES list on the keyboard’s top panel.
Notes:
• The keyboard has 12-note (maximum) polyphonic sound. This
means that you can play up to 12
different notes at the same time with
most of the keyboard’s preset tones.
Some of the keyboard’s preset
tones, however, are capable of only
6-note polyphony.
• Most tones on this keyboard have
been recorded an d processed using
a technique called d igital sampling.
To e nsure a high level of tonal quality, samples are taken in the low,
mid, and high ranges a nd are then
combined to sound amazing ly close
to the originals. You might notice
very slig ht differences in v olume or
sound quality for som e tones when
you play them at different positions
on the keyboard. This is an unavoidable result of multiple sampling and
is not a malfunction.
• Some sound effect tones, such as
PERCUSSION (No. 99), do not fol-
low the musical scale when played,
but change effect as you play them
in different octaves on the keyboard.
Selecting/Playing a Preset
Tone
1. Press
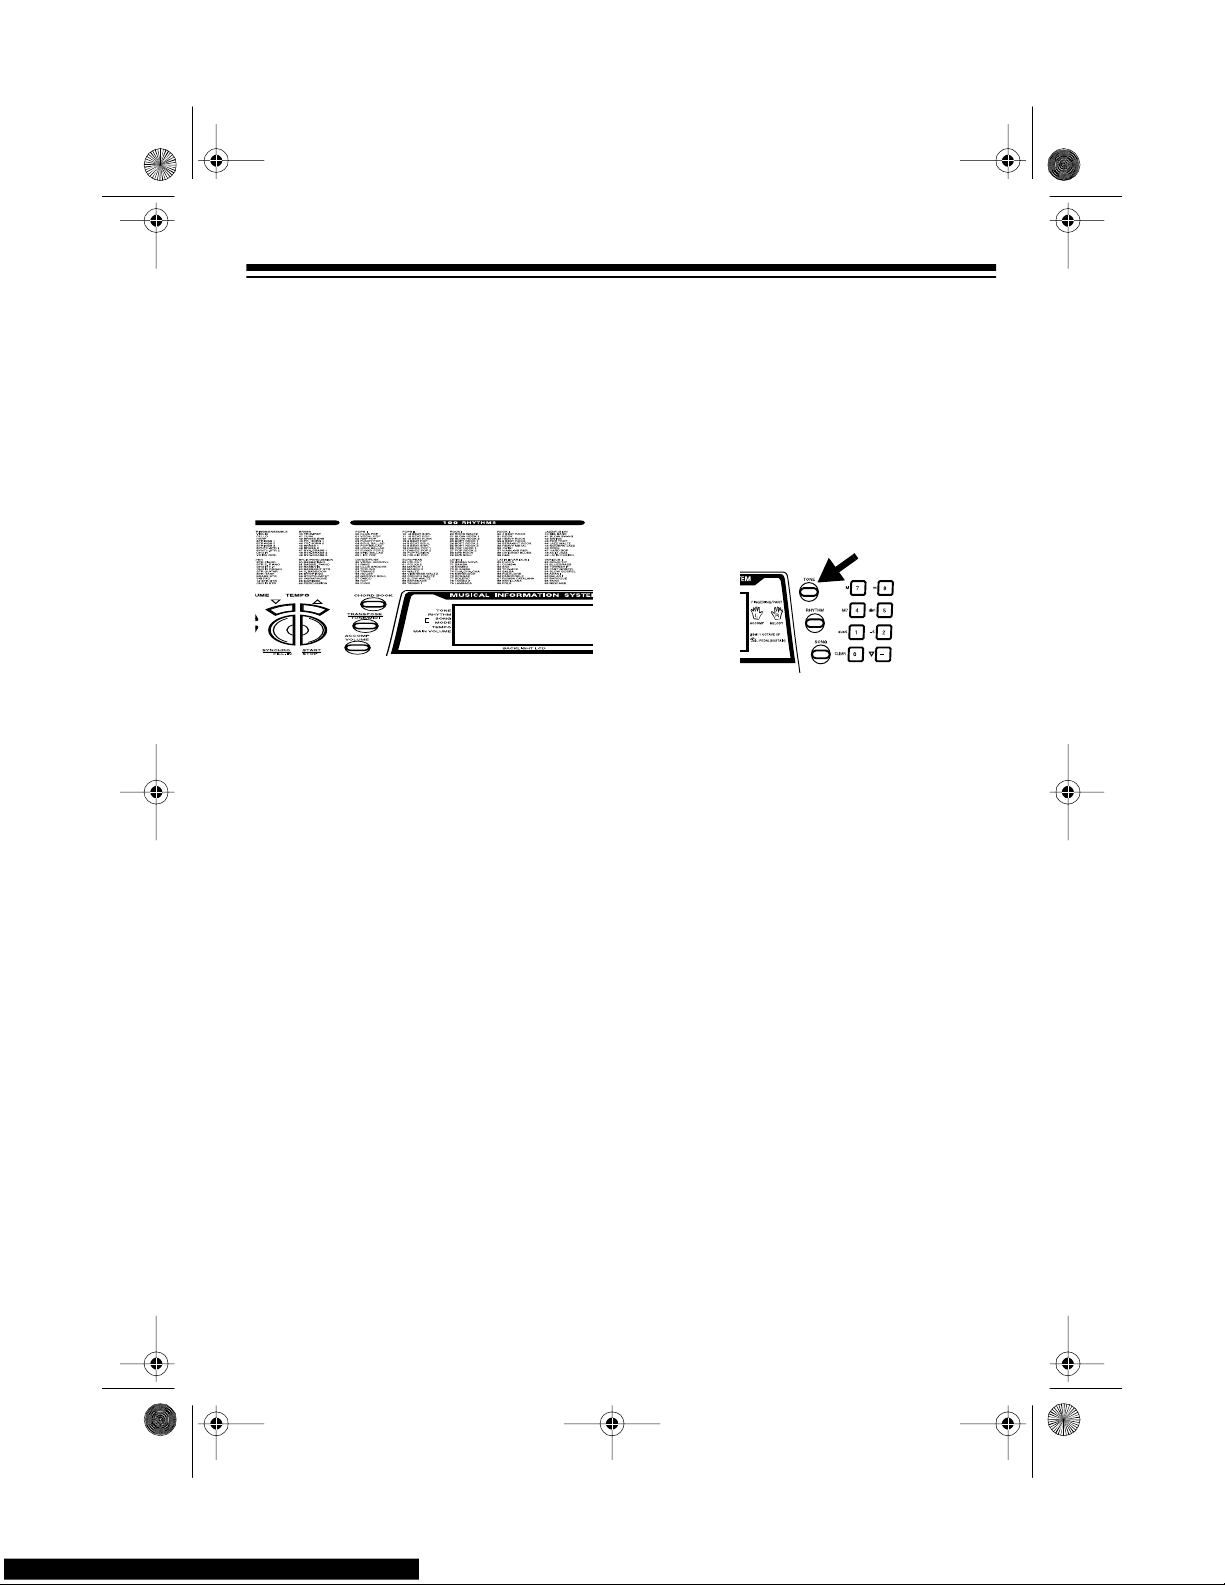
TONE
.
TONE
and the current
tone’s number appears.
Note:
Each time you turn the keyboard on, it automatically selects the
tone PIANO 1 (No. 00).
2. To play a different tone, choose a
preset tone from the 100 TONES list
and enter its two-digit number on
the keypad. As you press the keys,
the selected digits appear.
Or, you can use
+
or – to move to
the next higher or lower numbered
tone.
Notes:
• Precede a single-digit number
with a 0. For example, to select
ELEC PIANO 1 (No. 04), press
0
4
.
• If you enter an i nc orrect f irst digi t,
press
TONE
to clear your entry,
then enter the correct digit.
3. Play the keyboard to hear the
selected tone and adjust
MAIN VOL-
UME
to the desired level.
4. To select a different tone, repeat
Steps 1 and 2.
42-403 8.fm Page 15 Thursday, August 12, 1999 8:50 AM
Page 16
16
Keyboard Split Tones
The preset tones numbered 90 through
96 on your keyboard let you automatically play two different musical instruments or sound effects independently
on opposite sides of the keyboard.
The instrument listed first in the tone’s
name plays on the left half of the keyboard (below middle C). The instrument
listed next plays on the right half of the
keyboard (above middle C). For example, BS/PNO (No. 90) plays a bass tone
on the left half of the keyboard and a piano tone on the right.
Layered Tones
The preset tones numbered 80 through
89 on your keyboard let you automatically play two different layered tones at
the same time when you press on e key.
For example, STR PNO (No. 80) plays
string and piano tones when you press a
key.
Percussion Sounds
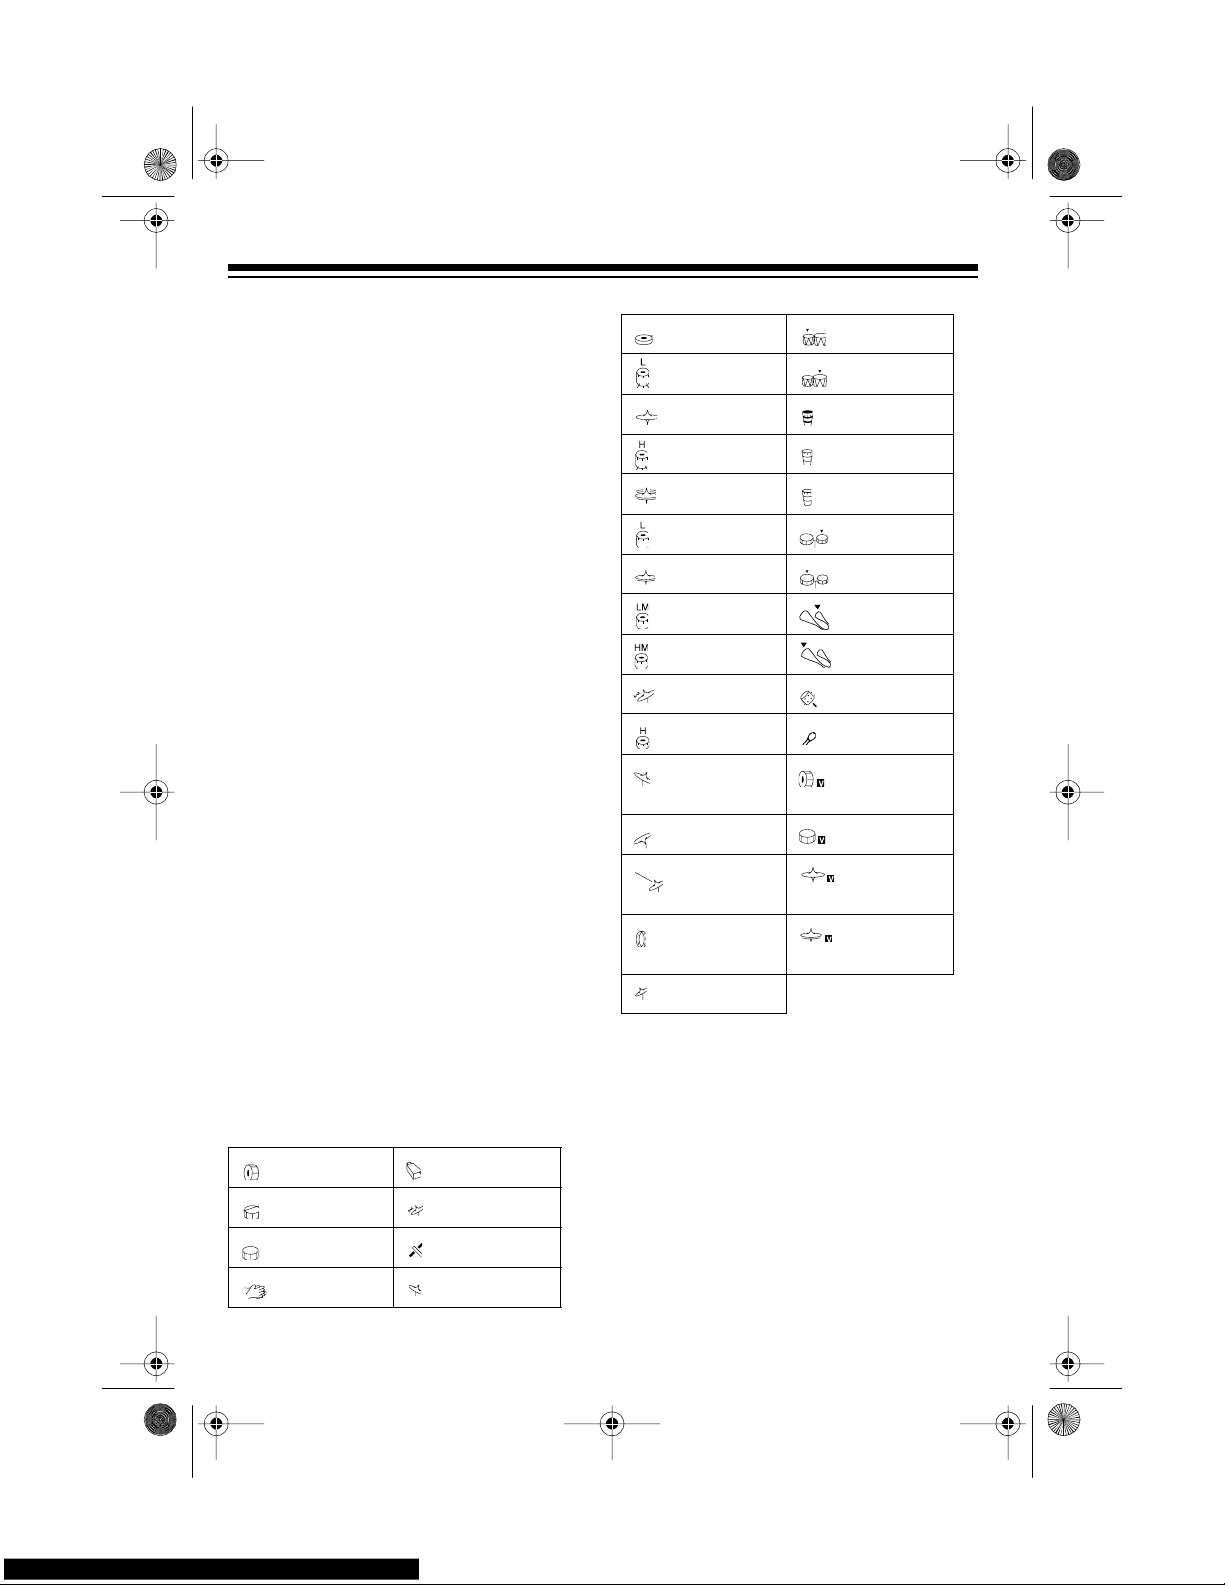
PERCUSSION (No. 99) lets you play the
35 different percussion sounds shown
here. The symbol for each sound appears above the corresponding key on
the keyboard.
Bass Drum Cowbell
Side Stick Crash Cymbal 2
Acoustic Snare Claves
Hand Clap Ride Cymbal 2
Note:
When you select the Fingered or
Concert Chord mode, the keys in the
lower 1
1
/2 octaves become the accompaniment keys and do not produce percussion sounds. See “Using Auto
Accompaniment” on Page 18.
Electric Snare High Bongo
Low Floor Tom Low Bongo
Closed Hi-Hat Mute High Conga
High Floor Tom Open H igh Conga
Pedal Hi-Hat Low Conga
Low Tom High Timbale
Open Hi-Hat Low Timbale
Low-Mi d Tom High Agogo
High-Mid Tom Low Agogo
Crash Cymbal 1 Cab asa
High Tom Maracas
Ride Cymbal 1 Voice Ba ss
Drum
Chinese Cymb al Voice Snare
Ride Bell Voice Closed
Hi-Hat
Tambourine Voice Open
Hi-Hat
Splash Cymbal
42-403 8.fm Page 16 Thursday, August 12, 1999 8:50 AM
Page 17
17
USING THE PRESET
AUTO-RHYTHMS
Your keyboard has 100 preset autorhythms that provide a steady beat for
your music. The name and two-digit
number of each preset auto-rhythm is
listed on the keyboard’s top panel.
You can play a preset auto-rhythm on
the keyboard in any of the following
ways:
• select and play a rhythm (see
“Selecting/Playing an AutoRhythm”)
• synchronize the start of a rhythm
with your music (see “Using SYNCHRO” on Page 18)
• briefly vary the pattern of a rhythm
(see “Using FILL-IN” on Page 18)
Selecting/Playin g
an Auto-Rhythm
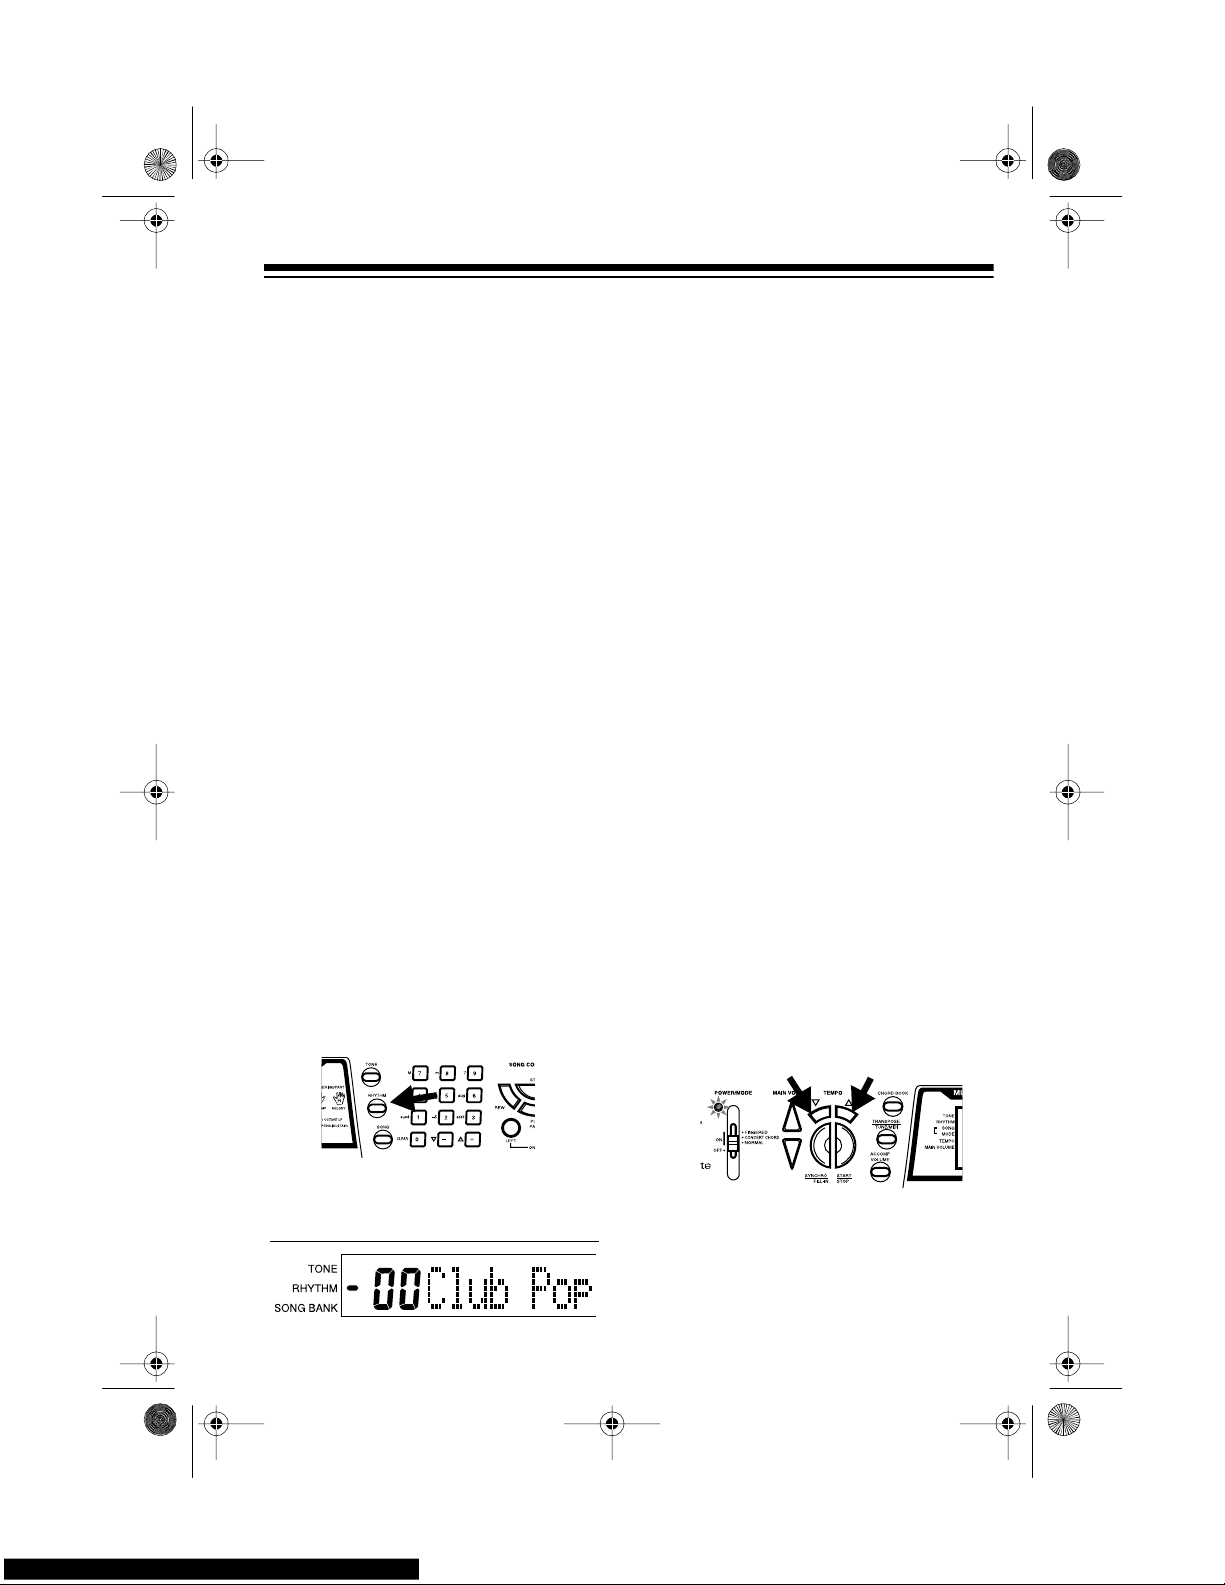
1. Press
RHYTHM
. An indicator
appears to the right of
RHYTHM
and the number of the current
auto-rhythm appears.
Note:
Each time you turn on the
keyboard, it automatically selects
the rhythm Club Pop (No. 00).
2. To select a different rhythm,
choose an auto-rhythm from the
100 RHYTHMS list and enter its
two-digit number on the keypad.
Or, repeatedly press
+
or – to
move to the next higher or lower
numbered rhythm.
Notes
:
• Precede a single-digit number
with a 0. For example, press
0 5
to select POP BALLAD (No. 05).
• If you incorrectly enter the first
digit of the rhythm, press
RHYTHM
to clear the entry a nd
return to the last selected autorhythm.
3. Press
START/STOP
to start the
selected auto-rhythm.
4. Adjust
MAIN VOLUME
and
ACCOMP VOLUME
to the desired
level (see “Adjusting the Accompaniment Volume” on Page 19).
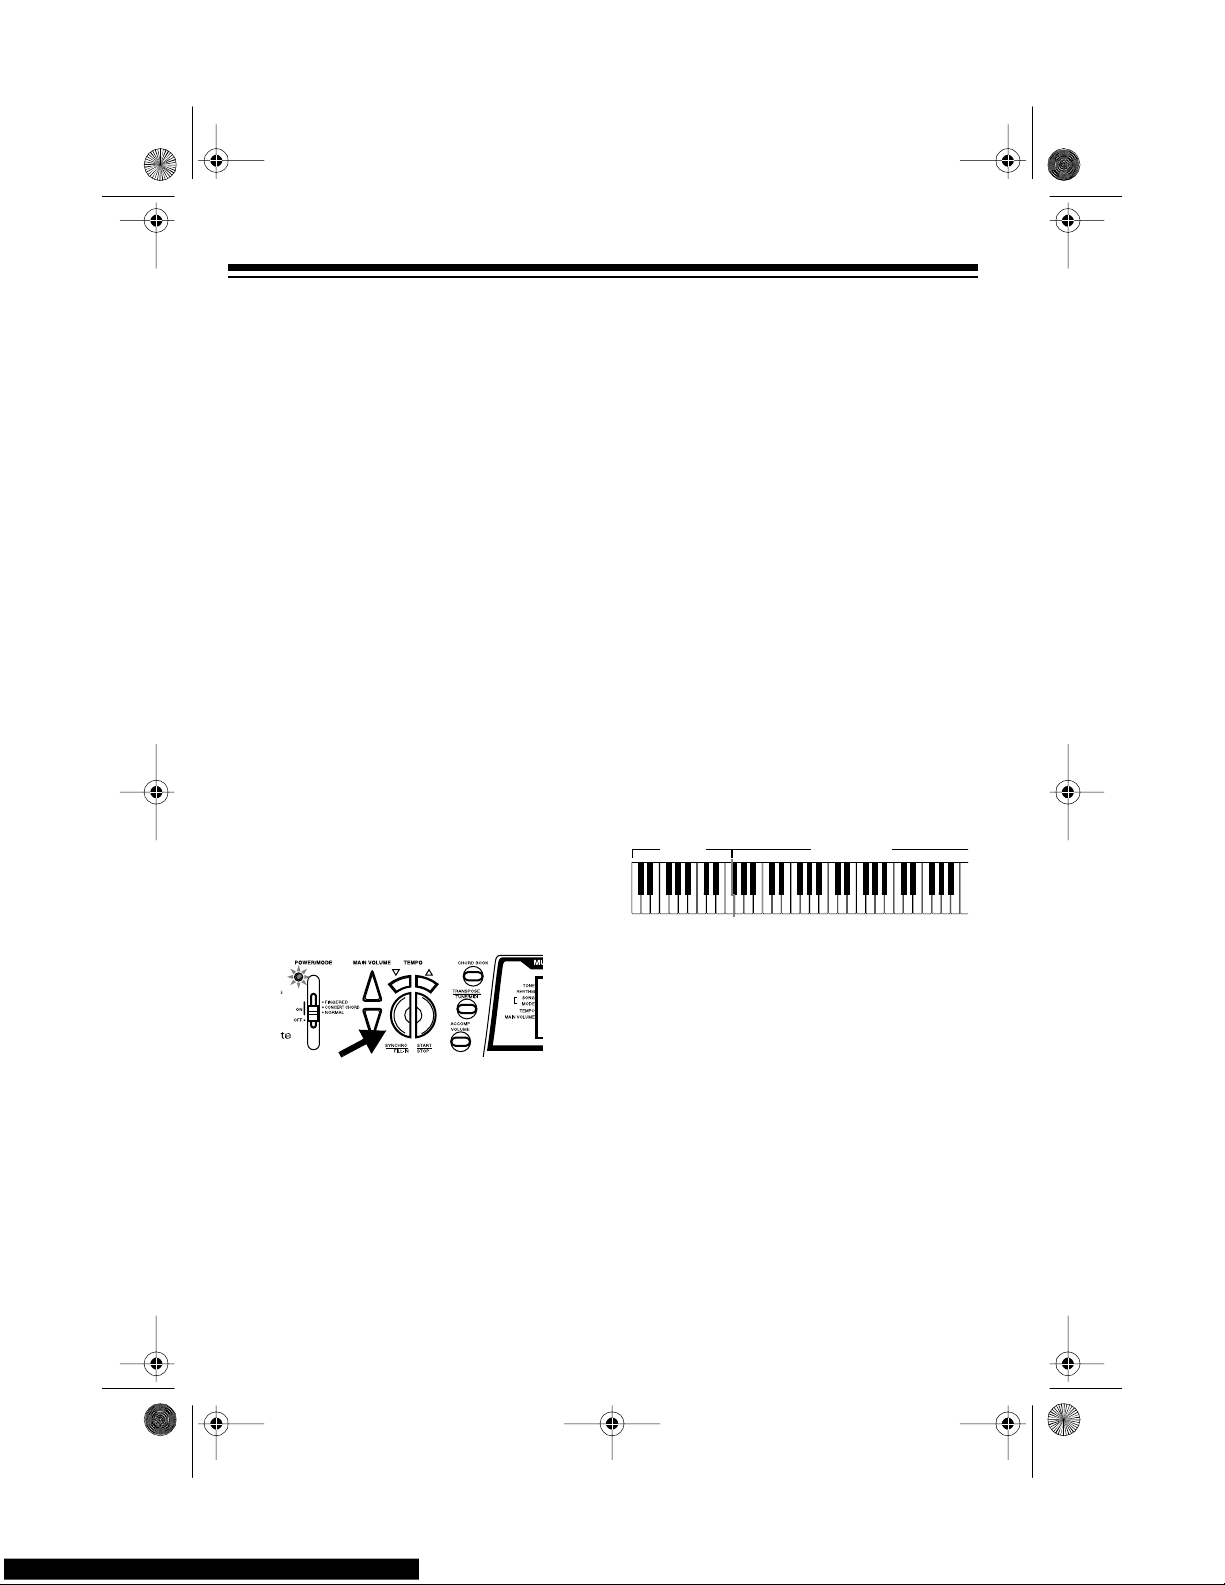
5. To change the auto-rhythm speed,
press
TEMPO
t or s. The current
tempo setting appears.
Notes
:
• You can adjust the tempo
to
play an auto-rhythm from 2 0 to
255 beats per minute.
42-403 8.fm Page 17 Thursday, August 12, 1999 8:50 AM
Page 18
18
• To quickly slow down or s peed up
the tempo, hold down
TEMPO
t or
s.
• To reset the tempo to its default
(original) speed, press
TEMPO
s
and t at the same time.
6. Play the keyboard along with the
auto-rhythm.
7. To select a di fferent rhythm, repeat
Steps 1 and 2.
8. To stop the auto-rhythm, press
START/STOP
again.
Using SYNCHRO
This feature lets you synchronize the
start of an auto-rhythm with the beginning of your music.
After you select and enter an autorhythm, press
SYNCHRO/FILL-IN
. The
bars of the metronom e flash on the display to show the keyboard is in a st andby mode.
Begin playing the keyboard. The keyboard automatically begins to play the
rhythm when you press any key within
the f irst 1
1
/2 octaves of the lower end of
the keyboard (the first 18 keys from the
left side of the keyboard).
Using FILL-IN
This feature lets you in se rt a s hort (1- to
2-measure) variation in the be at pattern
of a selected auto-rhythm.
Simply press and release
SYNCHRO/
FILL-IN
while the auto-rhythm is playing.
The keyboard inserts a 1- to 2-measure
variation, then the original rhythm automatically resumes at the end of the current measure.
USING AUTO
ACCOMPANIMENT
The 18 keys on the left side of the keyboard with note labels above them are
called
accompaniment keys
.
You can set the keyboard to play two different types of auto accompa niment using the accompaniment keys.
•
Concert Chord
— lets you play
chords on the accompaniment keys
using chord formations of from one
to four notes. The number of keys
you press determines the type of
chord that plays (see “Concert
Chord” on Page 19).
•
Standard Fingering
— lets you play
chords on the accompaniment keys
using standard chord formations of
three or four notes (see “Standard
Fingering” on Page 20).
Accompaniment
Ke
y
board
Melod
yKey
board
42-403 8.fm Page 18 Thursday, August 12, 1999 8:50 AM
Page 19
19
Notes:
• You can use the keyboard’s rhythm
controls (
FILL-IN
and
SYNCHRO
)
with both types o f auto accompaniment.
• After you press the auto accompaniment keys, the keyboard plays the
same chord until you press other
keys to play a different chord or
press
START/STOP
.
Adjusting the Accompaniment
Volume
The Concertmate 980 lets you adjust the
volume of your accompaniment separately from the overall volume of the keyboard.
1. Press
ACCOMP VOLUME
. The current accompanimen t volume setting
appears on the display next to
Acomp Vol
.
2. Within 5 seconds, enter a number
from 0 (no sound) to 9 (loude st) on
the keypad. The number appears on
the display as you press the key.
Or, press
–
or + to select the next
lowest or highest accompaniment
volume setting.
To reset the accom paniment volume to
its de fa ult val ue o f 7, pres s
–
and + at th e
same time.
Note: You can adjust the accompani-
ment volume separately for your keyboard play and prerecorded tune
playback.
Concert Chord
The concert chord method lets beginning keyboard players easily select and
play a chord.
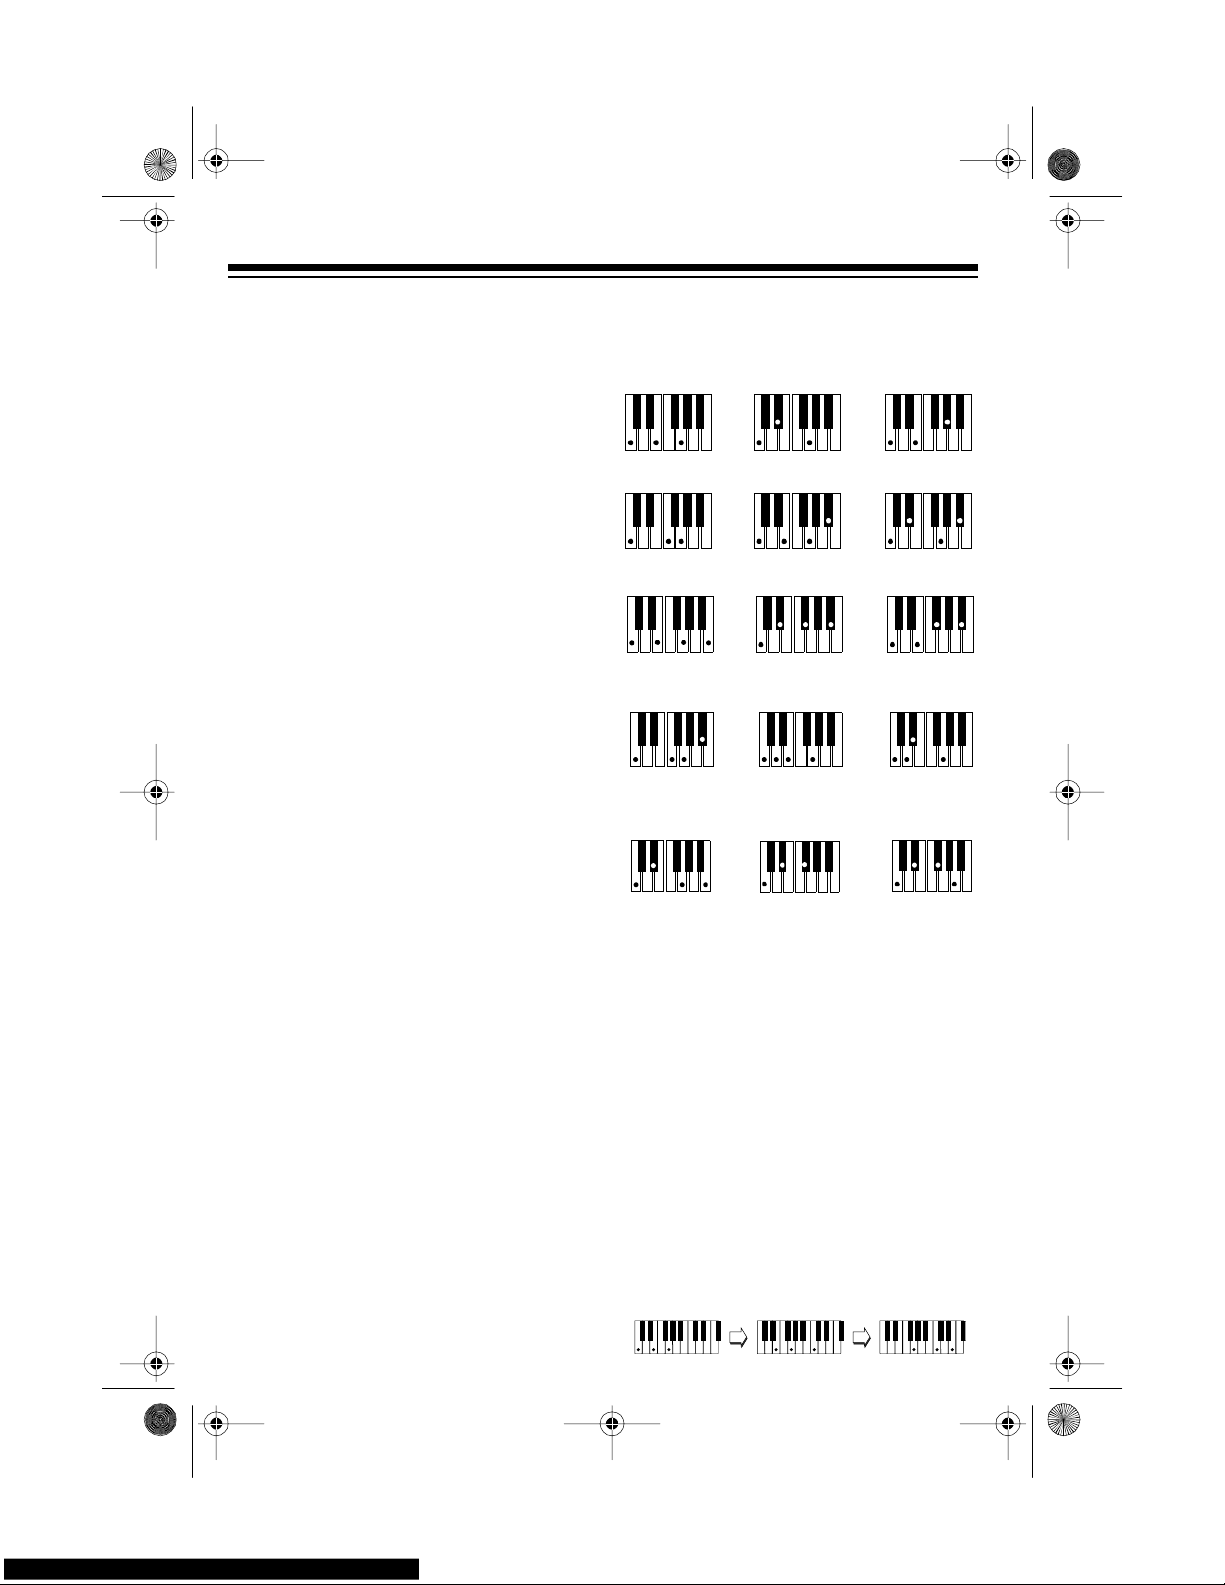
The number of accompaniment keys
you press determines the t ype of chord
that plays. This chart shows the chord
type that plays when you press one,
two, three, or four acc ompaniment keys
at the same time.
The lowest note you play determines the
key of the chord. For example, if the lowest note is C, the keyboard plays a C
chord.
Note: You can press
any
labeled note(s)
to the right of the lowest note in the
chord to produce a minor, a dominant
seventh, or minor seventh chord.
Number of Keys
Pressed
Chord Type
Major
Minor (m)
Dominant
Seventh (7)
Minor
Seventh
(m7)
C DEFGABCDEF
C DEFGABCDEF
C DEFGABCDEF
C DEFGABCDEF
42-403 8.fm Page 19 Thursday, August 12, 1999 8:50 AM
Page 20
20
Follow these steps to start concert chord
auto accompaniment.
1. Set
POWER/MODE
to
CONCERT
CHORD
.
2. Enter a two-digit auto-rhythm number.
3. To start the auto-rhythm before the
auto accompaniment, press
START/
STOP
.
Or, to synchronize the start of the
selected auto-rhythm with your
accompaniment, press
SYNCHRO/
FILL-IN
.
4. Begin the accompaniment at the
desired interval by pressing the
desired accompaniment key(s).
To play a melody along with the
accompaniment, press any key(s) to
the right of the accompaniment
keys.
5. Adjust the tempo,
MAIN VOLUME
,
and
ACCOMP VOLUME
to the de-
sired levels.
6. To change cho rds without interrupting the rhythm, simply press the
auto accompaniment key(s) required to form the new chord.
7. To stop auto accompaniment and
the auto-rhythm, press
ST ART/STOP
.
Standard Fingering
The standard fingering method uses
standard formations of three or four
notes, and lets the experienced musician play a wider variety of accompaniment chords.
This chart shows the 15 chord types you
can play on your keyboard by using
standard fingering.
Notes:
• You do not have to press the key
marked with parentheses on the
keyboard in the preceding chart to
produce a 7, m7, M7, mM7, 9, or m9
chord.
• This chart shows only one possible
fingering position for each chord. It
is possible to play a chord using
several different positions. For example, the following three fingering
positions produce the same C
chord.
() ()
Major (M) Minor (m) Augmented
(aug)
Suspended
4th (SUS4)
Dominant
7th (7)
Minor 7th
(m7)
Major 7th
(M7)
Minor HalfDiminished
(m7-5)
()
Major Half-
Diminished
(7-5)
Dominant
Suspended
4th (7sus4)
Major 9th
(add9)
()
()
Minor 9th
(madd9)
()
Minor/Maj or
7th (mM7)
Diminished Diminished
7th (dim7)
42-403 8.fm Page 20 Thursday, August 12, 1999 8:50 AM
Page 21
21
• When you play an aug, 7
–
5
, or dim7
chord, the lowest note you play
determines the root of the chord. Be
sure that your fingering correctly
defines the root you want.
Note: See “Standard Fingering Chord
Charts” on Page 31 for a list of all the
chords you can play on your keyboard
using standard fingering accompaniment.
Follow these steps to s tart standard fingering auto accompaniment.
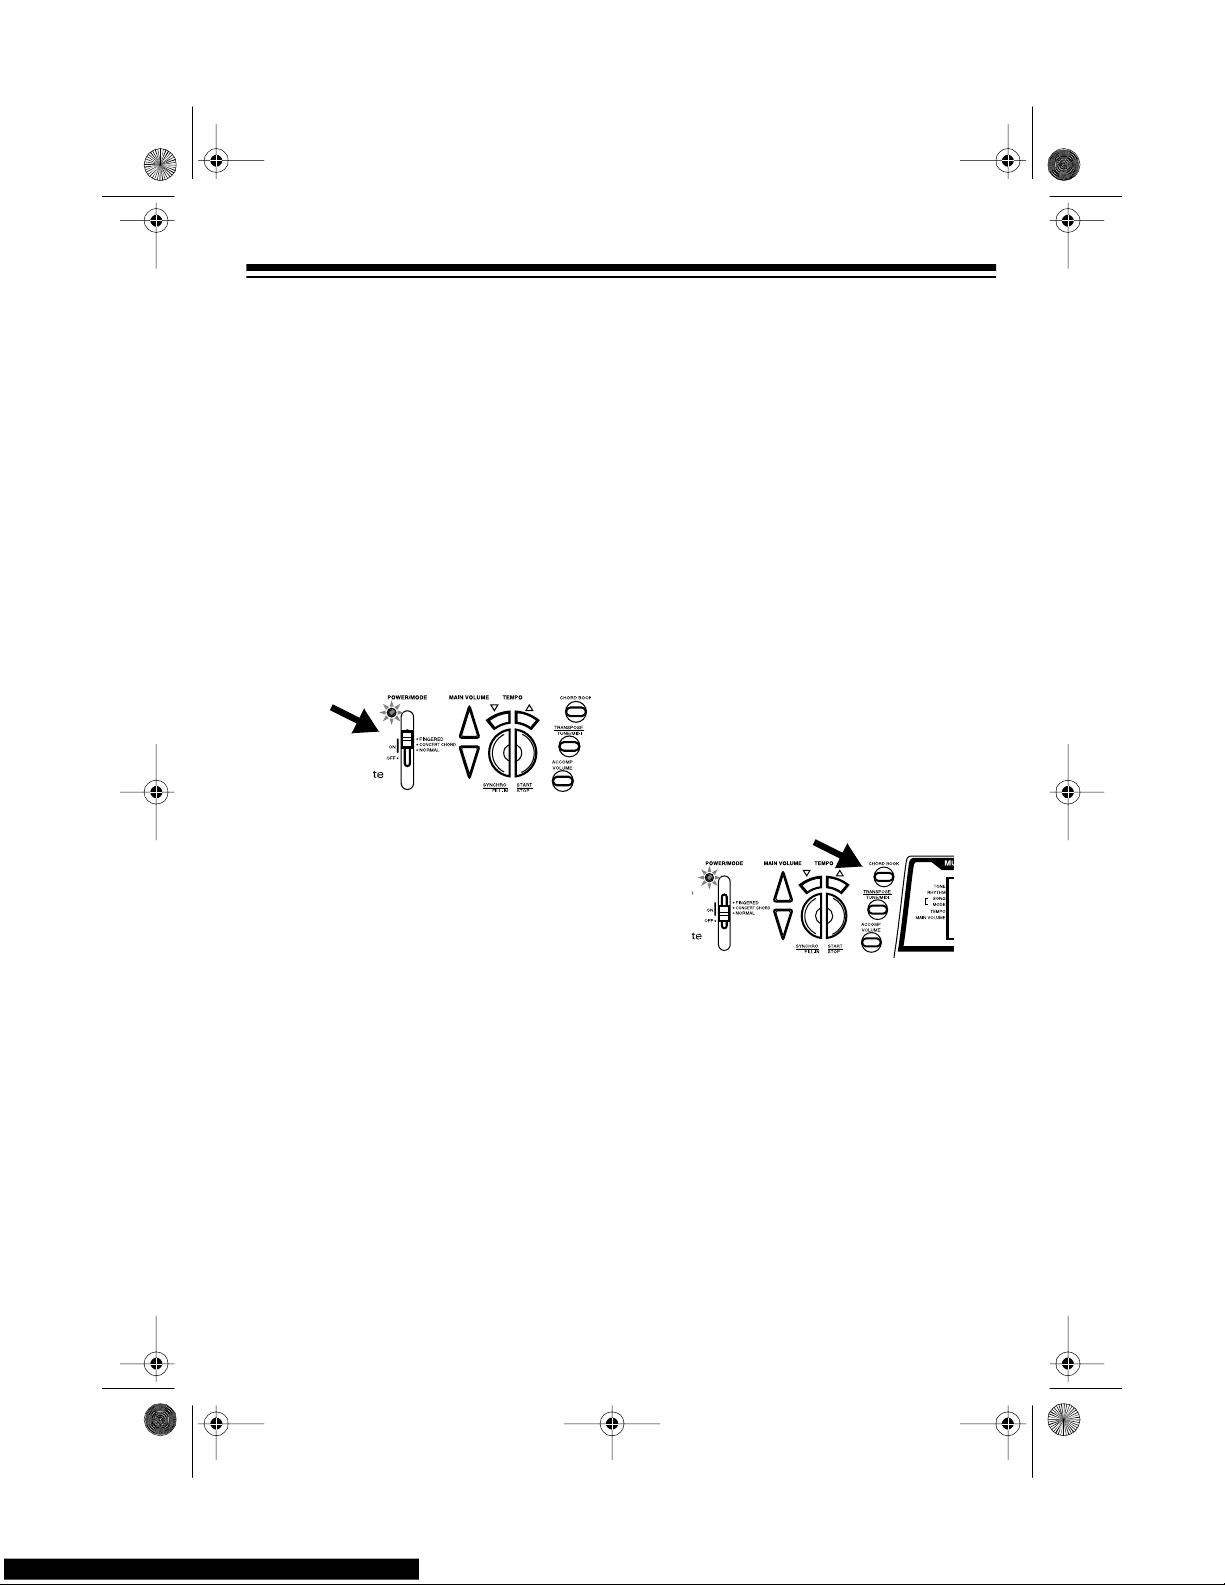
1. Set
POWER/MODE
to
FINGERED
.
2. Select and enter an auto-rhythm.
3. To start the aut o-rhythm before your
auto accompaniment, press
START/
STOP
.
Or, to synchronize the start of the
selected auto-rhythm with your
accompaniment, press
SYNCHRO/
FILL-IN
.
4. Begin the accompaniment at the
desired interval by pressing at least
three accompaniment keys to play
the desired chord.
To play a melody along with the
accompaniment, press any key(s) to
the right of the accompaniment
keys.
5. Adjust the tempo,
MAIN VOLUME
,
and
ACCOMP VOLUME
to the de-
sired levels.
6. To change chords wi thout interrupting the rhythm, simply press the
auto accompaniment keys required
to form the new chord.
7. To stop auto accompaniment and
the auto-rhythm, press
START/STOP
.
USING THE CHORD BOOK
You can use your keyboard’s chord
book display feature to see which keys
to press and which fingers to use to form
a chord. You can also display the name
of a chord you play.
Follow these steps to use the chord
book feature.
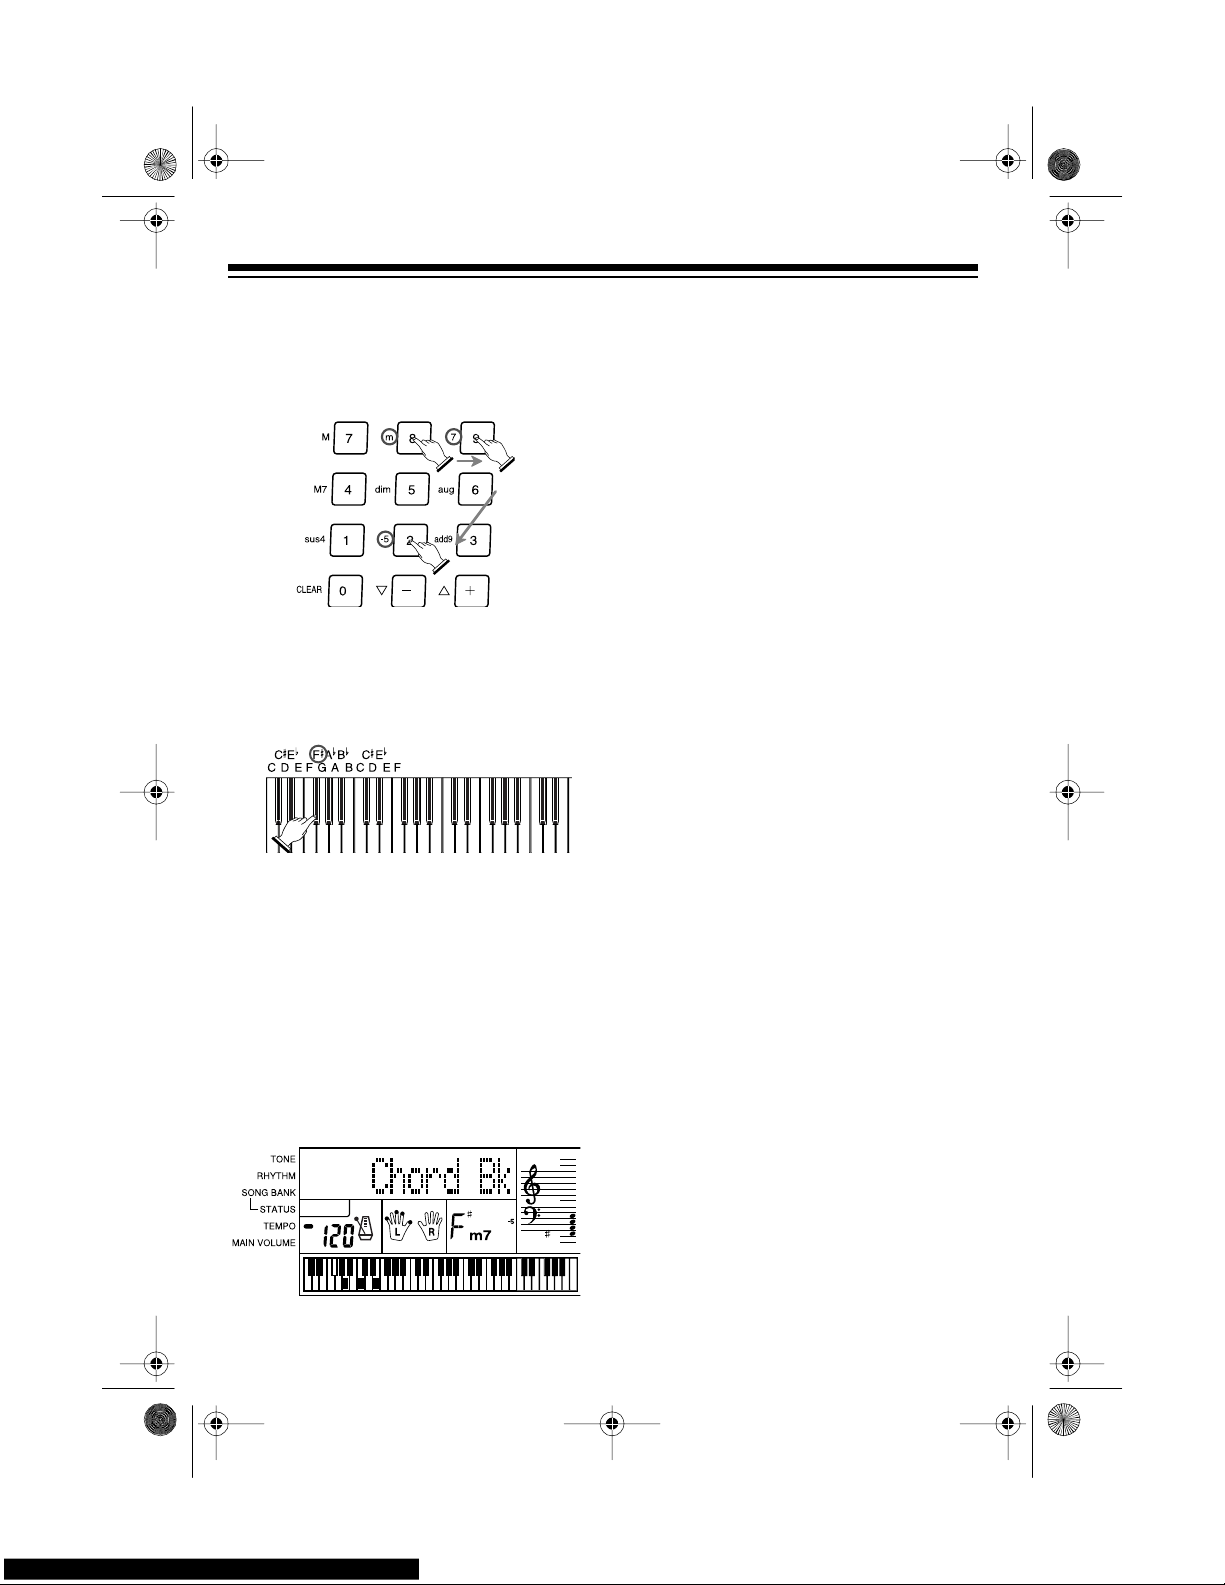
1. Set
POWER/MODE
to
NORMAL
or
CONCERT CHORD
, then press
CHORD BOOK
.
2. Press
CLEAR (0
) to clear any previ-
ous chord entry.
3. If you want to see information about
a major chord while you play it, skip
to Step 4. Otherwise (if the desired
chord name is a minor chord), enter
the chord’s name using that chord’s
keys on the numeric keypad.
42-403 8.fm Page 21 Thursday, August 12, 1999 8:50 AM
Page 22
22
For example, to enter a mi no r 7
–
5
chord, press m (8) 7 (9)
–5 (2
) as
shown below. Or, to enter 7sus4,
press
7 (9
) and
sus4 (1
).
4. Press the root key on the acc ompaniment keyboard to pl ay the chord.
For example, to play an F# chord,
press the F# key as shown here.
As the chord plays, the display
shows:
• the chord you entered
• the keys to press to form the chord
(on the bottom “keyboard”)
• the fingers you need to use to play
the chord (on the center “hands”)
• the notes that make up the chord
(on the staff display)
5. Use
–
or + to scroll through the
chords associated with the root
chord you entered in Step 3. Or,
press a different root key to see the
chords based on that key.
Notes:
• If the chord is not recognized by
the keyboard, only a dash appears on the display.
• Since the keyboa rd automatically
changes some chords so y ou can
play them on the accompani ment
keyboard, the keyboard might display some chords in inverted
form.
6. Using the center “hands” as a guide,
play the displayed chord on the keyboard.
7. When you have finished, press
CHORD BOOK
to turn off chord
book.
42-403 8.fm Page 22 Thursday, August 12, 1999 8:50 AM
Page 23
23
SPECIAL FEATURES
CHANGING KEYS
The keyboard autom atically selects the
key of middle C each time you turn it on.
For added flexibility as you play, the
keyboard lets you change (transpose)
the musical key in which it plays.
Note:
You cannot change the key while
a prerecorded tune is sele cted or playing.
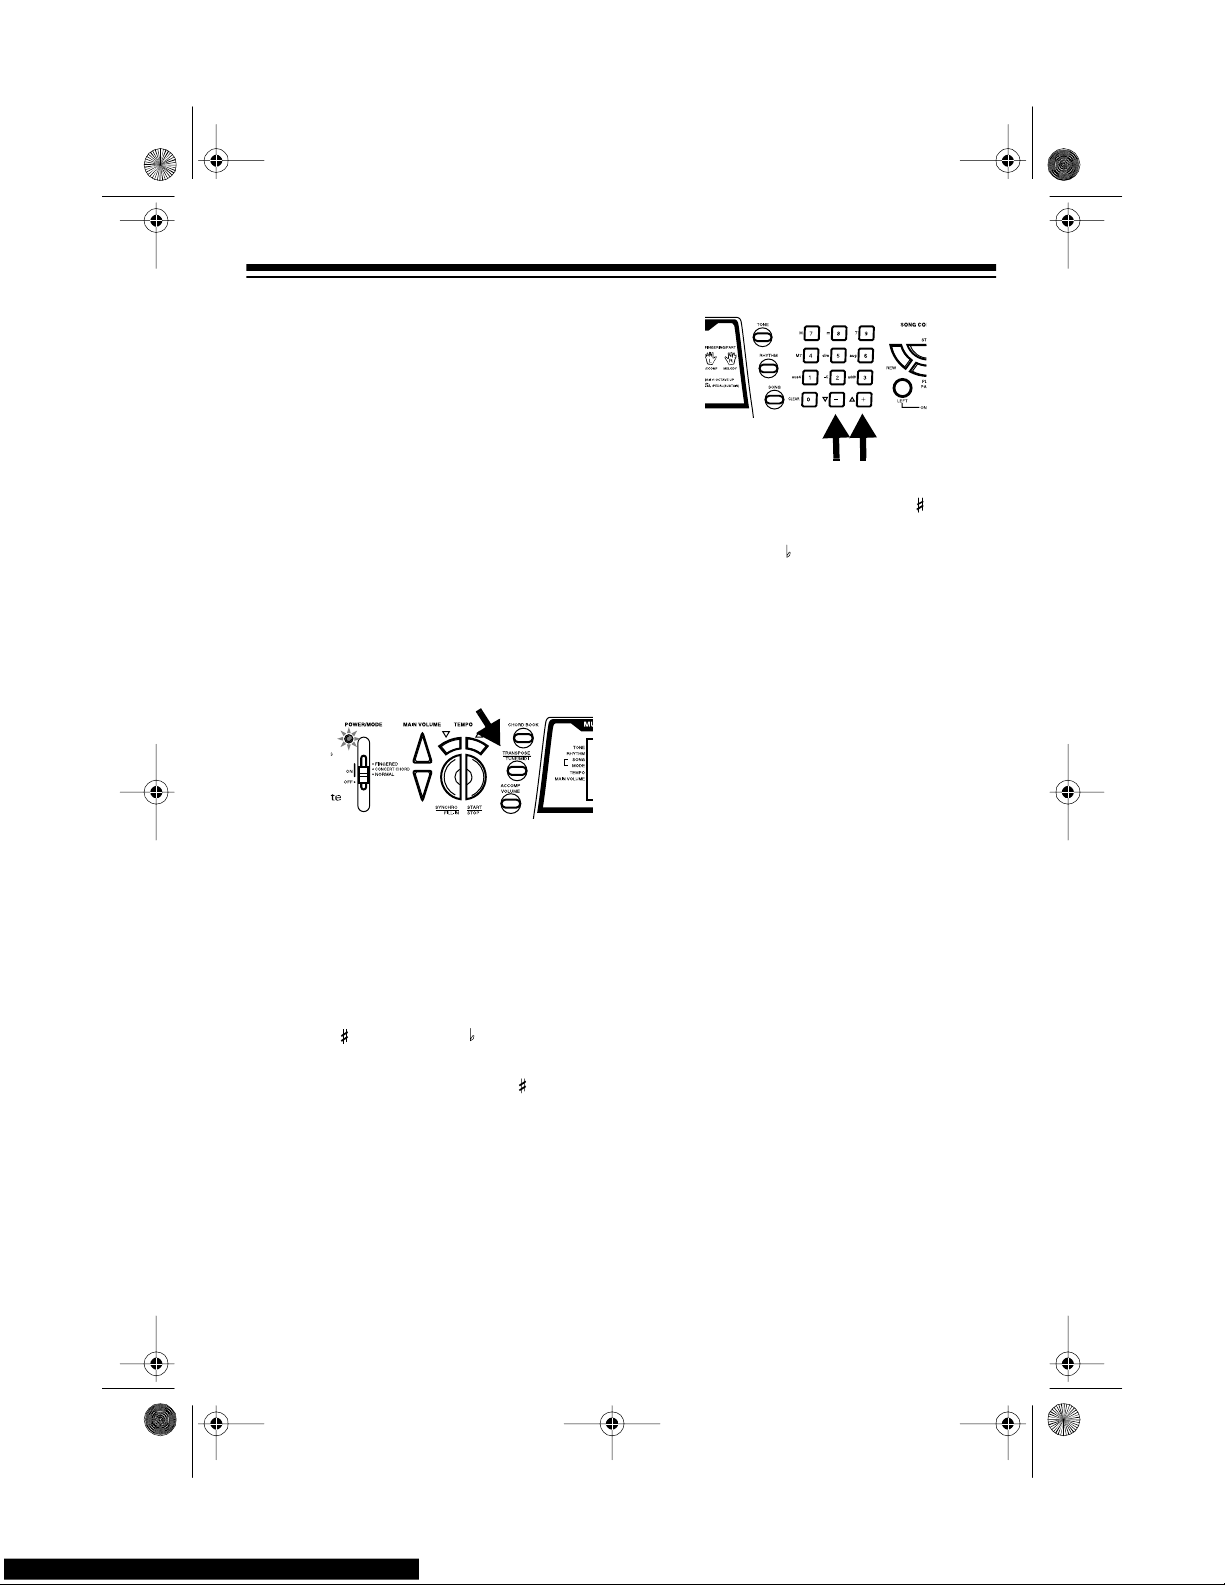
1. Repeatedly press
TRANSPOSE/
TUNE/MIDI
until
Trans
and the cur-
rent key setting appear
.
Note:
The number on the display is
the number of “semitones” t o which
the keyboard is set, compared to its
default key. A semitone is a measurement that represents the acoustical interval between the tones of
any two keys on the keyboard. For
example, the difference between C
and C or B and B is one semitone. You can transpose the key
down 6 semitones (to an F ) and up
5 semitones (to an F) — a full
octave.
2. Within 5 seconds, press
–
or + to
lower or raise the key. Each time
you press
–
or +, the number on the
display decreases or increases by 1
(semitone).
As you raise the key ,
1
is C , 2 is D,
and so on. As you lower the key, –
1
is B, –2 is B , –3 is A, and so on.
Notes
:
• You can also use the number keypad to quickly raise the key. Simply
press the semitone change v alue (1
to 5).
• The keyboard automatically resets
the key to the default value of 0
(middle C) each time you play a prerecorded tune.
• Each preset tone plays within a
specified range. If a key change
causes a note to exceed its range,
the same note sounds in the nearest
octave.
• When you select preset tones 90
through 96 after changing the key,
the keyboard split point changes
accordingly (see “Keyboard Split
Tones” on Page 16).
• Changing the key does not affect
the PERCUSSION (No. 99) preset
tone.
42-403 8.fm Page 23 Thursday, August 12, 1999 8:50 AM
Page 24
24
TUNING THE KEYBOARD
Although your keyboard never goes out
of tune, it does let you adjus t its pitch to
match other instruments or musical recordings.
Note:
You cannot tune the keyboard
while a prerecorded tune is displayed or
playing.
Follow these steps to tune the keyboard.
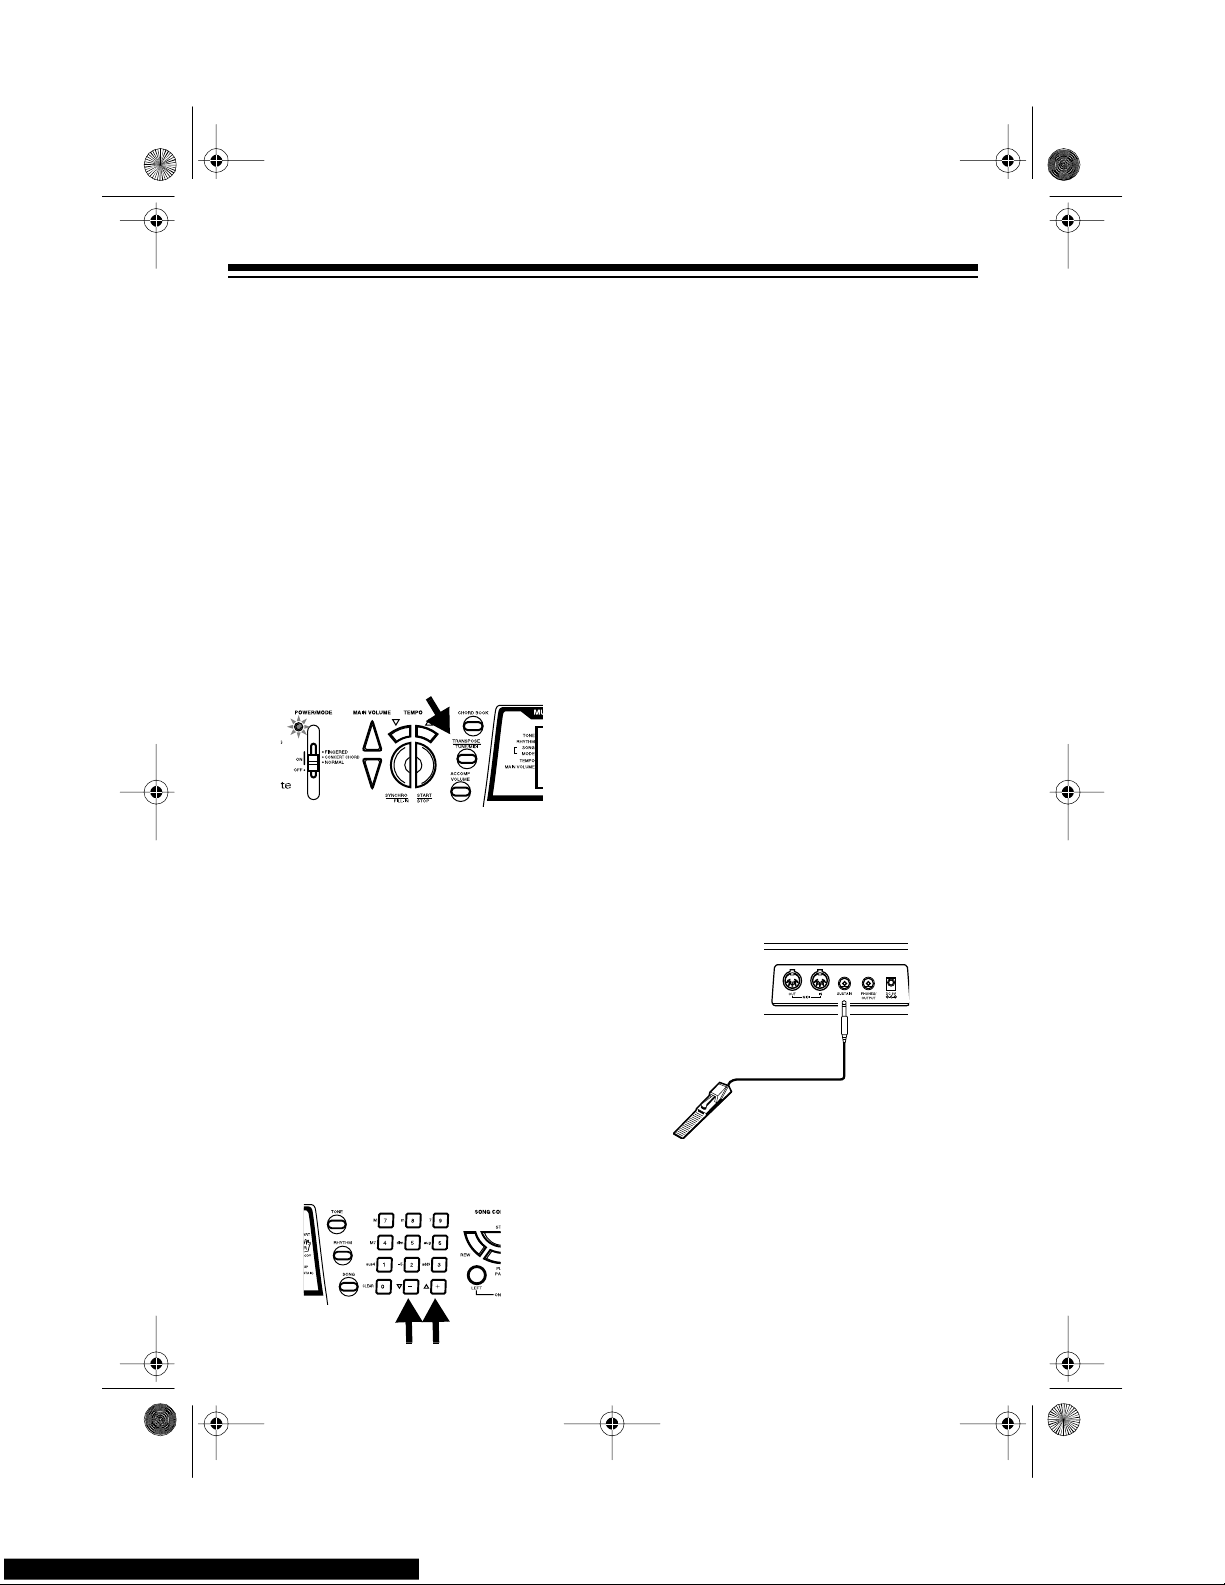
1. Repeatedly press
TRANSPOSE/
TUNE/MIDI
until the display shows
Tune
and the current pitch setting.
Note:
The number on t he display is
the number of “cents” to which the
keyboard is currently tuned, compared to its default pitch. A cent is
the measurement that represents
the acoustical interval between two
tones. 1200 cents equal 1 octave.
You can tune the k eyboard to within
50 cents (101 levels) of its default
pitch.
2. Within 5 seconds, repeatedly press
–
or + to lower or raise the keyboard’s pitch. Each time you press
the key, the number on the display
decreases or increases by 1 (cent).
Notes:
• You c an use the number keypad to
raise the pitch by entering the cent
change value.
• The keyboard automatically resets
the tuning pitch to the d efault value
of 00 (cents) each time y ou turn off
the keyboard or play the prerecorded tunes.
USING A SUSTAIN PEDAL
For added flexib ility and control as you
make music, you can connect an optional sustain pedal (not supplied), such as
RSU No. 10288520 (available through
your local RadioShack store). A sustain
pedal lets you sustain the keyboard’s
sound.
To connect a sustain pedal to your Concertmate 980, insert the plug on the pedal’s c ord into
SUSTAIN
on the back of the
keyboard.
42-403 8.fm Page 24 Thursday, August 12, 1999 8:50 AM
Page 25
25
USING MIDI
Your Concertmate 980 includes a feature called MIDI (Musical Instrument
Digital Interface). MIDI is the universal
standard for sending and receiving performance data between all types of electronic musical inst ruments, regardless of
the manufacturer.
Using MIDI, you can play music on yo ur
Concertmate 980 and another instrument at the same time while pressing
the keys on only one, record your music
to a sequencer, acquire a wider selection of preset tones from a sound module, and much more.
ABOUT MIDI
Every MIDI-equipped instrument has
MIDI OUT and IN terminals, and some
also have a MIDI THRU terminal. Each
of these terminals serves a different purpose.
MIDI OUT sends MIDI data to (“talks
to”) the other MIDI instrument(s).
MIDI IN receives (“listens to”) MIDI data
sent by the other MIDI instrument(s).
MIDI THRU lets you connect (“network”)
additional MIDI instruments, and sends
along to other MIDI devices a copy of all
data it receives through its MIDI IN terminal.
Your Concertmate 980 has
MIDI OUT
and
MIDI IN
termi n als.
The cable that connects MIDI devices
does not actually carry sound between
them, like a speaker wire carries sound
from a receiver to a speaker. Instead,
MIDI-equipped devices communicate
with each other using dig ital codes (instructions). One MIDI device sends digital instructions representing exactly
what is being played on it. The other
MIDI device receives and translates
those instructions, then produces (or
records) the sound exactly as it was
played on the first device.
Note:
Connecting your keyboard to another MIDI device requires a MID I cable
(not supplied). See “Making the MIDI
Connections.”
MAKING THE MIDI
CONNECTIONS
To connect your Concertmate 980 to another MIDI-equipped device, you must
use a MIDI cable, such as RSU Cat. No.
42-2468 or 26-0379.
Cautions:
• Always turn off power to your Concertmate 980 and the other MIDI device before you connect or disconnect MIDI cables.
• As you make the cable connections,
be sure to align the MIDI cable pins
with the matching holes on your
keyboard’s
MIDI OUT
and
MIDI IN
terminals. If you have trouble p lugging
in the cable, do not force it! You
might damage the plug or the instrument.
42-403 8.fm Page 25 Thursday, August 12, 1999 8:50 AM
Page 26
26
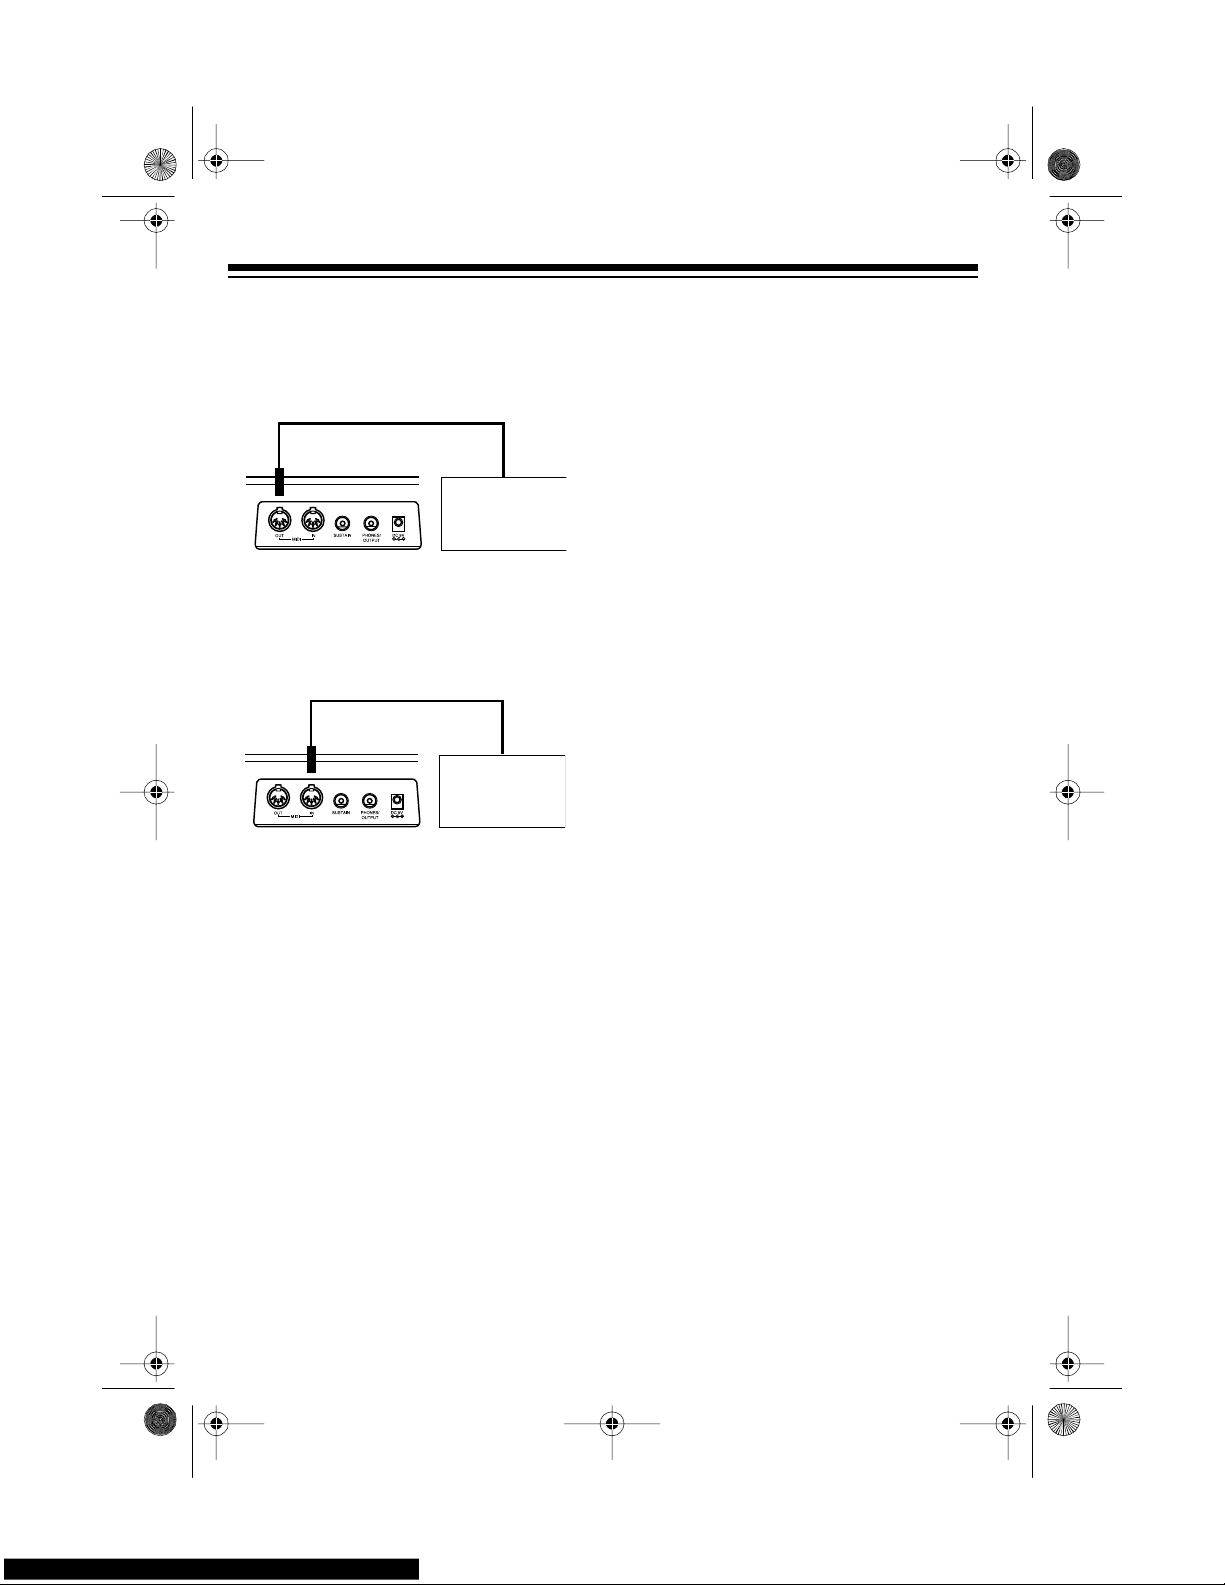
To send MIDI data from your keyboard,
use a MIDI cable to connect the Concertmate 980’s
MIDI OUT
terminal to the
other device’s MIDI IN terminal.
To receive MIDI data on your keyboard,
use a MIDI cable to connect the Concertmate 980’s
MIDI IN
terminal to the
other device’s MIDI OUT terminal.
Note:
You do not need to make both
connections if you are only either sending or receiving.
MIDI DATA
Your Concertmate 980 can send and receive several different types of MIDI data. The Concertmate 980’s tones,
rhythms, and other types of MIDI data
are sent automatically as you play.
Notes:
• The Concertmate 980’s prerecorded
tunes cannot be sent as MIDI data.
• For detailed specifications of the
MIDI function, see the “MIDI Implementation Chart” on Page 36.
Note On/Off
—
specifies which keys are
pressed (Note On) or released (Note
Off). Also includes how loud a note is
played as a value from 0 to 127.
Notes:
• The pitch of a note dep ends on the
tone that is bei ng used, as shown in
the “Note Table” on Page 34.
• If the keyboard receives a “request”
to play notes outside of its range
(higher or lower), it automatically
selects the same note in the nearest
octave.
Pro
g
ram Change —
specifies the tone.
The keyboard sends program change
data in the range of 0 to 99, corresponding to tone numbers. It receives data
within the same range if GM tone mapping is set to N, or in the range of 0 to
127 if GM tone m apping is set to G. In
the latter case, tones in the range of 100
to 127 are translated to t he close st tone
that the keyboard has.
Pitc h B end —
supplies pitch bend information. The keyboard’s pitch changes
as it receives a Pitch Bend message
through the
MIDI IN
terminal.
Control Chan
g
e —
adds effects such
as vibrato and volume changes app lied
during keyboard play. The message includes a control number (the effect type)
and a control value (the on/off and depth
of the effect).
MIDI IN
MIDI
Device
MIDI OUT
MIDI
Device
42-403 8.fm Page 26 Thursday, August 12, 1999 8:50 AM
Page 27
27
Here is the data that can be received
with this keyboard and the corresponding control number.
The Concertmate 980 can send Hold1
Control Change data only when you connect a sustain pedal and press it.
CHANGING MIDI
SETTINGS
The Concertmate 980 lets you change
two MIDI parameters, Tone Map and
Keyboard Channel.
Keyboard Channel
— sets the channel
for sending MIDI data to an external devic e (De fau lt: 0 1). The Concertmate 980
receives MIDI data on channels 1 through
4 and 10 on ly. The data receiv ed o n ot her
channels a re ignore d. Fo r transmiss ion o f
MIDI data, you can use any of 16 channels.
1. Repeatedly press
TRANSPOSE/
TUNE/MIDI
until
Keybd Ch
appears.
2. Within 5 seconds, press
–
or + to
select the channel you want.
Effect
Control
Number
Modulation 1
Volume 7
Pan 10
Hold1 (Sustain) 64
Tone Map
—sets the range of program
change values received/recognized by
this keyboard.
1. Repeatedly press
TRANSPOSE/
TUNE/MIDI
until
TonMap=N
ap-
pears.
2. Within 5 seconds, press
–
or + to se-
lect the setting you want.
N
: Normal Tone Map. This setting
allows receipt of 0 to 99 program
changes. Each program change
corresponds to one of the keyboard’s prerecorded tones.
G
: General MIDI Tone Map. This
setting allows receipt of all 0 to 1 27
program changes. Any data over
100 are translated to the closest
tone the Concertma te 980 has. See
“Note Table” on Page 34 for details.
Select
G
when you listen to Genera l
MIDI data from an external device.
NOTES ABOUT THE MIDI
IMPLEMENTATION
CHART
The “MIDI Implementation Chart” on
Page 36 illustrates the details of the keyboard’s MIDI function. An O in the chart
means that the keyboard has this feature; X means it does not have this f eature. The following notes explain what
the keyboard can do.
42-403 8.fm Page 27 Thursday, August 12, 1999 8:50 AM
Page 28
28
Basic Channel — MIDI uses up to 16
channels to exchange data. As in a TV
broadcast, different channels send different data. The keyboard can send data
in any of 16 channels, but receives data
only on channels 1 through 4 or 10.
Mode — The chart shows that Mode 3
is OMNI OFF, POLY. This means the
keyboard sends and receives pol yphonic data on only one channel at a time.
Note Number — This number represents each key of the keyboard. The
lowest number (0) is five octaves below
middle C. Since the keyboard’s lowest
note is two octaves below m iddle C and
the highest is three octaves above middle C, your keyboard can send note
numbers between 36 and 96 and receive note numbers f rom 0 t hrough 127.
The keyboard automatically assigns any
key outside its range to a key within its
key range.
Velocity — This number shows how
fast the key was pressed, or how loud
the note should sound. Piani ssimo (1) is
the lowest velocity, Fortissimo (127) is
the loudest. A zero (0) means the key is
released. Your keyboard can send volume level 75 or 100, and rec eive all volume levels from 0 through 127.
9n — This means that the Note On
message is 9 hexadecimal, and n is the
channel number.
Pitch Ben der — The keyboard receives
(but cannot send) pitch bending signals.
Control Change — This feature sends
data on various controllers, each having
its own number. For the d etails of each
parameter, see “MIDI Data” on Page 26.
Program Change — This feature
changes the preset sounds. Each sound
number corresponds to a program n umber between 0 and 12 7. For more information, see “MIDI Data” on Page 26.
42-403 8.fm Page 28 Thursday, August 12, 1999 8:50 AM
Page 29
29
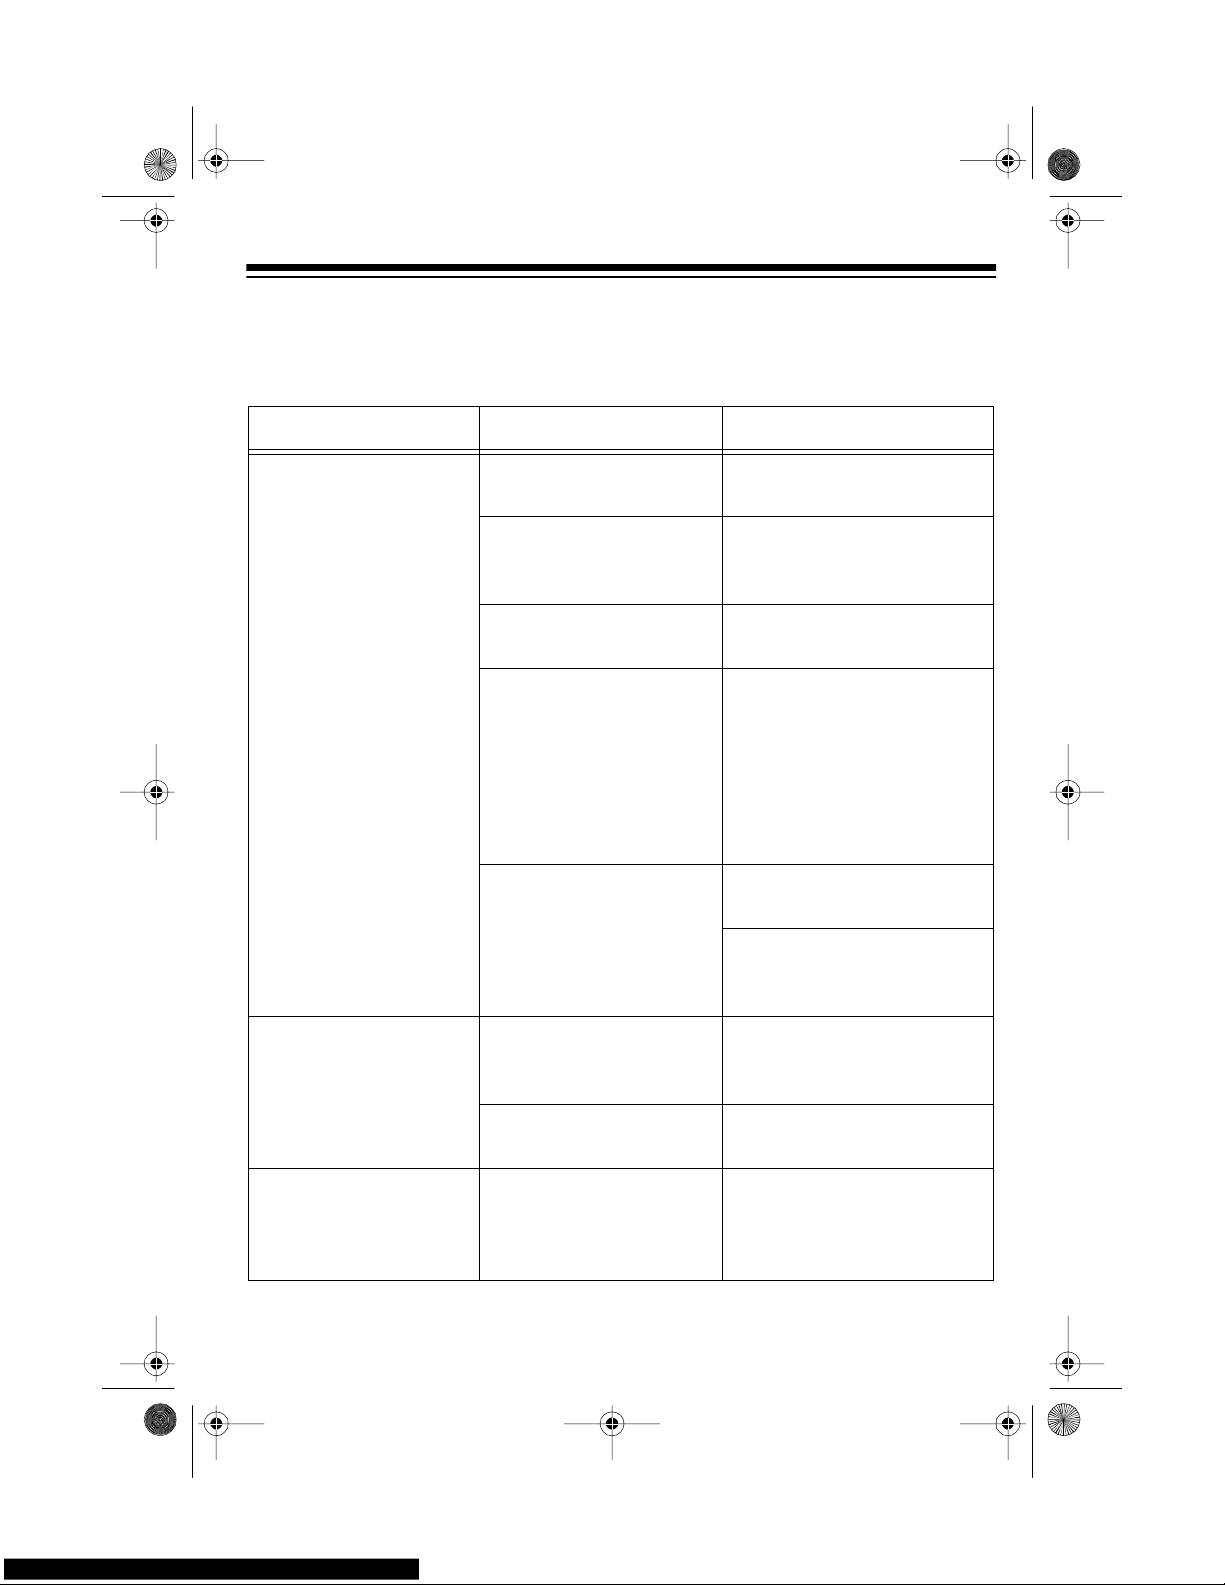
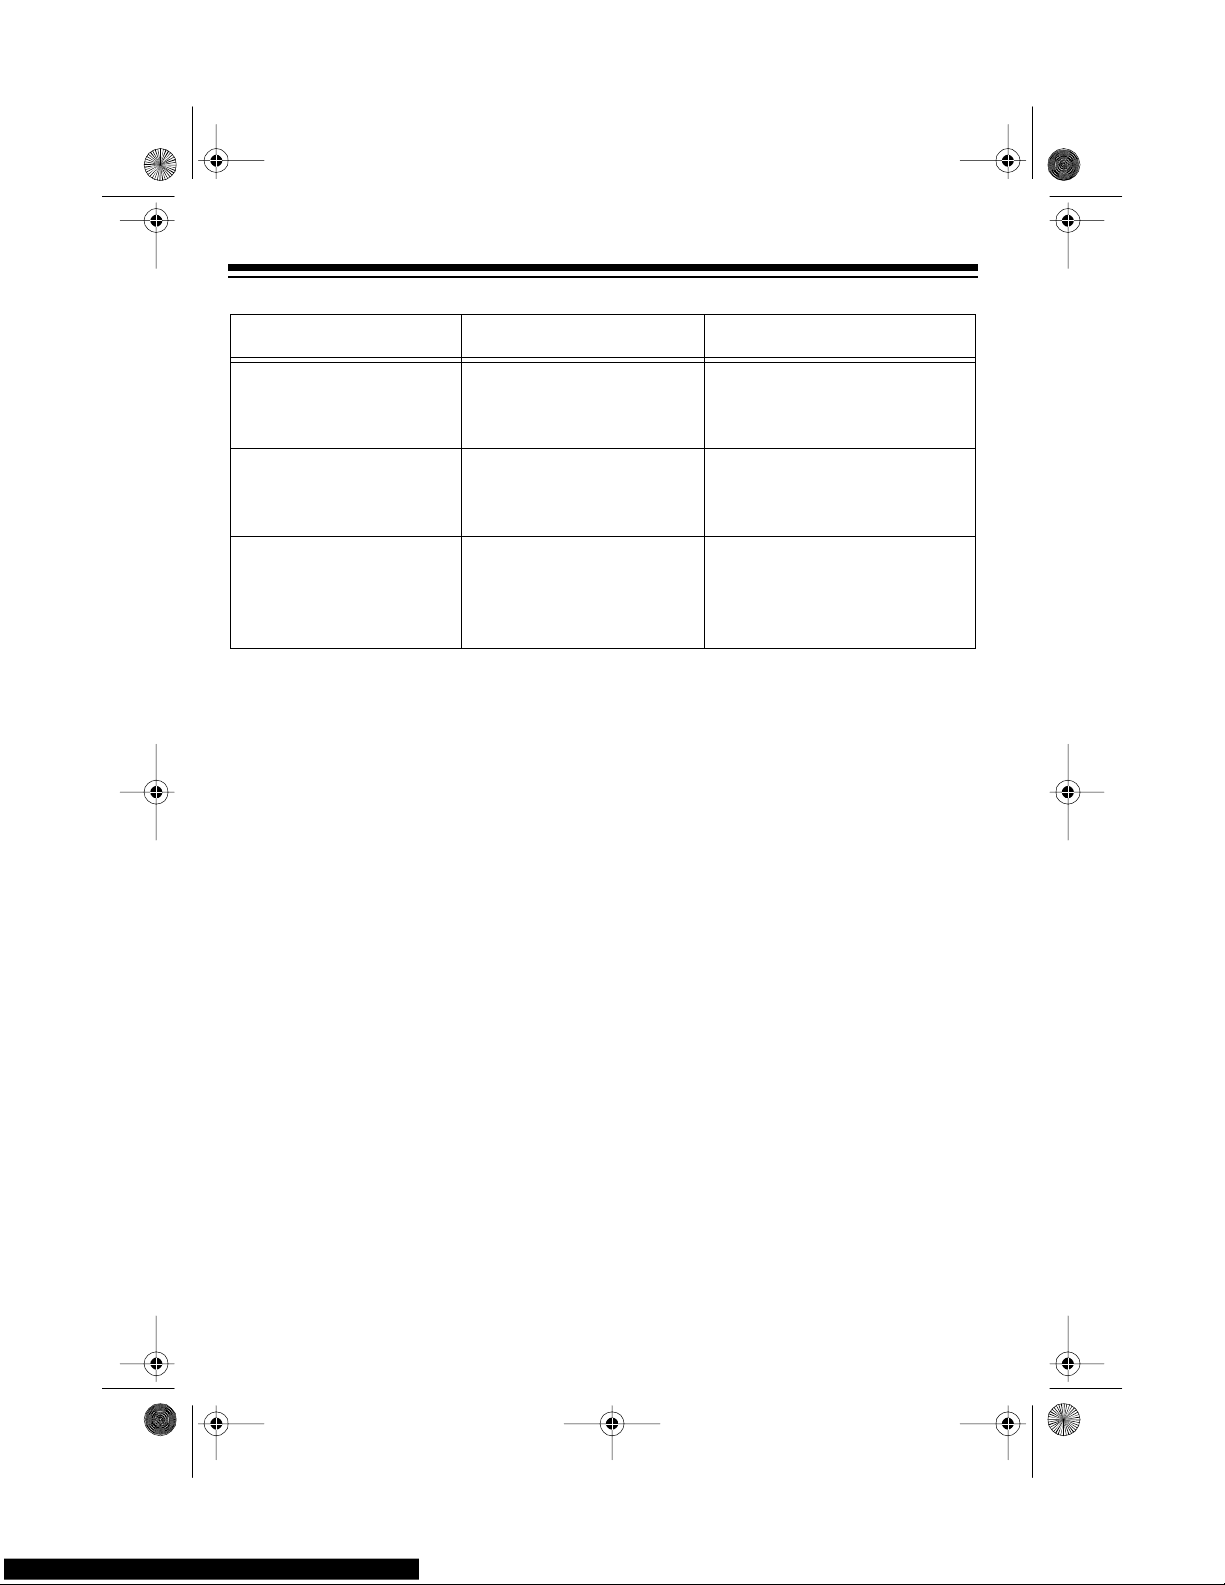
TROUBLESHOOTING
If your Concertmate 980 is not performing as it should, these suggestions might help.
If you still cannot solve the problem, take the keyboard to your local RadioShack
store for assistance.
Tr ouble Possible Cause Remedy
No sound, even if keys
are pressed.
The keyboard has
turned off automatically.
Set
POWER/MODE
to
OFF
then
ON
again.
Volume is turned down. Repeatedly press
MAIN
VOLUME
s to increase the
volume.
Headphones are connected.
Disconnect headphones.
Power supply problem. Check the power supply.
• Are battery symbols
(+/–) facing correctly?
• Are the batteries fresh?
• Is the AC or DC adapter
connected properly?
You are pressing too few
accompaniment keys
while
POWER/MODE
is
set to
FINGERED
.
Set
POWER/MODE
to
NOR-
MAL
or
CONCERT CHORD
.
Press 3 or 4 keys to form a
chord while
POWER/MODE
is set to
FINGERED
.
No sound when connected to an external
amplifier.
Volume
is turned down. Repeatedly press
MAIN
VOLUME
s to increase the
volume.
Defective connection
cord.
Replace the connection
cord.
The key or tuning does
not match when playing
along with another
MIDI instrument.
The tuning or transpose
parameter is set to a value other than
0
or 00.
Set the
tuning or transpose
to
0
or
00
.
42-403 8.fm Page 29 Thursday, August 12, 1999 8:50 AM
Page 30
30
No sound when receiving and playing MIDI
data.
MIDI cabl es are not c onnected properly.
Check the connection.
Bass notes in General
MIDI data are sent out
one octave lower.
Tone map parameter is
set to
N
.
Set the tone map parameter
to G (see “Changing MIDI
Settings” on Page 27).
Sounds sent to another
MIDI device by the keyboard do not sound
correct.
The other device’s MIDI
THRU function is turned
on.
Turn off the MIDI THRU
function on the other device.
Trouble Possible Cause Remedy
42-403 8.fm Page 30 Thursday, August 12, 1999 8:50 AM
Page 31
31
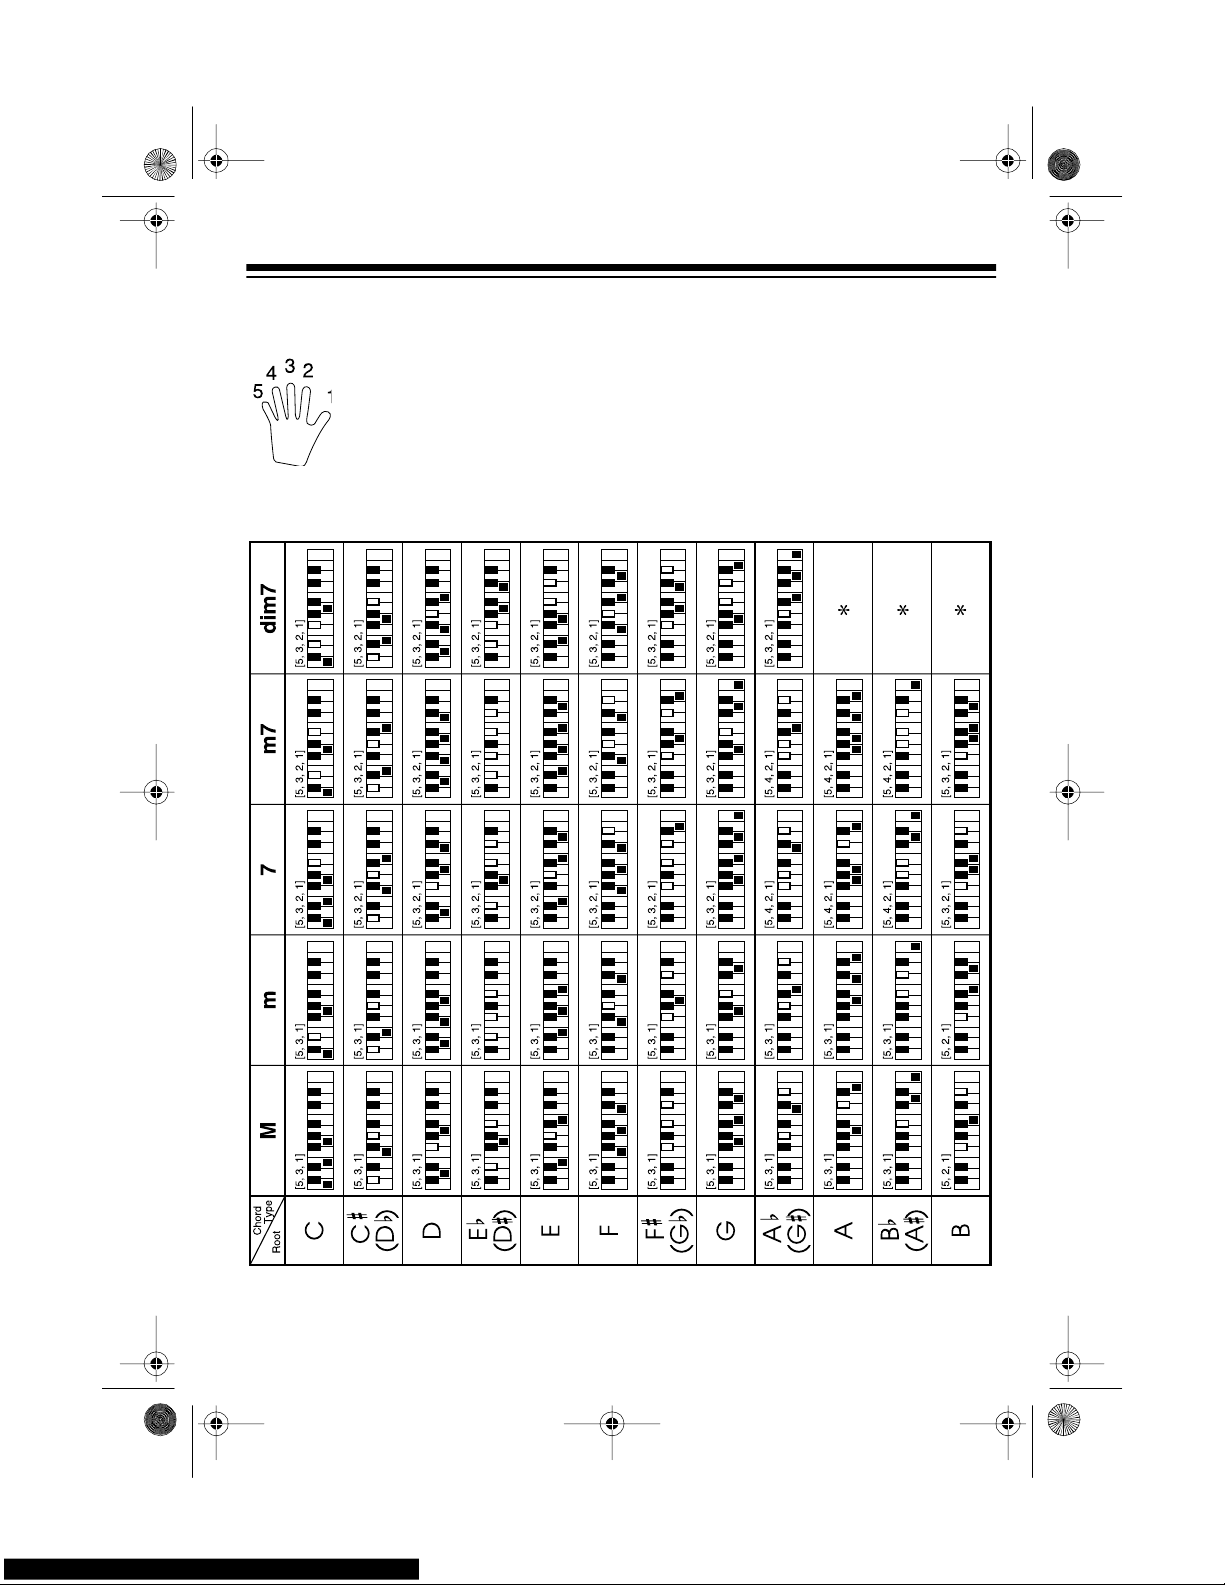
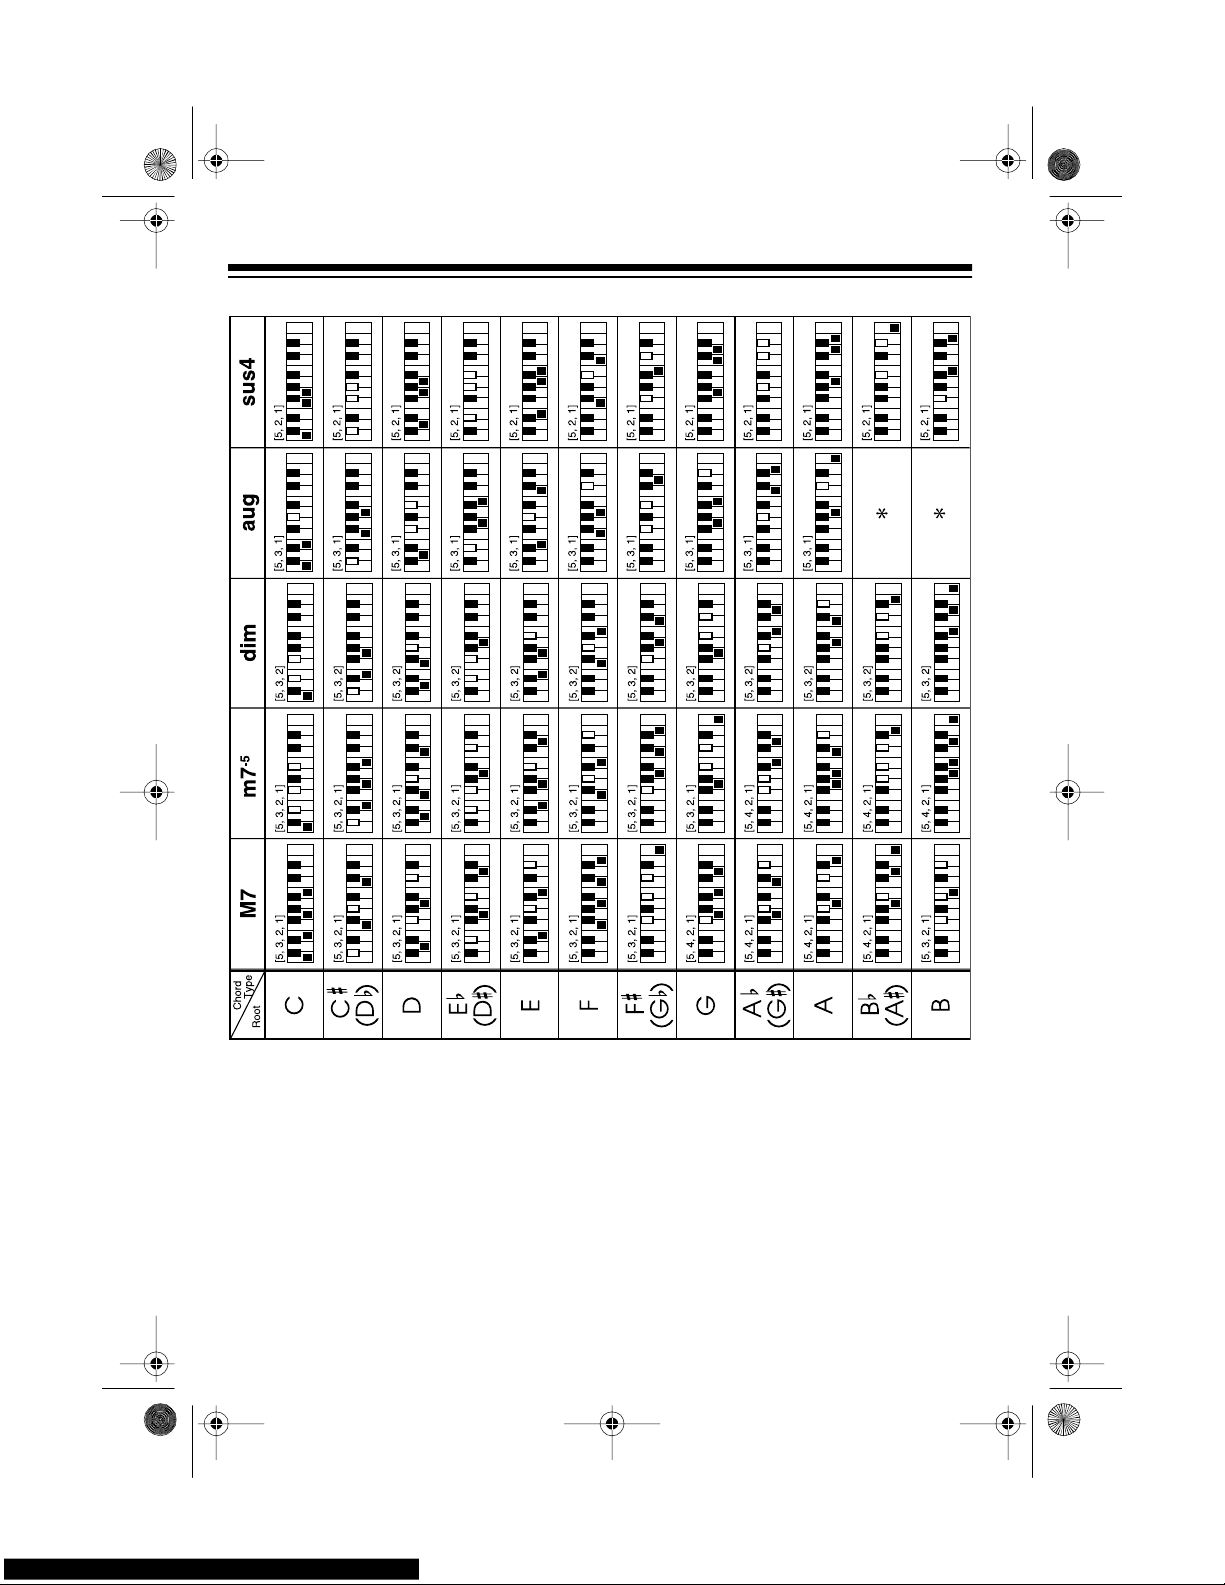
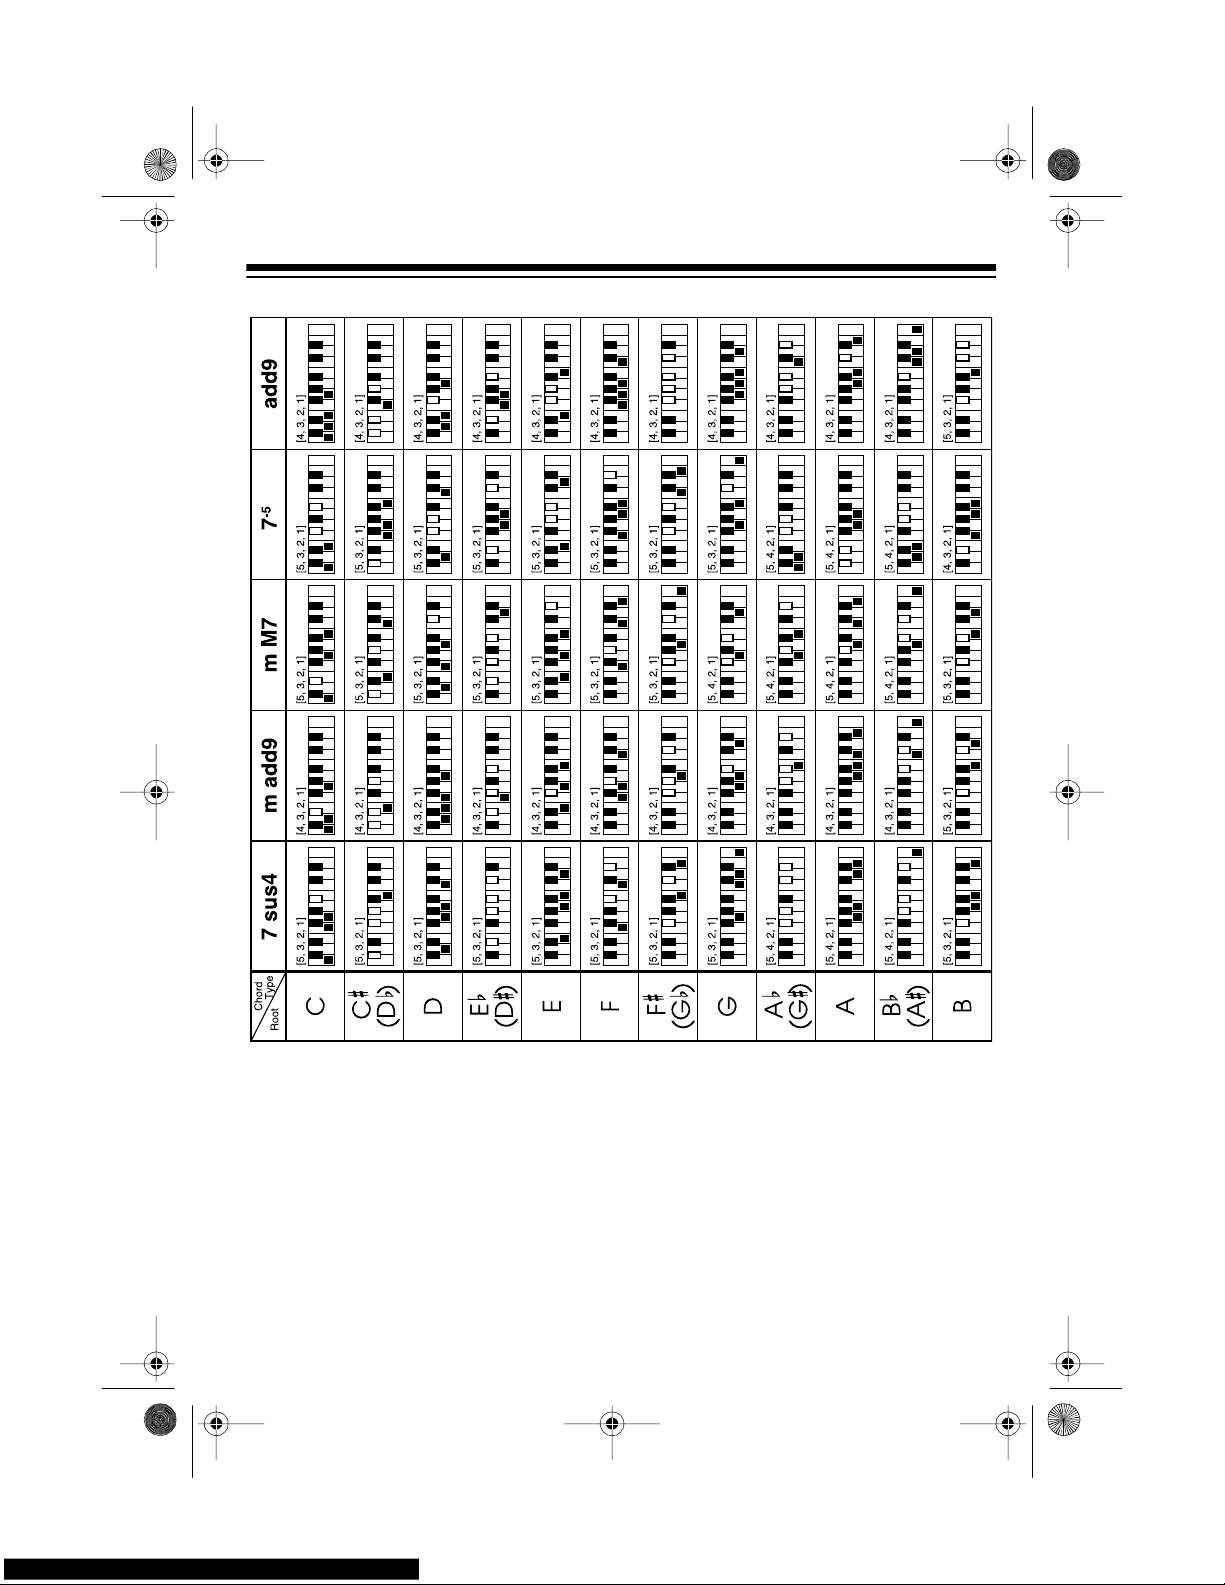
STANDARD FINGERING CHORD CHARTS
These tables show the left-hand fingering for the chords you play most often.
This illustration shows which fingers on your left hand match the numbers on the charts. The illustration also appears on your keyboard’s display.
Note:
You cannot play chords marked with an asterisk (*) in the fingered mode on
this keyboard.
42-403 8.fm Page 31 Thursday, August 12, 1999 8:50 AM
Page 32
32
42-403 8.fm Page 32 Thursday, August 12, 1999 8:50 AM
Page 33
33
42-403 8.fm Page 33 Thursday, August 12, 1999 8:50 AM
Page 34
34
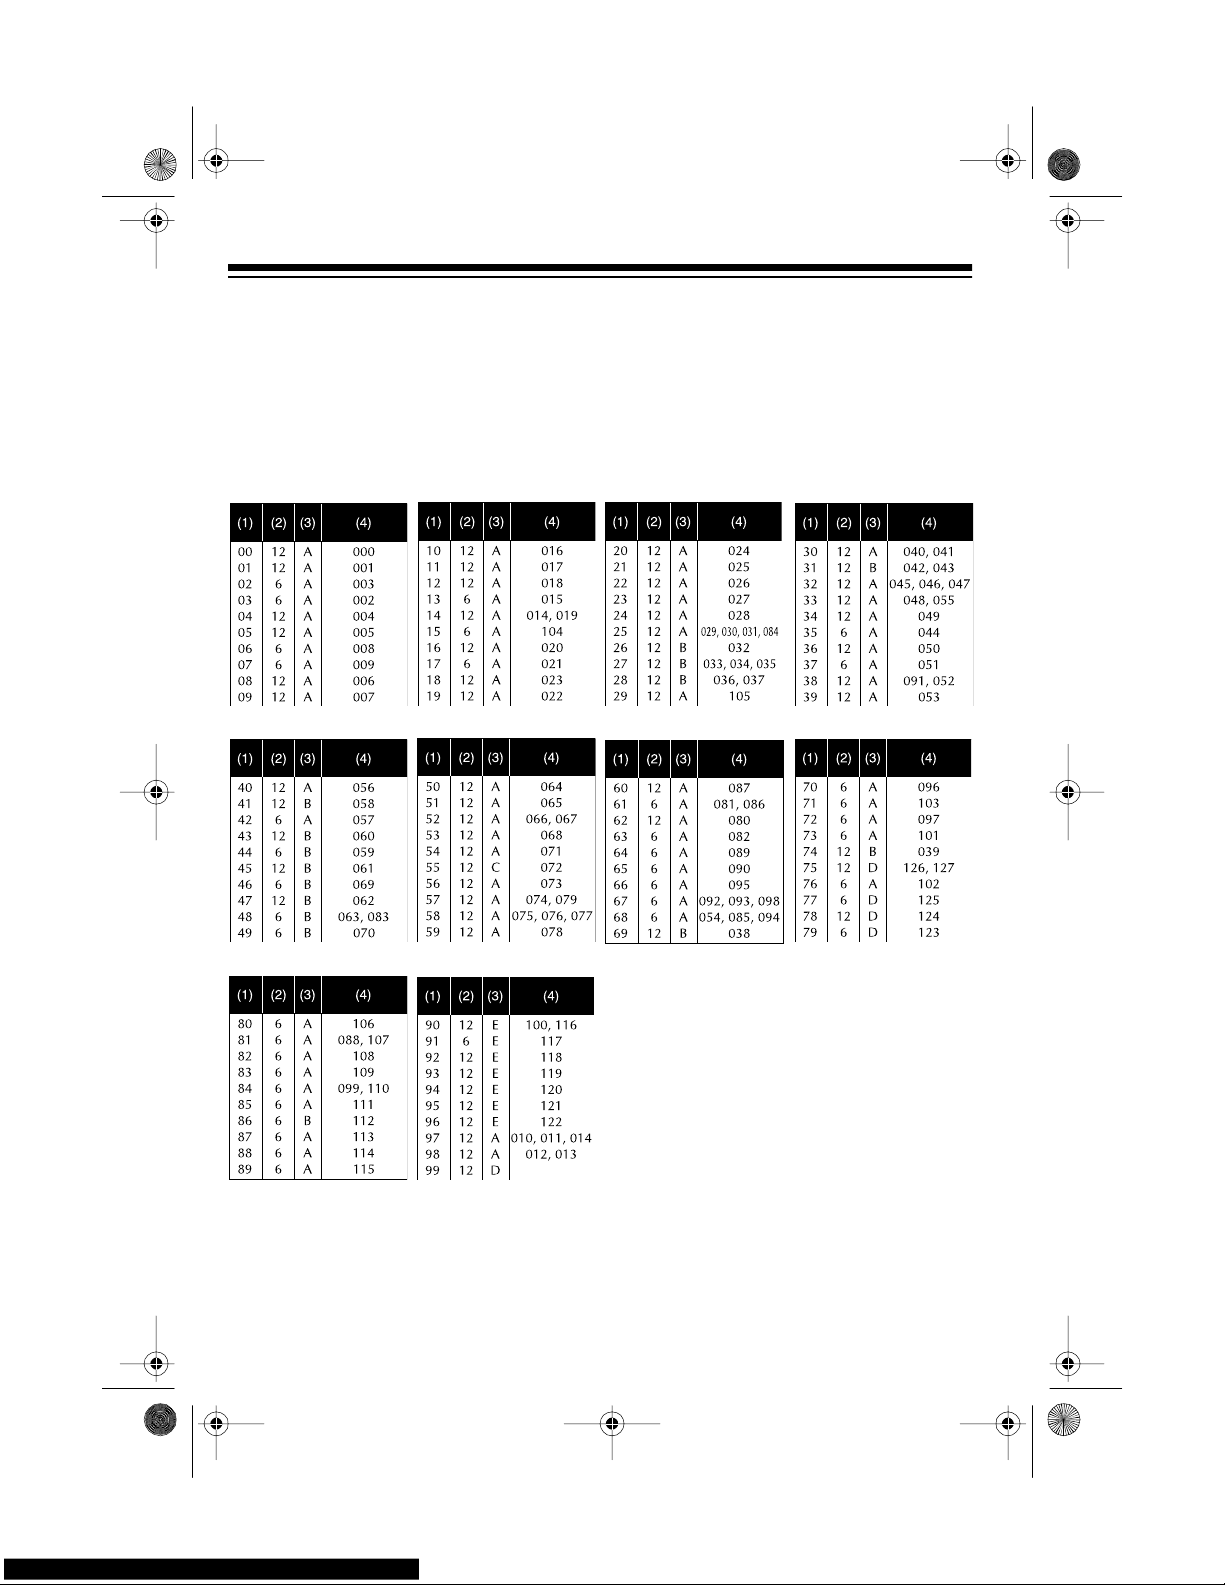
NOTE TABLE
Legend:
(1) Tone number
(2) Maximum polyphony
(3) Range type (see Page 35)
(4) Corresponding general MIDI number (see “MIDI Data” on Page 26)
42-403 8.fm Page 34 Thursday, August 12, 1999 8:50 AM
Page 35
35
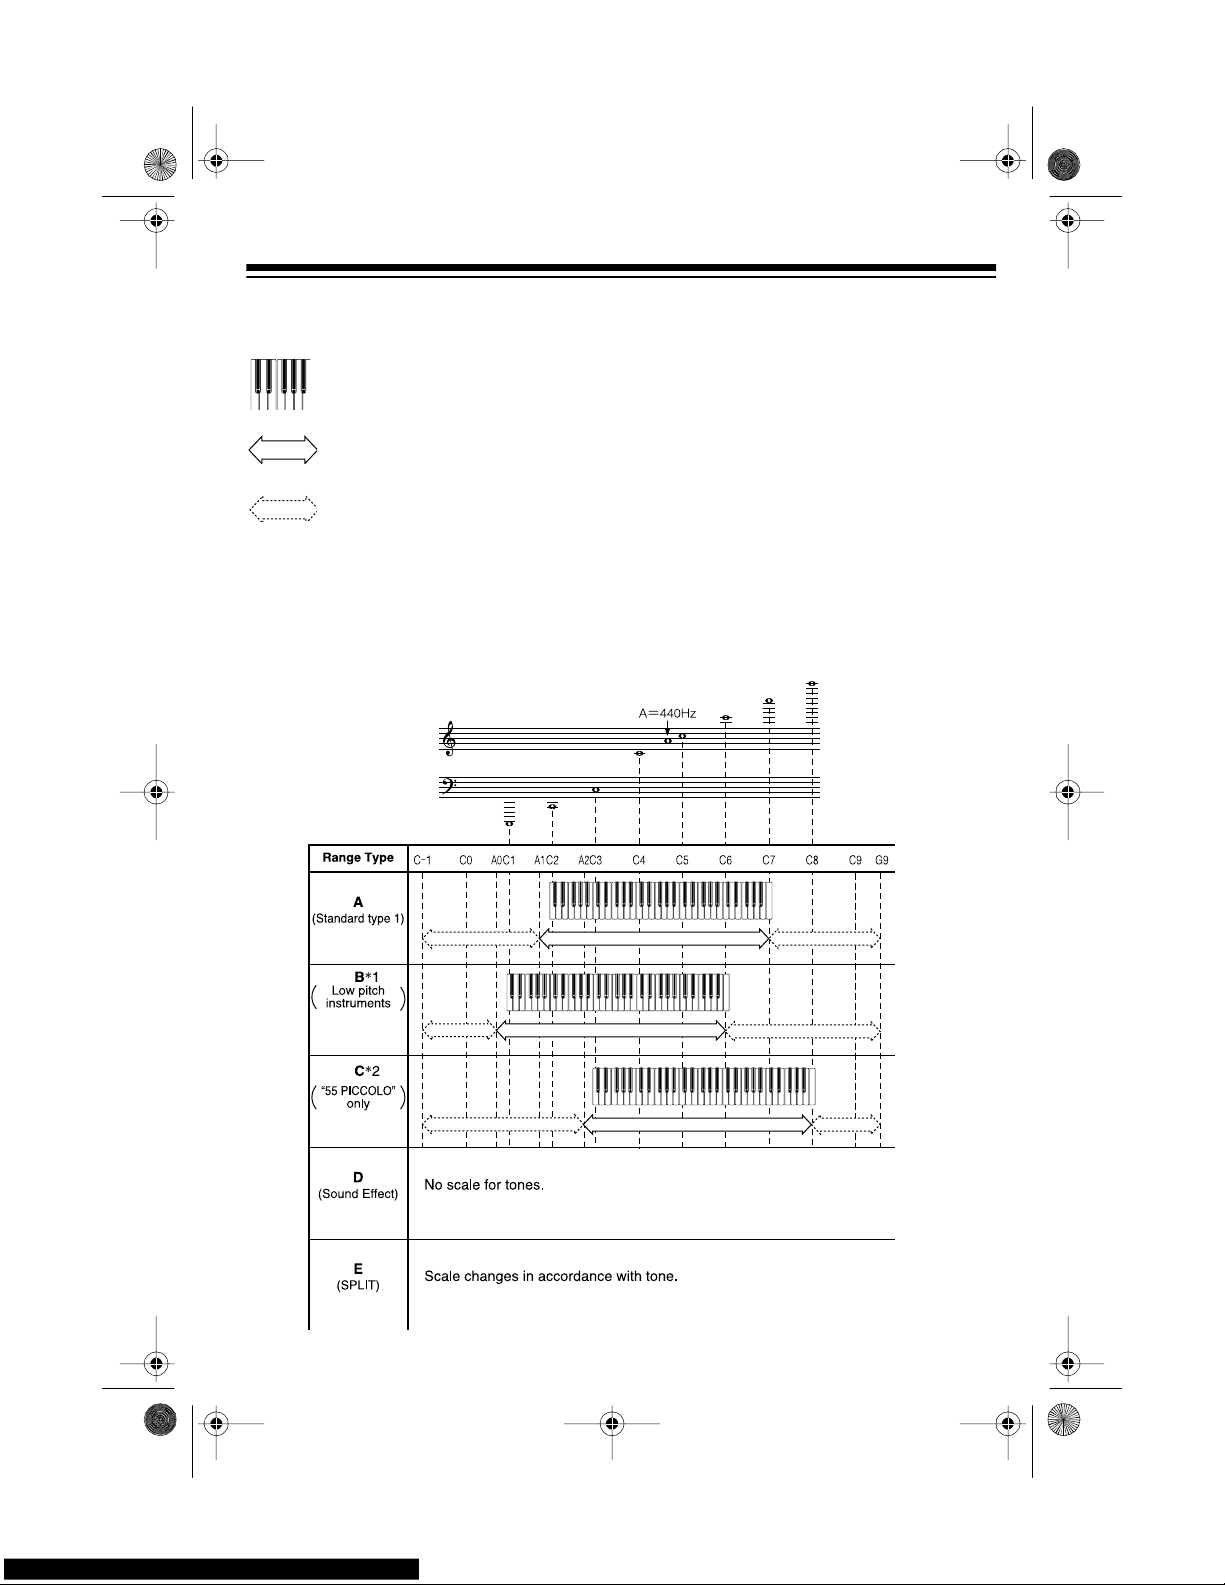
Legend:
Range of keyboard play
Playable range (when receiving MIDI data)
Range transposed to nearest octave (when receiving MIDI data or us ing the
keyboard’s transpose function)
(1) The received MIDI data is played one octave lower
(2) The received MIDI data is played one octave higher
42-403 8.fm Page 35 Thursday, August 12, 1999 8:50 AM
Page 36
36
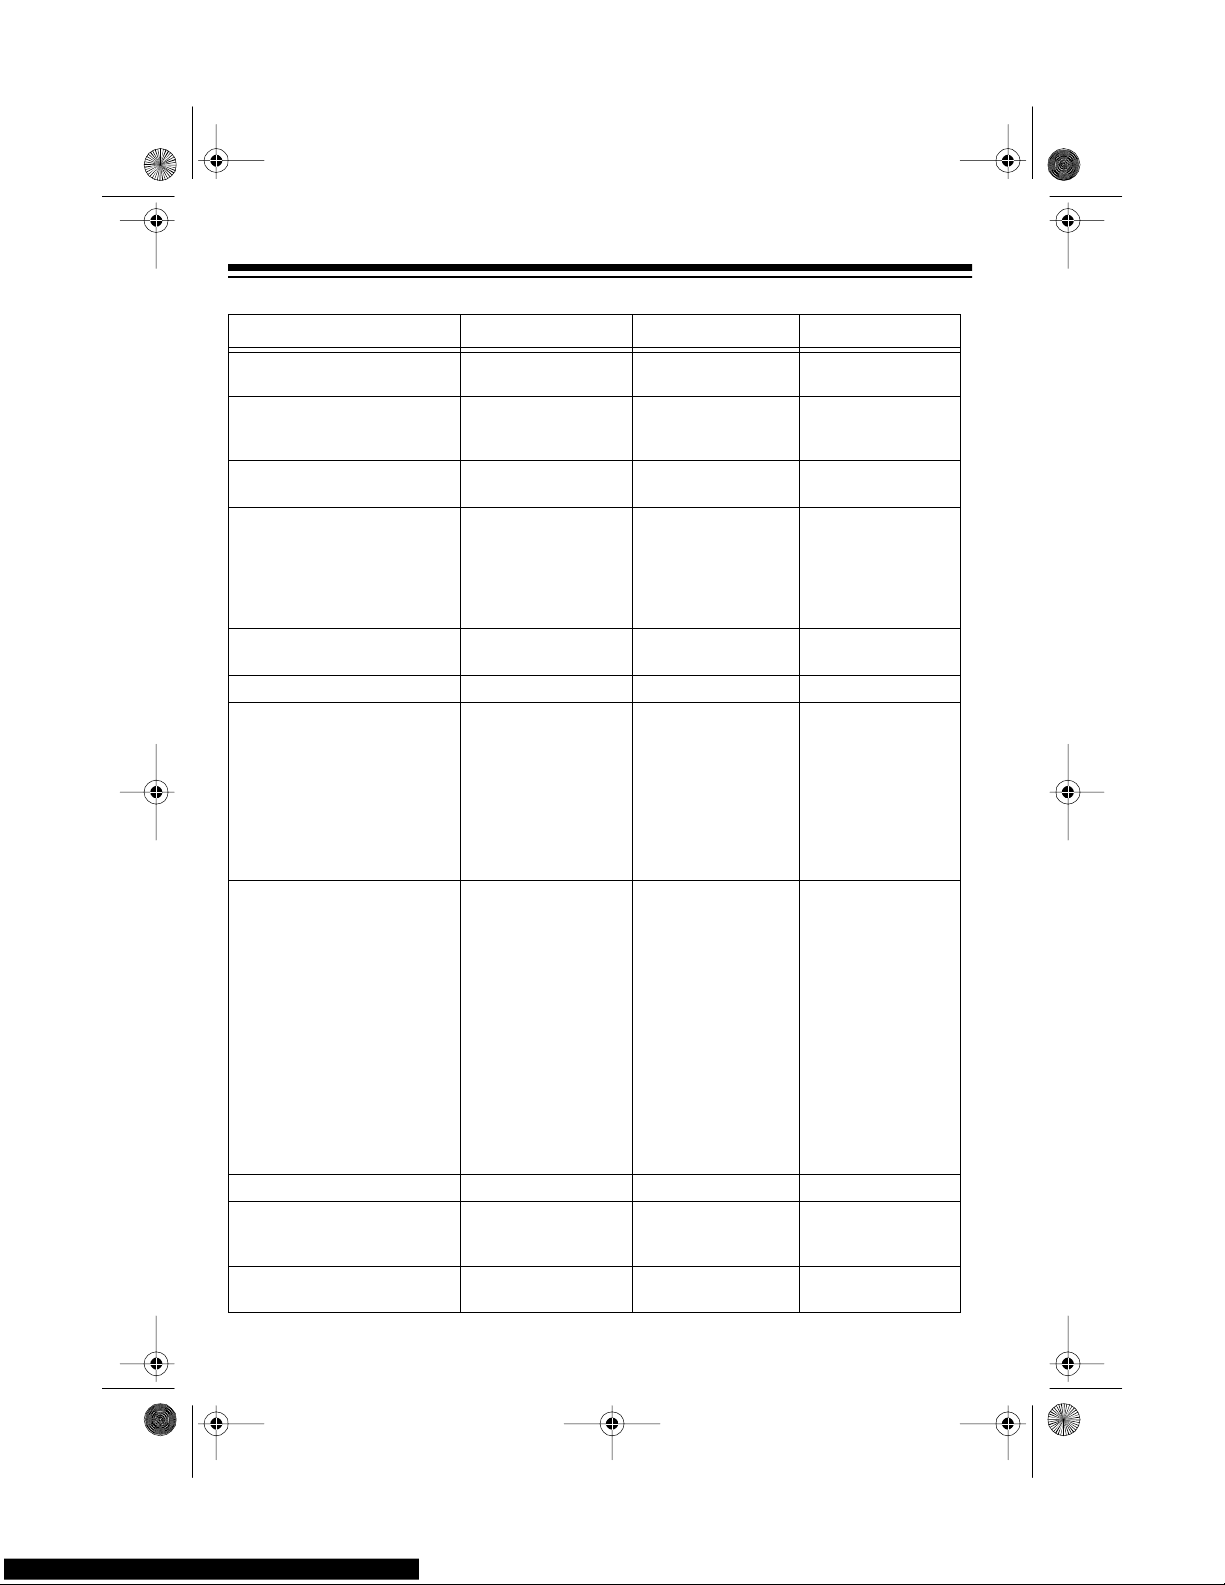
MIDI IMPLEMENTATION CHART
FUNCTION TRANSMITTED RECOGNIZED REMARKS
Basic
Channel
Default
Chan
g
ed
1
1–16
1–4, 10
1–4, 10
Mode Default
Messa
g
es
Altered
Mode 3
X
jjjjjjjjjjjjjjjj
Mode 3
X
jjjjjjjjjjjjjjj
Note
Number: True voice
36–96
jjjjjjjjjjjjjjjj
0–127
36–96
*
1
*
1
Depends on tone
Velocit
y
Note ON
Note OFF
O 9nH v=75,100
*2
X 9nH v=0
O 9nH v=1–1 27
X 9nH v=0, 8nH v=
*3
*2
: V(Velo ci ty)=100
when note on date
when the main volume value of this uni t
is 9 to 2, and V=75
when the main volume va l u e is 1 or 0.
*3
no relation
After
Touch
Ke
y
s
Channels
X
X
X
X
Pitch Bender X O
Control
Chan
g
e
1
6, 38
7
10
11
64
100, 101
120
121
X
X
X
X
X
O
X
X
X
O
X
O
O
X
O
X
X
X
Modulation
Data entr
y
Volume
Pan
Expression
Hold1
RPN LSB, MSB
All sound off
Reset all controller
Pro
g
ram
Chan
g
e: True #
O 0–99
jjjjjjjjjjjjjjjj
O 0–127
*4
jjjjjjjjjjjjjjj
*4
: Depends on GM
Tone Map settin
g
When set to N, only
the 100 normal list
tones from 0 to 99 are
received.
When set to G, tone
numbers 0 to 127 are
received. Those that
most closel
y
match
the 100 prerecorded
tones of this ke
y
board are mapped to
the applicable tone
numbers (0 to 99)
S
y
stem Exclusive X X
S
y
stem
Common
: Song Pos
: Son
g
Sel
: Tune
X
X
X
X
X
X
S
y
stem
Real T i m e
: Clock
: Commands
X
X
X
X
42-403 8.fm Page 36 Thursday, August 12, 1999 8:50 AM
Page 37
37
Mode 1: OMNI ON, POLY Mode 3: OMNI OFF, POLY O: Yes
Mode 2: OMNI ON, MONO Mode 4: OMNI OFF, MONO X: No
Aux
Messa
g
es
: Local ON/ O FF
: All notes OFF
: Active Sense
: Reset
X
X
X
X
X
X
X
X
FUNCTION TRANSMITTED RECOGNIZED REMARKS
42-403 8.fm Page 37 Thursday, August 12, 1999 8:50 AM
Page 38
38
CARE AND MAINTENANCE
Your Optimus Concertmate 980 is an example of superior design and craftsmanship.
The following suggestions will help you care for your keyboard so you can enjoy it for
years.
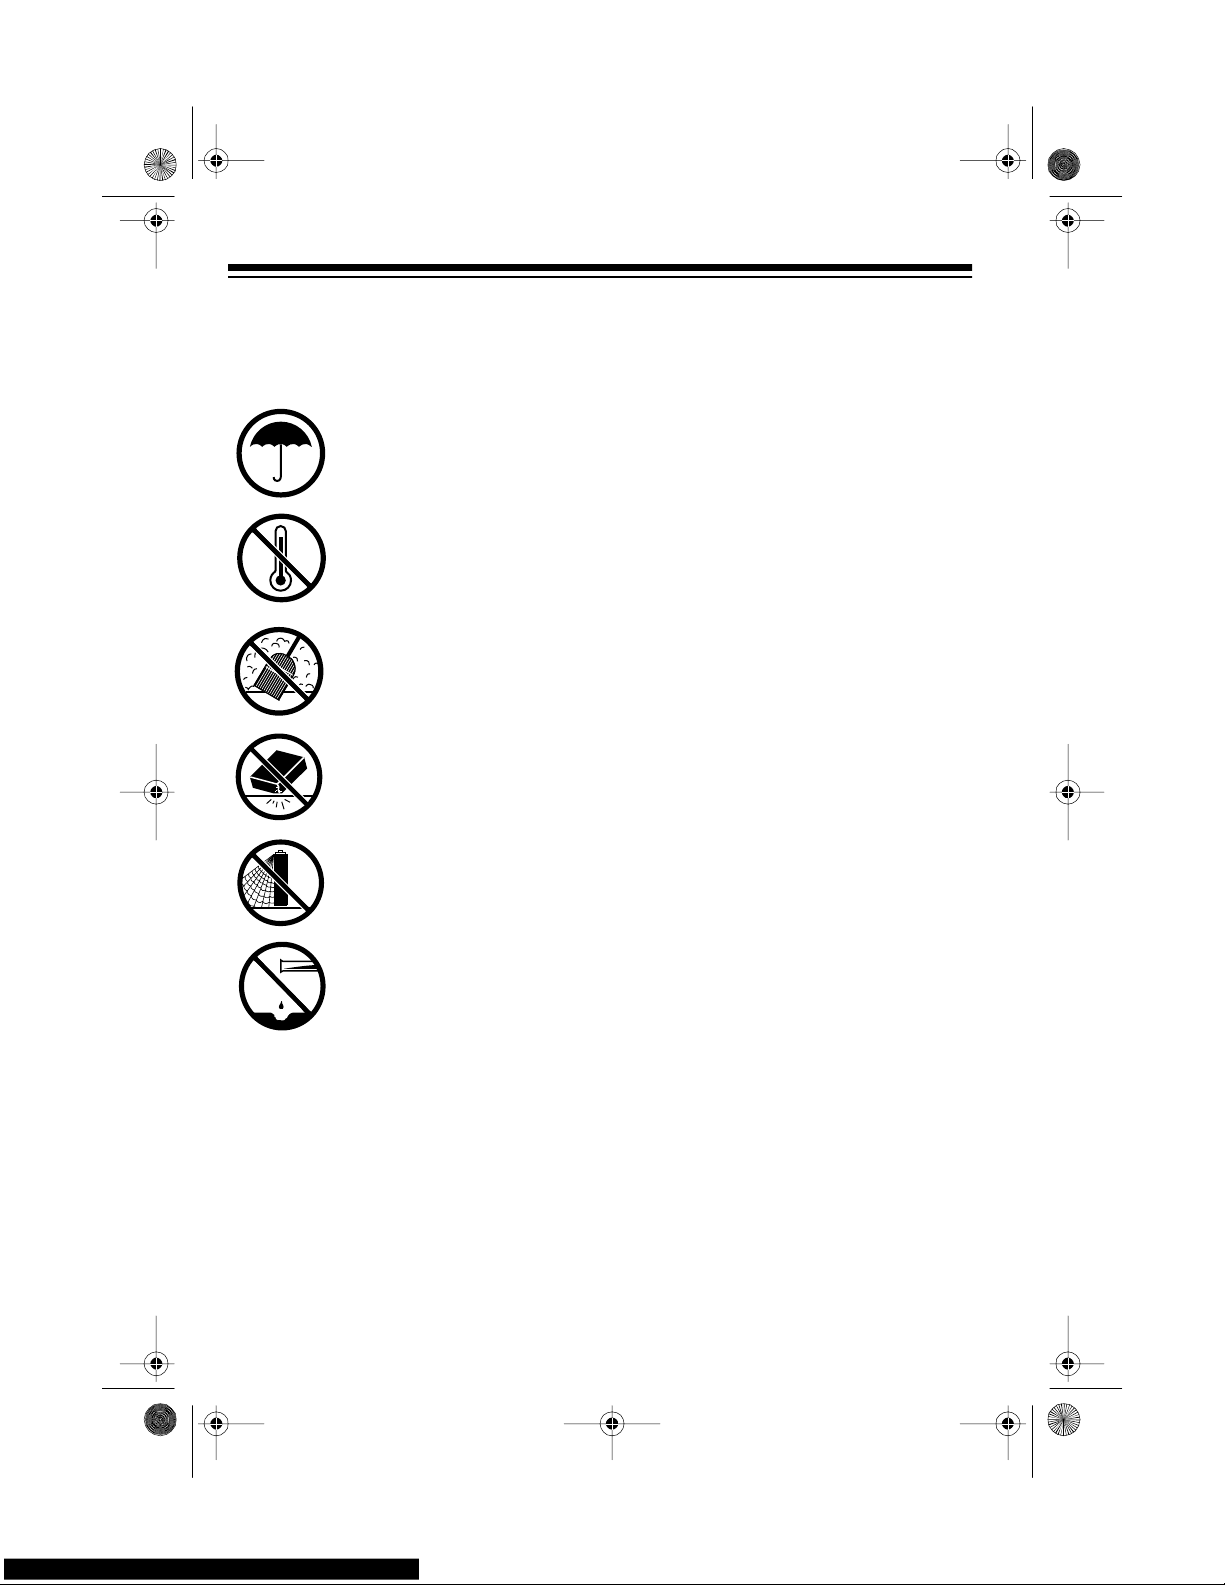
Keep the keyboard dry. If it gets wet, wipe it dry immediately. Liquids
might contain minerals that can corrode the electronic circuits.
Use and store the keyboard only in normal temperature environments.
Temperature extremes can shorten the life of electronic devices, damage batteries, and distort or melt plastic parts.
Keep the keyboard away from dust and dirt, which can cause premature wear of parts.
Handle the keyboard gently and carefully. Dropping it can da mag e circuit boards and cases and can cause the keyboard to work improperly.
Use only fresh batteries of the required size and recommende d type.
Batteries can leak chemicals that damage your keyboard’ s electronic
parts.
Wipe the keyboard with a damp cloth occasionall y to keep it looking
new. Do not use h arsh chemicals, cleaning sol vents, or strong detergents to clean the keyboard.
Modifying or tampering with the keyboard’s internal components can cause a malfunction and might invalidate your keyboard’s warranty and void your FCC authorization to
operate it. If your keyboard is not perf orming as it should, take it to your local RadioShack store for assistance.
42-403 8.fm Page 38 Thursday, August 12, 1999 8:50 AM
Page 39
39
SPECIFICATIONS
Number of Keys ...................................................................................................... 61
Polyphonic Sound ................................................................................ 12-note (Max.)
Preset T ones ......................................................................................................... 100
Auto-Rhyt hms ................. ......................................................... ............................. 100
Tempo ...................................................... A djustable (20–255 Bea ts Per Minute)
Other ...............................................................................Fill-in and Synchro Start
Accompaniments ................................................................. Concert Chord, Fingered
Prerecorded Tunes .................................................................................... 100 Tunes
Transpose ................................................................................. (F ~C~F: half-notes)
Tuning ................................................................... Adjustable A4 = 440 Hz ±50 cents
Built-In Speakers .......................................... 4
3
/4 Inch (12 cm) × 2 (Output 2W + 2W)
Terminals:
Power Supply .....................................................................................
DC 9V
Jack
PHONES/OUTPUT Jack ............................. ........... Output Impedance: 78 Ohms
Output Voltage: 4V (RMS) MAX
MIDI ......................................................................................................... IN, OUT
SUSTAIN ...........................................................................
1
/4-Inch Standard Jack
Power Sources ................................................... DC: 6 D batteries (Cat. No. 23-550)
AC: 120V, 60Hz , with AC adapter (Cat. No. 273-1656)
Vehicle Battery: 9V with DC adapter (Cat. No. 273-1815)
Power Consumption .......................................................................................... 7.7 W
Dimensions (HWD) ............................................................ 5
1
/2 × 377/8 × 151/16 Inches
(139 × 961 × 381 mm)
Weight (Without Batteries) ......................................................................... 11 lb 10 oz
(5.4 kg)
Included Accessories .................................................................... Sheet Music Sta nd
Sheet Music and Play Guide for the Prerecorded Tunes
Specifications are typical; individual units might vary. Specifications are subject to
change and improvement without notice.
42-403 8.fm Page 39 Thursday, August 12, 1999 8:50 AM
Page 40
RadioShack
A Division of Tandy Corporation
Fort Worth, Texas 76102
7A8N Printed in Malaysia
Limited One-Year Warranty
This product is warran ted by RadioShac k against ma nufacturing defec ts in materi al and workman ship under normal use for one (1) year from the date of purchase from RadioShack company-owned
stores and authorized RadioShack franchisees and dealers. EXCEPT AS PROVIDED HEREIN, RadioShack MAKES NO EXPRESS WARRANTIES AND ANY IMPLIED WARRANTIES, INCLUDING
THOSE OF MERCHANTABILITY AND FITNESS FOR A PARTICULAR PURPOSE, ARE LIMITED
IN DURATION TO THE DURATION OF THE WRITTEN LIMITED WARRANTIES CONTAINED
HEREIN. EXCEPT AS PROVIDED HEREIN, RadioShack SHALL HAVE NO LIABILITY OR RESPONSIBILITY TO CUSTOMER OR ANY OTHER PERSON OR E NTITY WITH RESPECT TO ANY
LIABILITY, LOSS OR DAMAGE CA USED DIRECTLY O R INDIRECTLY BY USE OR PERFORMANCE OF THE PRODUCT OR A RISING OUT OF ANY BREACH OF THIS WARRANTY, INCLUDING, BUT NOT LIMITED TO, ANY DAMAGES RESULTING FROM INCONVENIENCE, LOSS
OF TIME, DATA, PROPERTY, REVENUE, OR PROFIT OR ANY INDIRECT, SPECIAL, INCIDENTAL, OR CONSEQUENTIAL DAMAGES, EVEN IF RadioShack HAS BEEN ADVISED OF THE
POSSIBILITY OF SUCH DAMAGES.
Some states do not allow the limitations on how long an implied warranty lasts or the exclusion of incidental or consequential damages, so the above limitations or exclusions may not apply to you.
In the event of a product defect during the war ranty period, take the product and the RadioShack
sales receipt as proof of purch ase da te to any Radio Shack store. Radi oSh ack will, at i ts option, un less otherwise provided by law: (a) correct the defect by product repair without charge for parts and
labor; (b) replace the produ ct with one of the same or similar design; or (c) refund the purchase
price. All replaced parts and pr oducts, and pr oducts on which a refun d is made, become the property of RadioShack. New or reconditioned parts and pro ducts may be used in the performan ce of
warranty ser vice. Rep aired or r eplaced parts an d prod ucts are w arrante d for the rema inder of the
original warranty period. You will be charged for repair or replacement of the product made after the
expiration of the warranty period.
This warranty does not cover: (a) damage or failure caused by or attributable to acts of God, abuse,
accident, misuse, imprope r or abnorma l us age, failure to fol lo w instru ctions , imprope r insta llation or
maintenance, alterati on, lightning or other incidence of exc ess voltage or current; (b) any repairs
other than those provi ded by a RadioShack Auth orized Service Facili ty; (c) consumables suc h as
fuses or batteries; (d) cosmeti c damage; ( e) trans por tation, sh ipping or insuran ce cos ts; or ( f) costs
of product removal, installation, set-up service adjustment or reinstallation.
This warranty gives you spec ific l egal ri ghts, and you m ay also have oth er rig hts whi ch vary from
state to state.
RadioShack Customer Relations, Dept. W, 100 Throckmorton St., Suite 600, Fort Worth, TX 76102
We Service W hat We Sell
3/97
42-403 8.fm Page 40 Thursday, August 12, 1999 8:50 AM
 Loading...