

Page 1

42-507 5.fm Page 1 Th ursday, Au gust 12, 1999 1:03 PM
Cat. No. 42-5075/42-5076
OWNER’S MANUAL
Please read before using this equipment.
Portable Compact Disc Player
with Digital Anti-Shock
CD-3680 (42-5075)
CD-3690 (42-5076)
Page 2

g
g
g
y
g
y
y
y
y
42-507 5.fm Page 2 Th ursday, Au gust 12, 1999 1:03 PM
FEATURES
Your Optimus CD-3680 (42-5075)/
CD-3690 (42-5076) Portable Compact
Disc Player with Digital Anti-Shock
uses the latest digital audio technol ogy to give you the clean, c risp sound
of compact discs. You can connect
the CD player to your home audio or
autosound system or connect a pair of
stereo earphones for portable , private
listening.
The CD player’s features include:
Di
ital Anti-Shock System (DAS2)
— rapidly scans 3 seconds (42-5075)
or 10 seconds (42-507 6) of data f rom
the CD and stores it in memory for uninterrupted play with no sound skip
even when the CD player is exposed
to shocks or vibration, making this CD
player excellent for use in your vehicle.
Ei
ht-Times Oversampling with
Di
ital Filtering
— improves the
CD’s sound by multiplying the standard 44.1 kHz sample rate by eight
and using a digital filter to reduce or
eliminate distortion.
1-Bit DAC
— uses the latest in digitalto-analog conversion circuitry to accurately reproduce all sound levels w ith
virtually no distortion.
Automatic Search Music S
(ASMS)
— lets you quickly locate and
stem
play any track on a CD.
Audible Search
— lets you rapidly
play a CD in either direction to locat e
a desired section of a track.
Pro
rammable Pla
— le ts you program and play up to 24 tracks in any
sequence you choose.
Repeat Pla
— lets you automatically
repeat a single track, an entire CD, or
a programmed sequence.
Random Pla
— randomly selects
and plays tracks from the loaded CD.
— lets you cue a track for play at
Cue
a later time.
Intro Scan
— scans and plays the
first 10 seconds of each tr ack, so you
can find a specific track.
Extended Bass S
stem
— creates a
fuller bass sound.
Auto Power On/Off
— automatically
turns on the CD player when you
press
when you press
PLAY/PAUSE
, and turns it off
STOP/CLEAR
or 2
minutes after it finishes playing, to
help preserve battery life.
— prevents accidentally chang-
Hold
ing the CD player’s control settings
and preserves battery life by locking
most controls.
© 1997 Tandy Corporation.
Optimus and RadioShack are registered trademarks used by Tandy Corporation.
All Rights Reserv ed .
2
Page 3
42-507 5.fm Page 3 Th ursday, Au gust 12, 1999 1:03 PM
Resume — lets you easily resume listening to the track that was selected
when you stopped playing a CD.
Three Power Sources — let you
power your CD player from tw o standard or rechargeable nickel-cadmium
AA batteries, your vehicle’s battery using the supplied DC adapter, or standard AC power using an optional AC
adapter.
Power/Charging Jack — lets you
charge nickel-cadmium batteries
without removing them from the CD
player.
Lighted Buttons and Display —
when you operate the CD player with
an AC or DC adapter, the buttons and
display light up for easy viewing in the
dark.
Supplied CD-to-Cassette Adapter
— lets you connect the CD player di rectly to a cassette player in your
home or vehicle.
Important: Y ou need a pair of stereo
headphones, earphones , or amplified
speakers, or a home audio or autosound system to use your CD player.
Your local RadioShack st ore carries a
complete line of headphones, earphones, speakers, and audio systems.
CDs that can be played on this CD
player have this mark on them:
The CD player’s advanced technol ogy
makes it simple to operate. But, be
sure you read this Owner’s Manual
completely so you can take advantage
of all its advanced features.
We recommend you record your CD
player’s serial number here. T he num ber is inside the CD player’s battery
compartment.
Line Out Jack and Supplied YCable — makes it easy to connect the
CD player to your sound system’s l owlevel inpu ts.
5- or 3-Inch CD Compatible
Carrying Pouch (Supplied with 42-
5076 only)
Serial Number __________________
3
Page 4

42-507 5.fm Page 4 Th ursday, Au gust 12, 1999 1:03 PM
This CD player is made and tested to
meet exacting safety standards. It
meets FCC requirements and complies with safety performance standards of the U.S. Department of
Health and Human Services.
Warnings:
• This CD player employs a laser
light beam. Only a qualified service person should remove the
cover or attempt to service this
device, due to possible eye injury.
• The use of controls, adjustments,
or procedures other than those
specified herein might result in
hazardous radiation exposure.
FCC INFORMATION
This equipment complies with the limits for a Class B digital device as specified in Part 15 of
limits provide reasonable protection
against radio and TV interference in a
residential area. However, your CD
player might cause TV or radio interference even when it is operating
properly. To eliminate interference,
you can try one or more of the following corrective measures:
• Increase the distance between the
CD player and the radio or TV.
• Use outlets on different electrical
circuits for the CD player and the
radio or TV.
Consult your local RadioShack store if
the problem still exists.
FCC Rules
. These
4
Page 5

g
42-507 5.fm Page 5 Th ursday, Au gust 12, 1999 1:03 PM
CONTENTS
Powering the CD Player ...................................................................................... 6
Using Batteries ................................................................................................ 6
Recharging Nickel-Cadmium Batteries ..................................................... 7
Using Vehicle Battery Power ........................................................................... 8
Using AC Power .............................................................................................. 8
Connections ....................................................................................................... 10
Connecting Earphones/Headphones . . .......................................................... 10
Listening Safely ...................................................................................... 10
Traffic Safety ........................................................................................... 10
Connecting Amplified Speakers .................................................................... 11
Connecting to a Home Audio System ........................................................... 11
Connecting to an Autosound System ............................................................ 11
Operation ............................................................................................................ 13
Loading a CD ................................................................................................ 13
Playing a CD ................................................................................................. 13
Digital Anti-Shock System (DAS
Automatic Search Music System (ASMS) ..................................................... 14
Locking the Controls ..................................................................................... 15
Viewing the Elapsed Time ............................................................................. 15
Turning E-Bass On and Off ........................................................................... 15
Audible Search .............................................................................................. 16
Pause/Cue .................................................................................................... 16
Intro Scan ...................................................................................................... 16
Repeat Play .................................................................................................. 16
Random Play ................................................................................................ 17
Programmed Play ......................................................................................... 17
Resume ......................................................................................................... 18
2
) ................................................................ 14
Troubleshootin
Care and Maintenance ...................................................................................... 20
Replacing the DC Adapter’s Fuse ................................................................. 21
CD Care Tips ................................................................................................ 21
Specifications .................................................................................................... 22
................................................................................................ 19
5
Page 6
42-507 5.fm Page 6 Th ursday, Au gust 12, 1999 1:03 PM
POWERING THE CD PLAYER
You can power your CD player from
any of these sources:
• Two AA alkaline batteries (not
supplied)
• Two rechargeable AA nickelcadmium batteries (not supplied)
• Vehicle battery power using the
supplied DC adapter
• Standard AC power using an AC
adapter (not supplied)
Connecting an AC or DC adapt-
Note:
er to the CD player with non-rechargeable batteries installed disconnects
the batteries.
USING BATTERIES
You can power your CD player from
two AA alkaline batteries (such as RadioShack Cat. No. 23-552) or two rechargeable AA nickel-cadmium batteries (such as Cat. No. 23-125).
Cautions
• Always use fresh, or freshly
• Do not mix old and new batteries,
:
charged, batteries of the required
size and type.
different types of batteries (standard, alkaline, or rechargeable
nickel-cadmium), or rechargeable batteries of different capacities.
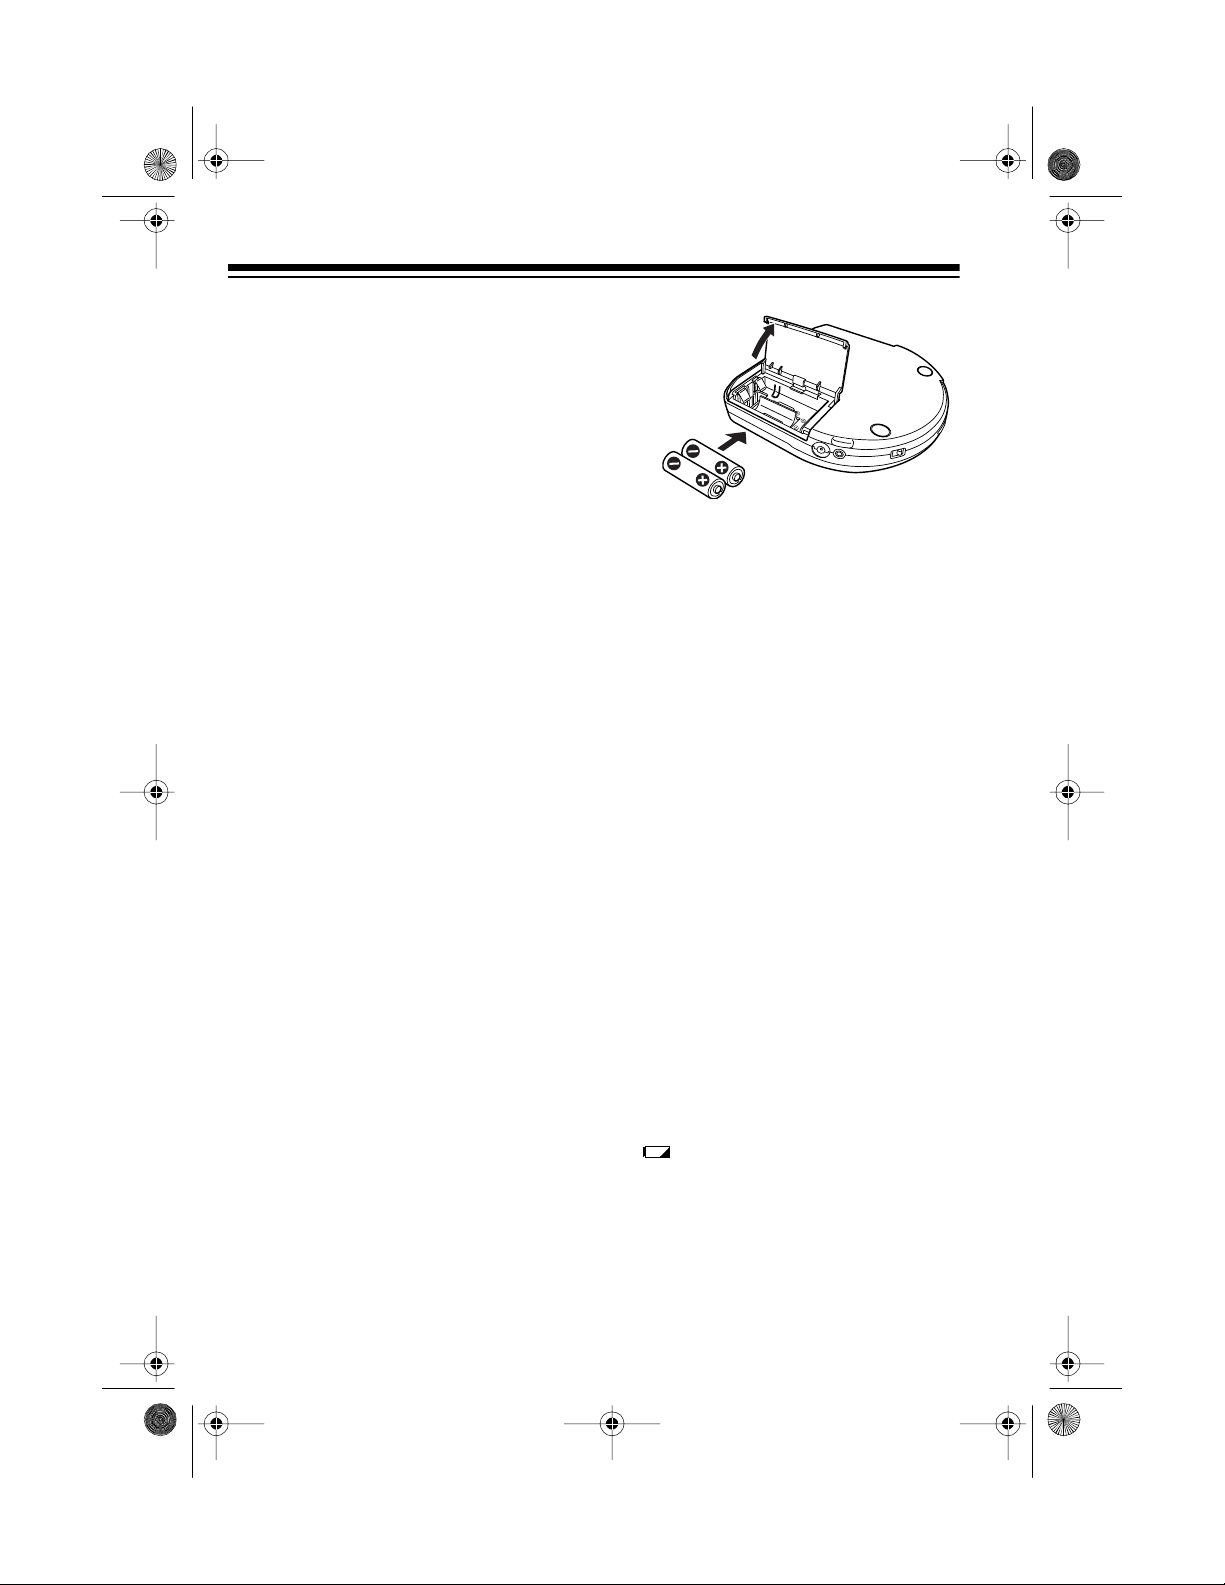
1. Press down on the battery com-
2. Put two AA alkaline batteries or
3. Close the battery compartment
If flashes on the display, the
sound distorts, or the volume weakens, replace or recharge the batteries.
partment cover and slide it in the
direction of the arrow on the
cover , then lift the cover.
Caution:
ment cover is a ttached to the CD
player. Do not try to remove it.
two AA nickel-cadmium batteries
in the battery compartment, as
indicated by the polarity symbols
(+ and –) marked inside.
Note
play er wi th n ick el-ca dmi um b att eries, you need to charge them,
either in an external battery
charger (such as Cat. No. 23-134)
or in the CD player (see “Recharging Nickel-Cadmium Batteries” on
Page 7).
cover.
The battery compart-
: Before you use the CD
Follow these steps to install the batteries.
6
Page 7
42-507 5.fm Page 7 Th ursday, Au gust 12, 1999 1:03 PM
Cautions:
• If you will not be using the CD
player with battery power for several months, remove the batteries.
• Dispose of old b atteries promptly
and properly.
Recharging Nickel-Cadmium
Batteries
If you connect the supplied DC adapt er (see “Using Vehicle B attery Power”
on Page 8) or an AC adapter (see
“Using AC Power” on Page 8) to the
CD player, you can set the CD player to charge nickel-cadmium batteries while they are inside the CD
player’s battery compartment.
Cautions:
• Use only the supplied DC adapter
or an AC adapter that meets the
specifications in “Using AC Power”
on Page 8 to recharge t he b at ter ie s
in the CD player. Other adapters
could damage your CD player or
the batteries.
• Do not use the CD player or open
the CD compartment cover while
you are charging nickel-cadmium
batteries.
Follow these steps to charge nickelcadmium batteries in the CD player.
1. Connect an AC adapter or the
supplied DC adapter to your CD
player (see “Using AC Power” on
Page 8 or “Using Vehicle Battery
Power” on Page 8).
2. With rechargeable batteries installed and the CD compartment
cover closed, press
CHG
flashes on the display. Then
CHG CHG CHG
CD player starts to recharge the
batteries.
It takes about 3 hours to charge
new or fully discharged nickelcadmium batteries. Subsequent
charges take 2–3 hours.
3. When the batteries are fully
charged, the CD player automatically stops charging them and
turns itself off. Disconnect the AC
or DC adapter.
STOP/CLEAR
appears and the
.
• Nickel-cadmium batteries charge
more efficiently if the temperature
is above 40°F (4.5°C) and below
90°F (32°C).
7
Page 8
42-507 5.fm Page 8 Th ursday, Au gust 12, 1999 1:03 PM
Important: Your CD player is capable
of using nickel-cadmium batteries. At
the end of the batteries’ useful life,
they must be recycled or dispos ed of
properly. Contact your local, county,
or state hazardous waste management authorities for information on recycling or disposal programs in your
area. Some options that might be
available are: municipal curbside collection, drop-off boxes at retailers
such as your local RadioShack store,
recycling collection centers, and mail back programs.
USING VEHICLE
BATTERY POWER
You can power your CD player from
your vehicle’s cigarette-lighter socket
with the supplied DC adapter.
Cautions:
• The supplied DC ada pter suppli es
6 volts and delivers at least 500
milliamps. Its center tip is set to
positive, and its pl ug correctly fits
the CD player’s
Using a DC adapter that does not
meet these specifications could
damage the CD player or the DC
adapter.
• When you finish using the CD
player, always unplug the DC
adapter from the cigarette-lighter
socket before you disconnect it
from your CD player.
DC IN 6V
jack.
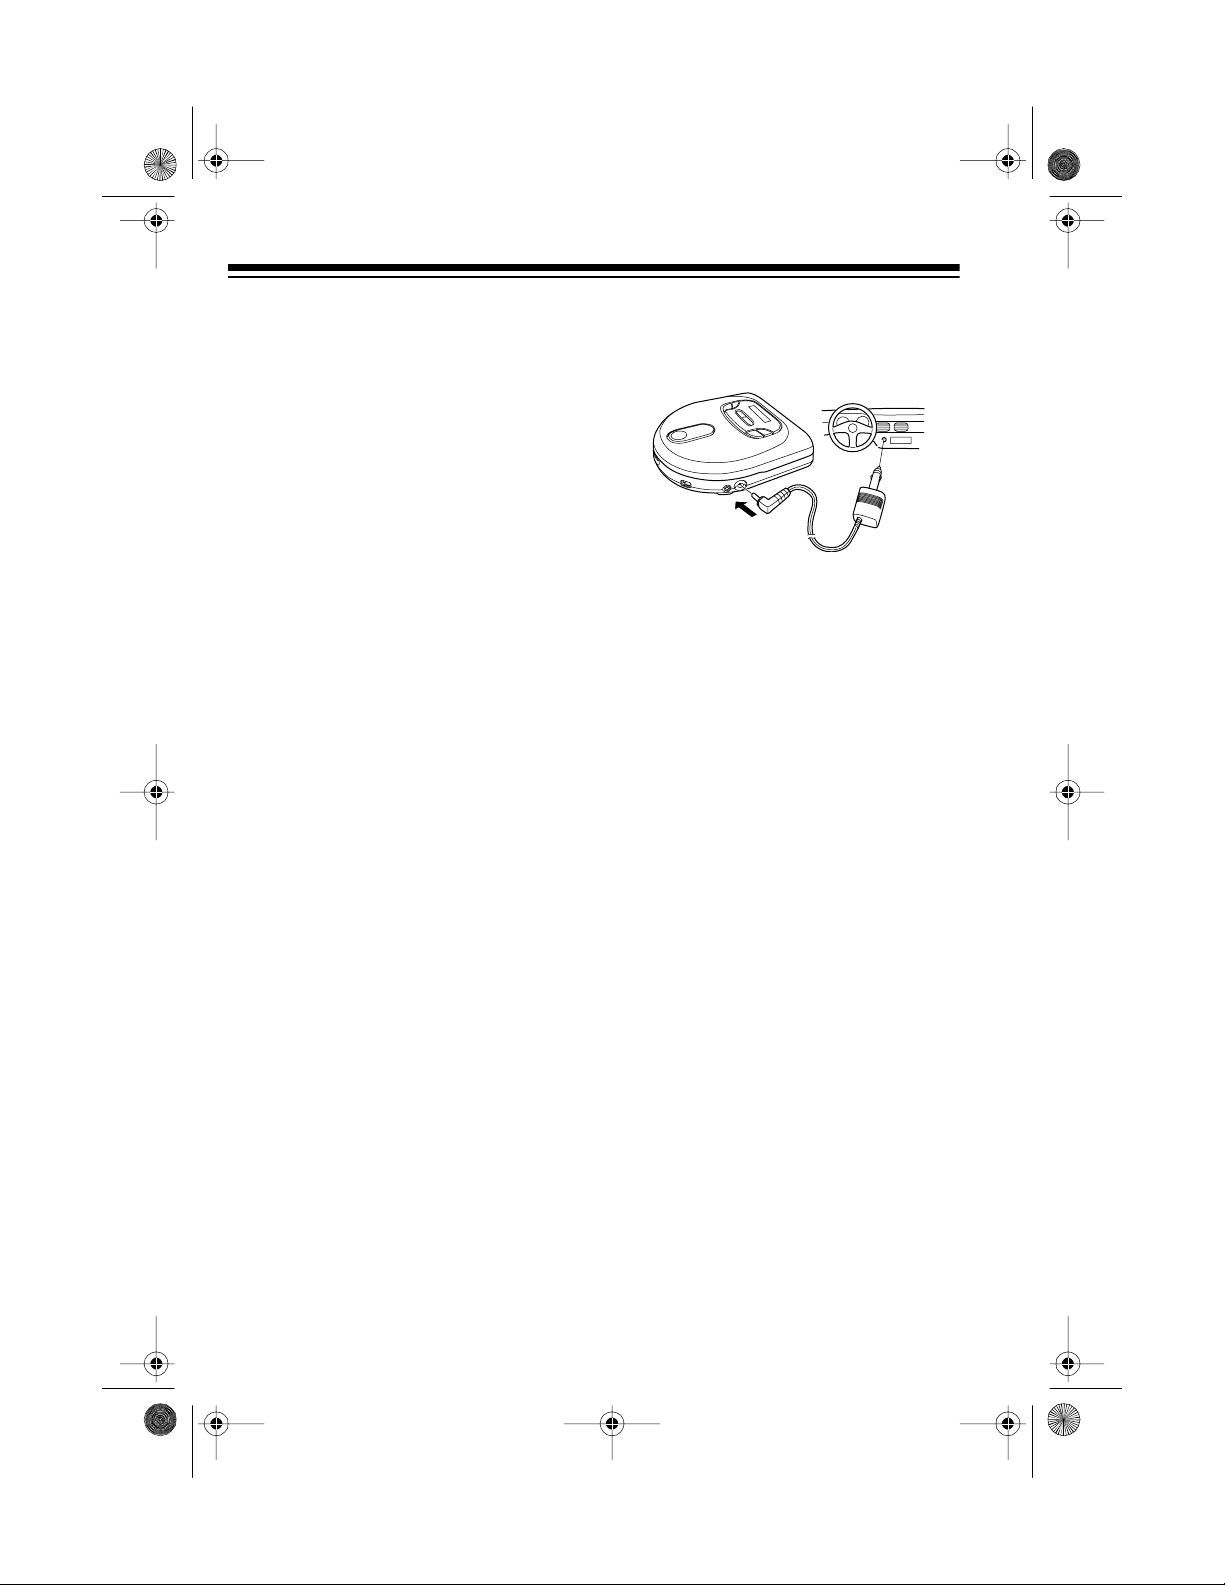
Follow these steps to connect the
cigarette-lighter socket to the CD player.
1. Insert the DC adapter’s barrel
plug into the CD pl ayer’s
jack.
2. Make sure the DC adapter ’s tip is
securely attached, then plug the
DC adapter’s other end i nto your
vehicle’s cigarette-lighter socket.
Note: If the CD player does not
operate when you use the DC
adapter, unplug the cord from the
cigarette-lighter socket and clean
any ashes or debris from the
socket.
DC IN 6V
USING AC POWER
You can power the CD player from a
standard AC outlet using an optional
AC adapter such as Cat. No. 273-
1664.
Cautions:
• You must use an AC adapter that
supplies 6 volts and delivers at
least 500 milliamps. Its center tip
must be set to positive, and its
plug must correctly fit the CD
player’s
DC IN 6V
jack. The recom-
8
Page 9

42-507 5.fm Page 9 Th ursday, Au gust 12, 1999 1:03 PM
mended adapter meets these
specifications. Using an adapter
that does not meet t hese specifications could damage the CD
player or the adapter.
• When you finish using the AC
adapter, unplug it from the AC outlet first, then disconnect it from the
CD player.
Follow these steps to conne ct the CD
player to AC power.
1. Insert the AC adapter’s 4.0 mm
outer diameter/1.7 mm inner
diameter barrel plug into the
adapter’s cord, setting TIP to +
(positive).
2. Set the AC adapter’s voltage
switch to 6V.
3. Insert the AC adapter’s barrel plug
into the CD player’s
DC IN 6V
jack.
4. Plug the other end of t he adapter
into a standard AC outlet.
9
Page 10

42-507 5.fm Page 10 T hursday, A ugust 12, 1999 1:03 P M
CONNECTIONS
You can listen to your CD player by
connecting earphones/headphon es or
amplified speakers to the player’s
PHONES
home audio or autosound system to
the CD player’s
Note:
do not match the plugs on the supplied Y-cable, check with your local
RadioShack store for the proper cable
adapter.
jack, or by connecting a
LINE OUT
If the jacks on your equipment
jack.
CONNECTING
EARPHONES/
HEADPHONES
For private listening, you can plug a
pair of stereo earphones or headphones with a
plied) into the
player.
1
/8-inch plug (not sup-
PHONES
jack on the CD
Listening Safely
To protect your hearing, follow these
guidelines when you use earphones
or headphones.
• Set the volume to the l owest setting before you begin listening.
After you begin listening, adjust
the volume to a comfortable level.
• Do not listen at extremely high
volume levels. Extended highvolume listening can lead to permanent hearing loss.
• Once you set the volume, do not
increase it. Over time, your ears
adapt to the volume level, so a
volume level that does not cause
discomfort might still damage your
hearing.
Traffic Safety
Do not wear earphones or headphones while operating a motor vehicle or riding a bicycle. This can create
a traffic hazard and co uld be illegal in
some areas.
10
Even though some earphones and
headphones let you hear some outside sounds when listening at normal
volume levels, they still can present a
traffic hazard .
Page 11

42-507 5.fm Page 11 T hursday, A ugust 12, 1999 1:03 P M
CONNECTING
AMPLIFIED SPEAKERS
You can listen to your CD player
through optional amplified speakers
(such as Cat. No. 40-1387). Plug the
speaker cable’s
CD player’s
1
/8-inch plug into the
PHONES
jack.
CONNECTING TO A
HOME AUDIO SYSTEM
You can listen to your CD player
through your home audio system’s
amplifier/receiver and full-size speakers. Connect the supplied Y-cable’s
1
/8-inch plug to the CD player’s
OUT
jack. Then connect t he Y-cable’s
phono plugs to your audio system’s
left and right CD, AUX, or TV audio input jacks.
LINE
CONNECTING TO AN
AUTOSOUND SYSTEM
You can listen to your CD player
through your autosound system in one
of the following ways:
• If your autosound system has
LINE IN jacks, connect the supplied Y-cable’s
CD player’s
connect the Y-cable’s phono
plugs to your autosound system’s
LINE IN input jacks.
• If your autosound system has a
CD input jack, connect one end of
1
a
/8-inch stereo patch cable (such
as Cat. No. 42-2387, not supplied)
to the CD player’s
Then connect the other end to
your autosound system’s CD
INPUT jack.
1
/8-inch plug to the
LINE OUT
jack. Then
LINE OUT
jack.
11
Page 12

42-507 5.fm Page 12 T hursday, A ugust 12, 1999 1:03 P M
• If your autosound system has a
cassette deck, connect the supplied CD-to-cassette adapter’s
plug to the CD player’s
PHONES
jack. Then insert the adapter’s
other end into your cassette deck
just like a standard cassette.
You can mount your CD player
Note:
in your car using an optional mounting
bracket. Your local RadioShack store
has a complete line of mounting
brackets and hardware.
12
Page 13

42-507 5.fm Page 13 T hursday, A ugust 12, 1999 1:03 P M
OPERATION
LOADING A CD
Caution:
entering the CD player, always keep
the CD compartment cover closed except when loading or unloading CDs.
1. Set
2. Slide
3. Carefully place a CD, label side
To help prevent dust from
OFF/RESUME/HOLD
OPEN
in the direction of the
arrow and lift the CD compartment
cover.
up, over the center hub inside the
CD compartment. Then gently
press the center of the CD until it
snaps down onto the center hub.
to
OFF
.
PLAYING A CD
Warning:
you are using earphones or headphones, set
ting before you play a CD.
Press
automatically turns on and
flashes on the display. Then and
the current track numb er appear and
Track 1 begins to play.
If you connected an earphone/headphones or amplified speakers to the
CD player’s
UME
volume.
To protect your hearing if
VOLUME
PLAY/PAUSE
PHONES
on the CD player to adjust the
to its lowest set-
. The CD player
00
briefly
jack, use
VOL-
Center Hub
4. Close the compartment cover.
If you connected the CD player to your
home audio system or autosound system using the
must use the home audio or autosound system’s volume control to adjust the volume.
LINE OUT
jack, you
13
Page 14

42-507 5.fm Page 14 T hursday, A ugust 12, 1999 1:03 P M
If you connected an external power
source, the CD player’s buttons light
until you stop the CD and t urn the CD
player off, or the CD player turns itself
off automatically.
To temporarily stop play, press
PAUSE
play, press
When the last track finishes playing,
the CD stops and the display alternately shows the total number of
tracks and total playing time of the CD
for about 2 minutes, then the CD player automatically turns off. To turn it off
sooner, press
. flashes. To resume
PLAY/PAUSE
STOP/CLEAR
again.
PLAY/
.
DIGITAL ANTI-SHOCK
SYSTEM (DAS
Your CD player contains special circuits to overcome sound skipping
problems caused by shock or vibration. This means you can carry the CD
player anywhere you go or use it in
your vehicle. When you turn on the
anti-shock system, the CD player continuously saves 3 seconds (42-5075)
or 10 seconds (42-5076) of music in
memory. During a shock or vibration
that would normally make a track skip
or pause, the CD player plays directly
from m e mory .
2
)
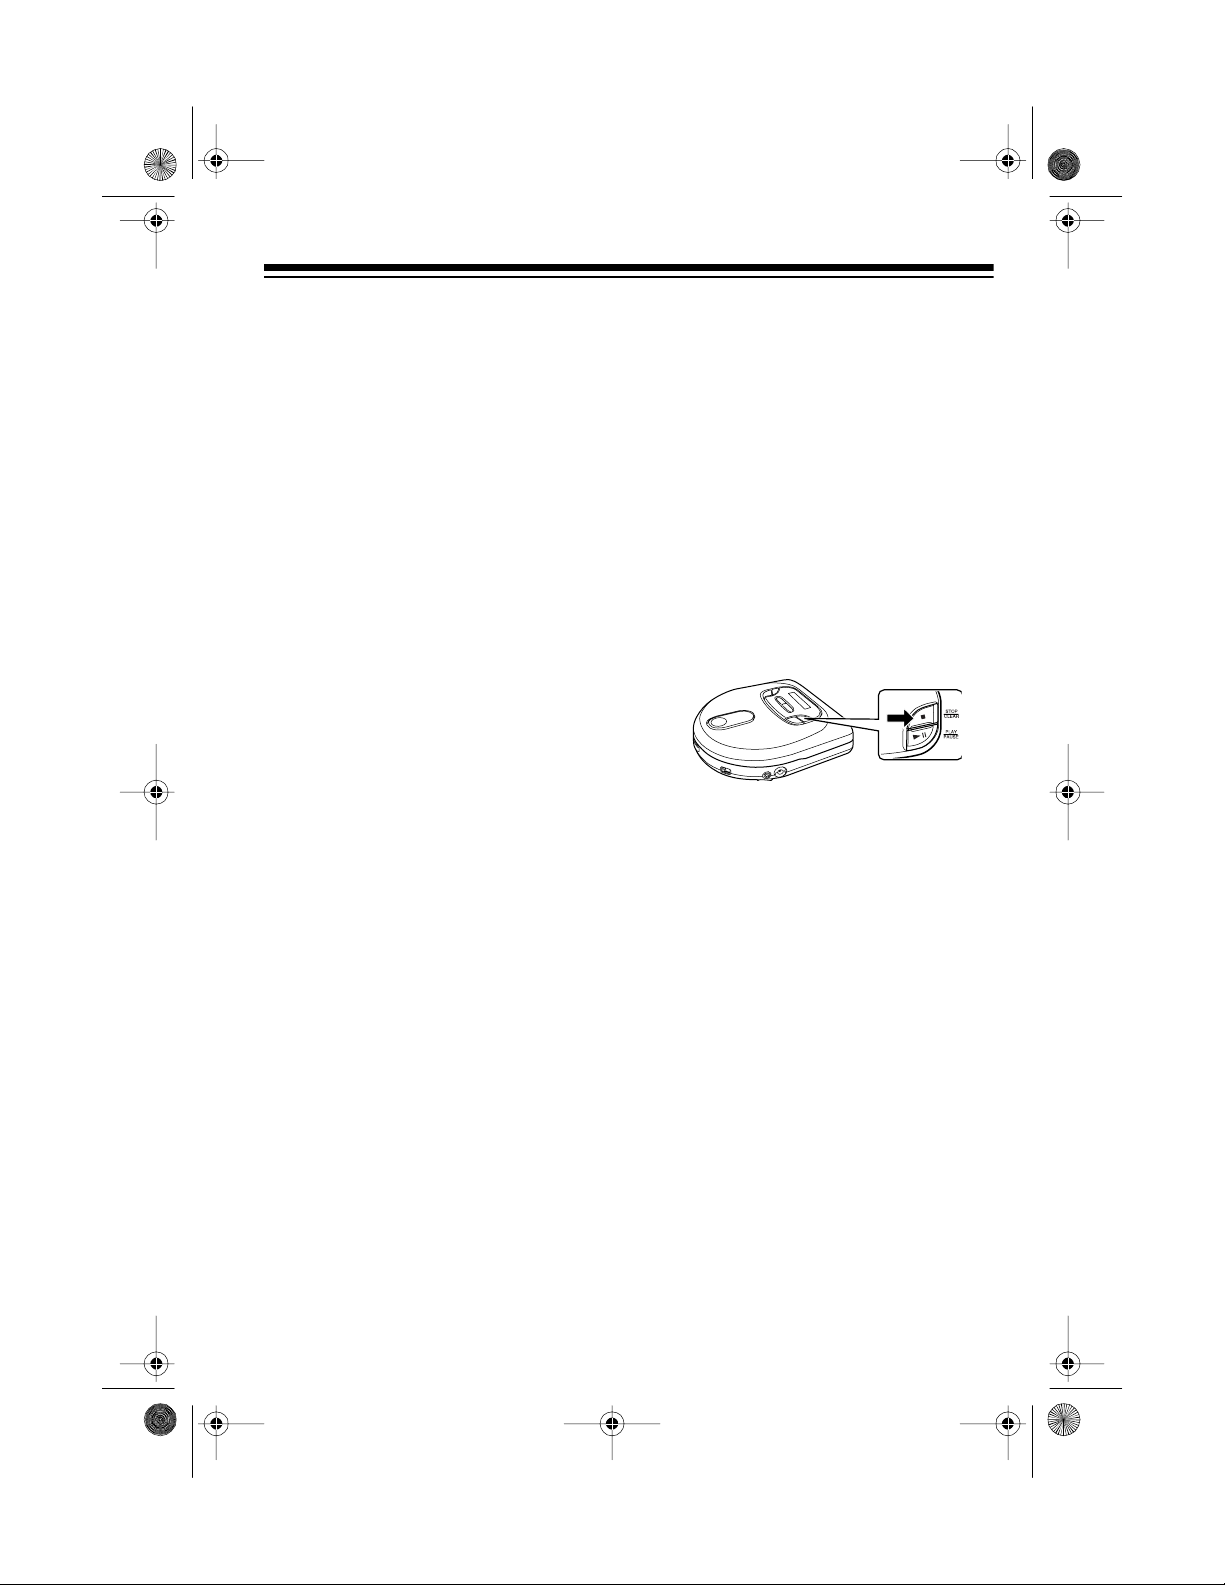
To turn on the anti-shock system, set
DAS OUT/IN
playing a CD, the sound briefly stops,
then appears on the display
and the sound continues.
to IN. If the CD player is
AUTOMATIC SEARCH
MUSIC SYSTEM (ASMS)
You can use ASMS before or during
regular or programmed play (see “Programmed Play” on Page 17) to quickly
locate any track on a CD.
While the CD is stopped, repeatedly
press
or forward to the desi red track. Press
PLAY/PAUSE
During play, press to return to
the beginning of the current track.
Press twice to return to the beginning of the previous track. To move
to the beginning of the next track,
press .
Note:
tional battery power when you use the
anti-shock system. When you use the
CD pl ay er in a s ta b l e loc a t io n, se t
OUT/IN
or to move backward
to play the track.
The CD player consumes addi-
DAS
OUT
to
to save battery power.
14
Page 15

42-507 5.fm Page 15 T hursday, A ugust 12, 1999 1:03 P M
To turn off the anti-shock system, set
DAS OUT/IN
stops, then disappears from the
display.
to
OUT
. The sound b riefly
LOCKING THE
CONTROLS
You can protect y our CD player from
accidental program changes by locking all controls except
DAS OUT/IN
UME
,
HOLD
itself)
To turn on the control lock, set
RESUME/HOLD
OFF/RESUME/HOLD
set
(and
.
HOLD
to
OPEN, VOL-
OFF/RESUME/
OFF/
. To turn it off,
OFF
to
.
VIEWING THE ELAPSED
TIME
To display the current track’s elapsed
time, hold down
about 1 second.
E-BASS
track display
again to return to the current
MEMORY/E-BASS
Hold down
.
for
MEMORY/
TURNING E-BASS ON
AND OFF
To enhance the bass sound, press
MEMORY/E-BASS.
the display. To turn the bass sound
off, press
MEMORY/E-BASS
disappears from the display.
appears on
again
.
15
Page 16

42-507 5.fm Page 16 T hursday, A ugust 12, 1999 1:03 P M
AUDIBLE SEARCH
To search forward or back ward during
play, hold down
plays rapidly and you hear the music at
a high speed and low volume. The current track’s elapsed time appears on
the display.
Release the button t o resume normal
play.
Note:
If you hold down while the
last track is playing, audible search
starts again at the beginning of that
same track. If you hold down
during the first track, audible search
stops at the beginning of Track 1.
or .
The CD
INTRO SCAN
You can set t he st ereo to play the first
10 seconds of each trac k on the CD,
so you can find the track you want to
listen to.
To begin scanning, repeatedly press
PLAY MODE
display. Intro scan starts from the first
track.
To return to normal play, repeatedly
press
pears.
Notes:
• Intro scan plays t he tracks in the
programmed order if you have
programmed a sequence (see
“Programmed Play” on Page 17).
• You can use
skip through the tracks.
until appears on the
PLAY MODE
until disap-
and to
PAUSE/CUE
To temporarily pause play, press
PLAY/PAUSE
play. Press
sume play.
You can also use
lect (cue) a track before playing.
When the CD player is stoppe d, pres s
or to select the track you
want to cue. Then press
PAUSE
When you are rea dy to p lay the track,
press
16
. flashes on the dis-
PLAY/PAUSE
PLAY/PAUSE
twice. flashes.
PLAY/PAUSE
again to re-
to se -
PLAY/
again.
REPEAT PLAY
You can repeat a singl e track on the
CD, all tracks on the CD, or a programmed sequence (see “Programmed Play” on Page 17).
To repeat a single track, press
MODE
playing. app ears on the display,
and the CD player continuously replays the track.
once while the desired track is
PLAY
Page 17

42-507 5.fm Page 17 T hursday, A ugust 12, 1999 1:03 P M
To cancel random play, repeatedly
press
pears.
PLAY MODE
until disap-
PROGRAMMED PLAY
To repeat all tracks on a CD or in a programmed sequence, press
MODE
display.
When the CD player reaches the end
of the CD or the programmed sequence, it continuously returns to the
first track and replays al l the tra cks.
To cancel repeat play, repeatedly
press
twice. appears on the
PLAY MODE
disappear,
until and
PLAY
RANDOM PLAY
In random play, the CD player plays all
the tracks once in random order, then
automatically stops. To start random
play, repe atedl y pr ess
appears on th e di splay.
If you select random play during
Note:
programmed play, the CD player
stops the programmed sequence and
starts random play of all tracks.
PLAY MOD E
until
You can program up to 24 tracks from
the loaded CD to play in any order you
choose, and you can program the
same track to play more than once.
Follow these steps to program and
play a sequence.
1. While the CD is stopped, hold
MEMORY/E-BASS
down
3 seconds. The display shows the
selection number (
track number (
flashes.
2. Repeatedly press either or
to display the n umber of the
first track you want to program.
3. Press
the selected track number. The
selection number advances by
one and the track number returns
to
4. Repeat Steps 2 and 3 for each
track you want to program, up t o
24 tracks.
Note:
track in memory,
5. To play the programmed se-
quence, press
lights and the first track in the
sequence plays.
MEMORY/E-BASS
00
.
When you store the 24th
PLAY/PAUSE
01
00
), and
FuLL
for about
) and the
to store
appears.
.
17
Page 18

42-507 5.fm Page 18 T hursday, A ugust 12, 1999 1:03 P M
While the programmed sequence
plays, you can use to move
for w ar d o r
to move backward
in the sequence.
6. After the last programmed track
ends, the CD player stops. T o stop
the CD before the end of the
sequence, press
Note:
You can replay, check, or add
STOP/CLEAR
.
to the programmed sequence within 2
minutes after play stops. Otherwise,
the CD player turns off and clears the
programmed sequence.
To replay the programmed se-
•
quence
To check the programmed se-
•
quence
, press
, press
PLAY/PAUSE
MEMORY/E-BASS
.
The display shows the number of
the first programmed track. Each
time you press
MEMORY/E-BASS
the display shows the number of
the next track in the sequence.
To add to the end of a pro-
•
grammed sequence
MEMORY/E-BASS
press
number
00
appears. Then follow
, repeatedly
until track
Steps 3 and 4.
To clear the programmed sequence
from memory, press
STOP/CLEAR
twice or open the CD compartment
door.
RESUME
You can set the CD player t o remember the track it was playing when you
stopped the CD or it turned itself of f.
That way, when you play the CD
again, the CD player resumes playing
at the beginning of that track.
To set the CD player to resume, set
OFF/RESUME/HOLD
time. Then, after you have pressed
STOP/CLEAR
to turn off the CD player,
you can simply press
resume play.
To cancel resume play, set
RESUME/HOLD
to
compartment.
.
Notes:
,
• If you press
close to the beginning or end of a
track, the CD player might play
the track before or after that track
instead when you press
PAUSE
. This is not a malfunction.
• If you install a different CD while
OFF/RESUME/HOLD
SUME
, play might not start from
Track 1 on the new CD. If this
happens, press
OFF/RESUME/HOLD
PLAY/PAUSE
press
RESUME
to
PLAY/PAUSE
OFF
or open the CD
STOP/CLEAR
STOP/CLEAR
again.
at any
very
PLAY/
is set to
OFF
to
, then
to
OFF/
RE-
, set
18
Page 19

42-507 5.fm Page 19 T hursday, A ugust 12, 1999 1:03 P M
TROUBLESHOOTING
If you have problems operating your CD play er, check this chart. If these suggestions do not solve the problem, contact your local RadioShack store for assistance.
Problem Possible Cause Solution
The CD player does not
work.
OFF/RESUME/HOLD
HOLD
set to
.
No power. Be sure the batteries are
A CD is loaded, but the
CD player does not
start.
The CD is loaded
upside-down.
The CD is dirty or
defective.
Sound from a CD skips. The CD is dirty or
defective.
is
OFF/RESUME/HOLD
Set
OFF
to
.
not weak.
Make sure an AC adapter
or the DC adapter is
properly connected.
If you are using a DC
adapter to power the CD
player, check the adapter’s fuse. See “Replacing
the DC Adapter’s Fuse”
on Page 21.
Reload the CD, label side
up.
Clean the CD and reload
it, or try a different CD.
See “Replacing the DC
Adapter’s Fuse” on
Page 21.
Clean the CD and reload
it, or try a different CD.
See “Replacing the DC
Adapter’s Fuse” on
Page 21.
Vibration is excessive. Set
Place the CD player in a
different location.
Moisture has condensed on the pickup
Wait 1 hour for the moisture to evaporate.
lens.
DAS OUT/IN
to IN.
19
Page 20

42-507 5.fm Page 20 T hursday, A ugust 12, 1999 1:03 P M
CARE AND MAINTENANCE
Your Optimus CD-3680/CD-369 0 Portable Compact Disc Player wi th Digital AntiShock is an example of superior design and craftsman ship. The following suggestions will help you care for your CD player so you can enjoy it for years.
Keep the CD player dry. If it gets wet, wipe it dry immediately. Liquids
might contain minerals that can corrode the electronic circuits.
Use and store the CD player only in normal temperature e nvironments. Temperature extrem es can shorten t he life of electronic devices, damage batteries, and distort or melt plastic parts.
Keep the CD player away from dust and dirt, which can cause premature wear of parts.
Handle the CD player gently and carefully. Dropping it can damage
circuit boards and cases and can cause th e CD player to work improperly.
Use only fresh batteries of the required size and type. Batteries can
leak chemicals that damage your CD player’s electronic parts.
Wipe the CD player with a damp cloth occasionally to keep it looking
new. Do not use harsh chemicals, cleaning solvents, or strong detergents to clean the CD player.
Modifying or tampering with the CD player’s internal components can caus e a m alfunction and might invalidate your CD player’s warranty and void your FCC authorization to operate it. If your CD p layer is not performing as it should, take it to your
local RadioShack store for assistance.
20
Page 21

42-507 5.fm Page 21 T hursday, A ugust 12, 1999 1:03 P M
REPLACING THE DC
ADAPTER’S FUSE
If the CD player stops operating,
check the fuse in the DC adapter’s
cigarette-lighter plug. If it has blown,
follow these steps to rep lace it with a
3-amp, 5 × 20 mm, fast-acting fuse
such as Cat. No. 270-1054 (no t supplied).
Caution:
meet these ratings can damage your
CD player or the vehicle’s electrical
system.
1. Carefully unscrew the tip of the
2. Remove the old fuse and replace
3. Screw the cigarette-lighter plug’s
Using a fuse that does not
cigarette-lighter plug.
it with the new fuse.
tip back onto the body.
CD CARE TIPS
Even though a CD is very durable, you
should handle it with care.
• Keep the CD inside the CD player
or in its protective case or sleeve
when you are not playing it.
• Handle a CD by its edges to avoid
fingerprints that can prevent the
CD player’s laser beam from
accurately reading the CD. Your
local RadioShack store sells a
suitable CD cleaner kit.
• Do not write on either s ide of the
CD, particularly the non-label
side. (Signals are read from the
non-label side.)
• Keep the CD dry. A water drop
can act as a lens and affect the
laser beam’s focus.
• Never use chemicals such as
record cleaning sprays, anti-static
sprays or fluids, benzene or thinner to clean CDs. These chemicals will permanently damage the
plastic surface of the CD.
• If a CD skips when you try to
play it, the CD might be
scratched. Your local RadioShack store sells a Scratch ’n
Fix kit (Cat. No. 42-127) that
might stop the skip. Also see
“Troubleshooting” on Page 19.
21
Page 22

42-507 5.fm Page 22 T hursday, A ugust 12, 1999 1:03 P M
SPECIFICATIONS
AUDIO
Frequency Response (±3 dB) ........................................................... 20–20,000 Hz
Dynamic Range ............................................................................................. 80 dB
Signal-to-Noise Ratio ..................................................................................... 80 dB
Harmonic Distortion at 1 kHz ........................................................................ 0.07%
Separation at 1 kHz ....................................................................................... 55 dB
Wow/Flutter .................................................................................... Not Measurable
Earphones Output (10% THD at 32 ohm) ..................................... .. .. 7 mW + 7 mW
Line Output ..................................................................................................... 0.6 V
SIGNAL FORMAT
Sampling Frequency ................................................................................. 44.1 kHz
Oversampling .............................................................................................. 8 Times
Quantization Number ............................................................ 16-Bit Linear/Channel
Transmission Bit Rate ............................................................... 4.3218 Mb/Second
Signal-Processing Rate ........................................................... ....... ....... . 352.8 kHz
PICK-UP
Tracking System ....................................................... 3-Beam Tracking Servo Type
Object Lens Drive System ......................................... 2-Dimensional Parallel Drive
Optical Source ....................................................................... Semiconductor Laser
Wavelength .................................................................................................. 780 nm
GENERAL
Power Requirements .................................................... DC 3V; Two AA Alkaline or
Rechargeable Nickel-Cadmium Batteries (not supplied),
DC Adapter (supplied)
AC Adapter such as 273-1664 (not supplied),
Power Consumption .......................................................................................... 8 W
Battery Life (EIAJ Method) ................................................. 7 Hours (with DAS
1
Dimensions (HWD) ........................... 1
Weight (without batteries) . ................................................................ 9.5 oz (270 g)
Included Accessories .................................. Y-Cable, DC Adapter, CD-to-Cassette
Specifications are typical; individu al units might va ry. Specifications are subject to
change and improvement without notice.
22
/8 × 51/16 × 53/8 Inches (32 × 129 × 137 mm)
Adapter, Carrying Case (CD-3690 only)
2
off )
Page 23

42-507 5.fm Page 23 T hursday, A ugust 12, 1999 1:03 P M
NOTES
23
Page 24

42-507 5.fm Page 24 T hursday, A ugust 12, 1999 1:03 P M
Limited One-Year Warranty
This product is warranted by RadioShack against manu facturing defects in materi al and workmanship under
normal use for one (1) year from the date of purchase from RadioShack company-owned stores and authorized
RadioShack franc hisees and de alers. EXCEPT AS PROVIDE D H EREIN, R adioSha ck MAK ES NO EXP RESS
WARRANTIES AND ANY IMPLIED WARRANTIES, INCLUDING THOSE OF ME RCHANTABILITY AND FITNESS FOR A PARTICULAR PURPOSE, ARE LIMITED IN DURATION TO THE DURATION OF THE WRITTEN LIMITED WARRANTIES CONTAINED HEREIN. EXCEPT AS PROVIDED HEREIN, Rad ioShack SHALL
HAVE NO LIABILITY OR RESPONSIBILITY TO CUSTOMER OR ANY OTHER PERSON OR ENTITY WITH
RESPECT TO ANY LIABILITY, LOSS OR DAMAGE CAUSED DIRECTLY OR INDIRECTLY BY USE OR PERFORMANCE OF THE PRODUCT OR ARISING OUT OF A NY BREACH O F THIS WARRANTY, INCLUDING,
BUT NOT LIMITED TO, ANY DAMAGES RESULTING FROM INCONVENIENCE, LOSS OF TIME, DATA,
PROPERTY, REVENUE, OR PROFIT OR ANY INDIRECT, SPECIAL, INCIDENTAL, OR CONSEQUENTIAL
DAMAGES, EVEN IF RadioShack HAS BEEN ADVISED OF THE POSSIBILITY OF SUCH DAMAGES.
Some states do not allow the limitations on how long an implied warranty lasts or the exclusion of incidental or
consequential damages, so the above limitations or exclusions may not apply to you.
In the event of a product defect during the warranty period, take the produc t and the Radio Shack sales receipt
as proof of purchase date to any RadioShack store. RadioShack will, at its option, unless otherwise provided by
law: (a) correct the defect by product repair without charge for parts and labor; (b) replace the product with one
of the same or similar design; or (c) refund the purchase price. All replaced parts and products, and products on
which a refund is made, become the property of RadioShack. New or reconditioned parts and products may be
used in the performance of warranty service. Repaired or replaced parts and products are warranted for the remainder of the original warranty period. You will be charged for repair or replacement of the product made after
the expiration of the warranty period.
This warranty does not cov er : (a) d amage or fail ure ca used by or attr ibut able to ac ts o f God, abus e, a ccide nt,
misuse, imprope r or abnormal us age, failur e to follow i nst ructions, imp roper instal lat ion or main tenan ce, alte ration, lightning or other incidence of exces s voltage or current; (b) any repairs other than those pro vided by a
RadioShack Authorized Service Facility; (c) consumables such as fuses or batteries; (d) cosmetic damage; (e)
transportation, shipp ing or insuran ce costs; or (f) costs of product remova l, installation , set-up service adjustment or reinstallation.
This warranty gives you specific legal rights, and you may also have other rights which vary from state to state.
RadioShack Customer Relations, Dept. W, 100 Throckmorton St., Suite 600, Fort Worth, TX 76102
We Service What We Sell
3/97
RadioShack
A Division of Tandy Corporation
Fort Worth, Texas 76102
9A7 Printed in Thailand
 Loading...