

Page 1

42-506 7.fm Page 1 Thursday, Augu st 12, 1999 10:10 AM
Please read before using this equipment.
Portable Compact Disc Player
Cat. No. 42-5067
OWNER’S MANUAL
CD-3580
Page 2

42-506 7.fm Page 2 Thursday, Augu st 12, 1999 10:10 AM
FEATURES
Your Optimus CD-3580 Portable
Compact Disc Player uses the latest
digital audio technology to give you
the clean, crisp sound of compact
discs. You can connect the CD player to your home audio system, or
connect a pair of stereo earphones
for portable, private listening. Its
unique digital anti-shock system virtually eliminates skips caused by
sudden shocks.
The CD player’s features include:
Digital Anti-Shock System (DAS
— rapidly scans data from the CD
and stores it in memory for uninterrupted play with no sound skip even
when the CD player is exposed to
shocks or vibration, making this CD
player excellent for use with your
auto sound syst em .
Eight-Times Oversampling with
Digital Filtering
— improves the
CD’s sound by multiplying the stan-
©
1996 Tandy Corporation.
Optimus is a registered trademark used by Tandy Corporation.
RadioShack is a trademark used by Tandy Corporation.
All Rights Reserved.
2
dard 44.1 kHz sample rate by eight
and using a digital filter to reduce or
eliminate distortion.
1-Bit DAC
— uses the latest in digital-to-analog conversion circuitry to
accurately reproduce all sound levels with virtual ly no distortion.
BASS Switch
— lets you adjust the
frequency response to match the
type of music you listen to.
Automatic Search Music System
2
(ASMS)
)
— lets you quickly locate
and play any track on a CD.
Audible Search
— helps you locate
a particular section of a track by rapidly playing the CD in either direction.
Programmable Play
program and play up to 22 tracks in
any sequence you choose.
— lets you
Page 3
42-506 7.fm Page 3 Thursday, Augu st 12, 1999 10:10 AM
Repeat Play — lets you automatically repeat a single track, an entire
CD, randomly selected tracks, or a
programmed sequence of tracks.
Pause — lets you temporarily stop
playback of a CD and start it again
from the same point.
Intro Scan — helps you locate a desired track by playing the first 10
seconds of each track on t he CD.
Auto Power On/Off — automatically turns power on when you load a
CD, so you can immediately begin
play; and turns power off when all
tracks finish, to save power.
Hold Function — prevents you from
accidentally changing the CD’s programmed play sequence, and preserves battery life by locking all
controls when you turn off the CD
player.
Three Power Sources — let you
power your CD player from AA batteries, standard AC power (using an
optional AC adapter), or your vehicle’s battery (using an optional DC
adapter).
Built-In Battery Charger — recharges the battery inside the CD
player when you use a special-order
nickel-cadmium battery pack.
5- and 3-Inch CD Compatible
Important: You need a pair of ste-
reo earphones or amplified speakers
or a home audio or auto sound system to use your CD-3580. Your local
RadioShack store carries a complete line of earphones, amplified
speakers, and audio systems.
The CD player’s advanced technology makes it simple to operate. Be
sure you read this Owner’s Manual
completely so you can take advantage of all the CD player’s advanced
features.
3
Page 4
42-506 7.fm Page 4 Thursday, Augu st 12, 1999 10:10 AM
We recommend you record the CD
player’s serial number here. The
number is in the battery compartment.
Serial Number
CDs that can be played on this play-
er have this mark on the m:
FCC INFORMATION
This equipment complies with the
limits for a Class B digital device as
specified in Part 15 of
These limits provide reasonable protection against radio and TV interference in a residential area. However,
your equipment might cause TV or
radio interference even when it is
operating properly. To eliminate interference, you can try one or more
of the following corrective meas ures:
• Increase the distance between
the CD player and the radio or
TV.
• Use outlets on different electrical circuits for the CD player
and the radio or TV.
• Consult your local RadioShack
store if the probl em sti ll exists.
FCC Rules
.
4
Page 5

42-506 7.fm Page 5 Thursday, Augu st 12, 1999 10:10 AM
CONTENTS
Choosing a Power Source ............... ........................................... ................ 7
Using Batteries ....................................................................................... 7
Installing Batteries ........................................................................... 7
Charging a Nickel-Cadmium Battery Pack ...................................... 8
Charging Tips .................................................................................. 9
Using AC Power ................................................................................... 10
Using Vehicle Battery Power ................................................................ 11
Conne ctions ..... .......... ............ ............ ............ .......... ............ ............ .......... 13
Connecting Earphones ....................................................... .. ................ 13
Listen in g S af e ly ......... ....... .. ............... ... .............. ... .............. ... ....... 13
Traffic Saf e ty ... ....... ... .. ....... ... .. ........ .. ....... ... .. ........ .. ............... .. ..... 14
Connecting Amplified Speakers ............ .. .................... .. ....................... 14
Connecting to a Home Audio System ... .............................. .. ................ 15
Connecting to an Auto Sound System .................................................. 15
Oper at io n ..... ....... ... .. ....... ... .............. ... ....... ... .. ....... ... .............. ... .............. ... 17
Playing a CD ......................................................................................... 17
Digital Anti-Shock System (DAS
Locking the Controls ............................................................................. 19
Paus e .... .. ............... .. ............... .. ........ .. ... ....... .. ... ....... ... ....... .. ... ....... .. ... 19
Bass Switch .......................................................................................... 20
Checking Remaining Time ................................................................... 20
Intro S ca n ... .. ........ .. .. ........ .. ............... .. ........ .. .. ........ .. ............... .. .......... 21
Automatic Search Music System (ASMS) ............................................ 21
Audib le S earch ..... ....... .. ............... .. ........ .. ... ....... .. ............... .. ............... 22
2
) .. ............... .. ............... .. ............... .. ... 18
5
Page 6
42-506 7.fm Page 6 Thursday, Augu st 12, 1999 10:10 AM
Programmed Play ................................................................................. 22
Checking, Adding To, Replacing, or Clearing the
Programmed Sequence ................................................................. 24
Repeat Play .......................................................................................... 24
Troubleshooting ......................................................................................... 26
Care and Maintenance ............................................................................... 27
Caring for the CD-3580 ....... .. ............ .. ........... ........................ .. .. ........... 27
CD Care Tips ........................................................................................ 29
Laser Safety .......................................................................................... 29
Specifications ............................................................................................. 30
6
Page 7

42-506 7.fm Page 7 Thursday, Augu st 12, 1999 10:10 AM
CHOOSING A POWER SOURCE
You can power your CD player from:
• Two AA alkaline batteries (not
supplied) or one special-order
rechargeable nickel-cadmium
battery pack (not supplied)
• Standard AC power, using an
AC adapter (not supplied)
• A vehicle’s battery power, using
a DC adapter (not supplied)
USING BATTERIES
You can power your CD player from
two AA alkaline batteries, such as
RadioShack Cat. No. 23-552, or one
special-order rechargeable nickelcadmium battery pack (Cat. No.
RSU 11649035, available through
your local RadioShack store). The
CD player can recharge the specialorder nickel-cadmium battery pack
while it is in the CD player.
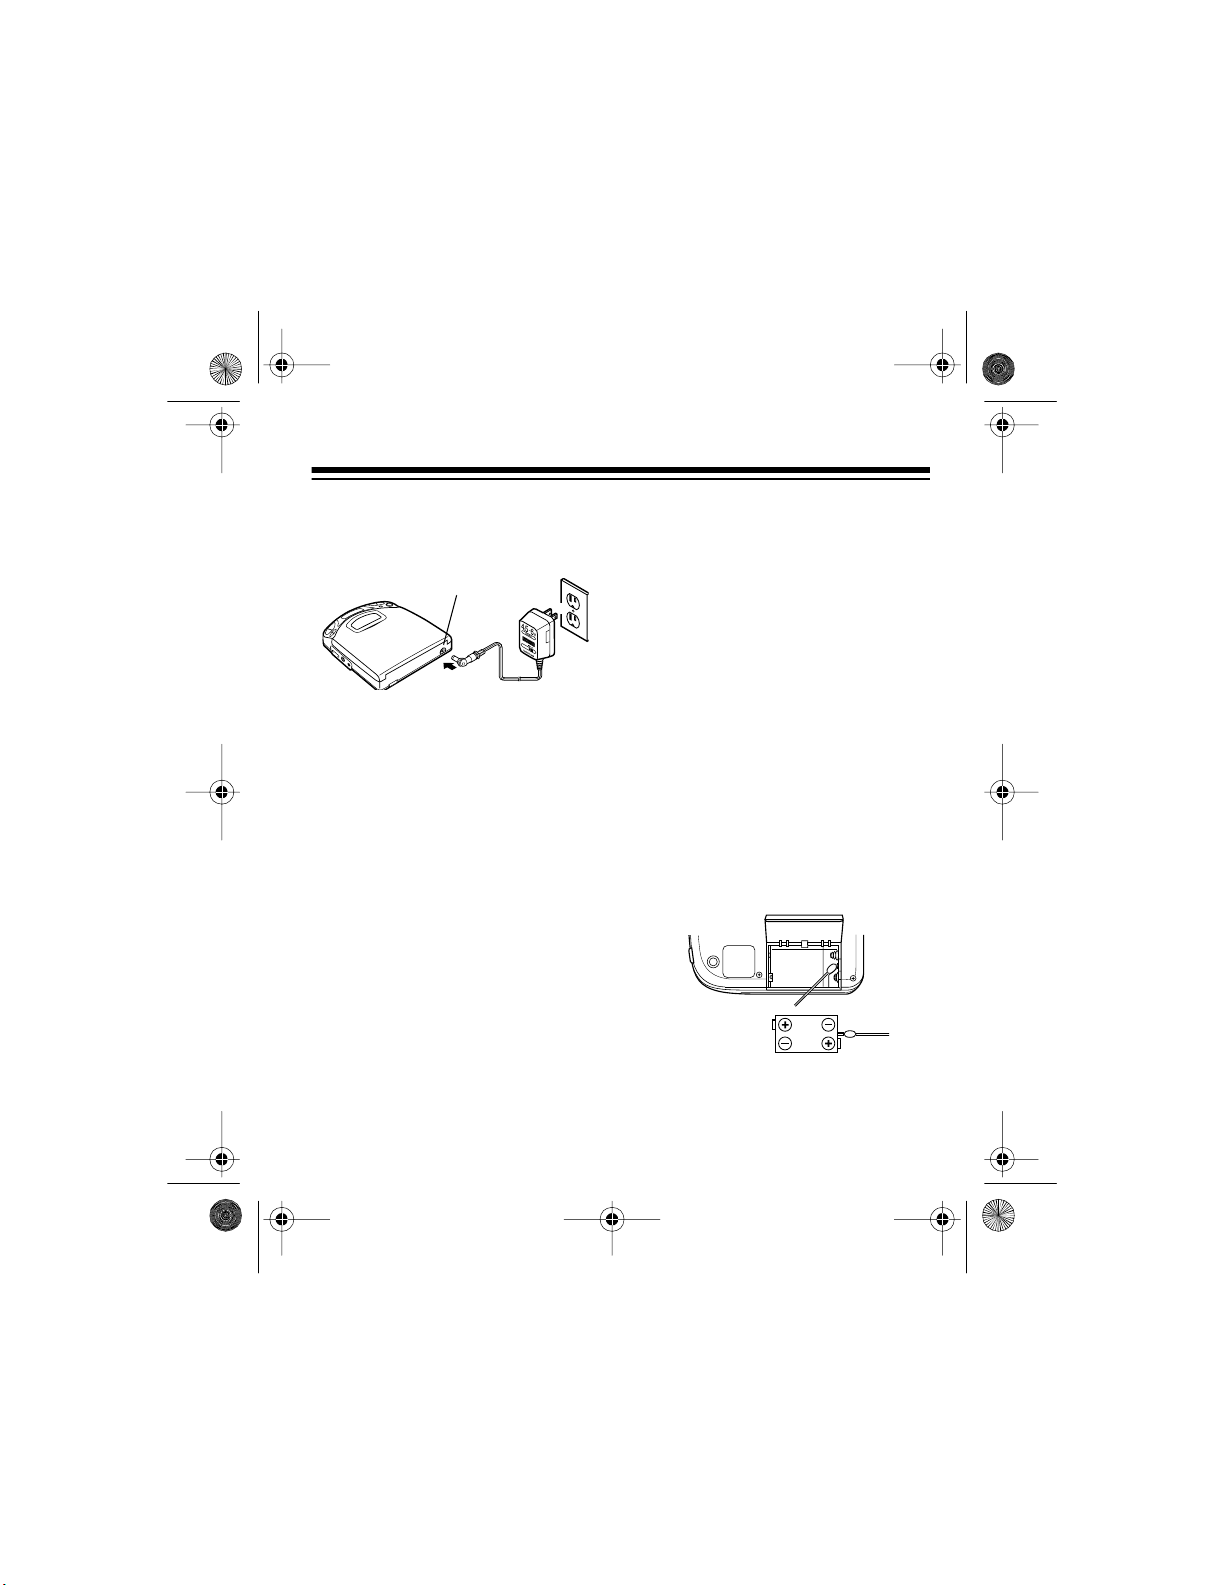
Installing Batteries
1. Slide the battery compartment
cover in the direction of the
arrow, then lift it open.
2. Place two AA batteries or the
special-order nickel cadmium
battery pack in the compart m ent
as indicated by the polari ty symbols (+ and –) marked inside the
compartment.
7
Page 8
42-506 7.fm Page 8 Thursday, Augu st 12, 1999 10:10 AM
Cautions:
• Use only batteries of the
required size and type.
• Never mix fresh and old batteries, alkaline and nickelcadmium batteries, or nickelcadmium batteries of different capaciti es.
• If you do not plan to use the
CD player for a month or
more, or you plan to power it
only from an optional AC or
DC adapter, remove and
store the batteries.
3. Close the battery compartment
cover.
When the batteries become weak,
flashes, then the CD player
automatically turns off. Replace alkaline batteries or recharge the
nickel-cadmium battery pack when
this happens.
Cautions:
• Always dispose of old batteries
promptly and properly.
• Never heat, disassemble, or
throw b at te ries into a fir e .
• Never leave dead, old, or weak
batteries in the CD player. Batteries can leak chemicals that
corrode or damage electronic
circuits.
Charging a NickelCadmiu m B attery Pac k
The nickel-cadmium battery pack
comes fully discharged. You can
charge the special-order battery
pack while it is in the battery compartment using an AC adapter (such
as Cat. No. 273-1664, not supplied)
or DC adapter (such as Cat. No.
273-1801, not supplied). See “Using
AC Power” on Page 10 and “Using
Vehicle Battery Power ” on Page11.
8
Page 9
42-506 7.fm Page 9 Thursday, Augu st 12, 1999 10:10 AM
Follow these steps to recharge a
nickel-cadmium battery pack while it
is in the battery compartment.
EXT DC 6V
1. Set the tip polarity on the
adapter to positive (+), and set
the adapter’s voltage switch to
6V.
2. Insert the adapter’s 4.0 mm
outer diameter/1.7 mm inner
diameter barrel plug into the CD
player’s
EXT DC 6V
jack.
3. Plug the adapter’s other end
into your vehicle’s cigarette
lighter socket or a standard AC
outlet.
4. When the nickel-cadmium battery pack fully charges, unplug
the adapter, then disco nnect the
adapter from the CD playe r.
Notes:
• It takes about 10 hours for the
CD-3580 to charge a fully discharged nickel-cadmium battery
pack.
• You can play a CD while
recharging the battery pack;
however, this could cause the
battery pack to recharge more
slowly.
Charging Tips
• Alw ay s keep the cha r ging termi nals clean. Use a cotton swab
dipped in alcohol to clean the
terminals.
• Under normal usage conditions, the nickel-cadmium battery pack can be recharged
about 500 times.
9
Page 10

42-506 7.fm Page 10 Thursday, August 12, 1999 10:10 AM
• Fully discharge the battery pack
occasionally by playing the CD
player until it no longer plays.
Then fully recharge the battery
pack. This helps restore the battery pack’s full charging capacity.
• Avoid charging the battery pack
in a hot environment (more than
113°F) as this can permanently
reduce the battery pack’ s charging capacity.
• Do not overcharge the battery
pack. Overcharging can severely reduce a battery pack’s
useful life.
• Do not short-circuit the battery
pack’s terminals (+ and –).
Important: This portable CD player
is capable of using a rechargeable
nickel-cadmium battery pack. At the
end of its useful l ife, the battery pack
must be recycled or disposed of
properly. Contact your local, county,
or state hazardous waste management authorities for information on
recycling or disposal programs in
your area. Some options that might
be available are: municipal curb-side
collection, drop-off boxes at retailers, recycling collection centers, and
mail-back programs.
USING AC POWER
You can power the CD player from
standard AC power using an AC
adapter, such as Cat. No. 273-1664
(not supplied).
Cautions:
• You must use an AC adapter
that supplies 6 volts and delivers at least 550 milliamps. Its
center tip must be set to positive, and its plug must correctly
fit the CD player’s
jack. The recommended AC
adapter meets these specifications. Using an adapter that
does not meet these specifications could damage the CD
player or the adapter.
EXT DC 6V
10
Page 11

42-506 7.fm Page 11 Thursday, August 12, 1999 10:10 AM
• When you finish using the AC
adapter, disconnect it from the
AC outlet first, then unplug it
from the CD player.
Follow these steps to use an AC
adapter.
EXT DC 6V
1. Attach the 4.0 mm outer diameter/1.7 mm inner diameter barr el
plug to the adapter cord, matching the positive (+) on the plug
with TIP on the cord.
2. Set the adapter’s voltage switch
to 6V.
3. Insert the adapter’s barrel plug
into the CD player’s
jack.
Note:
Battery power disconnects when you connect an AC
adapter to the CD player
(unless you are using a special-
EXT DC 6V
order nickel-cadmium battery
pack).
4. Plug the other end of the
adapter into a standard AC outlet.
USING VEHICLE
BATTERY POWER
You can power your CD player from
your vehicle’s battery using an optional DC adapter, such as Cat. No.
273-1801.
Cautions:
• You must use a DC adapter that
supplies 6 volts and delivers at
least 550 milliamps. Its center
tip must be set to positive, and
its pl u g must co rrectly fit the C D
player’s
recommended adapter meets
these specifications. Using an
adapter that does not meet
these specifications can damage the CD player or the
adapter.
EXT DC 6V
jack. The
11
Page 12

42-506 7.fm Page 12 Thursday, August 12, 1999 10:10 AM
• Disconnect the adapter from the
cigarette-lighter socket after you
turn off the vehicle to prevent
the vehicle’s battery from being
drained.
• Always disconnect the adapter
from the cigarette-lighter socket
before you unplug it from the
CD player.
• If you park your vehicle in the
sun, temperatures inside can
easily reach levels that could
damage your CD player and
your CDs. To prevent heat damage, avoid leaving your CD
player or CDs in your vehicle.
Follow these steps to use your vehicle’s battery power.
EXT DC 6V
1. Attach the 4.0 mm outer diameter/1.7 mm inner diameter barrel
plug to the adapter cord, matching positive (+) on the plug with
TIP on the cord.
2. Set the adapter’s voltage switch
to 6V.
3. Insert the adapter’s barrel plug
into the CD player’s
EXT DC 6V
jack.
Note:
Battery power disconnects when you connect a DC
adapter to the CD player
(unless you are using a specialorder nickel-cadmium battery
pack).
4. Plug the other end of the
adapter into your vehicle’s cigarette-lighter socket.
12
Page 13

42-506 7.fm Page 13 Thursday, August 12, 1999 10:10 AM
CONNECTIONS
You can listen to your CD player by
connecting stereo earphones or amplified speakers to the player’s
PHONES
player’s
dio or auto sound system. Your local
RadioShack store car ries a varie ty of
earphones, amplified speakers, cassette adapters, cable adapters, and
audio patch cables.
Notes:
jack, or by connecting the
LINE OUT
• If you use the CD player’s
PHONES
player’s
the volume control of the amplified speakers) to adjust the volume.
• If you use the CD player’s
OUT
jack, use the home audio
or auto sound system’s volume
control to adju st the volume.
jack to a home au-
jack, use the CD
VOLUME
control (and
LINE
CONNECTING
EARPHONES
For private listening, plug a pair of
stereo earphones with a
(not supplied) into the CD player’s
PHONES
jack.
PHONES
Listening Safely
To protect your hearing, follow these
guidelines when y ou use earphones.
• Set the volume to the lowest
setting before you begin listening. After you begin listening,
adjust the volume to a comfortable level.
1
/8-inch plug
13
Page 14

42-506 7.fm Page 14 Thursday, August 12, 1999 10:10 AM
• Do not listen at extremely high
volume levels. Extended highvolume listening can lead to
permanent hearing loss.
• Once you set the volume, do
not increase it. Over time, your
ears adapt to the volume level,
so a volume level that does not
cause discomfort might still
damage your hearing.
Traffic Safety
Do not wear earphones while operating a motor vehicle or riding a bicy cle. This can create a traffic hazard
and can be illegal in some areas.
Even though some earphones let
you hear som e outside sounds when
listening at normal volume levels,
they stil l can present a traffic hazar d.
CONNECTING
AMPLIFIED SPEAKERS
To listen to your CD player through
amplified speakers (not supplied),
plug the amplified speakers’
plug into the CD player’s
jack.
PHONES
1
/8-inch
PHONES
14
Page 15

42-506 7.fm Page 15 Thursday, August 12, 1999 10:10 AM
CONNECTING TO A
HOME AUDIO SYSTEM
To listen to your CD player through
your home audio system’s amplifier/
receiver and full-size speakers, connect the supplied Y-cable’s
plug to the CD player’s
jack. Then connect the Y-cable’s
phono plugs to the CD, AUX, or TV
audio LEFT and RIGHT input jacks
on your amplifier/receiver. (If the
jacks on your equipment do not
match the plugs on the Y-cable,
check with your local RadioShack
store for the proper cabl e adapter.)
Amplifier/Receiver with
LEFT and RIGHT Input Jacks
1
/8-inch
LINE OUT
CONNECTING TO AN
AUTO SOUND SYSTEM
You can connect your CD player to
your stereo auto sound system in
one of three ways.
If your auto sound system has LINE
IN jacks — plug the supplied Y-ca-
1
ble’s
/8-inch plug into the CD play-
LINE OUT
er’s
the Y-cable’s phono plugs to your
auto sound system’s LINE IN input
jacks. (If the jacks on your equipment do not match the plugs on the
cable, check with your local RadioShack store for the proper cable
adapter.)
Auto Sound System with
Two LINE IN Jacks
jack. Then connect
15
Page 16

A
42-506 7.fm Page 16 Thursday, August 12, 1999 10:10 AM
If your auto sound system has a CD
input jack — you need a stereo
1
/8inch patch cable, such as Cat. No.
42-2387. Connect one end to the CD
player’s
LINE OUT
jack and the other
end to the auto sound system’s CD
INPUT ja ck.
uto Sound System with
CD Input Jack
If your auto sound syste m has a cassette player — you need a CD-tocassette adapter, such as Cat. No.
12-1951. Inser t the adapter into your
car’s cassette player just as you
would insert a regular cassette.
Then connect the CD-to-cassette
adapter’s cord into the CD player’s
PHONES
jack.
PHONES
You can mount your CD player in
your car using a CD mounting bracket. Your local RadioShack store has
a complete line of mounting kits.
16
Page 17

42-506 7.fm Page 17 Thursday, August 12, 1999 10:10 AM
OPERATION
PLAYING A CD
1. Set
2. Press
3. Carefully place the CD, label
VOLUME
level and move
position.
compartment cover.
side up, over the disc compartment’s center hub. Press down
slightly on the CD until it clicks
and lies flat in the compartmen t.
Then close the disc compartment cover.
The display briefly shows a
flashing
ber of tracks and the CD’s total
playing time. Afte r about 10 sec-
to the minimum
HOLD
OPEN
and lift the disc
– –
, then the total num-
to the off
onds, the CD player displa ys
briefly, then turns off.
4. Press . The display briefly
shows a flashing
first track begins to play. The
display shows the current track
number and elapsed time.
5. Adjust the volume to a comfortable listening le vel.
• If you connected earphones,
amplified speakers, or a CDto-cassette adapter to the CD
player’s
VOLUME
• If you connected the CD
player’s
amplified speakers, your
home audio system, or your
auto sound system, use the
volume controls on those
units to set the desired volume as needed.
– –
PHONES
to the desired level.
LINE OUT
jack, set
00
, then the
jack to
17
Page 18

42-506 7.fm Page 18 Thursday, August 12, 1999 10:10 AM
Caution: This CD player has a
wide dynamic range. If you turn
up your amplifier’s volume too
high during soft (low volume)
parts of the music, you might
damage your speakers when a
sudden loud passage occurs.
6. When the last track finishes
playing, the CD player automat ically stops and turns off in about
10 seconds.
To stop playing the CD before it
ends, press . The display shows
for about 10 seconds, then the
00
CD player automatically turns off.
DIGITAL ANTI-SHOCK
SYSTEM (DAS
Your CD-3580 contains special circuits to overcome sound skipping
problems caused by shock or vibration. This means you can carry the
CD player anywhere you go or use it
in your vehicle. When you turn on
the anti- shock system, the CD player
18
2
)
continuously saves the next few seconds of music in memory. During a
shock or vibration t hat would normally make a track skip or pause, the
CD player plays directly from memory.
During play, press
the anti-shock system. The sound
briefly stops, then appears on
the display and quickly changes to
then as the music is stored
in memory.
When the CD player is subjected to
a shock during play, the music
stored in memory plays and the
amount of storage in begins to
decrease. When the shock is over
and the CD player can properly read
the CD again, music is once again
stored in memory, and changes
to .
DAS
2
to turn on
Page 19

42-506 7.fm Page 19 Thursday, August 12, 1999 10:10 AM
Notes:
• If shocks are received repeat-
edly, the memory is quickly
used. When appears (showing empty), the sound might
skip.
• The CD player consumes addi-
tional battery power when you
use the anti-shock system.
When you use the player in a
stable location, turn off the system to conserve battery power.
To turn off the anti-shock system,
press
stops, then disappears from the
display.
2
again. The sound briefly
DAS
LOCKING THE
CONTROLS
If you press any button other than
OPEN, VOLUME
is set to the on p osition,
HOLD
briefly appears.
Move
HOLD
erate the controls again.
, or
to the off position to op-
BASS
when
HoLd
PAUSE
To temporarily pause play, press
. The time indicator flashes on
the display. Press again to resume play.
To prevent accidentally turning the
CD player on or off, or changing the
track you are listening to, set
to the on position.
pears, then no controls work (except
OPEN, VOLUME
, and
HoLd
BASS
HOLD
briefly ap-
).
19
Page 20

42-506 7.fm Page 20 Thursday, August 12, 1999 10:10 AM
Note: If the CD player is paused for
more than about 3 minutes, it automatically turns off.
BASS SWITCH
Use
response of the system to match the
type of music you listen to.
MAX — boosts low frequencies so
these sounds do not drop out when
you listen at low volume levels.
MID — uses a smaller bass boost
than
OFF — maintains flat (even) frequency response.
Note: If you connect the CD player
to your home audio or auto sound
to adjust the frequency
BASS
.
MAX
system using the
has no effect.
BASS
LINE OUT
jack,
CHECKING
REMAINING TIME
During normal play or pause, press
M-SET/REMAIN
maining time on the current track.
Note: The CD player does not show
the remaining time when track number 31 (or higher) is playing (the display shows – – : – –).
Press
M-SET/REMAIN
play the number of remaining tracks
and the CD’s total remaining time.
Press
M-SET/REMAIN
turn to th e n or m a l di sp lay.
to display the re-
again to dis-
again to re-
20
Page 21

42-506 7.fm Page 21 Thursday, August 12, 1999 10:10 AM
INTRO SCAN
The intro scan feature automatically
plays the first 10 seconds of each
track on a CD.
Note:
Intro scan does not play the
tracks in a programmed sequence
(see “Programmed Play” on
Page 22).
1. Repeatedly press
INTRO
2. Press .
steadily, and intro scan starts
from the first track.
To return to normal play, press
is playing. Normal play continues
from the beginning of that track.
To cancel intro scan, press or repeatedly press
cator appears.
flashes on the display.
again while the desired track
P MODE
P MODE
lights
INTRO
until no indi-
until
AUTOMATIC SEARCH
MUSIC SYSTEM
(ASMS)
You can use ASMS before or during
regular or programmed play to
quickly locate any track on a CD.
During play, press to return to
the beginning of the current track.
Press again to return to the beginning of the previous track.
To move to the beginnin g of the next
track, press .
21
Page 22

42-506 7.fm Page 22 Thursday, August 12, 1999 10:10 AM
While the CD is stopped, repeatedly
press or t o move backward or forward to the desired track.
Then press within 10 seconds
to play the track.
AUDIBLE SEARCH
Use audible search during play to
rapidly search forward or backward
to locate a specific section of a track.
During audible search, the CD plays
at a lower volume and a higher
speed.
To search forward, press and hold
. To search backward, press
and hold .
To resume normal play, release the
button.
Notes:
• If you press and hold down
while the las t track pla ys,
the CD player automatically
stops and turns off at the end of
the track.
• If you press and hold down
while the first track plays,
normal play automatically starts
from the beginning of the first
track.
PROGRAMMED PLAY
You can program up to 22 tracks on
a CD to play in any order you
choose, and even program th e sam e
track to play more than once.
Follow these steps to program a sequence.
1. Repeatedly press
and
Selection number
on the display.
flash on the display.
00
P MODE
appears
01
until
22
Page 23

42-506 7.fm Page 23 Thursday, August 12, 1999 10:10 AM
Note: As you press
P MODE
,
appears on the display with
and without . You can
program the CD player in either
mode.
2. Repeatedly press either or
to display the number of
the first track you want to program.
3. Press
M-SET/REMAIN
to store
the selected track number. The
selection number advances by
one and the track number on
the display returns to
00
.
4. Repeat Steps 2 and 3 for each
track you want to program, up to
22 tracks.
Note: The CD player automatically begins to play if you program 22 tracks.
5. To play the programmed
sequence, press .
appears steadily and the first
track in the sequence plays.
While you play the programmed
sequence, you can use to
move forward or to move
backward in the sequence.
6. After the last programmed track
ends, the CD player stops.
At the end of programmed play,
disappears from the display, but the
programmed sequence is still in the
player’s memory.
Notes:
• To return to normal play from
programmed play, repeatedly
press
P MODE
until disap-
pears from the display.
• To replay the programmed
sequence, repeatedly press
until appears on the
MODE
display. Then press
within 10 seconds to play the
sequence.
23
P
Page 24

42-506 7.fm Page 24 Thursday, August 12, 1999 10:10 AM
Checking, Adding To,
Replacing, or Clearing the
Programmed Sequence
To check the programmed sequence, repeatedly press
until t he first programmed track number and flash on the display.
Then repeatedly press
MAIN
. Each time you press
REMAIN
, the display shows the number of the next track in the sequence.
To add to the end of a programmed
sequence, repeatedly press
until t he first programmed track number and flash on the display.
Then repeatedly press
MAIN
until 00 flashes on the display.
Press or to display the
new track number you want to program. Then press
Note:
You cannot program more
M-SET/REMAIN
than 22 tracks.
P MODE
M-SET/RE-
M-SET/
P MODE
M-SET/RE-
.
programmed track number and
flash on the disp lay. Then repeatedly
M-SET/R EMAIN
press
to view the
track numbers in the programmed
sequence. When the track number
you want to replace flashes on the
display, press or to select the track you want to program in
its place. Then press
M-SET/REMAIN
to program the new tra ck number.
To clear the programmed sequence
from memory, press to stop the
CD player, then press
OPEN
.
REPEAT PLAY
Your CD player can repeated ly play a
single track, the entir e CD, rando mly
selected t racks, or a progr ammed sequence (see “Programmed Play” on
Page 22).
To replace a programmed track, repeatedly press
P MODE
until the first
24
Page 25

42-506 7.fm Page 25 Thursday, August 12, 1999 10:10 AM
To repeat a single track, repeatedly
P MODE
press
until and 1 appear on the display. At the end of the
track, the CD player repeatedly
plays it.
To repeat an entire CD, repeatedly
P MODE
press
until and
ALL
appear on the display. When the CD
player reaches the end of the CD, it
returns to the first track and repeatedly plays all the tracks.
To repeat randomly selected tracks,
repeatedly press
and
RANDOM
P MODE
until
appear on the display.
All tracks on the CD repeatedly play
in random order.
To repeat a programmed sequence,
repeatedly press
P MODE
during
play until appears and and
the first programmed number flash
on the display. Then press .
and a track number light steadi ly and
the programmed sequence repeatedly plays.
To cancel repeat play, press or
repeatedly press
P MODE
until no in-
dicator appears .
25
Page 26

42-506 7.fm Page 26 Thursday, August 12, 1999 10:10 AM
TROUBLESHOOTING
If you have probl em s operating your CD player, check this chart for a sol ution.
If these suggestions do not solve the problem, contact your local RadioShack
store for assistance.
Problem Possible Cause Remedy
Operation buttons do not
work.
CD is loaded
but it does not
start.
The sound
skips.
The CD player
sudden ly stops
operating.
26
Hold function is
active.
No power. Check the batteries or adapter.
CD is loaded upside
down.
CD is dirty. Clean the CD or try a different CD.
Insufficient power. Use a recommended AC/DC adapter.
Weak batteries. Replace alkaline batter ies or recharge
CD is dirty or
scratched.
Vibration is heavy. Activate the anti-shock system.
Weak batteries. Replace alkaline batter ies or recharge
Set
Reload the CD, label side up.
the nick e l- c ad m ium batte r y pa ck .
Clean the CD or try a different CD. See
“CD Care Tips” on Page 29.
Try not to vibrate the CD player.
the nick e l- c ad m ium batte r y pa ck .
to the off position.
HOLD
Page 27

42-506 7.fm Page 27 Thursday, August 12, 1999 10:10 AM
CARE AND MAINTENANCE
CARING FOR THE CD-3580
Your Optimus CD-3580 Portable Com pact Disc Player is an example of superior design and craftsmanship. The following suggestions will help you care for
the CD player so you can enjoy it for years.
Keep the CD player dry. If it gets wet, wipe it dry immedi ately.
Liquids can contain minerals that corrode the electronic circuits.
Handle the CD player gently and carefully. Dropping it can
damage the circuit board and case, and can cause the player
to work improperly.
Keep the CD player away from dust and dirt, which can cause
premature wear of parts.
Wipe the CD player with a damp cloth occasionally to keep it
CLEANER
looking new. Do not use harsh chemicals, cleaning solvents,
or strong deterge nts to clean the CD player.
Use and store the CD player only in normal temper ature environments. Temperature extremes can shorten the life of electronic devices, damage batteries, and distort or melt plastic
parts.
27
Page 28

42-506 7.fm Page 28 Thursday, August 12, 1999 10:10 AM
Use only fresh batteries of the required size and type. Always
remove old or weak batteries. Batteries can leak chemicals
that destroy electronic circuits.
Modifying or tampering with the CD player’s internal components can cause a
malfunction and might invalidate the CD player’s warranty and void your FCC
authorization to operate it. If your CD player is not performing as it should,
take it to your local RadioShack store for assistance.
28
Page 29

42-506 7.fm Page 29 Thursday, August 12, 1999 10:10 AM
CD CARE TIPS
• If you move the player from a
very cold r oom to a warmer one,
moisture can condense on the
pickup lens, preventing proper
CD play. If this happens, wait 30
minutes before resuming play.
• Do not place anything but a CD
in the disc tray. This can damage the drive mechanis m.
• During play, a severe shock or
jolt could make the CD’s rotation speed change suddenly
and produce some noise. This
is not a malfunction.
• Always handle a CD by the
edges and keep it in its protective case or sleeve when it is not
in use. Fingerprints and
scratches on the CD’s surface
can prevent the laser beam
from correctly reading the digital
information. To clean the CD,
use a CD cleaner kit (RadioShack Cat. No. 42-226).
• A scratch on the CD’s surface
can make the CD skip or stop
playing. If the CD gets
scratched, use Scratch ’n Fix
(RadioShack Cat. No. 42-127)
to repair the scratch.
• Keep CDs dry. A water drop can
act as a lens and affect the laser
beam focus.
LASER SAFETY
This unit employs a la ser. Onl y q ualified service persons should remove
the cover or attempt to service this
device, due to possible eye injury.
Warning:
justments or the performance of procedures other than specified herein
can result in hazardous exposure to
laser light.
The use of controls or ad-
29
Page 30

42-506 7.fm Page 30 Thursday, August 12, 1999 10:10 AM
SPECIFICATIONS
AUDIO (at LINE OUT)
Frequency Response (± 3 dB) .................................................. 20–20,000 Hz
Dynami c R a ng e .......... .. ............... .. ............... .. ............... .. ............... .. ...... 86 dB
Signal-to-Noise Ratio ............................................................................. 84 dB
Harmonic Distortion at 1 kHz ................................................................... 0.1%
Separation at 1 kHz ................................................................................ 63 dB
Wow/Flutter ............................................................................ Not Measurable
Earphones Output (10% THD at 16 ohm) ............................................. 10 mw
Line Output ............................................................................................ 0.65 V
DISC
Diameter ........................ ................................Standard 5-Inch and 3-I nch CDs
SIGNAL FORMAT
Sampling Frequency ........ .. .......... .. .............................. .. ................... 44.1 kHz
Oversampling ...................................................................................... 8 Times
Quantizati on Num ber ............................. .. ....................... 1-Bit Linear/Channel
Tran smission Bit Rate ................................ ....................... 4.3218 MB/Second
Signal-Proc essing Rate .............. ..................................................... 352.8 kHz
30
Page 31

42-506 7.fm Page 31 Thursday, August 12, 1999 10:10 AM
PICK-UP
Tracking System ................................................ 3-Beam Tracking Servo Type
Object Lens Drive System .................................. 2-Dimensional Parallel Drive
Optical Source ................................... .......... ............ ...... Semiconductor Laser
Waveleng th .............. .. .................... .. .................... .. .............................. 785 nm
GENERAL
Power Requirements ............................................................................. DC 3V
Two AA Size Alkaline Batteries
or Rechargeable Nick el- Cadm ium
Battery Pack (Not Included),
Optional AC Adapter (273- 1664), or
Optional DC Adapter (273-1801)
Power C o ns u m p ti o n .... ....... .. ............... .. ........ .. ... ....... .. ............... .. ............. 2 W
Battery Life (EIAJ Method) .................. .. .................... .. ......................... 8 Hours
Dimensions (HWD) ............... 1
1
16
/
× 5 × 5
9
/16 Inches (27 × 127.8 × 141.3 mm)
Weight (without batteries) .......................................................... 8.4 oz (238 g)
Included Accessory ........... .................................................. .. .............. Y-Cable
Specifications are typical; individual units might vary. Specifications are subject to change and improvement without notice.
31
Page 32

g y
y
42-506 7.fm Page 32 Thursday, August 12, 1999 10:10 AM
RadioShack Limited W arranty
This product is warranted against defects for 1 year from date of purchase from
RadioS hack compan y-owned st ores and auth orized Radi oShack fran chisees
and de alers. W ithin this period , we will r epair it w ithout charge fo r parts a nd
labor. Simply
brin
our RadioSha ck s ale s sli p
as proof of purchase date to
any RadioShack store. Warranty does not cover transportation costs. Nor does
it cover a product subjected to misu se or accidental damage.
EXCEPT AS PROVIDED HE REIN, Rad ioShack M AKE S NO EXP RESS WARRANTIES AND ANY IMPLIED WARRANTIES ARE LIMITED IN DURATION
TO THE DURATION OF THE WRITTEN LIMITED WARRANTIES CONTAINED HEREIN. Some states do not permit limitation or exclusion of implied
warranties; therefore, the aforesaid limitation(s) or exclusion(s) may not apply
to the purchaser.
This warranty gives you specif i c legal rights and you may also have other rights which var
from state to state.
We Service What We Sell
10/95
A Division of Tandy Corporation
RadioShack
Fort Worth, Texas 76102
1AD6P1P0362-V
6A6 Printed in Malays ia
 Loading...