

Page 1

TV connection guide
Installation Guide Version 3.3
Page 2
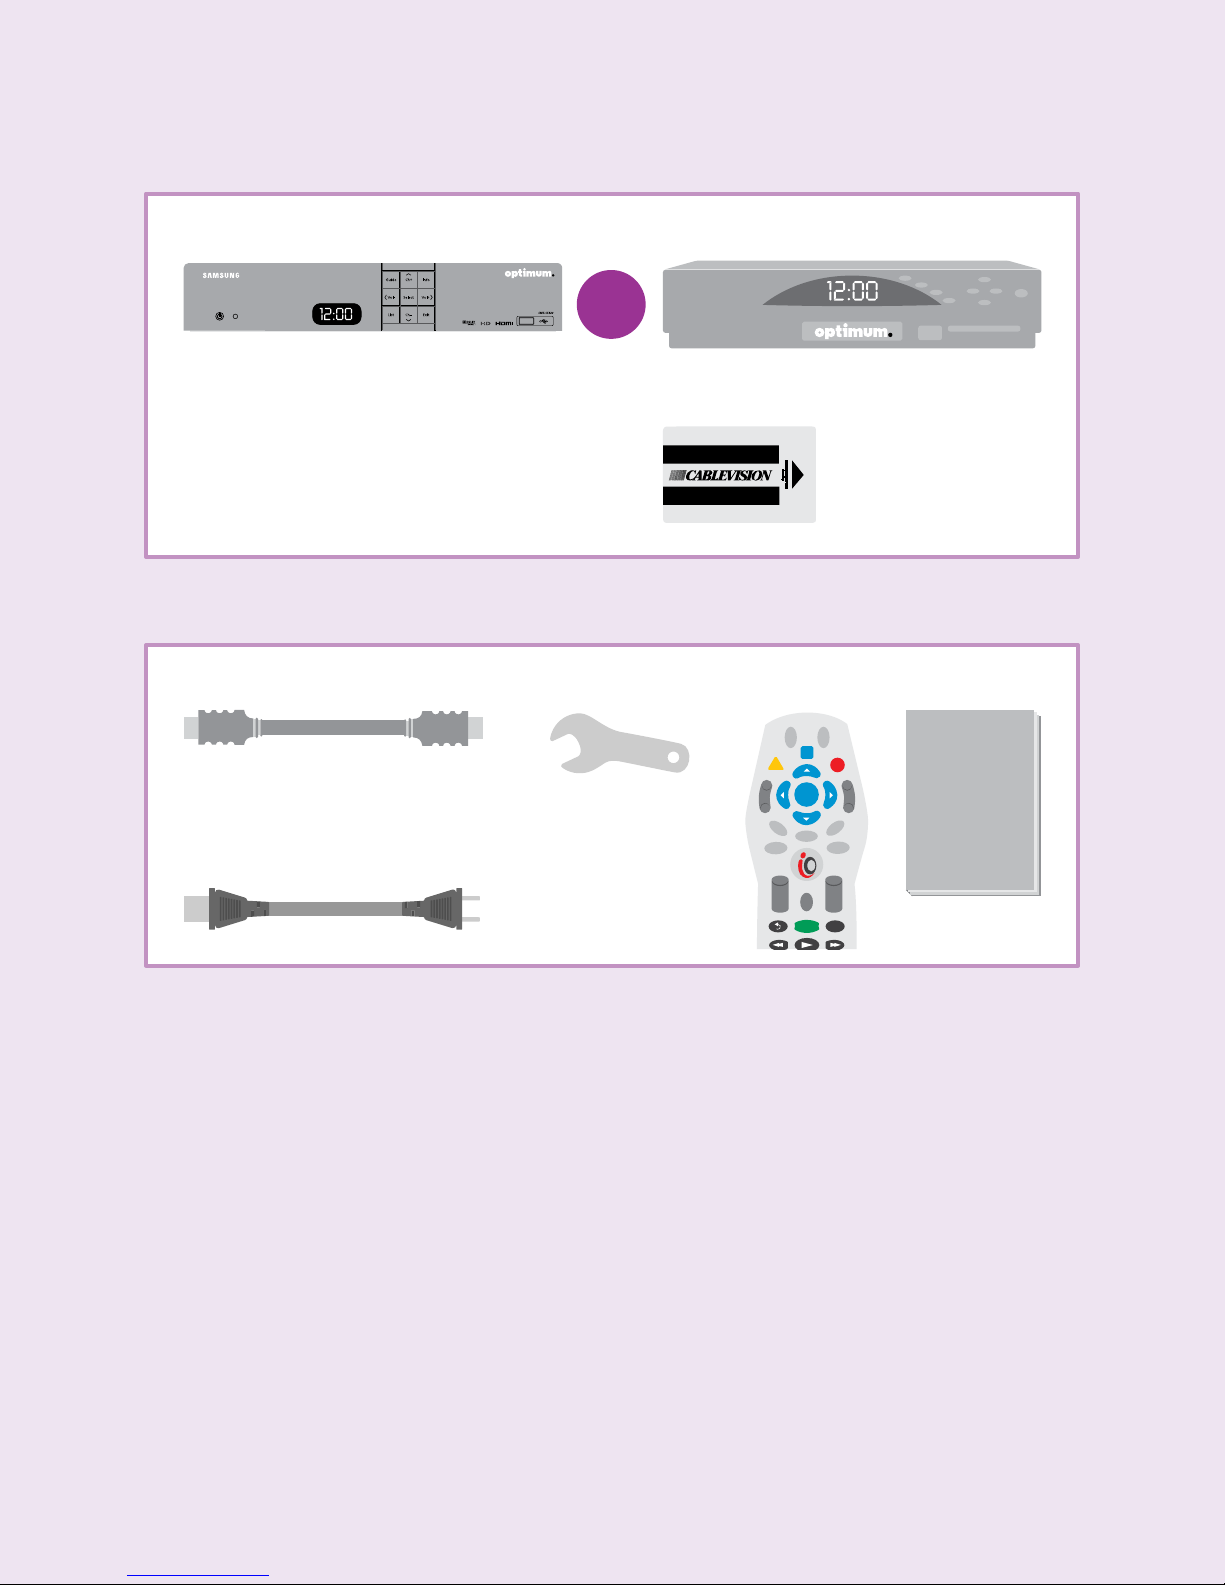
Do you have?
Samsung model
You should have:
HDMI cable
Only for HD Installation.
You may use component cables (red, blue and
green) and audio cables (red and white) instead.
Power cord
Wrench
or
Scientific Atlanta model
Smart Card for Scientific
Atlanta model
Remote control
C
T
B
V
L
B
A
C
SEL
INFO
LAST
EXIT
GUIDE
FAV
MUTE
VOL
C
H
DVR LIVE
The
Optimum
Guide
A few tips to keep in mind:
If the picture freezes or the digital cable box won’t respond, you can reboot your digital cable box:
• Unplug the power cord. Wait five seconds, plug it back in and when you see “turn” and “on” alternating on the front panel of the
cable box, you can turn it back on. When the digital cable box displays the time, the reboot is complete.
If you experience a “postage stamp” image or gray/black bars on the left and right of the HDTV screen:
• If you’re using component cables (red, blue and green), make sure the colors on your component cables match the color of the
outlet they’re being plugged into.
• For Samsung models, make sure the proper picture format is set on your HDTV and digital cable box (see Step 5).
• If you have a Scientific Atlanta digital cable box, check to make sure it’s an HD model. If the model number located on the front of
the cable box includes the letters “HD,” then you have an HD cable box. All Samsung digital cable boxes are HD.
If you’re replacing an existing cable box:
• Unplug the cables and power cord and start at Step 1 of the model that pertains to you. You’ll need to return the cable box and
power cord to any Optimum store or you can get a shipping label to ship them back at optimum.net/shippinglabel.
To block channels, visit optimum.net/parentalcontrols. Please refer to your Optimum Guide for more information and to start enjoying all the features now
available to you with your TV service.
2
Page 3
VHF/UHF
S VIDEO
VIDEO
VIDEO IN
13
VHF/UHF
S VIDEO
VIDEO
L AUDIO
R AUDIO
VIDEO IN
13
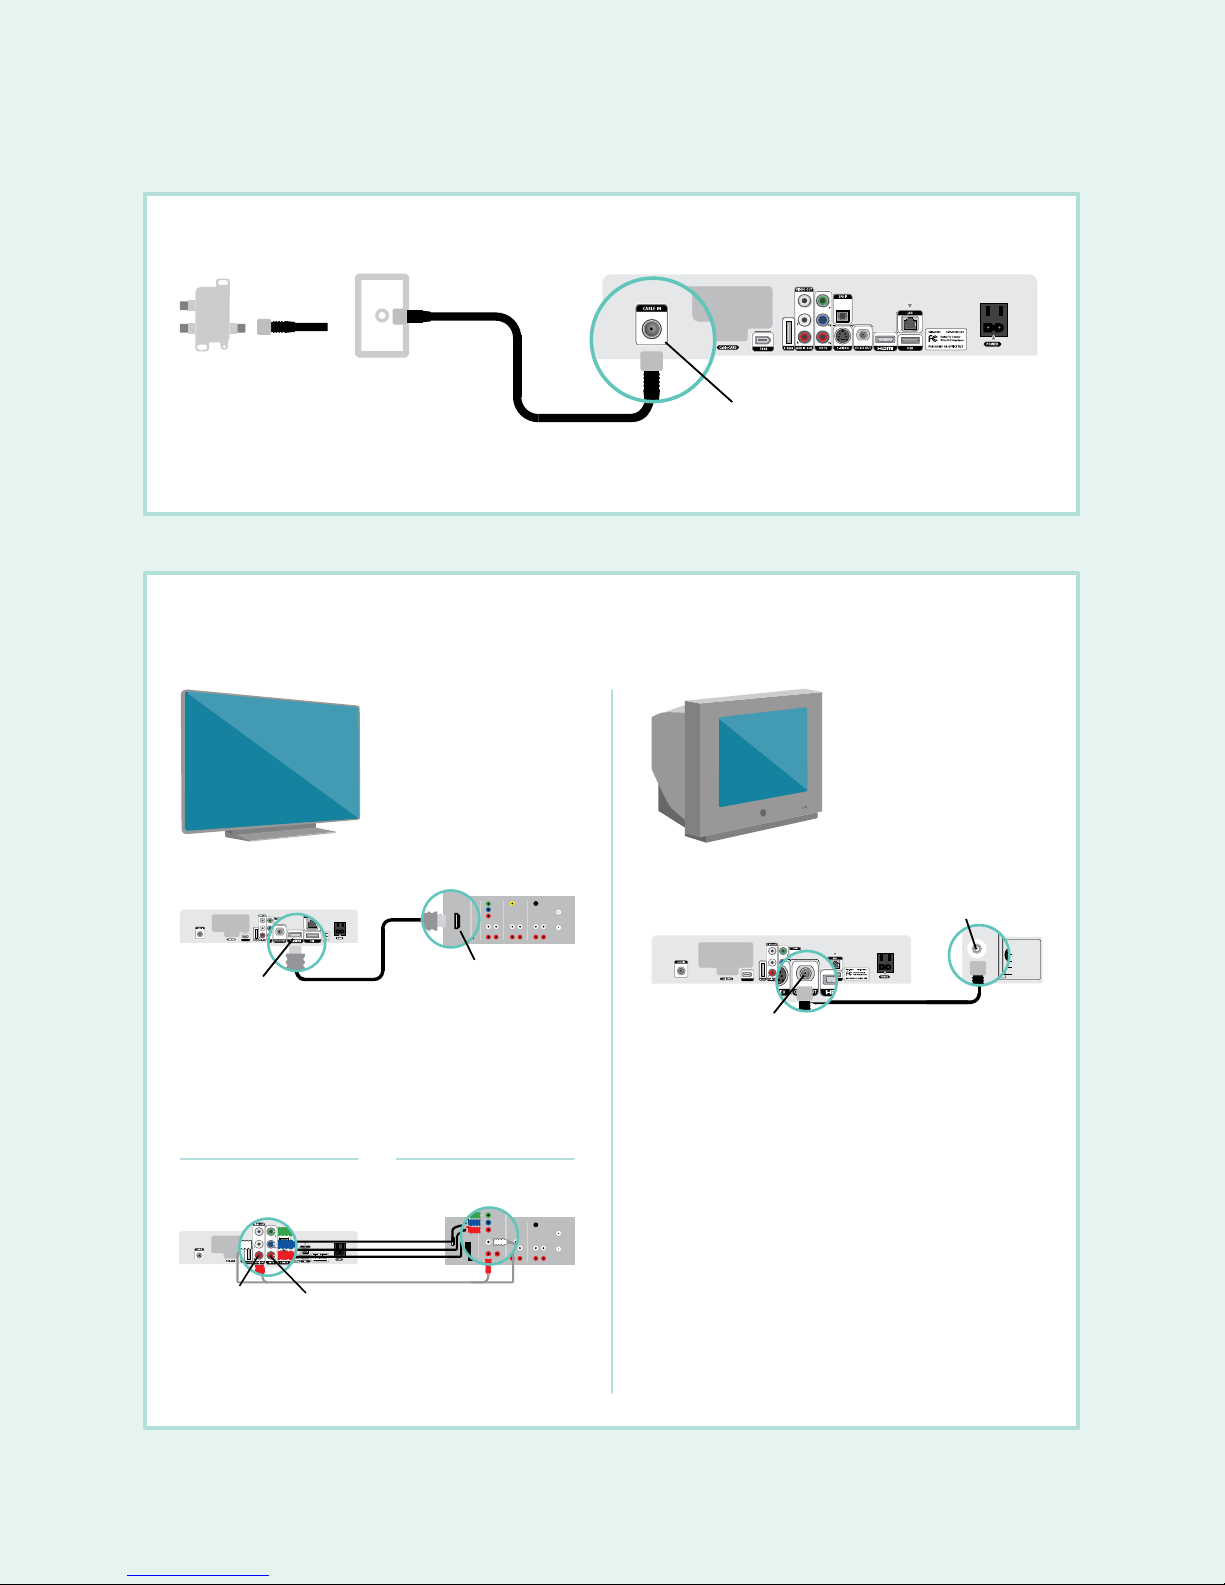
Samsung Model
Connect the digital cable box
1
IN
OUT
Cable splitter or Wall outlet
Coaxial cable
Back of digital cable box
Cable in
• Connect the coaxial cable from the cable splitter or wall to the “CABLE IN” port on the back of the digital
cable box/HD digital cable box.
Connect the digital cable box to the TV
2
Either HDMI or component cables can be used for HDTV.
HDTV SDTV
Back of digital cable box
Back of HDTV
HDMI port
HDMI port
HDMI cable
Using an HDMI cable to connect your HDTV:
• Connect it from the HDMI port on the back of the
digital cable box to the back of the HDTV.
DO NOT connect any additional cables.
OR
Plug the component and audio cables into specified colors.
Audio ports
Using component cables to connect your HDTV:
Component
cables
Component ports
Back of
HDTV
• Connect them from the HD digital cable box to the
back of the HDTV according to the specified colors.
VHF/UHF
or
Back of digital cable box
CH 3/4 out
Coaxial cable
antenna in
VHF/UHF
VIDEO IN
13
S VIDEO
VIDEO
L AUDIO
R AUDIO
Back of
SDTV
Connect your SDTV:
• Connect one end of the coaxial cable to the
“CH 3/4 out” port on the digital cable box and the
other end to the “VHF/UHF” or “antenna in” port
on your TV.
DO NOT connect any additional cables.
For the best picture quality, use the wrench included to
make sure the cable connections are secure.
3
Page 4
Samsung Model (Cont.)
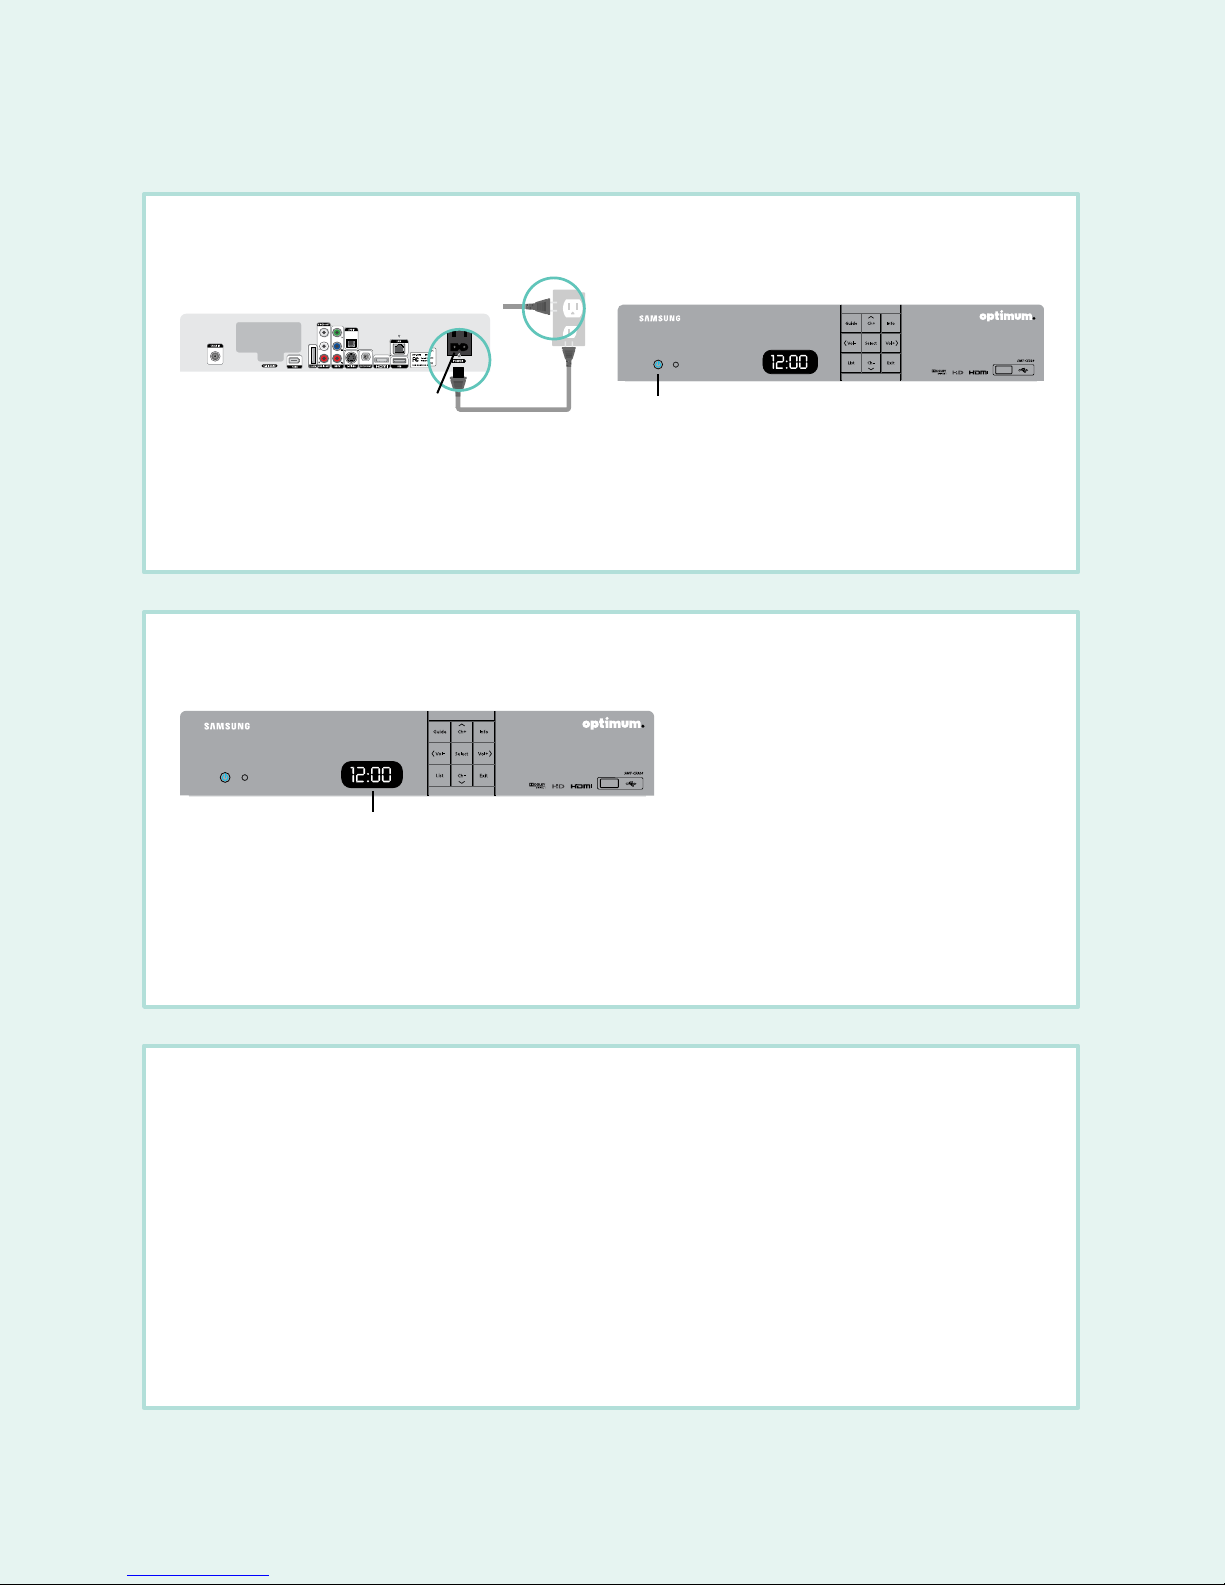
Connect the power
3
Back of digital cable box
AC power input
• Plug the power cord from the AC power input on the digital cable box into the wall outlet or surge protector.
The blue light on the front of the box will indicate the power is on. Press the power button in the lower left corner of
the box if it’s not on.
DO NOT plug other components such as DVD players, VCRs or gaming consoles into the back of the digital cable box.
Activate
4
LED screen
• Activation begins automatically and a series of numbers and letters will display on the LED screen on the front of your
digital cable box. Once “turn” and “on” alternate on the LED screen every three seconds, turn on your digital cable box;
a blue light will indicate the power is on.
• Make sure your TV is on and you’ll see a gray screen that says, “Please wait, we are preparing the service for you.”
When the correct time displays on the LED screen, wait up to 15 minutes to be sure service is fully activated.
TV plug
Power cord
Power button
Setting the picture format
5
HDTV:
• For the best display, press the SETTINGS button on your remote twice to get the full settings menu.
• The default picture format setting on the Samsung HD digital cable box is 480p (best SD). Use the ARROWS to highlight
“HD settings” and press SEL, then highlight “Display Resolution” and press SEL. Scroll to 1080i (best HD) and press SEL.
Next, go to the menu on your HDTV and set the Picture Format “Aspect Ratio” to 16:9.
SDTV:
• The “Display Resolution” should be 480p (best SD) and the Picture Format “Aspect Ratio” should be 4:3.
Check that the TV is on the correct input for the cable box by pressing the TV/Video, Input or Source button on your TV manufacturer’s
remote control. The input selected must match the input you used to connect your HDMI cables or component cables from your digital
cable box to your TV.
4
Page 5
120 VAC
60Hz 40W
120 VAC
60Hz 400W
BYPASS
0003B4287797
SABDQXTL N0006246618
IR
1394 1394
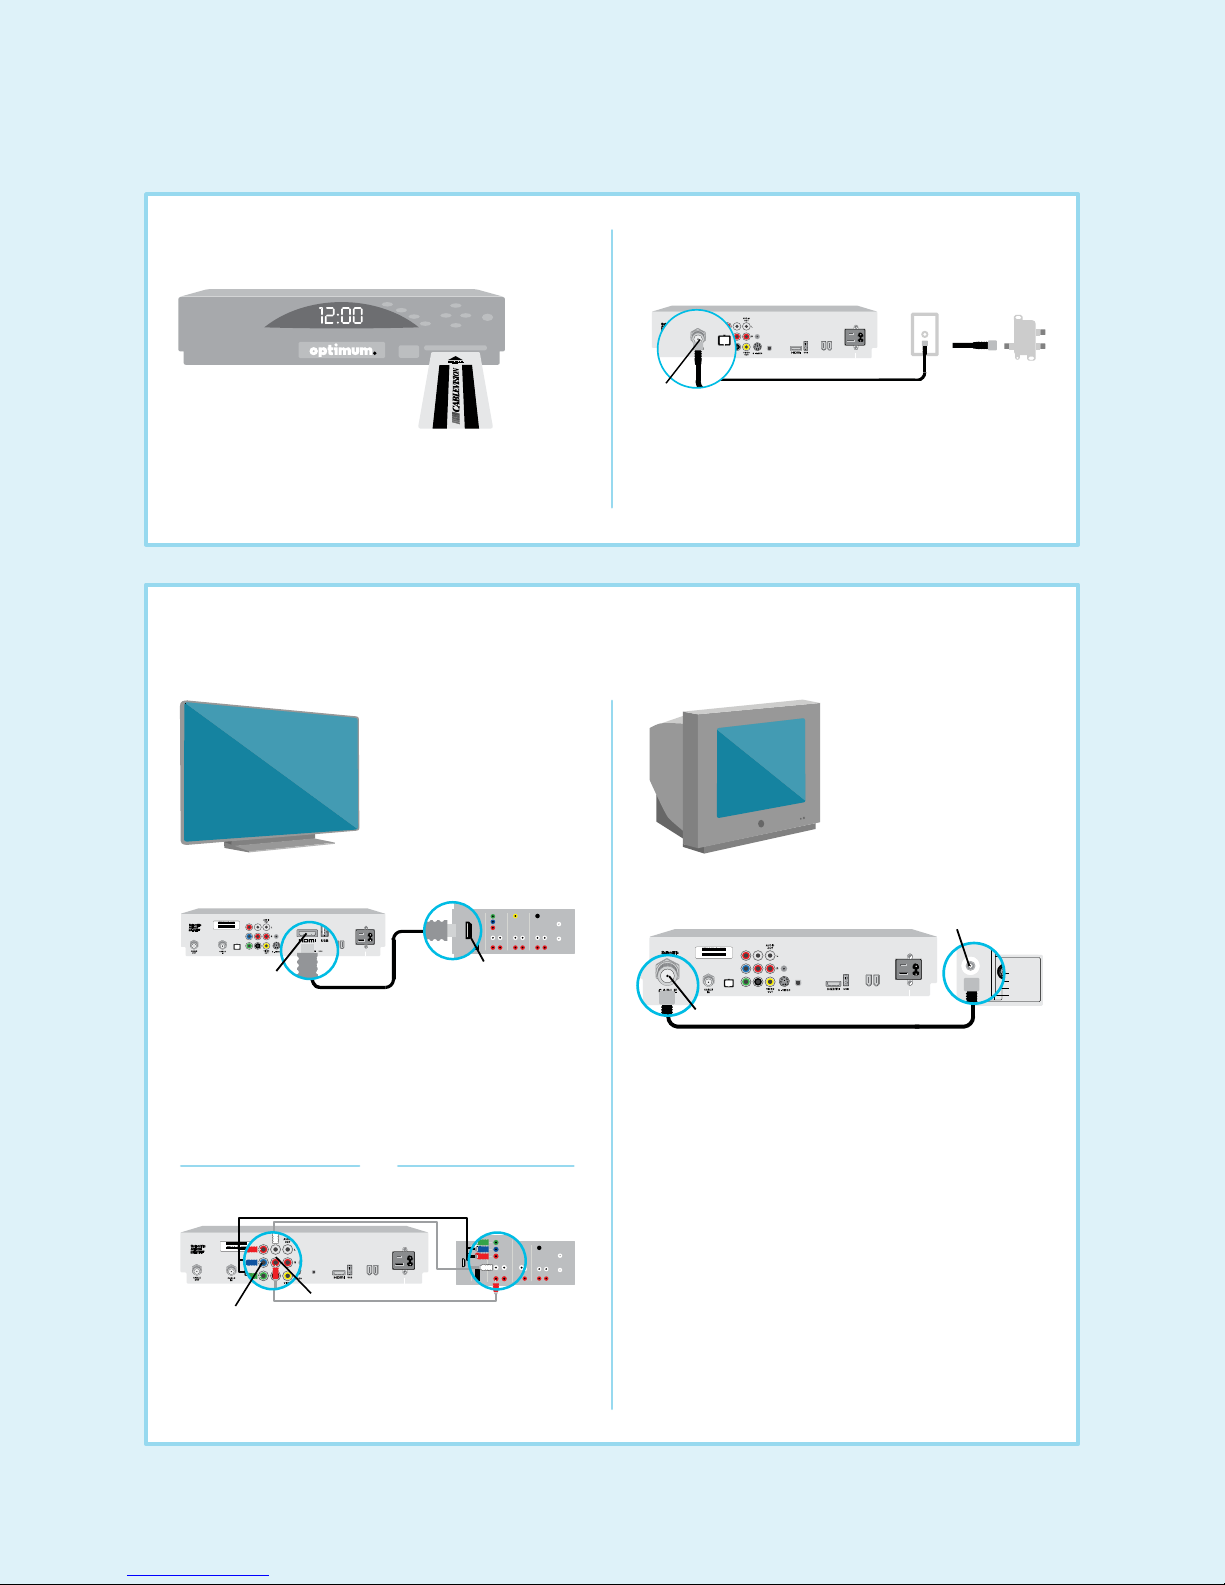
Scientific Atlanta Model
120 VAC
60Hz 40W
120 VAC
60Hz 400W
BYPASS
0003B4287797
SABDQXTL N0006246618
IR
1394 1394
VHF/UHF
S VIDEO
VIDEO
L AUDIO
R AUDIO
VIDEO IN
13
120 VAC
60Hz 40W
120 VAC
60Hz 400W
1394 1394
VHF/UHF
S VIDEO
VIDEO
L AUDIO
VIDEO IN
13
120 VAC
60Hz 40W
120 VAC
60Hz 400W
IR
1394 1394
Insert the Smart Card Connect the digital cable box
1 2
• Insert the Smart Card (will only partially insert).
Once inserted, DO NOT REMOVE.
3 Connect the digital cable box to the TV
Either HDMI or component cables can be used for HDTV.
HDTV SDTV
Back of digital cable box
0003B4287797
SABDQXTL N0006246618
IR
BYPASS
Wall
outlet
13941394
120 VAC
120 VAC
60Hz 40W
60Hz 400W
Cable
or
splitter
IN
OUT
Coaxial cable
Cable in
• Connect the coaxial cable from the cable splitter or
wall to the “CABLE IN” port on the back of the
digital cable box.
Back of digital cable box Back of HDTV
0003B4287797
SABDQXTL N0006246618
IR
13941394
120 VAC
120 VAC
60Hz 40W
BYPASS
HDMI port
60Hz 400W
HDMI port
HDMI cable
Using an HDMI cable to connect your HDTV:
• Connect it from the HDMI port on the back of the
digital cable box to the back of the HDTV.
DO NOT plug in any additional cables.
OR
Plug the component and audio cables into specified colors.
0003B4287797
SABDQXTL N0006246618
IR
BYPASS
13941394
120 VAC
120 VAC
60Hz 40W
60Hz 400W
Audio ports
Component ports
Using component cables to connect your HDTV:
Component cables
Back of
HDTV
• Connect them from the HD digital cable box to the
back of the HDTV according to the specified colors.
VHF/UHF
or
120 VAC
60Hz 40W
antenna in
120 VAC
60Hz 400W
VIDEO IN
VHF/UHF
13
S VIDEO
VIDEO
L AUDIO
R AUDIO
Back of
SDTV
Back of digital cable box
0003B4287797
SABDQXTL N0006246618
BYPASS
IR
1394 1394
Coaxial cableCable out
Connect your SDTV:
• Connect one end of the coaxial cable to the
“CABLE OUT” port on the digital cable box and
the other end to the “VHF/UHF” or “antenna in”
port on your TV.
DO NOT connect any additional cables.
For the best picture quality, use the wrench included to make
sure the cable connections are secure.
5
Page 6
Scientific Atlanta Model (Cont.)
120 VAC
60Hz 400W
4
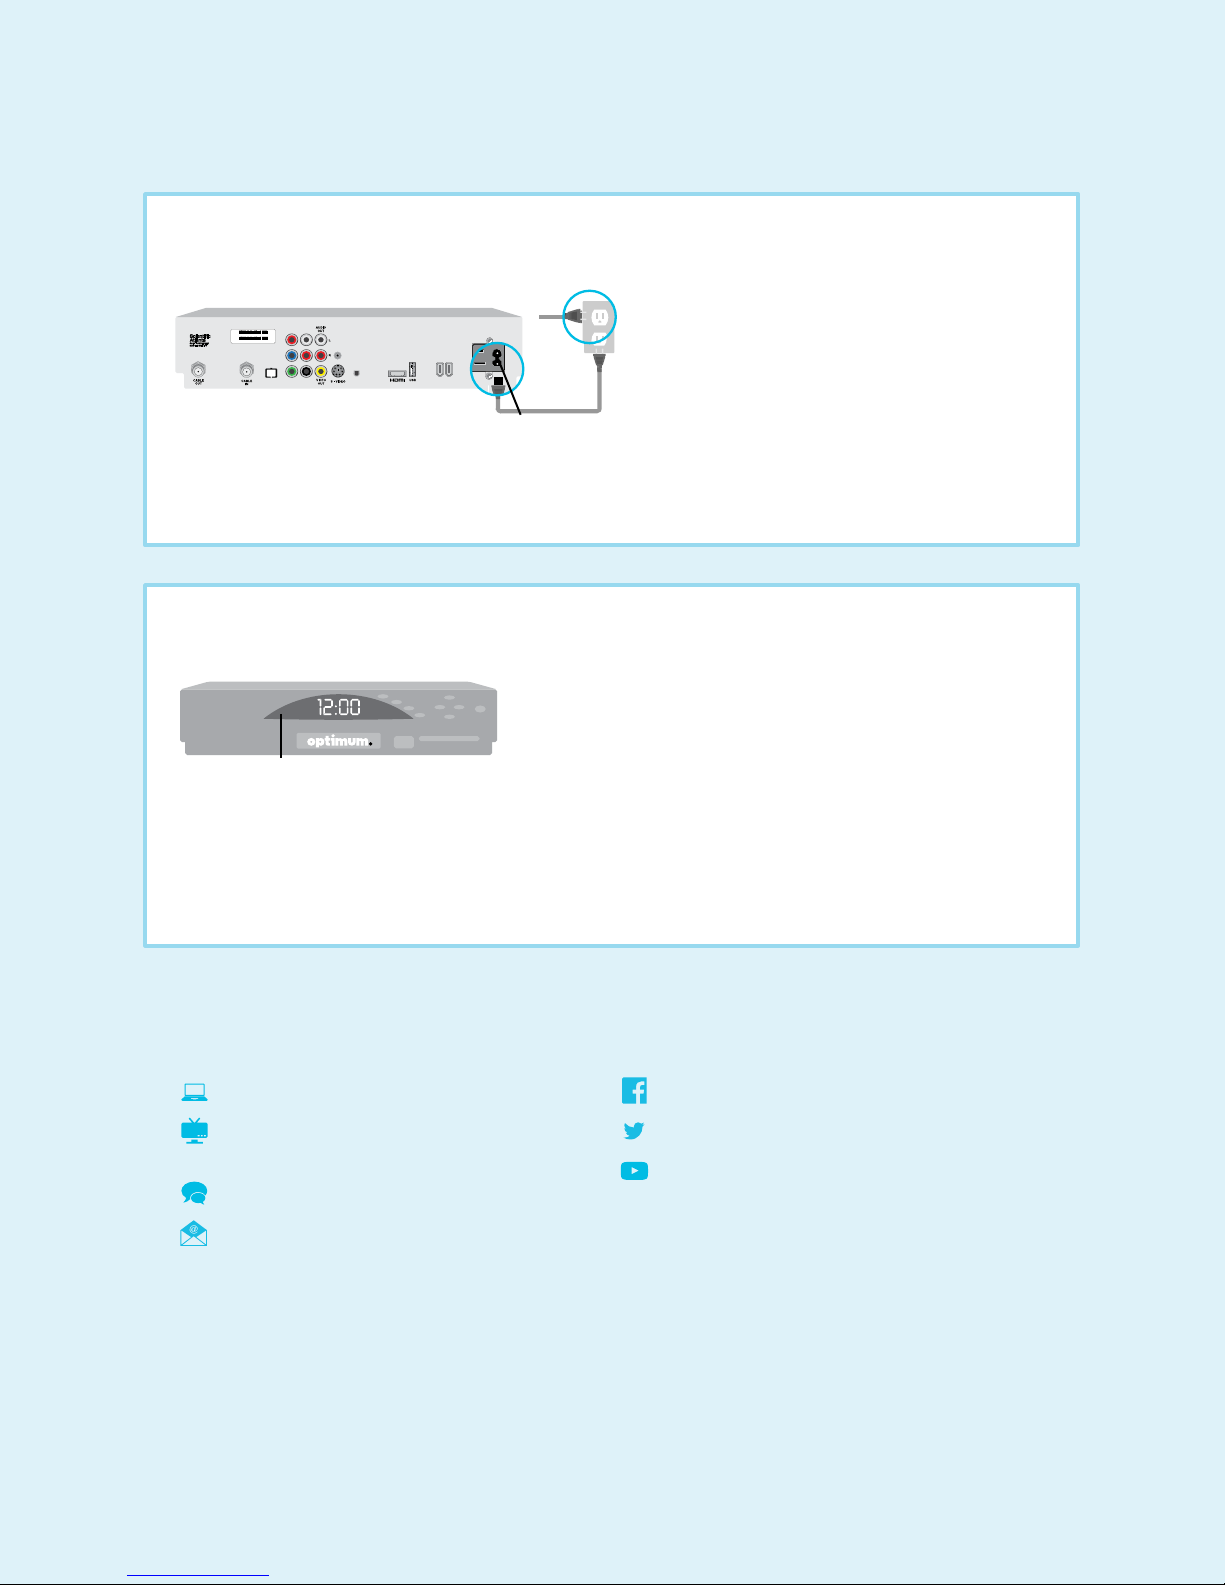
Connect the power
Back of digital cable box
0003B4287797
SABDQXTL N0006246618
BYPASS
IR
1394 1394
Power cord
120 VAC
120 VAC
60Hz 40W
60Hz 400W
TV plug
AC power input
• Plug the power cord from the AC power input on the digital cable box into the wall outlet or surge protector.
DO NOT plug other components such as DVD players, VCRs or gaming consoles into the back of the digital cable box.
Activate
5
LED screen
• Activation begins automatically and takes about three minutes. “BOOT” then “HOLD” will display on the LED
screen on the front of your digital cable box.
• Once “turn on” or the correct time displays on the LED screen, turn on your digital cable box and make sure the
TV is on.
• Wait up to 15 minutes to be sure service is fully activated.
We’re here to help.
Reach us 24/7:
optimum.net/support
Explore Optimum Channel 900 and
Optimum Channel 14
optimum.net/chat
optimum.net/emailus
facebook.com/Optimum
@OptimumHelp
youtube.com/OptimumBrandVideos
6
 Loading...