

Page 1

PX-35
①
②
⑥
⑫
③
⑧
⑨
⑩
⑪
④
⑤
⑦
Quick Start Guide
Introduction
• Read this quick start guide carefully before installing and/or using this product.
• Keep this quick start guide for future reference and store it in a safe place.
Notice
• This quick start guide may be revised or withdrawn at any time without prior notice.
• This quick start guide may not, in whole or in part, be copied, photocopied, reproduced, translated or converted to any
electronic or machine readable form without prior written consent of Opticon.
• Trademarks used are property of their respective owners.
Under no circumstances shall Opticon be held responsible for any special, incidental, consequential or indirect damages
•
howsoever caused.
Caution and Warning
1. LED Safety
• Do not stare into the LED light from the optical window. It may cause damage to your eyes.
2. Use of the Product
Radio frequency energy from wireless devices may affect some sensitive electronic medical equipment. In order to avoid
interference with the operation of this equipment, wireless devices should be switched off when requested in hospitals,
clinics, or health care facilities.
3. Handling Instructions
】
【
PX-35
• Do not attempt to disassemble, modify or update this device.
• Operating the device while operating machinery or a vehicle can be distracting.
• Do not drop this product or put heavy items on this product.
• Avoid static electricity
• Do not use this device near combustible materials.
• Do not store this device in an extremely cold or hot environment.
• Scanning performance may decline due to excessive ambient light.
• Do not swing the device around by the strap.
• Do not insert a sharp object into this device.
• Keep the device out of the reach of small children.
• When cleaning this product, rub gently with either a soft dry cloth or a damp cloth with mild detergent.
• Do not use this product in the following areas:
-In areas exposed to direct sunlight for long periods of time.
-Near water or other liquids, or in extremely high humidity.
-In dusty environments.
-Near heat sources, such as radiators, heat registers, stoves, or other types of devices that produce heat.
-Near microwaves, medical devices, or RF-emitting devices.
-In areas where dew condenses.
-In any other areas where serious damage is considered to occur.
】
Copyright© 2008, Opticon All ri ghts reserved.
【
Battery Pack
• Do not attempt to disassemble this battery.
Do not expose the battery pack to liquids or allow the battery contacts to get wet.
•
• Do not expose the battery pack to heat sources including other devices that produce heat.
• Do not short the power leads on the battery pack. If the (+) and (-) terminals come in contact with metals (such as necklace
or hairpin), a short circuit will occur.
Do not load the battery pack with its (+) and (-) terminals reversed.
•
• Check the local regulations for proper battery disposal.
4. Radio Equipment
• Do not peel off the certification label.
5. Bluetooth
• Bluetooth® is a registered trademark owned by Bluetooth SIG, Inc., U.S.A. and is used by OPTICON under license.
• This product supports Bluetooth wireless communication with other Bluetooth devices that have the same profile.
• This product complies with Bluetooth version 2.0; however, its communication performance with equipment other than
cradles or devices stated in this manual is not guaranteed.
• Bluetooth devices use the 2.4 GHz frequency band. Scientific, medical, and industrial devices, including radio stations,
microwave ovens, wireless security (camera) systems and WLAN use the same frequency band as this product. Interference
from other devices may affect the communication speed or communication range of this scanner or vice versa.
( Please refer to the specification manual and instruction guide for details.)
Page 2
Before Getting Started
①
②
⑥
⑫
③
⑧
⑨
⑩
⑪
④
⑤
⑦
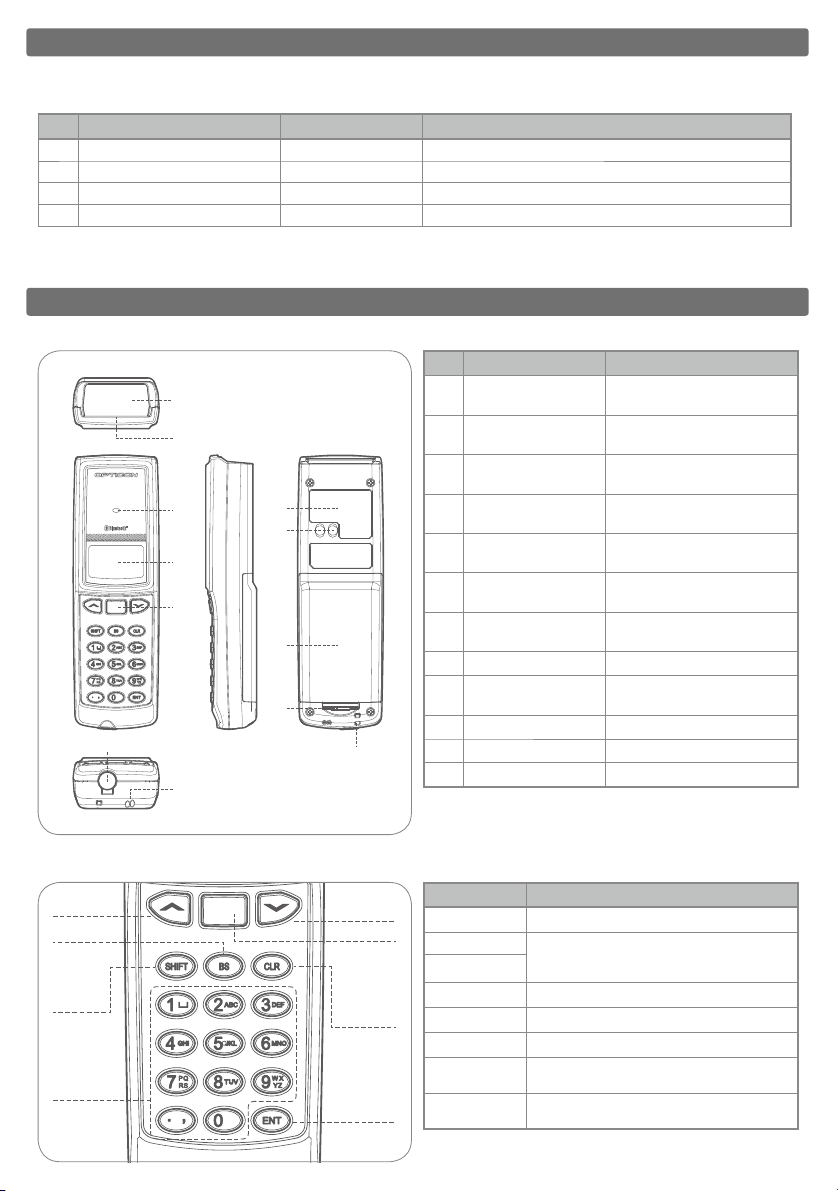
■
Whatʼs in the Box
Confirm that you have the following items before getting started:
No. Item Product No. Function
1 Scanner PX-35 Data collector with Bluetooth
2
Lithium-ion rechargeable battery BTR0400 Dedicate d for PX-35
3
Hand strap
4
Quick Start Guide
* T he num ber of accessor ies ma y differ depend ing on th e prod uct s pecifi cation .
Please conta ct the ne arest dealer if acces sories ar e dama ged o r miss ing.
−−−−−−−
PX-3 5019062 -0-00 Prov ides p roduct in formation and inst ruction g uide
Overview
■
Detailed View
No. Part Function
Optical Window
①
IrDA Communication
②
Window
LED
③
LCD
④
Trigger /Scan Key
⑤
DC jack
⑥
with rubber cap
Buzzer Hole
⑦
⑧
Product Label
Charging Terminals
⑨
⑩
Battery Cover
⑪
Battery Cover Lock
Strap hook To attaches the str ap.
⑫
CMOS imager which reads 1D &
2D barcodes.
Por t to com municat e with the
designated c radle.
Indicates the status of scanning
or communicating.
Indicates the operating function
and scanned data.
Starts th e bar code sca nnin g
operation.
To conn ect the dedicated AC
adapter for charging.
Bu zz er so unds t hro ugh t he
buzzer hole.
Connects the dedicated cradle
for charging.
Protects the battery pack.
Locks the battery cover.
■
Key Layout
UP
BS
SHIFT
Numeric
keys
DOWN
Trigger/
SCAN
CLEAR
ENT
Key Function
Trigger /Scan
UP
DOWN
ENT
BS Deletes one letter before the cursor.
CLR Cancels an input.
0-9, .
SHIFT
* The layout of keys may dif fer depending on the produc t specifica tion.
Scans a barcode.
Select a menu.
(t hese keys can be pro gra mme d for th e
user's application. )
Determines the input.
10 numeric keys to input numbers, alphabets
or symbols.
Shifts from “number input mode” to “alphabet
input mode
”
and vice versa.
Page 3

■
①
②
⑥
⑫
③
⑧
⑨
⑩
⑪
④
⑤
⑦
PX-35 Basic Specifications
Parameter Specifications Remark s
Physical
Features
Control
Section
External
Memory
Displ ay
Sect ion
Operation Section
Others Section
Scanning
Section
Wireless
Communication
Section
IrDA
Clock Section
Power Sup ply
Sect ion
Durability
Siz e
Weight Approx. 130g (incl. Lithium-ion Battery )
MPU
Internal Memory
FLASH R OM
SRAM 2MB
LCD
No. of Dots 112 x 6 4 dots
Backl ight Wh ite L EDs
Keys 18 Key s: Nume ric keys, Tri gger key, BS key, Sh ift ke y, CLR key, ENT key, P W key, Up/Dow n keys
Status confirma tion
Light Source / Wavele ngth
Optical Scheme SXGA CMOS are a sensor (1280 x 1024 pixe ls)
Supported Symbologies
(2D)
Supported Symbologies
(1D)
Specifications Blueto oth Ver.1.2
Supported Protocol
Output Level
Connec tion 1 PX-35 : 1 BT device (host)
Operation Mode
Comm. Distance 10m
Secur ity Auth entica tion an d encr yption avai lable
Specif ications
Real Time Clock YYYY/ MM/DD hh:mm: ss Clo ck (l eap ye ar sup ported)
Main B attery Lithiu m-ion secon dary battery (1800 mAh)
Backup Battery M anganese silicon li thium rechargeable battery (3.4mAh)
Operat ing Time Approx. 25 hours
Chargi ng Method
Chargi ng Temp. 0 to 4 0 deg. C
Chargi ng Time approx. 7.5 hours by cradle or AC adapter
Data Retention Time
Operating Temp.
Operating Humidity
Storage Temp. -20 to 60 deg C
Storage Humidity 20 to 85 % (non- condensing)
Ambient Light
Immunity
Dust-and Dr ip P roof
Shock Endurance
Static Electricity 15kV (no de struction )
(H)140 X (W) 44 X (D) 26 mm
32 bit RISC micro computer
ROM : 256KB + 16KB (for data)
RAM : 64KB
4MB
Se mi-t rans missive Dot Matr ix LC D
Buz zer and Tri-color L ED (Red /Green /Blue)
Re d las er d iode / 630 nm
PDF417 , Micro PDF417, QR Code, Micro QR Code, Codabloc k F, Data M atrix(ECC 0-140,ECC2 00),
Maxi Code(mode 2 to5), Aztec Code, Composite Code, Intelligent Mail Barcode
EAN , JAN, UPC-A/ UPC-E, Industr ial 2 of 5, IATA , Int erleave d 2 of 5, NW-7(CODAB AR), CO DE-39,
CODE-93, CODE-128, MSI/Ples sey, RSS Code
SPP, G AP
Class 2 (4dBm or less)
Master mode / Sla ve mode
Ver.1. 2, Baud rat e: 2400bps to 115. 2kpbs*
Connects to AC adaptor or the dedicated cradle
72 hou rs or longe r
-10 to 40 deg.C
20 to 85 % (non- condensing)
Fluore scent : up to 10,000lx
Sunlig ht: up to 1 00,000lx
IP42
Droppe d 3 times from each of 6 a ngles onto concrete f rom a height of 150cm with n o defects foun d. (Total 18 times)
■
How to Insert or Exchange a Battery
Overview
ご使用にあたって
Battery Pack
For Data
For OS /AP
For Work /Data
may be shorter depends on the environment
* Theoreti cal value
accurate within 90 seconds per month
BTR0400(sold s eparately)
For RAM/RTC backup
When scanning once every 5 seconds at room temperature with
a new and fully-charged main battery with always-on Bluetooth.
after fully discharged
STEP
1
Firstly open the battery
cover.
STEP
2
Confirm the direction (indicated on the surface
of the battery pack) and insert the dedicated
lithium ion battery pack in the battery bay.
STEP
3
Put the battery cover back
and confirm if the cover is
firmly locked.
STEP 3STEP 2STEP 1
Page 4

ご使用にあたって
①
②
⑥
⑫
③
⑧
⑨
⑩
⑪
④
⑤
⑦
System Menu
■
System Menu Screen
The system menu screen starts when turning the power
on. If you do not have user applications, then "figure
1" appears on the screen. Use the Up or Down keys to
move, then Trigger or ENT key to choose the menu. To
move back to the top screen, push the CLR key.
■
Function List
System menu Function
Cancel
Restart
Download appl.
Set contrast
Show version
List files
Terminal id
Diagnostics
Input address
Input PINcode
BLT Local name
BLT com port
MDI download
Returns t o the application to r esume user activ ities.
Closes th e main menu to restar t the applicatio n. When no applica tion loaded, the s ystem menu will start.
Application can be d ownloaded and started a fter the succesf ull installation .
Adjust disp lay, brightness and contrast.
Displays the version of OS, ROM, Bluetooth and MDI (scan engine).
Displays the contents of the RAMdisk and has option to format RAMdisk.
Sets and confirms the terminal id.
Tests (and sets conditions where applicable) in a fixed sequence: 1. Display, 2. Memory, 3. Time & Date, 4. Keypad, 5. Scanner
Sets Bluetooth address
Sets Bluetooth PINcode
Sets Bluetooth local name
Sets Bluetooth com port
Updates scan engine software
* The System Menu may be revised or withdrawn at any time without prior notice.
(
*Please refer to the system menu instruction guide for details of default settings
□
figure 1
SYSTEM MENU
Restart
Power off
Download appl.
Upload appl.
SYSTEM MENU
Settings
Diagnostics
List files
Show version
)
AC/DC Adapter
(Optional)
To recharge the battery, AC/DC adapter (SFP0602000P-PSE) can be directly connected to the PX-35.
Size (H) 75.0
Inpu t
Output
Charging Time Approx. 7.5 h ours
Communication &
Charging Cradle
CRD-9723
RS-232C
* To conne ct the cr adle to a hos t using a de dicated US B cable, yo u must fir st instal l a dedica ted USB driv er on the ho st.
* Pleas e refer to the speci ficatio n manual or t he instru ction gui de for det ails of desi gnated cr adles.
Power Voltage
Supply Current 0. 5A ma x
Power Voltage
Maximum Current 2.0 A ma x
Communication Method
(Cradle to Host)
Size
Weigh t
Charging Time Approx. 7.5 hours
USB
Please contact OPTICON or your l ocal dealer.
More product details, additional support, and configuration options (from the Universal Menu Book) are available at www.opticon.com.
The Netherlands
U.S.A.
France
Germany
Italy
Spain
Opticon Sensors Europe B.V.
tel: +31 (0)23-5692700
Opticon Inc.
tel: 800-636-0090
Opticon S.A.S.
tel: +33 (0)1-41461260
Opticon Sensoren GmbH
tel: +49 (0)6074-91890-0
Opticon s.r.l.
tel: +39 (0)051-6321800
Opticon Sensores S.L.
tel: +34 (0)902-747469
×
(W) 47.5 × (D) 28.0 mm max
AC 90V t o 265 V
5.7 V to 6.3V
Designated Cradles
Communicates with the host via
RS-232C or USB interface.
(H) 67.5 × (W) 71.5 × (D) 98.5 mm Max
85g Max (excluding AC adapter and cable)
email: sales@opticon.com
/
email: opticon@opticonUSA.com
/
email: opticon@opticon.fr
/
email: sales.de@opticon.com
/
email: opticon@opticonitalia.it
/
email: info@opticon.es
/
(Optional)
Line-up of CRD-9723 series
- single-bay cradle (1 x charging, 1 x c ommunication)
- multi-bay cradle (5 x charging, 1 x communication)
- multi-bay cradle (5 x charging, 5 x communication)
Charging Cradle CRD-9722
- single-bay cradle (1 x charging, no communication)
Contact
Sweden
United Kingdom
Taiwan
China
Australia
Brazil
Opticon Sensors Nordic AB
tel: +46 (0)8-58548560
Opticon Limited
tel: +44 (0)1582-635100
Opticon Far Eastern Ltd.
tel: +886 2-27597444 / email: taiwan@opticon.com
Opticon Sensors Europe B.V., Shanghai Representative Oce
tel: +86 21-64480881
Opticon Sensors Pty. Ltd.
tel: +61 (0)2-43402666
Opticon Sensors Europe B.V., Latin American Oce
tel: +55 11-5081 2088
:
:
email: henrik@opticon-sensors.se
/
email: sales@opticon.co.uk
/
email: china@opticon.com
/
email: sales@opticon.com.au
/
email: sales.la@opticon.com
/
PX-35019062- 0-00
 Loading...