

Page 1

User’s Manual
Wand Terminal DWT 7133
Cradle DCW 9931
Page 2

Opticon user's manual
page
INTRODUCTION 3
1. THE DWT7133 4
1.1 Components DWT7133 4
1.2 Cradle DCW9931 4
1.3 Terminal on cradle 5
1.4 Characteristics of the DWT7133 6
1.5 Battery charging 6
2. INSTALLATION AND STARTUP 8
2.1 Power supply 8
2.2 Connecting cradle to host 8
2.2.1 Serial mode (RS232 interface) 9
2.2.2 Network mode (RS485 interface) 9
3. OPERATION OF THE TERMINAL 10
4. READING BAR CODES
WITH DWT7133 11
4.1 Holding the DWT7133 11
4.2 Reading the bar code labels 11
5. TECHNICAL SPECIFICATIONS 12
5.1 DWT 7133 terminal 12
5.1.1 Electrical specifications 12
5.1.2 Optical specifications 12
5.1.3 Environmental specifications 12
5.1.4 Physical specifications 12
5.1.5 Functionality 12
5.1.6 Supported symbologies 13
5.2 DCW 9931 cradle 13
5.2.1 Electrical specifications 13
5.2.2 Physical specifications 13
5.2.3 Functionality 13
5.2.4 Environmental specifications 13
APPENDICES
A. Pinout description 14
A 1 RS 232 cable to PC 14
A 2 RS 485 network cable 14
B. Trouble shooting 15
C. Product ordering information 16
U
SER’SMANUAL
DWT 7133
3
U
SER’S MANUAL
DWT 7133
DWT7133-ver1-98 / printed 11 00
CONTENTS
CAUTION: This user’s manual may be revised
or withdrawn at any time without prior notice.
Copyright 2000
Opticon Sensors Europe B.V.
All rights reserved.
This manual may not, in whole or in part, be
copied, photocopied, reproduced, translated
or converted to any electronic or machine
readable form without prior written consent of
Opticon Sensors Europe B.V.
Limited warranty and disclaimers
By opening the package of this product you agree to
become bound by the liability and warranty conditions
as described below.
Under all circumstances this manual should be read
attentively, before installing and or using the product.
In no event, Opticon Sensors Europe will be liable for
any direct, indirect, consequential or incidental
damages arising out of use or inability to use both
the hardware and software, even if Opticon has been
informed about the possibility of such damages.
A serial number appears on all Opticon products.
This official registration number is strictly related to
the device purchased. Make sure that the serial
number appearing on your Opticon device has not
been removed. Servicing by our Repair Department
can only be carried out under warranty.
All Opticon products are warranted for a period of one
year after purchase, covering defects in material and
workmanship. Opticon will repair or, at its opinion,
replace products that prove to be defective in material
or workmanship under proper use during the warranty
period.
Opticon will not be liable in case modifications are
made by the customer. In such case the standard
repair charge will be applicable. The standard charge
for repair will also be applicable in case no defect is
found at all. These rules also apply for products that
are still under warranty. Therefore, you are advised
to have the product’s specifications allways at hand.
Trademarks used are property of their respective owners.
The general use and functioning of the
terminal together with the cradle will be
described in this manual.
The exact behavior of the terminal
depends on the user application that is
running. For instructions about applications
please consult the documentation of
that software.
Please read this manual carefully
before using the terminal, to maximise
the efficiency of this terminal.
The DWT7133 is a handheld terminal having
the size of a normal optical pen. It incorporates
a powerful microprocessor, a real time clock, a
large memory, a bar code decoder/reader and
an optical interface for communication.
The DWT7133 handheld wand terminal is
user programmable. The incorporated bar
code pen easily reads all popular bar code
symbologies. Visual feedback and assistance
is provided on a LCD display. It is ideal for
numerous applications and outdoor use
because it is lightweight, robust and
watertight.
The terminal is programmable with ANSI “C”
language. This means data storage and
processing can be customized conform your
own requirements and preferences.
Data transmission to a host system can be
achieved by using the DCW9931 cradle. This
cradle supports both RS232 and RS485
communication, which allows you to connect
only one or several cradles to a host
computer. It offers you the possibility to use
the terminal in a network structure.
Application programs can be written on your
Personal Computer. The DCW9931 cradle is
used to download application programs to the
DWT7133 terminal.
INTRODUCTION
Page 3
Opticon user's manual
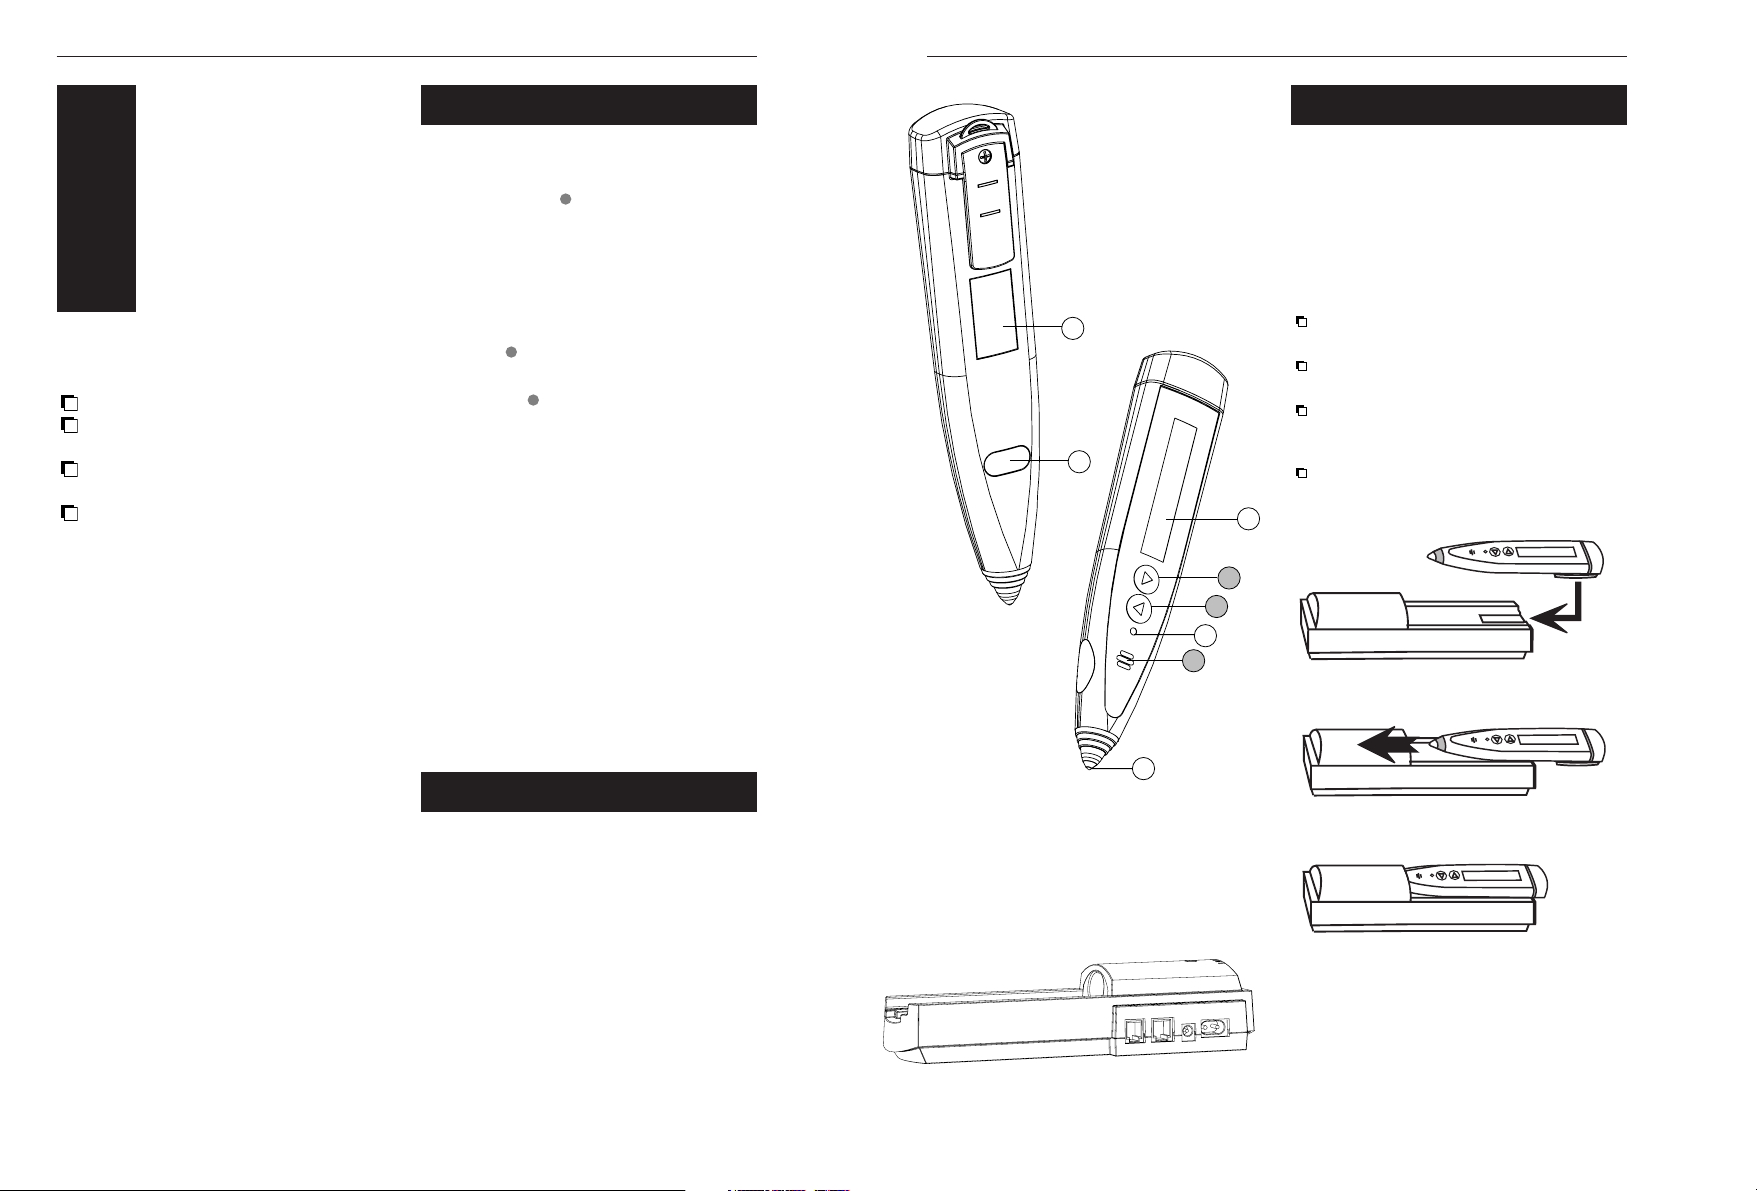
When placing the terminal on the cradle,
make sure that the terminal is placed fully
inwards the cradle. If the terminal is not
placed correctly there is no contact with the
cradle, and as a result communication or
charging activity is not possible.
The following points should be observed:
The reading tip of the terminal will be
placed inwards the cradle.
The clip on the backside of the terminal
should fit into the saving on the cradle.
The terminal is pressed with slight force
into the direction of the cradle untill it fits
properly.
Typically the yellow gasket at the top of the
terminal should align with the edge of the
cradle.
U
SER’SMANUAL
DWT 7133
5
U
SER’S MANUAL
DWT 7133
4
Before you begin your installation, be certain
that you have all the items listed below:
This manual.
The DWT7133 pen terminal.
If ordered:
The DCW9931 cradle
(including powercable)
If ordered:
Connection cables.
Remove the packaging and check for any
physical damage. We recommend you to save
all packaging: it should be used whenever you
need to transport your terminal for service.
Damage caused by improper repackaging is
not covered by the warranty.
THE DWT7133
3
1
1. Reading Tip
An optical reader for bar codes.
2. Activation key definable by user’s application
Typical use: Enables the user to activate
the bar code reader.
3. Bi-colour signalling LED
For visual indication of the bar code
reader's operation (lights up green or
red). To be defined by the user.
4. Up key definable by user’s application
Typical use: Menu scroll key upwards.
5. Down key definable by user’s application
Typical use: Menu scroll key downwards.
6. LCD display
Displays e.g. bar code data, host
messages and user instructions or user
data.
7. Optical Window
Window for optical data transmission.
8. Product label
Do not remove this label!
* A rechargeable battery and beeper are
inside the terminal.
See figure 1.1.
The DCW9931 cradle must be used to upload an
application program to the DWT7133 terminal.
Data transmission to a host system (PC or
network) can be achieved by using the
DCW9931 cradle. Thanks to the flexibility of
the DCW9931 cradle it is possible to connect
one single terminal to a host computer or
implement several terminals in a network
structure. The cradle supports both RS232
and RS485 communication.
See figure 1.2.
1.1 COMPONENTS DWT 7133
1.2 CRADLE DCW 9931
DW
T
6
5
4
3
2
1
Figure 1.1 Components of the DWT7133
8
7
Figure 1.2 The DCW9931 cradle
1.3 TERMINAL ON CRADLE
Figure 1.3 Placing the terminal on the cradle
Page 4

Opticon user's manual
U
SER’SMANUAL
DWT 7133
7
U
SER’S MANUAL
DWT 7133
6
When using the DWT7133:
- for the first time,
- after a long period of disuse,
it is strongly recommended to
charge the terminal on the cradle
for at least 15 hours. After this use
the terminal untill it is fully
discharged.
Although the DWT7133 can operate
on a partial first charging, at least one
full charge is needed for optimum
battery condition and accurate battery
status monitoring.
When the terminal switches off due
to an empty battery, it should be
placed on the cradle.
A fully charged backup battery will
safeguard the data in the RAM for at
least one week. Within this period data
the main battery in the terminal must
be charged, otherwise data may be
lost.
General function
When the main battery of the DWT runs empty,
the terminal is switched off automatically. The
collected data inside the RAM memory is at
this time preserved by the backup battery.
When the backup battery is full, the DWT7133
will keep its data for at least one week. The
application program is stored in Flash-ROM
and will always be preserved, regardless of the
status of the batteries.
Warning levels / Charging indicators
It might be possible to use your own warning
levels for the battery capacity or to set your
own indication for the charging process in
your application program. Consult the
documentation of your application program.
!
!
1.5 BATTERY CHARGING
User programmable
The DWT7133 is user programmable with the
C-programming language (ordered as C-library
and C-compiler). It enables you to develop and
upload data storage and data processing
applications conforming to your own
requirements and preferences.
Supports all popular bar code symbologies
Auto discrimination among all popular bar
code symbologies. This offers you flexibility in
bar code applications.
User friendly
The terminal contains a real time clock. Visual
assistance is provided on an LCD display. User
programmable indicators such as the beeper
and the LED provide audible and visual
feedback to the user. A good read, for
example, can be highlighted by a beep and
the lightup of the LED.The DWT7133 will
switch off automatically after the last operation
(deactivation time is programmable, default 30
seconds).
Rechargeable battery
The DWT is equipped with a rechargeable
Nickel Metal Hydride battery pack, that allows
long operating time. In addition, a rechargeable
Lithium backup battery safeguards the data
when the main battery is empty.
Contactless battery charging and data
transmission
There is no direct electrical contact between
the cradle and the terminal. Optical data
transmission technology and inductive charging
technology is used. The eliminiation of worn,
corroded or dirty contacts assures safety and
reliability.
Outdoor use
The terminal is ideal for numerous
applications and outdoor use because it is
robust, lightweight and water resistant.
1.4 CHARACTERISTICS OF
THE DWT 7133
Advise for normal use
After use, place the terminal on the cradle for
recharging. Keeping the terminal on the cradle
(for example at night) ensures that the battery
is regularly fully charged. This will keep the
batteries in optimum condition and will speed up
recharging.
Charging sequence
By monitoring the current flow into and out of
the main battery, the DWT7133 can provide
an accurate battery status indication and
optimise the charging performance.
The charging process can be controlled
accurately when the maximum capacity and
the current status of the battery are known.
These values first become available after a
complete charging and discharging cycle.
The main battery is normally quick-charged
until it reaches the level of 80%. The
remaining charge level up to 100% is charged
at a lower current, to keep the battery in
optimum condition.
The result is that the DWT7133 is quickly
available for use again, and the main battery
will be fully charged when the terminal is
placed on the cradle for a longer time (for
example at night).
CHARGE REGULARLY
Discharging
The “memory effect” of the Nickel Metal Hydride
battery in the DWT7133 can be neglected.
Therefore discharging the batteries is not
necessary.
Charging times
first charge approx. 15 hours
full charge approx. 4 - 15 hours *
normal charge
0 - 80 % (quick) approx. 2 hours
80 - 100 % approx. 2 hours
*) Note to avoid long charging times
Obtaining a full charge enables the
DWT7133 to determine more accurately
when to switch to a lower current. After a
long period of disuse, or after many partial
charges, the terminal will switch more early
to a lower current, resulting in longer
charging times (in extreme cases up to
14 - 15 hours as in first time use). The
recharging time is reset to normal as soon
as a full charge is reached again.
Page 5

Opticon user's manual
U
SER’SMANUAL
DWT 7133
9
U
SER’S MANUAL
DWT 7133
8
The cradle can be powered directly from the
AC mains voltage or from a DC voltage. For DC
voltage, you can use a 12 V stabilized
adapter.
Be sure that the mains voltage
corresponds with the cradle voltage.
When you choose a mains voltage
connection to the cradle (220 or 110 V AC):
1. Plug the rounded end of the power cord
into port04 on the back side of the cradle.
2. Plug the other end of the power cord into
an AC outlet.
When you choose a DC voltage connection
to the cradle (12 V DC + 10% stabilized):
1. Make sure that the polarity of the 12 V DC
connector is correct.
2. Plug the round connector into port03 on
the back side of the cradle.
3. Plug the adapter into an AC outlet or connect
the other end of the cord to the external
12V battery.
Data transmission from the DWT7133 terminal
to a host computer is achieved by using the
DCW9931 cradle. This cradle supports both
RS232 and RS485 communication, which
allows you to use the terminal in both single or
network mode.
An advantage of the RS485 interface over the
RS232 is the possibility to use terminals in a
network structure.
!
2.1 POWER SUPPLY
(12 V DC)
Port
03
(220-110 V AC)
Port
04
Figure 2.1 Cradle ports
2.2 CONNECTING CRADLE
TO HOST
+
-
Polarity 12V DC connector
Centre pin + (positive)
This chapter will provide instructions on how
to install the DCW9931 cradle and the DWT7133
terminal.
The flexibility of the DCW9931 cradle allows
you to use the DWT7133 terminal in two
modes:
Single mode: A single cradle is connected
to a serial port of a host computer.
Network mode: Several cradles are
connected to a single serial port of a host
computer.
After the installation the terminal is ready for
receiving your application program. Please
refer to the documentation of the used
software.
Exercise caution at all times when
working with AC powered equipment.
Turn off your host computer before
installation.
Do not operate these devices before
reading this chapter.
Consult Appendix B for troubleshooting
information if you experience difficulties
after the installation.
Determine what type of connection
cables are needed for your host
computer.
Refer to appendix A.
!!!
INSTALLATION
AND
STARTUP
3
2
2.2.1
Serial mode (RS232 interface)
When you use an RS232 interface cable, a
single cradle can be directly connected to a
serial port of a host computer.
To set up the cradle in single mode:
(see figure 2.2.1)
1. Switch off all the devices to be used.
2. Plug the RS232 interface cable into port02
on the back side of the cradle.
3. Plug the other end of the cable into the
serial port on your host computer.
4. Make sure power is supplied to the cradle.
5. If all devices are properly connected, the
computer can be switched on.
RS232 connection requires cable:
DB type 9-pin <==> Mod. 8P8 (PC/AT), or.
DB type 25-pin <==> Mod. 8P8 (PC/XT)
2.2.2
Network mode (RS485 interface)
RS485 interface allows extension of the single
mode by connecting several terminals to a
single serial line of a host computer.
To set up the cradle in network mode:
(see figure 2.2.2)
1. Switch off all the devices to be used.
2. Connect each DCW9931 cradle with a
network cable to the next cradle.
The network cable should be connected
from port01 to port02 on the back side of
the cradle.
4. Connect one of the cradles to the PC with
the RS232 interface cable from port02 to
the (host) computer.
5. Make sure power is supplied to all cradles.
6. If all devices are connected properly,
the (host) computer can be switched on.
RS485 connection requires cables:
Mod. 8P8 <==> Mod. 6P6 connector
and
DB type 9-pin <==> Mod. 8P8 (PC/AT), or
DB type 25-pin <==> Mod. 8P8 (PC/XT)
Connection
to cradle Port02
Connection
to a serial port
Host
Port
02
Figure 2.2.1 Installing cradle in serial mode
Connection
to cradle Port02
Port
02
Connection
to a serial port
Connection
to cradle Port02
Connection
to cradle Port02
RS485
RS232
RS485
Host
Port
01
Port
02
Port
01
Port
02
Port
01
Figure 2.2.2 Networking the cradle
A pinout description is given in Appendix A *Ordering information is given in Appendix C
Page 6

Opticon user's manual
4.1
Holding the DWT7133
1. Hold the terminal lightly in your
hand as if it were a normal pen.
2. Keep it slightly inclined with respect to its
bar code-supporting surface (approximately
5 degrees).
3. The wand tip must emit red light. If not,
first press the trigger key.
3. Brush its tip lightly along the entire length
of the code.
See figure 4.1.
U
SER’SMANUAL
DWT 7133
11
U
SER’S MANUAL
DWT 7133
10
READING
BAR CODES
WITH DWT7133
3
4
4.2
Reading the bar code labels
Pressing hard does not improve the
quality of reading, but may actually
damage the label and in the long run
the wand tip!
Good read: the terminal has read the entire
length of the code from X to X. Figure 4.2.1
illustrates a good read.
The figure 4.2.2 below illustrates two incorrect
reads: the terminal pointed initially at X has
not scanned all the bars making up the code.
!
OPERATION OF
THE TERMINAL
3
3
DWT
15
o
XX
X
X
X
X
Figure 4.2.1 A good read
Figure 4.2.2 Two incorrect reads
Figure 4.1 How to hold the DWT7133
The functionality of the terminal is determined
by software, the so-called user application,
that is running on the terminal.
Usually, the terminal is not equipped with
software and has no functionality. At first the
user application must be loaded before the
terminal can be used for barcode scanning.
Tools for developing a user application on the
PC for use on the terminal, as supplied by
Opticon are: C language, consisting of
Microtec ANSI-C compiler and C library for
handheld terminals, or the DMC interpreter.
The user application must be downloaded
from the PC into the terminal. You can use the
cradle for communication between the terminal
and the PC. A program on the PC will send
the user application to the terminal, where it is
stored in FlashROM memory.
When the functionality of the terminal is defined
by the application it is ready for operation.
In a typical application you will press the trigger
key and scan a bar code label as described in
the next chapter. Scanned data and data
entered from the keyboard is stored in the
terminal's RAM. The user application can use
this data in subsequent steps.
The collected data can be transmitted to the PC
for further processing. For data transmission
you can use the cradle.
Page 7

Opticon user's manual
Reading angle 0 - 45 oin all directions
Resolution
at PCS 0.9 0.15 mm (6 mil)
Min. PCS value 0.3
5.1.3
Environmental specifications
Temperature 0 - +50 oC in operation
-30 - +70 oC in storage
Emission According to EN50081, part 1
Immunity According to EN50082, part 1
Protection against According to IEC529,
dust and moisture IP 65
5.1.4
Physical specifications
Dimensions
(l x w x d) 183 x 40 x 22 mm
Case material ABS
Weight 110 g
5.1.5
Functionality
Memory ROM : 32 kB
FlashROM (for O/S and
program): 512 kB
battery backed up RAM
(for data): 128 kB S-RAM
Microcontroller 16-bit CMOS single chip
Real time clock Quartz RTC, time and date
programmable with leap year
handling
Display Alpha-numeric LCD
2 lines x 16 characters
Indicators Piezo buzzer
Good read LED (red/green)
Keyboard 3 Programmable function keys
Programming User applications written in C
may be downloaded via the
cradle.
Transmission speed 2400 - 19200 baud
U
SER’SMANUAL
DWT 7133
13
U
SER’S MANUAL
DWT 7133
12
5.2.3
Functionality
Interfaces supported RS232
(communication to computer)
RS485
(communication to computer)
Serial communication RS232 Baudrate:
2400 - 19200 baud
RS485 Baudrate:
2400 - 19200 baud
Transmission modes Half duplex, RS232
Half duplex RS485
Parity Odd, Even, None
Stop bit 1 or 2
5.2.4
Environmental specifications
Temperature 0 - +50 oC in operation
-30 - +70 oC in storage
Emission According to EN50081, part 1
Immunity According to EN50082, part 1
5.1.6
Supported symbologies
Chinese Post 2of5
Codabar incl. ABC and CX
Code 39, incl. full ASCII
Code 93
Code 128
EAN-8 incl. +2,+5
EAN-13 incl. +2,+5
EAN 128
IATA
Industrial 2of5
Interleaved 2of5
ISBN
Italian Pharmaceutical
Laetus
Matrix 2of5
MSI/Plessey
UK/Plessey
S-Code
Telepen
UPC-A incl. +2,+5
UPC-E incl. +2,+5
5.2.1
Electrical specifications
Voltage requirement 220/230 V AC, +
10%,
50/60 Hz,
optional:
110/115 V AC, +
10%,
50/60 Hz,
12V, +
10%, stabilized,
130mA (200mA peak)
Battery charging time First charge:
approx. 15 hours
Normal charge:
approx. 3-4 hours
5.2.2
Physical specifications
Dimensions
(l x w x h) 240 x 65 x 58 mm
Case material ABS
Weight 340 g.
Standard connector RS 232:
DB9 female - Mod 8P8
RS485:
Mod 6P6 - Mod 8P8
5.1.1
Electrical specifications
Main battery NI-MH rechargeable
Main battery operating time
When making every 5 seconds 1 scan with
1 sec reading LED on and 0.2 sec. green LED
on and 0.2 sec. buzzer on, operating time is:
approx. 9 hours
Different operation conditions affect the
operating time
Backup battery Lithium,
recharged from main battery
Backup battery If fully charged: 2 weeks
operating time backup time
Battery management Indicators for battery
voltage and remaining
charge can be defined by
user application.
When battery is low the
terminal switches off
automatically.
Charging method Contactless via cradle
5.1.2
Optical specifications
Light source Red light LED: 660 nm
optional:
Infra red light LED: 940 nm
Photo sensor PIN photo diode
Scan velocity res. 0.15 mm / PCS.09 :
50 -800 mm/s
res. 0.25-0.40 mm / PCS 0.9 :
50-2000 mm/s
TECHNICAL
SPECIFICATIONS
3
5
5.1
DWT7133 TERMINAL
5.2
DCW9931 CRADLE
Page 8

Opticon user's manual
U
SER’SMANUAL
DWT 7133
15
U
SER’S MANUAL
DWT 7133
14
This appendix contains the pinout description
of the connection cables which can be used to
connect the DCW9931 cradle to a host
computer. Also the pinout of the network cable
is described.
A 1
RS 232 cable to PC
A 2
RS 485 network cable
PINOUT
DESCRIPTION
3
A
Modular
plug
(8P8)
1
3
5
DB9
connector
Female
2
5
3
Signal
TxD
GND
RxD
1
8
RS232
cable
1
9
Modular
plug
(6P6)
1
2
6
1
8
Modular
plug
(8P8)
6
7
3
1
6
Signal
SRDSRD+
GND
Network
cable
RS485
The terminal has a problem reading the
label:
The reading tip of the terminal is not
emitting red light.
The LED in the reading tip might switch off
after a certain time.
Press the trigger key (typical use) to
activate the LED.
The terminal does not read the barcodes
very well.
The barcode labels might be damaged or
poorly printed. If so, replace the labels.
The reading tip might be damaged. If so,
contact your local dealer to replace the
reading tip.
?
?
The terminal does not respond.
The terminal does not respond
immediately after the installation
procedure.
When the battery is completely empty, it
takes some time for charging the battery
to a certain activation voltage.
Put the terminal in the cradle for charging.
The terminal does not respond at all and
has an empty display
.
Possibly the battery is empty and will not
charge anymore.
Contact your local dealer to replace the
battery.
The terminal can not send its data to the
PC.
The PC receives no data.
The terminal might not be placed correctly.
Check if the terminal is placed fully inwards
the cradle. If not, place properly.
The cradle might not be well connected.
Check the power cable and communication
cable. If needed, connect them properly.
The application program might not run on
the PC. Check if the application program is
running properly.
?
?
?
TROUBLE
SHOOTING
3
B
Page 9

Opticon user's manual
Opticon Code
Handheld wand terminal
DWT 7133
red light A73104R0010
optional: infra red light A73104 I 0010
Communication and charging station
DCW 9931 cradle
220 V AC A73300N0010
optional: 110 V AC A73300N0030
Connection cables for cradle
RS 232 cable DB9 female (DB9-Mod.8P8) A73400N0030
RS 232 cable DB25 female (DB25-Mod.8P8) A73400N0040
RS 485 cable (Mod.8P8-Mod.6P6) A73400N0020
Protective bag
Nylon bag for DWT7133 A73100N0010
Software development tools
C-language:
Microtec ANSI C compiler O8010000010
C-library for handheld terminals D4030000020
DMC:
DMC-kit DWT7133 D1070000010
U
SER’S MANUAL
DWT 7133
16
PRODUCT
ORDERING
INFORMATION
3
C
Opticon Article Code
O0225000030
 Loading...