


User Manual
for the OPERA™ E1/T1 Option
OPR-002-E1T-P
This information may be subject to change. All brand and product names are trademarks and/or
registered trademarks of their respective owners. All rights reserved.
Copyright © 2001 by OPTICOM GmbH · www.opticom.de

CONTENTS
Contents
Contents .............................................................................................................................................i
1 Preface......................................................................................................................................1
2 Setup of the Cable Connections...........................................................................................3
3 Setup of the E1/T1 Board Parameters..................................................................................5
3.1 Configuration Parameters Overview...........................................................................5
3.1.1 Protocols ................................................................................................................5
3.1.2 Call Progress Tones..............................................................................................6
3.1.3 D-Channel Configuration.....................................................................................7
3.1.4 Line Code...............................................................................................................7
3.1.5 T1 Framing Method..............................................................................................7
3.1.6 CAS ABCD Idle Pattern.......................................................................................7
3.1.7 Coding Law............................................................................................................8
3.1.8 Line Build Out........................................................................................................8
3.1.9 Destination Numbering Type..............................................................................8
3.1.10 Destination Numbering Plan...............................................................................8
3.1.11 Source Numbering Type ......................................................................................8
3.1.12 Source Number Presentation...............................................................................8
3.1.13 Source Number Screening...................................................................................8
3.1.14 Source Phone Number ..........................................................................................8
3.1.15 Source Phone Subnumber...................................................................................8
3.1.16 Transfer Capability...............................................................................................9
3.1.17 Inter Exchange Prefix Number.............................................................................9
3.1.18 B-Channel Selection.............................................................................................9
3.2 Using the OptiConf™ Application.............................................................................9
3.2.1 The Parameter Field “Protocol Type”..............................................................10
3.2.2 The Parameter Field “Protocol Version”..........................................................10
3.2.3 The Parameter Field “Protocol Subversion”...................................................10
3.2.4 The Parameter Field “Call Progress Tones Conf.”.........................................11
3.2.5 The Parameter Field “DChannel Configuration”............................................11
3.2.6 The Parameter Field “Line Code”.....................................................................11
3.2.7 The Parameter Field “T1 Framing Method”....................................................11
3.2.8 The Parameter Field “CAS ABCD Idle Pattern”.............................................11
3.2.9 The Parameter Field “Coding Law”..................................................................11
3.2.10 The Parameter Field “Line Build Out ”.............................................................11
3.2.11 The Parameter Field “Termination Side”.........................................................12
3.2.12 The Parameter Field "Set B-Channel Parameters"..........................................12
3.3 Setting up B-Channel Configuration Parameters ....................................................12
4 Signal Acquisition Using OptiCall™.................................................................................17
5 OptiCall™ Command Line Parameters...............................................................................19
6 Measurement Examples .......................................................................................................21
6.1 Example Parameter Settings for Several Protocol Types........................................21
6.1.1 E1_Euro_ISDN....................................................................................................21
6.1.2 T1_CAS................................................................................................................22
6.1.3 E1_MFCR2...........................................................................................................25
6.1.4 E1_CAS_R2.........................................................................................................26
6.1.5 T1_NI2_ISDN......................................................................................................26
6.1.6 T1_5ESS_10_ISDN.............................................................................................28
6.1.7 T1_DMS100_ISDN.............................................................................................28
6.2 Example 1: Stand Alone Loop Measurement...........................................................29
6.3 Example 2: Measurements From a Batch File...........................................................32
i

CONTENTS
7 Options for Advanced Users..............................................................................................33
7.1 Editing a Call Progress Tones Configuration File...................................................33
7.2 Editing a CAS Protocol Table ....................................................................................34
7.2.1 Overview..............................................................................................................34
7.2.2 Constructing or Modifying a CAS Protocol Table........................................35
7.2.3 Table Elements ....................................................................................................35
7.2.4 State’s Line Structure.........................................................................................38
7.3 Protocol Trace Option.................................................................................................44
7.3.1 Tracing CAS/Robbed Bit Protocols .................................................................44
7.4 Downloadables Construction Utility........................................................................46
7.4.1 Location................................................................................................................46
7.4.2 Description...........................................................................................................46
7.4.3 Operation..............................................................................................................46
8 Technical Specifications......................................................................................................47
9 References .............................................................................................................................48
10 Glossary of Terms ............................................................................................................49
10.1 ANI.................................................................................................................................49
10.2 CLI..................................................................................................................................49
ii

CHAPTER 1: PREFACE
1 Preface
The documentation on hand is meant as a completion to the user manual of
the OPERA™ measurement system. This documentation describes the E1/T1
Option (OPR-002-E1T-P) for the OPERA™ voice quality analyzer. Before you
start reading this documentation, you should have studied the OPERA™ User
Manual thoroughly, since the basic operation of components of the OPERA™
system is assumed to be known in the following.
OPTICOM's E1/T1 interface option provides you with a large variety of
protocols. In the current version the following protocol types are available:
E1 Euro ISDN,
E1 MFC-R2 CAS protocol including many country-specific variants,
E1 CAS-R2 protocol including R2D and R2D modified variants,
T1 CAS/Robbed Bit protocols including E&M wink start, E&M
immediate start, E&M delay dial/start, loop start and ground start, and
T1 National ISDN-2 PRI protocol.
T1 ISDN implementations for particular switches are supported as
T1 ISDN PRI protocol for the Lucent®/AT&T® 4ESS switch,
T1 ISDN PRI protocol for the Lucent®/AT&T® 5ESS-9 switch,
T1 ISDN PRI protocol for the Lucent®/AT&T® 5ESS-10, and
T1 ISDN PRI protocol for the Nortel® DMS100 switch.
In addition, a number of transparent protocols are available that provide the
physical interface layer, without any signalling-related functions. The
protocol types including all parameter settings for the interface board are
fully software configurable.
With the E1/T1 Option for the OPERA™ voice quality analyzer, you may
modify the protocol parameters and even the entire state machine of T1
CAS, E1 MFC-R2 and E1 CAS-R2 protocols. You may also create your own
call progress tones configuration files if the files provided by OPTICOM
should not meet your requirements.
In Section 2 of this document you will find a description of the board
hardware. Section 3 provides information about the setup process of the
interface board parameters, an overview of the available parameters and
their meaning is given here. How to perform measurements with the E1/T1
interface is explained in Section 4, the new command line parameters for
automated measurements from script files are described in Section 5.
Measurement examples can be found in Section 6. Here, you will also find
example parameter settings for several protocol types.
1

CHAPTER 1: PREFACE
Advanced users will find descriptions for useful options in Section 7. On
these pages, it is explained how to modify or construct CAS protocol tables
and how to edit call progress tones configurations. In addition, you will
learn how to trace protocols. The technical specifications for the interface
board are listed in Section 8. The documentation concludes with references
and a glossary of terms in Sections 9 and 10.
2
CHAPTER 2: SETUP OF THE CABLE CONNECTIONS
2 Setup of the Cable Connections
The E1/T1 Option for the OPERA™ voice quality analyzer enables you to
perform measurements with digital PSTN systems like Primary Rate Access
(PRA) to ISDN, E1 CAS/MFR2 protocols or T1 CAS/Robbed Bit protocols.
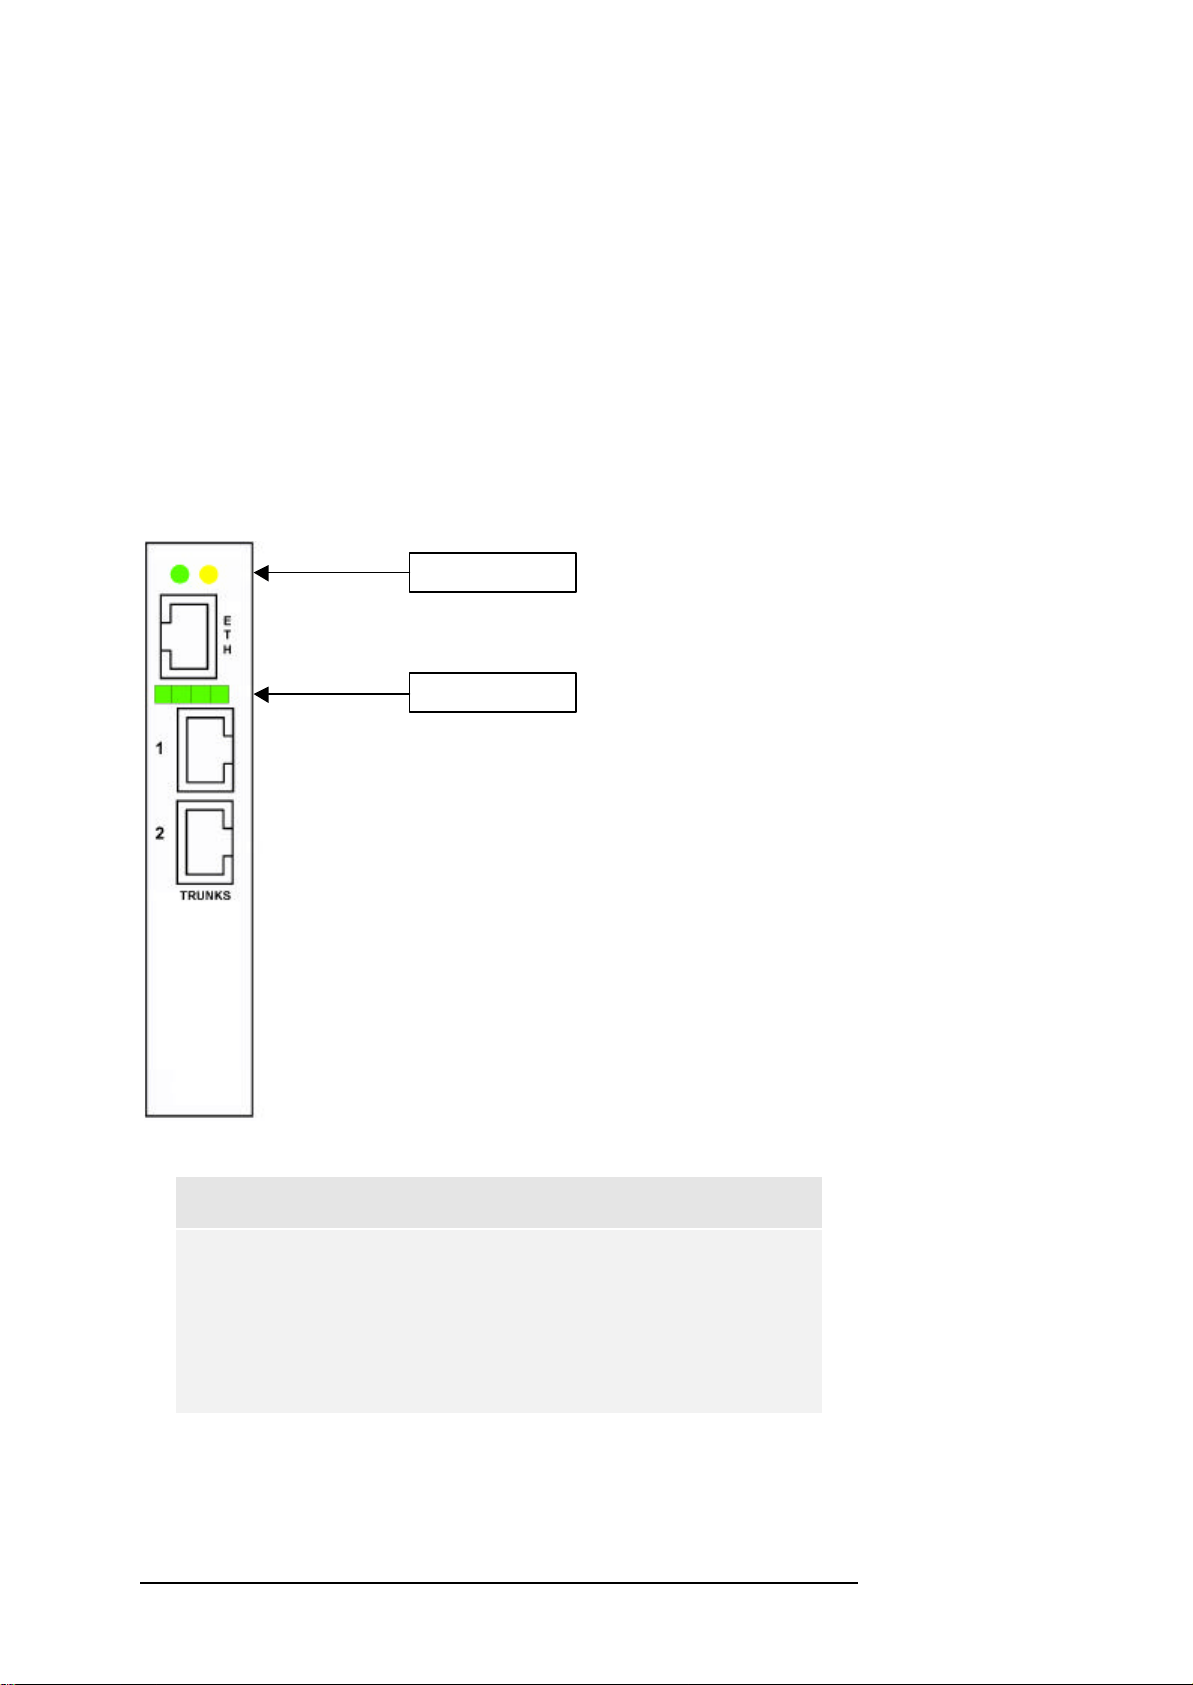
To connect the OPERA™ system to your system under test, two RJ-48
connectors are provided as shown in Figure 2.1. These trunks are labelled
“1” and “2” on the back plate of the E1/T1 interface board. The Indicator
LEDs shown above of the RJ-48 connectors are dual-colour LEDs that
indicate the status of trunk 1 and 2, left to right. The LEDs are lit green for
normal operation. If an LED is lit red either a loss of signal (LOS) or a loss of
frame alignment (LFA) has been detected.
Ethernet LEDs
Ethernet RJ-45
Indicator LEDs
2 Trunks RJ-48
Figure 2.1: Rear View of the E1/T1 Interface Board.
Note:
The RJ-45 connector labelled “ETH” and the two Ethernet
LEDs are not supported in the current version of OPERA™.
In future versions, the Ethernet trunk will provide a
connection to your IP network, thus giving the option of
assessing voice quality in VoIP systems.
In Figure 2.2 the connector pins for RJ-48 are shown.
3

CHAPTER 2: SETUP OF THE CABLE CONNECTIONS
Figure 2.2: RJ-48 Connector Pins
4

CHAPTER 3: SETUP OF THE E1/T1 BOARD PARAMETERS
3 Setup of the E1/T1 Board Parameters
Before you will be able to start performing measurements with the E1/T1
interface board, the board’s configuration parameters will have to be set up.
These parameters affect the board’s operation. For instance, the protocol
type that is being used is defined at this point.
After the user has finished setting all necessary parameter values, the
initialization process is started during which the configuration parameter set
is downloaded via the computer host’s PCI bus to the E1/T1 interface board.
Note:
The board configuration parameters are not “on-the-flychangeable” in the sense that changes will only take effect
after the consecutive initialization process.
Please note, that after the start-up of the OPERA™ host PC, the last chosen
parameter configuration set of the E1/T1 board is immediately available. If
this configuration meets your requirements, you may directly start the
OptiCall™ application in order to perform measurements. For a description
of the OptiCall™ application, please refer to Section 4.
3.1 Configuration Parameters Overview
In this section an overview of the available configuration parameters and
their meaning is given. Only those parameters are described that will have to
be set up by the user.
3.1.1 Protocols
The E1/T1 Option for OPERA™ offers a large variety of protocol types which
are listed and described in the following.
E1 Euro-ISDN – ISDN PRI Pan-European (CTR4) protocol with many
information elements and call control messages.
E1 MFC-R2 - Common E1 MFC-R2 CAS protocols including line signalling
and compelled register signalling. National variants such as for China, Israel,
Mexico, Philippines and more are available. You may change the protocol
parameters and even the entire state machine by editing the protocol textual
table that is downloaded to the E1/T1 interface board after the setup of the
configuration parameters will have been finished. For a description of how
to edit a CAS protocol table, please refer to Section 7.1.
E1 CAS-R2 - Common E1 CAS protocols including line signalling and
MF/DTMF address transfer. Available are R2D and R2D modified variants.
You may change the protocol parameters and the state machine by editing
the protocol textual table. For a description of how to edit a CAS protocol
table, please refer to Section 7.1.
5

CHAPTER 3: SETUP OF THE E1/T1 BOARD PARAMETERS
T1 CAS – Common T1 robbed bit protocols including E&M wink start, E&M
immediate start, E&M delay dial/start, loop start and ground start. You may
change the protocol parameters and the state machine by editing the
protocol textual table. For a description of how to edit a CAS protocol table,
please refer to Section 7.1.
T1 NI2 ISDN - National ISDN-2 PRI protocol with many ISDN information
elements and call control messages.
T1 4ESS ISDN - ISDN PRI protocol for the Lucent®/AT&T® 4ESS switch with
many ISDN information elements and call control messages.
T1 5ESS-9 ISDN - ISDN PRI protocol for the Lucent®/AT&T® 5ESS-9 switch
with many ISDN information elements and call control messages.
T1 5ESS-10 ISDN - ISDN PRI protocol for the Lucent®/AT&T® 5ESS-10
switch with many ISDN information elements and call control messages.
T1 DMS100 ISDN - ISDN PRI protocol for the Nortel® DMS100 switch with
many ISDN information elements and call control messages.
In addition to these protocol types, the E1/T1 Option for OPERA™ offers a
number of transparent protocols. Transparent protocols provide the physical
interface layer, without any signalling-related functions. These protocol types
are listed below.
E1 Transparent-62 – Transparent protocol, where no signalling is to be
provided by the E1/T1 interface board. Time slots 1-31 of each trunk are
mapped to the DSP channels hosted on the board. The first trunk is fully
mapped, i.e. all 31 time slots, while the last trunk and its last time slots (30
and 31) will not have any DSP channel.
E1 Transparent-60 - Transparent protocol, where no signalling is to be
provided by the E1/T1 interface board. Time slots 1-31, excluding time slot
16 of both trunks, are mapped to 60 DSP channels on the board.
T1 TRANSPARENT - Transparent protocol, where no signalling is to be
provided by the E1/T1 board. Time slots 1-24 of both trunks are mapped to
60 DSP channels.
J1 TRANSPARENT - Transparent protocol, where no signalling is to be
provided by the E1/T1 board. [AUDI01]
3.1.2 Call Progress Tones
The call progress tones to be detected, or generated by the board,
respectively, are defined in a Call Progress Tones Configuration File. You
can either use one of the files supplied by OPTICOM, or construct your own
file. A description of how to edit a Call Progress Tones Configuration File
can be found in Section 7.1.
6

CHAPTER 3: SETUP OF THE E1/T1 BOARD PARAMETERS
3.1.3 D-Channel Configuration
The D-channel configuration setting is applicable only to ISDN PRI
protocols that support the NFAS and/or D-channel backup procedures. Only
the US variants NI2, DMS, 4ESS, 5ESS-9, and 5ESS-10 are supported, and
will be affected by this configuration. Table 3.1 lists the possible
combinations.
Trunk 1 Trunk2 Description
Primary Primary Normal and default configuration for PRI protocols for 23
bearer channels and one CCS (Common Channel Signalling)
channel for each trunk.
Primary NFAS NFAS mode using Trunk 1 carrying the CCS channel. This
trunk is also used to set-up calls for both trunks. Thus, Trunk 2
supports 24 bearer channels.
Primary Backup Backup mode using the first trunk’s CCS has a primary
signaling channel setting up the calls for both trunks. The
second trunk supports 23 bearer channels and its CCS channel
is used as a back-up or stand-by channel. In the case of
malfunction, the second trunk changes roles with the 1st span
and becomes the primary span.
Table 3.1: PSTN Interface and Protocol Configuration for the E1/T1 interface board.
Note:
Currently only identical configuration setups of Trunk 1 and
Trunk 2 are possible. This is about to change in future
versions of the E1/T1 option.
3.1.4 Line Code
Selects the line code type to be used for the trunks. Two common types of
line coding are defined for E1, namely AMI or HDB3. For a T1 network
valid line code types are AMI or B8ZS.
3.1.5 T1 Framing Method
This parameter is applicable for T1 protocol types only. It specifies the
framing format used by the trunk. T1 and E1 delineate frames differently. In
the case of T1, either D4 framing (also known as SF or Super Frame) or ESF
(Extended Super Frame) is applicable. In the case of E1 protocols, there is
only one framing method defined.
3.1.6 CAS ABCD Idle Pattern
The CAS ABCD Idle Pattern is the pattern that will be used whenever a
channel is in idle state (at initialization - before opening the channel, or at all
times when it is closed). In the frame format for E1 and for ESF on T1, this
pattern consists of 4 bits – ABCD. When T1 with D4 frame format is used,
there are 2 bits relevant – AB. This parameter is relevant only when using
the E1/T1 interface with CAS protocols.
7

CHAPTER 3: SETUP OF THE E1/T1 BOARD PARAMETERS
3.1.7 Coding Law
The coding law parameter defines the companding characteristic that is used
on the PC internal TDM bus. The companding characteristic is a formula
which translates the amplitudes of the sampled voice signal into the 8 bit
code words. Supported coding laws are A-Law and Mu-Law. The coding
law must match the coding law of the speech file that is send through a
system under test. Please note, this parameter does not refer to the telephone
line coding law.
3.1.8 Line Build Out
There are two parameters applicable for the line build out, the Line Build
Out Loss parameter and the Overwrite parameter. The Line Build Out Loss
parameter is used to control loss for different lengths of the line and
applicable only to T1 protocols. The second parameter, Overwrite, enables
users to write to the 3 Pulse Mask (XPM) registers, thus controlling the
trunk’s analog pulse shape (applicable to E1 and T1 trunks).
3.1.9 Destination Numbering Type
The type of the destination (called) number as defined in Q.931(ISDN only).
3.1.10 Destination Numbering Plan
The plan number of the destination (called) number as defined in Q.931
(ISDN only).
3.1.11 Source Numbering Type
In the case of ISDN, this parameter specifies the type of the source (calling)
number as defined in Q.931. For MFC-R2 protocols, the source number type
is used to provide the calling number category.
3.1.12 Source Number Presentation
Presentation of source phone (calling) number as defined in Q.931 (ISDN
only).
3.1.13 Source Number Screening
Screening of source phone (calling) number as defined in Q.931 (ISDN
only).
3.1.14 Source Phone Number
Specifies the phone number of the calling (originating) party for protocols
that use ANI (Automatic Number Identification) or CLI (Calling Line
Identification).
3.1.15 Source Phone Subnumber
Specifies the source sub address phone number for ANI.
8
CHAPTER 3: SETUP OF THE E1/T1 BOARD PARAMETERS
3.1.16 Transfer Capability
In the case of ISDN, this parameter specifies controls the BC (Bearer
Capability) and optionally HLC (Higher Layer Capability). For MFC-R2
protocols, the transfer capability is used to provide the service category.
3.1.17 Inter Exchange Prefix Number
This parameter is an option to send an additional phone number before the
address (destination) phone number. The address phone number is selected
in the OptiCall™ application.
3.1.18 B-Channel Selection
This parameter defines whether the B-channel is used in exclusive mode. If a
call is initiated in exclusive mode, the calling party exclusively defines the Bchannel to be used for the call. Alternatively, the PSTN is assumed to specify
the B-channel to be used for the call (ISDN only). [AUDI01]
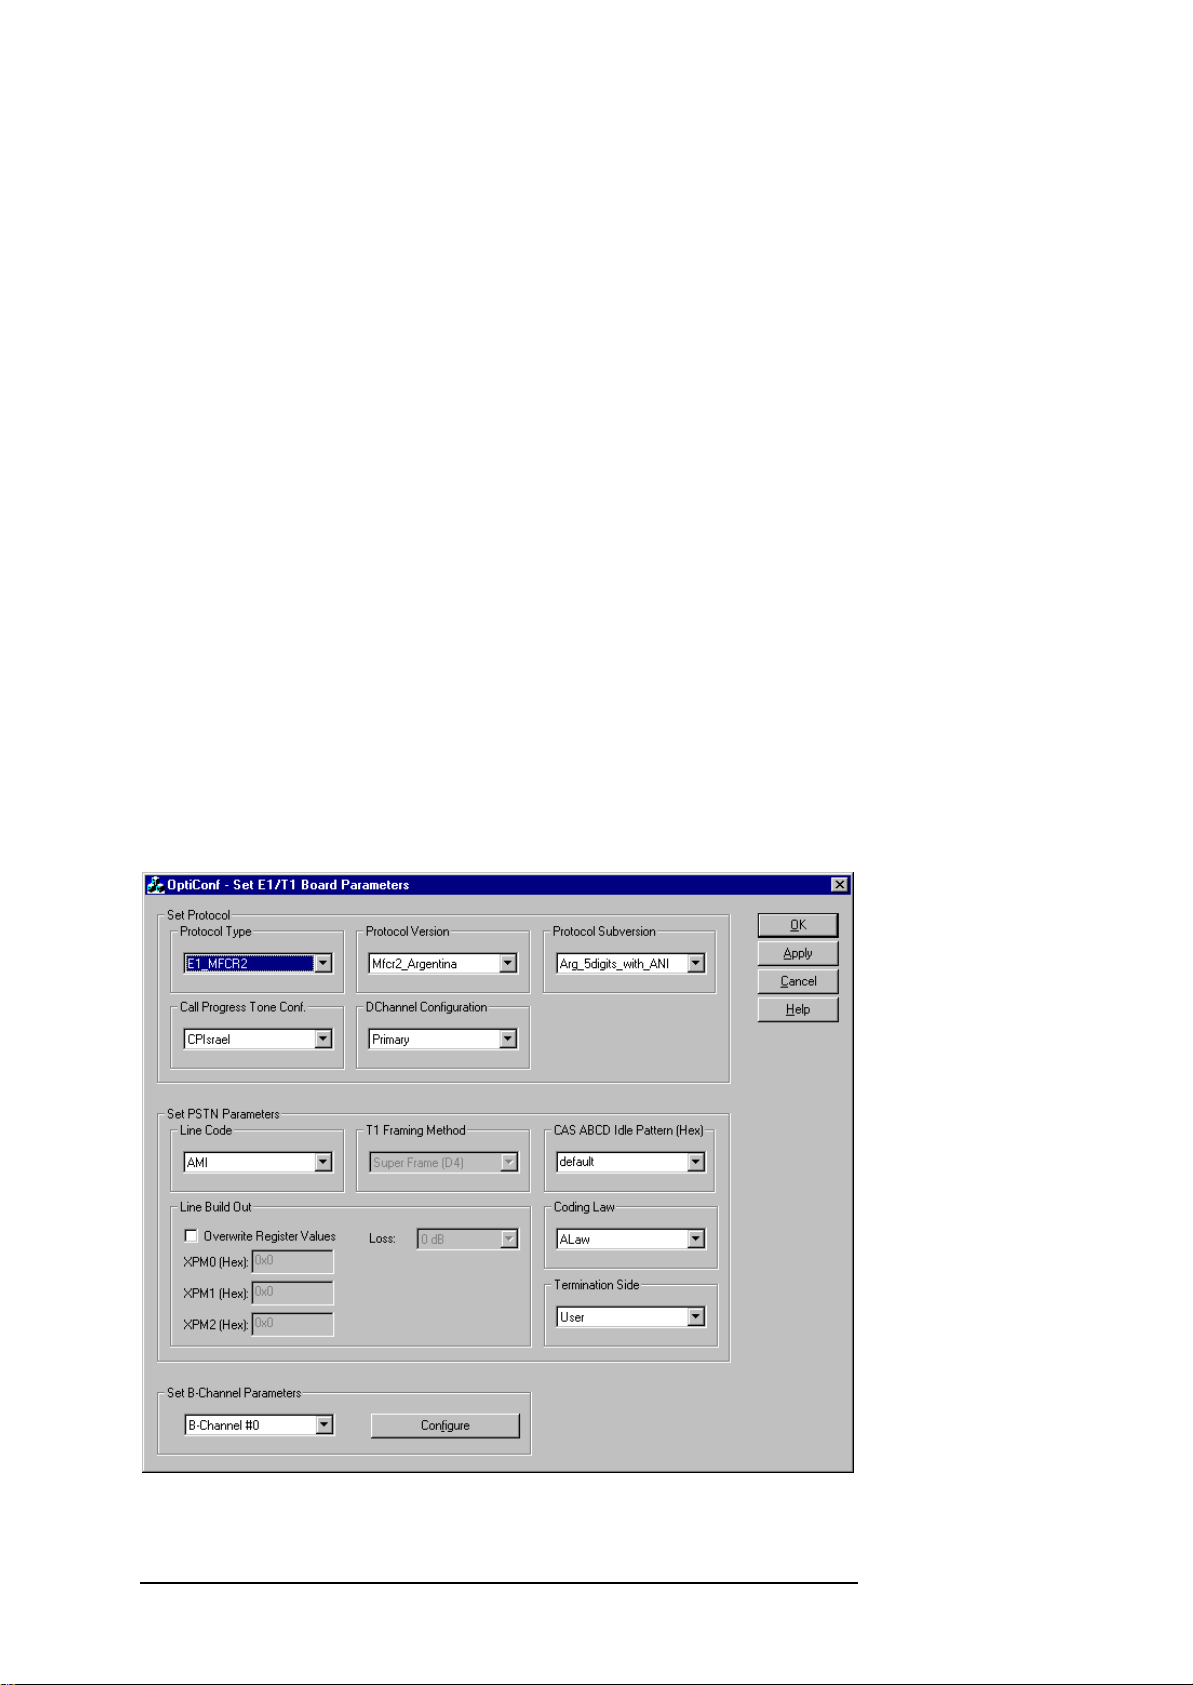
3.2 Using the OptiConf™ Application
The configuration parameters are setup with the help of the OptiConf™
application. You start OptiConf™ from the Start Menu of your Windows™
platform by selecting the menu entry Start|Programs|Opera|OptiConf. The
application will come up with the dialog shown in Figure 3.1. In this state,
OptiConf™ will display the currently active configuration parameter settings
for the E1/T1 interface. This configuration has already been downloaded to
the interface board and is thus available for measurements.
Figure 3.1: The OptiConf™ dialog main window.
9

CHAPTER 3: SETUP OF THE E1/T1 BOARD PARAMETERS
If these settings do not meet your requirements, you may change them. In a
first step you might for example select an entry from the Protocol Type
control listbox field. After having done so, the corresponding parameter
values will be set in the other parameter fields of the OptiConf™ dialog. If
necessary, you may modify one or more parameters now. This is done by
either selecting an entry from the listbox field of a control or by directly
entering the necessary value in an edit field where possible.
Some parameter fields are shown in grey colour and thus may not be
modified. These disabled configuration parameters are either not relevant for
the protocol chosen, or there is only one valid value.
After you will have finished setting all the necessary parameter values, you
may start the initialization process by either clicking on the OK or the Apply
button. After having done so, a message dialog comes up that informs you
that the download process might take up to approx. 2 minutes. Please note,
that the initialization process is started only after you have confirmed the
message by clicking on the OK button. The application will then download
the configuration set to the E1/T1 interface board.
Note:
Start OptiCall™ only after the initialization process is
finished. Only then the chosen E1/T1 configuration is
available to perform measurements.
In the following the parameter fields and its valid values are described. For
more detailed information about the parameters, refer to the overview in
Section 3.1.
3.2.1 The Parameter Field “Protocol Type”
Here you select the name of the protocol type. After choosing a protocol
from the list, the corresponding default parameter values will be assigned to
the parameter fields in the OptiConf™ dialog. For some protocol types, there
are variants available that may represent country specific variants, for
instance. These variants are available in the Protocol Version and Protocol
Subversion control fields.
3.2.2 The Parameter Field “Protocol Version”
This control offers a set of protocol variants that are available for some
protocol types. If there are no variants available, the control will show “Not
available”.
3.2.3 The Parameter Field “Protocol Subversion”
Some protocol types provide another subset of variants which are available
from this control field. For example, the MFC-R2 protocol provides variants
for several countries in the Protocol Version field, and a subset of different
protocol variants for the chosen country in the Subversion control.
10

CHAPTER 3: SETUP OF THE E1/T1 BOARD PARAMETERS
3.2.4 The Parameter Field “Call Progress Tones Conf.”
Selects the call progress tones configurations file. If no call progress tones
are to be used the correct entry is “No call progress support”.
3.2.5 The Parameter Field “DChannel Configuration”
The D-channel configuration can be set to Primary, NFAS or Backup.
3.2.6 The Parameter Field “Line Code”
Specifies the line code type. Select AMI or HDB3 for E1 protocols and AMI
or B8ZS for a T1 network.
3.2.7 The Parameter Field “T1 Framing Method”
This parameter is applicable for T1 protocol types only. It is used to select
“Super Frame (D4)” (12 frames multi-frame - SF) or “Extended Super Frame”
(24 frames multi-frame - ESF) for T1.
3.2.8 The Parameter Field “CAS ABCD Idle Pattern”
When defining the Idle Pattern, you may choose between an entry in the list
field of the controls or you may enter a value in the control’s edit field.
Please note, that the entered value needs to be a hexadecimal number. You
may enter the value including the prefix “0x” or without it. In both cases
your entry will be interpreted as a hex value. Valid entries are in the range
between 0x0 - 0xf.
For example, if you want to specify a pattern ABCD=1010, you have to
enter the corresponding hex value which is 0xa.
3.2.9 The Parameter Field “Coding Law”
This control selects the coding law that is used on the PC internal TDM bus.
Available values are Mu-Law and A-Law. The coding law must match the
coding law of the speech file that is send through a system under test. Please
note, that this parameter does not refer to the telephone line coding law.
3.2.10 The Parameter Field “Line Build Out ”
The Line Build Out Loss parameter can be set to 0 dB, -7.5 dB, -15 dB, or -
22.5 dB. This parameter is disabled in the case of E1 protocols.
The Overwrite parameter may be switched on by by enabling the checkbox.
Then, you may define the values for the 3 Pulse Mask (XPM) registers. Please
note, that these values have to be entered in hexadecimal data format only.
As in the CAS ABCD Idle Pattern field, you may enter the value including
the prefix “0x” or without it. In both cases your entry will be interpreted as a
hex value. The Overwrite parameter is applicable to E1 and T1 protocols.
11

CHAPTER 3: SETUP OF THE E1/T1 BOARD PARAMETERS
3.2.11 The Parameter Field “Termination Side”
Some protocols are not symmetrical, that is, the user and the network side of
the protocol are different. In the Termination Side control field you may
change whether your OPERA host computer shall be configured as the user
side or the network side of a protocol.
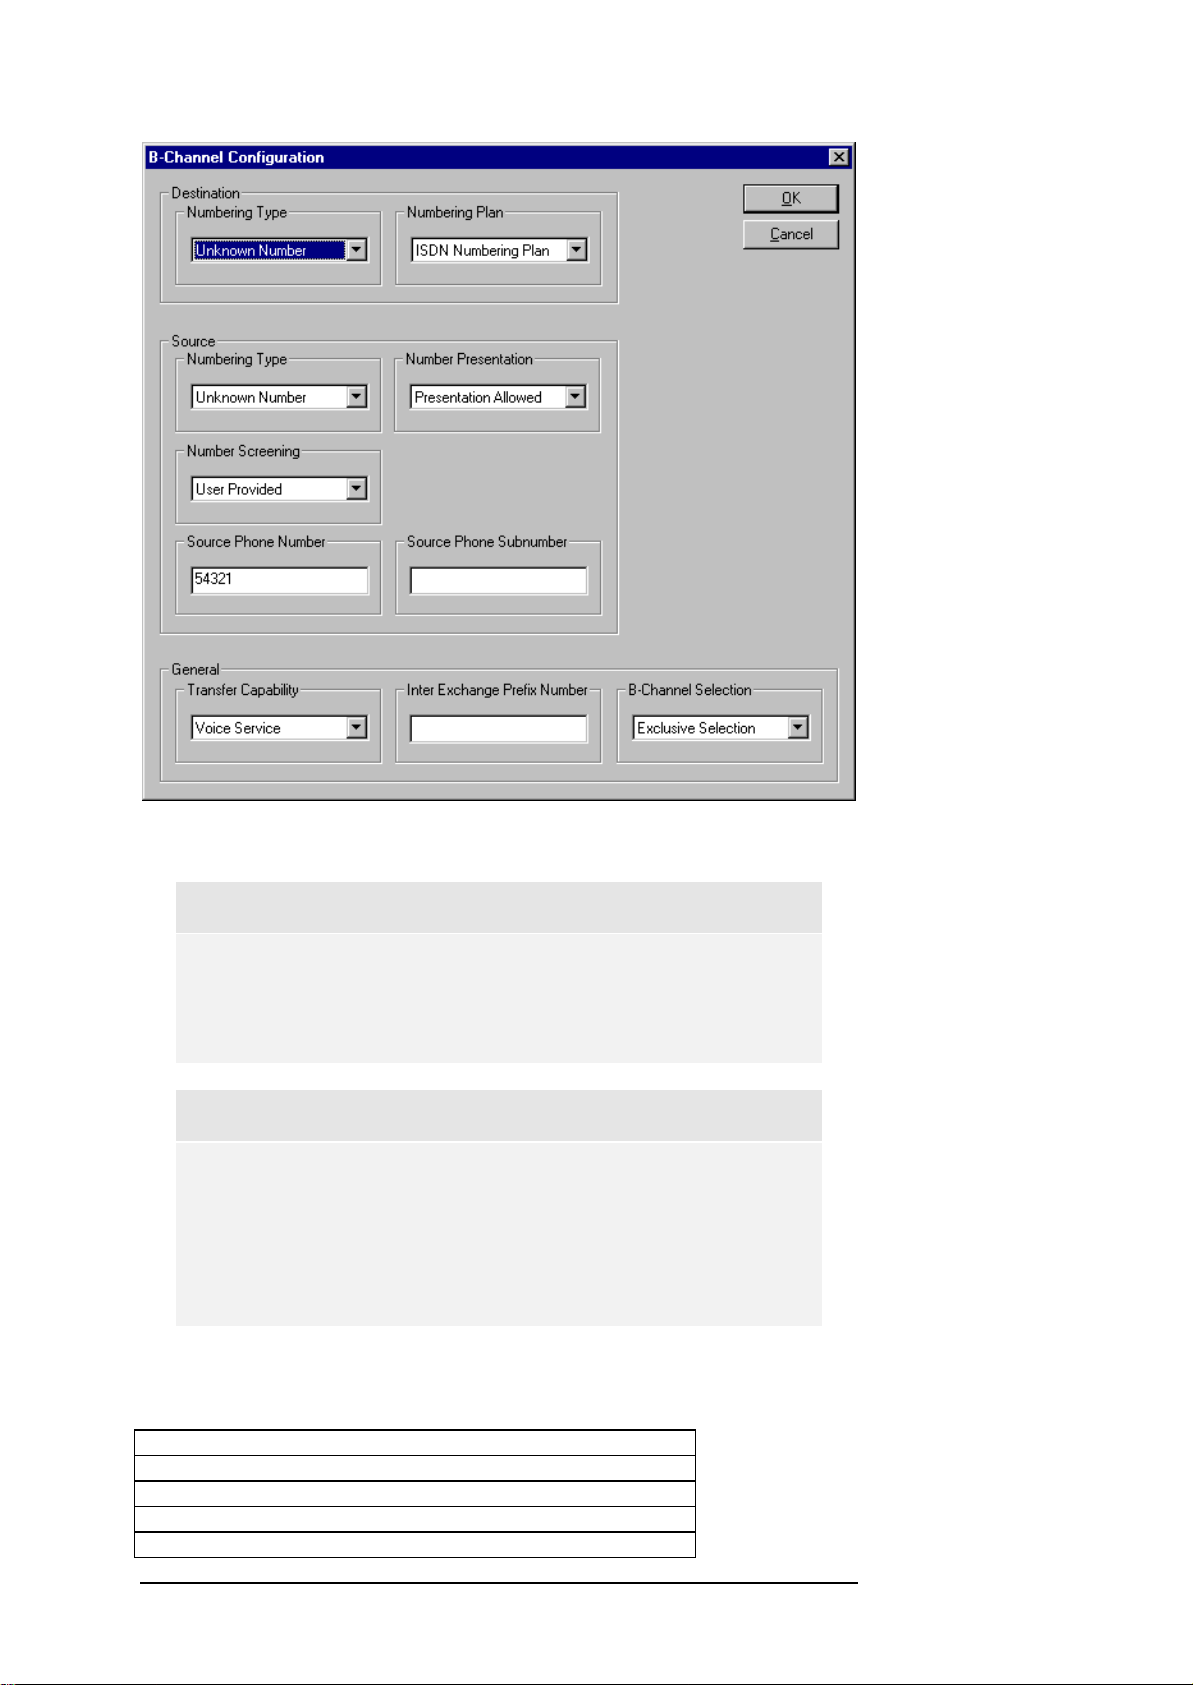
3.2.12 The Parameter Field "Set B-Channel Parameters"
For some protocol types, like ISDN or MFC-R2, the parameters for the Bchannels need to be set.. In this field you may select from the drop-down list
the B-channel you want to configure. After clicking on the "Configure"
button, the dialog for the B-channel configuration will come up as shown in
Figure 3.2.
Please note, that only those channels are shown in the list that may carry
voice information. That is, for instance, the D-channel of an ISDN
configured trunk will not be found in the B-channel list. The numbering of
the B-channels starts with zero.
Note:
Currently only identical configuration setups of Trunk 1 and
Trunk 2 are possible. This is about to change in future
versions of the E1/T1 option.
3.3 Setting up B-Channel Configuration Parameters
Sections 3.1.9 to 3.1.16 describe a number of parameters that are to be set
for each single B-channel of a trunk. Most of these channel configuration
parameters are applicable for ISDN. Only some might be applicable for
MFC-R2 protocols, too, which are Source Phone Number, Source Phone
Subnumber, Source Number Type and Transfer Capability.
For modifying B-channel parameter settings, choose the B-channel that your
changes shall apply to in the main dialog of OptiConf™. When pressing the
"Configure" button the dialog shown in Figure 3.2 will come up. Here, you
will see the current settings of the selected B-channel. The parameter values
for each B-channels are set separately, and modifying them for one specific
B-channel will not affect the settings of another B-channel.
You may also configure all available B-Channels in one step by selecting the
entry “All Channels” from the drop-down list in the “Set B-Channel
Parameters” field of the main dialog.
In the following, an overview of the B-channel parameters is given.
12
CHAPTER 3: SETUP OF THE E1/T1 BOARD PARAMETERS
Figure 3.2: The B-Channel Configuration dialog window.
Note:
Please recall, when changing the channel configuration, your
changes will only be available after you have re-initialized the
E1/T1 board.
Note:
Currently, only channel configuration settings for Trunk #0
are supported. That is, that the channel configurations of the
second trunk will be the same as for the first trunk of the
interface board. . This is about to change in future versions of
the E1/T1 option.
Destination Numbering Type- Table 3.2 gives an overview of the values for
the parameter Destination Numbering Type.
Not Included
Unknown Number
International Number
National Number
Network Specific Number
13

CHAPTER 3: SETUP OF THE E1/T1 BOARD PARAMETERS
Subscriber Number
Abbreviated Number
MFRn1
MFRn2
MFRn3
MFRn4
MFRn5
MFRn6
MFRn7
MFRn8
MFRn9
MFRn10
MFRn11
MFRn12
MFRn13
MFRn14
MFRn15
Table 3.2: Parameter values for the Destination Numbering Type, respectively Source Numbering Type.
Destination Numbering Plan- Table 3.3 gives an overview of the parameter
values for the Destination Numbering Plan.
NOT_INCLUDED
Unknown Numbering Plan
ISDN Numbering Plan
Data Numbering Plan
TELEX Numbering Plan
National Numbering Plan
Private Numbering Plan
Reserved Numbering Plan
Table 3.3: Parameter values for the Destination Numbering Plan.
Source Numbering Type – The parameter values set is the same as for the
parameter Destination Numbering Type. Please refer to Table 3.2.
Source Number Presentation – Table 3.4 shows the parameter values for
the Source Number Presentation.
Not Included
Presentation Allowed
Presentation Restricted
Presentation Not Aviable
Table 3.4: Values for the Source Number Presentation parameter.
Source Number Screening – Table 3.5 shows the valid registry values for
the Source Number Screening and their meaning.
Not Included
User Provided
User Passed
User Failed
Network Provided
Table 3.5: Parameter values for the Source Number Screening.
14

CHAPTER 3: SETUP OF THE E1/T1 BOARD PARAMETERS
Source Phone Number – Enter a string representing the phone number of
the source (origin).
Source Phone SubNumber - Enter a string representing the phone sub-
number of the source (origin).
Transfer Capability – Table 3.6 shows the parameter values for the transfer
Capability when ISDN is used. Table 3.7 lists the values for the BC (Bearer
Capability) and the optional HLC (Higher Layer Capability).
In the case of MFC-R2 protocols, you find in Table 3.8 the parameter values
for the service category which is also selected from the Transfer Capability
control.
Not Included
Voice Service
Data Service
Modem Service
Audio 7 Service
Table 3.6: Parameter values for the Transfer Capability in the case of ISDN.
Voice Service BC= speech, HLC= telephony
Data Service BC= data
Modem Service BC= 3.1 kHz audio, HLC= telephony
Audio 7 Service BC= 7 kHz audio
Table 3.7: The meaning of the Transfer Capability parameter values for ISDN. BC is the Bearer
Capability and HLC represents the Higher Layer Capability.
MFRn_1
MFRn_2
MFRn_3
MFRn_4
MFRn_5
MFRn_6
MFRn_7
MFRn_8
MFRn_9
MFRn_10
MFRn_11
MFRn_12
MFRn_13
MFRn_14
MFRn_15
Table 3.8: Parameter values for the Transfer Capability in the case of MFC-R2 protocols. The list
represents the service category.
InterExchangePrefixNum – Enter a string representing the Inter Exchange
Prefix Phone Number.
B-Channel Selection– Table 3.9 lists the parameter values for the B-Channel
Selection parameter .
Any B-channel selection
Preferred selection
Exclusive selection of the B-channel
15

CHAPTER 3: SETUP OF THE E1/T1 BOARD PARAMETERS
Table 3.9: Parameter values for the Exclusive and their meaning.
16

CHAPTER 4: SIGNAL ACQUISITION USING OPTICALL™
4 Signal Acquisition Using OptiCall™
This section provides a short description of how to use the OptiCall™
application to perform measurements using the E1/T1 interfaces. For a more
detailed explanation, please refer to Section 4.2.3 (page 39) in the OPERA™
User Manual Version 3.0.
If you are already familiar with using OptiCall™ with POTS telephony or
audio interfaces, you will not face any need for reorientation when
performing measurements with the E1/T1 interface option. There are only a
few things you need to notice which are explained in the following.
Figure 4.1: The OptiCall™ dialog showing selected E1 MFC-R2 interface devices.
As shown in the example screen shot of OptiCall™ in Figure 4.1, the
protocol type you have selected within OptiConf™ (see Section 3.2), is
shown as a part of the device name in the list box for the origin and
termination device, respectively. The protocol name is then followed by the
port number that represents the index of a trunk of the E1/T1 interface board.
For instance, “Port 0” represents the first trunk.
Each E1/T1 device name is terminated by the B-channel notation – e.g. “BCh
0” would represent the first valid voice bearing channel of a particular trunk.
Please note, that only those channels of a trunk are registered in the device
list that may carry voice information. That is, the D-channel of an ISDN
configured trunk will not be found in the device list of OptiCall™, for
instance. Consequently, all E1/T1 entries found in the list boxes of OptiCall™
may be used for measuring. The numbering of those channels starts with
zero.
17

CHAPTER 4: SIGNAL ACQUISITION USING OPTICALL™
Note:
The DDLC™ mechanism that compensates for latencies of
the Windows NT operating system is not available for the
current version of the E1/T1 interface option. This may result
in a lower accuracy when measuring the delay of signals.
However, this restriction is about to change in future versions.
18

CHAPTER 5: OPTICALL™ COMMAND LINE PARAMETERS
5 OptiCall™ Command Line Parameters
This section describes the new features for the automated execution use of
OptiCall™ from scripts. For more detailed explanation of the functionality of
the command line parameters, refer to page 46 in Section 4.2.3 in the
OPERA User Manual Version 3.0.
Note:
The command line parameters described in this section
correspond with the OptiCall™ application but not with
OptiConf™. Please remind that you have to configure the
E1/T1 interface board using the OptiConf™ dialog before
using the automated execution option.
Three new parameters have been added to the automated execution which
are listed in Table 5.1. The Mirror parameter defines that the terminating
interface index is the originating interface index + an offset. That is that in
the case of an E1 CAS protocol with 30 B-channels an offset value of 30
would be useful, for instance. In that case, you are able to mirror the Bchannel #0 of trunk #0 to the B-channel #0 of trunk #1. By doing so, you
may simply omit the parameter definition for the terminating line.
The Repetitions parameter defines how often a specified call shall be
repeated.
When using the Bulk parameter with a parameter value of n, calls will be
automatically performed on n consecutive lines starting from the defined line
for the originating and the terminating line, respectively. For example, if you
have defined a call with OriginatingLine=4 and TerminatingLine=10, and
Bulk=2, the following calls will be performed: from line 4 to 10, from line 5
to 11 and from line 6 to 12.
Parameter name Parameter
value
Description
-Mirror <offset> Terminating interface is
originating + offset
-Repetitions <n> Perform n calls
-Bulk <n> Perform calls from n consecutive
lines
Table 5.1: Description of the additional command line parameters.
Note:
These parameter options are applicable to POTS and audio
interfaces, too.
19

CHAPTER 5: OPTICALL™ COMMAND LINE PARAMETERS
20

CHAPTER 6: MEASUREMENT EXAMPLES
6 Measurement Examples
This chapter will be helpful if you are not yet familiar with the OPERA™
E1/T1 option. The first section provides some example parameter settings for
all protocol types available. Section 6.2 demonstrates a typical loop
measurement using OptiCall™, while 6.3 will show a typical application of
an automated measurement using a script file. Both examples put the
emphasis on the signal acquisition. If you are looking for examples of how
to use the OPERA™ analyzer, please refer to the OPERA™ user manual.
6.1 Example Parameter Settings for Several Protocol Types
In the following, a number of tables containing parameter configurations are
listed. These tables represent example settings for all protocol types
available, except for the transparent protocol types. The parameter
configuration is divided into two sets, the trunk parameters and the Bchannel parameters. In the case of those protocol types that do not support
any B-channel parameters, you may simply omit the configuration of those
parameters. Some of the supported protocols are not symmetrical, that is,
that the user and the network side of the protocol are different. The relevant
configuration field is “Termination Side”. Please note, that currently only
identical configurations for all trunks of a board are supported. As a
consequence, it is currently not possible to configure one trunk as the user
side and the other as the network side of the protocol.
6.1.1 E1_Euro_ISDN
E1_Euro_ISDN is a non-symmetrical protocol. Please select the
corresponding termination side for the user or the network.
Field Name Value
Protocol Type E1_Euro_ISDN
Protocol Version Protocol Subversion Call Progress Tone Configuration CPIsrael
Dchannel Configuration Primary
Line Code HDB3
T1 Framing Method CAS ABCD Idle Pattern Coding Law Alaw
Termination Side User, respectively Network
Overwrite Register Values Off
Table 6.1: Trunk parameter settings for E1_Euro_ISDN.
Field Name Value
Destination Numbering Type Unknown Number
Destination Numbering Plan ISDN Numbering Plan
Source Numbering Type Unknown Number
Source Number Presentation Presentation Allowed
Source Number Screening User Provided
Source Phone Number Source Phone Subnumber Transfer Capability Voice Service
Inter Exchange Prefix Number -
21

CHAPTER 6: MEASUREMENT EXAMPLES
B-Channel Selection Exclusive Selection
Table 6.2: B-channel parameter settings for E1_Euro_ISDN.
6.1.2 T1_CAS
For T1_CAS, there is a number for variants available which are listed in the
tables of this section. For T1_CAS protocols, the B-channel parameters are
not relevant and can thus be omitted.
E&M Wink Start Variant
Field Name Value
Protocol Type T1_CAS
Protocol Version E_M_WinkStart
Protocol Subversion E_M_WinkTable
Call Progress Tone Configuration CPIsrael
Dchannel Configuration Primary
Line Code AMI
T1 Framing Method Super Frame (D4)
CAS ABCD Idle Pattern 0x0
Coding Law Alaw
Termination Side User
Overwrite Register Values Off
Table 6.3: Trunk parameters setting for a E&M Wink Start variant of the T1_CAS protocol.
Field Name Value
Destination Numbering Type Unknown Number
Destination Numbering Plan Unknown Numbering Plan
Source Numbering Type MFRn_1
Source Number Presentation Presentation Allowed
Source Number Screening User Provided
Source Phone Number Source Phone Subnumber Transfer Capability MFRn_1
Inter Exchange Prefix Number B-Channel Selection Exclusive Selection
Table 6.4: B-channel parameter settings for a E&M Wink Start variant of the T1_CAS protocol.
E&M Immediate Start Variant
Field Name Value
Protocol Type T1_CAS
Protocol Version E_M_ImmediateStart
Protocol Subversion E_M_ImmediateTable
Call Progress Tone Configuration CPIsrael
Dchannel Configuration Primary
Line Code AMI
T1 Framing Method Super Frame (D4)
CAS ABCD Idle Pattern 0x0
Coding Law Alaw
Termination Side User
Overwrite Register Values Off
Table 6.5: Trunk parameters setting for a E&M Immediate Start variant of the T1_CAS protocol.
22

CHAPTER 6: MEASUREMENT EXAMPLES
Field Name Value
Destination Numbering Type Unknown Number
Destination Numbering Plan Unknown Numbering Plan
Source Numbering Type MFRn_1
Source Number Presentation Presentation Allowed
Source Number Screening User Provided
Source Phone Number Source Phone Subnumber Transfer Capability MFRn_1
Inter Exchange Prefix Number B-Channel Selection Exclusive Selection
Table 6.6: B-channel parameter settings for a E&M Immediate Start variant of the T1_CAS protocol.
E&M Delay Start Variant
Field Name Value
Protocol Type T1_CAS
Protocol Version E_M_DelayStart
Protocol Subversion E_M_DelayTable
Call Progress Tone Configuration CPIsrael
Dchannel Configuration Primary
Line Code AMI
T1 Framing Method Super Frame (D4)
CAS ABCD Idle Pattern 0x0
Coding Law Alaw
Termination Side User
Overwrite Register Values Off
Table 6.7: Trunk parameters setting for a E&M Delay Start variant of the T1_CAS protocol.
Field Name Value
Destination Numbering Type Unknown Number
Destination Numbering Plan Unknown Numbering Plan
Source Numbering Type MFRn_1
Source Number Presentation Presentation Allowed
Source Number Screening User Provided
Source Phone Number Source Phone Subnumber Transfer Capability MFRn_1
Inter Exchange Prefix Number B-Channel Selection Exclusive Selection
Table 6.8: B-channel parameter settings for a E&M Delay Start variant of the T1_CAS protocol.
23

CHAPTER 6: MEASUREMENT EXAMPLES
E&M FGD Wink Start Variant
Field Name Value
Protocol Type T1_CAS
Protocol Version E_M_FGDWinkStart
Protocol Subversion E_M_FGDWinkTable
Call Progress Tone Configuration Default
Dchannel Configuration Primary
Line Code AMI
T1 Framing Method Super Frame (D4)
CAS ABCD Idle Pattern 0x0
Coding Law Alaw
Termination Side User
Overwrite Register Values Off
Table 6.9: Trunk parameters setting for a E&M FGD Wink Start variant of the T1_CAS protocol.
Field Name Value
Destination Numbering Type Unknown Number
Destination Numbering Plan Unknown Numbering Plan
Source Numbering Type MFRn_1
Source Number Presentation Presentation Allowed
Source Number Screening User Provided
Source Phone Number Source Phone Subnumber Transfer Capability MFRn_1
Inter Exchange Prefix Number B-Channel Selection Exclusive Selection
Table 6.10: B-channel parameter settings for a E&M FGD Wink Start variant of the T1_CAS protocol.
E&M FGB Wink Start Variant
Field Name Value
Protocol Type T1_CAS
Protocol Version E_M_FGBWinkStart
Protocol Subversion E_M_FGBWinkTable
Call Progress Tone Configuration Default
Dchannel Configuration Primary
Line Code AMI
T1 Framing Method Super Frame (D4)
CAS ABCD Idle Pattern 0x0
Coding Law Alaw
Termination Side User
Overwrite Register Values Off
Table 6.11: Trunk parameters setting for a E&M FGB Wink Start variant of the T1_CAS protocol.
24

CHAPTER 6: MEASUREMENT EXAMPLES
Field Name Value
Destination Numbering Type Unknown Number
Destination Numbering Plan Unknown Numbering Plan
Source Numbering Type MFRn_1
Source Number Presentation Presentation Allowed
Source Number Screening User Provided
Source Phone Number Source Phone Subnumber Transfer Capability MFRn_1
Inter Exchange Prefix Number B-Channel Selection Exclusive Selection
Table 6.12: B-channel parameter settings for a E&M FGB Wink Start variant of the T1_CAS protocol.
6.1.3 E1_MFCR2
The example settings shown in Table 6.13 and Table 6.14 are for a E1 MFCR2 protocol using a national variant with ANI (Automatic Number
Identification). For the sake of the ANI functionality, the B-channel
parameter “SourcePhoneNumber” contains the phone number of the calling
party. For variants not using ANI, this parameter value can be simply
omitted.
Field Name Value
Protocol Type E1_MFCR2
Protocol Version Mfcr2_Argentina
Protocol Subversion Arg_5digits_with_ANI
Call Progress Tone Configuration CPIsrael
DChannel Configuration Primary
Line Code AMI
T1 Framing Method CAS ABCD Idle Pattern Coding Law Alaw
Termination Side User
Overwrite Register Values Off
Table 6.13: Trunk parameter settings for E1_MFCR2.
Field Name Value
Destination Numbering Type Unknown Number
Destination Numbering Plan Unknown Numbering Plan
Source Numbering Type MFRn_1
Source Number Presentation Presentation Allowed
Source Number Screening User Provided
Source Phone Number 54321
Source Phone Subnumber Transfer Capability MFRn_1
Inter Exchange Prefix Number B-Channel Selection Exclusive Selection
Table 6.14: B-channel parameter settings for E1_MFCR2.
25

CHAPTER 6: MEASUREMENT EXAMPLES
6.1.4 E1_CAS_R2
Field Name Value
Protocol Type E1_CAS_R2
Protocol Version E1_R2D
Protocol Subversion E1_R2D
Call Progress Tone Configuration CPIsrael
Dchannel Configuration Primary
Line Code AMI
T1 Framing Method CAS ABCD Idle Pattern Coding Law Alaw
Termination Side User
Overwrite Register Values Off
Table 6.15: Trunk parameter settings for E1_CAS_R2.
Field Name Value
Destination Numbering Type Unknown Number
Destination Numbering Plan Unknown Numbering Plan
Source Numbering Type MFRn_1
Source Number Presentation Presentation Allowed
Source Number Screening User Provided
Source Phone Number Source Phone Subnumber Transfer Capability MFRn_1
Inter Exchange Prefix Number B-Channel Selection Exclusive Selection
Table 6.16: B-channel parameter settings for E1_CAS_R2.
6.1.5 T1_NI2_ISDN
T1_NI2_ISDN is a non-symmetrical protocol. Please select the
corresponding termination side for the user or the network.
Field Name Value
Protocol Type T1_NI2_ISDN
Protocol Version Protocol Subversion Call Progress Tone Configuration CPIsrael
Dchannel Configuration Primary
Line Code B8ZS
T1 Framing Method Extended Super Frame
CAS ABCD Idle Pattern Coding Law Alaw
Termination Side User, respectively Network
Overwrite Register Values Off
Table 6.17: Trunk parameter settings for T1_NI2_ISDN.
26

CHAPTER 6: MEASUREMENT EXAMPLES
Field Name Value
Destination Numbering Type National Number
Destination Numbering Plan ISDN Numbering Plan
Source Numbering Type National Number
Source Number Presentation Presentation Allowed
Source Number Screening User Provided
Source Phone Number Source Phone Subnumber Transfer Capability Voice Service
Inter Exchange Prefix Number B-Channel Selection Exclusive Selection
Table 6.18: B-channel parameter settings for T1_NI2_ISDN.
27

CHAPTER 6: MEASUREMENT EXAMPLES
6.1.6 T1_5ESS_10_ISDN
T1_5ESS_10_ISDN is a non-symmetrical protocol. Please select the
corresponding termination side for the user or the network.
Field Name Value
Protocol Type T1_5ESS_10_ISDN
Protocol Version Protocol Subversion Call Progress Tone Configuration CPIsrael
Dchannel Configuration Primary
Line Code B8ZS
T1 Framing Method Extended Super Frame
CAS ABCD Idle Pattern Coding Law Alaw
Termination Side User, respectively Network
Overwrite Register Values Off
Table 6.19: Trunk parameter settings for T1_5ESS_10_ISDN.
Field Name Value
Destination Numbering Type National Number
Destination Numbering Plan ISDN Numbering Plan
Source Numbering Type National Number
Source Number Presentation Presentation Allowed
Source Number Screening User Provided
Source Phone Number Source Phone Subnumber Transfer Capability Voice Service
Inter Exchange Prefix Number B-Channel Selection Exclusive Selection
Table 6.20: B-channel parameter settings for T1_5ESS_10_ISDN.
6.1.7 T1_DMS100_ISDN
T1_DMS100_ISDN is a non-symmetrical protocol. Please select the
corresponding termination side for the user or the network.
Field Name Value
Protocol Type T1_DMS100_ISDN
Protocol Version Protocol Subversion Call Progress Tone Configuration CPIsrael
Dchannel Configuration Primary
Line Code B8ZS
T1 Framing Method Extended Super Frame
CAS ABCD Idle Pattern Coding Law Alaw
Termination Side User, respectively Network
Overwrite Register Values Off
Table 6.21: Trunk parameter settings for T1_DMS100_ISDN.
28

CHAPTER 6: MEASUREMENT EXAMPLES
Field Name Value
Destination Numbering Type National Number
Destination Numbering Plan ISDN Numbering Plan
Source Numbering Type National Number
Source Number Presentation Presentation Allowed
Source Number Screening User Provided
Source Phone Number Source Phone Subnumber Transfer Capability Voice Service
Inter Exchange Prefix Number B-Channel Selection Exclusive Selection
Table 6.22: B-channel parameter settings for T1_DMS100_ISDN.
6.2 Example 1: Stand Alone Loop Measurement
First of all, in order to perform a loop call, you will have to take care that the
telephone line is looped back on the far end, so you will get your signal to
the terminating line. After having connected both trunks of the E1/T1
interface board to the SUT, start the board parameter configurator by
choosing the menu Start|Programs|Opera|OptiConf. In the dialog of
OptiConf™, we select the protocol type “E1_MFCR2” as shown in Figure
6.1. The protocol version “Mfcr2_ITU” is chosen with a subversion using 5
digits without ANI function.
We will run a measurement from B-channel 0 with OptiCall™. For this Bchannel, the parameter settings as shown in Figure 6.2 are selected within
the B-channel configuration dialog. Confirm the B-channel configuration
with the OK button.
All the other parameter values in the main dialog of OptiConf™ are assumed
to be fine in our example. We leave them as they are and start the
initialization process by clicking on the Apply button.
29

CHAPTER 6: MEASUREMENT EXAMPLES
Figure 6.1: Settings within the OptiConf™ dialog.
Figure 6.2: Settings within the B-Channel Configuration.
30

CHAPTER 6: MEASUREMENT EXAMPLES
After the initialization process has been finished, start the OptiCall™
program from the Windows™ Start menu Start|Programs|Opera|OptiCall
(you may also click on the icon on the desktop). As shown in Figure 6.3,
select the loop mode button in the OptiCall™ dialog. Enter the desired phone
number which has to comprise five digits according to the protocol
subversion chosen.
Figure 6.3: Settings in the OptiCall™ dialog.
Select the file that contains a speech sample that will be sent through the
network, in the field Reference. In this example we use the WAVE file that is
located in the installation directory of your OPERA™ system,
"DefaultRefFile.wav".
Finally, enter the destination directory where the test files shall be saved to.
Also enter the root file name for your test files after the character #, e.g.
"D:\test#E1_T1”. In the “Origin” list box, select the entry “4: E1_MFCR2 Port
0 BCh 0”. Select “34: E1_MFCR2 Port 1 BCh 0” as the terminating device.
Please note, that depending on the hardware configuration of the selected
OPERA host computer, the index numeration in the list boxes of OptiCall™
may be different than stated in this example. The OPERA™ host computer is
selected in the Network Node entry field of the OptiCall™ dialog.
After having pressed the start button, the connection will be established. The
speech sample will be sent and the test samples will be saved to the location
we have defined above.
After the test call has terminated, there will be two test files stored in the
specified destination directory. "E1_T1-Line4.wav" is the relevant file if you
want to use PSQM or PESQ, "E1_T1-Line34.wav" is the relevant file if an
analysis of Echo shall be performed with OPERA™.
31

CHAPTER 6: MEASUREMENT EXAMPLES
6.3 Example 2: Measurements From a Batch File
This example describes only the command line functionality to acquire the
signals with a system under test. For an example of how to use the
command line option to analyze files, please refer to the OPERA™ user
manual.
Again, you will have to take care that the telephone line is looped back on
the far end, so you will get your signal to the terminating line. Connect both
trunks of the E1/T1 interface board to the SUT. As described in the example
in 6.1, we have to configure the E1/T1 interface using the OptiConf™ dialog,
before we run the automated measurement from the script file. In OptiConf™
™, we select the protocol type “E1_MFCR2”, the protocol version
“Mfcr2_ITU” and the subversion using 5 digits without ANI function (see
Figure 6.1). Since all the other parameter values are fine for our example, we
leave them as they are and start the initialization process by clicking on the
Apply button.
Note:
Only run the batch file after you have received the message
that the initialization process has been finished. Only then the
board configuration is available for the automated execution.
We now want to use the same settings as described in Example 1. We will
perform a loop measurement, the number to dial is “12345”, the reference
file is taken from the location “C:\programme\opera\DefaultRefFile.wav”,
destination directory is "D:\test#E1_T1”. The originating line index is chosen
corresponding to the index number of the device entry “4:
E1_MFCR2_ITU_5Digits_no_ANI Port 0 BCh 0” and the terminating line
index would then be 34. We will use the Mirror parameter to set the
terminating line. The correct offset value is then 30 in accordance with the
chosen E1 protocol. Thus, the correct command line will be as follows
(should be written in one line in the batch file):
Opticall /Exec –Loop –OriginatingLine 4 –Mirror 30
–Phonenumber 12345 –RefFileOrigin
C:\programme\opera\DefaultRefFile.wav –
RefFileTermination
C:\programme\opera\DefaultRefFile.wav –
DestinationPath D:\test –Root E1_T1
After the batch file has been executed, the resulting files will be
D:\test\E1_T1-Line4.wav (to be used for PSQM or PESQ analysis) and
D:\test\E1_T1-Line34.wav (for Echo analysis).
32

CHAPTER 7: OPTIONS FOR ADVANCED USERS
7 Options for Advanced Users
7.1 Editing a Call Progress Tones Configuration File
The Call Progress Tones Configuration File contains the definitions of the
call progress tones to be detected/generated by the board. Users can use
either one of the files supplied by OPTICOMor construct their own file.
The Call Progress Tones Configuration File used for the configuration of the
E1/T1 interface board is a binary file (with extension .dat). Users can
construct their own configuration file by starting with the Windows ini file
format and then converting it into binary format using the “Downloadable
construction utility” described in Section 7.4.
The Windows® ini file format contains two sections, [NUMBER OF CALL
PROGRESS TONES] and [CALL PROGRESS TONE #X]. A description of
both of them is given in the following.
[NUMBER OF CALL PROGRESS TONES] Only one key is provided:
• Number of Call Progress Tones - Defines the number of call
progress tones to be defined in the file.
[CALL PROGRESS TONE #X] - Containing the Xth tone definition
(starting from 1 and not exceeding the number of call progress tones defined
in the first section) using the following keys:
• Tone Type - Call progress tone type as defined in Table 7.1
(assign the number and not the enumeration):
Tone Type Number Definition
CallProgressDialTone 1
CallProgressRingingTone 2
CallProgressBusyTone 3
CallProgressCongestionTone 4
CallProgressSpecialInfoTone 5
CallProgressWarningTone 6
CallProgressReorderTone 7
Table 7.1: Available tone types and assigned number definitions.
• Low Freq [Hz] - Frequency in Hertz of the lower tone
component in the case of a dual frequency tone or the frequency of
the tone in the case of a single tone.
• High Freq [Hz] - Frequency in Hertz of the higher tone
component in the case of dual frequency tone or zero (0) in the case
of a single tone.
• Low Freq Level [-dBm] - Generation level in dBm of the lower
tone component in the case of a dual frequency tone or the
generation level of the tone in the case of a single tone.
33

CHAPTER 7: OPTIONS FOR ADVANCED USERS
• High Freq Level [-dBm] - Generation level in dBm of the
higher tone component in the case of a dual frequency tone, or zero
(0) in the case of a single tone.
• First Signal On Time [10 msec] - “Signal On” period (in 10
msec units) for the first cadence on-off cycle.
• First Signal Off Time [10 msec] - “Signal Off” period (in 10
msec units) for the first cadence on-off cycle.
• Second Signal On Time [10 msec] - “Signal On” period (in 10 msec
units) for the second cadence on-off cycle.
• Second Signal Off Time [10 msec] - “Signal Off” period (in 10 msec
units) for the second cadence on-off cycle.
Using this configuration file, the user can create up to 16 different call
progress tones using up to 15 different frequencies. Each one of the call
progress tones is specified by the following parameters: the tone frequency
(either single or dual frequencies are supported) and the tone cadence. This
is specified by 2 sets of ON/OFF periods, but you may discard the use of the
second On/Off cycle by setting the relevant parameters to zero. When the
tone is made up of single frequency, the second frequency field should be
set to zero. [AUDI01]
7.2 Editing a CAS Protocol Table
7.2.1 Overview
CAS/Robbed Bit protocols implement the specific state machine. The user
can change the protocol’s parameters and even the entire state machine via
two related files: the Protocol Table Text File and the User-defined
Parameters Header File.
The Protocol Table Text File is describing the protocol state machine and
various initialization parameters for tuning to a specific switch or PBX. The
Protocol Table Text File is named xxx.txt.
The User-defined Parameters Header File maps the text-named parameters
defined in the above Protocol Table Text File to their User-defined numerical
values. The User-defined Parameters Header File is named
UserProt_defines_xxx.h.
The Protocol Table/Script File is the file that is being created after the
Protocol Table Text File xxx.txt has been compiled. It is the file which is
downloaded to the E1/T1 interface board during the initialization process.
The Protocol Table/Script File is named xxx.dat.
After a change has been made, the Protocol Table Text File must be recompiled and the interface board must be re-initialized in order to download
the updated Protocol Table/Script File xxx.dat.
34

CHAPTER 7: OPTIONS FOR ADVANCED USERS
7.2.2 Constructing or Modifying a CAS Protocol Table
The protocol table text file is a textual file containing the protocol’s state
machine that defines the whole protocol process. It is constructed of States,
pre-defined Actions/Events, and pre-defined Functions.
Thus, the user has full control of the CAS protocol by a relatively simple
textual tool. The user is capable of defining or changing any CAS protocol by
writing the protocol state machine in a text file with a few simple rules.
The user procedure to generate the protocol file is as follows:
• Learn the protocol text file rules which are explained in the
following sections. Rules detailed in this manual and syntax are
based on C pre-processor commands.
• Get example files provided by Opticom. These files can be found in
the directory ~\E1_T1 Protocols where “~” represents the OPERA™
installation directory. For instance, you might want to have a look at
the directory ~\E1_T1 Protocols\T1_CAS\E_M_WinkStart.
• Build the specific protocol table text file (xxx.txt) and its related
numerical value header file (xxx.h).
• Compile the xxx.txt with the Downloadable Conversion Utility to
produce the xxx.dat file. Refer to Section 7.4 for a detailed
description of the utility usage.
• Re-initialize the E1/T1 interface using OptiConf™.
7.2.3 Table Elements
The file CASSetup.h includes all the pre-defined tools needed to build a new
protocol text file or modifying an existing one. The protocol table text file is
composed of the following elements:
INIT variables
The user can change the numeric values of INIT variables in
UserProt_defines_xxx.h. For example, INIT_RC_IDLE_CAS defines the
ABCD bits expected to be received in the IDLE state, INIT_DTMF_DIAL
defines the on-time and off-time for the DTMF digits generated towards the
PSTN. See the detailed list in CASSetup.h and in the sample protocol text
file. Please refer to the ST_INIT detailed explanation below.
Actions
Actions (i.e. protocol table events) are protocol table events activated either
by the DSP (e.g. EV_CAS_01) or by the user (e.g., EV_PLACE_CALL,
EV_TIMER_EXPIRED1). The full list of the possible pre-defined events list
can be found in the CASSetup.h file.
35

CHAPTER 7: OPTIONS FOR ADVANCED USERS
Functions
The functions define a certain procedure that can be activated in any state or
in the transition from one state to another. The available functions include
for example SET_TIMER (timer number, timeout in ms.) or SEND_CAS (AB
value, CD value). A full list of the possible pre-defined functions list can be
found in the CASSetup.h file.
States
Each Protocol Table consists of several states that it switches between during
the call setup and tear down process. Every state definition begins with the
prefix ST_ followed by the state name and colons. The body of the state is
composed of up to 4 unconditional performed functions and list of actions
that may trigger this state.
As an example, the following was taken from an E&M wink start table
protocol file. Table 7.2 shows the protocol table elements for the dial state
ST_DIAL.
ParameterAction Function
#1 #2 #3
FUNCTION0 SET_TIMER 2 Extra Delay
Before Dial
EV_TIMER_
EXPIRED2
EV_DIAL_
ENDED
Table 7.2: ST_DIAL: Protocol table elements.
SEND_DEST_NUMNone None None NO_STATE
SET_TIMER 4 No Answer Time None ST_DIAL_ENDED
None DO
When the state machine reaches the dial state, it sets timer number 2 and
then waits for one of the two possible actions to trigger: either timer 2
expiration or end of dial event. When timer 2 expires, the protocol table
executes SEND_DEST_NUM function and stays in the same state
(NEXT_STATE=NO_STATE). When the dial event ends, the protocol table
sets timer 4 and moves to ST_DIAL_ENDED written in the NEXT_STATE
field.
Although Users can define their own states, there are two states defined in
the CASSetup.h file that must appear in every protocol table created. Those
two states are ST_INIT and ST_IDLE which are described in the following.
Next State
1) ST_INIT - When channels initialization is selected, the table enters the
Init state. This state contains functions that initialize the global parameters
described in Table 7.3.
Parameter Description
RC_IDLE_CAS
TX_IDLE_CAS Defines the ABCD bits transmitted on IDLE state in the specific protocol.
DIAL_PLAN A change regarding the issue of an incoming call dialed number is implemented in
Defines the ABCD bits expected to be received in the IDLE state in the specific
protocol.
revision 3.21 as opposed to revision 3.2 and earlier. In revision 3.2 and earlier, users
36

CHAPTER 7: OPTIONS FOR ADVANCED USERS
had to pre-define the expected number of digit to receive an incoming call. If a lower
number of digits from the expected were received, the call setup would have failed.
Table 7.3: Global parameters for ST_INIT.
The incoming call detection event is processed by declaring the end of digit
reception in the following ways (both for ADDRESS/destination number and
ANI/source number):
• Receiving ‘#’ digit (in MF or DTMF).
• The number of digits collected reaches its max value defined as
DIAL_PLAN Parameter #1 and #2 for destination and ANI numbers
respectively.
• A pre-defined time-out value defined as DIAL_PLAN Parameter #3
elapses.
Note:
This method is not used when working with MFC-R2
protocols. MFC-R2 uses the expected number of digits
defined in the file UserProt_defines_xxx.h.
• DTMF_DIAL - Defines the on-time and off-time for the DTMF digits
generated towards the PSTN.
• COMMA_PAUSE_TIME - Defines the delay between each digit
when a comma is used as part of the dialed number string.
• DTMF_DETECTION - Defines the min/max On time for DTMF
digit dialing detection.
• PULSE_DIAL_TIME - Not supported by current stack version.
Defines the Break and Make time for pulse dialing.
• PULSE_DIAL - Not supported by current stack version. Defines the
Break and Make ABCD bits for pulse dialing.
• DEBOUNCE - Defines the interval time of CAS to be considered as
a hit.
• COLLECT_ANI - Enable or Disable reception of ANI in a
specific protocol.
• DIGIT_TYPE - Defines the dialing method used (DTMF, MF). In
the case of MFC-R2 protocols, this parameter is not applicable (digits
are assumed to be R2 digits).
2) ST_IDLE - When no active call is established or being established, the
table resides in Idle state, allowing it to start the process of incoming or
37

CHAPTER 7: OPTIONS FOR ADVANCED USERS
outgoing calls. When the call is cleared the state machine table returns to its
idle state.
Reserved words
Reserved words like DO, NO_STATE, etc. are listed in CASSetup.h.
7.2.4 State’s Line Structure
Each text line in the body of each state is composed of 6 columns:
• action/event
• function
• parameter #1
• parameter #2
• parameter #3
• next state
These columns are described in the following.
Action/event
The name of the table’s events which are the possible triggers for the whole
protocol state machine. Those can be selected from the list of events defined
in the CASSetup.h file (e.g. EV_DISCONNECT_INCOMING).
At the beginning of the state, there can be up to 4 special unconditional
action/events called FUNCTION. These events are functions that are
unconditionally performed when the table reaches the state. These actions
are labeled FUNCTION0 to FUNCTION3.
Following is the list of available protocols table actions (events to the state
machine):
1) User command oriented:
EV_PLACE_CALL - when the user places a call.
EV_ANSWER - when the user answers a call.
EV_DISCONNECT_OUTGOING - when the user disconnects a
call and the call is outgoing.
EV_DISCONNECT_INCOMING - when the user disconnects a call and
the call is incoming.
EV_RELEASE_CALL - when the user releases a call.
2) CAS change oriented:
38

CHAPTER 7: OPTIONS FOR ADVANCED USERS
EV_CAS_1_1 - a new CAS A,B bits received (A=1, B=1, was
stable for the bouncing period).
EV_CAS_1_0 - a new CAS A,B bits received (A=1, B=0, was
stable for the bouncing period).
EV_CAS_0_1 - a new CAS A,B bits received (A=0, B=1, was
stable for the bouncing period).
EV_CAS_0_0 - a new CAS A,B bits received (A=0, B=0, was
stable for the bouncing period).
3) Timers oriented:
EV_TIMER_EXPIRED1 - timer 1 that was previously set by table had
expired.
EV_TIMER_EXPIRED2 - timer 2 that was previously set by table had
expired.
EV_TIMER_EXPIRED3 - timer 3 that was previously set by table had
expired.
EV_TIMER_EXPIRED4 - timer 4 that was previously set by table had
expired.
EV_TIMER_EXPIRED5 - timer 5 that was previously set by table had
expired.
EV_TIMER_EXPIRED6 - timer 6 that was previously set by table had
expired.
EV_TIMER_EXPIRED7 - timer 7 that was previously set by table had
expired.
EV_TIMER_EXPIRED8 - timer 8 that was previously set by table had
expired.
4) Counters oriented:
EV_COUNTER1_EXPIRED - counter 1 value reached 0.
EV_COUNTER2_EXPIRED - counter 2 value reached 0.
5) IBS oriented:
EV_RB_TONE_STARTED - ring back tone according to its definition in
the call progress ini file (type and index) was detected.
EV_RB_TONE_STOPPED - ring back tone according to its definition in
the call progress ini file (type and index) was stopped after it was
previously detected.
6) MF oriented (MFC-R2 protocol related):
39

CHAPTER 7: OPTIONS FOR ADVANCED USERS
EV_MFRn_1 - MF digit 1 detected.
EV_MFRn_2 - MF digit 2 detected.
EV_MFRn_3 - MF digit 3 detected.
EV_MFRn_4 - MF digit 4 detected.
EV_MFRn_5 - MF digit 5 detected.
EV_MFRn_6 - MF digit 6 detected.
EV_MFRn_7 - MF digit 7 detected.
EV_MFRn_8 - MF digit 8 detected.
EV_MFRn_9 - MF digit 9 detected.
EV_MFRn_10 - MF digit 10 detected.
EV_MFRn_11 - MF digit 11 detected.
EV_MFRn_12 - MF digit 12 detected.
EV_MFRn_13 - MF digit 13 detected.
EV_MFRn_14 - MF digit 14 detected.
EV_MFRn_15 - MF digit 15 detected.
EV_MFRn_1_STOPPED - MF digit 1 previously detected, now
stopped.
EV_MFRn_2_ STOPPED - MF digit 2 previously detected, now
stopped.
EV_MFRn_3_ STOPPED - MF digit 3 previously detected, now
stopped.
EV_MFRn_4_ STOPPED - MF digit 4 previously detected, now
stopped.
EV_MFRn_5_ STOPPED - MF digit 5 previously detected, now
stopped.
EV_MFRn_6_ STOPPED - MF digit 6 previously detected, now
stopped.
EV_MFRn_7_ STOPPED - MF digit 7 previously detected, now
stopped.
EV_MFRn_8_ STOPPED - MF digit 8 previously detected, now
stopped.
40

CHAPTER 7: OPTIONS FOR ADVANCED USERS
EV_MFRn_9_ STOPPED - MF digit 9 previously detected, now
stopped.
EV_MFRn_10_ STOPPED - MF digit 10 previously detected, now
stopped.
EV_MFRn_11_ STOPPED - MF digit 11 previously detected, now
stopped.
EV_MFRn_12_ STOPPED - MF digit 12 previously detected, now
stopped.
EV_MFRn_13_ STOPPED - MF digit 13 previously detected, now
stopped.
EV_MFRn_14_ STOPPED - MF digit 14 previously detected, now
stopped.
EV_MFRn_15_ STOPPED - MF digit 15 previously detected, now
stopped.
EV_END_OF_MF_DIGIT - User dialed an MF number and no more
dialed number digits are available. (They have
already been sent. For example, the far side
requests the next ANI digit, but all digits have
been already sent). This event usually appears
in MFR2 tables.
EV_NO_ANI - User dialed an MF number and no ANI was
specified by the outgoing subscriber. (MFC-R2
protocols specifications should define what to
do when no ANI digits are available. Usually
I-12 is sent).
Note:
MF digit is MF R1 or R2-FWD or R2-BWD according to the
context, protocol type and call direction.
EV_ACCEPT - When the user accepts a call (used
only in MFC-R2) with CALLED_IDLE
as its reason parameter.
EV_REJECT_BUSY - When the user rejects a call with
CALLED_BUSY as its reason
parameter.
EV_REJECT_CONGESTION - User rejects a call with
CALLED_CONGESTION as its reason
parameter.
41

CHAPTER 7: OPTIONS FOR ADVANCED USERS
EV_REJECT_UNALLOCATED - When the user rejects a call with
CALLED_UNALLOCATED as its
reason parameter.
EV_REJECT_RESERVE1 - User rejects a call with
CALLED_RESERVE1 as its reason
parameter.
EV_REJECT_RESERVE2 - User rejects a call with
CALLED_RESERVE2 as its reason
parameter.
7) Miscellaneous:
EV_DIALED_NUM_DETECTED - (Incoming call) dialed destination
number has been collected after
START_COLLECT was previously
activated and the condition for
incoming_call_detected event is
satisfied (see ST_INIT for conditions
details).
EV_DIAL_ENDED - Dialing initiated by table
SEND_DEST_NUM has been
completed (last digit has been sent).
EV_ANI_NUM_DETECTED - This action is used to inform the
script file of a successful reception of
the ANI digits string, or when timeout
of digit waiting occurs. This will be
reported at the incoming call detected
event, when ANI flag is YES.
EV_FIRST_DIGIT - Reception of first digit out of the
incoming digit string. Used in the FXO
protocols, where informing the script
of receiving of the first digit, enables
the script to use SEND_PROG_TON
function to stop the dial tone.
Function
The function rubric holds the name of the function to be activated when the
action specified in the action/events field occurs. Select the functions from
the list of the eight functions defined in CasSetup.h. (e.g., START_COLLECT).
When NONE is specified in this rubric, no function is executed. For a
description of the available functions and their parameters, please refer to
Table 7.4.
Parameter #1, Parameter #2, Parameter #3
These columns are used as the function’s parameters. NONE should be
placed when the parameter is not essential. The list of global parameters can
42

CHAPTER 7: OPTIONS FOR ADVANCED USERS
•
be found in CasSetup.h. See Table 7.4 for a description of user functions and
their parameters.
User Functions
(Parameters)
SET_TIMER
(timer number, timeout)
Description
Used to set timers that are managed per B-channel, and their expiration
triggers the state machine table. Each protocol table/state machine can use
up to 8 timers per B-channel/call, (timeout in ms).
SEND_CAS
ABCD bits sent as line signaling for the specific channel the call is setup.
(AB value, CD value)
SEND_EVENT
The specified event type is sent to the host/user.
(event type, cause)
SEND_DEST_NUM() Enbloc dialing when the number is input when a call is originated by the
user. Three types are possible:
(1) ADDRESS, (2) InterExchangePrefix, (3) ANI
DEL_TIMER
Delete a specific or all timers (0 for all) for the B-channel.
(timer number)
START_COLLECT Initiating the collection of address information, i.e. the dialed (destination)
number for incoming calls where appropriate by the protocol. At the time
between START_COLLECT and STOP_COLLECT no digits are reported to
the User (EV_DIGIT is blocked), the destination number is reported in the
EV_INCOMING_CALL_DETECTED event.
STOP_COLLECT See START_COLLECT.
SET_COUNTER (counter
number,
counter value or NONE)
Used to set counters that are managed per B-channel and their expiration
triggers the state machine. The counter initialization value should be non-
negative number. To delete all timers, perform this function with 0 in the
counter number field.
DEC_COUNTER (counter
number)
Decrease the counter value by 1. When the counter value reaches 0
EV_COUNTERx_EXPIRES is sent to the table (the ‘x’ representing the
counter number).
SEND_MF
(MF type,
MF digit or index or NONE,
MF sending time)
This function is used only with MFC-R2 protocols.
MF Type - When the code reaches the dialing section it sends MF digit
according to the MF type specified in the MF type rubric (the types are
defined in CASSetup.h file):
• ADDRESS – Send digit from the address vector (destination
number) according to the index requested. (See Index explanation).
• ANI - Send digit from the ANI vector (source number) according
to the index requested.
• SPECIFIC – Send the MF digit specified in the Parameter #2 rubric.
• SOURCE_CATEGORY - Send pre-defined source category MF
digit. The second and third parameters have no use when using
this type.
TRANSFER_CAPABILITY - Send pre-defined line category MF
digit. The second and third parameters have no use when using
this type.
Index - The Index parameter specifies the offset of the next digit to be sent
from vector (ADDRESS or ANI types described above):
• Use index 1 for sending next digit in the vector.
• Use index -n for sending last but n digit. Underflow can occur if n
is greater than the number of digits sent so far.
43

CHAPTER 7: OPTIONS FOR ADVANCED USERS
• Use index 0 to send last sent digit.
• Use index SEND_FIRST_DIGIT (see CASSetup.h)to start sending
the digits vector from the beginning.
MF Send Time - The send time parameter specifies the maximum
transmission time of the MF.
STOP_SEND_MF Stop sending the current MF.
SEND_PROG_TON
(Operation,
Tone or NONE)
CHANGE_COLLECT_TYPE
(Collect Type)
Table 7.4: List of available User-functions and their parameters (in brackets).
Two operations are available:
1. Send the call progress tone specified in the Parameter #2 rubric (The
second parameter can be taken from CASsetup.h).
2. Stop sending the last parameter.
Used only in MFC-R2 protocol by the incoming user to indicate his waiting
for the reception of MF digit of the requested type. The type can be one of
the following:
ADDRESS - User is waiting for the reception of address digits.
ANI - User is waiting for the reception of ANI digits.
SOURCE_CATEGORY - User is waiting for the reception of the source
category.
TRANSFER_CAPABILITY - User is waiting for the reception of the source
transfer capability (line category).
Next State
This column contains the next state the table moves to, after executing the
function for the particular action/event line. When the user selects to stay in
the same state, insert NO_STATE or use the current state.
Note the difference between NO_STATE and the current state name in this
field. If the user selects to stay in the same state he is currently in, the
unconditional actions (FUNCTION0) at the beginning of the state are
performed. In contrast, NO_STATE skips these function and just waits for
another action to come.
The reserved word “DO” must be written in the next state field if the
unconditional actions (FUNCTION0) at the beginning of the state are used.
[AUDI01]
7.3 Protocol Trace Option
7.3.1 Tracing CAS/Robbed Bit Protocols
To fully understand a CAS/Robbed Bit protocol trace, you need to be
familiar of how to edit a CAS protocol table, see Section 7.2. Tracing of CAS
protocols is supported by choosing the protocol trace level in the Windows
NT registry. If you want to check or change the protocol trace level, open
the registry key “HKEY_LOCAL_MACHINE\SOFTWARE\opticom\
opticonf\Board#<x>\Trunk#<y>”, where <x> represents the index of the
board and <y> the trunk ID that you want to set the trace level for. If you
are not familiar with the usage of the operating system registry, please ask a
specialist for support.
Go to the specified registry key and you will find an entry
“ProtocolTraceLevel”. The possible values for this registry entry are 0 (no
trace) 1 (Full Trace) or 2 (Layer3 ISDN Trace). For the trace utility for
44

CHAPTER 7: OPTIONS FOR ADVANCED USERS
CAS/Robbed Bit protocols, there is no difference between the full trace and
the Layer3 ISDN trace. This differentiation is only relevant for tracing ISDN
protocols. Table 7.5 shows the trace levels for CAS/Robbed Bit protocols.
Trace Level Description
0 - No Trace No trace packets are sent from the board to
the user
1 - Full Trace or
2 - Layer3 ISDN Trace
Table 7.5: The trace levels for CAS/Robbed Bit protocols and their meaning.
Trace messages are sent from the board to
the user
When the protocol trace utility is enabled, the trace information is saved in
binary data format to the file CASTrace0.dat. This file can be found in the
OPERA™ installation directory. In order to get a readable text file, invoke the
application CAS_Trace.exe which is located in the same directory.
CAS_Trace.exe converts the .dat file into the file CASTrace0.txt which will
be found in the OPERA™ installation directory, too.
The textual trace file CASTrace0.txt is composed of text lines. Each line
depicts an event that has occurred in the protocol for a specific B-channel. In
this regard an event is defined as any change of any kind that occurred in the
protocol’s state machine, i.e. protocol table actions.
The trace line includes the fields that are explained in Table 7.6.
Trace Line Field Description
No The serial numberation of the events.
Time The time of the event in milliseconds.
From The source of the event that can be DSP (CAS ABCD
change), User (when a call has been placed), or Table
(SET_TIMER table function).
CurrentState The current state of the Protocol.
Event The event that happened, for example: EV_PLACE_CALL
from User or EV_TIMER_EXPIRED1 from Table. The
reserved word ‘FUNCTION’ in the event’s field is used for
lines describing the table’s function execution.
NextState The next state in the table only for events whose source is
table (Table). When the event source is DSP or User, the
value will be as NO_STATE.
Function The function that is used by the table. When the event
45

CHAPTER 7: OPTIONS FOR ADVANCED USERS
comes from DSP or from User, the value will be as NONE.
Parameter, #1, #2, #3 The table’s function parameters as in the protocol table.
Trunk The trunk number the event is associated with.
Bchannel The B-Channel number the event is associated with.
ConId The connection ID the event is associated with. The ConId
is related to the CallHandle.
Table 7.6: Description of the fields of a textual trace file for CAS/Robbed Bit protocols [AUDI01].
In the text file, there are two events which seem to be duplicated, but are
from different sources, which means that the event came from one source
and was sent to another. For example: EV_CAS_0_1 From_DSP and then the
same event From_Table, means DSP sends this event and Table receives it
later. [AUDI01]
7.4 Downloadables Construction Utility
7.4.1 Location
~\E1_T1 Utilities\TPDMUtil.exe, where “~” represents the OPERA™
installation directory.
7.4.2 Description
This utility can generate CAS protocol configuration files and Call progress
tones configuration files. These files are part of the board configuration that
is downloaded in the initialization process to the E1/T1 interface.
7.4.3 Operation
Generating call progress tones configuration file - first construct an “ini”
file according to the instructions in Section 7.1. Now invoke TPDMUtil.exe
and press the “Process New File” button inside the “CallProgress Tones”
area. In the CallProgress Tones dialog, press the “Select File” button to select
the “ini” file to be converted (this automatically selects the output file to be
of the same name and path but with extension xxx.dat). Fill in the vendor,
version and version description fields and press the “Make File” button. The
last action generates the “dat” file in the same directory and with the same
name as the “ini” file.
Generating CAS protocol configuration file - first construct the CAS
protocol xxx.txt and xxx.h files according to the instructions in Section 7.2.
Copy them (at least the xxx.h file) to the same directory in which
TPDUtil.exe is located, and ensure that the two following files: CASSetup.h
and CPP.exe are located in the same directory. Now invoke TPDUtil.exe
and press the “Convert Files” button inside the “CAS files” area. In the
“Signaling Files” dialog press the “Select File” button to select the “txt” file to
be converted (this automatically selects the output file to be of the same
name and path but with extension xxx.dat). Fill in the vendor, version and
version description fields and press the “Make File” button. The last action
should generate the “dat” file in the same directory and with the same name
as the “txt” file. [AUDI01]
46

CHAPTER 8: TECHNICAL SPECIFICATIONS
8 Technical Specifications
Capacity Up to 60 independent digital voice ports.
Voice Compression G.723.1 MP-MLQ @ 6.3 kbps / ACELP @ 5.3 kbps
G.729A CS-ACELP @ 8 kbps
G.711 PCM @ 64 kbps µ-law/A-law
G.726/G.727 16 to 40 kbps ADPCM and E-ADPCM
NetCoder®@ 4.8 to 9.6 kbps, 800 bps increments
GSM 6.10 @ 13 kbps
Silence Suppression G.729 Annex B; G.723.1 Annex A; NetCoder®
PCM and ADPCM – Proprietary (AudioCodes) VAD and
CNG
GSM 6.10
Echo Cancellation G.168, 30 msec
Gain Control Programmable
VoIP IA Compliance DTMF: mute, transfer in coder or in RTP payload
RTP/RTCP per RFC 1889/1890
In-band Signaling DTMF (TIA 464B)
MF R1/R2, MFC, AC15, SS-4, SS-5
Call progress tones generation and detection
E1/T1 Interface RJ-48 Connector, 120.Ohm
Supported PSTN Protocols European ISDN PRI, North American ISDN, E1
CAS/MFR2 Protocols, T1 CAS/Robbed Bit Protocols.
Packet interface On-board NIC or PCI; Selectable per port
Ethernet 10/100 Base-T, RJ-45 (used by card for RTP/RTCP)
Control Processor Motorola PowerQUICC MPC860
Control Protocols AudioCodes: MGCP TrunkPack API, TPNCP API,
VoIPLib API
Core DSP AudioCodes AC48105A-C VoIP DSP
Maximum Power 3.0 A @ 5V without E1/T1, 128 channels
3.6 A with E1/T1
Physical Full length, 32-bit PCI card, Rev 2.1, slave, 33 MHz
Table 8.1: E1/T1 interface board specifications. All specifications are subject to change without prior
notice [AUDI01].
47

CHAPTER 9: REFERENCES
9 References
[AUDI01] AudioCodes, User Manual and Library Reference.
[INTM01] INT Media Group Incorporated, http://isp.webopedia.com.
[STT100] Standards Committee T1 Telecommunications,
http://www.its.bldrdoc.gov/projects/telecomglossary2000.
48

CHAPTER 10: GLOSSARY OF TERMS
10 Glossary of Terms
10.1 ANI
Short for automatic number identification, a service that provides the
telephone number of an incoming call. ANI is used for a variety of functions
-- by receiving the incoming telephone number, telephone companies can
direct a call to the proper long distance carrier's equipment; it can help
identify the caller's address to speed response time to 911 calls; and it can
route an 800 call to the nearest vendor. ISDN supports ANI [INTM01].
10.2 CLI
Calling line identification (CLI): At a minimum, the calling line identification
includes a single calling party number; it may also include a second calling
party number, a calling party subaddress, and redirecting number
information. Calling line identification may not include any calling party
number due to interworking, or because of an interaction with the CLIR
supplementary service [STT100].
49
 Loading...