

Optex TX-460, RX-460 Installation Manual
Installation Manual
Wireless Push Button & Receiver
TX-460/RX-460
Preparations
The TX-460 can control the RX-460 receiver over a large distance,
even within buildings. Upon activating the push button by pushing it,
a signal is transmitted. No matter how short or fast the push on the
push button is, the full signal will be transmitted, and the receiver will
always be activated.
The TX-460 has a xed, private code that cannot be altered. This is
meant to give the push button its own coding within the 433 Mhz
band, so no other system can take over the control. All push buttons
have a unique code.
+
+
+
+
2x
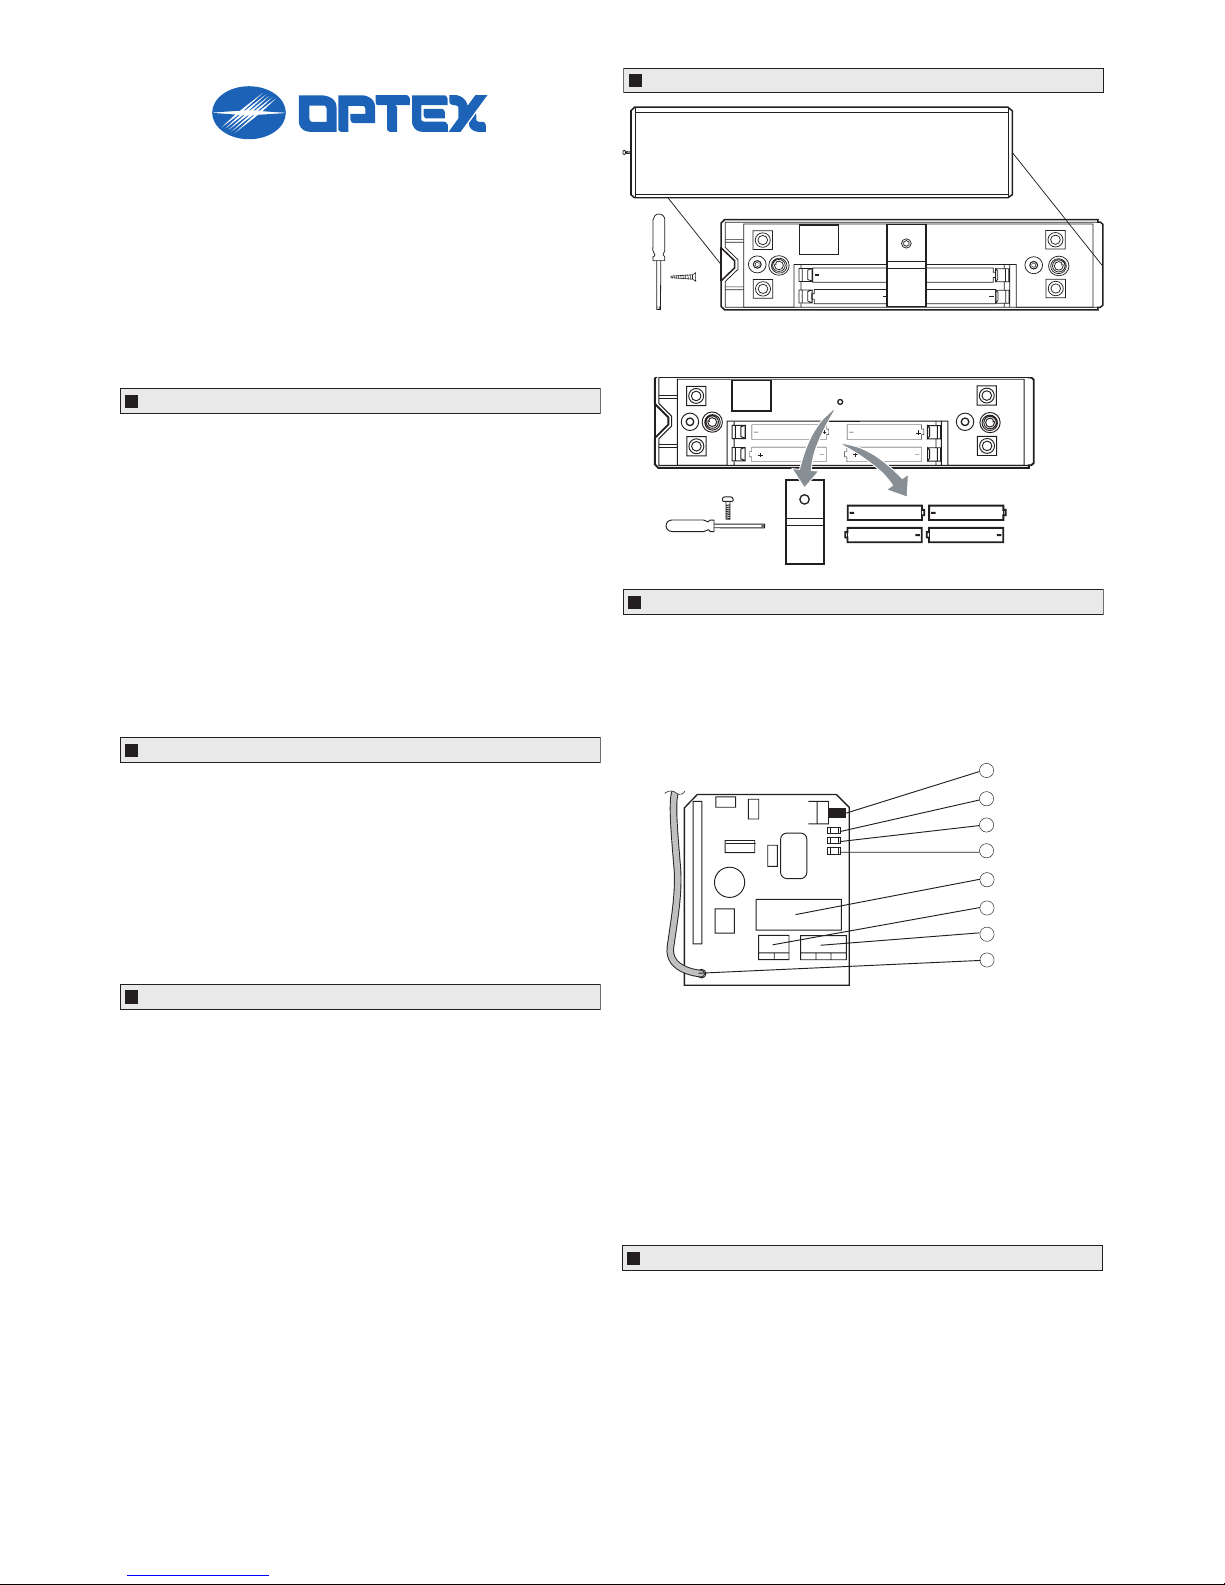
Battery replacement
4 batteries AAA 1,5V
General information
TX-460 transmitter
IMPORTANT!
In order to get the best out of your system it is important you take
the time to read through the instruction before you start to install/
program your equipment.
Frequency modulation
The system works at the frequency 433.92 MHz and uses frequency
modulation.
Self-instruction of code
Each TX-460 transmitter supplied has a xed, individual code that
cannot be altered. In system TX/RX-460, transmitters and receivers
are co-coded through self-instruction, i.e. the receiver learns the
transmitter’s code.
Assembly and installation
1. Select a suitable location for assembly of the receiver
2. Connect the operating voltage to the receiver.
3. Co-program the transmitter and receiver.
4. Mount the transmitter on a at surface. Make sure the batteries
are tted correctly in the transmitter.
5. Connect the required functions to be controlled over the receiver.
TX-460 transmitter (continued)
Installation
To mount the push button on a surface, make sure that the surface is
as equally at as possible. A surface which is not equally at will not
provide a good mounting position for the push button, and will interfere with normal functioning of the button.
Since surfaces where the push button is to be mounted upon dier, no
standard screws or other mounting material is provided. When you
have chosen your screws to install the push button, make sure that
the head of the screw is not bigger than 8 mm, otherwise the push
button will be damaged.
RX-460 receiver
The RX-460 is a self-learning plug-in receiver which can learn up to
ten diertent signals. It consists of 1 relay outpur which can be used
as a Normally Open (NO) or Normally Closed (NC) contact.
The power supply on the receiver should be from 12 to 30 Volts AC or
DC. The supply can be between these values, and it does not matter
how the voltage is connected.
+ +
+ +
1x
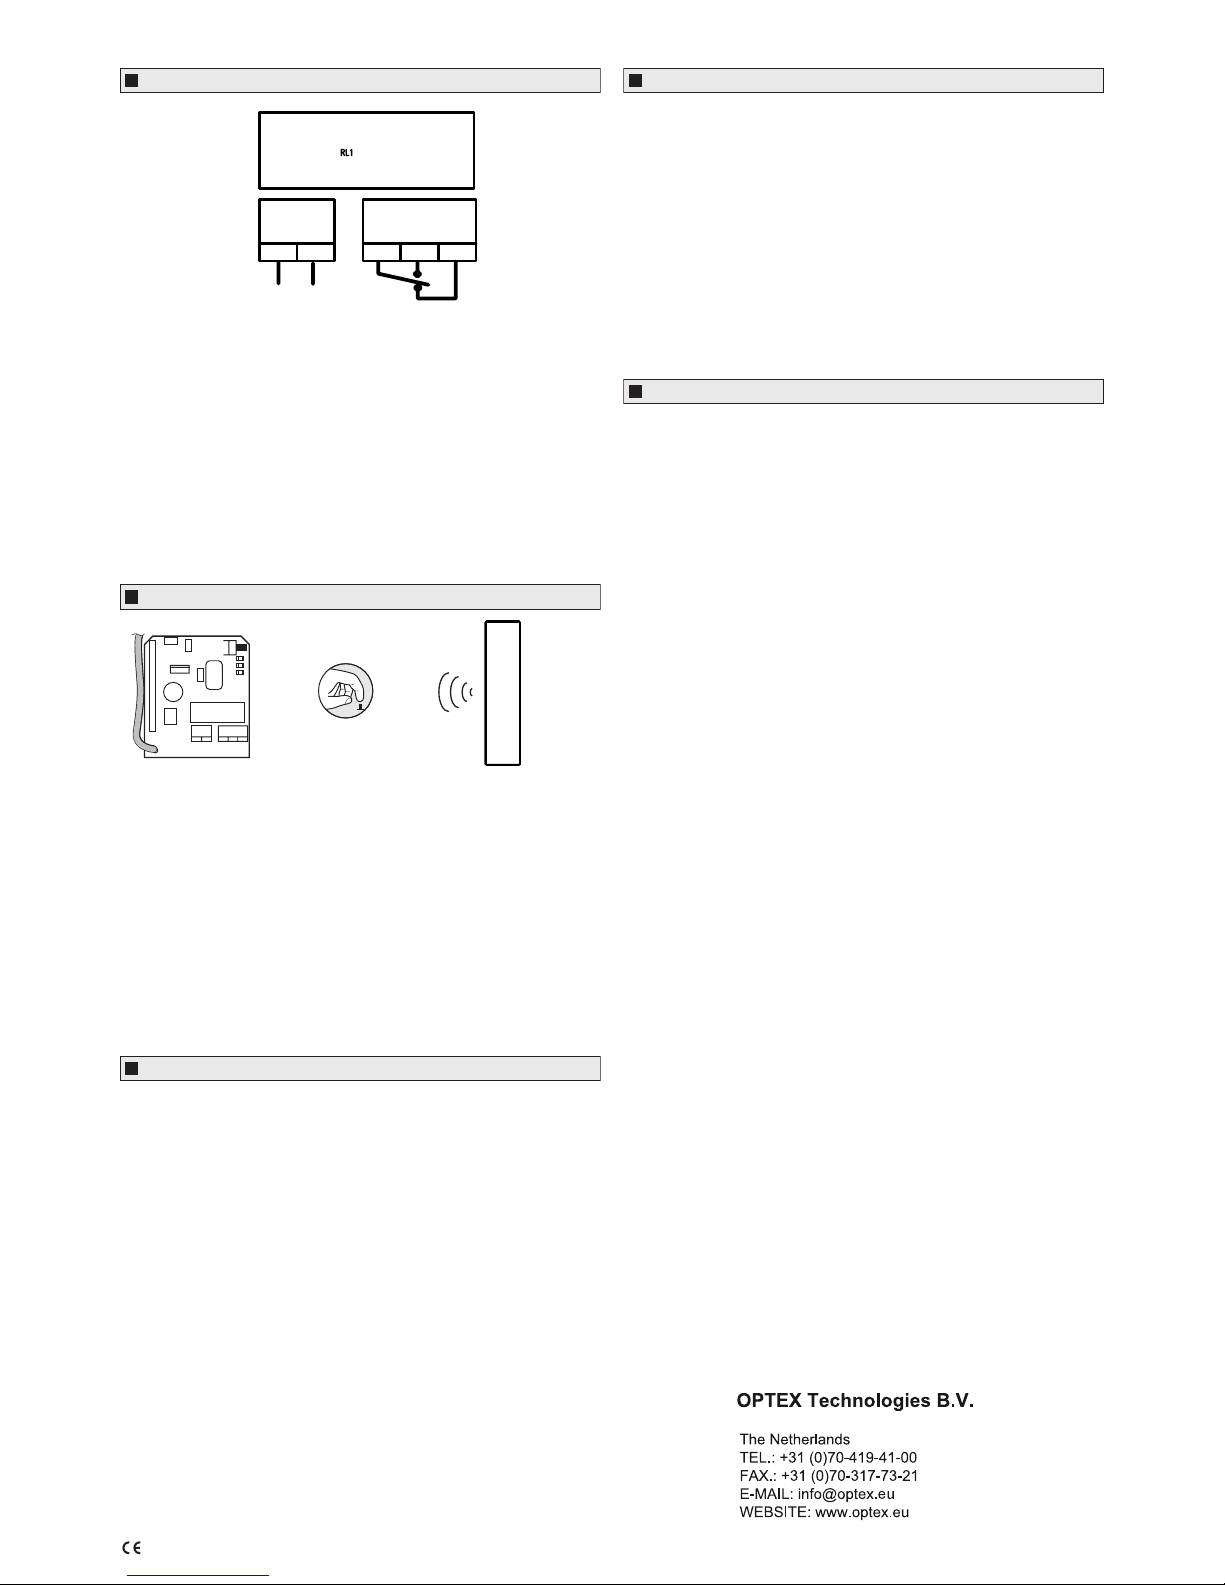
1
2
3
4
6
7
8
5
1. Button Button for self-instruction and/or era
sing.
2. Green LED LED lights when the receiver receives
a radio signal.
3. Yellow LED LED lights when the receiver has the
correct operating voltage.
4. Red LED LED shows programming status.
5. Relay Max. load over relay is 8A for resistive
load.
6. Connection terminal Connection terminal for voltage.
7. Connection terminal Connection terminal for relay.
8. Antenna Special wire antenna for optimum
reception.
The RX-460 can learn up to 10 dierent signals, both groupcodes
(through dipswitches) as unique/private codes. The TX-460 only has
the ability to learn unique/private codes. Up to 10 TX-460 push buttons can be programmed on 1 RX-460 receiver. When a combination
with handtransmitters is used on a RX-460, the RX-460 has also the
ability to learn in a dipswitch setting (the groupscoding) of these transmitters.
Push the button two times during the programming procedure to learn
the private coding and push only one time to learn the group coding.
For more information about these settings and possibilities of the
handtransmitters, we recommend you to read the installation manual
of these transmitters.
Learning the transmitter with the receiver
Connecting the RX-460 receiver
12-30 V AC/DC
C NO NC
Connecting the operating voltage
1. Connect the operating voltage to the voltage connection terminal
(Polarity insensitive).
Connecting the relay
2. Connect the control signal (control voltage) to C.
3. The relay can be used to either close or break a circuit.
* Closing function: When the relay is actuated, a control signal is
received at relay output NO.
* Breaking function: A control signal is received at relay output NC
and is broken when the relay is actuated.
Simple Programming of the RX-460 receiver
To learn a signal, just push the self-learning button on the pcb two
times, and the red LED will light up and switch of again, to indicate
that the receiver is in the (private) learning mode. Activate the transmitter, and the green LED will light up, to indicate that it receives a signal. Keep the transmitter activated, and the red LED will start blinking,
indicating that the signal is learned. Follow this procedure if you want
to learn more signals (transmitters).
In normal operation mode, the receiver will indicate if it has loaded any
signals. When it has learned one or more signals, it ashes two times.
To delete the learned signals from the memory of the receiver, push
the self-learning button for four seconds, and all learned signals will
be deleted from its memory.
Specifications
TX-460 Wireless push button
Power supply 6V (4 batteries of 1,5V size AAA)
Transmitting method Radiocontrol, 433, 92 MHz Fm
Humidity 10-90%
Dimensions 185 * 50 * 21 (L * W * H)
Weight 98g.
Security Unique coding per sender
Operating temperature -20°C to +55°C
Battery life 2 years or 100.000 activations (for opti mum operation, we advise to change
batteries every year)
RX-460 Pluggable self-learning receiver
Power supply 12 - 30V AC/DC ±10%
Humidity <95%
Relay 1 output, NO/NC 8A/250V AC
Dimensions 63 * 54 * 20 (L * W * H)
Security Learns all coding combinations
Functionality Learns up to 10 dierent coding
combinations
Operating temperature -30°C - 70°C
System range guaranteed up to 10 metres within buildings with several obstructions.
Version 1.6 The specications herein are subject to change without prior notice due to
improvements.
The receiver has been equipped with software which does not recognize the dipswitch setting (groups coding) if the receiver is programmed on the ‘0’-setting (factory setting). In order to avoid false control,
this has been deliberately designed this way, because all contacts are
delivered with the same dipswitch setting. If use of the dipswitch is
desired, there should be given an own setting to the dipswitch. Only
then the receiver will accept the setting.
If the receiver gets the instruction to learn in the group coding, but the
dipswitch is set in the ‘0’-setting (factory setting), the receiver will then
automatically learn the unique code of the transmitter. If it concerns
a transmitter, which is part of the 460 system, the receiver will not be
able to learn in this transmitter as there has not been sent out an unique coding with the transmitters.
The RX-460 receiver is standard delivered with a pulse function, but
can easily be programmed with a toggle function as well:
Learn the transmitter into the receiver. Activate the function by pressing the transmitter. While the function is activated, press the learn
button during three seconds. The red LED will turn o and pulse after three seconds to indicate that the function has been changed. In
this way, it is possible to switch from pulse to toggle version and vice
versa.
Functionality group coding
Toggle/pulse function
Henricuskade 17, 2497 NB
The Hagu
e
 Loading...