

Page 1
Securitron Magnalock Corp. www.securitron.com ASSA ABLOY, the global leader
Tel 800.624.5625 techsupport@securitron.com
in door opening solutions
MODEL SP-1 TOUCH SENSITIVE WALL SWITCH
INSTALLATION AND OPERATING INSTRUCTIONS
1. DESCRIPTION
The SP-1 is a touch sensitive wall switch which is generally used as a superior alternative to wall
mounted mechanical push buttons. When touched by the human hand (even through gloves)
the unit operates a set of internal dry contacts. The unit includes an internal timer, an LED
which indicates operation and a redundant backup switch. The SP-1 is intended for indoor use
only.
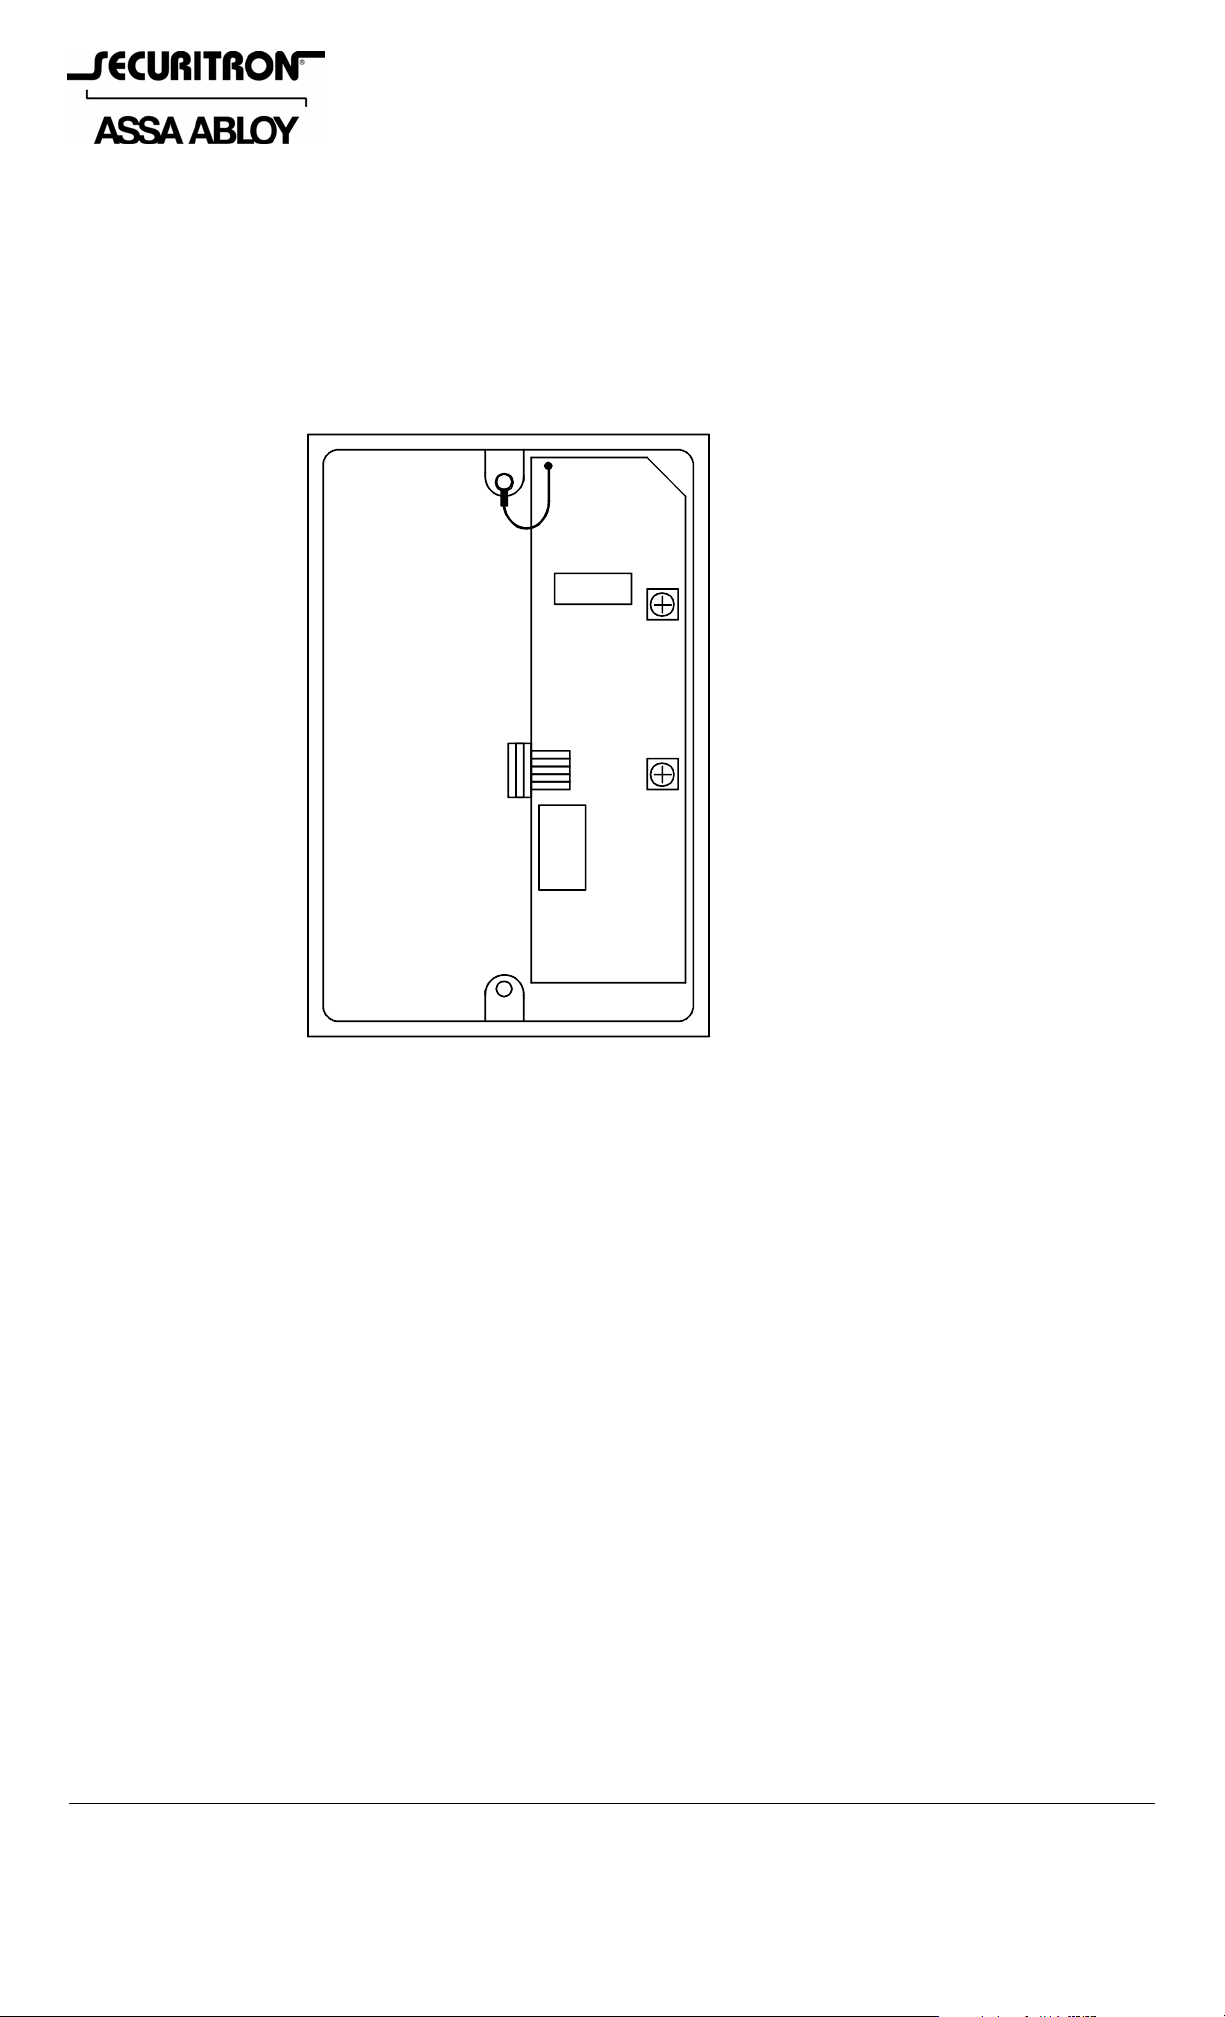
FIGURE 1: SP-1 OVERVIEW
CONNECTION WIRE
FROM SENSOR TO
PLATE
SEN
POT TO ADJU ST TOUCH
SENSITIVITY
CABLE
CONNECTOR
TIME
POT TO SET TIME
DELAY (1-35 SEC)
2. PHYSICAL MOUNTING
Identify the top of the unit by noting that the LED is on the top face of the backb ox. Remove
the bottom screw of the plate. Note that the top screw includes a spring that goes around
the screw below the plate. Do not lose this spring as its presence is necessary for proper
operation. It is not necessary to remove the top screw with th e spring on it, but to just loosen
this screw and rotate the plate enough to access the mounting screw points. Mount the unit to
the wall using the supplied screws. Note that there are two approaches to mounting. You can
use the holes at the diagonal corners of the box and optionally one of the interior holes for
surface mounting on dry wall or other material. #8 x 1 1/2" Sheet metal screws are provided
for this purpose. Alternately, if you are putting the SP-1 over a US type backbox, you can use
two machine screws (supplied) to mount into the standard backbox tab threads.
Note that the stainless steel plate must be isolated from any conductive (metal)
surface. At least one inch of separation must be maintained between the edge of the
plate and any protruding metal piece.
3. WIRING
The SP-1 has 6 colored wires which are for sensor power and DPST relay output:
Red - "+" DC Power
Black - "-" DC Power
White - Relay Common, Pole 1
Green - Relay Normally Closed, Pole 1
Blue - Relay Common, Pole 2
Orange - Relay Normally Open, Pole 2
© Copyright, 2011, all rights reserved PN# 500-15600
Page 1 Rev. D, 03/11
Page 2
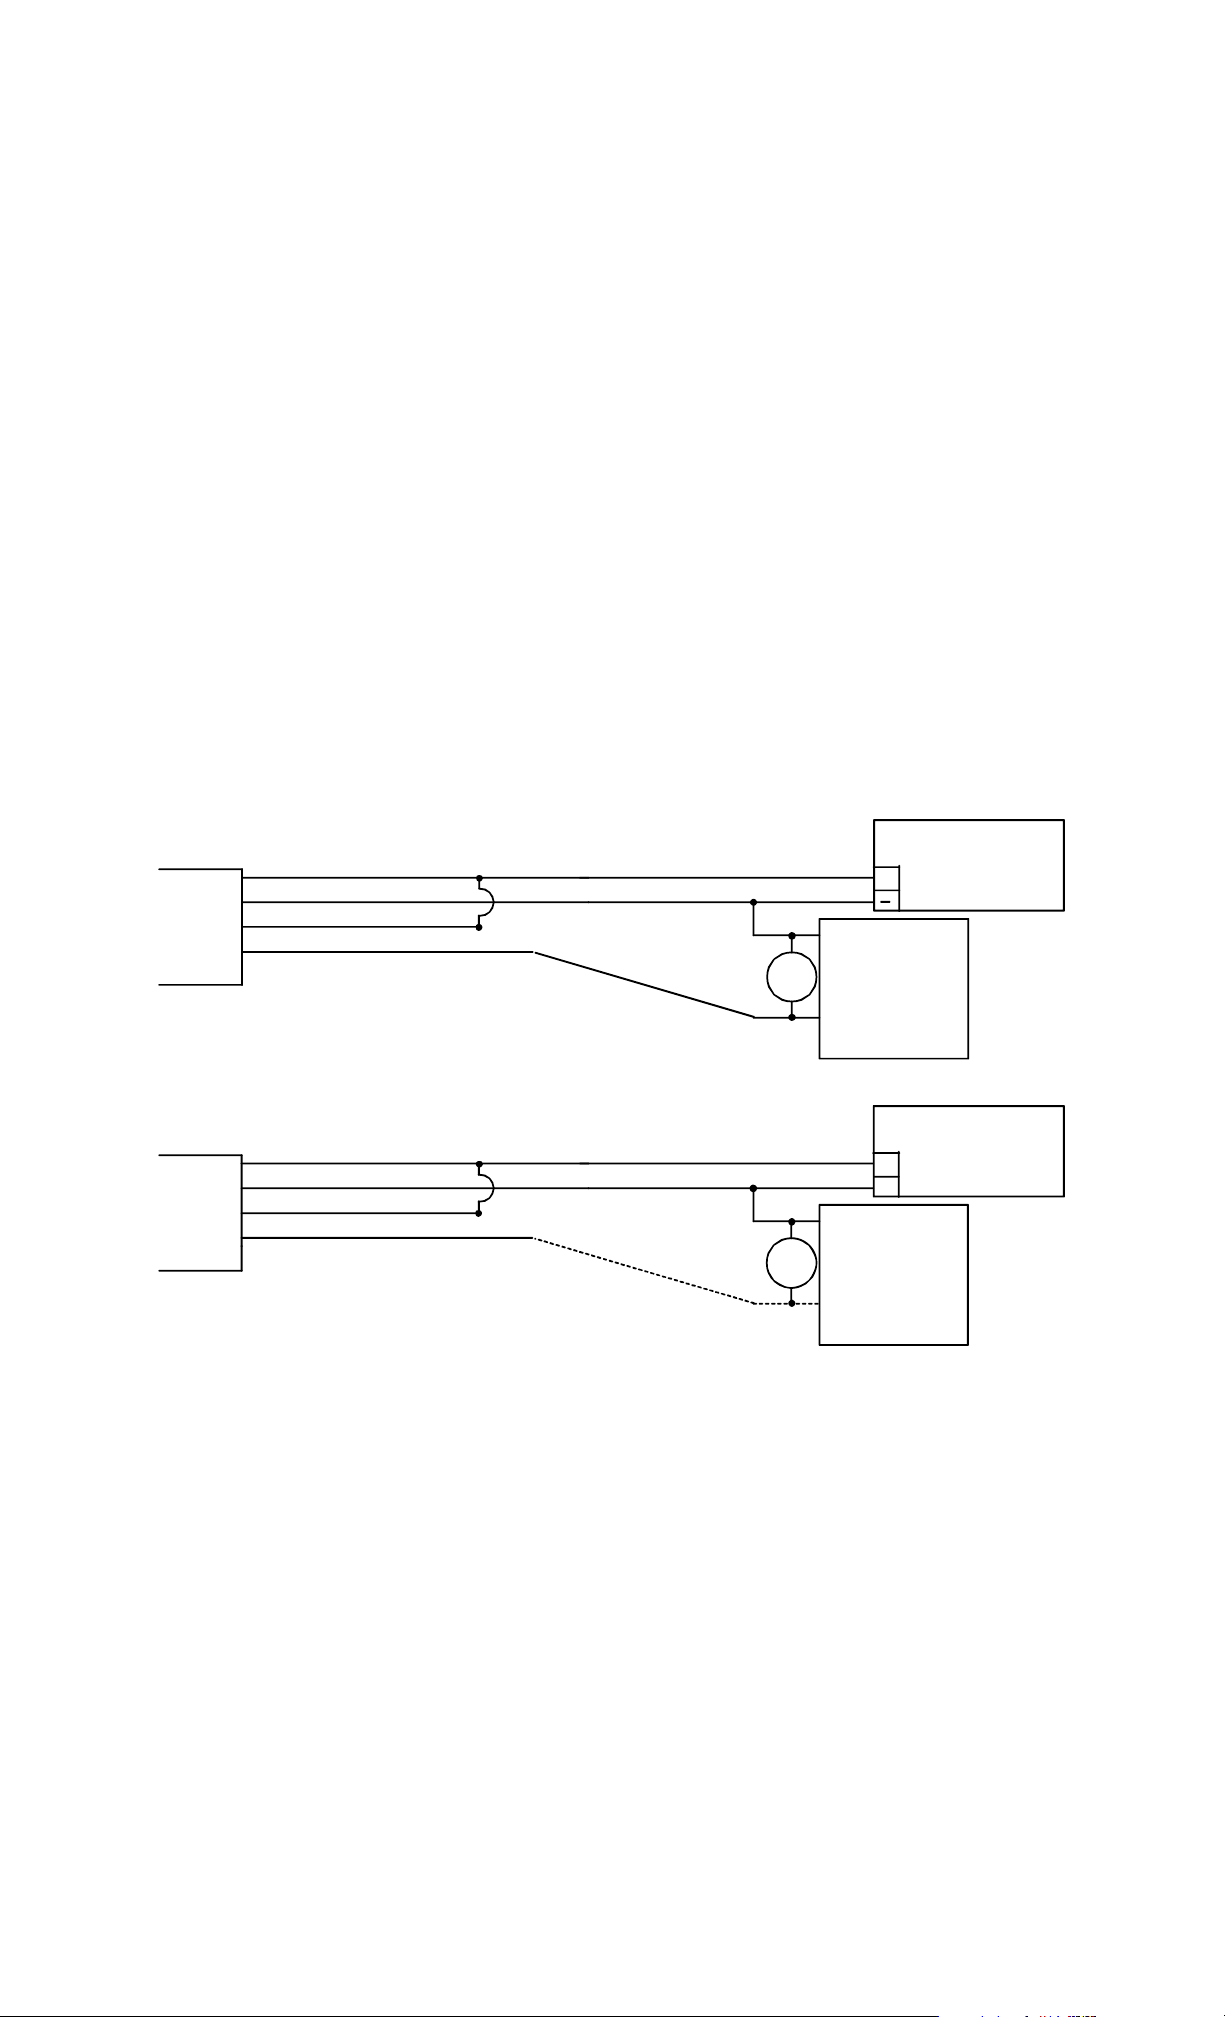
The relay has 2 amp contacts; the operation of the SP-1 is fail safe. When the SP-1 re ceives
power, its control relay automatically energizes. It de-energizes when the plate is touched. For
applications releasing an electric lock, the following drawing (Figure 2) shows typical connections
of sensor, power supply and both fail safe (secure when powered) or fail secure (released
when powered) electric locks. Note installation of the MOV in parallel wi th the electric lo ck. The
MOV is supplied loose with the SP-1. It is a black or blue disk-like component with two bare
wires for connection. The MOV acts to suppress the inductive kickback from the lock which will
greatly shorten the life of the relay contacts if not suppressed. To work properly it should be
spliced in as close to the electric lock as possible. It has no polarity. If, however,
Securitron's Magnalock is used in the installation, the MOV is not necessary as the
Magnalock is internally suppressed.
The sensor operates on 12-24 volts DC and is normally powered by the same pow er supply that
operates the electric lock. When wiring power, polarity must be observed. Note that the
sensor draws 40 mA when "at rest" and 25 mA when it is releasing the lock. . As an additional
safety feature, the SP-1 includes a low voltage sensing circuit. The unit will keep working
normally if input voltage declines until it reaches roughly 9 volts. At that point, the SP-1 will
automatically act as if all power was removed. If a lock is being controlle d, it will release. Inp ut
voltage could decline if the unit was being operated on batteries and the batteries were
discharging or because of a fault in the power supply.
When employing the cable to make electrical connections, never coil the gray cable within
the white backbox. It must be pulled straight out. A coiled cable in the white backbox will
interfere with proper electronic operation of the unit.
FIGURE 2: SP-1 TYPICAL WIRING
WIRING FOR FAIL SAFE LOCK
POWER SUPPLY
12-24 VDC
+
ELECTRIC
LOCK
CABLE
RED (+ POWER)
BLACK (- POWER)
WHITE (RELAY COM1)
GREEN (RELAY N.C.1)
MOV
WIRING FOR FAIL SECURE LOCK
POWER SUPPLY
RED (+ POWER)
BLACK (- POWER)
CABLE
NOTE 1: MOV NOT NEEDED IF SECURITRON MAGNALOCK USED
NOTE 2: POWER SUPPLY MUST ALWAYS CONNECT DIRECTLY TO
SENSOR. OTHER CONTROL SWITCHES SHOULD BREAK OR PARALLEL RELAY CONTACTS.
NOTE 3: INPUT POWER POLAR I TY MUST BE OBSER VE D.
BLUE (RELAY COM2)
ORANGE (RELAY N.O.2)
MOV
12-24 VDC
+
-
ELECTRIC
LOCK
3.1 DOUBLE BREAK WIRING
Many installations include a controlled entry device such as a digital keypad or card reader.
Such devices typically have a REX (request to exit) input.
If the REX input alone is used for exiting a safety/reliability problem will exist. If the entry
device malfunctions, exit will not be possible and people may be trapped. We therefore always
recommend double break wiring which is supported by the SP-1 because of its two pole relay.
The SP-1's NC contacts are used to break power to the fail safe electric lock while its NO
contacts trip the REX input of the controlled entry device. This releases the lock a second time,
hence the term, "double break". If the controlled entry device fails f or any reason, direct exit is
still possible. This type of circuit works only with fail safe locks but these comprise the great
majority of lock types used for safety related exit.
PN# 500-15600
Page 2 Rev. D, 03/11
Page 3

FIGURE 3: DOUBLE BREAK WIRING
POWER SUPPLY
12-24 VDC
+
FAIL SAFE
ELECTRIC
LOCK
CABLE
RED (+ POWER)
BLACK (- POWER)
WHITE (RELAY COM1)
GREEN (RELAY N.C.1)
BLUE (RELAY COM2)
ORANGE (RELAY N.O.2)
ENTRY CONTROL
REX INPUT
MOV
ENTRY CONTROL
LOCK CONTROL
NC CONTACTS
4. TIMED OPERATION
In timed operation, the SP-1 will operate its contacts for 1-35 seconds after it is touched. Time
duration is set by adjusting the potentiometer located in the center of th e control circuit board
(see Figure 1). The pot is factory set for approximately 7 seconds. Time is increased by
turning the pot clockwise. Timing is of the "retriggerable, off delay" type. This means first
that the contacts will stay switched as long as the person's hand remains on the plate. Timing
starts when the hand is removed and if the plate is touched a second time during the switched
cycle, the contacts will remain switched for the selected time which will be “retriggered”.
If the SP-1 is being used to trigger some other device such that only a momentary signal is
required, turn the pot all the way counterclockwise and the contacts will switch for roughly one
second.
5. LABELING
A vinyl press-on label is supplied with the unit which says, "TOUCH TO EXIT" and includes a
graphic representation of a hand. An international handicap symbol is also available (ordered
separately SP-1LH). The label may be applied to the stainle ss steel plate completely or p ortions
may be applied only to create the desired prompt. To use the label, first slowly remove the
backing sheet by starting peeling from one corner. Too rapid removal of the backing may take
some of the label with it. When the backing has been removed, you can "edit" the label copy by
carefully removing portions of the message. Use a knife tip to peel away the vinyl characters.
Then line up and press the label top carrier onto the plate. Firmly rub all o ver the top carrier
sheet to apply the vinyl lettering to the stainless plate and remove a ir bubbles. Th e n slowly p eel
off the top carrier sheet, again starting from a corner. If while peeling some of the vinyl may
come off with the top carrier, rub over the carrier again aggressively to make the vinyl adhere.
6. USE OF REDUNDANT BACKUP SWITCH
When you open or remove the plate from the backbox, you'll
notice a push button switch soldered to the circuit board by two
wires. The switch is lightly stuck down to the backbox ba se. As
factory delivered, pushing the button breaks the connection
between the white (COM1) and green (NC1) wires just the sa me
way as if the plate was touched. It does not however affect the
COM2 and NO2 circuit (blue and orange). If the application
for the SP-1 is safety related and employs the NC
contacts, remove the plastic plug and mount the switch
through the hole in the bottom of the backbox as shown in
the drawing on the right. With the switch mounted, there are
two independent controls which can release the door. In the event that the sensor fails, the
button will still work. Of course, in a double break installation (see Figure 3) the button will not
activate the REX input of the entry control device because its use only affects the NC contacts,
nor will it activate the SP-1's internal timer but the lock will still release for safety as long
as the button is held. Never cut the wires from the switch to the circuit board. If the
switch is not used, it must be left inside the backbox as its wires are part of the circuit.
PN# 500-15600
Page 3 Rev. D, 03/11
Page 4

7. ADJUSTING SENSITIVITY
The sensitivity pot (see Figure 1) must be adjusted for proper operation. The setting de pends
somewhat on whether the unit is mounted on a metal or non-conducting surface. To perform
this adjustment, you have to start with the unit completely wired (receiving power) and
mounted as it will be used. NOTE: the top screw includes the spring and ring terminal
underneath that creates the electrical connection between the plate and the sensor.
Turn the timing pot all the way counterclockwise, the shortest time between tests of
operation. Re- tighten the top screw and turn
the sensitivity pot clockwise without touching
TO ADJUSE SENSITIVITY,
ROTATE PLATE ENOUGH
TO REVEAL SENSITIVITY
POT. RETIGHTEN TOP
SCREW HOLDING PLATE
AND THEN ADJUST POT.
the plate until the LED just comes on. In this
condition, sensitivity is so high that the unit is
on all of the time. Slowly rotate the pot
counter-clockwise until the LED goes out and
then another 15 degrees counter-clockwise.
This is generally a good setting. Before reattaching the plate, test by touching the plate
and observing that the LED comes on. test with
gloves if you expect that they will be used. You
may want to increase the sensitivity somewhat,
but if you leave it just below the point where
the LED is on all the time, you risk a condition
where the unit will fail by being on all of the
time.
8. TROUBLESHOOTING
PROBLEM: The unit will not operate when the plate is touched.
There are three ways to know that the SP-1 is working when you touch the plate. The LED should come
on, you should be able to hear the relay click and the device should do what is supposed to in the
installation (such as releasing a door). If you get the click and LED but the unit doesn't release the door,
check the installer wiring.
If you don't get a click or LED, the sensor is not reading your touch. Make sure you understand section 7
on how to adjust sensitivity. It may be set too low. Another fault could be that the sensor itself is not
receiving 12-24 DC power on the red and black wires. Check the power supply and, be sure the input
polarity is correct. Also even if power is being applied on the red and black wires, it's possible that it's
not getting into the sensor. Check the connector block that plugs into the sensor circuit board for loose
wires. Finally, it is possible that the connection from the sensor to the plate has come loose. Review
Figure 1. The ring terminal must go around the top mounting screw and the spring must be present
around the screw.
PROBLEM: The LED remains on constantly
First, make sure that the sensitivity is not set too high. Review section 7. If you can rotate the pot
counterclockwise all the way and the unit still remains activated, the most likely cause is that the sensor
"sees" an overwhelmingly large signal as if someone was continually touching the plate. This will happen
if the plate is not properly isolated from a mass of metal. The plastic backbox achieves this isolation but it
is possible that metal is too close to the side of the plate. You must have one inch clearance all around.
The same effect will occur if the plate is used outside and becomes wet. This is an indoor product only.
Certain large electronic noise sources can "swamp" the sensor although this is rare. Examples would
include large radio or radar transmitters in the building or a high voltage neon sign mounted within a few
feet of the unit. Call the factory if you suspect noise induced problems.
PROBLEM: The sensor is very difficult to adjust
This is usually caused by coiling the electrical cable within the backbox. The cable must directly exit the
backbox through the provided hole. Also, if the backup switch has not been installed in the side of the
backbox, it should remain stuck down to the backbox base. If its wires are laying up against the plate,
this can increase sensor adjustment difficulty.
Another possibility is that sometimes during handling of the product a static charge can be built up on the
board. Remove power at the source (not by unplugging the cable). Turn the pot all the way
counterclockwise. Reapply power and adjust sensitivity as described in Section 7.
9. MAGNACARE LIFETIME REPLACEMENT WARRANTY
For warranty information visit www.securitron.com/en/site/securitron/About/MagnaCare-Warranty
PN# 500-15600
Page 4 Rev. D, 03/11
 Loading...