

Page 1

DVD PLAYER
DV-970HD
ADVANCED
SETUP GUIDE
A SUPPLEMENT TO THE
USER MANUAL
Page 2

Page 3

T able of Contents
Table of Contents................................................................................1
HOW TO USE THIS GUIDE...................................................................2
Using the DVD Setup Menu System .............................................................................................. 3
SETTING UP THE PLAYER: BASICS....................................................4
Use the Best Available Video Connection .................................................................................... 4
Determine Your Display Type........................................................................................................ 4
Use the Best Available Audio Connection .................................................................................... 6
Connections for Most CD or DVD Playback..................................................................................................................6
But, Wait – I Have HDMI!..............................................................................................................................................7
Connections for Non-Dolby Digital/DTS Receivers, DVD-Audio and SACD.................................................................8
SETTING UP THE PLAYER: ADVANCED.............................................. 9
Setup Menu Options....................................................................................................................... 9
Entering the Setup Menu System..................................................................................................................................9
General Setup Page ..................................................................................................................... 10
Speaker Setup Page..................................................................................................................... 11
Audio Setup Page......................................................................................................................... 14
Video Setup Page......................................................................................................................... 16
Preference Page........................................................................................................................... 18
i
Page 4

HOW T O USE THIS GUIDE
This guide is written in a very procedural manner. Unlike
most User Manuals which read like dictionaries and are only
slightly less interesting, OPPO was kind enough to allow us
to contribute to a “kindler and gentler” Setup Guide that
takes you through the setup process the way we do it –
almost every week of our lives.
So, forget what you know. If you want to learn how to point a
remote control, put in batteries, or find out that it’s bad to
leave a DVD player out in the rain, read the standard User
Manual. If you want to explore the DV-970HD and get it up
and running on your system in the best way possible… read
on.
- Clint DeBoer
Editor-in-Chief, Audioholics.com
Watch out for these tech notes along the way to help you get the most out of
your DVD player purchase. Following these notes can mean the difference
Tech Note
between a good picture and a GREAT picture!
2
Page 5
HOW TO USE THIS GUIDE
Using the DVD Setup Menu System
In many places of this guide, the DVD player’ s Setup Menu n eeds to be adjusted to match your specifi c
audio/video configuration. To access the DVD player’ s Setup Menu simply p ress the SETUP button on the
remote control when the disc is stopped. When askin g you to make menu adjustm ents, we will use the foll owing
terminology to indicate the location of the desi red function:
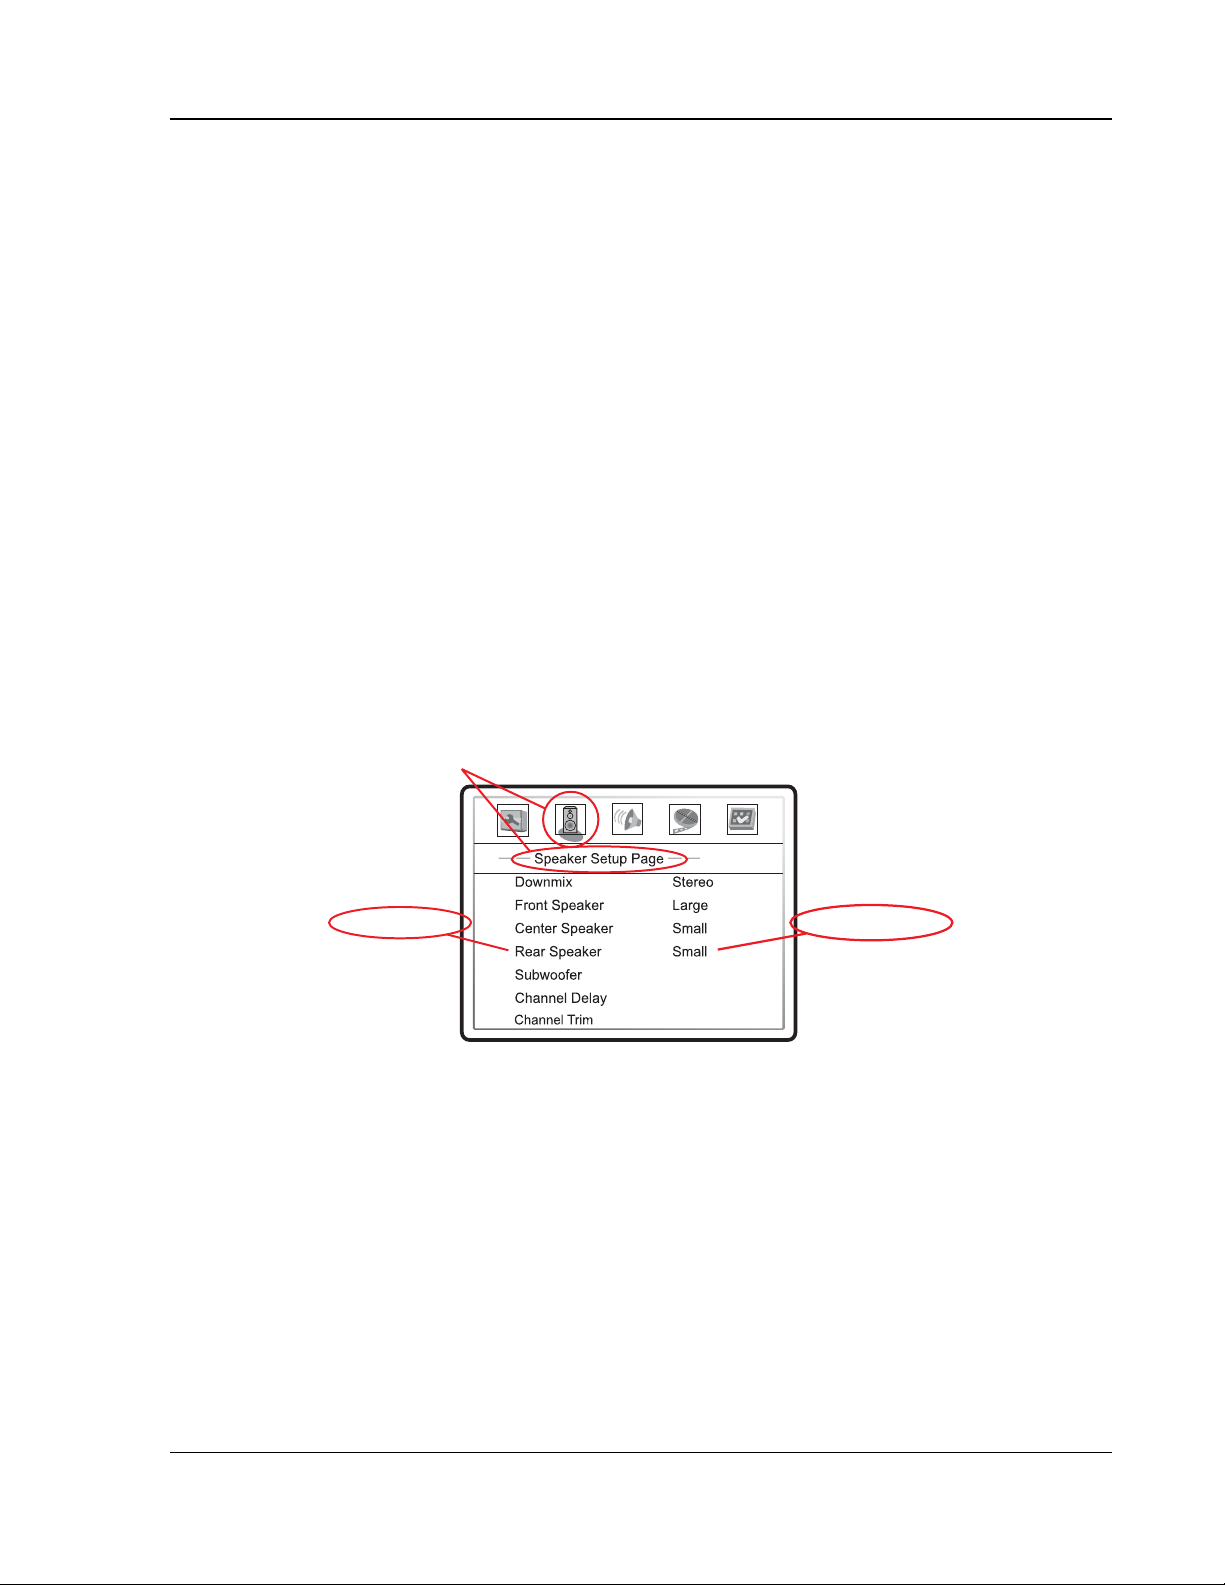
Setup Menu Name > Menu Item > Submenu Item (or Selection)
Setup Menu Name is the actual name of the uppermost set up menu level. With the OPPO DV-970HD there
are exactly five (5) Setup Menu pages or secti ons, each rep resented by an icon on the top of the Setup Me nu
screen. They are: General Setup Page, Speaker Setup Page, Audio Setup Page, Video Setup Page, and
Preference Page.
Menu Item is the parameter to be adjusted which appears below the Top Menu Name. It is the list of items on
the left of the current Setup screen.
Submenu Item (or the selection) is the act ual numeric or d escriptive element that rep resents the chang e
being made to the selected parameter. It is the item locat ed to the imme diate right of its correspondi ng Menu
Item.
This diagram should give a good de scription of the vario us elements and th eir context. In this scre en we could,
for example, instruct you to set the Rear Speaker parameter to Small in the Speaker Setup Page. To indicate
where we were, you would see the following: Speaker Setup Page > Rear Speake r > Small.
Setup Menu Name
Menu Item Submenu Item
Off
3
Page 6
SETTING UP THE PLA YER: B ASICS
Follow these simple steps to successfu lly set up your player for u se in your sy stem
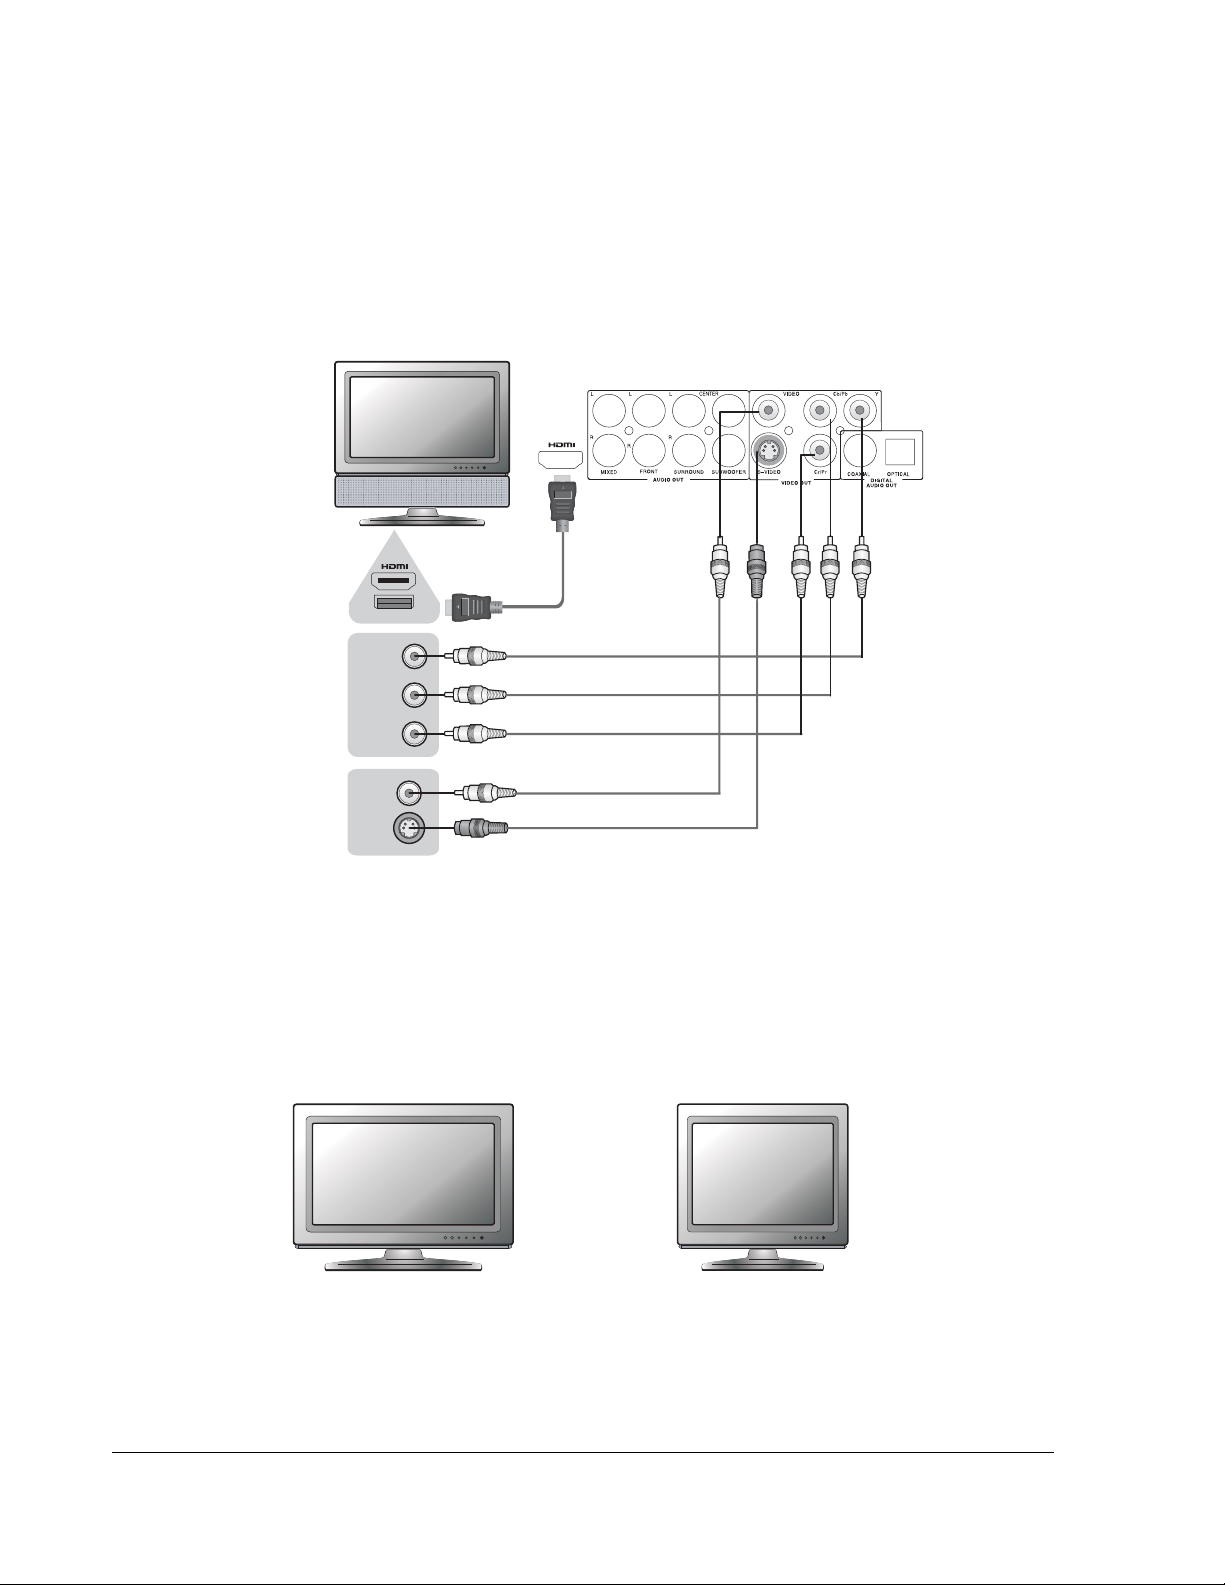
Use the Best Available Video Connection
Rear Panel
Or
HDMI (included) or
HDMI-to-DVI Cable
BEST
DVI In
(Y)
Component Video Cable (optional)
BETTER
GOOD
(Pb/Cb)
(PrCr)
Video In
S-Video
Video Cable (yellow, included)
S-Video Cable (optional)
If an HDMI or DVI connection is present on your television or display, use it. The OPPO DVD play er has an
HDMI (digital) video output which presents the hi ghest possible resol utions and video quality. If the television
you are using has only component video inputs, the n select a compone nt video cable (it has t hree RCA-style
connections on each end typically colored red, gree n, and blue). If your televisio n is older and ha s neither of
these inputs you may use s-video (a special 4-pin cable ) or composit e (typically a single yello w RCA-style
cable).
Determine Y our Display T ype
Widescreen, or 16:9 TV
Standard Definition, or 4:3 TV
For best performance, your Oppo DVD player must be correctly configured for playback even before the first
disc is inserted. This is done under General Setup Page > TV Display in the Setup Menu.
4
Page 7
SETTING UP THE PLAYER: BASICS
If you have a widescreen (16:9) display as pictured on the left, select one of these options:
• 16:9 Wide – 16:9 (widescreen) sources will be displayed in their native aspect ratio, and 4:3
sources will be stretched.
• 16:9 Wide/SQZ – 16:9 (widescreen) as well as 4:3 sources will be displayed in their native
aspect ratio. Please note that in this mode 4:3 sources will be displayed with black borders on
both sides to maintain the correct 4:3 aspect ratio.
If you are using a plasma or widescreen CRT display you will want to
avoid leaving black bars on the screen for any length of time as you may
encounter temporary burn-in where the display retains memory of the
“used” part of screen and the unused (black bar) portions are clearl y
Tech Note
defined on the screen during subsequent viewing sessions. The “16:9
Wide” mode is the best choice for these types of displays.
If you have a 4:3 or standard definition screen as pictu red on the right, sel ect one of these options:
• 4:3 Pan/Scan – 4:3 TV Pan and Scan. Choose when the display is 4:3. Both sides of a
widescreen image are clipped (you lose about 30% of the picture).
• 4:3 Letterbox – 4:3 TV Letterbox. Choose when the display is 4:3. Widescreen image is
displayed in “letterbox” format with black borders on top and bottom (preferred).
Notes When Using HDMI
• If your AV receiver or display has an HDMI input, you can use the included HDMI cable to
connect the DVD player to the TV. This is the most preferred connection method as it provides a
pure digital connection for video signal and, depending upon your system, can also deliver high
resolution digital audio over the same cable.
• When playback is completely stopped, use the “HDMI” button on the remote control to switch the
video output resolution. Select the resolution that produces the best picture quality on your TV.
For most flat panels and DLP™, LCD or LCoS (SXRD™, D-ILA™) rear projection televisions this
will be 720p. For CRT rear projection televisions this will likely be 1080i. For non HD displays
(very rare if they have HDMI or DVI) this will be 480p.
• If the HDMI input of your TV is only capable of decoding 2-channel digital audio, it is
recommended that you set Speaker Setup Page > Down-mix to “Stereo”. This sets the audio
down-mix mode of the DVD player to “Stereo”.
5
Page 8

SETTING UP THE PLAYER: BASICS
Use the Best Available Audio Connection
Connections for Most CD or DVD Playback
Analogue
Audio Cables
(Red/White)
BESTGOOD
Rear Panel
Audio In
AV Receiver/Integrated Amplifier
Coaxial In
Optical In
Connect ONE of these
digital audio cables:
Coaxial S/PDIF
or Optical S/PDIF
If at all possible you will want to connect audio using digital cables (either coaxial S/PDIF or optical S/PDIF). If
your receiver or integrated amplifier does not have Dolby Digital or DTS capability (for instance, an older Pro
Logic model) then you should con nect the “Mixed” st ereo output of the OPPO DV D player to your receiver or
integrated amplifier (and immediately start saving fo r an upgrade!) Sett ing up, you have the follo wing choices:
• No Surround Speakers: If the audio system does not have surround speakers, please u se the
analogue RCA-style cables and set the Speaker Setup Page > Down-mix to “Stereo” or “V.
Surround”.
• Surround, But No Dolby Digital or DTS Support: If the audio system has surround speakers
and Dolby Pro Logic Surround support, please use the analogue RCA-style cables set the
Speaker Setup Page > Down-mix to “Left/Right”.
• Surround Speakers and/or DTS and/or Dolby Digital Support: If your receiver supports Dolby
Digital and/or DTS then please use a digital coaxial or optical cable and set the Audio Setup
Page > SPDIF Output to “Raw”. No additional audio cables will be needed unless you listen to
SACD (see below).
None
Off
Raw
48K
00
On
Off
Speaker Setup Page > Downmix*
settings: Left/Right, Stereo, V.Surr, 5.1CH
*does not affect digital player outputs
EQ Type
Sound Field
SPDIF Output
LPCM Rate
Audio Tone
Pro Logic II
Dolby Digital Setup
HDMI Audio
Audio Setup Page > SPDIF Output*
settings: Raw, PCM
*does not affect analogue player outputs
Manufactured under license from Dolby Laboratories. “Dolby” and the double-D symbol are trademarks of Dolby Laboratories.
“DTS” and “DTS Digital Out” are trademarks of Digital Theater Systems, Inc.
6
Page 9

SETTING UP THE PLAYER: BASICS
But, Wait – I Have HDMI!
Rear Panel
HDMI (included) or
BEST
HDMI-to-DVI Cable
DVI In
AV Receiver/Integrated Amplifier
HDMI can transmit both audio AND video signals over a single cable. If you have an HDMI-capable
display or, better yet, an HDMI-capable receiver that can support HDMI audio, you are in luck. Simply run
an HDMI cable from the OPPO DVD player to your display or receiver and enable HDMI audio (if
necessary) on that device (see your receiver or display’s owners’ manual for more information). You are
now equipped to send all current audio formats to your display or receiver.
HDMI is a wonderful thing. A single cable can transport both audio AND
video from your DVD player to your display. Be aware, however, that
HDMI is an evolving standard, and there could be compatibility issues.
The OPPO DV-970HD supports HDMI 1.1 audio. A receiver that supports
HDMI 1.1 is required in order to play multi-channel audio for all formats,
including DVD-Video/Audio and SACD (SACD DSD audio converted to
Tech Note
multi-channel PCM). If the receiver supports HDMI 1.0 only, DVD-Audio
and SACD will NOT be able to be sent via HDMI. To utlize DVD-Audio or
SACD, please see next section for multi-channel analogue audio
connection.
To get the best possible audio via HDMI, you may need to set the following options on the DVD player’s
setup menu, depending on your HDMI-capable receiver/display configuration:
• No Surround Speakers (such as a TV): If the receiver or TV does not have surround speakers,
please set the Speaker Setup Page > Down-mix to “Stereo” or “V. Surround”. Also set the
Audio Setup Page > HDMI Audio to “Multi-Channel”. Alternatively, you may set Audio Setup
Page > HDMI Audio to “SPDIF” and Audio Setup Page > SPDIF Output to “PCM”.
• Surround and Dolby Digital or DTS Support, or HDMI 1.0: If the audio system has surround
speakers and can support Dolby Digital or DTS with its HDMI input, please set Audio Setup
Page > HDMI Audio to “SPDIF” AND Audio Setup Page > SPDIF Output to “Raw”. In this case
your audio system will perform decoding for Dolby Digital or DTS surro und audio. Unfortunately
the HDMI standard does not allow DVD-Audio or SACD to be sent over HDMI in this
configuration.
• Surround Speakers and HDMI 1.1 Multi-Channel PCM Audio Support: If your receiver
supports HDMI 1.1 Multi-Channel PCM audio, please set Speaker Setup Page > Down-mix to
“5.1 CH” and Audio Setup Page > HDMI Audio to “Multi-Channel”. In this configuration you
can enjoy all audio formats using the HDMI connection. The DVD player performs decoding for
compressed audio.
7
Page 10

SETTING UP THE PLAYER: BASICS
Connections for Non-Dolby Digital/DTS Receivers, DVD-Audio and SACD
Receiver/Amplifier with 5.1ch Audio Input
Dolby Pro Logic Receivers
If you have an older Dolby Pro Logic surround receive r that does not suppo rt Dolby Digital or DTS but h as multichannel inputs, you will want to connect the 6 analogue outputs of the OPPO DVD player to the analogue multi-
channel inputs of your receiver. To do this you must:
• Use six (6) analogue RCA-style cables and set the Speaker Setup Page > Down-mix to
“5.1CH”.
• Enable or select the multi-channel analogue input s on your re ceiver
This is absolutely worth it if you haven’t yet upgraded your receiver. Truly discrete audio cha nnels are a
wondrous thing, so enjoy them if you can.
SACD or DVD-Audio Playback
To utilize SACD or DVD-Audio* you will also need to connect six (6 ) analogue RCA -style cables f rom the OPPO
DVD player to your receiver’s multi-channel anal ogue inputs. The se multi-channel output s will also su pport
playback of DVD-Audio, DTS, Dolby Digital and stereo sources. Here are some general note s and guideline s to
following depending upon what formats you inte nd to play:
• No DVD-Audio or SACD: Use HDMI or one of the digital ca ble connection choices if you do n ot intend
to use SACDs or DVD-Audio discs in your system.
• DVD-Audio But No SACD: Use HDMI if you have a re ceiver that handles HDMI au dio and multi-
channel outputs if you do not. To do this you mu st have a receiv er with availabl e multi-channel i nputs.
Set the Speaker Setup Page > Down-mix to “5.1CH”.
• DVD-Audio and SACD: Use HDMI if you have a receiver that handles HDMI audio and t he analogue
audio outputs for SACD. To do this you must have a receiver wit h available multi-cha nnel inputs. Set
the Speaker Setup Page > Down-mix to “5.1CH”.
*DVD-Audio and SACD (DSD conv erted to PCM ) can also be p layed back via HDMI to a receiver which
supports HDMI 1.1 audio. “DVD-Audio” i s a high resolutio n PCM-based format and is not to b e confused with
the Dolby Digital or DTS audio found on normal DVDs.
8
Page 11

SETTING UP THE PLA YER: AD V ANCED
Setup Menu Options
The following is an advanced tour of the Setup Menu options which enables control over how your DVD
player functions in various situations and with various program material and hardware. The OPPO DV970HD DVD player comes with a “safe” default configuration, so you should get performance out of your
player even if you don’t touch the Setup Menu system. For those of you wanting to understand more and
really tweak your settings, read on…
Entering the Setup Menu System
1. Press the SETUP button on the remote control, and the TV screen displays:
10
SETUP
2. Press the LEFT/RIGHT ARROW buttons to select the setup page. There are 5 pages: General
Setup, Speaker Setup, Audio Setup, Video Setup, and Preference. Press the SELECT button
to enter the selected setup page. The Preference page can only be accessed when playback is
completely stopped, or when there is no disc in the player.
3. Press the UP/DOWN ARROW buttons to select the setup item to be changed, and press the
SELECT button to change the setting. Grayed-out setup items cannot be changed. To allow
changing of such items, make sure the item is applicable, that playback is completely stopped,
and/or there is no disc in the player.
For example, in the Video Setup Page (below), you may use the UP/DOWN ARROW buttons to
select the “Contrast” setup item, and press the SELECT button to change the “Contrast” setting.
4. To select a value from the list of available settings, press the UP/DOWN ARROW buttons and
then press the SELECT button to confirm.
5. To exit the SETUP menu, press the SETUP button on the remote control.
9
Page 12

SETTING UP THE PLAYER: ADVANCED
General Setup Page
1. TV Display: This is a primary setting and is addressed in the Setting Up the Player: Basics
section. To set the aspect ratio of the DVD player’s output image to match your TV, select from
the following:
• 16:9 Wide – 16:9 (widescreen) sources will be displayed in their native aspect ratio, and 4:3
sources will be stretched.
• 16:9 Wide/SQZ – 16:9 (widescreen) as well as 4:3 sources will be displayed in their native
aspect ratio. Please note that in this mode 4:3 sources will be displayed with black borders on
both sides to maintain the correct 4:3 aspect ratio.
• 4:3 Pan/Scan – 4:3 TV Pan and Scan. Choose when the display is 4:3. Both sides of a
widescreen image are clipped (you lose about 30% of the picture).
• 4:3 Letterbox – 4:3 TV Letterbox. Choose when the display is 4:3. Widescreen image is
displayed in “letterbox” format with black borders on top and bottom (preferred).
DVD Content
4:3
4:3
Pan-Scan Letterbox Wide Wide/SQZ
TV Screen Appearance
16:9
16:9
2. OSD Lang (English): English is the only available language for the US version of this player.
3. Screen Saver (on/off): To turn on/off the screen saver function. When the screen saver is on, a
moving logo will appear instead of the static image after 2 minutes of inactivity. This is designed
to minimize the burn-in issue for plasma and CRT display devices.
4. Angle Mark (on/off): To turn on/off the display of angle mark when DVD content with multiple
available angles is played.
5. SACD Priority: To select which audio tracks to play for SACD (Super Audio CD). The options
are:
• Multi-Channel – Play the multi-channel surround audio
• 2-Channel – Play the 2-channel stereo audio
• CD MODE – Play the CD layer of a hybrid SACD disc
10
Page 13

SETTING UP THE PLAYER: ADVANCED
6. DVD-Audio Mode: To select which portion of a hybrid DVD-Audio disc to playback. The options
are:
• DVD-Audio – Play the DVD-Audio portion of the disc with surround audio
• DVD-Video – Play the DVD-Video portion of the disc with Dolby Digital or DTS audio
7. DivX VOD: Select this to display the device registration code for DivX Video on Demand service
(also exits the Setup Menu). To learn more, visit
www.divx.com/vod
Speaker Setup P age
1. Down-mix Mode: This sets the audio down-mix mode to convert multi-channel audio into twochannel output. This setting only affects the “Mixed L/R” analogue audio outputs. The options
are:
• Left/Right - Left and Right channels only. This mode is intended for use with two-channel
Dolby Pro Logic receivers. If the content is encoded with Dolby Pro Logic then the encoded
audio will be correctly preserved and passed to the receiver for Dolby Pro Logic processing.
For stereo content the output will be stereo.
• Stereo - This mode down-mixes decoded multi-channel (5.1ch) audio to 2-channel stereo
output. For stereo content the output will be stereo. For multi-channel content the surround
and center channels will be mixed with the left and right front channels. Recommended for
use with TV sets or stereo receiver/amplifiers.
• V. Surround - Virtual Surround. This mode creates a virtual surround effect from stereo or
multi-channel audio contents.
• 5.1CH – This mode enables 5.1ch decoded analogue audio output. The number of actual
output channels depends on the disc. Note: For multi-channel content, only the left front and
right front channels will be re-produced from the Down-mix outputs. If you are using two
speakers and don’t hear dialogue or vocals, double check that this mode is not engaged.
11
Page 14

SETTING UP THE PLAYER: ADVANCED
Analogue Multi-Channel Output Settings
The following settings only affect the analogue multi-channel outputs, not the digital coaxial or optical
outputs of the DVD player. We recommend using the analogue multi-channel outputs of this player
only when you are playing SACD or DVD-Audio discs and/or cannot utilize HDMI or the digital audio
outputs with your audio system.
2. Front Speaker: To set the sound filtering control for the front speakers. The options are:
• Large – Choose if the front speakers are full range (reproduce down to at least 40Hz) and if
you do not have a subwoofer. Bass frequencies are passed to the front speakers.
• Small – Choose if the front speakers are not “full range” speakers (almost all speakers
qualify to be “small”). Bass frequencies are not passed to the front speakers to reduce
possible distortion. This is the preferred setting for all systems utilizing a subwoofer.
3. Center Speaker: To set the sound filtering control for the center speaker. The options are:
• Large – Choose if the center speaker is full range (reproduces down to at least 40Hz) and if
you do not have a subwoofer. Bass frequencies are passed to the center speaker.
• Small – Choose if the center speaker is not a “full range” speakers (almost all center
channels qualify to be “small”). Bass frequencies are not passed to the front speakers to
reduce possible distortion. This is the preferred setting for all systems utilizing a subwoofer.
• Off – Choose if there is no center speaker. This sends Center Speaker information to the
Front Speaker outputs.
4. Rear Speaker: To set the sound filtering control for the rear speakers. The options are:
• Large – Choose if the rear/surround speakers are full range (reproduce down to at least
40Hz) and if you do not have a subwoofer. Bass frequencies are passed to the rear
speakers.
• Small – Choose if the rear/surround speakers are not “full range” speakers (almost all
speakers qualify to be “small”). Bass frequencies are not passed to the rear speakers to
reduce possible distortion.
• Off – Choose if there are no rear speakers. This sends Rear Speaker information to the
Front Speaker outputs.
5. Subwoofer: To enable/disable the Subwoofer output. The options are:
• On – Subwoofer output is enabled.
• Off – Subwoofer output is disabled.
6. Channel Delay: This feature, which is displayed in inches, sets the delay time for the Center and
Rear speakers as well as the Subwoofer. The delay is to compensate for differences between
the distance of the Front speakers to the listening position, and the distances measured by the
other speakers in the system (Center, Surrounds and Subwoofer).
• Measure the distance (in inches) from the primary listening position to the Front Left Speaker.
This is your baseline measurement – the primary distance that will determine the adjustments
12
Page 15

SETTING UP THE PLAYER: ADVANCED
for your system. Your Front Right and Left speakers should measure the same distance. If
they do not, please adjust them if possible.
• Press the UP/DOWN ARROW buttons to select the first speaker to configure.
• Measure the distance (in inches) from that speaker to the listening position. If it is LESS than
the distance to the Front Left speaker, enter the difference (as close as possible) in inches
using the LEFT/RIGHT ARROW buttons. If it is GREATER than the distance to the Front Left
speaker, then leave the value at 0.
• Repeat for each speaker in the system (Center, Left Surround, Right Surround, and
Subwoofer) as available.
• Press the SELECT button to confirm the settings and return to the Speaker Setup Page.
Example Channel Delay Adjustment:
Supported Configuration Unsupported Configuration
Settings:
Center Speaker – 4 Inches
Subwoofer – 4 Inches
Left Surround – 12 Inches
Right Surround – 12 Inches
• If the distance between the listener and the front speakers are 60 inches, and the distance
• This DVD player does not support delays for when the distance between the center or
• In case the channel delay settings cannot match your speaker configuration, please set all
Settings:
Center Speaker – 0 Inch
Subwoofer – 0 Inch
Left Surround – 0 Inch
Right Surround – 0 Inch
between the listener and the left surround speaker is 80 inches, the distance difference is 20
inches.
surround speakers and the listener are shorter than that between the front speakers and the
listener.
distance difference to 0 inch and use your receiver/amplifier to set the channel delay (if
possible).
13
Page 16

SETTING UP THE PLAYER: ADVANCED
7. Channel Trim: To set the volume of each individual channel.
• Press the LEFT/RIGHT ARROW buttons to select the channel to be adjusted.
• Press the UP/DOWN ARROW buttons to raise or lower the volume of the selected channel in
0.5dB increments.
• Press the SELECT button to confirm the settings and return to the Speaker Setup Page.
Audio Setup Page
1. EQ Type (None/Rock/Pop/Live/Dance/Techno/Classic/Soft): This sets a corresponding
equalization pattern type to the current music track. Note: These EQ options are not available for
SACD, DTS or DVD-Audio tracks.
2. Sound Field (Off/Concert/Living/Room/Hall/Bathroom/Cave/Arena/Church): These allow
users to engage fun sound field effects that will alter the original audio presentation as it was
intended. Note: These EQ options are not available for SACD, DTS or DVD-Audio tracks.
3. SPDIF Output: This set the bit stream type of the digital audio output for use with Dolby Digital
and DTS-compatible receivers. The options are:
• Raw – Passes the encoded multi-channel digital audio unaltered. Choose this setting if your
receiver/amplifier is capable of decoding Dolby Digital and/or DTS.
• PCM – Forces down-mixed 2-channel digital audio output. Choose this setting if your
receiver/amplifier only supports stereo digital (PCM) audio.
4. LPCM Rate: To set the maximum Linear PCM output frequency. The options are:
• 48K – Supported by most equipment.
• 96K – Allows a higher sampling rate and frequency response. Ensure that the
receiver/amplifier can support it.
• 192K – Allows the highest sampling rate and frequency response. Ensure that the
receiver/amplifier can support it and that your dogs are safely away from the listening area.
Note: The LPCM rate is selectable only when HDMI Audio is turned off.
14
Page 17

SETTING UP THE PLAYER: ADVANCED
5. Audio Tone (+/-16): This function raises or lowers the tone (key/pitch) of the audio track. This is
useful for playing Karaoke discs and should not be used for regular music listening or movies.
• Press the SELECT button to show the tone control window.
• Press the LEFT/RIGHT ARROW buttons to lower or raise the tone/pitch.
• Press the SELECT button to confirm the setting.
6. Pro Logic II: Taking a step further than most DVD players, the OPPO DVD player allows you to
configure Dolby Pro Logic II to expand 2-channel source audio into full 5-channel surround
sound. Note: Pro Logic II functionality is effective only when Speaker Setup Page > Down-mix
is set to “5.1ch” and SPDIF Output is set to “Raw”.
• Press the SELECT button to enter the Pro Logic II Config page.
• Press the LEFT ARROW button to exit the Pro Logic II Config page.
A. Pro Logic II: To turn on or off the Pro Logic II processing. The options are:
• On – Pro Logic II processing is always on
• Off –Pro Logic II processing is disabled
• Auto – Pro Logic II processing is on only when Dolby Pro Logic II encoded content is
detected.
B. Mode: To set the processing mode of Pro Logic II. The options are:
• Music – The surround experience is tailored for multi-channel music playback
• Movie – Emphasis is given to the center channel as two-channel audio is decoded and
played back into your 5.1 system
• Pro Logic – This activates decoding and processing of the original Dolby Pro Logic
processing with mono-surround channel. We recommend u sing the Dolby Pro Logic
Movie mode in lie of this 4-channel surround format.
• Auto – Automatically selects processing mode based on the input format
C. Panorama (Music mode only): Turns on/off panorama mode. When turned on, the front
stereo audio is partially fed into the surround channels for an enveloping effect.
D. Dimension (Music mode only): Allows gradual adjustment of the soundfield either towards
the front or towards the rear. This is useful in setting a more even balance from all speakers
with some rooms.
E. Center Width (Music mode only): To control the width of the center channel sound effect by
blending the center speaker to the left and right speakers. As the level number increases,
the center channel sound moves toward the left and right speakers.
15
Page 18

SETTING UP THE PLAYER: ADVANCED
7. Dolby Digital Setup: To configure the Dolby Digital decoder, press the SELECT button to enter
the Dolby Digital Setup page and press the LEFT ARROW button to exit the Dolby Digital Setup
page.
A. Dual Mono: To choose the output for Dolby Digital discs encoded with two independent
audio channels, such as bilingual programs. The options are:
• Stereo – Stereo output
• L-Mono – Left channel output to both Left and Right speakers.
• R-Mono – Right channel output to both Left and Right speakers.
• Mix Mono – Left and Right channels mixed to both Left and Right speakers.
B. Dynamic: To set the Dynamic Range Compression (DRC). DRC can smooth out the sonic
peaks and valleys common with wide-range digital audio. Increasing DRC may make low
level audio more audible during low-level listening. Decreasing or turning off DRC restores
the sonic energy present in the original recording.
8. HDMI Audio: Turns the audio output from the HDMI port on or off.
A. Multi-Channel – Digital audio output via HDMI will be multi-channel PCM format (HDMI 1.1
audio). The Down-mix setting in the “Speaker Setup Page” will affect whether and how multichannel audio content will be down-mixed to stereo. When this option is selected,
compressed audio bit streams will decoded by the DVD player.
B. SPDIF – Digital audio output via HDMI will be the same as the SPDIF (digital coaxial/optical
audio) output. The SPDIF setting will affect whether 2-channel PCM or raw compressed bit
streams will be carried over via HDMI. When this option is selected and SPDIF is set to
“Raw”, the TV or HDMI A/V receiver must decode compressed audio formats. (Copyright
protection on some DVD-Audio and Super Audio CD discs may prevent audio output via
HDMI with this setting.)
C. Off – No digital audio output via HDMI.
Video Setup Page
1. Sharpness: To set the sharpness of video output. Sharpness level can be set with the following
options:
• Sharp – Enables edge enhancement which is an artificial and picture-degrading feature. We
recommend leaving this off.
• Soft – Softens edges by smoothing the image which may cause slight loss of details.
• Off (recommended) – Turns off edge enhancement completely.
16
Page 19

SETTING UP THE PLAYER: ADVANCED
2. Brightness: Adjusts the brightness (black level) of the video output.
• Press the SELECT button to show the Brightness scale, and then use the LEFT/RIGHT
ARROW buttons to adjust.
• Press the SELECT button to confirm the new setting.
3. Contrast: Adjusts the contrast (white level) of the video output.
The ability to set brightness and contrast is no small thing. If you do not
have the correct black and white levels then your images can appear
washed out or you won’t be able to see into the shadows when watching
darker scenes in movies. Televisions have brightness (black level) and
contrast (white level) controls; however it may take a combination of
tweaking both the DVD player and your television to get just the right
Tech Note
result. We recommend using a calibration DVD like AVIA Guide to Home
Theater or Digital Video Essentials and setting your display for the best
possible picture. Once that is done, see if the DVD player settings can get
even closer.
4. Hue: Adjusts the hue (tint) of the video output.
5. Saturation: Adjusts the saturation (color intensity level) of the video output.
6. Gamma: Adjusts the Gamma (the actual transition from black to white) of the video output. The
available settings are High, Medium, Low and Off.
7. Color Space: Selects the color space for the HDMI output. The available options are:
• Auto (recommended) – Allows the DVD player to automatically select the best color space
based on capability information collected from the TV display.
• YCbCr 4:4:4 – Forces YCbCr 4:4:4 color space. If you select this option please make sure
that your TV is configured to accept YCbCr 4:4:4 signals, otherwise the video color will be
incorrect.
• RGB – Forces RGB color space. If you select this option please make sure that your TV is
configured to accept RGB signals, otherwise the video color will be incorrect.
17
Page 20

SETTING UP THE PLAYER: ADVANCED
Preference Page
The Preference Page can only be accessed when playback is completely stopped, or when there is
no disc in the DVD player.
1. TV Type: Sets the output video system (PAL/NTSC) to match the type of TV. The options are:
• Auto – No system conversion is performed. The output video system is the same as that
encoded on the disc. This requires a TV that supports NTSC and PAL input.
• PAL – When playing PAL-encoded discs, no system conversion is performed. NTSC-
encoded discs are converted to PAL output.
• NTSC (default) – When playing NTSC-encoded (Region 1) discs, no system conversion is
performed. PAL-encoded discs are converted to NTSC output.
2. PBC (Play Back Control): Enables/disables play back control by disc contents. The options are:
• On – If the disc contains Play Back Control, follow the disc instructions.
• Off – Play back the contents by sequence.
3. Audio: Sets the preferred audio language for DVD. If an audio track of the selected language is
available on the disc, the audio track will be played back.
4. Subtitle: Sets the preferred subtitle language for DVD. If a subtitle of the selected language is
available, it will be displayed. When “Auto” is selected, the subtitle display is decided by the disc.
5. Disc Menu: Sets the preferred language for displaying DVD disc menus. If a disc menu of the
selected language is available, the menu will be shown instead of the default disc menu.
If your preferred language is not listed in the Audio, Subtitle or Disc Menu
options, select “Other” and enter the Language Code found on the Users
Manual that comes with your DVD player.
Tech Note
6. Parental Control: Sets parental control ratings in order to prevent minors from watching
inappropriate contents. This function requires that the disc being properly rated and encoded.
• Press the SELECT button to bring up the rating selection menu.
• Press the UP/DOWN ARROW buttons to select the rating to allow (G/PG/PG
13/PGR/R/NC17/ADULT). The selected rating and below will be allowed, and any rating
above the selected will be blocked.
• Press the SELECT button to confirm the selection. You will be asked for the parental control
password. Enter the password (default password: 7890) and press the SELECT button.
18
Page 21

SETTING UP THE PLAYER: ADVANCED
7. Password: Sets parental control password. To change the password, enter the old password
(default: 7890) and then enter a 4-digit number as the new password. Enter the new password
again to confirm, and then press the SELECT button.
8. Default: Resets all settings to the factory default value. The parental control password will not be
reset.
19
Page 22

OPPO Digital, Inc.
453 Ravendale Dr. Suite D
Mountain View, CA 94043, U.S.A.
www.oppodigital.com
service@oppodigital.com
(650) 961-1118
5194139 V1.01
 Loading...