

Page 1

Writer Guide
Free eBook Edition
Word Processing with OpenOffice.org
This PDF is designed to be read onscreen, two pages at a
time. If you want to print a copy, your PDF viewer should
have an option for printing two pages on one sheet of
paper, but you may need to start with page 2 to get it to
print facing pages correctly. (Print this cover page
separately.)
Second edition
March 2010
Updated for V3.2
Page 2

Copyright
Free eBook Edition
This document is Copyright © 2005–2010 by its contributors as listed
in the section titled Authors. You may distribute it and/or modify it
under the terms of either the GNU General Public License, version 3 or
later, or the Creative Commons Attribution License, version 3.0 or
later. All trademarks within this guide belong to their legitimate
owners.
Authors
Jean Hollis Weber Michele Zarri
Magnus Adielsson Agnes Belzunce
Ken Byars Bruce Byfield
Daniel Carrera Dick Detwiler
Laurent Duperval Martin Fox
Katharina Greif Tara Hess
Peter Hillier-Brook Lou Iorio
John Kane Stefan A. Keel
Michael Kotsarinis Sigrid Kronenberger
Peter Kupfer Ian Laurenson
Alan Madden Paul Miller
Vincenzo Ponzi Scott Rhoades
Carol Roberts Iain Roberts
Gary Schnabl Robert Scott
Janet M. Swisher Barbara M. Tobias
Catherine Waterman Bob Wickham
Claire Wood Linda Worthington
Feedback
Please direct any comments or suggestions about this document to:
authors@documentation.openoffice.org
Publication date and software version
Second edition. Published 25 March 2010. Based on OpenOffice.org
3.2.
You can download
an editable version of this document from
http://oooauthors.org/english/userguide3/published/
Page 3

Contents
Free eBook Edition
Chapter 1
Introducing Writer...................................................................10
What is Writer?.................................................................................11
Starting Writer.................................................................................. 11
The Writer interface..........................................................................15
Changing document views................................................................23
Using the Navigator.......................................................................... 23
Starting a new document..................................................................28
Opening an existing document..........................................................30
Saving a document............................................................................ 31
Getting help......................................................................................33
Undoing and redoing changes..........................................................34
Closing a document..........................................................................34
Closing Writer................................................................................... 35
Chapter 2
Setting up Writer......................................................................36
Choosing options that affect all of OOo............................................37
Choosing options for loading and saving documents........................50
Choosing options for Writer..............................................................56
Choosing options for HTML documents............................................66
Choosing language settings..............................................................66
Controlling Writer’s AutoCorrect functions......................................69
Chapter 3
Working with Text.....................................................................70
Introduction......................................................................................71
Selecting text.................................................................................... 71
Cutting, copying, and pasting text....................................................73
Finding and replacing text................................................................74
Inserting special characters..............................................................78
Formatting paragraphs.....................................................................80
Formatting characters......................................................................84
OpenOffice.org 3.x Writer Guide 3
Page 4

Autoformatting.................................................................................. 84
Free eBook Edition
Creating numbered or bulleted lists.................................................86
Using footnotes and endnotes...........................................................89
Checking spelling and grammar.......................................................91
Using built-in language tools............................................................93
Using the thesaurus.......................................................................... 95
Hyphenating words...........................................................................95
Using AutoCorrect............................................................................ 98
Using word completion..................................................................... 99
Using AutoText................................................................................ 100
Line numbering............................................................................... 100
Tracking changes to a document....................................................101
Adding other comments..................................................................105
Linking to another part of a document...........................................107
Switching between insert and overwrite mode...............................112
Counting the words in a selection...................................................112
Chapter 4
Formatting Pages.....................................................................113
Introduction.................................................................................... 114
Choosing a layout method...............................................................114
Setting up basic page layout using styles.......................................116
Changing page margins..................................................................121
Using columns to define the page layout........................................122
Using frames for page layout..........................................................126
Using tables for page layout...........................................................133
Using sections for page layout........................................................136
Updating links................................................................................. 144
Creating headers and footers..........................................................146
Numbering pages............................................................................ 150
Defining borders and backgrounds.................................................161
4 OpenOffice.org 3.x Writer Guide
Page 5

Chapter 5
Free eBook Edition
Printing, Exporting, Faxing, and E-Mailing...........................165
Introduction.................................................................................... 166
Quick printing................................................................................. 166
Controlling printing........................................................................166
Printing a brochure......................................................................... 170
Printing envelopes..........................................................................171
Printing labels.................................................................................174
Sending a fax.................................................................................. 176
Exporting to PDF............................................................................176
Exporting to XHTML.......................................................................183
E-mailing Writer documents...........................................................183
Digital signing of documents..........................................................187
Chapter 6
Introduction to Styles.............................................................188
What are styles?.............................................................................. 189
The Styles and Formatting window.................................................190
Applying styles................................................................................ 195
Modifying styles.............................................................................. 203
Creating custom paragraph styles: examples.................................208
Copying and moving styles.............................................................212
Deleting styles................................................................................214
Assigning styles to shortcut keys....................................................215
Defining a hierarchy of headings....................................................215
Chapter 7
Working with Styles..................................................................224
Introduction.................................................................................... 225
Creating custom (new) styles..........................................................225
Working with paragraph styles.......................................................229
Working with conditional paragraph styles.....................................241
Working with character styles........................................................243
Working with frame styles..............................................................246
Working with page styles................................................................249
OpenOffice.org 3.x Writer Guide 5
Page 6

Working with list styles...................................................................259
Free eBook Edition
Chapter 8
Working with Graphics...........................................................268
Graphics (images) in Writer............................................................269
Creating and editing images...........................................................269
Adding images to a document.........................................................271
Modifying an image........................................................................276
Using Writer’s drawing tools..........................................................283
Positioning graphics within the text................................................286
Adding captions to graphics............................................................296
Creating an image map...................................................................300
Adding an image to the Gallery.......................................................302
Chapter 9
Working with Tables...............................................................304
Introduction.................................................................................... 305
Creating a table..............................................................................305
Formatting the table layout............................................................309
Formatting the table text................................................................319
Data entry and manipulation in tables............................................322
Additional table operations.............................................................325
The Table menu and toolbar...........................................................332
Chapter 10
Working with Templates.........................................................335
Introduction.................................................................................... 336
Using a template to create a document..........................................336
Creating a template........................................................................ 337
Editing a template........................................................................... 339
Adding templates with Extension Manager....................................341
Setting a default template..............................................................342
Associating a document with a different template..........................343
Organizing templates...................................................................... 345
6 OpenOffice.org 3.x Writer Guide
Page 7

Chapter 11
Free eBook Edition
Using Mail Merge...................................................................348
What is mail merge?.......................................................................349
Creating the data source................................................................349
Registering a data source...............................................................350
Creating a form letter..................................................................... 353
Printing mailing labels....................................................................358
Printing envelopes..........................................................................363
Using the Mail Merge Wizard to create a form letter.....................368
Chapter 12
Tables of Contents, Indexes, and Bibliographies...................380
Introduction.................................................................................... 381
Tables of contents...........................................................................381
Alphabetic indexes.......................................................................... 393
Other types of indexes....................................................................403
Bibliographies................................................................................. 405
Tools for working with bibliographies.............................................417
Chapter 13
Working with Master Documents...........................................418
Why use a master document?.........................................................419
Styles and master documents.........................................................419
Using the Navigator........................................................................ 420
Creating a master document........................................................... 421
Recommended method for creating master documents..................423
Editing a master document.............................................................432
Cross-referencing between subdocuments.....................................433
Creating one file from a master document and its subdocuments. .437
Problem solving..............................................................................439
Chapter 14
Working with Fields...............................................................444
Introduction to fields......................................................................445
Quick and easy field entry..............................................................445
Using document properties to hold information that changes........446
OpenOffice.org 3.x Writer Guide 7
Page 8

Using other fields to hold information that changes.......................447
Free eBook Edition
Using AutoText to insert often-used fields......................................449
Defining your own numbering sequences.......................................450
Using automatic cross-references...................................................452
Using fields in headers and footers.................................................456
Using fields instead of outline numbering for appendix numbering
........................................................................................................ 458
Tricks for working with fields.........................................................459
Developing conditional content.......................................................460
Using placeholder fields.................................................................468
Using input fields and input lists....................................................469
Chapter 15
Using Forms in Writer............................................................473
Introduction to forms...................................................................... 474
When to use forms..........................................................................474
Creating a simple form...................................................................475
Form controls reference.................................................................478
Example: a simple form..................................................................484
Accessing data sources...................................................................490
Advanced form customization.........................................................497
XForms............................................................................................ 500
Chapter 16
Math Objects..........................................................................501
What is Math?................................................................................. 502
Chapter 17
Customizing Writer................................................................503
Introduction.................................................................................... 504
Customizing menu content.............................................................504
Customizing toolbars......................................................................508
Assigning shortcut keys..................................................................512
Assigning macros to events.............................................................517
Adding functionality with extensions..............................................518
8 OpenOffice.org 3.x Writer Guide
Page 9

Appendix A
Free eBook Edition
Keyboard Shortcuts................................................................521
Introduction.................................................................................... 522
Function keys for Writer.................................................................523
Shortcut keys for Writer.................................................................524
Shortcut keys for tables in Writer...................................................526
Shortcut keys for paragraphs and heading levels...........................527
Shortcut keys for moving and resizing frames, graphics and objects
........................................................................................................ 528
Index.........................................................................................529
OpenOffice.org 3.x Writer Guide 9
Page 10

Chapter 1
Free eBook Edition
Introducing Writer
Page 11

What is Writer?
Free eBook Edition
Writer is the word processor component of OpenOffice.org (OOo). In
addition to the usual features of a word processor (spelling check,
thesaurus, hyphenation, autocorrect, find and replace, automatic
generation of tables of contents and indexes, mail merge, and others),
Writer provides these important features:
• Templates and styles
• Page-layout methods, including frames, columns, and tables
• Embedding or linking of graphics, spreadsheets, and other
objects
• Built-in drawing tools
• Master documents—to group a collection of documents into a
single document
• Change tracking during revisions
• Database integration, including a bibliography database
• Export to PDF, including bookmarks
• And many more
Styles are central to using Writer. Using styles, you can easily format
your document consistently and change the format with minimal effort.
A style is a named set of formatting options. Writer defines several
types of styles, for different types of elements: characters, paragraphs,
pages, frames, and lists. Often, you are using styles whether you
realize it or not. The use of styles is described in more detail in
Chapter 6 (Introduction to Styles) and Chapter 7 (Working with Styles).
The other features of Writer listed above are also covered in detail in
other chapters of this guide.
Starting Writer
If you are reading this document in OpenOffice.org, you already know
how to start Writer. However, if this is a printed version or a PDF
version, you may not know how to start Writer. So let’s look at three
ways to do that:
• From the system menu
• From an existing document
• From the command line
Chapter 1 Introducing Writer 11
Page 12

Starting from the system menu
Free eBook Edition
The most common way to start Writer is by using the system menu,
the standard menu from which most applications are started. On
Windows, it is called the Start menu. On GNOME, it is called the
Applications menu. On KDE, it is identified by the KDE logo. On Mac
OS X, it is the Applications menu.
When OpenOffice.org was installed on your computer, in most cases a
menu entry for each component was added to your system menu. (If
you are using a Mac, see note below.) The exact name and location of
these menu entries depends on the operating system and graphical
environment.
Note for Mac users
You should see the OpenOffice.org icon in the Applications folder.
When you double-click this icon, a text document opens in Writer. To
open the other components (Draw, Calc, Impress, Base), go to the File
menu of the Writer window and select the component you want.
OOo does not automatically put a shortcut icon on the desktop, but you
can add one if you wish. If you don’t know how to add shortcut icons
for launching programs, please consult the help for your operating
system.
Starting from an existing document
All Writer documents are associated with the Writer application. This
means that you can start OpenOffice.org automatically, simply by
double-clicking a Writer document in a file manager such as Windows
Explorer.
You can spot an OpenOffice.org Writer document by its icon: .
Note for Windows users
If you have associated Microsoft Office file types with OOo, then when
you double-click on a *.doc (Word) file, it opens in OOo Writer.
If you did not associate the file types, then when you double-click on a
Microsoft Word document, it opens in Microsoft Word (if Word is
installed on your computer).
You can use another method to open *.doc files in OOo and save in the
*.doc format from OOo. See “Opening an existing document” on page
30 for more information.
12 OpenOffice.org 3.x Writer Guide
Page 13
Using the Quickstarter under Windows
Free eBook Edition
The Quickstarter is an icon that is placed in the Windows system tray
during system startup. It indicates that OpenOffice.org has been
loaded and is ready to use. (The Quickstarter loads library *.DLL files
required by OOo, thus shortening the startup time for OOo components
by about half.) If the Quickstarter is disabled, see “Reactivating the
Quickstarter” on page 14 if you want to enable it.
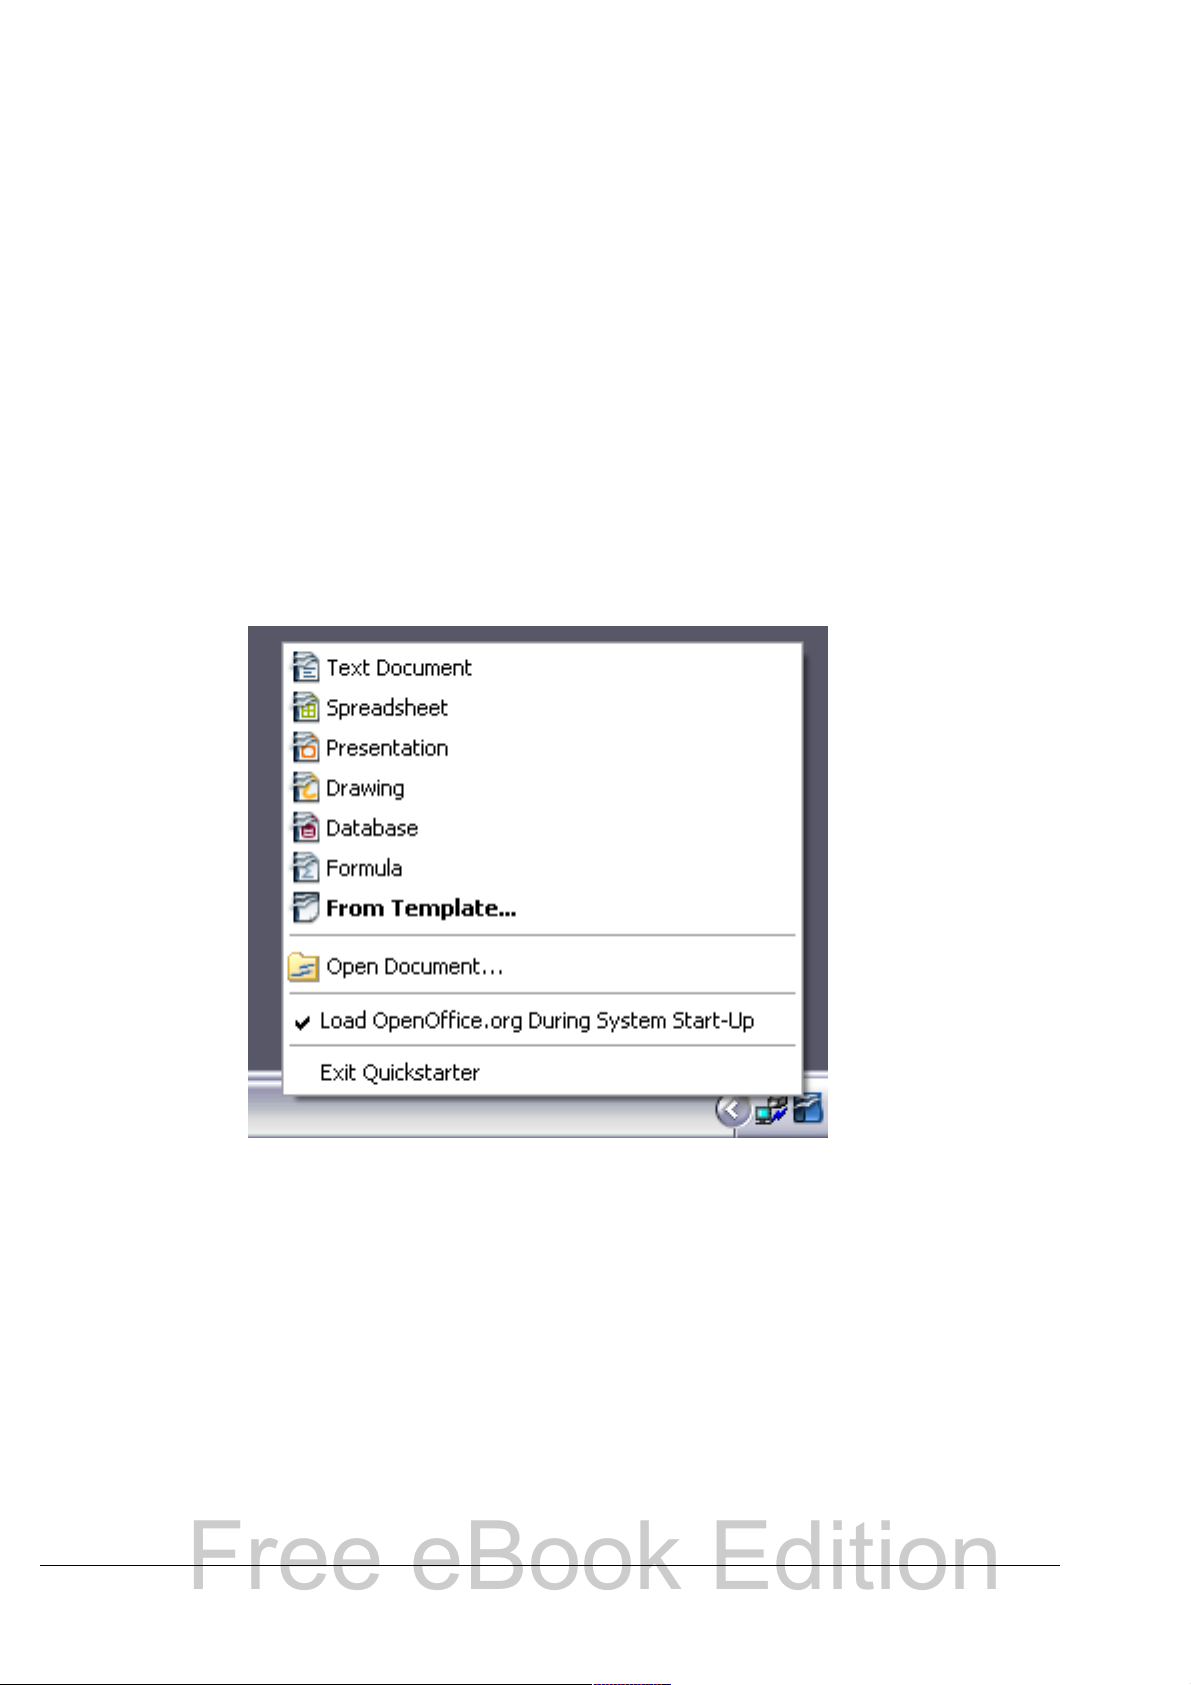
Using the Quickstarter icon
Right-click the Quickstarter icon in the system tray to open a pop-up
menu from which you can open a new document, open the Templates
and Documents dialog box, or choose an existing document to open.
You can also double-click the Quickstarter icon to display the
Templates and Documents dialog box.
Figure 1: Quickstarter pop-up menu
Disabling the Quickstarter
To close the Quickstarter, right-click on the icon in the system tray and
then click Exit Quickstarter on the pop-up menu. The next time the
computer is restarted, the Quickstarter will be loaded again.
To prevent OpenOffice.org from loading during system startup,
deselect the Load OpenOffice.org During System Start-Up item on
the pop-up menu. You might want to do this if your computer has
insufficient memory, for example.
Chapter 1 Introducing Writer 13
Page 14

Reactivating the Quickstarter
Free eBook Edition
If the Quickstarter has been disabled, you can reactivate it by selecting
the Load OpenOffice.org during system start-up option in Tools >
Options > OpenOffice.org > Memory.
Using the Quickstarter under Linux
Some installations of OpenOffice.org under Linux have a Quickstarter
that looks and acts like the one described above for Windows (the
option on the Memory page is labeled Enable systray quickstarter).
Preloading OOo under Linux/KDE
In Linux/KDE, you can use KDocker to have OOo loaded and ready for
use at startup. KDocker is not part of OOo; it is a generic “systray app
docker” that is helpful if you open OOo often.
Starting from the command line
You may want to start Writer from the command line (using the
keyboard instead of the mouse). Why? Well, by using the command
line, you have more control over what happens when Writer is started.
For example, using the command line, you can tell Writer to load a
document and print it immediately, or to start without showing the
splash screen.
Note
There is more than one way to start Writer from the command line,
depending on whether you have installed a customized version or the
standard download from the OOo web site.
If you installed using the download on the OOo web site, you can start
Writer by typing at the command line:
soffice -writer
or
swriter
Most users will never need to do this.
Writer will start and create a new document.
To see a list of options you can use when starting Writer at the
command line, type:
soffice -?
Below is a list of some of the more popular options.
14 OpenOffice.org 3.x Writer Guide
Page 15
Option Description
Free eBook Edition
-help
-nologo
-show <odp-file>
-view <documents ...>
-minimized
-norestore
-invisible
If you have a customized version of OOo (such as the one provided by
Linux Mandrake or Gentoo), you can start Writer by typing at the
command line:
oowriter
Get a complete list of options.
Do not show the startup screen.
Start presentation immediately.
Open documents in viewer (read-only) mode.
Start OOo minimized.
Suppress restart/restore after fatal errors.
No startup screen, no default document and
no UI. This is useful for third-party
applications that use functionality provided
by OOo.
Note
Although the command syntax differs, the effect is identical: it
starts OOo with an empty Writer document.
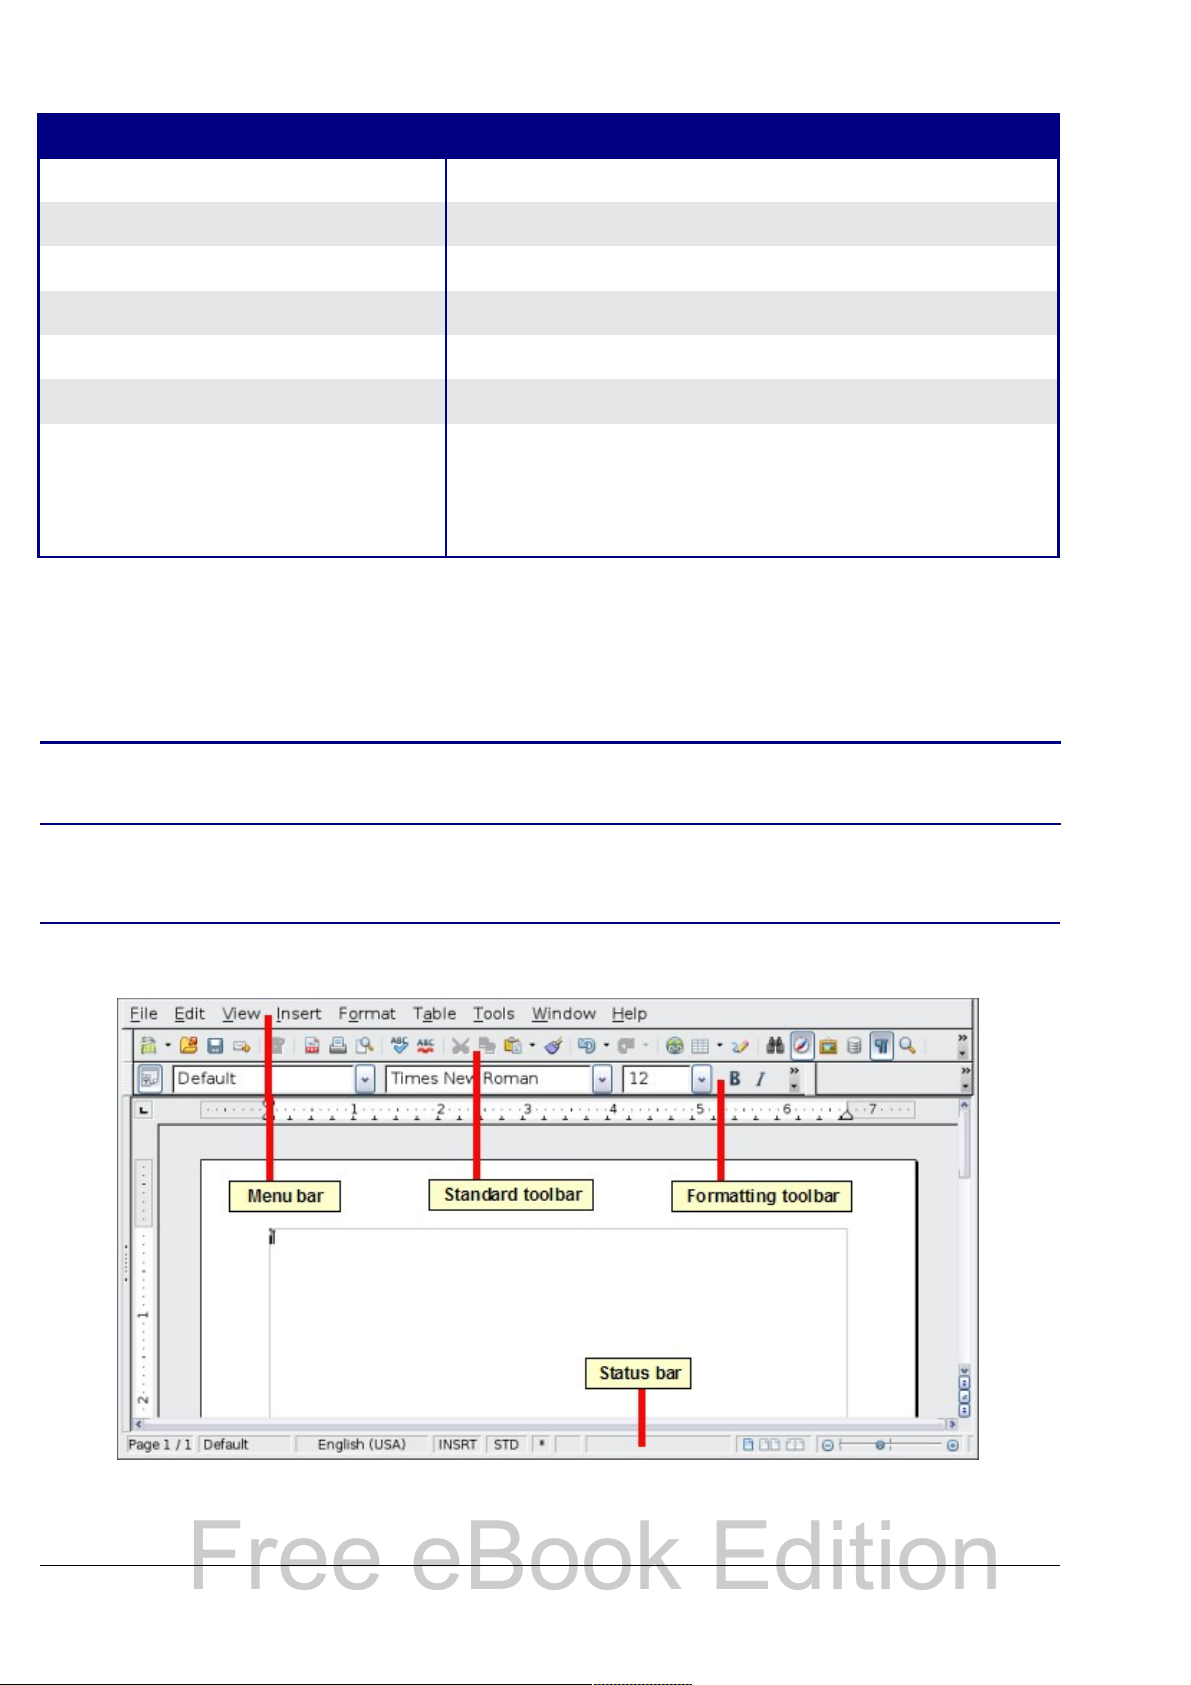
The Writer interface
The main Writer workspace is shown in Figure 2.
Figure 2: The main Writer workspace in Print Layout view
Chapter 1 Introducing Writer 15
Page 16

Menus
Free eBook Edition
The Menu bar is located across the top of the Writer window, just
below the Title bar. When you choose one of the menus listed below, a
submenu drops down to show commands.
• File contains commands that apply to the entire document such
as Open..., Save, and Export as PDF....
• Edit contains commands for editing the document such as Undo:
xxx (where xxx is the command to undo) and Find &
Replace.... It also contains commands to cut, copy, and paste
selected parts of your document.
• View contains commands for controlling the display of the
document such as Zoom... and Web Layout.
• Insert contains commands for inserting elements into your
document such as headers, footers, and pictures.
• Format contains commands for formatting the layout of your
document, such as Styles and Formatting, Paragraph, and
Bullets and Numbering.
• Table shows all commands to insert and edit a table in a text
document.
• Tools contains functions such as Spelling and Grammar,
Customize..., and Options....
• Window contains commands for the display window.
• Help contains links to the OpenOffice.org Help file, What’s This?,
and information about the program. See “Getting help” on page
33.
Toolbars
Writer has several types of toolbars: docked, floating, and tear-off.
Docked toolbars can be moved to different locations or made to float,
and floating toolbars can be docked.
The top docked toolbar (default position) is called the Standard
toolbar. The Standard toolbar is consistent across the OpenOffice.org
applications (Writer, Calc, Draw, Impress, Base).
The second toolbar across the top (default location) is the Formatting
toolbar. It is a context-sensitive bar that shows the relevant tools in
response to the cursor’s current position or selection. For example,
when the cursor is on a graphic, the Formatting bar provides tools for
formatting graphics; when the cursor is in text, the tools are for
formatting text.
16 OpenOffice.org 3.x Writer Guide
Page 17
Displaying or hiding toolbars
Free eBook Edition
To display or hide toolbars, choose View > Toolbars, then click on the
name of a toolbar in the list. An active toolbar shows a check mark
beside its name. Tear-off toolbars are not listed in the View menu.
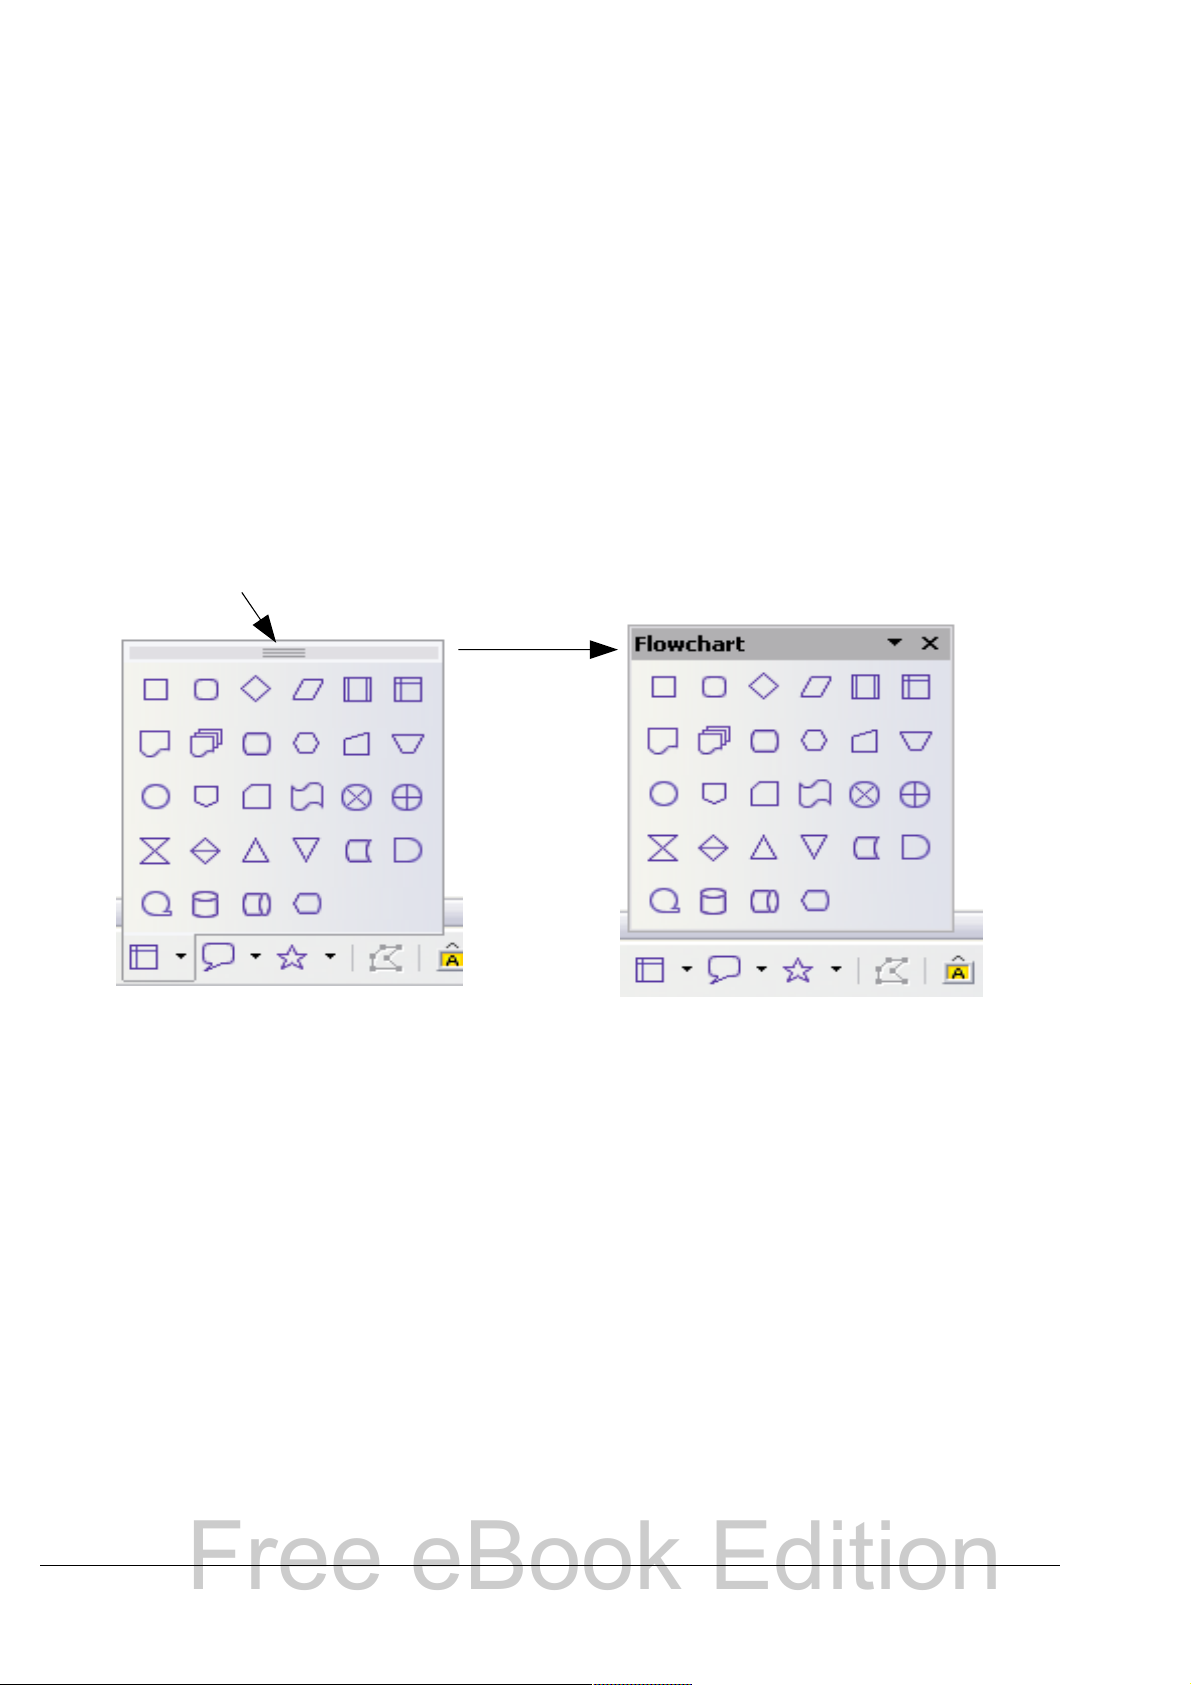
Submenus and tear-off toolbars
Toolbar icons with a small triangle to the right will display submenus,
tear-off toolbars, and other ways of selecting things, depending on the
icon. Figure 3 shows a tear-off toolbar from the Drawing toolbar.
Tear-off toolbars can be floating or docked along an edge of the screen
or in one of the existing toolbar areas. To move a floating tear-off
toolbar, drag it by the title bar. See “Moving toolbars” below.
Click here and drag Toolbar tears off and floats
Figure 3: Example of a tear-off toolbar
Moving toolbars
To move a docked toolbar, place the mouse pointer over the toolbar
handle, hold down the left mouse button, drag the toolbar to the new
location, and then release the mouse button (Figure 4).
To move a floating toolbar, click on its title bar and drag it to a new
location (Figure 5).
Chapter 1 Introducing Writer 17
Page 18
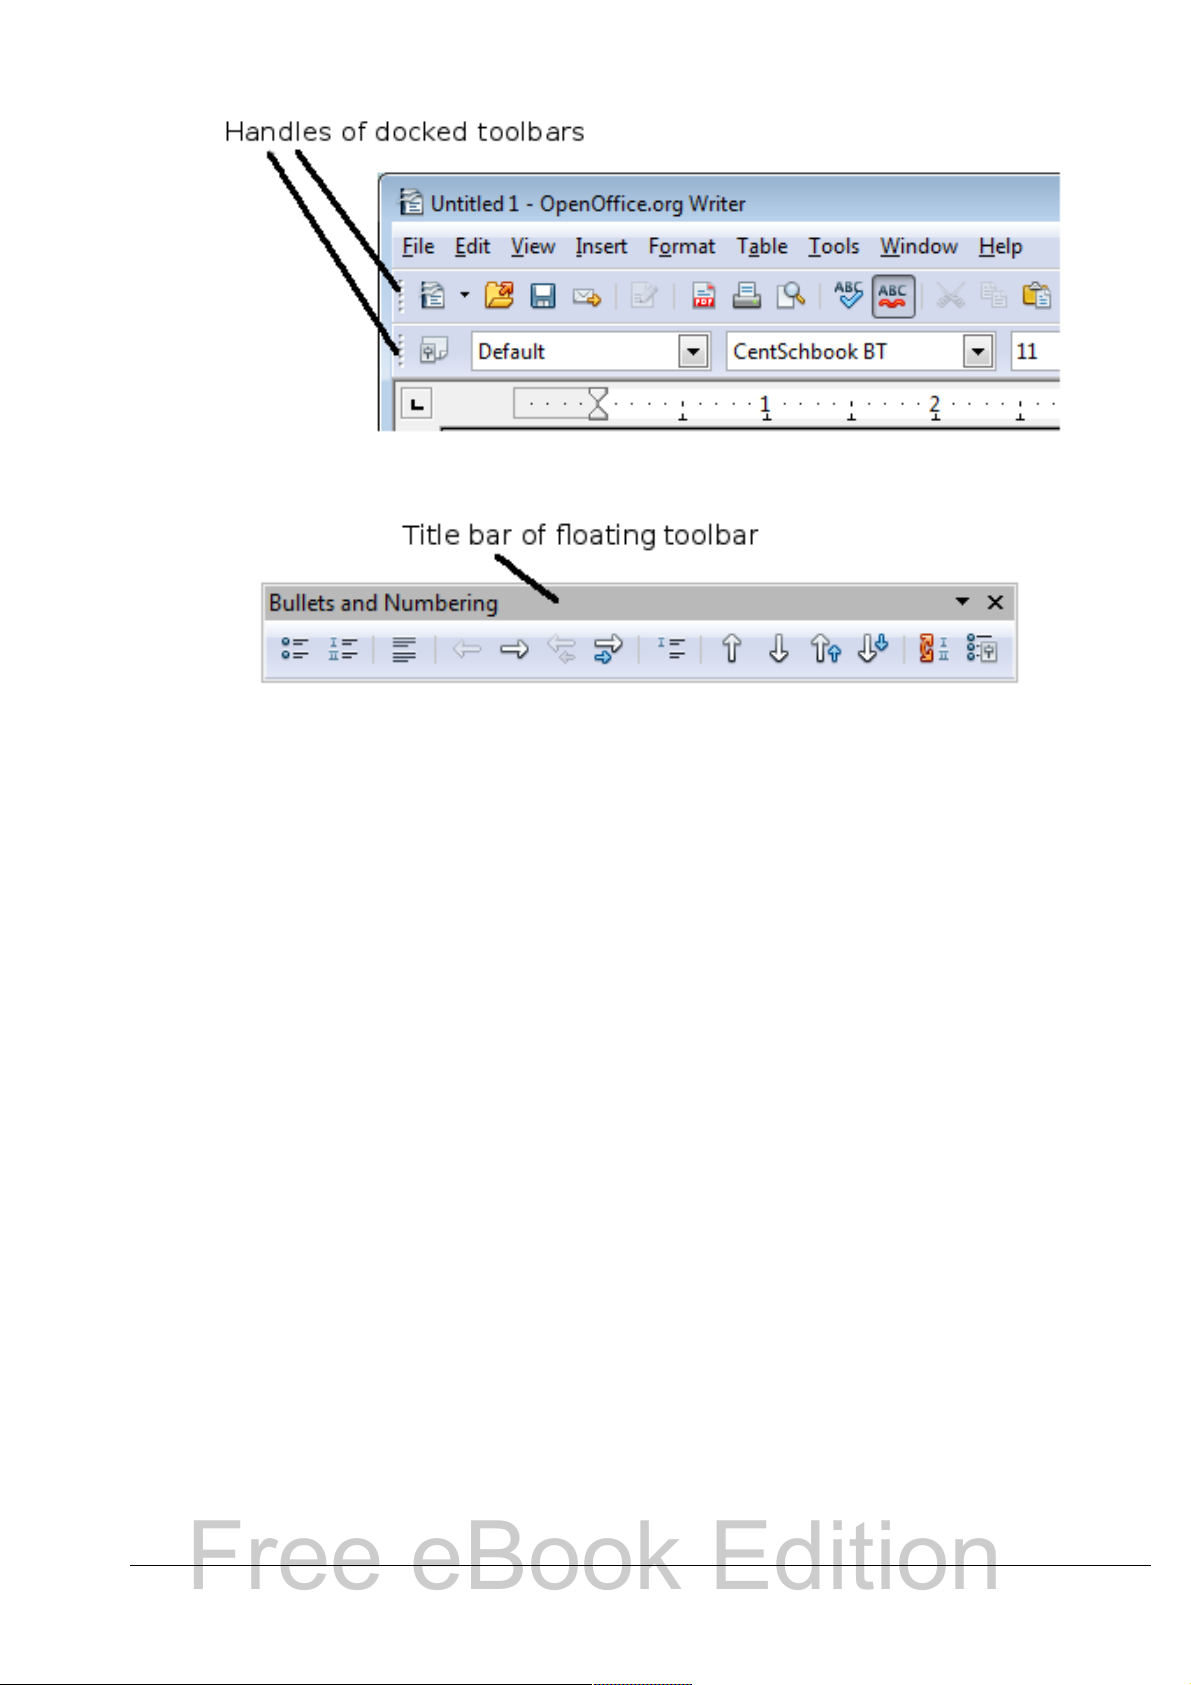
Figure 4: Moving a docked toolbar
Free eBook Edition
Figure 5: Moving a floating toolbar
Floating toolbars
Writer includes several additional context-sensitive toolbars, whose
defaults appear as floating toolbars in response to the cursor’s current
position or selection. For example, when the cursor is in a table, a
floating Table toolbar appears, and when the cursor is in a numbered
or bullet list, the Bullets and Numbering toolbar appears. You can dock
these toolbars to the top, bottom, or side of the window, if you wish
(see “Moving toolbars” on page 17).
Docking/floating windows and toolbars
Toolbars and some windows, such as the Navigator and the Styles and
Formatting window, are dockable. You can move, resize, or dock them
to an edge.
18 OpenOffice.org 3.x Writer Guide
Page 19
To dock a window, do one of the
Free eBook Edition
following:
• Click on the title bar of the
floating window and drag it to
the side until you see the outline
of a box appear in the main
window (see Figure 6) and then
release the window. This method
depends on your system’s
window manager settings, so it
may not work for you.
• Hold down the Control key and
double-click on a vacant part of
the floating window to dock it in
its last position. If that does not
work, try double-clicking
without using the Control key.
To undock a window, hold down the
Control key and double-click on a
vacant part of the docked window.
Figure 6: Docking a window
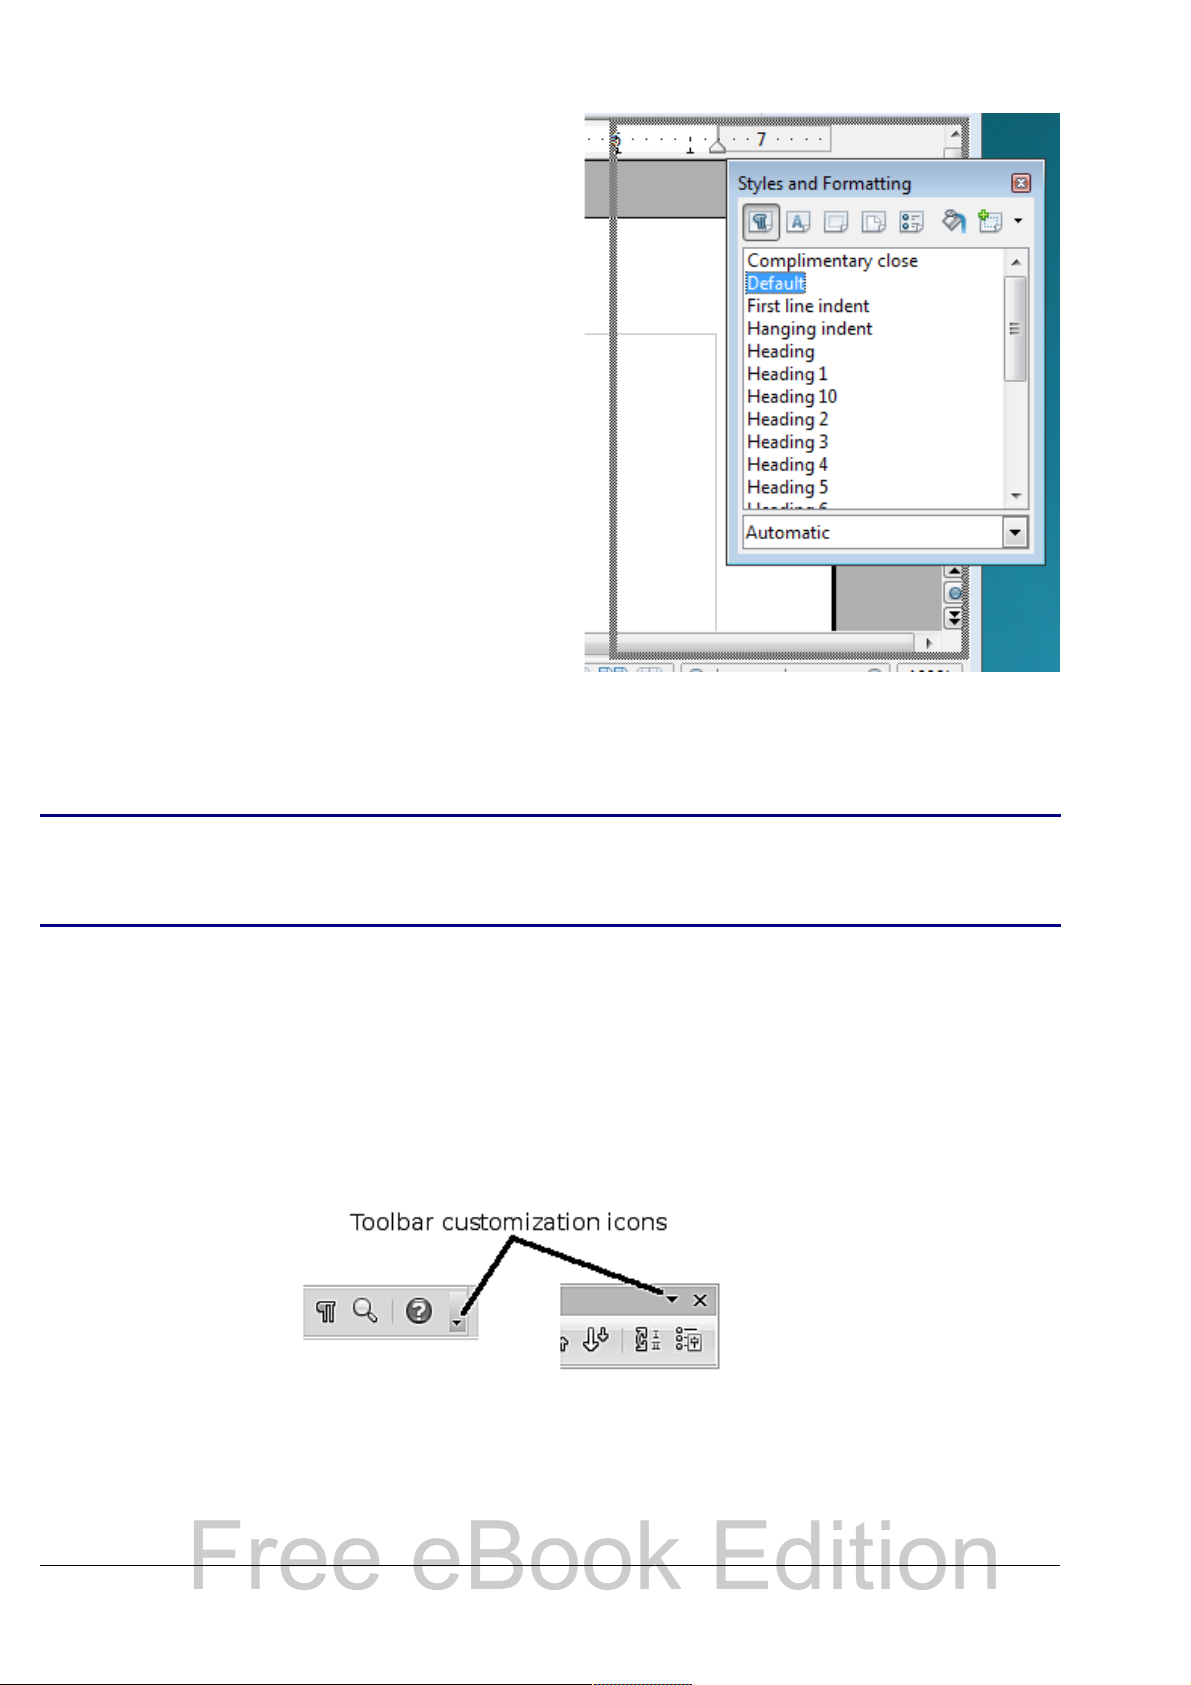
The Styles and Formatting window can also be docked or
Note
undocked by using Control+double-click on the gray area next to
the icons at the top of the window.
Customizing toolbars
You can customize toolbars in several ways, including choosing which
icons are visible and locking the position of a docked toolbar. You can
also add icons and create new toolbars, as described in Appendix B.
To access a toolbar’s customization options, use the down-arrow at the
end of the toolbar or on its title bar (see Figure 7).
Figure 7: Customizing toolbars
To show or hide icons defined for the selected toolbar, choose Visible
Buttons from the drop-down menu. Visible icons have a checkmark
next to them. Click on icons to select or deselect them.
Chapter 1 Introducing Writer 19
Page 20
Right-click (context) menus
Free eBook Edition
You can quickly access many menu functions by right-clicking on a
paragraph, graphic, or other object. A context menu will pop up. Often
the context menu is the fastest and easiest way to reach a function. If
you’re not sure where in the menus or toolbars a function is located,
you can often find it by right-clicking.
Rulers
To show or hide rulers, choose View > Ruler. To enable the vertical
ruler, choose Tools > Options > OpenOffice.org Writer > View and
select Vertical ruler.
Figure 8. Turning on the vertical ruler
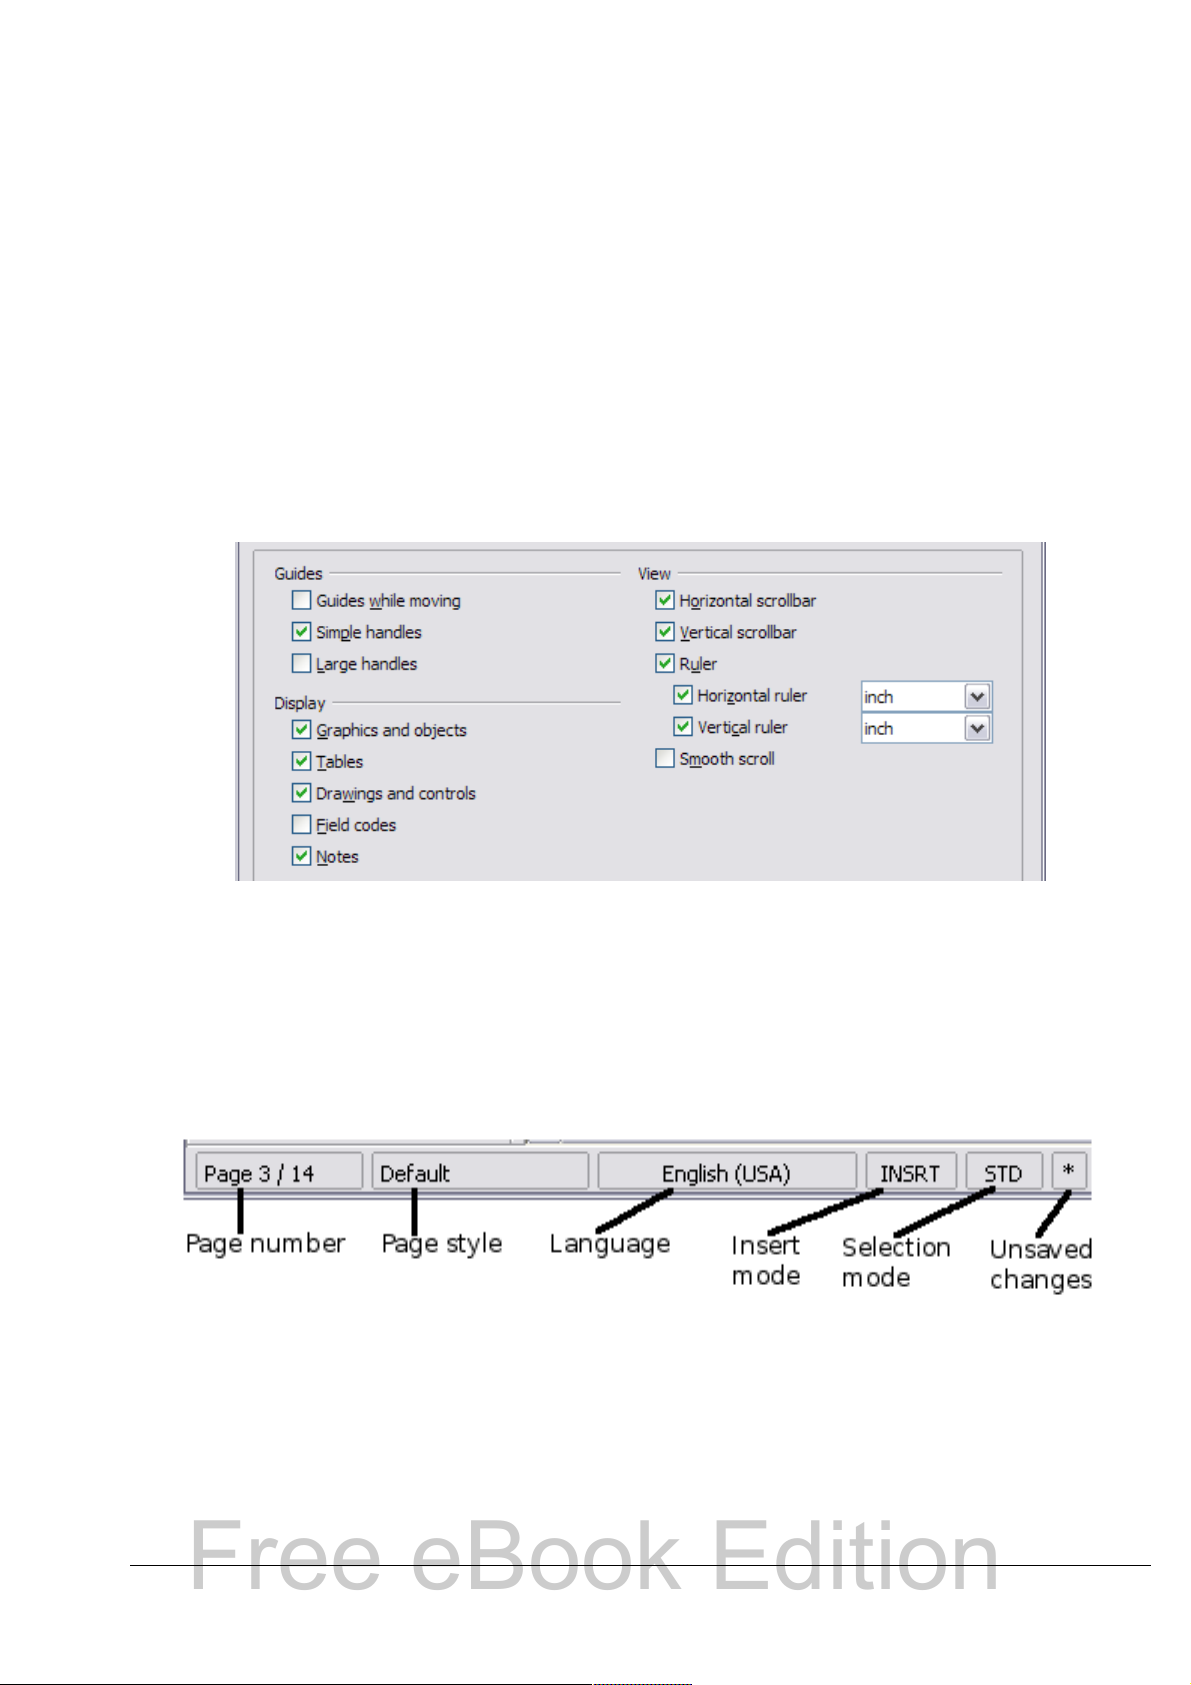
Status bar
The Writer status bar provides information about the document and
convenient ways to quickly change some document features. From left
to right, the fields are as follows.
Figure 9: Left end of status bar
Page number
Shows the current page number, the sequence number of the
current page (if different), and the total number of pages in the
document. For example, if you restarted page numbering at 1 on the
third page, its page number is 1 and its sequence number is 3.
20 OpenOffice.org 3.x Writer Guide
Page 21
If any bookmarks have been defined in the document, a right-click
Free eBook Edition
on this field pops up a list of bookmarks; click on the required one.
To jump to a specific page in the document, double-click on this
field. The Navigator opens (see page 23). Click in the Page Number
field and type the sequence number of the required page. After a
brief delay, the display jumps to the selected page.
Page style
Shows the style of the current page. To change the page style, rightclick on this field. A list of page styles pops up; choose a different
style by clicking on it.
To edit the current page style, double-click on this field. The Page
Style dialog box opens.
Language
Shows the language for the selected text.
Click to open a menu where you can choose another language for
the selected text or for the paragraph where the cursor is located.
You can also choose None (Do not check spelling) to exclude the
text from a spelling check or choose More... to open the Character
dialog box.
Insert mode
Click to toggle between Insert and Overwrite modes when typing.
Selection mode
Click to toggle between STD (Standard), EXT (Extend), ADD (Add)
and BLK (Block) selection. EXT is an alternative to Shift+click when
selecting text. See Chapter 3 (Working with Text) for more
information about ADD and BLK.
Unsaved changes
An asterisk (*) appears here if changes to the document have not
been saved.
Figure 10: Right end of status bar
Chapter 1 Introducing Writer 21
Page 22
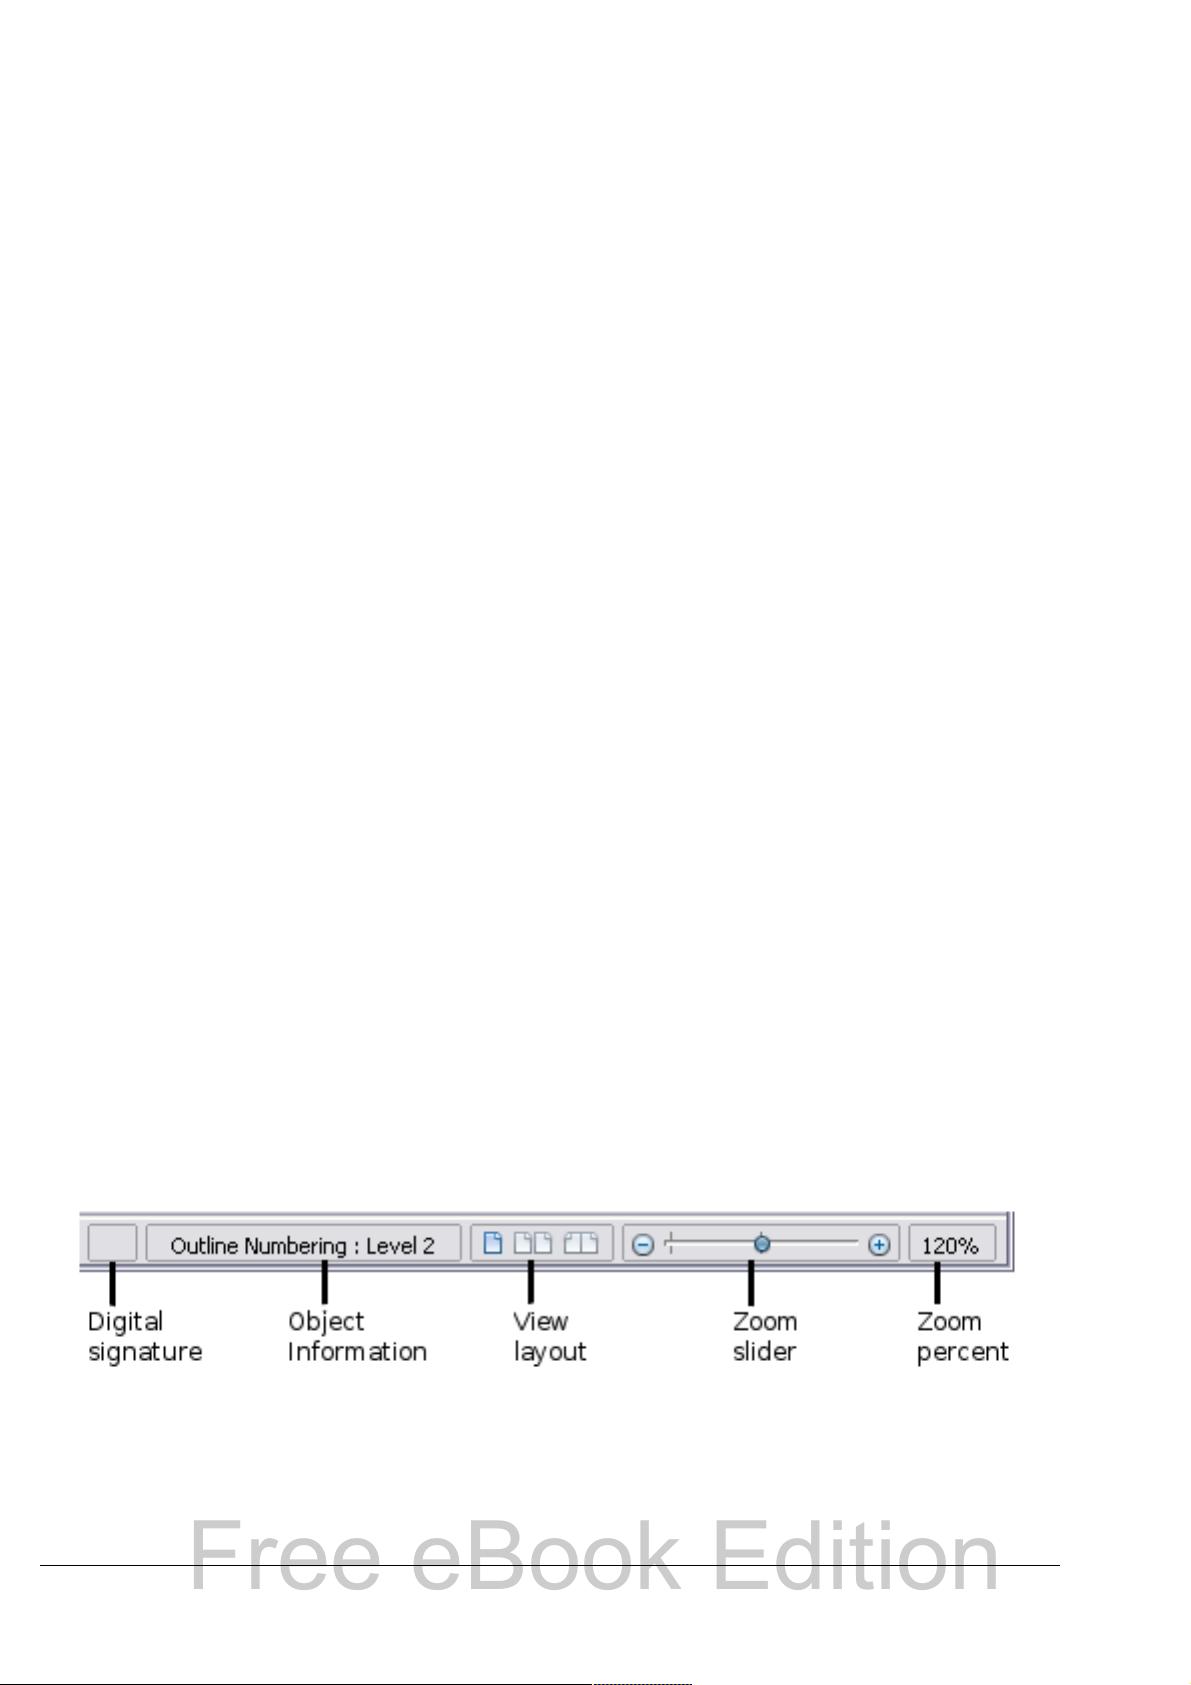
Digital signature
Free eBook Edition
If the document has been digitally signed, an icon shows here.
You can double-click the icon to view the certificate.
Section or object information
When the cursor is on a section, heading, or list item, or when an
object (such as a picture or table) is selected, information about that
item appears in this field. Double-clicking in this area opens a
relevant dialog box.
Object Information shown Dialog box opened
Picture Size and position Format Picture
List item Level and list style Bullets and Numbering
Heading Outline numbering level Bullets and Numbering
Table Name or number and cell
reference of cursor
Section Name of section Edit Sections
Other (Blank) Fields (Cross References page)
Table Format
1
1
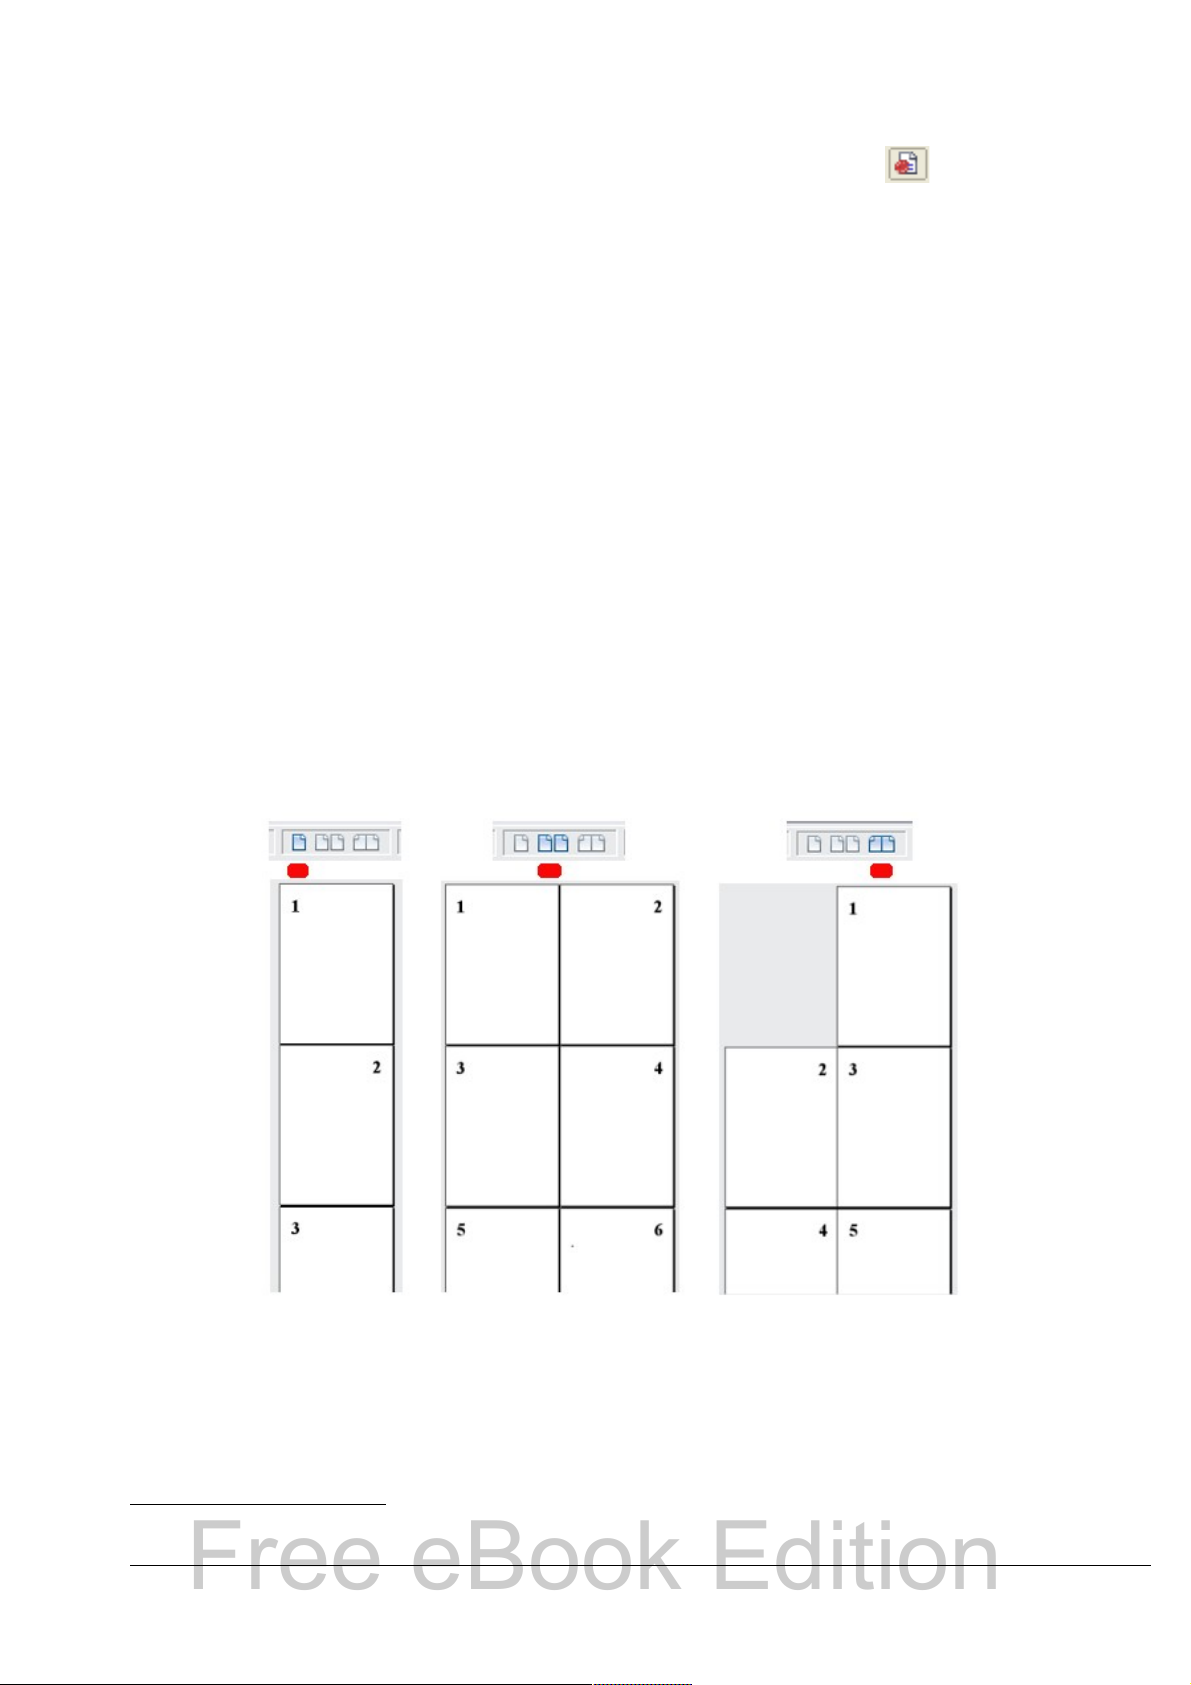
View layout
Click an icon to change between single page, side-by-side, and book
layout views (Figure 11). You can edit the document in any view.
Figure 11. View layouts: single, side-by-side, book
Zoom
To change the view magnification, drag the Zoom slider, or click on
the + and – signs, or right-click on the zoom level percent to pop up
a list of magnification values from which to choose. Zoom interacts
1 If a list style was used with a list item or heading, no dialog box appears.
22 OpenOffice.org 3.x Writer Guide
Page 23
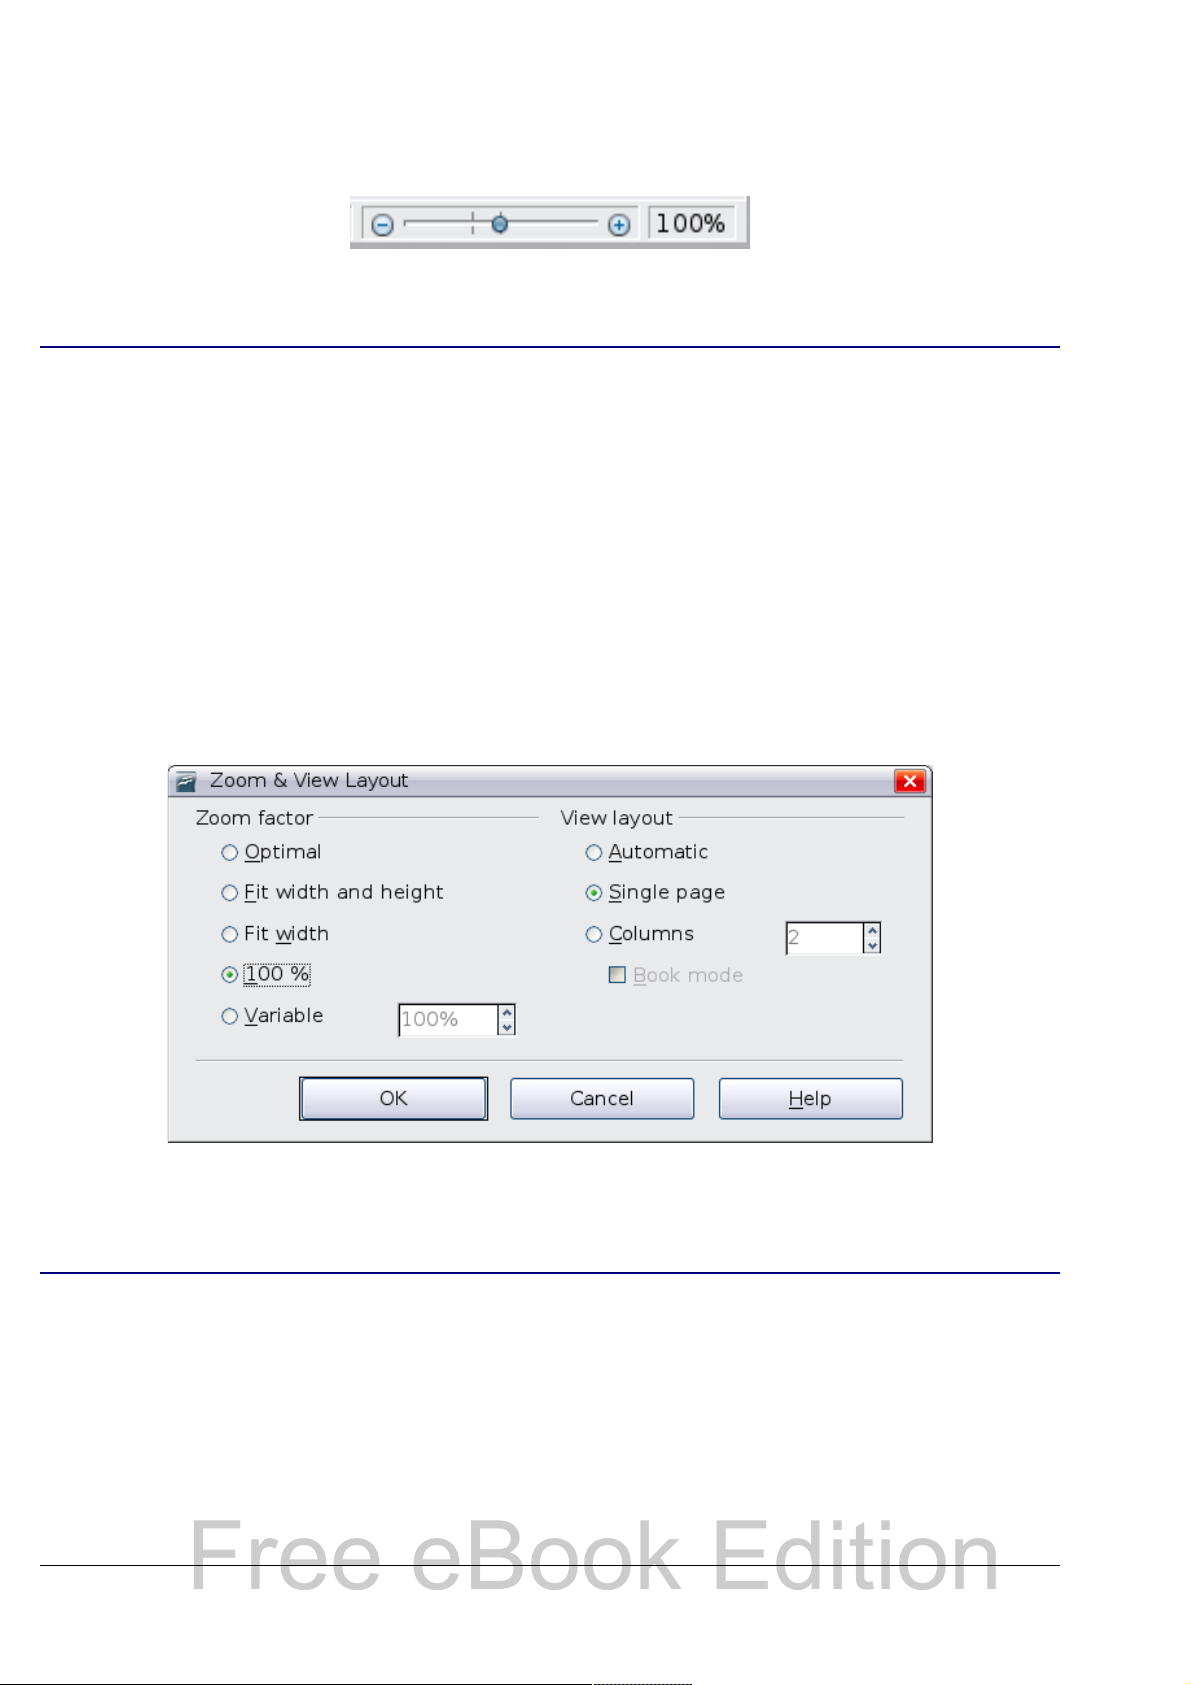
with the selected view layout to determine how many pages are
Free eBook Edition
visible in the document window.
Changing document views
Writer has several ways to view a document: Print Layout, Web Layout,
and Full Screen. To access these and other choices, go to the View
menu and click on the required view. (When in Full Screen view, press
the Esc key to return to either Print or Web Layout view.)
When in Print Layout, you can use both the Zoom slider and the View
Layout icons on the Status bar. In Web Layout, you can use the Zoom
slider.
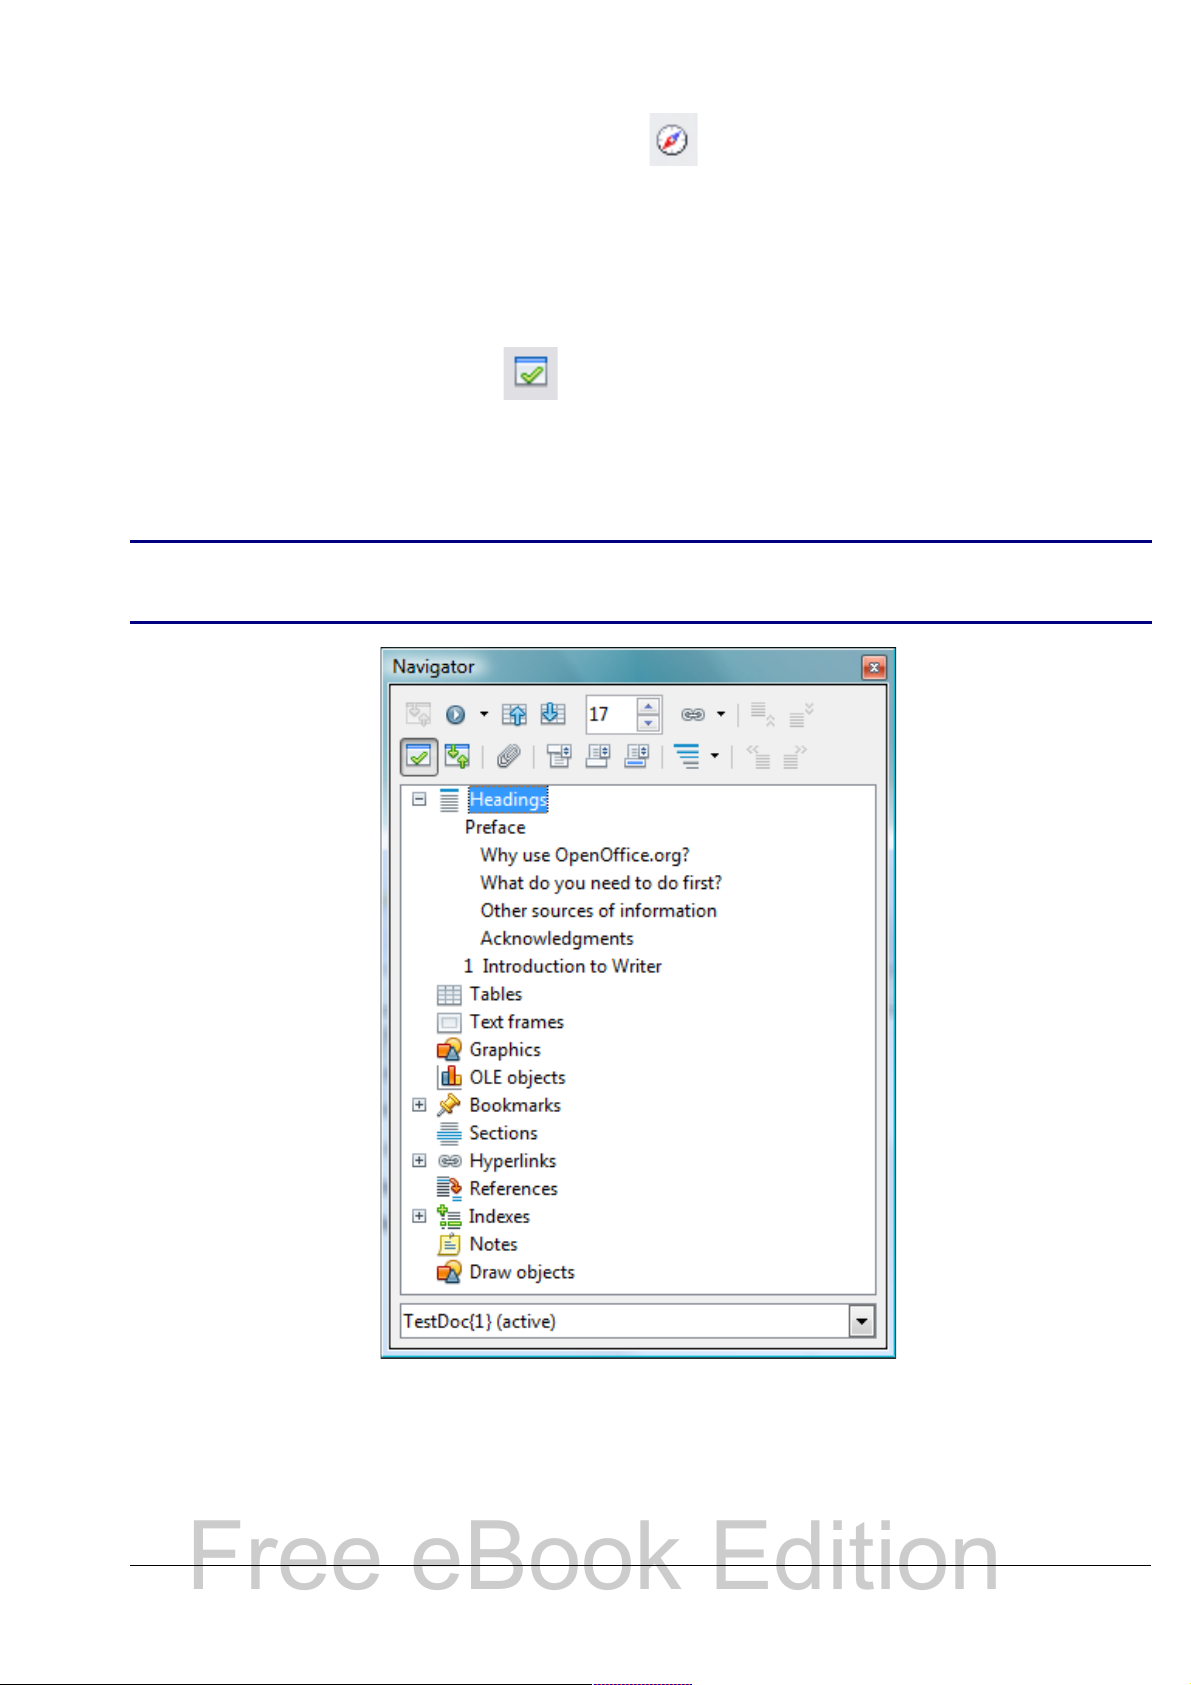
You can also choose View > Zoom from the menu bar to display the
Zoom & View Layout dialog box (see Figure 12), where you can set the
same options as on the Status bar. In Web Layout view, most of the
choices are not available.
Figure 12. Choosing Zoom and View Layout options
Using the Navigator
In addition to the Page Number field on the Status bar (described on
page 20), Writer provides other ways to move quickly through a
document and find specific items by using the many features of the
Navigator, the Navigation toolbar, and related icons.
The Navigator lists all of the headings, tables, text frames, graphics,
bookmarks, and other objects contained in a document.
Chapter 1 Introducing Writer 23
Page 24
To open the Navigator, click its icon on the Standard toolbar, or
Free eBook Edition
press F5, or choose View > Navigator on the menu bar, or doubleclick on the Page number field on the status bar. You can dock the
Navigator to either side of the main Writer window or leave it floating
(see “Docking/floating windows and toolbars” on page 18).
To hide the list of categories and show only the icons at the top, click
the List Box On/Off icon . Click this icon again to show the list.
Click the + sign by any of the lists to display the contents of the list.
Table 1 summarizes the functions of the icons at the top of the
Navigator.
Note
The Navigator has different functions in a master document. See
Chapter 13 (Working with Master Documents).
Figure 13. The Navigator
24 OpenOffice.org 3.x Writer Guide
Page 25
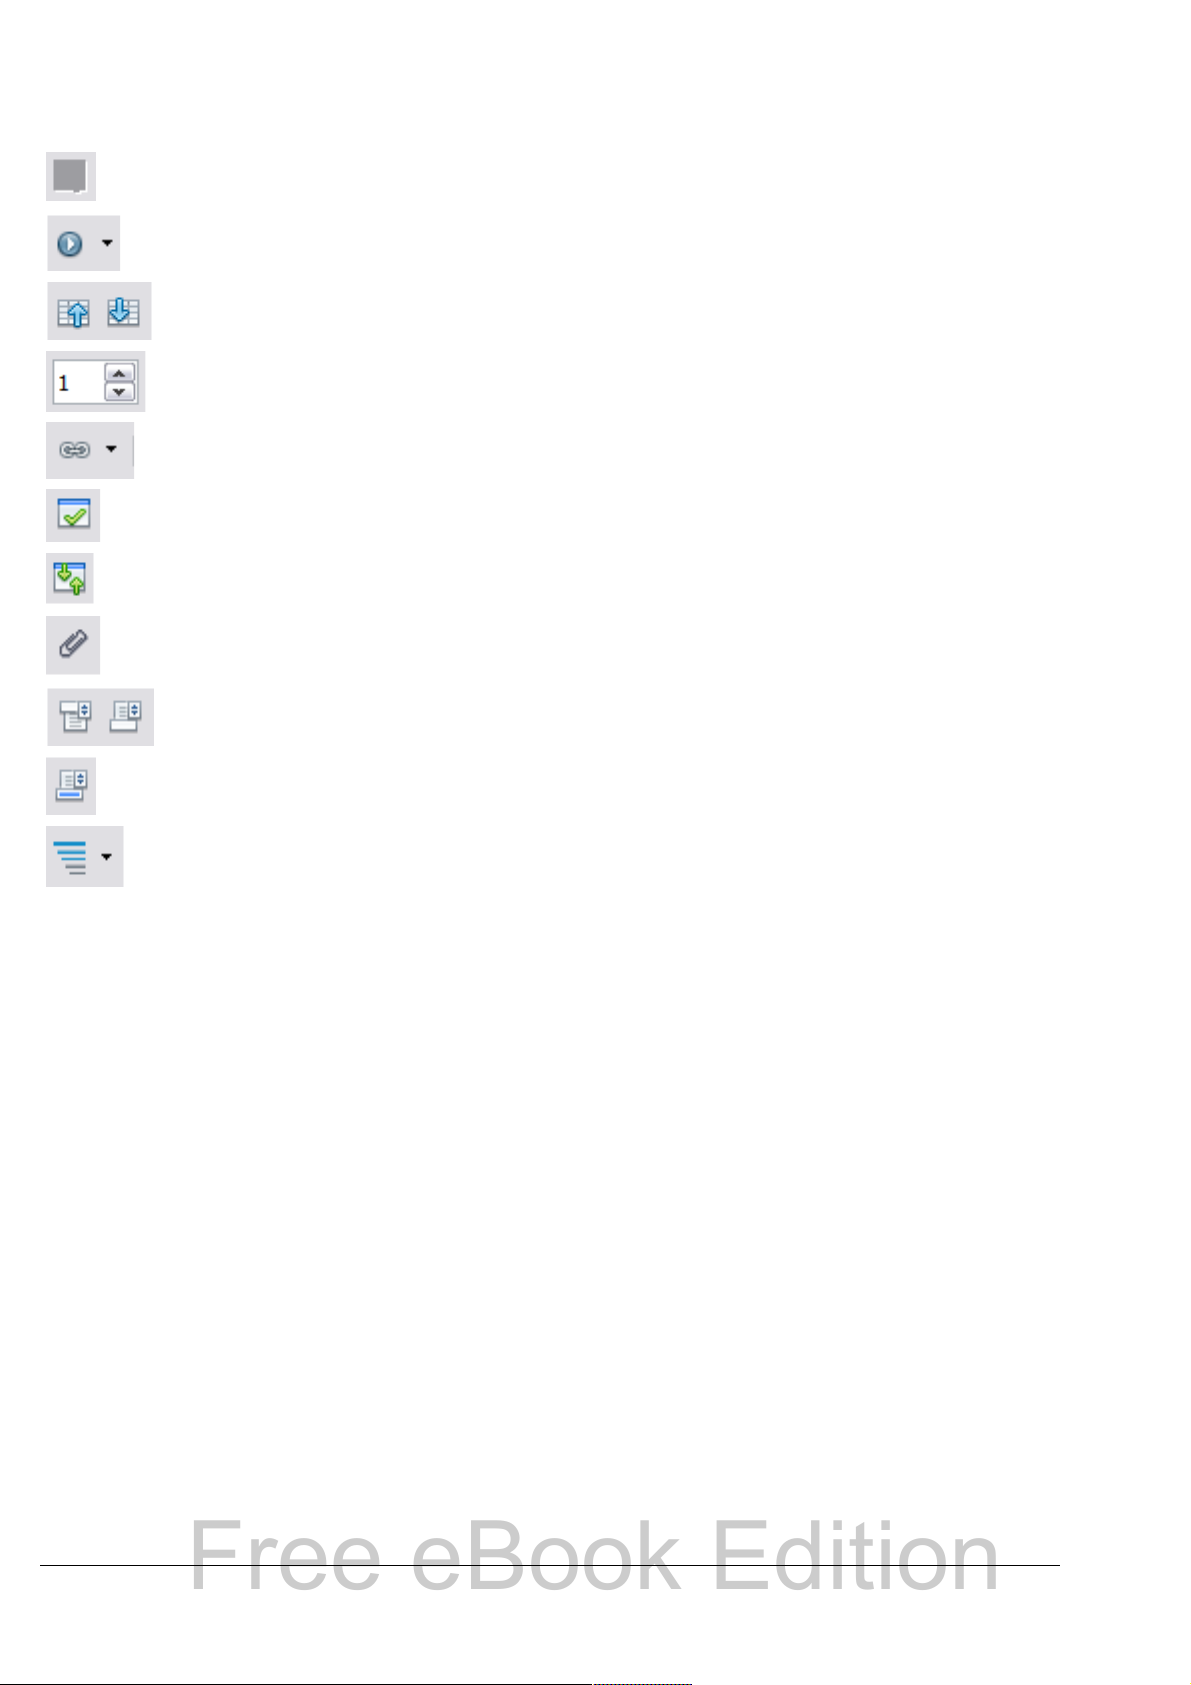
Table 1: Function of icons in the Navigator
Free eBook Edition
Not active in ordinary documents. In a master document, switches
between the master document file and its subdocuments.
Opens the Navigation toolbar (see page 26).
Jumps to the previous or next item in the document. To select the
category of items, see “Using the Navigation toolbar“ on page 26.
Jumps to the page number in the box. Type the page number or
select it using the up and down arrows.
Drag Mode. Select hyperlink, link, or copy. See “Choosing drag
mode” on page 28 for details.
List Box On/Off. Shows or hides the list of categories.
Content View. Switches between showing all categories and
showing only the selected category.
Inserts a reminder (see page 27).
Jumps between the text area and the header or footer area (if the
page has them).
Jumps between a footnote anchor and the corresponding footnote
text.
Choose the number of heading levels to be shown.
Moving quickly through a document
The Navigator provides several convenient ways to move around a
document and find items in it:
• To jump to a specific page in the document, type its sequence
number in the box at the top of the Navigator.
• When a category is showing the list of objects in it, double-click
on an object to jump directly to that object’s location in the
document.
To see the content in only one category, highlight that category
and click the Content View icon. Click the icon again to display
all the categories. You can also change the number of heading
levels shown when viewing Headings.
• Use the Previous and Next icons to jump to other objects of the
type selected in the Navigation toolbar. (See below for details.)
Chapter 1 Introducing Writer 25
Page 26
Objects are much easier to find if you have given them names
Free eBook Edition
Tip
Note
when creating them, instead of keeping OOo’s default names of
graphics1, graphics2, Table1, Table2, and so on—which may not
correspond to the position of the object in the document.
A hidden section (or other hidden object) in a document appears
gray in the Navigator, and displays the word “hidden” as a
tooltip.
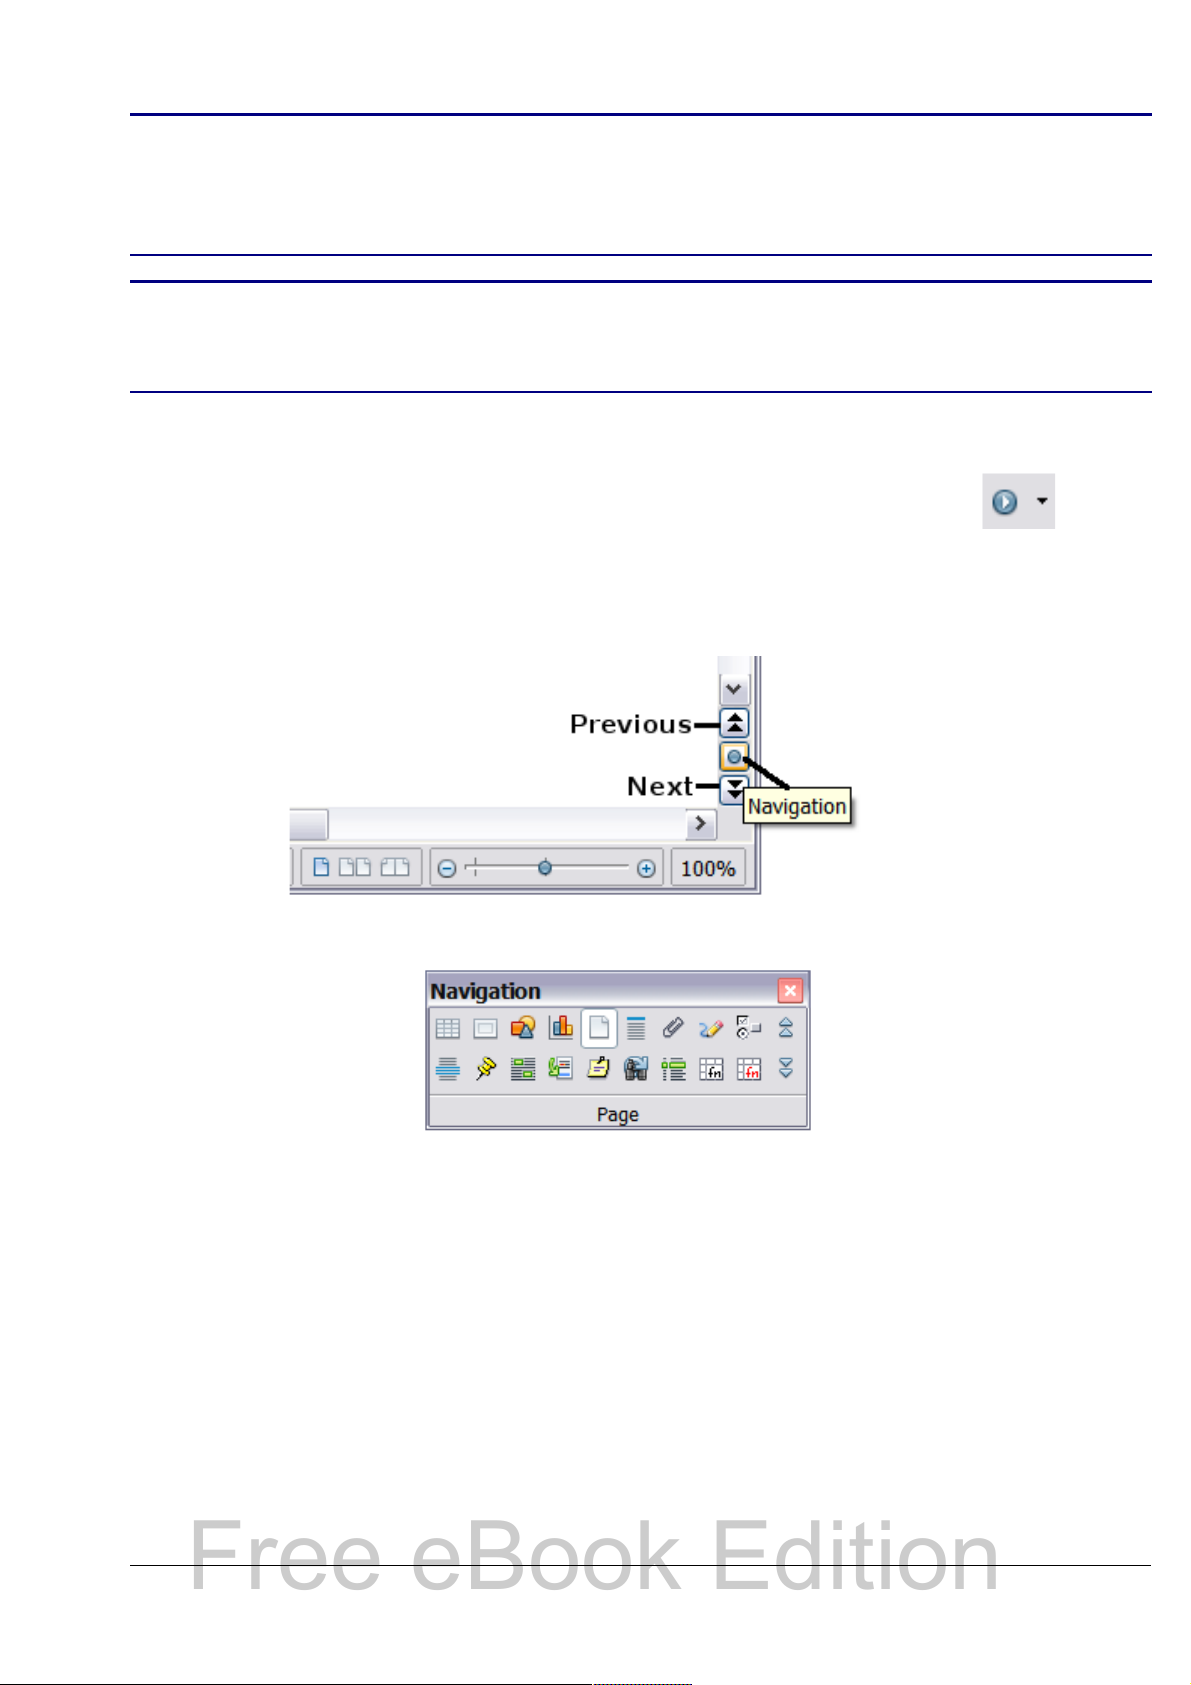
Using the Navigation toolbar
To display the Navigation toolbar, click the Navigation icon
(second icon from the left at the top of the Navigator. Figure 13) or the
small Navigation icon near the lower right-hand corner of the window
below the vertical scroll bar (Figure 14).
Figure 14: Previous, Navigation, and Next icons
Figure 15: Navigation toolbar
The Navigation toolbar (Figure 15) shows icons for all the object types
shown in the Navigator, plus some extras (for example, the results of a
Find command).
Click an icon to select that object type. Now all the Previous and Next
icons (in the Navigator itself, in the Navigation Toolbar, and on the
scroll bar) will jump to the next object of the selected type. This is
particularly helpful for finding items like index entries, which can be
difficult to see in the text. The names of the icons (shown in the
tooltips) change to match the selected category; for example, Next
Graphic or Next Bookmark.
26 OpenOffice.org 3.x Writer Guide
Page 27
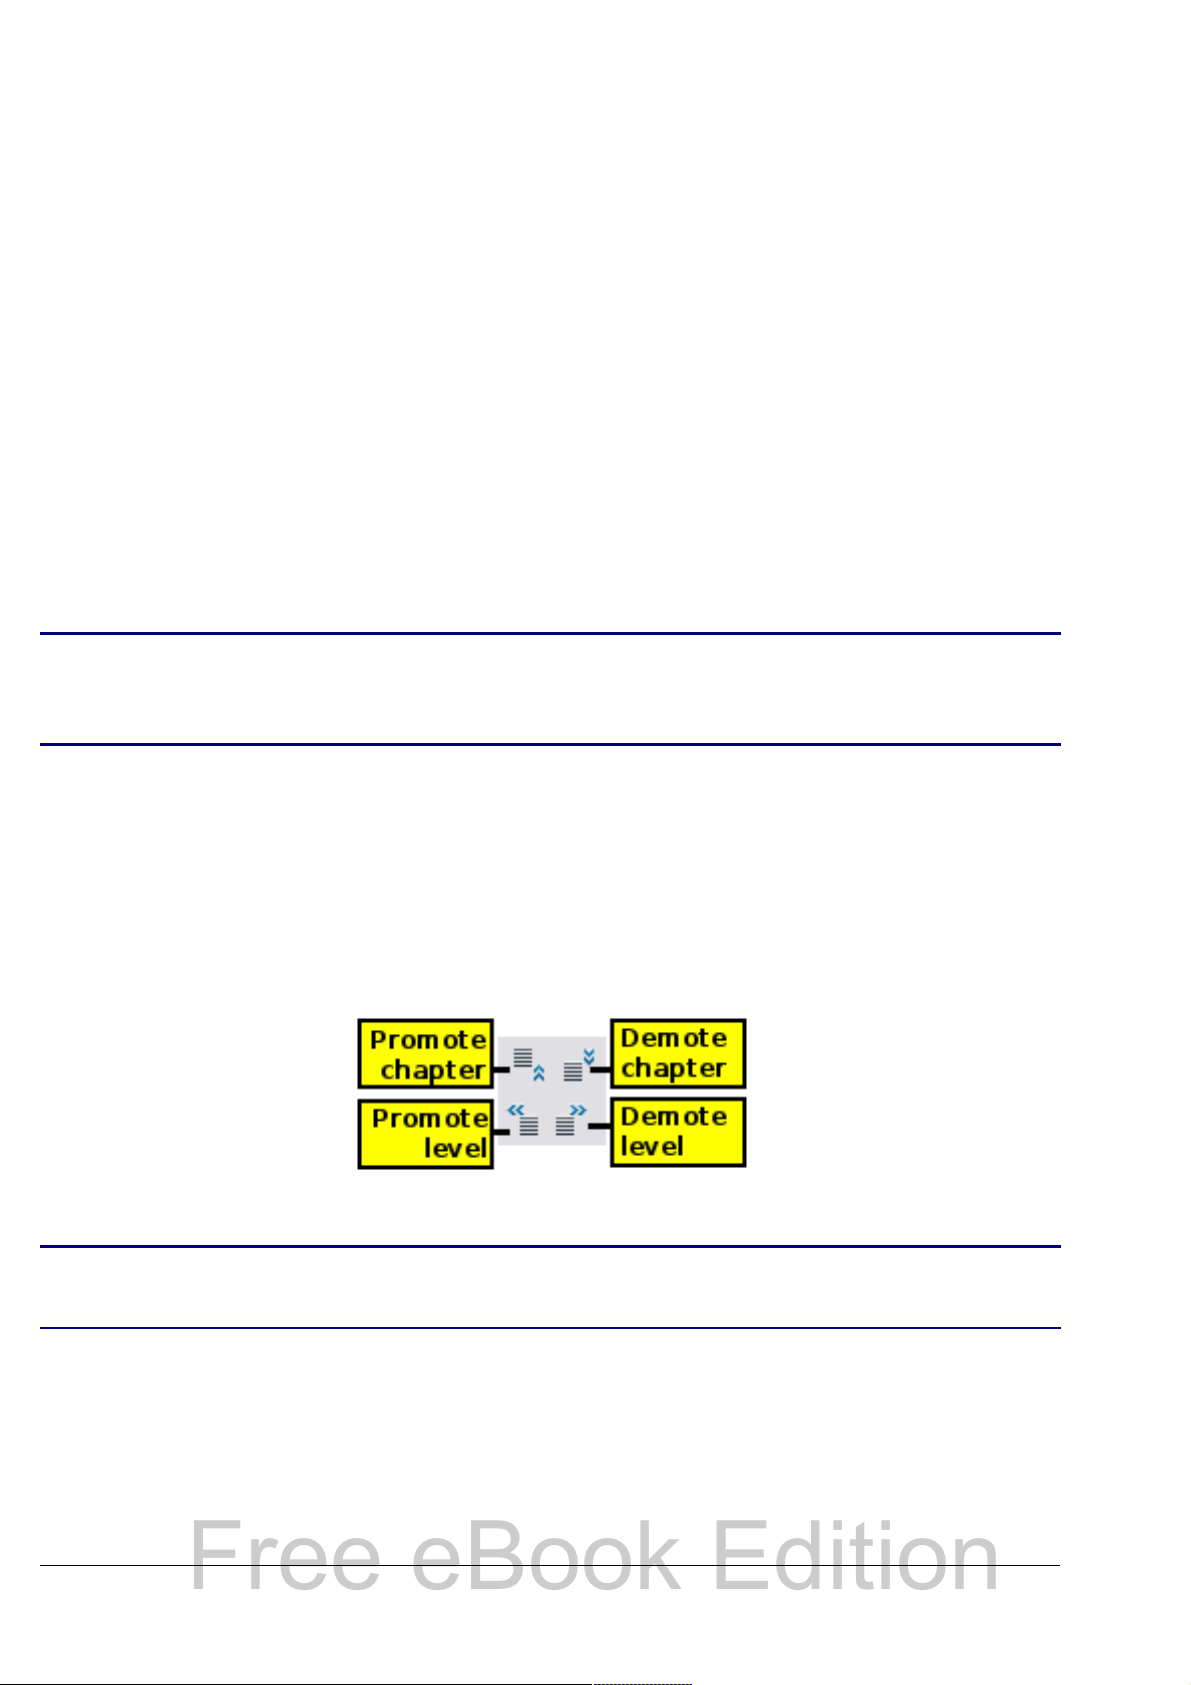
Rearranging chapters using the Navigator
Free eBook Edition
You can arrange chapters and move headings in the document by using
the Navigator.
1) Click the Content View icon to expand the headings, if necessary.
2) (Optional) If you have several subheading levels, you can more
easily find the headings you want, by changing the Heading
Levels Shown selection to show only 1 or 2 levels of headings.
3) Click on the heading of the block of text that you want to move
and drag the heading to a new location on the Navigator, or click
the heading in the Navigator list, and then click either the
Promote Chapter or Demote Chapter icon. All of the text and
subsections under the selected heading move with it.
To move only the selected heading and not the text associated
with the heading, hold down Control, and then click the icon.
The tooltips (Promote Chapter and Demote Chapter) are
Tip
misleading; all headings defined in Tools > Outline
Numbering can be rearranged using this function.
4) To quickly change the outline level of a heading and its associated
subheadings, select the heading in the Navigator, and then click
either the Promote Level or Demote Level icon. This action
does not change the location of the heading, only its level.
To increase the outline level of only the selected heading, but not
its associated subheadings, hold down Control, and then click the
icon.
Figure 16. Reorganizing with the Navigator
Note
Users of MS Office Word will note the similarity between this
functionality and Word's Outline View.
Setting reminders
One of the little known features of Writer which you may find quite
useful is the possibility of jumping between reminders. Reminders let
you mark places in your document that you want to return to later on,
Chapter 1 Introducing Writer 27
Page 28

to add or correct information, make some other change, or simply
Free eBook Edition
mark where you finished editing. The possible uses of reminders are
limited only by your imagination.
To set a reminder at the cursor's current location, click on the
icon in the Navigator. You can set up to 5 reminders in a document
(setting another causes the first to be deleted).
Reminders are not highlighted in any way in the document, so you
cannot see where they are, except when you jump from one to the next
—the location of the cursor then shows the location of the reminder.
To jump between reminders, first select the Reminder icon on the
Navigation toolbar. Then click the Previous and Next icons.
Choosing drag mode
Sets the drag and drop options for inserting items into a document
using the Navigator.
Insert As Hyperlink
Creates a hyperlink when you drag and drop an item into the
current document.
Insert As Link
Inserts the selected item as a link where you drag and drop in the
current document. Text is inserted as protected sections. However,
you cannot create links for graphics, OLE objects, references, or
indexes using this method.
Insert As Copy
Inserts a copy of the selected item where you drag and drop in the
current document. You cannot drag and drop copies of graphics,
OLE objects, or indexes.
Starting a new document
Creating a blank document
You can create a new, blank document in Writer in several ways.
When OOo is open but no document is open (for example, if you close
all the open documents but leave the program running), a Welcome
screen is shown. Click one of the icons to open a new document of that
28 OpenOffice.org 3.x Writer Guide
Page 29

type, or click the Templates icon to start a new document using a
Free eBook Edition
template.
You can also start a new document in one of the following ways. If a
document is already open in OOo, the new document opens in a new
window.
• Press the Control+N keys. A new empty document opens. If you
already have a document open, the new document appears in a
new window.
• Use File > New > Text Document. The result is the same as
pressing the Control+N keys.
• Click the New button on the main toolbar .
Creating a document from a template
You can use templates to create new documents in Writer. Templates
serve as the foundation of a set of documents, to make sure they all
have a similar layout. For example, all the documents of the Writer
Guide are based on the same template. As a result, all the documents
look alike; they have the same headers and footers, use the same fonts,
and so on.
A new OpenOffice.org installation does not contain many templates. It
is possible for you to add new templates to your installation and use
them for new documents. This is explained in Chapter 10 (Working
with Templates). Many more templates can be downloaded from
http://extensions.services.openoffice.org/ and other websites.
Once you do have templates on your system, you can create new
documents based on them by using File > New > Templates and
Documents. This opens a window where you can choose the template
you want to use for your document.
The example shown in Figure 17 uses a template called “Book” in the
My Templates folder. Select it, then click the Open button. A new
document is created based on the formats defined in the template.
Chapter 1 Introducing Writer 29
Page 30
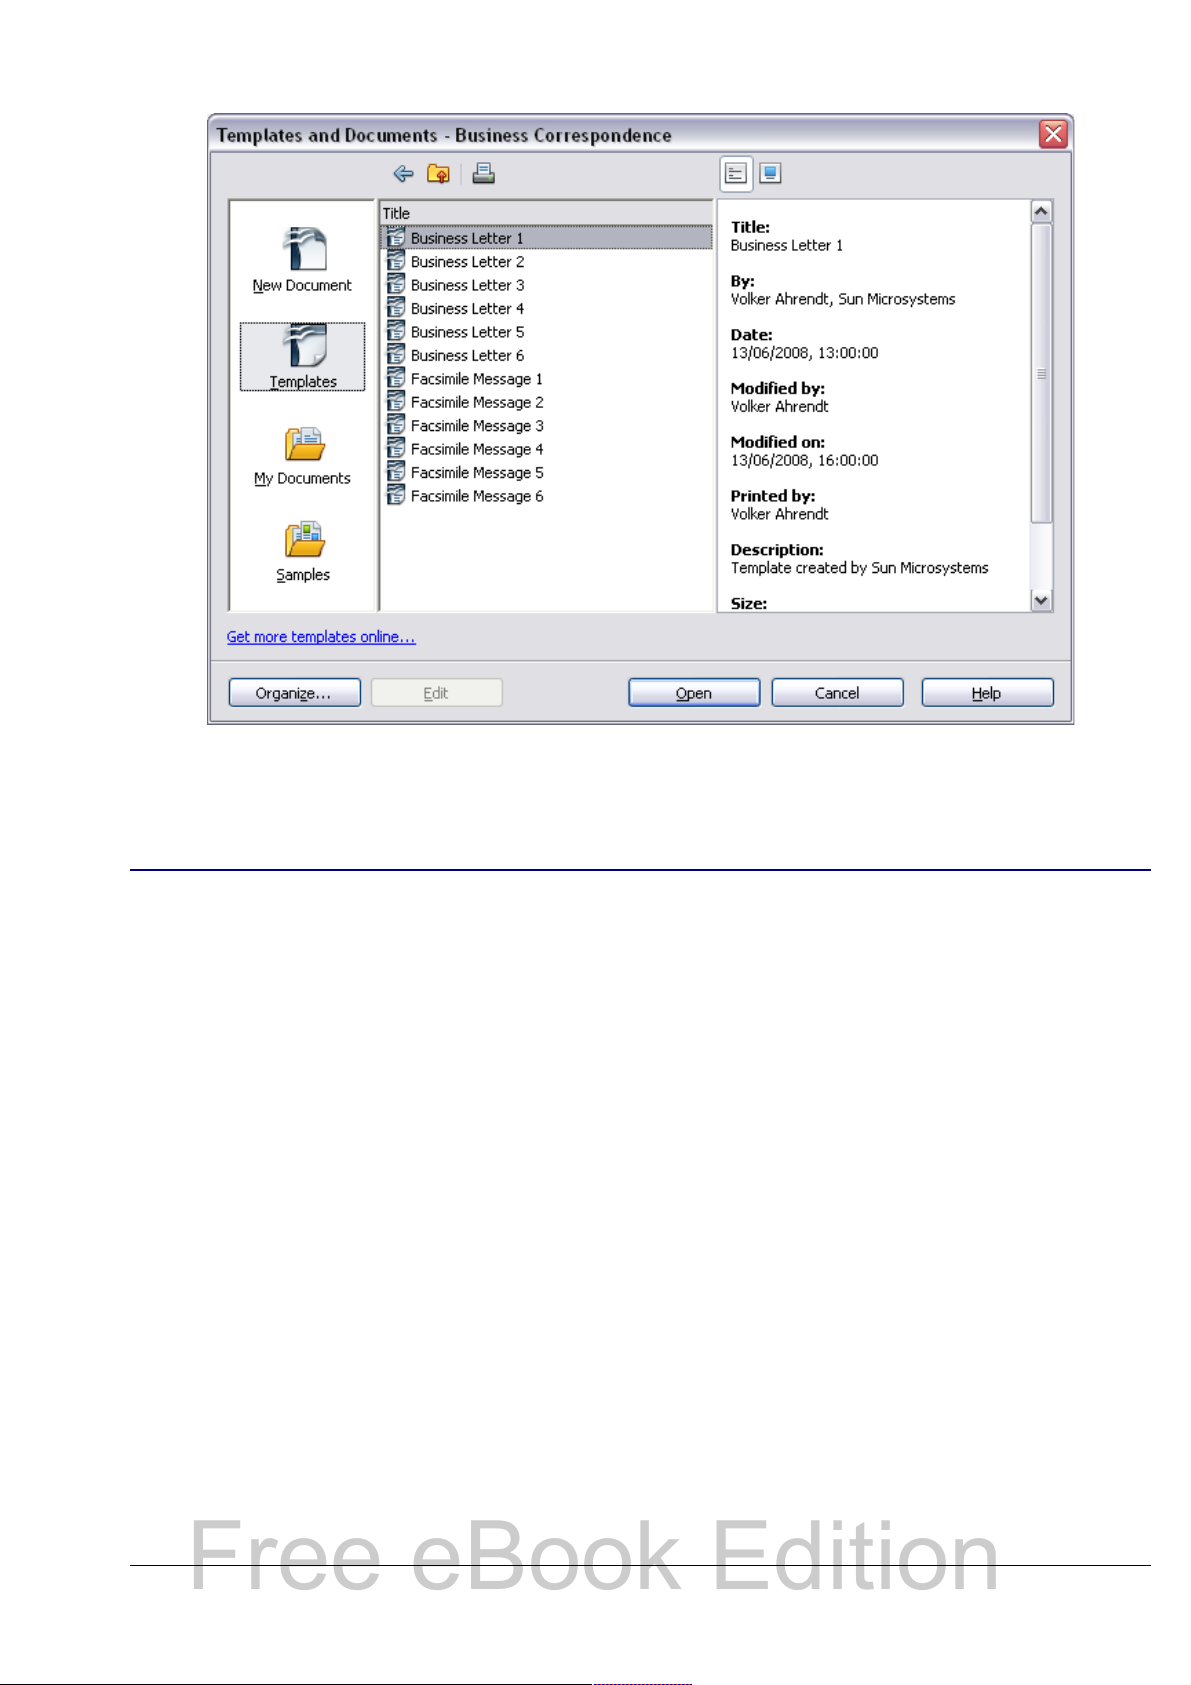
Figure 17. Creating a document from a template
Free eBook Edition
Opening an existing document
When no document is open, the Welcome screen provides an icon for
opening an existing document.
You can also open an existing document in one of the following ways. If
a document is already open in OOo, the second document opens in a
new window.
• Click File > Open....
• Click the Open button on the main toolbar.
• Press Control+O on the keyboard.
In each case, the Open dialog box appears. Select the file you want,
and then click Open.
In the Open dialog box, you can reduce the list of files by selecting the
type of file you are looking for. For example, if you choose Text
documents as the file type, you will only see documents Writer can
open (including *.odt, *.doc, *.txt). This method opens Word (*.doc)
files, as well as OOo files and other formats.
30 OpenOffice.org 3.x Writer Guide
Page 31

You can also open an existing OOo Writer document using the same
Free eBook Edition
methods you would use to open any document in your operating
system.
If you have associated Microsoft Office file formats with
OpenOffice.org, you can also open these files by double-clicking on
them.
Saving a document
To save a new document in Writer, do one of the following:
• Press Control+S.
• Select File > Save.
• Click the Save button on the main toolbar.
When the Save As dialog box appears, enter the file name and verify
the file type (if applicable).
To save an open document with the current file name, choose File >
Save. This will overwrite the last saved state of the file.
Password protection
To protect an entire document from being viewable without a
password, use the option on the Save As dialog box to enter a
password. This option is only available for files saved in
OpenDocument formats or the older OpenOffice.org 1.x formats.
1) On the Save As dialog box, select the Save with password
option, and then click Save. You will receive a prompt:
Chapter 1 Introducing Writer 31
Page 32

2) Type the same password in the two fields, and then click OK. If
Free eBook Edition
the passwords match, the document is saved password protected.
If the passwords do not match, you receive the prompt to enter
the password again.
Note
OOo uses a very strong encryption mechanism that makes it almost
impossible to recover the contents of a document in case you lose the
password.
Passwords must contain a minimum of 5 characters. Until you
have entered 5 characters, the OK button remains inactive.
Saving a document automatically
You can choose to have Writer save your document automatically at
regular intervals. Automatic saving, like manual saving, overwrites the
last saved state of the file. To set up automatic file saving:
1) Select Tools > Options > Load/Save > General.
2) Click on Save AutoRecovery information every and set the
time interval. The default value is 15 minutes. Enter the value you
want by typing it or by pressing the up or down arrow keys.
Saving as a Microsoft Word document
If you need to exchange files with users of Microsoft Word, they may
not know how to open and save .odt files. Microsoft Word 2007 with
Service Pack 2 (SP2) can do this. Users of Word 2007, 2003, XP, and
2000 can also download and install a free OpenDocument Format
(ODF) plugin from Sun Microsystems.
Some users of Microsoft Word may be unwilling or unable to receive
*.odt files. (Perhaps their employer won’t allow them to install the
plug-in.) In this case, you can save a document as a Microsoft Word
file.
1) Important—First save your document in the file format used by
OOo Writer, *.odt. If you do not, any changes you made since the
last time you saved will only appear in the Microsoft Word version
of the document.
2) Then click File > Save As.
3) On the Save As dialog box (Figure 18), in the File type (or Save
as type) drop-down menu, select the type of Word format you
need.
4) Click Save.
32 OpenOffice.org 3.x Writer Guide
Page 33

From this point on, all changes you make to the document will occur
Free eBook Edition
only in the Microsoft Word document. You have changed the name and
file type of your document. If you want to go back to working with the
*.odt version of your document, you must open it again.
To have Writer save documents by default in the Microsoft Word
file format, go to Tools > Options > Load/Save > General. In
Tip
the section named Default file format, under Document type,
select Text document, then under Always save as, select your
preferred file format.
Figure 18. Saving a file in Microsoft Word format
Getting help
Writer provides several forms of help. In addition to a full Help file
(reached by pressing F1 or choosing Help > OpenOffice.org Help
from the menu bar), you can choose whether to activate tooltips,
extended tips, and the Help Agent from Tools > Options >
OpenOffice.org > General.
Placing the mouse pointer over any of the icons displays a small box,
called a tooltip. It gives a brief explanation of the icon’s function. For a
more detailed explanation, select Help > What’s This? and hold the
mouse pointer over the icon you need more help with.
Chapter 1 Introducing Writer 33
Page 34

Undoing and redoing changes
Free eBook Edition
When a document is open, you can undo the most recent change by
pressing Control+Z, or clicking the Undo icon on the Standard
toolbar, or choosing Edit > Undo from the menu bar.
The Edit menu shows the latest change that can be undone, as shown
in Figure 19.
Figure 19: Edit > Undo last action
Click the small triangle to the right of the Undo icon to get a list of all
the changes that can be undone (Figure 20). You can select multiple
changes and undo them at the same time.
Figure 20: List of actions that can be undone
After changes have been undone, Redo becomes active. To redo a
change, select Edit > Redo, or press Control+Y or click on the Redo
icon . As with Undo, click on the triangle to the right of the arrow to
get a list of the changes that can be reapplied.
Closing a document
To close a document, click File > Close.
You can also close a document by clicking on the Close icon on the
document window. In Windows XP, this button looks like the X in the
red box shown in Figure 21.
34 OpenOffice.org 3.x Writer Guide
Page 35

If more than one OOo window is open, each window looks like the
Free eBook Edition
sample shown on the left in Figure 21. Closing this window leaves the
other OOo windows open.
If only one OOo window is open, it looks like the sample shown on the
right in Figure 21. Notice the small black X below the larger X in the
red box. Clicking the small black X closes the document but leaves
OOo open. Clicking the larger X closes OOo completely.
Figure 21. Close icons
If the document has not been saved since the last change, a message
box is displayed. Choose whether to save or discard your changes.
• Save: The document is saved and then closed.
• Discard: The document is closed, and all modifications since the
last save are lost.
• Cancel: Nothing happens, and you return to the document.
Caution
Not saving your document could result in the loss of recently
made changes, or worse still, your entire file.
Closing Writer
To close Writer completely, click File > Exit, or close the last open
document as described in “Closing a document” on page 34.
If all the documents have been saved, Writer closes immediately. If any
documents have been modified but not saved, a warning message
appears. Follow the procedure in “Closing a document” to save or
discard your changes.
Chapter 1 Introducing Writer 35
Page 36

Chapter 2
Free eBook Edition
Setting up Writer
Choosing options to suit the way you work
Page 37

Choosing options that affect all of OOo
Free eBook Edition
This section covers some of the settings that apply to all the
components of OOo and are particularly important when using Writer.
Other general options are discussed in Chapter 2 (Setting Up
OpenOffice.org) in the Getting Started guide.
Click Tools > Options. The list on the left-hand side of the Options –
OpenOffice.org dialog box varies depending on which component of
OOo is open. The illustrations in this chapter show the list as it appears
when a Writer document is open.
Click the + sign by OpenOffice.org on the left-hand side. A list of pages
drops down. Selecting an item in the list causes the right-hand side of
the dialog box to display the relevant page.
Figure 22: OpenOffice.org options
The Back button has the same effect on all pages of the
Note
Options dialog box. It resets options to the values that were in
place when you opened OOo.
User Data options
Because Writer uses the name or initials stored in the OpenOffice.org –
User Data page for several things, including document properties
(created by and last edited by information) and the name of the author
of notes and changes, you will want to ensure that the correct
information appears here.
Fill in the form (shown in Figure 23) or amend or delete any existing
incorrect information.
Chapter 2 Setting up Writer 37
Page 38

Figure 23: Filling in user data
Free eBook Edition
General options
The options on the OpenOffice.org – General page are described below.
Figure 24: Setting general options for OpenOffice.org
Help - Tips
When Tips is active, one or two words will appear when you hold the
mouse pointer over an icon or field, without clicking.
Help - Extended tips
When Extended tips is active, a brief description of the function of a
particular icon or menu command or a field on a dialog box appears
when you hold the mouse pointer over that item.
38 OpenOffice.org 3.x Writer Guide
Page 39

Help Agent
Free eBook Edition
To turn off the Help Agent (similar to Microsoft’s Office Assistant),
deselect this option. To restore the default behavior, click Reset
Help Agent.
Help formatting
High contrast is an operating system setting that changes the
system color scheme to improve readability. To display Help in high
contrast (if your computer’s operating system supports this), choose
one of the high-contrast style sheets from the pull-down list.
High-contrast style Visual effect
Default Black text on white background
High Contrast #1 Yellow text on black background
High Contrast #2 Green text on black background
High Contrast Black White text on black background
High Contrast White Black text on white background
Open/Save dialogs
To use the standard Open and Save dialog boxes for your operating
system, deselect the Use OpenOffice.org dialogs option. When
this option is selected, the Open and Save dialog boxes supplied with
OpenOffice.org will be used. This book uses the OOo Open and Save
dialog boxes in illustrations.
Document status
If this option is selected, then the next time you close the document
after printing, the print date is recorded in the document properties
as a change and you will be prompted to save the document again,
even if you did not make any other changes.
Year (two digits)
Specifies how two-digit years are interpreted. For example, if the
two-digit year is set to 1930, and you enter a date of 1/1/30 or later
into your document, the date is interpreted as 1/1/1930 or later. An
“earlier” date is interpreted as being in the following century; that
is, 1/1/20 is interpreted as 1/1/2020.
Chapter 2 Setting up Writer 39
Page 40

Memory options
Free eBook Edition
In the Options dialog, click OpenOffice.org > Memory. Some
considerations:
• More memory can make OpenOffice.org faster and more
convenient (for example, more undo steps require more memory);
but the trade-off is less memory available for other applications
and you could run out of memory altogether.
• If your documents contain a lot of objects such as images, or the
objects are large, OOo’s performance may improve if you increase
the memory for OOo or the memory per object. If you find that
objects seem to disappear from a document that contains a lot of
them, increase the number of objects in the cache. (The objects
are still in the file even if you cannot see them on screen.)
• To load the Quickstarter (an icon on the desktop or in the system
tray) when you start your computer, select the option near the
bottom of the dialog. This makes OpenOffice.org start faster; the
trade-off is OOo uses some memory even when not being used.
This option (sometimes called Enable systray quickstarter) is
not available on all operating systems.
Figure 25: Choosing Memory options for the OpenOffice.org
applications
View options
The options on the OpenOffice.org – View page (Figure 26) affect the
way the document window looks and behaves. Some of these options
are described below. Set them to suit your personal preferences.
40 OpenOffice.org 3.x Writer Guide
Page 41

Figure 26: Choosing View options for OpenOffice.org applications
Free eBook Edition
User Interface – Scaling
If the text in the help files or on the menus of the OOo user interface
is too small or too large, you can change it by specifying a scaling
factor. Sometimes a change here can have unexpected results,
depending on the screen fonts available on your system. However, it
does not affect the font size of the text in your documents.
User Interface – Icon size and style
The first box specifies the display size of toolbar icons (Automatic,
Small, or Large); the Automatic icon size option uses the setting
for your operating system. The second box specifies the icon style
(theme); here the Automatic option uses an icon set compatible
with your operating system and choice of desktop: for example, KDE
or Gnome on Linux.
User Interface – Use system font for user interface
If you prefer to use the system font (the default font for your
computer and operating system) instead of the font provided by OOo
for the user interface, select this option.
User interface – Screen font antialiasing
(Not available in Windows; not shown in Figure 26.) Smooths the
screen appearance of text. Enter the smallest font size to apply
antialiasing.
Menu – Show icons in menus
Causes icons as well as words to be visible in menus.
Chapter 2 Setting up Writer 41
Page 42

Font Lists - Show preview of fonts
Free eBook Edition
Causes the font list to look like Figure 27, Left, with the font names
shown as an example of the font; with the option deselected, the font
list shows only the font names, not their formatting (Figure 27,
Right). The fonts you will see listed are those that are installed on
your system.
Figure 27: Font list (Left) showing preview; (Right) without preview
Font Lists - Show font history
Causes the last five fonts you have assigned to the current document
are displayed at the top of the font list.
Graphics output – Use hardware acceleration
Directly accesses hardware features of the graphical display adapter
to improve the screen display. Not supported on all operating
systems and OOo distributions.
Graphics output – Use anti-aliasing
Enables and disables anti-aliasing, which makes the display of most
graphical objects look smoother and with fewer artifacts. Not
supported on all operating systems and OOo distributions.
Tip
Mouse positioning
Specifies if and how the mouse pointer will be positioned in newly
opened dialog boxes.
Middle mouse button
Defines the function of the middle mouse button.
Press Shift+Control+R to restore or refresh the view of the
current document.
• Automatic scrolling – dragging while pressing the middle
mouse button shifts the view.
• Paste clipboard – pressing the middle mouse button inserts the
contents of the “Selection clipboard” at the cursor position.
The “Selection clipboard” is independent of the normal clipboard
that you use by Edit > Copy/Cut/Paste or their respective
42 OpenOffice.org 3.x Writer Guide
Page 43

keyboard shortcuts. Clipboard and “Selection clipboard” can contain
Free eBook Edition
different contents at the same time.
Function Clipboard Selection clipboard
Copy content
Paste content
Pasting into
another document
Edit > Copy
Control+C
Edit > Paste
Control+V pastes at
the cursor position.
No effect on the
clipboard contents.
Select text, table, or object.
Clicking the middle mouse
button pastes at the mouse
pointer position.
The last marked selection is
the content of the selection
clipboard.
Print options
On the OpenOffice.org – Print page, set the print options to suit your
default printer and your most common printing method.
Figure 28. Choosing general printing options to apply to
all OOo components
In the Printer warnings section near the bottom of the page, you can
choose whether to be warned if the paper size or orientation specified
in your document does not match the paper size or orientation
available for your printer. Having these warnings turned on can be
quite helpful, particularly if you work with documents produced by
people in other countries where the standard paper size is different
from yours.
Chapter 2 Setting up Writer 43
Page 44

If your printouts are incorrectly placed on the page or chopped
Free eBook Edition
Tip
off at the top, bottom, or sides or the printer is refusing to
print, the most likely cause is page-size incompatibility.
Path options
On the OpenOffice.org – Paths page, you can change the location of
files associated with, or used by, OOo to suit your working situation. In
a Windows system, for example, you might want to store documents by
default somewhere other than My Documents.
To make changes, select an item in the list shown in Figure 29 and
click Edit. On the Select Paths dialog (not shown), add or delete
folders as required, and then click OK to return to the Options dialog.
Note that many items can have at least two paths listed: one to a
shared folder (which might be on a network) and one to a user-specific
folder (normally on the user’s personal computer).
You can use the entries in the OpenOffice.org – Paths dialog to
Tip
compile a list of files, such as those containing AutoText, that
you need to back up or copy to another computer.
Figure 29: Viewing the paths of files used by OOo
44 OpenOffice.org 3.x Writer Guide
Page 45

0Color options
Free eBook Edition
On the OpenOffice.org – Colors page, you can specify colors to use in
OOo documents. You can select a color from a color table, edit an
existing color, or define new colors. These colors will then be available
in color selection palettes in OOo.
Figure 30: Defining colors to use in color palettes in OOo
To modify a color:
1) Select the color to modify from the list or the color table.
2) Enter the new values that define the color. If necessary, change
the settings from RGB (Red, Green, Blue) to CMYK (Cyan,
Magenta, Yellow, Black) or vice versa. The changed color appears
in the lower of the two color preview boxes at the top.
3) Modify the Name as required.
4) Click the Modify button. The newly defined color is now listed in
the Color table.
Alternatively, click the Edit button to open the Color dialog, shown in
Figure 31. Here you can select a color from one of the color windows
in the upper area, or you can enter values in the lower area using your
choice of RGB, CMYK, or HSB (Hue, Saturation and Brightness) values.
The upper right color window is linked directly with the color input
fields in the lower area; as you choose a color in the upper window, the
numbers change accordingly. The two color fields at the lower right
show the value of the selected color on the left and the currently set
value from the color value fields on the right.
Chapter 2 Setting up Writer 45
Page 46

Modify the color components as required and click OK to exit the
Free eBook Edition
dialog. The newly defined color now appears in the lower of the color
preview boxes shown in Figure 30. Type a name for this color in the
Name box, then click the Add button. A small box showing the new
color is added to the Color table.
Figure 31: Editing colors
Another way to define or alter colors is through the Colors page of the
Area dialog, where you can also save and load palettes, a feature that
is not possible here. In Writer, draw a temporary draw object and use
the context menu of this object to open the Area dialog.
Font options
You can define replacements for any fonts that might appear in your
documents. If you receive from someone else a document containing
fonts that you do not have on your system, OOo will substitute fonts for
those it does not find. You might prefer to specify a different font from
the one the program chooses.
On the OpenOffice.org – Fonts page (Figure 32):
1) Select Apply Replacement Table option.
2) Select or type the name of the font to be replaced in the Font box.
(If you do not have this font on your system, it will not appear in
the drop-down list in this box, so you need to type it in.)
46 OpenOffice.org 3.x Writer Guide
Page 47

3) In the Replace With box, select a suitable font from the drop-
Free eBook Edition
down list of fonts installed on your computer.
4) The check mark to the right of the Replace with box turns green.
Click on this check mark. A row of information now appears in the
larger box below the input boxes. Select the boxes under Always
and Screen.
5) In the bottom section of the page, you can change the typeface
and size of the font used to display source code such as HTML
and Basic (in macros).
Figure 32: Defining a font to be substituted for another font
Security options
Use the OpenOffice.org – Security page (Figure 33) to choose security
options for saving documents and for opening documents that contain
macros.
Security Options and warnings
If you record changes, save multiple versions, or include hidden
information or notes in your documents, and you do not want some
of the recipients to see that information, you can set warnings to
remind you to remove it, or you can have OOo remove some of it
automatically. Note that (unless removed) much of this information
is retained in a file whether the file is in OpenOffice.org’s default
OpenDocument format, or has been saved to other formats,
including PDF.
Chapter 2 Setting up Writer 47
Page 48

Figure 33: Choosing security options for opening and
Free eBook Edition
saving documents
Click the Options button to open a separate dialog with specific
choices (Figure 34).
Remove personal information on saving. Select this option to
always remove user data from the file properties when saving the
file. To manually remove personal information from specific
documents, deselect this option and then use the Delete button
under File > Properties > General.
Figure 34: Security options and warnings dialog box
48 OpenOffice.org 3.x Writer Guide
Page 49

Ctrl-click required to follow hyperlinks. In older versions of
Free eBook Edition
OOo, clicking on a hyperlink in a document opened the linked
document. Now you can choose whether to keep this behavior (by
unchecking this box). Many people find creation and editing of
documents easier when accidental clicks on links do not activate the
links.
The other options on this dialog should be self-explanatory.
Macro security
Click the Macro Security button to open the Macro Security dialog,
where you can adjust the security level for executing macros and
specify trusted sources.
File sharing options for this document
Select the Open this document in read-only mode option to
restrict this document to be opened in read-only mode only. This
option protects the document against accidental changes. It is still
possible to edit a copy of the document and save that copy with the
same name as the original.
Select the Record changes option to enable recording changes.
This is the same as Edit > Changes > Record. To allow other users
of this document to apply changes, but prevent them from disabling
change recording, click the Protect button and enter a password.
Appearance options
Writing, editing, and (especially) page layout are often easier when you
can see the page margins (text boundaries), the boundaries of tables
and sections, grid lines, and other features. In addition, you might
prefer to use colors that are different from OOo’s defaults for such
items as note indicators or field shadings.
On the OpenOffice.org – Appearance page (Figure 35), you can specify
which items are visible and the colors used to display various items.
• To show or hide items such as text boundaries, select or deselect
them.
• To change the default colors for items, click the down-arrow in
the Color setting column by the name of the item and select a
color from the pop-up box.
• To save your color changes as a color scheme, type a name in the
Scheme box and click Save.
Chapter 2 Setting up Writer 49
Page 50

Figure 35: Showing or hiding text, object, and table
Free eBook Edition
boundaries
Choosing options for loading and saving documents
You can set the Load/Save options to suit the way you work.
If the Options dialog is not already open, click Tools > Options. Click
the + sign to the left of Load/Save.
Figure 36: Load/Save options
General Load/Save options
Most of the choices on the Load/Save – General page (Figure 37) are
familiar to users of other office suites. Some items of interest are
described below.
50 OpenOffice.org 3.x Writer Guide
Page 51

Figure 37: Choosing Load and Save options
Free eBook Edition
Load user-specific settings with the document
When you save a document, certain settings are saved with it. Some
settings (printer name, data source linked to the document) are
always loaded with a document, whether or not this option is
selected. If you select this option, these document settings are
overruled by the user-specific settings of the person who opens it. If
you deselect this option, the user’s personal settings do not overrule
the settings in the document. For example, your choice (in the
options for OOo Writer) of how to update links is affected by the
Load user-specific settings option.
Load printer settings with the document
If this option is not selected, the printer settings that are stored
with the document are ignored when you print it using the Print
File Directly icon. The default printer in your system is used
instead.
Edit document properties before saving
If this option is selected, the Document Properties dialog pops up to
prompt you to enter relevant information the first time you save a
new document (or whenever you use Save As).
Save AutoRecovery information every __ Minutes
Choose whether to enable AutoRecovery and how often to save the
information used by the AutoRecovery process.
AutoRecovery in OpenOffice.org overwrites the original file. If you
also choose Always create backup copy, the original file then
overwrites the backup copy. If you have this option set, recovering
Chapter 2 Setting up Writer 51
Page 52

your document after a system crash will be easier; but recovering an
Free eBook Edition
earlier version of the document may be harder.
Save URLs relative to file system / internet
Relative addressing to a file system is only possible if the source
document and the referenced document are both on the same drive.
A relative address always starts from the directory in which the
current document is located. It is recommended to save relatively if
you want to create a directory structure on an Internet server.
Default file format and ODF settings
ODF format version. OpenOffice.org by default saves documents in
Open Document Format (ODF) version 1.2. While this allows for
improved functionality, there may be backwards compatibility
issues. When a file saved in ODF 1.2 is opened in an earlier version
of OpenOffice.org (using ODF 1.0/1.1), some of the advanced
features may be lost. Two notable examples are cross-references to
headings and the formatting of numbered lists. If you plan to share
documents with people who are still using older versions of
OpenOffice.org, save the document using ODF version 1.0/1.1.
Size optimization for ODF format. OpenOffice.org documents are
XML files. When you select this option, OOo writes the XML data
without indents and line breaks. If you want to be able to read the
XML files in a text editor in a structured form, deselect this option.
Document type. If you routinely share documents with users of
Microsoft Word, you might want to change the Always save as
attribute for text documents to one of the Word formats.
Although Writer can open files in the .docx format produced by
Note
Word 2007, it cannot save in .docx format. This capability is
planned for a future release.
VBA Properties Load/Save options
On the Load/Save – VBA Properties page (Figure 38), you can choose
whether to keep any macros in Microsoft Office documents that are
opened in OpenOffice.org. These macros are disabled in OOo.
If you choose Load Basic code, you can edit the macros in OOo. The
changed code is saved in an OOo document but is not retained if you
save into a Microsoft Office format.
If you choose Save original Basic code, the macros are retained
unchanged if you save the file into Microsoft Office format.
52 OpenOffice.org 3.x Writer Guide
Page 53

Save original Basic code takes precedence over Load Basic code. If
Free eBook Edition
both options are seleted and you edit the disabled code in OOo, the
original Microsoft Basic code will be saved when saving in a Microsoft
Office format.
To remove any possible macro viruses from the Microsoft Office
document, deselect Save original Basic code. The document will be
saved without the Microsoft Basic code.
Figure 38: Choosing
Load/Save VBA Properties
Microsoft Office Load/Save options
On the Load/Save – Microsoft Office page (Figure 39), you can choose
what to do when importing and exporting Microsoft Office OLE objects
(linked or embedded objects or documents such as spreadsheets or
equations).
Select the [L] check boxes to convert Microsoft OLE objects into the
corresponding OpenOffice.org OLE objects when a Microsoft document
is loaded into OOo (mnemonic: “L” for “load”).
Select the [S] check boxes to convert OpenOffice.org OLE objects into
the corresponding Microsoft OLE objects when a document is saved in
a Microsoft format (mnemonic: “S” for “save”).
Figure 39: Choosing Load/Save Microsoft Office options
Chapter 2 Setting up Writer 53
Page 54

HTML compatibility Load/Save options
Free eBook Edition
Choices made on the Load/Save – HTML Compatibility page affect
HTML pages imported into OpenOffice.org and those exported from
OOo. See HTML documents; importing/exporting in the Help for more
information.
Figure 40: Choosing HTML compatibility options
Font sizes
Use these fields to define the respective font sizes for the HTML
<font size=1> to <font size=7> tags, if they are used in the HTML
pages. (Many pages no longer use these tags.)
Import - Use 'English (USA)' locale for numbers
When importing numbers from an HTML page, the decimal and
thousands separator characters differ according to the locale of the
HTML page. The clipboard, however, contains no information about
the locale. If this option is not selected, numbers will be interpreted
according to the Language - Locale setting in Tools > Options >
Language Settings > Languages (see page 66). If this option is
selected, numbers will be interpreted as for the English (USA)
locale.
Import - Import unknown HTML tags as fields
Select this option if you want tags that are not recognized by OOo to
be imported as fields. For an opening tag, an HTML_ON field will be
created with the value of the tag name. For a closing tag, an
HTML_OFF will be created. These fields will be converted to tags in
the HTML export.
54 OpenOffice.org 3.x Writer Guide
Page 55

Import - Ignore font settings
Free eBook Edition
Select this option to have OOo ignore all font settings when
importing. The fonts that were defined in the HTML Page Style will
be used.
Export
To optimize the HTML export, select a browser or HTML standard
from the Export box. If OpenOffice.org Writer is selected, specific
OpenOffice.org Writer instructions are exported.
Export - OpenOffice.org Basic
Select this option to include OOo Basic macros (scripts) when
exporting to HTML format. You must activate this option before you
create the OpenOffice.org Basic macro; otherwise the script will not
be inserted. OpenOffice.org Basic macros must be located in the
header of the HTML document. Once you have created the macro in
the OpenOffice.org Basic IDE, it appears in the source text of the
HTML document in the header.
If you want the macro to run automatically when the HTML
document is opened, choose Tools > Customize > Events. See
Chapter 13 (Getting Started with Macros) in the Getting Started
guide for more information.
Export - Display warning
When the OpenOffice.org Basic option (see above) is not selected,
the Display warning option becomes available. If the Display
warning option is selected, then when exporting to HTML a
warning is shown that OpenOffice.org Basic macros will be lost.
Export - Print layout
Select this option to export the print layout of the current document
as well.
The HTML filter supports CSS2 (Cascading Style Sheets Level 2) for
printing documents. These capabilities are only effective if print
layout export is activated.
Export - Copy local graphics to Internet
Select this option to automatically upload the embedded pictures to
the Internet server when uploading using FTP.
Export - Character set
Select the appropriate character set for the export.
Chapter 2 Setting up Writer 55
Page 56

Choosing options for Writer
Free eBook Edition
Settings chosen on the pages in the OpenOffice.org Writer section of
the Options dialog box determine how your Writer documents look and
behave while you are working on them.
If the Options dialog box is not already open, click Tools > Options.
Click the + sign by OpenOffice.org Writer on the left-hand side of the
Options – OpenOffice.org dialog box. A list of pages drops down.
Figure 41: OpenOffice.org Writer options
General options
The choices on the OpenOffice.org Writer – General page affect the
updating of links and fields, the units used for rulers and other
measurements, and the default tab stop positions.
Figure 42: Choosing general options for Writer
Update links when loading
Depending on your work patterns, you may not want links to be
updated when you load a document. For example, if your file links to
other files on a network, you won’t want those links to update when
you are not connected to the network.
56 OpenOffice.org 3.x Writer Guide
Page 57

Update fields and charts automatically
Free eBook Edition
You may not want fields or charts to update automatically when you
are working, because that slows down performance.
Settings – Tab stops
The Tab stops setting specifies the distance the cursor travels for
each press of the Tab key. This setting is also used for the indent
distance applied by the Increase Indent and Decrease Indent
buttons on the Formatting Bar, which affect the indentation of
entire paragraphs.
Using the default tab stops to space out or indent material on a page
is not recommended. If you use the default tab interval and then
send the document to someone who uses a different default tab
interval, then your tabbed material will be displayed using the other
person’s default tab settings. In addition, any changes to the default
tab stops will change the existing default tab stops in any document
you open afterward, as well as tab stops you insert after making the
change.
To avoid these unwanted changes, define your own tabs in
paragraph styles or individual paragraphs (see “Defining your own
tab stops and indents” in Chapter 3).
View options
Two pages of options set the defaults for viewing Writer documents:
View (described here) and Formatting Aids (described below).
If the items on the OpenOffice.org Writer - View page are not selfexplanatory, you can easily test their effects in a blank document.
This is a good page to check if, for example, you cannot see graphics
on the screen or you see field codes instead of the text or numbers you
are expecting.
Figure 43: Choosing View options for Writer
Chapter 2 Setting up Writer 57
Page 58

Formatting Aids options
Free eBook Edition
The display of symbols such as paragraph ends and tabs help you when
writing, editing, and doing page layout. For example, you might want
to know if any blank paragraphs or tabs are included or if any tables or
graphics are too wide and intrude into the margins of the page.
On the OpenOffice.org Writer – Formatting Aids page, select the
required options.
Figure 44: Choosing Formatting Aids options
Direct cursor lets you enter text, images, tables, frames, and
other objects in any blank area in your document. Writer inserts
blank paragraphs and tabs to position the text or objects.
Note
This feature is incompatible with rigorous use of styles and can
lead to many formatting oddities, so it should be avoided by
professional writers.
Grid options
Specifying “snap to grid” can be very helpful when you are trying to
align several objects such as graphics or tables.
On the OpenOffice.org Writer – Grid page, you can choose whether to
enable this feature and what grid intervals to use. If the grid intervals
(subdivisions) are too large, you may find that you do not have enough
control in placing the objects.
58 OpenOffice.org 3.x Writer Guide
Page 59

Figure 45: Choosing Grid options
Free eBook Edition
Default fonts
The default fonts specified on the OpenOffice.org Writer – Basic Fonts
(Western) page apply to both Writer documents and HTML (Web)
documents.
Figure 46: Choosing default fonts
• If you want to change the defaults, do so on this page. You can, of
course, choose other fonts for use in specific documents, either by
applying direct formatting or by defining and applying styles in
those documents.
• When choosing fonts on this page you are not limited to single
fonts or to the ones shown in the drop-down list. You can specify a
“font family”as a comma-separated set of fonts that includes those
suitable for Windows, Macintosh, Linux, and other operating
systems. These choices are particularly important in HTML
documents.
• If the document is viewed on a system that does not have the first
font specified, it will use one of the other fonts if that one is
Chapter 2 Setting up Writer 59
Page 60

available. Otherwise, it will substitute a font that is available on
Free eBook Edition
the system.
• Type the list of fonts, separated by commas, in the boxes. If you
want these defaults to apply to the current document only, select
that option. The Default button resets the values on this page to
the defaults installed with OpenOffice.org.
Print options
On the OpenOffice.org Writer – Print page (Figure 47), you can choose
which items are printed with the document by default. These options
are in addition to those on the OpenOffice.org – Print page (Figure 28).
Figure 47: Choosing Print options for Writer
Some considerations:
• When you are working on drafts and you want to save printer ink
or toner, you might want to deselect some of the items in the
Contents section.
• The Print black selection causes color text (but not graphics) to
print as black on a color printer; on a black-and-white printer, this
option causes color text to print as solid black instead of shades
of grey (dithered).
• The Print black option has a different effect to the Convert
colors to greyscale on the Options – OpenOffice.org – Print page
(Figure 23), which prints all graphics as greyscale on color
printers. (On black-and-white printers, color in graphics normally
prints as greyscale.)
60 OpenOffice.org 3.x Writer Guide
Page 61

• If you are printing double-sided on a non-duplexing printer, you
Free eBook Edition
might choose to print only left or right pages, then turn the stack
over and print the other pages.
• Depending on how your printer ejects pages (face up or face
down), you might need to print the pages in reverse order so they
stack in the correct order as they are printed.
You can override any of these defaults when printing a
Tip
document. Click File > Print, then click the Options button
on the Print dialog box. The Printer Options dialog box that
appears is similar to the one shown in Figure 47.
Default table options
On the OpenOffice.org Writer – Table page, you can specify the default
behavior of tables.
Figure 48: Choosing default Table options
Some considerations:
• If most of your tables will require borders or headings, select
those options. If most of your tables are used for page layout,
deselect borders and headings.
• Number recognition can be very useful if most of your tables
contain numerical data; Writer will recognize dates or currency,
for example, and format the numbers appropriately. However, if
you want the numbers to remain as ordinary text, this feature can
be quite irritating, so you will want to deselect it.
Chapter 2 Setting up Writer 61
Page 62

• The Keyboard handling section specifies the distances that cells
Free eBook Edition
move when you use keyboard shortcuts to move them and the size
of rows and columns inserted using keyboard shortcuts.
• The choices in the Behavior of rows/columns section determine
the effects that changes to rows or columns have on adjacent
rows or columns and the entire table. You might need to test
these selections to fully understand the effects.
Change tracking options
If you plan to use the change-tracking feature of Writer, use the
OpenOffice.org Writer – Changes page to choose the way inserted and
deleted material is marked, whether and how attribute changes are
marked, and whether and how change bars are marked in the margins.
Figure 49: Choosing options for tracking changes
Compatibility options
Do you need to import Microsoft Word documents into OOo Writer? If
so, you might want to select some or all of the settings on the
OpenOffice.org Writer – Compatibility page. If you are not sure about
the effects of these settings, leave them as the defaults provided by
OOo. For information about the settings not described below, see the
Help.
62 OpenOffice.org 3.x Writer Guide
Page 63

Figure 50: Choosing compatibility options
Free eBook Edition
Use printer metrics for document formatting
If this option is selected, the printer specified for the document
determines how the document is formatted for viewing on screen.
The line breaks and paragraph breaks you see on screen match
those that apply when the document is printed on that printer.
This setting can be useful when several people are reviewing a
document that will eventually be printed on a specific printer or
when the document is exported to PDF (a process that uses “Adobe
PDF” as the printer).
If this option is not selected, a printer-independent layout will be
used for screen display and printing.
Add spacing between paragraphs and tables (in current
document)
In OpenOffice.org Writer, paragraph spacing is defined differently
than it is in MS Word documents. If you have defined spacing
between two paragraphs or tables, spacing is also added in the
corresponding MS Word documents.
If this option is selected, MS Word-compatible spacing is added
between paragraphs and tables in OpenOffice.org Writer documents.
Add paragraph and table spacing at tops of pages (in current
document)
You can define paragraphs to have space appear before (above)
them. If this option is selected, any space above a paragraph will
also appear if the paragraph is at the beginning of a page or column,
Chapter 2 Setting up Writer 63
Page 64

if the paragraph is positioned on the first page of the document, or
Free eBook Edition
after a manual page break.
If you import an MS Word document, the spaces are automatically
added during the conversion.
Add paragraph and table spacing at bottom of table cells
Specifies that the bottom spacing is added to a paragraph, even
when it is the last paragraph in a table cell.
Use as Default
Click this button to use the current settings on this page as the
default in OpenOffice.org.
AutoCaption options
Do you want OOo to automatically insert captions for tables, pictures,
frames, and OLE objects that have been inserted in a Writer
document?
You may not always want captions for every table, for example,
Note
If you do want automatic captions on one or more object types:
1) Choose OpenOffice.org Writer > AutoCaption on the Options
dialog box.
2) On the OpenOffice.org Writer – AutoCaption page (Figure 51),
select the check box next to an object you want to be
automatically captioned (Picture in the example shown).
3) With the item highlighted, specify the characteristics of the
caption. The supplied categories for captions are Drawing,
Illustration, Table, and Text. However, you are not limited to the
supplied categories. If you want to use another name (for
example, Figure) for the caption label, type the required term in
the box. In the example shown, I have added the category
“Figure” to the list.
if you use tables for layout as well as for tables of data. You
can always add captions to individual tables, graphics, or other
objects (right-click > Caption).
Additional information about numbering captions by chapter, character
styles, frame styles, and other items on the AutoCaption page, is given
in later chapters in the Writer Guide.
64 OpenOffice.org 3.x Writer Guide
Page 65

Figure 51: Setting up a new category for automatic
Free eBook Edition
captions on graphics
Mail Merge E-mail options
You can produce form letters using Writer and then use the mail merge
function to personalize those letters and send them to a number of
addresses taken from a data source, such as an address book. Mail
merged documents can be printed and mailed, or sent by e-mail.
Use the OpenOffice.org Writer – Mail Merge E-mail page to set up the
user and server information for sending form letters by e-mail. If you
are not sure what information to put in any of the fields, consult your
e-mail program or your Internet service provider.
Figure 52: Specifying settings for use when e-mailing
mail-merged form letters
Chapter 2 Setting up Writer 65
Page 66

Choosing options for HTML documents
Free eBook Edition
You can configure OpenOffice.org to treat HTML documents in Writer
differently than regular documents.
1) If the Options dialog box is not already open, click Tools >
Options.
2) Click the + sign by OpenOffice.org Writer/Web on the left-hand
side of the Options – OpenOffice.org dialog box. A list of pages
drops down.
Here you can customize settings related to printing, formatting aids,
view options, table defaults, the grid, and a default background for
HTML documents you're working with in Writer.
Many of the options available under Options – OpenOffice.org
Writer/Web are identical to the settings under Options –
Note
OpenOffice.org Writer but will only affect HTML documents
opened in Writer. The previous sections contain detailed
discussion on these options.
Choosing language settings
You may need to do several things to set the language settings to what
you want:
• Install the required dictionaries
• Change some locale and language settings
• Choose spelling options
Install the required dictionaries
OOo3 automatically installs several dictionaries with the program. To
add other dictionaries, be sure you are connected to the Internet, and
then use Tools > Language > More Dictionaries Online. OOo will
open your default web browser to a page containing links to additional
dictionaries that you can install. Follow the prompts to select and
install the ones you want.
Change some locale and language settings
You can change some details of the locale and language settings that
OOo uses for all documents or for specific documents.
66 OpenOffice.org 3.x Writer Guide
Page 67

In the Options dialog box, click Language Settings > Languages.
Free eBook Edition
Figure 53: OpenOffice.org language options
On the right-hand side of the Language Settings – Languages page
(Figure 54), change the User interface, Locale setting, Default
currency, and Default languages for documents as required. In the
example, English (UK) has been chosen for all the appropriate settings.
If you want the language (dictionary) setting to apply to the current
document only, instead of being the default for all new documents,
select For the current document only.
If necessary, select the options to enable support for Asian languages
(Chinese, Japanese, Korean) and support for CTL (complex text layout)
languages such as Hindi, Thai, Hebrew, and Arabic. If you choose
either of these options, the next time you open this page, you will see
some extra pages under Language Settings, as shown in Figure 55.
These pages (Searching in Japanese, Asian Layout, and Complex Text
Layout) are not discussed here.
Figure 54: Choosing language options
Chapter 2 Setting up Writer 67
Page 68

Figure 55: Extra pages available when enhanced language
Free eBook Edition
support options are selected
Choose spelling options
To choose the options for checking spelling, click Language Settings
> Writing Aids. In the Options section of the page, choose the
settings that are useful for you.
Figure 56: Choosing languages, dictionaries, and
options for checking spelling
Some considerations:
• If you do not want spelling checked while you type, deselect
Check spelling as you type.
• If you use a custom dictionary that includes words in all
uppercase and words with numbers (for example, AS/400), select
Check uppercase words and Check words with numbers.
• Check special regions includes headers, footers, frames, and
tables when checking spelling.
68 OpenOffice.org 3.x Writer Guide
Page 69

Here you can also check which of the user-defined (custom)
Free eBook Edition
dictionaries are active, or you can add or remove dictionaries by
clicking the New or Delete buttons.
OpenOffice.org does not have a grammar checker, but you can
Note
install a grammar checker extension such as Language Tool
and access that tool from Tools > Spelling and Grammar.
See Chapter 14 for more about installing extensions.
Controlling Writer’s AutoCorrect functions
Some people find some or all of the items in Writer’s AutoCorrect
feature annoying because Writer changes what you type when you do
not want it changed. Many people find some of the AutoCorrect
functions quite helpful; if you do, then select the relevant options. But
if you find unexplained changes appearing in your document, this is a
good place to look to find the cause.
To open the AutoCorrect dialog box, click Tools > AutoCorrect
Options. (You need to have a document open for this menu item to
appear.) In Writer, this dialog box has five tabs. Many of the options in
this dialog box are described in Chapter 3 (Working with Text).
Chapter 2 Setting up Writer 69
Page 70

Chapter 3
Free eBook Edition
Working with Text
Page 71

Introduction
Free eBook Edition
This chapter covers the basics of working with text in Writer, the wordprocessing component of OpenOffice.org (OOo). It assumes that you
are familiar with the use of a mouse and keyboard and that you have
read about Writer’s menus and toolbars and other topics covered in
Chapter 1 (Introducing Writer).
We recommend that you also follow the suggestions in Chapter 2
(Setting up Writer) about displaying formatting aids, such as end-ofparagraph marks, and selecting other setup options.
When you have read this chapter, you should know how to:
• Select, cut, copy, paste, and move text
• Find and replace text
• Insert special characters
• Format paragraphs and characters
• Create numbered or bulleted lists
• Check spelling, use the thesaurus, and choose hyphenation
options
• Use the autocorrection, word completion, autotext, and line
numbering features
• Track changes, undo and redo changes, and insert notes
• Link to other parts of a document
Selecting text
Before you can do anything with text, you need to select it. Selecting
text in Writer is similar to selecting anything in other applications.
In addition to selecting blocks of text, you can select items that are not
consecutive, and columns (vertical blocks) of text.
Selecting items that are not consecutive
To select nonconsecutive items (as shown in Figure 57) using the
mouse:
1) Select the first piece of text.
2) Hold down the Control (Ctrl) key and use the mouse to select the
next piece of text.
3) Repeat as often as needed.
Chapter 3 Working with Text 71
Page 72

Now you can work with the selected text (copy it, delete it, change the
Free eBook Edition
style, and so on).
Note
To select nonconsecutive items using the keyboard:
1) Select the first piece of text. (For more information about
keyboard selection of text, see the topic “Navigating and
Selecting with the Keyboard” in the OpenOffice.org Help (F1).)
2) Press Shift+F8. This puts Writer in “ADD” mode. The word ADD
appears on the Status Bar.
3) Use the arrow keys to move to the start of the next piece of text
to be selected. Hold down the Shift key and select the next piece
of text.
4) Repeat as often as needed.
Now you can work with the selected text.
Press Esc to exit from this mode.
Macintosh users: substitute the Command key when
instructions in this chapter say to use the Control key.
Figure 57: Selecting items that are not next to each other
Selecting a vertical block of text
You can select a vertical block or “column” of text that is separated by
spaces or tabs (as you might see in text pasted from e-mails, program
listings, or other sources), using OOo’s block selection mode. To
change to block selection mode, use Edit > Selection Mode > Block
Area, or click several times in the status bar on STD until it changes to
BLK.
Now you can highlight the selection, using mouse or keyboard, as
shown in Figure 58.
72 OpenOffice.org 3.x Writer Guide
Page 73

Figure 58: Selecting a vertical block of text
Free eBook Edition
Cutting, copying, and pasting text
Cutting and copying text in Writer is similar to cutting and copying text
in other applications. You can copy or move text within a document, or
between documents, by dragging or by using menu selections, icons, or
keyboard shortcuts. You can also copy text from other sources such as
Web pages and paste it into a Writer document.
To move (cut and paste) selected text using the mouse, drag it to the
new location and release it. To copy selected text, hold down the
Control key while dragging. The text retains the formatting it had
before dragging.
When you paste text, the result depends on the source of the text and
how you paste it. If you click on the Paste icon, then the pasted text
keeps its original formatting (such as bold or italics). Text pasted from
Web sites and other sources may also be placed into frames or tables.
If you do not like the results, click the Undo icon or press Control+Z.
To make the pasted text take on the formatting of the text surrounding
where it is pasted, choose either:
• Edit > Paste Special, or
• Click the triangle to the right of the Paste icon, or
• Click the Paste icon without releasing the left mouse button.
Then select Unformatted text from the resulting menu.
The range of choices on the Paste Special menu varies depending on
the origin and formatting of the text (or other object) to be pasted. See
Figure 59 for an example with text on the clipboard.
Figure 59: Paste Special menu
Chapter 3 Working with Text 73
Page 74

This example includes the formatting option DDE link. DDE is an
Free eBook Edition
acronym for Dynamic Data Exchange, a mechanism whereby selected
data in document A can be pasted into document B as a linked, ‘live’
copy of the original. It would be used, for example, in a report written
in Writer containing time-varying data, such as sales results sourced
from a Calc spreadsheet. The DDE link ensures that, as the source
spreadsheet is updated so is the report, thus reducing the scope for
error and reducing the work involved in keeping the Writer document
up to date.
Finding and replacing text
Writer has a Find and Replace feature that automates the process of
searching for text inside a document. In addition to finding and
replacing words and phrases, you can:
Use wildcards and regular expressions to fine-tune a search.
• Find and replace specific formatting.
• Find and replace paragraph styles.
To display the Find & Replace dialog box (Figure 60), use the keyboard
shortcut Control+F or choose Edit > Find & Replace from the menu
bar.
Type the text you want to find in the Search for box.
1) To replace the text with different text, type the new text in the
Replace with box.
2) You can select various options, such as matching the case,
matching whole words only, or doing a search for similar words.
(See below for some other choices.)
3) When you have set up your search, click Find. To replace text,
click Replace instead.
If you click Find All, Writer selects all instances of the search
Tip
text in the document. Similarly, if you click Replace All
button, Writer replaces all matches.
Caution
74 OpenOffice.org 3.x Writer Guide
Use Replace All with caution; otherwise, you may end up with
some hilarious (and highly embarrassing) mistakes. A mistake
with Replace All might require a manual, word-by-word
search to fix, if not discovered in time to undo.
Page 75

Figure 60: Expanded Find & Replace dialog box
Free eBook Edition
Find and replace specific formatting
A very powerful use of Find & Replace takes advantage of the format
option. For example, you might want to replace underlined words with
italics.
On the Find & Replace dialog box (with More Options displayed, as in
Figure 60):
1) To search for text with specific formatting, enter the text in the
Search for box. To search for specific formatting only, delete any
text in the Search for box.
2) Click Format to display the Text Format (Search) dialog box. The
tabs on this dialog box are similar to those on the Paragraph
format and Paragraph Style dialog boxes.
3) Choose the formats you want to search for and then click OK. The
names of selected formats appear under the Search for box. For
example, you might search for all text in 14-point bold Helvetica.
4) To replace text as well as formatting, type the replacement text in
the Replace with box.
Chapter 3 Working with Text 75
Page 76

To search for specific text with specific formatting (for example,
Free eBook Edition
the word hello in bold), specify the formatting, type the text in
the Search for box and leave the Replace with box blank.
To remove specific character formatting, click Format, select the
Font tab, then select the opposite format (for example, No Bold).
The No Format button on the Find & Replace dialog box clears
all previously selected formats.
5) Click Find, Find All, Replace, or Replace All
Unless you plan to search for other text using those same
attributes, click No Format to remove the attributes after
Tip
completing your search. If you forget to do this, you may
wonder why your next search fails to find words you know are
in the document.
Find and replace paragraph styles
If you combine material from several sources, you may discover that
lots of unwanted paragraph styles have suddenly shown up in your
document. To quickly change all the paragraphs of one (unwanted)
style to another (preferred) style:
1) On the expanded Find & Replace dialog box (Figure 60), select
Search for Styles. (If you have attributes specified, this option is
labeled Including Styles.) The Search for and Replace with boxes
now contain a list of styles.
2) Select the styles you want to search for and replace.
3) Click Find, Find All, Replace, or Replace All.
Repeat steps 2 and 3 for each style that you want to replace.
Use wildcards (regular expressions)
Wildcards (also known as regular expressions) are combinations of
characters that instruct OOo how to search for something. Regular
expressions are very powerful but not very intuitive. They can save
time and effort by combining multiple finds into one.
Table 2 shows a few of the regular expressions used by OOo.
Tip
The online help describes many more regular expressions and
their uses.
76 OpenOffice.org 3.x Writer Guide
Page 77

To search for a character that is defined as a wildcard, type a
Free eBook Edition
Note
backslash (\) before the character. For example, to find the text
$5.00, you would conduct a search using \$5\.00.
To use wildcards and regular expressions when searching and
replacing:
1) On the Find & Replace dialog box, click More Options to see
more choices. On this expanded dialog box (Figure 60), select the
Regular expressions option.
2) Type the search text, including the wildcards, in the Search for
box and the replacement text (if any) in the Replace with box. Not
all regular expressions work as replacement characters; the line
break (\n) is one that does work.
3) Click Find, Find All, Replace, or Replace All (not
recommended).
Table 2. Examples of search wildcards (regular expressions)
To find
Any single
character
One of the
specified
characters
Any single
character in this
range
Any single
character except
the characters
inside the brackets
The beginning of a
word
The end of a word end\> log\> finds catalog, but not logistics.
Use this
expression
.
[xyz] b[iu]n finds bin and bun.
[x-y] [r-t]eed finds reed, seed, and teed;
[^x] p[^a]st finds post and pest, but not
\<start \<log finds logbook and logistics, but
Examples and comments
b.d finds bad, bud, bid, and bed.
ranges must be in alphabetically
ascending order.
past.
not catalog.
A paragraph
marker
A line break \n Finds a line break that was inserted
Chapter 3 Working with Text 77
$ Does not work as a replacement
character. Use \n instead.
with Shift+Enter. When used as a
replacement character, it inserts a
paragraph marker.
Page 78

Inserting special characters
Free eBook Edition
A “special” character is one not found on a standard English keyboard.
For example, © ¾ æ ç ñ ö ø ¢ are all special characters. To insert a
special character:
1) Place the cursor in your document where you want the character
to appear.
2) Click Insert > Special Character to open the Special
Characters dialog box (Figure 61).
Figure 61: The Special Characters dialog box, where you can
insert special characters
3) Select the characters (from any font or mixture of fonts) you wish
to insert, in order; then click OK. The selected characters are
shown in the lower left of the dialog box. As you select each
character, it is shown on the lower right, along with the numerical
code for that character.
Tip
Note
Notice that the characters selected appear in the bottom-left
corner of the dialog box.
Different fonts include different special characters. If you do
not find a particular special character you want, try changing
the Font selection.
78 OpenOffice.org 3.x Writer Guide
Page 79

Inserting non-breaking spaces and hyphens
Free eBook Edition
Non-breaking spaces
To prevent two words from being separated at the end of a line,
press Control+spacebar after the first word.
Non-breaking hyphen
You can use a non-breaking hyphen in cases where you do not want
the hyphen to appear at the end of a line, for example in a number
such as 123-4567. To insert a non-breaking hyphen, press
Shift+Control+minus sign.
Inserting en and em dashes
To enter en and em dashes, you can use the Replace dashes option
under Tools > AutoCorrect > Options (Figure 70). This option
replaces two hyphens, under certain conditions, with the
corresponding dash.
In the following table, the A and B represent text consisting of letters A
to z or digits 0 to 9.
Text that you type: Result
A - B (A, space, minus, space, B) A – B (A, space, en-dash, space, B)
A -- B (A, space, minus, minus, space, B) A – B (A, space, en-dash, space, B)
A--B (A, minus, minus, B) A—B (A, em-dash, B)
A-B (A, minus, B) A-B (unchanged)
A -B (A, space, minus, B) A -B (unchanged)
A --B (A, space, minus, minus, B) A –B (A, space, en-dash, B)
Another means of inserting en or em dashes is through the Insert >
Special Characters menu. Select the U+2013 or U+2014 character,
respectively.
A third method uses keyboard shortcuts. These shortcuts vary
depending on your operating system.
You can also record macros to insert en and em dashes and
Tip
assign those macros to unused key combinations, for example
Ctrl+Shift+N and Ctrl+Shift+M. For more information, see
Chapter 17 (Customizing Writer).
Chapter 3 Working with Text 79
Page 80

Windows
Free eBook Edition
Hold down one of the Alt keys and type on the numeric keypad: 0150
for an en dash or 0151 for an em dash. The dash appears when you
release the Alt key.
On a keyboard with no numeric keypad, use a Fn (Function)
key combination to type the numbers. (The Fn key is usually to
the right of the left-hand Ctrl key on the keyboard.)
Tip
Linux
Hold down the Compose key and type two hyphens and a period for
an en dash, or three hyphens for an em dash. The dash appears
when you release the Compose key.
Tip
For example, on a US keyboard layout, the combination for an
en dash should be Alt+Fn+mjim and for an em dash it should
be Alt+Fn+mjij.
The key that operates as a Compose key varies with the Linux
distribution. It is usually one of the Alt or Win keys, but may be
another key, and should be user-selectable.
Mac OS X
Hold down the Option (Alt) key and type a hyphen for an en dash.
For an em dash, the combination is Shift+Option+Hyphen.
Formatting paragraphs
You can apply many formats to paragraphs using the buttons on the
Formatting toolbar. Figure 62 shows the Formatting toolbar as a
floating toolbar, customized to show only the buttons for paragraph
formatting.
It is highly recommended that you use paragraph styles rather
Tip
than manually formatting paragraphs, especially for long or
standardized documents. For information on the advantages of
styles and how to use them, see Chapters 6 and 7.
80 OpenOffice.org 3.x Writer Guide
Page 81

Open Styles and
Free eBook Edition
1
Formatting Window
Apply Style
2
Align Left
3
Centered
4
Align Right
5
Justified
6
Line Spacing: 1
7
Line Spacing: 1.5
8
Line Spacing: 2
9
Numbering On/Off
10
Bullets On/Off
11
Decrease Indent
12
Increase Indent
13
Paragraph format dialog box
14
Figure 62: Formatting toolbar, showing icons for paragraph formatting
Figure 63 shows examples of the text alignment options.
Figure 63: Text alignment options
When using justified text, the last line is by default aligned to the left;
however, if so desired, you can also align the last line to the center of
the paragraph area or justify it so that spaces are inserted between the
words in order to fill the whole line. In the case where the last line
consists of a single word, you can also have this word stretched to
cover the whole line. Figure 64 shows an example of the effect
obtained when setting each of these options.
Figure 64: Four choices for the last line of a justified paragraph
These options are controlled in the Alignment page of the Format >
Paragraph dialog box (see Figure 65).
Chapter 3 Working with Text 81
Page 82

Figure 65: Options for the last line of a justified paragraph
Free eBook Edition
Setting tab stops and indents
The horizontal ruler shows both the default tab stops and any tab stops
that you have defined. Tab settings affect indentation of full
paragraphs (using the Increase Indent and Decrease Indent icons on
the Formatting toolbar) as well as indentation of parts of a paragraph
(by pressing the Tab key on the keyboard).
Using the default tab spacing can cause formatting problems if you
share documents with other people. If you use the default tab spacing
and then send the document to someone else who has chosen a
different default tab spacing, tabbed material will change to use the
other person’s settings. This may cause major formatting problems.
Instead of using the defaults, define your own tab settings, as
described in this section.
To define indents and tab settings for one or more selected
paragraphs, double-click on a part of the ruler that is not between the
left and right indent icons to open the Indents & Spacing page of the
Paragraph dialog box. Double-click anywhere between the left and
right indent icons on the ruler to open the Tabs page of the Paragraph
dialog box (Figure 66).
A better strategy is to define tabs for the paragraph style. See
Chapters 6 and 7 for more about paragraph styles.
82 OpenOffice.org 3.x Writer Guide
Page 83

Figure 66: Specifying tab stops and fill characters
Free eBook Edition
Using tabs to space out material on a page is not recommended.
Tip
Depending on what you are trying to accomplish, a table is
usually a better choice.
Changing the default tab stop interval
Any changes to the default tab setting will affect the existing
Note
To set the measurement unit and the spacing of default tab stop
intervals, go to Tools > Options > OpenOffice.org Writer >
General.
default tab stops in any document you open afterward, as well
as tab stops you insert after making the change.
Figure 67: Selecting a default tab stop interval
You can also set or change the measurement unit for rulers in the
current document by right-clicking on the ruler to open a list of units,
as shown in Figure 68. Click on one of them to change the ruler to that
unit. The selected setting applies only to that ruler.
Chapter 3 Working with Text 83
Page 84

Figure 68: Ruler showing default tab stops
Free eBook Edition
Formatting characters
You can apply many formats to characters using the buttons on the
Formatting toolbar. Figure 69 shows the Formatting toolbar as a
floating toolbar, customized to show only the buttons for character
formatting.
1 Open Styles and
Formatting Window
2 Apply Style 8 Superscript 14 Background Color
3 Font Name 9 Subscript 15 Open Character Format
4 Font Size 10 Increase Font
5 Bold 11 Reduce Font
Figure 69: Formatting toolbar, showing icons for character formatting
It is highly recommended that you use character styles rather than
manually formatting characters. For information on styles and how to
use them, see Chapters 6 and 7.
To remove manual formatting, select the text and click Format
Tip
> Default Formatting or right-click and select Default
Formatting from the pop-up menu.
6 Italic 12 Font Color
7 Underline 13 Highlighting
dialog box
Autoformatting
Writer can be set to automatically format parts of a document
according to the choices made on the Options page of the AutoCorrect
dialog box (Tools > AutoCorrect Options). See Figure 70.
84 OpenOffice.org 3.x Writer Guide
Page 85

Figure 70: Autoformat choices on the Options page of
Free eBook Edition
the AutoCorrect dialog box
The Help describes each of these choices and how to activate the
autoformats. Some common unwanted or unexpected formatting
changes include:
• Horizontal lines. If you type three or more hyphens (---),
underscores (___) or equal signs (===) on a line and then press
Enter the paragraph is replaced by a horizontal line as wide as
the page. The line is actually the lower border of the preceding
paragraph.
• Bulleted and numbered lists. A bulleted list is created when you
type a hyphen (-), asterisk (*), or plus sign (+), followed by a
space or tab at the beginning of a paragraph. A numbered list is
created when you type a number followed by a period (.), followed
by a space or tab at the beginning of a paragraph. Automatic
numbering is only applied to paragraphs formatted with the
Default, Text body or Text body indent paragraph styles.
Tip
Chapter 3 Working with Text 85
If you notice unexpected formatting changes occurring in your
document, this is the first place to look for the cause.
Page 86

To automatically format the file according to the options you have set,
Free eBook Edition
choose Format > AutoCorrect Options and select or deselect the
items on the submenu.
While Typing
Automatically formats the document while you type.
Apply
Automatically formats the document.
Apply and Edit Changes
Automatically formats the file and then opens a dialog box where
you can accept or reject the changes.
AutoCorrect Options
Opens the AutoCorrect dialog (Figure 70).
Creating numbered or bulleted lists
There are several ways to create numbered or bulleted lists:
• Use autoformatting, as described above.
• Use list styles, as described in Chapter 7 (Working with Styles).
• Use the Numbering and Bullets icons on the paragraph
formatting toolbar (see Figure 62). This method is described here.
To produce a numbered or bulleted list, select the paragraphs in the
list and then click on the appropriate icon on the toolbar.
It is a matter of personal preference whether you type your
Note
information first, then apply Numbering/Bullets or apply these
as you type.
Using the Bullets and Numbering toolbar
You can create a nested list (where one or more list items has a sublist
under it, as in an outline) by using the buttons on the Bullets and
Numbering toolbar (Figure 71). You can move items up or down the
list, create subpoints, and even change the style of bullets.
It is possible to move a list entry up, together with all of its
Tip
86 OpenOffice.org 3.x Writer Guide
sub-entries. Do this by clicking the Promote One Level With
Subpoints button.
Page 87

1 Bullets On/Off 6 Move Up (One Level) with
Free eBook Edition
2 Numbering On/Off 11 Move Up in Sub-points
3 Numbering Off 7 Move Down (One Level) with
4 Up One Level 8 Insert Unnumbered Entry 13 Restart Numbering
5 Down One Level 9 Move Up 14 Bullets and Numbering
Sub-points
Sub-points
10 Move Down
12 Move Down in Sub-points
Figure 71: Bullets and Numbering toolbar
If you create a nested list using the predefined styles, all the levels of
the list (up to 10) apply the same numbering (or bullet), however in
many circumstances you will want to use a combination of numbering
formats and bullets when creating a nested lists. Such lists with a
mixture of numbering formats and bullets can be easily configured as
described in the following example. Additional information on lists and
in particular the technique to create your own list style is described in
Chapter 7 (Working with Styles).
When creating nested lists, one option is to enter all the list
paragraphs first and apply the levels afterwards.
You can use keyboard shortcuts to move paragraphs up or
down the outline levels. Place the cursor at the beginning of
the numbered paragraph and press:
Tip
Tab Down a level
Shift+Tab Up a level
To insert a tab stop at the beginning of a numbered paragraph
(that is, after the number but before the text), press
Control+Tab.
Example: configuring a nested list
We will use a numbering style to produce the following effect:
I. Level-1 list item
A. Level-2 list item
i. Level-3 list item
a) Level-4 list item
Chapter 3 Working with Text 87
Page 88

This example uses one of the supplied styles, Numbering 1, however if
Free eBook Edition
you intend to reuse this type of nested list you can also create a new
style as illustrated in Chapter 7 (Working with Styles).
1) Open the Styles and Formatting
window and click the List
Styles icon at the top. Rightclick on the Numbering 1 style
and choose Modify from the
pop-up menu.
2) On the Numbering Style dialog
box, go to the Outline page,
where you will find that one
style matches our
requirements. Click once on
that style.
Figure 72: Modifying a list style
Figure 73: Choosing a predefined outline-numbering style
3) To modify the layout of the list, use the Options tab (Figures 74
and 75). Notice that the preview on the right shows the outline
selected. In the Level box on the left, select 1, then 2, 3, and 4
and see how the information in the Numbering and After boxes
changes.
Use the Options page to set different punctuation; for example, a
period (full stop) after “a” on level 4 instead of a parenthesis.
88 OpenOffice.org 3.x Writer Guide
Page 89

Figure 74: Checking the outline numbering for level-1 list items
Free eBook Edition
Figure 75: Numbering style for level-2 list items
To make the indentation at each level greater or less than the
default, change it on the Position page. Select the level, then
make any changes in the indentation, spacing, or numbering
alignment.
4) Repeat for each level as required, then click OK.
With outline numbering you can define different bullet styles
for the different levels of a bullet list. Use the Bullets tab of the
Tip
Bullets and Numbering dialog box (not shown) to select the
basic style. Return to the Options tab to customize the bullet
for each indent level. Here you can set bullets to any
character. See the Graphics tab for more bullets.
Using footnotes and endnotes
Footnotes appear at the bottom of the page on which they are
referenced. Endnotes are collected at the end of a document.
To work effectively with footnotes and endnotes, you need to:
• Insert footnotes.
Chapter 3 Working with Text 89
Page 90

• Define the format of footnotes.
Free eBook Edition
• Define the location of footnotes on the page; see Chapter 4
(Formatting Pages).
Inserting footnotes/endnotes
To insert a footnote or an endnote, put the cursor where you want the
footnote/endnote marker to appear. Then select Insert > Footnote
from the menu bar or click the Insert Footnote Directly or Insert
Endnote Directly icon on the Insert toolbar.
Figure 76: Using the Insert Footnote Directly icon on the toolbar
A footnote (or endnote) marker is inserted in the text, and the cursor is
relocated to the footnote area at the bottom of the page (or to the
endnote area at the end of the document). Type the footnote or
endnote content in this area.
If you use Insert > Footnote, the Insert Footnote dialog box is
displayed. Here you can choose whether to use the automatic
numbering sequence specified in the footnote settings and whether to
insert the item as a footnote or an endnote.
Figure 77: Inserting a footnote directly
If you use the Insert Footnote Directly or Insert Endnote Directly
icon, the footnote or endnote automatically takes on the attributes
previously defined in the Footnote Settings dialog box.
You can edit an existing footnote or endnote the same way you edit any
other text.
90 OpenOffice.org 3.x Writer Guide
Page 91

To delete a footnote or endnote, delete the footnote marker. The
Free eBook Edition
contents of the footnote or endnote are deleted automatically, and the
numbering of other footnotes or endnotes is adjusted automatically.
Defining the format of footnotes/endnotes
To format the footnotes themselves, click Tools > Footnotes. On the
Footnote Settings dialog box, choose settings as required. The
Endnotes page has similar choices.
Figure 78: Defining footnote formatting
Checking spelling and grammar
Writer provides a spelling checker, which can be used in two ways.
AutoSpellcheck checks each word as it is typed and displays a
wavy red line under any misspelled words. When the word is
corrected, the red wavy line disappears.
To perform a separate spelling check on the document (or a text
selection) click the Spelling and Grammar button. This checks
the document or selection and opens the Spelling and Grammar
dialog box (Figure 86) if any misspelled words are found.
Here are some more features of the spelling checker:
• You can right-click on a word with a wavy underline, to open a
powerful context menu. If you select from the suggested words on
Chapter 3 Working with Text 91
Page 92

the menu, the selection will replace the misspelled word in your
Free eBook Edition
text. Other menu options are discussed below.
• You can change the dictionary language (for example, Spanish,
French, or German) on the Spelling and Grammar dialog box.
• You can add a word to a dictionary. Click Add in the Spelling and
Grammar dialog box and pick the dictionary to add it to.
• Click the Options button on the Spelling and Grammar dialog box
to open a dialog box similar to the one in Tools > Options >
Language Settings > Writing Aids described in Chapter 2.
There you can choose whether to check uppercase words and
words with numbers, and you can manage custom dictionaries,
that is, add or delete dictionaries and add or delete words in a
dictionary.
Figure 79: Selecting a word from dictionary using the
Spelling and Grammar dialog box
Writer does not include a grammar checker, but you can install an
extension such as Language Tool and access it from Tools > Spelling
and Grammar. (See Chapter 17 for more about installing extensions.)
Language Tool adds a new menu item and submenu to the Tools menu,
from which you can configure the tool and check or recheck the
document. Figure 80 shows an example of the Language Tool extension
in use.
92 OpenOffice.org 3.x Writer Guide
Page 93

Figure 80: The Language Tool extension
Free eBook Edition
Using built-in language tools
Writer provides some tools that make your work easier if you mix
multiple languages within the same document or if you write
documents in various languages.
The main advantage of changing the language is that you can then use
the correct dictionaries to check spelling and apply the localized
versions of Autocorrect replacement tables, thesaurus, and
hyphenation rules.
You can also set the language for a paragraph or a group of characters
as None. This option is especially useful when you insert text such as
web addresses or programming language snippets that you do not
want to check for spelling.
Specifying the language in character and paragraph styles is the
preferred method, because styles allow a greater level of control and
make changing the language much faster. On the Font tab of the
Paragraph Styles dialog box, you can specify that certain paragraphs
be checked in a language that is different from the language of the rest
of the document. See Chapter 7 (Working with Styles) for information
on how to manage the language settings of a style.
Chapter 3 Working with Text 93
Page 94

You can also set the language for the whole document, for individual
Free eBook Edition
paragraphs, or even for individual words and characters, all from
Tools > Language on the menu bar.
For selection
Applies a specified language to the selected text (the selection can
be as short as a few characters or as long as several paragraphs).
For paragraph
Select this option to apply the specified language to the paragraph
where the cursor is located.
For all text
Select this option to apply the specified language to all the
document.
Another way to change the language of a whole document is to use
Tools > Options > Language Settings > Languages. In the Default
languages for documents section, you can choose a different language
for all the text.
Figure 81: Options available in the Languages settings
Unlike the menu tool that applies to the individual document,
Caution
The spelling checker works only for those languages in the list which
have the symbol next to them. If you do not see this symbol next to
your preferred language, you can install the dictionary using Tools >
Languages > More dictionaries online.
The language used for checking spelling is also shown in the status
bar, next to the page style in use.
a change in the default language from the Options dialog
box is a general change of settings of OOo and will therefore
apply to all the documents created in the future. If you want
to change the language for the current document only, be
sure to select the For the current document only option.
94 OpenOffice.org 3.x Writer Guide
Page 95

Using the thesaurus
Free eBook Edition
The thesaurus gives alternative words and phrases. Select the word or
phrase you want to find more choices for and select Tools >
Language > Thesaurus or press Control+F7. Click on a meaning to
show alternative words and phrases for that meaning of the word. For
example, when given the word “house”, the thesaurus offers several
meanings, including “dwelling”, “legislature”, and “sign of the zodiac”.
If you click on “dwelling”, you will see “dwelling”, “home”, “domicile”,
“abode”, and other alternatives, as shown in Figure 82.
Note
Figure 82: The thesaurus offers alternatives to words
If the current language does not have a thesaurus installed,
this feature is disabled.
Hyphenating words
You have several choices regarding hyphenation: let Writer do it
automatically (using its hyphenation dictionaries), insert conditional
hyphens manually where necessary, or don’t hyphenate at all. Each
choice has its pros and cons.
Automatic hyphenation
To turn automatic hyphenation of words on or off:
1) Press F11 to open the Styles and Formatting window (Figure 83).
On the Paragraph Styles page, right-click on Default and select
Modify.
Chapter 3 Working with Text 95
Page 96

Figure 83: Modifying a paragraph style
Free eBook Edition
2) On the Paragraph Style dialog box, select the Text Flow tab.
Figure 84: Turning on automatic hyphenation
3) Under Hyphenation, select or deselect the Automatically option.
4) Click OK to save.
Turning on hyphenation for the Default paragraph style affects
all other paragraph styles that are based on Default. You can
individually change other styles so that hyphenation is not
Note
active; for example, you might not want headings to be
hyphenated. Any styles that are not based on Default are not
affected. For more on paragraph styles, see Chapter 6
(Introduction to Styles) and Chapter 7 (Working with Styles).
You can also set hyphenation choices through Tools > Options >
Language Settings > Writing Aids. In Options, near the bottom of
the dialog box, scroll down to find the hyphenation settings (see
Figure 85).
96 OpenOffice.org 3.x Writer Guide
Page 97

Figure 85: Setting hyphenation options
Free eBook Edition
To change the minimal number of characters for hyphenation, the
minimum number of characters before a line break, or the minimum
number of characters after a line break, select the item, and then click
the Edit button in the Options section.
Hyphenate without inquiry
Specifies that you will never be asked to manually hyphenate words
that the hyphenation dictionary does not recognize. If this box is not
selected, when a word is not recognized, a dialog box will open
where you can manually enter hyphens.
Hyphenate special regions
Specifies that hyphenation will also be carried out in footnotes,
headers, and footers.
Hyphenation options set on the Writing Aids dialog box are effective
only if hyphenation is turned on through paragraph styles.
Choices on the Writing Aids dialog box for Characters before line
break and Ccharacters after line break override settings in paragraph
styles for Characters at line end and Characters at line begin.
Manual hyphenation
To manually hyphenate words, do not use a normal hyphen, which will
remain visible even if the word is no longer at the end of a line when
you add or delete text or change margins or font size. Instead, use a
conditional hyphen, which is visible only when required.
To insert a conditional hyphen inside a word, click where you want the
hyphen to appear and press Control+hyphen. The word will be
hyphenated at this position when it is at the end of the line, even if
automatic hyphenation for this paragraph is switched off.
Chapter 3 Working with Text 97
Page 98

Using AutoCorrect
Free eBook Edition
Writer’s AutoCorrect function automatically corrects a long list of
common misspellings and typing errors. For example, “hte” will be
changed to “the”.
Select Tools > AutoCorrect Options to open the AutoCorrect dialog
box. There you can define what strings of text are corrected and how.
In most cases, the defaults are fine.
Figure 86: Replace tab of AutoCorrect dialog box
AutoCorrect is turned on when Writer is installed. To turn it off,
uncheck Format > AutoCorrect > While Typing.
To stop Writer replacing a specific spelling, go to the Replace tab,
highlight the word pair, and click Delete.
To add a new spelling to the list, type it into the Replace and With
boxes on the Replace tab, and click New.
See the different pages of the dialog box for the wide variety of other
options available to fine-tune AutoCorrect.
AutoCorrect can be used as a quick way to insert special
Tip
98 OpenOffice.org 3.x Writer Guide
characters. For example, (c) will be autocorrected to ©. You
can add your own special characters.
Page 99

Using word completion
Free eBook Edition
If Word Completion is enabled, Writer tries to guess which word you
are typing and offers to complete this word for you. To accept the
suggestion, press Enter. Otherwise, continue typing.
To turn off Word Completion, select Tools > AutoCorrect Options >
Word Completion and deselect Enable word completion.
You can customize word completion from the Word Completion tab.
• Add (append) a space automatically after an accepted word.
• Show the suggested word as a tip (hovering over the word) rather
than completing the text as you type.
• Collect words when working on a document, and then either save
them for later use in other documents or select the option to
remove them from the list when closing the document.
• Change the maximum number of words remembered for word
completion and the length of the smallest words to be
remembered.
• Delete specific entries from the word completion list.
• Change the key that accepts a suggested entry—the options are
right arrow, End key, Enter (Return), Space bar, and Tab.
Figure 87: Customizing word completion
Chapter 3 Working with Text 99
Page 100

Note
Free eBook Edition
Automatic word completion only occurs after you type a word
for the second time in a document.
Using AutoText
AutoText allows you to assign text, tables, graphics, and other items to
a key combination. For example, rather than typing “Senior
Management” every time you use that phrase, you just have to type
“sm” and press F3. You can also save graphics or tables (such as a
formatted Tip like the one on this page) as AutoText.
To assign some text to an AutoText shortcut:
1) Type the text into your document.
2) Select the text.
3) Go to Edit > AutoText (or press Control+F3).
4) Enter a name for your shortcut. Writer will suggest a one-letter
shortcut, which you can change.
5) Click the AutoText button on the right of the AutoText dialog box
and select New (text only) from the menu.
6) Click Close to return to your document.
To insert AutoText, type the shortcut and press F3.
If the only option under the AutoText button is Import, either
Tip
AutoText is especially powerful when assigned to fields. See Chapter
14 (Working with Fields) for more information.
you have not entered a name for your AutoText or there is no
text selected in the document.
Line numbering
Line numbering puts line numbers in the margin. The line numbers are
displayed on screen and are printed. Figure 88 shows an example with
numbering on every line.
Click Tools > Line Numbering and select the Show numbering
option in the top left corner. Then click OK.
100 OpenOffice.org 3.x Writer Guide
 Loading...