


Quick Start Guide
The Portable Wireless
Bluetooth Speaker
Designed and Engineered
TheOontZ.com

In the Package
Micro USB Charging Cable
Lanyard
Note: The cable and lanyard are packed below the cardboard insert in the box. Slide out the insert to locate them.

Table of Contents
Pages
Buttons, Lights and Connectors |
1 |
- 3 |
Attaching the Lanyard |
4 |
|
Battery Features and Charging the Battery |
5 |
- 7 |
Turning On and O |
8 |
|
Pair & Connect with Your Device |
9 |
- 12 |
To Play with Non-Bluetooth Devices use a 3.5mm Stereo Audio Cable |
13 |
|
IPX5 Water Resistance |
14 |
|
Wireless Hands Free Personal Speakerphone |
15 |
|
Reset Function |
16 |
|
Contacting Customer Support |
17 |
|
Safety and Precautions |
18 - 19 |
|
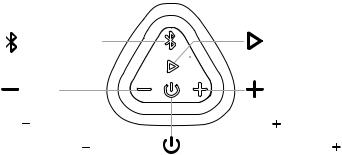
Buttons
Bluetooth Button |
|
Play/Pause Button |
(Dual Function) |
|
Press and Release |
|
|
to Pause/Play |
Button |
|
Button |
(Dual Function) |
|
(Dual Function) |
Volume Down |
|
Volume Up |
Press to decrease volume |
|
Press to increase volume |
Track Back |
Power |
Track Forward |
Press and Hold Down to go to the |
Press and Hold Down |
|
beginning of the track |
|
to go to the next track |
Press and Hold Down  twice to go to previous track
Note : Some apps may not support track back, track forward, or play/pause
Important : The volume control on your device and the speaker work independently of each other. To play the speaker at the loudest volume, set the volume on your device to maximum and raise the volume on the speaker to maximum.
Page 1
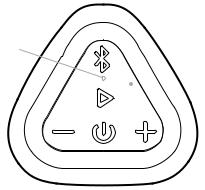
Lights
Blue Light lit when speaker is on:
-Flashing Blue
speaker is in pairing mode
- Solid Blue
speaker is connected
Red Light lit when charging: 
-Slowly flashing Red battery is charging
-Solid Red
battery is fully charged
Page 2

Connectors
Rubber Flap |
AUX IN Jack |
Micro USB |
|||
- covers connectors |
|
Charging Connector |
|||
- pull gently from the top to access |
|
|
|
||
connectors, it is a snug fit to |
|
|
|
||
provide water resistance |
|
|
|
||
|
|
|
|
|
|
|
|
|
|
|
|
|
|
|
|
|
|
|
|
|
|
|
|
Built-in Mic for Speakerphone |
Note: The rubber flap needs to be closed |
|
to keep the speaker water resistant |
|
Page 3 |
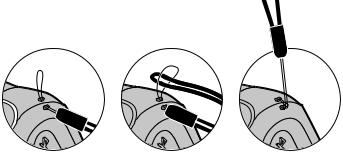
Attaching the Lanyard
-Slide the smaller lanyard loop through one of the lanyard attachment holes at the top of the speaker
-Slide the larger lanyard loop through the smaller lanyard loop that has passed though the other attachment hole
-The lanyard is not for use by children under 6 years of age. Small parts can present a choking hazard.
-Pull the larger lanyard loop completely through the smaller lanyard loop to fasten the lanyard to the speaker
Page 4
 Loading...