

Page 1

Ontrack®PowerControls™3.0 | User Guide
PowerControls™ Offers Flexibility and Saves Time, Money and
Resources When Recovering Exchange Data
Page 2

Notice to Users
Ontrack® PowerControls™ is a software application that has been developed, copyrighted, and licensed by
Kroll Ontrack Inc. Use of the software is governed by the terms and conditions of the end user license
agreement contained within the software.
This manual should not be construed as any representation or warranty with respect to the software named
herein. Occasionally, changes or variations exist in the software that are not reflected in the manual.
Generally, if such changes or variations are known to exist and affect the product significantly, a release
note or Read Me file will accompany the User Guide, or will be available on the Kroll Ontrack Web site.
In that event, please read the release notes or Read Me file before using the product.
Trademarks
Ontrack, PowerControls and other Kroll Ontrack brand and product names referred to herein are
trademarks or registered trademarks of Kroll Ontrack Inc., and/or its parent, in the United States and/or
other countries. All other brand and product names are trademarks of their respective holders.
Copyrights
Copyright © 2004 Kroll Ontrack Inc. All Rights Reserved.
No part of this publication may be reproduced, transmitted, transcribed, stored in a retrieval system, or
translated into a language or computer language, in any form by any means, electronic, mechanical, optical,
chemical, manual or otherwise, without the express written consent of Kroll Ontrack Inc.
U.S. Contact Information
Web Address
http://www.ontrack.com/powercontrols
Technical Support
Phone: 952-937-2121
Email: [email protected]
Web: http://www.ontrack.com/support
Hours: 8:00 a.m. - 5:00 p.m., M-F, CST
Software Sales
Toll Free: 800-645-3649
Web: http://www.ontrack.com/powercontrols
Corporate Headquarters
Kroll Ontrack Inc.
9023 Columbine Road
Eden Prairie, MN 55347
Toll Free: 800-872-2599
Phone: 952-937-5161
Fax: 952-937-5750
Web: http://
www.ontrack.com
Page 3

International Contact Information
United Kingdom
Kroll Ontrack Ltd.
The Pavilions, 1 Weston Road
Kiln Lane, Epsom
Surrey KT17 1JG
United Kingdom
http://www.ontrack.co.uk/powercontrols
Software Sales
Tel: +44 (0)1372 741 999
Fax: +44(0) 1372 740 629
[email protected]
Technical Support
Tel: +44 (0)1372 744 422
[email protected]
http://www.ontrack.co.uk/techsupport
Germany
Kroll Ontrack GmbH
Hanns-Klemm-Straße 5
71034 Böblingen
Deutschland
France
Kroll Ontrack SARL
2, impasse de la Noisette
91371 Verrières-le-Buisson Cedex 413
France
http://www.ontrack.fr/powercontrols
Support Commercial
Tél : +33 (0)1 69 53 66 92
Fax : +33 (0)1 69 53 66 81
[email protected]
Support Technique
Tél : 0820 09 87 72
[email protected]
http://www.ontrack.fr/techsupport
Spain
Kroll Ontrack
General Castaños 11, 1º izquierda
28004 Madrid
España
http://www.ontrack.de/powercontrols
Software Sales
Tel.: +49 (0)7031/644-0
Fax: +49 (0)7031/644-100
[email protected]
Technical Support (available in German and
English)
Tel: +49 (0)7031/644-244
[email protected]
http://www.ontrack.es/powercontrols
Venta de Licencias
Tel: +34 91 310 67 20
[email protected]
Soporte técnico
900 112 212
[email protected]
Page 4

Contents
Introduction ..................................................................................................................... 1
About this User Guide ..................................................................................................................... 1
Five Major Reasons for Using PowerControls ................................................................................ 1
PowerControls 3.0 Enhancements.................................................................................................. 2
System Requirements ..................................................................................................................... 3
Configuring Microsoft Outlook ......................................................................................................... 3
Installing PowerControls.................................................................................................................. 4
Updating PowerControls.................................................................................................................. 4
Uninstalling PowerControls ............................................................................................................. 4
Getting Help..................................................................................................................................... 5
PowerControls Editions ................................................................................................................... 7
Enabling the Licensing Agents ........................................................................................................ 8
The License .ini File......................................................................................................................... 9
About the Exchange Database...................................................................................................... 10
Organizing the Exchange Database Files for PowerControls....................................................... 10
Chapter 1: Using the ExtractWizard ............................................................................11
ExtractWizard: Welcome Page...................................................................................................... 11
ExtractWizard: Select the Exchange Information Store Extraction Source................................... 12
ExtractWizard: Catalog Performance Options............................................................................... 13
ExtractWizard: Catalog Progress .................................................................................................. 14
ExtractWizard: Exchange Information Store Selection.................................................................. 15
Step 1: Viewing an Exchange Backup .......................................................................................... 15
Step 2: Restoring an Online or Offline Backup.............................................................................. 16
Step 3: Saving an ExtractWizard Catalog File .............................................................................. 22
Step 4: Completing the Exchange Information Store Selection .................................................... 23
i
Page 5

Contents
ExtractWizard: Exchange Information Store Destination Folder................................................... 23
ExtractWizard: Exchange Information Store Copy Progress ........................................................ 24
ExtractWizard: Completing the Wizard.......................................................................................... 25
Organizing the Extracted Files for PowerControls ........................................................................ 25
Chapter 2: Looking at the Interface............................................................................. 26
PowerControls Main Window ........................................................................................................ 26
Previewing and Opening Messages.............................................................................................. 30
Opening Attachments .................................................................................................................... 31
Saving Attachments....................................................................................................................... 31
Changing the View ........................................................................................................................ 32
Viewing or Hiding the Toolbar and Status Bar .............................................................................. 32
Resizing Panes Separated by a Split Bar ..................................................................................... 32
Sorting Messages in the Message Lists........................................................................................ 34
Refreshing the Screen................................................................................................................... 34
Viewing the Properties of an EDB File, PST File, Folder, or Mailbox ........................................... 35
Viewing Deleted Messages ........................................................................................................... 37
Setting Preferences ....................................................................................................................... 37
Chapter 3: Starting PowerControls ............................................................................. 41
Running the PowerControls Data Wizard...................................................................................... 41
Data Wizard: Welcome Page ........................................................................................................ 41
Data Wizard: Source Path Selection ............................................................................................. 42
Guidelines for Selecting an Exchange Database.......................................................................... 43
Data Wizard: Target Type and Path Selection.............................................................................. 44
Data Wizard: Now Processing Data File ....................................................................................... 46
Data Wizard: Completing the Data Wizard.................................................................................... 47
Looking at the PowerControls Main Window after Using the Data Wizard................................... 48
ii
Page 6

Ontrack® PowerControls™ 3.0 User Guide
Returning to the PowerControls Data Wizard ............................................................................... 48
Opening the Source Database and Target Mailboxes from the Main Window ............................. 49
Opening Multiple Sources and Targets......................................................................................... 52
Closing Sources and Targets ........................................................................................................ 53
Chapter 4: Finding Messages ...................................................................................... 55
Guidelines for Using the Find Dialog Box...................................................................................... 55
Searching for Messages................................................................................................................ 56
Searching Within Results .............................................................................................................. 59
Viewing Previous Search Results.................................................................................................. 60
Clearing Fields and Clearing Results............................................................................................ 60
Opening and Saving Attachments in the Find Dialog Box ............................................................ 60
Exporting Messages from the Find Dialog Box ............................................................................. 60
Restoring Messages from the Find Dialog Box............................................................................. 60
Chapter 5: Exporting Messages ..................................................................................61
General Information about Exporting Messages........................................................................... 61
About Message (.msg) and Text (.txt) Export................................................................................ 61
Exporting Messages ...................................................................................................................... 62
About the Export Progress Dialog Box.......................................................................................... 65
Chapter 6: Restoring Exchange Data.......................................................................... 67
Quick Look at Restoring Your Exchange Data.............................................................................. 67
Restoring Your Exchange Data in Three Easy Steps ................................................................... 67
Limits for PST and Folder Targets................................................................................................. 68
About Restoring Messages to an Exchange Server...................................................................... 68
About the Copy Progress Dialog Box............................................................................................ 69
Creating, Renaming, and Deleting Folders in the Target Pane .................................................... 70
Copying and Pasting or Dragging and Dropping........................................................................... 71
iii
Page 7

Contents
Examples of Restoring Your Exchange Data................................................................................ 72
Restoring Messages with Copy-Paste .......................................................................................... 72
Restoring Messages with Paste Special ....................................................................................... 74
Restoring a Folder ......................................................................................................................... 82
Restoring a Mailbox....................................................................................................................... 84
Restoring an EDB File ................................................................................................................... 86
Chapter 7: Using the Command Line ..........................................................................87
Command Line Syntax .................................................................................................................. 87
Examples of Using the Command Line ......................................................................................... 88
Index............................................................................................................................... 91
iv
Page 8

Introduction
Welcome to Ontrack® PowerControls™ 3.0, the mailbox recovery software that saves time, money, and
resources when recovering Microsoft Exchange data.
PowerControls works with your existing Microsoft Exchange server backup architecture and procedures,
and allows you to recover individual mailboxes, folders, messages, attachments, and even calendar, notes,
and tasks directly to your production Exchange server or any PST file. This eliminates time-consuming and
expensive single mailbox (brick-level) backups. This powerful software also lets you search and create a
copy of all archived email that matches a given keyword or criteria.
The PowerControls ExtractWizard lets you restore Exchange Information Store data from tape and disk
backups to any alternate location (e.g., machine, volume, folder), thereby eliminating the need for a
recovery server. In contrast, most backup programs let you restore Exchange data only to the same or
duplicate server from which it was backed up.
About this User Guide
This user guide shows you how to install PowerControls, how to use its commands and design features, and
how to get help. It provides step-by-step instructions for completing specific tasks on the Windows
platform. See the table of contents or the index to locate the pages on which particular topics are discussed.
Use Adobe Acrobat to open the PDF version of this user guide. After you open the PDF file, click the Hand
tool to view the table-of-contents hyperlinks in layout view. Then click a hyperlink to jump to a specific
topic in the manual.
Five Major Reasons for Using PowerControls
There are five primary ways you can benefit from using PowerControls:
Minimize the time to restore an individual mailbox. PowerControls can slash restore time, making it
possible to restore mail items from a previous full backup directly into your production Exchange server, or
directly into a new or existing .PST file. This eliminates the need for a recovery server and the extra steps
required to separately import mail back into Exchange or Outlook.
Eliminate backups of an individual mailbox. PowerControls eliminates the need to back up individual
mailboxes because they can be restored directly from an .EDB file
Minimize the time to locate all email matching specific criteria. PowerControls includes an Advanced
Find feature that can search across all mailboxes in an archive .EDB file, rather than searching one mailbox
at a time or bringing an old backup back online for analysis. And you can search by a variety of criteria,
including keywords, subject, date and specific users.
Minimize storage space and the cost required to store and archive your backups. Because you don't
need to back up mailboxes individually doing a brick-level backup, you eliminate the backup space, cost,
and time associated with performing brick-level backups.
Minimize the time to back up all mailboxes. PowerControls eliminates the need to back up mailboxes
individually. Normally, companies do a full Exchange backup, and then run a second process to back up
"Very Important Mailboxes” (VIMs) individually as well. PowerControls eliminates this second process.
.
1
Page 9

Introduction
PowerControls 3.0 Enhancements
PowerControls 3.0 contains all the features and benefits of PowerControls 2.10 plus these exciting new and
improved features:
ExtractWizard Agent for IBM Tivoli Storage Manager This latest Agent addition offers IBM Tivoli users
ExtractWizard support for Tivoli Storage Manager 5.0, 5.1, and 5.2 tape formats. ExtractWizard for IBM
Tivoli catalogs and extracts regular backups, archives, and instant archives including those with software
compression.
Command Line Interface Allows users to easily batch repetitive processes such as multiple copy and
export tasks without initiating the PowerControls user interface. This feature is extremely beneficial in
PowerControls production environment implementations.
ExtractWizard in Free Edition PowerControls Free edition includes ExtractWizard functionality allowing
users to catalog all supported tape formats. The Free edition allows users to save a catalog file that works
with the full retail edition of ExtractWizard.
PowerControls Agent for PST Source New PowerControls Agent allows the user to select any PST file
and open it as a source data store, performing all database operations including copying, exporting, and
searching. Parent folders are implemented for PST sources to allow copying and pasting from a PST
source.
Ability to Open Multiple Source and Target Users have the ability to open multiple sources and targets
including EDB and PST files simultaneously. No more being limited to selecting one Source and one
Target during a session.
Enable Tamper-Proof Target As an added security feature, when the Enable Tamper-Proof Target option
is selected, PowerControls does not allow the user to delete messages or folders in the Target or rename
folders in the Target. When this setting is enabled, the user will only have the ability to copy to the Target.
Preferences and Customization PowerControls will allow only those users with administrative rights to
change security preferences. These new PowerControls preferences further allow users to easily customize
PowerControls to meet their individual and business usage needs.
Save View Settings PowerControls saves the view settings the user selects for each folder. Setting
preferences such as sort order and column width will be retained every time the user returns to the folder
during the PowerControls session.
No Preview Preference Furthering PowerControls security preferences, users can disallow the opening or
previewing of messages in the Source or Target. When selected, PowerControls will close the preview
window, and disable the preview menu option and corresponding icon. All attempts to open messages
while the preview functionality is disabled will be messaged as the viewing being currently disabled.
Viewing Tasks, Calendar, and Contacts PowerControls will now allow users to view details and content
for calendar, contact, and task messages in the preview pane.
2
Page 10

Ontrack® PowerControls™ 3.0 User Guide
System Requirements
To use PowerControls on your computer, you need the following hardware and software:
• Windows NT4 Server (SP6), Windows NT4 Workstation (SP6), Windows 2000 Server, Windows
2000 Professional, Windows XP Professional, Windows XP Home, or Windows 2003 Server
Note: The Operating Systems listed above are required to have the latest service packs installed.
• Microsoft Outlook 2000 or later
• Pentium-class processor
• 256 MB RAM
• 5 MB of free hard disk space for the installation of PowerControls. More disk space will be needed for
processing log files when opening an EDB file.
• Monitor with 800 x 600 or higher screen resolution
Note: PowerControls supports Microsoft Exchange Server 5.5, 2000, or 2003.
PowerControls is designed to run from a Windows workstation and uses native Microsoft Messaging APIs
(MAPI) to communicate to the Exchange Server, ensuring reliable and consistent operation of your server.
Outlook must be installed and configured on the workstation to connect to an Exchange server for MAPI to
initialize properly. PowerControls is not designed to run from an Exchange Server.
Configuring Microsoft Outlook
PowerControls requires that Microsoft Messaging API (MAPI) be installed on your computer. To get full
MAPI functionality, do the following:
1. Make sure that Microsoft Outlook is installed and has been run once.
2. Set up an e-mail account on a Microsoft Exchange server.
3. For those versions of Microsoft Outlook that distinguish between “Internet Email” and “Corporate
Email,” use “Corporate Email” when configuring Outlook.
4. Run Outlook again, and connect to the Exchange server.
3
Page 11

Introduction
Installing PowerControls
Follow these steps to install PowerControls:
1. Turn off any disk utility or antivirus program running in the background.
2. Insert the PowerControls CD-ROM into your CD-ROM drive.
3. The installation program will automatically start. If it does not, click Run on the Start menu, and type
D:\autorun.exe or D:\bin\setup.exe, where D is the drive letter of your CD-ROM drive. Click OK.
4. Follow the on-screen instructions.
Updating PowerControls
Ontrack periodically improves PowerControls—adding features, making changes based on customer
requests, and fixing problems. When these updates (also known as patches) are available to you,
EasyUpdate™ can download and install them in minutes.
If there are multiple components for updating, EasyUpdate provides you with a list of options—you can
update everything, or select a subset of options.
We recommend running EasyUpdate as soon as you purchase and install PowerControls, just in case there
is a program patch that was not included with your version.
To run EasyUpdate
1. Do one of the following:
• In PowerControls: On the Help menu, click EasyUpdate.
• In Windows: Click the Start button, and then point to Programs. Point to Ontrack, point to
PowerControls, and then click EasyUpdate.
2. Follow the on-screen instructions.
Uninstalling PowerControls
You can uninstall PowerControls by running the uninstall program.
1. Click the Start button and then click Control Panel. (In Windows 2000 and earlier, you will point to
Settings before you click Control Panel.)
2. In Control Panel, click the Add or Remove Programs icon.
3. Click PowerControls, and then click Change/Remove.
4. Click Yes when the confirmation dialog box appears.
5. Follow the on-screen instructions.
4
Page 12

Ontrack® PowerControls™ 3.0 User Guide
Getting Help
Ontrack provides you with the following ways to get help with PowerControls: online Help and technical
support.
Online Help
Online Help includes all of the information in the user guide and more, and it lets you quickly access this
information by using one of three tabs. The Contents tab offers a hierarchical view of the contents of the
user guide. The Search tab offers a full-text search of the user guide. The Index tab offers a keyword-based
way to get to specific topics.
To start online Help
Do one of the following:
• Click the Help menu and then click Contents.
• Click
• Press the F1 key.
To identify a tool or control
• Position the pointer over a tool or control, and then pause. A tool tip shows the name of the item.
on the toolbar.
Technical Support
If you have questions or problems not answered in the user guide or the online Help, call our Technical
Support group. When reporting an issue, please include any information that might help us diagnose the
problem. The following details are often the most helpful:
• The version of PowerControls you are using (on the Help menu, click About).
• The versions of Windows and Outlook that you are running.
• The version of Exchange that contained the source EDB file.
• The circumstances and sequence of steps that led to the problem.
• The text of the error messages (if any appeared), and the contents of the Details dialog box.
• A list of other Windows programs that you were running when the error occurred.
Contact Information
See “U.S. Contact Information” and “International Contact Information” at the beginning of this user guide.
5
Page 13

Introduction
Conventions in this Manual
This manual uses the following guidelines for documenting menu commands and shortcuts; commands
available on shortcut menu; and notes and tips.
Menu Commands and Shortcuts
This manual uses the following conventions for documenting menu commands and shortcuts:
Example Describes
On the File menu, point to Target PST, and then Choosing the Create New command on the Target
click Create New. PST submenu on the File menu.
On the Edit menu, click Paste Special. Choosing the Paste Special command on the Edit
menu.
Press Ctrl+S (Open Source EDB) Holding down the Ctrl key and the S key at the same
time and then releasing them.
Right-click Clicking the right mouse button.
Shortcut Menu
You can access many of the same commands available on the menu bar and toolbar by right-clicking the
mouse to display a shortcut menu. The contents of the shortcut menu depend on whether you right-click in
the Source panes or the Target panes. This manual seeks to teach you how to use commands on the menu
bar and toolbar, and doesn’t always specify when you can use the shortcut menu. Once you become
familiar with PowerControls, the commands available to you on the shortcut menu should become
apparent.
Notes and Tips1
Notes (including cautions, important notes, tips, and warnings, as well as general notes) call the user's
attention to information of special importance or information that can't otherwise be suitably presented in
the main text.
Note indicates neutral or positive information that emphasizes or supplements important points of the main
text. A note supplies information that may apply only in special cases—for example, memory limitations,
equipment configurations, or details that apply to specific versions of a program.
Tip helps users apply the techniques and procedures described in the text to their specific needs. A tip
suggests alternative methods that may not be obvious and helps users understand the benefits and
capabilities of the product. A tip is not essential to the basic understanding of the text.
Important Note provides information essential to the completion of a task. Users can disregard
information in a note and still complete a task, but they should not disregard an important note.
1
The information in this section is taken from the Microsoft Manual of Style for Technical Publications, 3rd
Edition. Redmond, WA: Microsoft Press, 2002.
6
Page 14

Ontrack® PowerControls™ 3.0 User Guide
PowerControls Editions
The PowerControls edition you choose depends on the number of servers and other requirements. The
Standard edition handles up to 100 mailboxes per server, the Business edition up to 250 mailboxes per
server, and the Enterprise and Commercial editions allow for a customized number of mailboxes per server.
PowerControls also offers a free edition. With this edition, you can open an Exchange database (EDB) file,
search mailboxes one at a time, and view messages. You can also use the new Verify feature to test the
ability of PowerControls to fully read all messages, but not restore them.
EW = ExtractWizard
PC = PowerControls
Product PC Feature Agents Feature
PowerControls 3.0
Standard Edition
PowerControls 3.0
Business Edition
PowerControls 3.0
Enterprise Edition
PowerControls 3.0
Commercial
Edition
PowerControls 3.0
Free
100 mailbox enforcement
250 mailbox enforcement
Server name enforcement
Subscription enforcement
All features included and
partially enabled (open
any edb, view all
mailboxes, search one,
copy none)
• EW Agent for Microsoft® NT Backup (included)
• EW Agent for VERITAS Backup Exec™ (priced separately)
• EW Agent for LEGATO NetWorker® (priced separately)
• EW Agent for Computer Associates® (priced separately)
• EW Agent for BrightStor™ ARCserve® (priced separately)
• EW Agent for VERITAS NetBackup™ (priced separately)
• EW Agent for IBM® Tivoli® Storage Manager (priced
separately)
• PC Agent for PST Source (priced separately)
• All Agents included and fully enabled
• All Agents included and partially enabled (each Agent allows
user to read and view from any source but cannot extract or
copy any data out)
• EW Agents will allow user to save the catalog file
Technical Note: PowerControls can process both Private Information Stores (priv.edb, containing
mailboxes) and Public Information Stores (pub.edb, containing public folders). In PowerControls, a
private store mailbox = public store root folder. PowerControls will not open either type of .EDB with
more mailboxes than originally licensed for. For example, if you purchased the Standard Edition (for 100
mailboxes per server), and try to open an .edb file with 101 mailboxes, the product will refuse to open the
file because it exceeds 100 mailboxes.
7
Page 15

Introduction
Enabling the Licensing Agents
Each edition of PowerControls is distributed with six ExtractWizard (EW) Agents and one PowerControls
(PC) Agent. The EW Agent for Microsoft NT Backup is included with the program at no extra cost, and is
enabled by default. All other Agents are shipped with all PowerControls editions in disabled conditions and
require a new license .ini file to enable them.
Agent Versions
Supported
EW Agent for Microsoft®
NT Backup
EW Agent for VERITAS
Backup Exec™
EW Agent for VERITAS
NetBackup™
EW Agent for LEGATO
NetWorker®
EW Agent for Computer
Associates® BrightStor™
ARCserve®
EW Agent for IBM® Tivoli®
Storage Manager
PC Agent for PST Source Microsoft Outlook
All Versions .BKF Files Microsoft Tape Format
7.x, 8.x, and 9.0 .BKF Files Microsoft Tape Format
3.4.1, 3.4.2 and 4.5 _C1_F* Files VERITAS NetBackup
6.0.1, 6.0.2, 6.1,
6.2, and 7.0
6.x, 2000, 9 .CTF (ARCserve)
5.0, 5.1, and 5.2 .BFS and .OST Files Tivoli Tape Format
2000 or later
Disk Backup Tape Backup
.0 (LEGATO) Files LEGATO Tape Format
Files
NA NA
(MTF)
(MTF)
Tape Format
ARCserve Tape Format
To view the currently enabled Agents
• On the Help menu, click About and then click License Info.
To enable an Agent
1. Contact a sales representative and specify which agent you wish to purchase. A license.ini file
containing the newly enabled agent will be sent to you.
Note: To contact a sales representative, see the contact information at the beginning of this user guide.
2. Replace the existing .ini file with the new .ini file. The default location for this file is in the
PowerControls directory.
8
Page 16

Ontrack® PowerControls™ 3.0 User Guide
The License .ini File
All PowerControls editions require a license .ini file. The purpose of this file is to let users buy the edition
that contains only those features they need. Each edition has a specific .ini file. Before PowerControls
enables itself, it checks the .ini file for four things:
• Mailbox limit if applicable. Applies to Standard and Business editions.
• Server name enforcement if applicable. Allows users to open EDB files only from the licensed server
names. Applies to the Enterprise edition.
• Subscription length if applicable. Example is customers who run computer forensics. Applies to
Commercial edition.
• Agents (ExtractWizard Agents, PowerControls PST Agent)
Note: If you have the PowerControls Standard Edition (100 mailboxes), and you attempt to open an EDB
file with 101 mailboxes, PowerControls will not open the file.
Tip: For information on specifying the location of the .ini file, see the instructions for the Options tab in the
Preferences dialog box on page 37.
Example of a license file: PowerControls license.ini file – Standard Edition with 3 Agents enabled
;=====================================================================
;Kroll Ontrack License File
;Any modification will invalidate this file
;Copyright Kroll Ontrack Inc. 2004
;=====================================================================
[Product]
Product=Ontrack PowerControls 3.0
[Edition]
Standard 8cb9=7OVGKkRQnAutC3kdS3Vy5uti3qz95nM4SAimfw==
[SLN]
SLN=08 2004 Company A
[Licensed Mailboxes]
100=juUCKhVQ8gs=
[Licensed Agents]
PCA3032-E943F4=7+VxKmRQwQv5CysdC3U75ohi3Ayq5iI4nwiSfwmB
PCA3062-XAD9GL=7+VxKmRQwQv5Cy4dC3u75pzipaza5ig4NgjqfwmB
PCA3092-99XW9E=7+VxKmRQwQv5CyEdC3u75v3i3Azg5kY4SAjjfwmB
;PCA3032-E943F4 = Agent for NT Backup
;PCA3062-XAD9GL = Agent for CA BrightStor ARCServe
;PCA3092-99XW9E = Agent for PST Source
;
[AUTHENTICATION]
Checksum=641e
9
Page 17

Introduction
About the Exchange Database2
The Exchange database consists of the following files:
• .edb file (rich text database file) contains data placed in the store through Messaging Application
Programming Interface (MAPI), as well as all the database tables that define mailboxes, messages,
folders, and attachments.
• .stm file (streaming database file) contains common Internet formatted content, such as Multipurpose
Internet Mail Extensions (MIME) content, that protocols other than the MAPI protocol place in the
store.
Note: The .stm file is new to Exchange 2000. Exchange 5.5 does not contain .stm files.
• .log files (transaction logs) are history files recording server activity. These files are useful in
restoring and backing up Exchange data. All Exchange 2000 transaction logs are 5 MB in size.
Each storage group uses its own set of transaction log files. For example, if a storage group contains
five stores, all transactions for all five stores are recorded in a single series of transaction log files. You
can determine where to locate the transaction log files for each storage group.
• .chk (check) files are checkpoint files used for recovering (playing) data from transaction logs into
.EDB files. The checkpoint is the place marker in the EDB.CHK file that indicates which transactions
have been committed. Whenever data is written to an .EDB file from the transaction log, the
EDB.CHK file is updated with information specifying that the transaction was successfully committed
to the respective .EDB file. Separate Exx.chk files are maintained for each storage group using ESE
(Extensible Storage Engine).
• .pat (patch) files are used to record information on page splits in Exchange 5.5 through Exchange
2000 (SP1). In Exchange 2000 (SP2) and later, the functionality provided by .pat files is incorporated
into Exchange log files.
Organizing the Exchange Database Files for PowerControls
For best results when using an online incremental or differential backup
• Put the .edb and .stm files in one directory.
• Put the associated log files (e.g., .log, .pat, .chk) in one directory.
Note: The two directories can be different.
PowerControls does not require .stm or .log files, but you should include them to ensure that all email data
is recovered. You may get corruption errors if these files are not present. In other words, the quality of the
recovery is better if you include the .stm and log files.
If you are using an offline backup
You need to use the .edb and .stm files. To ensure that all email data is recovered, you should also include
all .log files, as well as .pat and .chk files if they exist. PowerControls performs its own verification process
and will include the .log and .pat files to determine if it needs them to recover the data.
2
The information in this section is taken from Microsoft Training and Certification: Implementing and
Managing Microsoft Exchange 2000. Workbook. Redmond, WA: Microsoft Press, 2001.
10
Page 18
Chapter 1: Using the ExtractWizard
If you have not yet restored backed-up Exchange Information Store data, try using PowerControls
ExtractWizard. The ExtractWizard restores both private and public Exchange Information Store data from
tape and disk backups to any alternate location (e.g., machine, volume, folder), thereby eliminating the
need for a recovery server. In contrast, most backup programs let you restore Exchange data only to the
same or duplicate server from which it was backed up. To run the ExtractWizard, do the following:
1. Start the ExtractWizard and, if desired, request license files for ExtractWizard backup software agents.
For more information, see “Enabling the Licensing Agents” on page 8.
2. Tell the wizard where the data is currently located. PowerControls searches the location for data files,
and shows you all that it finds.
3. Choose the files you want to restore.
4. Tell the wizard where you want the data restored. The wizard goes to work restoring the data to the
location you defined.
5. Click Finish when the wizard displays the results of the file extractions.
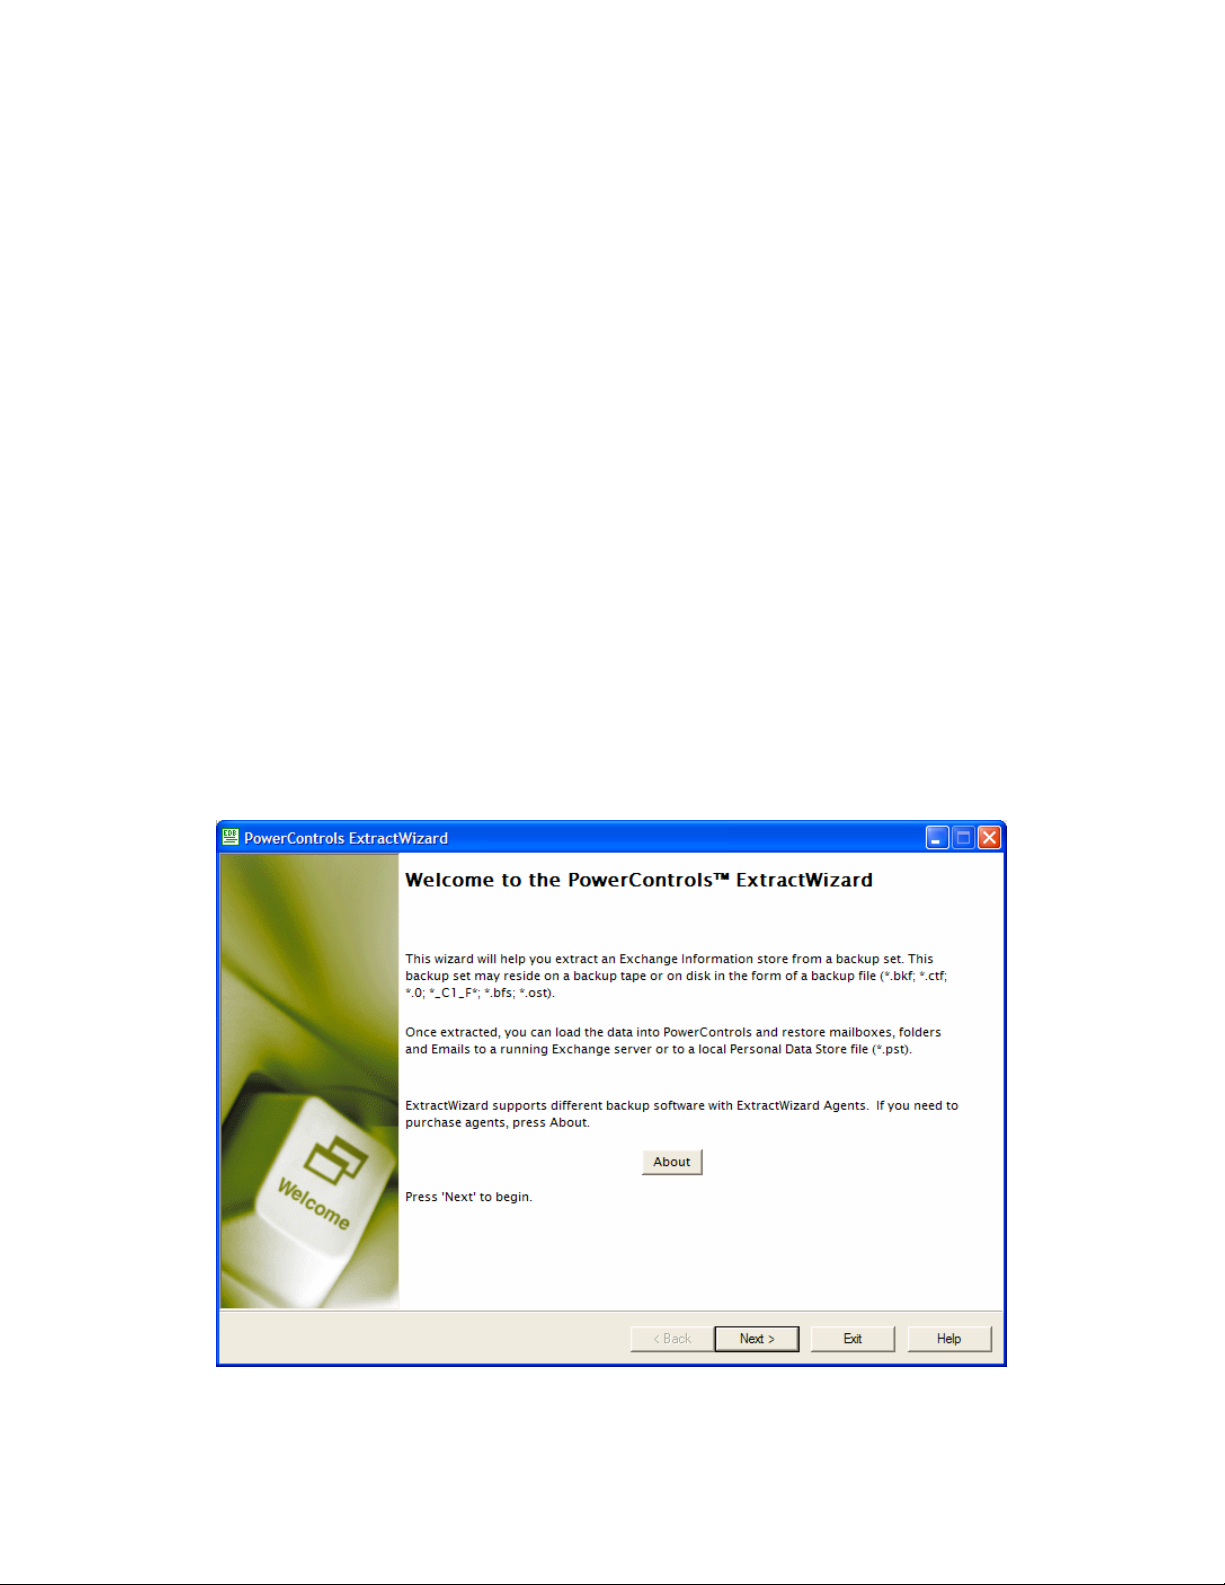
ExtractWizard: Welcome Page
1. Click the Start button, and then point to Programs. Point to Ontrack, point to PowerControls, and
then click ExtractWizard. The first page describes the wizard.
2. Click Next.
11
Page 19
Chapter 1: Using the ExtractWizard
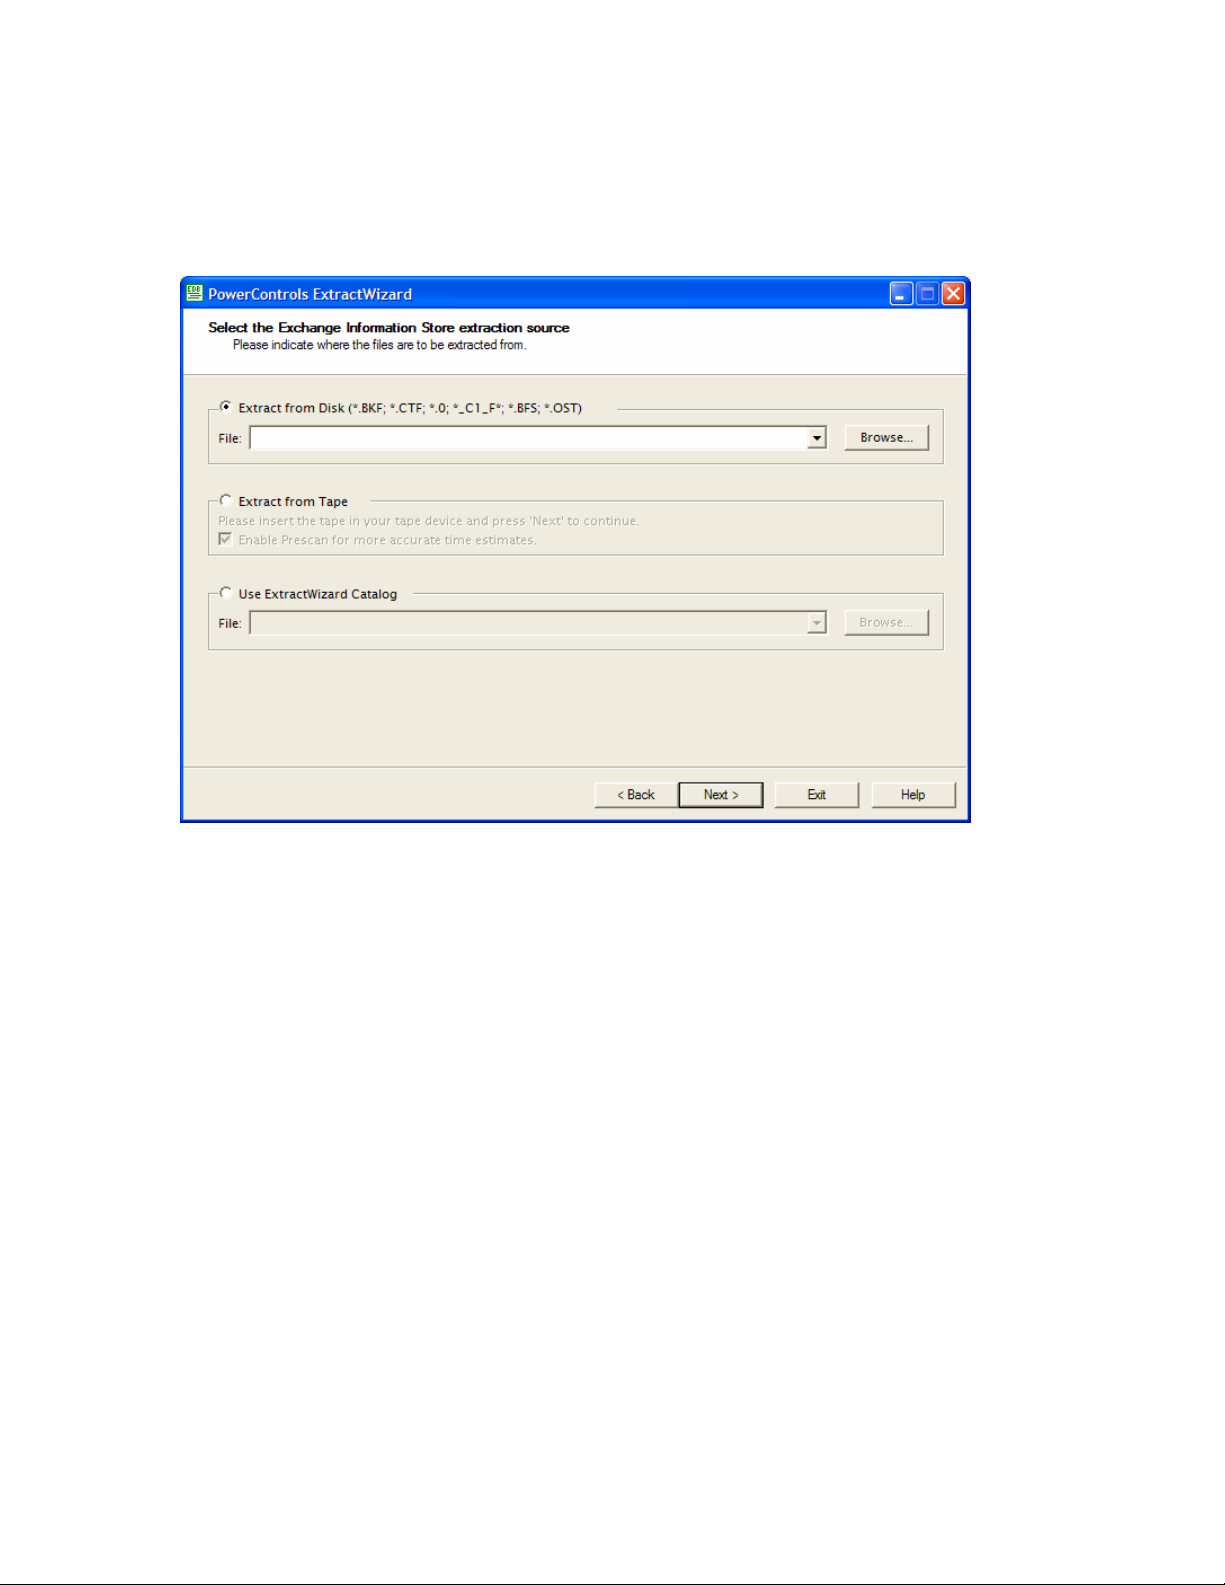
ExtractWizard: Select the Exchange Information Store
Extraction Source
On the second page of the ExtractWizard, select the Exchange Information store extraction source.
Do one of the following:
• Select Extract from Disk. Then type the extraction source file path, use the history drop-down menu,
or browse to it. Click Next.
• Select Extract from Tape. Then insert a backup tape in your tape device and, if desired, select the
Enable Prescan option for more accurate time estimates. Click Next.
If the ExtractWizard cannot locate a tape in the selected device, it will prompt you to insert the tape. If
you have more than one tape device connected to your system, another screen will appear. Select the
device containing the tape.
• Select Use ExtractWizard Catalog. Then browse to a previously created catalog file, or use the
history drop-down menu. Look for the .ewc extension on the file. Click Next. In order to select this
option, you must have previously created one or more ExtractWizard catalog files. For information on
creating an ExtractWizard catalog file, see “Saving an ExtractWizard Catalog File” on page 22.
Notes:
• ExtractWizard requires that the tape drive be configured and active in the Device Manager.
• ExtractWizard works best with Windows drivers supplied directly from the manufacturer of the tape
drive hardware.
• If ExtractWizard is installed on your backup server, make sure the services for the backup software are
disabled.
12
Page 20
Ontrack® PowerControls™ 3.0 User Guide
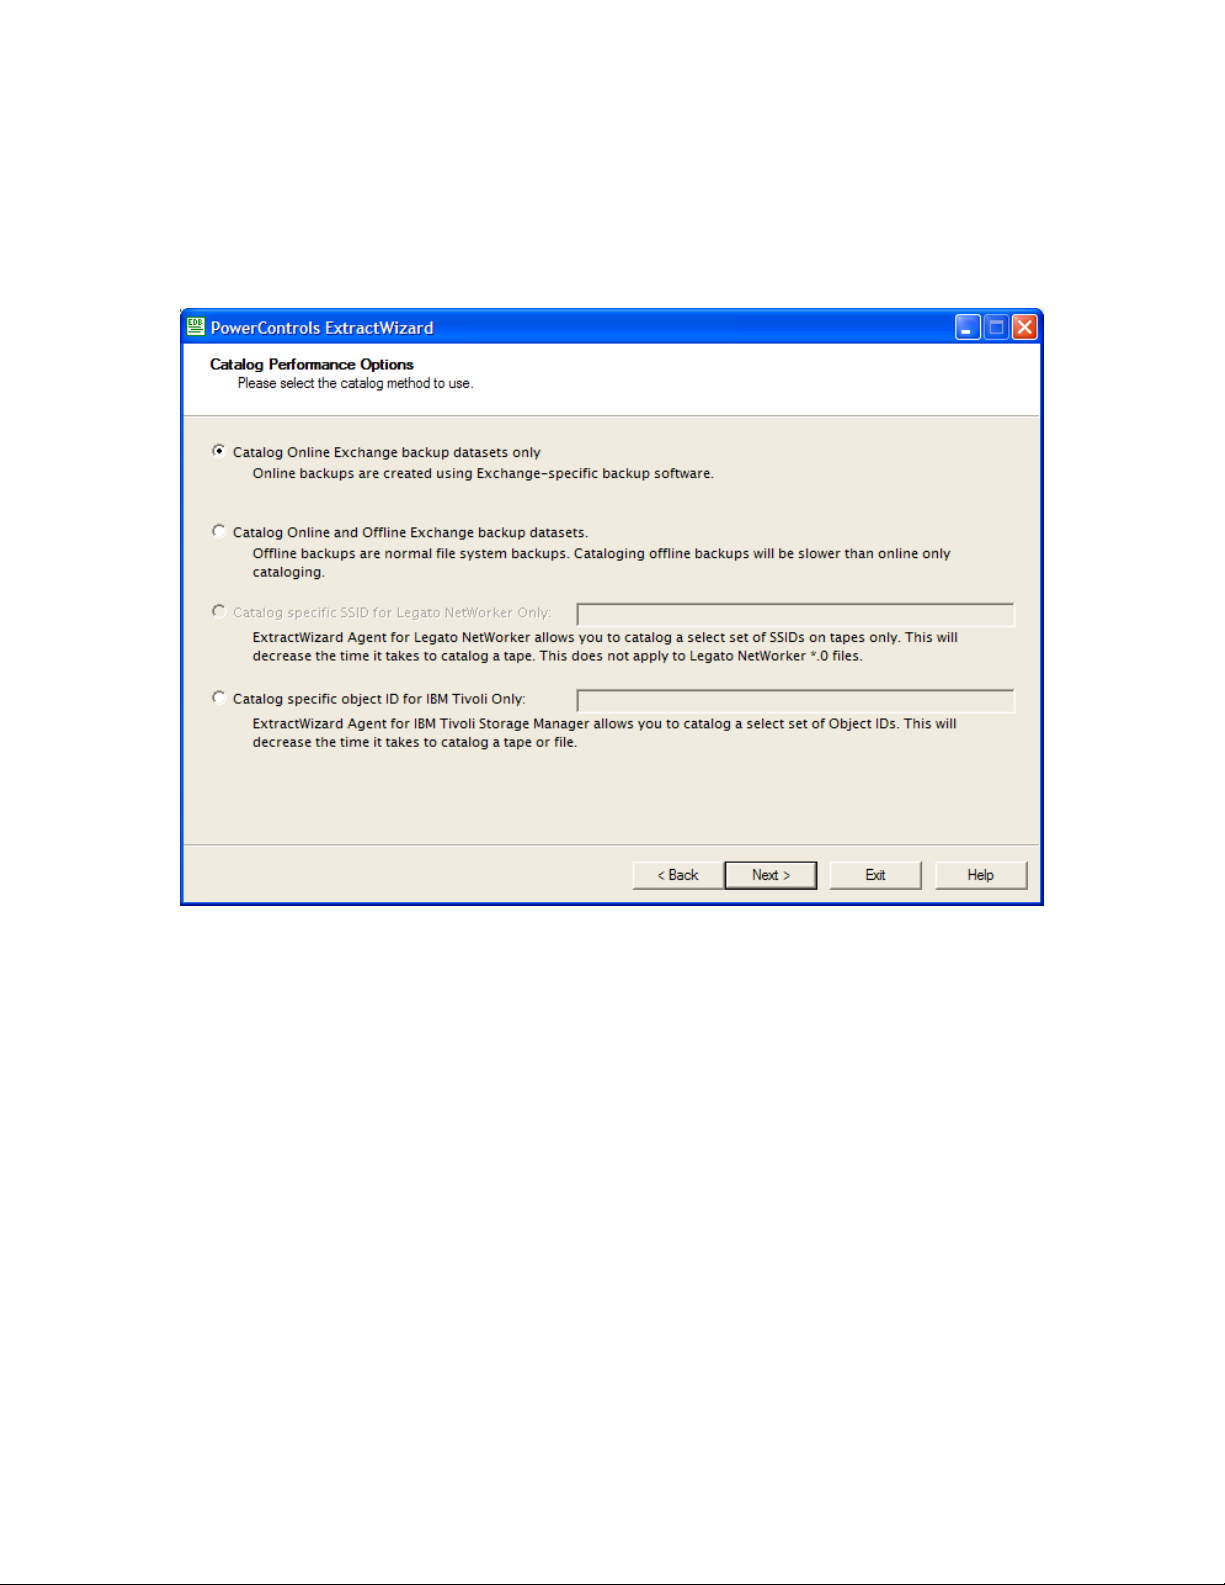
ExtractWizard: Catalog Performance Options
The Catalog Performance Options page of the ExtractWizard offers three options for cataloging
Exchange backup data sets. All three of the options will automatically skip over known backup types that
do not contain Exchange database files. These types include registry backups, SQL backups, UNIX
backups, image backups, NetWare backups, Macintosh backups.
To choose a catalog performance option
1. Do one of the following. Note that all three options will skip known non-Exchange backups (e.g.,
registry, SQL, Unix, Mac, Netware).
• Select Catalog Online Exchange backup datasets only. This option will catalog only known
online Exchange backup datasets. It will skip all other types of backups. If the backup type is
unknown, it will be skipped.
• Select Catalog Online and Offline Exchange backup datasets This option will catalog known
online and offline Exchange backup datasets. If an unknown backup type is encountered, Extract
Wizard will catalog it just in case it is a new backup identifier for Exchange backups. This option
is slower because it will catalog more types of backups.
• Select Catalog SSID for Legato Networker Only and enter a specific SSID or a list of SSIDs,
separated by commas, in the box. This option is available only if the Legato agent is installed and
you selected a tape source. ExtractWizard will catalog only the SSIDs listed. When ExtractWizard
detects the end of the SSIDs in the list, it will stop immediately and rewind the tape.
The third option greatly increases the catalog speed for Legato users who want to start on a tape in
the middle of a span set. If you select a specific SSID search on a non-Legato tape, it will behave
identically to the second option (Catalog Online and Offline Exchange backup datasets).
13
Page 21
Chapter 1: Using the ExtractWizard
• Select specific object ID for IBM Tivoli Only and enter a specific object ID or a list of object
IDs, separated by commas, in the box. This option is available only if the IBM Tivoli agent is
installed. ExtractWizard will catalog only the object IDs listed. When ExtractWizard detects the
end of the object IDs in the list, it will immediately stop processing.
The fourth option greatly increases the catalog speed for Tivoli users who know the Object ID of
the backup they wish to extract. If you select a specific Object ID search on a non-Tivoli tape, it
will behave identically to the second option (Catalog Online and Offline Exchange backup
datasets).
2. Click Next.
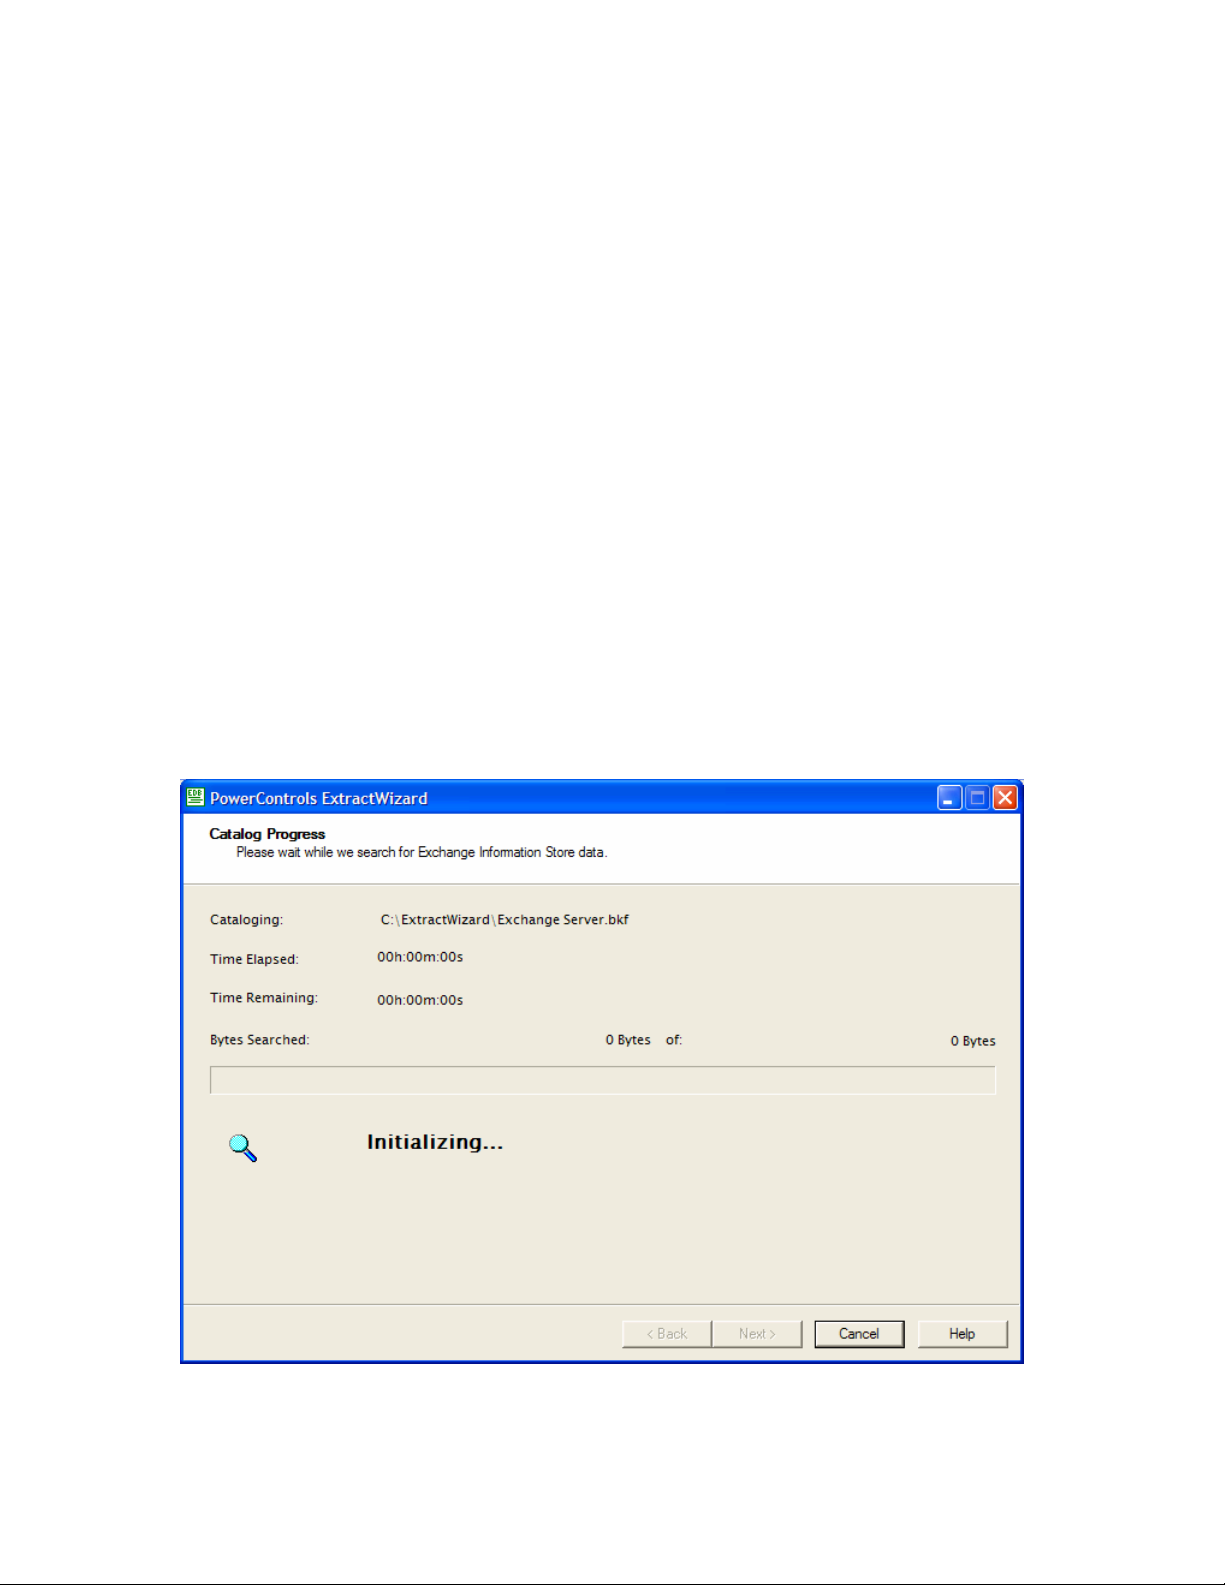
ExtractWizard: Catalog Progress
The Catalog Progress page of the ExtractWizard shows the catalog progress. The ExtractWizard catalogs
the disk or tape and locates the Information Store data. Cataloging a disk backup is much faster than
cataloging a full tape. During cataloging, the ExtractWizard can be in one of four states: initializing,
reading (processing one block at a time), scanning (seeking ahead multiple blocks), and rewinding.
Do one of the following:
• Click Cancel if you want to stop the catalog process. If you click Cancel, the ExtractWizard catalog
will display all files that it found to that point.
• When the catalog is completed, click Next to proceed to the next page of the ExtractWizard.
14
Page 22
Ontrack® PowerControls™ 3.0 User Guide
ExtractWizard: Exchange Information Store Selection
On the Exchange Information Store File Selection page of the ExtractWizard, you can select both the
private and public Exchange Information Store files that you want to restore from an Exchange backup.
This page of the wizard requires you to perform four steps:
Step 1: Viewing an Exchange Backup
Step 2: Restoring an Online or Offline Backup
Step 3: Saving an ExtractWizard Catalog File
Step 4: Completing the Exchange Information Store Selection
Step 1: Viewing an Exchange Backup
1. On the left side of the window, click the plus sign (+) next to a backup set to view its volumes.
2. Select a volume (select its name, not its check box) to display the Exchange Information Store Files on
the right side of the window.
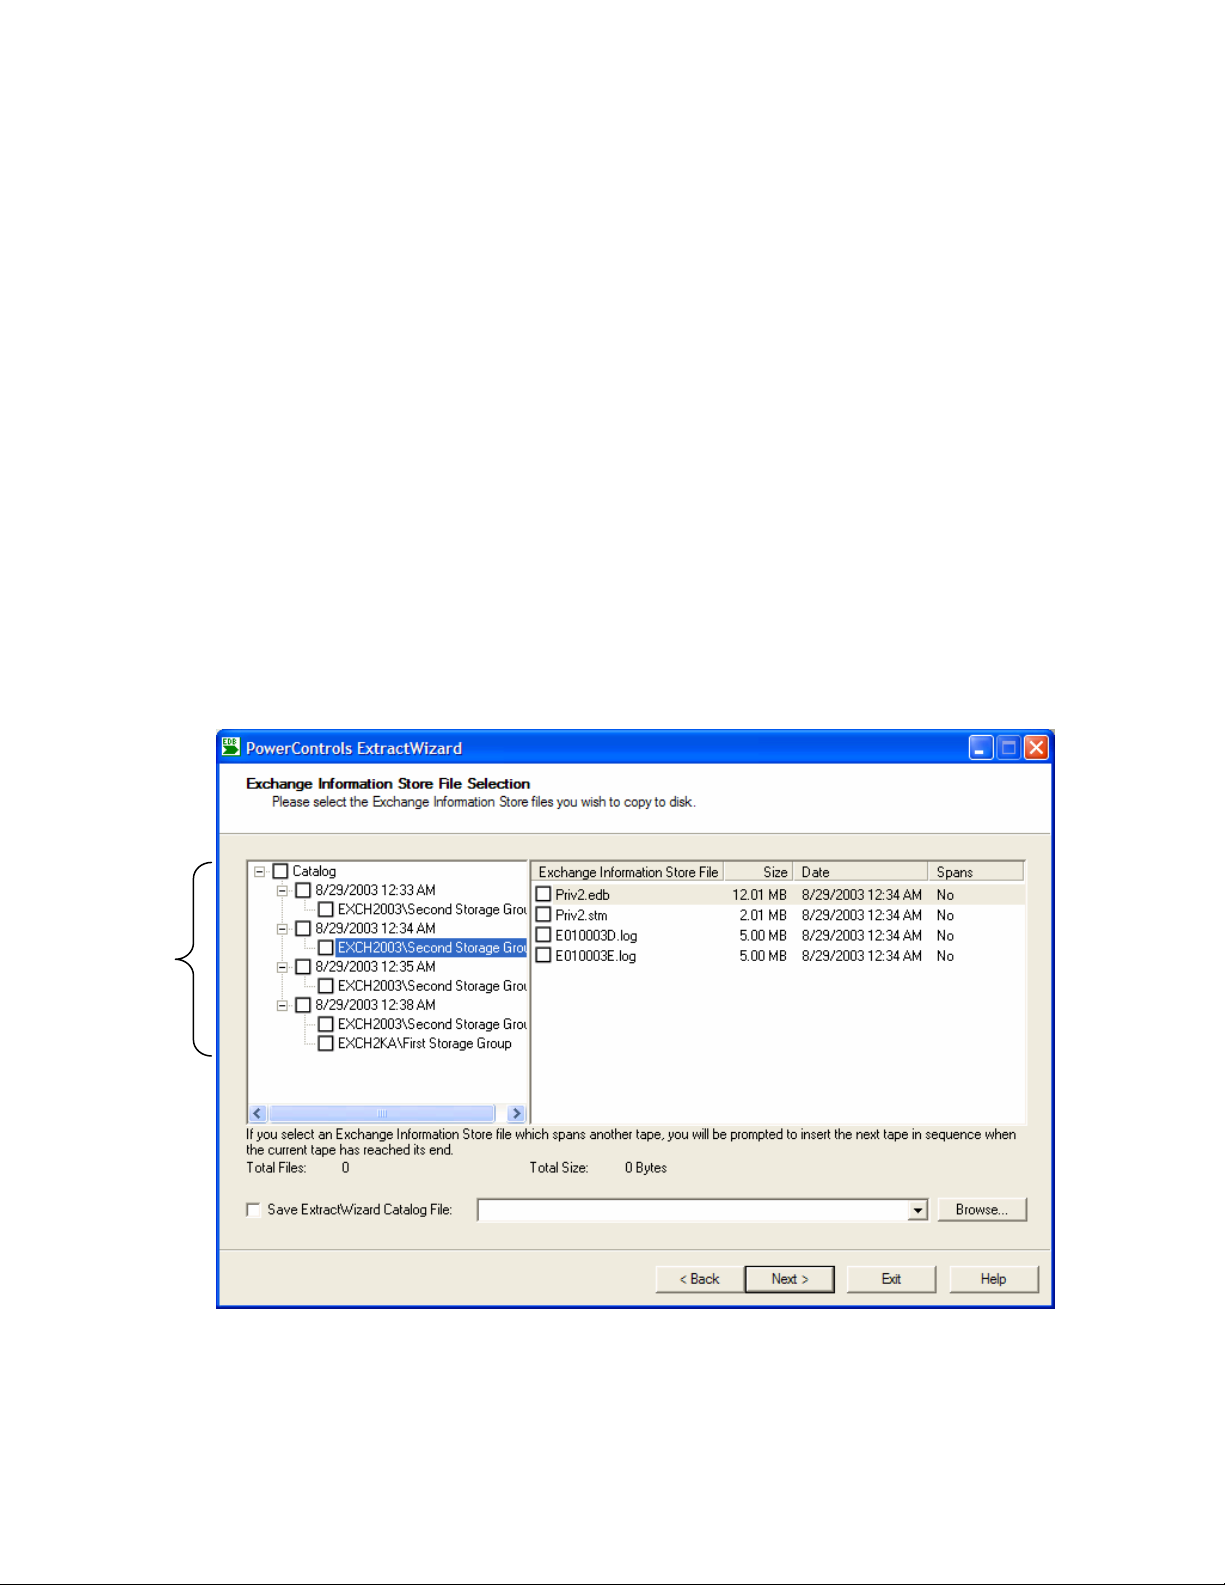
In the illustration below, the Microsoft NT Backup contains four backup sets and five volumes. Each
backup set lists the session day and time (e.g., 8/29/2003 12:34 AM). Each volume lists the machine
name and volume name (e.g., EXCH 2003\Second Storage Group).
Four full
online
backup sets
(Microsoft
NT Backup)
Viewing a full online disk backup (Microsoft NT Backup)
15
Page 23
Chapter 1: Using the ExtractWizard
Step 2: Restoring an Online or Offline Backup
After viewing the Exchange backup sets and information store files, you can select the files you want to
restore. When viewing and selecting files, keep in mind the following points:
• Microsoft NT Backup, VERITAS BackupExec, VERITAS NetBackup, and IBM Tivoli Storage
Manager can contain multiple backup sets for both disk and tape backups.
• Computer Associates Brightstor ARCserve and LEGATO NetWorker can contain only one backup set
for disk, but multiple backup sets for tape.
To restore a full online (normal) backup
• On the Exchange Information Store File Selection page of the ExtractWizard, select the .edb, .stm,
and .log files, as well as .pat files, if they exist.
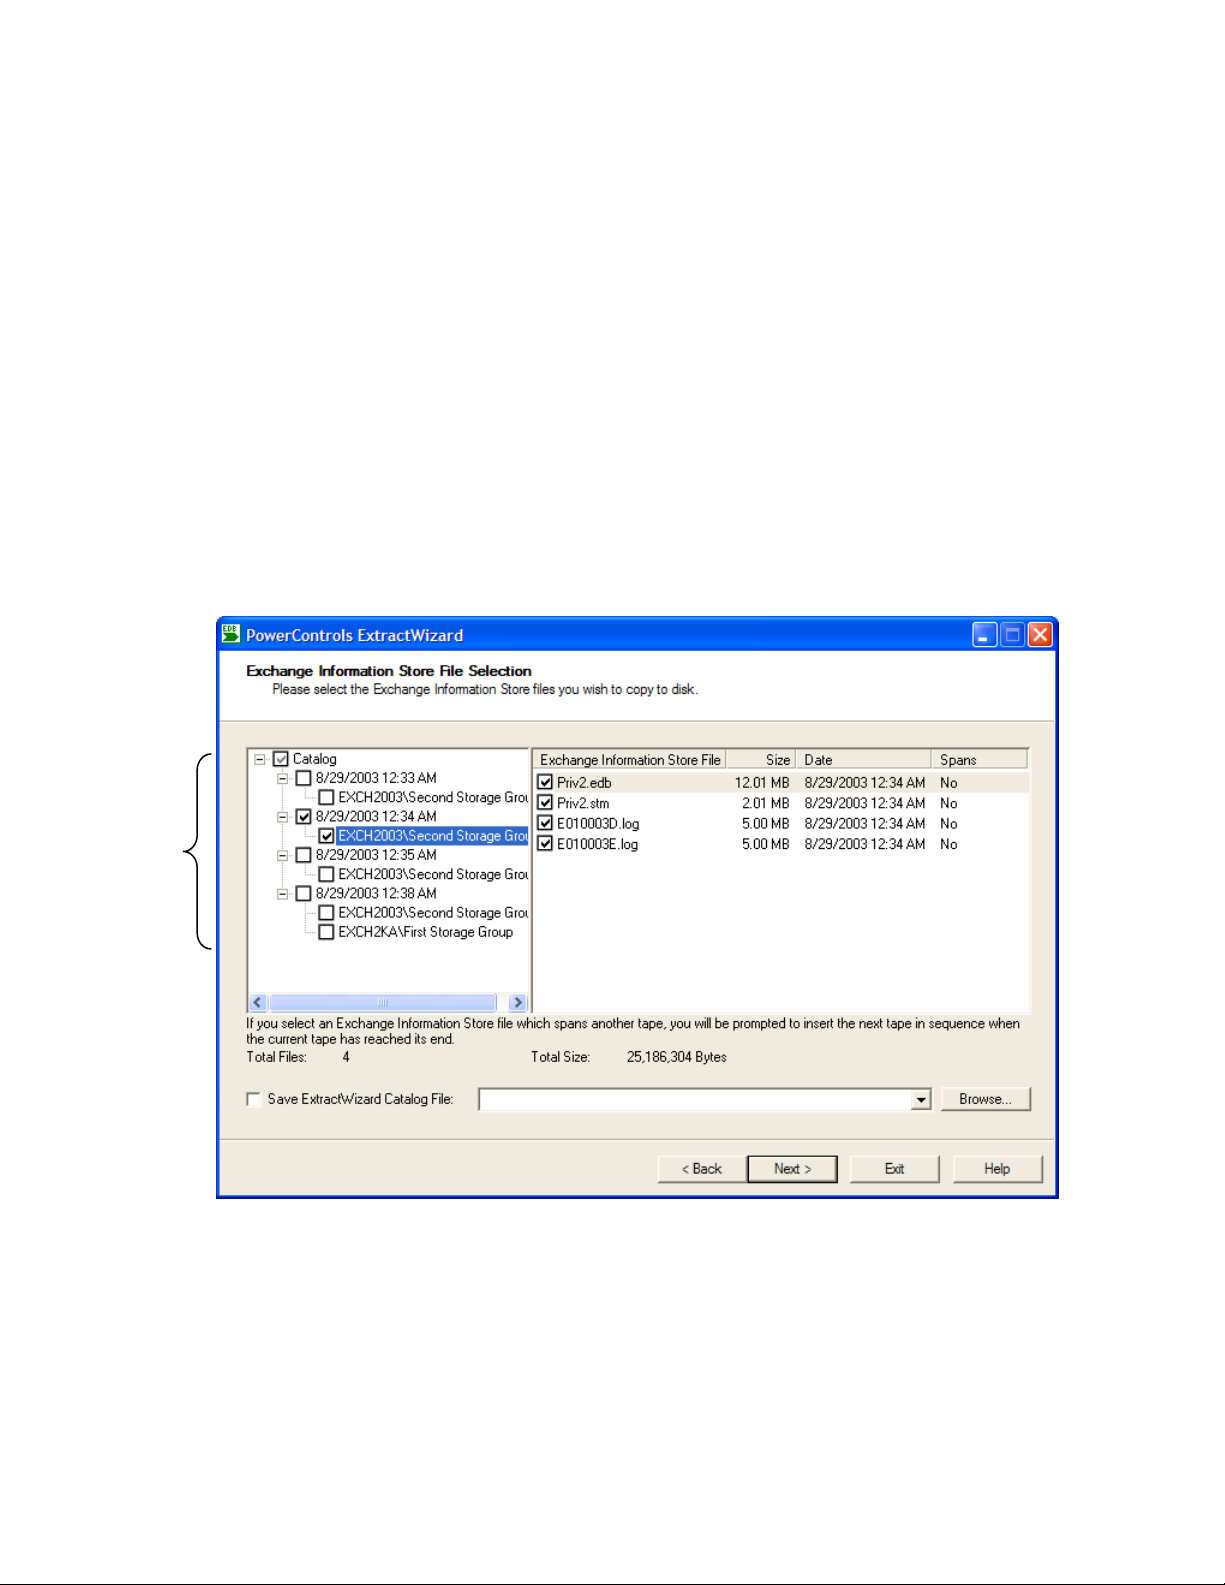
Example 1: Restoring a Full Online Disk Backup (Microsoft NT Backup)
A Microsoft NT Backup to disk can contain multiple backup sets and volumes. Each backup set lists
the session day and time (e.g., 8/29/2003 12:34 AM). Each volume lists the machine name and volume
name (e.g., EXCH 2003\Second Storage Group).
Four full
online
backup sets
(Microsoft
NT Backup)
Restoring a full online disk backup (Microsoft NT Backup)
16
Page 24
One full
online
backup set
(CA Brightstor
ARCserve)
Ontrack® PowerControls™ 3.0 User Guide
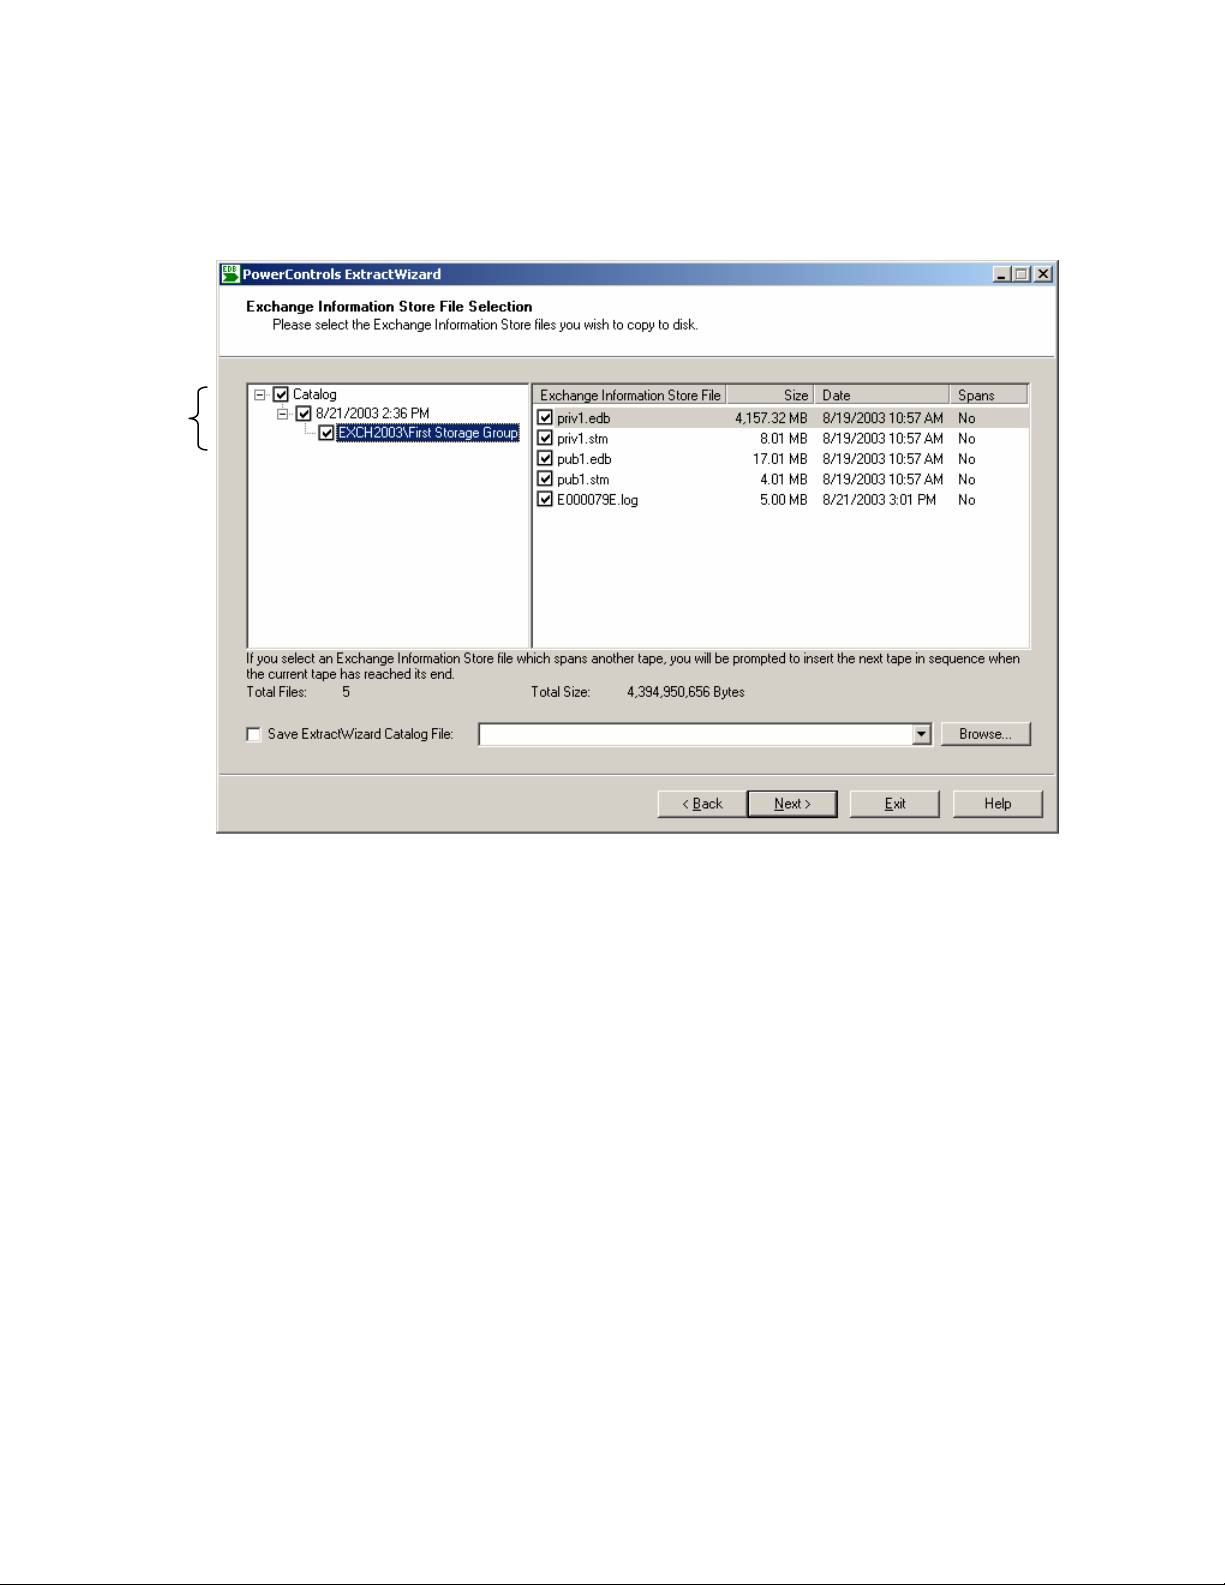
Example 2: Restoring a Full Online Disk Backup (Computer Associates Brightstor ARCserve)
A Computer Associates BrightStor ARCserve backup to disk can contain only one backup set and
volume. The backup set lists the session day and time (e.g., 8/21/2003 2:36 PM). Each volume lists the
machine name and volume name (e.g., Exch2003\First Storage Group).
Restoring a full online disk backup (Computer Associates Brightstor ARCserve)
17
Page 25
Four full
online
backup sets
(LEGATO
NetWorker)
Chapter 1: Using the ExtractWizard
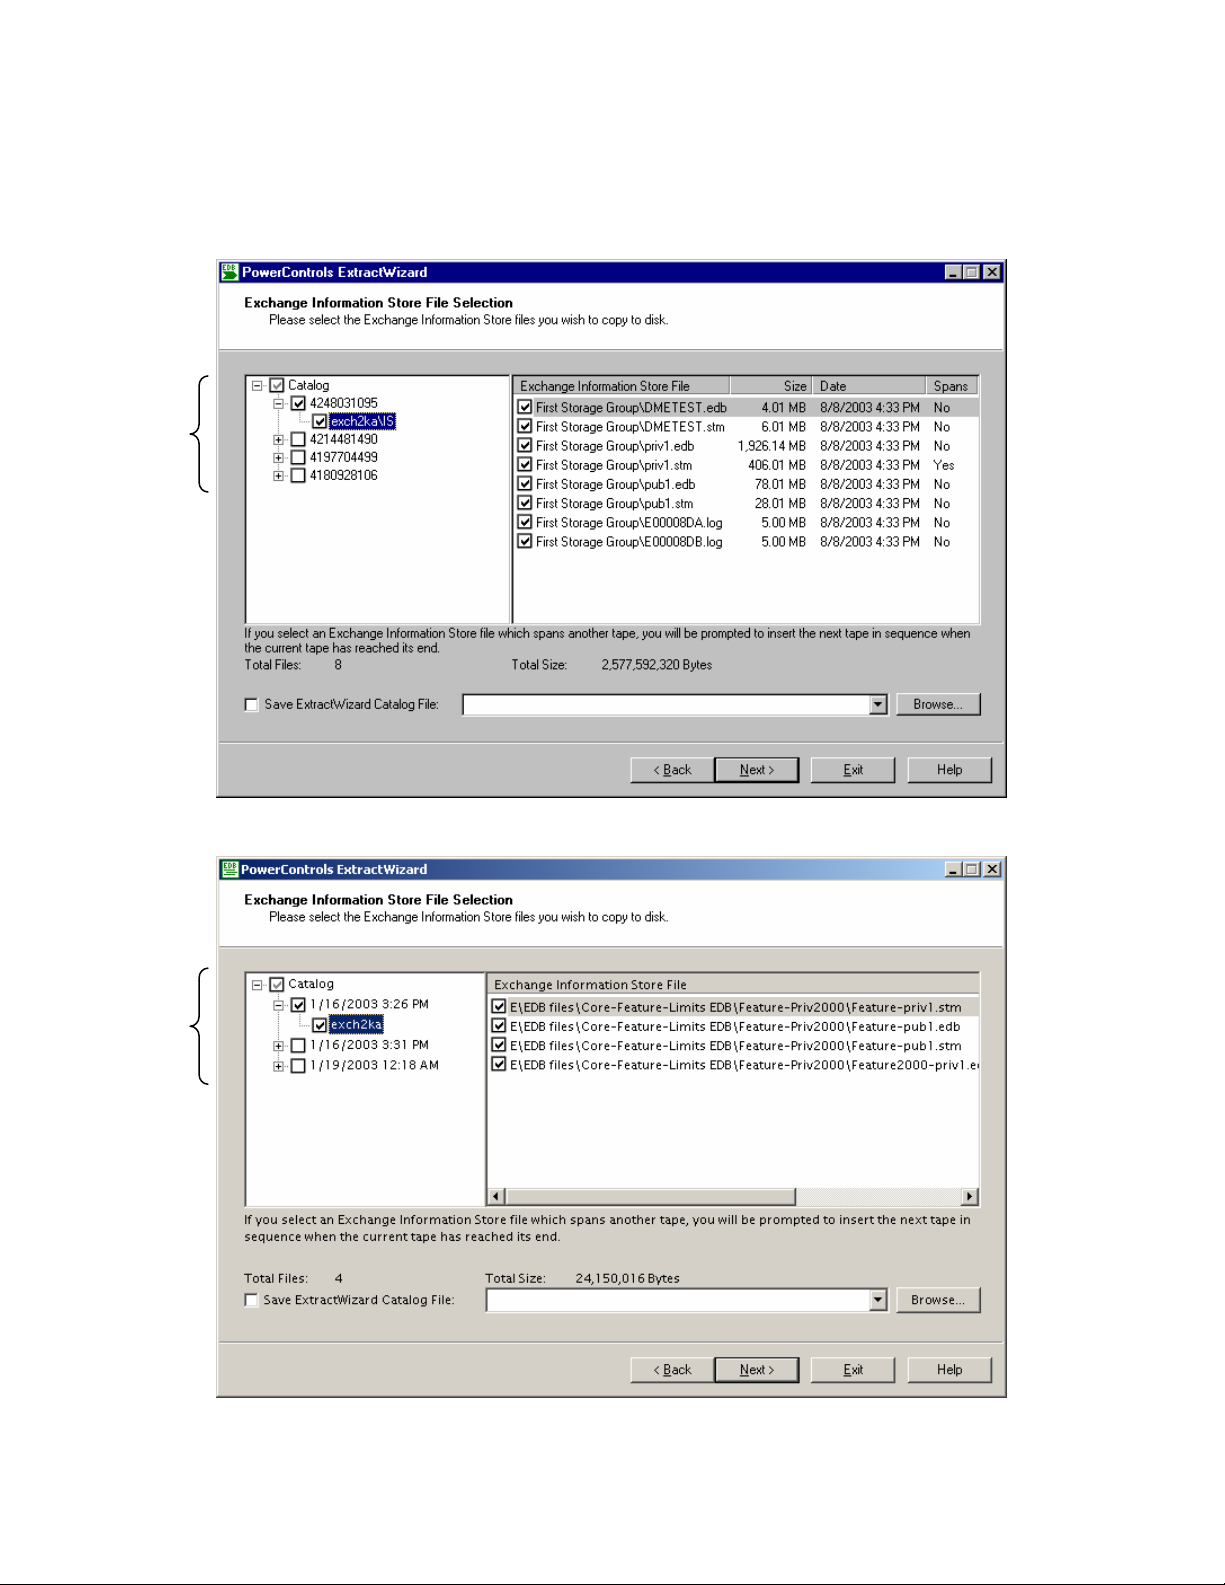
Example 3: Restoring a Full Online Tape Backup (LEGATO NetWorker)
A LEGATO NetWorker backup to tape can contain multiple backup sets and volumes. The backup set
lists the SSID (e.g., 4248031095). The volume lists the machine name and volume name (e.g.,
Exch2ka\IS).
Three full
online
backup sets
(VERITAS
NetBackup)
Restoring a full online tape backup (LEGATO NetWorker)
Restoring a full online tape backup (VERITAS NetBackup)
18
Page 26
One full
online
backup set
Three
incremental
backup sets
Ontrack® PowerControls™ 3.0 User Guide
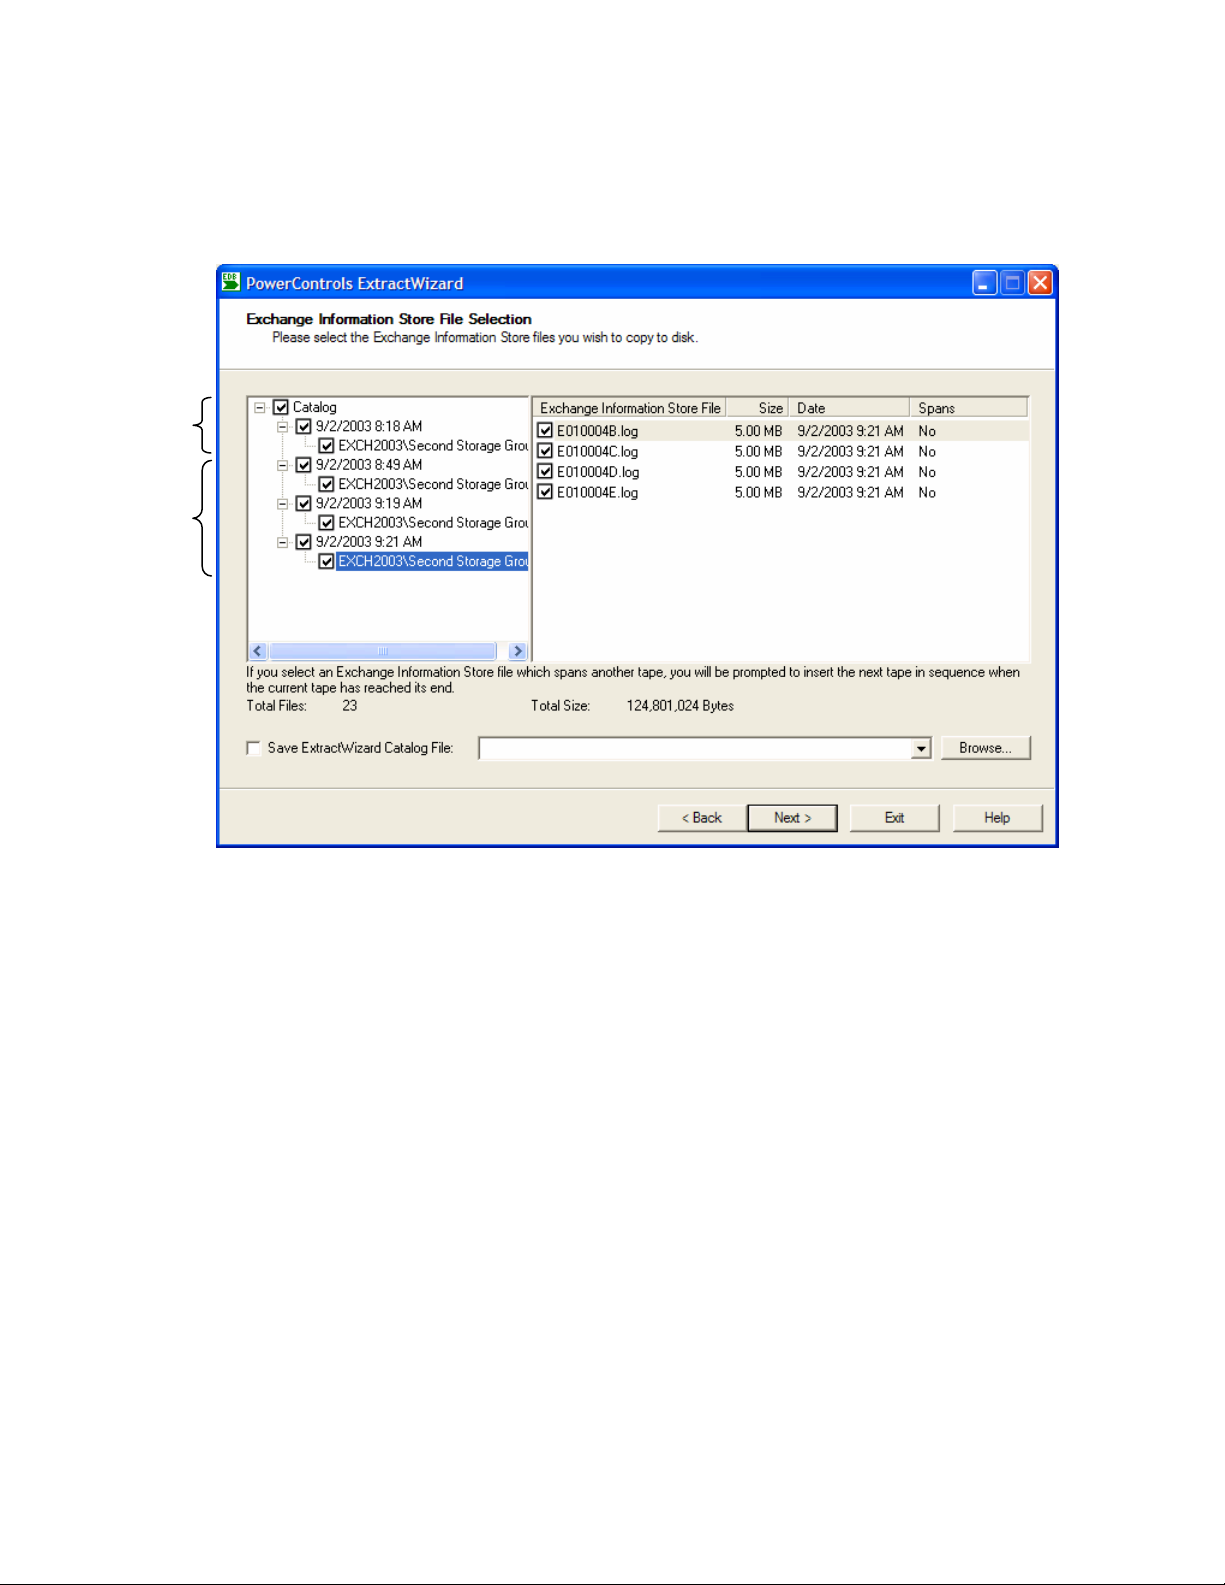
To restore the last full online and every incremental backup
• On the Exchange Information Store File Selection page of the ExtractWizard, select all of the files
(e.g., .edb, .log, .stm, .pat) from the last full online (normal) backup, plus the .log files from every
incremental backup.
Restoring the last full online plus every incremental backup to disk (Microsoft NT Backup)
19
Page 27
One full
online
backup set
Two
differential
backup sets
Chapter 1: Using the ExtractWizard
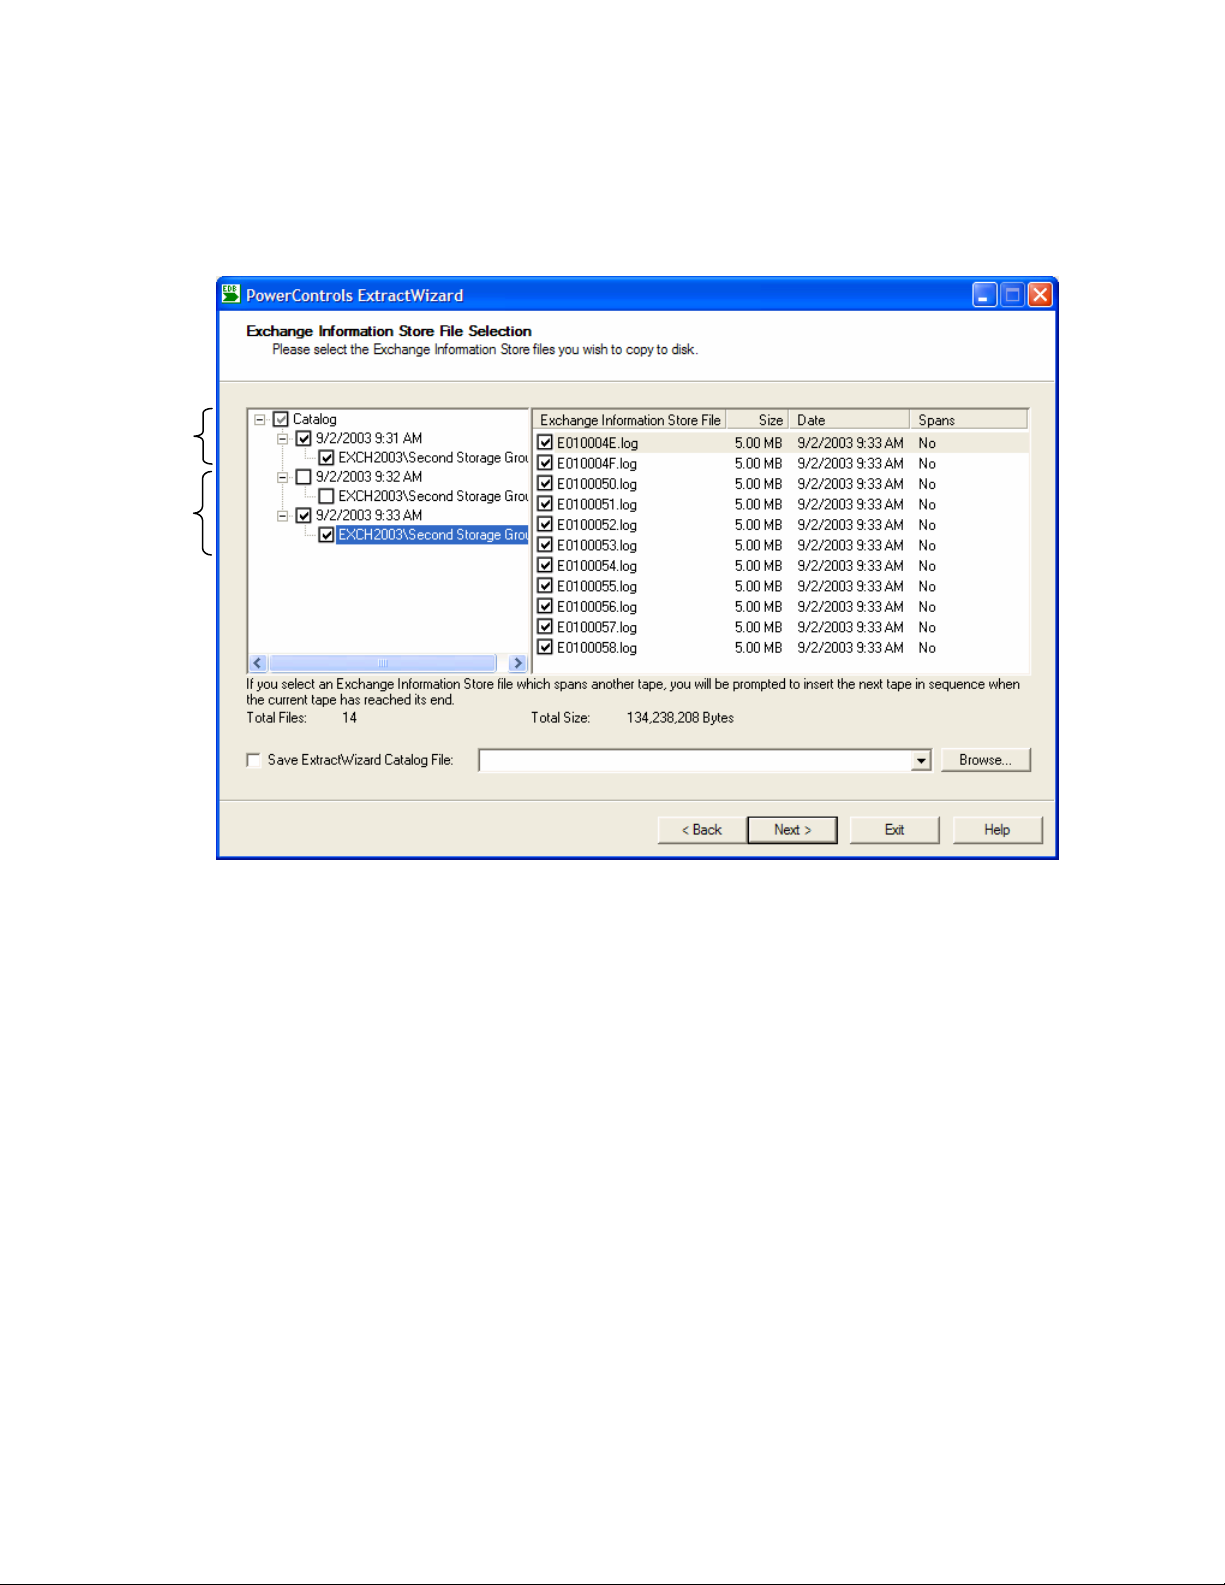
To restore the last full online and last differential backup
• On the Exchange Information Store File Selection page of the ExtractWizard, select all of the files
(e.g., .edb, .log, .stm, .pat) from the last full online (normal) backup, plus the .log files from the last
differential backup.
Restoring the last normal plus the last differential backup to disk (Microsoft NT Backup)
To restore an online copy backup (plus every incremental or last differential)
Use the same procedure for restoring a copy backup as you do for restoring a full online backup. A copy
backup also works the same as a full online backup when restoring a copy backup plus every incremental
or last differential backup. For more information see the following topics:
• “To restore a full online (normal) backup” on page 16.
• “To restore the last full online and every incremental backup” on page 19.
• “To restore the last full online and last differential backup” on page 20.
Note: The only difference between a full online backup and a copy backup is the following: For a full
online backup, the .log files are truncated. For a copy backup, the .log files are not truncated.
20
Page 28

Ontrack® PowerControls™ 3.0 User Guide
About Restoring a Full Offline Backup
The ExtractWizard works the same for an offline backup as it does for an online backup. There are four
differences between an offline backup and an online backup:
1. For an offline backup, you need to restore the .edb and .stm files. To ensure that all email data is
recovered, you should also include all .log files, as well as .pat and .chk files if they exist.
PowerControls performs its own verification process and will include the .log, .pat, and .chk files to
determine if it needs them to recover the data.
2. An offline backup can contain a .chk file.
3. The name of the volume for an offline backup displays the drive letter.
4. The volume for an offline backup restores the full path for the Information Store files.
To restore a full offline backup
• On the Exchange Information Store File Selection page of the ExtractWizard, select the .edb and
.stm files. To ensure that all email data is recovered, you should also select .log files, as well as .pat
and .chk files if they exist.
One full
offline
backup set
Restoring a full offline disk backup (
Microsoft NT Backup)
21
Page 29

Chapter 1: Using the ExtractWizard
About Restoring a Backup from Exchange 5.5 vs. Exchange 2000/2003
Restoring data from Exchange 5.5 works the same way as restoring data from Exchange 2000/2003.
However, when you are selecting files to restore on the Exchange Information Store File Selection page
of the ExtractWizard, you will notice the two following differences: vs. Exchange 2000/2003
• Exchange 5.5 through Exchange 2000 (SP1) contain .PAT (patch) files in their information stores,
whereas Exchange 2000 (SP2) and later do not contain .PAT files in their information stores.
In Exchange 5.5 through Exchange 2000 (SP1), the .PAT files are used to record information on page
splits. In Exchange 2000 (SP2) and later, the functionality provided by .PAT files is incorporated into
Exchange log files.
• Exchange 2000/2003 information stores contain .STM files in addition to the .EDB files. Exchange 5.5
does not contain .STM files.
Step 3: Saving an ExtractWizard Catalog File
The catalog file saves all the information that ExtractWizard needs to extract from a backup disk or tape.
Saving a catalog file means that the next time you extract from that tape or backup disk, you can skip the
catalog process.
To save an ExtractWizard Catalog File
1. On the Exchange Information Store File Selection page of the ExtractWizard, select the files you
want to restore, and then select the Save ExtractWizard Catalog File check box.
2. Browse to the desired location, type a file name, and click Save. Note that the catalog file is not saved
until you click Next.
22
Page 30
Ontrack® PowerControls™ 3.0 User Guide
Step 4: Completing the Exchange Information Store Selection
On the Exchange Information Store File Selection page of the ExtractWizard, make sure you have
selected the Information Store Files that you want to restore, and saved the ExtractWizard catalog file, if
desired. Then click Next to proceed to the last page of the wizard.
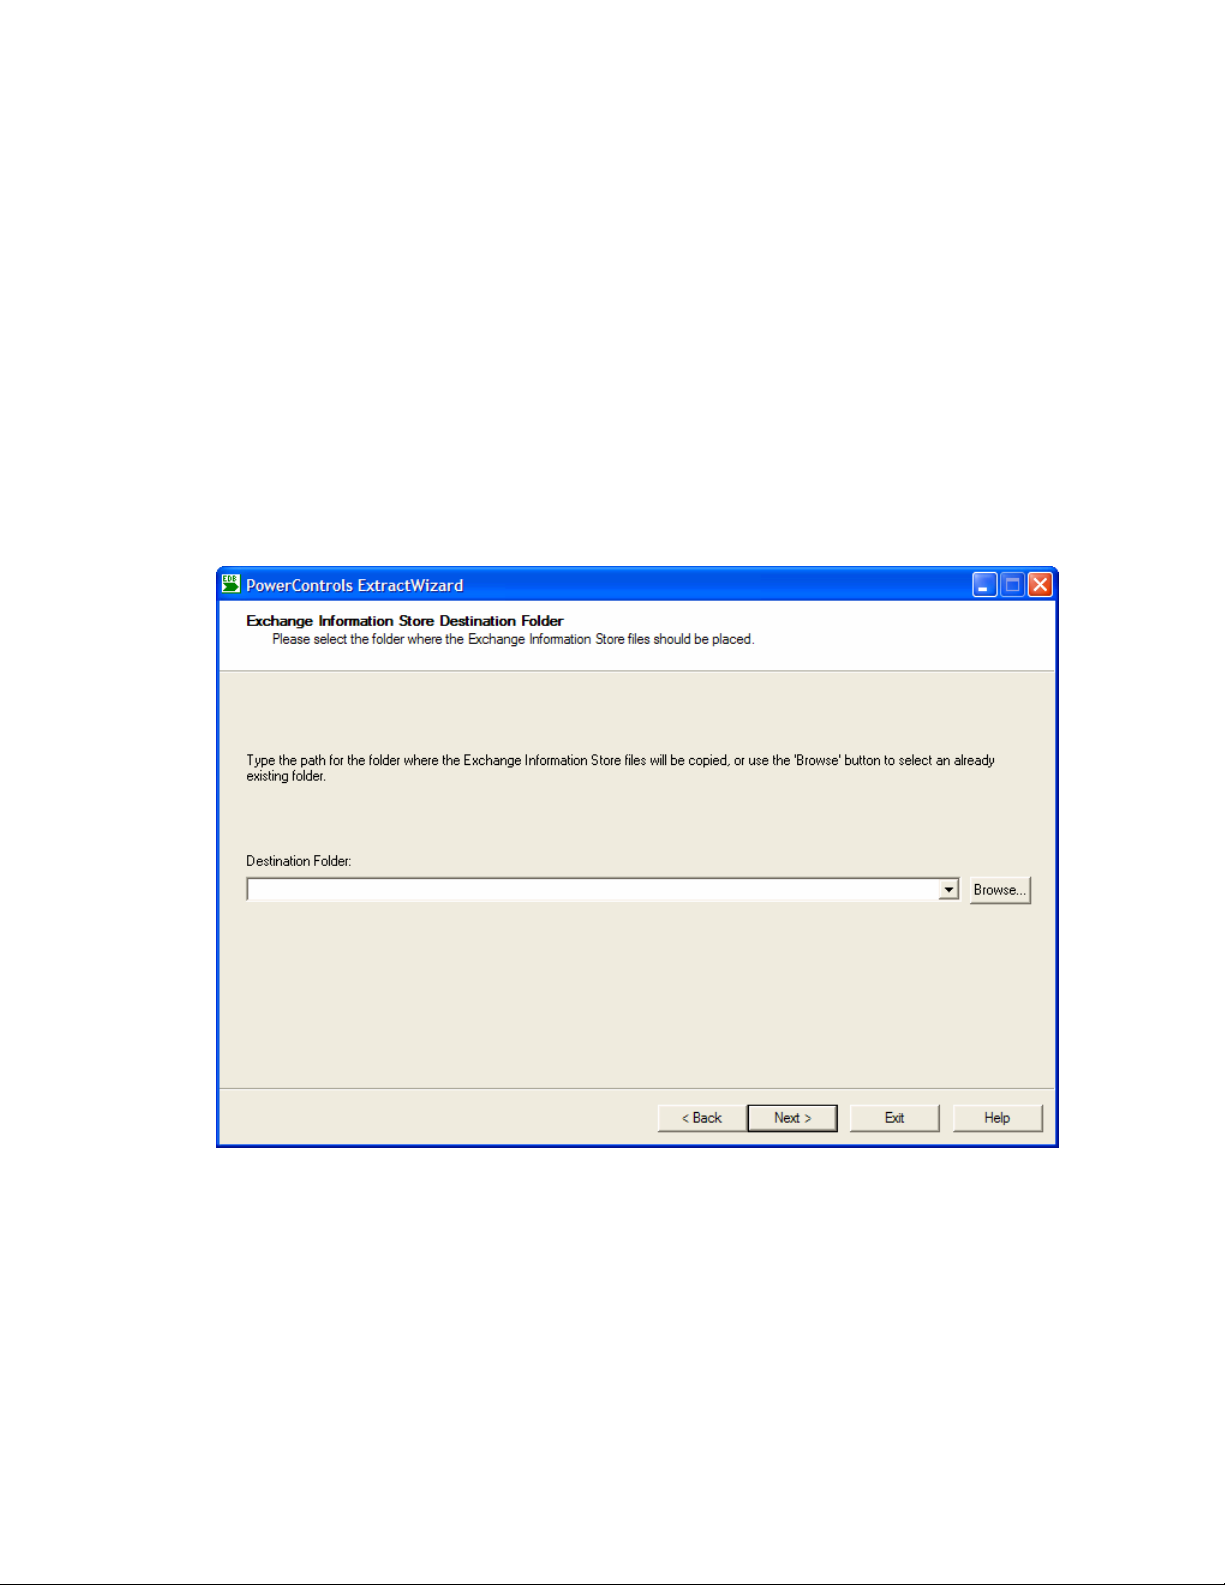
ExtractWizard: Exchange Information Store Destination Folder
1. On the Exchange Information Store Destination Folder page of the ExtractWizard, type the path
where you want PowerControls to restore the data, use the history drop-down menu, or browse to the
desired location and type the file name. (The Browse window lets you create a new folder on the target
volume, unless you are running Windows NT 4).
2. Click Next. The ExtractWizard verifies that you have enough disk space as well as access rights to
create files and directories.
23
Page 31
Chapter 1: Using the ExtractWizard
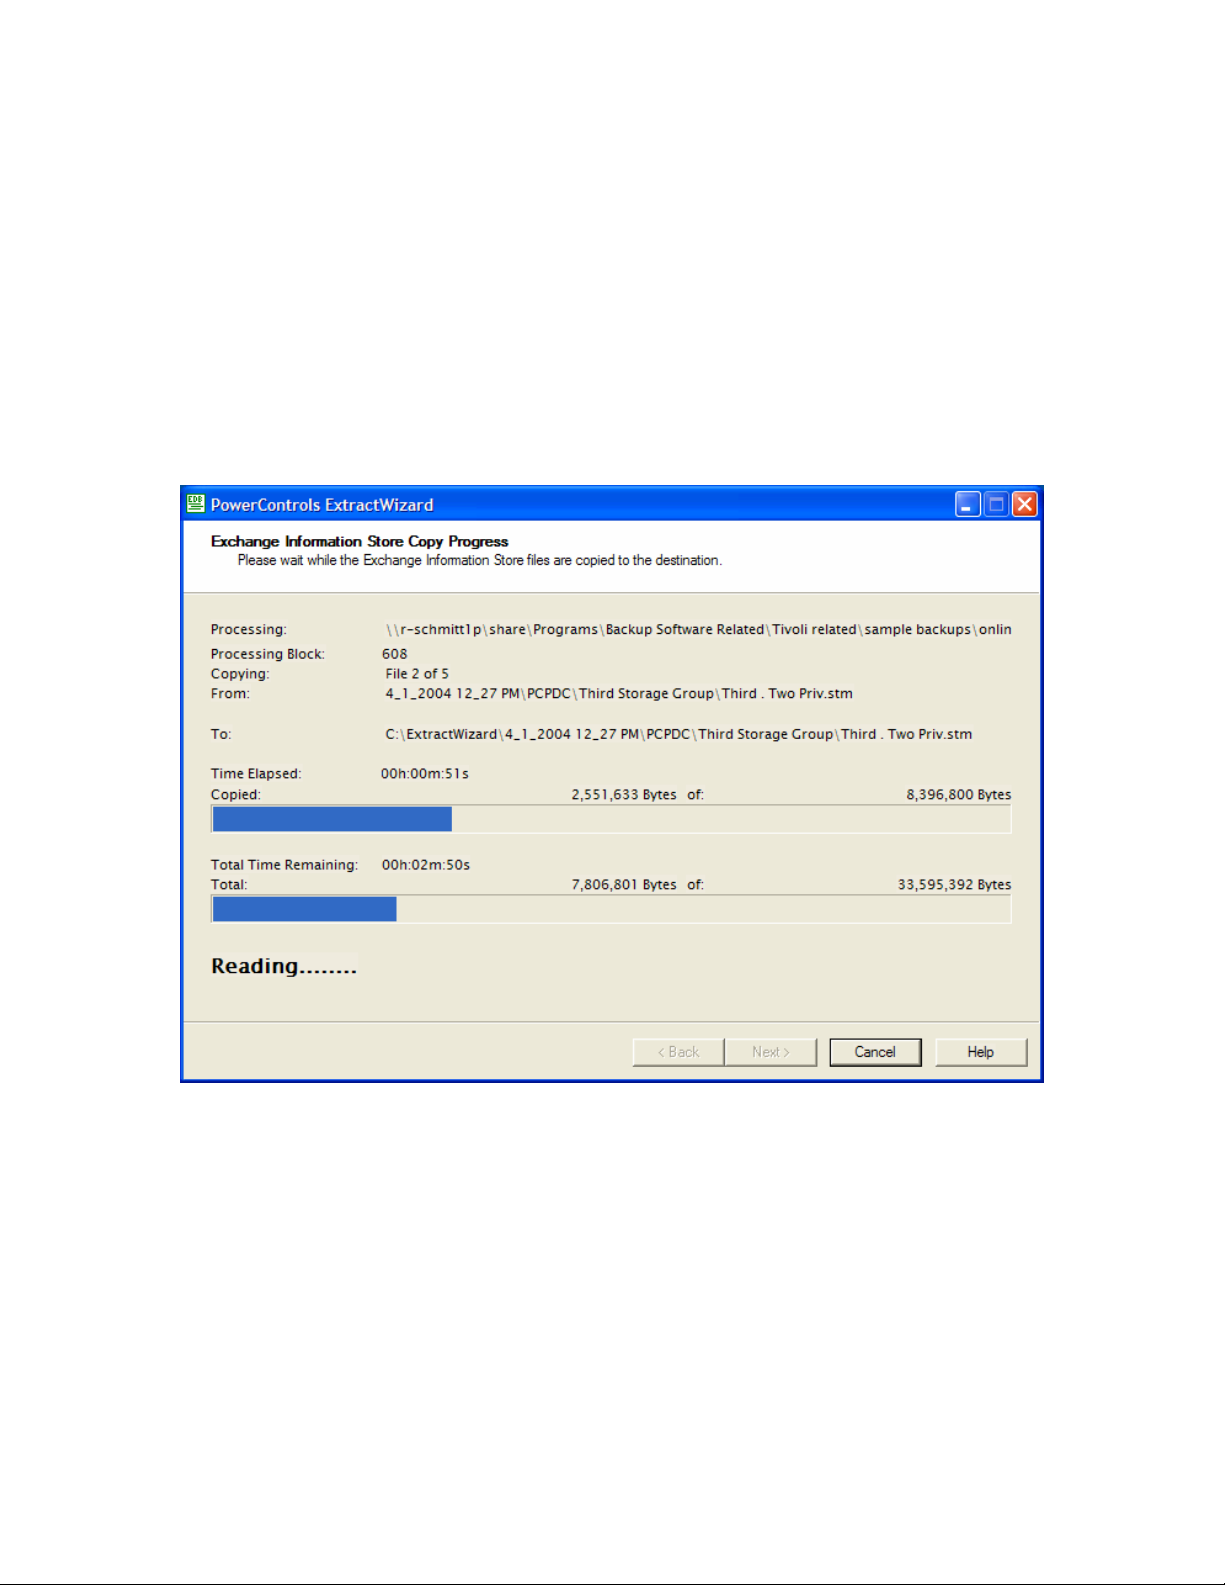
ExtractWizard: Exchange Information Store Copy Progress
The Exchange Information Store Copy Progress page of the ExtractWizard shows the progress of the
ExtractWizard restoring the Exchange Information Store data to the destination folder. This process may
take some time.
The top bar indicates the progress for the file that is currently being extracted. The bottom bar indicates the
progress for all of the files. For LEGATO and NetBackup tapes, the top bar may switch back and forth
between files if they are interleaved.
During file extraction, ExtractWizard can be in one of four states: initializing, reading (processing one
block at a time), scanning (seeking ahead multiple blocks), and rewinding.
Note: You can click Cancel to stop the process. The file currently being extracted will be deleted, but you
can access any files that have completed extraction.
24
Page 32
Ontrack® PowerControls™ 3.0 User Guide
ExtractWizard: Completing the Wizard
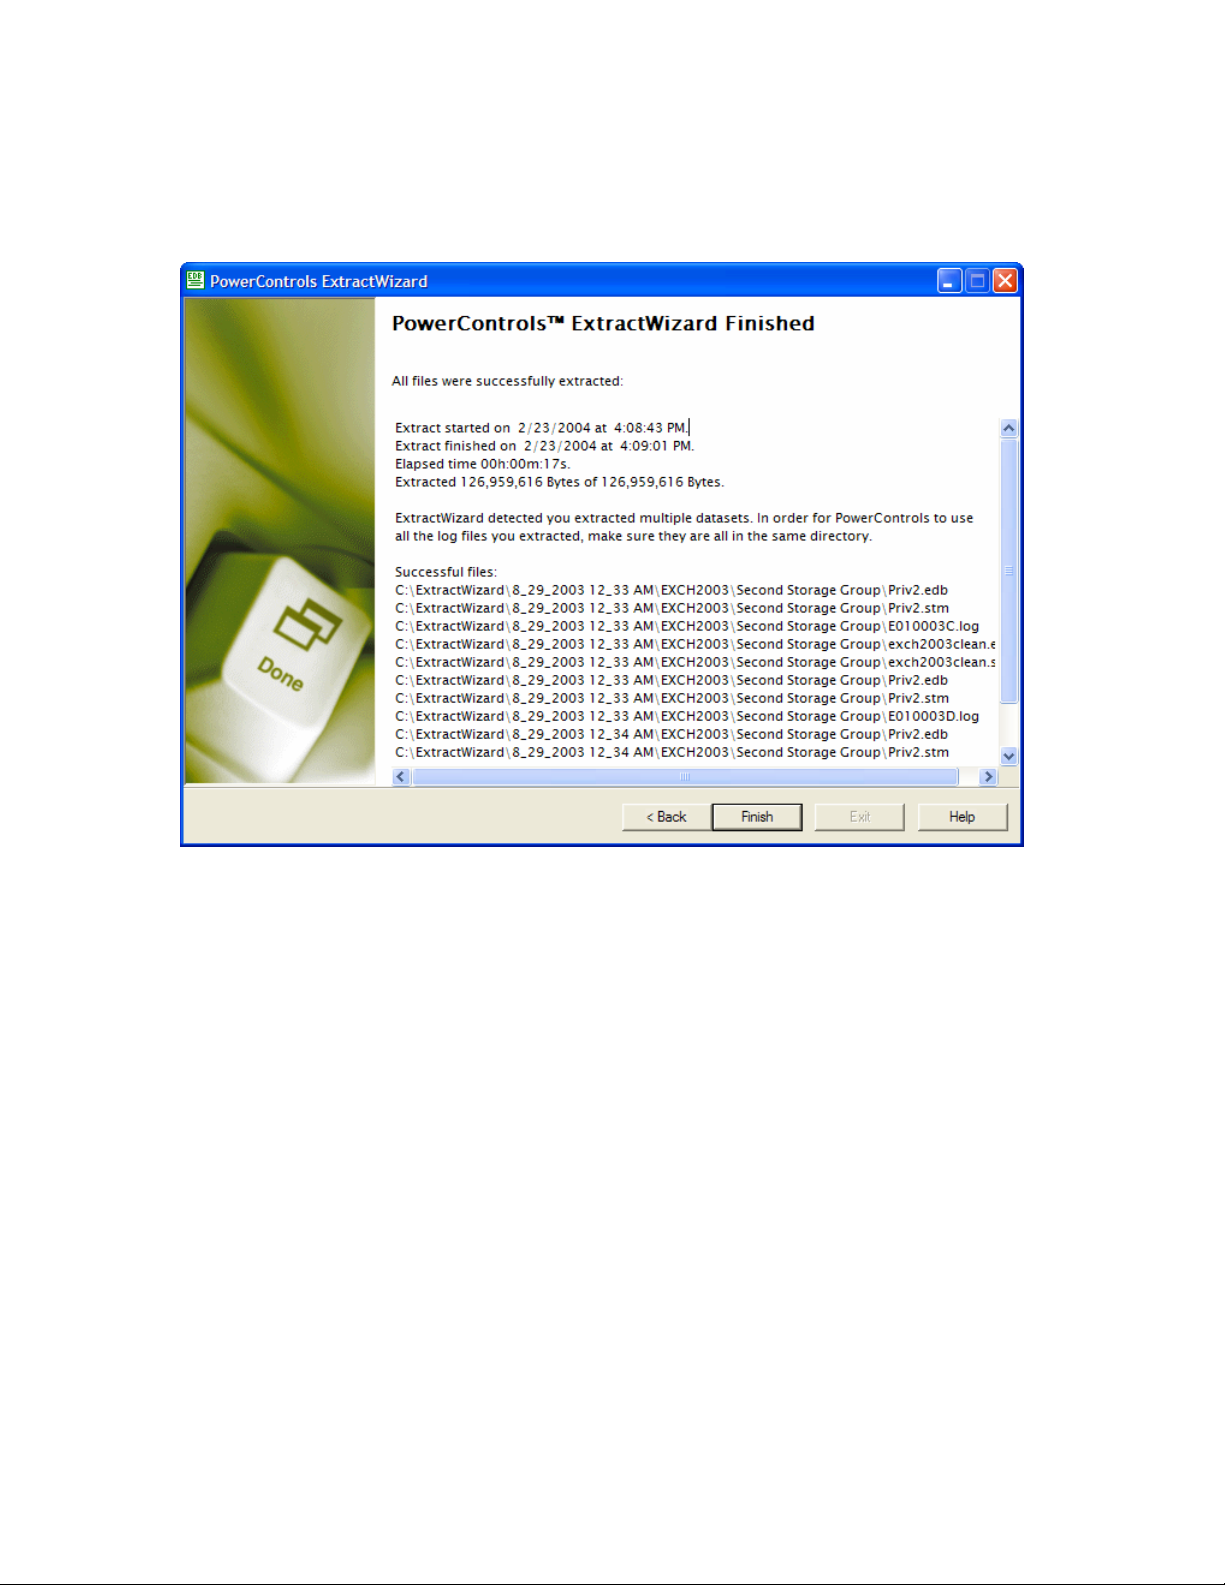
The last page of the ExtractWizard displays all of the files that were successfully extracted. If you are
satisfied with the results, click Finish.
If you extracted multiple data sets, see “Organizing the Extracted Files for PowerControls” below.
Organizing the Extracted Files for PowerControls
For best results when using an online incremental or differential backup
• Put the .edb and .stm files in one directory.
• Put the associated log files (e.g., .log, .pat, .chk) in one directory.
Note: The two directories can be different.
PowerControls does not require .stm or .log files, but you should include them to ensure that all email data
is recovered. You may get corruption errors if these files are not present. In other words, the quality of the
recovery is better if you include the .stm and log files.
If you are using an offline backup
You need to use the .edb and .stm files. To ensure that all email data is recovered, you should also include
all .log files, as well as .pat and .chk files if they exist. PowerControls performs its own verification process
and will include the .log and .pat files to determine if it needs them to recover the data.
Note: Exchange 5.5 does not use .stm files.
25
Page 33
Menu Bar
Toolbar
Chapter 2: Looking at the Interface
This chapter describes the parts of the main PowerControls window, and shows you how to preview
messages, view details of an EDB or PST file, and change the view.
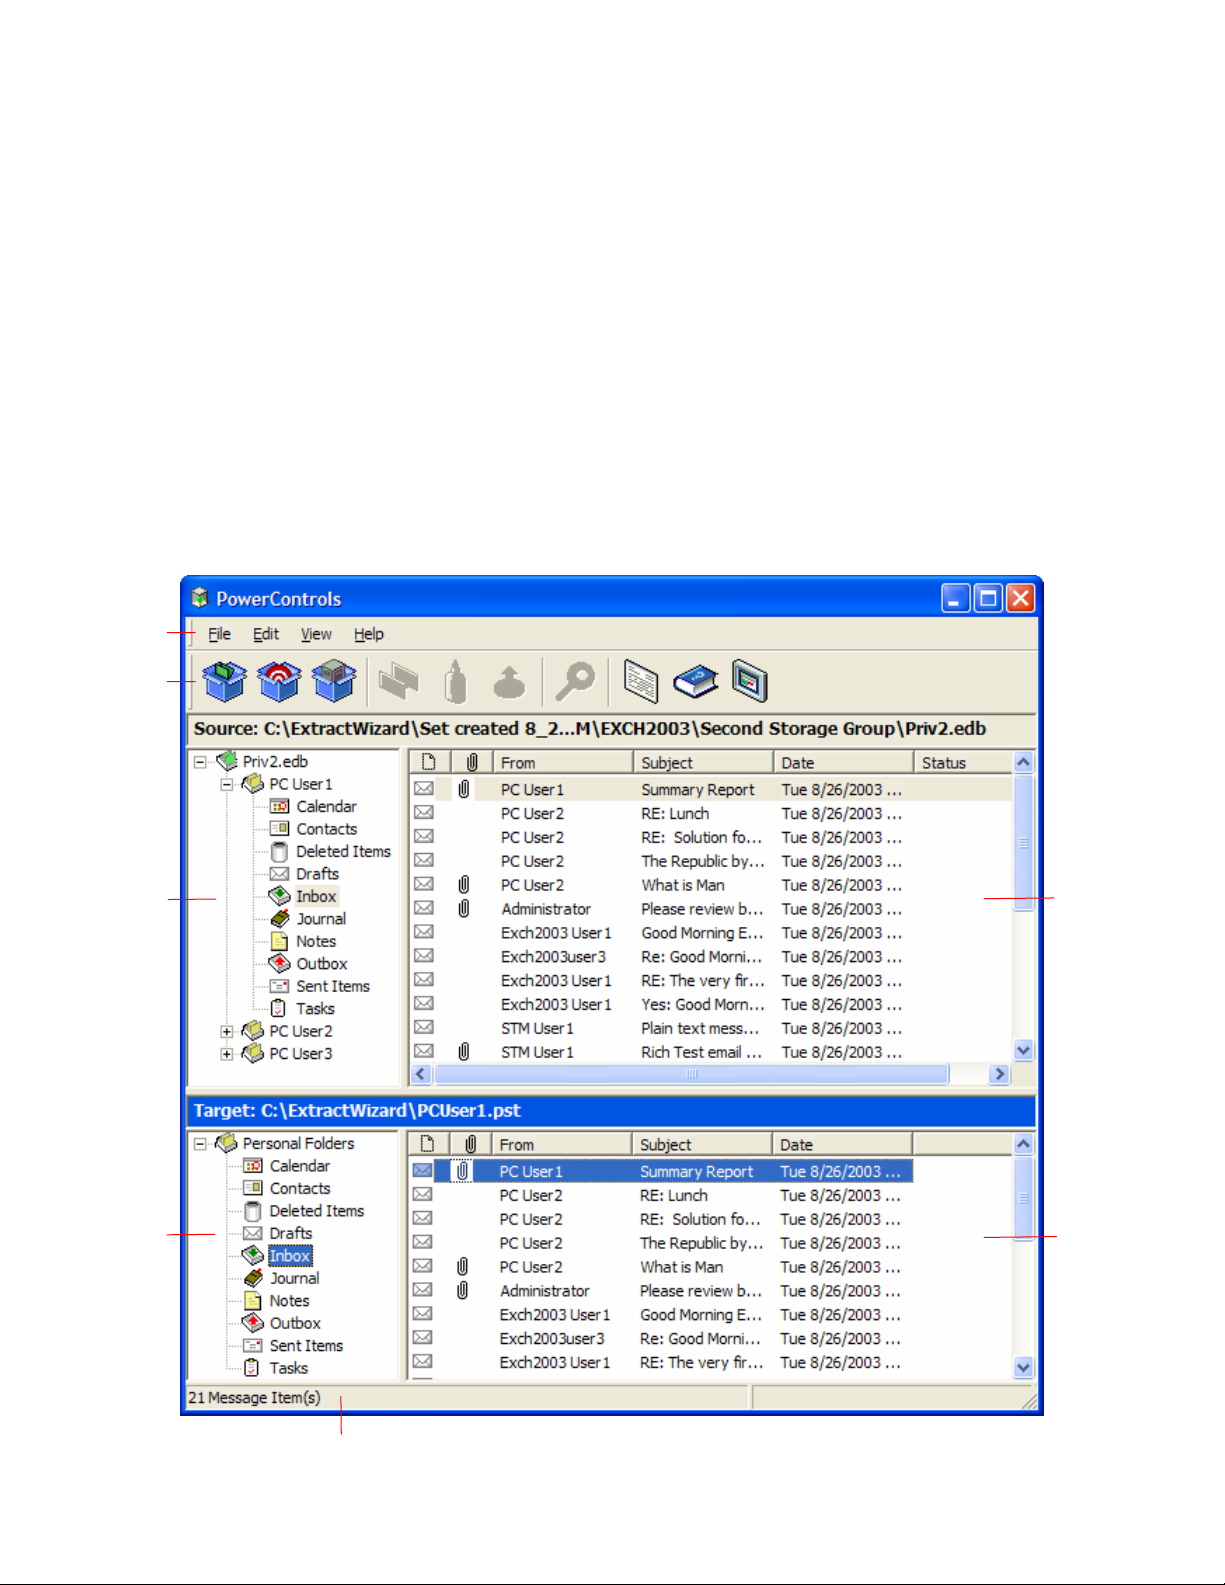
PowerControls Main Window
The PowerControls main window is where you do most of your work. This window displays the source
EDB or PST file(s) as well as the target PST file(s) or Exchange Server. The target acts as a container for
the restored files. The various work areas and controls are described in the following sections.
Note: In the illustration below, the Target pane displays a PST that acts as a container for restored files.
Keep in mind that the Target pane could just as easily display an Exchange server.
Source
pane
Target
Pane
Source
Message
List
Target
Message
List
Status Bar
26
Page 34
Ontrack® PowerControls™ 3.0 User Guide
Source Pane
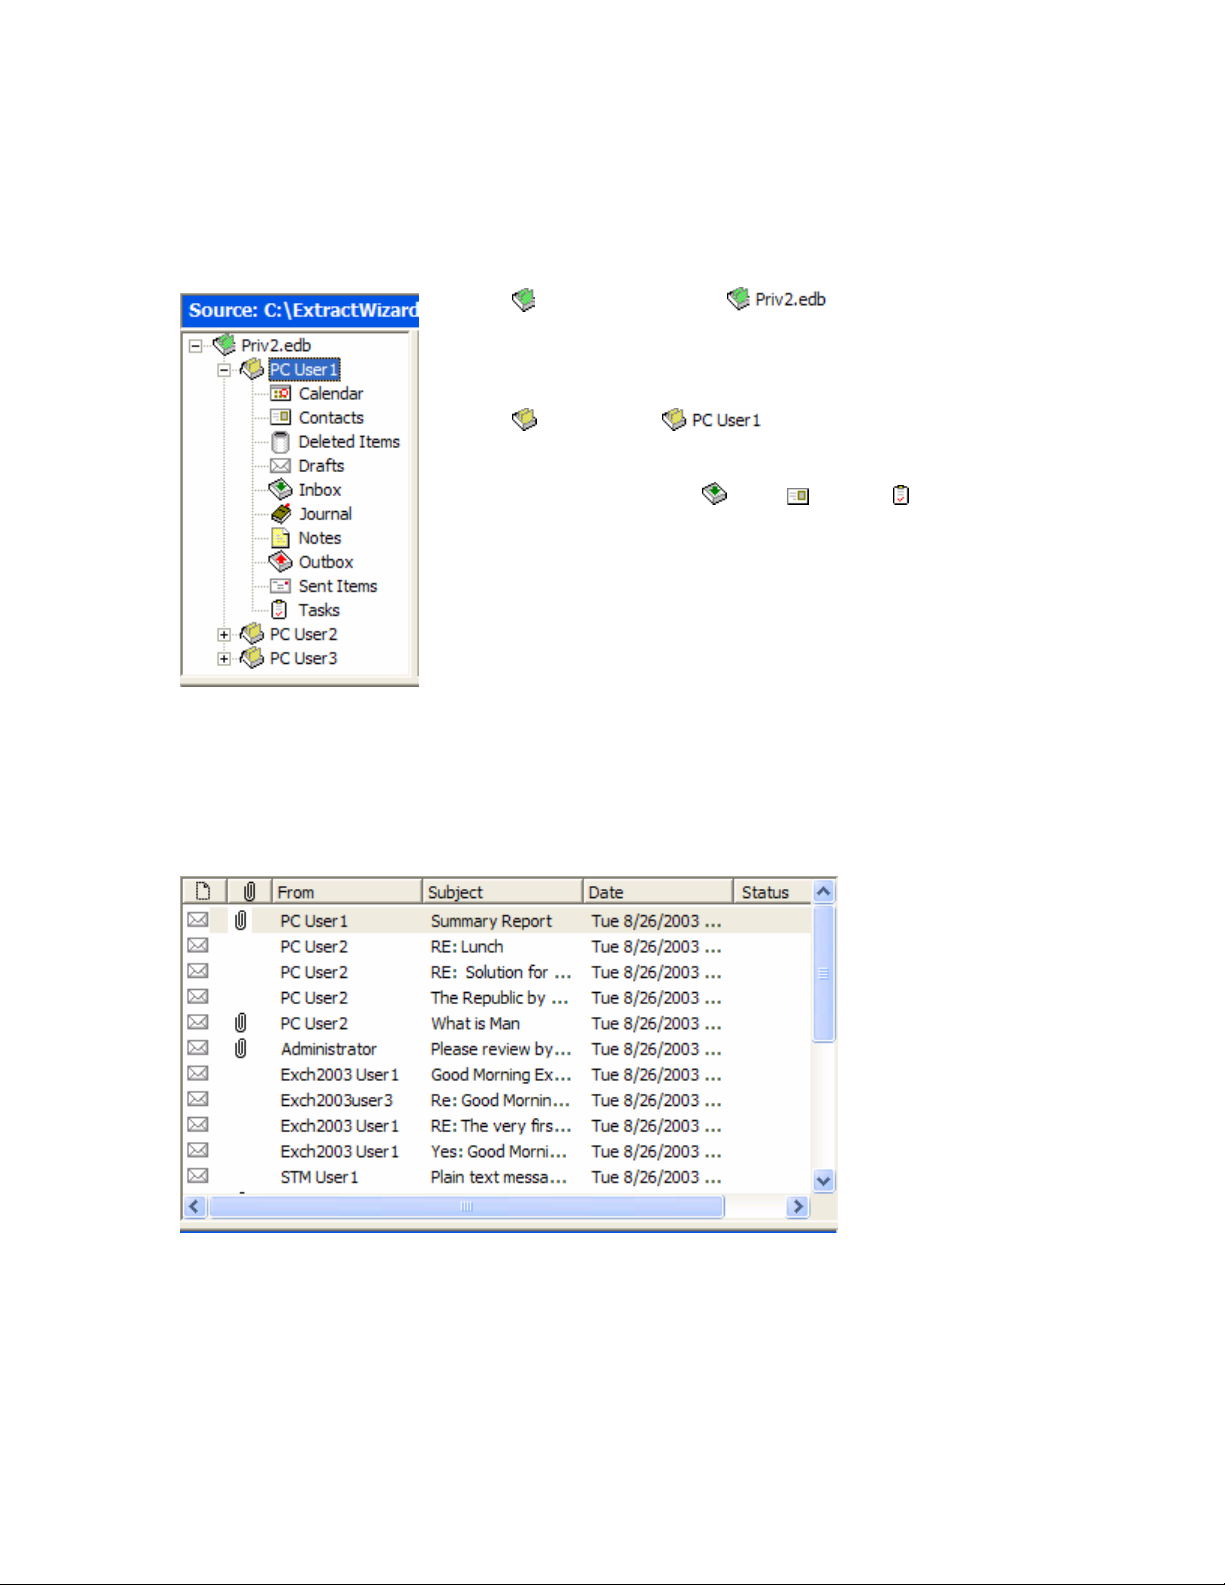
The Source pane displays the EDB file(s) that you extracted from a disk or tape backup. The Source pane
can also display one or more PST files if you have purchased the “PST as Source File” Agent. If you have
not yet extracted Exchange data from a backup tape or disk, see Chapter 1, “Using the ExtractWizard.”
Source EDB file (e.g., ) contains the Exchange
Information Store data that you extracted from a tape or disk
backup. Click the plus sign (+) next to an EDB file to expand
its contents.
Mailbox (e.g., ) contains the Outlook folders.
Click the plus sign (+) next to a mailbox to expand its contents.
Outlook Folders (e.g.,
contain Outlook message items. Select a folder to view its
contents in the source message list.
Notes: In the illustration on the left, the Source pane displays
an EDB file, but it could just as easily display a PST file or
even multiple EDB and PST files.
Inbox, Contacts, Tasks)
Source Message List
The source message list displays the message items in the Outlook folder that you selected in the Source
pane. This folder is one of the Outlook folders (e.g., Inbox, Contacts, Tasks). In the illustration below, the
source message list displays the messages in an Inbox.
The source message list displays metadata about the message items in six columns. The metadata includes
file type; attachments, if any; message sender; subject; date; and status. The Sent Items folder also displays
the “To” column. For more information on the message list, see “Sorting Messages in the Message Lists”
on page 34.
27
Page 35
Chapter 2: Looking at the Interface
Target Pane
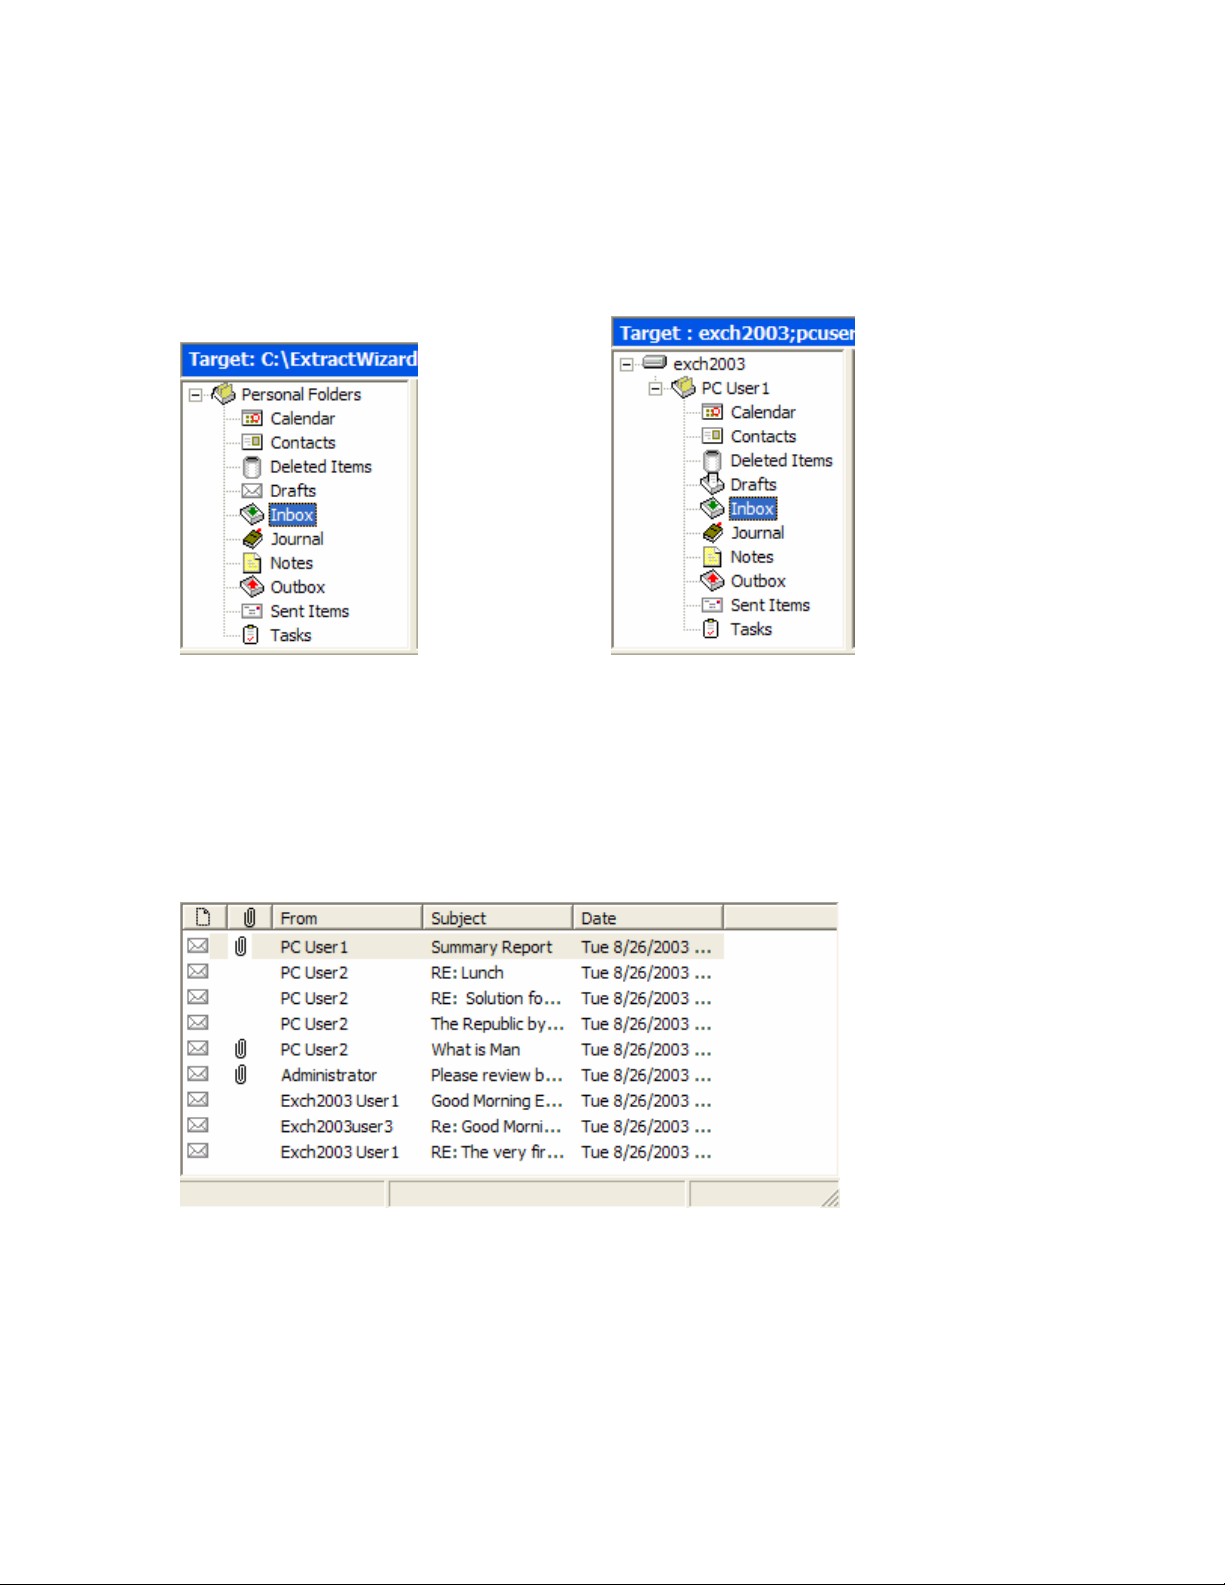
The Target pane can display one or more target PST files and/or one target mailbox from an Exchange
Server. The target acts as a container for your restored files. If a target is a newly created PST file, it
defaults to 10 Outlook folders. If a target is an existing PST file or Exchange server, it shows whatever
folders are in the target. It is into these folders that you paste and thus restore your message items. For
information on restoring message items, see Chapter 6, “Restoring Exchange Data.”
Target Pane for a PST File Target Pane for an Exchange Server
Target Message List (Restored Messages)
The target message list displays the message items in the Outlook folder that you selected in the Target
pane. If the target is a newly created PST file, the Outlook folders and message list will be empty. If the
target is an existing PST file or Exchange server, or if you have restored message items to a newly created
PST file, you can select a folder in the Target pane to display messages in the target message list.
Target Message List Displaying Restored Messages
The target message list displays metadata about the message items in five columns (instead of six columns
in the source message list). The metadata includes file type; attachments, if any; message sender; subject;
and date. The Sent Items folder also displays the “To” column. For more information on the message list,
see “Sorting Messages in the Message Lists” on page 34.
28
Page 36
Ontrack® PowerControls™ 3.0 User Guide
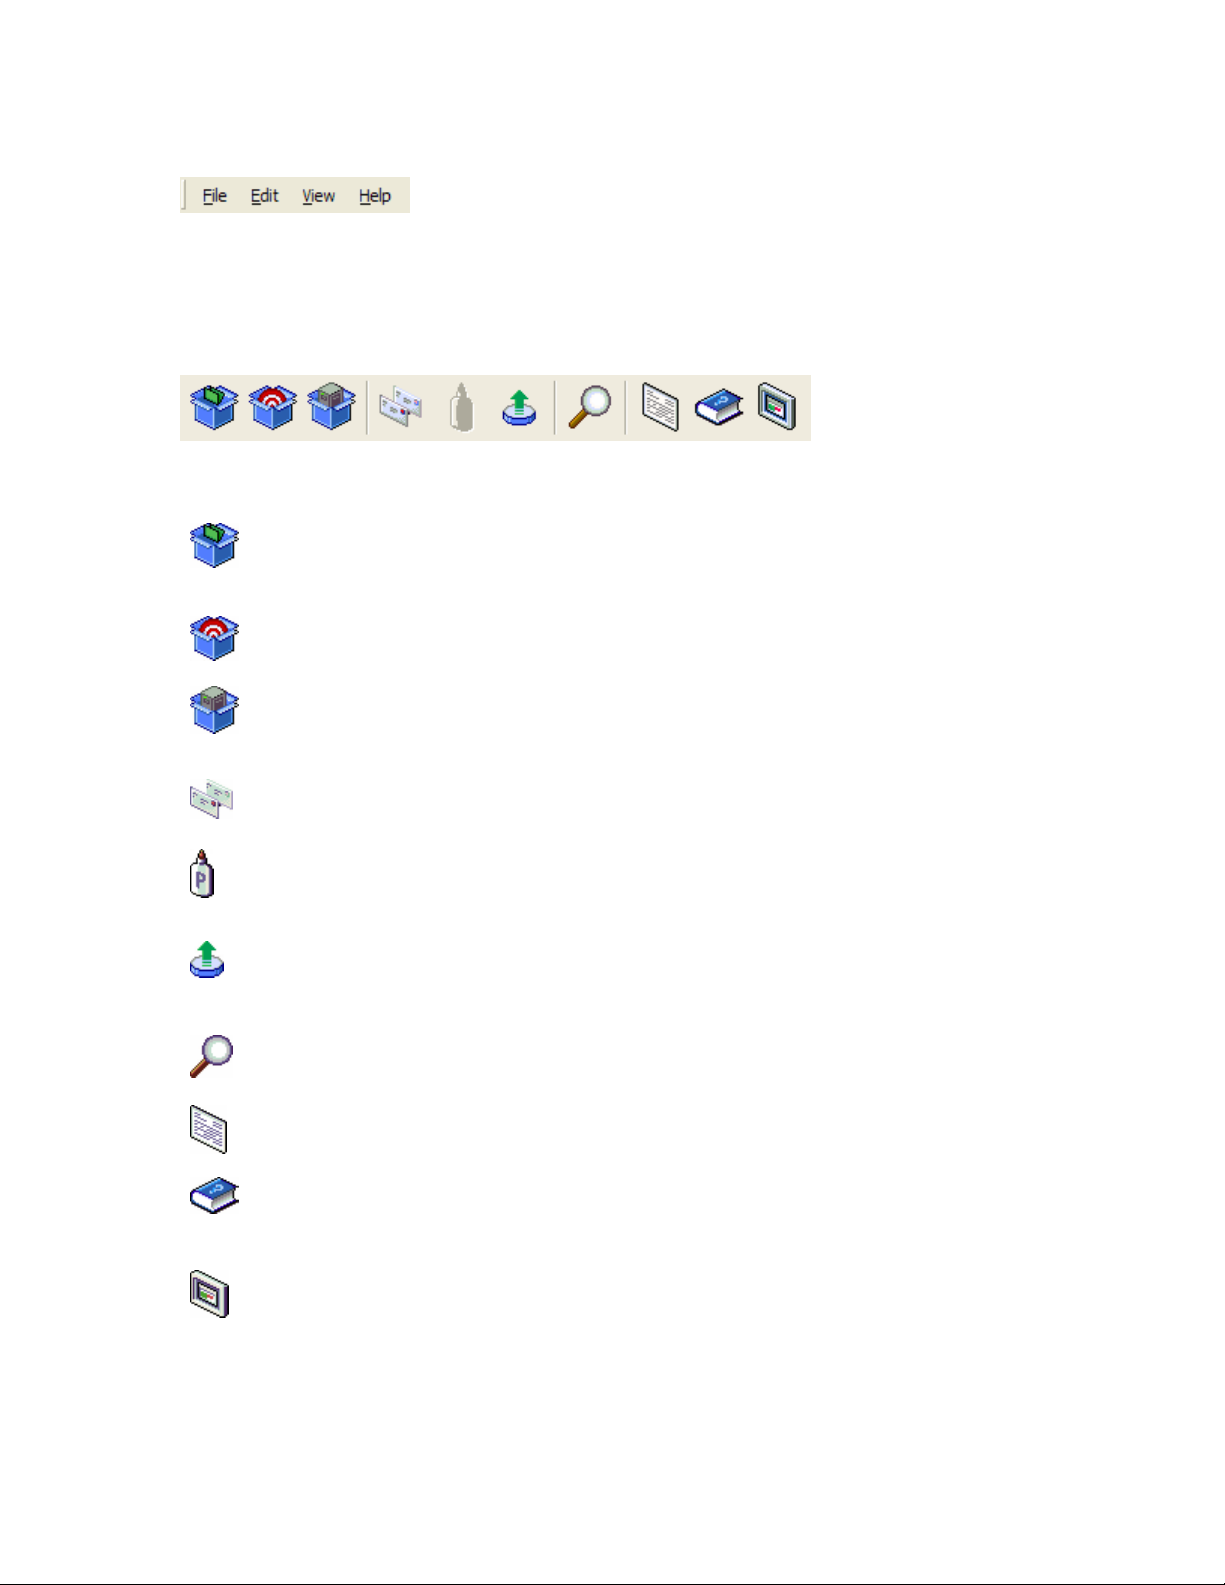
Menu Bar
The menu bar contains most of the PowerControls commands. The menu commands, submenu commands,
and resulting dialog boxes are discussed fully in the chapters that focus on those specific commands. See
the index to quickly locate the pages on which a menu command is discussed.
Toolbar
The ten buttons on the toolbar perform the following functions:
Open Source button displays the Open dialog box, which lets you navigate to and select a
source Exchange Database (EDB) or PST file. This EDB or PST file contains the message items
you want to restore.
Open Target PST button displays the Open dialog box, which lets you navigate to and select a
target Personal Folders (PST) file. The target PST file is a container for restored message items.
Open Target Exchange Server button displays the Connect to Exchange Server dialog box,
which lets you connect to a target Exchange server. The target Exchange server is a container for
restored message items.
Copy button copies into the Clipboard the selected message(s) in the source message list; or the
selected folder, mailbox, or EDB file in the Source pane.
Paste button pastes the items from the Clipboard into the selected folder in the Target pane. If
you wish to retain the directory structure of the restored messages, you must use the Paste
Special command instead of the Paste command or Paste button.
Export button displays the Export dialog box, which lets you export messages to a local or
network drive destination. You can choose to save exported messages as plain text files (.txt) or
as Microsoft Outlook files (.msg).
Search button displays the Find dialog box, which lets you specify the desired search criteria for
finding messages in the Source pane.
Preview Pane button displays the preview pane on the PowerControls main window so you can
read a message without opening it.
View Help button displays PowerControls Online Help, which includes all of the information in
this user guide and more. Online Help lets you quickly access this information by using a
Contents, Search, or Index tab.
Ontrack Web Site button takes you to the Ontrack Web site (www.ontrack.com), providing you
with additional information on products and services by Kroll Ontrack Inc.
29
Page 37
Chapter 2: Looking at the Interface
Status Bar
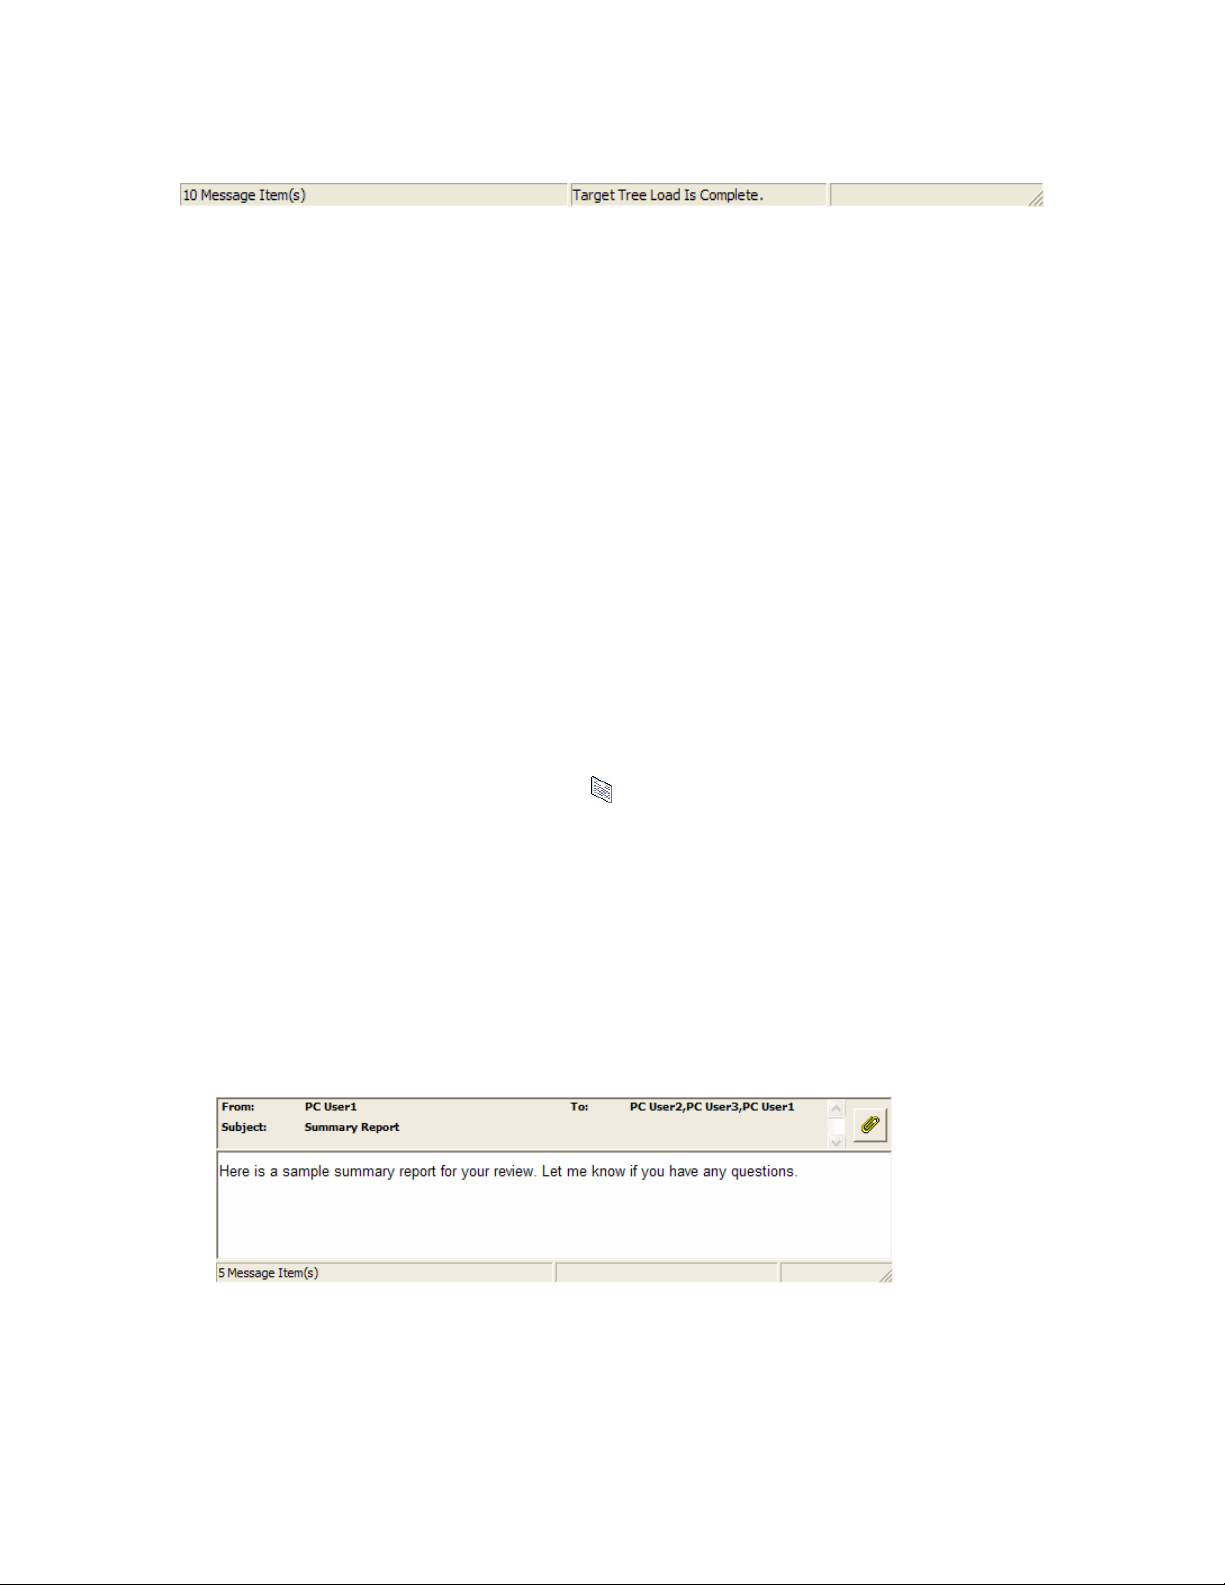
A B C
The sections in the status bar provide the following information:
A One of the following: total number of message items in the selected folder, error messages, copy
information, or description of selected menu command.
B Status while loading a source EDB file, a target PST file, or a target Exchange server.
C Status while displaying the contents of a folder (e.g., Inbox).
Previewing and Opening Messages
In the preview pane, you can read the contents of a message item and open attachments. You can preview a
message located in either the source message list or the target message list. The information displayed in
the Message Header is different for messages, calendars, contacts, tasks, and distribution lists.
To open the preview pane
Do one of the following:
• On the View menu, click Preview Pane.
• On the toolbar, click the Preview Pane button
To hide the preview pane
• Repeat one of the previous steps.
Tip: Hiding the preview pane will allow you to scroll through messages faster.
To display a message in the preview pane
1. In the source or target message list, select a message.
2. Open the preview pane.
.
Preview pane for a message
To open a message in its own window
• In the source or target message list, double-click a message.
30
Page 38

Ontrack® PowerControls™ 3.0 User Guide
Opening Attachments
If you have the appropriate program installed on your computer, PowerControls will load the application to
view the selected attachment (e.g., to view an .xls file attachment, PowerControls will launch MS Excel).
If no associated program is available for the attachment file type, PowerControls will present a message
dialog box saying the attachment cannot be viewed.
Note: PowerControls cannot view attached embedded graphics in HTML messages.
To open an attachment in an open message
1. In the message list, double-click a message that has the Attachment icon next to its name.
2. Click the Attachment button
attachments for the selected message.
3. Click the name of the attachment you want to view.
To open an attachment in the preview pane
1. In the message list, select a message that has the Attachment icon next to its name.
2. Open the preview pane. In the PowerControls main window, click the Preview Pane button
Find dialog box, select the Preview check box.
3. Click the Attachment button
A pop-up window lists the attachments for the selected message.
4. Click the name of the attachment you want to view.
on the right side of the message header. A pop-up window lists the
. In the
on the right side of the message header in the preview pane.
Saving Attachments
A “save attachments” option is available on the File menu and paperclip menu of an open message, as well
as on the paperclip menu of the preview pane. The Save Attachments dialog box lists the attachments for
the selected message and lets you select the attachments you want to save.
To save attachments in an open message
1. In the source or target message list, double-click a message that has the Attachment icon next to
its name.
2. In the open message, do one of the following:
• On the File menu, click Save Attachments.
• Click the Attachment button
Attachments.
3. In the Save Attachments dialog box, select one or more attachments, and click OK.
4. In the Browse For Folder dialog box, select a location for the attachment(s), and click OK.
on the right side of the message header, and then click Save
31
Page 39

Chapter 2: Looking at the Interface
To save attachments in the preview pane
1. In the source or target message list, select a message that has the Attachment icon next to its
name.
2. In the preview pane, click the Attachment button
then click Save Attachments.
3. In the Save Attachments dialog box, select one or more attachments, and click OK.
4. In the Browse For Folder dialog box, select a location for the attachment(s), and click OK.
on the right side of the message header, and
Changing the View
You can change the view in the PowerControls window by hiding the toolbar or status bar, by using split
bars; by sorting message lists; and by refreshing the screen.
Viewing or Hiding the Toolbar and Status Bar
The toolbar and status bar appear by default in the main PowerControls window, but you can easily hide
them.
To hide the toolbar or status bar
• On the View menu, click Toolbar or Status Bar. The check mark no longer appears next to the name
of the toolbar or status bar.
To view the toolbar or status bar
• On the View menu, click Toolbar or Status Bar. The check mark appears next to the name of the
toolbar or status bar.
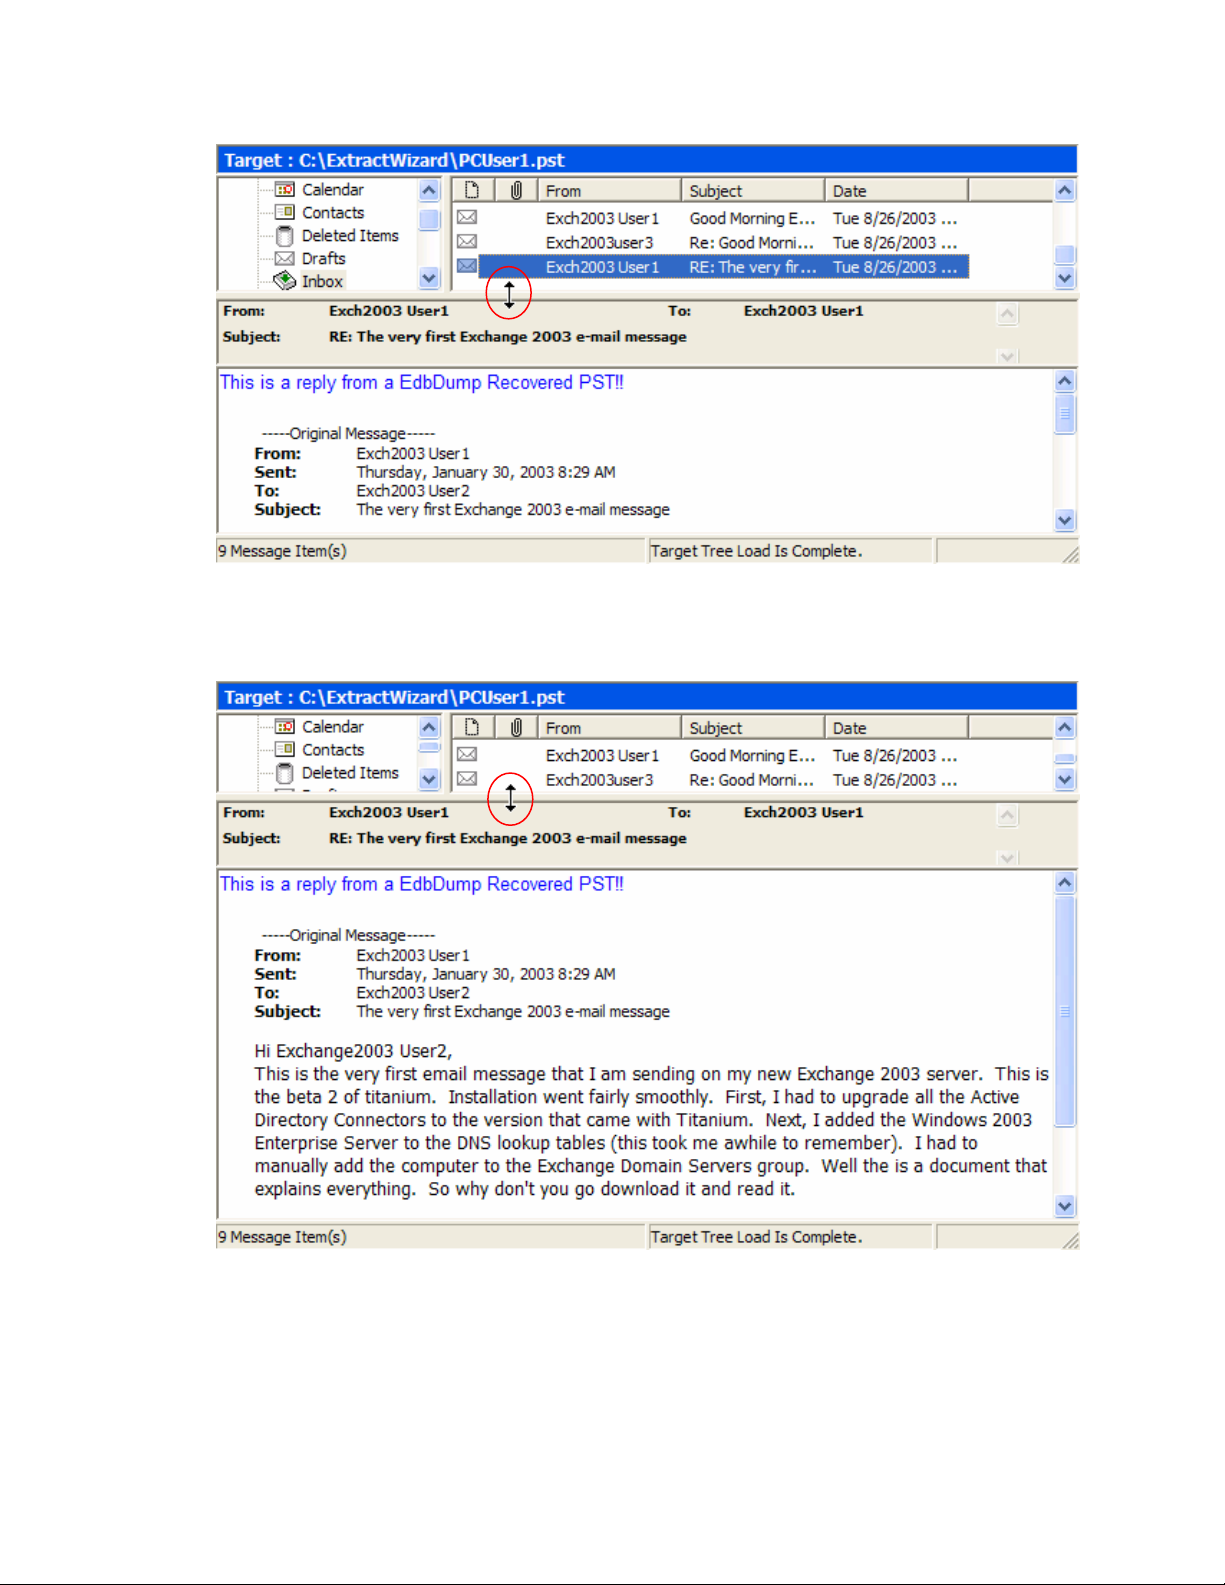
Resizing Panes Separated by a Split Bar
You can use a split bar (the horizontal or vertical double line that separates two panes) to increase the area
within one pane while simultaneously decreasing the area within the adjacent pane. The Source pane,
source message list, Target pane, target message list, and preview pane all border a split bar.
To resize panes separated by a split bar
1. Position the cursor over a split bar between two panes until a double arrow appears. A vertical
double arrow
32
appears if you position the cursor over a horizontal split bar.
Page 40
Ontrack® PowerControls™ 3.0 User Guide
Before dragging the split bar between the target message list and the preview pane
2. Drag the split bar until the two panes are the desired size.
After dragging the split bar upwards
33
Page 41
Chapter 2: Looking at the Interface
Sorting Messages in the Message Lists
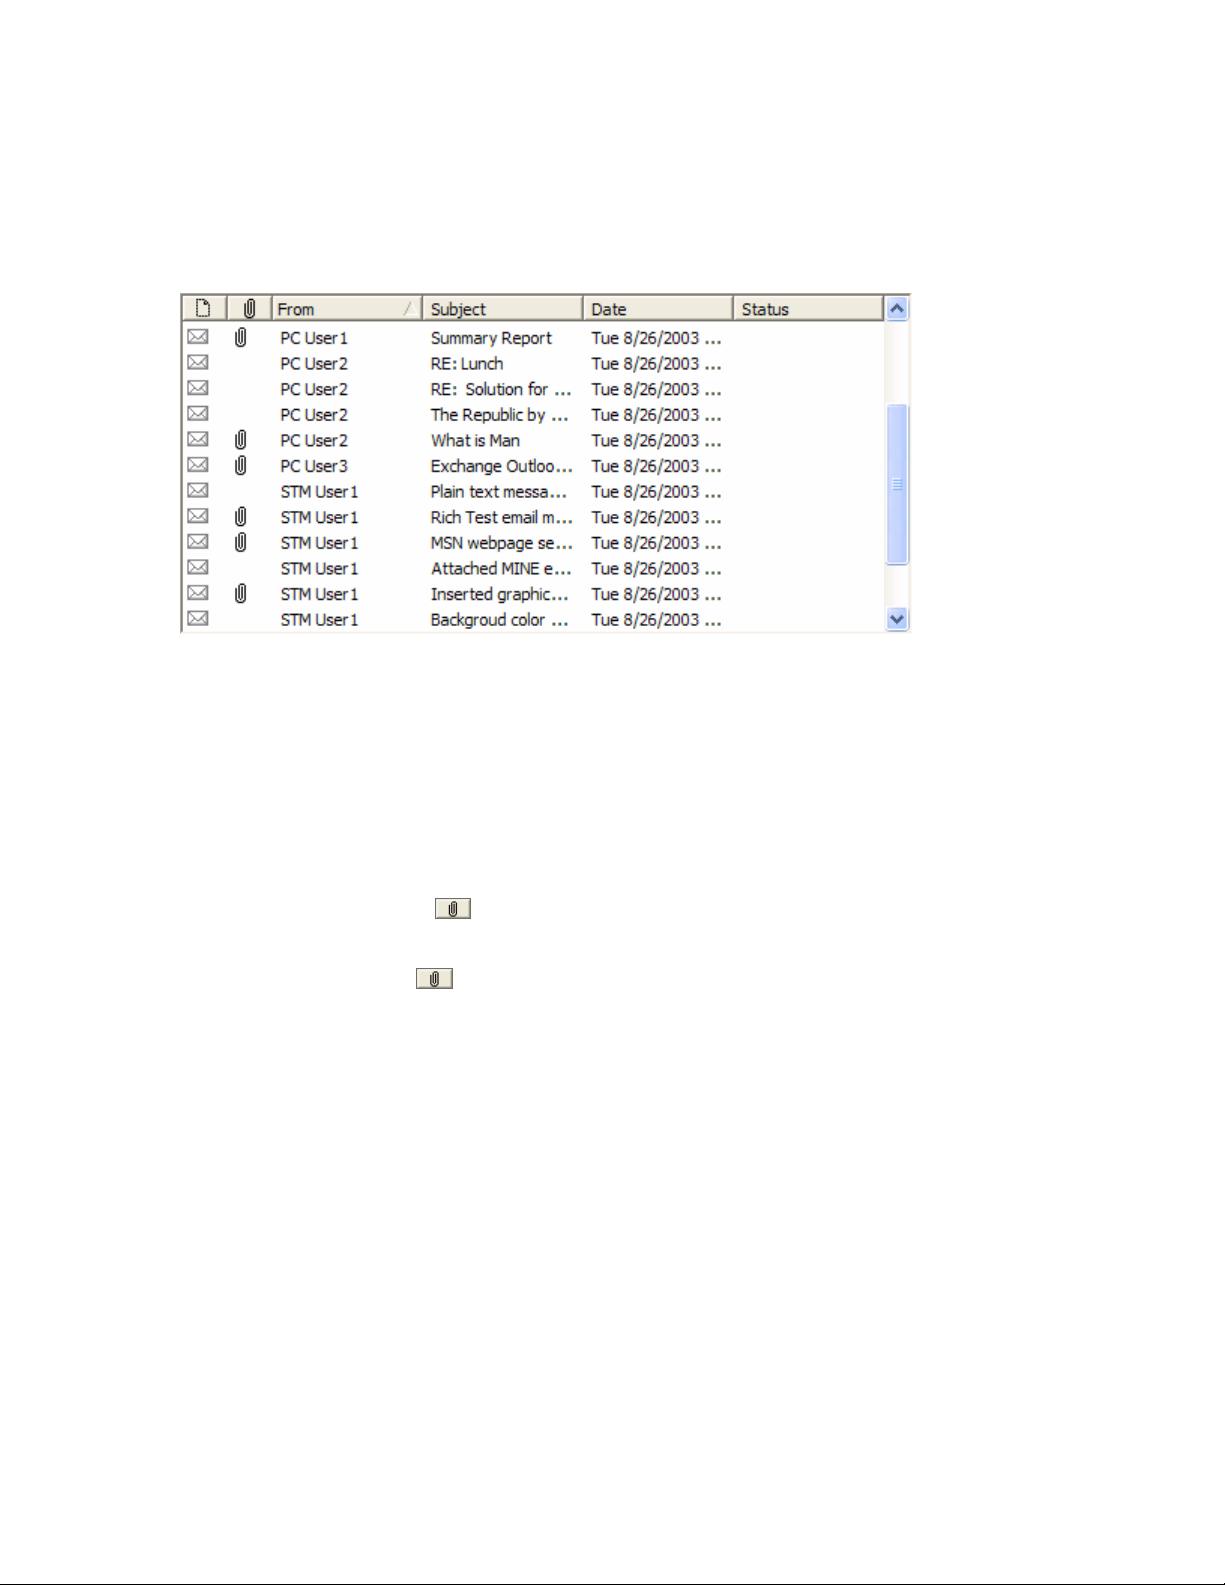
You can sort messages in the source and target message lists based on attachments, message sender,
subject, date, and status. In addition, the source message list lets you sort messages based on status, and the
Sent Items folder lets you sort items based on the “To” heading. Sorting messages on the From column,
for example, can help to identify messages from a specific sender.
To sort a message list
1. Click a column heading to sort the messages based on that heading. For most headings, an arrow
appears indicating the sort direction. An up arrow indicates that the messages appear in ascending
(A-Z) order. A down arrow indicates that the messages appear in descending (Z-A) order.
2. To reverse the order of the messages based on that column heading, click the column heading again.
Notice the arrow reverses directions.
An example of sorting messages
• If you click the attachment column heading, messages are sorted in ascending order based on this
heading, even though no arrow appears. This means that messages with attachments appear at the top
of the message list, while messages with no attachments appear at the bottom of the document list. If
you click the attachment
column heading again, the order is reversed.
Note: The view settings (sort order and column width) for a folder or mailbox are saved until you close the
data store.
Refreshing the Screen
You may wish to refresh the screen occasionally when you are connected to a target Exchange server.
That’s because the information on the server may change while you are connected.
To refresh the screen
Do one of the following:
• On the View menu, click Refresh.
• Press the F5 key.
34
Page 42
Ontrack® PowerControls™ 3.0 User Guide
Viewing the Properties of an EDB File, PST File, Folder,
or Mailbox
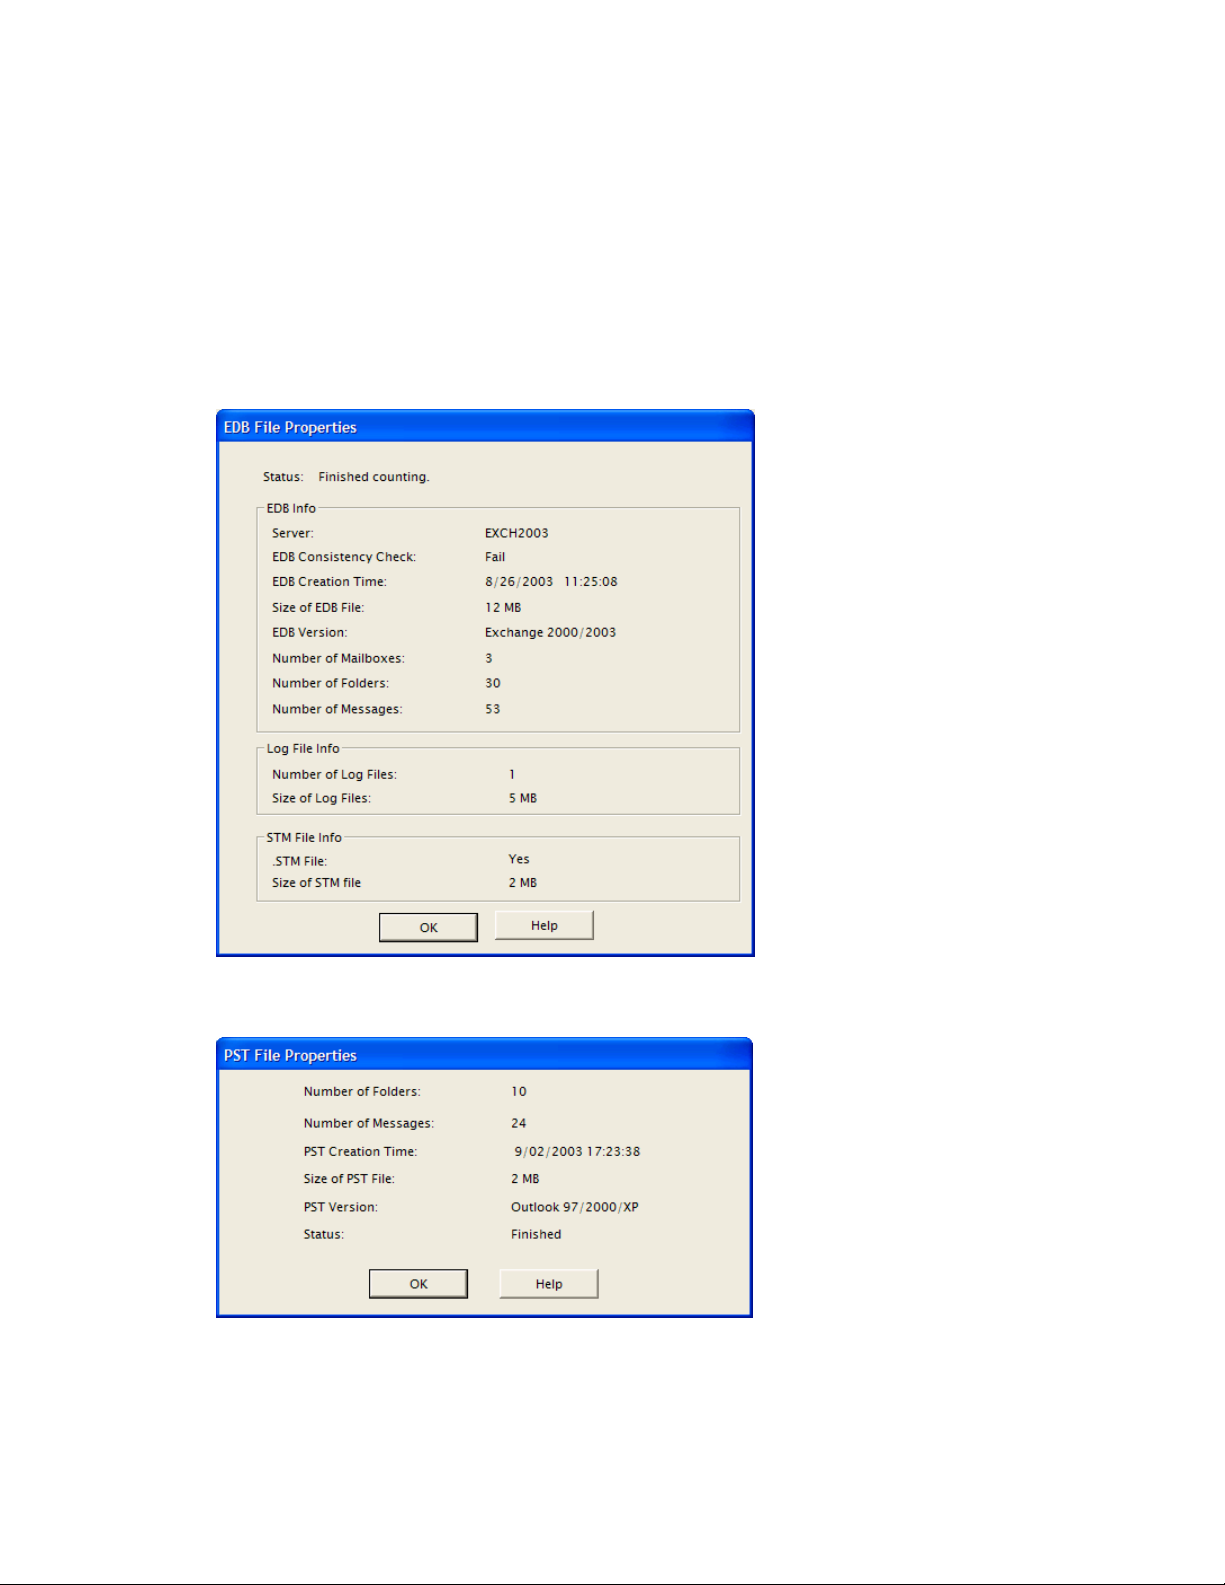
PowerControls makes it easy to view the properties of a source PST file, EDB file, mailbox, or folder.
To view the properties of an EDB file, PST file, mailbox, or folder
1. In the Source pane, right-click an EDB file, PST file, mailbox, or folder.
2. On the shortcut menu, click Properties. A properties dialog box appears.
Properties of an EDB File
Properties of a PST File
35
Page 43
Chapter 2: Looking at the Interface
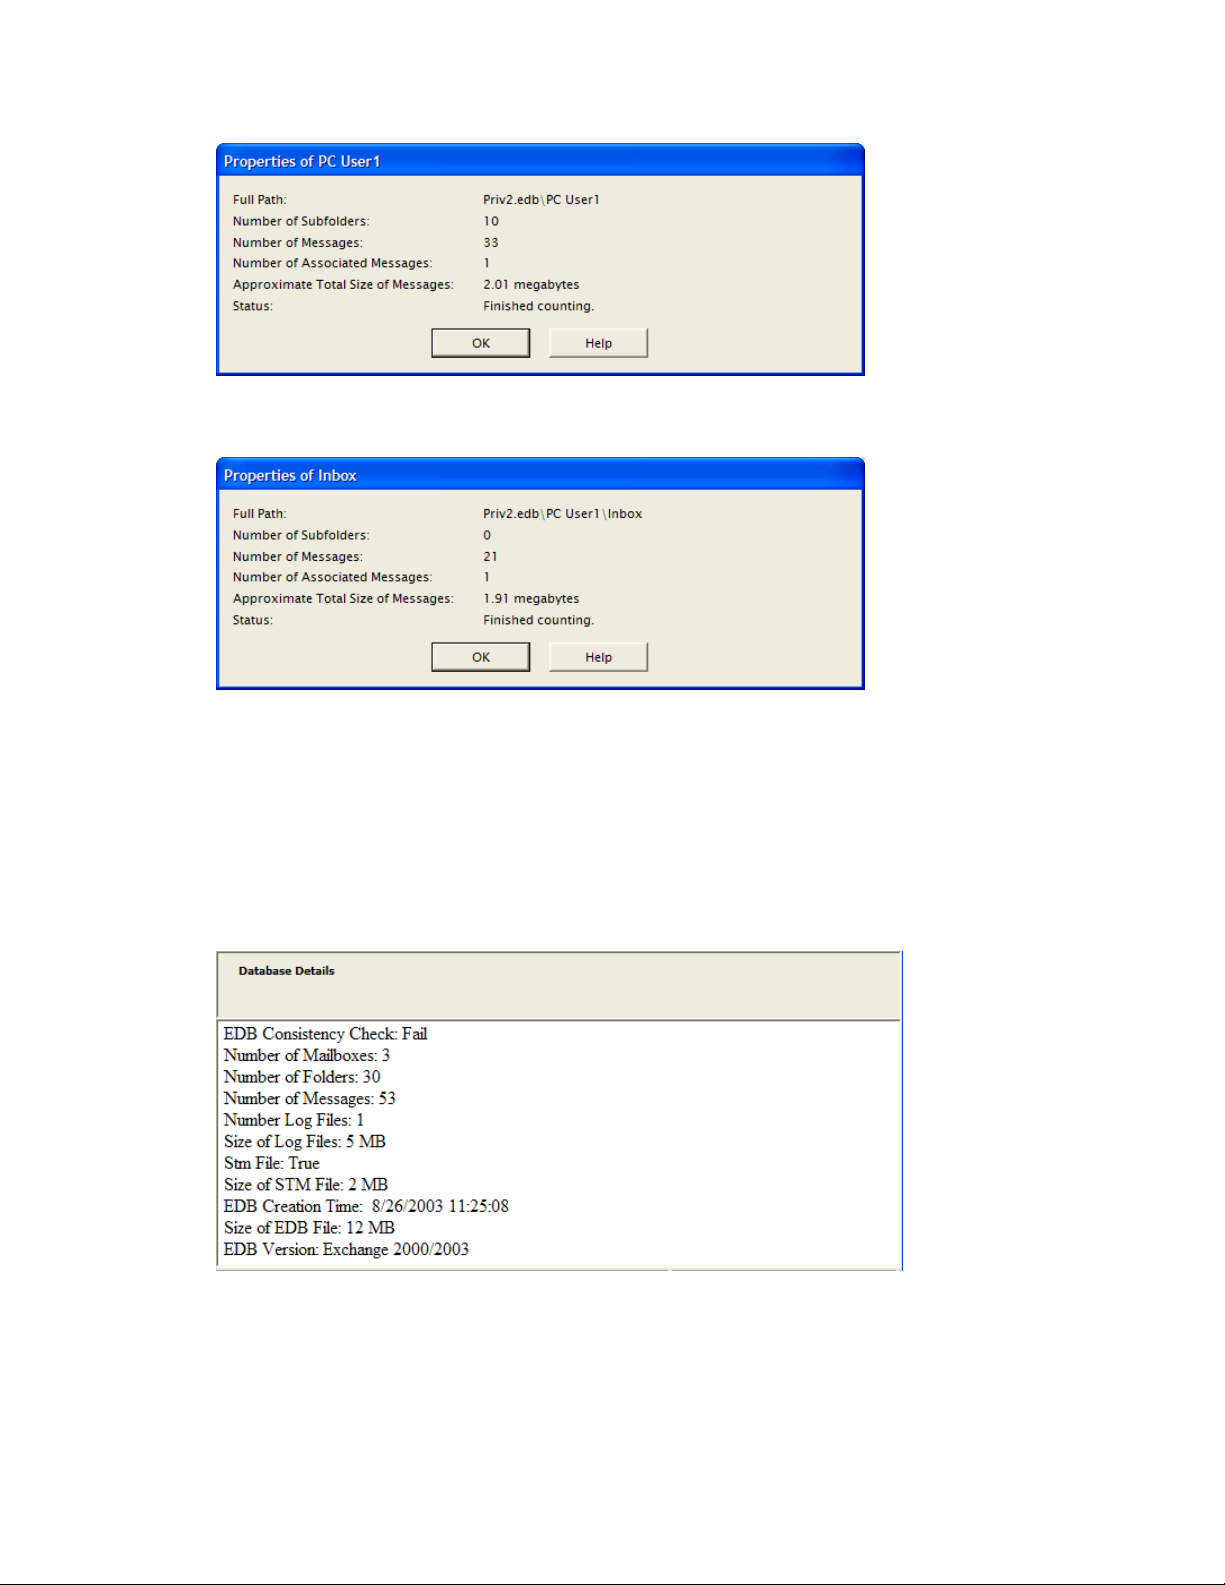
Properties of a Mailbox
Properties of a Folder
An alternate way to view the properties of an EDB or PST file
Once you have viewed the properties of the source EDB or PST file as described above, you can then
display the properties in the preview pane.
1. In the Source pane, select the source EDB or PST file.
2. Open the preview pane to display the properties.
Properties of an EDB File
36
Page 44
Ontrack® PowerControls™ 3.0 User Guide
Viewing Deleted Messages
PowerControls can view and restore deleted messages that are held in the EDB file. These messages appear
under the Status column in the source message list. If deleted messages have been purged from the EDB
file due to the deleted retention schedule, PowerControls cannot view or restore these messages.
Setting Preferences
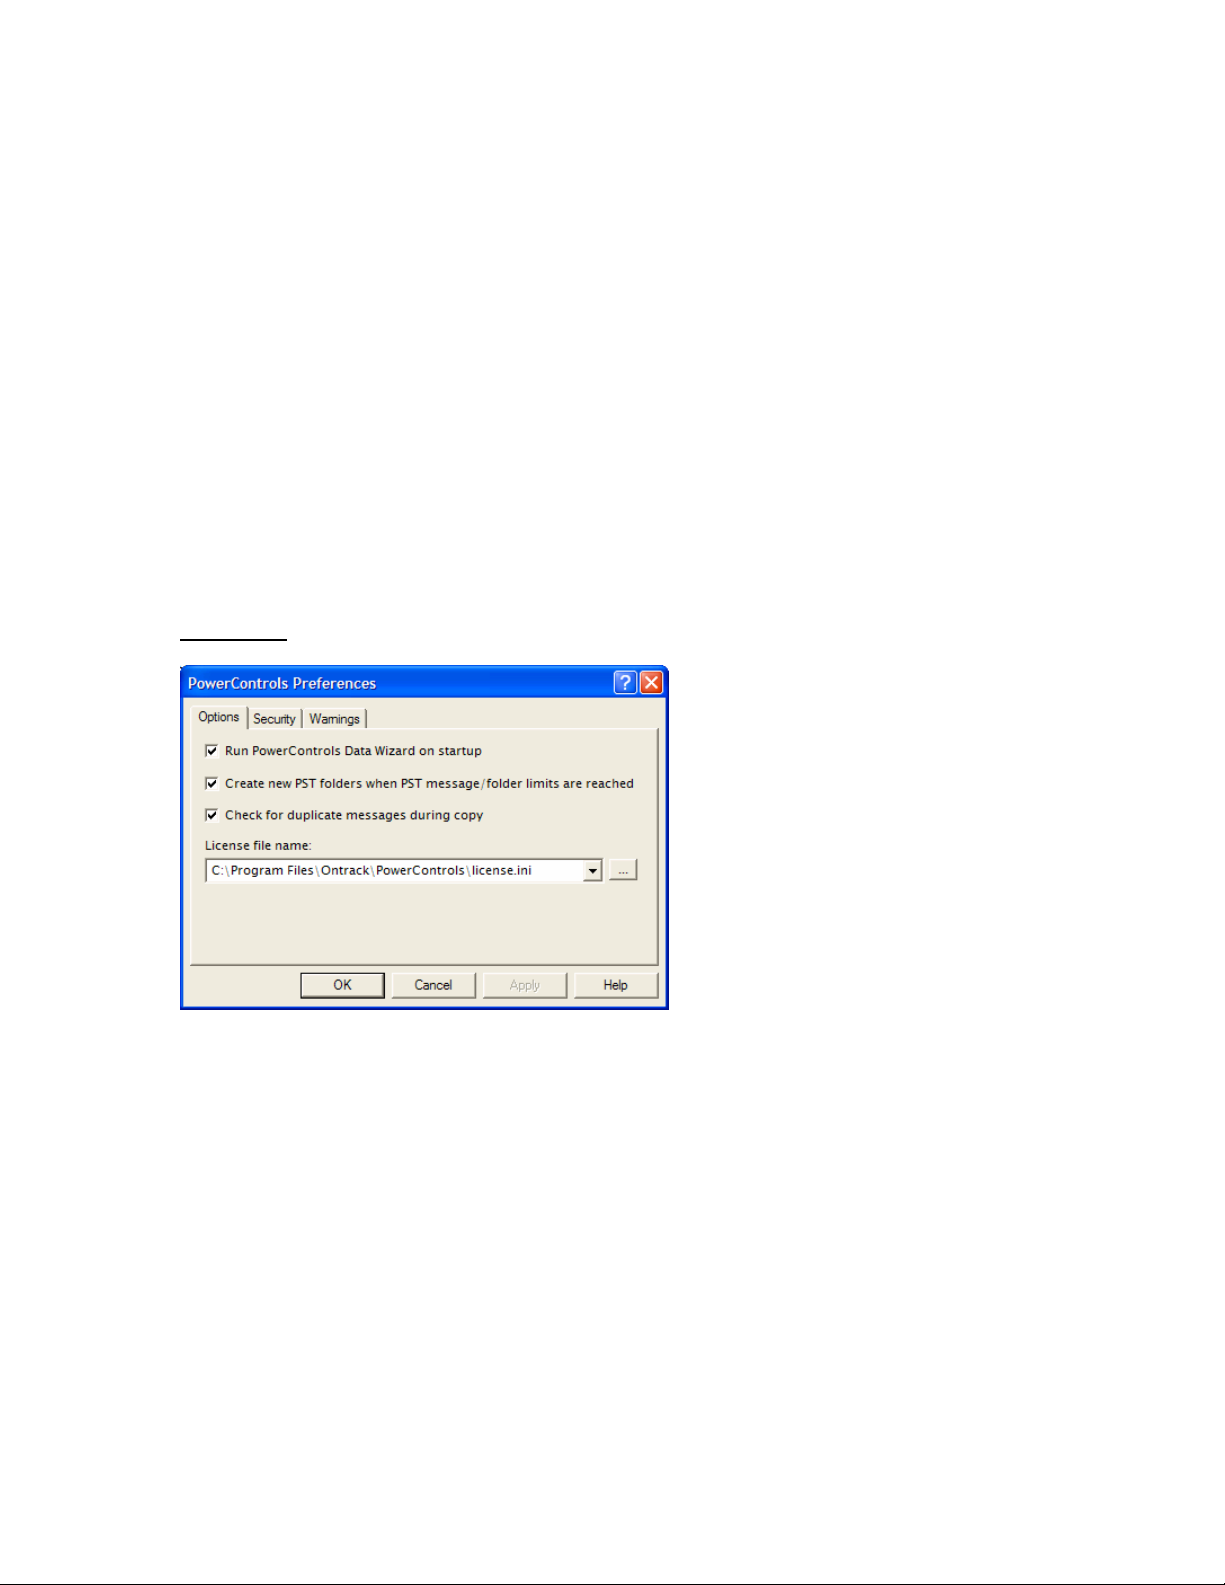
The Preferences dialog box allows you to streamline PowerControls operations. All of the preference
settings in the three tabs are selected by default. There is one exception: the “Enable Tamper-Proof Target”
setting in the Security tab. If you change the settings, they are stored and reloaded on the next run of
PowerControls.
To change preferences
1. On the Edit menu, click Preferences.
2. Select or clear the check boxes in the three tabs, as desired.
Options Tab
Run PowerControls Data Wizard on startup: The Data Wizard will launch every time you open
PowerControls.
Create new PST folders when PST message/folder limits are reached: PowerControls will
automatically create new folders (e.g., Inbox) when the 16,383 messages/folder limit is reached. After
PowerControls creates a new folder, it will continue to restore Exchange data where it left off. For more
information, see “Limits for PST and Folder Targets” on page 68.
Check for duplicate message during copy: PowerControls will check the current destination folder to see
if a copy of the message exists. Selecting this preference setting results in slower copy performance.
License file name: This box displays the current location of the license .ini file. To put this file in a
different location, click the Browse button and navigate to the desired location. There are two ways to
manage the location of the license.ini file:
• Multiple Copies of PowerControls: Put one license.ini in the PowerControls program directory of
each PowerControls installation.
37
Page 45
Chapter 2: Looking at the Interface
• Single Copy of PowerControls: Put one license.ini in a single network folder to which all
PowerControls installations make reference.
For more information about the license .ini file, see “The License .ini File” on page 9.
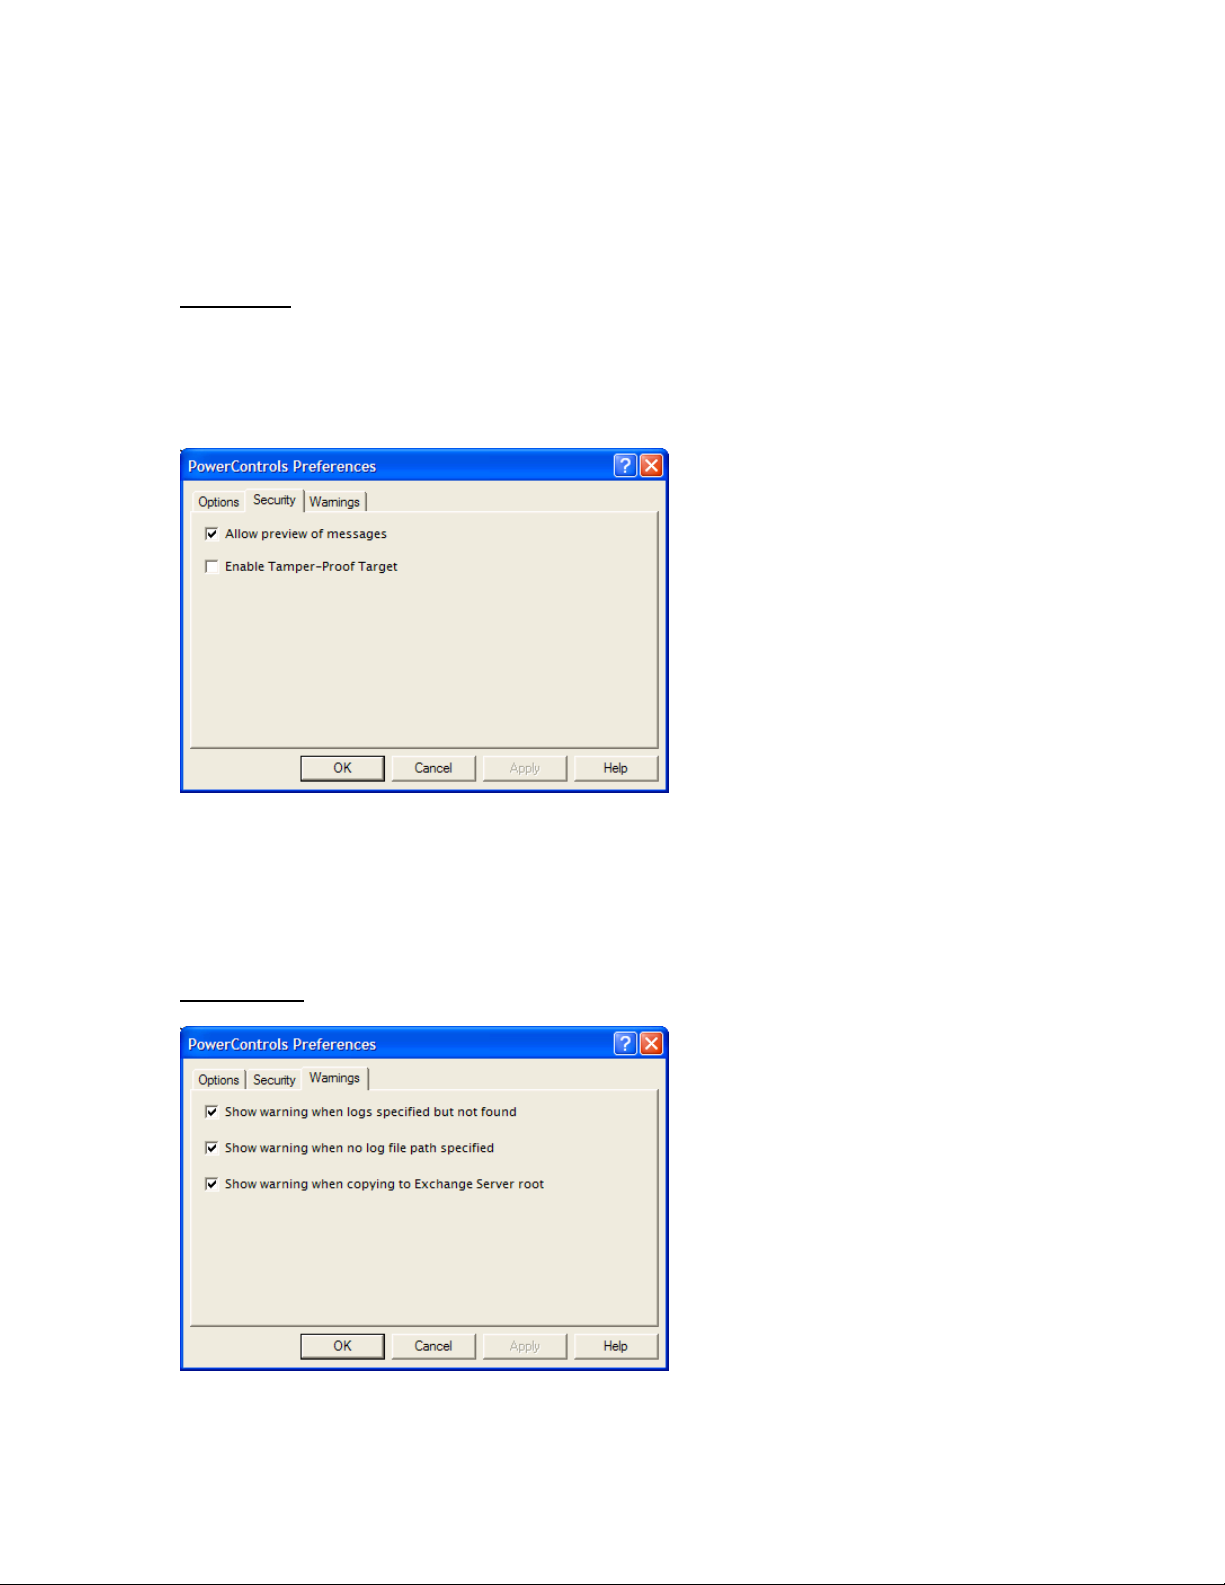
Security Tab
The options in this tab are modifiable by default only by users that belong to the Administrator Group.
The options are stored in the registry: HKEY_LOCAL_MACHINE\software\ontrack\powercontrols.
The PowerControls Installation program sets this registry key to have read/write access to users in the
Administrators group and read-only access by any user in the Users group.
Allow preview of messages: If this option is not checked, you will not have the ability to open or preview
messages in the source or target.
Enable Tamper-Proof Target: If this option is selected, PowerControls will not allow you to delete
messages or folders in the target or have the ability to rename folders in the target. You will only have the
ability to add (copy) to the target.
Warnings Tab
38
Page 46

Ontrack® PowerControls™ 3.0 User Guide
Show warning when logs specified but not found: PowerControls will warn you when opening an EDB
file if no .logs files were found at the specified directory.
Show warning when no log file path specified: PowerControls will warn you when opening an EDB file
if a .log file path has not been specified.
Show warning when copying to Exchange Server root: PowerControls will warn you when you are
about to copy a large amount of data to the Exchange server root.
39
Page 47

Chapter 2: Looking at the Interface
40
Page 48
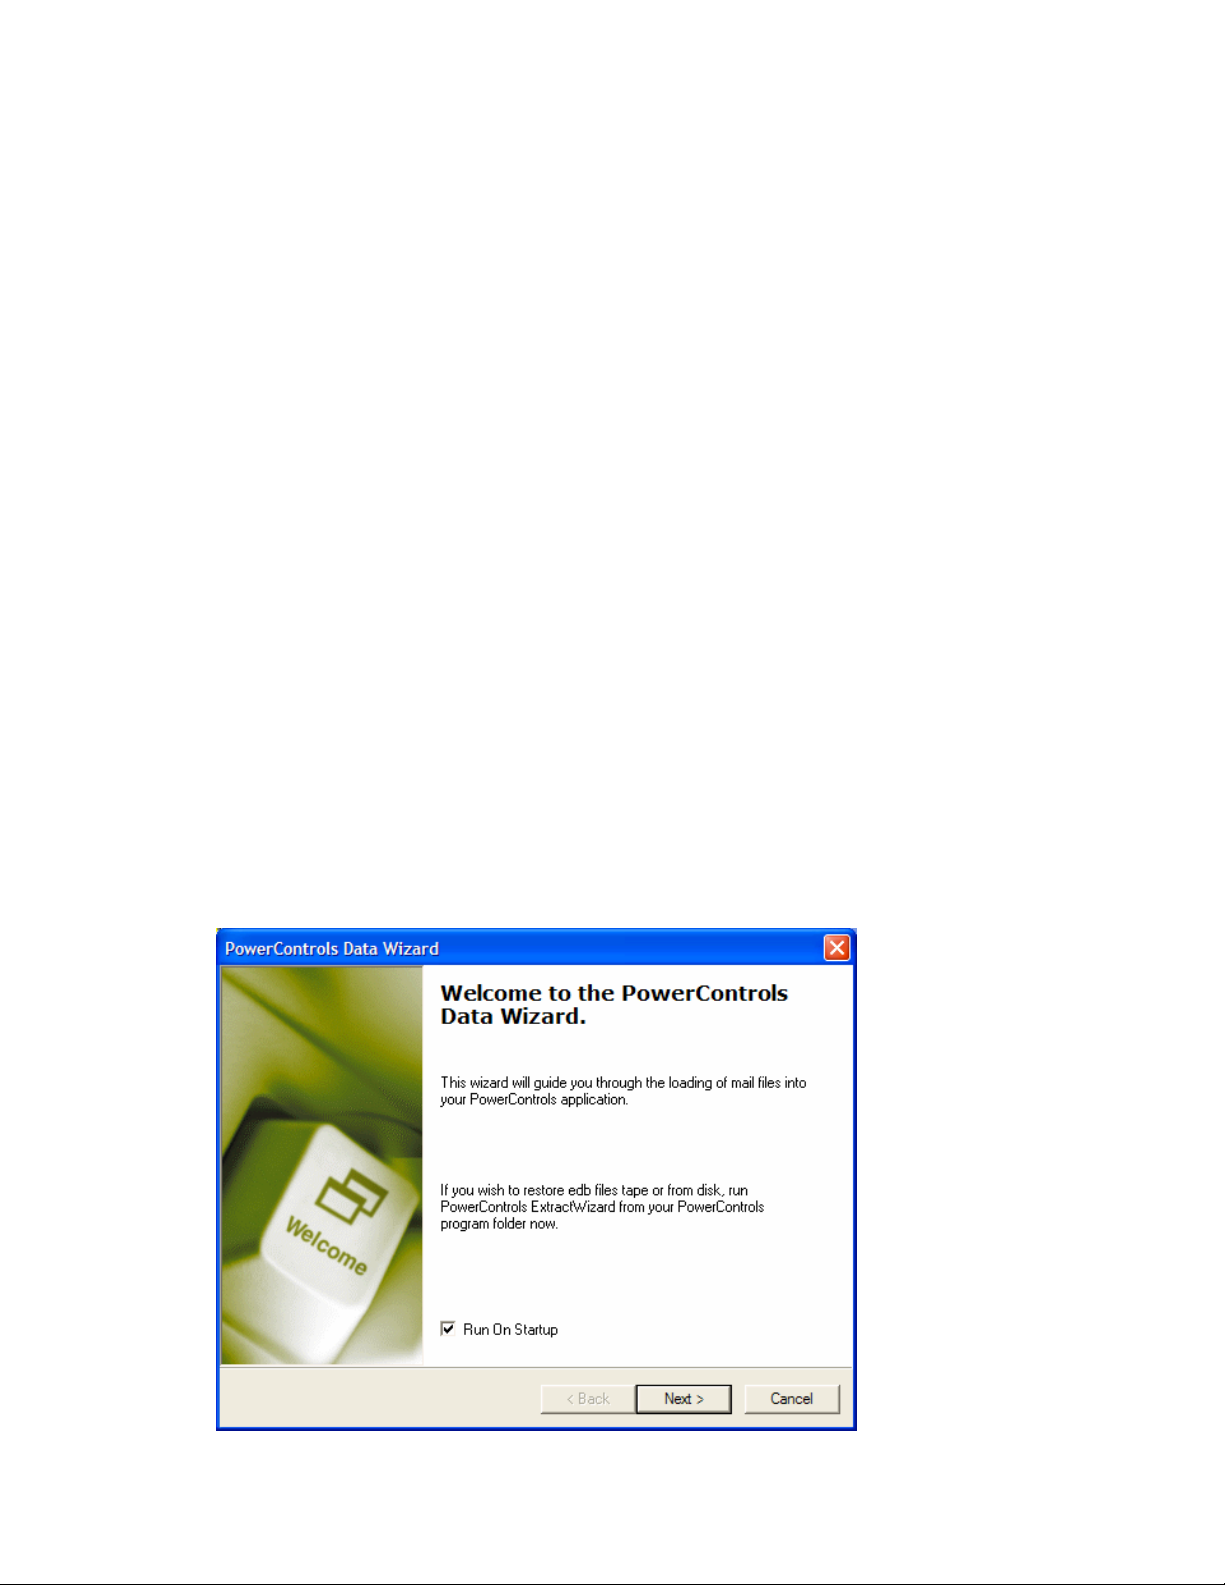
Chapter 3: Starting PowerControls
You can open a source Exchange Database (EDB) file or PST file and specify a target PST file or target
Exchange server by employing one of the following methods:
• Use the PowerControls Data Wizard.
• Open the source database and target mailboxes from the PowerControls main window.
Note: You cannot open the same PST file as both source and target.
Running the PowerControls Data Wizard
The first time you start PowerControls, the PowerControls Data Wizard starts. The Data Wizard guides you
through the loading of Exchange Database (EDB) or PST files into PowerControls, and shows you how to
specify the target PST file or Exchange server.
Before Using the Data Wizard: Use the PowerControls ExtractWizard if you have not yet restored backedup Exchange Information Store data. The ExtractWizard reads previous Exchange server backups and
restores EDB files to any machine, volume, or folder. For more information, see Chapter 1, “Using the
ExtractWizard.”
Data Wizard: Welcome Page
1. Click the Start button, and then point to Programs. Point to Ontrack, point to PowerControls, and
then click PowerControls. The PowerControls Data Wizard appears.
2. If you do not want to run the Data Wizard every time you start PowerControls, clear the Run On
Startup check box. Click Next.
41
Page 49
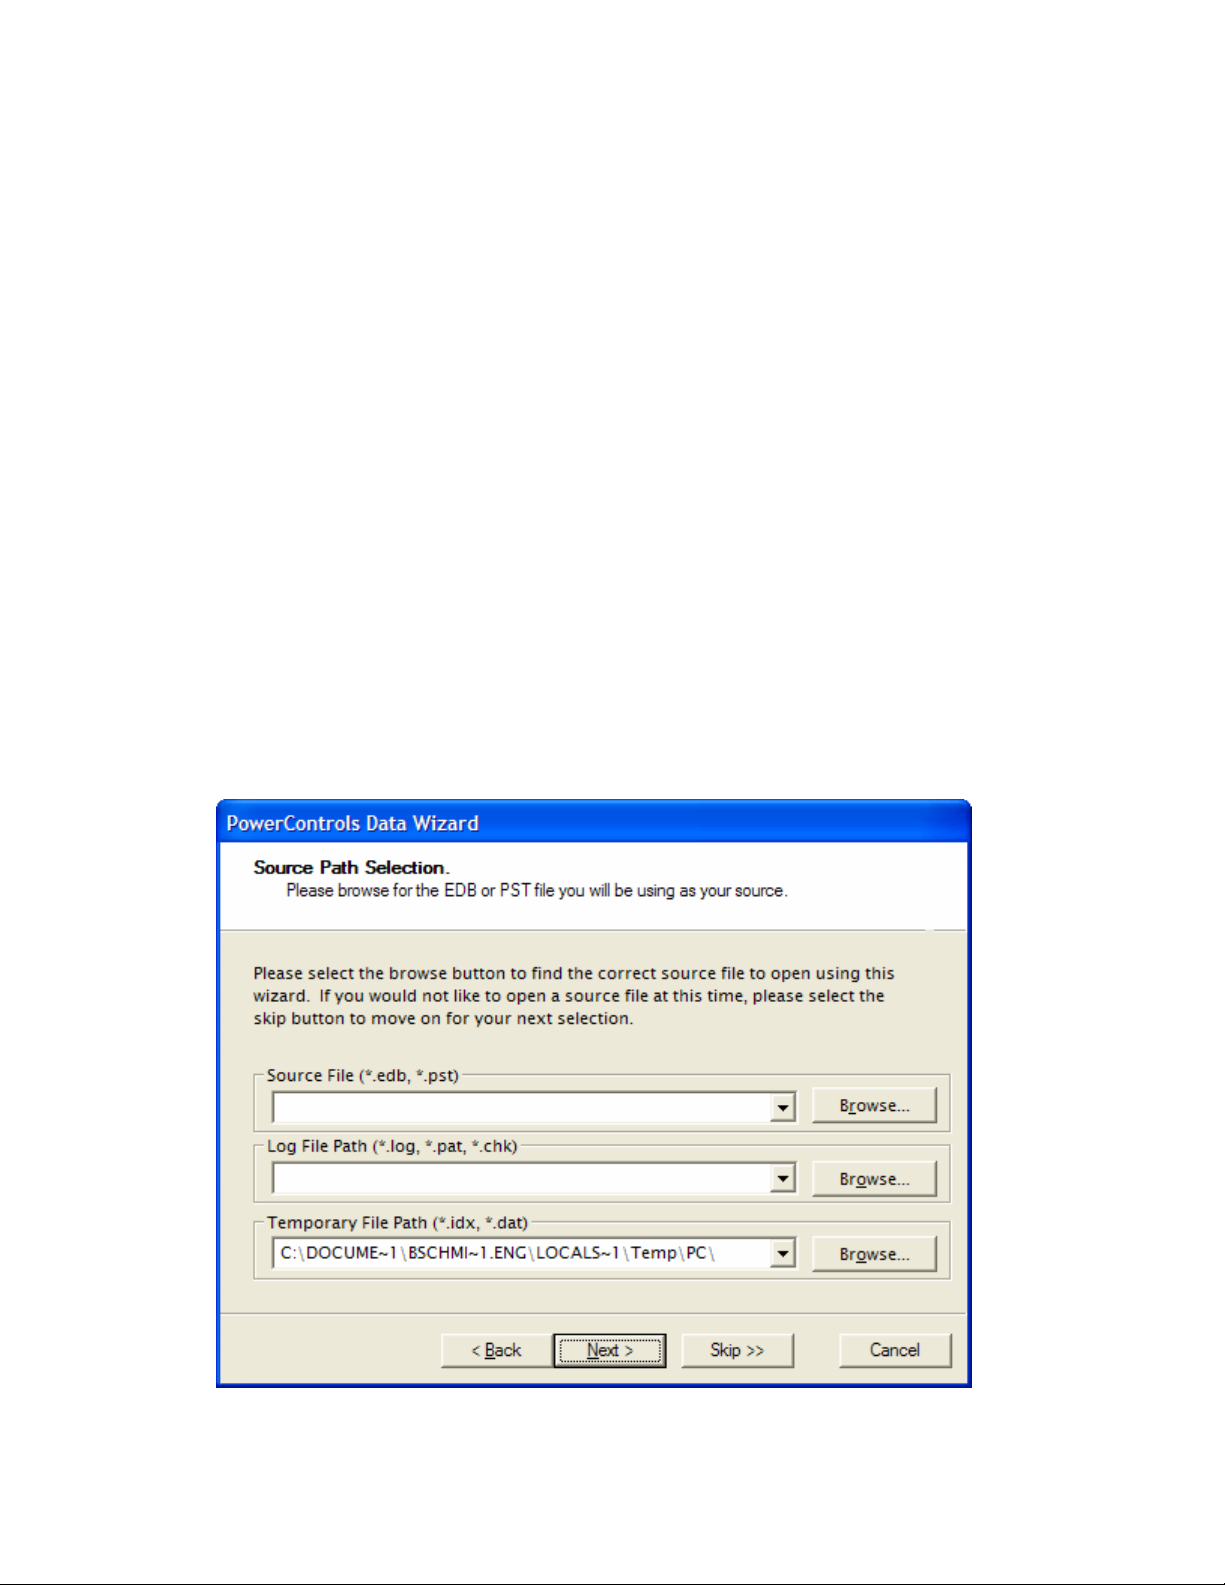
Chapter 3: Starting PowerControls
Data Wizard: Source Path Selection
On the Source Path Selection page of the Data Wizard, specify the source EDB file path along with its log
file path and temporary file path. Or specify the source PST file path. If you do not want to open a source
EDB or PST file at this time, click the Skip button.
Note: Due to the database nature of the PST file and MAPI subsystem, PSTs opened as source will be
modified.
To specify a source file
1. In the Source File box, use the Browse button to find the source EDB file or the source PST file.
2. If you specified a PST file path, proceed to step 5. PST files do not require log file or temporary file
paths.
3. In the Log File Path box, use the Browse button to find the log files associated with the source EDB
file.
Important Note: After you select an EDB file, the Log File Path box defaults to the source EDB file
path, even if the log files are not in the same directory as the source EDB file. Therefore, make sure
you enter the correct log file path in the Log File Path box.
4. In the Temporary File Path box, accept the default location for .idx and .dat files, or specify a new
location if they require more hard drive space. For more information, see "Guidelines for Selecting an
Exchange Database" on page 43.
5. Click Next.
42
Page 50

Ontrack® PowerControls™ 3.0 User Guide
Guidelines for Selecting an Exchange Database
1. For best results when using an online incremental or differential backup:
• Put the .edb and .stm files in one directory.
• Put the associated log files (e.g., .log, .pat, .chk) in one directory.
Note: The two directories can be different.
PowerControls does not require .stm or .log files, but you should include them to ensure that all email
data is recovered.
2. If you are using an offline backup: You need to use the .edb and .stm files. To ensure that all email
data is recovered, you should also include all .log files, as well as .pat and .chk files if they exist.
PowerControls performs its own verification process and will include the .log and .pat files to
determine if it needs them to recover the data.
3. For best results when specifying a temporary file path for .idx and .dat files: Make sure you have
a sufficient amount of hard drive space for .dat and .idx files. These files may require hard drive space
equal to the size of the .log files. Therefore, you may need to change the default file path for .idx and
.dat files if you need more space.
PowerControls never modifies an .edb file or its associated files (e.g., .log, .stm, .pat, .chk); however, it
does create .dat and .idx files the first time you open an .edb file from a directory that contains log
files. Each time you reopen the .edb file, PowerControls uses the information in the .dat and .idx files
so it can open the .edb file quicker.
Note: Exchange 5.5 does not use .stm files.
43
Page 51
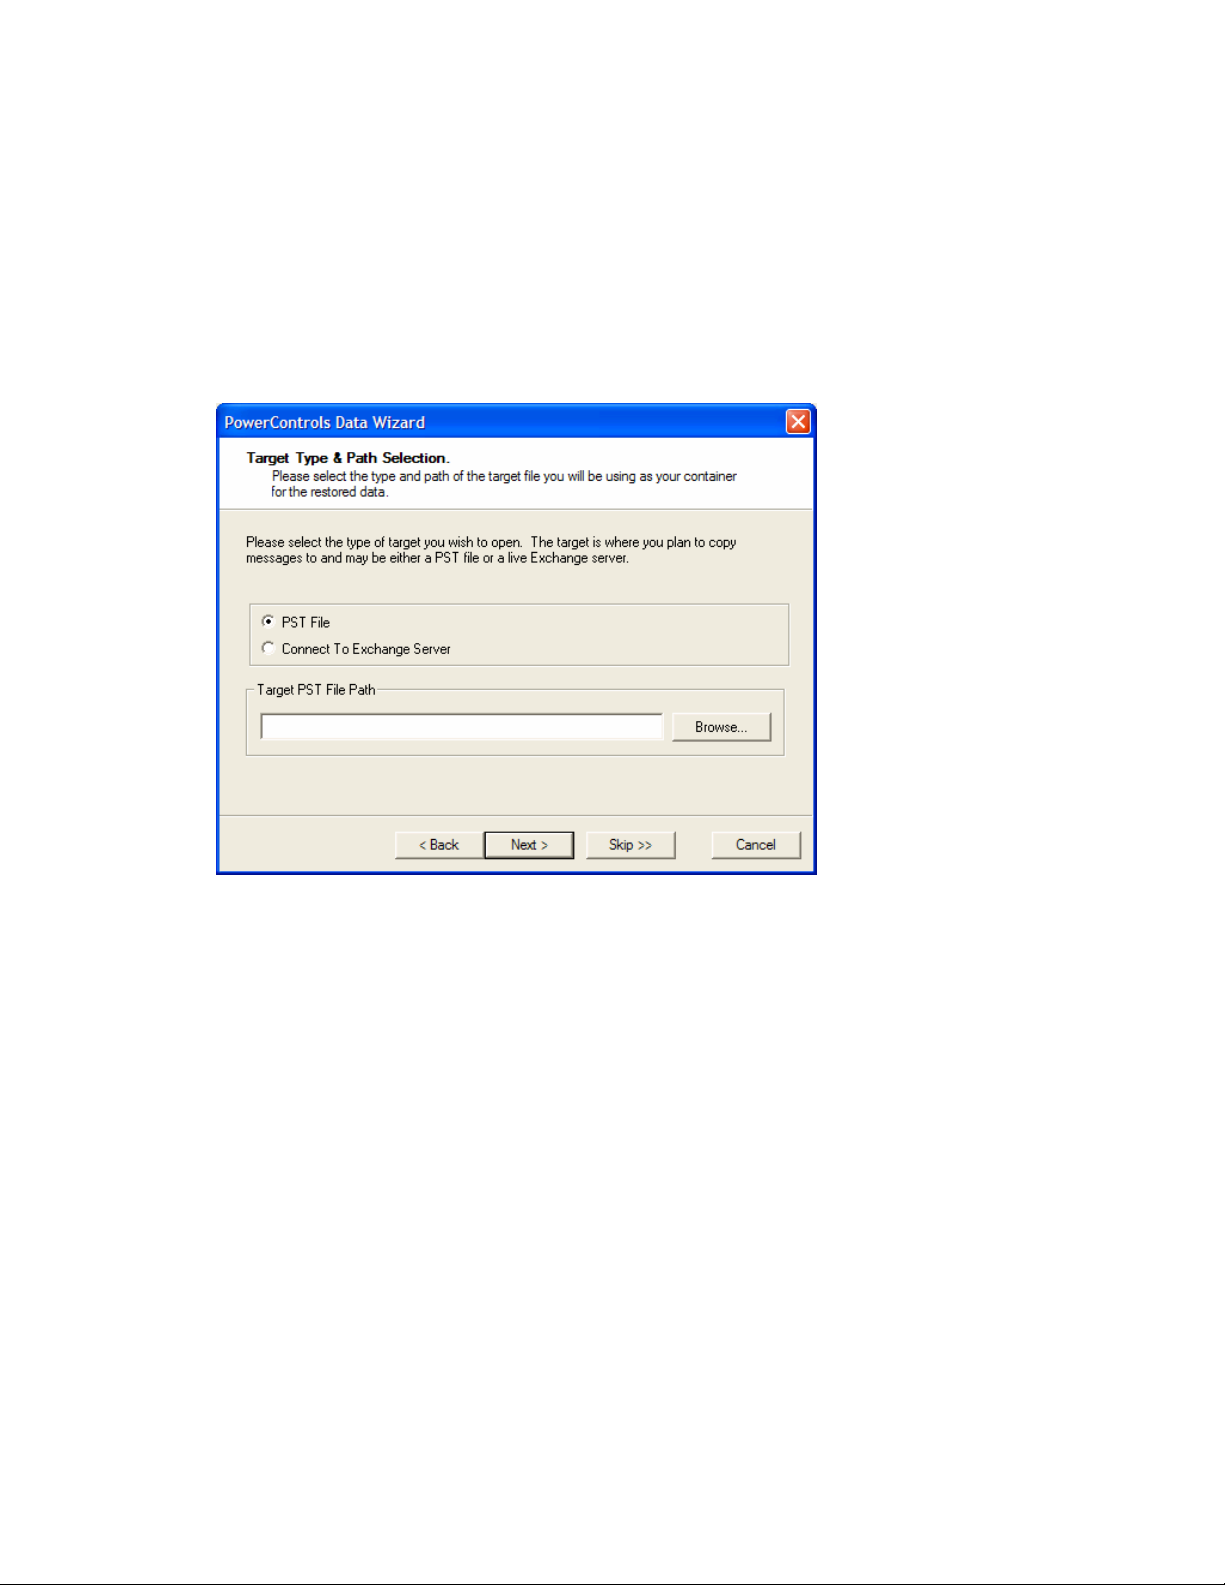
Chapter 3: Starting PowerControls
Data Wizard: Target Type and Path Selection
On the Target Type and Path Selection page of the Data Wizard, specify the type and path of the target
file you will be using as the container for your restored data. You have two choices: 1) specify a PST File
as the target for restored data; or 2) specify an Exchange server as the target for restored data.
Note: Click the Skip button if you do not want to select a target file at this time.
To specify a PST File as the target for restored data
1. Select the PST File option.
2. Do one of the following:
• If you know the target PST file path, type it in the Target PST File Path box.
• Click the Browse button to open the Create PST File dialog box, and navigate to the desired
location. Then create a new PST file by typing a name in the File name box, or select an existing
PST file. Next, click Open. The path of the target PST file will appear in the Target PST File
Path box.
3. Click Next.
44
Page 52
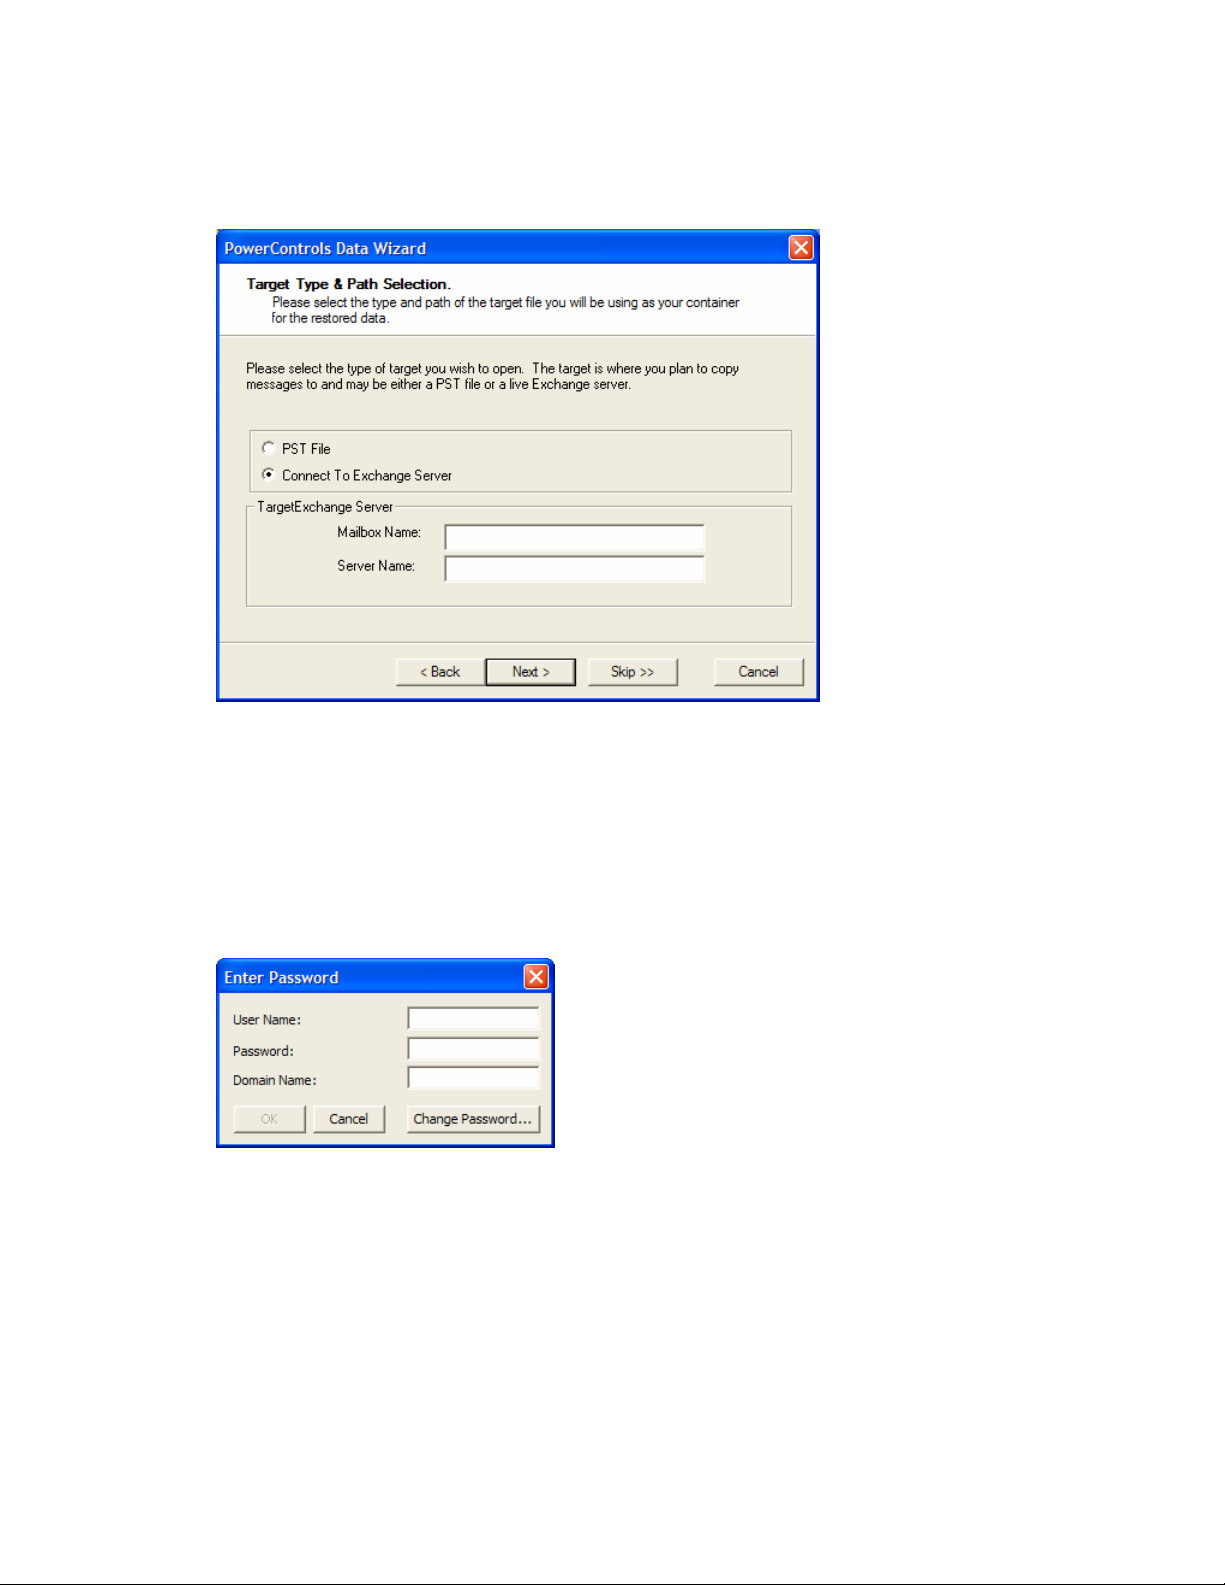
Ontrack® PowerControls™ 3.0 User Guide
To specify an Exchange server as the target for restored data
1. Select the Connect to Exchange Server option.
2. In the Mailbox Name and Server Name boxes, type the mailbox and server names.
Tip: If you don’t know the full name of the mailbox, type a sub-string (e.g., the first letter of the
mailbox) in the Mailbox Name box, and click Next. In the Check Name dialog box that appears, select
the mailbox from the list, and click OK.
3. If you are not connected to a domain, the Enter Password dialog box appears. In this dialog box, type
a user name that has full rights to the mailbox, a password, and a domain name. Then click OK. This
dialog box may appear again, which will require you to reenter this information.
4. Click Next.
45
Page 53
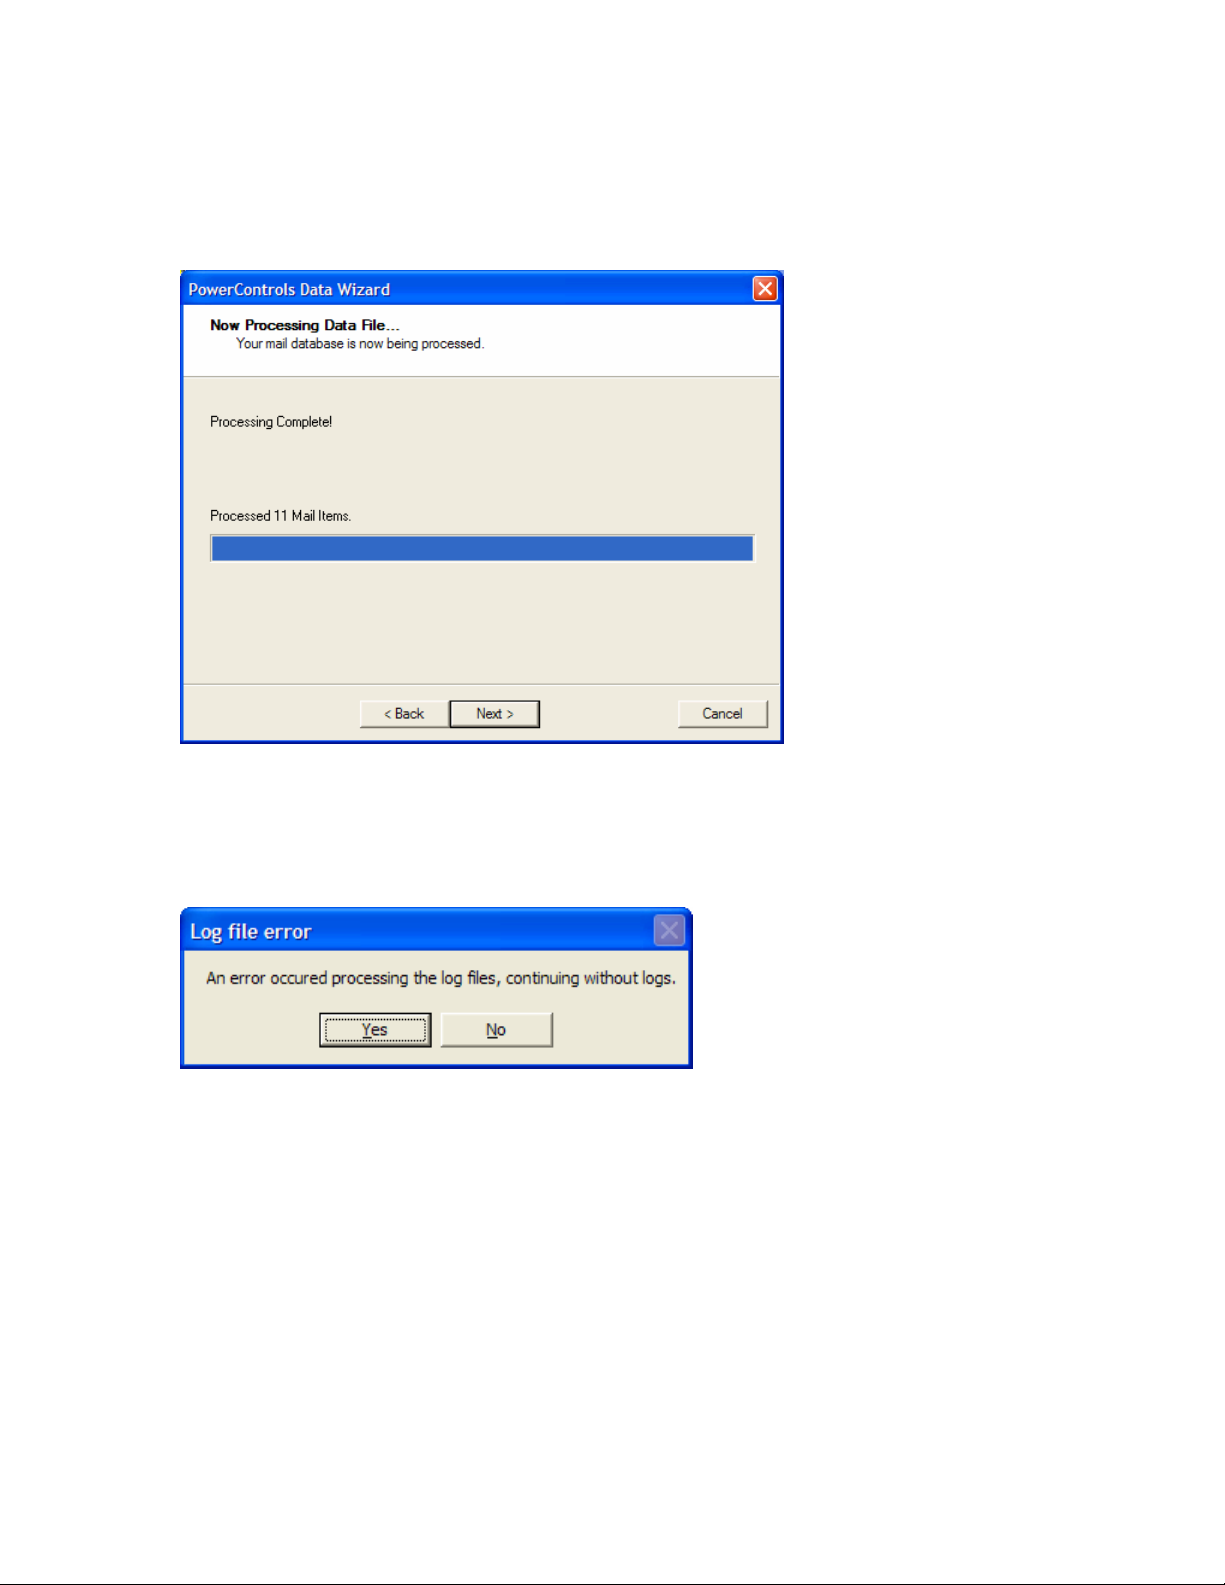
Chapter 3: Starting PowerControls
Data Wizard: Now Processing Data File
The Now Processing Data File page of the Data Wizard reports the processing of the EDB file in three
stages: pre-scanning the log files (integrity check); scanning the log files, (i.e., playing the log files); and
hashing the EDB file (building a folder hierarchy).
When the processing is complete, PowerControls automatically proceeds to the next page.
Note: If PowerControls encounters bad or missing log files during log playing, you will be given the option
to continue without playing the logs. If you choose to continue, PowerControls will process the EDB
without logs.
46
Page 54
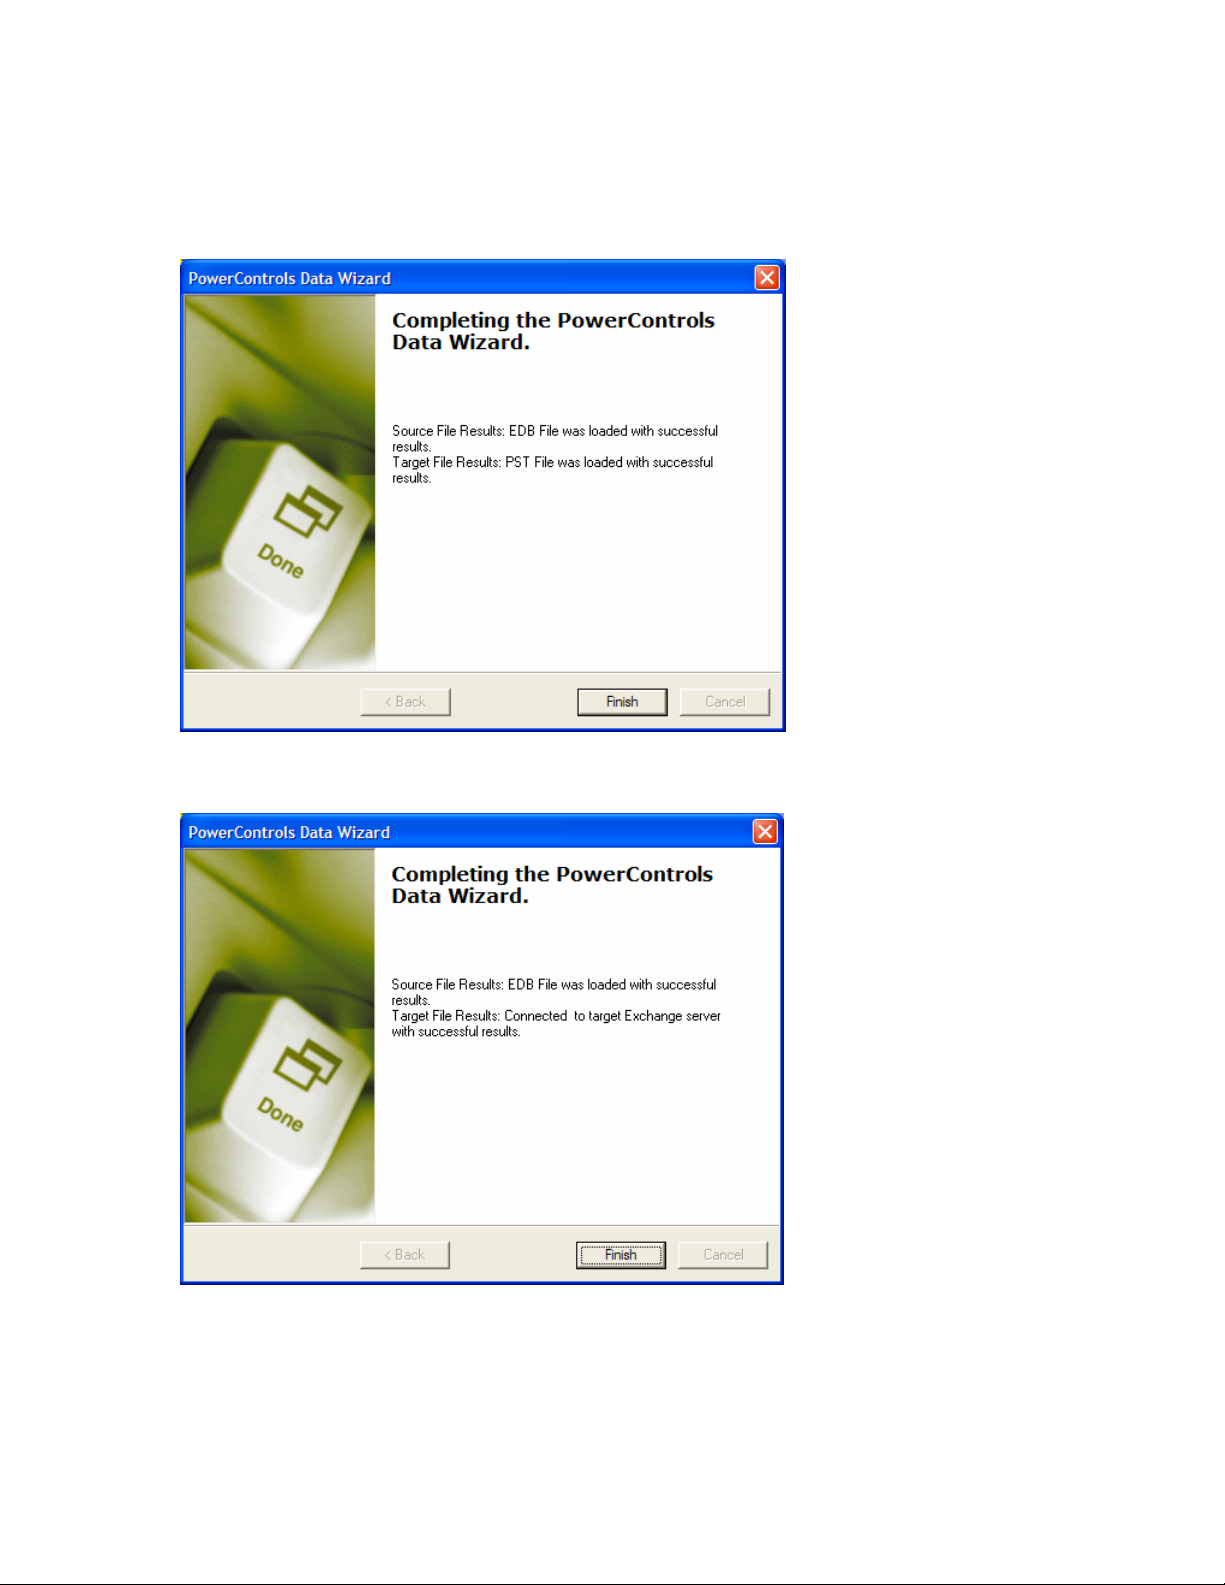
Ontrack® PowerControls™ 3.0 User Guide
Data Wizard: Completing the Data Wizard
On the last page of the Data Wizard, click Finish. This page of the Data Wizard lists the source file results
and the target file results.
Last page of the Data Wizard for a target PST file
Last page of the Data Wizard for a target Exchange server
47
Page 55
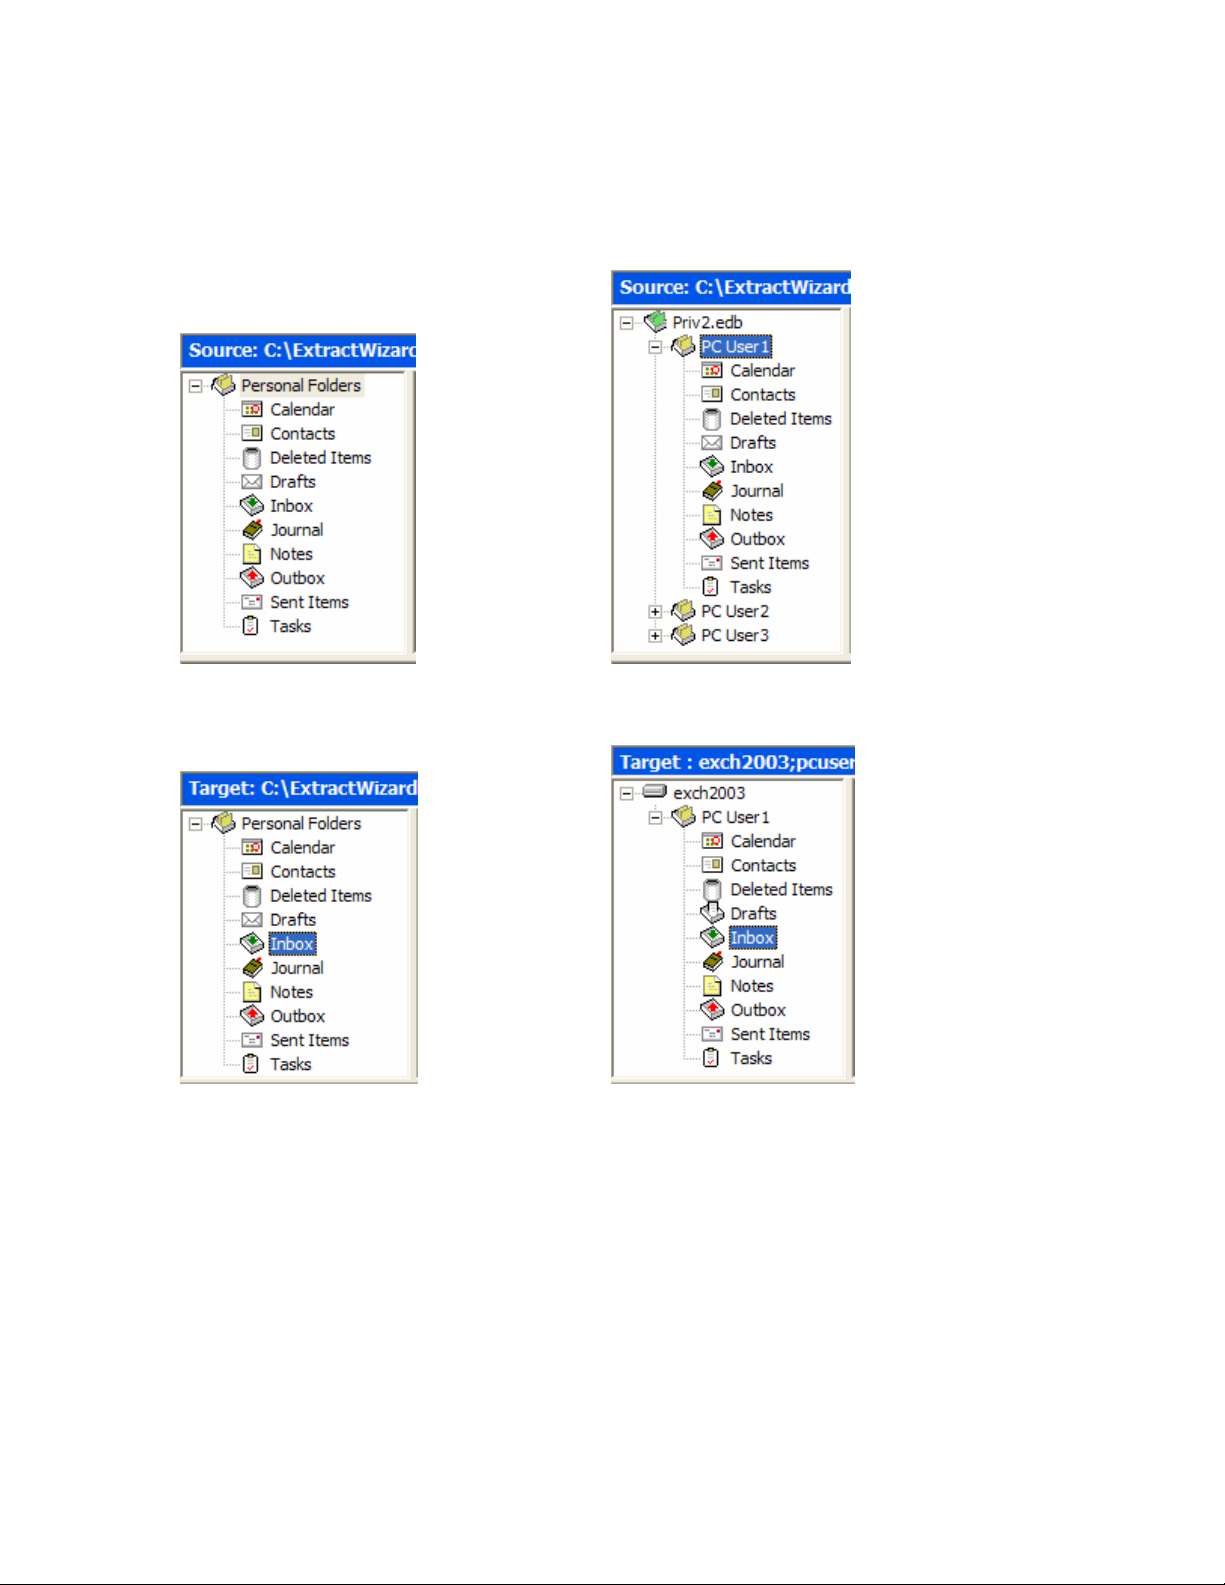
Chapter 3: Starting PowerControls
Looking at the PowerControls Main Window after Using the Data Wizard
In the PowerControls main window, the Source and Target panes will now contain a source EDB file and
either a target PST file or a target Exchange server.
Source pane for a PST file Source pane for an EDB file
Target pane for a PST file Target pane for an Exchange server
Returning to the PowerControls Data Wizard
When working in the PowerControls main window, you can return to the Data Wizard at any time.
To open the Data Wizard from the PowerControls main window
• On the File menu, click Use Wizard.
48
Page 56
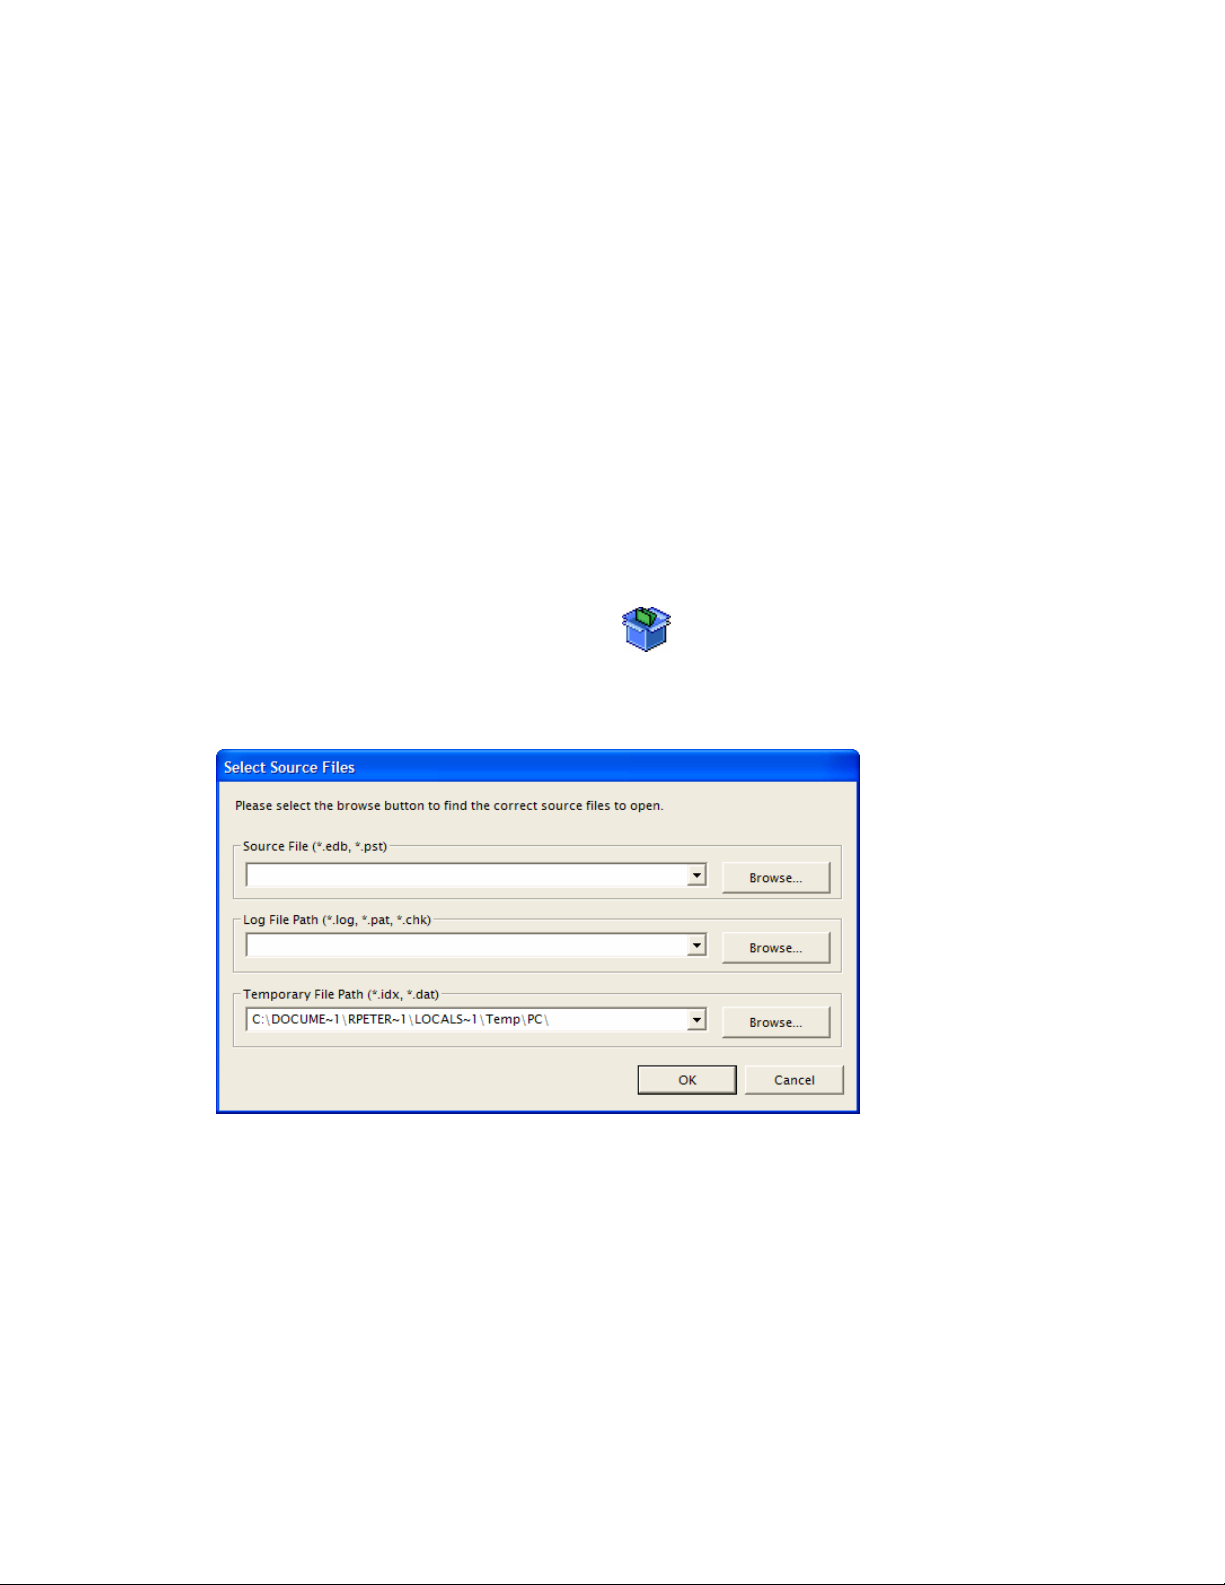
Ontrack® PowerControls™ 3.0 User Guide
Opening the Source Database and Target Mailboxes
from the Main Window
Instead of using the Data Wizard to open the source databases and target mailboxes, you can open them
from the PowerControls main window.
Before You Proceed: Use the PowerControls ExtractWizard if you have not yet restored backed-up
Exchange Information Store data. The ExtractWizard reads previous Exchange server backups and
restores EDB files to any machine, volume, or folder. For more information, see Chapter 1, “Using the
ExtractWizard.”
Note: Due to the database nature of the PST file and MAPI subsystem, PSTs opened as source will be
modified.
To open a source file
1. Do one of the following:
• On the File menu, click Open Source.
• On the toolbar, click the Open Source button
Important Note: Before you select a source EDB file in the dialog box below, see “Guidelines for
Selecting an Exchange Database” on page 43.
2. In the Source File box, use the Browse button to find a source EDB or PST file.
3. If you selected a PST file, proceed to step 6. PST files do not require log file or temporary file paths.
.
4. In the Log File Path box, use the Browse button to find the log files associated with the source EDB
file.
Important Note: After you select an EDB file, the Log File Path box defaults to the source EDB file
path, even if the log files are not in the same directory as the source EDB file. Therefore, make sure
you enter the correct log file path in the Log File Path box.
49
Page 57
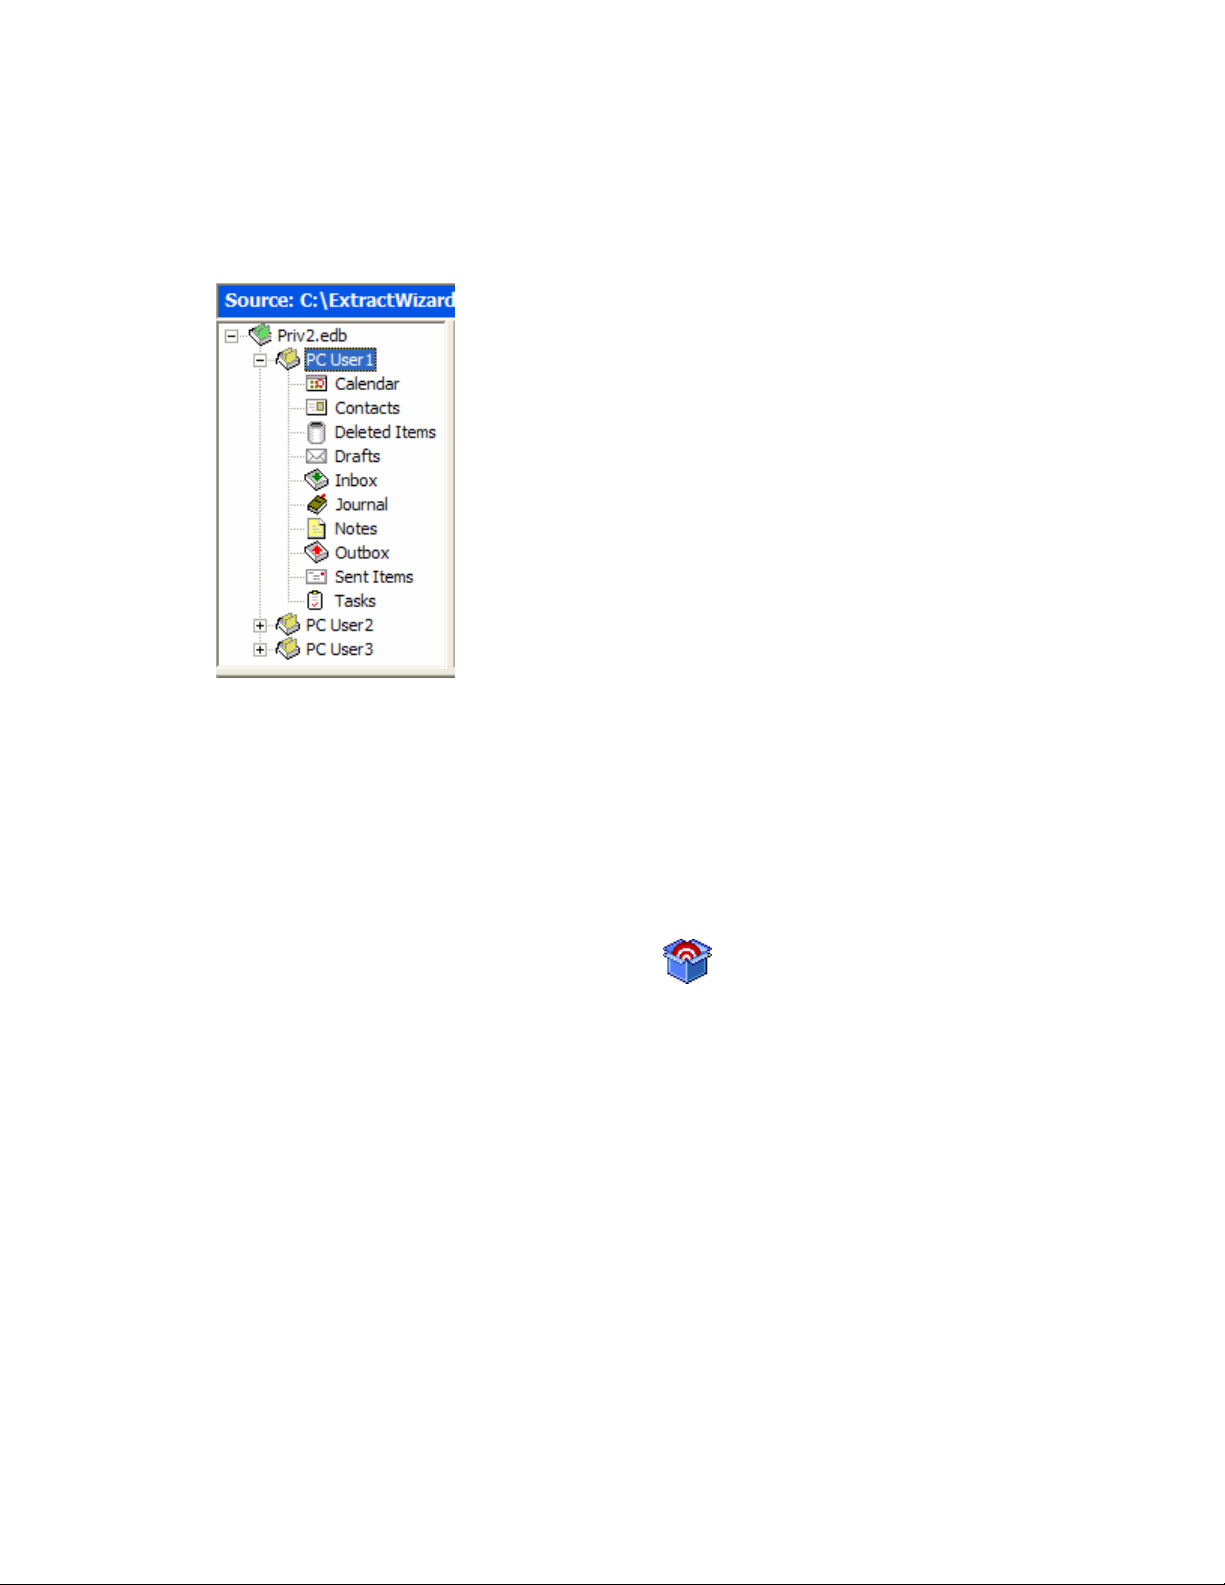
Chapter 3: Starting PowerControls
5. In the Temporary File Path box, accept the default location for .idx and .dat files, or specify a new
location if they require more hard drive space. For more information, see "Guidelines for Selecting an
Exchange Database."
6. Click OK. The EDB or PST file appears in the PowerControls Source pane.
Source pane for an EDB file
Tip: You can use Windows Explorer to open an EDB file. In Windows Explorer, double-click the EDB file
or drag into the PowerControls Source pane.
To open an existing target PST
1. Do one of the following:
• On the File menu, point to Target PST, and click Open Existing.
• On the toolbar, click the Open Target PST button
.
2. In the Open Existing PST dialog box, navigate to the desired location, and select an existing PST file.
3. Click Open. The PST file appears in the PowerControls Target pane.
Tip: In Windows Explorer, you can drag a PST file into the PowerControls Target pane. Note that doubleclicking a PST file will not open it when using Windows XP, Outlook XP, or Outlook 2003.
To create a new target PST
1. On the File menu, point to Target PST, and click Create New.
2. In the Create PST File dialog box, navigate to the desired location. You may want to create a new
folder.
3. In the File name box, type a name for the new PST file.
4. Click New. The PST file appears in the PowerControls Target pane.
50
Page 58
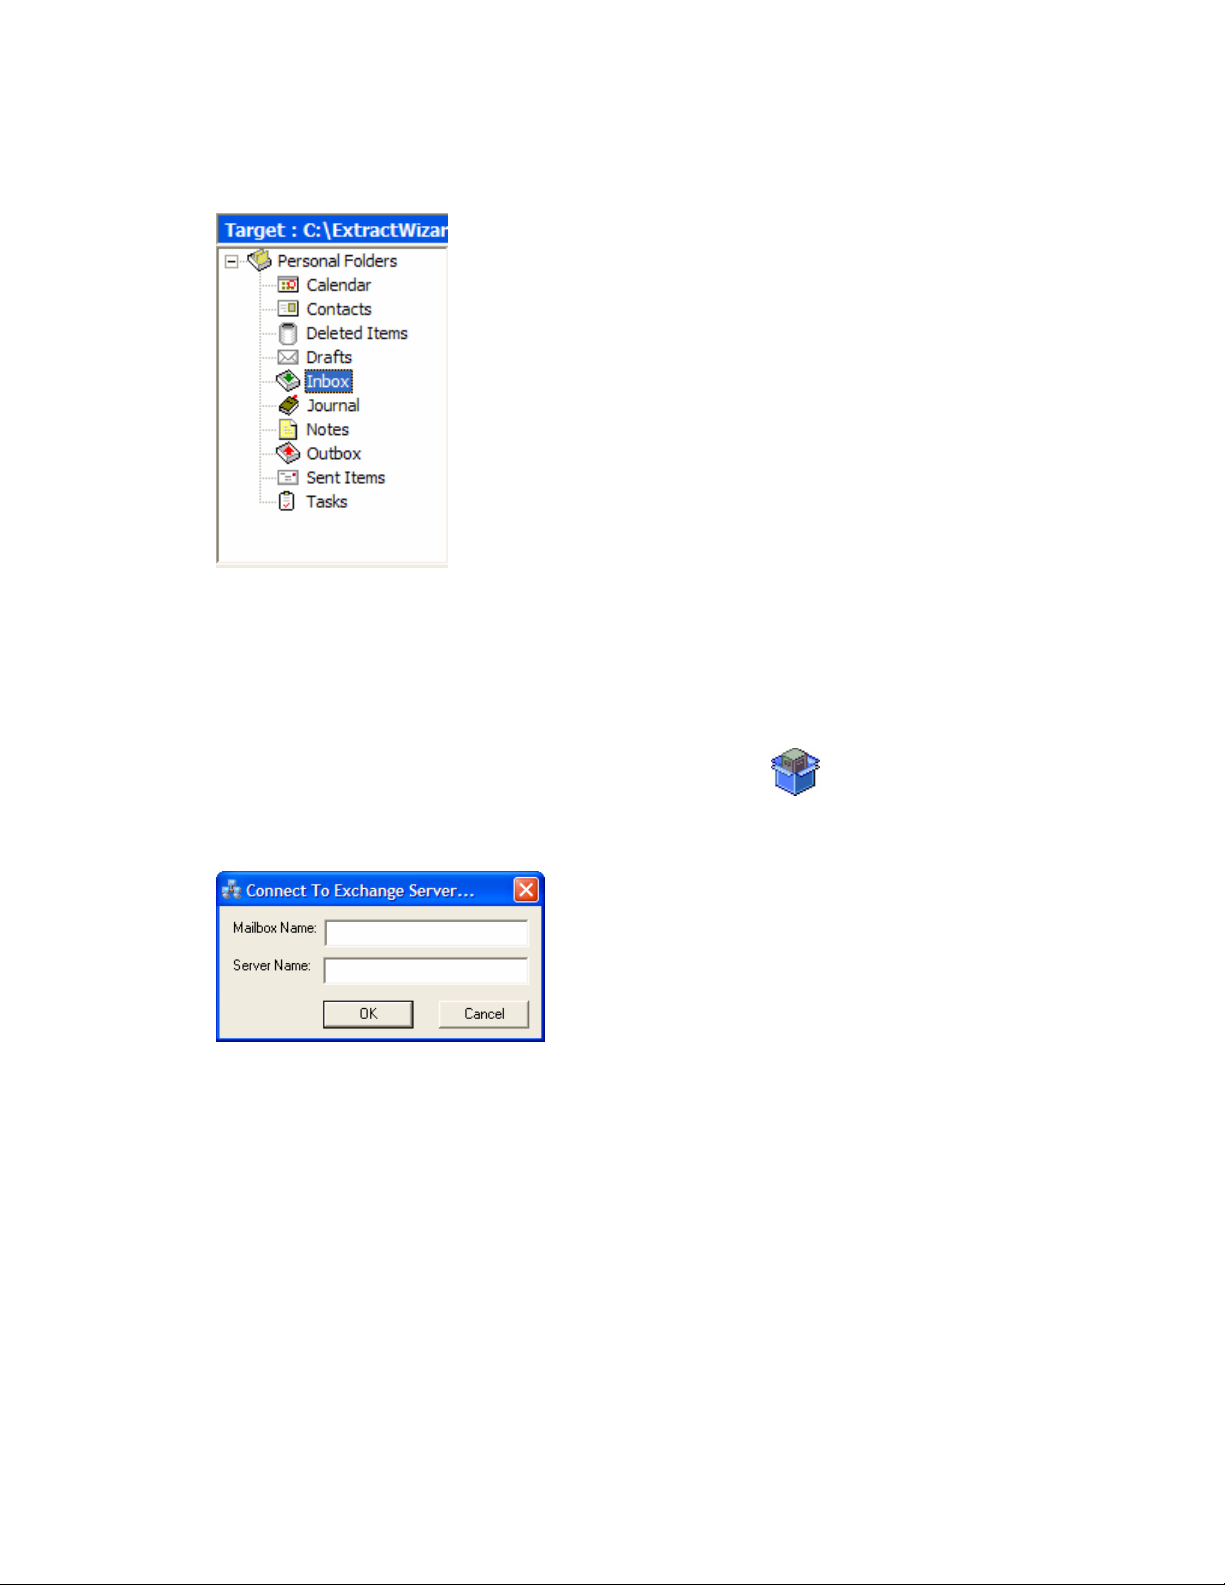
Ontrack® PowerControls™ 3.0 User Guide
Note: With Outlook 2003, you will have to choose between the 97 and 2003 version of the PST.
Target pane for a PST file
To open a target Exchange Server
1. Do one of the following:
• On the File menu, click Open Target Exchange Server.
• On the toolbar, click the Open Target Exchange Server button
.
The Connect to Exchange Server dialog box appears.
2. In the Mailbox Name and Server Name boxes, type the mailbox and server names.
Tip: If you don’t know the full name of the mailbox, type a sub-string (e.g., the first letter of the
mailbox) in the Mailbox Name box, and click Next. In the Check Name dialog box that appears, select
the mailbox from the list, and click OK.
3. If you are not authenticated to the domain, the Enter Password dialog box appears. In this dialog box,
type a user name that has full rights to the mailbox, a password, and a domain name. Then click OK.
This dialog box may appear again, which will require you to reenter this information.
51
Page 59
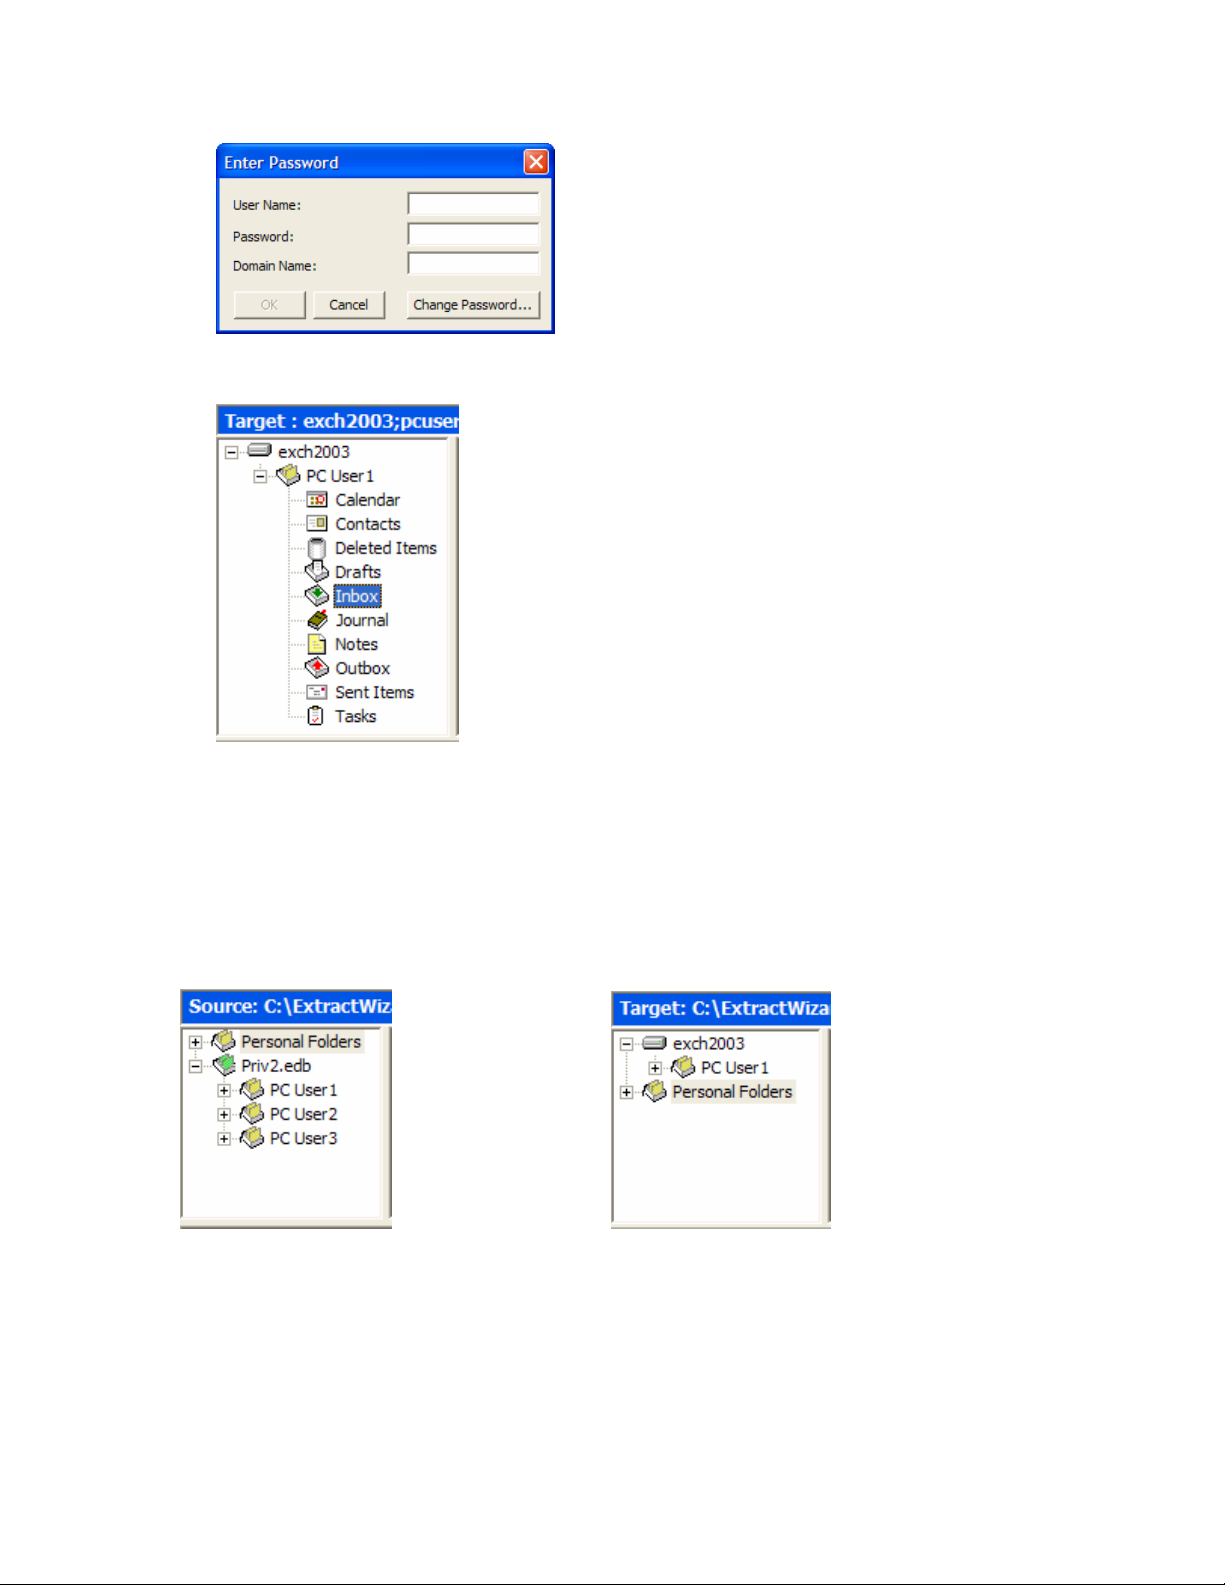
Chapter 3: Starting PowerControls
4. Click OK. The Exchange server appears in the PowerControls Target pane.
Target pane for an Exchange server
Opening Multiple Sources and Targets
You can display multiple sources in the Source pane and multiple targets in the Target pane. Sources
include EDBs and PSTs. Targets include PSTs and Exchange servers. See the instructions for using the
Data Wizard or the PowerControls main window to open one source or one target at a time.
Multiple sources Multiple targets
Note: Only one Exchange mailbox can be opened at a time.
52
Page 60

Ontrack® PowerControls™ 3.0 User Guide
Closing Sources and Targets
You can close sources and targets from the main window.
To close a source
1. In the Source pane, select an EDB or PST file.
2. Do one of the following:
• On the File menu, click Close Store.
• Right-click the selection, and on the context menu click Close Store.
To close a target
1. In the Target pane, select a PST file or Exchange database.
2. Do one of the following:
• On the File menu, click Close Store.
• Right-click the selection, and on the context menu click Close Store.
53
Page 61

Chapter 3: Starting PowerControls
54
Page 62
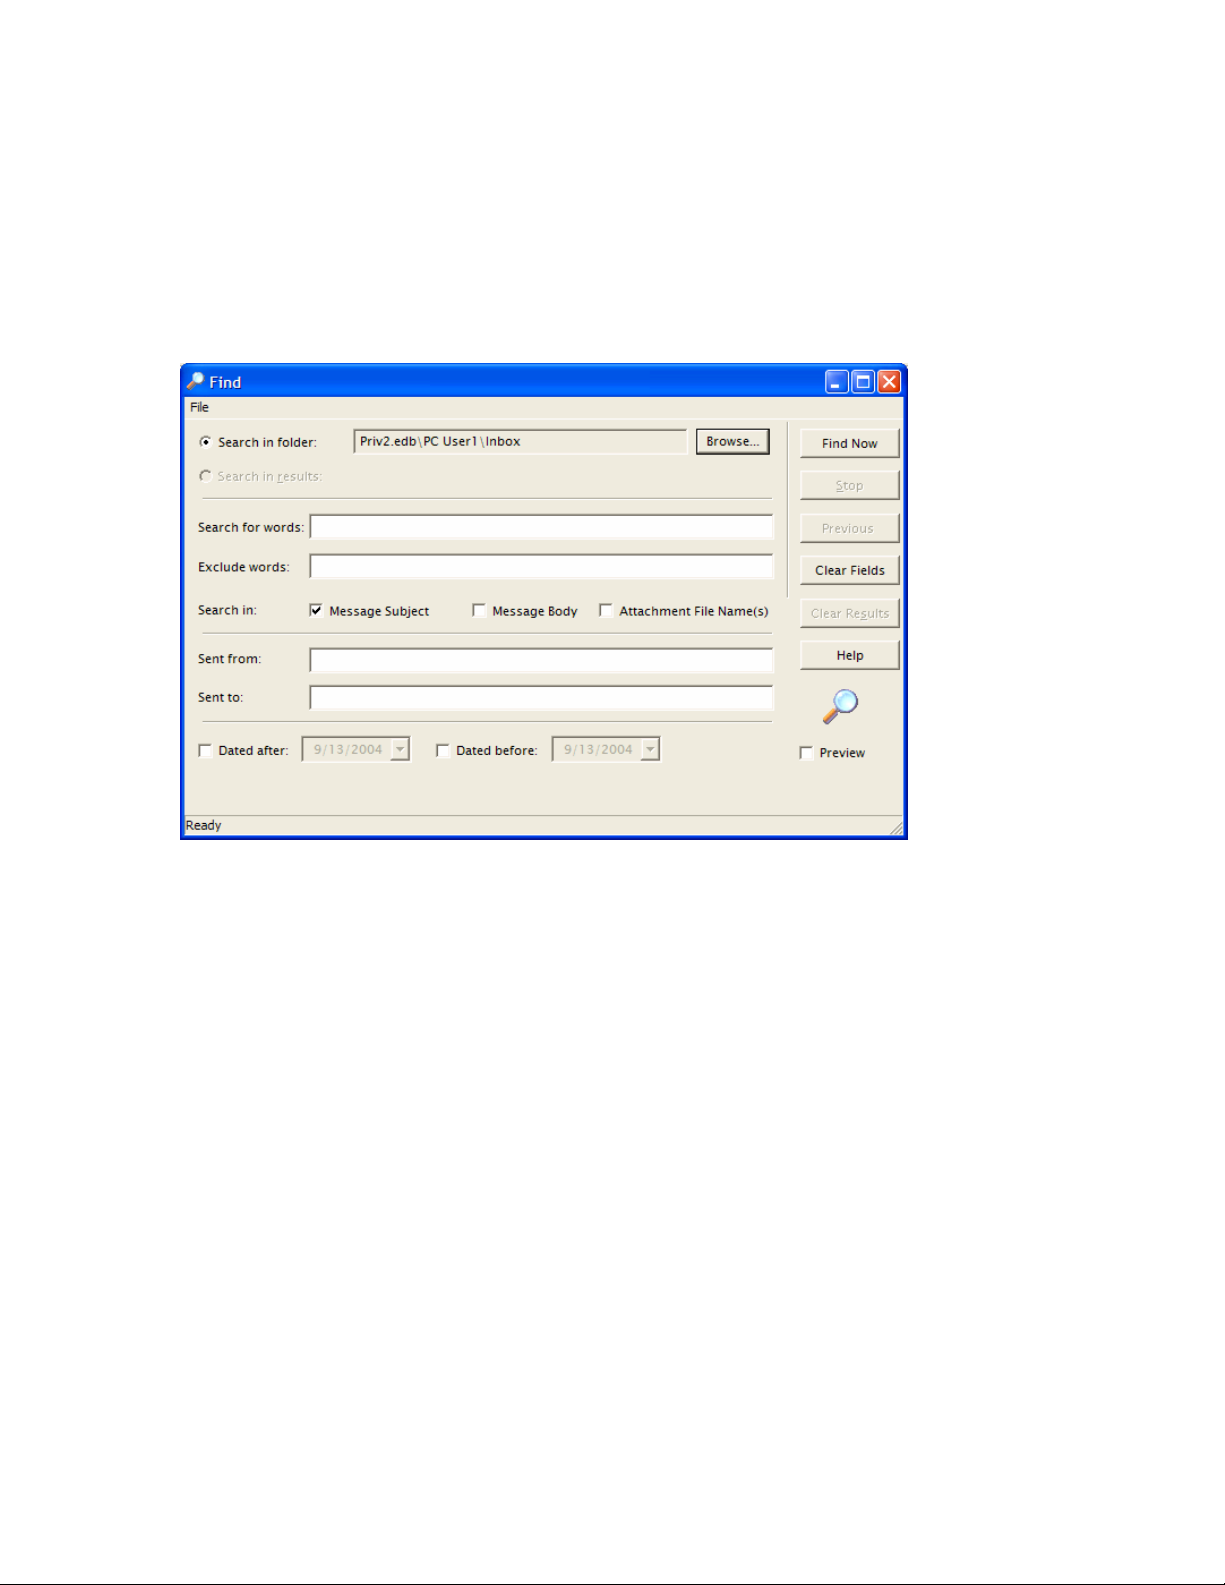
Chapter 4: Finding Messages
The Find dialog box lets you search a source EDB or PST file for message items that are defined by such
criteria as keywords, message senders and recipients, and message creation dates. In addition, this dialog
box lets you define the scope of your search: an EDB or PST file, one or more mailboxes or folders (e.g.,
Inbox), dates, or even previous search results.
Guidelines for Using the Find Dialog Box
1. The Find Now Button only becomes available if at least one of the following conditions is met:
• At least one Search in check box is selected.
• The Sent from or Sent to box contains at least one character.
• The Dated after or Dated before check box is selected.
2. Each Search in check box that you select is run as a separate query, and the results of the query are
combined (i.e., OR’d together). For example, if you enter “solution” in the Search for words box, and
then select the Message Subject and Message Body check boxes, PowerControls will return messages
that contain “solution” in either their message subject or message body.
3. If you select one or more Search in check boxes, but specify no additional search criteria,
PowerControls will return all of the messages in the folder(s) undergoing the search.
4. PowerControls can search only one information store at a time. PowerControls cannot search across
multiple sources.
55
Page 63
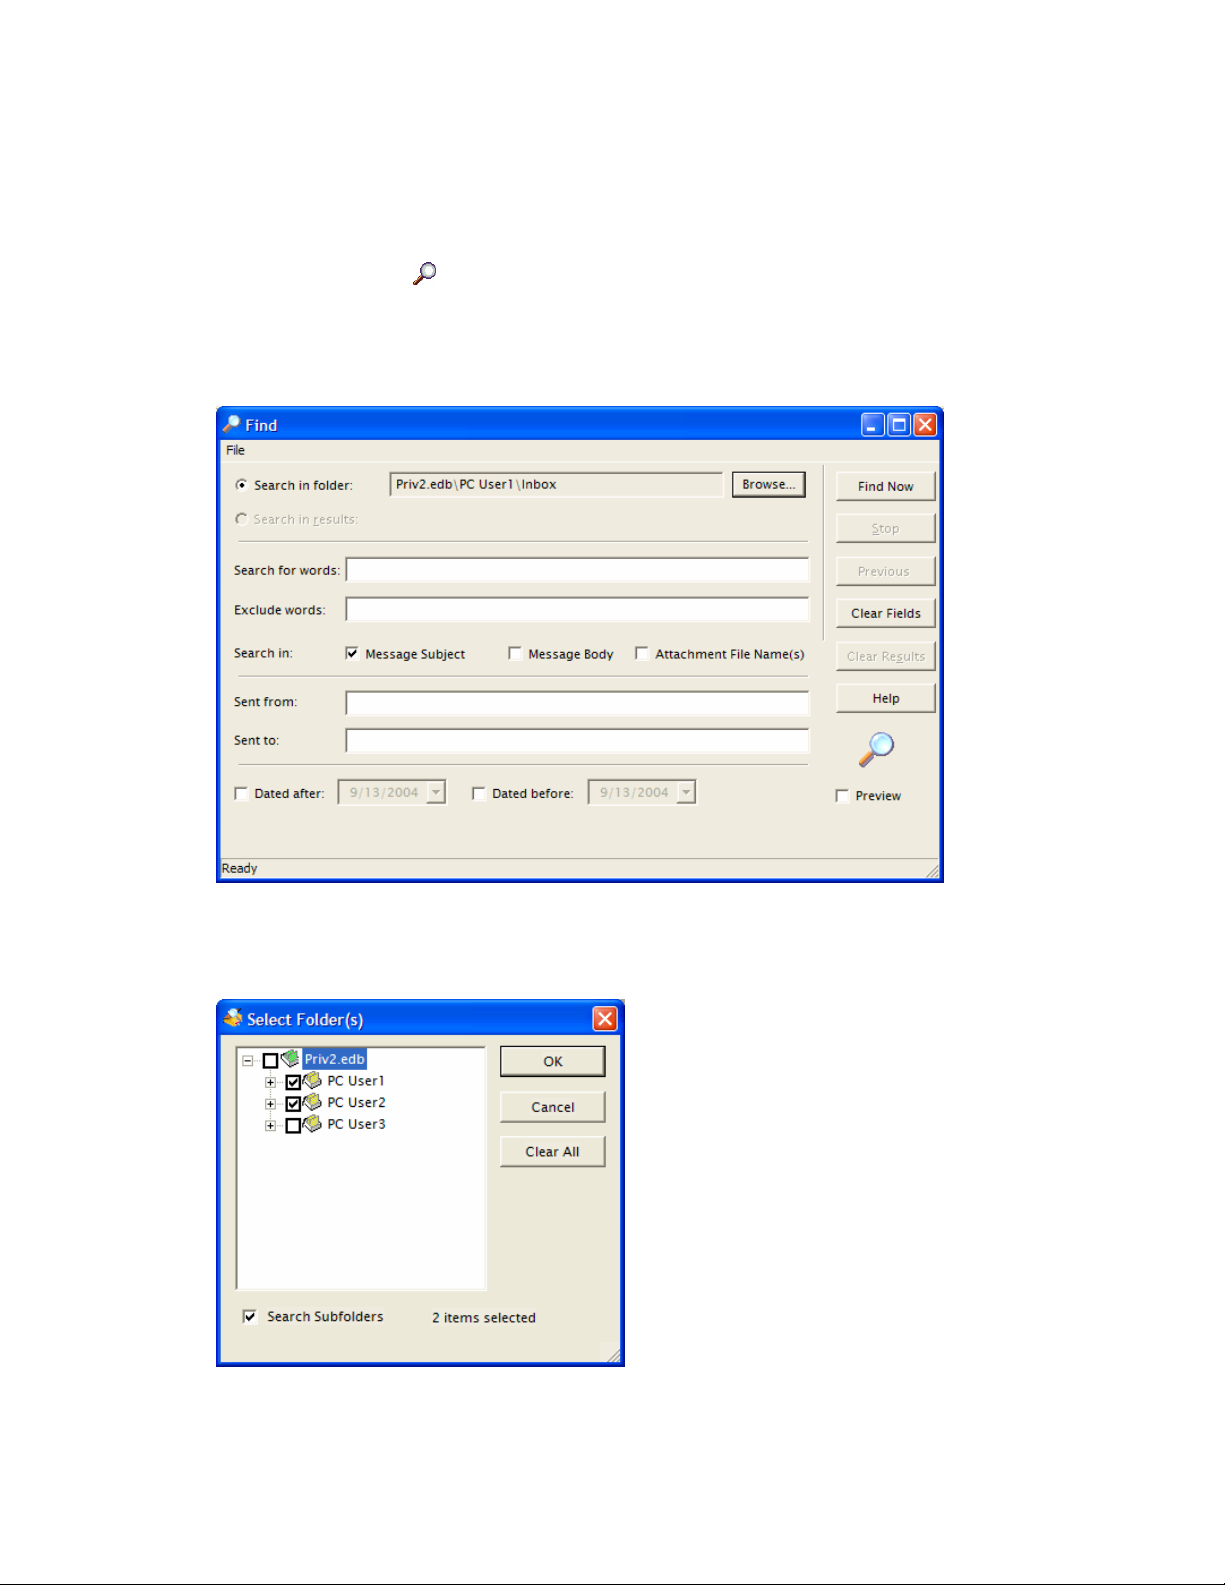
Chapter 4: Finding Messages
Searching for Messages
1. In the Source pane, select the folder (e.g., EDB or PST file, mailbox, Inbox) you want to search. The
folder you select defines the scope of your search.
2. Click the Search button
appears next to the Search in folder box.
The first time you search for messages, the Search in folder option is automatically selected. For
information on using the Search in results option, see “Searching Within Results” on page 59.
to display the Find dialog box. The name of the folder you selected
3. If you want to select multiple mailboxes or folders to search, click the Browse button. In the Select
Folder(s) dialog box, select the items you want to search. In the illustration below, two mailboxes
have been selected.
Note: If you select the Search Subfolders check box, PowerControls will include subfolders in the search.
56
Page 64
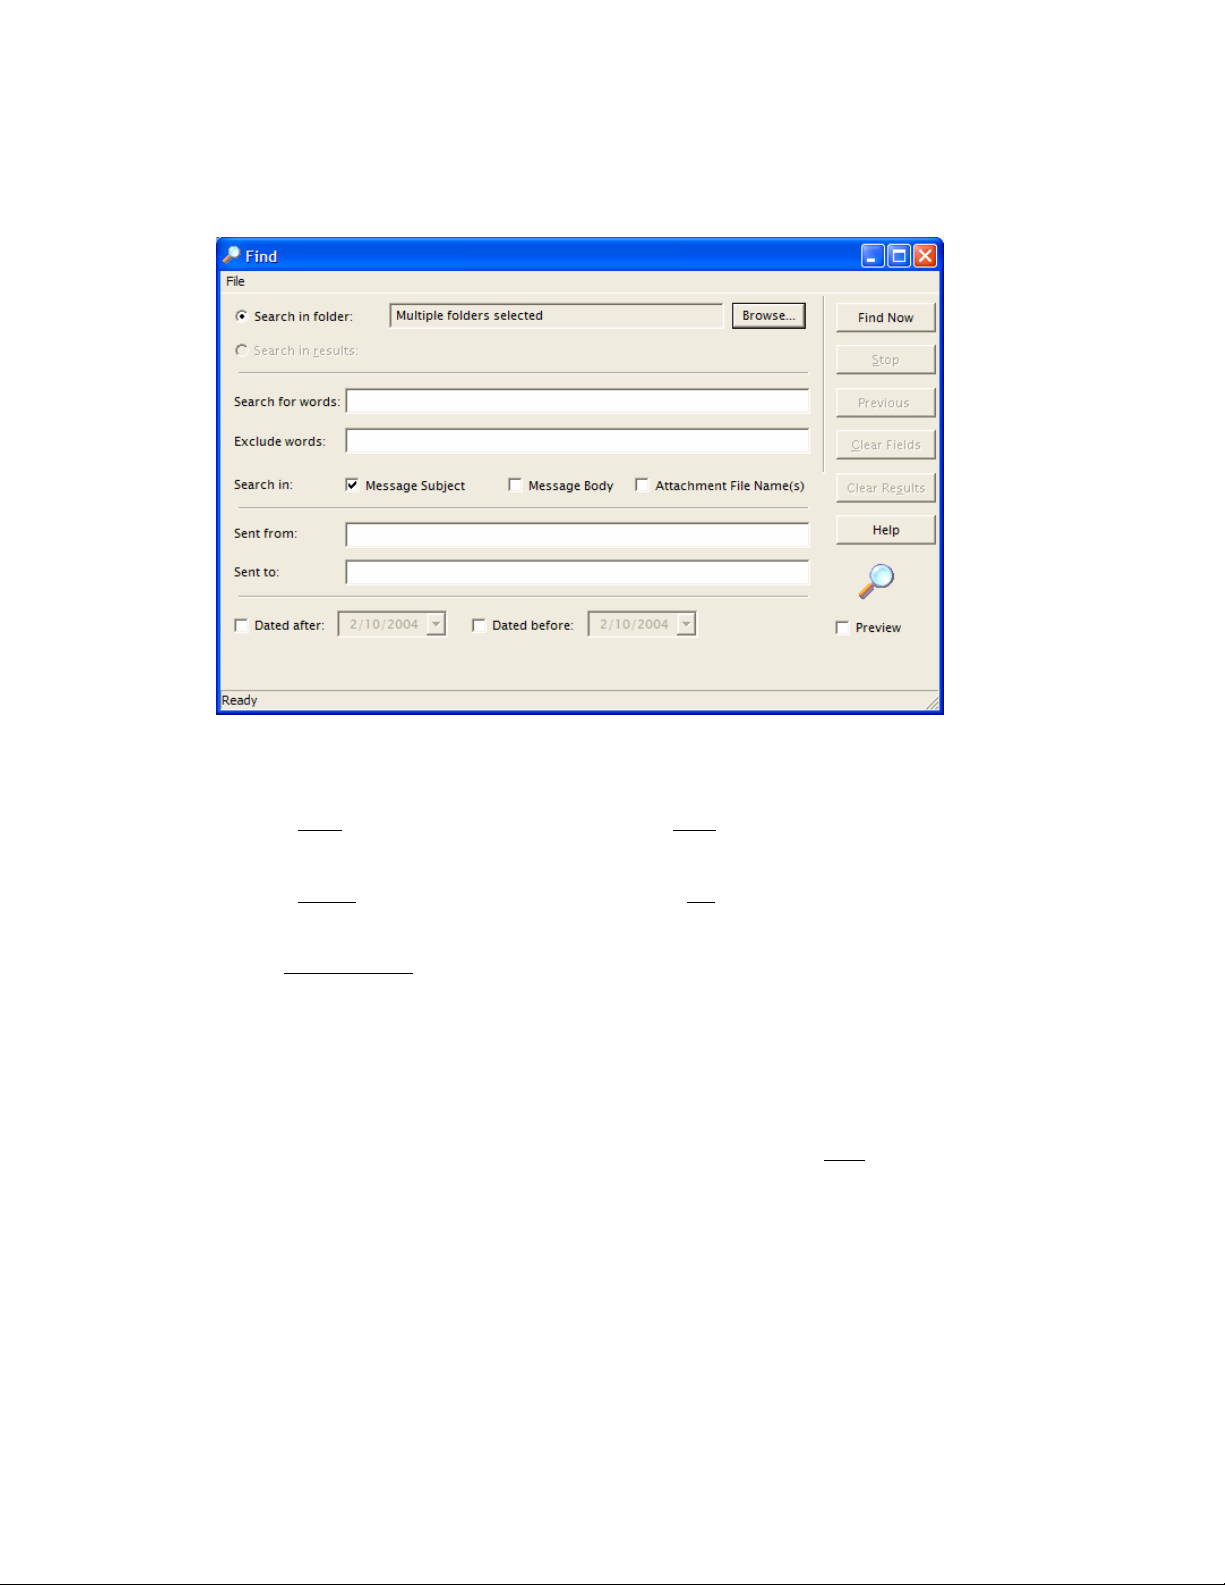
Ontrack® PowerControls™ 3.0 User Guide
4. Click OK to return to the Find dialog box.
In the illustration below, the Search in folder box now displays “Multiple folders selected.”
5. In the Search for words box, enter one or more words or phrases if you want to execute a keyword
search. Keep in mind the following points:
• Put a
space between words or phrases to perform an AND operation (i.e., all words must be
matched in order to include a message with the search results).
• Put a
comma between words or phrases to perform an OR operation (i.e., only one of the words
must be matched in order to include a message with the search results).
• Put
quotation marks around word phrases (i.e., the exact phrase must be matched in order to
include a message with the search results).
Example: Search for words: dog cat mouse, rat
Search results: Messages that contain [“dog” AND “cat” AND “mouse”] OR [“rat”] are
included in the search results.
6. In the Exclude words box, enter words or phrases if you want to perform a
NOT operation. If
matched, these words or phrases will exclude a message from the search results. The rules for using
spaces, commas, and quotation marks apply when excluding words from a search.
Example: Search for words: dog cat mouse, rat
Exclude words: bird
Search results: Messages that contain [“dog” AND “cat” AND “mouse”] OR [“rat”]
BUT NOT [“bird”] are included in the search results.
57
Page 65
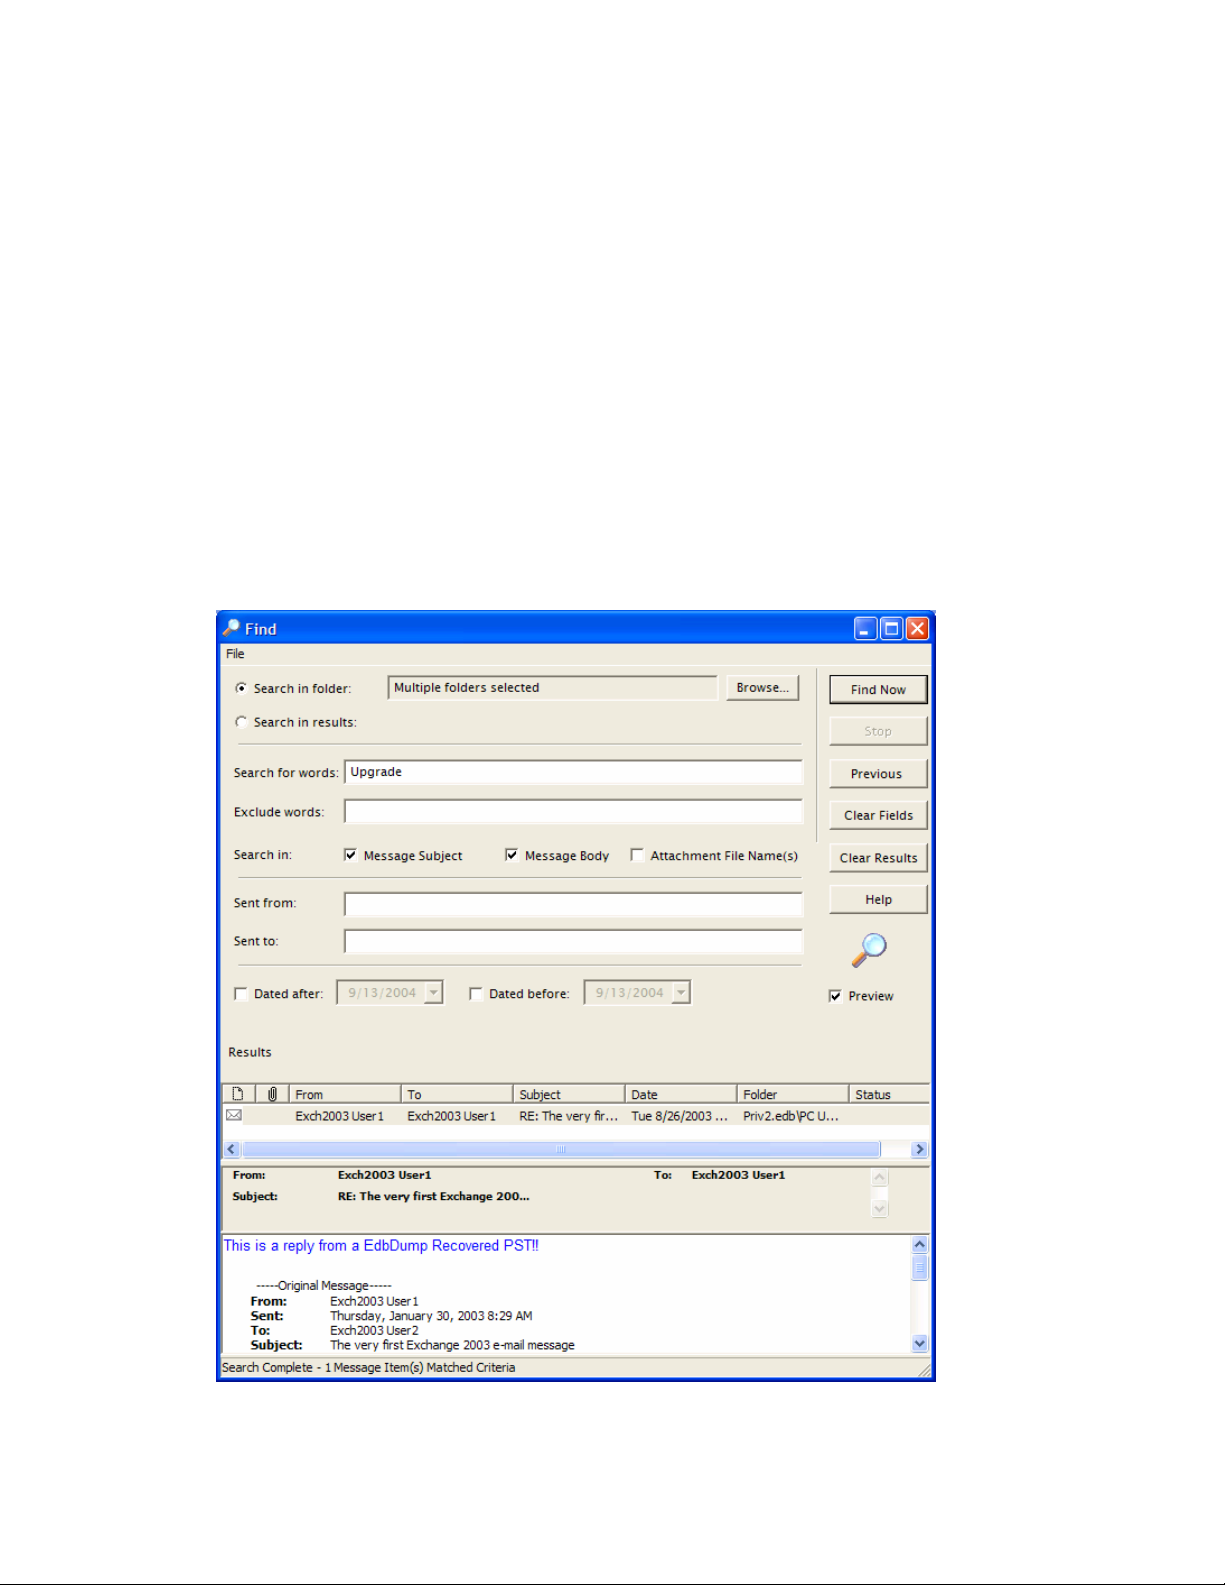
Chapter 4: Finding Messages
7. For Search in, select one or more of the following check boxes: Message Subject, Message Body, or
Attachment File Name(s). Each Search in check box that you select is run as a separate query, and
the results of the query are combined (i.e., OR’d together).
8. In the Sent from and Sent to boxes, enter the appropriate names, if desired. Using the Sent to box is
particularly useful if you are trying to find a message sent to multiple people. The rules for using
spaces, commas, and quotation marks apply when using the Sent from and Sent to boxes.
9. For Dated after and Dated before, select the appropriate check box, if desired. You may select both
check boxes. Then type or select the part of the date you want to change.
Dated after: Searches for documents dated on or after the selected date.
Dated before: Searches for documents dated on or before the selected date.
10. When you have finished specifying search criteria, click Find Now. The results of your search appear
in the message list.
11. To preview the messages returned by the search, click the Preview check box.
58
Page 66
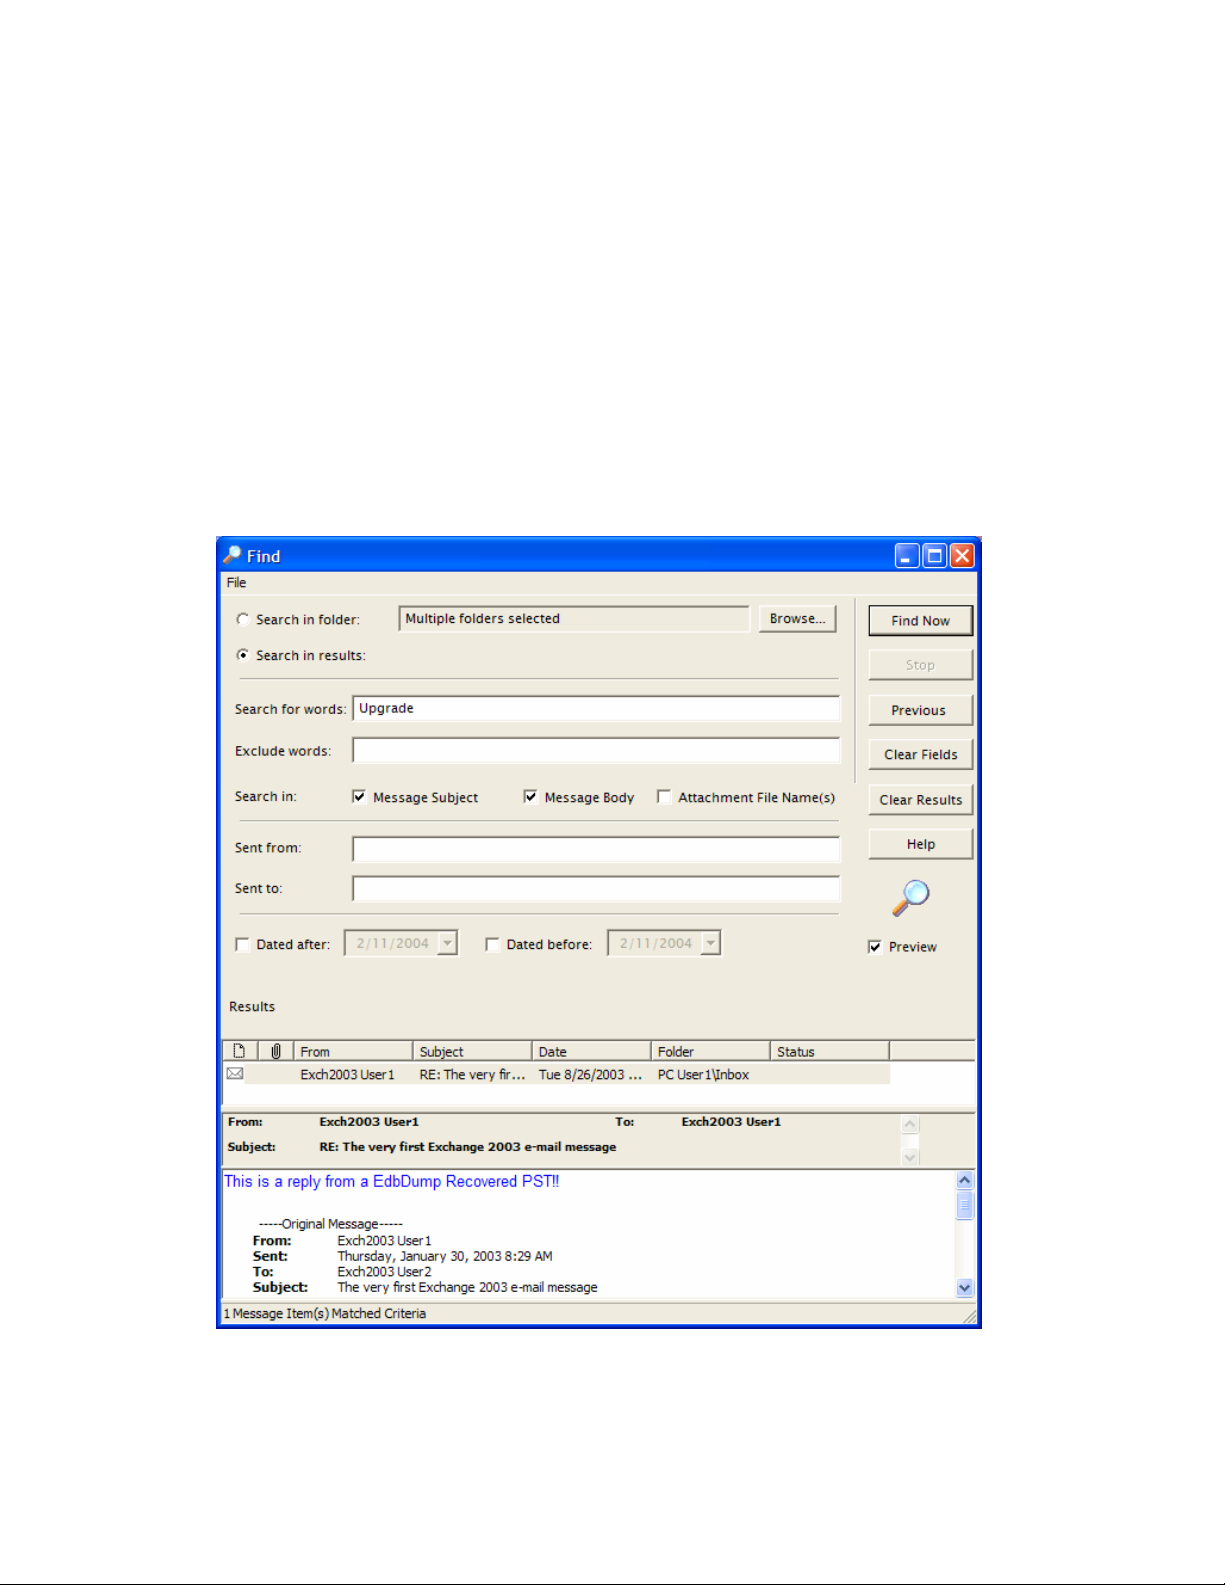
Ontrack® PowerControls™ 3.0 User Guide
Searching Within Results
The Search in results option lets you refine the search process using the previous search results.
To search within results
1. To make the Search in results option available, you must perform at least one search.
2. Modify the search criteria as desired. For information on specifying search criteria, see “Searching for
Messages” on page 56.
3. Select the Search in results option at the top left of the Find dialog box.
4. Click Find Now. The results of your new search appear in the message list.
5. To preview the messages returned by the search, click the Preview check box.
59
Page 67

Chapter 4: Finding Messages
Viewing Previous Search Results
You can click the Previous button multiple times to return to any previous search criteria and search
results. This button becomes unavailable when there are no more previous results.
To view previous search results
1. Perform at least two searches so the Previous button becomes available.
2. Click Previous. The results of the previous search appear in the in the message list.
3. You can now view the previous search, or you can modify the search criteria and conduct a new
search. For information on specifying search criteria, see “Searching for Messages” on page 56.
Clearing Fields and Clearing Results
If you click the Clear Fields button, all of the search criteria that you entered in the Find dialog box are
returned to the default settings. If you click the Clear Results button, all current and past search results are
cleared.
Opening and Saving Attachments in the Find Dialog Box
For instructions on opening and saving attachments, see “Opening Attachments” and “Saving Attachments”
on page on page 31.
Keep in mind that you must have an application on your computer that can open the attachment’s file type.
If no associated program is available for the attachment file type, PowerControls will present a message
dialog box saying the attachment cannot be viewed.
Exporting Messages from the Find Dialog Box
The Export feature allows you to copy individual messages from the Find dialog box to a local or network
drive destination. You can choose to save exported messages as plain text files (.txt) or Microsoft Outlook
files (.msg). For more information, see Chapter 5, “Exporting Messages.”
Restoring Messages from the Find Dialog Box
The results of conducting a search appear in the message list in the Find dialog box. You can restore the
messages in this list by dragging them or copying and pasting them into the target folder. If you want to
maintain the directory structure of restored individual messages, use the Paste Special command.
Note that you can also restore messages simply by browsing in the PowerControls main window and
dragging and dropping or copying and pasting from the main window to the target. You do not need to
search to restore messages. For more information, see Chapter 6, “Restoring Exchange Data.”
60
Page 68

Chapter 5: Exporting Messages
The Export feature allows you to export mail from an EDB or PST source file to a local or network drive
destination. You can save exported messages as Microsoft Outlook files (.msg) or plain text files (.txt).
This feature can assist customers who want to copy old email backups into an alternate or non-email
system. You can export at all levels: an EDB file, a PST file, a mailbox, a folder, and individual messages.
General Information about Exporting Messages
• The file name for an exported message is its subject. A duplicate subject name will create a file with
the same name but with an (x) appended to the filename: x = 1 for the first duplicate, x = 2 for the next
duplicate, and so on. If the subject contains illegal file name characters, the offending characters will
be replaced with an underscore.
• Associated messages and folder properties will not be exported.
• When exporting individual messages, you have the option to keep the folder/mailbox hierarchy,
similar to the paste special feature. When exporting a mailbox or folder, you have the option to also
export the subfolders.
About Message (.msg) and Text (.txt) Export
The file type for an exported message can be either Microsoft Outlook (.msg) or plain text (.txt).
Message (.msg) export
An .msg (OLE compound document) can be imported directly into Microsoft Outlook. This file type
encapsulates the entire message including attachments.
Text (.txt) export
A .txt file will be created with the following information. Note that neither message attachments nor
message properties will be exported.
Distribution List Calendar Item Contact Item Task Item Message and All
Other Items
List Name: Subject:
Location:
Creator Date: Start:
End:
Creation Name: Recurrence:
(if present)
Members of List: Required Attendees:
Resources:
Body:
Last Name:
First Name:
Business Address: Status:
Home: Total Work:
Category: Owner: Message Body
Subject:
Due Date:
Priority:
Percent Complete:
Actual Work:
From:
Sent: (created date)
To:
CC: (if present)
BCC: (if present)
Subject:
Attachment file names:
61
Page 69
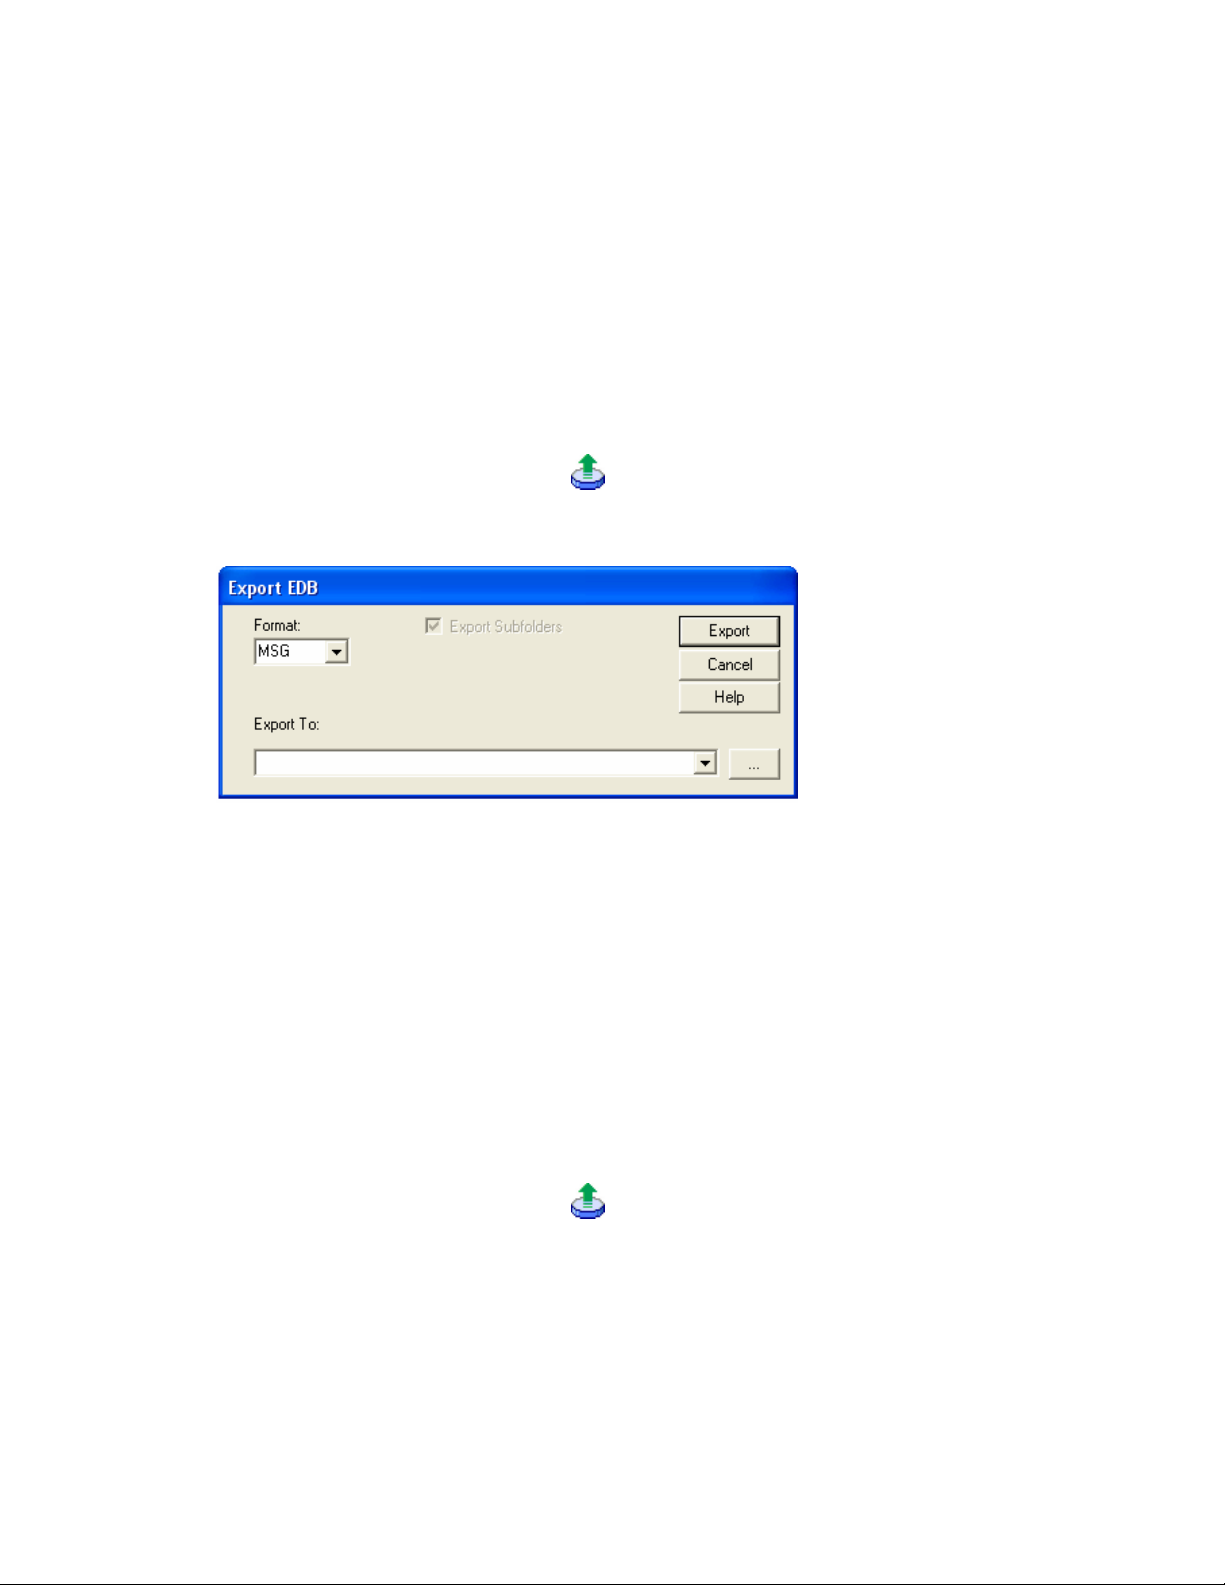
Chapter 5: Exporting Messages
Exporting Messages
The following instructions show you how to export an EDB file, a PST file, mailboxes, folders, and
messages from the source pane in the PowerControls main window. They also show you how to export
messages from the Find dialog box.
To export an entire EDB file
1. In the Source pane, select the EDB file.
2. Do one of the following:
• On the File menu, click Export.
• On the toolbar, click the Export button
• Right-click the EDB file, and on the shortcut menu, click Export.
.
3. In the Format box, select MSG or TXT.
4. In the Export To box, specify the location for the exported EDB file.
5. Click Export.
6. In the Export Progress dialog box, verify the EDB file was successfully exported, and click Close.
To export a PST file, a mailbox, or a folder
1. In the Source pane, select a PST file, a mailbox or a folder (e.g., Inbox).
2. Do one of the following:
• On the File menu, click Export.
• On the toolbar, click the Export button
• Right-click the mailbox or folder, and on the shortcut menu, click Export.
The Export Mailbox or Export Folder dialog box appears.
62
.
Page 70
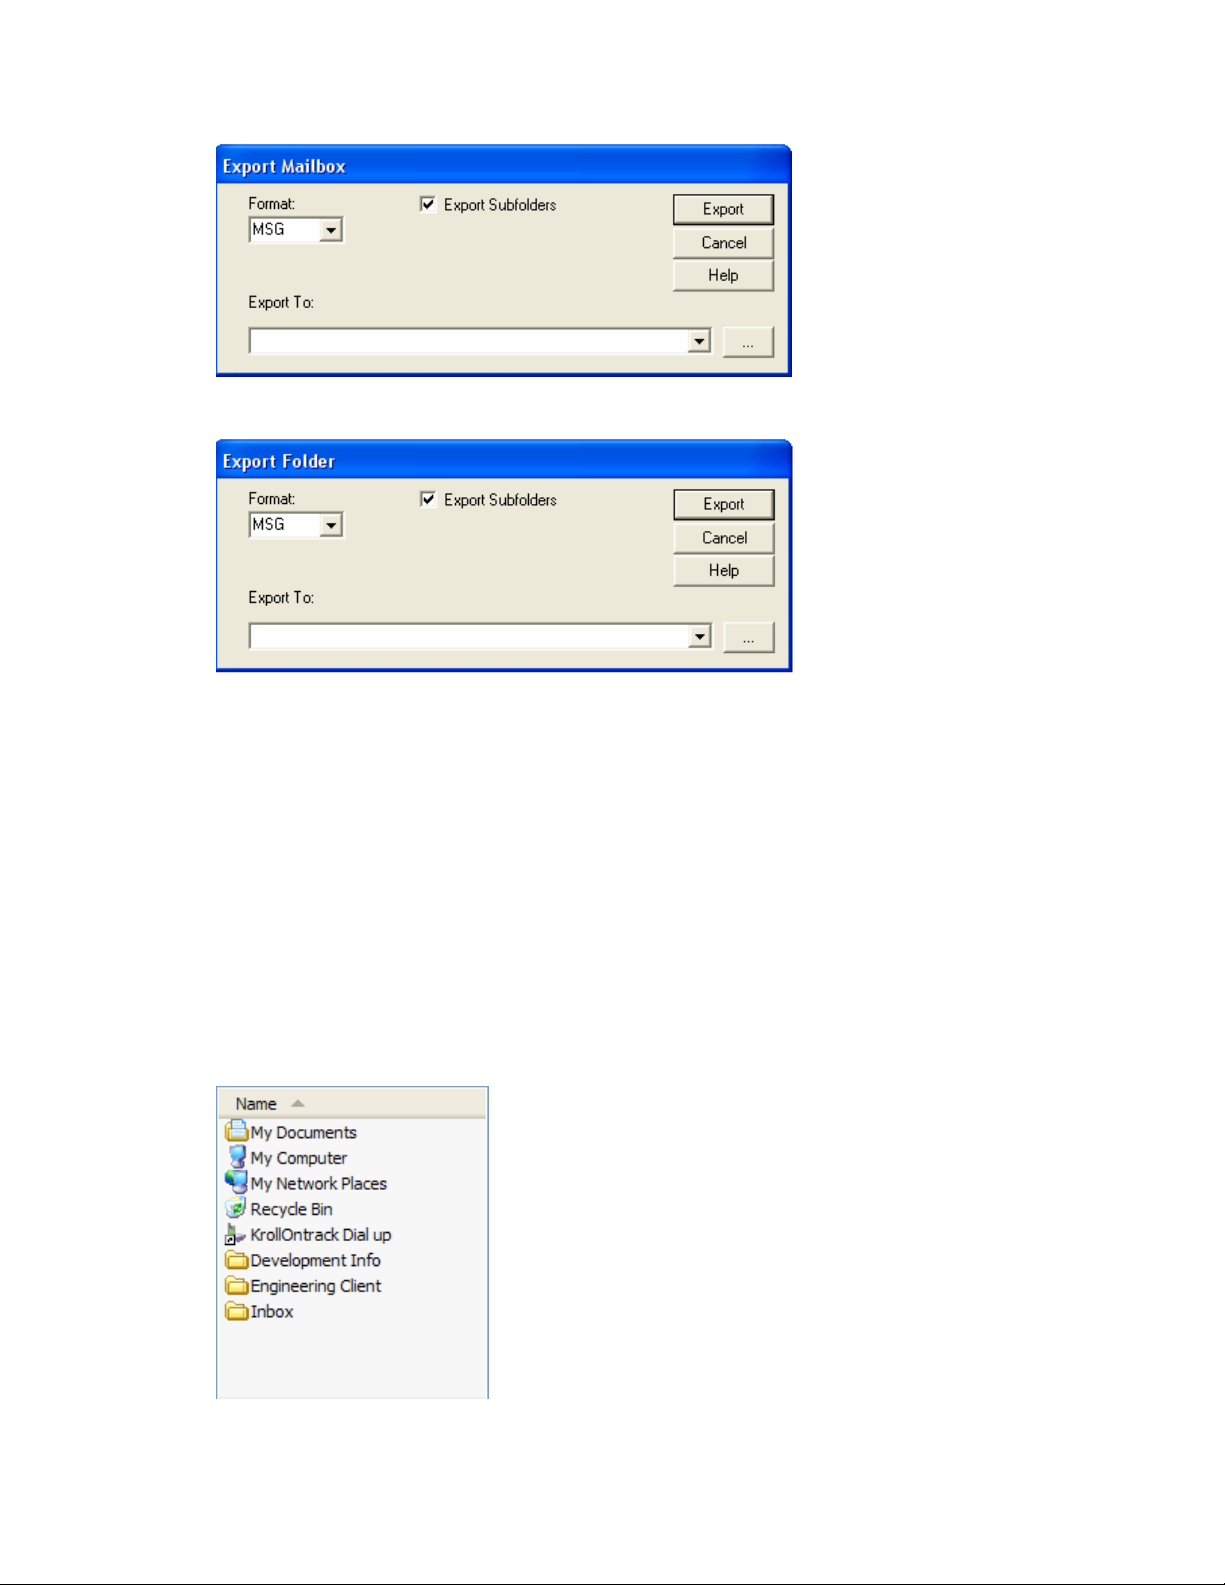
Ontrack® PowerControls™ 3.0 User Guide
Export Mailbox dialog box
Export Folder dialog box
3. In the Format box, select MSG or TXT.
4. In the Export To box, specify the location for the exported mailbox or folder.
5. Select the Export Subfolders check box if you want to export all of the subfolders for the selected
mailbox or folder.
6. Click Export.
7. In the Export Progress dialog box, verify the mailbox or folder was successfully exported, and click
Close.
The mailbox or folder appears in the specified location. In the illustration below, the exported folder is
the Inbox.
63
Page 71
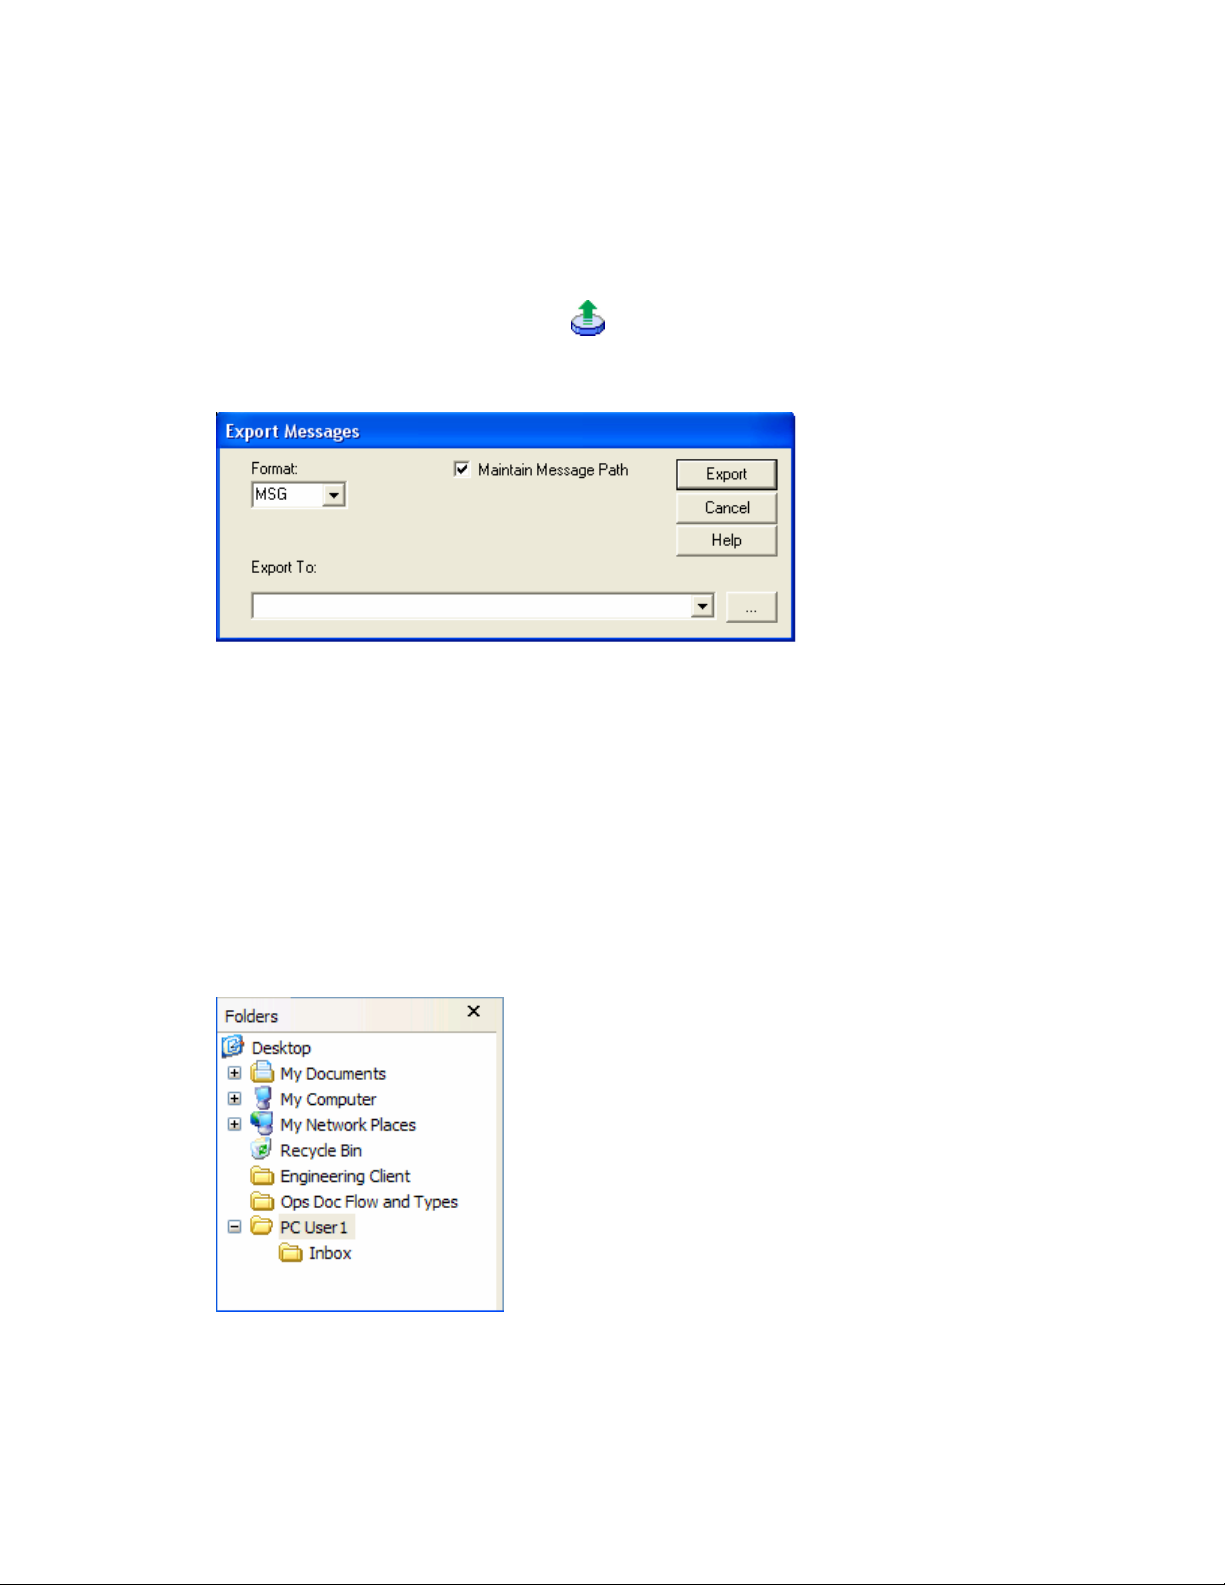
Chapter 5: Exporting Messages
To export individual messages
1. In the Source pane, select one or more messages from the message list.
2. Do one of the following:
• On the File menu, click Export.
• On the toolbar, click the Export button
.
• Right-click the selection, and on the shortcut menu, click Export.
3. In the Format box, select MSG or TXT.
4. In the Export To box, specify the location for the exported messages.
5. Select the Maintain Message Path check box if you want to maintain the directory structure of the
exported messages.
6. Click Export.
7. In the Export Progress dialog box, verify your messages were successfully exported, and click Close.
The messages appear in the specified location. In the illustration below, the exported messages come
from the “PC User 1” mailbox.
64
Page 72
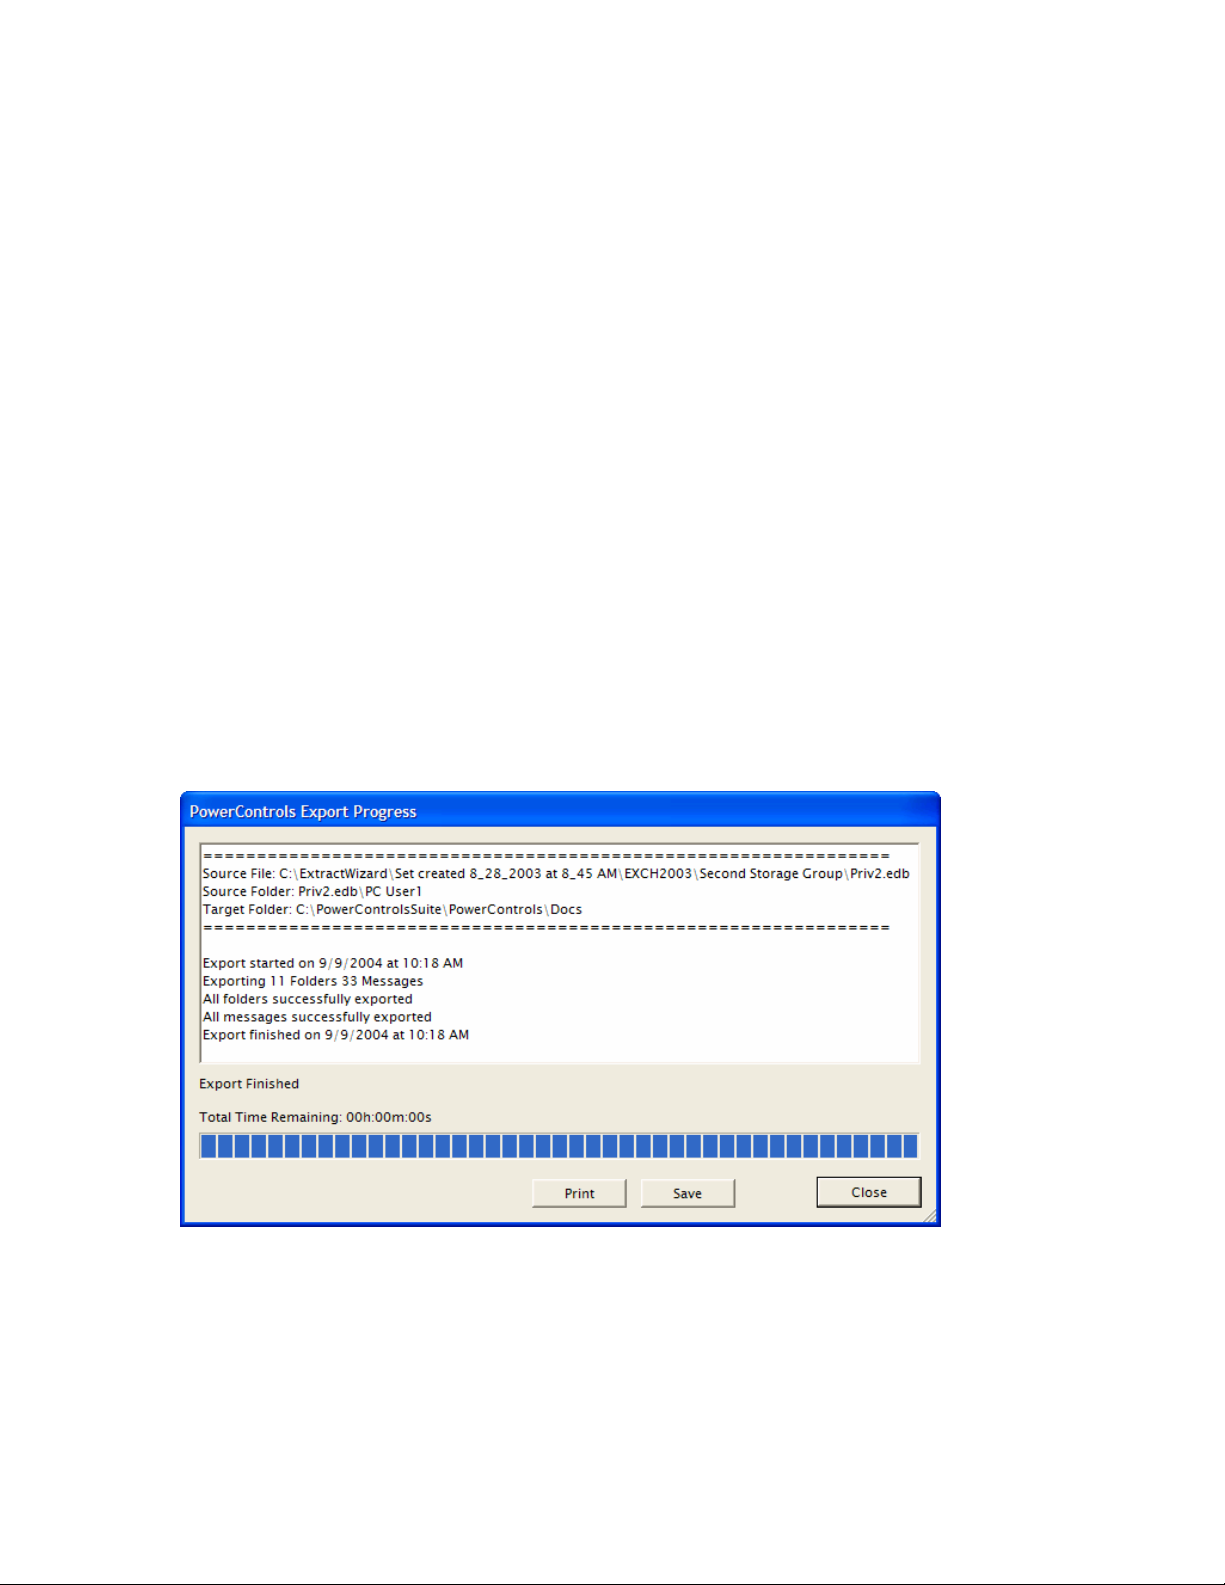
Ontrack® PowerControls™ 3.0 User Guide
To export individual messages from the Find dialog box
1. In the Find dialog box, select one or more messages from the message list.
2. Right-click the selection, and on the shortcut menu, click Export.
3. Perform steps 3-7 in the preceding section.
About the Export Progress Dialog Box
Each time you attempt to export messages, the Export Progress dialog box appears. This dialog box
displays the following information:
• Source and target
• Export start time
• Number of folders to export
• Number of messages to export
• Warnings or errors encountered during the export process. If an error occurs on a message, the
message subject and source path along with an error message will be displayed. If the message does
not have a subject, the date (created) and message sender will be displayed instead.
• Total folders and messages successfully exported
Notes:
• If an error occurs that PowerControls can recover from, such as a corruption that prevents it from
getting a message property, PowerControls will log an error, stop processing that message, and
continue.
• If an error occurs from which PowerControls cannot recover, such as a major corruption error,
PowerControls will log an error to the Export Progress dialog box and stop exporting.
65
Page 73

Chapter 5: Exporting Messages
66
Page 74

Chapter 6: Restoring Exchange Data
The first part of this chapter provides you with a quick look at restoring your Exchange database, so you
can begin to use PowerControls immediately. The second part of this chapter provides examples of
restoring messages, folders, mailboxes, and even an entire EDB file to the desired destination.
Note: The concepts in this chapter apply to both EDB and PST files (unless otherwise noted), even though
all of the examples are EDB files.
Quick Look at Restoring Your Exchange Data
Restoring data from a source EDB or PST file to a target destination is a simple process. Just drag and drop
or use the Copy and Paste/Paste Special commands.
Restoring Your Exchange Data in Three Easy Steps
If you copy an EDB file, a PST file, a mailbox, or a folder from the Source pane and paste it to any target
destination, PowerControls will preserve the directory structure of all restored messages. When restoring
individual messages, you must use the Paste Special command to preserve their directory structure.
To restore individual messages with Copy-Paste
1. In the Source pane or Find dialog box, copy messages from the message list.
2. In the Target pane, paste the messages into a folder.
3. In the Copy Progress dialog box, verify that your messages were successfully copied, and click Close.
To restore individual messages with Copy-Paste Special
1. In the Source pane or Find dialog box, copy messages from the message list.
2. In the Target pane, use Paste Special to paste the messages into a folder, mailbox, PST root, or
Exchange server root.
3. In the Copy Progress dialog box, verify that your messages were successfully copied, and click Close.
Tip: Use the Paste Special command to retain the directory structure of messages copied from the Find
dialog box, because messages in this dialog box often come from several source locations.
To restore a folder, a mailbox, an EDB file, or a PST file
1. In the Source pane, copy a folder, a mailbox, an EDB file, or a PST file.
2. In the Target pane, paste the copied item into a folder, mailbox, PST root, or Exchange server root.
3. In the Copy Progress dialog box, verify that your messages were successfully copied, and click Close.
Note: You cannot open the same PST as a Source and Target. In addition, you cannot restore messages
from a PST file to an Exchange Server root node.
To restore data even faster, use drag-and-drop
• Example: To restore an entire EDB file, drag it to the target Exchange server root.
67
Page 75

Chapter 6: Restoring Exchange Data
Limits for PST and Folder Targets
When restoring Exchange Data to a target PST or folder, PSTs have the following limits:
2 GB PST Limit
When a target PST file reaches 1.8 GB, PowerControls will create a new PST for the additional messages.
The new PST file will have the same name as the original target PST file, plus an appended number in
parentheses: Personal Folders (1), Personal Folders (2), and so on. PowerControls will create the folder
path in the new PST and continue to restore Exchange data where it left off.
Note: The 1.8 GB limit applies only to PST files created by Microsoft Outlook XP and earlier. This limit
does not apply to the new type of PST files created by Microsoft Outlook 2003.
16,383 Messages Per Folder (e.g., Inbox) Limit
When a target folder (e.g., Inbox) reaches 16,383 messages, PowerControls will create a new PST folder
for the additional messages. The new folder will have the same name as the original target folder plus an
appended number in parentheses: Inbox (1), Inbox (2), and so on. PowerControls will create the folder path
in the new folder and continue to restore Exchange data where it left off.
Note: If you have upgraded the PST file to a large table format, the PST can hold 64,000 messages per
folder. However, when a target folder (e.g., Inbox) reaches 16,383 messages, PowerControls will still
create a new PST folder for the additional messages.
To turn off the preference setting for the PST messages per folder limit
If you do not want PowerControls to create new folders when the number of messages reaches 16,383, do
the following:
1. On the Edit menu, click Preferences.
2. In the PowerControls Preferences dialog box, click the Options tab, and then clear the Create new
PST folders when PST message/folder limits are reached check box.
Note: If you turn off the preference, all messages above the messages per folder limit will fail to copy
correctly, and the PST file may become corrupt.
About Restoring Messages to an Exchange Server
You must have sufficient access rights to all of the Exchange mailboxes you are trying to restore messages
to. Keep in mind that you can connect to only one mailbox at a time.
Restoring Messages to Exchange 2000/2003
In Exchange 2000/2003, the permission that controls whether or not any mailbox can be copied to is Full
Mailbox Access. You must have Full Mailbox Access set to “Allow” in order to copy to a mailbox other
than the one you logged in under.
Restoring Messages to Exchange 5.5
In Exchange 5.5, the account you are logged in under needs an Exchange Service Account Administrator
rights or role. As long as you copy this role to your account, you can restore messages to any mailbox.
68
Page 76
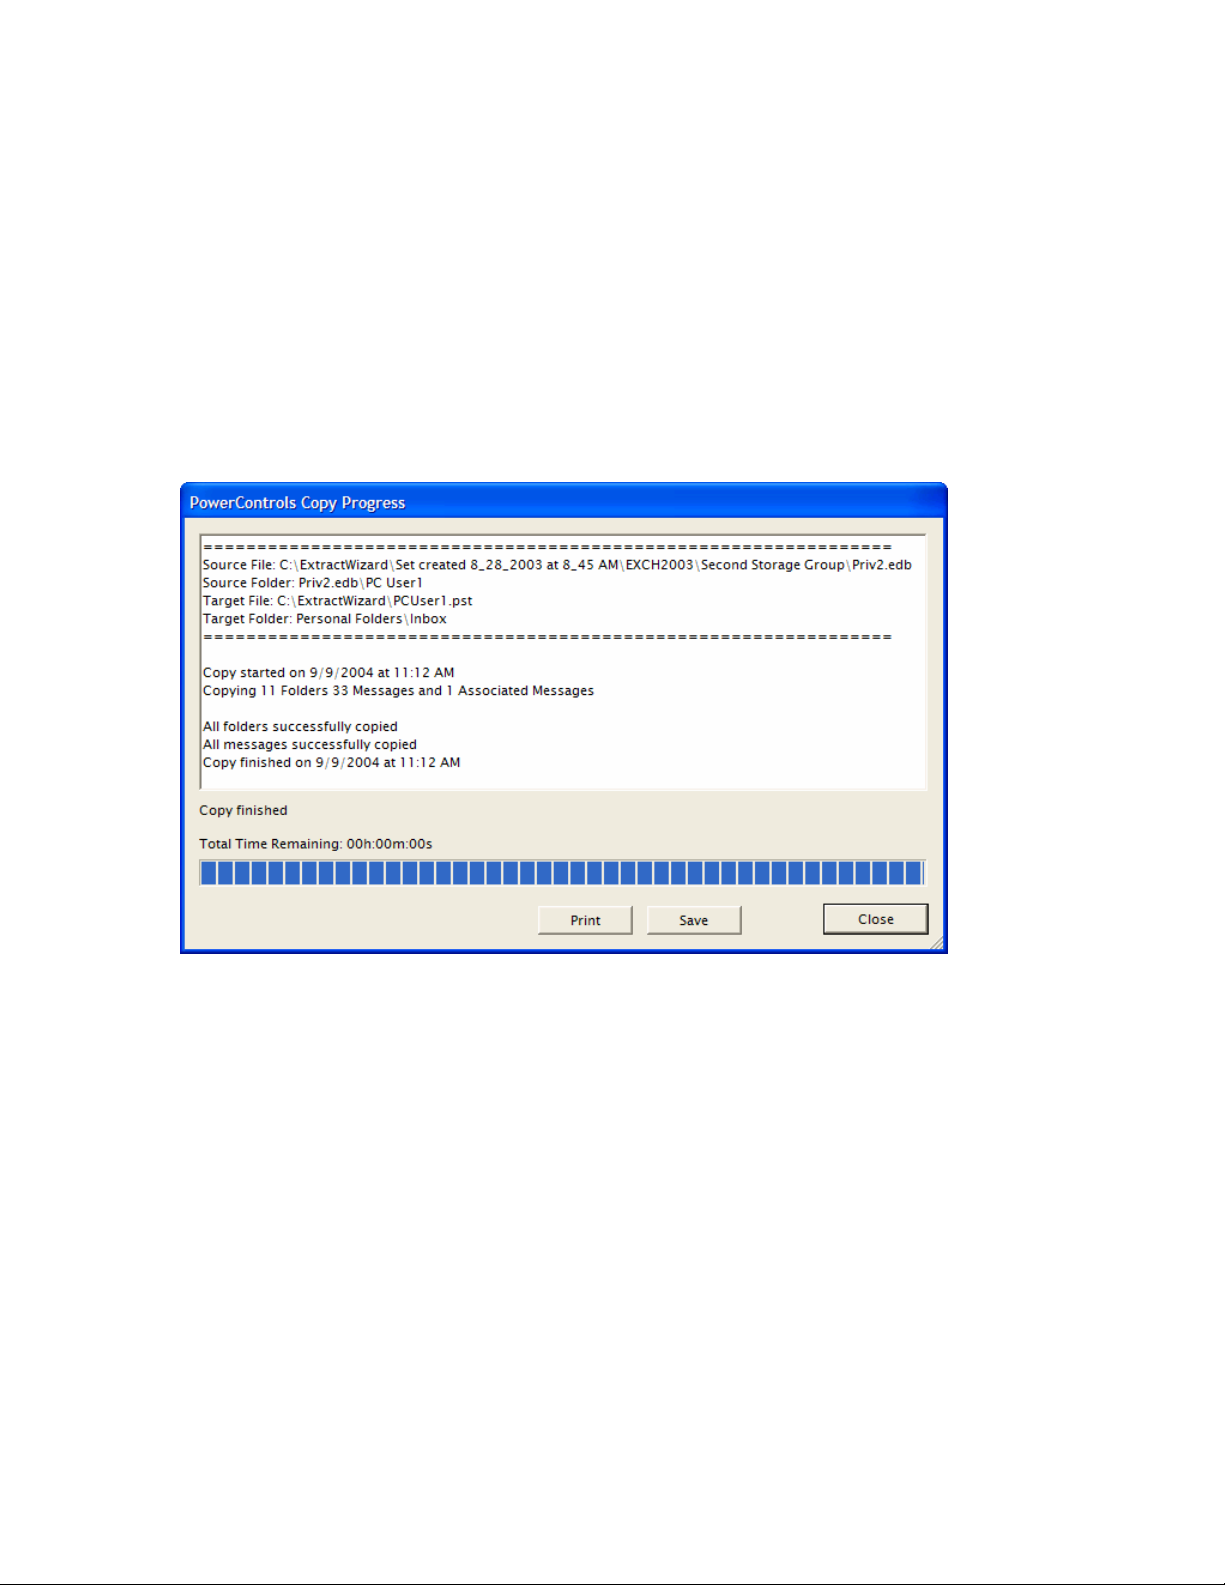
Ontrack® PowerControls™ 3.0 User Guide
About the Copy Progress Dialog Box
Each time you attempt to restore messages to the Target pane, the Copy Progress dialog box appears. This
dialog box displays the following information about the copy operation:
• Time of copy operation
• Number of messages, associated messages, and folders
• Errors, if any
• Mailboxes that PowerControls connected to or failed to connect to when copying to an Exchange
server
• Copy results
Important Note: Viewing the copy results in Copy Progress dialog box is especially important when
attempting to restore multiple mailboxes to an Exchange server root node. That’s because PowerControls
displays only one mailbox at a time in the Target pane; therefore, the only way you will know if all of the
mailboxes were successfully copied to the Exchange server will be to look at the copy results listed in this
dialog box.
If you do not have full access rights to the mailboxes you are trying to restore messages to, PowerControls
will be unable to connect to the mailboxes. For more information, see “About Restoring Messages to an
Exchange Server” on page 68.
69
Page 77

Chapter 6: Restoring Exchange Data
Creating, Renaming, and Deleting Folders in the Target Pane
The Target pane has folders in which you can place your restored messages. However, you may wish to
create new folders for your messages. You can also rename or delete any folder in the Target pane.
To create a new folder in the Target pane
1. In the Target pane, select a folder, a PST root node, or an Exchange mailbox.
2. Do one of the following:
• On the Edit menu, click New Folder.
• Right-click and on the shortcut menu, click New Folder.
• Press Ctrl+N.
3. In the Create New Mail Folder dialog box, name the folder and click OK. A subfolder is created in
the target folder.
To rename a folder in the Target pane
1. In the Target pane, select a folder.
2. Do one of the following:
• On the Edit menu, click Rename.
• Right-click and on the shortcut menu, click Rename.
• Press Ctrl+R.
3. Type a new name for the folder.
Note: You can also rename a PST root.
To delete a folder in the Target pane
1. In the Target pane, select a folder.
2. Do one of the following:
• On the Edit menu, click Delete.
• Press the Delete key.
70
Page 78

Ontrack® PowerControls™ 3.0 User Guide
Copying and Pasting or Dragging and Dropping
In PowerControls, you can restore data to the Target pane by using Copy-Paste, Copy-Paste Special, or
Drag-and-Drop.
To copy an item in the Source pane or Find dialog box
1. In the Source pane or Find dialog box, select messages, a folder, a mailbox, or the entire EDB file.
Note: In the Find dialog box, you can only select messages.
2. Do one of the following:
• On the Edit menu, click Copy.
• Right-click the selected item(s), and on the shortcut menu, click Copy.
• Click the Copy Mail Item button
on the toolbar.
• Press Ctrl +C.
To paste an item in the Target pane
1. In the Target pane, select a folder, a mailbox, the PST root node, or the Exchange root node.
2. Do one of the following:
• On the Edit menu, click Paste.
• Right-click the selected item, and on the shortcut menu, click Paste or Paste Special. For more
information on using the Paste Special command, see “Restoring Messages with Paste Special” on
page 74.
• Click the Paste button
on the toolbar.
• Press Ctrl + V (Paste) or Ctrl-Y (Paste Special).
To use drag-and-drop
• Drag an item from the Source pane into a folder in the Target pane. Dragging and dropping achieves
the same results as copying and pasting.
To use drag-and-drop when right-clicking a source item
1. In the Source pane, select one or more messages.
2. Right-click the selected messages and drag them to a folder in the Target pane.
3. When you let go of the mouse, a shortcut menu appears. On the shortcut menu, click Paste or Paste
Special. For more information on using the Paste Special command, see “Restoring Messages with
Paste Special” on page 74.
71
Page 79
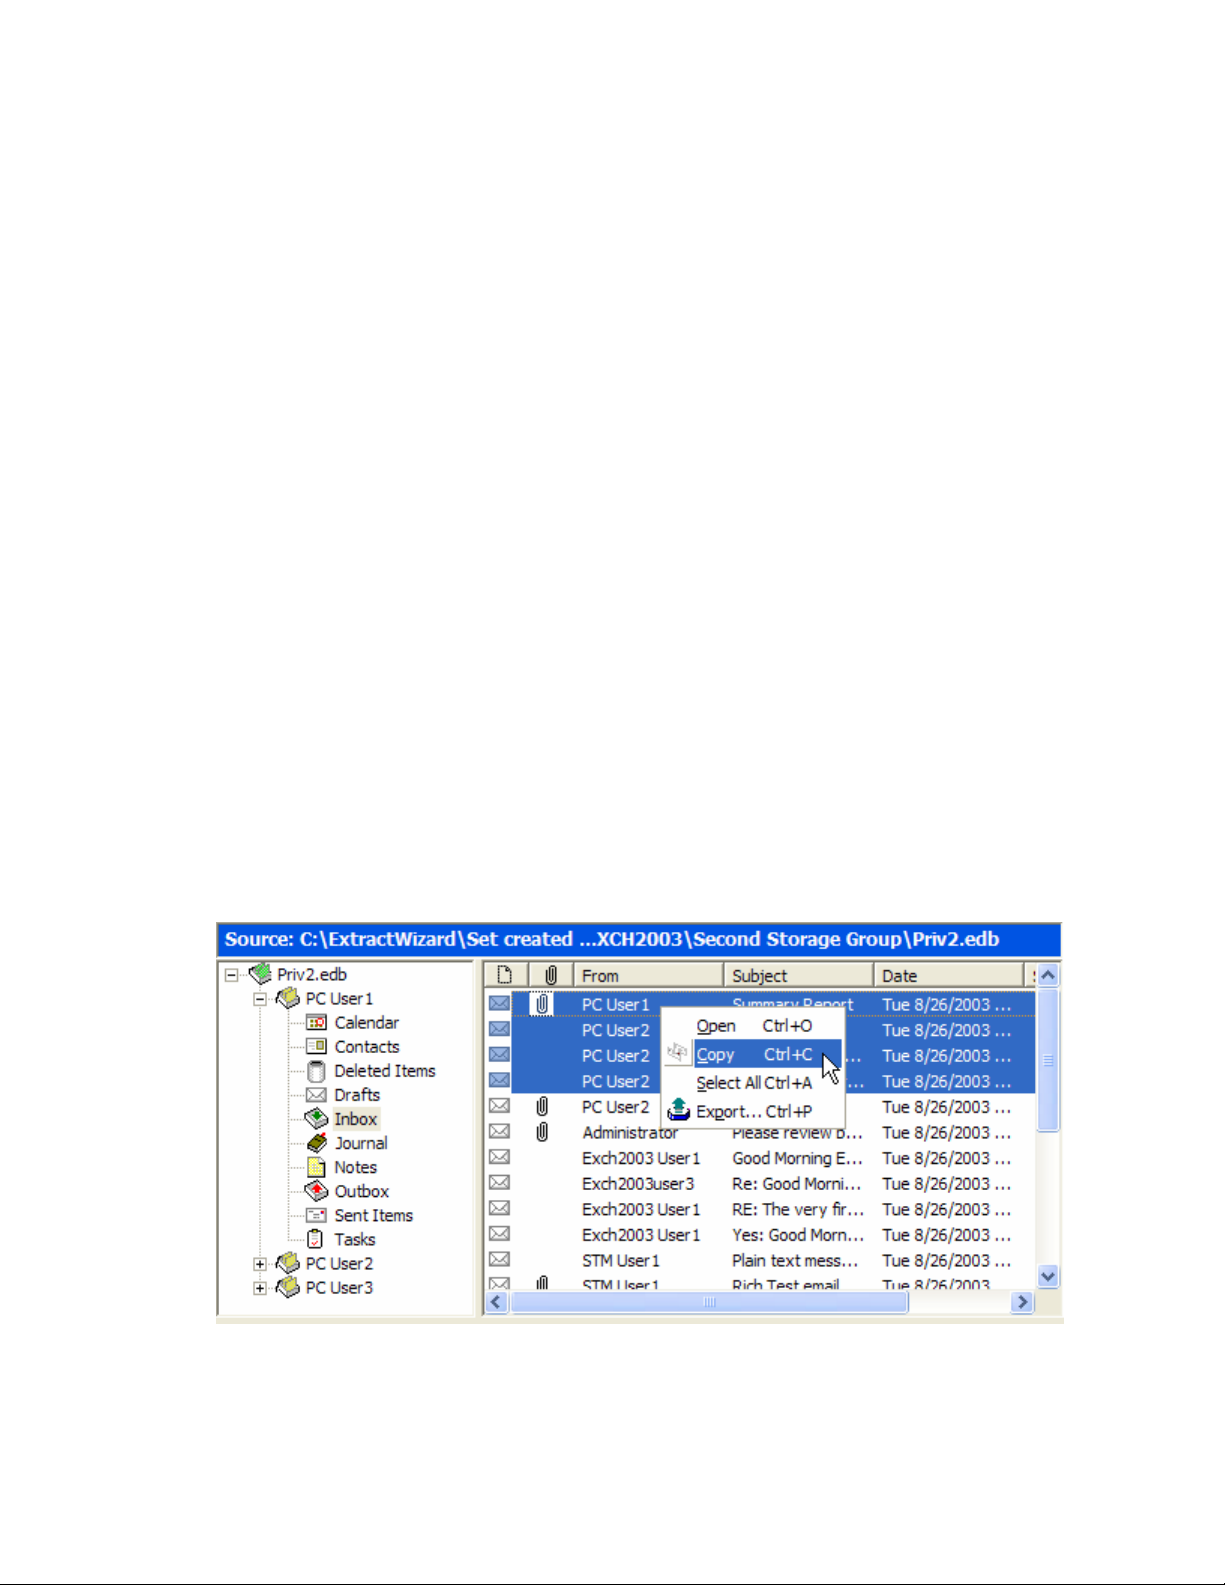
Chapter 6: Restoring Exchange Data
Examples of Restoring Your Exchange Data
This section provides examples of restoring messages, folders, mailboxes, and even an entire EDB file to
the desired destination. In each case, it provides guidelines for restoring messages.
Note: The concepts in this chapter apply to both EDB and PST files (unless otherwise noted), even though
all of the following examples are EDB files.
Restoring Messages with Copy-Paste
The following instructions show you how to restore individual messages to a folder in a target PST file or
Exchange Server by using Copy-Paste. Keep in mind that using Drag-and-Drop achieves the same results.
Guidelines for Restoring Messages
1. You can copy messages from the message list in the Source pane or the Find dialog box.
2. You can use Drag-and-Drop or Copy-Paste to restore individual messages to a folder in the Target
pane.
3. You cannot use Drag-and-Drop or Copy-Paste to restore individual messages to a PST root node, an
Exchange server root node, or an Exchange mailbox. However, you can use Paste Special to restore
individual messages to these locations.
4. Using Drag-and-Drop or Copy-Paste to restore individual messages does not preserve the directory
structure of the restored messages. If you want to preserve the directory structure of restored individual
messages, use Paste Special.
Tip: For information on Paste Special, see “Restoring Messages with Paste Special” on page 74.
To restore messages with Copy-Paste
1. In the Source pane or Find dialog box, copy messages from the message list.
2. In the Target pane, paste the messages into a folder (e.g., Inbox) in the target PST file or Exchange
Server.
72
Page 80
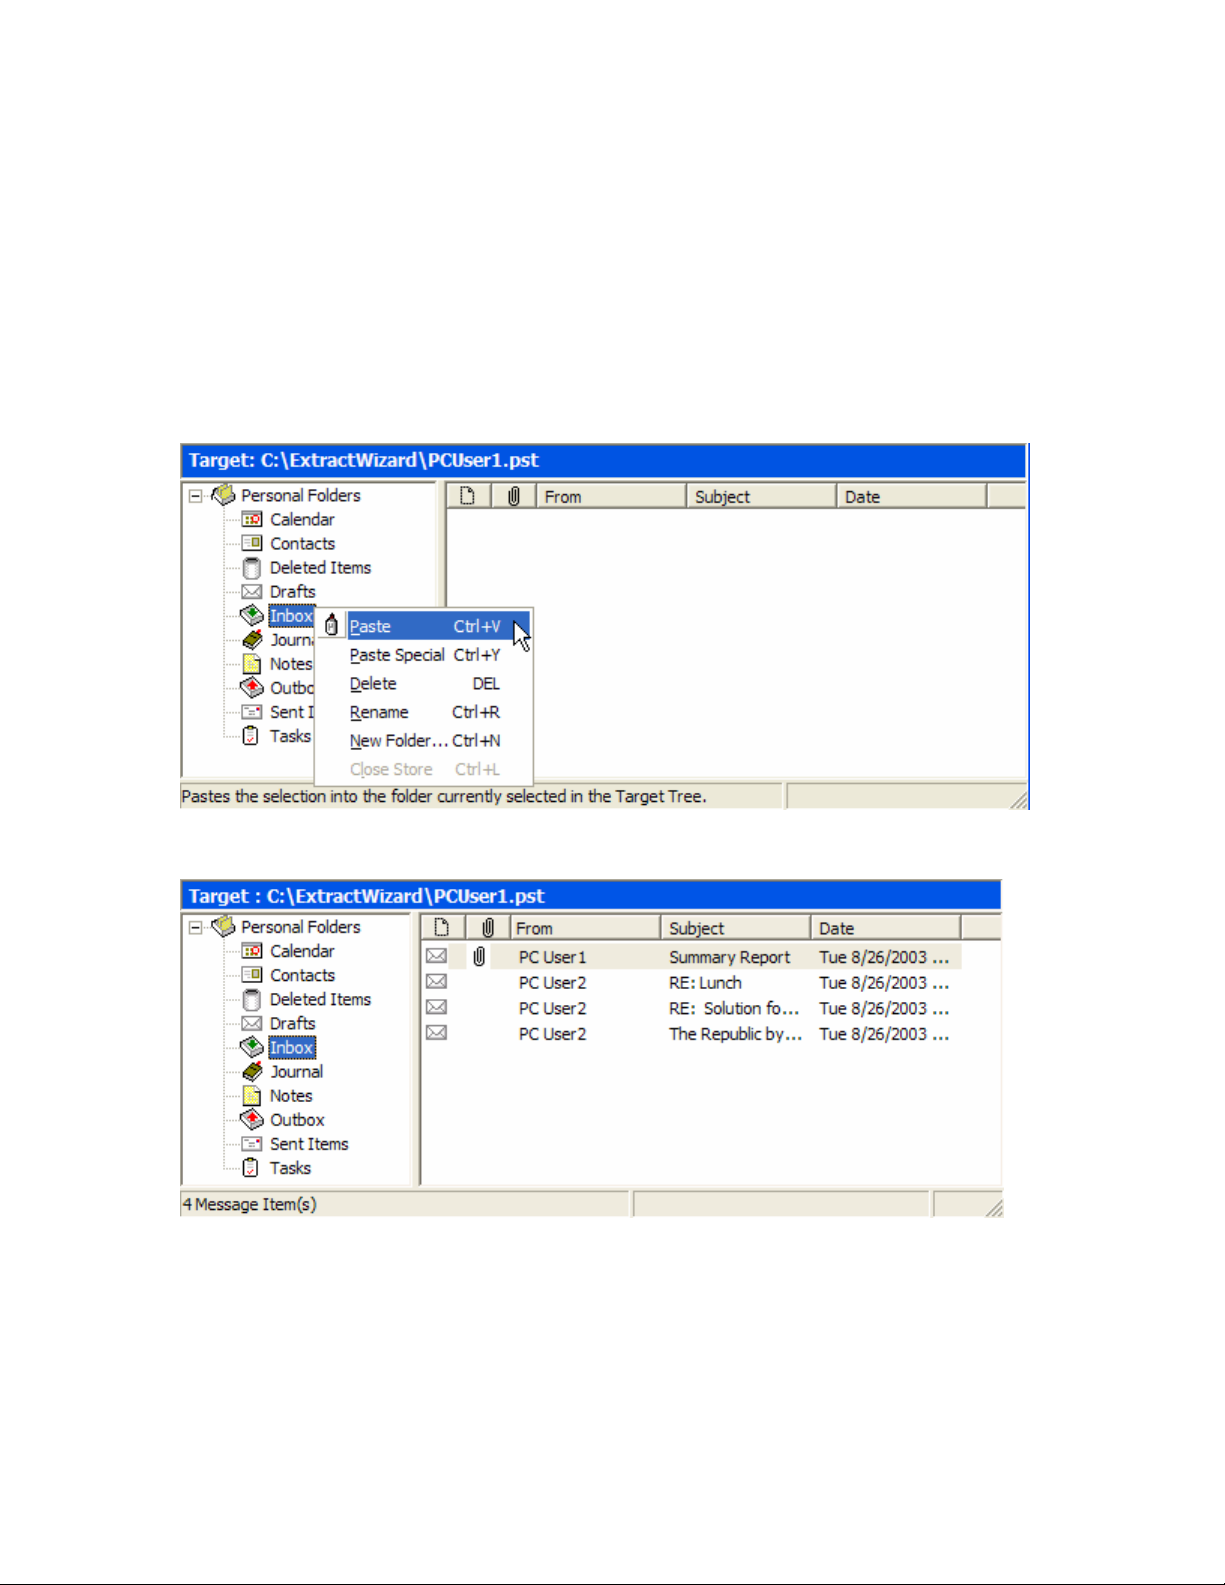
Ontrack® PowerControls™ 3.0 User Guide
3. In the Copy Progress dialog box, verify that your messages were successfully copied. You can also
print or save the copy report by doing one of the following.
• Click Print to print the copy report.
• Click Save to save the copy report as a text file.
4. In the Copy Progress dialog box, click Close to return to the PowerControls main window.
Results of Restoring Messages with Copy-Paste
All unduplicated messages will appear in the target folder.
Example 1: Pasting messages into a folder (Inbox) in the Target pane
Example 1: Results of pasting messages into a folder (Inbox) in the Target pane
73
Page 81
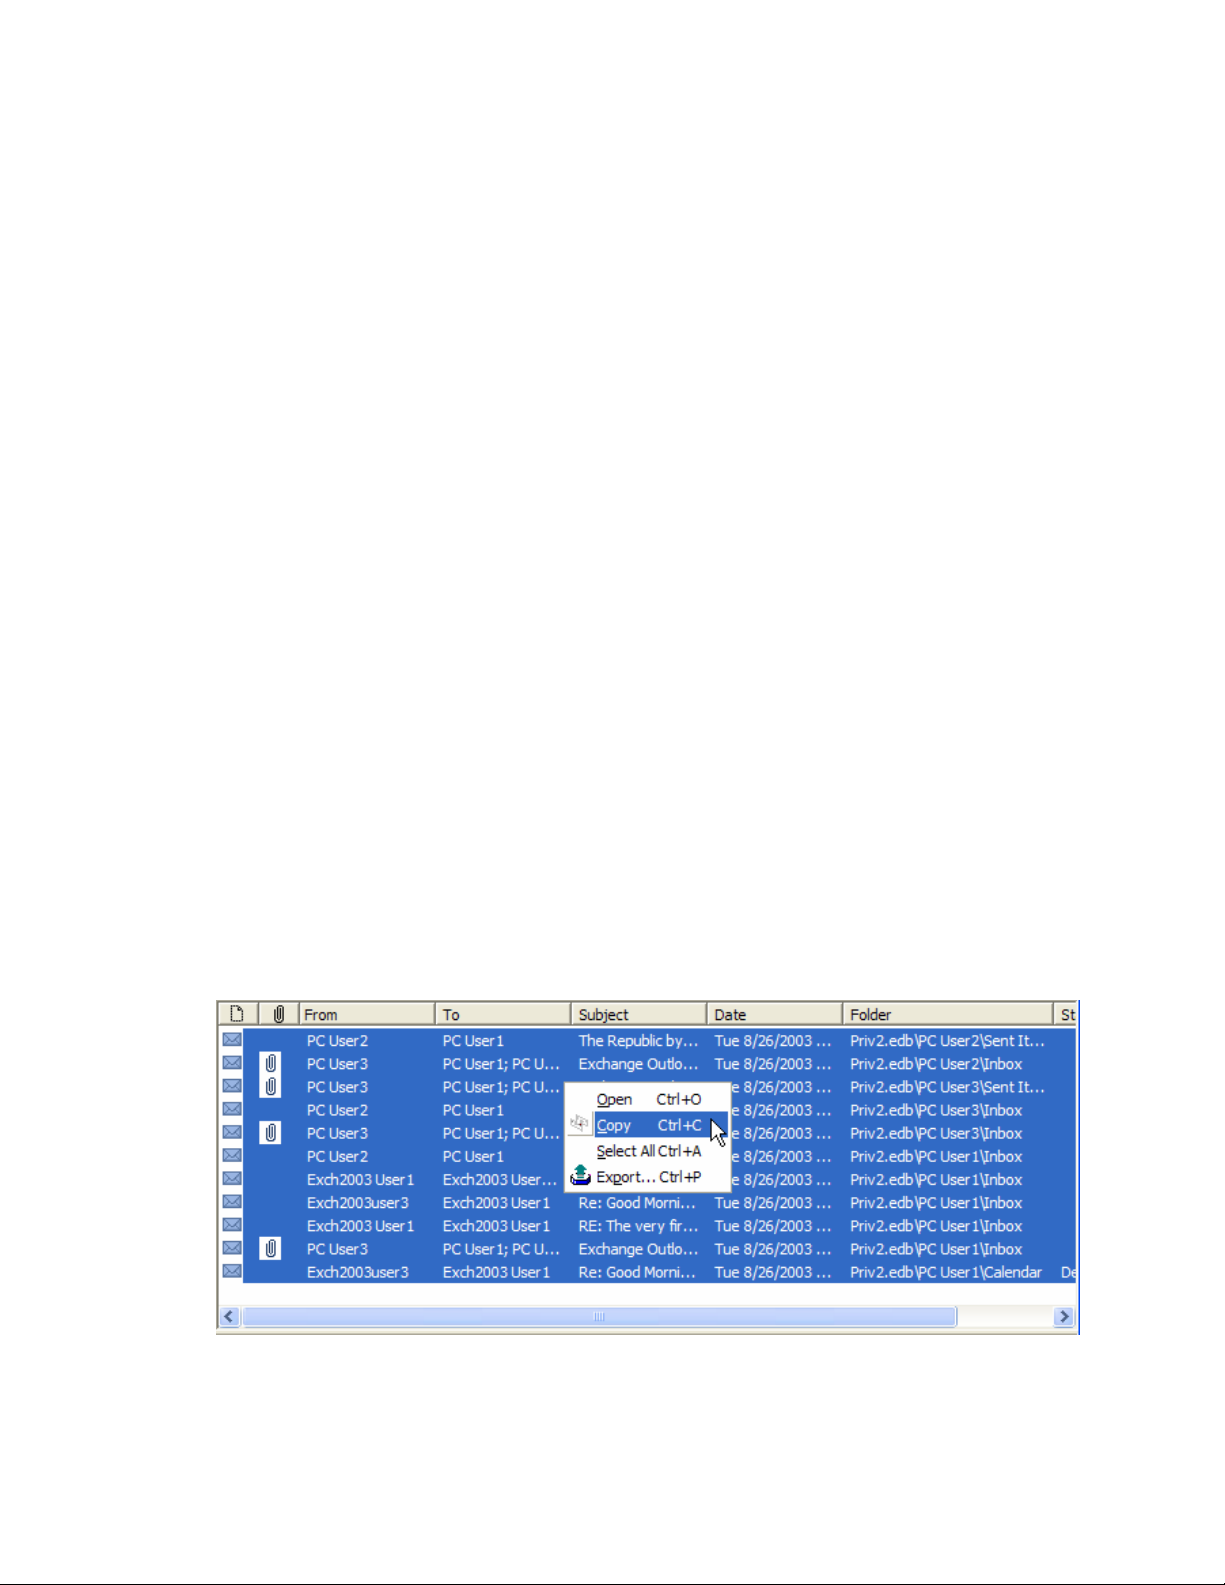
Chapter 6: Restoring Exchange Data
Restoring Messages with Paste Special
You can use the Paste Special command to preserve the directory structure of restored individual messages.
The Paste Special command is especially useful when restoring messages from the message list in the Find
dialog box, since these messages often come from several source locations.
Guidelines for Restoring Messages with Paste Special
1. You can use the Paste Special command to restore individual messages to any target destination. Using
the Paste Special command preserves the directory structure of the restored messages.
2. You can use the Paste Special command to restore individual messages only. You cannot use the Paste
Special command to restore an entire EDB file, a mailbox, or a folder.
3. If the target is a PST root node or folder, PowerControls will create a folder to represent each
mailbox. Each mailbox will be a subfolder of the folder the user selected for the Paste Special
operation.
4. If the target is an Exchange Server mailbox or folder, PowerControls will copy all messages to the
target. Each mailbox will be a subfolder of the folder the user selected for the Paste Special operation.
5. If the target is an Exchange Server root node, the Paste Special code will attempt to connect to each
mailbox one at a time and copy each message to its corresponding mailbox and folder. If the folder
does not exist, it will be created. If the mailbox does not exist, PowerControls will log an error in the
copy results, skip the entire mailbox, and continue the Paste Special operation.
Note: You cannot restore messages from a PST file to an Exchange Server root node.
To restore messages to a PST root or folder with Paste Special
If the target is a PST root node or folder, PowerControls will create a folder to represent each mailbox.
Each mailbox will be a subfolder of the folder the user selected for the Paste Special operation.
1. In the Source pane or Find dialog box, copy messages from the message list.
In this example, messages from three different mailboxes (PC User 1, PC User 2, and PC User 3) are
copied from the message list in the Find dialog box.
Copying messages from the Find dialog box
74
Page 82
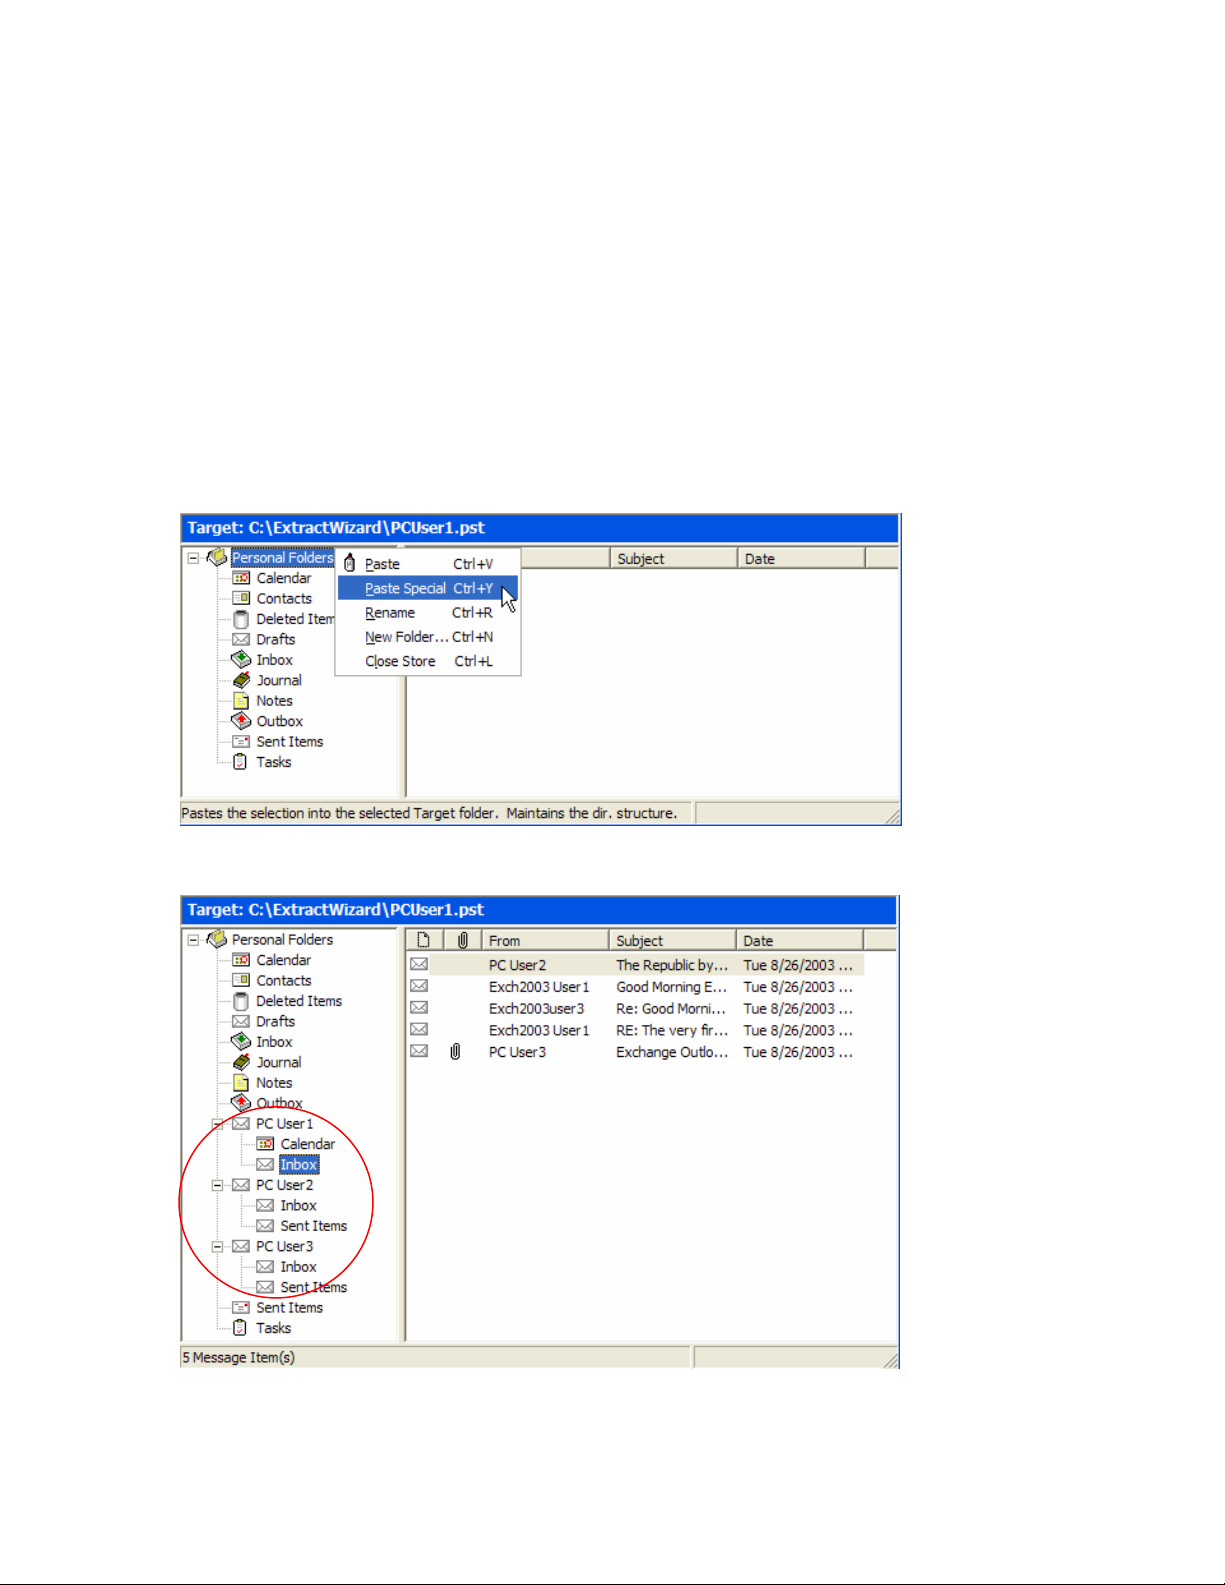
Ontrack® PowerControls™ 3.0 User Guide
2. In the Target pane, use Paste Special to paste the messages into a PST root node or folder.
3. In the Copy Progress dialog box, verify that your messages were successfully copied. You can also
print or save the copy report by doing one of the following.
• Click Print to print the copy report.
• Click Save to save the copy report as a text file.
4. In the Copy Progress dialog box, click Close to return to the PowerControls main window.
Results of Restoring Messages to a PST Root Node or Folder with Paste Special
All unduplicated messages will appear in the target destination, and their directory structure will be
preserved.
Example 2: Using Paste Special on a target PST root node
Example 2: Results of using Paste Special on a target PST root node
75
Page 83
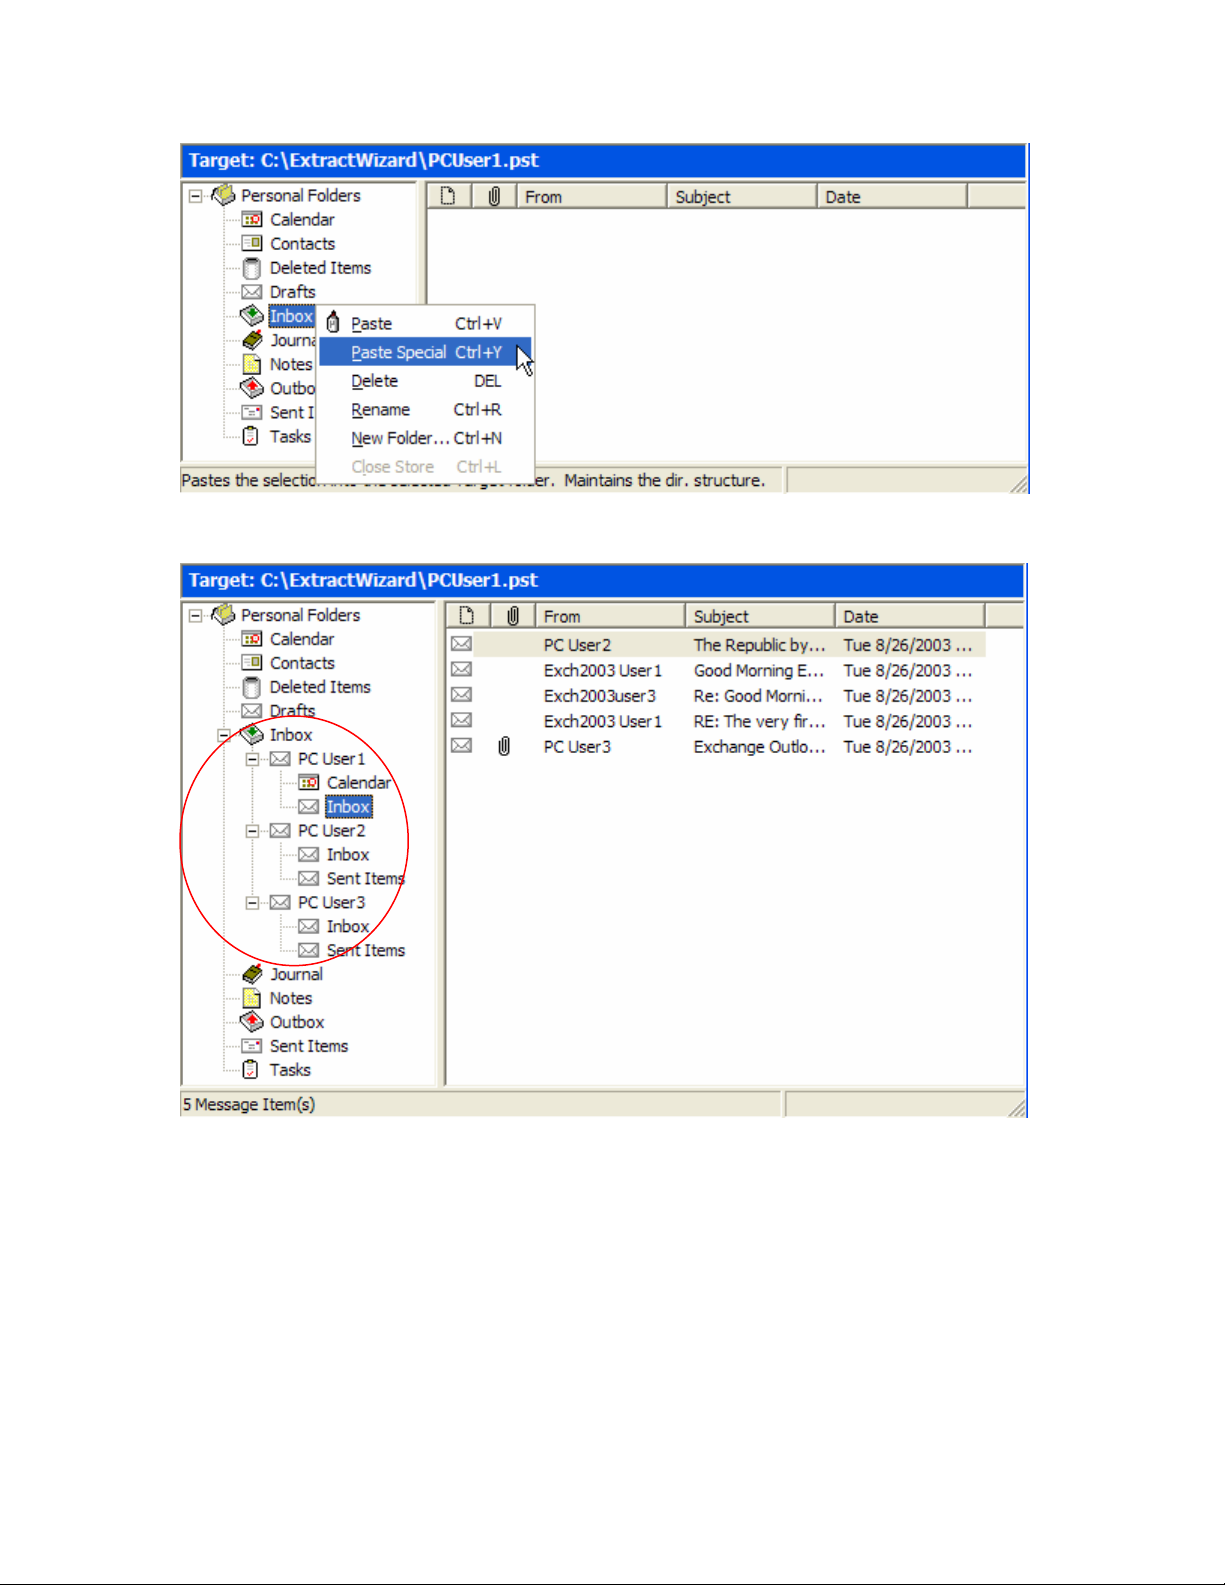
Chapter 6: Restoring Exchange Data
Example 3: Using Paste Special on a target PST Inbox
Example 3: Results of using Paste Special on a target PST Inbox
76
Page 84
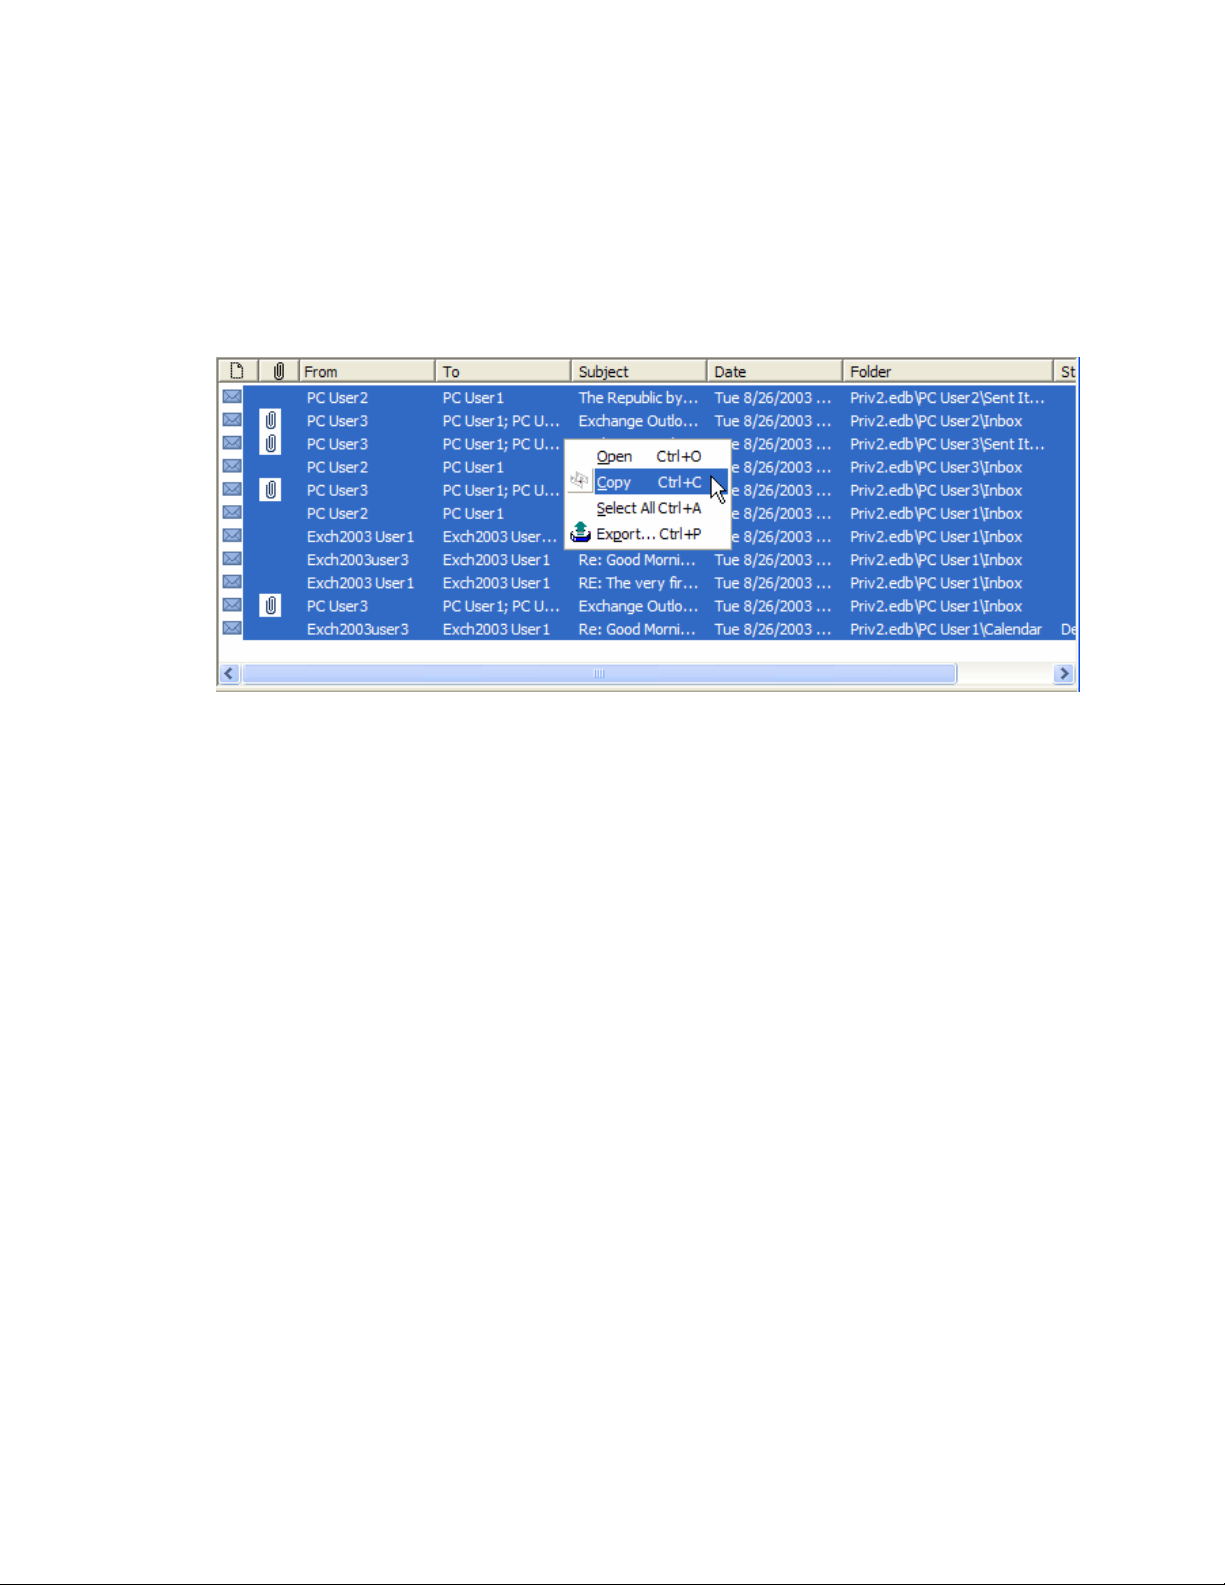
Ontrack® PowerControls™ 3.0 User Guide
To restore messages to an Exchange server mailbox or folder with Paste Special
If the target is an Exchange Server mailbox or folder, PowerControls will copy all messages to the target.
Each mailbox will be a subfolder of the folder the user selected for the Paste Special operation.
1. In the Source pane or Find dialog box, copy messages from the message list.
In this example, messages from three different mailboxes (PC User 1, PC User 2, and PC User 3) are
copied from the message list in the Find dialog box.
Copying messages from the Find dialog box
2. In the Target pane, use Paste Special to paste the messages into an Exchange mailbox or folder.
3. In the Copy Progress dialog box, review your results to make sure all the messages were copied to the
target destination. You can also print or save the copy report by doing one of the following.
• Click Print to print the copy report.
• Click Save to save the copy report as a text file.
4. In the Copy Progress dialog box, click Close to return to the PowerControls main window.
77
Page 85
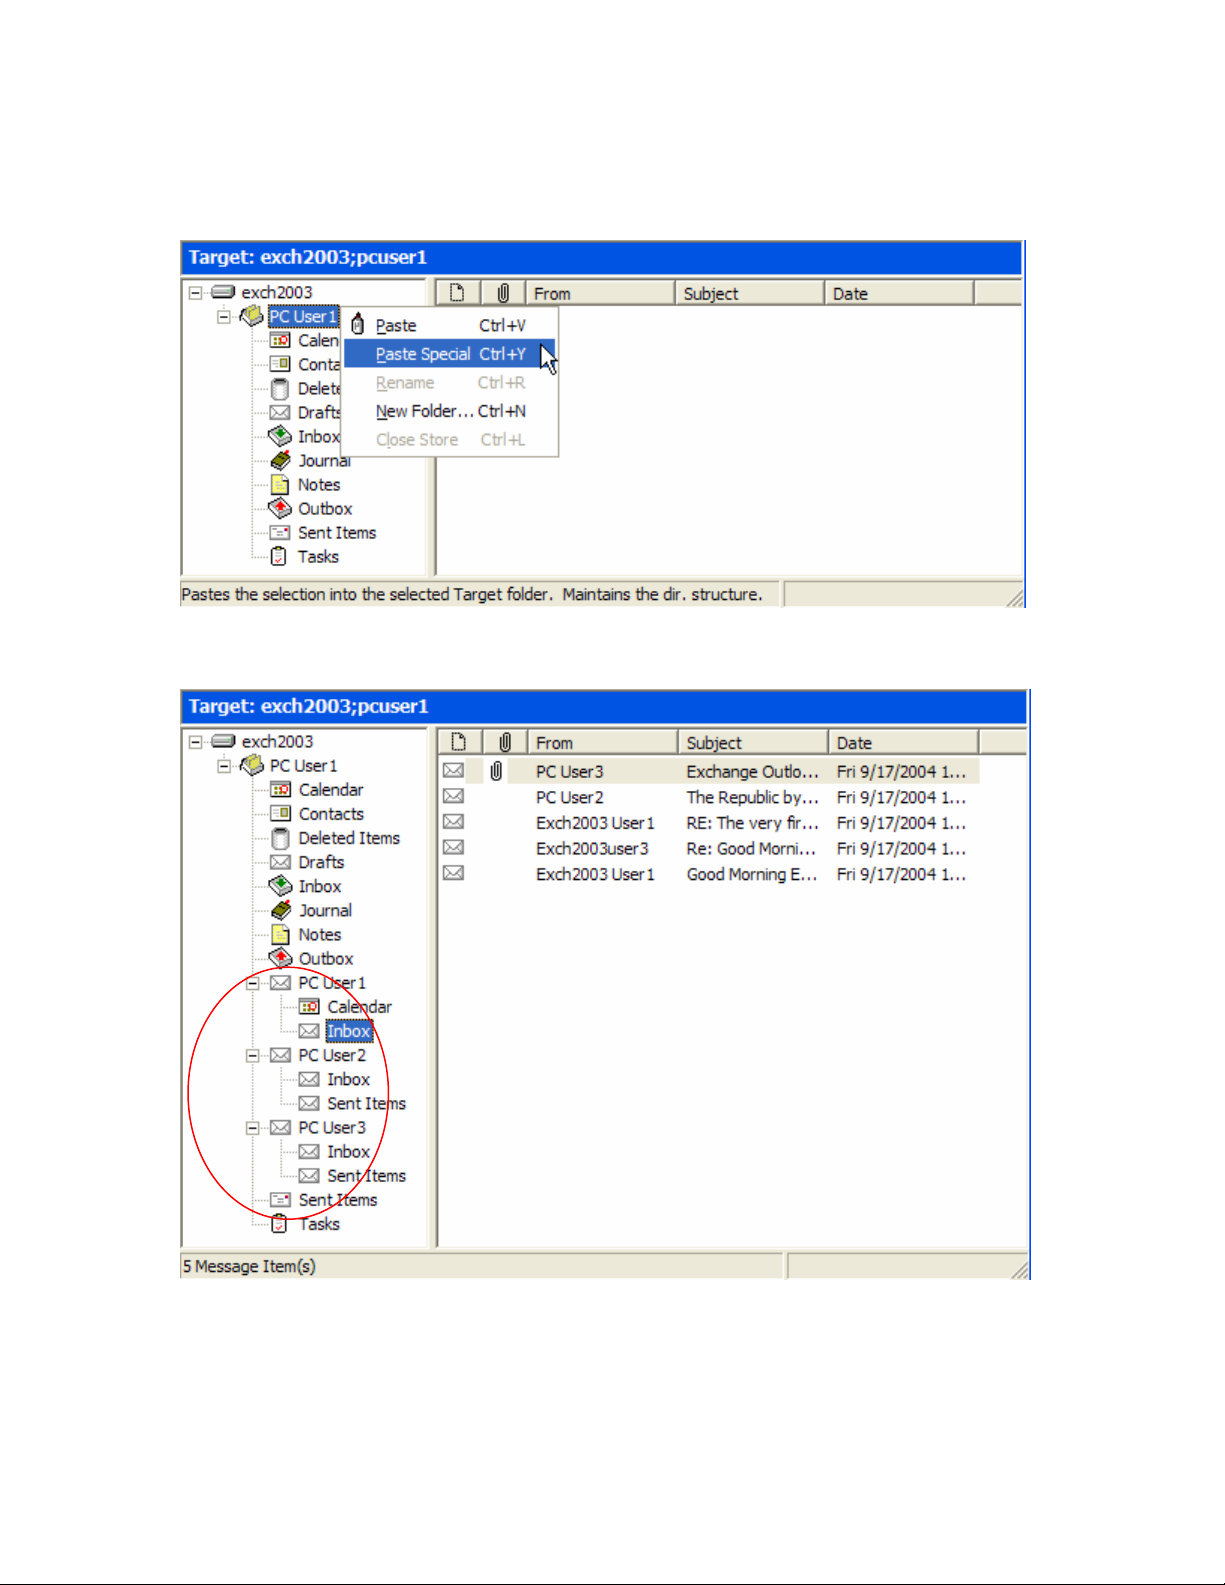
Chapter 6: Restoring Exchange Data
Results of Restoring Messages to an Exchange Server Mailbox or Folder with Paste Special
Each mailbox will be a subfolder of the target destination, and all unduplicated messages will be restored.
In addition, their directory structure will be preserved.
Example 4: Using Paste Special on a target Exchange mailbox
Example 4: Results of using Paste Special on a target Exchange mailbox
78
Page 86
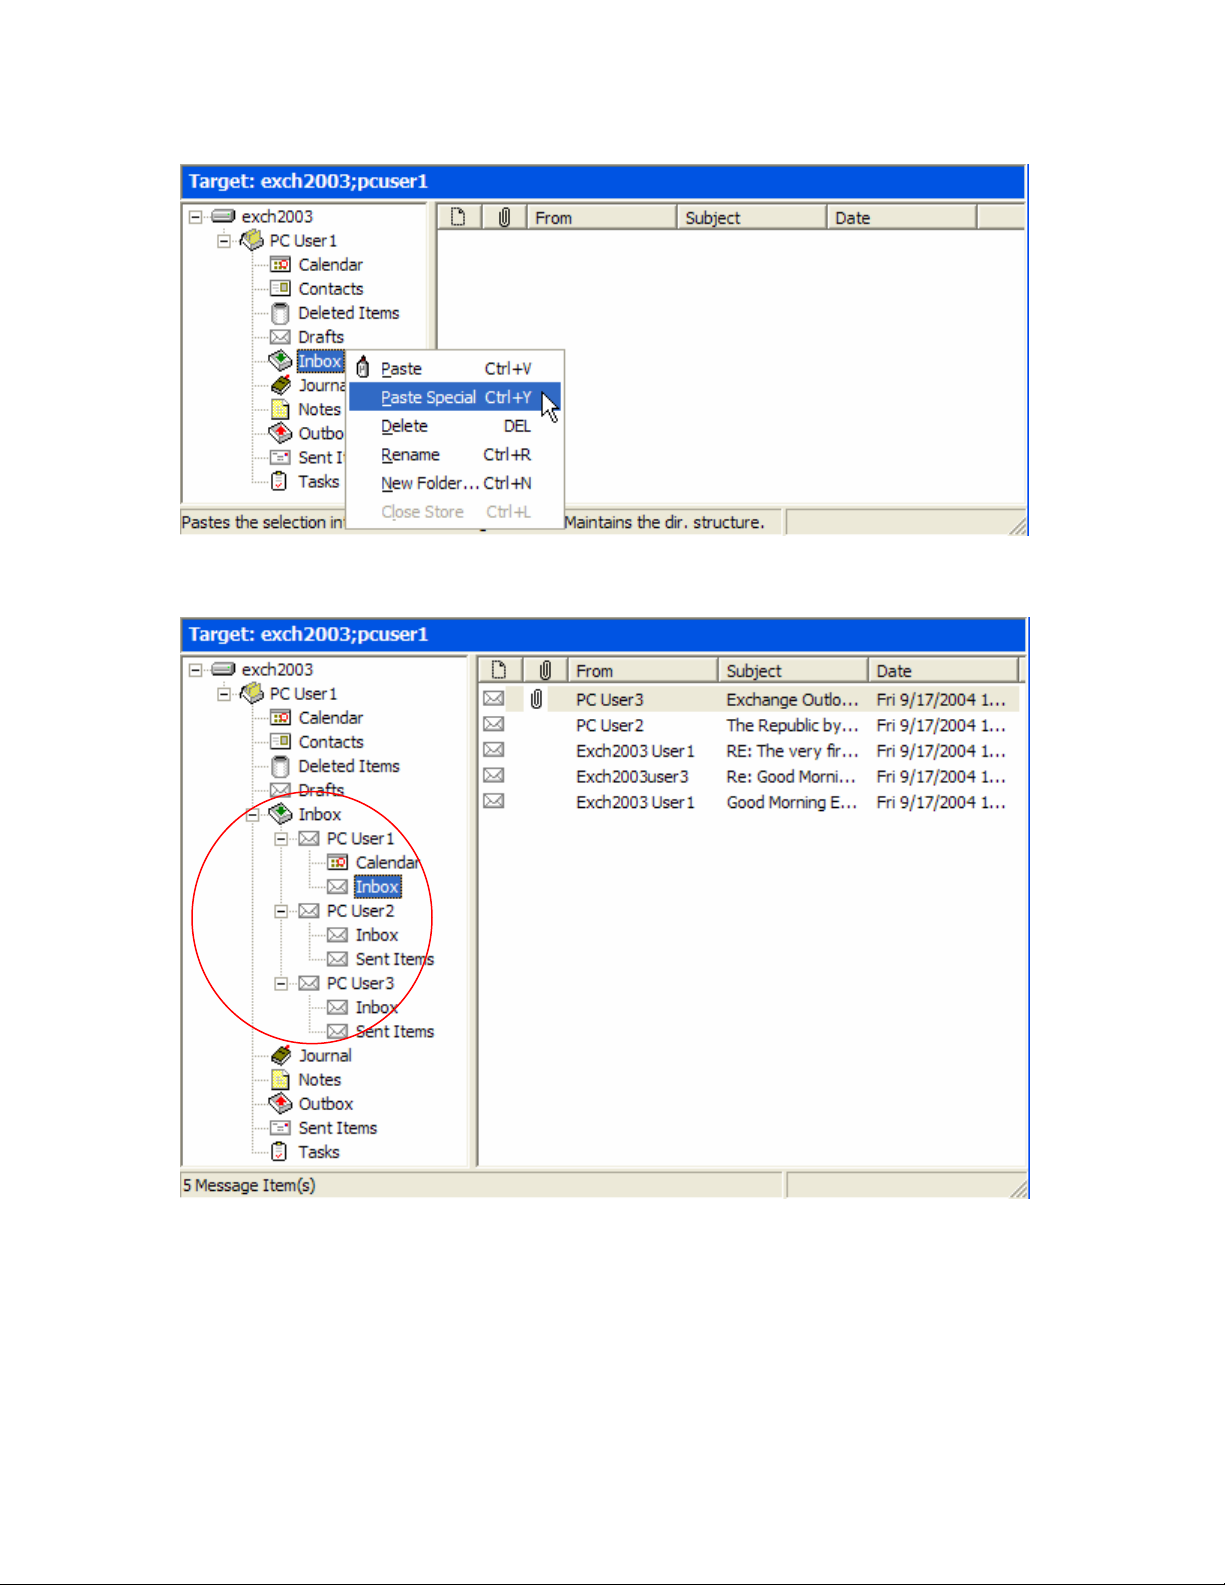
Ontrack® PowerControls™ 3.0 User Guide
Example 5: Using Paste Special on a target Exchange folder (e.g., Inbox)
Example 5: Results of using Paste Special on a target Exchange folder (e.g., Inbox)
79
Page 87
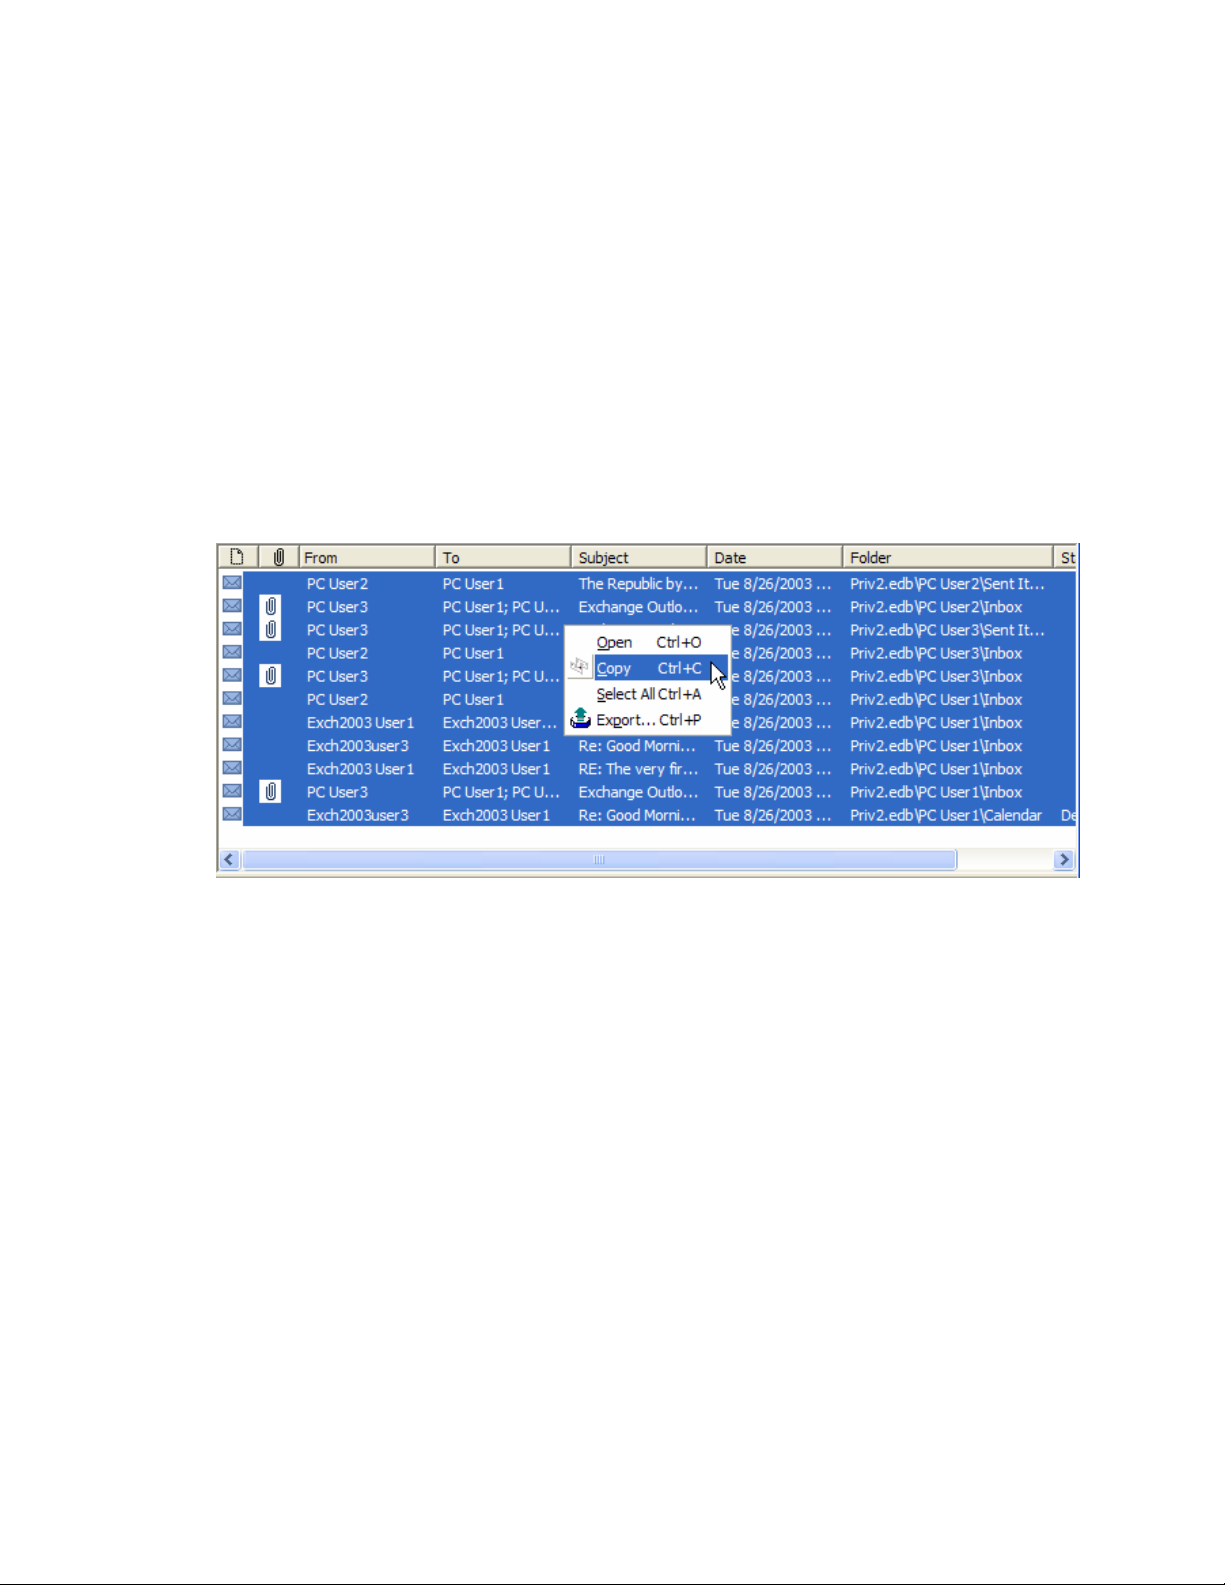
Chapter 6: Restoring Exchange Data
To restore messages to an Exchange server root node with Paste Special
If the target is an Exchange Server root node, PowerControls will attempt to connect to each mailbox one at
a time and copy each message to its corresponding mailbox and folder. If the folder does not exist, it will
be created. If the mailbox does not exist, PowerControls will log an error in the Copy Progress dialog box,
skip the entire mailbox, and continue the Paste Special operation.
Important Note: The source mailbox must exist on the target Exchange server, and you must have full
mailbox access rights to all of the Exchange mailboxes you are trying to restore messages to. For more
information on access rights, see “About Restoring Messages to an Exchange Server” on page 68.
1. Select one or more messages from the message list in the Find dialog box or the Source pane.
2. In the Source pane or Find dialog box, copy messages from the message list.
In this example, messages from three different mailboxes (PC User 1, PC User 2, and PC User 3) are
copied from the message list in the Find dialog box.
Copying messages from the Find dialog box
3. In the Target pane, use Paste Special to paste the messages into an Exchange Server root node.
4. In the Copy Progress dialog box, verify your results to make sure that your messages from all
mailboxes were copied to the target destination. You can also print or save the copy report by doing
one of the following.
• Click Print to print the copy report.
• Click Save to save the copy report as a text file.
5. In the Copy Progress dialog box, click Close to return to the PowerControls main window.
80
Page 88
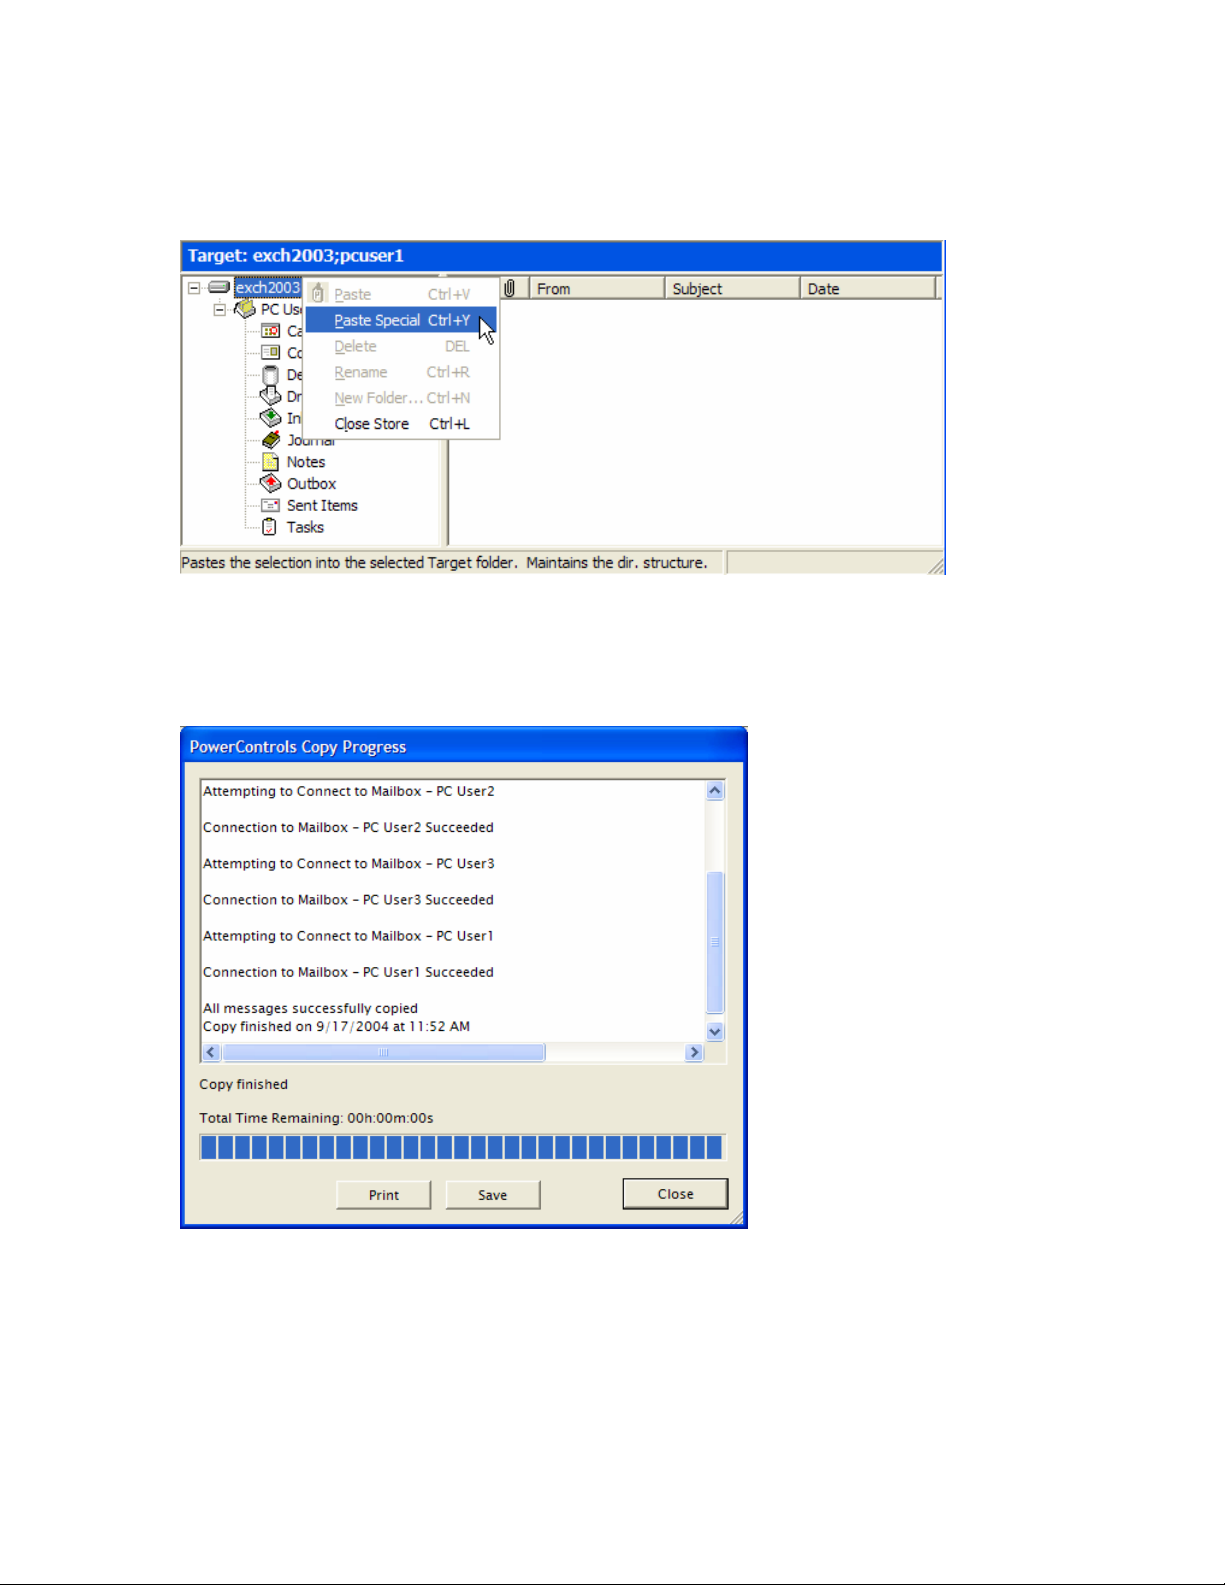
Ontrack® PowerControls™ 3.0 User Guide
Results of Restoring Messages to an Exchange Server Root Node with Paste Special
All unduplicated messages will be restored in each mailbox that PowerControls can connect to, and the
directory structure of the messages will be preserved.
Example 6: Using Paste Special on a target Exchange server root node
When attempting to restore multiple mailboxes to an Exchange server root node, you must look at the
Copy Progress dialog box to verify that your messages from all mailboxes were successfully copied to the
Exchange server. That’s because PowerControls displays only one mailbox at a time in the Target pane.
Example 6: The Copy Progress dialog box reports that PowerControls was able to connect to all mailboxes
and successfully copy all messages to Exchange server
81
Page 89
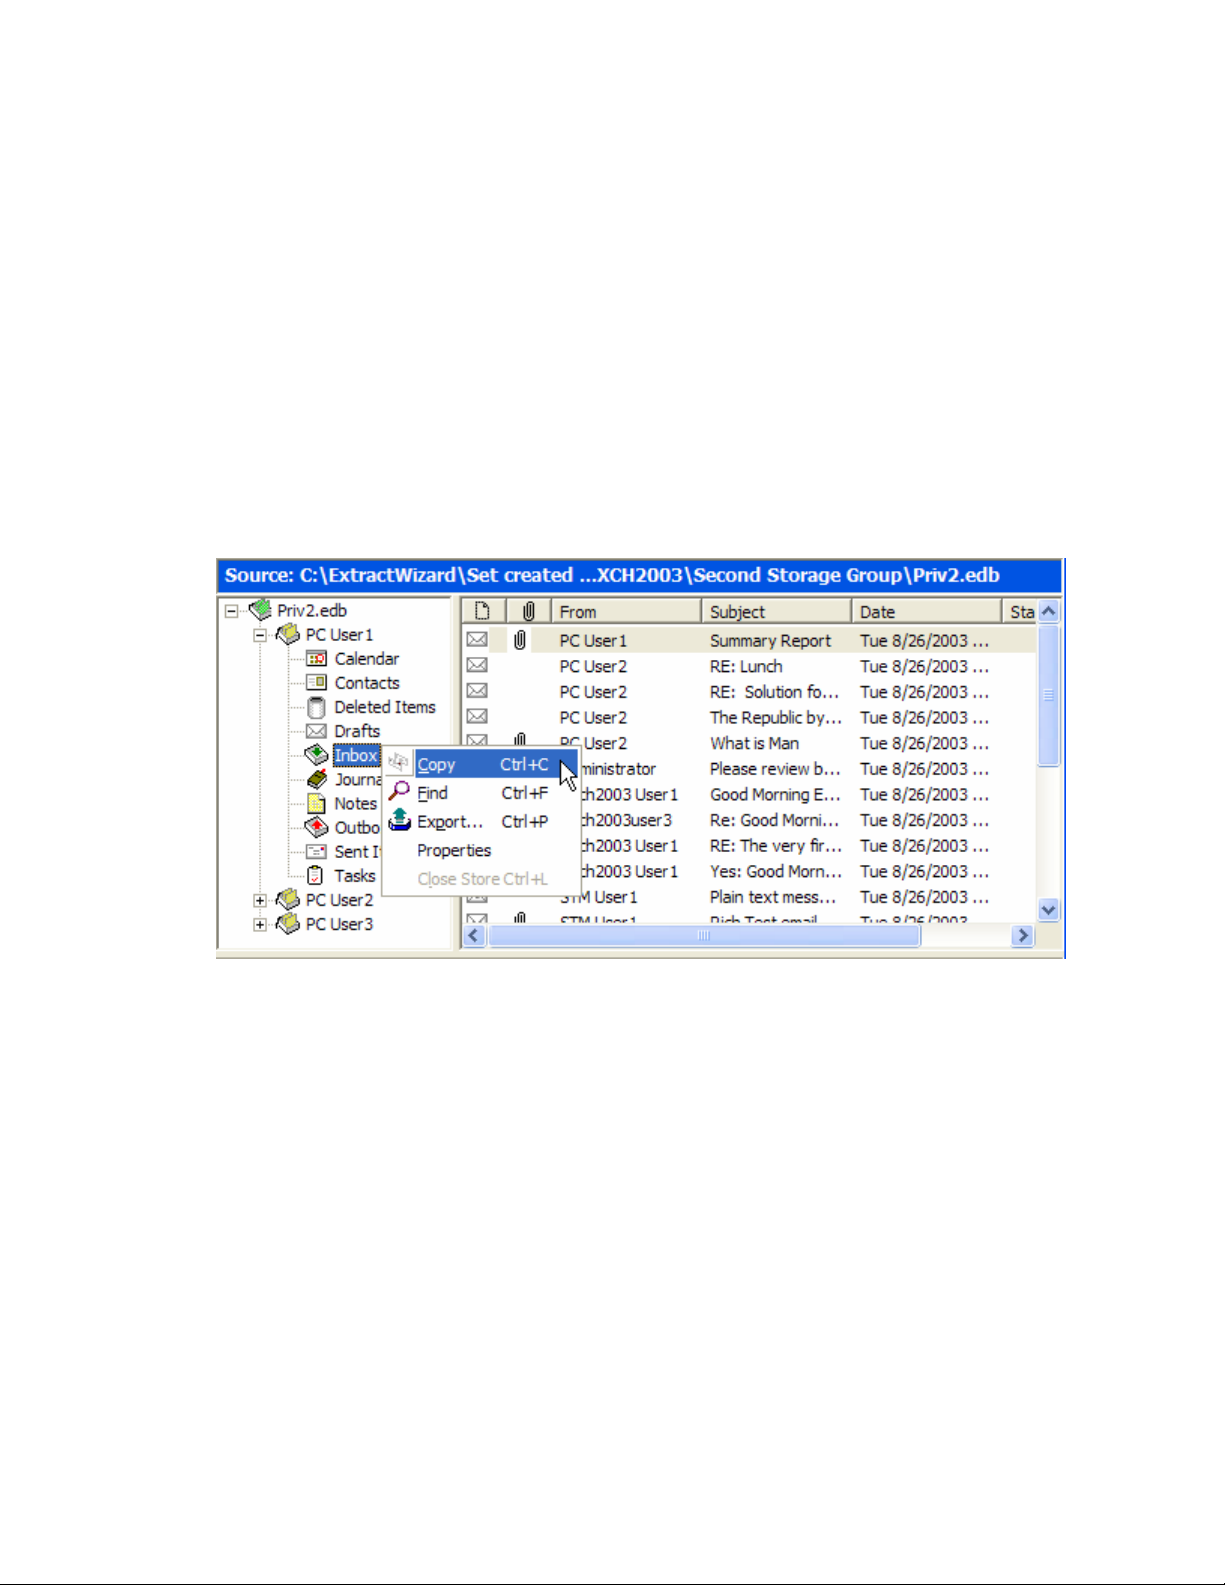
Chapter 6: Restoring Exchange Data
Restoring a Folder
The following instructions show you how to restore a folder to any target destination by using Copy-Paste.
Keep in mind that using Drag-and-Drop achieves the same results.
Guidelines for Restoring a Folder
1. You can use Drag-and-Drop or Copy-Paste to restore a folder to a target PST root node or folder, or
to an Exchange server mailbox or folder. If the folder does not exist, it will be created.
2. You cannot restore a folder to an Exchange server root node.
3. You cannot use the Paste Special command to restore a folder. You can use the Paste Special
command to restore individual messages only.
To restore a folder
1. In the Source pane, copy a folder (e.g., Inbox).
2. In the Target pane, paste the folder into a folder, mailbox, or PST root node.
3. In the Copy Progress dialog box, verify your results to make sure that your messages from all
mailboxes were copied to the target destination. You can also print or save the copy report by doing
one of the following.
• Click Print to print the copy report.
• Click Save to save the copy report as a text file.
4. In the Copy Progress dialog box, click Close to return to the PowerControls main window.
82
Page 90
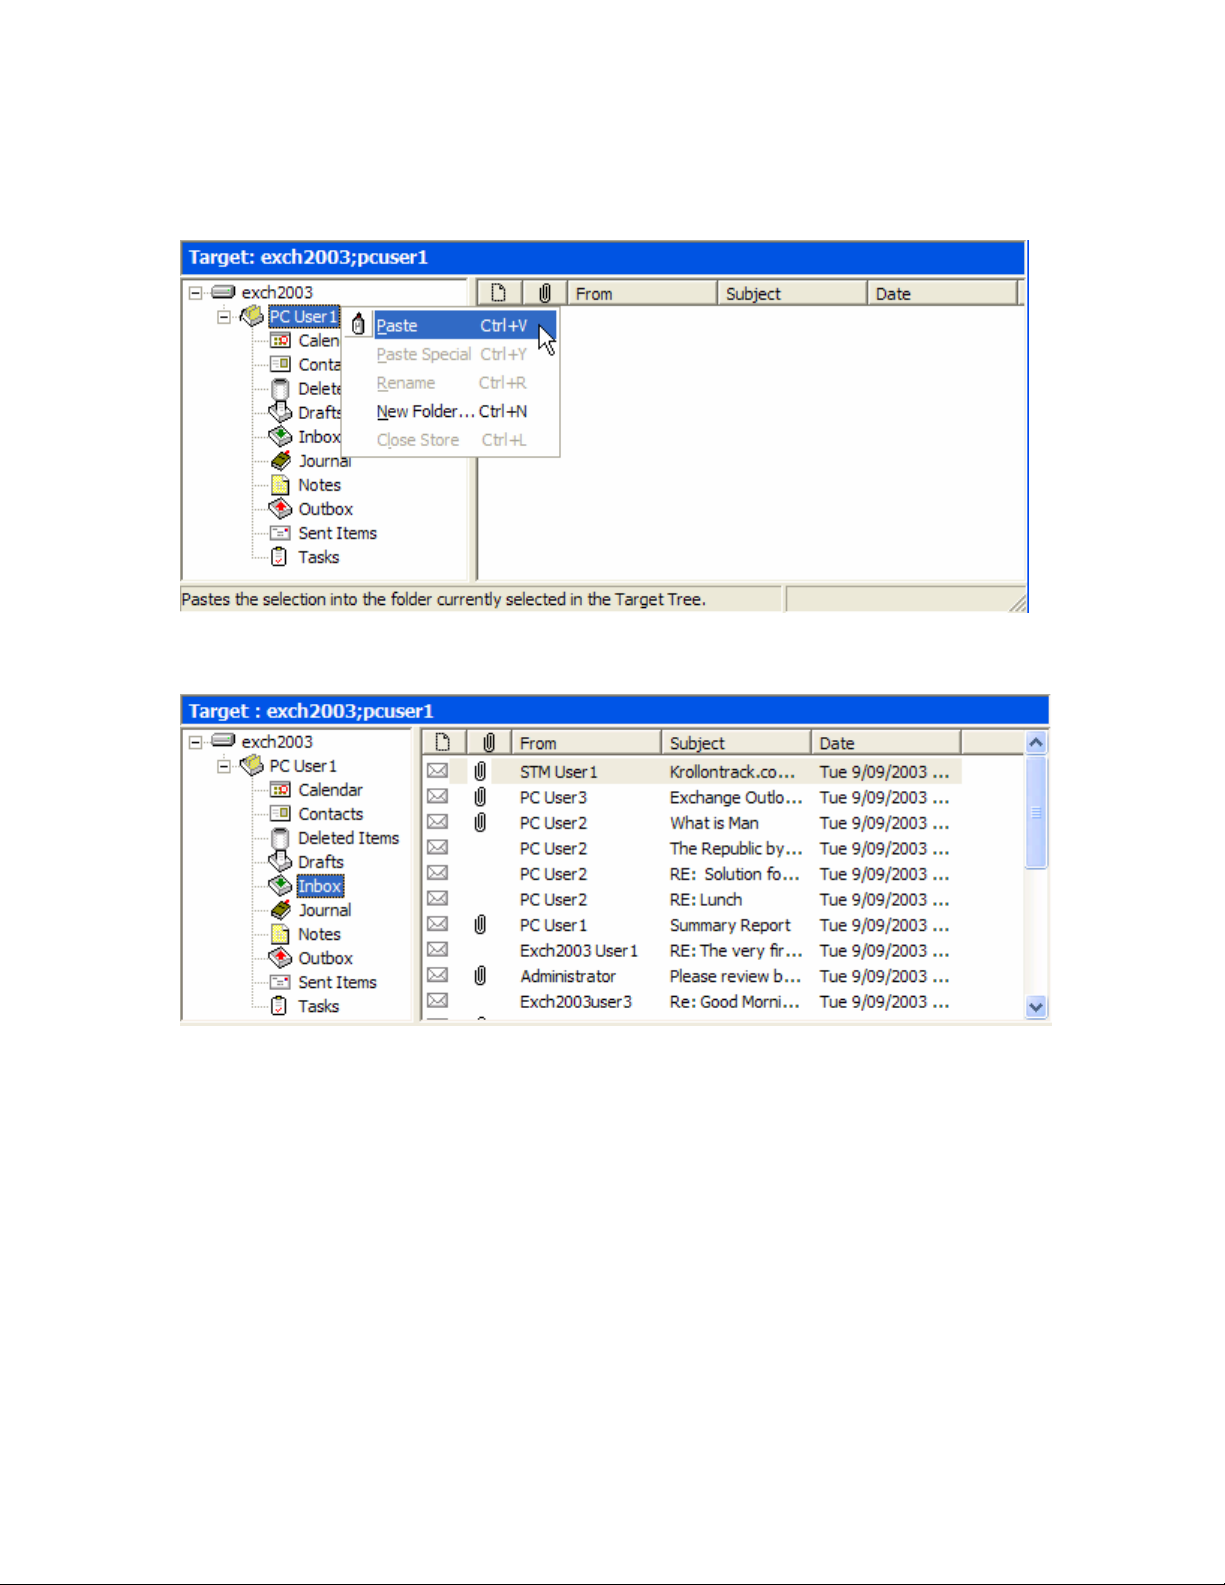
Ontrack® PowerControls™ 3.0 User Guide
Results of Restoring a Folder
All unduplicated messages in the folder will be restored and their directory structure will be preserved.
If the folder does not exist in the target destination, it will be created.
Example 7: Pasting a folder in a target destination (e.g., Exchange mailbox)
Example 7: Results of pasting a folder in a target destination (e.g., Exchange mailbox)
Note: No folder is created because the copied folder (Inbox) already exists in the target Exchange mailbox.
83
Page 91
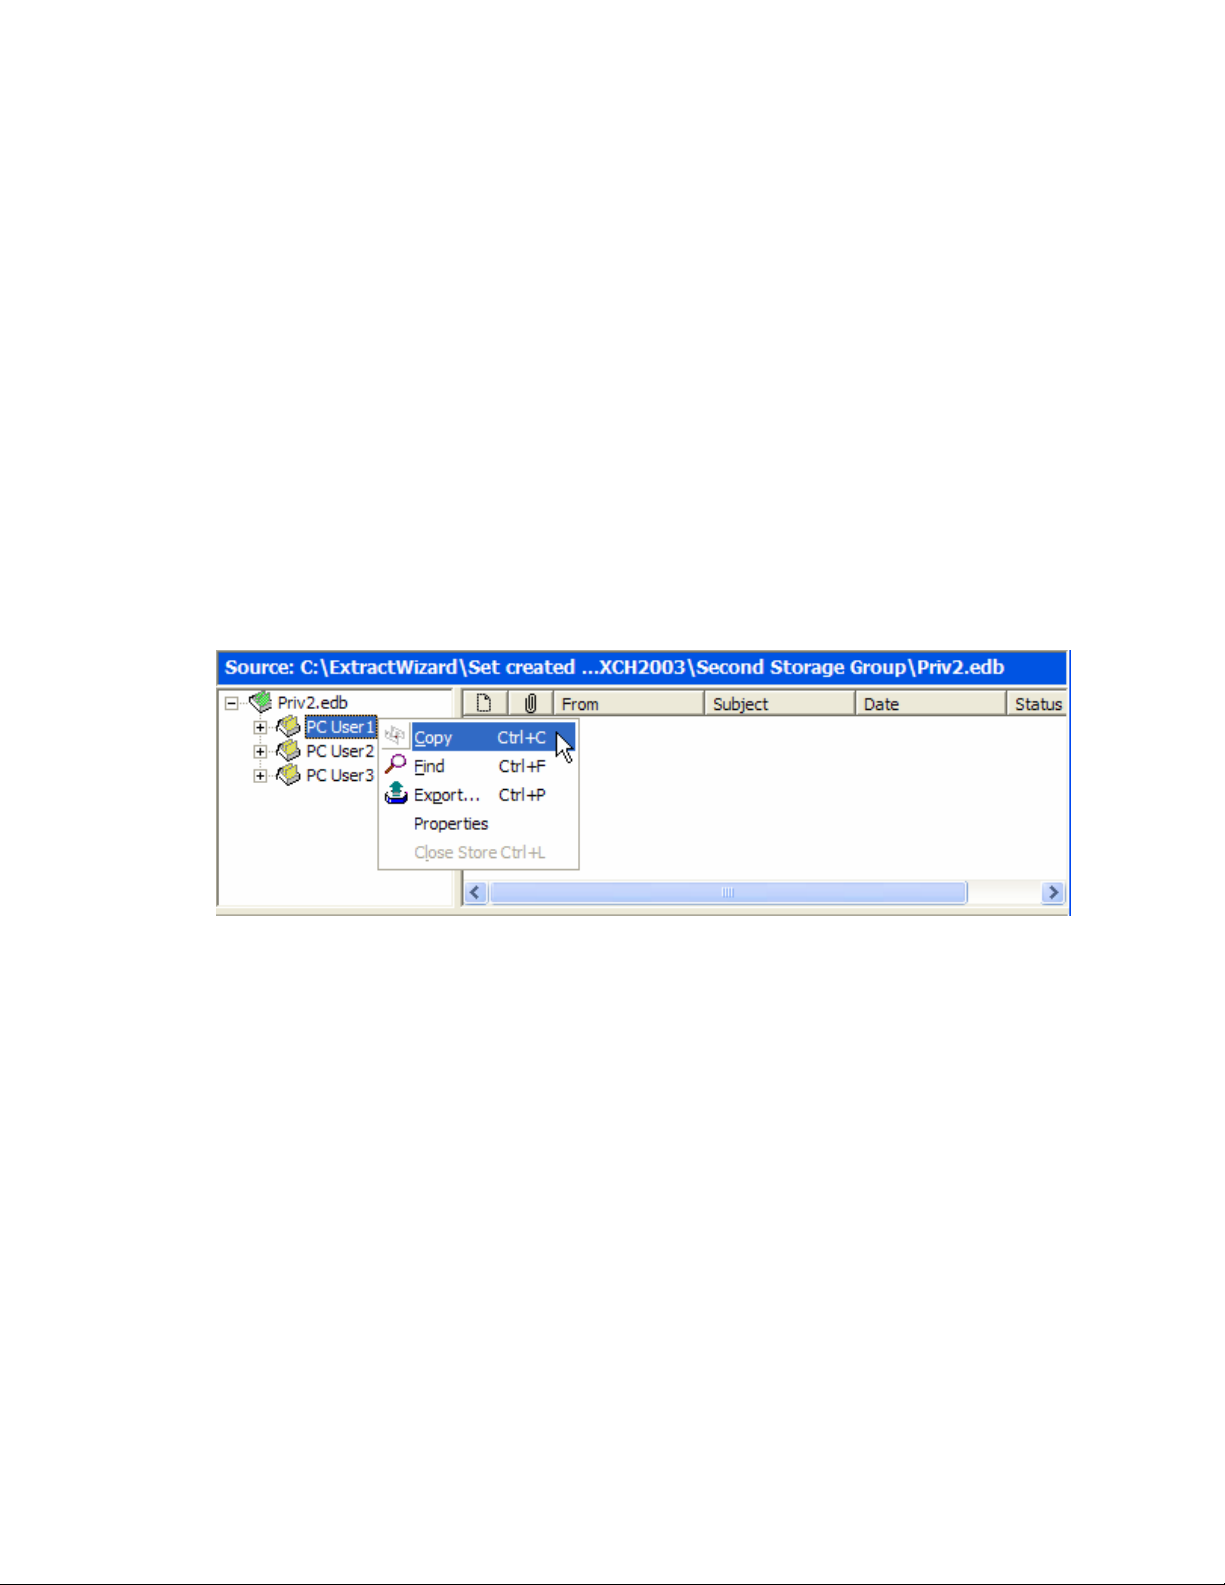
Chapter 6: Restoring Exchange Data
Restoring a Mailbox
The following instructions show you how to restore a mailbox to any target destination by using CopyPaste. Keep in mind that using Drag-and-Drop achieves the same results.
Guidelines for Restoring a Mailbox
1. You can use Drag-and-Drop or Copy-Paste to restore a mailbox to a target PST root node or folder,
or to an Exchange Server root node, mailbox, or folder. If the mailbox does not exist, a folder with its
name will be created.
Important Note: If you want to restore a mailbox to a target Exchange server root node, the source
mailbox must exist on the target Exchange server, and you must have full mailbox access rights to all
of the Exchange mailboxes you are trying to restore messages to. For more information on access
rights, see “About Restoring Messages to an Exchange Server” on page 68.
2. You cannot use the Paste Special command to restore a mailbox. You can use the Paste Special
command to restore individual messages only.
To restore a mailbox
1. In the Source pane, copy a mailbox (e.g., PC User 1).
2. In the Target pane, paste the mailbox into a folder, mailbox, PST root node, or Exchange server root
node.
3. In the Copy Progress dialog box, verify your results to make sure that your messages from all
mailboxes were copied to the target destination. You can also print or save the copy report by doing
one of the following.
• Click Print to print the copy report.
• Click Save to save the copy report as a text file.
4. In the Copy Progress dialog box, click Close to return to the PowerControls main window.
84
Page 92
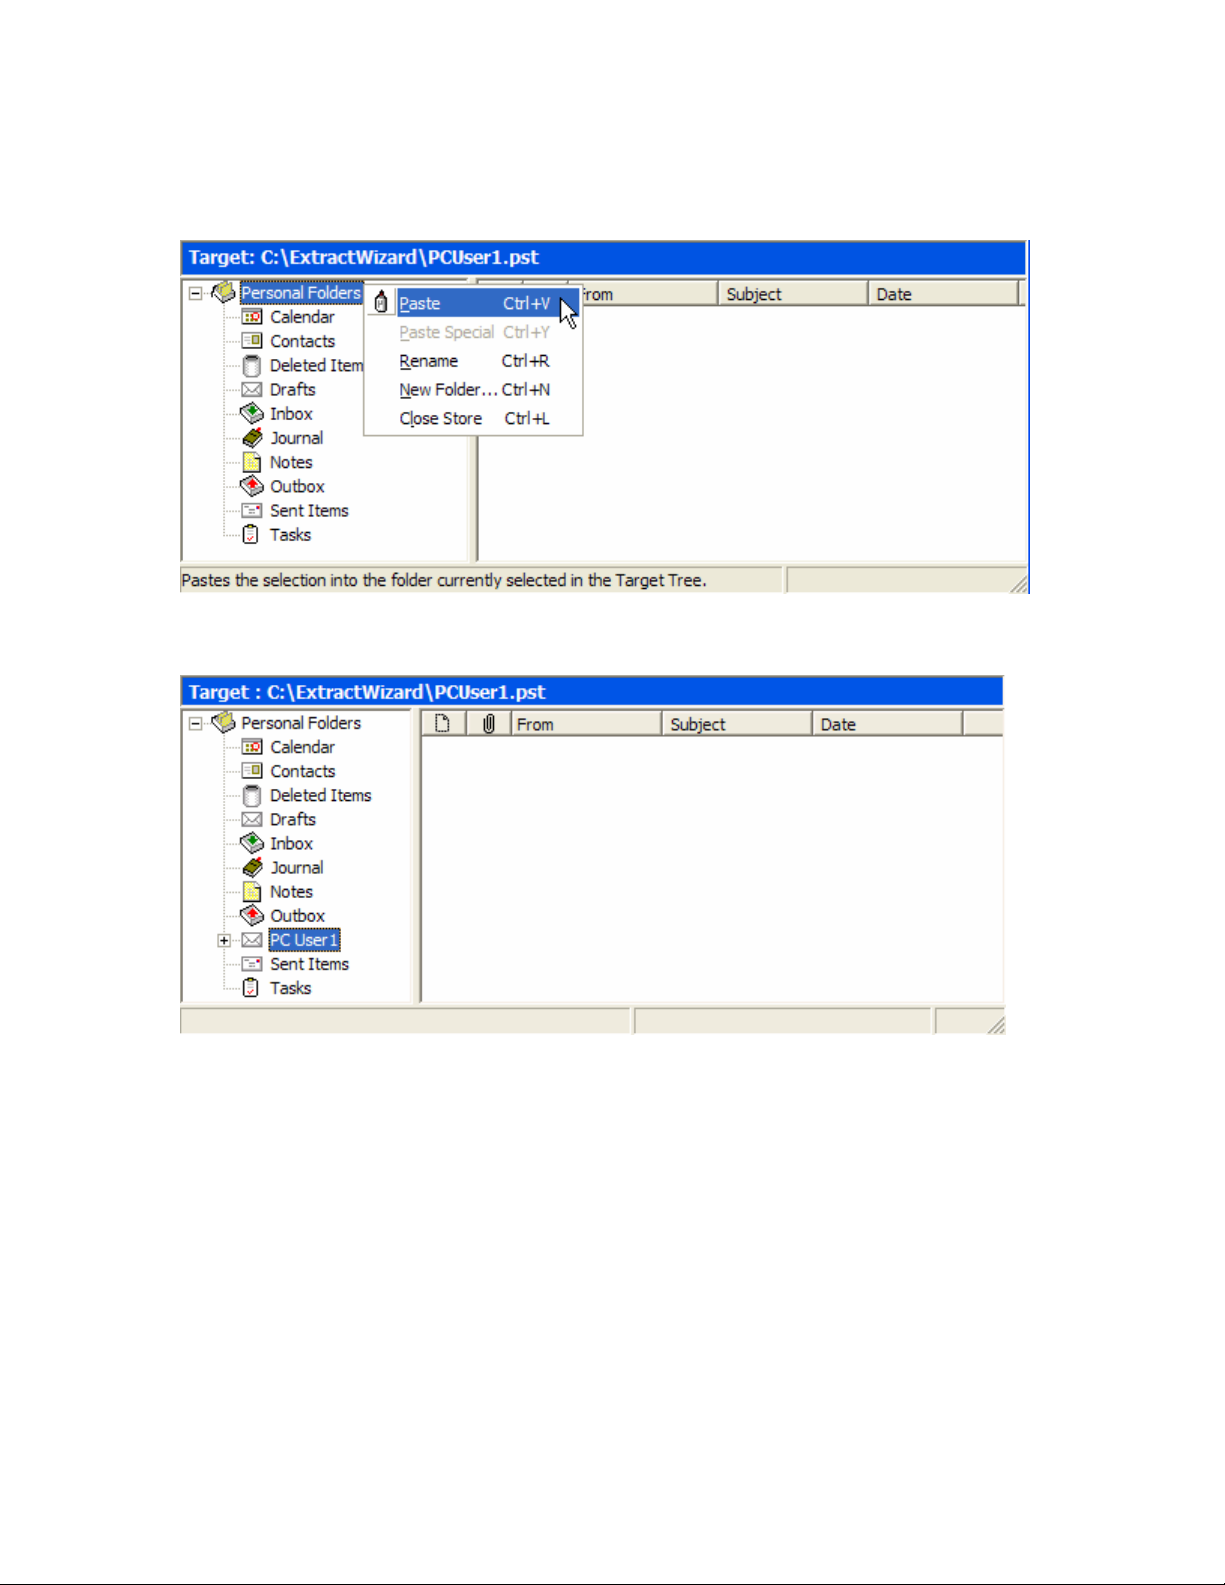
Ontrack® PowerControls™ 3.0 User Guide
Results of restoring a mailbox
All unduplicated messages in the folder will be restored and their directory structure will be preserved.
If the mailbox does not exist in the target destination, it will be created.
Example 8: Pasting a mailbox into a PST root node
Example 8: Results of pasting a mailbox into a PST root node
Note: A folder is created because the copied mailbox (PC User 1) does not exist in the target PST file
85
Page 93

Chapter 6: Restoring Exchange Data
Restoring an EDB File
The following instructions show you how to restore an entire EDB file to any target destination with CopyPaste. Keep in mind that using Drag-and-Drop achieves the same results.
Guidelines for Restoring an EDB File
1. It is recommended that you restore an EDB file to a target Exchange Server root node.
2. You can use Drag-and-Drop or Copy-Paste to restore an entire EDB file. You cannot use the Paste
Special command to restore an EDB file. You can use the Paste Special command to restore individual
messages only.
Important Note: If you restore an EDB file to a target Exchange server root node, the source mailbox must
exist on the target Exchange server, and you must have full mailbox access rights to all of the Exchange
mailboxes you are trying to restore messages to. For more information on access rights, see “About
Restoring Messages to an Exchange Server” on page 68.
To restore an EDB file
1. In the Source pane, select the EDB file.
2. On the Edit menu, click Copy.
3. In the Target pane, select the Exchange Server root node.
4. On the Edit menu, click Paste.
5. In the Copy Progress dialog box, review your results to make sure all the messages were copied to the
target destination. You can also print or save the copy report by doing one of the following.
• Click Print to print the copy report.
• Click Save to save the copy report as a text file.
6. In the Copy Progress dialog box, click Close to return to the PowerControls main window.
Results of restoring an EDB file
PowerControls will attempt to connect to each mailbox in the Target pane one at a time and copy each
message to its corresponding mailbox and folder. If the folder does not exist, it will be created. If the
mailbox does not exist, PowerControls will log an error in the Copy Progress dialog box, skip the entire
mailbox, and continue the operation.
86
Page 94

Chapter 7: Using the Command Line
The command line feature allows you to easily batch repetitive processes such as multiple copy and export
tasks without initiating the PowerControls user interface. This feature is extremely beneficial in
PowerControls production environment implementations.
Command Line Syntax
The syntax is as follows:
<< >> Required for all operations
< > Required for copy/export operations
[ ] Optional
Command Line Syntax
PowerControls <<Operation>> [Operation options] <<Source Store>> [Source options] <Source Folder
Path> <Target Store> <Target Folder Path>
<Operation>
-Copy
-Export
-List (report information about the database)
[Operation options]
-f <format>
format:
:msg – messages will be exported as .msg (.msg is the default)
:txt – message will be exported as .txt
-r
export/copy subfolders
-o <filename>
name of file to output progress information to default is CON
Note: If the file exists, PowerControls will append to the output progress file. If the file does not
exist, PowerControls will create it.
-v verbose
<Source Store>
Full path of EDB file or PST file
[Source options]
-l <Log file path>
-t <Temp file path>
< Source Folder Path >
full path, including mailbox to the source folder to be copied/exported or $ROOT for root
datastore folder
87
Page 95

Chapter 7: Using the Command Line
<Target Store>
ServerName;mailbox or Full path of PST
Ex. Pcpdc;jJones
Pcpdc;hJohnson
C:\archive.pst
Note: The Target Store is not needed for export.
<Target Folder Path>
Full path, including mailbox to the target folder to be copied/exported to or $ROOT for root
datastore folder
Note: Only message containers (i.e., mailboxes, folders, entire edb) can be selected for copy/export.
All messages contained will be copied/exported. Individual messages can not be selected from the
command line.
Examples of Using the Command Line
The following examples are for copy, export, and list (i.e., report information about the database).
Example 1: Copy pcuser1’s inbox and all subfolders from c:\pcdata.edb to the inbox in c:\target.pst.
c:\out1.txt will contain the copy report.
powercontrols -copy -r -o c:\out1.txt c:\pcdata.edb -t c:\ pcuser1\inbox c:\target.pst $ROOT
<Operation> Explanation
-copy Perform a copy operation
[Operation options] Explanation
-r copy subfolders
-o c:\out1.txt output report file name
<Source Store> Explanation
c:\pcdata.edb path to the database file name
[Source options] Explanation
-t c:\ temporary file path
<Source Folder Path> Explanation
pcuser1\inbox source folder to copy
<Target Store> Explanation
c:\target.pst target data store
<Target Folder Path> Explanation
$ROOT copy to the root folder of the data store
88
Page 96

Ontrack® PowerControls™ 3.0 User Guide
Example 2: Copy pcuser1’s inbox and all subfolders from c:\pcdata.edb to user1’s inbox on exchange
server pcpdc. c:\out1.txt will contain the copy report.
powercontrols -copy -r -o c:\out2.txt c:\pcdata.edb -t c:\ pcuser1\inbox pcpdc;user1 inbox
<Operation> Explanation
-copy perform a copy operation
[Operation options] Explanation
-r copy subfolders
-o c:\out2.txt output report file name
<Source Store> Explanation
c:\pcdata.edb path to the database file name
[Source options] Explanation
-t c:\ temporary file path
<Source Folder Path> Explanation
pcuser1\inbox source folder to copy
<Target Store> Explanation
pcpdc;user1 target data store (Exchange server name and logon ID)
<Target Folder Path> Explanation
inbox copy to the inbox
Example 3: Export pcuser1’s mailbox and all subfolders from pcdata.edb as text to c:\export
powercontrols -export -r -f:txt -o c:\out3.txt c:\pcdata.edb -t c:\ pcuser1 c:\export
<Operation> Explanation
-export perform an export operation
[Operation options] Explanation
-r export subfolders
-f:txt messages will be exported as .txt
-o c:\out3.txt export report file name
<Source Store> Explanation
c:\pcdata.edb path to the database file name
89
Page 97

Chapter 7: Using the Command Line
[Source options] Explanation
-t c:\ temporary file path
<Source Folder Path> Explanation
pcuser1 source folder to copy
<Target Store> Explanation
NA target data store
<Target Folder Path> Explanation
c:\export Root folder of the export
Example 4: Provides information on the databases including a list of mailboxes.
powercontrols –list –o c:\mblist.txt c:\priv1.edb
<Operation> Explanation
-list perform a list operation
[Operation options] Explanation
-o c:\mblist.txt output report file name
<Source Store> Explanation
c:\priv1.edb path to the database file name
Important Notes:
• All paths with spaces need to be in quotes.
• If a PST does not exist in the target, PowerControls will create a PST file compatible with Outlook 97,
98, 2000, and 2002.
90
Page 98

Index
A
attachments
opening, 31
opening and saving in Find dialog box, 60
saving, 31
searching for, 58
C
Catalog Performance Options, 13
Catalog Progress page of the ExtractWizard, 14
CHK file, 21
clearing fields and results, 60
closing sources and targets, 53
Command Line
examples, 88
syntax, 87
completing
the Data Wizard, 47
the ExtractWizard, 25
Computer Associates BrightStor ARCserve, 17
configuring Microsoft Outlook, 3
Connect to Exchange Server dialog box, 51
continue loading EDB file without logs, 46
conventions in this manual
menu commands and shortcuts, 6
notes and tips, 6
shortcut menu, 6
copy backup, 20
Copy Progress dialog box, 69
copying and pasting, 71
Create New Mail Folder dialog box, 70
Create New Target PST command, 50
creating a new folder in the Target pane, 70
D
Data Wizard
Completing the Data Wizard, 47
Now Processing Data File, 46
returning to, 48
Source Path Selection, 42
Target Type and Path Selection, 44
Welcome page, 41
deleting a folder in the Target pane, 70
differential backup, 20
displaying a message in the preview pane, 30
dragging and dropping, 71
E
EasyUpdate, 4, See also updating PowerControls
EDB file
about restoring to an Exchange server, 68
exporting, 62
guidelines for selecting, 43
in Source pane, 27, 48
restoring a folder, 82
restoring a mailbox, 84
restoring an entire EDB file, 86
restoring in three easy steps, 67
restoring messages with Copy-Paste, 72
restoring messages with Paste Special, 74
searching for messages, 56
Enter Password dialog box, 45, 51
Exchange database. See also EDB file
about, 10
guidelines for selecting, 43
Exchange Information Store File Selection, 15
Completing the Exchange Information Store
Selection, 23
Restoring an Online or Offline Backup, 16
Saving an ExtractWizard Catalog File, 22
Viewing an Exchange Backup, 15
Exchange server
opening a target, 51
specifying as target for restored data, 45
exporting
a PST file, mailbox or folder, 62
an EDB file, 62
individual messages, 64
individual messages from the Find dialog box, 65
messages from the Find dialog box, 60
exporting messages
about MSG and TXT files, 61
about the Export Progress dialog box, 65
general information, 61, 62
Extract from Disk option, 12
Extract from Tape option, 12
ExtractWizard
Catalog Performance Options, 13
Catalog Progress, 14
enabling license agent for, 8
Exchange Information Store Copy Progress, 24
Exchange Information Store Destination Folder, 23
Exchange Information Store Selection, 15
organizing the extracted files for PowerControls, 25
PowerControls ExtractWizard Finished, 25
restoring a backup from Exchange 5.5 vs. Exchange
2000/2003, 22
restoring a full offline backup, 21
restoring a full online backup, 16
restoring an online copy backup, 20
restoring the last full online and every incremental
backup, 19
restoring the last full online and last differential
backup, 20
Saving an ExtractWizard Catalog File, 22
Select the Exchange Information Store Extraction
Source, 12
Use ExtractWizard Catalog, 12
91
Page 99

Index
Welcome page, 11
F
Find dialog box
exporting messages from the Find dialog box, 60
guidelines for using, 55
opening and saving attachments, 60
restoring messages, 60
searching for attachments, 58
searching within results, 59
selecting multiple mailboxes or folders to search,
56
viewing previous results, 60
Free edition of PowerControls, 7
G
guidelines
for restoring a folder, 82
for restoring a mailbox, 84
for restoring an EDB file, 86
for restoring messages, 72
for restoring messages with Paste Special, 74
for selecting an Exchange database, 43
for using the Find dialog box, 55
H
Help
online Help, 5
technical support, 5
hiding the preview pane, 30
hiding the toolbar or status bar, 32
I
incremental backup, 19
installing PowerControls, 4
L
LEGATO NetWorker, 18
License .ini file, 9
License Agents for PowerControls, 8
log file error, 46
log files
organizing the Exchange database files for
PowerControls, 10
organizing the extracted files for PowerControls, 25
restoring an online or offline backup, 16
viewing an Exchange backup, 15
M
mailbox or folder
exporting, 62
menu bar, 29
messages
exporting, 61, 64
Microsoft NT Backup, 15, 16, 19
N
Now Processing Data File, 46
O
offline backup, 21
online backup, 16
online Help, 5
Open Existing Target PST command, 50
Open Source command, 49
Open Target Exchange Server command, 51
opening
a target Exchange Server, 51
an Exchange database (EDB) file or PST file, 49
an existing target PST, 50
attachments, 31
attachments in Find dialog box, 60
messages, 30
multiple sources, 52
the Data Wizard, 48
the ExtractWizard, 11
the preview pane, 30
the source database and target mailboxes, 49
organizing the Exchange database files for
PowerControls, 10
organizing the extracted files for PowerControls, 25
P
PAT (patch) file, 22
PowerControls
configuring Microsoft Outlook for, 3
editions of, 7
enhancements, 2
five reasons for using, 1
getting help, 5
installing, 4
preferences, 37
system requirements, 3
uninstalling, 4
updating, 4
PowerControls Data Wizard. See Data Wizard
PowerControls editions, 7
PowerControls ExtractWizard. See ExtractWizard
PowerControls license agents, 8
PowerControls main window
after using the Data Wizard, 48
illustration of, 26
menu bar, 29
Source message list, 27
Source pane, 27
status bar, 30
Target message list, 28
Target pane, 28
toolbar, 29
preferences, 37
preview pane
displaying a message in, 30
92
Page 100

Ontrack® PowerControls™ 3.0 User Guide
hiding, 30
opening, 30
opening attachments in, 31
saving attachments in, 32
previewing and opening messages, 30
properties of a PST file, EDB file, mailbox, or folder,
35
PST and folder limits, 68
PST file
as displayed in Target pane, 28
creating a new target, 50
exporting, 62
in Source pane, 48
opening an existing target, 50
restoring in three easy steps, 67
searching for messages, 56
specifying as target for restored data, 44
R
refreshing the screen, 34
renaming a folder in the Target pane, 70
resizing panes separated by a split bar, 32
restoring backup Exchange data with ExtractWizard
restoring a backup from Exchange 5.5 vs. Exchange
2000/2003, 22
restoring a full offline backup, 21
restoring a full online backup, 16
restoring an online copy backup, 20
restoring the last full online and every incremental
backup, 19
restoring the last full online and last differential
backup, 20
restoring Exchange data
looking at the Target pane, 28
restoring Exchange data to a PST file
about the Copy Progress dialog box, 69
looking at the Target message list, 28
restoring a folder, 82
restoring a folder, a mailbox, or an EDB file, 67
restoring a mailbox, 84
restoring an EDB file, 86
restoring individual messages with Copy-Paste, 67,
72
restoring individual messages with Paste Special,
67, 74
restoring Exchange data to an Exchange server
about the Copy Progress dialog box, 69
restoring a folder, 82
restoring a folder, a mailbox, or an EDB file, 67
restoring a mailbox, 84
restoring an EDB file, 86
restoring an Exchange server mailbox or folder
with Copy-Paste, 77
restoring individual messages to an Exchange
server root node with Paste Special, 80
restoring individual messages with Copy-Paste, 67,
72
restoring individual messages with Paste Special,
67, 75
restoring messages to Exchange 2000/2003, 68
restoring messages to Exchange 5.5, 68
restoring messages from the Find dialog box, 60
restoring your Exchange data in three easy steps, 67
S
Save ExtractWizard Catalog File, 22
saving
attachments, 31
attachments in Find dialog box, 60
searching
for attachments, 58
searching
for messages, 56
searching
within results, 59
Select the Exchange Information Store Extraction
Source, 12
selecting Exchange files you want to restore, 16
sorting messages in the message list, 32, 34
Source
EDB or PST file, 27
message list, 27
pane, 27
source file
opening, 49
Source Path Selection, 42
split bar, using to resize panes, 32
status bar, 30
viewing or hiding, 32
STM file, 22
system requirements, 3
T
Target message list, 28
Target pane
creating a new folder, 70
deleting a folder, 70
in PowerControls main window, 28
renaming a folder, 70
Target Type and Path Selection, 44
technical support, 5
toolbar
in PowerControls main window, 29
viewing or hiding, 32
U
uninstalling PowerControls, 4
updating PowerControls, 4
Use ExtractWizard Catalog option, 12
Use Wizard command, 48
V
viewing
deleted messages, 37
previous search results, 60
the properties of a PST file, EDB file, folder, or
mailbox, 35
the toolbar or status bar, 32
93
 Loading...