

Page 1

LS-T30
TV Speaker System
Control Reference Guide........... 4
Placement ................................. 7
Instruction Manual
Thank you for purchasing an Onkyo product. Please read this
manual thoroughly before making connections and plugging in
your new Onkyo product.
Following the instructions in this manual will enable you to
obtain optimum performance and listening enjoyment from your
new product.
Please retain this manual for future reference.
Connecting to a TV....................8
Listening to TV .......................... 9
Using a
TV Remote Controller.............. 11
Playing via
Bluetooth Connection ..............12
Troubleshooting.......................13
Supplied Accessories ..............15
Page 2
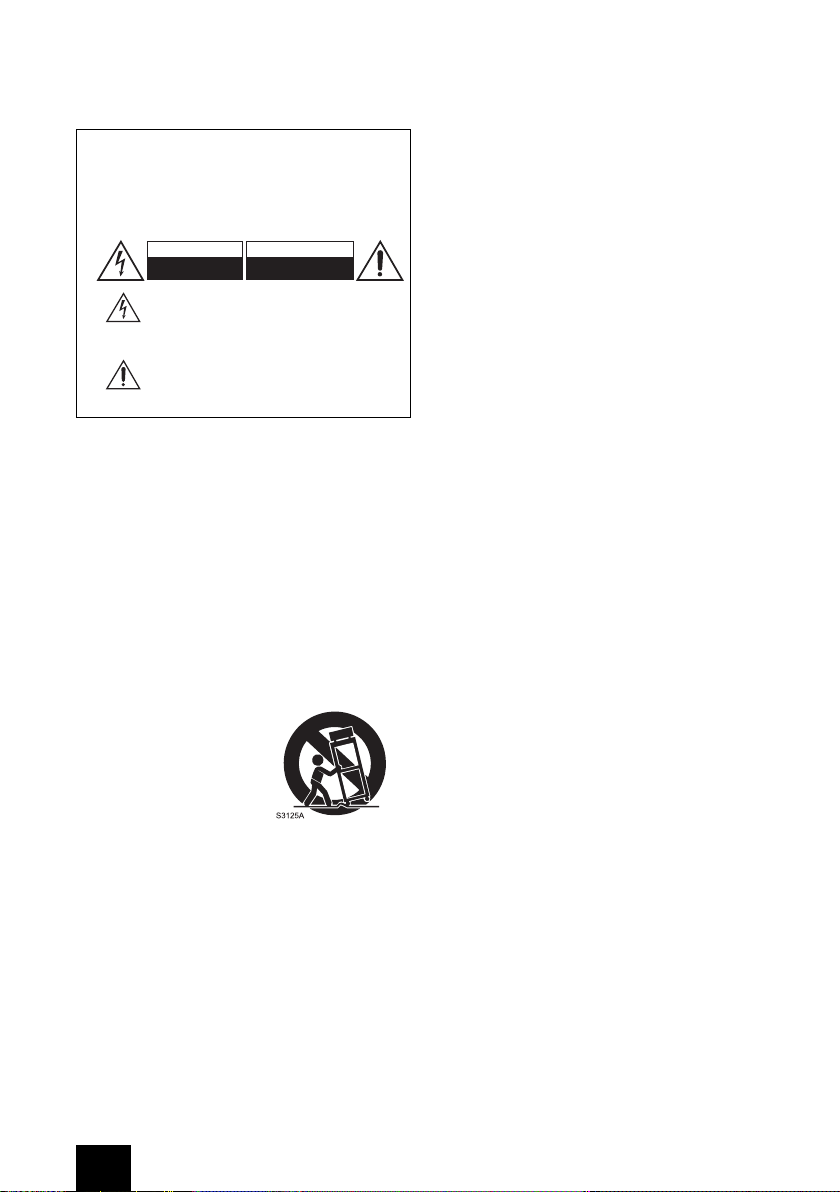
Safety precautions
PORTABLE CART WAR NING
WARNING:
TO REDUCE TH E RISK OF FIRE OR ELEC TRIC SHOCK, DO NOT
EXPOSE THIS APPARATUS TO RA IN OR MOISTURE.
CAUTION:
TO REDUCE THE RISK OF ELECTRIC SHOCK, DO NOT REMOVE
COVER (O R BACK). NO USE R-SERVICEAB LE PARTS IN SIDE.
REFER S ERVICING TO QUALIFIED SERVICE PER SONNEL.
Important Safety Inst ructions
1 Read these instructions.
2 Keep these instructions.
3 Heed all warnings.
4 Follow all instructions.
5 Do not use this apparatus near water.
6 Clean only with dry cloth.
7 Do not block any ventilation openings. Install in accordance with the
manufacturer’s instructions.
8 Do not install near any heat sources such as radiators, heat
registers, stoves, or other apparatus (including amplifiers) that
produce heat.
9 Do not defeat the safety purpose of the polarized or grounding-type
plug. A polarized plug has two blades with one wider than the other.
A grounding type plug has two blades and a third grounding prong.
The wide blade or the third prong are provided for your safety. If the
provided plug does not fit into your outlet, consult an electrician for
replacement of the obsolete outlet.
10 Protect the power cord from being walked on or pinched particularly
at plugs, convenience receptacles, and the point where they exit
from the apparatus.
11 Only use attachments/accessories specified by the manufacturer.
12 Use only with the cart,
stand, tripod, bracket, or
table specified by the
manufacturer, or sold with
the apparatus. When a cart
is used, use caution when
moving the cart/apparatus
combination to avoid injury
from tip-over.
13 Unplug this apparatus
during lightning storms or
when unused for long
periods of time.
14 Refer all servicing to
qualified service personnel. Servicing is required when the
apparatus has been damaged in any way, such as power-supply
cord or plug is damaged, liquid has been spilled or objects have
fallen into the apparatus, the apparatus has been exposed to rain or
moisture, does not operate normally, or has been dropped.
15 Damage Requiring Service Unplug the apparatus from the wall
outlet and refer servicing to qualified service personnel under the
following conditions:
A. When the power-supply cord or plug is damaged,
B. If liquid has been spilled, or objects have fallen into the
apparatus,
C. If the apparatus has been exposed to rain or water,
D. If the apparatus does not operate normally by following the
operating instructions. Adjust only those controls that are
covered by the operating instructions as an improper
adjustment of other controls may result in damage and will often
require extensive work by a qualified technician to restore the
apparatus to its normal operation,
E. If the apparatus has been dropped or damaged in any way, and
F. When the apparatus exhibits a distinct change in performance
this indicates a need for service.
16 Object and Liquid Entry
Never push objects of any kind into the apparatus through openings
as they may touch dangerous voltage points or short-out parts that
WARNING
RISK OF ELECTRIC SHOCK
DO NOT OPEN
The lightning flash with arrowhead symbol, within
an equilateral triangle, is intended to alert the user
to the presence of uninsulated “dangerous voltage”
within the product’s enclosure that may be of
sufficient magnitude to constitute a risk of electric
shock to persons.
The exclamation point within an equilateral triangle
is intended to alert the user to the presence of
important operating and maintenance (servicing)
instructions in the literature accompanying the
appliance.
AVIS
RISQUE DE CHOC ELECTRIQUE
NE PAS OUVRIR
could result in a fire or electric shock. The apparatus shall not be
exposed to dripping or splashing and no objects filled with liquids,
such as vases shall be placed on the apparatus. Don’t put candles or
other burning objects on top of this unit.
17 Batteries
Always consider the environmental issues and follow local
regulations when disposing of batteries.
18 If you install the apparatus in a built-in installation, such as a
bookcase or rack, ensure that there is adequate ventilation. Leave
20 cm (8”) of free space at the top and sides and 10 cm (4”) at the
rear. The rear edge of the s
be set 10 cm (4”) away from the rear panel or wall, creating a
flue-like gap for warm air to escape.
Precautio ns
1 Recording Copyright - Unless it’s for personal use only, recording
copyrighted material is illegal without the permission of the copyright
holder.
2 AC Fuse - The AC fuse inside the unit is not user-serviceable. If you
cannot turn on the unit, contact your Onkyo dealer.
3 Care - Occasionally you should dust the unit all over with a soft cloth.
For stubborn stains, use a soft cloth dampened with a weak solution
of mild detergent and water. Dry the unit immediately afterwards with
a clean cloth. Don’t use abrasive cloths, thinners, alcohol, or other
chemical solvents, because they may damage the finish or remove
the panel lettering.
4 Power
WARNING
BEFORE PLUGGING IN THE UNIT FOR THE FIRST TIME, READ
THE FOLLOWING SECTION CAREFULLY.
AC outlet voltages vary from country to country. Make sure that the
voltage in your area meets the voltage requirements printed on the
unit’s rear panel (e.g., AC 230 V, 50 Hz or AC 120 V, 60 Hz).
The power cord plug is used to disconnect this unit from the AC
power source. Make sure that the plug is readily operable (easily
accessible) at all times. For models with [POWER] button, or with
both [POWER] and [ON/STANDBY] buttons: Pressing the [POWER]
button to select OFF mode does not fully disconnect from the mains.
If you do not intend to use the unit for an extended period, remove
the power cord from the AC outlet. For models with [ON/STANDBY]
button only: Pressing the [ON/STANDBY] button to select Standby
mode does not fully disconnect from the mains. If you do not intend
to use the unit for an extended period, remove the power cord from
the AC outlet.
5 Preventing Hearing Loss
Caution
Excessive sound pressure from earphones and headphones can
cause hearing loss.
6 Batteries and Heat Exposure
Warning
Batteries (battery pack or batteries installed) shall not be exposed to
excessive heat as sunshine, fire or the like.
7 Never Touch this Unit with Wet Hands - Never handle this unit or its
power cord while your hands are wet or damp. If water or any other
liquid gets inside this unit, have it checked by your Onkyo dealer.
8 Handling Notes
≥ If you need to transport this unit, use the original packaging to
pack it how it was when you originally bought it.
≥ Do not leave rubber or plastic items on this unit for a long time,
because they may leave marks on the case.
≥ This unit’s top and rear panels may get warm after prolonged
use. This is normal.
≥ If you do not use this unit for a long time, it may not work properly
the next time you turn it on, so be sure to use it occasionally.
For U.S. a nd Cana dian mode ls
FCC CAUTION
Changes or modifications not expressly approved by the party
responsible for compliance could void the user’s authority to operate the
equipment.
NOTE:
This equipment has been tested and found to comply with the limits for a
Class B digital device, pursuant to part 15 of the FCC Rules. These limits
are designed to provide reasonable protection against harmful
interference in a residential installation. This equipment generates, uses
and can radiate radio frequency energy and, if not installed and used in
accordance with the instructions, may cause harmful interference to radio
communications. However, there is no guarantee that interference will not
occur in a particular installation. If this equipment does cause harmful
interference to radio or television reception, which can be determined by
turning the equipment off and on, the user is encouraged to try to correct
the interference by one or more of the following measures:
helf or board above the apparatus shall
2
Page 3

- Reorient or relocate the receiving antenna.
- Increase the separation between the equipment and receiver.
- Connect the equipment into an outlet on a circuit different from
that to which the receiver is connected.
- Consult the dealer or an experienced radio/TV technician for
help.
This device complies with Industry Canada licenceexempt RSS
standard(s). Operation is subject to the following two conditions: (1) this
device may not cause interference, and (2) this device must accept any
interference, including interference that may cause undesired operation
of the device.
This transmitter must not be co-located or operated in conjunction with
any other antenna or transmitter.
RF Exposure Compliance
This equipment complies with FCC/IC radiation exposure limits set forth
for an uncontrolled environment and meets the FCC radio frequency (RF )
Exposure Guidelines in Supplement C to OET65 and RSS-102 of the IC
radio frequency (RF) Exposure rules. This equipment has very low levels
of RF energy that it deemed to comply without maximum permissive
exposure evaluation (MPE). But it is desirable that it should be installed
and operated keeping the radiator at least 20 cm or more away from
person’s body (excluding extremities: hands, wrists, feet and ankles).
For Can adian Mode ls
NOTE:
CAN ICES-3 B/NMB-3 B
For models having a power cord with a polarized plug:
CAUTION:
TO PREVENT ELECTR IC SHOCK, MATCH WIDE BLADE OF PLUG TO
WIDE SLOT, FULLY INSERT.
This device complies with Industry Canada licence-exempt RSS
standard(s). Operation is subject to the following two conditions: (1) this
device may not cause interference, and (2) this device must accept any
interference, including interference that may cause undesired operation
of the device.
For British models
Replacement and mounting of an AC plug on the power supply cord of
this unit should be performed only by qualified service personnel.
IMPOR TANT
The wires in the mains lead are coloured in accordance with the following
code:
Blue: Neutral
Brown: Live
As the colours of the wires in the mains lead of this apparatus may not
correspond with the coloured markings identifying the terminals in your
plug, proceed as follows: The wire which is coloured blue must be
connected to the terminal which is marked with the letter N or coloured
black. The wire which is coloured brown must be connected to the
terminal which is marked with the letter L or coloured red.
IMPOR TANT
The plug is fitted with an appropriate fuse. If the fuse needs to be
replaced, the replacement fuse must approved by ASTA or BSI to
BS1362 and have the same ampere rating as that indicated on the plug.
Check for the ASTA mark or the BSI mark on the body of the fuse. If the
power cord’s plug is not suitable for your socket outlets, cut it off and fit a
suitable plug. Fit a suitable fuse in the plug.
For European Models
WEEE
http://www.onkyo.com/manual/weee/weee.pdf
Declaration of Conformity
We declare, under our sole responsibility, that this
product complies with the standards:
-Safety
- Limits and methods of measurement of radio
disturbance characteristics
- Limits for harmonic current emissions
- Limitation of voltage changes, voltage fluctuations and flicker
- RoHS Directive, 2011/65/EU
- Hereby, Onkyo Corporation, declares that this LS-T30 is in
compliance with the essential requirements and other relevant
provisions of Directive 1999/5/EC.
Speaker Precautions
Placement
≥ The subwoofer cabinet is made out of wood and is therefore
sensitive to extreme temperatures and humidity, do not put it in
locations subject to direct su nlight or in humid places, such as
near an air conditioner, humidifier, bathroom, or kitchen.
≥ Do not put water or other liquids close to the speakers. If liquid is
spilled over the speakers, the drive units may be damaged.
≥ Speakers should only be placed on sturdy, flat surfaces that are
free from vibration. Putting them on uneven or unstable surfaces,
where they may fall and cause damage, will affect the sound
quality.
Safety precautions
≥ Subwoofer is designed to be used in the upright vertical position
only. Do not use it in the horizontal or tilted position.
≥ If the unit is used near a turntable, CD player or DVD player,
howling or slipping of sound may occur. To prevent this, move
the unit away from the turntable, CD player or DVD player,
otherwise lower the unit’s output level.
Use wit h a TV set
In general, Braun tubes used for color television sets, etc. are extremely
sensitive and can be affected even by the magnetism of the earth. If a
speaker system is used near them, therefore, discoloring or distortion of
pictures will occur. These speakers are not provided with magnetic
shielding. If discoloration or dis tortion occurs, move the speaker s apart
from the television set.
Input Signal Warning
The speakers can handle the specified input power when used for normal
music reproduction. If any of the following signals are fed to them, even if
the input power is within the specified rating, excessive current may flow
in the speaker coils, causing burning or wire breakage:
1 Interstation noise from an untuned FM radio.
2 Sound from fast-forwarding a cassette tape.
3 High-pitched sounds generated by an oscillator, electronic musical
instrument, and so on.
4 Amplifier oscillation.
5 Special test tones from audio test CDs and so on.
6 Thumps and clicks caused by connecting or disconnecting audio
cables (Always turn off your amplifier before connecting or
disconnecting cables).
7 Microphone feedback.
- Par la présente, Onkyo Corporation déclare que l’appareil LS-T30 est
conforme aux exigencies essent ielles et aux autres dispo sitions
pertinentes de la directive 1999/5/CE.
- Por la presente, Onkyo Corporation, declara que este LS-T30 cumple con
los requisites esenciales y otras exigenc ias relevant es de la Directiva
1999/5/EC.
- Con la present e Onkyo Cor poration dichiar a che questo LS-T30 è
conform e ai requisit i essenziali ed alle alt re disposizio ni pertine nti stabilit e
dalla direttiva 1999/5/CE.
- Hiermit erkl ärt Onkyo Corpor ation, dass sich das Gerät LS-T30 in
Übereinstimmung mit den grundlegende n Anforderungen und den übrigen
einschlägigen Bestimmungen der Richtlinie 1999/5/EG befindet.
- Hierbij ver klaart Onky o Corporation dat het toestel l LS-T30 in
overeenstemming is met de e ssentiële eisen en de andere relevante
bepalingen van richtlijn 1999/5/ EG.
- Härmed förklar ar Onkyo Corporati on att denna LS-T30 följer de väsentliga
kraven och andra relevanta stadga r i Direktiv 1999/5/EC.
- С настоящето, Onkyo Corpor ation, дек ларира, че LS-T30 е в
съответствие със съществените изисквания и другитеп риложими
разпоредби на Директива 1999/5/ EC.
- Onkyo Corporation tímto prohlašuje, že LS-T30 splňuje základní
požadavky a všechna příslušná ustanoveni Směrnice 1999/5/ES.
- Undertegnede Onkyo Corporation erklærer herved, at følgende udstyr
LS-T30 overholder de væsentli ge krav og ø vrige relevante krav i dire ktiv
1999/5/EF.
- Käesolevaga k innitab Onkyo Co rporation seadm e LS-T30 vastavust
direktiivi 1999/5/EÜ põhinõuet ele ja ni metatud direktii vist tulenevatele
teistel e asjakoh astele sä tetele.
- ΜΕ ΤΗΝ ΠΑΡΟΥΣΑ Ο ΚΑΤΑΣΚΕΥΑΣΤΗΣ Onkyo Corporation ΔΗΛΩΝΕΙ
ΟΤΙ LS-T3 0 ΣΥΜΜΟΡΦΩΝΕΤΑΙ ΠΡΟΣ Τ ΙΣ ΟΥΣΙΩΔΕΙΣ ΑΠΑΙΤΗ ΣΕΙΣ ΚΑΙ
ΤΙΣ ΛΟΙΠ ΕΣ ΣΧΕΤΙ ΚΕΣ ΔΙΑΤΑΞΕΙΣ ΤΗΣ ΟΔΗΓΙΑΣ 1999/5/Ε Κ
- Ar šo Onkyo Corporation deklarē, ka LS-T30 atbilst Direktīvas 1999/5/EK
būtiskajām prasībām un citi em ar to sais tītajiem not eikumiem.
- Šiuo Onkyo Cor poration de klaruoja, kad šis LS -T30 atitinka esminius
reikalavimus ir kitas 1999/5/EB Direktyvos nuostatas.
- A Onkyo Corporation ezzennel kijelenti, hogy a LS-T30 típusú beren-dezés
teljesíti az alapvető követ elményeket és m ás 1999/5/EK irányelvben
meghatározott vonatkozó rendel kezéseket.
- Niniejszym Onkyo Corporation deklaruje że LS-T30 jest zgodny z
zasadniczymi wymaganiami i innymi właściw ymi postanowieniami
Dyrektywy 1999/5/EC.
- Eu, Onkyo Cor poration, decla ro que o LS-T30 cumpre os requisitos
essenciais e outras provisõe s relevantes da Directiva 1999/5/EC.
- Prin prezenta, Onkyo Corporation, declară că aparatul LS-T30 e ste în
conformitate cu cerinţele es enţiale şi cu alte prevederi pertinente ale
Directivei 1999/5/CE.
- Onkyo Corporation týmto vyhlasuje, že LS-T30 a spĺňa základné
požiadavky a všetky príslušné ustanovenia Smernice 1999/5/ES.
- Onkyo Corporat ion izjavlj a, da je ta LS- T30 v skladu z bistvenimi
zahtevami in drugimi r elevantnimi določili direktive 1999/5/ES.
- Onkyo Corporat ion vakuuttaa täten että LS-T30 tyyppinen laite on
direktiivin 1999/5/EY oleellisten vaatimusten ja sitä koskevien direktiivi n
muiden ehtojen mukainen.
- Hér með lýsir On kyo Corpora tion því yfi r að varan LS -T30 er í samræmi við
grunnkröfur og aðrar kröf ur sem gerðar eru í tilskipun 1999/5/EC.
- Onkyo Corporat ion erklærer herved at d enne LS-T30 er i
overensstemmelse med vesentli ge krav og and re relevante be stemmelser
I direktiv 1999/5/EC.
- Ovime Onkyo C orporation, potvrđuje da je LS-T30 u suglasnosti sa
osnovnim zahtjevima i ostalim relevantn im odredbama Direktive
1999/5/EC.
3
Page 4
Control Reference Guide
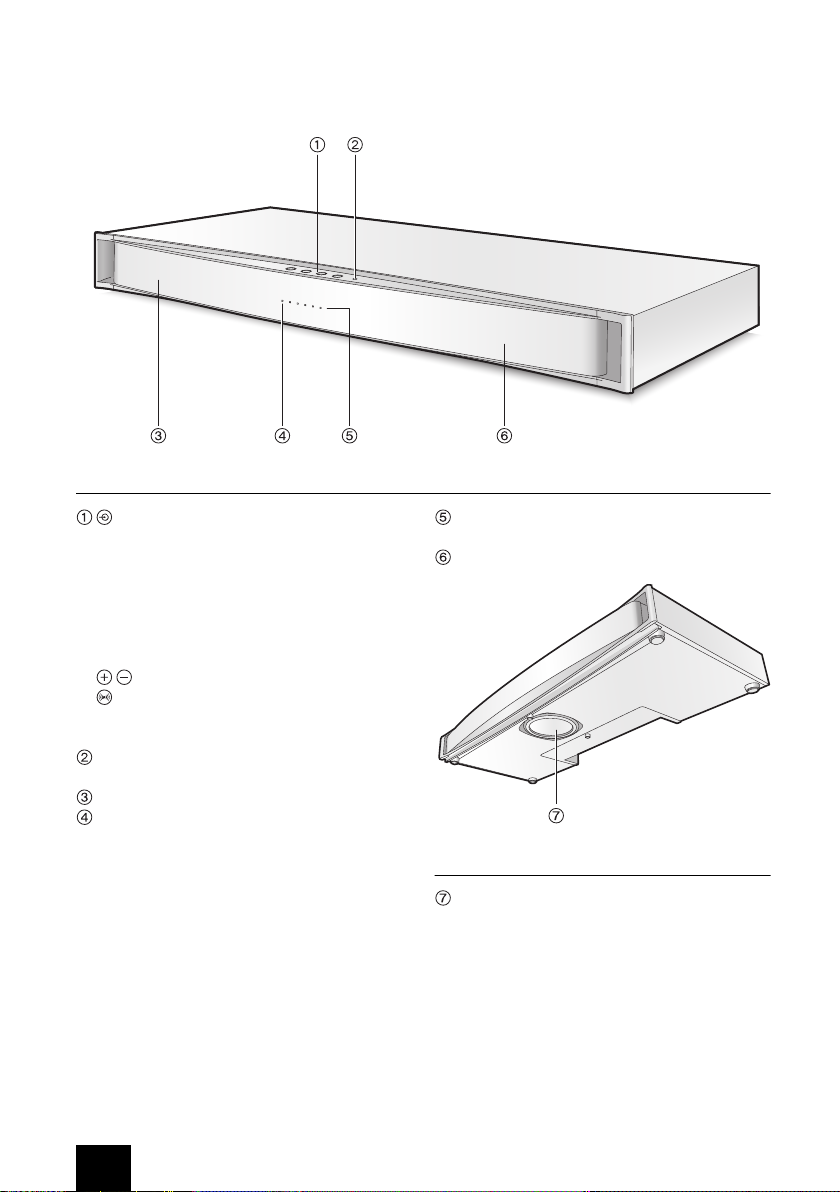
Main unit
INPUT button: Switches the input
source. Each time the button is pressed,
input modes are switched in order of TV#
USB (North American models) #
Bluetooth # ....
* Also, switches the power on/standby. Press
and hold for approximately 3 seconds to place
the device into Standby. Press once to turn the
power on.
VOLUME i/j buttons
SOUND MODE button: Use this button to
select the desired sound mode for the
playback audio. (# P10)
Dolby indicator: Lights when the digital
audio input signal is Dolby Digital.
Left channel speaker
Input source indicator: Lights in
accordance with the input source. The
indicator lights in white for TV, yellow for
USB (North American models), and blue for
Bluetooth.
Status indicators: Displays the sound
mode, volume, and subwoofer level.
Right channel speaker
Bottom of the unit
Subwoofer: Plays sub-bass frequencies.
4
Page 5
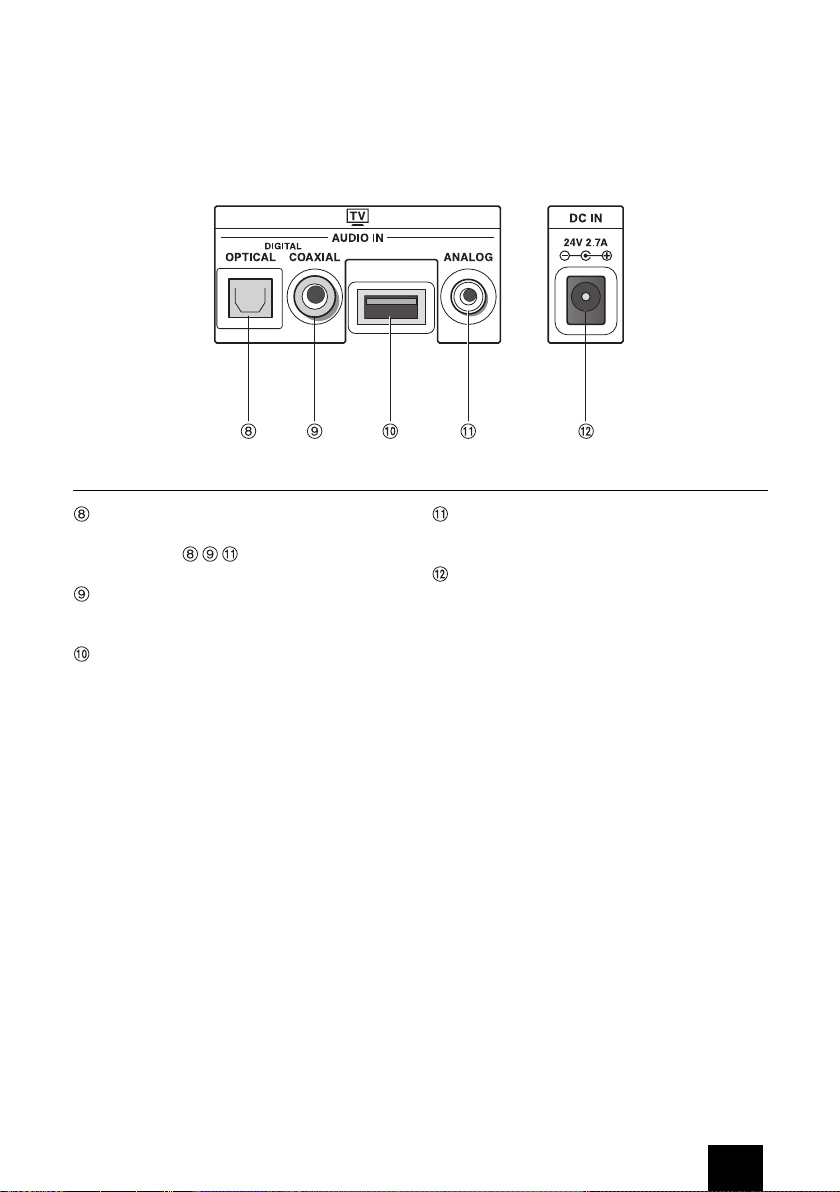
Rear of the unit (terminals)
Control Reference Guide
OPTICAL jack: Makes a digital connection
to the TV with the supplied optical digital
audio cable. are used depending on
the audio outputs available on your TV.
COAXIAL jack: Makes a digital connection
to the TV using a coaxial cable
(sold separately).
USB port: (North American models)
Connects a USB flash memory.
(Others) This port is used for service
purposes only. Do not use it.
ANALOG jack: Makes an analogue
connection with the TV using the supplied
stereo mini plug cable.
DC IN terminal: Connects the supplied
AC adapter.
5
Page 6

Control Reference Guide
North American models Others
Positive (i) side
Remote control sensor
Approx.
5 m (16 ft)
Remote controller
This manual outlines procedures using the
remote controller.
ON/STANDBY button: Switches the power
on/standby.
SUBWOOFER i/j buttons: Adjust the
subwoofer level.
SOUND MODE button: Use this button to
select the desired sound mode for the
playback audio.
INPUT buttons: Switches the input source.
VOLUME i/j buttons
MUTING button
USB operation buttons (North American
models): Allows operation when the input
source is USB.
plays or pauses playback. return to
the start of the file being played. Press twice
to return to the previous file. skip to the
next file.
When using the remote controller for the first
time, remove the insulation sheet.
Use a CR2025 lithium coin battery for battery
replacement.
20°
30°
30°
20°
6
Page 7

Placement
Mountable area
The illustration shows an example of
placement. Mount the unit on a firm surface
such as the top of a low board. Also, subwoofer
is located on the bottom side of the unit. Please
take extra care on setting.
TVs meeting the following requirements may be
placed on the unit.
0 Weight: 60 kg (132.2 lbs) or less
0 Width of TV stand: 900 mm (35-7/16") or
less
0 Depth: 360 mm (14-3/16") or less
1. Affix the cushioning pads to the bottom of the
TV stand.
Using the supplied cushions will allow you to
limit the effect of vibrations on the TV.
Wrap the TV in a blanket or soft cloth to
avoid damage during installation. Installation
should be performed by at least two people.
When the supplied cushions and the feet of
the TV do not match, cut and shape the
cushions for use as needed.
2. Place the unit on top of the low board.
The unit is extremely heavy. Be very careful
not to trap your fingers when mounting it.
Mount the TV so that it does not protrude
from the top face of the unit. If the TV stand
protrudes from the top face of the unit, the
TV may tip over and cause injury. Also, for
TV tip-over/fall prevention measures, see the
TV owner’s manual.
0 If the unit vibrates after placement, mount
the supplied vibration prevention cushions
under the feet of this unit, and adjust so that
it does not vibrate.
0 Onkyo is not responsible for accidents or
damage caused by improper installation,
improper cushion attachment, improper use
or natural calamity, etc.
7
Page 8

Connecting to a TV
If there is the OPTICAL jack on the TV
being used (illustrated above)
Make a digital connection to the TV with the
supplied optical digital audio cable. Connect the
AC adapter/power cord into the DC IN on the
unit, and then connect the other end of the
power cord into an electrical outlet.
Important :
Depending on the TV to be used with this
unit, the sound coming through the TV’s
built-in speakers can be out of sync with the
sound coming through the unit. Be sure to
turn off the built-in speaker output on your TV
before using the unit. Perform the same
procedure when also making connections
using the stereo mini plug cable or coaxial
cable.
8
If there is no OPTICAL jack on the TV
being used
Connect either of the following.
∫ Make an analogue connection with the TV
using the supplied stereo mini plug cable.
∫ Make a digital connection to the TV using a
coaxial cable (sold separately).
Page 9

Listening to TV
Basic operations
1. Turn on the TV.
Auto Power On is turned on by default, and
so power to the unit turns on automatically.
The input source automatically switches to
TV, and audio from the TV is played.
0 The input source switches to TV, and the
input source indicator lights in white.
To cancel Auto Power On: press and hold
on the unit, and then press and hold
while continuing to press
source indicator flashes twice (white) to
indicate that this setting is now off.
0 Repeating this procedure switches
between on/off. The indicator flashes
once to indicate that this setting is now
on.
0 When this setting is off, press to turn
on the power to the unit, and then press
to switch the input source to TV.
. The input
To adjust the volume of this unit
Allows to adjust the volume by 1 step in the 0 to
35 range.
1. Press VOLUME i/j.
To adjust the subwoofer level
Allows to adjust the subwoofer level by 1 step in
the j10 to i10 range while listening to the
sound. The default setting is 0. Also, the
subwoofer level is set to individual levels for
each different SOUND MODE.
1. Press SUBWOOFER i/j.
The status indicators (white) indicate the
subwoofer level.
Volume: “Standard”
To mute the sound
1. Press MUTING.
The status indicators (white) indicate the
volume level.
Volume: “Middle”
The status indicator flashes when the audio is
muted. Press again to cancel muting. Muting
will also be canceled when the volume is
changed or the power is turned off and on.
0 When using buttons on the unit, press
and at the same time. Press again to
cancel muting.
9
Page 10

Change the desired sound quality
(SOUND MODE)
You can switch the sound mode of input sound
as desired.
1. Press SOUND MODE button.
The sound modes are switched in the
following order each time this button is
pressed. The status indicator lights (orange)
indicate the current mode.
(Standard)
Play files with a good balance from low
through to high frequencies. This is the
standard mode with neutral settings.
(Surround)
Creates a richer sound field, provides
realistic sound movement and amplifies
bass sounds. Ideal for watching movies.
(Stereo)
Suitable for listening to music. Playback
music with pure quality similar to the
original sound.
(Voice)
Play files with voice clearly. Ideal when
watching the news or documentary
programmes.
Listening to TV
Auto Standby function:
If there is no audio input and no operation of
the unit has been performed for some time,
the power will automatically enter standby
mode as Auto Standby is on by default. The
time taken to enter standby mode depends
on the connected cables or the input source.
0 Connecting with the optical digital audio
cable or coaxial cable: 2 hours
(5 minutes when power to the TV is off)
0 Connecting with the stereo mini plug
cable: 5 minutes
0 Bluetooth/USB (North American models):
5 minutes
To cancel this function, press and hold on
the unit, and then press and hold while
continuing to press
indicator flashes twice (white) to indicate that
this setting is now off.
0 Repeating this procedure switches
between on/off. The indicator flashes
once to indicate that this setting is now
on.
. The input source
Switch audio in sound-multiplex
programmes
This can be set only when the audio signal is
Dolby Digital. Press and hold the SOUND
MODE button on the remote controller for
approximately 3 seconds. Pressing and holding
switches the source in the following order.
Main: The input indicator (white) flashes
once.
Secondary: The input indicator (white)
flashes twice.
MainiSecondary: The input indicator
(white) flashes three times.
10
Page 11

Using a TV Remote Controller
Preprogrammed feature
The unit has been preprogrammed so that the unit
can be operated using your TV remote controller.
Volume control and muting(*) operations can be
performed with this feature. If you want to use other
functions or cannot operate the unit with your TV
remote controller, you can use the learning function
(described below) to enable these features.
To cancel this feature, press and hold for
approximately 3 seconds while continuing to
press and hold on this unit The input source
indicator will flash (white) for 10 seconds. Do not
operate the unit during this time. Afterwards, it
will flash 3 times to indicate that this feature has
been cancelled. Perform the same procedures to
use the TV remote controller again.
* The mute state can be turned over each time you
press the Mute button on your TV remote controller.
In such case, you can synchronize the mute status of
the unit and the TV by pressing and holding the Mute
button on your TV remote controller.
Learning function
The unit is set so that signals emitted from each
button on your TV remote controller control
specific operations.
* It is recommended to select buttons that do not
prevent TV operation when assigning the functions
to your remote controller. Signal of some types of
remote controller may not be received by the unit.
E.g.) To assign the unit's ON/STANDBY
function to the TV remote controller:
1. Press the button on the unit for
approximately 3 seconds while pressing and
holding the button. The input source
indicator (white) flashes for 10 seconds.
2. While the input source indicator is flashing,
press any button on the TV remote controller
3 times while aiming it at the remote control
signal sensor of the unit.
The indicator flashes twice (white) to indicate
that this was successfully configured. After
this is set, pressing the button on the TV
remote controller will enable ON/STANDBY
operation on the unit.
The learning function enables the following unit
functions to be operated with your TV remote
controller. Press and hold the following buttons
instead of in step 1.
-VOLUME i:
-VOLUME j:
- MUTING: and
- INPUT: and
- SOUND MODE: and
To prevent incorrect operation:
The unit is preprogrammed to support a large
number of TV remote controllers. For this
reason, using remote controllers other than
that supplied with the unit and TV remote
controllers may result in unexpected operation.
To prevent incorrect operation, press and
hold on the unit, and then press and hold
while continuing to press for 3
seconds. The input source indicator will flash
(white) for 10 seconds. During this time, aim
the TV remote controller toward the unit and
press either the volume button or mute
button once. The input source indicator will
flash twice (white), which indicates that the
unit will not accept signals emitted when
buttons are pressed on remote controllers
other than the supplied remote controller or
the TV remote controller.
0 Controlling function may not be set to
some TV remote controller.
11
Page 12

Playing via Bluetooth Connection
Approx.10 m (33 ft)
You can wirelessly enjoy music files stored in a
smartphone or other Bluetooth-enabled device.
The coverage area is 10 meters (33 feet).
Pairing
Pairing is necessary when using the
Bluetooth-enabled device for the first time.
Before starting the procedure, learn how to
enable the Bluetooth setting function and to
connect with other devices on the
Bluetooth-enabled device.
1. Press to turn on the unit.
2. Press to switch the selector to Bluetooth.
The unit begins pairing, and the input source
indicator on the unit will flash quickly (blue).
The pairing mode will be cancelled after 30
seconds. During this time, perform the
following operation. The indicators will flash
slowly indicating that this has been
cancelled.
3. Select the unit (Onkyo LS-T30) after it
displays on the screen on the Bluetooth
device. After a short time, the input source
indicator will light (blue), and the devices are
now paired.
0 If a passcode (password, passkey or PIN
code) is requested, enter "0000".
0 Devices should be in close proximity
when pairing.
Playing sound of the
Bluetooth-enabled device
1. Press to turn on the unit.
2. Press to switch the selector to Bluetooth.
The input source switches to Bluetooth, and
the input source indicator lights in blue.
3. Play music files by after connecting the
Bluetooth device.
0 If the volume setting on the
Bluetooth-enabled device is low, the
sound will not be output from this unit.
0 Due to the characteristics of Bluetooth
wireless technology, the sound produced
on this unit may slightly be behind the
sound played on the Bluetooth-enabled
device.
To register other Bluetooth devices: Turn
on the power to the unit, switch the input to
Bluetooth, and then press and hold to
start pairing on the unit. Next, select the unit
(Onkyo LS-T30) on some other Bluetooth
device to make a connection.
0 Up to 16 Bluetooth devices can be saved
with the unit.
0 When using buttons on the unit, press
and hold .
12
Page 13

Troubleshooting
Befor e start ing the procedure
Problems may be solved by simply turning
the power on/off or disconnecting/connecting
the power cord, which is easier than working
on the connection, setting and operating
procedure. Try the simple measures on both
the unit and the connected device.
∫ Resetting the unit
Resetting the unit to the status at the time of
shipment may solve the problem. Reset the unit
with the following procedure.
Press and hold the button on the unit when
the power is on, and then press and hold
while continuing to press for 10 seconds.
When reset is complete, the INPUT source
indicator and all status indicators light and the
unit automatically enters the standby mode.
Can’t turn on the unit
0 Make sure that the power cord is properly
plugged into the wall outlet.
0 Unplug the power cord from the wall outlet,
wait 10 seconds or more, then plug it in
again.
The unit turns off unexpectedly
0 The unit will automatically enter standby
mode when Auto Standby launches.
The sound stops suddenly, or stops
during playback
0 The protective circuits of the unit may be
operating. Unplug the power cord from the
wall outlet immediately. Check that all cables
are connected and that the input source is
correct, and leave the power cord unplugged
for 5 minutes. Plug the power cord in again
and turn the unit power on. If the sound still
cuts out, unplug the power cord and contact
your Onkyo dealer.
0 If smoke, smell or abnormal noise is
produced by the unit, unplug the power cord
from the wall outlet immediately and contact
your Onkyo dealer.
There’s no sound, or it’s too small
0 Make sure that all audio connecting plugs
are pushed in all the way.
0 Make sure that the input of device is
connected properly.
0 When the status indicator flashes in white,
the muting is enabled. Press MUTING button
on the remote controller or the
VOLUME i/j buttons on the remote
controller or the unit to disable the muting.
0 Make sure that none of the connecting
cables are bent, twisted, or damaged.
0 Audio is output through only one type of
connection. When multiple terminals are in
use, the priority of audio output is given in
the order of the OPTICAL terminal,
COAXIAL terminal, and ANALOG terminal.
Noise can be heard
0 Do not bind the power cord, connection
cables and other audio cables with a band.
0 An audio cable may be picking up
interference. Try repositioning your cables.
The remote controller doesn't work
0 Make sure that the battery is installed with
the correct polarity.
0 Make sure that the remote controller is not
too far away from the unit, and that there’s
no obstruction between the remote controller
and the unit’s remote control sensor.
0 Make sure that the unit is not subjected to
direct sunshine or inverter type fluorescent
lights. Relocate if necessary.
0 If the remote controller does not work the
first time after purchase or if it has not been
used for a long period of time, the battery
may have become flat and the remote
controller will not operate. Try the following
methods.
- Press and hold the VOLUME jbutton on
the remote controller for some time
(10 seconds or more). (try this several
times)
- Remove the button cell, wipe it with a
clean cloth and insert it again.
13
Page 14

Specifications
Rated Output Power (FTC):
Front speaker:
(North American) 12.5 W minimum
continuous power per channel, 4 ohm
loads, 2 channel driven at 1 kHz, with a
maximum total harmonic distortion of 1%
Subwoofer:
(North American) 25 W minimum
continuous power, 4 ohm loads, 1 channel
driven at 80 Hz, with a maximum total
harmonic distortion of 1%
Rated Output Power (IEC):
Front speaker:
(Others) 2chk12.5 W at 4 ohms, 1 kHz 1ch
driven of 1%
Subwoofer:
(Others) 1chk25 W at 4 ohms, 80 Hz 1ch
driven of 1%
Frequency response: 20 Hz - 20 kHz
Power Supply: AC100 - 240 V, 50/60 Hz
Power Consumption: 17 W
Stand-by Power Consumption:
(North American) 0.40 W
(Others) 0.45 W
Dimensions (WkHkD):
905 mmk95 mmk400 mm
(35-5/8"k3-3/4"k15-3/4")
Weight: 10.4 kg (22.9 lbs.)
Audio inputs
Digital input: OPTICAL: 1
COAXIAL: 1
(North American) USB: 1
Analog Stereo Input: Ø 3.5 mm mini
Bluetooth: Version: 2.1iEDR
Profile: A2DP GAVDP
Speaker unit (None magnetic shielding)
Front speaker: 6.5 cm (2-1/2") Cone k4
Subwoofer: 16 cm (6-1/2") Cone k1
0 Design and specifications are subject to
change without notice.
Playing USB Memory (North American models)
0 The unit supports USB memory formatted using
FAT12, FAT16 and FAT32 file system.
0 The unit is compatible with WAV playback and
following audio format is supported.
Format: Microsoft PCM format
Number of channels: 1 or 2 channels
Sampling frequency: 32 to 48 kHz
Quantization bit width: 8 or 16 bit depth
RIFF chunk: format chunk (without extended),
data chunk
0 You can play WAV files stored on the root folder
only. WAV files stored on the other folders cannot
be played on this unit.
0 The unit supports USB flash drives only. Note,
however, that playback may not be possible with
some USB flash drives.
Disclaimer
0 The unit contains a microcomputer for signal
processing and control functions. In very rare
situations, severe interference, noise from an
external source, or static electricity may cause it to
lock up. In the unlikely event that this happens,
unplug the power cord from the wall outlet, wait at
least five minutes, and then plug it back in.
If it doesn’t work properly, please try resetting.
∫ Trademarks and Licensing
Manufactured under license from Dolby Laboratories.
Dolby and the double-D symbol are trademarks of
Dolby Laboratories.
For DTS patents, see http://patents.dts.com.
Manufactured under license from DTS Licensing
Limited. DTS, the Symbol, & DTS and the Symbol
together are registered trademarks, and
DTS Studio Sound is a trademark of DTS, Inc.
(C)DTS, Inc. All Rights Reserved.
14
The Bluetooth
trademarks owned by Bluetooth SIG, Inc. and any use
of such marks by Onkyo is under license.
Other trademarks and trade names are those of their
respective owners.
R
word mark and logos are registered
Page 15

Supplied Accessories
Make sure you have the following items before
use.
0 The number in parenthesis indicates the
quantity.
0 In catalogs and on packaging, the letter at
the end of the product name indicates the
color.
AC adapter (1)
Power cord (1)
Remote controller (1)
RC-894S (North
American models)
RC-895S (Others)
Optical digital audio
cable 1.5 m (5 ft.) (1)
Ø 3.5 mm stereo mini
plug cable (1)
Cushion (8)
(attach to the bottom
face of the TV)
Vibration prevention
cushions (4)
15
Page 16

Onkyo Corporation
Kitahama Chuo Bldg, 2-2-22 Kitahama, Chuo-ku, OSAKA 541-0041, JAPAN
http://www.onkyo.com/
The Americas
Onkyo U.S.A. Corporation
18 Park Way, Upper Saddle River, N.J. 07458, U.S.A.
For Dealer, Service, Order and all other Business Inquiries:
Tel: 201-785-2600 Fax: 201-785-2650
http://www.us.onkyo.com/
For Product Support Team Only:
1-800-229-1687
http://www.us.onkyo.com/
Europe
Onkyo Europe Electronics GmbH
Liegnitzerstrasse 6, 82194 Groebenzell, GERMANY
Tel: +49-8142-4401-0 Fax: +49-8142-4208-213
http://www.eu.onkyo.com/
Onkyo Europe Electronics GmbH (UK Branch)
Meridien House, Ground floor, 69 - 71 Clarendon Road, Watford, Hertfordshire, WD17 1DS, United Kingdom
Tel: +44 (0)8712-00-19-96 Fax: +44 (0)8712-00-19-95
China
Onkyo China Limited (Hong Kong)
Unit 1033, 10/F, Star House, No 3, Salisbury Road, Tsim Sha Tsui Kowloon, Hong Kong.
Tel: 852-2429-3118 Fax: 852-2428-9039
http://www.hk.onkyo.com/
Onkyo China PRC (Mainland)
1301, 555 Tower, No.555 West NanJing Road, Jing’an District, Shanghai, China 200041,
Tel: 86-21-52131366 Fax: 86-21-52130396
http://www.cn.onkyo.com/
Asia, Oceania, Middle East, Africa
Please contact an Onkyo distributor referring to Onkyo SUPPORT site.
http://www.intl.onkyo.com/support/
The above-mentioned information is subject to change without prior notice.
Visit the Onkyo web site for the latest update.
SN29401856
(C) Copyright 2014 Onkyo Corporation Japan. All rights reserved.
*29401856*
F1408-0
 Loading...