

Page 1
HT-R410
Basic Operation Guide
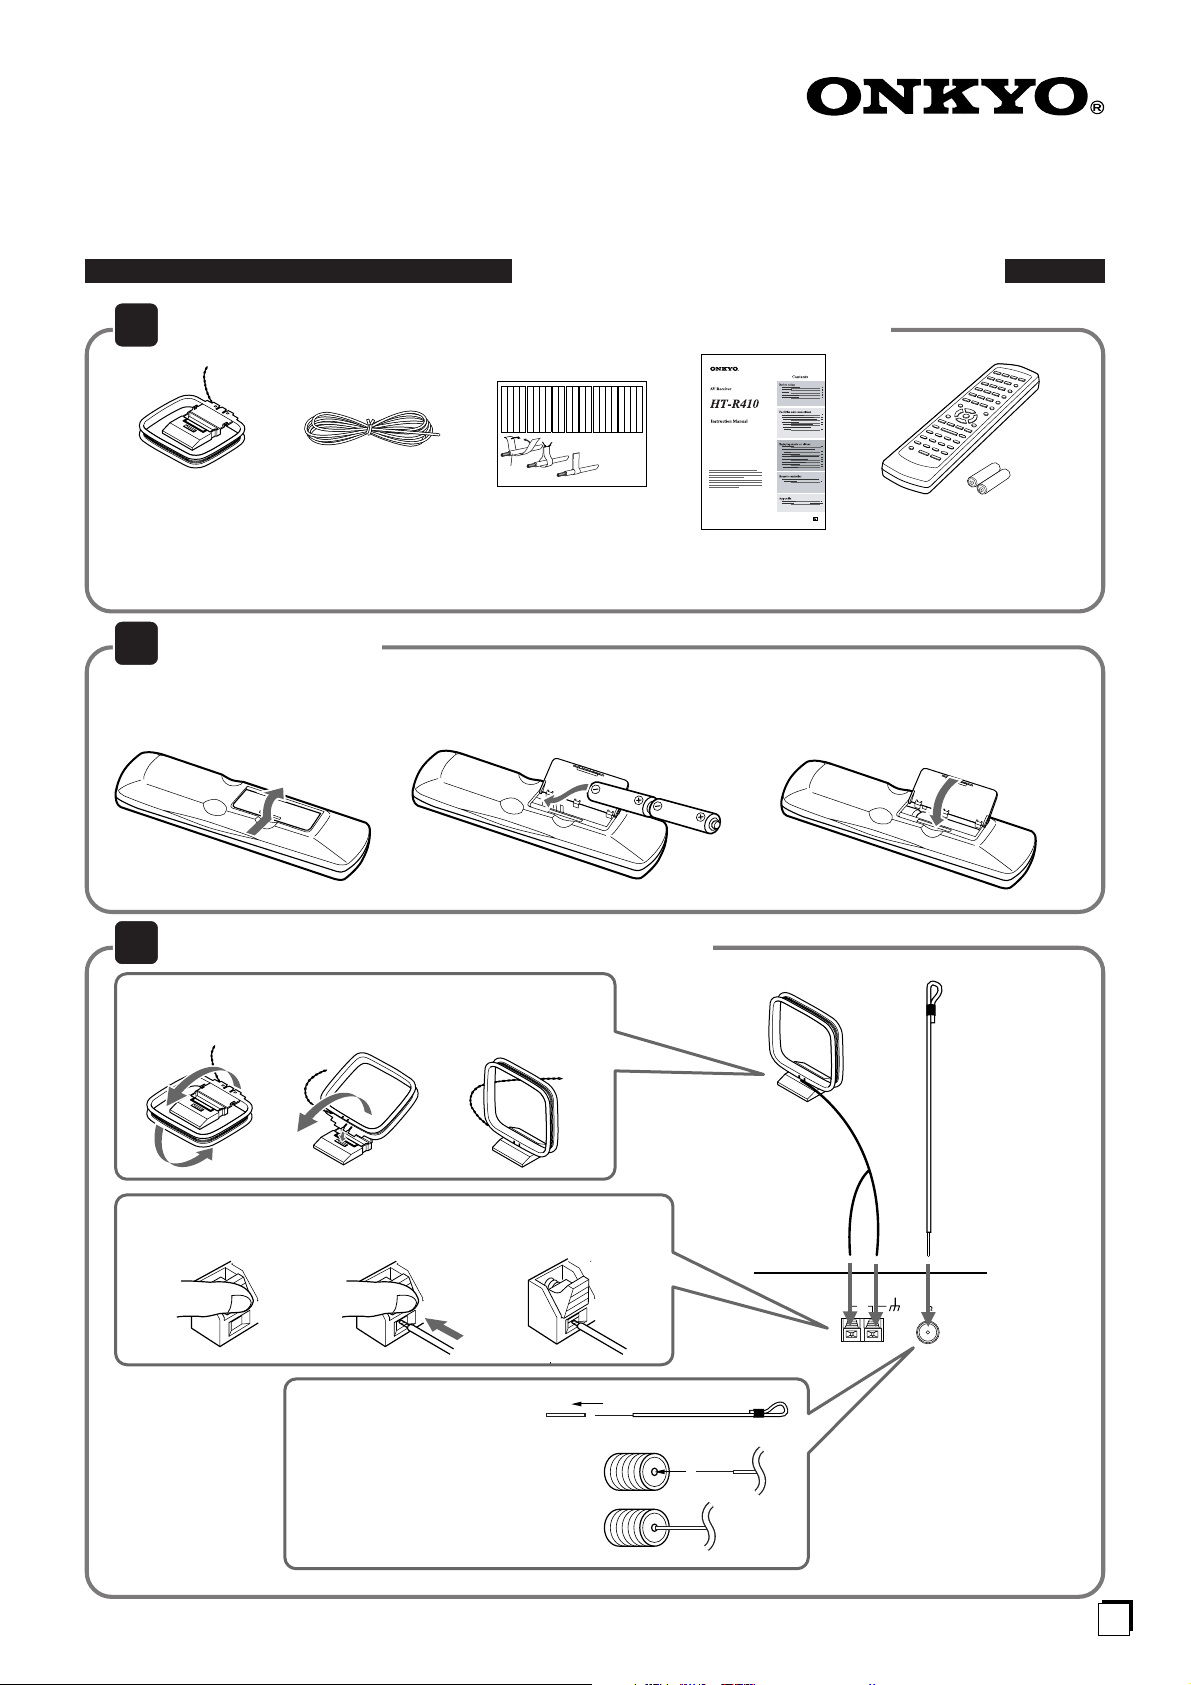
1 Check that the following accessories are supplied with the HT-R410.
Left
Left
Left
Left
Front
Front
Right
Right
Front
Front
Right
Right
Zone 2
Zone 2
Zone 2
Zone 2
/
/
/
/
Surround
SP-B
SP-B
SP-B
SP-B
Zone 2
Zone 2
Zone 2
Zone 2
/
/
/
/
Front
Left
Front
Right
SP-B
Left
SP-B
Right
Surround
Front
Left
Front
Right
SP-B
Left
SP-B
Right
1
2
Speaker Cable
Left
Left
Left
Left
Left
Left
Right
Right
Surround
Surround
Surround
Surround
Right
Left
Surround
Right
Surround
Left
3
Right
Right
Right
Right
Center
Center
Zone 2
Zone 2
Zone 2
Zone 2
Surround Back
Surround Back
Surround Back
Surround Back
Zone 2
Right
Zone 2
Left
Center
Zone 2
Right
Zone 2
Left
Surround Back
Right
Surround Back
Left
Center
Surround Back
Right
Surround Back
Left
& AM loop antenna × 1 & Speaker cable label × 1 & Remote controller × 1
& FM indoor antenna × 1 & Instruction manual × 1 & Batteries (AA or R6) × 2
2 Insert the batteries
2 Insert the two size AA/R6 batteries.
Be sure to match the + and – ends of the batteries with the
1 Detach the battery cover.
diagram inside the battery compartment.
3 Attach the battery cover.
3 Connect the supplied FM and AM indoor antennas.
AM indoor
Rotate the outer
frame of the antenna.
Insert into
the hole.
Extend the
antenna cord.
antenna
FM indoor
antenna
Press and hold
up the lever.
Insert the end
of the cord.
Release the lever to
secure the connection.
1 Strip away the insulation
from the end of the cord.
2 Fully insert the stripped end of
the cord.
AM
FM
75
ANTENNA
En
Page 2
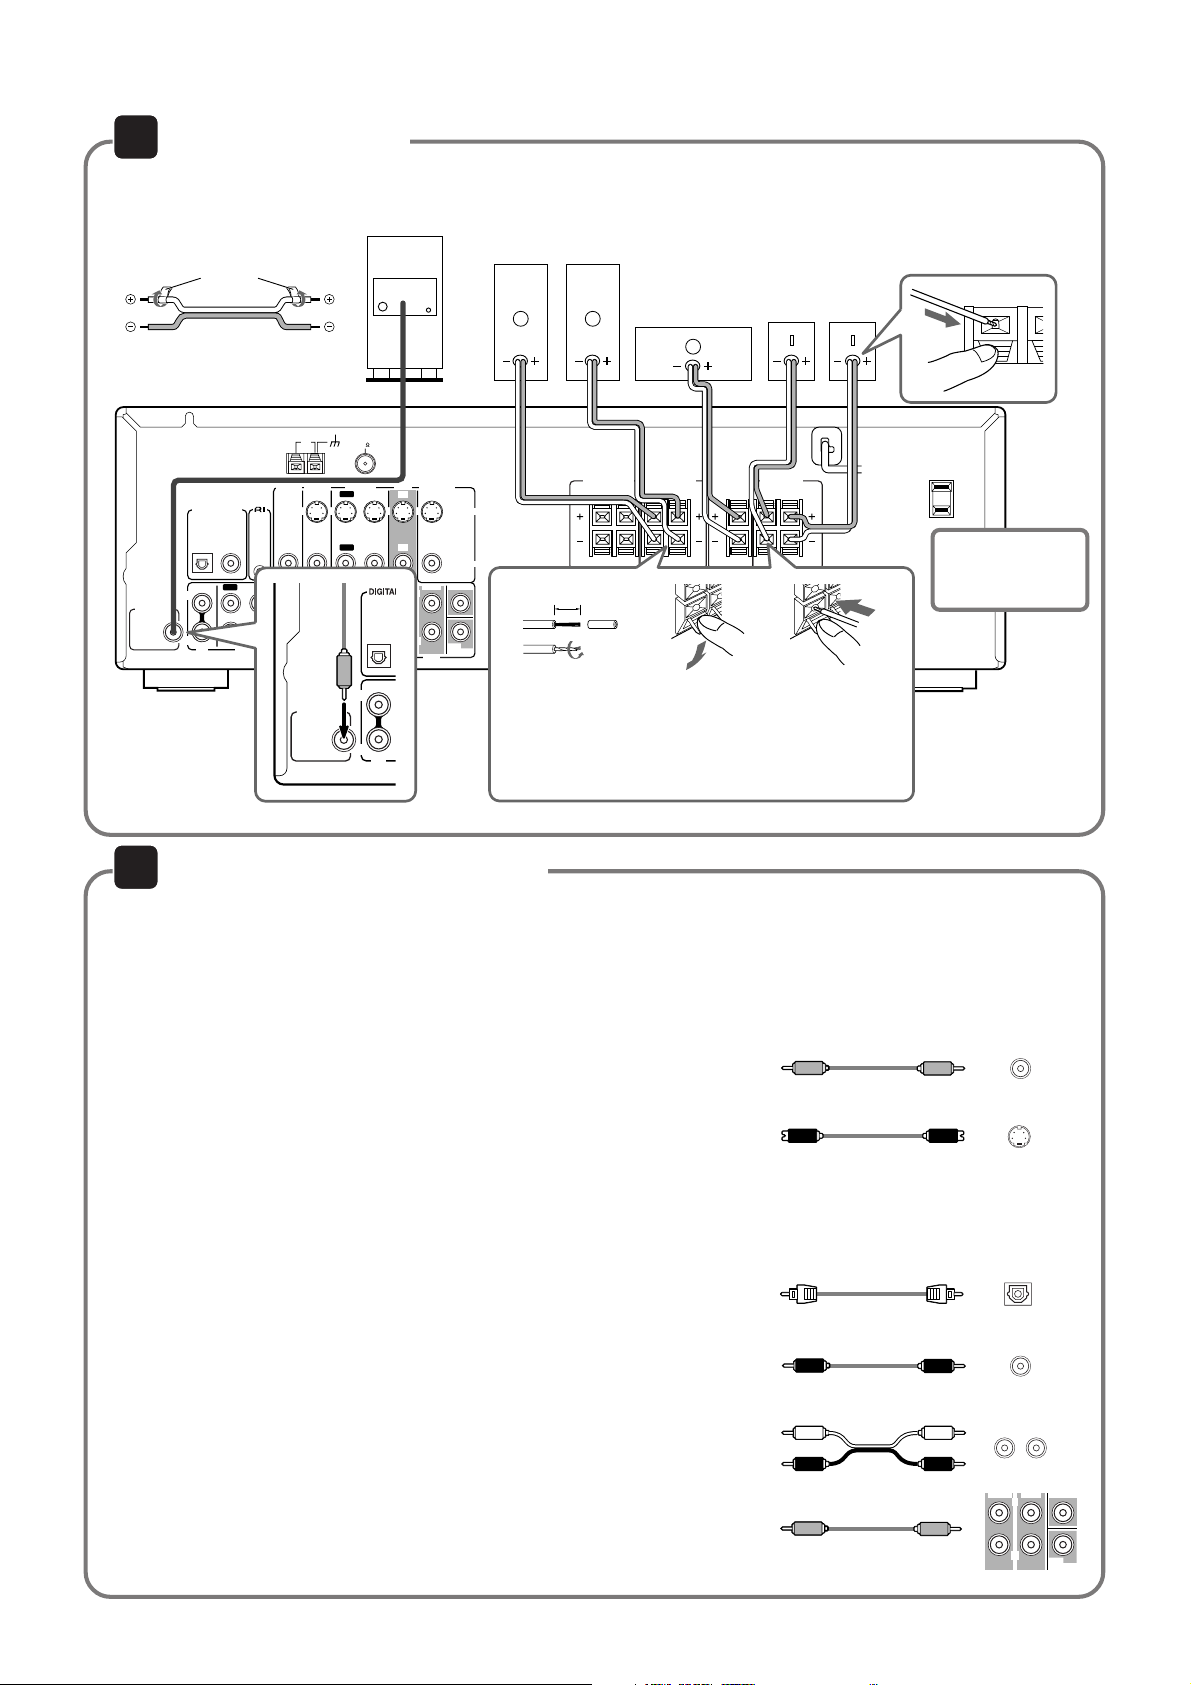
4 Connect the speakers.
If all of the speakers shown below are not available, connect at least the front right and left speakers. This makes it
possible to enjoy the stereo audio.
Subwoofer Front speakers
Speaker cable label
DIGITAL INPUT
COAXIAL
OPTICAL
REMOTE
CONTROL
IN
OUT
IN
L
SUBWOOFER
PRE OUT
R
TAPE
CD
VIDEO 3
AM
VIDEO 2VIDEO 3
IN
VIDEO 2
SUBWOOFER
PRE OUT
LeftRight
Center
speaker
FM
ANTENNA
75
FRONT
VIDEO 1
DVD MONITOR
IN
OUT
IN
OUT
ININ
OUT
IN
OPTICAL
VIDEO 1
L
OUT
IN
IN
IN
IN
FRONT
IN
S VIDEO
VIDEO
SURR
CENTER
L
R
SUB
WOOFER
DVD
3/8” (10 mm)
Strip 3/8” (10 mm)
SPEAKERS B
from the end of
each cable, then
R
CD
twist the exposed
wires tightly.
FRONT
SPEAKERS A
RLRL
CENTER
SPEAKER
Press and hold
the lever.
Surround
speakers
LeftRight
SURROUND
SPEAKERS
RL
Insert the stripped
end of the cable.
By releasing the
lever, the lever is
replaced.
Terminals on speaker
AC OUTLET
Do not connect
the power cord
at this time.
5 Before connecting to other devices.
Basic infomation about video terminals
There are 3 basic types of video signal terminals: video (composite), S-Video, and component video. The type of terminals available
may vary for each component. Please check the terminals available on your components and prepare the appropriate cables before
making connections. With this unit, the video signal input and output must use the some type of terminal. For example, when the
DVD player has both the S-Video and video terminals and the TV has only the video terminal, the two units should be connected
using the video terminals.
The video terminal (composite video) uses a standard video jack found in many video
components such as TV and VCR. The connection to this terminal uses an RCA type
connection cable equipped with RCA type pin plugs.
The S-Video terminal can transmit video with higher quality than the composite video
terminal. The connection to this terminal uses a S-Video cable.
In addition, although not used in this unit, the component video terminals are use in
some TV featuring high video quality. These terminals output the video luminance and
chrominance signals separately for faithful reproduction of original colors.
Preparatory knowledge on video terminals
Audio signal terminals include those for digital audio and those for analog audio.
The digital audio terminals are compatible with multiple channels and can transmit
audio with higher quality than analog audio terminals. The digital audio terminals
include Optical and Coaxial terminals but their audio quality is identical. The Digital
Optical terminals should be connected using an optical fiber cable while the Digital
Coaxial terminals should be connected using a coaxial cable (RCA type).
The analog terminals (L/R) should be connected using an audio connection cable (RCA
type).
The analog multichannel terminals are found in DVD players with DVD audio
compatibility. This unit uses an analog multichannel terminal as the DVD terminal.
The connection of this terminal should use an audio connection cable (RCA type).
Video cable
S video cable
Optical fiber cable
Coaxial cable
Audio connection cable
Audio connection cable
VIDEO OUT
S VIDEO OUT
DIGITAL OUT
OPTICAL
DIGITAL OUT
COAXIAL
FRONT
LR
SURR
FRONT
L
CENTER
SN 29343470
R
SUB
WOOFER
W0302-1
Page 3

Note
Either the S-Video or Video terminal
can be used for connection. However,
the type of the terminals used in
connection between the DVD player
and this unit should be identical to that
used in connection between the TV and
this unit.
DVD player
S VIDEO
OUT
VIDEO
OUT
DIGITAL
OUT
COAXIAL
FRONT
L
R
Note
Enjoying DVD
1.
Connect the monitor TV and the DVD player.
Here, only the typical connections are shown. For details, see pages 10 and 11 of the main
manual.
AM
VIDEO 2VIDEO 3
IN
VIDEO 3
IN
ININ
IN
VIDEO 2
DIGITAL INPUT
COAXIAL
OPTICAL
L
SUBWOOFER
PRE OUT
R
2.
Connect the power cord to a wall outlet.
REMOTE
CONTROL
IN
OUT
IN
TAPE
CD
OUT
OUT
OUT
FM
75
VIDEO 1
VIDEO 1
ANTENNA
IN
IN
IN
DVD MONITOR
OUT
IN
IN
SURR
FRONT
L
R
DVD
CENTER
SUB
WOOFER
S VIDEO
VIDEO
Note
S VIDEO
VIDEO
OUT
OUT
TV or projector
:Signal flow
3
9
4
10
5
-1
7
7-2
8
The STANDBY indicator lights up.
Wall outlet
3.
Turn on the power.
The STANDBY indicator turns off, and the display area lights up.
Make sure that the power switch on the DVD player is also turned ON.
4.
Select the speaker system(s) to be used.
5.
Set the Input Select to DVD.
6.
If you connect the digital output jack of the DVD player to the COAXIAL jack on
the HT-R410 in step 1, proceed to step 7. If you connect to the OPTICAL jack on the
HT-R410, perform the following settings.
1 Press the DIGITAL INPUT button on the HT-R410.
The default DVD setting (Coaxial) appears.
2 Press the DIGITAL INPUT button repeatedly to select “Optical”.
7.
Play a DVD.
The video appears on the monitor TV.
In the following cases, you can control an Onkyo DVD player using the remote controller
of this unit.
• When an Onkyo DVD player is z-connected.
(See page 16 of the main manual for details.)
• When the manufacturer’s code is entered.
(See pages 33-34 of the main manual for details.)
How to play a DVD using the remote controller:
1 Press the CD/DVD button.
2 Press the s button.
8.
Adjust the volume.
9.
Select the listening mode.
The selectable listening mode varies depending on the source. (See pages 28–29 of the
main manual for details).
10
.
Select the audio mode.
You can compare the analog and digital sound. (See page 26 of the main manual for
details).
To enjoy multi channel input See page 27 of the main manual.
To retain better sound effect, we recommend to make the following settings.
“Connecting speakers”
“Speaker Setup”
See pages 12–13 of the main manual.
See pages 18–20 of the main manual.
Page 4

1.
Connect the CD player.
Enjoying CD
3
9
4
10
CD player
DIGITAL
OUT
OPTICAL
AUDIO OUT
(PLAY)
7
7
5
8
L
R
-1
-2
FM
75
ANTENNA
VIDEO 1
DVD MONITOR
IN
OUT
IN
IN
OUT
ININ
OUT
IN
IN
VIDEO 1
FRONT
OUT
IN
IN
S VIDEO
VIDEO
SURR
CENTER
L
R
SUB
WOOFER
DVD
SUBWOOFER
PRE OUT
2.
Connect the power cord to a wall outlet.
3.
Turn on the power.
DIGITAL INPUT
OPTICAL
IN
L
R
CD
COAXIAL
OUT
TAPE
REMOTE
CONTROL
IN
IN
VIDEO 3
AM
VIDEO 2VIDEO 3
VIDEO 2
The STANDBY indicator turns off, and the display area lights up.
Make sure that the power switch on the CD player is also turned ON.
4.
Select the speaker system(s) to be used.
5.
Set the Input Select to CD.
6.
If you connect the digital output jack of the CD player to the OPTICAL jack on the
HT-R410 in step 1, proceed to step 7. If you connect to the COAXIAL jack on the
HT-R410, perform the following settings.
1 Press the DIGITAL INPUT button on the HT-R410.
The default CD setting (Optical) appears.
2 Press the DIGITAL INPUT button repeatedly to select “Coaxial”.
7.
Play a CD.
When an Onkyo CD player is z-connected, you can control an Onkyo CD player using
the remote controller of this unit.
You need to enter the manufacturer’s code “300”. (See pages 33–34 of the main manual
for details.)
How to play a CD using the remote controller:
1 Press the CD/DVD button.
2 Press the s button.
8.
Adjust the volume.
9.
Select the listening mode.
The selectable listening mode varies depending on the source. (See pages 28–29 of the
main manual for details).
If no sound is heard.
The power turns on but no sound is heard.
The MUTING indicator flashes.
The headphones are connected.
The connections are incorrect.
The digital input setting is incorrect.
The power does not turn on.
The connections are incorrect.
The external noise has affected the internal .
10
.
Select the audio mode.
You can compare the analog and digital sound. (See page 26 of the main manual for
details).
Press the MUTING button on the remote controller to turn off the
MUTING indicator
Disconnect the headphones.
Make sure that all connections are made correctly.
Make sure that correct input source is set in step 6 above.
Make sure the power cord is connected correctly.
Unplug the power cord from the AC outlet to turn off the unit and then
plug it again after about five seconds.
 Loading...