

Page 1
7.1ch Home Theater Speaker Package
English Français Español
HTP-770
SKS-HT870
SKF-770 FRONT SPEAKERS
SKC-770 CENTER SPEAKER
SKR-770 SURROUND SPEAKERS
SKB-770 SURROUND BACK SPEAKERS
SKW-770 POWERED SUBWOOFER
Universal Port Option Dock for iPod
UP-A1
Instruction Manual
®
Getting Started ............En-2
Pour commencer..........Fr-2
Procedimientos
iniciales..................... Es-2
Installing & Using ......En-10
Installation et
utilisation .................Fr-10
Instalación y uso .......Es-10
Appendix ....................En-12
Thank you for purchasing an Onkyo home theater speaker package.
Please read this manual thoroughly before using your new speakers.
Following the instructions in this manual will enable you to obtain
optimum performance and listening enjoyment from your speaker
package.
Please retain this manual for future reference.
Manuel d’instructions
Merci d’avoir acheté cet ensemble Home Cinema Onkyo. Veuillez bien
lire ce manuel avant d’utiliser vos nouvelles enceintes. Suivre les
instructions de ce manuel vous permettra d’obtenir des performances et
une qualité d’écoute optimales de votre ensemble d’enceintes.
Conservez ce manuel afin de pouvoir le consulter ultérieurement.
Manual de Instrucciones
Gracias por adquirir un juego de altavoces home theater de Onkyo. Por
favor, lea atentamente este manual antes de utilizar sus nuevos
altavoces. El respeto de las instrucciones de este manual le permitirá
obtener un rendimiento y un disfrute óptimos de su juego de altavoces.
Guarde este manual para futuras referencias.
Annexe.........................Fr-12
Apéndice ....................Es-12
Universal Port Option
®
Dock for iPod
Option de port universel
pour iPod
Opción de puerto universal
para iPod®...............Es-14
®
........En-14
...............Fr-14
E
n
Fr Es
Page 2
WARNING:
G
TO REDUCE THE RISK OF FIRE OR ELECTRIC
SHOCK, DO NOT EXPOSE THIS APPARATUS TO
RAIN OR MOISTURE.
CAUTION:
TO REDUCE THE RISK OF ELECTRIC SHOCK,
DO NOT REMOVE COVER (OR BACK). NO
USER-SERVICEABLE PARTS INSIDE. REFER
SERVICING TO QUALIFIED SERVICE
PERSONNEL.
Important Safety Instructions
WARNING
RISK OF ELECTRIC SHOCK
DO NOT OPEN
The lightning flash with arrowhead symbol, within an
equilateral triangle, is intended to alert the user to the
presence of uninsulated “dangerous voltage” within
the product’s enclosure that may be of sufficient
magnitude to constitute a risk of electric shock to
persons.
The exclamation point within an equilateral triangle is
intended to alert the user to the presence of important
operating and maintenance (servicing) instructions in
the literature accompanying the appliance.
AVIS
RISQUE DE CHOC ELECTRIQUE
NE PAS OUVRIR
1. Read these instructions.
2. Keep these instructions.
3. Heed all warnings.
4. Follow all instructions.
5. Do not use this apparatus near water.
6. Clean only with dry cloth.
7. Do not block any ventilation openings. Install in
accordance with the manufacturer’s instructions.
8. Do not install near any heat sources such as
radiators, heat registers, stoves, or other apparatus
(including amplifiers) that produce heat.
9. Do not defeat the safety purpose of the polarized or
grounding-type plug. A polarized plug has two
blades with one wider than the other. A grounding
type plug has two blades and a third grounding
prong. The wide blade or the third prong are
provided for your safety. If the provided plug does
not fit into your outlet, consult an electrician for
replacement of the obsolete outlet.
10. Protect the power cord from being walked on or
pinched particularly at plugs, convenience
receptacles, and the point where they exit from the
apparatus.
11. Only use attachments/accessories specified by the
manufacturer.
12.
Use only with the cart, stand,
PORTABLE CART WARNIN
tripod, bracket, or table
specified by the
manufacturer, or sold with
the apparatus. When a cart is
used, use caution when
moving the cart/apparatus
S3125A
combination to avoid injury from tip-over.
13. Unplug this apparatus during lightning storms or
when unused for long periods of time.
14. Refer all servicing to qualified service personnel.
Servicing is required when the apparatus has been
damaged in any way, such as power-supply cord or
plug is damaged, liquid has been spilled or objects
have fallen into the apparatus, the apparatus has
been exposed to rain or moisture, does not operate
normally, or has been dropped.
15. Damage Requiring Service
Unplug the apparatus from the wall outlet and refer
servicing to qualified service personnel under the
following conditions:
A. When the power-supply cord or plug is
damaged,
B. If liquid has been spilled, or objects have fallen
into the apparatus,
C. If the apparatus has been exposed to rain or
water,
D. If the apparatus does not operate normally by
following the operating instructions. Adjust
only those controls that are covered by the
operating instructions as an improper
adjustment of other controls may result in
damage and will often require extensive work
by a qualified technician to restore the apparatus
to its normal operation,
E. If the apparatus has been dropped or damaged in
any way, and
F. When the apparatus exhibits a distinct change in
performance this indicates a need for service.
16. Object and Liquid Entry
Never push objects of any kind into the apparatus
through openings as they may touch dangerous
voltage points or short-out parts that could result in
a fire or electric shock.
The apparatus shall not be exposed to dripping or
splashing and no objects filled with liquids, such as
vases shall be placed on the apparatus.
Don’t put candles or other burning objects on top of
this unit.
17. Batteries
Always consider the environmental issues and
follow local regulations when disposing of batteries.
18. If you install the apparatus in a built-in installation,
such as a bookcase or rack, ensure that there is
adequate ventilation.
Leave 20 cm (8") of free space at the top and sides
and 10 cm (4") at the rear. The rear edge of the shelf
or board above the apparatus shall be set 10 cm (4")
away from the rear panel or wall, creating a fluelike gap for warm air to escape.
En-2
Page 3
Precautions
Contents
1. AC Fuse—The fuse is located inside the chassis
and is not user-serviceable. If power does not come
on, contact your Onkyo authorized service station.
2. Care—From time to time you should wipe off the
cabinet with a soft cloth. For heavier dirt, dampen a
soft cloth in a weak solution of mild detergent and
water, wring it out dry, and wipe off the dirt.
Following this, dry immediately with a clean cloth.
Do not use rough material, thinners, alcohol or other
chemical solvents or cloths since these may damage
the finish or remove the panel lettering.
Use a vacuum cleaner to remove dust from hard-toreach grilles.
3. Power
WARNING
BEFORE PLUGGING IN THE UNIT FOR THE
FIRST TIME, READ THE FOLLOWING
SECTION CAREFULLY.
The voltage of the available power supply differs
according to country or region. Be sure that the
power supply voltage of the area where this unit will
be used meets the required voltage (AC 120 V,
60 Hz) written on the rear panel.
The power cord plug is used to disconnect this unit
from the AC power source. Make sure that the plug
is readily operable (easily accessible) at all times.
Getting Started
Important Safety Instructions..................................... 2
Precautions ............................................................... 3
Speaker Precautions................................................. 4
Package Contents..................................................... 5
Enjoying Home Theater............................................. 6
Getting to know Your Speaker Package ...................7
Installing & Using
Connecting the Speakers ........................................10
Appendix
Troubleshooting....................................................... 12
Specifications .......................................................... 13
Universal Port Option Dock for iPod
®
Universal Port Option Dock for iPod
..................... 14
®
For Canadian Models
NOTE: THIS CLASS B DIGITAL APPARATUS
COMPLIES WITH CANADIAN ICES-003.
For models having a power cord with a polarized plug:
CAUTION: TO PREVENT ELECTRIC SHOCK,
MATCH WIDE BLADE OF PLUG TO WIDE SLOT,
FULLY INSERT.
Modèle pour les Canadien
REMARQUE: CET APPAREIL NUMÉRIQUE DE
LA CLASSE B EST CONFORME À LA NORME
NMB-003 DU CANADA.
Sur les modèles dont la fiche est polarisée:
ATTENTION: POUR ÉVITER LES CHOCS
ÉLECTRIQUES, INTRODUIRE LA LAME LA PLUS
LARGE DE LA FICHE DANS LA BORNE
CORRESPONDANTE DE LA PRISE ET POUSSER
JUSQU’AU FOND.
En-3
Page 4

Speaker Precautions
Placement
• The speaker cabinets are made out of wood and are
therefore sensitive to extreme temperatures and
humidity, do not put them in locations subject to direct
sunlight or in humid places, such as near an air
conditioner, humidifier, bathroom, or kitchen.
• Do not put water or other liquids close to the speakers.
If liquid is spilled over the speakers, the drive units
may be damaged.
• Speakers should only be placed on sturdy, flat surfaces
that are free from vibration. Putting them on uneven or
unstable surfaces, where they may fall and cause
damage, will affect the sound quality.
• Subwoofer is designed to be used in the upright
vertical position only. Do not use it in the horizontal or
tilted position.
• If the unit is used near a turntable, CD player or DVD
player, howling or slipping of sound may occur. To
prevent this, move the unit away from the turntable,
CD player or DVD player otherwise lower the unit’s
output level.
Using Close to a TV or Computer
TVs and computer monitors are magnetically sensitive
devices and as such are likely to suffer discoloration or
picture distortion when conventional speakers are placed
nearby. In such situations, try moving the speakers away
from your TV or monitor. If discoloration should occur,
turn off your TV or monitor, wait 15 to 30 minutes, and
then turn it back on again. This normally activates the
degaussing function, which neutralizes the magnetic
field, thereby removing any discoloration effects. Note
that discoloration can also be caused by a magnet or
demagnetizing tool that’s too close to your TV or
monitor.
Input Signal Warning
The speakers can handle the specified input power when
used for normal music reproduction. If any of the
following signals are fed to them, even if the input power
is within the specified rating, excessive current may flow
in the speaker coils, causing burning or wire breakage:
1. Interstation noise from an untuned FM radio.
2. Sound from fast-forwarding a cassette tape.
3. High-pitched sounds generated by an oscillator,
electronic musical instrument, and so on.
4. Amplifier oscillation.
5. Special test tones from audio test CDs and so on.
6. Thumps and clicks caused by connecting or
disconnecting audio cables. (Always turn off your
amplifier before connecting or disconnecting
cables.)
7. Microphone feedback.
Speaker Care
Wipe the cabinet occasionally with a dry silica or soft
cloth. For heavier dirt, after dampening a soft cloth in a
weak solution of mild detergent and water and wringing
it out dry, wipe off the dirt. Then, dry immediately with
a clean cloth. Do not use rough material, thinners,
alcohol or other chemical solvents or cloths since these
could damage the finish, remove the panel lettering, or
cause discoloration. If you are using a chemical cloth,
always follow the instructions that come with the cloth.
For dust accumulated on grilles, use a vacuum cleaner or
brush it off.
Power Cord Precautions
• Before connecting the power cord, connect all of your
speakers and AV components.
• Turning on the SKW-770 may cause a momentary
power surge that might interfere with other electrical
equipment on the same circuit. If this is a problem,
plug the SKW-770 into a different branch circuit.
En-4
Page 5
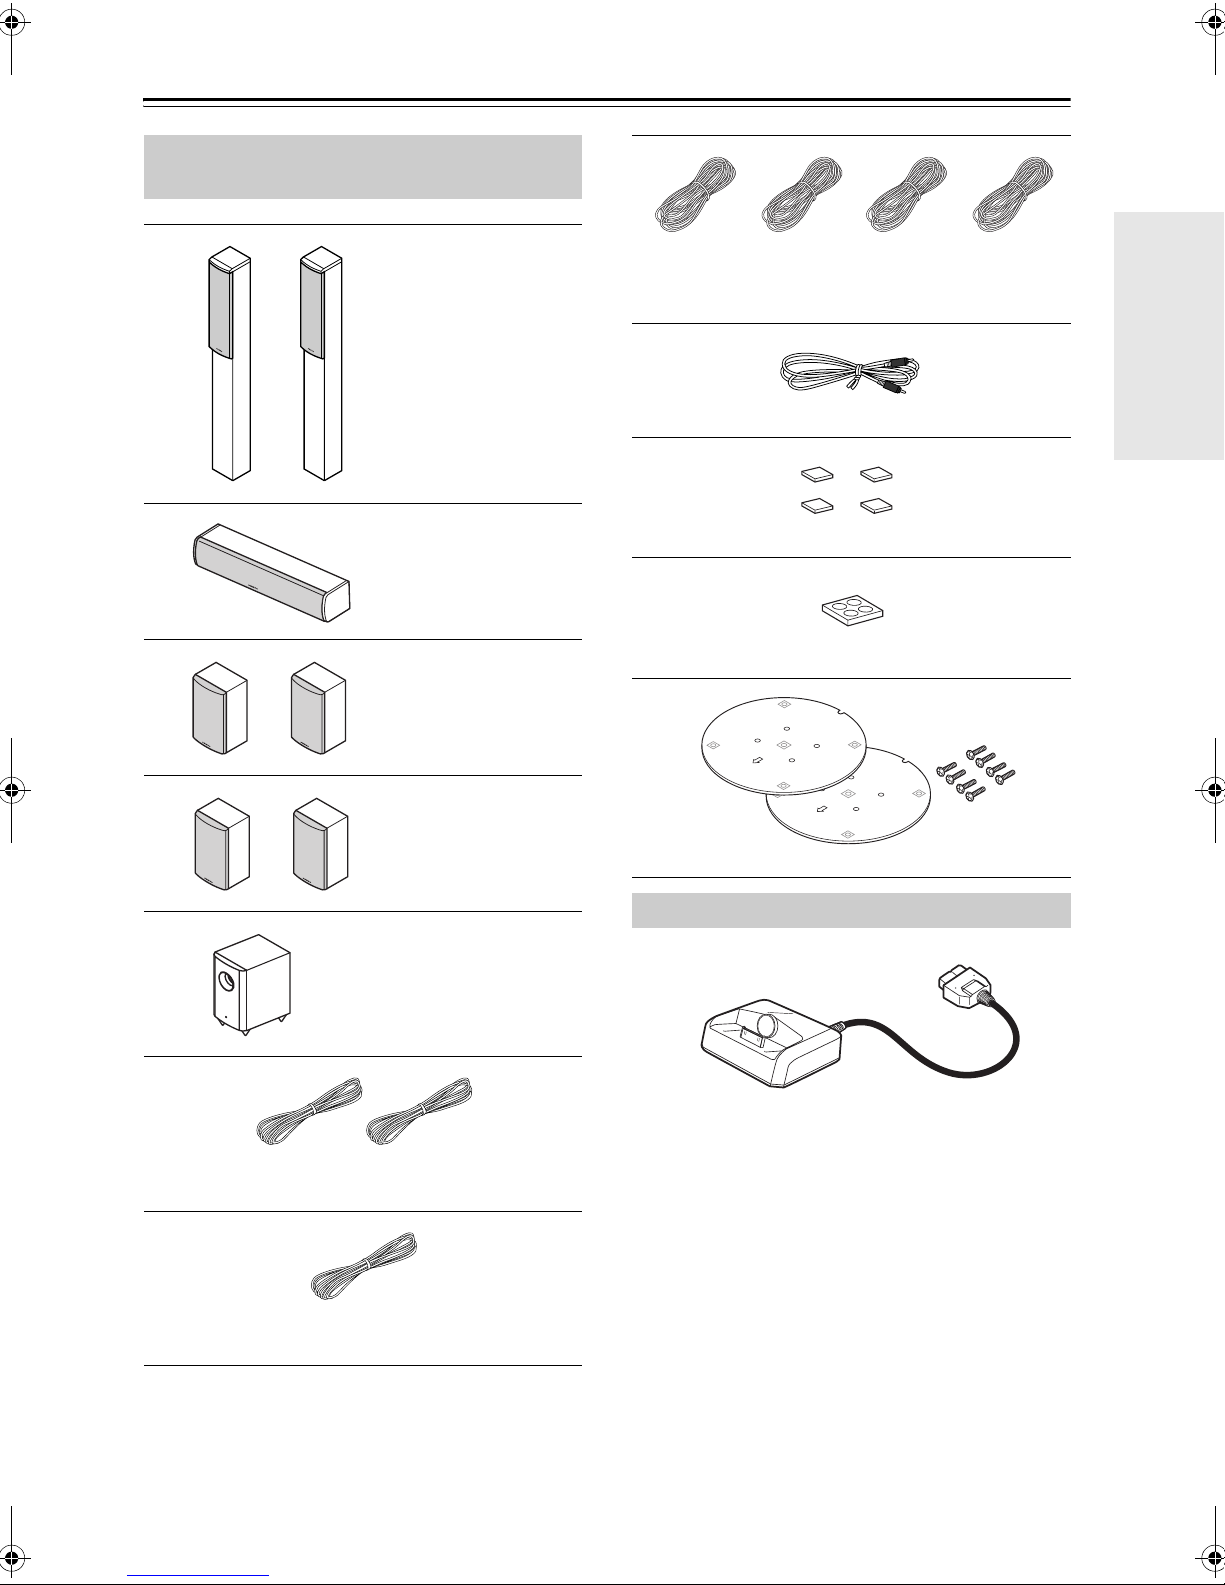
Package Contents
Speaker Package HTP-770/
SKS-HT870
Front speakers
(SKF-770)
(Blue) (Gray) (Brown) (Tan)
Speaker cables for surround and surround back
speakers 26 ft. (8.0 m)
RCA cable for subwoofer connection 10 ft. (3.0 m)
Center speaker
(SKC-770)
Surround speakers
(SKR-770)
Surround back
speakers (SKB-770)
Subwoofer (SKW-770)
4 floor pads for the subwoofer
4 cork stoppers for center speaker
2 speaker bases and 8 screws
Dock for iPod UP-A1
(Red)(White)
Speaker cables for front speakers 11 ft. (3.5 m)
(Green)
Speaker cable for center speaker 10 ft. (3.0m)
* In catalogs and on packaging, the letter at the end of the product
name indicates the color. Specifications and operation are the
same regardless of color.
En-5
Page 6
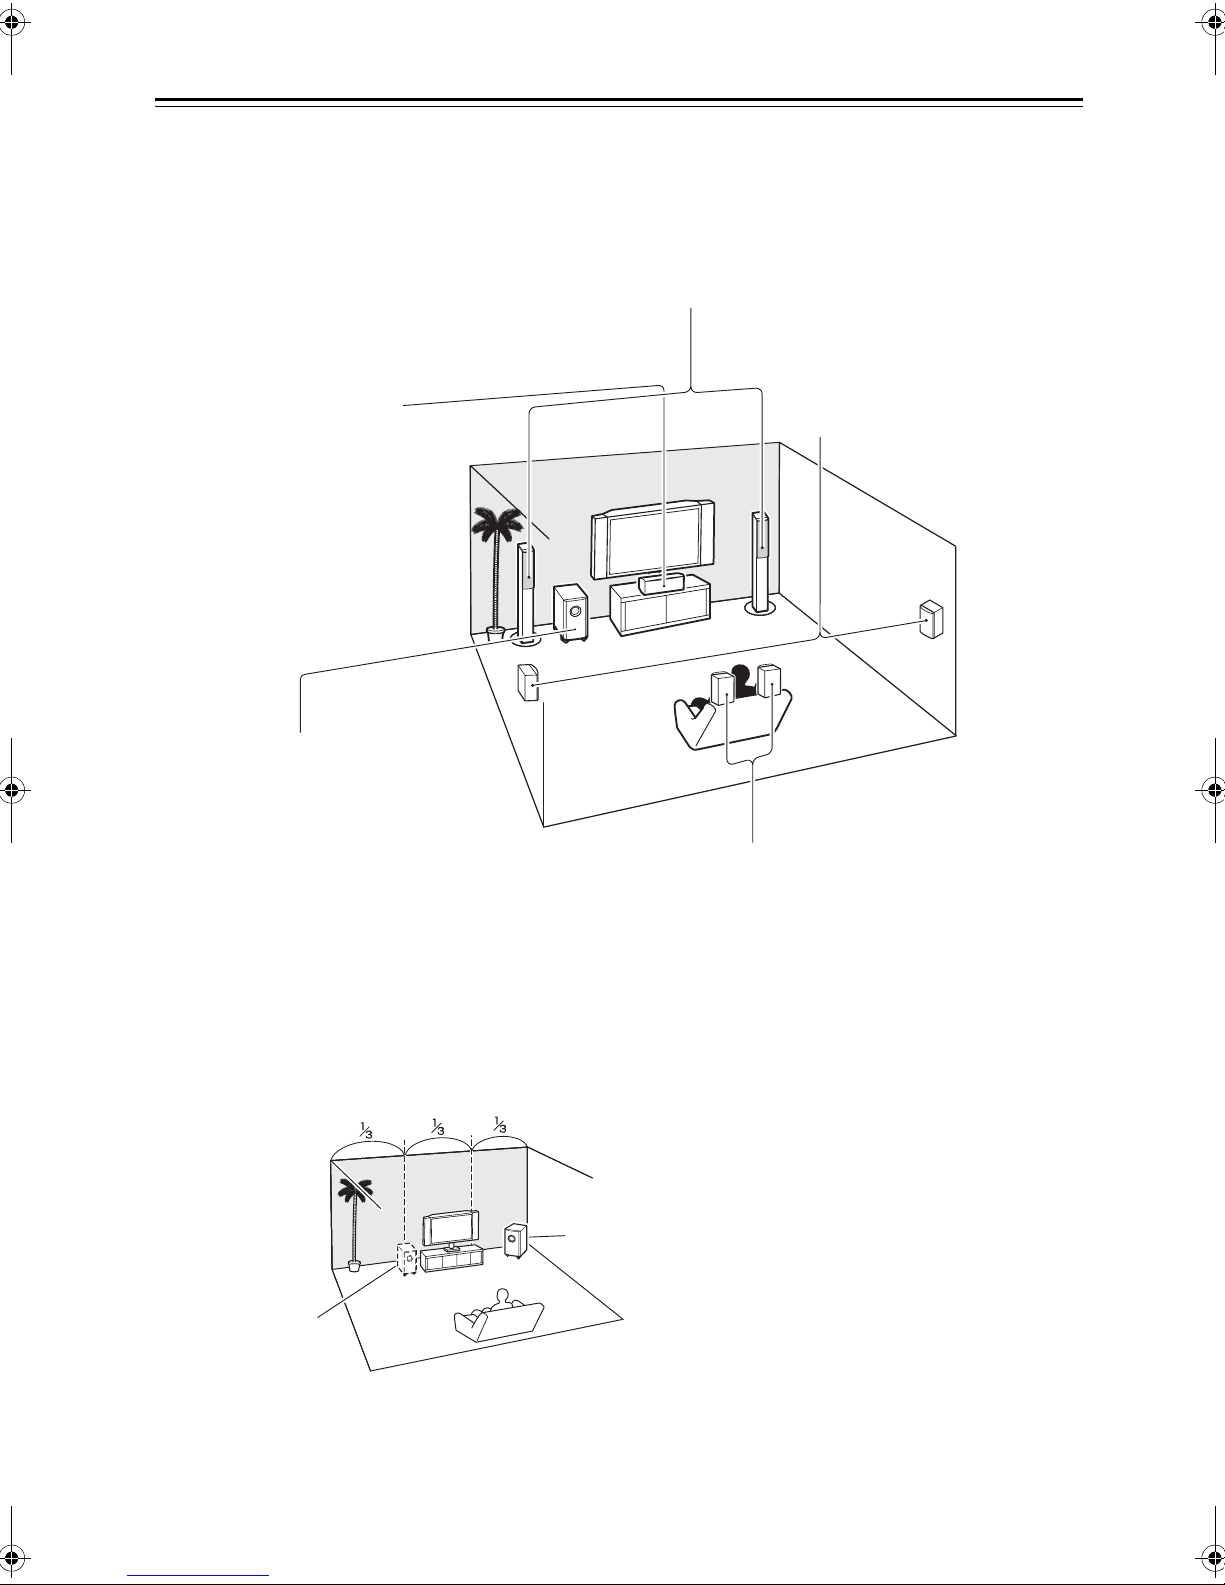
Enjoying Home Theater
The Home Theater means that you can enjoy surround sound with a real sense of movement in your own home — just
like being in a movie theater or concert hall.
Front left and right speakers (SKF-770)
These output the main sound. Their role in a home theater is to provide a solid
anchor for the sound image. They should be positioned facing the listener at
about ear level, and equally spaced from the TV. Angle them inward slightly so
as to create a triangle, with the listener at the apex.
Center speaker (SKC-770)
This speaker enhances the front left
and right speakers, making sound
movements distinct and providing a
full sound image. For movies it’s used
mainly for dialog.
Position it close to your TV (preferably
on top) facing forward at about ear
level, or at the same height as the
front left and right speakers.
Subwoofer (SKW-770)
The subwoofer handles the bass sounds of the
LFE (Low-Frequency Effects) channel. The
volume and quality of the bass output from
your subwoofer will depend on its position, the
shape of your listening room, and your
listening position. In general, a good bass
sound can be obtained by installing the
subwoofer in a front corner, or at one-third the
way along the front wall, as shown.
Tip: To find the best position for your
subwoofer, while playing a movie or some
music with good bass, experiment by placing
your subwoofer at various positions within the
room and choose the one that provides the
most satisfying results.
Surround back left and right speakers (SKB-770)
These speakers are necessary to enjoy Dolby Digital
EX, DTS-ES Matrix, DTS-ES Discrete, etc. They
enhance the realism of surround sound and improve
sound localization behind the listener. Position them
behind the listener about 2 to 3 feet (60 to 100 cm)
above ear level.
Surround left and right speakers
(SKR-770)
These speakers are used for precise
sound positioning and to add realistic
ambience.
Position them at the sides of the
listener, or slightly behind, about 2 to
3 feet (60 to 100 cm) above ear level.
Ideally they should be equally spaced
from the listener.
1/3 of wall
position
En-6
Corner
position
Page 7
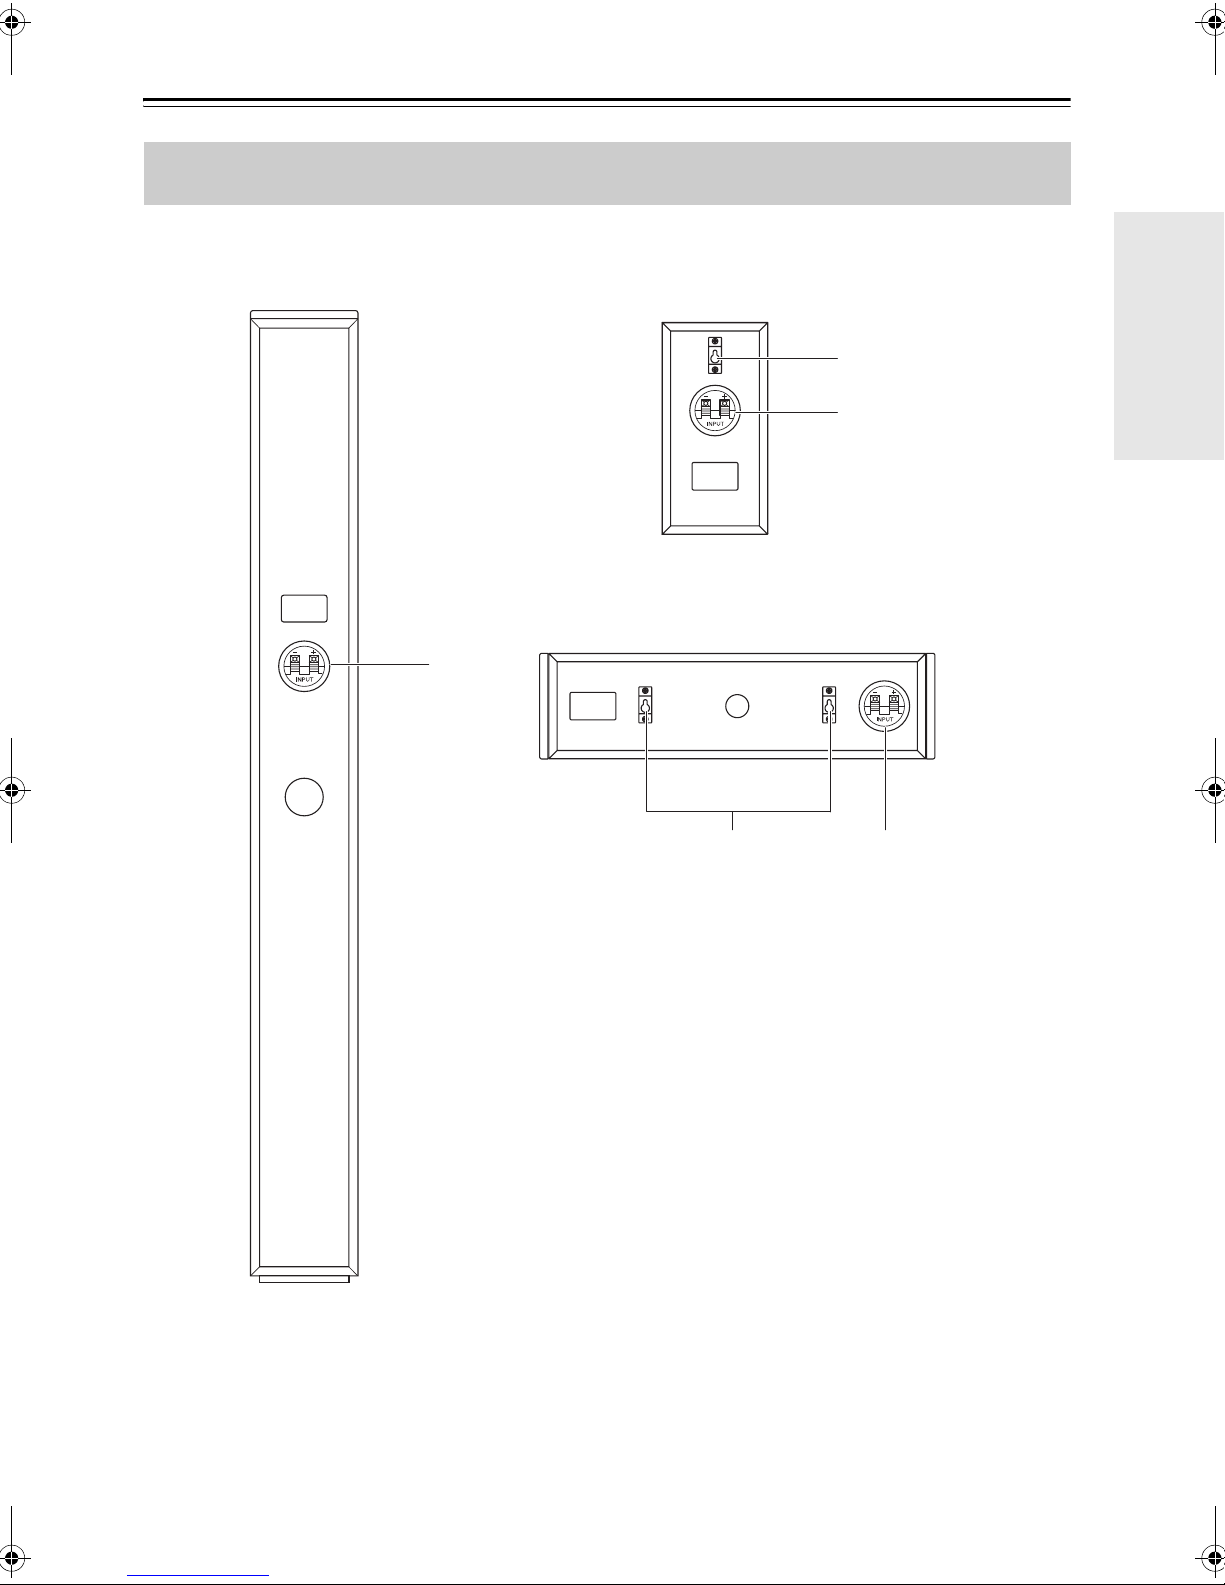
Getting to know Your Speaker Package
Front, Center, Surround, and Surround Back Speakers
(SKF-770, SKC-770, SKR-770, and SKB-770)
■ Rear
SKF-770
SKR-770/SKB-770
a
b
SKC-770
b
ab
a Keyhole slots
These keyhole slots can be used to wall-mount the speaker
(see page 11).
b Speaker terminals
These push terminals are for connecting the speaker to the
AV receiver with the supplied speaker cables. The supplied
speaker cables are color-coded for easy identification.
Simply connect each cable to the same-colored positive
speaker terminal.
Caution:
The front grilles are not designed to be removed so do not attempt
to remove them forcibly, as this will damage them.
En-7
Page 8
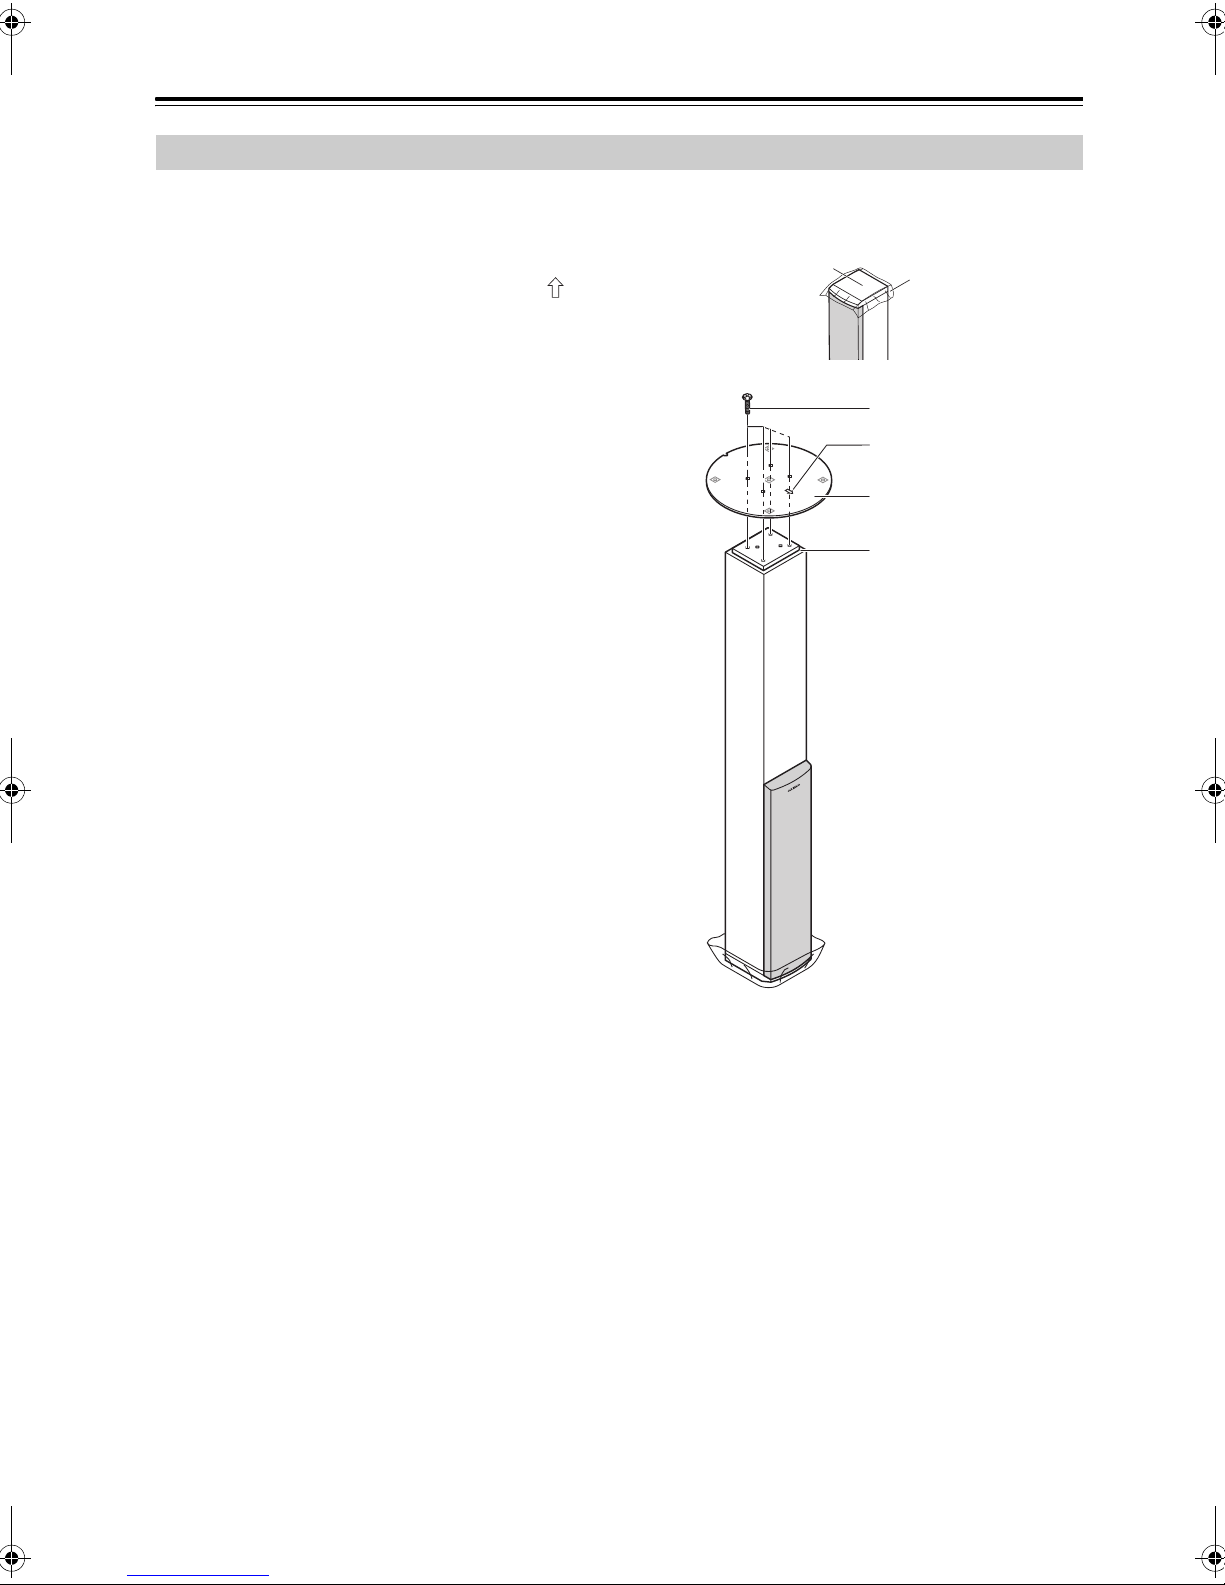
Getting to know Your Speaker Package—Continued
Attaching the Speaker Bases
Before you connect the speakers, attach the supplied
speaker base to each SKF-770.
1. Turn the speaker upside down with the protection
cover attached.
2. Align the speaker base while the arrow mark is
headed in the same direction as the speaker’s face.
Be careful not to tip over the speaker.
3. Align the screw holes on the speaker base with
those on the bottom of each speaker, and affix the
speaker base using the supplied screws.
Recommended torque is 10 kgf·cm (9 lbf·in).
Be careful not to tip over the speaker.
4. Turn the speaker right side up.
5. Remove the protection cover.
SAFETY PRECAUTIONS:
• Attach the speaker bases in a manner that will not
allow the speakers to tip over.
• Be sure to tighten the screws when you attach the
speaker bases.
• Attach the speaker bases on a flat, level, and stable
floor.
• After you attach the speaker bases, make sure that the
speakers stand upright and are stable.
Top of SKF-770
Protection cover
Supplied screws
Arrow mark
Speaker base
Bottom of SKF-770
En-8
Page 9
Getting to know Your Speaker Package—Continued
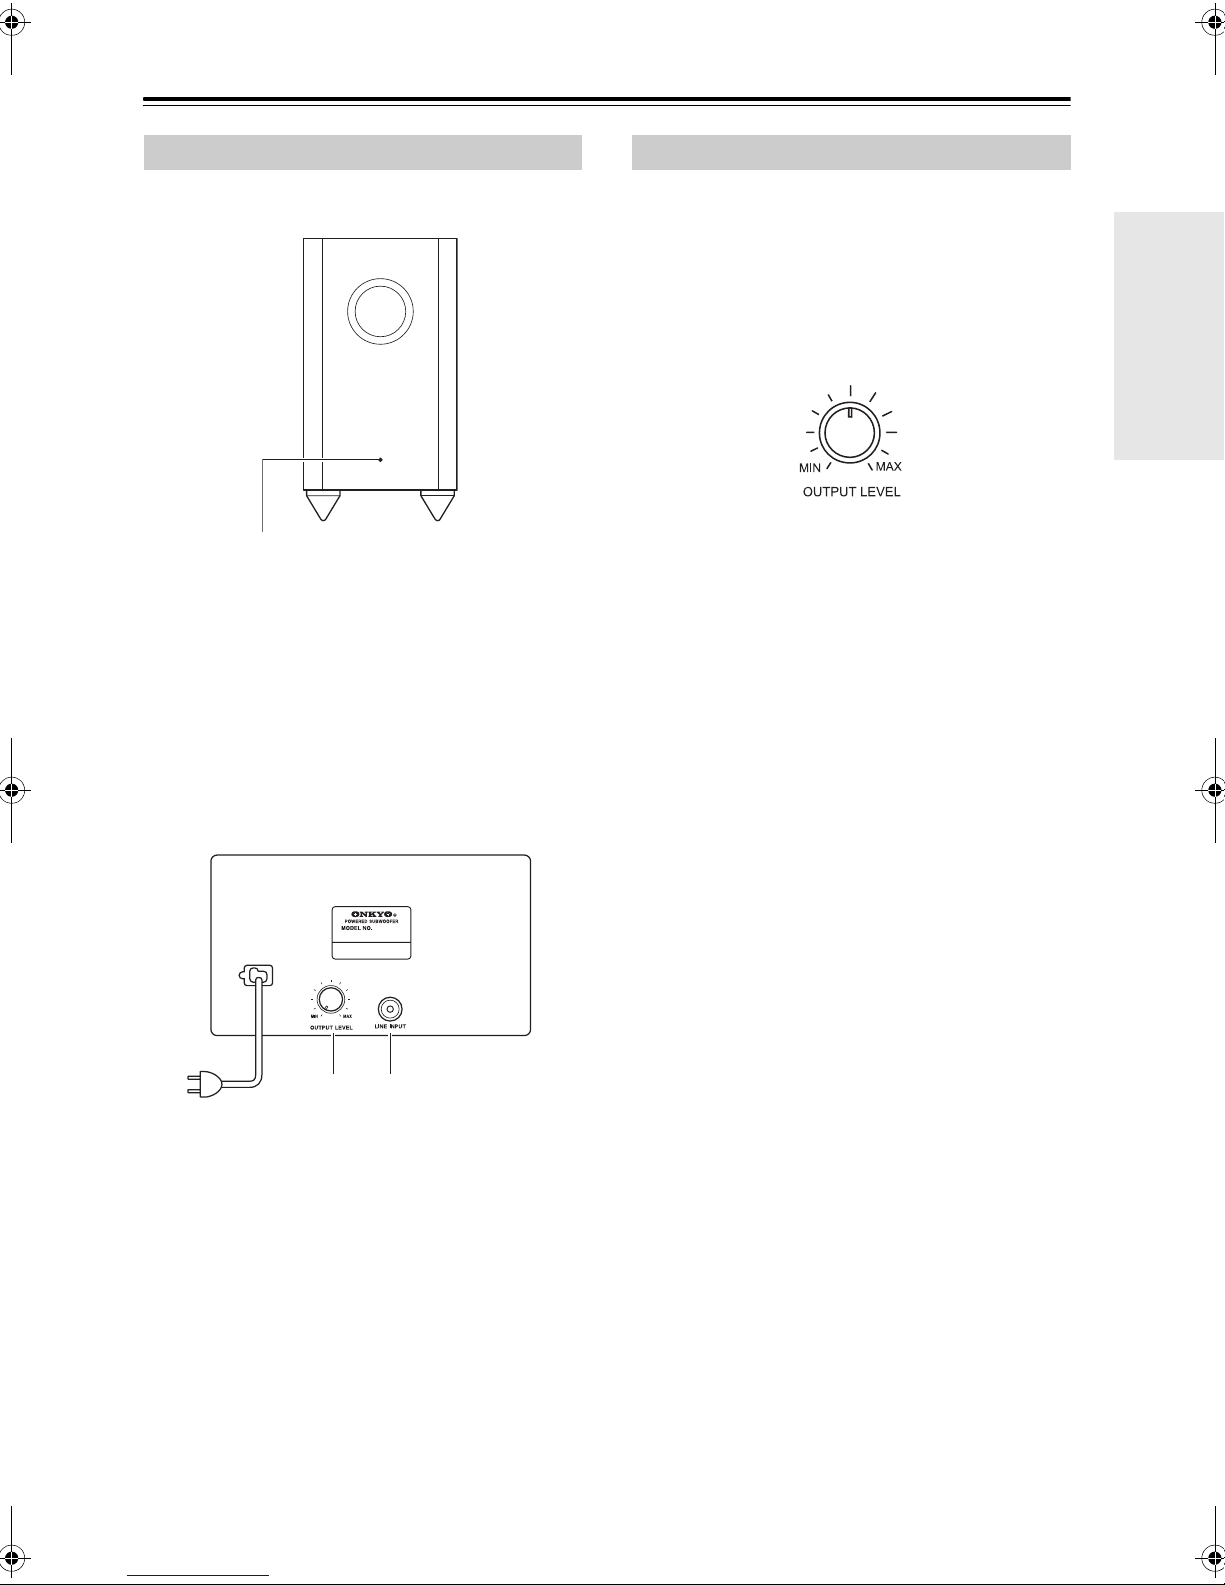
Subwoofer (SKW-770)
■ Front
STANDBY/ON indicator
STANDBY/ON indicator
Red: Subwoofer in standby mode
Blue: Subwoofer on
With the Auto Standby function, the SKW-770
automatically turns on when an input signal is
detected in Standby mode. When there’s no input
signal for a while, the SKW-770 automatically
enters Standby mode.
Setting the Subwoofer Level
To set the level of the subwoofer, use the OUTPUT
LEVEL control. Set it so that bass sounds are evenly
balanced with the treble sounds from the other speakers.
Because our ears are less sensitive to very low bass
sounds, there’s a temptation to set the level of the
subwoofer too high. As a rule of thumb, set the
subwoofer level to what you think is the optimal level,
and then back it off slightly.
■ Rear
SKW-770
ab
To AC outlet
a OUTPUT LEVEL control
This control is used to adjust the volume of the
subwoofer.
b LINE INPUT
This RCA input should be connected to the
subwoofer pre out on your AV receiver with
supplied RCA cable.
Note:
The Auto Standby function turns the subwoofer on when
the input signal exceeds a certain level. If the Auto
Standby function does not work reliably, try slightly
increasing or decreasing the subwoofer output level on
your receiver.
En-9
Page 10
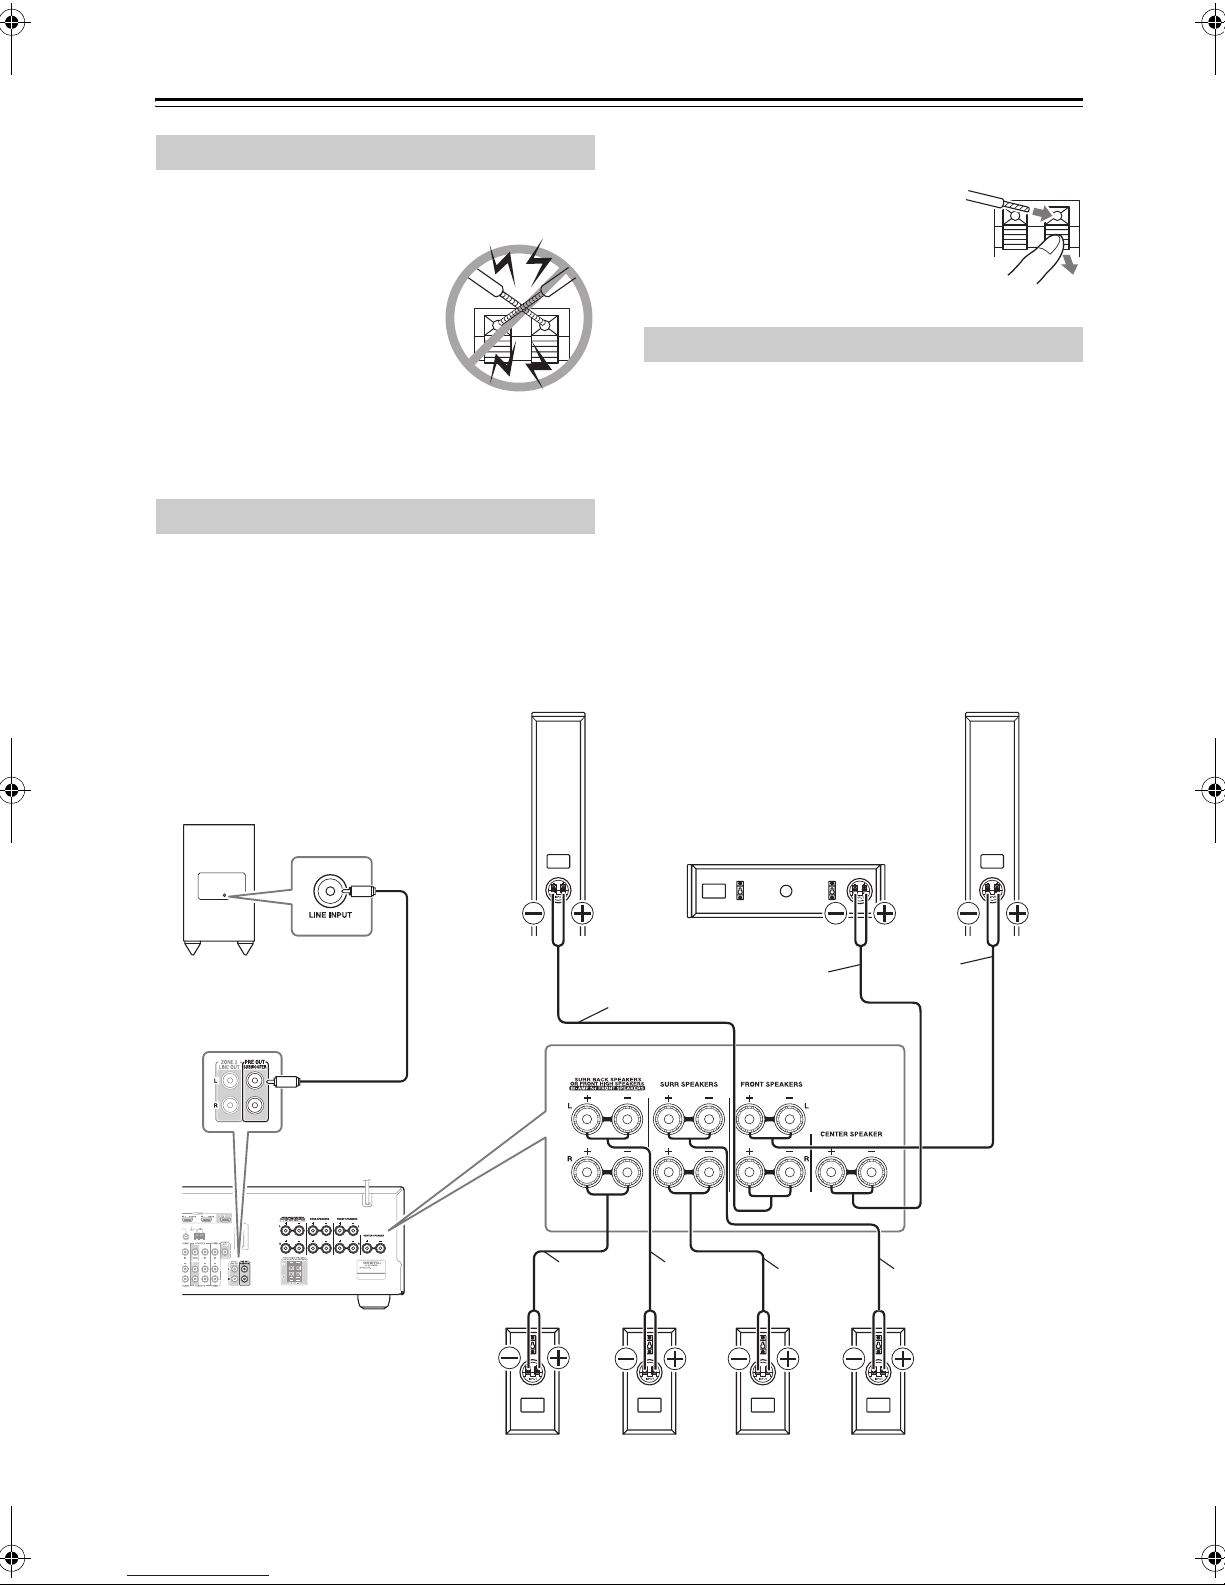
Connecting the Speakers
Speaker Connection Precautions
Read the following before connecting your speakers:
• Turn off your receiver before making any connections.
• Pay close attention to speaker
wiring polarity. Connect positive
(+) terminals to only positive (+)
terminals, and negative (–)
terminals to only negative (–)
terminals. If the speakers are
wired incorrectly, the sound will
be out of phase and will sound unnatural.
• Be careful not to short the positive and negative wires.
Doing so may damage your amp.
Connecting the Speaker Cables
Use the supplied speaker cables to connect
each speaker input terminals to the
corresponding speaker output terminals on
your receiver.
Front right
speaker
Match the color of each cable to the corresponding
speaker terminal.
To make a connection, while pressing the
terminal lever, insert the wire into the
hole, and then release the lever. Make
sure that the terminals are gripping the
bare wires, not the insulation.
Connecting the Subwoofer
Using the supplied RCA cable, connect the
subwoofer’s LINE INPUT to your receiver’s PRE
OUT: SUBWOOFER.
HT-S7200: If you are using an Onkyo HT-S7200
system, you can connect the powered subwoofer with
two PRE OUT: SUBWOOFER jacks respectively. When
using a single subwoofer, you can connect either jack.
The other jack is for connecting additional subwoofer.
Front left
speaker
Powered
subwoofer
Red
Center speaker
Green
GrayBrownTa n
White
Blue
En-10
Surround
back right
speaker
Surround
back left
speaker
Surround
right
speaker
Surround
left
speaker
Page 11
Connecting the Speakers—Continued
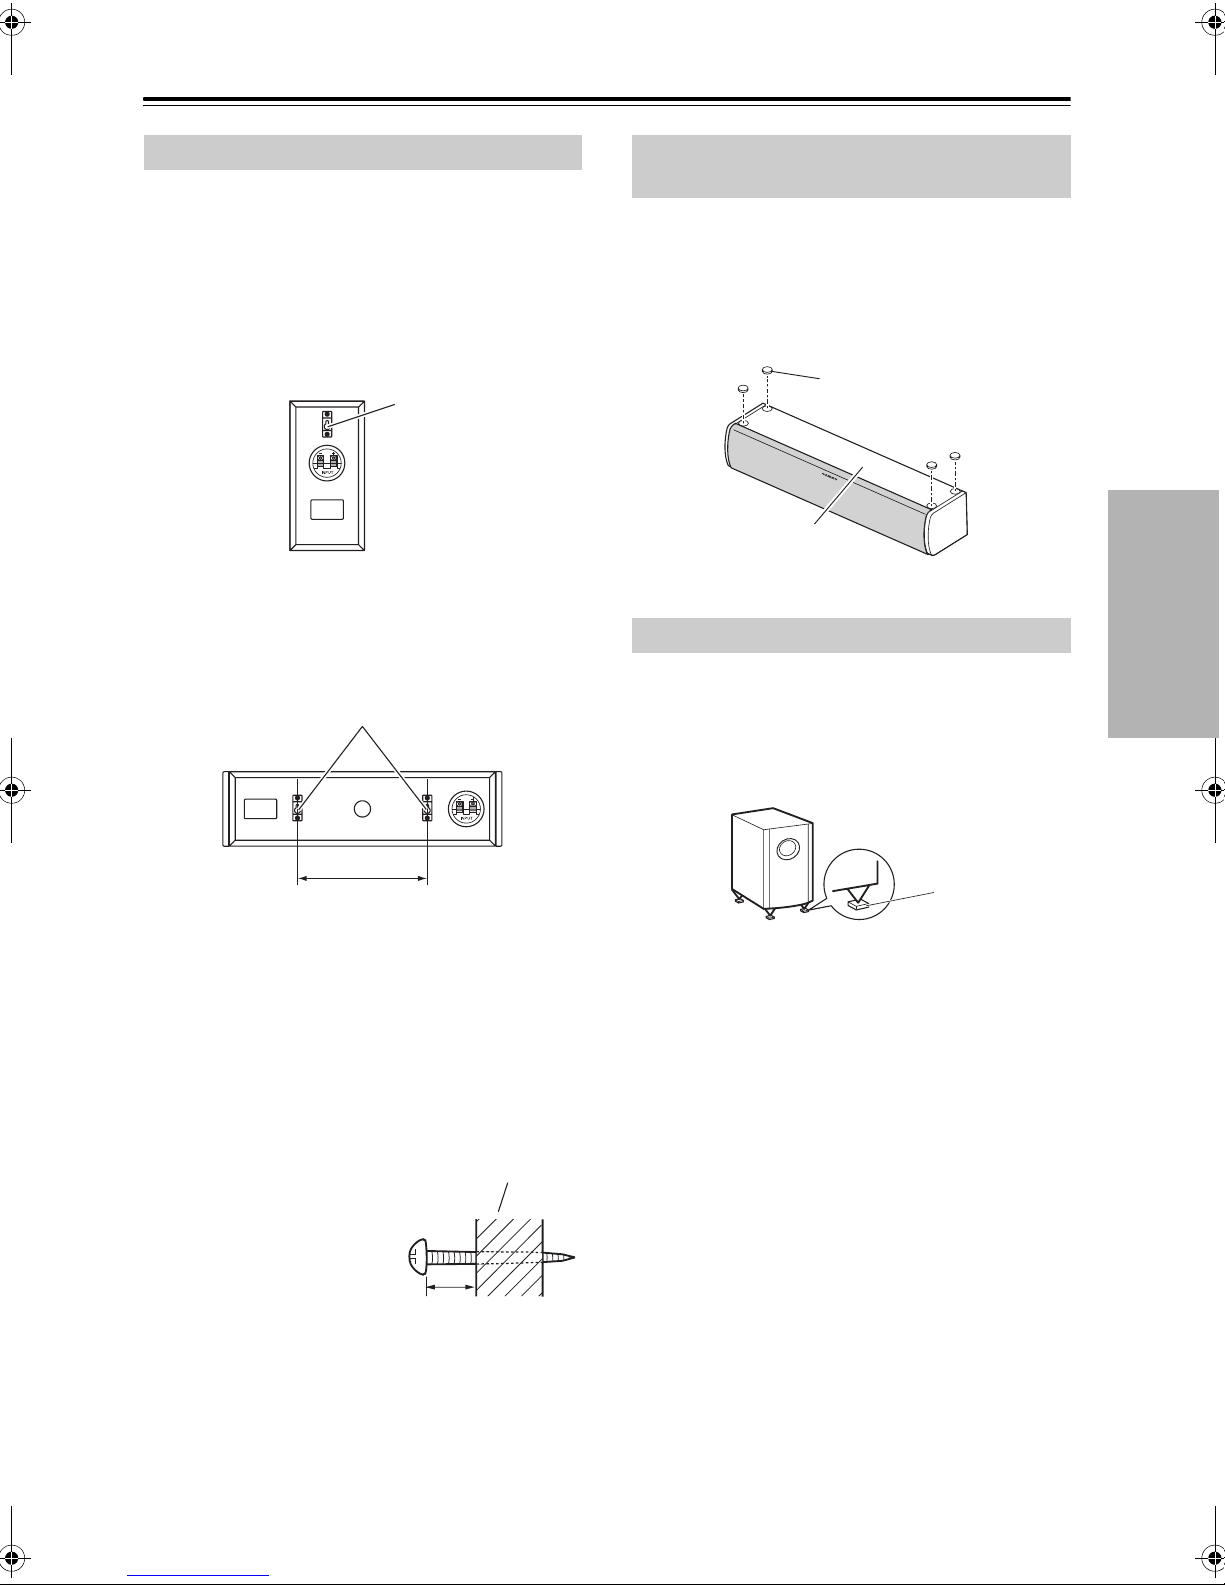
Wall Mounting
The speakers (center, surround, and surround back) can
easily be wall mounted by using the keyhole slots.
To mount the surround or surround back speakers
vertically, use the keyhole slot shown to hang each
speaker on a screw that’s securely screwed into the wall.
Surround speakers/Surround back speakers
(SKR-770/SKB-770)
Keyhole slot for wall
mounting
To mount the center speaker horizontally, use the two
keyhole slots shown to hang each speaker on two screws
that are securely screwed into the wall.
Center speaker (SKC-770)
Keyhole slots for wall mounting
Using the Cork Stoppers for a More
Stable Platform
We recommend using the provided cork stoppers to
achieve the best possible sound from your speakers. The
cork stoppers prevent the speakers from moving,
providing a more stable platform. Use stoppers for the
center speaker.
Cork stoppers
Bottom of the
SKC-770
Using the Floor Pads for Subwoofer
If the subwoofer is placed on a hard floor (wood, vinyl,
tile, etc.) and playback is very loud, the subwoofer’s feet
may damage the flooring. To prevent this, place the
supplied pads underneath the subwoofer’s feet. The pads
also provide a stable base for the subwoofer.
7-7/8" (200 mm)
Caution:
A mounting screw’s ability to support a speaker depends
on how well it’s anchored to the wall. If you have hollow
walls, screw each mounting screw into a stud. If there are
no studs, or the walls are solid, use suitable wall anchors.
Use screws with a head diameter of 5/16" (8 mm) or less
and a shank diameter of 5/32" (4 mm) or less. With
hollow walls, use a cable/pipe detector to check for any
power cables or water pipes before making any holes.
Leave a gap of between 7/32"
(5 mm) and 3/8" (10 mm)
Wall
between the wall and the base
of the screw head, as shown.
(We recommend that you
consult a home installation
professional.)
7/32" to 3/8"
(5 to 10mm)
Pad
En-11
Page 12

Troubleshooting
Symptom Possible cause Remedy
There’s no sound
coming from certain
speakers?
The subwoofer does not
turn on?
The subwoofer produces
no sound?
The subwoofer produces
hardly any sound?
A humming sound can
be heard from the
subwoofer?
The speaker cables are not connected
properly.
The speaker configuration is not set
correctly.
The power plug is not fully inserted into
the wall outlet.
The OUTPUT LEVEL control is set to
minimum.
The RCA cable is not properly connected
to the subwoofer’s LINE INPUT.
The level of the input signal was too low
and the subwoofer entered Standby
mode.
The Subwoofer configuration is not set
correctly.
The source material contain little or no
bass content.
The RCA cable is not properly connected
to the subwoofer’s LINE INPUT.
External interference from a TV or other
electronic device is being picked up.
Check the speaker cables and correct as
necessary.
Check the speaker configuration.
Insert the power plug fully into the wall
outlet.
Turn up the OUTPUT LEVEL control.
Make sure that the RCA cable is properly
connected to the subwoofer’s LINE INPUT.
Slightly increase the subwoofer pre out
output level on your AV receiver.
Check the subwoofer setting in the speaker
configuration on your AV receiver.
Choose source material with more bass
content.
Make sure that the RCA cable is properly
connected to the subwoofer’s LINE INPUT.
Move the subwoofer and RCA cable away
from the interference source. Make sure your
audio system is grounded properly.
En-12
Page 13
Specifications
■ Powered Subwoofer (SKW-770)
Type: Bass-reflex
Input sensitivity/impedance:
140 mV / 20 kΩ
Maximum output power: 290 W (Dynamic Power)
Frequency response: 25 Hz to 150 Hz
Cabinet capacity: 37 L (1.3 cubic feet)
Dimensions (W × H × D):
275 × 507 × 411 mm
(10-13/16" × 19-15/16" × 16-3/16")
(incl. projection)
Weight: 11.6 kg (25.6 lbs.)
Drivers unit: 25 cm (10") Cone Woofer × 1
Power supply: AC 120 V, 60 Hz
Power consumption: 163 W
Other: Auto Standby function
■ Front Speakers (SKF-770)
Type: 2 Way Bass-reflex
Impedance: 6 Ω
Maximum input power: 130 W
Sensitivity: 79.5 dB/W/m
Frequency response: 55 Hz to 50 kHz
Crossover frequency: 4 kHz
Cabinet capacity: 7.3 L (0.26 cubic feet)
Assembly dimensions (with supplied speaker base)
(W × H × D):
262 × 1050 × 262 mm
(10-5/16" × 41-5/16" × 10-5/16")
(incl. projection)
Weight: 5.2 kg (11.5 lbs.)
(incl. speaker base)
Drivers unit: 8 cm (3-1/4") cone (Woofer) × 2
2.5 cm (1") Balanced dome (Tweeter)
Terminal: Spring type color coded
Grille: Fixed
■ Center Speaker (SKC-770)
Type: 2 Way Bass-reflex
Impedance: 6 Ω
Maximum input power: 130 W
Sensitivity: 79 dB/W/m
Frequency response: 60 Hz to 50 kHz
Crossover frequency: 4 kHz
Cabinet capacity: 2.8 L (0.10 cubic feet)
Dimensions (W × H × D):
430 × 115 × 121 mm
(16-15/16" × 4-1/2" × 4-3/4")
(incl. grille and projection)
Weight: 2.2 kg (4.9 lbs.)
Drivers unit: 8 cm (3-1/4") Cone (Woofer) × 2
2.5 cm (1") Balanced dome (Tweeter)
Terminal: Spring type color coded
Keyhole slot: 2
Grille: Fixed
■ Surround/Surround Back Speakers
(SKR-770/SKB-770)
Type: Full-range closed box
Impedance: 6 Ω
Maximum input power: 130 W
Sensitivity: 81 dB/W/m
Frequency response: 80 Hz to 20 kHz
Cabinet capacity: 1.0 L (0.036 cubic feet)
Dimensions (W × H × D):
115 × 230 × 96 mm
(4-1/2" × 9-1/16" × 3-3/4")
(incl. grille and projection)
Weight: 1.0 kg (2.2 lbs.)
Drivers unit: 8 cm (3-1/4") Cone
Terminal: Spring type color coded
Keyhole slot: 1
Grille: Fixed
Specifications and appearance are subject to change
without prior notice.
En-13
Page 14
Universal Port Option Dock for iPod
®
WARNING:
TO REDUCE THE RISK OF FIRE OR ELECTRIC
SHOCK, DO NOT EXPOSE THIS APPARATUS TO
RAIN OR MOISTURE.
CAUTION:
TO REDUCE THE RISK OF ELECTRIC SHOCK,
DO NOT REMOVE COVER (OR BACK). NO
USER-SERVICEABLE PARTS INSIDE. REFER
SERVICING TO QUALIFIED SERVICE
PERSONNEL.
Important Safety Instructions
1. Read these instructions.
2. Keep these instructions.
3. Heed all warnings.
4. Follow all instructions.
5. Do not use this apparatus near water.
6. Clean only with dry cloth.
7. Do not install near any heat sources such as
radiators, heat registers, stoves, or other apparatus
that produce heat.
8. Protect the connection cord from being walked on.
9. Unplug this apparatus during lightning storms or
when unused for long periods of time.
10. Refer all servicing to qualified service personnel.
Servicing is required when the apparatus has been
damaged in any way, such as connection cord is
damaged, liquid has been spilled or objects have
fallen into the apparatus, the apparatus has been
exposed to rain or moisture, does not operate
normally, or has been dropped.
WARNING
RISK OF ELECTRIC SHOCK
DO NOT OPEN
The lightning flash with arrowhead symbol, within an
equilateral triangle, is intended to alert the user to the
presence of uninsulated “dangerous voltage” within
the product’s enclosure that may be of sufficient
magnitude to constitute a risk of electric shock to
persons.
The exclamation point within an equilateral triangle is
intended to alert the user to the presence of important
operating and maintenance (servicing) instructions in
the literature accompanying the appliance.
AVIS
RISQUE DE CHOC ELECTRIQUE
NE PAS OUVRIR
11. Damage Requiring Service
Unplug the apparatus from the AV receiver and
refer servicing to qualified service personnel under
the following conditions:
A. When the connection cord is damaged,
B. If liquid has been spilled, or objects have fallen
into the apparatus,
C. If the apparatus has been exposed to rain or
water,
D. If the apparatus does not operate normally by
following the operating instructions. Adjust
only those controls that are covered by the
operating instructions as an improper
adjustment of other controls may result in
damage and will often require extensive work
by a qualified technician to restore the apparatus
to its normal operation,
E. If the apparatus has been dropped or damaged in
any way, and
F. When the apparatus exhibits a distinct change in
performance this indicates a need for service.
En-14
Page 15

Universal Port Option Dock for iPod®—Continued
Precautions
1. Care—Occasionally you should dust the unit all
over with a soft cloth. For stubborn stains, use a soft
cloth dampened with a weak solution of mild
detergent and water. Dry the unit immediately
afterwards with a clean cloth. Don’t use abrasive
cloths, thinners, alcohol, or other chemical solvents,
because they may damage the finish or remove the
panel lettering.
2. Never Touch this Unit with Wet Hands—Never
handle this unit or its connection cord while your
hands are wet or damp. If water or any other liquid
gets inside this unit, have it checked by your Onkyo
dealer.
For U.S. models
FCC Information for User
CAUTION: The user changes or modifications not
expressly approved by the party responsible for
compliance could void the user’s authority to operate the
equipment.
NOTE:
This equipment has been tested and found to comply
with the limits for a Class B digital device, pursuant to
Part 15 of the FCC Rules. These limits are designed to
provide reasonable protection against harmful
interference in a residential installation.
This equipment generates, uses and can radiate radio
frequency energy and, if not installed and used in
accordance with the instructions, may cause harmful
interference to radio communications. However, there is
no guarantee that interference will not occur in a
particular installation. If this equipment does cause
harmful interference to radio or television reception,
which can be determined by turning the equipment off
and on, the user is encouraged to try to correct the
interference by one or more of the following measures:
• Reorient or relocate the receiving antenna.
• Increase the separation between the equipment and
receiver.
• Connect the equipment into an outlet on a circuit
different from that to which the receiver is connected.
• Consult the dealer or an experienced radio/TV
technician for help.
For Canadian Models
For models having a power cord with a polarized plug:
CAUTION: TO PREVENT ELECTRIC SHOCK,
MATCH WIDE BLADE OF PLUG TO WIDE SLOT,
FULLY INSERT.
Modèle canadien
Sur les modèles dont la fiche est polarisée:
ATTENTION: POUR ÉVITER LES CHOCS
ÉLECTRIQUES, INTRODUIRE LA LAME LA PLUS
LARGE DE LA FICHE DANS LA BORNE
CORRESPONDANTE DE LA PRISE ET POUSSER
JUSQU’AU FOND.
About the UP-A1
With the UP-A1 connected to an Onkyo Universal Portcapable AV receiver, you can enjoy the music stored on
your iPod
UP-A1. And, you can charge your iPod or iPhone while
listening to your music.
Notes:
• Before using the UP-A1, update your iPod or iPhone
• For the latest information on the UP-A1, see the
• The instructions in this manual apply to the iPod and
*1 iPod is a trademark of Apple Inc., registered in the U.S. and
*2 iPhone is a trademark of Apple Inc.
* “Made for iPod” means that an electronic accessory has been
Compatible iPod/iPhone models
• All iPhone models
• iPod touch (2nd generation)
• iPod touch (1st generation)
• iPod classic
• iPod (5th generation)
• iPod (4th generation)
• iPod nano (4th generation)
• iPod nano (3rd generation)
• iPod nano (2nd generation)
• iPod nano (1st generation)
• iPod mini
*1
or iPhone*2 simply by inserting it into the
with the latest software, available from the Apple Web
site at: www.apple.com
Onkyo Web site at: www.onkyo.com
iPhone as of December 2008, and may change with
future upgrades to the iPod or iPhone software.
other countries.
designed to connect specifically to iPod and has been certified
by the developer to meet Apple performance standards.
“Works with iPhone” means that an electronic accessory has
been designed to connect specifically to iPhone and has been
certified by the developer to meet Apple performance standards.
Apple is not responsible for the operation of this device or its
compliance with safety and regulatory standards.
En-15
Page 16
Universal Port Option Dock for iPod®—Continued
Getting to Know the UP-A1
Adapter
Dock connector
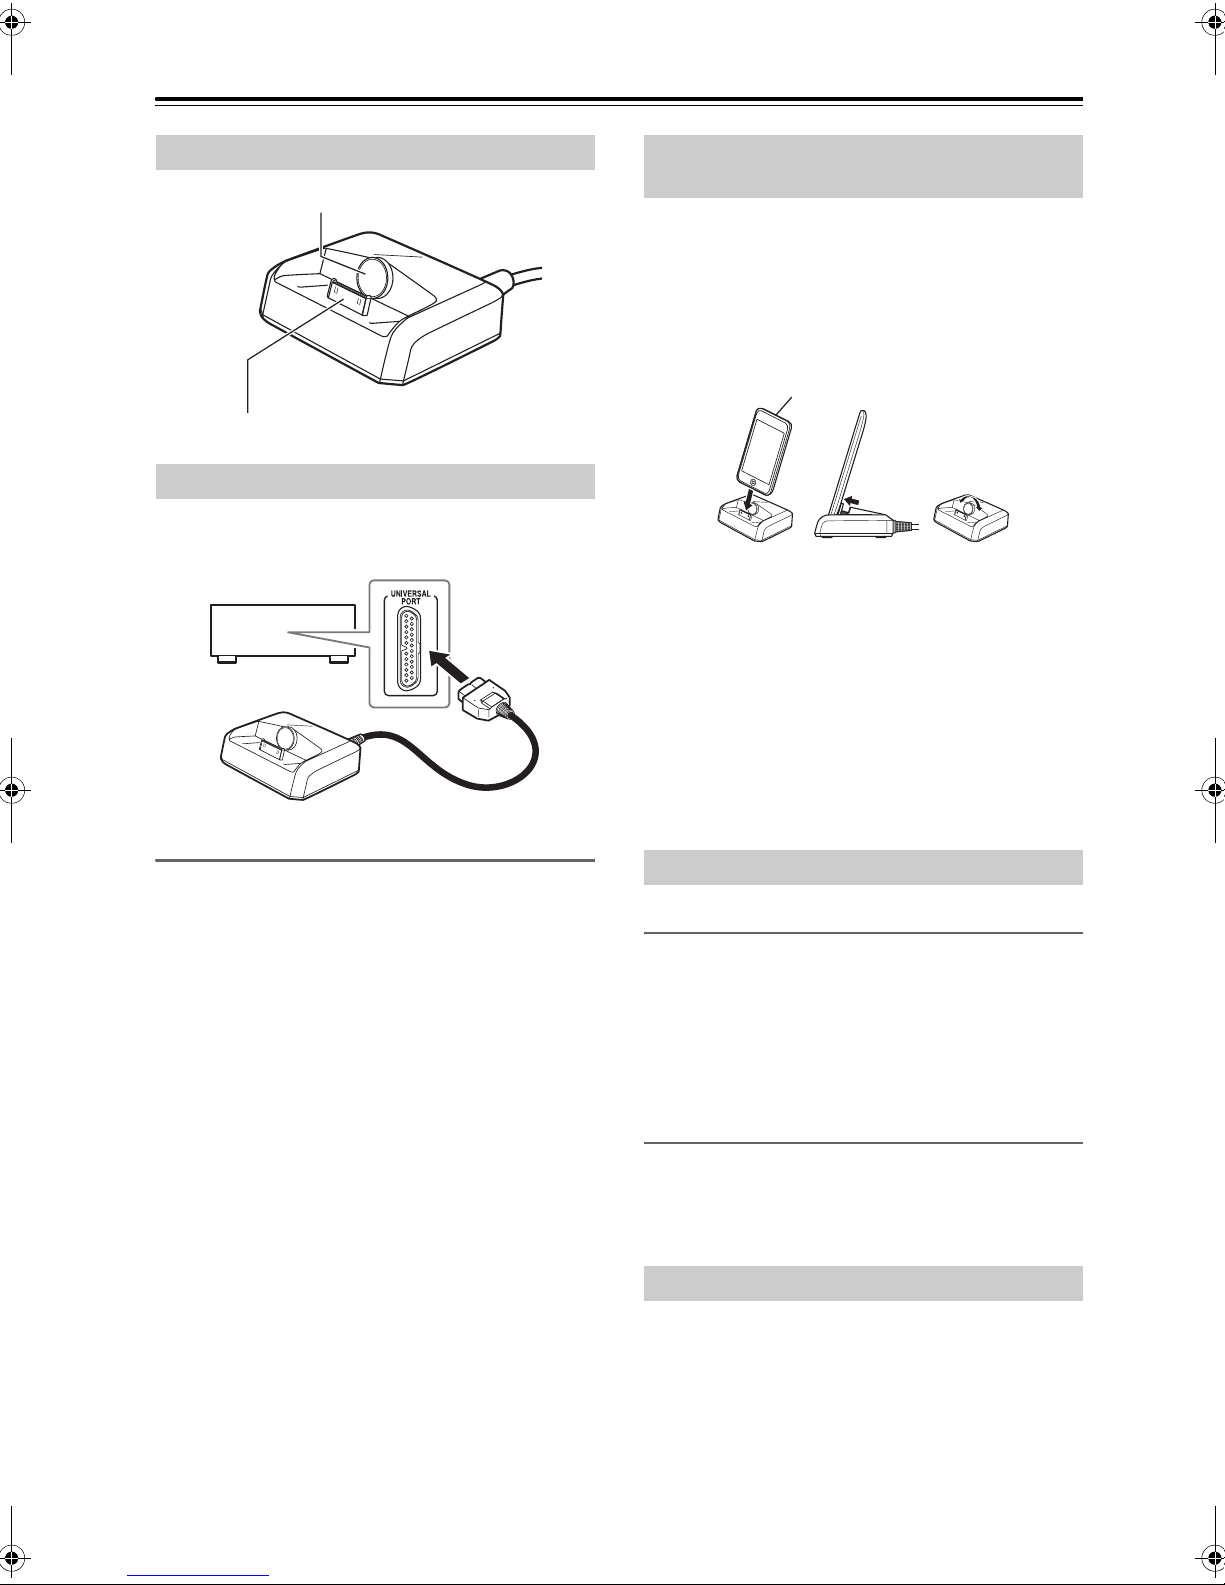
Connecting the UP-A1
Connect the UP-A1 to the Universal Port on your Onkyo
AV receiver as shown.
Onkyo AV receiver
About Operation
Functionality depends on your iPod or iPhone model and
generation and your AV receiver model and generation.
Putting Your iPod/iPhone in the
UP-A1
Align your iPod or iPhone with the UP-A1’s dock
connector and push it down so that it’s fully seated. If
there’s a gap between the back of your iPod or iPhone
and the adapter, turn the adapter counterclockwise to
close the gap. Turning the adapter counterclockwise
moves it forward. Turning it clockwise moves it
backward.
Remove case (if fitted)
Notes:
• Remove the case, if fitted, from your iPod or iPhone
before inserting it into the UP-A1. Otherwise, a poor
connection may result in no sound or remote control
issues.
• To prevent damage to the dock connector, don’t twist
your iPod or iPhone when inserting or removing it,
and be careful not to knock over the UP-A1 while your
iPod or iPhone is inserted.
• Don’t use the UP-A1 with any other iPod or iPhone
accessories, such as FM transmitters and
microphones, because they may cause a malfunction.
Troubleshooting
There’s no sound
• Make sure your iPod or iPhone is playing.
• Make sure your iPod or iPhone is inserted properly in
the UP-A1.
• Make sure your AV receiver is turned on, the correct
input source is selected, and the volume is turned up.
• Make sure all plugs are pushed in all the way.
FM/AM radio is noisy
• If there’s any noise when listening to FM/AM radio on
your tuner or receiver, try moving the antenna cable
away from the UP-A1 and iPod or iPhone. Also, keep
the antenna cable away from other cables.
Specifications
Weight: 170 g (6 ounces)
Dimensions (W × H × D): 83 × 33 × 74 mm
(3-1/4" × 1-5/16" × 2-15/16")
En-16
Page 17

Memo
En-17
Page 18

ATTENTION:
AFIN DE REDUIRE LES RISQUES D’INCENDIE
ET DE DECHARGE ELECTRIQUE, NE PAS EXPOSER CET APPAREIL A LA PLUIE OU A
L’HUMIDITE.
DANGER:
AFIN D’EVITER TOUT DANGER DE DECHARGE ELECTRIQUE, NE PAS OUVRIR LE BOITIER
(OU L’ARRIERE) DE L’APPAREIL. CONFIER
TOUT TRAVAIL D’ENTRETIEN OU DE REPARATION A UN TECHNICIEN QUALIFIE.
Remarques importantes pour votre sécurité
WARNING
RISK OF ELECTRIC SHOCK
DO NOT OPEN
Un symbole d’éclair fléché dans un triangle
équilatéral est destiné à attirer l’attention de
l’utilisateur sur le fait que certains organes internes
non-isolés de l’appareil sont traversés par un courant
électrique assez dangereux pour constituer un resque
d’électrocution.
Un point d’exclamation dans un triangle équilatéral
est destiné à attirer l’attention de l’utilisateur sur des
instructions importantes relatives à l’entretien et à
l’utilisation du produit.
AVIS
RISQUE DE CHOC ELECTRIQUE
OUVRIR
NE PAS
1. Veuillez lire ces instructions.
2. Veuillez conserver ces instructions.
3. Respectez tous les avertissements.
4. Suivez toutes les instructions.
5. Ne vous servez pas de cet appareil à proximité
d’eau.
6. Essuyez le boîtier avec un chiffon sec uniquement.
7. Ne bloquez pas les orifices d’aération. Installez cet
appareil en suivant les instructions du fabricant.
Ne le placez pas à proximité de sources de chaleur
8.
telles que radiateurs, chauffage, poêles ou autre
dispositif (y compris les amplificateurs) générateur de
chaleur.
9. N’essayez pas de circonvenir le dispositif de
sécurité que représente une fiche polarisée ou une
fiche avec mise à la terre. Une fiche polarisée
dispose de deux lames dont l’une est plus large que
l’autre. Une fiche avec terre est munie de deux
lames ainsi que d’une broche de mise à la terre. La
lame la plus large ou la broche assurent votre
sécurité. Si la fiche fournie ne peut être insérée dans
la prise murale, demandez à un électricien de
remplacer la prise.
10. Protégez le cordon d’alimentation en évitant qu’on
ne marche pas dessus et qu’il ne soit plié
(notamment au niveau des fiches, des cache-câbles
et de la sortie de l’appareil).
11. Servez-vous exclusivement des fixations/
accessoires préconisés par le fabricant.
12. Utilisez exclusivement le
chariot, le support, le trépied,
AVERTISSEMENT POUR
SUPPORTS À ROULETTES
la fixation ou la table
spécifié(e) par le fabricant ou
vendu(e) avec l’appareil. Un
chariot contenant l’appareil
doit toujours être déplacé
avec précaution pour éviter
S3125A
qu’il ne se renverse et blesse quelqu’un.
13. Débranchez l’appareil durant un orage ou lorsqu’il
reste inutilisé longtemps.
14. Veuillez faire appel à un technicien qualifié pour
l’entretien. Un entretien est indispensable si
l’appareil a été endommagé d’une façon ou d’une
autre : cordon d’alimentation ou fiche
endommagée, liquide renversé ou chute de petits
objets dans l’appareil, exposition à la pluie ou à une
humidité excessive, fonctionnement anormal ou
chute de l’appareil.
15. Dommages nécessitant réparation
Débranchez l’appareil du secteur et confiez-le à un
technicien qualifié lorsque :
A. Le cordon d’alimentation ou sa fiche sont
endommagés.
B. Des objets sont tombés dans l’appareil ou du
liquide a été renversé et a pénétré ce dernier.
C. L’appareil a été exposé à la pluie.
D. L’appareil ne semble pas fonctionner
normalement lorsque vous l’utilisez en
respectant les instructions données. N’effectuez
que les réglages préconisés dans le manuel car
un mauvais réglage d’autres commandes risque
d’endommager l’appareil et nécessitera un long
travail de remise en état par un technicien
qualifié.
E. L’appareil est tombé ou son boîtier est
endommagé.
F. Ses performances semblent affectées.
16. Pénétration de corps étrangers et de liquide
Veillez à ne pas insérer d’objets à l’intérieur de
l’appareil car ils pourraient toucher des points de
tension dangereux ou provoquer des court-circuits :
il y a risque d’incendie ou d’électrocution.
Veillez à ne jamais exposer l’appareil à des gouttes
ou des jets d’eau. Ne déposez aucun objet contenant
un liquide (un vase, par exemple) sur l’appareil.
Ne déposez pas de bougies ou d’autres objets
brûlants sur cette appareil.
17. Piles
Songez à l’environnement et veillez dès lors à
respecter les consignes officielles pour la
liquidation de piles épuisées.
18. Veillez à n’installer cet appareil que dans un rack ou
un meuble qui n’entrave pas la ventilation.
Laissez un espace libre de 20 cm au-dessus et à côté
de l’appareil ainsi que 10 cm en face arrière. La face
arrière du rack ou du meuble doit se trouver à 10 cm
ou plus du mur pour assurer une aération adéquate
en vue de dissiper la chaleur.
Fr-2
Page 19

Précautions
Table des matères
1. Fusible—Le fusible à l’intérieur du appareil ne peut
pas être remplacé par l’utilisateur. Si vous n’arrivez
pas à mettre l’appareil sous tension, adressez-vous à
votre revendeur Onkyo.
2. Entretien—Essuyez régulièrement le boîtier de
l’appareil avec un chiffon doux et sec. Vous pouvez
éliminer les taches rebelles avec un chiffon
légèrement imbibé d’eau et de détergent doux.
Essuyez ensuite l’appareil avec un chiffon propre et
sec. N’utilisez jamais de chiffons rêches, de
dissolvant, d’alcool ou d’autres solvants chimiques
car ceux-ci pourraient endommager la finition ou
faire disparaître la sérigraphie du boîtier.
3. Alimentation
AVERTISSEMENT
LISEZ LES CONSIGNES SUIVANTES AVANT
DE BRANCHER L’APPAREIL AU SECTEUR
POUR LA PREMIÈRE FOIS.
La tension du secteur change selon le pays. Vérifiez
que la tension du secteur dans votre région
correspond aux caractéristiques électriques figurant
en face arrière de l’appareil (CA 120 V, 60 Hz, par
exemple).
Pour débrancher l’unité du secteur, veuillez
déconnecter le cordon d’alimentation. Songez à
faire le nécessaire pour que la fiche du cordon soit
accessible à tout moment.
Pour commencer
Remarques importantes pour votre sécurité ............. 2
Précautions ............................................................... 3
Précautions concernant les enceintes....................... 4
Contenu de l’emballage............................................. 5
Vivez une expérience
cinématographique à domicile ................................ 6
Découverte de l’ensemble d’enceintes...................... 7
Installation et utilisation
Branchement des enceintes.................................... 10
Annexe
Dépannage.............................................................. 12
Caractéristiques techniques.................................... 13
Option de port universel pour iPod
®
Option de port universel pour iPod
........................ 14
®
Modèle pour les Canadien
REMARQUE : CET APPAREIL NUMÉRIQUE DE
LA CLASSE B EST CONFORME À LA NORME
NMB-003 DU CANADA.
Sur les modèles dont la fiche est polarisée :
ATTENTION : POUR ÉVITER LES CHOCS
ÉLECTRIQUES, INTRODUIRE LA LAME LA PLUS
LARGE DE LA FICHE DANS LA BORNE
CORRESPONDANTE DE LA PRISE ET POUSSER
JUSQU’AU FOND.
Fr-3
Page 20

Précautions concernant les enceintes
Emplacement
• Le coffrage des enceintes est en bois, aussi, il est
sensible aux températures extrêmes et à l’humidité.
Ne placez pas les enceintes dans des endroits soumis
à la lumière directe du soleil ou à l’humidité, par
exemple, à proximité d’un climatiseur, d’un
humidificateur, dans une salle de bains ou une cuisine.
• Ne placez pas d’eau ni d’autres liquides à côté des
enceintes. Si du liquide est renversé sur les enceintes,
les amplificateurs peuvent être endommagés.
• Les enceintes doivent être placées uniquement sur des
surfaces solides et planes non soumises aux
vibrations. Les placer sur des surfaces inégales ou
instables, d’où elles pourraient tomber et causer des
dégâts, affectera la qualité sonore.
• Le subwoofer est conçu pour être utilisé en position
verticale uniquement. Ne l’utilisez pas en position
horizontale ou inclinée.
• Si l’appareil est utilisé à proximité d’une platine
disque, d’un lecteur CD ou d’un lecteur DVD, ceci
pourrait produire une réaction acoustique ou un
décalage du son. Pour empêcher ceci, éloignez
l’appareil de la platine disque, du lecteur CD ou du
lecteur DVD, ou bien réduisez le niveau de sortie de
l’appareil.
Utilisation à proximité d’un téléviseur
ou d’un ordinateur
Les téléviseurs et les moniteurs d’ordinateur sont des
appareils sensibles au magnétisme et sont susceptibles
de subir une décoloration ou une distorsion de l’image
lorsque des enceintes conventionnelles sont placées à
proximité. Dans de telles situations, essayez d’éloigner
les enceintes de votre téléviseur ou de votre moniteur. Si
une décoloration se produit, éteignez votre téléviseur ou
votre moniteur, attendez 15 à 30 minutes, puis rallumez
le téléviseur ou le moniteur. Ceci active normalement la
fonction de démagnétisation, qui neutralise le champ
magnétique, supprimant ainsi les effets de décoloration.
La décoloration peut également être causée par un
aimant ou un outil de démagnétisation se trouvant trop
près de votre téléviseur ou de votre moniteur.
Avertissement concernant le signal
d’entrée
Les enceintes peuvent supporter la puissance d’entrée
indiquée lorsqu’elles sont utilisées pour une restitution
musicale normale. Si l’un des signaux suivants leur sont
envoyés, même si la puissance d’entrée se situe dans la
norme indiquée, un courant excessif peut traverser les
bobines des enceintes, causant ainsi une brûlure ou une
rupture des fils :
1. Le bruit entre deux stations d’une radio FM non
réglée.
2. Le son d’avance rapide d’une cassette.
3. Les sons aigus créés par un oscillateur, un
instrument de musique électronique, etc.
4. L’oscillation d’un amplificateur.
5. Les tons de test spéciaux des CD de test audio, etc.
6. Les bruits sourds et les clics causés par le
branchement ou le débranchement des câbles audio.
(Éteignez toujours votre amplificateur avant de
brancher ou de débrancher les câbles.)
7. La réaction acoustique d’un microphone.
Entretien des enceintes
Essuyez de temps en temps le coffrage à l’aide d’un
chiffon au silicone sec ou doux. Pour des salissures plus
importantes, après avoir trempé un chiffon doux dans
une solution faible de produit de nettoyage doux et
l’avoir essoré, enlevez les salissures. Ensuite, essuyez
immédiatement avec un chiffon propre. N’utilise pas de
matières abrasives, de diluants, d’alcool, ou tout autre
solvant chimique ou chiffon imbibé de produit chimique,
car ceux-ci peuvent endommager la finition, enlever la
gravure du panneau, ou causer une décoloration. Si vous
utilisez un chiffon imbibé de produit chimique, suivez
toujours les instructions fournies avec le chiffon. Pour
enlever la poussière accumulée sur les grilles, utilisez un
aspirateur ou une brosse.
Précautions concernant le cordon
d’alimentation
• Avant de brancher le cordon d’alimentation, branchez
toutes vos enceintes et tous vos appareils AV.
• La mise sous tension du SKW-770 peut entraîner une
surtension passagère pouvant se ressentir sur les
autres appareils électriques branchés sur le même
circuit. Si cela pose un problème, branchez le
SKW-770 sur un circuit différent.
Fr-4
Page 21

Contenu de l’emballage
Ensemble d’enceintes HTP-770/
SKS-HT870
Enceintes avant
(SKF-770)
(Bleu) (Gris) (Marron) (Marron clair)
Câbles d’enceintes pour les enceintes surround et
surround arrière 8 m (26 ft)
Câble RCA pour le branchement du subwoofer 3 m
(10 ft)
Enceinte centrale
(SKC-770)
Enceintes surround
(SKR-770)
Enceintes surround
arrière (SKB-770)
Subwoofer (SKW-770)
4 tampons de protection pour le subwoofer
4 bouchons en liège pour l’enceinte centrale
2 bases d’enceintes et 8 vis
Dock pour iPod UP-A1
(Blanc) (Rouge)
Câbles d’enceinte pour les enceintes avant 3,5 m
(11 ft)
(Vert)
Câbles d’enceinte pour les enceinte centrale 3 m
(10 ft)
* La lettre figurant derrière le nom du produit dans les catalogues
et sur l’emballage indique la couleur du produit. Les
caractéristiques techniques et le fonctionnement du produit ne
changent pas, quelle que soit la couleur du produit.
Fr-5
Page 22

Vivez une expérience cinématographique à
domicile
Grâce au Home Cinema, vous pouvez profiter d’un son surround très réaliste à votre domicile — comme si vous étiez
dans une salle de cinéma ou de concert.
Enceintes avant gauche et droite (SKF-770)
Ce sont elles qui émettent le son principal. Leur rôle dans un système Home
Cinema consiste à fournir un ancrage solide à l’image sonore. Elles doivent
être positionnées face à l’auditeur, à la hauteur des oreilles et être situées
à distance égale du téléviseur. Orientez-les légèrement vers l’intérieur de
manière à créer un triangle avec l’auditeur.
Enceinte centrale (SKC-770)
Cette enceinte complète les enceintes
avant gauche et droite et rend les
mouvements du son plus nets. Elle
fournit une image sonore complète.
Dans un film, elle sert principalement
pour les dialogues.
Positionnez-la à proximité de votre
téléviseur (de préférence dessus), face
à vous, à la hauteur des oreilles ou à la
même hauteur que les enceintes avant
gauche et droite.
Enceintes surround gauche et droite
(SKR-770)
Ces enceintes permettent d’obtenir un
positionnement précis du son et de
renforcer le réalisme.
Positionnez-les latéralement par rapport
à l’auditeur ou légèrement derrière, à
environ 60 à 100 cm (2 à 3 ft) au-dessus
du niveau des oreilles. Idéalement, elles
doivent se situer à égale distance de
l’auditeur.
Subwoofer (SKW-770)
Le subwoofer gère les graves du canal chargé
des effets LFE (effets basse fréquence). Le
volume et la qualité des sons graves émis par
le subwoofer dépendent de sa position, de la
forme de la pièce où le système est installé et
de votre position d’écoute. En général, il est
possible d’obtenir un bon son grave en
installant le subwoofer dans un coin situé
devant l’auditeur ou à environ un tiers de la
largeur du mur (cf. illustration).
Conseil : Pour trouver la meilleure position
possible pour votre subwoofer, mettez un film
ou un morceau musical comportant de bons
sons graves et faites des essais en plaçant
votre subwoofer à différents endroits de la
pièce. Choisissez celui qui offre les meilleurs
résultats.
Enceintes surround arrière gauche et droite (SKB-770)
Ces enceintes sont nécessaires pour bénéficier du son Dolby
Digital EX, DTS-ES Matrix, DTS-ES Discrete, etc. Elles
renforcent le réalisme du son surround et améliorent la
localisation du son derrière l’auditeur. Positionnez-les derrière
l’auditeur à environ 60 à 100 cm (2 à 3 ft) au-dessus du niveau
des oreilles.
Emplacement
de coin
Emplacement au
tiers de la
longueur du mur
Fr-6
Page 23

Découverte de l’ensemble d’enceintes
Enceintes avant, centrale, surround et surround arrière
(SKF-770, SKC-770, SKR-770, et SKB-770)
■ Arrière
SKF-770
SKR-770/SKB-770
a
b
SKC-770
b
ab
a Encoches en trou de serrure
Les encoches en trou de serrure servent à fixer l’enceinte au
mur (cf. page 11).
b Bornes d’enceinte
Ces bornes-poussoirs servent à brancher l’enceinte au amplituner AV à l’aide des câbles d’enceintes fournis. Les câbles
d’enceintes fournis comportent un code couleur permettant
une identification facile. Branchez simplement chaque câble
à la borne d’enceinte positive de même couleur.
Mise en garde :
Les grilles avant ne sont pas faites pour être retirées, aussi
n’essayez pas de les retirer de force, car ceci les endommagera.
Fr-7
Page 24

Découverte de l’ensemble d’enceintes— Suite
Mise en place des bases d’enceintes
Avant de brancher les enceintes, mettez en place chacune
des bases d’enceintes à chaque SKF-770.
1. Retournez l’enceinte en laissant la protection en
place.
2. Alignez la base d’enceinte, la flèche dirigée
vers la face avant de l’enceinte.
Faites attention de ne pas faire tomber l’enceinte.
3. Alignez les trous des vis de la base d’enceinte avec
ceux situés sous chaque enceinte, et fixez la base
d’enceinte à l’aide des vis fournies. Le couple
recommandé est 10 kgf·cm (9 lbf·in).
Faites attention de ne pas faire tomber l’enceinte.
4. Retournez l’enceinte.
5. Retirez la protection.
PRÉCAUTIONS DE SÉCURITÉ :
• Fixez les bases d’enceintes de façon à ce que les
enceintes ne puissent pas basculer.
• Assurez-vous de serrer les vis lorsque vous fixez les
bases d’enceintes.
• Fixez les bases d’enceintes sur un sol plat, égal et
stable.
• Après avoir fixé les bases d’enceintes, assurez-vous
que les enceintes tiennent bien droit et qu’elles sont
stables.
Dessus de la SKF-770
Protection
Vis fournies
Flèche
Base d’enceinte
Dessous de la SKF-770
Fr-8
Page 25

Découverte de l’ensemble d’enceintes— Suite
Subwoofer (SKW-770)
■ Avant
Indicateur STANDBY/ON
Indicateur STANDBY/ON
Rouge : Subwoofer en mode veille
Bleu : Subwoofer allumé
Grâce à la fonction de mise en veille automatique, la
SKW-770 s’allume automatiquement lorsqu’un
signal d’entrée est détecté en mode Veille.
Lorsqu’aucun signal d’entrée n’est transmis
pendant un certain temps, la SKW-770 passe
automatiquement en mode Veille.
Réglage du niveau sonore du
subwoofer
Pour régler le niveau sonore du subwoofer, utilisez le
bouton OUTPUT LEVEL. Réglez-le de façon à ce que
les basses soient équilibrées avec les aigus provenant des
autres enceintes. Étant donné que nos oreilles sont moins
sensibles aux basses très faibles, vous pouvez être tenté
de régler le niveau sonore du subwoofer trop haut. En
règle générale, réglez le niveau sonore du subwoofer au
niveau que vous estimez être optimal, et diminuez-le
légèrement.
■ Arrière
SKW-770
ab
Vers la prise murale
a Bouton OUTPUT LEVEL
Ce bouton sert à régler le volume sonore du
subwoofer.
b LINE INPUT
Cette entrée RCA doit être branchée à la pré-sortie
du subwoofer de votre ampli-tuner AV à l’aide du
câble RCA fourni.
Remarque :
La fonction de mise en veille automatique allume le
subwoofer lorsque le signal d’entrée dépasse un certain
niveau. Si la fonction de mise en veille automatique ne
fonctionne pas correctement, essayez d’augmenter ou de
diminuer légèrement le niveau de sortie du subwoofer de
votre récepteur.
Fr-9
Page 26

Branchement des enceintes
Précautions concernant le
branchement des enceintes
Lisez ce qui suit avant de brancher vos enceintes :
• Éteignez votre récepteur avant d’effectuer les
branchements.
• Faites très attention à respecter la
polarité des câbles de vos
enceintes. Ne branchez les bornes
positives (+) que sur les bornes
positives (+) et les bornes
négatives (–) que sur les bornes
négatives (–). Si les enceintes sont
branchées de façon incorrecte, le son sera déphasé et
ne semblera pas naturel.
• Faites attention de ne pas mettre les fils positifs et
négatifs en court-circuit. Vous risqueriez
d’endommager votre ampli.
Branchement des câbles d’enceinte
Utilisez les câbles d’enceinte fournis pour
raccorder les bornes d’entrée de chaque
Enceinte
avant droite
enceinte aux bornes de sortie d’enceinte
correspondantes de votre récepteur.
Faites correspondre la couleur de chaque câble à la borne
d’enceinte correspondante.
Pour effectuer un branchement, appuyez
sur le levier, insérez le fil dans le trou,
puis relâchez le levier. Assurez-vous que
les bornes agrippent bien les fils nus, et
non la gaine.
Branchement du subwoofer
À l’aide du câble RCA fourni, branchez la borne
LINE INPUT du subwoofer à la borne PRE OUT:
SUBWOOFER de votre récepteur.
HT-S7200 : Si vous utilisez un système Onkyo
HT-S7200, vous pouvez brancher le subwoofer à l’aide
de deux prises PRE OUT: SUBWOOFER
respectivement. Lorsque vous utilisez un seul
subwoofer, vous pouvez le brancher sur l’une des prises
de votre choix. L’autre prise est destinée à raccorder un
autre subwoofer.
Enceinte
avant gauche
Subwoofer
clair
Rouge
Enceinte centrale
Ver t
GrisMarronMarron
Blanc
Bleu
Fr-10
Enceinte
surround
arrière droite
Enceinte
surround
arrière gauche
Enceinte
surround
droite
Enceinte
surround
gauche
Page 27

Branchement des enceintes— Suite
Fixation au mur
Les enceintes (centrale, surround et surround arrière)
peuvent être fixées facilement au mur à l’aide des
encoches en trou de serrure.
Pour fixer les enceintes surround ou surround arrière de
façon verticale, utilisez l’encoche en trou de serrure pour
accrocher chaque enceinte sur une vis bien vissée au
mur.
Enceintes surround/enceintes surround arrière
(SKR-770/SKB-770)
Encoche en trou de
serrure pour la
fixation au mur
Pour fixer l’enceinte centrale de façon horizontale,
utilisez les deux encoches en trou de serrure indiquées
pour accrocher l’enceinte à deux vis bien vissées au mur.
Enceinte centrale (SKC-770)
Encoche en trou de serrure pour la fixation au mur
Utilisez les Bouchons en Liège pour
un Plateau Plus Stable
Nous vous recommandons d’utiliser les bouchons en
liège fournis pour obtenir le meilleur son possible de vos
enceintes. Les bouchons en liège empêchent les
enceintes de bouger et garantissent une meilleure
stabilité du plateau. Utilisez les bouchons pour
l’enceinte centrale.
Bouchons en liège
Dessous de la
SKC-770
Utilisation des tampons de
protection pour le subwoofer
Si le subwoofer est placé sur un sol dur (bois, vinyl,
carrelage, etc.) et si le niveau sonore de la lecture est
élevé, les pieds du subwoofer peuvent endommager le
sol. Pour empêcher ceci, placez les tampons fournis sous
les pieds du subwoofer. Les tampons fournissent
également une base stable au subwoofer.
200 mm (7-7/8")
Mise en garde :
La capacité de la vis de fixation de supporter une
enceinte dépend de la façon dont elle est fixée au mur. Si
vos murs sont creux, vissez chaque vis de fixation dans
un montant. S’il n’y a aucun montant, ou si les murs sont
pleins, utilisez des fixations murales adéquates. Utilisez
des vis dont la tête a un diamètre de 8 mm maximum et
un diamètre de la partie lisse de la tige de 4 mm
maximum. Pour les murs creux, utilisez un détecteur de
câbles/canalisations pour vérifier la présence éventuelle
de câbles d’alimentation ou de canalisations d’eau avant
d’effectuer des percements.
Laissez un espace de 5 à
10 mm (7/32" à 3/8") entre le
Mur
mur et la base de la tête de la
vis, comme indiqué.
(Nous vous recommandons de
consulter un professionnel de
l’installation domestique.)
5 à 10 mm
(7/32" à 3/8")
Tampon
Fr-11
Page 28

Dépannage
Symptôme Cause possible Solution
Certaines enceintes ne
restituent aucun son ?
Le subwoofer ne
s’allume pas ?
Le subwoofer ne
reproduit aucun son ?
Le subwoofer ne
reproduit presque
aucun son ?
Les câbles d’enceintes ne sont pas
branchés correctement.
La configuration des enceintes n’a pas été
correctement effectuée.
La fiche d’alimentation n’est pas insérée
complètement dans la prise murale.
Le bouton OUTPUT LEVEL est réglé au
minimum.
Le câble RCA n’est pas correctement
branché à la borne LINE INPUT du
subwoofer.
Le niveau sonore du signal d’entrée était
trop bas et le subwoofer est passé en
mode Veille.
La configuration du subwoofer n’a pas
été correctement effectuée.
La source contient peu ou aucune basse. Choisissez une source contenant plus de
Vérifiez les câbles d’enceintes et corrigez si
nécessaire.
Vérifiez la configuration des enceintes.
Insérez complètement la fiche d’alimentation
dans la prise murale.
Augmentez le volume à l’aide du bouton
OUTPUT LEVEL.
Assurez-vous que le câble RCA est
correctement branché à la borne LINE
INPUT du subwoofer.
Augmentez légèrement le niveau sonore de la
pré-sortie sur votre ampli-tuner AV.
Vérifiez le réglage du subwoofer dans la
configuration des enceintes sur votre amplituner AV.
basses.
Un bourdonnement est
produit par le
subwoofer ?
Le câble RCA n’est pas correctement
branché à la borne LINE INPUT du
subwoofer.
Des interférences externes provenant
d’un téléviseur ou d’un autre appareil
électronique sont captées.
Assurez-vous que le câble RCA est
correctement branché à la borne LINE
INPUT du subwoofer.
Éloignez le subwoofer et le câble RCA de la
source d’interférences. Assurez-vous que
votre système audio est relié correctement à
la terre.
Fr-12
Page 29

Caractéristiques techniques
■ Subwoofer amplifié (SKW-770)
Type : Bass-reflex
Sensibilité/impédance d’entrée :
140 mV/20 kΩ
Puissance de sortie maximale :
290 W (puissance dynamique)
Distorsion de fréquence :25 Hz à 150 Hz
Capacité du coffrage : 37 L (0,037 mètre cube)
Dimensions (L × H × P) :
275 × 507 × 411 mm
(10-13/16" × 19-15/16" × 16-3/16")
(y compris la projection)
Poids : 11,6 kg (25,6 lbs.)
Amplificateur : Woofer conique de 25 cm (10") × 1
Alimentation : 120 V c.a., 60 Hz
Consommation : 163 W
Autre : Fonction de mise en veille automatique
■ Enceintes avant (SKF-770)
Type : Bass-reflex 2 canaux
Impédance : 6 Ω
Puissance d’entrée maximale :
130 W
Sensibilité : 79,5 dB/W/m
Distorsion de fréquence :55 Hz à 50 kHz
Fréquence de crossover : 4 kHz
Capacité du coffrage : 7,3 L (0,0073 mètre cube)
Dimensions de l’ensemble (avec la base d’enceinte fournie)
(L × H × P) :
262 × 1050 × 262 mm
(10-5/16" × 41-5/16" × 10-5/16")
(y compris la projection)
Poids : 5,2 kg (11,5 lbs.)
(y compris la base d’enceinte)
Amplificateur : Woofer conique de 8 cm (3-1/4") × 2
Dôme équilibré (tweeter) de 2,5 cm (1")
Bornes : À ressort et à code couleur
Grille : Fixée
■ Enceinte centrale (SKC-770)
Type : Bass-reflex 2 canaux
Impédance : 6 Ω
Puissance d’entrée maximale :
130 W
Sensibilité : 79 dB/W/m
Distorsion de fréquence :60 Hz à 50 kHz
Fréquence de crossover : 4 kHz
Capacité du coffrage : 2,8 L (0,0028 mètre cube)
Dimensions (L × H × P) :
430 × 115 × 121 mm
(16-15/16" × 4-1/2" × 4-3/4")
(y compris la grille et la projection)
Poids : 2,2 kg (4,9 lbs.)
Amplificateur : Woofer conique de 8 cm (3-1/4") × 2
Dôme équilibré (tweeter) de 2,5 cm (1")
Bornes : À ressort et à code couleur
Encoches en trou de serrure :
2
Grille : Fixée
■ Enceintes surround/enceintes surround
arrière (SKR-770/SKB-770)
Type : Large bande à coffrage fermé
Impédance : 6 Ω
Puissance d’entrée maximale :
130 W
Sensibilité : 81 dB/W/m
Distorsion de fréquence :80 Hz à 20 kHz
Capacité du coffrage : 1,0 L (0,001 mètre cube)
Dimensions (L × H × P) :
115 × 230 × 96 mm
(4-1/2" × 9-1/16" × 3-3/4")
(y compris la grille et la projection)
Poids : 1,0 kg (2,2 lbs.)
Amplificateur : Cône de 8 cm (3-1/4")
Bornes : À ressort et à code couleur
Encoches en trou de serrure :
1
Grille : Fixée
Les caractéristiques techniques et l’apparence de cet
appareil sont susceptibles d’être modifiées sans préavis.
Fr-13
Page 30

Option de port universel pour iPod
®
ATTENTION:
AFIN DE REDUIRE LES RISQUES D’INCENDIE
ET DE DECHARGE ELECTRIQUE, NE PAS EXPOSER CET APPAREIL A LA PLUIE OU A
L’HUMIDITE.
DANGER:
AFIN D’EVITER TOUT DANGER DE DECHARGE ELECTRIQUE, NE PAS OUVRIR LE BOITIER
(OU L’ARRIERE) DE L’APPAREIL. CONFIER
TOUT TRAVAIL D’ENTRETIEN OU DE REPARATION A UN TECHNICIEN QUALIFIE.
Remarques importantes pour votre sécurité
1. Veuillez lire ces instructions.
2. Veuillez conserver ces instructions.
3. Respectez tous les avertissements.
4. Suivez toutes les instructions.
5. Ne vous servez pas de cet appareil à proximité d’eau.
6. Essuyez le boîtier avec un chiffon sec uniquement.
7. Ne le placez pas à proximité de sources de chaleur
telles que radiateurs, chauffage, poêles ou autre
dispositif générateur de chaleur.
8. Protégez le câble de connexion pour éviter qu’on ne
marche dessus.
9. Débranchez l’appareil durant un orage ou lorsqu’il
reste inutilisé longtemps.
10. Confiez toute réparation à un technicien qualifié.
Un entretien est indispensable quand le produit a été
endommagé d’une façon ou d’une autre: le cordon
ou la fiche secteur sont endommagés, du liquide ou
des objets ont pénétré dans le produit, il a été exposé
à la pluie ou à une humidité excessive, il ne
fonctionne plus correctement, il est tombé etc.
11. Dommages nécessitant réparation
Débranchez le produit de l’ampli-tuner AV à un
service de réparation qualifié dans les cas suivants:
A. Le câble de connexion est endommagé.
B. Des objets sont tombés dans l’appareil ou du
C. L’appareil a été exposé à la pluie.
D. L’appareil ne semble pas fonctionner
E. L’appareil est tombé ou son boîtier est
F. Ses performances semblent nettement affectées.
WARNING
RISK OF ELECTRIC SHOCK
DO NOT OPEN
Un symbole d’éclair fléché dans un triangle
équilatéral est destiné à attirer l’attention de
l’utilisateur sur le fait que certains organes internes
non-isolés de l’appareil sont traversés par un courant
électrique assez dangereux pour constituer un resque
d’électrocution.
Un point d’exclamation dans un triangle équilatéral
est destiné à attirer l’attention de l’utilisateur sur des
instructions importantes relatives à l’entretien et à
l’utilisation du produit.
AVIS
RISQUE DE CHOC ELECTRIQUE
OUVRIR
NE PAS
liquide a été renversé et a pénétré ce dernier.
normalement lorsque vous l’utilisez en
respectant les instructions données. N’effectuez
que les réglages préconisés dans le manuel car
un mauvais réglage d’autres commandes risque
d’endommager l’appareil et nécessitera un long
travail de remise en état par un technicien
qualifié.
endommagé.
Fr-14
Page 31

Option de port universel pour iPod®—suite
Précautions
1. Entretien—Essuyez régulièrement le boîtier de
l’appareil avec un chiffon doux et sec. Vous pouvez
éliminer les taches rebelles avec un chiffon
légèrement imbibé d’eau et de détergent doux.
Essuyez ensuite l’appareil avec un chiffon propre et
sec. N’utilisez jamais de chiffons rêches, de
dissolvant, d’alcool ou d’autres solvants chimiques
car ceux-ci pourraient endommager la finition ou
faire disparaître la sérigraphie du boîtier.
2. Ne touchez jamais cet appareil avec des mains
mouillées—Ne maniez jamais ce produit ou le
câble de connexion avec les mains mouillées ou
humides. Si de l’eau ou tout autre liquide pénètre à
l’intérieur du produit, veuillez le faire examiner par
votre revendeur Onkyo.
INFORMATIONS FCC DESTINÉES
À L’UTILISATEUR
ATTENTION: Toute modification apportée par
l’utilisateur et non approuvée expressément par la partie
responsable de la conformité du produit pourrait rendre
illicite l’utilisation de l’appareil.
REMARQUE:
Après avoir subi des tests, cet appareil a été reconnu
conforme aux limites prévues pour des appareils
numériques de classe B, définies par la partie 15 des
réglementations FCC. Ces limites sont conçues pour
offrir une protection raisonnable contre les interférences
dans une installation résidentielle.
Cet appareil génère, utilise et peut diffuser des
fréquences radio. S’il n’est pas installé et utilisé
conformément aux instructions fournies, il risque
d’engendrer des interférences et de perturber les
émissions radio. Toutefois, le fabricant ne garantit pas
l’absence d’interférence dans une installation donnée. Si
l’appareil semble produire des interférences et perturber
la réception d’émissions radiodiffusées ou télévisées,
mettez-le successivement sous puis hors tension pour
vous en assurer. En cas d’interférence avérée, essayez de
résoudre ce problème en appliquant une ou plusieurs des
mesures proposées ci-dessous:
• Réorientez ou déplacez l’antenne.
• Augmentez la distance entre l’appareil et
l’équipement affecté.
• Branchez l’appareil à une prise secteur dépendant
d’un circuit différent de celui auquel le ampli-tuner est
branché.
• Consultez votre revendeur ou un technicien radio/TV
compétent.
Modèle canadien
Sur les modèles dont la fiche est polarisée:
ATTENTION: POUR ÉVITER LES CHOCS
ÉLECTRIQUES, INTRODUIRE LA LAME LA PLUS
LARGE DE LA FICHE DANS LA BORNE
CORRESPONDANTE DE LA PRISE ET POUSSER
JUSQU’AU FOND.
A propos de l’UP-A1
En branchant l’UP-A1 à la prise Universal Port d’un
ampli-tuner AV Onkyo, vous pouvez écouter la musique
de votre iPod
dans l’UP-A1. De plus, vous pouvez charger votre iPod
ou iPhone en écoutant la musique.
Remarques :
• Avant d’utiliser l’UP-A1, mettez votre iPod ou iPhone
à jour avec la dernière version du système, disponible
sur le site d’Apple: www.apple.com
• Pour obtenir les informations les plus récentes
relatives à l’UP-A1, voyez site Onkyo:
www.onkyo.com
• Les instructions de ce manuel s’appliquent à l’iPod et
iPhone disponible en décembre 2008 et peuvent
changer en fonction de mises à jour ultérieures du
système de l’iPod ou iPhone.
*1 iPod est une marque déposée d’Apple Inc. aux Etats-Unis et
dans d’autres pays.
*2 iPhone est une marque commerciale d’Apple Inc.
* “Made for iPod” signifie qu’un accessoire électronique a été
spécialement conçu pour les iPod et qu’il a été certifié conforme
aux normes de performance d’Apple.
“Works with iPhone” signifie qu’un accessoire électronique a
été spécialement conçu pour se connecter aux iPhone et qu’il a
été certifié conforme aux normes de performance d’Apple.
Apple n’est pas tenu responsable du fonctionnement de ces
appareils ou de leur conformité avec les normes réglementaires
et les normes de sécurité.
Modèles d’iPod/iPhone compatibles
• Tous les modèles iPhone
• iPod touch (2ème génération)
• iPod touch (1ère génération)
• iPod classic
• iPod (5ème génération)
• iPod (4ème génération)
• iPod nano (4ème génération)
• iPod nano (3ème génération)
• iPod nano (2ème génération)
• iPod nano (1ère génération)
• iPod mini
*1
ou iPhone*2 en l’insérant simplement
Fr-15
Page 32

Option de port universel pour iPod®—suite
Découvrir l’UP-A1
Adaptateur
Connecteur de dock
Connexion de l’UP-A1
Branchez l’UP-A1 à la prise Universal Port de votre
ampli-tuner AV Onkyo comme illustré.
Ampli-tuner AV Onkyo
Remarques :
• Retirez l’étui de protection de l’iPod ou iPhone s’il en
est équipé avant de l’insérer dans l’UP-A1. Faute de
quoi, une mauvaise connexion risque d’entraîner des
problèmes de son ou de télécommande.
• Pour éviter d’endommager le connecteur de dock, ne
tournez pas l’iPod ou iPhone en l’insérant ou en
l’extrayant et veillez à ne pas renverser l’UP-A1 tant
qu’un iPod ou iPhone est inséré.
• N’utilisez pas l’UP-A1 avec des accessoires pour iPod
ou iPhone comme les transmetteurs FM et les
microphones car cela risque d’occasionner des
dysfonctionnements.
Dépannage
Il n’y a pas de son
• Vérifiez que la lecture est en cours sur l’iPod ou
iPhone.
• Vérifiez que l’iPod ou iPhone est convenablement
inséré dans l’UP-A1.
• Vérifiez que l’ampli-tuner AV est sous tension, que la
bonne source d’entrée est sélectionnée et que le
volume est bien réglé.
• Vérifiez que toutes les fiches sont correctement
enfoncées.
Opérations
Les opérations possibles dépendent du modèle et de la
génération de votre iPod ou iPhone ainsi que du modèle
et de la génération de votre ampli-tuner AV.
Installation de l’iPod/iPhone dans
l’UP-A1
Alignez l’iPod ou iPhone avec le connecteur de dock de
l’UP-A1 et enfoncez-le pour qu’il soit correctement
installé. S’il y a un interstice entre le dos de l’iPod ou
iPhone et l’adaptateur, tournez l’adaptateur dans le sens
inverse des aiguilles d’une montre pour fermer
l’interstice. En tournant l’adaptateur dans le sens inverse
des aiguilles d’une montre, vous l’avancez. Tournez-le
dans l’autre sens pour le reculer.
Retirez l’étui (s’il en est doté)
La réception FM/AM est parasitée
• Si vous entendez des bruits parasites lorsque vous
écoutez la radio FM/AM sur votre ampli-tuner,
éloignez le câble d’antenne de l’UP-A1 et de l’iPod ou
iPhone. De plus, le câble d’antenne doit être éloigné
des autres câbles.
Caractéristiques techniques
Poids: 170 g (6 onces)
Dimensions (L × H × P): 83 × 33 × 74 mm
(3-1/4" × 1-5/16" × 2-15/16")
Fr-16
Page 33

Memo
Fr-17
Page 34

ADVERTENCIA:
PARA REDUCIR EL RIESGO DE INCENDIOS O DE
DESCARGAS ELÉCTRICAS, NO EXPONGA ESTE
APARATO A LA LLUVIA NI A LA HUMEDAD.
PRECAUCIÓN:
PARA REDUCIR EL RIESGO DE DESCARGAS
ELÉCTRICAS, NO QUITE LA CUBIERTA (O PANEL
POSTERIOR). EN SU INTERIOR NO EXISTE
NINGUNA PIEZA QUE PUEDA REPARAR EL
USUARIO. EN CASO DE AVERIA, SOLICITE LOS
SERVICIOS DE PERSONAL DE REPARACIÓN
CUALIFICADO.
Instrucciones de seguridad importantes
WARNING
RISK OF ELECTRIC SHOCK
DO NOT OPEN
El símbolo de rayo con cabeza de flecha, inscrito en
un triángulo equilátero, tiene la finalidad de avisar al
usuario la presencia de “tensiones peligrosas” no
aisladas dentro de la caja del producto que son de
magnitud suficiente como para constituir un riesgo de
descargas eléctricas a personas.
El signo de exclamación, inscrito en un triángulo
equilátero, tiene la finalidad de avisar al usuario la
presencia de instrucciones importantes de operatión y
mantenimiento (reparación) en la literatura que
acompaña a este producto.
AVIS
RISQUE DE CHOC ELECTRIQUE
NE PAS OUVRIR
1. Lea estas instrucciones.
2. Guarde estas instrucciones.
3. Tenga en cuenta todas las advertencias.
4. Siga todas las instrucciones.
5. No use este aparato cerca del agua.
6. Límpielo únicamente con un paño seco.
7. No bloquee los orificios de ventilación. Instálelo
siguiendo las instrucciones del fabricante.
8. No lo instale cerca de radiadores, aparatos de
calefacción, estufas ni ningún tipo de aparatos
(incluyendo amplificadores) que generen calor.
9. Tenga en cuenta los fines de seguridad de los
conectores con derivación a masa y / o polarizados.
Los conectores polarizados tienen dos contactos,
uno de mayor tamaño que el otro. Un conector con
derivación a masa tiene dos contactos con un tercero
para derivar a masa. El contacto ancho o el tercer
contacto se instalan con fines de seguridad. Si el
conector del equipo no encaja en la toma de
corriente disponible, acuda a un técnico electricista
cualificado para que le substituya la toma obsoleta.
10. Evite que el cable de alimentación pueda ser pisado
o atrapado, en especial en los conectores, y en los
puntos en que sale del aparato.
11. Use sólo los accesorios / conexiones especificados
por el fabricante.
Use sólo el soporte, trípode,
12.
abrazadera o mesa indicados
ADVERTENCIA PARA CARRITOS
CON RUEDAS
por el fabricante, o vendidos
junto con el aparato. Si
utiliza una mesilla con
ruedas, tenga cuidado, al
desplazar el conjunto de
mesilla / aparato, ya que si se
vuelca podría recibir
S3125A
lesiones.
13. Desconecte este aparato si hay tormenta o cuando
no vaya a ser utilizado por largos períodos de
tiempo.
14. Deje que el mantenimiento lo lleve a cabo personal
cualificado. Es necesario reparar el aparato cuando
ha recibido algún tipo de daño, como por ejemplo si
el cable de alimentación ha sufrido daños, si se ha
derramado algún líquido en el interior del aparato o
si éste ha quedado expuesto a la lluvia o humedad y
no funciona normalmente o si ha caído al suelo.
15. Daños que requieren reparación
Desenchufe el aparato y solicite los servicios de
personal cualificado cuando:
A. El cable de alimentación o el enchufe esté
dañado.
B. En el interior del aparato hayan entrado objetos
sólidos o líquidos.
C. El aparato haya estado expuesto a la lluvia o al
agua.
D. El aparato parezca no funcionar adecuadamente
aunque se sigan las instrucciones de operación.
Ajuste solamente los controles indicados en el
manual de instrucciones, ya que un ajuste
inadecuado podría resultar en daños, y podría
requerir el trabajo laborioso de un técnico
cualificado para devolver el aparato a su
funcionamiento normal.
E. El aparato haya caído o haya sufrido otros
daños, y.
F. El aparato parezca no funcionar normalmente,
indicando que necesita reparación.
16. Introducción de objetos sólidos y líquidos
No introduzca nunca ningún objeto a través de las
aberturas del aparato, ya que podrían tocar puntos
de tensión peligrosa o cortocircuitar partes, lo que
resultaría en un incendio o descargas eléctricas.
El equipo no se debería exponer a gotas ni a
salpicaduras y nunca debería colocar objetos que
contengan líquidos, como los floreros, encima de
éste.
No coloque velas ni otros objetos incandescentes
encima de la unidad.
17. Baterías
Tenga en cuenta los aspectos ambientales y siga las
regulaciones locales a la hora de desechar las
baterías.
18. Si instala el aparato en una instalación empotrada,
como en una estantería o en una librería, asegúrese
de que esté bien ventilado.
Deje 20 cm de espacio libre por encima y por los
lados y 10 cm en la parte posterior. El borde
posterior del estante o el tablero de encima del
aparato debería estar a unos 10 cm del panel
posterior o de la pared, de forma que deje un
espacio libre para que el aire caliente pueda circular.
Es-2
Page 35

Precauciones
Índice
1. Fusible de CA—El fusible de CA se encuentra en
el interior de la unidad y no es un elemento
accesible al usuario. Si todavía no puede activar la
unidad, póngase en contacto con su distribuidor
Onkyo.
2. Mantenimiento—De vez en cuando limpie esta
unidad con un paño suave. Para la suciedad más
difícil de eliminar, use un paño suave ligeramente
humedecido con una solución de agua y detergente
suave. A continuación, seque la unidad
inmediatamente con un paño limpio. No use paños
abrasivos, alcohol, ni disolventes químicos de
ningún tipo ya que con ellos podría dañar el
acabado de la unidad e incluso borrar la serigrafía
del panel.
3. Alimentación
AT EN CI Ó N
ANTES DE CONECTAR LA UNIDAD POR
PRIMERA VEZ, LEA CON ATENCIÓN LA
SECCIÓN SIGUIENTE.
Los voltajes de las tomas de CA varían para cada
país. Compruebe que el voltaje de su zona cumpla
con los requisitos de voltaje indicados en la etiqueta
de características que se encuentra en el panel
posterior de esta unidad (por ejemplo, AC 120 V,
60 Hz).
El cable de alimentación se utiliza para desconectar
esta unidad de la fuente de alimentación de CA.
Asegúrese de que el conector esté siempre operativo
(fácilmente accesible).
Procedimientos iniciales
Instrucciones de seguridad importantes.................... 2
Precauciones............................................................. 3
Precauciones sobre los altavoces............................. 4
Contenidos del paquete ............................................ 5
Cómo disfrutar del Home Theater .............................6
Cómo aprender a conocer su juego de altavoces..... 7
Instalación y uso
Conexión de los altavoces ...................................... 10
Apéndice
Resolución de problemas........................................ 12
Especificaciones...................................................... 13
Opción de puerto universal para iPod
Opción de puerto universal para iPod
®
................... 14
®
Es-3
Page 36

Precauciones sobre los altavoces
Colocación
• Los muebles de los altavoces están hechos de madera
y, consiguientemente, son sensibles a temperaturas y
humedad extremas. No los coloque en lugares
expuestos a la luz solar directa ni en lugares húmedos,
como por ejemplo cerca de un equipo de aire
acondicionado, un humidificador, en el baño o en la
cocina.
• No coloque agua u otros líquidos cerca de los
altavoces. Si se derramara líquido sobre los altavoces,
los conos podrían resultar dañados.
• Los altavoces únicamente podrán colocarse sobre
superficies robustas y planas libres de vibraciones. La
colocación de los mismos sobre superficies irregulares
o inestables, de las cuales puedan caer y causar daños,
afectarán a la calidad de sonido.
• El subwoofer está diseñado para su uso en posición
vertical únicamente. No lo utilice en posición
horizontal ni inclinada.
• Si se utiliza la unidad cerca de un plato de tocadiscos,
un reproductor de CD o un DVD, podrían producirse
acoples o un deterioro del sonido. Para evitarlo, aleje
la unidad del plato de tocadiscos, reproductor de CD o
reproductor de DVD o baje el nivel de salida de la
unidad.
Uso cerca de un televisor u
ordenador
Los televisores y los monitores de ordenadores son
dispositivos sensibles magnéticamente y, como tales, es
probable que sufran decoloración o distorsión de la
imagen cuando se coloquen altavoces convencionales
cerca de los mismos. En dichas situaciones, pruebe a
alejar los altavoces del televisor o el monitor. Si se
produce decoloración, apague el televisor o el monitor,
espere entre 15 y 30 minutos y, a continuación, vuélvalo
a encender. Esto normalmente activa la función de
desmagnetización, que neutraliza el campo magnético,
eliminando así cualquier efecto de decoloración.
Obsérvese que la decoloración también puede estar
causada por un imán o una herramienta de
desmagnetización colocados demasiado cerca del
televisor o monitor.
Advertencia sobre la señal de
entrada
Los altavoces podrán soportar la potencia de entrada
especificada siempre y cuando se utilicen para la
reproducción de música normal. Si se les alimenta
cualquiera de las siguientes señales, aunque la potencia
de entrada esté dentro del valor especificado, podría fluir
una corriente excesiva a los bobinados de los altavoces,
provocando el quemado de éstos o la rotura del hilo:
1. Ruido entre emisoras de una radio de FM no
sintonizada.
2. Sonido de avance rápido de una cinta de casete.
3. Sonidos agudos generados por un oscilador, un
instrumento musical electrónico, etc.
4. Oscilación del amplificador.
5. Tonos de prueba especiales de CDs de prueba de
audio y otros.
6. Sonidos fuertes y clics al conectar o desconectar los
cables de audio (apague siempre el amplificador
antes de conectar o desconectar cables).
7. Acoples de micrófonos.
Cuidado de los altavoces
Limpie los muebles de los altavoces de vez en cuando
con un paño de silicio o un paño suave secos. Para
suciedad más incrustada, humedezca un paño suave en
una solución ligera de detergente suave y agua, escúrralo
bien y limpie la suciedad. A continuación, seque
inmediatamente con un paño limpio. No utilice
materiales rugosos, diluyentes, alcohol u otros
disolventes o paños químicos, ya que éstos podrían
dañar el acabado, borrar la rotulación de los paneles o
provocar decoloración. Si va a utilizar un paño químico,
siga siempre las instrucciones proporcionadas con el
mismo. Para el polvo acumulado en las rejillas, emplee
un aspirador o elimínelo con una brocha.
Precauciones sobre el cable de
alimentación
• Conecte todos los altavoces y componentes de AV
antes de conectar el cable de alimentación.
• El encendido del SKW-770 podría causar una
sobretensión momentánea que podría interferir con
otros equipos eléctricos ubicados en el mismo
circuito. Si esto constituyera un problema, enchufe el
SKW-770 a un circuito eléctrico diferente.
Es-4
Page 37

Contenidos del paquete
Juego de altavoces HTP-770/
SKS-HT870
Altavoces frontales
(SKF-770)
(Azul) (Gris) (Marrón) (Habano)
Cables de altavoces para altavoces de surround y
altavoces de surround traseros 8 m (26 ft)
Cable RCA para la conexión del subwoofer 3 m
(10 ft)
Altavoz central
(SKC-770)
Altavoces de surround
(SKR-770)
Altavoces de surround
traseros
(SKB-770)
Subwoofer (SKW-770)
4 almohadillas para colocar debajo del subwoofer
4 tapones de corcho para el altavoz central
2 bases de altavoces y 8 tornillos
Dock para iPod UP-A1
(Blanco) (Rojo)
Cables de altavoces para los altavoces frontales
3,5m (11ft)
(Verde)
Cables de altavoces para los altavoz central 3,0 m
(10 ft)
* En los catálogos y en el embalaje, la letra que figura al final del
nombre del producto indica el color. Las especificaciones y el
funcionamiento son los mismos, independientemente del color.
Es-5
Page 38

Cómo disfrutar del Home Theater
El Home Theater le permitirá disfrutar de sonido surround con una verdadera sensación del movimiento en su propia
casa—como si estuviera en una sala de cine o de conciertos.
Altavoces frontales izquierdo y derecho (SKF-770)
Éstos emiten el sonido principal. Su papel en un home theater es proporcionar
una base sólida para la imagen del sonido. Deberán colocarse de cara al
oyente aproximadamente a la altura del oído y equidistantes respecto al
televisor. Angúlelos ligeramente hacia dentro para crear un triángulo, con el
oyente en el vértice.
Altavoz central (SKC-770)
Este altavoz realza los altavoces
frontales izquierdo y derecho, haciendo
que los movimientos del sonido sean
nítidos y proporcionando una imagen
de sonido completa. En las películas se
utiliza principalmente para los diálogos.
Colóquelo cerca de su televisor
(preferiblemente encima), mirando
hacia delante y a la altura aproximada
del oído, o a la misma altura que los
altavoces frontales izquierdo y derecho.
Subwoofer (SKW-770)
El subwoofer trata los sonidos graves del
canal de LFE (Low-Frequency Effects, Efectos
de baja frecuencia). El volumen y la calidad de
la salida de graves del subwoofer dependerá
de su posición, la forma de la sala y la posición
de audición del oyente. En general, es posible
obtener un buen sonido de graves instalando
el subwoofer en una de las esquinas frontales
o a un tercio de la longitud de la pared frontal,
según se muestra.
Consejo: Para encontrar la posición óptima
del subwoofer, mientras reproduce una
película o música con buenos graves,
experimente colocándolo en distintas
posiciones dentro de la sala y elija la que
proporcione los resultados más satisfactorios.
Altavoces de surround traseros izquierdo y derecho
(SKB-770)
Estos altavoces son necesarios para disfrutar de sonido
Dolby Digital EX, DTS-ES Matrix, DTS-ES Discrete, etc.
Realzan el realismo del sonido envolvente y mejoran la
localización del sonido detrás del oyente. Colóquelos
detrás del oyente a una altura de 60 a 100 cm (2 a 3 ft)
por encima del nivel del oído.
Altavoces de surround izquierdo y
derecho (SKR-770)
Estos altavoces se utilizan para un
posicionamiento preciso del sonido y
para añadir un ambiente realista.
Colóquelos a los lados del oyente, o
ligeramente por detrás, a una altura
aproximada de 60 a 100 cm (2 a 3 ft)
por encima del nivel del oído. Lo ideal
es que estén equidistantes respecto al
oyente.
Posición de 1/3
de la pared
Es-6
Posición de
esquina
Page 39

Cómo aprender a conocer su juego de altavoces
Altavoces frontales, central, de surround y de surround traseros
(SKF-770, SKC-770, SKR-770, y SKB-770)
■ Parte posterior
SKF-770
SKR-770/SKB-770
a
b
SKC-770
b
ab
a Ranuras de bocallave
Estas ranuras de bocallave se utilizan para el montaje mural
de los altavoces (consulte la página 11).
b Terminales de altavoces
Estos terminales de presión sirven para conectar el altavoz al
Receptor de AV con los cables de altavoces suministrados.
Los cables de altavoces suministrados están codificados por
colores para una identificación sencilla. Simplemente
conecte cada cable al terminal de altavoz positivo del mismo
color.
Precaución:
Las rejillas frontales no están diseñadas para su extracción; por
tanto, no intente retirarlas a la fuerza ya que podrían resultar
dañadas.
Es-7
Page 40

Cómo aprender a conocer su juego de altavoces—Continúa
Cómo acoplar las bases de los altavoces
Antes de conectar los altavoces, acople la base
suministrada a cada SKF-770.
1. Gire el altavoz boca abajo con la cubierta de
protección colocada.
2. Alinee la base del altavoz con la marca de la flecha
apuntando en la misma dirección que la parte
frontal del altavoz.
Tenga cuidado de no volcar el altavoz.
3. Alinee los orificios de tornillos de la base del
altavoz con los de la parte inferior de cada altavoz y
fije la base empleando los tornillos suministrados.
El par de apriete recomendado es de 10 kgf·cm
(9 lbf·in).
Tenga cuidado de no volcar el altavoz.
4. Gire el altavoz boca arriba.
5. Retire la cubierta de protección.
PRECAUCIONES DE SEGURIDAD:
• Acople las bases de los altavoces de forma que no
permitan el volcado de los altavoces.
• Asegúrese de apretar los tornillos cuando acople las
bases de los altavoces.
• Acople las bases de los altavoces en una superficie
plana, nivelada y estable.
• Tras acoplar las bases de los altavoces, asegúrese de
que los altavoces permanecen en posición vertical y
son estables.
Parte superior de SKF-770
Cubierta de
protección
Tornillos suministrados
Marca de flecha
Base del altavoz
Parte inferior de SKF-770
Es-8
Page 41

Cómo aprender a conocer su juego de altavoces—Continúa
Subwoofer (SKW-770)
■ Parte frontal
Indicador STANDBY/ON
Indicador STANDBY/ON
Rojo: Subwoofer en modo en espera
Azul: Subwoofer encendido
Con la función Auto Standby (En espera
automático), el SKW-770 se encenderá
automáticamente cuando se detecte una señal de
entrada en el modo Standby (En espera). Cuando no
exista señal de entrada durante cierto tiempo, el
SKW-770 pasará automáticamente al modo
Standby.
Ajuste del nivel del subwoofer
Para ajustar el nivel del subwoofer, emplee el control
OUTPUT LEVEL. Ajústelo de modo que los sonidos
graves estén perfectamente equilibrados con los sonidos
agudos de los demás altavoces. Como nuestros oídos son
menos sensibles a los sonidos muy graves, existe una
tendencia a establecer el nivel del subwoofer demasiado
alto. Por regla general, ajuste el nivel del subwoofer en
el nivel que considere óptimo y, a continuación, bájelo
un poquito.
■ Parte posterior
SKW-770
ab
A la toma de red de CA
a Control OUTPUT LEVEL
Este control se utiliza para ajustar el volumen del
subwoofer.
b LINE INPUT
Esta entrada de RCA deberá conectarse a la salida
de previo de subwoofer de su Receptor de AV con el
cable de RCA suministrado.
Nota:
La función Auto Standby (En espera automático)
encenderá el subwoofer cuando la señal de entrada
supere un nivel determinado. Si la función Auto Standby
no funciona de un modo fiable, pruebe a subir o bajar
ligeramente el nivel de salida del subwoofer en el
receptor.
Es-9
Page 42

Conexión de los altavoces
Precauciones para la conexión de los
altavoces
Lea lo siguiente antes de conectar los altavoces:
• Apague el receptor antes de efectuar cualquier
conexión.
• Preste especial atención a la
polaridad del cableado de los
altavoces. Conecte los terminales
positivos (+) únicamente a terminales
positivos (+) y los terminales
negativos (–) solamente a terminales
negativos (–). Si los altavoces se
cablean de forma incorrecta, el
sonido saldrá desfasado y no sonará natural.
• Tenga cuidado de no cortocircuitar los cables positivos y
negativos. Esto podría provocar daños en el amplificador.
Conexión de los cables de los
altavoces
Utilice los cables de los altavoces
suministrados para conectar los terminales de
Altavoz frontal
derecho
entrada de cada altavoz a los terminales de
salida de altavoces correspondientes del
receptor.
Haga coincidir el color de cada cable con el terminal de
altavoces correspondiente.
Para efectuar una conexión, mientras
presiona la palanca del terminal, inserte el
cable en el orificio y, a continuación, suelte la
palanca. Asegúrese de que los terminales
pinzan los cables pelados y no el aislamiento.
Conexión del subwoofer
Empleando el cable de RCA suministrado,
conecte la entrada LINE INPUT del subwoofer a
la salida PRE OUT: SUBWOOFER del receptor.
HT-S7200: Si está utilizando un sistema Onkyo
HT-S7200, podrá conectar el subwoofer activo con dos
jacks PRE OUT: SUBWOOFER respectivamente.
Cuando use un único subwoofer, podrá conectar
cualquier jack. El otro jack es para conectar un
subwoofer adicional.
Altavoz frontal
izquierdo
Subwoofer
activo
Rojo
Altavoz central
Verde
GrisMarrónHabano
Blanco
Azul
Es-10
Altavoz de
surround
trasero derecho
Altavoz de
surround trasero
izquierdo
Altavoz de
surround
derecho
Altavoz de
Altavoz de
surround
surround
izquierdo
izquierdo
Page 43

Conexión de los altavoces—Continúa
Montaje mural
Los altavoces (central, de surround y de surround
traseros) pueden montarse fácilmente sobre la pared
empleando las ranuras de bocallave.
Para montar los altavoces de surround o de surround
traseros verticalmente, utilice la ranura de bocallave
mostrada para colgar cada altavoz sobre un tornillo
fijado de modo seguro a la pared.
Altavoces de surround/Altavoces de surround traseros
(SKR-770/SKB-770)
Ranura de bocallave
para montaje mural
Para montar el altavoz central horizontalmente, utilice
las dos ranuras de bocallave mostradas para colgar el
altavoz sobre dos tornillos fijados de modo seguro a la
pared.
Altavoz central (SKC-770)
Ranura de bocallave para montaje mural
Uso de los tapones de corcho para
una plataforma más estable
Se recomienda emplear los tapones de corcho
proporcionados para lograr el mejor sonido posible de
sus altavoces. Los tapones de corcho impiden que los
altavoces se muevan, proporcionando así una plataforma
más estable. Emplee tapones para el altavoz central.
Tapones de corcho
Parte inferior de
SKC-770
Uso de las almohadillas para el
subwoofer
Si se coloca el subwoofer sobre un suelo duro (madera,
vinilo, baldosas, etc.) y la reproducción se hace con un
volumen muy alto, las patas del subwoofer podrían dañar
el suelo. Para evitarlo, coloque las almohadillas
suministradas debajo de las patas del subwoofer. Las
almohadillas proporcionan asimismo una base estable
para el subwoofer.
200 mm (7-7/8")
Precaución:
La capacidad de un tornillo de montaje para soportar el
peso de un altavoz dependerá de cómo esté anclado a la
pared. Si sus paredes son huecas, fije cada tornillo de
montaje a un espárrago. Si no dispone de espárragos o
las paredes son sólidas, emplee anclajes murales
adecuados. Utilice tornillos con un diámetro de cabeza
de 8 mm (5/16") o menos y un diámetro de vástago de
4 mm (5/32") o menos. En paredes huecas, emplee un
detector de cables/tuberías para comprobar si existen
cables de corriente o tuberías de agua antes de realizar
los taladros.
Deje un hueco de entre 5 mm
(7/32") y 10 mm (3/8") entre la
pared y la base de la cabeza del
tornillo según se muestra
(se recomienda consultar a un
profesional de instalaciones
domésticas).
5 a 10 mm
(7/32" a 3/8")
Almohadilla
Pared
Es-11
Page 44

Resolución de problemas
Síntoma Posible causa Solución
¿Algunos altavoces no
producen sonido?
¿El subwoofer no se
enciende?
¿El subwoofer no
produce ningún sonido?
¿El subwoofer no
produce apenas sonido?
Los cables de los altavoces no están
conectados correctamente.
La configuración de los altavoces no está
establecida correctamente.
El enchufe no está totalmente insertado
en la toma de red.
El control OUTPUT LEVEL está
establecido en el mínimo.
El cable de RCA no está conectado
correctamente a la entrada LINE INPUT
del subwoofer.
El nivel de la señal de entrada era
demasiado bajo y el subwoofer ha pasado
al modo Standby (En espera).
La configuración del subwoofer no está
establecida correctamente.
El material fuente tiene muy poco o
ningún contenido de graves.
Compruebe los cables de los altavoces y
corrija según sea necesario.
Compruebe la configuración de los altavoces.
Inserte totalmente el enchufe en la toma de
red.
Suba el control OUTPUT LEVEL.
Asegúrese de que el cable de RCA está
conectado correctamente a la entrada LINE
INPUT del subwoofer.
Suba ligeramente el nivel de salida de previo
del subwoofer en el Receptor de AV.
Compruebe el ajuste del subwoofer en la
configuración de los altavoces del Receptor
de AV.
Seleccione un material fuente con más
contenido de graves.
¿El subwoofer produce
una especie de
zumbido?
El cable de RCA no está conectado
correctamente a la entrada LINE INPUT
del subwoofer.
Se están recogiendo interferencias
externas de un televisor u otro dispositivo
electrónico.
Asegúrese de que el cable de RCA está
conectado correctamente a la entrada LINE
INPUT del subwoofer.
Aleje el subwoofer y el cable de RCA de la
fuente de interferencias. Asegúrese de que su
sistema de audio está conectado a tierra
correctamente.
Es-12
Page 45

Especificaciones
■ Subwoofer activo (SKW-770)
Tipo: Bass-reflex
Sensibilidad de entrada/impedancia:
Potencia máxima de
salida:
Respuesta de frecuencia: 25 Hz a 150 Hz
Capacidad del mueble: 37 L (1,3 pies cúbicos)
Dimensiones (An × Al × Pr):
Peso: 11,6 kg (25,6 lbs.)
Conos: Cono de graves de 25 cm (10") × 1
Alimentación: 120 V CA, 60 Hz
Consumo: 163 W
Otros: Función Auto Standby
140 mV / 20 kΩ
290 W (potencia dinámica)
275 × 507 × 411 mm
(10-13/16" × 19-15/16" × 16-3/16")
(incluida la proyección)
(En espera automático)
■ Altavoces frontales (SKF-770)
Tipo: Bass-reflex de 2 vías
Impedancia: 6 Ω
Potencia máxima de entrada:
Sensibilidad: 79,5 dB/W/m
Respuesta de frecuencia: 55 Hz a 50 kHz
Frecuencia de cruce: 4 kHz
Capacidad del mueble: 7,3 L (0,26 pies cúbicos)
Dimensiones de montaje (con base de altavoz suministrada)
(An × Al × Pr):
Peso: 5,2 kg (11,5 lbs.)
Conos: Cono de 8 cm (3-1/4") (graves) × 2
Terminales: Codificados por colores de tipo resorte
Rejilla: Fija
130 W
262 × 1050 × 262 mm
(10-5/16" × 41-5/16" × 10-5/16")
(incluida la proyección)
(incluida la base del altavoz)
Cúpula equilibrada de 2,5 cm (1")
(agudos)
■ Altavoz central (SKC-770)
Tipo: Bass-reflex de 2 vías
Impedancia: 6 Ω
Potencia máxima de entrada:
Sensibilidad: 79 dB/W/m
Respuesta de frecuencia: 60 Hz a 50 kHz
Frecuencia de cruce: 4 kHz
Capacidad del mueble: 2,8 L (0,10 pies cúbicos)
Dimensiones (An × Al × Pr):
Peso: 2,2 kg (4,9 lbs.)
Conos:
Terminales: Codificados por colores de tipo resorte
Ranuras de bocallave: 2
Rejilla: Fija
130 W
430 × 115 × 121 mm
(16-15/16" × 4-1/2" × 4-3/4")
(incluida la rejilla y la proyección)
Cono de 8 cm (3-1/4") (graves) × 2
Cúpula equilibrada de 2,5 cm (1")
(agudos)
■ Altavoces de surround/Altavoces de
surround traseros
(SKR-770/SKB-770)
Tipo: Caja cerrada de gama completa
Impedancia: 6 Ω
Potencia máxima de entrada:
Sensibilidad: 81 dB/W/m
Respuesta de frecuencia: 80 Hz a 20 kHz
Capacidad del mueble: 1,0 L (0,036 pies cúbicos)
Dimensiones (An × Al × Pr):
Peso: 1,0 kg (2,2 lbs.)
Conos: Cono de 8 cm (3-1/4")
Terminales: Codificados por colores de tipo resorte
Ranuras de bocallave: 1
Rejilla: Fija
130 W
115 × 230 × 96 mm
(4-1/2" × 9-1/16" × 3-3/4")
(incluida la rejilla y la proyección)
Las especificaciones y el aspecto están sujetos a cambios
sin previo aviso.
Es-13
Page 46

Opción de puerto universal para iPod
®
ADVERTENCIA:
PARA REDUCIR EL RIESGO DE INCENDIOS O DE
DESCARGAS ELÉCTRICAS, NO EXPONGA ESTE
APARATO A LA LLUVIA NI A LA HUMEDAD.
PRECAUCIÓN:
PARA REDUCIR EL RIESGO DE DESCARGAS
ELÉCTRICAS, NO QUITE LA CUBIERTA (O PANEL
POSTERIOR). EN SU INTERIOR NO EXISTE
NINGUNA PIEZA QUE PUEDA REPARAR EL
USUARIO. EN CASO DE AVERIA, SOLICITE LOS
SERVICIOS DE PERSONAL DE REPARACIÓN
CUALIFICADO.
Instrucciones de seguridad importantes
1. Lea estas instrucciones.
2. Guarde estas instrucciones.
3. Tenga en cuenta todas las advertencias.
4. Siga todas las instrucciones.
5. No use este aparato cerca del agua.
6. Límpielo únicamente con un paño seco.
7. No lo instale cerca de radiadores, aparatos de
calefacción, estufas ni ningún tipo de aparatos que
generen calor.
8. Evite pisar el cable de alimentación.
9. Desconecte este aparato si hay tormenta o cuando
no vaya a ser utilizado por largos períodos de
tiempo.
10. El mantenimiento lo debería llevar a cabo personal
cualificado. Debe reparar el equipo cuando ha
sufrido algún tipo de daño, como por ejemplo si el
cable de conexión está deteriorado, si se ha
derramado algún líquido en el interior del equipo, si
ha quedado expuesto a la lluvia o a la humedad y no
funciona normalmente o si ha caído al suelo.
WARNING
RISK OF ELECTRIC SHOCK
DO NOT OPEN
El símbolo de rayo con cabeza de flecha, inscrito en
un triángulo equilátero, tiene la finalidad de avisar al
usuario la presencia de “tensiones peligrosas” no
aisladas dentro de la caja del producto que son de
magnitud suficiente como para constituir un riesgo de
descargas eléctricas a personas.
El signo de exclamación, inscrito en un triángulo
equilátero, tiene la finalidad de avisar al usuario la
presencia de instrucciones importantes de operatión y
mantenimiento (reparación) en la literatura que
acompaña a este producto.
AVIS
RISQUE DE CHOC ELECTRIQUE
NE PAS OUVRIR
11. Daños que requieren reparación
Desconecte el equipo de Receptor de AV y deje las
reparaciones en manos de personal cualificado, en
las siguientes condiciones:
A. Si el cable de conexión está dañado,
B. En el interior del aparato hayan entrado objetos
sólidos o líquidos.
C. El aparato haya estado expuesto a la lluvia o al
agua.
D. El aparato parezca no funcionar adecuadamente
aunque se sigan las instrucciones de operación.
Ajuste solamente los controles indicados en el
manual de instrucciones, ya que un ajuste
inadecuado podría resultar en daños, y podría
requerir el trabajo laborioso de un técnico
cualificado para devolver el aparato a su
funcionamiento normal.
E. El aparato haya caído o haya sufrido otros
daños, y
F. El aparato parezca no funcionar normalmente,
indicando que necesita reparación.
Es-14
Page 47

Opción de puerto universal para iPod®—Continúa
Precauciones Acerca del UP-A1
1. Mantenimiento—De vez en cuando limpie esta
unidad con un paño suave. Para la suciedad más
difícil de eliminar, use un paño suave ligeramente
humedecido con una solución de agua y detergente
suave. A continuación, seque la unidad
inmediatamente con un paño limpio. No use paños
abrasivos, alcohol, ni disolventes químicos de
ningún tipo ya que con ellos podría dañar el
acabado de la unidad e incluso borrar la serigrafía
del panel.
2. Nunca toque esta unidad con las manos
húmedas—Nunca utilice esta unidad ni su cable de
conexión si tiene las manos húmedas o mojadas. Si
penetra agua o algún otro líquido en el interior de
esta unidad, debería revisarlo su distribuidor de
Onkyo.
FCC INFORMATION FOR USER
PRECAUCIÓN:
Los cambios o modificaciones del usuario que no estén
aprobados explícitamente por la parte responsable de la
conformidad podrían invalidar la autoridad del usuario a
utilizar el equipo.
NOTA:
Se ha probado este equipo y cumple con los límites de
los dispositivos digitales de la Clase B, conforme a la
Part 15 de las reglas de la FCC. Estos límites están
diseñados para ofrecer una protección razonable contra
las interferencias nocivas en una instalación residencial.
Este equipo genera, utiliza y puede emitir energía de
radiofrecuencia y, si no se instala y utiliza de acuerdo
con las instrucciones, pude producir interferencias
nocivas en las comunicaciones por radio. Sin embargo,
no existe ninguna garantía que indique que no se
producirán interferencias en una instalación en concreto.
Si este equipo provoca interferencias nocivas en la
recepción de radiocomunicaciones o de televisión, las
cuales se pueden determinar desactivando y activando el
equipo, se anima al usuario a intentar corregir las
interferencias siguiendo una o varias de las siguientes
medidas:
• Vuelva a orientar o vuelva a colocar la antena de
recepción.
• Aumente la separación entre el equipo y el receptor.
• Conecte el equipo a una toma de corriente de un
circuito diferente al que está conectado el receptor.
• Para más ayuda, consulte con su distribuidor o con un
técnico de radio/televisión.
Con el UP-A1 conectado a Receptor de AV de Onkyo
compatible con un puerto universal, podrá disfrutar de la
*1
música guardada en el iPod
o iPhone*2 insertándolo
simplemente en el UP-A1. Además, puede cargar el iPod
o iPhone mientras escucha música.
Notas:
• Antes de utilizar el UP-A1, actualice el iPod o iPhone
a la última versión de software, disponible en el sitio
web de Apple en: www.apple.com
• Para más información acerca del UP-A1, consulte el
sitio web de Onkyo en: www.onkyo.com
• Las instrucciones de este manual son válidas para el
iPod y iPhone desde diciembre del 2008 y pueden
variar en futuras actualizaciones del software del iPod
o iPhone.
*1 iPod es una marca comercial de Apple Inc., registrada en los
EE.UU. y en otros países.
*2 iPhone es una marca comercial de Apple Inc.
* “Made for iPod” significa que un accesorio electrónico ha sido
diseñado para conectarse específicamente a un iPod y su
conformidad con los estándares de rendimiento de Apple ha sido
certificada por el desarrollador.
“Works with iPhone” significa que un accesorio electrónico ha
sido diseñado para conectarse específicamente a un iPhone y su
conformidad con los estándares de rendimiento de Apple ha sido
certificada por el desarrollador.
Apple no se hace responsable del funcionamiento de este
dispositivo ni de su conformidad con los estándares de seguridad
y normativos.
Modelos compatibles con el
iPod/iPhone
• Todos los modelos de iPhone
• iPod touch (2ª generación)
• iPod touch (1ª generación)
• iPod classic
• iPod (5ª generación)
• iPod (4ª generación)
• iPod nano (4ª generación)
• iPod nano (3ª generación)
• iPod nano (2ª generación)
• iPod nano (1ª generación)
• iPod mini
Es-15
Page 48

Opción de puerto universal para iPod®—Continúa
Descripción del UP-A1
Adaptador
Conector de la base Dock
Conectar el UP-A1
Conecte el UP-A1 al puerto universal del Receptor de
AV de Onkyo como se muestra.
Onkyo Receptor de AV
Colocar el iPod/iPhone en el UP-A1
Alinee el iPod o iPhone con la base Dock del UP-A1 y
apriételo hasta que encaje completamente. Si existe
algún espacio entre la parte posterior del iPod o iPhone
y el adaptador, gire el adaptador en sentido antihorario
para cerrar dicho espacio. Si gira el adaptador en sentido
antihorario, se mueve hacia delante. Si lo gira en sentido
horario, se mueve hacia atrás.
Retire la funda (si es necesario)
Notas:
• Si es necesario, retire la funda del iPod o iPhone, antes
de insertarlo en el UP-A1. En caso contrario, una
conexión defectuosa puede provocar problemas con el
sonido o con el control remoto.
• Para evitar dañar el conector de la base dock, no gire
el iPod o iPhone al insertarlo o extraerlo, y procure no
volcar el iPod o iPhone al insertarlo en UP-A1.
• No utilice el UP-A1 con ningún otro accesorio del
iPod o iPhone, como transmisores FM y micrófonos,
ya que podrían provocar un funcionamiento anómalo.
Acerca del funcionamiento
La funcionalidad depende del modelo y de la generación
del iPod o iPhone y del modelo y de la generación de tu
Receptor de AV.
Solucionar problemas
No se emite sonido
• Compruebe que el iPod o iPhone está reproduciendo.
• Asegúrese de que el iPod o iPhone está insertado
correctamente en el UP-A1.
• Compruebe que el Receptor de AV está activado, que
la fuente de entrada está seleccionada y que el
volumen está subido.
• Compruebe que todos conectores están
completamente conectados.
Las emisoras FM/AM se escuchan con
interferencias
• Si se producen interferencias al escuchar emisoras
FM/AM en el receptor o sintonizador, intente apartar
la antena del UP-A1 y del iPod o iPhone. Separe
también el cable de antena del resto de cables.
Especificaciones
Peso: 170 g (6 onzas)
Dimensiones (Anch.
× Alt. × Prof.):
83 × 33 × 74 mm
(3-1/4" × 1-5/16" × 2-15/16")
Es-16
Page 49

Memo
Es-17
Page 50

Memo
Es-18
Page 51

Memo
Es-19
Page 52

Sales & Product Planning Div. : 2-1, Nisshin-cho, Neyagawa-shi, OSAKA 572-8540, JAPAN
Tel: 072-831-8023 Fax: 072-831-8163
ONKYO U.S.A. CORPORATION
18 Park Way, Upper Saddle River, N.J. 07458, U.S.A.
Tel: 201-785-2600 Fax: 201-785-2650 http://www.us.onkyo.com/
ONKYO EUROPE ELECTRONICS GmbH
Liegnitzerstrasse 6, 82194 Groebenzell, GERMANY
Tel: +49-8142-4401-0 Fax: +49-8142-4401-555 http://www.eu.onkyo.com/
ONKYO EUROPE UK Office
Suite 1, Gregories Court, Gregories Road, Beaconsfield, Buckinghamshire, HP9 1HQ
UNITED KINGDOM Tel: +44-(0)1494-681515 Fax: +44(0)-1494-680452
ONKYO CHINA LIMITED
Unit 1&12, 9/F, Ever Gain PlazaTower 1, 88, Container Port Road, Kwai Chung,
N.T., HONG KONG Tel: 852-2429-3118 Fax: 852-2428-9039
http://www.ch.onkyo.com/
SN 29400086
(C) Copyright 2009 ONKYO CORPORATION Japan. All rights reserved.
20
HOMEPAGE
http://www.onkyo.com/
Y0905-1
* 2 9 4 0 0 0 8 6 *
 Loading...