

Page 1

Universal remote
Universal Fernbedienung
Télécommande universelle
Mando a Distancia Universal
Telecomando Universal
Telecomando Universale
Universele Afstandsbediening
Univerzális távvezérlő
Uniwersalny pilot zdalnego sterowania
Univerzální dálkové ovládání
URC-8308
URC-8308
ONE FOR ALL KAMELEON 8
706002
Instruction manual . . . . . . . . . . . . . . . . . . . . . . . . . . . . . . . . . . . . . .P. 1
Bedienungsanleitung . . . . . . . . . . . . . . . . . . . . . . . . . . . . . . . . . .S. 27
Mode d’emploi . . . . . . . . . . . . . . . . . . . . . . . . . . . . . . . . . . . . . . . . . .P. 53
Guía del usario . . . . . . . . . . . . . . . . . . . . . . . . . . . . . . . . . . . . . . . . . .P. 79
Manual de instruções . . . . . . . . . . . . . . . . . . . . . . . . . . . . . . . .P. 105
Istruzioni per l’uso . . . . . . . . . . . . . . . . . . . . . . . . . . . . . . . . . . .P. 131
Gebruiksaanwijzing . . . . . . . . . . . . . . . . . . . . . . . . . . . . . . . . . .P. 157
Használati útmutató
. . . . . . . . . . . . . . . . . . . . . . . . . . . . . . .P. 183
Instrukcja obsługi
. . . . . . . . . . . . . . . . . . . . . . . . . . . . . . . . . . . . .P. 209
Návod k použití
. . . . . . . . . . . . . . . . . . . . . . . . . . . . . . . . . . . . . . . .P. 235
English
Deutsch
Français
Español
Português
Italiano
Nederlands
Magyar
Polski
Česky
Page 2
WW W.ONEFORALL.COM 1
A
BOUT YOUR KAMELEON 8
.
. . . . . . . . . . . . . . . . . . . . . . . . . . . . . . . . . . . . . . . . . . . . . .
2
B
ATTERIES
.
. . . . . . . . . . . . . . . . . . . . . . . . . . . . . . . . . . . . . . . . . . . . . . . . . . . . . . . . . . . . . . . .
3
THE KEYPAD
.
. . . . . . . . . . . . . . . . . . . . . . . . . . . . . . . . . . . . . . . . . . . . . . . . . . . . . . . . .
4 - 11
•
SETTING UP THE KAMELEON 8 . . . . . . . . . . . . . . . . Page 12
(
How to set up the KAMELEON 8 to control your devices)
• Search Method
. . . . . . . . . . . . . . . . . . . . . . . . . . . . . . . . . . . . . . . . . . . . . . . . . . 13
S
ET-UP CODES
T
V : Television / LCD / Plasma / Projector / Rear Projection
.
. . . . . . . . .
2
61
V
CR : Video Cassette Recorder / TV/VCR Combi / PVR
. . . . . . . . . . . . . . .
2
72
SAT : Satellite Receiver / Set-Top-Box / DVB-S / DVB-T /
Freeview (UK) / TNT (F) / Digitenne (NL) / DTT (I) / TDT (E)
S
AT/HDD
. . . . . . . . . . . . . . . . . . . . . . . . . . . . . . . . . . . . . . . . . . . .
2
75
CBL : Cable Converter / Set-Top-Box / DVB-C
.
. . . . . . . . . . . . . . . . . . .
279
VAC : Video Accessory like Media Centres / AV Accessories /
A
V Selectors
. . . . . . . . . . . . . . . . . . . . . . . . . . . . . . . . . . . . . . . . .
2
80
C
D : CD Player / CD-R / MD
.
. . . . . . . . . . . . . . . . . . . . . . . . . . . . . . . . .
2
80
PHO : Phonograph
. . . . . . . . . . . . . . . . . . . . . . . . . . . . . . . . . . . . . . . . .
280
MIS : Audio / Miscellaneous Audio
. . . . . . . . . . . . . . . . . . . . . . . . . . . . .
281
HOM : Home Automation (e.g. IR controlled curtains /
IR controlled light switches etc.)
. . . . . . . . . . . . . . . . . . . . . . . . . .
281
AMP : Audio / Amplifier / Active Speaker System
.
. . . . . . . . . . . . . . . . .
281
TUN : Audio / Audio Receiver/Tuner/Amplifier / (DVD)
Home Cinema
. . . . . . . . . . . . . . . . . . . . . . . . . . . . . . . . . . . . . . . .
281
CAS : Cassette Recorder (Tape Deck)
.
. . . . . . . . . . . . . . . . . . . . . . . . . .
282
LDP : Laser Disc Player / Video CD
. . . . . . . . . . . . . . . . . . . . . . . . . . . . .
283
DAT : Digital Audio Tape / DCC
. . . . . . . . . . . . . . . . . . . . . . . . . . . . . . . .
283
DVD : DVD Player / DVD-R / DVD Home Cinema /
DVD Combi / DVD/HDD / DVD/PVR / DVD/VCR Combi
. . . . . . . . . .
283
PVR : Personal Video Recorder
. . . . . . . . . . . . . . . . . . . . . . . . . . . . . . . .
288
CODE BLINK OUT . . . . . . . . . . . . . . . . . . . . . . . . . . . . . . . . . . . . . . . . . . . . . . . . . . . . . . . . . 14
(To find out which code is currently programmed)
QUICK CODE REFERENCE
. . . . . . . . . . . . . . . . . . . . . . . . . . . . . . . . . . . . . . . . . . . . . . . . . 14
LEARNING FEATURE
. . . . . . . . . . . . . . . . . . . . . . . . . . . . . . . . . . . . . . . . . . . . . . . . . . . . . . 15
(How to copy functions from your original working remote
onto the KAMELEON 8)
OPERATIONAL RESET
. . . . . . . . . . . . . . . . . . . . . . . . . . . . . . . . . . . . . . . . . . . . . . . . . . . . . 17
EXTRA FEATURES
• Key Magic® (How to program missing functions)
. . . . . . . . . . . . . . . . . . 18
• Mode re-assignment
(How to set up two of the same devices on the KAMELEON 8)
. . . . . 19
• Volume Punch-Through
. . . . . . . . . . . . . . . . . . . . . . . . . . . . . . . . . . . . . . . . . . . 20
• Device Sleeptimer
. . . . . . . . . . . . . . . . . . . . . . . . . . . . . . . . . . . . . . . . . . . . . . . . . 21
• KAMELEON 8 - Timer
. . . . . . . . . . . . . . . . . . . . . . . . . . . . . . . . . . . . . . . . . . . . . . 21
• Macros (sequence of commands)
. . . . . . . . . . . . . . . . . . . . . . . . . . . . . . . . . . 22
• Code upgrade technology
. . . . . . . . . . . . . . . . . . . . . . . . . . . . . . . . . . . . . . . . . 24
• Colour & Brightness
. . . . . . . . . . . . . . . . . . . . . . . . . . . . . . . . . . . . . . . . . . . . . . . 25
TROUBLE-SHOOTING
• Problem & Solution
. . . . . . . . . . . . . . . . . . . . . . . . . . . . . . . . . . . . . . . . . . . . . . . 25
• Customer Service
. . . . . . . . . . . . . . . . . . . . . . . . . . . . . . . . . . . . . . . . . . . . . . . . . . 26
TABLE OF CONTENTS
E
n
g
l
i
sh
Use the OneForAll Web Wizard to set up your remote with the help
of the Internet. This wizard tells you how to install your different devices
without reading the complete manual. To use this easy set-up tool, please
visit www.oneforallwebwizard.com.
Page 3

2 WWW.ONEFORALL.COM
About Your KAMELEON 8
Easy to use unique “EL” display
By choosing the ONE FOR ALL KAMELEON 8 universal remote control you have
o
pted for easy use. Your KAMELEON 8 features a unique, user-friendly backlit
d
isplay, which ensures you have easy access to all the keys you need, whilst
hiding those you don’t. Made of the strictest quality, it will provide long-term
satisfaction. When inserting the batteries the KAMELEON 8 will be in “demo-
mode” and show several screens. The “demo mode” will be cancelled by setting
u
p your remote (press and hold MAGIC for about 3 seconds then press and
release ESC) .
After replacing batteries, you will need to first press any key before the screen
will light up. From then on, the display will automatically illuminate
w
henever the remote is picked up (touching screen and remote simultaneously).
I
t is also possible to change the activation-mode into activation by key press. To
set the ”EL” display to activation by key press, see page 4, section: ”EL” screen
a
ctivation setting.
Controls up to 8 devices
Your KAMELEON 8 is designed to let you use one remote to operate your Video
a
nd Audio equipment; any device designed to be operated by an infrared signal.
Y
our KAMELEON 8 comes with 2 IR (infra-red) wide range transmitters for
maximum range and is High Frequency capable up to 450 kHz. You can choose
any combination of 8 devices you would like to operate.
TV Television / LCD / Plasma / Projector / Rear Projector
SAT Satellite Receiver, Cable Converter, DSS / Video Accessory
(e.g. Media Centres)
DVD DVD Player / DVD-R / DVD Home Cinema / DVD Combi / DVD/HDD /
Laser Disc Player
VCR Video Cassette Recorder / TV/VCR Combi / DVD/VCR Combi / Cassette
Player (Tape Deck) / Digital Audio Tape / DCC
PVR Personal Video Recorder, Hard Disc Recorder
CD CD Player / CD-R / MD / Phonograph / Home Automation
(e.g. IR controlled curtains etc.
AUD Audio / Audio Receiver/Tuner/Amplifier / (DVD) Home Cinema
LIGHT IR controlled light switches - The KAMELEON 8 also features a
“LIGHT” mode, for control of power modules used in Light Control™
Dedicated addressable 433.92 MHz protocol. This mode will send out
InfraRed (IR) commands to a separately available “ONE FOR ALL Light
Control™ Starters Kit - HC-8300”, which will convert the IR commands in RadioFrequency (RF) to be received by power modules for
dimming and switching lights.
To enable Light Control™ on your KAMELEON 8 you must
purchase the „ONE FOR ALL Light Control™ Starters kit HC-8300“.
Page 4
WW W.ONEFORALL.COM 3
Learning feature
The KAMELEON 8 comes equipped with the unique “learning feature”, which
m
eans that you can copy almost any function (max. ± 50) from your original
(
working) remote control onto your new KAMELEON 8 (See “Learning Feature”
on page 15). This comes in handy, when after having setup your KAMELEON 8
you may find that some functions from your original remote are missing on your
KAMELEON 8 key pad.
Macros (sequence of commands)
Your KAMELEON 8 comes with an easy-to-use Macro feature, allowing you to
send several commands with the press of a single key (for example turning a few
d
evices on or off).
Y
ou can use for example the custom keys (I, II, III, IV) for this feature. Once
you programmed a macro on one of these keys, the sequence will be performed
i
n every mode.
Code upgrade technology
Your ONE FOR ALL KAMELEON 8 also offers a Code upgrade technology.
T
his technology gives you the possibility to add codes to the memory. If your
d
evice uses a particular code which is not found in the KAMELEON 8 memory
(using the “Direct code set up” on page 12 or the “Search Method” on page
13) you may use the ”Code Upgrade Technology” (see page 24). Thanks to this
t
echnology your KAMELEON 8 will never become obsolete.
Note: when inserting the batteries the KAMELEON 8 will be in
“demo-mode (showing several screens). The KAMELEON 8 will go
out of demo-mode automatically as you set it up.
Your KAMELEON 8 requires 4 AAA/LR03 alkaline batteries.
1. Unscrew the battery door using a coin.
2. Insert the batteries with the positive end (+) upwards.
3. Replace the battery door back into position.
Low Voltage Indicator
As soon as the batteries run out of power the KAMELEON 8 will indicate this.
The IR indicator will flash 5 times whenever you press a key and you cannot
access programming mode.
Please make sure to replace the batteries with 4 new AAA/LR03 alkaline
batteries.
About Your KAMELEON 8
Batteries
Page 5
4 WWW.ONEFORALL.COM
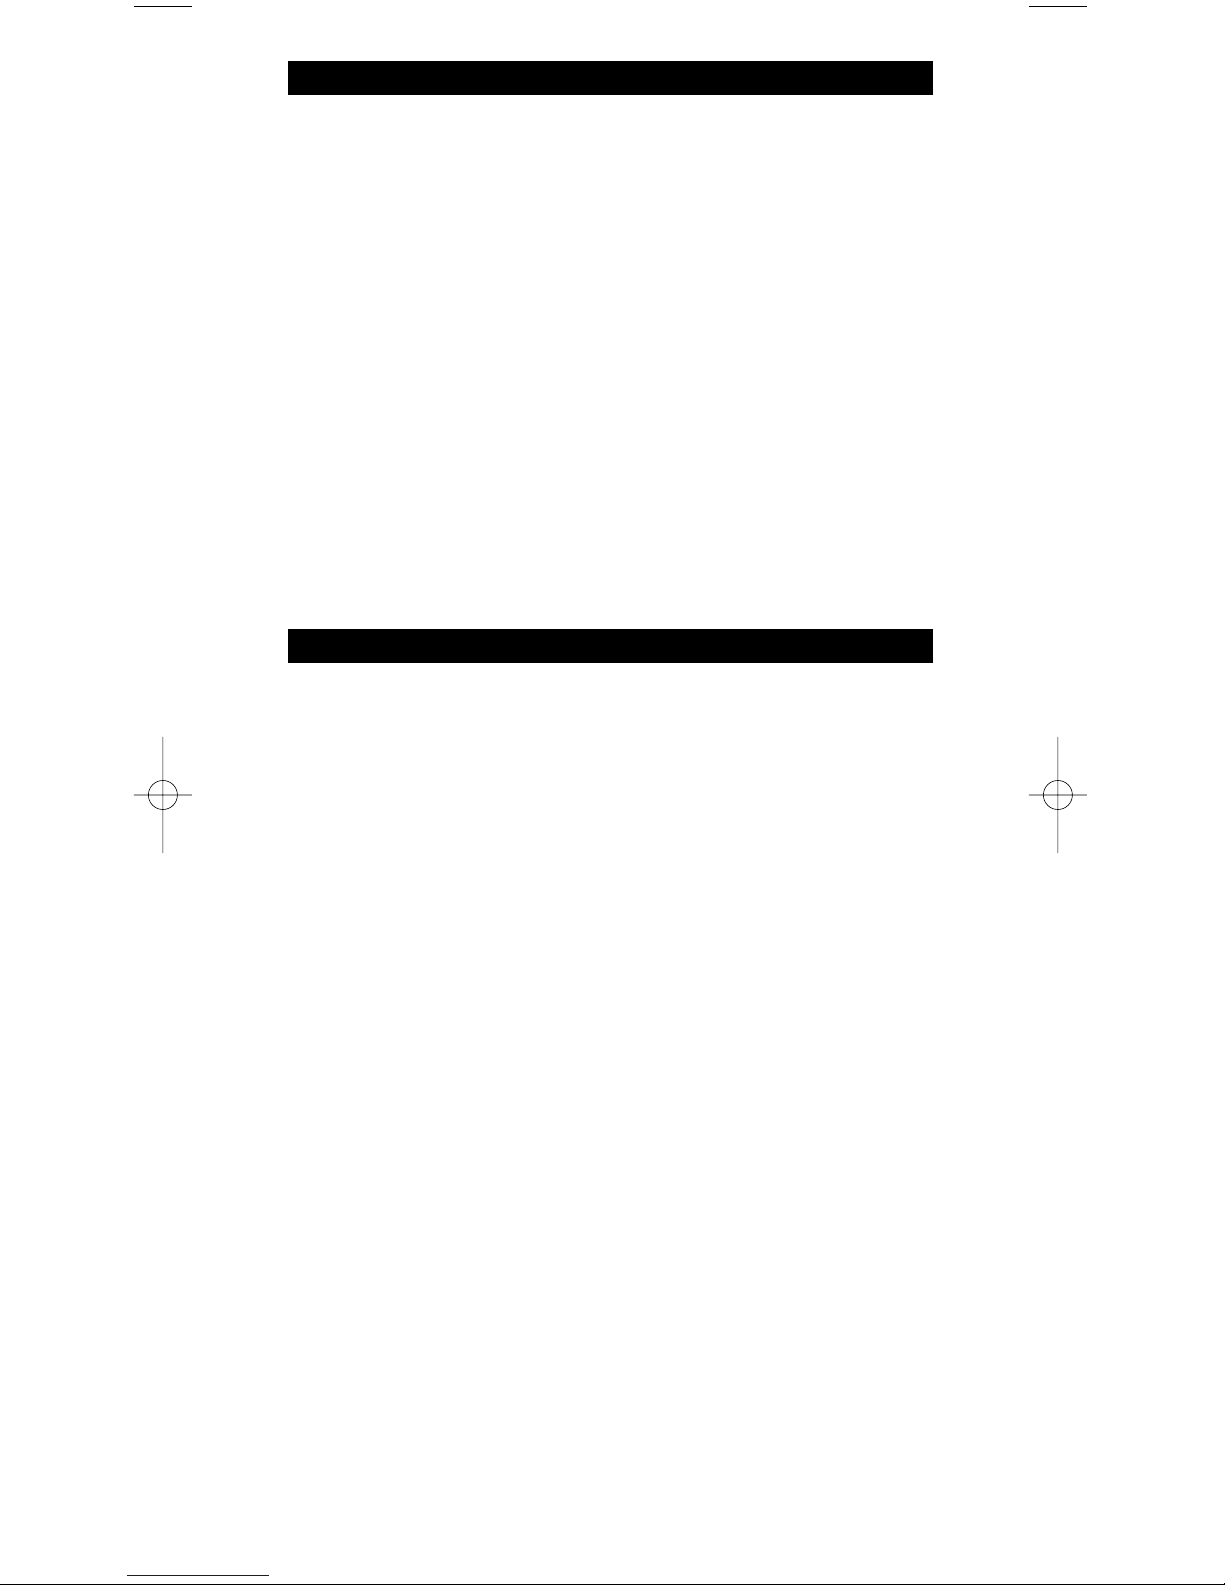
“EL” Screen brightness adjustment
To increase or decrease the brightness of the KAMELEON 8 “EL” screen:
1. Press and hold the MAGIC key for about 3 seconds.
The screen will change to the setup screen.
2. Press BRIGHT.
3. > To increase the brightness of the “EL” screen press and
hold NEXT
> To decrease the brightness of the “EL” screen press and
hold PREVIOUS.
4. Press ENTER to store the brightness setting and return
to the setup screen OR press ESC to return to the previously
set brightness level.
- Increasing the brightness of the KAMELEON “EL” panel can decrease
the battery life. Battery life varies from 3 - 12 months (depending on
brightness setting and usage).
This product features an “EL” panel (Electro Luminescence technology) which is
activated by touching screen and remote simultaneously to activation by
k
eypress. In order to save battery life, the “EL” screen will stay illuminated for
8
seconds during normal use.
One of the key features of the KAMELEON 8 is the “EL” display, which changes
to suit the device you are controlling. The overview on page 6 will show you all
t
he possible functions that you may obtain.
“EL” Screen activation setting
The KAMELEON 8 features an “EL” panel which is activated by touching screen
a
nd remote simultaneously or by keypress.
It is possible to lock the KAMELEON 8 to one activation setting:
1. Press and hold the MAGIC key for about 3 seconds.
The screen will change to the setup screen.
2. Press OTHER.
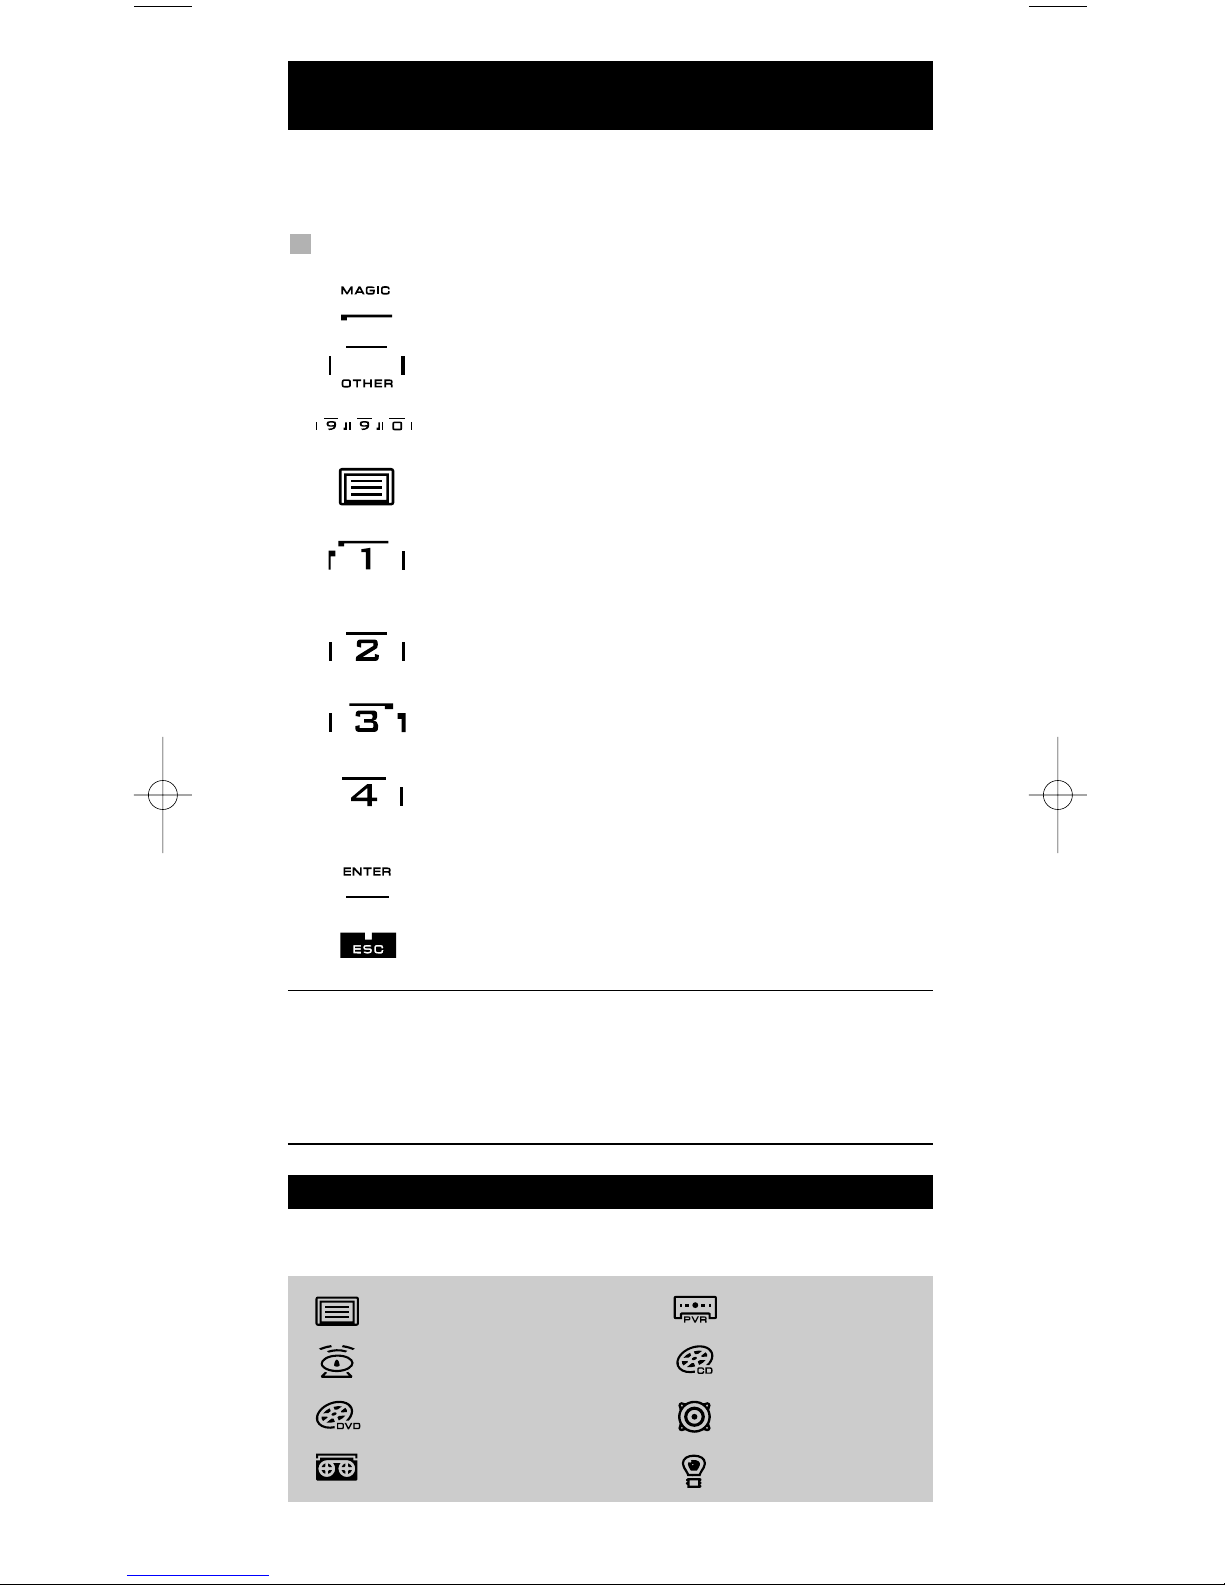
3. Now press 9 8 9. The IR Indicator will blink twice (or 4 times).
-> If the animated IR Indicator blinks twice the “EL” panel will be activated only
by touching screen and remote simultaneously.
-> If the animated IR Indicator blinks four times the “EL” panel will be activated
only by keypress.
Simply perform these steps to lock the KAMELEON 8 to the activation
setting that you prefer.
The Keypad
Page 6
WW W.ONEFORALL.COM 5
The Keypad
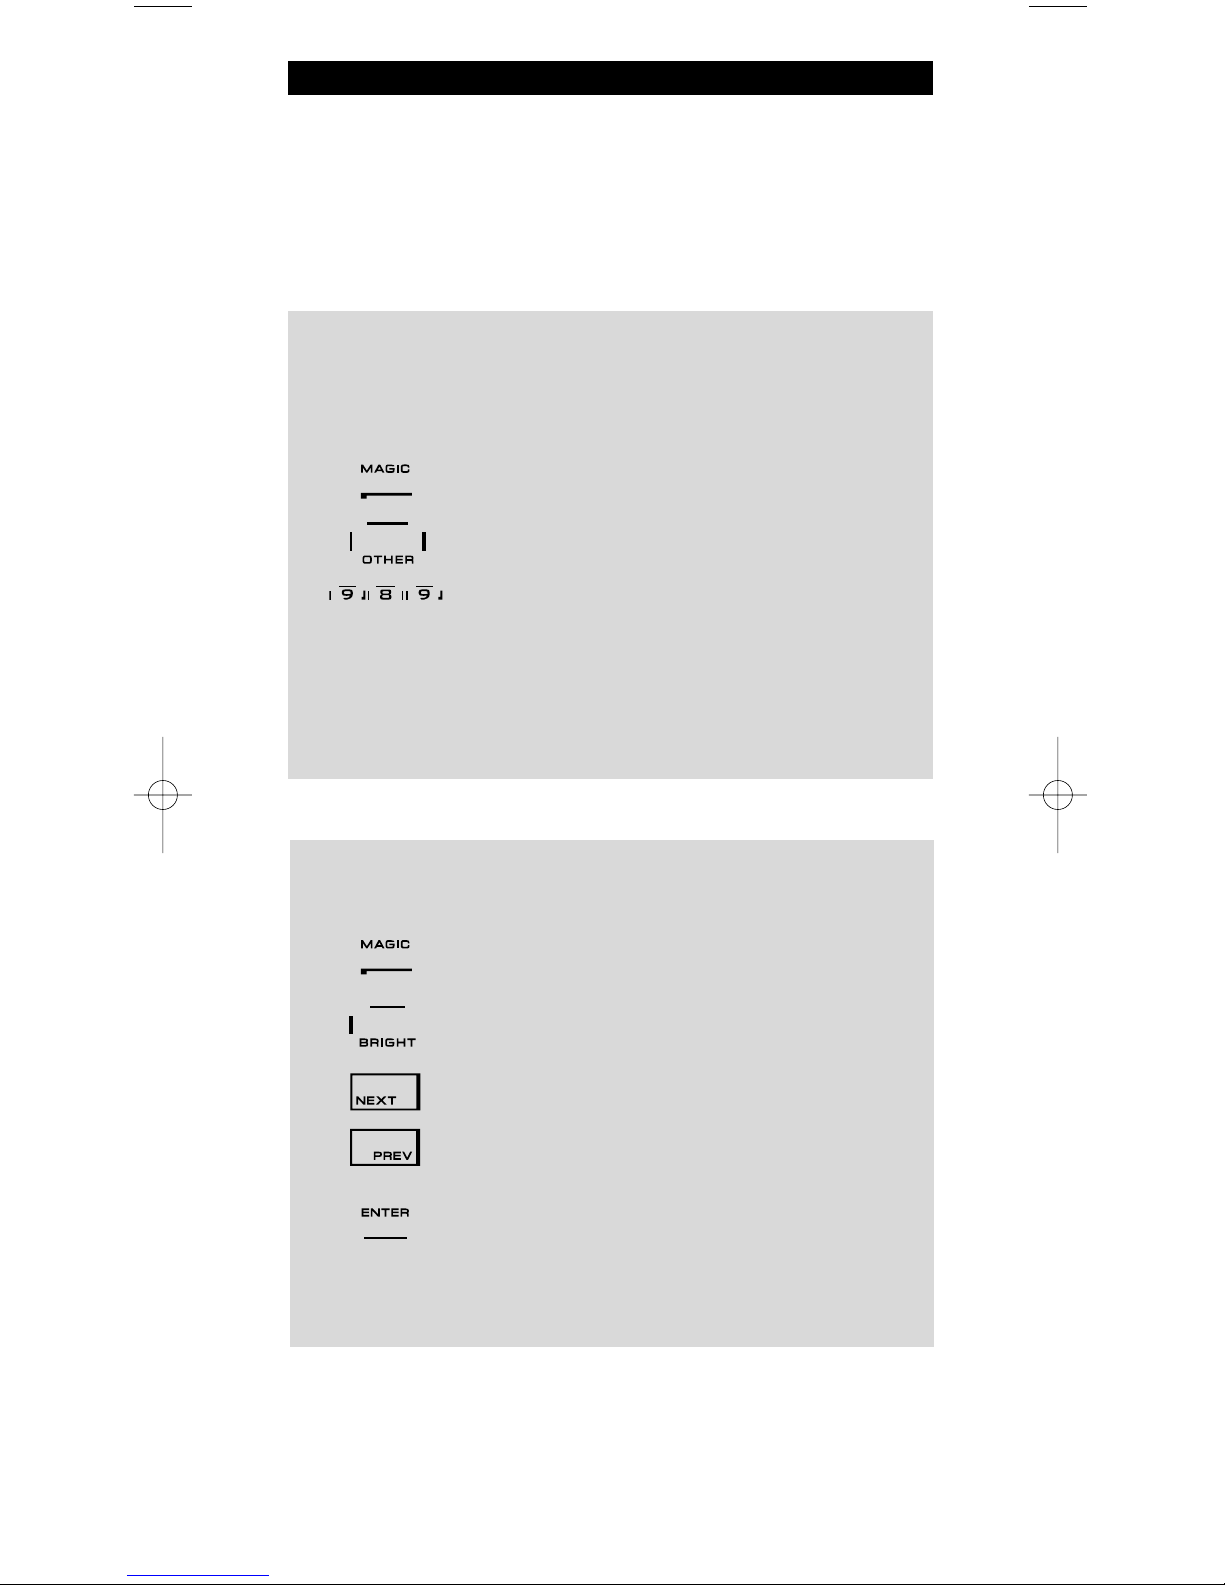
“EL” On time setting
T
o change the duration (default: 8 sec.) that the KAMELEON 8 “EL” screen will be
O
N, after each keypress during use of the remote (not programming mode):
1. Press and hold the MAGIC key for about 3 seconds.
The screen will change to the setup screen.
2. Press OTHER.
3. Press 9 7 8. The IR Indicator will blink twice.
4
. Press 1, 2, 3, 4 or 5 (e.g. 1 = 4 seconds) depending on
your choice, see table below. The animated IR Indicator
w
ill blink twice. Press ENTER to store the new EL on time
s
etting and to return to the SETUP screen OR press ESC
t
o return to the previously set EL on-time setting.
Selection “EL” On Time
14seconds
2 8 seconds (default)
3 12 seconds
4 16 seconds
5 20 seconds
Page 7

6 WWW.ONEFORALL.COM
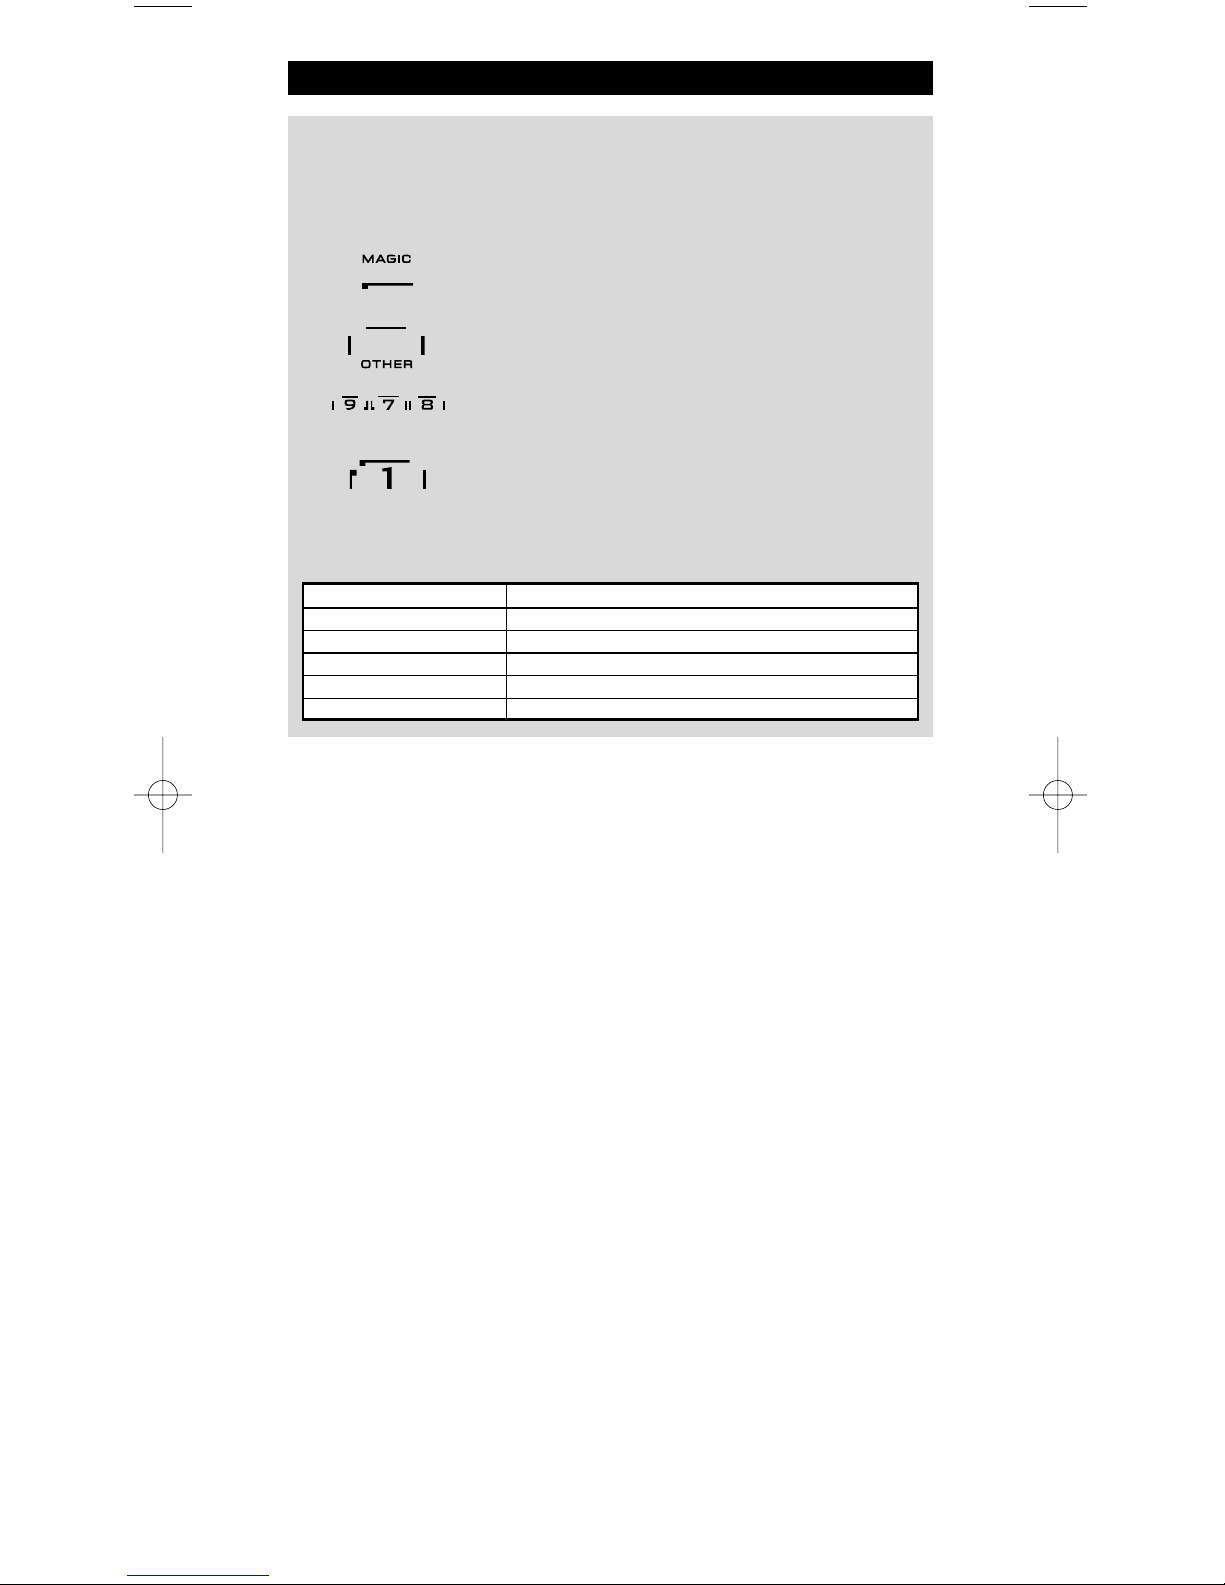
The Keypad
TV
SAT
DVD
VCR
PVR
CD
AUD
L
IGHT
IR Indicator
Page 8
WW W.ONEFORALL.COM 7
1. IR (infra-red) Indicator
The IR Indicator animates when IR is being “sent” or
“
received”. The KAMELEON 8 animated IR Indicator will
s
how “outgoing IR” whenever a function key is pressed.
When using the “Learning Procedure” or “Code Upgrade
Procedure” the animated IR indicator will show “incoming
IR”. Outgoing IR will be indicated by an “outside to inside”
a
nimation of the IR Indicator. Ingoing IR will be indicated
by an “inside to outside” animation of the IR Indicator. The
IR Indicator will give feedback when keys are pressed both
during normal use and in programming mode (middle segm
ent of the IR Indicator will blink).
2
. Device keys
The TV, SAT, DVD, VCR, PVR, CD, AUD and LIGHT keys select the device to be
controlled. For example pressing the TV key allows the remote to control
t
he functions of your Television, after pressing VCR you can operate your
V
ideo Recorder, after pressing the SAT key you can operate your Satellite
Receiver or Cable Converter etc. (see page 2 for more details). After pressing
a device (mode) key on your KAMELEON 8 the applicable device icon will
a
nimate, to show the currently activated mode. Pressing the device key will
allow you to return to the main screen (TV, SAT and AUD modes). The
KAMELEON 8 also features a “LIGHT” mode. Together with a separately
available “ONE FOR ALL Light Control™ Starters Kit - HC-8300”, this allows
you to dim and switch ON/OFF lights through-out your whole house.
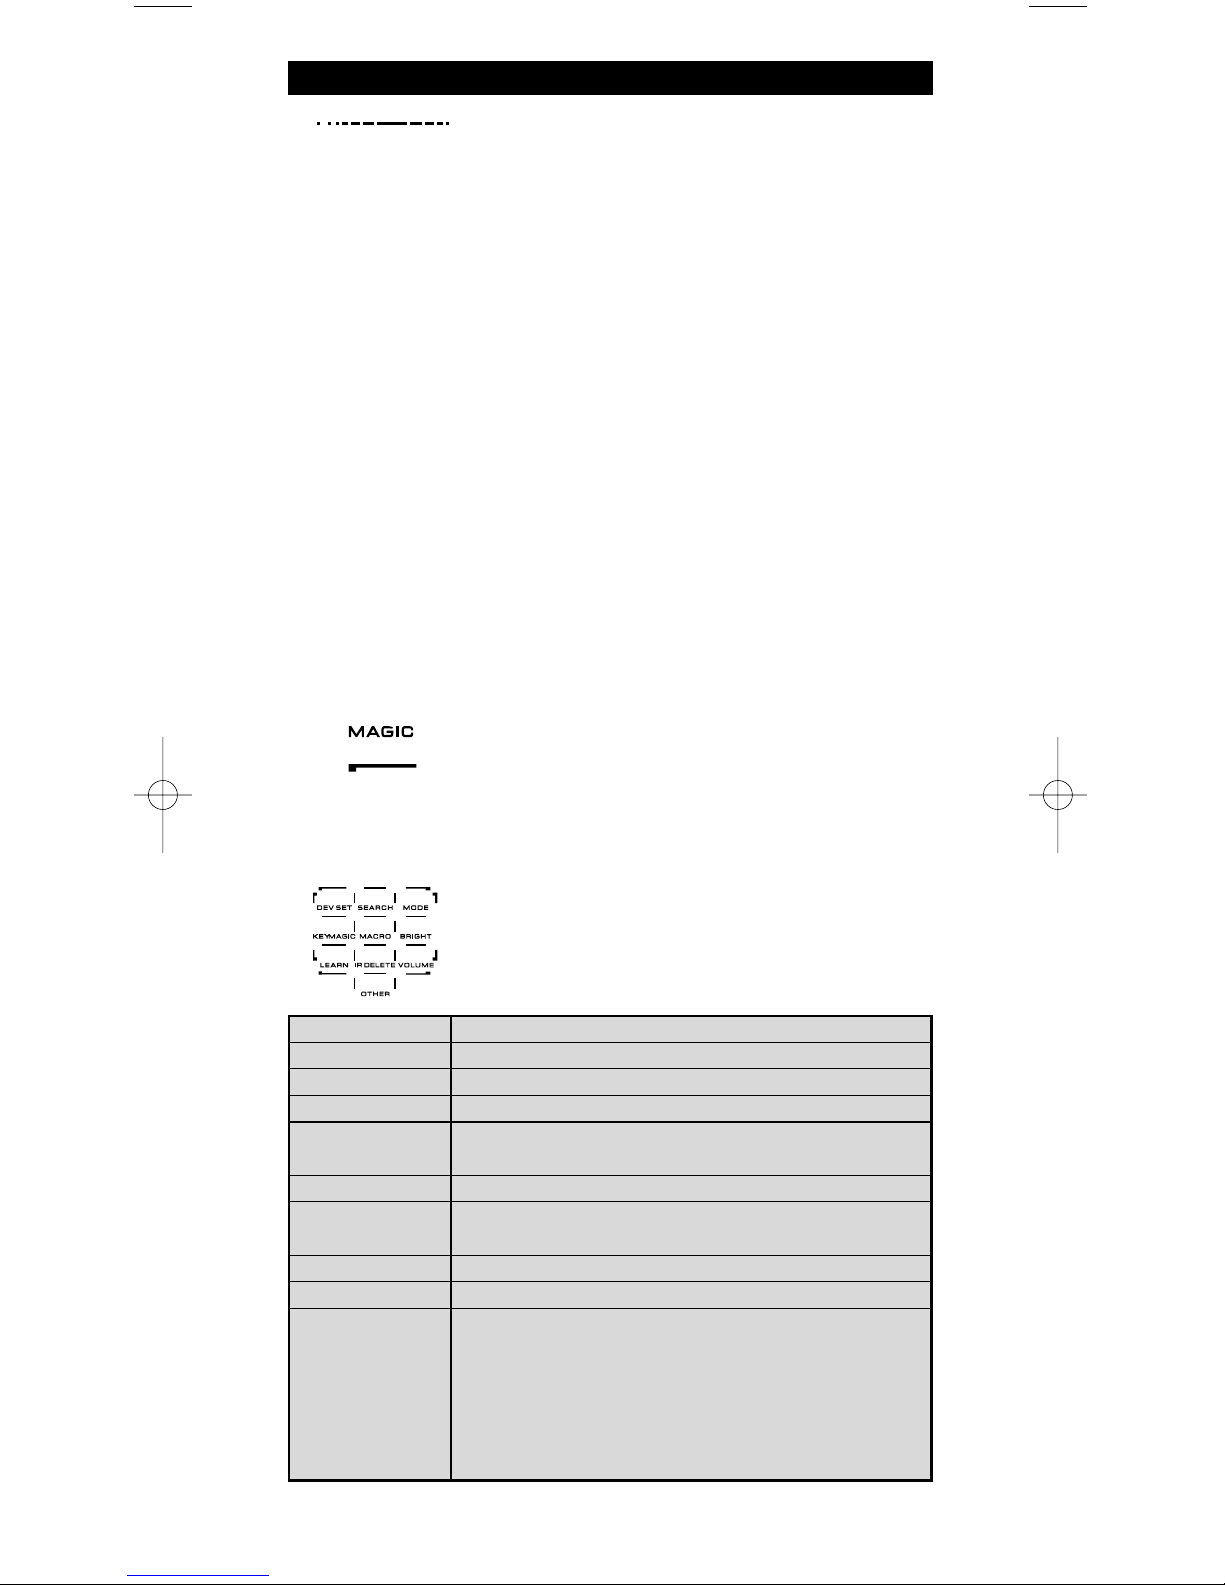
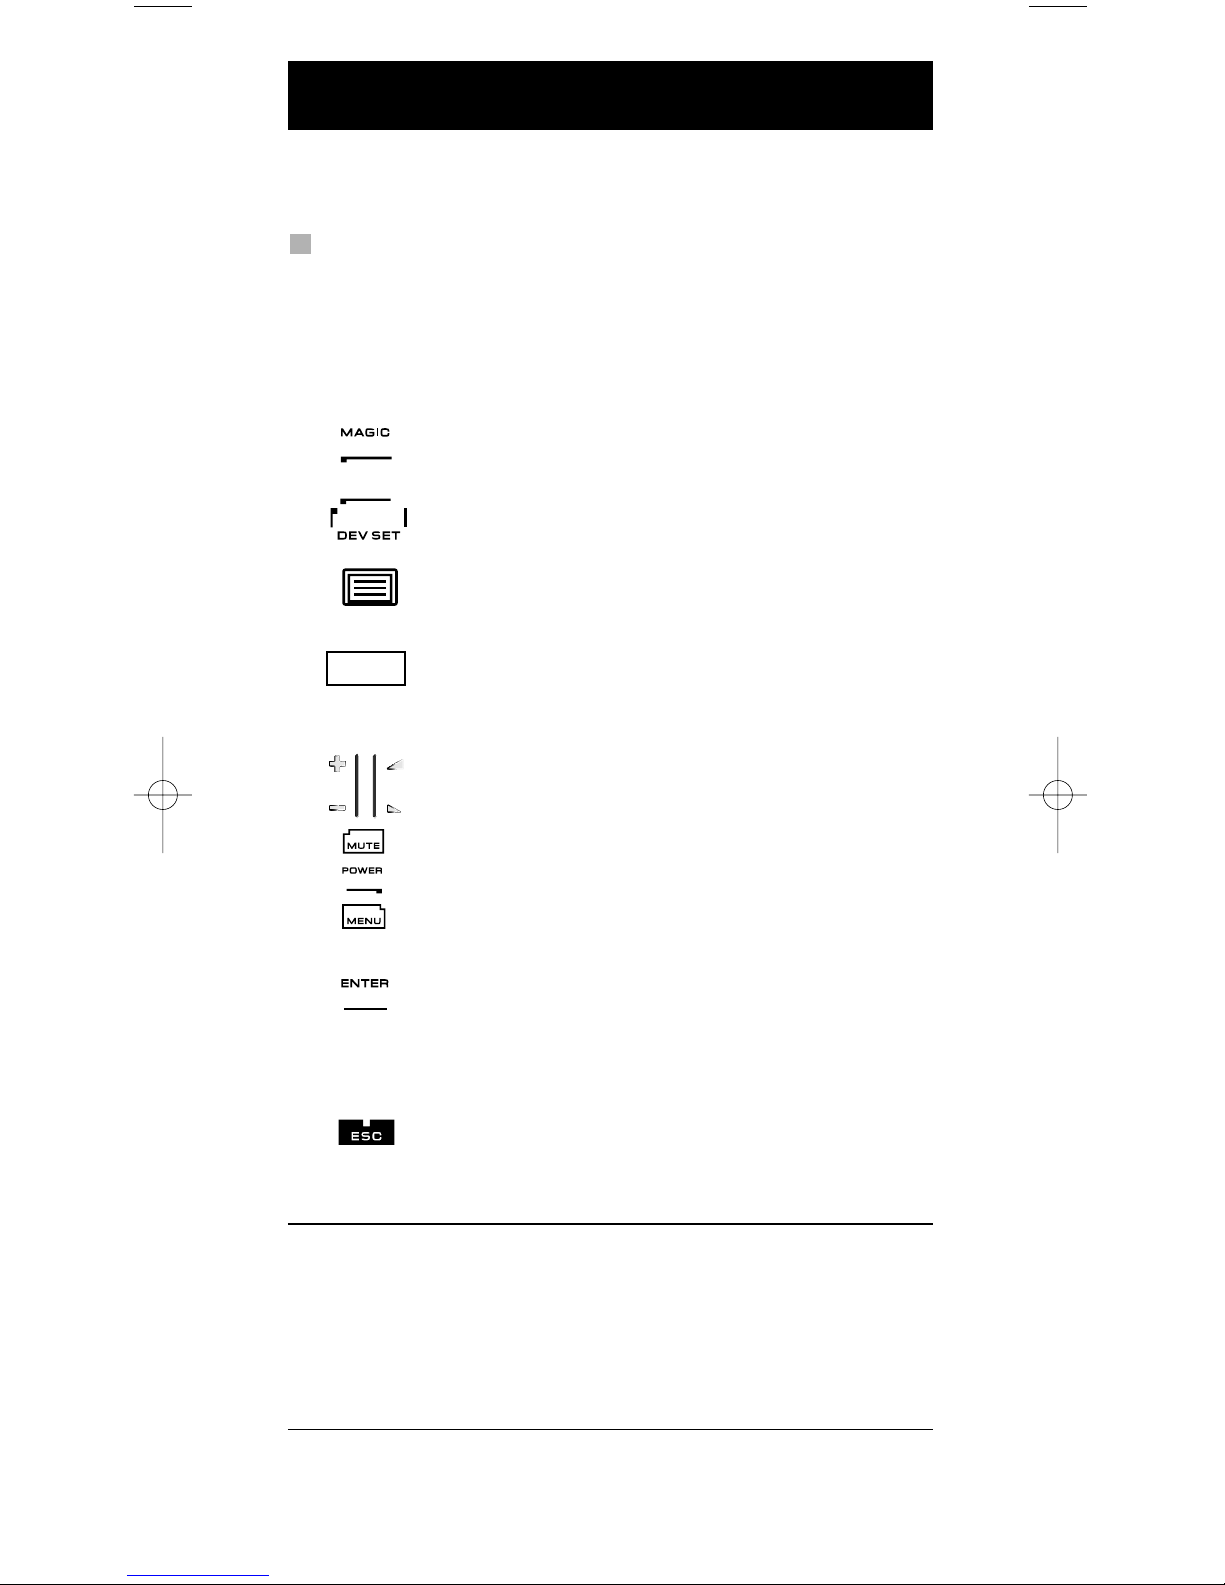
3. MAGIC (in ”shifted” or ”programming” mode)
The MAGIC key is used to set up your KAMELEON 8 and to
access special functions. If you press this key shortly, the
screen will go into ”shifted” mode (for 10 seconds) which
will give access to some secondary functions such as color,
brightness and sleeptimer.
Programming mode
If you press the MAGIC key longer (about 3 seconds), the
KAMELEON 8 will enter ”programming” mode. The screen
will change to the “setup screen”.
The Keypad
DEV SET
SEARCH
MODE
KEY MAGIC
MACRO
BRIGHT
LEARN
IR DELETE
VOLUME
OTHER
• Device Setup mode
• Search Method
• Mode re-assignment
• To program missing functions
• To setup a key (I, II, III, IV) with a Sequence of
commands
• “EL” Screen brightness adjustment
• To copy functions from your original working remote
onto the KAMELEON 8
• Deleting learned and Key Magic functions
• Volume punch through feature
• Variable EL On time (4 sec, 8 sec, 12 sec, 16 sec, 20 sec)
• Operational Reset
• KAMELEON 8 - Timer
• EL screen activation setting
• Code Verification
• Modem Upgrade
Page 9

8 WWW.ONEFORALL.COM
4. SCROLL
The SCROLL key gives you the possibility to move through
t
he different screens (if applicable) within a certain mode
d
uring normal use and programming mode. This only
applies to TV, SAT and AUD modes.
5. ENTER
The ENTER key allows you to confirm your choice in
programming mode.
6
. POWER (in shifted mode; Sleeptimer)
T
he POWER key controls the same function as on your
original remote.
7. PP / TIMER / RAND.
In TV and SAT mode this key may feature the “Last
C
hannel”, “Previous Program” or “Recall” function
(depending on your original remote control). In VCR and
DVD mode you will obtain the TIMER RECORD or TIMER
ON/OFF function. In CD and AUD mode you will obtain the
RANDOM (or shuffle) function.
8. PRESET / BACK
In AUD mode, the PRESET key will change to the
PRESET/MENU screen allowing access to the PRESETS 1 - 9,
0 and +10 on the digits. In PVR and SAT menu mode you
may use the “back” key to go to the previous menu screen.
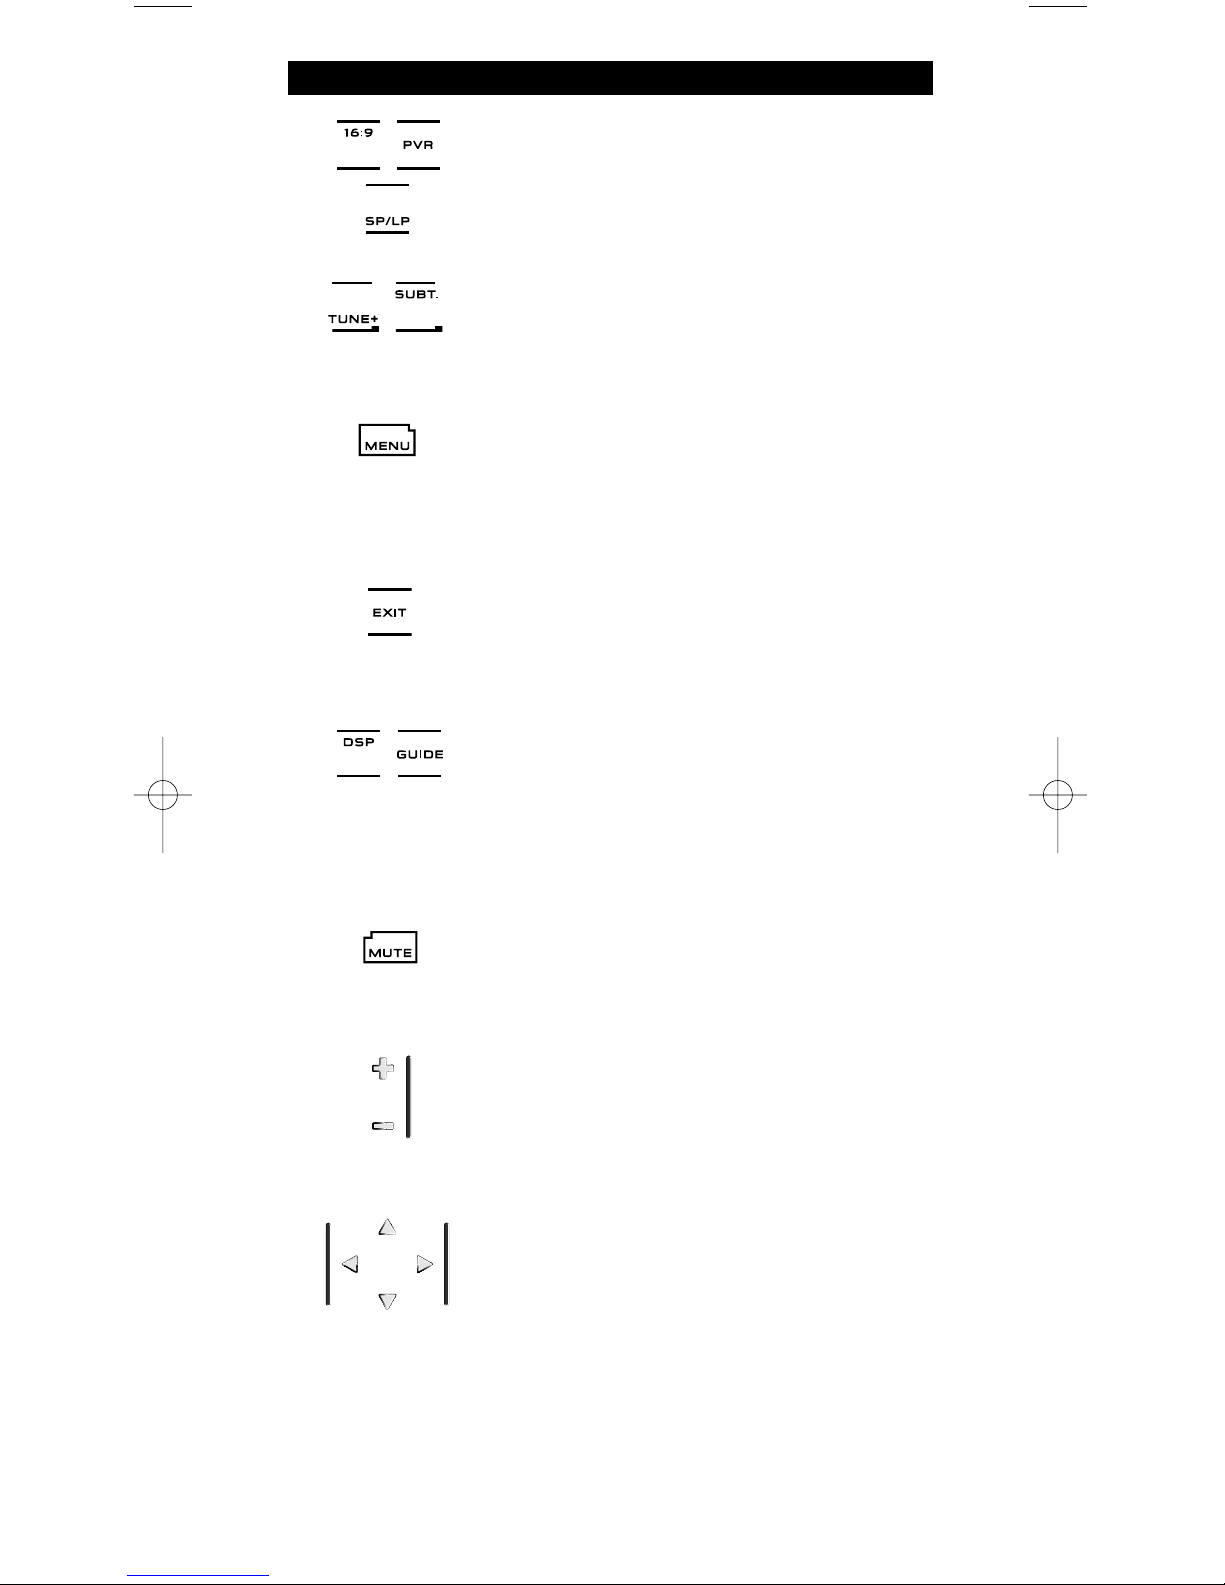
9. 16:9 / PROG.
In TV mode you will obtain the 16:9 (screen format) function. In VCR, DVD, AUD (main screen) and CD mode you
will obtain the PROG (program) function.
10. TV/VCR / TV/SAT / TV/DVD
In VCR mode you will obtain the TV/VCR function. In SAT
mode you will obtain the TV/SAT function. In DVD mode
you will obtain the TV/DVD function.
11. AUDIO / TUNE -
In DVD, SAT, PVR and AUD mode (main screen) you will
obtain the “Audio” function. In AUD mode (preset/Menu
screen) you will obtain the “TUNE –“ function.
12. INFO / CLEAR
In SAT and PVR mode you can select the “info” function. In
CD, AUD (main screen) and DVD mode you will obtain the
“clear” function.
The Keypad
Page 10
WW W.ONEFORALL.COM 9
The Keypad
1
3. FAV / EDIT / SP/LP
I
n SAT and PVR mode you will obtain the FAV (favourite)
f
unction. In DVD, CD and AUD mode you will obtain the
EDIT function to edit information. In VCR mode you will
o
btain the SP/LP (tape speed) function.
1
4. SUBT. / TUNE +
I
n SAT, PVR, DVD and AUD main mode you will obtain the
S
UBTITLE function. In AUD mode you will obtain the
“TUNE +” function in the preset/Menu screen.
15. MENU
P
ressing this key will allow you to operate the Menu and
i
n TV and AUD mode will also change the screen to the
menu mode. The MENU key operates the same function it
did on your original remote control.
1
6. EXIT
The EXIT key will operate the same as on your original
remote. To return to the main screen (TV, SAT and AUD
mode) press the device key or use the SCROLL key.
17. DSP / GUIDE
If available on your original remote, in AUD mode you will
obtain the “DSP” function. In TV, SAT, DVD, VCR and PVR
mode the “GUIDE” key will provide you the “guide”
function, if available on your original remote control. In
TV mode the “GUIDE” key will change the screen to
“menu mode screen”.
18. MUTE
The Mute key operates the same function it did on your
original remote control.
19. CH +/- (in shifted mode; brightness +/-)
These keys operate just as those on your original remote.
In shifted TV mode (accessed by pressing MAGIC shortly
and releasing it) these keys may provide you the brightness +/- function.
20. Directional keys (Up, Down, Left, Right)
If available on your original remote control, these keys
will allow you to navigate through the menu. On some
TV’s you may have to press CH+/- and VOL+/- keys OR the
color keys (red, green, yellow, blue) to navigate through
the menu, depending on your model of TV. In AUD main
mode these keys will (if available on your original remote)
allow you to adjust the CENTRE and REAR levels of your
speaker(s). In AUD menu mode these keys will (if available
on your original remote) allow you to navigate in the
menu-screen.
Page 11

10 WW W.ONEFORALL.COM
21. OK / SURROUND
In menu mode this key will confirm your choice. On some
d
evices you can confirm your menu option simply by
p
ressing MENU. In AUD main mode this key will allow you
to access the surround mode of your device (if available on
your original remote).
22. VOL +/- (in shifted mode; colour +/-)
The volume keys operate just as those on your original
r
emote. In shifted TV mode (accessed by pressing MAGIC
s
hortly and releasing it) these keys may provide you the
colour +/- function.
23. Number keys / INPUT (in prog. Mode; setup features)
T
he number (1 – 9, 0) keys provide functions just like your
o
riginal remote. In AUD mode, the number (1 – 9, 0, -/—)
keys may provide (if available on your original remote) an
INPUT function (TUNER, CD etc.). If your original remote
f
eatures a “function select” or “input select” function you
may find this under the AV key. When in programming
mode, the digit keys will display the various setup
features.
24. -/-- / PPV
If your original remote uses one/two digit input switching
(-/-- symbol), this function can be obtained by pressing the
-/-- key. In SAT (menu screen) and PVR mode you will
obtain the PPV function.
25. AV / HELP
The AV key operates the same function it did on your
original remote control. If your original television or video
remote uses a 20 key, this function can be found by
pressing the AV key. If your original satellite or PVR
remote comes with a “help” function, you can obtain this
pressing the HELP key. In AUD mode you will obtain the
“input source” function.
26. ESC
This key only appears in programming mode and is used to
return to the Setup screen or to exit programming mode.
27. Transport keys (PLAY, STOP etc.)
When in VCR, DVD, SAT (menu screen), PVR, CD or AUD
mode; these keys operate the transport functions like
PLAY, FF, REW, SKIP+/- (TRACK+/-) etc.of your device. To
prevent accidental recording, the RECORD key must be
pressed twice to start recording.
The Keypad
Page 12
WW W.ONEFORALL.COM 11
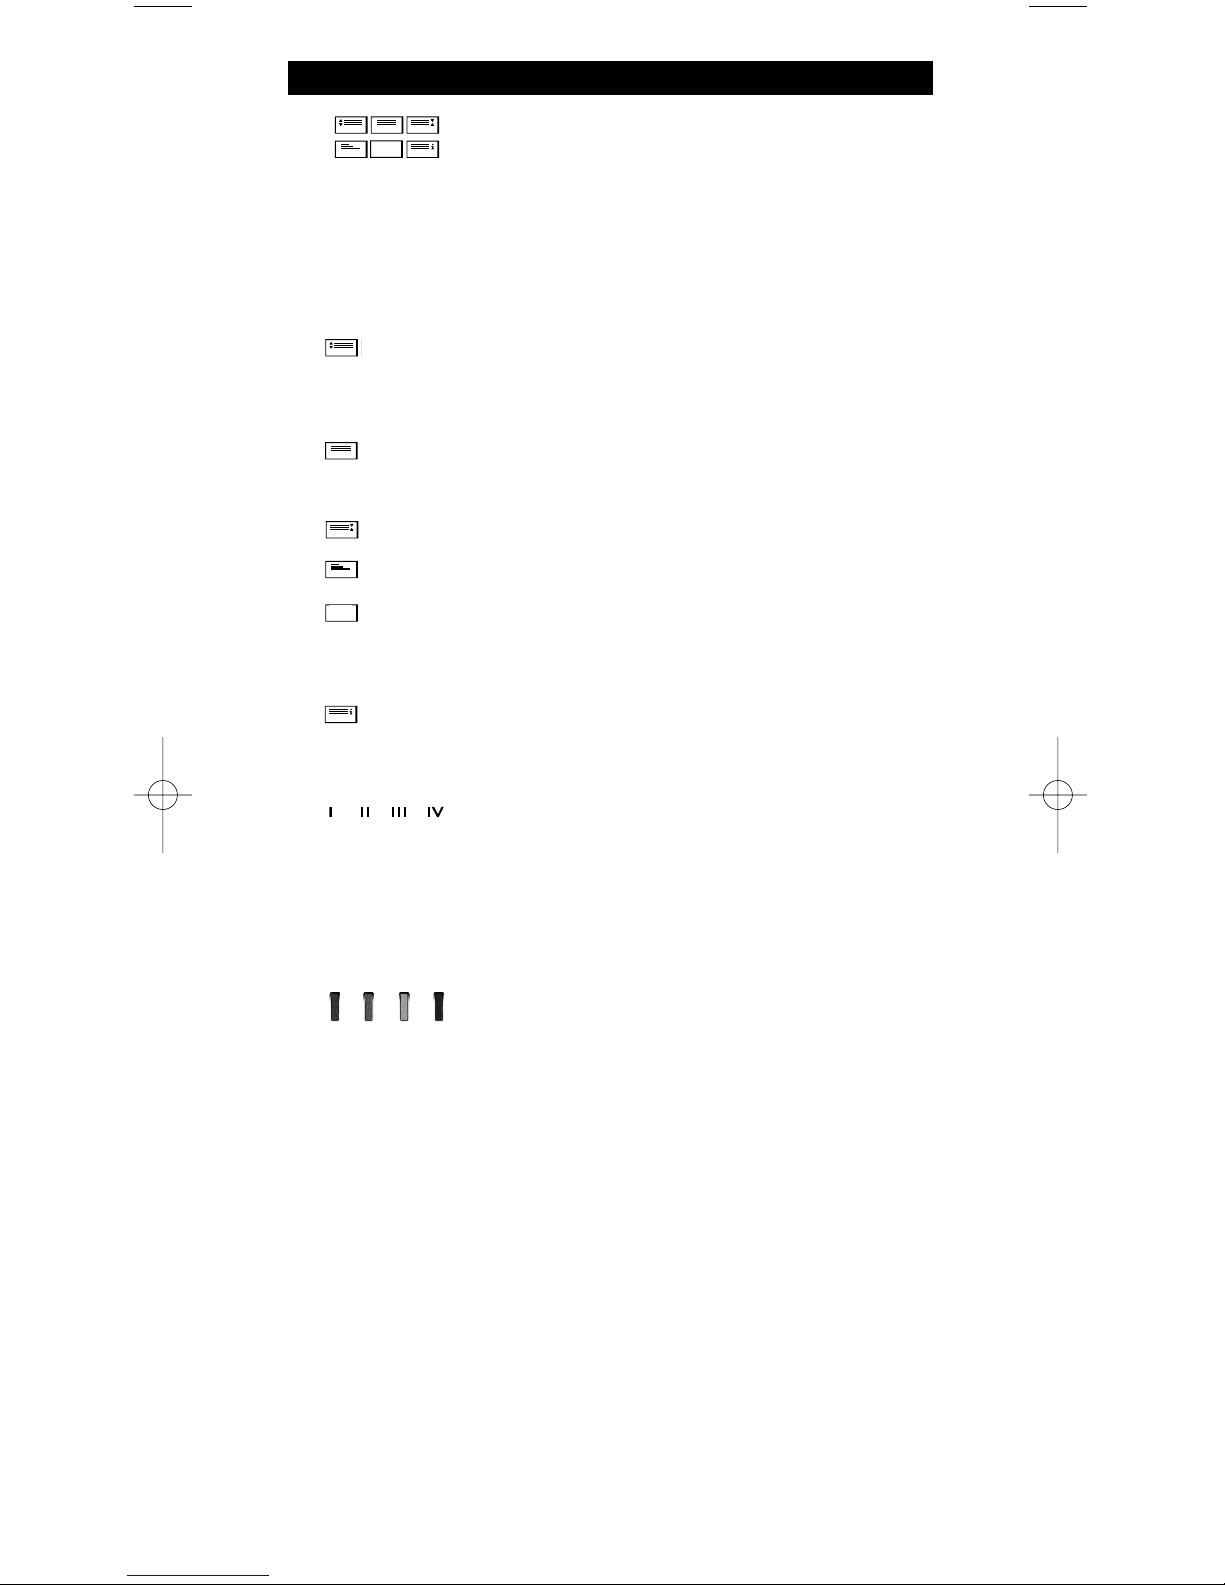
28. Teletext Keys
These keys are used to operate the main teletext
f
unctions. Of course, your Television must have teletext
c
apability. For a more detailed explanation of teletext and
fastext, please refer to the manual of your television.
Remember, different televisions control teletext and
fastext functions in different ways. Not all of the teletext
f
unctions may be available on your particular model.
E
XPAND: Shows the top half of the teletext page in larger letters.
B
y pressing again, you can see the bottom half of the teletext page
enlarged. To return to regular teletext viewing, press the EXPAND key
a
gain, or press the TEXT ON key, depending on your television.
TEXT ON: In TV mode: once in text mode, pressing this key may
switch to MIX or TURN OFF text, depending on your television.
T
his function is also available in SAT mode.
HOLD/STOP: Stops changing pages.
M
IX: Shows both text and TV picture.
TEXT OFF: In TV mode: switches the television back to regular
viewing mode. On some televisions this may be done by pressing
the “TEXT ON” key several times. This function is also available in SAT
mode.
TEXT INDEX: This key will give you access to the index function
within the text mode.
29. Custom keys (I, II, III, IV)
The custom keys are spare keys that give you the possibility
to customize the KAMELEON 8 according to your original
remote control using the “Learning feature” (see page 15)
or ”Key Magic®” (see page 18). These keys are also ideal
for use as “Macro keys” (see page 22).
30. Red / Green / Yellow / Blue
When accessing the text mode, the colour keys marked
red, green, yellow and blue, allow you to access the fastext
functions of your television. If on your original remote
control these keys are used for Menu navigation,
the KAMELEON 8 Fastext keys may operate the same.
The Keypad
Page 13
12 WW W.ONEFORALL.COM
N
ote: when inserting the batteries the KAMELEON 8 will be in “demo-
m
ode (showing several screens). Just follow the next steps and
the KAMELEON 8 will go out of demo-mode automatically.
E
xample: To set up the KAMELEON 8 for your television:
1
. Make sure your television is switched ON (not on standby).
2. Find your device code in the codelist (pages 261 - 288). Codes are list-
e
d by device mode and brand name. The most popular code for each brand
i
s listed first. If your brand is not listed at all in the code section, try the
Search Method on page 13.
3
. Press and hold the MAGIC key for about 3 seconds.
T
he screen will change to the setup screen.
4
. Press the DEV SET key.
5. Press and release the TV key to select the device type you like
to setup.
6. Enter the first four-digit code (see codelist pages 261 -
288) using the number keys. The animated IR Indicator will
blink twice.
7. Now, aim your KAMELEON 8 at your television and try the
following keys to test if the KAMELEON 8 will work with your
device;
• CHANNEL +, CHANNEL-
• VOLUME +, VOLUME -
• MUTE
• POWER.
• MENU.
8. If your device is responding, press ENTER to save the code.
If your device does not respond, just enter the next code listed
under you brand. If none of the codes listed for your brand
operate your device, then try the Search Method described on
page 13.
9. Press and keep ESC pressed for about 3 seconds to
return to user mode (all keys for the device mode are
displayed), OR press a device key to select the next
device you like to setup.
- Most TV’s do not switch back on pressing the POWER key, please try
pressing “CHANNEL+” key to switch your TV back on.
- Some codes are quite similar. If your device does not respond or is not
functioning properly with one of the codes, try another code listed under
your brand.
- To set up your other devices, follow the same instructions above,
only press the appropriate device key during step 5.
- Remember to press the correct device key before operating your device.
Only one device can be assigned to a device key.
To set up a second TV, VCR, SAT, PVR, CD, AUD or DVD (See page 19).
Setting up the KAMELEON 8
(How to set up the KAMELEON 8 to control your devices)
_ _ _ _
Page 14

WW W.ONEFORALL.COM 13
Search Method
-
-> If your device does not respond to the KAMELEON 8 after you have tried
a
ll the codes listed for your brand.
--> If your brand is not listed at all.
The Search Method allows you to scan through all the codes contained in
t
he memory of the KAMELEON 8.
Example: To search for your TV code:
1
. Switch ON your Television (not on standby).
2. Press and hold the MAGIC key for about 3 seconds.
T
he screen will change to the setup screen.
3. Press SEARCH.
4. Press and release the TV key to select the device type you
l
ike to setup.
5. Next, press POWER.
6. Point the KAMELEON 8 at your Television. Now press
NEXT over and over, until your Television turns off
(every time you press the NEXT key the KAMELEON 8 will
send out a POWER signal from the next code contained in
the memory). You may have to press NEXT many times
(up to 150 times) so please be patient. Remember to
keep pointing the KAMELEON 8 at your Television
while pressing this key. (If you skip past a code, you can
go to the previous code(s) by pressing the PREVIOUS key).
7. When your Television switches off, press the ENTER
key to store the Code. The animated IR Indicator will
light up twice.
8. Press ESC to return to the setup screen, or press a
device key if you want to perform the Search Method for
another device.
9. Press ESC again to return to user mode (all keys are
displayed).
Turn your device (television) back on and try all the
remote’s functions to ensure they are working properly. If
you cannot control your Television properly, please continue the Search Method, you may be using the wrong Code.
- During step 5, instead of POWER you can also press any other key displayed.
This will be the function sent for the next key presses of NEXT or PREVIOUS
in step 6. If for example; during step 5 you press “2” instead of “POWER”,
the KAMELEON 8 will send the “number 2” signal every time you press
NEXT during step 6 (make sure your TV is switched to another channel).
- To search for your other devices, follow the same instructions above, only
press the appropriate device key during step 4.
- If your Video’s original remote control does not have a POWER key, press
PLAY instead of POWER during step 5.
- In the LIGHT-mode the Search Method does not work.
Setting up the KAMELEON 8
Page 15
14 WW W.ONEFORALL.COM
Code blink out
(To find out which code is currently programmed)
I
f you have set up your KAMELEON 8 via the Search Method, you can blink
b
ack your code for future reference. Please note that the animated IR Indicator
will indicate the 4 digits by animated blinks.
E
xample: To blink out your television code:
1. Press and hold down the MAGIC key (for about 3 seconds).
The screen will change to the setup screen.
2. Press OTHER.
3
. Press 9 9 0, the animated IR Indicator will light up twice.
4. Press and release the TV key to select the device type you like
t
o check the code for.
5
. For the first digit of your four-digit code, press 1 and count
the blinks of the animated IR Indicator. If there are no blinks,
the digit is “0”.
6. For the second digit, press 2 and count the animated blinks.
If there are no blinks, the digit is “0”.
7. For the third digit, press 3 and count the animated blinks.
If there are no blinks, the digit is “0”.
8. For the fourth digit, press 4 and count the animated blinks.
If there are no blinks, the digit is “0”. Now you have found
your four-digit code.
9. Press ENTER to return to the setup screen OR press a device
key if you want to perform the blink out for another device.
10. Press and hold ESC (for about 3 seconds) to return to user mode.
- You can perform steps 5 – 8 in any order and as many times as you want. So,
if you lost count it is possible to blink back the corresponding number again
(e.g. if during step 6 you did not see exactly how many times the animated
IR Indicator blinked just press “number 2” again and count again).
- To blink back the code for your other devices follow the instructions above,
only press the appropriate device key during step 4.
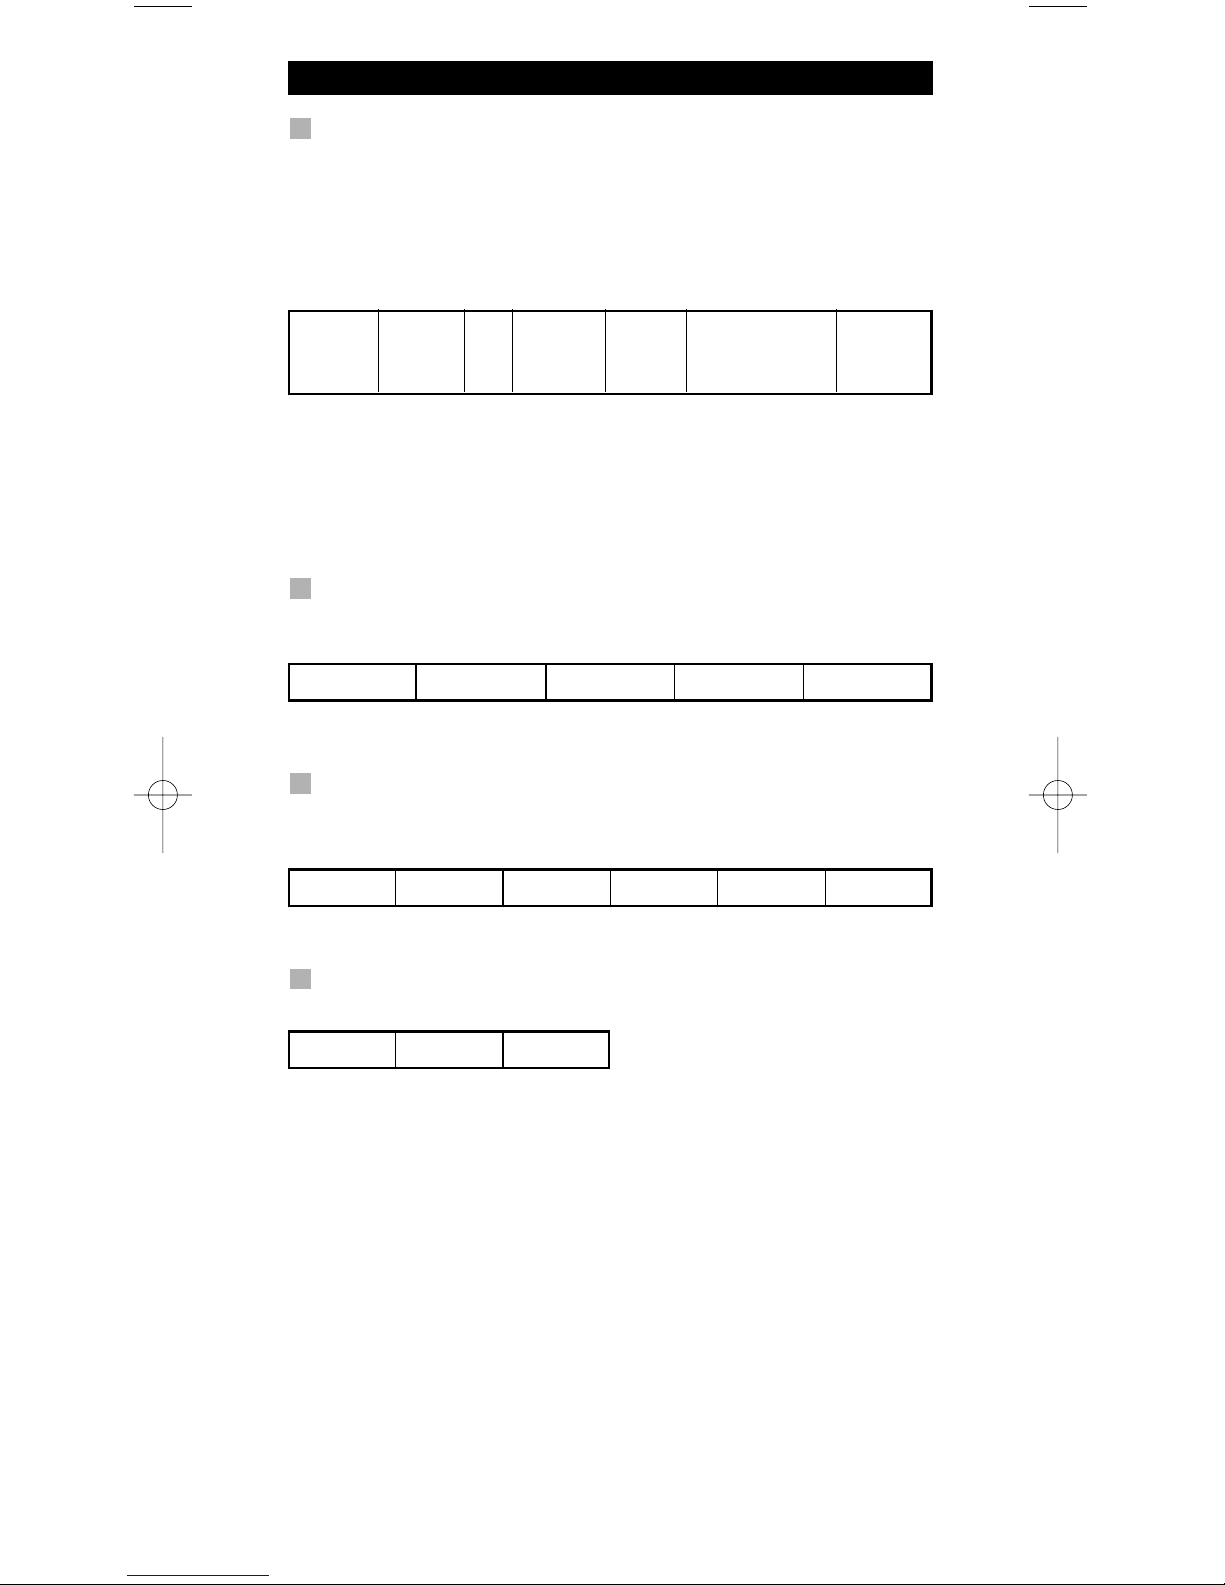
Quick code Reference
Write down the codes for your devices in the boxes below for quick and
easy reference.
■
■
■
■
■
■
■
■
■
■
■
■
■
■
■
■
■
■
■
■
■
■
■
■
■
■
■
■
■
■
■
■
■
■
■
■
■
■
■
■
■
■
■
■
■
■
■
■
■
■
■
■
■
■
■
■
■
■
■
■
■
■
■
■
Page 16
WW W.ONEFORALL.COM 15
T
he KAMELEON 8 comes with a complete library of pre-programmed codes.
After you have set up the KAMELEON 8 for your device, you may find that there
are one or more keys that you had on the original remote control, which do not
have a place on the KAMELEON 8 keypad.
T
he KAMELEON 8 offers a special Learning feature that allows you to copy
almost any function from your original remote control onto the keypad of the
KAMELEON 8.
B
efore you start:
- Make sure your original remote is working correctly.
- Make sure neither your KAMELEON 8, nor your original remote control is
p
ointing at your device.
Learning (direct)
Example: To copy the “mono/stereo” function from your original TV
r
emote control onto the ”I, II, III or IV”-key of your
K
AMELEON 8.
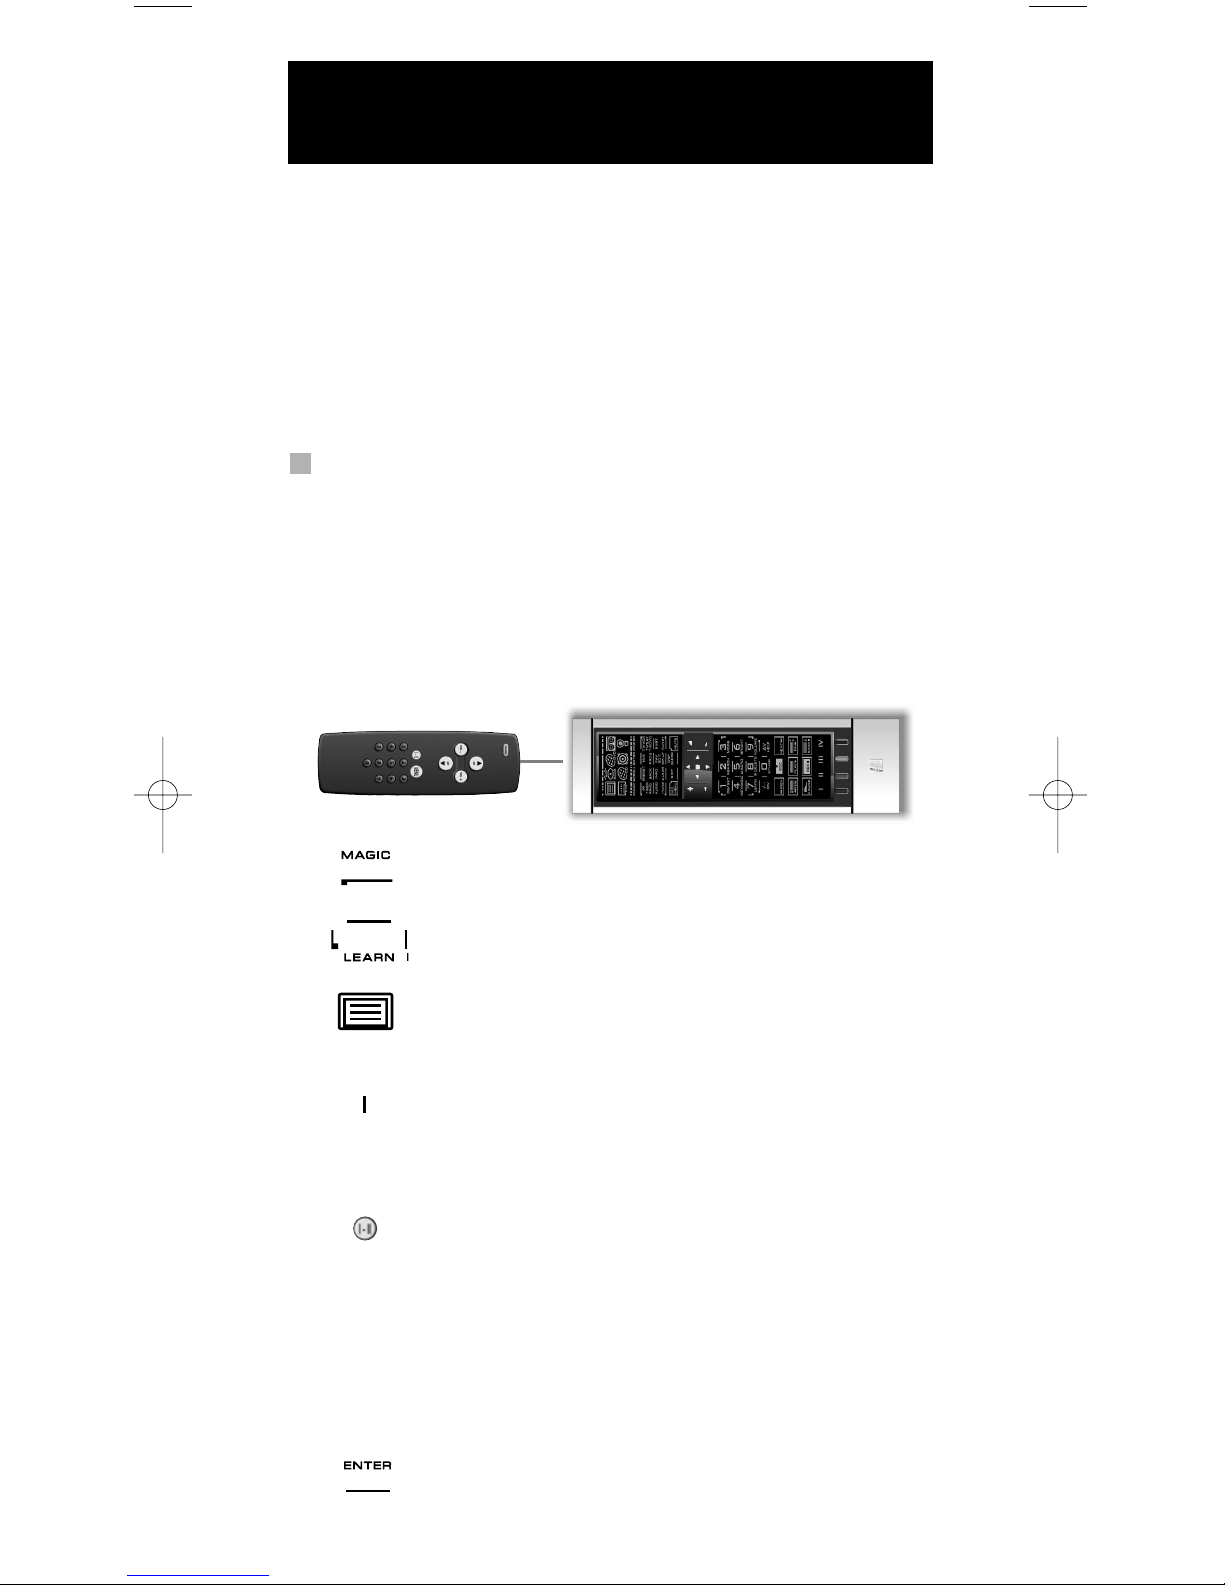
1. Place the KAMELEON 8 and your original remote control on a flat
surface. Make sure the ends which you normally point at your
device are facing each other. Point the original remote to the front
of the KAMELEON 8 (see picture below). Keep the remotes at a distance of 2 to 5 cm (0.8 to 2 inches).
2. Press and hold down the MAGIC key (for about
3 seconds). The screen will change to the setup screen.
3. Press LEARN.
4. Press the device key (Example: TV key) on the KAMELEON 8
remote to select the mode to which you want to place the
learned function.
5. Press the key (Example: “I” key) on the KAMELEON 8 remote
where you want to place the learned function. The IR Indicator
will show “incoming IR” three times and then the display will
switch off.
6. Press and hold the key that you want to copy (Example:
mono/stereo) on your original remote control. The display
switches back on and you will see two blinks to indicate
successful learning operation.
7. If you want to copy other functions within the same mode, simply repeat
steps 5 and 6 pressing the next key you want to copy by learning. If you
want to copy another function in a different mode, simply continue with
step 4 followed by steps 5 and 6.
8. Press ENTER to exit the learning mode and return to the setup
screen OR press and hold ESC to return to the user screen.
Learning Feature
(How to copy functions from your original working
r
emote onto the KAMELEON 8)
Page 17

16 WW W.ONEFORALL.COM
- As soon as the display switches off in step 5 you need to press the key (in
this example: the ”mono/stereo” key) on your original remote within
1
5 seconds. If no key is pressed while in learning mode, the remote will
r
eturn to user mode after 30 seconds.
-
During learning, keys such as (TV) menu, (TV) guide etc. will not change
screen when pressed.
-
If you learn a function on a key, the original KAMELEON 8 function
a
utomatically becomes shifted. Press the MAGIC key then the key to access
i
t (this excludes the POWER, Channel and Volume keys). If you learned on a
digit key, access the original function by pressing magic twice and then
t
he digit.
-
If you want to learn a function on a key that is not in the main screen, use
the SCROLL key to change the screen.
- The learning feature is mode specific. Therefore you can place one learned
f
unction per mode on the same key.
- The KAMELEON 8 can learn approximately 50 functions. The amount of keys
depends on the other programmed functions and on the remote to be
learned from.
- You can replace a learned function by placing another learned function on
t
op.
- Please make sure not to use the learning procedure when in direct sunlight
o
r under incandescent lights.
- Make sure you are using new batteries before following the learning
instructions.
- Upon changing the batteries, your learned functions will be retained.
Shifted Learning
It is also possible to place a function shifted on a key to maintain the original
function.
Example: to place the mono/stereo function shifted on the “red” key.
To place the (e.g. mono/stereo) function shifted on the red key, simply follow
steps 1-8 on page 15, only press ”MAGIC” then the ”red” key (instead of
“I”) during step 5.
To access the e.g. ”mono/stereo” function in this example; simply press
”MAGIC” and then the ”red” key.
- If a Shifted Learned function is placed on the Channel and Volume keys
then the “Colour & Brightness“ features will be sacrificed.
- If you place a function shifted on a digit key (0 - 9) you need to press
MAGIC twice then the digit key to access this shifted function.
Learning Feature
Page 18
WW W.ONEFORALL.COM 17
To delete a “Key Magic function” or “learned
function” from a certain key:
Example: to delete a “Key Magic function” or “learned function” from the “I”
k
ey in TV mode:
1. Press and hold the MAGIC key for about 3 seconds. The screen will
change to the setup screen.
2. Press IR DELETE.
3
. Press the corresponding device key (example TV).
4. Press the corresponding function key (example “I”).
5. Press ENTER to restore the original function OR press and hold ESC to
return to the user screen.
- The original function (if present) of the KAMELEON 8 will be restored.
To delete a shifted “Key Magic function” or “learned
function” from a certain key:
E
xample: To delete one single ”shifted” learned or Key Magic function, follow
the steps below.
Example: to delete the mono/stereo function learned shifted on the ”red” key
in TV mode:
1. Press and hold the MAGIC key for about 3 seconds. The screen will
change to the setup screen.
2. Press IR DELETE.
3. Press the corresponding device key (example TV).
4. Press MAGIC.
5. Press the corresponding function key (example “Red key”).
6. Press ENTER to restore the original function OR press and hold ESC to
return to the user screen.
- The original function (if present) of the KAMELEON 8 will be restored.
To delete all “Key Magic functions” or “learned
functions” from a certain mode:
Example: to delete all “Key Magic function” or “learned functions” from the TV
mode:
1. Press and hold the MAGIC key for about 3 seconds. The screen will
change to the setup screen.
2. Press IR DELETE.
3. Press the corresponding device key (example TV).
4. Press ENTER to restore the original function OR press and hold ESC to
return to the user screen.
- The original function (if present) of the KAMELEON 8 will be restored.
The Operational Reset will erase all learned functions across all modes.
It may also delete some other programmed functions like Key Magic or Macros.
1. Press and hold the MAGIC key for about 3 seconds. The screen will
change to the setup screen.
2. Press OTHER.
3. Press 9 8 0. The IR Indicator will blink four times and the remote will return
to the setup screen.
Learning Feature
Operational Reset
Page 19

18 WW W.ONEFORALL.COM
Key Magic
®
(
How to program missing functions)
K
ey Magic® is an exclusive ONE FOR ALL feature. The design of the KAMELEON
8 ensures that many functions of your original remote control can be operated even those that do not have their own key on the KAMELEON 8 keypad.
F
requently used functions can be assigned to a key of your choice using the Key
Magic® feature of your KAMELEON 8. In order to program a certain function
with Key Magic® you need to know the corresponding function code. As the
function codes vary with different types of devices, they cannot be found in the
m
anual. You can request your function codes through our consumer service
help-line, by letter, fax or e-mail.
All we need to know is:
•
Brand and Model number of the device in question (for verification if you
are using the correct code).
•
The 4-digit set-up code your device is working with.
• How the function was labeled on your original remote control.
You can also visit our website (www.oneforall.com) to find an answer to your
q
uestions.
Once you obtain(ed) your function code(s) from customer service,
programming the code is easy:
1. Press and hold the MAGIC key for about 3 seconds. The screen will
change to the setup screen.
2. Press KEY MAGIC.
3. Press the device key (TV, SAT, DVD, VCR, PVR, CD or AUD).
4. Press the MAGIC key once.
5. Enter the 5-digit function code (provided by customer service).
6. Press the key to which the function will be assigned (if this key is
located in a different screen than the main screen, use the SCROLL key
to access the screen). The IR Indicator will blink twice and the screen will
return to the Setup screen.
- Key Magic® functions are mode specific. To access the function you have
programmed, press the device key first.
- Key Magic® can be assigned to any key EXCEPT the following: Device keys,
ESC, ENTER, MAGIC key and the SCROLL key.
- Please note all the extended function codes you obtain from customer
service for easy future reference.
- Keys such as (TV) menu, (TV) guide etc. will not change screen when
pressed during Key Magic® programming.
EXTENDED FUNCTION REFERENCE
(first entry is an example):
DEVICE SET-UP CODE FUNCTION FUNCTIONCODE
TV 0556 16/9 format 00234
Extra Features
Page 20

WW W.ONEFORALL.COM 19
Mode re-assignment
(How to set up two of the same devices on the KAMELEON 8)
I
t is possible to change the mode of any device key. This is useful if you want to
s
et up two of the same devices on the KAMELEON 8. The modified device key
w
ill display the applicable keys for the revised mode. The code can be set up
using the “Direct set up” (p. 12) or “Search method” (p. 13). To change a device
key, see the two examples below.
E
xample 1; if you like to program a second TV on the DVD key.
Example 2; if you like to program a second VCR on the SAT key.
Example 1:
To program a second Television on the DVD key (for example), you need to
change the DVD key into a TV key, so press:
The DVD key has now become a second TV key and will
display the applicable keys for this mode.
Now enter the Set-Up code for your second TV by pressing:
Example 2:
To program a second Video Recorder on the SAT key (for example), you need
to change the SAT key into a VCR key, so press:
The SAT key has now become a second VCR key and will display the
applicable keys for this mode.
Now enter the Set-Up code for your second VCR by pressing:
- If you program a different device type on another key (e.g. second TV on
the DVD key) the original device key icon will remain, but the displayed
function keys will change to suit the new device mode. For example; if a
second TV is programmed on the DVD key, TV-text functions will be
displayed in DVD mode.
Resetting a Device key
Example: To reset the DVD key to its original mode, press:
(*) Press and hold the MAGIC key for about 3 seconds. The screen
will change to the setup screen.
(**) The animated IR Indicator will blink twice (the screen will
change to the setup screen).
Extra Features
(*) (**)(*) (**)
(TV Code) (**)
_ _ _ _
(*) (**)
(VCR Code) (**)
_ _ _ _
(*) (**)
Page 21

20 WW W.ONEFORALL.COM
Volume Punch-Through
T
his feature allows you to adjust the volume of a certain mode (e.g. TV mode)
w
hile being in a different mode (e.g. VCR). If for example you’re watching a
programme on your Video, you can adjust the volume (a TV function) without
first pressing the TV key. The chart below lists some of the possibilities:
L
ast key pressed: You can control:
SAT : TV volume up and down, mute
DVD : TV volume up and down, mute
VCR : TV volume up and down, mute
P
VR : TV volume up and down, mute
C
D : TV volume up and down, mute
AUD : TV volume up and down, mute
LIGHT : TV volume up and down, mute
E
xample: To punch through to AUD volume, being in any other mode
(e.g. VCR, SAT or DVD mode):
1
. Press and hold the MAGIC key for about 3 seconds. The screen will
change to the setup screen.
2
. Press VOLUME.
3. Then press the AUD key and the animated IR Indicator will blink twice and
the remote will return to the setup screen.
Result: VOL+/- and MUTE wil be from AUD mode independent of the selected
device mode.
To cancel the “Volume Punch Through” per mode:
Example: to cancel the “Volume Punch Through” for the VCR mode:
1. Press and hold the MAGIC key for about 3 seconds. The screen will
change to the setup screen.
2. Press VOLUME.
3. Then press the VOL- ( ) key.
4. Press VCR once. The IR Indicator will blink four times and the unit will
return to the SETUP screen.
Result: being in VCR mode, you will be able to control VOL+/- and MUTE
functions of your VCR (provided it has volume control).
To cancel the “Volume Punch Through” for all modes:
1. Press and hold the MAGIC key for about 3 seconds. The screen will
change to the setup screen.
2. Press VOLUME.
3. Then press the VOL+ ( ) key and the IR Indicator will blink four times
and the screen will return to the setup screen.
Result: In all modes the VOL+, VOL- and MUTE keys will now operate
the original functions again.
Extra Features
Page 22

WW W.ONEFORALL.COM 21
Device Sleeptimer
I
f your device has a “Sleeptimer” function built in, you can access this function
w
ith your KAMELEON 8 remote. To do so:
1. Make sure your device is switched on.
2
. Press the device key TV (or SAT, DVD, VCR, PVR, CD, AUD).
3. Point the KAMELEON 8 at your device and press and release the MAGIC key
then press POWER. You should see the Sleeptimer activate on your device.
T
o increase the timer, simply press POWER again (within 10 seconds) until
t
he timer gets to the desired time.
- To deactivate the “Sleeptimer”, repeat steps 1 – 3 above. During step 3,
c
ontinue pressing POWER again (within 10 seconds) until the timer indicates
z
ero minutes.
- Depending on how you used sleeptimer on the original remote, you might
need to access sleeptimer in a different way (through menu for example).
KAMELEON 8 - Timer
The KAMELEON 8 – Timer function allows you to activate a <desired function>
from a specific <device mode> within a <specific amount of minutes>
(max. amount of timer is 60 minutes).
- The <desired function> can be an existing function within a specific mode, a
Macro, a Key Magic function or a Learned function.
Example: you want your TV to switch off after 45 minutes.
1. Press and hold the MAGIC key for about 3 seconds. The screen will
change to the setup screen.
2. Press OTHER.
3. Press 9 8 5 to enter the KAMELEON 8 –Timer programming mode.
The animated IR Indicator will blink twice.
4. Press TV to select the mode where the KAMELEON 8 – Timer function will
come from. The animated IR Indicator will blink twice.
5. Press the POWER key to select the desired function. The animated IR
Indicator will blink twice.
6. Now press 4 5 to enter the amount of minutes after which the <Desired
function> needs to be activated (e.g. for 5 min. press 05, max. up to 60).
7. Press ENTER. The animated IR Indicator will blink twice and the KAMELEON
8– Timer function will be activated.
- Invalid key presses during the programming of KAMELEON 8 - Timer will
be ignored.
- The <Desired function> can be any key except for Device keys, SCROLL,
ESC, ENTER and MAGIC.
- While the KAMELEON 8 – Timer is running, the IR animation will light
every 15 seconds.
- The KAMELEON 8 –Timer function is cancelled by setting up a new
KAMELEON 8 – Timer function.
- If no key is pressed while setting up a KAMELEON 8 – Timer function,
the remote will return to user mode after 30 seconds.
- The SCROLL key can be accessed any time during programming if
applicable in the current device mode.
Extra Features
Page 23

22 WW W.ONEFORALL.COM
Macros (sequence of commands)
M
acros (direct)
Y
ou can program your KAMELEON 8 to issue a sequence of commands at the
press of one button. For example, you may want to turn off your TV, VCR and
Satellite at the same time. Any sequence of commands you regularly use can be
r
educed to one key stroke for your convenience. A key that is programmed with
a
Macro works through all modes (provided it’s accessible in that mode).
Therefore a Macro can best be set on either the I, II, III or IV key. However, you
can install a Macro on any key (provided it’s accessible in that mode), except for
t
he device keys (TV, SAT, DVD, VCR, PVR, CD, AUD and LIGHT), MAGIC, ESC,
E
NTER and the SCROLL key.
Example: To set up a Macro that switches off your TV, VCR and SAT on the
“
I” key on your KAMELEON 8:
1. Press and hold the MAGIC key for about 3 seconds. The screen will
change to the setup screen.
2
. Press MACRO.
3
. Press the device key (e.g. TV) to display all keys of the mode.
4. Then press the key to which the Macro will be assigned, in this case
the “I” key.
5. Next press TV, POWER, VCR, POWER, SAT, POWER.
6. To store the Macro, press ENTER. The screen will return to the setup screen.
Result: Whenever you press the “I” key, the KAMELEON 8 will turn off your TV,
VCR and Satellite receiver.
- Each MACRO can consist of a maximum of 22 keystrokes.
- To include a function from a particular screen in a mode,
use the SCROLL key.
- Make sure that you program a Macro on a spare key that you don’t use in
any mode.
- Once you program a Macro on a specific key, the sequence will work
regardless of the mode (TV, SAT, DVD, VCR, PVR, CD, AUD or LIGHT) you are
using (if the label is the same as the label on which the Macro was
programmed). This means that the function picked on that specific key
will be sacrificed.
- To avoid accidental recordings with the KAMELEON 8, you must press the
RECORD key twice to begin recording. Please note that if you assign a
Macro or Shifted Macro to the RECORD key, this will deactivate the double
key press. Therefore we recommend not to assign a Macro to this key.
- If you had to hold down a key for a few seconds on the original remote
control to get a function, this function may not work in a macro on your
KAMELEON 8 remote.
- Keys such as (TV) menu, (TV) guide etc. will not change screen when pressed
during Macro programming.
- Upon changing the batteries your Macro(s) will be retained.
- If you program a Macro on a key, the original function will become shifted
(excluding POWER, CH+/- and VOL+/- keys). Press MAGIC then the key to
access it. If you place a Macro on a digit key, access the original function by
pressing MAGIC twice and then the digit key.
- You can replace a Macro by placing another Macro on top.
Extra Features
Page 24
WW W.ONEFORALL.COM 23
Shifted Macros
It is also possible to place a shifted Macro on a key to maintain
t
he original function. The MAGIC key can be used as “SHIFT-function”.
Example: To set up a Shifted Macro that switches off your TV, VCR and SAT
on the “RED” key on your KAMELEON 8: (so that you will keep the original
f
unction on the “RED” key).
Now every time you press ”MAGIC”, then the ”red” key, the KAMELEON 8 will
t
urn off your TV, VCR and Satellite.
- If a Shifted Macro is placed on the POWER, CH+/- or VOL+/- keys, the
S
leeptimer and Colour/Brightness features will be sacrificed.
To erase a (direct) Macro from a key
Example: To erase the Macro from the “I” key, press:
To erase a (shifted) Macro
Example: To erase the Shifted Macro from the ”red” key press:
To erase all Macros in all modes
(*) Press and hold the MAGIC key for about 3 seconds.
The screen will change to the setup screen.
Extra Features
M
AGIC* MACRO TV MAGIC “Red” ENTER
TV, POWER,
VCR, POWER,
SAT, POWER
MAGIC* MACRO TV “I” ENTER
MAGIC* MACRO TV MAGIC ”red” ENTER
MAGIC* MACRO ENTER
Page 25
24 WW W.ONEFORALL.COM
Code Upgrade Technology
Y
our KAMELEON 8 contains a unique feature, which allows new codes to
b
e added simply by holding it to your telephone. In a matter of seconds,
our magnetic coupling technology quickly and reliably transfers information
to the KAMELEON 8 without complex plugs, adapters or attachments.
This means, as you buy new products in the future, the KAMELEON 8 will never
b
ecome obsolete.
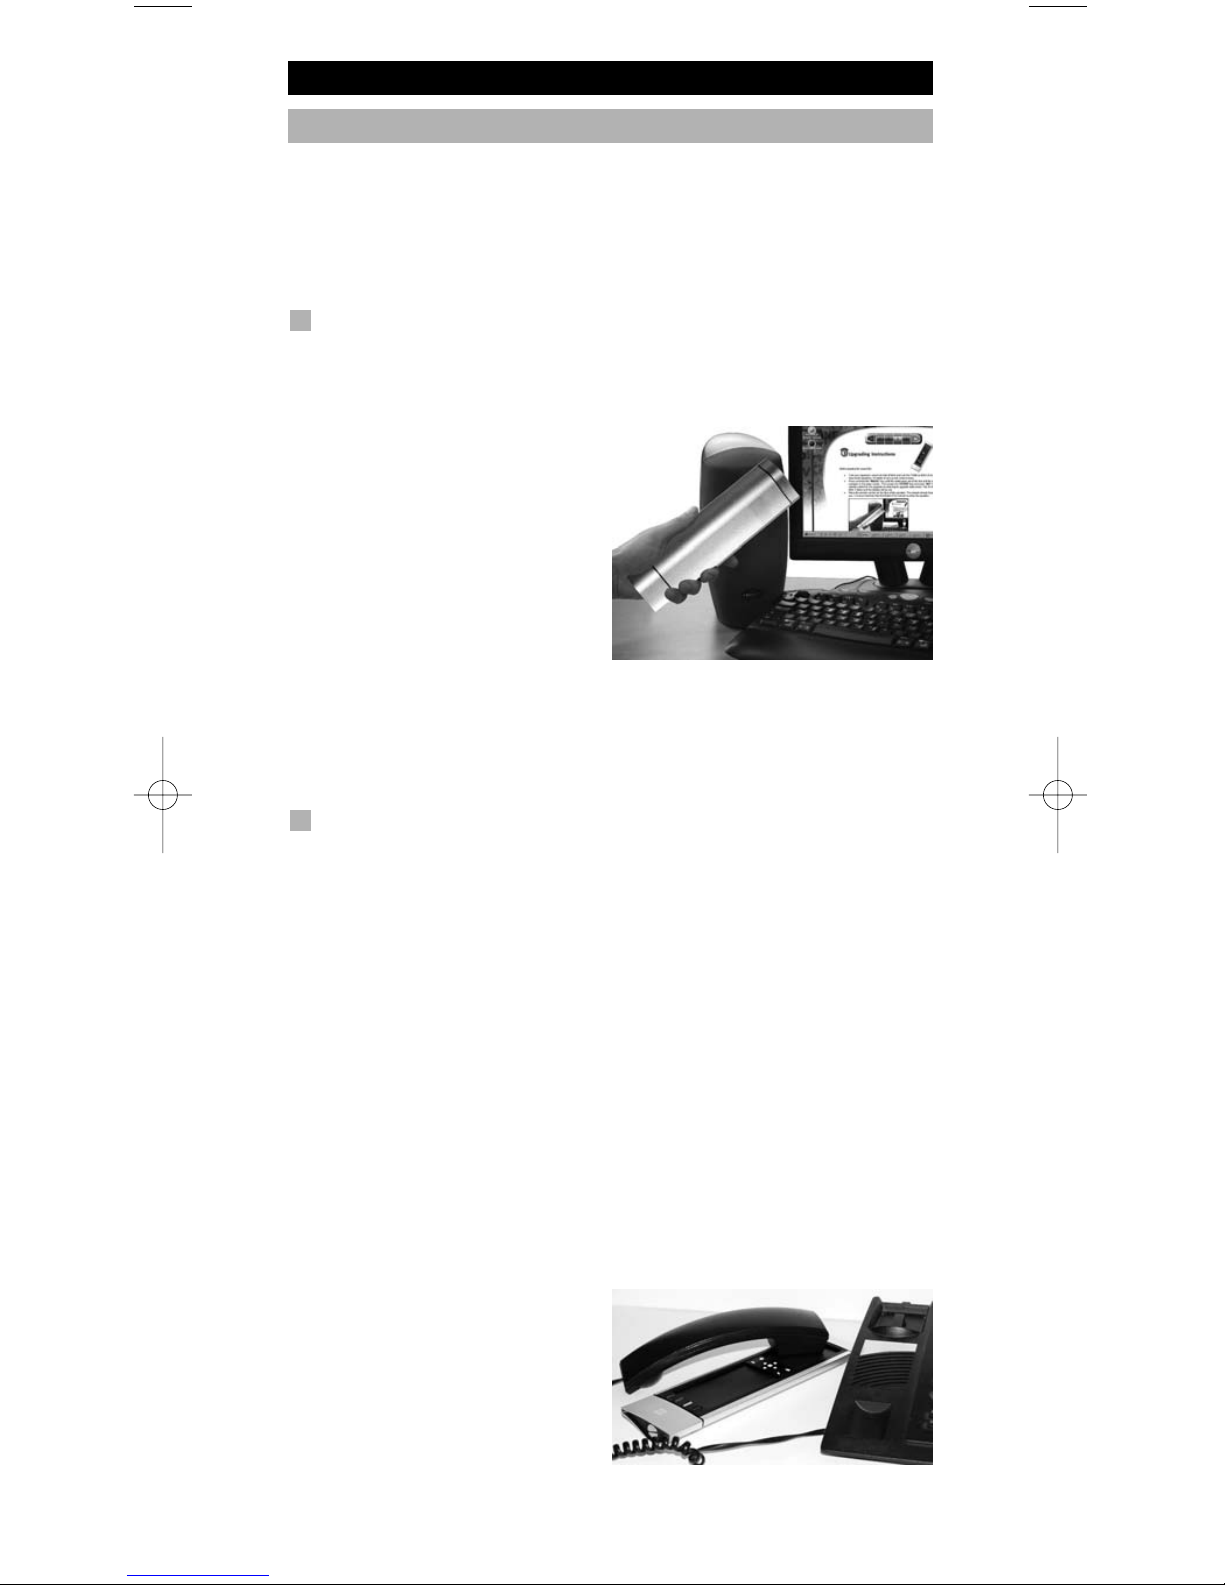
Internet download
(Upgrade your KAMELEON 8 remote…via your PC)
1
. Visit our website “www.oneforall.com”.
2. Select your region.
3. Select “Product support”.
4. Select “Universal Remote
Controls”.
5. Select the ONE FOR ALL remote
y
ou want to upgrade:
KAMELEON 8 (URC-8308).
6. Select ‘Internet Download’.
Now you have entered our special Online Download section. From this
point just follow the instructions on the screen for easy upgrade of your
remote.
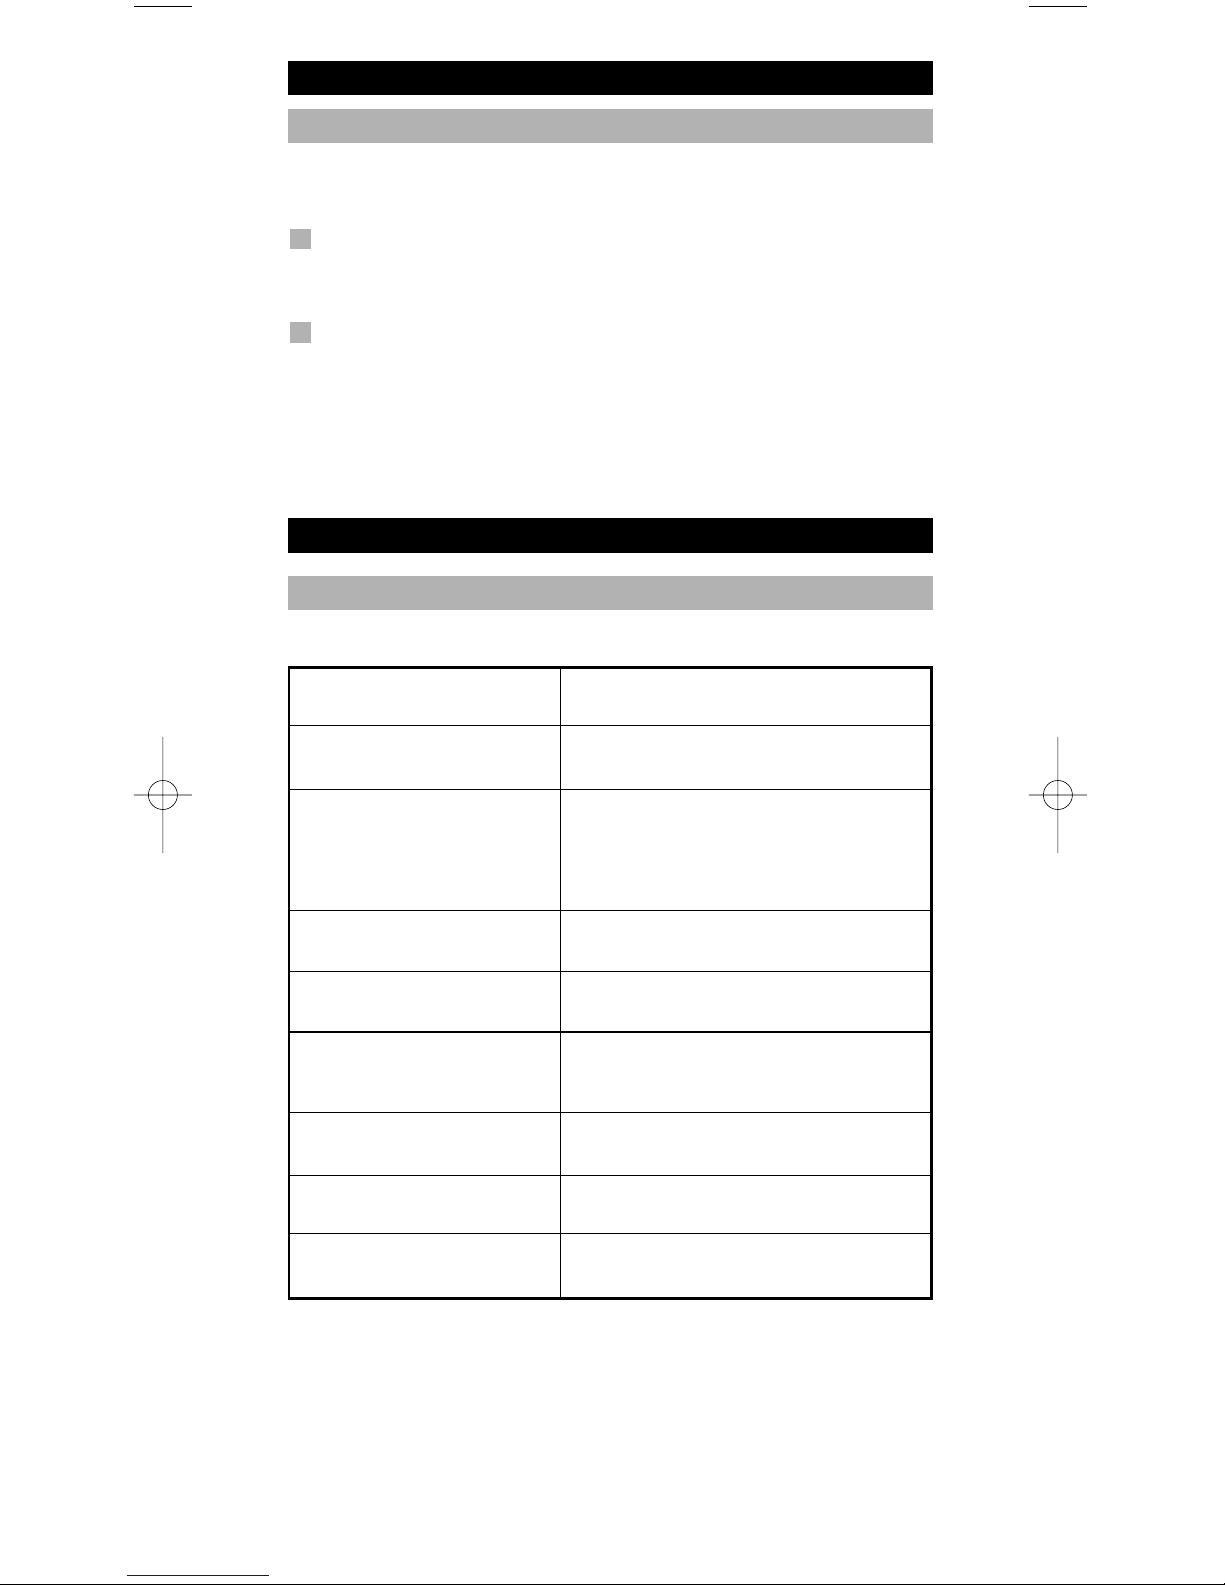
Phone upgrade
(Upgrade your KAMELEON 8 remote…via your phone)
Alternatively ring our consumer help-line and one of our customer service
representatives will assist you through the entire process of upgrading your
KAMELEON 8. To ensure the process goes smoothly, here are a few steps to
follow:
1. Write down the brand name(s) and model number(s) of your device(s)
in the space provided on the Consumer Service page before you call.
2. Ring our consumer help-line and explain which device(s) you would like
added to your KAMELEON 8.
3. After our customer service agent records the brand name(s) and model
number(s) of your device(s), he/she will lead you through the set up
procedure and then will ask you to hold the KAMELEON 8 to the speaker
portion of your telephone (see diagram below). In doing this, the information needed for your device is transferred through the telephone into your
KAMELEON 8 in a matter of seconds.
Please note, cordless telephones, speaker telephones and mobile
telephones are not recommended.
4. After your KAMELEON 8 has
been upgraded by telephone,
stay on the line. Our customer
service agent will ensure that your
KAMELEON 8 is working properly
with your device(s) and will answer
any other questions you may have.
Extra Features
Page 26
WW W.ONEFORALL.COM 25
Colour & Brightness
D
epending on the functions of your original remote control, the KAMELEON 8
c
an operate the colour and brightness settings of your Television.
T
o adjust the colour:
Press the MAGIC key followed by Volume + (for colour +) or
V
olume - (for colour -).
To adjust the brightness:
Press the MAGIC key followed by Channel + (for brightness +) or
C
hannel - (for brightness -).
D
epending on how you used colour and brightness on the original remote, you
may need to access colour and brightness in a different way (through menu for
example).
Extra Features
Trouble-Shooting
Problem & Solution
Problem:
Your brand is not listed in the
code section?
The KAMELEON 8 does not
operate your device(s)?
The KAMELEON 8 is not
performing commands
properly?
Problems changing channels?
Video / PVR / DVD / CD / AUD
not recording?
The KAMELEON 8 does not
respond after pressing a key?
Your original remote had a
“20” key?
Upon each key press, the IR
indicator will blink 5 times?
You are not able to enter
programming mode?
Solution:
Try the search method on page 13.
A) Try all the codes listed for your brand.
B) Try the search method on page 13.
You may be using the wrong code. Try
repeating the Direct Set-Up using another
code listed under your brand or start the
search method over again to locate the
proper code.
Enter the program number exactly as you
would on your original remote.
As a safety feature on your KAMELEON 8,
you must press the Record key twice.
Make sure you are using new batteries and
are aiming the KAMELEON 8 at your
device.
You can find this function on the AV key.
Replace batteries with 4 fresh, new
“AAA/LR03” alkaline batteries.
Replace batteries with 4 fresh, new
“AAA/LR03” alkaline batteries.
Page 27
26 WW W.ONEFORALL.COM
Customer Service
I
f you still have questions about the operation of your ONE FOR ALL KAMELEON
8
universal remote and could not find the answer(s) in the Trouble-Shooting
section (page 25), you may want to contact the customer service department for
assistance.
Y
ou may care to visit our Internet-site: www.oneforall.com
O
ur internet-site has many advantages:
- 24 hours access
-
no waiting time
-
page for Frequently Asked Questions
- info about the ONE FOR ALL product range
B
efore contacting us, by Fax, E-mail or Phone, make sure you have the
r
equired information available by filling in the table below.
What do we need to know before you contact us:
1
That you have the ONE FOR ALL KAMELEON 8 URC-8308 (*)
u
niversal remote.
2
The date of purchase (.........../.........../...........).
3 A list of your equipment/models: (see example below).
Device Brand Device Remote SET-UP
model nr. model nr. code
TV Sony KV-25C5D RM-883 1505 (example)
Type/model numbers can often be found in your equipment
owner’s manual or on the factory plate behind the device.
4. Then Fax, E-mail or Dial us:
In the UK
E-mail : ofahelp@uebv.com (***)
Fax : +31 53 432 9816
Tel. : 0901-5510010 (£ 0,50 per minute) (*) (**)
In Ireland In Australia
E-mail : ofahelp@uebv.com (***) E-mail : ofahelp@uebv.com (***)
Fax : +31 53 432 9816 Fax : 03 9672 2479
Tel. : 016015986 (*) (**) Tel. : 1 300 888 298
In South Africa In New Zealand
E-mail : support@oneforall.co.za E-mail : ofahelp@uebv.com (***)
Fax : 011 298 2302 Fax : (06) 878 2760
Tel. : 0860 100551 Tel. : 0508 ONE 4 ALL (663 4 255)
Tel. : 011 298 2300
(*) When you call us you will be asked to enter a URC-number.
The URC-number of your KAMELEON 8 is 8308.
(**) When calling with a mobile phone:
- You may be charged extra when calling us from; the UK or
France.
- You may not be able to contact us when calling from; Belgium,
the Netherlands, Luxemburg, Greece, Portugal, Switzerland,
Italy, Ireland or Austria.
(***) Just send a blank message, you’ll get a form to be filled out as
auto-reply.
Trouble-Shooting
Page 28
WW W.ONEFORALL.COM 27
IHRE KAMELEON 8 . . . . . . . . . . . . . . . . . . . . . . . . . . . . . . . . . . . . . . . . . . . . . . . . . . . . . . . 28
B
ATTERIEN
. . . . . . . . . . . . . . . . . . . . . . . . . . . . . . . . . . . . . . . . . . . . . . . . . . . . . . . . . . . . . . . 2
9
D
AS TASTENFELD
. . . . . . . . . . . . . . . . . . . . . . . . . . . . . . . . . . . . . . . . . . . . . . . . . . . . 3
0 - 37
• EINSTELLUNG DER KAMELEON 8
. . . . . . . . . . .
Seite 38
(
Wie Sie die KAMELEON 8 auf Ihre Geräte einstellen)
•
Code Suchlauf . . . . . . . . . . . . . . . . . . . . . . . . . . . . . . . . . . . . . . . . . . . . . . . . . . 3
9
EINSTELLCODES
TV : Fernsehgerät/LCD/Plasma/Projektor/Rückprojektor
. . . . . . . . . . . .
261
V
CR : Video-Kassettenrecorder/TV/VCR Kombi/DVD
. . . . . . . . . . . . . . . .
2
72
SAT : Satellitenempfänger/Set-Top-Box/ DVB-S/DVB-T/Freeview (UK)/
T
NT (F)/Digitenne (NL) / TDT (E) / DTT (I) / SAT/HDD
. . . . . . . . . . .
2
75
CBL : Kabeldecoder/ Set-Top-Box/DVB-C
. . . . . . . . . . . . . . . . . . . . . . . .
279
VAC : Videozubehör wie Medienzentren/AV-Zubehör/AV-Wähler
. . . . .
280
C
D : CD-Spieler/CD-R/MD
. . . . . . . . . . . . . . . . . . . . . . . . . . . . . . . . . . .
2
80
PHO : Plattenspieler
. . . . . . . . . . . . . . . . . . . . . . . . . . . . . . . . . . . . . . . .
280
MIS : Audio/Verschiedene Audio
. . . . . . . . . . . . . . . . . . . . . . . . . . . . . .
281
HOM : Home Automation (z.B. IR-gesteuerte Vorhänge/IR-gesteuerte
Lichtschalter usw.)
. . . . . . . . . . . . . . . . . . . . . . . . . . . . . . . . . . . . .
281
AMP : Audio/Verstärker/Aktivlautsprechersystem
. . . . . . . . . . . . . . . . . .
281
TUN : Audio/Audio Receiver/Tuner/Verstärker/(DVD) Home Cinema
. . . .
281
CAS : Kassettenrecorder (Tape Deck)
. . . . . . . . . . . . . . . . . . . . . . . . . . .
282
LDP : Laser-CD-Spieler/Video-CD
. . . . . . . . . . . . . . . . . . . . . . . . . . . . . . .
283
DAT : Digitale Audio-Kassette/DCC
. . . . . . . . . . . . . . . . . . . . . . . . . . . . .
283
DVD : DVD-Spieler/DVD-R/DVD Home Cinema / DVD Kombi /
DVD/HDD / DVD/PVR / VCR Kombi
. . . . . . . . . . . . . . . . . . . . . . . . .
283
PVR : Personal Video Recorder
. . . . . . . . . . . . . . . . . . . . . . . . . . . . . . . .
288
CODE AUSLESEN . . . . . . . . . . . . . . . . . . . . . . . . . . . . . . . . . . . . . . . . . . . . . . . . . . . . . . . . . 40
(Um heraus zu finden welcher Code Aktuell programmiert ist)
CODE-ÜBERSICHT
. . . . . . . . . . . . . . . . . . . . . . . . . . . . . . . . . . . . . . . . . . . . . . . . . . . . . . . . 40
LERNFÄHIGKEIT
. . . . . . . . . . . . . . . . . . . . . . . . . . . . . . . . . . . . . . . . . . . . . . . . . . . . . . . . . . 41
(Funktionen von Ihrer Originalfernbedienung auf
die KAMELEON 8 kopieren.)
BENUTZER RESET
. . . . . . . . . . . . . . . . . . . . . . . . . . . . . . . . . . . . . . . . . . . . . . . . . . . . . . . . 43
EXTRA FUNKTIONEN
• Key Magic® (Das Programmieren von fehlenden Funktionen) . . . . . . 44
• Gerätemodus Neuzuordnung (Wenn Sie zwei Geräte gleicher
Art auf der KAMELEON 8 einstellen möchten) . . . . . . . . . . . . . . . . . . . . 45
• Lautstärke Direktbedienung
. . . . . . . . . . . . . . . . . . . . . . . . . . . . . . . . . . . . . . . 46
• Geräte Sleeptimer
. . . . . . . . . . . . . . . . . . . . . . . . . . . . . . . . . . . . . . . . . . . . . . . . . 47
• KAMELEON 8 - Timer
. . . . . . . . . . . . . . . . . . . . . . . . . . . . . . . . . . . . . . . . . . . . . . 47
• Makros (Bestimmte Befehlsfolge auf Knopfdruck)
. . . . . . . . . . . . . . . . . . 48
• Code Nachladung
. . . . . . . . . . . . . . . . . . . . . . . . . . . . . . . . . . . . . . . . . . . . . . . . . 50
• Farbe & Helligkeit
. . . . . . . . . . . . . . . . . . . . . . . . . . . . . . . . . . . . . . . . . . . . . . . . . 51
NÜTZLICHE HINWEISE
• Problem & Lösung
. . . . . . . . . . . . . . . . . . . . . . . . . . . . . . . . . . . . . . . . . . . . . . . . 51
• Kundendienst
. . . . . . . . . . . . . . . . . . . . . . . . . . . . . . . . . . . . . . . . . . . . . . . . . . . . . 52
INHALTSVERZEICHNIS
D
eu
tsch
Benutzen Sie den One For all Web Assistenten , um Ihre Fernbedienung mit
Hilfe des Internets zu programmieren. Dieser Assistent teilt Ihnen mit,
wie Sie Ihre verschiedenen Geräte programmieren können, ohne die
komplette Bedienungsanleitung lesen zu müssen. Um diese Einstellhilfe
benutzen zu können, besuchen Sie bitte die Webseite
www.oneforallwebwizard.com
Page 29

28 WW W.ONEFORALL.COM
Ihre KAMELEON 8
Einfaches Benutzen durch das einzigartige “EL” Display
Bei der Wahl der ONE FOR ALL KAMELEON 8 haben Sie sich für eine leicht zu
b
enutzende Universalfernbedienung entschieden. Die KAMELEON 8 ist ausges-
t
attet mit einem einzigartigem, benutzerfreundlichem Display mit
Hintergrundbeleuchtung, was einen einfachen Zugang zu allen benötigten
Tasten sicherstellt, da die Funktionen, die Sie nicht benötigen, versteckt bleiben.
Hergestellt unter den strengsten Qualitätsmaßstäben, wird eine langfristige
Z
ufriedenheit geboten. Wenn Sie die Batterien in die KAMELEON 8 einlegen,
befindet diese sich im „Demo Mode“ und zeigt verschiedene Screens an. Der
“Demo Mode” wird abgebrochen durch die Einstellung Ihrer Fernbedienung
(halten Sie die Magic Taste gedrückt für ca. 3 Sekunden und drücken Sie dann
d
ie ESC Taste und lassen diese dann wieder los).
N
ach dem Batterieeinlegen, müssen Sie erst eine beliebige Taste drücken, um die
Hintergrundbeleuchtung zu aktivieren. Ab dann können Sie das Display
a
ktivieren durch gleichzeitiges berühren von Gehäuse und”EL” Display. Es ist
a
uch möglich den Aktivierungsmodus zu ändern, um das EL-Display per
Knopfdruck zu aktivieren. Lesen Sie bitte auf Seite 30 das Kapitel „EL-Display
Aktivierungseinstellung“.
B
edient bis zu 8 Geräte
Ihre KAMELEON 8 ist so konzipiert, dass Sie nur eine Fernbedienung zur
Steuerung Ihrer Audio- und Videogeräte benötigen, vorausgesetzt das diese mit
e
inem Infrarotsignal funktionieren. Ihre KAMELEON 8 ist mit zwei weitreichenden Infrarot-Übermittlern für maximalen Bedienbereich ausgestattet und ist HFtauglich (Hochfrequenz) bis zu 450 kHz. Sie können jede beliebige
Kombination von bis zu 8 Geräten zum Bedienen auswählen.
TV Fernsehgerät/LCD/Plasma/Projektor/Rückprojektor
SAT Satellitenempfänger, Kabeldecoder, DSS / Video Zubehör
(z.B. Media Centers)
DVD DVD Spieler / DVD-R / DVD Home Cinema / DVD Kombi / DVD/HDD /
Laser Disc Spieler
VCR Video Recorder / TV/VCR Kombi / DVD/VCR Kombi / Kassetten Spieler
(Tape Deck) / Digital Audio Tape / DCC
PVR Personal Video Recorder, Hard Disc Recorder
CD CD Spieler / CD-R / MD / Phono / Heimgebrauch (z.B.. IR Signal
gesteuerte Vorhänge etc.
AUD Verstärker/ Tuner / Audioverstärker / Diverse Audio / (DVD) Heimkino
LIGHT IR kontrollierte Lichtschalter – Die KAMELEON 8 verfügt auch über
einen sogenannten “LIGHT” Modus, zur Kontrolle von Power Modulen
verwendet mit Light Control™. Dieser Modus sendet Infrarot (IR)
Signale zu einem separat erhältlichen “ONE FOR ALL Light Control™
Starters Kit - HC-8300”, welches diese Signale von Infrarot- in Funk
Signale (RF) umwandelt, welche wiederum von Power Modulen empfangen werden um Lampen zu schalten bzw. zu dimmen.
Um mit Ihrer KAMELEON 8 Beleuchtungssysteme z.B.
Lichtschalter etc. ( light control™ ) steuern zu können,
benötigen Sie das ONE FOR ALL „LIGHT CONTROL – STARTERS KIT
(HC-8300)”.
Page 30
WW W.ONEFORALL.COM 29
Batterien
Bitte beachten: Wenn Sie die Batterien in die KAMELEON 8 einlegen,
befindet diese sich im „Demo Mode“ und zeigt verschiedene Screens
an. Der “Demo Mode” wird abgebrochen durch die Einstellung Ihrer
Fernbedienung (halten Sie die Magic Taste gedrückt für ca. 3 Sekunden
und drücken Sie dann die ESC Taste und lassen diese dann wieder los.
Ihre KAMELEON 8 benötigt 4 AAA/LR03 Alkali-Batterien.
1. Entfernen Sie den Deckel des Batteriefachs auf der Rückseite der
KAMELEON 8 mit einer Münze.
2. Legen Sie die Batterien in die entsprechenden (+) und (-) Markierungen ein.
3. Schließen Sie den Deckel des Batteriefachs wieder.
Anzeige bei schwachen Batterien
Bei schwächer werdenden Batterien wird die KAMELEON 8 Ihnen dies anzeigen.
Die IR Anzeige wird dann 5x aufleuchten, sobald Sie eine Taste drücken und der
Einstellungsmodus ist nicht erreichbar.
Ersetzen Sie die Batterien durch 4 neue AAA/LR03 Alkali-Batterien.
Lernfähigkeit
Ihre KAMELEON 8 ist ausgerüstet mit einer einzigartigen “Lernfähigkeit”. Das
b
edeutet, dass Sie fast jede Funktion (max. ± 50) von Ihrer
O
riginalfernbedienung auf Ihre neue KAMELEON 8 kopieren können (siehe
“Lernfähigkeit“ Seite 41). Dies ist praktisch, wenn Sie nach dem Einstellen Ihrer
KAMELEON 8 feststellen, dass Ihnen vielleicht einige Funktionen von Ihrer
Originalfernbedienung auf der KAMELEON 8 Tastatur fehlen.
Makros (bestimmte Befehlsfolge auf Knopfdruck)
Ihre KAMELEON 8 ist mit einem einfach zu bedienen Makro Merkmal
ausgestattet. Dies ermöglicht Ihnen durch Drücken einer einzelnen Taste
m
ehrere Befehle gleichzeitig zu senden (zum Beispiel um mehrere Geräte AUS
z
u schalten). Hierfür können Sie einer der Sonderfunktionstasten (I, II, III oder IV)
benutzen. Wenn die Befehlfolge auf diese Taste programmiert wurde,
f
unktioniert sie in jedem Gerätemodus.
Codenachlade -Technologie
Ihre ONE FOR ALL KAMELEON 8 besitzt auch eine Möglichkeit um Codes
n
achzuladen. Diese Technik ermöglicht Ihnen Codes dem Speicher hinzuzufügen.
W
enn Ihr Gerät einen bestimmten Code benötigt, welcher sich nicht im Speicher
der KAMELEON 8 befindet (bei Benutzung der “Code Einstellung“ von Seite 38
oder des “Code Suchlauf” von Seite 39), können Sie von der Codenachlade T
echnologie gebrauch machen (siehe Seite 50). Dank dieser Technologie wird
Ihre KAMELEON 8 immer aktuell bleiben.
About Your KAMELEON 8
Page 31

30 WW W.ONEFORALL.COM
“EL“ Display Helligkeitseinstellung
Um die Helligkeit auf Ihrem KAMELEON 8 “EL“ Display zu erhöhen oder zu verringern:
1. Halten Sie die MAGIC -Taste für 3 Sekunden gedrückt..
Die KAMELEON 8 wird zum Setup Display umschalten.
2. Drücken Sie BRIGHT.
3. > Um die Helligkeit auf dem “EL“ Display zu erhöhen, halten
Sie NEXT gedrückt.
> Um die Helligkeit auf dem “EL“ Display zu verringern,
halten Sie PREVIOUS gedrückt.
4. Drücken Sie die ENTER Taste um die Helligkeitseinstellung
zu sichern und zurück zu kehren zum Setup Display ODER
drücken Sie ESC um zur ursprünglichen Helligkeitseinstellung
zurück zu kehren.
- Die Helligkeit des KAMELEON 8 “EL“ Displays kann Einfluss auf die Lebensdauer
der Batterien haben. Die Lebensdauer der Batterien variiert zwischen 3 – 12
Monaten (abhängig von Helligkeitseinstellung und Gebrauch).
Dieses Produkt hat ein “EL“ Display (Elektro-Luminenz-Technologie), welches
durch gleichzeitiges berühren von Gehäuse und „EL“ Display oder per
K
nopfdruck aktiviert wird. Um eine längere Lebensdauer der Batterien zu
g
ewährleisten, wird das “EL“ Display, bei normalem Gebrauch nach 8 Sekunden
automatisch ausgeschaltet.
Die Besonderheit des “EL“ Displays der KAMELEON 8 ist die Anpassung an die
j
eweils zu bedienenden Geräte. Die Übersicht auf Seite 32 zeigt Ihnen alle
Funktionstasten die möglich sind.
„EL“ Display Aktivierungseinstellung
Die KAMELEON 8 besitzt ein EL-Display, welches durch gleichzeitiges berühren
v
on Gehäuse und „EL“ Display oder per Knopfdruck aktiviert wird.
U
m eine der Aktivierungseinstellungen festzulegen:
1
. Halten Sie die MAGIC -Taste für 3 Sekunden gedrückt.
D
ie KAMELEON 8 wird zum Setup Display umschalten.
2. Drücken Sie OTHER.
3
. Drücken Sie 9 8 9. Die IR-Anzeige wird zweimal aufleuchten
(oder viermal).
-> Wenn die IR-Anzeige zweimal blinkt, wird das EL-Display durch gleichzeitiges
berühren von Gehäuse und „EL“ Display aktiviert.
-> Wenn die IR-Anzeige viermal blinkt, wird das EL-Display per Knopfdruck
aktiviert.
Führen Sie einfach diese Schritte durch, um Ihren bevorzugten
Aktivierungsmodus auszuwählen.
Das Tastenfeld
Page 32

WW W.ONEFORALL.COM 31
Das Tastenfeld
“EL“ Display Beleuchtungsdauer
U
m die „EL“ Beleuchtungsdauer (Grundeinstellung: 8 sec.) zu ändern (außer in
E
instellungs-Modus):
1. Halten Sie die MAGIC -Taste für 3 Sekunden
g
edrückt. Die KAMELEON 8 wird umschalten zum Setup
D
isplay.
2
. Drücken Sie OTHER.
3. Drücken Sie 9 7 8. Die IR-Anzeige wird zweimal
a
ufleuchten.
4
. Drücken Sie 1, 2, 3, 4 oder 5 (z.B. 1 = 4 Sekunden), siehe
T
abelle. Die IR-Anzeige wird zweimal aufleuchten.
Drücken Sie die ENTER Taste um die Beleuchtungsdauer
z
u sichern und zurück zu kehren zum Setup Display
O
DER drücken Sie ESC um zur ursprünglichen
Beleuchtungsdauer zurück zu kehren.
Selektion Beleuchtungsdauer
14Sekunden
2 8 Sekunden (Grundeinstellung)
3 12 Sekunden
4 16 Sekunden
5 20 Sekunden
Page 33

32 WW W.ONEFORALL.COM
Das Tastenfeld
TV
SAT
DVD
VCR
PVR
CD
AUD
L
IGHT
IR Indicator
Page 34

WW W.ONEFORALL.COM 33
1. IR (Infrarot) Anzeige
Die IR Anzeige zeigt an, wann IR”gesendet” oder “empf
angen” wird. Die bei der KAMELEON 8 animierte IR
A
nzeige gibt ein “ausgehendes IR” immer an, sobald eine
beliebige, funktionierende Taste gedrückt wird. Bei
Benutzung der “Lern-Prozedur” oder der „Code Nachlade
Prozedur“ zeigt die IR Anzeige Ihnen ein ankommendes IR
S
ignal an. Ausgehende Signale werden durch ein „von
außen nach innen“ Animation des IR Indikators gezeigt.
Der IR Indikator wird eine Bestätigung zeigen: sobald eine
Taste “bei normalem Gebrauch” wie auch im
„
Programmier-Modus“ gedrückt wird (das mittlere
S
egment des IR Indikators wird aufleuchten).
2
. Gerätetasten
Mit den TV, SAT, DVD, VCR, PVR, CD, AUD und LIGHT Tasten wählen Sie das
Gerät, welches Sie bedienen möchten. Zum Beispiel, wenn Sie die TV Taste
d
rücken, ermöglicht die Fernbedienung Ihnen die Bedienung der
F
unktionen Ihres Fernsehers, nachdem Sie auf VCR drücken, können Sie
Ihren Videorecorder bedienen, nachdem Sie die SAT Taste gedrückt haben,
können Sie Ihren Satellitenempfänger oder Kabeldecoder etc. bedienen (für
m
ehr Details siehe Seite 28). Sobald eine Gerätetaste gedrückt wird, wird
das ausgewählte Gerät Symbol animiert sein um den gerade ausgewählten
Modus zu signalisieren. Durch das Drücken einer Gerätetaste (Auswahl von
TV, SAT, und AUD) wird Ihnen die Rückkehr ins Hauptdisplay gewährt. Die
KAMELEON 8 verfügt außerdem über einen “LIGHT” modus. Zusammen mit
einem separat erhältlichen “ONE FOR ALL Light Control™ Starters Kit - HC8300”, ermöglicht Ihnen dieses Set, Lampen in Ihrem gesamten Haus an und
aus zu schalten bzw. zu dimmen.
3. MAGIC (Umschalt “Shift” oder Einstellungs-Taste)
Die MAGIC Taste ist bei Ihrer KAMELEON 8 zur Einstellung
und als Zugang zu speziellen Funktionen zu gebrauchen.
Wenn Sie diese Taste kurz drücken, wird das Display in den
Umschalt “Shift” Modus wechseln (für 10 Sekunden) und
wird Ihnen Zugang zu weiteren Funktionen ermöglichen
sowie Farbe, Helligkeit und Sleeptimer.
Einstellungs-Modus
Wenn Sie die MAGIC Taste länger gedrückt halten (ca. 3
Sekunden), wird die KAMELEON 8 zum ProgrammierModus umschalten. Die KAMELEON 8 wird zum Setup
Display umschalten.
Das Tastenfeld
DEV SET
SEARCH
MODE
KEY MAGIC
MACRO
BRIGHT
LEARN
IR DELETE
VOLUME
OTHER
• Gerät Einstellung
• Code Suchlauf
• Gerate Neuzuordnung
• Das Programmieren von fehlenden Funktionen
• Zur Programierung einer bestimmten Befehlsfolge auf
eine Taste (I, II, III, IV)
• „EL“ Display Helligkeitseinstellung
• Funktionen von Ihrer Originalfernbedienung auf die
KAMELEON 8 kopieren
• Löschen von „gelernte“ und „Key Magic“ Funktionen
• Lautstärke Direktbedienung
• Beleuchtungsdauer (4 sec, 8 sec, 12 sec, 16 sec, 20 sec)
• Benutzer Reset
• KAMELEON 8 Timer
• EL-Display Aktivierungseinstellung
• Code Auslesen
• Code Nachladung
Page 35

34 WW W.ONEFORALL.COM
4. SCROLL
Die SCROLL Taste gibt Ihnen die Möglichkeit zwischen den
v
erschiedenen Displays (wenn anwendbar) zu wechseln.
D
ies funktioniert beim normalen Gebrauch aber auch im
Einstellungs-Modus. Das gilt im TV, SAT und AUD Modus.
5. ENTER
Die ENTER Taste erlaubt es Ihnen Ihre Auswahl im
Programmierung Modus zu bestätigen.
6
. POWER (im Shifted Modus; Sleeptimer)
D
ie POWER Taste hat dieselbe Funktion wie auf Ihrer
Originalfernbedienung.
7. PP / TIMER / RAND.
Im TV und SAT Modus wird diese Taste entweder die
F
unktionen: “Letzter Kanal“, “voriges Programm“ oder
“Zurücksetzung“ übernehmen (jeweils abhängig von Ihrer
Originalfernbedienung). Im VCR und DVD–Modus erhalten
Sie die TIMER RECORD oder TIMER ON/OFF–Funktion. Im
CD und AUD Modus bekommen Sie die RANDOM (oder
Shuffle) Funktion.
8. PRESET / BACK
Im AUD Modus wird die PRESET-Taste zum PRESET/MENU
umschalten und Ihnen Zugang verschaffen zu den
PRESET- Tasten 1 - 9, 0 and +10. Im PVR und SAT Menü
Modus können Sie mit der Taste “Back“ in das
vorhergehende Bildschirm-Menü zurückgehen.
9. 16:9 / PROG
Im TV Modus erhalten Sie die 16:9 (Breitbild) Funktion. Im
VCR, DVD, CD und AUD Modus erhalten Sie die Funktion
PROG (Programm).
10. TV/VCR / TV/SAT / TV/DVD
Im VCR Modus erhalten Sie die Funktion TV/VCR. Im SAT
Modus erhalten Sie die Funktion TV/SAT. Im DVD Modus
erhalten Sie die Funktion TV/DVD.
11. AUDIO / TUNE -
Im DVD, SAT, PVR und AUD (Haupt Schirm) erhalten Sie die
Funktion AUDIO. Im AUD (PRESET/MENÜ) Modus erhalten
Sie die „TUNING -" Funktion.
12. INFO / CLEAR
Im SAT und PVR Modus können Sie die “Info“ Funktion
auswählen. Wenn erhältlich auf Ihre
Originalfernbedienung, bekommen Sie die CLEAR Funktion
(im CD, AUD (Haupt Schirm) und DVD Modus).
Das Tastenfeld
Page 36

WW W.ONEFORALL.COM 35
Das Tastenfeld
1
3. FAV / EDIT / „SP/LP“
I
m SAT und PVR Modus erhalten Sie die FAV (Favoriten)
F
unktion. Im DVD, CD und AUD Modus erhalten Sie die
EDIT Funktion. Im VCR Modus erhalten Sie die Funktion
S
P/ LP (Bandgeschwindigkeit).
1
4. SUBT. / TUNE +
I
m SAT, PVR, DVD und AUD Modus (Hauptschirm) erhalten
S
ie die UNTERTITEL (SUBTITLE) Funktion. Im AUD PRESET/MENÜ Modus erhalten Sie die Tuning+ Funktion im
voreingestellten Screen.
1
5. MENÜ
B
eim Drücken dieser Taste wird Ihnen das Bedienen des
Menüs ermöglicht. Im TV und AUD Modus wechselt das
Display in den Menü Modus. Die Menü Taste hat dieselbe
F
unktion wie auf Ihrer Originalfernbedienung.
16. EXIT
Die EXIT Taste hat dieselbe Funktion wie auf Ihrer
Originalfernbedienung. Um zum Hauptdisplay zurückzukehren (TV, SAT und AUD Modus), drücken Sie die
Gerätetaste oder die SCROLL Taste.
17. DSP / GUIDE
Im AUD Modus erhalten Sie die “DSP” Funktion. Im TV,
SAT, DVD, VCR und PVR Modus erhalten Sie die „GUIDE“
Funktion (wenn erhältlich auf Ihrer Original-fernbedienung). Im TV Modus wird die “GUIDE” Taste den Screen
in den “Menu Modus Screen” umschalten.
18. MUTE (Stummtaste)
Die Mute Taste hat dieselbe Funktion wie auf Ihrer
Originalfernbedienung.
19 CH +/- (im Umschalt “Shift” -Modus; Helligkeit +/-)
Diese Tasten haben dieselben Funktionen wie auf Ihrer
Originalfernbedienung. Im TV Umschalt “Shift” Modus
(zugänglich durch kurzes Drücken der MAGIC Taste) werden diese Tasten die Helligkeitseinstellung +/- Ihres
Fernsehers regulieren.
20. Richtungstasten
Falls auf Ihrer Originalferndienung Richtungstasten vorhanden sind, ermöglichen diese Tasten Ihnen die Navigation im
Menü. Bei einigen Fernsehern müssen die CH+/- und VOL+/ODER die Farbtasten (rot, grün, gelb, blau) für die
Navigation im Menü gedrückt werden; dies hängt von Ihrem
Fernsehermodell ab. Im AUD (Haupt Schirm) wird Ihnen mit
diesen Tasten (wenn auf Ihrer Originalfernbedienung
vorhanden) ermöglicht, die Lautstärke Ihrer Center (Mittel)
und Rear (Hinteren) Lautsprecher zu regeln. Abhängig von
der Originalfernbedienung kann man die Richtungstasten
benutzen, um im Menü zu navigieren (im Audio Menu
Modus).
Page 37

36 WW W.ONEFORALL.COM
21. OK / SURROUND
I
m Menü Modus wird diese Taste Ihre Wahl bestätigen
(
Bestätigungstaste). Abhängig von der
O
riginalfernbedienung muss man die MENÜ Taste (statt
OK) drücken, um Ihre Wahl im Menü zu bestätigen. Wenn
a
uf Ihrer Originalfernbedienung vorhanden, erhalten Sie,
i
n AUD Haupt Modus, mit dieser Taste den Zugang in den
S
urround Modus Ihres Gerätes.
2
2. VOL +/- (im Umschalt “Shift”modus; Farbe +/-)
Die Lautstärke Tasten haben dieselben Funktionen wie auf
Ihrer Originalfernbedienung. Im TV Umschalt “Shift”
M
odus (zugänglich durch kurzes Drücken der MAGIC Taste)
werden diese Tasten die Farbeinstellung +/- Ihres
Fernsehers regulieren.
23. Nummerntasten / INPUT (In Einstell- Modus:
d
ie jeweiligen Einstellungen)
D
ie Nummerntasten (1 - 9, 0) funktionieren wie auf Ihrer
Originalfernbedienung. Im Audiobereich werden die
Nummerntasten 1 - 9, 0) eine Eingangsfunktion (z.B.
TUNER, CD etc.) darstellen (falls auf Ihrer OriginalFernbedienung vorhanden). Hat die Originalfernbedienung
eine „Eingangs/Select- Taste“, finden Sie diese unter der
AV- Taste. Im Einstellungs- Modus werden die
Nummertasten die jeweiligen Einstellmöglichkeiten
anzeigen.
24. -/-- / PPV
Wenn Ihre Originalfernbedienung zwischen einer ein- bzw.
zweistelligen Kanalauswahl unterscheidet (-/--), kann diese
Funktion mit Drücken der -/-- Taste aufgerufen werden. Im
SAT (Menu Schirm) oder PVR
25. AV / HELP
Die AV Taste hat dieselbe Funktion wie auf Ihrer
Originalfernbedienung. Falls Ihre Originalfernbedienung
(TV oder Video) eine 20-Taste besitzt, erhalten Sie diese
Funktion durch Drücken der AV-Taste. Im SAT oder PVR
Modus wird durch die “HELP“ Taste die „Hilfefunktion“
ausgewählt. In AUD Modus wird die “input source”
Funktion ausgewählt.Modus wird die Funktion “PPV“
aufgerufen.
26. ESC
Diese Taste erscheint nur im Einstellungs-Modus und wird
benutzt um zum Setup Display zurückzukehren oder um
den Einstellungs-Modus zu verlassen.
27. Transport Tasten (REW, PLAY, STOP etc.)
Wenn Sie Sich in VCR, DVD, SAT (Menu Schirm), PVR, CD
oder AUD Modus befinden, werden diese Taste die
Funktionen: PLAY, FF, REW SKIP +/- (TRACK+/-) +/- etc.
übernehmen. Um eine unbeabsichtigte Aufzeichnung zu
vermeiden, muss die Aufnahmetaste (RECORD) zweimal
gedrückt werden.
Das Tastenfeld
Page 38

WW W.ONEFORALL.COM 37
Das Tastenfeld
28. Texttasten
N
achdem Sie die TV Text Taste gedrückt haben, erscheinen
i
m Display die restlichen Textfunktionen. Diese Tasten wer-
d
en benötigt, um die Hauptfunktionen des Videotextes zu
steuern. Voraussetzung hierfür ist, dass Ihr Fernseher
V
ideotext empfangen kann. Weitere Erklärungen zu
V
ideotext und Toptext finden Sie in der
B
edienungsanleitung Ihres Fernsehers. Denken Sie daran,
dass bei verschiedenen Geräten die Videotext- und
Toptext- Funktionen auch unterschiedlich bedient werden.
E
s kann sein, dass bei Ihrem Modell nicht alle Videotext
F
unktionen verfügbar sind.
VERGRÖßERN: Zeigt die obere Hälfte vom Videotext in
vergrößerten Buchstaben. Bei nochmaligem Drücken werden
S
ie die untere Hälfte der Videotext Seite vergrößert
s
ehen. Um die reguläre Seitengröße zu sehen, drücken Sie
nochmals die Vergrößerungstaste, oder drücken Sie die
TEXT EIN- Taste, um in den TV Modus zurückzukehren.
T
EXT EIN (im TV Modus): Wenn Sie sich im Text Modus befinden
(abhängig von Ihrem Fernseher), drücken Sie diese Taste um zu MIX
oder TEXT AUS zu gelangen. Diese Funktion
ist auch im SAT Modus möglich.
HALT/ STOP: Stoppt das Wechseln der Seiten.
MIX: Zeigt Videotext und Fernsehbild gleichzeitig.
TEXT AUS (im TV Modus): Schaltet den Fernseher in den normalen
Fernsehmodus zurück. Bei einigen Fernsehmodellen muss die “TEXT
EIN“ Taste zu diesem Zweck mehrmals gedrückt werden. Diese
Funktion ist auch im SAT Modus möglich.
TEXT INDEX: Gibt Ihnen Zugang zur Index Funktion im
Videotext Modus.
29. Sonderfunktionstasten (I, II, III, IV)
Die Sonderfunktionstasten sind FREIE-Tasten, die Ihnen die
Möglichkeit bieten, mit der KAMELEON 8 durch die
“Lernfähigkeit“ (siehe Seite 41) oder “Key Magic®“ (siehe
Seite 44), Sonderfunktionen zu übernehmen. Diese Tasten
sind auch ideal, um als “Makro Tasten“ (siehe Seite 48)
benutzt zu werden.
30. Rot / Grün / Gelb / Blau
Bei Benutzung des Videotextes sind die farbigen Tasten,
rot, grün, gelb und blau für die Toptext Funktionen Ihres
Fernsehers zuständig. Wenn auf Ihrer OriginalFernbedienung diese Tasten benutzt werden, um das Menü
zu steuern, werden die KAMELEON 8 Toptext Tasten auf
die gleiche Weise funktionieren.
Page 39

38 WW W.ONEFORALL.COM
B
itte beachten: Wenn Sie die Batterien in die KAMELEON 8 einlegen,
b
efindet sich diese im „Demo Mode“ und zeigt
verschiedene Screens an. Folgen Sie einfach den
nächsten Schritten und die KAMELEON 8 wird
automatisch den „Demo Mode“ verlassen.
Beispiel: Wie Sie die KAMELEON 8 auf Ihren Fernseher einstellen:
1. Vergewissern Sie sich, dass Ihr Gerät eingeschaltet ist (nicht im Standby Modus).
2
. Ermitteln Sie den richtigen Code für Ihr Gerät in der Codeliste (Seite
261 - 288). Die Codes sind eingeteilt nach Geräteart und Markennamen. Die
meist verwendeten Codes stehen an erster Stelle. Wenn Ihre Gerätemarke
n
icht aufgeführt ist, versuchen Sie es mit dem Code Suchlauf auf Seite 39.
3. Halten Sie die MAGIC -Taste für 3 Sekunden gedrückt.
Die KAMELEON 8 wird zum Setup Display umschalten.
4
. Drücken Sie die DEV SET Taste.
5. Drücken Sie kurz die TV Taste, um den Gerätetyp zu
selektieren, den Sie einstellen möchten.
6. Geben Sie mit Hilfe der Nummerntasten Ihren
vierstelligen Code ein. Die IR Anzeige wird zweimal
aufleuchten.
7. Richten Sie jetzt Ihre KAMELEON 8 auf Ihren Fernseher
und drücken Sie eine der folgenden Tasten und kontrollieren
Sie ob Ihr Gerät reagiert.
• CH +, CH-
• VOL +, VOL -
• MUTE
• POWER.
• MENU.
8. Sobald Ihr Gerät reagiert, drücken Sie bitte die ENTER-Taste
um diesen Code zu speichern. Wenn Ihr Gerät nicht
reagiert, geben Sie den nächsten Code ein, der unter Ihrer
Marke aufgelistet ist. Wenn Ihr Gerät nicht mit einem der
aufgelisteten Codes Ihrer Marke funktioniert, versuchen Sie es
mit dem Code-Suchlauf auf Seite 39.
9. Halten Sie die ESC Taste für ca. 3 Sekunden gedrückt um zum
Gebrauchermodus zurückzukehren (alle Tasten des Geräte
Modus werden angezeigt) ODER drücken Sie die Gerätetaste
für das nächste Gerät das Sie einstellen möchten.
- Die meisten Fernseher lassen sich nicht mit der POWER Taste einschalten.
Bitte drücken Sie die „CH+“ -Taste um Ihren Fernseher wieder einzuschalten.
- Manche Codes sind sich sehr ähnlich. Wenn Ihr Gerät gar nicht oder nicht
richtig funktioniert, versuchen Sie einen anderen Code unter Ihrer
Gerätemarke.
- Um Ihre anderen Geräte einzustellen, folgen Sie denselben Anweisungen.
Drücken Sie aber bei Schritt 5 die gewünschte Gerätetaste.
- Vergessen Sie bitte nicht, die richtige Gerätetaste zu drücken, bevor Sie Ihr
Gerät bedienen. Es kann nur ein Gerät pro Gerätetaste zugeordnet werden.
Um ein zweiten TV, VCR, SAT, PVR, CD, AUD oder DVD einzustellen
(sehen Sie bitte auf Seite 45 nach).
Einstellung der KAMELEON 8
(Wie Sie die KAMELEON 8 einstellen, um Ihre Geräte zu bedienen)
_ _ _ _
Page 40

WW W.ONEFORALL.COM 39
Code Suchlauf
-
-> Wenn Sie Ihr Gerät nicht mit der KAMELEON 8 Fernbedienen können,
n
achdem Sie alle aufgelisteten Codes Ihrer Gerätemarken ausprobiert haben.
--> Wenn Ihre Gerätemarke nicht im Codebuch aufgelistet ist.
Mit dem Code- Suchlauf können Sie auch den Code für Ihr Gerät finden,
i
ndem Sie alle Codes im Speicher der KAMELEON 8 durchlaufen.
Beispiel: Um Ihren TV Code zu finden:
1
. Schalten Sie Ihren Fernseher ein (nicht auf Standby).
2. Halten Sie die MAGIC -Taste für 3 Sekunden gedrückt.
D
ie KAMELEON 8 wird zum Einstell-Display umschalten.
3. Drücken Sie die SEARCH Taste.
4. Drücken Sie die TV Taste um das Gerät auszuwählen das
Sie bedienen möchten.
5. Als nächstes drücken Sie die POWER Taste.
6. Richten Sie die KAMELEON 8 auf Ihren Fernseher.
Drücken Sie NEXT bis sich Ihr Fernseher ausschaltet
(wenn Sie die NEXT Taste drücken, wird die KAMELEON 8
das POWER Signal vom jeweils nächsten Code im Speicher
aussenden). Möglicherweise müssen Sie diese Taste
viele Male drücken (bis zu 150 Mal). Haben Sie etwas
Geduld. Beachten Sie bitte, dass Ihre KAMELEON 8
immer auf Ihr Gerät gerichtet ist, während Sie diese
Taste drücken (wenn Sie einen Code verpasst haben, kön-
nen Sie zu dem vorherigen Code zurück schalten, indem
Sie die Taste PREVIOUS drücken).
7. Sobald sich Ihr Fernseher ausschaltet, drücken Sie die
ENTER Taste um den gefundenen Code zu speichern. Die
animierte IR Anzeige wird zweimal aufleuchten.
8. Drücken Sie bitte die ESC -Taste um zum Setup Display
zurückzukehren ODER eine Gerätetaste, um ein anderes
Gerät einzustellen.
9. Drücken Sie bitte noch mal die ESC -Taste um zum
Gebrauchermodus zurückzukehren (alle Tasten werden
angezeigt). Schalten Sie Ihr Gerät (Fernseher) wieder ein
und probieren Sie alle Funktionen der Fernbedienung aus,
um sich zu vergewissern, dass diese richtig funktionieren.
Wenn Sie Ihr Gerät nicht richtig bedienen können, wiederholen Sie bitte den Code-Suchlauf, vielleicht haben Sie
noch nicht den richtigen Code gefunden.
- Bei Schritt 5 können Sie anstelle von POWER, auch irgendwelche andere
angezeigte Tasten, drücken. Dadurch wird dieselbe Funktion ausgesendet,
wie NEXT oder PREVIOUS bei Schritt 6. Wenn Sie z.B. bei Schritt 5, die Taste
2 anstatt POWER drücken, wird die KAMELEON 8 das Signal der Taste 2
senden wenn Sie die Taste NEXT bei Schritt 6 drücken (vergewissern Sie sich,
das Ihr Fernseher zu einem anderen Sender schaltet).
- Um den Code für ein anderes Gerät zu suchen, befolgen Sie die gleichen
Anweisungen. Drücken Sie jedoch bei Schritt 4 die entsprechende Gerätetaste.
- Wenn die Originalfernbedienung Ihres Videorecorders keine POWER- Taste
hat, drücken Sie bei Schritt 5 anstelle von POWER die Play-Taste.
- Im LIGHT-Modus funktioniert der Suchlauf nicht.
Setting up the KAMELEON 8
Page 41

40 WW W.ONEFORALL.COM
■
■
■
■
■
■
■
■
■
■
■
■
■
■
■
■
■
■
■
■
■
■
■
■
■
■
■
■
■
■
■
■
■
■
■
■
■
■
■
■
■
■
■
■
■
■
■
■
■
■
■
■
■
■
■
■
■
■
■
■
■
■
■
■
Code Auslesen
(Um heraus zu finden welcher Code Aktuell programmiert ist)
W
enn Sie Ihre KAMELEON 8 mit Hilfe des Code-Suchlaufs eingestellt haben,
k
önnen Sie Ihren Code auslesen um ihn in Ihrer Persönlichen Code-Übersicht zu
notieren. Bitte beachten Sie, dass die animierte IR Anzeige Ihnen die 4 Nummern
d
urch Aufleuchten anzeigen wird.
Zum Beispiel: Um Ihren Fernseher-Code auszulesen:
1. Halten Sie die MAGIC -Taste für 3 Sekunden gedrückt.
D
ie KAMELEON 8 wird zum Einstell-Display umschalten.
2. Drücken Sie die OTHER Taste.
3. Drücken Sie dann 9 9 0, die animierte IR Anzeige wird zweimal
a
ufleuchten.
4. Drücken Sie die TV Taste um das Gerät auszuwählen, das Sie
überprüfen möchten.
5
. Für die erste Ziffer Ihres vierstelligen Codes drücken Sie 1
und zählen Sie, wie oft die animierte IR Anzeige aufleuchtet.
Wenn diese nicht aufleuchtet, ist die gesuchte Ziffer “0“.
6. Für die zweite Ziffer drücken Sie 2 und zählen Sie, wie oft die
Animation aufleuchtet. Wenn diese nicht aufleuchtet, ist die
gesuchte Ziffer “0“.
7. Für die dritte Ziffer drücken Sie 3 und zählen Sie, wie oft die
Animation aufleuchtet. Wenn diese nicht aufleuchtet, ist die
gesuchte Ziffer “0“.
8. Für die vierte Ziffer drücken Sie 4 und zählen Sie, wie oft die
Animation aufleuchtet. Wenn diese nicht aufleuchtet, ist die
gesuchte Ziffer “0“. Damit haben Sie nun den vierstelligen
Code ermittelt.
9. Drücken Sie bitte die ENTER-Taste um zum Setup Display
zurückzukehren oder eine Gerätetaste um einen anderen
Gerat auszulesen.
10. Drücken und halten Sie die ESC -Taste für ca. 3 Sekunden um
zum Gebrauchermodus zurückzukehren.
- Sie können die Schritte 5 – 8 sooft in jeglicher Reihenfolge wiederholen.
Sollten Sie die Anzahl des aufleuchten vergessen haben, so ist es möglich
das aufleuchten noch einmal anzeigen zu lassen (z.B. wenn Sie bei Schritt 6
die Anzahl nicht mitbekommen haben). Um zu sehen wie oft der animierte
IR Indikator aufleuchtet, pressen Sie einfach die Nummer 2 Taste noch einmal und zählen das aufleuchten.
- Um die Codes für Ihre anderen Geräte zu finden, wiederholen Sie bitte die gle-
ichen Schritte, drücken Sie aber dann bei Schritt 4 die passende Gerätetaste.
Code-Übersicht
Tragen Sie die Codes Ihrer Geräte in die dafür vorgesehenen Kästchen
ein, damit Sie diese bei Bedarf schnell nachschlagen können.
Page 42

WW W.ONEFORALL.COM 41
D
ie KAMELEON 8 wird mit einem kompletten vorprogrammiertem CodeSpeicher geliefert. Nachdem Sie Ihre KAMELEON 8 auf Ihre Geräte eingestellt
haben, können Sie vielleicht feststellen, dass Ihre Originalfernbedienung eine
oder mehrere Funktionen zusätzlich beinhaltet, die nicht auf Ihrer KAMELEON 8
T
astatur zu finden sind. Die KAMELEON 8 hat eine spezielle Lernfähigkeit,
welche Ihnen die Möglichkeit gibt, fast jede Funktion Ihrer
Originalfernbedienung auf die Tastatur Ihrer KAMELEON 8 zu kopieren.
B
evor Sie beginnen:
- Vergewissern Sie Sich, dass Ihre Originalfernbedienung einwandfrei funktioniert.
- Vergewissern Sie Sich, dass weder die KAMELEON 8, noch Ihre
O
riginalfernbedienung auf Ihre Geräte gerichtet sind.
Lernen (Direkt)
Beispiel: die Funktion “Mono/ Stereo“ von Ihrer Originalfernbedienung
a
uf die ”I” Taste der KAMELEON 8 kopieren:
1
. Legen Sie die KAMELEON 8 und Ihre Originalfernbedienung auf eine
flache Oberfläche. Vergewissern Sie Sich, dass die Seiten die
normalerweise auf die Geräte gerichtet sind, gegeneinander
gerichtet sind. Legen Sie die Originalfernbedienung mittig vor die
KAMELEON 8 (siehe Abbildung). Halten Sie zwischen den
Fernbedienungen einen Abstand von ca. 2 bis 5 cm ein.
2. Halten Sie die MAGIC -Taste für 3 Sekunden gedrückt.
Die KAMELEON 8 wird zum Einstell-Display umschalten.
3. Drücken Sie LEARN.
4. Wählen Sie den Gerätemodus (auf der KAMELEON 8
Fernbedienung) unter dem Sie die Funktion kopieren
möchten (Beispiel: TV Taste).
5. Drücken Sie nun die Taste auf der KAMELEON 8
Fernbedienungen, auf der Sie die Funktionen lernen möchten
(z.B. „I“ Taste). Die IR wird 3 mal eingehendes IR anzeigen, das
Display wird sich dann ausschalten.
6. Drücken Sie die Taste, die Sie kopieren möchten und halten
Sie diese gedrückt. (z.B. Die Mono/Stereo Taste Ihrer
Original-fernbedienung). Das Display wird sich wieder einschalten und nach Beendigung des erfolgreichen Lernvorganges
wird die animierte IR Anzeige zweimal aufleuchten.
7. Wenn Sie eine weitere Funktion im selben Gerätemodus lernen möchten,
wiederholen Sie einfach die Schritte 5 und 6. Drücken Sie dann die nächste
Taste, die Sie kopieren möchten. Wenn Sie eine andere Funktion aus einem
anderen Gerätemodus kopieren möchten, machen Sie einfach bei Schritt 4
weiter, gefolgt durch die Schritte 5 und 6.
8. Drücken Sie ENTER um den Lernmodus zu beenden und zum
Setup Display umzuschalten ODER halten Sie die ESC Taste
gedrückt um zum Gebrauchermodus zurückzukehren.
Lernfähigkeit
(Funktionen von Ihrer Originalfernbedienung auf
d
ie KAMELEON 8 kopieren)
Page 43

42 WW W.ONEFORALL.COM
- Sobald sich das Display bei Schritt 5 ausgeschaltet hat, müssen Sie innerhalb
von 15 Sekunden die Taste (im Beispiel oben: die mono/stereo Taste) auf
I
hrer Originalfernbedienung drücken. Wenn (während Sie sich im
L
ernmodus befinden) keine Taste gedrückt wird, wird sich die
Fernbedienung nach 30 Sekunden wieder in den normalen
Gebrauchermodus zurückschalten.
-
Während des Lernens werden Tasten wie (TV) Guide, (TV) Menü etc. nicht
d
as Display verändern.
- Wenn Sie auf einer Taste lernen, die bei der KAMELEON 8 schon eine
Funktion hat, wird diese automatisch auf eine zweite Ebene umgeschaltet.
D
rücken Sie dann die MAGIC Taste, danach die entsprechende Taste, um
d
iese Funktion aufzurufen. Dieses Umschalten sollte nicht auf der POWER,
CH+/- und VOL+/- Tasten genutzt werden. Wenn Sie auf einer der
Nummerntasten lernen, können Sie den Zugang zur Originalfunktion
b
ekommen, indem Sie zweimal MAGIC und dann die entsprechende
Nummerntaste drücken.
- Wenn Sie eine Taste neu belegen möchten, die sich nicht auf dem
Hauptdisplay befindet, benutzen Sie die SCROLL Taste, um das Display zu
w
echseln.
-
Die Lernfähigkeit ist modusspezifisch. Sie können also pro Modus die dafür
vorgesehenen Tasten verschieden programmieren.
-
Die KAMELEON 8 kann ungefähr 50 Funktionen lernen. Die genaue Anzahl
ist abhängig von den anderen programmierten Funktionen und der
Fernbedienung von der gelernt wird.
- Sie können eine gelernte Funktion ersetzen, indem Sie diese mit einer
anderen Funktion überschreiben.
- Führen Sie diese Prozedur niemals unter Einwirkung des direkten
Sonnenlichtes oder bei weißem Licht (Neonlicht) durch.
- Vergewissern Sie sich, dass Sie neue Batterien einlegen, bevor Sie die oben
aufgeführten Instruktionen befolgen.
- Wenn Sie die Batterien wechseln, werden die gelernten Funktionen nicht
gelöscht.
Lernen (Umschalt “Shift“ Funktion)
Lernen (Umschalt “Shift“ Funktion)
Es ist möglich, eine Funktion auf eine Taste zu platzieren, ohne die
Originalfunktion zu verlieren.
Beispiel: Die Funktion mono/ stereo als “Shift“ Funktion auf die “rote“ Taste
platzieren:
Um die Funktion Mono/Stereo als “Shift“ Funktion auf die rote Taste zu
platzieren, folgen Sie einfach den Schritten 1-8 von Seite 41. Drücken Sie bei
Schritt 5 (statt die “I“ Taste) “MAGIC“ und dann die “rote“ Taste.
Um in diesem Beispiel Zugang zu der Funktion “Mono/Stereo“ zu bekommen,
drücken Sie einfach “MAGIC“ und dann die “rote“ Taste.
- Wenn die “Shift” Funktion auf die CH+/- und VOL+/- Tasten platziert sind,
werden die Funktionen “Farbe & Helligkeit“ verloren gehen.
- Wenn Sie eine "Shift" Funktion auf die Nummerntasten (0 - 9) programmieren, müssen Sie, um Zugang zu dieser "Shift" Funktion zu bekommen,
die MAGIC Taste zweimal drücken und dann die Nummerntaste.
Lernfähigkeit
Page 44

WW W.ONEFORALL.COM 43
Um eine gelernte und Key Magic Funktion von einer
speziellen Taste zu löschen:
B
eispiel: Um die gelernte oder Key Magic Funktion Mono/ Stereo von der Taste
”I” im TV Modus zu löschen:
1
. Halten Sie die MAGIC -Taste für 3 Sekunden gedrückt. Die KAMELEON 8
wird zum Einstell-Display umschalten.
2. Drücken Sie IR DELETE.
3. Wählen Sie den Gerätemodus, (auf der KAMELEON 8 Fernbedienung) unter
d
em Sie die Funktion wieder löschen möchten aus (Beispiel: TV Taste).
4
. Drücken Sie die Taste, die Sie wieder herstellen möchten (Beispiel I). Die IR
Anzeige wird zweimal aufleuchten. Die KAMELEON 8 wird zum
Einstell-Display umschalten.
5
. Drücken Sie ENTER um die Original Funktion wiederherzustellen ODER
h
alten Sie die ESC gedrückt um zum Gebrauchermodus zurückzukehren.
- Die Originalfunktion (wenn vorhanden) wird auf der KAMELEON 8 wieder
hergestellt sein.
Um eine „gelernte“ und „Key Magic“ – StiftFunktion von einer speziellen Taste zu löschen:
Beispiel: Um eine einzelne gelernte oder Key Magic “Shift” Funktion zu löschen fol-
gen Sie bitte Schritten weiter unten. Um die gelernte „Shift“ Funktion
Mono / Stereo von der “roten“ Taste im TV Modus zu löschen:
1. Halten Sie die MAGIC -Taste für 3 Sekunden gedrückt. Die KAMELEON
8 wird zum Einstell- Display umschalten.
2. Drücken Sie IR DELETE.
3. Wählen Sie den entsprechenden Gerätemodus (Beispiel: TV Taste).
4. Drücken Sie MAGIC.
5. Drücken Sie die Funktions-Taste die Sie wiederherstellen möchten (Beispiel
“rote“ Taste).
6. Drücken Sie ENTER um die gelernte Funktion zu löschen ODER halten Sie
die ESC Taste gedrückt um zum Gebrauchermodus zurückzukehren.
- Die Originalfunktion (wenn vorhanden) wird auf der KAMELEON 8
wiederhergestellt sein.
Um alle „gelernten“ und „Key Magic“ Funktionen
innerhalb eines Gerätemodus zu löschen:
Beispiel: Um alle „gelernten“ und „Key Magic“ Funktionen im TV Modus zu löschen:
1. Halten Sie die MAGIC -Taste für 3 Sekunden gedrückt. Die KAMELEON 8
wird zum Einstell- Display umschalten.
2. Drücken Sie IR DELETE.
3. Drücken Sie die entsprechende Gerätemodus-Taste (in diesem Beispiel: die
TV-Taste).
4. Drücken Sie ENTER um die gelernten und Key Magic Funktionen zu löschen
ODER halten Sie die ESC gedrückt um zum Gebrauchermodus zurückzukehren.
- Die Originalfunktion (wenn vorhanden) wird auf der KAMELEON 8 wiederhergestellt sein.
Bei dem Benutzer Reset, werden sämtliche nachträglich programmierte
Funktionen (gelernte Funktionen, Key Magic®, Makros etc.) gelöscht.
1. Halten Sie die MAGIC -Taste für 3 Sekunden gedrückt. Die KAMELEON
8 wird zum Einstell- Display umschalten.
2. Drücken Sie OTHER.
3. Drücken Sie 9 8 0. Die animierte IR Anzeige wird viermal aufleuchten.
Die KAMELEON 8 wird zum Einstell-Display umschalten.
Lernfähigkeit
Benutzer Reset
Page 45

44 WW W.ONEFORALL.COM
Key Magic
®
(
Das Programmieren von fehlenden Funktionen)
K
ey Magic® ist eine exklusive ONE FOR ALL Funktion. Der Aufbau der KAMELEON
8gewährleistet, dass viele Funktionen von Ihrer Originalfernbedienung gesteuert
w
erden können, sogar diejenigen, welche keine eigene(n) Taste(n) auf der
K
AMELEON 8 (hat) haben. Zur Programmierung einer bestimmten Funktion mit
Key Magic® müssen Sie die entsprechenden Funktionscodes kennen. Da die
Funktionscodes von Gerät zu Gerät variieren, sind diese nicht in der
B
edienungsanleitung verzeichnet. Sie können die Funktionscodes bei unserem
t
elefonischen Kundenservice, per Post, Fax oder Email erfragen.
Wir benötigen:
• Marke und Modelnummer des betreffenden Gerätes um zu kontrollieren
d
as Sie den richtigen Code benutzen.
• Den 4-stelligen Einstellcode, mit dem Sie Ihr Gerät eingestellt haben.
•
Die Bezeichnung der gewünschten Funktion Ihrer Originalfernbedienung.
S
ie können uns auch im Internet besuchen (www.oneforall.de) um eine
A
ntwort auf Ihre Fragen zu bekommen.
S
obald Sie den Funktionscode von unserem Kundendienst erhalten
haben, können Sie den Code ganz einfach wie folgt programmieren:
1. Halten Sie die MAGIC -Taste für 3 Sekunden gedrückt. Die KAMELEON
8 wird zum Einstell- Display umschalten.
2. Drücken Sie KEY MAGIC.
3. Drücken Sie eine Gerätetaste (TV, SAT, DVD, VCR, PVR, CD or AUD).
4. Drücken Sie die MAGIC Taste einmal.
5. Geben Sie den 5-stelligen Funktionscode ein, den Sie beim Kundendienst
erhalten haben.
6. Drücken Sie die Funktionstaste, die Sie mit dieser Funktion belegen
möchten. Wenn diese Taste in einem anderen Display als der des
Hauptdisplay steht, benutzen Sie die SCROLL Taste, um Zugang zu diesem
Display zu bekommen. Die IR Anzeige wird zweimal aufleuchten. Die
KAMELEON 8 wird zum Einstell-Display umschalten.
- Die Key MAGIC® Funktion ist gerätespezifisch. Für die Aktivierung dieser
Funktion drücken Sie bitte zuerst die gewünschte Gerätetaste.
- Sie können die Key MAGIC® Funktion auf alle Tasten einprogrammieren,
mit Ausnahme der folgenden Tasten: Gerätetasten, ESC, ENTER, MAGIC
Taste und der SCROLL Taste.
- Bitte notieren Sie sich die Funktionscodes, die Sie vom Kundendienst
erhalten haben, damit Sie diese für die Zukunft parat haben.
- Während Sie Key Magic® programmieren, können die Tasten wie z.B. (TV)
Guide, (TV) Menü etc. das Display nicht verändern. Dies ist nur mit der
SCROLL Taste möglich.
Ihre persönliche Funktionscode-Übersicht
(Der erste Eintrag ist ein Beispiel):
GERÄT EINSTELL CODE FUNKTION FUNCTIONSCODE
TV 0556 16/9 format 00234
Extra Funktionen
Page 46

WW W.ONEFORALL.COM 45
Gerätemodus Neuzuordnung
(
Wenn Sie zwei Geräte gleicher Art auf der KAMELEON 8 einstellen möchten)
E
s ist möglich, den Modus jeder beliebigen Gerätetaste zu ändern. Dieses ist
p
raktisch, wenn Sie zwei (oder mehrere) Geräte gleicher Art (z.B. drei Fernseher)
auf der KAMELEON 8 einstellen möchten. Die geänderte Gerätetaste zeigt die
anwendbaren Tasten für den korrigierten Modus an. Der Code kann durch
“Code Eingabe“ (Seite 38) oder mit dem “Code-Suchlauf“ (Seite 39) eingestellt
w
erden. Um eine Gerätetaste zu ändern, siehe die zwei folgenden Beispiele:
Beispiel 1: Wenn Sie einen zweiten Fernseher auf die DVD Taste
programmieren möchten.
B
eispiel 2: Wenn Sie einen zweiten VCR auf die SAT Taste programmieren
m
öchten.
B
eispiel 1:
Um einen zweiten Fernseher auf die DVD Taste zu programmieren, müssen
Sie die DVD Taste in eine TV Taste ändern. Drücken Sie bitte:
D
ie DVD Taste ist nun eine zweite TV Taste und wird in diesem
M
odus die notwendigen TV Funktionen beinhalten.
Um die Einstellung für Ihren zweiten Fernseher zu vervollständigen
drücken Sie:
Beispiel 2:
Um einen zweiten Video Recorder auf die SAT Taste zu programmieren,
müssen Sie die SAT Taste in eine VCR Taste verändern. Drücken Sie bitte:
Die SAT Taste ist nun eine zweite VCR Taste und wird in diesem
Modus die notwendigen VCR Funktionen beinhalten.
Um die Einstellung für Ihren VCR zu vervollständigen drücken Sie:
- Die Animation der Gerätetaste bleibt bestehen, obwohl der Modus geän-
dert wurde. Wenn Sie unterschiedliche Geräte Typen auf eine andere Taste
legen (z.B.: dritten Fernseher auf DVD Taste), wird das Symbol der
Originalgerätetaste bestehen bleiben, aber die Funktionen werden sich dem
neuen Gerätemodus anpassen. Zum Beispiel: Wenn ein dritter Fernseher auf
der DVD Taste programmiert ist, werden die Videotext Funktionen im DVD
Modus trotzdem zur Verfügung stehen.
Geräte Taste wiederherstellen
Beispiel: wenn Sie die DVD Taste wiederherstellen möchten, drücken Sie:
(*) Halten Sie die MAGIC -Taste für 3 Sekunden gedrückt.
Die KAMELEON 8 wird zum Einstell-Display umschalten.
(**) Die animierte IR Anzeige wird zweimal aufleuchten. Die
KAMELEON 8 wird zum Einstell-Display umschalten.
Extra Funktionen
(*) (**)(*) (**)
(TV Code) (**)
_ _ _ _
(*) (**)
(VCR Code) (**)
_ _ _ _
(*) (**)
Page 47

46 WW W.ONEFORALL.COM
Lautstärke Direktbedienung
D
ieses Merkmal ermöglicht Ihnen die Lautstärkeregelung in einem bestimmten
M
odus, (z.B. TV) obwohl Sie Sich in einem anderen Gerätemodus (z.B. VCR)
befinden. Wenn Sie zum Beispiel einen Film über Ihren Videorecorder ansehen,
können Sie die Lautstärke (eine TV Funktion) regeln, ohne vorher auf die TV
T
aste gedrückt zu haben.
Zuletzt gedrückte Taste: Folgende Funktionen können
kontrolliert werden
S
AT : TV Volumen plus und minus und Mute
D
VD : TV Volumen plus und minus und Mute
VCR : TV Volumen plus und minus und Mute
PVR : TV Volumen plus und minus und Mute
C
D : TV Volumen plus und minus und Mute
A
UD : TV Volumen plus und minus und Mute
LIGHT : TV Volumen plus und minus und Mute
Bespiel: Sie möchten die Lautstärke Ihres Verstärkers, die auf der AUD Taste
programmiert ist, regeln, während Sie in einem anderen Modus sind (z.B. SAT,
VCR oder DVD Modus):
1. Halten Sie die MAGIC -Taste für 3 Sekunden gedrückt. Das Display wird zum
Einstell-Display umschalten.
2. Drücken Sie VOLUME.
3. Drücken Sie dann die AUD Taste und die IR Anzeige wird zweimal
aufleuchten. Das Display wird zum Einstell-Display umschalten.
Resultat: Wahrend Sie z.B. im DVD Modus sind, können Sie trotzdem die
Lautstärke +/- oder MUTE-Taste Ihres Verstärkers bedienen.
Um in einem Modus die “Lautstärke Direktbedienung“ zu löschen:
(Beispiel: Sie möchten die “Lautstärke Direktbedienung’’ vom VCR- Spieler
löschen)
1. Halten Sie die MAGIC -Taste für 3 Sekunden gedrückt. Das Display wird
zum Einstell-Display umschalten.
2. Drücken Sie VOLUME.
3. Drücken Sie VOL- ( ).
4. Drücken Sie VCR einmal und die IR Anzeige wird viermal aufleuchten.
Das Display wird zum Einstell-Display umschalten.
Resultat: In VCR Modus sind Sie jetzt wieder in der Lage, die Lautstärke +/- oder
MUTE- Taste von Ihrem VCR- Spieler zu bedienen (vorausgesetzt bei Ihrem VCRSpieler ist eine Lautstärkeregelung / Stummtaste vorhanden).
Um in jedem Modus die “Lautstärke Direktbedienung“ zu löschen:
1. Halten Sie die MAGIC -Taste für 3 Sekunden gedrückt. Das Display wird
zum Einstell-Display umschalten.
2. Drücken Sie VOLUME.
3. Drücken Sie VOL+ ( ) und die IR Anzeige wird viermal aufleuchten und
das Display wird zum Einstell-Display umschalten.
Resultat: In jeden Modus wird die VOL+, VOL- und MUTE- Taste wieder die
Originalfunktion erhalten.
Extra Funktionen
Page 48

WW W.ONEFORALL.COM 47
Geräte Sleeptimer
W
enn Ihr Gerät einen Sleeptimer enthält, haben Sie mit der KAMELEON 8
F
ernbedienung ebenfalls die Möglichkeit zur Bedienung dieser Funktion.
1
. Vergewissern Sie sich, dass Ihr Gerät eingeschaltet ist.
2
. Drücken Sie die Gerätetaste TV (oder SAT, DVD, VCR, PVR, CD, AUD).
3
. Richten Sie die KAMELEON 8 auf Ihr Gerät und drücken Sie dann kurz die
MAGIC Taste und danach POWER. Der Sleeptimer Ihres Fernsehers sollte
jetzt aktiviert sein. Um die Zeit (bis zu 60 min.) zu erhöhen, drücken
Sie einfach noch einmal POWER (innerhalb von 10 Sekunden), bis der
T
imer die gewünschte Zeit angibt.
- Um den “Sleeptimer“auszuschalten, wiederholen Sie die obenstehenden
Schritte 1-3. Bei Schritt 3 drücken Sie weiter POWER (innerhalb von 10
S
ekunden) bis die Zeiteinstellung Null angibt.
- Abhängig davon wie Sie den Sleeptimer auf Ihrer Originalfernbedienung
e
instellen, kann es sein, dass Sie den Sleeptimer auf eine andere Weise
bedienen müssen (zum Beispiel über das MENÜ).
KAMELEON 8 - Timer
Die KAMELEON 8 - Timer ermöglicht Ihnen eine “gewünschte Funktion” aus
einem bestimmten “Gerätemodus” während eines “bestimmten Zeitraumes“
(max. Zeit ist 60 Minuten) zu aktivieren.
- Die gewünschte Funktion kann eine existierende Funktion eines bestimmtes Modus,
entweder ein Makro, Key Magic Funktion, oder eine gelernte Funktion, sein.
Beispiel: Sie möchten das sich Ihr Fernseher nach 45 Minuten ausschaltet.
1. Halten Sie die MAGIC -Taste für 3 Sekunden gedrückt. Die KAMELEON
8 wird zum Einstell- Display umschalten.
2. Drücken Sie OTHER.
3. Drücken Sie 9 8 5 um den KAMELEON 8 – Timer Funktion zu aktivieren.
Die animierte IR Anzeige wird zweimal aufleuchten.
4. Drücken Sie TV um den Apparatmodus zu selektieren wo sich die
gewünschte Funktion befindet. Die animierte IR Anzeige wird zweimal
aufleuchten.
5. Drücken Sie POWER um die gewünschte Funktion zu selektieren.
Die animierte IR Anzeige wird zweimal aufleuchten.
6. Drücken Sie 4 5 um die zeit einzugeben wonach die gewünschte Funktion
Aktiviert wird (z.B. für 5 Min. drücken Sie 05. Max. ist 60 Min.).
7. Drücken Sie die ENTER-Taste um den KAMELEON 8 – Timer Funktion zu
aktivieren. Die animierte IR Anzeige wird zweimal aufleuchten.
- Die KAMELEON 8 wird während des KAMELEON 8 - Timer
Programmiermodus das drücken von unerlaubten Tasten ignorieren.
- Jede gewünschte Funktionstaste kann benutzt werden, nicht aber die
Gerätetasten, SCROLL, ESC, ENTER und MAGIC.
- Während der KAMELEON 8 - TIMER aktiv ist, wird die animierte IR-Anzeige
alle 15 Sekunden aufleuchten.
- Die KAMELEON 8 - Timer Funktion wird gelöscht mittels einer
Programmierung einer neuen KAMELEON 8 - Timer Funktion.
- Wenn (während Sie sich im KAMELEON 8 - Timermodus befinden) keine
Taste gedrückt wird, wird sich die Fernbedienung nach 30 Sekunden wieder
in den normalen Gebrauchermodus zurückschalten.
- Die SCROLL Taste steht (während Sie sich im KAMELEON 8 – Timermodus
befinden) immer zur Verfügung um das gewünschte Display aufzurufen.
Extra Funktionen
Page 49

48 WW W.ONEFORALL.COM
Makros (Bestimmte Befehlsfolge per Knopfdruck)
M
akros (direkt)
S
ie können die KAMELEON 8 so programmieren, dass Sie mit einem Knopfdruck
eine bestimmte Reihenfolge von Befehlen durchführen können. Zum Beispiel:
Sie möchten Ihren Fernseher, Videorecorder und Satellitenempfänger gleichzeiti
g ausschalten. Jede Befehlsfolge, die Sie regelmäßig verwenden, können Sie
e
infach auf einen Knopfdruck reduzieren. Wenn eine Taste mit einem Makro
programmiert ist, funktioniert diese in jedem Modus (vorausgesetzt dass es in
diesem Modus verfügbar ist). Ein Makro sollte am besten nur auf den
S
onderfunktionstasten (I, II, III, IV) einprogrammiert werden. Sie können jedoch
a
uf jeder beliebigen Taste ein Makro programmieren (sofern in diesem
Gerätemodus vorhanden), außer auf den Gerätetasten (TV, SAT, DVD, VCR, PVR,
CD, AUD und LIGHT), MAGIC, ESC, ENTER and der SCROLL Taste.
U
m ein Makro (Beispiel: Ausschalten Ihres Fernsehers, Videorecorders und
Satellitenempfängers) auf die Taste “I“ Ihrer KAMELEON 8 zu programmieren:
1. Halten Sie die MAGIC -Taste für 3 Sekunden gedrückt. Die KAMELEON
8
wird zum Einstell-Display umschalten.
2
. Drücken Sie dann MACRO.
3. Als nächstes drücken Sie die Gerate -Taste (z.B. TV) um die gewünschte Taste
im gewünschten Modus zu zeigen.
4. Drücken Sie die gewünschte Taste (z.B. „I“) wo Sie das Makro program-
mieren möchten.
5. Drücken Sie TV, POWER, VCR, POWER, SAT, POWER.
6. Um das Makro zu speichern, drücken Sie die ENTER Taste. Die KAMELEON
8 wird zum Einstell-Display umschalten.
Resultat: Immer, wenn Sie jetzt die “I“ Taste drücken, wird die KAMELEON 8
Ihren Fernseher, Videorecorder und Satellitenempfänger ausschalten.
- Jedes Makro kann eine Sequenz von bis zu 22 Befehlen speichern.
- Um eine Funktion von einem bestimmten Display in einem Modus zu
erhalten, benutzen Sie die SCROLL Taste.
- Vergewissern Sie sich, dass die Taste, auf die Sie das Makro programmieren
möchten, nicht für eine andere Möglichkeit nutzen (lehr und von keinem
Gerät benützt wird).
- Sobald Sie das Makro auf eine bestimmte Taste programmiert haben, wird
die Befehlsfolge in jedem Gerätemodus funktionieren. Dies ist unabhängig
davon, in welchemGerätemodus Sie sich befinden (TV, SAT, DVD, VCR, PVR,
CD, AUD oder LIGHT). Das bedeutet, dass jede vorprogrammierte Funktion
auf dieser bestimmten Taste ihre Funktion verliert.
- Um eine versehentliche Aufnahme mit der KAMELEON 8 zu vermeiden,
müssen Sie die Aufnahmetaste zweimal drücken, bevor die Aufnahme
beginnt. Wenn Sie also einen Makro oder “Shift“ Makro auf die Aufnahme
Taste (Record) programmieren, wird das ”doppelte Tasten drücken
deaktiviert”. Deswegen empfehlen wir, kein Makro auf diese Taste zu
programmieren.
- Wenn Sie auf Ihrer Originalfernbedienung eine Taste länger gedrückt halten
müssten, um eine bestimmte Funktion zu erhalten, kann es sein, dass diese
im Makrobereich der KAMELEON 8 nicht funktionieren wird.
- Tasten wie (TV) Guide, (TV) Menü etc. werden während des Programmieren
eines Makros nicht das Display wechseln.
- Bei einem Batteriewechsel werden die Makros beibehalten.
- Wenn Sie das Makro auf eine Taste programmieren, wird die
Originalfunktion eine “Shift“ Funktion (exklusive POWER, CH+/- und VOL+/Tasten). Drücken Sie MAGIC und dann die Taste, um Zugang zu dieser
Funktionen zu bekommen. Wenn Sie ein Makro auf eine Nummerntaste
programmieren, müssen Sie, um die Originalfunktion zu bekommen, die
MAGIC Taste zweimal drücken und dann die Nummerntaste.
- Sie können ein Makro verändern, indem Sie dieses mit einem neuen Makro
überschreiben.
Extra Funktionen
Page 50

WW W.ONEFORALL.COM 49
Umschalt “Shift“ Makro
Es ist möglich ein “Shift“ Makro auf eine Taste zu programmieren, so dass
d
iese Ihre Originalfunktion behält. Die Magic Taste kann als Shift Funktion
b
enützt werden.
Zum Beispiel: Sie möchten ein “Shift“ Makro auf die „rote“ Taste
p
rogrammieren, dass Ihren TV, VCR und Satelliten Receiver ausschaltet, damit
d
ie „rote“ Taste Ihre Originalfunktion behält.
N
un wird jedes Mal wenn Sie “MAGIC“ und dann die “rote“ Taste drücken,
die KAMELEON 8 Ihren Fernseher, Videorecorder und Satellitenempfänger
ausschalten.
-
Wenn Sie ein “Shift“ Makro auf die POWER, CH+/- oder VOL +/- Tasten
p
rogrammieren, werden die Funktionen des Sleeptimers und der
Farbe/Helligkeit verloren gehen.
Ein Makro entfernen
Beispiel: Um das Makro von der Taste “I“ zu entfernen:
Ein Umschalt “Shift“ Makro entfernen
Beispiel: Um das „Shift“ Makro von der “roten“ Taste zu entfernen:
Um alle Makros in allen Gerätemodi zu löschen
(*) Drücken und halten Sie die Magic Taste für ca. 3 Sekunden.
Das Display wird zum Einstell-Display umschalten.
Extra Funktionen
M
AGIC* MACRO TV MAGIC “Red” ENTER
TV, POWER,
VCR, POWER,
SAT, POWER
MAGIC* MACRO TV “I” ENTER
MAGIC* MACRO TV MAGIC ”red” ENTER
MAGIC* MACRO ENTER
Page 51

50 WW W.ONEFORALL.COM
Code Nachladung
I
hre KAMELEON 8 verfügt über eine einzigartige Technologie, mit der neue
I
nformationen hinzugefügt werden können, indem Sie die Fernbedienung an Ihr
Telefon halten. Innerhalb weniger Sekunden werden alle Informationen mit
Hilfe unserer “magnetic coupling technology” schnell und zuverlässig ohne
schwierige Stecker, Adapter oder Zubehörteile auf die KAMELEON 8 übertragen.
D
ies bedeutet, dass die KAMELEON 8 niemals veraltet sein wird, gleichgültig
welche neuen Produkte Sie in Zukunft kaufen werden.
Internet Download
(
Code Nachladung der KAMELEON 8 ...per PC) Beginnen Sie wie folgt:
1. Besuchen Sie die Webseite
“www.oneforall.de”.
2. Wählen Sie
“Produktunterstützung”.
3. Wählen Sie
“
Universal-Fernbedienungen”.
4
. Wählen Sie die ONE FOR ALL
Fernbedienung die Sie nachladen
wollen: KAMELEON 8 (URC-8308).
5. Wählen Sie nun
“Internet Download”. Jetzt haben Sie unseren speziellen OnlineDownload-Bereich erreicht. Folgen Sie ab jetzt bitte den Anweisungen am
Bildschirm für eine einfache Nachladung Ihrer Fernbedienung.
Telefonische Nachladung
(Code Nachladung der KAMELEON 8 ...per Telefon)
Als Alternative ist es möglich unseren Kundendienst anzurufen, und einer
unserer Kundendienstmitarbeiter hilft Ihnen beim Nachladevorgang Ihrer
KAMELEON 8. Um sicherzugehen, dass das Nachladen glatt verläuft,
sollten Sie folgende Schritte durchführen:
1. Notieren Sie, bevor Sie uns anrufen, den/die Markennamen und die
Modellnummer(n) Ihres/Ihrer Gerätes/Geräte an der dafür vorgesehenen
Stelle.
2. Rufen Sie den Kundendienst an und teilen Sie uns mit, welche(s) Gerät(e) Sie
auf Ihrer KAMELEON 8 hinzufügen möchten.
3. Nachdem unser Kundendienstmitarbeiter den/die Markennamen und die
Modellnummer(n) Ihres/Ihrer Geräts/Geräte notiert hat, wird er/sie Sie bitten, Ihre KAMELEON 8 an den Hörer Ihres Telefons zu halten (siehe
Diagramm). So werden die für Ihr Gerät benötigten Informationen innerhalb weniger Sekunden über das Telefon auf die KAMELEON 8 übertragen.
Bemerkung: Drahtlose Telefone, Lautsprechertelefone und Handys werden
nicht empfohlen.
4. Nachdem Ihre KAMELEON 8 auf
diese Weise nachgeladen wurde,
sollten Sie noch kurz am Telefon
bleiben. Unser
Kundendienstmitarbeiter wird
sich vergewissern, dass Ihre
KAMELEON 8 richtig auf Ihr/Ihre
Gerät(e) eingestellt ist, und
er/sie wird sämtliche Fragen
Ihrerseits beantworten.
Extra Funktionen
Page 52

WW W.ONEFORALL.COM 51
Farbe & Helligkeit
Abhängig von den Funktionen Ihrer Originalfernbedienung, kann die
KAMELEON 8 die Farbsättigung und Helligkeit Ihres Fernsehers steuern.
Um die Farbe einzustellen:
Drücken Sie MAGIC, danach Lautstärke + (für Farbe +) oder Lautstärke –
(für Farbe -).
Um die Helligkeit einzustellen:
D
rücken Sie MAGIC danach Programm + (für Helligkeit +) oder
Programm– (für Helligkeit -).
A
bhängig davon, wie die Farb- und Helligkeitseinstellung auf Ihrer
O
riginalfernbedienung funktioniert, können Sie diese Funktion auf eine andere
W
eise aufrufen (z.B. über das Menü).
Extra Funktionen
Nützliche Hinweise
Problem & Lösung
Problem:
Ihre Marke ist nicht in der
Codeliste aufgeführt?
Ihre KAMELEON 8 steuert
Ihr(e) Gerät(e) nicht?
Die KAMELEON 8 führt die
Befehle nicht richtig aus?
Probleme beim Kanalwechsel?
Videorecorder / PVR / DVD / CD
/ AUD nimmt nicht auf?
Die KAMELEON 8 reagiert
nicht, wenn eine Taste
gedrückt wird?
Ihre Originalfernbedienung
hat eine Taste “20“?
Nach jeden Tastendruck
leuchtet die obere IR Anzeige
fünfmal auf.
Es gelingt nicht den EinstellModus zu erreichen.
Solution:
Versuchen Sie es mit dem
Code-Suchlauf von Seite 39.
A) Probieren Sie alle für Ihr Gerät
aufgelisteten Codes.
B) Versuchen Sie es mit dem Code-Suchlauf
von Seite 39.
Möglicherweise verwenden Sie den
falschen Einstellcode. Versuchen Sie mit
der Direkteinstellung alle Codes, die unter
Ihrer Marke in der Liste stehen, oder
starten Sie noch einmal den Code-Suchlauf,
um Ihren richtigen Code zu finden.
Geben Sie die Programmnummer (ARD,
ZDF etc.) genauso wie bei Ihrer
Originalfernbedienung ein.
Als Sicherheitsfunktion Ihrer KAMELEON 8
müssen Sie die Aufnahmetaste zweimal
drücken.
Vergewissern Sie sich, dass Sie neue
Batterien verwenden und die KAMELEON 8
auf Ihr Gerät gerichtet ist.
Sie finden diese Funktion auf der
AV- Taste.
Tauschen Sie die Batterien durch 4 neue
“AAA/LR03“ Alkali-Batterien aus.
Tauschen Sie die Batterien durch 4 neue
“AAA/LR03“ Alkali-Batterien aus.
Page 53

52 WW W.ONEFORALL.COM
Kundendienst
F
alls Sie noch Fragen haben zur Bedienung Ihrer KAMELEON 8
U
niversalfernbedienung und noch keine Antwort auf der Seite 51 “Problem &
Lösung“ gefunden haben, dann nehmen Sie bitte mit unserem Kundendienst
K
ontakt auf. Wir helfen Ihnen gerne weiter.
Besuchen Sie uns im Internet: www.oneforall.de
Unsere Internet-Seite bietet viele Vorteile:
-
24 Stunden erreichbar
-
keine Wartezeiten
- Seite für oft gestellte Fragen (FAQ)
- Informationen über die ONE FOR ALL Produkt Reihe
B
evor Sie uns kontaktieren, per FAX, E-mail oder Telefon, vergewissern
Sie sich, dass Sie folgende Information in die untenstehende Liste
e
ingetragen haben.
Was Sie benötigen, bevor Sie uns kontaktieren:
1 Ihre ONE FOR ALL KAMELEON 8 Universalfernbedienung hat die
M
odellnummer URC-8308 (*).
2 Das Kaufdatum (.........../.........../...........).
3 Eine Liste mit Ihren Geräten/ Modellnummern/ Hilfecodes(*): (siehe
untenstehendes Beispiel)
Gerät Marke Mod. Nr. Mod. Nr. Einstellcode
Gerät. Fernbedienung
TV Sony KV-25C5D RM-883 1505 (Beispiel)
Marke und Modellnummer finden Sie vorne oder hinten am
Gerätegehäuse, in der Bedienungsanleitung oder auf dem
Fabrikaufkleber auf der Rückseite Ihres Gerätes.
4. Faxen, E-mailen oder rufen Sie uns an:
In Deutschland
E-Mail : ofahelp@uebv.com (***)
Fax : +31 53 432 9816
Tel. : 09001-545459 ( 0.62 pro Minute) (*) (**)
In Õsterreich In der Schweiz
E-Mail : ofahelp@uebv.com (***) E-Mail : ofahelp@uebv.com (***)
Fax : +31 53 432 9816 Fax : +31 53 432 9816
Tel. : 0800 292506 (*) (**) Tel. : 0800 837762 (*) (**)
In Luxemburg
E-Mail : ofahelp@uebv.com (***)
Fax : +31 53 432 9816
Tel. : 0800 23150 (*) (**)
(*) Wenn Sie uns anrufen, werden wir Sie nach der URC-Nummer
Ihrer ONE FOR ALL Fernbedienung fragen. Die URC-Nummer Ihrer
KAMELEON 8 ist URC-8308.
(**) Sollten Sie uns mit einem Mobiltelefon (Handy) anrufen:
- Können für Sie zusätzliche Gebühren anfallen, wenn Sie aus
Großbrittanien oder Frankreich anrufen.
- Können Sie uns möglicherweise nicht erreichen, wenn Sie aus
Belgien, den Niederlanden, Luxemburg, Griechenland, Portugal,
der Schweiz, Italien, Irland oder Österreich anrufen.
(***) Bitte senden Sie uns nur eine leere E-Mail, Sie erhalten direkt
eine automatisch generierte Antwort.
Nützliche Hinweise
52 WW W.ONEFORALL.COM
Page 54

WW W.ONEFORALL.COM 53
INFORMATION SUR VOTRE KAMELEON 8 . . . . . . . . . . . . . . . . . . . . . . . . . . . . . . . . 54
LES PILES
. . . . . . . . . . . . . . . . . . . . . . . . . . . . . . . . . . . . . . . . . . . . . . . . . . . . . . . . . . . . . . . . . 55
LE CLAVIER
. . . . . . . . . . . . . . . . . . . . . . . . . . . . . . . . . . . . . . . . . . . . . . . . . . . . . . . . . . 56 - 63
•
Configuration du KAMELEON 8 . . . . . . . . . . . . . Page 64
(Procédure de configuration du KAMELEON 8 pour vos appareils)
• Méthode de recherche
. . . . . . . . . . . . . . . . . . . . . . . . . . . . . . . . . . . . . . . . . . 65
CODES DE PROGRAMMATION
TV : Téléviseur/à cristaux liquides/plasma/projecteur/rétroprojecteur
. .
261
VCR : Magnétoscope / Combiné TV/Magnétoscope / Enregistreur vidéo .272
SAT : Récepteur satellite / Décodeur / DVB-S / DVB-T / Freeview (R-U) /
TNT (F) / Digitenne (NL) TDT (E) / DTT (I) / SAT / HDD
. . . . . . . . . .
275
CBL : Décodeur câble / Décodeur / DVB-C
. . . . . . . . . . . . . . . . . . . . . . .
279
VAC : Centres multimédia tels que les accessoires vidéo /
accessoires AV / sélecteurs AV
. . . . . . . . . . . . . . . . . . . . . . . . . . . .
280
CD : Lecteur de CD / CD-R / MD
. . . . . . . . . . . . . . . . . . . . . . . . . . . . . .
280
PHO : Électrophone
. . . . . . . . . . . . . . . . . . . . . . . . . . . . . . . . . . . . . . . . .
280
MIS : Audio / Audio divers
. . . . . . . . . . . . . . . . . . . . . . . . . . . . . . . . . . .
281
HOM : Automatisation à domicile (par exemple rideaux commandés
par IR / commutateurs d'éclairage commandés par IR, etc.)
. . . . .
281
AMP : Audio / Amplificateur / Système de haut-parleurs actifs
. . . . . . . .
281
TUN : Audio / Récepteur audio / Tuner / Amplificateur / Cinéma à
domicile (DVD)
. . . . . . . . . . . . . . . . . . . . . . . . . . . . . . . . . . . . . . .
281
CAS : Lecteur de cassette (magnétophone)
. . . . . . . . . . . . . . . . . . . . . .
282
LDP : Lecteur de disque laser / CD vidéo
. . . . . . . . . . . . . . . . . . . . . . . . .
283
DAT : Digital Audio Tape / DCC
. . . . . . . . . . . . . . . . . . . . . . . . . . . . . . . .
283
DVD : Lecteur de DVD / DVD-R / Cinéma à domicile DVD /
Combi DVD / DVD/HDD / DVD/PVR /
Combiné DVD/Magnétoscope
. . . . . . . . . . . . . . . . . . . . . . . . . . . .
283
PVR : Personal Video Recorder
. . . . . . . . . . . . . . . . . . . . . . . . . . . . . . . .
288
COMMENT LIRE LE CODE . . . . . . . . . . . . . . . . . . . . . . . . . . . . . . . . . . . . . . . . . . . . . . . . 66
(Pour un appareil déjà programmé)
RÉFÉRENCE RAPIDE
. . . . . . . . . . . . . . . . . . . . . . . . . . . . . . . . . . . . . . . . . . . . . . . . . . . . . . 66
FONCTION D’APPRENTISSAGE
. . . . . . . . . . . . . . . . . . . . . . . . . . . . . . . . . . . . . . . . . . . 67
(Comment copier sur le KAMELEON 8 les fonctions d’une télécommande
d’origine en état de marche)
MISE À ZÉRO OPÉRATIONNELLE . . . . . . . . . . . . . . . . . . . . . . . . . . . . . . . . . . . . . . . . . 69
FONCTION COMPLÉMENTAIRES
• Key Magic® (Programmation de fonctions supplémentaires)
. . . . . . . 70
• Ré-affectation de mode
(pour installer deux appareils similaires sur le KAMELEON 8 )
. . . . . . 71
• Accès direct au volume
. . . . . . . . . . . . . . . . . . . . . . . . . . . . . . . . . . . . . . . . . . . 72
• Minuterie d’appareil (Sleeptimer)
. . . . . . . . . . . . . . . . . . . . . . . . . . . . . . . . . 73
• Minuterie KAMELEON 8
. . . . . . . . . . . . . . . . . . . . . . . . . . . . . . . . . . . . . . . . . . 73
• Macros (séquences de commandes)
. . . . . . . . . . . . . . . . . . . . . . . . . . . . . . . 74
• Technologie d’actualisation de code
. . . . . . . . . . . . . . . . . . . . . . . . . . . . . . 76
• Couleur & Luminosité
. . . . . . . . . . . . . . . . . . . . . . . . . . . . . . . . . . . . . . . . . . . . 77
GUIDE DE DÉPANNAGE
• Problème & Solution
. . . . . . . . . . . . . . . . . . . . . . . . . . . . . . . . . . . . . . . . . . . . . . 77
• Service consommateurs
. . . . . . . . . . . . . . . . . . . . . . . . . . . . . . . . . . . . . . . . . . . . 78
TABLE DES MATIÈRES
Français
Utilisez le site One For All Wizard pour programmer votre télécommande
avec l'aide d'internet. Ce Wizard, vous indiquera comment installer vos
différents appareils sans avoir à lire tout le manuel. Afin d'utliser
cette aide d'outil facile d'installation, veuillez visiter le site :
www.oneforallwebwizard.com
Page 55

54 WW W.ONEFORALL.COM
INFORMATION sur votre KAMELEON 8
Ecran unique ”EL” simple d’utilisation
En choisissant la télécommande universelle ONE FOR ALL KAMELEON 8, vous
a
vez opté pour une utilisation simplifiée. Votre KAMELEON 8 possède un écran
r
étro-éclairé unique et particulièrement simple vous garantissant un accès facile
à toutes les touches nécessaires et en masquant automatiquement celles inutiles.
Le KAMELEON 8 est un produit de grande qualité conçu pour durer.
Une fois les piles insérées, le KAMELEON 8 se trouve en mode “démo” et affiche
l
es touches de plusieurs modes. La programmation de la télécommande annulera
ce mode “Démo” (appuyez sur la touche MAGIC pendant environ 3 secondes
puis appuyez et relâchez la touche ESC).
Quand des piles sont de nouveau insérées, il est nécessaire d’appuyer d’abord
s
ur une touche pour que l’écran s’allume. Dès lors, il s’éclairera automatiquem
ent en touchant simultanément l’écran et la télécommande. Il est possible de
changer le mode d’activation de l’écran ”EL”. Pour passer au mode d’activation
d
e l’écran “EL“ en appuyant sur une touche, voir page 56, section “Réglage du
m
ode d’activation de l’écran “EL“.
Commande jusqu’à 8 appareils
V
otre KAMELEON 8 est conçu pour vous permettre d’utiliser une seule télécom-
m
ande pour commander vos appareils audios & vidéos; à savoir, tout appareil
fonctionnant avec un signal infrarouge. Votre KAMELEON 8 est doté de deux
émetteurs IR (infrarouges) puissants permettant un champ d’action maximal et
u
ne capacité haute-fréquence allant jusqu’à 450 kHz. Vous pouvez choisir
n’importe quelle combinaison de 8 appareils télécommandables.
TV Téléviseur/à cristaux liquides/plasma/projecteur/rétroprojecteur
SAT Démodulateur Satellite, Décodeur Câble, DSS / Accessoire Vidéo
(Centre Média etc.)
DVD Lecteur DVD / DVD-R / DVD Home Cinema / DVD Combi / DVD/HDD /
LD (Laser Disc)
VCR Magnétoscope / Combi TV/VCR / Combi DVD/VCR / Lecteur audio-cas-
sette / Lecteur DAT / DCC
PVR Enregistreur Vidéo Personnel (PVR), Enregistreur Disque Dur
CD Lecteur CD / CD-R / MD / Tourne-disque/ Domotique (stores télécom-
mandables par IR etc.)
AUD Audio / Amplificateur / Amp/Tuner / Home Cinéma (DVD)
LIGHT Interrupteurs de lumières télécommandables par IR – Le KAMELEON 8
possède également un mode “LIGHT” (LUMIERE) lui permettant de
commander les interrupteurs utilisés pour le contrôle des lumières
(Light Control™). Ce mode permettra l’envoi des commandes
IfraRouges (IR) vers un ONE FOR ALL Light Control™ Starters Kit HC-8300 (disponible séparément) qui convertira l’IR en Fréquence
Radio (RF) reçus par les interrupteurs de contrôle des lumières.
Pour permettre le contrôle de lumière (light control™ ) sur
votre KAMELEON 8, vous devez acheter le "LIGHT CONTROL STARTERS KIT (HC-8300)" de marque ONE FOR ALL.
Page 56

WW W.ONEFORALL.COM 55
Information sur votre KAMELEON 8
Fonction d’apprentissage
Le KAMELEON 8 est équipé de la fonction unique d’apprentissage, ce qui
s
ignifie que vous pouvez copier presque toutes les fonctions (max. ± 50) de
v
otre télécommande d’origine sur votre nouveau KAMELEON 8 (voir ”Fonction
d’apprentissage”, page 67). C’est particulièrement utile lorsque, après avoir
configuré votre KAMELEON 8 et avoir essayé son clavier, vous vous apercevez
que certaines fonctions de votre télécommande d’origine manquent.
Macros (séquences de commandes)
Votre KAMELEON 8 est doté d’une fonction Macro facile vous permettant
d’envoyer une suite de commandes en appuyant sur une seule touche (par ex.:
a
llumer ou éteindre l’ensemble de vos appareils simultanément). Vous pouvez
u
tiliser les touches (I, II, III ou IV) pour cette fonction. Une fois que vous avez
programmé une macro sur une de ces touches, cette touche exécutera cette
m
acro dans tous les modes.
Technologie d’actualisation de code
Votre KAMELEON 8 vous offre également la technologie d’actualisation. Cette
t
echnologie vous donne la possibilité d’ajouter des codes à la mémoire.
S
i votre appareil a besoin d’un code particulier non encore inclus dans la
mémoire du KAMELEON 8 (après essai de «la Configuration directe », page 64
ou la « Méthode de recherche », page 65), vous pouvez avoir recours au service
d
’actualisation (voir page 76).
Grâce à cette technologie, votre KAMELEON 8 ne sera jamais dépassé.
Piles
Note: une fois les piles insérées, le KAMELEON 8 se trouve en mode
“démo” (affichage les touches de plusieurs modes).
Votre KAMELEON 8 fonctionne avec 4 piles alcalines AAA/LR03.
1. Dévissez le couvercle du compartiment des piles à l’aide une pièce
de monnaie.
2. Insérez les piles avec le pôle positif (+) en haut.
3. Replacez le couvercle.
Indication de la baisse du voltage des piles
Le KAMELEON 8 vous indique une baisse du voltage des piles lorsqu’à
l’appui d’une touche, l’indicateur IR s’allume 5 fois de suite et lorsqu’il est
impossible d’accéder au mode de programmation.
Veuillez alors remplacer les piles par 4 nouvelles piles alcalines AAA/LR03.
Page 57

56 WW W.ONEFORALL.COM
Ce produit est doté d’un tableau de bord EL (Electro- Luminescent) qui s’allume
en touchant simultanément l’écran et la télécommande et/ou en appuyant sur
u
ne touche. Pour économiser les piles, l’écran EL va rester illuminé pendant 8
s
econdes lors d’une utilisation normale.
Une des caractéristiques des touches du KAMELEON 8 réside dans l’écran EL
qui change en fonction de l’appareil commandé. Vous trouverez page 58
l
’image de le KAMELEON 8 et toutes les fonctions disponibles pour tous
les modes.
Réglage du mode d’activation de l’écran “EL“
Le KAMELEON 8 possède un écran “EL » qui s’allume en touchant simultanément
l
’écran et la télécommande et/ou en appuyant sur une touche.
P
our changer le mode d‘activation:
1. Appuyez sur la touche MAGIC et maintenez-la
appuyée (pendant environ 3 secondes) jusqu’à ce
que l’écran de configuration apparaisse.
2. Appuyez sur OTHER.
3. Composez 9 8 9.
-> Si L’indicateur IR s’allume deux fois, l’écran “EL“ s‘activera en touchant
simultanément l’écran et la télécommande.
-> Si L’indicateur IR s’allume quatre fois, l’écran “EL“ s’activera en
appuyant sur une touche.
Suivez ces étapes afin de régler votre KAMELEON 8 sur le mode
d’activation que vous préférez.
Le Clavier
Réglage de la luminosité de l’écran ”EL”
Pour augmenter ou diminuer la luminosité de l’écran ”EL” du KAMELEON 8.
1. Appuyez sur la touche MAGIC et maintenez-la appuyée
(pendant environ 3 secondes) jusqu’à ce que l’écran
de configuration apparaisse.
2. Appuyez sur BRIGHT.
3. -> Pour augmenter la luminosité de l’écran ”EL”, appuyez
sur NEXT.
-> Pour diminuer la luminosité de l’écran ”EL”, appuyez
sur PREVIOUS.
4. Appuyez sur la touche ENTER et maintenez-la appuyée pour
mémoriser le nouveau réglage et revenir à l’écran de
configuration OU appuyez sur ESC pour retourner en mode
d’utilisation.
- Augmenter la luminosité du ”tableau de bord” de KAMELEON 8 influence
considérablement la durée de vie des piles (elle peut varier de 3 à 12 mois selon
le degré de luminosité et l’usage).
Page 58

WW W.ONEFORALL.COM 57
Le Clavier
Réglage de la durée d’éclairage de l’écran “EL”
Pour régler la durée (8 sec. par défaut) d’éclairage de l’écran “EL” du KAMELEON 8
entre deux utilisations (ceci ne vaut pas pour la durée de l’éclairage en mode de
p
rogrammation).
1. Appuyez sur la touche MAGIC et maintenez-la appuyée
(
pendant environ 3 secondes) jusqu’à ce que l’écran
de configuration apparaisse.
2
. Appuyez sur OTHER.
3
. Composez 9 7 8.
4. Appuyez sur 1, 2, 3, 4 ou 5 ( par ex.1 = 4 secondes) selon
v
otre choix, voir tableau ci-dessous. L’indicateur IR animé
s’allumera deux fois. Appuyez sur la touche ENTER pour
m
émoriser le nouveau réglage et revenir à l’écran de configura-
tion OU appuyez sur ESC pour retourner en mode d’utilisa-
tion.
S
élection Durée de l’éclairage de l’écran “EL”
14secondes
2 8 secondes (par défaut)
3 12 secondes
4 16 secondes
5 20 secondes
Page 59

58 WW W.ONEFORALL.COM
Le Clavier
TV
SAT
DVD
VCR
PVR
CD
AUD
L
IGHT
IR Indicator
Page 60

WW W.ONEFORALL.COM 59
1. Indicateur IR (infrarouge)
L’indicateur infrarouge s’anime lorsqu’un signal IR est émis
o
u reçu. L’indicateur IR du KAMELEON 8 fera un ”signal IR
s
ortant” quand une touche fonctionnelle est appuyée.
Lorsque vous utilisez la ”procédure d’apprentissage” et le
”service d’actualisation”, l’indicateur IR fera un ”signal IR
entrant”. L’indicateur IR s’active lorsque des touches sont
a
ppuyées pendant l’utilisation normale et dans le mode de
de configuration. Outgoing IR will be indicated by an “outside to inside” animation of the IR Indicator. Ingoing IR will
be indicated by an “inside to outside” animation of the IR
I
ndicator. The IR Indicator will give feedback when keys are
p
ressed both during normal use and in programming mode
(middle segment of the IR Indicator will blink).
2. Touches d’appareil
Les touches TV, SAT, DVD, VCR, PVR, CD, AUD et LIGHT sélectionnent les
a
ppareils que vous voulez commander. Par exemple, en appuyant sur la
t
ouche TV, vous pourrez accéder au contrôle des fonctions de votre
téléviseur. En appuyant sur la touche VCR, vous pourrez commander votre
magnétoscope, en appuyant sur SAT, le satellite ou le câble, etc. Après avoir
a
ppuyé sur une touche d’appareil (mode) de votre KAMELEON 8, l’icône
correspondant à cet appareil apparaîtra afin d‘indiquer le mode activé.
Le fait d’appuyer sur la touche d’appareil vous permettra de retourner à
l’écran principal. Le KAMELEON 8 possède également un mode “LIGHT”
(LUMIÈRE). En combinaison avec le “ONE FOR ALL Light Control™ Starters
Kit - HC-8300”, ce mode vous permet de régler, d’allumer ou d’éteindre
les lumières dans toute la maison.
3. MAGIC (en mode shifté ou de programmation)
La touche MAGIC est utilisée pour configurer votre
KAMELEON 8 et pour accéder à des fonctions spéciales. Si
vous appuyez brièvement dessus, vous passerez en mode
shifté (disponible pendant 10 secondes) pour l’accès au
commandes de la couleur, la luminosité et la minuterie
(sleeptimer).
Mode de programmation
Si vous appuyez dessus plus longuement (environ
3 secondes), le KAMELEON 8 passera en mode
de programmation. L’écran « de configuration » apparaîtra.
Le Clavier
DEV SET
SEARCH
MODE
KEY MAGIC
MACRO
BRIGHT
LEARN
IR DELETE
VOLUME
OTHER
• Configuration des appareils
• Méthode de recherche
• Mode de ré-affectation (changement de mode)
• Programmation de fonctions supplémentaires
• Programmation d’une séquence de commandes sur
les touches I, II, III ou IV.
• Réglage de la luminosité de l’écran « EL”
• Comment copier sur le KAMELEON 8 les fonctions d’une
télécommande d’origine en état de marche (apprentissage).
• Effacer des fonctions apprises (effacer apprentissage).
• Accès direct au volume.
• Durée d’éclairage de l’écran EL (4 sec, 8 sec, 12 sec,
16 sec, 20 sec)
• Remise à zéro opérationnelle
• Minuterie – KAMELEON 8
• Mode d’activation de l’écran EL
• Vérification Code
• Actualisation par Modem
Page 61

60 WW W.ONEFORALL.COM
4. SCROLL
La touche SCROLL vous permet de traverser les différents
é
crans (si disponibles) dans un certain mode lors de l’utili-
s
ation normale ou lors de la configuration. Cela s’applique
uniquement aux modes TV, SAT et AUD.
5. ENTER
La touche ENTER vous permet de confirmer une sélection
dans le mode de configuration.
6
. VEILLE (en mode shifté: Minuterie)
L
a touche VEILLE donne la même fonction que celle de
votre télécommande d’origine.
7. PP / TIMER / RAND.
En mode TV et Satellite, cette touche peut vous donner la
f
onction « chaîne précédente » ou « rappel de la dernière
chaîne » (selon votre télécommande d’origine). En mode
Magnétoscope et DVD vous obtiendrez la fonction TIMER
RECORD ou TIMER ON/OFF. En mode CD et AUD, vous
obtiendrez la fonction « Random/Shuffle » (choix aléatoire/mélange).
8. PRESET / BACK (retour)
En mode AUD, la touche PRESET fait apparaître l’écran
PRESET/MENU vous permettant l’accès aux PRESETS de 1-9,
0 et +10. Dans les modes PVR et SAT la touche BACK vous
permet d’aller à la page précédente du menu.
9. 16 :9 / PROG
En mode TV cette touche donne la fonction ”16:9” (format
écran). En mode VCR, DVD, AUD et CD, la touche vous
donne la fonction « PROG » (programme).
10. TV/VCR / TV/SAT / TV/DVD
En mode VCR, cette touche vous donne la fonction
”TV/VCR”. En mode SAT vous obtenez la fonction
”TV/SAT”. En mode DVD la touche vous donne la fonction
”TV/DVD”.
11. AUDIO / TUNE -
Dans les modes DVD, SAT, PVR et AUD (écran principal)
cette touche correspond à la fonction “Audio”. Dans le
mode AUD (écran preset/Menu) vous avez la fonction
“TUNE –“.
12. INFO / CLEAR
Dans les modes SAT et PVR, cette touche vous permet d’avoir
la fonction “info” Dans les modes CD, AUD (écran principal)
et DVD, elle vous donne la fonction “clear” (effacer).
Le Clavier
Page 62

WW W.ONEFORALL.COM 61
Le Clavier
13. FAV / EDIT / SP/LP
Dans les modes SAT et PVR, vous obtenez la fonction
“
FAV” (favori), dans les modes DVD, CD et AUD, la fonc-
t
ion EDIT (modifier) et en mode VCR, vous accédez à la
fonction SP/LP (vitesse de la cassette).
14. SUBT. (sous-titre)/ TUNE +
En mode SAT, PVR,DVD et AUD (écran principal), vous avez
la fonction « SUBTITLE »(sous-titre). Dans l’écran
p
reset/Menu du mode AUD, cette touche vous donne la
f
onction “TUNE +“.
15. MENU
En appuyant sur cette touche vous obtenez le menu et
d
ans les modes TV et AUD l’écran menu apparaît. La
t
ouche MENU reproduit la même fonction que celle de
votre télécommande d’origine.
16. EXIT (sortie)
La touche ”Exit” vous offre la même fonction que celle de
votre télécommande d’origine. Pour retourner à l’écran
principal (modes TV, SAT, AUD) appuyez sur la touche d’appareil correspondante ou sur la touche SCROLL.
17. DSP / GUIDE
Si elle est présente sur la télécommande d’origine, vous
obtendez la fonction DSP en mode AUD. Dans les modes
TV, SAT, DVD, VCR et PVR la touche « GUIDE » vous donne
la fonction équivalente si elle est présente sur la télécommande d’origine. En mode TV, cette touche fait apparaître
l’écran « mode menu ».
18. MUTE (Silence)
Cette touche reproduit la même fonction que celle de
votre télécommande d’origine.
19. CH+/- (en mode shifté: luminosité +/-)
Ces touches reproduisent les mêmes fonctions que celles
de votre télécommande d’origine. En mode TV shifté
(accessible en appuyant brièvement sur MAGIC), ces touches peuvent vous donner la fonction luminosité +/-.
20. Les touches directionnelles (haut, bas, droite, gauche)
Ces touches vous permettent de naviguer dans le menu si
elles sont également présentes sur la télécommande d’origine. Pour certains téléviseurs il est possible que vous
ayez besoin d’appuyer sur les touches CH+/- et VOL+/- OU
sur les touches de couleur (rouge, jaune, vert, bleu) afin de
naviguer dans le menu, cela dépend de votre modèle de
téléviseur. Si celles-ci sont présentes sur la télécommande
d’origine, elles vous donnent accès, en mode AUD (écran
principal), aux fonctions de réglage des enceintes centrales
et arrières. Dans l’écran menu du mode AUD, ces touches
vous font naviguer dans le menu si cela est posssible avec
la télécommande d’origine.
Page 63

62 WW W.ONEFORALL.COM
21. OK / SURROUND
Dans l’écran menu cette touche ”OK”permet de confirmer
u
n choix. Sur certains appareils, il vous suffit d’appuyer sur
l
a touche MENU pour confirmer.
En mode AUD, cette touche vous permet d’accéder au
mode Surround de votre appareil (si celui-ci est disponible
sur votre télécommande d’origine).
22. VOL+/- (en mode shifté: couleur +/-)
C
es touches reproduisent les mêmes fonctions que celles
d
e votre télécommande d’origine. En mode TV shifté
(accessible en appuyant brièvement sur MAGIC) ces touche
s peuvent vous donner la fonction couleur +/-.
2
3. Touches numériques / INPUT (en mode de programm
ation : options de configuration)
Les touches numériques (1 - 9, 0, -/--) remplissent les
mêmes fonctions que celles de votre télécommande d’origi
ne. En mode AUD, les touches numériques (1 – 9, 0, -/--)
peuvent vous donner la sélection des entrées (si
disponibles sur la télécommande d’origine comme TUNER,
CD etc.). Si votre télécommande d’origine possède une
touche “function select” ou “input select” vous devriez la
retrouver sur la touche AV. En mode de configuration les
touches numériques affichent les différentes options.
24. -/-- / PPV
Si votre télécommande d’origine fonctionne avec un
numéro à un/deux chiffre(s) (symbole -/--), cette fonction
peut être obtenue en appuyant sur la touche -/--. En mode
SAT (écran principal) et PVR, vous obtienez la fonction PPV.
25. AV / HELP (Aide)
La touche AV commande la même fonction que celle de
votre télécommande d’origine. Si votre télécommande d’origine a une touche 20, vous retrouverez cette fonction sur
la touche AV. Si la télécommande d’origine de votre SAT
ou de votre PVR possède la fonction « help » (aide), elle
sera dispónible sur la touche HELP. En mode AUD, HELP
vous donne accès à la fonction de “function select” ou
“input select”
26. ESC (Échapper)
Cette touche apparaît seulement en mode de configuration et permet de retourner à l’écran des options de configuration ou de quitter le mode de configuration.
27. Touches de transfert (LECTURE, STOP etc.)
Lorsque vous vous trouvez en mode VCR, DVD, SAT (écran
menu), PVR, CR ou AUD, ces touches commandent les
fonctions Lecture, Avance et Retour Rapide, etc. de votre
appareil. Pour éviter des enregistrements accidentels, la
touche d’ENREGISTREMENT doit être appuyée deux fois
avant que l’enregistrement ne commence.
Le Clavier
Page 64

WW W.ONEFORALL.COM 63
28. Touches de Télétexte
Ces touches sont utilisées pour accéder aux fonctions télét
exte de votre téléviseur. Celui-ci doit bien sûr disposer de
c
es fonctions au départ. Pour plus d’informations sur le
télétexte et le fastexte, veuillez vous référer au mode
d’emploi de votre téléviseur. Rappelez-vous, certains
téléviseurs commandent le télétexte et le fastexte de
f
açon différente. Toutes les fonctions télétexte ne seront
peut-être pas disponibles pour votre modèle particulier.
E
LARGISSEMENT: Vous montre la première moitié (partie haute) de la
page télétexte de manière élargie. En appuyant de nouveau, vous
v
errez la deuxième moitié (partie basse) de la même manière. Pour
r
etourner en mode télétexte normal, il vous faut appuyer de nouveau
sur cette touche élargissement ou sur la touche Texte/marche, selon
votre téléviseur.
T
EXTE/MARCHE: En mode TV: une fois dans le télétexte appuyer de
nouveau sur cette touche pourra vous donner les fonctions MIX ou
Texte/Arrêt, selon votre téléviseur. Cette fonction est aussi disponible en
m
ode SAT.
HOLD/STOP: Arrête le changement de pages du télétexte.
MIX: Combine texte et image du téléviseur.
TEXTE/ARRÊT: En mode TV: Permet au téléviseur de revenir au mode
normal de visionnage et au KAMELEON 8 de revenir au mode TV
principal. Sur certains téléviseurs, vous pouvez obtenir cette fonction en
pressant plusieurs fois sur la touche Texte/marche. Cette fonction est
aussi disponible en mode SAT.
INDEX: Cette touche vous donne accès à la fonction Index du télétexte.
29. Touches personnalisables (I, II, III, IV)
Les touches personnalisables vous donnent la possibilité de
personnaliser le KAMELEON 8 en utilisant les technologies
« d’apprentissage » (voir page 67) et de « Key Magic® »
(voir page 70). Ces touches sont également idéales pour
programmer des « macros » (voir page 74).
30. Rouge / Vert / Jaune / Bleu
Après avoir accédé au mode télétexte, les touches de
couleur rouge, verte, jaune et bleue, vous permettent d’accéder aux fonctions Fastexte de votre téléviseur. Si votre
télécommande d’origine possède également les touches de
couleur pour pouvoir naviguer dans le menu, les touches
Fastexte du KAMELEON 8 auront la même fonction.
Le Clavier
Page 65

64 WW W.ONEFORALL.COM
Configuration du KAMELEON 8
(Comment configurer le KAMELEON 8 pour le contrôle de vos appareils)
N
ote: une fois les piles insérées, le KAMELEON 8 se trouve en mode
“
démo” ( affichage les touches de plusieurs modes). Suivez les
étapes suivantes et ce mode démo sera automatiquement désactivé.
E
xemple de la configuration du KAMELEON 8 pour votre téléviseur:
1
. Allumez votre téléviseur sur un programme (pas en veille).
2. Cherchez le code d’appareil dans la liste des codes (page 261 - 288).
L
es codes sont listés par type d’appareil (voir pictogrammes) et par nom de
m
arque. Le code le plus courant est listé en premier. Si votre marque n’est
pas du tout listée dans la section des codes, essayez la Méthode de
Recherche à la page 65.
3
. Appuyez sur la touche MAGIC et maintenez-la appuyée
(
pendant environ 3 secondes) jusqu’à ce que l’écran
de configuration apparaisse.
4
. Appuyez sur la touche DEV SET.
5. Appuyez sur la touche TV afin de sélectionner l’appareil que
vous désirez installer.
6. Composez le code à quatre chiffres en utilisant les touches
numériques (voir la liste des codes). L’indicateur IR animé
s’allume deux fois.
7. Pointez maintenant votre KAMELEON 8 vers votre
télévision et essayer les touches suivantes afin de savoir si le
KAMELEON 8 fonctionnera avec votre appareil;
• CHANNEL +, CHANNEL-
• VOLUME +, VOLUME -
• MUTE
• POWER.
• MENU.
8. Si votre appareil répond, appuyez sur ENTER pour
mémoriser le code. Si votre appareil ne répond pas, entrez
simplement le code suivant listé pour votre marque. Si votre
appareil ne répond à aucun code, veuillez alors essayer la
Méthode de Recherche décrite à la page 65.
9. Appuyez sur la touche ESC (pendant environ 3 secondes)
pour retourner au mode d’utilisation (toutes les touches
apparaissent), OU appuyez sur une touche d’appareil pour
sélectionner le prochain appareil que vous souhaitez installer.
- Beaucoup de téléviseurs ne se rallumeront pas en ré-appuyant sur la touche
VEILLE, alors essayez la touche CH+ pour rallumer votre TV.
- Certains codes se ressemblent. Si votre appareil ne répond pas ou s’il ne
fonctionne pas correctement avec l’un des codes, essayez un autre code
listé pour votre marque.
- Pour installer vos autres appareils, suivez les mêmes instructions que
ci-dessus mais appuyez sur la touche d’appareil correspondante lors
de l’étape 5.
- Rappelez-vous d’appuyer sur la bonne touche d’appareil avant de pouvoir
commander celui-ci. Seul un appareil peut être affecté par touche.
- Pour la programmation par ex. d’un deuxième téléviseur ou d’un
deuxième démodulateur satellite voir page 71.
_ _ _ _
Page 66

WW W.ONEFORALL.COM 65
Méthode de Recherche
-
-> Si votre appareil ne répond pas au KAMELEON 8 après avoir essayé tous les
c
odes listés pour votre marque.
--> Si votre marque n’est pas du tout listée.
Cette méthode vous permet de passer en revue tous le codes présents en
m
émoire.
Exemple: pour chercher le code de votre téléviseur.
1
. Allumez votre téléviseur sur un programme (pas en veille).
2. Appuyez sur la touche MAGIC et maintenez-la appuyée
(
pendant environ 3 secondes) jusqu’à ce que l’écran de
configuration apparaisse.
3. Appuyez sur SEARCH.
4. Appuyez sur la touche TV afin de sélectionner l’appareil
que vous désirez installer.
5. Ensuite, appuyez sur VEILLE.
6. Pointez votre KAMELEON 8 vers votre téléviseur.
Maintenant, appuyez sur NEXT plusieurs fois jusqu’à ce
que le téléviseur s’éteigne (chaque fois que vous appuyez sur
NEXT le KAMELEON 8 passe en revue chacun des codes de la
mémoire et émet le signal de VEILLE correspondant). Peut-
être devrez-vous appuyer sur cette touche de très nombreuses fois (jusqu’à 150), aussi soyez patient!
N’oubliez pas de garder le KAMELEON 8 pointé vers
votre téléviseur pendant cette étape. (Si vous pensez
avoir omis un code, retournez au précédent en appuyant sur
la touche PREVIOUS.)
7. Lorsque votre téléviseur s’éteint, appuyez sur ENTER
afin de mémoriser le code. l’indicateur IR animé s’allume
deux fois. Votre KAMELEON 8 est dorénavant prêt à
pouvoir commander votre téléviseur.
8. Appuyez sur ESC pour retourner à l’écran de configuration ,
ou appuyez sur une touche d’appareil si vous désirez suivre
la Méthode de Recherche pour un autre appareil.
9. Appuyez encore sur ESC pour retourner en mode
d’utilisation (toutes les touches apparaissent). Rallumez
votre appareil (téléviseur) et essayez les différentes fonctions afin de vérifier leur bon fonctionnement. Si vous ne
parvenez pas à commander votre téléviseur correctement,
veuillez continuer la ”Méthode de Recherche” car
peut-être n’utilisez-vous pas tout à fait le bon code.
- Lors de l’étape 5, vous pouvez appuyer sur n’importe quelle touche allumée
au lieu de VEILLE. Ce sera la fonction émise lors de chaque pression de la
touche NEXT ou PREVIOUS lors de l’étape 6. Si, par exemple, vous choisissez
”2” au lieu de VEILLE à l’étape 5, le KAMELEON émettra le signal ”2” de
chaque code en mémoire chaque fois que vous appuierez sur NEXT à l’étape 6
(le téléviseur doit être allumé sur une autre chaîne auparavant).
- Pour chercher les codes de vos autres appareils, suivez les mêmes instructions
que mentionnées plus haut, mais en appuyant sur la touche d’appareil
appropriée lors de l’étape 4.
- Si la télécommande d’origine de votre magnétoscope n’a pas de touche
VEILLE, appuyez sur LECTURE à l’étape 5.
- La méthode de recherche ne fonctionne pas avec le mode LIGHT (LUMIÈRE)
Configuration du KAMELEON 8
Page 67

66 WW W.ONEFORALL.COM
■
■
■
■
■
■
■
■
■
■
■
■
■
■
■
■
■
■
■
■
■
■
■
■
■
■
■
■
■
■
■
■
■
■
■
■
■
■
■
■
■
■
■
■
■
■
■
■
■
■
■
■
■
■
■
■
■
■
■
■
■
■
■
■
Comment lire le code
(Pour découvrir le code d’un appareil déjà programmé)
S
i vous avez programmé le KAMELEON 8 par la « Méthode de Recherche », il est utile
d
e connaître le code programmé pour pouvoir vous y référer dans le futur. Vous pou-
vez lire le code à quatre chiffres grâce aux clignotements animés de l’indicateur IR.
E
xemple pour lire le code de votre téléviseur:
1
. Appuyez sur la touche MAGIC et maintenez-la appuyée
(pendant environ 3 secondes) jusqu’à ce que l’écran de configuration apparaisse.
2. Appuyez sur la touche OTHER.
3. Composez 9 9 0. L’indicateur IR animé s’allume deux fois.
4
. Appuyez sur la touche TV afin de sélectionner l’appareil dont
vous désirez lire le code.
5. Pour obtenir le premier chiffre de votre code à quatre
chiffres, appuyez sur 1 et comptez le nombre de clignote-
ments émis par l’indicateur IR. S’il n’y a pas de clignotement,
le chiffre est ”0”.
6. Pour obtenir le deuxième chiffre, appuyez sur 2 et comptez
le nombre de clignotements. S’il n’y a pas de clignotement,
le chiffre est ”0”.
7. Pour obtenir le troisième chiffre, appuyez sur 3 et comptez
le nombre de clignotements. S’il n’y a pas de clignotement,
le chiffre est ”0”.
8. Pour obtenir le quatrième chiffre, appuyez sur 4 et comptez
le nombre de clignotements. S’il n’y a pas de clignotement,
le chiffre est ”0”. Vous avez maintenant votre code à
quatre chiffres.
9. Appuyez sur ENTER pour retourner à l’écran
de configuration , ou appuyez sur une touche d’appareil si
vous désirez lire le code d’ un autre appareil.
10. Appuyez encore sur ESC (pendant environ 3 secondes) pour
retourner en mode d’utilisation.
- Pour lire le code de vos autres appareils, suivez les mêmes étapes que
précédemment, seulement appuyez sur la touche de l’appareil désiré lors
de l’étape 4.
Référence Rapide
Inscrivez les codes de vos appareils dans les cases ci-dessous pour vous
y référer facilement dans le futur.
Page 68

WW W.ONEFORALL.COM 67
L
e KAMELEON 8 contient une bibliothèque complète de codes préprogrammés.
Après avoir programmé le KAMELEON 8 pour votre appareil, il se peut que vous
constatiez qu’une ou plusieurs touches de votre télécommande d’origine ne se
retrouve(nt) pas sur le clavier du KAMELEON 8 .
V
otre KAMELEON 8 possède la technologie d’apprentissage qui vous permet
de copier et de transférer presque toutes les fonctions de votre
télécommande d’origine sur le clavier du KAMELEON 8 .
A
vant de commencer:
- Assurez-vous que votre télécommande d’origine fonctionne parfaitement.
- Le KAMELEON 8 et la télécommande d’origine ne doivent pas être pointés vers
l
’appareil.
Apprentissage/Copier (direct)
Exemple: pour copier la fonction ”mono/stéréo” de votre télécommande
d
’origine de TV sur les touches ”I, II, III ou IV” du KAMELEON 8 :
1. Placez le KAMELEON 8 et la télécommande d’origine sur une surface
plate. Assurez-vous que les parties de ces télécommandes que vous
pointez généralement vers votre appareil soient face à face. Pointez
la télécommande d’origine vers la partie avant du KAMELEON 8
(voir illustration ci-dessous). Gardez une distance de 2 à 5 cm entre
les deux télécommandes.
2. Appuyez sur la touche MAGIC et maintenez-la appuyée
(pendant environ 3 secondes) jusqu’à ce que l’écran de configuration apparaisse.
3. Appuyez sur LEARN.
4. Appuyez sur la touche d’appareil (exemple: touche TV) du
KAMELEON 8 pour sélectionner le mode dans lequel vous
désirez copier la fonction.
5. Appuyez sur la touche (exemple: touche ”I”) du KAMELEON 8
où vous voulez placer la fonction à copier. L’indicateur IR
indiquera 3 signaux IR rentrants, puis l’écran s’éteint.
6. Appuyez et maintenez la touche que vous désirez copier
(exemple: la touche mono/stéréo de la télécommande
d’origine). L’écran s’allume alors et vous voyez apparaître deux
lumières indiquant le succès de l’opération.
7. Si vous voulez copier d’autres fonctions dans le même mode, répétez simple-
ment les étapes 5 et 6 en appuyant sur la touche suivante que vous
souhaitez copier par ”apprentissage”. Si vous voulez copier une fonction
mais dans un mode différent, reprenez l’étape 4 suivie par les étapes 5 et 6.
8. Appuyez sur ENTER pour sortir du mode d’apprentissage et
retourner à l’écran de configurartion OU appuyez sur ESC
(pendant environ 3 secondes) pour retourner en mode
d’utilisation.
Fonction d’apprentissage
(comment copier sur le KAMELEON 8 les fonctions d’une
t
élécommande d’origine en état de marche)
Page 69

68 WW W.ONEFORALL.COM
- Dès que l’écran s’éteint durant l’étape 5, vous devez appuyer sur la touche à
c
opier de votre télécommande d’origine dans les 15 secondes. Si aucune
t
ouche n’a été pressée pendant le mode apprentissage, le KAMELEON 8
r
eviendra en mode normal après 30 secondes.
- Durant le mode apprentissage, appuyer sur les touches de (TV) menu, (TV)
g
uide etc. ne fera pas changer l’écran.
-
Si vous copiez une fonction sur une touche déjà occupée, la fonction d’orig-
ine de cette touche deviendra automatiquement ”shiftée”. Pour y accéder, il
vous suffira d’appuyer sur MAGIC puis sur ladite touche (à l’exception de
VEILLE, touches de CHAINE et VOLUME). En copiant une fonction sur une
d
es touches numériques, vous accéderez à la fonction d’origine en appuyant
d’abord deux fois sur MAGIC puis ledit chiffre.
- Si vous souhaitez copier une fonction sur une touche hors de l’écran
principal, vous devez utiliser la touche SCROLL pour passer à l’écran désiré.
-
La technique d’apprentissage est dépendante d’un mode spécifique. Ainsi
vous pouvez placer une fonction par mode sur la même touche.
-
Le KAMELEON 8 peut apprendre approximativement 50 fonctions. Cela
dépend des autres fonctions programmées et de la télécommande d’origine.
-
Vous pouvez remplacer une fonction copiée en en plaçant une autre
p
ar-dessus.
- Il est conseillé de pratiquer l’apprentissage à l’abri du soleil ou de toute
source incandescente.
- Assurez-vous que vous utilisiez des piles neuves avant de procéder à la
procédure d’apprentissage.
- Les fonctions qui auront été apprises resteront en mémoire même lors d’un
changement de piles.
Apprentissage/Copier shifté
Il est également possible de placer une fonction dite ”shiftée” (en double) sur
une touche afin de maintenir sa fonction initiale.
Exemple: pour placer la fonction shiftée mono/stéréo sur la touche ”rouge”:
Pour placer la fonction mono/stéréo shiftée sur la touche ”rouge”, suivez les
étapes de 1 à 8 de la page 67. Mais vous devez appuyer sur MAGIC puis sur la
touche ”rouge” (au lieu de « I ») lors de l’étape 5.
Ensuite, pour avoir accès à la nouvelle fonction ”mono/stéréo” sur le KAMELEON
8, vous devrez appuyer sur MAGIC puis sur la touche ”rouge”.
- Si une fonction est apprise shiftée sur les touches VEILLE, CHAINE et VOL-
UME, alors les fonctions complémentaires ”minuterie” et ”couleur/luminosité” seront sacrifiées.
- Si vous placez une fonction shiftée sur une touche numérique (de 0 à 9),
cette dernière sera dorénavant disponible en appuyant d’abord deux fois
sur MAGIC et puis sur la touche numérique.
Fonction d’apprentissage
Page 70

WW W.ONEFORALL.COM 69
P
our effacer une « fonction Key Magic » ou une «
fonction apprise » sur une touche
E
xemple pour effacer une «fonction Key Magic» ou une « fonction apprise » de
l
a touche ”I” en mode TV:
1. Appuyez sur la touche MAGIC et maintenez-la appuyée (pendant environ
3 secondes) jusqu’à ce que l’écran de configuration apparaisse.
2
. Appuyez sur IR DELETE.
3
. Appuyez sur la touche d’appareil appropriée (exemple: touche TV)
4. Appuyez sur la touche où se trouve la fonction à effacer (exemple: touche ”I”)
-
La fonction d’origine (si présente) de la touche du KAMELEON 8 lui sera
r
estituée.
Pour effacer une « fonction Key Magic shiftée» ou
une « fonction apprise shiftée »
E
xemple: pour effacer la fonction ”mono/stéréo” apprise shiftée sur la touche
”
rouge” en mode TV:
1. Appuyez sur la touche MAGIC et maintenez-la appuyée (pendant environ
3 secondes) jusqu’à ce que l’écran de configuration apparaisse.
2. Appuyez sur IR DELETE.
3. Appuyez sur la touche d’appareil (exemple: touche TV)
4. Appuyez sur MAGIC
5. Appuyez sur la touche où se trouve la fonction à effacer a été copiée
(exemple: touche ”rouge“
6. Appuyez sur ENTER pour restituter à la touche sa fonction d’origine OU
appuyez ESC (pendant environ 3 secondes) pour retourner en
mode d’utilisation d’utilisation.
- La fonction d’origine (si présente) de la touche du KAMELEON 8 lui sera restituée.
Pour effacer toutes les « fonctions Key Magic » et les
« fonctions apprises » dans un mode spécifique:
Exemple pour effacer toutes les « fonctions Key Magic » et les « fonctions
apprises »dans le mode TV:
1. Appuyez sur la touche MAGIC et maintenez-la appuyée (pendant environ 3
secondes) jusqu’à ce que l’écran de configuration apparaisse.
2. Appuyez sur IR DELETE.
3. Appuyez sur la touche d’appareil (exemple: touche TV)
4. Appuyez sur ENTER pour restituter à la touche sa fonction d’origine OU
appuyez ESC (pendant environ 3 secondes) pour retourner en mode
d’utilisation d’utilisation.
- Les fonctions d’origine (si présentes) de la touche du KAMELEON 8 lui sera
restituée.
La mise à zéro opérationnelle effacera toutes les fonctions apprises dans tous
les Modes.
Cette remise à zéro pourra effacer d’autres fonctions programmées comme les
fonctions Key magic ou les macros.
1. Appuyez sur la touche MAGIC et maintenez-la appuyée (pendant
environ 3 secondes) jusqu’à ce que l’écran de configuration apparaisse.
2. Appuyez sur OTHER.
3. Composez 9 8 0. L’indicateur IR s’allume quatre fois et l’écran de configura-
tion apparaît.
Fonction d’apprentissage
La mise à zéro opérationnelle:
Page 71

70 WW W.ONEFORALL.COM
Key Magic
®
(Programmation des fonctions manquantes)
Key Magic® est une fonction exclusive ONE FOR ALL. Le design du KAMELEON 8
vous assure l’accès à beaucoup de fonctions de votre télécommande d’origine
m
ême des fonctions qui n’ont pas de touche propre sur le clavier du KAMELEON
8. Des fonctions fréquemment utilisées peuvent être affectées à la touche de
votre choix en utilisant la procédure Key Magic® de votre KAMELEON 8 . Afin
de programmer une certaine fonction avec Key Magic®, vous avez besoin de
c
onnaître son code correspondant. Comme ces codes de fonction varient selon
l
es différents modèles d’appareil, vous ne les trouverez pas dans ce mode d’emploi. Vous pouvez néanmoins obtenir les codes de fonction par l’intermédiaire
de notre service après-vente par téléphone, par courrier, fax ou e-mail.
T
out ce que notre service a besoin de savoir :
• La marque et le numéro de modèle de l’appareil en question (pour vérifier
si vous utilisez le bon code).
• Le code de configuration à quatre chiffres avec lequel l’appareil fonctionne.
•
Le nom précis sur la télécommande d’origine de la fonction désirée.
Vous pouvez également nous rendre visite sur notre site (www.oneforall.com)
a
fin de trouver une réponse à vos questions.
Une fois le(s) code(s) de fonction obtenu(s) par notre service, il est
facile de le(s) programmer:
1. Appuyez sur la touche MAGIC et maintenez-la appuyée (pendant environ
3 secondes) jusqu’à ce que l’écran de configuration apparaisse.
2. Appuyez sur KEY MAGIC.
3. Appuyez sur la touche d’appareil (TV, SAT, VCR, CD, AUD ou DVD).
4. Appuyez sur MAGIC une fois.
5. Entrez le code de fonction à cinq chiffres (obtenu par le service après vente).
6. Appuyez sur la touche où la fonction va être assignée (si cette touche se
trouve dans un écran autre que l’écran principal, utilisez la touche SCROLL
pour y accéder). L’indicateur IR s’allume deux fois et l’écran de configuration
apparaît.
- Une Key Magic® étant liée à un mode spécifique vous devrez, pour accéder
à la fonction programmée, appuyer sur la touche d’appareil en premier lieu.
- Une Key Magic® peut être attribuée à toute touche SAUF aux suivantes:
touches d’appareil, MAGIC et SCROLL.
- Notez bien tous les codes de fonctions obtenus par notre service après-
vente.
- Les touches comme (TV) menu, (TV) guide etc., n’appelleront pas l’écran
habituel correspondant pendant la programmation d’une Key Magic®.
FONCTIONS PROGRAMMÉES (référence rapide)
(la première ligne a été remplie à titre d’exemple)
APPAREIL CODE DE CONFIGURATION FONCTION CODE DE FONCTION
TV 0556 16/9 format 00234
Fonctions Complémentaires
Page 72

WW W.ONEFORALL.COM 71
Ré-affectation de mode
(
Pour installer deux appareils similaires sur le KAMELEON 8)
I
l est possible de changer le mode de n’importe quelle touche d’appareil. Cela
p
eut être utile, par exemple, si vous souhaitez installer deux (ou d’autre encore)
appareils similaires sur le KAMELEON 8. La touche d’appareil modifiée fera
apparaître les touches de fonction correspondantes au nouveau mode. Vous
pouvez installer le code en utilisant ”la Configuration Directe” (page 64) ou la
”
Méthode de Recherche” (page 65). Deux exemples vous sont donnés ci-dessous.
Exemple 1; Programmer une seconde TV sur la touche DVD.
Exemple 2; Programmer un second VCR sur la touche SAT.
Exemple 1:
P
our programmer une seconde TV sur la touche DVD (par exemple), vous
d
evrez ”ré-affecter” la touche DVD en touche TV, soit:
The DVD key has now become a second TV key and will
display the applicable keys for this mode.
Introduisez le code de configuration du 2nd téléviseur:
Exemple 2:
Pour programmer un 2nd SAT sur la touche VCR, vous devrez
”transformer” la touche SAT en touche VCR, soit:
La touche SAT est maintenant devenue une seconde touche
VCR et les touches correspondantes apparaissent.
Introduisez le code de configuration du 2nd VCR:
- L’icône animée correspondant à la touche d’appareil sera conservée bien
que le mode ait changé. Si vous programmez un type d’appareil différent
sur une autre touche (ex: 2nd TV sur la touche DVD), l’icône de la touche
d’appareil initiale sera maintenue, mais sa fonction changera et s’adaptera
au nouveau mode d’appareil. Par exemple, si un troisième téléviseur est
programmé sur la touche DVD, les fonctions télétexte seront disponibles
sous l’icône DVD.
Réinitialiser une touche d’appareil
Exemple: pour réinitialiser la touche DVD, faites:
(*) Appuyez sur la touche MAGIC et maintenez-la appuyée
(pendant environ 3 secondes). L’écran de configuration apparaìt.
(**) L’indicateur IR s’allume deux fois (l’écran de configuration
apparaît).
Fonctions Complémentaires
(
*) (**)
(
*) (**)
(TV Code) (**)
_ _ _ _
(*) (**)
(VCR Code) (**)
_ _ _ _
(*) (**)
Page 73

72 WW W.ONEFORALL.COM
Accès direct au volume
C
ette fonction vous permet de régler le volume d’un certain mode (par ex: TV)
b
ien que vous vous trouviez dans un mode différent (par ex: mode
VCR). Si par exemple, vous êtes en train de visionner un programme
de votre magnétoscope, vous pouvez également régler le volume (fonction TV
généralement), sans pour autant appuyer sur la touche TV d’abord.
V
oici quelques possiblités :
Dernière touche appuyée: Vous pouvez contrôler:
S
AT : TV volume haut et bas, silence
D
VD : TV volume haut et bas, silence
VCR : TV volume haut et bas, silence
PVR : TV volume haut et bas, silence
C
D : TV volume haut et bas, silence
A
UD : TV volume haut et bas, silence
LIGHT : TV volume haut et bas, silence
E
xemple: vous pouvez aussi accéder au volume AUD bien qu’en vous trouvant en
un autre mode (par ex. Magnétoscope, Satellite ou DVD):
1. Appuyez sur la touche MAGIC et maintenez-la appuyée (pendant environ
3 secondes) jusqu’à ce que l’écran de configuration apparaisse.
2. Appuyez sur VOLUME.
3. Appuyez sur la touche AUD et l’indicateur IR s’allume deux fois et l’écran
de configuration apparaît.
Résultat : vous pourrez toujours commander directement le volume +/- et le
silence de votre audio à partir de tous les modes (par ex. DVD)
Comment annuler ”l’accès direct au volume” par mode:
Exemple pour annuler « l’accès direct au volume » du mode VCR.
1. Appuyez sur la touche MAGIC et maintenez-la appuyée (pendant environ
3 secondes) jusqu’à ce que l’écran de configuration apparaisse.
2. Appuyez sur VOLUME.
3. Appuyez sur la touche VOL- ( ).
4. Appuyez sur VCR et l’indicateur IR s’allume quatre fois et l’écran de
configuration apparaît
Résultat : tout en étant en mode VCR, vous serez en mesure de retrouver
les fonctions VOL+/- d’origine de votre magnétoscope (si présentes
initialement).
Comment annuler ”l’accès direct au volume” dans tous les modes:
1. Appuyez sur la touche MAGIC et maintenez-la appuyée (pendant environ
3 secondes) jusqu’à ce que l’écran de configuration apparaisse.
2. Appuyez sur VOLUME.
3. Appuyez sur la touche VOL+ ( ) et l’indicateur IR s’allume quatre fois et
l’écran de configuration apparaît.
Résultat : tous les modes retrouveront maintenant leurs fonctions VOL(+),
VOL(-) et SILENCE d’origine.
Fonctions Complémentaires
Page 74

WW W.ONEFORALL.COM 73
Minuterie d’appareil (Sleeptimer)
S
i votre appareil a une fonction minuterie (sleeptimer) intégrée,
v
ous pouvez également l’obtenir sur votre KAMELEON 8 comme suit:
1. Allumez votre appareil.
2
. Appuyez sur la touche TV (SAT, DVD, VCR, PVR CD ou AUD) du
KAMELEON 8 .
3. Pointez le KAMELEON 8 vers votre appareil, appuyez sur MAGIC et
r
elâchez, puis sur VEILLE. La minuterie devrait apparaître à l’écran de
l
’appareil. Pour augmenter la minuterie, appuyez de nouveau sur VEILLE
(dans les 10 secondes) jusqu’à ce que la minuterie ait atteint le temps désiré.
-
Pour désactiver la minuterie, répétez les étapes de 1 à 3 ci-dessus. Lors de
l
’étape 3 continuez à appuyer sur VEILLE (dans les 10 secondes) jusqu’à ce
que vous arriviez à zéro (min.).
- Attention, chaque appareil (et sa télécommande d’origine) est différent;
p
eut-être que vous accédez à la minuterie différemment (par exemple en
passant par le menu).
La Minuterie du KAMELEON 8
La Minuterie - KAMELEON 8 vous permet d’envoyer une <fonction
désirée> d’un <appareil spécifique> après un certain <nombre de minutes>
(avec un maximum de 60 minutes).
- La <fonction désirée> peut être une fonction préprogragrammée sous un
mode spécifique, une Macro, une fonction Key Magic, ou une fonction apprise.
Exemple: vous souhaitez que votre TV s’éteigne dans 45 minutes.
1. Appuyez sur la touche MAGIC et maintenez-la appuyée (pendant environ 3
secondes) jusqu’à ce que l’écran de configuration apparaisse.
2. Appuyez sur OTHER.
3. Tapez 9 8 5 afin d’entrer dans le Mode Minuterie - KAMELEON 8.
L’indicateur IR s’allume deux fois.
4. Appuyez sur TV afin de sélectionner l’appareil sous lequel se trouve
la fonction désirée pour le mode minuterie - KAMELEON 8. L’indicateur IR
s’allume deux fois.
5. Appuyez sur VEILLE afin de sélectionner la fonction désirée. L’indicateur IR
s’allume deux fois.
6. Tapez alors 4 5 afin d’entrer le nombre de minutes après lequel la fonction
désirée devrait être envoyée (par ex. pour 5 min. tapez 05, max. de 60).
7. Appuyez et maintenez appuyé ENTER. L’indicateur IR s’allume deux fois
et la Minuterie du KAMELEON 8 est activée.
- L’appui de touches incorrectes durant la programmation du Mode Minuterie
KAMELEON 8 ne sera pas pris en compte.
- La <Touche désirée> ne peut pas être une touche d’appareil, la touche
SCROLL, ESC, ENTER ou MAGIC.
- Lors du Mode Minuterie - KAMELEON 8, l’animation IR s’allumera toutes
les 15 secondes.
- Le Mode Minuterie du KAMELEON 8 est annulé en programmant un
nouveau Mode Minuterie - KAMELEON 8.
- Si aucune touche n’est appuyée durant la programmation du Mode
Minuterie – KAMELEON 8, la télécommande retournera en mode
d’utilisation après 30 secondes.
- La touche SCROLL, si disponible sous l’appareil choisi, est accessible durant
toute la programmation.
Fonctions Complémentaires
Page 75

74 WW W.ONEFORALL.COM
Macros (séquences de commandes)
Macros (directes)
Vous pouvez programmer votre KAMELEON 8 de façon à ce qu’il réalise une
séquence de commandes en n’appuyant que sur une seule touche. Par exemple,
s
i vous souhaitez que votre téléviseur, magnétoscope et satellite s’éteignent en
m
ême temps, c’est maintenant possible. Toutes les séries de commandes que
vous effectuez fréquemment peuvent être réduites à la pression d’une seule
touche. Une touche qui a été programmée avec une macro fonctionne dans
t
ous les modes (à condition qu’elle soit accessible dans ce mode).
C
’est pourquoi une Macro ne devrait être programmée que sur les touches I, II,
III et IV. Toutefois vous pouvez programmer une Macro sur n’importe quelle
touche, à l’exception des touches d’appareil (TV, SAT, DVD, VCR, PVR CD, AUD et
L
IGHT), des touches MAGIC, ESC, ENTER et SCROLL.
Exemple: pour programmer une Macro qui éteint votre Téléviseur,
M
agnétoscope et Satellite sur la touche « I » du KAMELEON 8 :
1. Appuyez sur la touche MAGIC et maintenez-la appuyée (pendant environ
3
secondes) jusqu’à ce que l’écran de configuration apparaisse.
2
. Appuyez sur ”MACRO”.
3. Appuyez sur la touche d’appareil (par ex. TV) pour faire apparaître
l
es touches dans ce mode.
4. Appuyez alors sur la touche sur laquelle vous souhaitez programmer
la Macro, ici il s’agit de la touche “I”.
5. Appuyez sur TV, VEILLE, VCR, VEILLE, SAT, VEILLE.
6. Pour mémoriser la Macro, appuyez ENTER. L’écran de configuration
apparaît.
Résultat : dès que vous appuierez sur la touche ”I”, le KAMELEON 8 éteindra
votre Téléviseur, Magnétoscope et Satellite.
- Chaque Macro peut consister en un maximum de 22 commandes.
- Pour inclure une fonction issue d’un écran autre que l’écran principal d’un
mode utilisez la touche SCROLL.
- Vous ne devez programmer une Macro que sur une touche libre que vous
n’utilisez encore dans aucun mode.
- Une fois la Macro programmée sur une touche spécifique, la séquence
fonctionnera peu importe le d’appareil (TV, SAT, DVD, VCR, PVR CD, AUD ou
LIGHT) que vous utilisiez. Cela implique que la fonction se trouvant sur cette
touche spécifique disparaîtra.
- Pour éviter des enregistrements accidentels avec le KAMELEON 8 , vous
devrez appuyer deux fois sur la touche ENREGISTREMENT (REC) avant de
pouvoir débuter un enregistrement. Notez que si vous affectez une Macro
ou une Macro shiftée sur la touche REC, cela désactivera la double pression
nécessaire à son accès. C’est pourquoi nous vous conseillons de ne pas
attribuer de Macro à cette touche REC (enregistrement).
- Si vous deviez appuyer sur une touche de la télécommande d’origine pen-
dant quelques secondes afin d’obtenir une fonction, celle-ci pourrait ne pas
fonctionner lors d’une macro sur le KAMELEON 8 .
- Les touches comme (TV) menu, (TV) guide etc., n’appelleront pas l’écran
habituel correspondant pendant la programmation d’une Macro.
- Vos Macros resteront en mémoire même lors d’un changement de piles.
- Si vous programmez une Macro sur une touche, sa fonction d’origine
deviendra ”shiftée” (= en double), à l’exception des touches VEILLE, CH+/-et
VOL+/-. Pour y accéder, appuyez sur MAGIC puis la touche. Si vous placez
une Macro shiftée sur une touche numérique, vous aurez accès à sa fonction
d’origine en appuyant sur MAGIC deux fois puis le chiffre.
- Vous remplacerez une Macro en en plaçant une autre par-dessus.
Fonctions Complémentaires
Page 76

WW W.ONEFORALL.COM 75
Macros shiftées
Il est aussi possible de placer une Macro shiftée sur une touche afin que
c
elle-ci garde sa fonction d’origine. La touche MAGIC peut être utilisée comme
u
ne « fonction SHIFT ».
Si, par exemple, vous désirez programmer une Macro shiftée (pour éteindre
v
otre TV, VCR et SAT) sur la touche ”rouge” (pour lui garder sa fonction
d
’origine).
Résultat : à chaque fois que vous appuyez sur MAGIC, puis sur la touche
”
rouge”, le KAMELEON 8 éteindra votre Téléviseur, Magnétoscope et Satellite.
- Si une Macro shiftée est placée sur VEILLE, CH+/- et VOL+/-, Les fonctions
s
econdaires ”minuterie” et ”couleur/luminosité” seront sacrifiées.
Effacer une Macro (directe)
Exemple pour effacer la Macro de la touche ”A”, appuyez sur:
Effacer une Macro shiftée
Exemple: pour effacer la Macro shiftée de la touche ”rouge”, appuyez sur:
Pour effacer toutes les macros sous tous les modes
(*) Maintenez la touche MAGIC appuyée jusqu’à ce que
le lapin sorte du chapeau. L’écran de configuration configuration apparaît.
Fonctions Complémentaires
M
AGIC* MACRO TV MAGIC “Rouge” ENTER
TV, VEILLE,
VCR, VEILLE,
S
AT, VEILLE
MAGIC* MACRO TV “I” ENTER
MAGIC* MACRO TV1 MAGIC ”rouge” MAGIC**
MAGIC* MACRO ENTER
Page 77

76 WW W.ONEFORALL.COM
Technologie d’actualisation de code
V
otre KAMELEON 8 possède une fonction unique en son genre qui vous permet
d
e lui ajouter de tous nouveaux codes en mémoire, soit par Internet ou
soit par téléphone. En quelques secondes, notre technologie de couplage
magnétique transmet des informations au KAMELEON 8, sans fiches, ni
a
daptateurs ou connecteurs. Cela signifie que votre KAMELEON 8 ne sera
j
amais dépassé, même pour vos achats d’appareils futurs. Il vous suffit de
consulter notre site Internet ou d’appeler notre Service Après-Vente et l’un de
nos spécialistes vous assistera pendant toute la durée du processus
d
’actualisation de votre KAMELEON 8.
Actualisation de code par Internet
(Mettez à jour votre KAMALEON 8
…
avec votre ordinateur)
1
. Rendez-vous sur notre site web
« www.oneforall.com ».
2
. Sélectionnez votre « région ».
3. Sélectionnez « product support »
(support produit).
4. Sélectionnez « universal remote
controls »
(télécommandes universelles).
5. Sélectionnez la télécommande
ONE FOR ALL que vous souhaitez actualiser, soit: KAMELEON 8 (URC-8308).
6. Sélectionnez « internet download » (téléchargement). Maintenant vous
vous trouvez dans notre section spéciale de Téléchargement En Ligne.
A partir d’ici, vous n’avez plus qu’à suivre les instructions à l’écran pour une
actualisation rapide de votre télécommande.
Actualisation de code par téléphone
Vous pouvez aussi contacter notre Service Après-Vente et indiquer quel(s)
appareil(s) vous souhaitez ajouter au KAMELEON 8.
1. Inscrivez le(s) nom(s) de(s) marque(s) et numéro(s) de modèle de votre(vos)
appareil(s) avant d’appeler.
2. Appelez notre numéro d’assistance consommateurs et indiquez quel(s)
est(sont) l’(les) appareil(s) que vous désirez ajouter à votre KAMELEON 8.
3. Après avoir noté vos informations, notre agent vous guidera pendant la
procédure de configuration et vous demandera d’appliquer l’écouteur de
votre téléphone sur votre KAMELEON 8 (voir illustration ci-dessous).
L’information nécessaire concernant votre appareil sera alors transférée par
téléphone dans votre KAMELEON 8 en une poignée secondes.
Des téléphones sans-fil, téléphones à haut-parleur et téléphones
portables ne sont pas recommandés.
4. Après que votre KAMELEON 8 a été
mis à jour par téléphone, restez
en ligne. Notre agent du Service
Après-Vente va s’assurer que
le KAMELEON 8 fonctionne
correctement avec votre (vos)
appareil(s) et répondra à toutes
les questions que vous pourriez
encore vous poser.
Fonctions Complémentaires
Page 78

WW W.ONEFORALL.COM 77
Couleur & Luminosité
L
e KAMELEON 8 peut modifier le réglage de la couleur et de la luminosité de
v
otre téléviseur, si ces fonctions sont aussi présentes sur la télécommande
d’origine.
P
our régler la couleur:
A
ppuyez sur MAGIC suivie de Volume + (pour couleur +) ou Volume -
(pour couleur -).
P
our régler la luminosité:
A
ppuyez sur MAGIC suivie de Chaîne + (pour luminosité +) ou Chaîne -
(
pour luminosité -).
La manière de régler la couleur et la luminosité dépend de la télécommande
d
’origine, il est possible que le réglage de la couleur et de la luminosité soit
d
ifférent (par exemple en passant par un menu).
Fonctions Complémentaires
Problème & Solution
Guide de dépannage
Problème:
Votre marque ne figure pas
dans la liste des codes?
Le KAMELEON 8 ne fait pas
fonctionner vos appareils?
La KAMELEON 8 n’exécute
pas les commandes
correctement?
Vous rencontrez des
problèmes lors d’un
changement de chaînes?
Magnétoscope / PVR / DVD /
CD / AUD refuse d’enregistrer?
Le KAMELEON 8 ne réagit pas
après avoir pressé une touche?
Votre télécommande d’origine
a une touche 20?
La partie supérieure de
l’indicateur IR s’allume 5 fois à
chaque appui de touche.
Vous ne pouvez pas accéder au
mode de programmation?
Solution:
Essayez la Méthode de Recherche à
la page 65.
A) Essayez tous les codes listés pour votre
marque.
B) Essayez la Méthode de Recherche à la
page 65.
Il se peut que vous utilisiez un code
inadéquat. Essayez la configuration directe
en utilisant un autre code sous votre
marque ou recommencez la Méthode de
Recherche afin de localiser le code approprié.
Introduisez le numéro de la chaîne comme
vous le feriez sur votre télécommande
d’origine.
Pour éviter des enregistrements
accidentels, vous devez appuyer deux
fois sur la touche Enregistrement de votre
KAMELEON 8.
Assurez-vous d’avoir de nouvelles piles et
de bien pointer votre KAMELEON vers
votre appareil.
Vous retrouverez cette fonction sous
la touche AV.
Veuillez remplacer les piles par 4 nouvelles
piles alcalines AAA/LR03.
Veuillez remplacer les piles par 4 nouvelles
piles alcalines AAA/LR03.
Page 79

78 WW W.ONEFORALL.COM
Service Consommateurs
A
u cas où vous auriez encore des questions sur le fonctionnement de votre
K
AMELEON 8 ONE FOR ALL et pour lesquelles vous ne trouvez pas de solution
dans le guide de dépannage (Problème & Solution) voir page 77, nous vous
invitons à prendre contact avec notre service consommateurs pour une aide
c
omplémentaire.
R
endez-nous visite sur notre site Internet: www.oneforall.com
Notre site vous offre de multiples avantages:
-
accès 24/24 h
-
pas de temps d’attente
- page spéciale sur les questions les plus souvent posées
- informations sur la gamme de produits ONE FOR ALL
A
vant de nous contacter, par Fax, E-mail ou Téléphone, munissez-vous
des informations demandées en vous aidant du tableau ci-dessous
que vous aurez rempli auparavant.
1
Modèle de votre ONE FOR ALL, soit: URC-8308 KAMELEON 8 (*).
2
Date d’achat (.........../.........../...........).
3 Liste de vos appareils/modèles (voir exemple ci-dessous):
Appareil Marque N° modèle N° modèle Code
appareil télécommande d’installation
TV Sony KV-25C5D RM-883 1505 (example)
Les numéros de type/modèle se trouvent souvent dans le mode
d’emploi de vos appareils ou sur une plaque d’identification au dos de
ceux-ci.
4. Puis envoyez-nous un Fax ou e-mail ou alors appelez-nous:
En France
E-mail : ofahelp@uebv.com (***)
Fax : +31 53 432 9816
Tel. : 0892-687062 (0,34 par minute) (*) (**)
En Belgique Au Luxembourg
E-mail : ofahelp@uebv.com (***) E-mail : ofahelp@uebv.com (***)
Fax : +31 53 432 9816 Fax : +31 53 432 9816
Tel. : 0800-74525 (*) (**) Tel. : 0800-23150 (*) (**)
En Suisse
E-mail : ofahelp@uebv.com (***)
Fax : +31 53 432 9816
Tel. : 0800-837762 (*) (**)
(*) Lorsque vous nous appellerez, nous vous demanderons de
composer un numéro URC. Le numéro URC de votre KAMELEON 8
est 8308.
(**) Si vous appelez avec un téléphone portable:
- il peut y avoir des frais supplémentaires si vous nous appelez
du Royaume-Uni ou de la France.
- il est possible que vous ne puissiez pas nous joindre si vous
appelez de la Belgique, des Pays-Bas, du Luxembourg, de la
Grèce, du Portugal, de la Suisse, de l'Italie, de l'Irlande ou de
l'Autriche.
(***) Envoyez juste un message ‘blanc’, vous obtiendrez
automatiquement un questionnaire à remplir.
Guide de dépannage
Page 80

WW W.ONEFORALL.COM 79
ÍNDICE DE CONTENIDOS
E
sp
a
ñ
o
l
EL KAMELEON 8 . . . . . . . . . . . . . . . . . . . . . . . . . . . . . . . . . . . . . . . . . . . . . . . . . . . . . . . . . . 80
P
ILAS
. . . . . . . . . . . . . . . . . . . . . . . . . . . . . . . . . . . . . . . . . . . . . . . . . . . . . . . . . . . . . . . . . . . . . 8
1
E
L TECLADO
. . . . . . . . . . . . . . . . . . . . . . . . . . . . . . . . . . . . . . . . . . . . . . . . . . . . . . . . . 8
2 - 89
•
PROGRAMACIÓN DEL KAMELEON 8 . . . . . . . . Pág. 90
(Cómo configurar el KAMELEON 8 para que controle sus aparatos)
•
Método de búsqueda
. . . . . . . . . . . . . . . . . . . . . . . . . . . . . . . . . . . . . . . . . . . 9
1
CÓDIGOS DE PROGRAMACIÓN
TV : Televisión / LCD / Plasma / Proyector / Retroproyector
. . . . . . . . . .
261
V
CR : Grabador de vídeocasete / Combi TV/VCR /
. . . . . . . . . . . . . . . . . .
2
72
S
AT : Receptor de satélite / Convertidor y descodificador
i
ntegrado / DVB-S / DVB-T / TDT (E) / Freeview (Reino Unido) /
DTT (I) / TNT (F) / Digitenne (NL) / SAT/HDD
. . . . . . . . . . . . . . . . . .
275
C
BL : Convertidor de cable / Convertidor y descodificador
integrado / DVB-C
. . . . . . . . . . . . . . . . . . . . . . . . . . . . . . . . . . . . .
279
VAC : Accesorios de vídeo como Media Centres / Accesorios AV /
S
electores AV
. . . . . . . . . . . . . . . . . . . . . . . . . . . . . . . . . . . . . . . .
2
80
CD : Reproductor de CD / CD-R / MD
. . . . . . . . . . . . . . . . . . . . . . . . . .
280
PHO : Tocadiscos
. . . . . . . . . . . . . . . . . . . . . . . . . . . . . . . . . . . . . . . . . . .
280
MIS : Audio / Audio Varios
. . . . . . . . . . . . . . . . . . . . . . . . . . . . . . . . . . .
281
HOM : Automatización doméstica (p.ej. cortinas controladas
por IR / interruptores de luces controlados por IR, etc.)
. . . . . . . .
281
AMP : Audio / Amplificador / Sistema de altavoz activo
. . . . . . . . . . . . .
281
TUN : Audio / Receptor de Audio/Sintonizador/Amplificador /
Cine en Casa (DVD)
. . . . . . . . . . . . . . . . . . . . . . . . . . . . . . . . . . . .
281
CAS : Reproductor de casete
. . . . . . . . . . . . . . . . . . . . . . . . . . . . . . . . .
282
LDP : Reproductor disco láser / CD vídeo
. . . . . . . . . . . . . . . . . . . . . . . .
283
DAT : Cinta audio digital / DCC
. . . . . . . . . . . . . . . . . . . . . . . . . . . . . . . .
283
DVD : Reproductor DVD / DVD-R / Cine en Casa DVD/ Combi DVD /
DVD/HDD / DVD/PVR / Combi DVD/VCR
. . . . . . . . . . . . . . . . . . . . . . .
283
PVR : Personal Video Recorder
. . . . . . . . . . . . . . . . . . . . . . . . . . . . . . . .
288
LECTURA DE CÓDIGOS . . . . . . . . . . . . . . . . . . . . . . . . . . . . . . . . . . . . . . . . . . . . . . . . . . . 92
(Para saber qué código está utilizando actualmente)
REFERENCIA DE CÓDIGOS
. . . . . . . . . . . . . . . . . . . . . . . . . . . . . . . . . . . . . . . . . . . . . . . 92
MÉTODO DE APRENDIZAJE
. . . . . . . . . . . . . . . . . . . . . . . . . . . . . . . . . . . . . . . . 93
(Cómo copiar funciones de su mando a distancia original en el KAMELEON 8)
REAJUSTE OPERACIONAL . . . . . . . . . . . . . . . . . . . . . . . . . . . . . . . . . . . . . . . . . . . . . . . . 95
FUNCIONES ADICIONALES
• Key Magic® (Cómo programar funciones adicionales)
. . . . . . . . . . . . . . 96
• Re-asignación de modo (Para programar dos aparatos del
mismo tipo en el KAMELEON 8 )
. . . . . . . . . . . . . . . . . . . . . . . . . . . . . . . . . . . 97
• Interfuncionalidad del volumen
. . . . . . . . . . . . . . . . . . . . . . . . . . . . . . . . . . . 98
• Autoapagado (Sleeptimer) del aparato
. . . . . . . . . . . . . . . . . . . . . . . . . . . . 99
• Timer del KAMELEON 8
. . . . . . . . . . . . . . . . . . . . . . . . . . . . . . . . . . . . . . . . . . . 99
• Macros (secuencias de comandos)
. . . . . . . . . . . . . . . . . . . . . . . . . . . . . . . . 100
• Actualización de códigos
. . . . . . . . . . . . . . . . . . . . . . . . . . . . . . . . . . . . . . . . . 102
• Color y brillo
. . . . . . . . . . . . . . . . . . . . . . . . . . . . . . . . . . . . . . . . . . . . . . . . . . . . 103
CONSEJOS ÚTILES
• Problemas y Soluciones
. . . . . . . . . . . . . . . . . . . . . . . . . . . . . . . . . . . . . . . . . . 103
• Servicio de atención al cliente
. . . . . . . . . . . . . . . . . . . . . . . . . . . . . . . . . . . . 104
Use el Mágico de Web OneForAll para programar su mando con la ayuda
del Internet. Este mágico le dice como instalar sus diferentes aparatos sin
tener que leer todo el manual de instrucciones. Para usar esta herramienta
fácil de usar, por favor visite www.oneforallwebwizard.com.
Page 81

80 WW W.ONEFORALL.COM
El KAMELEON 8
Pantalla “EL” de fácil utilización
Al escoger el mando a distancia universal KAMELEON 8 de ONE FOR ALL, usted
h
a optado por una utilización sencilla. Su KAMELEON 8 posee una pantalla lumi-
n
osa, única y especial que le asegura el acceso a todas las teclas que necesita
mientras esconde las que no le son útiles en ese momento. Fabricado con la más
estricta calidad, le proporcionará una gran satisfacción a largo plazo. Cuando le
ponga pilas nuevas, el KAMELEON 8 se iniciara en el modo de “demo” y
m
ostrará distintas pantallas. Este modo se puede cancelar al configurar el
mando a distancia (pulse y mantenga apretada la tecla
MAGIC durante tres segundos y luego pulse y suelte la tecla ESC). Después de
colocar las pilas tendrá que pulsar cualquier tecla para que la pantalla se ilum
ine. A partir de entonces, la pantalla se iluminará automáticamente cada vez
q
ue coja el mando a distancia universal (al tocar la pantalla y el mando
simultáneamente). También existe la posibilidad de cambiar el modo de
a
ctivación directo por el modo de activación a través de la pulsación de una
t
ecla. Para programar la pantalla “EL” en el modo de activación a través de la
pulsación de una tecla, deberá consultar la página 82, sección “Programación de
la activación de la pantalla EL”.
C
ontrola hasta 8 aparatos
Su KAMELEON 8 está diseñado para permitirle el uso de un sólo mando a
distancia para controlar equipos audiovisuales de señal infrarroja de cualquier
t
ipo. Su KAMELEON 8 viene equipado con dos transmisores IR (infrarrojos) de
alto alcance para ser utilizado a distancias un poco más largas que
las convencionales.
Su capacidad de alta frecuencia le da la posibilidad de controlar
aparatos de hasta 450 kHz. Usted puede elegir cualquier combinación
de 8 aparatos que quiera controlar.
TV Televisión / LCD / Plasma / Proyector / Retroproyector
SAT Receptor de satélite, decodificador de TV por cable , DSS / accesorios
de vídeo (por ejemplo, Media Center)
DVD Reproductor de DVD / DVD-R / DVD Home Cinema / DVD Combi /
DVD/HDD / reproductor de Laser Disc
VCR Reproductor de vídeo / TV/VCR Combi / DVD/VCR Combi / reproductor
de cassette / reproductor digital de cassette / DCC
PVR Cámara de vídeo, grabadores de disco duro
CD Reproductor de CD / CD-R / MD / Tocadiscos / automatización del
hogar (por ejemplo, sistemas de cortinas controladas por señal
infarroja ).
AUD Audio / audio receptor / sintonizador / ampificador / (DVD) Home
Cinema
LIGHT Interruptores de luz controlados por señal IR - El KAMELEON 8
también incorpora el modo “LIGHT” (LUZ), para controlar
los módulos utilizados en el Light Control™ con protocolo de
433MHz. Este modo enviará por separado comandos de señal IR a un
“ONE FOR ALL Light Control™ Starters Kit - HC-8300”, que los convertirá en comandos de radio freceuncia (RF) para que a su vez sean
captados por los módulos que atenuarán la luz y controlarán los
interruptores.
Para que permita su mando a distancia en ( light control™ )
su KAMELEON 8 tendrá que comprar el ONE FOR ALL “LIGHT
CONTROL – STARTERS KIT (HC-8300)”.
Page 82

WW W.ONEFORALL.COM 81
Función de aprendizaje
El KAMELEON 8 posee también la especial función de aprendizaje, lo cual
q
uiere decir que usted puede copiar casi cualquier función (max. +/- 50
f
unciones) de su mando original en el KAMELEON 8 (consulte el método de
aprendizaje en la página 93). Ello le será de gran utilidad cuando haya programado su KAMELEON 8 y se dé cuenta de que le puede faltar alguna función de
su mando a distancia original.
Macros (secuencias de comandos)
Su KAMELEON 8 es capaz de realizar macros de un modo sencillo permitiéndole
enviar varios comandos a sus aparatos simplemente pulsando una sola tecla (por
e
jemplo, encender o apagar al mismo tiempo sus aparatos). Puede usar las teclas
p
ersonalizadas (I, II, III, IV) para esta función. Una vez haya programado un
macro en una de estas teclas, la secuencia funcionará en todos los modos de los
a
paratos.
Actualización de códigos
El KAMELEON 8 de ONE FOR ALL también le ofrece la posibilidad de actualizar
c
ódigos. Esta tecnología le permite añadir códigos en la memoria del
m
ando a distancia. Si su aparato utiliza un código en particular que no se
encuentra en la memoria del mando (después de haber utilizado la programación directa de códigos de la página 90 y el método de búsqueda de
l
a página 91) podrá utilizar el servicio de actualizaciones (vea la página 102).
Gracias a esta tecnología su KAMELEON 8 nunca se quedará obsoleto.
Nota: Cuando le ponga pilas nuevas,el KAMELEON 8 se iniciará en el
modo de “demo” y mostrará distintas pantallas.
Su KAMELEON 8 necesita 4 pilas alcalinas del tipo AAA/LR03.
1. Desatornille la tapa del compartimiento de las pilas utilizando una moneda
2. Coloque las pilas con el polo positivo (+) hacia arriba
3. Vuelva a colocar en su sitio la tapa del compartimiento de las pilas
Indicador de bajo voltaje
Una vez se hayan agotado las pilas, el mando a distancia universal KAMELEON
8 se activará para avisarle. El indicador IR parpadeará 5 veces cada vez que
pulse cualquier tecla y no podrá acceder al modo de programación.
Por favor, asegúrese de que utiliza 4 pilas alcalinas del tipo AAA/LR03.
El KAMELEON 8
Pilas
Page 83

82 WW W.ONEFORALL.COM
Ajuste de la luminosidad de la pantalla "EL"
Para aumentar o disminuir la luminosidad de la pantalla “EL”en el KAMELEON 8:
1. Pulse y mantenga apretada la tecla MAGIC durante 3
segundos. La pantalla cambiará al modo de programación.
2. Pulse BRIGHT.
3. > Para aumentar la luminosidad de la pantalla “EL” pulse y
mantenga la tecla NEXT.
> Para disminuir la luminosidad de la pantalla “EL pulse y
mantenga la tecla PREVIOUS.
4. Pulse ENTER para memorizar la configuración de luminosidad
y regresar a la pantalla de programación O pulse ESC para
volver al nivel previo de luminosidad.
- Incrementar el brillo del panel “EL” puede afectar la duración de sus pilas.
La duración de éstas puede ser de 3 a 12 meses (dependiendo de los ajustes
de brillo y de uso).
Este producto dispone de un panel “EL” (tecnología electro luminiscente) el cual
se activa al tocar la pantalla y el mando a distancia simultáneamente y / o al
p
ulsar una tecla. Para poder preservar la duración de las pilas, la pantalla “EL”
p
ermanecerá iluminada durante 8 segundos.
Una de las características especiales del KAMELEON 8 es el panel “EL”,
el cual cambia para adecuarse al aparato que está controlando en ese
p
reciso momento. La imagen de la página 84 le muestra las funciones que
puede llegar a obtener.
Activación de la pantalla "EL"
El KAMELEON 8 tiene un panel “EL” el cual se activa al tocar la pantalla y el
mando a distancia simultáneamente y / o al pulsar una tecla.
Si lo desea podrá programar el KAMELEON 8 en un modo de activación concreto.
1. Pulse y mantenga apretada la tecla MAGIC durante 3
segundos. La pantalla cambiará al modo de programación.
2
. Pulse OTHER.
3. Pulse 9 8 9.
-> Si el indicador IR parpadea dos veces, el panel “EL” se activa al tocar
la pantalla y el mando a distancia simultáneamente.
-> Si el indicador IR parpadea cuatro veces, el panel “EL” se activará al pulsar
una tecla.
Simplemente siga estos pasos para utilizar el KAMELEON 8 con el modo
de activación que usted prefiera.
El Teclado
Page 84

WW W.ONEFORALL.COM 83
El Teclado
Programación del tiempo de encendido del
panel “EL”
P
ara cambiar el tiempo (por defecto 8 segundos) que la pantalla “EL” del
K
AMELEON 8 permanece encendida, después de la pulsación de cualquier tecla del
m
ando a distancia universal (no en modo de programación):
1
. Pulse y mantenga apretada la tecla MAGIC
d
urante 3 segundos. La pantalla cambiará al modo
d
e programación.
2
. Pulse OTHER.
3
. Pulse 9 7 8.
4. Pulse 1, 2, 3, 4 o 5 (por ejemplo 1 = 4 segundos)
dependiendo de lo que elija, consulte con la tabla que
le mostramos a continuación. El indicador IR parpadeará
dos veces y la pantalla del mando volverá al modo de
programación. Pulse ENTER para memorizar el nuevo
tiempo de encendido programado y para regresar a la
pantalla de programación O pulse ESC para volver al
tiempo de encendido anterior.
Selección Tiempo de encendido de la pantalla EL”
14segundos
2 8 segundos (por defecto)
3 12 segundos
4 16 segundos
5 20 segundos
Page 85

84 WW W.ONEFORALL.COM
El Teclado
TV
SAT
DVD
VCR
PVR
CD
AUD
L
IGHT
IR Indicator
Page 86

WW W.ONEFORALL.COM 85
1. Indicador de IR (infrarrojos)
E
l indicador de infrarrojos se ilumina cuando se está
“
enviando” o “recibiendo” señal infrarroja. El indicador IR
d
el KAMELEON 8 mostrará así la “salida” de señal IR cada
vez que se pulse cualquier tecla. Cuando se utilice el “métod
o de aprendizaje” o “el método de actualización de códig
os”, el indicador de IR mostrará la de señal IR “entrante”.
L
a salida de señal IR se indicará con una animación de “salida a entrada”. El indicador IR le proporcionará información
cuando las teclas se utilicen durante su uso cotidiano y
c
uando se utilicen para realizar cualquier tipo de configu-
r
ación (el segmento medio del indicador IR parpadeará).
2. Teclas de aparato
L
as teclas TV, SAT, DVD, VCR, PVR, CD, AUD y LIGHT seleccionan el aparato que
desea controlar. Por ejemplo, al pulsar la tecla TV1 usted podrá controlar las
funciones del televisor, después de pulsar la tecla VCR podrá controlar
las funciones de su reproductor de vídeo, al pulsar SAT manejará las funciones
de su receptor de satélite o decodificador de TV por cable etc. (para más
detalles consulte en la página 80). Cuando pulse la tecla de un aparato en su
K
AMELEON 8, aparecerá el icono del aparato que está controlando en ese
momento, para indicar así el modo en el cual está operando. Al pulsar la tecla
de aparato volverá a la pantalla principal (modos TV, SAT y AUD). El KAMELEON
8 también incorpora el modo LIGHT. Junto con el “ONE FOR ALL Light
Control™ Starters Kit - HC-8300” podrá atenuar la iluminación o apagar y
encender la luz de toda su casa.
3. MAGIC (en modo de cambio o de programación)
La tecla MAGIC se utiliza para programar el KAMELEON 8 y
para acceder a las funciones especiales. Si usted pulsa esta
tecla una vez, la pantalla cambiará al modo de segunda función (durante 10 segundos) lo cual le dará acceso a algunas
funciones secundarias tales como color, brillo y auto apagado.
Modo de programación
Si pulsa esta tecla durante más tiempo (3 segundos), el
KAMELEON 8 cambiará al modo de programación (durante
el modo de programación verá el icono del sombrero de
copa con el conejo).
El Teclado
DEV SET
SEARCH
MODE
KEY MAGIC
MACRO
BRIGHT
LEARN
IR DELETE
VOLUME
OTHER
• Programación de códigos para los aparatos
• Método de búsqueda
• Re-asignación de modo
• Para programar funciones que faltan en el mando
• Para programar una tecla (I, II, III, IV) con una secuencia de
órdenes o comandos
• Ajuste de la luminosidad de la pantalla
• Para copiar funciones de su mando a distancia original
en el KAMELEON 8
• Eliminar funciones programadas con el método de
aprendizaje o con Key Magic
• Interfuncionalidad del volumen
• Variación del tiempo de encendido de la pantalla EL
(4 segundos, 8 segundos, 12 segundos, 16 segundos, 20
segundos)
• Reajuste operacional
• Timer del KAMELEON 8
• Programación de la activación de la pantalla EL
• Verificación de códigos
• Actualización a través de módem
Page 87

86 WW W.ONEFORALL.COM
4. SCROLL
La tecla SCROLL le da la posibilidad de moverse entre las
d
iferentes pantallas (siempre que sea posible) de un modo
e
n concreto durante su utilización normal y durante el
modo de programación. Esto será sólo posible en los
modos de TV, SAT, y AUD.
5. ENTER
L
a tecla ENTER le permite confirmar las opciones elegidas
e
n el modo de programación
6
. POWER (en el modo de segunda función; autoapagado)
La tecla POWER (encendido/apagado) controla la misma
f
unción que en el mando a distancia original.
7. PP / TIMER / RANDOM
E
n los modos de TV y SAT, esta tecla funcionará como
“
último canal”, “programa previo” o “recall” (siempre y
cuando esta función se encuentre disponible en el mando
a distancia original). En modo VCR y DVD obtendrá la función TIMER RECORD o TIMER ON/OFF. En el modo de CD, y
AUD obtendrá la función de RANDOM (o shuffle).
8. PRESET / BACK
En el modo de AUD, la tecla PRESET le dará acceso a la
pantalla PRESET/ MENU y a su vez y en los dígitos, a las
pre-programaciones del 1 al 9, 0 y +10. En el modo de
menú PVR y SAT podrá utilizar la tecla “back” para acceder
al menú previo
9. 16:9 / PVR / PROG
En el modo de TV obtendrá la función 16:9 (formato de
pantalla). En el modo VCR, DVD, AUD y CD obtendrá la
función PROG (programa).
10. TV/SAT / TV/VCR / TV/DVD
En modo VCR obtendrá la función de TV/VCR. En el modo
SAT, obtendrá la función de TV/SAT. En el modo DVD,
obtendrá la función de TV/DVD.
11. AUDIO / TUNE -
En el modo de DVD, SAT, PVR y AUD (pantalla principal)
obtendrá la función “audio”. En el modo AUD (pantalla de
menú / preset), usted obtendrá la función “TUNE –“.
12. INFO / CLEAR
En el modo de SAT y PVR usted podrá seleccionar
la función “info”. En los modos CD, AUD (pantalla
principal) y DVD obtendrá la funcion “clear”
El Teclado
Page 88

WW W.ONEFORALL.COM 87
El Teclado
1
3. FAV / EDIT / SP/LP
E
n el modo de SAT y PVR obtendrá la función de FAV
(favorito). En el modo de DVD, CD Y AUD, obtendrá
la función EDIT para acceder a la información “edit”.
E
n el modo de VCR, obtendrá la función de SP/LP
(
velocidad de la cinta).
1
4. SUBT. / TUNE+
E
n los modos de SAT, PVR, DVD y AUD, obtendrá la funcion de subtítulo. En el modo AUD usted obtendrá la func
ión “TUNE +“ en la pantalla Preset/Menu .
1
5. MENÚ
Pulsando esta tecla usted podrá controlar el menú y en el
modo de TV y AUD, cambiará directamente a la pantalla
del modo de menú. La tecla menú funciona igual que en
s
u mando a distancia original.
16. EXIT
La tecla EXIT funcionará del mismo modo en que lo hacía
en su mando a distancia original. Para regresar a
la pantalla principal (modos TV, SAT, y AUD) pulse la tecla
de aparato o la tecla SCROLL.
17. GUIDE / DSP
En el modo de AUD obtendrá la función DSP siempre y
cuando ésta esté disponible en el mando a distancia
original. En los modos TV, SAT, DVD, VCR y DVD la tecla
“GUIDE” le dará acceso a la función guía siempre y
cuando ésta esté disponible en su mando a distancia
original. En el modo TV la tecla “Guía” le dará acceso
a la pantalla de modo de menú.
18. MUTE (sordina)
Esta tecla controla la misma función que en su mando a
distancia original.
19. CH+/- (en el modo de segunda función: brillo+/-)
Estas teclas funcionan igual que en el mando a distancia
original. En el modo de TV y como segunda función estasteclas controlan el ajuste de brillo+/- (para acceder a esa
segunda función se debe pulsar MAGIC una vez y suelte).
20. Teclas direccionales (arriba, abajo, derecha,
izquierda)
Si se encuentran disponibles en su mando a distancia original, estas teclas le permitirán navegar a través del menú.
Es posible que en algunos televisores usted deba pulsar
CH+/- y VOL+/- o las teclas de color (roja, verde, amarilla,
azul) para desplazarse por el menú. Esto dependerá del
modelo de televisor que usted tenga. En el modo AUD
estas teclas (si se encuentran disponibles en el mando a
distancia original) le permitirán controlar los niveles de
sonido de los altavoces. En el menú del modo AUD, estas
teclas le permitirán navegar a través del menú.
Page 89

88 WW W.ONEFORALL.COM
21. SURROUND / OK
E
n el modo de menú esta tecla confirmará las selecciones
e
legidas. En algunos aparatos usted puede confirmar la
o
pción de menú elegida simplemente pulsando MENU. En
el modo AUD, esta tecla le dará acceso al modo de sonido
surround de su aparato siempre y cuando, esta función, se
e
ncuentra disponible en su mando a distancia original.
2
2. VOL+/- (en el modo de segunda función: color+/-)
L
as teclas de volumen funcionan del mismo modo que en
el mando a distancia original. En el modo de TV y como
segunda función (para acceder a esa segunda función se
d
ebe pulsar MAGIC una vez y suelte), estas teclas
controlan el ajuste de color+/-.
2
3. Teclas numéricas / Input (En el modo de programación: funciones de configuración)
L
as teclas numéricas (1 – 9, 0) le proveen de las mismas fun-
c
iones que en el mando a distancia original. En el modo
AUD las teclas numéricas (1 – 9, 0, --/-) le podrán proporcionar (si se encuentra disponible en su mando a distancia
original) la función INPUT (TUNER, CD etc.).
Si su mando a distancia original dispone de las funciones
“selección de función” o “selección de input”, usted las
encontrará bajo la tecla AV. En el modo de programación,
las teclas numéricas mostrarán las distintas funciones de
configuración.
24. -/-- / PPV
Si su mando a distancia original utiliza el símbolo de uno
dos dígitos para cambiar de canal (-/--), esta función la
obtendrá al pulsar la tecla -/-- del KAMELEON 8 . En el
modo SAT (pantalla de menú) obtendrá esta función.
25. AV / HELP
La tecla AV funciona del mismo modo que en el mando a
distancia original. Si su mando original tiene la tecla 20,
esta función la obtendrá pulsando la tecla AV del
KAMELEON 8. Si en el mando a distancia original de su
receptor de satélite o PVR tiene la función “help”, la podrá
obtener pulsando la tecla HELP. En el modo de AUD le
proporcionará la función de selección de “input”.
26. ESC
Esta tecla solo aparecerá en el modo de programación y se
utiliza para volver a la pantalla de configuración, o para
salir del modo de programación.
27. Teclas de movimiento o rebobinado
En los modos de VCR, DVD, SAT (modo menú) PVR, CD y
AUD, estas teclas realizarán las funciones de movimiento
(PLAY, FF, REW, etc…) de su aparato. Para prevenir
grabaciones accidentales deberá pulsar la tecla RECORD
dos veces para comenzar la grabación.
El Teclado
Page 90

WW W.ONEFORALL.COM 89
28. Teclas de teletexto
E
stas teclas se utilizan para controlar las funciones
p
rincipales del teletexto. Por favor consulte el manual de
i
nstrucciones de su televisor para más información sobre su
funcionamiento. Recuerde que no todos los televisores
controlan el teletexto y sus funcionas del mismo modo. Es
p
osible que muchas funciones de teletexto no se encuen-
t
ren disponibles en su modelo.
E
XPAND: Le muestra la primera parte del texto en caracteres más
grandes. Pulsándola otra vez podrá ver la segunda parte del texto
también en caracteres más grandes. Para volver a obtener caracteres
d
e tamaño normal deberá pulsar la tecla EXPAND de nuevo o
simplemente la tecla TEXT ON, eso dependerá de cómo lo haga con el
mando a distancia original de su televisor.
T
EXT ON: En el modo de TV y una vez dentro del teletexto, esta tecla
l
e dará acceso a la función de MIX o la de TEXT OFF (salida de teletexto). Esta función también está disponible en el modo de SAT.
H
OLD/STOP: Esta tecla detiene el cambio de páginas.
MIX: Esta tecla le muestra al mismo tiempo el teletexto y la imagen
real de su televisor.
TEXT OFF: En el modo de TV le permite la salida del teletexto
obteniendo de nuevo la imagen del canal en el que se encuentre. En
algunos televisores esta función se obtiene pulsando la tecla “TEXT
ON“ varias veces. Esta función está también disponible en el modo
SAT.
TEXT INDEX: Esta tecla le dará acceso a la función de índice del
teletexto.
29. Teclas personalizadas (I, II, III y IV)
Las teclas personalizadas son teclas extra que le dan la
posibilidad de personalizar su KAMELEON 8 y hacer que
sea lo más parecido a su mando a distancia original. Para
ello podrá utilizar los métodos de “aprendizaje” (vea la
página 93) y/o “Key Magic®” (vea la página 96). Estas
teclas también son ideales para programar “macros” (vea
la página 100).
30. Roja / verde / amarilla / azul:
Dentro del modo de teletexto, las teclas de colores
le permiten el acceso a las opciones de selección rápida.
Si en el mando a distancia original de su televisor usted
utilizaba estas teclas para navegar a través del menú, en el
KAMELEON 8 realizarán la misma función.
El Teclado
Page 91

90 WW W.ONEFORALL.COM
N
ota: al introducir las pilas, el KAMELEON 8 iniciará el modo "demo"
(
aparecerán distintas pantallas). Realice los siguientes pasos y el
KAMELEON 8 saldrá automáticamente del modo "demo".
E
jemplo: Para programar su TV en el KAMELEON 8 :
1
. Asegúrese de que su televisor esté encendido (no en standby).
2. Busque el código de su aparato en la sección de códigos (páginas
2
61 - 288). Los códigos están anotados por tipo de aparato y nombre de la
m
arca. Los primeros códigos anotados son los más comunes de cada marca.
Si la marca de su aparato no se encuentra anotada en la sección de códigos,
intente el Método de Búsqueda de la página 91.
3. Pulse y mantenga apretada la tecla MAGIC (durante 3 segundos
más o menos). La pantalla cambiará al modo de programación.
4
. Pulse y suelte la tecla DEV SET.
5. Pulse y suelte la tecla TV para seleccionar el tipo de aparato
que desea configurar.
6. Entre el código de cuatro dígitos utilizando las teclas
numéricas. El indicador IR parpadeará dos veces.
7. Ahora apunte su KAMELEON 8 hacia su televisor y pruebe
con las distintas teclas para comprobar si el KAMELEON 8
funciona con su aparato;
• CHANNEL +, CHANNEL-
• VOLUME +, VOLUME -
• MUTE
• POWER.
• MENU.
8. Si su aparato responde, pulse la tecla ENTER para
memorizar el código. Si su aparato no responde, utilice el
próximo código que se encuentre anotado en la lista que
corresponde a su marca. Si ninguno de los códigos para su
marca funciona con su aparato, pruebe entonces con el
Método de Búsqueda descrito en la página 91.
9. Pulse y mantenga apretada (durante 3 segundos aproximadamente) la tecla ESC para volver al modo normal de
utilización (todas las teclas del modo serán visualizadas)
O pulse una tecla de aparato para seleccionar el
siguiente aparato que desea programar.
- Muchos televisores no se vuelven a encender pulsando la tecla POWER,
por favor intente encenderlo pulsando la tecla CH+.
- Algunos códigos son parecidos. Si su aparato no responde o no funciona
debidamente con uno de esos códigos, pruebe con otro que esté anotado
en la lista para su marca.
- Para programar sus otros aparatos siga las mismas instrucciones. En este caso
deberá pulsar en el paso 5 la tecla del aparato correspondiente.
- Recuerde que debe pulsar la tecla correcta antes de empezar a controlar su
aparato. Solamente se puede asignar un aparato a cada tecla de aparato.
Para programar un segundo TV, vídeo, satélite, PVR, CD, equipo de audio
o DVD, consulte la página 97.
PROGRAMACIÓN DEL KAMELEON 8
(Cómo configurar el KAMELEON 8 para que controle sus aparatos)
_ _ _ _
Page 92

WW W.ONEFORALL.COM 91
Método de búsqueda
-
-> Si su aparato no funciona con el KAMELEON 8 después de haber
i
ntroducido todos los códigos anotados en la lista para su marca.
--> Si la marca de su aparato no aparece en la lista de códigos.
El método de búsqueda le permite encontrar el código de su aparato ya que
e
l KAMELEON 8 explora todos los códigos que contiene en su memoria.
Ejemplo: para localizar el código de su TV:
1
. Encienda su televisor (no en standby).
2
. Pulse y mantenga apretada la tecla MAGIC (durante 3
segundos más o menos). La pantalla cambiará al modo de
p
rogramación.
3
. Pulse SEARCH.
4
. Pulse y suelte la tecla TV para seleccionar el tipo de
a
parato que desea buscar.
5. A continuación pulse POWER.
6. Apunte con el KAMELEON 8 hacia su televisor. Ahora
pulse la tecla NEXT una y otra vez hasta que su
televisor se apague (cada vez que pulse la tecla NEXT el
KAMELEON 8 enviará la señal de POWER de cada código
que contiene en su memoria). Es posible que tenga que
pulsar esta tecla varias veces (quizás hasta 150
veces), por favor, sea paciente. Recuerde que debe
seguir apuntando el KAMELEON 8 hacia su televisor
mientras pulsa esta tecla. (Si se pasa de código, puede
volver hacia atrás pulsando la tecla PREVIOUS)
7. Cuando su televisor se haya apagado, pulse ENTER
para memorizar el código. El indicador IR parpadeará
dos veces.
8. Pulse ESC para regresar a la pantalla de programación, o pulse una tecla de aparato si desea realizar
el Método de Búsqueda para otro aparato.
9. Pulse ESC otra vez para volver al modo normal de
utilización (dónde se muestran todas las teclas).
Encienda de nuevo su aparato (televisión) y pruebe todas
las funciones del mando a distancia para asegurarse de que
éstas funcionan correctamente. Si no puede controlar su
televisión normalmente, por favor continúe con el Método
de Búsqueda, es posible que esté utilizando un código que
no sea el correcto.
- Durante el paso 5 en lugar de POWER también puede pulsar cualquier tecla
iluminada. Esta será la función que se enviará para la próxima vez que se
pulse NEXT o PREVIOUS en el paso 6 (asegúrese de que su televisor está
encendido en otro canal).
- Para buscar los códigos de sus otros aparatos siga las mismas instrucciones.
En este caso deberá pulsar durante el paso 4 la tecla que corresponda al
aparato que quiera programar.
- Si el mando a distancia original de su reproductor de vídeo no tiene la tecla
POWER, pulse la tecla PLAY en su lugar durante el paso 5.
- En el modo LIGHT, el Método de Búsqueda no funciona
Programación del KAMELEON 8
Page 93

92 WW W.ONEFORALL.COM
Lectura de códigos
(Para saber qué código se está utilizando actualmente)
S
i ya ha programado su KAMELEON 8 a través del método de búsqueda, usted
p
uede leer el código para anotarlo como referencia. Por favor, tenga en cuenta
que la parte de abajo de la animación del indicador IR, indicará los 4 dígitos con
parpadeos animados.
Ejemplo: para leer el código de su televisor:
1. Pulse y mantenga apretada la tecla MAGIC (durante 3 segundos
más o menos). La pantalla cambiará al modo de
p
rogramación.
2. Pulse OTHER.
3. Pulse 9 9 0. El indicador IR parpadeará dos veces.
4. Pulse la tecla TV para seleccionar el tipo de aparato que desea leer.
5. Para el primer dígito de su código, pulse 1 y cuente los parpadeos
del indicador IR. Si no hay ningún parpadeo el dígito será el 0.
6. Para el segundo dígito de su código, pulse 2 y cuente los parpadeos
del indicador IR. Si no hay parpadeos el dígito será el 0.
7. Para el tercer dígito de su código, pulse 3 y cuente los parpadeos del
indicador IR. Si no hay parpadeos el dígito
será el 0.
8. Para el cuarto dígito de su código, pulse 4 y cuente los parpadeos del
indicador IR. Si no hay parpadeos el dígito será el 0. Ahora ya ha
completado su código de cuatro dígitos.
9. Pulse ENTER para regresar a la pantalla de programación O pulse una
tecla de aparato si desea realizar la lectura del código para otro
aparato.
10. Pulse ESC y manténgala apretada (durante 3 segundos más o
menos) para regresar al modo normal de utilización.
- Puede utilizar los pasos del 5 al 8 tantas veces como quiera. Si ha perdido
la cuenta de los parpadeos podrá comenzar de nuevo (si por ejemplo
durante el paso 6 no vio exactamente cuantas veces parpadeó el indicador
IR, pulse el número 2 otra vez y vuelva a contar).
- Para leer los códigos de otros aparatos siga las mismas instrucciones. En este
caso deberá pulsar durante el paso 4 la tecla del aparato en cuestión.
Referencia de códigos
Anote los códigos de sus aparatos en las casillas que le indicamos a
continuación para que tenga una referencia sencilla.
■
■
■
■
■
■
■
■
■
■
■
■
■
■
■
■
■
■
■
■
■
■
■
■
■
■
■
■
■
■
■
■
■
■
■
■
■
■
■
■
■
■
■
■
■
■
■
■
■
■
■
■
■
■
■
■
■
■
■
■
■
■
■
■
Page 94

WW W.ONEFORALL.COM 93
E
l KAMELEON 8 contiene en su memoria una librería completa de códigos
preprogramados. Después de haber configurado el KAMELEON 8 con su
aparato es posible que le falten una o más funciones del mando a distancia
o
riginal y que no se encuentran en el teclado del KAMELEON 8 .
E
L KAMELEON 8 le ofrece la función especial de aprendizaje que le permite
copiar casi todas las funciones de su mando a distancia original.
Antes de comenzar:
-
Asegúrese de que su mando a distancia original funciona correctamente.
- Asegúrese de que ni el KAMELEON 8 ni su mando a distancia original
apuntan hacia su aparato.
Aprendizaje (directo)
Ejemplo: Para copiar la función “mono/stereo” del mando a distancia
original de su TV en las teclas I, II, IIO o IV de su KAMELEON 8 .
1
. Coloque el KAMELEON 8 y su mando a distancia original en una
superficie plana. Asegúrese de que las partes del final que normalmente apuntan hacia su aparto se encuentran cara a cara. Apunte el
mando a distancia original hacia la parte frontal del KAMELEON 8
(vea el diagrama que le indicamos abajo). Mantenga los mandos a
unos 2 o 5 centímetros de distancia el uno del otro.
2. Pulse y mantenga apretada la tecla MAGIC (durante 3
segundos más o menos). La pantalla cambiará al modo de
programación.
3. Pulse LEARN.
4. Pulse la tecla del aparato (por ejemplo TV1) en el KAMELEON
8 para seleccionar el modo en el que usted desea copiar
la función.
5. Pulse la tecla (por ejemplo la tecla I) dónde quiere programar
esa función en el KAMELEON 8 . El indicador IR parpadeará tres
veces y luego la pantalla se apagará.
6. Pulse y mantenga apretada la tecla que quiere copiar
(ejemplo mono/stereo en su mando a distancia original). La pan-
talla se volverá a encender y el indicador IR parpadeará dos veces
indicándole que la operación ha funcionado correctamente.
7. Si desea copiar otras funciones en el mismo modo de aparato, simplemente
repita los pasos 5 y 6 pulsando la próxima tecla que quiere copiar a través
de este método. Si quiere copiar otra función en un modo distinto de
aparato, continúe con el paso 4 seguido del paso 5 y 6.
8. Para salir del modo de aprendizaje y para regresar al modo
normal de utilización pulse la tecla ENTER o pulse y mantenga
apretada la tecla ESC para volver a la pantalla
de programación.
MÉTODO DE APRENDIZAJE
(
Cómo copiar funciones de su mando a distancia original
e
n el KAMELEON 8)
Page 95

94 WW W.ONEFORALL.COM
- Tan pronto como la pantalla se apague en el paso 5, deberá pulsar la tecla
en que desea copiar de su mando a distancia original en menos de 15
s
egundos. Si no pulsa ninguna tecla durante la operación, el KAMELEON 8
v
olverá a su función normal al cabo de 30 segundos.
-
Durante el aprendizaje las teclas como (TV) menú, (TV) guía etc., no cam-
biarán de pantalla cuando se pulsen.
-
Si copia una función en una tecla, la función original del KAMELEON 8 se
c
onvertirá automáticamente en una segunda función. Pulse la tecla MAGIC
u
na vez y después la tecla para acceder a ésta (esto excluye la tecla POWER
y las teclas de cambio de canal y volumen). Si ha copiado una función en
u
na tecla numérica, accederá a su función original pulsando la tecla MAGIC
d
os veces y luego el dígito.
- Si quiere copiar una función en una tecla que no se encuentra en la pantalla
principal, utilice la tecla SCROLL para cambiar de pantalla.
-
La función de aprendizaje es específica para cada aparato. Así pues usted
puede programar una función por cada modo en la misma tecla.
- EL KAMELEON 8 puede aprender hasta 50 funciones aproximadamente. La
cantidad de teclas dependerá de la programación de otras funciones y del
mando del cual se están copiando las funciones.
-
Usted puede reemplazar una función programando otra encima de esa.
- Por favor asegúrese de que no utiliza este método cerca de luces incandesc
entes o en la luz directa del sol.
- Asegúrese de que utiliza pilas nuevas antes de seguir todas estas instrucciones.
- Aunque cambie las pilas, las funciones que ha programado permanecerán
en la memoria del KAMELEON 8 .
Aprendizaje indirecto
También es posible programar una función “aprendida” como segunda función
en una tecla en concreto y para que ésta conserve su función original.
Ejemplo: para programar la función mono/stereo como segunda función en la
tecla roja.
Para programar la función mono/stereo como segunda función en la tecla roja
simplemente siga los pasos del 1 al 8 que se describen en la página 93.
Deberá pulsar MAGIC y luego la tecla roja (en lugar de I) durante el paso 5.
Para acceder, en este ejemplo, a la función mono/stereo pulse MAGIC y luego
la tecla “roja”.
- Si se “aprende” una segunda función en las teclas de cambio de canal y de
volumen, las funciones de control de color y brillo se perderán.
- Si “aprende” una segunda función en una tecla numérica (0-9) deberá
pulsar MAGIC dos veces y luego el dígito para poder utilizar la segunda
función.
Método de aprendizaje
Page 96

WW W.ONEFORALL.COM 95
Como eliminar una función “Key Magic” o
“aprendida”:
Para eliminar la función de una tecla “aprendida” o con “Key Magic”, siga los
p
asos que le indicamos a continuación.
Ejemplo: para eliminar la función mono/stereo que ha sido previamente
“aprendida”o copiada con “Key Magic” en la tecla I y en el modo de TV:
1. Pulse y mantenga apretada la tecla MAGIC (durante tres segundos más o
menos). La pantalla cambiará al modo de programación.
2
. Pulse IR DELETE.
3
. Pulse la tecla de aparato (por ejemplo TV)..
4. Pulse la tecla “aprendida” o “copiada”que desea reinicializar (por ejemplo I).
5. Pulse ENTER para memorizar la función original o pulse ESC para regresar a
la pantalla de programación.
-
La función original (si está presente) del KAMELEON 8 volverá a restablecerse.
Cómo eliminar una segunda función “Key Magic” o
“aprendida”:
P
ara eliminar la función secundaria “aprendida” o copiada con “Key Magic”,
siga los pasos que le indicamos a continuación.
Ejemplo: para eliminar la función mono/stereo “aprendida” o copiada con “Key
Magic” como segunda función de la tecla roja y en el modo de TV:
1. Pulse y mantenga apretada la tecla MAGIC (durante tres segundos más
o menos). La pantalla cambiará al modo de programación.
2. Pulse IR DELETE.
3. Pulse la tecla de aparato (por ejemplo TV).
4. Pulse MAGIC.
5. Pulse la tecla “aprendida” o copiada que desea reinicializar (por ejemplo
la tecla roja).
6. Pulse ENTER para memorizar la función original o pulse ESC para regresar
a la pantalla de programación.
- La función original (si está presente) del KAMELEON 8 volverá a restablecerse.
Cómo eliminar todas las funciones “Key Magic” o
“aprendidas” dentro de un modo en concreto:
Ejemplo: para eliminar todas las funciones “Key Magic” o “aprendidas” en el
modo de TV:
1. Pulse y mantenga apretada la tecla MAGIC (durante tres segundos más o
menos). La pantalla cambiará al modo de programación.
2. Pulse IR DELETE.
3. Pulse la tecla de aparato o modo (por ejemplo TV)
4. Pulse ENTER para memorizar la función original o pulse ESC para regresar a
la pantalla de programación.
- La función original (si está presente) del KAMELEON 8 volverá a restablecerse.
El Reajuste Operacional eliminara todas las funciones “aprendidas” en todos los modos.
Es posible que elimine otras funciones programadas como Key Magic o Macros.
1. Pulse y mantenga apretada la tecla MAGIC (durante tres segundos más o
menos). La pantalla cambiará al modo de programación.
2. Pulse OTHER.
3. Pulse 9 8 0. El indicador IR parpadeará cuatro veces. La pantalla cambiará al
modo de programación.
Método de aprendizaje
Reajuste Operacional
Page 97

96 WW W.ONEFORALL.COM
Key Magic
®
(
Cómo programar funciones que faltan)
K
ey Magic® es una función exclusiva de ONE FOR ALL. El diseño del KAMELEON
8 le asegura que la mayoría de las funciones de su mando a distancia original
puedan ser controladas (incluso aquellas que no tengan una tecla específica en
e
l teclado del KAMELEON 8). Utilizando la función de Key Magic® de su
KAMELEON 8 puede asignar las funciones más comunes a cualquier tecla que
desee. Para programar una función en concreto con Key Magic® necesita saber
el código que corresponde a esa función. Ya que los códigos de las funciones
p
ueden variar dependiendo del tipo de aparato, no los podrá encontrar en el
manual de instrucciones, podrá obtener los códigos para su función a través del
servicio de atención al cliente, por teléfono, por carta, fax o E-mail.
T
odo lo que necesitamos saber es:
• Marca(s) y número(s) de modelo(s) de su(s) aparato(s).
•
El código de programación de 4 dígitos de su aparato.
• Como se llama esa función en su mando a distancia original.
También puede visitar nuestra página de Internet (www.oneforall.com) para
e
ncontrar la respuesta a sus preguntas.
Una vez obtenga del servicio de atención al cliente el/los código(s)
de la(s) función(es) podrá comenzar fácilmente la programación:
1. Pulse y mantenga apretada la tecla MAGIC (durante 3 segundos más o
menos). La pantalla cambiará al modo de programación.
2. Pulse KEY MAGIC.
3. Pulse la tecla de aparato (TV, SAT, DVD, PVR, CD o AUD).
4. Pulse una vez la tecla MAGIC.
5. Entre el código de 5 dígitos para su función (facilitado por el servicio de
atención al cliente).
6. Pulse la tecla en la cual quiere asignar la función deseada (si esta tecla
se ubica en una pantalla diferente a la pantalla principal, utilice la tecla
SCROLL para acceder a ella). El indicador IR se encenderá dos veces. La pantalla cambiará al modo de programación.
- Las funciones de Key Magic® son especificas de cada modo. Para acceder a
ellas debe pulsar primero la tecla de aparato correspondiente.
- Se puede asignar funciones de Key Magic® a cualquier tecla EXCEPTO las
siguientes: teclas de aparato, ESC, ENTER, tecla MAGIC y tecla SCROLL.
- Por favor anote todos los códigos de las funciones adicionales que obtenga
del servicio de atención al cliente como futura referencia.
- Las teclas como (TV) menú, (TV) guía etc. no cambiarán de pantalla cuando
se pulsen durante la programación de Key Magic®.
REFERENCIA DE FUNCIONES ADICIONALES
(la primera línea es un ejemplo):
APARATO
CÓDIGO PROGRAMACIÓN
FUNCIÓN CÓDIGO FUNCIÓN
TV 0556 16/9 format 00234
Funciones adicionales
Page 98

WW W.ONEFORALL.COM 97
Re-asignación de modo
(Para programar dos aparatos del mismo tipo en el KAMELEON 8)
E
s posible cambiar el modo de cualquier tecla de aparato. Esto le será útil si
q
uiere programar hasta dos (o más) aparatos del mismo tipo en el KAMELEON 8.
L
a tecla de aparato modificada mostrará en pantalla las teclas que necesite para
su aparato. El código lo puede programar utilizando el método de
programación directa de códigos (página 90) o el método de búsqueda (página
9
1). Para cambiar una tecla de aparato siga los ejemplos que le describimos a
c
ontinuación:
Ejemplo 1; Si desea programar un tercer televisor en la tecla DVD.
E
jemplo 2; Si desea programar un segundo vídeo en la tecla SAT.
Ejemplo 1:
Para programar un tercer televisor en la tecla DVD (por ejemplo) debe
convertir primero la tecla DVD en tecla TV, así pues, pulse:
La tecla DVD se ha convertido así en tecla TV y le mostrará las teclas
necesarias para este tipo de aparato.
Ahora entre el código de programación para su segundo televisor pulsando:
Ejemplo 2:
Para programar un segundo vídeo en la tecla SAT (por ejemplo)
debe convertir primero la tecla SAT en tecla VCR, así pues, pulse:
La tecla SAT se ha convertido así en tecla VCR para que pueda
programar un segundo vídeo y le mostrará las teclas necesarias para
este tipo de aparato.
Ahora entre el código de programación para su segundo vídeo pulsando:
- Si programa un tipo de aparato diferente en otra tecla (por ejemplo: un
segundo televisor en la tecla DVD) el icono de la tecla de aparato original
permanecerá, pero la función cambiará para satisfacer sus necesidades en el
nuevo modo. Por ejemplo: si se programa un segundo televisor en la tecla
DVD, las funciones de teletexto estarán disponibles en el modo DVD.
Reinicialización de las teclas de aparato
Ejemplo: para reinicializar la tecla DVD a su modo original, pulse:
(*) Pulse y mantenga apretada la tecla MAGIC (durante 3 segundos
más o menos). La pantalla cambiará al modo de programación.
(**) El indicador IR parpadeará dos veces. La pantalla cambiará al
modo de programación.
Funciones adicionales
(*) (**)(*) (**)
(TV Code) (**)
_ _ _ _
(**)
(SAT Code) (**)
_ _ _ _
(*) (**)
(*)
Page 99

98 WW W.ONEFORALL.COM
Interfuncionalidad del volumen
E
sta función le permite ajustar el volumen en un modo en concreto (por ejemplo
e
l modo de TV) mientras está en un modo diferente (por ejemplo VCR). Si por
ejemplo usted está viendo un programa en su vídeo, podrá ajustar el volumen
(una función del televisor) sin tener que pulsar primero la tecla TV
L
a siguiente tabla le muestra las distintas posibilidades:
Última tecla pulsada Puede controlar:
SAT : Volumen y mute del TV
D
VD : Volumen y mute del TV
V
CR : Volumen y mute del TV
PVR : Volumen y mute del TV
CD : Volumen y mute del TV
A
UD : Volumen y mute del TV
L
IGHT : Volumen y mute del TV
Ejemplo: para obtener el volumen del AUD estando en otro modo
(
por ejemplo VCR, SAT o DVD):
1
. Pulse y mantenga apretada la tecla MAGIC (durante 3 segundos más o
menos). La pantalla cambiará al modo de programación.
2. Pulse VOLUME.
3. Pulse la tecla AUD. El indicador IR parpadeará dos veces. La pantalla
cambiará al modo de programación.
Resultado: Estando en algún modo (por ejemplo DVD) usted será capaz de con-
trolar las funciones volumen +/- y mute de su audio.
Para cancelar la interfuncionalidad del volumen por modo:
1. Pulse y mantenga apretada la tecla MAGIC (durante 3 segundos más o
menos). La pantalla cambiará al modo de programación.
2. Pulse VOLUME.
3. Pulse la tecla VOL- ( ).
4. Pulse la tecla VCR. El indicador IR parpadeará cuatro veces. La pantalla
cambiará al modo de programación.
Resultado: Estando en el modo VCR usted será capaz de controlar las funciones
originales de volumen+/- y mute de su VCR (si se encuentra
disponible en su mando a distancia original).
Para cancelar la ínterfuncionalidad del volumen en todos los modos:
1. Pulse y mantenga apretada la tecla MAGIC (durante 3 segundos más o
menos). La pantalla cambiará al modo de programación.
2. Pulse VOLUME.
3. Pulse la tecla VOL+ ( ). El indicador IR parpadeará cuatro veces. La
pantalla cambiará al modo de programación.
Resultado: En todos los modos las teclas VOL +, VOL - y MUTE volverán a
realizar sus funciones originales.
Funciones adicionales
Page 100

WW W.ONEFORALL.COM 99
Autoapagado del aparato
S
i su aparato incluye la función de auto apagado (sleeptimer), podrá acceder a
e
sta función con el KAMELEON 8 . Para ello haga lo siguiente:
1. Asegúrese de que su aparato está encendido.
2
. Pulse la tecla TV (o SAT, DVD, VCR, PVR, CD, AUD, LIGHT).
3. Apunte el KAMELEON 8 hacia su aparato y pulse y suelte la tecla MAGIC,
seguidamente pulse la tecla POWER. Debería ver el sleeptimer activado en
l
a pantalla de su aparato. Para aumentar el tiempo, simplemente pulse la
t
ecla POWER de nuevo (en menos de 10 segundos) hasta que el sleeptimer
haya aumentado al tiempo deseado.
-
Para desactivar el auto apagado del aparato repita los pasos del 1 al 3.
D
urante el paso 3 continúe pulsando de nuevo la tecla POWER (en menos
de 10 segundos) hasta que el sleeptimer indique 0 minutos.
- Dependiendo de cómo utilice el sleeptimer en su mando a distancia original
e
s posible que necesite acceder a éste de una forma diferente (por ejemplo
a través de la tecla menú).
Timer del KAMELEON 8
La función timer del KAMELEON 8 – le permite activar <una foncion deseada>
desde <un modo de aparato> específico dentro de <una cantidad
específica de minutos> (el tiempo máximo del timer es de 60 minutos).
- La <función deseada> puede ser una función existente dentro de un modo
específico, un Macro, una función Key Magic o una función “aprendida”.
Ejemplo: usted desea que su TV se apague después de 45 minutos.
1. Pulse y mantenga apretada la tecla MAGIC (durante 3 segundos más o
menos). La pantalla cambiará al modo de programación.
2. Pulse OTHER.
3. Pulse 9 8 5 para acceder al modo de programación timer del KAMELEON 8.
El indicador IR se encenderá dos veces.
4. Pulse TV para seleccionar el modo dónde se programará la función timer del
KAMELEON 8. El indicador IR se encenderá dos veces.
5. Pulse la tecla POWER para seleccionar la función deseada. El indicador IR se
encenderá dos veces.
6. Ahora pulse 4 5 para programar la cantidad de minutos después de los
cuales <la función deseada > debe activarse (por ejemplo para 5 min. pulse
05, hasta un máximo de 60).
7. Pulse ENTER. El indicador parpadeará dos veces y se activará la función timer
del KAMELEON 8.
- Aquellas pulsaciones que no hayan sido válidas durante la programación de
la función de timer del KAMELEON 8, serán ignoradas.
- La <función deseada > se puede programar en cualquier tecla a excepción
de las teclas de aparatos, la tecla SCROLL, ESC, ENTER y la tecla MAGIC.
- Mientras el timer del KAMELEON 8 esté funcionando, el indicador IR se
encenderá cada 15 segundos.
- La función timer del KAMELEON 8 se puede cancelar programando una
nueva función timer.
- Si no se pulsa ninguna tecla mientras se esté configurando la función timer
del KAMELEON 8, el mando a distancia regresará al modo normal de
utilización al cabo de 30 segundos.
- La tecla SCROLL se puede utilizar durante la programación, en cualquier
momento y si es necesario en el modo actual de aparato.
Funciones adicionales
 Loading...