

Page 1

Contents
Introduction ................................................ 2
Features and Functions .............................. 2
Key Charts ................................................... 3
Device Table ................................................ 4
Installing Batteries ..................................... 4
Programming Device Control .................... 5
Searching For Your Code ........................... 6
Checking the Codes .................................... 6
Re-Assigning Device Keys .......................... 7
Changing Volume Lock .............................. 7
Clearing Custom Programming ................. 8
Restoring Factory Default Settings ........... 9
Troubleshooting ......................................... 9
Additional Information ............................ 10
Limited Lifetime Warranty ...................... 22
Contentu
Introduction .............................................. 11
Caractéristiques et fonctions ................... 11
Tableaux des touches ............................... 12
Tableau des appareils ............................... 13
Installer les piles ....................................... 13
Programmer la commande
des appareils ............................................. 14
Rechercher votre code ............................. 15
Vérifier les codes ...................................... 16
Réaffecter les touches d’appareil ............ 16
Changer le verrouillage de volume ......... 17
Effacer la programmation
personnalisée ............................................ 18
Rétablir les paramètres par
défaut de l’usine ...................................... 18
Dépannage ............................................... 19
Autres renseignements ............................ 20
Garantie à vie limitée ............................... 23
Universal
Remote Control
Télécommande
universelle
Owners Manual CURC4110
Guide de l’utilisateur
Page 2

2
Introduction
This One For All 4-Device Universal Remote Control
(CURC4110) is designed to operate up to four home
entertainment devices. Its sophisticated technology
allows you to consolidate your original home
entertainment remote controls into one easy-to-use
product.
Advanced features include:
• Intuitive buttons to allow easy access to functions
and menus on your DVD player, PVR (or DVR), and
Cable, Satellite or Digital TV converter devices
• Direct code setup for easy device programming
• Step-and-Set code search and Code Verication for
an alternate way to program devices
• Volume Lock/Unlock feature to lock or unlock the
volume control to one mode or individual modes
• Device Key Re-Assignment to operate a second,
duplicate device
• Color-coded keys to quickly locate popular functions
• Extensive code library for popular video devices
including DVD players and PVRs (or DVRs)
This remote requires two (2) new AAA alkaline batteries
(not included) and some easy programming to control
your devices. For best results, please read and perform
all instructions listed here. Also, keep this guide for
future reference.
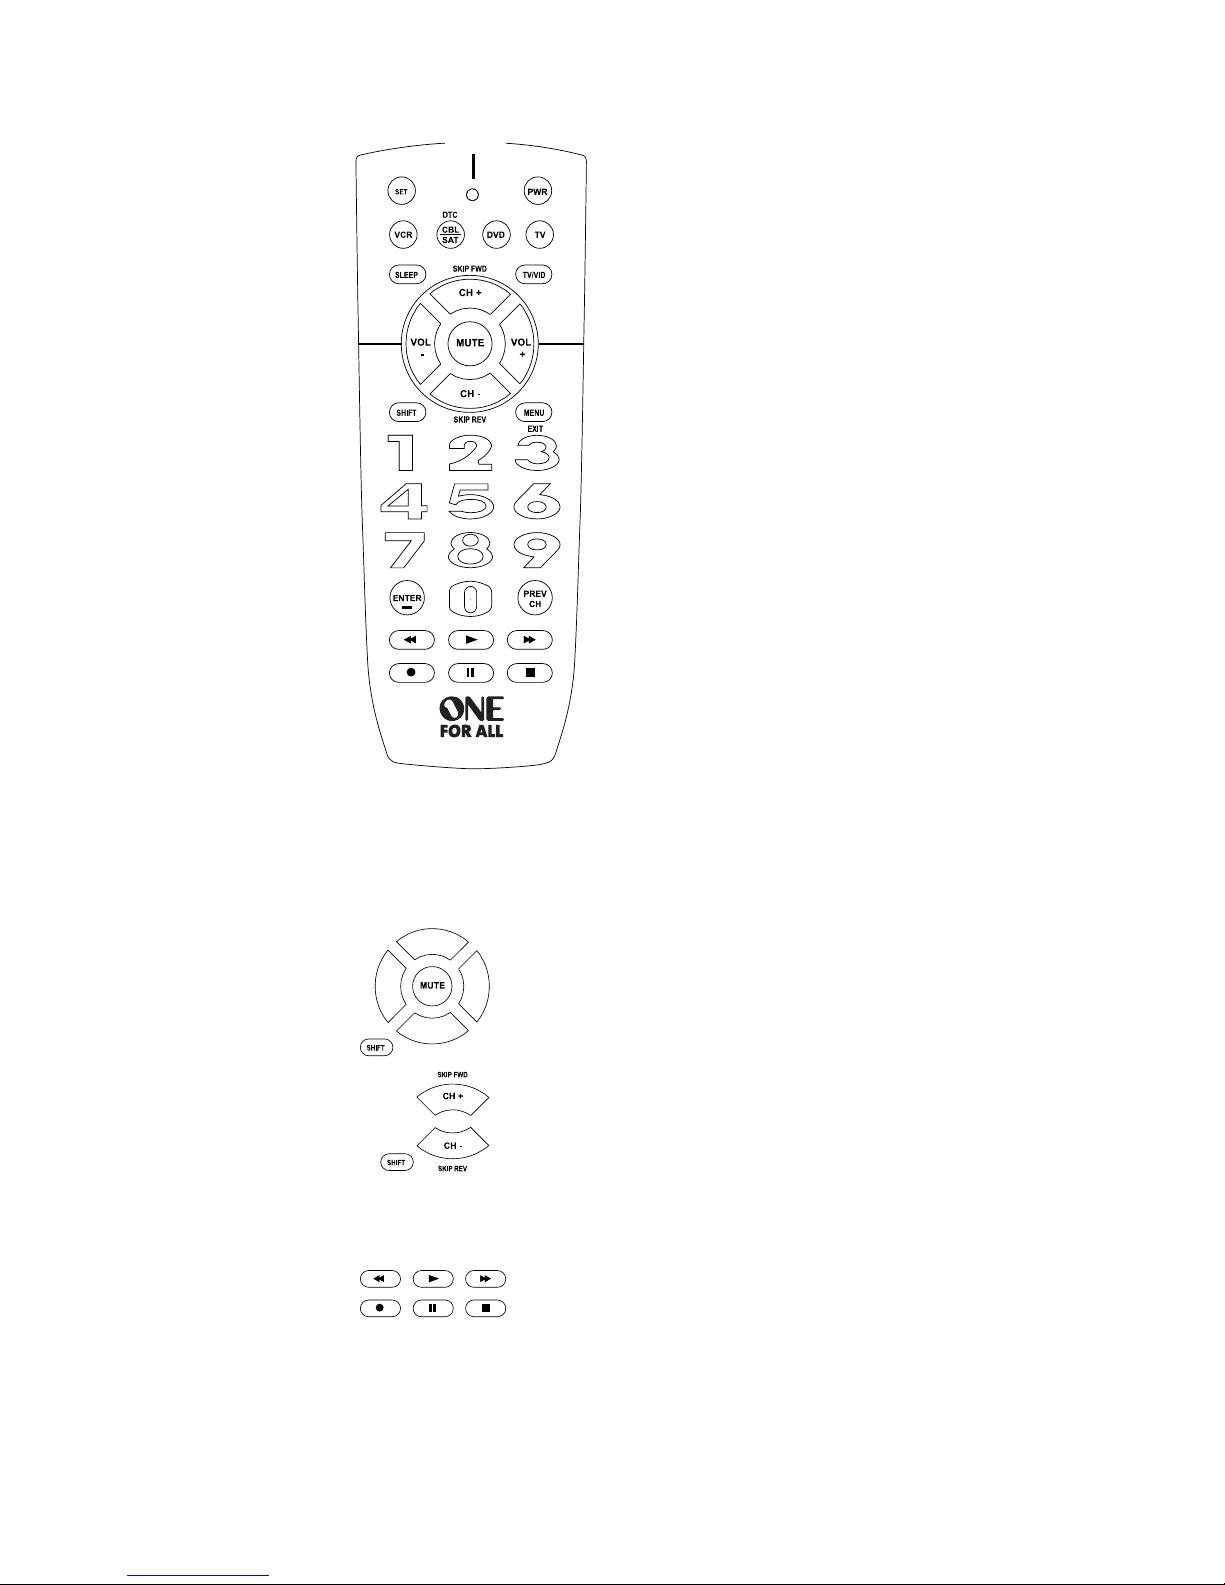
Features and Functions
Use the following illustration to locate features on this
remote. Then study the Key Charts in the next section to
learn how they function.
To find out what type of devices can be controlled by
each device key after programming, see the Device
Table on page 4.
Page 3
3
Key Charts
When the LED (red light)
blinks, the remote control
is working and (after
programming) is sending
signals.
Press VCR, DVD, CBL/
SAT (DTC), or TV once
to select a desired home
entertainment device to
control. Also see the Device
Table on page 4.
Note: DTC stands for
Digital TV Converter.
Press PWR once to turn on
or off the selected device.
Use the keypad (1 ~ 9
and 0) to directly select
channels (e.g., 009 or 031).
Use TV/VID to switch the
TV’s input to view TV or
video programs.
Press ENTER/– once after
entering the channel
numbers on some TVs. When
you’re entering digital TV
channel numbers directly,
this button lets you separate
the main channel number
from the sub-channel
number (such as 59.1).
Press MENU (EXIT) once to display (or clear) your
selected device’s main menu.
Press GO BACK once to recall the last channel.
Use CH + (or CH -) to select the next higher (or lower)
channel.
LED
Press SHIFT in device menu systems to
use the CH and VOL keys as arrow keys
in the menu systems. Press SHIFT, then
MUTE to select the highlighted item.
Press SHIFT in DVD mode to use the
CH keys as SKIP FORWARD and SKIP
REVERSE keys (to go forward or
backward one chapter).
Press MUTE once to turn the sound off or on.
Use VOL + (or VOL -) to raise (or lower) the sound
volume.
Use Rewind, Play, Forward, Pause,
or Stop to control your VCR, PVR (or
DVR), or DVD player.
Press REC twice to record a VCR or PVR (or DVR)
program.
Use SLEEP to set the sleep timer on a selected device if
equipped with this feature.
Use SET for all programming sequences.
Page 4
4
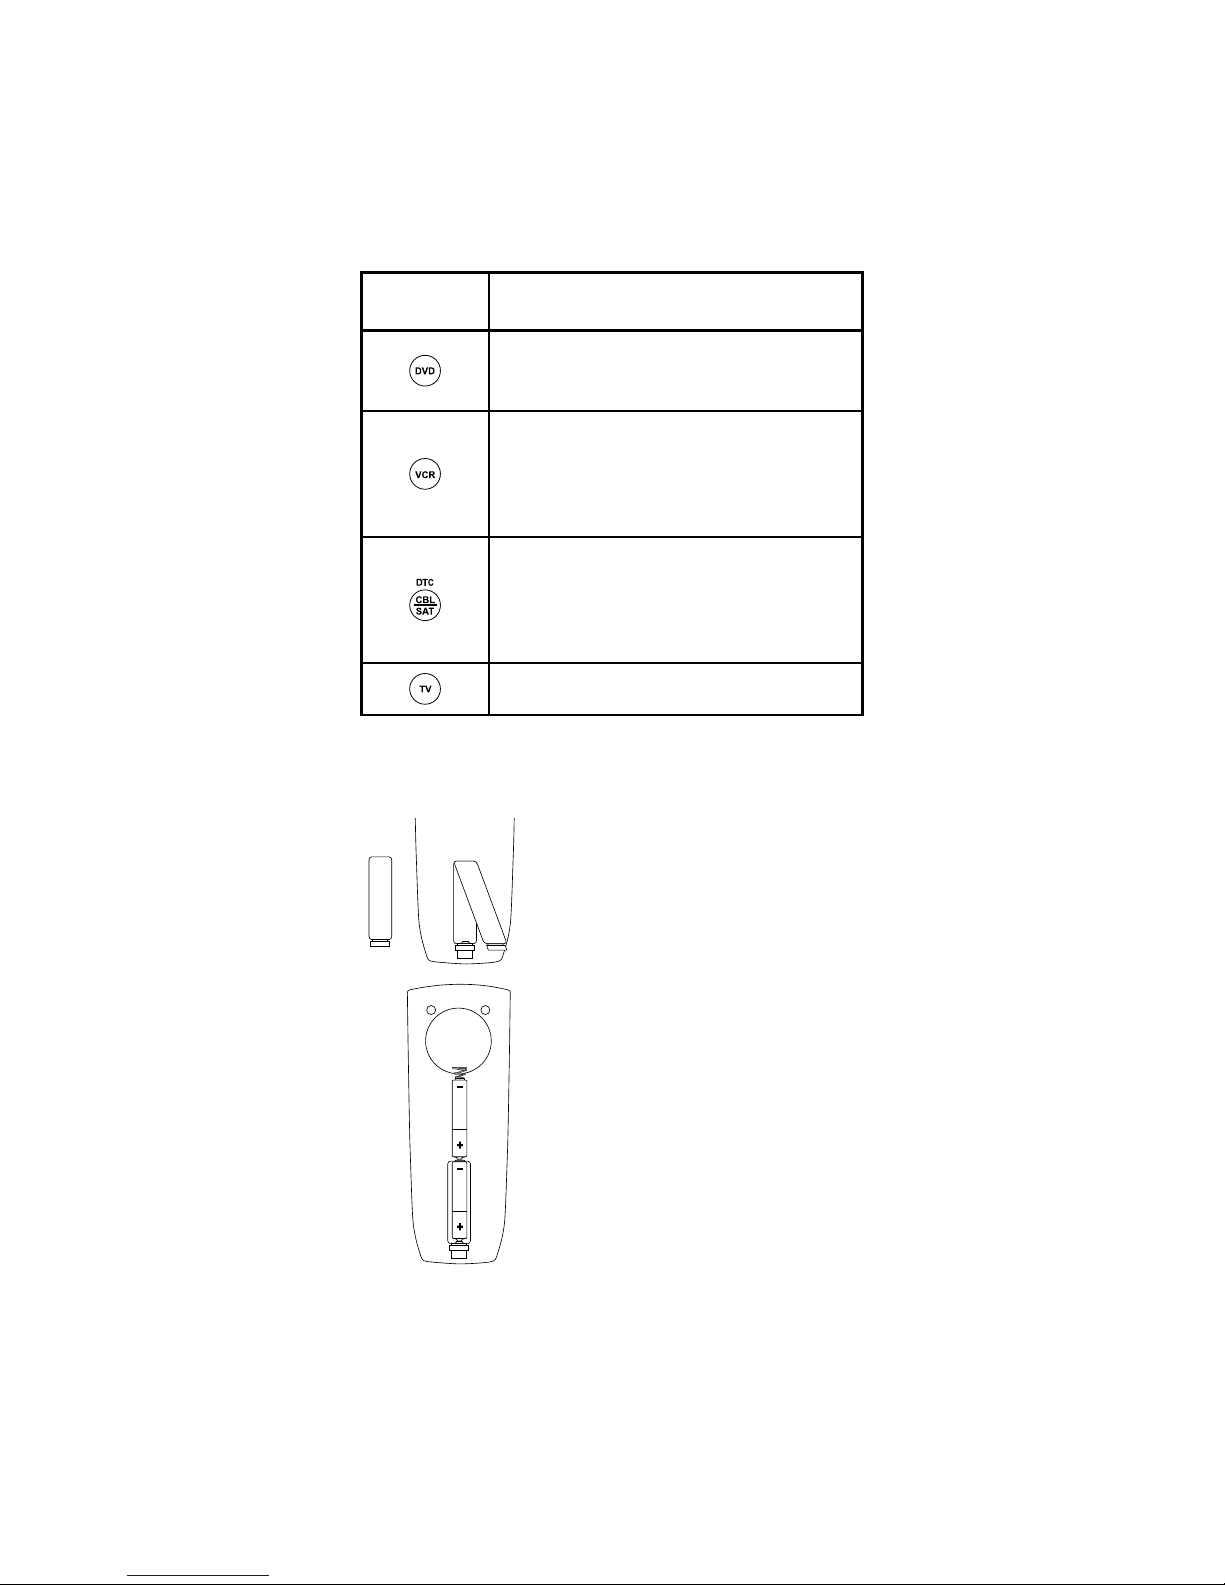
Device Table
NOTE: Please refer to the table below when performing
the instructions in “Programming Device Control” on
page 5.
After programming, this remote will be able to control
the following types of devices:
Device
Key
Controls These Types Of Devices
• DVD Player
• TV/DVD Player Combo
• VCR/DVD Player Combo
• VCR
• TV/VCR Combo
• TV/VCR/DVD Player Combo
• VCR/DVD Player Combo
• PVR (or DVR)
• Cable Box (or Converter)
• Cable Box/PVR (or DVR) Combo
• Satellite Receiver
• Satellite Receiver/PVR (or DVR) Combo
• Digital TV Converter
• Television
Installing Batteries
1. On the remote control’s back,
push the tab and lift off the
battery cover.
2. Obtain two (2) new AAA
alkaline batteries. Match the +
and – marks on the batteries to
the + and – marks in the battery
case, then insert the new
batteries.
3. Press the battery cover back
into place. The tab should click
when the cover is locked.
4. Test the remote control by
pressing any mode key (e.g.,
TV). If the batteries are inserted
correctly, the LED (red light) will
blink.
NOTE: When batteries need replacement, the remote
control will stop operating. Remove the old batteries
and insert new ones within 10 minutes to ensure all of
your programming information is restored.
Page 5

5
Battery Precautions:
• Do not mix old and new batteries.
• Do not mix alkaline, standard (carbon-zinc) or
rechargeable (nickel cadmium) batteries.
• Always remove old, weak or worn-out batteries
promptly and recycle or dispose of them in
accordance with Local and National Regulations.
Programming Device Control
This remote is preprogrammed at the factory to operate
an RCA TV, a Sony DVD player, a Motorola cable box,
and an RCA VCR. To control devices other than the
default brands, perform the following steps; otherwise
skip this section:
1. Turn on a desired device (e.g., VCR or DVD player)
and, if applicable, insert media (e.g., cassette or disc).
NOTE: Please read steps 2 through 4 completely
before proceeding. Highlight or write down the
codes and device you wish to program before
starting step 2.
2. On the remote control, press a device key once (i.e.,
VCR, DVD, CBL/SAT (DTC), or TV).
NOTES:
• ToprogramcontrolofaVCR,PVR(orDVR),TV/VCR
Combo,orTV/VCR/DVDPlayerCombopressVCR
once. After programming a VCR Combo device,
you will be able to control channel selection,
volume, and VCR functions.
• ToprogramcontrolofaDVDPlayer,DVDPlayer/
VCRCombo,orTV/DVDPlayerCombo,pressDVD
once. After programming a DVD Combo device,
you will be able to control channel selection,
volume, and DVD functions.
• ToprogramcontrolofaCableBox,CableBox/PVR
(orDVR)Combo,SatelliteReceiver,oraSatellite
Receiver/PVR(orDVR)Combo,pressCBL/SAT
(DTC) once.
3. Press and hold SET until the LED (red light) blinks
twice, then release SET.
4. Use the accompanying code list to locate the type
of device and brand name and then enter the
first four-digit code for your device. If performed
correctly, the LED will blink twice.
NOTE: If the LED did not blink twice, repeat steps 2
through 4 and enter the same code again.
5. Aim the remote control at the device and press PWR
(Power) once. The device should turn off. If it does not,
repeat steps 2 through 5, trying each code for your
brand until you find one that works. If it still doesn’t
work, try Searching For Your Code on next page.
NOTE: If the device does not have a Power key,
press PLAY.
Page 6

6
Searching For Your Code
If your device does not respond to the remote control
after trying all codes listed for your brand, or if your
brand is not listed at all, try searching for your code.
NOTE: Before performing a code search for a DVD
player or a VCR, turn on the device and insert the
required media.
For example, to search for a code for your TV:
1. On the remote control, press TV once.
2. Press and hold SET until the LED (red light) blinks
twice, then release SET.
3. Enter 9 - 9 - 1. The LED will blink twice.
4. Aim the remote control at the TV and slowly
alternate between pressing PWR (Power) and TV.
Stop when the TV turns off (after pressing PWR).
If the device does not have a Power key, you can
substitute another function, such as digits 0 ~ 9, CH
+, or PLAY).
NOTE: In the search mode, the remote control sends
IR codes from its library to the selected device,
starting with the most popular code first.
5. To lock in the code, press and release SET. The LED
will blink twice.
6. To search for the codes of your other devices, repeat
steps 1 through 5, but substitute the appropriate
device key for the device you are searching for.
6. Repeat steps 1 through 5 for each device you want
to control. For future reference, write down each
working device code in the following boxes:
VCR Code:
Device Type:______________
DVD Code:
Device Type:______________
CBL/SAT (DTC) Code:
Device Type:______________
TV Code:
Device Type:______________
Checking the Codes
If you have set up the remote control using the
Searching For Your Code procedure above, you may
need to find out which four-digit code is operating your
equipment.
For example, to find out which code is operating
your TV:
1. On the remote control, press TV once.
2. Press and hold SET until the LED (red light) blinks
twice, then release SET.
Page 7

7
3. Enter 9 - 9 - 0. The LED will blink twice.
4. To view the code for the first digit, press 1 once.
Wait 3 seconds, count the LED blinks (e.g., three
blinks = 3) and write down the number in the leftmost box in the TV code boxes on page 6.
NOTE: If a code digit is “0”, the LED will not blink.
5. Repeat step 4 three more times for remaining digits.
Use 2 for the second digit, 3 for the third digit, and
4 for the fourth digit. Write down the code digits in
the remaining TV code boxes on page 6.
6. To check for codes of other devices, repeat steps
1 through 5 (starting on the previous page), but
substitute the appropriate device key for each
device you are checking.
Write down the device’s code digits in the
appropriate code boxes on page 6.
Re-Assigning Device Keys
This remote can be set to control a second PVR, VCR, or
DVD player.
For example, to control a TV, a cable box, and two DVD
players, re-assign the unused VCR key to operate the
second DVD player as follows:
1. On the remote control, press and hold SET until the
LED (red light) blinks twice, then release SET.
2. Enter 9 - 9 - 2. The LED will blink twice.
3. Press DVD once.
4. Press VCR once. The LED will blink twice. The VCR
key is now ready to be set up to control your second
DVD player. See Programming Device Control on
page 5.
To re-assign a second VCR or PVR (or DVR) to the unused
DVD key, repeat steps 1 through 4. However, in step 3
substitute VCR for DVD, and in step 4 substitute DVD
for VCR. Now the DVD key will be ready to be set up
as your second VCR or PVR (or DVR). See Programming
Device Control on page 5.
NOTE: Only one device can be assigned to an unused
device key at a time.
Changing Volume Lock
This remote is set at the factory for independent volume
control of each selected device. However, you can
change the Volume Lock setting to Global Volume Lock
so that a device’s volume will be locked to one mode
(e.g., to control TV volume in all other modes). After
that, if desired, you can perform Individual Volume
Unlock on a selected device to set its volume control for
independent operation.
Locking Volume Control To One Mode (Global
Volume Lock)
1. Press and hold SET until the LED (red light) blinks
twice, then release SET.
Page 8

8
2. Enter 9 - 9 - 3 and then press any mode key once
(e.g., TV). The LED will blink twice.
3. Now, when you press VOL +, VOL -, or MUTE,
the volume of the selected device (e.g., TV) will
be controlled, regardless of the mode you have
selected.
Unlocking Volume Control For A Single Device
(Individual Volume Unlock)
1. After performing Global Volume Lock, press a
desired mode key where you want volume to be
unlocked (e.g., DVD) and controlled within its own
mode.
2. Press and and hold SET until the LED (red light)
blinks twice, then release SET.
3. Enter 9 - 9 - 3 and then press VOL - once. The LED
will blink four times.
4. If desired, repeat steps 1 through 3 for each device
that you want volume to be unlocked.
5. Now, after you select a device that has volume
unlocked (e.g., DVD), pressing VOL +, VOL -, or
MUTE will control the device’s volume only in its
own mode.
Unlocking All Volume Control (Restoring
Default Setting)
NOTE: Performing these instructions will restore
independent volume control for all programmed
devices(e.g.,TVvolumecontrolinTV mode, VCR
volume in VCR mode, etc.).
1. On the remote control, press and hold SET until the
LED (red light) blinks twice, then release SET.
2. Enter 9 - 9 - 3 and then press VOL + once. The LED
will blink four times.
3. Volume will again be independently controlled
according to its default states for all programmed
devices.
Clearing Custom Programming
This remote contains an Operational Feature Reset
program. If desired, you can use it to clear custom
programming (everything except your setup codes and
reassigned device keys), and reset them to original
factory settings. (See also “Restoring Factory Default
Settings”, below.)
IMPORTANT: Executing this program will erase all your
custom settings for Volume Lock.
1. Press and hold SET until the LED (red light) blinks
twice, then release SET.
2. Enter 9 - 8 - 0. The LED will blink twice. The remote
control will return to normal operation.
Page 9

9
Restoring Factory Default Settings
This remote also contains a Factory Reset program that
you can use to reset all custom settings and setup codes
to original factory settings. (See also “Clearing Custom
Programming”, above.)
IMPORTANT: Executing this program will erase all your
custom settings for Volume Lock, Reassigned Devices,
and all device settings.
1. Press and hold SET until the LED (red light) blinks
twice, then release SET.
2. Enter 9 - 8 - 1. The LED will blink twice. The remote
control will return to normal operation.
Troubleshooting
PROBLEM: LED (red light) does not blink when you
press a key.
SOLUTION: Replace batteries with two new AAA
alkaline batteries.
PROBLEM: LED blinks when you press a key, but
home entertainment device does not respond.
SOLUTION: Make sure the remote control is aimed at
your home entertainment device and is not more than
15 feet away.
PROBLEM: The unit does not control home
entertainment devices or commands are not
working properly.
SOLUTION: Try all listed codes for the device brands
being set up. Make sure they can be operated with an
infrared remote control.
PROBLEM: Changing channels does not work.
SOLUTION: If the original remote required pressing
ENTER to change channels, press ENTER on this remote
after entering the channel number.
PROBLEM: Tried Searching For Your Code method
and still could not find a working code.
SOLUTION: Clear the device key as follows: Press and
hold SET until the LED (red light) blinks twice, then
release. Next enter 9 - 9 - 2. Then press the device key
to be cleared twice. Now repeat the Searching For Your
Code method on page 6.
PROBLEM: No remote control of volume.
SOLUTION: See Changing Volume Lock on page 7 to
lock/unlock volume.
For additional information:
• Internet: http://www.oneforall.com
Page 10

10
Instructions to the User
This equipment has been tested and found to comply
with the limits for a class B digital device, pursuant
to part 15 of the FCC Rules. These limits are designed
to provide a reasonable protection against harmful
interference in a residential installation. This equipment
generates, uses, and can radiate radio frequency energy
and if not installed and used in accordance with the
instructions, may cause harmful interference to radio
communications. However, there is no guarantee that
interference will not occur in a particular installation.
If this equipment does cause harmful interference to
radio or television reception, which can be determined
by turning the equipment off and on, the user is
encouraged to try to correct the interference by one or
more of the following measures:
• Reorient or relocate the receiving antenna.
• Increase separation between equipment and
receiver.
• Connect equipment into an outlet or a circuit
different from that to which the receiver is
connected.
• Consult dealer or experienced radio/TV technician
for help.
Additional Information
ONE FOR ALL® is the registered trademark of Universal
Electronics Inc. Audiovox Accessories Corporation is the
Licensee of the ONE FOR ALL® brand for North America.
© 2009 by Universal Electronics Inc. No part of
this publication may be reproduced, transmitted,
transcribed, stored in any retrieval system, or translated
to any language, in any form or by any means,
electronic, mechanical, magnetic, optical, manual, or
otherwise, without the prior written permission of
Universal Electronics Inc.
The One For All® 4-Device Universal Remote Control is
compatible for use in North America, excluding Mexico.
This One For All® 4-Device Universal Remote Control is
covered by one or more of the following US Patents:
6,587,067 6,496,135 5,515,052 5,959,751 6,587,067
5,481,256
CURC4110 06/09
Page 11

11
Introduction
Cette télécommande universelle ONE FOR ALL®
pour 4 appareils (CURC4110) permet de commander
jusqu’à quatre appareils de divertissement maison.
Sa technologie complexe permet de regrouper vos
télécommandes de divertissement maison originales en
une seule télécommande facile à utiliser.
Parmi les fonctions avancées, notons :
• Boutons intuitifs facilitant l’accès aux fonctions
et menus de votre lecteur DVD, PVR (ou DVR) et
câblosélecteur, satellite ou convertisseur de télé
numérique
• Programmation de code directe facilitant la
programmation des appareils
• Recherche de code et vérication de code pour
programmer les appareils
• La fonction Verrouillage/déverrouillage de volume
pour verrouiller ou déverrouiller la commande de
volume pour un mode ou des modes individuels.
• Réaffectation de touche d’appareil pour commander
un second appareil ou un autre appareil identique
• Touches codées en couleurs pour repérer
rapidement les fonctions populaires
• Bibliothèque de codes complète pour les appareils
vidéo populaires dont les lecteurs DVD et les PVR
(ou DVR)
Cette télécommande est alimentée par deux (2) piles
alcalines AAA neuves (non comprises) et exige une
certaine programmation pour commander vos appareils.
Pour de meilleurs résultats, lisez et suivez toutes les
instructions données ici. Conservez aussi ce guide pour
fins de référence ultérieure.
Caractéristiques et fonctions
Utilisez l’illustration qui suit pour repérer les fonctions
de cette télécommande. Étudiez ensuite les tableaux des
touches à la section qui suit pour vous familiariser avec
leur fonction.
Pour connaître le type d’appareil vous pouvez
commander avec chaque touche d’appareil après
la programmation, lisez la section « Tableau des
appareils » à la page 13.
Page 12

12
Tableaux des touches
Quand le voyant DÉL
(rouge) clignote, la
télécommande fonctionne
et (après la programmation)
transmet les signaux.
Appuyez une fois sur VCR,
DVD, CBL/SAT (DTC), ou
TV pour choisir l’appareil de
divertissement maison que
vous voulez commander.
Consultez aussi le Tableau
des appareils à la page 13.
Note : DTC signifie
Convertisseur de télé
numérique.
Appuyez une fois sur PWR
pour allumer ou éteindre
l’appareil choisi.
Utilisez le clavier (1 à 9 et
0) pour choisir les canaux
directement (ex. : 009 ou
031).
Utilisez TV/VID pour
changer l’entrée de télé
pour regarder des émissions
de télé ou des vidéos.
Appuyez une fois sur ENTER/– après avoir entré les
numéros de canal sur certains téléviseurs. Si vous entrez
les numéros de canal de télé numérique directement, ce
bouton permet de séparer le numéro de canal principal
du numéro de sous-canal (comme 59.1).
Appuyez une fois sur MENU (EXIT) pour afficher (ou
effacer) le menu principal de l’appareil choisi.
Appuyez une fois sur GO BACK una vez para volver al
canal anterior.
Utilisez CH + (ou CH -)pour choisir le canal suivant (ou
précédent).
Voyant DÉL
Appuyez sur SHIFT dans les systèmes
de menu de l’appareil pour utiliser les
touches CH et VOL comme touches
fléchées dans les systèmes de menu.
Appuyez sur SHIFT, puis sur MUTE
pour choisir l’élément en surbrillance.
Appuyez une fois sur MUTE pour activer ou désactiver
le son.
Utilisez VOL + (ou VOL -) pour monter (ou baisser) le
volume.
Appuyez sur SHIFT en mode DVD
pour utiliser les touches CH comme
touches SKIP FORWARD et SKIP
REVERSE (pour avancer ou reculer
d’un chapitre).
Page 13

13
Utilisez REW, PLAY, FWD, PAUSE,
ou STOP pour commander le
magnétoscope, le PVR (ou le DVR)
ou le lecteur DVD.
Appuyez deux fois sur REC our enregistrer une émission
au magnétoscope ou au PVR (ou DVR).
Utilisez SLEEP pour programmer la minuterie-sommeil
d’un appareil choisi disposant de cette fonction.
Utilisez SET pour toutes les séquences de programmation.
Tableau des appareils
NOTE : Consultez le tableau qui suit quand vous
exécutez les instructions sous « Programmer la
commande des appareils » à la page 14.
Une fois programmée, cette télécommande peut
commander les types d’appareils suivants :
Touche
d'appareil
Commande ces types d’appareils
• Lecteur DVD
• Télé/lecteur DVD combinés
• Magnétoscope/lecteur DVD combinés
• Magnétoscope
• Télé/magnétoscope combinés
• Télé/magnétoscope/lecteur DVD combinés
• Magnétoscope/lecteur DVD combinés
• PVR (ou DVR)
• Câblosélecteur (ou convertisseur)
• Câblosélecteur/PVR (ou DVR) combinés
• Récepteur satellite
• Récepteur satellite/PVR (ou DVR) combinés
• Convertisseur de télé numérique
• Téléviseur
Installation des piles
1. Au dos de la télécommande,
appuyez sur l’onglet et
soulevez le couvercle du
logement à piles.
2. Obtenez deux (2) piles
alcalines AAA neuves. Faites
correspondre les marques +
et – des piles et les marques +
et – du logement à piles, puis
insérez les piles neuves.
Page 14

14
3. Enfoncez le couvercle du logement à piles en place.
La languette doit cliquer pour que le couvercle soit
bloqué en place.
4. Testez la télécommande en appuyant sur une touche
de mode (ex. : TV). Si les piles sont correctement en
place, le voyant DÉL (rouge) clignote.
NOTE : Quand il faut remplacer les piles, la
télécommande cesse de fonctionner. Retirez les
vieilles piles et insérez des piles neuves dans les 10
minutes afin de rétablir toute votre information de
programmation.
Précautions concernant les piles :
• Ne mêlez pas les piles anciennes et neuves.
• Ne mêlez pas les piles alcalines, standard
(carbone-zinc) et rechargeables (nickel cadmium).
• Retirez toujours rapidement les piles anciennes,
faibles ou usées et recyclez ou jetez-les
conformément aux règlements municipal et national.
Programmer la commande des
appareils
Cette télécommande est préprogrammée à l’usine pour
commander un téléviseur RCA, un lecteur DVD Sony, un
câblosélecteur Motorola et un magnétoscope RCA. Pour
commander des appareils autres que ceux des marques
par défaut, exécutez les étapes suivantes ; sinon, sautez
cette section :
1. Allumez l’appareil voulu (ex. : magnétoscope ou
lecteur DVD) et, s’il y a lieu, insérez y un média
(ex. : cassette ou disque).
NOTE : Lisez les étapes 2 à 4 en entier avant de
continuer. Mettez en surbrillance ou inscrivez les
codes et l’appareil que vous voulez programmer
avant de passer à l’étape 2.
2. Sur la télécommande, appuyez une fois sur une
touche d’appareil (ex. : VCR, DVD, CBL/SAT (DTC),
ou TV).
NOTES :
• Pourprogrammerlacommanded’un
magnétoscope,PVR(ouDVR),télé/magnétoscope
combinésoutélé/magnétoscope/lecteurDVD
combinés, appuyez une fois sur VCR. Après avoir
programmé un magnétoscope combiné, vous
pourrez commander la sélection des canaux, le
volume et les fonctions du magnétoscope.
• Pourprogrammerlacommanded’unlecteurDVD,
lecteurDVD/magnétoscopecombinésoutélé/
lecteur DVD combinés, appuyez une fois sur DVD.
Après avoir programmé un lecteur DVD combiné,
vous pourrez commander la sélection des canaux,
le volume et les fonctions du lecteur DVD.
• Pourprogrammerlacommanded’un
câblosélecteur,câblosélecteur/PVR(ouDVR)
combinés, récepteur satellite ou récepteur
satellite/PVR(ouDVR)combinés,appuyezunefois
sur CBL/SAT (DTC).
Page 15

15
3. Maintenez SET enfoncé jusqu’à ce que le voyant
DÉL (rouge) clignote deux fois, puis relâchez SET.
4. Utilisez la liste de codes jointe pour repérer le type
d’appareil et la marque, puis entrez le premier code
à quatre chiffres de l’appareil. Si l’opération est
correctement exécutée, le voyant DÉL clignote
deux fois.
NOTE : SilevoyantDÉLneclignotepasdeuxfois,
répétez les étapes 2 à 4 et entrez de nouveau le
même code.
5. Pointez la télécommande en direction de l’appareil
et appuyez une fois sur PWR. L’appareil devrait
s’éteindre. Dans le cas contraire, répétez les étapes
2 à 5 en essayant chaque code de la marque jusqu’à
ce que vous trouviez celui qui fonctionne. S’il ne
fonctionne toujours pas, essayez Rechercher votre
code à la page suivante.
NOTE : Sil’appareilnedisposepasd’unetouche
PWR, appuyez sur PLAY.
6. Répétez les étapes 1 à 5 pour chaque appareil que
vous voulez commander. Pour ns de référence
ultérieure, inscrivez chaque code d’appareil
compatible dans les cases ci-dessous :
Code de VCR:
Type d’appareil : ______________
Code de DVD:
Type d’appareil : ______________
Code de CBL/SAT (DTC):
Type d’appareil : ______________
Code de TV:
Type d’appareil : ______________
Rechercher votre code
Si votre appareil ne répond pas à la télécommande
après que vous avez essayé tous les codes indiqués pour
votre marque ou si votre marque ne figure pas dans la
liste, essayez de rechercher votre code.
NOTE : Avant d’effectuer une recherche de code pour
un lecteur DVD ou un magnétoscope, allumez l’appareil
et insérez le média nécessaire.
Par exemple, pour rechercher un code pour
le téléviseur :
1. Sur la télécommande, appuyez une fois sur TV.
2. Maintenez SET enfoncé jusqu’à ce que le voyant
DÉL (rouge) clignote deux fois, puis relâchez SET.
3. Entrez 9 - 9 - 1. Le voyant DÉL clignotera deux fois.
4. Pointez la télécommande en direction du téléviseur
et appuyez successivement et lentement sur PWR
(Marche) et TV. Arrêtez quand le téléviseur s’éteint
(après avoir appuyé sur PWR). Si l’appareil ne
dispose pas d’une touche PWR, choisissez une autre
fonction, comme les chiffres 0 à 9, CH +, ou PLAY).
Page 16

16
NOTE : En mode recherche, la télécommande émet
les codes IR de sa bibliothèque à l’appareil choisi, en
commençant par le code le plus populaire.
5. Pour verrouiller le code, appuyez sur SET. . Le
voyant DÉL clignotera deux fois.
6. Pour rechercher les codes de vos autres appareils,
répétez les étapes 1 à 5, mais utilisez la touche de
l’appareil pour lequel vous faites une recherche.
Vérifier les codes
Si vous avez programmé la télécommande à l’aide de la
fonction Rechercher votre code ci-dessus, vous devrez
peut-être déterminer le code à quatre chiffres qui
commande votre équipement.
Par exemple, pour trouver le code compatible avec
votre téléviseur :
1. Sur la télécommande, appuyez une fois sur TV.
2. Maintenez SET enfoncé jusqu’à ce que le voyant
DÉL (rouge) clignote deux fois, puis relâchez SET.
3. Entrez 9 - 9 - 0. Le voyant DÉL clignotera deux fois.
4. Pour voir le premier chiffre du code, appuyez
une fois sur 1. Attendez 3 secondes, comptez le
nombre de clignotements du voyant DÉL (ex. : trois
clignotements = 3) et inscrivez le chiffre dans la case
à l’extrême gauche du code de télé à la page 15.
NOTE : Si le chiffre du code est « 0 », le voyant DÉL
ne clignotera pas.
Répétez l’étape 4 trois autres fois pour les autres
chiffres. Utilisez 2 comme deuxième chiffre, 3
comme troisième chiffre et 4 comme quatrième
chiffre. Inscrivez les chiffres du code dans les autres
cases du code de télé à la page 15.
6. Pour vérifier les codes des autres appareils,
répétez les étapes 1 à 5 (en commençant à la page
précédente), mais utilisez la touche de l’appareil
que vous vériez.
Inscrivez les chiffres du code de l’appareil dans les
cases de code appropriées à la page 15.
Réaffecter les touches d’appareil
Cette télécommande peut être programmée pour
commander un second PVR, magnétoscope ou lecteur
DVD.
Par exemple, pour commander un téléviseur, un
câblosélecteur et deux lecteurs DVD, réaffectez la
touche VCR inutilisée pour commander le second
lecteur DVD comme suit :
1. Sur la télécommande, maintenez SET enfoncé
jusqu’à ce que le voyant DÉL (rouge) clignote deux
fois, puis relâchez SET.
2. Entrez 9 - 9 - 2. Le voyant DÉL clignotera deux fois.
Page 17

17
3. Appuyez une fois sur DVD.
4. Appuyez une fois sur VCR. Le voyant DÉL clignotera
deux fois. La touche VCR est maintenant prête
pour commander le second lecteur DVD. Voir
Programmer la commande des appareils à la page
14.
Pour réaffecter un second magnétoscope ou PVR (ou
DVR) à la touche DVD inutilisée, répétez les étapes 1
à 4. Cependant, à l’étape 3, utilisez VCR por DVD y
en el paso 4, DVD por VCR. Ahora la tecla DVD , et
à l’étape 4, utilisez DVD au lieu de VCR. La touche
DVD est maintenant prête pour commander le second
magnétoscope ou PVR (ou DVR). Voir Programmer la
commande des appareils à la page 14.
NOTE : Un seul appareil à la fois peut être affecté à une
touche d’appareil inutilisée.
Changer le verrouillage de volume
Cette télécommande est programmée à l’usine pour
commander le volume de façon indépendante de chaque
appareil choisi. Cependant, vous pouvez changer le
réglage Verrouillage de volume à Verrouillage de volume
global pour que le volume d’un appareil soit verrouillé à
un mode (ex. : pour commander le volume de la télé dans
tous les autres modes). Vous pouvez ensuite effectuer
un déverrouillage de volume individuel pour un appareil
choisi pour programmer sa commande de volume pour
une utilisation indépendante.
Verrouiller la commande de volume à un mode
(verrou de volume global)
1. Maintenez SET enfoncé jusqu’à ce que le voyant DÉL
(rouge) clignote deux fois, puis relâchez SET.
2. Entrez 9 - 9 - 3, puis appuyez sur une fois sur une touche
de mode (ex. : TV). Le voyant DÉL clignotera deux fois.
3. Désormais, quand vous appuyez sur VOL +,
VOL - ou MUTE, le volume de l’appareil choisi
(ex. : téléviseur) sera commandé, quel que soit le mode
choisi.
Déverrouiller la commande de volume pour
un seul appareil (déverrouillage de volume
individuel)
1. Après avoir exécuté le Verrouillage de volume global,
appuyez sur la touche de mode désirée dans lequel le
volume doit être déverrouillé (ex. : DVD) et commandé
dans son propre mode.
2. Maintenez SET enfoncé jusqu’à ce que le voyant DÉL
(rouge) clignote deux fois, puis relâchez SET.
3. Entrez 9 - 9 - 3, puis appuyez une fois sur VOL -. Le voyant
DÉL clignotera quatre fois.
4. Répétez au besoin les étapes 1 à 3 pour chaque appareil
dont le volume doit être déverrouillé.
5. Désormais, après avoir choisi un appareil dont le volume
est déverrouillé (ex. : DVD), si vous appuyez sur VOL +,
VOL - ou MUTE, vous pourrez commander le volume de
l’appareil seulement dans son propre mode.
Page 18

18
Déverrouiller toutes les commandes de
volume (rétablir le réglage par défaut)
NOTE : Suivezcesinstructionspourrétablirlacommande
de volume indépendante pour tous les appareils
programmés(ex.:commandedevolumedetéléenmode
TV, volume de magnétoscope en mode VCR,etc.).
1. Sur la télécommande, maintenez SET enfoncé
jusqu’à ce que le voyant DÉL (rouge) clignote deux
fois, puis relâchez SET.
2. Entrez 9 - 9 - 3, puis appuyez une fois sur VOL +. Le
voyant DÉL clignotera quatre fois.
3. Le volume sera de nouveau commandé de façon
indépendante selon ses états par défaut pour tous
les appareils programmés.
Effacer la programmation
personnalisée
Cette télécommande contient un programme
de rétablissement des fonctions opérationnelles.
Vous pouvez au besoin l’utiliser pour effacer la
programmation personnalisée (tout sauf vos codes de
programmation et les touches d’appareil réaffectées)
et rétablir les réglages d’usine originaux. (Voir aussi
« Rétablir les réglages par défaut d’usine » ci-dessous.)
IMPORTANT : L’exécution de ce programme effacera
tous vos réglages personnels de verrouillage de volume.
1. Maintenez SET enfoncé jusqu’à ce que le voyant
DÉL (rouge) clignote deux fois, puis relâchez SET.
2. Entrez 9 - 8 - 0. Le voyant DÉL clignotera deux
fois. La télécommande retourne au mode de
fonctionnement normal.
Rétablir les paramètres par
défaut de l’usine
Cette télécommande renferme aussi un programme de
rétablissement d’usine qui permet de rétablir tous les
réglages personnalisés et les codes de programmation
aux réglages d’usine originaux. (Voir aussi « Effacer la
programmation personnalisée » ci-dessus.)
IMPORTANT : L’exécution de ce programme effacera
tous vos réglages personnalisés de verrouillage de
volume, d’appareils réaffectés et tous les réglages
d’appareil.
1. Maintenez SET enfoncé jusqu’à ce que le voyant
DÉL (rouge) clignote deux fois, puis relâchez SET.
2. Entrez 9 - 8 - 1. Le voyant DÉL clignotera deux
fois. La télécommande retourne au mode de
fonctionnement normal.
Page 19

19
Dépannage
PROBLÈME : Le voyant DÉL (rouge) ne clignote pas
quand vous appuyez sur une touche.
SOLUTION : Remplacez les piles par deux piles alcalines
AAA neuves.
PROBLÈME : Le voyant DÉL clignote quand vous
appuyez sur une touche, mais l’appareil de
divertissement maison ne répond pas.
SOLUTION : Assurez-vous que la télécommande est
pointée en direction de l’appareil de divertissement
maison et que vous vous trouvez à moins de 15 pieds de
l’appareil.
PROBLÈME : La télécommande ne commande pas
les appareils de divertissement maison ou les
commandes ne fonctionnent pas correctement.
SOLUTION : Essayez tous les codes indiqués pour la
marque de l’appareil programmé. Assurez-vous qu’ils
peuvent être commandés avec une télécommande
infrarouge.
PROBLÈME : Impossible de changer les canaux.
SOLUTION : S’il fallait appuyer sur ENTER sur la
télécommande originale pour changer les canaux,
appuyez sur ENTER sur cette télécommande après avoir
entré le numéro du canal.
PROBLÈME : Impossible de trouver un code
compatible après avoir essayé la méthode
Rechercher votre code.
SOLUTION : Effacez la touche d’appareil comme suit :
maintenez SET enfoncé jusqu’à ce que le voyant DÉL
(rouge) clignote deux fois, puis relâchez la touche.
Entrez ensuite 9 - 9 - 2. Appuyez ensuite deux fois sur
la touche d’appareil à effacer. Répétez la méthode
Rechercher votre code à la page 15.
PROBLÈME : Impossible de commander le volume à
distance.
SOLUTION : Voir Changer le verrouillage de volume à la
page 17 pour verrouiller/déverrouiller le volume.
Pour en savoir plus :
• Internet : http://www.oneforall.com
Instructions à l’utilisateur
Cet équipement a été testé et jugé conforme aux
limites d’un dispositif numérique de Classe B, en vertu
de la Partie 15 du règlement de la FCC. Ces limites sont
conçues pour assurer une protection raisonnable contre
l’interférence nuisible dans une installation résidentielle.
Cet équipement produit, utilise et peut transmettre
par rayonnement de l’énergie radiofréquence et,
s’il n’est pas installé et utilisé conformément aux
instructions, peut produire de l’interférence nuisible aux
Page 20

20
communications radio. Toutefois, il n’est aucunement
garanti qu’aucune interférence ne sera produite dans
une installation particulière. Dans l’éventualité où
cet équipement produirait de l’interférence nuisible
à la réception radio ou télévision, laquelle peut être
déterminée en allumant et en éteignant l’équipement,
on recommande à l’utilisateur de tenter d’éliminer cette
interférence d’une des façons suivantes :
• Réorientez ou déplacez l’antenne de réception.
• Éloignez l’équipement davantage du récepteur.
• Branchez l’équipement dans une prise ou un circuit
différents de ceux dans lesquels le récepteur est
branché.
• Consultez le détaillant ou un technicien spécialisé en
radio/télévision pour obtenir de l’aide.
Autres renseignements
ONE FOR ALL® est une marque déposée d’Universal
Electronics Inc. Audiovox Accessories Corporation est
le détenteur de licence de la marque ONE FOR ALL® en
Amérique du Nord.
© 2009 par Universal Electronics Inc. Aucune partie
de ce document ne peut être reproduite, transmise,
transcrite, mémorisée dans un système de récupération
ou traduite dans quelque langue que ce soit, dans
quelque forme ou par quelque moyen que ce soit,
électronique, mécanique, magnétique, optique, manuel
ou autre, sans la permission écrite préalable d’Universal
Electronics Inc.
La télécommande universelle One For All® pour 4
appareils est compatible partout en Amérique du Nord,
sauf au Mexique.
Cette télécommande universelle One For All® pour 4
appareils est couverte par un ou plusieurs des brevets
américains suivants : 6,587,067 6,496,135 5,515,052
5,959,751 6,587,067 5,481,256
CURC4110 06/09
Page 21

21
Page 22

22
Limited Lifetime Warranty
Audiovox Electronics Corporation (the “Company”)
warrants to you the original retail purchaser of this
product that should it, under normal use and conditions,
be proven defective in material or workmanship during its
lifetime while you own it, such defect(s) will be repaired
or replaced (at the Company’s option) without charge for
parts and repair labor. To obtain repair or replacement
within the terms of this Warranty, the product is to be
delivered with proof of warranty coverage (e.g. dated bill
of sale), specification of defect(s), transportation prepaid,
to the Company at the address shown below.
This Warranty does not cover product purchased, serviced
or used outside the United States or Canada. This Warranty
is not transferable and does not extend to costs incurred
for installation, removal or reinstallation of the product.
This Warranty does not apply if in the Company’s opinion,
the product has been damaged through alteration,
improper installation,mishandling, misuse, neglect,
accident, or the simultaneous use of different battery types
(e.g. alkaline, standard or rechargeable). THE EXTENT OF
THE COMPANY’S LIABILITY UNDER THIS WARRANTY IS
LIMITED TO THE REPAIR OR REPLACEMENT PROVIDED
ABOVE AND, IN NO EVENT, SHALL THE COMPANY’S
LIABILITY EXCEED THE PURCHASE PRICE PAID BY
PURCHASER FOR THE PRODUCT.
This Warranty is in lieu of all other express warranties
or liabilities. ANY IMPLIED WARRANTIES, INCLUDING
ANY IMPLIED WARRANTY OF MERCHANTABILITY OR
FITNESS FOR A PARTICULAR PURPOSE SHALL BE LIMITED
TO DURATION OF THIS WARRANTY. IN NO CASE SHALL
THE COMPANY BE LIABLE FOR ANY CONSEQUENTIAL
OR INCIDENTAL DAMAGES WHATSOEVER. No person or
representative is authorized to assume for the Company
any liability other than expressed herein in connection
with the sale of this product. Some states/provinces do not
allow limitations on how long an implied warranty lasts or
the exclusion or limitation of incidental or consequential
damage so the above limitations or exclusions may not
apply to you. This Warranty gives you specific legal rights
and you may also have other rights, which vary from state/
province to state/province.
U.S.A.: Audiovox Electronics Corporation, 150 Marcus
Blvd., Hauppauge, NewYork 11788
CANADA: Audiovox Return Center, c/o Genco,
6685 Kennedy Road, Unit 3, Door 16, Mississauga, Ontario
L5T 3A5
Page 23

23
Garantie limitée à vie
Audiovox Electronics Corporation (la « compagnie »)
garantit à l’acheteur au détail original de ce produit
que si celui-ci, dans les conditions normales d’utilisation,
présente des défauts de matériaux ou de main-d’œuvre
pendant sa durée utile en votre possession, lesdits défauts
seront réparés ou l’appareil sera remplacé (au choix de la
compagnie) sans aucuns frais de pièces et de main-d’œuvre
de réparation.
Pour obtenir une réparation ou un remboursement en
vertu des conditions de la présente garantie, le produit
doit être livré avec la preuve de garantie (c.-à-d. facture
datée), indication précise de défauts, port payé, à la
compagnie, à l’adresse indiquée ci-dessous. Ne pas
retourner ce produit au détaillant.
La présente garantie ne couvre pas les produits achetés,
réparés ou utilisés à l’extérieur des États-Unis ou du
Canada.
La présente garantie ne peut être cédée et ne couvre
pas les frais engagés pour l’installation, le retrait ou
à réinstallation du produit. La présente garantie ne
s’applique pas si, de l’avis de la compagnie, le produit a
été endommagé à la suite de la modification, la mauvaise
installation, la manipulation inappropriée, la mauvaise
utilisation, la négligence ou un accident.
LA RESPONSABILITÉ DE LA COMPAGNIE EN VERTU DE
LA PRÉSENTE GARANTIE EST LIMITÉE À LA RÉPARATION
OU AU REMPLACEMENT PRÉVUS CI-DESSUS ET, EN
AUCUN CAS, LA RESPONSABILITÉ DE LA COMPAGNIE NE
DÉPASSERA LE PRIX D’ACHAT PAYÉ PAR L’ACHETEUR POUR
LE PRODUIT.
La présente garantie remplace toutes les autres
garanties ou responsabilités expresses. TOUTE GARANTIE
IMPLICITE, DONT LES GARANTIES IMPLICITES DE
QUALITÉ MARCHANDE OU D’ADAPTATION À UN USAGE
PARTICULIER SERA LIMITÉE À LA DURÉE DE LA PRÉSENTE
GARANTIE. LE COMPAGNIE NE SERA EN AUCUN CAS
RESPONSABLE DES DOMMAGES ACCESSOIRES OU
ACCIDENTELS, QUELS QU’ILS SOIENT. Aucune personne
ni aucun représentant n’est autorisé à assumer pour la
compagnie une responsabilité autre que celle exprimée
aux présentes relativement à la vente de ce produit.
Certains états/certaines provinces ne permettent pas de
limiter la durée d’une garantie implicite ni d’exclure ou
de limiter les dommages accessoires ou accidentels ; il se
peut donc que les limitations ou exclusions ci-dessus ne
s’appliquent pas à vous. Cette garantie vous confère des
droits légaux spéciques et vous pouvez avoir d’autres
droits qui peuvent varier d’un état/d’une province à
l’autre.
E.U.: Audiovox Electronics Corporation, 150 Marcus Blvd.,
Hauppauge, New York 11788
CANADA: Audiovox Return Center, c/o Genco, 6685
Kennedy Road, Unit 3, Door 16, Mississauga, Ontario
L5T 3A5
Page 24

 Loading...