

Page 1

USER´S MANUAL
SMARTSTEP Junior
Servomotors/Servo Drivers
MODELS R7M-Z
@@
(Servomotors)
R7D-ZP
@@
(Servo Drivers)
Cat. No. I553-E1-01
Page 2

Thank you for choosing this SMARTSTEP Junior product.
This manual provides information on installation, wiring, and switch setting for the SMARTSTEP Junior
Servomotors and Servo Drivers. For information about troubleshooting, refer to the S MARTSTEP Junior
User’s Manual (Cat. No. I553).
Intended Audiences
This manual is intended for the following personnel, who must also have knowledge of
electrical systems (an electrical engineer or the equivalent).
• Personnel in charge of installing FA systems
• Personnel in charge of designing FA systems
• Personnel in charge of managing FA systems and facilities
NOTICE
This manual contains information necessary for the operation of the SMARTSTEP Junior
Servomotors and Servo Drivers. Please read this manual thoroughly and understand its
contents before attempting to operate the product. Please keep this manual handy for
future reference after reading it.
Be sure that this manual accompanies the product to its final user.
OMRON, 2006
All rights reserved. No part of this publication may be reproduced, stored in a retrieval system, or transmitted, in any form, or
by any means, mechanical, electronic, photocopying, recording, or otherwise, without the prior written permission of
OMRON.
No patent liability is assumed with respect to th e use of the information contained herein. Moreover, because OMRON is
constantly striving to improve its high-quality products, the information contained in this manual is subject to change without
notice. Every precaution has been taken in the preparati on of this manual. Nevertheless, OM RON assumes no responsibility
for errors or omissions. Neither is any liability assumed for damages resulting from the use of the information contained in
this publication.
Page 3

2
Page 4
Read and Understand this Manual
Please read and understand this manual before using the product. Please consult your OMRON
representative if you have any questions or comments.
Warranty and Limitations of Liability
WARRANTY
OMRON's exclusive warranty is that the products are free from defects in materials and workmanship for a
period of one year (or other period if specified) from date of sale by OMRON.
OMRON MAKES NO WARRANTY OR REPRESENTATION, EXPRESS OR IMPLIED, REGARDING
NON-INFRINGEMENT, MERCHANTABILITY, OR FITNESS FOR PARTICULAR PURPOSE OF THE
PRODUCTS. ANY BUYER OR USER ACKNOWLEDGES THAT THE BUYER OR USER ALONE HAS
DETERMINED THAT THE PRODUCTS WILL SUITABLY MEET THE REQUIREMENTS OF THEIR
INTENDED USE. OMRON DISCLAIMS ALL OTHER WARRANTIES, EXPRESS OR IMPLIED.
LIMITATIONS OF LIABILITY
OMRON SHALL NOT BE RESPONSIBLE FOR SPECIAL, INDIRECT, OR CONSEQUENTIAL DAMAGES,
LOSS OF PROFITS OR COMMERCIAL LOSS IN ANY WAY CONNECTED WITH THE PRODUCTS,
WHETHER SUCH CLAIM IS BASED ON CONTRACT, WARRANTY, NEGLIGENCE, OR STRICT
LIABILITY.
In no event shall the responsibility of OMRON for any act exceed the individual price of the product on
which liability is asserted.
IN NO EVENT SHALL OMRON BE RESPONSIBLE FOR WARRANTY, REPAIR, OR OTHER CLAIMS
REGARDING THE PRODUCTS UNLESS OMRON'S ANALYSIS CONFIRMS THAT THE PRODUCTS
WERE PROPERLY HANDLED, STORED, INSTALLED, AND MAINTAINED AND NOT SUBJECT TO
CONTAMINATION, ABUSE, MISUSE, OR INAPPROPRIATE MODIFICATION OR REPAIR.
3
Page 5
Application Considerations
SUITABILITY FOR USE
OMRON shall not be responsible for conformity with any standards, codes, or regulations that apply to the
combination of products in the customer's application or use of the products.
At the customer's request, OMRON will provide applicable third party certification documents identifying
ratings and limitations of use that apply to the products. This information by itself is not sufficient for a
complete determination of the suitability of the products in combination with the end product, machine,
system, or other application or use.
The following are some examples of applications for which particular attention must be given. This is not
intended to be an exhaustive list of all possible uses of the products, nor is it intended to imply that the
uses listed may be suitable for the products:
•
Outdoor use, uses involving potential chemical contamination or electrical interference, or conditions or
uses not described in this manual.
• Nuclear energy control systems, combustion systems, railroad systems, aviation systems, medical
equipment, amusement machines, vehicles, safety equipment, and installations subject to separate
industry or government regulations.
• Systems, machines, and equipment that could present a risk to life or property.
Please know and observe all prohibitions of use applicable to the products.
NEVER USE THE PRODUCTS FOR AN APPLICATION INVOLVING SERIOUS RISK TO LIFE OR
PROPERTY WITHOUT ENSURING THAT THE SYSTEM AS A WHOLE HAS BEEN DESIGNED TO
ADDRESS THE RISKS, AND THAT THE OMRON PRODUCTS ARE PROPERLY RATED AND
INSTALLED FOR THE INTENDED USE WITHIN THE OVERALL EQUIPMENT OR SYSTEM.
PROGRAMMABLE PRODUCTS
OMRON shall not be responsible for the user's programming of a programmable product, or any
consequence thereof.
4
Page 6
Disclaimers
CHANGE IN SPECIFICATIONS
Product specifications and accessories may be changed at any time based on improvements and other
reasons.
It is our practice to change model numbers when published ratings or features are changed, or when
significant construction changes are made. However, some specifications of the products may be changed
without any notice. When in doubt, special model numbers may be assigned to fix or establish key
specifications for your application on your request. Please consult with your OMRON representative at any
time to confirm actual specifications of purchased products.
DIMENSIONS AND WEIGHTS
Dimensions and weights are nominal and are not to be used for manufacturing purposes, even when
tolerances are shown.
PERFORMANCE DATA
Performance data given in this manual is provided as a guide for the user in determining suitability and
does not constitute a warranty. It may represent the result of OMRON's test conditions, and the users must
correlate it to actual application requirements. Actual performance is subject to the OMRON Warranty and
Limitations of Liability.
ERRORS AND OMISSIONS
The information in this manual has been carefully checked and is believed to be accurate; however, no
responsibility is assumed for clerical, typographical, or proofreading errors, or omissions.
5
Page 7
General Warnings
To ensure safe and proper use of SMARTSTEP Junior Servomotors and Servo Drivers, read the general
warnings provided below along with the rest of this manual to gain sufficient knowledge of the devices, safety
information, and precautions before actual use.
This OPERATION MANUAL is to be delivered to the actual end users of the products.
Please keep this manual close at hand for future reference.
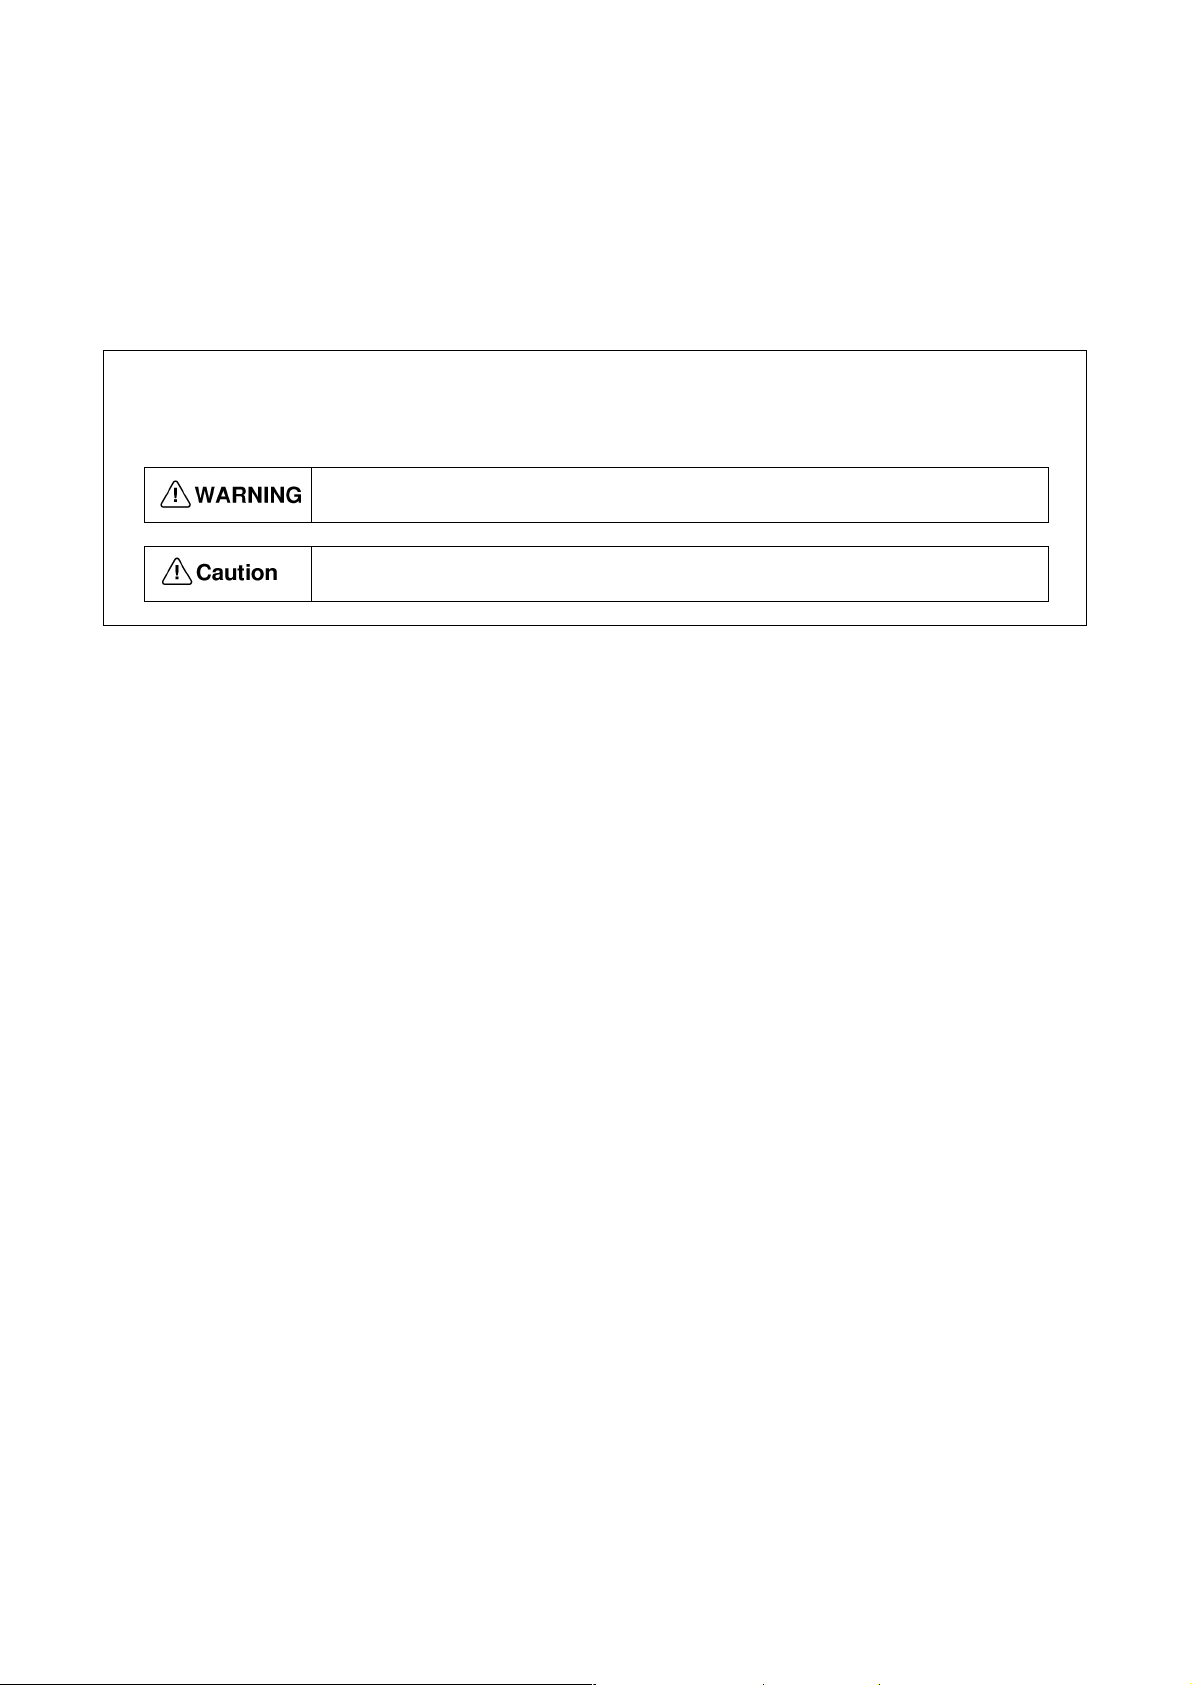
The following conventions are used to indicate and classify precautions in this manual. Always heed
the information provided with them. Failure to heed precautions can result in injury to people or
damage to property.
Indicates a potentially hazardous situation which, if not avoided, could result in
death or serious injury. Additionally, there may be severe property damage.
Indicates a potentially hazardous situation which, if not avoided, may result in
minor or moderate injury, or property damage.
6
Page 8
General Warnings
• This manual may include illustrations of the product with protective covers or shields removed in order
to describe the components of the product in detail. Make sure that these protective covers and shields
are on the product before use.
• Consult your OMRON representative when using the product after a long period of storage.
WARNING
Always connect the frame ground terminals of the Servo Driver and the Servomotor to a
class-3 ground (to 100 Ω or less). Not connecting to a class-3 ground may result in electric
shock.
Do not touch the inside of the Servo Driver. Doing so may result in electric shock.
Do not remove the front cover, terminal covers, cables, or optional items while the power is
being supplied. Doing so may result in electric shock.
Installation, operation, maintenance, or inspection must be performed by authorized
personnel. Not doing so may result in electric shock or injury.
Wiring or inspection must not be performed for at least five minutes after turning OFF the
power supply. Doing so may result in electric shock.
Do not damage, press, or put excessive stress or heavy objects on the cables.
Doing so may result in electric shock.
Do not touch the rotating parts of the Servomotor in operation. Doing so may result in injury.
Do not modify the product. Doing so may result in injury or damage to the product.
Provide a stopping mechanism on the machine to ensure safety. The holding brake is not
designed as a stopping mechanism for safety purposes.
Provide an external emergency stopping mechanism that can stop operation and shutting
off the power supply immediately. Not doing so may result in injury.
Do not come close to the machine immediately after resetting momentary power
interruption to avoid an unexpected restart. (Take appropriate measures to secure safety
against an unexpected restart.) Doing so may result in injury.
7
Page 9
General Warnings
CAUTION
Use the Servomotors and Servo Drivers in a specified combination. Using them incorrectly
may result in fire or damage to the products.
Do not store or install the product in the following places. Doing so may result in fire, electric
shock, or damage to the product
• Locations subject to direct sunlight.
• Locations subject to temperatures or humidity outside the range specified in the
specifications.
• Locations subject to condensation as the result of severe changes in temperature.
• Locations subject to corrosive or flammable gases.
• Locations subject to dust (especially iron dust) or salts.
• Locations subject to shock or vibration.
• Locations subject to exposure to water, oil, or chemicals.
Do not touch the Servo Driver radiator, Servo Driver regeneration resistor, or Servomotor
while the power is being supplied or soon after the power is turned OFF.
Doing so may result in a skin burn due to the hot surface.
Storage and Transportation Precau tions
CAUTION
Do not hold the product by the cables or motor shaft while transporting it. Doing so may result
in injury or malfunction.
Do not place any load exceeding the figure indicated on the product. Doing so may result in
injury or malfunction.
8
Page 10
General Warnings
Installation and Wiring Precautions
CAUTION
Do not step on or place a heavy object on the product. Doing so may result in injury.
Do not cover the inlet or outlet ports and prevent any foreign objects from entering the product.
Doing so may result in fire.
Be sure to install the product in the correct direction. Not doing so may result in malfunction.
Provide the specified clearances between the Servo Driver and the control panel or with other
devices. Not doing so may result in fire or malfunction.
Do not apply any strong impact. Doing so may result in malfunction.
Be sure to wire correctly and securely. Not doing so may result in motor runaway, injury, or
malfunction.
Be sure that all the mounting screws, terminal screws, and cable connector screws are
tightened to the torque specified in the relevant manuals. Incorrect tightening torque may
result in malfunction.
Use crimp terminals for wiring. Do not connect bare stranded wires directly to terminals.
Connection of bare stranded wires may result in burning.
Always use the power supply voltage specified in the User’s Manual. An incorrect voltage may
result in malfunction or burning.
Take appropriate measures to ensure that the specified power with the rated voltage and
frequency is supplied. Be particularly careful in places where the power supply is unstable. An
incorrect power supply may result in malfunction.
Install external breakers and take other safety measures against short-circuiting in external
wiring. Insufficient safety measures against short-circuiting may result in burning.
Take appropriate and sufficient countermeasures when installing systems in the following
locations. Failure to do so may result in damage to the product.
• Locations subject to static electricity or other forms of noise.
• Locations subject to strong electromagnetic fields and magnetic fields.
• Locations subject to possible exposure to radioactivity.
• Locations close to power supplies.
9
Page 11
General Warnings
Operation and Adjustment Precautions
CAUTION
Confirm that no adverse effects will occur in the system before performing the test operation.
Not doing so may result in equipment damage.
Check the newly set parameters and switches for proper execution before actually running
them. Not doing so may result in equipment damage.
Do not make any extreme adjustments or setting changes. Doing so may result in unstable
operation and injury.
Separate the Servomotor from the machine, check for proper operation, and then connect to
the machine. Not doing so may cause injury.
When an alarm occurs, remove the cause, reset the alarm after confirming safety, and then
resume operation. Not doing so may result in injury.
Do not use the built-in brake of the Servomotor for ordinary braking. Doing so may result in
malfunction.
Do not operate the Servomotor connected to a load that exceeds the applicable load moment
of inertia. Doing so may result in malfunction.
Maintenance and Inspection Precautio ns
CAUTION
Do not attempt to disassemble, repair, or modify any Units. Any attempt to do so may result
in malfunction, fire, or electric shock.
Resume operation only after transferring to the new Unit the contents of the data required
for operation. Not doing so may result in an unexpected operation.
10
Page 12
General Warnings
Warning Labels
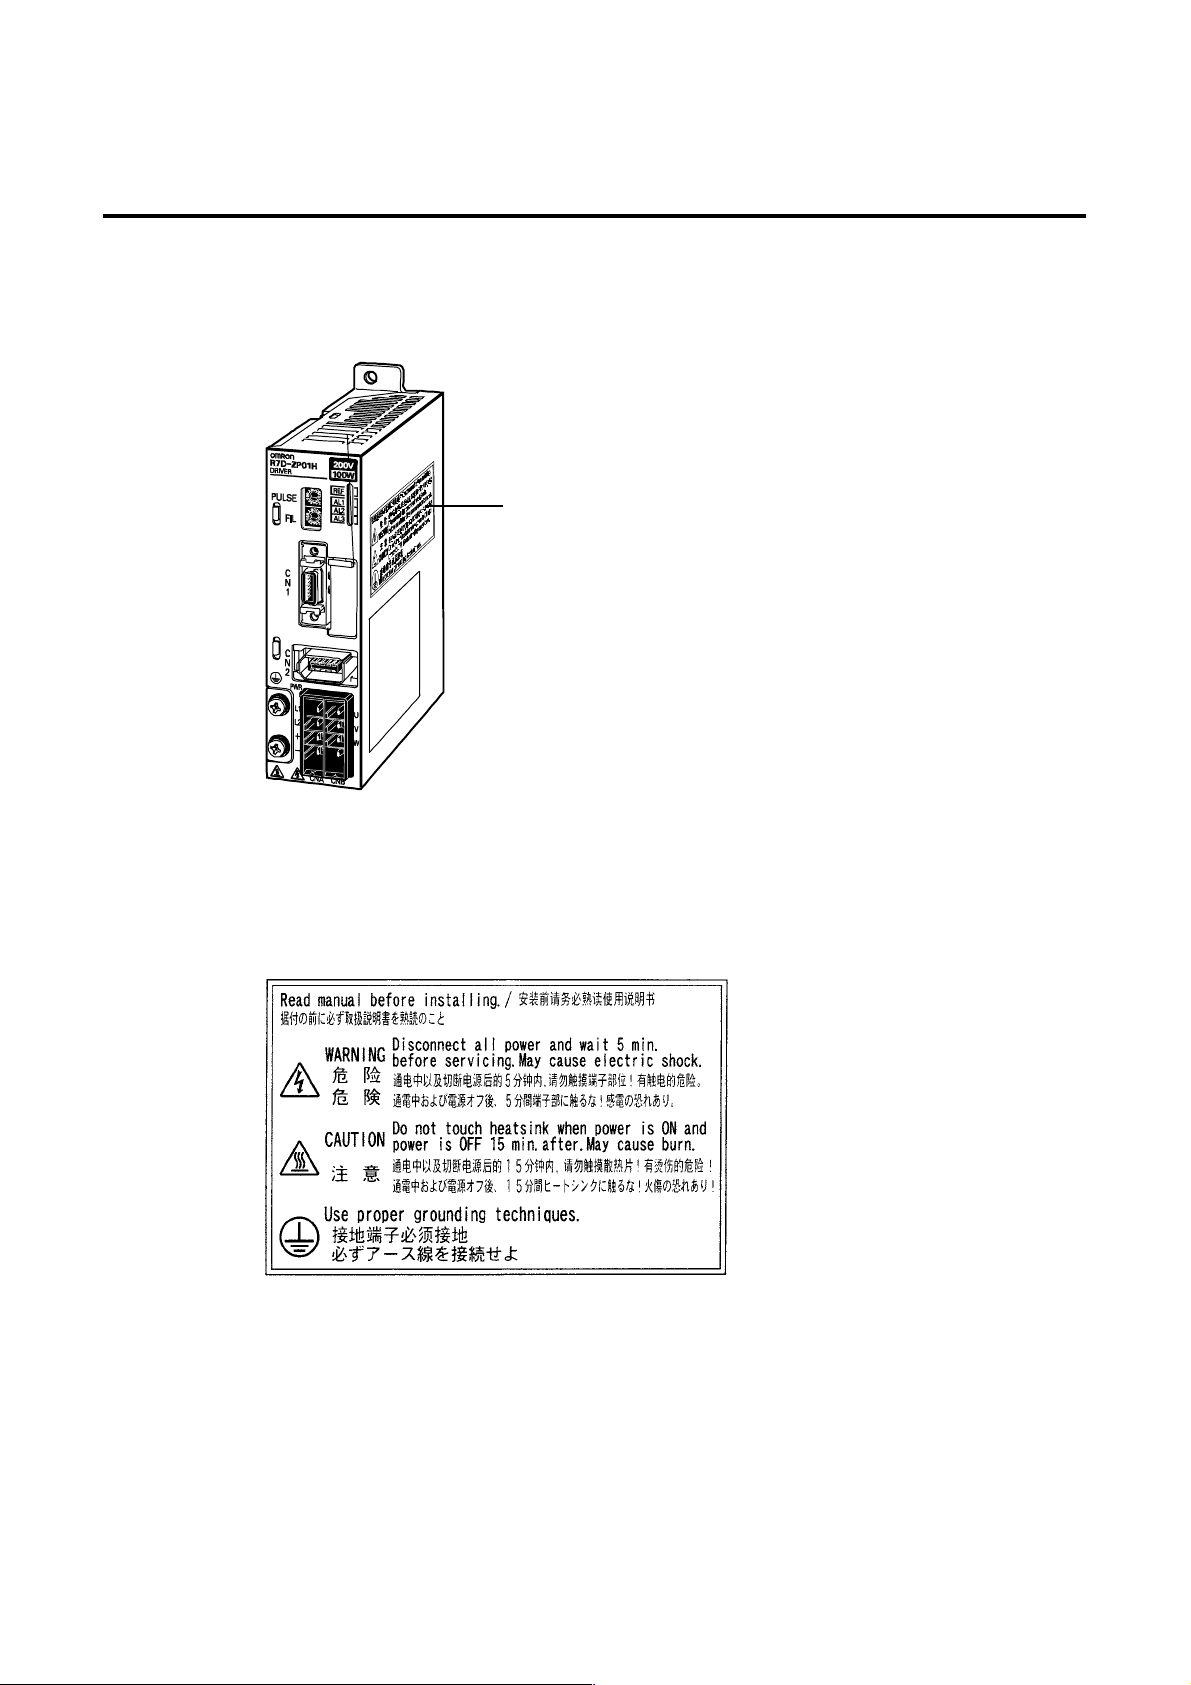
Warning labels are pasted on the product as shown in the following illustration. Be sure to
follow the instructions given there.
Warning label
Example from R7D-ZP01H
Warning Label Contents
11
Page 13
Items to Check When Unpacking
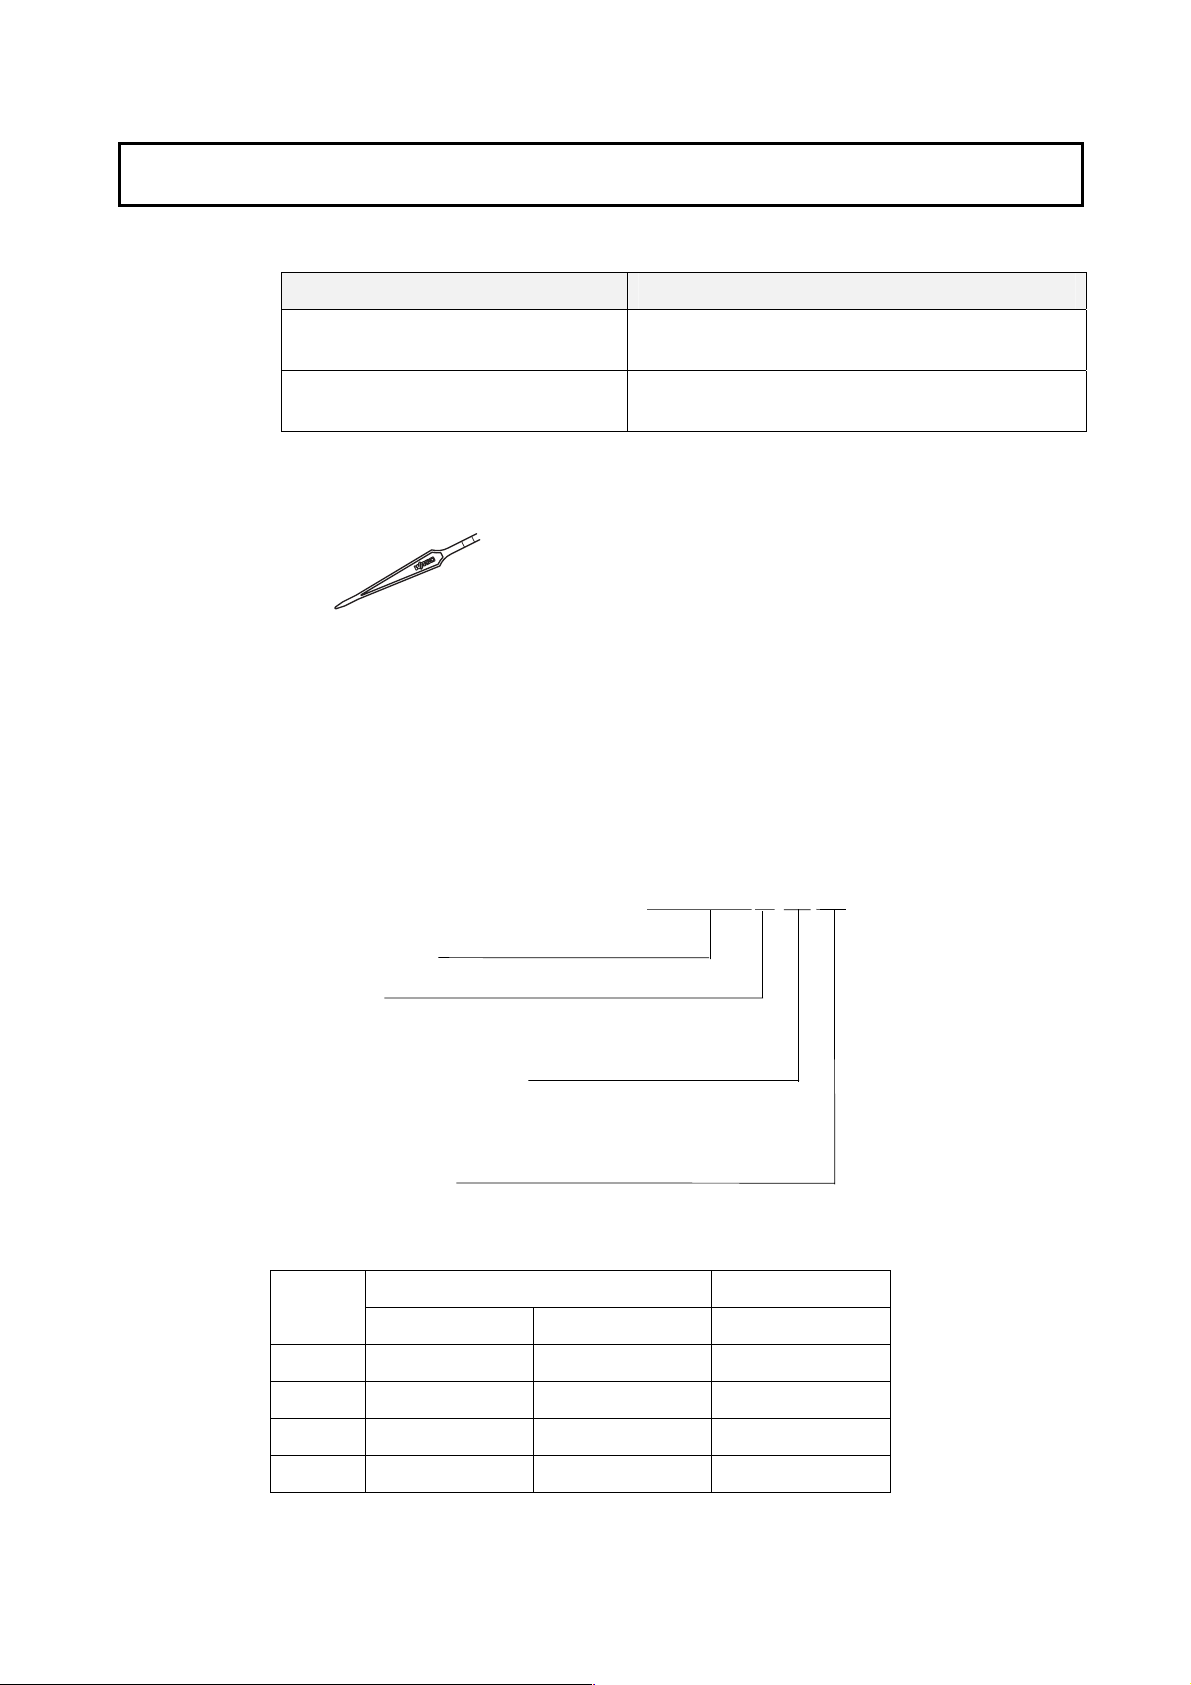
Check the following items after removing the product from the package.
Item Method
Has the correct product been delivered? Check the model number on the namepl ate on the side of
the product.
Has the product been damaged in
shipping?
Inspect the outside of the product and carefully check that
there has been no damage during shi pping.
• Accessories
1. Special screw driver for setting the rotary switch × 1
2. Safety Precautions document × 1
No connectors or mounting screws are provided. Obtain these separately.
If something is missing, the Servo Driver is damaged, or some other fault exists, please
contact the point of purchase or your OMRON representative.
• Interpreting the Model Number
The model number provides information such as the Servo Driver type, the applicable
Servomotor capacity, and the power supply voltage.
R7D-ZP01H
SMARTSTEP Junior
Servo Driver
Driver Type
P: Pulse string input
12
Applicable Servomotor Capacit y
01: 100 W
02: 200 W
04: 400 W
08: 750 W
Power Supply Voltage
H: 200 VAC
• Servo Driver and Servomotor Combinations
Rated
output
100 W R7M-Z10030-S1 R7M-Z10030-B S1 R7D-ZP01H
200 W R7M-Z20030-S1 R7M-Z20030-B S1 R7D-ZP02H
400 W R7M-Z40030-S1 R7M-Z40030-B S1 R7D-ZP04H
750 W R7M-Z75030-S1 R7M-Z75030-B S1 R7D-ZP08H
Without brake With brake Pulse string input
Servomotor Servo Driver
Page 14

Section 1 Features and System Configuration
Section 2 Standard Models and Dimensions
Section 3 Specifications
Section 4 System Design
Section 5 Operation
Section 6 Troubleshooting
Appendix
13
Page 15

Contents
Read and Understand this Manual.................................................................................3
Warranty and Limitations of Liability...............................................................................3
Application Considerations.............................................................................................4
Disclaimers....................................................................................................................5
General Warnings..........................................................................................................6
Items to Check When Unpacking................................................................................. 12
Contents ..................................................................................................................... 14
Section 1 Features and System Configuration
1-1 Introduction....................................................................................................1-2
1-1-1 Introduction ................................................................................................................... 1-2
1-1-2 SMARTSTEP Junior Features...................................................................................... 1-2
1-2 System Configuration.....................................................................................1-3
1-3 Nomenclature and Functions.........................................................................1-4
1-3-1 Servo Driver Nomenclature and Functions................................................................... 1-4
1-4 System Block Diagrams.................................................................................1-6
1-4-1 Pulse-train Input Servo Driver....................................................................................... 1-6
1-5 Applicable Standards.....................................................................................1-7
1-5-1 EC Directives ................................................................................................................ 1-7
1-5-2 UL and cUL Standards ................................................................................................. 1-7
Section 2 Standard Models and Dimensions
2-1 Standard Models ............................................................................................2-2
2-1-1 Servo Drivers................................................................................................................ 2-2
2-1-2 Servomotors.................................................................................................................. 2-2
2-1-3 Servo Driver-Servomotor Combinations....................................................................... 2-2
2-1-4 Decelerators (Straight Shaft with Key).......................................................................... 2-3
2-1-5 Accessories and Cables ............................................................................................... 2-4
2-2 External and Mounted Dimensions ................................................................2-5
2-2-1 Servo Drivers................................................................................................................ 2-5
2-2-2 Servomotors.................................................................................................................. 2-7
2-2-3 Decelerator Dimensions ............................................................................................... 2-9
Section 3 Specifications
3-1 Servo Driver Specifications............................................................................3-2
3-1-1 General Specifications.................................................................................................. 3-2
3-1-2 Characteristics .............................................................................................................. 3-3
3-1-3 Main Circuit and Servomotor Connector Specifications (CNA and CNB) .................... 3-3
14
Page 16

3-1-4 Control I/O Specifications (CN1)................................................................................... 3-5
3-1-5 Control Input Circuits .................................................................................................... 3-7
3-1-6 Control Input Details ..................................................................................................... 3-8
3-1-7 Control Output Circuits ...............................................................................................3-10
3-1-8 Control Output Details ................................................................................................ 3-10
3-1-9 Encoder Connector Specifications (CN2)...................................................................3-11
3-2 Servomotor Specifications...........................................................................3-13
3-2-1 General Specifications................................................................................................ 3-13
3-2-2 Characteristics ............................................................................................................ 3-14
3-2-3 Encoder Specifications ............................................................................................... 3-16
3-3 Decelerator Specifications...........................................................................3-17
3-3-1 Standard Models and Specifications .......................................................................... 3-17
3-4 Cable and Connector Specifications............................................................3-18
3-4-1 Control Cable Specifications....................................................................................... 3-18
3-4-2 Servomotor Power Cable Specifications .................................................................... 3-19
3-4-3 Encoder Cable Specifications..................................................................................... 3-21
3-4-4
Connector Specifications............................................................................................ 3-22
3-5 Regeneration Resistance Unit......................................................................3-24
3-5-1 Regeneration Resistance Unit (R88A-RG08UA) Specifications ................................ 3-24
3-6 AC Reactors................................................................................................3-26
3-6-1 AC Reactor Specifications..........................................................................................3-26
Section 4 System Design
4-1 Installation Conditions....................................................................................4-2
4-1-1 Servo Drivers................................................................................................................ 4-2
4-1-2 Servomotors.................................................................................................................. 4-3
4-1-3 Decelerators.................................................................................................................. 4-5
4-2 Wiring ............................................................................................................4-6
4-2-1 Connecting Cables........................................................................................................ 4-6
4-2-2 Selecting Connecting Cables........................................................................................ 4-7
4-2-3 Peripheral Device Connection Examples ..................................................................... 4-8
4-2-4 Wiring the Main Circuit and Servomotor Connections.................................................. 4-9
4-2-5 Conforming to EMC Directives ................................................................................... 4-11
4-3 Regenerative Energy Absorption .................................................................4-21
4-3-1 Calculating the Regenerati ve Ener g y ......................................................................... 4-21
4-3-2 Servo Driver Regenerative Energy Absorption Capacity............................................ 4-23
4-3-3 Absorbing Regenerati ve Ener g y with an External Res is tor........................................ 4-23
Section 5 Operation
5-1 Operational Procedure...................................................................................5-2
5-1-1 Operational Procedure.................................................................................................. 5-2
5-2 Switch Settings..............................................................................................5-3
5-2-1 Switch Names...............................................................................................................5-3
15
Page 17

5-2-2 Switch Functions........................................................................................................... 5-3
5-3 Preparing for Operation..................................................................................5-5
5-3-1 Turning ON the Power and Checking Indicators .......................................................... 5-5
5-4 Trial Operation...............................................................................................5-7
5-4-1 Preparing for Trial Operation ........................................................................................ 5-7
5-4-2 Trial Operation .............................................................................................................. 5-7
5-5 Operating Functions.......................................................................................5-9
5-5-1 Brake Interlock..............................................................................................................5-9
Section 6 Troubleshooting
6-1 Error Processing............................................................................................6-2
6-1-1 Preliminary Checks when a Problem Occurs ............................................................... 6-2
6-1-2 Precautions When Troubleshooting.............................................................................. 6-3
6-1-3 Replacing the Servomotor and Servo Driver................................................................6-3
6-2 Alarm Table...................................................................................................6-4
6-2-1 Alarm Table................................................................................................................... 6-4
6-3 Troubleshooting.............................................................................................6-5
6-3-1 Error Diagnosis using the Alarm Indicators .................................................................. 6-5
6-3-2 Error Diagnosis using the Operating Stat us ................................................................. 6-8
6-4 Overload Characteristics (Electronic Thermal Function)...............................6-11
6-4-1 Overload Character istics Graphs................................................................................ 6-11
6-5 Periodic Maintenance ..................................................................................6-12
6-5-1 Servomotor Maintenance............................................................................................ 6-12
6-5-2 Servo Driver Maintenance .......................................................................................... 6-13
6-5-3 Replacing the Cooling Fan ......................................................................................... 6-13
Appendix
A-1 Connection Examples....................................................................................A-2
Revision History......................................................................................................... R-1
16
Page 18
Section 1 Features and System Configuration
Page 19

1-1 Introduction
1-1-1 Introduction
1-1 Introduction
1-1-1 Introduction
The SMARTSTEP Junior is a Servo Driver with a pulse-string input for position control.
The SMARTSTEP Junior is easy to set up and start because it does not require the
complex parameter settings and Servo adjustments normally associated with Servos.
The SMARTSTEP Junior Servomotor and Servo Driver are easy-to-use, yet provide the
responsiveness, high-speed, high-torque, and precision of traditional Servo systems.
This manual describes the SMARTSTEP Junior as a pulse-string input Servo Driver for
position control.
1-1-2 SMARTSTEP Junior Features
The SMARTSTEP Junior has the following features.
No Setup Parameters
No parameter settings are required for setup, so you can start using the Servo Driver
immediately simply by removing it from the box and wiring it. If it is necessary to set the
positioning resolution or reference pulse method, these settings can be set or changed
easily with the rotary switches on the front of the Servo Driver.
No Servo Adjustments Required
With the newest auto-tuning function, it isn’t necessary to adjust the Servo Driver to
achieve excellent responsiveness. Auto-tuning achieves excellent responsiveness while
providing compatibility with a range of stepping motors. A Servomotor with moderate
inertia is used to improve control system stability.
1-2
Page 20
1-2 System Configuration
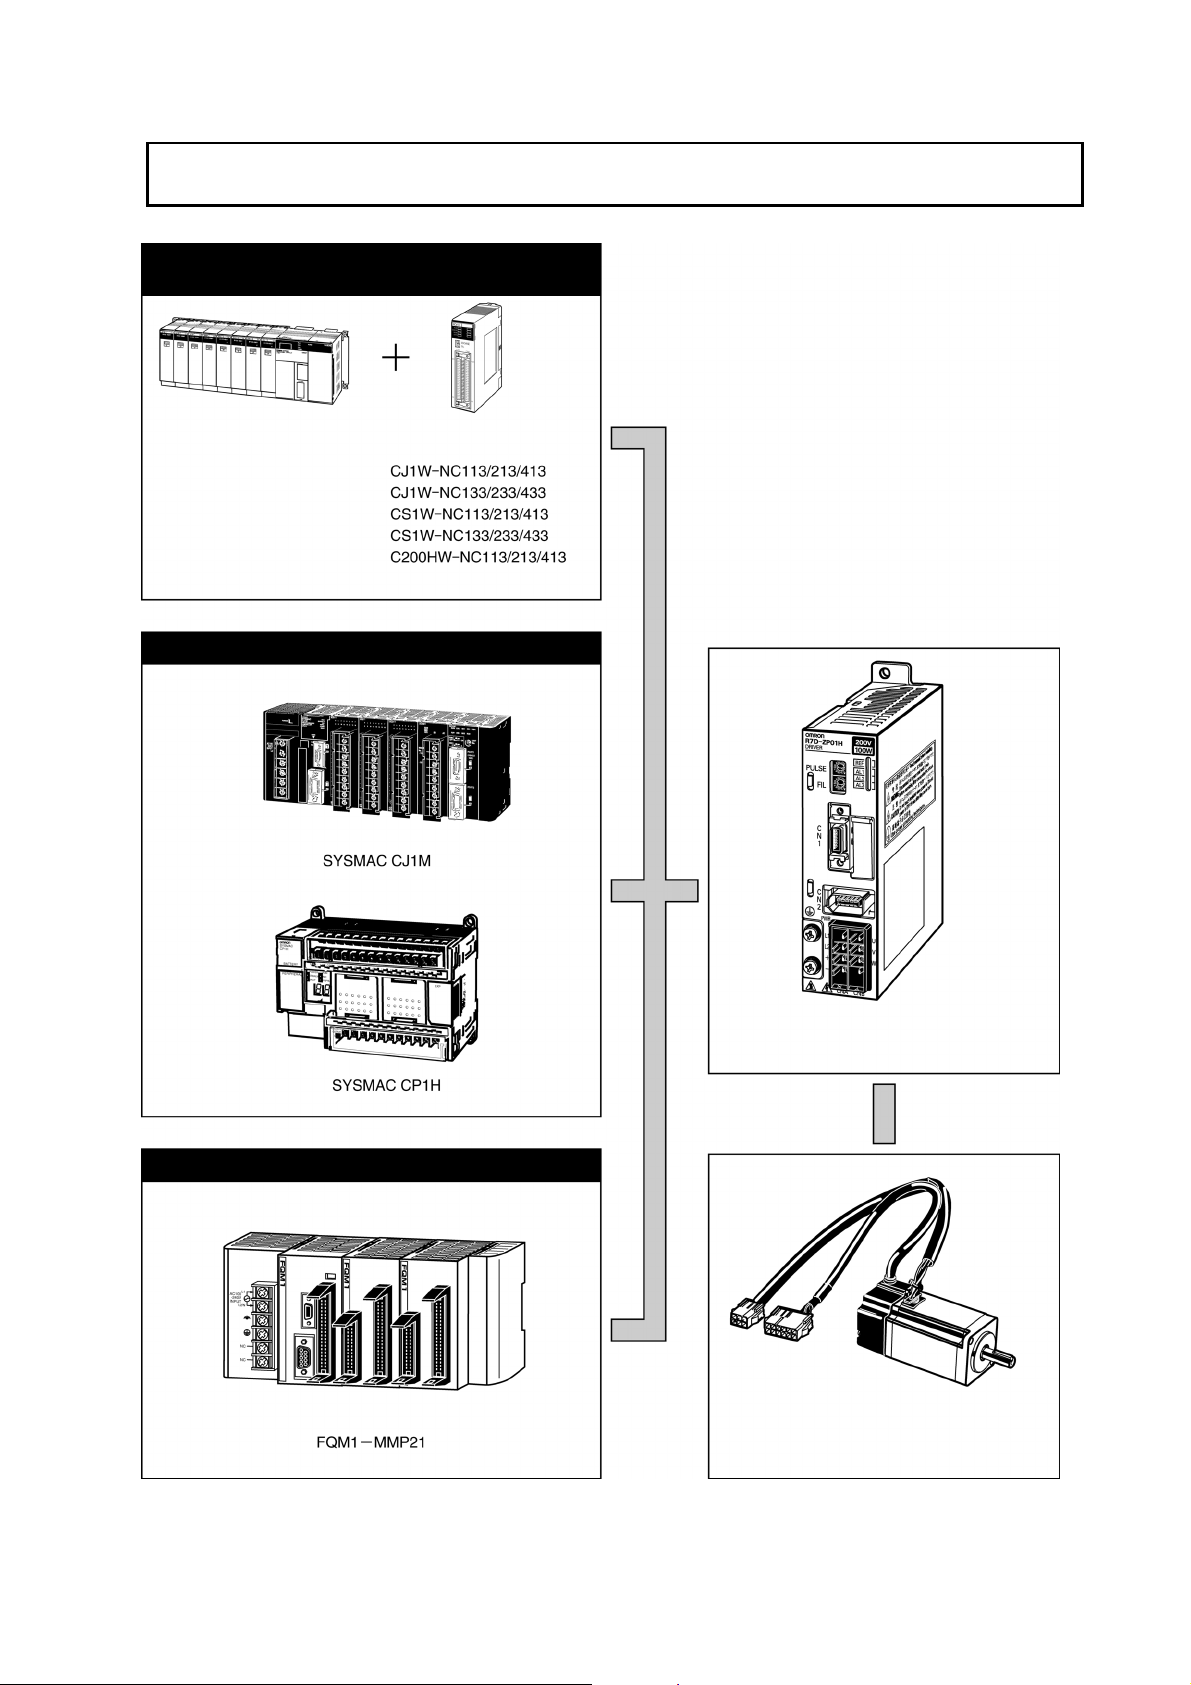
SYSMAC PLC + Position Control Unit
with pulse-string output
Pulse string
1-2 System Configuration
SYSMAC
Position Control Unit
CJ1/CS1/C-series
Programmable Controlle r
SYSMAC PLC with pulse output functions
SMARTSTEP Junior Servo Driver
R7D-ZP@
Flexible Motion Controller with pulse I/O
SMARTSTEP Junior Servomotor
R7M-Z@
1-3
Page 21
1-3 Nomenclature and Functions
r
r
r
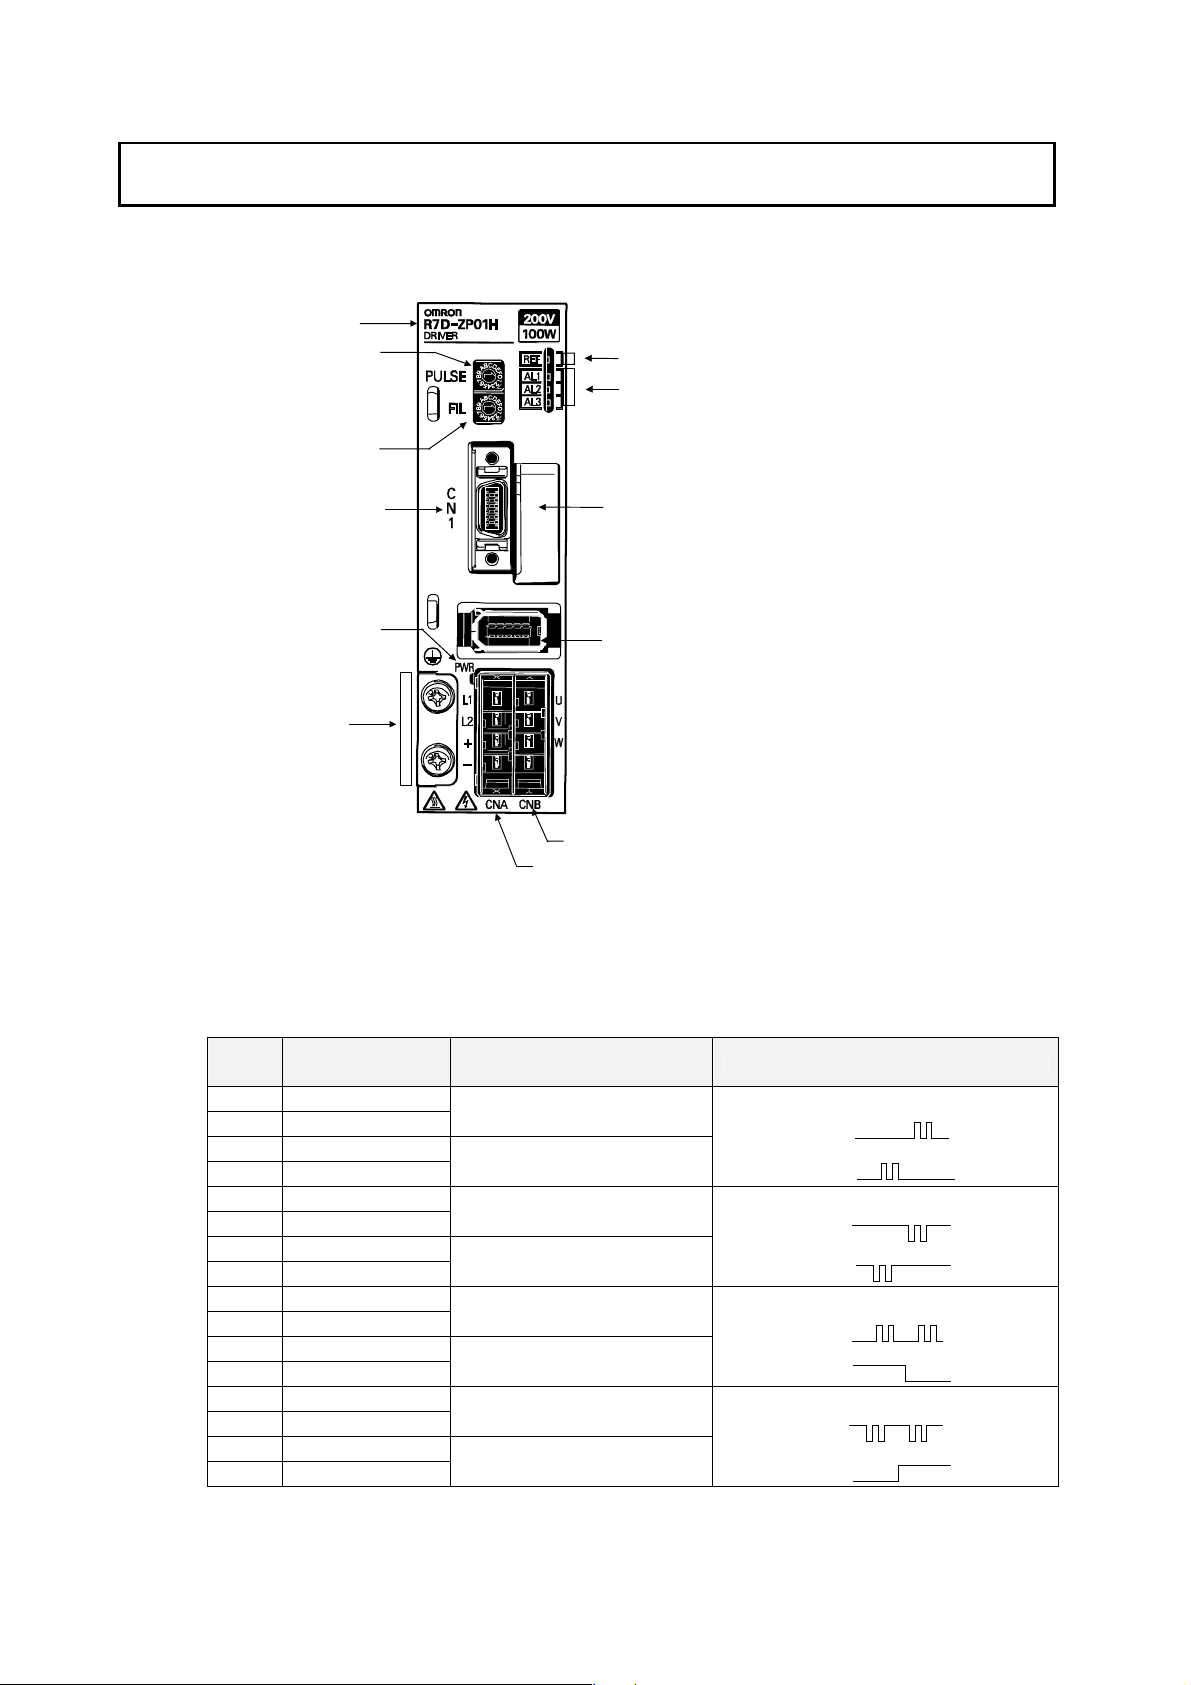
1-3-1 Servo Driver Nomenclature and Functions
1-3 Nomenclature and Functions
1-3-1 Servo Driver Nomenclature and Functions
Rotary switch for settin g
command pulse (PULSE) Command indicators (REF)
Rotary switch for settin g
command filter (FIL)
Model
Alarm indicators (AL1 to AL3)
Control I/O
connector (CN1)
Power supply indicato
(PWR)
FG terminals fo
power supply and
servomotor power
Main circuit connector (CNA)
Note: Do not remove the protective cov ers f or
these connectors.
These connectors are for manufacturer
adjustments.
Do not use these connectors.
The Servo Driver may malfunction if
these connectors are used.
Encoder input connector (CN2)
Moto
connector (CNB)
Rotary Switch for Setting Command Pulse (PULSE)
Always turn OFF the power supply before setting the rotary switch. (The switch is
factory-set to 0.)
Setting
Command pulse
resolution
0 1000
1 2500
2 5000
3 10000
4 1000
5 2500
6 5000
7 10000
8 1000
9 2500
A 5000
B 10000
C 1000
D 2500
E 5000
F 10000
Command pulse connection
method
Open collector or line driver
Line driver
Open collector or line driver
Line driver
Open collector or line driver
Line driver
Open collector or line driver
Line driver
Command pulse type
CW+CCW, positive logic
CW
CCW
CW+CCW, negative logic
CW
CCW
Sign + pulse string, positive
logic
PULS
SIGN
Sign + pulse string, negative
logic
PULS
SIGN
1-4
Page 22
1-3 Nomenclature and Functions
1-3-1 Servo Driver Nomenclature and Functions
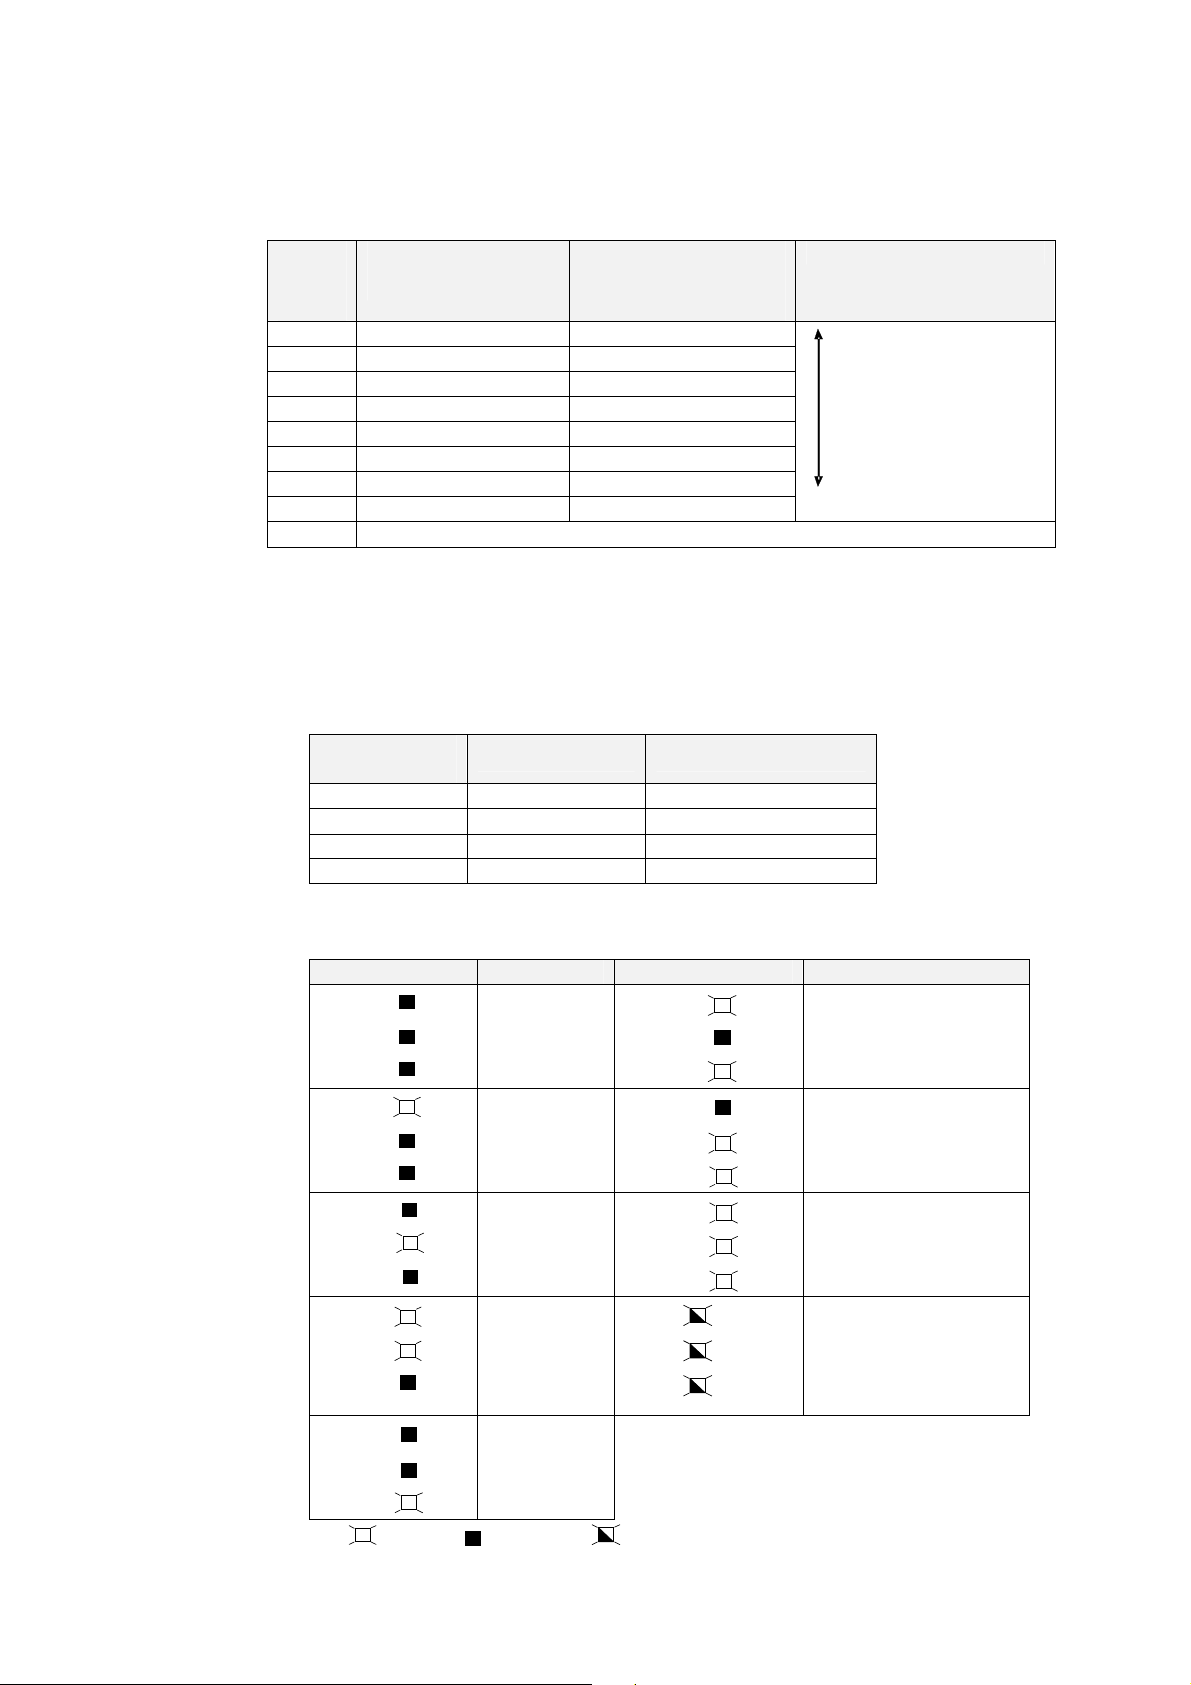
Rotary Switch for Setting Command Filter (FIL)
This switch does not need to be set if the machine is not subject to vibration. (The switch
is factory-set to 0.)
Filter
setting
(See
note 1.)
0 45 ms 100 to 200 ms
1 50 ms 110 to 220 ms
2 60 ms 130 to 260 ms
3 65 ms 150 to 300 ms
4 70 ms 170 to 340 ms
5 80 ms 200 to 400 ms
6 85 ms 250 to 500 ms
7 170 ms 500 to 1,000 ms
8 to F
Acceleration/deceleration
time for STEP command
(See note 3.)
Approx. time from end of
command to end of
positioning (s ettling time)
Description
(See note 2.)
Smaller filter time
constant
(short positioning time)
Larger filter time constant
(longer positioning time
with little vibration)
Do not set this switch to 8 to F.
Note 1. Increase the value of the filter setting if there is vibration when starting or stopping.
2. The settling time depends on the commanded acceleration/deceleration, the rigidity
of the machine motor drive, the encoder resolution, and other factors.
3. Use the acceleration/deceleration times as a guideline for determining the
Servomotor capacity that can be driven when using STEP commands without
commanded acceleration/deceleration.
Command Indicators (REF)
Indicator
(See note.)
Lit orange. OFF None
Flashing orange. OFF Pulse being input.
Lit green. ON None
Flashing green. ON Pulse being input.
Note: The indicator stays lit (yellow) for 1 s when there is a deviation counter reset input.
Power to motor Command pulse
Alarm Indicators (AL1/AL2/AL3)
Indicator status Alarm Indicator Alarm
AL1
AL2
AL3
AL1
AL2
AL3
AL1
AL2
AL3
AL1
AL2
AL3
AL1
AL2
AL3
Normal
Overspeed
Overload
Encoder error
Voltage error
Lit: Not lit: Flashing:
AL1
AL2
AL3
AL1
AL2
AL3
AL1
AL2
AL3
AL1
AL2
AL3
Flashing at a constant interval.
Overcurrent
Servo Driver built-in fan is
stopped
System error
Rotary switch for setting
command pulse (PULSE)
has been changed.
1-5
Page 23
1-4 System Block Diagrams
‡
,
p
g
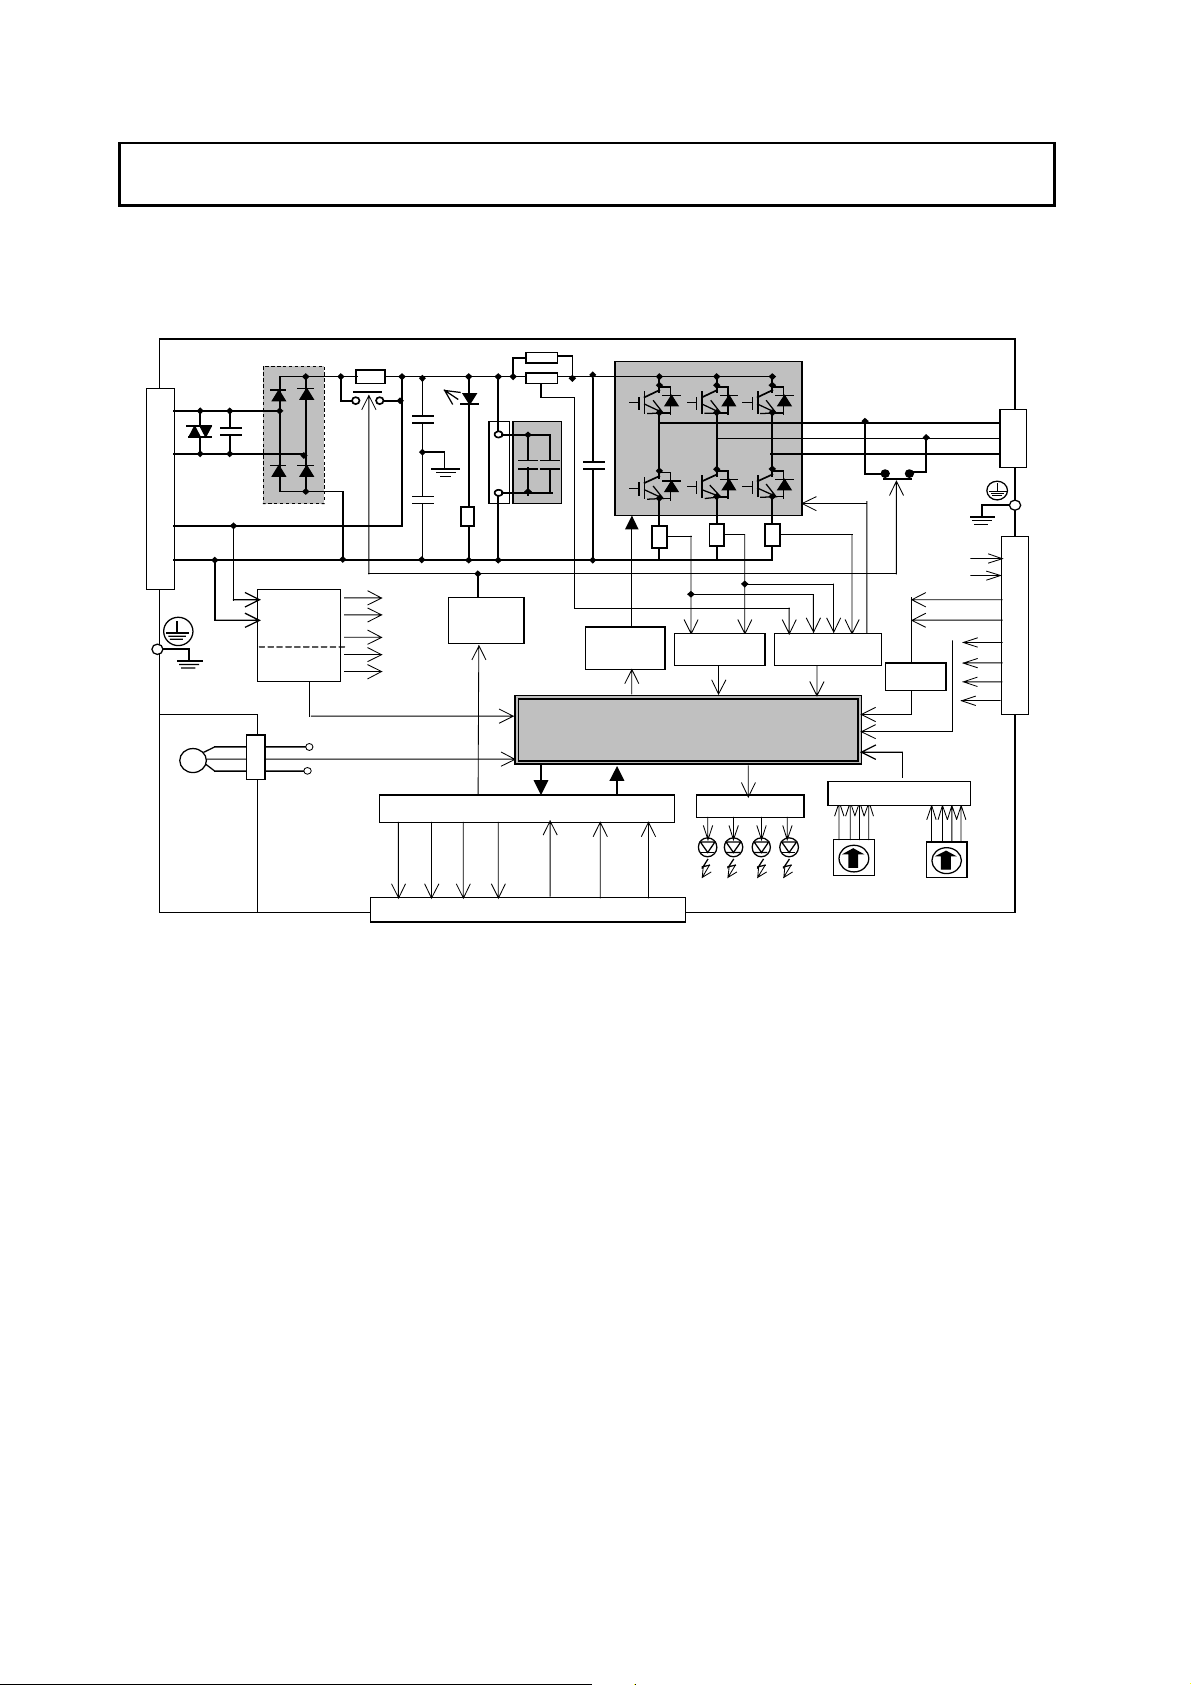
1-4-1 Pulse-string Input Servo Driver
1-4 System Block Diagrams
1-4-1 Pulse-string Input Servo Driver
GR
L1
L2
P
N
FAN
U
V
W
GR
+VCC
G
SW power
supply
Main circuit
control
Control power
supply
G
-VCC
15V2
VCC2
+VCC
-VCC
G
Main circuit voltage
detection
Fan alarm
INP output
output
Alarm
Relay
drive
Position, speed, and torque processor
I/O and drive circuits
Brake out
ut
Run input
output
Origin
Control I/O connector
Gate
drive
CCW input
Current
detection
MPU & ASIC
Display circuit
CW input
Overcurrent
protection
Set value read circuit
Command
format setting
+A,-A
-B
+B
Phase U
Phase V
Phase W
ADC
Phase Z
Command filter
setting
nal input connector
Encoder si
1-6
Page 24
1-5 Applicable Standards
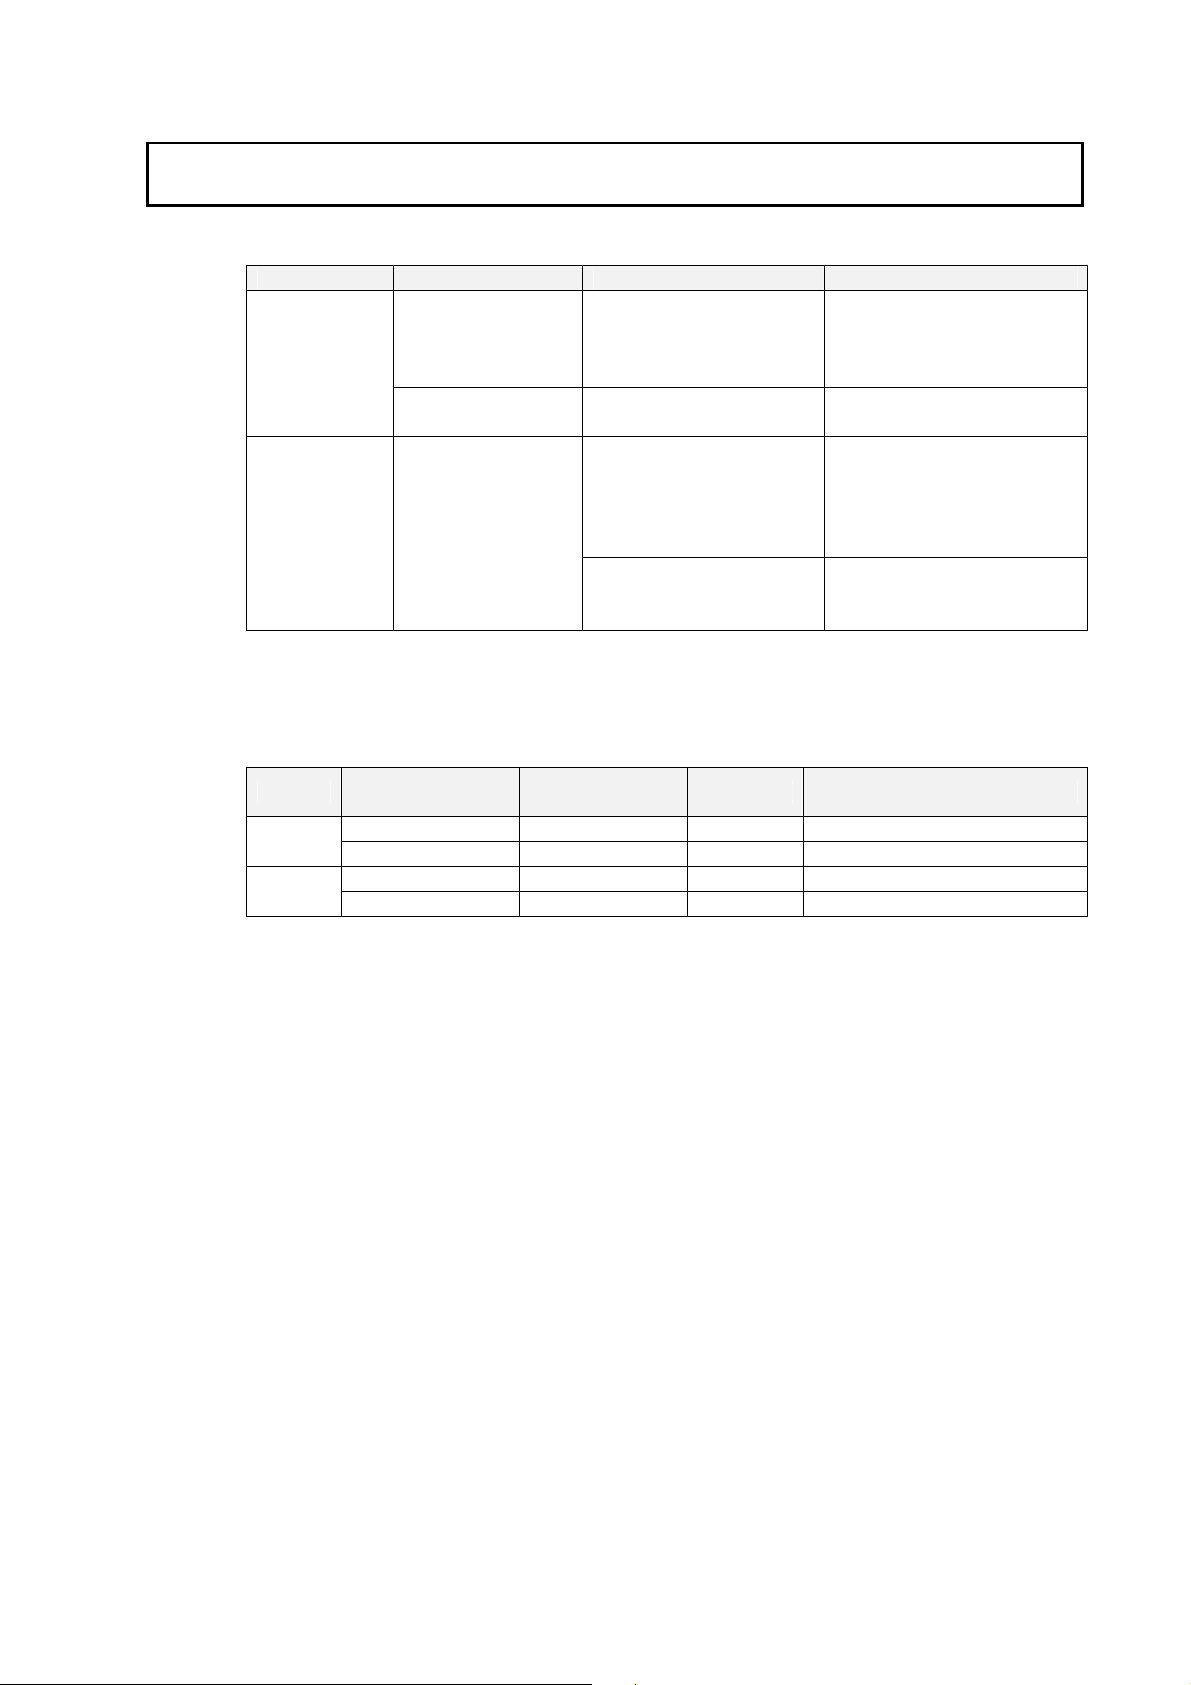
1-5-1 EC Directives
EC Directive Product Applicable standards Comments
Low Voltage
Directive
EMC Directive
Note: To conform to EMC Directives, the Units must be installed under the conditions described
AC Servo Drivers EN 50178
AC Servomotors
AC Servo Drivers and
AC Servomotors
in 4-2-5 Conforming to EMC Directives.
IEC 60034-1, -5, -8, and -9
EN 60034-1 and -9
EN 550011 Class A Group1
EN 61000-6-2
1-5 Applicable Standards
1-5-1 EC Directives
Safety requirements for
electronic equi pment for
measurement, contr ol, or
laboratory use
Rotating electric machines
Limits and methods of
measurement of radio
disturbance of i ndustrial,
scientific, and medical
radio-frequency equi pment
Electromagnetic compatibility
(EMC): Immunity st andard for
industrial environments
1-5-2 UL and cUL Standards
Standard Product
UL
cUL
AC Servo Drivers UL 508C E179149 Power Conversion Equipment
AC Servomotors UL 1004 E179189 Electric Motors
AC Servo Drivers cUL C22.2 No.14 E179149 Industrial Control Equipment
AC Servomotors cUL C22.2 No.100 E179189 Motors and Generation Equipment
Applicable
standards
File number Comments
1-7
Page 25

1-5 Applicable Standards
1-5-2 UL and cUL Standards
1-8
Page 26
Section 2
Standard Models and
Dimensions
Page 27
2-1 Standard Models
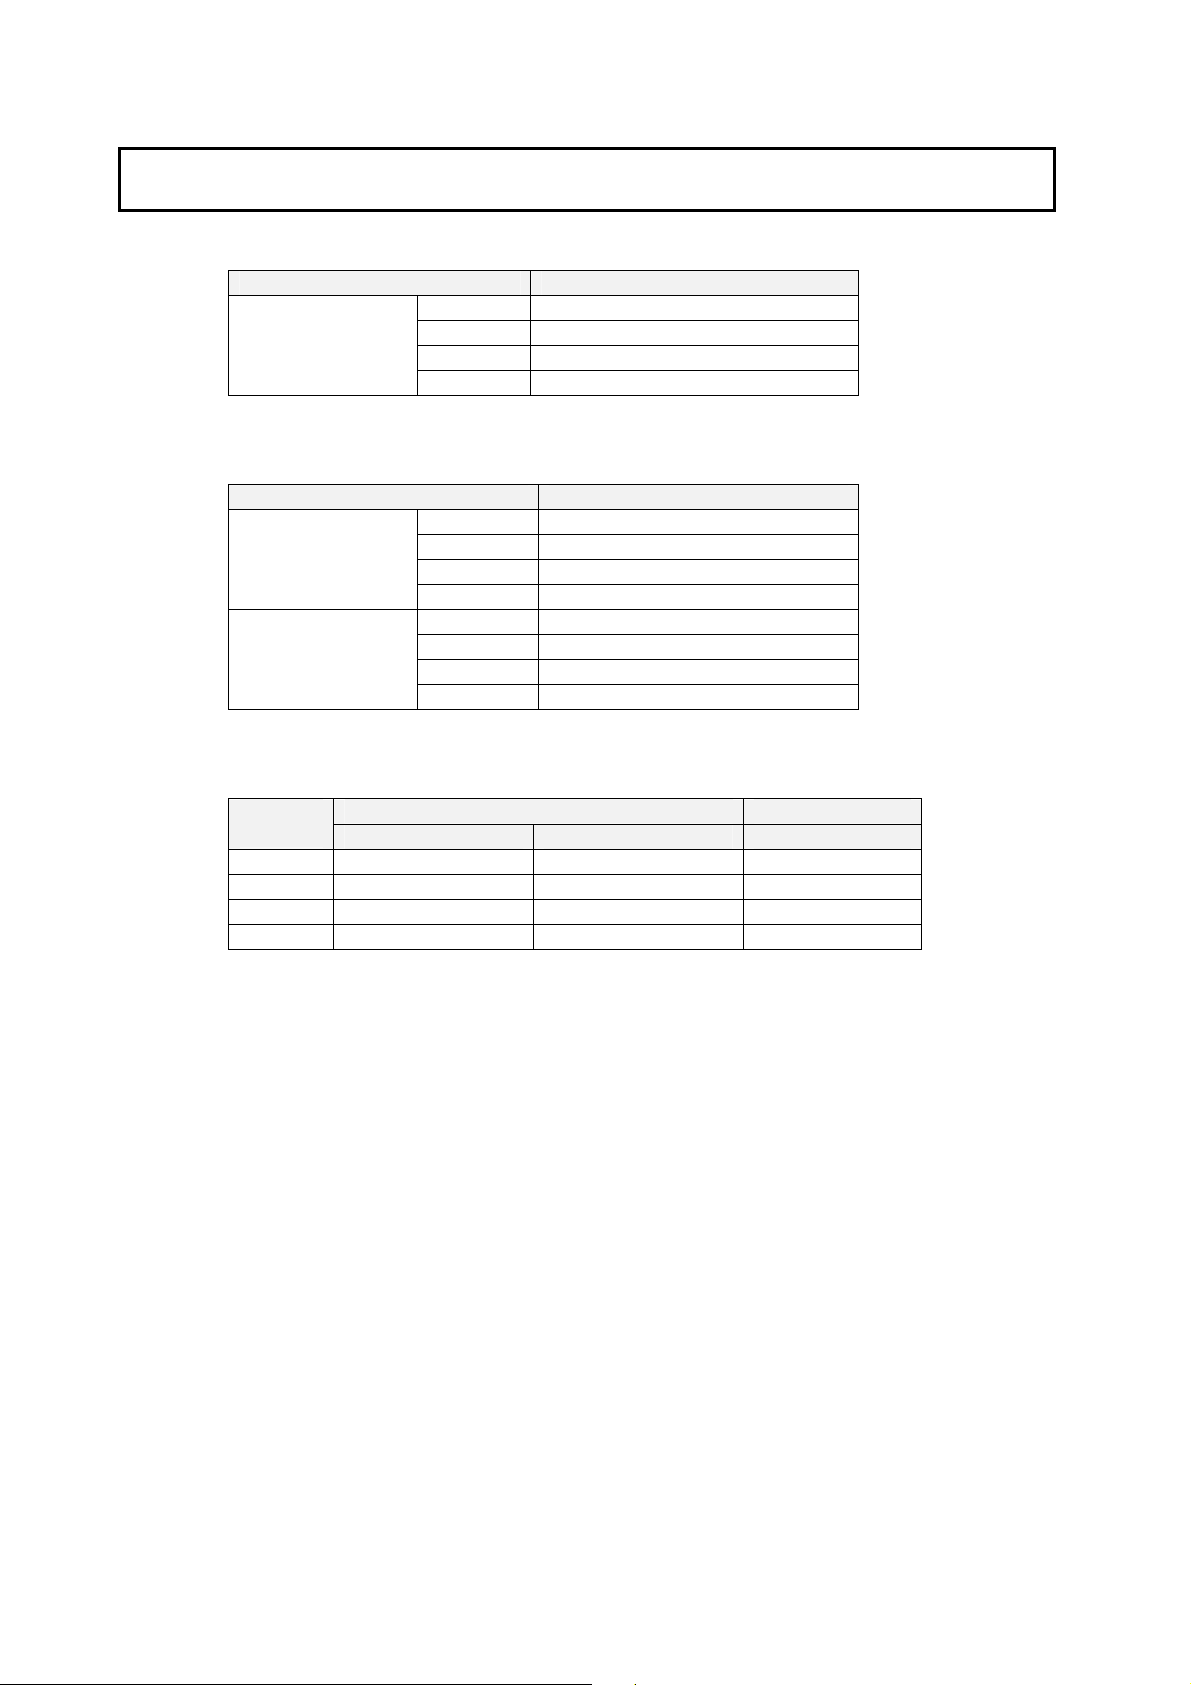
2-1-1 Servo Drivers
2-1 Standard Models
2-1-1 Servo Drivers
Pulse string input
2-1-2 Servomotors
Without brake
With brake
Specifications Model
100 W R7D-ZP01H
200 W R7D-ZP02H
400 W R7D-ZP04H
750 W R7D-ZP08H
Specifications Model
100 W R7M-Z10030-S1
200 W R7M-Z20030-S1
400 W R7M-Z40030-S1
750 W R7M-Z75030-S1
100 W R7M-Z10030-BS1
200 W R7M-Z20030-BS1
400 W R7M-Z40030-BS1
750 W R7M-Z75030-BS1
2-1-3 Servo Driver-Servomotor Combinations
Servomotor Servo Driver Rated
output
100 W
200 W
400 W
750 W
Note: Only the Servomotor and Servo Driver combinations listed here can be used. Do not use
Without brake With brake Pulse string input
R7M-Z10030-S1 R7M-Z10030-BS1 R7D-ZP01H
R7M-Z20030-S1 R7M-Z20030-BS1 R7D-ZP02H
R7M-Z40030-S1 R7M-Z40030-BS1 R7D-ZP04H
R7M-Z75030-S1 R7M-Z75030-BS1 R7D-ZP08H
other combinations.
2-2
Page 28
2-1-4 Decelerators (Straight Shaft with Key)
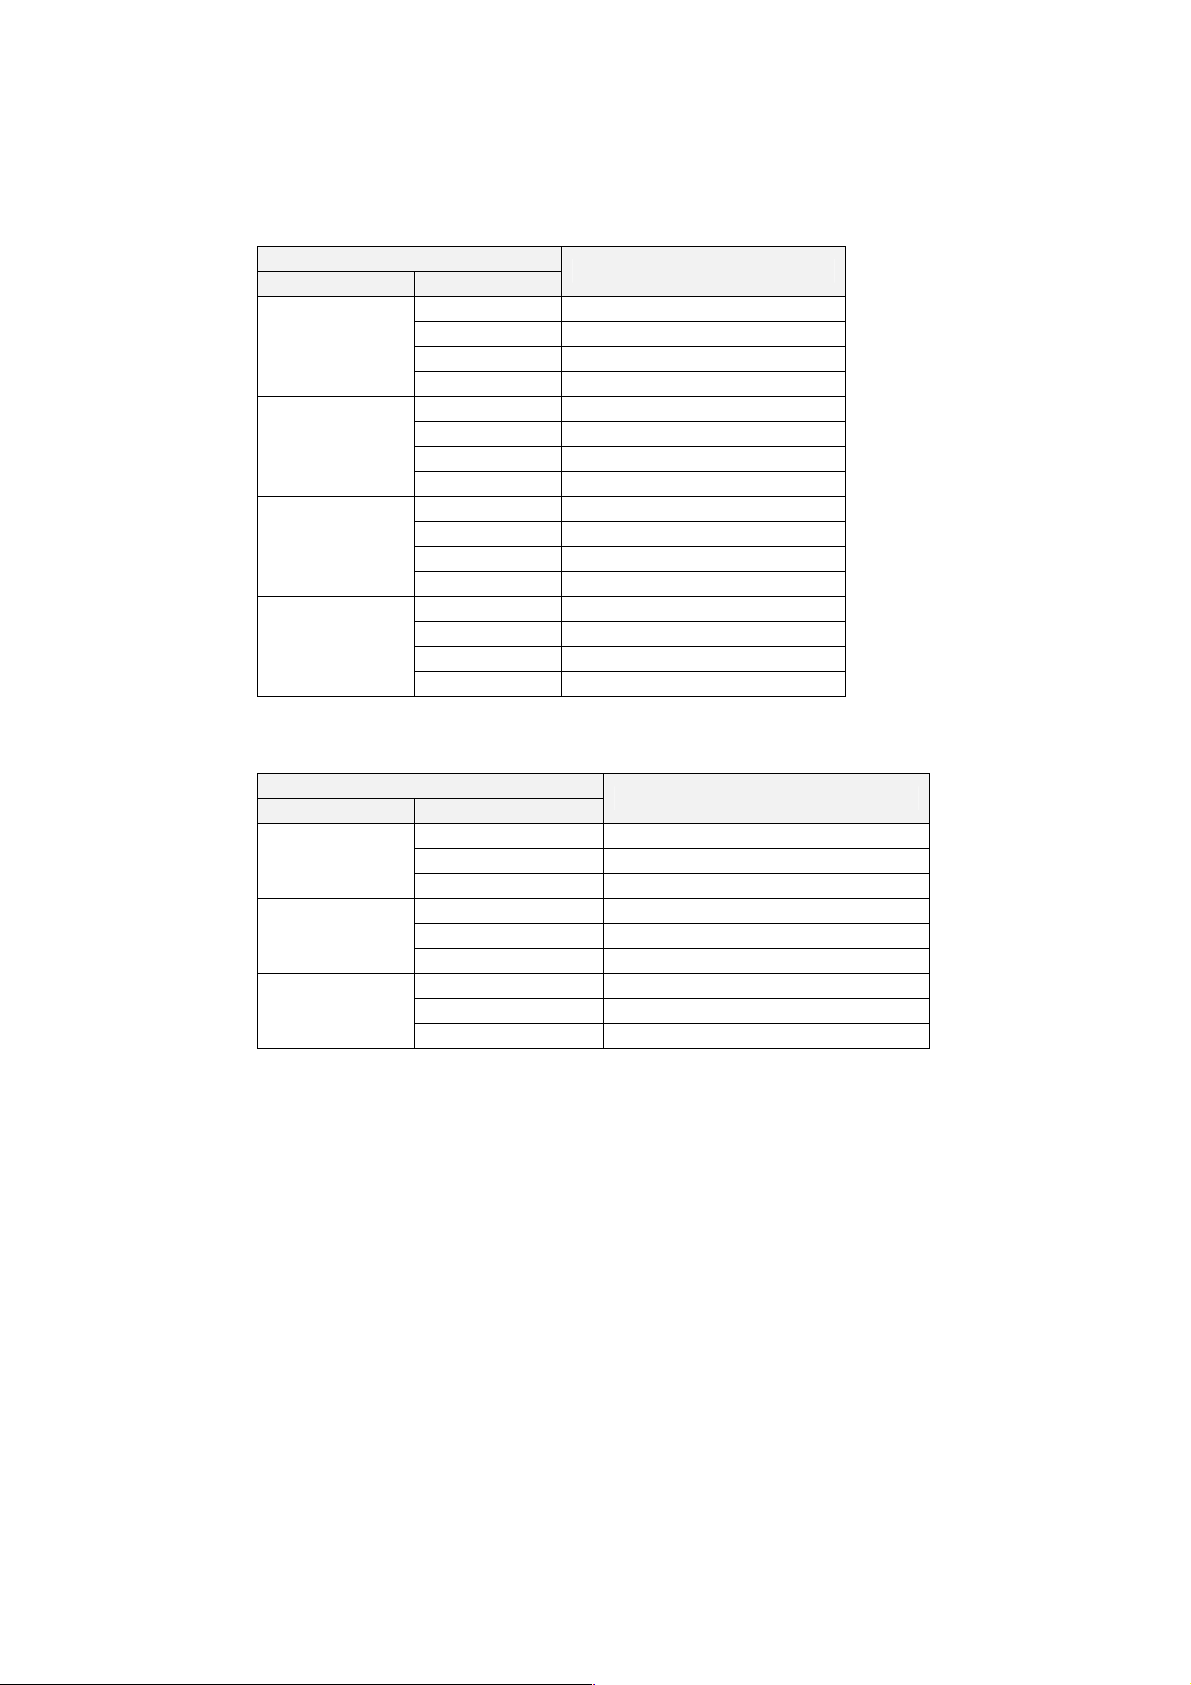
2-1-4 Decelerators (Straight Shaft with Key)
Backlash: 3 Arcminutes Max.
2-1 Standard Models
Specifications
Motor capacity Gear ratio
1/5 R7G-VRSFPB05B100
100 W
200 W
400 W
750 W
1/9 R7G-VRSFPB09B100
1/15 R7G-VRSFPB15B100
1/25 R7G-VRSFPB25C100
1/5 R7G-VRSFPB05B200
1/9 R7G-VRSFPB09C400
1/15 R7G-VRSFPB15C400
1/25 R7G-VRSFPB25C200
1/5 R7G-VRSFPB05C400
1/9 R7G-VRSFPB09C400
1/15 R7G-VRSFPB15C400
1/25 R7G-VRSFPB25D400
1/5 R7G-VRSFPB05C750
1/9 R7G-VRSFPB09D750
1/15 R7G-VRSFPB15D750
1/25 R7G-VRSFPB25E750
Model
Backlash: 45 Arcminutes Max.
Specifications
Motor capacity Gear ratio
1/5 R7G-RGSF05B100
100 W
200 W
400 W
1/9 R7G-RGSF09B100
1/15 R7G-RGSF15B100
1/5 R7G-RGSF05B200
1/9 R7G-RGSF09C400
1/15 R7G-RGSF15C400
1/5 R7G-RGSF05C400
1/9 R7G-RGSF09C400
1/15 R7G-RGSF15C400
Model
2-3
Page 29
2-1 Standard Models
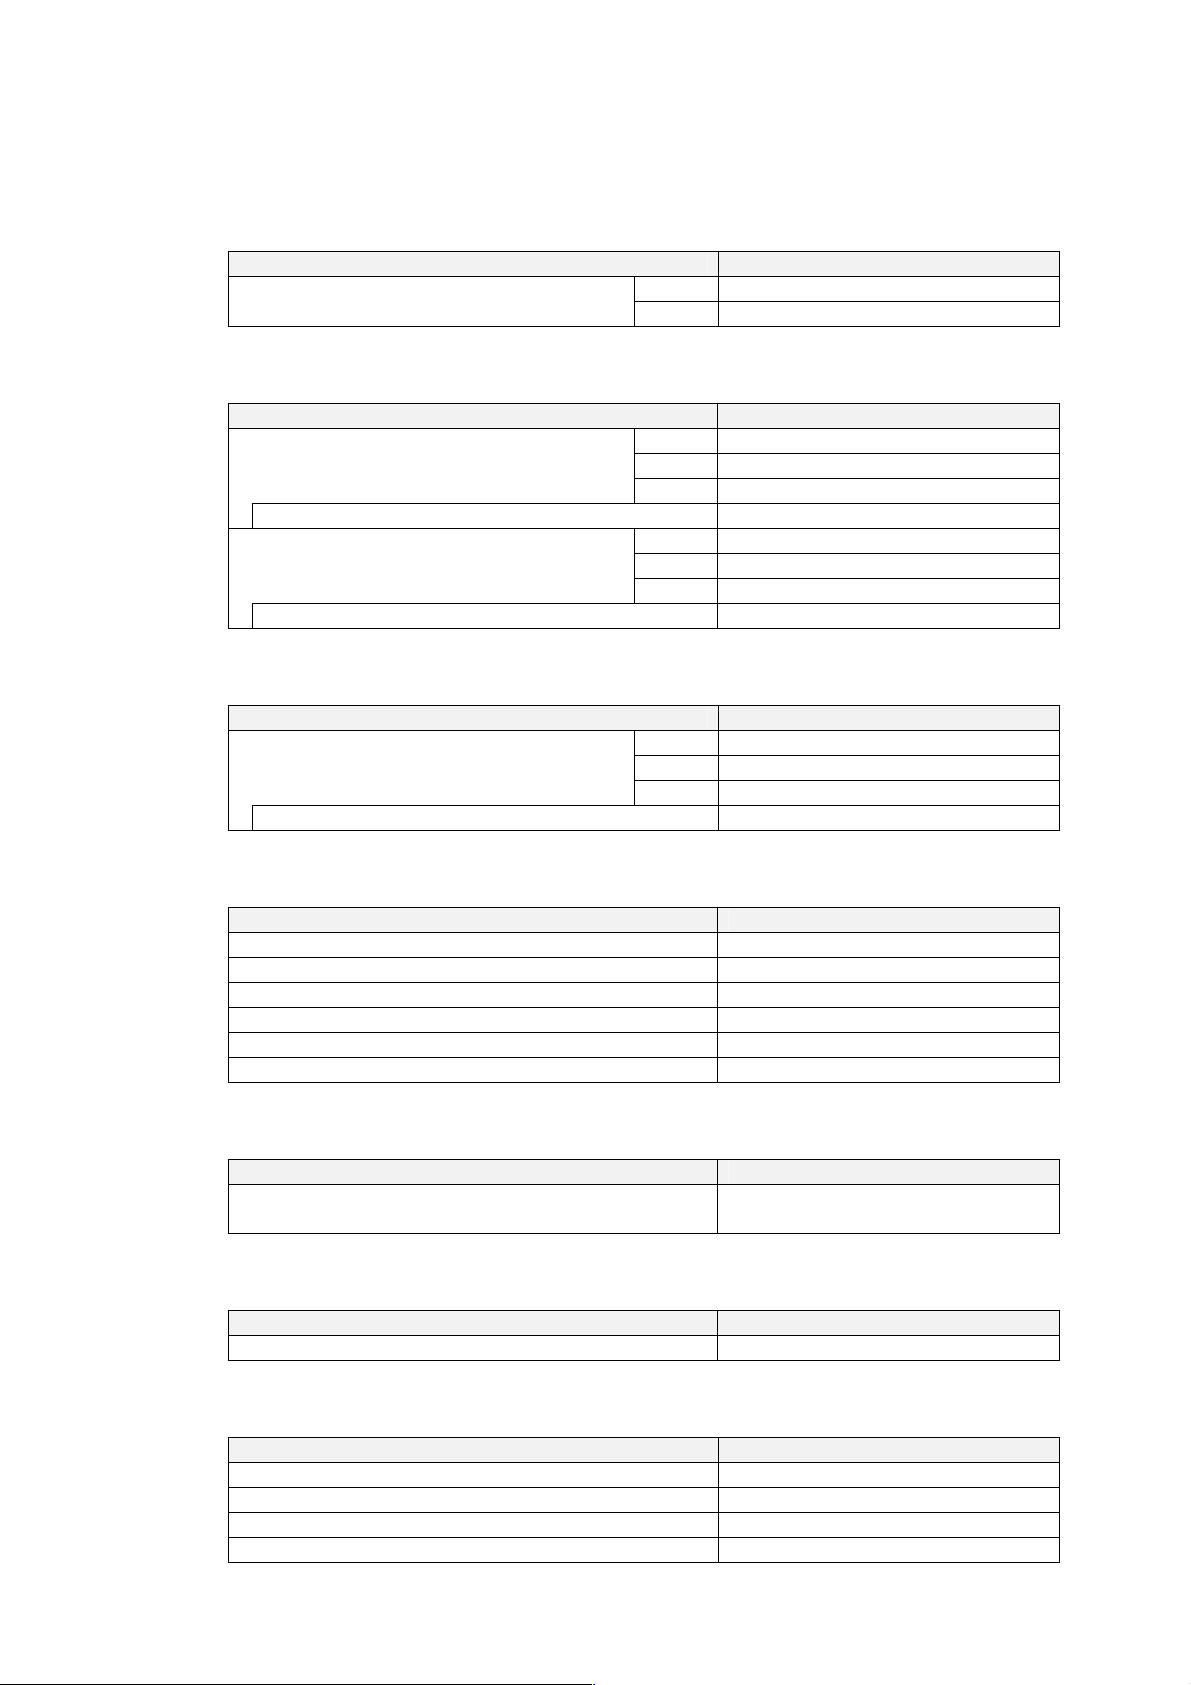
2-1-5 Accessories and Cables
2-1-5 Accessories and Cables
Control Cables (for CN1)
Specifications Model
Servomotor Power Cables (for CNB)
Specifications Model
Power Cables for Servomotors without B rakes
(connector attached)
Cable Only (in 1-m increment s) R7A-CAZ001
Power Cables for Servomotors with B rakes
(connector attached)
Cable Only (in 1-m increment s) R7A-CAZ01B
1 m R7A-CPZ001S General-purpose Control Cables
2 m R7A-CPZ002S
3 m R7A-CAZ003S
5 m R7A-CAZ005S
10 m R7A-CAZ010S
3 m R7A-CAZ003B
5 m R7A-CAZ005B
10 m R7A-CAZ010B
Encoder Cables (for CN2)
Specifications Model
Encoder Cables (connector attached)
Cable Only (in 1-m increment s) R7A-CRZ001
3 m R7A-CRZ003C
5 m R7A-CRZ005C
10 m R7A-CRZ010C
Connectors
Specifications Model
Main Circuit Connector (CNA) with Ej ector Levers R7A-CNZ01P
Servomotor Connector (CNB) R7A-CNZ01A
Control Input Connector (CN1) R7A-CNA01R
Encoder Input Connector (CN2) R7A-CNZ01R
Servomotor Connector for E ncoder Cable R7A-CNZ02R
Servomotor Connector for S ervomotor Power Cable R7A-CNZ02A
Regeneration Resistance Unit
Specifications Model
Regeneration current: 8 A
Internal resistance: 50 Ω, 12 W
R88A-RG08UA
2-4
External Regeneration Resistor
Specifications Model
Regeneration capacity: 70 W, 47 Ω R88A-RR22047S
AC Reactors
Specifications Model
R7D-ZP01H R88A-PX5052
R7D-ZP02H R88A-PX5053
R7D-ZP04H R88A-PX5054
R7D-ZP08H R88A-PX5056
Page 30
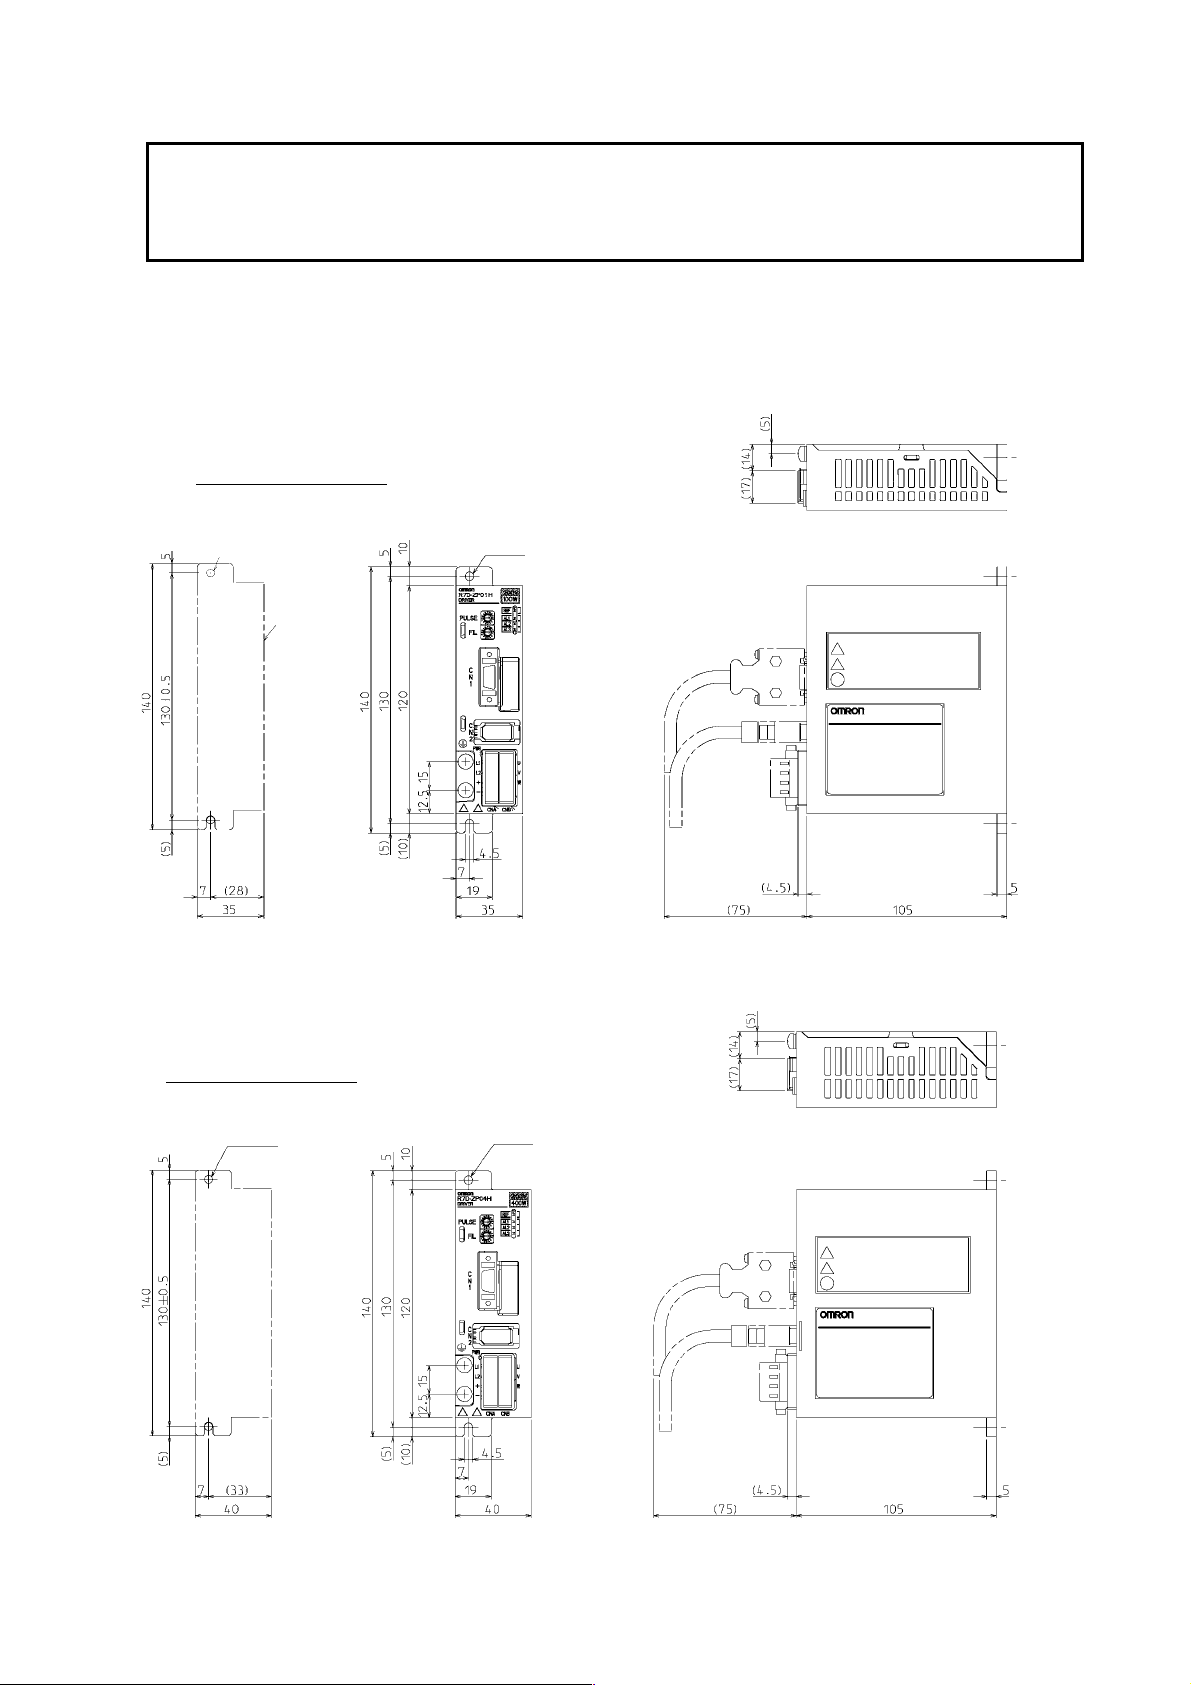
2-2 External and Mounted Dimensions
g
g
2-2 External and Mounted
Dimensions
2-2-1 Servo Drivers
R7D-ZP01H/-ZP02H (100 W/200 W)
Mounting Hole Dimensions
2-2-1 Servo Drivers
Two, M4 screw holes
Footprint
pitch
Mountin
R7D-ZP04H (400 W)
Mounting Hole Dimensions
4.5-dia. hole
Two, M4 screw holes
pitch
Mountin
4.5-dia. hole
2-5
Page 31
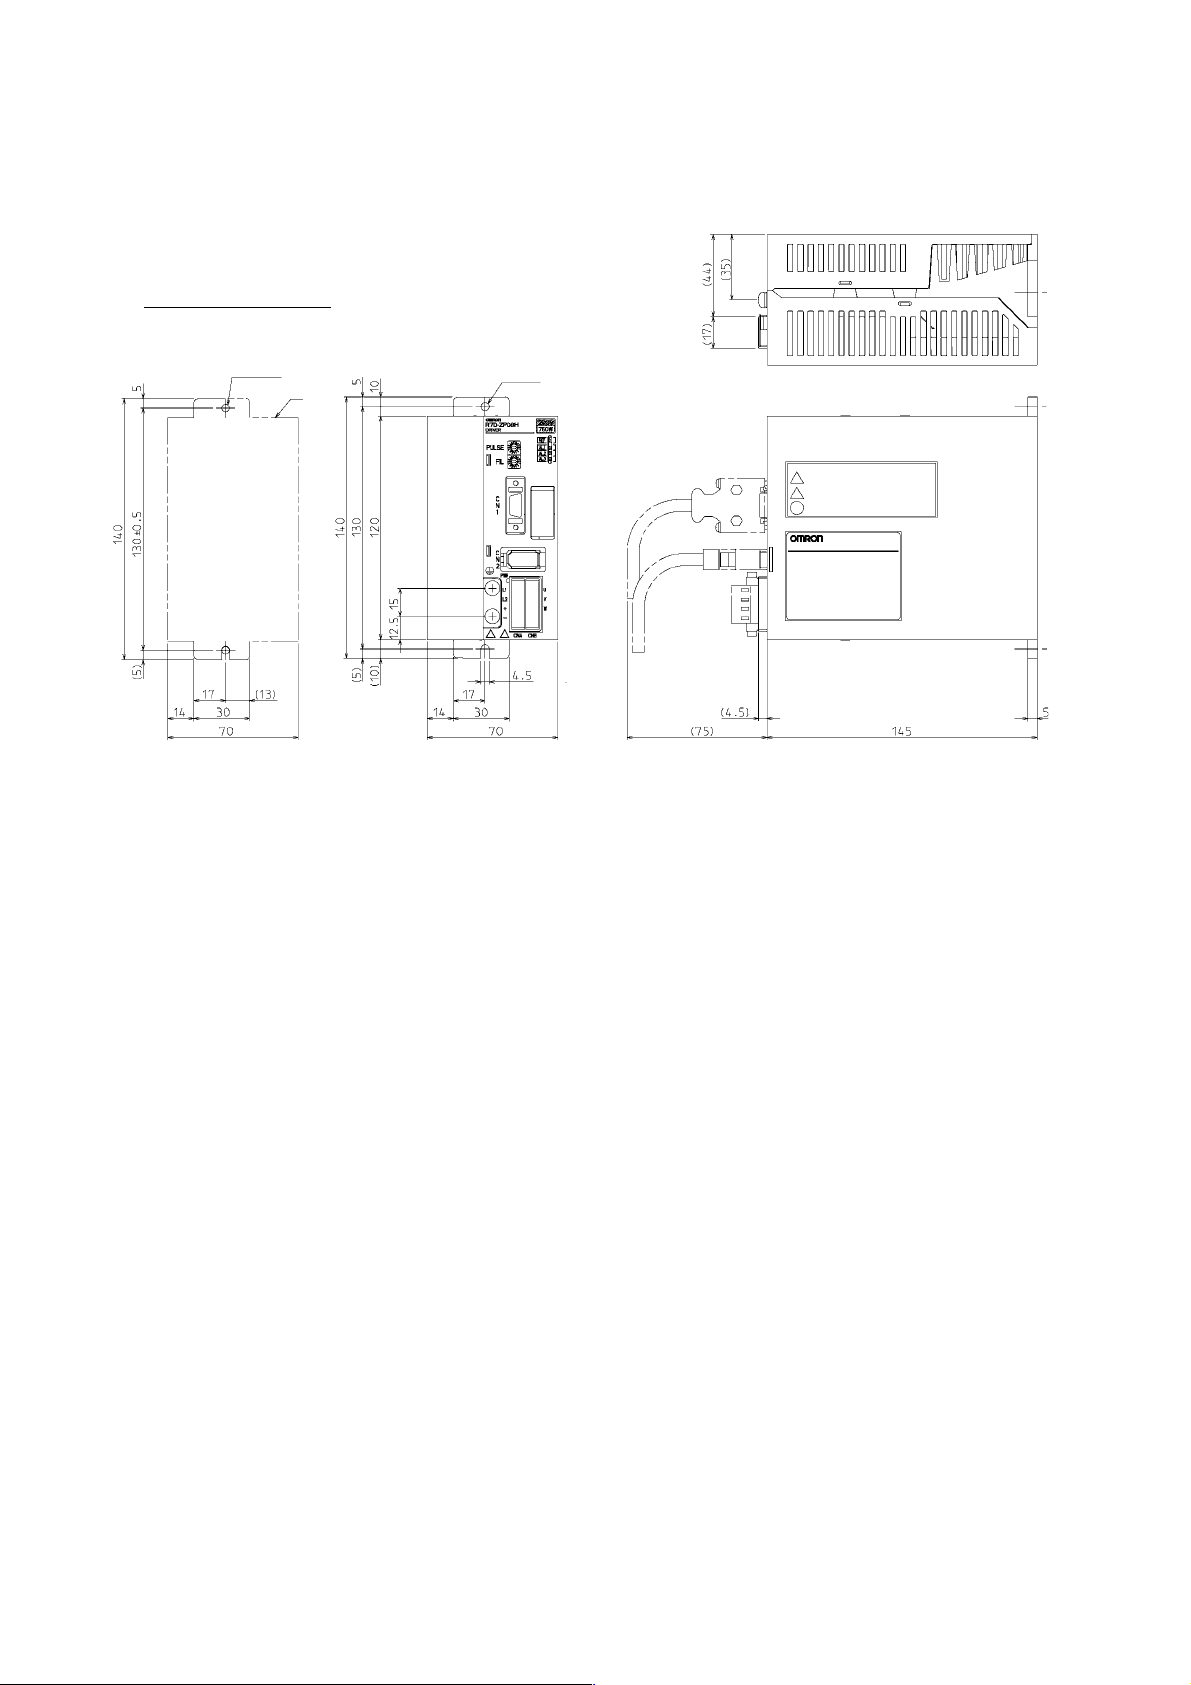
2-2 External and Mounted Dimensions
2-2-1 Servo Drivers
R7D-ZP08H (750 W)
Mounting Hole Dimensions
Two, M4 screw holes
Exterior
Mounting pitch
4.5-dia. hole
2-6
Page 32
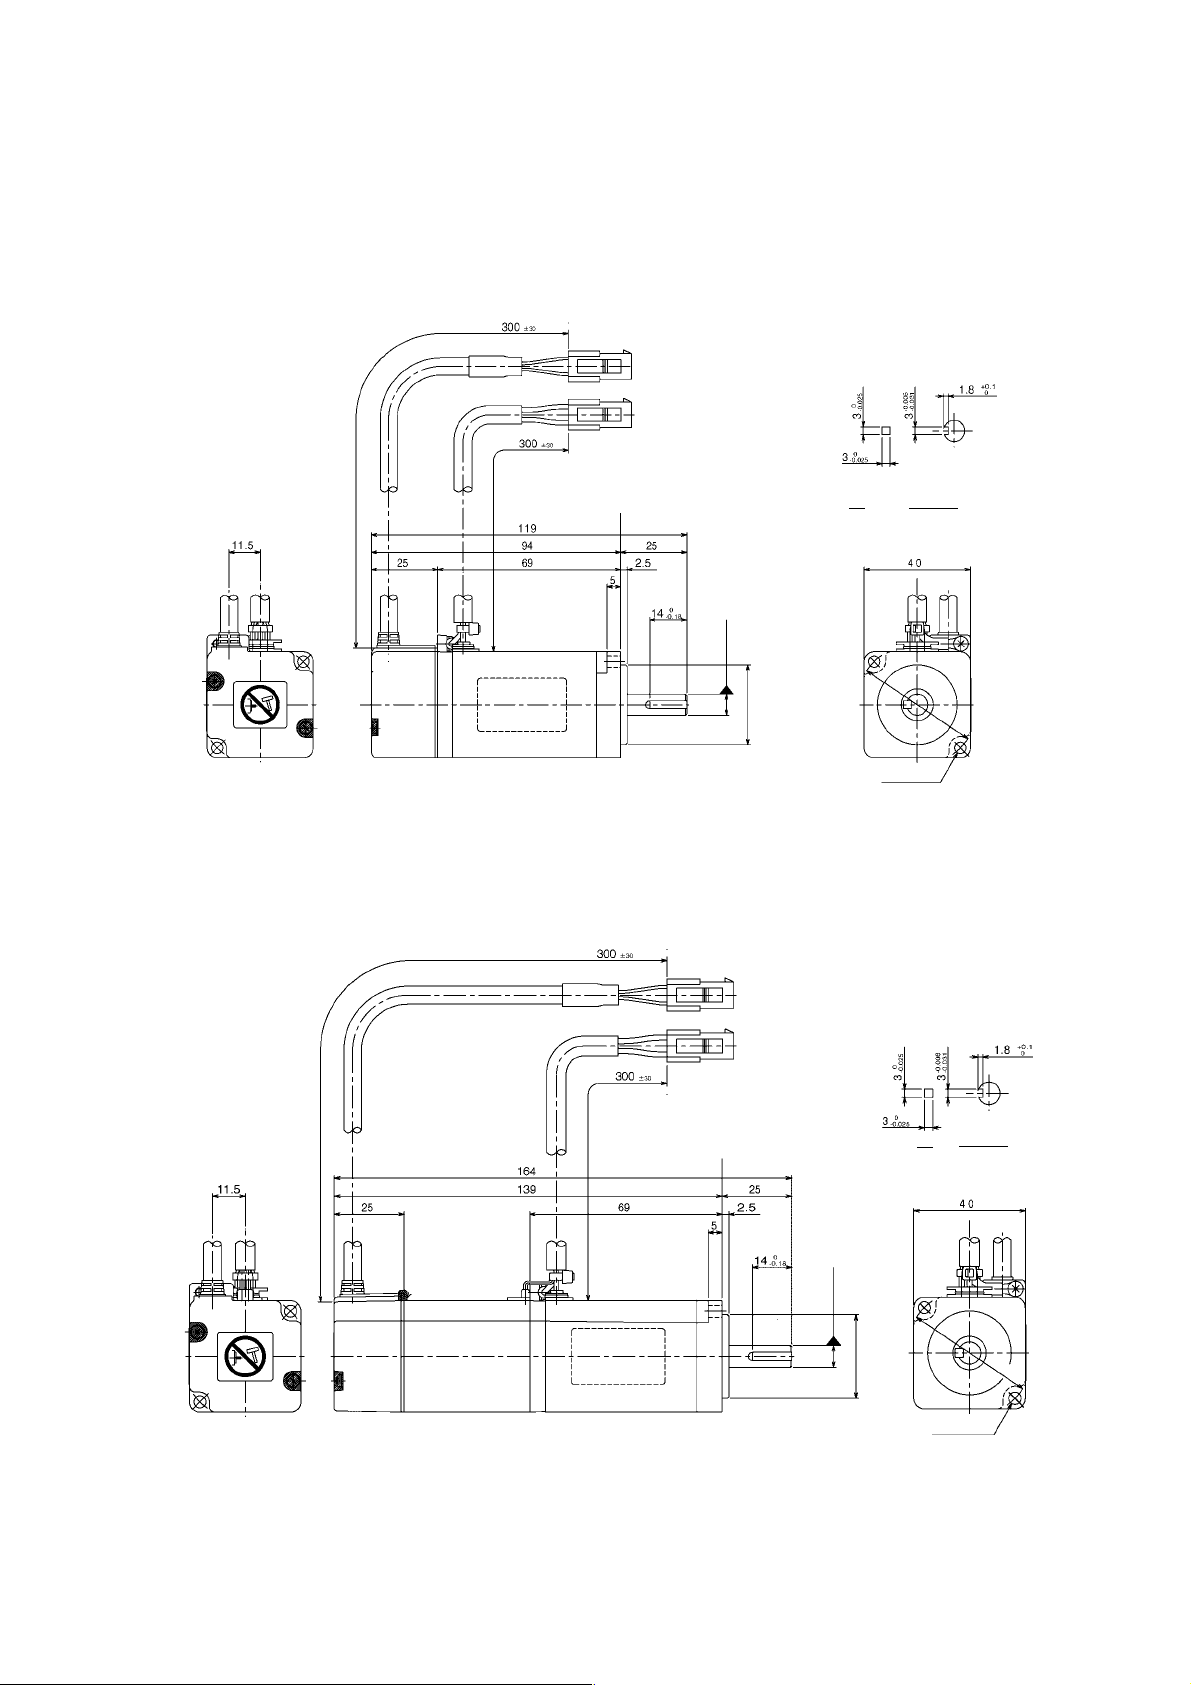
2-2-2 Servomotors
g
g
g
g
100-W Servomotor without a Brake
R7M-Z10030-S1
2-2 External and Mounted Dimensions
2-2-2 Servomotors
Key gr oove Key
ht: 6
8 dia., hei
ht: 8
100-W Servomotor with Brake
R7M-Z10030-BS1
30 dia., hei
ht: 6
Two, 4.3 dia.
Key
46 dia.
Key groove
8 dia., hei
ht: 8
46 dia.
30 dia., hei
Two, 4.3 dia.
2-7
Page 33
2-2 External and Mounted Dimensions
2-2-2 Servomotors
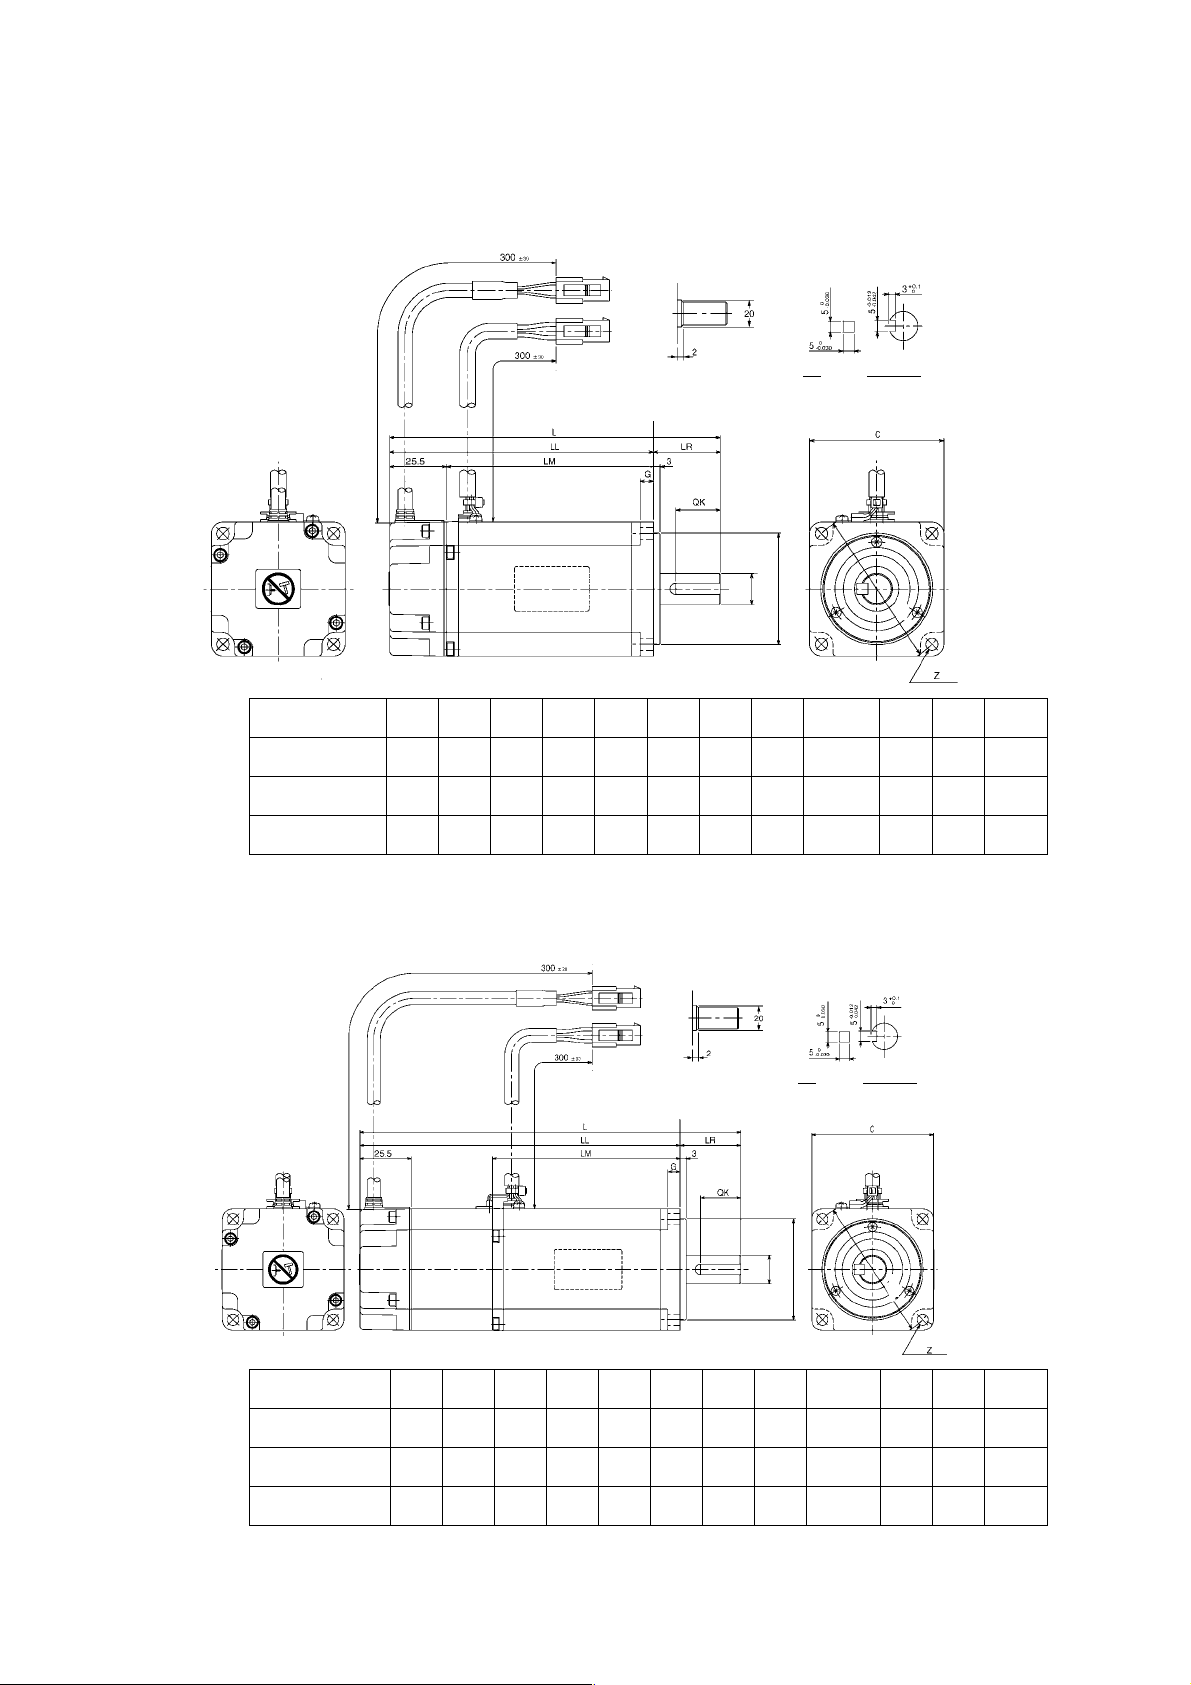
200-W/400-W/750-W Servomotors without Brakes
R7M-Z20030-S1/Z40030-S1/Z75030-S1
Output Section on 750-W
Servomotor
Key groove
Key
S dia.
D2 dia.
L
LL
LM
Model
(mm)
(mm)
(mm)
LR
(mm)C (mm)
D1
(mm)
D2
(mm)G (mm)
R7M-Z20030-S1 125.5 95.5 70 30 60 70 50h8 6
R7M-Z40030-S1 148.5 118.5 93 30 60 70 50h8 6
R7M-Z75030-S1 173 133 107.5 40 80 90 70h8 8
200-W/400-W/750-W Servomotors with Brakes
R7M-Z20030-BS1/Z40030-BS1/Z75030-BS1
Output Section on 750-W
Servomotor
Z
(mm) S (mm)
Four,
5.5 dia.
Four,
5.5 dia
Four,
7 dia
Key
Key groove
D1 dia.
QK
Output
(mm)
14h6 20 200
14h6 20 400
16h6 30 750
(w)
2-8
S dia.
D2 dia.
L
LL
LM
Model
(mm)
(mm)
(mm)
LR
(mm)C (mm)
D1
(mm)
D2
(mm)G (mm)
R7M-Z20030-BS1 165.5 135.5 70 30 60 70 50h8 6
R7M-Z40030-BS1 188.5 158.5 93 30 60 70 50h8 6
R7M-Z75030-BS1 216 176 107.5 40 80 90 70h8 8
D1 dia.
Z
(mm) S (mm)
Four,
5.5 dia.
Four,
5.5 dia
Four,
7 dia
14h6 20 200
14h6 20 400
16h6 30 750
QK
(mm)
Output
(w)
Page 34
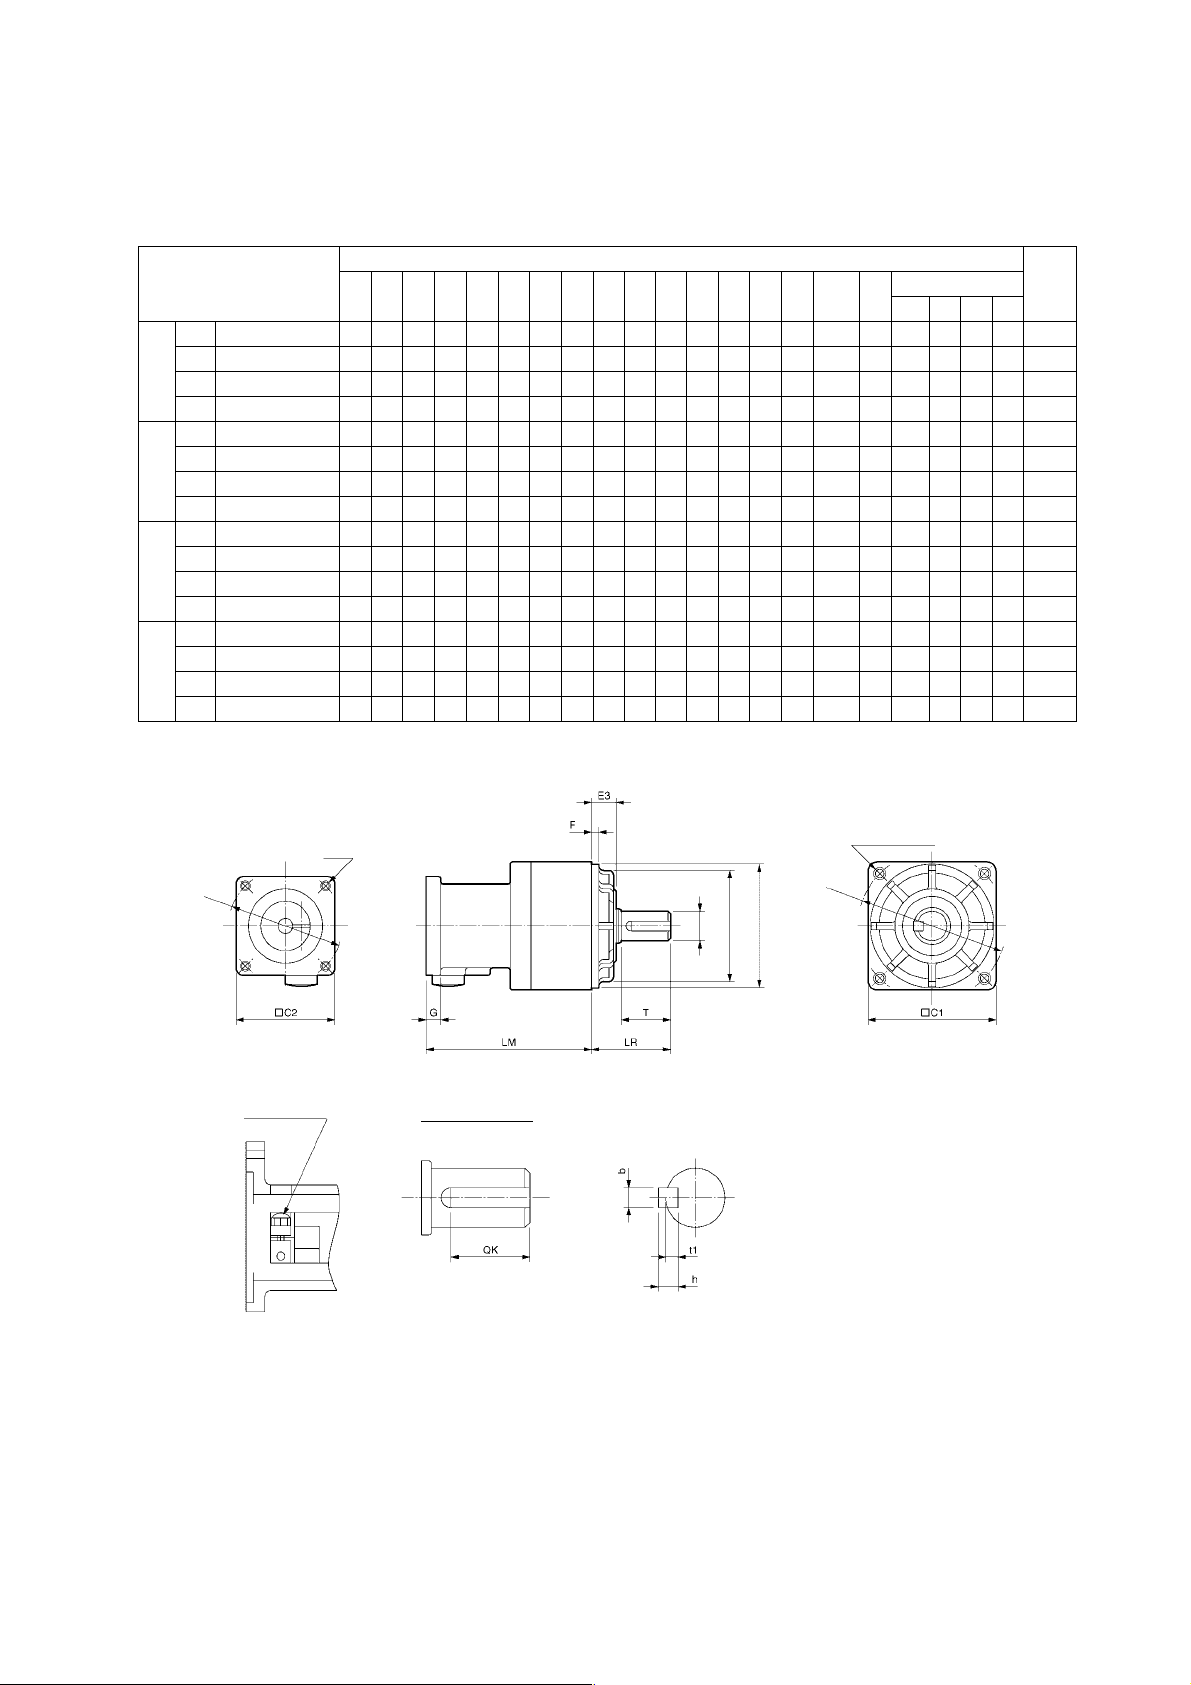
2-2-3 Decelerator Dimensions
A
Backlash: 3 Arcminutes Max.
2-2 External and Mounted Dimensions
2-2-3 Decelerator Dimensions
Dimensions (mm)
Model
1/5 R7G-VRSFPB05B100 67.5 32 52 40 46 60 50 45 10 3 6 12 20 M4 M5 M3 12 16 4 4 2.5 0.55
100
W
1/9 R7G-VRSFPB09B100 67.5 32 52 40 46 60 50 45 10 3 6 12 20 M4 M5 M3 12 16 4 4 2.5 0.55
1/15 R7G-VRSFPB15B100 78 32 52 40 46 60 50 45 10 3 6 12 20 M4 M5 M3 12 16 4 4 2.5 0.7
1/25 R7G-VRSFPB25C100 92 50 78 40 46 90 70 62 17 3 6 19 30 M4 M6 M3 20 22 6 6 3.5 1.7
1/5 R7G-VRSFPB05B200 72.5 32 52 60 70 60 50 45 10 3 10 12 20 M5 M5 M4 12 16 4 4 2.5 0.72
200
W
1/9 R7G-VRSFPB09C400 89.5 50 78 60 70 90 70 62 17 3 8 19 30 M5 M6 M4 20 22 6 6 3.5 1.7
1/15 R7G-VRSFPB15C400 100 50 78 60 70 90 70 62 17 3 8 19 30 M5 M6 M4 20 22 6 6 3.5 2.1
1/25 R7G-VRSFPB25C200 100 50 78 60 70 90 70 62 17 3 8 19 30 M5 M6 M4 20 22 6 6 3.5 2.1
1/5 R7G-VRSFPB05C400 89.5 50 78 60 70 90 70 62 17 3 8 19 30 M5 M6 M4 20 22 6 6 3.5 1.7
400
W
1/9 R7G-VRSFPB09C400 89.5 50 78 60 70 90 70 62 17 3 8 19 30 M5 M6 M4 20 22 6 6 3.5 1.7
1/15 R7G-VRSFPB15C400 100 50 78 60 70 90 70 62 17 3 8 19 30 M5 M6 M4 20 22 6 6 3.5 2.1
1/25 R7G-VRSFPB25D400 104 61 98 60 70 115 90 75 18 5 8 24 40 M5 M8 M4 20 30 8 7 4 3.2
1/5 R7G-VRSFPB05C750 93.5 50 78 80 90 90 70 62 17 3 10 19 30 M6 M6 M4 20 22 6 6 3.5 2.1
750
W
1/9 R7G-VRSFPB09D750 97.5 61 98 80 90 115 90 75 18 5 10 24 40 M6 M8 M4 20 30 8 7 4 3.4
1/15 R7G-VRSFPB15D750 110 61 98 80 90 115 90 75 18 5 10 24 40 M6 M8 M4 20 30 8 7 4 3.8
1/25 R7G-VRSFPB25E750 135 75 125 80 90 135 110 98 17 5 10 32 55 M6 M10 M4 20 45 10 8 5 7.2
LM LR C1 C2 D1 D2 D3 D4 E3 F G S T Z1 Z2
T(See
note.)
Key dimensions
l
QK b h t1
Note: AT is the size of the set bolt.
Outline Drawings
Four, Z1
D1 dia.
Four, Z2 (Effective depth: l)
D2 dia.
Weight
(kg)
dia.
Sh6
D4 dia.
D3h7 dia.
Set bolt (AT)
Key dimensions
2-9
Page 35
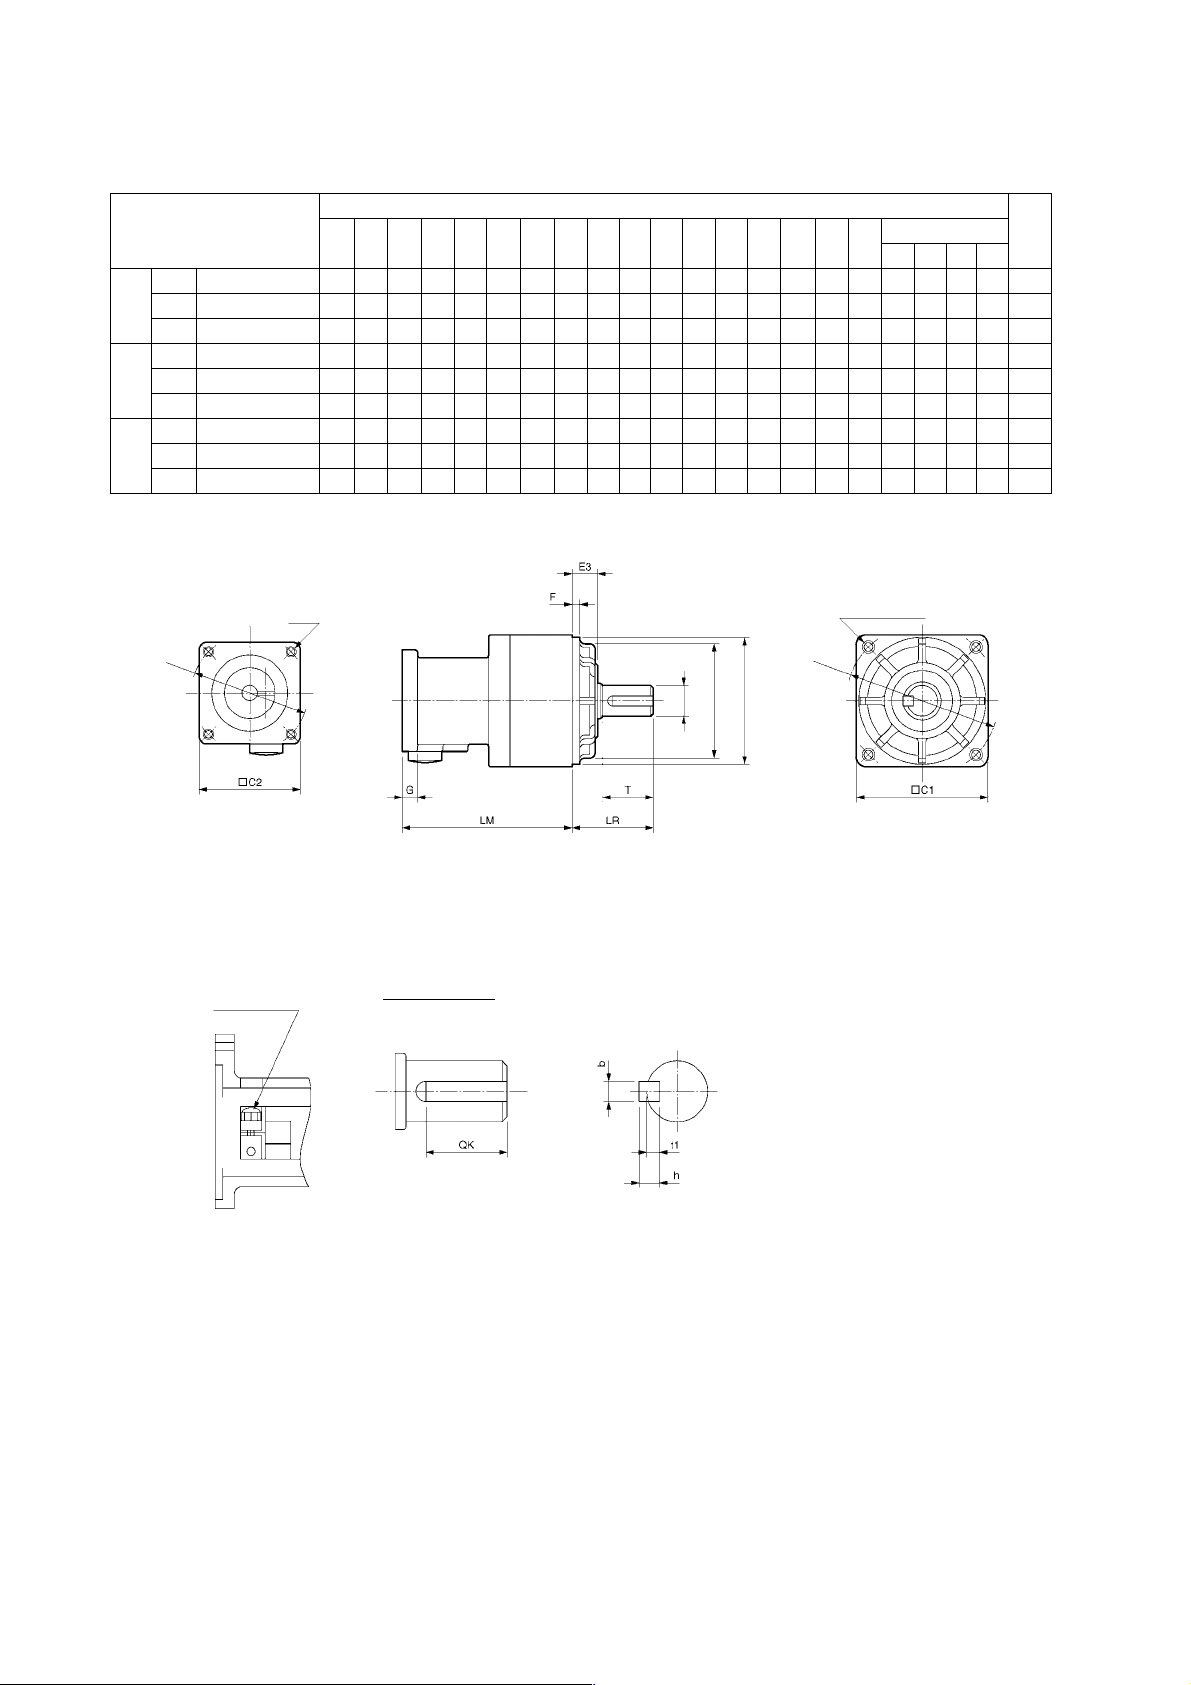
2-2 External and Mounted Dimensions
2-2-3 Decelerator Dimensions
Backlash: 45 Arcminutes Max.
Dimensions (mm)
Model
1/5 R7G-RGSF05B100 67.5 32 52 40 46 60 50 45 10 3 6 12 20 M4 M5 M3 12 16 4 4 2.5 0.55
100 W
1/9 R7G-RGSF09B100 67.5 32 52 40 46 60 50 45 10 3 6 12 20 M4 M5 M3 12 16 4 4 2.5 0.55
1/15 R7G-RGSF15B100 78 32 52 40 46 60 50 45 10 3 6 12 20 M4 M5 M3 12 16 4 4 2.5 0.7
1/5 R7G-RGSF05B200 72.5 32 52 60 70 60 50 45 10 3 10 12 20 M5 M5 M4 12 16 4 4 2.5 0.72
200 W
1/9 R7G-RGSF09C400 89.5 50 78 60 70 90 70 62 17 3 8 19 30 M5 M6 M4 20 22 6 6 3.5 1.7
1/15 R7G-RGSF15C400 100 50 78 60 70 90 70 62 17 3 8 19 30 M5 M6 M4 20 22 6 6 3.5 2.1
1/5 R7G-RGSF05C400 89.5 50 78 60 70 90 70 62 17 3 8 19 30 M5 M6 M4 20 22 6 6 3.5 1.7
400 W
1/9 R7G-RGSF09C400 89.5 50 78 60 70 90 70 62 17 3 8 19 30 M5 M6 M4 20 22 6 6 3.5 1.7
1/15 R7G-RGSF15C400 100 50 78 60 70 90 70 62 17 3 8 19 30 M5 M6 M4 20 22 6 6 3.5 2.1
LM LR C1 C2 D1 D2 D3 D4 E3 F G S T Z1 Z2 AT l
Key dimensions
QK b h t1
Note: AT is the size of the set bolt.
Outline Drawings
Four, Z2 (Effective depth: l)
D2 dia.
D1 dia.
Four, Z1
Sh6
dia.
D4 dia.
D3h7 dia.
Weight
(kg)
Set bolt (AT)
Key dimensions
2-10
Page 36
Section 3
Specifications
Page 37
3-1 Servo Driver Specifications
3-1-1 General Specifications
3-1 Servo Driver Specifications
Select the Servo Driver in combination with the Servomotor being used. (For details, refer to 2-1-3 Servo
Driver-Servomotor Combinations.)
3-1-1 General Specifications
Item Specifications
Ambient operating temperature 0 to 55°C
Ambient operating humidity 90% max. (with no condensation)
Ambient storage temperature −20 to 70°C
Ambient storage humidity 90% max. (with no condensation)
Storage and operating atmosphere
Vibration resistance
Impact resistance Acceleration 19.6 m/s2 max., in X, Y, and Z directions, three times
Insulation resistance
Dielectric strength
Degree of protection Built into panel (IP10).
EC
International
standards
Note 1. The above items reflect individual evaluation testing. The results may differ under
2. Depending on the operating conditions, some Servo Driver parts will require maintenance.
3. The service life of the Servo Driver is 50,000 hours at an average ambient temperature of
Directives
UL standards UL 508C
cUL standards cUL C22.2 No.14
compound conditions.
Refer to 6-5 Periodic Maintenance in the User’s Manual for details.
40°C at 80% of the rated torque (excluding axial-flow fan).
EMC Directive
Low Voltage
Directive
No corrosive gasses, no dust, no iron dust, no exposure to moisture or
cutting oil
10 to 55 Hz in X, Y, and Z directions with 0.1-mm double amplitude;
acceleration: 4.9 m/s
Between power supply/power line terminals and frame ground:
0.5 MΩ min. (at 500 V DC)
Between power supply/power line terminals and frame ground: 1,500 V
AC for 1 min at 50/60 Hz
Between each control signal and frame ground: 500 V AC for 1 min
EN 55011 Class A Group 1
EN 61000-6-2
EN 50178
2
max.
3-2
WARNING 意
Never perform withstand-voltage or other megameter tests on the Servo Driver.
Page 38
3-1-2 Characteristics
Control Specifications
Item
Continuous output current (rms) 0.84 A 1.1 A 2.0 A 3.7 A
Momentary maximum output current
(rms)
Input power supply
(For main circuit and control circuit)
Heat generated
Control method All-digital servo
Inverter method IGBT-driven PWM method
Maximum response frequency
(command pulses)
Weight 0.5 kg 1.0 kg
Applicable motor capacity 100 W 200 W 400 W 750 W
Applicable Servomotors (R7M-) Z10030-S1 Z20030-S1 Z40030-S1 Z75030-S1
Main circuit 6 W 8 W 16 W 27 W
Control circuit 8 W 8 W 8 W 8 W
3-1 Servo Driver Specifications
3-1-2 Characteristics
R7D-
ZP01H ZP02H ZP04H ZP08H
2.5 A 3.3 A 6.0 A 11.1 A
Single-phase 200 to 230 VAC (170 to 253 V), 50/60 Hz
750 kpps
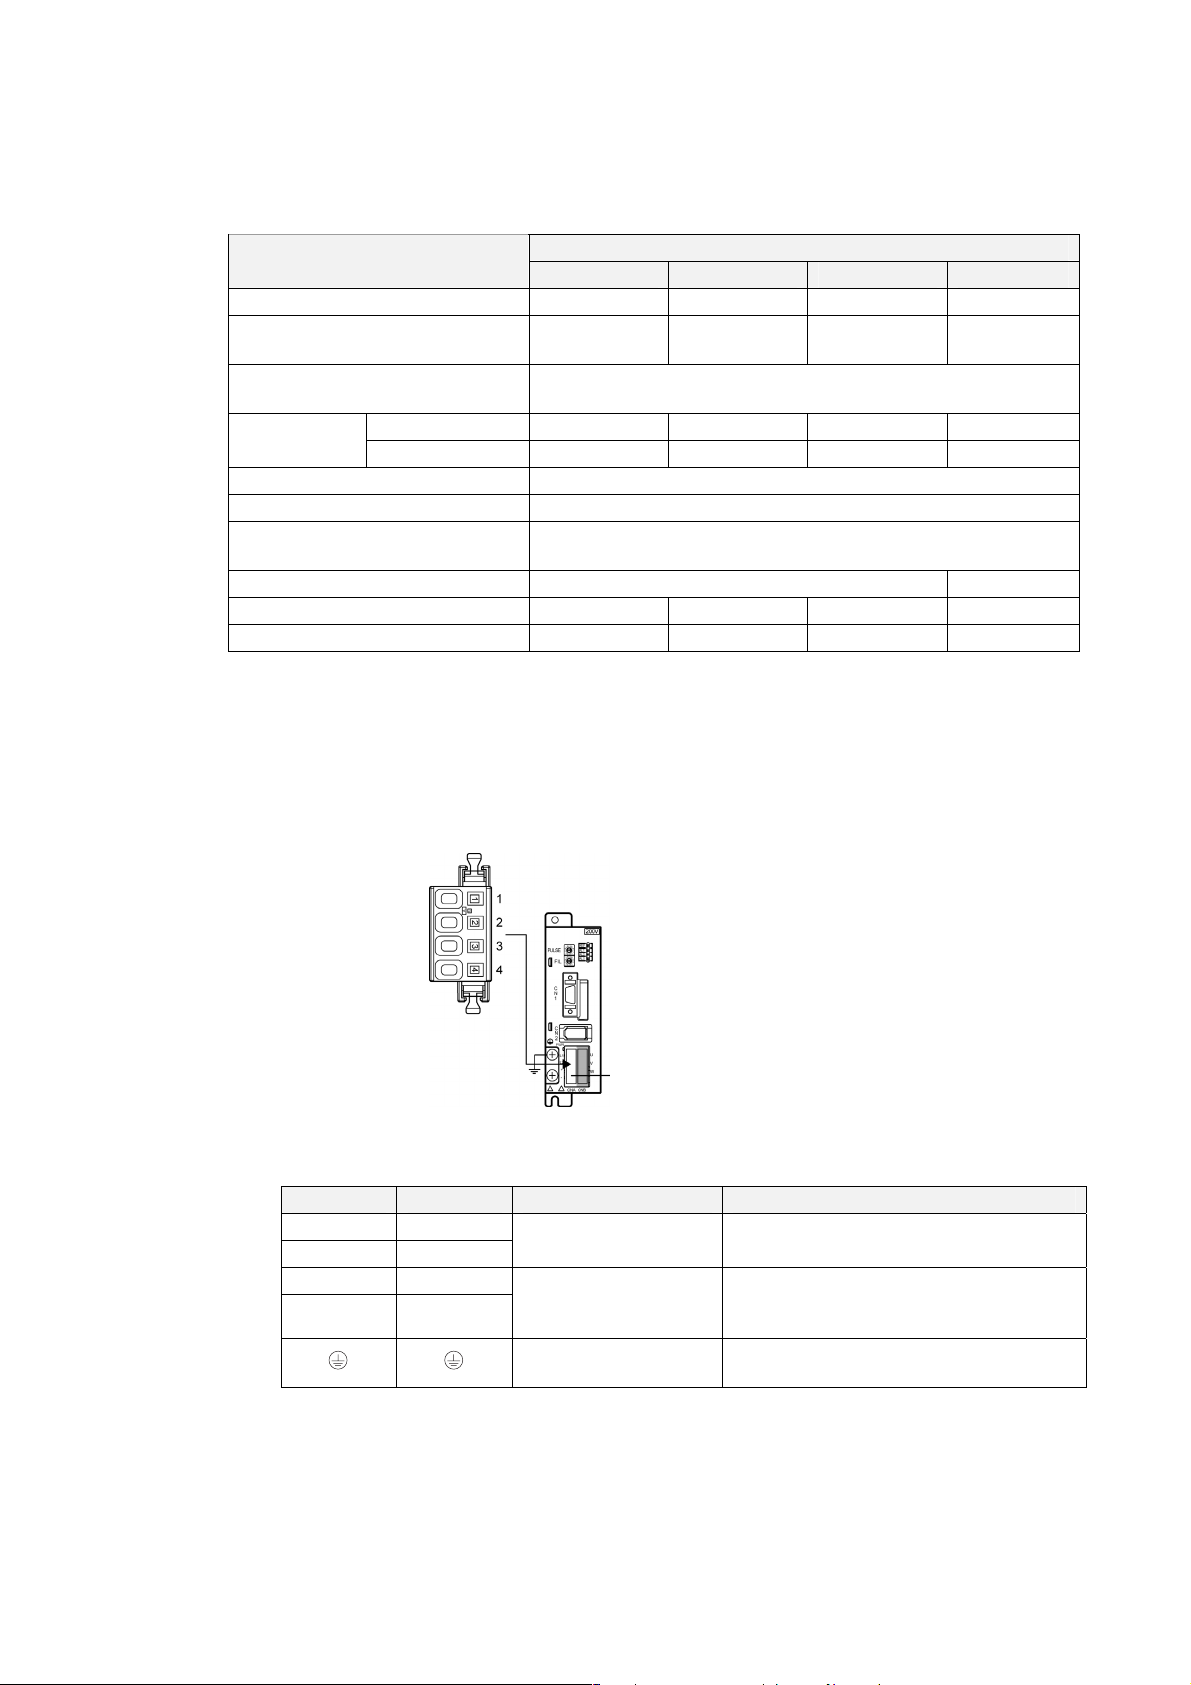
3-1-3 Main Circuit and Servomotor Connector Specificati ons (CNA
and CNB)
R7A-CNZ01P (CNA) Main Circuit Connector Specifications
CNA Connector
Main Circuit Connector (CNA) Pin Arrangement
Signal No. Signal Function Condition
1 L1
2 L2
3 +
4 −
Main circuits power supply
input
Regeneration Resistance
Unit connection terminals
Frame ground
Single-phase 200/230 V AC
(170 to 253 V AC) 50/60 Hz
If regenerative energy is high, connect a
Regeneration Resistance Unit between P and
N.
This is the ground terminal. Ground to a
minimum of 100 Ω (class D, class 3).
3-3
Page 39
3-1 Servo Driver Specifications
3-1-3 Main Circuit and Servomotor Connector Specifications (CNA and CNB)
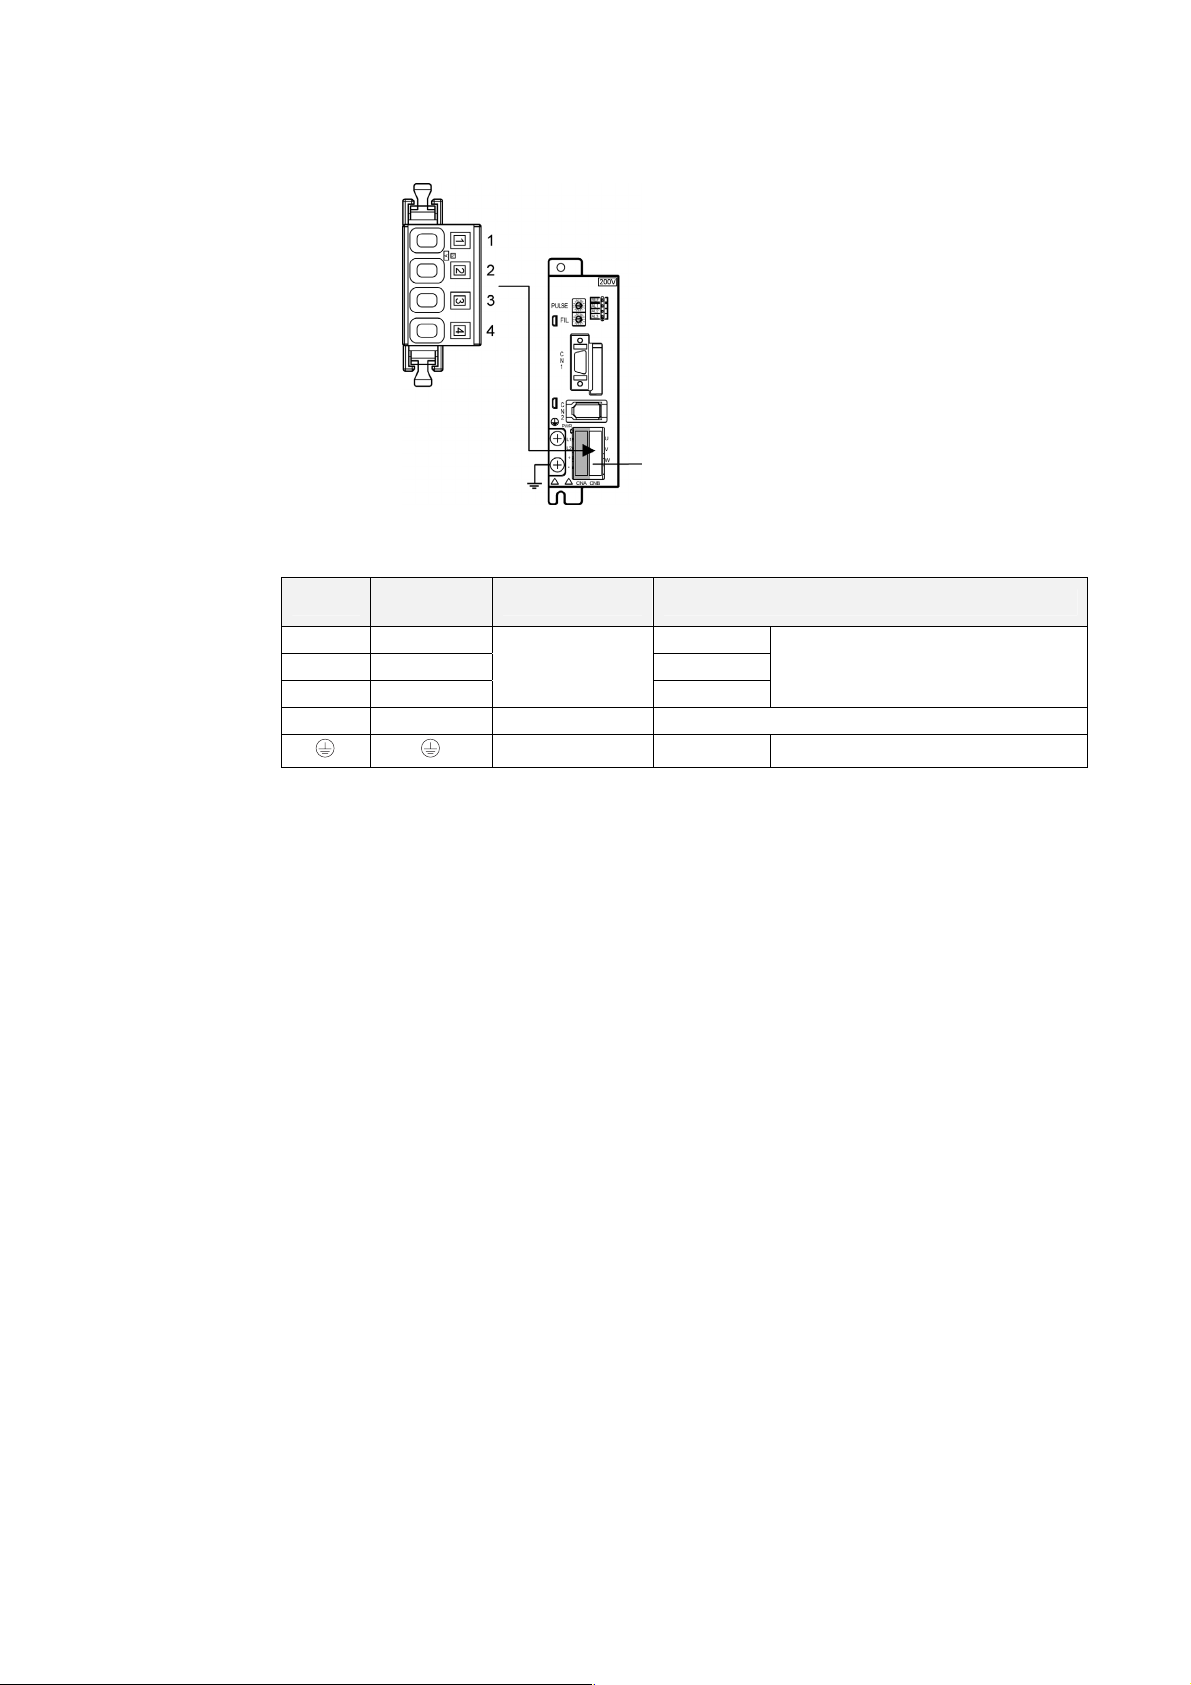
R7A-CNZ01A (CNB) Servomotor Connector Specifications
CNB Connector
Servomotor Connector (CNB) Pin Arrangement
Pin No.
1 U Red
2 V White
3 W
4 --- Do not connect anything to this terminal.
Frame ground Green/Yellow Connect the Servomotor FG terminal.
Terminal
label
Name Function
Servomotor
connection
Terminals
Blue
These are the output terminals to the
Servomotor. Be careful to wire them
correctly.
3-4
Page 40
3-1-4 Control I/O Specifications (CN1)
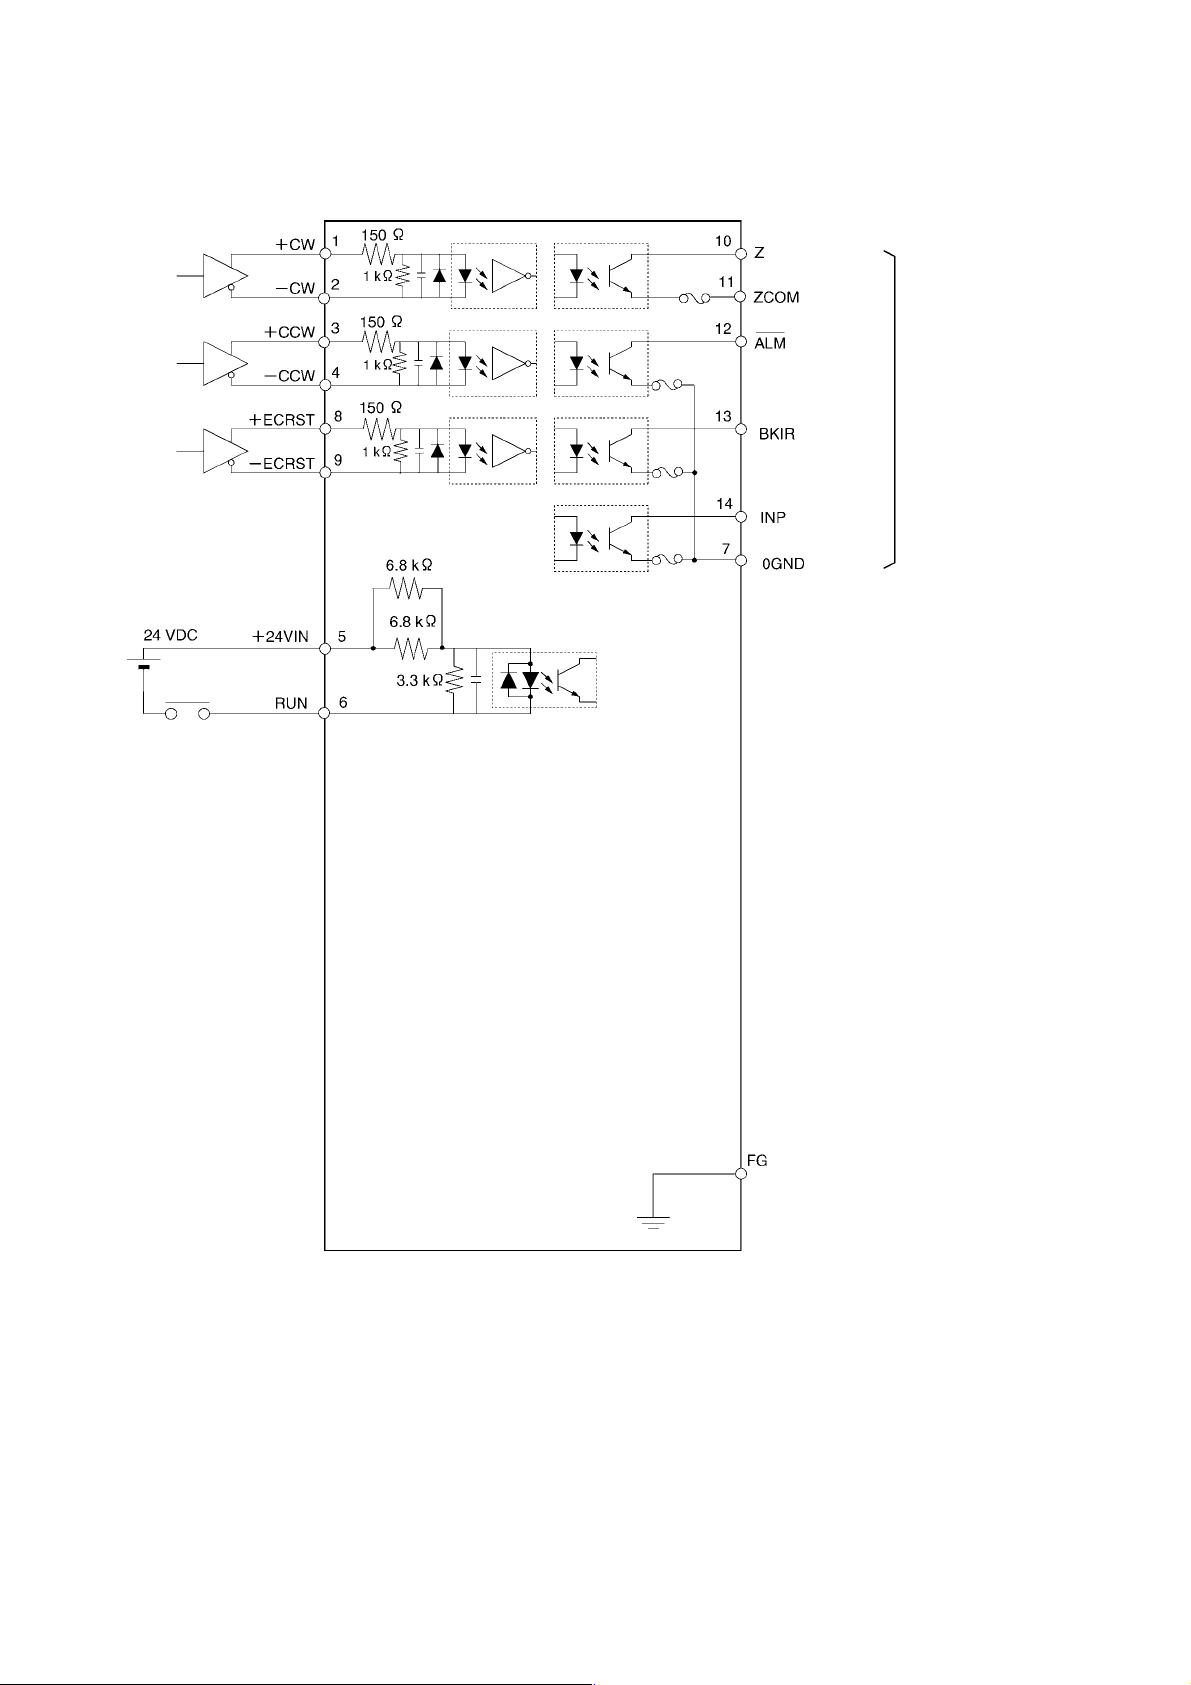
Control I/O Signal Connections and External Signal Processing
3-1 Servo Driver Specifications
3-1-4 Control I/O Specifications (CN1)
Reverse
pulse
Forward
pulse
Deviation
counter
reset
RUN command
Phase Z
Alarm output
Brake
interlock
Positioning
completed
output
Maximum operating
voltage: 30 V DC
Maximum Output
Current: 50 mA DC
Shell
Frame ground
3-5
Page 41
3-1 Servo Driver Specifications
3-1-4 Control I/O Specifications (CN1)
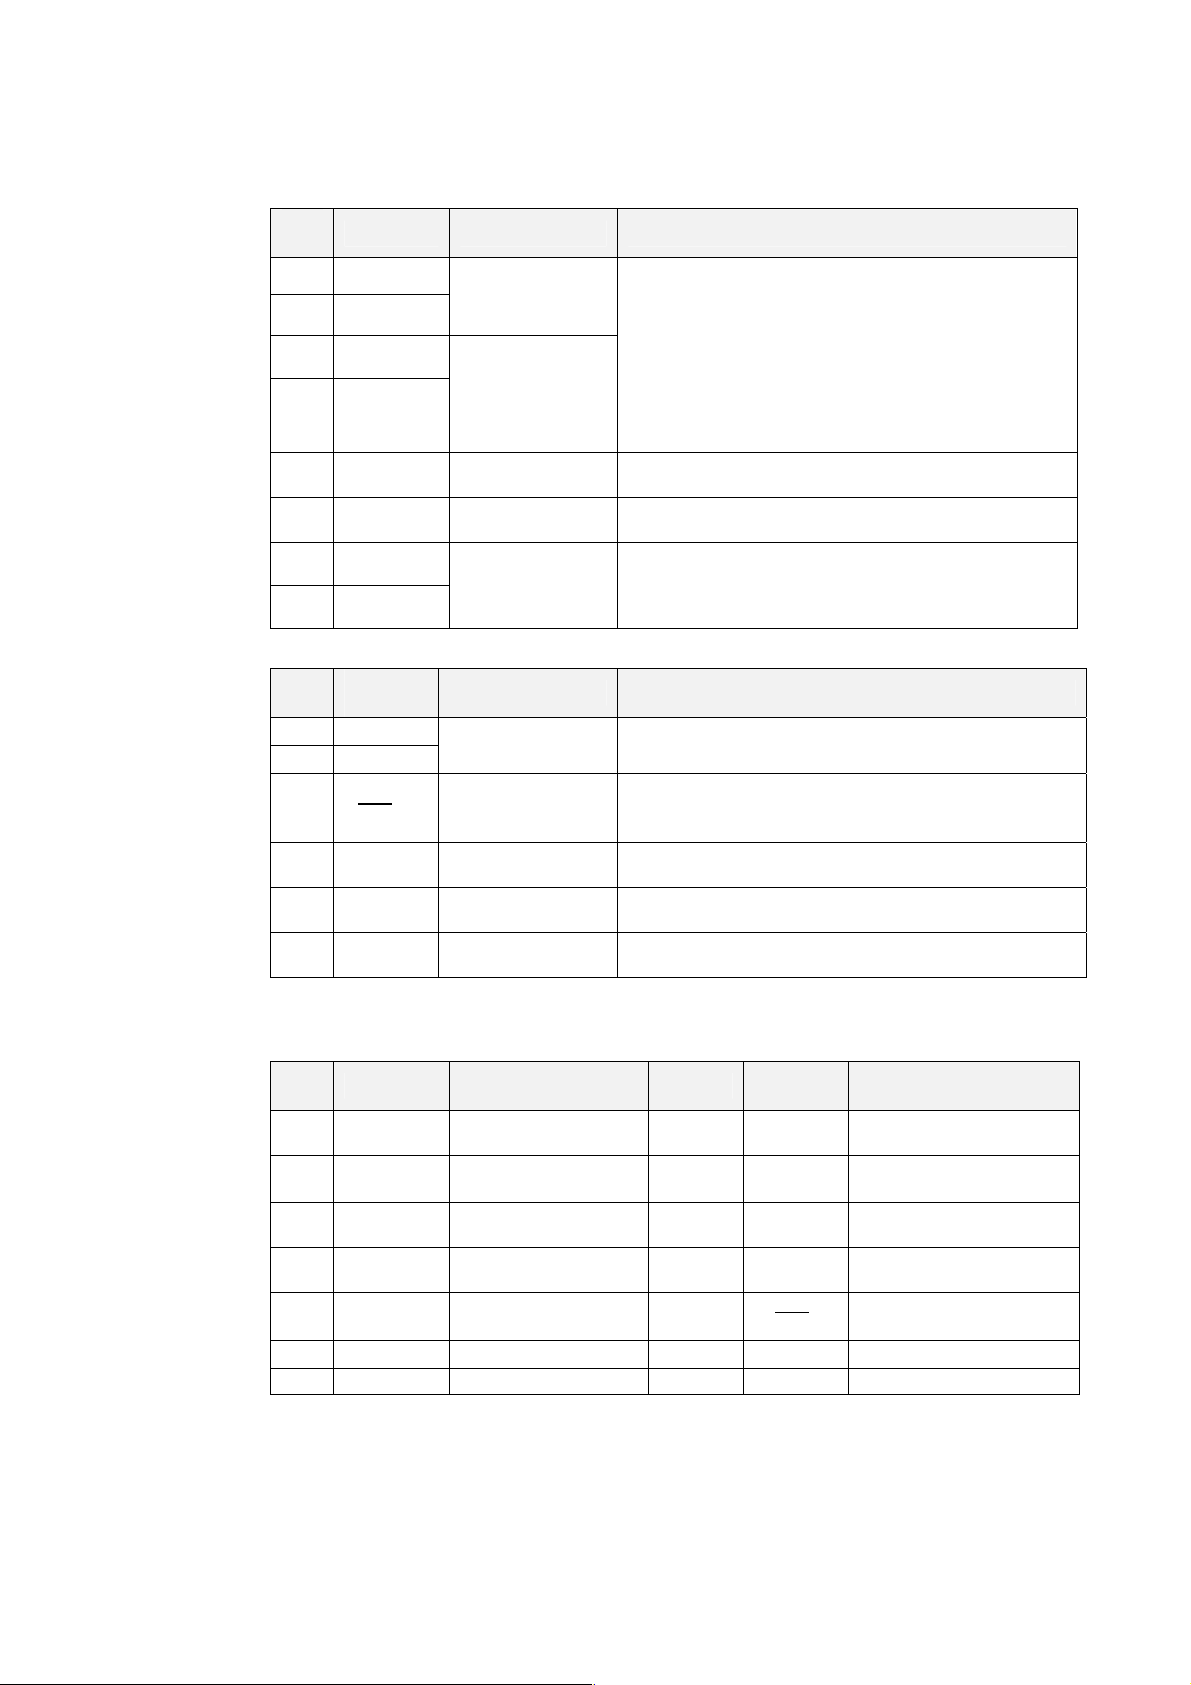
Control I/O Signals
CN1 Control Inputs
Pin
Signal name Function Function/Interface
No.
1 +CW/PULS
2 −CW/PULS
3 +CCW/SIGN
4 −CCW/SIGN
5 +24VIN
6 RUN
8 +ECRST
9 −ECRST
CN1 Control Outputs
Pin
No.
10
11 ZCOM
12
13 BKIR
14 INP
7 0GND
Note: An open-collector output interface is used for sequence outputs (maximum operating
Signal
name
ALM
Z
Phase Z output
Alarm output
Brake interlock output
Positioning completed
output
Output ground
common
voltage: 30 V DC; maximum output current: 50 mA).
CN1: Pin Arrangement
Pin
Signal name Function Pin No.
No.
1 +CW/PULS
2 −CW/PULS
3 +CCW/SIGN
4 −CCW/SIGN
5 +24VIN
6 RUN
7 0GND
Reverse pulses,
feed pulses
Forward pulses,
phase difference
signals
+24-V power supply
input for control DC
RUN command
input
Deviation counter
reset
Function Function/Interface
+ reverse pulse,
+ feed pulse
− feed pulse,
− reverse pulse
+ forward pulse,
+ direction signal
− forward pulse,
− direction signal
Control DC
+24-V input
RUN command input
Output ground common
Pulse string input terminals for position commands.
Line-driver input:
Maximum response frequency: 750 kpps
Open-collector input:
Maximum response frequency: 187.5 kpps
Note: Either forward and reverse pulses (CW/CCW), or
feed pulses and direction signal (PULS/SIGN) can be
selected using the rotary switch for setting command
pulses, located on the front of the Unit.
Power supply input terminal (+24 V DC) for sequence inputs
(pin 6).
ON: Servo ON (Starts power to Servomotor.)
ON: Pulse commands prohibited and deviation counter
cleared.
Note: Input for at least 20 µs.
Outputs the Encoder’s phase Z. (1 pulse/revolution)
Note: Use the rising edge of the ON signal.
When the Servo Driver generates an alarm, the output turns
OFF.
Note: OFF for approx. 2 s after the power is turned ON.
Outputs the holding brake timing signals. Release the holding
brake when this signal is ON.
ON when the position deviation is within ±10 pulses.
Ground common for sequence outputs (pins 12, 13 and 14).
Signal
name
8 +ECRST
9 −ECRST
10 Z
11 ZCOM
12
13 BKIR
14 INP
ALM
Function
+ deviation counter reset
− deviation counter reset
Encoder phase Z output
Phase Z output ground
Alarm output
Brake interlock output
Positioning completed output
3-6
Page 42
CN1 Connectors (14P)
Soldered Connectors
Name Model Manufacturer
Cable plug 10114-3000VE
Cable case (shell kit) 10314-52A0-008
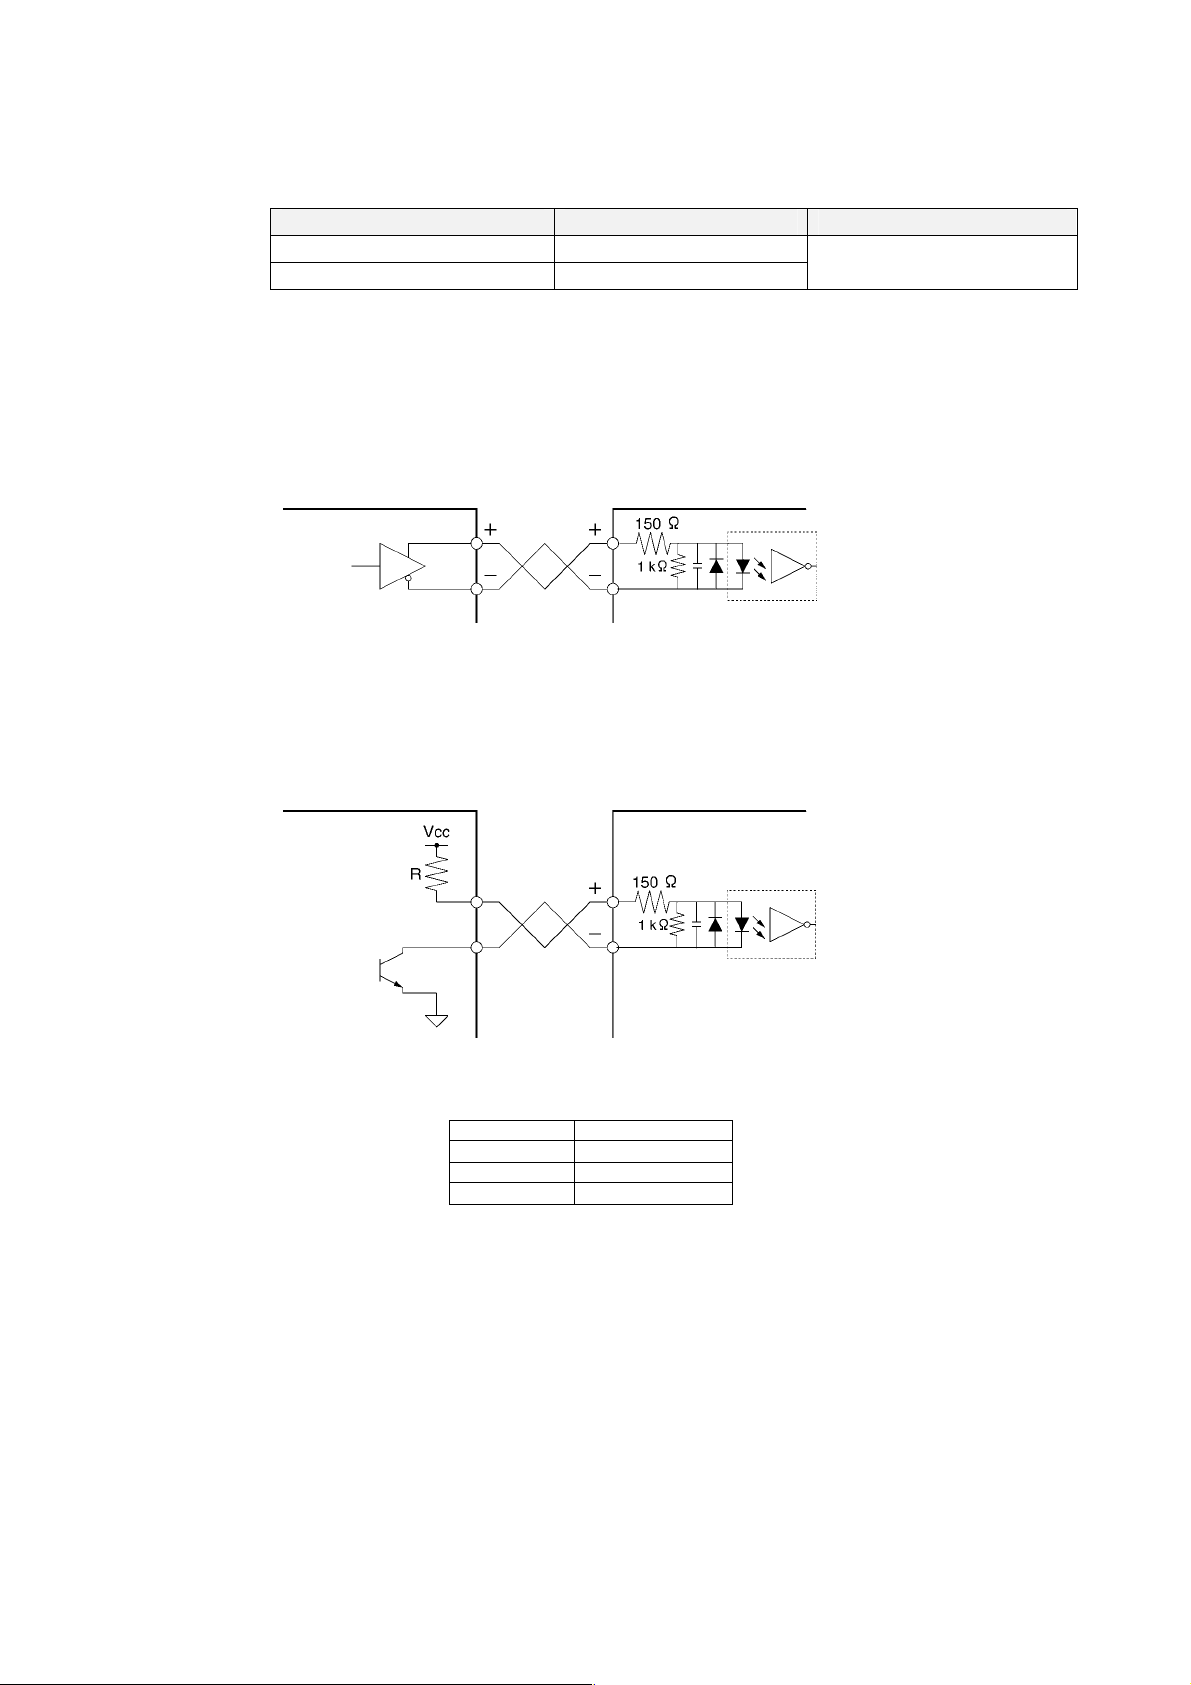
3-1-5 Control Input Circuits
Position Command Pulse Inputs and Deviation Counter Reset Inputs
Line Driver Input
Controller
3-1 Servo Driver Specifications
3-1-5 Control Input Circuits
Sumitomo 3M
Servo Driver
Input current: 9 mA, 3 V
Applicable line driver:
SN75174, MC3487, AM26LS31A equivalent
Open Collector Input
Controller Servo Driver
Input current: 7 to 15 mA
Note: Select a value for resistance R so that the input current will be from 7 to 15 mA.
Vcc R
24 V 1.6 to 2.2 kΩ
12 V 750 to 1 kΩ
5 V 180 Ω
3-7
Page 43
3-1 Servo Driver Specifications
3-1-6 Control Input Details
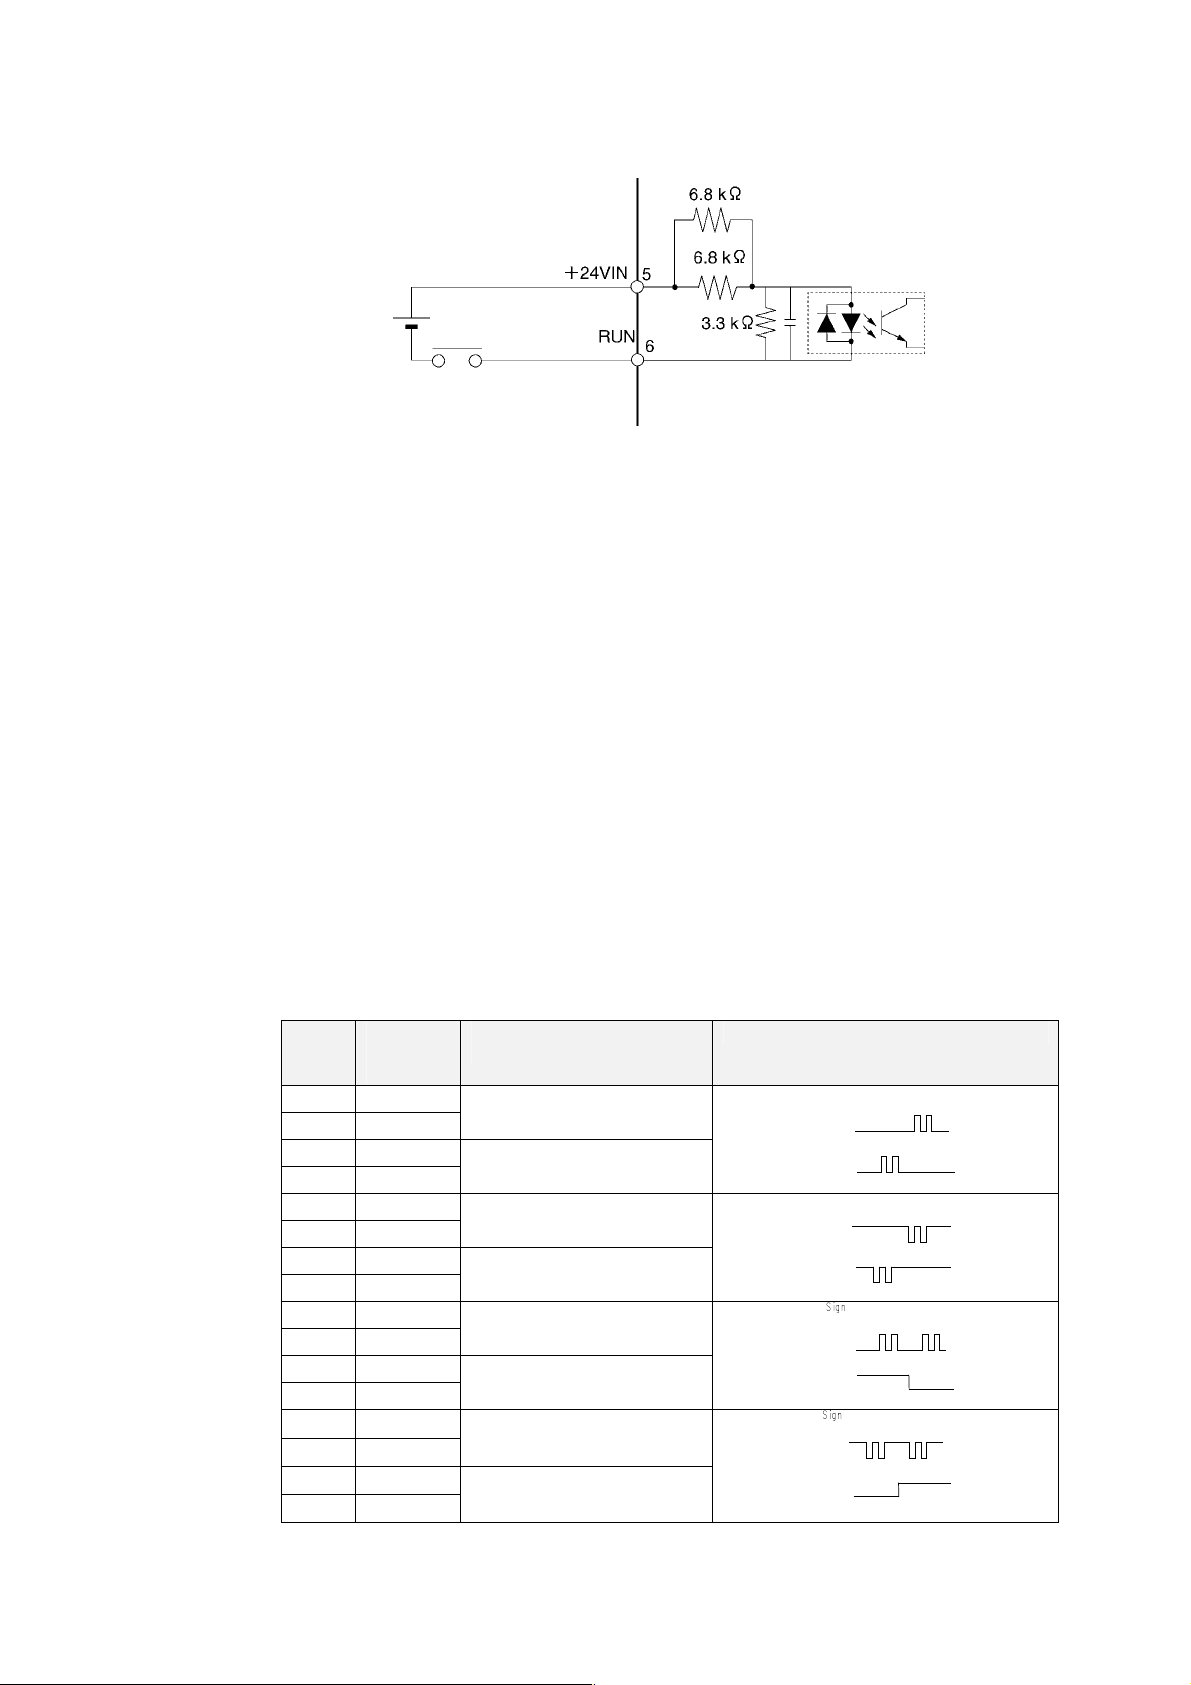
Sequence Inputs
External power supply:
24 V ±1 V DC
Power supply capacity:
50 mA min. (per Unit)
Photocoupler input:
24 V DC, 7 mA
Signal Levels
Minimum ON time: 40 ms
On level: Minimum (+24 VIN−11)V
OFF level: Maximum (+24 VIN−1)V
3-1-6 Control I nput Detai ls
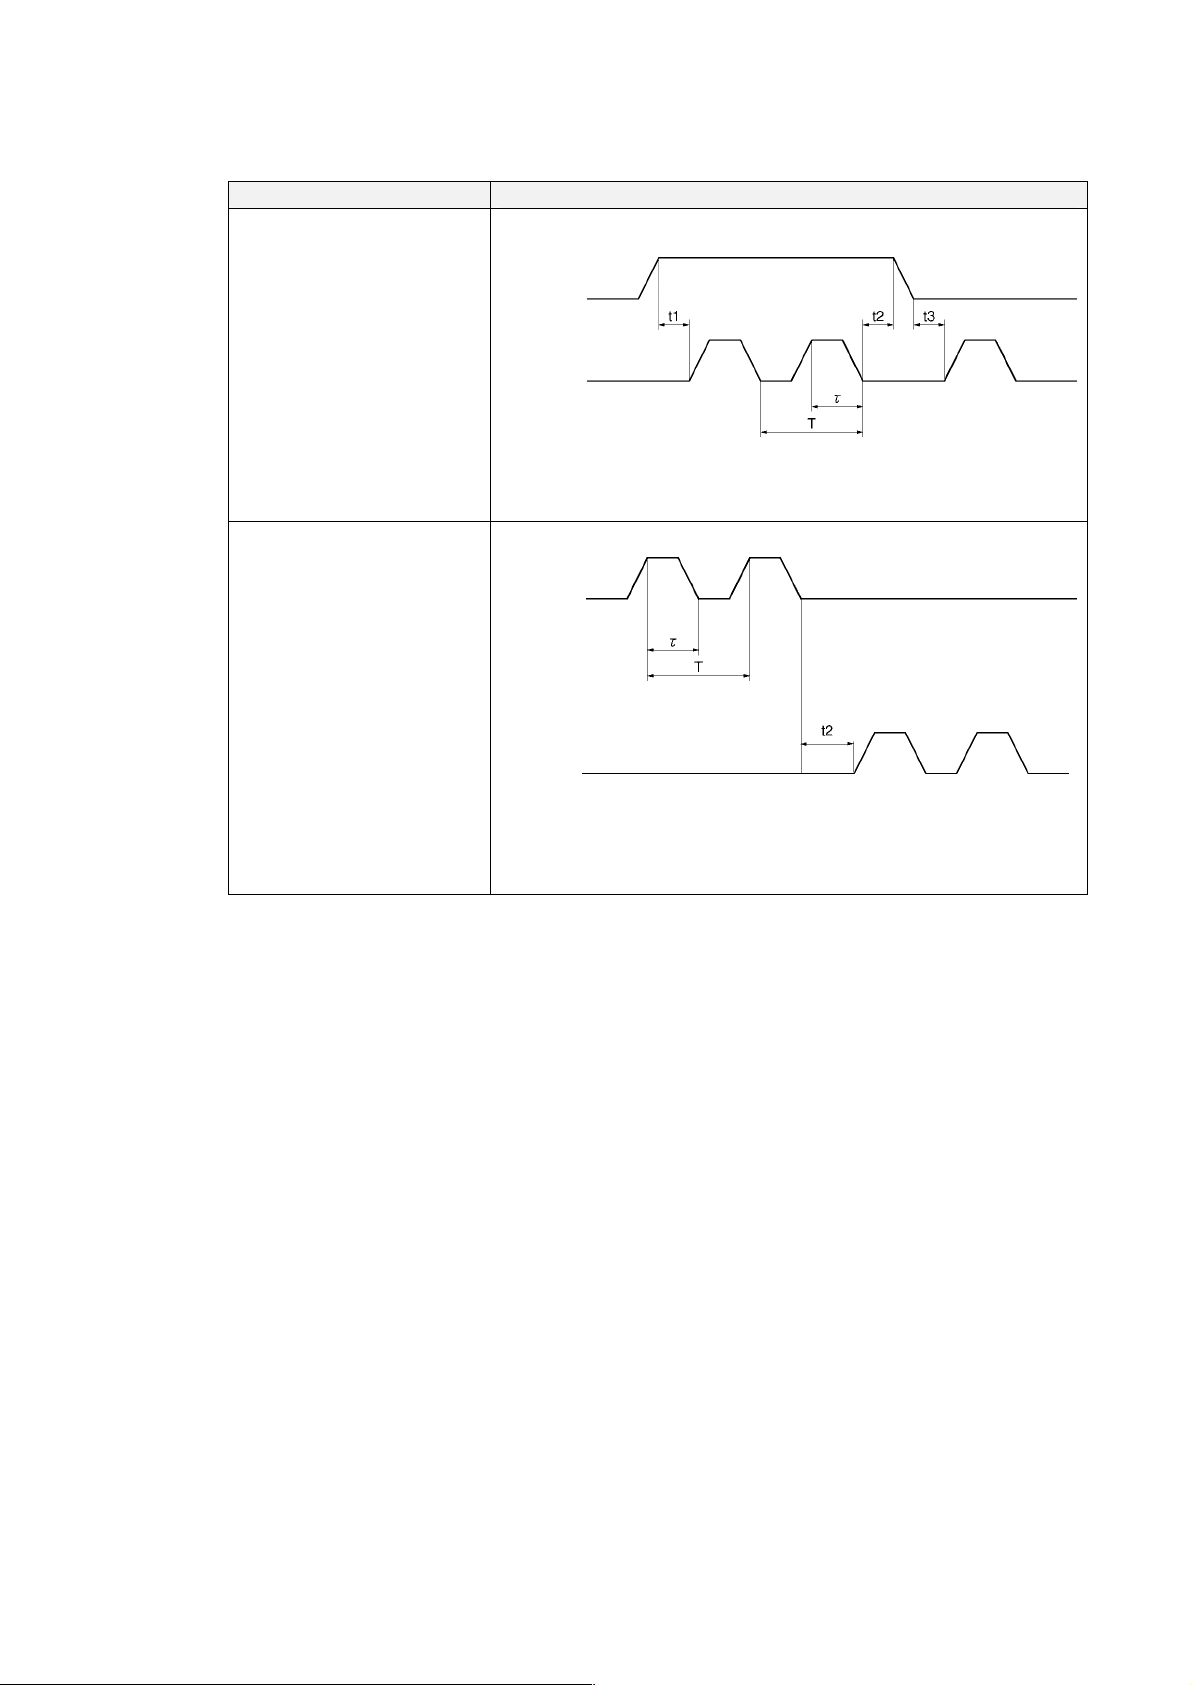
Feed Pulse/Direction Signal, Reverse Pulse/Forward Pulse
CN1 Pin Numbers
CN1 pin 1:
+Reverse Pulse (+CW), +Feed Pulse (+PULS)
CN1 pin 2:
–Reverse Pulse (–CW), –Feed Pulse (–PULS)
CN1 pin 3:
+Direction Signal (+SIGN), +Forward Pulse (+CCW)
CN1 pin 4:
–Direction Signal (–SIGN), –Forward Pulse (–CCW )
Signal Functions
The functions of these signals depend on the setting of the command pulse rotary switch
(PULSE) on the front of the Servo Driver. Turn OFF the Servo Driver’s power before
setting the PULSE Switch. The factory setting is 0.
3-8
Setting
0
1
2
3
4
5
6
7
8
9
A
B
C
D
E
F
Command
pulse
resolution
1000
2500
5000
10000
1000
2500
5000
10000
1000
2500
5000
10000
1000
2500
5000
10000
Command pulse connection
method
Open collector or line driver
Line driver
Open collector or line driver
Line driver
Open collector or line driver
Line driver
Open collector or line driver
Line driver
Command pulse type
CW + CCW, positive logic
CW
CCW
CW + CCW, negative logic
CW
CCW
+ pulse string,
positive logic
PULS
SIGN
+ pulse string,
negative logic
PULS
SIGN
Page 44
3-1 Servo Driver Specifications
Command Pulse Timing
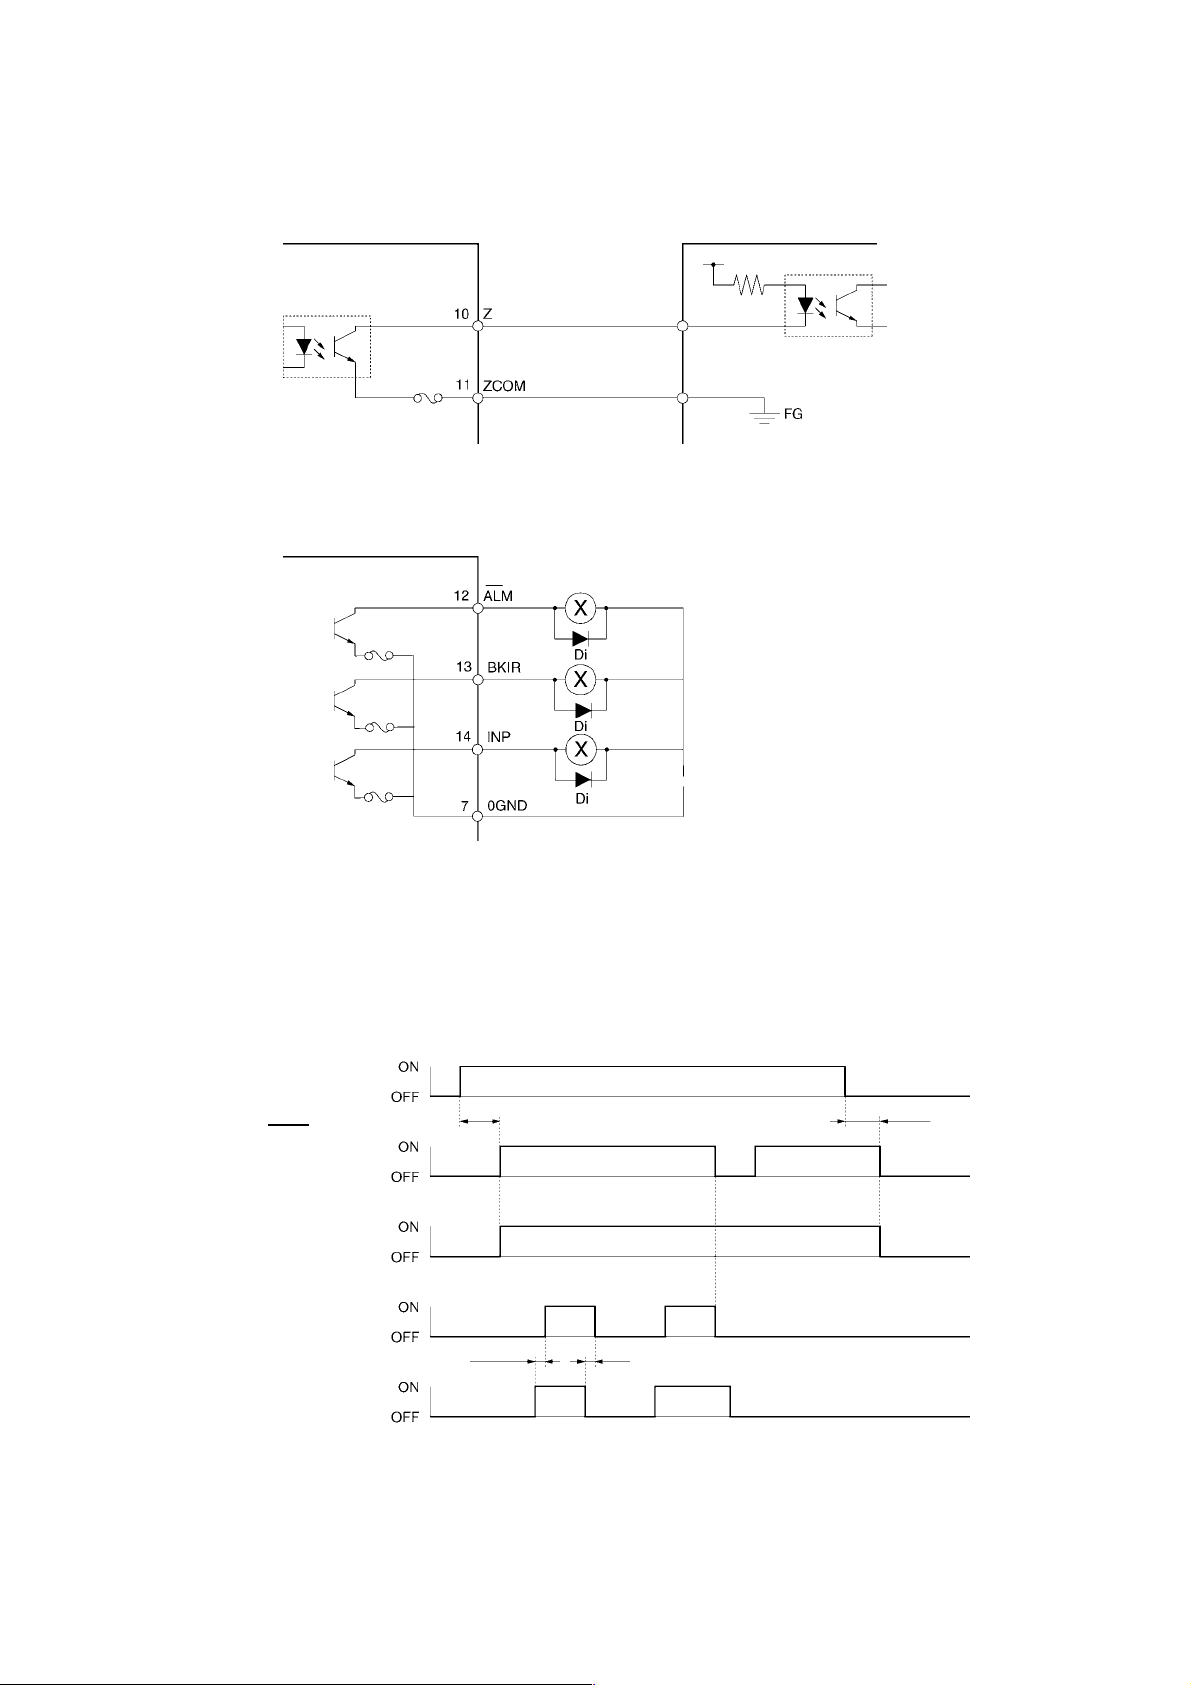
Command Pulse Mode Timing details
Feed pulse and direction signal
Maximum input frequency
Line driver: 750 kpps
Open collector: 187.5 kpps
Reverse and forward pulses
Maximum input frequency
Line driver: 750 kpps
Open collector: 187.5 kpps
Direction signal
Feed pulse
Forward pulse
3-1-6 Control Input Details
Reverse commandForward command
t1, t2, and t3 > 3.0 µs
τ ≥ 0.66 µs
T ≥ 1.33 µs
(τ / T) × 100 ≤ 50 (%)
Forward command
Reverse pulse
t2 > 3.0 µs
τ ≥ 0.66 µs
T ≥ 1.33 µs
(τ / T) × 100 ≤ 50 (%)
Deviation Counter Reset (ECRST)
The CN1 connector input pins are as follows:
+Deviation Counter Reset (8: +ECRST)
−Deviation Counter Reset (9: –ECRST)
Functions
• The value of the deviation counter will be reset when the deviation counter reset signal
turns ON and the position loop will be disabled.
• Input the reset signal for 20 µs minimum. The counter will not be reset if the signal is
too short.
RUN Command Input (RUN)
RUN Command Input (pin 6: RUN)
Functions
This is the input that turns ON the power drive circuit for the main circuit of the Servo
Driver. If this signal is not input (i.e., servo-OFF status), the Servomotor cannot operate
except for JOG operations.
3-9
Page 45
3-1 Servo Driver Specifications
y
3-1-7 Control Output Circuits
3-1-7 Control Output Ci rcuits
Phase Z Output
Servo Driver
Controller
Maximum operating voltage: 30 V DC
Maximum output cu rrent: 50 mA
Sequence and Alarm Outputs
Servo Driver
Maximum operating voltage: 30 V DC
Maximum output current: 50 mA
External power suppl
24 V DC ±1 V
:
3-1-8 Control Output Details
Control Output Sequence
Power supply input
(L1 and L2)
Alar m o utput (A LM )
Positioning Completed Output
(INP)
Brake Interlock output (BKIR)
Run command input
(RUN)
Di: Diode for preventing surge voltage (Use speed diodes.)
Approx. 2 s
0 to 35 ms 2 ms
30 s max.
3-10
Page 46
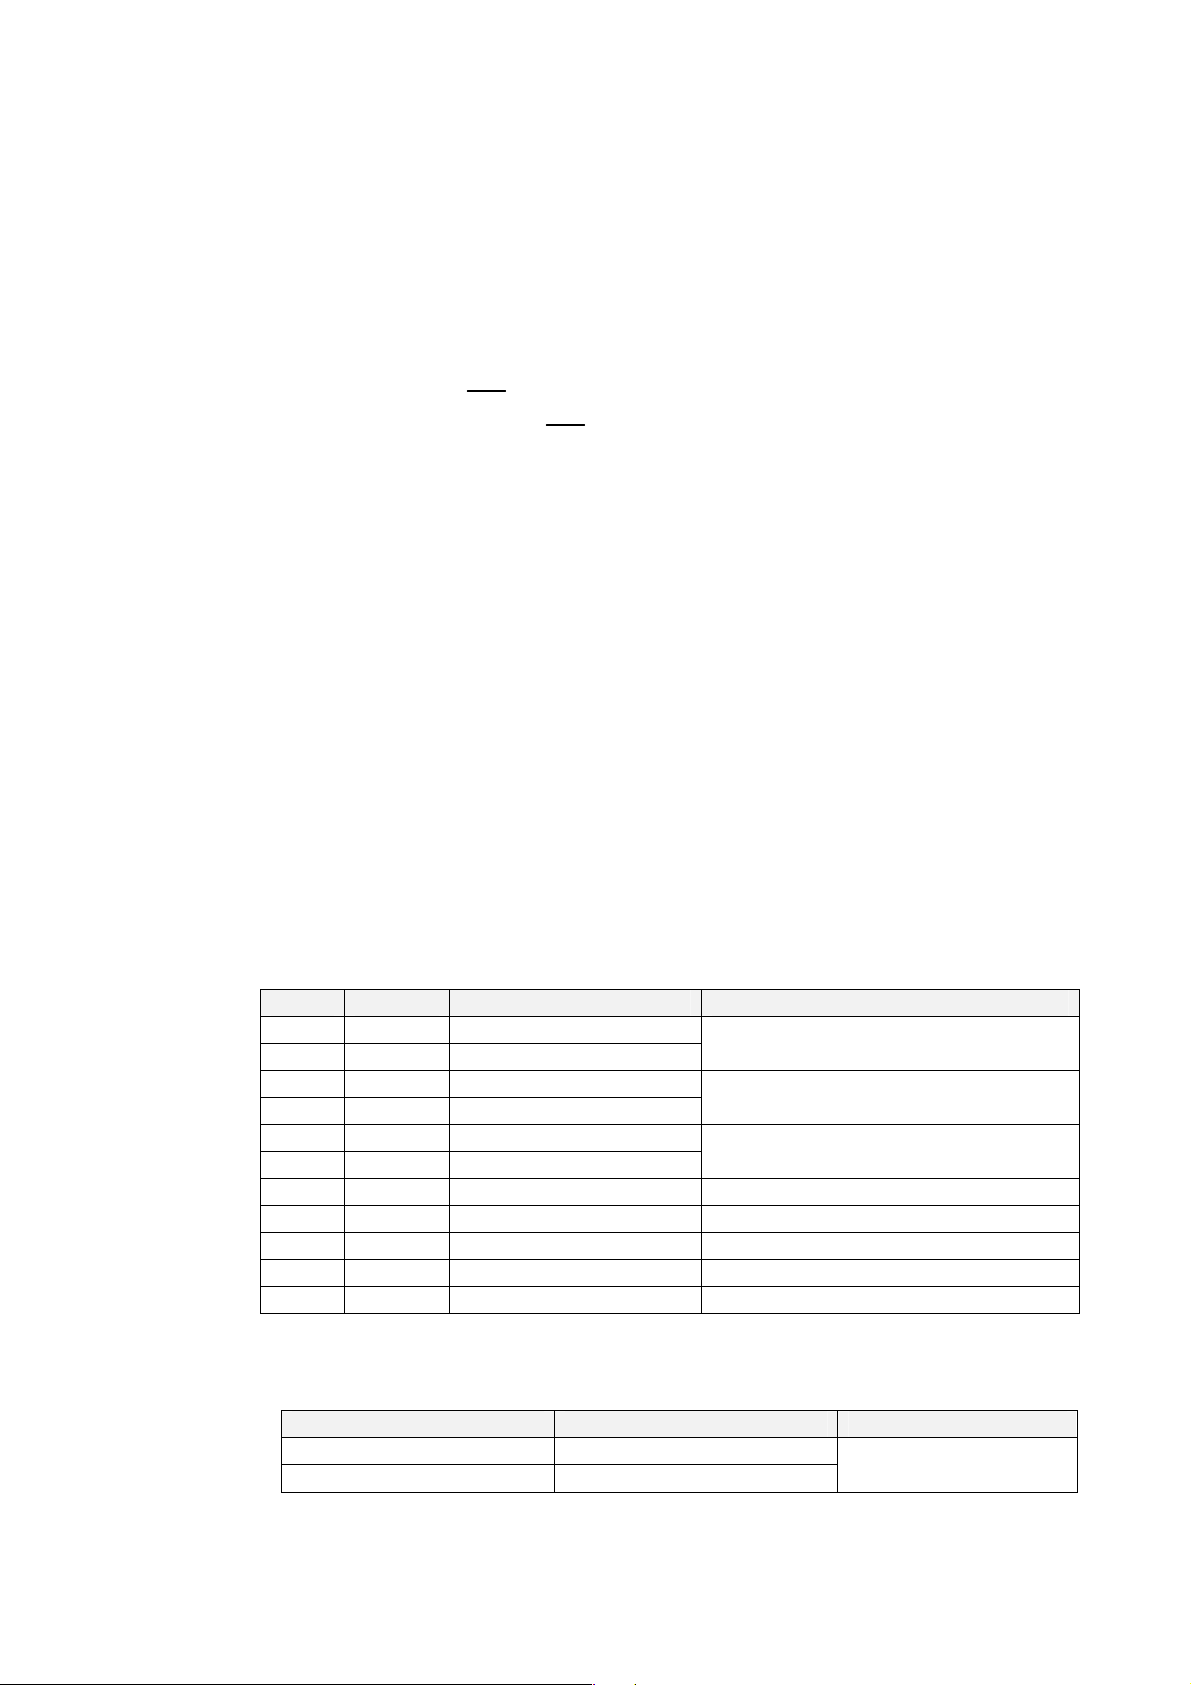
3-1 Servo Driver Specifications
A
3-1-9 Encoder Connector Specifications (CN2)
Phase Z Output (Z)
The following CN1 connector pins are used for the phase Z output.
Pin No. 10: Phase Z output (Z)
Pin No. 11: Phase Z output ground (ZCOM)
Function
• The Encoder phase Z is output.
• One pulse is output for each rotation.
Alarm Output ( )
• Pin No.12: Alarm Output ( )
ALM
LM
Function
• The alarm output is turned OFF when the Servo Driver detects an error.
• This output is OFF at startup and turns ON when the initial processing has been
completed. (Approx. 2 s is required for initial processing.)
Brake Interlock Output (BKIR)
Pin No.13: Brake Interlock output (BKIR)
Function
• The external brake timing signal is output.
Positioning Completed Output (INP)
Pin No.14: Positioning Completed Output (INP)
Function
• The INP signal turns ON when the number of accumulated pulses in the deviation
counter is less than 10.
3-1-9 Encoder Connector Specifications (CN2)
Pin No. Signal Name Function/interface
1 E5V Encoder power supply, +5 V
2 E0V Encoder power supply, GND
3 Phase A+ Encoder phase +A input
4 Phase A– Encoder phase –A input
5 Phase B+ Encoder phase +B input
6 Phase B– Encoder phase –B input
7 Phase Z Encoder phase Z input Open collector input
8 Phase U Pole sensor phase U input Open collector input
9 Phase V Pole sensor phase V input Open collector input
10 Phase W Pole sensor phase W input Open collector input
Shell FG Shield ground Cable shield ground
Connectors for CN2 (10-pin)
Power supply output for the encoder
5 V, 70 mA
Differential sine-wave input
Differential cos-wave input
Soldered Connector
Name Model Maker
Plug, Cable, and Cover Set 54599-1005
Plug Connector 51593-1011
Molex Japan Co.
3-11
Page 47
3-1 Servo Driver Specifications
3-1-9 Encoder Connector Specifications (CN2)
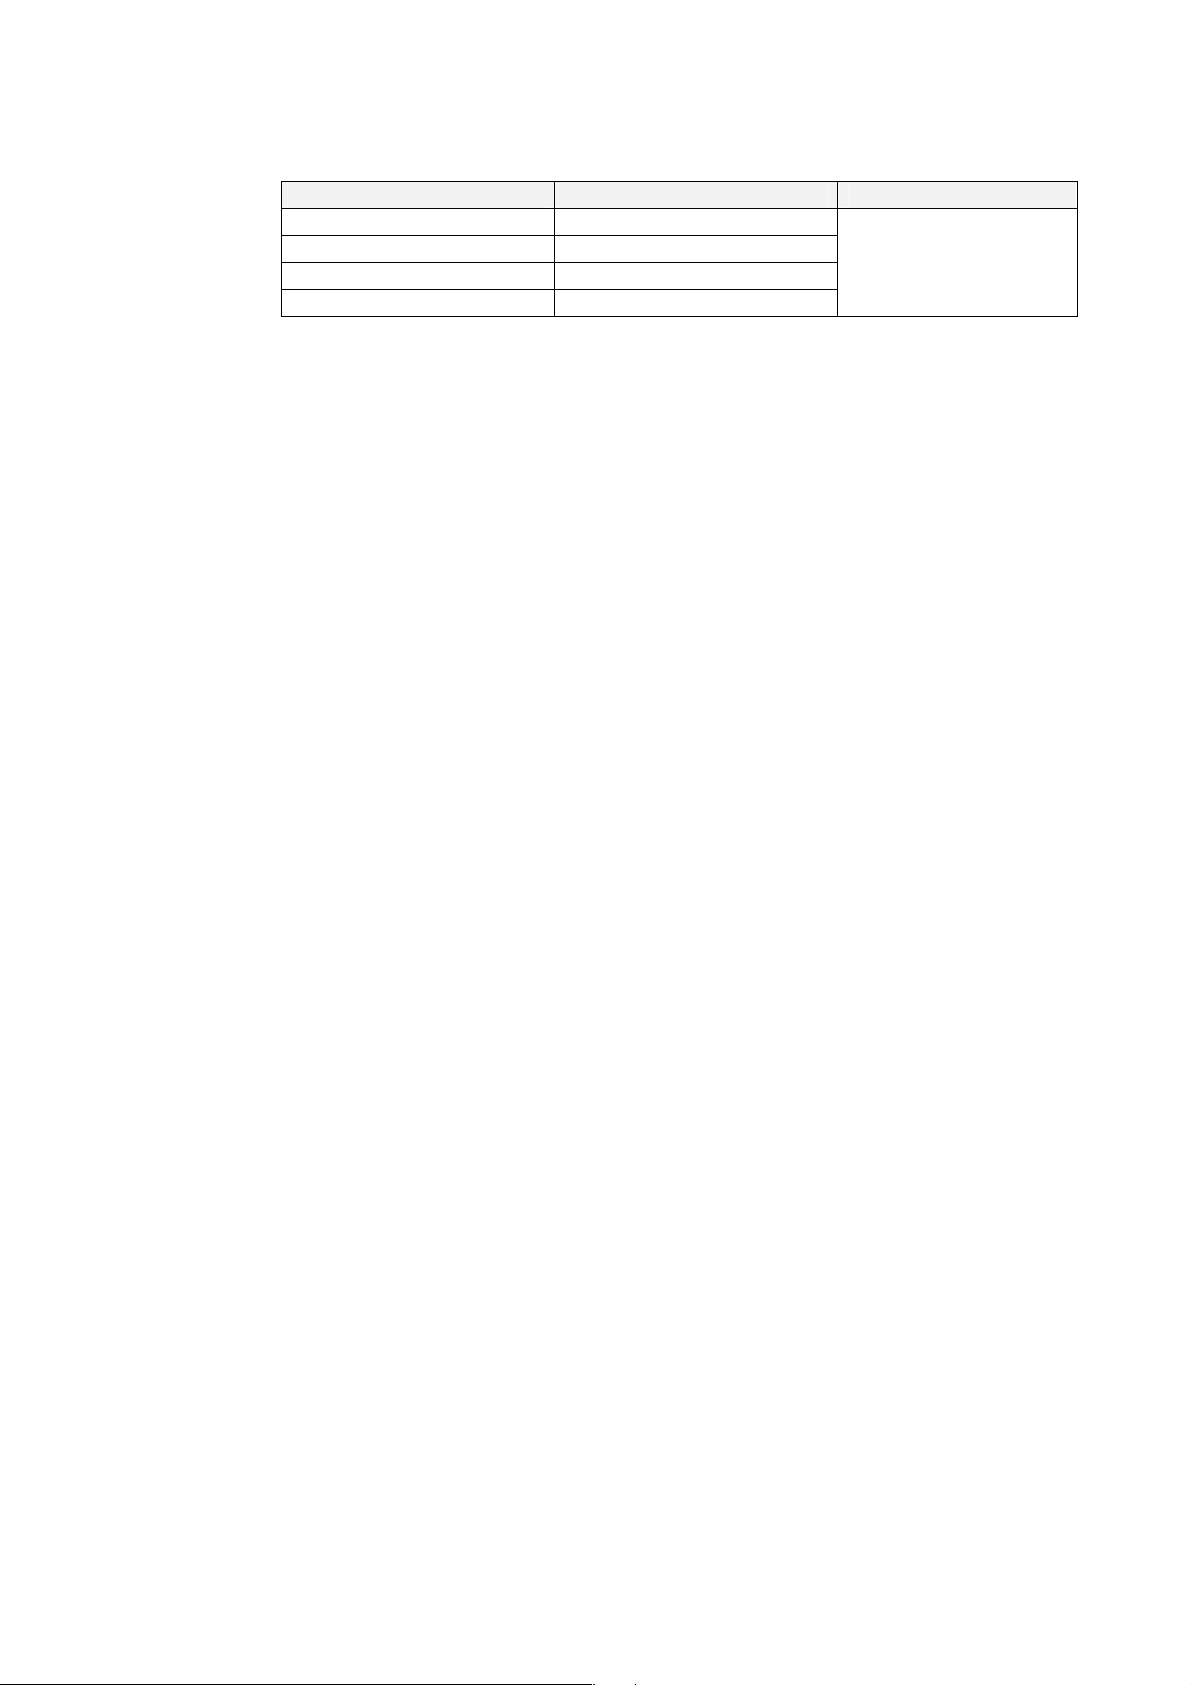
Crimped (Solderless) Connector
Name Model Maker
Plug, Cable, and Cover Set 54559-1005
Plug Housing 51209-1001
Crimp Terminal 59351-8187 (Loose wire)
Crimping Tool 57401-5300
Molex Japan Co.
3-12
Page 48
3-2 Servomotor Specifications
3-2-1 General Specifications
3-2 Servomotor Specifications
Select a Servomotor based on the mechanical system’s load conditions and the installation environment.
There are various options available on the Servomotors, such as brakes.
3-2-1 General Specifications
Item Specifications
Ambient operating temperature 0 to 40°C
Ambient operating humidity 20% to 80% (with no condensation)
Ambient storage temperature −20 to 60°C
Ambient storage humidity 20% to 80% (with no condensation)
Storage and operating atmosphere No corrosive gases
Vibration resistance
Impact resistance 98 m/s2 max. (twice in vertical direction)
Insulation resistance
Dielectric strength
Operating position Any direction
Insulation class Type B
Construction Totally-enclosed, self-cooling
Degree of protection IP55 (excluding the through-shaft portion)
Vibration class V-15
Mounting method Flange-mounting
EMC Directive
Low Voltage
Directive
International
standards
EC
Directives
UL standards UL 1004
cUL standards cUL C22.2 No. 100
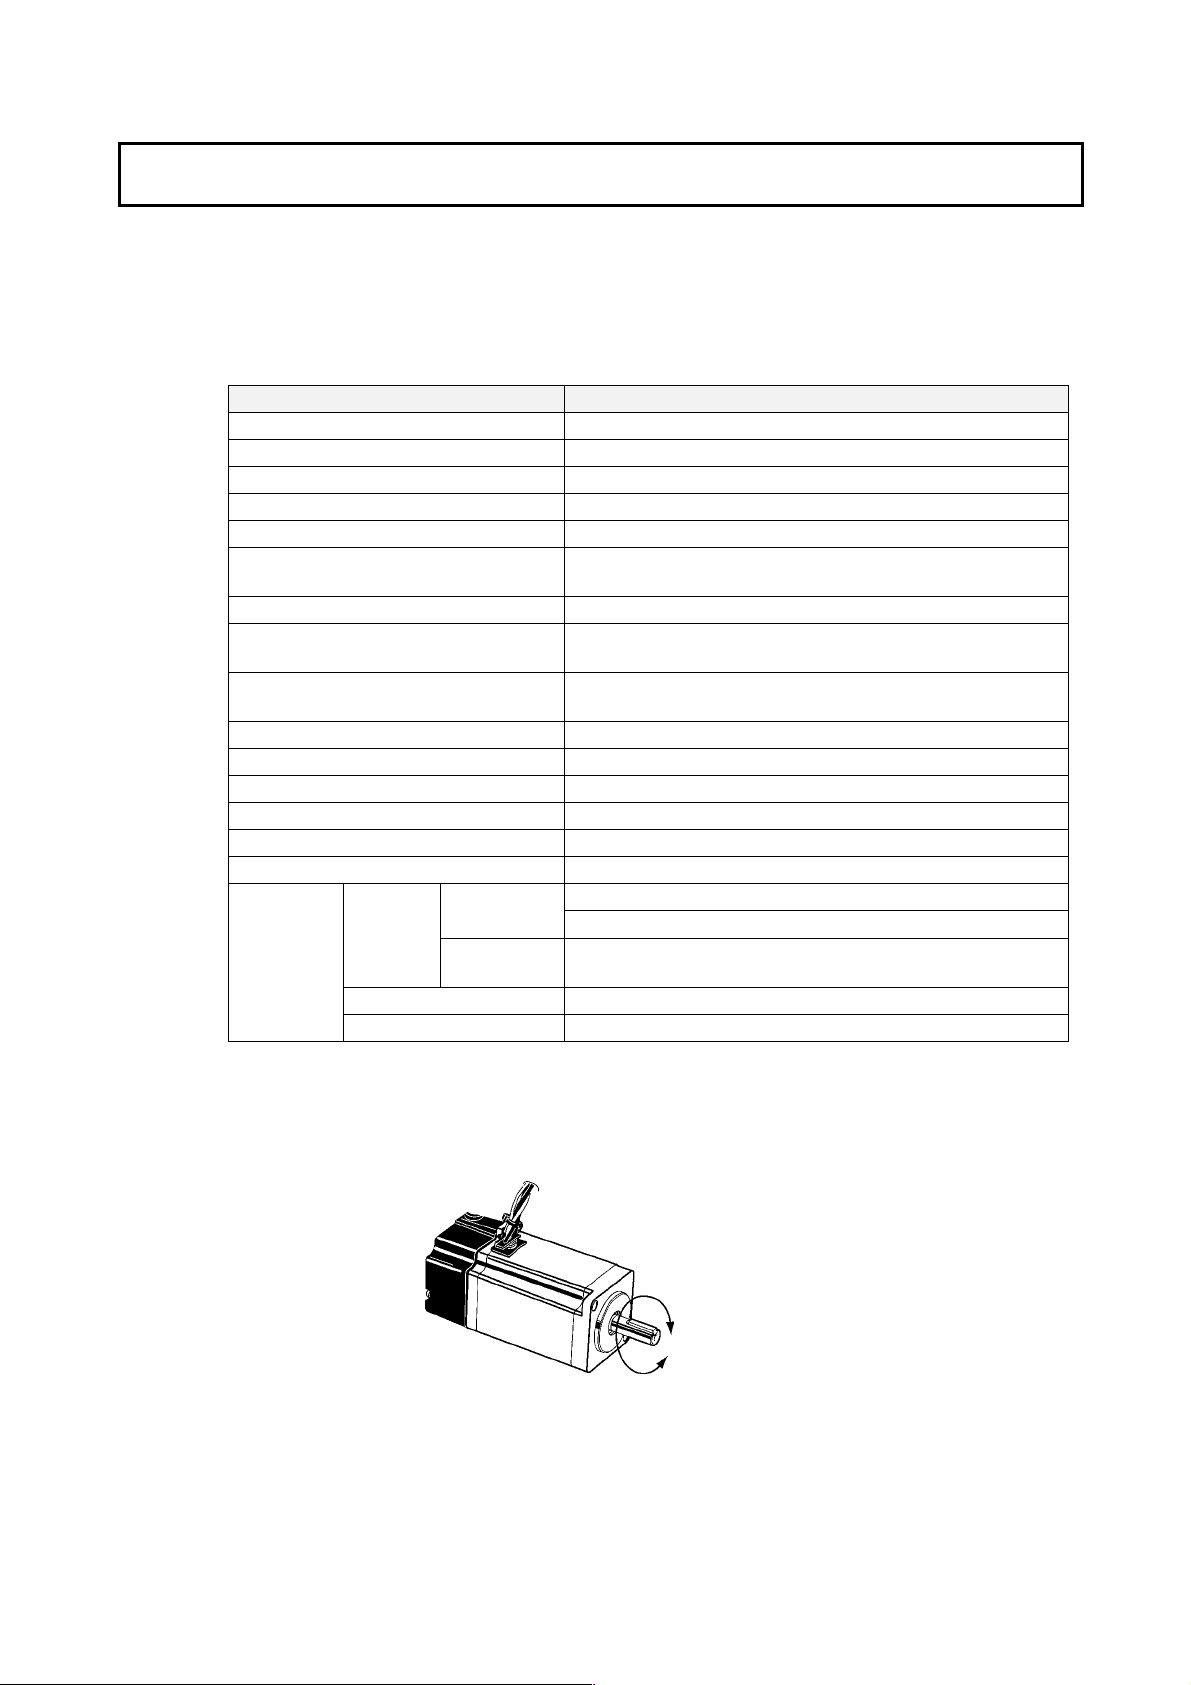
Motor Rotation Directions
In this manual, the Servomotors rotation directions are defined as forward and reverse.
Viewed from the end of the motor’s output shaft, counterclockwise (CCW) rotation is
forward and clockwise (CW) rotation is reverse.
10 to 2,500 Hz, with a 0.2-mm double amplitude or acceleration of
24.5 m/s
10 MΩ min. at 500 VDC between the power terminals and FG
terminal
1,500 VAC (50 or 60 Hz) for 1 minute between the power terminals
and FG terminal
EN 550011 Class A, Group1
EN 61000-6-2
IEC 60034-1, -5, -8, and -9
EN 60034-1 and -9
2
(whichever is smaller) in the X, Y, and Z directions
Reverse
Forward
3-13
Page 49
3-2 Servomotor Specifications
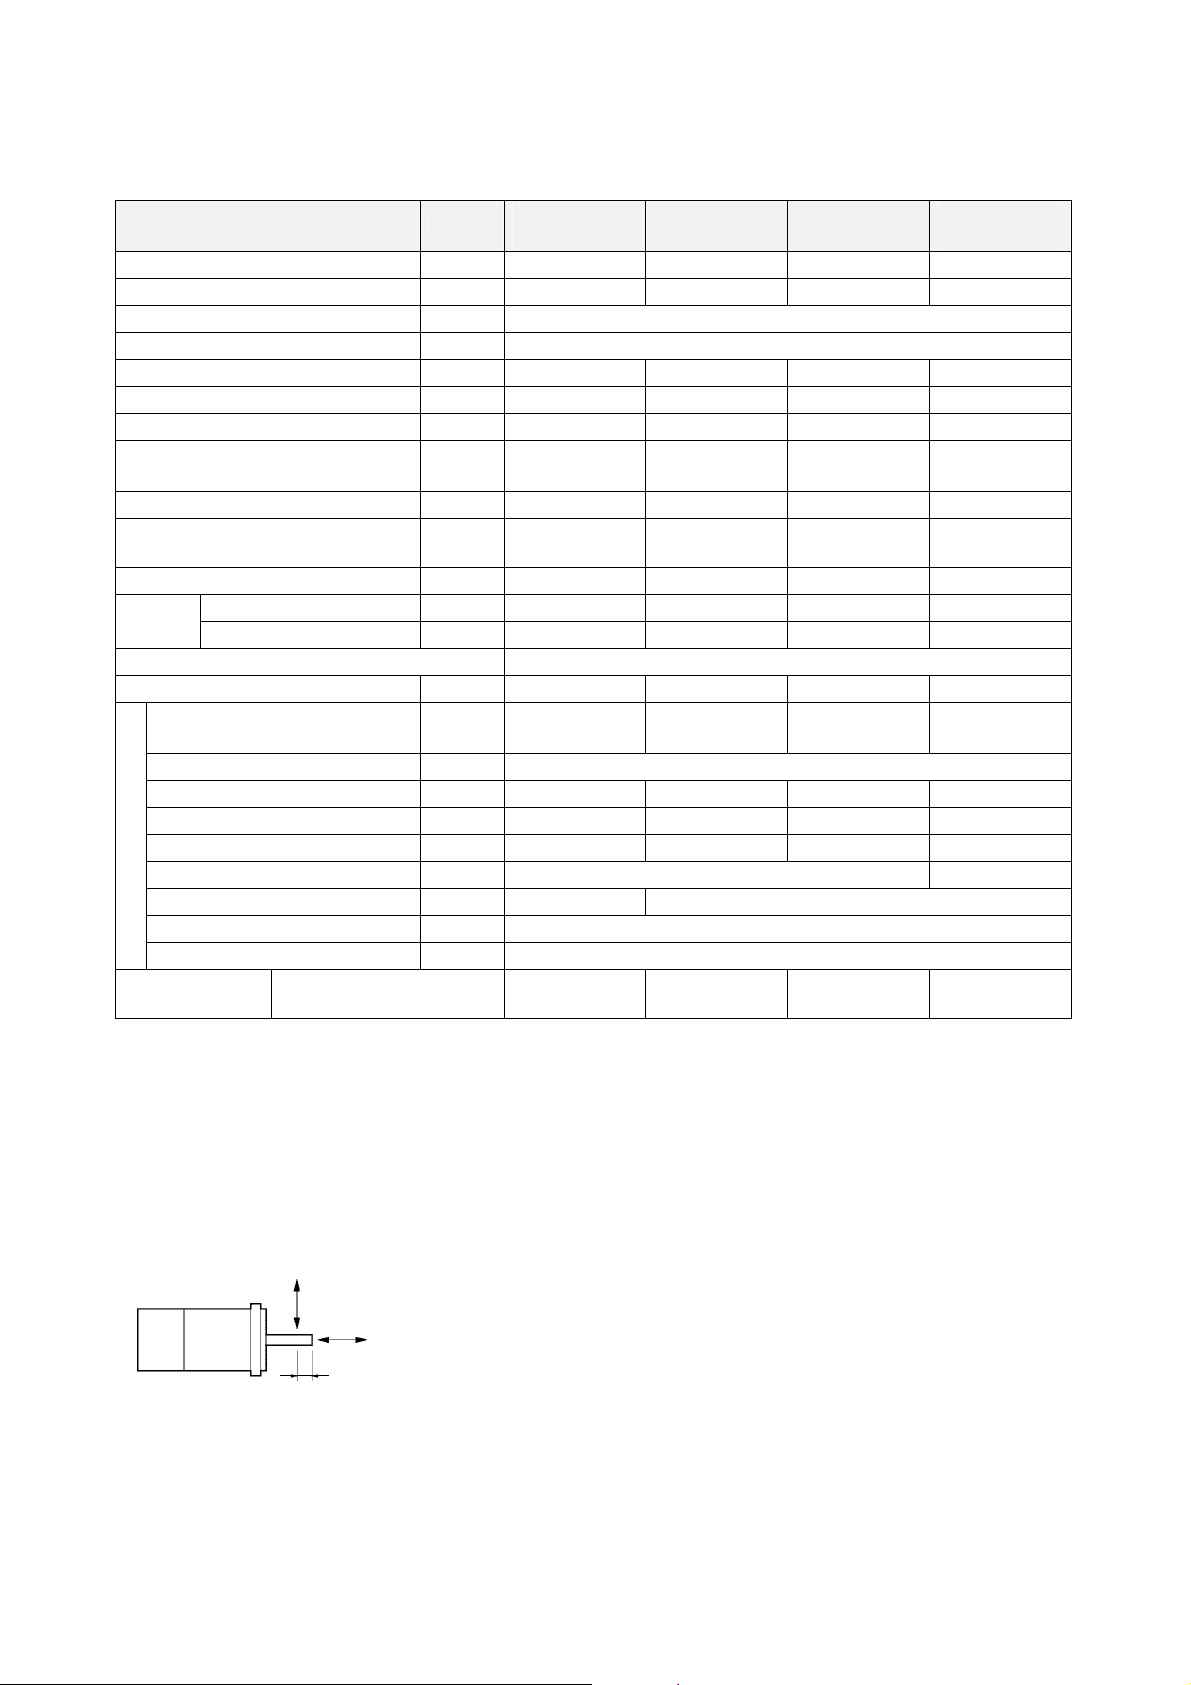
3-2-2 Characteristics
3-2-2 Characteristics
Item Unit
Rated output (See note 1.) W 100 200 400 750
Rated torque (See note 1.) N⋅m 0.318 0.637 1.27 2.39
Rated rotation speed r/min 3,000
Max. momentary speed r/min 4,500
Max. momentary torque (See note 1.) N⋅m 0.955 1.91 3.82 7.16
Rated current (See note 1.) A (rms) 0.84 1.1 2.0 3.7
Max. momentary current (See note 1.) A (rms) 2.5 3.3 6.0 11.1
Rotor inertia
Power rate (See note 1.) kW/s 16.0 12.3 26.7 38.1
Allowable radial load (See notes 5 and
6.)
Allowable thrust load (See note 5.) N 54 74 74 147
Weight
Radiation shield dimensions (material) t6×@250 (Al)
Applicable load inertia (See note 2.) kg⋅m
Brake specifications
Applicable Servo
Drivers (R7D-)
Without brake kg 0.5 0.9 1.3 2.6
With brake kg 0.7 1.5 1.9 3.5
Brake inertia
Excitation voltage (See note 3.) V 24 VDC ±10%
Power consumption (at 20°C) W 6 7 7 7.7
Current consumption (at 20°C) A 0.25 0.29 0.29 0.32
Static friction torque N⋅m 0.318 min. 0.637 min. 1.27 min. 2.45 min.
Attraction time (See note 4.) ms 60 max. 80 max.
Release time (See note 4.) ms 30 max. 20 max.
Backlash --- 1° max.
Rating --- Continuous
Pulse-train models
kg·m2
2
/4)
(GD
N 78 245 245 392
2
2
kg⋅m
2
(GD
/4)
R7M-
Z10030-S1
6.34 × 10
6.0 × 10⁻⁵ (9.5 ×) 3.0 × 10
7.54 × 10
-6
3.30 × 10⁻⁵ 6.03 × 10⁻⁵ 1.50 × 10⁻⁴
-7
6.4 × 10⁻⁶ 6.4 × 10⁻⁶ 1.71 × 10
ZP01H ZP02H ZP04H ZP08H
Note 1. These are the values when the Servomotor is combined with a Servo Driver and the armature winding
temperature is 100°C. Other values are at normal conditions (20°C, 65%). The momentary maximum torque
shown above indicates the standard value.
2. This is the value without an accessory, such as an external Regeneration Resistance Unit.
3. The brakes operate when the circuit is open (i.e., they are released when voltage is applied).
4: The operation time is the measured value (reference value) with a varistor installed as a surge suppressor.
5. The allowable radial and thrust loads are the values determined for a service life of 20,000 hours at normal
operating temperatures.
6. The value indicated for the allowable radial load at the location shown in the following diagram.
R7M-
Z20030-S1
-4
(9.1 ×) 5.0 × 10⁻⁴ (8.3 ×) 1.0 × 10⁻³ (6.7 ×)
R7M-
Z40030-S1
R7M-
Z75030-S1
-5
3-14
Radial load
Thrust load
Page 50
3-2 Servomotor Specifications
3-2-2 Characteristics
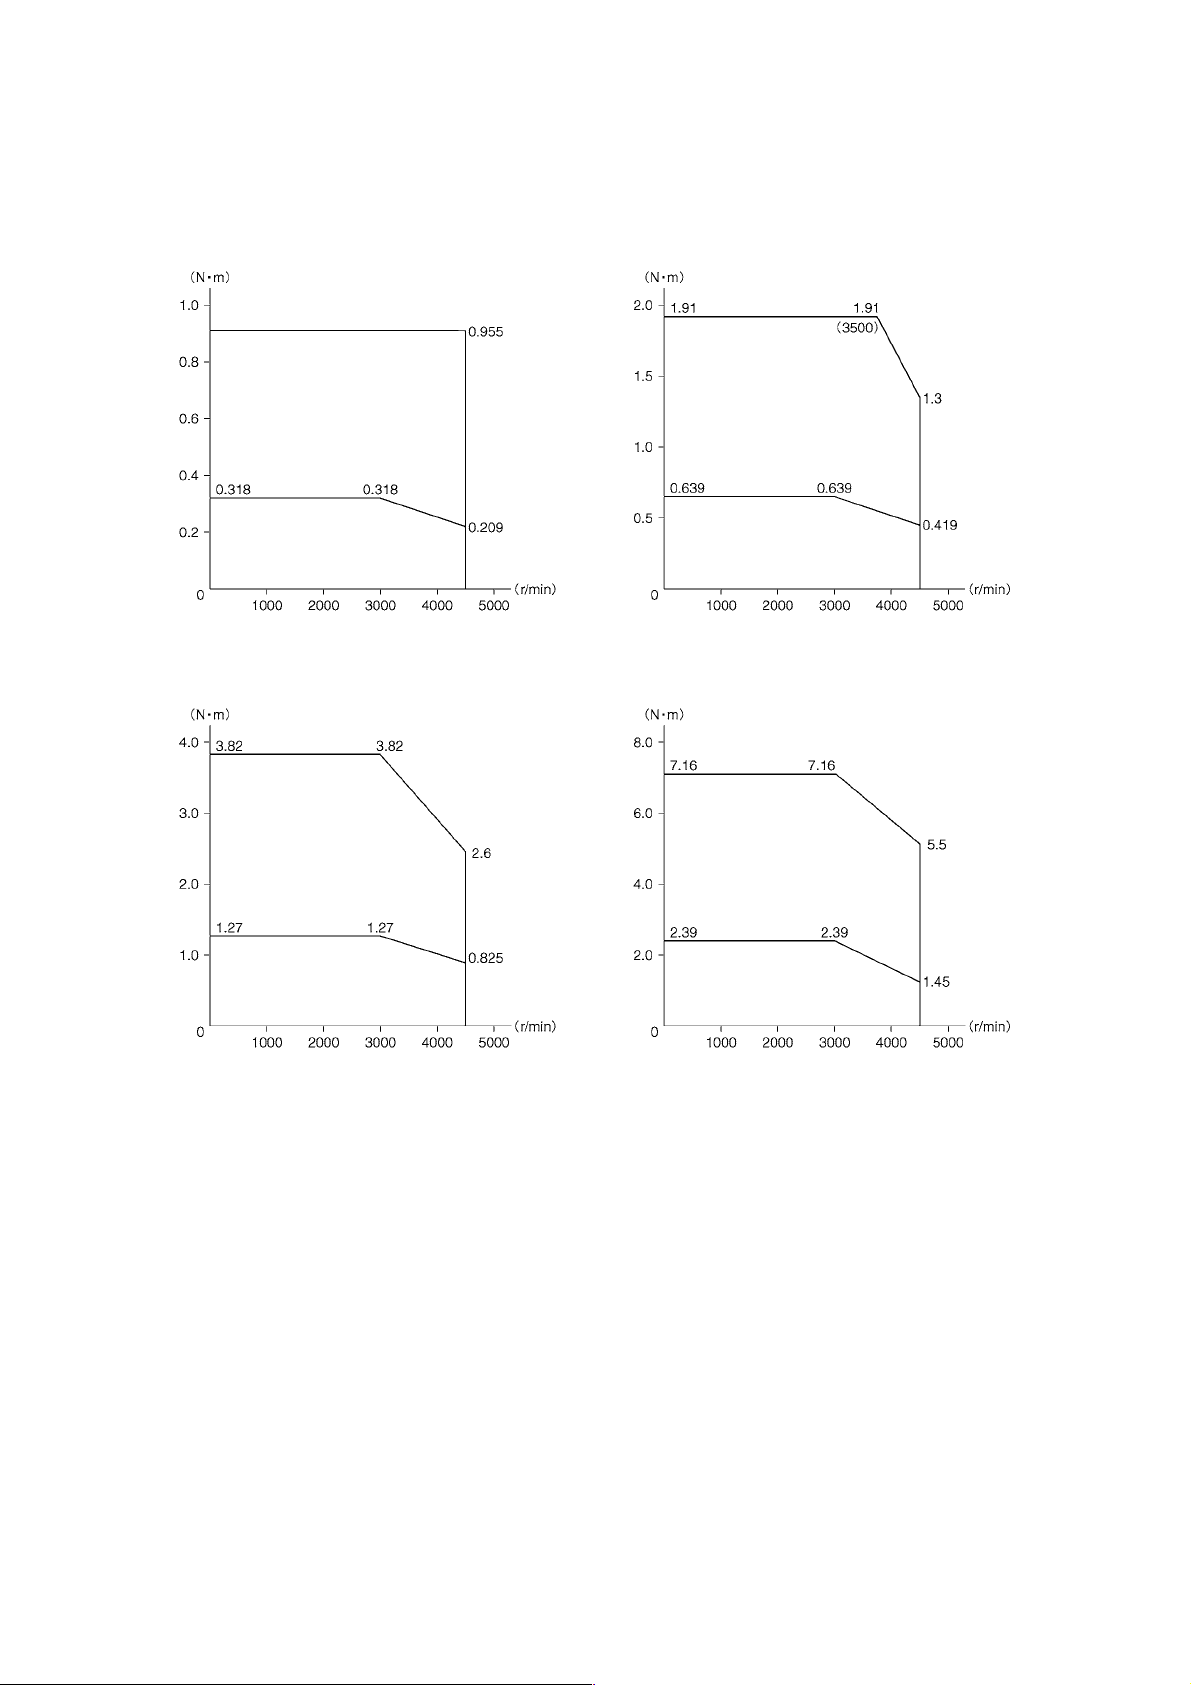
Torque and Rotation Speed Characteristics
The following graphs show the characteristics with a 3-m standard cable and a 200-V AC
input.
R7M-Z10030-S1
Repetitive usage
Continuous usage
R7M-Z20030-S1
Repetitive usage
Continuous usage
R7M-Z40030-S1 R7M-Z75030-S1
Repetitive usage
Continuous usage
Repetitive usage
Continuous usage
3-15
Page 51
3-2 Servomotor Specifications
3-2-3 Encoder Specifications
Temperature Characteristics of the Servomotor and Mechanical
System
• SMARTSTEP Junior Servomotors use rare earth magnets (neodymium-iron
magnets). The temperature coefficient for these magnets is approximately –0.13%/°C.
As the temperature drops, the Servomotor's maximum momentary torque increases,
and as the temperature rises, the Servomotor's maximum momentary torque
decreases. The maximum momentary torque is about 4% higher at –10°C compared to
the normal temperature of 20°C. Conversely, the maximum momentary torque
decreases about 8% when the Servomotor warms up to 80°C from the normal
temperature of 20°C.
• Generally, when the temperature drops in a mechanical system, the friction
torque and the load torque increase. For that reason, overloading may occur at low
temperatures. In particular, in systems that use a Decelerator, the load torque at low
temperatures may be nearly twice the load torque at normal temperatures. Check with
a current monitor to see whether there is overloading at low temperatures. Also check
operation at high temperatures to see whether there is abnormal Servomotor
overheating or alarms.
• An increase in load friction torque visibly increases load inertia. Therefore, even
if the Servo Driver parameters are properly adjusted at a normal temperature, the
Servomotor may not operate optimally at low temperatures. Check operation at low
temperatures to see whether operation is optimal in those conditions, too.
3-2-3 Encoder Specifications
Item Specification
Encoder method Optical encoder (incremental encoder)
Number of output pulses
Power supply voltage 5 VDC ±5%
Power supply current 70 mA max.
Output signals +A, –A, +B, –B, Z, U, V, and W
Output interface
Phase A, B: 256 waves/revolution
Phase Z: 1 pulse/revolution
+A, –A, +B, and –B Sine wave voltage output
Z, U, V, and W Transistor output
3-16
Page 52
3-3 Decelerator Specifications
3-3-1 Standard Models and Specifications
3-3 Decelerator Specifications
3-3-1 Standard M odels and Specifications
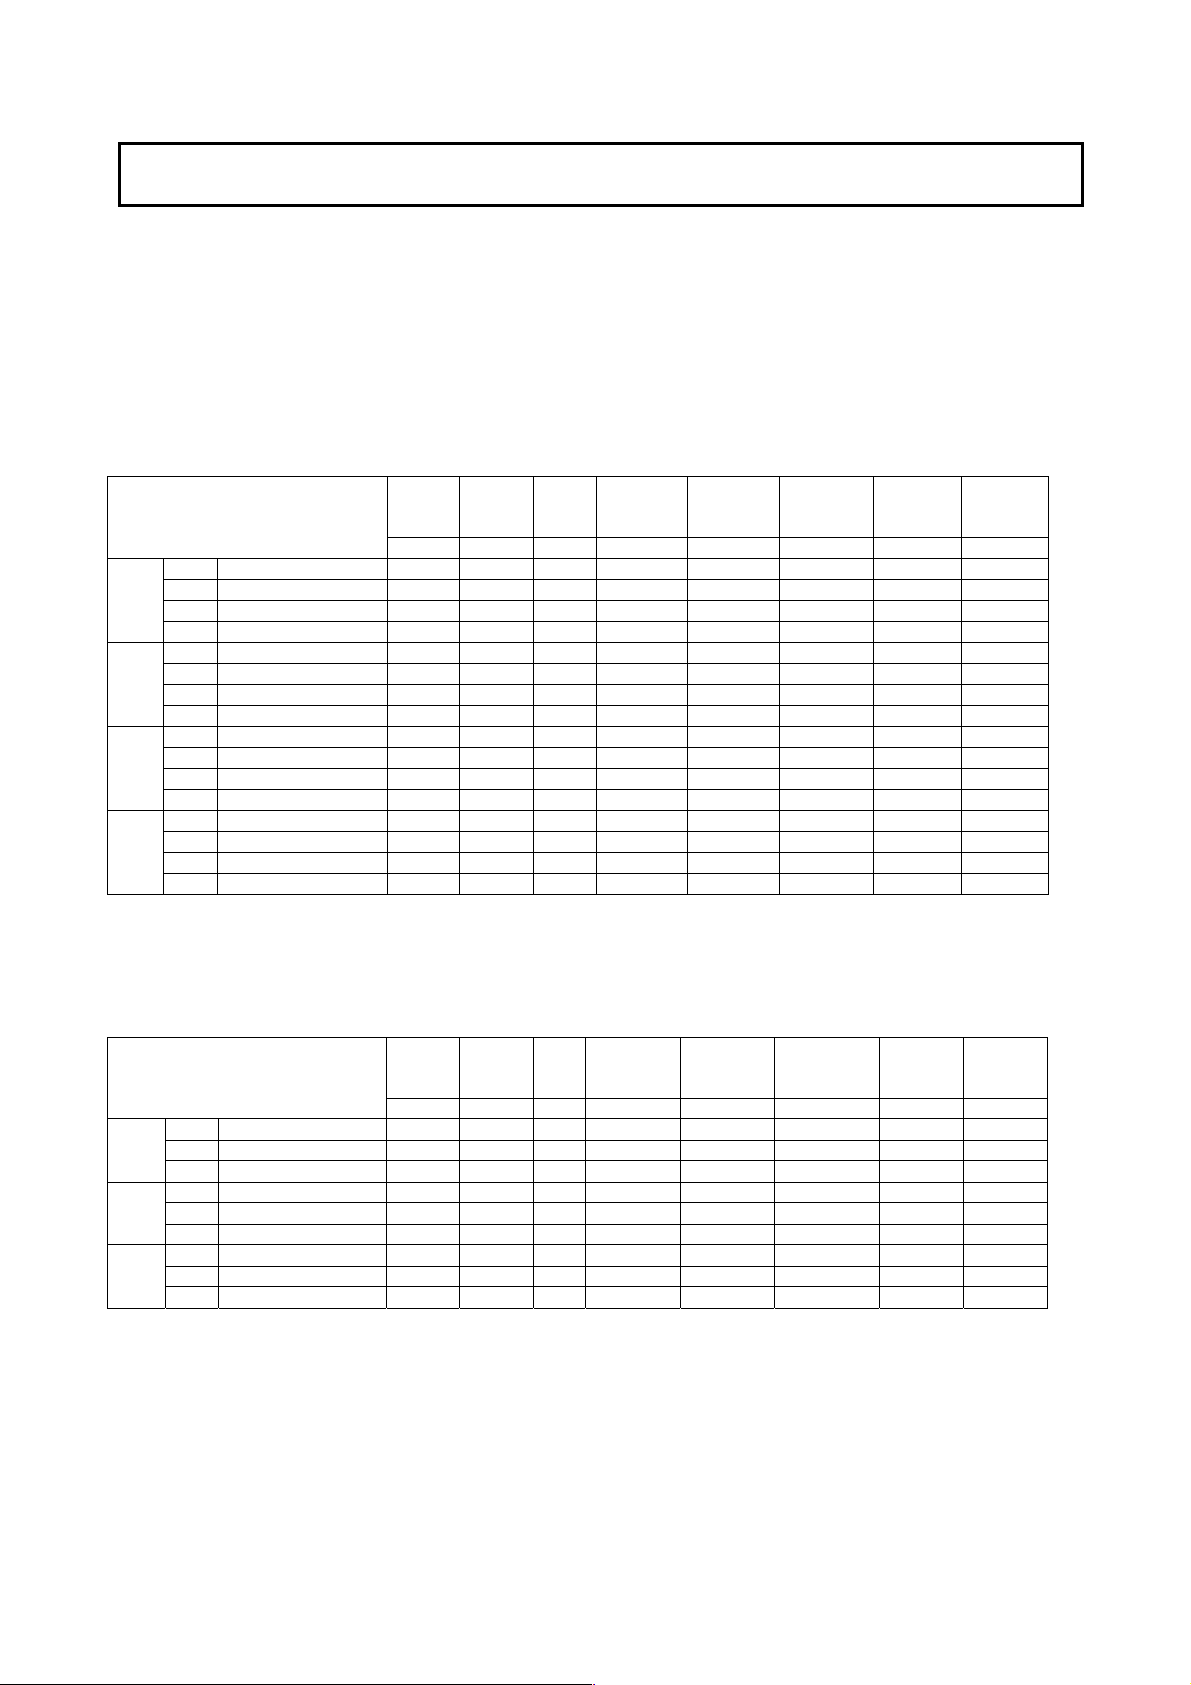
The following Decelerators are available for use with SMARTSTEP Junior Servomotors.
Select a Decelerator to match the Servomotor capacity.
• Backlash: 3 arcminutes max.
• Backlash: 45 arcminutes max.
There are four reduction ratios: 1/5, 1/9, 1/15, and 1/25.
Backlash: 3 Arcminutes Max.
100
W
200
W
400
W
750
W
100 W
200 W
400 W
Rated
Model
1/5 R7G-VRSFPB05B100 600 1.19 75 900 3.60 4.08 × 10⁻⁶ 392 196
1/9 R7G-VRSFPB09B100 333 2.29 80 500 6.91 3.43 × 10⁻⁶ 441 220
1/15 R7G-VRSFPB15B100 200 3.82 80 300 11.5 3.62 × 10⁻⁶ 588 294
1/25 R7G-VRSFPB25C100 120 6.36 80 180 19.2 3.92 × 10
1/5 R7G-VRSFPB05B200 600 2.71 85 900 8.12 1.53 × 10⁻⁵ 392 196
1/9 R7G-VRSFPB09C400 333 3.78 66 500 11.3 2.68 × 10⁻⁵ 931 465
1/15 R7G-VRSFPB15C400 200 6.31 66 300 18.9 2.71 × 10⁻⁵ 1176 588
1/25 R7G-VRSFPB25C200 120 11.1 70 180 33.4 2.67 × 10
1/5 R7G-VRSFPB05C400 600 5.40 85 900 16.2 3.22 × 10⁻⁵ 784 392
1/9 R7G-VRSFPB09C400 333 9.49 83 500 28.5 2.68 × 10⁻⁵ 931 465
1/15 R7G-VRSFPB15C400 200 15.8 83 300 47.6 2.71 × 10⁻⁵ 1176 588
1/25 R7G-VRSFPB25D400 120 26.4 83 180 79.3 2.79 × 10
1/5 R7G-VRSFPB05C750 600 10.8 90 900 32.0 7.17 × 10⁻⁵ 784 392
1/9 R7G-VRSFPB09D750 333 18.3 85 500 54.3 6.50 × 10⁻⁵ 1176 588
1/15 R7G-VRSFPB15D750 200 30.5 85 300 90.5 7.09 × 10⁻⁵ 1372 686
1/25 R7G-VRSFPB25E750 120 50.8 85 180 151 7.05 × 10
speed
r/min N·m % r/min N·m kg·m
Rated
torque
Ratio
Maximum
momentary
speed
Note 1. The Decelerator inertia is the Servomotor shaft conversion value.
2. The enclosure rating for Servomotors with Decelerators is IP44.
3. The allowable radial load is the value at the center of the shaft.
Backlash: 45 Arcminutes Max.
Rated
Model
1/5 R7G-RGSF05B100 600 1.19 75 900 3.60 4.08 × 10⁻⁶ 392 196
1/9 R7G-RGSF09B100 333 2.29 80 500 6.91 3.43 × 10⁻⁶ 441 220
1/15 R7G-RGSF15B100 200 3.82 80 300 11.5 3.62 × 10
1/5 R7G-RGSF05B200 600 2.71 85 900 8.12 1.53 × 10⁻⁵ 392 196
1/9 R7G-RGSF09C400 333 3.78 66 500 11.3 2.68 × 10⁻⁵ 931 465
1/15 R7G-RGSF15C400 200 6.31 66 300 18.9 2.71 × 10
1/5 R7G-RGSF05C400 600 5.40 85 900 16.2 3.22 × 10⁻⁵ 784 392
1/9 R7G-RGSF09C400 333 9.49 83 500 28.5 2.68 × 10⁻⁵ 931 465
1/15 R7G-RGSF15C400 200 15.8 83 300 47.6 2.71 × 10
speed
r/min N·m % r/min N·m kg·m
Rated
torque
Note 1. The Decelerator inertia is the Servomotor shaft conversion value.
2. The enclosure rating for Servomotors with Decelerators is IP44.
3. The allowable radial load is the value at the center of the shaft.
Ratio
Maximum
momentary
speed
Maximum
momentary
torque
Maximum
momentary
torque
Decelerator
inertia
Decelerator
inertia
Allowable
radial load
2
N N
-6
1323 661
-5
1323 661
-5
1617 808
-5
2058 1029
Allowable
radial
2
load
N N
-6
588 294
-5
1176 588
-5
1176 588
Allowable
thrust load
Allowable
thrust
load
3-17
Page 53
3-4 Cable and Connector Specifications
3-4-1 Control Cable Specifications
3-4 Cable and Connector
Specifications
3-4-1 Control Cable Specifications
General-purpose Control Cables (R7A-CPZ@@@S)
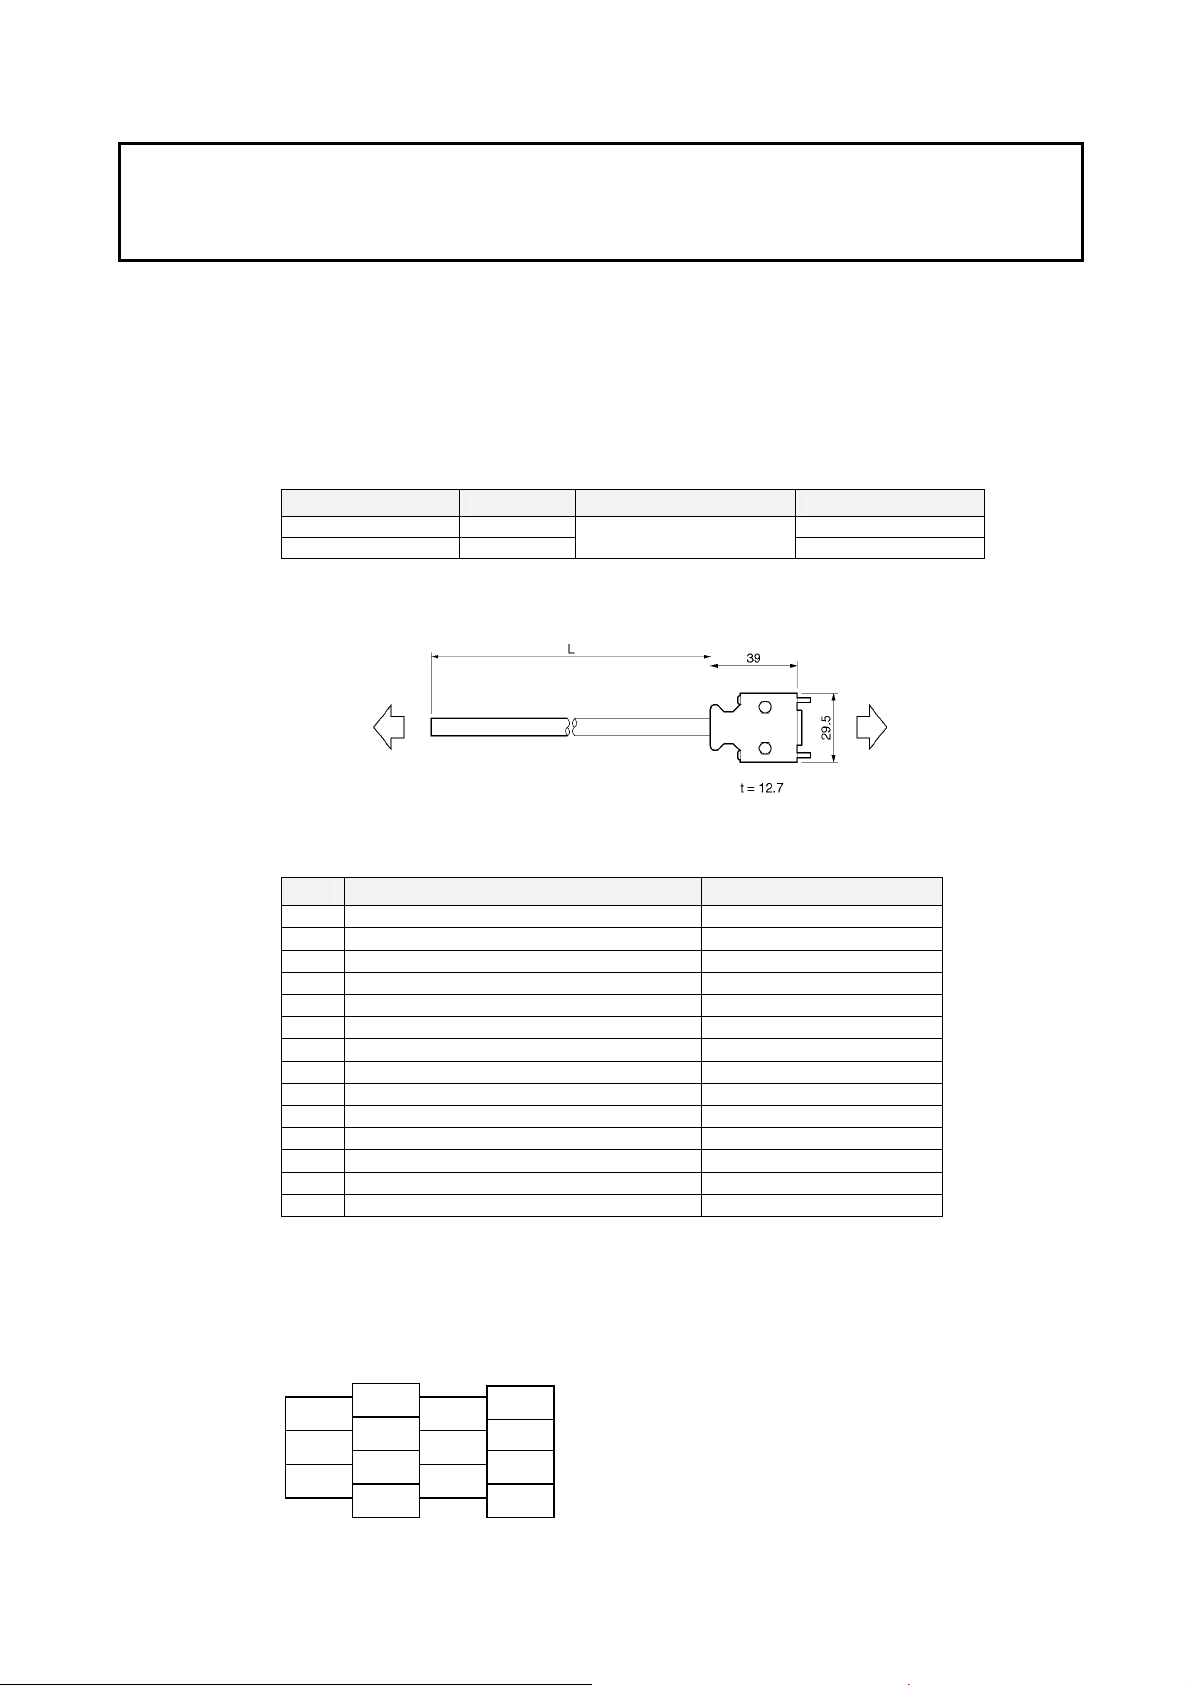
A General-purpose Control Cable connects to the Servo Driver’s Control I/O Connector
(CN1). There is no connector on the controller end. Wire a connector to match the
controller if you are connecting to a Position Control Unit and a compatible cable is not
available or connecting to a controller manufactured by another company.
Cable Models
Model Length (L) Outer diameter of cable Weight
R7A-CPZ001S 1 m Approx. 0.1 kg
R7A-CPZ002S 2 m
Connection Configuration and Dimensions
5.6 dia.
Approx. 0.2 kg
Controller end Servo Driver end
R7D-ZP
@
Wiring
No. Wire color/Mark color Signal
1 Orange/Red (−) +CW/PULS
2 Orange/Black (−) −CW/PULS
3 Gray/Red (−) +CCW/SIGN
4 Gray/Black (−) −CCW/SIGN
5 White/Red (−) +24VIN
6 Yellow/Black (−) RUN
7 W hite/Black (−) OGND
8 Pink/Red (−) +ECRST
9 Pink/Black (−) −ECRST
10 Orange/Red (−−) Z
11 Orange/Black (−−) ZCOM
12 Gray/Red (−−) /ALM
13 Gray/Black (−−) BKIR
14 Yellow/Red (−) INP
Connector plug: 10114-3000VE (Sumitomo 3M)
Connector case: 10314-52A0-008 (Sumitomo 3M)
Cable: AWG24 × 7P UL20276
Wires with the same wire color and the same number of marks are a twisted pair.
Connector Pin Arrangement
2
4
6
1
3
5
7
9
11
13
10
12
14
8
3-18
Page 54
3-4 Cable and Connector Specifications
3-4-2 Servomotor Power Cable Specifications
3-4-2 Servomotor Power Cable Specifications
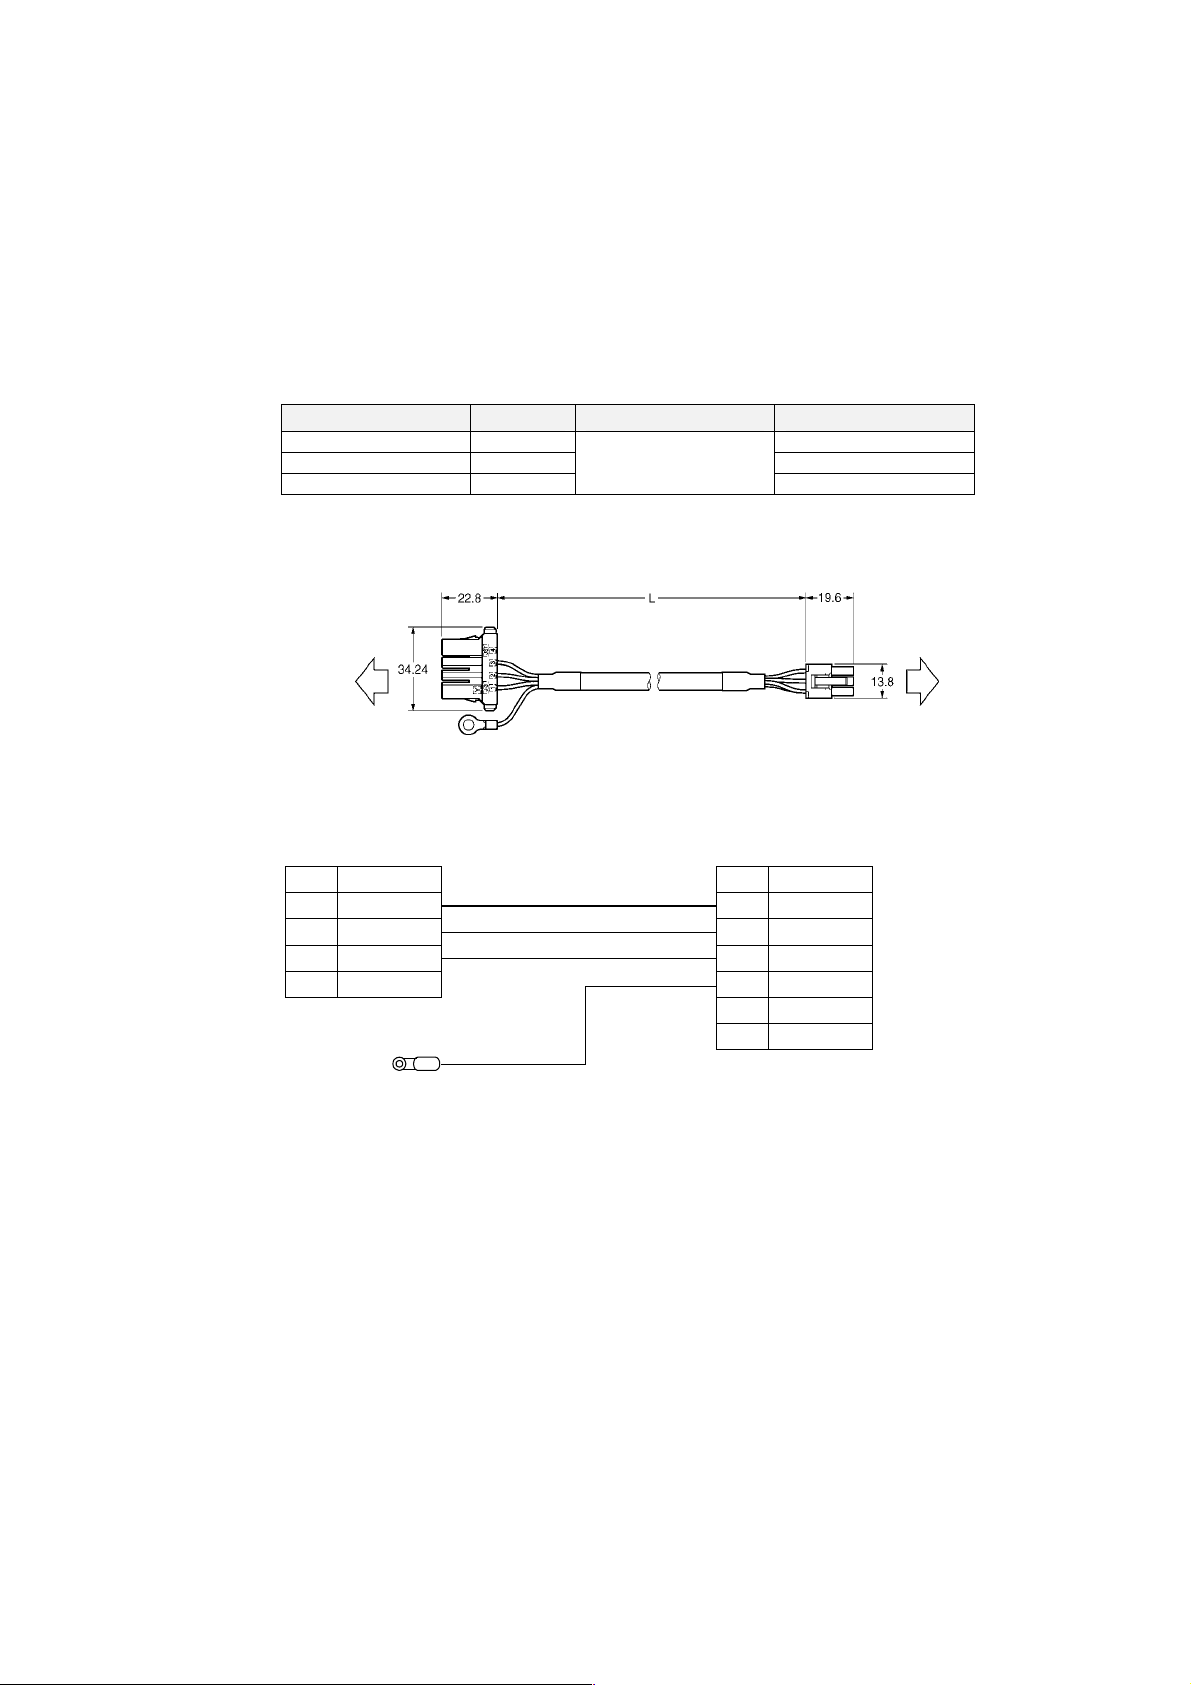
The Servomotor Cable supplies power between the Servo Driver and Servomotor.
Servomotor Power Cables are available in two forms: Servomotor Power Cables with an
attached CNB Connector and Servomotor Power Cables without a connector (Cable
Only). Select the Cable to match the Servomotor being used.
Note: When connecting to moving parts, use robot cable and make a custom cable.
Power Cables with CNB Connector for Servomotors without Brakes
Cable Models
Model Length (L) Outer diameter of cable Weight
R7A-CAZ003S 3 m Approx. 0.4 kg
R7A-CAZ005S 5 m Approx. 0.8 kg
R7A-CAZ010S 10 m
Note: The maximum distance between the Servo Driver and Servomotor is 20 meters.
Connection Configuration and Dimensions
Servo Driver end Servomotor end
7.4 dia.
Approx. 1.2 kg
R7M-Z
@R7D-ZP@
Wiring
Servo Driver
No.
1
2
3
4
Connector plug
04JFAT-SAYGF-N (JST Mfg. Co., Ltd.)
Signal
Phase U
Phase V
Phase W
---
AWG20, Red
AWG20 , White
AWG20, Blue
Green/Yellow
M4 crimp terminal
Servomotor C o nn ec torServo Driver Connector
Connector plug
5557-06R-210 (Molex Japan)
Connector case
5556TL (Molex Japan)
Servomotor
No.
1
2
3
4
5
6
Signal
Phase U
Phase V
Phase W
FG
---
---
3-19
Page 55
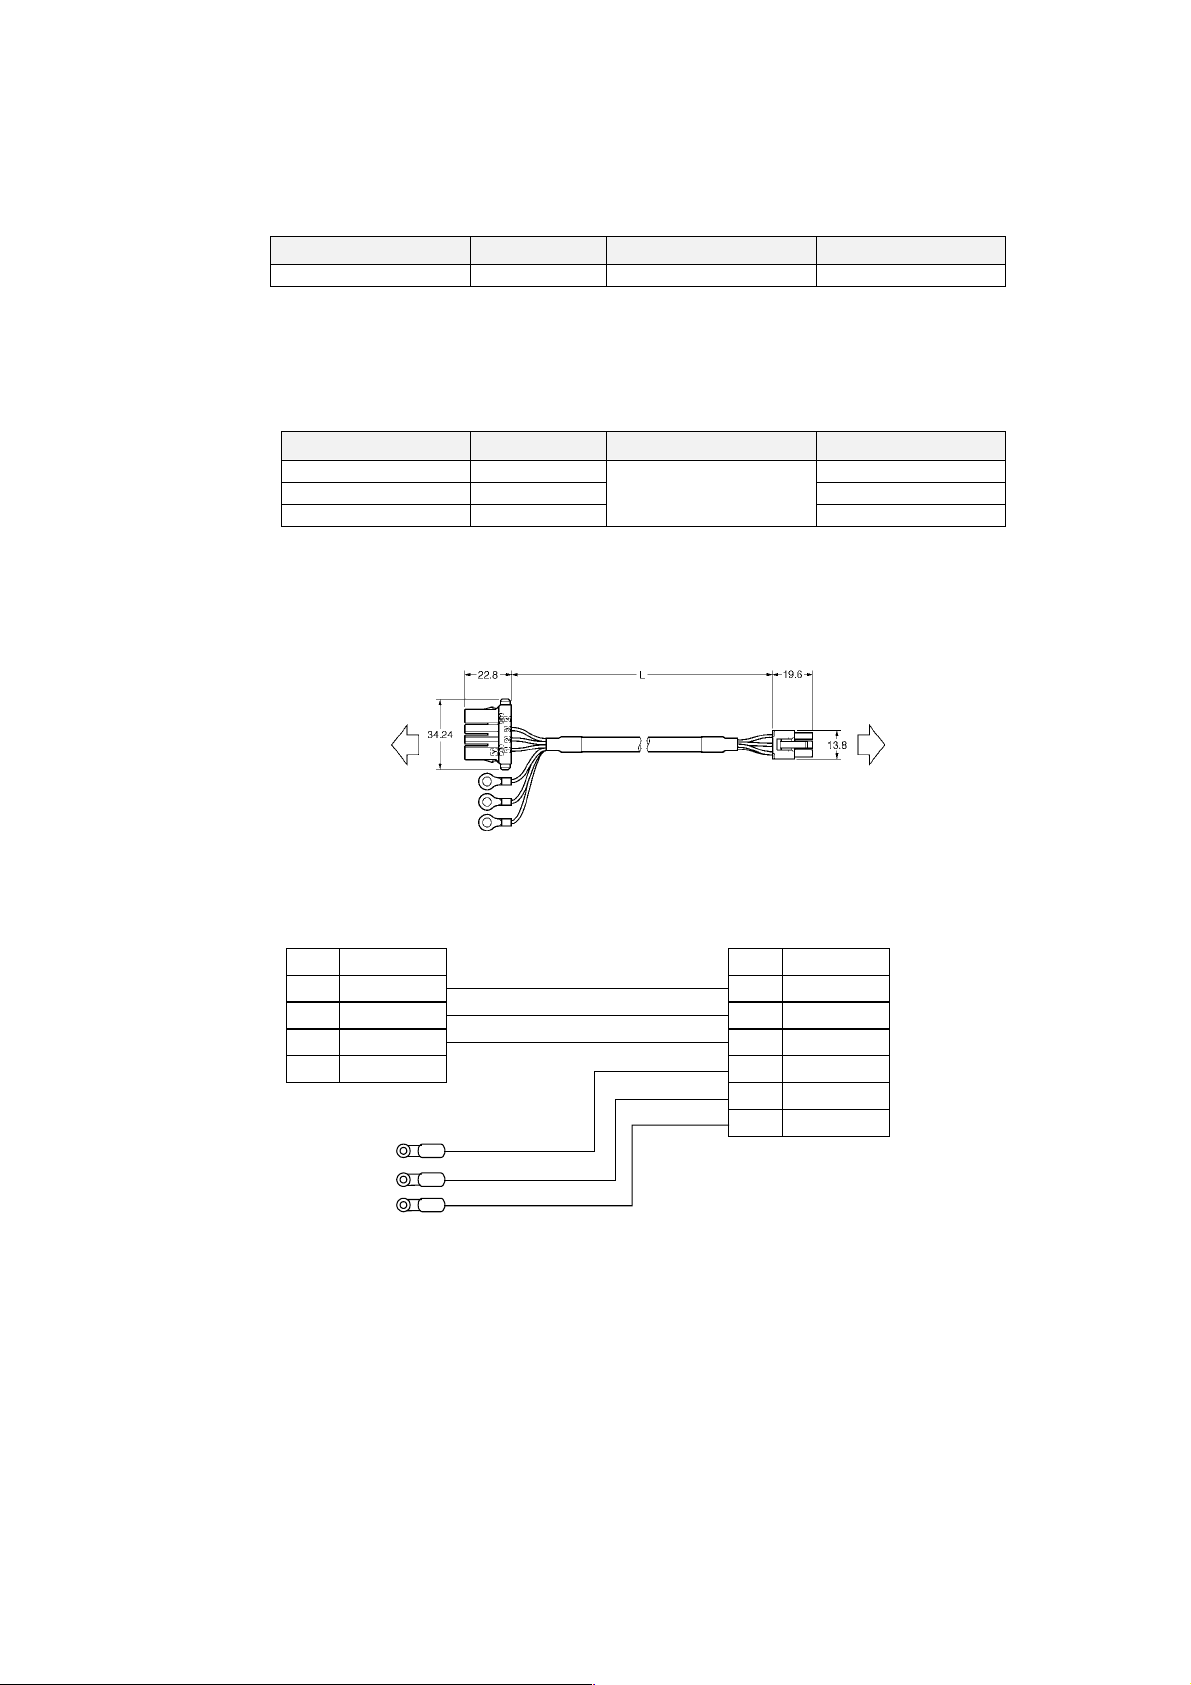
3-4 Cable and Connector Specifications
3-4-2 Servomotor Power Cable Specifications
Power Cables without Connector (Loose Wires) for Servomotors
without Brakes
Cable Models
Model Length (L) Outer diameter of cable Weight
R7A-CAZ001 1 m 7.4 dia. Approx. 0.1 kg
Note 1. The maximum distance between the Servo Driver and Servomotor is 20 meters.
2. Cables are sold in 1-m increments. It is cut to the specified length.
Power Cables with CNB Connector for Servomotors with Brakes
Cable Models
Model Length (L) Outer diameter of cable Weight
R7A-CAZ003B 3 m Approx. 0.4 kg
R7A- CAZ005B 5 m Approx. 0.8 kg
R7A- CAZ010B 10 m
Note: The maximum distance between the Servo Driver and Servomotor is 20 meters.
Connection Configuration and Dimensions
7.4 dia.
Approx. 1.2 kg
Servo Driver end Servomotor end
R7M-Z
@ R7D-ZP@
Wiring
Servo Driver
No.
1
2
3
4
Signal
Phase U
Phase V
Phase W
---
AWG20, Red
AWG20, W hi te
AWG20, Blue
AWG20,
Green/Yellow
AWG20, Black
AWG20, Brown
Servomotor Connector:Servo Driver Connector:
Servomotor
No.
1
2
3
4
5
6
Signal
Phase U
Phase V
Phase W
FG
Brake
Brake
3-20
Connector plug
04JFAT-SAYGF-N (JST Mfg. Co., Ltd.)
Connector plug
5557-06R-210 (Molex Japan)
Connector case
5556TL (Molex Japan)
Page 56
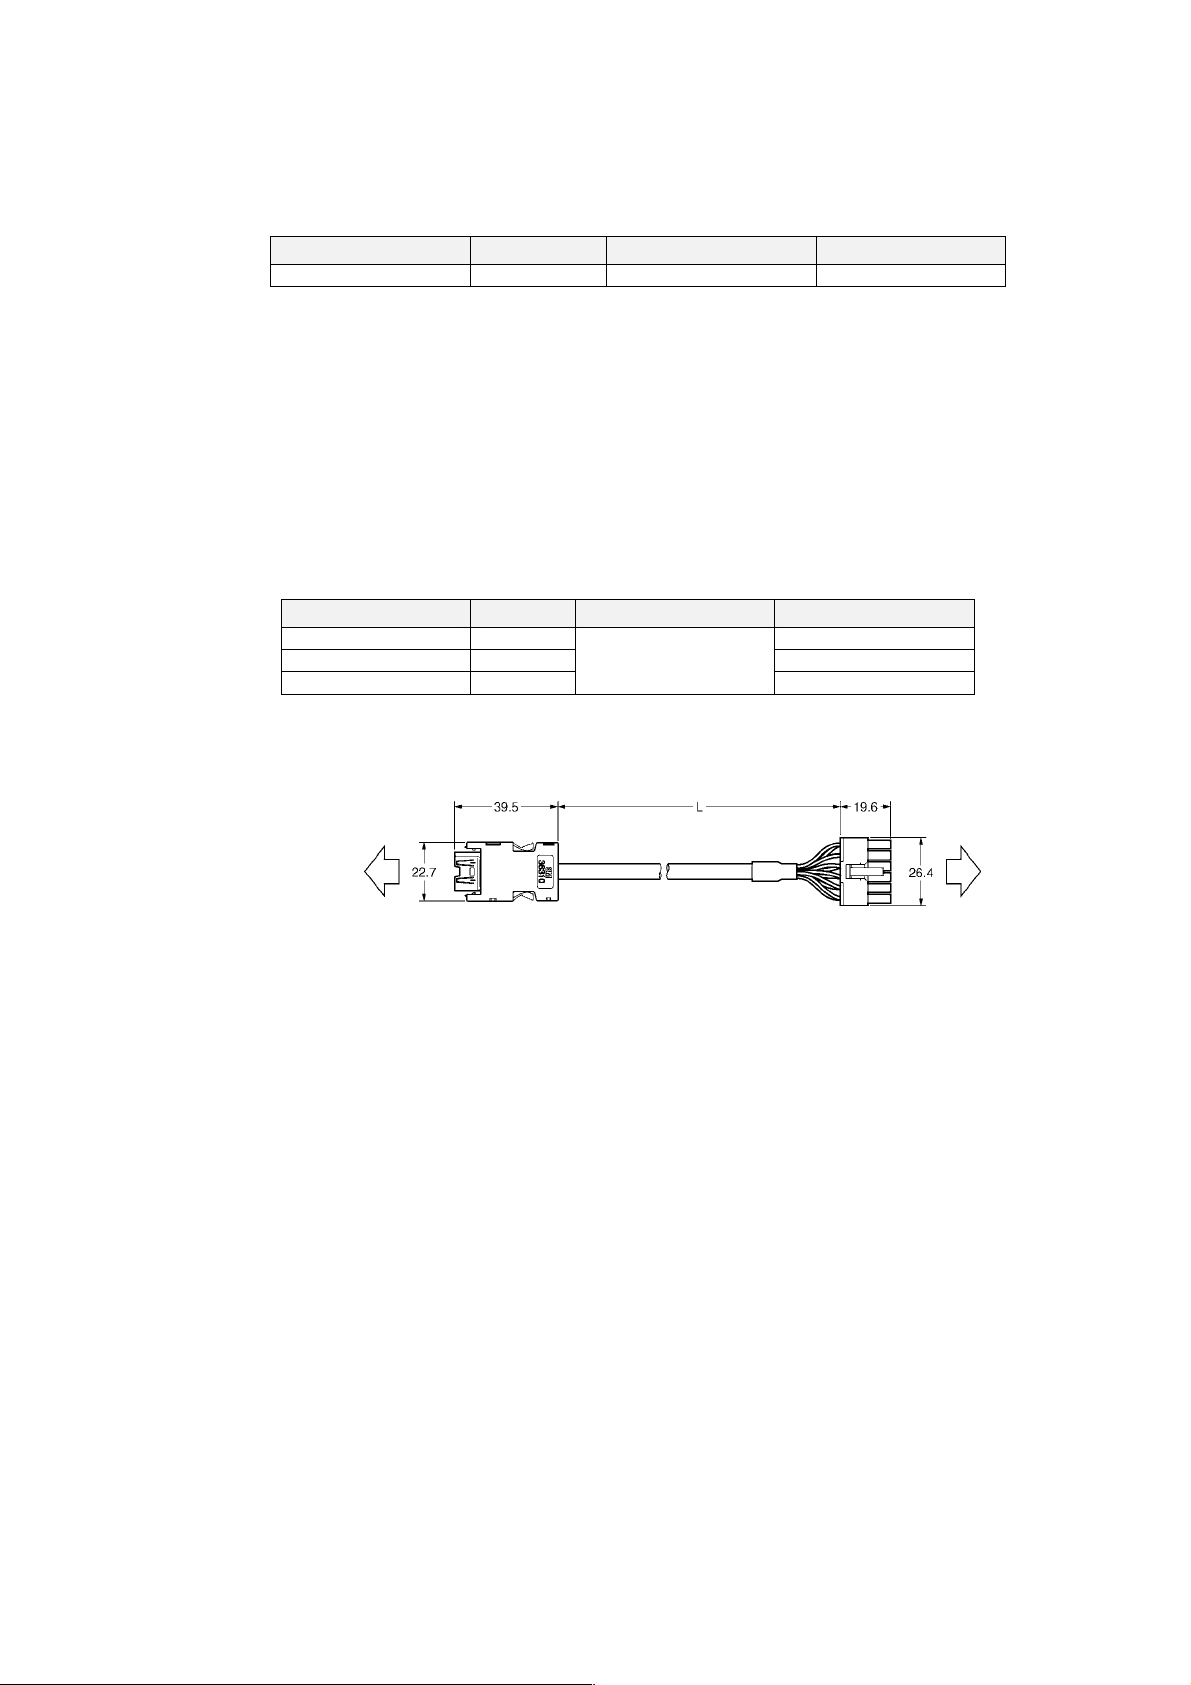
Power Cables without Connectors (Loose Wires) for Servomotors
with Brakes
Cable Models
Model Length (L) Outer diameter of cable Weight
R7A-CAZ01B 1 m 7.4 dia. Approx. 0.1 kg
Note 1. The maximum distance between the Servo Driver and Servomotor is 20 meters.
2. Cables are sold in 1-m increments. It is cut to the specified length.
3-4-3 Encoder Cable Specifications
The Encoder Cable connects the encoder between the Servo Driver and Servomotor.
Encoder Cables are available in two forms: Encoder Cables with an attached CN2
Connector and plain cable only.
Note: When connecting to moving parts, use robot cable to make a custom cable.
Encoder Cable (CN2 Connector Attached)
Cable Models
Model Length (L) Outer diameter of cable Weight
R7A-CRZ003C 3 m Approx. 0.4 kg
R7A-CRZ005C 5 m Approx. 0.8 kg
R7A- CRZ010C 10 m
Note: The maximum distance between the Servo Driver and Servomotor is 20 meters.
Connection Configuration and Dimensions
3-4 Cable and Connector Specifications
3-4-3 Encoder Cable Specifications
7.1 dia.
Approx. 1.2 kg
Servomotor end Servo Driver end
R7M-Z
@
R7D-ZP@
3-21
Page 57
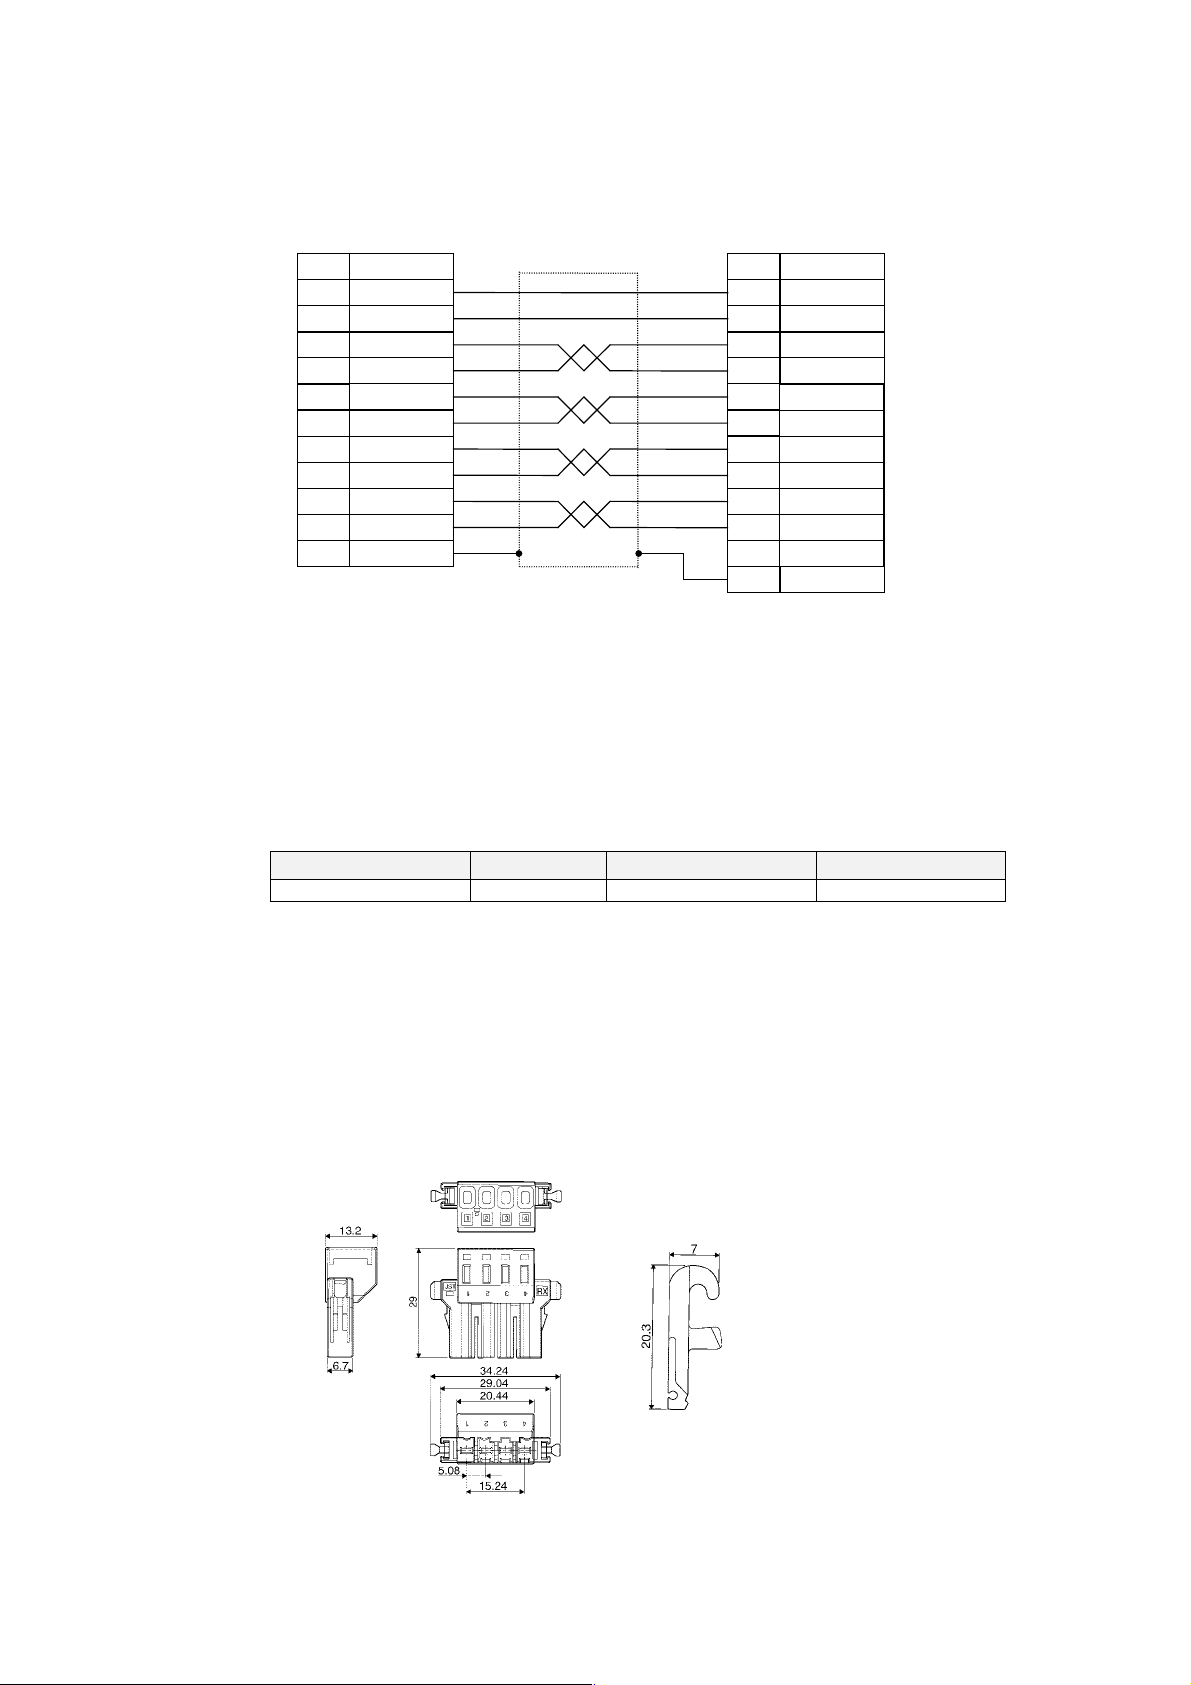
3-4 Cable and Connector Specifications
A
A
A
A
A
A
r
r
3-4-4 Connector Specifications
Wiring
Servo Driver
No.
1
2
3
4
5
6
7
8
9
10
Shell
Servo Driver Connector: Servomotor Connector:
Signal
E5V
E0V
+
−
B+
B−
Z
Phase U
Phase V
Phase W
FG
Plug
54593-1019
Connector case
54599-1005 (JST
Mfg. Co., Ltd.)
Encoder Cable (Loose Wires Only)
AWG22 Red
AWG22
AWG26 Blue
WG26
Blue/White
AWG26 Yellow
WG26
Yel l ow / Wh i te
AWG26 Purple
AWG26
AWG26
AWG26 Orange
No
Black
Gray
Green
10
11
12
Connector plug
5557-12R-210
Connector case
5556T2L
Mfg. Co., Ltd.)
(JST
Servomotor
.
Signal
1
2
3
4
5
6
7
8
Phase U
9
Phase V
Phase W
E5V
E0V
+
-
B+
B-
Z
---
FG
Cable Models
Model Length (L) Outer diameter of cable Weight
R7A-CRZ001 1 m 7.1 dia. Approx. 0.1 kg
Note 1. The maximum distance between the Servo Driver and Servomotor is 20 meters.
2. Cable are sold in 1-m increments. It is cut to the specified length.
3-4-4 Connector Specifications
Main Circuit Connector (R7A-CNZ01P)
The Main Circuit Connector connects to the Servo Driver’s Main Circuit Connector (CNA).
Dimensions
Main Circuit Connecto
04JFAT-SBXGF-N
(JST Mfg. Co., Ltd.)
Wiring Leve
J-FAT-OT
(JST Mfg. Co., Ltd.)
3-22
Page 58
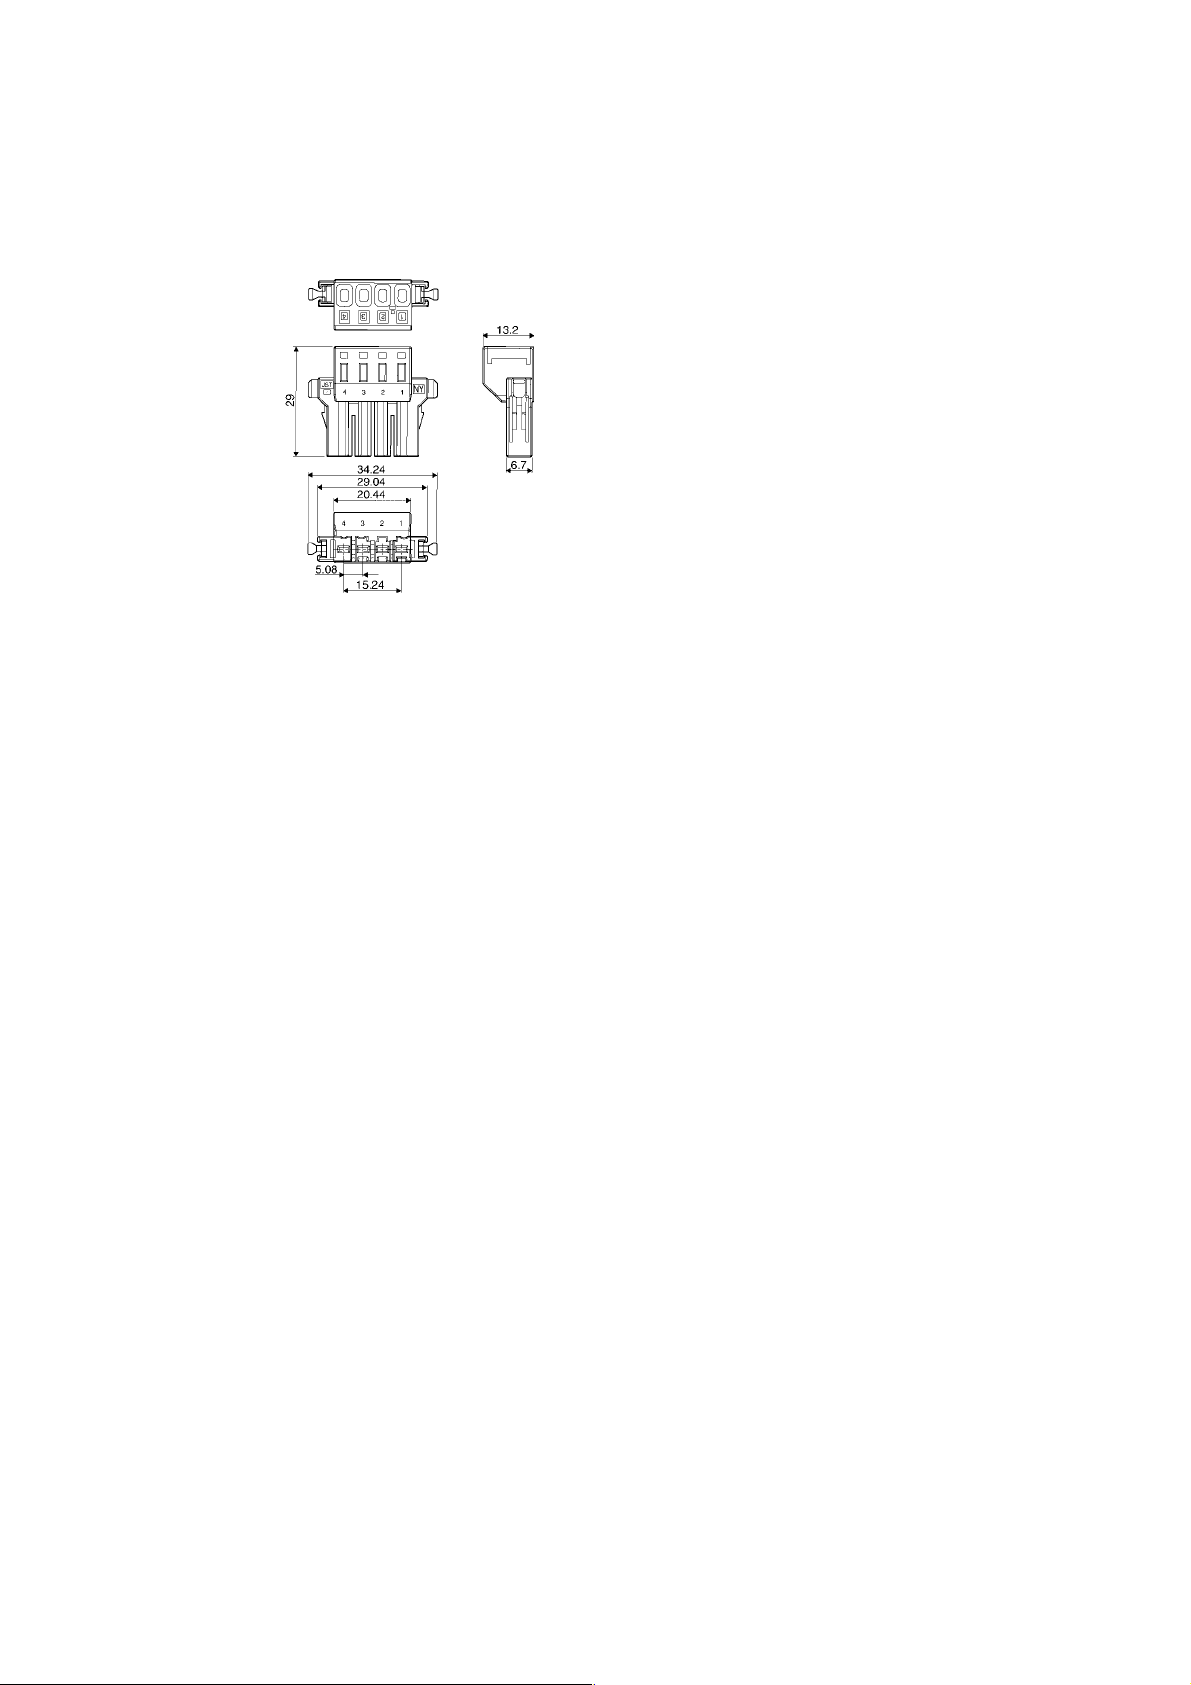
3-4 Cable and Connector Specifications
r
3-4-4 Connector Specifications
Servomotor Connector (R7A-CNZ01A)
The Servomotor Connector connects to the Servo Driver’s Servomotor Connector (CNB).
Dimensions
Servomotor Connecto
04JFAT-SAYGF-N
(JST Mfg. Co., Ltd.)
3-23
Page 59
3-5 Regeneration Resistance Unit
3-5-1 Regeneration Resistance Unit (R88A-RG08UA) Specifications
3-5 Regeneration Resistance Unit
3-5-1 Regeneration Resistance Unit (R88A-RG08UA) Specifications
General Specifications
Item Specifications
Ambient operating temperature 0 to 55°C
Ambient operating humidity 35% to 85% (with no condensation)
Ambient storage temperature −10 to 75°C
Ambient storage humidity 35% to 85% (with no condensation)
Storage and operating
atmosphere
Vibration resistance 4.9 m/s2 max.
Impact resistance Acceleration 19.6 m/s2 max.
Characteristics
Item Specifications
Regeneration operating voltage 380 VDC
Regeneration current 8 A (DC)
Average internal regeneration power 12 W (internal resistance: 50 Ω, 60 W)
Externally connected regeneration
resistance
Error detection functions Regeneration resistance disconnection, Regeneration transistor
Alarm output Single-pole NC contact (open when protection function is
Dimensions 55 × 160 × 130 mm (W × H × D)
LED Indicator Specifications
Item Specifications
POWER Lit when power is being supplied to the P and N terminals.
REGEN Lit during regeneration operation.
ALARM-REGEN
ALARM-OV Lit when there is an overvoltage.
Note 1. If an error is detected, an alarm is output from the Regeneration Resistance Unit. Set up
a sequence so that the power to the Servo Driver (L1 and L2) is turned OFF when an
alarm occurs.
2. When an error is detected and the Servo Driver’s power is turned OFF, the Regeneration
Resistance Unit will not reset normally unless the Servo Driver’s power is OFF for 2 to 3
seconds. (The Regeneration Resistance Unit will reset to its normal status after the
Servo Driver’s internal capacitors discharge completely and the voltage drops across
terminals P and N.)
3. The Regeneration Resistance Unit does not comply with the EC Directives.
No corrosive gasses
47 Ω ±5%
failure, and overvoltage
operating), can handle 200 VAC.
Lit when the regeneration resistance is disconnected or the regeneration
transistor failed.
3-24
Page 60
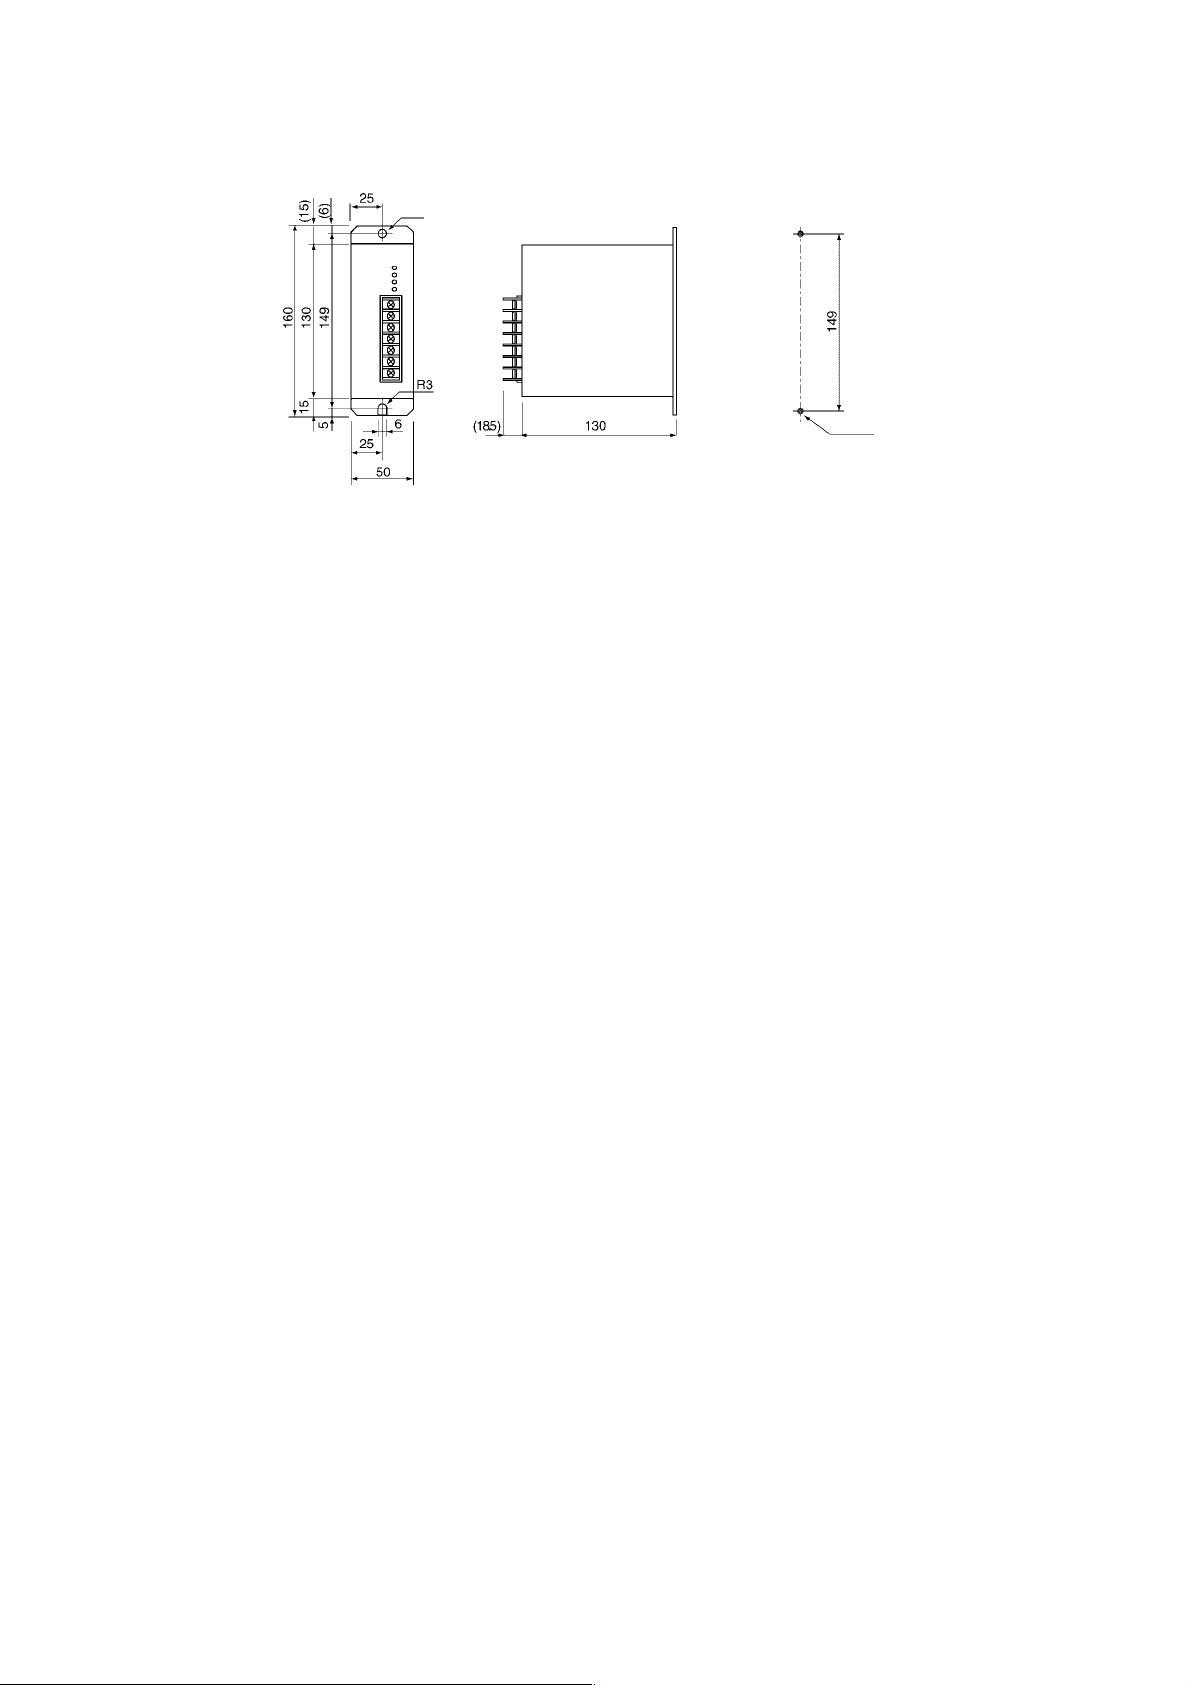
Dimensions
3-5 Regeneration Resistance Unit
3-5-1 Regeneration Resistance Unit (R88A-RG08UA) Specifications
6 dia.
Mounting Hole
Dimensions
Two, M4
3-25
Page 61
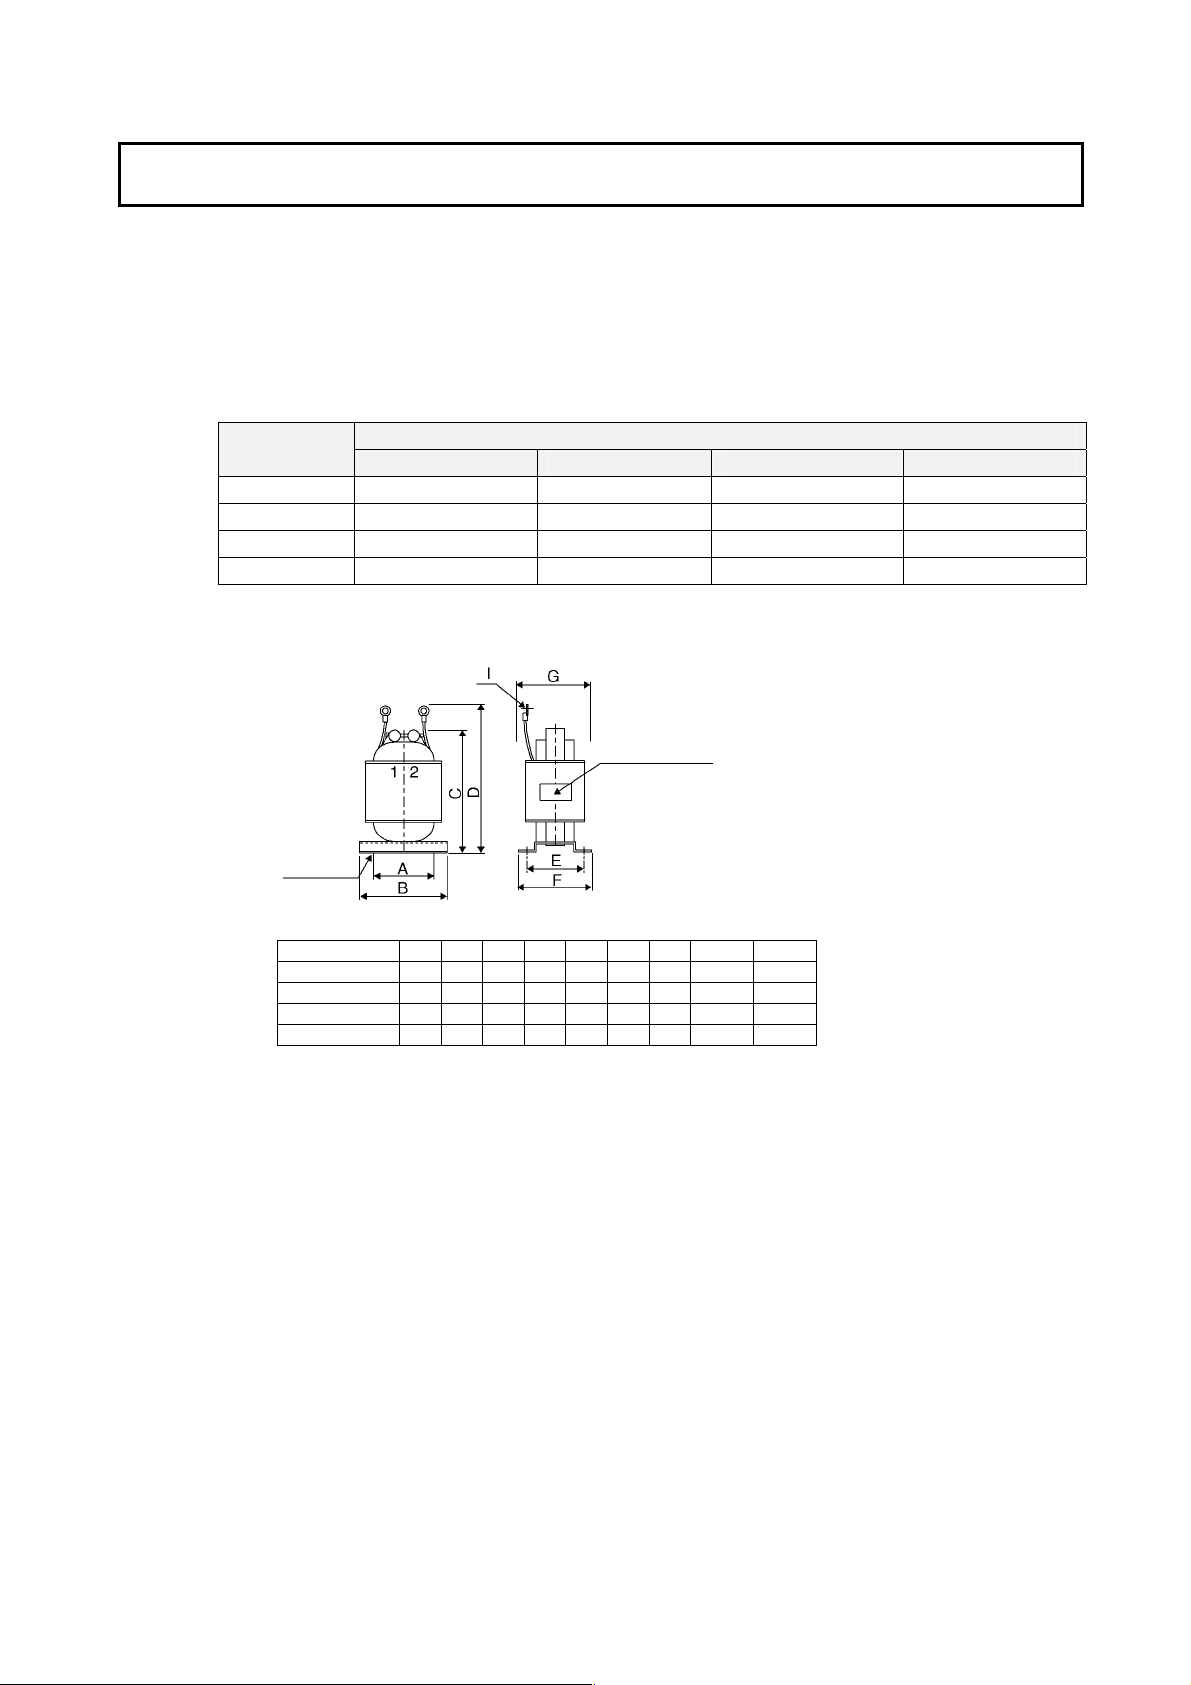
3-6 AC Reactors
3-6-1 AC Reactor Specifications
3-6 AC Reactors
An AC Reactor can be connected to the Servo Driver to suppress harmonic currents. Select a model to
match the Servo Driver being used.
3-6-1 AC Reactor Specifications
Specifications
Servo Driver
model
R7D-ZP01H R88A-PX5052 1.0 45.0 Approx. 0.4
R7D-ZP02H R88A-PX5053 2.0 20.0 Approx. 0.6
R7D-ZP04H R88A-PX5054 3.0 5.0 Approx. 0.4
R7D-ZP08H R88A-PX5056 5.0 2.0 Approx. 0.4
Model Rated current (A) Inductance (mH) Weight (kg)
Dimensions
Units: mm
AC Reactor
Nameplate
Four, H dia.
Model A B C D E F G H dia. I dia.
R88A-PX5052 35 52 80 95 30 40 45 4 4.3
R88A-PX5053 35 52 90 105 35 45 50 4 4.3
R88A-PX5054 35 52 80 95 30 40 45 4 4.5
R88A-PX5056 35 52 80 95 30 40 45 4 4.3
3-26
Page 62
Section 4
System Design
Page 63
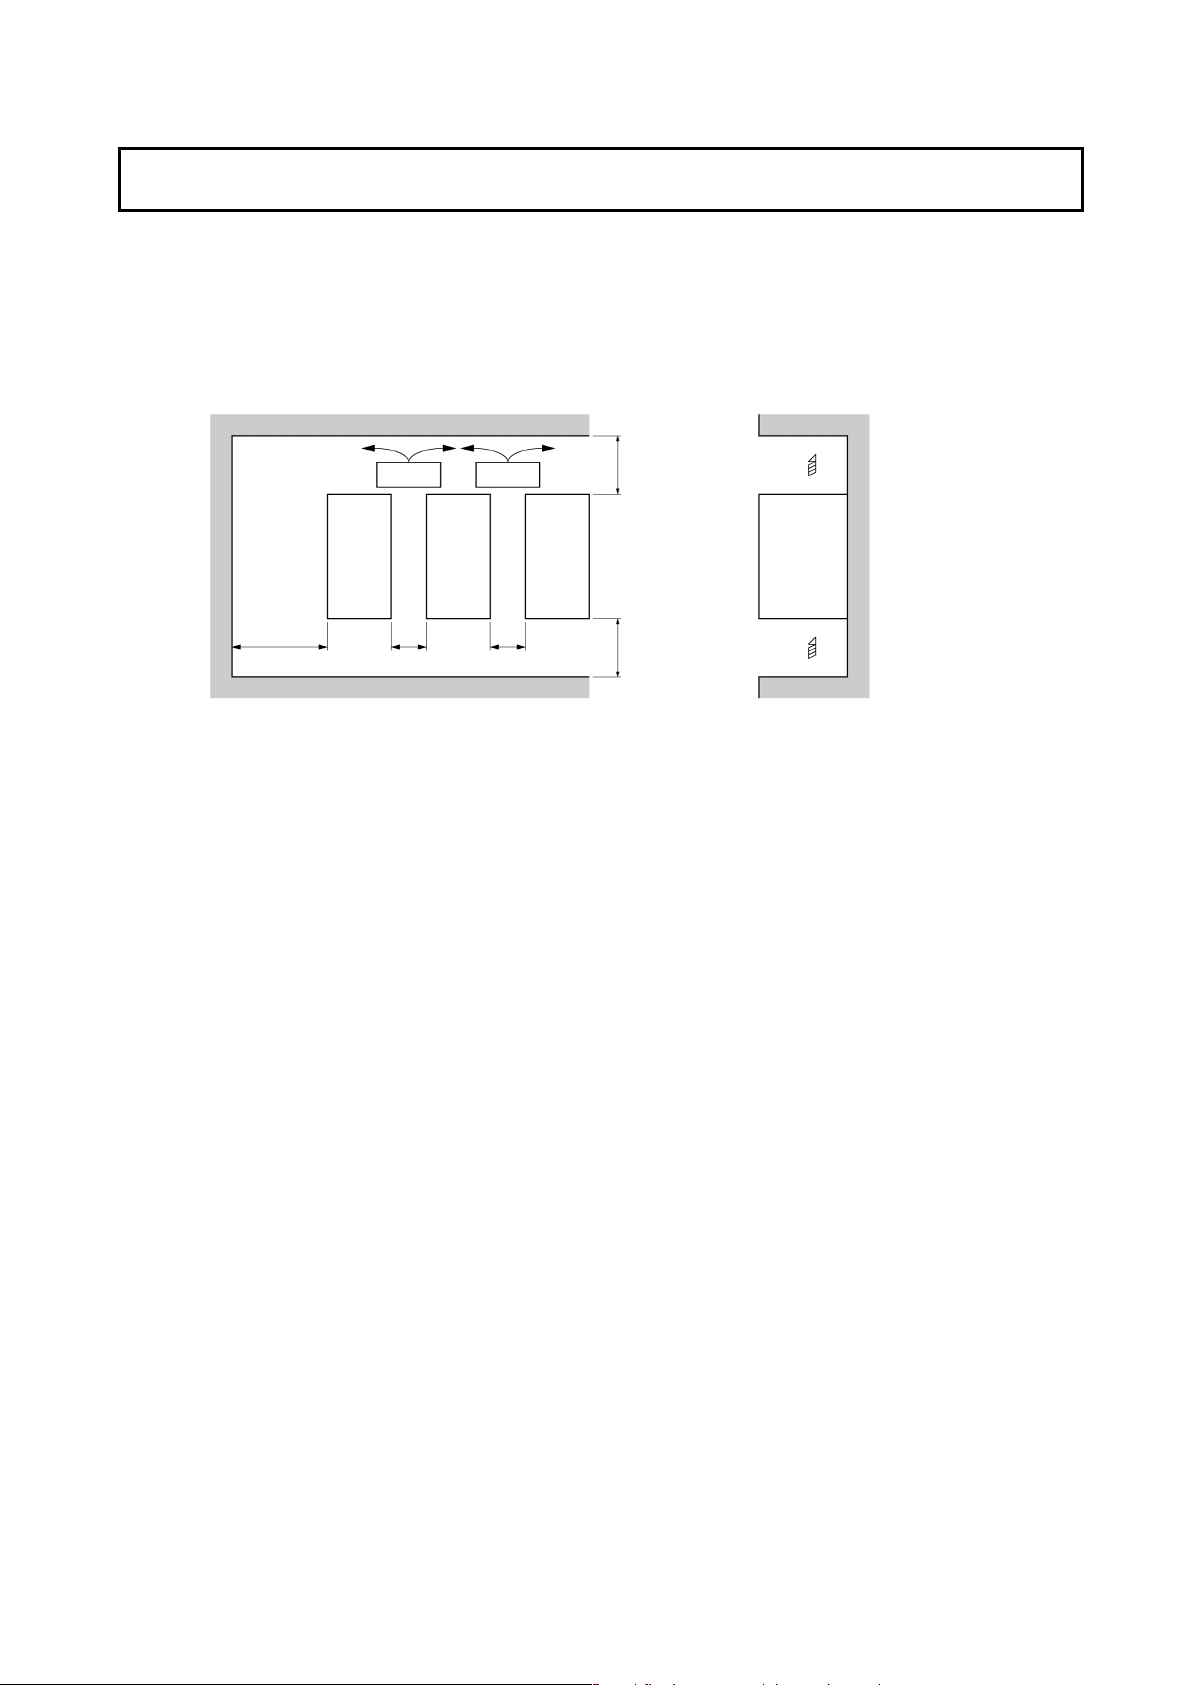
4-1 Installation Conditions
r
r
4-1-1 Servo Drivers
4-1 Installation Conditions
4-1-1 Servo Drivers
Space around Drivers
Install Servo Drivers according to the dimensions shown in the following illustration to
ensure proper heat dispersion and convection inside the panel. Also install a fan for
circulation if the Servo Drivers are installed side by side to prevent uneven temperatures
from developing inside the panel.
30 mm min.
Fan
Servo Driver
W
W = 10 mm min.
Fan
Servo Driver
W
Servo Driver
50 mm min.
50 mm min.
Ai
Side
panel
Ai
Mounting Direction
Mount the Servo Drivers in a direction (perpendicular) such that the lettering for the
model number, and so on, can be seen.
Operating Environment
The environment in which Servo Drivers are operated must meet the following conditions.
Servo Drivers may malfunction if operated under any other conditions.
• Ambient operating temperature: 0 to 55°C (Take into account temperature rises in the
individual Servo Drivers themselves.)
• Ambient operating humidity: 20% to 90% max. (with no condensation)
• Atmosphere: No corrosive gases.
Ambient Temperature
• Servo Drivers should be operated in environments in which there is minimal
temperature rise to maintain a high level of reliability.
• Temperature rise in any Unit installed in a closed space, such as a control box, will
cause the Servo Driver’s ambient temperature to rise. Use a fan or air conditioner to
prevent the Servo Driver’s ambient temperature from exceeding 55°C.
• Servo Driver surface temperatures may rise to as much as 30°C above the ambient
temperature. Use heat-resistant materials for wiring, and keep separate any devices or
wiring that are sensitive to heat.
• The service life of a Servo Driver is largely determined by the temperature around the
internal electrolytic capacitors. The service life of an electrolytic capacitor is affected by
a drop in electrolytic volume and an increase in internal resistance, which can result in
overvoltage alarms, malfunctioning due to noise, and damage to individual elements.
• If a Servo Driver is always operated at the maximum ambient temperature of 40°C and
at 80% of the rated torque, then a service life of approximately 50,000 hours can be
expected (excluding axial-flow fan). A drop of 10°C in the ambient temperature will
double the expected service life.
4-2
Page 64
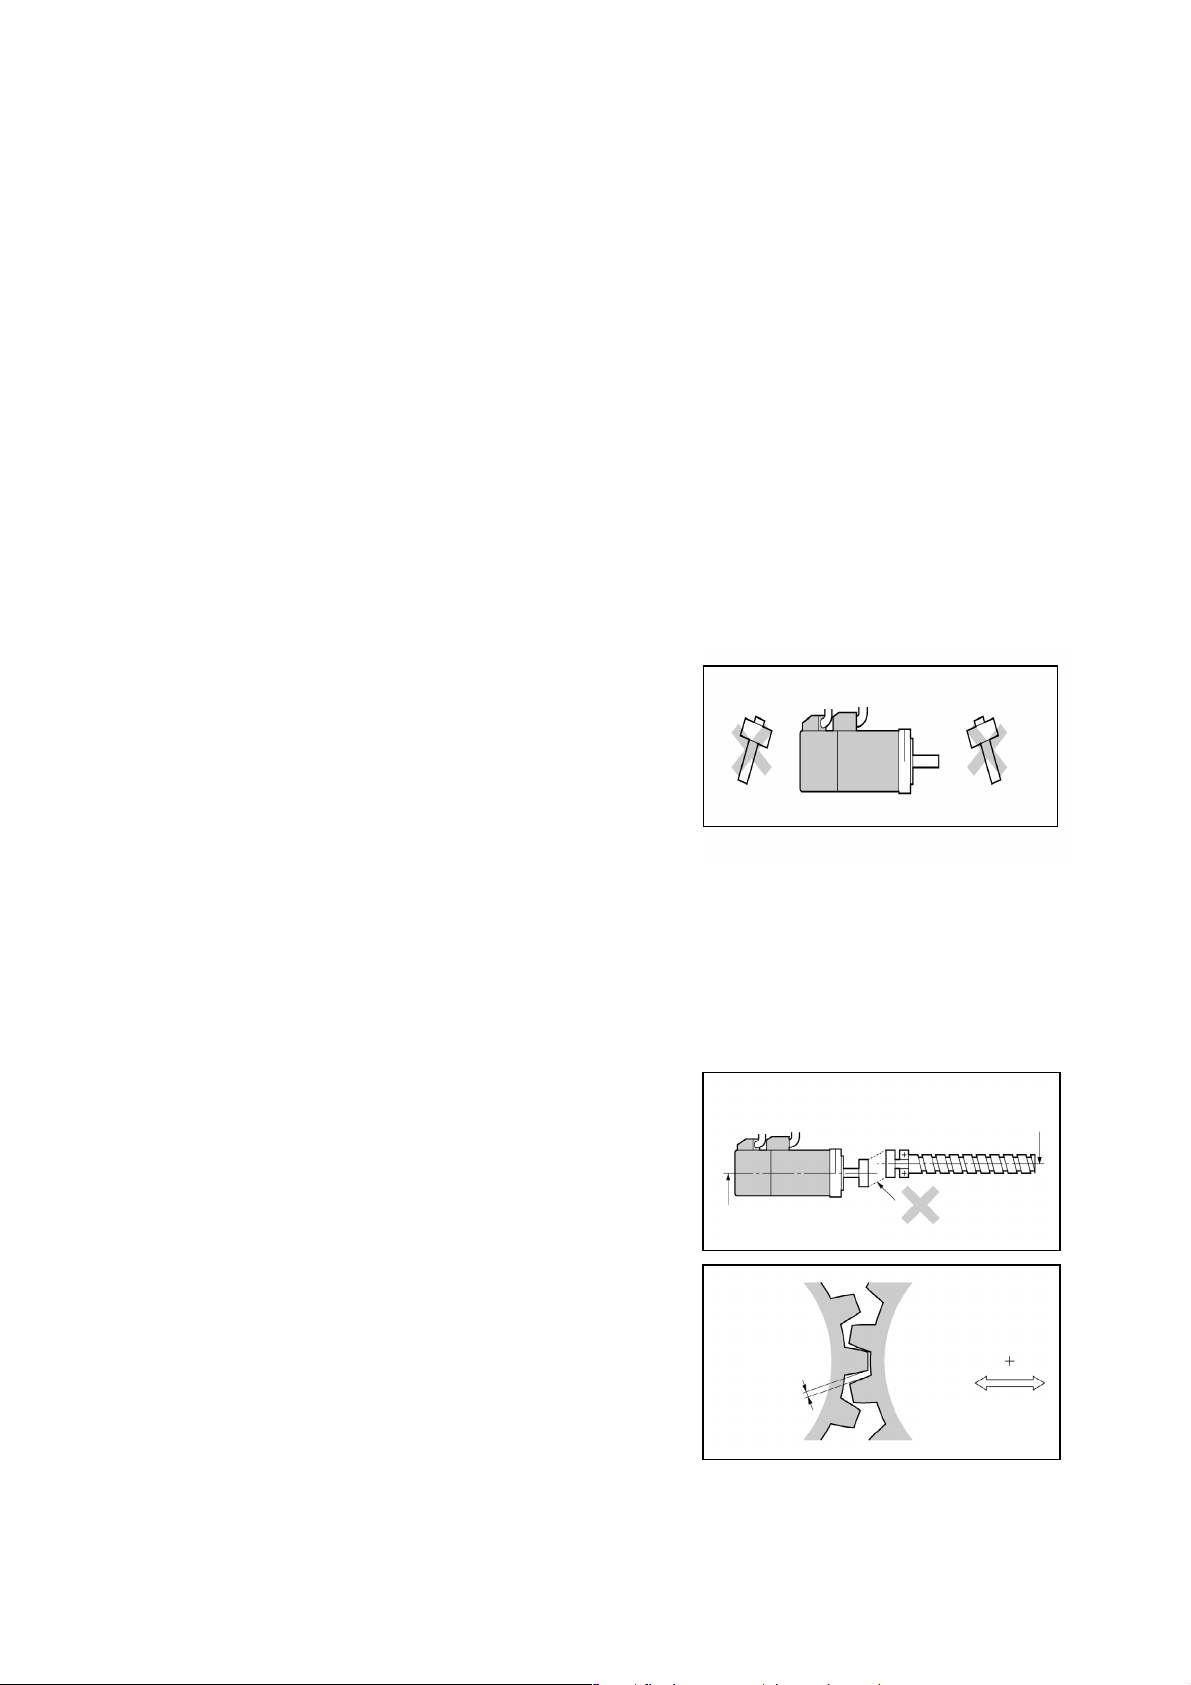
Keeping Foreign Objects Out of Units
• Place a cover over the Units or take other preventative measures to prevent foreign
objects, such as drill filings, from getting into the Units during installation. Be sure to
remove the cover after installation is complete. If the cover is left on during operation,
heat buildup may damage the Units.
• Take measures during installation and operation to prevent foreign objects such as
metal particles, oil, machining oil, dust, or water from getting inside of Servo Drivers.
4-1-2 Servomotors
Operating Environment
The environment in which the Servomotor is operated must meet the following conditions.
Operating the Servomotor outside of the following ranges may result in malfunction of the
Servomotor.
• Ambient operating temperature: 0 to +40°C
• Ambient operating humidity: 20% to 80% (with no condensation)
• Atmosphere: No corrosive gases.
Impact and Load
• The Servomotor is resistant to impacts of
up to 98 m/s
impacts or loads during transport,
installation, or removal.
• When transporting it, hold onto the
Servomotor itself, and do not hold onto the
encoder, cable, or connector areas.
Holding onto weaker areas such as these
can damage the Servomotor.
• Always use a pulley remover to remove
pulleys, couplings, or other objects from
the shaft.
• Secure cables so that there is no impact o
load placed on the cable connector areas.
Connecting to Mechanical Systems
• The axial loads for Servomotors are
specified in 3-2-2 Characteristics. If an
axial load greater than that specified is
applied to a Servomotor, it will reduce the
service life of the motor bearings and may
damage the motor shaft.
• When connecting to a load, use couplings
that can sufficiently absorb mechanical
eccentricity and variation.
• For spur gears, an extremely large radial
load may be applied depending on the
gear precision. Use spur gears with a high
degree of accuracy (for example, JIS class
2: normal line pitch error of 6 µm max. for
a pitch circle diameter of 50 mm).
• If the gear precision is not adequate, allow
backlash to ensure that no radial load is
placed on the motor shaft.
2
. Do not subject it to heavy
r
Servomotor shaft
center line
4-1 Installation Conditions
4-1-2 Servomotors
Ball screw center line
Do not offset center lines.
Backlash
Adjust backlash by
adjusting the
distance between
shafts.
4-3
Page 65
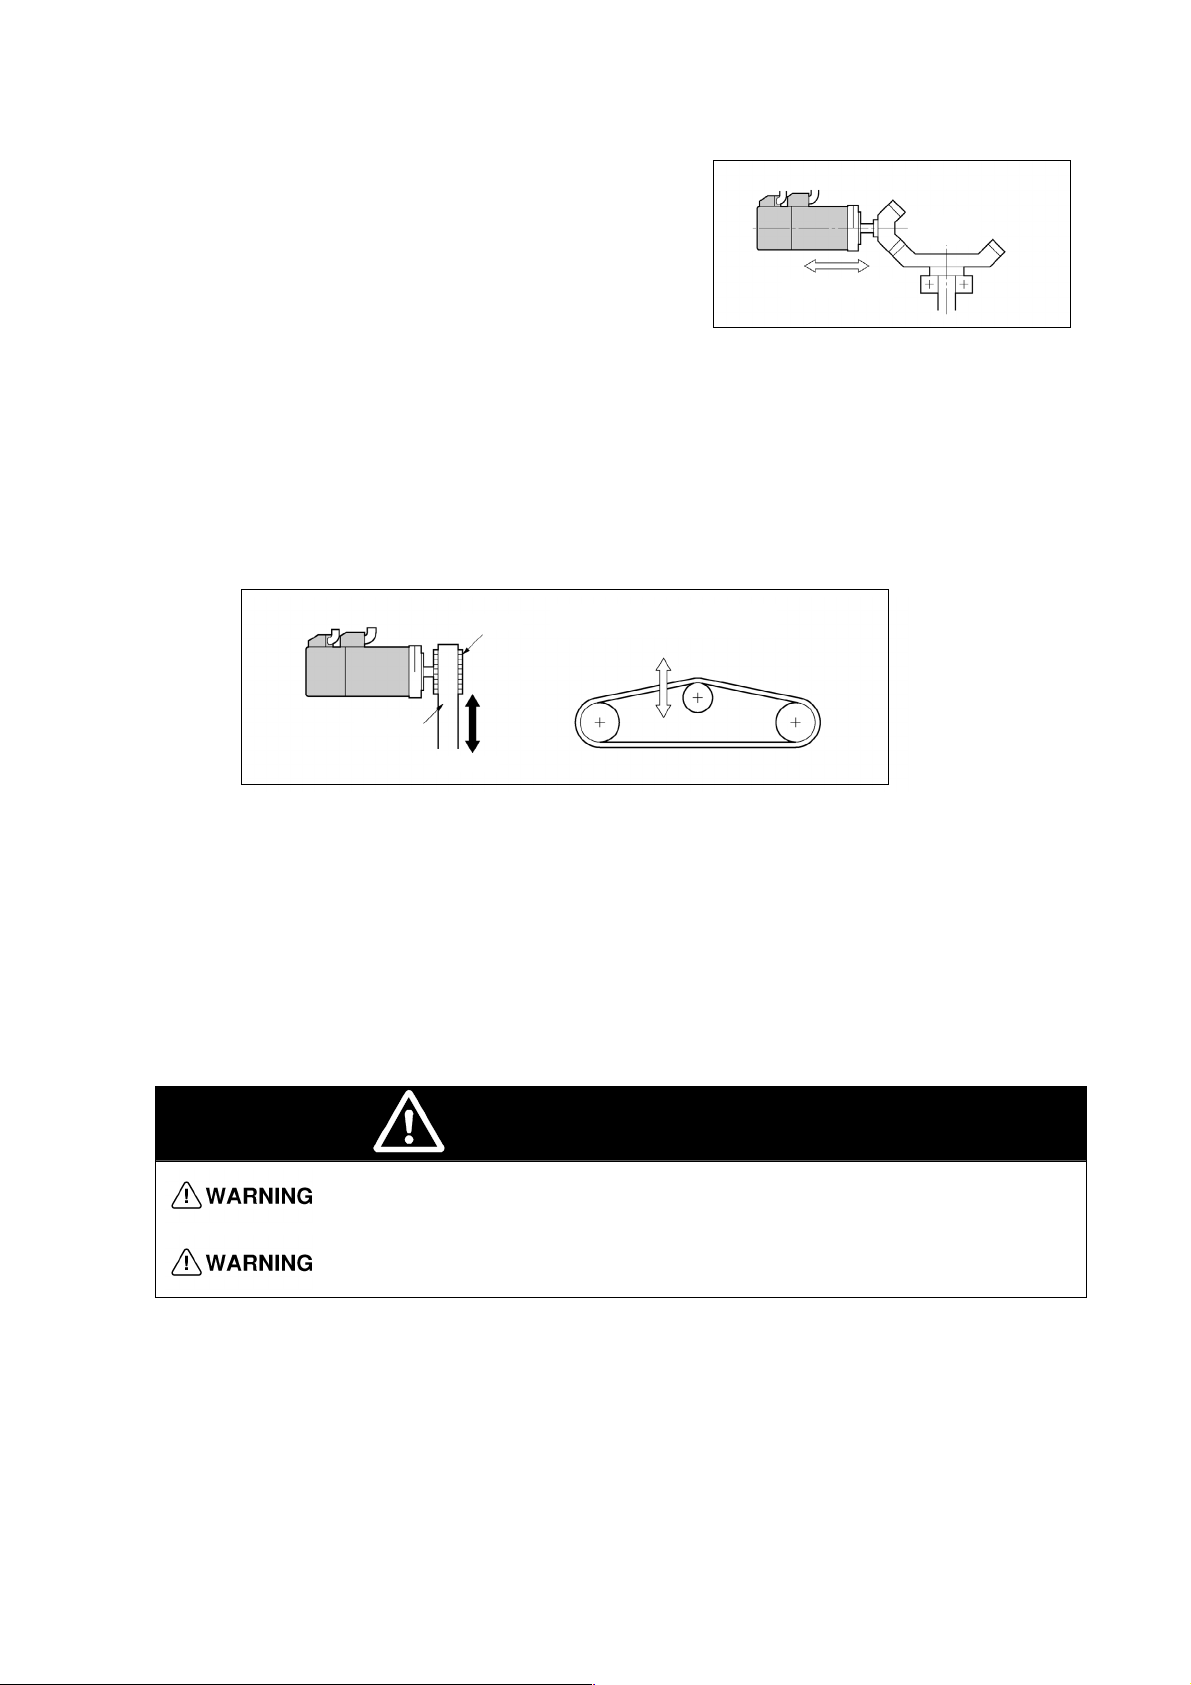
4-1 Installation Conditions
gear
eable
4-1-2 Servomotors
• Bevel gears will cause a load to be applied
in the thrust direction depending on the
structural precision, the gear precision, and
temperature changes. Provide appropriate
backlash or take other measures to ensure
that no thrust load is applied which exceeds
specifications.
• Do not put rubber packing on the flange
surface.
• When connecting to a V-belt or timing belt, consult the maker for belt selection and
tension.
• A radial load twice the belt tension will be placed on the motor shaft. Do not allow a
radial load exceeding specifications to be placed on the motor shaft due to belt tension.
If an excessive radial load is applied, the motor shaft and bearings may be damaged.
• Set up a movable pulley between the motor axis and the load axis so that the belt
tension can be adjusted.
Make mov
Bevel
.
Pulley
Belt
Tension
Pulley for tension adjustment
(Make adjustable.)
Water and Drip Resistance
The enclosure ratings for the Servomotors are as follows:
IP55 (except for through-shaft parts and cable exit holes)
Other Precautions
Take measures to prevent the shaft from rusting. The shafts are coated with anti-rust oil
when shipped, but anti-rust oil or grease should also be applied when connecting the
shaft to a load.
WARNING
Do not apply commercial power directly to the Servomotor.
Applying commercial power directly will burn out the motor coils.
Do not attempt to disassemble, repair, or modify any Units. Any attempts to do so
may result in electric shock or other injury.
4-4
Page 66
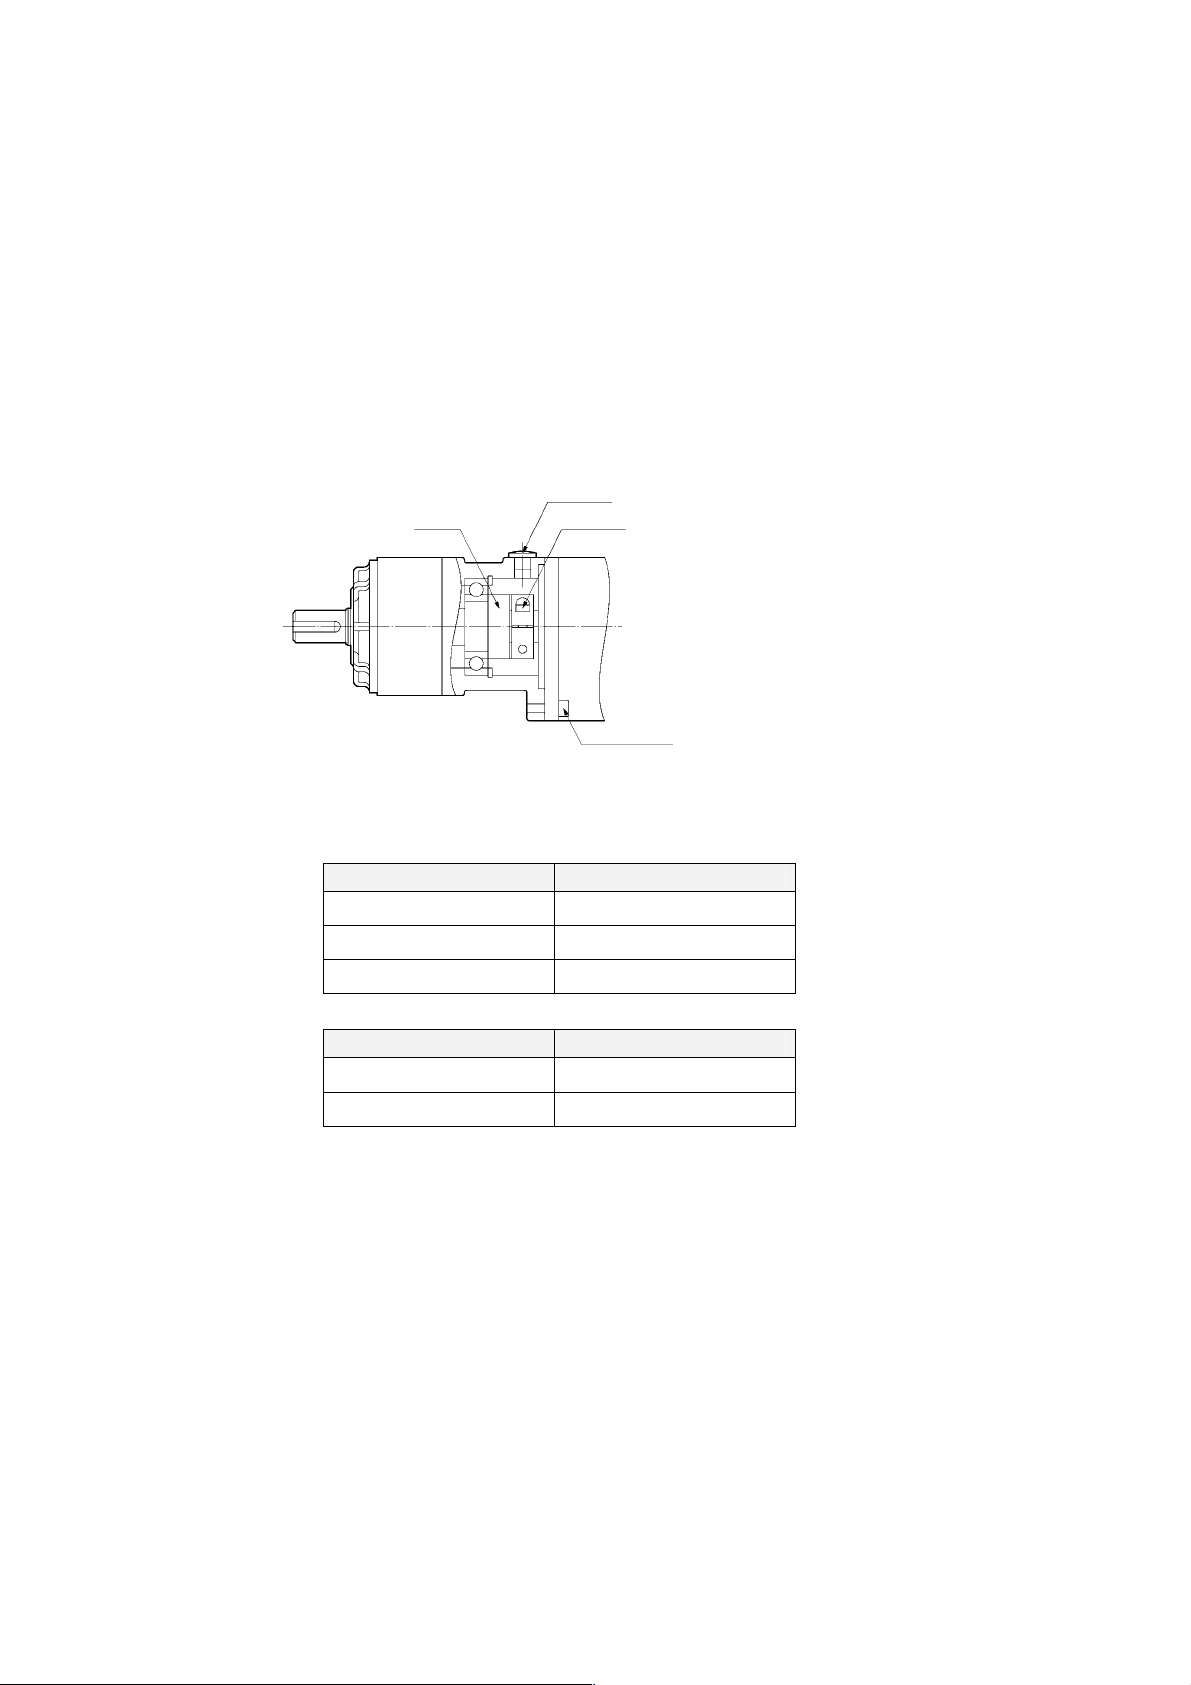
4-1-3 Decelerators
Installing Decelerators
• Use only the specified combinations of Servomotors and Decelerators. The service life
of the motor bearings may be shortened you use a combination that is not specified,
another company's reductions gear, or another company’s Servomotor.
• The dimensions of the Servomotor mounting flange on the Decelerators differ for each
Servomotor. Do not install Decelerators on a Servomotor other than the one specified.
• Use the following procedure when installing a Decelerator on the Servomotor.
• When installing the Servomotor, avoid the Servomotor shaft’s key groove when
installing the set bolt.
Input shaft
4-1 Installation Conditions
4-1-3 Decelerators
Rubber cap
Set bolt
Servomotor installation bolt
(1) Remove the rubber cap and check that the set bolt is loose.
(2) Insert the Servomotor shaft into the input shaft.
(3) Tighten the Servomotor installation bolt to the torque specified in the following table.
Servomotor installation bolt Tightening torque (N·m)
M4 2.9
M5 5.8
M6 9.8
(4) Tighten the set bolt to the torque specified in the following table.
Set bolt Tightening t orque (N·m)
M3 1.0
M4 2.9
(5) After tightening the set bolt, replace the rubber cap.
Using Another Company’s Decelerator (Reference Information)
If the system configuration requires another company’s decelerator to be used in
combination with a SMARTSTEP Junior Servomotor, select the decelerator so that the
load on the motor shaft (i.e., both the radial and thrust loads) is with the allowable values.
(Refer to 3-2-2 Characteristics for details on the allowable loads for motors.) Also, select
the decelerator so that the allowable input speed and allowable input torque of the
decelerator is not exceeded.
4-5
Page 67
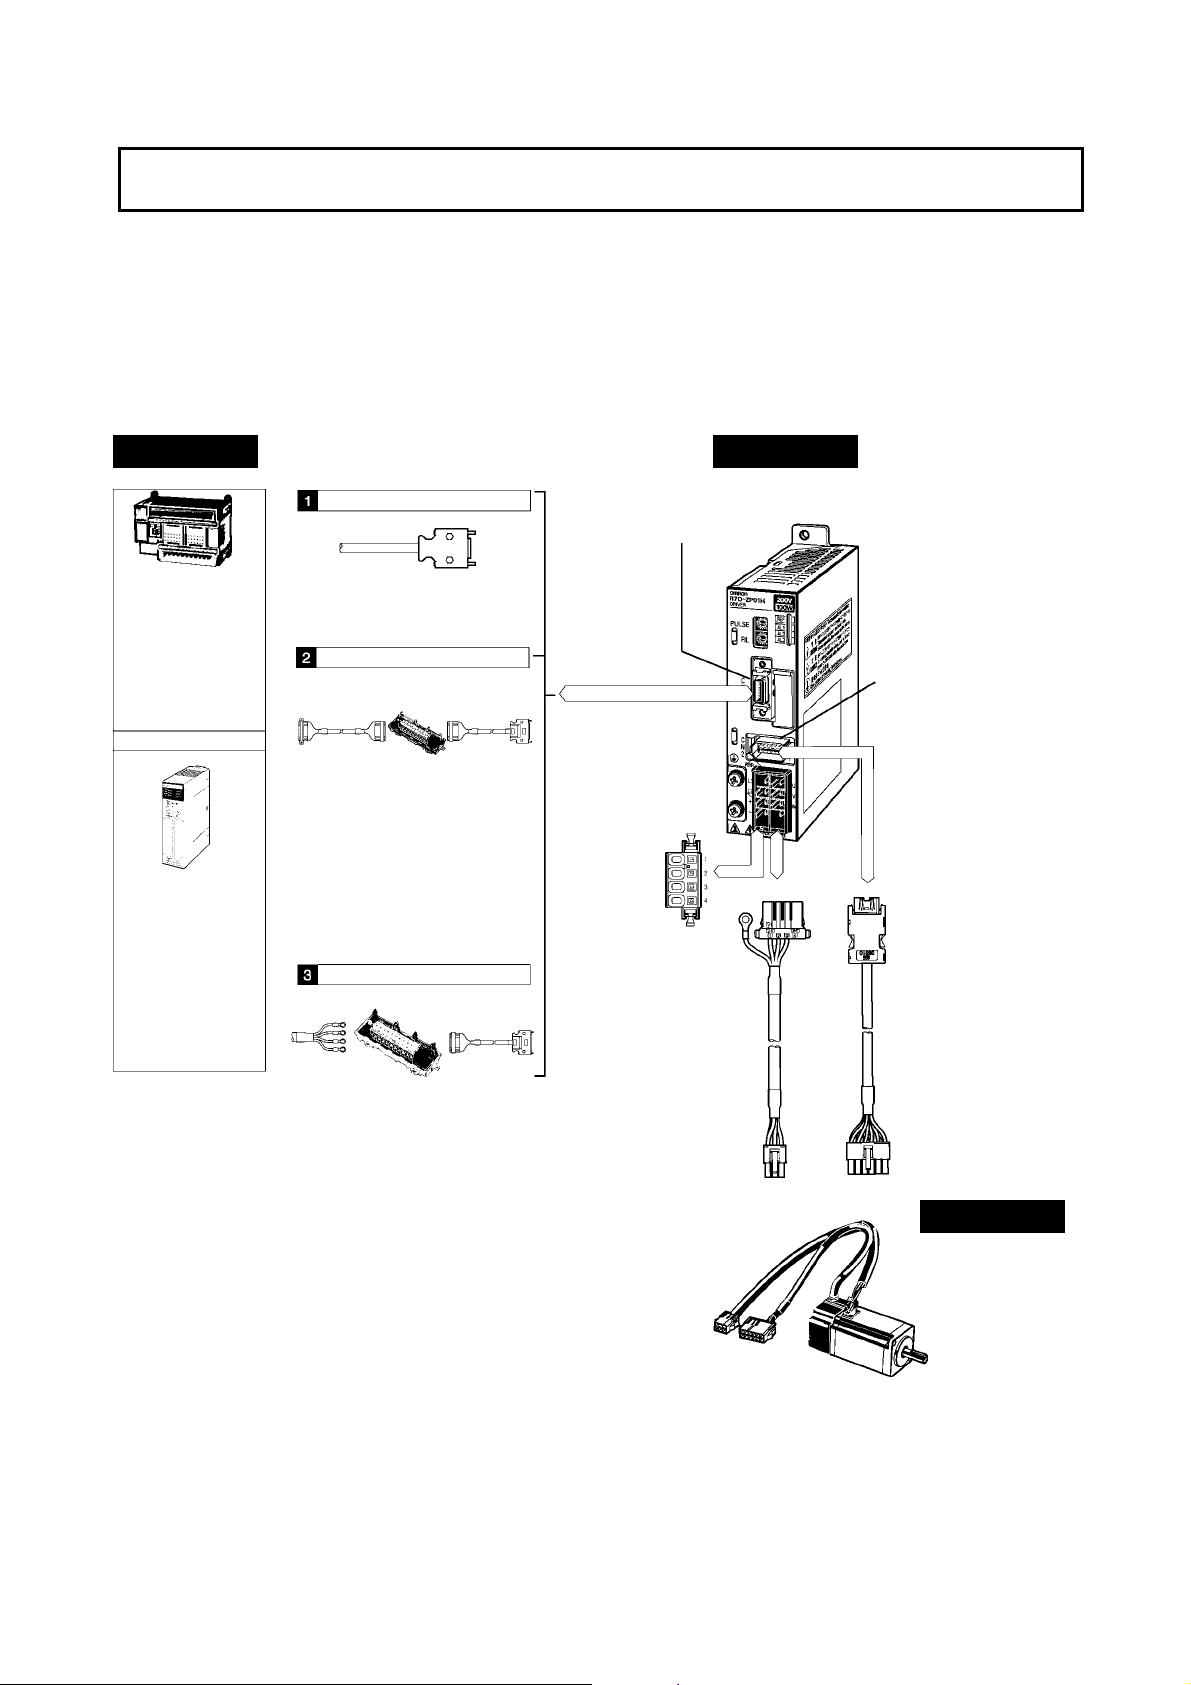
4-2 Wiring
G
k
4-2-1 Connecting Cables
4-2 Wiring
4-2-1 Connecting Cables
This section shows the types of connecting cables used in a SMARTSTEP Junior system.
A wide selection of cables are available for OMRON SYSMAC Position Control Units,
making it easy to wire a servo system.
System Configuration
Controller Servo Driver
R7D-ZP@
SYSMAC PLC with
pulse string output
CP1H-X40D@-@
CP1H-XA40D@-@
CP1H-Y20DT-D
CQM1H-PLB21
CS1W-HCP22
CJ1M-CPU21/22/23
Flexible Motion
Controller
FQM1-MMP21/22
Position Control Unit
eneral-purpose Control Cable and
Control I/O Connector
Servo Relay Unit Cable
Position Control
Unit Cable
Servo Relay Unit
Servo
Driver
Cable
CN1 (Control I/O Connector)
CN2 (Encoder Input Connec tor)
Position Control Unit
with a pulse s tring
output
CJ1W-NC113/133
CJ1W-NC213/233
CJ1W-NC413/433
CS1W-NC113/133
CS1W-NC213/233
CS1W-NC413/433
C200HW-NC113
C200HW-NC213
C200HW-NC413
Connector Terminal Block and Cable
Connector
Terminal Block
Cable for Connector
Terminal Bloc
R7A-CNZ01P
Main Circuit
Connector ( s old
separately)
Servomotor
Power Cable
Encoder
Cable
Servomotor
R7M-Z
@
4-6
Page 68
4-2-2 Selecting Connecting Cables
General-purpose Control Cables
If you are connecting to a controller that does not have a standard cable available, use
General-purpose Control Cable to assemble a cable to connect to the Servo Driver’s
Control I/O Connector (CN1).
Name Model number Comments
General-purpose
Control Cable
Servomotor Power Cables (CNB)
There are two kinds of Servomotor Power Cables, one for Servomotors with a brake and
another for Servomotors without a brake. Select the Cable to match the Servomotor
being used.
Specification Model number Comments
For a Servomotor
without a brake
For a Servomotor
with a brake
Encoder Cables (CN2)
Name Model num ber Comments
Encoder Cable R7A-CRZ@@@C
R7A-CPZ@@@S
R7A-CAZ@@@S
R7A-CAZ@@@B
4-2 Wiring
4-2-2 Selecting Connecting Cables
This cable has a connector at tached to connect to the
Control I/O Connector (CN1).
The @@@ digits in the model number indicate the cable
length (either 1 m or 2 m).
Example model number: R7A -CP Z001S (1 m)
The @@@ digits in the model number indicate the cable
length (3 m, 5 m, or 10 m).
Example model number: R7A -CA Z003S (3 m cable for a
Servomotor without a brake)
The @@@ digits in the model number indicate the cable
length (3 m, 5 m, or 10 m).
Example model number: R7A -CRZ003C (3 m)
4-7
Page 69
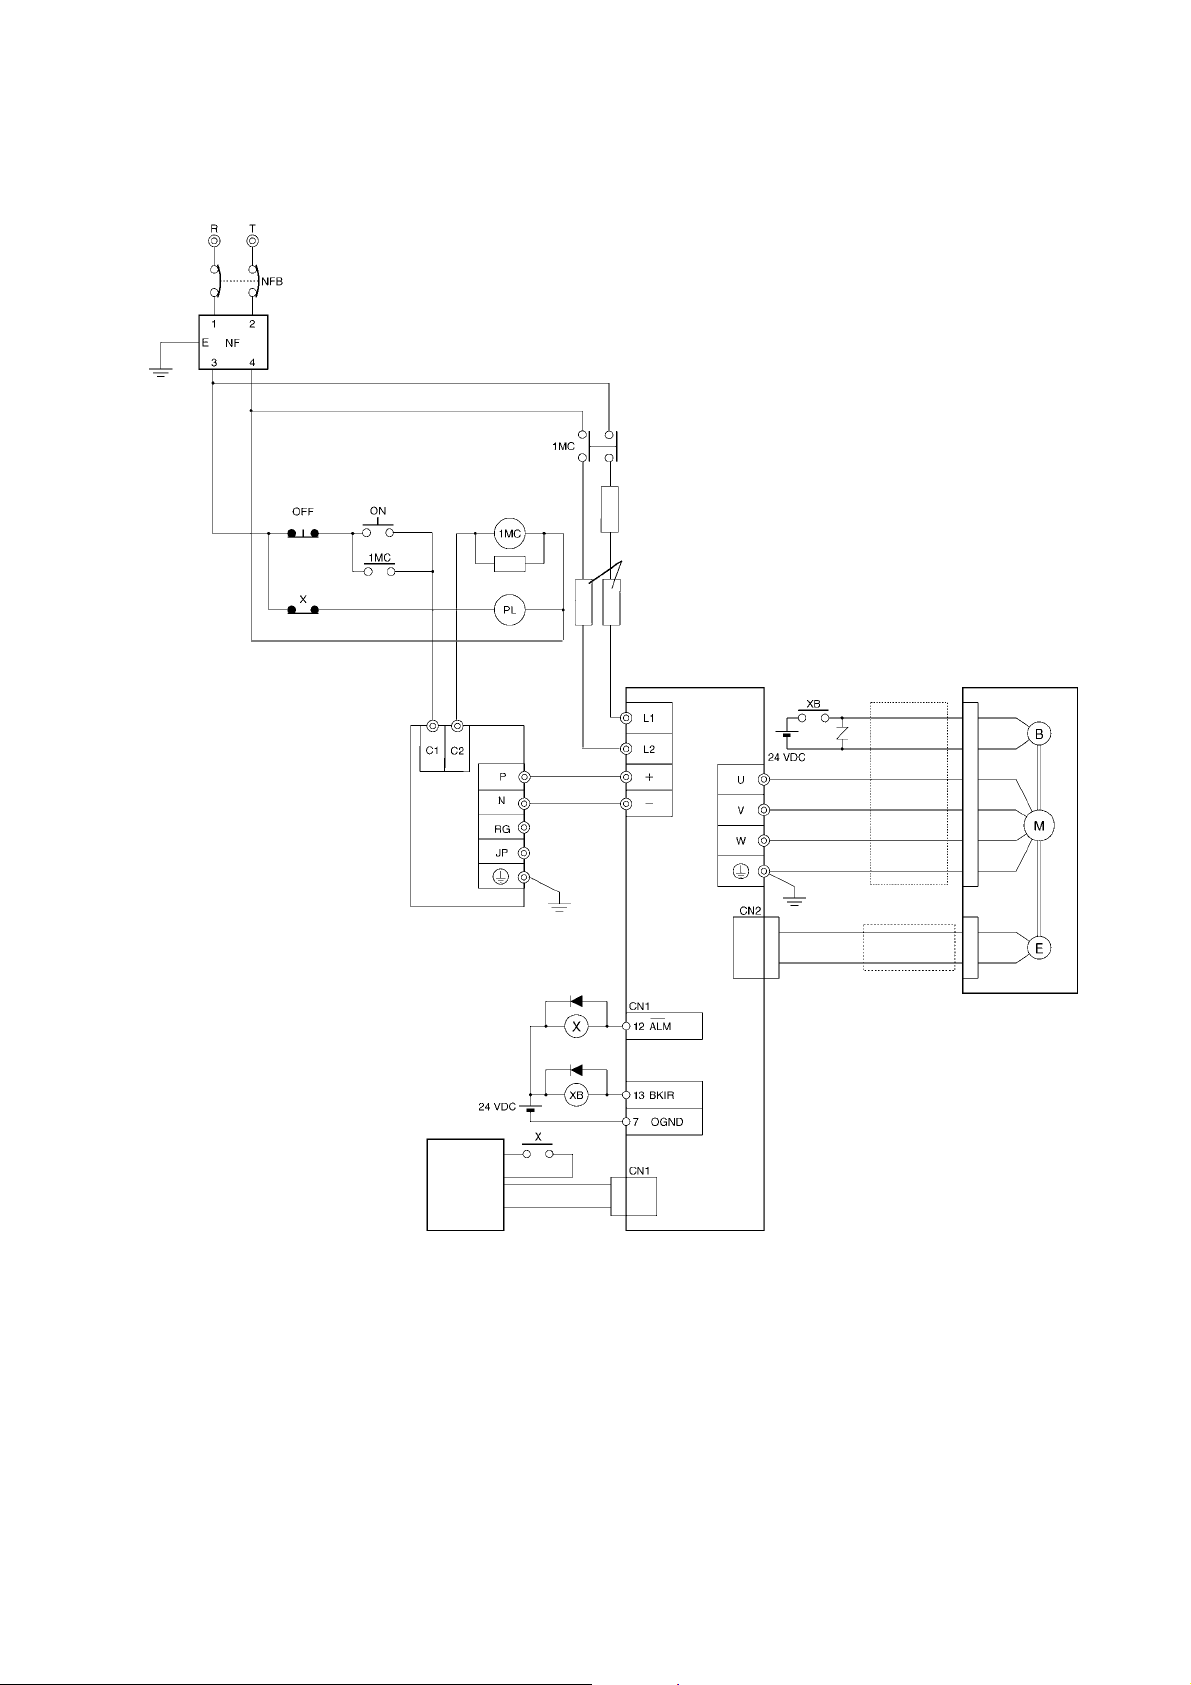
4-2 Wiring
C
4-2-3 Peripheral Device Connection Examples
4-2-3 Peripheral Device Connection Examples
R7D-ZP01H/-ZP02H/-ZP04H/-ZP08H
Single-phase 200 to 230 VAC, 50/60 Hz: R7D-ZP@
Noise filter (See note 1.)
Class D ground
(Class 3 ground:
100 Ω or less)
Main-circuit power supply
Note 1. Recommended products are listed
in 4-2-5 Conforming to EM
Directives.
2. Recommended Relay: OMRON
MY-series Relay (24-V model)
3. An R88A-RR22047S External
Regeneration Resistor can be
connected. Connect the
R88A-RR22047S if the
regenerative energy exceeds the
capacity of the External
Regeneration Unit. Connect the
R88A-RR22047S so that the
power supply is cut o ff w hen the
thermal switch output opens.
4. The dynamic brake will operate
while the main circuit power supply
or the control circuit power supply
is OFF.
Main-circuit contactor
(See note 1.)
Surge killer
(See note 1.)
Servo error display
External Regeneration Unit
(See note 3.)
User
control
device
(See note 2.)
Control cable
Linear reactor
Fuse
SMARTSTEP Junior
Servo Driver
Servomotor
power cable
Class D ground
(Class 3 ground:
100 Ω or less)
Encoder cable
SMARTSTEP Junior
Servomotor
4-8
Page 70
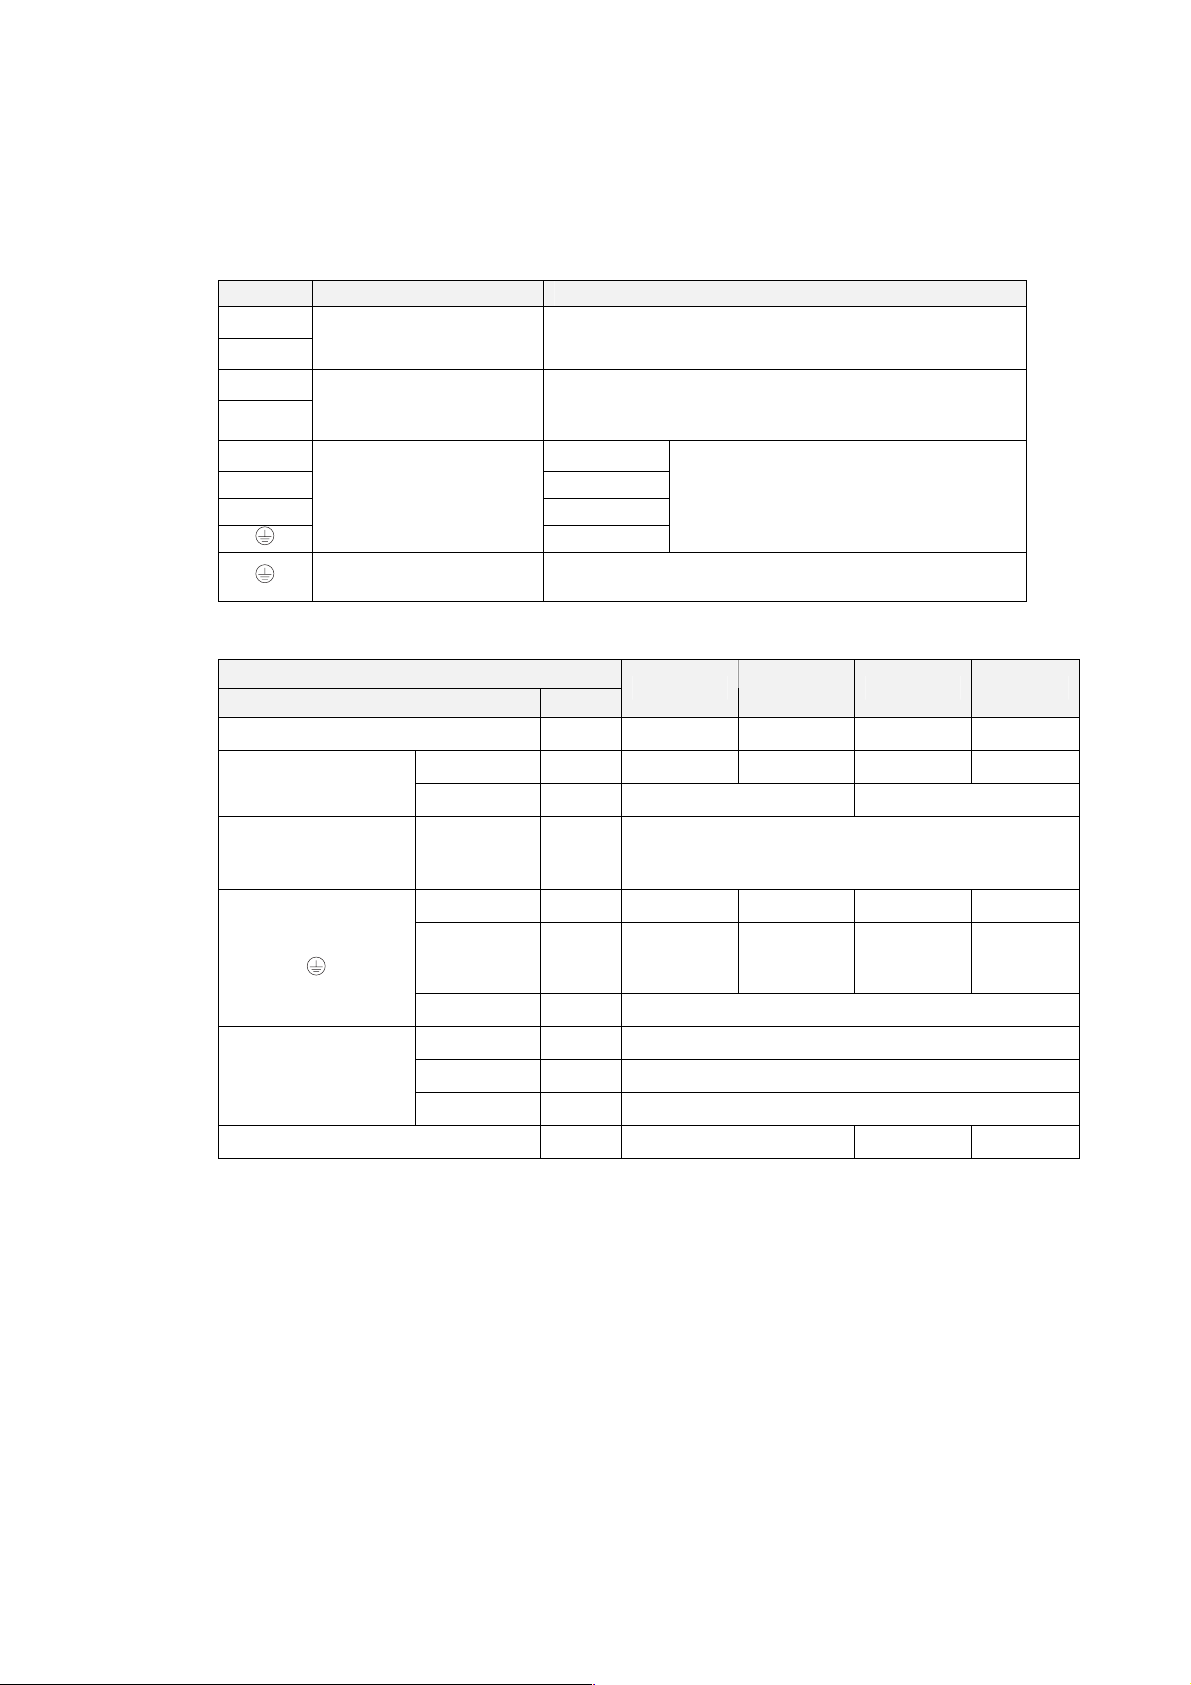
4-2-4 Wiring the Main Circuit and Servomotor Connections
4-2-4 Wiring the Main Circuit and Servomotor Connections
When wiring a Terminal Block, use proper wire sizes, grounding systems, and anti-noise
measures.
Terminal Block Names and Functions
Signal Function Condition
L1
L2
+
−
U
V White
W Blue
Terminal Block Wire Sizes
Power supply capacity
Main circuit power
supply input (L1, L2)
External Regeneration
Unit connection
terminals (+, −)
Servomotor connection
terminal
(U, V, W,
(See note.)
Frame ground
No-fuse breaker or fuse capaci ty
Wire Size and Allowable Current (Reference)
Main circuits power supply
input
External regeneration
resistance connecti on
terminals
Servomotor connection
terminals
Frame ground
Model (R7D-)
Item Unit
)
Rated current
Wire size
Wire size
Rated current
Maximum
momentary
current
Wire size
Wire size
Screw size
Torque
Single-phase 200/230 V AC (170 to 253 V A C) 50/ 60 Hz
If regenerative energy is high, connec t an External Regeneration
Unit.
Red
Green/Yellow
This is the ground terminal . Ground to a minimum of 100 Ω
(class D, class 3).
kVA
0.4 0.75 1.2 2.2
A (rms)
1.8 3.5 5.5 10
2
mm
1.25 2.0
2
1.25 (Wiring lengt h: 0.5 m max.)
mm
A (rms)
0.84 1.1 2.0 3.7
2.5 3.3 6.0 11.1
A (rms)
2
1.25 (Wiring length: 20 m max.)
mm
2
mm
2.0 mi n.
---
M4
1.2 to 1.4
N•m
A (rms)
4 8 16
These are the terminals f or out puts to the
Servomotor. Be sure to wire these terminals
correctly.
ZP01H ZP02H ZP04H ZP08H
Note: Connect an OMRON Servomotor Cable to the Servomotor connection terminals.
The following table shows the allowable current when there are three power supply wires.
Use a current below these specified values.
4-2 Wiring
4-9
Page 71
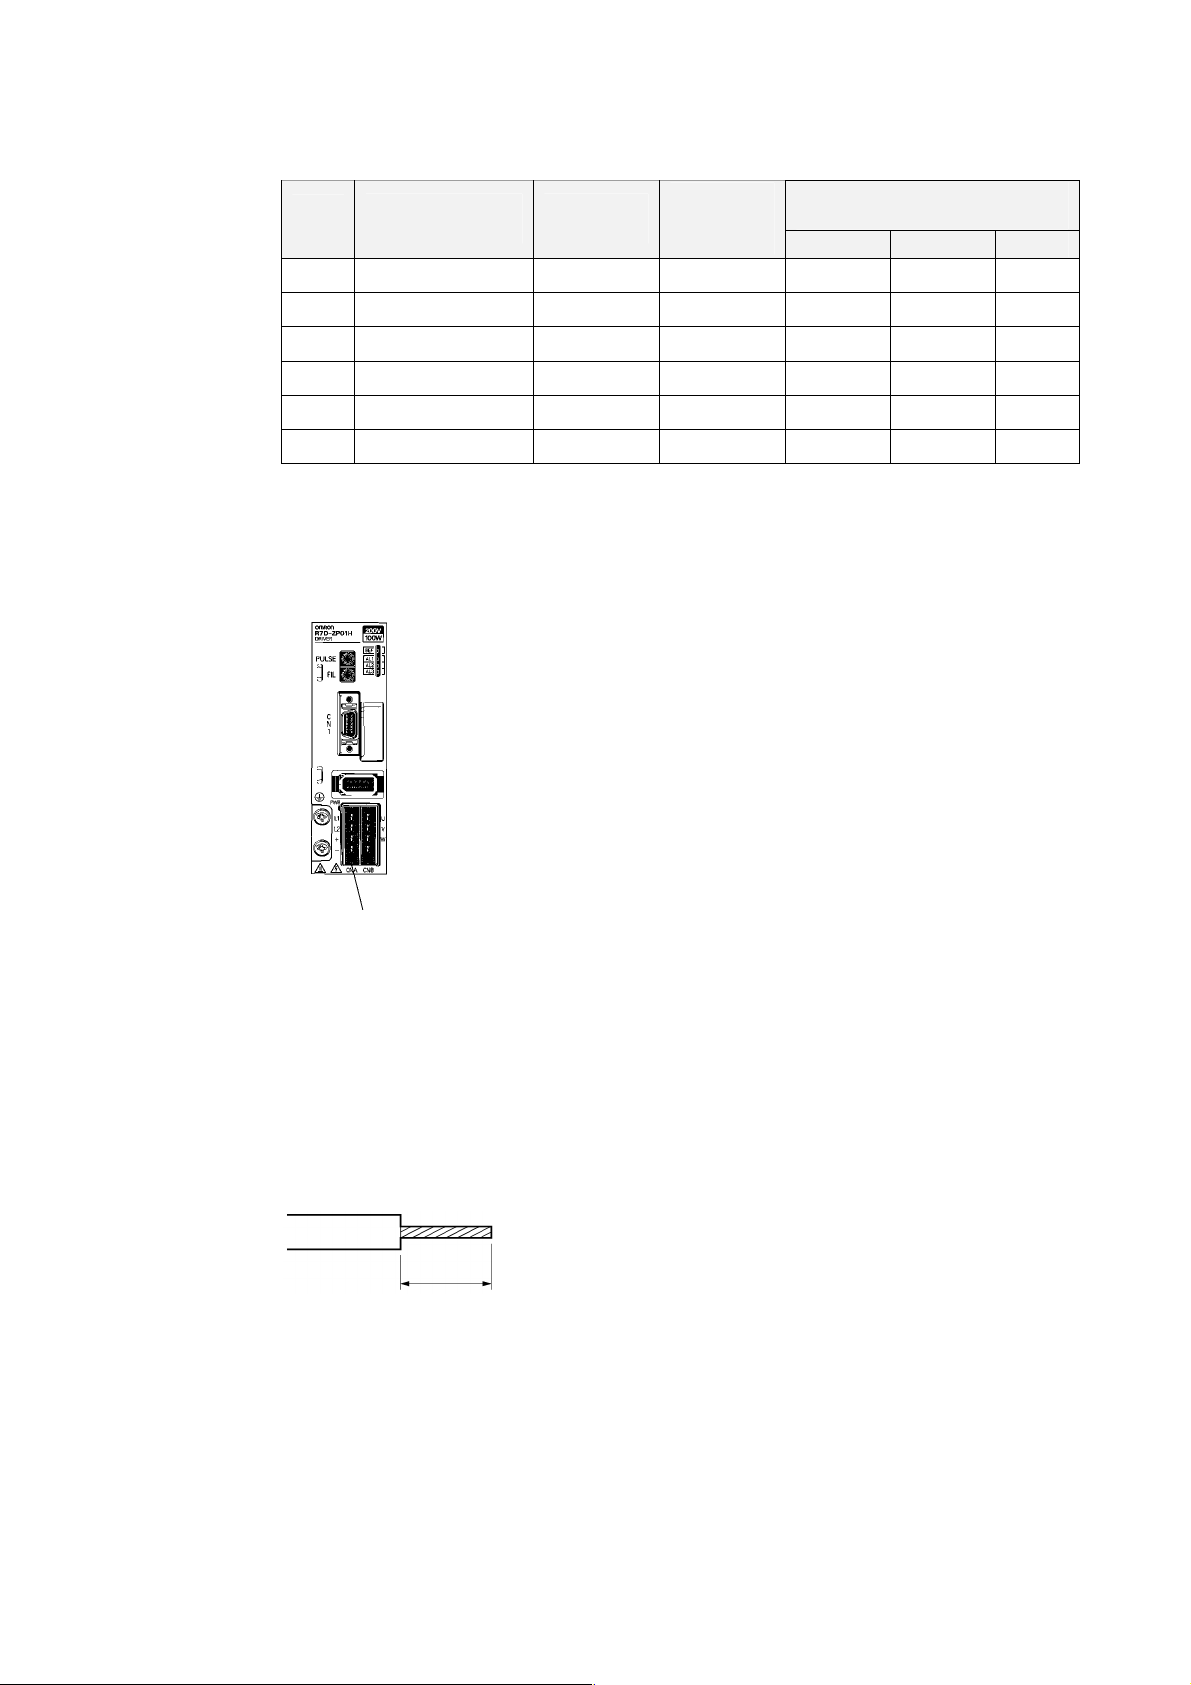
4-2 Wiring
4-2-4 Wiring the Main Circuit and Servomotor Connections
600-V Heat-resistant Vinyl Wire (HIV) (Reference Values)
AWG
size
20 0.5 19/0.18 39.5 6.6 5.6 4.5
--- 0.75 30/0.18 26.0 8.8 7.0 5.5
18 0.9 37/0.18 24.4 9.0 7.7 6.0
16 1.25 50/0.18 15.6 12.0 11.0 8.5
14 2.0 7/0.6 9.53 23 20 16
12 3.5 7/0.8 5.41 33 29 24
Cross-sectional area
(mm2)
Configuration
(wires/mm2)
Terminal Block Wiring Procedure
Spring-type connectors are used for SMARTSTEP Junior Servo Drivers. The procedure
for wiring these is described below.
Conductive
resistance
(Ω/km)
Allowable current (A) for ambient
temperature
30°C 40°C 50°C
CNA Connector
1. Remove the Terminal Block from the Servo Driver.
The Terminal Block must be removed from the Servo Driver before being wired.
The Servo Driver will be damaged if the wiring is done with the Terminal Block in place.
2. Strip the covering off the ends of the wires.
Prepare wires of the right sizes, according to the tables provided under Terminal Block
Wire Sizes above, and strip off 9 to 10 mm of the covering from the end of each wire.
9 to 10 mm
3. Open the wire insertion slots in the Terminal Block
There are two ways to open the wire insertion slots, as follows:
• Pry the slot open using the lever that comes with the Servo Driver (as in Fig. A).
• Insert a flat-blade screwdriver (end width: 2.5 to 3.0 mm) into the opening for Servo
Driver installation, and press down firmly to open the slot (as in Fig. B).
4-10
Page 72
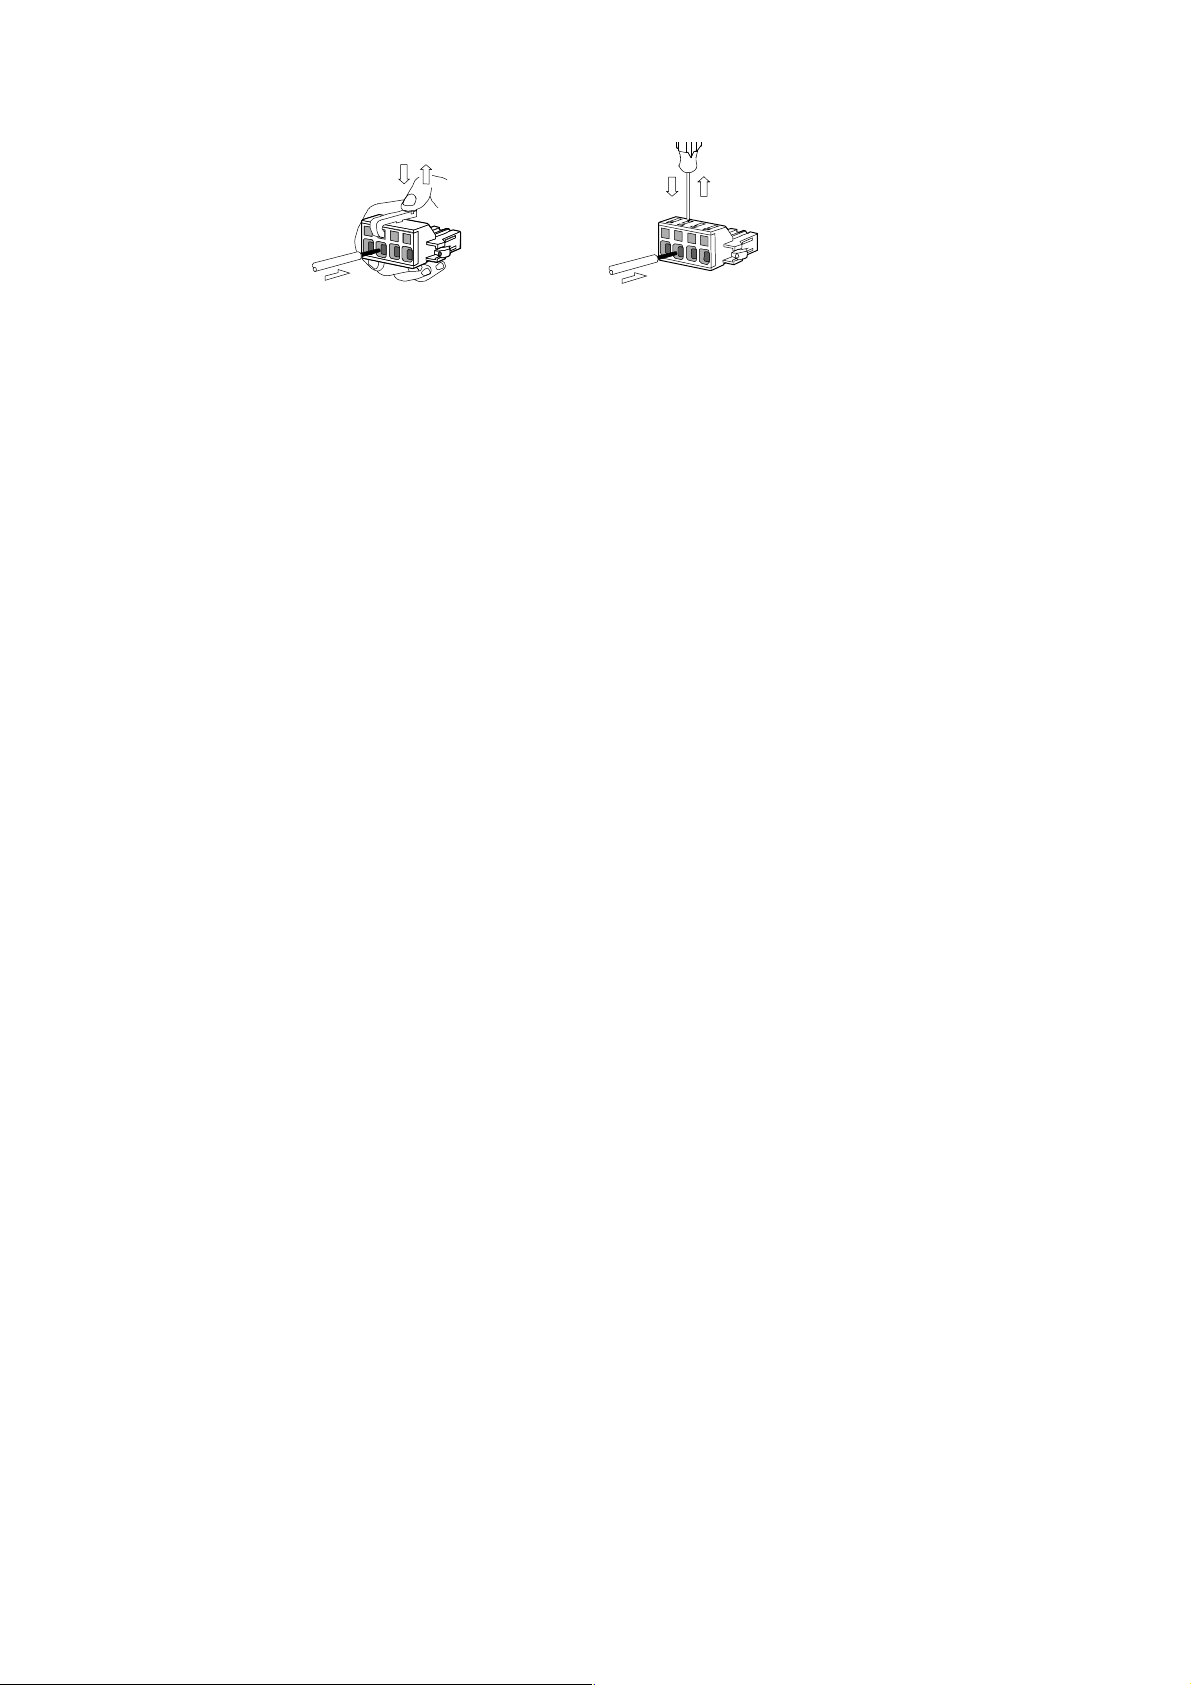
T
Fig. A Fig. B
Model: J-FA
(JST Mfg. Co. Ltd.)
-OT
4. Insert the wire into the slot.
With the slot held open, insert the end of the wire. Then let the slot close by releasing
the pressure from the lever or the screwdriver.
5. Mount the Terminal Block to the Servo Driver.
After all of the terminals have been wired, return the Terminal Block to its original
position on the Servo Driver.
4-2-5 Conforming to EMC Directives
Conformance to EMC Directives (EN55011 class A group 1 (EMI) and EN61000-6-2
EMS)) can be ensured by wiring under the conditions described below. These conditions
are for conformance of SMARTSTEP Junior products to EMC Directives.
EMC-related performance of these products, however, will vary depending on the
configuration, wiring, and other conditions of the equipment in which the products are
installed. The customer must, therefore, perform final checks to confirm that devices and
the overall installation conform to EMC Directives.
The following conditions must be met to conform to EMC Directives.
• The Servo Driver must be installed in a metal case (control panel). (The Servomotor
does not, however, have to be covered with a metal plate.)
• Noise filters and surge absorbers must be installed on all power supply lines.
• Shielded cables must be used for all I/O signal lines and encoder lines. (Use tin-plated,
soft copper wires for the shield weaving.)
• All cables leaving the control panel must be wired in metal ducts or conduits with
blades. (The 30-cm power cable, encoder cable, and connector do not have to be
inserted in metal ducts or conduits.)
• Clamp filters must be installed on cables with braided shields, and the shield must be
directly grounded to a ground plate.
4-2 Wiring
4-2-5 Conforming to EMC Directive s
4-11
Page 73
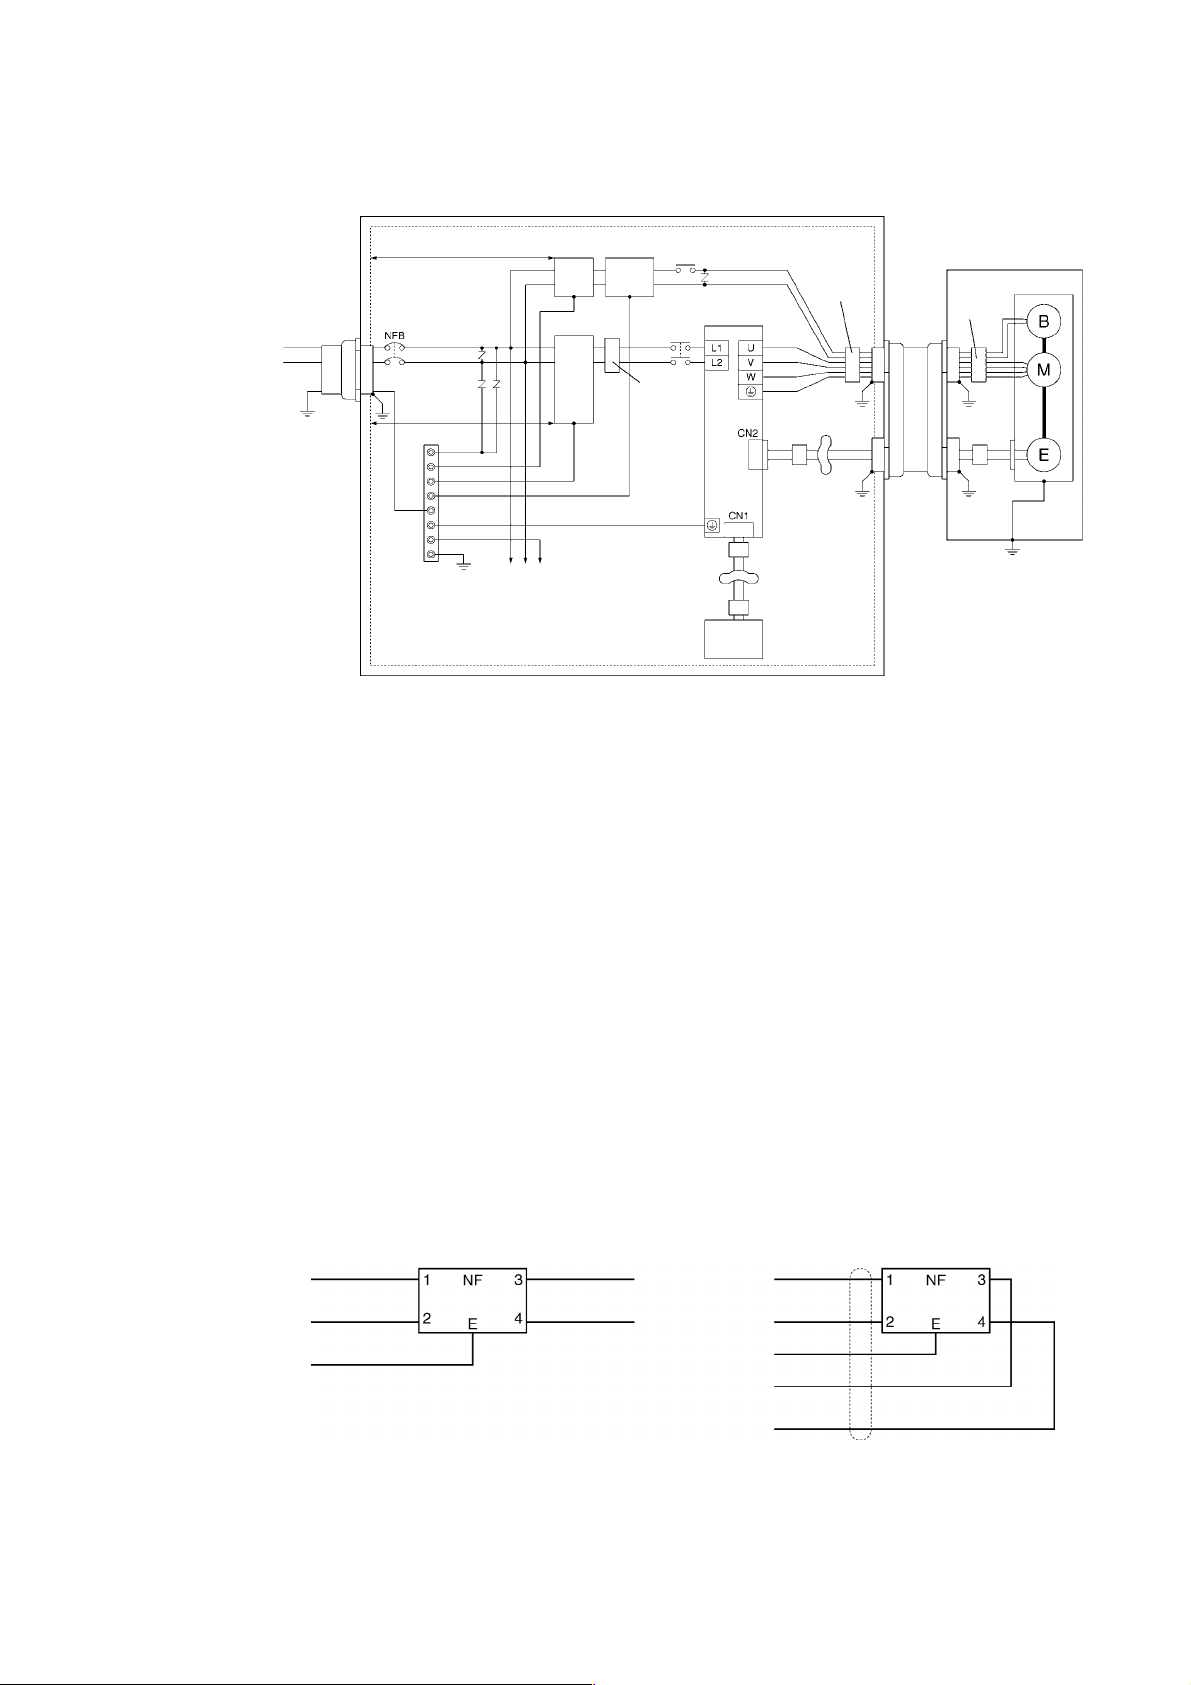
4-2 Wiring
A
4-2-5 Conforming to EMC Directive s
Wiring Method
Control panel
Metal duct
or conduit
C power
supply
Class ground
(to 100 Ω or
less)
Metal plate
Surge
absorber
2 m max.
Ground
plate
2 m max.
Controller
power supply
Noise
filter
Noise
filter
Brake
power
supply
Contactor
Radio
noise
filter
Clamp
R7D-Z@
Controller
Clamp
filter
Clamp
Clamp filter
Clamp filter
Radio
noise
filter
Device with built-in motor
Radio
Metal
duct or
conduit
noise
filter
Clamp
filter
R7D-Z@
Note 1. Make 1.5 turns for the ferrite core’s cable winding.
2. Peel the insulation off the cable at the clamp, and directly connect the shield to the metal
plate.
• Ground the motor’s frame to the machine ground when the motor is on a movable
shaft.
• Use a grounding plate for the frame ground for each Unit, as shown in the above
diagrams, and ground to a single point.
2
• Use ground lines with a minimum thickness of 3.5 mm
, and arrange the wiring so that
the ground lines are as short as possible.
• No-fuse breakers, surge absorbers, and noise filters (NF) should be positioned near the
input terminal block (ground plate), and I/O lines should be isolated and wired using the
shortest distance possible.
• If no-fuse breakers are installed at the top and the power supply line is wired from the
lower duct, use metal tubes for wiring and make sure that there is adequate distance
between the input lines and the internal wiring. If input and output lines are wired
together, noise resistance will decrease.
• Wire the noise filter as shown at the left in the following illustration. The noise filter
should be installed at the entrance to the control box whenever possible.
Correct: Separate input and output
AC input
AC output
Wrong: Noise not filtered effectively
AC input
Ground
Ground
AC output
• Use twisted-pair cables for the power supply cables whenever possible, or bind the
cables.
4-12
Page 74
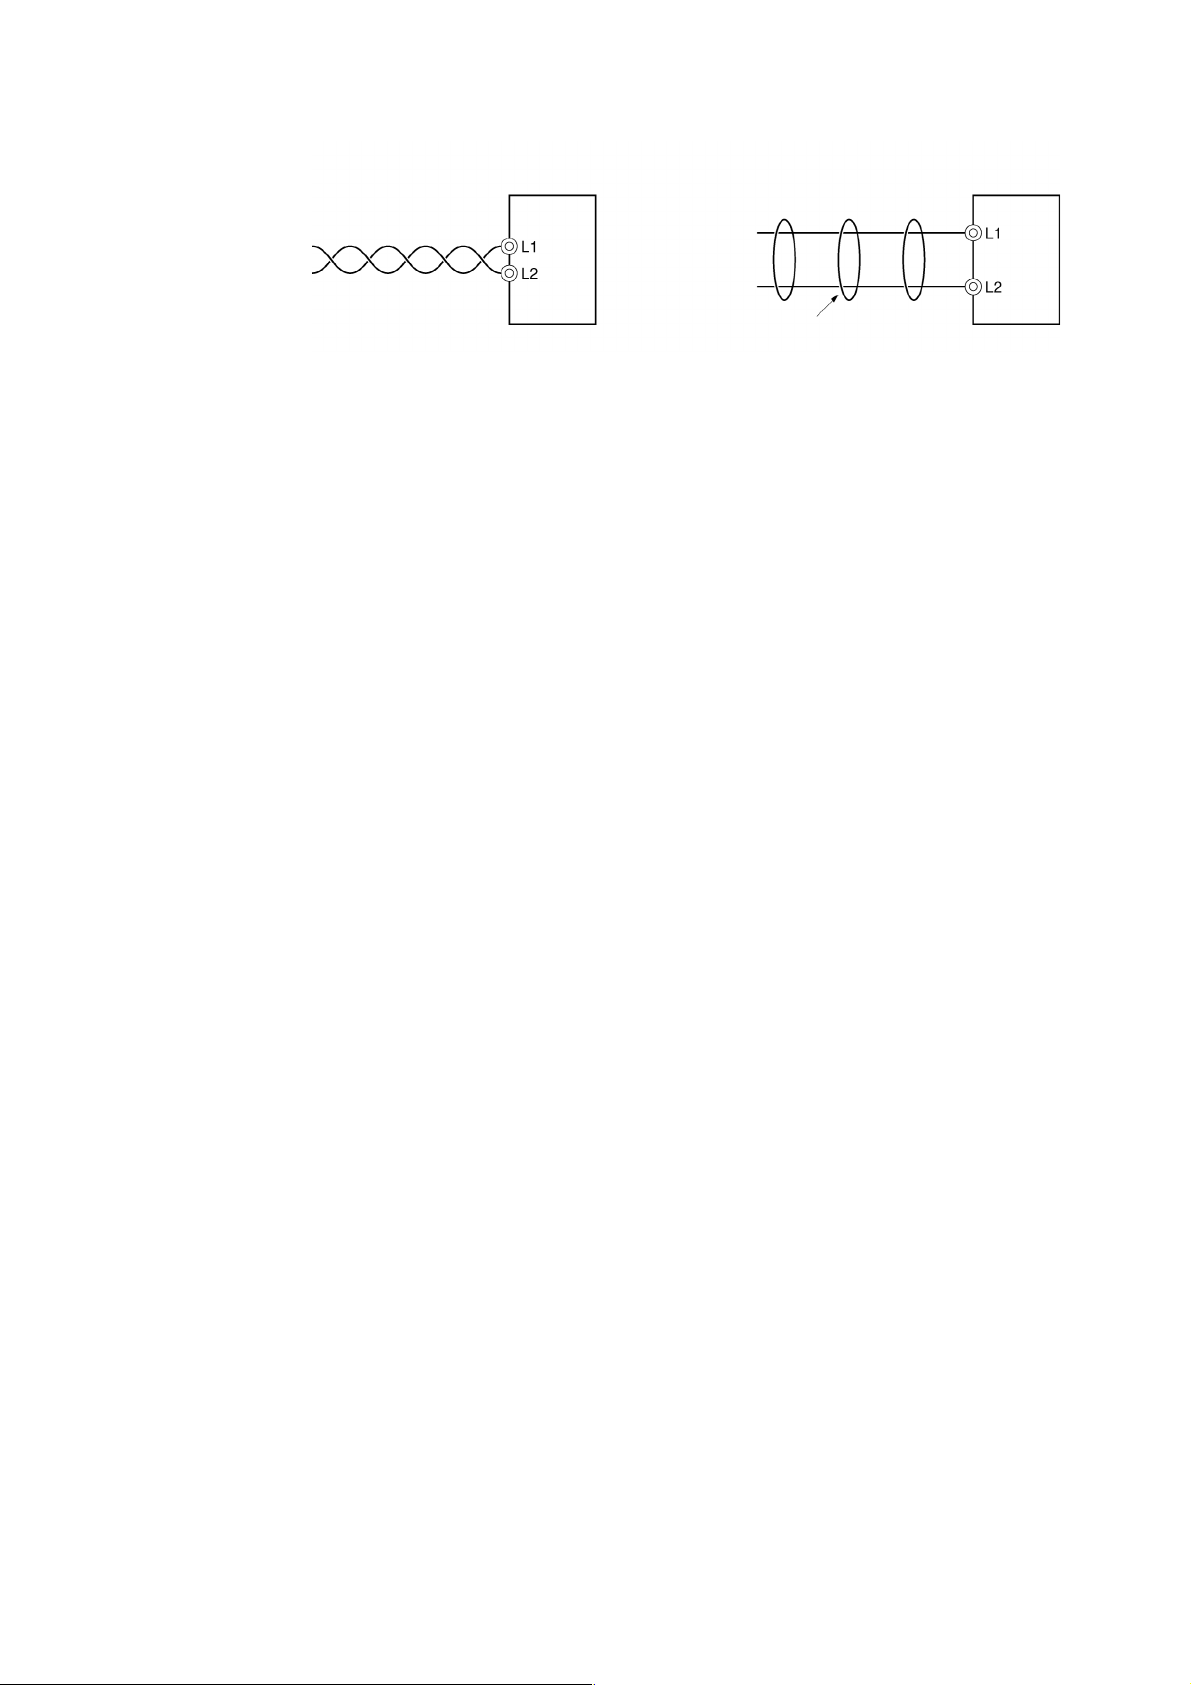
4-2 Wiring
4-2-5 Conforming to EMC Directive s
Correct: Properly twisted
Driver
Correct: Cables are bound.
Binding
Driver
• Separate power supply cables and signal cables when wiring.
Control Panel Construction
Openings in the control panel, such as holes for cables, operating panel mounting holes,
and gaps around the door, may allow electromagnetic waves into the panel. To prevent
this from occurring, observe the recommendations described below when designing or
selecting a control panel.
Case Structure
• Use a metal control panel with welded joints at the top, bottom, and sides so that the
surfaces will be electrically conductive.
• During assembly, strip the paint off of joint areas (or mask them during painting), to
make them electrically conductive.
• If gaps appear in the control box case when screws are tightened, make adjustments to
prevent this from occurring.
• Do not leave any conductive part unconnected.
• Ground all Units within the case to the case itself.
Door Structure
• Use a door that is made of metal.
• Use a water-draining structure where the door and case fit together, and leave no gaps.
(Refer to the diagrams below.)
• Use a conductive gasket between the door and the case, as shown in the diagrams
below. (Refer to the diagrams below.) Strip the paint off of the sections of the door and
case that will be in contact with the conductive gasket (or mask them during painting),
so that they will be electrically conductive.
• Gaps may open between case panels when screws are tightened. Be sure that no
gaps appear when tightening down screws.
4-13
Page 75
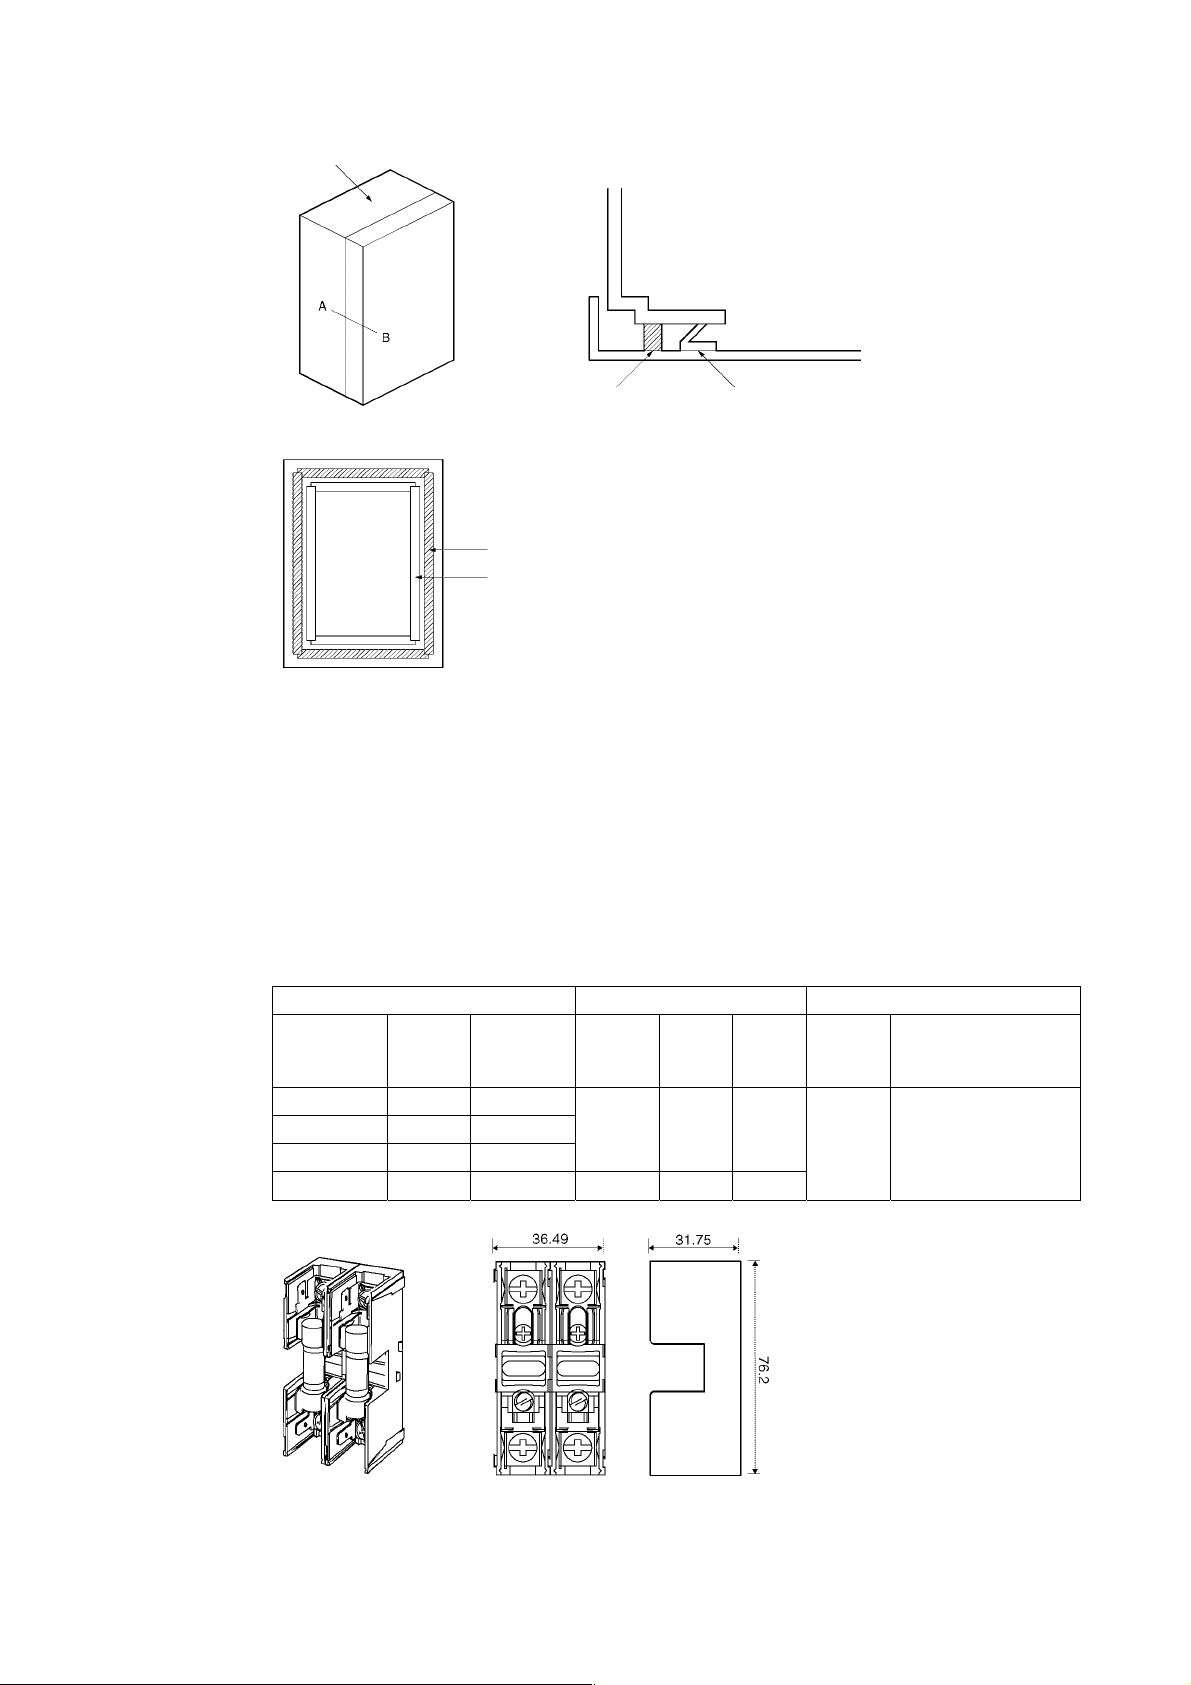
4-2 Wiring
r
4-2-5 Conforming to EMC Directive s
Case
Doo
Oil-resistant gasket Conductive gasket
Control panel
Oil-resistant gasket
Conductive gasket
Cross-sectional view of A–B
Door (interior view)
Selecting Connection Components
This section explains the criteria for selecting the connection components required to
improve noise resistance. Review each component’s characteristics, such as its capacity,
performance, and app licab le cond itions when s elect ing the components. For m ore detai ls,
contact the manufacturers directly.
Fuses
Always install a fuse at each Servo Driver to prevent fire or burn damage. We
recommend the following fuses, based on the rated current, current at the maximum
momentary torque, and inrush current when the power is turned ON.
Servo Driver Fuse (Littelfuse, Inc.) Fuse block (Littelfuse, Inc.)
Model
R7D-ZP01H 100 4
R7D-ZP02H 200 4
R7D-ZP04H 400 8
R7D-ZP08H 750 16 KLK030 30 60
Capacity
(W)
Momentary
rating
A (rms)
Model
KLK015 15 30
RatingA Inrush
A
0-P
Model Specifications
Max. AC voltage: 600 V
L60030M
-2SQ
Max. rated current: 30 A
Screw/Q.C. Terminals
4-14
Page 76
4-2 Wiring
4-2-5 Conforming to EMC Directive s
No-fuse Breakers (NFB)
• When selecting a no-fuse breaker, consider the maximum input current and the inrush
current.
Maximum Input Current:
• The Servo Driver’s maximum momentary output is approximately three times the rated
output, and can be output for up to three seconds. Therefore, select no-fuse breakers
with an operating time of at least five seconds at 300% of the rated maximum output.
General-purpose and low-speed no-fuse breakers are generally suitable.
• The table in 4-2-4 Wiring the Main Circuit and Servomotor Connections shows the
rated power supply input current for each Servomotor. Select a no-fuse-breaker with a
rated current greater than the total effective load current (when multiple Servomotors
are used).
• Add the current consumption of other controllers, and any other components, when
selecting the NFB.
Inrush Current:
• The following table lists the Servo Drivers’ inrush currents.
• With low-speed no-fuse breakers, an inrush current 10 times the rated current flows for
0.02 second.
• When there is a simultaneous inrush for multiple Servo Drivers, select a
no-fuse-breaker with a 20-ms allowable current greater than the total inrush current for
those Servo Drivers, shown in the following table.
Servo Driver model
R7D-ZP01H/-ZP02H/-ZP04H 30
R7D-ZP08H 60
Inrush current (A
Main circuit power supply
Surge Absorbers
• Use surge absorbers to absorb surges from power supply input lines due to lightning,
abnormal voltages, etc.
• When selecting surge absorbers, take into account the varistor voltage, the amount of
surge immunity, and the amount of energy resistance.
• For 200-V AC systems, use surge absorbers with a varistor voltage of 470 V.
• The surge absorbers shown in the following table are recommended.
Maker Model
Okaya
Electric
Industries
Co., Ltd.
Note 1. Refer to the manufacturers’ documentation for operating details.
2. The surge immunity is for a standard impulse current of 8/20 µs. If pulses are wide,
R⋅A⋅V-781BYZ-2 783 V 2,500 A
R⋅A⋅V-781BWZ-4 783 V 2,500 A
either decrease the current or change to a larger-capacity surge absorber.
Max. limit
voltage
Surge
immunity
)
0-p
Type Remarks
Between power
Block
supply lines
Between power
supply line grounds
4-15
Page 77
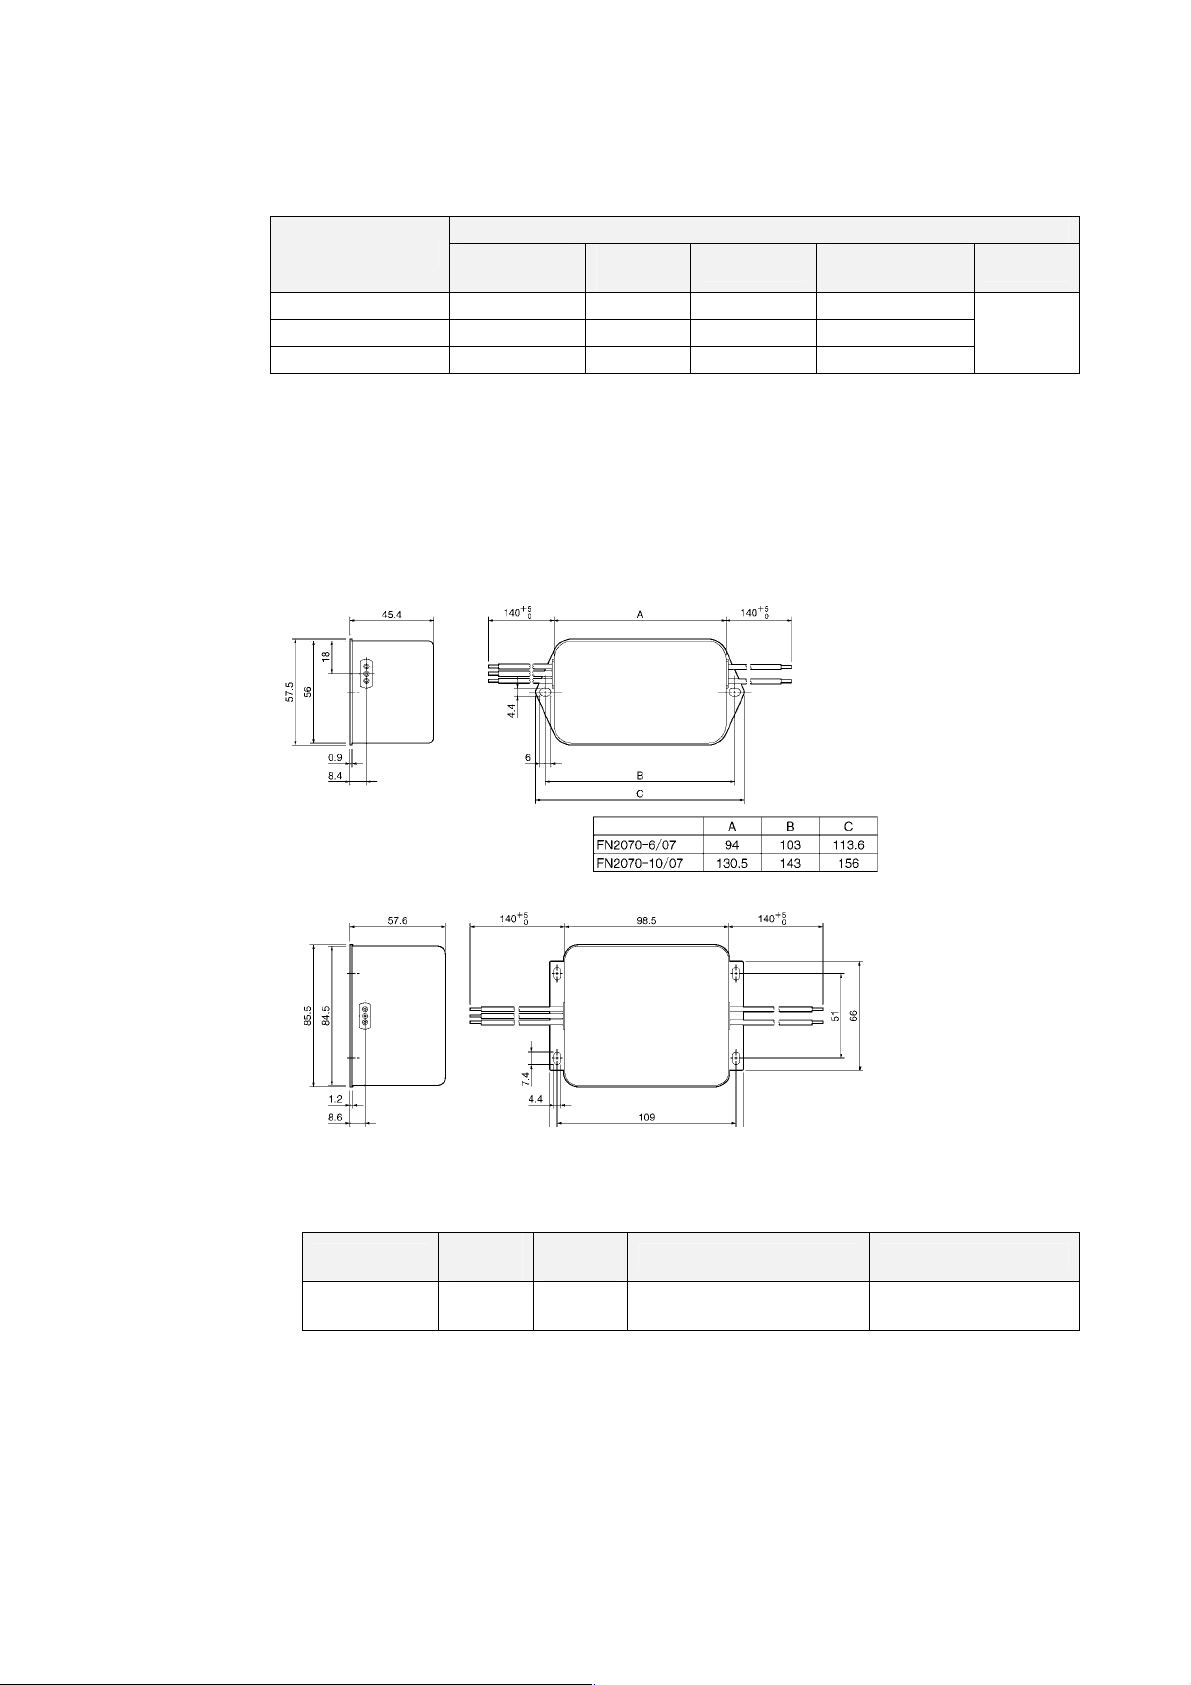
4-2 Wiring
4-2-5 Conforming to EMC Directive s
Noise Filters for the Power Supply Input
• Use the following noise filters for the Servo Driver’s power supply.
Servo Driver model
R7D-ZP01H/ZP02H FN2070-6/07 6 A 250 V 0.4 mA/phase
R7D-ZP04H FN2070-10/07 10 A 250 V 0.4 mA/ phase
R7D-ZP08H FN2070-16/07 16 A 250 V 0.4 mA/ phase
Note: The last two digits of the noise filter model number indicate the type of terminal connection.
The /07 models have lead wires, the /06 models have fast-on connections that can be
soldered, and the /08 models have screw terminals. Select the appropriate version for your
application. Contact the manufacturer (www.schaffner.c om) for details.
Dimensions
The following diagram shows the dimensions of a noise filter with lead wires. Contact the
manufacturer for dimensions of the noise filters with other connections.
Single-phase Input (Models FN2070-6 /07 and FN2070-10 /07)
Model
(See note.)
Rated
current
Noise filter
Rated voltage
Leakage current
(50 Hz)
Maker
Schaffner
Model
Single-phase Input (Model FN2070-16 /07)
Dimensions (m m)
Noise Filter for the Brake Power Supply
• Use the following noise filter for the brake power supply.
Model
SUP-P5H-EPR 5 A 250 V 0.6 mA (at 250 Vrms, 60 Hz)
Rated
current
Rated
voltage
Leakage current Maker
Okaya Electric Industries
Co., Ltd.
4-16
Page 78
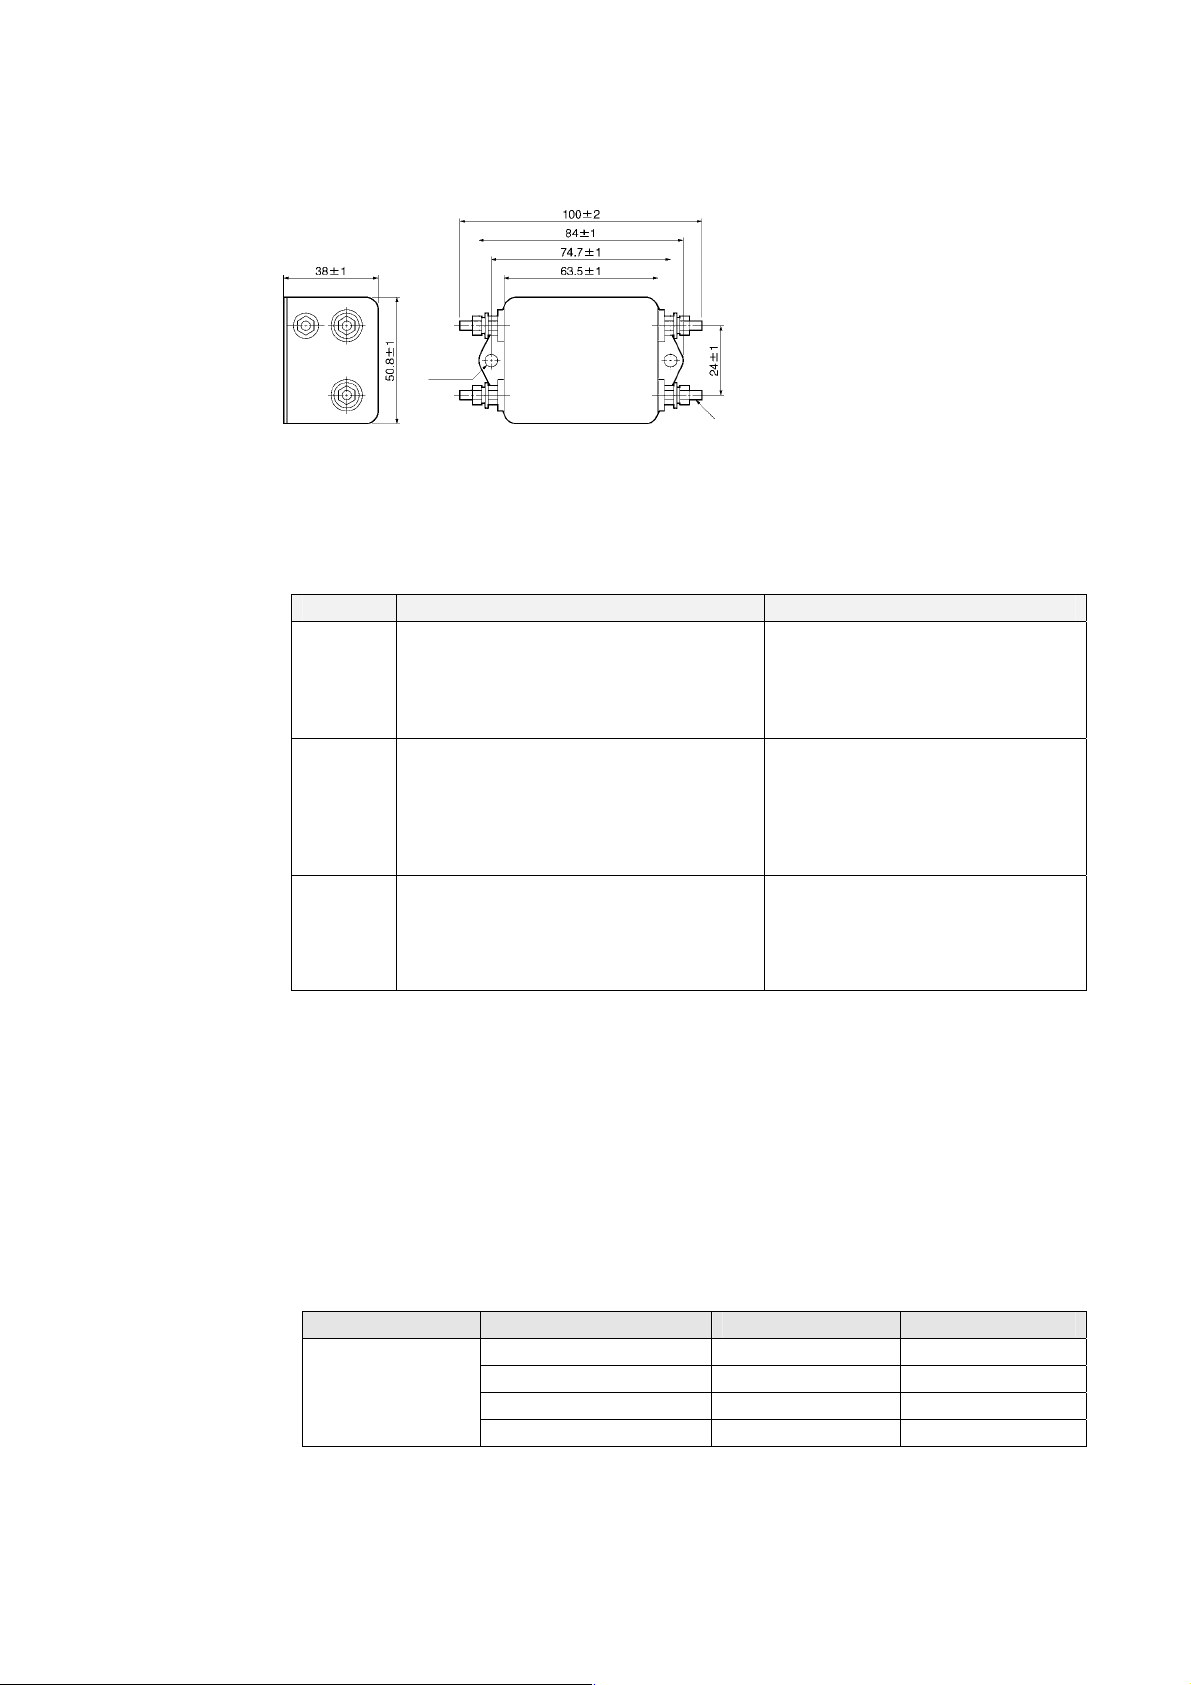
4-2 Wiring
4-2-5 Conforming to EMC Directive s
Dimensions
• Noise Filter for the Brake Power Supply (SUP-P5H-EPR)
Two, 4.8 dia.
Five, M4
Surge Suppressors
• Install surge suppressors for loads that have induction coils, such as relays, solenoids,
brakes, clutches, etc.
• The following table shows types of surge killers and recommended products.
Type Features Recommended products
Diodes are used for relatively small loads when
the reset time i s not an issue, suc h as relays.
Diode
Thyristor or
varistor
Capacitor +
resistor
The reset time is i ncreased because the surge
voltage is the lowest when power is cut off.
Used for 24/48-V DC systems.
Thyristors and varistors are used for loads when
induction coils are l arge, as in electromagnet ic
brakes, solenoids, etc., and when reset time is
an issue. The surge voltage when power is cut
off is approximately 1. 5 times the varistor
voltage.
The capacitor + resistor combination is used to
absorb vibration in the surge when power is cut
off. The reset time can be shortened by
selecting the appropriate capacitance and
resistance.
Note: Thyristors and varistors are made by the following companies. Refer to manufacturers’
documentation for details on these components.
Thyristors: Ishizuka Electronics Co.
Varistors: Ishizuka Electronics Co., Matsushita Electric Industrial Co.
Contactors
• Select contactors based on the circuit's inrush current and the maximum momentary
current.
• The Servo Driver inrush current is covered in the preceding explanation of no-fuse
breaker selection, and the maximum momentary current is approximately twice the
rated current.
• The following table shows the recommended contactors.
Maker Model number Rated current Coil voltage
J7L-09-22200 11 A 200 VAC
OMRON
J7L-12-22200 13 A 200 VAC
J7L-18-22200 18 A 200 VAC
J7L-32-22200 26 A 200 VAC
Use a fast-recovery diode with a s hort
reverse recovery time.
Example: Fuji Electric Co., ERA22-06
Select the varist or voltage as follows:
24 VDC system: 39 V
100 VDC system: 200 V
100 VAC system: 270 V
200 VAC system: 470 V
Okaya Electric I ndustries Co., Ltd.
XEB12002 0.2 µF – 120
XEB12003 0.3 µF – 120
Ω
Ω
4-17
Page 79
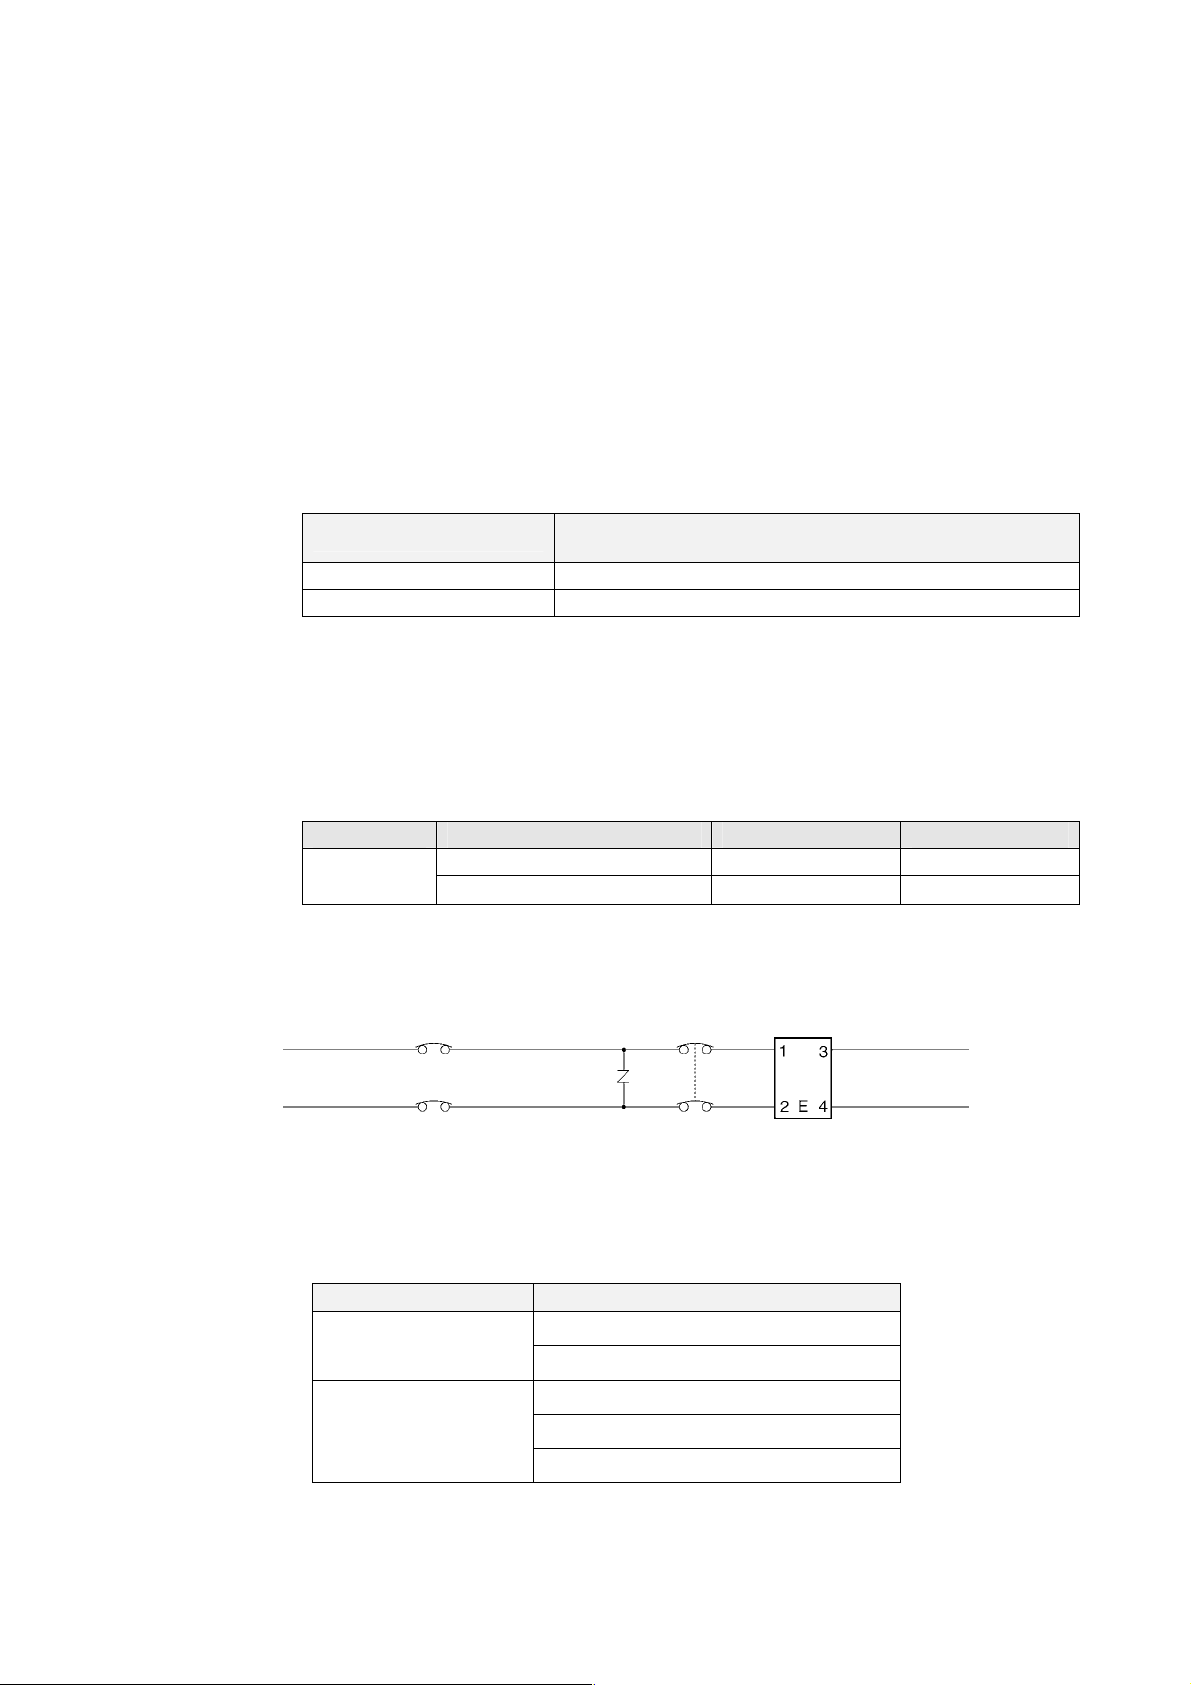
4-2 Wiring
4-2-5 Conforming to EMC Directive s
Leakage Breakers
• Use leakage breakers designed for motors.
• Since switching takes place inside the Servo Drivers, harmonic current leaks from the
armature of the motor. With leakage breakers designed for motors, harmonic current is
not detected, preventing the breaker from operating due to leakage current.
• When selecting leakage breakers, remember to add the leakage current in devices
besides the Servomotor that use the switching power supply, such as noise filters and
inverters.
• For details on leakage breakers, refer to the manufacturer’s catalog.
• The following table shows the Servomotor leakage current for each Servo Driver
model.
Servo Driver model
R7D-ZP01H/-ZP02H/-ZP04H 3 mA max.
R7D-ZP08H 5 mA max.
Note 1. The leakage current shown above is for Servomotor power cables less than 5 meters
long.
(The leakage current depends on the power cable length and the insulation.)
2. The leakage current shown above is for normal temperature and humidity. (The leakage
current depends on the temperature and humidity.)
The following table shows the recommended leakage breakers. (Conform to UL/CSA and
CE standards.)
Maker Model number Rated current Sensitive current
Fuji Electric
Corp.
Driver Leakage current (resistor/capacitor measurement) in the
commercial power suppl y frequency range
EG33CM/30-30MA·CE 30 A 30 mA
EG33CM/30-100MA·CE
30 A 100 mA
Leakage Breaker Connection Example
Leakage Breaker Connection Example
AC power
supply side
No-fuse
breaker
Surge
absorber
Leakage
breaker
Noise filter
NF
Servo Driver side
Radio Noise Filters
Use a radio noise filter to reduce the Servo Driver’s PWM noise. The following table
shows some available radio noise filters.
Maker Model number
FDK Corporation
Hitachi Metals
RN603620M
RN80UD
FT-3KMF6045GB
FT-3KMS10085GB
FT-1KMF6045GB
4-18
Page 80
4-2 Wiring
4-2-5 Conforming to EMC Directive s
Improving Encoder Cable Noise Resistance
Take the following steps during wiring and installation to improve the encoder’s noise
resistance.
• Always use the specified Encoder Cables.
• If cables are joined midway, be sure to connect them with connectors and do not
remove more than 50 mm of the cable insulation. In addition, always use shielded
cable.
• Do not coil cables. If cables are long and are coiled, mutual induction and inductance
will increase and will cause malfunctions. Always use cables fully extended.
• When installing noise filters for Encoder Cables, use clamp filters. The following table
shows the recommended ferrite-core clamp filter models.
Maker Product name Model number Specifications
NEC TOKIN Clamp-type EMI Core ESD-SR-250 For cable diameter up to 13 mm
ZCAT2032-0930 For cable diameter up to 9 mm
TDK Clamp Filt ers for Cable
• Do not place the Encoder Cable in the same duct as Control Cables for brakes, solenoids,
clutches, and valves.
ZCAT3035-1330 For cable diameter up to 13 mm
ZCAT2035-0930A For cable diameter up to 9 mm
Improving Control I/O Signal Noise Resistance
Positioning can be affected and I/O signal errors can occur if control I/O is influenced by
noise. Follow the methods outlined below for the power supply and wiring.
• Use completely separate power supplies for the control power supply (especially 24 V
DC) and the external operation power supply. In particular, do not connect the two
power supply ground wires. Install a noise filter on the primary side of the control power
supply.
• If Servomotors with brakes are being used, do not use the same 24-VDC power supply
for both the brakes and the control I/O. Additionally, do not connect the ground wires.
Connecting the ground wires may cause I/O signal errors.
• Keep the power supply for pulse commands and deviation counter reset input lines
separated from the control power supply as far as possible. In particular, do not
connect the two power supply ground lines.
• We recommend using line drivers for the pulse command and deviation counter reset
outputs.
• Always use twisted-pair shielded cable for the pulse command and deviation counter
reset signal lines, and connect both ends of the shield to frame grounds.
• If the control power supply wiring is long, noise resistance can be improved by adding
1-µF laminated ceramic capacitors between the control power supply and ground at the
Servo Driver input section or the controller output section.
• For open-collector specifications, keep the length of wires to within two meters.
4-19
Page 81
4-2 Wiring
4-2-5 Conforming to EMC Directive s
Selecting Other Parts for Noise Resistance
This section explains the criteria for selecting other connection components required to
improve noise resistance. Review each component’s characteristics, such as its capacity,
performance, and app licab le cond itions when s elect ing the components. For m ore detai ls,
contact the manufacturers directly.
Noise Filters for the Power Supply Input
• Use a noise filter to attenuate external noise and reduce noise emitted from the Servo
Driver.
• Select a noise filter with a rated current that is at least two times greater than the
effective load current (the rated current of the main circuit power supply input shown in
the table in 4-2-4 Wiring the Main Circuit and Servomotor Connections).
Maker Model number Rated current Applicable standards
NEC TOKIN
Soshin Electric
Company
TDK
Note 1. To attenuate noise at low frequencies below 200 kHz, use an isolation transformer and a
2. To attenuate noise at high frequencies over 30 MHz, use a ferrite core and a
3. If multiple Servo Drivers are being connected to a single noise filter, select a noise filter
Noise Filters for Servomotor Output
• Use noise filters without built-in capacitors on the Servomotor output lines.
• Select a noise filter with a rated current at least two times the Servo Driver’s continuous
• The following table shows the noise filters that are recommended for
Servomotor output.
NEC TOKIN
Soshin Electric
Company
Note 1. Servomotor output lines cannot use the same noise filters used for power supplies.
2. Typical noise filters are used with power supply frequencies of 50/60 Hz. If these noise
noise filter.
high-frequency noise filter with a through-type capacitor.
with a rated current at least two times the total rated current of all the Servo Drivers.
output current.
Maker Model number Rated current
CC3005C-AZ 5 A
filters are connected to outputs of 11.7 kHz (the Servo Driver’s PWM frequency), a very
large (about 100 times larger) leakage current will flow through the noise filter’s
condenser and the Servo Driver could be damaged.
GT-2050 5 A
GT-2100 10 A
GT-2150 15 A
GT-2200 20 A
HF2005A-UP 5 A
HF2010A-UP 10 A
HF2015A-UP 15 A
HF2020A-UP 20 A
HF2030A-UP 30 A
ZRCS2006-00S 6 A
ZRCS2010-00S 10 A
ZRCS2020-00S 20 A
ZRCS2030-00S 30 A
LF-310KA 10 A
LF-320KA 20 A
CC3010C-AZ 10 A
CC3015C-AZ 15 A
UL, CSA, VDE, and TUV
UL and TUV
UL, CSA, and NEMKO
Applicable
standards
UL For inverter out put
---
For inverter output
Remarks
4-20
Page 82
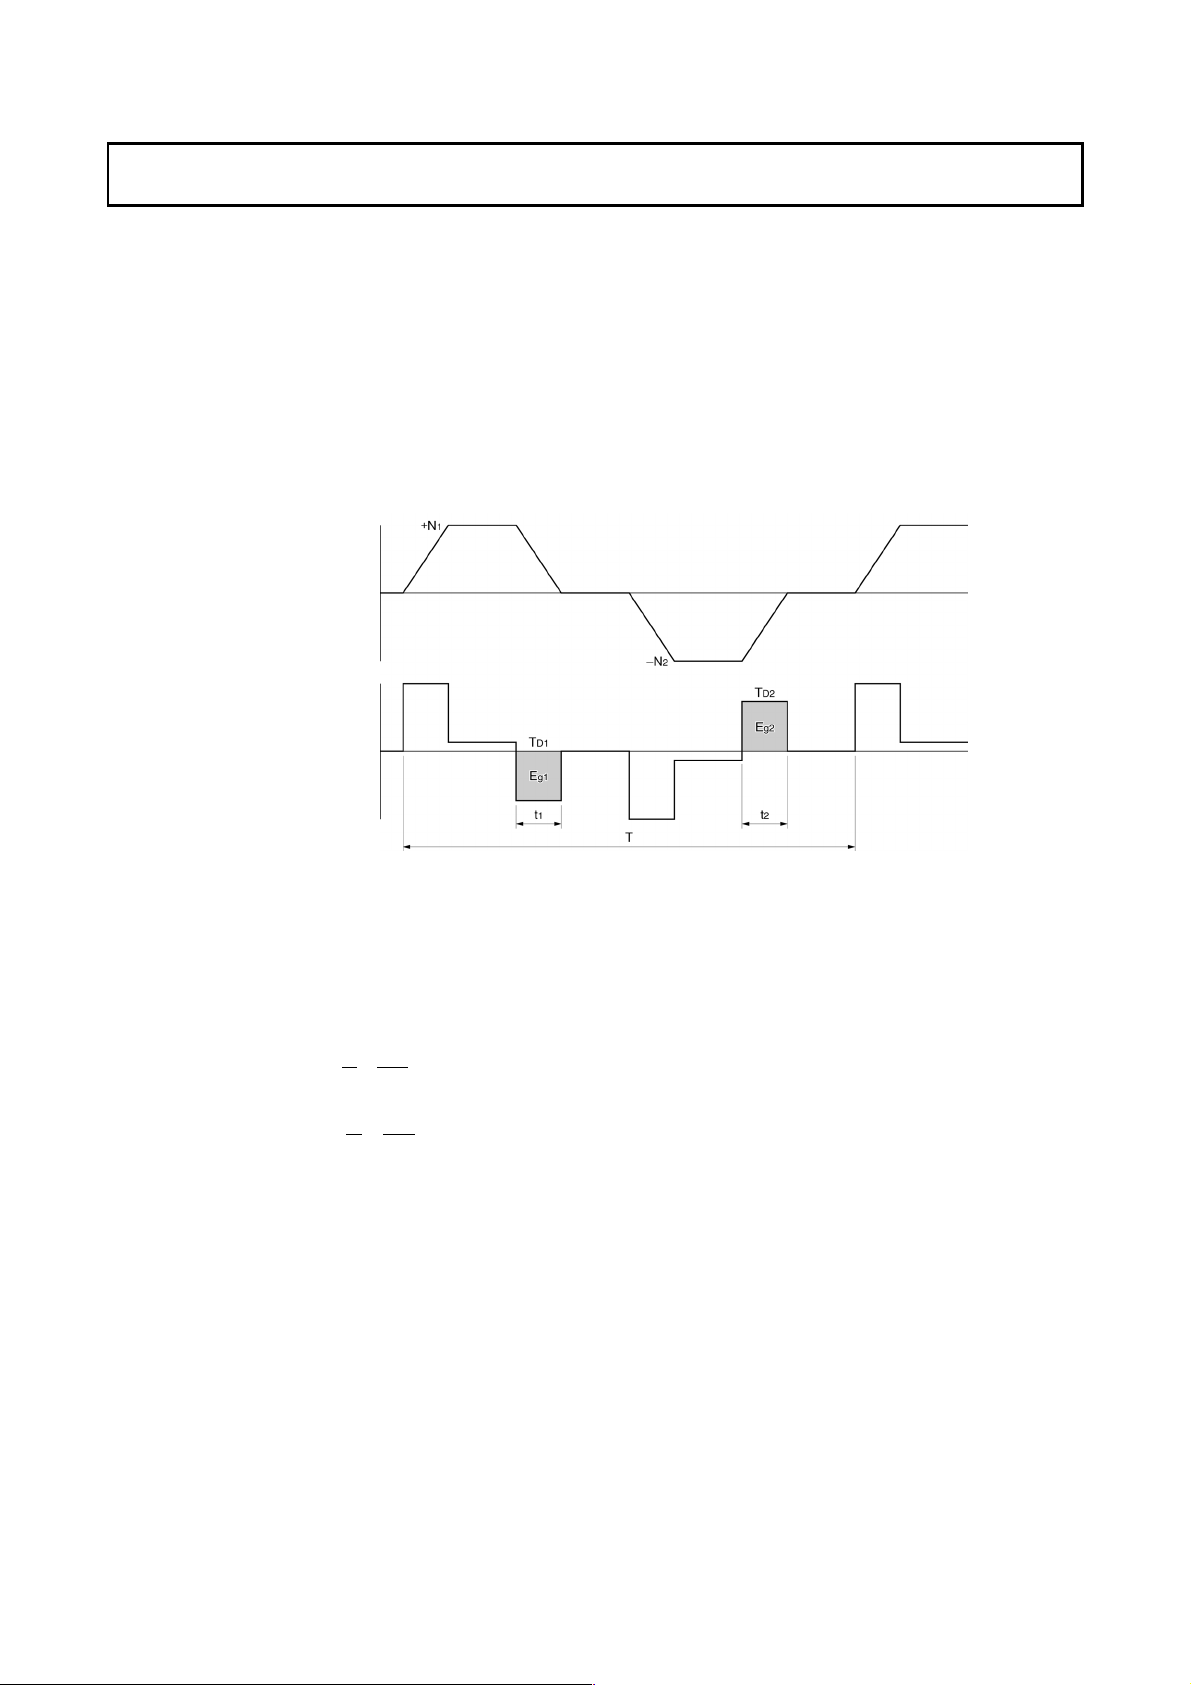
4-3 Regenerative Energy Absorption
π
π
(
)
4-3-1 Calculating the Regenerative Energy
4-3 Regenerative Energy Absorption
The Servo Drivers have internal regenerative energy absorption circuitry, which absorbs the regenerative
energy produced during Servomotor deceleration and prevents the DC voltage from increasing. An
overvoltage error is generated, however, if the amount of regenerative energy from the Servomotor is too
large. If this occurs, measures must be taken to reduce the regenerative energy produced by changing
operating patterns, or to increase the regenerative energy absorption capacity by connecting external
regeneration resistance.
4-3-1 Calculating the Regenerative Energy
Horizontal Axis
Servomotor
operation
Servomotor
output torque
Note: In the output torque graph, acceleration in the positive direction is shown as positive, and
acceleration in the negative direction is shown as negative.
• The regenerative energy values for each region can be derived from the following
equations.
2
1
60
2
2
1
60
2
N
, n [r/min]
N2: Rotation speed at beginning of deceleratio
1
, TD2: Deceleration torq
T
D1
, t time [s]
: Deceleration
t
1
2
Note: There is some loss due to winding resistance, so the actual regenerative energy will be
approximately 90% of the values derived from these equations.
• The average regeneration power (Pr) is the power consumed by regeneration
resistance in one cycle of operation.
tTNE
1111
Dg ∗∗∗∗=
[J] [J] 1110524.0 tTN D ∗∗∗=
[J] [J] 2220524.0 tTN D ∗∗∗=
2222
Dg ∗∗∗∗=
tTNE
ue [N⋅m]
T: Operation cycle [s]
+= [W]
TEE
/Pr
gg
21
4-21
Page 83
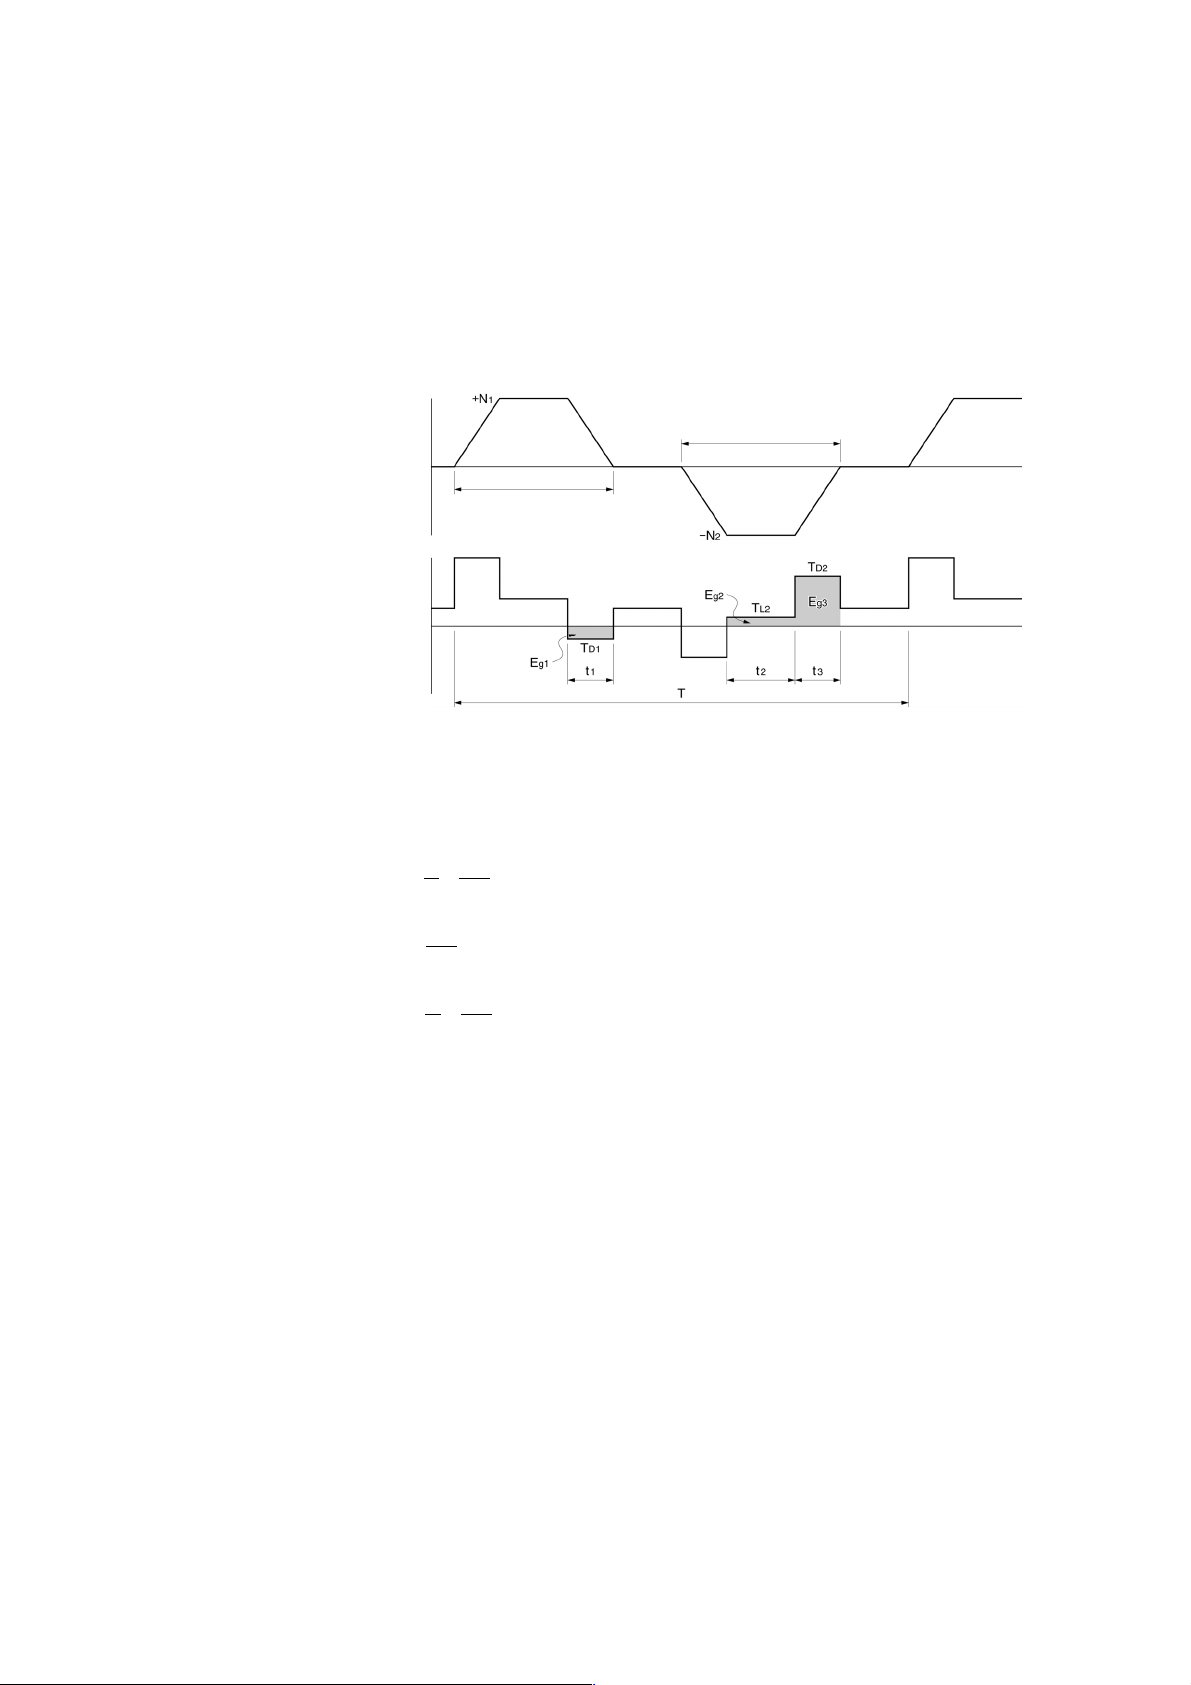
4-3 Regenerative Energy Absorption
π
π
π
4-3-1 Calculating the Regenerative Energy
• Since there is an internal capacitor to absorb regenerative energy, the value for Eg1 a
Eg2 (unit: J) must be lower than the Servo Driver’s regenerative energy absorption
capacity. (The capacity varies depending on the model. For details, refer to 4-3-2 Serv
Driver Regenerative E
nergy Absorption Capacity.)
If an external Regeneration Resistance Unit is connected, be sure that the average
regeneration power (Pr) does not exceed the external Regeneration Resistance Unit’s
regenerative energy abs
orption capacity (12 W).
Vertical Axis
nd
o
Servomotor
operation
Servomotor
output torque
Rising
Falling
Note: In the output torque graph, acceleration in the positive direction (rising) is shown as positive,
and acceleration in the negative direction (falling) is shown as negative.
• The regenerative energy values in each region can be derived from the following
equations.
2
1111
1
60
2
2
Lg ∗∗∗=
tTNE Dg ∗∗∗∗=
[J] [J] 1110524.0 tTN D ∗∗∗=
tTNE
2222
[J] = [J] 222105.0 tTN L ∗∗∗
60
2
3223
1
60
2
N
T
T
t
t
1
D1
L2
, t3:
1
:
2
, N2:
, TD2:
:
Rotation speed at beginning of deceleration [r/min]
Deceleration torque [N⋅m]
Torque when falling [N⋅m]
Deceleration time [s]
Constant-velocity travel time when falling [s]
Note: There is some loss due to winding resistance, so the actual regenerative energy will be
approximately 90% of the values derived from these equations.
• The average regeneration power (Pr) is the power consumed by regeneration
resistance in one cycle of operation.
Dg ∗∗∗∗=
tTNE
[J] [J] 3220524.0 tTN D ∗∗∗=
[W] TEEE
++=
/)(Pr
ggg
321
T: Operation cycle [s]
4-22
Page 84
4-3 Regenerative Energy Absorption
4-3-2 Servo Driver Regenerative Energy Absorption Capacity
• Since there is an internal capacitor to absorb regenerative energy, the value for Eg1 an
+ Eg3 (unit: J) must be lower than the Servo Driver’s regenerative energy absorption
E
g2
capacity. (The capacity varies depending on the model. For details, refer to 4-3-2 Serv
Driver Regenerative E
nergy Absorption Capacity.)
If an external Regeneration Resistance Unit is connected, be sure that the average
regeneration power (Pr) does not exceed the external Regeneration Resistance Unit’s
regenerative energy abs
orption capacity (12 W).
4-3-2 Servo Driver Regenerative Energy Absorption Capacity
Amount of Internal Regeneration Resistance in Servo Drivers
The SMARTSTEP Junior Servo Drivers absorb regenerative energy internally with built-in
capacitors. If the regenerative energy is too large to be processed internally, an
overvoltage error is generated and operation cannot continue. The following table shows
the regenerative energy (and amount of regeneration) that each Servo Driver can absorb.
If these values are exceeded, take the following measures.
• Connect an External Regeneration Resistance Unit (to increase the regeneration
processing capacity).
• Reduce the operating rotation speed. (The amount of regeneration is proportional to
the square of the rotation speed.)
• Lengthen the deceleration time (to decrease the regenerative energy produced per
time unit).
• Lengthen the operation cycle, i.e., the cycle time (to decrease the average regenerative
power).
d
o
Servo Driver
R7D-ZP01H 13
R7D-ZP02H 19
R7D-ZP04H 28
R7D-ZP08H 59
Regenerative energy (J) that can be
absorbed by the internal capacitor
4-3-3 Absorbing Regenerative Energy with an External Resistor
If the regenerative energy exceeds the absorption capacity of the R88A-RG08UA
External Regenerative Resistance Unit, connect an External Regeneration Resistor. To
connect an External Regeneration Resistor, remove the shorting bar between the RG-JP
terminals and connect the resistor to the P-RG terminals. Double-check the terminal
names when connecting the resistor, because the External Regeneration Resistance Unit
can be damaged if the resistor is connected to the wrong terminals. (The External
Regeneration Resistance Unit does not conform to EC Directives.)
Note: The External Regeneration Resistor can reach a temperature of approximately 120°C, so
install it at a distance from heat-sensitive devices and wiring. In addition, install a
heat-radiating heat sink to cool the resistor if necessary.
External Regeneration Resistor
External Regeneration Resistor Models
Model Resistance
R88A-RR22047S 47 Ω ±5% 220 W 70 W
Nominal
capacity
Regeneration
absorption at 120°C
Heat
radiation
t1.0 × @350
(SPCC)
Thermal switch output
specifications
Operating temperature:
170°C
±5%
NC contact
Rated output: 3A
4-23
Page 85
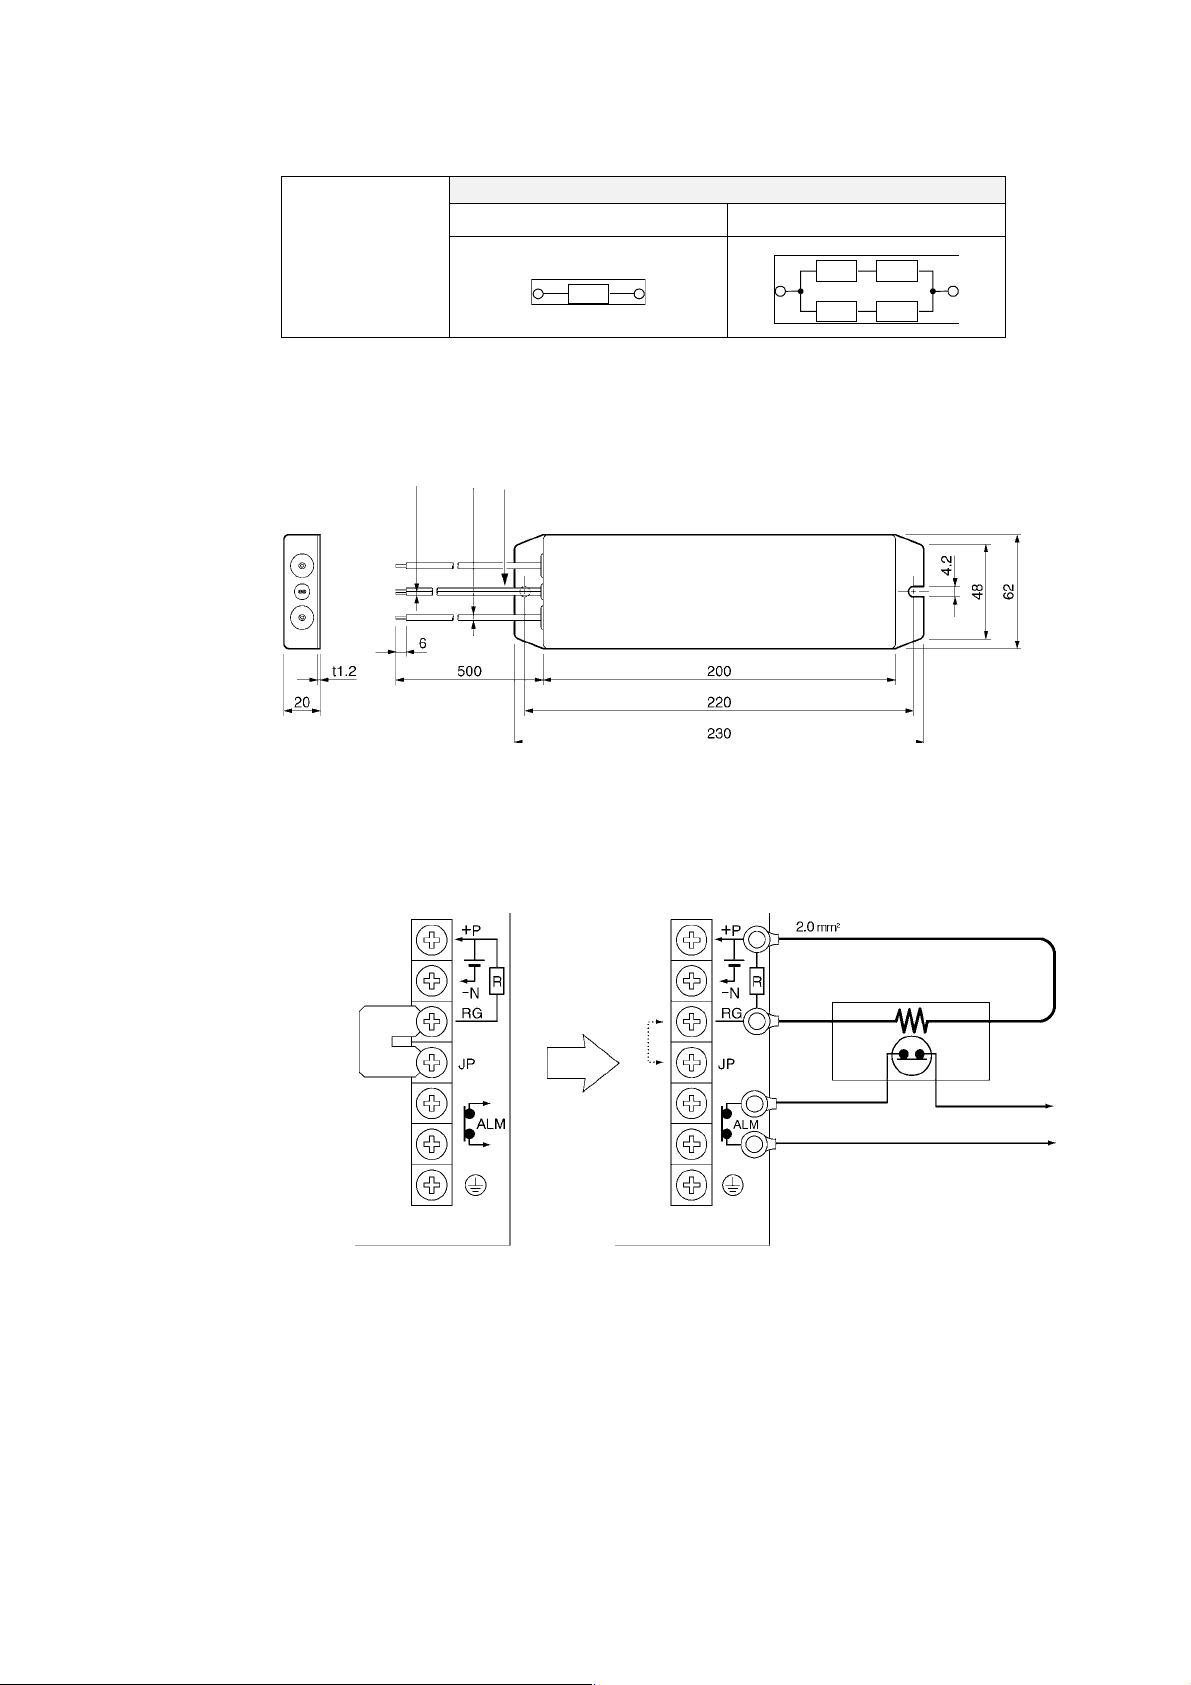
4-3 Regenerative Energy Absorption
j
r
4-3-3 Absorbing Regenerative Energy with an External Resistor
Combining External Regeneration Resistors
Resistor
configurations
Note: Select a combination that has an absorption capacity greater than the average regeneration
power (Pr).
Dimensions
Thermal switch output
)
2
)
2
3 dia
1.5 dia
(0.75 mm
(0.3 mm
Regeneration absorption capacity
70 W 280 W
R
RR
RR
Wiring the External Regeneration Resistor
When installing an External Regeneration Resistor, remove the shorting bar between the
RG-JP terminals and connect the resistor to the P-RG terminals.
External Regeneration
Resistor
Shorting
bar
Note: Connect the thermal switch
output
Regeneration Resistance Unit’s
ALM output, so that the powe
supply will be shut off when the
thermal switch opens. If a
sequence is not added t o cut off
the power with this output, the
resistor may overheat.
ust like the External
4-24
Page 86
Section 5 Operation
Page 87
5-1 Operational Procedure
5-1-1 Operational Procedure
5-1 Operational Procedure
5-1-1 Operational Procedure
After mounting, wiring, and connecting a power supply, check the operation of the
Servomotor and Servo Driver.
Item Description Reference
Mounting and
installation
Wiring and
connections
Switch settings
Preparing for
operation
Trial operation
Adjustments Manually adjust the gain as required.
Operation
Install the Servomotor and Servo Driver according to the installation conditions.
(Do not connect the Servomotor to the mechanical system before checking the
no-load operation.)
↓
Connect to power supply and peripheral devices.
Note: Specified installation and wiring requirements must be satisfied,
particularly for models conforming to the EC Directives.
↓
Make sure that the power supply is turned OFF, and set the Servo Driver’s
front panel switches.
↓
After checking the necessary items, turn ON the Unit’s power supply. Check to
see whether there are any internal errors in the Servo Driver.
↓
Firstly, check the Servomotor’s no-load operation. Next, turn the power OFF
then ON again, and connect the Servomotor to the mechanical system. Turn
ON the power, and check to see whether protective functions such as
emergency stop and operational limits are working reliably. Check operation at
both low speed and high speed, with either no workpiece or a dummy
workpiece.
↓
↓
Operation can now begin. If any trouble should occur, refer to Section 6
Troubleshooting.
Section 4-1
Section 4-2
Section
5-2
5-3
5-4
5-2
6
Section
Section
Section
Section
5-2
Page 88
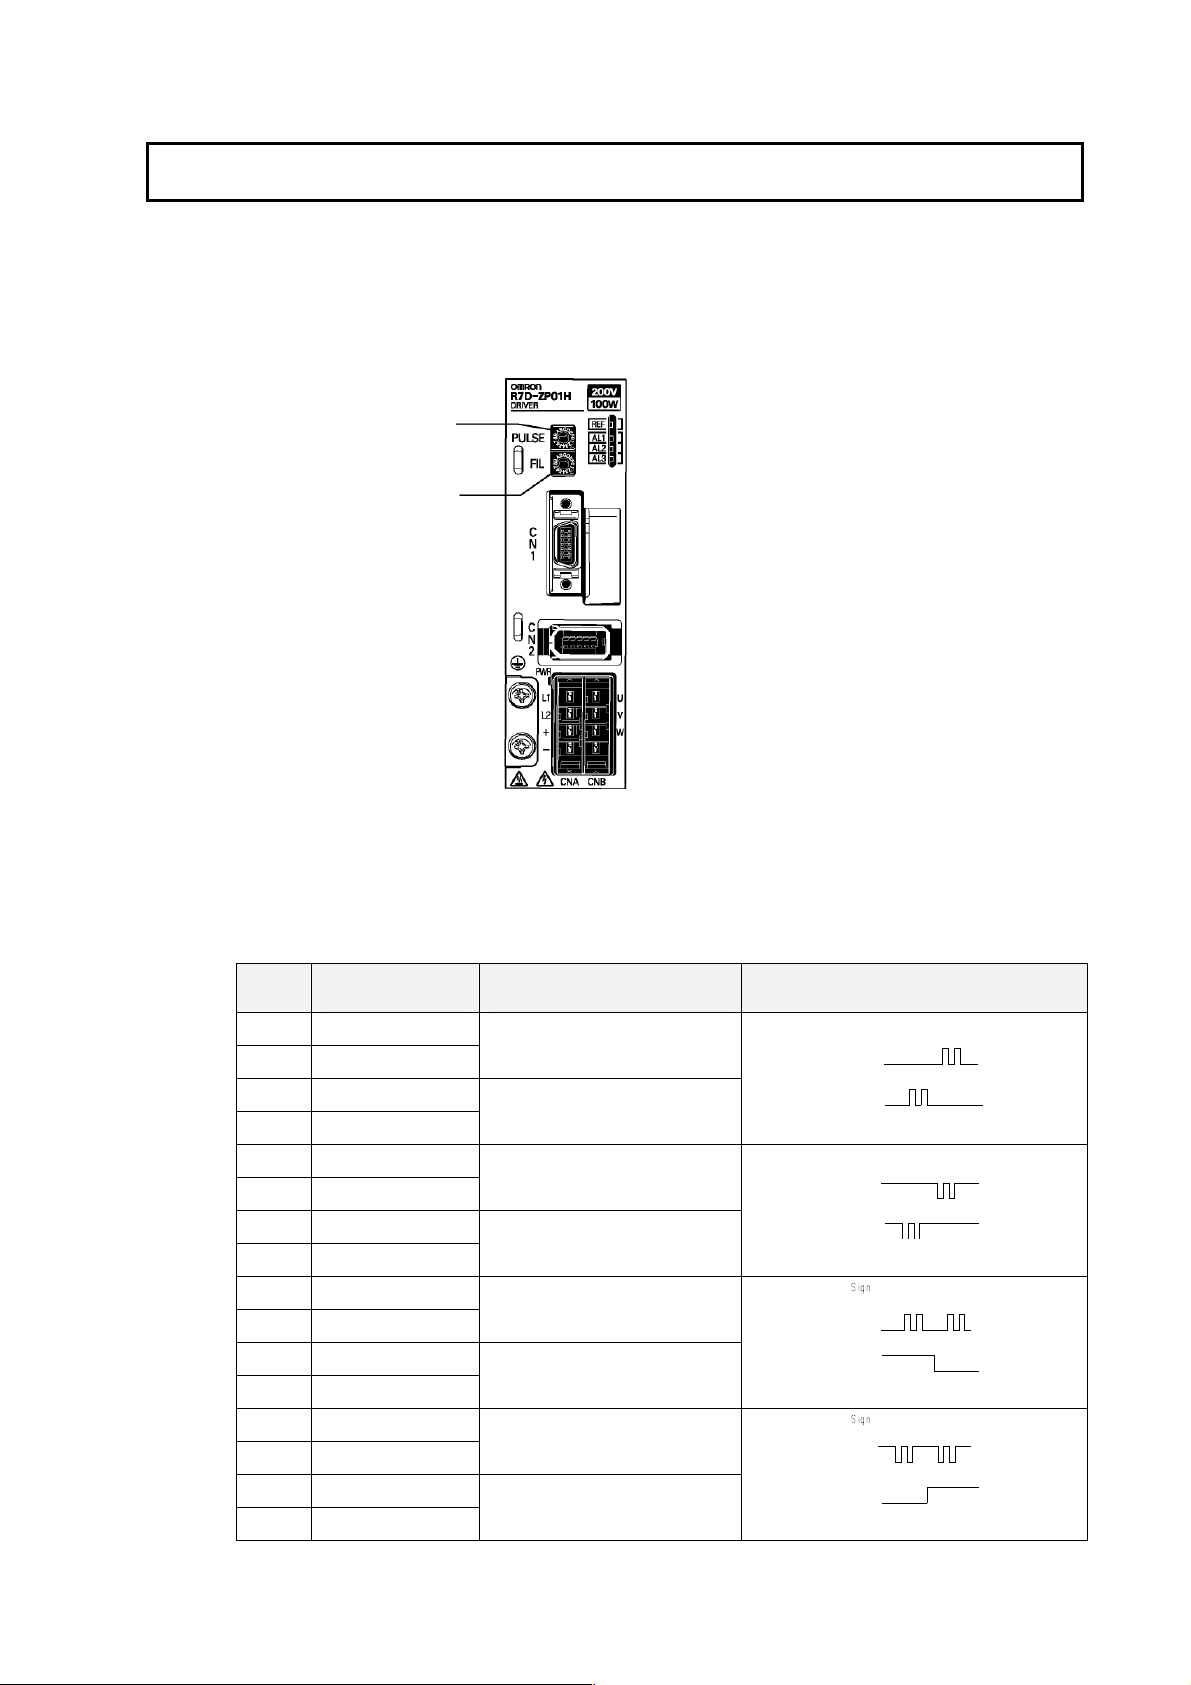
5-2 Switch Settings
5-2-1 Switch Names
5-2 Switch Settings
With SMARTSTEP Junior Servo Drivers, the settings required for operation can be made simply by
setting the front panel switches. Set the switches appropriately according to the system configuration.
5-2-1 Switch Names
Rotary switch for
command pulse
setting (PULSE)
Rotary switch for
command filter
setting (FIL)
5-2-2 Switch Functions
Rotary Sw itch for Command Pulse Setting (PULSE)
Always turn OFF the power supply before setting the rotary switch. (The switch is
factory-set to 0.)
Setting Command pulse
resolution
0 1000
1 2500
2 5000
3 10000
4 1000
5 2500
6 5000
7 10000
8 1000
9 2500
A 5000
B 10000
C 1000
D 2500
E 5000
F 10000
Open collector or line driver
Line driver
Open collector or line driver
Line driver
Open collector or line driver
Line driver
Open collector or line driver
Line driver
Command pulse connec t i on
method
Command pulse type
CW + CCW, positive logic
CW
CCW
CW + CCW, negative logic
CW
CCW
+ pulse string,
positive logic
PULS
SIGN
+ pulse string,
negative logic
PULS
SIGN
5-3
Page 89
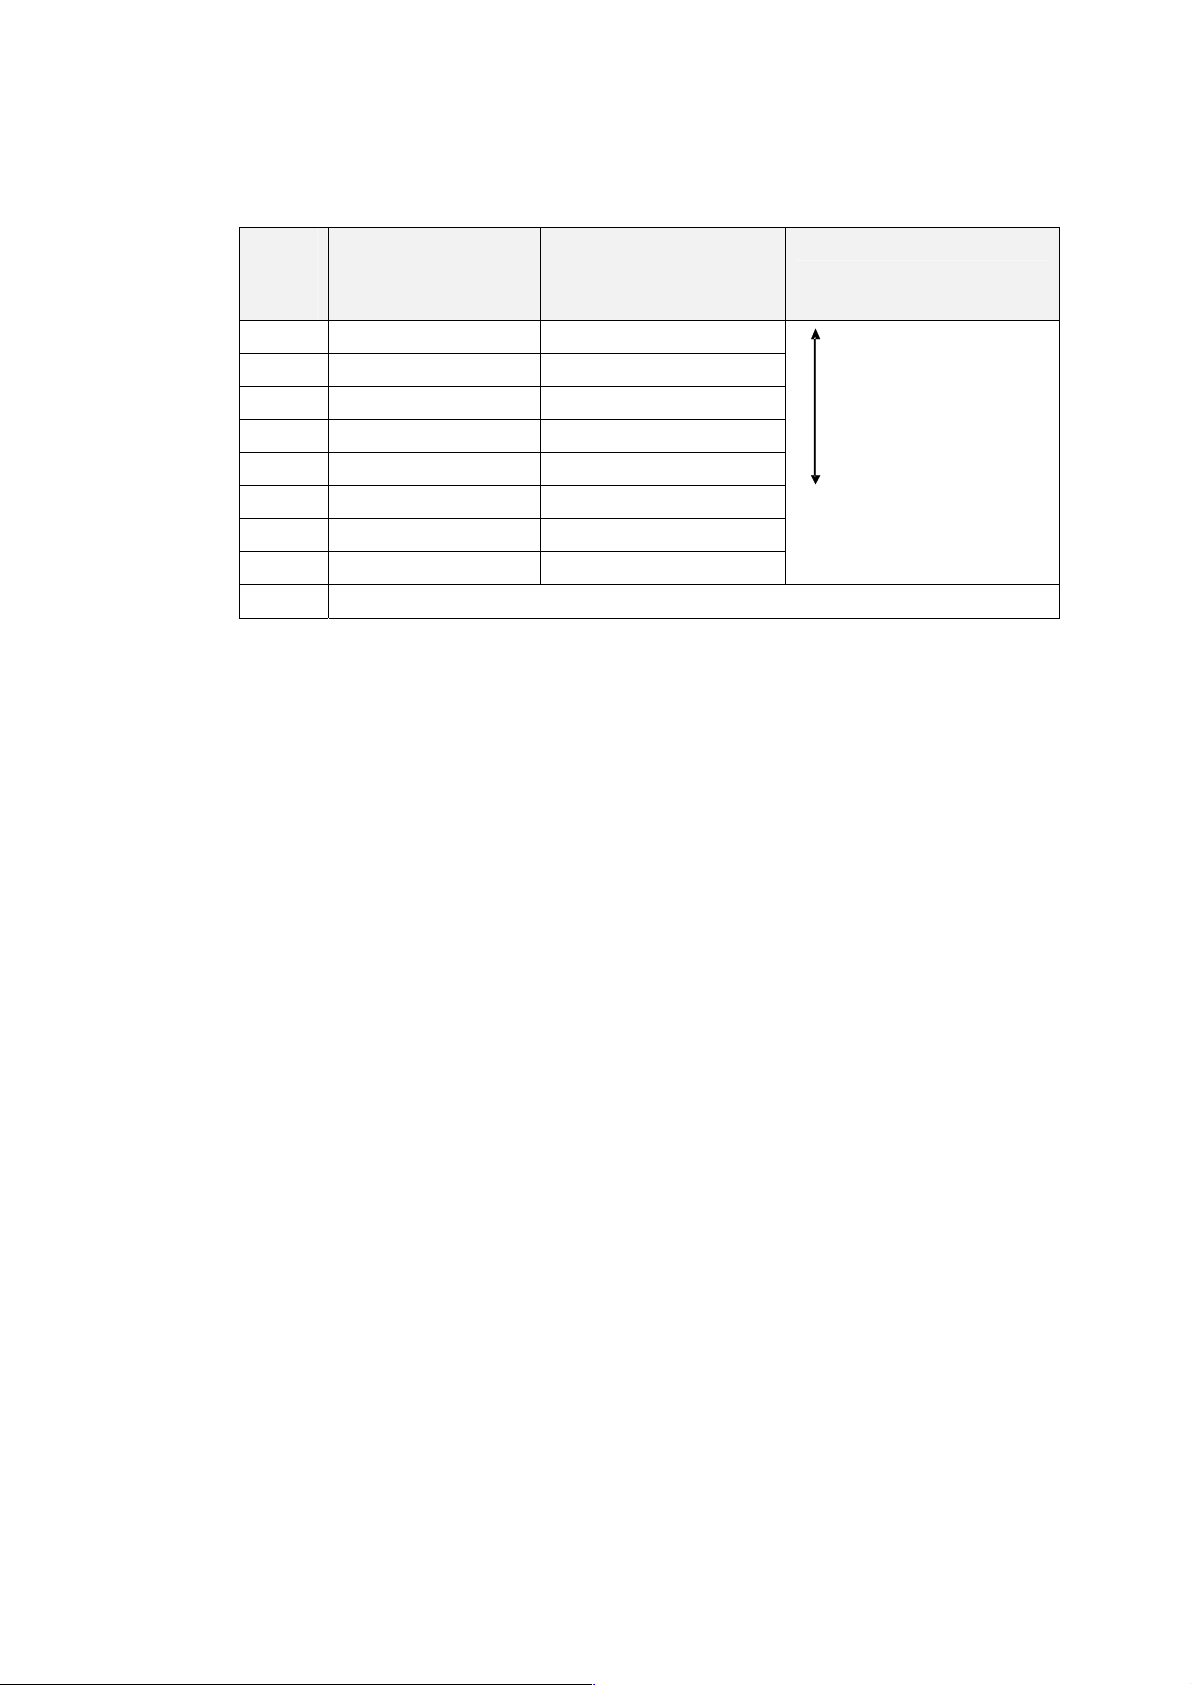
5-2 Switch Settings
5-2-2 Switch Functions
Rotary Sw itch for Command Filter Setting (FIL)
This switch does not need to be set if the machine is not subject to vibration. (The
switch is factory-set to 0.)
Filter
setting
(See
note 1.)
0 45 ms 100 to 200 ms
1 50 ms 110 to 220 ms
2 60 ms 130 to 260 ms
3 65 ms 150 to 300 ms
4 70 ms 170 to 340 ms
5 80 ms 200 to 400 ms
6 85 ms 250 to 500 ms
7 170 ms 500 t o 1000 ms
8 to F Do not set this switch to 8 to F.
Note 1. Increase the value of the filter setting if there is vibration when starting or stopping.
Acceleration/deceleration
time for STEP command
(See note 3.)
Approx. time from end of
command to end of pos i tioning
(settling time) (See note 2.)
Description
Smaller filter time
constant
(short positioning time)
Larger filter time constant
(longer positioning time
with little vibration)
2. The settling time depends on the commanded acceleration/deceleration, the rigidity of
the machine motor drive, the encoder resolution, and other factors.
3. Use the acceleration/deceleration times as a guideline for determining the
Servomotor capacity that can be driven when using STEP commands without
command acceleration/deceleration.
5-4
Page 90

5-3 Preparing for Operation
5-3-1 Turning ON the Power and Checking Indicators
5-3 Preparing for Operation
This section explains the procedure following installation, wiring, and switch setting of the Servomotor
and Servo Driver, to prepare the mechanical system for trial operation.
It explains what you need to check both before and after turning ON the power.
5-3-1 Turning ON the Power and Checking Indicators
Items to Check Before Turning ON the Power
Checking Power Supply Voltage
• Check to be sure that the power supply voltage is within the ranges shown below.
R7D-ZP
Main-circuit power supply: Single-phase 200/230 V AC (170 to 253 V) 50/60 Hz
Checking Terminal Block Wiring
• The main-circuit power supply inputs (L1/L2) must be properly connected to the
terminal block.
• The Servomotor’s red (U), white (V), and blue (W) power lines and the yellow/green
ground wire (
Checking the Servomotor
• There should be no load on the Servomotor. (Do not connect to the mechanical
system.)
• The Servomotor’s power lines and Servomotor Power Cable must be connected
securely.
• The Encoder Cable must be securely connected to the Encoder Connector (CN2) at
the Servo Driver.
• The Encoder Cable must be securely connected to the Encoder Connector at the
Servomotor.
Checking the Control Connectors
• The Control Cable must be securely connected to the I/O Control Connector (CN1).
• The RUN command (RUN) must be OFF.
@@H (Single-phase 200-V AC input)
) must be properly connected to the terminal block.
Turning ON Power
• First carry out the preliminary checks, and then turn ON the main circuit power
supply.
• The ALM output will take approximately 2 seconds to turn ON after the power has
been turned ON. Do not attempt to detect an alarm using the Host Controller during
this time (when power is being supplied with the Host Controller connected).
Checking Displays
• Once the power has been turned ON, check that the command indicator (REF) is lit
orange or green.
• If the command indicator is orange, turn ON the RUN command input (RUN) and
check that the indicator changes from orange to green.
• If the indicator does not change to green or one of the alarm indicators is lit (AL1 to
AL3), refer to Section 6 Troubleshooting and correct the error.
5-5
Page 91
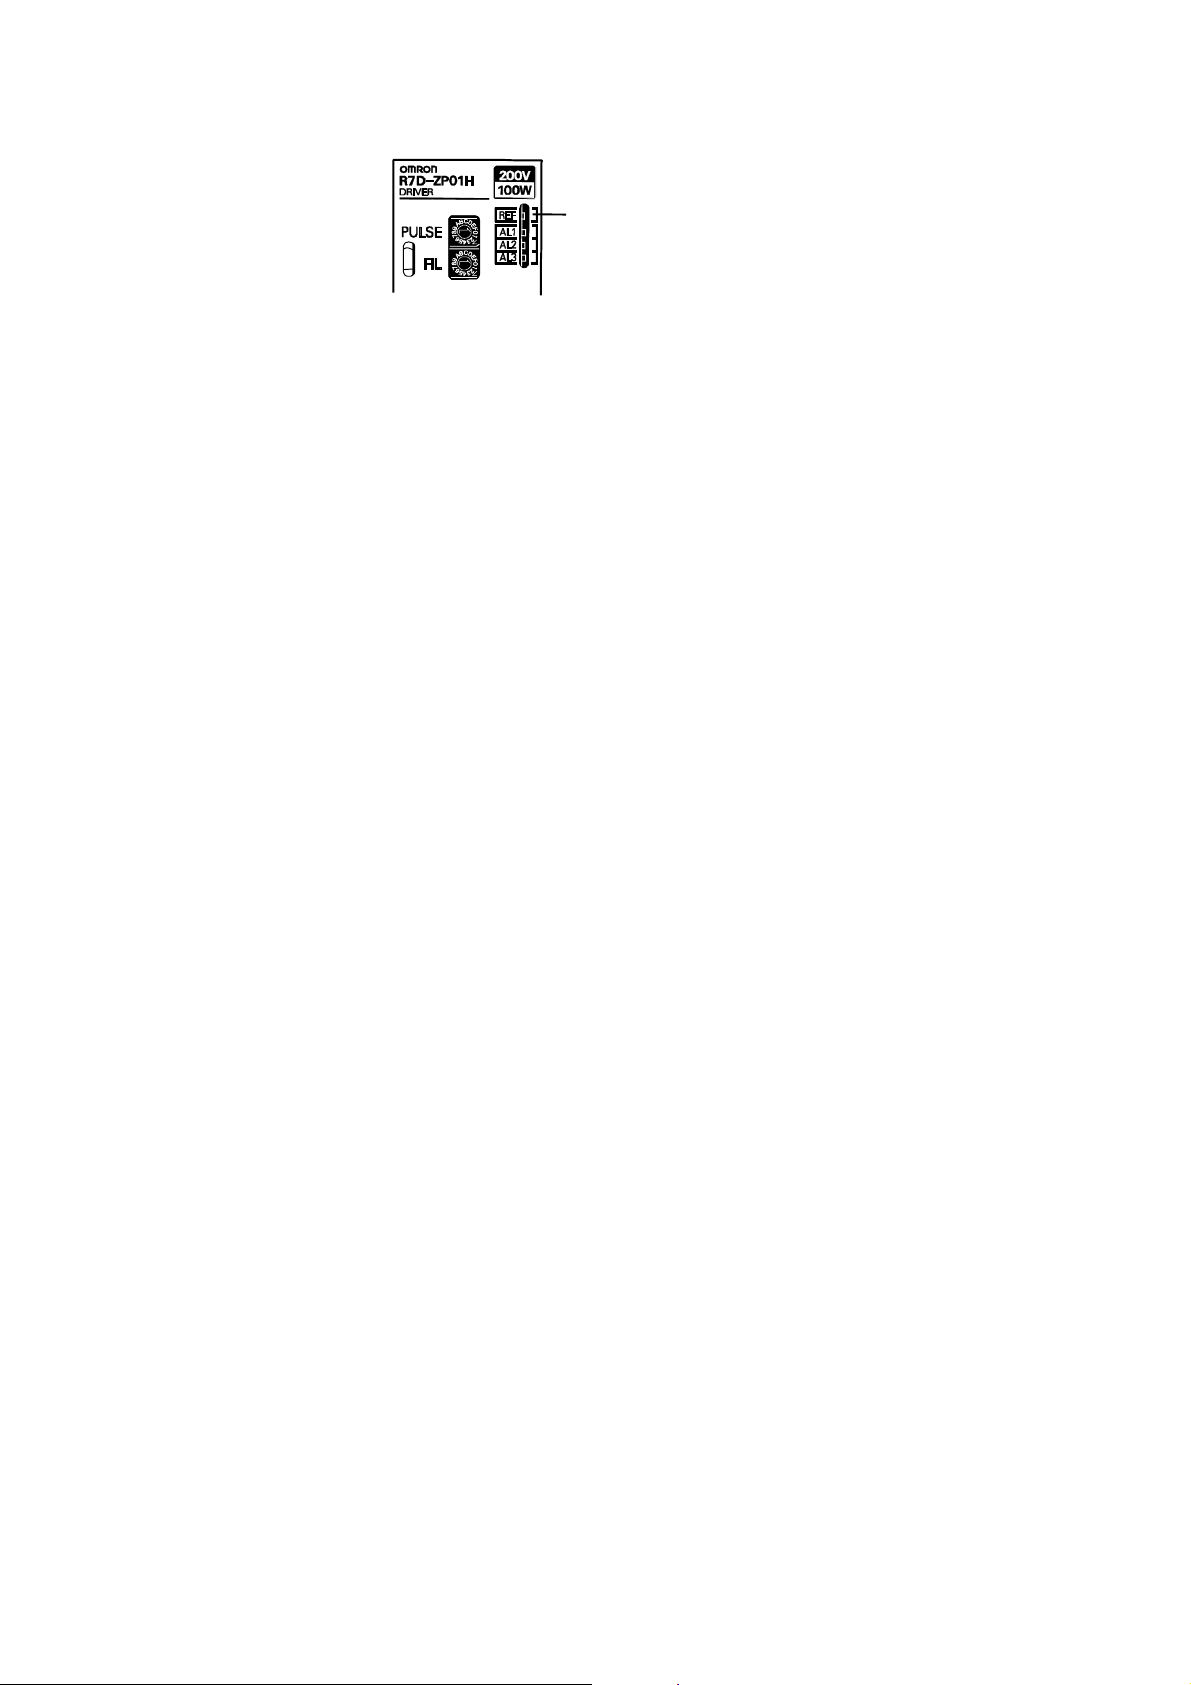
5-3 Preparing for Operation
r
5-3-1 Turning ON the Power and Checking Indicators
Check that the command
indicator is lit orange o
green.
5-6
Page 92

5-4 Trial Operation
5-4-1 Preparing for Trial Operation
5-4 Trial Operation
Once mounting, wiring, switch setting, and connecting a power supply have been finished and normal
status has been confirmed, perform trial operation. The main purpose of trial operation is to confirm
that the servo system is operating correctly electrically. First no-load operation and then loaded
operation is checked.
Note 1. If an error occurs during the trial operation, refer to Section 6 Troubleshooting to eliminate the cause.
Then check for safety, reset the alarm, and then retry the trial operation.
2. If the machine vibrates when starting or stopping, refer to 5-2 Switch Settings and adjust the command
filter.
5-4-1 Preparing for Trial Operation
Switch Settings
After turning OFF the power supply, set the following switches.
• Set the rotary switch setting for command pulse (PULSE) to the same setting as the
Host Controller.
• Set the command filter rotary switch (FIL) to 0.
Turning OFF the Servomotor
Set up the system so that the power and the RUN command can be turned OFF so
that the Servomotor can be immediately turned OFF if an abnormality occurs in the
system.
5-4-2 Trial Operation
1) No-load Operation
• Turn ON the power supply to the control circuits, main circuits, and peripheral
devices.
• Turn ON the RUN command.
• Check that Servomotor is ON.
• Send a command from the Host Controller to rotate the Servomotor and confirm that
Servomotor rotation direction is correct and that the rotation speed and rotation
amount match the command that was sent.
2) Power OFF, Mechanical Device Connection, Power ON
• Turn OFF the power supply.
• Connect the mechanical device to the Servomotor shaft.
• Turn ON the power supply.
3) Loaded Low-speed Operation
• Send a low-speed command from the Host Controller to rotate the Servomotor. (The
definition of low speed varies depending on the mechanical system, but a rough
estimate is 1/10 to 1/5 of the normal operating speed.)
• Check the following items.
· Is the emergency stop operating correctly?
· Are the limit switches operating correctly?
· Is the operating direction of the machinery correct?
· Are the operating sequences correct?
· Are there any abnormal sounds or vibration?
· Is any error (or alarm) generated?
5-7
Page 93

5-4 Trial Operation
5-4-2 Trial Operation
Note 1. If anything abnormal occurs, refer to Section 6 Troubleshooting and apply the
2. If the machine vibrates when starting or stopping, refer to 5-2-2 Switch Functions and
4) Operation under Actual Conditions
Operate the Servomotor in a regular pattern and check the following items.
· Is the operating speed correct?
· Is the load torque roughly equivalent to the measured value?
· Are the positioning points correct?
· When an operation is repeated, is there any discrepancy in positioning?
· Are there any abnormal sounds or vibration?
· Is either the Servomotor or the Servo Driver abnormally overheating?
· Is any error (or alarm) generated?
Note 1. If anything abnormal occurs, refer to Section 6 Troubleshooting and apply the
2. If the machine vibrates when starting or stopping, refer to 5-2-2 Switch Functions and
5) Completing the Trial Operation
Performing the above procedures completes the trial operation.
appropriate countermeasures.
adjust the command filter rotary switch setting (FIL).
appropriate countermeasures.
adjust the command filter rotary switch setting (FIL).
5-8
Page 94
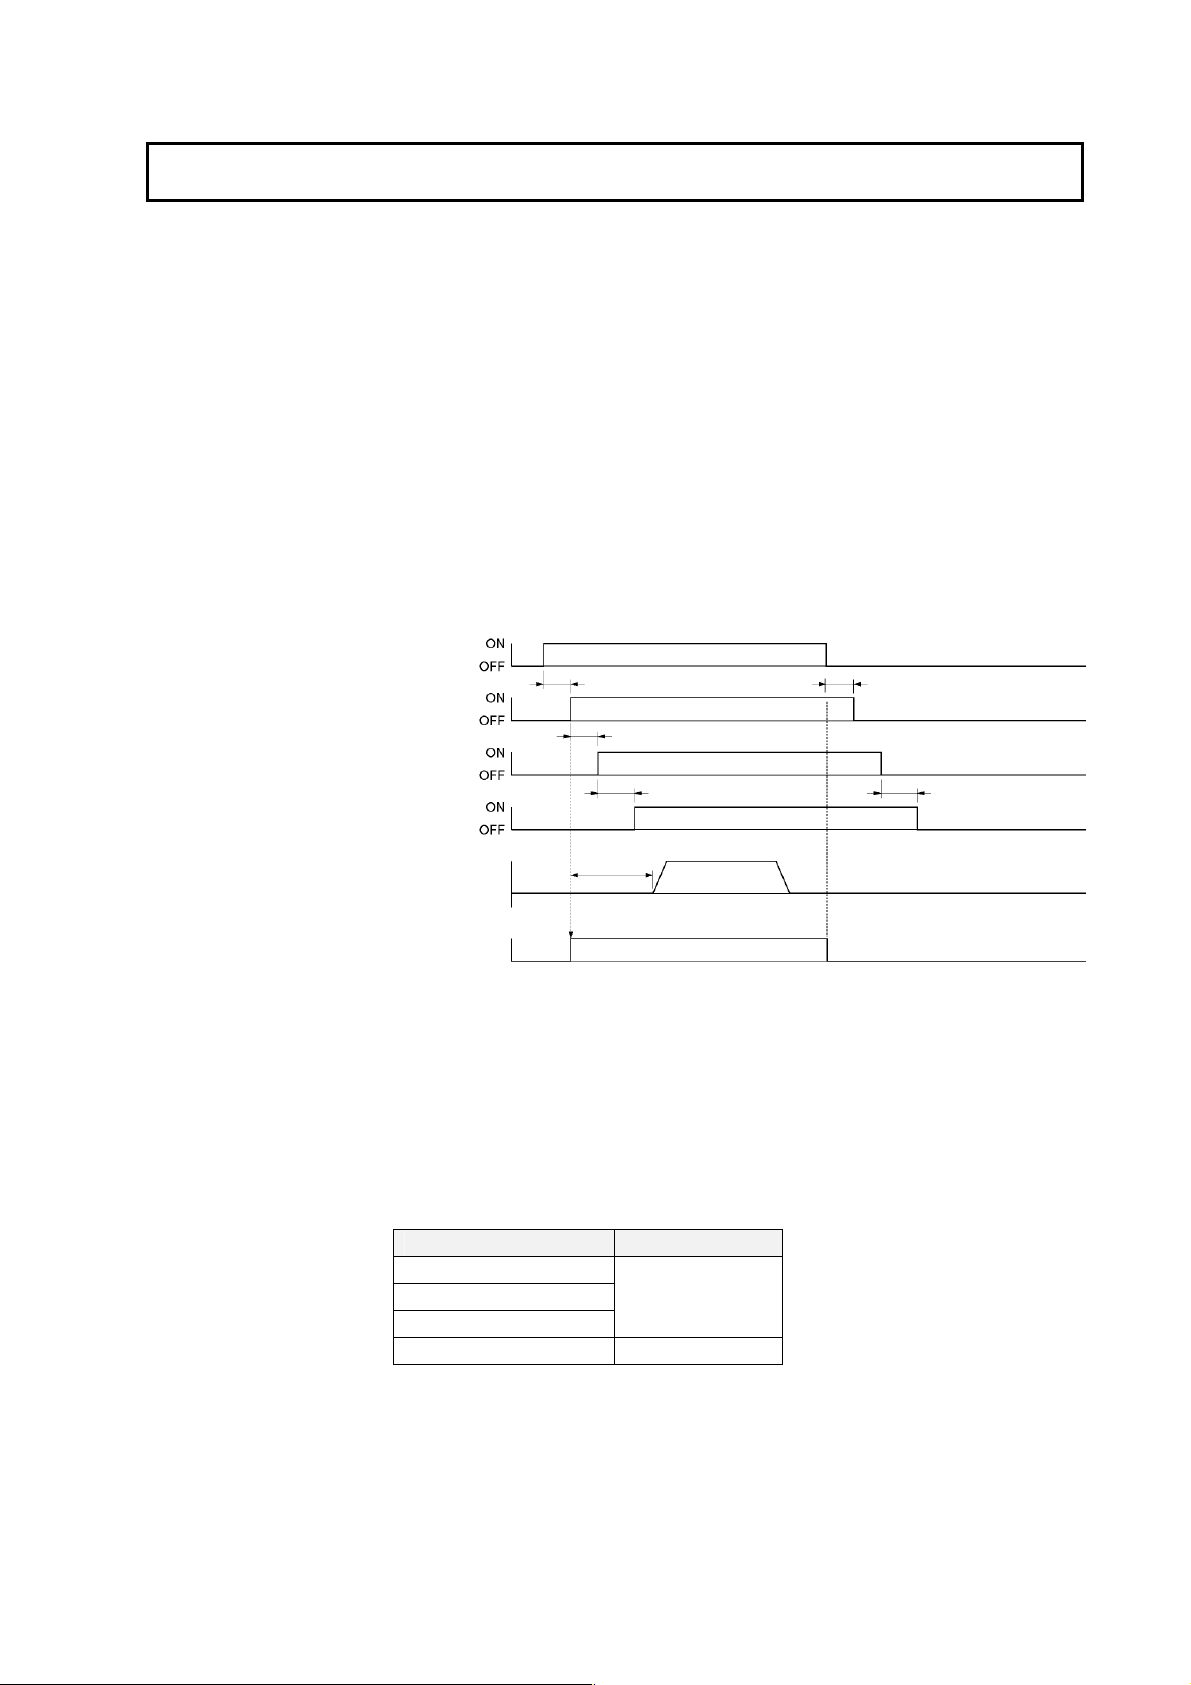
5-5 Operating Functions
5-5-1 Brake Interlock
Precautions When Using the Electromagnetic Brake
The electromagnetic brake of a Servomotor with a brake is a non-excitation brake
especially for holding. First stop the Servomotor and then turn OFF the brake power
supply. If the brake is applied while the Servomotor is operating, the brake disk may
become damaged or malfunction due to friction, causing damage to the Servomotor.
Function
Output the BKIR (brake interlock) signal, which turns the electromagnetic brake ON
and OFF.
Operation
RUN Command Timing (When Servomotor Is Stopped)
RUN
(Run command)
BKIR
(brake interlock)
Brake power supply
Brake operation
About 40 ms
Relay operation time (See note 1.)
(See note 3.)
5-5 Operating Functions
5-5-1 Brake Interlock
(See note 4.)
100 ms max. (See note 5.)
Pulse command
Servomotor power
+ Speed
– Speed
Energized
Not
energized
(See note 1.)
Note 1. The timechart above shows the time it takes from inputting the Run command (RUN)
until the brake being released. Take this delay into account when sending the pulse
command, so that the pulse command is sent after the brake has been released.
In addition, there is some delay between a change in the BKIR signal and the brake
power switching, so check the relay’s response time.
2. The time from turning OFF the brake power supply to the brake engaging is 100 ms
max.
3. The time from turning ON the brake power supply to the brake being released
depends on the Servomotor being used. The following table shows the delay for each
model.
Model Delay
R7M-Z10030-B
R7M-Z20030-B
R7M-Z40030-B
R7M-Z75030-B 80 ms max.
4. Refer to the following page for the stop sequence.
5. The brake’s operation time depends on the model of surge suppressor installed on
the brake.
60 ms max.
5-9
Page 95
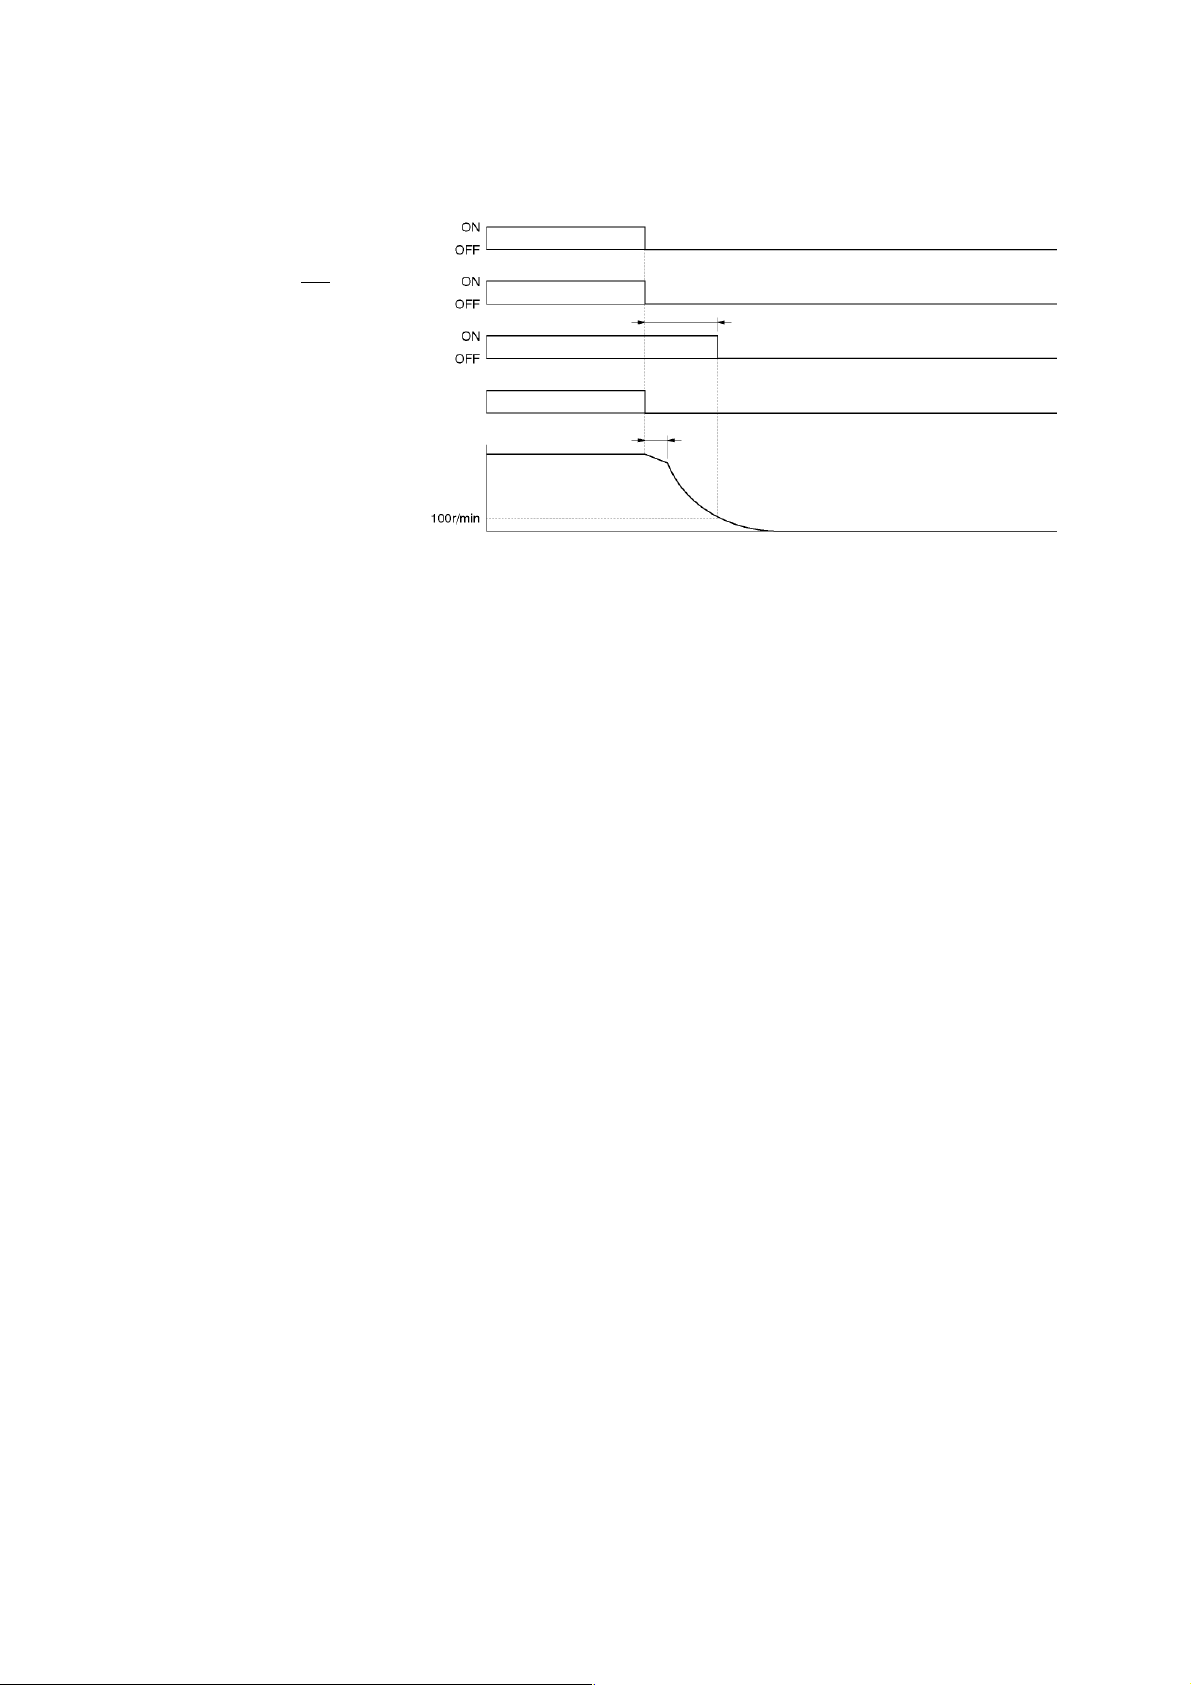
5-5 Operating Functions
5-5-1 Brake Interlock
RUN Command Timing (When Servomotor Is Rotating)
RUN
(Run command)
ALM
(alarm out put )
BKIR
(brake interlock)
Servomotor power
Servomotor spe ed
Note 1. The Servomotor will continue to rotate due to its momentum for about 15 ms after the
Servomotor de-energizes until the dynamic brake operates.
2. The BKIR (brake interlock) signal will be turned OFF if the Servomotor rotation speed
falls below 100 r/min or 500 ms has elapsed since the Servo went OFF.
Energized
Not
energized
(See note 2.)
(See note 1.)
5-10
Page 96
Section 6
Troubleshooting
Page 97

6-1 Error Processing
6-1-1 Preliminary Checks when a Problem Occurs
6-1 Error Processing
6-1-1 Preliminary Checks when a Problem Occurs
This section explains the preliminary checks and analytical tools required to determine
the cause of a problem if one occurs.
Checking the Power Supply Voltage
• Check the voltage at the power supply input terminals.
Main-circuit Power Supply Input Terminals (L1, L2)
Single-phase 200/230 V AC (170 to 253 V) 50/60 Hz
If the voltage is outside of this range, there is a risk of incorrect operation, so be
sure that the power supply is correct.
• Check the voltage of the sequence input power supply and verify that the +24 VIN
Terminal (pin CN1-5) is within the allowed range of 23 to 25 VDC. If the voltage is
outside of this range, there is a risk of malfunction, so be sure that the power supply
is correct.
Checking Whether an Alarm Has Occurred
Check the alarm indicators (AL1 to AL3) on the front of the Servo Driver to see
whether an alarm has occurred.
Checking Whether an Alarm Has Occurred
• When an alarm is indicated:
Check the status of the alarm indicators (AL1 to AL3) and evaluate the problem
based on the alarm indicated.
• When an alarm is not indicated:
Evaluate the problem with the error information.
Note: In either case, refer to 6-3 Troubleshooting for details.
6-2
Page 98

6-1-2 Precautions When Troubleshooting
6-1-2 Precauti ons When Troubleshooting
When checking and verifying I/O after a problem has occurred, the Servo Driver may
suddenly start to operate or suddenly stop, so always take the following precautions.
In addition, never attempt operations that are not specified in this manual.
Precautions
• Disconnect any cables before checking whether they are broken or damaged. Even
if you have checked the conduction of the wiring, there is a risk of conduction due to
the return circuit.
• If the encoder signal is lost, the Servomotor may overrun, or an error may be
generated. Be sure that the Servomotor is disconnected from the mechanical
system before checking the encoder signal.
• When performing tests, first check that there are no personnel in the vicinity of the
mechanical equipment, and that the equipment will not be damaged even if the
Servomotor overruns. Before performing the tests, verify that you can immediately
stop the machine using an emergency stop even if the Servomotor overruns.
6-1 Error Processing
6-1-3 Replaci ng the Servomotor and Servo Driver
Use the following procedure to replace the Servomotor or Servo Driver.
Replacing the Servomotor
(1) Replace the Servomotor.
(2) Perform origin teaching.
• When the Servomotor is replaced, the Servomotor’s specific origin position
(Z-phase) may slip, so origin teaching must be performed.
• Refer to the Position Controller’s manual for details on performing origin
teaching.
Replacing the Servo Driver
(1) Replace the Servo Driver.
(2) Match the previous switch settings.
• Set the new Servo Driver’s switches (command pulse setting rotary switch and
command filter setting rotary switch) to match the old Servo Driver’s switch
settings.
6-3
Page 99
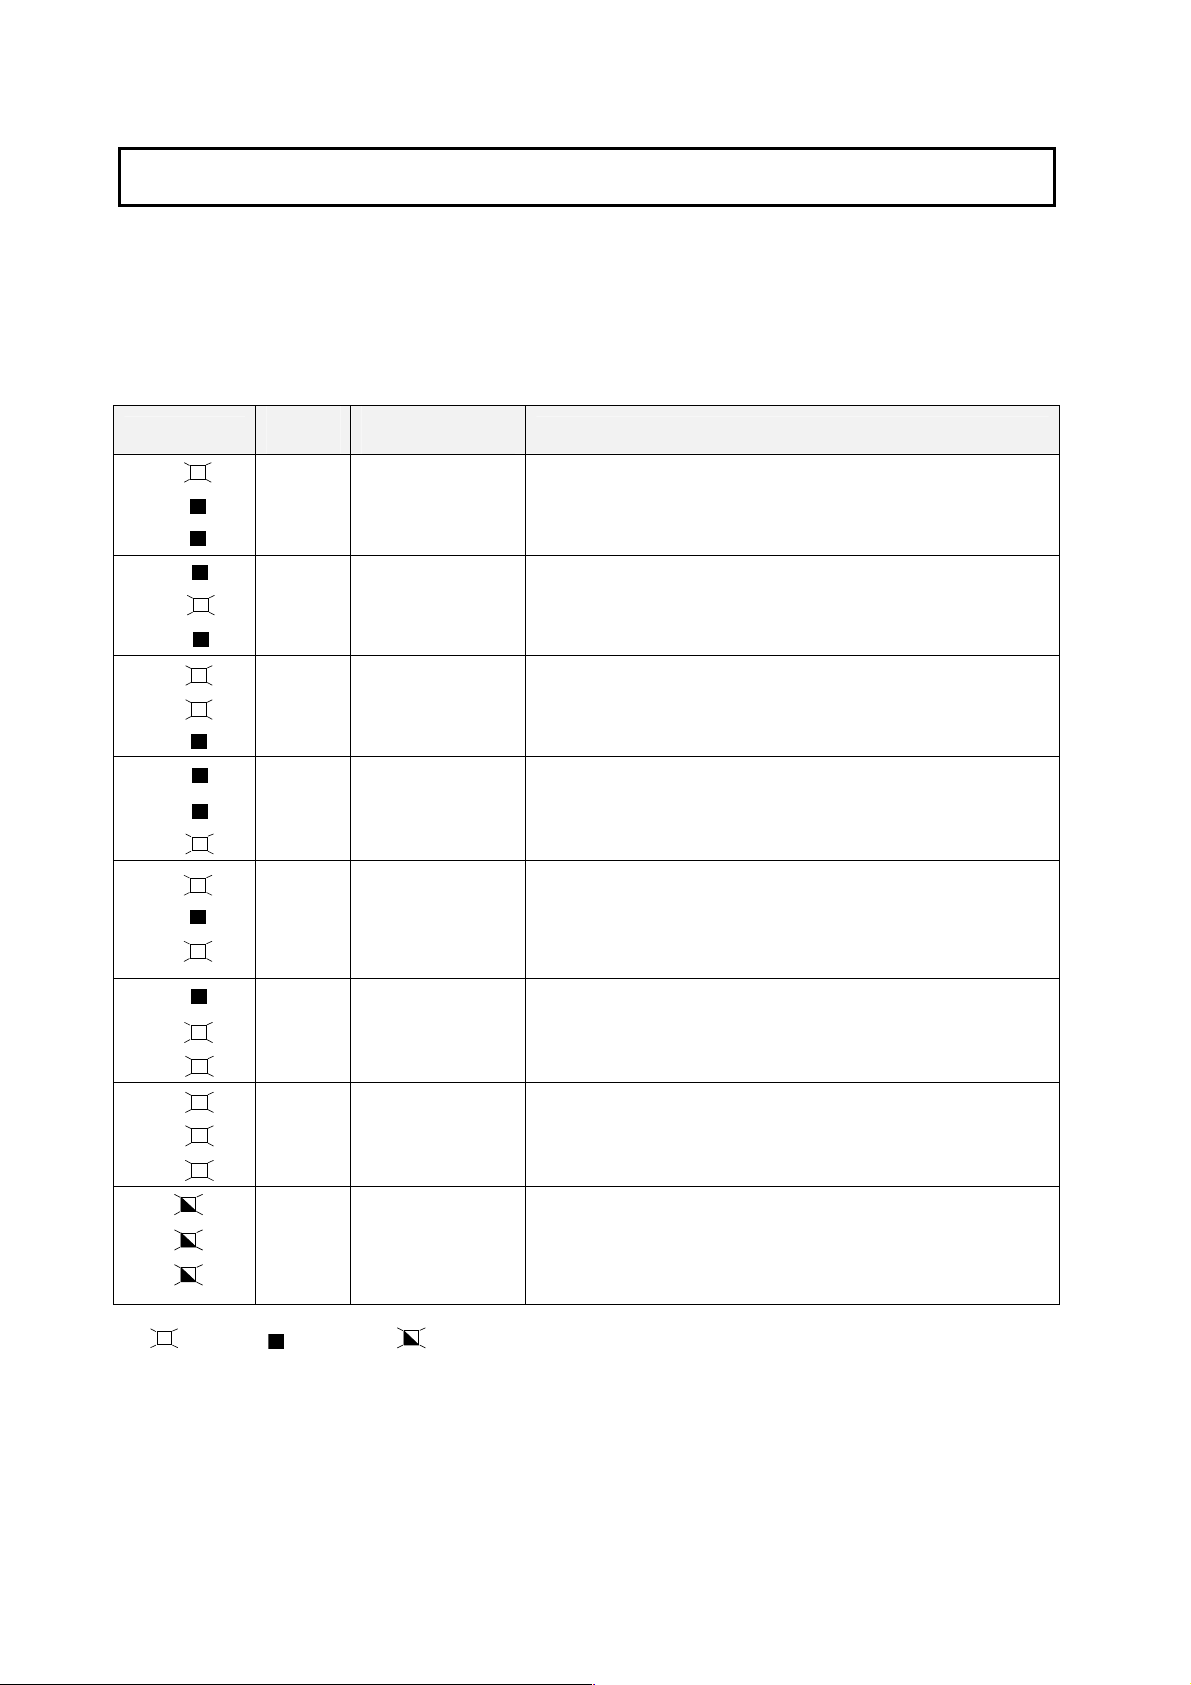
6-2 Alarm Table
6-2-1 Alarm Table
6-2 Alarm Table
If the Servo Driver detects an error, ALM (alarm output) will be output, the power drive circuit in the
Servo Driver will be turned OFF, and the alarm code will be displayed. Refer to 6-3-1 Error Diagnosis
using the Alarm Indicators for details on appropriate alarm countermeasures.
6-2-1 Alarm Table
LED Indicators
AL1
AL2
AL3
AL1
AL2
AL3
AL1
AL2
AL3
AL1
AL2
AL3
AL1
AL2
AL3
AL1
AL2
AL3
AL1
AL2
AL3
AL1
AL2
AL3
Flashing steadily
Lit:
Not lit: Flashing:
ALM
output
OFF
OFF
OFF
OFF
OFF
OFF
OFF
---
Error detection
function
Speed error
(Overspeed)
A speed error occurs if the Servomotor’s speed exceeds 1.1 t i mes the
maximum speed (4,950 rpm).
Cause of error
Either reduce the position command’s speed or c orrect the command
pulse resolution.
Overload This error occurs when the Servomotor’s torque exceeds the range of
the overload characteristi cs (electronic thermal functi
on).
Check the load, review the accelerat ion/deceleration time, and check for
Servomotor vibration.
Encoder error This error occurs when data c annot be read from the Encoder or the
expected differential-phase signal i s not present.
Check the cables.
Voltage error This error occurs if the voltage between P–N is outside of the
acceptable range of 170 to 410 V during
Check whether the input voltage is bet ween 170 and 253 V.
Overcurrent This error occurs when the current exceeds t he power m odul e’ s
operation.
maximum allowable current or t he t e mperature in the module exceeds
the allowed level.
Check for shorted outputs , ground problems, or insufficient Servo Driver
cooling/air circulat i on.
Servo Driver fan
stopped
System error An internal MPU error occurred.
This error occurs when the Servo Driver’s buil t-in axle fan stopped.
Replace the fan.
Replace the Unit.
Command pulse
setting rotary switch
(PULSE) changed
Displayed when the setting on the front panel’s command pulse setting
rotary switch was changed. This is not an alarm.
6-4
Page 100
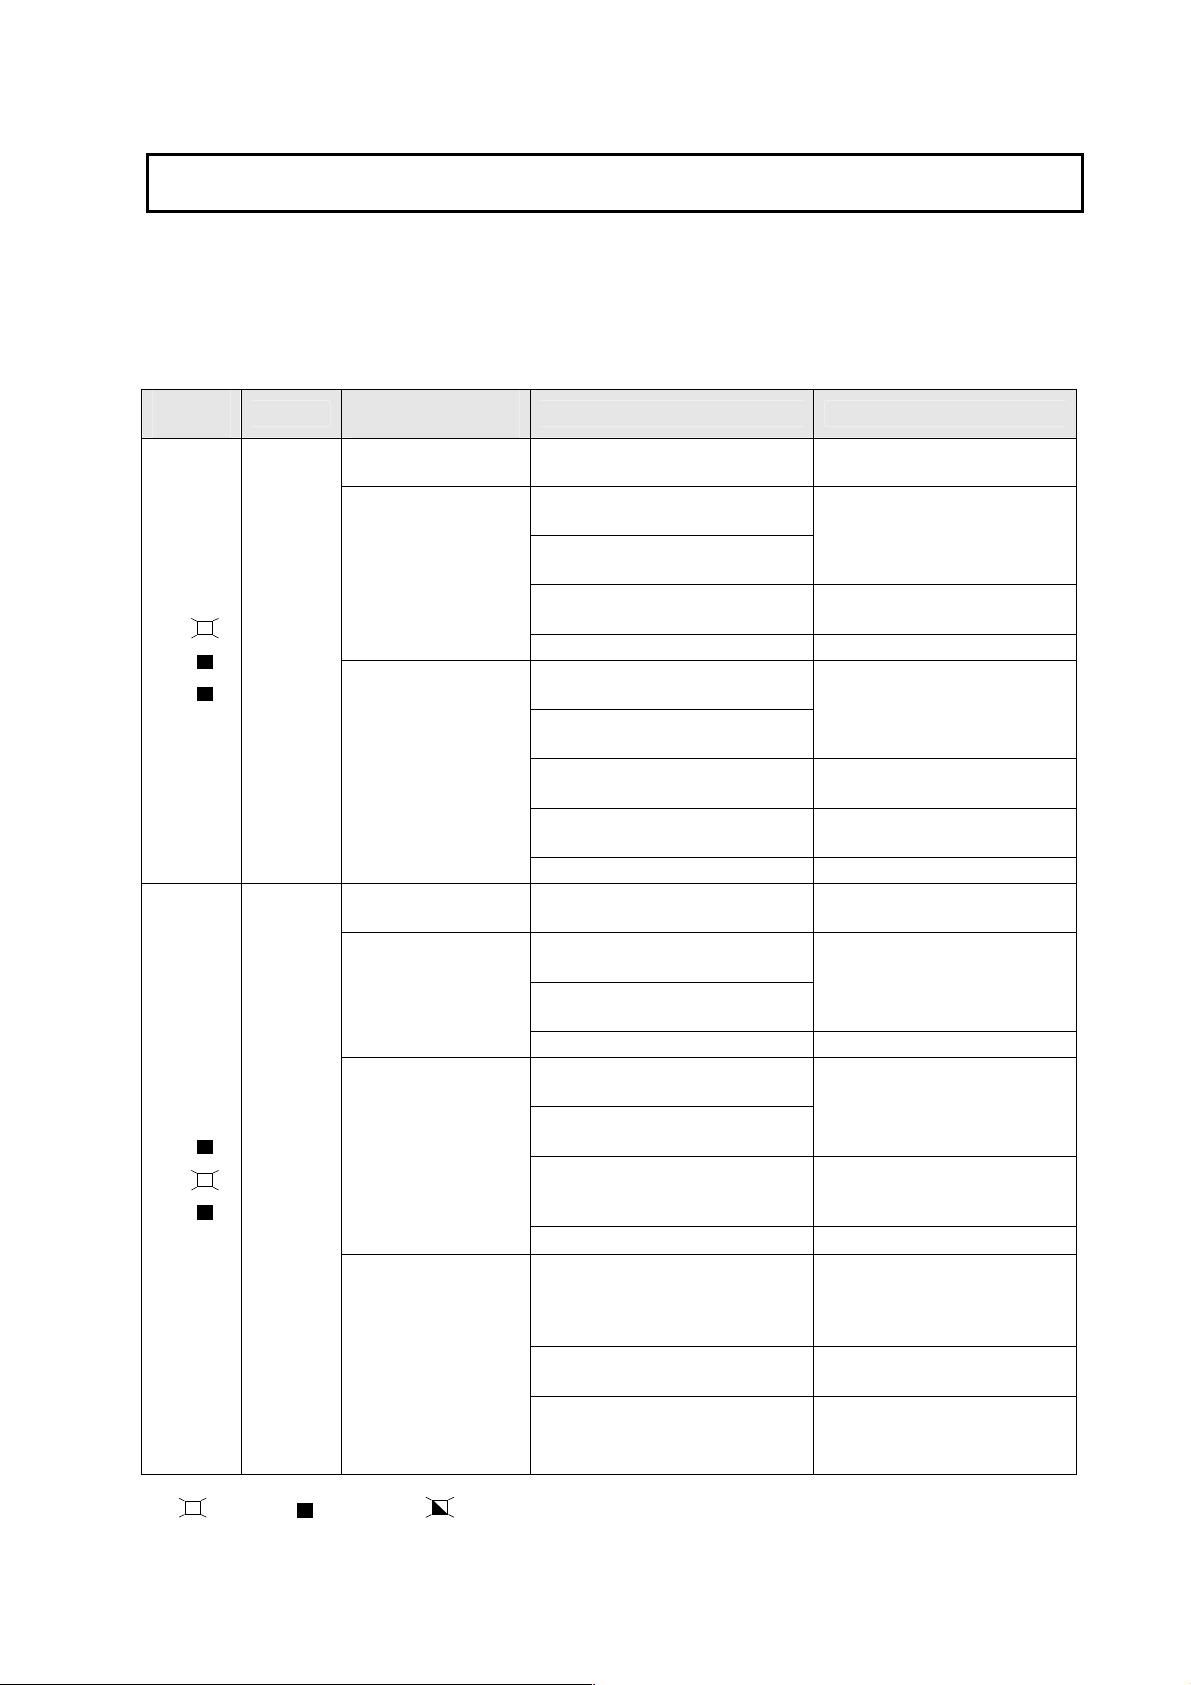
6-3 Troubleshooting
6-3-1 Error Diagnosis using the Alarm Indicators
6-3 Troubleshooting
If an error occurs in the machinery, determine the error conditions from the alarm indicators and
operating status, identify the cause of the error, and take appropriate countermeasures.
6-3-1 Err or Diagnosis using the Alarm Indicators
LED
Indicators
AL1
AL2
AL3
AL1
AL2
AL3
Lit:
Error
Speed
error
Overload
Not lit: Flashing:
Status when error
occurs
Occurs when the
power is turned ON.
Occurs when the servo
is turned ON.
Occurs when the
Servomotor starts
running or after
initiating high-speed
rotation.
Occurs when the
power is turned ON.
is turned ON.
Servomotor will not
rotate even though
command pulses are
being input.
Occurs during normal
operation.
Cause of error Countermeasure
The Servo Driver is faulty. Replace the Servo Driver.
The U phase, V phase, W phase, or
GR wires are wired incorrectly.
The encoder wires are wired
incorrectly.
Noise infiltrated the En coder Cable
and caused improper operation.
The Servo Driver is faulty. Replace the Servo Driver.
The U phase, V phase, W phase, or
GR wires are wired incorrectly.
The encoder wires are wired
incorrectly.
Noise infiltrated the En coder Cable
and caused improper operation.
The position comm and i nput
exceeds a rate of 4,500 rpm.
The Servo Driver is faulty. Replace the Servo Driver.
The Servo Driver is faulty. Replace the Servo Driver.
The U phase, V phase, W phase, or
GR wires are wired incorrectly.
The encoder wires are wired
incorrectly.
The Servo Driver is faulty. Replace the Servo Driver.
The U phase, V phase, W phase, or
GR wires are wired incorrectly.
The encoder wires are wired
incorrectly.
The Servomotor shaft is l ocked. Check the l oad status and
The Servo Driver is faulty. Replace the Servo Driver.
Operation continued with an
effective torque exceeding the rated
torque, within the electronic t hermal
function’s operation range.
Power supply voltage dropped. Keep the power supply voltage
Servomotor winding is burned out. Measure the winding resistance
Rewire correctly.
Take countermeasures against
noise in the Encoder Cable.
Rewire correctly.
Take countermeasures against
noise in the Encoder Cable.
Input the comm and val ue
correctly.
Rewire correctly. Occurs when the servo
Rewire correctly.
re-evaluate the Servomotor
capacity.
Re-evaluate the load conditions
and conditions, or re-evaluate the
Servomotor capacit y.
within the allowed range.
and replace the Servomotor if t he
winding is burned out.
6-5
 Loading...