

Page 1
Activity monitor
Jog style
• Instruction Manual 1
• Gebrauchsanweisung 23
• Manuale di istruzioni 45
• Mode d’emploi 67
IM-HJA-300-E-01-05/2010
5328882-5A
EN
DE
IT
FR
HJA-300-E_A_M12_100120.pdf
HJA-300-E_A_M.book Page 1 Monday, February 22, 2010 12:02 PM
Page 2
HJA-300-E_A_M.book Page 2 Monday, February 22, 2010 12:02 PM
Page 3
1
EN
1 Introduction
Dear customer,
Thank you for purchasing this high-quality OMRON activity
monitor. The new Jog style will keenly measure your physical
activity and helps to assist with your diet or motivates you to
reach your daily walking target.
The OMRON Jog style HJA-300 uses OMRON’s new Active
Engine technology to measure the intensity and amount of
exercise, ranging from walking to jogging and running.
In addition to measuring the step count and the number of
calories burned during everyday activities, it can also keep a
record of each workout. This makes it useful for planning an
exercise program based on the intensity of your training.
■
Active Engine
This OMRON technology can accurately detect and calculate
any fast or slow signals caused by physical activity.
Active Engine makes it possible to monitor not only the
physical activity of walking, but can also capture the more
intense activity of jogging in real time and calculate the
amount of fat and calories burned.
■
Workout
For most health related activities, “workout” means a training
program to improve your fitness. However, in this instruction
manual it is used to refer to one training period of jogging or
walking.
■
The OMRON Jog style Features
Fat burned/Calories burned
By measuring the intensity of your activity, the unit can
calculate the amount of fat and calories burned.
Workout mode
Workout mode records the time between when a workout
is started and when it is stopped as single record, using
stopwatch like display (refer to Chapter 6.3).
The data includes the distance, time, calories burned and
average speed for each workout.
The unit automatically records the workout data for up to
7 previous sessions.
Workout stopped
If a workout continues for more than 30 minutes, the
message “Good job” scrolls on the display after you finish
Workout mode.
HJA-300-E_A_M.book Page 1 Monday, February 22, 2010 12:02 PM
Page 4

2
2 Use of the OMRON Jog style
2.1 Cautions
• Do not look at the display while jogging. Always stop where
it is safe to do so before checking the display.
• Contact your doctor or healthcare provider before beginning
a weight reduction or exercise program.
• Always take a rest if you feel tired or experience pain while
exercising. If the pain or discomfort continues, immediately
stop your exercise and consult a doctor.
• Keep the unit out of the reach of young children.
• If young children swallow the battery, battery cover or screw,
immediately consult a doctor.
• Do not swing the unit by the strap. Swinging the unit while
holding the strap may cause an injury.
• Do not put the unit in the back pocket of your shorts or
trousers. It could be damaged if you sit down while the unit
is still in your pocket.
• If battery fluid should get in your eyes, immediately rinse
with plenty of clean water. Consult a doctor immediately.
• If battery fluid should get on your skin or clothing,
immediately rinse with plenty of clean water.
• Do not insert the battery with the polarities in the wrong
direction.
• Always use the type of battery indicated.
• Replace a worn battery with a new one immediately.
• Remove the battery from this unit when you are not going to
use it for a long period of time (approximately 3 months or
more).
• Do not throw the battery into fire because it may explode.
• When disposing the product, remove the battery and follow
local regulations on environmental protection.
HJA-300-E_A_M.book Page 2 Monday, February 22, 2010 12:02 PM
Page 5
3
EN
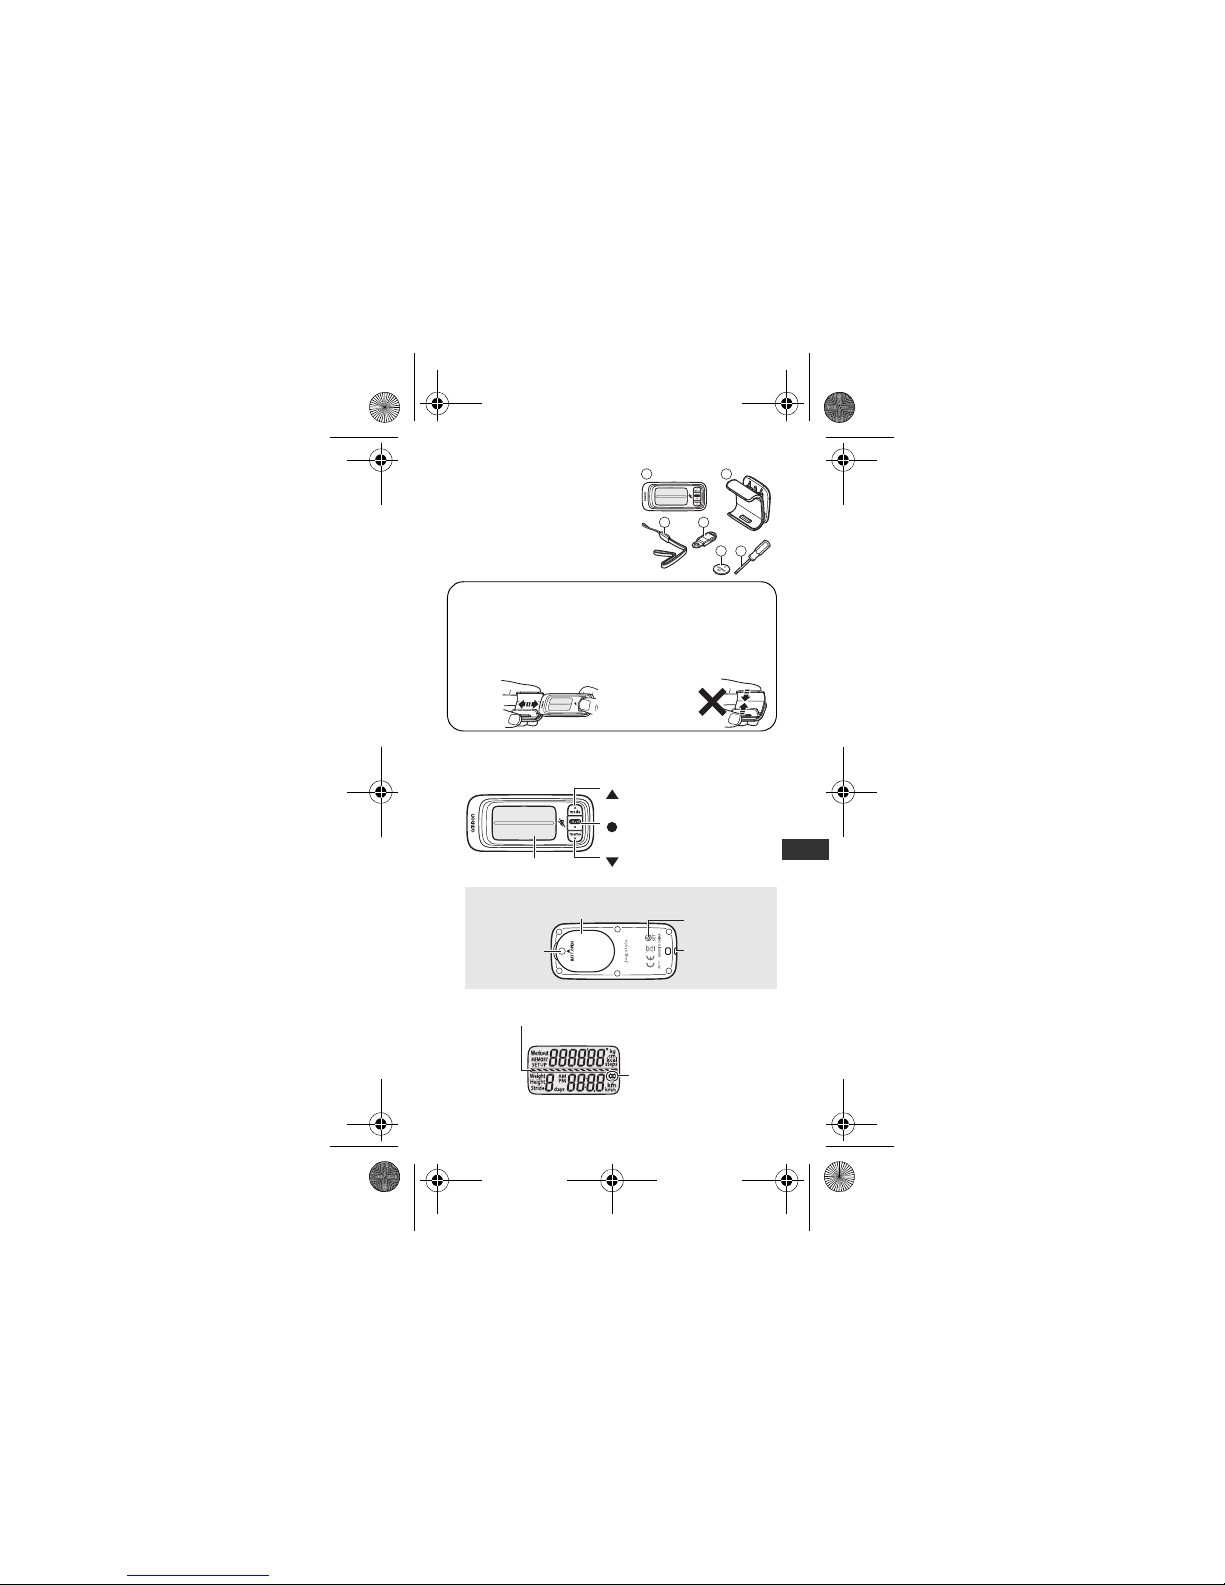
3 Overview
A
Main unit
B
Holder
C
Strap
D
Clip
E
Battery
* The battery is already installed in
the unit.
F
Screwdriver
4 Know your unit
B
D
C
A
E
F
Holder
Use this holder when attaching the unit to your belt or the top
of your pants.
Attach/remove the holder as
shown in the illustrations
below.
Note:
When attaching the holder, do
not grip it strongly at the top
and bottom.
Strap
attachment
(Back of the main unit)
Battery cover
SET button
/mode (mode switch) button
Display
/start button
/memo (memory) button
■
Display
Workout indicator
(Refer to Chapter
6.3
)
Battery low indicator
Note:
This illustration displays all items.
Battery cover
screw
■
Main Unit
HJA-300-E_A_M.book Page 3 Monday, February 22, 2010 12:02 PM
Page 6
4
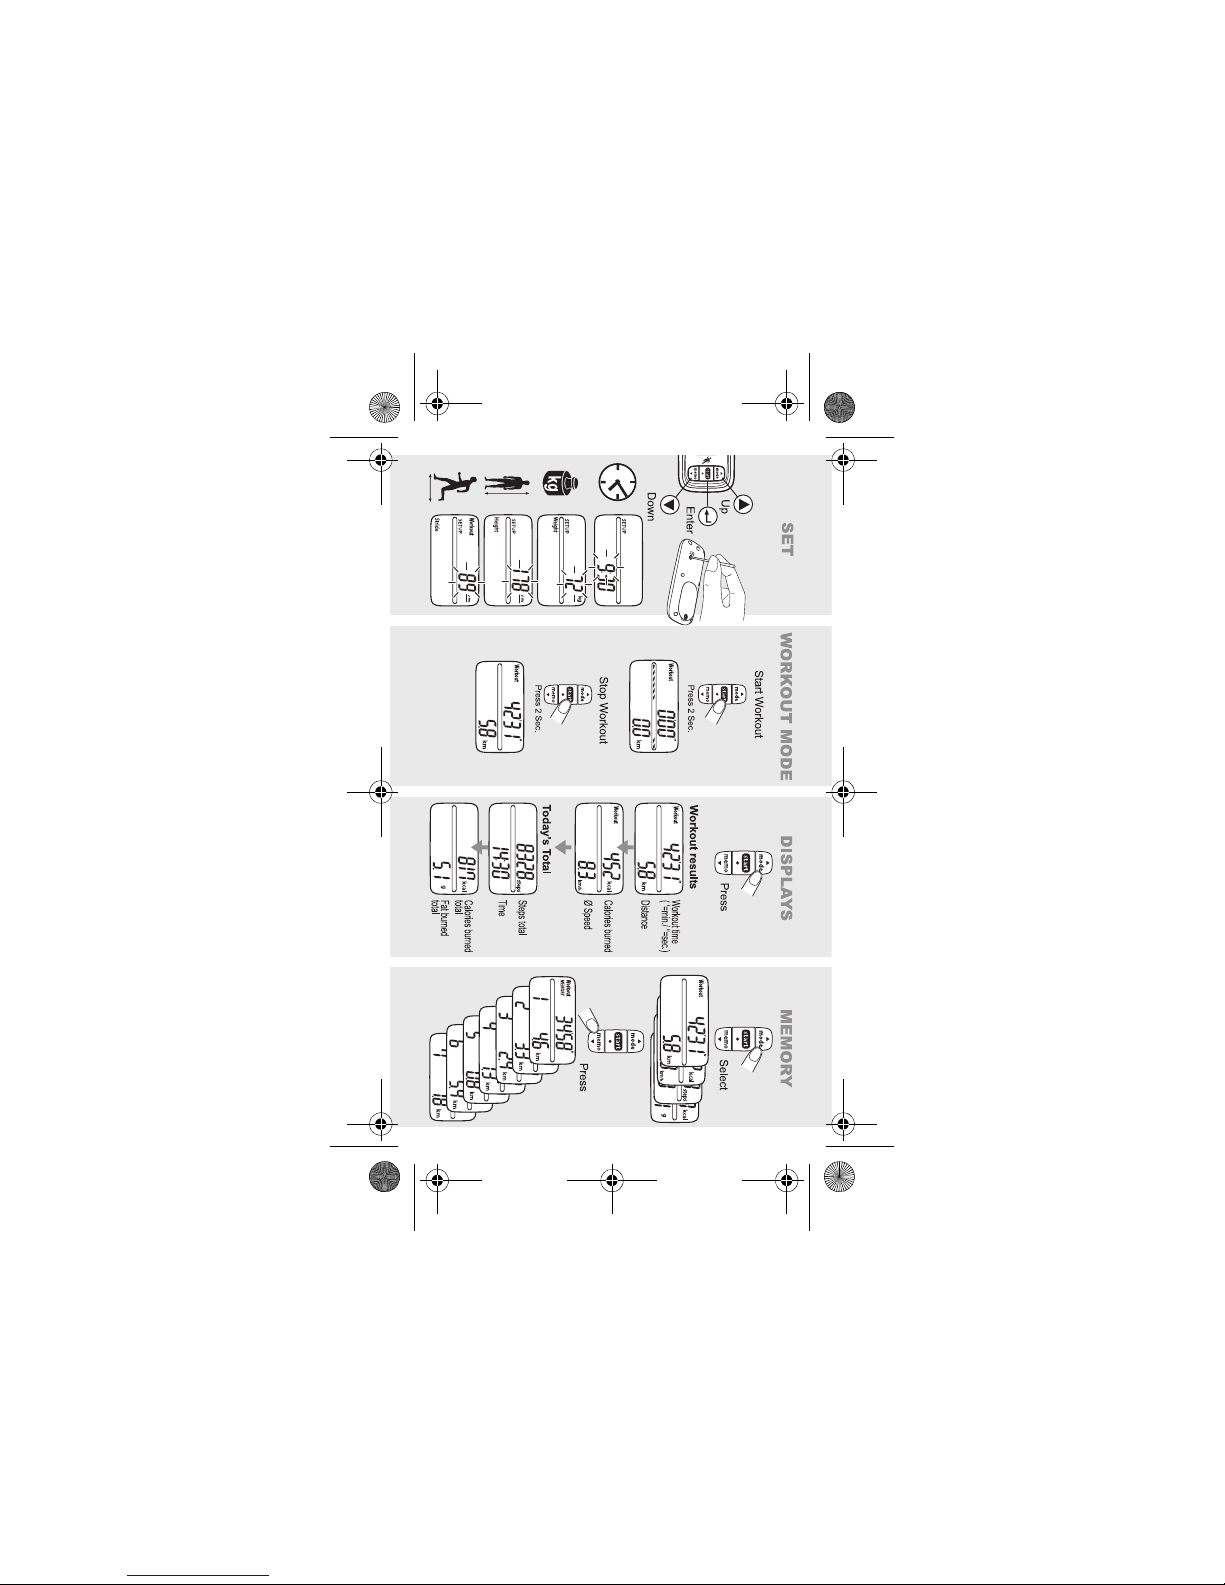
5 Settings
5.1 Setting the Time, Weight, Height and Stride Length
When you use the unit for the first time or you want to change
settings, follow the steps below.
1
Press the SET button on the back of the unit with
a thin, sturdy, stick that will not break easily.
Note:
Do not press the button with a sharp point. This
could cause damage.
The hour flashes on the display.
Note:
If no settings are made for more than 5 minutes...
• When setting up the unit for the first time
→
The display will be turned off.
• When adjusting the settings
→
The display will revert to the Workout time/distance
display.
* Setting range details refer to Chapter 13 “Technical data”.
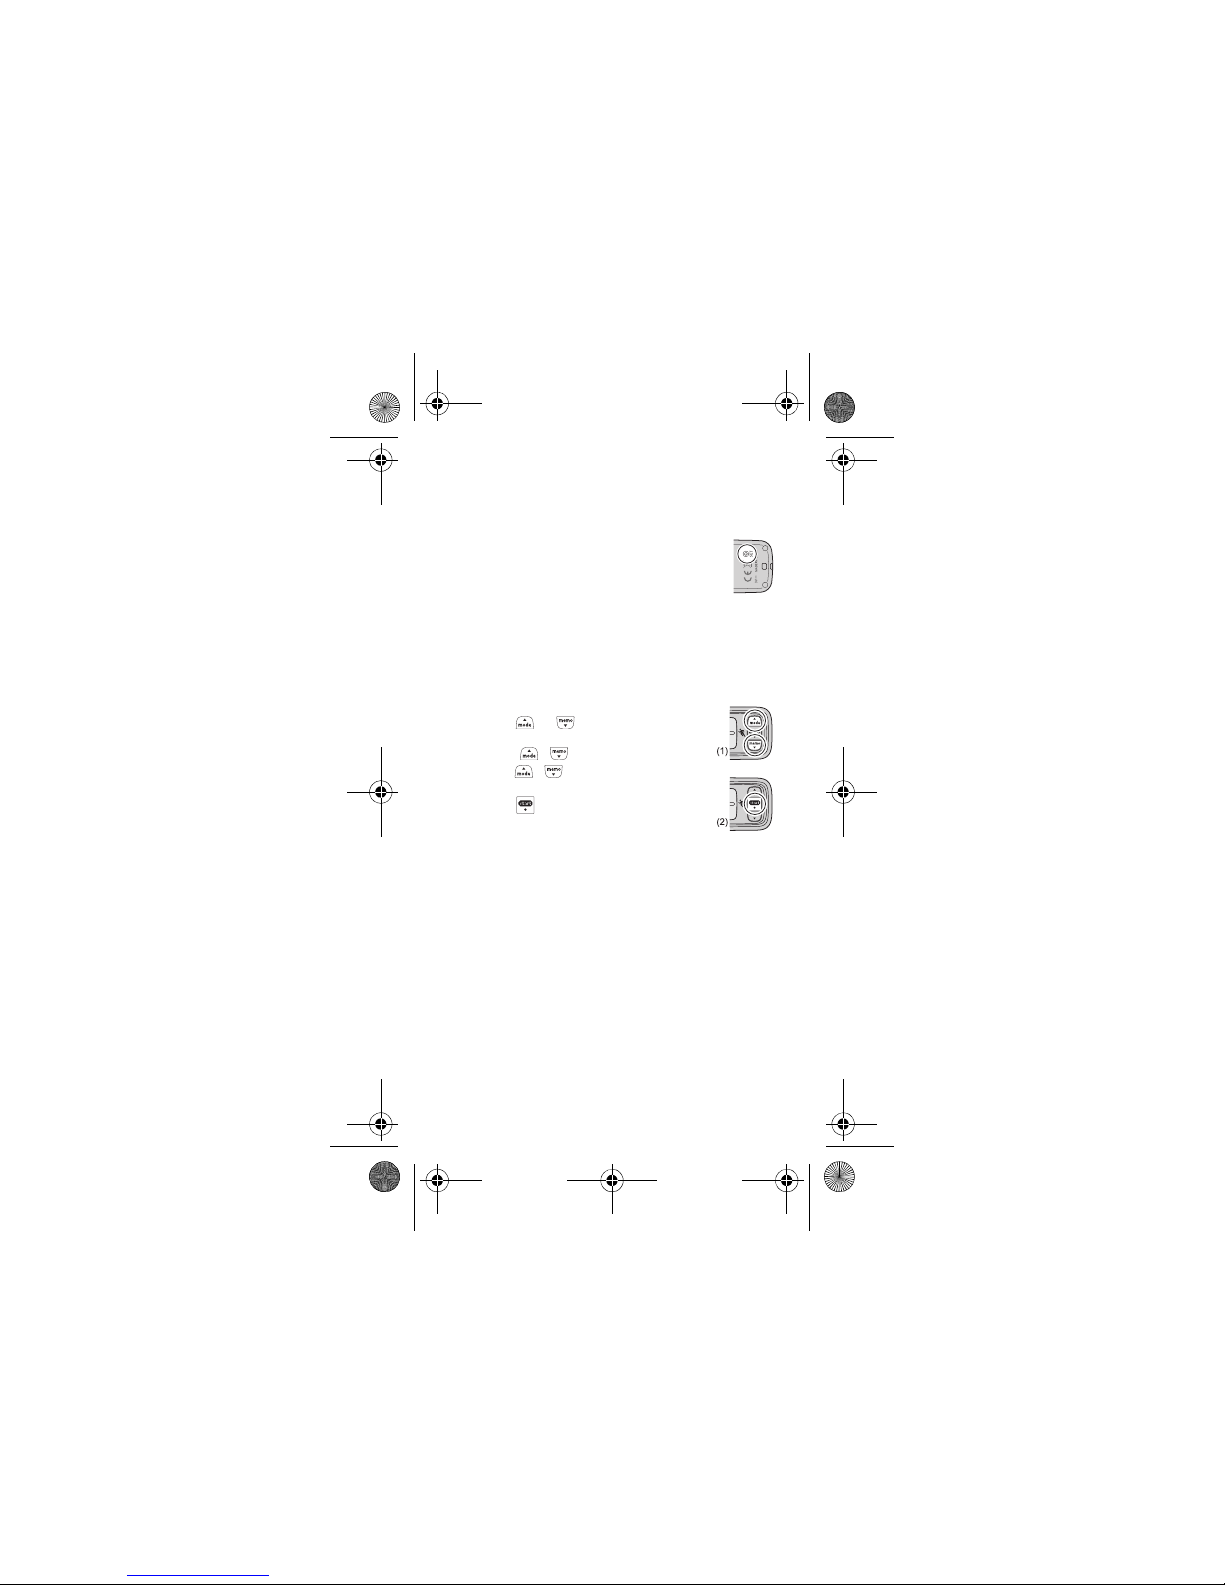
2
Setting the hour.
(1) Press or to select the desired
value for a setting.
• Press ( ) to advance (go back) one.
• Hold ( ) down to advance (go back)
rapidly.
(2) Press to confirm the setting.
3
Repeat steps (1) to (2) to set the minute.
4
Repeat steps (1) to (2) to set the weight.
5
Repeat steps (1) to (2) to set the height.
6
Repeat steps (1) to (2) to set the stride length for workout.
This completes the setup.
■
About stride length setting
The initial stride length value* that blinks on the display is an
estimated stride length calculated from the Height set in
step 5.
Set the actual stride length to use for workouts based on the
type of training (jogging/walking) you will use and your own
physique.
* When setting up the unit for the first time, or after the
settings have been reset.
Refer to Chapter 6.3, if you want to set the stride length more
accurately.
HJA-300-E_A_M.book Page 4 Monday, February 22, 2010 12:02 PM
Page 7
5
EN
6 Using the OMRON Jog style
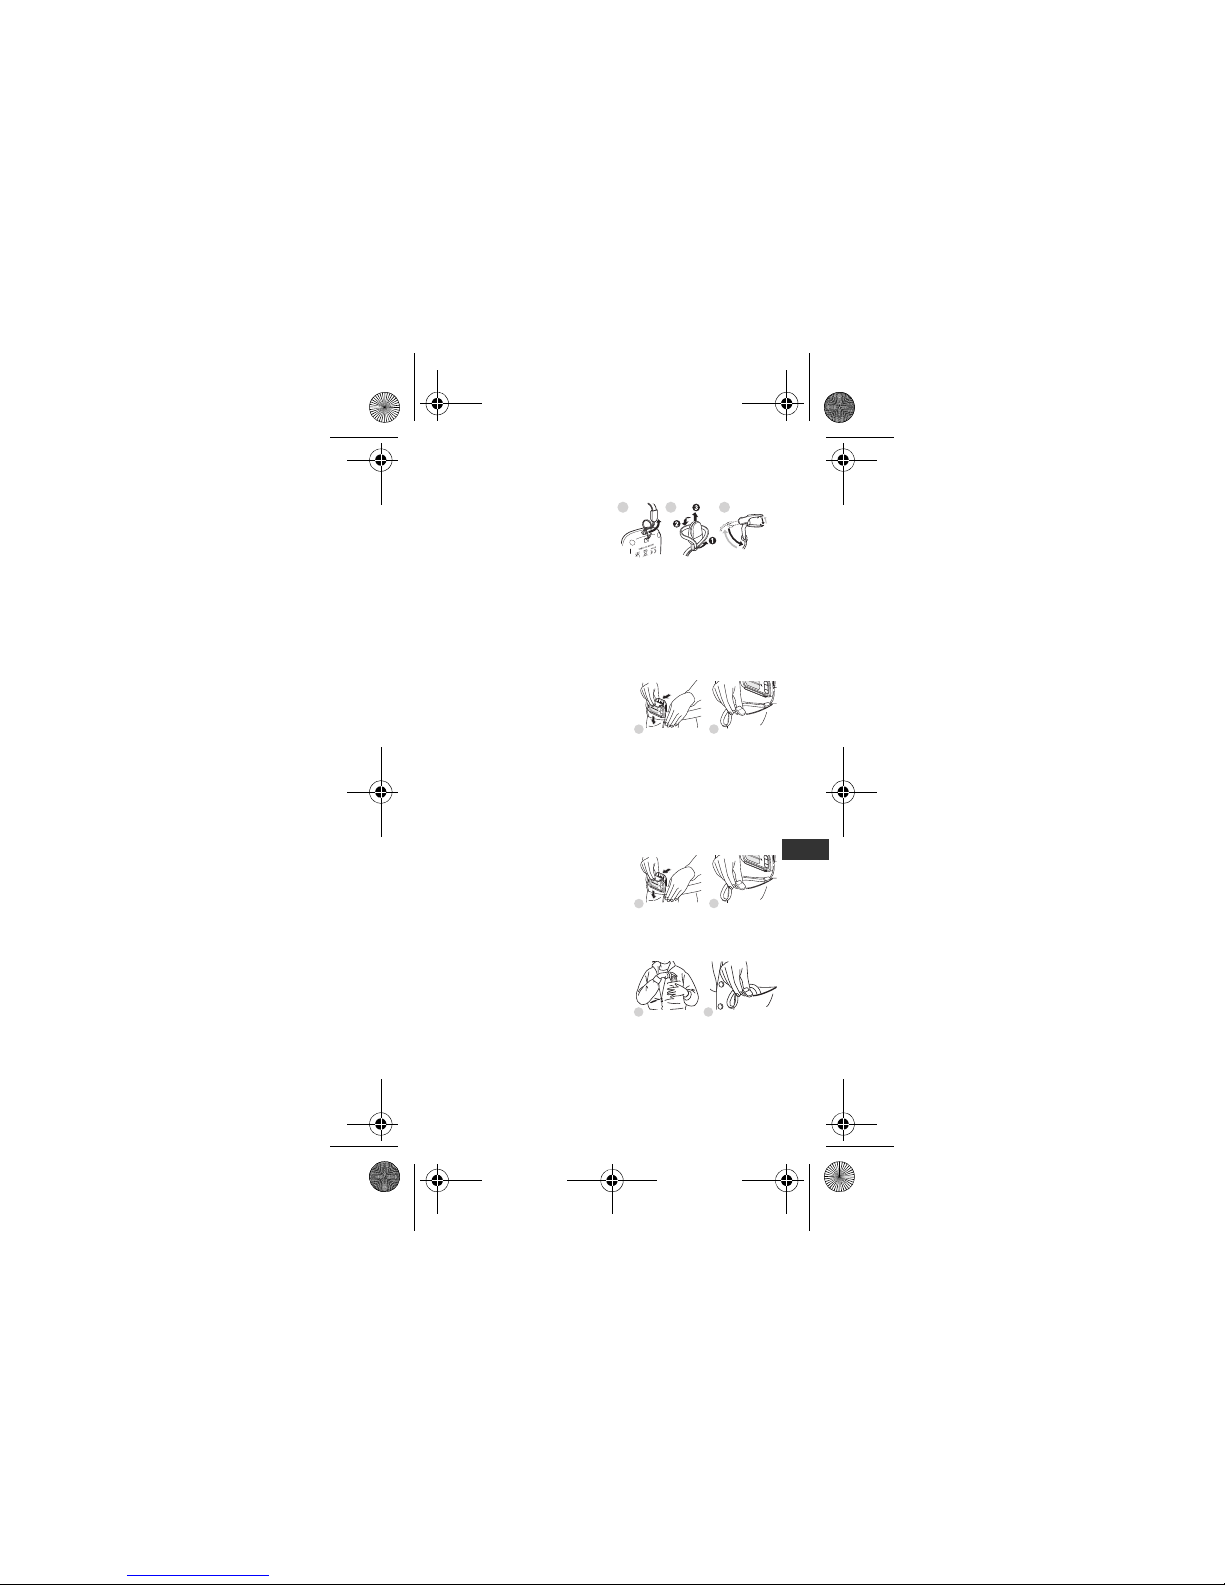
6.1 Assemble the OMRON Jog style
1
Attach the strap to the unit.
2
Attach the clip to the strap.
3
Open and close the clip.
Note:
Press the clip open to
remove the unit.
Depending on the material, the clip may cause damage or
scratches to your clothes if it is attached or removed
roughly.
6.2 How to attach the OMRON Jog style
[During workout]
Belt
1
Clip the holder with the unit to
the band or belt of your shorts or
trousers.
2
Clip the strap to your shorts or
trousers.
Note:
Always attach the unit to your waist when jogging.
[During workout off (walking)]
We recommend attaching the unit to your belt, your pocket,
your bag or hanging it from your neck.
Belt
1
Clip the holder with the unit to
the band or belt of your shorts or
trousers.
2
Clip the strap to your shorts or
trousers.
Pocket
1
Put the unit in your upper front
or trousers pocket.
2
Clip the strap to the edge of
your pocket.
Note:
Do not put the unit in the back pocket of your shorts or
trousers.
1 2 3
1
2
1
2
1 2
HJA-300-E_A_M.book Page 5 Monday, February 22, 2010 12:02 PM
Page 8

6
Bag
1
Put the unit in your bag.
Notes:
• Be sure you can hold the bag tightly.
• Be sure the unit is securely fastened to your bag.
• Clip the strap to the edge of your bag.
Neck
1
Attach a commercially available string, strap or
key cord to the unit and hang it from your neck.
Note:
The included strap and clip are to prevent the
unit from falling. Do not hang the unit from your
waist or a bag.
6.3 Actual use of the OMRON Jog style
[Workout mode]
Start Jogging mode (Workout mode)
1
Press for 2 seconds.
Workout mode starts.
The unit starts to record the distance, time, calories burned,
and average speed.
Note:
During a workout, the Workout indicator bar appears in all
the displays. Start your workout after checking that this bar
is being displayed.
Stop Jogging mode (Workout mode)
2
Press for 2 seconds.
Workout mode stops.
Notes:
• Workout mode will automatically stop 24 hours after it is started.
• If a workout continues for more than 30 minutes, the message
“Good job” scrolls on the display after you finish Workout mode.
Workout indicator bar
HJA-300-E_A_M.book Page 6 Monday, February 22, 2010 12:02 PM
Page 9

7
EN
[Stride length measurement mode]
Use stride length measurement mode for more accurate
stride length.
Examples of suitable locations:
• On a running track
• A jogging course with distances marked, or similar locations
1
Display the workout time and distance.
Be sure to stop Workout mode beforehand.
2
Press for 2 seconds.
The Distance display blinks.
3
Set the workout distance for measuring stride length.
Press or to select the desired value for a setting.
Note:
The distance is set in 100 m increments. Perform the
workout where you can measure distances of 100 m.
4
Press to start the workout.
Do a workout of the distance entered in step 3.
While measuring stride length, the display is different from
normal Workout mode, as shown below.
Note:
Even when measuring stride length, the total calories and
fat burned, and number of steps are recorded. However,
the workout time, distance, workout calories burned and
average speed are not recorded.
Initial stride length setting
(Setting a Distance of 400 m)
Moves slowly across
display
Lit
HJA-300-E_A_M.book Page 7 Monday, February 22, 2010 12:02 PM
Page 10

8
5
Press for 2 seconds to end the workout.
The stride length blinks after measurement.
Note:
If you want to make further adjustments, press and
to adjust the stride length.
6
Press to confirm the stride length.
The Workout time/distance display appears.
Note:
The distance display for future workouts will be calculated
using the new stride length setting.
■
To cancel stride length measurement mode
[Before starting the workout]
1
Press or to change the distance display to
“----km”.
2
Press .
Stride length measurement mode ends and the Workout
time/distance display appears.
[After starting the workout]
To cancel stride length measurement mode during the
workout, you must end the workout.
Stop the workout (refer to step 5) and enter the original stride
length.
HJA-300-E_A_M.book Page 8 Monday, February 22, 2010 12:02 PM
Page 11

9
EN
[Workout mode off (walking)]
1
Start walking.
Note:
In order to avoid counting steps that are not part of a walk,
the unit does not display the step count for the first
4 seconds of walking. If you continue walking for more
than 4 seconds, it displays the step count for the first
4 seconds and then continues to count.
2
After you walk, press to read the data (refer to Chapter
7 “Checking the measurement result”).
To ensure an accurate step count, be sure to read “Cases
where the unit may not be able to count steps accurately” in
Chapter 7.2 before using the unit.
HJA-300-E_A_M.book Page 9 Monday, February 22, 2010 12:02 PM
Page 12

10
7 Checking the measurement result
7.1 Button operation flow
[Workout Off screens]
Press to change the display.
To start Workout mode, press for 2 seconds in any of the
displays.
Workout calories/
average speed
Daily steps counted/
24 hour time
Daily additional calories
burned/fat burned
Workout time/
distance
(Refer to Chapter 7.2)
(Refer to Chapter 7.2)
(Refer to Chapter 7.2)
(Refer to Chapter 7.2)
Workout results
Today’s Total
HJA-300-E_A_M.book Page 10 Monday, February 22, 2010 12:02 PM
Page 13

11
EN
[During a workout]
Press to change the display.
Note:
During a workout, the Workout indicator bar blinks across the
screen in all the displays.
To stop Workout mode, press for 2 seconds in any of the
displays.
■
About the energy saving function
In order to save energy, the display of the unit will be turned
off if no buttons are pressed for more than 5 minutes.
However, the unit will continue to monitor your step count.
Press , or to turn the display on again.
Workout calories/
average speed
Daily steps counted/
24 hour time
Daily additional calories
burned/fat burned
Workout time/
distance
(Refer to Chapter 7.2)
(Refer to Chapter 7.2)
(Refer to Chapter 7.2)
(Refer to Chapter 7.2)
Workout results
Today’s Total
HJA-300-E_A_M.book Page 11 Monday, February 22, 2010 12:02 PM
Page 14

12
7.2 About the individual displays
The values do not change after Workout mode has been
stopped.
The values do not change after Workout mode has been
stopped.
Notes:
• The average speed displays the average speed for the time
between when Workout mode started and when it was stopped. In
order to keep an accurate record, press for 2 seconds to stop
Workout mode as soon as you have finished your workout.
• When you start Workout mode, the workout time, distance, workout
calories burned and average speed values for the previous
workout are reset and measurement begins.
Workout time/distance
Distance
Distance during Workout mode.
Workout time
Time elapsed since Workout mode
started.
Displayed in minutes and seconds.
Workout calories/average speed
Average speed
Average speed from the start of the workout to the
present time.
Workout calories
Displays the calories burned for each
workout.
Workout start display
HJA-300-E_A_M.book Page 12 Monday, February 22, 2010 12:02 PM
Page 15

13
EN
Notes:
• The calories burned for each workout is displayed as “Workout
calories”.
• If a workout continues for more than 30 minutes, the message
“Good job” scrolls on the display after you finish Workout mode.
■
Cases where the unit may not be able to count steps
accurately
[When jogging]
When the unit is attached somewhere other than your waist.
[When walking]
Irregular movement
• When the unit is placed in a bag that moves irregularly because it
hits your foot or clothes.
• When the unit hangs from your waist or a bag.
Inconsistent walking pace
• When you shuffle or wear sandals etc.
• When you cannot walk at a consistent pace in a crowded area.
• When walking very slowly.
[When jogging or walking]
Excessive vertical movement or vibration
• When standing up and/or sitting down.
• When doing sports other than walking.
• When ascending or descending stairs or on a steep slope.
• When there is vertical or horizontal vibration in a moving vehicle
such as on the bicycle, in a car, trains or a bus.
Daily steps counted/24 hour time
24 hour time
Daily steps counted
Displays the total steps for the day,
including those in a workout.
Daily additional calories burned/fat burned
Daily additional calories burned/fat burned
The intensity of your walking is measured
and the amou nts of calories and f at burned
are calculated. Displays the additional
energy consumption that has been burned
during a day (Resting metabolism +
additional energy burned = total energy
consumptio n for one day). Assists y ou with
your diet.
HJA-300-E_A_M.book Page 13 Monday, February 22, 2010 12:02 PM
Page 16

14
8 Memory function
The measurements for one day (calories burned, fat burned,
number of steps) are automatically stored in memory and
reset to 0 at midnight (0:00) each day.
However, the workout time, distance, workout calories burned
and average speed are not reset to 0.
Note:
The values do not switch the display during a workout.
8.1 Recall data
1
Press to select the type of display you want to see.
2
Press to view the measurement results.
The values for the previous time or previous day are
displayed.
• With each press of , you can view the measurement
values for up to 7 previous times or 7 previous days.
• Keep pressed to advance rapidly.
• You can also press to select the type of display you
want to see while viewing the previous results.
• Press to return to the current display.
Notes:
• The time is not displayed while viewing previous results.
• If no buttons are pressed for more than 1 minute, the display
returns to the display before you started the memory function.
HJA-300-E_A_M.book Page 14 Monday, February 22, 2010 12:02 PM
Page 17

15
EN
9 Battery life and replacement
If the symbol blinks or appears on the display, replace the
battery with a new (CR2032) battery.
Notes:
• Do not replace the battery around midnight (0:00). The
measurement results of the day when the battery was removed will
be added to the measurement results for the day the battery was
inserted.
(It is assumed that the battery will be removed and replaced with a
new one on the same day.)
• The measurement results for calories and fat burned, and the
number of steps are automatically stored in memory on the hour
(e.g. at 0:00, 1:00, 2:00, ... 21:00, 22:00, 23:00). The measurement
results from the hour until the time the battery is replaced will be
deleted for that day.
• When the battery is removed, the time will be reset to “0:00”. Set
the time after inserting the new battery (refer to Chapter 5
“Settings”).
(The measurement results stored in memory and the weight,
height, and stride length settings are not deleted.)
• The attached battery is for trial use. This battery may run out in 4.5
months.
Blinking Battery power is low.
Appears
continuously
Battery power exhausted.
The unit stops counting steps.
Battery life
The battery life will vary depending on how frequently you
workout and on how long the unit is worn.
The following examples offer a guide to expected battery
life.
• Worn during everyday life
- Approx. 4.5 months (4 hours of activity each day)
Everyday life is defined as wearing the unit for 15 hours a day,
of which 4 hours are counted as walking steps.
• Worn only during workouts
- Approx. 6 months
This assumes that the unit is only worn when jogging or
walking for 2 hours (approx. 10,000 steps) a day.
Note:
In both cases, the battery life may be shorter if the amount
of walking or activity increases.
HJA-300-E_A_M.book Page 15 Monday, February 22, 2010 12:02 PM
Page 18

16
9.1 Replacing the battery
1
Loosen the screw of the battery cover on
the back of the unit, and remove the
battery cover by pulling it off in the
direction of the arrow.
Use the supplied screwdriver or use a
small screwdriver to loosen the screw on
the battery cover.
2
Remove the battery with a thin, sturdy,
stick that will not break easily.
Note:
Do not use a pair of metal tweezers or
a screwdriver.
3
Insert the battery (CR2032) with the
positive (+) side face up.
4
Replace the battery cover by
sliding the catch in first, then
tighten the screw.
10 Deleting all settings
Follow the procedure below to delete all the previous
measurement results and settings, including the time, weight,
height, and stride length.
1
Press the SET button on the back of the unit with
a thin, sturdy, stick that will not break easily.
Note:
Do not press the button with a sharp point. This
could cause damage.
The hour setting will flash.
2
Press and at the same time for at least
2 seconds.
After “ALL Clr” has been displayed, the hour setting will
appear.
The measurement results stored in memory and the
settings for the time, weight, height, and stride length are
deleted. To continue using the unit, reset the time, weight,
height, and stride length settings (refer to Chapter 5
“Settings”).
HJA-300-E_A_M.book Page 16 Monday, February 22, 2010 12:02 PM
Page 19

17
EN
11 Maintenance and storage
11.1 Maintenance
Always keep the unit clean.
The unit should be cleaned with a soft dry cloth.
To remove stubborn stains, wipe the unit with a damp cloth
moistened with water or mild detergent. Then wipe it dry.
Maintenance and storage precautions
Do not use volatile liquids, such as benzene, or thinner, to
clean the unit.
Please observe the following storage conditions.
• Do not disassemble or modify the unit. Changes or
modifications not approved by OMRON HEALTHCARE will
void the user warranty.
• Do not subject the unit to strong shocks or vibrations, drop
it, step on it, or leave it at an angle.
• Do not immerse the unit or any of the components in water.
The unit is not waterproof. Do not wash it or touch it with wet
hands. Be careful that water does not get into the unit.
• Do not subject the unit to extreme temperatures, humidity,
moisture, or direct sunlight.
• Do not store the unit where it will be exposed to chemical or
corrosive vapours.
Always store the unit out of the reach of young children.
Remove the batteries if the unit will not be used for a long
time (3 months or more).
12 Troubleshooting
Phenomenon Cause Rectification
Blinks or ap pears
continuously.
Battery weak or
exhausted.
Insert a new 3V lithium
battery type CR2032
(refer to Chapter 9.1).
The display does
not change.
Workout mode is
off.
Workout time, distance,
workout calories burned
and average speed are
only recorded in Workout
mode.
Start Workout mode (refer
to Chapter 6.3).
HJA-300-E_A_M.book Page 17 Monday, February 22, 2010 12:02 PM
Page 20

18
Note:
If a malfunction has occurred and you need to repair your
unit, all settings and measurement results are deleted. We
recommend you to record measurement results.
Physical Activity and Public Health in Older Adults (M. E. Nelson;
et al.)
ACSM/AHA Recommendation; Circulation 2007;116:1094-1105
Physical Activity and Public Health (W. L. Haskell; et al.)
Update: ACSM/AHA Recommendation; Circulation
2007;116:1081-1093
Nothing is
displayed.
Polarities of
battery (+ and -)
aligned in wrong
directions.
Insert battery in correct
alignment (refer to
Chapter 9.1).
Battery weak or
exhausted.
Insert a new 3V lithium
battery type CR2032
(refer to Chapter 9.1).
Energy saving
function active.
Press either of ,
or
(refer to Chapter
7.1).
The distance
display is not
correct.
The stride length
setting is not
correct.
Adjust the stride length
(refer to Chapter 6.3).
Displayed values
are incorrect.
The unit is
attached
incorrectly.
Follow instructions (refer
to Chapter 6.2).
You are walking
at inconsistent
pace.
Cases where the unit may
not be able to count steps
accurately (ref er to
Chapter 7.2).
Settings are
wrong.
Change settings (refer to
Chapter 5.1).
“Err” is displayed.
A malfunction
has occurred.
Remove the battery then
insert it again (refer to
Chapter 9.1).
The display is unusual or the buttons
do not operate normally.
Remove the battery then
insert it again (refer to
Chapter 9.1).
Phenomenon Cause Rectification
HJA-300-E_A_M.book Page 18 Monday, February 22, 2010 12:02 PM
Page 21

19
EN
13 Technical data
These specifications are subject to change without notice. This
OMRON product is produced under the strict quality system of
OMRON HEALTHCARE Co., Ltd. Japan.
* New battery life based on OMRON testing.
OMRON HEALTHCARE EUROPE B.V. guarantees this product for 2
years after date of purchase.
The guarantee does not cover battery, packaging and/or damages of
any kind due to misusage (such as dropping or physical misuse)
caused by the user. Claimed products will only be replaced when
returned together with the original invoice / cash ticket.
Product name Jog style
Type HJA-300-EY/HJA-300-EK
Power supply 3V Lithium battery type CR2032
Battery life Approx. 6 months* (when used for 2 hours a day
[approx. 10,000 steps])
Note:
Supplied battery is for trial use. This battery can
run out within 6 months.
Measurement
range
Workout results
Time 0'00" to 1440'00"
Distance 0.0 to 999.9 km
Calories burned 0 to 59,999 kcal
Average speed 0.0 to 999.9 km/h
Total today
Calories burned today 0 to 59,999 kcal
Fat burned today 0.0 to 999.9 g
Steps today 0 to 999,999 steps
Time 0:00 to 23:59
Capacit y of
memory
Workout results
Time
1 to 7 previous measurements
Distance
1 to 7 previous measurements
Calories burned
1 to 7 previous measurements
Average speed
1 to 7 previous measurements
Total today
Calories burned today 1 to 7 days ago
Fat burned today 1 to 7 days ago
Steps today 1 to 7 days ago
Setting range Time: 0:00 to 23:59 (24-hour display)
Weight: 30 to 136 kg in units of 1 kg
Height: 100 to 199 cm in units of 1 cm
Stride length: 30 to 250 cm in units of 1 cm
Operating
temperature/humidity
-10°C to +40°C/30 to 85% RH
External dimensions
75.5(W) × 33.5(H) × 11.8(D) mm
Weight Approx. 28 g (including battery)
Contents
Activity monitor, Holder, Strap, Clip, 3V Lithium battery
type CR2032, Screwdriver and Instruction manual
HJA-300-E_A_M.book Page 19 Monday, February 22, 2010 12:02 PM
Page 22

20
Correct Disposal of This Product
(Waste Electrical & Electronic Equipment)
This marking shown on the product or its literature,
indicates that it should not be disposed of, with other
household wastes at the end of its working life. To prevent
possible harm to the environment or human health from
uncontrolled waste disposal, please separate this from
other types of wastes and recycle it responsibly to promote
the sustainable reuse of material resources.
Household users should contact either the retailer where
they purchased this product, or their local government
office, for details of where and how they can take this item
for environmentally safe recycling.
Business users should contact their supplier and check the
terms and conditions of the purchase contract. This
product should not be mixed with other commercial wastes
for disposal.
This product does not contain any hazardous substances.
Disposal of used batteries should be carried out in
accordance with the national regulations for the disposal of
batteries.
Battery
HJA-300-E_A_M.book Page 20 Monday, February 22, 2010 12:02 PM
Page 23

21
EN
Made in China
Manufacturer
OMRON HEALTHCARE Co., Ltd.
24, Yamanouchi Yamanoshita-cho,
Ukyo-ku, Kyoto,
615-0084 Japan
EU-representative
OMRON HEALTHCARE EUROPE
B.V.
Kruisweg 577, 2132 NA Hoofddorp,
The Netherlands
www.omron-healthcare.com
Production facility
OMRON (DALIAN) CO., LTD.
Economic & Technical Development
Zone Dalian 116600, China
Subsidiary
OMRON HEALTHCARE UK
LIMITED
Opal Drive
Fox Milne, Milton Keynes MK15
0DG, United Kingdom
OMRON MEDIZINTECHNIK
HANDELSGESELLSCHAFT mbH
John-Deere-Str. 81a, 68163
Mannheim, Germany
www.omron-medizintechnik.de
OMRON Santé France SAS
14, rue de Lisbonne, 93561 Rosnysous-Bois Cedex, France
HJA-300-E_A_M.book Page 21 Monday, February 22, 2010 12:02 PM
Page 24

22
HJA-300-E_A_M.book Page 22 Monday, February 22, 2010 12:02 PM
 Loading...