

Page 1
Keys to Warning Symbols
H7CX-R@-N
Digital Tachometer
EN
INSTRUCTION MANUAL
Thank you for purchasing the OMRON Product.
To ensure the safe application of the Product, read this
manual carefully before using the Product and always keep
it close at hand when the Product is in use.
OMRON Corporation
©All Rights Reserved
For details, refer to the latest datasheet (Cat. No. M079).
OMRON shall not be responsible for conformity with any standards, codes, or regulations that
apply to the combination of the products in the customer's application or use of the product.
Take all necessary steps to determine the suitability of the product for the systems, machines,
and equipment with which it will be used. Know and observe all prohibitions of use applicable to
this product.
NEVER USE THE PRODUCTS FOR AN APPLICATION INVOLVING SERIOUS RISK TO LIFE
OR PROPERTY WITHOUT ENSURING THAT THE SYSTEM AS A WHOLE HAS BEEN
DESIGNED TO ADDRESS THE RISKS, AND THAT THE OMRON PRODUCT IS PROPERLY
RATED AND INSTALLED FOR THE INTENDED USE WITHIN THE OVERALL EQUIPMENT
OR SYSTEM.
See also Product catalog for Warranty and Limitation of Liability.
Suitability for Use
1148655-4C
Mounting and Panel-cutout Dimensions Diagram
Mounting Dimensions (Unit: mm)
Flush Mounting
Y92S-29 (order separately)
Waterproof Packing
48
48
Panel-cutout Dimensions Diagram
(Unit: mm)
Panel cutouts are as shown below
(according to DIN43700).
To allow easier operation, it is recommended
that Adapters be mounted so that the gap
between sides with hooks is at least 15 mm
(i.e., with the panel cutouts separated by at
least 60 mm).
+0.6
−0
45 × 45
60 min.
Note 1: The mounting panel thickness should
be 1 to 5 mm.
Note 2: It is possible to mount counters side
by side, but only in the direction
without the hooks.
n Units mounted
side-by-side
A(48n2.5)
Note 3: If the Tachometers are mounted side by
side, water resistance will be lost.
Parameters must be set using both the DIP switch and the operation keys
on the front panel. Refer to the following for the detailed procedure.
58
15 min.
A
1
0
(The Adapter and Waterproof Packing are
sold separately.)
Y92F-30 (order separately)
Flush Mounting Adapter
Panel
P3GA-11 (order separately)
Back-connecting Socket
(51)
Surface Mounting
P2CF-11(-E) (order separately)
Back-connecting Socket
H7CX-R@-N
48
* These dimensions vary with the
type of DIN track (reference
value).
Package Contents
• Digital Tachometer
• Instruction manual (this document)
89.97.5
100.9
103.2*
Step1
Set the basic parameters.
Item
Input mode *1
1
Counting speed/Minimum
2
input signal width
3
Output mode *3
4
5
Average processing
6
7
NPN/PNP
8
input mode
* The characters displayed in reverse
video are the default settings.
The settings made using the DIP switch can be checked in the DIP switch monitor mode.
*1. The setting is disabled (OFF) for the H7CX-R11W@.
*2. The value is 5 KHz for the H7CX-R11W@.
*3. For the H7CX-R11W@.
Output 1 mode
3
Output 2 mode
4
OFF
Refer to the
table on the right.
Refer to the
table on the right.
Refer to the
table on the right.
---
---
NPNONPNP
Item
Step2
Note: Refer to the datasheet (Cat. No. M079) for detailed parameter settings.
Change to Function Setting Mode.
DIP switch
monitor mode
Terminal Arrangement and Wiring Connections
dip
1off
MODE
MODE
(Factory setting)
ON
OFF
1
2345678
---
ON
OFF
Refer to the table on the right.
Refer to the table on the right.
Powe r ON
+
U
1
1 s min.
1 s min.
Run mode
+
U
1
OFF
ON
OFF
ON
Pin 3
OFF
ON
OFF
ON
Pin 5
OFF
ON
OFF
ON
Pin 2Pin 1
OFF
OFF
ON
ON
Pin 4
Pin 6
Pin 3
OFF
ON
Pin 4
OFF
ON
OFF
OFF
ON
ON
OFF
OFF
ON
ON
Input mode
Tachometer
AMD compatible
Tachometer
AMD compatible
MODE
MODE
Counting speed/
minimum input signal width
30 Hz
10 ms
10 kHz *2
1 ms
Output mode
Upper and lower limit
Area
Upper limit
Lower limit
Average processing
OFF (no average processing)
2 times
4 times
8 times
Output mode
Upper limit
Lower limit
Output mode
Upper limit
Lower limit
3 s min.
Function
setting mode
3 s min.
AMD-S H7CX-R11-N
Connection Sockets: 8PFA
Sensor
Note 1: Wiring must be changed from an 8-pin socket to an 11-pin socket.
2:
3: Order the P2CF-11Connecting Socket separately.
Black (white)
Brown
(red)
Blue
(black)
8PFA
Tc Ta
100/110 VAC
(200/220 VAC)
Take into consideration the length of the wires and the terminal numbers.
Connection Sockets: P2CF-11
3456
2187
TbTa
Tc
Contact
Tb
output
Contact
output
HOLD HOLD
Black
(white)
54678
P2CF-11
9
2311110
100 to 240 VAC
Blue
(black)
Brown (red)
Do not allow pieces of metal, wire clippings, or fine metallic
shavings or fillings from installation to enter the product. Doing so
may occasionally result in electric shock, fire, or malfunction.
Minor injury due to explosion may occasionally occur. Do not use
the Tachometer where subject to flammable or explosive gas.
Fire may occasionally occur. Tighten the terminal screws to the
rated torque.
P2CF Socket terminals: 4.4 lb-in (0.5 N⋅m)
Minor injury due to electric shock may occasionally occur. Do not
touch any of the terminals while power is being supplied. Be sure to
mount the terminal cover after wiring.
The life expectancy of the output relay varies considerably according to its
usage. Use the output relay within its rated load and electrical life
expectancy. If the output relay is used beyond its life expectancy, its
contacts may become fused or there may be a risk of fire. Also, be sure
that the load current does not exceed the rated load current and when
using a heater, be sure to use a thermal switch in the load circuit.
Minor electric shock, fire, or malfunction may occasionally occur.
Do not disassemble, modify, or repair the Tachometer or touch
internal components.
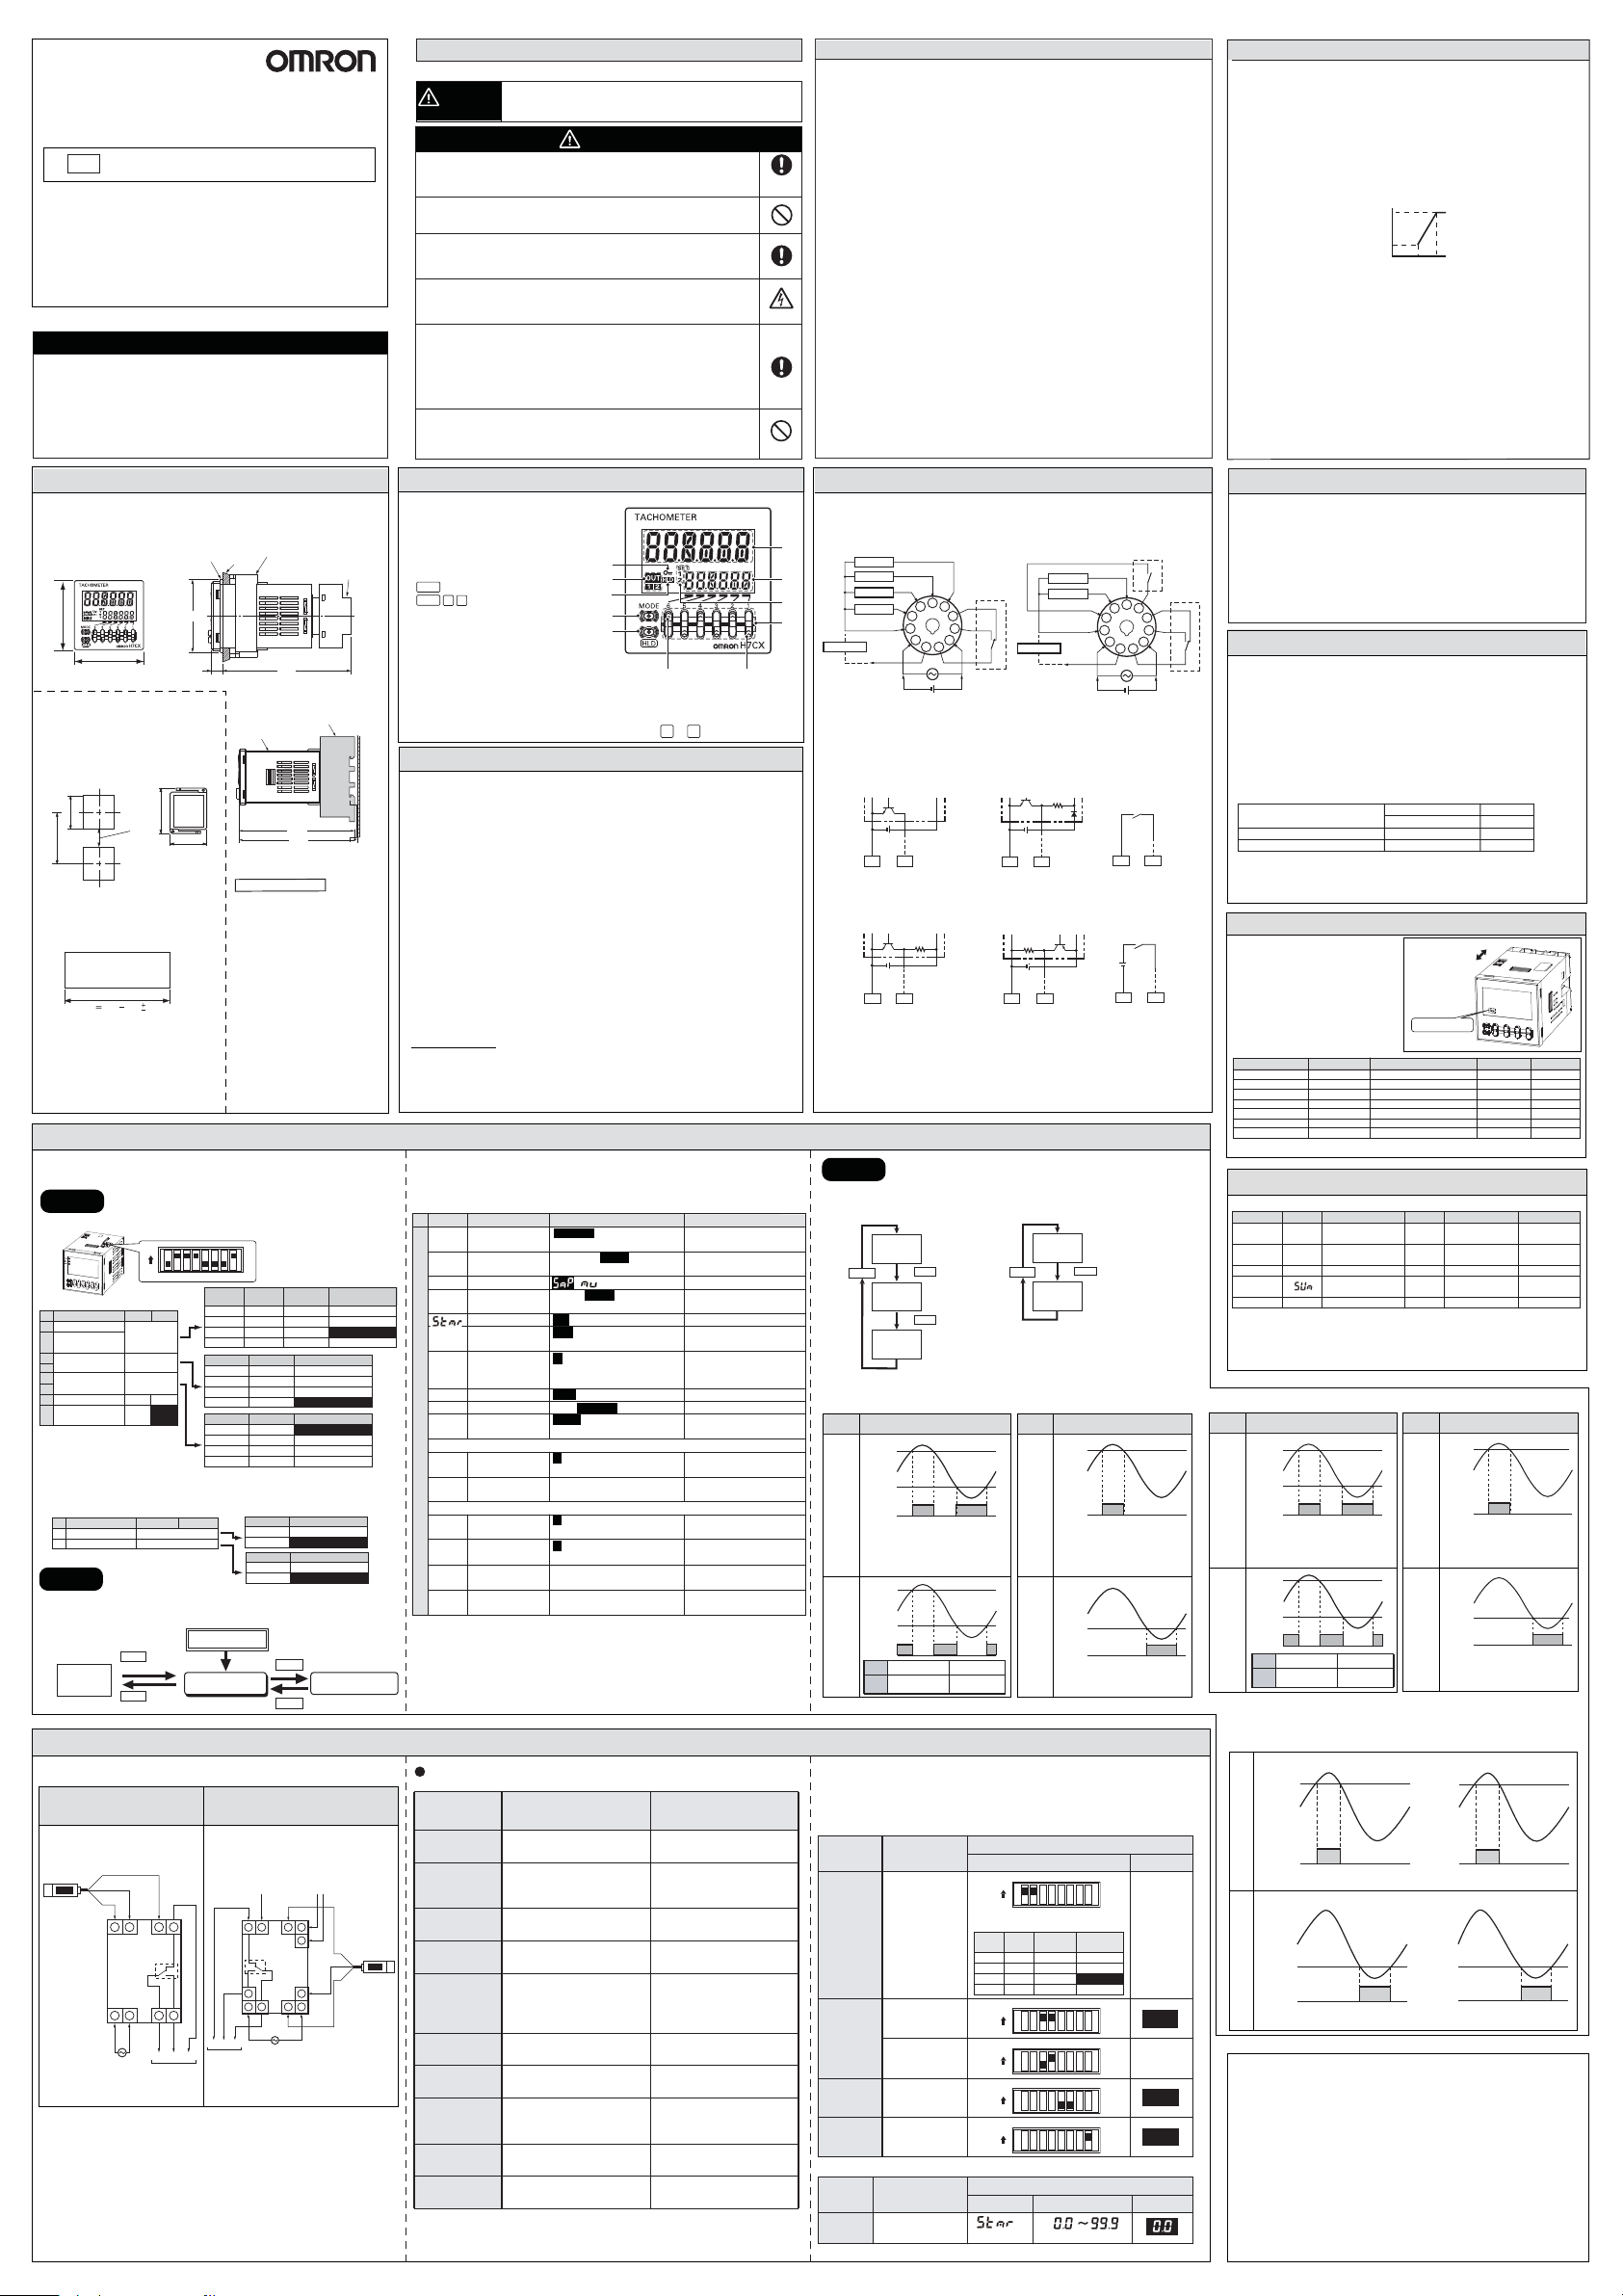
Display Section
1. Hold Indicator (orange)
(Lit when the hold input or hold key is ON.)
2. Key Protect Indicator (orange)
Lit when the key protect switch is ON.
3. Control Output Indicator (orange)
OUT (1-output models)
OUT 1 2 (2-output models)
4. Comparison Value 1, 2 Stage
Indicator
5. Present Value (Main Display)
Character height: 10 mm (red)
6. Comparison Value (Sub-display)
Character height: 6 mm (green)
Operation Keys
7. Mode Key
(Used to switch mode and setting items.)
Power supply voltage 100 to 240 VAC, 50/60 Hz (Other than H7CX-R11@D1)
Allowable voltage fluctuation range
Power consumption
Operating temperature range
Storage temperature range
Operating humidity range
Altitude 2,000 m max.
Recommended fuse T2A, 250VAC, time-lag, low-breaking capacity
Weight Approx. 110 g (main unit only)
Installation environment Over-voltage category II, pollution degree 2. (IEC 61010-1)
Input method
No-voltage input ON impedance: 1 kΩ max. (Leakage current: 12 mA when 0 Ω)
ON residual voltage: 3 V max.
OFF impedance: 100 kΩ min.
Voltage input High (logic) level: 4.5 to 30 VDC
Low (logic) level: 0 to 2 VDC (Input resistance: approx. 4.7 kΩ)
No-voltage (NPN) input/voltage (PNP) input (switchable)
Control output Contact output 250 VAC, 3 A (resistive load)
Electrical life of relay 100,000 operations (at an ambient temperature of 23°C)
Mechanical life of relay 10,000,000 operations (at an ambient temperature of 23°C)
External power supply 12 VDC, 100 mA
Degree of protection IEC IP66, UL508 Type 4X *
Individual mounting:
*
UL 508 Type 4X when all of the following conditions are satisfied:
•
The Y92S-29 waterproof packing and Y92F-30 mounting adapter are used with the
Tachometer. Use only these parts for replacement.
•
The Tachometer is mounted on the flat surface of an enclosure that is rated and marked
"Type 4X for Indoor Use Only."
Set the parameters that cannot be set with the DIP switch.
Set the parameters using the U Key.
The characters displayed in reverse video are the default settings.
Function setting mode
*1:
Converting from the AMD-S to the H7CX-R11-N
Item
Power supply
voltage
Input method
External power
supply
Sensor
Relay output
Output mode
Setting method
*
Detection rotation rate range
Startup time
Life expectancy
Memory backup None
*When set to AMD mode.
SAFETY PRECAUTIONS
CAUTION
Indicates a potentially hazardous situation which, if not
avoided, is likely to result in minor or moderate injury or in
property damage.
CAUTION
Nomenclature
5
2
3
1
7
6
4
9
8
1st digit6th digit
8. Hold Key
(Used to sustain the measurement value
and output.)
9. Up Keys to
1 6
Ratings (Specifications)
12 to 24 VDC/24 VAC, 50/60 Hz (H7CX-R11@D1)
85% to 110% of rated supply voltage (12 to 24 VDC: 90% to 110%)
Approx. 9.4 VA at 100 to 240 VAC,
−10 to 55°C (−10 to 50°C if Tachometer are mounted side by side)
(with no icing or condensation)
−25 to 70°C (with no icing or condensation)
25% to 85%
CDV 42 ot 21/CAV 42 ta W 7.4/AV 2.7 .xorppA
30 VDC, 3 A (resistive load)
Degree of protection on the f ront p anel o f the
Tachometer conforms to
Settings
Parameter name
Display
Decimal point
dp
position
Prescale value
pscl
Averaging method
avgt
Auto-zero time
auto0
Startup time
Peak/bottom
dhld
hold enabled
Output
hys
hysteresis
Output OFF delay
offd
Set value upper limit
sl-h
Key protect
kypt
level
Models other than “-R11W@” Models
Output ON count
on-a
alarm set value
Output ON
on-c
count monitor value
“-R11W@” Models
Output 1 OUT1) ON
on1a
count alarm set value
Output 2 OUT2) ON
on2a
count alarm set value
Output 1 OUT1) ON
on1c
count monitor value
Output 2 OUT2)
on2c
ON count monitor value
After reaching the last set value, the U Key will scroll to the first set value.
Characteristics
Model
100 to 110 VAC
200 to 220 VAC
Voltage input (high: 4 to
14 V, low: 0 to 1 V)
12 VDC ±1 V, 12 mA 12 VDC (±10%), 100 mA
5 A at 200 VAC (resistive
load)
Rotation increase (AMDSU@)
Rotation decrease (AMDSL@)
Input pulse interval (s) Input pulse interval (s) *
6 to 6,000 rpm
(for 1 pulse/rotation)
Always from 0.1 to 10 s
(Always 10 s if not
specified.)
Output relay electrical
operations of 500,000 min.
Set value
------, -----.-,
----.--, ---.--- *1
0.001 to1.000 to 99.999
, *1
0.1 to 999.9
0.0 to 99.9
off, on *1
0 to 99999
0.00 to 19.99
1 to 999999
kp-1, kp-2, kp-3, kp-4,
kp-5, kp-6, kp-7 *1
0 to 9999
---
0
to
9999
0 to 9999
---
---
Set value
---
Displayed only when the mode is
not AMD compatible mode.
---
Displayed only when the mode is
not AMD compatible mode. Unit: second
Unit: second
---
The position of the decimal point for the
value after prescaling will be set according
to the decimal point position setting.
Unit: Second
---
---
× 1,000
The monitor value is only displayed.
It cannot be set.
× 1,000
× 1,000
The monitor value is only displayed.
It cannot be set.
The monitor value is only displayed.
It cannot be set.
AMD-S H7CX-R11-N
100 to 240 VAC
No-voltage input/voltage
input (high: 4.5 to 30 V, low:
0 to 2 V)
3 A at 250 VAC/30 VDC
(resistive load)
HI-LO, AREA, HI-HI, LO-LO
(Set using DIP switch.)
0.00006 to 20,000 rpm *
(for 1 pulse/rotation)
Setting range: 0.0 to 99.9 s
Output relay electrical
operations of 100,000 min.
EEPROM (overwrites:
100,000 times min.)
× 1,000
× 1,000
× 1,000
1) When mounting the Tachometer to a panel, tighten the two mounting screws alternately, a little at a
time, so as to keep them at an equal tightness. If the panel screws are tightened unequally, water may
enter the panel.
2) Store the Tachometer at the specified temperature. If the Tachometer has been stored at a temperature
of less than −10°C, allow the Tachometer to stand at room temperature for at least 3 hours before use.
3) Mounting the Tachometer side-by-side may reduce the life expectancies of internal components.
4) Use the Tachometer within the specified ranges for the ambient operating temperature and humidity.
5) Do not use in the following locations:
• Locations subject to sudden or extreme changes in temperature.
• Locations where high humidity may result in condensation.
• Locations with excessive vibration or shock.
• Locations subject to water.
• Locations subject to oil.
6) Do not use this Tachomet er in dusty environments, in locations where corrosive gasses are present, or in
locations subject to direct sunlight.
7) Install the Tachometer well away from any sources of static electricity, such as pipes transporting
molding materials, powders, or liquids.
8) Do not use the Tachometer outside of the rated ranges for vibration, shock, water exposure, and oil
exposure.
9) Internal elements may be destroyed if a voltage outside the rated voltage range is applied.
10) Separate the Tachometer from sources of noise, such as devices with input signals from power lines
carrying noise, and wiring for I/O signals.
11) Do not connect more than two crimp terminals to the same terminal.
12) Up to two wires of the same size and type can be inserted into a single terminals.
13) Use the specified wires for wiring. Applicable Wires: AWG 18 to AWG 22, solid or twisted, copper
14) Install a switch or circuit breaker that allows the operator to immediately turn OFF the power, and label it
to clearly indicate its function.
15) When the Tachometer is operated with no-voltage input (NPN input), approximately 14 V is output from
the input terminals. Use a sensor that contains a diode.
16) Use a switch, relay, or other contact so that the rated power supply voltage will be reached within 0.1
seconds. If the power supply voltage is not reached quickly enough, the Tachometer may malfunction or
outputs may be unstable.
17) Use a switch, relay, or other contact to turn the power supply OFF instantaneously. Outputs may
malfunction and memory errors may occur if the power supply voltage is decreased gradually.
18) When changing the comparison value during operation, because the H7CX uses a constant read-in
system, the output status will change if the comparison value is changed to a value on the other side of
the present value.
19) When the power is turned ON using the factory settings, the output will turn ON after 999.9 s if no pulses
are received as count input.
20) Do not use organic solvents (such as paint thinners or benzine), strong alkali, or strong acids. They will
damage the external finish.
21) Confirm that indications are working normally, including the backlight LED, and LCD. The indicator LEDs,
LCD, and resin parts may deteriorate more quickly depending on the application environment, preventing
normal indications. Periodic inspection and replacement are required.
22) The waterproof packing may deteriorate, shrink, or harden depending on the application environment.
Periodic inspection and replacement are required.
Precautions for Safe Use
Terminal Arrangement
Wire properly after checking the specifications of the power supply voltage.
H7CX-R11-N/-R11D1-N H7CX-R11W-N/-R11WD1-N
Hold*
Count
Hold*
Hold*
0 V
(−)
Sensor
(+)
power supply
*The hold function is the same whichever terminal is connected. Terminals are not connected
internally and so do not use them for cross wiring.
3
12 VDC
External
Internal circuit
6
5
7
4
8
9
2
10
1
11
OUT
(−)
(+)
(−)
(+)
Sensor
Count 1
Count 2
12 VDC
External
power supply
Internal circuit
OUT2
Internal circuit
6
5
7
4
0 V
8
3
9
2
10
111
OUT1
(−)
(+)
Input Connections
No-voltage Inputs (NPN Inputs)
Open Collector Voltage Output Contact Input
PLC or
sensor
0 V
Hold
Note: Operate with transistor ON
Voltage Inputs (PNP Inputs)
No-contact Input
(NPN Transistor)
Sensor
0 V
Hold
Note: Operate with transistor OFF
Sensor
0 V
Hold
Count
Note: Operate with transistor ON Note: Operate with relay ON
No-contact Input
(PNP Transistor)
Sensor
Count
Note: Operate with transistor ON Note: Operate with relay ON
Count
0 V
Hold
Count
0 V
Contact Input
0 V
Hold
Hold
Count
Count
Step3
Set the comparison values after switching from function setting mode to run mode.
Output Mode: Upper/
Lower Limit or Area
2280.00
Measurement value Measurement value
(Not displayed for R11W)
2280.00
SET1
2300.00
2280.00
SET2
2000.00
MODE
Measurement value
Comparison value 1
MODE
Measurement value
Comparison value 2
MODE
Output Mode Setting
Models Other Than H7CX-R11W@ in Tachometer Mode
Output mode
setting
Upper
and
lower
limit
(HI-LO)
ON condition: Measurement value ≤ Comparison
value 1 or Measurement value ≥ Comparison
value 2
Note:
Area
(AREA)
Operation
Comparison value 2
(Upper-limit)
Measurement
value
Comparison
value 1
(Lower-limit)
OUT
When comparison value 1 ≥ Comparison
value 2, the output is always ON regardless
of the comparison value.
Comparison
value 2
Measurement
value
Comparison
value 1
OUT
Comparison value 1 ≤
Condi-
Comparison value 2
tion
ON
Comparison value 1 ≤
measurement value ≤
condi-
Comparison value 2
tion
Setting Procedure
Perform the following settings to achieve the functions of the
AMD-S using the H7CX-R11-N.
DIP Switch Settings
Model
Item DIP switch pin status Set value
Measuring
ranges
Output
mode
Average
processing
Input mode Voltage Input
AMD-S
0.01 to 0.1 s
(AMD-S@1),
0.1 to 1 s
(AMD-S@2),
1 to 10 s
(AMD-S@3)
Rotation increase
detection
(AMD-SU@)
Rotation decrease
detection
(AMD-SL@)
None
Operation Key Settings
Model
Item Param eters Setting range Set value
Startup
time
Note: The characters displayed in reverse video are the default settings.
AMD-S
Fixed (0.1 to 10 s)
Output Mode:
Upper Limit or Lower Limit
2280.00
2280.00
SET
2300.00
Output mode
setting
Comparison
value
(Upper-limit)
Upper
limit
(HI-HI)
Note:
Measurement value
Lower
Comparison
limit
value
(Lower-limit)
Note:
H7CX-R11-N
1
2345678
Input
mode
Tachometer
AMD compatible
Tachometer
AMD compatible
1
2345678
1
2345678
1
2345678
1
2345678
H7CX-R11-N
Measurement value
MODE
Measurement value
Comparison value
OUT
ON condition: Measurement value ≥
Comparison value
OUT
ON condition: Measurement value ≤
Comparison value
Counting Speed /
Minimum input signal width
10 kHz
MODE
(LO-LO)
Comparison value 1 >
Comparison value 2
Comparison value 2 ≤
measurement value ≤
Comparison value 1
ON
OFF
Set DIP switch pin 1 to ON for
AMD-compatible mode.
Pin 2Pin 1
OFF
OFF
ON
OFF
OFF
ON
ON
ON
ON
OFF
ON
OFF
ON
OFF
ON
OFF
* When set to AMD Compatible Mode
(STMR)
30 Hz
10 ms
1 ms
(99.9 s)(0.0 s)
Operation
*
1 ms
10 ms
Lower
limit
Upper
limit
OFF
PNP
1) An inrush current of approx. 10 A will flow for a short time when the power supply is turned ON. If
the capacity of the power supply is not sufficient, the Tachometer may not start. Be sure to use a
power supply with sufficient capacity.
2) Maintain voltage fluctuations in the power supply within the specified operating voltage range.
3) To allow for the startup time of peripheral devices (e.g., sensors), start Tachometer timing operation
200 ms to 290 ms after turning ON the power. The input signal will not be accepted before 200 to
290 ms has elapsed.
4) The input signal will not be accepted after 5 to 1005 ms has elapsed from when the power supply is
turned OFF.
5) Inrush current generated by turning ON or OFF the power supply may deteriorate contacts on the
power supply circuit. Turn ON or OFF to a device with the rated current of more than 10 A.
6) The capacity of the external power supply is 100 mA at 12 V. When using a 24 VAC/12 to 24 VDC
power supply, reduce the load with the power supply voltage, as shown in the following diagram
(DC power supplies only).
7) If the prescale value setting is incorrect, a counting error will occur. Check that the settings are
correct before using this function.
8) Make sure that all settings are appropriate for the application. Unexpected operation resulting in
property damage or accidents may occur if the settings are not appropriate.
9) Do not leave the Tachometer for long periods at a high temperature with output current in the ON
state. Doing so may result in the premature deterioration of internal components (e.g., electrolytic
capacitors).
10) EEPROM is used as memory when the power is interrupted. The write life of the EEPROM is
100,000 writes. The EEPROM is written when the power is turned OFF or when switching from
function setting mode to run mode.
11) Dispose of the product according to local ordinances as they apply.
100
Load
current
(mA)
20
0
10.8 15
Power supply voltage (VDC)
Conformance to EN/IEC Standards
Precautions for Correct Use
• When conforming to EMC standards, refer to the information provided in this
Instruction Manual for cable selection and other conditions.
• This is a class A product. In residential areas it may cause radio interference, in
which case the user may be required to take adequate measures to reduce
interference.
• Basic insulation is provided between power supply and input terminals and
between input and output terminals.
• Connect the input and output terminals to devices that do not have any exposed
charged parts.
• When double insulation is required, apply double insulation as defined in IEC
60664 that is suitable for the maximum operating voltage with clearances or
solid insulation.
Precautions for Compliance with UL Standards and CSA Standards
Notice to Users of the H7CX in the USA and Canada
Please use the following installation information instead of the general information in the instruction
manuals in order to use the product under certified conditions of UL and CSA when the product is
installed in the USA or Canada. These conditions are required by NFPA 70, National Electrical Code in
the USA and the Canadian Electrical Code, Part I in Canada and may vary from information given in
the product manuals or safety precautions.
• Installation in a Panel
H7CX is normally installed on a flat surface in an operation panel. Use a Type 1 Enclosure for the
operation panel.
• Use the isolated source for Inputs.
• Environment
Surrounding Air Temperature: −10 to 40°C
Use an isolated source for power input for H7CX-@D1.•
• Accessories (Order Separately)
Track Mounting/Front Connecting Socket
Flush Mounting Adapter
Waterproof Packing
11-pin
11-pin, finger-safe type
---
---
Key-protect Switch Settings
When the key-protect switch is ON,
individual key operations can be
disabled to preven t setting errors
according to the key prot ect leve ls
(KP-1 to KP-7) shown in the
following table.
* Key protect levels are set in
function setting mode.
Level
*Mode change
KP-1 (default setting)
KP-2
KP-3
KP-4
KP-5
KP-6
KP-7
Invalid
Invalid
Invalid
Invalid
Invalid
Invalid
Invalid
OFF (disable)
(Factory setting)
Key protect indicator
Display switch in the run mode
Vali d
Vali d
Vali d
Vali d
Invalid
Invalid
Invalid
* Changing mode to DIP switch monitor mode or function setting mode.
Self-diagnostic Functions
The following displays will appear if an error occurs.
Main display
ffffff
*3
e
1
e2
e2
e3 *
4
*1. This includes times when the life of the EEPROM has expired.
*2. Occurs when the measurement value reaches 999,999.
*3. Display flashes (1-second cycles).
*4. The normal display and e3 will appear alternately.
When the Hold Key is pressed, e3 with no longer be displayed even if the alarm set value is exceeded.
(Monitoring is possible, however, because the counter will continue without clearing the output ON count.)
Models Other Than H7CX-R11W@ in AMD Compatible Mode
Output mode
setting
Comparison value 2
(Upper-limit)
Measurement
Upper
value
and
Comparison
value 1
lower
(Lower-limit)
limit
OUT
(HI-LO)
ON condition: Measurement value < Comparison
value 1 or Measurement value ≥ Comparison
value 2
Note:
When comparison value 1 ≥ comparison
value 2, the output is always ON regardless
of the comparison value.
Comparison
value 2
Measurement
value
Comparison
Area
value 1
(AREA)
OUT
Comparison value 1 ≤
Condi-
Comparison value 2
tion
ON
Comparison value 1 ≤
measurement value <
condi-
Comparison value 2
tion
*If time “a” is exceeded during operation, the output will turn ON. If time “b” is exceeded during
operation, the output will turn OFF. (If average processing is enabled, the output operation will be
performed when the time is exceeded once.)
H7CX-R11W@
Output 1
Comparison
value 1
CP1 display
value
Upper
limit
(HI-HI)
OUT1
ON condition for output 1: CP1 present value (display value) ≥ Comparison value 1
ON condition for output 2: CP2 present value (display value) ≥ Comparison value 2
Output 1
CP1
display value
Comparison
Lower
value 1
limit
(LO-LO)
OUT1
ON condition for output 1: CP1 present value (display value) ≤ Comparison value 1
ON condition for output 2: CP2 present value (display value) ≤ Comparison value 2
OMRON EUROPE B.V.
Wegalaan 67-69-2132 JD Hoofddorp
The Netherlands
Tel: (31)2356-81-300/Fax: (31)2356-81-388
OMRON ELECTRONICS LLC (U.S.A.)
Tel: (1) 847-843-7900/Fax: (1) 847-843-7787
OMRON ASIA PACIFIC PTE. LTD. (SINGAPORE)
Tel: (65) 6835-3011/Fax: (65) 6835-2711
OMRON (CHINA) CO., LTD.
Tel: (86) 21-5037-2222/Fax: (86) 21-5037-2200
Sub-display
No change
OFF
OFF
No change
Operation
Description
Measurement value
overflow*2
CPU error
Memory error (RAM)
Memory error
(EEP-ROM)*1
Output Counter Overflow
a
b
Comparison value 1 >
Comparison value 2
Comparison value 2 ≤
measurement value <
Comparison value 1
Output status
No change
OFF
OFF
OFF
No change
Output mode
setting
Upper
limit
(HI-HI)
Lower
limit
(LO-LO)
Output 2
Comparison
CP2 display
Output 2
display value
Comparison
P2CF-11
P2CF-11-E
Y92F-30
Y92S-29
ON (enable)
Hold Key
Valid
Invalid
Valid
Invalid
Invalid
Valid
Invalid
Correction method
Measurement value ≤ 999999
Either press the hold
key or reset the power supply.
Turn ON the power again
Hold key
Hold Key
Operation
Comparison
value
(Upper-limit)
Measurement value
OUT
Note:
ON condition: Measurement value ≥
Comparison value
Measurement value
Comparison
value
(Lower-limit)
OUT
Note:
ON condition: Measurement value <
Comparison value
value 2
value
OUT2
CP2
value 2
OUT2
Up Key
Valid
Valid
Invalid
Invalid
Invalid
Valid
Valid
Set value after reset
No change
No change
No change
Factory setting.
No change
a
b
Page 2
注意
注意
ご使用に際してのご承諾事項
形H7CX-R□-N
電子タコメータ
JPN
オムロン製品をお買い上げいただきありがとうござ い ま す 。
この製品を安 全に正しく使用していただくために 、お使いに
なる前にこの取扱説明書をお読みになり、十分にご理解くだ
さい 。お読みになったあとも、いつも手元に置いてご使用く
ださい 。
©All Rights Reserved
詳細は、最新版のカタログ(SGTB-014)を参 照してください 。
ご使用に際してのご承諾事項
下記用途に使用される場合、当社営業担当者までご相談のうえ仕様書などによりご確認いただくとともに 、
定格・性能に対し余裕を持った使い方や、万一故障があっても危険を最小にする安全回路などの安全対
策を講じてください 。
a) 屋外の用途、潜在的な化学的汚染あるいは電気的妨害を被る用途またはカタログ、取
扱説明書等に記載のない条件や環境での使用
b) 原子力制御設備、焼却設備、鉄道・航空・車両設備、医用機械、娯楽機械、安全装置、
および行政機関や個別業界の規制に従う設備
c) 人命や財産に危険が及びうるシ ステ ム・機械・装置
d) ガス、水道、電 気の供給システムや24時間連続運転システムなど高い信頼性が必要な
設備
e) その他 、上記 a)〜 d)に準ずる、高度な安 全性が 必要とされる 用 途
*上記は適合用途の条件の一 部です。当社のベスト、 総合カタログ、データシート等最 新 版
のカタログ、マニュアルに記載の保証・免責事項の内容をよく読ん でご 使 用ください 。
取扱説明書
安全上のご注意
●警告表示の意味
正しい 取 扱 いをしなければ 、この危険 のために、時
に軽傷・中程度の傷害をおったり、あるいは 物 的
注意
損害を受ける恐れがあります 。
注意
軽度の感電、発火、機器の故障が稀に起こる恐れがあり
ます 。製品の中に金属、導線または、取り付け加工中の
切粉などが入らないようにしてください 。
爆発により稀に軽度の傷害の恐れがあります。引火性、
爆発性ガスのある所では使用しないでください 。
発火が稀に起こる恐れがあります。端子ネジは下記の規
定トルクで締めてください 。
P2CF࠰ࠤ࠶࠻端子: 4.4 Lb-In(0.5 N・m)
感電により軽度の傷害が稀に起こる恐れがあります。通
電中は端子に触らないでください 。また 、配線後、必ず端
子カバーを取り付けてください 。
出力リレーの寿命は、開閉容量、開閉条件により大きく異
なるので必ず実使用条件を考慮し、定格負荷、電気的寿
命回数内でご使用ください 。寿命を超えた状態で使用す
ると接点溶着や焼損の恐れがあります 。また 、負荷電流は
必ず定格以下でご使用いただき、ヒータ等を使 用 する場
合は、必ず負荷回路にサーモ・スイッチをご使用ください 。
軽度の感電、発火、機器の故障が稀に起こる恐れがありま
す。分解、改造、修理したり、内部に触らないでください 。
1)パネルへの 取り付けの際は2ヵ所 のねじを交互 にバランスを取りながらしっ かり締 めてください 。
安全上の要点
バランスがとれていない場合、パネルの内部に水が浸入する可能性があります 。
2)保存は、記載された定格範囲内としてください 。また 、−10℃以下で保存後、使用する場合は、常
温に3時間以上放置してから通電してくださ い 。
3)密着取り付けをすると内部部品の寿命が短くなる恐 れ があります。
4)使用周囲温度や使用周囲湿度については、記載された定格範囲内でご使用ください 。
5)下記環境下での使用は避けてください 。
・ 温度変化の激しいところ。
・ 湿 度が高く結 露が生じる恐れのあるところ
・振動、衝撃の影響が大きいところ
・水がかかるところ
・被油のあるところ
粉塵の多い場所、腐食ガスの発生する場所、直射日光の当たる場所での使用は避けてください 。
6)
7)多量の静電気が発生する環境(成形材料、粉、流体材料をパイプ搬送する場合など)でご使 用
の場合は静電気発生源を製品本体より離してください 。
8)定格以外の電圧を印加しますと、内部素子が破壊する恐れがあります 。
9)端子の極性は、誤配線のないようにしてくださ い 。
10)ノイズ発生源、ノイズがのった強電線から入力信号源の機器、入力信号線の配線、および 製 品
本体を離してください 。
11)圧着端子を使用する場合は1つの端子に2個までとしてください 。
配線は1端子あたり2本までは締め付けられますが、その場合、2本は同じ線種で使用してください 。
12)
13)配線に使用する適用電線は記載された適切なものを使用してください 。
適用電線 AWG18〜 22 単線またはより線 銅
作業者がすぐ電源をOFFできるよう、スイッチまたはサーキットブレーカを設 置し、適切に表示してください 。
14)
15)無電圧入力(NPN入力)で使用される場合、入力端子より約14Vが出力されます。ダイオードの
入ったセンサをご 使用ください 。
16)電源電圧は0.1秒以内に定格電圧に達するようにス イッチ、リレーなどの接点を 介して一気 に印
加してください 。徐々に電圧を印加しますと、電源リセットしなかったり出力の誤動作が発生するこ
とがあります 。
17)電源遮断時はスイッチ 、リレーなどの接 点を介して一 気 に行ってください 。徐々に電圧を低下させ
ますと、出力の誤動作やメモリ異常が発生することがあります。
18)常時読込方式を採用しているため、動作中に比較値を変更する場合に、現在計測値をまたぐよ
うな変 更をすると出力 状態に 影響します。
19)工場出荷時の設定で電源を投入し、カウント入力にパルスが入らない状態で放置すると999.9
秒後に出力がONします。
20)本体の外装は有機溶剤(シンナー ・ベンジンなど)強アルカリ性、強酸物質に侵されますので使
用しない でください 。
21)表示(バックライトLED、LCD)が正常に動作していることをご確認ください 。ご使用環境によって
は、LED,LCD,樹脂部品の劣化を早め、表示不良になることがあります ので 、定期的な点検お
よび 交換をお 願いします。
22)防水パッキンはご使用環境によっては、劣化・収縮および硬化するため定期的な点検および
交換をお願いします。
1)電源投入時に短時間ですが突入電流が流れ( 約10A)、電源の容 量によっては起動しな
使用上の注意
いことがありますので 、充分な容量の電源をご使用ください 。
2)電源電圧の変動範囲は、許容範囲内としてください 。
3)タコメータの周辺機器(センサ等)の立ち上がり時間を考 慮して、電源ONから200 〜
290ms経過後にタコメータ 動 作を 開 始します。200 〜 290msの前では入力信号の受付
をしないのでご注意ください 。
4)電源OFFから5 〜 1005ms経過 後は入 力を受け付けませんのでご注意ください 。
5)電源ON/OFF
6)外部供給電源の容量は12V 100mAです 。
7)プリスケール値の設 定を間 違えるとカウント誤 差に つながります 。設定に間違いがないか
8)各種設定値は、計測対象に合わせて正しく設 定し てください 。設定内容と計測対象の内
9)高温中に長時間、出力電流を流した状態で放置されますと、内部部品(電解コンデンサ
10)EEP-ROMにより停電記憶を行っています。EEP-ROMの書き換え寿命は10万回です。
11)本製品を廃棄する場合は、各地方自治体の産業廃棄物処理方法に従って処理してくだ
時の突入電流によって電源回路上の接点の劣化が考えられ
格10A以上の機器での開閉をおすすめします 。
ただしAC24V/DC12〜 24V仕 様の機 種で外部 供給
電源をご使用の場合、供給する電源電圧に応じて右図
のように 負 荷を 軽 減し てください 。(DC電圧供給時のみ)
確かめてからご使用ください 。
容が異なる場合には、意図しない動作により装置の破損や事故の原因になります 。
等)の劣化を早める恐れがあります の で避 けてください 。
EEP-ROMは電源OFF時および機能設定モードから運転モードに移行する時 に書き換
えます 。
さい 。
100
負荷
電流
(mA)
20
0
電源電圧(VDC)
ますの で 、定
10.8 15
取付およびパネル加工寸法図
●取付寸法図(単位:mm)
(アダプタ・防水パッキンは別売です)
〈埋込取付〉
形Y92S-29(別売)
防水パッキン
48
48
●パネル加工寸法図(単位:mm)
標準パネルカットは下図のとおりです。
(DIN43700 準拠)
アダプタのフック側方向への取付間隔は、作
業性を考慮すると15mm 以上(パネルカット
間隔60mm 以上)あけることを推 奨します。
+0.6
ー0
□45
60以上
注1. 取付パネルの板厚は1〜5mmが適当で
す。
注2. アダプタの取付により密着取付が可能
です。(ただしフックのない方 向の み)
(51)
58
15以上
48
形Y92F-30(別売)
埋込み取付用アダプタ
パネル
〈表面取付〉
形P3GA-11(別売)
裏面接続ソケット
89.97.5
形P2CF-11(-E)(別売)
表面接続ソケット
形H7CX-R□-N
100.9
103.2
*
DINレールの種類により異なり
ます。
*
(参考値)
梱包内容
● 製品本体
● 取扱説明書(本紙)
n個密着取付
A
1
A(48n2.5)
0
注3. 密着取り付け時は、耐水性が失われます。
パラメータを 設 定 するには ディップス イッチによる設 定と前 面キーによる設 定の
両方が必要になります 。詳細は以下手順をご覧ください 。
Step1
●基本的なパラメータの設定を行います。
項目
入力モード*1
1
計数速度 /
2
最小入力信号幅
3
出力モード*3
4
5
平均回数
6
−
7
NPN/PNP入力
8
モード切替
※反転文字は工場出荷時の設定です。
ディップスイッチで設定した内容はディップスイッチモニタモードで確認できます。
*1形H7CX-R11W□の場合、設定内容は無効(OFF設定)になります。
*2形H7CX-R11W□の場合、5kHzになります。
*3形H7CX-R11W□の場合
項目
3
出力1モード
4
出力2モード
ON
OFF
1
OFF
右記参照
右記参照
右記参照
ーー
NPNONPNP
OFF
右記参照
右記参照
(出荷時設定値)
2345678
スイッチ1
OFF
OFF
スイッチ3
スイッチ5
ON
ON
ON
OFF
ON
OFF
ON
OFF
ON
OFF
ON
スイッチ3
OFF
ON
スイッチ4
OFF
ON
スイッチ2
OFF
OFF
ON
ON
スイッチ4
OFF
OFF
ON
ON
スイッチ6
OFF
OFF
ON
ON
出力モード
出力モード
入力モード
タコメータ
AMD互換
タコメータ
AMD互換
出力モード
上下限
平均回数
OFF(平均化処理なし)
上限
下限
上限
下限
計数速度/最小入力信号幅
10kHz*2
範囲
上限
下限
2回
4回
8回
Step2
※各パラメータの設定値の詳細は、カタログを参照してください。
●運転モードを機能設定モードに 切 替えます。
ディップスイッチ
モニタモード
dip
1off
1 秒以上押す
MODE
1 秒以上押す
MODE
1 秒以上押す
+
+
電源投入
U
1
運転モード
U
1
MODE
MODE
3 秒以上押す
機能設定モード
3 秒以上押す
●表示部
①ホールド表示
(ホールド入力またはホールドキー O N 時 に 点 灯 )
②キープロテクト表示(橙色)
キープロテクトスイッチON時に点灯
③制御出力表示(橙色)
OUT(1出力タイプ)
OUT12(2出力タイプ)
④比較値1、2表示の段階表示
⑤計測値(第1表示)
(文字高さ10mm、赤色)
⑥比較値(第2表示)
(文字高さ6mm、緑色)
●操作キー部
⑦モードキー
(モード移行、設定項目の切替)
⑧ホールドキー
(計測値、出力を保持)
⑨アップキー
・EMC に適合するための、ケーブル選定・その他の条件については、本取扱説明
書の記載内容を参照してください 。
・この商 品は「classA」(工業環境商品 )です。住宅環境でご利用されると、電波妨
害の原因となる可能性があります 。その場合には電波妨害に対する適切な対策が
必要となります 。
・電源−入力−出力間は基礎絶縁です。
・入力、出力端 子は露出した充 電部をもたない装置に接続してください 。
・二重絶縁が必要な場合、空間距離や固体絶縁などにより最高使用電圧に適した、
IE60664 にて定義されている二重絶縁を施してください 。
●ディップスイッチで設定できないパラメータを設定します。
●各パラメータは
反転文字は工場出荷時の設定です。
パラメータ名
画面
小数点位置
dp
プリスケール 値
pscl
平均方法
avgt
オートゼロ 時 間
auto0
起動補償タイマ
stmr
ピーク / ボトム
30Hz
10ms
1ms
dhld
ホールド有 効
出力ヒステリシス
機能設定モ ー ド
hys
出力オフディレイ
offd
設定リミット上 限
sl-h
キープロテクト
kypt
レベル
●-R11W□タイプ以外の場合
出力 ON 回数
on-a
警報設定値
出力 ON 回数
on-c
モニタ値
●-R11W□タイプの場合
出力 1(OUT1)
on1a
ON 回数警報設定値
出力 2(OUT2)
on2a
ON 回数警報設定値
出力1(OUT1)
on1c
ON 回数モニタ値
出力2(OUT2)
on2c
ON 回数モニタ値
※1:設定値が最後尾に来たとき、Uキーで再び先頭にスクロールします。
形AMD-Sから形H7CX-R11-Nへの置換
●端子配置 /配線接続
形AMD-S 形AMD-S
・接続ソケット:形8PFA ・接続ソケット:形P2CF-11
センサ
※1.8ピン⇒11ピンへの配線変更が必要です。
※2.配線の長さ、端子番号にはご留意ください 。
※3.接続ソケット(形P2CF-11)は別売です。
黒(白)
茶(赤)
青(黒)
形8PFA
AC100/110V
(AC200/220V)
Tc Ta
リレー出 力
3456
2187
Tb
形H7CX-R11-N 形H7CX-R11-N
HOLD HOLD
黒(白)
54678
形P2CF-11
青(黒)
2311110
茶(赤)
TbTa
リレー出 力
9
Tc
AC100〜240V
●性能
電源電圧
入力方式
外部供給電源
リレー出力
センサ
出力モード
設定方法
検出回転数範囲
起動補償タイマ
寿命
停電記憶方式
*AMDモードに設定した場合
フロント部の名称
(橙色)
2
3
1
7
8
1 6
〜
EN/IEC規格対応について
U キーで設定します。
設定値
------,-----.-,
----.--,---.---※1
0.001 〜 1.000 〜 99.999
smp,mv※1
0.1 〜 999.9
0.0 〜 99.9
off,on※1
0 〜 99999
0.00 〜 19.99
1 〜 999999
kp-1,kp-2,kp-3,kp-4,
kp-5,kp-6,kp-7※1
0 〜 9999
−
0 〜 9999
0 〜 9999
−
−
・AC100〜110V
・AC200〜220V
電圧入力
(H:4〜14V,L:0〜1V)
DC12V±1V12mA
AC200V5A(抵抗負荷)
回転上昇(形AMD-SU□)
回転低下(形AMD-SL□)
入力パルス間隔(s)
6〜6000rpm
(1パルス/回転の時)
0.1〜10sの範囲で固 定
(特に指定がない場合は10s固定)
出力リレー
電気的50万回以上
無し
・AC100〜240V
無電圧入力/
電圧入力(H:4.5〜30V,L:0〜2V)
DC12V(±10%)100mA
AC250V/DC30V3A(抵抗負荷)
上下限、範囲、上限、下限
(ディップスイッチにて切替え可能)
入力パルス間隔(s)*
0.00006〜20000rpm*
(1パルス/回転の時)
0.0〜99.9sで可変可能
出力リレー
電気的10万回以上
EEP-ROM
5
6
4
9
1桁目6桁目
設定方法
特記事項
−
AMD 互換モード以外
の時のみ表示
−
AMD 互換モード以外
の時のみ表示。単位:秒
単位:秒
−
プリスケール後の値を対
象とし、小数点位置は小
数点位置設定にしたがう。
単位:秒
−
−
×1000
モニタ値の表示のみ。
設定ではありません 。
×1000
×1000
×1000
モニタ値の表示のみ。
設定ではありません 。
×1000
モニタ値の表示のみ。
設定ではありません 。
×1000
(書換え回数10万回以上)
定格(仕様)
電源電圧 ・AC100 〜 240V50/60Hz
・AC24V50/60Hz / DC12 〜 24V
許容電圧変動範囲
消費電力 約9.4VA(AC100〜240V)、
約7.2VA/4.7W(AC24V/DC12
使用温度範囲
(ただし、氷結、結露しないこと)
保存温度範囲 −25 〜+70℃(ただし、氷結、結露しないこと)
使用周囲湿度 25 〜 85%
高度 2,000m以下
推奨ヒューズ T2A、AC250V、タイムラグ ヒューズ 、低遮断容量
質量 約110g(本体のみ)
設置環境 過電圧カテゴリⅡ、汚染度2(IEC61010-1による)
入力方式
無電圧入力 短絡時インピーダン ス: 1 kΩ 以 下(0Ω時流出電流12mA)、
電圧入力 Hレベル:DC4.5〜 30V、Lレベル:DC0 〜 2V(入力
抵抗約4.7kΩ)
無電圧(NPN)入力/電圧(PNP)入力(切替)
制御出力 リレー出力 AC250V 3A(抵抗負荷 )
DC30V 3A(抵抗負荷)
リレーの電気的寿命 10万回(周囲温度条件:23℃)
リレーの機械的寿命 1000万回(周囲温度条件:23℃)
外部供給電源 DC12V100mA
保護構造 IEC規格IP66、UL508Type4X*
*単品取付け:フロント部の保護構造は、以下の条件が全て満たされた場合
・防水パッキン形Y92S-29と取付アダプタ形Y92F-30をタコメータと共 に
・タコメータは、Type4XforIndoorUseOnlyの認定の表示がある制
Step3
●機能設定モードから運転 モードに切替えた後、比較値を設定します。
<出力モード( 上下限、範囲 )> <出力モード ( 上限、下限 )>
MODE
■出力モードの設 定
形H7CX-R11W□以外(タコメータモード時)
出力モード
の設定
(上限値)
(下限値)
上下限
ON条件:計測値≦比較値1または
注.比較値1≧比較値2の場合、比較値
比較値2
比較値1
範囲
ON条件
●設定方法
形AMD-Sの機能を形H7CX-R11-Nで実現させるためには下表のとおり設定してください 。
【ディップスイッチ 設 定 】 ※反転文字は、出荷時の設 定です。
計測範囲
出力モード
平均回数
入力モード
【前面キー設定】
起動補償
タイマ
定格電源電圧の85〜 110%(DC12 〜 24Vは90〜 110%)
−10 〜+5 5℃(密着取付時:−10 〜+50℃
〜
短絡時残留電圧:3V以下、開放時インピーダンス:100kΩ以上
に、UL508Type4Xに適合します。
使用する。取り替え時も、これらの 部 品を使 用 する 。
御ボックスの 平 面 に 取り付 ける。
2280.00
2280.00
SET1
2280.00
SET2
比較値2
計測値
比較値1
OUT
にかかわらず、常時 ONします。
計測値
OUT
条件
(-R11W は非表示)
MODE
2300.00
MODE
2000.00
動作
計測値≧比較値2
比較値1≦比較値2
比較値1≦計測値≦比較値2
計測値
計測値
比較値 1
計測値
比較値 2
比較値1>比較値2
比較値2≦計測値≦比較値1
形AMD-S
0.01〜0.1s
(形AMD-S□1)
0.1〜1s
(形AMD-S□2)
0.1〜1s
(形AMD-S□2)
回転上昇検出
(形AMD-SU□)
回転低下検出
(形AMD-SL□)
無し
電圧入力
形AMD-S
固定(0.1〜10s)
AMD互換モードにするには、ディップ
スイッチ1 をO N にしてください 。
スイッチ1
ON
ON
パラメータ
(STMR)
2280.00
MODE
2280.00
SET
2300.00
出力モード
の設定
比較値
(上限値)
計測値
上限
OUT
注.ON条件:計測値≧比較値
計測値
比較値
(下限値)
下限
OUT
注 .ON条件:計測値≦比較値
形H7CX-R11-N
ディップスイッチ状態 設定値
ON
OFF
1
2345678
スイッチ2
入力モード
OFF
ON
ON
OFF
1
ON
OFF
1
ON
OFF
1
ON
OFF
1
計数速度/最小入力信号幅
AMD互換
AMD互換
2345678
2345678
2345678
2345678
※AMD 互換モードに設定した場合
形H7CX-R11-N
設定範囲
〜99.9stmr
0.0
(99.9s)
(0.0s)
24V)
MODE
動作
10ms
1ms
計測値
計測値
比較値
)
1ms
10ms
下限
上限
OFF
PNP
設定値
0.0
端子配置
・電源仕様を確認し、配線をしてください 。
形 H7CX-R11-N/-R11D1-N 形 H7CX-R11W-N/-R11WD1-N
(−)
センサなど
(+)
*. どの端 子に接 続してもホールド機能は同じです。端子は内部で接 続していませ
入力の接続
●無電圧入力(NPN入力)
〈オープンコレクタ〉
PLC、
センサなど
●電圧入力(PNP入力)
〈無接点入力(NPNトランジスタ)〉 〈無接点入力(PNPトランジスタ)〉
センサなど
形H7CX--R11W□以外(AMD互換モード時)
出力モード
の設定
上下限
範囲
※計測中にaの時間を過ぎた場合は、OUT=ON、bの時間を過ぎた場合はOUT=OFFとなります 。
(平均有効の場合でも、1度経過すれば出力動作します)。
形H7CX-R11W□の場合
上限
(HI)
下限
(LO)
*
ホールド
カウント
*
ホールド
ホールド
DC12V
外部供給電源
*
4
0V
3
内部回路
6
5
7
8
9
2
10
1
11
(+)(−)
(−)
(+)
OUT
んので、渡り配線には使用しないでください 。
〈電圧出力〉 〈有接点入力〉
センサなど
0V
ホールド
カウント
※トランジスタONで動作
0V
ホールド
カウント
※トランジ スタO F Fで 動 作
動作
比較値2
(上限値)
計測値
比較値1
(下限値)
OUT
ON条件:計測値<比較値1または
計測値≧比較値2
注.比較値1≧比較値2の場合、比較値
にかかわらず、常時 ONします。
比較値2
計測値
比較値1
OUT
比較値1≦比較値2
条件
比較値1≦計測値<比較値2
ON条件
OUT1の場合
比較値1
CP1表示値
OUT1
OUT1の場合
CP1表示値
比較値1
OUT1
比較値1>比較値2
比較値2≦計測値<比較値1
OUT1のON条件:CP1現在計測(表示値)≧比較値1
OUT2のON条件:CP2現在計測(表示値)≧比較値2
OUT1のON条件:CP1現在計測(表示値)≦比較値1
OUT2のON条件:CP2現在計測(表示値)≦比較値2
センサなど
b
※トランジスタONで動作
※トランジスタONで動作
出力モード
の設定
上限
下限
カウント1
カウント2
0V
センサなど
DC12V
外部供給電源
0V
ホールド
カウント
ホールド
カウント
0V
比較値
(上限値)
計測値
OUT
注.ON条件:計測値≧比較値
計測値
比較値
(下限値)
OUT
注 .ON条件:計測値<比較値
OUT2の場合
比較値2
CP2表示値
OUT2
OUT2の場合
CP2表示値
比較値2
OUT2
内部回路
6
5
7
4
3
2
1
11
(+)(−)
※接点ONで動作
〈有接点入力〉
※接点ONで動作
動作
8
9
10
0V
0V
キープロテクトスイッチの 設 定
キープロテクトスイッチ「ON」時は、
下表のキープロテクトレ ベ ル(KP-1
〜KP-7)に応じて、各キーの操作を
禁止し、誤設定を防止することがで
きます 。
※キープロテクトレベルは機能設定モード
で設定します。
*モードの移行
レベル
KP-1(初期値)
KP-2
KP-3
KP-4
KP-5
KP-6
KP-7
*「ディップスイッチ モ ニタモ ード」・「機能設定モード」への移 行
不可
不可
不可
不可
不可
不可
不可
キープロテクト表示
運転モードでの表示切替
可
可
可
可
不可
不可
不可
OFF(無効)
(出荷時設定)
ホールドキー
可
不可
可
不可
不可
可
不可
ON(有効)
アップキー
可
可
不可
不可
不可
可
可
自己診断機能
異常が発 生した時は下 記の表 示になります。
第1表示
ffffff
e
1
e2
e2
e3
*4
*1.EEP-ROMの書き換え寿命に達した場合も含みます。
*2.計測値が999999を上回った場合に発生します。
*3.点滅表示します。(1 秒周期)
*4. e3と通常表示を交互に表示します。
ホールドキーを押すと、警報設定値以上でもe3は表示しません(ただし、出力 ON 回数はクリアされずカウント継続する
ため、モニタは可)。
東京都品川区大崎1-11-1ゲートシティ大崎ウエストタワー
●
技術的なお問い合わせ
0120−919−066(フリ−コ−ル )
携帯電話・PHSなどは
直通の制御機器の技術窓口は
■営業時間:
■営業日:年末年始を除く
●FAXによるお 問 い 合わ せ
テクニカルセンタ お客様相談室
●インターネットによるお問 い 合わ せ/ F A Q(よくあるご質 問 )の検索はオムロン
IndustrialWebをご利用ください 。 http://www.fa.omron.co.jp/
内容
第2表示
計測値オーバー
*3
変化なし
フロー
CPU異常
消灯
メモリ異 常(RAM)
消灯
メモリ異 常
sum
(EEP-ROM)
出力回数オーバー
変化なし
インダストリア ル オートメーションビジネスカンパニー 営業統轄事業部
9:00 〜 12:00/13:00 〜 19:00(土・日・祝祭日は17:00まで)
出力状態
変化なし
*2
055-982-5015です。
OFF
OFF
OFF
*1
変化なし
055-982-5000です。
FAX055-982-5051
復帰方法
計測値≦999999
ホールドキーまたは
電源再投入
電源再投入
ホールドキー
ホールドキー
14F(〒141-0032)
復帰後の設定値
変化なし
変化なし
変化なし
出荷時の状態
変化なし
OUT2
内部回路
OUT1
ホールド
カウント
ホールド
カウント
aa
b
 Loading...