

Page 1

24-hour/Weekly Time Switch H2F 1
24-hour/Weekly Time Switch
H2F
Up to 96 ON/OFF Cycles from DIN-sized
(72 x 72 mm) Timer
• Easy setting with color-coded programming tabs.
• Choose from 24-hour or 1 -week models wi th either SPST-NO or
SPDT control outputs.
• Minute dial assures accur ate settings.
• Models with memory protection available.
• Control outputs can be manual ly turned ON/OFF.
• Designed for surface, flush, or trac k mounting.
Model Number Structure
■Model Number Legend
1. Operation cycle
D: 24-hour
W: 1-week
2. Motor type
None:Synchronous motor
M: Quartz motor
3. Mounting method
None:Flush mounting
F: Surface mounting, DIN track mounting
4. Output type
None:SPST-NO
C: SPDT
1 2 34
H2F-@@@@
Page 2
2 24-hour/Weekly Time Switch H2F
Ordering Information
■Accessories (Order Separately)
Note: 1. The 24-hour models are supplied with three pairs of programming tabs.
The 1-week models are supplied with seven pairs of programming tabs.
2. A Rechargeable Battery is provided in the H2F. When the life of the Battery has expired, order a replacement using this model number.
Specifications
■Time Ranges
■ON/OFF Cycle
■Ratings
Note: Select the appropriate frequency using the frequency selector switch provided on the upper part of the rear panel.
Mounting method Control output 24-hour operation 1-week operation
Synchron ous motor Quartz motor (with
memory protection)
Quartz motor (with
memory protection)
Flush SPST-NO H2F-D H2F-DM H2F-WM
SPDT H2F-DC H2F-DMC H2F-WMC
Surface/track SPST-NO H2F-DF H2F-DMF H2F-WMF
SPDT H2F-DFC H2F-DM F C H2F-WMFC
Extra Programmi ng Tabs 1 pair for each ON/OFF (See note 1.) Y92S-21
Rechargeable Battery (See note 2.) Y92S-42
Operation period Minimum division Minimum set time Maximum set time
24-hour 15 min 15 min 23 h 45 min
1-week 1 h 2 h 166 h
Operation period 24-hour 1-week
Maximum cycles 96 84
Rated supply voltage Synchronous motor: 100/110/120 VAC, 200/220/240 VAC (50/60 Hz) (See note.)
Quartz motor: 100 to 240 VA C (50/60 Hz)
Operating voltage range 85% to 110% of rated supply voltage
Power consumption Synchronous motor: 3 VA max.
Quartz motor: 1 VA max. at 100 to 120 VAC, 4 VA max. at 200 to 240 VAC
Control outputs 15 A at 250 VAC, resistive load, SPST-NO, SPDT
Terminal screw tightening t orque 0.98 N·m max.
Page 3
24-hour/Weekly Time Switch H2F 3
■Characteristics
Note: 1. Accuracy of operating time of when the H2F is ON or when the H2F is OFF.
2. Difference between the set and actual operation time with the pointer set to the present time.
3. When the H2F is used for the first time after energization for 72 h.
Item 24-hour operation 1-week operation
Synchronous motor Quartz motor
Accuracy of operating time (See note 1.)
±3 min max. ±30 min max.
Influence of voltage
Influence of temperature
Setting error (See note 2.)
±3 min max. ±30 min max.
Cyclic error
±3 min max. ±30 min max.
Memory protection a gainst power failure --- 180 h min. (See note 3.)
Insulation resistance 100 M
Ω min. (at 500 VDC)
Dielectric strength 2,000 VA C, 50/60 Hz for 1 min (between current-carrying terminals and non-current-carrying
metal parts)
1,000 VAC, 50/60 Hz for 1 min (between non-continuous contacts)
Vibration resistance Destruction: 16.7 Hz, 2-mm single amplitude
Malfunction: 10 to 55 Hz, 0.25-mm single amplitude
Shock resistance
Destruction: 1,000 m/s
2
Malfunction: 200 m/s
2
Ambient temperature Operating: –10°C to 55°C
Ambient humidity Operating: 35% to 85%
Life expectancy Contacts: 10,000 operations min.
Motor: 20,000 hours
Approved standards UL917, CSA C22.2 No. 14
Case color Light gray (Munsell 5Y7/1)
Weight Flush mounting: approx. 150 g
Surface mounting:approx. 200 g
Page 4

4 24-hour/Weekly Time Switch H2F
Connections
Synchronous Motor Model
(SPST-NO Output)
H2F-D
(SPDT Output)
H2F-DCH2F-DF H2F-DFC
Quartz Motor Model
(SPST-NO Output)
H2F-DM/H2F-WM
(SPDT Output)
H2F-DMC/WMCH2F-DMF/H2F-WMF H2F-DMFC/WMFC
2
Note 1: Connect an independent power source to the load.
2: Do not exceed the following torque when tightening the screws.
Specified torque: 0.8 N·m
Maximum torque: 0.98 N·m
3: When connecting leads to the terminal block, use the same wire size for all leads. If different wire sizes are used,
the thinner leads may come off during operation.
4: Recommended lead wires: AWG18 to AWG24 (cross-section: 0.205 to 0.823 mm
2
), solid or twisted wire
5: When using crimp terminals, connect a maximum of two crimp terminals to any one terminal.
Page 5

24-hour/Weekly Time Switch H2F 5
Dimensions
Note: All units are in millimeters unless otherwise indicated.
Mounting Dimensions
Surface Mounting: H2F-DF/-DMF/-WMF
Track Mounting: H2F-DFC/-DMFC/-WMFC
Mounting Holes
M3.5
6
29
Two, M3 holes
Screw size
M3 x 45
(included)
Flush Mounting: H2F-D/-DM/-WM/-DC/-DMC/-WMC
Panel Cutout
Recommended panel thickness: 1 to 3.2 mm
Note: The mounting adapter and
screws are included.
65.5
Page 6

6 24-hour/Weekly Time Switch H2F
Precautions
Flush Mounting
1. To mount the adapter to the panel cutout, first deform the adapter
by pushing it on the two opposing corners (as indicated by arrows
A. Then push part B into t he cutout (i.e., toward the back of the
panel).
2. After the adapter is mounted, inser t the H2F as shown in the figure below. Secure the H2F b y tightening the two mounting screws
(M3 x 16) included as accessories.
3. If the lead wires have been connected to the H2F from the front of
the panel before the H2F is mounted in the panel, engage the
H2F to part A of the adapter and push it in the direction of B. Then
tighten the two screws as described in 2.
Time Setting
To set the time, turn the center knob clockwise to the correct time.
Turning it counterclockwise or turning it with your fingers hooked on
the setting bracket may cause a malfunction.
With 24-hour models, set the hour to the arrow on the upper left corner of the front panel and the minute to the arrow on the center knob.
With 1-week models, set the day of the week to the arrow on the
upper left corner of the front panel and the hour to the arrow on the
center knob.
Use the gold setting tabs to set the ON time and the silver ones to set
the OFF time. Position the thick leg of the tab toward the outside of
the dial and insert the tab securely into the groove on the dial.
Three pairs of setting tabs are attached.
Store the spare tabs in the compartment at the lower right corner of
the front panel.
Panel
Adapter
B
A
Panel
Lead wire
B
A
H2F Time Switch
Page 7
24-hour/Weekly Time Switch H2F 7
Manual Switch
SPST-NO Output
A 3-position selector switch, located at the lower left corner of the
front panel, determines output operation. In the OFF position, the
control output is forcibly turned OFF regardless of the setting of the
programming tabs. Set to the A UTO position, the output is turned ON
and OFF according to the settings of the programing tabs. In the ON
position, the output is forcibly turned ON regardless of the setting of
the programming tabs.
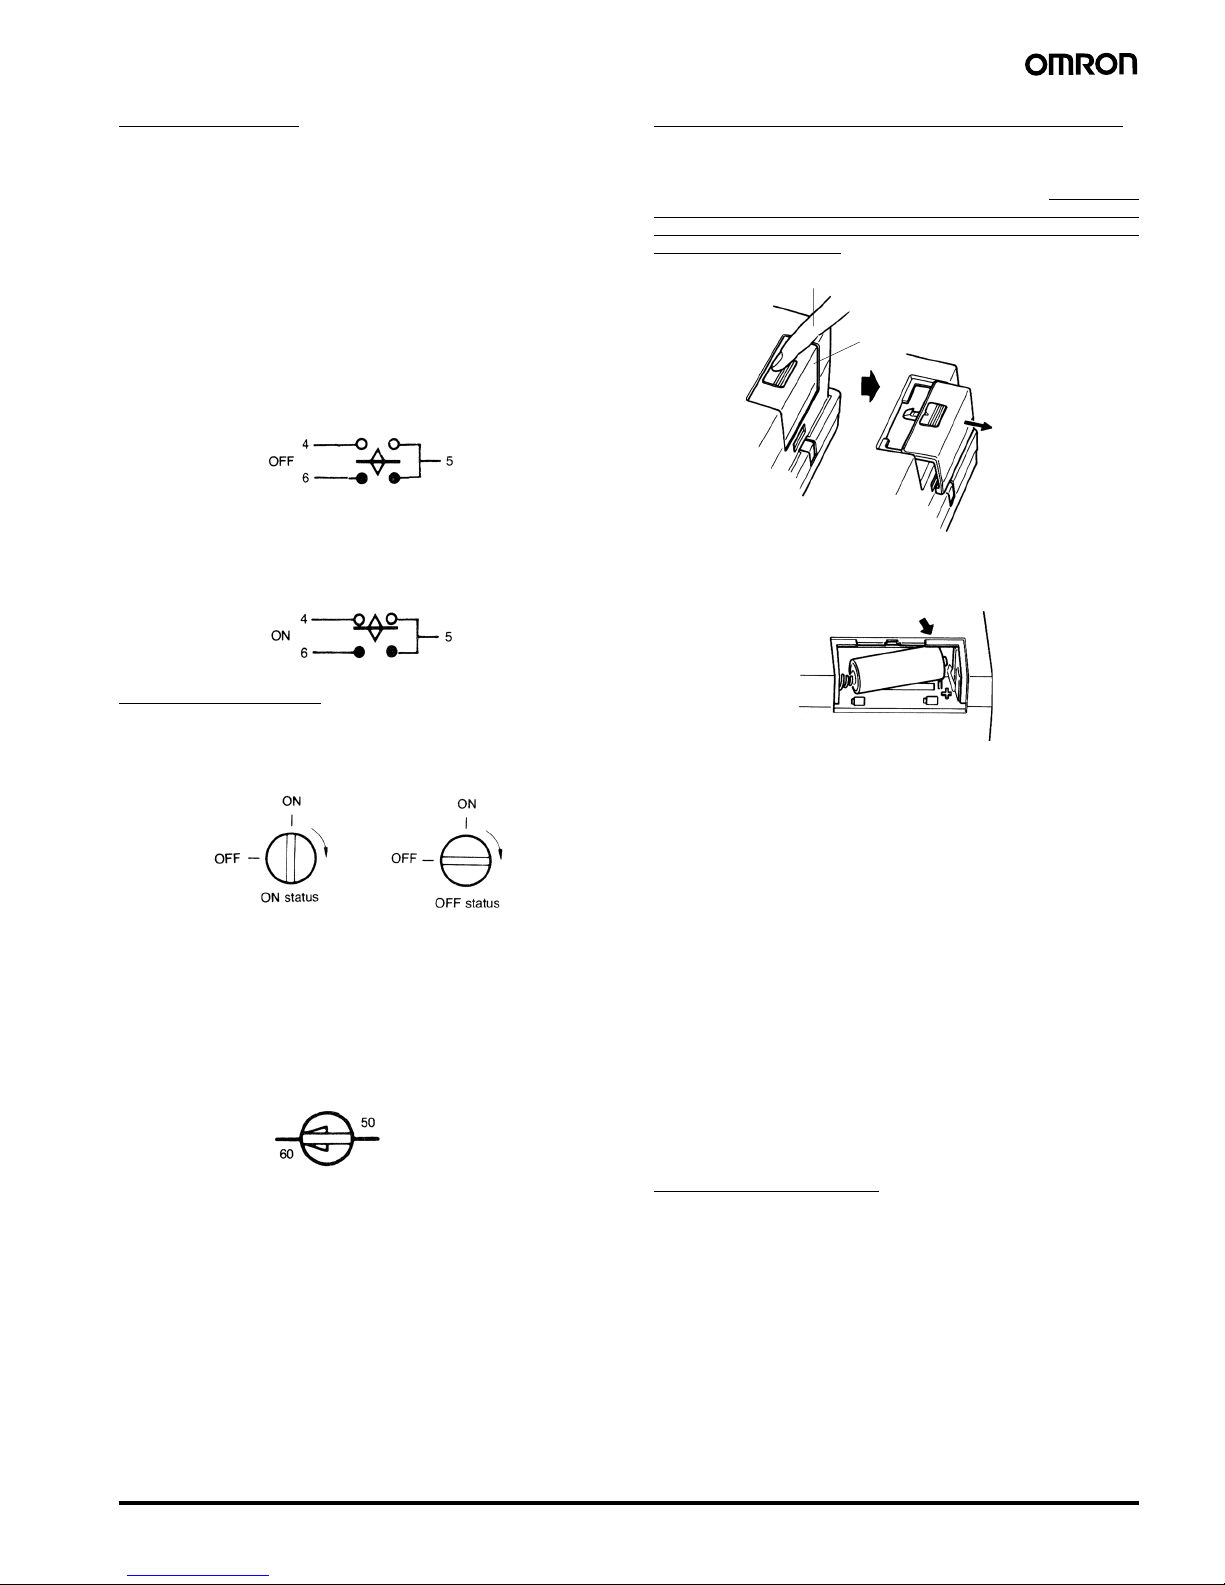
SPDT Output
When the manual switch at the lower left corner of the front is set to
the OFF position, both load 1 (connected across terminals 4 and 5)
and load 2 (across 5 and 6) are turned OFF.
When it is set to the AUTO position, the output is turned ON and OFF
according to the setting of the programming tabs.
When the manual switch is set to the ON position, load 1 (connected
across terminals 4 and 5) is turned ON and load 2 (across 5 and 6) is
turned OFF.
Output Indicator
The output indicator at the upper left corner of the front panel shows
the status of the output when the manual switch is set to the AUTO
position.
In addition, the output can be manually turned ON or OFF by rotating
the knob clockwise (in the arrow direction). The knob will not tur n
counterclockwise.
Precaution for the H2F-D, -DF Serie s (Synchronous Motor
Models)
Before using the H2F, select the appropriate frequency of your area
by the frequency selector switch provided on the upper part of the
rear panel.
H2F-@M Series (Quartz Motor Models)
Battery
Remove the battery cover on the rear panel of the H2F, load the provided Battery into the battery box, then turn ON the H2F. Be sure to
load the Battery before using the H2F. If the Battery is not loaded, the
H2F will not work properly.
Be sure to load the Battery with the correct polarity. The polarity is
indicated in the battery box. After loading the Battery, be sure to
place the cover on the battery box.
The Battery is fully charged before shipment. The Battery may lose
its charge while the Battery is stored. Therefore, there is a backup
function that is guaranteed for 180 hours on condition that the Battery is loaded into the H2F and charged continuously for 72 hours. If
the Battery has no charge, the H2F may not operate immediately
after it is turned ON. In that case, continue providing power to the
H2F for three or more minutes before setting the time.
If the H2F is turned ON and OFF frequently, the Battery life will be
greatly reduced. Use the H2F with a continuous supply of power.
The Battery has a life of approximately three years at room temperature. If three years have passed since the Battery was loaded,
replace the Battery as soon as possible with a AAAA-size NiCd
rechargeable battery.
If the H2F is idle over a long time, unload the Battery from the H2F
and store the Battery separately in order to prevent the Battery from
being overly discharged.
Always turn OFF the power supply before replacing the Battery.
Use only the specified Replacement Batter y (Y92S-42). Using any
other battery may result in leakage of battery fluid or battery r upture,
possibly causing equipment damage or injury.
Other Precautions
When connecting to a heater, alwa ys use a thermal switch in the load
circuit.
Do not exceed the specified ranges for vibration and shock.
The H2F is neither waterproof nor oil-proof. Do not use the H2F
where it would be subjected to water or oil.
Upper part of rear panel
(cycles per second)
Press down.
Battery cover
Slide out
Battery
Page 8

In the interest of product im provement, specificatio ns are subje ct to cha nge wi thout n otice.
ALL DIMENSIONS SHOWN ARE IN MILLIMETERS.
To convert millimeters into inches, multiply by 0.03937. To convert grams into ounces, multiply by 0.03527.
Cat. No. L013-E1-05
OMRON Corporation
Industrial Automation Company
Control Devices Division H.Q.
Analog Controller Division
Shiokoji Horikawa, Shimogyo-ku,
Kyoto, 600-8530 Japan
Tel: (81)75-344-7080/Fax: (81)75-344-7189
Printed in Japan
0506-0.3C (0696) (M)
!WARNING
Do not short the terminals of, disassemble, deform under
pressure, or incinerate the Battery. Doing so may result in
minor injury due to bursting, ignition, or leakage of fluid.
!CAUTION
Do not touch any of the terminals or the back panel while
power is being supplied. Doing so may result in electric
shock. Be sure to mount the terminal cover after wiring.
Before changing times or other settings while power is
being supplied, either turn OFF the power on the load
side or set the output ON/OFF switch to OFF and confirm
the safety of the system. Unexpected operation may
occasionally result.
Tighten the terminal screws to the specified torque.
Loose screws may occasionally result in fire or
malfunction.
Do not allow metal fragments or lead wire scraps to fall
inside the Product. This may occasionally cause electric
shock, fire, or malfunction.
Never disassemble, repair, or modify the Product. This
may occasionally cause electric shock, fire, or
malfunction.
Do not use the Product where flammable or explosive gas
is present. There may occasionally be a risk of explosion
resulting in minor injury.
 Loading...