

Page 1
5
3
TM
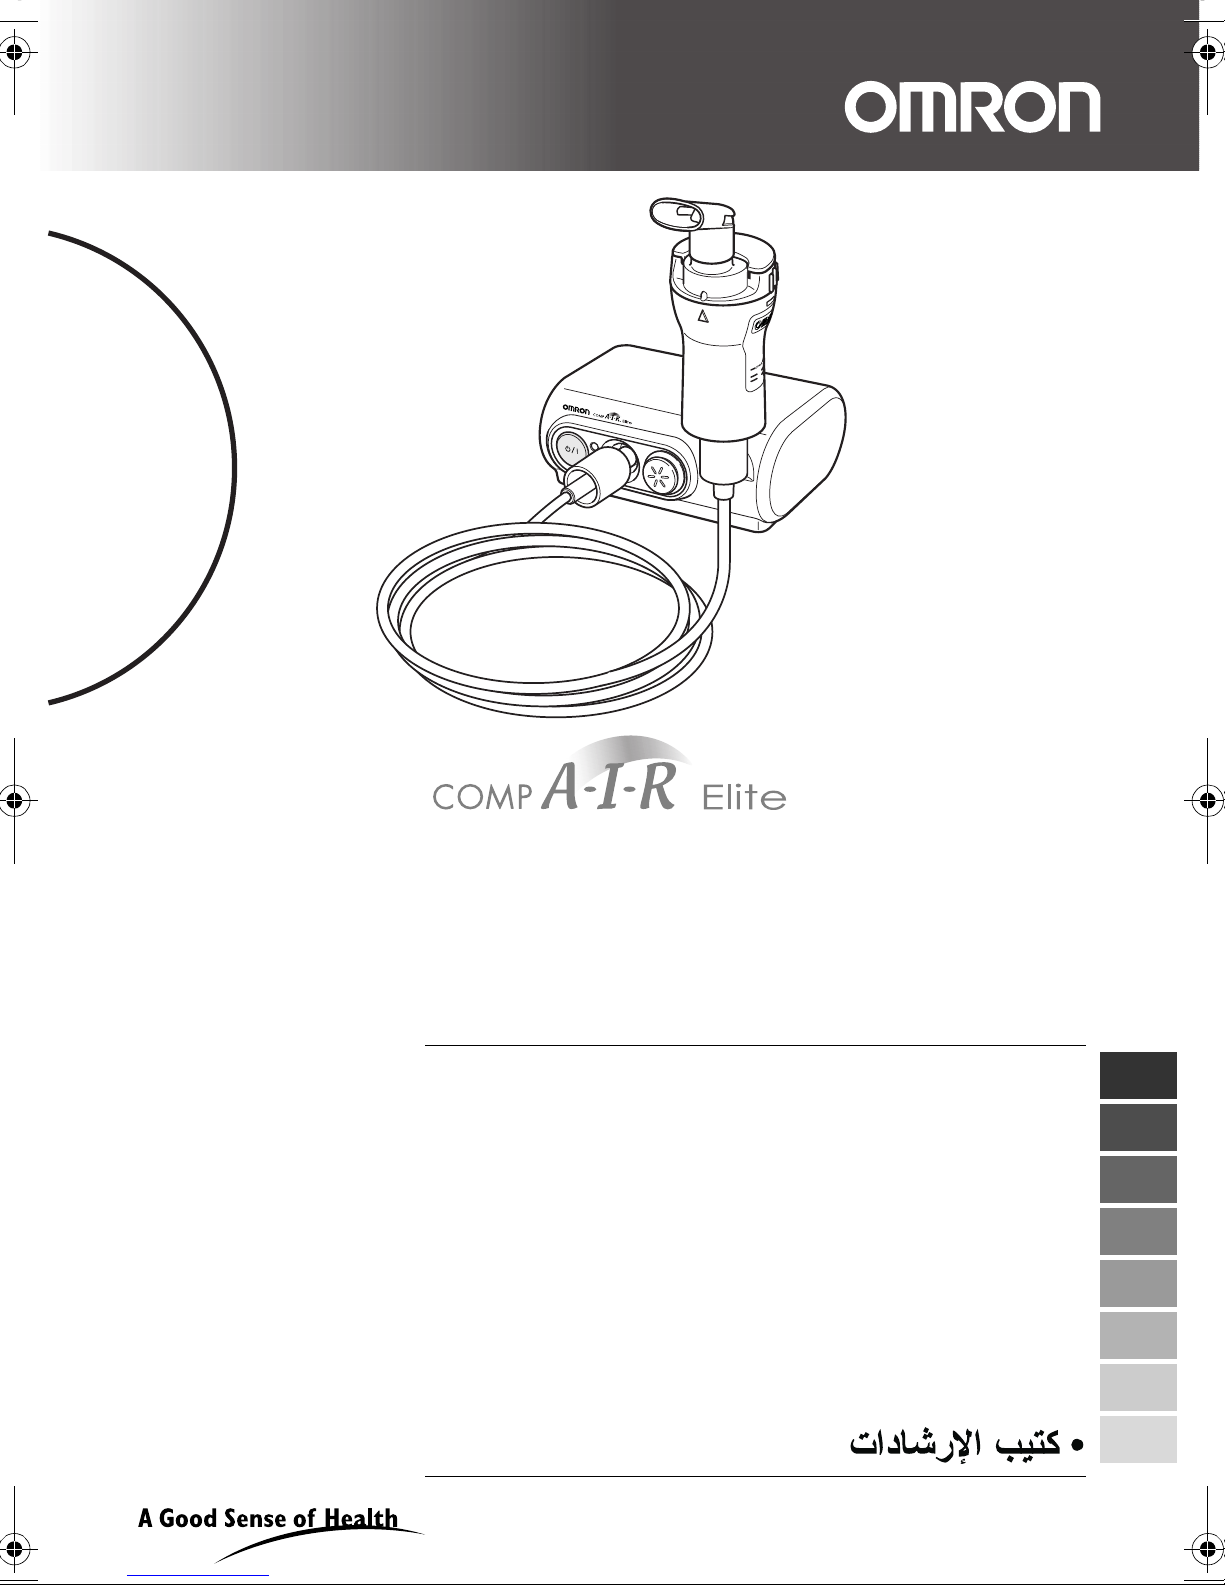
Compressor Nebuliser
Model
NE-C30-E
• Instruction Manual
• Mode d’emploi
• Gebrauchsanweisung
• Manuale di istruzioni
• Manual de instrucciones
• Gebruiksaanwijzing
• РУКОВОДСТВО ПО ЭК СП ЛУАТАЦИИ
EN
FR
DE
IT
ES
NL
RU
AR
IM-NE-C30-E-02-11/06
Page 2

Before using the unit
Contents
Before using the unit
Introduction ................................................................................................... 3
Important safety instructions....................................................................... 4
1. Know your unit........................................................................................ 8
2. Guide to using the Comp Air Elite....................................................... 10
Operating instructions
3. Preparing the nebuliser for use ........................................................... 11
3.1 Connecting the AC adapter................................................................ 11
3.2 Adding medication and assembling the parts .................................... 12
4. Taking medication ................................................................................ 16
Care and maintenance
5. Cleaning and daily disinfecting ........................................................... 19
5.1 Cleaning............................................................................................. 19
5.2 Disinfecting the nebulising parts ........................................................ 20
6. Maintenance and storage..................................................................... 21
7. Changing the air filter........................................................................... 22
8. Troubleshooting.................................................................................... 23
9. Technical data ....................................................................................... 25
10. Optional parts and accessories........................................................... 29
11. Using optional accessories ................................................................. 31
11.1 Using the optional rechargeable battery ............................................ 31
2
Page 3
Introduction
Thank you for purchasing the OMRON Comp Air Elite.
This product was developed in conjunction with respiratory therapists for the
successful treatment of asthma, chronic bronchitis, allergies and other respiratory
disorders. The compressor forces air to the nebuliser. When the air enters the
nebuliser, it converts the prescribed medication into an aerosol of microscopic
droplets that can easily be inhaled.
The Comp Air Elite is a medical device. Operate this device only as instructed by
your doctor and/or respiratory therapist.
EN
3
Page 4
Important safety instructions
Read all the information in the instruction manual and any other literature included
in the box before using the device.
When using an electrical product, especially when children are present, basic
safety precautions should always be followed including the following:
Warning:
Indicates a potentially hazardous situation which, if not avoided, could result in
serious injury.
(Usage)
• For type, dose, and regime of medication follow the instructions of your doctor or
respiratory therapist.
• Do not use only water in the nebuliser, for nebulising purposes.
• Clean and disinfect the nebuliser kit, mouthpiece and optional nosepiece or
masks before using them for the first time after purchase, if the device has not
been used for a long period of time, or if more than one person uses the same
device.
• Be sure to wash the parts after use, and ensure that they are thoroughly
disinfected and dried, and stored in a clean location.
• Keep the device out of the reach of unsupervised infants and children. The
device may contain small pieces that can be swallowed.
• Store the device and accessories in a clean location.
• Do not store the air tube while there is moisture or medication remaining inside it.
• Always rinse the nebulising parts with clean hot tap water after disinfecting them.
Never leave the cleaning solution in the medication tank or mouthpiece.
• Do not use or store the device where it may be exposed to noxious fumes or
volatile substances.
• Do not use the device where it may be exposed to flammable gas.
• Make sure that the nebuliser kit is clean before use.
• Always dispose of any remaining medication after use, and use fresh medication
each time.
• Do not use in anaesthetic or ventilator breathing circuits.
(Risk of electrical shock)
• When using the optional rechargeable battery, always charge the battery fully
using the battery charger specially designed for this device. If the battery is
frequently used without being fully charged, the capacity of the battery will be
reduced and the device may stop during use. In this case have an alternative
power source, such as the AC adapter ready.
4
Page 5
Important safety instructions
• Do not use the main unit, AC adapter, optional rechargeable battery, or optional
battery charger while they are wet, or connect them to a power outlet or other
devices with wet hands.
• The compressor, AC adapter, and optional rechargeable battery and charger are
not waterproof. Do not spill water, or other liquids, on these parts. If liquid does
spill on these parts, immediately unplug the power cord and wipe off the liquid
with gauze or other absorbent material.
• Do not immerse the main unit in water or other liquid.
• Do not use or store the device in humid locations, such as a bathroom.
• Do not short circuit the battery terminals on the rechargeable battery. Make sure
battery terminals do not come in contact with keys, coins or other metal objects.
• When using the carrying bag to carry the device and optional rechargeable
battery, do not place hair pins or other metal objects in the bag.
• Use only original OMRON AC adapter for AC power outlet. Use of unsupported
AC adapter may damage the device.
• Do not operate the unit with a damaged cord or plug.
• Keep the power cord away from heated surfaces.
Read and follow the “Important information regarding Electro Magnetic
Compatibility (EMC)” in the Technical Data Section.
Caution:
Indicates a potentially hazardous situation which if not avoided, may result in minor
or moderate injury, or physical damage.
(Usage)
• Provide close supervision when this device is used by, on, or near children or
invalids.
• Make sure that the parts are attached correctly.
• Make sure that the vaporiser head is correctly installed before use.
• Make sure that the air filter is correctly attached.
• Make sure that the air filter is clean. If the air filter has changed colour, or has
been used on average for more than 60 days, replace it with a new one.
• Do not spill liquid or medication on the compressor.
• Do not tilt the nebuliser kit so that it is at an angle of greater than 45°, or shake it
while in use.
EN
• Do not use or store the device while the air tube is creased.
• Use only original nebulising parts, air tube, air filter and filter cover.
• Do not add more than 7 ml of medication to the medication tank.
• Do not carry or leave the nebuliser kit while the medication tank contains
medication.
5
Page 6
Important safety instructions
• Do not leave the unit unattended with infants or persons who cannot express
their consent.
• Do not subject the device or the parts to any strong shocks such as dropping the
device on the floor.
• Do not distort the vaporiser head, or jab the nozzle of the medication tank with a
pin etc.
• Do not cover the compressor, optional rechargeable battery and charger with a
blanket or towel etc., during use.
• Do not insert fingers or objects inside the compressor.
• Do not disassemble or attempt to repair the compressor, AC adapter, optional
rechargeable battery or charger.
• Do not leave the device or its parts where is will be exposed to extreme
temperatures or changes in humidity, such as in a vehicle during the summer, or
where it will be exposed to direct sunlight.
• Do not block the air filter cover.
• When sterilising parts by boiling, make sure that the container does not boil dry.
• Never place, or attempt to dry the compressor, AC adapter or nebulising parts in
a microwave oven.
• Do not use the device while sleeping or if drowsy.
• To avoid injury to the nose mucosa, do not squeeze the nosepiece into the back
of the nose.
• Do not block the slit between the cap and the inhalation air inlet.
• Do not use a microwave oven or hair dryer to dry the nebulising parts.
• Approved for human use only.
(Risk of electrical shock)
• Always unplug the AC adapter from the power outlet after use and before
cleaning.
• Plug the device into the appropriate voltage outlet. Do not overload power outlets
or use extension cords.
• Always read the instructions included with optional parts, such as the
rechargeable battery and charger, before using them.
• Always remove the optional battery and AC adapter from the device after use
and before cleaning.
• Do not misuse the cord of the AC adapter.
• Do not wind the cord of the AC adapter around the main unit or AC adapter.
• Changes or modifications not approved by OMRON Healthcare will void the user
warranty.
6
Page 7
Important safety instructions
General Safety Precautions:
• Inspect the device and parts before using them each time, and check that there
are no problems. In particular, be sure to check the following:
- That the vaporiser head, nozzle or air tube are not damaged.
- That the nozzle is not blocked.
- That the compressor operates normally.
• When using this device, there will be some noise and vibration caused by the
pump in the compressor. There will also be some noise caused by the emission
of compressed air from the nebuliser kit. This is normal and does not indicate a
malfunction, or reduce the working life of the device.
• Limit use to 20 minutes at a time, and allow a 40 minute interval before using the
device again.
• Operate the device only as intended. Do not use the device for any other
purpose.
• Do not use the device at temperatures greater than +40°C.
• Do not spill liquid or medication on the battery connector, optional rechargeable
battery or charger connectors, or allow them to become dusty. Immediately wipe
off the liquid or dust with gauze or other absorbent material.
• Make sure that the air tube is securely attached to the compressor (main unit)
and nebulising parts, and does not come loose. Twist the air tube slightly when
inserting it into the connectors to avoid the tube disconnecting during use.
• The AC adapter is provided so that the unit can be completely isolated from the
power source. To completely isolate the unit from the power source unplug the
AC adapter from the power source.
Read and follow the “Correct Disposal of This Product” in the Technical Data
Section when disposing of the device and any used accessories or optional parts.
Save these instructions for future reference.
EN
7
Page 8
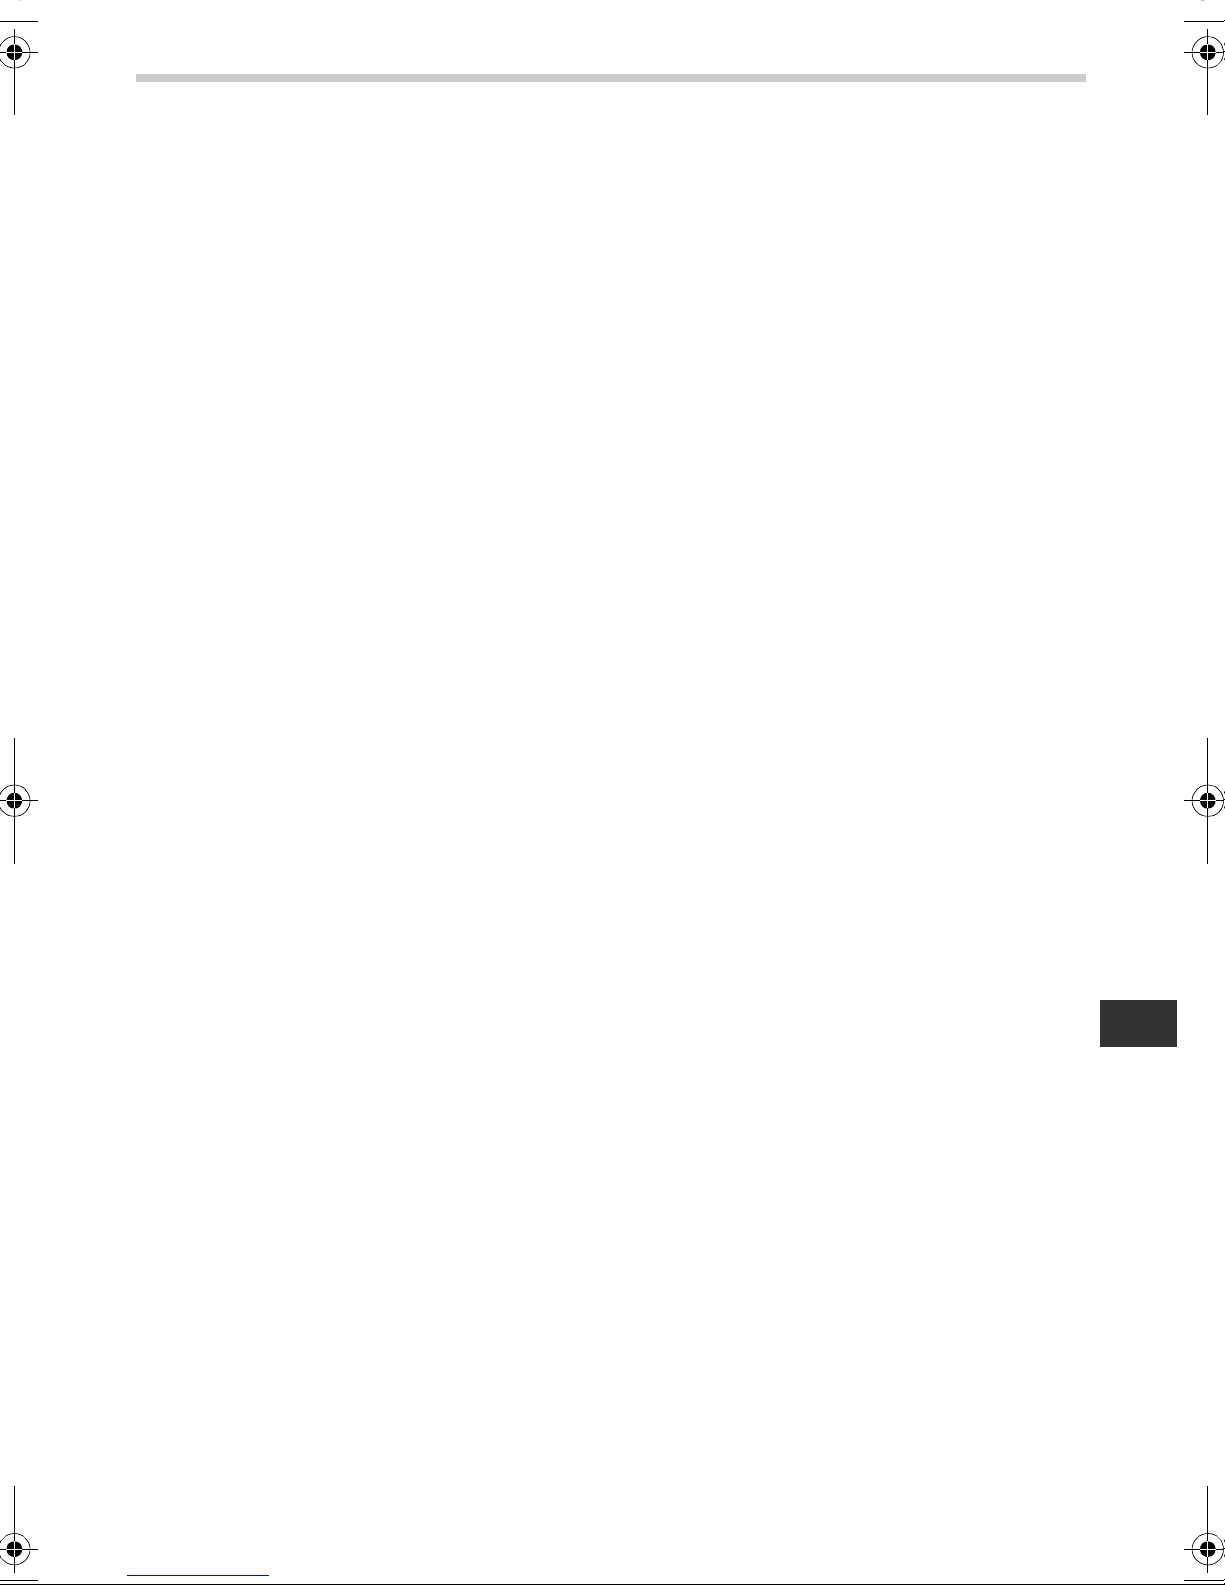
1. Know your unit
A C
A1
A2
A3
A4
A5
A6
B1
B
Rear View Bottom View
B2
D
D2 D3D1
5
3
D4
E
E1
E2
E3
E4
A7
A. Compressor (Main Unit)
A1. Power Indicator
A2. Power Switch
A3. Charge Indicator
A4. Air Connector
A5. Filter Cover
(* Air filter inside.)
A6. Nebuliser Kit Holder
A7. AC Adapter Jack
A8. Battery Connector
B. Air Tube (PVC, 207cm)
B1. Air Plug
B2. Air Plug
C. Nebulising Parts
A8
E6
E5
5
3
E7
D. Inhalation Attachments
D1. Mouthpiece
D2. Adult Mask (PVC)
D3. Child Mask (PVC)
D4. Nosepiece
E. Nebuliser Kit
E1. Cap
E2. Inhalation Air Inlet
E3. Inhalation Top
E4. Vaporiser Head
E5. Medication Tank
E6. Nozzle
E7. Air Tube Connector
8
Page 9

Accessories
1. Know your unit
F
G2
G1
G
I J
F. Spare Air Filters x 5
G. AC Adapter
I. Instruction Manual
J. Warranty Card
G1. Power Connector
G2. Power Cord
H. Carrying Bag
Material of attachment
Nebuliser Kit, Mouthpiece, Nosepiece, Adapter for
Child Mask (SEBS):
Adult Mask (PVC), Child Mask (PVC): PVC
Adult Mask (SEBS), Child Mask (SEBS): SEBS
Air Tube: PVC and Polypropylene
Air Filter: Polyester
Air Filter Cover: ABS
Polypropylene
H
EN
• Also applicable Section 10. Optional parts and accessories.
9
Page 10

2. Guide to using the Comp Air Elite
Preparing the Nebuliser for Use (Section 3)
Note: Clean and disinfect the nebuliser kit and applicable inhalation
attachments before using the device for the first time, or if it has not
been used for more than one week.
Taking Medication (Section 4)
Notes:
• Do not tilt the nebuliser kit so that it is at an
angle of greater than 45
• Do not crease or fold the air tube.
°.
x
x
x
x
a
a
a
a
m
m
m
m
5
5
5
5
3
3
3
3
Cleaning Parts After Use (Section 5)
Note: Failure to clean the nebulising parts
after use may lead to infection.
How the nebuliser kit works
The compressed air from the
compressor is forced through the
nozzle, as it does so, it is mixed with
the medication in the vaporiser head
and forced upwards. The medication
is then turned into a fine aerosol and
directed upwards by the baffle,
where it is broken down into many
smaller aerosol particles.
Aerosol
Nozzle
Medication
Baffle
Aerosol
Vaporiser
Head
Medication
10
Compressed Air
Page 11

Operating instructions
3. Preparing the nebuliser for use
Warning:
Clean and disinfect the nebuliser kit, mouthpiece and optional nosepiece or
masks before using them for the first time after purchase, if the device has
not been used for a long period of time, or if more than one person uses the
same device.
For directions on cleaning and disinfecting the parts of the device refer to Section 5
in this instruction manual.
Note: Make sure that the air filter is changed regularly. (See “7. Changing the air
filter”.)
3.1 Connecting the AC adapter
1. Insert the power connector of the AC adapter
into the AC adapter jack on the compressor.
Power Connector
AC Adapter Jack
2. Plug the AC adapter into a power outlet.
Power Outlet
Note: When disconnecting the AC adapter, unplug the AC adapter from
the power outlet before removing the power connector on the
compressor.
EN
11
Page 12

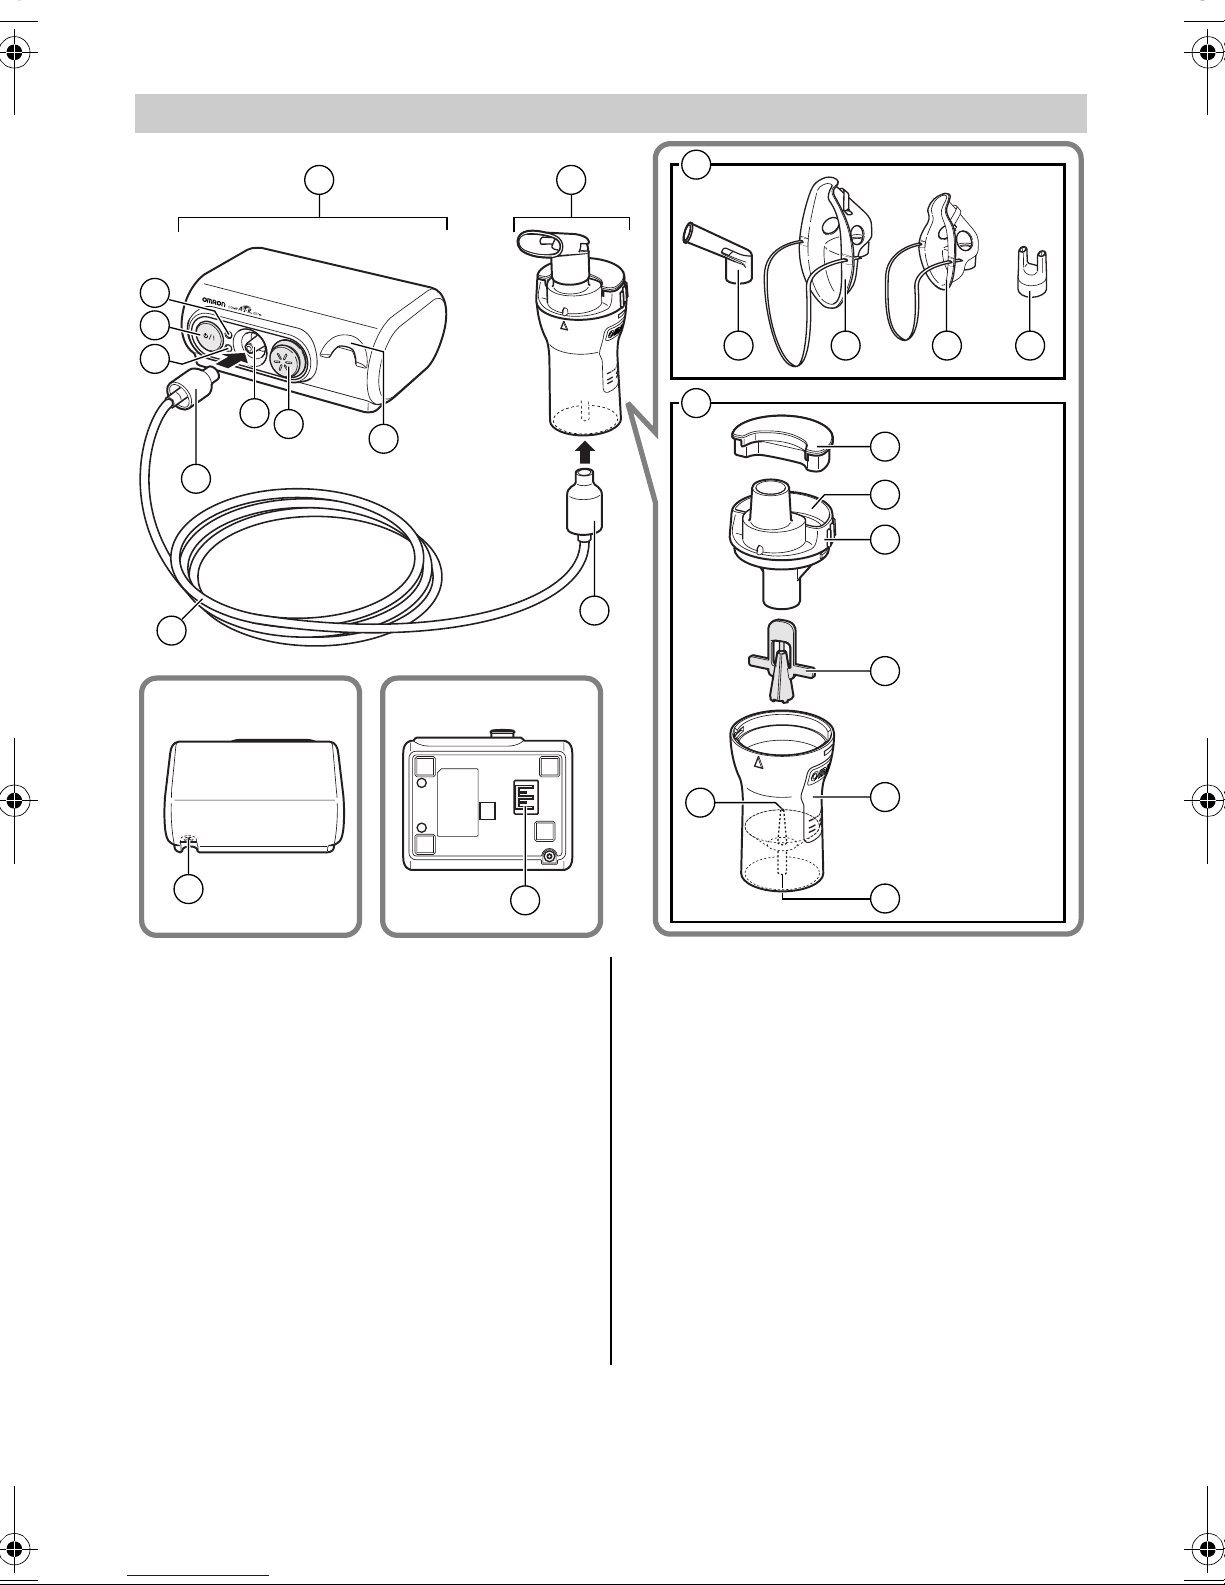
3. Preparing the nebuliser for use
3.2 Adding medication and assembling the parts
1. Remove the mouthpiece and cap from the
nebuliser kit.
2. Remove the inhalation top from the medication
tank.
1) Rotate the inhalation top anti-clockwise.
2) Lift the inhalation top out of the medication
tank.
3. Remove the vaporiser head from the medication
tank.
4. Add the correct amount of prescribed
medication to the medication tank.
2
1
5
3
Caution: The capacity of the medication
tank is 2 to 7 ml.
Note: Scales on the nebuliser kit are for
reference only. The scale on the outside
of the tank is with vaporiser head in place.
The scale on the inside is with no vaporiser head. Please use the
scale on your syringe or vial for accurate measurement of
medication.
12
max
5
3
Page 13
3. Preparing the nebuliser for use
5. Reattach the vaporiser head to the medication
tank.
6. Put the inhalation top back inside the
medication tank.
1) Align the protrusion on the inhalation top
1
with the indent on the medication tank, as
shown.
max
5
2) Rotate the inhalation top clockwise and align
3
with the medication tank until they click in
place.
7. Attach the desired inhalation attachment, as described below.
Attaching the mouthpiece
Make sure you also attach the cap, when using
the mouthpiece.
1) Attach the cap to the inhalation air inlet.
2) Attach the mouthpiece to the inhalation top.
2
2
1
EN
Attaching the adult mask (PVC)
Attach the mask to the inhalation top.
Note: If the amount of aerosol is too great,
attach the cap.
13
Page 14

3. Preparing the nebuliser for use
Attaching the child mask (PVC)
Attach the mask to the inhalation top.
1) Attach the cap to the inhalation air inlet.
2) Attach the child mask to the inhalation top.
Attaching the nosepiece
Attach the cap when using the nosepiece.
1) Attach the cap to the inhalation air inlet.
2) Attach the nosepiece to the inhalation top.
2
1
2
1
14
Page 15

3. Preparing the nebuliser for use
8. Attach the air tube.
1) Attach the air tube to the air connector on the compressor.
2) Attach the other end of the air tube to the air tube connector on the
medication tank.
2
1
Notes:
• Make sure that the air tube is securely connected. Otherwise, air may
leak from the air tube during use.
• Take care not to spill the medication when attaching the air tube. Keep
the nebuliser kit upright.
• Use the nebuliser kit holder as a temporary
holder for the nebuliser kit.
EN
15
Page 16

4. Taking medication
1. Hold the nebuliser kit as indicated on the right.
Caution:
Do not tilt the nebuliser kit so that
it is at an angle of greater than
45°. Medication may flow into the
mouth.
x
x
a
a
m
m
5
5
3
3
45°
x
x
a
a
m
m
5
5
3
3
2. Press the power switch.
The compressor starts and nebulisation
starts.
Notes:
• The green light shows that the power is
on.
• Observe whether aerosol is generated.
To stop nebulisation
Press the power switch again. The light goes out.
Caution:
Do not block the air filter cover.
Notes:
• Do not leave the compressor on for a long period of time. This could
result in the compressor overheating or malfunctioning.
• Limit use to 20 minutes at a time, and allow a 40 minute interval (cool off
period) before using the device again.
16
Page 17

4. Taking medication
3. Inhale medication according to your doctor’s and/or health care adviser’s
instructions.
Using the mouthpiece
Prepare your mouthpiece according to
Section 3.2.7.
Insert the mouthpiece into your mouth and
inhale the medication breathing normally.
Exhale as normal through the mouthpiece.
Using the nosepiece
Prepare your nosepiece according to
Section 3.2.7.
Inhale the medication through the nosepiece, as
shown and exhale through the mouth.
x
x
a
a
m
m
5
5
3
3
Using the adult mask (PVC)
Attach the mask so that it covers your nose and
mouth and inhale the medication.
Exhale through the mask.
Note: If the amount of aerosol is too great,
attach the cap.
Using the child mask (PVC)
Prepare your child mask according to
Section 3.2.7.
Attach the mask so that it covers your nose and
mouth and inhale the medication.
Exhale through the mask.
x
x
a
a
m
m
5
5
3
3
x
x
a
a
m
m
5
5
3
3
EN
x
x
a
a
m
m
5
5
3
3
17
Page 18

4. Taking medication
4. When treatment is complete, turn the power off. Check that there is no
condensation or moisture in the air tube and unplug the device from the
power outlet.
Power Outlet
Warning:
Condensation may occur in the air tube. Do not store the air tube
while it contains condensation or moisture. This could result in
infection via bacteria.
If there is moisture or liquid remaining in the air tube, be sure to follow the
procedure below to remove any moisture from within the air tube.
1)Make sure that the air tube is still connected to the air connector on the
compressor.
2)Unplug the air tube from the nebuliser kit.
3)Turn on the compressor and pump air through the air tube to expel the
moisture.
18
Page 19

Care and maintenance
5. Cleaning and daily disinfecting
5.1 Cleaning
Following the cleaning instructions after each use will prevent any remaining
medication in the tank from drying, resulting in the device not nebulising effectively
and also for preventing infections.
Warning:
Thoroughly rinse the nebuliser and the mask, nosepiece or mouthpiece with
clean hot tap water after each use, and disinfect the parts of the nebuliser kit
and applicable inhalation attachments after the last treatment of the day.
Note: Do not start operation before the cleaned parts are completely dried.
1. Make sure that the power indicator is out.
Power Indicator
2. Disconnect the AC adapter from the wall outlet
and the compressor.
3. Remove the nebuliser kit from the air tube and disassemble the nebuliser
kit. (see Section 3)
4. Discard any remaining medication in the
medication tank.
3
5
x
a
m
EN
5. Wash all the nebulising parts in warm water and mild detergent and rinse in
clean hot tap water, or wash in a dishwasher.
For instructions on how to disinfect the parts, see the following section.
19
Page 20

5. Cleaning and daily disinfecting
6. After cleaning and disinfecting the parts, rinse them thoroughly with clean
water and allow the parts to air dry in a clean environment.
5
3
7. If the compressor is dirty, wipe it clean with a soft
Mild Detergent
cloth moistened with water or mild detergent.
Caution: The compressor is not
waterproof.
8. If the outside of the air tube is dirty, wipe it clean
with a soft cloth moistened with water or mild detergent.
9. Reassemble the nebuliser kit. Put the parts in a dry, sealed bag and place
in the storage pocket of the carrying bag.
Note: Nebuliser kit should be replaced after using for 6 months.
5.2 Disinfecting the nebulising parts
Always clean before disinfection. (See Section 5.1)
Always disinfect the medication tank, mouthpiece and other nebulising parts after
the last treatment of the day. To disinfect the parts, use one of the methods
described below:
A. Use a commercially available disinfectant. Follow the instructions provided by
the disinfectant manufacturer.
1. Submerge the parts in the cleansing solution for the specified period.
2. Remove the parts and discard the solution.
3. Rinse the parts with clean hot tap water, shake off excess water and allow
to air dry in a clean environment.
B. Parts may be boiled between 15 to 20 minutes (except for PVC mask).
After boiling, carefully remove the parts, shake off excess water and allow to air dry
in a clean environment.
20
Page 21

6. Maintenance and storage
To keep your device in the best condition and protect the device from damage
follow these directions:
Caution:
• Do not leave the unit unattended with infants or persons who cannot
express their consent.
• Do not subject the device or the parts to any strong shocks such as
dropping the device on the floor.
Notes:
• Do not store the device in extreme hot or cold temperatures, high humidity or
under direct sunlight.
• Do not crease or fold the air tube.
• Dispose of the device and any used accessories or optional parts according to
applicable local regulations.
• Never clean with benzene, thinner or a flammable
chemical.
Always transport the device in its carrying bag, and store the device in the bag if it
will not be used for a long period.
Benzene
Thinner
Gasoline
EN
Caution:
Do not carry or leave the nebuliser while the medication tank contains
medication.
21
Page 22

7. Changing the air filter
On average, the air filter should be changed every 60 days or so, or when the filter
has changed colour from white.
1. Pull the air filter cover off the compressor.
2. Change the air filter.
Remove the old air filter with a sharp object,
such as a toothpick, and insert the new air
filter.
3. Put the air filter cover back in place.
Notes:
• Use only OMRON air filters designed for this
unit. Do not operate without a filter.
• There is no front or back orientation for the
air filters.
• Check that air filters are clean and free of dust before inserting them.
• Do not attempt to wash or clean the filter. If the air filter becomes wet,
replace it. Damp air filters can cause blockages.
• To prevent the air filter cover from becoming blocked, wash the cover
regularly. Do not boil the air filter cover.
Remove the air filter cover, wash it, and make sure it is dry and
reattached correctly.
• Please contact your OMRON dealer for additional air filters, or if the parts
supplied with the device are damaged or missing.
22
Page 23

8. Troubleshooting
Check the following if your unit should fail during operation. You can also refer to
the pages of this manual for complete instructions.
Symptom Cause Remedy
Nothing happens when the
power switch is pressed.
(The power indicator does
not light.)
Is the AC adapter connected
correctly to the an electrical
outlet and the compressor?
Is the optional rechargeable
battery connected correctly?
Is the optional rechargeable
battery charged sufficiently?
Is the optional DC auto
adapter connected
correctly?
Is there medication in the
medication tank?
Is there too much/little
medication in the medication
tank?
Is the vaporiser head
missing and not assembled
correctly?
Check that the plug is
inserted in an electrical
outlet. Unplug then reinsert
the plug if necessary.
Make sure that the battery is
correctly attached.
Charge the battery.
Make sure that the adapter
is correctly attached.
Fill the medication tank.
Add the correct amount of
medication to the medication
tank.
Attach the vaporiser head
correctly.
No nebulisation or low
nebulisation rate, when the
power is on. (The green
power indicator is lit.)
The device is abnormally
loud.
Is the nebuliser kit
assembled correctly?
Is the nozzle blocked?
Is the nebuliser kit tilted at a
sharp angle?
Is the air tube connected
correctly?
Is the air tube folded or
damaged?
Is the air tube blocked?
Is the air filter dirty?
Is the air filter cover attached
correctly?
Assemble the nebuliser kit
correctly.
Make sure that the nozzle is
free of blockages.
EN
Make sure that the nebuliser
kit is not tilted at an angle of
more than 45 degrees.
Make sure that the air tube is
correctly connected to the
compressor and nebuliser.
Make sure that the air tube
does not contain kinks.
Make sure that the air tube is
free of blockages.
Replace the air filter with a
new one.
Attach the air filter cover
correctly.
23
Page 24

8. Troubleshooting
Symptom Cause Remedy
The device is very hot.
The device stops soon when
using the optional
rechargeable battery, or
operation time is short.
The compressor is covered
by a cloth.
Is the optional rechargeable
battery charged sufficiently?
The battery has expired and
cannot be recharged
enough.
Has the battery been left
unused for a long time?
Is the battery allowed to fully
rundown before it is
recharged?
Remove the cloth.
Charge the battery.
Replace with a new battery.
Charge the battery.
Rundown, then recharge the
battery two or three times.
(See Section 11)
Notes:
• If the suggested remedy does not solve the problem, do not try to repair the
device - no parts of the unit are user serviceable.
Return the unit to an authorized OMRON retail outlet or distributor.
• The device should be serviced once a year by an approved OMRON service
centre.
24
Page 25

9. Technical data
Name: Comp Air Elite
Model: OMRON NE-C30-E
Type: Non-heating compressor nebuliser
Power Supply: 12VDC 1A (Compressor)
100 - 240VAC, 50/60Hz (AC adapter)
Power Consumption: 12 watts
Operating Temperature/
Humidity:
Storage Temperature/
Humidity/Air Pressure:
Weight: 440 g (compressor only)
Dimensions:
Contents: Compressor, Nebuliser Kit, Air Tube (PVC, 207cm),
Notes:
• Subject to technical modification without prior notice.
• The device may not work if the temperature and voltage conditions are different to those defined in
the specifications.
+10
°C to +40°C 30% to 85% RH
°C to +60°C 10% to 95% RH 700 - 1060 hPa
-20
Approx. 124 (W)
5 pcs Replacement Filters, Mouthpiece, Adult Mask (PVC),
Child Mask (PVC), Nosepiece, AC Adapter, Carrying Bag,
Instruction Manual, Warranty Card.
× 52 (H) × 103 (D) mm (compressor only)
EN
25
Page 26

9. Technical data
Technical data for the OMRON Comp Air compressor with the OMRON V.V.T.
(Virtual Valve Technology) Nebuliser kit:
Particle Size: *MMAD **approximately 3µm
Medication Tank
Capacity:
Appropriate Medication
Quantities:
7 ml maximum
2 ml minimum - 7 ml maximum
Sound: Noise level (at 1 m distance) 53 db
Nebulisation Rate: 0.35 ml/min (by weight loss)
Aerosol Output: **0.3 ml (2ml, 1%NaF)
Aerosol Output Rate: **0.05 ml/min (2ml, 1%NaF)
Notes:
• Performance may vary with drugs such as suspensions or high viscosity. See
drug supplier’s data sheet for further details.
• The data above is referenced by Omron Healthcare.
• See web site of Omron Healthcare Europe to update technical information.
Result of cascade impactor** measurements for particle size with OMRON
NE-C30-E and OMRON V.V.T. Nebuliser kit
100
90
80
70
60
50
40
30
Cumulative Undersize%
20
10
0
0.1 1 10 100
Cumulative % particle mass of sodium fluoride under size
Individual tests
Mean
MMAD: 3µm
Particle Size Dp (µm)
*MMAD = Mass Median Aerodynamic Diameter
**Independently measured at SolAero Ltd., Canada, Dr. John Dennis, according to
EN 13544-1
26
 Loading...