

Page 1

Page 2
ZUSATZINFORMATION ZUR BEDIENUNGSANLEITUNG
ADDITIONAL INFORMATION FOR THE USER MANUAL
INFORMATION ADDITIONNEL POUR LE MODE D'EMPLOI
INFORMACION ADICIONAL PARA EL MANUAL DEL USUARIO
UPGRADE 6/00
OMNITRONIC PA-240 POWER AMPLIFIER
SPEAKER
A RIGHT A LEFT
+ - - +
----------------------------------
B RIGHT B LEFT
+ - - +
Deutsch
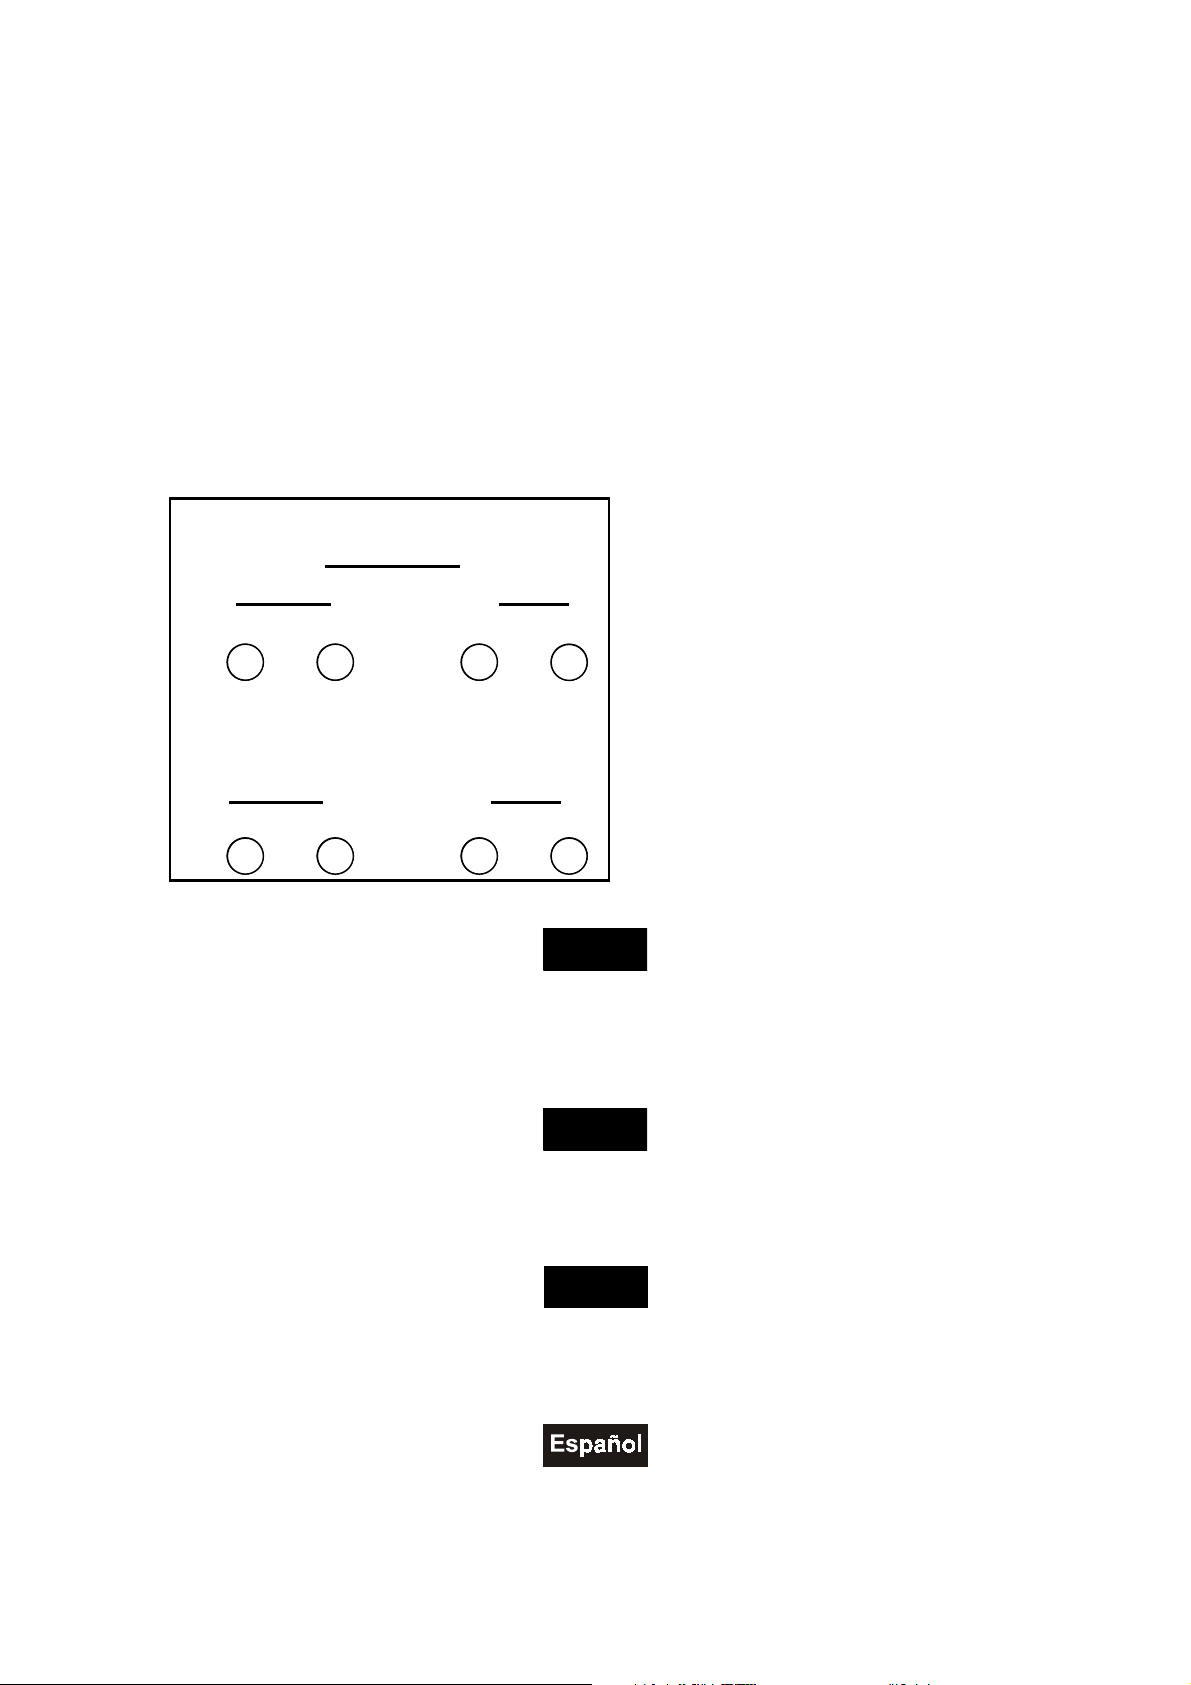
Die Rückseitenbedruckung der Endstufe ist bei der Anschlussbelegung der Ausgangsbuchsen etwas unklar.
Die Belegung der Kanäle A und B gliedert sich wie in obenstehender Zeichnung.
Die Mindestimpedanz der anzuschließenden Boxen darf 8 Ohm nicht unterschreiten.
English
The rear panel printing of the power amplifier next to the output sockets is unclear. The occupation of the
channels A and B is as illustrated in the illustration above.
The minimum impedance of the speaker-systems must not be under 8 Ohms.
Français
La description de la connection des douilles de sortie au dos de l'amplificateur n'est pas très claire.
L'occupation des canaux A et B et comme illustré au-dessus.
L'impédance minimum des enceintes connectés ne doit pas être sous 8 Ohm.
La descripción de la conexión de los casquillos de sortida en el panel trasero del amplificador no está muy
clara. La ocupación de los canales A y B es como descrito arriba.
La impedancia de los bafles conectados no debe ser menos de 8 Ohmios.
Page 3

Das vorliegende Produkt ist ein Produkt der OMNITRONIC Showequipment GmbH, GERMANY.
Telefon: 0931/4066788
Telefax: 0931/4066789
This is a product of OMNITRONIC Showequipment GmbH, GERMANY.
Phone no.: 0049-931-4066788
Fax no.: 0049-931-4066789
Ce produit est un produit d’OMNITRONIC Showequipment GmbH, ALLEMAGNE.
No. téléphone: 0049-931-4066788
No. fax: 0049-931-4066789
Weitere Produkte aus dem OMNITRONIC-Sortiment:
Further products of the OMNITRONIC-range:
Autres produits de l'assortiment d'OMNITRONIC:
Artikelbeschreibung
Article designation
Description d’article
CD-PLAYERS
CD-PLAYERS
PLATINES LASER
OMNITRONIC Doppel-CD-Player CDP-440 10602265
OMNITRONIC Einzel-CD-Player CDP-420 10602258
OMNITRONIC CDT-550 Top-Loading-CD-Player 10602280
MISCHPULTE
MIXERS
TABLES DE MIXAGE
OMNITRONIC DJ 30 DJ-Battle-Mixer 10006555
OMNITRONIC SM 120, Sound-Mixer 10006700
OMNITRONIC SM 150, Sound-Mixer 10006720
OMNITRONIC PM 520 PRO, Pro-Mixer 10006821
OMNITRONIC PM 640 PRO, Pro-Mixer 10006840
PLATTENSPIELER
TURTABLES
PLATINES
OMNITRONIC DD 1215 incl. System 10603027
OMNITRONIC DD 1220 incl. System 10603030
OMNITRONIC BD 1030 incl. System 10603035
OMNITRONIC BD 1100 incl. System 10603040
ENDSTUFEN
AMPLIFIERS
AMPLIFICATEURS
OMNITRONIC PA 240 2 x 120W an 4 Ohm 10450810
OMNITRONIC PA 240 2 x 200W an 4 Ohm 10450830
OMNITRONIC PA 1100 2 x 550 W an 4 Ohm 10450840
OMNITRONIC PA 1600 2 x 800 W an 4 Ohm 10450850
SPEZIAL SOUND-EFFEKTGERÄTE
SPECIAL SOUND EFFECTORS
EFFETS DE SON SPECIAUX
OMNITRONIC XO-230 Aktive Frequenzweiche 10304050
OMNITRONIC PEQ-215 Equalizer, 2 x 15 Band 10200035
OMNITRONIC KLEINBESCHALLUNGSSYSTEME
OMNITRONIC MINI SPEAKER SERIES
OMNITRONIC HAUT-PARLEURS PETITS
OMNITRONIC Control 100 2-W.20/60W 1 Paar 11036550
OMNITRONIC Control 200 2-W.35/100W 1 Paar 11036560
OMNITRONIC DJ-BOXEN
OMNITRONIC DJ-SPEAKERS
OMNITRONIC ENCEINTES DJ
OMNITRONIC D 800 Kompaktbox, 90 W 11037010
OMNITRONIC D 1000 Kompaktbox, 120 W 11037020
OMNITRONIC D 1200 Kompaktbox, 140 W 11037030
OMNITRONIC D 1500 Kompaktbox, 180 W 11037040
Art. nr.
Art. no.
No. d’art.
Page 4

Deutsch
BEDIENUNGSANLEITUNG
PA 240 Endstufe
Lesen Sie vor der ersten Inbetriebnahme zur eigenen Sicherheit diese
Bedienungsanleitung sorgfältig durch!
Alle Personen, die mit der Aufstellung, Inbetriebnahme, Bedienung, Wartung und Instandhaltung dieses Ge-
rätes zu tun haben, müssen
- entsprechend qualifiziert sein
- diese Betriebsanleitung genau beachten.
EINFÜHRUNG
Wir freuen uns, daß Sie sich für eine OMNITRONIC PA 240 Endstufe entschieden haben. Sie haben hiermit
ein zuverlässiges und leistungsstarkes Gerät erworben. Wenn Sie nachfolgende Hinweise beachten, sind wir
sicher, daß Sie lange Zeit Freude an Ihrem Kauf haben werden.
Nehmen Sie die OMNITRONIC PA 240 aus der Verpackung.
Bitte überprüfen Sie vor der ersten Inbetriebnahme, ob kein offensichtlicher Transportschaden vorliegt. Soll-
ten Sie Schäden am Stromkabel oder am Gehäuse entdecken, nehmen Sie das Ger ät nicht in Betrieb und
setzen sich bitte mit Ihrem Fachhändler in Verbindung.
SICHERHEITSHINWEISE
Dieses Gerät hat das Werk in sicherheitstechnisch einwandfreiem Zustand verlassen. Um diesen Zustand zu
erhalten und einen gefahrlosen Betrieb sicherzustellen, muß der Anwender unbedingt die Sicherheitshinweise
und die Warnvermerke beachten, die in dieser Gebrauchsanweisung enthalten sind.
Unbedingt lesen:
Bei Schäden, die durch Nichtbeachtung dieser Bedienungsanleitung verursacht werden, erlischt der
Garantieanspruch. Für daraus resultierende Folgeschäden übernimmt der Hersteller keine Haftung.
Gerät vor Feuchtigkeit und Nässe schützen!
Setzen Sie das Gerät niemals ätzenden Chemikalien, Reinigungsmitteln, etc. aus.
Das Gerät darf nicht in Betrieb genommen werden, nachdem es von einem kalten in einen warmen Raum
gebracht wurde. Das dabei entstehende Kondenswasser kann unter Umständen Ihr Gerät zerstören. Lassen
Sie das Gerät solange uneingeschaltet, bis es Zimmertemperatur erreicht hat!
Vergewissern Sie sich, daß die anzuschließende Netzspannung nicht höher ist, als auf dem Gerät angegeben.
Verwenden Sie ausschließlich Schukosteckdosen mit max. 230V Wechselspannung und 50-60Hz!
3
Page 5

Deutsch
Die Endstufe und ihre Zuleitungen sind vor Blitzschlag zu schützen.
Schließen Sie das Gerät nur im ausgeschaltenen Zustand an!
Schließen Sie die Ein- oder Ausgänge niemals an eine Stromquelle an (Batterie, o.ä.).
Vermeiden Sie unter allen Umständen, daß Ausgang mit Ausgang verbunden wird!
Beachten Sie bitte, daß Schäden, die durch manuelle Veränderungen an diesem Gerät verursacht werden,
nicht unter den Garantieanspruch fallen.
Kinder und Laien vom Gerät fernhalten!
Öffnen Sie während des Betriebes niemals das Gehäuse.
Die Endstufe ist nicht für Hochfrequenzbetrieb geeignet und darf deshalb nicht über 40 KHz mit großer Lei-
stung betrieben werden.
Leuchtet die Clippinganzeige an der Frontplatte auf, ist das Ausgangssignal verzerrt. Stellen Sie die Regler
entsprechend niedriger ein.
Im Geräteinneren befinden sich keine zu wartenden Teile, öffnen Sie deshalb niemals das Gehäuse!
Wartungs- und Servicearbeiten sind ausschließlich dem autorisierten Fachhandel vorbehalten!
BESTIMMUNGSGEMÄSSE VERWENDUNG
Dieses Gerät wurde ausschließlich zur Verwendung in geschlossenen Räumen konzipiert.
Das Gerät kann an jedem beliebigen Ort installiert werden. Achten Sie jedoch dar auf, daß das G erät nicht zu
großer Hitze, Feuchtigkeit und Staub ausgesetzt wird. Vergewissern Sie sich, daß keine Kabel frei herumliegen. Sie gefährden Ihre eigene und die Sicherheit Dritter!
Nehmen Sie das Gerät erst in Betrieb, nachdem Sie sich mit seinen Funktionen vertraut gemacht haben.
Lassen Sie das Gerät nicht von Personen bedienen, die sich nicht mit dem Gerät auskennen. Wenn Geräte
nicht mehr korrekt funktionieren, ist das meist das Ergebnis von unsachgemäßer Bedienung!
Beachten Sie bitte, daß eigenmächtige Veränderungen an dem Gerät aus Sicherheitsgründen verboten sind.
GERÄTEBESCHREIBUNG
Die OMNITRONIC PA 240 ist für den professionellen Anwendungsbereich vorgesehen. Die Anschlüsse befinden sich auf der Rückseite des Gerätes, die Lautstärkeregler befinden sich auf der Frontseite.
Die OMNITRONIC PA 240 ist dauerkurzschlußfest, gegen Überhitzung geschützt und besitzt eine Einschaltverzögerung. Außerdem ist sie mit einer lastunabhängigen Clippinganzeige ausgestattet.
Die Eingänge der OMNITRONIC PA 240 sind mit Klinken- sowie Cinch-Buchsen, die Ausgänge mit
Schraub/Klemm-Buchsen ausgestattet.
RACKEINBAU
Diese Endstufe ist für ein 19" Rack/483mm vorgesehen. Die Höhe beträgt nur 108mm. Sie können die Endstufe mit vier Schrauben M6 im Rack befestigen.
Achten Sie bei der Standortwahl der Endstufe darauf, daß eine ausreichende Luftzirkulation stattfinden kann.
Dauerhafte Überhitzung kann zu Schäden an der Endstufe führen.
Die Leistungsaufnahme einer Endstufe setzt sich zusammen aus der Ausgangsleistung, die an die Lautsprecher abgegeben wird, und der Verlustleistung, die als Wärme an die Luft abgegeben werden muß.
Beim Rackeinbau ist darauf zu achten, daß die warme Luft aus dem Rack entweichen kann und genügend
Abstand zu anderen Geräten vorhanden ist. Das Rackgehäuse sollte mit einem Lüfter versehen sein.
Ihr Gerät ist zusätzlich mit Ventilatoren ausgestattet, die für die notwendige Kühlung sorgen. Da die warme
Luft hinten aus den Geräten herausgeblasen wird, sollte die Rückwand des Racks während des Betriebes der
Endstufen geöffnet werden.
Seien Sie vorsichtig beim Einbau des Verstärkers in ein Rack. Bauen Sie die schwersten Geräte in den unteren Teil des Racks ein. Die Frontplatte allein reicht allerdings nicht aus, um eine Endstufe sicher zu befestigen. Es muß eine gleichmäßige Befestigung durch Boden- und Seitenschienen gewährleistet sein.
4
Page 6

Deutsch
Wenn Racks transportiert oder für mobile Beschallungen verwendet werden, sollte man die Rückbügel der
Geräte noch zusätzlich an den Boden- oder den Seitenschienen des Racks befestigen. So kann sich die
Endstufe beim Transport nicht nach hinten verschieben, da die Frontplatte Beschleunigungskräfte, wie sie im
Roadbetrieb vorkommen, nicht alleine auffangen kann.
EINGÄNGE
Gute Kabelführung verbessert die Klangqualität Ihres PA-Systems enorm. Eingangskabel sollten kurz und
direkt sein, da hohe Frequenzen stark gedämpft werden, wenn die Kabel unnötig lang sind. Außerdem ist die
Gefahr von Brummeinstreuungen und Rauschen bei langen Kabeln erheblich größer. Müssen jedoch lange
Kabelwege zurückgelegt werden, sollten auf jeden Fall symmetrische Kabel verwendet werden.
Die Eingänge Ihrer OMNITRONIC PA 240 sind mit Klinken- sowie Cinch Buchsen ausgestattet.
AUSGÄNGE
Der hohe Dämpfungsfaktor Ihres Verstärkers sorgt für eine klare Wiedergabe. Unnötig lange und dünne
Lautsprecherkabel können den Dämpfungsfaktor und damit die niedrigen Frequenzen negativ beeinflussen.
Der Dämpfungsfaktor sollte mindestens bei 50 liegen um gute Audioqualitäten zu gewährleisten. Je länger ein
Kabel sein muß, um so dicker sollte es sein.
Die Ausgänge Ihrer OMNITRONIC PA 240 sind mit Schraub/Klemm-Buchsen ausgestattet.
NETZANSCHLUSS
Die OMNITRONIC PA 240 darf erst dann ans Stromnetz angeschlossen werden, wenn sichergestellt ist, daß
die richtige Netzspannung (220/230V) und die Schutzerdung vorhanden ist. Das Ger ät entspr icht der Schutzklasse I. Die Schutzerdung darf nicht vom Gehäuse getrennt werden! Ihr Gerät ist mit einer 4AT Sicherung
abgesichert.
STEREOBETRIEB
Schließen Sie Ihr Eingangssignal an der Rückseite des Gerätes an die Eingangsbuchsen an.
Schließen Sie Ihre Lautsprecher an die Schraub/Klemmbuchsen Output Channel 1 und Output Channel 2 an.
Achtung! Die Impedanz der angeschlossenen Lautsprecher muß zwischen 4 und 16 Ohm liegen.
Achtung! Bevor Sie die Endstufe einschalten beachten Sie bitte die Erläuterungen unter Bedienung.
Stellen Sie die Endstufenleistung der Kanäle über die Lautstärkeregler CH1 und CH2 an der Vorderseite des
Gerätes ein.
Achtung! Erhöhen Sie die Leistung der Kanäle nur soweit, bis die Clip LED kurz aufleuchtet. Damit verhindern Sie, daß das Ausgangssignal verzerrt und Ihre Lautsprecher beschädigt werden.
BEDIENUNG
Nachdem Sie Ihren Verstärker angeschlossen haben, drehen Sie die gerasterten Lautstärkeregler gegen den
Uhrzeigersinn bis zum Anschlag zurück. Schalten Sie erst alle Vorstufen und dann erst die Endstufe ein. Jetzt
muß die rote "power on" Leuchtdiode aufleuchten. Ist dies nicht der Fall, prüfen Sie bitte, ob der Verstärker an
eine spannungsführende Netzleitung angeschlossen ist. Nach der Einschaltverzögerung sind die Lautspr echerausgänge aktiviert. Wenn die Pegelregler der Vorstufen zugedreht sind, drehen Sie bitte die beiden Lautstärkeregler der Endstufe bis zur Mitte auf. Es darf kein lautes Brummen zu hören sein. Ist dies jedoch der
Fall, überprüfen Sie bitte nochmals die Verbindungskabel zwischen der Vor- und der Endstufe. Stellen Sie
nun die gewünschte Lautstärke an den Lautstärkereglern ein CH1 und CH2.
Alle wichtigen Betriebszustände der Endstufe werden über die Zustandsanzeige an der Frontseite angezeigt:
CLIP Kurzschluß oder zu niedrige Lastimpedanz oder verzerrtes Signal
-20 dB Eingangssignal liegt an
PROTECT während der Stabilisierungsphase beim Einschalten aktiv, oder wenn
eine der Schutzschaltungen angesprochen hat
POWER Die Endstufe ist in Betrieb
THERMAL Bei Überhitzung des Gerätes
Wenn Sie die Anlage wieder abschalten wollen, schalten Sie zuerst die Endsstufen und danach die Vor stufen
aus, damit kein Ausschaltknacksen an die Lautsprecher gelangt.
WARTUNG
Das Lüftergitter muß regelmäßig gereinigt werden. Verwenden Sie niemals aggressive Reinigungsmittel sondern einfach ein angefeuchtetes Tuch.
5
Page 7

Deutsch
PROBLEMANALYSE
Lüfter arbeitet nicht, LEDs leuchten nicht Sicherung auf der Geräterückseite wechseln
Lüfter arbeitet, eine der Power LEDs leuchtet nicht Sicherung des jeweiligen Kanals erneuern (Typ: T 6,3
A/250)
Protect LED leuchtet permanent -An Eingängen liegt einseitige Spannung an. Schalten
Sie die Eingänge ab.
-Überhitzung des Gerätes durch Verunreinigungen.
Reinigen Sie das Lüftergitter.
-zu niedrige Impedanz der Lautsprecher
-Kurzschluß in der Lautsprecherleitung oder in den
Lautsprechern.
-Technischer Defekt in der Endstufe
Protect LED leuchtet, Kanal schaltet ab -zu hoher Frequenzgang über 40 KHz
-zu niedriger Frequenzgang unter 20Hz
Beheben Sie den Fehler durch den Einsatz eines
Mischpultes, Equalizers, Low-Cuts oder High-Cuts
Thermal LED leuchtet nicht mehr -Überhitzung des Gerätes durch Verunreinigungen.
Reinigen Sie das Lüftergitter.
TECHNISCHE DATEN OMNITRONIC PA 240:
Spannungsversorgung: 230 V/50 Hz
Spannungsfestigkeit: 230 V +/- 10 % (207 V – 253 V)
Gesamtanschlußwert (max.): 350 W
Kurzfristige Spitzenleistung bei 1 KHz: 170 W / 4 Ohm
Maximalleistung: 2 x 170 W / 4 Ohm
Nominalleistung: 2 x 120 W / 4 Ohm
Ausgangsleistung sinus:
Stereo 4 Ohm 2 x 120 W
Stereo 8 Ohm 2 x 65 W
Frequenzbereich: 20 – 40 000 Hz
Dämpfungsfaktor: 200
Klirrfaktor: < 0,05 %
Geräuschspannungsabstand: > 98 dB
Kanaltrennung (bei 1 KHz): > 100 dB
Mindesteingangsspannung: 0,6 V
Eingangsimpedanz: 50 kOhm
Innenwiderstand: 0,25 Ohm
Eingangsbuchsen: 2 Klinkeneinbaubuchsen, 2 Cinch-Buchsen
Ausgangsbuchsen: 2 Zonen mit Schraub-/Klemmverbindungen, 6,3 mm Klinken-
Kopfhörerausgang
Steuerelemente: Netzschalter, 2 Gain-Regler, Zonenumschalter, Spannungs-
wahlschalter 230 V/110 V
LED Anzeige (pro Kanal): Power, Protect, Temperature, Signal, Clipping
Schutzschaltungen: Kurzschlußschutzschaltung, Überlastschutzschaltung, Ein-
schaltverzögerung
Bauweise: Stahlchassis, Frontplatte Aluminium
Maße:
Gewicht: 10 kg
Leistungs-/Gewichts-Verhältnis: 12 W/kg
483 x 95 x 272 mm
4/98 ©
6
Page 8

English
OPERATING INSTRUCTIONS
PA 240 amplifier
For your own safety, please read this user manual carefully before you initial start-up.
All persons involved in the installation, operation and maintenance of this device have to:
- be qualilfied
- follow the instructions of this manual
INTRODUCTION
Thank you for having chosen a OMNITRONIC PA 240. You have acquired a reliable and powerful device. If
you follow the instructions given in this manual, we can assure you that you will enjoy this device for many
years.
Unpack your OMNITRONIC PA 240.
Please make sure that there are no obvious transport damages. Should you notice any damages on the A/C
connection cable or on the casing, do not take the device into operation and immediately consult your local
dealer.
SAFETY INSTRUCTIONS
This device has left our premises in absolutely perfect condition. In order to maintain this condition and to
ensure a safe operation, it is absolutely necessary for the user to follow the safety instructions and warning
notes written in this user manual.
Important:
Damages caused by the disregard of this user manual are not subject to warranty. The dealer will
not accept liability for any resulting defects or problems.
Keep away from rain and moisture!
Never expose the device to agressive chemicals, detergents, etc!
If the device has been exposed to drastic temperature fluctuation (e.g. after transportation), do not switch it on
immediately. The arising condensation water might damage your device. Leave the device switched off until it
has reached room temperature.
Make sure that the available voltage is not higher than stated on the device.
The device and all connections have to be lightning protected.
Only connect the device when the power switch is off.
7
Page 9

English
Never connect the inputs or outputs to any power source (batteries, etc.)
Never connect output to output.
Please consider that damages caused by manual modifications on the device or unauthor ized operation by
unqualified persons are not subject to warranty.
Keep away children and amateurs!
Never open the housing during operation!
This amplifier is not proposed for high frequency operation. Therefore any operation over 20,000 Hz is forbid-
den.
If the clipping LED on the front panel lights up, the output signal is distorted. Adjust the Gain control accor-
dingly.
There are no servicable parts inside the device. Therefore, never open the housing.
Maintenance and service operations are only to be carried out by authorized dealers.
OPERATING DETERMINATIONS
This device was designed for indoor use only.
Do not shake the device. Avoid brute force when installing or operating the device.
You can install the device at any desired place. Please make sure that the device is not exposed to extreme
heat, moisture or dust. There should not be any cables lying around. You endanger your own and the safety
of others!
Operate the device only after having familiarized with its functions. Do not allow an operation by persons who
do not know the device well enough. Most damages are the result of unprofessional operation!
Please consider that unauthorized modifications on the device are forbidden due to safety reasons!
DESCRIPTION
The OMNITRONIC PA 240 is designed for professional application. The inputs and outputs are located on the
rear panel, the gain controls on the front panel.
The OMNITRONIC PA 240 is sustained short-circuit proof, protected against overtemperature and features
turn-on delay and load-independent clipping LEDs.
The OMNITRONIC PA 240 is equipped with 6.35mm and Cinch input jacks and Screw/clamp output jacks.
RACK MOUNTING
The amplifier is built for 19" racks/483mm. The height is 108mm only. You can fix the amplifier with four
screws M6 in the rack.
When mounting the amplifier into a rack, please make sure that there is a proper air circulation. Steady overheating will damage your device.
The amplifier’s total power consumption consists of the output power passed on to the speakers and the power loss which has to be passed on to the air in the form of heat.
Please make sure that there is enough space around the device so that the heated air can be passed on. The
rack should be provided with a cooling fan.
Your amplifier additionally features built-in cooling fans that supply the necessary ventilation. Since the heated
air is passed on through the device’s rear panel, the back of the rack should be left open during operation.
Be careful when mounting the amplifier into the rack. Put the heaviest devices into the lower part of the rack.
Be aware that fastening the amplifier with four screws on the front panel is not enough. In order to ensure
safety, additional fastening by using ground and side bars is necessary.
If racks are to be transported or used for mobile use, additionally fasten the devices by connecting the rear
brackets with the side or ground bars of the rack. In this way, the amplifier cannot be pushed backwards. The
front panel alone is not designed to absorb acceleration forces occuring during transportation.
8
Page 10

English
INPUTS
A good cable run improves the sound quality remarkably. Input cables should be short and dire ct, since high
frequencies will be mostly be absorbed if the cables are unnecessarily long. Besides that a longer cable may
lead to humming and noise trouble. If long cable runs are unavoidable, you should use balanced cables.
The inputs of your OMNITRONIC PA 240 are equipped with 6.35mm and Cinch jacks.
OUTPUTS
The high damping factor of your amplifier supplies a clear sound reproduction. Unnecessarily long and thin
cables will influence the damping factor and thus the low frequencies in a negative way. In order to safeguar d
good sound quality, the damping factor should lie around 50. The longer a cable has to be, the thicker it
should be.
The outputs of your OMNITRONIC 200 are equipped with Screw/clamp jacks.
CONNECTION TO THE MAINS
Connect the OMNITRONIC PA 240 only after having made sure that the right voltage (220/230V) is supplied
and that the ground lead is earthed. This device falls under potection class I. Do not detach the ground lead
from the housing!
This device features a 4A fuse.
STEREO OPERATION
Connect the input signal to the input jacks on the rearpanel.
Connect your speakers to the Screw/clamp jacks Output Channel 1 and Output Channel.
Caution! The impedance of the speakers must be between 4 and 16 Ohm.
Caution! Before switching on your amplifier, please refer to the explanations under Operation.
Adjust the level of each channel with Gaincontrol CH1 and CH2 on the frontpanel.
Caution! Increase the level of each channel only so far that the Clip LED lights up shortly. Thus, you avoid
that the output signal is distorted and your speakers are damaged.
OPERATION
After having connected your amplifier to the mains, turn both gain controls counter-clockwise to null-position.
The last device to be switched on is the amplifier. The "power on" LED lights up now. If it does not, check if
the amplifier is connected to the mains correctly.
After the turn-on delay the speakers are activated.
After having set the volume controls of the pre-amplifier in null-position, turn the gain controls of your amplifier
to mid-position. You must not hear any loud humming. If there is humming nevertheless, check the connecting cables between the pre-amplifier and the amplifier. Now adjust the volume with the gain controls CH1 and
CH2.
All important operating modi of the amplifier are displayed on the frontpanel.
CLIP short-circuit or impedance too low or signal distorted
-20 dB input signal available
PROTECT active during stabilisation period after switching on or when one of the
protective circuits started
POWER amplifier is online
THERMAL when overheated
If you want to switch off the system, switch off the amplifier first and then the pre-amplifiers in order to
avoid acoustic shocks on the speakers.
MAINTENANCE
The ventilation grille has to be cleaned regularly. Never use aggressive detergents - simply use a damp cloth
instead
9
Page 11

English
PROBLEM CHART
Fan does not work, LEDs do not light up Change fuse on rearpanel
Fan works, one of the Power LEDs does not light up Change fuse of the individual channel (Type: T 6,3
A/250)
Protect LED lights up permanently -inputs receive single-sided power; switch inputs off.
-impedance of speakers too low
-short-circuit in speaker connection or in speakers
-technical default of amplifier
Protect LED lights up, channel cuts off -frequency exceeds 40 KHz
-frequency under 20Hz
Solution: connect mixer, equalizers, low-Cuts or highCuts
Thermal LED no longer lights up -device is overheated due to contamination. Clean
ventilation grille.
TECHNICAL SPECIFICATIONS OMNITRONIC PA 240:
Power supply:
Power-range:
Power consumption (max.):
Momentary music peak power at 1 KHz:
Maximum power output:
Nominal power output:
Power output sine:
Stereo 4 Ohm
Stereo 8 Ohm
Frequency range:
Damping-factor
Distortion factor:
Signal to noise-ratio:
Channel seperation (at 1 KHz):
Min. input sensitivity:
Input impedance
Internal resistance: 0.25 Ohms
Input-connectors 2 x 1/4“-jack-plugs, 2 cinch-plugs
Output-connectors 2 speaker-zones with screw-connectors, ¼“-jack-
Control elements Power switch, 2 input attenuators, zone-selector, voltageLED indicators (per channel)
Protection circuits Short-circuit, Overload protection-circuit, Muting after power
Construction Steel chassis, aluminium frontpanel
Dimensions 483 x 272 x 95 mm
Weight
Power/weight-relation:
:
230 V/50 Hz
230 V +/- 10 % (207 V – 253 V)
350 W
170 W / 4 Ohms
2 x 170 W / 4 Ohms
2 x 120 W / 4 Ohms
2 x 120 W
2 x 65 W
20 – 40,000 Hz
200
< 0,05 %
> 98 dB
> 100 dB
0.6 V
50 kOhms
headphones-plug
selector 230 V/110 V
Power, Protect, Temperature, Signal, Clipping
turned ON
10 kg
12 W/kg
4/98 ©
10
Page 12

Français
MODE D’EMPLOI
PA 240 amplificateur
Pour votre propre sécurité, veuillez lire ce mode d'emploi avec attention avant la première mise en
service.
Toute personne ayant à faire avec le montage, la mise en marche, le maniement et l’entretien de cet appareil
- doit être suffisamment qualifiée
- est priée de suivre strictement les instructions de service suivantes.
INTRODUCTION
Votre OMNITRONIC PA 240 vous a été expédié dans un emballage spécialement adapté. Ne pas jeter le
carton et les produits avéolaires destinés à la protection de l’appareil dans le cas d’un transport repété.
Avant tout, assurez-vous que l’appareil n’a pas subi de dommages lor s de son transport. Si tel était le cas,
contactez immédiatement votre r evendeur et ne mettez pas l’appareil en service. Gardez le carton endommagé comme preuve.
INSTRUCTIONS DE SÉCURITÉ
Cet appareil a quitté les ateliers dans un état irréprochable. Pour assurer un bon fonc tionnement, s ans danger, l'utilisateur doit suivre les instructions contenues dans ce mode d'emploi.
Attention:
Tout dommage occasionné par la non observation des instruct ions de montage ou d'utilisation n'est
pas couvert par la garantie.
L'appareil ne devrait pas être mis en ser vice lorsqu'il a été transpor té d'un endroit froid à un endr oit chaud. Il
se forme de la condensation qui pourrait endommager l'appareil. Laissez celui-ci atteindre la température
ambiante avant de le mettre en service.
Toute modification effectué sur cet appareil annule la garantie.
DESCRIPTION DE L’APPAREIL
Les connexions se situent au revers de l’appareil et les régulateurs gains au front.
Le OMNITRONIC PA 240 est résistant en permanence court-circuit, protégé contre la surchauffe et il
possède un retardateur de mise en s ervice. En outre il est équipé d’un tém oin clipping indépendant du secteur. Les entrées du OMNITRONIC PA 240 s ont équipées avec des douilles j ack 6.35MM ET CINCH, et les
avec des douilles À VIS DE SERRAGE.
INSTRUCTIONS POUR L’INSTALLATION DU RACK
Prendre garde lors de la mise en plac e de l'amplif icateur qu’une circ ulation d’air suf fisante soit ass urée. Une
surchauffe permanente peut entr aîner des dommages à l'am plificateur. La puissance absorbée de l'am plificateur se constitue de la puissance de sortie transferée aux enceintes et de la puissance dissipée
s’échappant sous forme de chaleur à l’air libre. En ce qui concer ne les amplificateurs jusqu’à 200 watts, cette
11
Page 13

Français
chaleur s’échappe sur des refroidis s eurs c onventionnels à l’aide du cour ant de c onvection natur el ( l’air c haud
monte et entraîne automatiquement de l’air froid d’en bas).
Lors de l’installation du rack f aire attention à ce que l’air chaud puiss e s’échapper du rack et qu’il y ait suffisamment de distanc e entre les étages de sortie. Le boîtier du rack devrait être équipé d’un ventilateur. Le
courant de convection naturel n’est pas suf fis ant pour les am plif icateurs de haute capacité. Pour cette raison
ils sont munis de ventilateurs qui assurent le ref roidissem ent nécessair e. Comm e l’air chaud quitte l’appareil
par l'arrière, laisser le dos de l’appareil libre pendant que celui-ci est en marche.
Soyez prudent lors de l’installation de l’am plificateur dans un rack . Intégrer les appareils les plus lour ds dans
la partie inférieure du rack. La face avant ne s uff it pas elle-m êm e pour f ixer un am plificateur . Procéder à une
fixation proportionnée à l'aidedes barres tr ansversales et laterales. Si des r acks sont tr ansportés ou utilisés
pour des sonorisations m obiles, les ceintres au revers de l’appareil devraient être fix és en plus à la base ou
aux barres du rack. Ainsi l'amplificateur ne se deplacera pas en arrière lors du transport.
RACCORDS D’ENTRÉE
Un bon guidage des câbles ameliore rem arquablement la qualité du son de votre système PA. Monter les
câbles d’entrée le plus court et le plus direct possible. Une longueur inutile du cablage affa iblira les hautes
fréquences, le risque de ronflem ent et de bruit en sera plus grand. Si de longs cablages sont inévitables,
utilisez des câbles symmétriques. Les entr ées de votre OMNITRONIC PA 240 sont équipés avec douilles
6.35MM ET CINCH.
RACCORDS DE SORTIE
Le fort affaiblissement linéique assureune reproduction claire et nette. Des câbles d’enceintes inutilement
longs et fins peuvent influencer négativement l’affaiblissement linéique et donc les basses fréquences.
L’affaiblissement linéique devrait se situer au moins à 50 pour garantir une bonne qualité audio. Plus un
câble est long, plus il devra être épais. Les sorties de votre OMNITRONIC PA 240 s ont équipés avec douilles
À VIS DE SERRAGE.
CONNEXION AU SECTEUR
Brancher le OMNITRONIC PA 240 seulement au réseau après avoir assuré une tension de réseau de
220/230V et une protection de terre. L'appareil est conform e aux normes de séc urité de catégorie I. La protection par terre ne doit pas être séparée du boîtier! Votre appareil est protégé par un fusible 4AT.
UTILISATION
Après avoir branché votre am plificateur, tourner les r égulateurs gain dans le s ens invers des aiguilles d’une
montre jusqu’à la butée. Allumer tous les étages prélim inaires avant l’étage de sortie. La diode rouge "power
on" doit s'allumer à ce mom ent là. Si tel n'est pas le cas, vérifier si l'amplif icateur est branché à une ligne
d'alimentation sous tension. Après le r etard de mise en service les entrées d'enceintes s ont activées. Si le
réglage de niveau est fermé, ouvrir les régulateurs gain de l'amplificateur à demi. Il ne devrait pas se produire
de forts ronflements. Si tel était le cas, vérifier les câbles de r accord entre l'étage prélim inaire et l'amplificateur. Régler maintenant le volume souhaité à l'aide des régulateurs gain. Si vous voulez éteindre l'ensemble,
commencez par les étages de sortie pour éviter un crépitement lors de l'arrêt.
ATTENTION
Dans la plupart des cas les enceintes et les appareils défec tueux résultent d'un maniement non professionnel. Cela se produit lorsqu'on donne aux personnes qui ne connaissent pas suff isament l'appareil la pos sibilité de changer de leur propre autorité des réglages ou d'entreprendre même la pose de c âbles. Pour cette
raison tenez des enfants et des non-initiés éloignés de l'appareil!
Ne jamais brancher les entrées ou les sorties à une autre source de courant (pile etc).
Vérifier que la tension de réseau n'est pas supérieure à celle qui est indiquée sur l'appareil.
Faire attention à ce que l'appareil ne soit jamais en contact avec des produits chimiques, c austiques, des
produits à nettoyage ou des liquides.
Ne jamais ouvrir le boîtier sans avoir débranché.
Protéger l'amplificateur et ses lignes éléctriques contre la foudre.
L'amplificateur n'est pas conçu pour un fonctionnement en hautes fréquences et ne doit ainsi pas être actionné à haute capacité au-dessus de 40 KHz.
Si le témoin clipping s'allume à la face avant, le signal de sor tie est déformé. Tourner les r égulateurs plus
bas.
12
Page 14

Français
CARACTÉRISTIQUES TECHNIQUES OMNITRONIC PA 240:
Alimentation: 230 V/50 Hz
Rigidité diélectrique: 230 V +/- 10 % (207 V – 253 V)
Puissance de rendement (max.): 350 W
Puissance maximale à court terme à 1 KHz: 170 W / 4 Ohm
Puissance impulse: 2 x 170 W / 4 Ohm
Puissance nominale: 2 x 120 W / 4 Ohm
Puissance de sortie sinus:
Stereo 4 Ohm 2 x 120 W
Stereo 8 Ohm 2 x 65 W
Courbe de réponse: 20 – 40 000 Hz
Fact amort: 200
Distorsion: < 0,05 %
Rapport S/N: > 98 dB
Séparation des canaux (à 1 KHz): > 100 dB
Tension minimale de l’entrée: 0,6 V
Impedance de l‘entrée: 50 kOhm
Resistance interne: 0,25 Ohm
Douilles d’entrée: 2 douilles jack, 2 douilles cinch
Douilles de sortie: 2 zones d’enceintes avec bornes plates, douille jack pour
casques d‘écoute
Elements de contrôle:
L’affichage de diodes: Power, Protect, Temperature, Signal, Clipping
Circuits de protection:
Construction:
Dimensions:
Poids: 10 kg
Rapport puissance/poids: 12 W/kg
Interrupteur secteur, 2 régulateurs gain, sélecteur de
zone, sélecteur de ténsion 230 V/110 V
Court-circuit, protection de surcharge, temporisation de
démarrage
Châssis acier, platine avant d‘aluminium
483 x 272 x 95 mm
4/98 ©
13
 Loading...