

Page 1

© 2017 XRS Corporation, All rights reserved
Page 1
Omnitracs XRS Mobile ELD Driver Guide
Android Operating System
ELD ID: XRSAN1
Page 2

© 2017 XRS Corporation, All rights reserved
Page 2
Table of Contents
Overview .................................................................................................................................... 3
Logging In to Omnitracs XRS Mobile ......................................................................................... 4
Logging Out of Omnitracs XRS Mobile ...................................................................................... 5
Omnitracs XRS Mobile Dashboard ............................................................................................. 7
Hours of Service (HOS) Functions .............................................................................................. 8
Change Duty Status ................................................................................................................ 8
Change Duty Status – Personal Conveyance ......................................................................10
Change Duty Status – Yard Move ......................................................................................11
Log Editor Overview .................................................................................................................13
Viewing Your Driver Logs ......................................................................................................13
Editing Your Driver Log .........................................................................................................16
Confirming Carrier Edits ........................................................................................................19
Certifying Logs ......................................................................................................................20
Unassigned Vehicle Activity ...................................................................................................23
Diagnostic and Malfunction Alerts ............................................................................................25
Paper Log Mode .......................................................................................................................25
Sending eRODS to FMCSA .......................................................................................................26
Page 3
© 2017 XRS Corporation, All rights reserved
Page 3
Overview
Omnitracs XRS Mobile will run on many Android and Windows Mobile-based devices,
including both phones and tablets.
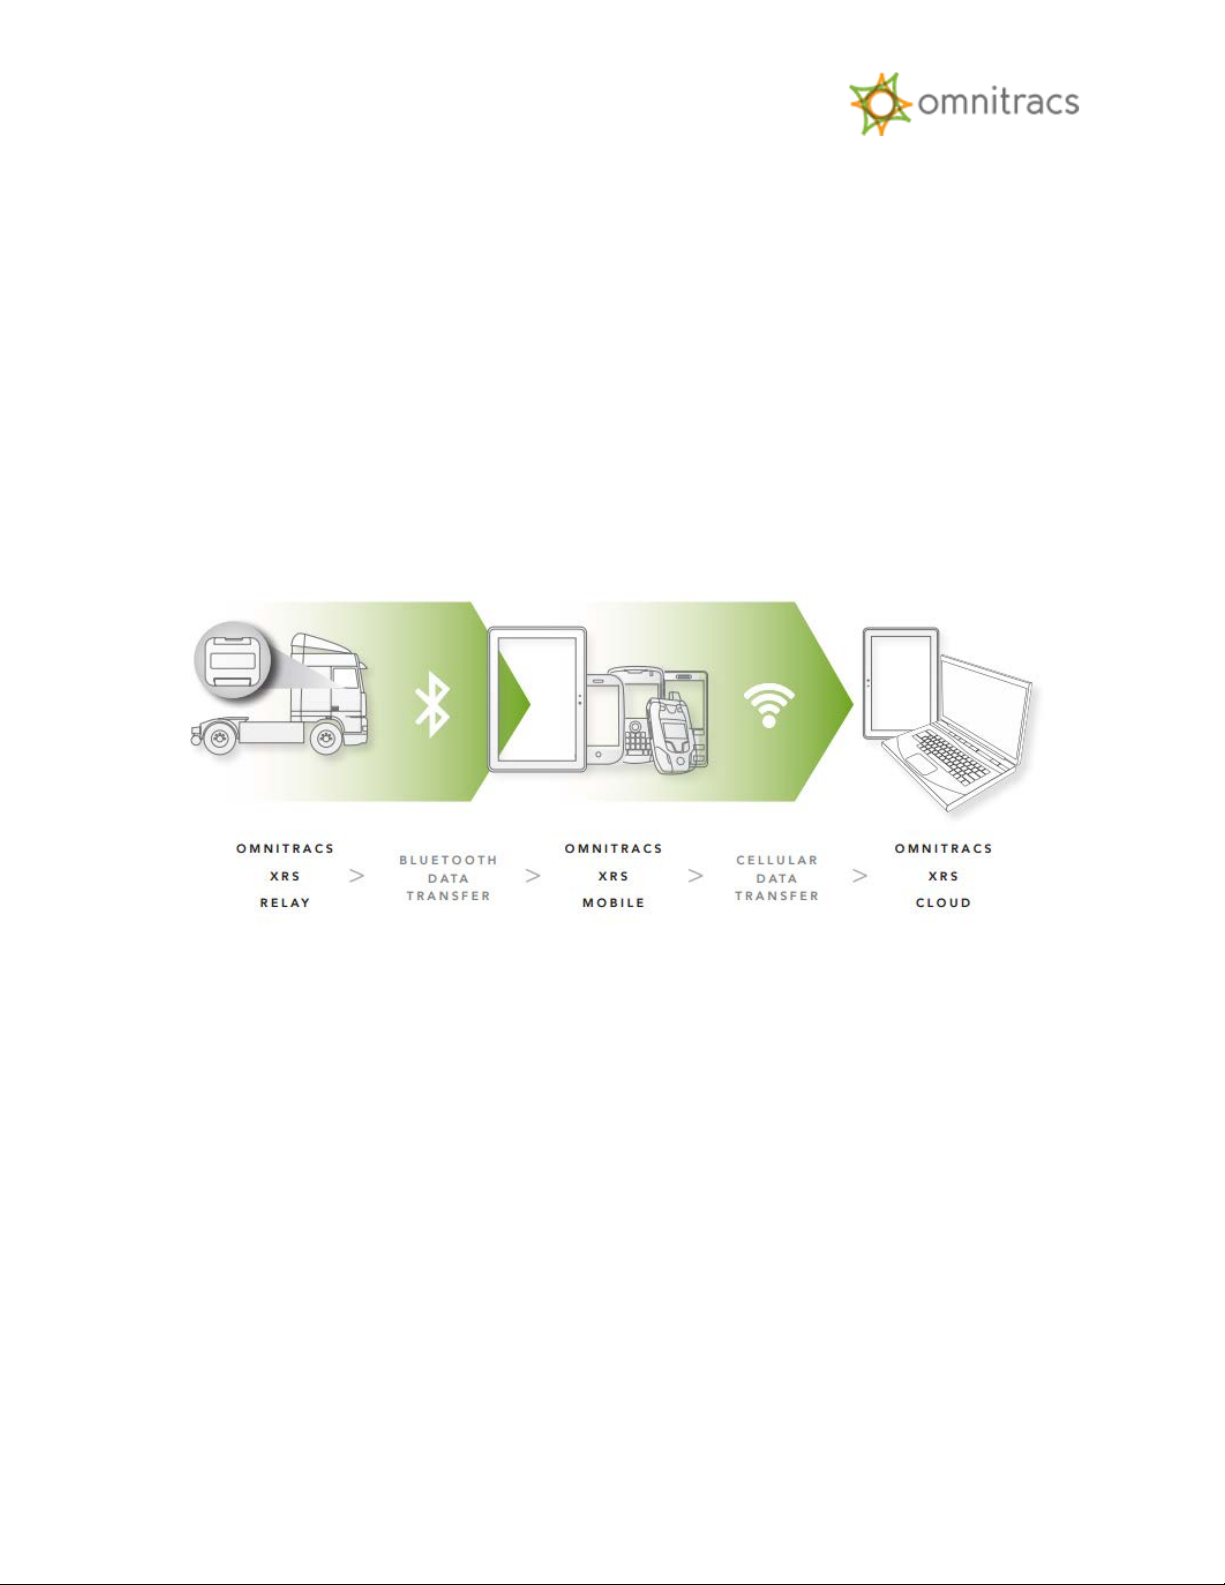
Omnitracs XRS Mobile uses the Bluetooth capability of a mobile device to connect to an
Omnitracs XRS Relay and obtain engine data automatically. The small, easily installed in-cab
Omnitracs XRS Relay taps into the truck’s computer.
Data is transferred from the Relay via Bluetooth to the driver’s smartphone, tablet, computer,
or rugged device. The data is then transferred via cellular network from the mobile device to
the Omnitracs XRS host website for data collection and analysis.
The result is an easy-to-use dashboard of compliance and fleet optimization data and
scorecards.
Drivers can use Omnitracs XRS Mobile to view and update Hours of Service (HOS) logs, record
Driver Vehicle Inspection results, begin and end routes and stops, and perform a variety of
other tasks. The information automatically collected from the Omnitracs XRS Relay, in addition
to any information provided by the driver, is sent to the Omnitracs XRS host website using the
mobile device's carrier network.
Page 4
© 2017 XRS Corporation, All rights reserved
Page 4
Logging In to Omnitracs XRS Mobile
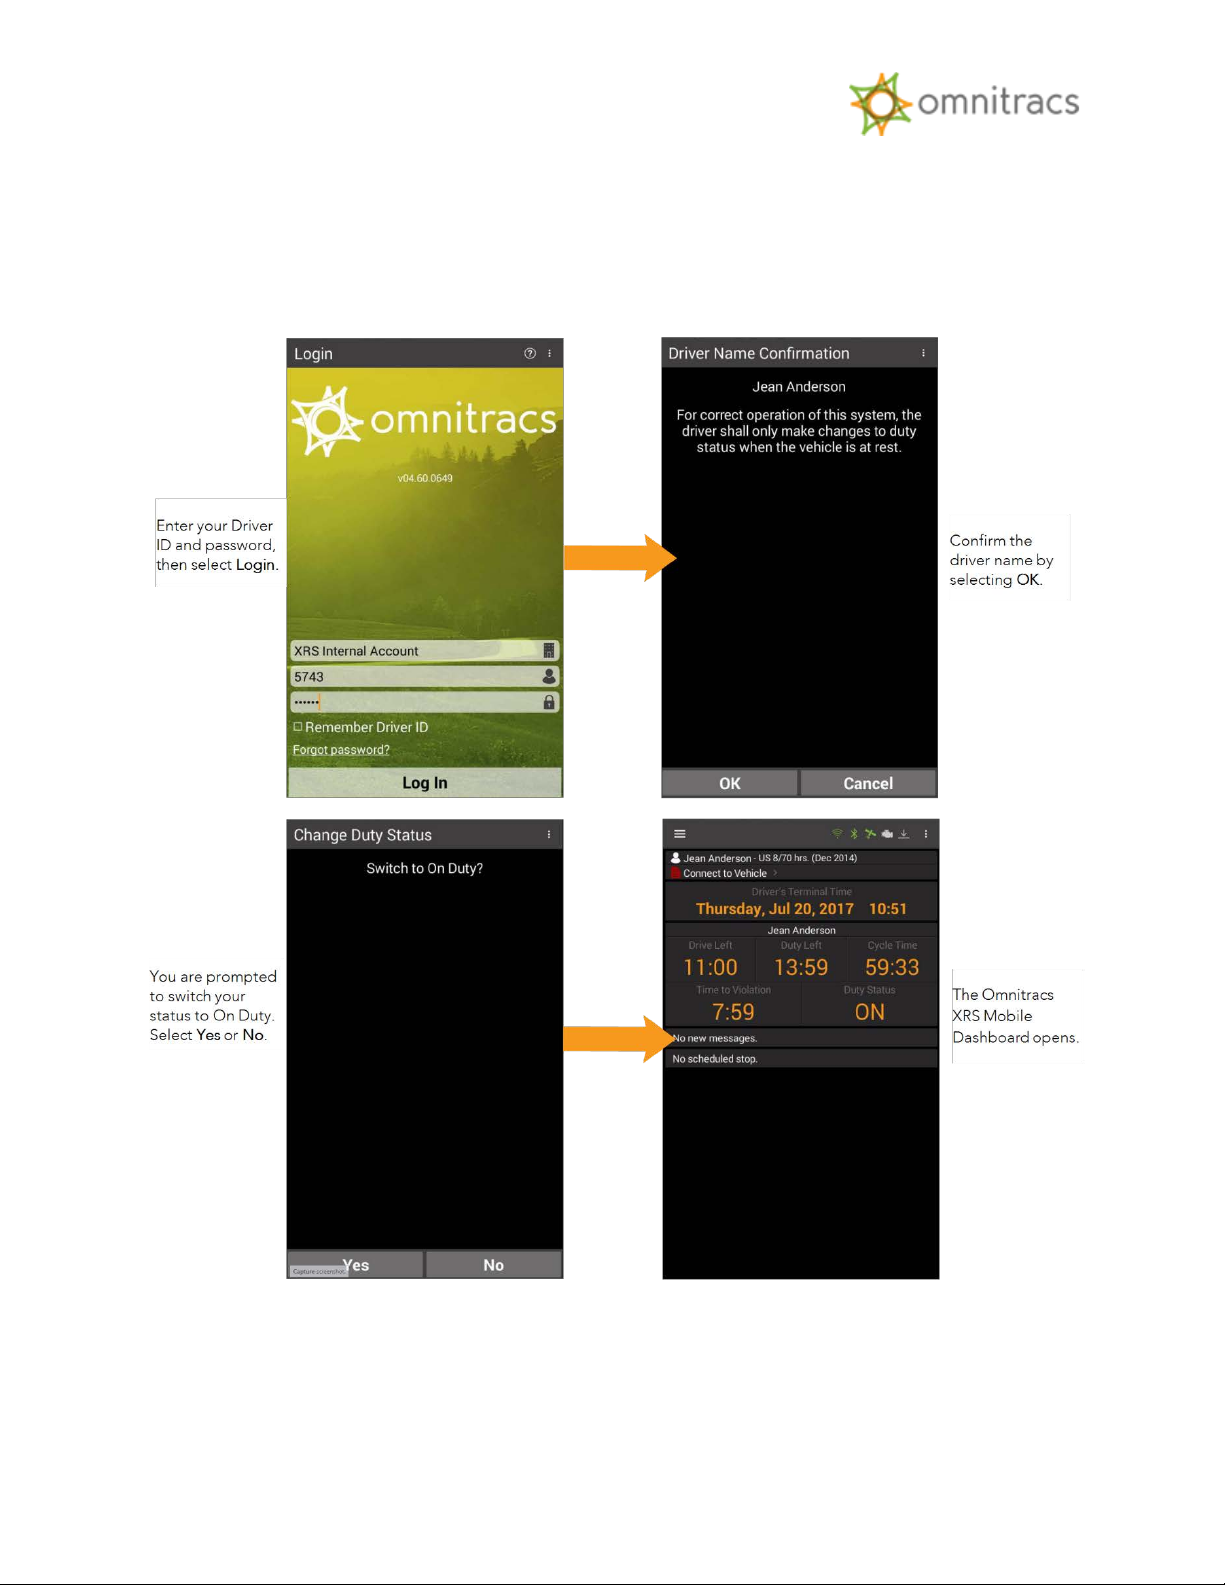
To log in to Omnitracs XRS Mobile, select the Omnitracs XRS icon from your app menu. The
Omnitracs XRS login screen appears.
Page 5
© 2017 XRS Corporation, All rights reserved
Page 5
Logging Out of Omnitracs XRS Mobile
When you log out of Omnitracs XRS Mobile, you may leave remarks as well as adjust your log
time. Omnitracs XRS will ask you to acknowledge any errors and confirm that all log entries are
true and correct.
Omnitracs XRS automatically records inspection and logout information and makes it available
through your office’s web user account.
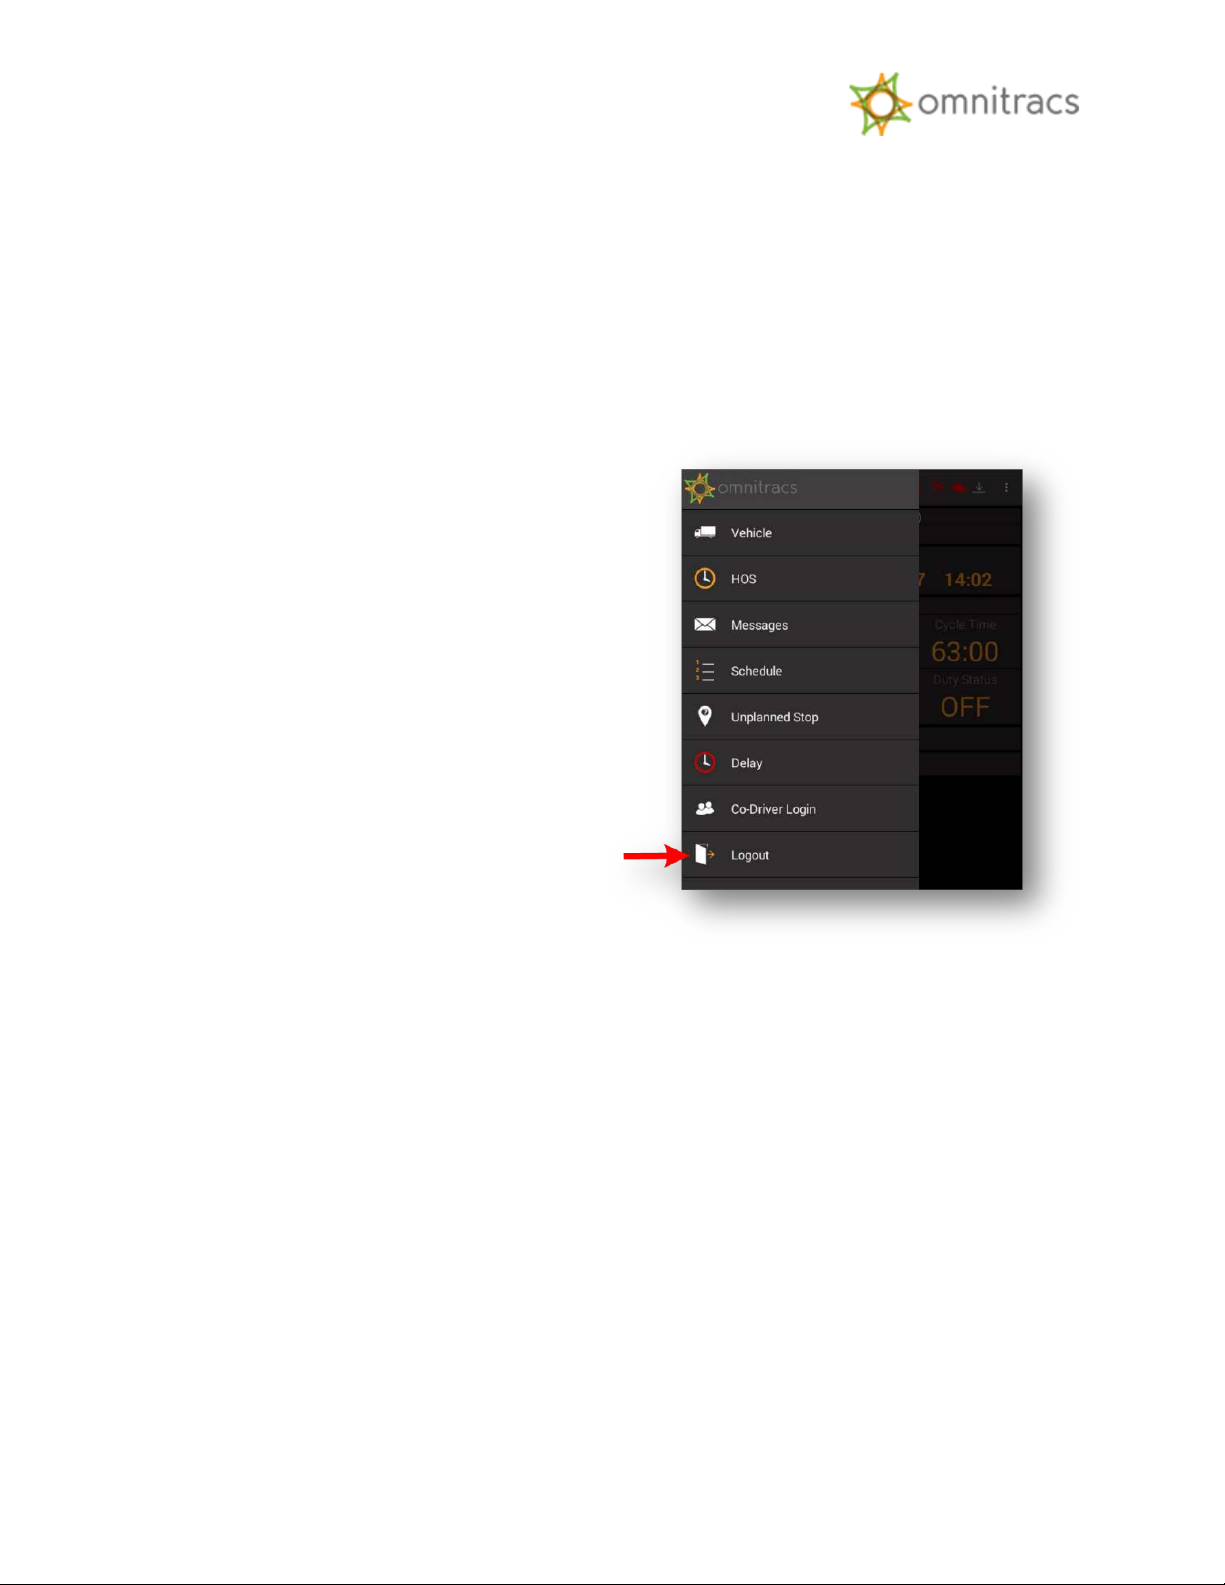
To log out, select the three-line menu button
in the upper left corner of the Mobile
Dashboard, then select
out menu.
Logout from the fly-
Page 6
© 2017 XRS Corporation, All rights reserved
Page 6
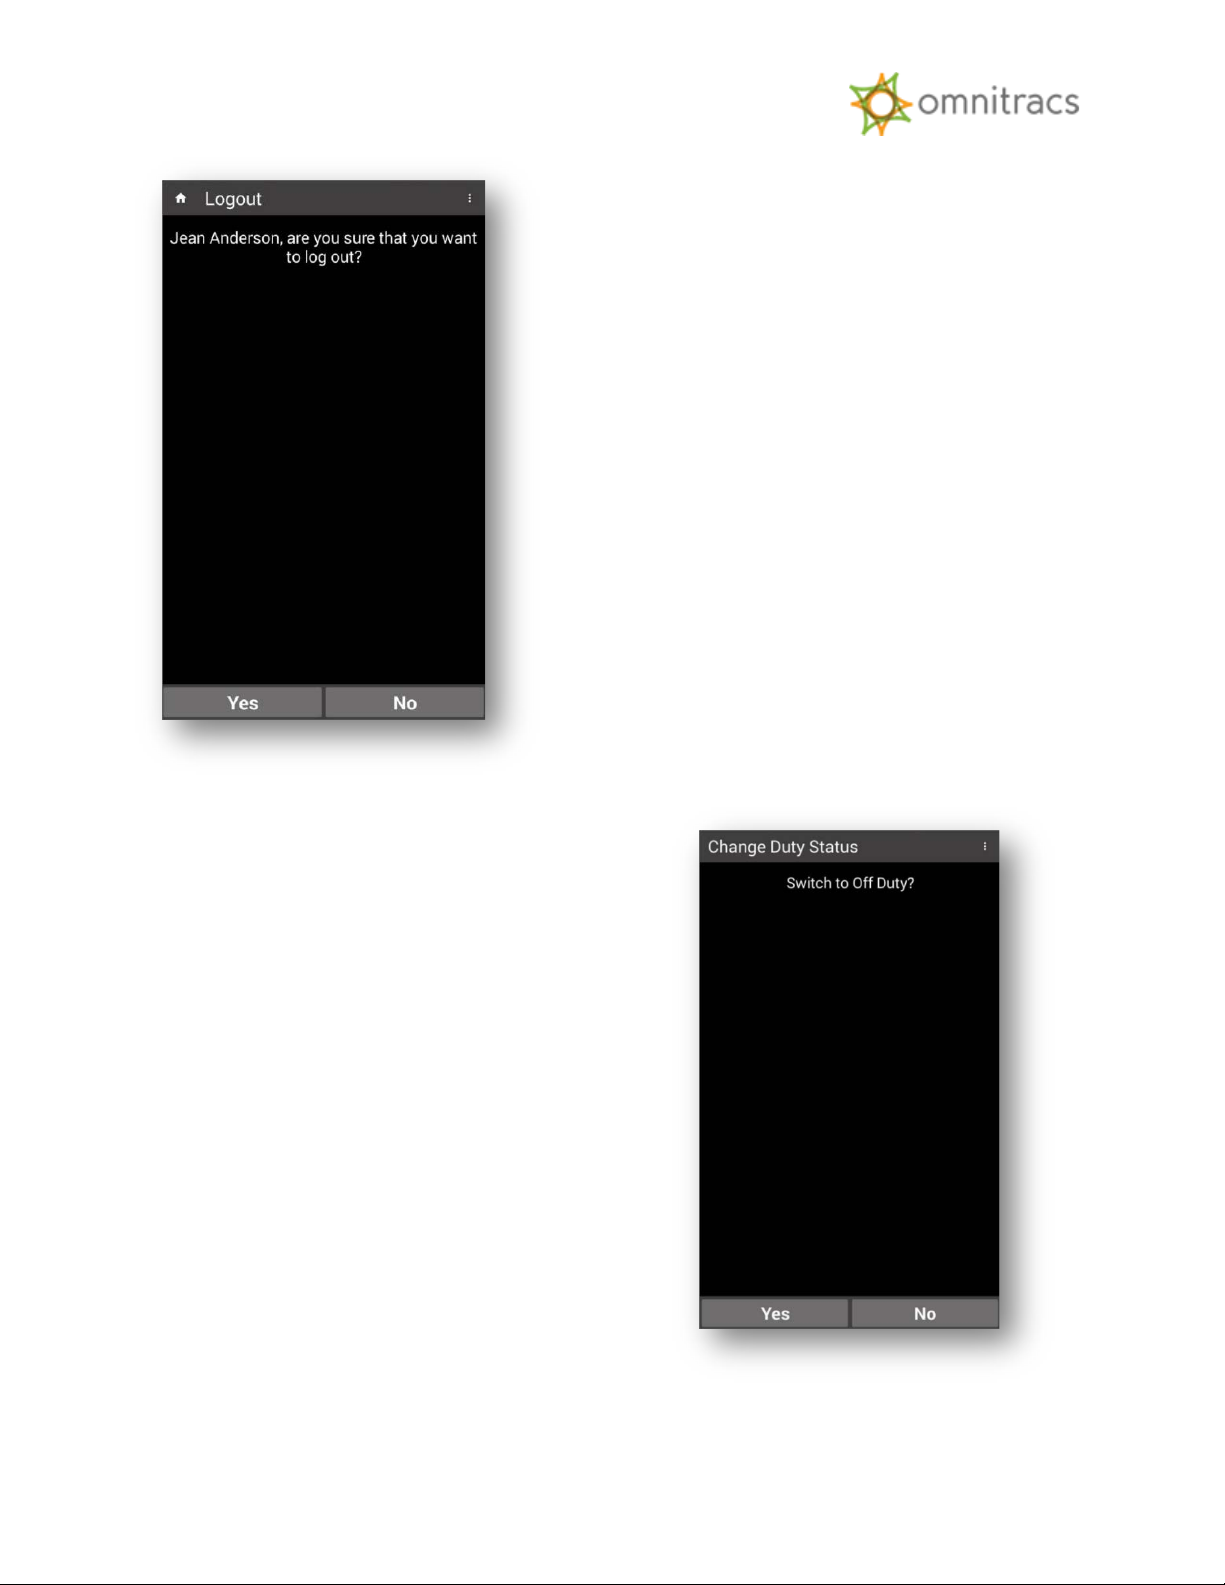
The Logout screen appears, asking you to confirm
that you want to log out.
Select Yes. If you are still On Duty, you are
prompted to go Off Duty.
Select Yes to log out of the application. It is
recommended that you always go Off Duty when
you log out. If you select
Duty even though you are no longer logged in.
No, you will remain On
Page 7

© 2017 XRS Corporation, All rights reserved
Page 7
Omnitracs XRS Mobile Dashboard
The Omnitracs XRS Mobile Dashboard provides real-time driver information such as HOS
and connection status, as well as access to the Omnitracs XRS system via a fly-out menu,
which is accessible by selecting the three-line (or “Hamburger”) menu button located in
the top left corner of the Mobile Dashboard. The menu button also provides an at-aglance view of pending notifications. Information, Hours of Service, and Messages make
up the majority of the Omnitracs XRS Mobile Dashboard, while other applications are
Page 8
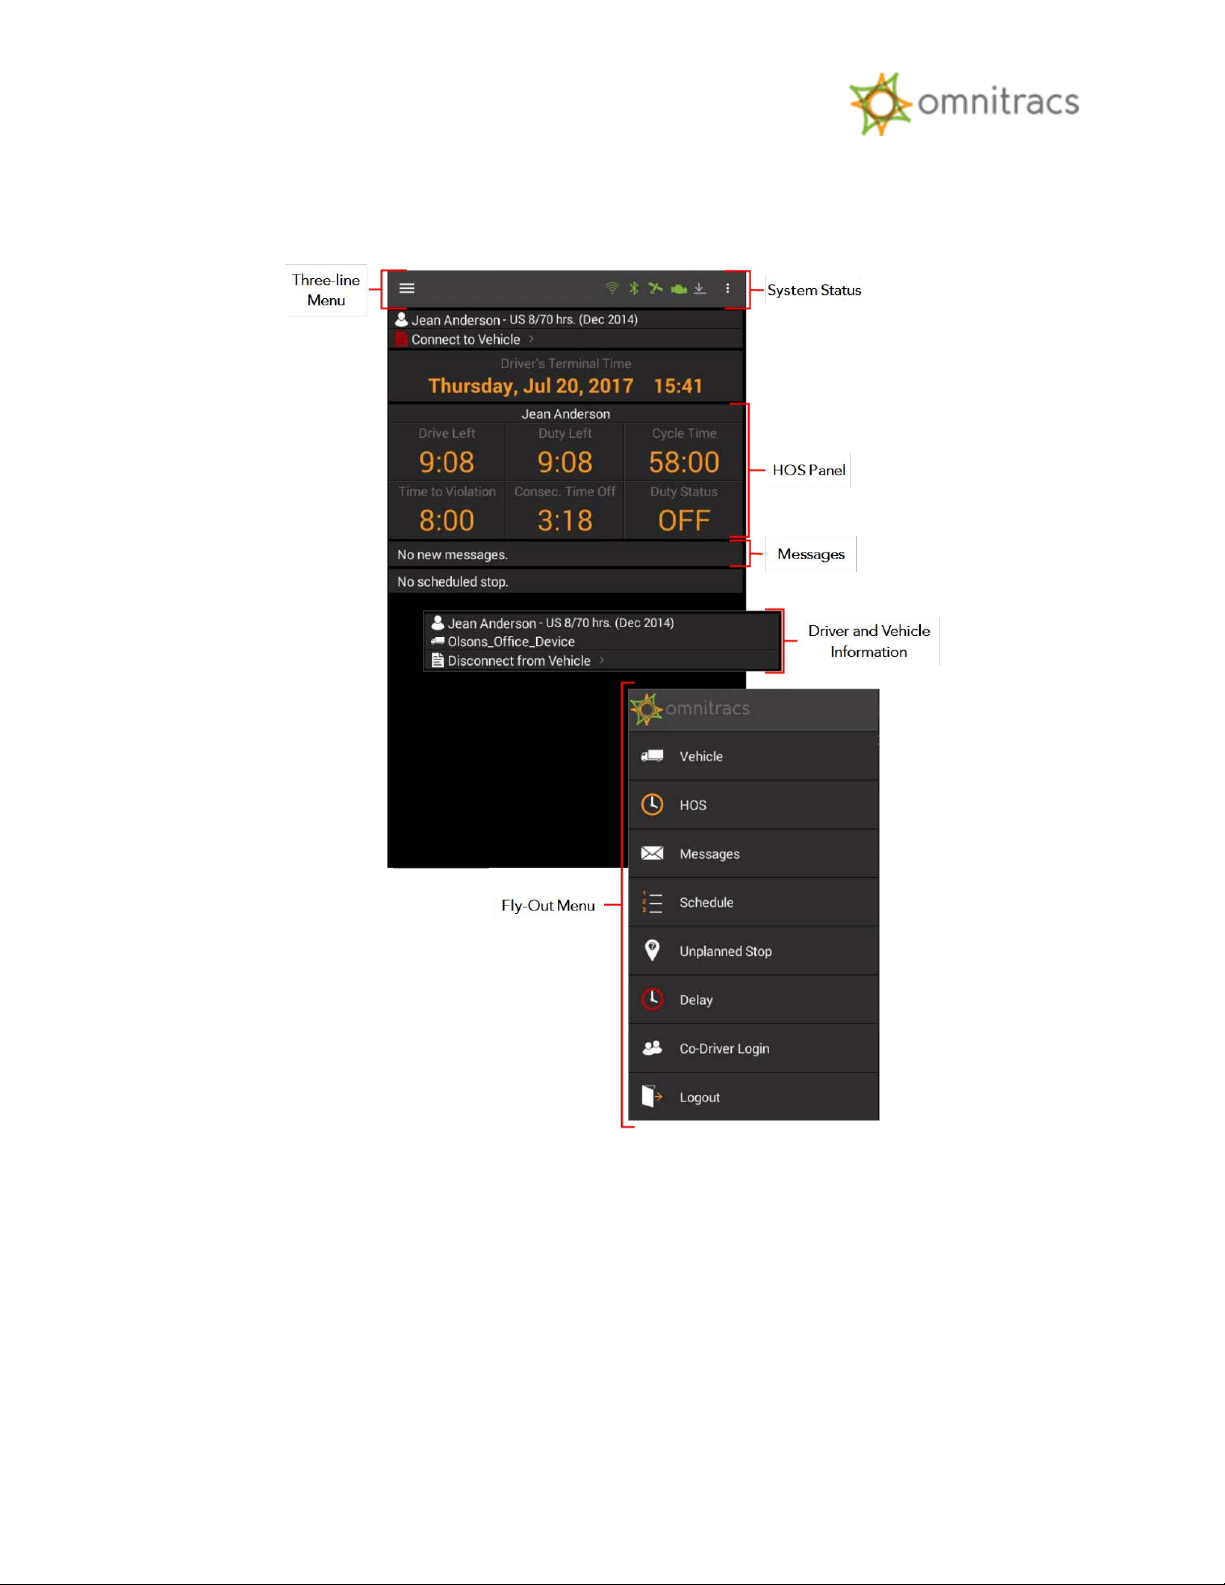
© 2017 XRS Corporation, All rights reserved
Page 8
available from the fly-out menu. All of the components are dynamic and can be either
touched or swiped to access new information.
Hours of Service (HOS) Functions
The HOS function of Omnitracs XRS monitors On Duty, Off Duty, Sleeper Berth, and Drive
time.
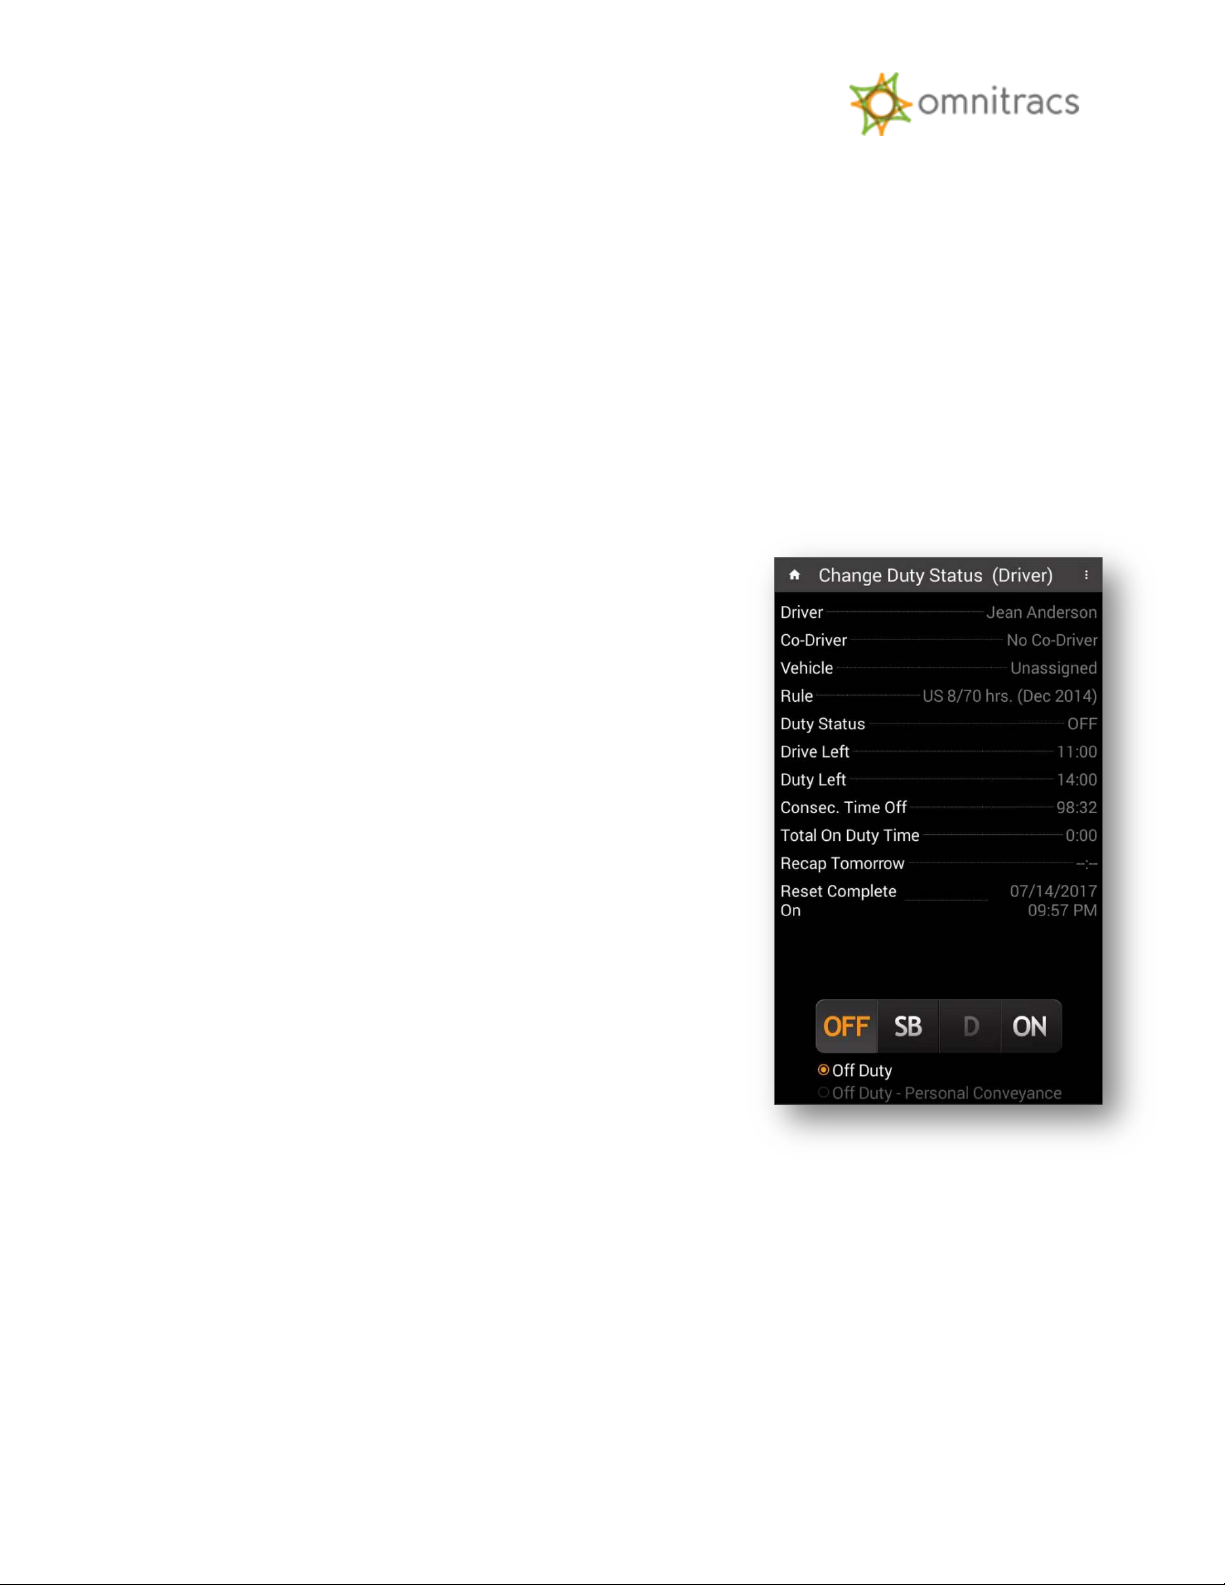
Change Duty Status
You can adjust your duty status on the Omnitracs XRS Mobile dashboard by touching any
element in the HOS panel to open the
Change Duty Status screen. The HOS function features
Page 9
© 2017 XRS Corporation, All rights reserved
Page 9
Automatic Duty Status change when the vehicle is in motion. A device that is in On Duty status
will automatically switch to Drive when the vehicle moves.
The Change Duty Status screen displays your current Duty Status and remaining Drive and
Duty Time, as well as any violations currently applied to the driver status.
Once you are logged in, you can adjust your duty status manually:
1. From the dashboard, select the three-line menu button in the upper left corner of your
screen. The fly-out menu appears.
2. Select HOS from the menu. The HOS Log screen appears.
3. Select the three-dot menu button in the upper right corner of the screen and select
Options from the menu. The HOS Menu screen appears.
4. Select Change Duty Status. The Change Duty Status
screen appears.
Note: You can also open the Change Duty Status
screen by touching anywhere in the HOS panel of
the Mobile Dashboard.
5. Select one of the following to change the current HOS status:
o OFF - Off Duty
o SB - Sleeper Berth
o D – Drive
o ON - On Duty
Page 10

© 2017 XRS Corporation, All rights reserved
Page 10
If your company is configured to allow any special driving conditions, you might also see
options for Personal Conveyance or Yard Move when you change your status to On Duty (Yard
Move) or Off Duty (Personal Conveyance).
Change Duty Status – Personal Conveyance
The Personal Conveyance work time extension can be declared to allow off-duty drivers to use
an unladen Commercial Motor Vehicle (CMV) in order to drive to their domicile or other nonwork-related locations when they are off-duty. Your company must be configured to allow
Personal Conveyance for this option to be available.
To declare Personal Conveyance, you must be Off Duty and must have associated to a vehicle.
1. In the HOS panel of the Mobile Dashboard, select the Duty Status tile. The Change Duty
Status screen appears.
2. Select OFF from the status options at the bottom of the screen. Two additional options,
Off Duty and Off Duty -- Personal Conveyance, become available.
3. Select Off Duty – Personal Conveyance. The Enter PC Comment screen appears.
4. Enter a comment (4–60 characters) to explain your use of PC and select OK. You return
to the Change Duty Status screen, which indicates that your duty status is being
Page 11

© 2017 XRS Corporation, All rights reserved
Page 11
updated.
5. Select the Home icon to return to the
Omnitracs XRS Mobile dashboard. The Duty
Status tile now flashes orange and indicates
that you are Off Duty and have declared
Personal Conveyance.
If you exceed the daily maximum Personal
Conveyance distance allowed by your company,
the screen becomes red and issues a warning
message:
Change Duty Status – Yard Move
On-duty drivers can declare a Yard Move work time extension when they need to move trucks
and trailers in a non-road space, such as the yard of a manufacturing facility, warehouse, or
distribution center. Your company must be configured to enable Yard Move for this option to
be available.
In order to declare Yard Move, the driver must be On Duty and associated to a vehicle.
Page 12

© 2017 XRS Corporation, All rights reserved
Page 12
1. In the HOS panel of the Mobile Dashboard, select the Duty Status tile. The Change Duty
Status screen appears.
2. Select ON from the status options at the bottom of the screen. Two options, On Duty
and On Duty – Yard Move, become available.
3. Select On Duty – Yard Move. The Enter YM Comment screen appears.
4. Enter a comment (4–60 characters) and select OK. You return to the Change Duty Status
screen.
Page 13

© 2017 XRS Corporation, All rights reserved
Page 13
5. Select the Home icon to return to the Omnitracs XRS Mobile dashboard. The Duty
Status tile now flashes orange and indicates that you are On Duty and have declared
Yard Move.
Log Editor Overview
Viewing Your Driver Logs
You can use the HOS Log screen in Omnitracs XRS Mobile to view the HOS Log in a variety of
ways.
It is important to know how to display this screen when law enforcement personnel
request access to the HOS log or in the event of a roadside inspection.
The HOS Log screen has three different tabs: HOS Log, Header, and Certify.
All three tabs display eight days’ worth of logs—the current day plus the previous seven days.
Use the right and left arrow buttons to move backward and forward through the logs.
Page 14

© 2017 XRS Corporation, All rights reserved
Page 14
HOS Log
Inspection Mode
Inspection Mode
On
Inspection
Mode
inspection.
Header
The
the log graph and all log
events for the given day.
This tab includes an
Switch
to display detailed
information about ELDonly events. You can
present the
screen to law
enforcement personnel
during a roadside
tab displays
option.
to
The
detailed information about
the driver, carrier, vehicle,
trailer, and other data
unrelated to log events.
tab displays
Page 15

© 2017 XRS Corporation, All rights reserved
Page 15
Certify
Certify
Certify
tab label disappears.
Unidentified
The
drivers to certify their HOS
logs, which is required by
the ELD Mandate at least
once per 24-hour period.
The tab displays all log
events for a given day.
Simply select the
button to certify your log
for that day.
If you need to certify logs
for more than one day,
select the right or left
arrow buttons on either
side of the header to move
to the next or previous
day’s log. When you have
certified all logs, the red
indicator next to the
tab enables
The Unidentified tab
displays details about any
unassigned vehicle activity
you confirmed when you
reviewed carrier edits. This
tab is intended for use by
law enforcement officers
when they review driver
logs during an inspection.
The
visible if you are associated
to an ELD vehicle and the
associated vehicle has a
cumulative total of at least
30 minutes of rejected
UVA within the last seven
days.
tab is only
Page 16

© 2017 XRS Corporation, All rights reserved
Page 16
If there is no unassigned
vehicle activity for a given
day, or if you rejected any
UVA when you reviewed
carrier edits, the tab
displays a message saying
there were no unidentified
driving events for that day.
Editing Your Driver Log
ELD drivers are able to add and edit On-Duty, Sleeper Berth, and Off-Duty time directly from
their mobile devices. They are also required to accept or reject edits made by their carrier
before they will be allowed to add or edit events from their mobile device.
You cannot edit:
• Other drivers’ logs
• Intermediate logs
• Driver login/logout activity
• Engine power-up or shut-down activities
• ELD malfunction or data diagnostic events
• Inactive events
• Personal Conveyance time
In addition, you are not able to reduce or delete drive time.
To edit your log:
1. Select the three-line menu button in the upper left corner of the Omnitracs XRS Mobile
dashboard. The main menu appears.
Page 17

© 2017 XRS Corporation, All rights reserved
Page 17
2. Select HOS from the menu. The HOS Log screen appears.
3. Select the three-dot menu button in the upper
right corner of the screen and select Log Editor
from the menu. The Log Editor screen appears.
Editable events are indicated by a pencil icon.
4. To add an event, select the +Event button in the upper right corner of the screen. The
Select Event to Add screen appears.
a. Select Duty Status, Add Shipping Information, or Remark. The screen that
appears will depend on which event you selected.
b. Complete all required fields. When you have finished, select Continue to return
to the Log Editor screen. The event you added is shown in green in the graph
and in the events list.
Page 18

© 2017 XRS Corporation, All rights reserved
Page 18
c. Select Save to save the added event. The Violation Changes screen appears to
alert you to any potential HOS violations that have occurred as a result of the
change you made.
d. Select Continue to return to the Log Editor screen. The new event has been
added to the graph and the events list.
Note: If you add a Remark or Shipping Information, you are prompted to add a
trailer after you select Continue. If you are adding a remark, you can select Skip
to bypass this step; if you are adding shipping information, you must add and
save trailer information.
5. To edit an event, select the pencil icon next to the event you need to edit. The Edit
Duty Status screen opens for that event.
a. Edit the fields as needed. When you are finished, select Continue. You return to
the Log Editor screen. The edits you made appear in green in the log.
b. Select Save to save your edits to the log.
After you add or edit events, you will need to re-certify your logs. Select the Certify tab, review
the logs, and select
Certify.
Page 19

© 2017 XRS Corporation, All rights reserved
Page 19
Note: Drive events cannot be shortened, deleted, or replaced. Also, Personal Conveyance and
Yard Move events cannot be deleted.
Confirming Carrier Edits
If the carrier made any edits to your log on the Omnitracs XRS host website (for example, ,
Unassigned Vehicle Activity or carrier-initiated ELD exemptions), you must confirm or reject
each edit.
Drivers are notified of carrier edits once they have logged in, changed their status to On Duty,
and associated to a vehicle. If edits arrive while the vehicle is in motion, drivers will be notified
as soon as the vehicle is stationary. If there are team drivers, the drivers are notified
immediately, even if the vehicle is in motion.
To confirm carrier edits:
1. Log in to Omnitracs XRS Mobile, change your status
to On Duty, and associate to a vehicle. You receive a
message telling you that the carrier has made edits
to your log and that you must confirm or reject the
edits before you can continue.
Page 20

© 2017 XRS Corporation, All rights reserved
Page 20
2. Select OK. The Review Carrier Edits screen
appears, showing the edits that were made by the
carrier.
3. Review each edit and select Confirm or Reject. If you reject an edit, you will be required to
include a comment that explains the reason for rejecting the edit.
You must be within Bluetooth range of the associated ELD vehicle for proposed carrier
edits to be displayed.
4. When you have confirmed or rejected all edits, select Save. The changes are incorporated
into your log and you return to the Mobile Dashboard.
Certifying Logs
As part of the ELD Mandate, drivers are required to certify their HOS logs at least once per 24hour period.
1. To certify your log, select the three-line menu button from the dashboard and select HOS
from the fly-out menu. The
certified by the driver, the Certify tab on the HOS Log screen displays a red notification
badge showing the number of uncertified days.
HOS Log screen appears. If there are events waiting to be
Page 21

© 2017 XRS Corporation, All rights reserved
Page 21
2. Select the Certify tab. The screen displays log events for the selected date. If the events for
the day are not yet certified, a Not Certified notice, indicated by a red X, appears at the top
of the list.
Page 22

© 2017 XRS Corporation, All rights reserved
Page 22
3. Select the Certify button. The HOS Log screen appears, asking you to certify that the log
entries are true and correct for the designated 24-hour period.
4. Select Agree to certify your log. The Not Certified notification is replaced by a Certified
notification, indicated by a white check mark.
Select the left and right arrow buttons at the top of the screen to see logs for other days. If any
of them need to be certified, repeat steps 3–4. Once you have certified all uncertified logs, the
red notification next to the tab label disappears.
Page 23

© 2017 XRS Corporation, All rights reserved
Page 23
If there are no events to be certified on a given day, a No Events notification (denoted with a
white minus icon) appears at the top of the list of log events.
Once all logs are certified, a Certification of Records event is added to the log. After you certify
your logs, new events that occur within the 24-hour period must be certified again.
Unassigned Vehicle Activity
If you associate to an ELD vehicle within eight days of unassigned vehicle activity being
recorded for that vehicle, the ELD must notify you of any unassigned driving segments that
have been stored on the relay within those eight days. You receive this notification when you
open your
must confirm or reject all UVA before you can proceed.
HOS Log screen; the message informs you that UVA exists and reminds you that you
UVA is always presented to the driver on the mobile first.
If you reject the UVA, it is sent back to the carrier, where it can be assigned to another driver.
When a host user assigns UVA to a driver, it is sent to the assigned driver as an edit to their
log, which they will then have to confirm or reject.
When you receive notification of UVA:
1. Select Review Activity on the notification window. The Review Unassigned Driving Events
screen appears, displaying all UVA for the vehicle for the past eight days.
2. Select Confirm or Reject for each unassigned driving event. Select the View Graph button if
you want to see how the UVA would fit into your existing log.
3. When you are finished, select Save to add the confirmed UVA event(s) to your log. You
return to the HOS Log screen and can see that the UVA has now been added to your log.
Note: You cannot perform log edits or send an eRODS transfer as long as unreconciled UVA
exists on the ELD.
Page 24

© 2017 XRS Corporation, All rights reserved
Page 24
Once you have accepted the UVA, the Unidentified
tab displays the details of the activity. Having the
information on a separate tab makes it easier for law
enforcement officials to view UVA when they are
inspecting logs.
Page 25

© 2017 XRS Corporation, All rights reserved
Page 25
Diagnostic and Malfunction Alerts
Malfunction Indicator
Diagnostic Indicator
Malfunction and
Diagnostic Indicators
The ELD Mandate requires that the ELD record and store relevant diagnostic and malfunction
events and alert drivers when a diagnostic or malfunction event occurs. The relay detects and
records the diagnostic and malfunction events for a minimum of eight days. Omnitracs XRS
Mobile includes features that enable you to monitor and log diagnostics and malfunctions.
When an ELD diagnostic fails or a malfunction is detected, Omnitracs XRS Mobile displays a
red X (for malfunction) or orange exclamation point (for diagnostic) indicator on the right side
of the status indicator bar on the Mobile Dashboard.
Depending on the nature of the Diagnostic or Malfunction event, the HOS Status values may
change as well. You can select the indicator to open the Diagnostics and Malfunction screen,
which lists any Diagnostic or Malfunction events that have been detected since login.
Paper Log Mode
Paper Log Mode (PLM) is triggered by any ELD Compliance Malfunction that is logged while
the ELD is associated to a vehicle. When PLM is triggered, you immediately go into Paper Log
Mode; you are not offered the option of doing so.
When Paper Log Mode starts, you receive a message saying, “There is an active ELD
malfunction. You must keep paper logs until the malfunction clears.”
Page 26

© 2017 XRS Corporation, All rights reserved
Page 26
Select
“NA.”
When the malfunction that triggered the PLM has cleared, you are taken out of Paper Log
Mode. You receive a message saying, “ELD malfunction has cleared. You may resume use of
the ELD as your Record of Duty Status.” Select
OK. When you return to the Mobile Dashboard, the values in the HOS Panel all read
OK to return to the Mobile Dashboard.
Sending eRODS to FMCSA
As part of the ELD Mandate, drivers must be able to present safety officials with a copy of their
Driver Logs for the past seven days upon request. Omnitracs XRS Mobile’s eRODS File Transfer
functionality allows drivers to do so using either Web Services or email. Drivers must be On
Duty and within Bluetooth range of an associated vehicle to use this option, which is available
from the HOS
From the HOS Log screen:
1. Select the three-dot menu in the upper right corner of the HOS Log screen. The three-dot
menu appears.
Options menu.
2. From the three-dot menu, select ERODS File Transfer. The ERODS File Transfer screen
appears.
3. Select the Web Services or Email field to choose a transfer method.
Page 27

© 2017 XRS Corporation, All rights reserved
Page 27
4. Enter a comment in the Enter a Comment (Optional) field if you would like to record
additional information.
5. Select Send. A message stating the ERODS file is being processed appears.
6. When the ERODS file transfer is complete, you receive a notification that the file was either
sent successfully or that delivery failed.
Important Note: eRODS transfer capability will be enabled when the FMCSA mechanisms are in
place to receive the transfer file. In the interim, law enforcement personnel will use the HOS
Inspection Mode display to review RODS.
Page 28

For use with Omnitracs XRS Mobile 4.60 Android operating as an ELD Device
OMNITRACS XRS
DRIVER CAB CARD
ELD ID: XRSAN1
VIEW DRIVER LOGS
Select the 3-line Menu icon in the
1 2
upper left corner of the screen.
Select the Inspection Mode switch on
3 4
the HOS Log screen to view detailed
information about ELD events.
Select the HOS item on the menu to
view the HOS Log screen.
Select the Header tab to view a daily
summary. Use the Header to view
driver, carrier, distance, and other
information.
© 2017 XRS Corporation. All Rights Reserved. XRS-9818
Page 29

MALFUNCTIONS AND DIAGNOSTICS
If you receive any of the following errors or malfunctions on your ELD you are required to keep paper logs until
the malfunction has been corrected.
• Power - An ELD must be powered and function
within one minute of the vehicle’s engine receiving
power and remain powered for as long as the
vehicle’s engine stays powered.
• Engine Synchronization - An ELD is required to
establish a link to the engine ECM and monitor its
connectivity to the engine ECM and its ability to
retrieve the vehicle parameters.
• Timing - The ELD must cross-check its compliance
with the external UTC source and must record any
timing compliance malfunction.
• Positioning - An ELD must monitor the availability
of position measurements meeting the listed
accuracy requirements and track the distance and
time from the last valid measured point.
ERODS TRANSFER
From the HOS Log screen, select the
1 2
3-dot menu, located in the top-right
corner of the screen.
• Data Recording - An ELD must monitor its storage
capacity and integrity and must detect a data
recording compliance malfunction if it can no
longer record or retain required events.
• Data Transfer - An ELD must implement inservice monitoring functions to verify that the data
transfer mechanism(s) are continuing to function
properly.
• Other - Any other ELD-detected malfunction such
as Bluetooth, relay, etc.
Select ERODS File Transfer. The
ERODS File Transfer screen appears.
Select a Transfer Method, either Web
3
Services or Email. Select Send.
© 2017 XRS Corporation. All Rights Reserved.
The message ERODS File is Being
4
Processed by Omnitracs appears. If
the transfer fails, the HOS Log screen
display is considered a compliant
secondary record.
XRS-9818
 Loading...