

OMEX Shift Light Sequential Installation And User Instructions Manual
OMEX
PERFORMANCE ELECTRONICS
Please ensure that you read this manual thoroughly before you install this unit. In conjunction
with this Shift Light, we recommend use of a high quality rev limiter, such as the Omex Rev
Limiter Clubman or Rev Limiter Clubman with Launch Control.
This unit is suitable for most 4-stroke petrol engines and most ignition types, including CDi
systems with tachometer output.
INSTALLATION
Ensure that the ignition is turned off before starting installation.
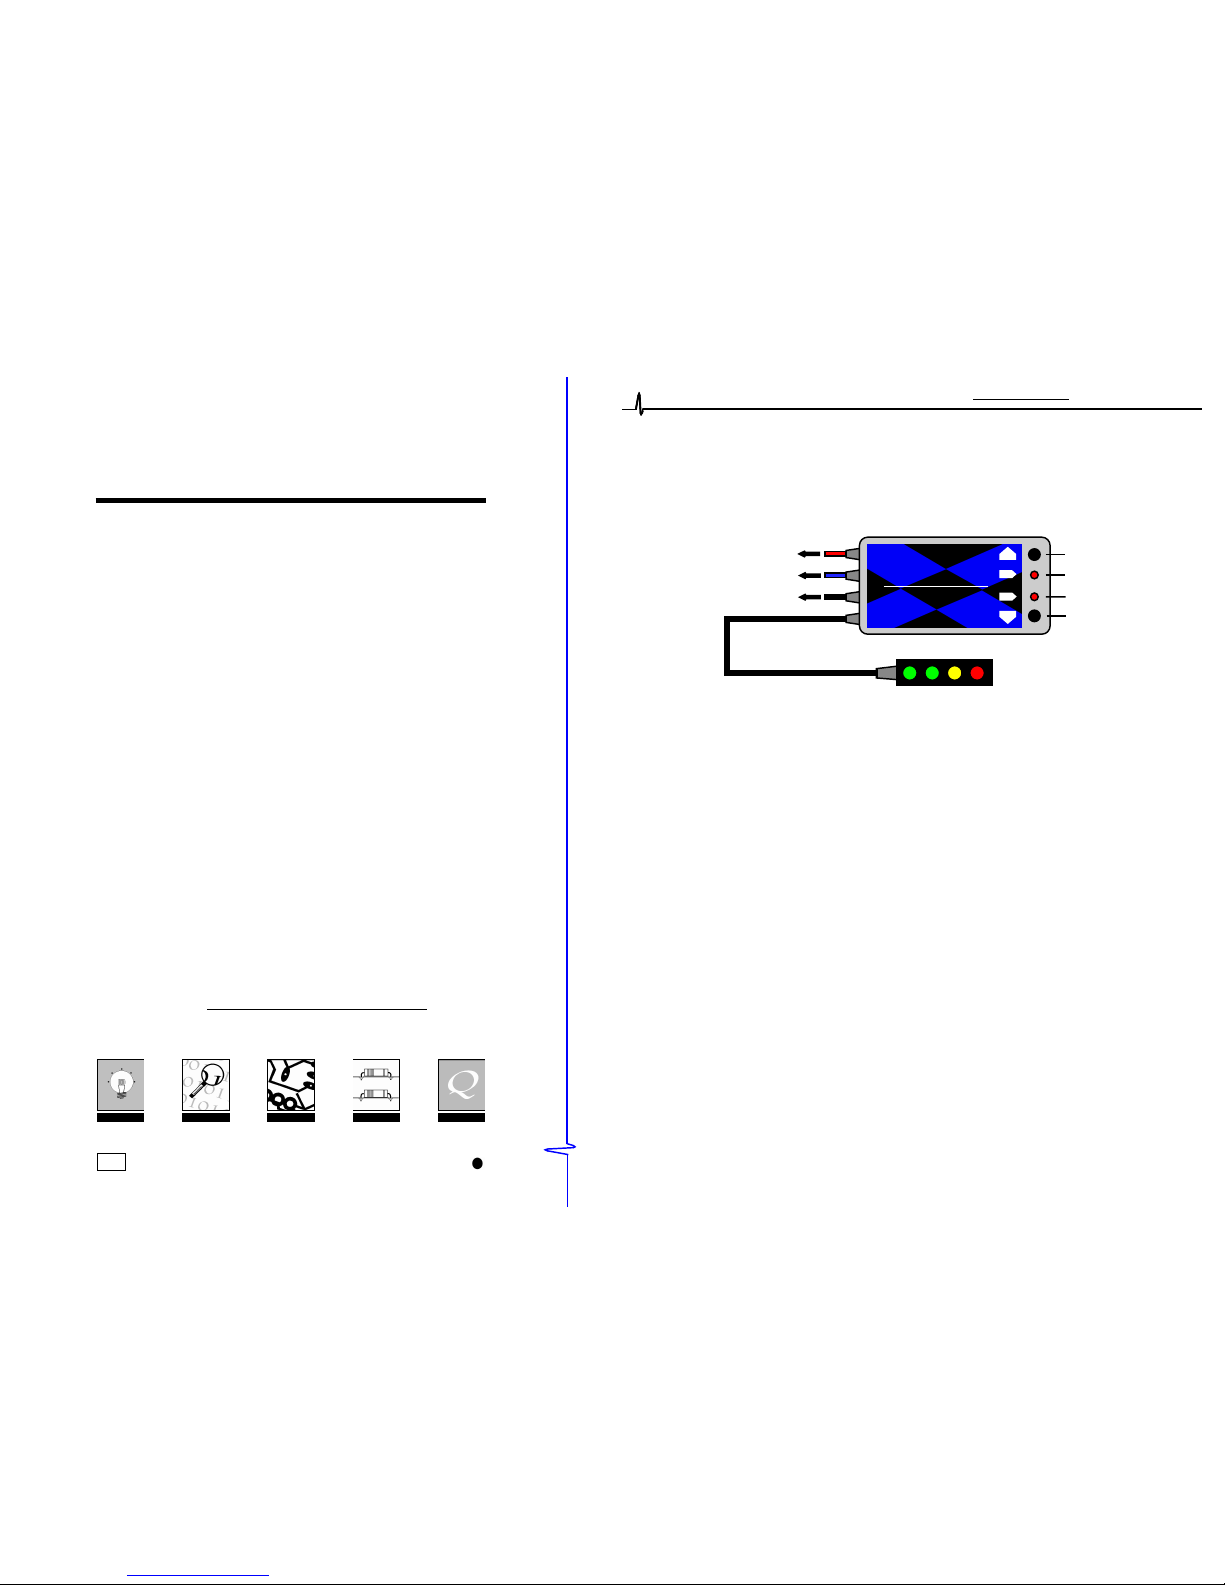
The unit is connected to the engine using the attached colour coded wires and the supplied
cable connectors.
BLUE WIRE Connect this to the coil negative (-) terminal
RED WIRE Connect this to the coil positive (+) terminal. If this is not easily accessible
then this wire can be connected to any positive feed that is switched by
the ignition switch.
BLACK WIRE Connect this wire to any good electrical connection on the car bodywork.
A self-tapping screw and spring washer are supplied for this purpose if no
bolt heads are within easy reach of the wire. It is essential that a good
quality connection is made.
Keep wires clear of hot or rotating parts using the supplied cable ties.
CDi IGNITIONS - Telephone our help line for specific instructions.
Distributorless Systems - Use the tachometer output from the ECU, or one of the coil
negative connections. For dual coil vehicles ALWAYS set the number of cylinders to two.
MOUNTING THE UNIT - Remove the backing from the adhesive pad on the back of the unit
and mount it to a clean, flat, grease-free surface. Keep the unit away from hot or exposed
areas. Ensure that the unit and all wires are kept as far as possible from the HT parts
of the ignition system.
MOUNTING THE LED MODULE - The LEDs have a narrow viewing angle so ensure that the
module is facing straight towards the driver. Mount the module using the supplied adhesive
pads.
‘+’ BUTTON
‘-’ BUTTON
COIL POSITIVE (+)
COIL NEGATIVE (-)
EARTH
RED
BLUE
BLACK
LED MODULE
LED 1
LED 2
+
LED 1
LED 2
OMEX
-
SHIFT LIGHT
SEQUENTIAL
SEQUENTIAL
OMEX
PERFORMANCE ELECTRONICS
K
o
K
VERSION
INSTALLATION
AND
USER INSTRUCTIONS
OMEX TECHNOLOGY SYSTEMS LTD
3 Mackenzie Way
Manor Road
Cheltenham
GLOS GL51 9TX
T: +44 (0)1242 260656 F: +44 (0)1242 578069
Email: info@omextechnology.co.uk
SHIFT LIGHT
INNOVATION RESEARCH DESIGN
MANUFACTURE
QUALITY
www.omextechnology.co.uk
72/245 - 95/54 - 1573 - 00
e
11
EUROPEAN TYPE APPROVED
2
OMEX
PERFORMANCE ELECTRONICS
OMEX
PERFORMANCE ELECTRONICS
1
SEQUENTIAL
SHIFT LIGHT
OMEX
PERFORMANCE ELECTRONICS
CUSTOMER CARE
As part of our commitment to providing the best possible products and aftersales service, we operate a telephone Help
line and Warranty Care service. For any queries, just call during office hours or email and we will endeavour to resolve
the problem.
WARRANTY
OMEX TECHNOLOGY SYSTEMS LTD (OMEX) warrants that if the whole or any part of the REV LIMITER CLUBMAN is
defective as to materials or workmanship, provided that such defect is notified to OMEX as soon as the customer
becomes aware and in any event within one year of purchase from OMEX or one of its distributors, OMEX will make good
the said defect without charge by repair or, at the discretion of OMEX, by replacement. The warranty does not extend to
defects caused wholly or partly by improper use, failure to follow installation or operation instructions, wilful default, act of
God, or accident.
OMEX will not be held liable for any injury, damage, direct or consequential loss, however caused relating to the OMEX
REV LIMITER CLUBMAN.
The Maximum Shift Point is 20,000 RPM (4 cylinder), 12,000 RPM (6 cylinder), 10,000 RPM
(8 cylinder) and 20,000 RPM (2 cylinder)
The Minimum Shift Point is 2,000 RPM for all number of cylinders.
RESETTING THE SHIFT POINT - in order to provide a reference point, you may wish to reset
the unit back to 6,000 RPM. To do so, switch the ignition to the ‘off’ position. Press and hold
down both buttons, then turn the ignition on,but do not start the engine. Both LEDs will flash
twice to show the rev limit has been reset. The unit will automatically enter into the ‘set’ mode
(see above) as you let go of the buttons.
SETTING THE LED INTERVAL
The unit has 4 LEDs which can be programmed to light at different engine speeds. The last
LED will light at the set shift point, the others lighting at set intervals beforehand. This interval
can be set between 0 RPM and 600 RPM per LED in 100 RPM steps, it is set to 600 RPM
during manufacture. To change the interval, turn the ignition ‘off’. Keep the ‘-’ button pressed
whilst turning the ignition ‘on’ -do not start the engine, then release. To increase the interval
by 100 RPM press and release the ‘+’ button. To decrease it by 100 RPM press and release
the ‘-’ button. At the maximum (600 RPM) or minimum (0 RPM) setting, both LEDs will flash. If
the interval is set to 0 RPM all 4 LEDs will light simultaneously at the shift point. To exit, start
the engine or turn the ignition ‘off’.
For Example - The Shift Light Sequential has a factory set shift point of 6,000 RPM and
interval of 600 RPM. So, if whilst in ‘set shift point’ mode, the ‘+’ button is pressed 10 times (I.e.
+ 1,000 RPM), the first LED will light at 5,200 RPM, the second at 5,800 RPM, the third at 6,400
The Omex product range is European Type Approved and therefore legal for vehicle road use.
Attention. Within the EU, used electrical and electronic equipment should not be mixed with general household
waste; it must be treated separately and in accordance with legislation that requires proper treatment, recovery
and recycling. Private households may return their used electrical and electronic equipment to designated
collection facilities free of charge. If the product is used for business purposes and you want to discard it, small
quantities may be taken back by your local collection facilities. Please contact your local authority for further
details. Outside of the EU, please contact your local authority for advice.
OMEX
PERFORMANCE ELECTRONICS
SETTING UP
The two buttons and LED indicators allow you to set and control all the functions on your Shift
Light Sequential. During manufacture, the unit is programmed to the most common settings.
These may be changed by the following procedures:-
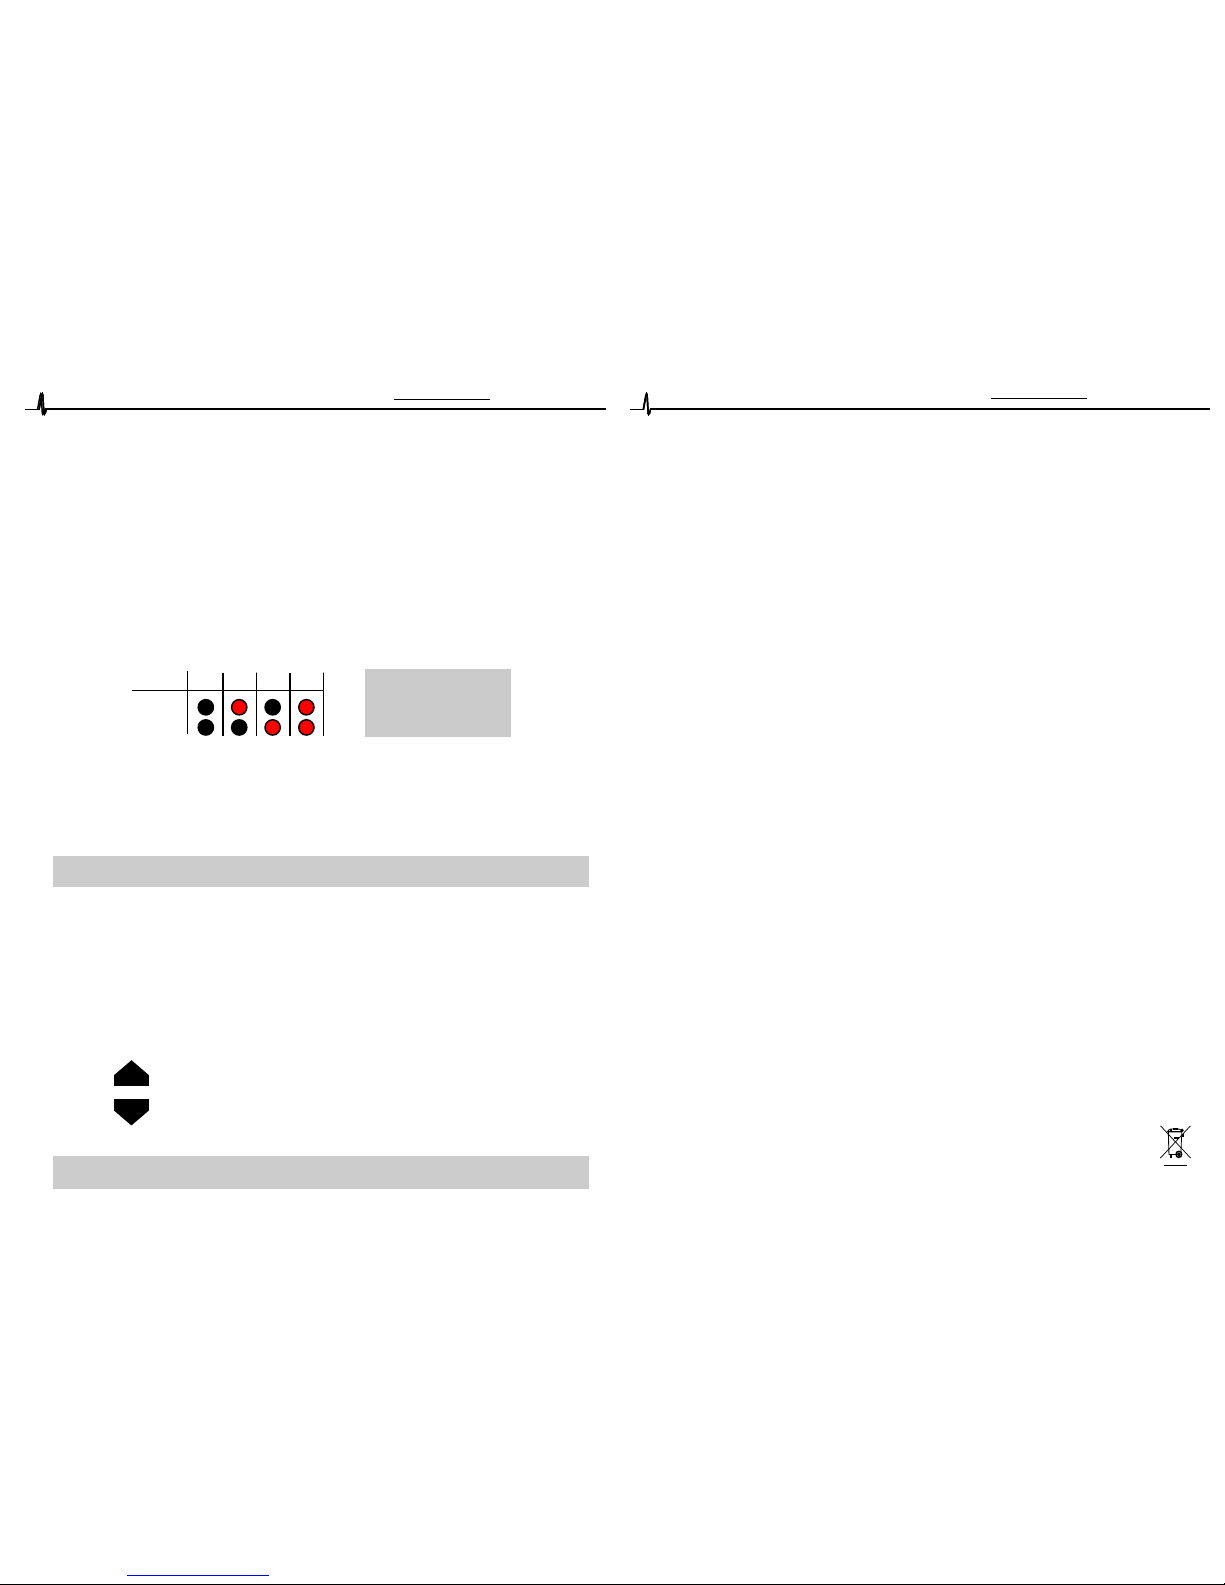
SETTING THE NUMBER OF CYLINDERS
During manufacture, the unit is set to four cylinders. To change this, turn the ignition to the ‘off’
position. Press and hold down the ‘+’ button. Whilst still holding the ‘+’ button, turn the ignition
on, but do not start the engine. The two LED indicators situated between these buttons will
show the cylinder setting (see table below). Let go of the button.
To change the cylinder setting, press and release the ‘+’ button (or ‘-’ button). The number of
cylinders will go to the next (or previous) setting. To exit from Set Cylinder mode, turn the
ignition off or start the engine.
Changing the number of cylinders automatically
resets the shift point to 6,000 RPM
LED 1
LED 2
4
For Dual Coil vehicles
ALWAYS set the
number of cylinders to
two
CYLINDERS
SETTING THE SHIFT POINT
The shift point can be increased or decreased in steps of 100 RPM, allowing for an extremely
accurate shift point, irrespective of tachometer error. The unit is set to 6,000 RPM during
manufacture. To prevent accidental change of the rev limit, the unit must be put into ‘set shift
point’ mode. To do this, turn the ignition on - but do not start the engine - then press and
hold both buttons. Both LEDs will flash briefly. Release the buttons.
The ‘+’ button will increase the shift point by 100 RPM
each time it is pressed and released. LED 1 will flash to
confirm this.
The ‘-’ button will decrease the shift point by 100 RPM
each time it is pressed and released. LED 2 will flash to
confirm this.
When the unit reaches its maximum or minimum possible setting, both LEDs wil
+
-
6 8 2
OMEX
PERFORMANCE ELECTRONICS
OMEX
PERFORMANCE ELECTRONICS
Changing the number of cylinders automatically
Resets the rev limit to 6,000 RPM
OMEX
PERFORMANCE ELECTRONICS
OMEX
PERFORMANCE ELECTRONICS
3 4
SEQUENTIAL
SHIFT LIGHT
SEQUENTIAL
SHIFT LIGHT
 Loading...