

Page 1
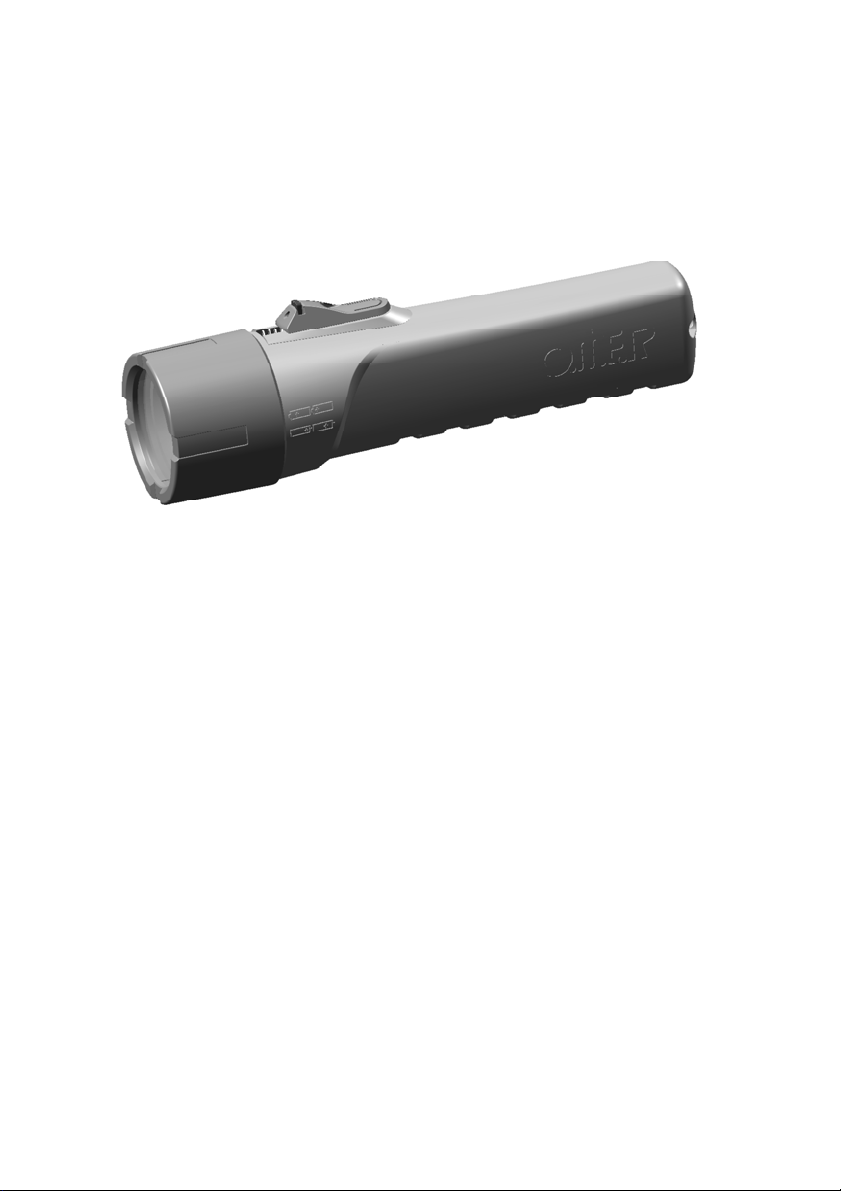
Sunrise
Instruction manual [GB]
Manuale d’istruzione [IT]
Manuel d’utilization [FR]
Manual de istrucciones [ES]
Руководство пользователя [RU]
Instrukcja obsługi [PL]
Gebruiksaanwijzing [NL]
Használati utasítás [HU]
Návod k použití [CZ]
Manual de instrucţiuni [RO]
Kullanım Kılavuzu [TR]
Page 2

English 3-11
Italiano 12-20
Francais 21-29
Espanol 30-38
Pусский 39-48
Polski 49-58
Nederlands 59-68
Magyar 69-78
Československý 79-87
Român 88-97
Türk 98-106
2
Page 3

LED FLASHLIGHT SUNRISE
Compliments for having purchased the LED
flashlight "SUNRISE" from OMER. This flashlight is
the result of technological advances made over
years of experience in the underwater fishing
sector. Its versatility and functionality, combined
with the highest quality materials and the
technological design, make this SUNRISE truly
one-of-a-kind, and essential for skindiving and
underwater fishing.
The simple shape and small size make it easy to
carry. It can be hooked to any part of your
equipment, thus limiting any encumbrances. The
SUNRISE was designed for skindiving; however it
can be easily adapted to scuba diving.
The concentrated light beam is created by a Recoil
System parabolic reflector using reverse light
aimed at a 4° angle. This system provides a beam
with a maximum intensity of 80 mm in diameter at
a distance of 1 metre between the SUNRISE and
the wall to be lighted, with a remaining ring of lower
intensity with 0.5 metres in diameter. Thus the light
beam is easily able to penetrate darkness in any
underwater caves or cavities.
3
Page 4

IMPORTANT WARNINGS
WARNING: Before using the SUNRISE, carefully
read this manual.
WARNING: Do not aim the SUNRISE directly
into your own eyes or those of other people,
either out of water or underwater.
WARNING: Make sure to block the switch when
transporting the flashlight, in order to avoid
turning it on by accident.
WARNING: Make sure to remove the batteries
during plane flights.
WARNING: When changing the batteries,
remember to check the + and – signs.
WARNING: Use only high quality batteries.
WARNING: When leaving the flashlight unused
for long periods, be sure to remove the
batteries.
WARNING: When leaving the flashlight unused
for long periods, slightly unscrew the front
metal ring in order to avoid blockage.
GENERAL WARNINGS
Do not keep the flashlight in the ON position
when out of water.
Do not unscrew the front face when
underwater or when the flashlight is wet.
4
Page 5

Do not place the Flashlight near high
temperature heat sources.
Only use original spare parts for ordinary or
special maintenance, including the
replacement of the LED unit.
Do not use batteries that have different charge
levels.
Clean and lubricate the O-rings occasionally,
using silicone grease.
Periodically check the wear and tear on the O-
rings and replace them if they appear worn.
TECHNICAL SPECIFICATIONS
Body made in highly resistant ABS.
Optical unit produces concentrated beam.
Front ring, covered in non-slip thermal rubber.
Sliding magnetic switch.
N°1 LED, white temperature 6200K powered by
specific electronics.
Double O-ring in NBR, for watertight sealing
between the ring and the body of the SUNRISE.
Easily adjustable polyurethane band. Moreover,
it was designed to safely unhook under high
traction force if the flashlight gets snagged in
the cave or cavity during diving.
5
Page 6

V
)
FEATURES LED SUNRISE
Power
Lumen
LUX
olts
Battery type
Battery location
Supplied light source
Body material
Face/lens material
O-ring
Weight in air
Weight in air
Length
Diameter
Switch
Safety catch on switch
Heat temperature
Light beam
Range durability,
continuous use
Range durability, 100%
of efficiency
3 W
210 lm
15000
6.0 V
AA format 1.5 V
Directly in the Sunrise body, insert
only as shown in the diagram.
1 Power LED 3 W
Highly resistant ABS
Polycarbonate
NBR
247 grams with 4 alkaline
batteries inserted
154 grams without batteries
190 mm
50 mm
Sliding magnetic switch
Mechanical, with 1 OFF position
and 1 ON position
6200°K
Concentrated (80 mm diameter at
1 metre from the Sunrise to the
wall to be lighted
1200 minutes
180 minutes
6
Page 7
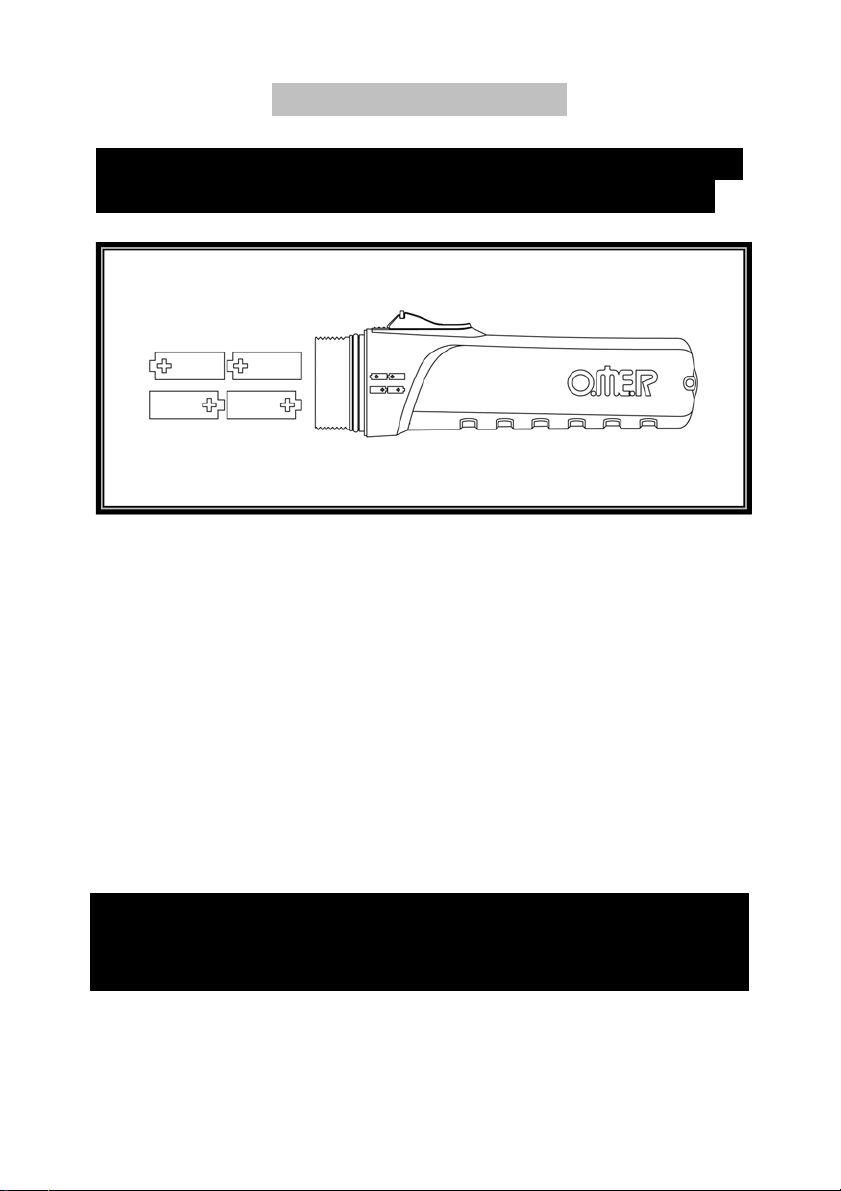
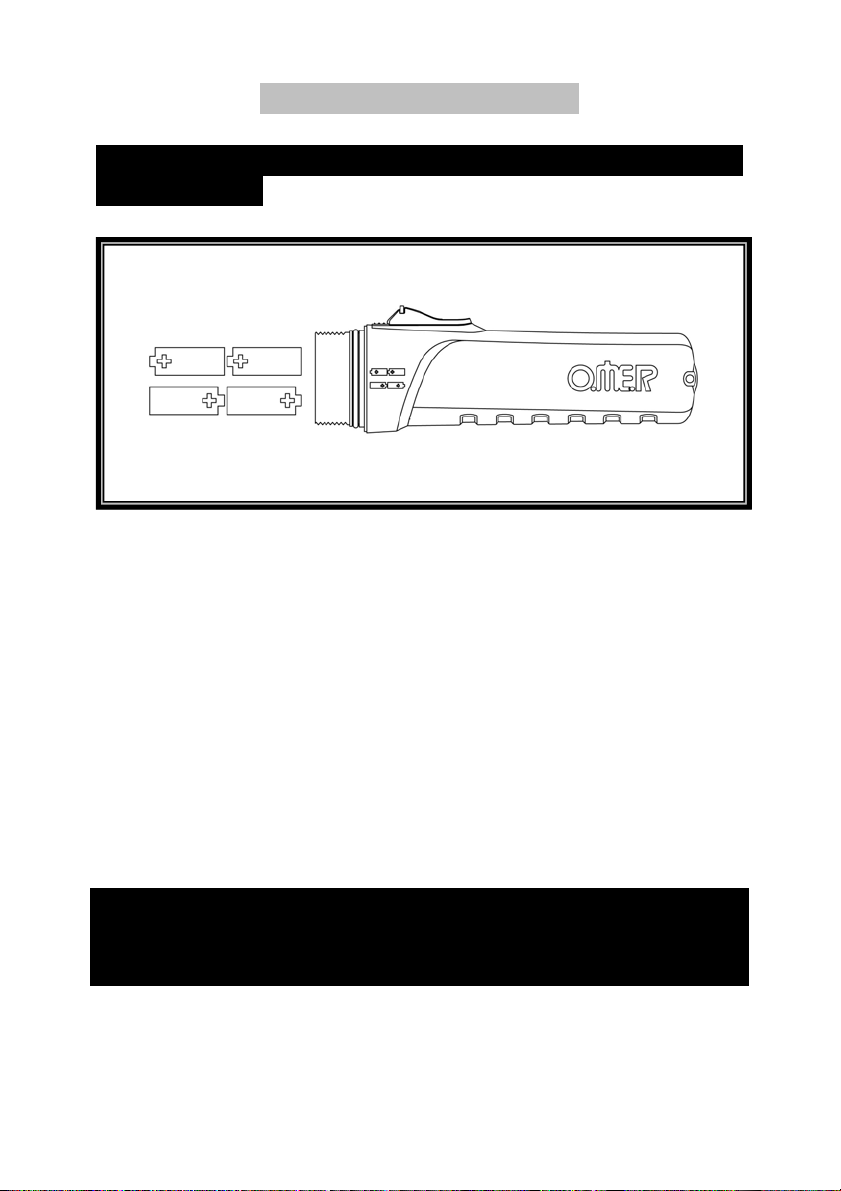
BATTERY INSERTION
WARNING: It is very important to insert the
batteries correctly according to the + / - signs!
Unscrew the front face of the flashlight, in the
counter clockwise direction.
Insert the batteries following + / - directions
indicated on the flashlight body.
Lubricate the watertight O-rings with a thin layer
of silicone grease.
Screw the face of the flashlight back into place, in
the clockwise direction.
Make sure that the flashlight turns on correctly by
activating the switch.
WARNING: Batteries placed in the wrong position
(inverted polarities) could damage the LED light
source.
7
Page 8

CHECKS TO BE CARRIED OUT BEFORE DIVING
If the SUNRISE hasn’t been used for some time,
check the state of the batteries by turning on the
flashlight.
Make sure the body is perfectly closed.
Once in water, check that air bubbles are not
constantly coming out of the flashlight body.
FLOODING
If water enters the flashlight, the following steps
should be taken: unscrew the front face and
remove the batteries, which are no longer usable;
rinse the inner parts (including the LED unit) with
fresh water, and then dry the parts with a cloth and
a hairdryer, using warm air, paying particular
attention to the mechanical parts. Carefully remove
any oxidation that has formed on the metal parts,
insert new batteries, and test to see if the SUNRISE
works.
If the SUNRISE sits for a long period of time with a
noteworthy amount of water on the inside, we
recommend rinsing the inner parts with fresh water,
then contacting an authorized service centre for
repair work.
8
Page 9

LIMITATIONS FOR USE
Maximum operational depth is 50 metres.
Due to the high temperature that the LED
reaches, we recommend using the Flashlight
only in the underwater environment.
REPLACING THE LED LIGHT
Unscrew the front face ring plate.
Remove the LED to be replaced, and insert
the new LED, making sure that it fits the slot in
the flashlight body.
Re-insert everything and screw on the front
panel, after lubricating the O-rings to seal the
flashlight.
9
Page 10
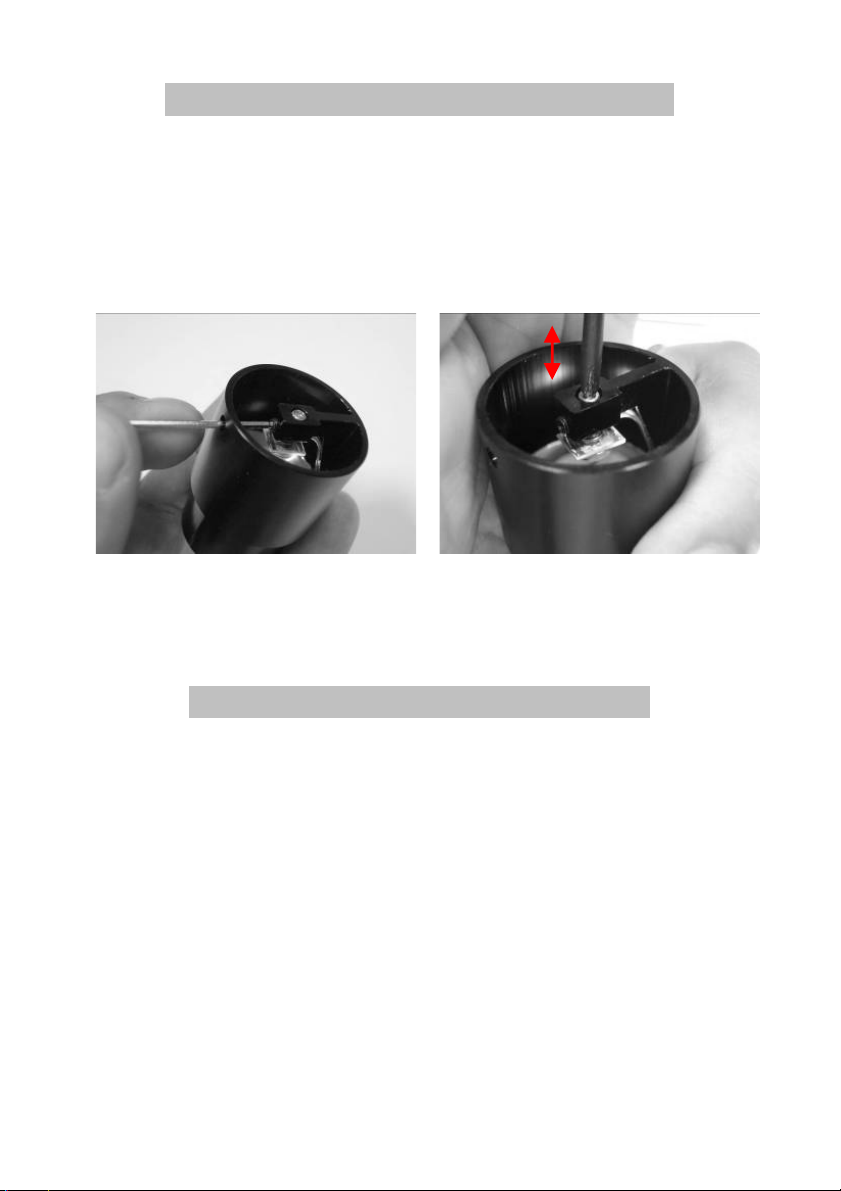
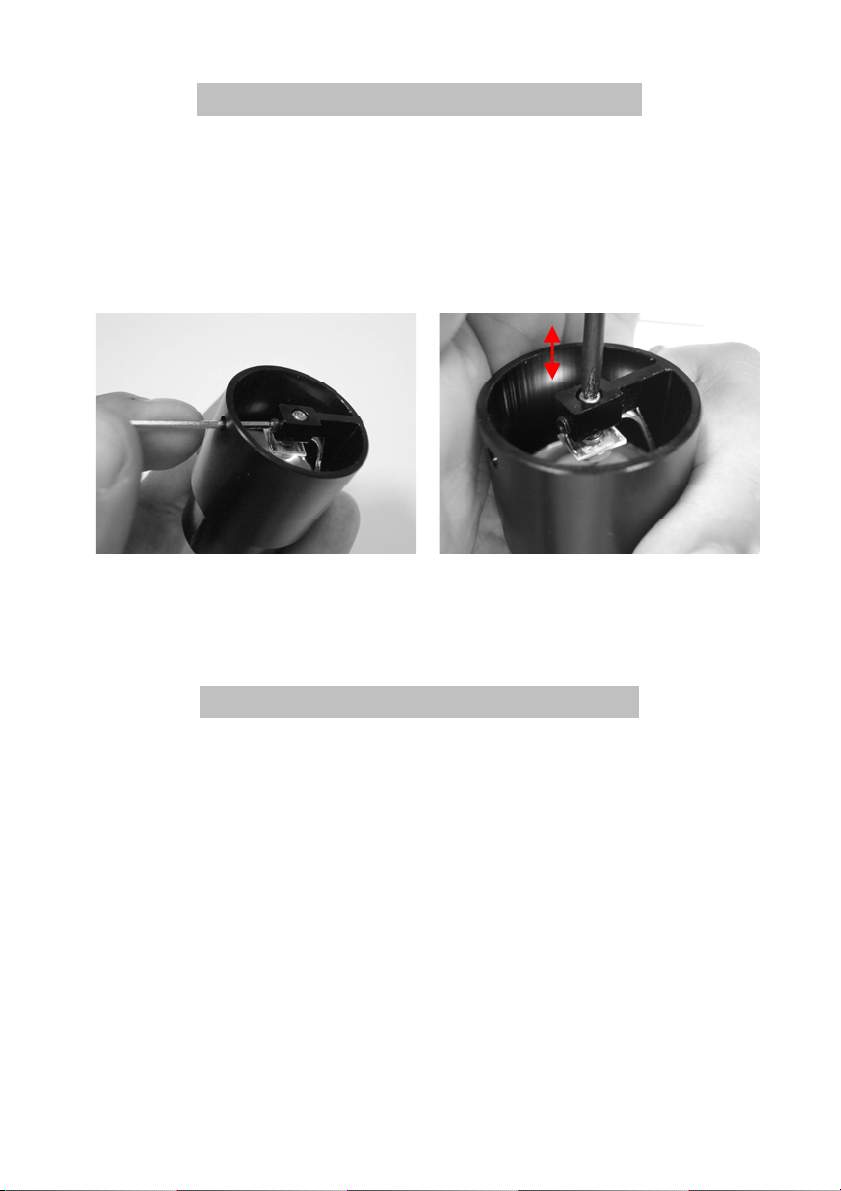
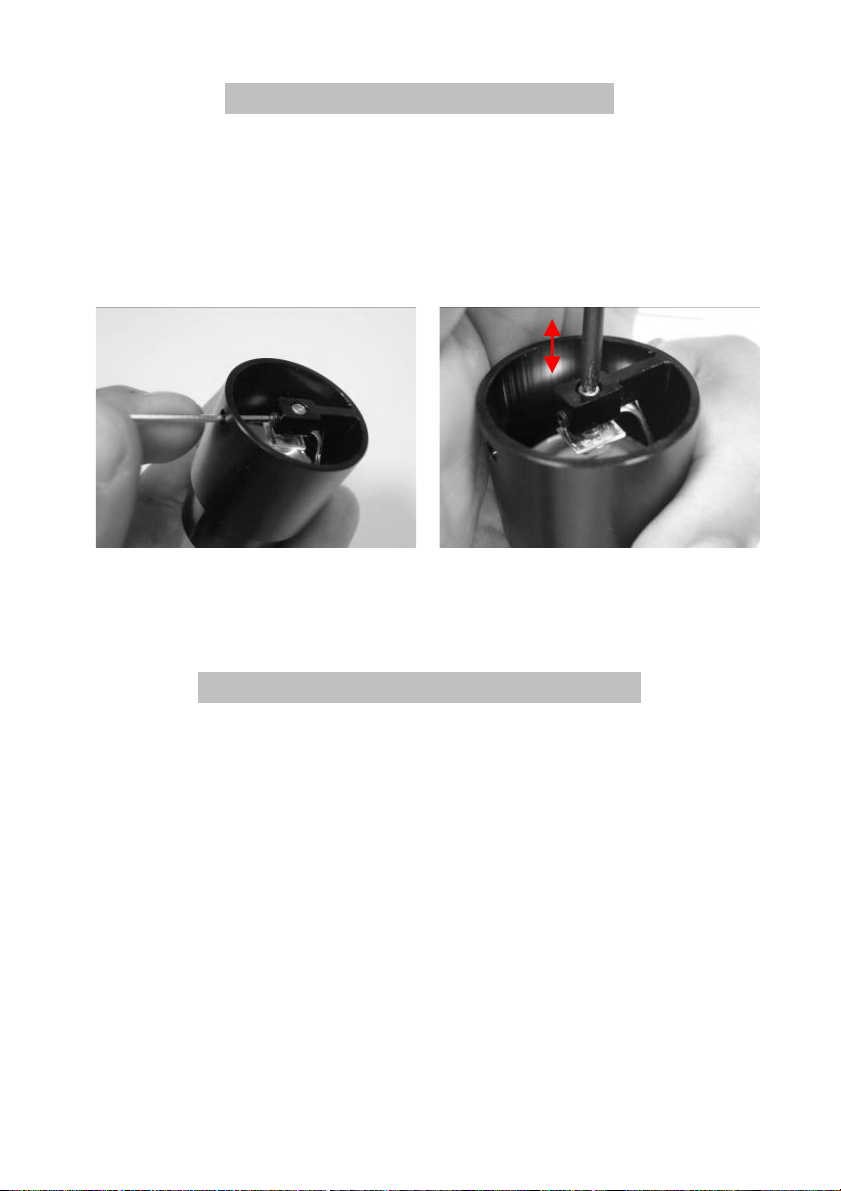
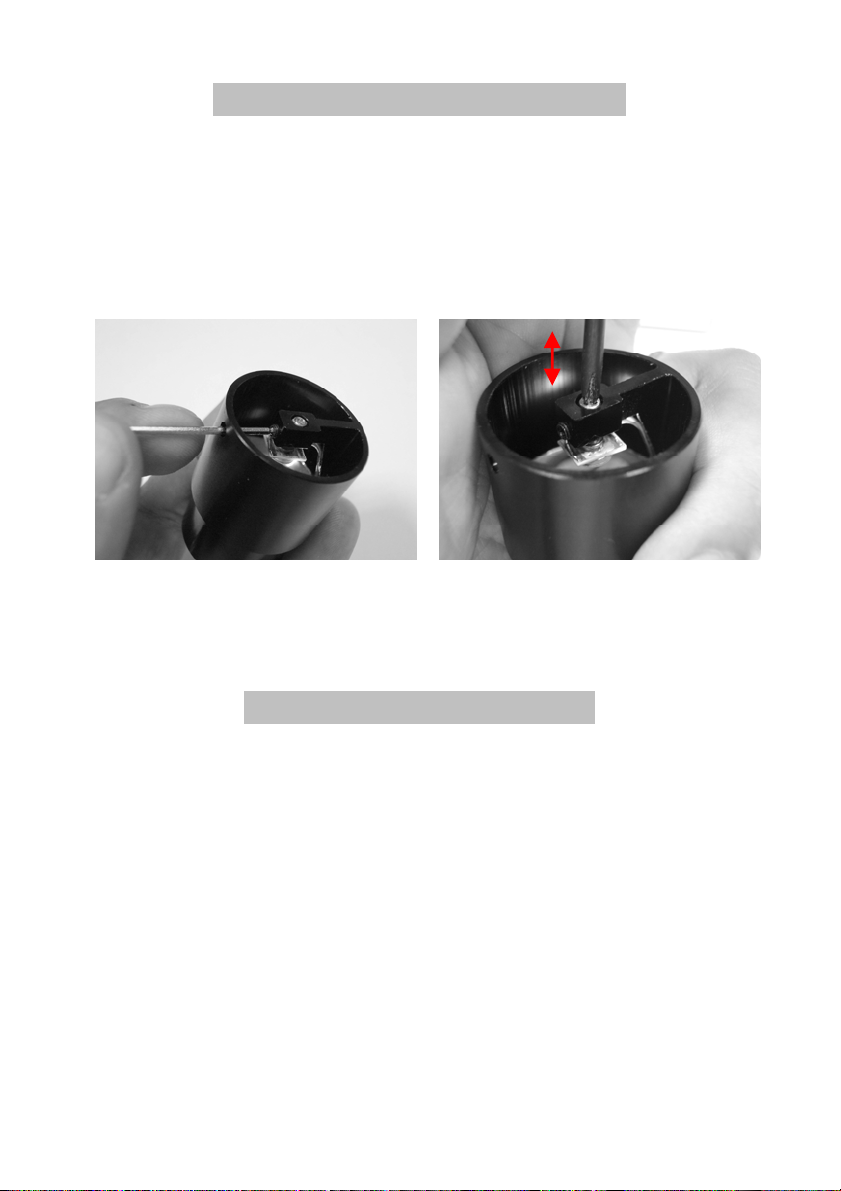
ADJUSTING THE FOCUS OF THE LED
Loosen the threaded locking dowel with the
hex key provided.
Move the LED towards the interior or the
exterior with a Phillips screwdriver.
Tighten the threaded locking dowel with the
hex key.
MAINTENANCE AND TRANSPORT
It is important to follow the instructions below:
Always transport the SUNRISE in a bag that
protects it from impact or shock.
Avoid leaving the SUNRISE in direct sunlight.
After each dive (sea, lake, or swimming pool),
rinse with fresh water and then dry.
Check the status of the watertight seals (O-
rings) each time the front ring is opened.
10
Page 11

If opening the flashlight, use silicone grease to
clean and lubricate the parts that require this
sort of care.
We recommend yearly checks by an
authorized service centre.
WARRANTY CONDITIONS
All OMER products have a warranty that covers
defects with regard to materials and construction for
a period of two years from the date of purchase.
The present warranty does not cover damages
due to:
Improper use or misuse of the product.
Changes or repairs carried out by unauthorized
personnel.
Accidents or natural events.
Use in chlorinated water or polluted water.
Use in liquids other than water.
Prolonged exposure to the sun or heat sources.
OMER denies any liability for damages caused
to the user due to improper use of the
equipment.
This also applies to direct or indirect damages
of any nature caused to people or things due to
periods of non-use or misuse of the product.
11
Page 12

TORCIA LED SUNRISE
Complimenti per aver acquistato la torcia LED
SUNRISE di OMER. Questa torcia è il risultato di una
crescita tecnologica maturata con anni di esperienza
nel settore della pesca subacquea. La versatilità
d’impiego, la funzionalità unita ai materiali di alto
livello e la tecnologia con la quale è stata concepita,
fanno di questa torcia un oggetto assolutamente
unico ed indispensabile per l’apnea e la pesca
subacquea.
La semplicità della forma e le proporzioni contenute la
rendono facilmente collocabile ed agganciabile a
qualsiasi dispositivo dell’attrezzatura, limitando
l’ingombro al minimo. La torcia SUNRISE è stata
concepita per l’uso in apnea, ma si adatta
ottimamente anche per le immersioni sportive con
autorespiratore.
Il fascio di luce è di tipo concentrato grazie ad una
parabola di tipo Recoil System a luce inversa
progettata con una angolazione di 4°. Tale sistema
permette di ottenere un fascio di massima intensità di
80 mm di diametro a circa 1mt tra torcia e parete da
illuminare, con una restante corona periferica di
minore intensità di circa 0,5 mt di diametro. Si viene
così a creare un fascio luminoso ad altissimo
rendimento in grado di penetrare in profondità in
qualsiasi cavità sommersa.
12
Page 13

AVVERTENZE IMPORTANTI
ATTENZIONE: Prima di utilizzare la SUNRISE
leggere attentamente questo manuale.
ATTENZIONE: Non puntare la SUNRISE verso i
propri occhi o verso gli occhi di altri, sia in
ambiente aereo sia durante l’immersione.
ATTENZIONE: Accertarsi di posizionare
l’interruttore nella posizione di blocco durante le
fasi di trasporto in modo da impedire accensioni
involontarie.
ATTENZIONE: Assicurarsi di togliere le batterie
durante il trasporto in aereo.
ATTENZIONE: Durante la sostituzione delle
batterie ricordarsi di rispettare la polarità delle
stesse.
ATTENZIONE: Utilizzare batterie di ottima qualità.
ATTENZIONE: Non lasciare mai la torcia
inutilizzata chiusa per un lungo periodo con le
batterie inserite.
ATTENZIONE: Nei periodi di non utilizzo della
torcia , tenere leggermente svitata la ghiera
frontale per evitare il bloccaggio della stessa.
AVVERTENZE GENERALI
Non tenere la torcia accesa fuori dall’acqua.
Non svitare la ghiera frontale della torcia in
immersione o se bagnata.
13
Page 14

Non tenere la torcia vicino a fonti di calore estreme.
Utilizzare sempre ricambi originali per eventuali
operazioni di ordinaria e straordinaria
manutenzione compresa la sostituzione del gruppo
LED.
Non utilizzate batterie con differente stato di carica.
Pulire e lubrificare gli ORings periodicamente con
grasso siliconico.
Verificare periodicamente lo stato di usura degli
ORings e sostituire nel caso di evidente usura.
CARATTERISTICHE TECNICHE
Corpo realizzato in ABS ad alta resistenza.
Gruppo ottico a fascio concentrato.
Ghiera frontale ricoperta in termo gomma
antisdruciolo.
Interruttore di tipo magnetico scorrevole.
N°1 LED di potenza bianco 6200 °K pilotato da
specifica elettronica.
Doppio ORing in NBR per la tenuta stagna tra
ghiera e corpo torcia
Cinghiolo realizzato in poliuretano facilmente
regolabile. E’ inoltre stato dimensionato per
potersi sganciare in assoluta sicurezza se
trazionato fortemente a causa di un gravoso
impiglio della torcia in una cavità durante la fase
di emersione.
14
Page 15

CARATTERISTICHE SUNRISE LED
g
Potenza
Lumen
LUX
Volt
3 W
210 lm
15000
6 V
Tipo di batterie
Alloggiamento batterie
Lampadina in otazione
Materiale corpo
Materiale Lente
ORin
Peso in aria
Peso in aria
Lunghezza
Diametro
Interruttore
Sicurezza su
interruttore
Temperatura calore
Fascio luminoso
Autonomia in uso
continuo
Formato AA 1,5 V
Direttamente nel corpo torcia
tramite apposito schema da
seguire scrupolosamente.
1 Power LED 3 W
ABS ad alta resistenza
Policarbonato
NBR
247 grammi con 4 batterie alkaline
inserite
154 grams senza batterie
190 mm
50 mm
Magnetico a scorrimento
Meccanica 1 posizione OFF e 1
posizione ON
6200°K
Concentrato (80 mm di diametro a 1
metro di distanza tra muro e
sorgente da illuminare)
1200 minuti
Autonomia al 100%
180 minutes
15
Page 16
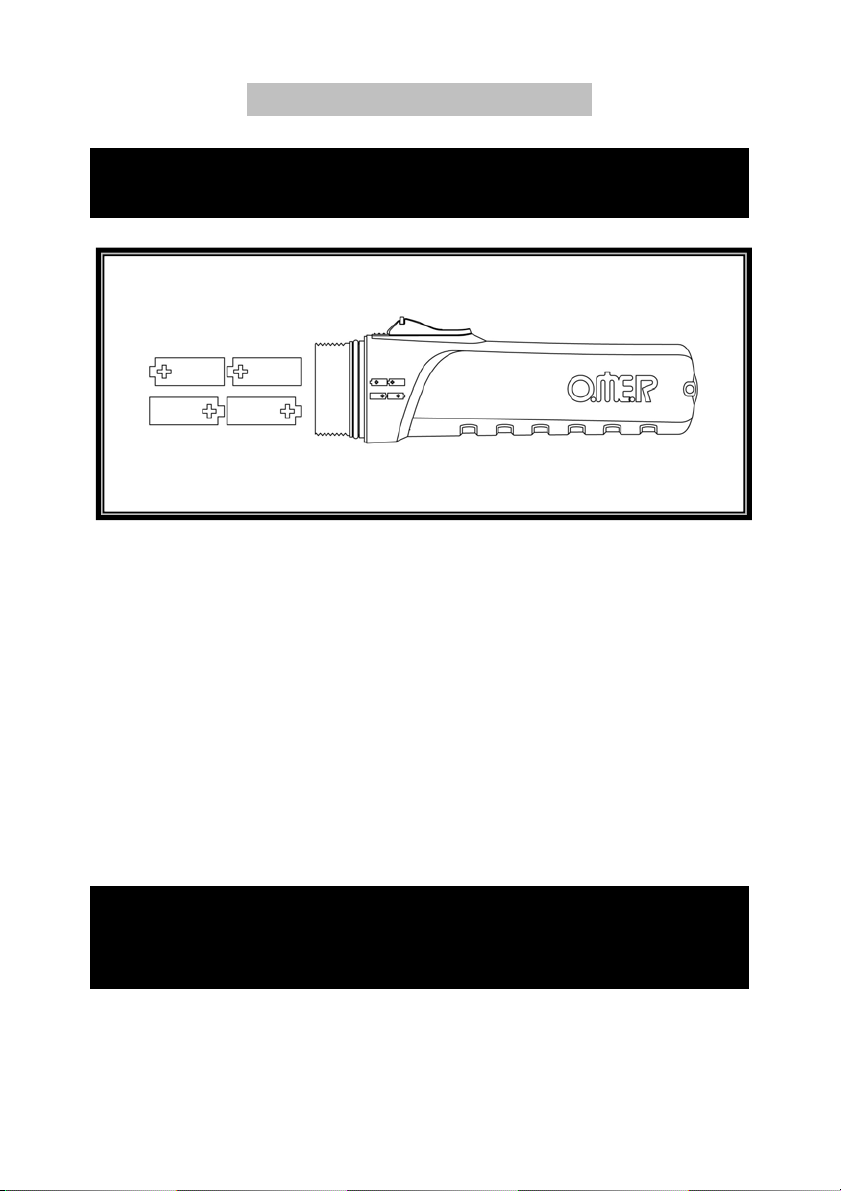
INSERIMENTO BATTERIE
ATTENZIONE: Rispettare tassativamente
l’indicazione delle polarità!
Svitare in senso antiorario la ghiera frontale
della torcia.
Inserire le batterie seguendo le indicazioni di
polarità (+ o -) indicate sul corpo torcia.
Lubrificare gli ORings di tenuta con un velo di
grasso al silicone.
Avvitare la ghiera frontale in senso orario.
Verificare l’accensione della torcia tramite
l’apposito interruttore.
ATTENZIONE: In caso di errato posizionamento
delle batterie (inversione polarità) si potrebbe
danneggiare il gruppo LED.
16
Page 17

MODALITA’ DI CONTROLLO PRIMA
DELL’IMMERSIONE
Se non utilizzata recentemente, verificare lo
stato delle batterie procedendo ad una verifica
dell’accensione.
Controllare la perfetta chiusura del corpo.
Appena giunti in acqua verificare che non vi sia
presenza continua di bolle che fuoriescono dal
corpo della torcia.
ALLAGAMENTO
Qualora dovesse entrare acqua all’interno della
torcia è necessario agire nel seguente modo:
svitare la ghiera frontale ed estrarre le batterie, non
più utilizzabili; sciacquare con acqua dolce le parti
interne (anche il gruppo LED) e successivamente
asciugarle con un panno e con un phone ad aria
tiepida, prestando particolare attenzione alle parti
meccaniche. Asportare accuratamente l’eventuale
ossido formatosi sulle parti metalliche, inserire le
batterie nuove e procedere ad una prova di
funzionalità della SUNRISE.
Se la SUNRISE dovesse restare per un lungo
periodo con una consistente quantità d’acqua al
suo interno, si consiglia comunque di sciacquare le
parti interne con acqua dolce, ma successivamente
17
Page 18

rivolgersi ad un centro autorizzato per eventuali
opere di riparazione.
LIMITI DI IMPIEGO
La profondità massima operativa è di 50 m.
A causa delle alte temperature raggiunte dal
gruppo LED si consiglia l’uso della stessa solo
ed esclusivamente in ambiente subacqueo.
SOSTITUZIONE DEL GRUPPO LED
Svitare la ghiera frontale.
Estrarre il gruppo LED da sostituire ed inserire
quello nuovo facendo attenzione che combaci
con il foro dell’alloggio nel corpo torcia.
Reinserire il tutto, avvitare la ghiera frontale
procedendo preventivamente a lubrificare gli
ORings di tenuta.
18
Page 19
REGOLAZIONE DEL FUOCO LED
Allentare il grano filettato di bloccaggio con la
chiave esagonale in dotazione.
Muovere verso l’esterno o l’interno il LED con
un giravite a croce.
Serrare il grano filettato di bloccaggio con la
chiave esagonale in dotazione.
MANUTENZIONE E TRASPORTO
E’ importante attenersi alle seguenti istruzioni:
Trasportare sempre la SUNRISE all’interno di una
borsa che la protegga da eventuali urti.
Evitare prolungate esposizioni ai raggi solari.
Alla fine di ogni immersione (mare, lago o piscina)
sciacquare sempre con acqua dolce e asciugare.
Verificare lo stato delle guarnizioni di tenuta
(ORings) ogni volta che si è proceduto all’apertura
della ghiera frontale.
19
Page 20

Pulire e lubrificare le parti interessate all’apertura
con grasso siliconico.
Si consiglia di far ispezionare annualmente il
prodotto da un centro autorizzato
.
CONDIZIONI DI GARANZIA
Tutti i prodotti OMER sono garantiti da difetti sul
materiale e sulla lavorazione per un periodo di due
anni dalla data di acquisto.
La presente garanzia non copre danni dovuti a :
Utilizzo in maniera impropria o scorretta.
Modifiche o riparazioni, eseguite da personale non
autorizzato.
Eventi accidentali o naturali.
Utilizzo in acque cariche di cloro o inquinate.
Utilizzo in liquidi diversi dall’acqua.
Prolungata esposizione ai raggi solari o a intense
fonti di calore.
OMER declina ogni responsabilità relativa a danni
causati all’utilizzatore da un uso improprio delle
attrezzature.
Altrettanto dicasi per danni diretti o indiretti di
qualsiasi natura causati a persone o cose dovuti
ad eventuali periodi di inutilizzo del prodotto o da
un uso scorretto dello stesso.
20
Page 21

TORCHE LED SUNRISE
Nous vous félicitions d’avoir acheté la torche LED
SUNRISE de OMER. Cette torche est le résultat
d’une croissance technologique grâce à des années
d’expérience dans le secteur de la pêche sousmarine. La versatilité d’emploi, la fonctionnalité
associée aux matériaux de haut niveau et la
technologie suivant laquelle elle a été conçue, font de
cette torche un objet absolument unique et
indispensable pour l’apnée et la pêche sous-marine.
Grâce à la simplicité de sa forme et à ses proportions
réduites, elle peut être facilement placée et
accrochée à tout dispositif de l’équipement, limitant
ainsi l’encombrement au minimum. La torche
SUNRISE a été conçue pour l’utilisation en apnée ;
mais elle s’adapte parfaitement aux immersions
sportives avec un appareil de plongée.
Le faisceau de lumière est de type concentré grâce à
une parabole de type Recoil System à lumière
inversée projetée avec un angle de 4°. Ce système
permet d’obtenir un faisceau d’une intensité maximale
de 80 mm de diamètre à environ 1 m entre la torche
et la paroi à éclairer, avec une couronne périphérique
restante de moindre intensité d’environ 0,5 m de
diamètre. Un faisceau à rendement très élevé est
ainsi crée, en mesure de pénétrer en profondeur dans
toute cavité sous-marine.
21
Page 22

AVERTISSEMENTS IMPORTANTS
ATTENTION : Avant d’utiliser la torche SUNRISE,
lire attentivement ce manuel.
ATTENTION : Ne pas diriger la torche vers vos
yeux ou vers les yeux des autres, à l’air libre ou en
immersion.
ATTENTION : Veiller à positionner l’interrupteur en
position de blocage durant le transport de manière
à empêcher tout allumage involontaire.
ATTENTION : S’assurer d’avoir enlevé les piles
durant le transport en avion.
ATTENTION : Durant le remplacement des piles,
ne pas oublier de respecter leur polarité.
ATTENTION : Utiliser des piles d’excellente
qualité.
ATTENTION : Ne jamais laisser les piles dans la
torche en cas de longue période d’inutilisation de
cette dernière.
ATTENTION : Durant les périodes de nonutilisation de la torche, la bague frontale doit être
légèrement dévissée pour éviter son blocage.
AVERTISSEMENTS GÉNÉRAUX
Ne pas laisser la torche allumée hors de l’eau.
Ne pas dévisser la bague frontale de la torche lors
d’une immersion ou bien si elle est mouillée.
Éloigner la torche des sources de chaleur extrême.
22
Page 23

Toujours utiliser des pièces de rechange originales
pour d’éventuelles opérations d’entretien ordinaire
et extraordinaire, y compris le remplacement du
groupe LED.
Ne pas utiliser de piles ayant un état de charge
différent.
Nettoyer et lubrifier périodiquement les joints
toriques avec de la graisse siliconique.
Vérifier périodiquement l’état d’usure des joints
toriques et les remplacer en cas d’usure évidente.
CARACTÉRISTIQUES TECHNIQUES
Corps réalisé en ABS hautement résistant.
Groupe optique à faisceau lumineux concentré.
Bague frontale recouverte de caoutchouc
thermique antidérapant.
Interrupteur de type magnétique coulissant.
1 LED blanche de puissance 6 200°K pilotée par
un système électronique spécifique.
Double joint torique en NBR pour l’étanchéité entre
la bague et le corps de la torche.
Courroie réalisée en polyuréthane facilement
réglable. En outre, elle est dimensionnée pour un
décrochage parfaitement sûr en cas de forte
traction suite à l’encastrement de la torche dans
une cavité au cours de l’émersion.
23
Page 24

CARACTÉRISIQUES LED SUNRISE
r
Puissance
Lumen
LUX
Volt
3 W
210 lm
15 000
6 V
Type de piles
Logement piles
Ampoule fournie
Matériau corps
Matériau lentille
Joint torique
Poids à l’air libre
Poids à l’air libre
Longueu
Diamètre
Interrupteur
Sécurité sur l’interrupteur
Température chaleur
Faisceau lumineux
Autonomie en utilisation
continue
Format AA 1,5 V
Directement dans le corps de la
torche suivant le schéma
spécifique à suivre
scrupuleusement
1 Power LED 3 W
ABS haute résistance
Polycarbonate
NBR
247 grammes avec 4 piles
alcalines insérées
154 grammes avec 4 piles
alcalines insérées
190 mm
50 mm
Magnétique coulissant
Mécanique à 1 position OFF et
1 position ON
6 200°K
Concentré (80 mm de diamètre
à 1 m de distance entre la
source et la paroi à éclairer)
1 200 minutes
Autonomie à 100 %
24
180 minutes
Page 25
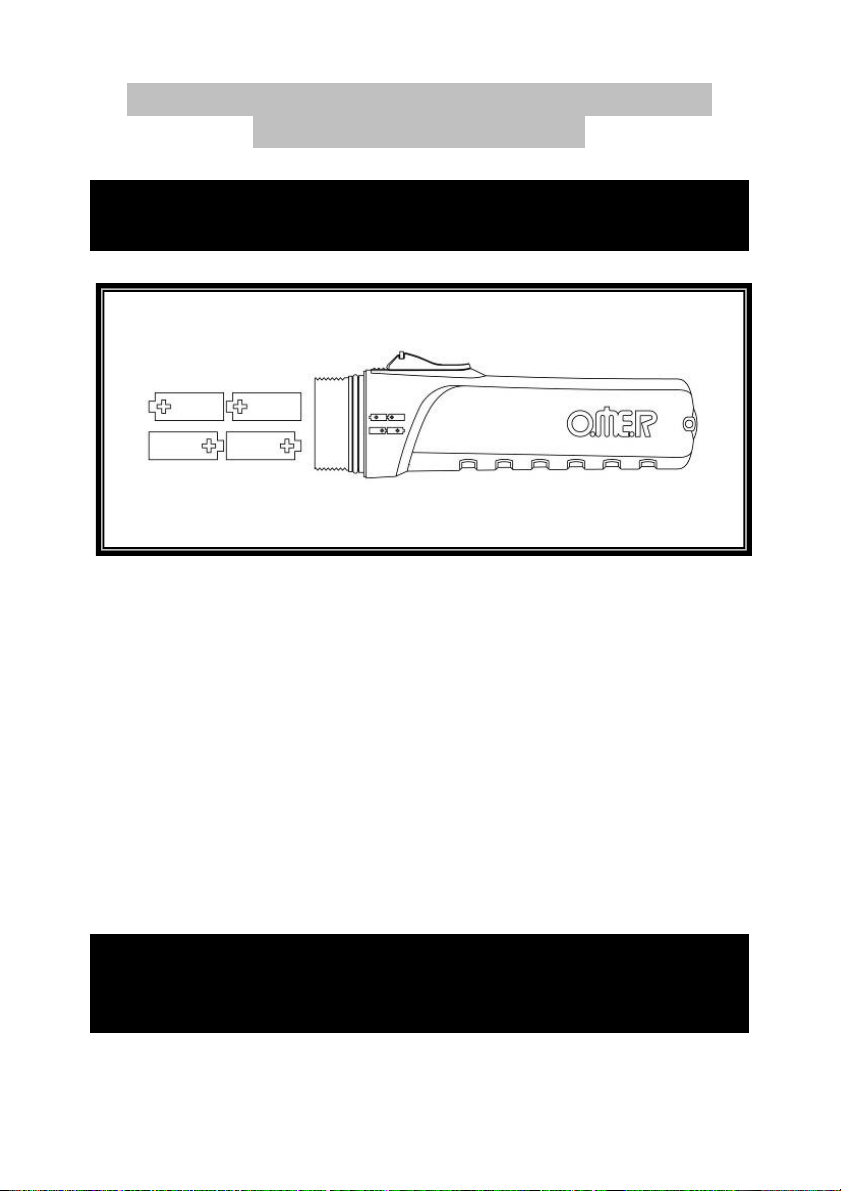
SCHÉMA DE POSITIONNEMENT DES PILES
DANS LEUR LOGEMENT
ATTENTION : Respecter impérativement
l’indication des polarités !
Dévisser la bague frontale de la torche dans le
sens des aiguilles d’une montre.
Placer les piles en suivant les indications de la
polarité (+ ou -) figurant sur le corps de la torche.
Lubrifier les joints toriques d’étanchéité avec une
fine couche de graisse à la silicone.
Visser la bague frontale dans le sens des aiguilles
d’une montre.
Vérifier l’allumage de la torche au moyen de
l’interrupteur.
ATTENTION : Un positionnement erroné des piles
(inversion de la polarité) pourrait endommager le
groupe LED.
25
Page 26

MODALITÉS DE CONTRÔLE AVANT
L’IMMERSION
Si la torche n’a pas été utilisée récemment,
vérifier l’état des piles en procédant à un
contrôle de l’allumage.
Contrôler la fermeture parfaite du corps.
Dès qu’on est dans l’eau, vérifier l’absence
permanente de bulles s’échappant de la torche.
INONDATION
Si de l’eau pénètre à l’intérieur de la torche, agir
comme suit : dévisser la bague frontale et extraire
les piles qui ne sont plus utilisables ; rincer les
parties internes à l’eau douce (notamment le
groupe LED) puis les sécher avec un chiffon et un
sèche-cheveux à air tiède, en faisant bien attention
aux pièces mécaniques. Éliminer minutieusement
l’oxydation éventuelle qui s’est formée sur les
parties métalliques, introduire les piles neuves et
effectuer un essai de fonctionnement de la torche
SUNRISE.
Si une grande quantité d’eau reste longtemps à
l’intérieur de la SUNRISE, on conseille de toujours
rincer les parties internes à l’eau douce, mais
s’adresser ensuite à un centre autorisé pour les
éventuelles réparations.
26
Page 27

LIMITES D’UTILISATION
La profondeur maximale de fonctionnement est
de 50 m.
En raison des températures élevées atteintes
par le groupe LED, on conseille de l’utiliser
exclusivement sous l’eau.
REMPLACEMENT DU GROUPE LED
Dévisser la bague frontale.
Extraire le groupe LED à remplacer et introduire
le nouveau groupe en veillant à ce qu’il coïncide
avec le trou du logement dans le corps de la
torche.
Remettre le tout en place et visser la bague
frontale en lubrifiant préalablement les joints
toriques d’étanchéité.
RÉGLAGE DU FEU LED
Visser le grain fileté de blocage à l’aide de la
clé hexagonale fournie.
Bouger la LED vers l’extérieur ou l’intérieur
avec un tournevis cruciforme.
27
Page 28
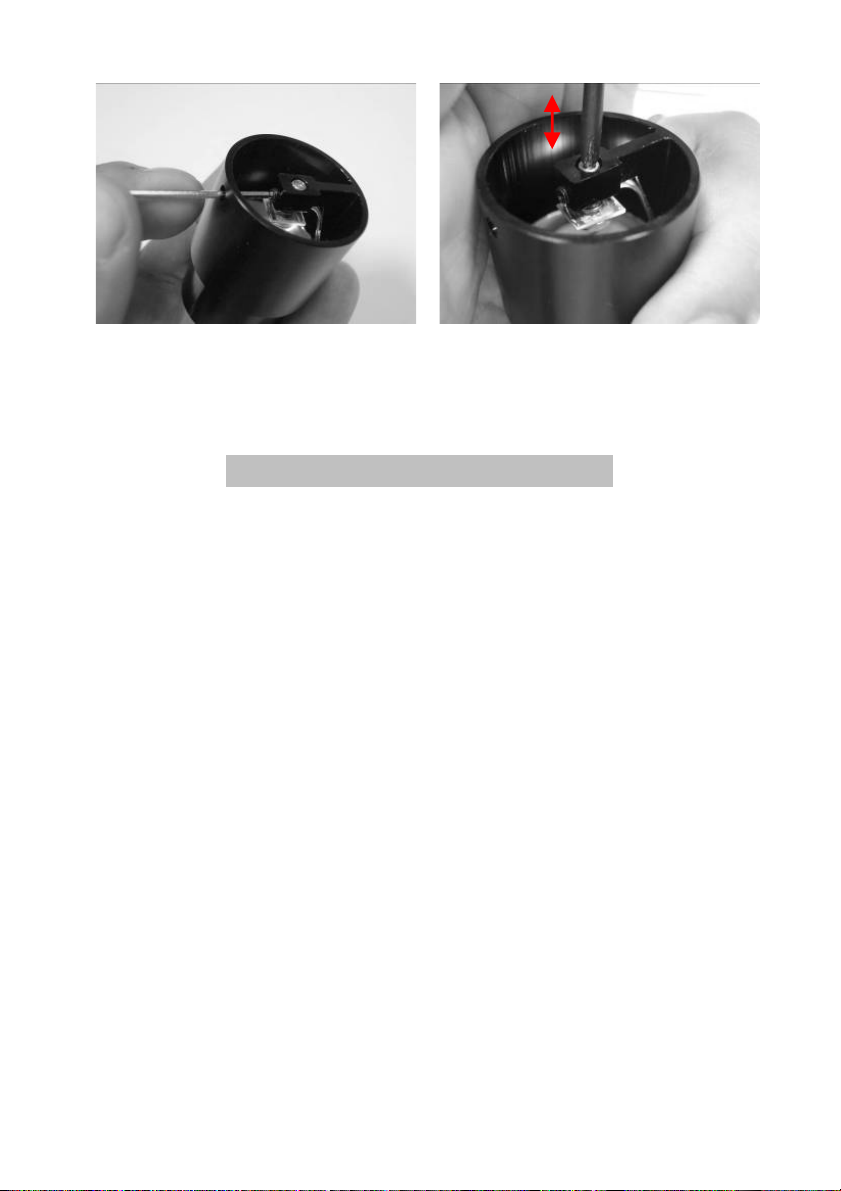
Serrer le grain fileté de blocage à l’aide de la
clé hexagonale fournie.
ENTRETIEN ET TRANSPORT
Suivre attentivement les instructions suivantes :
Toujours transporter la torche SUNRISE à
l’intérieur d’un sac qui la protège contre les
chocs.
Éviter les expositions prolongées aux rayons du
soleil.
A la fin de chaque immersion (mer, lac ou
piscine), toujours rincer à l’eau douce et sécher.
Vérifier l’état des joints d’étanchéité (joints
toriques) après chaque ouverture de la bague
frontale.
Nettoyer et lubrifier les parties concernées par
l’ouverture avec de la graisse siliconique.
On conseille une inspection annuelle dans un
centre autorisé.
28
Page 29

CONDITIONS DE GARANTIE
Tous les produits OMER sont garantis contre les
défauts de matériel et de fabrication pendant une
période de deux ans à compter de la date
d’achat.
La présente garantie ne couvre pas les dégâts
dus à :
Une utilisation impropre ou incorrecte.
Des modifications ou des réparations exécutées
par du personnel non autorisé.
Des évènements accidentels ou naturels.
Une utilisation dans des eaux chargées de
chlore ou polluées.
Une utilisation dans des liquides autres que de
l’eau.
Une exposition prolongée aux rayons du soleil
ou à des sources de chaleur intense.
OMER décline toute responsabilité relative à
des dommages subis par l’utilisateur suite à un
usage impropre des équipements, ou à des
dommages directs ou indirects de toute nature
subis par les personnes ou les choses suite à
d’éventuelles périodes d’inutilisation du produit
ou à un usage incorrect de ce dernier.
29
Page 30

LINTERNA LED SUNRISE
Le felicitamos por haber comprado la linterna led
SUNRISE de OMER. Esta linterna es el resultado
de un incremento tecnológico madurado con años
de experiencia en el sector de la pesca submarina.
La versatilidad de uso, la funcionalidad junto con
los materiales de alto nivel y la tecnología con la
cual ha sido concebida, hacen de esta linterna un
objeto absolutamente único e indispensable para
la apnea y la pesca submarina.
La sencillez de la forma y sus reducidas
proporciones facilitan su colocación y enganche a
cualquier dispositivo del equipamiento, limitando
de esta manera el espacio ocupado.
El haz luminoso es de tipo concentrado gracias a una
parábola Recoil System con luz invertida diseñada
con un ángulo de 4°.
un haz de máxima intensidad de 80 mm de
diámetro a casi 1 metro entre la linterna y la pared
que debe iluminarse, con una restante corona
periférica de menor intensidad de
aproximadamente 0,5 metros de diámetro. Gracias
a ello, se crea un haz luminoso de altísimo
rendimiento capaz de penetrar en profundidad en
cualquier cavidad sumergida.
Este sistema permite obtener
30
Page 31

ADVERTENCIAS IMPORTANTES
ATENCIÓN: Antes de utilizar la linterna SUNRISE lea
atentamente este manual.
ATENCIÓN: No apunte la linterna hacia los propios
ojos o hacia los ojos de los demás, ya sea en
ambiente aéreo que durante el buceo.
ATENCIÓN: Asegúrese de colocar el interruptor en la
posición de bloqueo durante las fases de transporte,
de manera tal que no pueda ser encendido
involuntariamente.
ATENCIÓN: Asegúrese de extraer las baterías
durante el transporte en avión.
ATENCIÓN: Durante la sustitución de las baterías, no
olvide respetar la polaridad de las mismas.
ATENCIÓN: Utilice baterías de excelente calidad del
tipo Energizer AA Lithium.
ATENCIÓN: No deje nunca la linterna sin utilizar
cerrada durante un largo período de tiempo con las
baterías introducidas.
ATENCIÓN: Durante los períodos en que no se utilice
la linterna, deje ligeramente desenroscado el
casquillo frontal para evitar el bloqueo del mismo.
ADVERTENCIAS GENERALES
No mantenga la linterna encendida fuera del agua.
No desenrosque el casquillo frontal de la linterna
durante el buceo o si está mojada.
No acerque la linterna a fuentes de calor extremas.
31
Page 32

Utilice siempre repuestos originales para
eventuales operaciones de ordinario y
extraordinario mantenimiento, incluida la
sustitución del grupo LED.
No utilice baterías con estados de carga diferentes.
Limpie y lubrifique las juntas tóricas con grasa de
silicona.
Compruebe periódicamente el estado de desgaste
de las juntas tóricas y sustitúyalas en caso de
evidente desgaste.
CARACTERÍSTICAS TÉCNICAS
Cuerpo realizado en ABS de alta resistencia.
Grupo óptico y haz concentrado.
Casquillo frontal recubierto con termogoma
antideslizante.
Interruptor de tipo magnético
N°1 LED de potencia blanco 6200 °K controlado
por especificación electrónica.
Doble anillo toroidal de NBR para la estanqueidad
entre el anillo y el cuerpo de la linterna.
Correa realizada en poliuretano fácilmente
regulable. Además ha sido dimensionado para
poderse desenganchar con absoluta seguridad si
sufre una fuerte tracción debida a un grave
enganche de la linterna en una cavidad durante la
fase de emersión.
32
Page 33

CARACTERÍSTICAS SUNRISE LED
Potencia
Lumen
LUX
Volt
3 W
210 lm
15000
6 V
Tipo de baterías
Ubicación baterías
Bombilla suministrada
Material cuerpo
Material lente
Junta Tórica
Peso en el aire
Peso en el aire
Longitud
Diámetro
Interruptor
Disp. seguridad en el
interruptor
Temperatura calor
Haz luminoso
Autonomía en uso
continuo
Autonomía al 100%
Formato AA 1,5 V
Directamente en el cuerpo de la
linterna siguiendo el
correspondiente esquema que
debe seguirse
escrupulosamente.
1 Power LED 3W
ABS de alta resistencia
policarbonato
NBR y Silicona para retención
cristal
247 gramos con 4 baterías
alcalinas introducidas
154 gramos sin baterías
190 mm
50 mm
Magnético de deslizamiento
Mecánico con 1 posiciones OFF
y 1 posición ON
6200°K
Concentrado (80mm de
diámetro a 1 m de distancia
entre fuente luminosa y pared a
iluminar)
1200 minutos
180 minutos
33
Page 34
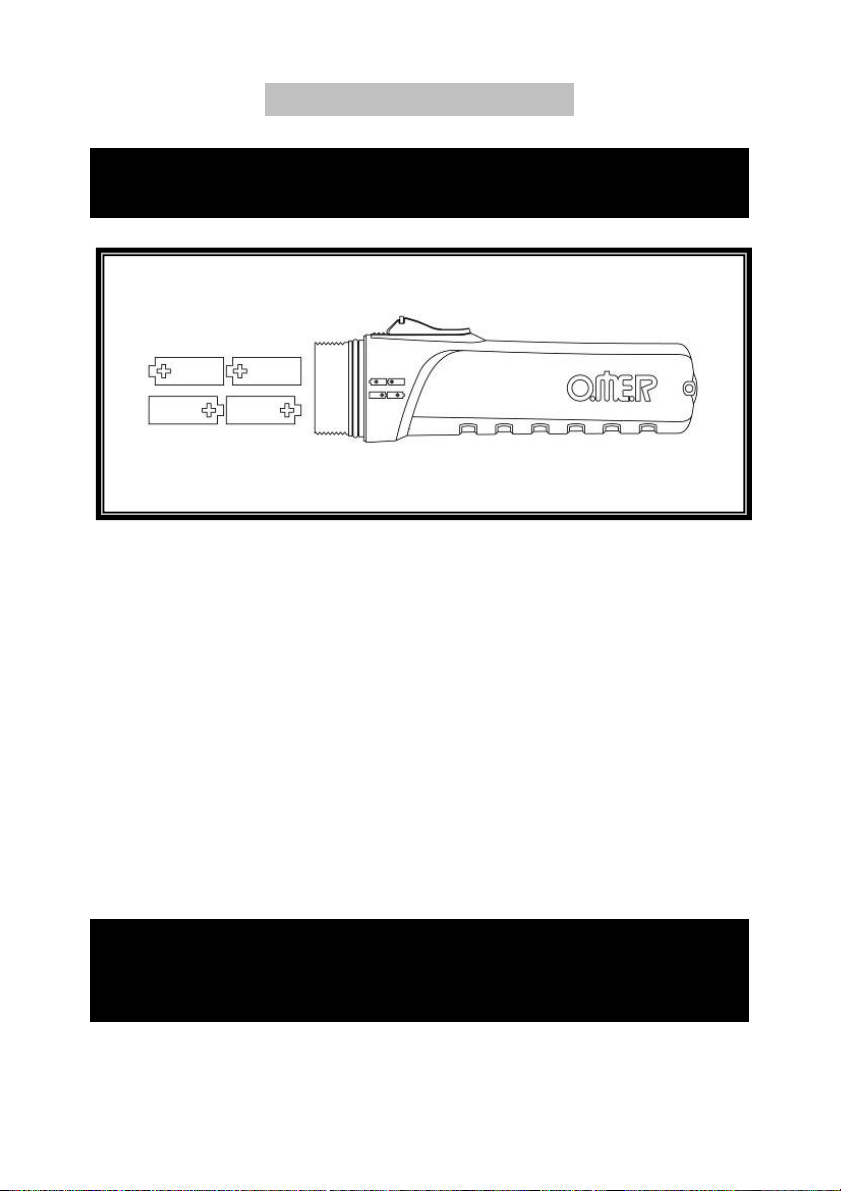
INSERCIÓN BATERÍAS
ATENCIÓN: ¡Respetar taxativamente la
indicación de las polaridades!
Desenrosque en sentido antihorario el casquillo
frontal de la linterna.
Introduzca las baterías siguiendo las
indicaciones de polaridad (+ o -) indicadas en la
tapa.
Lubrifique las juntas tóricas de estanqueidad
con una capa de grasa de silicona.
Enrosque el casquillo frontal en sentido horario.
Compruebe el encendido de la linterna
mediante el correspondiente interruptor.
ATENCIÓN: En caso de colocación equivocada
de las baterías (inversión de polaridad) se
podría dañar el grupo LED.
34
Page 35

MODALIDAD DE CONTROL ANTES DE LA
INMERSIÓN
Si no se ha utilizado recientemente, compruebe
el estado de las baterías efectuando un control
del encendido.
Controlar que el cuerpo esté perfectamente
cerrado.
Una vez en el agua, comprobar que no se
produzca una presencia continua de burbujas
que salgan del cuerpo de la linterna.
ENTRADA DE AGUA
Si se produjera la entrada de agua en el interior de
la linterna, es necesario actuar del modo siguiente:
desenrosque el casquillo frontal y extraiga las
baterías que no podrán ser utilizadas de nuevo.
Enjuague con agua dulce las partes internas
(incluido el grupo LED) y a continuación séquelas
con un paño y con un secador de aire tibio,
prestando una atención especial a las partes
mecánicas. Extraiga con cuidado cualquier
eventual oxidación que se hubiera formado en las
partes metálicas e introduzca las baterías nuevas,
procediendo luego a efectuar una prueba de
funcionalidad.
Si la linterna permaneciera durante un largo
periodo de tiempo con una consistente cantidad de
35
Page 36

agua en su interior, se aconseja de todos modos
aclarar las partes internas con agua dulce,
dirigiéndose sucesivamente a un centro autorizado
para eventuales operaciones de reparación.
LÍMITES DE USO
La profundidad máxima operativa es de 50 m.
Debido a las altas temperaturas alcanzadas por
el grupo LED, se aconseja el uso de la misma
sólo y exclusivamente en ambiente submarino.
SUSTITUCIÓN DEL GRUPO LED
Desenrosque el casquillo frontal.
Extraiga el grupo led que debe sustituirse e
introduzca el nuevo procurando que coincida
con el orificio de alojamiento en el cuerpo de la
linterna.
Vuelva a insertar el grupo. Enrosque el casquillo
frontal lubrificando primero las juntas tóricas de
estanqueidad.
36
Page 37
REGULACIÓN DE LA LUZ LED
Aflojar el tornillo roscado de bloqueo con la llave
hexagonal incluida.
Mover hacia el exterior o interior el LED con un
destornillador de estrella.
Apretar el tornillo roscado de bloqueo con la llave
hexagonal incluida.
MANTENIMIENTO Y TRANSPORTE
Es importante respetar las instrucciones siguientes:
Transporte siempre la linterna en el interior de una
bolsa que la proteja contra eventuales golpes.
Evite prolongadas exposiciones a los rayos solares.
Al final de cada inmersión (mar, lago o piscina)
enjuáguela siempre con agua dulce y séquela.
Compruebe el estado de las juntas estancas
(juntas tóricas) cada vez que se haya abierto el
casquillo frontal.
37
Page 38

Limpie y lubrifique las partes cercanas a la
apertura con grasa de silicona.
Se recomienda hacer inspeccionar anualmente el
producto en un centro autorizado.
CONDICIONES DE GARANTÍA
Todos los productos OMER están garantizados contra
defectos en el material y en la fabricación durante un
periodo de dos años desde la fecha de compra.
La presente garantía no cubre daños debidos a:
Uso de manera impropia e incorrecta.
Modificaciones o reparaciones efectuadas
por personal no autorizado.
Eventos accidentales o naturales.
Uso en aguas cargadas de cloro o
contaminadas.
Uso en líquidos diferentes del agua.
Prolongada exposición a los rayos solares o
a intensas fuentes de calor.
OMER no se asume ninguna responsabilidad
relativa a daños ocasionados por el usuario
debido a un uso inadecuado de los equipamientos.
Lo mismo vale para los daños directos o
indirectos de cualquier naturaleza causados a
personas o cosas debidos a eventuales periodos
en que no se ha utilizado el producto o debido a
un uso incorrecto del mismo.
38
Page 39

ПОДВОДНЫЙ СВЕТОДИОДНЫЙ
ФОНАРЬ SUNRISE
Поздравляем Вас с приобретением подводного
светодиодного фонаря SUNRISE от OMER.
Этот фонарь является результатом применения
новых технологий и многолетнего опыта в
области подводной охоты. Универсальность и
функциональность вместе с
высококачественными материалами и
технологическим дизайном делают этот фонарь
действительно уникальным и необходимым для
погружений на задержке дыхания и подводной
охоты.
Его простая форма
позволяют легко держать фонарь, его также
можно пристегнуть к любой части снаряжения.
Фонарь SUNRISE был разработан для
подводной охоты, однако он может быть легко
адаптирован для дайвинга.
Концентрированный луч света создается
параболой типа отражательной системы с
обратным светом, спроектированным под углом
4°. Эта система обеспечивает луч с
максимальной
диаметре на расстоянии около 1 метра от
фонаря до освещаемой стены с остаточным
интенсивностью 80 мм в
и небольшие размеры
39
Page 40

лучом более низкой интенсивности диаметром
0,5 метра. Таким образом обеспечивается
высокая световая отдача и возможность
проникновения луча в любые подводные
углубления.
ВАЖНЫЕ ПРЕДУПРЕЖДЕНИЯ
ВНИМАНИЕ! Перед использованием фонаря
SUNRISE внимательно прочтите это руководство.
ВНИМАНИЕ! Не направляйте луч света прямо в
свои глаза или в глаза других людей ни на
поверхности, ни под водой.
ВНИМАНИЕ! Перед транспортировкой фонаря
убедитесь, что выключатель заблокирован,
чтобы избежать случайного включения фонаря.
ВНИМАНИЕ! Перед полетом на самолете
убедитесь, что батарейки извлечены из фонаря.
ВНИМАНИЕ! При замене батареек проверяйте их
соответствие полярности.
ВНИМАНИЕ! Используйте только качественные
батарейки.
ВНИМАНИЕ! Когда фонарь не используется
продолжительное время, извлеките из него
батарейки.
ВНИМАНИЕ! Когда фонарь не используется
продолжительное время, чтобы избежать
блокировки, слегка открутите фронтальную
крышку.
40
Page 41

ОБЩИЕ ПРЕДУПРЕЖДЕНИЯ
Не удерживайте фонарь включенным вне
воды.
Не откручивайте фронтальную крышку
под водой или если фонарь мокрый.
Не размещайте фонарь вблизи
источников тепла.
Используйте только оригинальные
запчасти для обычного и специального
обслуживания, включая замену
светодиодного блока.
Не используйте батарейки с различным
уровнем заряда.
Периодически очищайте и смазывайте
силиконовой смазкой кольцевые
уплотнения.
Периодически проверяйте на предмет
износа кольцевые уплотнения. При
обнаружении повреждений замените их.
41
Page 42

ТЕХНИЧЕСКИЕ ХАРАКТЕРИСТИКИ
Корпус изготовлен из высокопрочного
пластика.
Оптический блок с концентрированным
лучом.
Фронтальная крышка, покрытая
нескользящей терморезиной.
Ползунковый магнитный выключатель.
№1 светодиод, белый, 6200 °K,
управляемый специальной электроникой.
Двойное кольцевое уплотнение из NBR
для герметизации между крышкой и
корпусом фонаря.
Легко регулируемый полиуретановый
ремешок. Ремешок может
в условиях полной безопасности при
сильном натяжении в случае
застревания фонаря в углублении во
время всплытия.
отстегиваться
42
Page 43

ХАРАКТЕРИСТИКИ СВЕТОДИОД SUNRISE
Мощность
Яркость
Светосила
Напряжение
Тип батареек
Размер AA, 1,5 В
3 Вт
210 люмен
15000
6 В
Расположение
батареек
Лампочка, входящая в
комплект
Материал корпуса
Материал линзы
Кольцевое уплотнение
Вес на воздухе
Вес на воздухе
Длина
Диаметр
Выключатель
Предохранитель
выключателя
Цветовая температура
Луч света
Автономность при
непрерывной
эксплуатации
В корпусе фонаря, в точности следуя
диаграмме.
1 светодиод 3 Вт
Ударопрочный пластик
Поликарбонат
NBR
247 г с 4 установленными
щелочными батарейками
154 г без батареек
190 мм
50 мм
Магнитный ползунковый
Механический с 1 положением ВЫКЛ
и 1 положением ВКЛ
6200°K
Концентрированный (80 мм в
диаметре при расстоянии 1 метр от
стены до освещаемого источника)
1200 минут
Автономность при
100%
43
180 минут
Page 44
УСТАНОВКА БАТАРЕЕК
ВНИМАНИЕ! Необходимо соблюдать указание
полярности!
Открутите против часовой стрелки
фронтальную крышку фонаря.
Вставьте батарейки, следуя указаниям
полярности (+ / -) на корпусе фонаря.
Смажьте кольцевые уплотнения тонким слоем
силиконовой смазки.
Закрутите по часовой стрелке фронтальную
крышку фонаря.
Убедитесь, что фонарь включается при
активации выключателя.
ВНИМАНИЕ! Неправильная установка батареек
(нарушение полярности) может повредить
светодиодный блок.
44
Page 45

РАБОЧАЯ ПРОВЕРКА ПЕРЕД ПОГРУЖЕНИЕМ
Если фонарь не использовался какое-то
время, проверьте состояние батареек,
включив фонарь.
Убедитесь, что корпус фонаря хорошо закрыт.
Оказавшись в воде, проверьте, чтобы не
было постоянного присутствия пузырьков
воздуха, выходящих из корпуса фонаря.
ПРОТЕКАНИЕ
Если вода проникла в фонарь, необходимо
действовать следующим образом: открутите
фронтальную крышку и извлеките батарейки,
которые больше не подлежат использованию;
промойте пресной водой внутренние части
фонаря (включая светодиодный блок), затем
высушите детали салфеткой и феном,
используя теплый воздух, при этом обращая
особое внимание на механические детали.
Осторожно удалите окислы,
металлических деталях, вставьте новые
батарейки и проверьте работоспособность
фонаря.
Если внутри фонаря длительное время
оставалась вода, рекомендуется промыть
внутренние части пресной водой, а затем
образовавшиеся на
45
Page 46

обратиться в уполномоченный центр для
проведения ремонтных работ.
ОГРАНИЧЕНИЯ ИСПОЛЬЗОВАНИЯ
Максимальная рабочая глубина составляет
50 метров.
Из-за высоких температур, которых достигает
светодиодный блок, рекомендуется
использовать фонарь только под водой.
ЗАМЕНА СВЕТОДИОДНОГО БЛОКА
Открутите фронтальную крышку.
Извлеките светодиодный блок, подлежащий
замене, и вставьте новый светодиодный блок,
убедившись, что он вошел в посадочное
место корпуса фонаря.
Установите все на место и закрутите
фронтальную крышку, предварительно
смазав кольцевые уплотнения.
РЕГУЛИРОВКА ФОКУСА СВЕТОДИОДА
Ослабьте стопорный резьбовой штифт
шестигранным ключом, входящим в
комплект поставки.
Переместите светодиод наружу или внутрь
крестообразной отверткой.
46
Page 47
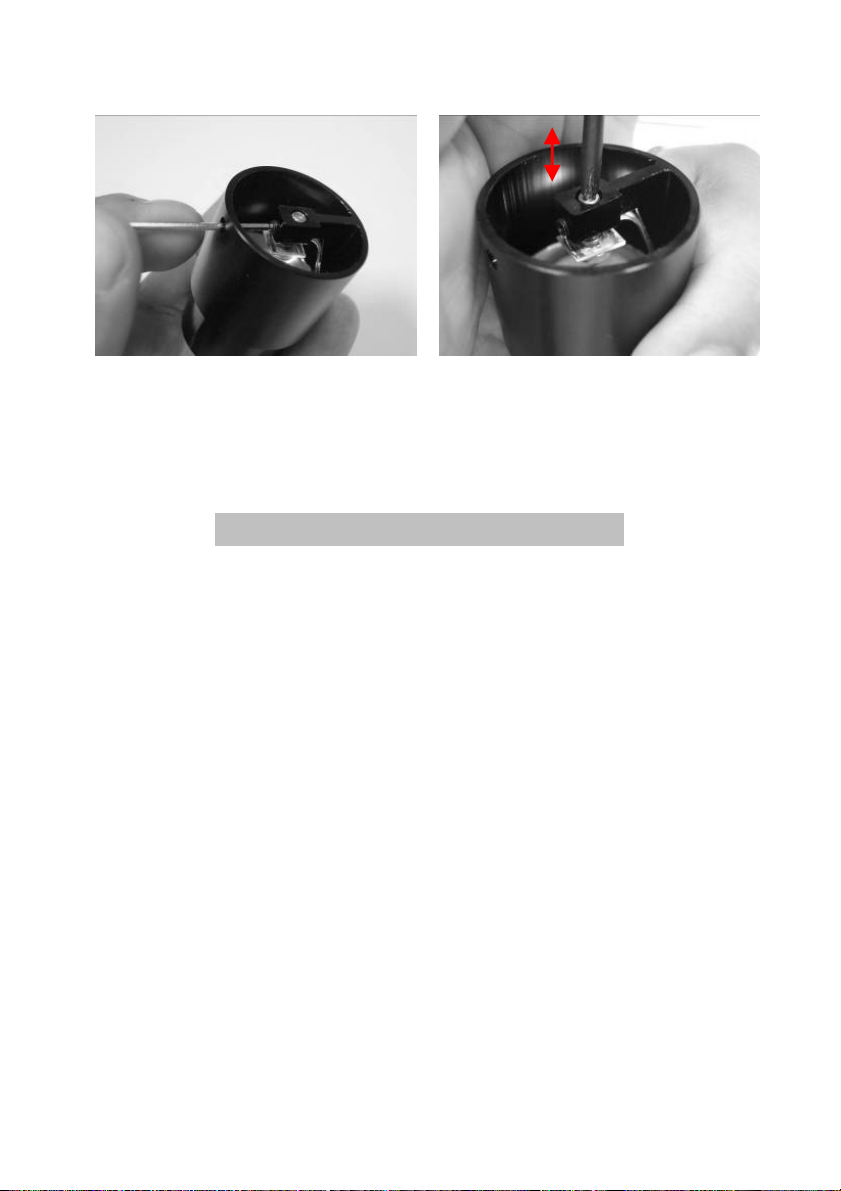
Затяните стопорный резьбовой штифт
шестигранным ключом, входящим в комплект
поставки.
УХОД И ТРАНСПОРТИРОВКА
Очень важно соблюдать следующие инструкции:
Всегда транспортируйте фонарь в сумке,
которая защищает фонарь от ударов.
Не оставляйте фонарь под прямыми
солнечными лучами.
После каждого погружения (в море, озере
или бассейне) ополаскивайте фонарь
пресной водой, а затем высушивайте его.
Проверяйте состояние уплотнительных
прокладок (кольцевых
уплотнений) всякий
раз при открытии фронтальной крышки.
Очищайте и смазывайте силиконовой
смазкой соединительные детали.
47
Page 48

Рекомендуется ежегодная проверка в
уполномоченном центре.
УСЛОВИЯ ГАРАНТИИ
Вся продукция OMER имеет гарантию, которая
покрывает дефекты материалов и изготовления на
период два года с момента приобретения.
Настоящая гарантия не покрывает
повреждения, вызванные:
Неправильным использованием изделия.
Изменениями или ремонтом, произведенными
неуполномоченными лицами.
Случайными событиями или природными
факторами.
Использованием в хлорированной или
загрязненной воде.
Использованием в жидкостях, отличных от
воды.
Продолжительным воздействием солнечных
лучей или интенсивных источников тепла.
OMER не несет никакой ответственности за
повреждения, вызванные неправильным
использованием снаряжения.
Это касается также прямых или косвенных
повреждений любого характера, причиненных
людям или предметам во время
неиспользования или неправильного
использования изделия.
48
Page 49

LATARKA LED SUNRISE
Gratulujemy zakupu latarki LED SUNRISE firmy
OMER. Niniejsza latarka jest rezultatem rozwoju
technologicznego i lat doświadczenia w sektorze
łowiectwa podwodnego. Wszechstronność
zastosowania, funkcjonalność połączona z
materiałami wysokiej jakości i najnowszą technologią,
sprawiają, że latarka jest wyjątkowym i absolutnie
niezbędnym przedmiotem w nurkowaniu
bezdechowym i w łowiectwie podwodnym.
Prostota formy i mały rozmiar sprawiają, że można ją
łatwo zaczepić o jakąkolwiek część sprzętu,
ograniczając do minimum zajmowaną przestrzeń.
Latarka SUNRISE została zaprojektowana do
użytkowania w nurkowaniu bezdechowym, ale nadaję
się świetnie również do nurkowania z butlami.
Wiązka światła jest skoncentrowana dzięki paraboli
typu Recoil System ze światłem odbitym pod kątem
4°. System ten pozwala na uzyskanie wiązki o
maksymalnej intensywności 80 mm o średnicy około
1m między latarką z ścianką do oświetlenia, z
pozostałą wiązką o mniejszej intensywności, z około
0,5 m średnicy. Tworzy się w ten sposób wiązka
świetlna o bardzo wysokiej wydajności, będąca w
stanie oświetlić każdy rów podwodny.
49
Page 50

WAŻNE OSTRZEŻENIA
UWAGA: Przed użyciem latarki SUNRISE należy
przeczytać uważnie niniejszą instrukcję.
UWAGA: Nie kierować latarki SUNRISE stronę
oczu, ani na powietrzu, ani pod wodą.
UWAGA: Upewnić się o ustawieniu wyłącznika w
pozycji zablokowanej podczas transportu tak, aby
uniknąć przypadkowego włączenia.
UWAGA: Upewnić się, że wyciągnęło się baterie
podczas transportu w samolocie.
UWAGA: Podczas wymiany baterii, należy
przestrzegać ich biegunowości.
UWAGA: Używać baterii dobrej jakości.
UWAGA: Nie pozostawiać nigdy latarki
nieużywanej przez dłuższy czas z włożonymi
bateriami.
UWAGA: W okresach, gdy latarka nie jest
użytkowana, należy odkręcić lekko przednią
tulejkę, aby uniknąć jej zablokowania.
OSTRZEŻENIA OGÓLNE
Nie włączać latarki poza wodą.
Nie odkręcać przedniej tulejki pod wodą lub, gdy
jest mokra.
Nie trzymać latarki w pobliżu silnych źródeł ciepła.
Używać zawsze oryginalnych części zamiennych,
przy czynnościach zaprogramowanej i
50
Page 51

niezaprogramowanej konserwacji, włączając
wymianę zespołu LED.
Nie używać baterii w różnym stanie ładowania.
Wyczyścić i smarować okresowo pierścienie
uszczelniające O-rings, używając smaru
silikonowego.
Sprawdzać okresowo stan zużycia pierścieni
uszczelniających i wymienić je w przypadku
zużycia.
CHARAKTERYSTYKI TECHNICZNE
Korpus wykonany z tworzywa ABS o wysokiej
wytrzymałości.
Zespół optyczny ze skoncentrowaną wiązką
Przednia tulejka z gumy przeciwpoślizgowej firmy
Termogomma
Wyłącznik magnetyczny, przesuwny.
1 biały LED o mocy 6200 °K sterowany
odpowiednią elektroniką.
Podwójny pierścień uszczelniający z gumy NBR
dla uszczelnienia połączenia tulejki z korpusem
latarki
Pasek z poliuretanu, łatwo regulowany. Ponadto
został tak zwymiarowany, aby można było go
bezpiecznie odczepić poprzez mocne
pociągnięcie, w przypadku zablokowania latarki w
szczelinie podczas nurkowania.
51
Page 52

CHARAKTERYSTYKI LATARKI SUNRISE LED
Moc
Lumen
LUX
Volt
3 W
210 lm
15000
6 V
Typ baterii
Gniazdo na baterie
Żarówka w
wyposażeniu
Materiał korpusu
Materiał soczewki
Pierścień
uszczelniający O-Ring
Ciężar w powietrzu
Ciężar w powietrzu
Długość
Średnica
Wyłącznik
Zabezpieczenie
wyłącznika
Temperatura ciepła
Wiązka świetlna
Autonomia przy
ciągłym użytkowaniu
AA 1,5 V
Bezpośrednio w korpusie latarki,
przy pomocy odpowiedniego
schematu, którego należy
skrupulatnie przestrzegać.
1 Moc LED 3 W
Tworzywo ABS o wysokiej
wytrzymałości
Poliwęglan
Guma NBR
247 gram z włożonymi 4 bateriami
alkalicznymi
154 gram bez baterii
190 mm
50 mm
Magnetyczny przesuwny
Mechaniczne 1 pozycja OFF i 1
pozycja ON
6,200°K
Skoncentrowana (80 mm średnicy z
długością 1 metra między murem a
źródłem światła)
1200 minut
Autonomia 100%
52
180 minut
Page 53
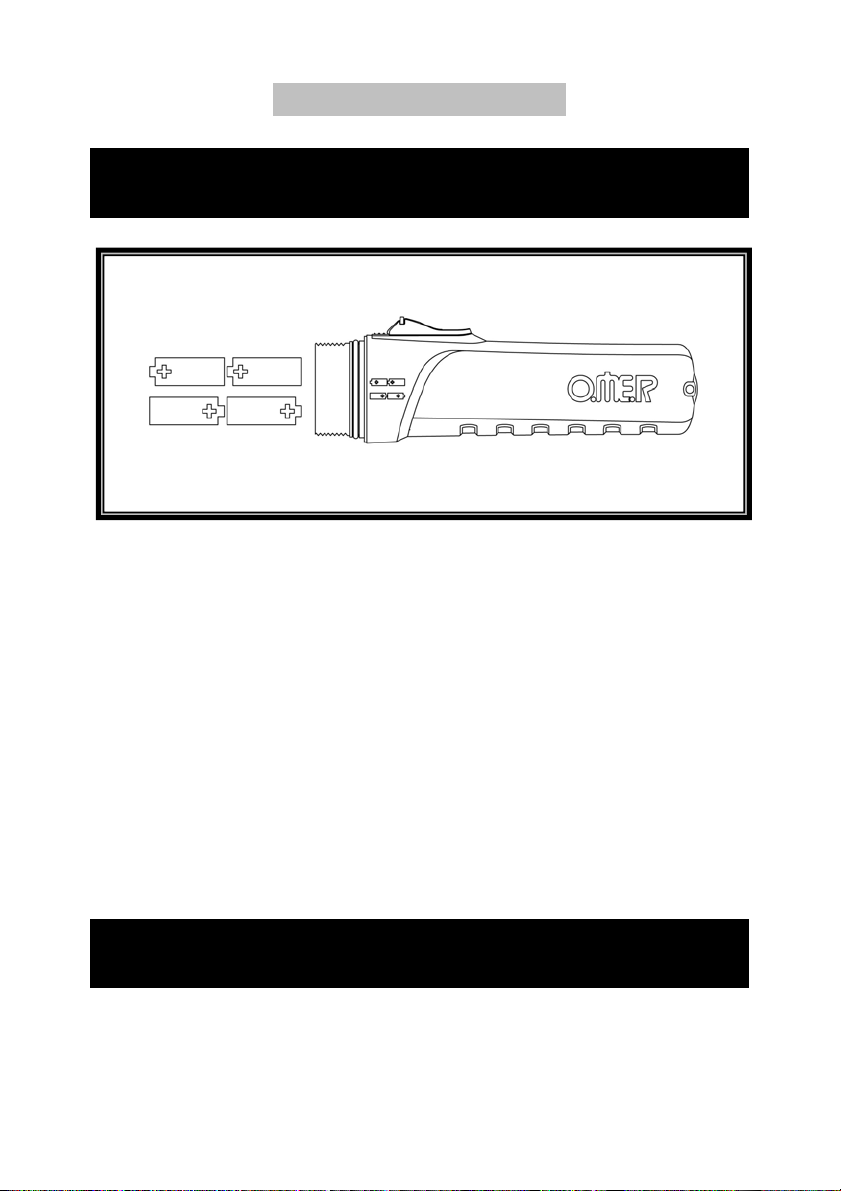
WKŁADANIE BATERII
UWAGA: Należy koniecznie przestrzegać
wskazań biegunowości!
Odkręcić w kierunku przeciwnym do ruchu
wskazówek zegara, przednią tulejkę latarki.
Włożyć baterie, przestrzegając biegunowości (+
lub -) wskazanej na korpusie latarki.
Nasmarować pierścienie uszczelniające O-
Rings cienką warstwą smaru silikonowego.
Zakręcić przednią tulejkę w kierunku zgodnym z
ruchem wskazówek zegara.
Sprawdzić, przy pomocy odpowiedniego
wyłącznika, czy latarka się zapala.
UWAGA: W przypadku błędnego
pozycjonowania baterii (odwrócenie
53
Page 54

biegunowości), może dojść do uszkodzenia
zespołu LED.
KONTROLE PRZED ZANURZENIEM
Jeśli latarka nie była używana przez dłuższy
czas, należy sprawdzić stan baterii, poprzez jej
włączenie.
Sprawdzić idealne zamknięcie korpusu.
Zanurzyć latarkę w wodzie i sprawdzić czy nie
wychodzą z niej pęcherzyki powietrza.
ZALANIE
W przypadku, gdyby do wnętrza latarki dostała się
woda, należy postępować następująco: odkręcić
przednią tulejkę i wyciągnąć baterie, które należy
wyrzucić, wypłukać słodką wodą wewnętrzne części
(również zespół LED) i następnie osuszyć je szmatką
lub suszarką z letnim strumieniem powietrza,
zwracając szczególną uwagę na części mechaniczne.
Usunąć dokładnie z części mechanicznych
ewentualnie powstały tlenek, włożyć nowe baterie i
sprawdzić funkcjonalność latarki SUNRISE.
Jeśli latarka SUNRISE pozostaje przez dłuż
zalana dużą ilością wody, zaleca się przepłukanie
wewnętrznych części słodką wodą, a następnie
zwrócenie się do autoryzowanego serwisu w celu
ewentualnej naprawy.
szy czas
54
Page 55

OGRANICZENIA W UŻYTKOWANIU
Maksymalna głębokość użytkowania wynosi 50
m.
Z powodu wysokiej temperatur osiąganej przez
zespół LED, zaleca się użytkowanie latarki tylko
i wyłącznie pod wodą.
WYMIANA ZESPOŁU LED
Odkręcić przednią tulejkę.
Wyciągnąć stary zespół LED i włożyć nowy,
zwracając uwagę aby wszedł do otworu gniazda
w korpusie latarki.
Włożyć pozostałe części, dokręcić przednią
tulejkę, smarując uprzednio pierścienie
uszczelniające O-ring.
55
Page 56
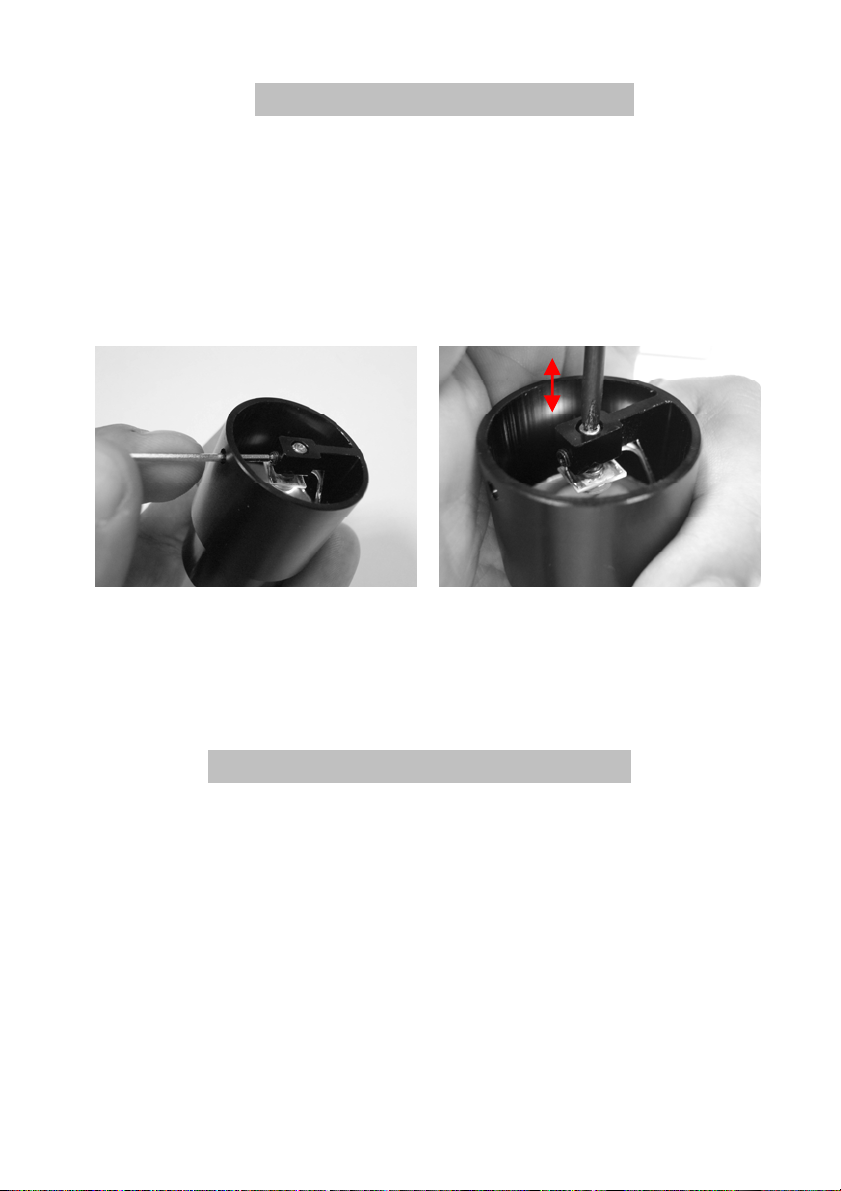
REGULACJA OGNISKA LED
Poluzować gwintowany kołek blokujący, przy
użyciu klucza sześciokątnego będącego w
wyposażeniu.
Przesunąć na zewnątrz lub do wewnątrz LED,
przy pomocy wkrętaka krzyżowego.
Dokręcić gwintowany kołek blokujący, przy
użyciu klucza sześciokątnego będącego w
wyposażeniu.
KONSERWACJA I TRANSPORT
Należy przestrzegać następujących instrukcji:
Transportować zawsze latarkę SUNRISE w torbie,
która będzie chronić przed ewentualnymi
uderzeniami.
Unikać długiego wystawienia na promienie
słoneczne.
56
Page 57

Po zakończeniu nurkowania (w morzu, w jeziorze,
w basenie), wypłukać dokładnie słodką wodą i
osuszyć.
Sprawdzić stan uszczelek (O-Rings), za
każdym razem, gdy otwiera się przednią tulejkę.
Wyczyścić i nasmarować smarem silikonowym
otwierane części.
Zaleca się coroczny przegląd latarki w
autoryzowanym serwisie
.
WARUNKI GWARANCJI
Wszystkie produkty firmy OMER posiadają gwarancję
na wady materiału i na wykonanie, na okres dwóch
lat od daty zakupu.
Niniejsza gwarancja nie pokrywa szkód
spowodowanych:
Użytkowaniem w nieprawidłowy i nieodpowiedni
sposób.
Modyfikacją lub naprawami wykonanymi przez
nieautoryzowany personel.
Przypadkowymi i naturalnymi zdarzeniami.
Użytkowaniem w wodach z wysoką zawartością
chloru lub zanieczyszczonych.
Użytkowaniem w płynach innych niż woda.
Przedłużonym wystawieniem na promienie
słoneczne lub na intensywne źródła ciepła.
57
Page 58

Firma OMER zrzeka się jakiejkolwiek
odpowiedzialności za szkody spowodowane przez
użytkownika w wyniku nieprawidłowego
użytkowania sprzętu.
Dotyczy to również szkód bezpośrednich i
pośrednich, jakiejkolwiek natury, spowodowanych
przez osoby lub rzeczy podczas ewentualnych
okresów nieużytkowania produktu lub przez
nieprawidłowe użytkowanie produktu.
58
Page 59

ZAKLAMP LED SUNRISE
Wij feliciteren u met de aankoop van de zaklamp LED
SUNRISE van OMER. Deze zaklamp is het resultaat
van een technologische groei die gerijpt is door jaren
van ervaring in de sector van de onderwatervissport.
De flexibiliteit van het gebruik, de functionaliteit
gepaard aan materialen van hoge kwaliteit en de
technologie waarmee hij is ontwikkeld, maken van
deze zaklamp een absoluut uniek en onmisbaar
voorwerp voor apneuduiken en onderwatervissen.
Dankzij de simpele vorm en de handige verhoudingen
kan hij gemakkelijk een plaats vinden en aangehaakt
worden aan ieder stuk van de uitrusting, waardoor hij
weinig ruimte in beslag neemt. De zaklamp SUNRISE
is ontworpen voor het gebruik in apneu, maar past
zich ook prima aan voor sportduiken met aqualong.
De lichtstraal is geconcentreerd dankzij een parabool
type Recoil System met omgekeerd licht ontworpen
met een hoek van 4°. Dit systeem maakt het mogelijk
om een straal te verkrijgen met een maximum
intensiteit van 80 mm diameter op circa 1 mt tussen
lamp en te verlichten wand, met een resterende
buitenring van lagere intensiteit van circa 0,5 mt
diameter. Op deze manier wordt een lichtstraal
gecreëerd met uiterst hoge opbrengst, in staat om
diep in iedere onderwatergrot binnen te dringen.
59
Page 60

BELANGRIJKE WAARSCHUWINGEN
LET OP: Lees zorgvuldig deze gebruiksaanwijzing
voordat men de SUNRISE gebruikt.
LET OP: Richt de SUNRISE niet op uw ogen of op
de ogen van anderen, noch boven, noch onder
water.
LET OP: Controleer dat de schakelaar is
geblokkeerd tijdens het vervoer om onopzettelijk
inschakelen te voorkomen.
LET OP: Haal de batterijen er uit tijdens vervoer
per vliegtuig.
LET OP: Let bij het verwisselen van de batterijen
op de polariteit.
LET OP: Gebruik batterijen van de beste kwaliteit.
LET OP: Laat de zaklamp nooit lange tijd
ongebruikt liggen met de batterijen erin.
LET OP: In de periodes dat men de lamp niet
gebruikt, de frontale bevestigingsring een beetje
losser draaien om de blokkering ervan te
voorkomen.
ALGEMENE WAARSCHUWINGEN
Houd de lamp niet aan buiten het water.
Draai de frontale bevestigingsring niet los tijdens
een duik of als hij nat is.
Houd de zaklamp niet dichtbij bronnen van zeer
grote hitte.
60
Page 61

Gebruik altijd originele onderdelen voor eventueel
gewoon of buitengewoon onderhoud, met inbegrip
van de vervanging van de LED-groep
Gebruik geen batterijen met een verschillende
ladingstoestand.
Reinig en smeer de O-ringen geregeld met
siliconenvet.
Controleer geregeld de slijtage van de O-ringen en
vervang ze indien ze versleten zijn.
TECHNISCHE KENMERKEN
Structuur vervaardigd van hoogresistent ABS.
Optische groep met geconcentreerde straal.
Frontale bevestigingsring bekleed met thermisch
antislip rubber.
Magnetische schuifbare schakelaar
N°1 LED met wit vermogen 6200 °K bestuurd
door specifieke elektronica.
Dubbele O-ring van NBR voor de waterdichtheid
tussen de bevestigingsring en de structuur van de
zaklamp
Ring gemaakt van polyurethaan is gemakkelijk
afstelbaar. Hij is verder zo vormgegeven dat hij
zich absoluut veilig loskoppelt bij te sterke tractie
wanneer hij vast blijft zitten in een grot tijdens de
fase van opstijgen.
61
Page 62

V
KENMERKEN SUNRISE LED
Vermogen
Lumen
LUX
olt
Type batterijen
Formaat AA 1,5 V
3 W
210 lm
15000
6 V
Rechtstreeks in de zaklamp
Behuizing batterijen
volgens het schema dat
nauwkeurig opgevolgd moet
worden.
Bijgeleverd lampje
1 Power LED 3 W
Materiaal structuur
Materiaal lenzen
O-Ring
Gewicht in de lucht
Gewicht in de lucht
Lengte
Diameter
Schakelaar
Veiligheidsblokkering
op schakelaar
Temperatuur warmte
Lichtstraal
Autonomie bij continu
gebruik
Autonomie op 100%
Hoogresistent ABS.
Polycarbonaat
NBR
247 gram met 4 ingevoegde alkaline
batterijen
154 gram zonder batterijen
190 mm
50 mm
Magnetische schuifbare
Mechanisch1 positie OFF en 1
positie ON
6200°K
Geconcentreerd (80 mm diameter
op 1 meter afstand tussen muur en
lichtbron)
1200 minuten
180 minuten
62
Page 63
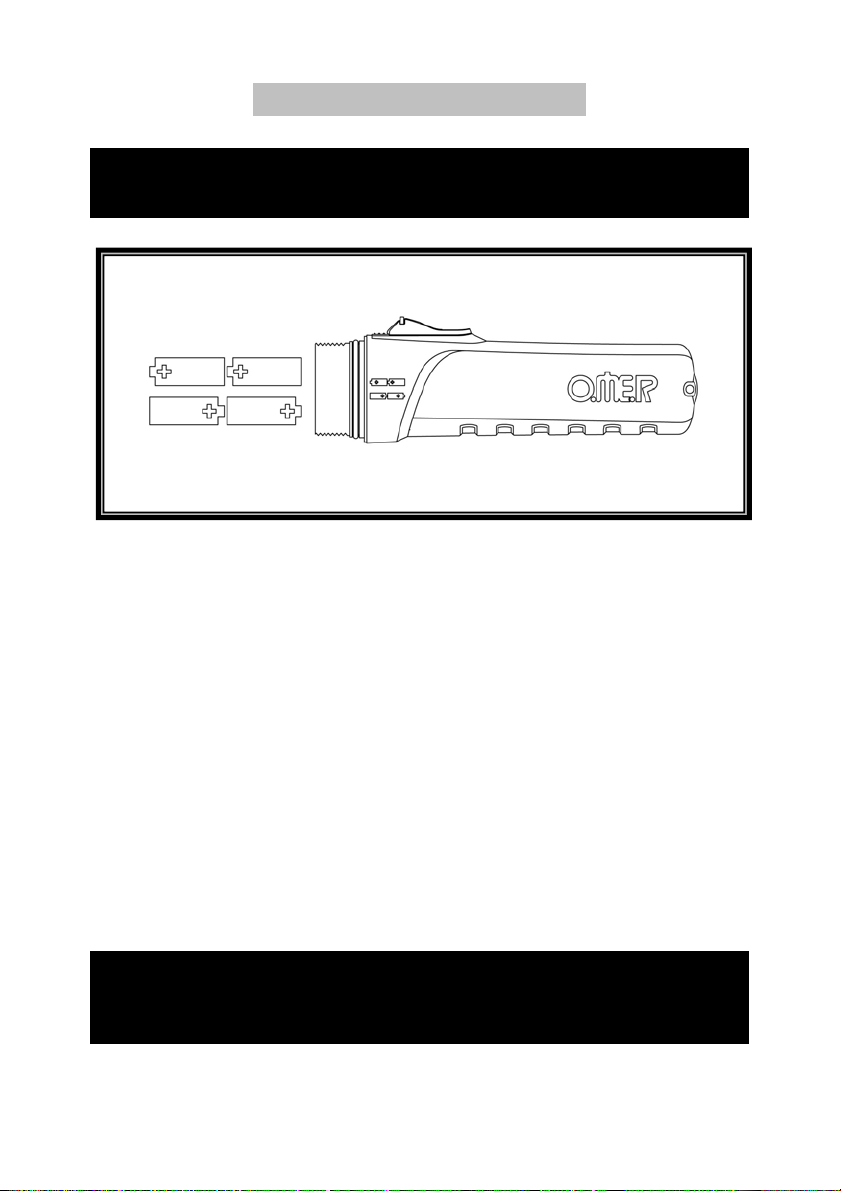
INVOEGEN BATTERIJEN
LET OP: De polariteitsrichting van de batterijen
moet absoluut worden gerespecteerd!
Draai de frontale bevestigingsring van de
zaklamp tegen de wijzers van de klok in los.
Voeg de batterijen in volgens de
polariteitsrichting (+ of -) aangegeven op de
zaklamp zelf.
Smeer de O-houd-ringen met een dun laagje
siliconenvet.
Draai de frontale bevestigingsring erop met de
wijzers van de klok mee.
Controleer dat de zaklamp aangaat met de
daartoe bestemde schakelaar.
LET OP: Als de batterijen verkeerd zijn geplaatst
(omkering van de polariteit) kan de LED-groep
beschadigen.
63
Page 64

CONTROLEMODALITEIT VOOR DE DUIK
Als de zaklamp niet recent is gebruikt,
controleer dan de toestand van de batterijen
door hem aan te doen.
Controleer of de zaklamp zelf perfect dicht is.
Controleer onder water of er geen bellen blijven
komen uit de zaklamp zelf.
BINNENDRINGING VAN WATER
Als er toch water in de zaklamp is gekomen moet men
als volgt te werk gaan: Draai de frontale
bevestigingsring los en verwijder de batterijen, deze
zijn niet meer bruikbaar; spoel met zoet water de
binnendelen (ook de LED-groep) en droog ze
vervolgens af met een doek en met een lauwe föhn,
behandel de mechanische delen voorzichtig.
Verwijder zorgvuldig eventuele oxidatie die zich op de
metalen delen heeft gevormd, voeg nieuwe batterijen
in en controleer of de SUNRISE functioneert.
Als de SUNRISE lange tijd een aanzienlijke
hoeveelheid water in zich heeft gehad, is het toch
aangeraden om de binnendelen te spoelen met zoet
water, maar daarna dient u zich te wenden tot een
geautoriseerd servicecentrum voor eventuele
reparaties.
64
Page 65

GEBRUIKSBEPERKINGEN
De maximale operatieve diepte is 50 m.
Omdat de LED-groep zeer hoge temperaturen
bereikt is het aan te raden deze uitsluitend en
alleen onder water te gebruiken.
VERVANGING VAN DE LED-GROEP
Haal de frontale bevestigingsring los.
Haal de te vervangen LED-groep eruit en voeg
de nieuwe in, let er op dat de deze samenvalt
met het behuizingsgat in de zaklamp zelf.
Voeg alles er weer in, draai de frontale
bevestigingsring aan, en smeer de O-houdringen.
65
Page 66
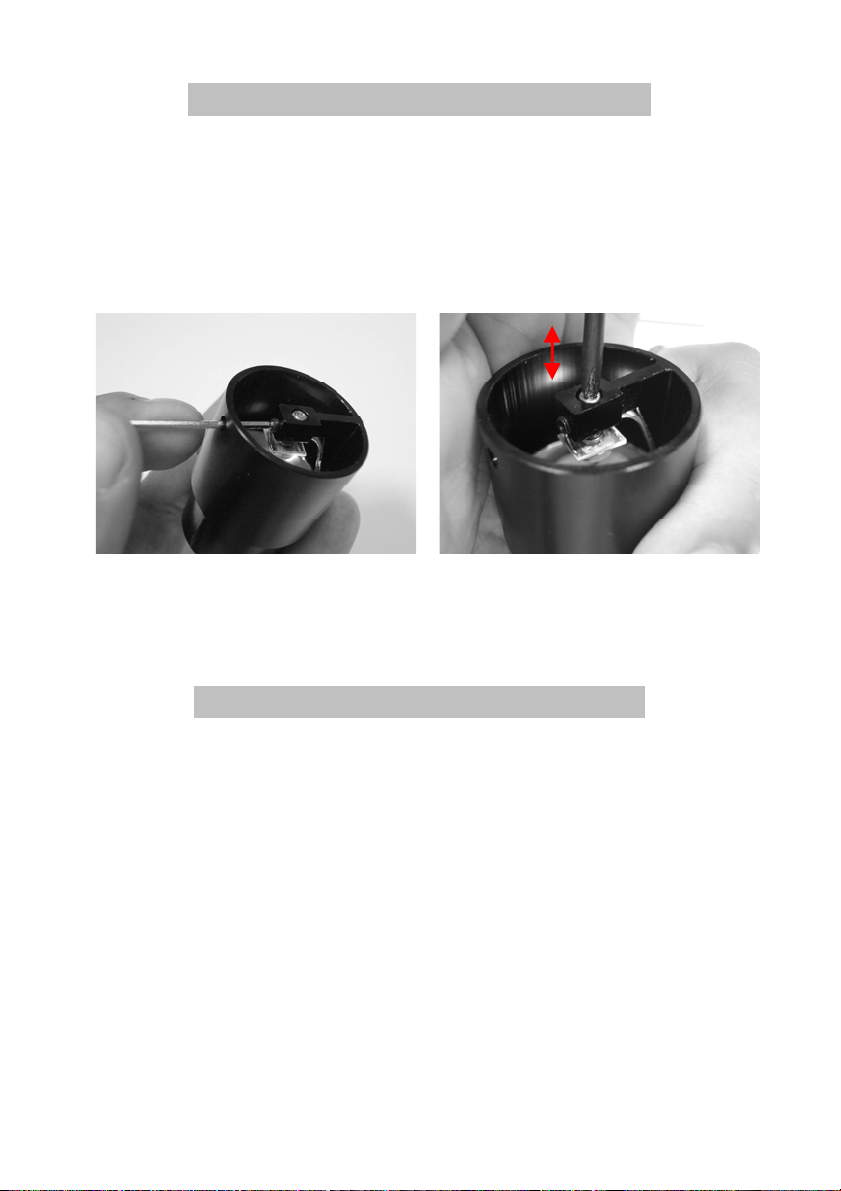
FOCUS-AFSTELLING VAN DE LED
Maak de stelschroef losser met de
meegeleverde inbussleutel.
Beweeg de LED naar buiten of naar binnen
met een kruiskopschroevendraaier.
Zet de stelschroef vast met de meegeleverde
inbussleutel.
VERPLAATSING EN TRANSPORT
Het is belangrijk dat men zich aan de volgende
instructies houdt:
Vervoer de SUNRISE altijd in een tas die tegen
eventuele botsingen beschermt.
Vermijd langdurige blootstelling aan zonnestraling.
Na iedere duik (zee, meer of zwembad) altijd
afspoelen met zoet water en drogen.
66
Page 67

Controleer de toestand van de pakkingen (O-
ringen) elke keer dat men de frontale
bevestigingsring heeft geopend
Reinig en smeer de onderdelen die met de
opening te maken hebben met siliconenvet.
Aangeraden wordt om het product jaarlijks te laten
nakijken door een geautoriseerd centrum.
GARANTIEVOORWAARDEN
Alle Omer producten worden gegarandeerd voor
materiaalfouten en op de bewerking voor een
periode van twee jaar vanaf de aankoopdatum.
Deze garantie dekt geen schade te wijten aan:
Oneigenlijk of onjuist gebruik.
Modificaties of reparatie, uitgevoerd door niet
geautoriseerd personeel.
Ongelukken of natuurlijke gebeurtenissen.
Gebruik in water dat veel chloor bevat of
verontreinigd is.
Gebruik in andere vloeistoffen dan water.
Langdurige blootstelling aan zonnestralen of
intense hittebronnen.
OMER wijst elke aansprakelijkheid af voor
schade veroorzaakt aan de gebruiker ten
gevolge van oneigenlijk gebruik van de
uitrusting.
67
Page 68

Dit geldt ook voor directe of indirecte schade
van welke aard dan ook, veroorzaakt aan
personen of voorwerpen te wijten aan eventuele
periodes van niet gebruik van het product of
oneigenlijk gebruik ervan.
68
Page 69

SUNRISE LED BÚVÁRLÁMPA
Gratulálunk az OMER SUNRISE LED búvárlámpa
megvásárlásához! Ez a búvárlámpa annak a
technológiai fejlődésnek az eredménye, amely a víz
alatti horgászat szektorban következett be több év
tapasztalatainak eredményeképpen. A sokoldalúság,
a célnak tökéletesen megfelelő, csúcsminőségű
anyagok és a kivitelezési technológia olyan
egyedülállóvá teszik a búvárlámpát, hogy az
elengedhetetlen tartozékává válik a szabadtüdős
merülésnek és a víz alatti horgászatnak.
A búvárlámpa alakja egyszerűsége és visszafogott
méretei miatt bárhová könnyen elhelyezhető és
bármilyen eszközre felakasztható, a lehető legkisebb
helyet foglalva el. A SUNRISE búvárlámpát
szabadtüdős merüléshez tervezték, de tökéletesen
megfelel az oxigénpalackos sportbúvárkodáshoz is.
A fénynyaláb a 4° szögbeállítású, inverz fényű Recoil
System típusú parabolának köszönhetően koncentrált
típusú. Ez a rendszer lehetővé teszi, hogy a
maximális intenzitású fénynyaláb átmérője 80 mm
legyen a búvárlámpa és a megvilágítandó fal közötti 1
méter távolságból. A kisebb intenzitású perifériás
korona átmérője kb. 0,5 mm. Ennek köszönhetően
fényes és rendkívül nagyteljesítményű fénynyaláb
keletkezik, mely bármilyen víz alatti üregbe képes
behatolni.
69
Page 70

FONTOS FIGYELMEZTETÉSEK
FIGYELEM: A SUNRISE búvárlámpa használata előtt
gondosan olvassa el a használati utasítást!
FIGYELEM: Ne irányítsa a SUNRISE búvárlámpát
saját vagy mások szeméhez, se a szárazföldön, se a
víz alatt.
FIGYELEM: Győződjön meg arról, hogy szállítás
közben a búvárlámpa kapcsolója blokkolt helyzetben
van, hogy a lámpa ne tudjon magától bekapcsolni.
FIGYELEM: Repülőgépen történő szállítás előtt
győződjön meg arról, hogy a búvárlámpából kivette
az elemeket.
FIGYELEM: Elemcsere közben ne feledkezzen meg
arról, hogy az elemeket a polaritások
figyelembevételével kell behelyezni.
FIGYELEM: Kiváló minőségű elemeket használjon.
FIGYELEM: A használaton kívüli búvárlámpában ne
hagyja sokáig az elemeket.
FIGYELEM: Amikor a búvárlámpa használaton kívül
van, tartsa enyhén kicsavarva az elülső gyűrűt, hogy
az ne szorulhasson be.
ÁLTALÁNOS FIGYELMEZTETÉSEK
A bekapcsolt állapotban lévő búvárlámpát ne tartsa
ki a vízből.
Ne csavarja ki a búvárlámpán lévő elülső gyűrűt,
ha a lámpa víz alatt van vagy vizes.
70
Page 71

Ne tartsa a búvárlámpát nagyon forró
hőforrásokhoz.
Az esetleges normál és rendkívüli karbantartási
munkálatok elvégzéséhez mindig eredeti
alkatrészeket használjon, ez a LED egység
cseréjére is vonatkozik.
Ne használjon különböző töltöttségi állapotban
lévő elemeket.
Rendszeresen tisztítsa meg az O-gyűrűket,
valamint kenje azokat szilikonzsírral.
Rendszeresen ellenőrizze az O-gyűrűk kopottságát,
ha elhasználódtak, cserélje azokat le.
MŰSZAKI SAJÁTOSSÁGOK
Magas ellenállású ABS anyagból készült test.
Koncentrált fénynyalábot adó optikai egység.
Csúszásmentes thermo-gumival bevont elülső
gyűrű.
Csúsztatható, mágneses típusú kapcsoló.
Elektronikus vezérlésű, 6200 K színhőmérsékletű,
fehér fényű, csúcsminőségű LED lámpa.
NBR O-gyűrű, mely biztosítja a hermetikus
záródást a gyűrű és a lámpatest között.
Könnyen állítható poliuretán rögzítőpánt. Úgy lett
megtervezve, hogy teljes biztonsággal kiakadjon
olyan erős rántás esetén, mely akkor következik
be, ha a búvárlámpa súlyosan beszorul egy
üregbe felszínre emelkedés közben.
71
Page 72

CARATTERISTICHE SUNRISE LED
g
Teljesítmény
Lumen
LUX
Volt
3 W
210 lm
15000
6 V
Elemtípus
Elemek elhelyezése
Forgó lámpa
Lámpatest anyag
Lencse anyag
O-gyűrű
Súly a levegőben
Súly a levegőben
Hosszúsá
Átmérő
Kapcsoló
Kapcsoló biztonság
Színhőmérséklet
Fénynyaláb
Autonómia folyamatos
használat közben
AA méret, 1,5 V
Közvetlenül a lámpatestbe a
megfelelő ábra alapján, melynek
utasításait pontosan követni kell.
1 Power LED 3 W
Magas ellenállású ABS
Polikarbonát
NBR
247 gramm, a behelyezett 4 db
alkáli elemmel együtt
154 gramm elemek nélkül
190 mm
50 mm
Csúsztatható mágneskapcsoló
Mechanikus, 1 OFF pozíció és 1 ON
pozíció
6 200°K
Koncentrált (a fal és a kivilágítandó
forrás között 1 méter távolságból 80
mm átmérőjű)
1200 perc
100%-os autonómia
72
180 perc
Page 73
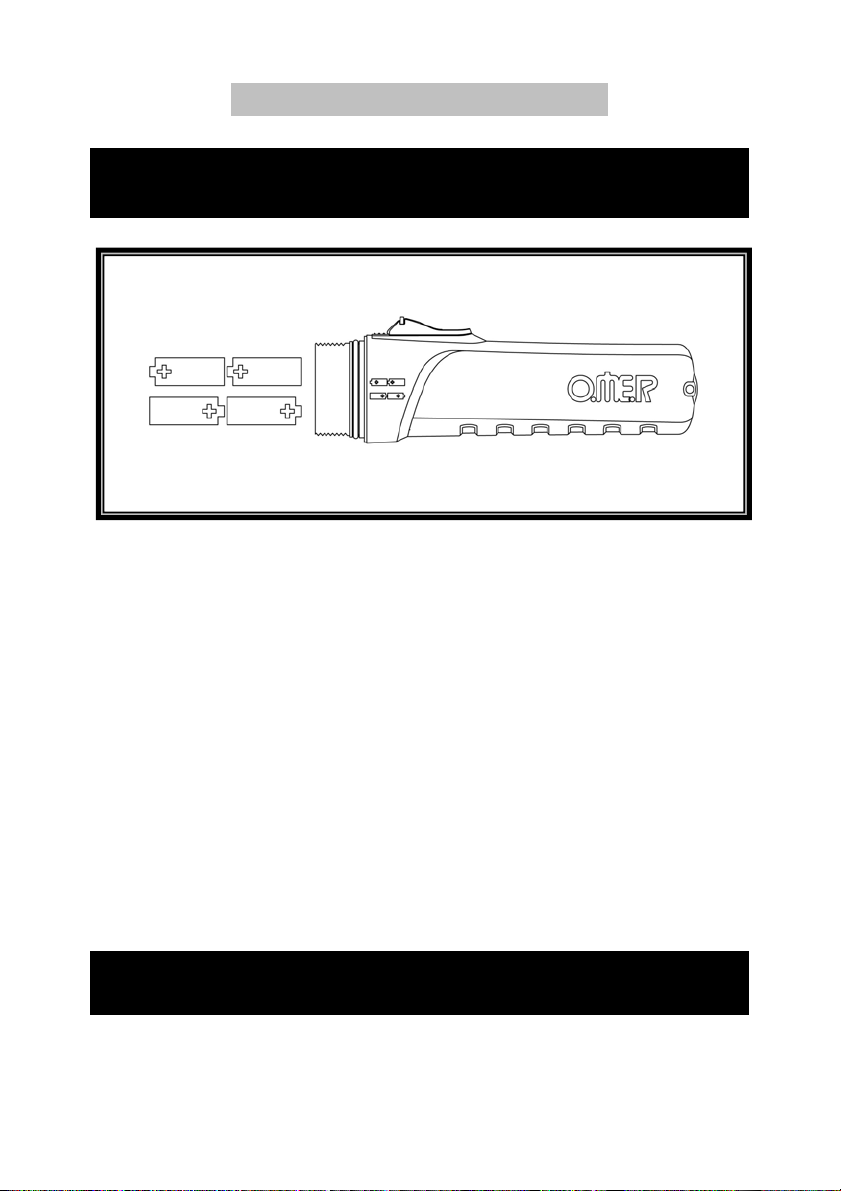
AZ ELEMEK BEHELYEZÉSE
FIGYELEM: Szigorúan tartsa be a polaritásokkal
kapcsolatos utasítást!
Csavarja ki a búvárlámpa elülső gyűrűjét az
óramutató járásával ellentétes irányban.
Helyezze be az elemeket a lámpatesten
feltüntetett polaritások (+ vagy -)
figyelembevételével.
Szilikonzsírral vékonyan kenje be a tömítő O-
gyűrűket.
Csavarja be az elülső gyűrűt az óramutató
járásával megegyező irányban.
A megfelelő kapcsolón keresztül ellenőrizze,
hogy bekapcsol-e a búvárlámpa.
FIGYELEM: Az elemek helytelen behelyezése esetén
(polaritások felcserélése) megsérülhet a LED egység.
73
Page 74

MERÜLÉS ELŐTTI ELLENŐRZÉS
Amennyiben a lámpát hosszú ideig nem
használták, ellenőrizze az elemek állapotát.
Ehhez próbálja bekapcsolni a lámpát.
Ellenőrizze a test tökéletes zárását.
Miután a lámpa vízbe merült, ellenőrizze, hogy
nem távoznak-e folyamatosan buborékok a
lámpatestből.
VÍZBEFOLYÁS
Ha víz folyik be a lámpatestbe, a következőképpen
járjon el: csavarja ki az elülső gyűrűt és távolítsa el
az elemeket, melyek a továbbiakban már nem
használhatók; édesvízzel öblítse le a belső
részeket (a LED egységet is), majd szárítsa meg
azokat egy ruhával és egy langyos levegőt fújó
hajszárítóval. Fokozottan ügyeljen a mechanikus
részekre. Gondosan tisztítsa meg a fém részeket
az esetlegesen formálódott oxidoktól, helyezze be
az új elemeket, majd próbálja ki, hogy működik-e a
SUNRISE lámpa.
Ha a SUNRISE lámpa belsejében hosszú ideig víz
marad, öblítse ki azt édesvízzel, de utána forduljon
egy felhatalmazott szakszervizhez az esetleges
javítások elvégzéséhez.
74
Page 75

MŰKÖDTETÉSI HATÁROK
A legnagyobb megengedett működtetési
mélység 50 méter.
A LED egység magas hőmérsékleteket ér el,
ezért a búvárlámpát csak és kizárólag víz alatt
tanácsos használni.
A LED EGYSÉG CSERÉJE
Csavarja ki az elülső gyűrűt.
Távolítsa el a cserélni kívánt LED egységet és
helyezze be az újat. Eközben figyeljen arra,
hogy az egység illeszkedjen a lámpatesten lévő
nyíláshoz.
Mindent helyezzen vissza a lámpába, majd
kenje meg a tömítő O-gyűrűket és csavarja
vissza az elülső gyűrűt.
75
Page 76
A LED LÁMPA FÓKUSZÁLÁSA
A mellékelt imbuszkulcs segítségével csavarja
ki a rögzítő hernyócsavart.
Egy keresztcsavarhúzó segítségével
mozgassa befelé és kifelé a LED lámpát.
A mellékelt imbuszkulcs segítségével szorítsa
meg a rögzítő hernyócsavart.
TISZTÍTÁS ÉS SZÁLLÍTÁS
Fontos az alábbi utasítások betartása:
A SUNRISE búvárlámpát mindig olyan táskában
szállítsa, mely megvédi azt az esetleges
ütődésektől.
Ne tegye ki a lámpát hosszú ideig a napfénynek.
Minden merülés végén (tenger, tó vagy medence)
öblítse le a lámpát édesvízzel és szárítsa meg.
76
Page 77

Minden alkalommal, mikor az elülső gyűrű
kinyitására kerül sor, ellenőrizze a tömítő O-gyűrűk
állapotát.
Kinyitáskor kenje meg az érintett részeket
szilikonzsírral.
Ajánlatos a terméket minden évben ellenőriztetni
egy felhatalmazott szakszervizben.
GARANCIÁLIS FELTÉTELEK
Minden OMER termékre a vásárlástól számítva 2 év
garancia van az anyag- és gyártási hibamentességre
vonatkozóan.
A garancia nem érvényes az alábbi esetekben
bekövetkezett károk esetén:
Nem megfelelő vagy helytelen használat.
Nem felhatalmazott személyek által elvégzett
módosítások vagy javítások.
Balesetek vagy természeti katasztrófák.
Klórral teli vagy szennyezett vízben történt
használat.
A víztől eltérő folyadékban történt használat.
Hosszú idejű kitettség napfénynek vagy intenzív
hőforrásnak.
Az OMER nem tekinthető felelősnek olyan
balesetekkel kapcsolatban, melyek a termék
helytelen használata miatt érik a felhasználót.
77
Page 78

A gyártót nem terheli felelősség abban az esetben
sem, ha a termék nem megfelelő használata vagy
hosszú ideig tartó használatlansága miatt
bármilyen természetű, közvetlen vagy közvetett
személyi sérülés vagy dologi kár következik be.
78
Page 79

LED BATERKA SUNRISE
Blahopřejeme k zakoupení LED baterky SUNRISE
značky OMER. Tato baterka je výsledkem
technologického vývoje a letité zkušenosti v oblasti
podmořského rybolovu. Všestranné použití, její
funkčnost v kombinaci s vysoce kvalitními materiály a
technologií, se kterou byla baterka koncipována, z ní
dělá naprosto jedinečný a nepostradatelný objekt pro
volné potápění a podmořský rybolov.
Jednoduchost tvaru a rozměrové proporce usnadňují
umístění a propojení baterky na jakákoli jiná zařízení
s tím, že je zatěžuje jen minimálně. Baterka
SUNRISE je určena pro použití v apnoe (ve volném
potápění), ale je optimálně vhodná i pro sportovní
potápění pomocí dýchacího přístroje.
Díky parabole odrážecího typu Recoil System
s inverzním světlem projektovaným pod úhlem 4 ° je
svazek světelných paprsků koncentrovaný. Takovýto
systém umožňuje získat světelný paprsek o průměru
80 mm s maximální intenzitou ve vzdálenosti mezi
baterkou a osvětlenou stěnou okolo 1 m a se
zbývající obvodovou korunou nižší intenzity světla o
průměru asi 0,5 metru. Může tedy vytvořit světelný
paprsek s velmi vysokou účinností, schopný
proniknout do hloubky jakékoli submersní díry.
79
Page 80

DŮLEŽITÁ UPOZORNĚNÍ
POZOR: Před použitím SUNRISE si pozorně
přečtěte tento návod.
POZOR: Nemiřte SUNRISE na vlastní oči nebo na
očích ostatních, a to jak na povrchu, tak i v
průběhu ponoru.
POZOR: Ujistěte se, že spínač je v poloze blokace
tak, aby se během přepravy zabránilo náhodnému
rozsvícení.
POZOR: Ujistěte se, že baterie jsou během letecké
přepravy odstraněny.
POZOR: Při výměně baterií nezapomeňte
respektovat stejnou polaritu.
POZOR: Používejte kvalitní baterie.
POZOR: Nikdy nenechávejte baterie vložené do
baterky, pokud ji nebudete používat na delší dobu.
POZOR: Během období, kdy baterku nepoužíváte,
lehce povolte přední kroužek tak, aby se zabránilo
jejímu zablokování.
VŠEOBECNÁ UPOZORNĚNÍ
Nedržte baterku zapnutou nad vodou.
Přední kroužek baterky neodšroubujte pod vodou,
anebo když je mokrá.
Nevystavit baterku v blízkosti extrémních zdrojů
tepla.
80
Page 81

Vždy používejte originální náhradní díly pro
případné úkony běžné i mimořádné údržby, včetně
výměny skupiny LED.
Nepoužívejte baterie různých stupňů nabití.
Pravidelně čistěte a promázněte O-kroužky
silikonovým mazivem.
Pravidelně kontrolujte stav opotřebení O-kroužků a
vyměňte je v případě zjevného opotřebení.
TECHNICKÉ PARAMETRY
Těleso je vyrobeno z vysoko-pevnostního ABS
materiálu.
Optická sestava s koncentrovaným světelným
paprskem.
Přední kroužek protiskluzově tepelně pogumovaný.
Magneticko-klouzavý spínač.
1 LED o výkonu bílá 6200 °K, řízena speciální
elektronikou.
Dvojitý O-kroužek z nitrilu butadien-kaučuku pro
těsnění mezi kroužkem a tělesem baterky
Snadno nastavitelný pás z polyuretanu. A
dimenzován tak, aby byl velmi bezpečně odpojen
při silném tažení, způsobeno zachycením baterky
v dutině během potápění.
81
Page 82

y
CHARAKTERISTIKY LED SUNRISE
Výkon:
Světelný tok
Intenzita osvětlení
Napětí
Typ baterie
Formát AA 1,5 V
3 W
210 lm
15000 lx
6 V
Přímo do tělesa baterky
Umístění baterie
prostřednictvím zvláštního
schématu, které musí být
dodržováno.
Otáčecí žárovka
Materiál tělesa
Materiál čočk
O-kroužek
Hmotnost
Hmotnost
Délka
Průměr
Spínač
Bezpečnost spínače
Teplota
Svazek světelných
paprsků
Životnost baterie při
trvalém užívání
Baterie 100%
Mechanická 1 poloha OFF a poloha
Soustředěný (průměr 80 mm na 1
1 Power LED 3 W
Vysoko-pevnostní ABS
Polykarbonát
Nitril butadien-kaučuk
247 g se 4 alkalickými bateriemi
154 g bez baterie
190 mm
50 mm
Magnetický, klouzavý
ON
6200°K
metr vzdálenosti mezi stěnou a
zdroj osvětlení)
1200 minut
180 minut
82
Page 83
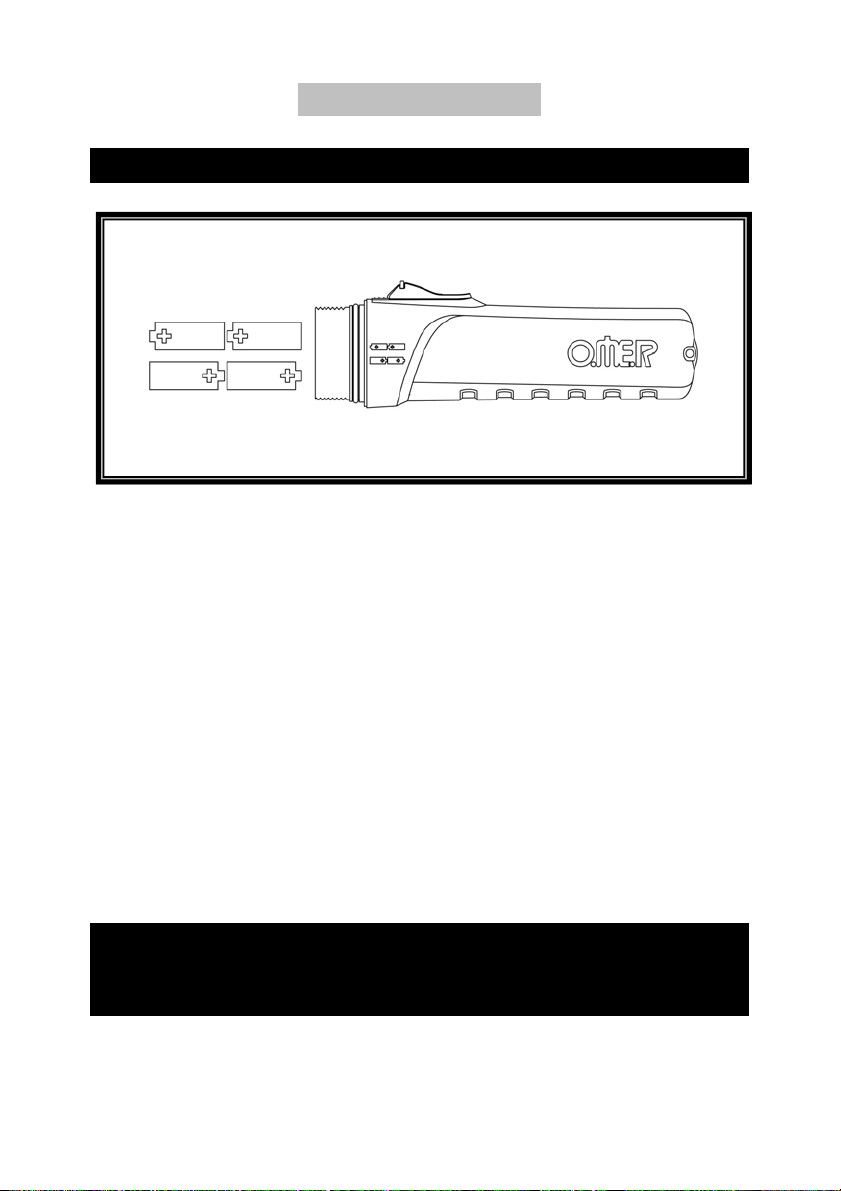
VLOŽENÍ BATERIÍ
POZOR: Absolutně respektovat značení polarity!
Odšroubujte přední kroužek baterky v opačném
směru hodinových ručiček.
Vložte baterie podle označení polarity (+ nebo -)
vyznačené na tělesu baterky.
Namažte těsnicí O-kroužky tenkou vrstvou
silikonového maziva.
Zašroubujte přední kroužek ve směru
hodinových ručiček.
Zkontrolujte zapínání baterky pomocí
příslušného spínače.
POZOR: V případě nesprávného umístění baterie
(reverse polarity), může dojít k poškození sestavy
LED.
83
Page 84

REŽIM KONTROLY PŘED POTÁPĚNÍM
Pokud jste baterku v poslední době nepoužíval,
zkontrolujte stav baterie rozsvícením.
Zkontrolujte dokonalost uzavření tělesa.
Jakmile se dostanete k vodě, zkontrolujte
přítomnost bublin unikajících z tělesa baterky.
ZAPLAVENÍ
Pokud by se voda dostala dovnitř tělesa baterky, je
nutné postupovat následovně: odšroubujte přední
kroužek a vyjměte baterie, nejsou již k použití;
opláchněte čistou vodou vnitřní plochy (včetně
sestavy LED), a pak je osušte utěrkou a proudem
vlažného vzduchu, věnujte zvláštní pozornost
mechanickým dílům. Opatrně odstraňte případný
oxid, který se může tvořit na kovových částech,
vložte nové baterie a proveďte test funkčnosti
baterky SUNRISE.
Pokud podstatné množství vody zůstane uvnitř
baterky SUNRISE delší dobu, je doporučeno
vypláchnout vnitřní části čistou vodou, ale pak se
obraťte na autorizované servisní středisko pro
případné opravy.
84
Page 85

OMEZENÍ POUŽITÍ
Maximální operační hloubka je 50 m.
Vzhledem k vysokým teplotám, kterých
dosahuje sestava LED, je doporučeno použít
baterku pouze a výhradně v podvodním
prostředí.
VÝMĚNA SESTAVY LED
Odšroubujte přední kroužek.
Odstraňte sestavu LED, která se má nahradit, a
vložte novou, dávejte pozor, aby odpovídala
otvoru uložení v tělese baterky.
Nasaďte všechno, zašroubujte přední
kroužek, ale ještě předtím namastěte těsnicí
O-kroužky.
85
Page 86
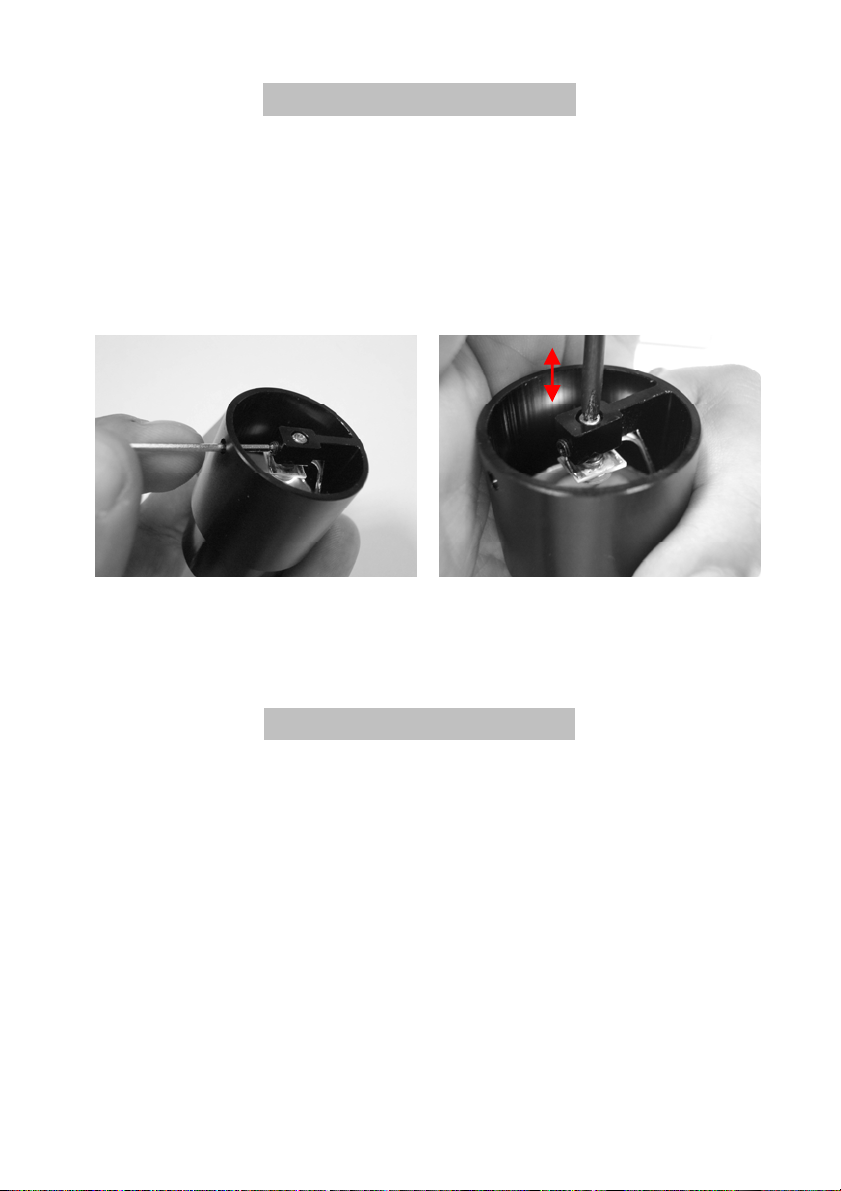
NASTAVENÍ ŽÁRU LED
Povolte zajišťovací šroub pomocí
imbusového klíče.
Pomocí křížového šroubováku posuňte
LED směrem ven nebo dovnitř.
Utáhněte zajišťovací šroub pomocí
imbusového klíče.
ÚDRŽBA A PŘEPRAVA
Je důležité postupovat podle následujících pokynů:
SUNRISE noste vždy uvnitř sáčku tak, aby byl
chráněn před případnými nárazy.
Zabraňte vystavení se dlouhodobému působení
slunečního záření.
Na konci každého ponoru (do moře, jezera či
bazénu) vždy opláchněte baterku čistou vodou a
osušte ji.
86
Page 87

Po každém otevření předního kroužku zkontrolujte
stav těsnění (O-kroužku).
Čistěte a promázněte silikonovým mazivem
veškeré plochy, které se zúčastní otevírání.
Je doporučeno provést roční kontroly výrobku
autorizovaným servisním centrem
.
ZÁRUČNÍ PODMÍNKY
Všechny výrobky OMER mají záruku na vadu
materiálu a zpracování po dobu dvou let od data
nákupu.
Tato záruka se nevztahuje na škody způsobené:
Nevhodným nebo nesprávným používáním.
Změnami nebo opravami provedenými
neoprávněnými osobami.
Náhodnými nebo přírodními událostmi.
Použitím v znečištěných a chlorovaných vodách.
Použitím do jiných kapalin než voda.
Při delším vystavení slunci nebo intenzivnímu teplu.
OMER se zříká jakékoliv odpovědností za škody
způsobené nesprávným použitím zařízení.
Totéž platí pro jakékoli přímé nebo nepřímé škody,
jakéhokoliv druhu způsobené na zdraví nebo na
majetku, které vznikly případně při době použití
výrobku nebo jeho nesprávným použitím.
87
Page 88

LANTERNĂ LED SUNRISE
Vă mulţumim pentru că aţi cumpărat lanterna LED
SUNRISE marca OMER. Această lanternă este
rezultatul unei dezvoltări tehnologice îmbinată cu ani
de experienţă în domeniul pescuitului subacvatic.
Flexibilitatea la utilizare, funcţionalitatea îmbinată cu
materiale de nivel ridicat precum şi tehnologia cu care
a fost concepută, fac ca această lanternă să fie un
obiect absolut unic şi indispensabil pentru apnee şi
pescuitul subacvatic.
Simplitatea formei şi proporţiile limitate fac ca aceasta
să fie uşor de amplasat şi de prins la orice dispozitiv
al echipamentului, limitând la maxim volumul.
Lanterna SUNRISE a fost concepută pentru utilizarea
în stare de apnee, dar se adaptează foarte bine şi la
scufundările sportive cu autorespiraţie.
Raza de lumină este de tip concentrat datorită unei
parabole de tip Recoil System cu lumină inversă
proiectată cu un unghi de 4°. Asemenea sistem
permite obţinerea unei raze cu o intensitate maximă
de 80 mm în diametru la aproximativ 1m între
lanternă şi peretele de luminat, rămânând o coroan
periferică cu intensitate mai mică de aproximativ 0,5
m în diametru. Se crează astfel o rază luminoasă cu
randament ridicat în măsură să pătrundă în
profunzime în orice cavitate submersă.
ă
88
Page 89

AVERTIZĂRI IMPORTANTE
ATENŢIE: Înainte de a utiliza lanterna SUNRISE
citiţi cu atenţie acest manual.
ATENŢIE: Nu îndreptaţi lanterna SUNRISE către
proprii ochi sau către ochii altora, fie în mediu cu
aer fie în timpul scufundării.
ATENŢIE: Asiguraţi-vă că întrerupătorul este
poziţionat în poziţia blocat în timpul fazelor de
transport astfel încât să împiedice aprinderi
nedorite.
ATENŢIE: Asiguraţi-vă că aţi scos bateriile în
timpul transportului în avion.
ATENŢIE: În timpul înlocuirii bateriilor amintiţi-vă
să respectaţi polarităţile acestora.
ATENŢIE: Folosiţi baterii de bună calitate.
ATENŢIE: Nu lăsaţi niciodată lanterna neutilizată
închisă pentru o perioadă lungă cu bateriile
introduse.
ATENŢIE: În perioadele de nefolosire ale lanternei,
lăsaţi inelul frontal uşor deşurubat pentru a evita
blocarea acestuia.
AVERTIZĂRI GENERALE
Nu ţineţi lanterna aprinsă afară din apă.
Nu înşurubaţi inelul frontal al lanternei în timpul
submersiei sau dacă este udă.
Nu ţineţi lanterna aproape de surse de căldură.
89
Page 90

Folosiţi întotdeauna piese de schimb originale
pentru eventualele operaţii de întreţinere curentă şi
extraordinară, inclusiv înlocuirea grupului LED.
Nu utilizaţi baterii cu stări de încărcare diferite.
Curăţaţi şi ungeţi garniturile ORings periodic cu
vaselină siliconică.
Verificaţi periodic starea de uzură a garniturilor
ORings şi înlocuiţi-le în caz de uzură evidentă.
CARACTERISTICI TEHNICE
Corp realizat din ABS cu rezistenţă ridicată.
Grup optic cu rază concentrată.
Inel frontal acoperit în cauciuc termic antiderapant.
Întrerupător de tip magnetic culisant.
Nr.1 LED de putere alb 6200 °K pilotat de o parte
electronică specială.
Dublă ORing din NBR pentru strângere etanş
între inel şi corpul lanternei
Curea realizată din poliuretan uşor de reglat. A
fost de asemenea dimensionată pentru a se putea
desface în deplină siguranţă dacă este trasă cu
putere datorită unei blocări dificile a lanternei întro cavitate în timpul fazei de ridicare la suprafaţă.
90
Page 91

V
Î
CARACTERISTICI SUNRISE LED
Putere
Flux luminos
LUX
olt
Tip baterii
Format AA 1,5 V
3 W
210 lm
15000
6 V
Direct în corpul lanternei cu
Amplasare baterii
ajutorul schemei ce trebuie
respectată întocmai.
Bec
1 Power LED 3 W
Material corp
Material Geam
ORing
Greutatea în aer
Greutatea în aer
Lungime
Diametrul
ntrerupător
Siguranţă pe
întrerupător
Temperatura căldură
Rază luminoasă
Autonomie la utilizarea
continuă
Autonomie la 100%
ABS cu rezistenţă ridicată
Policarbonat
NBR
247 grame cu 4 baterii alcaline
montate
154 grame fără baterii
190 mm
50 mm
Magnetic culisant
Mecanică 1 poziţie OFF şi 1 poziţie
ON
6200°K
Concentrată (80 mm în diametru la
1 metru distanţă între perete şi
sursa de iluminare)
1200 minute
180 minute
91
Page 92
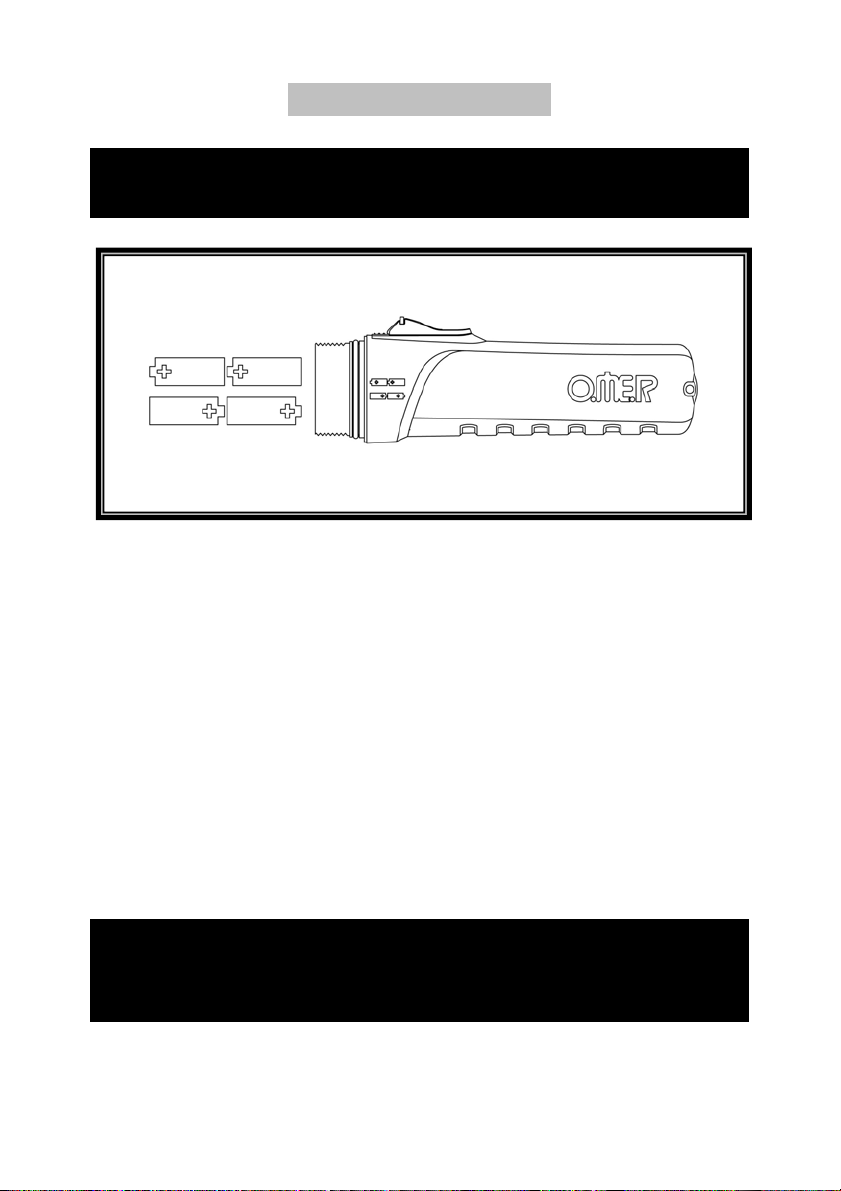
MONTARE BATERII
ATENŢIE: Respectaţi în mod obligatoriu
indicarea polarităţilor!
Deşurubaţi în sens invers acelor de ceasornic
inelul frontal al lanternei.
Introduceţi bateriile urmând indicaţiile de
polaritate (+ sau -) redate pe corpul lanternei.
Ungeţi garniturile ORings de etanşare cu un
strat subţire de vaselină cu silicon.
Înşurubaţi inelul frontal în sensul acelor de
ceasornic.
Verificaţi aprinderea lanternei cu ajutorul
întrerupătorului respectiv.
ATENŢIE: În cazul unei poziţionări greşite a
bateriilor (inversarea polarităţii) este posibilă
deteriorarea grupului LED.
92
Page 93

MODALITĂŢI DE CONTROL ÎNAINTE DE
SCUFUNDARE
Dacă nu a fost utilizată de curând, controlaţi
starea bateriilor efectuând o verificare a
aprinderii.
Controlaţi închiderea perfectă a corpului.
Imediat ce aţi intrat în apă controlaţi dacă nu
sunt prezente bule de aer care ies în mod
continuu din corpul lanternei.
INUNDAREA
În cazul în care a intrat apă la interiorul lanternei
este necesar să procedaţi în modul următor:
deşurubaţi inelul frontal şi scoateţi bateriile, care nu
mai pot fi utilizate; clătiţi cu apă dulce părţile interne
(inclusiv grupul LED) după care uscaţi-le cu o cârpă
şi cu un feon cu aer clăduţ, acordând atenţie
deosebită părţilor mecanice. Îndepărtaţi cu grijă
oxidul format eventual pe părţile metalice,
introduceţi baterii noi şi faceţi o probă de
funcţionare a lanternei SUNRISE.
Dacă lanterna SUNRISE a rămas pentru o perioadă
lungă cu o cantitate de apă considerabilă în
interiorul său, se recomandă oricum clătirea păr
interne cu apă dulce, dar ulterior trebuie să vă
ţilor
93
Page 94

adresaţi unui centru autorizat pentru eventuale
lucrări de reparaţie.
LIMITE DE FOLOSIRE
Adâncimea maximă operaţională este de 50 m.
Datorită temperaturilor ridicate atinse de grupul
LED se recomandă folosirea acesteia numai şi
exclusiv în mediul subacvatic.
ÎNLOCUIREA GRUPULUI LED
Deşurubaţi inelul frontal.
Scoateţi grupul LED care trebuie înlocuit şi
introduceţi-l pe cel nou fiind atenţi să se
potrivească cu orificiul lăcaşului din corpul
lanternei.
Reintroduceţi totul, înşurubaţi inelul frontal
efectuând mai întâi o ungere a garniturilor de
etanşare.
94
Page 95
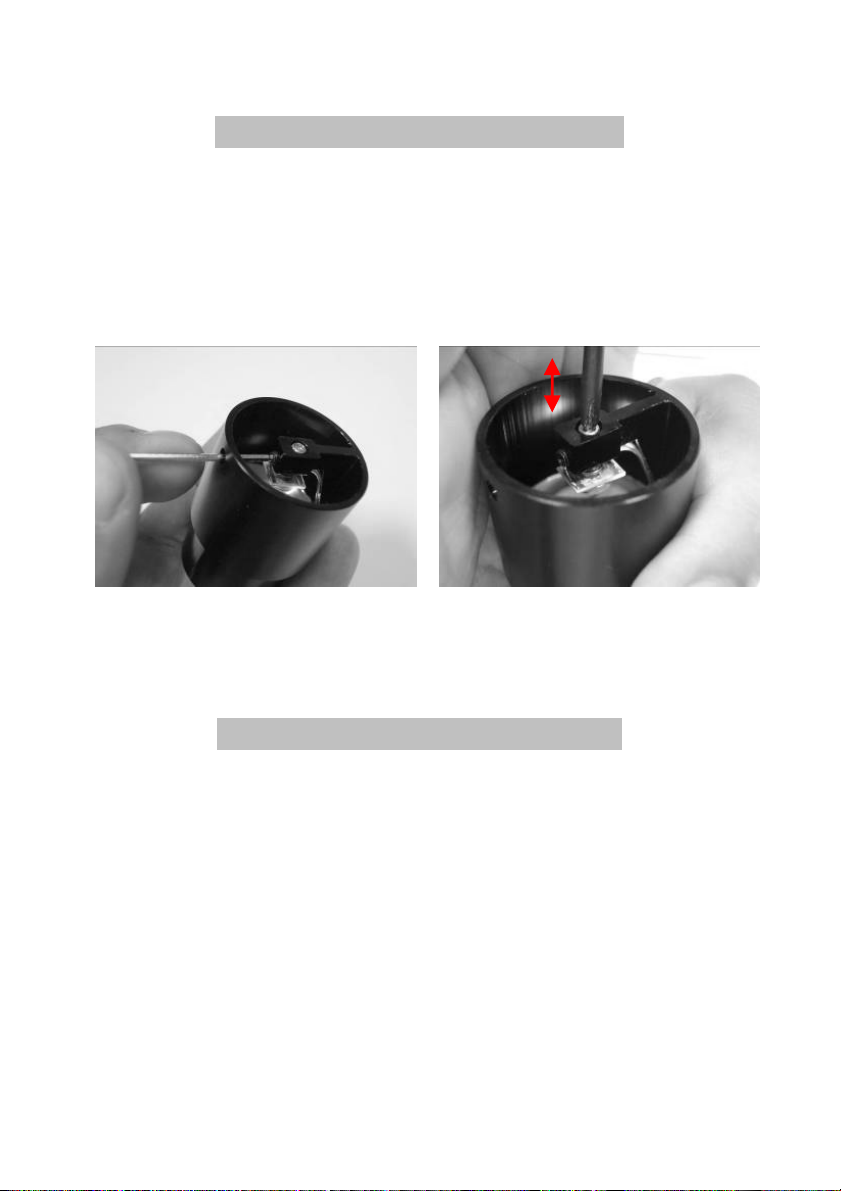
REGLAREA FOCALIZĂRII LED
Slăbiţi corpul filetat de blocare cu ajutorul cheii
hexagonale din dotare.
Mişcaţi spre exterior sau interior LED-ul cu o
şurubelniţă în cruce.
Strângeţi corpul filetat de blocare cu ajutorul
cheii hexagonale din dotare.
ÎNTREŢINERE ŞI TRANSPORT
Este importantă respectarea următoarelor instrucţiuni:
Transportaţi întotdeauna lanterna SUNRISE într-o
geantă care să o protejeze de eventuale lovituri.
Evitaţi expuneri prelungite la razele soarelui.
La sfârşitul fiecărei scufundări (mare, lac sau
piscină) clătiţi întotdeauna cu apă dulce şi uscaţi.
95
Page 96

Verificaţi starea garniturilor de etanşare
(ORings) ori de câte ori aţi efectuat deschiderea
inelului frontal.
Curăţaţi şi ungeţi părţile care privesc deschiderea
cu vaselină siliconică.
Se recomandă controlul anual al produsului de
către un centru autorizat
.
CONDIŢII DE GARANŢIE
Toate produsele mărcii OMER sunt garantate
împotriva defectelor referitoare la materiale şi de
prelucrare pentru o perioadă de doi ani de la data
cumpărării.
Prezenta garanţie nu acoperă daunele datorate
unor:
Utilizări improprii sau incorecte.
Modificări sau reparaţii, efectuate de personal
neautorizat.
Evenimente accidentale sau naturale.
Utilizări în ape încărcate cu clor sau poluate.
Utilizări în lichide diferite de apă.
Expuneri prelungite la razele solare sau la intense
surse de căldură.
OMER îşi declină orice răspundere referitoare la
daune produse utilizatorului de o folosire
improprie a echipamentelor.
96
Page 97

Aceasta este valabil şi în cazul daunelor directe
sau indirecte de orice natură produse persoanelor
sau lucrurilor datorită unor eventuale perioade de
nefolosire a produsului sau de o folosire incorectă
a acestuia.
97
Page 98

SUNRISE LED LAMBALI EL FENERİ
OMER SUNRISE LED lambalı el fenerini satın almış
olduğunuz için tebrik ederiz. Bu el feneri, su altı
avcılığı sektöründe yıllar süren deneyimlerle
kazanılmış bir teknolojik gelişimin sonucudur.
Kullanım esnekliği, yüksek kalitedeki malzemeler ile
birleşen işlevselliği ve tasarlanmış olduğu teknoloji, bu
el fenerinin nefesli dalış ve sualtı avcılığı için eşsiz ve
elzem bir alet olmasını sağlamaktadır.
Şeklinin basitliği ve az alan kaplaması, hacmini
minimuma indirerek, her türlü alete kolaylıkla
yerleştirilebilir ve takılabilir olmasına olanak
tanımaktadır. SUNRISE el feneri nefesli dalışta
kullanılmak üzere tasarlanmıştır, ancak otomatik
solunum cihazlarının kullanıldığı dalış sporlarına da
en iyi şekilde uyum sağlar.
Işık demeti 4°’lik bir açı ile tasarlanmış ters ışıklı
Recoil System tipi bir parabol sayesinde
yoğunlaştırılmış tiptendir. Bu sistem, el feneri ve
aydınlatılacak olan duvar arasında yaklaşık 1 metre
mesafede 80 mm çapında maksimum yoğunluğa
sahip bir ışık demeti elde etme imkanı tanır, yaklaşık
0,5 metre çapındaki geri kalan periferik çemberin
yoğunluğu daha azdır. Bu şekilde, su altındaki her
oyuğa derinlemesine girebilecek kapasitede çok
yüksek verimli bir ışık demeti elde edilir.
98
Page 99

ÖNEMLİ UYARILAR
DİKKAT: SUNRISE’ı kullanmadan önce, işbu
kılavuzu dikkatlice okuyunuz.
DİKKAT: Gerek havadar ortamda gerekse dalış
esnasında, SUNRISE’ı kendi gözlerinize veya
başkalarının gözlerine doğru yöneltmeyiniz.
DİKKAT: Taşıma esnasında kazaen çalıştırılmasını
önlemek amacıyla, şalteri bloke pozisyonuna
yerleştirmiş olduğunuzdan emin olunuz.
DİKKAT: Uçakta taşırken pilleri çıkardığınızdan
emin olunuz.
DİKKAT: Pilleri değiştirirken kutuplara uymaya
özen gösteriniz.
DİKKAT: Çok iyi kalitede piller kullanınız.
DİKKAT: El fenerini asla piller içinde olacak
şekilde uzun süre kullanmadan bırakmayınız.
DİKKAT: El fenerini kullanmadığınız zamanlarda,
bloke olmasını önlemek amacıyla, ön bileziği hafif
gevşetilmiş tutunuz.
GENEL UYARILAR
El fenerini suyun dışında açık tutmayınız.
El fenerinin ön bileziğini dalış esnasında veya ıslak
iken gevşetmeyiniz.
El fenerini aşırı ısı kaynaklarına yakın yerlerde
tutmayınız.
99
Page 100

LED lambası grubunun değiştirilmesi de dahil
olmak üzere, olası olağan ve olağanüstü bakım
işlemleri için daima orijinal yedek parçalar
kullanınız.
Farklı şarj durumuna sahip piller kullanmayınız.
O-ring’leri periyodik olarak temizleyiniz ve silikonlu
gres yağı ile yağlayınız.
O-ring’lerin aşınma durumunu periyodik olarak
kontrol ediniz ve belirgin bir aşınma durumunda
değiştiriniz.
TEKNİK ÖZELLİKLER
Yüksek rezistanslı ABS ile üretilmiş gövde.
Yoğunlaştırılmış demetli optik grup
Kaymayı önleyici termo kauçuk kaplı ön bilezik.
Sürgülü manyetik tipte şalter.
Elektronik sistem tarafından işletilen 6200 °K
beyaz güçlü 1 adet LED lambası.
Bilezik ile el feneri gövdesi arasında sızdırmazlık
için NBR çiftli O-ring
Kolaylıkla ayarlanabilir poliüretan kayış. Ayrıca, su
yüzeyine çıkarken, el fenerinin bir deliğe takılıp
kalması sebebiyle, güçlü biçimde çekilmesi
halinde son derece emin biçimde çözülebilecek
şekilde ebatlandırılmıştır.
100
 Loading...