


1.0 Introduction
Read this instruction manual entirely, making sure you fully understand the use and limitations of this instrument. Improper use may cause serious injury or death.
!IMPORTANT WARNINGS! WARNING! OMERSUB recommends you get proper certified training before attempting breath holding diving and spearfishing. You are the sole responsible for your own safety. WARNING! This computer is a supplementary device for properly trained free divers. The information provided by this watch is FOR REFERENCE ONLY and should never be used as a primary source of information in planning and/or executing sport dives.
WARNING! This computer, and the information it provides, should in no case be considered a substitute for certified freediving instruction or training. Insufficient or improper training may cause serious injury or death.
WARNING! This computer is solely intended to provide secondary information for the free diving activity. It should never be used for scuba diving with tanks, or any other activity in connection with commercial or professional diving.
WARNING! Always use back-up instruments such as a depth gauge, timer or watch.
If you have any questions about this manual, the above warnings or the SP1 freediving computer, contact your OMERSUB dealer before attempting to use this computer inside or outside the water.
2.0 Button and its Function
[EL] |
[U] |
auto backlight |
|
|
indicator |
[M][D]
DISPLAY
Current Time Mode |
Auto Backlight |
Mode Button [M]
To select among the Current Time, Dive Recall, Chronograph, Countdown Timer and Dual Time Mode.
Hold to enter Setting Mode
Up/Start/Stop Button [U]
To change the setting value or increase the set value during Setting Mode.
To activate the 'start' or 'stop' function during Chronograph and Countdown Timer Mode.
To change the sub-function display of Current Time Mode.
To select dive record in Dive Recall Mode.
Down/Reset Button [D]
To show the Daily Alarm.
To change the setting value or decrease the set value during setting display.
To clear the value for the Chronograph and Countdown Timer.
To select dive record in Dive Recall Mode.
EL Button [EL]
Hold the [EL] button for 2 seconds to set the auto backlight between ON and OFF.
To turn on the EL back light for about 3 seconds.
Auto Backlight
When Auto Backlight is set ON, the EL backlight will turn on for
3 seconds automatically when a key is pressed.
NOTE: The major key operations are summarized on the above paragraphs, however please read the coming chapters for the detail operations.
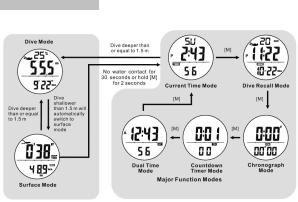
3.0 Major Function Modes

4.0 Current Time Mode - Sub-function Display and Daily Alarm
Current Time Sub-function Display
Press the [U] button will change the sub-function display on the 1st and 3rd row in the Current time Mode following the adjacent diagram:
The 1st row of display will show the Day of week or the current temperature.
The 2nd row will be the current Time.
The 3rd row will show the Second or Date.
Daily Alarm Display
Press the [D] button will display the Alarm Time until the [D] button is released.
NOTE: If [D] is pressed and hold for more than 2 seconds, it will go into the Alarm Time setting display. Please refer to the Chapter 4.2 for more details on Alarm Time setting.

4.1 Current Time Mode -The Setting Display
How to Set the Watch
To select the setting display, hold the [M] button for 2 seconds in the Current Time Mode, and then the 'Second' digits will start flashing.
In setting display, press the [M] button to move the flashing following the adjacent diagram to select among different settings.
During one of the settings (except second) is flashing, press the [U] or [D] button to increase or decrease the number / change the setting (hold down the button to change it at a higher speed).
When the second digits start flashing, press the [U] or [D] button to reset to zero.
When the ‘beep’ (Key tone) is set ON, there will be a beep sound when a key is pressed.
If the 'chime' (Hourly Chime) is turned ON ( ) the Watch will beep once every hour.
When the setting is completed, hold the [M] button for 2 seconds to exit the setting display. If there is NO keystroke for 1 minute, the Watch will also exit the setting display automatically.
NOTE: Please check the Chapter 8.3 for more detail of
Dive Mode Settings.

4.2 Current Time Mode -Setting the Daily Alarm
How to Set the Daily Alarm
To select the Daily Alarm setting display, hold the [D] button for 2 seconds in the Current Time Mode until the 'Minute’ digits start flashing.
In setting display, press the [M] button to move the flashing following the adjacent diagram to select among different settings.
When the digits of “minute” or “hour” is flashing, press the [U] or [D] button to increase or decrease the number (hold down the button to change the number at a higher speed).
When ‘ON’ or ‘OFF’ is flashing, press the [U] or [D] button to turn ON/OFF the daily alarm.
When the setting is completed, hold the [M] button for 2 seconds to exit the setting display. If there is NO keystroke for 1 minute, the Watch will also exit the setting display automatically.
When the daily alarm is ON, the daily alarm indicator will be appeared.
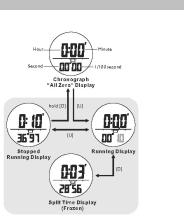
5.0 Chronograph Mode -Using the Chronograph
Chronograph Mode
This Watch includes a stopwatch function which measures elapsed time and current split time.
The measuring capacity of the chronograph: Measuring resolution: 1/100 second
Measuring range: 99 hours, 59 minutes and 59.99 seconds.
How to Use the Chronograph
When the Chronograph Display is selected, press the [U] button to start the chronograph. Press [U] again to Stop counting.
When the chronograph is running, press the [D] button will freeze the counting display for user to take a split time.
NOTE: When the [D] button is pressed, the chronograph is still running.
Press the [D] button again to resume the running display.
When the chronograph is stopped, hold the [D] button will reset the counter to all zero.
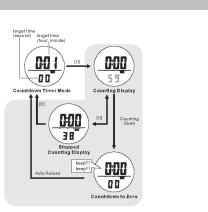
6.0 Countdown Timer Mode -Countdown Timer Display
Countdown Timer Mode
The measuring resolution of the timer is 1 second, and the target time of the timer can be set up to a maximum of 99 hours, 59 minutes and 59 seconds.
Press [U] to start counting when timer is stopped or stop the counting when the timer is running.
During counting, the Watch will beep for 30 seconds when counts down to zero.
When the timer counts to zero, it will reload the initial value of the target time automatically.
How to Reload the Timer
Press the [D] button to clear the timer and reload the target time to initial value when the timer is stopped counting.
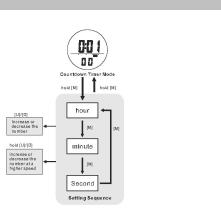
6.1 Countdown Timer Mode -Setting the Countdown Timer
How to Set the Countdown Timer
To select the setting display, hold the [M] button for 2 seconds in the Countdown Timer Display, and then the 'Hour' digit will start flashing.
In setting display, press the [M] button to move the flashing following the adjacent diagram to select among different settings.
When the digits are flashing, press the [U] or [D] button to increase or decrease the number (hold down the button to change the number at a higher speed).
When the setting is completed, hold the [M] button for 2 seconds to exit the setting display. If there is NO keystroke for 1 minute, the Watch will also exit the setting display automatically.
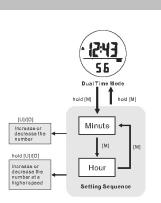
7.0 Dual Time Mode -Setting the Dual Time
Dual Time Mode
This Watch includes a Dual Time Mode which tells user another time when they travel overseas.
How to Set the Dual Time
To select the setting display,hold the [M] button for 2 seconds in the Dual Time Display, and then the 'Minute' digit will start flashing.
In setting display, press the [M] button to move the flashing following the adjacent diagram to select among different settings.
When ‘Hour’ or ‘Minute’ is flashing, press the[U] or [D] button to increase or decrease the number (hold down the button to change the number at a higher speed).
When the setting is completed, hold the [M] button for 2 seconds to exit the setting display. If there is NO keystroke for 1minute, the Watch will also exit the setting display automatically.
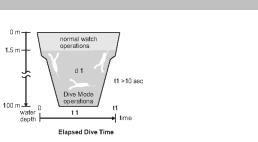
8.0 Dive Mode -Precaution and Dive Mode
Dive Mode Precaution
If moisture is escalated around the water sensor, it may activate the Dive Mode unintentionally. To prevent this happen, dry the water sensor with a soft cloth when the water sensor is wet.
If dirt is escalated around the water sensor, it may obstruct the Watch to switch to Dive Mode automatically when you are diving. To prevent this happen, clean the water sensor with a soft cloth before starting a dive.
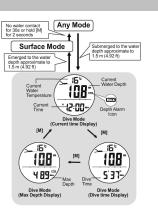
Dive Mode
The Dive Mode will be activated automatically if the user submerges, and reaches the water level approximately to 1.5 m (4.92 ft).
When the user emerges, and returns to the water level approximately to 1.5 m (4.92 ft) or shallower, the Surface Mode will be swiched on automatically (See 8.1 for detail).
When the Dive Mode appear, the following information will be displayed:
1) the Current water depth,
2) the Current water temperature,
3) the Dive Status Indicator, and
4) the Elapsed Dive Time.
5) Current Time Display (Optional)
6) Maximum Depth
Depth Alarm
If the alarm is enabled and the depth is over the preset value, the flashing MAX icon will be shown and a 30- second-sound alert will be heard.
8.1 Dive Mode -Dive Status Indicator and Dive Site Selection
Surface Mode
When the user dive shallower than 1.5 meters, the watch will switch to Surface mode automatically.
The surface time will start counting and will be shown on display.
During Surface mode, the user can ceck the Max depyh of last dive and Dive time of last dive by pressing [M].
When the user comes out of the wather the sensors are no contact with wather for 30 seconds or the user holds the [M] for 2 seconds, it will exit from the Surface Mode automatically.
Note: The surface Mode can only be activated after the user user returns from diving below wather level 1.5 m.
Sea and Lake dive
The watch can work either in sea water of lake water. Set ‘Sea’ for sea water diving or ‘Lake’ for lake water diving.
Ceck chapter 8.3 for more details on how to set the diving site setting.
8.2 Dive Mode -Dive Record for a Single Dive and Subsequent Dives
Dive Records
Each Time user starts a dive for more than 10 seconds (with at least 1.5m depth or deeper), the following information will be stored as a record into the Watch:
1.The Elapsed Dive Time,
2.The Maximum Reached Watch Depth,
3.The Minium Water Temperature during dive,
4.The Starting Time and Date of the dive, and
5.Dive Site Information
User can store up to 199 dive records, and user can recall these dive record(s) in a later day.
NOTE: Check the Chapter 9.0 for more detail of how to recall dive record.
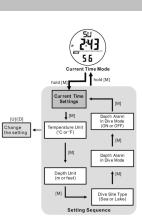
8.3 Dive Mode -Settings of Dive Mode
How to Set for the Dive Mode
Check for Chapter 4.1 of how to go into Setting Display. In setting display, press the [M] button to bypass the
settings of current time until ‘ C’ or ‘ F’ is flashing .
During one of the settings is flashing (selected), press the [U] or [D] button to change the setting.
How to Set Depth Alarm
This watch features depth alarm to remind the user when he/she reaches the pre-set depth. Once it is switched on and when the user dive deeper than the pre-set depth, a flashing icon MAX will be shown with alert sound for 30 seconds .
After the setting of th Dive site Type, the default depth 30 is flashing, press the [U] or [D] button to change the setting and the [M] button to confirm. Press the [U] or [D] button to switch on/off this function and the [M] button to confirm.
When the setting is completed, hold the [M] button for 2 seconds to exit the setting display. If NO button is pressed for 1 minute, the watch will exit the setting display automatically.
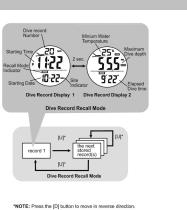
9.0 Dive Recall Mode -Recalling the Dive Records
Dive Record Recall Mode
To select the Dive Record Recall Mode, press the [M] button in the Current Time Mode.
User can store up to 199 dive records, and user can select displaying those records by pressing the [U] or [D] button.
When the number of the Dive records are over 199, the oldest one well be overwritten automatically.
Dive Record Display
In the Recall Mode, the Watch will show the following information alternatively:
Display 1:
1) Records Number
2) Starting Time
3) Starting Date
4) Dive Site indicator
Display 2:
5) Minium Water Temperature
6) Maximum Dive Depth
7) Elapsed Dive Time
How to Reset the records
Hold down the [M] button for 2 seconds to select deleting the CURRENT record. Press [U] or [D] to select YES or NO and hold [M] to confirm.
Hold down the [M] button for 4 seconds to select deleting the PREVIOUS record. Press [U] or [D] to select YES or NO and hold [M] to confirm.
Hold down the [M] button for 6 seconds to select deleting ALL records. Press [U] or [D] to select YES or NO and hold [M] to confirm.
In the ‘Del’ mode, if NO button is pressed for 1 minute, it will return to the Dive Recall Mode display.

9.1 RESET
The RESET function can be used to delete any error message or problems related to functioning of the SP1 software. To carry out this operation, access "CURRENT TIME” mode, push [M] to access time setting (the seconds flash), then press [U] and [D] together and hold them down for about 5 seconds. Initially a full line will appear accompanied by a “beep” sound, followed by a message that reads “RTS N”. Press the [U] or [D] buttons and the message on the display will be “RTS Y”, now press [M] to confirm resetting. The display will still show a complete segment and the entire internal memory will be reset completely, including the time. You can now continue using the watch with all its functions reset.

10.0 Specification |
|
Automatic Dive log memory |
|
Temperature Display
Current Time Mode
Hour, Minute, Second display
Month, Date, Day of Week display
Auto Calendar from 2000 to 2099
12/24 hour format
Month/Date or Date/Month display
Hourly Chime
Daily Alarm
Temperature Display
Chronograph Mode
Resolution : 1/100 second
Range : 99 hours, 59 minutes, 59.99 seconds
Split Time function
Countdown Timer Mode
Resolution : 1 second
Range : 99 hours, 59 minutes, 59 seconds
Beep once per minute for last 10 minutes
Beep once per 10 seconds for last minute
Beep once per second for last 5 seconds
Beep for 30 seconds when countdown to zero
Dive Mode
Unit : °C / °F selectable
Resolution : 1°C / 1°F
Range : -10C to +60C / 14F to 140F
Dive Recall Mode
Maximum 199 records to be recorded and recall
Each dive record contains:
Record number Starting Time and Date Dive Duration Maximum Dive Depth
Minimum Water Temperature Dive Site Indication
Delete current/previous/all records function
Battery
|
Type |
: |
Li.ion - Rechargeable |
|
Dimension |
: 20 x 3 mm |
|
|
Temp. of use |
: |
-20°C to 50°C |
|
Code |
: |
PD2032 3 Volts |
Sea or Lake diving site selectable
Automatically activate/deactivate Dive Mode when submerge or emerge to 1.5m of water depth.
Current Dive duration, Depth, Dive site, Current Time, Maximum depth and Water temperature display
Depth Unit : meter or feet selectable
Depth resolution : 0.1m / 0.328 ft
Maximum Depth : 100m / 328ft
11.0 Battery recharge
12.0 Maintenance
Avoid exposing the watch to extreme conditions for an unreasonable time, and avoid rough uses or sever impacts.
The battery of the MIK1 computer must be changed exclusively by the authorised OMER dealer where it was purchased or directly by OMERSUB Spa. If the battery is changed by unauthorised personnel, any guarantee valid for the product will immediately be considered null
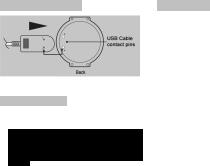
Occasionally, clean the watch, particularly the water sensor, on the back of the watch, with a soft cloth.
Never expose the watch to strong chemicals such as gasoline and alcohol, as they will damage the watch.
Always rinse the watch with fresh water, after use, and store it in a dry place.
13.0 Warranty
This Omer product is warranted to be free of defects in materials or workmanship for two year from the date of purchase in UE and one year outside of UE. Within this period, Omer will, at its sole option, repair or replace any components that fail during normal use. Such repairs or replacement will be made at no charge to the customer for parts or labour. In addition, Omer reserves the right to refuse warranty claims against products or services that are obtained and/or used in contravention of the laws of any country.
1.0 Introduzione |
|
2.0 Pulsanti e relative funzioni |
Leggere attentamente il presente manuale d’istruzioni, assicurandosi di comprendere appieno l’utilizzo e i limiti di questo strumento. L’utilizzo improprio può causare danni gravi o la morte.
!AVVERTENZE IMPORTANTI! ATTENZIONE! OMERSUB raccomanda di seguire un adeguato corso di addestramento certificato prima di effettuare le immersioni e la pesca in apnea. La sicurezza personale dipende unicamente da se stessi.
ATTENZIONE!Questo computer è uno strumento supplementare destinato agli esperti di immersioni in apnea. Le informazioni fornite da questo orologio sono PURAMENTE INDICATIVE e non vanno mai prese come fonte principale d’informazioni per la pianificazione e/o esecuzione di immersioni sportive.
ATTENZIONE!Questo computer e le relative informazioni fornite non devono mai sostituire le istruzioni o l’addestramento certificato in materia di immersioni in apnea. Un allenamento carente o non idoneo può causare danni gravi o la morte.
ATTENZIONE!Questo computer ha il solo scopo di fornire informazioni secondarie all’attività d’immersione in apnea. Non deve mai essere impiegato per immersioni con bombole, né per qualsiasi altra attività legata alle immersioni professionali o commerciali.
ATTENZIONE! Utilizzare sempre strumenti di riserva, profondimetro, timer od orologio.
[EL] |
[U] Indicatore di |
|
retroilluminazione |
|
automatica |
[M][D]
DISPLAY
Modalità ore attuale |
Retroilluminazione |
Pulsante Modalità [M]
Per scegliere tra le modalità Ora attuale, Richiamo immersione, Cronografo, Timer per conto alla rovescia e Doppio orario.
Tenere premuto per accedere alla modalità Impostazioni
Pulsante Su/Avvio/Stop [U]
Per modificare il valore o aumentare il valore impostato durante la modalità Impostazioni.
Per attivare la funzione “avvio” o “stop” durante la modalità Cronografo e Timer per conto alla rovescia
Per modificare la visualizzazione della sottofunzione nella modalità Ora attuale.
Per selezionare la registrazione nella modalità Richiamo immersione.
Pulsante Giù/Reset [D]
Per mostrare l’allarme giornaliero.
Per modificare il valore o diminuire il valore impostato durante la modalità Impostazioni.
Per cancellare il valore del Cronografo o del Timer per conto alla rovescia.
Per selezionare la registrazione nella modalità Richiamo immersione.
Pulsante EL [EL]
Tenere premuto il pulsante [EL] per 2 secondi per impostare la retroilluminazione automatica su ON o OFF.
In caso di domande circa il presente manuale, le avvertenze
esposte sopra o il computer da apnea SP1 contattare il proprioRetroilluminazione automatica rivenditore OMERSUB prima di impiegare il computer dentro o
fuori dall’acqua.
NOTA: I paragrafi precedenti riassumono le operazioni principali; tuttavia leggere i capitoli seguenti per i relativi dettagli.

3.0 Modalità di funzionamento principali
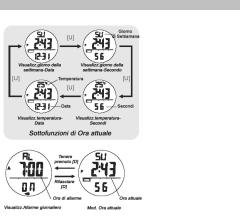
4.0 Modalità Ora attuale – Sottofunzioni e allarme giornaliero
Visualizzazione delle sottofunzioni dell’Ora attuale
Premendo il pulsante [U] le sottofunzioni della 1a e 3a riga della modalità Ora attuale cambiano in base al diagramma posto a lato:
La 1a riga mostrerà il giorno della settimana o la temperatura attuale.
La 2a riga mostrerà l’ora attuale.
La 3a riga mostrerà i secondi o la data.
Visualizzazione dell’allarme giornaliero
Premendo il pulsante [D] viene mostrata l’ora dell’allarme finché non si rilascia il pulsante.
NOTA: Se si tiene premuto [D] per oltre 2 secondi si
entra nella modalità d’impostazione dell’allarme. Per ulteriori dettagli sull’impostazione dell’allarme consultare il capitolo 4.2.
4.1 Modalità Ora attuale – Display d’impostazione
Come impostare l’orologio
Per selezionare il display d’impostazione tenere premuto il pulsante [M] per 2 secondi nella modalità Ora attuale: la cifra dei secondi inizierà a lampeggiare.
Nel display d’impostazione premere il pulsante [M] per spostarsi secondo il diagramma posto a lato e scegliere le diverse impostazioni.
Mentre un’impostazione (eccetto i secondi) sta lampeggiando premere il pulsante [U] o [D] per aumentare o diminuire il numero / modificare l’impostazione (tenere premuto il pulsante per aumentare la velocità di modifica).
Quando le cifre dei secondi iniziano a lampeggiare premere il pulsante [U] o [D] per azzerare.
Se è impostato il segnale acustico verrà emesso un suono quando si preme un tasto.
Se è impostato il campanello (  ) l’orologio emetterà un suono ogni ora.
Completata l’impostazione, tenere premuto il pulsante[M] per 2 secondi per uscire dal display d’impostazione. Se NON viene premuto alcun tasto per 1 minuto l’orologio abbandonerà automaticamente il display d’impostazione.
NOTA: Per ulteriori dettagli sulle impostazioni della modalità Immersione consultare il capitolo 8.3.
 Loading...