

Page 1
WBK20A
PCMCIA/EPP Interface Card and Cable
User’s Guide
For connecting a PC to a
WaveBook or DaqBook.
Released per EO #: 2086R16 November 2001
274-0901
p/n
rev
2.0
Page 2

ii
10-12-01
WBK20A, PCMCIA/EPP Interface Card
Page 3

Table of Contents
Overview ..........................................................................................1
Windows 2000 Setup for WBK20A..................................................3
Windows 95/98/Me Setup for WBK20A...........................................7
Connecting the WBK20A to Hardware..........................................11
Finding the Port Assignment.........................................................13
Testing the WBK20A Interface....................................................... 16
Troubleshooting............................................................................. 21
Specifications.................................................................................24
Reference Note - For DOS and Windows 3.x users:
If using DOS or W i ndows 3.x, refer to the Win3x_DOS .txt file located on t he data
acquisition CD. The ASCCII file contains software setup information pertaining to the
DOS and the Windows 3.x operating systems. The file is located in the root directory
of the data acquisition CD, in the folder named Windows 3x_DOS Driver Disk.
WBK20A, PCMCIA/EPP Interface Card
10-12-01
iii
Page 4

iv
10-12-01
WBK20A, PCMCIA/EPP Interface Card
Page 5
Overview
T
W
D
he DB25 connects to:
aveBook’s port labeled, “To Computer”, or to
aqBook’s port labeled, “From PC Parallel Port.”
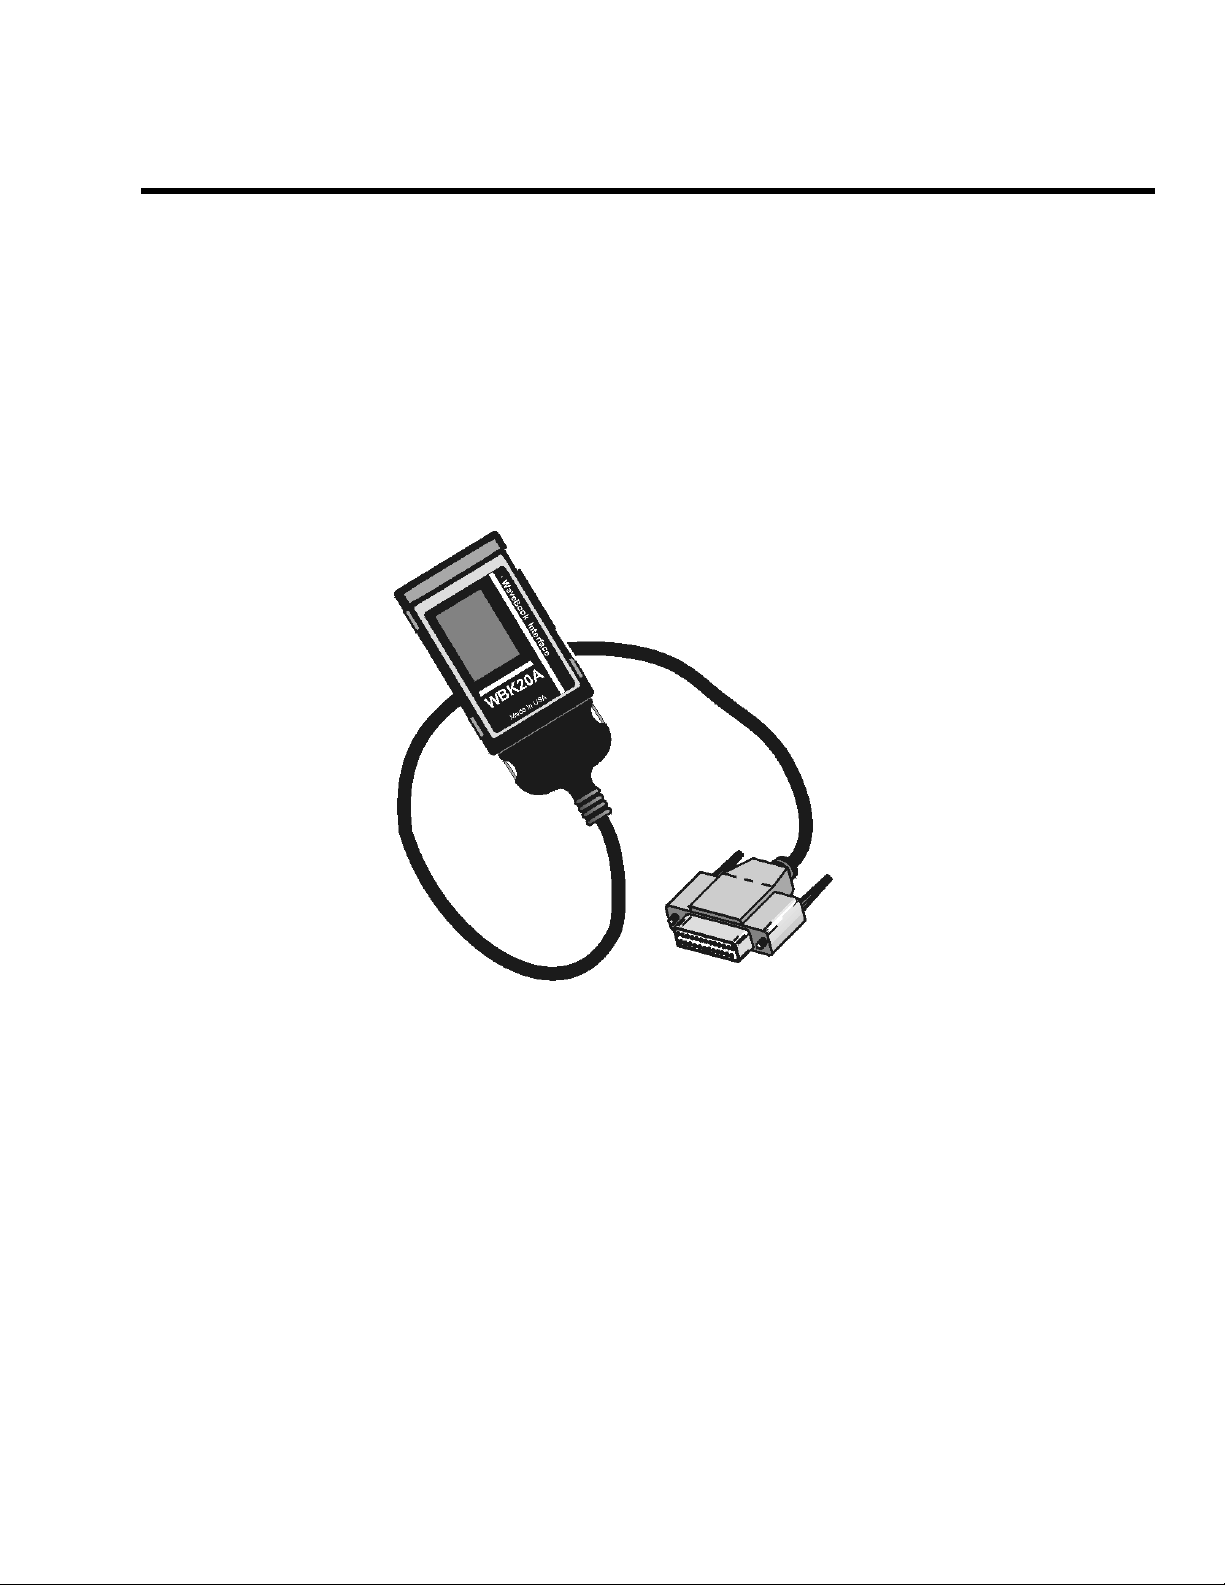
WBK20A Interface Card and Cable
The WBK20A is a PCMCIA/EPP Interface Card. Together, the card and associated cable provide a PC
with an EPP port by way of the computer’s PCMCIA slot.
The WBK20A typically has a data rate of 600 K to 1000 Kbytes/sec, or in terms of samples, 300 K to
500 K samples/sec [since 2 bytes is equal to 1 sample]. Although the WBK20A is capable of higher rates,
these are seldom realized because of such factors as: PC architecture, operating system, available
resources, and software implementation.
The earlier WBK20 and EPPCard/1 function the same as the WBK20A. The difference in
the devices is that the WBK20A uses cable CA-191-1, which has a locking cable connector;
whereas the earlier devices use a non-locking cable (CA-157-1). The two cable types cannot
be interchanged.
The WBK20A is not a “Hot-Swap” card. To ensure proper operation of the WBK20A card,
boot up the computer only after verifying that the WBK20A is inserted in the PC’s card slot.
Failure to do so may prevent the application software from recognizing the card as a
parallel port device.
Windows NT does not support the WBK20 or the WBK20A.
WBK20A, PCMCIA/EPP Interface Card
09-13-01
1
Page 6

2
10-12-01
WBK20A, PCMCIA/EPP Interface Card
Page 7
Windows 2000 Setup for WBK20A
Reference Note:
This section applies only to Windows 2000. If you are using Windows 95, Windows 98, or
Windows Me, refer to the subsequent section, Windows 95/98/Me Setup for WBK20A.
1. Place the Data Acquisition CD into your CD ROM drive.
(a) If you have not yet installed product support for your device; i.e., WaveBook Support or
DaqBook Support, do so at this time. Consult your WaveBook or DaqBook documentation as
needed. After installation, with the CD still in the drive, continue with step 2.
(b) If you have already installed product support for your device, and if your CD dri ve has auto-run,
wait for the Master Setup Screen to appear, then click <Exit>.
2. Insert the WBK20A, label-side up, into your computer’s PCMCIA adapter slot.
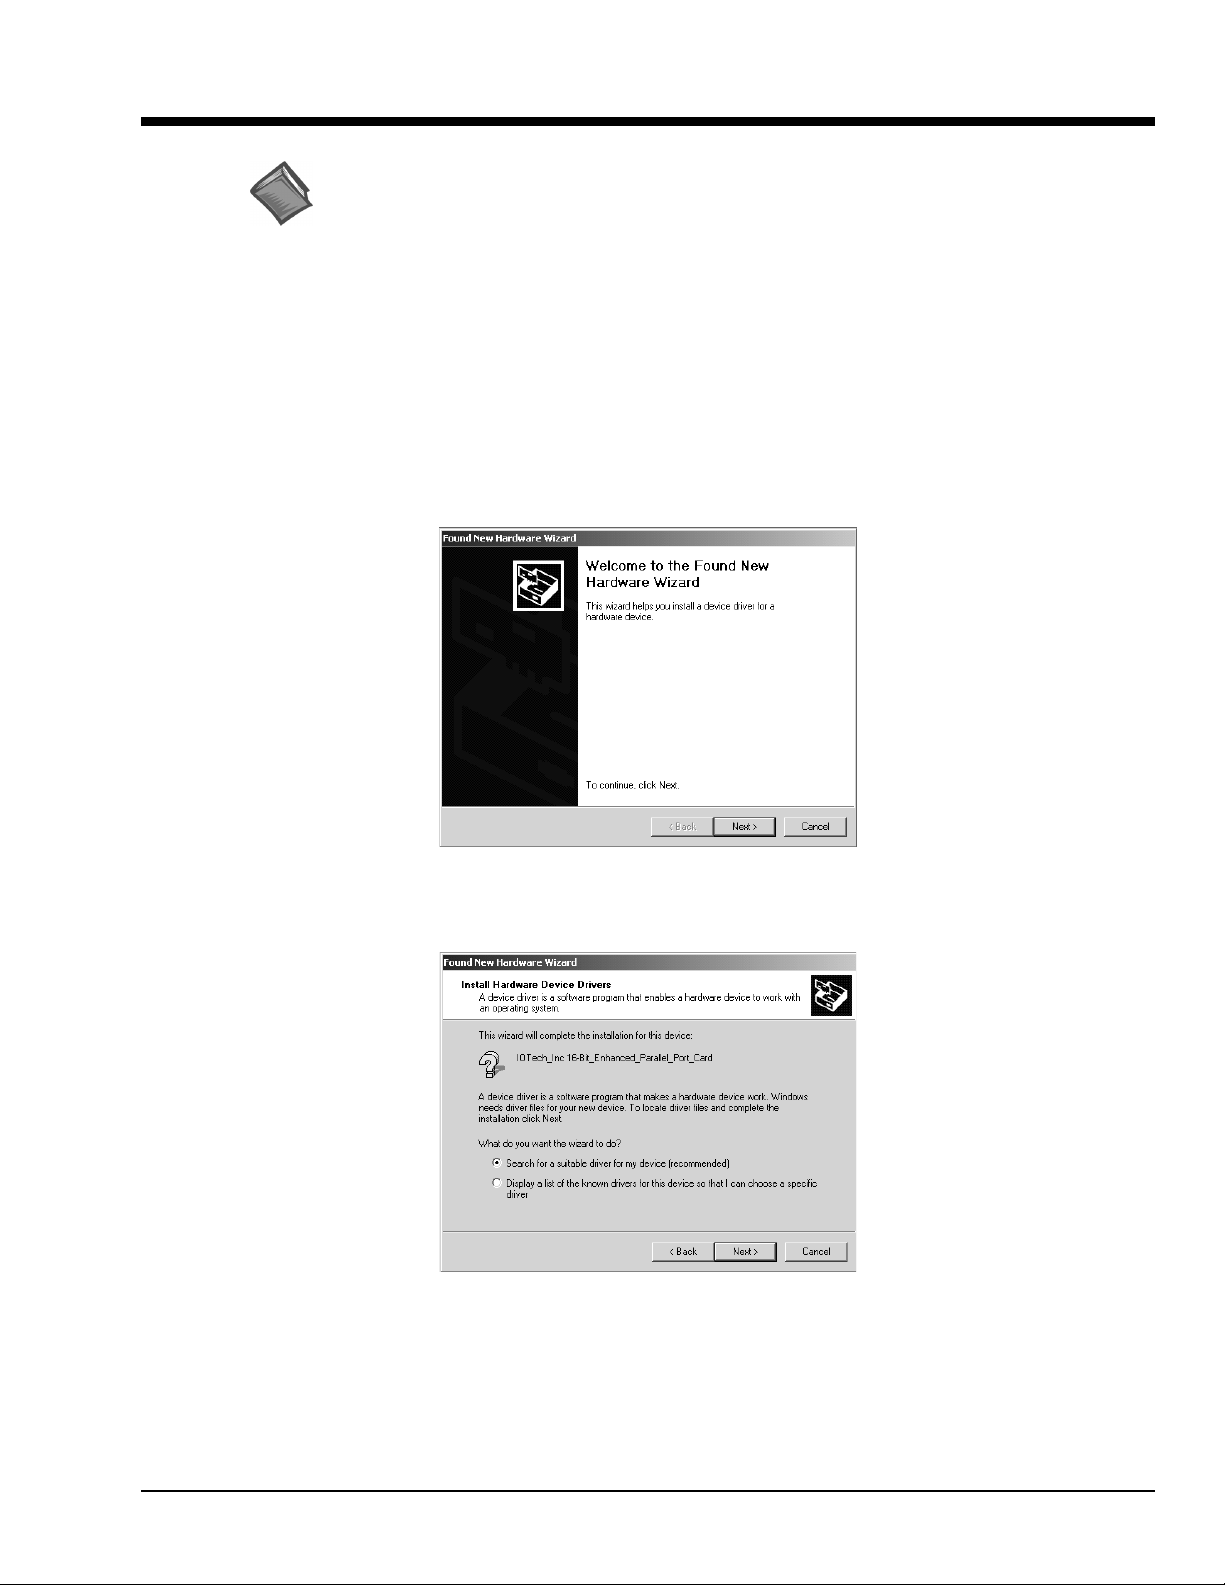
A dialog box should appear, indic ating that Windows has begun the inst allation process; and a
“Found New Hardware Wizard” will open, indicating that Windows 2000 is ready to install drivers for
the new hardware.
Found New Hardware W izard, Intro Screen
3. Click <Next>. The Wizard will proceed to a screen with the text, “Install Hardware Device Drivers”
(following figure) .
Install Hardware Device Driv e rs Screen
4. Select the radio button that reads, “Search for a suitable driver for my device.”
5. Click <Next>. The “Locate Driver Files” screen appears (following figure).
WBK20A, PCMCIA/EPP Interface Card
10-12-01
3
Page 8
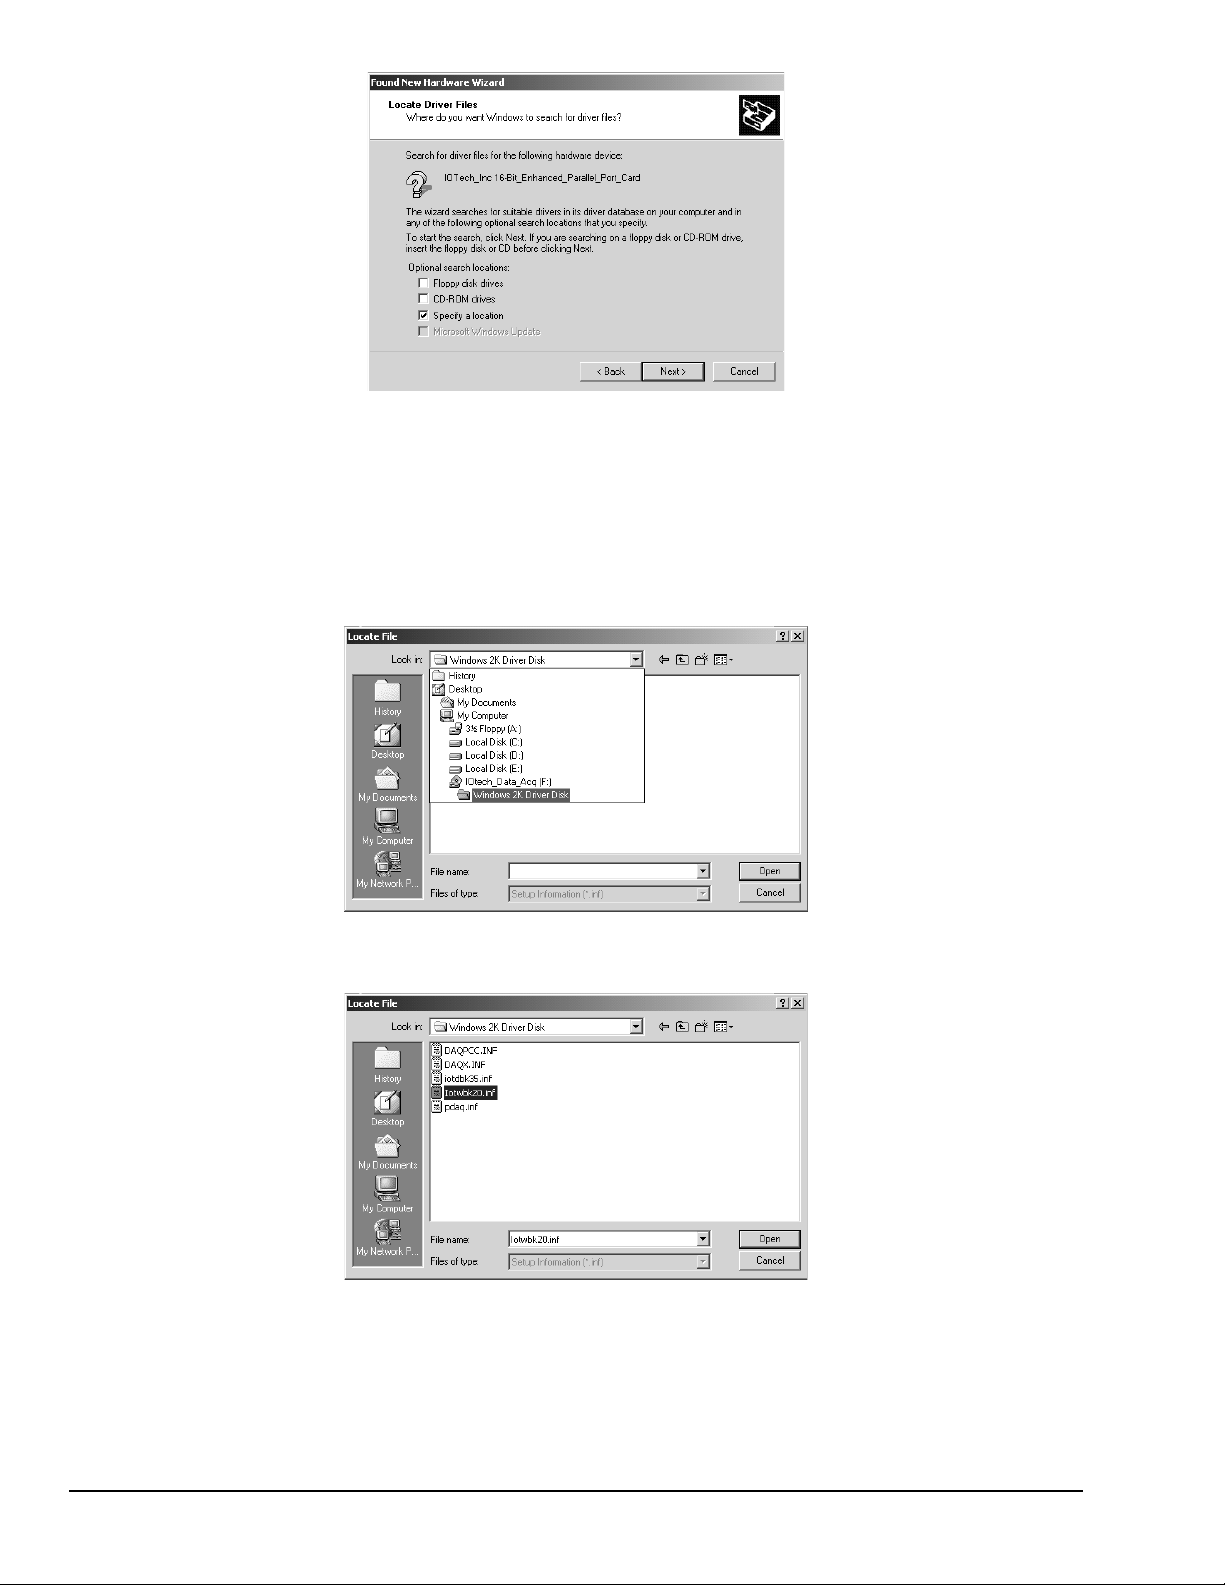
Locate Driver Files Screen
6. Check the “Specify a location” check box. Then click <Next>.
At this point you will be prompted to insert the manufacturer’s installation disk. On the
prompt [not shown], click <OK>.
7. Using Window’s browse feature, locate your Data Acquisition CD.
8. Expand the contents of the CD; then click on the folder labeled, “Windows 2K Driver Disk.”
(See follo wing figure.)
Locating the “Windows 2K Driver Disk” Folder
9. Select the file, “Iotwbk20.inf;” then click <Open> (see fo llowing figure).
Locating the Iowbk20.inf File
After clicking <Open>, you will once again see the Hardware Wizard’s prompt to insert the
manufacturer’s installation disk (following figure).
4
10-12-01
WBK20A, PCMCIA/EPP Interface Card
Page 9
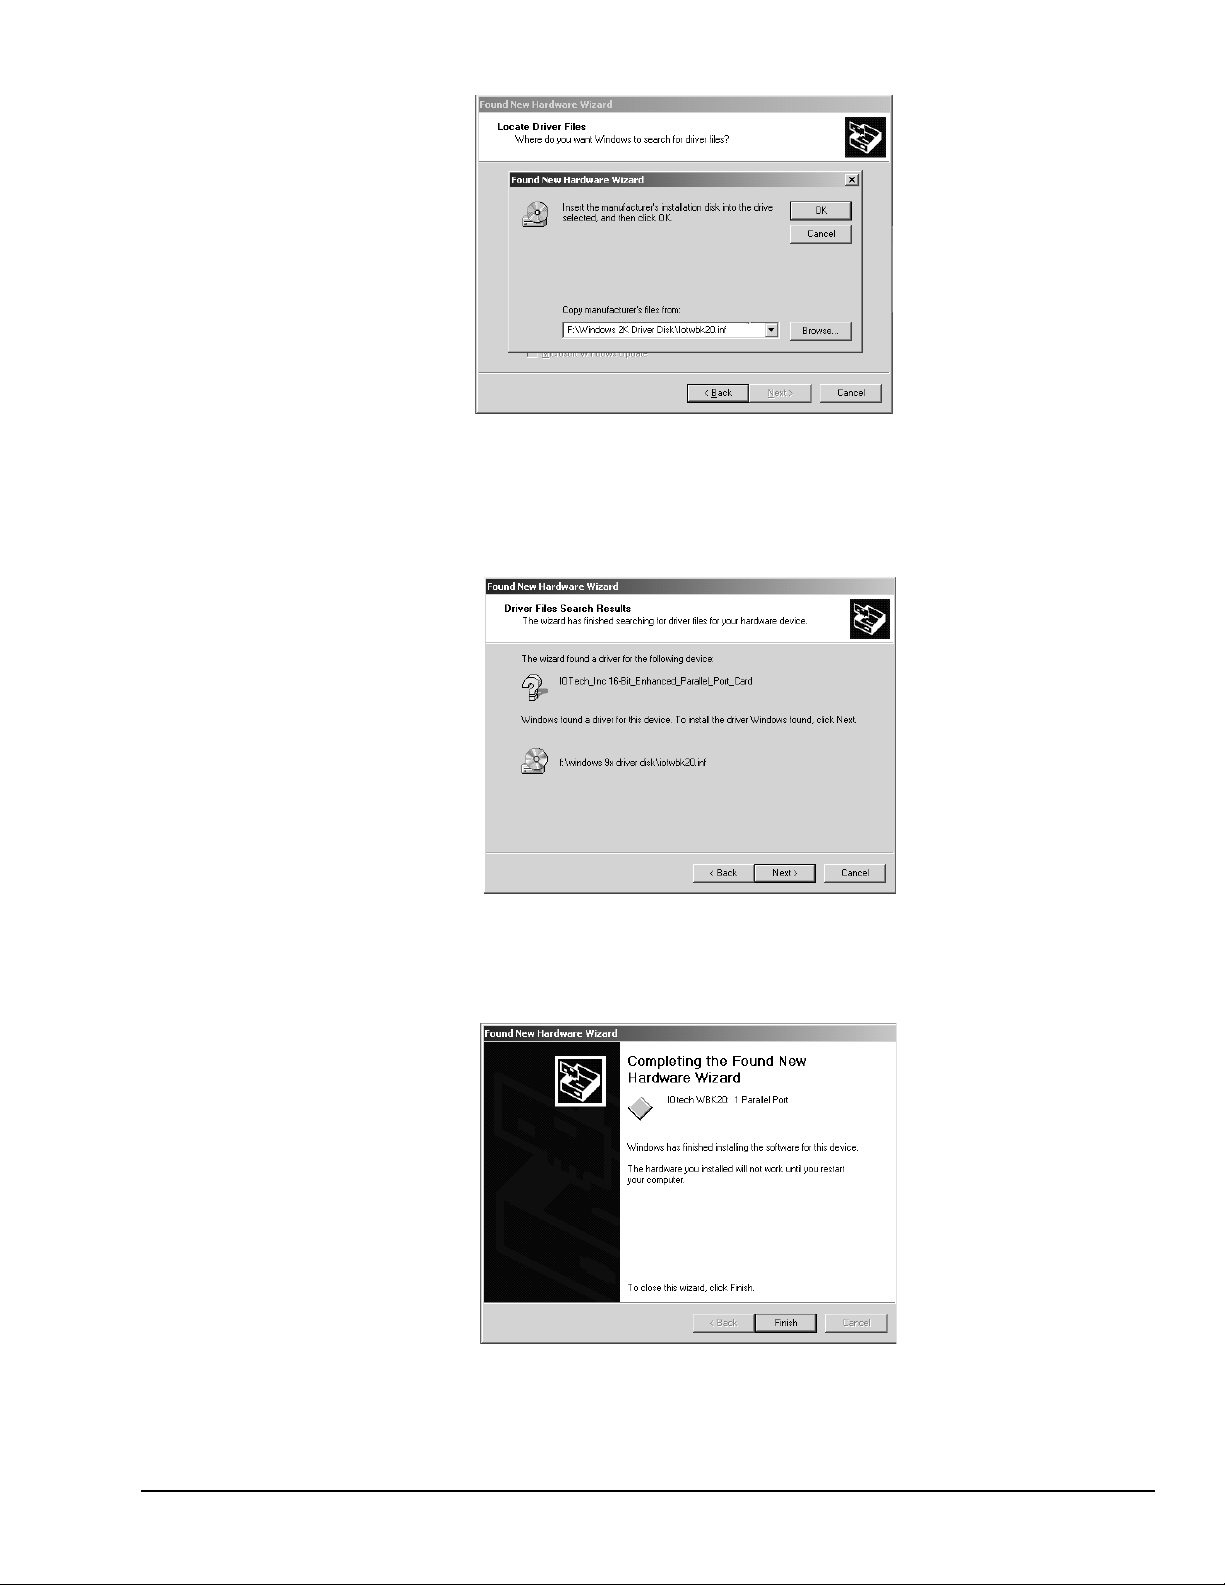
A Prompt to Insert the Manufacturer’s Disk
10. Click <Ok> (see above figure, central dialog box).
A screen with the text, “Driver Files Search Results,” appears (following figure).
The screen identifies the device and driver that were found.
Driver Files Search Results Screen
11. Click <Next> to install the driver.
12. After the Hardware Wizard indicates that “Windows has finished installing the software for
this device,” Click <Finish.>
WBK20A, PCMCIA/EPP Interface Card
Confirmation that the software has been installed.
10-12-01
5
Page 10

This completes the Windows 2000 Software setup for the WBK20A. You will need to reboot the computer
with the card installed.
The WBK20A is not a “Hot-Swap” card. To ensure proper operation of the WBK20A
card, boot up the computer only after verifying that the WBK20A is inserted in the PC’s
card slot. Failure to do so may prevent the application software from recognizing the
card as a parallel port device.
Reference Note:
Refer to Connecting the WBK20A to Hardware, beginning on page 11, in regard to connecting
the WBK20A to the WaveBook or DaqBook.
6
10-12-01
WBK20A, PCMCIA/EPP Interface Card
Page 11

Windows 95/98/Me Setup for WBK20A
Reference Note:
This section only applies to Windows 95, Windows 98, and Windows Me. If you are using
Windows 2000, refer to the preceding section, Windows 2000 Setup for WBK20A.
1. Place the Data Acquisition CD into your CD ROM drive.
(a) If you have not yet installed product support for your device; i.e., WaveBook Support or
DaqBook Support, do so at this time. Consult your WaveBook or DaqBook documentation as
needed. After installation, with the CD still in the drive, continue with step 2.
(b) If you have already installed product support for your device, and if your CD dri ve has auto-run,
wait for the Master Setup Screen to appear, then click <Exit>.
2. Insert the WBK20A, label-side up, into your computer’s PCMCIA adapter slot.
A dialog box shoul d appear, indi cating that Windows has begun the installation process for your
hardware; then the “Add New Hardware Wizard” will open, indicating that Windows is ready to install
drivers for the new hardware.
Add New Hardware W izard, Intro Screen
3. Click <Next>. The Wizard will proceed to a second screen that pertains to how the new driver is to be
located. The Windows Me screen differs slightly from the Windows 9x screen, as can be seen in the
following figures.
Selecting, “Search for the best driver …”
(for Windows 95 and Windows 98)
4. Windows 95/98 Users: Select the radio button that reads, “Search for the best driver for your device.”
Windows Me Users: Select the radio button that reads, “Specify the location of the driver.”
Selecting, “Specify the location of the driver …”
(for Windows Me)
WBK20A, PCMCIA/EPP Interface Card
10-12-01
7
Page 12

5. Click <Next>. A screen for locating driver files appears. See the following figures.
Specifying a Location for Driver Files
(for Windows 95/98)
Windows 95/98 Users: Ensure that only the “Specify a location” check box is selected.
6.
Specifying a Location for Driver Files
(for Windows Me)
Windows Me Users: Ensure that the radio button, “Search for the best driver for your device” is
selected; and select the two check boxes located above the browse pull-down list. These are:
“Removable Media,” and “Specify a Location.”
7. Click <Browse>, then use the Window’s browse feature to locate your Data Acquisition CD.
8. Expand the CD contents and click on the folder named “Windows 9x Driver Disk.” Note that the
Windows 9x Driver Disk folder is the correct folder for both Windows 9x and Windows Me
applications.
Selecting the Windows 9x Driver Disk Folder
(For Windows 95/98/Me)
9. Click <OK.>
8
10-12-01
WBK20A, PCMCIA/EPP Interface Card
Page 13

10. The Hardware Wizard now displays the driver disk location in the browse box. Click <Next.>
At this point, Windows 95/98 users skip to step 12.
Specifying a Location for Driver Files
(for Windows 95/98)
Windows Me users - select the radio button for installing “The updated software,” and then click
11.
Specifying a Location for Driver Files
(for Windows Me)
<Next.> Note that this step and the associated screen do not apply to Windows 95/98.
Selecting “Updated Software” (for Windows Me)
12. The Hardware Wizard indicates its search results, i.e., the device, the port, and the location of the
driver. Click <Next> to indicate that the driver is suitable. Windows will begin the install.
Note: Windows may prompt you to insert the Windows CD, so it can install Microsoft Drivers that
are not found on your PC. If prompted, remove the data acquisition CD and insert the
Windows CD; then click <Ok.>
WBK20A, PCMCIA/EPP Interface Card
Hardware Wizard’s Search Results
10-12-01
9
Page 14

13. The Hardware Wizard will inform you when the installation is complete, as indicated in the following
figure. At that point click <Finish.>
Confirmation that the software has been installed.
This completes the Windows 95/98/Me Software setup for the WBK20A. You will need to reboot the
computer with the card installed.
The WBK20A is not a “Hot-Swap” card. To ensure proper operation of the WBK20A
card, boot up the computer only after verifying that the WBK20A is inserted in the PC’s
card slot. Failure to do so may prevent the application software from recognizing the card
as a parallel port device.
Reference Note:
Refer to Connecting the WBK20A to Hardware, beginning on page 11, in regard to connecting
the WBK20A to the WaveBook or DaqBook.
10
10-12-01
WBK20A, PCMCIA/EPP Interface Card
Page 15

Connecting the WBK20A to Hardware
T
W
D
If you have not already setup your Windows operating system for the WBK20A, do so at
this time. Instructions for Windows 2000 begin on page 3. Instructions for Windows
95/98/Me begin on page 7.
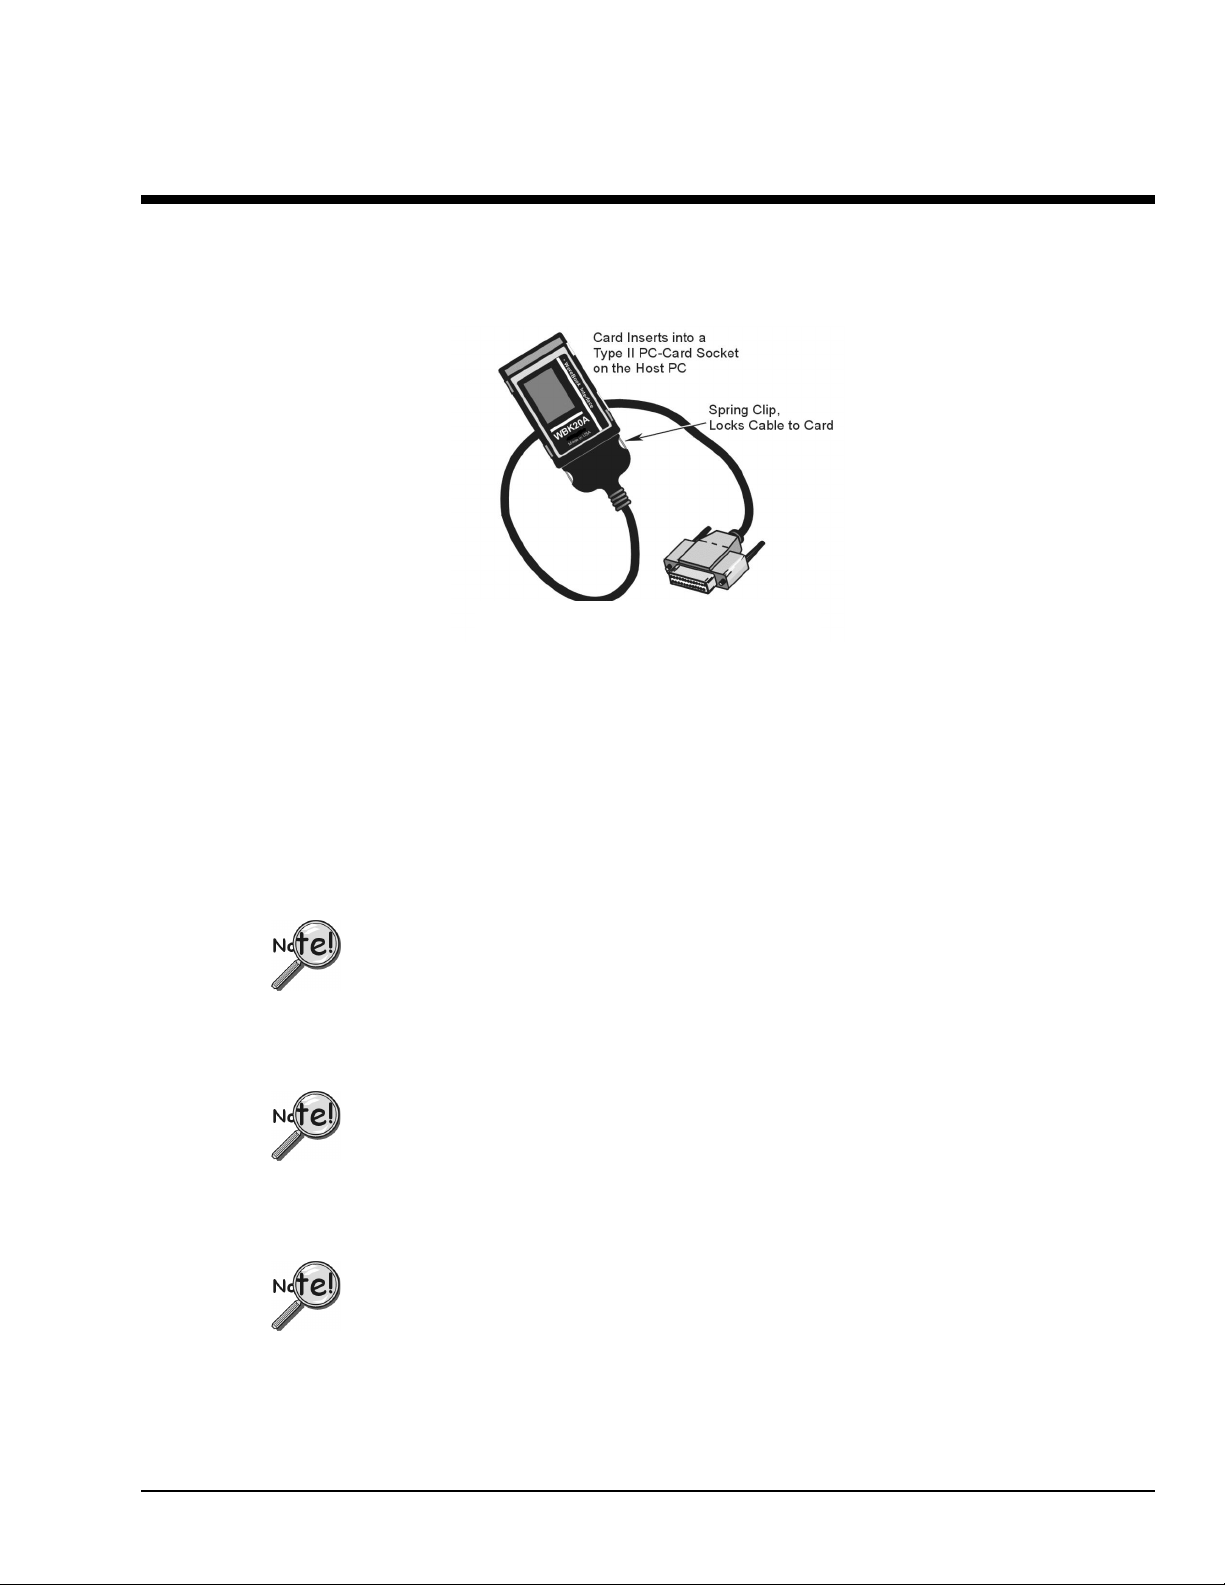
WBK20A Interface Card and Cable
he DB25 connects to:
aveBook’s port labeled, “To Computer”, or to
aqBook’s port labeled, “From PC Parallel Port.”
&$87,21
Do not force the WBK20A or the cable connections in a way that can damage the pins.
Apply a gentle force and adjust the WBK20A’s angle, as needed.
The WBK20A is not a “Hot-Swap” card. To ensure proper operation of the WBK20A
card, boot up the computer only after verifying that the WBK20A is inserted in the PC’s
card slot. Failure to do so may prevent the application software from recognizing the
card as a parallel port device.
If you own a WBK20 [WBK20A’s predecessor], you can use it and cable CA-157-1 to
connect your WaveBook or DaqBook to the PC. WBK20 is identical to WBK20A in
performance, but requires a non-locking cable (CA-157-1). It is important to note that
cables CA-191-1 and CA-157-1 are not interchangeable.
Note: No hardware configuration is required, i.e., there are no jumpers or DIP switches to set. All
configuration is performed via the provided software.
Complete the following steps to link a WaveBook or DaqBook to a PC, via a WBK20A.
1. Ensure the PC is powered “OFF; if not, shutdown and turn the PC “OFF” at this time.
2. Connect the PCMCIA-end of cable (CA-191-1) to the WBK20A.
3. If you have not already done so, insert the WBK20A, label-side up, into a Type II PCMCIA
slot on the PC.
4. Connect the cable’s DB25 connector to the WaveBook or DaqBook, as applicable. The
WaveBook and DaqBook connectors can be identified as follows:
•
The WaveBook’s DB25 connector is labeled “To Computer.”
•
The DaqBook’s DB25 connector is labeled “From PC Parallel Port.”
WBK20A, PCMCIA/EPP Interface Card
10-12-01
11
Page 16

5. Power “ON” the PC.
6. Apply power to the WaveBook or DaqBook.
7. Check the Window’s Device Manager and make note of the WBK20A’s port assignment.
If needed, refer to Finding the Port Assignment, which begins on page 13.
If IOtech WBK20A is not listed in the Windows Device Manager, refer to the
section entitled, “Troubleshooting, Symptom 1,” located on page 21 of this
document.
8. Before using the WBK20A in an actual application, test the interface as described in
Testing the WBK20A Interface. The section begins on page 17.
If the interface test fails, refer to the section entitled, “Troubleshooting,
Symptom 2,” located on page 22 of this document.
12
10-12-01
WBK20A, PCMCIA/EPP Interface Card
Page 17

Finding the Port Assignment
Using Windows 2000 to Find the Port Assignment
Reference Note:
This section applies only to Windows 2000. If you are using Windows 95, Windows 98, or
Windows Me, refer to the subsequent section, Using Windows 95/98/Me to Find the Port Assignment.
Prior to testing and using the WBK20A interface, you need to know the logical LPT port that Windows
assigned to the card. For Windows 2000 users, the port assignment can be found in the Window’s Device
Manager, as follows:
1. From the desktop, navigate to the System Properties window as follows:
Settings
⇒Control Panel
⇒ System
The System Properties window will appear.
2. Click on the Hardware Tab.
3. Click the <Device Manager> button (see following figure.)
After clicking the <Device Manager> button, a device tree (similar to that seen in the
following figure) appears.
WBK20A, PCMCIA/EPP Interface Card
10-12-01
Selecting Device Manager from the Hardware Tab
For Windows 2000
13
Page 18

Finding the Port Assignement of the WBK20A
for Windows 2000
4. On the device tree (above figure) expand the Ports (COM & LPT) selection. At this point
you should see a WBK20 listed. Note that the Device Manager recognizes WBK20A as a
WBK20, since the two cards are identical in function.
5. Look at the WBK20 [WBK20A] port designation. In the above example we see that the
WBK20A is assigned to port LPT2.
6. Make a note of the port designation for use in the WBK20A interface test. The test is
discussed in, Testing the WBK20A Interface, beginning on page 17.
If IOtech WBK20A is not listed in the Windows Device Manager, refer to the
section entitled, “Troubleshooting, Symptom 1,” located on page 21 of this
document.
14
10-12-01
WBK20A, PCMCIA/EPP Interface Card
Page 19

Using Windows 95/98/Me to Find the Port Assignment
Reference Note:
This section applies to Windows 95, Windows 98, and Windows Me. If you are using
Windows 2000, refer to the previous section, Using Windows 2000 to Find the Port Assignment.
1. From the desktop, navigate to the System Properties window as follows:
Settings
⇒Control Panel
⇒ System
The System Properties window will appear.
2. In the Systems Properties window, click on the Device Manager Tab. A device tree will
appear, similar to that seen in the following figure.
3. On the device tree, expand the Ports (COM & LPT) selection. At this point you should see a
WBK20 listed (see figure). Note that the Device Manager recognizes WBK20A as a WBK20,
since the two cards are identical in function.
4. Look at the WBK20 [WBK20A] port designation. In the following example we see that the
WBK20A is assigned to port LPT2.
5. Make a note of the port designation for use in the WBK20A interface test. The test is
discussed in the following section.
WBK20A, PCMCIA/EPP Interface Card
Finding the Port Assignment of the WBK20A
If IOtech WBK20A is not listed in the Windows Device Manager, refer to the
section entitled, “Troubleshooting, Symptom 1,” located on page 21 of this
document.
10-12-01
15
Page 20

16
10-12-01
WBK20A, PCMCIA/EPP Interface Card
Page 21

Testing the WBK20A Interface
N
During the installation of DaqBook Support, or WaveBook Support, from the data acquisition CD, a device
configuration utility (Daq* Configuration) is automatically installed in the Window’s Control Panel. The
utility checks and measures the PC’s port capabilities; and will check the interface of an installed WBK20A
that links a PC to a DaqBook or WaveBook.
Use the Daq* Configuration utility to test the WBK20A interf ace before running an application.
To test the WBK20A Interface you must:
•
Access the Daq* Configuration Utility
•
Add your DaqBook or WaveBook to the computer system.
•
Ensure the Device Settings are correct.
•
Run the “Resource Test.”
•
Check the test results.
A detailed description of these actions follows.
1. Access the Daq* Configuration Utility.
You can access Daq* Configuration by navigating from the desktop as follows:
Settings
⇒Control Panel
⇒ Daq* Configuration
The Daq* Configuration window appears (follo wing figur e).
If there is a device lis ted beneath the
ote:
Computer icon, highlight the device and
click the <Remove> but ton.
Accessing the Daq* Configuration Window
WBK20A, PCMCIA/EPP Interface Card
10-12-01
17
Page 22

2. Add your DaqBook or WaveBook to the computer system.
(a) Click the <Add Device> button (following figure).
(b) Select the applicable DaqBook or WaveBook from the pull-down list.
(c) Click <OK>.
Selecting the Applicable DaqBook or WaveBook
3. Ensure the device settings are correct.
(a) Click on the <Properties> button (lower left button, previous figure). A screen similar to
the following will appear.
(b) If desired, use the Device Name text box (following figure) to rename the device.
(c) Verify the Device Type is correct.
(d) Verify that the Parallel Port agrees with the one that is designated for the WBK20A.
If needed, refer to the section, Finding the Port Assignment, beginning on page 13.
Select the correct Parallel Port from the pull-down list, if applicable.
(e) For best performance, select a Protocol of “Fast EPP(WBK20/21).”
(f) Click the <Apply> button. If the <Apply> button is “grayed-out,” click the <OK> button
and proceed to the next step.
18
Verifying Device Settings
10-12-01
WBK20A, PCMCIA/EPP Interface Card
Page 23

4. Run the “Resource Test.”
(a) Click on the “Test Hardware” Tab. A screen similar to the following figure will appear.
Daq* Configuration, “Test Hardware” Tab
(b) Click the <Resource Test> button. The utility will run the test and display the results. An
example of test results is included in the following figure.
5. Check the “Test results.”
The Test Results (see previous figure) let you know if the WaveBook or DaqBook was detected,
and if the Base Address and Interrupt Level tests passed or failed. In addition, the test provides
performance information in terms of samples/sec. This is the maximum speed at which the data
was transferred.
If your Resource T ests “Passed,” click <OK> and close out of the Daq*Configuration Window.
This completes the WBK20A interface test.
WBK20A, PCMCIA/EPP Interface Card
Test Results
If either Resource Test fails, refer to the section entitled, “Troubleshooting,
Symptom 2,” located on page 22 of this document.
10-12-01
19
Page 24

20
10-12-01
WBK20A, PCMCIA/EPP Interface Card
Page 25

Troubleshooting
Symptom 1.
The WBK20A does not appear in the
Symptom Overview
If the Windows Device Manager fails to list the WBK20A, the installation was unsuccessful. The most
likely cause of an unsuccessful installation is the use of a wrong initialization file (inf).
For Windows 2000 and Windows 95/98/Me operating systems, an initialization file named Iotwbk20.inf
must be installed. Without this WBK20A-specific file, the installation will fail.
Note: In regard to WBK20A installations - in the Windows Device Manager, a yellow question mark and
a device labeled “unknown device” [or “other device”] is usually indicative of a failed installation.
Note: If you completed the installation using an old WBK floppy diskette, or a data acquisition CD
(p/n 1022-0601) that precedes version 2.1; then an outdated or a wrong inf file was selected.
Solution
To solve the problem of an incorrect WBK20A inf file, complete the following steps:
Windows Device Manager
1. Obtain a recent version of the file named: Iotwbk20.inf. You can acquire the file from your
data acquisition CD (version 2.1 or later), or you can download the WBK20A.exe file from an
FTP site. If you prefer to do the later, call for technical assistance.
.
2. In the Windows Device Manager, highlight the “unknown device,” or the “other device” entry.
3. Click the <Remove> button. This will remove the unknown device.
4. Physically remove the WBK20A from the computer. Note that you can do this while
Windows is running.
5. Reinsert the WBK20A into the computer.
6. Redo the installation process and, when prompted, select the correct inf file (Iotwbk20.inf).
You can obtain the file from the data acquisition CD, or from the file location where you
stored the downloaded inf file.
Reference Notes:
➣
Windows 2000 Users - Refer to the Windows 2000 Setup for WBK20A section
of this document, beginning on page 3.
➣
Windows95/98/Me Users - Refer to the Windows 95/98/Me Setup for WBK20A
section of this document, beginning on pa ge 7.
After completing the installation procedure, you should find that the WBK20A is listed in the
Windows Device Manager.
7. Make a note of the WBK20A’s LPT port.
8. Use the Daq* Configuration utility, located in the Windows Control Panel, to test the
WBK20A’s parallel port interface. Refer to previous sections of this document as needed.
WBK20A, PCMCIA/EPP Interface Card
10-12-01
21
Page 26

Symptom 2.
Resource tests in the
Symptom Overview
Daq* Configuration
The resource tests consist of a Base Address Test and an Interrupt Level Test. These tests are
performed through the Daq* Configuration utility. If either test “Fails,” complete the steps that
are provided in the following Solution.
utility failed.
Solution
Test Results
If either of the Resource Tests failed, complete the following steps:
1. Make sure that the primary data acquisition device, e.g., DaqBook or WaveBook, has
adequate power, and that the power is turned on.
2. Check for obvious defects in the WBK20A cable.
3. Verify that good connections exist between the WBK20A and the primary data acquisition
device.
4. Make sure that you have installed the proper software support, i.e., DaqBook Support or
WaveBook Support from the data acquisition CD (p/n 1022-0601, rev 2.1 or later).
5. When running the Daq* Configuration utility, make sure that you have selected the parallel
port that is assigned to the WBK20A. In general, this parallel port is not LPT1, since LPT 1 is
typically the computer’s native parallel port.
If the only selection is LPT1, and LPT1 is not the port assigned to the
WBK20A, then the installation has failed and you need to revisit the previous
troubleshooting section entitled, Symptom 1.
Although Windows 2000 lets you select a port designated LPT1, LPT2, LPT3,
or LPT4, you must be sure to select the LPT port that agrees with the
WBK20A label in the Windows Device Manager.
22
10-12-01
WBK20A, PCMCIA/EPP Interface Card
Page 27

If you have determined that the WBK20A has been installed successfully as an LPT device
but that the Daq*Configuration test does not wor k (after making sure that you have sel ected
the correct LPT port), then continue with step 6.
6. From the Windows Device Manager (in Control Panel ⇒System), see if there is an
exclamation point (!) in front of the WBK20A parallel port designation.
The exclamation point (!), if present, indicates that the parallel port was installed with a
resource conflict (I/O address or IRQ interrupt assignment).
If this is the case, complete the following:
•
Double-click on the WBK20A designation.
•
Select the Resources tab.
•
Uncheck the “use automatic settings” box.
•
Try different Basic Configuration options until you find one that shows no
resource conflicts.
An option is to try selecting either the interrupt request setting number or the
I/O address range and then clicking on the “Change Setting” button to
change the resources individually.
Note: Windows will give a message about whether the new configuration
conflicts with other devices or not.
7. After you have found an acceptable new resource setting, i.e., one that shows no conflicts,
restart the computer, then go to the Daq*Configuration utility and try the communication test
again.
You can find out what resources are currently free by going to the Windows Device
Manager and double-clicking on the Computer icon located at the top of the list. This
brings up a “View Resources” window that has an interrupt request (IRQ) option and
an Input/Output (I/O) resources option. Select each option in turn, and note which
IRQs and I/O addresses are not being used and are available.
8. If software support for other PCMCIA devices has been installed on the computer, but are not
currently being used, it is possible that there is a resource conflict that Windows is not
reporting. You can try to eliminate this conflict through the following process:
•
One at a time, insert each other PCMCIA device into your computer.
•
In the Device Manager, highlight the device, and click the <Remove> button to
remove the device from the list.
•
Repeat this process until you have removed all other PCMCIA devices from the
computer. This frees up the resources that these devices have been using and
eliminates any conflicts that were present.
•
If necessary, search for available resources and select them (see steps 6 and 7).
Restart the computer, go to the Daq*Configuration utility, then retry the
communication test.
Note: If the Resource Tests still fail after performing these steps, and there are no other devices to be
removed, it is likely that a successful WBK20A installation cannot be completed. If this is the
case, you will need to use the computer’s native parallel port. If the native parallel port is
available, and if you can run the port in either ECP or EPP mode, you will be able to obtain a
data transfer rate that approaches the WBK 20A throughput.
WBK20A, PCMCIA/EPP Interface Card
10-12-01
23
Page 28

WBK20A – Specifications
Name/Function
: WBK20A PC-Card Interface, or PCMCIA/EPP Card;
PC Parallel Port Interface and cable for WaveBooks and DaqBooks
Bus Interface
Dimensions
Transfer Rate
Power Consumption
Cable
: CA-191-1. The card-end of this 2-foot long cable includes latches for locking onto the
: 16-bit PCMCIA Card Standard 2.1
: 5 mm (PCMCIA Type II) card
:
In Kbytes/sec
In samples/sec
: 600 Kbytes/sec to 1000 Kbytes/sec (typical)
: 300 K samples/sec to 500 K samples/sec (typical)
1
1
: 5 V @ 35 mA
WBK20A; the Parallel-Port end of the cable has a DB25F connector. The CA-191-1 cable
is included with the WBK20A.
2
Notes
1
The WBK20A is capable of higher transfer rates, but is limited in actual applications due to such
factors as: PC architecture, operating system, available resources, and software implementation.
2
The CA-191-1 cable [used with WBK20A] can not be used with the WBK20. WBK20 uses cable
CA-157-1. The two cables are not interchangeable.
24
10-12-01
WBK20A, PCMCIA/EPP Interface Card
 Loading...