

Page 1
MADE IN
User’s Guide
Shop online at
omega.com
e-mail: info@omega.com
For latest product manuals:
omegamanual.info
DI-720 SERIES
Software-Configurable
Recording Instruments
DI-730 SERIES
Software-Configurable High
Voltage Recording Instruments
Page 2

OMEGAnet®Online Service Internet e-mail
omega.com info@omega.com
Servicing North America:
U.S.A.: One Omega Drive, P.O. Box 4047
ISO 9001 Certified
Stamford, CT 06907-0047
TEL: (203) 359-1660 FAX: (203) 359-7700
e-mail: info@omega.com
Canada: 976 Bergar
Laval (Quebec) H7L 5A1, Canada
TEL: (514) 856-6928 FAX: (514) 856-6886
e-mail: info@omega.ca
For immediate technical or application assistance:
U.S.A. and Canada: Sales Service: 1-800-826-6342 / 1-800-TC-OMEGA
Customer Service: 1-800-622-2378 / 1-800-622-BEST
Engineering Service: 1-800-872-9436 / 1-800-USA-WHEN
TELEX: 996404 EASYLINK: 62968934 CABLE: OMEGA
Mexico: En Espan˜ ol: (001) 203-359-7803 e-mail: espanol@omega.com
FAX: (001) 203-359-7807 info@omega.com.mx
®
®
®
Servicing Europe:
Benelux: Postbus 8034, 1180 LA Amstelveen, The Netherlands
TEL: +31 (0)20 3472121 FAX: +31 (0)20 6434643
Toll Free in Benelux: 0800 0993344
e-mail: sales@omegaeng.nl
Czech Republic: Frystatska 184, 733 01 Karviná, Czech Republic
TEL: +420 (0)59 6311899 FAX: +420 (0)59 6311114
Toll Free: 0800-1-66342 e-mail: info@omegashop.cz
France: 11, rue Jacques Cartier, 78280 Guyancourt, France
TEL: +33 (0)1 61 37 2900 FAX: +33 (0)1 30 57 5427
Toll Free in France: 0800 466 342
e-mail: sales@omega.fr
Germany/Austria: Daimlerstrasse 26, D-75392 Deckenpfronn, Germany
TEL: +49 (0)7056 9398-0 FAX: +49 (0)7056 9398-29
Toll Free in Germany: 0800 639 7678
e-mail: info@omega.de
United Kingdom: One Omega Drive, River Bend Technology Centre
ISO 9002 Certified Northbank, Irlam, Manchester
M44 5BD United Kingdom
TEL: +44 (0)161 777 6611 FAX: +44 (0)161 777 6622
Toll Free in United Kingdom: 0800-488-488
e-mail: sales@omega.co.uk
It is the policy of OMEGA Engineering, Inc. to comply with all worldwide safety and EMC/EMI
regulations that apply. OMEGA is constantly pursuing certification of its products to the European Ne
Approach Directives. OMEGA will add the CE mark to every appropriate device upon certification.
The information contained in this document is believed to be correct, but OMEGA accepts no liability for any
errors it contains, and reserves the right to alter specifications without notice.
W ARNING: These products are not designed for use in, and should not be used for, human applications.
w
Page 3

DI-720/DI-730 Series User Manual
Table of Contents
1. Introduction ........................................................................................................................................ 1
Features .............................................................................................................................................. 1
Analog Input ...................................................................................................................................... 1
Analog Output ................................................................................................................................... 2
Digital Input and Output (DI-720 Series Only) ................................................................................. 2
2. Specifications ...................................................................................................................................... 3
Signal Connections ............................................................................................................................ 3
Interface Characteristics .................................................................................................................... 3
Analog Inputs .................................................................................................................................... 3
Analog Outputs .................................................................................................................................. 4
Digital Input/Output (DI-720 Series Only) ....................................................................................... 4
Timing Input/Output .......................................................................................................................... 4
Input Scan List ................................................................................................................................... 4
Output Scan List ....................................................... ..... .................................................................... 5
On-board DSP ........................................................... ......................................................................... 5
Physical/Environmental ..................................................................................................................... 5
3. Getting Started ................................................................................................................................... 7
Unpacking .......................................................................................................................................... 7
Applying Power to the DI-7x0 Series Instrument ............................................................................. 7
Connecting the DI-7xx Series Instrument to your Computer ............................................................ 8
Parallel (Printer) Port Operation (All Instruments) ..................................................................... 8
Ethernet Operation (DI-720-EN or DI-730-EN Only) ................................................................ 9
USB Operation (DI-720-USB or DI-730-USB Only) ................................................................. 9
Controls and Indicators ................................................................................. ..... .... ............................ 10
DI-720 Series Instrument Front Panel ........................................................................................ 11
DI-730 Series Instrument Front Panel ........................................................................................ 13
Instrument Rear Panel ................................................................................................................. 14
PRINTER PORT .................................................................................................................. 14
STATUS LAMPS ................................................................................................................. 14
POWER INPUT JACK ........................................................................................................ 14
POWER SWITCH ................................................................................................................ 14
ETHERNET PORT .............................................................................................................. 15
RESET SWITCH .................................................................................................................. 15
USB PORT ........................................................................................................................... 15
4. Calibration Verification ..................................................................................................................... 17
Required Equipment .......................................................................................................................... 17
A/D Calibration (For DI-720 and DI-730 Series Instruments) ................................................... 17
D/A Calibration (DI-720 Instruments Only) ............................................................................... 17
A/D Calibration Verification (DI-720 and DI-730 Series Instruments) ............................................ 17
D/A Calibration (DI-720 Series Only) .............................................................................................. 18
Offset Calibration Verification (DI-720 Series Only) ....................................................................... 19
Table of Contents
iii
Page 4

DI-720/DI-730 Series User Manual
Full Scale (Span) Calibration Verification (DI-720 Series Only) ..................................................... 19
Offset Calibration Verification (DI-730 Series only) ........................................................................ 20
Full Scale (Span) Calibration Verification (DI-730 Series Only) ..................................................... 20
5. Block Diagram .................................................................................................................................... 21
Table of Contents
iv
Page 5

DI-720/DI-730 Series User Manual
1. Introduction
Congratulations on your purchase of a DI-720 Series or DI-730 Series data acquisition instrument. These instruments
permit data acquisition on IBM personal computers and compatibles from either Windows or the DOS programming
environments.
This manual describes how to connect and use all of the instruments in the DI-720 and DI-730 Series. Throughout the
majority of this manual, enough similarity exists to describe all instruments with the same procedure. The convention
used to annotate this similarity is "DI-7x0 Series" (this means that the procedure or information applies equally to the
DI-720-P, DI-720-EN, DI-720-USB, DI-730-P, DI-730-EN, or to the DI-730-USB). In cases where the resemblance
is not equal, separate procedures/descriptions exist for each instrument.
It is assumed that you have a general understanding of data acquisition, digital I/O, and DSP operations, and that you
possess enough proficiency in software to write your own application and/or diagnostic programs.
Features
The DI-7x0 Series provides the following features:
• All instruments connect to the parallel port of any desktop, transportable, notebook, or laptop PC-compatible
computer. Most communicate through the PC's parallel port in standard, bi-directional, or EPP mode. Models DI720-EN and DI-730-EN only communicate in bi-directional or EPP parallel port modes. Models DI-720-EN, DI730-EN, DI-720-USB, and DI-730-USB add optional Ethernet and USB communication modes respectively.
• Per channel software-configurable settings:
Single-ended or differential input (DI-720 Series only).
Input gain.
Sample rate.
Signal Averaging.
• Flexible power requirements. All instruments operate from any st andard 60Hz, 120V AC wall outlet with the
supplied power adapter. Or, power the instruments from any +9 to +36 volt DC source, such as a car battery.
• 250kHz burst sampling rate.
• 16-bit A/D converter, for high resolution measurement accuracy.
• 256-entry input list allows you to scan any sequence of input channels at any available gain. The 256-entry input
list also allows you to average 32,768 consecutive readings per channel for low-noise output signals.
• 256 counters are assigned to the input list allowing each channel to be programmed for a different sample rate.
• Supports analog pre- and post-triggering of data acquisition based on the level and slope of a specified channel.
The following provides a brief overview of the major subsystems of the DI-7x0 Series.
Analog Input
32 single-ended/16 differential analog inputs (on DI-720 Series instruments) or 8 differential analog inputs (on DI730 Series instruments) allow your analog signals to be converted into 16-bit digital data via the onboard A/D converter.
The DI-720 Series features software-programmable input measurement ranges of ±10V full scale at a gain of 1; ±5V
full scale at a gain of 2; ±2.5V full scale at a gain of 4; and ±1.25V full scale at a gain of 8. The DI-730 Series features
software programmable input measurement ranges of ±10mV, ±100mV, ±1V, ±10V, ±100V, and ±1000V full scale
(the ±1000V range is useable up to ±800 VDC or peak AC).
Introduction
1
Page 6

DI-720/DI-730 Series User Manual
Analog Output
On DI-720 instruments, the D/A subsystem features two, buffered, 12-bit D/A converters for outputting analog data.
DI-730 instruments have only one 12-bit D/A converter for outputting analog data.
Both instruments feature a software-programmable output range of ±10V.
Both instruments feature an onboard 16-entry output counter list that allows you to write analog or di gital output at
the maximum conversion rate of the instrument.
Digital Input and Output (DI-720 Series Only)
The DI-720 Series contains 8 each input and output lines for input/output operations. These lines provide an interface
for the transfer of data between user memory and a peripheral device connected to the instrument. Digital inputs can
monitor alarms or sensors with TTL outputs, while digital outputs can drive TTL inputs on control or measurement
equipment.
Introduction
2
Page 7

DI-720/DI-730 Series User Manual
2. Specifications
Signal Connections
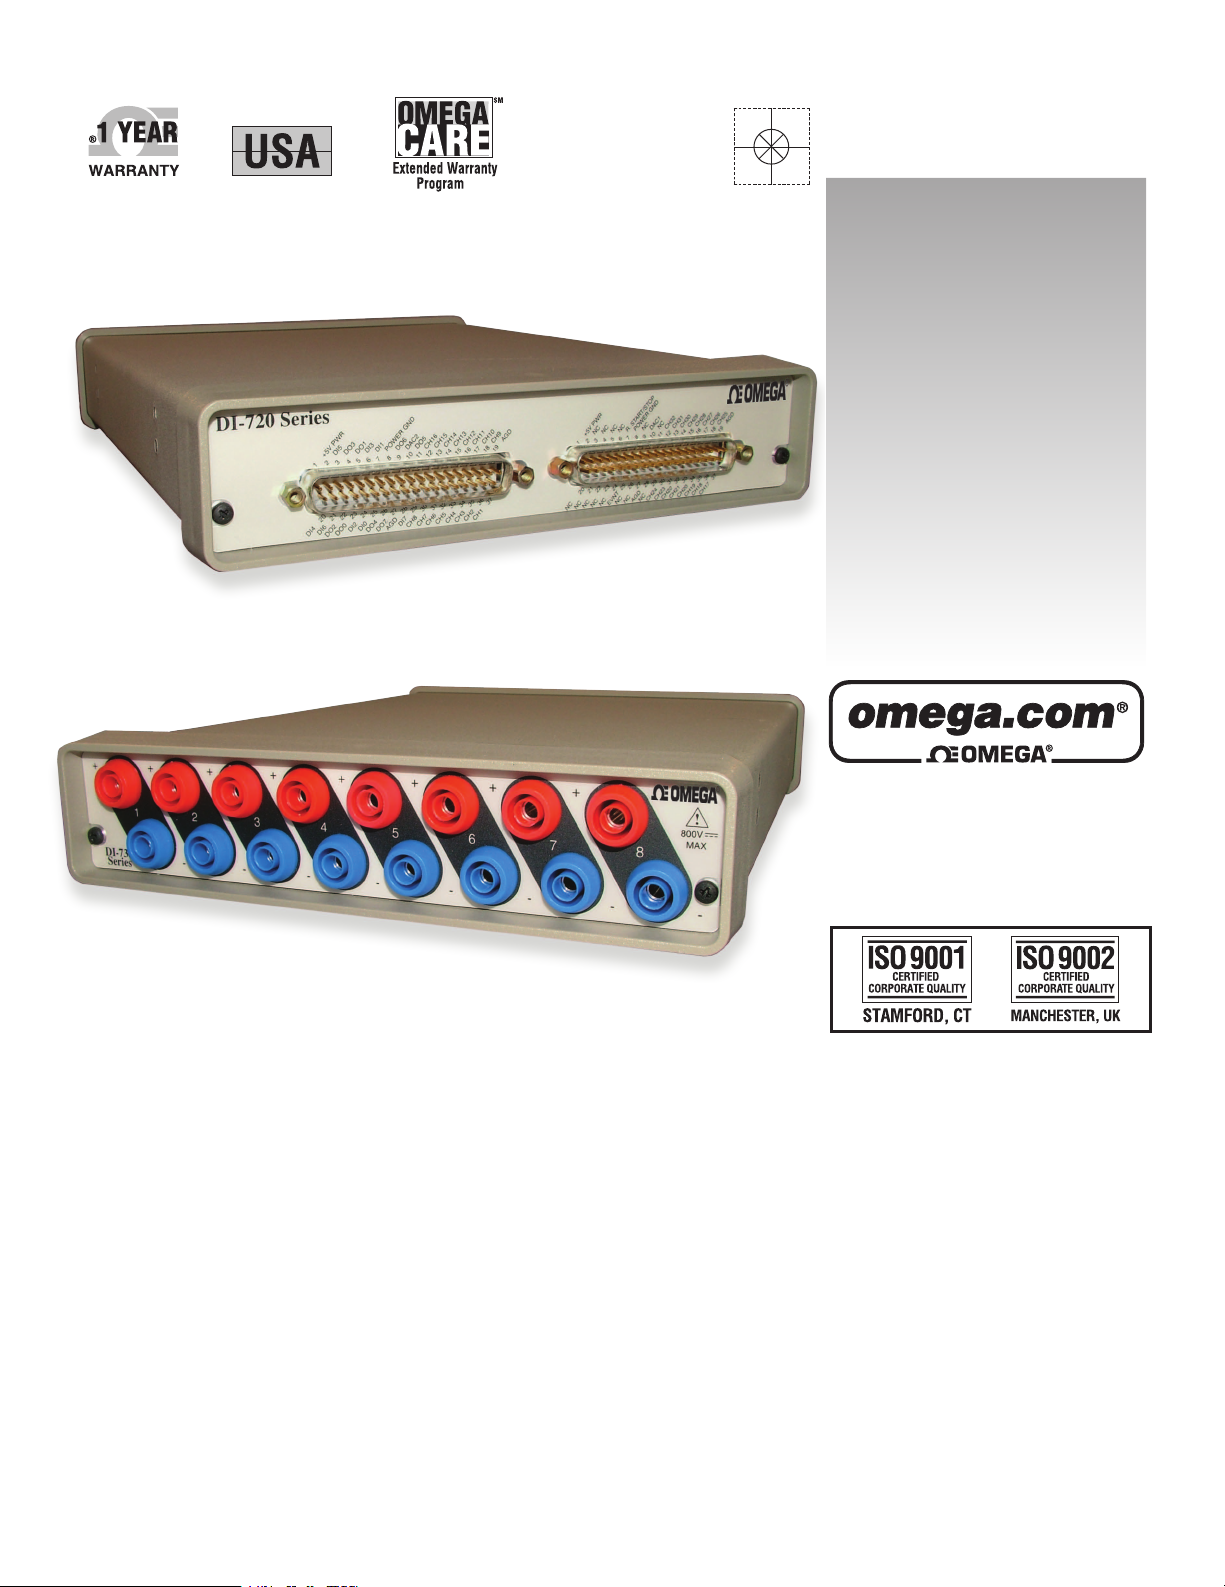
Signal connections are made directly to the two, 37-pin, D-type connectors on the front panel of DI-720 Series
instruments or to the 5-way binding posts (banana jacks) on the front panel of DI-730 Series instruments. On DI-720
Series instruments, signal connections can also be made with the DI-205, which is an optional, general purpose signal interface that provides convenient, 5-way binding posts (banana jacks) for analog input signals and a screw-terminal strip for digital and analog output signals. Refer to chapter 5 Accessories in this manual for complete DI-205
details. Note that the DI-205 is an extra-cost option that is not included with the purchase of a DI-720 Series instrument.
Interface Characteristics
Compatible computer architecture: Any PC architecture. Connects to computer via the parallel (or printer)
port. Supports standard, bi-directional, or EPP parallel port communication modes (models DI-720-EN and DI-730-EN only support bi-directional and EPP parallel port communication modes). Optional
communication interfaces include Ethernet and Universal Serial Bus
(USB).
Analog Inputs
Number of input channels:
DI-720 Series: 32 single-ended, 16 differential (software selectable per channel)
DI-730 Series: 8 differential
Converter resolution: 16-bit
Common mode rejection ratio:
DI-720 Series: 80 dB minimum @ Av=1
DI-730 Series: 20 dB minimum @ DC to 60Hz
Accuracy: ±0.25% of full scale range
Crosstalk: -75 dB @ 100kHz and 100W unbalance
Sample throughput rate:
Printer port: Standard port 40,000; bi-directional port 80,000; EPP 250,000 samples/
second max (software selectable per channel)
USB: 200,000 samples/second max
Ethernet: 2,000 samples/second max
Maximum analog measurement range
(software selectable per channel)
DI-720 Series: ±10V full scale at a gain of 1
±5V full scale at a gain of 2
±2.5V full scale at a gain of 4
±1.25V full scale at a gain of 8
Specifications
3
Page 8

DI-720/DI-730 Series User Manual
DI-730 Series: ±10mV full scale
±100mV full scale
±1V full scale
±10V full scale
±100V full scale
±1000V full scale (±1000V range useable up to ±800VDC or peak AC)
Gain error: 1 bit max @ 1kHz sample rate
Input offset voltage: 1 bit max @ 1kHz sample rate
Input settling time: 4µs to 0.01% at all gains
Input impedance
DI-720 Series: MΩ resistor tied to GND on the input channel
DI-730 Series: 0 MΩ
Analog Outputs
Number of channels:
DI-720 Series: Two buffered analog outputs
DI-730 Series: One analog output
Resolution: 12-bit; 1 part in 4,096 @ 250kHz
Output voltage range: ±10V full scale
Output impedance: 10Ω
Sample rate: standard port 40,000; bi-directional port 80,000; EPP 250,0 00 samples/
second max (software selectable per channel)
Output offset voltage: 1 bit max @ 1kHz sample rate
Gain error: 1 part in 16,384 @ 1kHz
Digital Input/Output (DI-720 Series Only)
Capacity: 8 each input and output
Compatibility: TTL compatible
Max source current: 0.4mA @ 2.4V
Max sink current: 8mA @ 0.5V
Digital input termination: 4.7kΩ pull-up to +5VDC
Timing Input/Output
Number of input counters: 256
Number of output counters: 16
Resolution: 1 part in 32,768
Base clock accuracy: 0.01%
Counter input frequency: 16 MHz
Input Scan List
Capacity: 240 elements
Specifications
4
Page 9

Output Scan List
Capacity 16 elements
On-board DSP
T y pe: Analog Devices ADSP2181, 32 MIPS
Clock frequency: 16 MHz external, 64 MHz internal
Data memory: 8k words
Program memory: 8k words
Physical/Environmental
Box dimensions: 7.29"W by 9"L by 1.52"H
I/O connector:
DI-720 Series: 37-pin male D-type
DI-730 Series: Banana jacks
Weight: 3 lbs
Operating environment:
Component temperature: 0º to 70º C
Relative humidity: 0% to 90% non condensing
Storage environment:
Temperature: 55º to 150º C
Relative humidity: 0% to 90% non condensing
DI-720/DI-730 Series User Manual
Specifications
5
Page 10

DI-720/DI-730 Series User Manual
Notes:
Specifications
6
Page 11

DI-720/DI-730 Series User Manual
3. Getting Started
Unpacking
The following items are included with each DI-7x0 Series instrument. Verify that you have the following:
• DI-7x0 Series instrument (i.e., DI-720-P, DI-720-EN, DI-720-USB, DI-730-P, DI-730-EN, or DI-730-USB)
• Communications cable designed to connect the DI-7x0 Series instrument to your computer's parallel (or printer)
port. If you ordered a DI-720-USB or DI-730-USB, you will have a second cable designed to connect the instru
ment to your computer's USB port.
• CD-ROM, "The Software Resource"
• DI-720 Series/DI-730 Series User's Manual (which you are currently reading)
• WINDAQ Software, in one of two forms:
If you ordered WINDAQ /Pro or WINDAQ /Pro+ recording software with your DI-7xx Series instrument (an
extracost option), there will be a sticker with a password on the sleeve of your CD-ROM. This password will
give you access to that software. If you did not order WINDAQ /Pro or WINDAQ /Pro+ recording software, the
WINDAQ/Lite recording software will be available to you without a password.
-
If an item is missing or damaged, call the manufactur er. They will guide you through the appropriate steps for replacing missing or damaged items. Save the original packing material in the unlikely event that your unit must, for any
reason, be sent back to the manufacturer.
Applying Power to the DI-7x0 Series Instrument
Use the following procedure to apply power to your DI-7x0 Series instrument:
1. Plug the five-pin DIN end of the power adapter cable into the five-pin jack labeled POWER on the rear panel of
the instrument.
POWER jack
Power adapter
cable
Getting Started
7
Page 12

DI-720/DI-730 Series User Manual
2. Plug one end of the supplied power cord into the power adapter and the other end into any standard 120VAC,
60Hz, single-phase outlet.
If an alternate power source is to be used, refer to the following pin-out diagram for power requirements.
3. Turn the POWER switch on.
Connecting the DI-7xx Series Instrument to your Computer
All DI-7xx Series instruments use your computer’s parallel (or printer) port to interface digital and analog signals to
your computer. Optionally, DI-7xx Series instruments with Ethernet or USB communication ports can also be used to
interface digital and analog signals to your computer, although not concurrently with the printer port.
Parallel (Printer) Port Operation (All Instruments)
Plug the appropriate end of the supplied parallel communications cable to the 25-pin male connector labeled
PRINTER PORT on the rear panel of the DI-7xx Series instrument and connect the other end of this cable to
yourcomputer’s parallel (printer) port.
7xx Series instruments, other parallel port communication modes allow data to pass from the instrument to your computer at higher speeds. Depending on the age of your computer and/or the sophistication of your parallel port, you
may have as many as four parallel port communication mode options: standard, bi-directional (PS/2), enhanced parallel port (EPP) and extended capabilities port mode (ECP). DI-7xx Series instruments support the following three parallel port operating modes:
Parallel Port Mode
Standard 40,000 samples/second
Bi-directional (PS/2) 80,000 samples/second
EPP (DI-720) 250,000 samples/second
EPP (DI-730) 150,000 samples/second
Maximum Data Throughput*
*This test is done under Windows 98.
Getting Started
8
Page 13

DI-720/DI-730 Series User Manual
The parallel port mode you use will depend on how many channels you wish to record and how fast you wish to
record them.
If, for example, you are only planning to record five channels at 20 Hz each, then standard mode operation will be
more than adequate (5 channels × 20 Hz = 100 Hz throughput, which is well within the DI-7xx Series 40KHz standard mode throughput). If, however, you plan to record at a much higher sample rate, for example five channels at
10KHz each, the standard parallel port mode will not reliably record your data gap-free, since this throughput rate
exceeds the DI-7xx’s standard mode maximum throughput (5 channels × 10KHz = 50KHz, which is greater than the
40KHz standard mode maximum throughput spec). To reliably record data gap-free at this sample rate, your computer’s parallel port must be operated in something other than standard mode.
The only way to change your computer’s parallel port operating mode (if necessary) is to access your computer’s
CMOS setup routine. This usually can be accomplished by pressing a certain key (or keys) on your keyboard at the
beginning of your computer’s boot-up process. In some cases, a message telling you which key to press is briefly displayed on your monitor at the beginning of the boot-up process. If you do not see such a message, consult your computer documentation for complete CMOS setup routine details.
Ethernet Operation (DI-720-EN or DI-730-EN Only)
If you have the DI-720-EN or DI-730-EN and you want to use the optional Ethernet communications interface, plug
the appropriate end of your Ethernet communications cable into the 10base-T Ethernet port (labeled ETHERNET) on
the rear panel of the instrument. Note that you must disconnect the parallel communications cable from the 25-pin
male connector labeled PRINTER PORT on the rear panel of the instrument (if connected) in order to use the Ethernet communications interface. Parallel and Ethernet communications cannot be used concurrently.
Connect Ethernet
communications cable here
USB Operation (DI-720-USB or DI-730-USB Only)
If you have the DI-720-USB or DI-730-USB and you want to use the optional USB commu nicati ons interface, you
must use Windows 98 or better.
1. With your computer powered, Windows running and all other applications closed, plug the appropriate end of the
supplied USB communications cable into the USB port (labeled USB) on the rear panel of the instrument. Con
nect the other end of this cable to your computer’s USB port.
Connect USB
cable here
Getting Started
9
-
Page 14

DI-720/DI-730 Series User Manual
The addition of this new hardware will be “sensed” by Windows and the “Add New Hardware Wizard” will automatically be launched, anticipating the installation of a device driver for the new hardware.
2. Insert the WINDAQ Resource CD-ROM into your CD-ROM drive. (The directory on the CD-ROM that contains
the appropriate drivers is D:\USB drivers.)
3. From the initial “Add New Hardware Wizard” screen click Next to get started, then choose the search for best
driver option (recommended) and click Next.
4. Specify the CD-ROM drive that contains the WINDAQ Resource CD-ROM as the search location and click
Next.
5. Follow the onscreen prompts. Depending on how Windows was originally installed on your computer, you may
need additional files from your Windows distribution CD-ROM to complete the driver installation. A dialog box
will appear indicating the drivers have been found. Click Next to continue.
With the driver installation complete, continue with step 6 to install WINDAQ software. Before continuing, makesure
the WINDAQ Resource CD-ROM is in your CD-ROM drive.
6. Click the Start button on the taskbar and then click Run…
7. In the text box that appears, type d:setup (where d specifies the drive containing the CD-ROM you inserted in
step 2) and press ENTER. A welcome dialog box appears onscreen.
8. Choose the OK button to start the installation.
9. Follow the instructions onscreen to specify the directory where you want to install WINDAQ software. We recommend you accept the default path, but you can name this new directory anything you like. Simply substitute
the desired drive and directory in the Destination Directory text box.
10. Choose the OK button. A dialog box is displayed asking if you would like to make backup copies of all files
replaced during the installation. This is offered as a safety courtesy; backup copies are not required. Choose the
No button if you don’t want to make backups. Choose the Yes button to create backups. If you decide to create
backups, you will be prompted to specify a backup file directory.
11. Specify a destination (or group window) for WINDAQ software icons. Again we recommend the default path,
but you can specify any group window you like.
12. Enter the ID address of the box. Every DI-720-USB or DI-730-USB is initially assigned an ID address of “0”. If
you are adding only one DI-720-USB or DI-730-USB to your system, do nothing. Default ID address “0” will
work fine.
13. If you are installing only one DI-720-USB or DI-730-USB on your system, then installation is complete. If you
are installing multiple devices, change the Device ID and run through the installation for each device (this does
not install multiple versions of the software).
Controls and Indicators
The following describes the user accessible items on the DI-720 and DI-730 Series instruments.
Getting Started
10
Page 15

DI-720/DI-730 Series User Manual
DI-720 Series Instrument Front Panel
Connect 16 single-ended or 8 differential
inputs directly to each of these connectors.
The 37-pin male “D” connector on the left is used to interface analog input channels 1 through 16, eight digital
inputs, and eight digital outputs to the DI-720 Series instrument. The analog inputs are labeled CH1 IN through CH16
IN, the digital inputs are labeled DI0 through DI7, and the digital outputs are labeled DO0 through DO7. Other items
include DAC2, which is a digital to analog converter that serves as a general-purpose analog output accessible
through WINDAQ and SDK software, and two analog grounds labeled AGD. On DI-720 Series instruments with the
Ethernet communications option (models DI-720-EN), digital outputs are not available.
DI-720 Series instruments can accept 32 high-level or preconditioned analog inputs in single-ended configuration or
16 high-level or preconditioned analog inputs in differential configuration. High-level inputs are typically low impedance, no-conditioning-required signals in the range of ±1.25 to ±10 volts full scale. Single-ended inputs are configured by connecting one signal lead to the desired channel and the other signal lead to analog ground (AGD).
Signal Leads
Channel 1 configured for single-ended operation
Differential inputs occupy two channels (i.e., these channel pairs constitute a differential input: 1 and 9, 2 and 10, 3
and 11, 4 and 12, 5 and 13, 6 and 14, 7 and 15, 8 and 16, etc.), with the lowest numbered channel in the pair assuming
the positive (+) input and the channel number. For example, say we have channels 2 and 10 configured as a differen-
Getting Started
11
Page 16

DI-720/DI-730 Series User Manual
tial input. Channel 2 is the positive (+) input, channel 10 is the negative (-) input, and the pair is referred to as “channel 2 differential.”
- input
Signal Leads
+ input
Channel 2 configured for differential operation
The 37-pin male “D” connector on the right, labeled EXPANSION, serves a dual purpose. In additio n to provi ding
access to analog input channels 17 through 32, this connector also allows you to expand (increase) the total analog
input channel capacity of the instrument. Up to 240 channels are possible with th e DI-720 Series and expansion
instruments. Pinout is as follows:
This connector also includes DAC1, which is a second digital-to-analog converter that serves as a general purpose
analog output; R. START/STOP , which allows you to remotely start and stop data storage to disk with a switch or
TTL level signal; EVNT, which allows you to remotely trigger event markers with a switch or TTL level signal; and
two analog grounds labeled AGD.
Getting Started
12
Page 17

DI-720/DI-730 Series User Manual
DI-730 Series Instrument Front Panel
DI-730 Series instruments can accept any eight differential analog inputs within a range of ±10mV to ±800VDC (or
peak AC). Its ±1000V of channel-to-channel and input-to-output isolation protect delicate control circuits, computer
equipment, and personnel from high common mode voltages.
When optional cable 100679 is plugged into the expansion connector on the rear panel of the DI-730, pinout is as follows:
Getting Started
13
Page 18

DI-720/DI-730 Series User Manual
Instrument Rear Panel
The rear panel options are the same for DI-720 and DI-730 Series instruments:
EXPANSION
PRINTER PORT
EXPANSION
PRINTER PORT
EXPANSION
PRINTER PORT
Instrument Rear Panel
ACTIVE POWER
Instrument Rear Panel with Ethernet Option
ETHERNET
ACTIVE POWER
Instrument Rear Panel with USB Option
USB
ACTIVE POWER
+9 to
+36 V
!
9-36V
@3A MAX
+9 to
+36 V
!
9-36V
@3A MAX
+9 to
+36 V
!
9-36V
@3A MAX
Common
Common
Common
PRINTER PORT
The printer port provides a way to get your input signals into your computer. All DI-720 and DI-730 Series instruments support standard, bi-directional and enhanced (EPP) printer port communication modes except for DI-720-EN
models, which only support bi-directional and EPP modes.
STATUS LAMPS
DI-720 and DI-730 Series instruments pro vi de two status lamps:
ACTIVE In DI-7xx-P instruments, this indicator will glow red whenever the instrument is streaming data. This
includes all digital input/output (where applicable), analog output and analog input function s.
• In DI-7xx-EN instruments, this indicator will glow red whenever data is sent back to the host computer.
• In DI-7xx-USB instruments, this indicator will glow when the USB controller is enabled.
POWER This indicator glows green when power is applied to the DI-720 or DI-730 Series instrument.
POWER INPUT JACK
Allows you to apply power to the instrument. Power can be applied with the included power adapter or you can use
an alternate source, as long as it is suitable (+9 to +36VDC @ 3A maximum).
POWER SWITCH
Controls power to the DI-720 or DI-730 Series instrument. 1 is on, 0 is off.
Getting Started
14
Page 19

DI-720/DI-730 Series User Manual
ETHERNET PORT
In addition to printer port communications, models DI-720-EN and DI-730-EN add Ethernet communication capability with this 10base T port. Note that the Ethernet communication interface cannot be used concurrently with the
printer port.
RESET SWITCH
Models DI-720-EN and DI-730-EN also add a reset switch for resetting Ethernet communications.
USB PORT
In addition to printer port communications, models DI-720-USB and DI-730-USB add Universal Serial Bus (USB)
communication capability with this port. Note that the USB communication interface cannot be used concurrently
with the printer port.
Getting Started
15
Page 20

DI-720/DI-730 Series User Manual
Notes:
Getting Started
16
Page 21

DI–720/DI-730 Series User Manual
4. Calibration Verification
This section provides calibration verification procedures for the A/D and D/A subsystems of the DI-7xx unit. Your
instrument is calibrated before it is shipped and, therefore, does not need immediate calibration. Should your unit not
comply with the calibration guidelines presented below, arrange to have the manufacturer recalibrate your instrument.
Required Equipment
A/D Calibration (For DI-720 and DI-730 Series Instruments)
• A precision DVM with resolution as a function of the input range being calibrated:
minimum DVM resolution = Instrument FSR x 0.1%
For example, suppose we have a DI-720-P and we want to calibrate the ±10 volt range (the DI-720 delivers ±10
volts at a gain of 1):
10V x 0.1% = 10mV
So we would need a DVM with a resolution of 10V or more to calibrate the ±10 volt range.
• A stable voltage source with a stability specification equal to or greater than the minimum DVM resolution, as
calculated above, required to calibrate the instrument at the highest desired gain.
OR
• An alternative is to use a voltage calibrator with enough resolution, as calculated above, to calibrate the instru-
ment at the highest desired gain.
D/A Calibration (DI-720 Instruments Only)
• A precision DVM with resolution of at least 1 mv.
A/D Calibration Verification (DI-720 and DI-730 Series Instruments)
Calibration verification of DI-720 Series instruments' A/D subsystem is performed on channel 1, with all other channels returned to analog common. Calibration of DI-730 Series instrument 's A/D subsystem is performed on a channel-by-channel basis for the 8 wide range inputs and on channel 17 for the general-purpose channels. The following
figures illustrate the necessary connections:
Calibration Verification
17
Page 22

DI–720/DI-730 Series User Manual
+
CH 8
+
DVM
Voltage
Source
+
CH 1
CH 2
CH 3
CH 4
CH 5
CH 6
CH 7
CH 8
CH 9
CH 30
CH 31
CH 32
S. GND
(signal
ground)
DI-720 Series Instruments and 16 DI-730 General-Pur-
CH 2
+
CH 3
++
CH 1
++
DVM
DI-730 Series 8 Wide-Range Channels
Voltage
Source
pose Channels
Or if you are using the alternative voltage calibrator, the following figure illustrates the necessary connections:
+
CH 8
Voltage
Calibrator
CH 2
+
CH 3
++
+
CH 1
CH 2
CH 3
CH 4
CH 5
CH 6
CH 7
CH 8
CH 9
CH 1
+
CH 30
CH 31
CH 32
S. GND
(signal
ground)
DI-720 Series Instruments and 16 DI-730 General-Pur-
Voltage
Calibrator
DI-730 Series 8 Wide-Range Channels
pose Channels
D/A Calibration (DI-720 Series Only)
D/A calibration involves adjusting the analog outputs to the correct full-scale range using the analog data value. The
following figure illustrates the necessary connections:
Calibration Verification
18
Page 23

DI–720/DI-730 Series User Manual
When the above circuit is connected, the calibration program can be initiated by typing “DI720CAL” at the DOS
prompt. D/A calibration is accomplished by following the on screen prompts.
Offset Calibration Verification (DI-720 Series Only)
1. Connect your voltage calibrator, or combination DVM and voltage source to your DI-7XX instrument as shown
above. Apply zero volts to the instrument (or short the instrument's analog channel input to ground).
2. Open the WINDAQ/Lite/Pro/Pro+ data acquisition screen. Enable the channel you will use to quantify offset.
Since all channels are adjusted together, any channel may be selected. Enable a maximum burst sample rate of
50,000 Hz by selecting EDIT-PREFERENCES- MAX SAMPLE RATE. Enable a W
Set the Acquisition Mode to AVERAGE and the gain factor to 1 through W
menu for the selected channel.
3. Referring to WINDAQ software's voltage display for the channel you're evaluating, compare this value to that
given in the OFFSET column of TABLE (1) for the selected gain factor.
4. Repeat steps 2 and 3 using a gain of 2, 4 and 8 for the selected channel.
5. If any readings are out of the acceptable ranges described in TABLE (1) arrange to have your instrument recali-
brated by the manufacturer.
INDAQ’s CHANNEL SETTINGS
INDAQ sample rate of 50 Hz.
Full Scale (Span) Calibration Verification (DI-720 Series Only)
1. Referring again to TABLE (1) set the instrument's gain to 1 and apply the voltage indicated by the SPAN VOLT-
AGE column of TABLE (1) to the selected channel. Note that since all channels are calibrated together, any
channel may be selected.
2. Verify the read ing by comparing the value displayed by WINDAQ software with the value of TABLE (1) in the
SPAN ACCURACY column.
3. Repeat for gain selections of 2, 4, and 8.
4. If any readings are out of the acceptable ranges described in TABLE (1) arrange to have your instrument recali-
brated by the manufacturer..
TABLE 1
Gain Factor Offset @ 0V Span Voltage Span Accuracy*
1 0V ±20mV 9.800V 9.800V ±25mV
2 0V ±10mV 4.900V 4.900V ±12.5mV
4 0V ±5mV 2.400V 2.400V ±6.25mV
8 0V ±5mV 1.200V 1.200 ±3.125mV
* Excludes offset errors.
TABLE 2 (Only applicable for DI-722 differential channels)
Gain Factor Offset @ 0V Span Voltage Span Accuracy*
1 0V ±40mV 19.600V 19.600V ±50mV
2 0V ±20mV 9.800V 9.800V ±25mV
4 0V ±10mV 4.800V 4.800V ±12.5mV
8 0V ±10mV 2.400V 2.400 ±6.25mV
* Excludes offset errors
Calibration Verification
19
Page 24

DI–720/DI-730 Series User Manual
Offset Calibration Verification (DI-730 Series only)
1. Connect your voltage calibrator, or combination DVM and voltage source to your DI-730 instrument as shown
above. Apply zero volts to the instrument (or short the instrument's analog channel input to ground).
2. Open the WINDAQ/Lite/Pro/Pro+ data acquisition screen. Enable the channel you want to verify. Enable a maximum burst sample rate of 50,000 Hz by selecting EDIT-PREFERENCES-MAX SAMPLE RATE. Enable a
W
INDAQ sample rate of 50 Hz. Set the Acquisition Mode to AVERAGE select the 10mV range through
W
INDAQ's CHANNEL SETTINGS menu for the selected channel.
3. Referring to WINDAQ software's voltage display for the channel you're evaluating, compare this value to that
given in the OFFSET column of TABLE (2) for the selected range.
4. Repeat steps 2 and 3 using for each measurement range.
5. Select the next channel, and repeat steps 2 through 4.
6. If any readings are out of the acceptable ranges described in TABLE (2) arrange to have your instrument recalibrated by the manufacturer.
Full Scale (Span) Calibration Verification (DI-730 Series Only)
1. Referring again to TABLE (2) select the 10mV range and apply the voltage indicated by the SPAN VOLTAGE
column of TABLE (2) to the selected channel.
2. Verify the read ing by comparing the value displayed by WINDAQ software with the value of TABLE (2) in the
SPAN ACCURACY column.
3. Repeat steps 1 and 2 for all ranges.
4. Repeat steps 1 through 3 for all channels.
5. If any readings are out of the acceptable ranges described in TABLE (1) arrange to have your instrument recalibrated by the manufacturer.
TABLE (2)
Channel Group Range Offset @ 0V Span Voltage Span Accuracy*
1 through 8 10mV 0 ±0.04mV 9mV 9mV ±0.025mV**
100mV 0 ±0.4mV 90mV 90mV ±0.25mV**
1V 0 ±4mV 900mV 900mV ±2.5mV
10V 0 ±10mV 9V 9V ±25mV
100V 0 ±100mV 90V 90V ±250mV
1000V 0 ±1V 700V 700V ±2V
17 through 32 10V 0 ±5mV 9V 9V ±25mV
5V 0 ±3mV 4.5V 4.5V ±12.5mV
2.5V 0 ±2mV 2V 2V ±6.2 5mV
1.25V 0 ±1mV 1V 1V ±3.125mV
*Excludes offset errors.
** These low-level measurements require an environment free from electrical noise.
Calibration Verification
20
Page 25

5. Block Diagram
DI–720/DI-730 Series User Manual
ANALOG
OUT
1
ANALOG
IN
32
MUX
PGA
16 MHz
PROGRAM
TIMER
RAM
8K
WORDS
ADC/DAC
DSP
DATA
RAM
8K
WORDS
DIG
OUT
PORT
DIG
IN
PORT
EE
PROM
1
DIGITAL
OUT
16
1
DIGITAL
IN
16
PARALLEL
INTERFACE
PARALLEL PORT
ETHERNET
INTERFACE
ETHERNET PORT
Block Diagram
21
USB
INTERFACE
USB PORT
Page 26

DI–720/DI-730 Series User Manual
Notes:
Block Diagram
22
Page 27

WARRANTY/DISCLAIMER
OMEGA ENGINEERING, INC. warrants this unit to be free of defects in materials and workmanship for a
period of 13 months from date of purchase. OMEGA’s WARRANTY adds an additional one (1) mont
grace period to the normal one (1) year product warrant
ensures that OMEGA’s customers receive maximum coverage on each product.
If the unit malfunctions, it must be returned to the factory for evaluation. OMEGA’s Customer Service
Department will issue an Authorized Return (AR) number immediately upon phone or written request
Upon examination by OMEGA, if the unit is found to be defective, it will be
charge. OMEGA’s
including but not limited to
improper repair, or unauthorized modification. This
having been tampered with or shows evidence of having been damaged as a
or current, heat, moisture or vibration; improper specification; misapplication; misuse or other operatin
conditions outside of OMEGA’s control. Components in which wear is not warranted,
limited to contact points, fuses, and triacs.
OMEGA is pleased to offer suggestions on
OMEGA neither assumes responsibility for any omissions or errors nor assumes liability for any
damages that
OMEGA, either verbal or written. OMEGA warrants only that the parts
company
REPRESENT
TITLE, AND ALL IMPLIED
AND FITNESS FOR A PARTICULAR PURPOSE ARE HEREBY DISCLAIMED. LIMIT
LIABILITY: The remedies of purchaser set forth herein are exclusive, and the total liability of
OMEGA with respect to this order, whether based on contract,
indemnification, strict liability or otherwise, shall not exceed the purchase price of the
co mponent upo n whi ch liabilit y is based. In no event shal l OMEGA be lia ble for
consequential, incidental or special damages.
CONDITIONS:
Component” under 10 CFR 21
applications or used on humans. Should any Product(s) be used in or with any nuclear installation or
activity, medical application, used on humans, or misused in any way, OMEGA assumes no
as set forth in our basic
OMEGA and hold OMEGA harmless from any liability or damage whatsoever arising out of
Product(s) in such a manner
will be as specified and free of defects. OMEGA MAKES NO OTHER WARRANTIES OR
WARRANTY does not apply to defects resulting from any action of the purchaser,
mishandling, improper interfacing, operation outside of design limits,
WARRANTY is VOID if the unit shows evidence of
the use of its various products. However,
result from the use of its products in accordance with information provided by
ATIONS OF ANY KIND WHATSOEVER, EXPRESSED OR IMPLIED, EXCEPT THAT OF
WARRANTIES INCLUDING ANY WARRANTY OF MERCHANTABILITY
Equipment sold by OMEGA is not intended to be used, nor shall it be used: (1) as a “Basic
(NRC), used in or with any nuclear installation or activity; or (2) in medical
WARRANTY/DISCLAIMER language, and, additionally, purchaser will indemnify
.
y to cover handling and shipping time. This
repaired or replaced at no
result of excessive corrosion;
include but are not
manufactured by the
ATION OF
warranty, negligence,
responsibility
the use of the
h
g
.
RETURN REQUESTS/INQUIRIES
Direct all warranty and repair requests/inquiries to the OMEGA Customer Service Department. BEFORE
RETURNING ANY PRODUCT(S) TO OMEGA, PURCHASER MUST OBTAIN AN AUTHORIZED RETURN
(AR) NUM B ER FROM OM E G A’S C USTOME R S E RV I CE DEPARTMEN T ( IN ORDER T O
PROCESSING DELAYS). The assigned AR number should then be marked on the outside of the retur
package and on any correspondence.
The purchaser is responsible for shipping charges, freight, insurance and proper packaging to prevent
breakage in transit.
WARRANTY RETURNS, please have the
FOR
following information available BEFORE
contacting OMEGA:
1. Purchase Order number under which the produc
was PURCHASED,
2. Model and serial number of the product under
warranty, and
3. Repair instructions and/or specific problems
relative to the product.
OMEGA’s policy is to make running changes, not model changes, whenever an improvement is possible. This affords
our customers the latest in technology and engineering.
OMEGA is a registered trademark of OMEGA ENGINEERING, INC.
© Copyright 2004 OMEGA ENGINEERING, INC. All rights reserved. This document may not be copied, photocopied,
reproduced, translated, or reduced to any electronic medium or machine-readable form, in whole or in part, without the
prior written consent of OMEGA ENGINEERING, INC.
FOR NON-WARRANTY REPAIRS,
for current repair charges. Have the following
information available BEFORE contacting OMEGA:
t
1. Purchase Order number to cover the COST
of the repair
2. Model and serial number of the product, and
3. Repair instructions and/or specific problems
relative to the product.
,
consult OMEGA
AVOID
n
Page 28

Where Do I Find Everything I Need for
Process Measurement and Control?
OMEGA…Of Course!
Shop online at omega.com
TEMPERATURE
Thermocouple, RTD & Thermistor Probes, Connectors, Panels & Assemblies
Wire: Thermocouple, RTD & Thermisto
Calibrators & Ice Point References
Recorders, Controllers & Process Monitors
Infrared Pyrometers
PRESSURE, STRAIN AND FORCE
Transducers & Strain Gages
Load Cells & Pressure Gages
Displacement Transducer
Instrumentation & Accessories
s
FLOW/LEVEL
Rotameters, Gas Mass Flowmeters & Flow Computers
Air Velocity Indicators
Turbine/Paddlewheel Systems
Totalizers & Batch Controllers
r
pH/CONDUCTIVITY
pH Electrodes, Testers & Accessorie
Benchtop/Laboratory Meters
Controllers, Calibrators, Simulators & Pumps
Industrial pH & Conductivity Equipment
s
DATA ACQUISITION
Data Acquisition & Engineering Software
Communications-Based Acquisition System
Plug-in Cards for Apple, IBM & Compatibles
Datalogging System
Recorders, Printers & Plotters
s
HEATERS
Heating Cable
Cartridge & Strip Heaters
Immersion & Band Heaters
Flexible Heater
Laboratory Heaters
s
ENVIRONMENTAL
MONITORING AND CONTROL
Metering & Control Instrumentatio
Refractometer
Pumps & Tubin
Air, Soil & Water Monitors
Industrial Water & Wastewater Treatment
pH, Conductivity & Dissolved Oxygen Instruments
s
g
n
s
M3531/1004
 Loading...