

Page 1

Instructions for the Use and Care and Installation of
OS450X
Steam Oven
CONTENTS
- 1 -
Page 2

NOTE:
This User Instruction Man u al c ontains important information, includin g s af et y & installation p oints, whic h will e nable you to
get the most out of your appliance. Please keep it in a safe place so that it is easily available for future reference; for you
or any person not familiar with the operation of the appliance.
IMPORTANT SAFETY I NFORMATION
• Yo ur safety is of the utmost importance to our company. Please m ake sure that you read this instruc tion booklet
before attempting to install or use the appliance. If you are unsure of any of the information contained in this
booklet, please contact the Technical Department.
• This appliance is designed for domestic household use and can be built into a standard kitchen cabinet or housing
unit. The adjacent furniture or housing and all materials used in the installation must be able to withstand a
minimum temperature of 85°C above the ambient temperature of the room it is located in, whilst in use.
• Any damage caused by the appliance being installed in contravention of this temperature limit, or by placing
adjacent cabinet materials closer than 4mm to the appliance, will be the liability of the owner.
• The use of this appliance for any other purpose or in any other environment without the express agreement of our
company will invalidate any warranty or liability claim.
• Repairs may only be carried out by Service Engineers or their authorized service agent.
• Do not modify or attempt to modify any of the characteristics of this appliance. This would be dangerous to your
safety.
Warning and safety instruction
• This appliance complies with all current European safety legislation. We do wish to emphasize that this
compliance does not remove the fact that the appliance surfaces will become hot during use and retain heat after
operation.
• Do not touch the surfaces when the appliance is working. Be care for the spouted steam heat from the appliance
when opening the door.
• Do not cook the food which is full of alcohol as the alcohol vapor is fire risk.
• Oven glove must be used when removing the accessory from the appliance.
• Do not clean the a pp lia nce im mediately once it is tur n e d off. Clean the applianc e a fter it is c oo l off as t he water in
steam tray is very hot.
Child Safety Precautions
Young children should be supervised to ensure that they do not
play
with the
appliance.
WARNING - Accessible parts will become hot when in use. To
be kept
away
avoid
burns and scalds, young children should
- 2 -
Page 3
Warning
• The Appliance is not intended for use by persons (including Children) with reduced physical, sensory or mental
capabilities, or lack of experience and knowledge, unless they have been given supervised instruction
concerning use of the appliance by a responsible person for their safety.
• Do not put any heavy things on the door nor lean the door when it is open, which may damage the hinge of the
door. Do not leave the broiled oil or fat in somewhere unwatched, since it may cause fire.
• Do not keep the core or plug connect with the heat zone of steam oven.
• Do not install the steam oven by the curtain or soft decoration.
• Never pull your appliance by the door handle
Attentions to installation
This product should be installed by qualified technician strictly according to installation manual.
Our company won’t take any responsibility for any hurt and lose caused by improper installation or operation.
There will be some heat, steam and mist generated during use, please be careful to avoid getting hurt, meanwhile,
make sure your kitchen is ventilated. If prolonging the using time of this unit, please prolong ventilation accordingly.
If there are any questions on ventilation, please consult some qualified technicians at local.
Related statement
2、4 This product is part of direct contact with food, in line with food hygiene and safety.
2、5 The steam oven is made of certified and qualified materials and requires the installation of this pro duct must comply
with current standards. This product is only by trained personnel within the family to use.
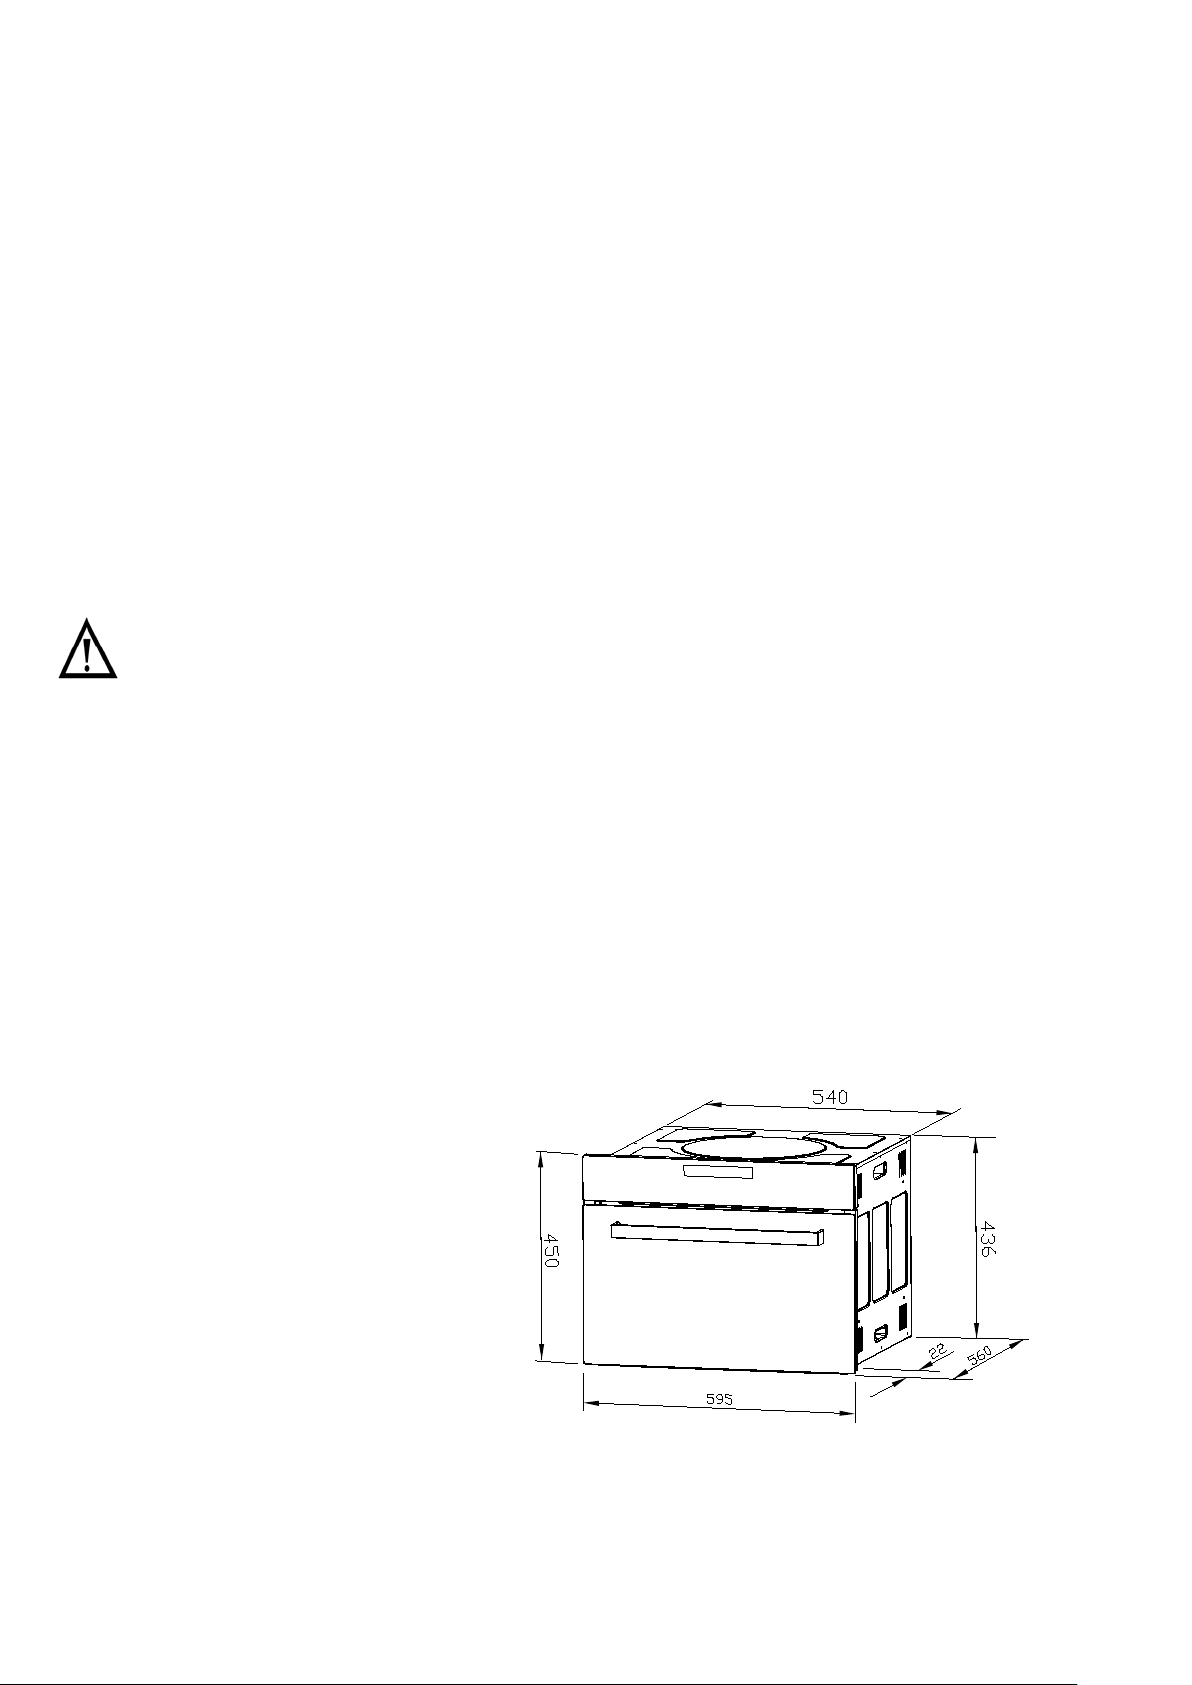
Products size:
Height: 450 mm
Width: 595 mm
Depth: 560 mm
Cooling fan
In order to stabilize the internal temperature of the steam oven and reduce the temperature of the outer surface,and
discharge internal water vapor. Cooling fan install in the interna l of st eam oven.When the oven after use of the cooling fan
will continue running for some time, until the steam oven is fully cooled.
- 3 -
Page 4
on behalf of four different height
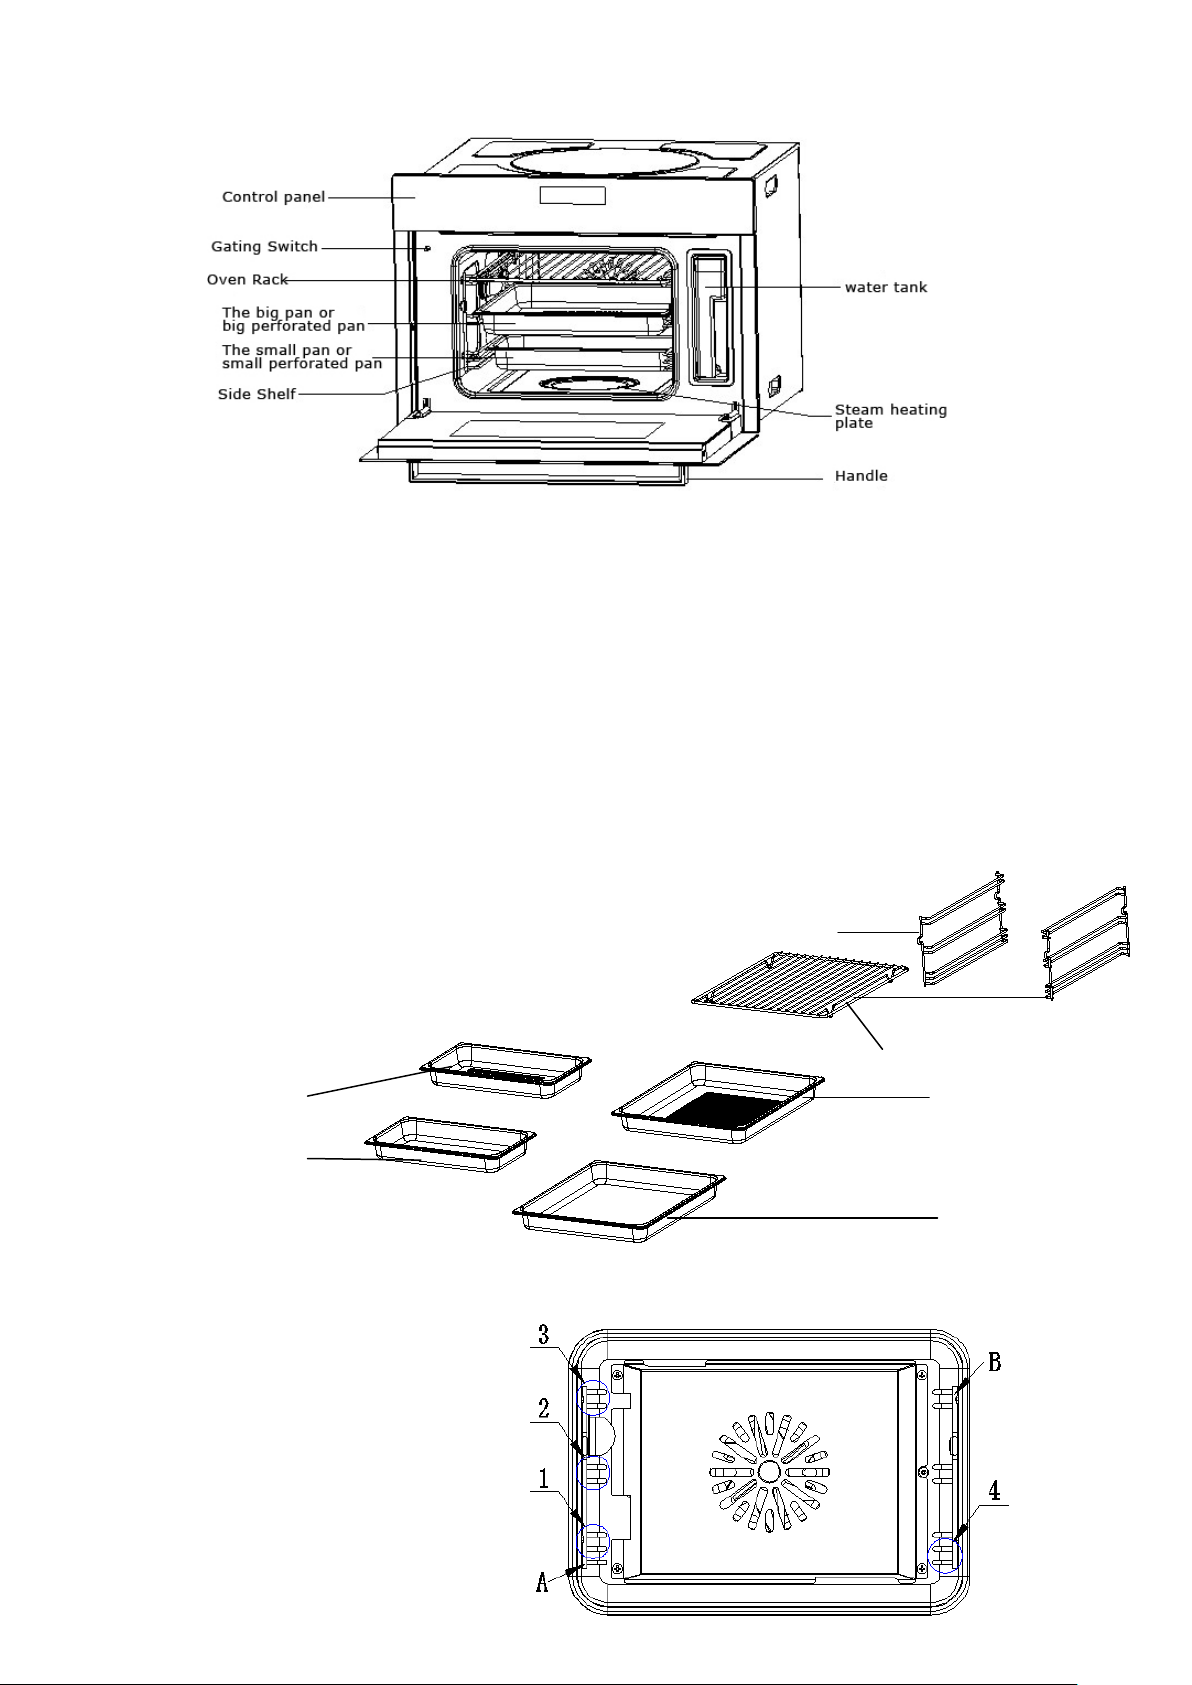
Product description
Technical Specifications
Rated using Voltage:220-240V, 50/60Hz。
Rated using power:1900W
Oven capacity:28L
Water tank capacity:1.2L
Spare part
1. Steam oven with bellowing spare parts:
a、one pair of side shelf, the food can be steam or bake in three different height positions
b.one food shelf
c.one big pan left side shelf
d.one big perforated pan right side shelf
e.one small pan
f.one small perforated pan pan rack
one small perforated pan one big perforated pan
one small pan
one big pan
2.
A:left side shelf B:right side shelf
(1)(2)(3)(4)
positions for your choosing
(2)For removable side shelf, you can adjust
four different height positions to bake food
- 4 -
Page 5
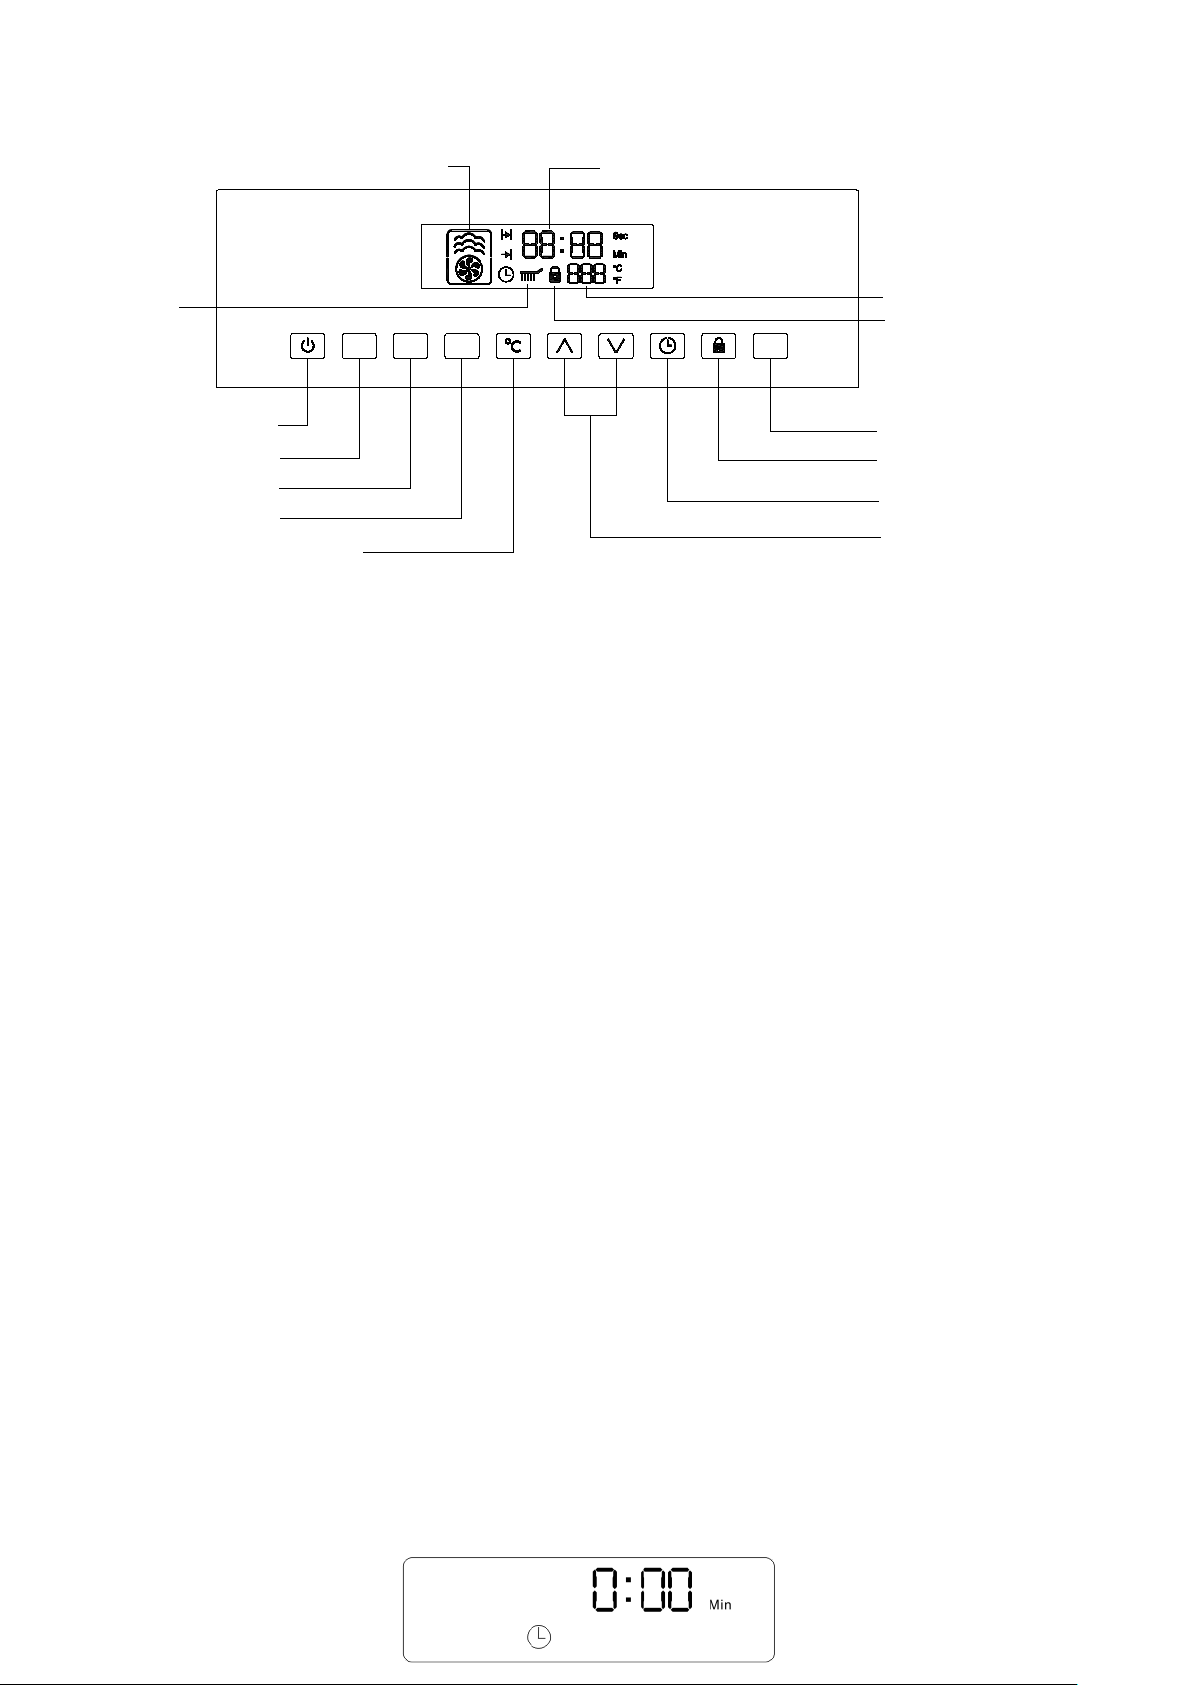
Fuctions
Temperuture/Meory program
Child safety device
Clock functions/Operating time
Clean symbol
P
Clean
OK
F
On/Off button
Function button
Memory Function
Clean Function
Temperuture selection button
Operating start button
Child safety button
Clock function
Selection buttons
1、Control panel
2. The use of water tanks
Water tank is necessary to prov ide water to generat e steam. Tank need pour on a clean water or bottled water. Avoid
distilled water or fluid loading to prevent damaging steam oven.
• Need pour on water in tank before every using
1) Open the oven door, can see the tank in the right side of the door.
2) Open the cover of tank and pour on water, pls noted the mark of MAX, make sure not overload.
3) Pls fasten the cover after filled with water.
4) Put the tank in fixed slot, make sure put in the right place to avoid leakage.
• The tank need empty remaining water after every using
1) Put out the tank from fixed slot, make sure level to take and avoid leakage.
2) Pour out the remaining water。
3) Open tank cover to dry box and seal.
• Water tank reminder
1) The tank run out of water when oven is working, it will show alarm signal and stop working. Pls pour on water
in tank at once.
2) It will show alarm signal when the steam oven not put in the tank and start button.. Pls put tank in fixed slot at
once.
The first time to use steam oven
3) Put on power, set the clock.
4) Heating empty steam oven with s team function, it wi ll automatic shutdown after 20 minutes with reminder
5) Wash all accessories with soap
sound. Half-open oven door until the oven cooled.
How to use steam oven
6) 1. Power on:Plug in and connected to the electrical supply,display backlight is light,display time,“0:00”
light,remind enter CLOCK.
- 5 -
Page 6

2. Set clock:
)
Every power on can be set clock. the dis play "0:00" starts to f lash, long press or s hort press button when
flash,Hour "0" can be quick ly adjusted fr om 0-23 by c ycles,Press the OK
press
press
time after adjustment,if not press
button, it w ill autom aticall y confirm after 6 seco nds, and converte d to m inutes “00 Min” ,long press or short
button when flash,mins“00 Min”can q uickly adj ust from 0-59 by cycles,press ok button to confirm
button, mins time will automatically confirm after 6 seconds,flash stop and clock
start time.
3. Switch( the power )button
press
button
or to choose f unctions,icon flashes,Mode is autom atically selected to work.Turn on and press p ower
close the function mode,Enter standby mode.
4. Manuall y set the func tion button
:Press power button in standby model, the default is "H-1" mode,at this time,
:Turn on and press enter th e manual sett ing func tion.At this t ime, dis play
button to confirm the hours time, If not
icons
and Gear icon flash,every time to pres s button,c ycle select func tion mode, respecti vely ar e:
(steam function) 、 (baking function) 、 (steam function+ baking functio n) 、 ( Defrost
function)
.Select function and direc t l y pres s ing button to confir m and into operation,if not pres s ok button
after 6 seconds, the system will automatically enter the function mode status.
5. Manual Mode Operation:
1
(Steam Function)
When selecting the steam function, the function symbol
and gears symbol are flashing. The
acquiescent timing is twenty minutes, the acquiescent temperature is 100℃。Press the button directly,the oven
start operation; If not press
button after 6 seconds, then the ovens will start this function automatically. When the
temperature of the oven casing reaches the setting one, the buzzer will sound twice.
- 6 -
Page 7

Clock function: when steam function operating,press the button , the display will show the time, long press
)
or short press
button,m inute “00”can increase or reduce rapid ly. When increasing to“59”m inutes,the
hour time will add “1”;wh en reducing to “00”,the hour tim e reduce to “1”,the time can be stetted in the range
of”0:00—6:00”。Press
symbol
keep flash and start working.
button after setting,the cloc k setting is fin ished, the countdown is beginning, func tion
Temperature setting:when steam function operating, press button, the acquiescent temperature of this
function can be checked. L ong press or shor t press
or35 to 100. Press the
button, temperature setting is finished, the display will show the casing temperature.
button,tem perature“10 0”can be adjust f rom100 to 35
2
(bake function)
Select bake function,function symbol
Press
directl y, the oven begins to work . The c lock and tem perature can set if you ne ed, the c lock range is 6
begin flash。The display shows CLOCK,and the temperature is“160℃”。
hours,the temperature range is 30-230℃。
3)
Select steam and bake function, the function symbol
acquiescent temperatur e is “160℃”。Press
(Steam+ bake function)
flash. The acquiescent time is “30:00”minutes,the
button di rectly,star wor king. T he clock and temperature c an set
according your requirement, the clock setting range is 6 hours,the temperature range is 120-230℃。
4)
(Defrost function)
Select defrost function,the function symbol
the oven casing. Press
button,the oven star work. The clock and temperature can set according your
flash。The acquiescent time is “30:00”,the temperature is same as
requirement, the clock setting range is 6 hours,the temperature range is 45-60℃。
- 7 -
Page 8

6. Automatic setup function :
Press
can chose 14 automatic function models circulatively by each press
synchronically when you choose th e corres ponding f unction mode, pl ease direc tly pres s
the system will get in work ing station automatically without press ing
acquiescent temperature by system, please press temperature setup button
to autom atic setup function after s tarting up, function icon and gears ic on will flash, and you
.The function icon and gear icon will flash
button to begin working, and
button within 6 seconds. If you want to check
,and the acquiescent temperature will be
displayed, which is un-adjustable. The buzzer will last 2 minutes after timing over during operating functions.
7. Reservation setup
Reservation setup includes two mode which are manual function mode and automatic function mode.
Reservation setup function is available under manual and automatic functions.
1)The Reservation s etup with Manual f unction mode: Firstly set the clock in the wa y of 6., Set the required tim e or
regular stalls in function after the default time,keep pressing hours button
two times, Appointment icon display
and hour “0”. Long press or short pres s button,hour“0” can cycle reg ulation to adjust q uickly, press
button after adjustm ent,system automatically co nverted to minute “00”,long press or short pr ess
minute“00”can cycle regulation to adjust quickly,press
button after adjustment,reservation setup finished. Not press
button,
button, system will automatically give up reservation setup after 6 seconds. Review the setting timer and appointment
setup time, press hour
2) The reservation setup with automatic function mode:Setting automatic function mode, press hour
the default setting tim e. Setting the default setting ti me according requirem ents, then press
button,display setting time,press again, display appointment setup time。
button,display
button an d finished
setting time。Setting the appointment time is the same operation with above instructions.
8. Child safety lock set
When using child safety lock feature, the control panel keys cannot do anythin g.
• Start Child safety lock set
When steam oven working, keeping press child safety lock
,display flashing, buzzer a sound, open child safety
lock. The button on control panel is locked and cannot do anything.
Open Child safety lock set
- 8 -
Page 9

Keeping press Child safety lock till not show symbol ,open child safety lock. It can operate functions.
When Child safety lock starting which still can stop steam oven working, pressing power button
can stop operation。
9. Cleaning Function
Inner Container Cleaning of Steam Oven
Sump Oil is easy to be removed after the dirt on the inner conta iner and assembly is softened by steam.
1. Drip Cleanser is added in the steam heater dish, then put inside steam oven after water tank is filled full of water.
2. Push ON/OFF key
icon
is displayed, then push confirmation key into cleaning work. It will be closed automatically after
, display is lighted, then push into cleaning function, function icon and speed
30 minutes with reminder warning sound until steam over is heating automatically up to 100℃
3. Tak e out assembly, then cleaning the soften dirt of inner container and st eam heating dish by soft cloth and
sponge.
• Calcium removing of steam heating dish
● In order to make the oven in continue normal working, calcium inside steam heating dish should be
removed termly.
1. Calcium removing solution is filled full inside steam heating dish, and fill full water of tank. Please pay
attention that don’t let the calcium removing solution tough control panel and other surface, if touch by
careless, please rinsing immediately.
2. On the status of oven is cooling. Push ON/OFF key , display is lighted, then push into cleaning
function, choosing c lea ni ng f unc tion
, then pus h c onf i rm at ion k e y into working. It will be close d
automatically after 30 m inutes with reminder warnin g sound until steam over is heating automatical ly up to
100℃
- 9 -
Page 10

Note: The lighting should be off when cleaning and calcium removing of steam heating dish.
Steam-oven using guildline
1、Please refer to the related information of the cooking temperature and time which shown on the food packaging. When
you are familiar with use of the steam oven, you can follow your own habits to set the cooking temperature and time.
2、If you are using hot-a ir cir culati on f or cooking, you should ref er to the pattern of such pr opos a ls of cooking on the food
packaging.
3、Ensure complete tha wing frozen food bef ore cooking or steam ing , unless a m ark of "no thaw befor e using" on food
packaging.
4、Do not make the wet food inside the steam oven liner for long-time storage, this will cause corrosion of the steam oven
liner.
5、When baking wet fr uit p i es, do not p ut to o much fruit pie in on the pan. If the juices dripping out fr om the pan, it wil l not
remove the stains left behind.
6、Select the hot-air circulation patterns, it should extend 10 to 15 minutes based on the food packaging components.
7、Check carefully if there were no extra parts before cooking, and remove them to ensure safety.
8、Please put the pan in the middle of the steam oven and leave enough sufficient gap on the pan to make the hot-air flow;
when there are hol es with s teaming food cooking co ntainer, the followin g must be placed on non-porous tray, used to drip
out of the liquid
9、Avoid to open the door to observe food cooking when steam oven is working.
10、Make sure pour out the r emaining water in tank after using, you can pour on water in tank when next using. Please
check tank regularly and clean it.
After using your oven, make sure that all the controls are in their stop position.
After using of steam oven, the temperature of internal oven is very high, please do not touch avoid
scald.
The water in heating plate is very hot, so need wait the oven cool and use the sponge to cleaning and dry.
After cooling the steam oven, the oil within the internal oven must be cleaned
Door glass and the drop on the sink must be dry.
DOOR INSTALLATION AND REMOVAL
It is easier to clean the oven when the door is removed
Notice: when you do not put the hinge of the door to the fixing position, the door may slam and get you hurt.
1. open the door widely and put the hinge into the fixing position
2. Open the door halfway and pull the door out with your hands holding the sides of the door
3. Clean the oven door
DOOR INSTALLA TION
Fix the door after cleaning
1. insert the hinges into the holes and make sure the hinges are fixed in the hole
2. Open the door widely and put the hinge to the fixed position and press tightly
3. Close oven door
- 10 -
Page 11

2. Clean the inner glass of the oven door
To clean the inner glass of the door, please remove the door from oven
1. put the door on the table with handle down
2. Take the internal glass out by removing the screw on the bracket
3. clean the gl ass by detergent
INSTALL THE DOOR AGAIN
1. Slide the door to the end for the bracket with printing facing inside
2. close the bracket and fix the screw
3. fix the door again
3. Ta ke off and install the left and right side shelf
The side shelf can be taken off to clean
1. Pull out the side shelf from the telescopic rail according to the direction which p oint ed in the pictur e .
2. It is available to clean them by detergent
Directly or put into dishwasher.
Installation side shelf
1.Hang up the clean side shelf to the hook inside of the oven cavity, push
it back with power until buckle up.
2. Please pay attention to the side shelf direction to avoid install oppositely.
Cleaning and maintenance
Cleaning operations must only be carried out when the steam oven is cool.
The appliance should be disconnected from your mains supply before commencing any cleaning
process.
1.The oven should be thoroughly cleaned before it is operated for the first time and after each use. This will avoid
residual food stuffs becoming baked on the oven cavity. After residues have been baked on several times, they are far
more difficult to remove.
2.The oven cavity should only be cleaned with warm soapy water, using either a sponge or soft cloth. No abrasive
cleaners should be used.
3、Any stains that may appear on the bottom of the oven will have originated from food splashes or spilt food, these
splashes occur during the cooking process. These could possibly be a result of the food being cooked at an
excessively high temperature or being placed in cookware that is too small.
- 11 -
Page 12

4、You should select a cooking temperature and function t ha t is ap pr opri ate f or th e f ood that you are cooking. You should
also ensure that the food is placed in an adequately sized dish and that you use the drip tray where appropriate.
5、To clean the surface of steam oven, also use the sponge or soft cloth with hot suds instead of abrasive detergent.
Replace bulb
Warning: Before replacement, make sure the power supply to the steam oven must be turned off, and wait till
the case body and bulbs are cool.
1、Rotate out the lamp cover counterclockwise.
2、Rotate out the bulb counterclockwise.
3、Change a new bulb in 25W/300°C with E14 scr ew sock et.
4、Do not use bulb in other type.
5、Assemble the seal rin g and grading ring on the lam p shade in sequence , tighten the lam p shade clockwise,
then turn on the power supply to the oven.
6、 Replace the damaged glass lamp shade, grading ring or seal ring timely.
Replace the door gasket
The door gasket is easy broken and leak air after a long time use , it must be replaced timely in case any damage.
1. Open the door and take down the old gasket.
2. Align the new gasket at the slot, make the seam of gasket on the side, and press down the gasket in place.
3. After pressing down the gasket, pull it gently to check if it is fully fastened.
Installation
The steam oven should be installed by professional person.
Current standard
Before power on, please ensure the supplying alternating current should comply with the rated voltage which marked on
label.
Warning: The steam oven must earthing.
If you need to change the power cord of steam oven, the earthing conductor must 10 mm longer than the wire.
Pay attention to ensure that the temperature of the alternating current line no more than 50 ℃.
If the alternating current line was broken and need to replace it, you can buy it from distributors.
- 12 -
Page 13

The dimensioned drawing for installation of steam oven and cabinet.
Ensure the steam oven installed safety in cabinet and fixed by two screws which should be inserted from steam oven(A).
Notice! The false installation method as following:
Abnormal analysis
Steam oven does not work
Check if the steam oven works under manual operation mode.
Check if you choose the cooking function, adjust the right temperature accordingly
Check if the door of steam oven has closed completely.
Steam oven does not work normally
Check if the steam oven connect with power cord well.
Check if follow the user manual to time setting and manual operation setting.
Check if choose the correct cooking function.
The water tank is full, but still display (E001)
Check if the water tank put the right position, re-move the water tank till it’s mesh completely.
If the water tank is dirty, flow water level indicator jam, please shake and clean the water tank accordingly .
Food cook unbalance
Check the steam oven if install the correct way and on the horizontal.
Check if the temperature is suitable, the position of bracket is correct.
The lamp not work
Follow the instruction of changing the lamp.
- 13 -
Page 14

Come out condensate water in steam oven
Food
Position
Mode
re (oC)
Food
Position
Mode
re (oC)
(min)
Pan
In the condition of full volume water to cook food, it is very nature to come out the steam and condensate
phenomenon when you cook the freezing food, chicken, etc.
Information code
When the steam oven working without water; the fault code will displa y E001,a nd the bu zzer wi ll honk accor ding l y.
When the sensor short circuit or open circuit, the fault code will display E002,and the buzzer will honk accordingly.
When the door of steam oven is open, the fault code will display E003 and shinning from time to time.
Caution: If the steam oven display is working abnormally please cut off the power.
Main Function Guide for Steam Oven
Steam Automation
Function Food
Weight of
Bake Pan
Pan
Operating
Temperatu
Time (min)
A -1
Broccoli
(small)
500g
A-2 Broccoli 1,000g
Hole Pan + Hole
less Pan
Hole Pan + Hole
less Pan
3/1 Steam 100 8-10
3/1 Steam 100 10-15
A-3 Rice 500g Hole less Pan 2 Steam 100 20-30
A -4 Fish 1,500g Hole less Pan 3 Steam 95 15-30
A -5
A -6
Quick-frozen
Food
Mixed
Vegetable
Hole Pan 2 Steam 100 8-12
Hole Pan + Hole
less Pan
3/1 Steam 100 8-15
Bake Automation
Function Food
B-1
Sliced
Bread
Weight of
Bake Pan
Hole less Pan 2 Hot Air 190 20-30
Pan
Operating
Temperatu
B-2 Cake Hole less Pan 3 Hot Air 165 25-35
Time
B-3 Pizza Hole less Pan 2 Hot Air 190 28-35
B-4 Beef 1,000g Rack + Hole less
Steam + Bake Automation
Function Food
C-1 Chicken 1,500g
C-2 Pork 2,000g
C-3 Beef 1,500g
C-4 Bread
Weight of
Food
3/1 Hot Air 175 40-50
Bake Pan Pan Position
Rack +
Hole less Pan
Rack + Hole
less Pan
Rack+Hole less
Pan
3/1
3/1
3/1
Operating
Mode
Hot Air +
Steam
Hot Air +
Steam
Hot Air +
Steam
Temperatu
o
re (
C)
Time (min)
185 50-60
170 40-45
170 45-60
Hole less Pan 2 Hot Air + 205 20-30
- 14 -
Page 15

Manual Defrost
Food
re (oC)
Function Food
Weight of
Steam
Bake Pan Pan Position
Temperatu
Time (min)
H-4 Chicken 1500g Rack + Hole less Pan
H-4 Beef 2500g Rack + Hole less Pan
3/1 45-60 60
3/1 45-60 60
- 15 -
 Loading...