

Page 1
Before using your tumble dryer, please read t his
manual carefully and keep it for future reference.
Tumble Dryer
OWNE R ’S MANUAL
R e ad Thi s Ma nu al
Inside you will find ma ny h elpful h int s on how t o us e
and mai nta in yo ur t umble dr yer prop erl y. Jus t a li ttl e
preventat ive car e on you r pa rt c an s ave you a gr eat
deal of t ime and mon ey over the lif e o f your tum ble
dryer. You’ll fi nd ma ny answer s to co mmon prob lem s
in the c har t of t rou bleshootin g tips. I f you rev iew the
chart of t roubles hoo ting tips first, you may not need
to call f
or service.
CAUTION: HOT SURFACE !
CAUTION: RISK OF FIRE !
Page 2
Catalogue
Catalogue
Safety information..............................................................1
Installation........................................................................6
Attention and advice...........................................................7
Safety information
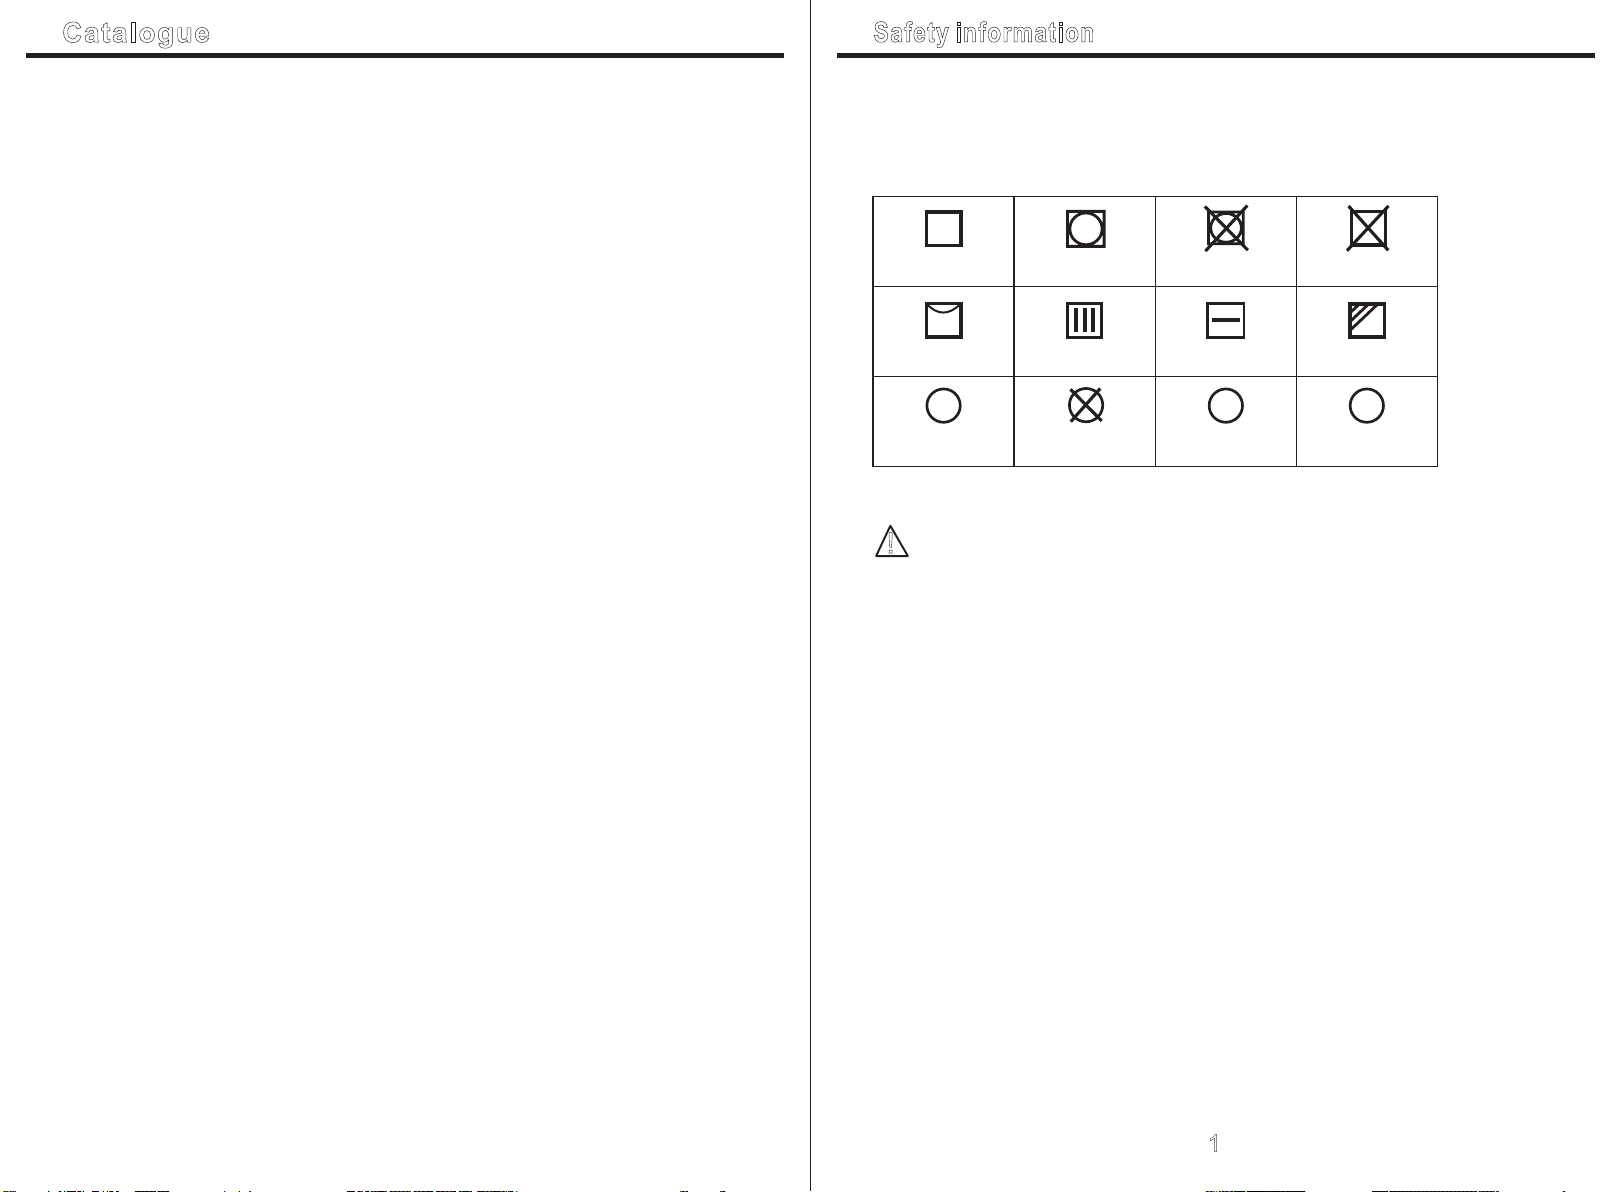
Laundry Symbols
Before placing clothes in this dryer, check for laundry symbols
which may indicate the suitability of using this appliance:
Part description............................................................... ..8
Description of controls.......................................................10
Opera
tion instruction.........................................................12
Programme table..............................................................13
Specialty drying function...................................................14
Cleaning and routine maintenance.....................................16
Error codes, solutions and precautions.............................
..............17
Technical specifications....................................................18
Dry
Line dry / hang to dry
Dry clean Do not dry clean
Safety notes
Normal
Drip dry
Not tumble dry normal
Dry flat
A
Dry clean normal cycle
with any solvent
Do not dry
In the shade
F
Dry clean normal cycle
petroleum solvent only
To prevent damage to your appliance and preven personal injury,
!
please read and follow the following safety information.
1.This appliance is not intended for use by persons (including children)
with reduced physical, sensory or mental capabilities, or lack of
experience or knowledge, unless they have been given supervision or
instruction concerning the use of the appliance by a person responsible
for their safety. Children should be supervised to ensure that they do not
play with the appliance.
2. In certain circumstances electrical appliances may be a danger hazard.
Check the conformity of voltage and power settings, which are specified on
the information plate attached to the appliance and/or packaging, with the
usage conditions available.
3. Do not place heavy objects in or on these appliances, or use for storage,
or let children play or swing from the door. Do not use the appliances until
fully installed.
4. The electrical connection must be accessible after installation. The
appliance must be electrically isolated before any maintenance can be
performed. The appliance is not intended to be operated by means of an
external timer or separate remote control system.
1
Page 3
Catalogue
Safety information
Safety information
2 3
Page 4
Catalogue
Safety information
Safety information
23.If the power cable is damaged, it must be replaced by the
manufacturer, its service agent or similarly qualified persons
in order to avoid a hazard.
24.This appliance is for indoor use only.
25.The openings must not be obstructed by a carpet.
26.Children of less than 3 years should be kept away unless
continuously supervised.
27.If the appliance appear high temperature abnormally ,
please draw the mail plug immediately.
28.The appliance is not intended for use by persons (including
children) with reduced physical, sensory or mental
capabilities, or lack of experience and knowledge, unless
they have been given supervision or instruction concerning
use of the appliance by a person responsible for their safety.
Children should be supervised to ensure that they do not play
with the appliance.(This warning is not for EUROPEAN
market)
Correct Disposal of this product:
This marking indicates that this product hould not be
disposed with other household wastes throughout the
EU. To prevent possible harm to the environment or
human health from uncontrolled waste disposal, recycle
it responsibly to promote the sustainable reuse of
material resources. To return your used device, please
use the return and collection systems or contact the
retailer where the product was purchased. They can take
this product for environmental safe recycling.
Electric shock hazard
1.Do not draw the power cord forcefully to pull out the mains
plug.
2.Please do not plug/draw the mains plug with wet hands.
3.Do not damage the power cord and the power plug.
Injury danger
1.Do not disassemble and install the dryer under no instruction
or supervision.
2.Do not stack this dryer on washing machine without stacking
kits.(if want stacking on washing machine, please purchase
the Independent parts and it must be installed by the
manufacturer, its service agent or similarly qualified persons
in order to avoid a hazard.)
3.Do not lean on the opened door of the dryer.
4.Do not put any pyrotoxin on the dryer, such as the candle,
electric cooker.
Damage danger
1.Do not dry over the rated capacity.
2.Do not operate the dryer without the filter door and filter base.
3.Do not dry the clothes before being spun.
4.Do not expose the dryer directly under the sun, and indoor
use only.
5.Do not install the dryer in the humid and drenching
environment.
6.At the cleaning and maintenance, please do remember to pull
out the power plug and do not directly wash the dryer with
water.
Explosion danger
Please do not dry the clothes with some flammable substances
such as the coal oil, alcohol or there will be the explosion.
4 5
Page 5

Catalogue
Installation
Attention and Advice
Transport
Move cautiously. Do not grasp any salient parts of machine. The machine door can not be
used as the handle for delivery. If the dryer can’t be transported erect, the dryer could be slant
to right less than 30° .
Installation Position
1.It is recommended that, for your convenience, the machine is p ositioned close to your washing
machine.
2.The tumble dryer must be installed in a clean place, where dirt do es not build up. Air must be able
to circulate freely all round the appliance. Do not obstruct the f ront air inlet or the air intake grilles
at the back of the machine.
3.To keep vibration and noise to a minimum when the drye r is in use, it should be placed on a firm
and level surface.
4.The feet must never be removed. Do not restrict the floor cleara nce through deep pile carpets,
strips of wood or similar. This mig ht cause heat built-up which would interfere with the operation
of the appliance.
Level Adjusting
Once in its permanent operating position,
check that the dryer is absolutely level with the aid
of a spirit level. If it is not, adjust the feet with a tool.
Power Supply Connection
1.Make sure that the voltage of the power supply is the same as the electric specification of the dryer.
2.Do not connect the dryer with the power connection board, the universal plug or socket.
Attention
Leave it to stand for 2 hours after transporting. Before first use , please use the soft fabric to
to clean the inside drum.
a)Put some clean rags into the drum.
b)Plug the power, press .【On/Off 】
c)Select the 【Refresh】 Programme, press 【Start/Pause】 button.
d)After finishing this programme, please follow the “cleaning and routine maintenance” (refer to page 15)
to clean the filter door.
During dryi ng, the compressor and the water pump generate some noise which is entirely normal.
Advice
1.Before drying, thoroughly spin the laundry in washing machine. High spin speed can reduce the drying
time and save energy consumption.
2.For uniform drying result, sort the laundry according to fabric type and drying programme.
3.Before drying, please close zips, hooks and eyelets, button up, tie fabric belts, etc.
4.Do not over dry the clothes, because over dried clothes can easily get creases or shrinkage.
5.Do not dry the articles containing rubber or similar elastic materials such as raincoats, bicycle covers and
etc.
6.The door can be opened only after the programme of the drying machine is completed. Do not open the
door before the programme finished, as the skin may be scalded by steam or hot surface.
7.Clean the lint filter and empty container after each use to avoid extension of drying time and energy
consumption.
8 .. Please choose the related programme when deal with wool material clothes, to make the cloth more fresh
. and fluffy.
9.The weight references as follows:
Blended Coats
(about 800g)
Single Sheets
(about 600g in
cotton)
Undershirts
(about 180g in
cotton)
Jackets (about
800g in cotton)
Work Clothes
(upper and lower)
(about 1120g in
cotton)
Underpants
(about 70g in
cotton)
Jeans Trousers
(about 800g)
Pajamas
(about 200g)
Socks (about 30g in
blended material)
Towel Quilts
(about 900g
in cotton)
Shirts (about
300g in cotton)
6 7
Page 6

Part description
Catalogue
Part description
Part Description
Control panel
Container
Power Cord
Door
Drum
Filter door
Air inlet
Filter base
Filter cover
Accessories
The following parts are optional for specific models.
If your dryer has following parts, please them instruction
below .
install following the
Hose holder(optional)
Step 3: put the hose holder on the washing basin or any other sink.
200 cm
Max .120 cm
Quick start
1.C heck if t he cont ainer a nd filt ers
hav e been cl eaned u p
2. Open the door and
load the laundry
3. Close the machine door
10.Unplug the power cord
9. Clean the filters and
emp ty cont ainer
Installation step:
Condensing drain
hose(optional)
Step 1: removing the drain hose from the
hose connector using plier.
Step 2: insert the external drainage hose.
8 9
4. Plug the power cord and
press the【On/Off】key
5. Select the desired
pro gramm e
8.Press the 【 】keyOn/Off
7. Remove the laundry when
finished
6. Press the 【Start/Pause】button
Page 7

Description of controls
1.Programme Selection knob
2.Display
5
4
5
3.Specialty function buttons ( Delay, Time, Intensity, Lamp, Signal, Anti-Crease, Childlock )
4.Start/Pause button
5.On/Off button
Display
4
Delay start
Time
Child lock
Remaining Time indicator/Error message
Cycle phase status
3
2
3
Clean filters (warning)
Empty water container (warning)
Dryness level (four grades)
2
Drum lamp indicator
Signal indicator
Anti-crease mode
1
1
Description of controls
10 11
Page 8

Operation instruction
Select the programme
1.Press the【On/Off 】 key ,when the LED display screen brighten up, rotate the programme
knob to select the desired programme.
2.Select th e【Delay】,【Time】,【Intensity】,【Signal】or【Anti-Crease】functions for
additional option.
3.Press the【Start/Pause】key.
Programme start
The drum will keep rotating after the programme start, the state l ight in the display area will flash in
sequence, the remaining time displayed will change automat ically.
Note:
Occasionally , the drum might suspend about 40 seconds during th e drying procedure, but the
screen displays normal. The dr yer is automatic adjustment in this time and will con tinue operation.
Programme end
Time
Delay
N
N
Y
Y N
Y
Y N
Y N
Y N
Y Y
1.The drum will stop running after the programme ends, the display will show , the
last cycle phase status light will flash. The dryer will start Anti-crease
user 【On/Off】 key
doesn’t remove the load in time (refer to page 13). Please press
to
cut off power and pull the plug out.
【 】 function if
2.Deal with the problem accroding to “Malfunction display and solutions , if there is a
“ ”
”
unexpected stop during the drying procedure and the dryer show information(refer to
page 16 ).
Application/Properties
To dry co tton pi eces of c lothi ng. Dry ing lev el: cup board d ry.
To dry co tton pi eces of c lothi ng. Dry ing lev el: ext ra dry.
(max)
Weight
Standard
Extra
For cottons and coloureds made of cotton or linen.
Programme
Programme table
Cotton
To dry co tton pi eces of c lothi ng. Dry ing lev el: app licab le to iro n.
7.0kg
Iron
Def ine and s ave you f averi ate pro gramm e.
To dry th in synt hetic f abric s which a re not ir oned, s uch as ea sy care s hirts , table l inen, b aby clo thes, s ocks.
To dry thick or multi-layered synthetic fabrics. Drying level: extra dry.
Extra
Synthetics
To dry th in synt hetic f abric s which a re also t o be iron ed, suc h as knit wear, sh irts.
3.5kg
Standard
Iron
For a f luffy a nd fresh wool cloth ing(C an not be u sed for d rying w ool clo thing ), When t he cycl e is done ,
1.0kg
Wool
Wool
tak e out the c lothe s at once , let the m dry in th e air.
To dry je ans or le isure c lothe s that ar e spun at h igh spe eds in th e washi ng mach ine.
5.0kg
Jeans
If yo u can not d eterm ine wha t the clo thing 's mate rial is , pleas e choos e Mix.
3.5kg
Mix
To dry sp ortsw ear, thi n fabri cs, pol yeste r,whic h are not i roned .
For e asy car e cloth es such s hirts a nd blou ses wit h anti- creas e mecha nism fo r minim um iron ing eff ort.
3.0kg
1.0kg
Sports
Special
Shirts
To dry de licat e laund ry that i s suita ble for d rying o r laund ry whic h is advi sed to be h and-w ashed
at a lo wer tem perat ure.
1.0kg
Delicate
For non-iron washing made of synthetic and blended fabrics,cotton.
Delicate
To warm clothes from minimum 10 min. to maximum 120 min.(in 10 min. steps).
Pla ce clot hes loo sely in t he drye r. Once dr ied, ha ng it on a cl othes h ange
Warm
My Cycle
My Cycle
To air clothes without blowing hot air from minimum 10 min. to maximum 30 min.(in 10 min. steps).
maximum 150 min.(in 10 min. steps).
To refresh the clothes that have been kept at closed environments for a long time from minimum 20 min. to
1.0kg
Cool
Refresh
“ ”
Time
Note:1 . Cotton+E xtra is fo r AS/NZS energy program.
2.The programmes above a re onl y recommended for using, us ers ca n choose the appropri ate pr ogra mme according to the pe rson al habits. Thick and multi-la yere d
fabrics,e.g. bedline n, jea ns, jackets etc, are not easy t o dry, yo u'd be tter c hoose Jeans program me and m aximum drying intensity l evel ..
12 13
Page 9

Specialty drying function
Specialty drying function
Specialty drying function
1. Instruction to the drying procedure【Delay】
To delay the drying programme from 0 hour to 24 hours. The delay time means the programme
will start after x hours. When the delay programme starts, the tim e starts to decrease on the
display and the icon blinks.
Steps in details
(1).Load your laundry and make sure the machine door is closed.
(2).Press the 【On/Off】button,then to turn the programme selector knob and select a desired
programme.
(3).You can select the 【Anti-Crease or 【Signal】functions according to your 】 need.
(4).To press the 【Delay】 key.
(5).Continue to press the 【Delay】to select the delay time.
(6).After the 【Start/Pause】 key is pushed, the dryer is at the run condition. The drying procedure
will be automatically performed when the delay time is over.
(7).If you push the【Start/Pause】button again, the delay function will be paused.
(8).If you want to cancel the “Delay” function, please press the 【On/Off】button.
2. Instruction of the Time function【 】
When the time programme is selected, the 【Time】 button can be used to adjust the drying time in
10 min. steps. The maximum time is 150 min.
3. Instruction of the Intensity function【 】
Used to adjust the dryness level of the laundry. The level has four grades .
The drying time increases 3 minutes in every grade.
(1).The intensity function can be activated only before the programme start.
(2).Press the 【Intensity】 button repeatedly to select the drying time.
(3).Except the 【Cotton Iron】【Delicate】【Synthetic Iron】 【Wool】【Time】, all the other
programmes can be setted the 【Intensity】 function.
4. Instruction of the function【My Cycle】
Used to define and save your favorite proragmmes that are used frequently.
(1).Use the programme selector to select the required programme and other drying functions.
(2).Press and hold the 【Intensity】 button for 3 seconds until the display flashing and the required
programme has been saved.
(3).Turn the programme selector to the 【My Cycle】 position, you can start your favorite proragmmes.
If you want to change the 【My Cycle】 settings, repeat the steps (1) and (2 ).
5. Instruction of the 【Lamp】
The lamp inside the drum will lighten about 3 minutes when the button pressed or 1 minute the door
opened.
6. Signal【 】
Set up the buzz er on or off. In general condition, the buzzer is on. Please press it if needed.
When the buzzer on:
(1) The dryer will give the leadin g sound if press the extra function buttons.
(2) If the drye r is running, rotate the function choosing knob, th e dryer will remind the operator
it is an invalid choose.
(3) When the dr ying programme is done, the buzzer will also remind t he user.
7. Instruction of the Anti-Crease function【 】
At the end of the drying cycle, the anti-crease operation time is 30 minutes (default ) or 120 minutes (selected).
The 【Anti-Crease】 light shall illuminate when the anti-crease function is selected. This function
prevents the laundry from creases. The laundry can be removed during the anti-crease phase. Except
【Cool】,【Refresh】and 【Wool】, all the other programmes have this function.
8. Instruction of the Child Lock feature【 】
(1).This machine incorporates a special child safety lock, which can prevent children from carelessly
pressing keys or making the faulty operation.
(2).When the dryer is at the operation state, press the【 】and Anti-Crease 【Signal】buttons at the
same time for over 3 seconds to start child lock function. When child lock function is set, the display
will show “ ” icon and no key can effect to the dryer except 【On/Off】button. Under the
start state of the child lock, the【Anti-Crease】and 【Signal】buttons shall be pressed at the same
time for over 3 seconds to release the child lock function.
14 15
Page 10

Cleaning and routine maintenance
Malfunction display and solutions and Precautions
Empty the water container
1. Hold and pul l out the water container
with two hand s;
2. Tilt the water container, pour out the
condensed water into basin;
3. Install the
WARNING:
Empty the water container after each use, the programme will be paused and the “ ”
1.
water conta iner.
icon will flash if the water container is full during the drying process. After the container
emptyed, the dryer can be restarted by pressing 【Start/Pause】button.
2.Do not drin k the condensed water
3.Do not use th e dryer without the water container
Clean the filter door
1.Open the door.
2.Take out the filter door.
3.Clean the filter door; wipe off the scrap threads
accumulated on the filter door.
4.Reinstall the filter door.
Clean filter base
1.Open the filter cover.
2.Unscrew both locking levers towardas each other.
3.Clean the filter base completely.
4.Re-insert the filter base!
5.Screw both locking levers.
6.Close the filter cover flap until it locks into position.
NOTE!
1.The fluff accumulated on the filter will block the air circulation,
which will cause the extension of drying time and energy consumption;
2.Do disconnect the power cord before cleaning!
3.Do not operate the dryer without the filter!
4.Clean the filter after each use to prevent lint accumulation inside the dryer.
.
Loc king le ver
Fil ter doo r
Fil ter bas e
Fil ter cov er
Clean heat exchanger
As necessary, approx. once ever y 2 months, remove the fluff from
the heat exchanger using the sponge or soft brush.
When doing this, please use gloves.
Note: The fluff can be rem oved more easily if it is first
dampened e. g. with a laundry dampener.
Malfunction display and solutions
Dispiay
“ ”is on
“ ”E32
“ ”E33
Container is full
Water pump failure or water
level sensor failure
Humidity sensor failure
Temperature sensor failure
Reason
Solutions
Empty container
P lease contact your
local service center
if the problem
persists
Precautions
Only authorised technicans can carry out repairs.
Before you call customer service, please check if you have deal wi th the fault by yourself
or if you have follow the user instructions.
A technician will charge you for advice, even during the warranty p eriod.
Problem
Display does not
light up
Dryer does not start
Door is open by itself
Degree of dryness is not
reached or drying time too
long
Check if the main plug is inserted.
Check if the programme is selected.
Check the main power supply.
Check if the start button is pushe d.
Check if the door is entirely clos ed.
Press door until it “clicks”in to position.
Check if the clothes is over load .
Clean the filter door and filter b ase.
Use the appropriate programm e.
keep the Air inlet clear.
Solution
If you cannot deal with the faulty by yourself and need help:
1.Press the key 【On/Off】.
2.Pull out the mains plug and call the service.
1716
Page 11

Technical specifications
Specification
Power supply
Rated power
Refrigerant
Ambient temperature
Overall Size
Rated Drying Capacity
Net Weight
Contains fluorinated greenhouse gases covered by the Kyoto P rotocol.
Hermetically sealed
Not e:
1. Th e rated c apaci ty is the m aximu m capac ity, make s ure tha t the dry c lothe s which a re load ed to the a pplia nce do no t
exc eed the r ated ca pacit y each ti me.
2.D o not ins tall th e tumbl e dryer i n a room wh en ther e is a risk o f frost o ccurr ing. At te mpera tures a round f reezi ng poin t the
tum ble dry er may no t be able t o opera te prop erly.
3.T here is a r isk of da mage if t he cond ensed w ater is a llowe d to free ze in the p ump, ho ses and / o r conde nsed wa ter con taine r.
220-240V~
650W
R134a
。~。
+5c +35c
595×622×845(mm)
7.0kg
52kg
50Hz
18
 Loading...