

Page 1

TRH444
Portable Turbidity Meter
Page 2
Page 3
Instruction Manual
Portable Turbidity Meter
Index
2. Specifications .......................................................3
3. Product Description ..........................................................4
4. Principles ..................................................................5
5. Turbidity Standard ...........................................................7
6. Techniques .................................................................8
7. Equipment Operation
Basic Operations ...........................................................10
Turning On the equipment ....................................................10
Proceedures for Set Up ......................................................11
Turbidity
Proceedures for Set Up ......................................................12
Proceedures for calibration ....................................................14
Proceedurs for Read .........................................................17
Proceedures for Manual Calibration .............................................18
Proceedures for Register Read ................................................19
Proceedures for Register Erasing ...............................................20
Turning Off the equipment ....................................................21
I
TRH444
Page 4

Accessories Supplied with equipment
Instruction manual in English
Stabilized Primary Std Formazine (3 vials)
Vial Kit 3 units
Carrying Case
2.
Optional Accessories
AC Adapter
CDH-30PW
Application
Read Turbidity
Display
Alphanumeric 2 Lines x 16 Characters
Turbidity Range 0 to 1000 NTU (automatically)
from 0.01 to 10.00 NTU (selectable Range 1)
from 0.01 to 100 NTU (selectable Range 2)
from 0.01 to1000 NTU (selectable Range 3)
Sulphate Range
from 0 to 70 mg/L
Resolution
0.01 / 0.1 / 1
Relative Precision
0.01 % (full scale)
Calibration Parameters
Automatic / Manual
Light Source
LED 890 nm (NIR)
Detector
Photocell
Case protection
IP-67
Vial (Ø x h)
24.5 mm x 60 mm
Mínimum Sample Volume
20 mL
Power
Battery 9 Vcc
Battery Life
60 hours
Dimensions (LAP)
103 x 217 x 81 mm
Weight
569 g
Specifications
2.
Specifications
6
IP- 7
Secondary Standard (Gel) 3vials (0.1, 10 & 90NTU) Model TRSS-444
1000NTU (Model TRS-444)
Model TRV-444
3
Page 5
3.
Seleção
Entra
Escape
Product Description
3
1
2
Description
5
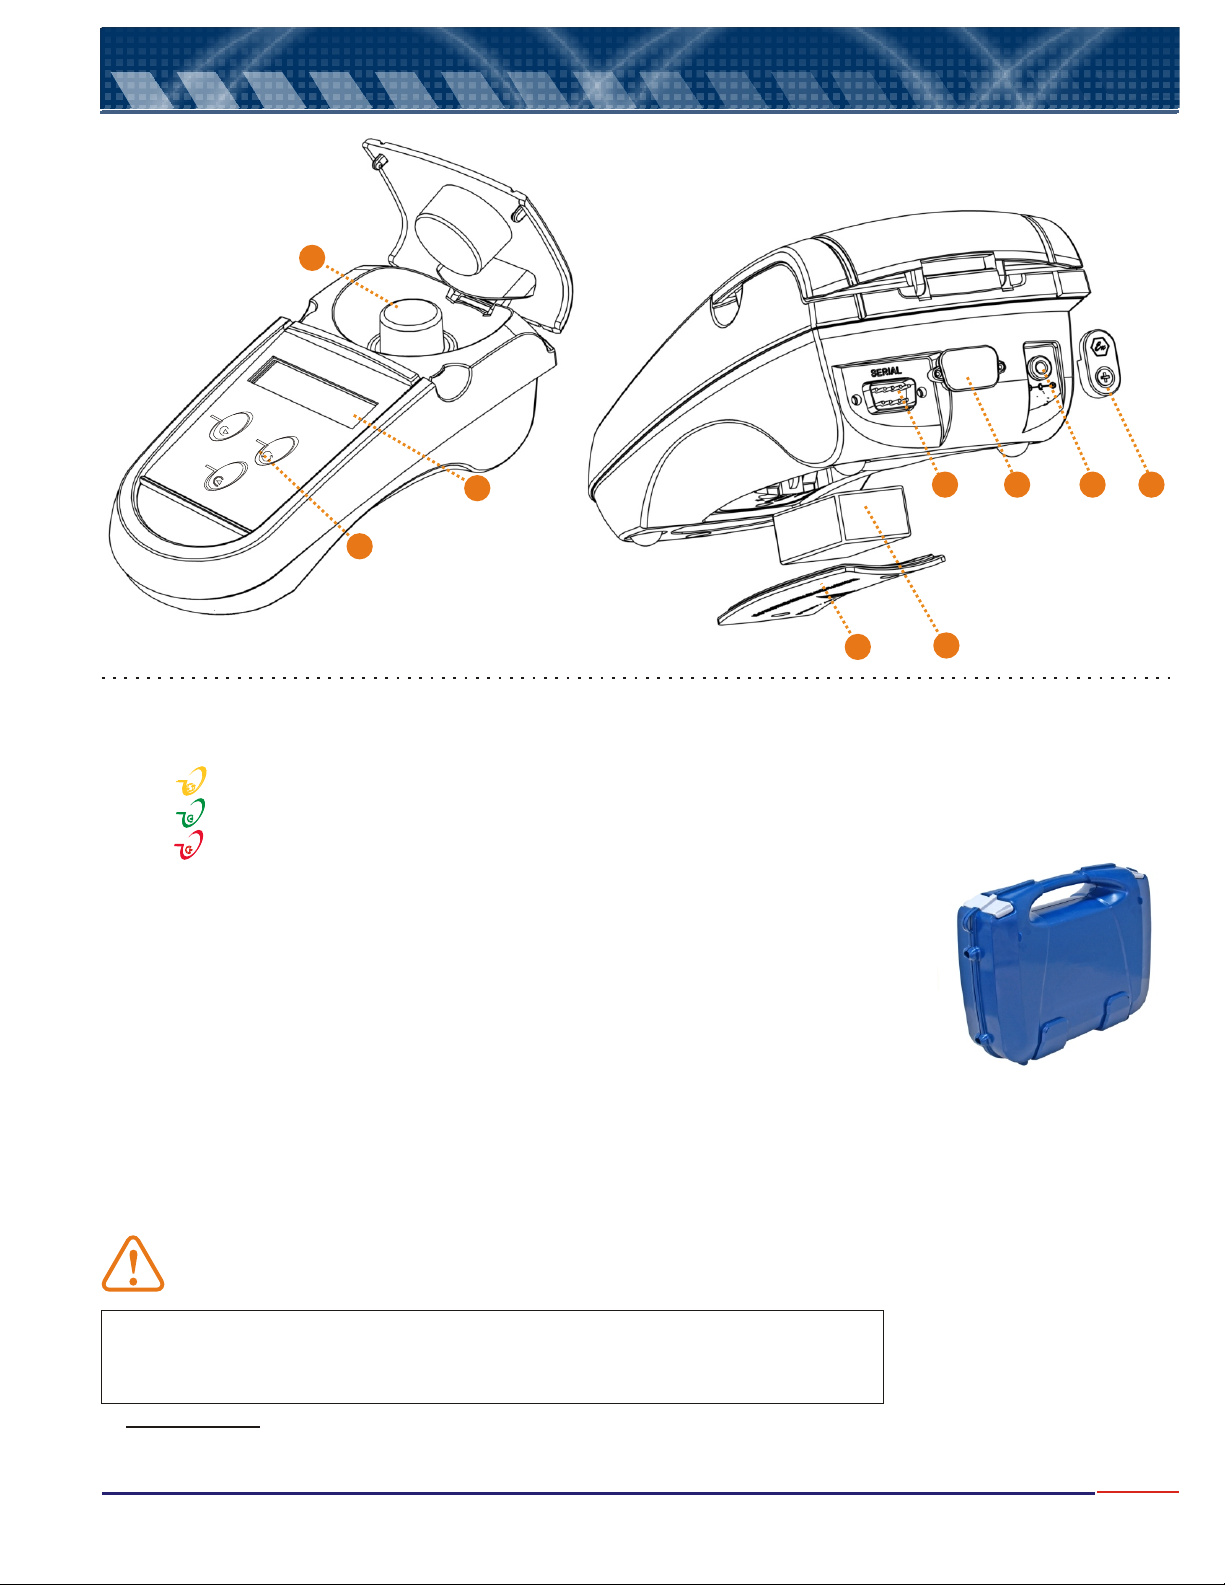
1 - Display: Alphanumeric 2 Lines x 16 characters
2 - Keyboard: with 3 Tactile membrane keys
Escape
Seleção
Entra
Key Select the menu option, flashing option.
Key Turns On the instrument and also confirms the flashing option.
Key goes back one screen for every touch and also allows to access instrument shut down screen.
3 - Vial
4 - AC Adapter inlet, model CDH-30PW (Optional).
5 - Battery compartnment cover lid.
6 - 9 VCC Battery (included)
7 - RS-232 Serial Output
8 - Covering caps for classified areas use.
9 - IP-67 Protection lid.
Important:
7 8
6
Carrying Case
4
9
IP-67
For protection , it is necessary to use lids as shown at above picture, items 8 & 9.
This instrument allows connection thru the power line by an AC
Adapter Model CDH-30PW (optional) 90-240Vac (50/60Hz)
8
! Do not use any other AC Adapter as it may damage the
instrument!
! Instrument floats when dropped in water.
Supplied with the instrument: Carrying Case, 3 Glass Vials (TRV-444), 3 Secondary
Standard Gel Vials(<0.1, 9 & 90NTU Vials) and 1000NTU Stabilized Standard Solution
(100ml.).
Accessories: TRV-444 -3 Glass Vials
TRSS-444 - Secondary Standards Gel (<0.1, 10, 100 & 800NTU Vials)
TRS-444 - Primary Standard Bottle of 1000NTU Formazine (250ml)
4
Page 6

4.
Turbidity Method
T
through Solids.
defined as Homogenous or Monophase mixtures are any set of substances that presents an unified visual
aspect (also called and Heterogenous or Polyphase mixtures are those where it is possible to
confirm the presence of more then one visual aspect (also called Suspensions). This way, if noticed in a
certain liquid a transparency lower than usually know, this is the presence beginning of any solid product in
suspension, that defines the system as heterogeneous. The relation to this heterogeneous is how the turbidity
concept is established. This turns to be a parameter that describes this quantity of suspended solid material in
liquid being as is the .
Turbidity consists in evaluation of the quantity of particles presence in such a liquid sample, from the
comparison of transparency degree/turbidity with a standard, with a know value, using a light. We denote that
hazel liquids are colloidal materials, presenting Tyndall effect, that consists of light spreading when it goes thru
a colloid. It is know that the light when hitting a material it can reflect, refract or absorbed.
As reflection is an inevitable phenomenon and common to any optical interaction, we must pay attention to two
other phenomenons, as absorption is related to color and turbidity alters the refraction thru the working fluid.
Digimed turbidimeters are nephelometric type, or simply nephelometric, that evaluate the Tyndall light spacing
at 90° of the light hitting the sample.
Principles
he measured Turbidity of a determined sample, is the reading referred by light dispersity and absorsion
that goes thru the sample.
Turbidity does not mean suspended solids measurement, but a effect determination of light refracted
To understand turbidity it is helpful to think about the characteristics of mixture between substances. It is
Solutions)
bigger bigger suspended solid quantity
Color Compensation
In order to avoid interference caused by the color components of the mixture being analyzed, the light used at
the nephelometric instrument in general presents closes to infra red range, as this range has relatively low
Material absorption, increasing the light sensibility. So it is possible an efficient measurement of the liquid
turbidity, as the turbidity measure at this instrument is done using the difference between the hitting light and
the detected light at a silicium photodiode, placed in right angle to the hitting light, that transforms the
transmitted light by the sample, in a tension signal proportional to Tyndal light source, being this light intensity
compared to the emitted light by the source (LED).
The color compensation is done by signal conditioning of two photo-cells, transmittance and nephelometric,
These area equalized in algorithm that performs the color compensation.
Sugar Reading
Internally at the equipment there is a curve for sugar analysis that can be selected during Set Up operation.
Vial
Light Source
“ NIR”
90°
Reflected Light @ 90°
Detector
Transmited Light
5
Page 7

4.
A
some, the most important, is the absortion caused by the sample color.
So it is essential to work in a wavelenght range where this absortion is minimum (near infrared), as if we worked at
a visible electromagnetical spectrum, this color interference certainly would decisively affect the results of the
turbidity quantity, it can be used many types of comparison standard, being the nephelometric Turbidity Unit
(NTU) the most usual one, developed from formazine standard suspensions. So, it is possible to have a a
comparison standard scale between both materials, being possible to evaluate the turbidity with precision.
Fuctuations Compensation at Readings
For signal fluctuations compensation emitted by the photocell caused by any particle with irregular dimension, the
Digimed turbidity meter execute the average reading during a time interval of 5s.. Considering the last 45 readings
average executed during a maximum time interval of 20s., related to the turbidity to be measured.
Principles (cont.)
s the dettection involvs the difference between the light hitting the vial and the transmitted by the sample
located at the vial, it is convinient to minimize the effects that diminishs the transmitted light intensity, between
mV
5 s
1 s
Average
Automatic Range
Selection
14s
Biographic References
Bela G. Lipták (editor in chief) Analytical Instrumentation;
Howard A. Strobel and William R. Heineman, Chemical Instrumentation, A Systematic Approach.
Calculation
Result
Indication
NTU
6
Page 8

Turbidity Standards
5.
Instructions on how to prepare the calibration solutions
1. Standard Zero
In order to obtain a turbidity close to Zero, use a good quality deionized or distilled water and filter it twice in
a roll, using a 0.2
(Blank).
Note: this water will be used to dilute the standard.
2. Standard Solutions
The instrument is supplied with a 100mL bottle of 1000NTU Stabilized Standard Solution, model# TRS-444,
for dilution and calibration purpose.
Attention: if the Standard (DM-S14AK-100) had been stored for some time, shake the bottle strongly
to mix the solution, then let it seat for about 15minutes, then start to manipulate below standards.
1 - Necessary Materials:
1.1 - 1 Volumetric Flask 100 mL
1 Volumetric Pipette 50 mL
2 L Distilled or Deionized Water, Filtered (0.2 µm)
2 - Calibration Solution 500 NTU
2.1 - In a 100ml Volumetric Flask, using the Volumetric Pipette add 50ml of 1000NTU Stabilized Standard
Solution.
2.2 - Add filtered water up to the mark on the flask.
2.3 - Before using the solution mix it by gently inverting the flask several times. Avoid creating bubbles.
2.4 - The Solution is Valid for 15 days.
Note:
place.
µm filter and theorically you will obtain a water with 0.12NTU, that can be considered Zero
For best storage conditions place the solution in a dark bottle and store it in a fresh and dark
3 - Calibration Solution 100 NTU
3.1 - In a 100ml Volumetric Flask, using the Volumetric Pipette add 10ml of 1000NTU Stabilized Standard
Solution.
3.2 - Add filtered water up to the mark on the flask.
3.3 - Before using the solution mix it by gently inverting the flask several times. Avoid creating bubbles.
3.4 - The Solution is Valid for 10 days.
3.5 - After its use, discharge the solution.
Note:
place.
4 - Calibration Solution 10 NTU
4.1 - In a 100ml Volumetric Flask, using the Volumetric Pipette add 1ml of 1000NTU Stabilized Standard
Solution.
4.2 - Add filtered water up to the mark on the flask.
4.3 - Before using the solution mix it by gently inverting the flask several times. Avoid creating bubbles.
4.4 - Stir it manually for before using it.
4.4 - The Solution is Valid for 5 days.
4.5 - After its use, discharge the solution.
Place.
For best storage conditions place the solution in a dark bottle and store it in a fresh and dark
Note:
For best storage conditions place the solution in a dark bottle and store it in a fresh and dark
Attention: for TURBIDITY, this instrument MUST BE calibrated using
Formazine Standard and cannot be calibrated using Polymers!!!
7
Page 9

6.
Techniques
For the most accurate results follow the steps below:
a. Use vials extremely clean on the inside and outside.
b. Fill the vial to the top to eliminate any bubble. Fill carefully to avoid
creating bubbles and to insure that the sample is homogeneous.
c. After filling the vial, dry it with a soft, lint-free absorbent paper to remove external
condensation caused by variation in temperature.
d. Using one drop of silicone oil, clean the external portion of the cuvette, this will
eliminate any small scratches (this is necessary for low Readings ONLY, below
20NTU).
Note:
e. Observe cautiously for the presence of bubbles and micro bubbles in the sample.
Bubbles are not desired! Bubbles will not disperse if the sample is allowed to rest,
the particles in the sample will settle, altering the real turbidity value, so do not
leave the sample to rest!
Instructions to apply: place one drop of silicone oil on the outside of
the vial, using a cloth spread the oil, creating an uniform oil film at the
surface.
8
Page 10

6.
Techniques (cont.)
1. Zero Turbidity
A. It is very difficult to locate a water without turbidity. What is done on practice is to filter 2 times (2x) a deionized or
distilled water using a 0.2 µm (0.2 micro meter) paper filter. So we can consider this water with turbidity of
0.12 NTU.
B. The water used as Zero, is used to dilute standards up to 40 NTU. Above this value, use can use normal
deionized water.
2 - Technical Measurement Considerations for Low Turbidity Readings - Range 0 to 10 NTU
A. Use an extremely clean vial (inside and outside). After its use, never leave any solution inside the vial.
B. Fill the vial, do not overfill! Fill the most possible, this procedure avoids bubbles formation.
C. After filling it and closing the cap, dry the external surface of the vial using a lint free absorbent paper in order to
avoid a possible condensation caused by temperature variation. DO NOT touch the vilas with your fingers!!!!!!
D. Always use matching Vials. When one of the vials break or needs to be replaced, it is necessary to replace the
hole set! DO NOT replace only one vial of a set!
E. Verify for bubbles or micro bubbles presence inside the sample, as they are not desired. In case they are
Noticed, try to eliminate them.
Note: and this will alter the real turbidity value
Never let the sample to rest, as the particlues will decantate .
F. If obtained low values, below the expected between 0.12 to 10.0 NTU, the vial could be dirty. Remove it, clean
and repeat the reading.
G. Keep the vial always at the same position, paying attention to the its direction, from calibration until the
reading. Note that the vial has a vertical white line mark and when inserting the vial at the compartnment, make
sure that this mark matches the mark trace located at the vial compartnment!
H. Recalibrate the equipment when the reading is lower than the first calibration point (0.12 NTU).
3 - Technical Measurement Considerations for Turbidity Readings - Range 0 to 100 NTU
A. Prepare the calibration standards (Standard 10 NTU and Standard 100 NTU) as indicated on page 7.
B. In order to obtain better precision results it is recommended to calibrate using above standards.
4 - Technical Measurement Consideratins for Turbidity Readings - Range 0 to 1000 NTU
A. Prepare the calibration standards (Standard 10 NTU, Standard 100 NTU and Standard 500NTU) as indicated
on page 7.
B. In order to obtain better precision results it is recommended to calibrate using above standards.
Vials
The turbidity instrument TRH444, leaves the factory with 3 matching vials. This allows to use them for caibration or
reading, any of the vials.
NOTE:
with the new set, as they can present differences at reading values.
in case one of the vials breaks it is necessary to purchase a new vial kit (TRV-444) do not mix the old vials
9
Page 11

Equipment Operation
7.
Basic Operations
1 - The software offers self explanatory menus with easy user interaction. The menu flashes at selected option
(represented at this manual in .
<SELECT>
Use
key to alter the flashing option of the menu then press key to confirm the option.
Blue Color
<ENTER>
2 - In case of a mistake, or to change data or to return to prior menu, press . At every touch the
screen will be moved back to prior screen. But in order to exit the reading mode, user must press and hold
<ESCAPE>
3 - The equipment stores all configurations in a non-volatile memory (E PROM). Even when turned off, the last
stored characteristics established for your work will be sustained.
4 - The equipment automatically monitors the battery charge. In order to save battery, the instrument will turn itself
off after 2 minutes of inactivity. After the reading is completed, user must press
reading, otherwise the equipment will turn itself off after 2 minutes.
.
key so the program can understand that the user really desires to exist this mode.
2
<ESCAPE>
<ENTER>
key
to proceed to the next
Turning On the equipment
1 - Turn on the equipment by pressing . The display will show the main menu.
<ENTER>
key
Press key in order to turn on the
<ENTER>
instrument
TURBIDIMETER
MODEL TRH444
TURBIDIMETER
/Set UpRead
10
Page 12

7.
Equipment Operation (cont.)
Set Up Proceedures
The instrument allows the user to choose the Range (programable) and also to pick the calibration values for the
Standard Solutions, that can be programmed while at Set Up Operation. See below table for possible calibration
values based on each calibration point ranges :
Calibration Minimum Value Maximum Value
1st Point 0.01NTU 1.00NTU
2sd Point 8.00NTU 10.00NTU
3th Point 80.0NTU 100NTU
4th Point 200NTU 900NTU
11
Page 13
7.
Equipment Operation - Turbidity Set Up
Set Up Proceedures
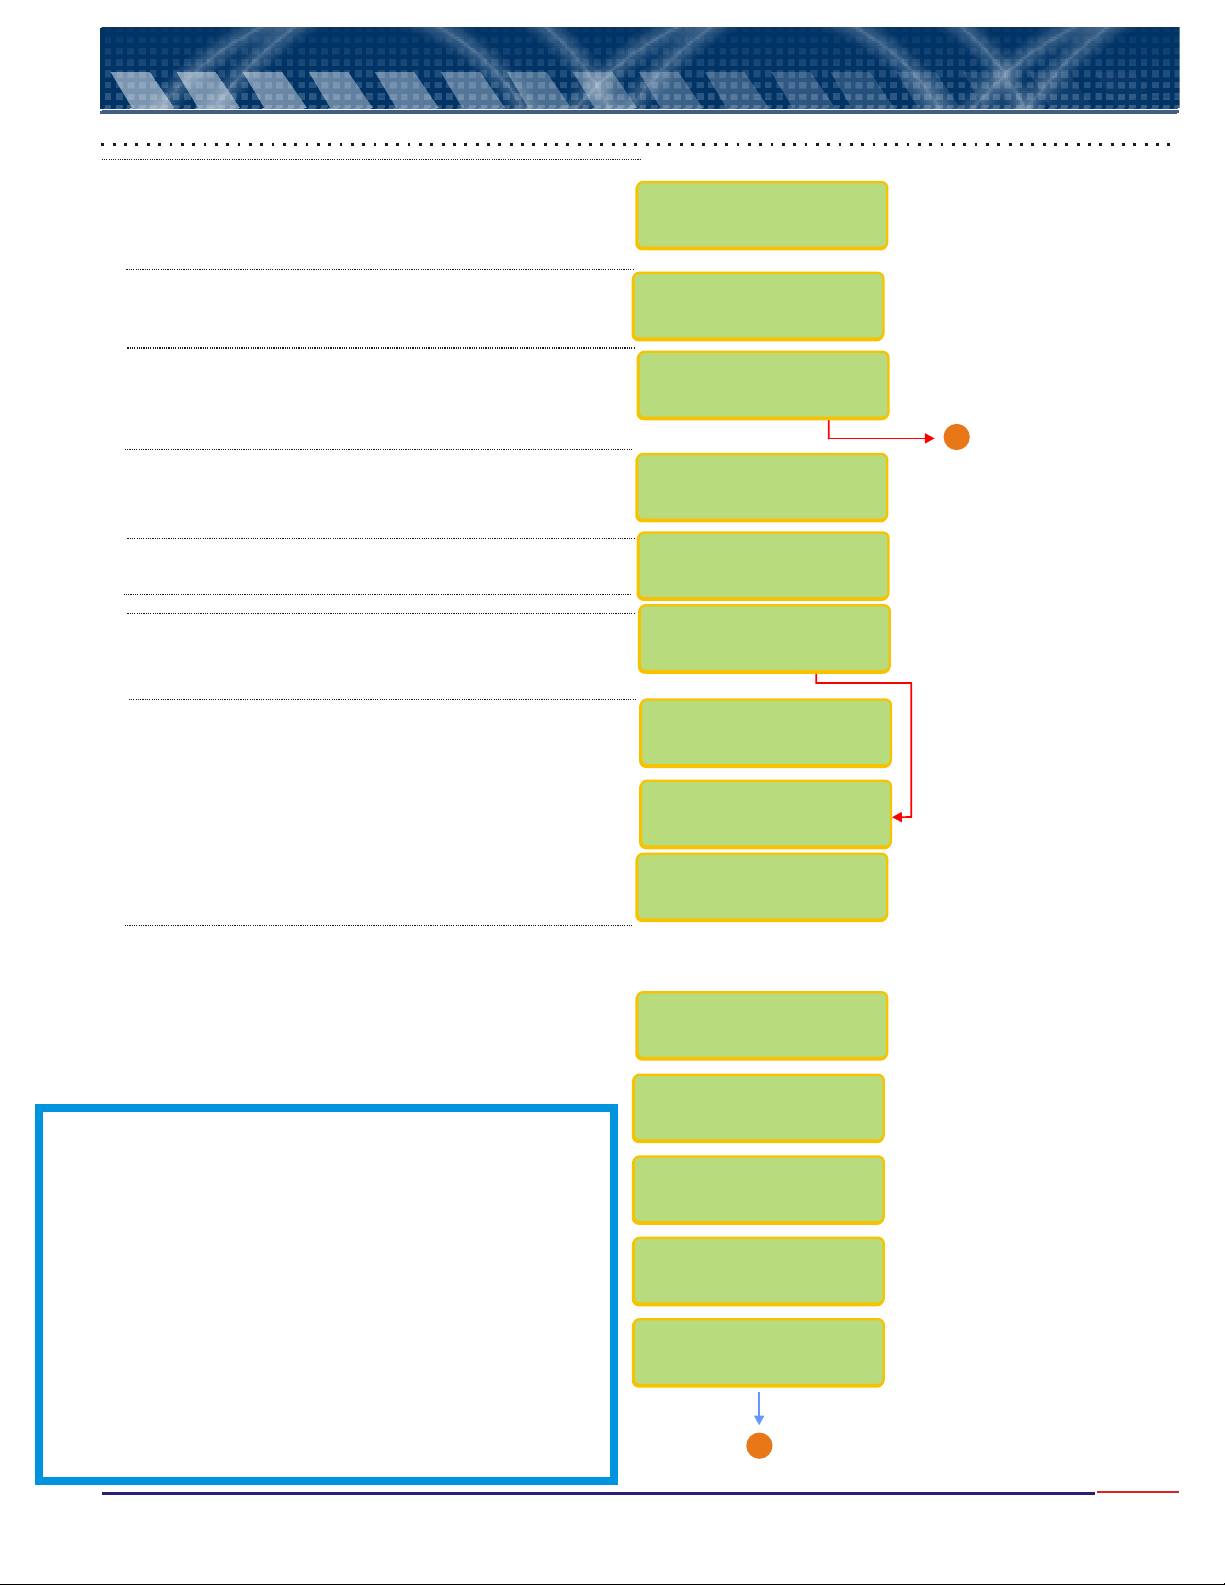
Press key in order to turn on the instrument and to
<ENTER>
access the main menu as shown. Press key until
option flashes, then press key to Confirm
option chosen.
Set Up
<SELECT>
Press key until desired language option flashes,
then press key to confirm the option chosen.
<ENTER>
<SELECT>
<ENTER>
TURBIDIMETER
READ/SET UP
LANGUAGE:PORT./
ENGLISH
/SPANISH
<SELECT> Turbidity
Press key until desired option flashes ( ),
then press key to confirm the option chosen.
Press key until desired option flashes, then press
<ENTER>
can read turbidity in water or sugar.
Press key until desired unit flashes, then press
<ENTER>
Press key until desired resolution option flashes,
then press key to confirm the option chosen.
Note A: Every time you see the symbols “ ” or “<”, that
means that the user can adjust the displayed value up or
down.
To increase the value press key until “ ” flashes,
then press to confirm, then press key and
at every touch the value will increase by one unit.
To decrease the value press key until “ ” flashes,
then press to confirm, then press key and
at every touch the value will decrease by one unit.
If a mistake is made, press key to return and correct
the value!
If user press and holds key, the units will move
faster, but be carreful when gets closer to the desired
number, as you canmiss it and if that happens, press
<ESC>
<ENTER>
<SELECT>
key to confirm the option chosen. This instrument
<SELECT>
key to confirm the option chosen.
Select the Reding Range mode by pressing
key until desired option flashes then press
Auto
key. range will work the instrument full range.
Ranges Value:
Range 1 - 0 to 10 NTU
Range 2 - 0 to 100 NTU
Range 3 - 0 to 1000 NTU
<SELECT>
<ENTER>
NOTE:
user to calibrate the instrument based on a known value.
ATTENTION:
calibration using Formazine Standards. It allows small
adjustment of the turbidity curve, after the reading
operation is performed. Refer to Page 21.
The Manual CALIBRATION function allows the
This calibration does not replace the
<SEL>
<ENT>
<SEL>
<ENT>
<ESC>
<SEL>
key to move back and correct the mistake.
<SEL>
<SEL>
<SELECT>
<ENTER>
>
READING OF:
/TURBIDIT SULPHAT
READING OF:
/SUGARWATER
UNIT:
/ASBC/EBC/FTUNTU
RANGES
/MANUAL AUTO
RANGES:
1 / 2 / 3
TURBIDITY
0 to 1000 NTU
RESOLUTION
1 / / 0.010.1
CALIBRATION
MANUAL/AUTO
CALIBRATION
Pt.1 0.2 NTU <>
CALIBRATION
Pt.2 10.0 NTU <>
CALIBRATION
Pt.3 100 NTU <>
CALIBRATION
Pt.4 500 NTU <>
Go to Page 13
A
Go to Page 18
A
12
Page 14

Equipment Operation - Turbidity Set Up (cont.)
7.
From Page 12
<SELECT>
Press key until desired option flashes, then
<ENTER>
press key to confirm the option chosen.
This option is offered to user, so the instrument can be
calibrated as when it left factory. Say user is in a
location where it is not possible to work with Standards
or does not have the standards, choose Yes and
confirm it and the instrument will calibrate as when left
the facotry.
DEFAULT CALIBR.?
A
/Yes No
CONFIRM ?
/Yes No
User can activate or not the RS 232 output.
Press key until desired option flashes, then
<SELECT>
press key to confirm the option chosen.
<ENTER>
RS232
/On Off
User can choose between PC or Printer.
Press key until desired option flashes, then
<SELECT>
press key to confirm the option chosen.
<ENTER>
Statistics calculation can be chosen or not.
Press key until desired option flashes, then
<SELECT>
press key to confirm the option chosen.
<ENTER>
If user desires to store data into memory (up to
99points), must be selected. Press key
until desired option flashes, then press key
To confirm the option chosen.
Refer to page 22 for further details.
Yes <SELECT>
<ENTER>
RS232
PC / PRINTER
SPEED (100bps)
12 24 48 96
STATISTICS?
/Yes No
REGISTER?
/Yes No
WAIT
...............
13
Page 15
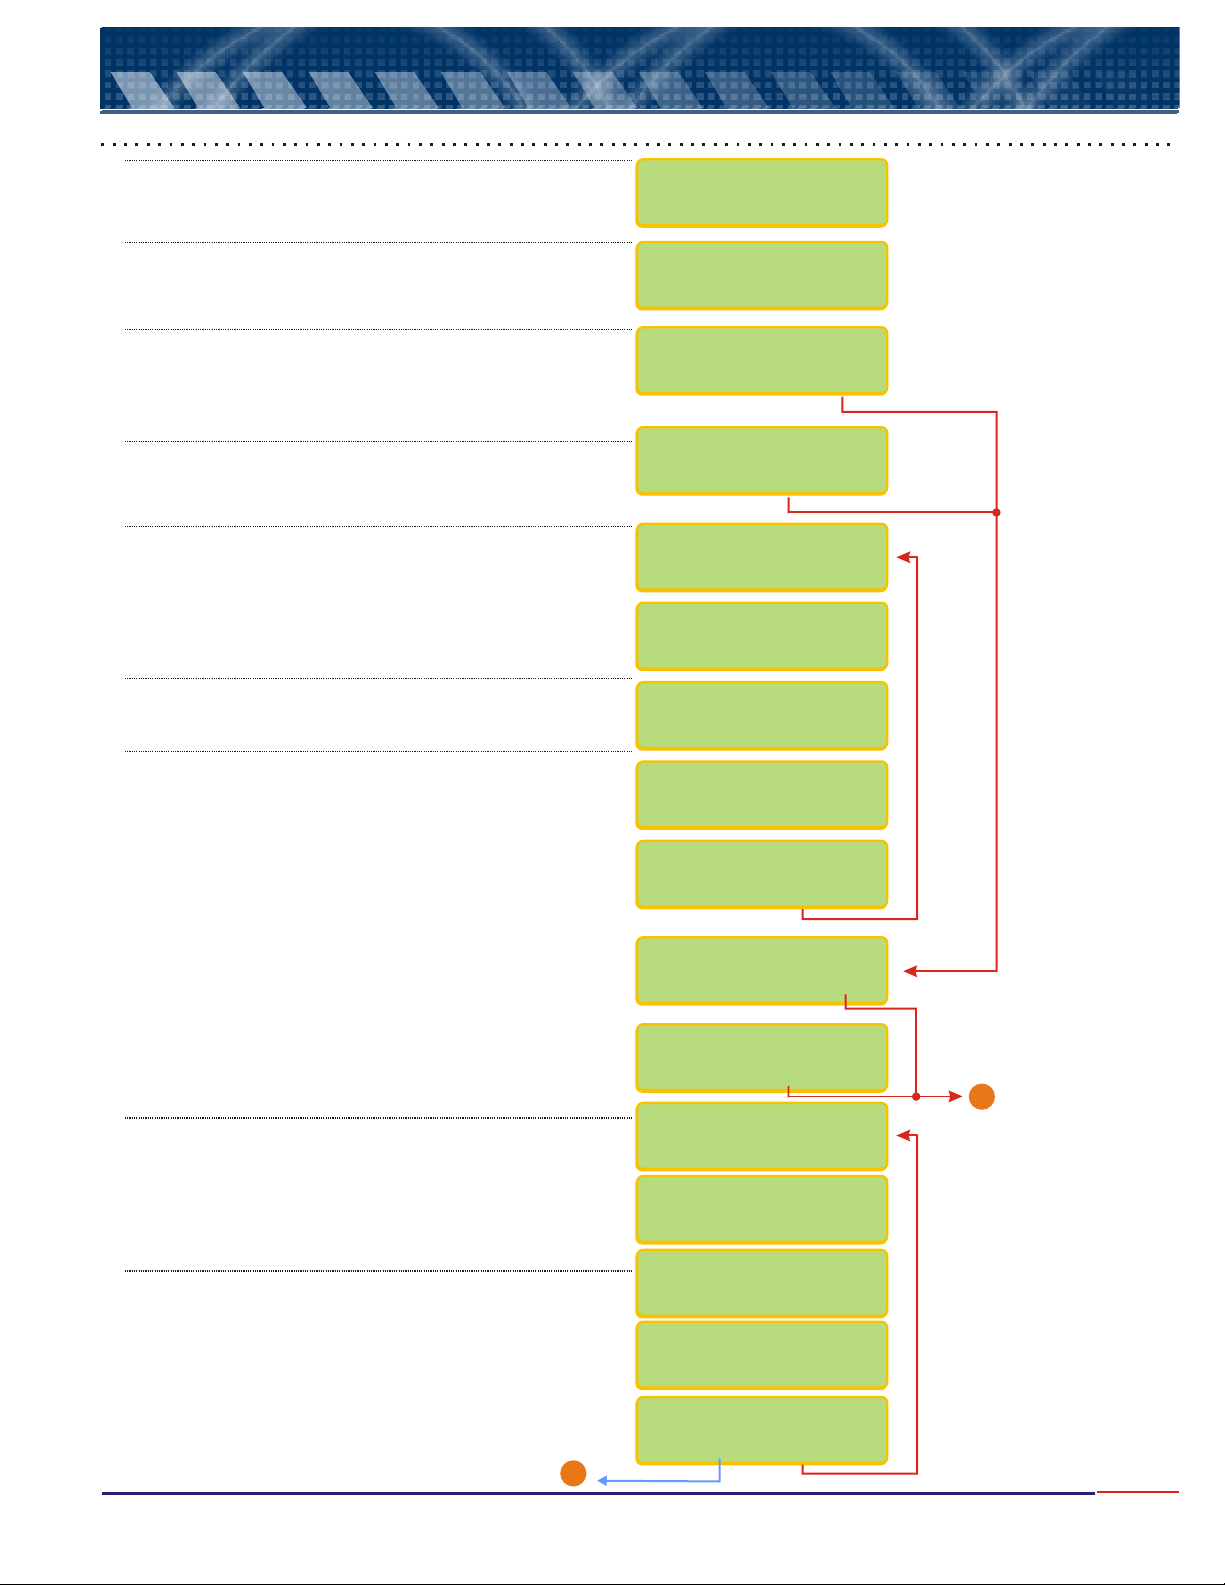
7.
Equipment Operation - Turbidity Calibration
Calibration Proceedures
Press key until option flashes, then press
<ENTER>
Press key until option flashes, then
press key to confirm option chosen.
<SELECT> Read
key to confirm option chosen.
<SELECT> Calibrate
<ENTER>
User will still have the option to accept every calibration
point chosen during Set Up Operation. Press
<SELECT>
<ENTER>
Press until desired option flashes, then
press key to confirm it.
Place vial with Standard 0.17NTU at compartnment,
then press key.
Make sure the white vertical line of the vial matches
the mark at the vial compartnment then push slowly
the vial into the compartnment, all the way to the end.
until desired option flashes, then press
key to confirm it.
<SELECT>
<ENTER>
<ENTER>
TURBIDIMETER
/READ SET UP
TURBIDIMETER
READ/CALIBRATE
POINT:0.17 NTU
CALIBRATE? /Y N
CONFIRM ?
/ Yes No
PLACE STANDARD
0.2 NTU
@ VIAL COMPARTN.
Ready ?
WAIT
STABILIZATION
The instrument program, verifies if the standard is within
conformance. Press key. Then user can
proceed with operation or go back and replace the
standard.
Note: if any problem occurs during the Reading operation,
the display will show: ATTENTION !VERIFY VIAL <ENTER>
User will still have the option to accept every calibration
point chosen during Set Up Operation. Press
<SELECT>
<ENTER>
Press until desired option flashes, then
press key to confirm it.
Place vial with Standard 10.0NTU at compartnment,
then press key.
Make sure the white vertical line of the vial matches
the mark at the vial compartnment then push slowly
the vial into the compartnment, all the way to the end.
The instrument program, verifies if the standard is within
conformance. Press key. Then user can proceed with
operation or go back and replace the standard.
until desired option flashes, then press
key to confirm it.
<SELECT>
<ENTER>
<ENTER>
<ENTER>
<ENTER>
STAND. NOT IN
CONFORM. <ENTER>
CONFIRM STANDARD
/ Yes No
POINT:10.0 NTU
CALIBRATE? /Y N
CONFIRM?
/ Yes No
PALCE STANDARD
10.0 NTU
@ VIAL COMPARTN.
Ready ?
WAIT
STABILIZATION
STAND. NOT IN
CONFORM.<ENTER>
Go to page 15
A
Note: if any problem occurs during the Reading operation, the
display will show: ATTENTION ! VERIFY VIAL <ENTER>
Go to Page 15
A
CONFIRM STANDARD
/ Yes No
14
Page 16

Equipment Operation-Turbidity Calibrat.(cont.)
7.
Calibration Proceedures
A
From Page 14
User will still have the option to accept every calibration
point chosen during Set Up Operation. Press
<SELECT>
<ENTER>
Press until desired option flashes, then
press key to confirm it.
Place vial with Standard 100NTU at compartnment,
then press key.
Make sure the white vertical line of the vial matches
the mark at the vial compartnment then push slowly
the vial into the compartnment, all the way to the end.
until desired option flashes, then press
key to confirm it.
<SELECT>
<ENTER>
<ENTER>
POINT:100 NTU
CALIBRATE? /Y N
PLACE STANDARD
@ VIAL COMPARTN.
STABILIZATION
The instrument program, verifies if the standard is within
conformance. Press key. Then user can
proceed with operation or go back and replace the
standard.
Note: if any problem occurs during the Reading operation, the
display will show: ATTENTION ! VERIFY VIAL <ENTER>
<ENTER>
CONFORM.<ENTER>
CONFIRM STAND.
CONFIRM?
/ Y N
100 NTU
Ready ?
WAIT
STD NOT IN
/ Yes No
Go to Page 16
B
Attention: for TURBIDITY, this instrument MUST BE calibrated using
Formazine Standard and cannot be calibrated using Polymers!!!
15
Page 17

7.
Equipment Operation - Turbidity Calibrat.(cont.)
Calibration Proceedure
From Page 15
B
User will still have the option to accept every calibration
point chosen during Set Up Operation. Press
<SELECT>
<ENTER>
Press until desired option flashes, then
press key to confirm it.
Place vial with Standard 500NTU at compartnment,
then press key.
Make sure the white vertical line of the vial matches
the mark at the vial compartnment then push slowly
the vial into the compartnment, all the way to the end.
The instrument program, verifies if the standard is within
conformance. Press key. Then user can proceed with
operation or go back and replace the standard.
Note: if any problem occurs during the Reading operation, the
display will show: ATTENTION ! VERIFY VIAL <ENTER>
until desired option flashes, then press
key to confirm it.
<SELECT>
<ENTER>
<ENTER>
<ENTER>
POINT:500 NTU
CALIBRATE? /Y N
CONFIRM?
/ Yes No
PLACE STANDARD
500 NTU
@ VIAL COMPARTN,
Ready ?
WAIT
STABILIZATION
SATANDARD NOT IN
CONFORM.<ENTER>
CONFIRM STANDARD
/ Yes No
If user is ready to measure the sample, place vial with
sample at compartnment, then press key.<ENTER>
Go to Sample!
Ready ?
WAIT
READING
For a new reading, press or press and hold
<ESCAPE>
instrument is left under Reading Mode, without
pressing for another reading, it will turn
itself off after 2 minutes, in order to save battery life!
key in order to exit Reading Mode. If
<ENTER>
<ENTER>
-> 1.70 NTU
Attention: for TURBIDITY, this instrument MUST BE calibrated using
Formazine Standard and cannot be calibrated using Polymers!!!
16
Page 18
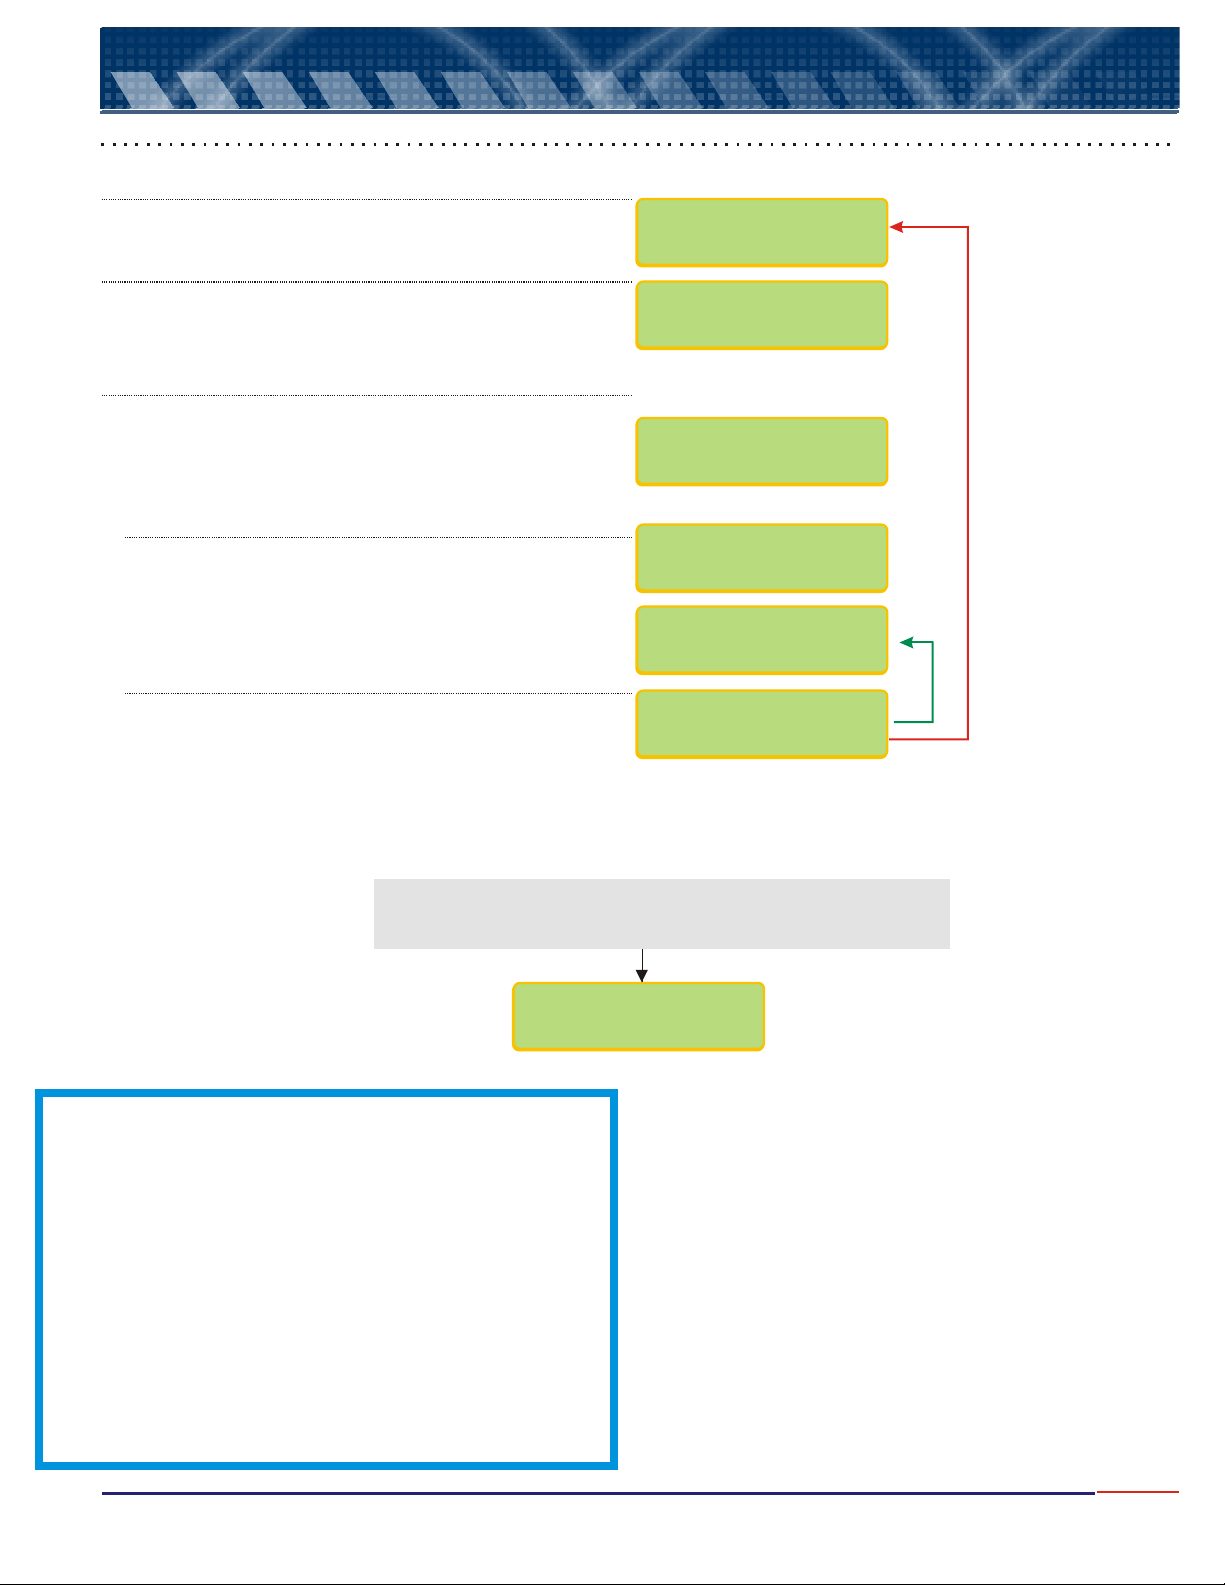
Equipment Operation - Turbidity Read
7.
Reading Proceedures
Press key until option flashes, then press
<ENTER>
Press key until option flashes, then press
<ENTER>
The option Register will only be displayed if user choose
Yes for Register option during Set Up operation (page13)!
<SELECT> Read
key to confirm option chosen.
<SELECT> Read
key to confirm option chosen.
This option will only be displayed if RS-232 is On (chosen
during Set Up operation). If chosen Off for RS-232, this
option will not appear. User can adjust the Initial Sample
number, refer to below instructions on how to change this
number.
If user is ready to measure the sample, place vial with
sample at compartnment, then press key.
Make sure the white vertical line of the vial matches
the mark at the vial compartnment then push slowly
the vial into the compartnment, all the way to the end.
For a new reading, press or press and hold
<ESCAPE>
instrument is left under Rading Mode, without
pressing for another reading, it will turn
itself off after 2 minutes, in order to save battery life!
key in order to exit Reading Mode. If
<ENTER>
<ENTER>
<ENTER>
TURBIDIMETER
/SET UPREAD
TURBIDIMETER
/Reg./CalibrRead
INITIAL SAMPLE:
N.: 1 <>
Go to Sample!
Ready ?
WAIT
READING
-> 1.70 NTU
If the sample being measured is above equipment range, user
will see the following screen. Please verify the sample used
and change for a valid value, within equipment range.
-> ------ NTU
Note A: Every time you see the symbols “ ” or “<”, that
means that the user can adjust the displayed value up or
down.
To increase the value press key until “ ” flashes,
then press to confirm, then press key and
at every touch the value will increase by one unit.
To decrease the value press key until “<” flashes,
then press to confirm, then press key and
at every touch the value will decrease by one unit.
If a mistake is made, press key to return and correct
the value!
If user press and holds key, the units will move
faster, but be carreful when gets closer to the desired
number, as you canmiss it and if that happens, press
<ESC>
<ENT>
key to move back and correct the mistake.
<SEL>
<SEL>
<ESC>
<SEL>
>
>
<SEL>
<SEL>
17
Page 19

7.
Equipament Operation - Register
Reading Register Proceedure
This Meter offers 99 points of dataloging for Readings storage.In order to activate this function, user must choose option
YES when asked about Option the Sub menu Reg will not be
Displayed on the screen
.
REGISTER during SET UP operation. If chosen
NO
Turn on the instrument by pressing <ENTER>
Press key until flashes, then press
<ENTER>
Press key until Flashes, Then press
<ENTER>
Press key until flashes, then press
<ENTER>
value to be stored!
This option will only be displayed if RS-232 is On (chosen
during Set Up operation). If chosen Off for RS-232, this
option will not appear. User can adjust the Initial Sample
number, refer to below instructions on how to change this
number.
Place the vial into the compartnment , then pess
<ENTER> to start Reading opertion.
to confirm.
to confirm.
to confirm. This procedure will allow Reading
TURBIDIMETER
VERSION : V5a
TURBIDIMETER
Read/Set Up
TURBIDIMETER
Read/ /Cal.Reg.
REGISTER
/Cons./EraseRead
INITIAL SAMPLE:
N.: 1 <>
Go to Sample!
Ready ?
WAIT
READING
The Read value will be displayed, press
to memorize the value.
<SELECT> key
-> 1.70 NTU
Register: 01
WAIT
Press <ENTER>
To exit this mode, prss and hold key.
key to start a new the Reading
<ESCAPE>
1.70 NTU
User can also Consult saved Readings, simple choose the option REGISTER (see above menu) and press
key to display every Reading stored!<ENTER>
18
Page 20

7.
Erase Register Proceedure
Equipment Operation - Register (cont.)
Turn on the instrument by pressing <ENTER>
Press key until flashes, then press
<ENTER>
Press key until Flashes, then press
<ENTER>
Press key until flashes, then press
<ENTER>
Registered values!
Press key until flashes, then press
<ENTER>
This is your last chance NOT to erase the stored values!
to confirm.
to confirm.
to confirm. This procedure will erase ALL
to confirm.
TURBIDIMETER
VERSION : V5a
TURBIDIMETER
Read/Set Up
TURBIDIMETER
Read/ /Cal.Reg.
REGISTER
/Cons./EraseRead
CONFIRM ?
/ Yes No
WAIT
...............
19
Page 21

7.
Equipment Operation - Turning Off
Turning Off the Equipment
1 - Press key repeatedly unitl the following message appears
<ESCAPE>
TURN OFF?
/ Yes No
2 - Press key until flashes then press key to confirm and turn it off.
Follow instructions below to turn the instrument off:
<SELECT> YES <ENTER>
Press and hold key in
order to exit the reading mode and
access the main menu.
Press key to move back <ESCAPE>
<ESCAPE>
TURBIDIMETER
->070 ppm
TURBIDIMETER
/CalibrateRead
Press key to move back<ESCAPE>
TURBIDIMETER
/Set UpRead
Press key in order to select option
<SELECT> Yes
(flashing), then press to confirm.
A message will display on the screen and
the equipment will turn off.
<ENTER>
TURN OFF?
/ Yes No
GOOD BYE !
...............
20
Page 22
Page 23

M-4713/0908
 Loading...