

Page 1

INSTR UCTI ON MANUA L F OR T HE O MEGA JUI CER WIT H TW IN G EAR S
HOUSEHOLD USE ONLY
Omega. . .
A Legendary
Name In
Fresh Juice
E x t r a c t i o n .
Omega Products, Inc.
Harrisburg,PA 17111-4523, U.S.A.
Phone: (717) 561-1105
Fax: (717) 561-1298
E-mail: OMEGAUS@aol.com
Page 2
I M P O RTANT SAFEGUARDS
When using electrical appliances, basic safety precautions should always
be followed including the following:
• Read all instructions.
• To protect against risk of electrical shock, do not put the motor base
in water or other liquid.
• Close supervision is necessary when any appliance is used by or
near children.
• Unplug from outlet when not in use, before putting on or taking off
parts, and before cleaning.
• Avoid contact with moving parts.
• DO NOT operate any appliance with a damaged cord or plug, or
after the appliance malfunctions, or is dropped or damaged in any
manner. Return appliance to the nearest authorized service facility
for examination, repair, or electrical adjustment.
• The use of attachments not recommended or sold by the
manufacturer may cause fire, electric shock, or injury.
• DO NOT use outdoors.
• DO NOT let cord hang over edge of table or counter.
• Always make sure juicer cover is clamped securely in place before
motor is turned on.
• Be sure to turn switch to off position after each use of your juicer.
• DO NOT put your fingers or other objects into the juicer opening
while it is in operation. If food becomes lodged in the opening, use
the plunger or another piece of fruit to push it down. When this
method is not possible, turn the motor off and disassemble juicer
to remove the remaining food.
• DO NOT plug in until familiar with all the instructions and
operating procedures.
SAVE THESE INSTRUCTIONS.
Page 3

I M P O RTANT SAFEGUARDS ( c o n t i n u e d )
• DO NOT unplug from electrical outlet by pulling on the cord.
To unplug, grasp the plug, not the cord, and pull.
• Turn off all controls before unplugging from or plugging into an
electrical outlet.
• When you connect the twin spiral gears to their respective base
receptacle, you must fit the three dots (indentations) of the twin
spiral gears and align them as shown in the photo. If you do not fit
the three dots properly the plastic ends
of these twin spiral gears will be broken,
and the motor in the base will be
severely damaged.
• Do not attempt to defeat the cover
interlock mechanism.
• Ensure that both the top and bottom
clamps are securely locked into place before operating the appliance;
otherwise, the juicer will not run.
WARNING: This appliance has a polarized plug (one blade is wider
than the other). To reduce the risk of electrical shock, this plug will fit in
a polarized outlet only one way. If the plug does not fit fully into the outlet,
reverse the plug. If it still does not fit, contact a qualified electrician.
Do not attempt to modify the plug in any way.
SAVE THESE INSTRUCTIONS.
I N T R O D U C T I O N
Welcome to the wonderful world of juicing with your Omega
Juicer. The juicing process can be an exciting nutritional adventure and
exploration toward a more robust and healthy life.
However, the juicer cannot benefit anyone just by owning it – you
have to use it regularly.
Those of you who incorporate juicing into your daily schedule will
use your juicer more often and consequently will achieve a higher level
of nutritional intake with its greater health benefits.
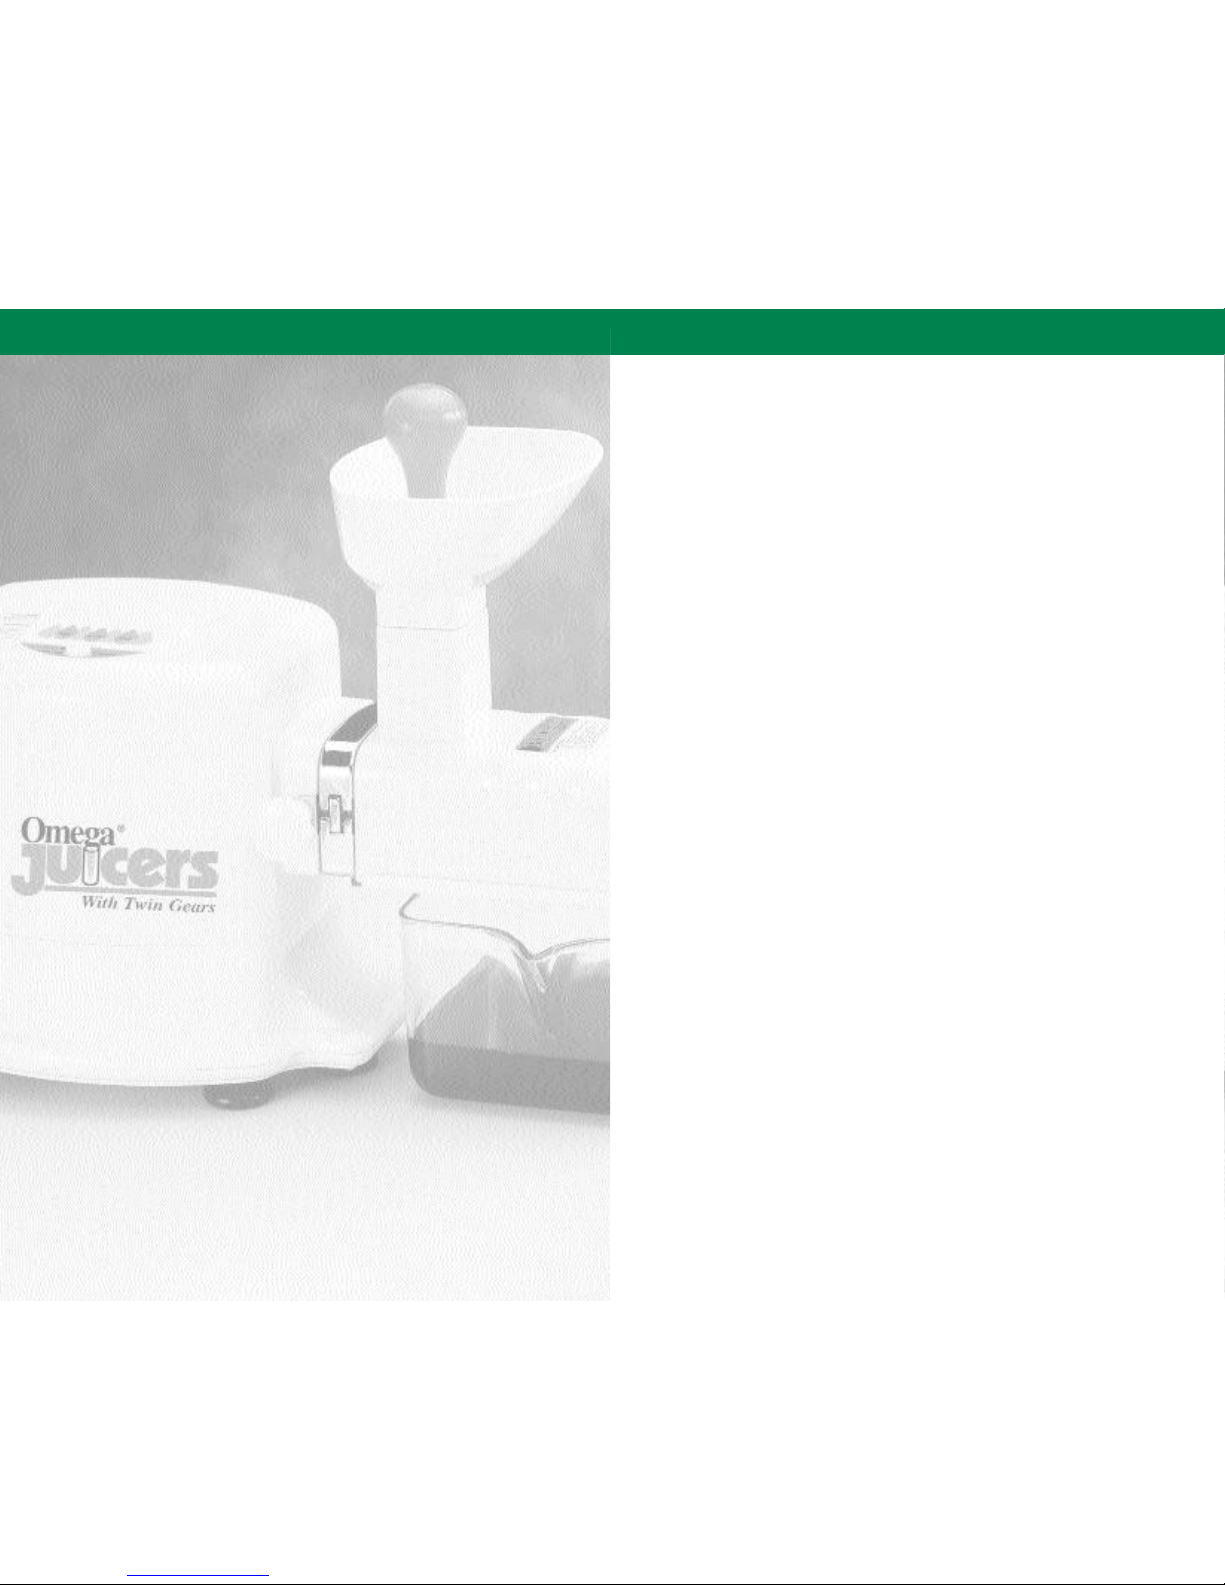
C O M P O N E N T S
CLEANING BRUSH
BOTTOM COVER
PLUNGER
MULTI PURPOSE STICK
STRAINING SCREEN
MASTICATING TWIN GEARS
MOTOR HOUSING
JUICE CUP RESIDUE CONTAINERS
FUNNEL
PULP OUTLET
GEAR HOUSING UNIT
ADJUSTMENT KNOB
GEAR HOUSING COVER
Page 4

STEP 5 The plastic ends of the twin gears should also mesh like the
metal teeth. While the juicer is unplugged, you should be able to turn
the twin gears manually and observe the precise manner by which the
twin gears function.
STEP 6 The Gear Housing Unit is
constructed of three parts (gear housing
cover, straining screen, and bottom
cover). With the gear housing cover held
upside down, insert the straining screen
with the hollow open end in first. Once
the straining screen is through the
opening, slide it forward to the end of the gear housing cover. Then
slide the bottom cover onto the two side grooves of the gear housing
cover until it stops sliding. CAUTION: These three parts should be
assembled upside down and should be completely assembled before turning
them upright. Do not turn the cover housing and straining screen upright
without the bottom cover in place; this would allow the straining screen to
fall out through the bottom hole and possibly become dented. It is best to
work over a counter top or table to avoid parts from falling onto the floor.
STEP 7 Slide this thre e - p a rt gear housing unit over the twin gears until
it fits flush against the motor housingwith no space show i n g .
STEP 8 Swing the top and bottom clamp into place, so that it holds
the gear housing unit firmly against the motor housing. CAUTION:
The bottom clamp should have a snug fit but should not require extreme
force to achieve this fit. If great force is required, this indicates that the
parts are probably not assembled properly, and you should pull off the
gear housing unit and the twin gears and repeat steps 3 through 8.
STEP 9 With both the top and bottom clamps fully in place, hand
tighten the bolt until snug. HINT: Do not overtighten.
STEP 10 Place the juicer funnel top onto the feed hole on the top
of the gear housing unit.
STEP 11 Put the juice cup under the hole of the bottom cover.
STEP 12 Slide the rectangular lip of the pulp container up against the
juice cup and under the pulp outlet hole of the juicer to catch any juice
drips and pulp residue.
A S S E M B LY
NOTE: For best results, go through the assembly procedures, carefully
noting all cautionary points and hints, which are included for your
understanding and benefit.
STEP 1 CAUTION. The various juicing parts have been engineered
to fit precisely together for your juicer to function properly. For the best
results, please take a little time to read these detailed instructions and
go through the assembly procedures step by step in cookbook fashion.
You should soon realize the proper assembly is precise but relatively
simple and logical. Normally, at first, it is helpful to read some parts
of any instruction manual two to three times for better understanding.
STEP 2 CAUTION. To avoid damaging the various juicing parts and
for your Omega Juicer to function properly, youmust achieve proper
alignment of the twin gears. The two gears are color coded. The front
gear is white and the rear gear, which is the main gear, is green.
STEP 3 Hold both gears in your hands. Note that on the end of each
gear there are one or two dots (indentations) on the teeth of the gears. For proper
alignment of the twin gears, you must put
the single dot of the white gear between
the two dots of the green gear. (See Picture.)
CAUTION: To prevent damage to the motor
and the twin gears, you must align the twin
gears precisely as described above. Note that as you turn the gears in your
hands, they mesh together, and that the single dot of the white gear
repeatedly intersects the two dots of the green gear.
STEP 4 While holding both gears together and properly aligned in
your hands, slide both gears into their respective receptacles. You may
have to turn the twin gears together in your hands until the dimple on
the back gear properly fits onto the rectangular drive shaft. Both gears
should be even at both ends. If the gears are not even at both ends,
that indicates that one or both of the gears are not fully seated in their
receptacles. CAUTION: If the gears come apart from one another while
inserting them, you must pull out the gears, visually ensure the one end dot
of the white gear is properly aligned with the two end dots of the green gear.
Page 5

STEP 3 F E E D I N GG R E E N S. Feed wheat grass into your juicer using
q u a rt e r - s i ze bunches in quick succession. Avoid feeding large bunches at
one time. Wheat grass may also be rolled inside pieces of other larger leafy
vegetables and then fed into your juicer. Feed leafy vegetables upside dow n
in fashion for better results. Some leaves (collards, cabbage, lettuce, turnip
g reens, etc.) may be rolled first. H I N T: A piece of lemon, lime or celery inter-
spersed with the wheat grass and/or other leafy vegetable may improve the taste
of the green juices.
STEP 4 F E E D I N GF RU I TSA N D V E G E TA B L E S. Cut soft fruits and
vegetables into smaller pieces before juicing. Ha rd fibrous root vegetables can
also be juiced when cut into narrow strips (about 1/4 inch wide) before
entering the Omega Ju i c e r. Your Omega Juicer easily juices celery and other
stem vegetables. It is not necessary to re m ove the celery strings or to cut
into sections. The various fruits and vegetables can be fed into your juicer
alternately to achieve a mixture of flavors. N OTE: In i t i a l l y, a small amount of
juice will come out of the outlet hole of the juicer. This will happen until the outlet
hole fills up with the pulp. Once filled, the pulp and juice can be re i n s e rted into the
j u i c e rto get the maximum amount of juice. The gears may be adjusted for larger
objects. The knob on the front of the machine adjusts the gap of the Twin Ge a r s .
When tightened, the gears run parallel to each other. When loosened, the gears have
a slight gap to allow larger pieces to be drawn into the gears.
STEP 5 Pour the juice in the juice cup into other containers for immediate
consumption or short term storage. H I N T: Although it is ideal to drink the
juices immediately, many times it is more practical to put some of the juice aside
for consumption four to eight hours later. This can still be ve ry beneficial. T h i s
s t o red juice should be put into small containers with a little lemon or lime juice
or vitamin C powder (ascorbic acid) added and with minimal air space, tightly
sealed, and cooled quickly. Juices can be fro zen for longer stora g e .
O P E R AT I N G
N OTE: For best results, go through the operating pro c e d u res, carefully noting
all cautionary points and hints, which are included for your understanding
and benefit.
C AU T I O N
• Your Omega Juicer may only be operated when fully assembled.
• Ne ver insert your fingers or any other objects into the feed chute except for
the plunger and any materials that you are juicing.
• Do not let long hair, loose clothing, or any other objects dangle over or into
the feed hole.
• Do n’t put any foreign objects into the feed hole.
• Do not place any of the plastic parts in ve ry hot water or in the dishwasher.
• Make sure you completely understand all instructions before using your
Omega Ju i c e r.
• Become familiar with the power and control panel.
• Make sure the pulp container and the residue cup are in place.
STEP 1 C L E A N I N G . Be f o re using your Omega Juicer initially, you should
first clean all juicing parts in detergent and water. Avoid putting plastic part s
into ve ry hot water. It is also helpful to “friction clean” the juicer, by feeding
two or more cups of vegetable and/or fruit scraps into your juicer. T h e n
d i s c a rd the scraps, disassemble and clean the juicer before reassembling and
using it.
STEP 2 P OW E R . To operate your Omega Ju i c e r, push the power button
on the control panel once to turn the unit on. You will see a blinking red light
indicating that the power is on. Now push the forw a rd button (FWD) and the
red light will turn off as the gears start to rotate. Push the re verse button
( R EV) and the gears will go on in the opposite rotation momentarily, then
return itself to the forw a rd motion. Push the stop (STOP) button and the
gears will stop. Pushing the REV button while in stop mode will turn the gears
in re verse motion momentarily, and then return to the stop position. W h e n
done juicing, turn the unit off by pushing the power button. N OTE: The REV
mode is used to back up the gears when jamming occurs. If the REV mode does not
c o r rect the jamming, then turn the unit off, disassemble, clean, reassemble and
continue juicing.
Page 6

D I S A S S E M B LY
STEP 1 Remove juice cup and residue container.
STEP 2 Remove funnel top from feed hole.
STEP 3 Loosen tightening bolt and swing down out of the way.
STEP 4 Lower bottom clamp.
STEP 5 Raise upper clamp.
STEP 6 Slide out the gear housing unit and the twin gears.
STEP 7 Set the twin gears aside.
STEP 8 Invert the gear housing unit and slide off the bottom cover.
STEP 9 Remove the strainer screen from the gear housing unit.
C L E A N I N G
NOTE: Cleaning is done after the Omega Juicer is turned off
and disassembled.
STEP 1 To dislodge any compacted pulp from inside the cover
housing, use the multi-purpose stick. Approach this compacted pulp
from the inside as well as the outside. Push the multi-purpose stick
back and forth through the pulp outlet hole.
STEP 2 Using a pan of water is helpful in dislodging pulp from the
various parts of the juicer while using a dishcloth, the multi-purpose
stick, or various brushes.
STEP 3 The strainer screen can best be cleaned with the long brush
for the inside and the shorter brush for the outside.
STEP 4 The twin gears can easily be cleaned with the short brush
under running water.
STEP 5 Use the multi-purpose stick to clean the pulp out of the twin
gear receptacles.
STEP 6 Wipe off any juice remnant from the motor housing with a
damp dishcloth.
CAUTION: To prevent electric shock or injury, never immerse the motor
housing in or under water!
 Loading...