

Page 1
DIGITAL CAMERA
Table of Contents
1. Preparation
2. Shooting
3. Using the Menus
4. Shooting Settings
Instruction Manual
5. Playback
6. Customizing the Camera
7. Setting Up the Camera
Connecting the Camera to
8.
External Devices
9. Cautions
10. Information
11. SAFETY PRECAUTIONS
Model No. : IM027
Thank you for purchasing our digital camera. Before you start to use your new camera, please
read these instructions carefully to enjoy optimum performance and a longer service life.
Be sure you have read and understood the contents of “11. SAFETY PRECAUTIONS”, before
using this product. Keep these instructions available for future reference.
We recommend that you take test shots to get accustomed to your camera before taking important
photographs.
The screen and camera illustrations shown in this manual were produced during the development
stages and may differ from the actual product.
If there are additions and/or modifications of functions due to firmware update for the camera, the
contents will differ. For the latest information, please visit our website.
Page 2

Before You Begin
Read and Follow Safety Precautions
Before Y ou Begin
To prevent incorrect operation resulting in re or other damage to property or harm to
yourself or to others, read “11. SAFETY PRECAUTIONS” (P. 332) in its entirety before
using the camera.
While using the camera, consult this manual to ensure safe and correct operation. Be
sure to keep the manual in a safe place once it is read.
Our company will not be held liable for violations of local regulations arising from use of
this product outside the country or region of purchase.
Wireless LAN and Bluetooth
The camera features built-in wireless LAN and Bluetooth®. Use of these features
outside the country or region of purchase may violate local wireless regulations; be
sure to check with local authorities before use. Our company will not be held liable for
the user’s failure to comply with local regulations.
Disable wireless LAN and Bluetooth
g “Disabling the camera’s wireless communication (Airplane Mode)” (P. 260)
User Registration
Visit our website for information on registering your products.
Installing PC Software/Apps
OM Workspace
This computer application is used to download and view photos and movies recorded
with the camera. It can also be used to update the camera rmware. The software can be
downloaded from our website. Be prepared to provide the camera serial number when
downloading the software.
OM Image Share
You can load images in the camera that have been marked for sharing (P. 195) to a
smartphone.
You can also operate the camera remotely and take pictures from a smartphone.
Visit our website for information about the application.
®
®
in areas where their use is prohibited.
2
EN
Page 3
Product Manuals
Instruction Manual (this pdf)
A how-to guide to the camera and its features. The Instruction
Manual can be downloaded from our website or directly using the
“OM Image Share” smartphone app.
Product Manuals
EN
3
Page 4
About This Manual
Taking Pictures Using the Shooting Modes
How to nd what you want to know
About This Manual
You can use the following methods to nd what you want to know in this manual.
Search method Where to look
Search based on what you want to do Table of Contents P. 6
Search based on names of buttons
and parts of the camera
Search based on menus and terms
displayed on the monitor
Search based on words
How to read this manual
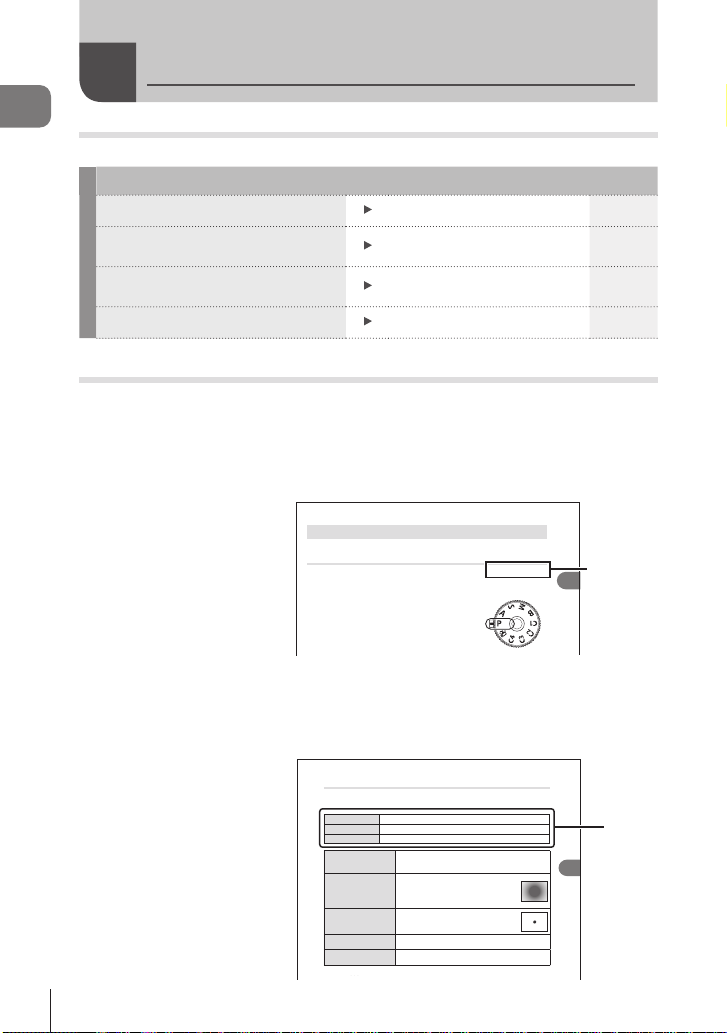
Shooting modes in which the function is available
In each explanation of a shooting function, the shooting modes in which the function
can be used are shown at the beginning. The shooting modes in which the function can
be used are shown in black. The shooting modes in which the function cannot be used
are shown in gray.
Letting the camera choose aperture and shutter speed
(P: Program AE)
The camera chooses the optimal aperture and shutter speed according to subject
brightness.
Rotate the mode dial to P.
1
Names of parts P. 15
Default Settings P. 311
Index P. 337
PASMB
g
Availability
n
of the
2
Shooting
function
in each
shooting
mode
How to set the function
The procedures for setting each function is described at the beginning of the
explanation of the function. For details, see “How to operate the menus” (P. 63) and
“How to change the shooting settings (Direct buttons/Super Control Panel)” (P. 66).
4
EN
Choosing how the camera measures brightness (Metering)
You can choose how the camera meters subject brightness.
Button
AF m button n FGk
Super Control Panel
Q n Metering
Menu
MENU n _ n5. Metering n Metering
Suited to most scenes, including back-lit subjects. The
Digital ESP
p
B
C
CHi
CSh
%The spot metering position can be set at the selected AF target. g “"Metering the Focus
camera meters 324 areas of the frame and calculates optimal
metering
exposure taking into consideration the nature of the scene.
Suited to compositions that place the main
Center weighted
subject at the center of the frame. The camera
averaging
sets exposure based on the average light level
metering
for the entire frame while assigning the greatest
weight to the area in the center.
Use a specic area of the subject meter
Spot metering
exposure. The camera meters a small portion
(approximately 2%) of the frame.
Spot metering
Increases spot metering exposure. Ensures bright subjects
(highlight)
appear bright.
Spot metering
Lowers spot metering exposure. Ensures dark subjects
(shadow)
appear dark.
PASMB
n
4
Shooting Settings
How to
set the
function
Page 5
Symbols in this manual
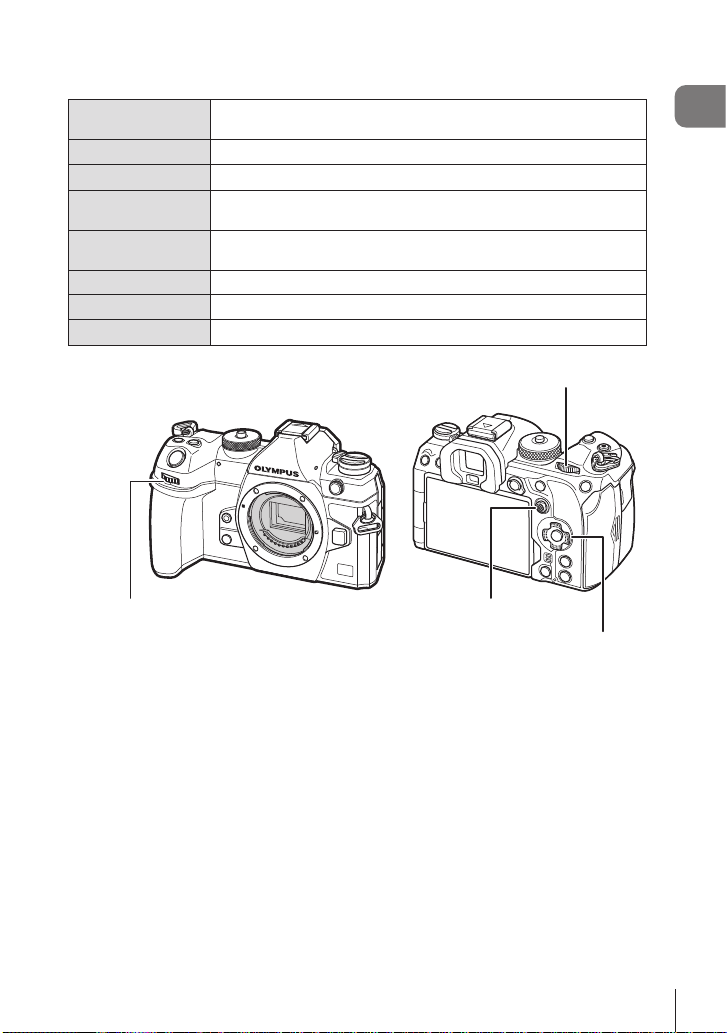
The following symbols are used throughout this manual.
FGHI
k
j
T
S
#
!
g
Symbols designating the buttons (respectively the up, down, left,
and right arrow buttons) to press on the arrow pad.
Represents operation of the front dial.
Represents operation of the rear dial.
Represents placing a nger lightly on the multi selector and pivoting
it in the desired direction.
Represents pressing down on the center of the multi selector much
as you would a button.
Cautions and limitations.
Tips and other helpful information for using the camera.
References to other pages in this manual.
About This Manual
Rear dial
Front dial
Multi selector
Arrow pad
About the screen illustrations in this manual
The camera monitor displays the super control panel (P. 69) by default. The screen
illustrations in this manual, however, show the live view display.
See “Switching between displays” (P. 37) for how to display the shooting screen on
the monitor.
EN
5
Page 6
Table of Contents
Table of Contents
Before Y ou Begin 2
Product Manuals 3
About This Manual 4
How to nd what you want to
know ...............................................4
How to read this manual.................4
Names of parts 15
1. Preparation 17
Unpacking the box contents .....17
Attaching the Strap ....................18
Attaching Cable Protectors .......19
Inserting and removing the
battery .........................................20
Inserting the battery......................20
Removing the battery ...................21
Charging the Battery using the
supplied USB-AC adapter ..........22
Charging the Battery using a
USB Device .................................23
Inserting and removing the
card ..............................................24
Inserting the card ..........................24
Removing the card .......................25
Using Two Memory Cards ............25
Usable cards ................................25
Attaching and removing
lenses ..........................................26
Attaching a lens to the camera .....26
Removing Lenses .........................28
Using the monitor .......................29
Turning the camera on ...............30
Sleep Mode ..................................30
Initial setup .................................31
What to Do If You Can’t Read
the Display ..................................33
2. Shooting 34
Information displays while
shooting ......................................34
Switching between displays ......37
Switching the information
display ..........................................38
Shooting still pictures ................39
Types of shooting modes .............39
Shooting with touch screen
operations .....................................41
Photo Review (Image Review) .....42
Taking Pictures Using the
Shooting Modes .........................43
Letting the camera choose
aperture and shutter speed
(P: Program AE) ...........................43
Choosing aperture
(A: Aperture-Priority AE) ..............45
Choosing shutter speed
(S: Shutter-Priority AE) ................47
Choosing aperture and shutter
speed (M: Manual Exposure) .......49
Long Exposures (
Lighten Blending (
Composite Photography)..............54
Saving Custom Settings to
the Mode Dial (C1/C2/C3/C4
Custom Modes) ..........................56
Saving Settings (Assign to
Custom Mode) ..............................56
Using Custom Modes
(C1/C2/C3/C4) ...........................57
Recording Movies ......................59
Recording movies in movie mode
(n) ..............................................59
: Bulb/Time) ...51
B
: Live
B
6
EN
Page 7

Recording movies in photo
shooting modes ............................61
Touch Controls (Silent Controls) ...62
3. Using the Menus 63
What you can do with menus ....63
How to operate the menus ........63
4. Shooting Settings 66
How to change the shooting
settings (Direct buttons/Super
Control Panel) .............................66
Direct Buttons ...............................66
The Super Control Panel/LV
Super Control Panel .....................69
Basic functions for focusing .....72
Choosing a focus mode
(KAF Mode / nAF Mode) .........72
Choosing a Focus Target
(AF Target Point) ..........................76
Choosing an AF Target Mode
(AF Target Mode) .........................77
Setting the options for AF target
modes
(KAF Target Mode Settings) ......79
Zoom frame AF/Zoom AF
(Super Spot AF) ............................80
Functions for conguring how
to focus .......................................82
Combined Auto and Manual
Focus (K AF+MF) ......................82
Conguring the AF operation
when the shutter button is
pressed
(KAF by half-pressing a) ..........83
Autofocus using the AF-ON
button ...........................................83
Using Autofocus in Manual Focus
Mode (e in MF mode) ..............84
Conguring camera operation
when it cannot focus on the
subject (Release Priority) .............84
Changing the settings of Starry
Sky AF (Starry Sky AF Setting) ....85
Functions for customizing AF
operation to t the subject ........86
C-AF Center Target Priority
(KC-AF Center Priority) .............86
C-AF Tracking Sensitivity
(KC-AF Sensitivity / nC-AF
Sensitivity) ....................................87
C-AF Focus Speed
(nC-AF Speed) ...........................87
Face priority AF/Eye priority AF
(Face & Eye Detection) ................88
Tracking Focus on Selected
Subjects (Subject Detection) ........90
Conguring the frame displays
for detected eyes
(Eye Detection Frame) .................91
Functions for changing camera
operation regarding focus .........92
Lens Focus Range
(KAF Limiter) .............................92
C-AF Lens Scanning
(KAF Scanner) ...........................94
Fine-Tuning Autofocus
(KAF Focus Adjustment) ...........95
AF Illuminator Autofocus Assist
(AF Illuminator) .............................96
AF Target Display Mode
(AF Area Pointer) ..........................96
Functions for setting the
focusing position .......................97
Matching AF Target Selection
to Camera Orientation
(KOrientation Linked N)..........97
Choosing the AF Home Position
(KN Set Home) .......................98
AF Target Selection
(NSelect Screen Settings) .........99
Enabling AF Target Selection
Wrap (N Loop Settings) ..........100
Touch AF Target Selection for
Viewnder Photography
(AF Targeting Pad) .....................101
Table of Contents
EN
7
Page 8

Other functions that are useful
when focusing ..........................102
Manual Focus Assist
Table of Contents
(MF Assist) .................................102
Focus Peaking Options
(Peaking Settings) ......................103
Choosing a Focus Distance for
Preset MF
(Preset MF distance) ..................104
Disabling the MF Clutch
(MF Clutch) .................................104
Lens Focus Direction
(Focus Ring) ...............................104
Resetting the Lens Position at
Shutdown (Reset Lens) ..............105
Metering and Exposure ............106
Controlling exposure
(Exposure Compensation)..........106
EV Steps for Exposure Control
(EV Step) ....................................107
Fine-Tuning Exposure
(Exposure Shift) ..........................107
Reducing Flicker Under LED
Lighting (KFlicker Scan /
nFlicker Scan) ..........................108
Choosing how the camera
measures brightness
(Metering) ...................................109
Locking the exposure
(AE Lock) ....................................109
AE Lock Exposure Metering
(Metering during B) ................110
Releasing AE Lock after shooting
(B Auto Reset) .......................110
Locking exposure when the
shutter button is pressed halfway
(AEL by half-pressing a) ...........111
Setting metering options for
sequential shooting
(Metering during j) .................112
Metering the Focus Target
(NSpot Metering) .....................112
Changing ISO sensitivity
(ISO) ...........................................113
8
EN
EV Steps for ISO Sensitivity
Control (ISO Step) ......................114
Setting the range of ISO
sensitivity values selected in
[Auto] mode
(KISO-A Upper/Default /
bISO-A Upper/Default)...........114
Setting the shutter speed at
which the camera automatically
raises ISO sensitivity
(KISO-A Lowest S/S) ...............115
Choosing the modes in which
[Auto] can be used for ISO
sensitivity
(KISO-Auto / bISO-Auto) ....115
High ISO Noise Reduction
Options (KNoise Filter /
nNoise Filter) ...........................116
Image Processing Options
(Low ISO Processing) ................116
Long Exposure Noise Reduction
Options (Noise Reduction) .........117
Flash photography ...................118
Using a ash
(Flash photography) ...................118
Choosing a Flash Mode
(Flash Mode) ..............................120
Conguring ash modes
(Flash Mode Settings) ................123
Adjusting ash output
(Flash Exposure Comp.) ............123
Wireless Remote Flash Control
(# RC Mode) .............................124
Choosing a Flash Sync Speed
(# X-Sync.) ................................124
Choosing the Minimum Shutter
Speed (# Slow Limit) .................124
Flash and Exposure
Compensation (x+F) .............124
Setting the exposure balance for
TTL metering
(Balanced Flash Metering) .........125
Sequential Shooting/
Self-Timer ..................................126
Performing the sequential/
self-timer shooting ......................126
Page 9

Conguring the sequential
shooting functions
(Sequential Shooting Settings) ...128
Conguring the self-timer
functions (Self-timer Settings) ....130
Shooting without the vibration
caused by shutter button
operations
(Anti-Shockr Settings) .............131
Shooting without shutter sound
(Silents Settings) .....................132
Shooting without a release time
lag (Pro Capture shooting) .........133
Reducing Flicker in Photographs
(Anti-Flicker Shooting) ................135
Image Stabilization ...................136
Reducing camera shake
(KImage Stabilizer / nImage
Stabilizer) ...................................136
Image stabilization options
(nIS Level) ...............................137
Half-press image stabilization
(aImage Stabilizer) ...................138
Burst mode image stabilization
(jImage Stabilizer)..................138
Displaying camera motion on the
monitor (Handheld Assist) ..........139
Image Stabilization for IS Lenses
(Lens I.S. Priority) .......................139
Color and Quality .....................140
Setting the Quality of Photos and
Movies (KK / nK) ...........140
Combinations of JPEG image
sizes and compression rates
(KK Detailed Settings) ..........143
Choosing the codec for
recording movies
(nVideo Codec) ........................144
Setting the image aspect
(Image Aspect) ...........................144
Peripheral illumination
(Shading Comp.) ........................144
Processing options (KPicture
Mode / nPicture Mode) ............145
Choosing which options are
displayed when selecting a
picture mode
(KPicture Mode Settings) ........149
Adjusting color
(WB (white balance)) ..................150
Locking the white balance in
movie mode
(nButton Function: WLock) ....153
Making ne adjustments to white
balance
Preserving the warm tones of
incandescent lighting when in
WB Auto mode
(KW Keep Warm Color/nW
Keep Warm Color) ......................154
Flash White Balance (#+WB) ...154
Setting the color reproduction
format (Color Space) ..................155
Preview Options for Movie
Picture Modes
(
Special shooting modes
(Computational Modes) ..........156
Shooting still pictures in a higher
resolution (High Res Shot) .........156
Slowing the Shutter in Bright
Light (Live ND Shooting) ............158
Increasing Depth of Field
(Focus Stacking) ........................160
Taking HDR (High Dynamic
Range) images (HDR) ................162
Recording multiple exposures in
a single image
(Multiple Exposure) ....................163
Digital Zoom
(KDigital Tele-converter /
nDigital Tele-converter) ............166
Shooting automatically with a
xed interval
(Interval Shooting) ......................167
Keystone correction and
perspective control
(Keystone Comp.) ......................170
Correcting Fisheye Distortion
(Fisheye Compensation) ............171
(KAll x/nAll x) .......153
nView Assist) ......................155
Table of Contents
9
EN
Page 10

Conguring BULB/TIME/COMP
Settings
(BULB/TIME/COMP Settings) ....173
Table of Contents
Recording a series of shots with
varied exposure (AE BKT) ..........174
Recording pictures with varied
white balance (WB BKT) ............175
Recording pictures with varied
ash level (FL BKT) ....................175
Recording pictures with varied
ISO sensitivity (ISO BKT) ...........176
Recording copies of one picture
with dierent art lters applied
(ART BKT) ..................................177
Recording pictures with dierent
focus positions (Focus BKT) ......178
Functions that are only
available in movie mode ..........180
Sound Recording Options
(Sound Recording Settings) .......180
Adjusting the headphone volume
(Headphone Volume) .................181
Time Codes
(Time Code Settings) .................181
HDMI Output
(nHDMI Output) .......................182
Displaying a + mark in the center
of the screen while recording
movies (Center Marker) ..............183
Displaying zebra patterns over
high luminance areas while
recording movies
(Zebra Pattern Settings) .............184
Displaying a red frame while
recording movies
(Red Frame during RREC) .......185
5. Playback 186
Information display during
playback ....................................186
Playback image information .......186
Switching the information
display ........................................187
Viewing photographs and
movies .......................................188
Viewing photographs ..................188
Watching movies ........................189
Finding Pictures Quickly
(Index and Calendar Playback) ..189
Zooming In (Playback Zoom) .....190
Playback Using Touch
Controls .....................................191
Full-frame playback ....................191
Index/Calendar playback ............191
Other functions ...........................192
Setting playback functions ......193
Rotating Pictures (Rotate) ..........193
Protecting Pictures (0) ...........193
Copying an image (Copy)...........193
Copying all images on a card
(Copy All) ....................................194
Deleting Pictures (Erase) ...........194
Deleting All Pictures (Erase All) ..194
Disabling Deletion Conrmation
(Quick Erase) .............................195
RAW+JPEG Deletion Options
(RAW+JPEG Erase) ...................195
Selecting Pictures for Sharing
(Share Order) .............................195
Selecting RAW+JPEG Pictures
for Sharing (RAW+JPEG h) ......196
Rating Pictures (Rating) .............196
Selecting the numbers of stars to
be used for rating
(Rating Settings) .........................197
Selecting Multiple Pictures
(Share Order Selected, Rating
Selected, 0, Copy Select,
Erase Selected) ..........................197
Print order (DPOF) .....................198
Resetting all protection/share
orders/print orders/ratings
(Reset All Images) ......................198
Adding Audio to Pictures (R) ......199
Retouching Pictures (Edit) ..........200
10
EN
Page 11

Combining Pictures
(Image Overlay) ..........................203
Trimming movies
(Movie Trimming) ........................204
Creating Movie Stills
(In-Movie Image Capture) ..........204
Changing the role of the R (H)
button during playback
(qRFunction) ..........................205
Changing the roles of the front
and rear dials during playback
(qDial Function) .......................205
Choosing the Playback Zoom
Ratio (qaDefault Setting) .......205
Automatically rotating portraitorientation pictures for playback
(R) ............................................205
Choosing the information
displayed during playback
(qInfo Settings) ........................206
Choosing the information
displayed during magnied
playback
(qaInfo Settings) ....................206
Conguring the index display
(G Settings) ..............................207
6. Customizing the Camera
208
Functions for Conguring
Camera Controls ......................208
Changing the roles of buttons
(Button Settings) .........................208
Assigning Roles to the Front and
Rear Dials
(KDial Function / nDial
Function) ....................................216
Changing the Dial Direction
(Dial Direction) ............................218
Changing the Functions of the
Multi Selector
(Multi Selector Settings) .............218
Customizing the Fn Lever
(Fn Lever Settings) .....................219
Power Zoom Lenses
(Electronic Zoom Settings) .........222
Locking the v Button
Choosing What Happens When
the Shutter Button Is Pressed
During Live View Zoom
(LV Close Up Mode) ...................223
Choosing the Behavior of the
Control Used for Depth-of-Field
Preview (zLock) ........................224
Button Hold Options
(Press-and-hold Time) ................224
Functions for adjusting the live
view display ..............................225
Changing the look of the display
(KLV Mode) ..............................225
Making the display easier to see
in dark places
(KNight Vision) .........................225
Viewnder Display Rate
(Frame Rate) ..............................225
Art Filter Preview
(Art LV Mode) .............................226
Reducing Flicker in Live View
(Anti-Flicker LV) ..........................226
Sele Assist (Sele Assist) .........227
Functions for Conguring
Information Display ..................228
Selecting the display style of the
viewnder (EVF Style) ................228
Shooting Indicators (KInfo
Settings / nInfo Settings) ..........230
Conguring the display for when
the shutter button is pressed
halfway
(Info by half-pressing a) ............231
Viewnder Info Display Options
(VKInfo Settings) ...................232
Displaying the Level Gauge when
the shutter button is pressed
halfway (Va Level Gauge) ......233
Framing Guide Options
(KGrid Settings / nGrid
Settings) .....................................234
(vLock) ..223
Table of Contents
EN
11
Page 12

Viewnder Framing Grid Options
(VKGrid Settings) ..................235
Choosing the Settings Available
Table of Contents
via Multi-Fn
(Multi Function Settings) .............236
Histogram Exposure Warning
(Histogram Settings) ...................236
Settings related to operation
and display of menus ...............237
Conguring the cursor on the
menu screen
(Menu Cursor Settings) ..............237
Choosing how to move between
pages with the rear dial
(g Loop in Menu Tab) ...............238
[Yes]/[No] Default
(Priority Set) ...............................238
“My Menu” Settings .................239
Using “My Menu” ........................239
7. Setting Up the Camera 241
Card/Folder/File Settings .........241
Formatting the card
(Card Formatting) .......................241
Setting the card to record to
(KCard Slot Settings / nCard
Slot Settings) ..............................242
Specifying a folder to save
images in
(Assign Save Folder) ..................244
File Naming Options
(File Name) .................................244
Naming Files (Edit Filename) .....245
User information .......................246
Saving lens info
(Lens Info Settings) ....................246
Output Resolution
(dpi Settings) ..............................247
Adding Copyright Information
(Copyright Info.) ..........................247
Monitor/Sound/Connection
Settings .....................................249
Disabling Touch Controls
(Touchscreen Settings) ...............249
Monitor Brightness and Hue
(Monitor Adjust) ..........................249
Viewnder Brightness and Hue
(EVF Adjust) ...............................250
Conguring the eye sensor
(Eye Sensor Settings) ................250
Disabling the Focus Beep (8) ..251
External Monitor Display Options
(HDMI Settings) ..........................251
Choosing a USB Connection
Mode (USB Settings) ..................252
Battery/Sleep Settings .............253
Displaying Battery Status
(NBattery Status).....................253
Setting which Battery Is Used
First (NBattery Priority) ............253
Changing the battery level
display during movie recording
(nNDisplay Pattern) ..............253
Dimming the Backlight
(Backlit LCD) ..............................254
Setting Sleep (Power Saving)
Options (Sleep) ..........................254
Setting Auto Power O Options
(Auto Power O) .........................254
Reducing Power Consumption
(Quick Sleep Mode) ....................255
Reset/Clock/Language/Others
Settings .....................................257
Restoring Default Settings
(Reset/Initialize Settings) ............257
Setting the Camera Clock
(X Settings) ...............................257
Choosing a Language
(W)...........................................257
Calibrating the Level Gauge
(Level Adjust) ..............................258
Image Processing Check
(Pixel Mapping) ..........................258
Viewing the Firmware Version
(Firmware Version) .....................258
12
EN
Page 13
Viewing Certicates
(Certication) ..............................258
8. Connecting the Camera
to External Devices 259
Precautions for Using Wi-Fi
and Bluetooth® .........................259
Disabling the camera’s wireless
communication
(Airplane Mode) ..........................260
Connecting the camera to a
smartphone ...............................260
Pairing the Camera and
Smartphone
(Wi-Fi Connection) .....................261
Wireless Connection Standby
Setting for When the Camera Is
On (Bluetooth) ............................262
Wireless Settings for When the
Camera Is O
(Power-o Standby) ...................263
Transferring images to a
smartphone ................................264
Automatically uploading images
while the camera is o ................264
Shooting remotely with a
smartphone (Live View) ..............265
Shooting remotely with a
smartphone (Remote Shutter) ....265
Adding position information to
images ........................................266
Resetting smartphone connection
settings (Reset d Settings) .........266
Changing the password
(d Connection Password) ..........267
Connecting to Computers via
Wi-Fi ...........................................267
Installing Software ......................267
Readying the Computer
(Windows) ..................................268
Pairing the Computer with the
Camera (New Link) ....................269
Adjusting Wi-Fi Settings
(Wi-Fi Connection) .....................271
Uploading Pictures as They Are
Taken ..........................................276
Ending the Connection ...............278
Using the Remote Control .......279
Names of parts ...........................279
Connection .................................279
Shooting from the remote
control .........................................281
MAC address of the remote
control .........................................282
Precautions for using the remote
control .........................................282
Connecting to Computers via
USB ............................................283
Installing Software ......................283
Uploading Pictures as They Are
Taken (0RAW/Control) ........284
Connecting the Camera for HighSpeed RAW Processing
(0RAW/Control) ...................285
Copying Pictures to the
Computer (Storage/MTP) ...........286
Powering the Camera via USB
(USB Power Delivery) ...............287
Connecting to TVs or External
Displays via HDMI ....................288
Viewing Pictures on a TV
(HDMI) ........................................288
9. Cautions 289
Information about Dust and
Water Resistant Features ........289
Battery and charger .................290
Using your charger abroad .....290
10. Information 291
Interchangeable lenses ............291
MF Clutch Lenses .....................292
Camera Displays for Lens SET
and CALL Functions ................293
Optional Accessories ...............294
Table of Contents
13
EN
Page 14
Using the charger (BCX-1) .........294
HLD-10 Power Battery Holder ....295
Notes on using this product ........296
Table of Contents
Designated External Flash
Units ...........................................297
Wireless remote control ash
photography ...............................298
Other external ash units ...........300
Principal Accessories .................301
System chart .............................302
Cleaning and storing the
camera .......................................304
Cleaning the camera ..................304
Storage .......................................304
Cleaning and checking the image
pickup device ..............................305
Pixel Mapping - Checking the
image processing functions ........305
Shooting tips and information 306
Error codes ...............................309
Default Settings ........................311
Super Control Panel ...................311
_
Tab........................................313
‘ Tab........................................316
AF Tab .......................................317
n
Tab ........................................319
q
Tab........................................320
G Tab .........................................321
e
Tab...........................................325
Memory Card Capacity ............327
Specications ...........................329
11. SAFETY PRECAUTIONS
332
SAFETY PRECAUTIONS ..........332
Index 337
14
EN
Page 15
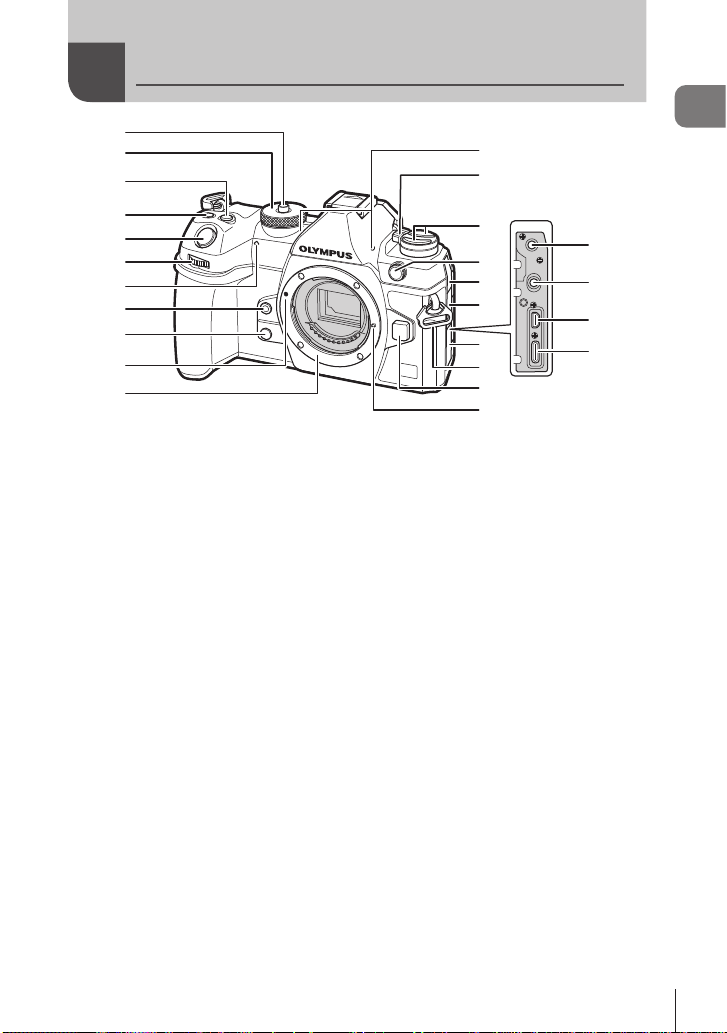
Names of parts
1
2
3
4
5
6
9
8
7
0
a
n
o
m
l
k
1 Mode dial lock .................................P. 39
2 Mode dial ........................................P. 39
3 F (Exposure compensation) button
..............................P. 43, 45, 47, 50, 106
4 R (Movie)/ h (High Res Shot)/
H (selection) button
..................................P. 59/P. 156/P. 197
5 Shutter button .................................P. 39
6 Front dial (k)
..................P. 43 – 50, 63, 188, 205, 216, 218
7 Self-timer lamp/AF illuminator
.............................................P. 126/P. 96
8 Y (One-touch white balance) button
......................................................P. 152
9 Z (Preview) button .......................P. 224
0 Lens attachment mark ....................P. 26
a Mount (Remove the body cap before
attaching the lens.)
b Stereo microphone ...............P. 180, 199
c ON/OFF lever ................................P. 30
b
c
d
e
f
g
h
i
j
d v button .......................................P. 223
AFm (AF/metering mode) button
......................................................P. 109
jY# (Sequential shooting/self-timer/
ash) button ..........................P. 120, 126
e External flash terminal ..................P. 119
f Microphone jack cover
g Cover for headphone jack.............P. 181
h Connector cover
i Strap eyelet.....................................P. 18
j Lens release button ........................P. 28
k Lens lock pin
l
Microphone jack (ø3.5 mm stereo minijack for third-party microphones)
m Headphone jack (ø3.5 mm stereo mini-
jack for third-party headphones) ...P. 181
n HDMI connector (Type D)
..........................................P. 182, P. 288
o USB connector (Type C)
..................................P. 22, 23, 283, 287
...P. 180
Names of parts
15
EN
Page 16
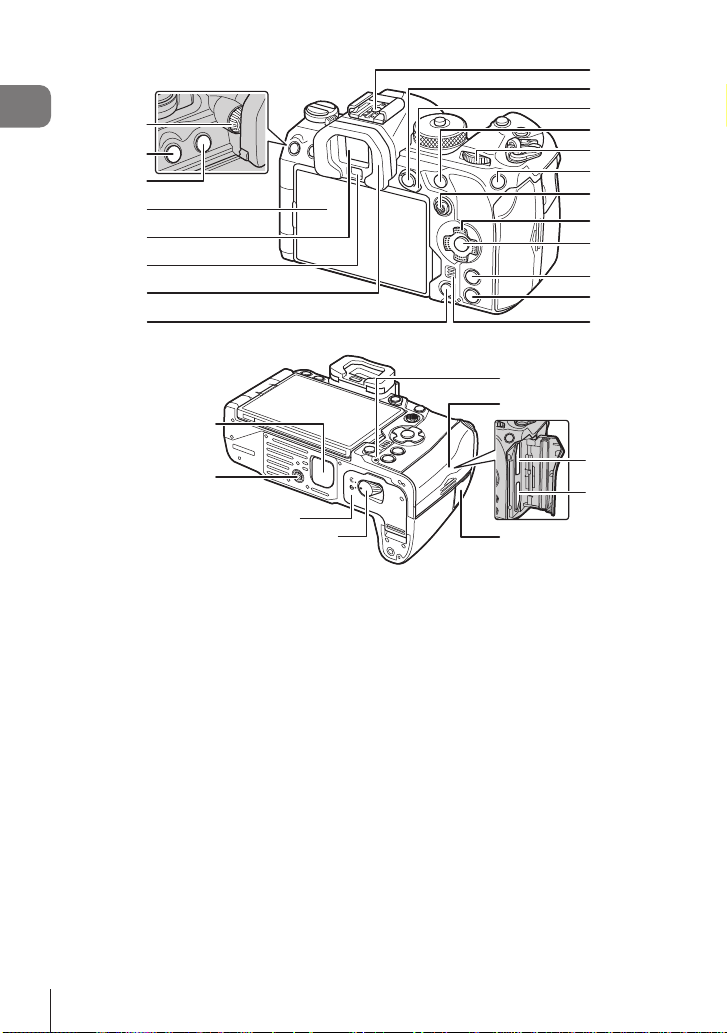
Names of parts
6
5
7
8
4
1
2
3
9
0
a
d
c
b
h
i
j
f
e
g
k
l
q
r
m
n
o
p
s
1 Diopter adjustment dial ...................P. 37
2 MENU button .................................P. 63
3 u (LV) button ..............................P. 37
4 Monitor (Touch screen)
............................P. 34, 37, 41, 101, 191
5 Viewnder ...............................P. 37, 228
6 Eye sensor
7 Eyecup ..........................................P. 301
8 D (Erase) button ..........................P. 194
9 Hot shoe ...............................P. 119, 300
0 AEL / 0 (Protect) button
...........................................P. 109/P. 193
a Fn lever ...........................P . 43 – 49, 219
b AF-ON button ......................P. 83, P. 84
c Rear dial (j)
................
d ISO / f (Rating) button
...........................................P. 113/P. 196
16
EN
P. 43 – 50, 63, 188, 205, 216, 218
e Multi selector (S/T) .............P. 76, 218
f Arrow pad (FGHI) ..................P. 188
g Q button ..........................P. 63, 69, 188
h INFO button .................P. 38, P. 65, 187
i q (Playback) button ....................P. 188
j Speaker
k Power battery holder (PBH) cover
......................................................P. 295
l Tripod socket
m Battery compartment cover.............P. 20
n Battery compartment lock ...............P. 20
o Battery charge lamp........................P. 23
p Card compartment cover ................P. 24
q Card slot 1 ......................................P. 24
r Card slot 2 ......................................P. 24
s Remote cable terminal cover
(Remote cable terminal) ...............P. 279
Page 17
1
Preparation
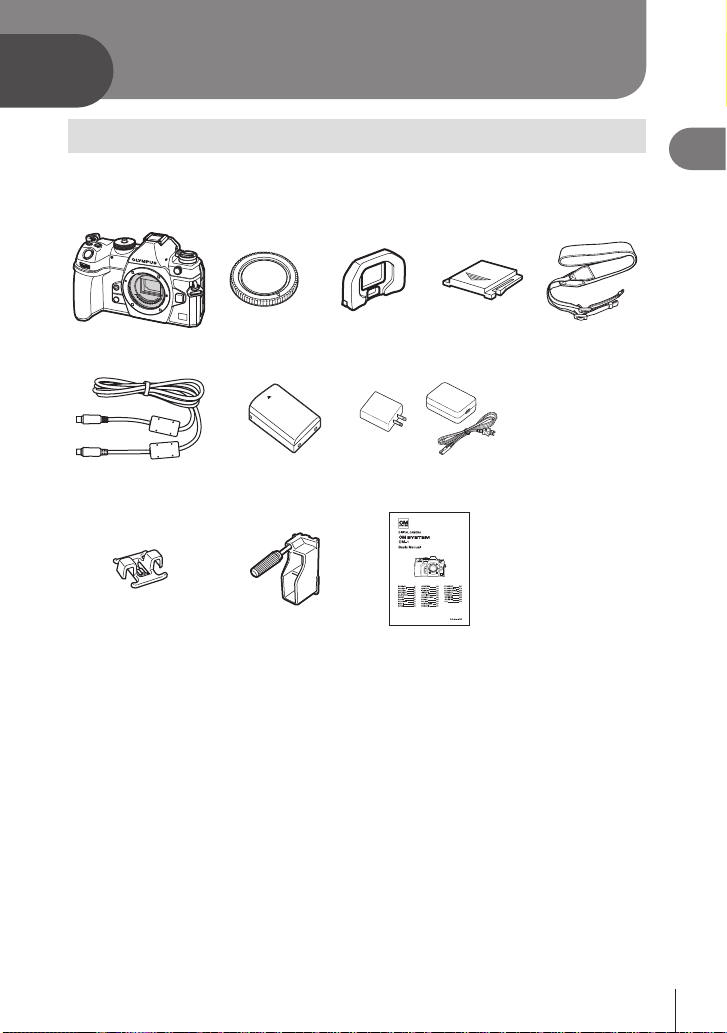
Unpacking the box contents
At purchase, the package contains the camera and the following accessories.
If anything is missing or damaged, contact the dealer from whom you purchased the
camera.
Camera Body cap * EP-18 eyecup * Hot shoe cover * Strap
or
CB-USB13 USB cable BLX-1 rechargeable
CC-1 cable clip CP-2 cable protector Basic Manual
* The body cap, eyecup, and hot shoe cover attached to or inserted in the camera.
# Contents may vary depending on purchase location.
# The battery will not be fully charged at the time of purchase. Charge the battery before
use (P. 22).
lithium-ion battery
USB-AC adapter
F-7AC
• Warranty Card
1
Preparation
EN
17
Page 18
Attaching the Strap
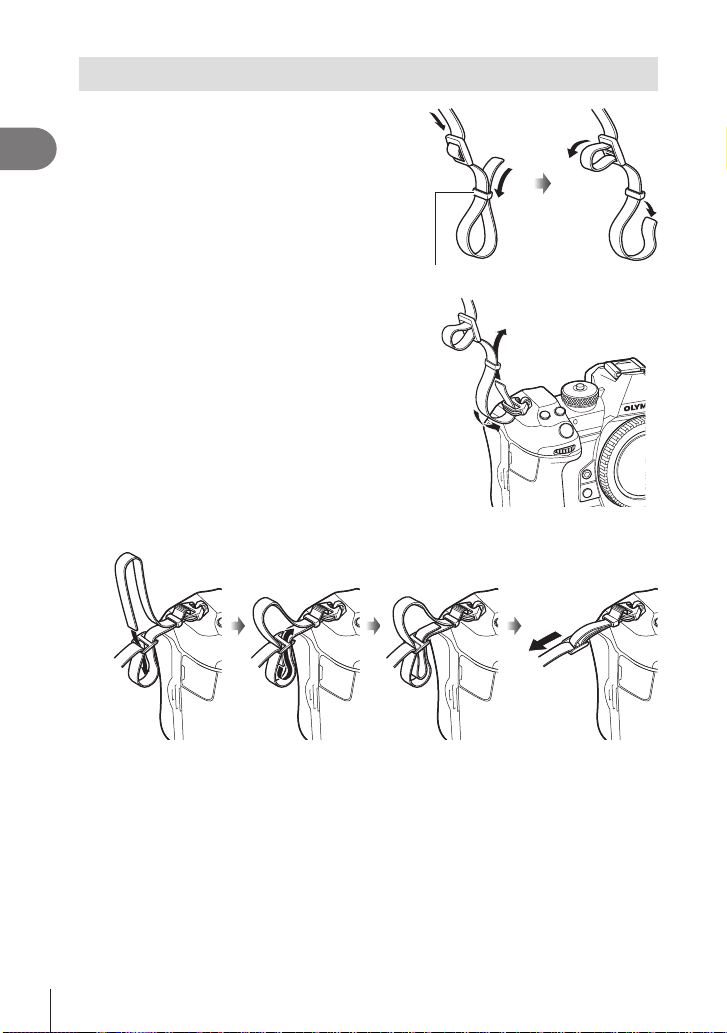
Before attaching the strap, remove the end
1
1
Preparation
from the keeper loop and loosen the strap
as shown.
Pass the end of the strap through the strap
2
eyelet and back through the keeper loop.
Pass the end of the strap through the buckle and tighten as shown.
3
Keeper loop
• Attach the other end of the strap to the other eyelet.
• After attaching the strap, pull on it rmly to ensure that it will not come loose.
18
EN
Page 19
Attaching Cable Protectors
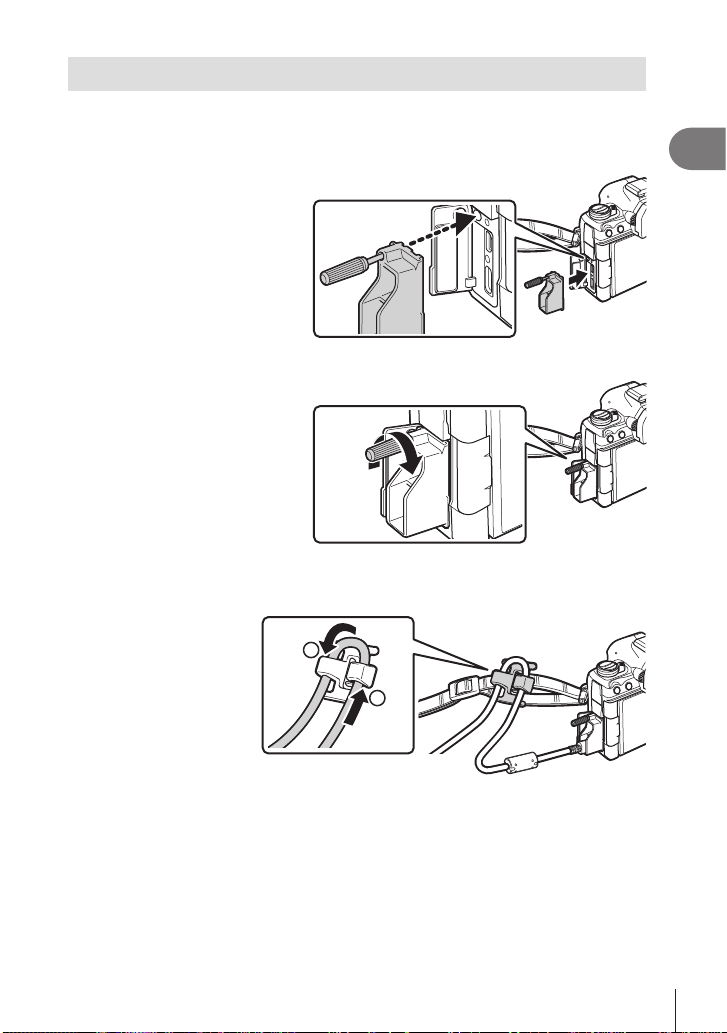
Attach the supplied cable protectors when connecting the supplied USB and HDMI
cables. This prevents accidental disconnection and damage to the connectors.
Mount the cable protector on the camera.
1
Tighten the screw.
2
Clip the cable clip to the cable and attach the clip to the strap.
3
• The clip attaches to the buckle.
2
1
Preparation
1
19
EN
Page 20
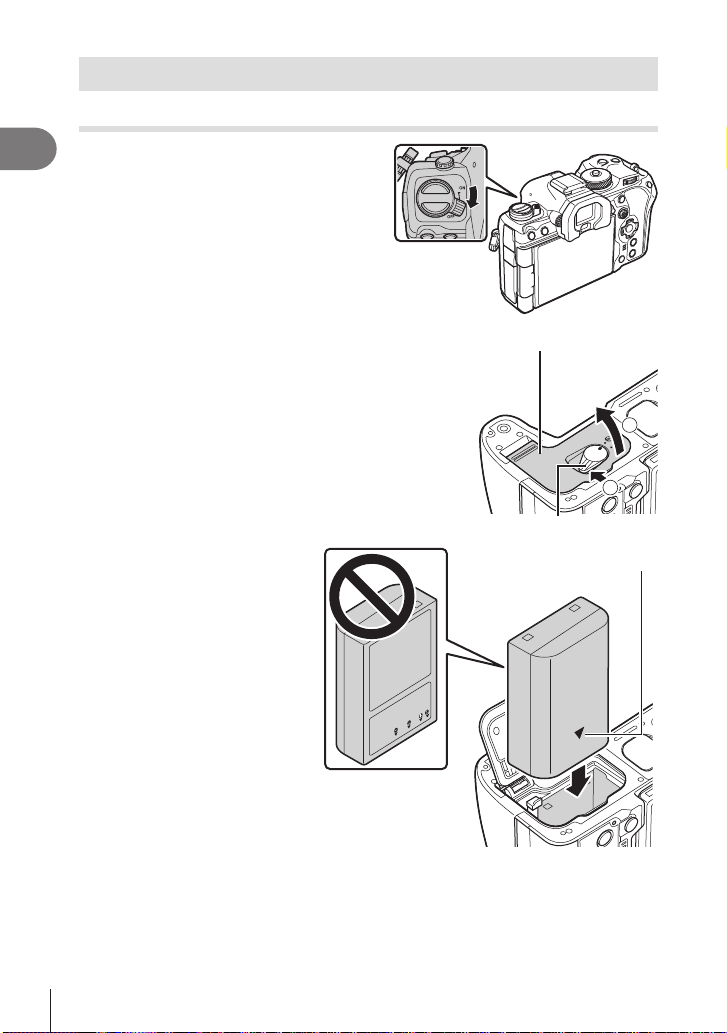
Inserting and removing the battery
Inserting the battery
1
Preparation
Conrm that the ON/OFF lever is in
1
the OFF position.
Open the battery compartment cover.
2
Loading the battery.
3
# Use only BLX-1 batteries
(P. 17, 331).
Battery compartment cover
2
1
Battery compartment lock
Direction indicating mark
20
EN
Page 21
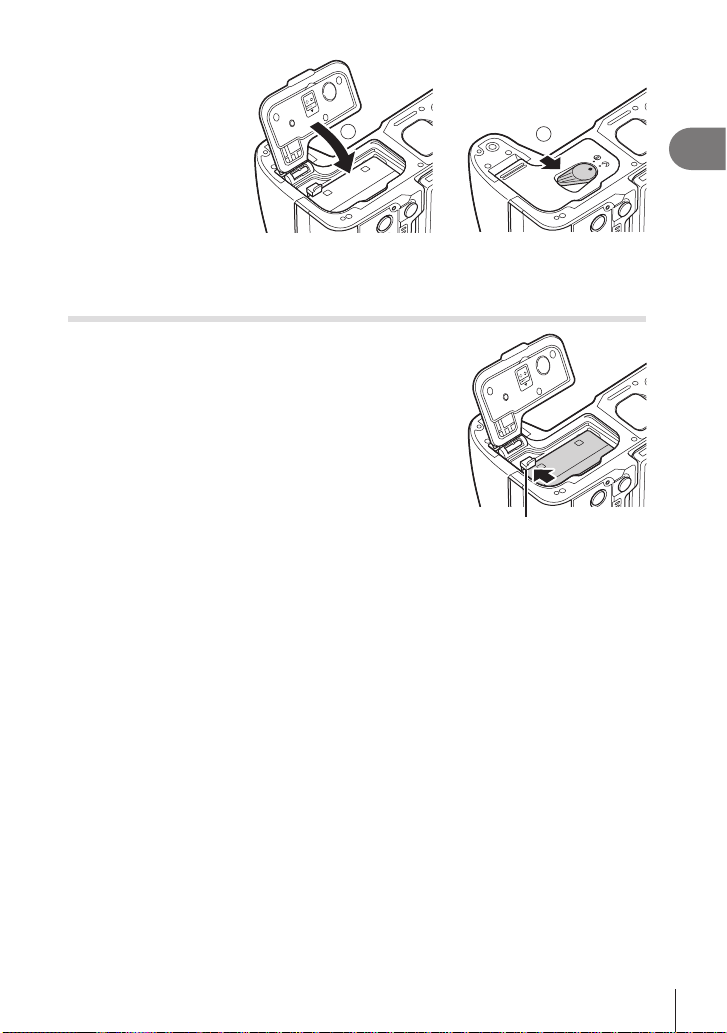
Close the battery
4
compartment cover.
# Be sure the battery
compartment cover
is closed before
using the camera.
%It is recommended to set aside a backup battery for prolonged shooting in case the
battery in use drains.
%Also read “Battery and charger” (P. 290).
1
2
Removing the battery
Turn o the camera before opening or closing the battery
compartment cover. To remove the battery, rst push the
battery lock knob in the direction of the arrow and then
remove.
# Never remove batteries or memory cards while the
memory card access indicator (P. 34) is displayed.
# Contact an authorized distributor or service center if you
are unable to remove the battery. Do not use force.
Battery lock knob
1
Preparation
EN
21
Page 22
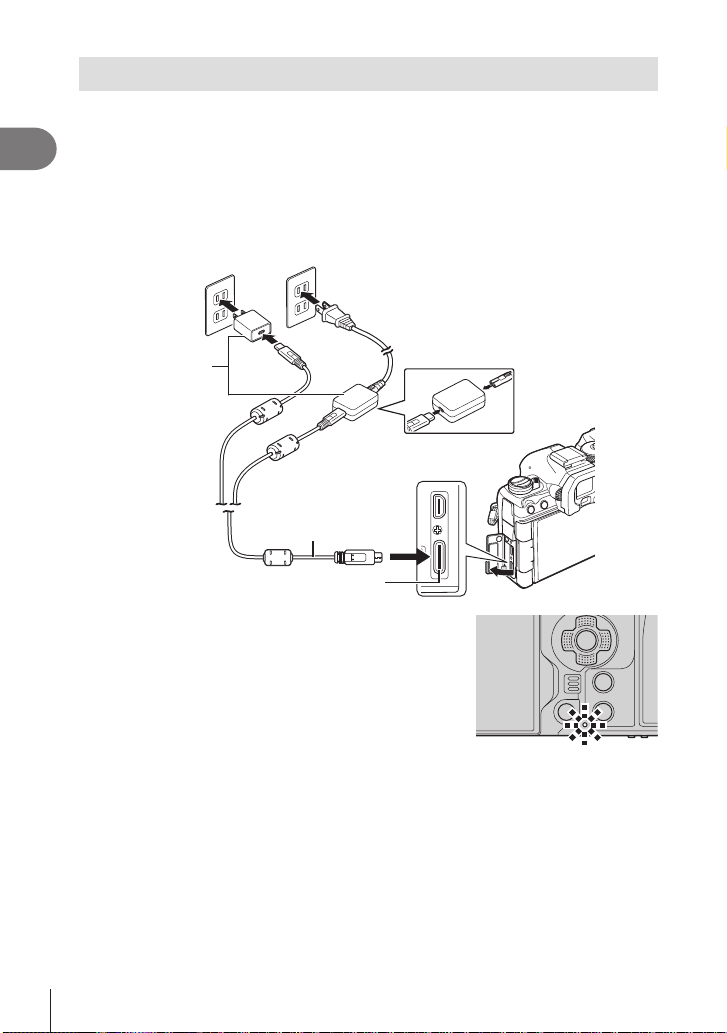
Charging the Battery using the supplied USB-AC adapter
# The battery will not be fully charged at the time of purchase. Charge the battery before
use.
1
Preparation
Check that the battery is in the camera, and connect the USB cable and
1
USB-AC adapter.
USB-AC adapter
(supplied)
• When attaching the USB cable, use the supplied cable protector and cable clip to
prevent damage to the connectors. g “Attaching Cable Protectors” (P. 19)
%Refrain from using anything other than the USB cable (CB-USB13) supplied with the
camera or sold separately.
AC outlet
USB cable
(supplied)
USB connector
• The battery charge lamp lights during charging.
Charging with the camera turned o takes about 2
hours 30 minutes. The lamp goes out as the batteries
reach full charge. Remove the USB cable from the
camera.
# If a charging error occurs, the battery charge lamp will
blink. Disconnect and reconnect the USB cable.
%The battery will be charged regardless of whether the camera is turned on or o.
The charging time will be longer if the camera is on.
%Charging stops when the battery temperature is too high. It will resume after the battery
temperature falls.
%A charger (BCX-1: sold separately) can be used to charge the battery (P. 294).
%For safety reasons, charging may take longer, or the battery may not reach full charge,
when the battery is charged in a high-temperature environment.
# The USB-AC Adapter
• Be sure to unplug the USB-AC adapter for cleaning. Leaving the USB-AC adapter
plugged in during cleaning could result in injury or electric shock.
22
EN
Page 23
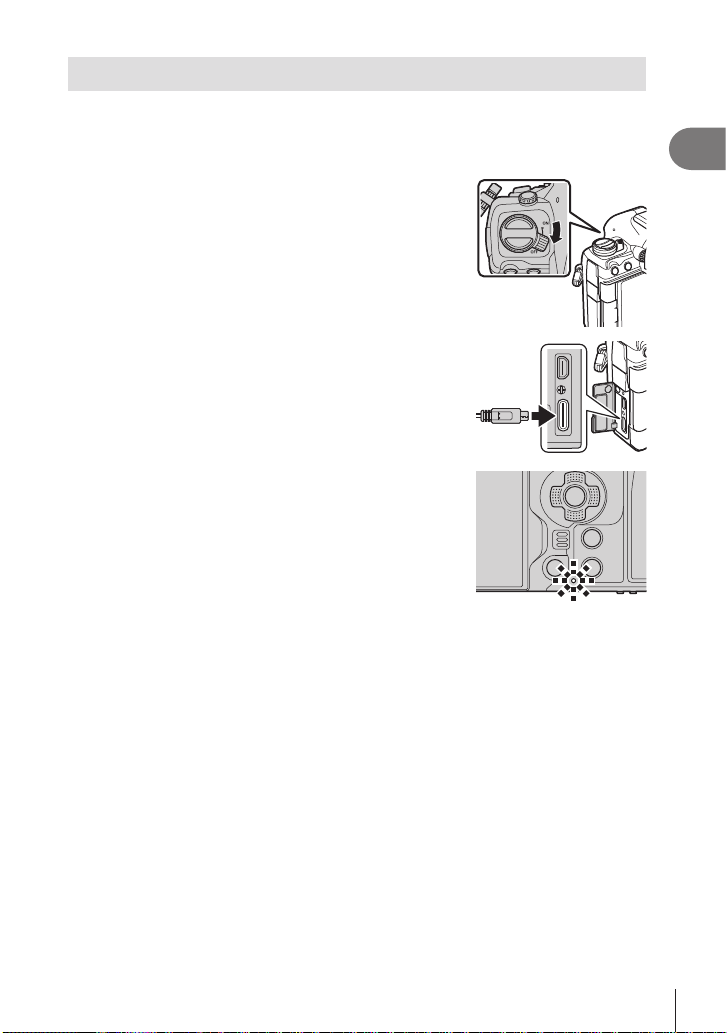
Charging the Battery using a USB Device
The battery inserted in the camera will charge when the camera is connected via a
USB cable to a USB PD-compliant USB device.
Charging via USB
Conrm that the ON/OFF lever is in the OFF
1
position.
Connect the camera to the USB device using a
2
USB cable.
• When attaching the USB cable, use the supplied cable
protector and cable clip to prevent damage to the
connectors. g “Attaching Cable Protectors” (P. 19)
• The battery charge lamp lights during charging.
Charging times vary with the output of the USB device.
The lamp goes out as the batteries reach full charge.
# If a charging error occurs, the battery charge lamp will blink. Disconnect and reconnect
the USB cable.
%The supply of power ends when the battery is charged. Disconnect and reconnect the
USB cable to resume charging.
%The camera can be powered using mobile batteries or similar devices connected via USB.
For more information, see “Powering the Camera via USB (USB Power Delivery)”
(P. 287).
1
Preparation
EN
23
Page 24
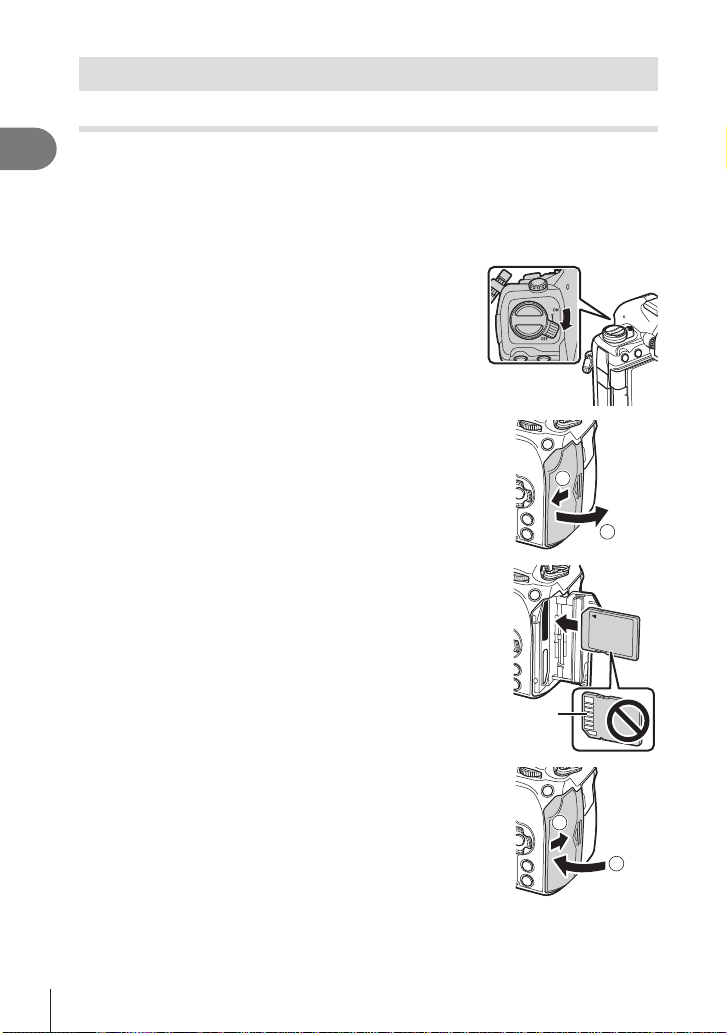
Inserting and removing the card
Inserting the card
In this manual, all storage devices are referred to as “cards.”
1
The camera uses third-party SD, SDHC, or SDXC memory cards conforming to the SD
Preparation
(Secure Digital) standard.
Cards must be formatted with this camera before rst use or after being used with
other cameras or computers. g “Formatting the card (Card Formatting)” (P. 241)
• The camera has two card slots.
Conrm that the ON/OFF lever is in the OFF
1
position.
Open the card compartment cover.
2
Insert the card.
3
• Slide the card in until it locks into place.
# Do not forcibly insert a damaged or deformed card.
Doing so may damage the card slot.
1
2
Terminal area
Close the card compartment cover.
4
• Close it securely until you hear it click.
2
1
24
EN
Page 25
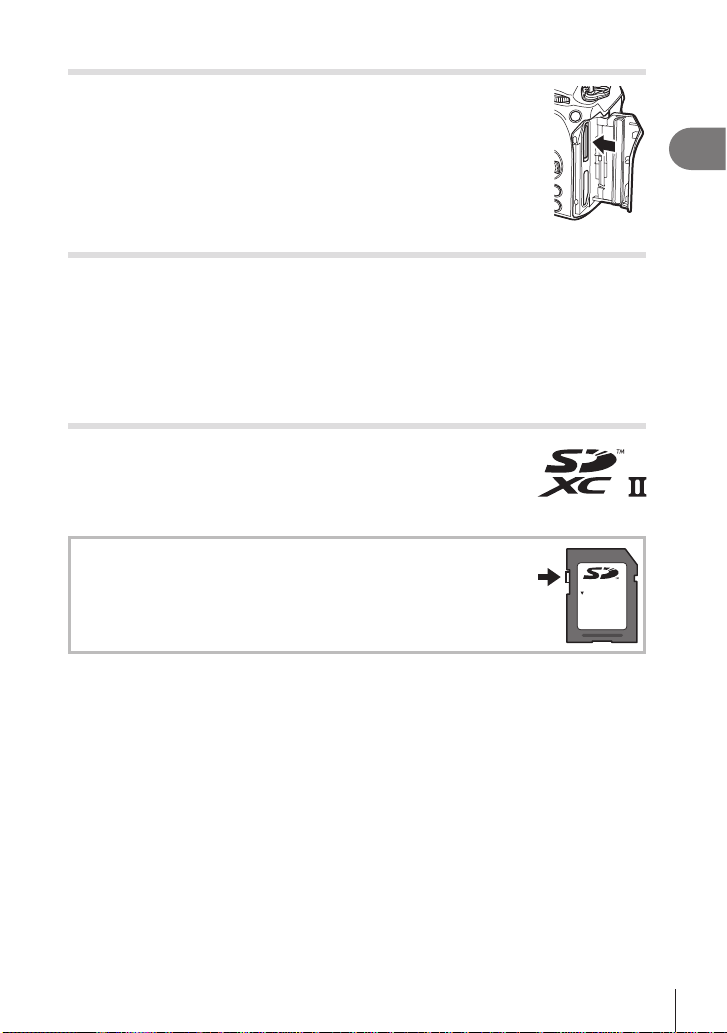
Removing the card
Press the card in to eject it. Pull out the card.
# Never remove batteries or memory cards while the memory card
access indicator (P. 34) is displayed.
Using Two Memory Cards
When two memory cards are inserted, you can choose how each card is used
according to your goals. g “Setting the card to record to (KCard Slot Settings /
nCard Slot Settings)” (P. 242)
• Record only to a selected card
• Record to a selected card until it is full, then record to the second card
• Record pictures with dierent sizes or compression ratios to dierent cards
• Record copies of each picture to both cards
Usable cards
In this manual, all storage devices are referred to as “cards”. The
following types of SD memory card (commercially available) can
be used with this camera: SD, SDHC, and SDXC. For the latest
information, please visit our website.
SD card write protect switch
The SD card body has a write protect switch. Setting the switch to
“LOCK” prevents data being written to the card. Return the switch to
the unlock position enable writing.
LOCK
1
Preparation
# When recording movies, use an SD card that supports an SD speed class of 10 or higher.
# A UHS-II or UHS-I card with a UHS speed class of 3 or better is required when:
a movie resolution of [4K] or [C4K] is selected in the [nK] menu or a Motion
Compensation of [A-I] (All-Intra) is selected in the [nK] menu
%The data in the card will not be erased completely even after formatting the card or
deleting the data. When discarding, destroy the card to prevent leakage of personal
information.
%Access to some playback functions and the like may be restricted when the write-protect
switch is in the “LOCK” position.
EN
25
Page 26
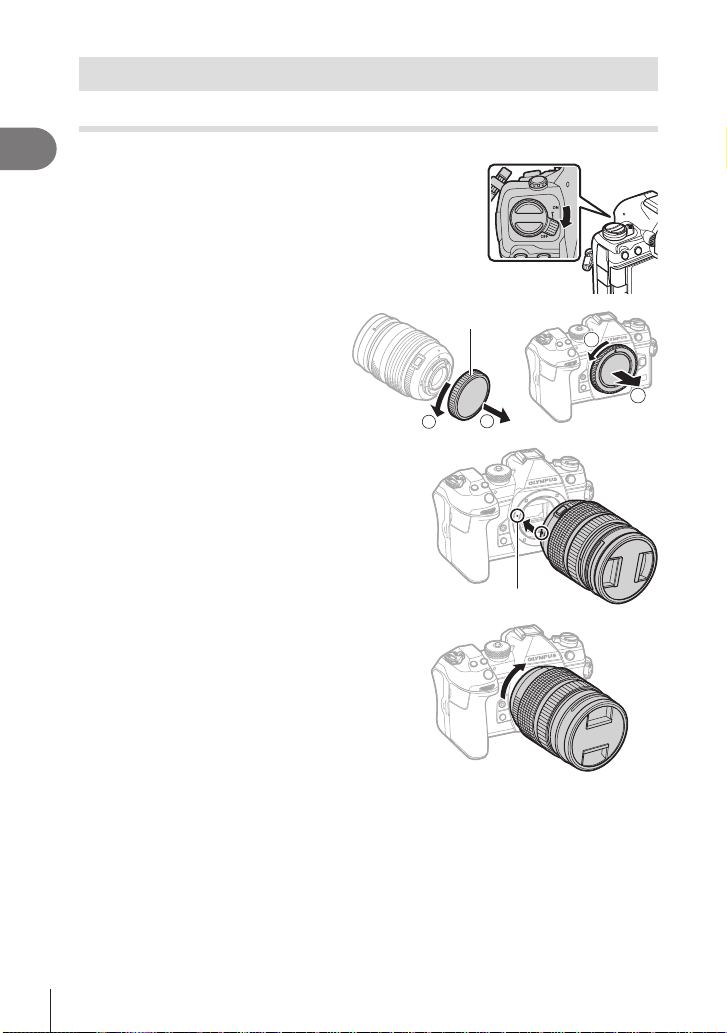
Attaching and removing lenses
1
2
Attaching a lens to the camera
• See page 291 for information on compatible lenses.
1
Preparation
Conrm that the ON/OFF lever is in the OFF
1
position.
Remove the rear cap of the lens
2
and the body cap of the camera.
Align the lens attachment mark (red) on
3
the camera with the alignment mark (red)
on the lens, then insert the lens into the
camera’s body.
Rotate the lens clockwise until you hear it
4
click.
# Do not press the lens release button.
# Do not touch internal portions of the camera.
Rear cap
1
2
Lens attachment mark
26
EN
Page 27
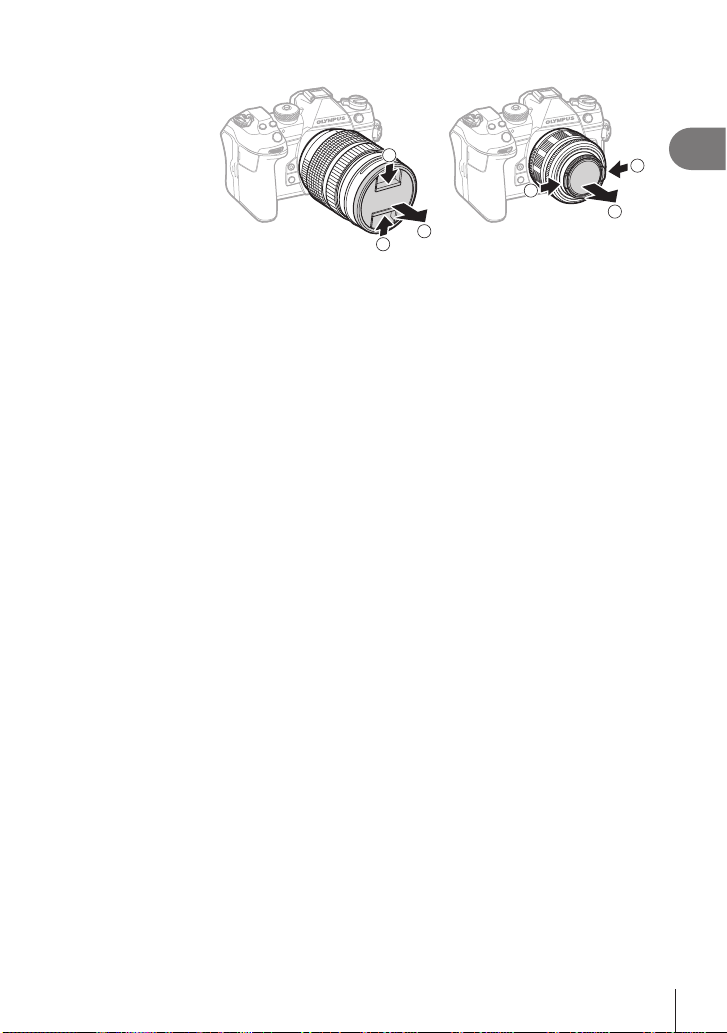
Remove the front lens cap.
1
5
1
1
2
2
1
1
Preparation
27
EN
Page 28
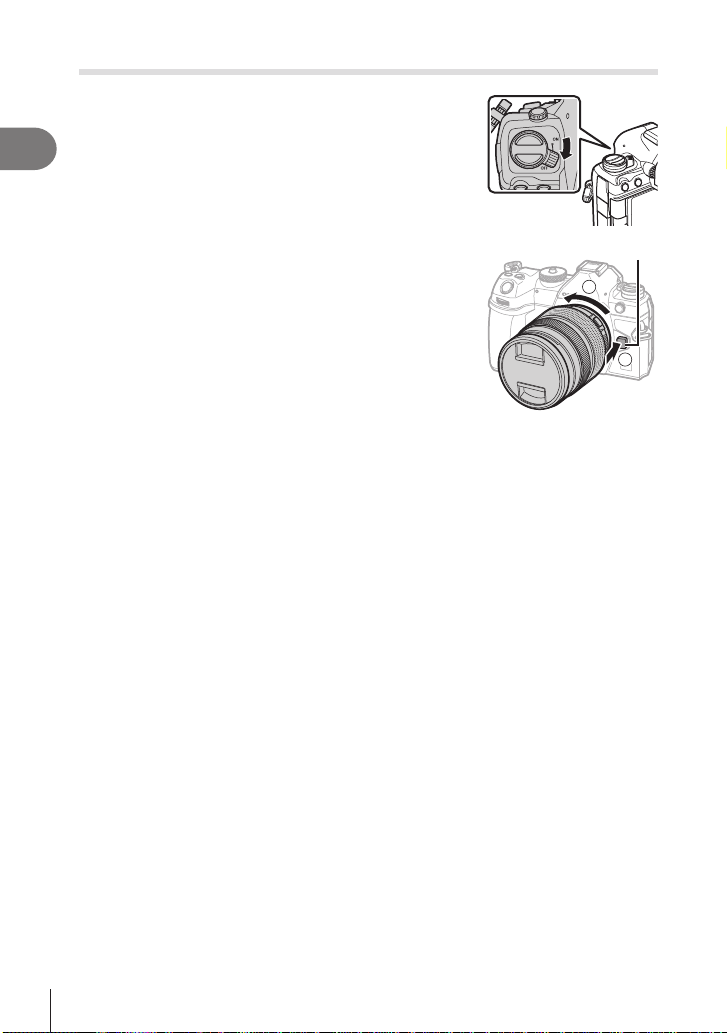
Removing Lenses
Conrm that the ON/OFF lever is in the OFF
1
position.
1
Preparation
Hold the lens release button and rotate the lens as
2
shown.
Lens release button
2
1
28
EN
Page 29
Using the monitor
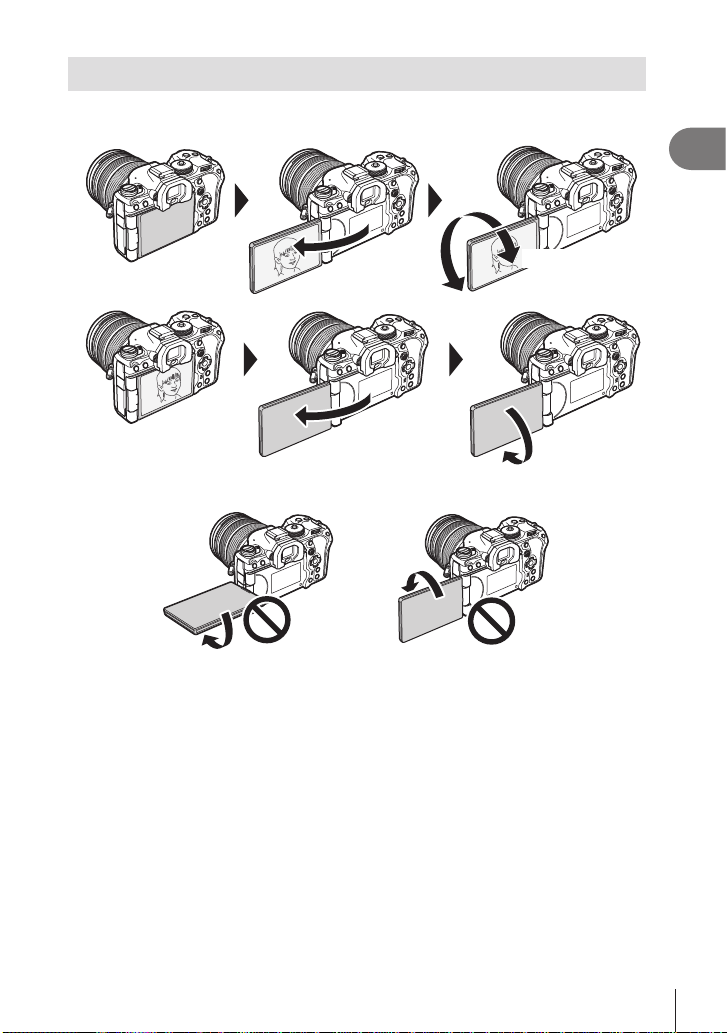
Rotate the monitor for ease of viewing. The angle of the monitor can be adjusted
according to conditions at the time of shooting.
1
Preparation
Up to 180°
• Gently rotate the monitor within its range of motion. Attempting to rotate the monitor
beyond the limits shown below could damage the connectors.
• The camera can be congured to display a mirror image of the view through the lens or
automatically zoom power zoom lenses all the way out when the monitor is rotated for self
portraits. g “Sele Assist (Sele Assist)” (P. 227)
Up to 90°
Up to 270°
EN
29
Page 30
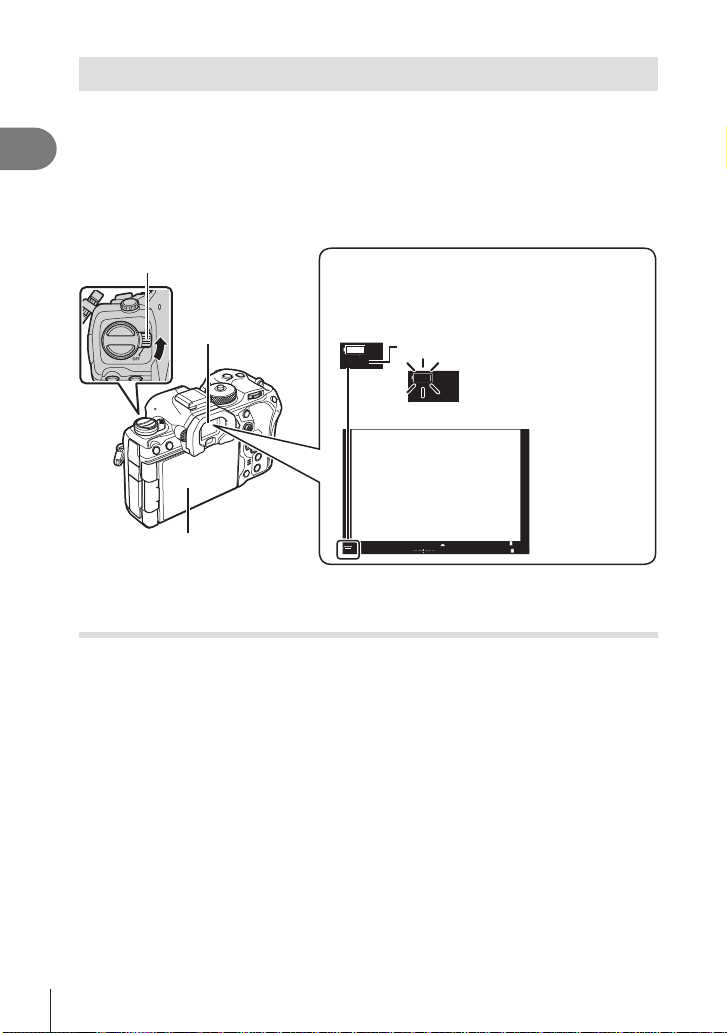
Turning the camera on
200200
Auto
Auto
WB
AutoWBAuto
]
]
10231023
PP
100 %
100 %
0.00.0
1
/
250
1
/
F
250
5.65.6
F
100
%100
%
Set the ON/OFF lever to the ON position.
1
1
Preparation
• When the camera is turned on, the monitor will turn on and display the super control
panel (P. 69).
The viewnder turns on when you put your eye to the viewnder. When the viewnder
is lit up, the monitor turns o.
See P. 37 for information on how to switch between the viewnder and the monitor.
• To turn the camera o, return the lever to the OFF position.
ON/OFF lever
Battery level
The camera displays the level of the battery
currently in use. The battery level is shown as
Viewnder
Monitor
percentages.
Level of current battery (%)
The indicator ashes red
when the level reaches 10%.
[1:02:
[1:02:
1
03
-
00
+
ISO
ISO
03
1
%The Fn lever can be congured to turn the camera on and o using the [Fn Lever/Power
Lever] option. g “Conguring [Fn Lever/Power Lever]” (P. 222)
Sleep Mode
If no controls are used for a set period, the camera will automatically enter suspend
operation to reduce the drain on the batteries. This is referred to as “sleep mode”.
• When the camera enters sleep mode, the monitor will turn o and operation will be
suspended. Pressing the shutter or q button reactivates the camera.
• If no operations are performed for a set period after the camera enters sleep mode, the
camera will turn o automatically. The camera can be reactivated by turning it on again.
# The camera may require additional time to recover from sleep mode when [On] (enabled)
is selected for [d Settings] > [Power-o Standby]. g “Wireless Settings for When the
Camera Is O (Power-o Standby)” (P. 263))
# The delay before the camera goes to sleep or turns o automatically can be selected in
the menu. g “Setting Sleep (Power Saving) Options (Sleep)” (P. 254), “Setting Auto
Power O Options (Auto Power O)” (P. 254)
30
EN
Page 31
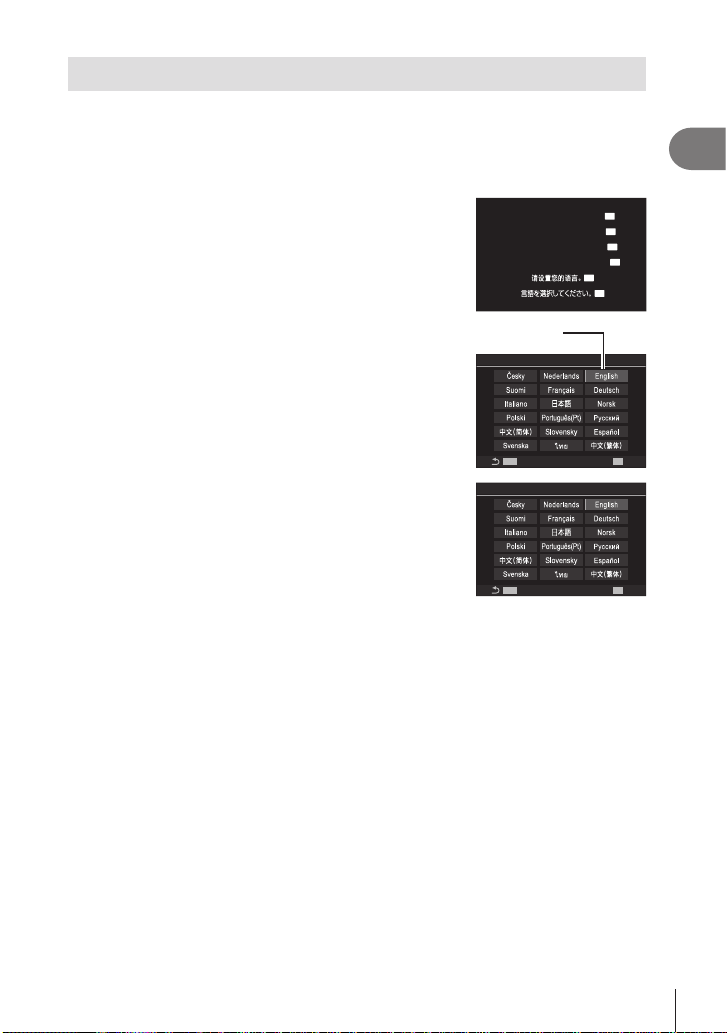
Initial setup
W
After turning the camera on for the rst time, perform the initial setup by choosing a
language and setting the camera clock.
# The le name is also included with the date and time information. Be sure to set the
correct date and time before using the camera. Some functions cannot be used if the date
and time have not been set.
Press the Q button when the initial setup dialog is
1
displaying prompting you to choose a language.
Please select your language.
Veuillez choisir votre langue.
Bitte wählen Sie Ihre Sprache.
Por favor, selecciona tu idioma.
OK
OK
OK
OK
1
Preparation
OK
OK
Highlight the desired language using the front or
2
rear dial or the FGHI buttons.
Press the Q button when the desired language is
3
highlighted.
Cursor
MENU
• If you press the shutter button before pressing the Q
button, the camera will exit to shooting mode and no
language will be selected. You can perform the initial
setup by turning the camera o and then on again to
display the initial setup dialog and repeating the process
MENU
from Step 1.
• The language can be changed at any time from the menu. g “What to Do If You
Can’t Read the Display” (P. 33)
OK
W
OK
31
EN
Page 32
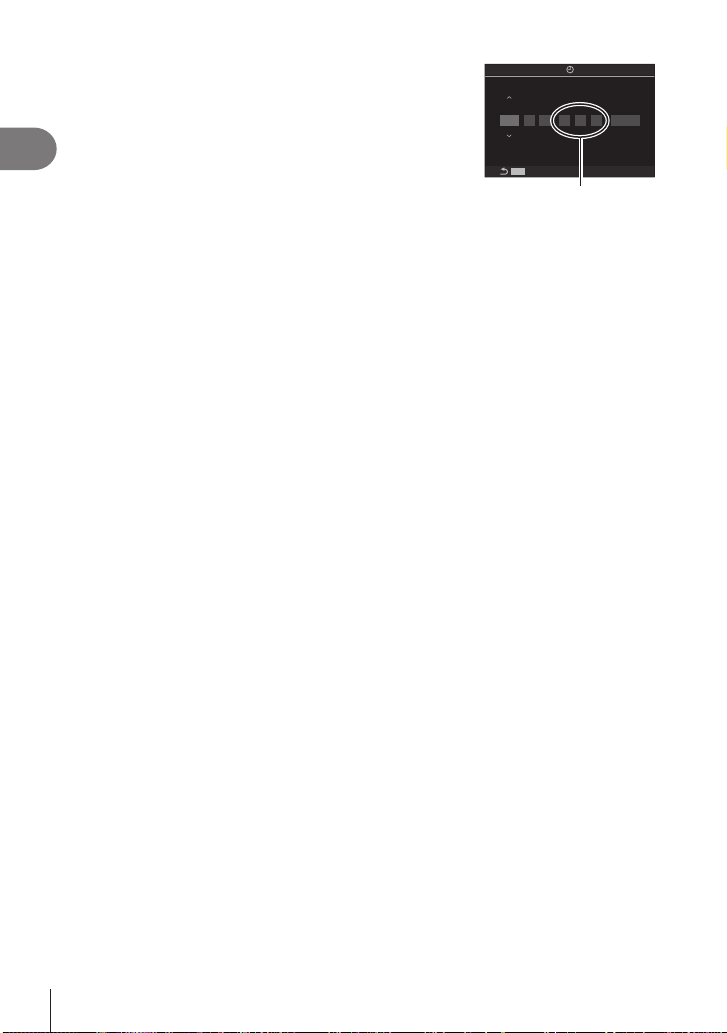
Set the date, time, and date format.
4
1
Press the Q button.
5
Preparation
Highlight a time zone using the FG buttons and press the Q button.
6
Press the Q button to set the clock.
7
%Date and time information is recorded on the card together with the images.
%If the battery is removed from the camera and the camera is left for a while, the date and
time may be reset. If this happens, set the date and time using the menu. g “Setting the
Camera Clock (X Settings)” (P. 257)
%You may also need to adjust the frame rate before shooting movies. g “Setting the
Quality of Photos and Movies (KK / nK)” (P. 140)
• Use the HI buttons to highlight items.
• Use the FG buttons to change the highlighted item.
• The clock can be adjusted at any time from the menu.
g “Setting the Camera Clock (X Settings)” (P. 257)
• Press the INFO button to enable or disable daylight saving time.
Y
––––.––.–– –– : ––:––
MENU
The time is displayed using a
DM
Time
24-hour clock.
Y/M/D
32
EN
Page 33
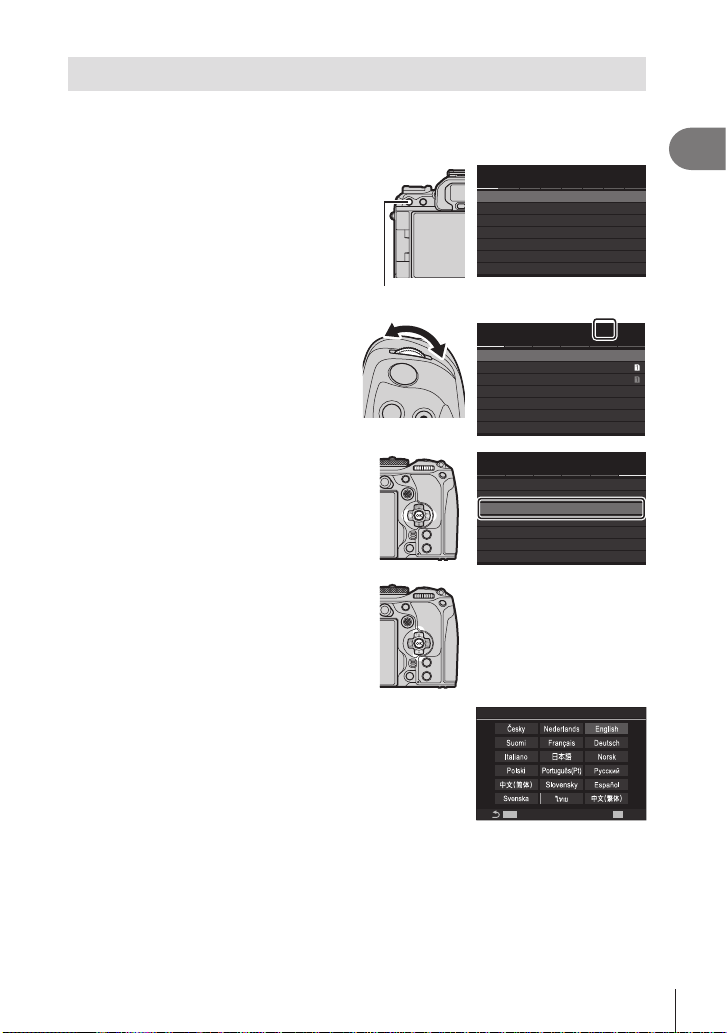
What to Do If You Can’t Read the Display
e
1.
AF
My
e
e
6.
If you see unfamiliar characters or words in other languages, you may not have
selected the language you intended. Follow the steps below to choose another
language.
Press the MENU button to view the
1
menus.
Highlight the e (setup) tab using
2
the front dial.
Select a screen on which [W]
3
appears using the HI buttons or
the rear dial.
Highlight [W] using the FG
4
buttons and press the Q button.
MENU button
K2K
K
n
AF
1
1
การตั้งค่าพื้นฐาน/คุณภาพของภาพ
1.
โหมดกำหนดเอง
K
K
การตั้งค่าโดยละเอียด
K
K
สัดส่วนภาพ
ตรวจดูภาพ
ชดเชยเงาแสง
K2K
n
AF
1
การ์ด/โฟลเดอร์/ไฟล์
การฟอร์แมตการ์ด
การตั้งค่าช่องเสียบการ์ด
K
การตั้งค่าช่องเสียบการ์ด
n
กำหนดโฟลเดอร์บันทึก
ชื่อไฟล์
แก้ไขชื่อไฟล์
K2K
n
1
รีเซ็ต/X/W/อื่นๆ
รีเซ็ต/เริ่มต้นการตั้งค่า
X
การตั้งค่า
W
ปรับตั้งระดับ
พิกเซลแมบปิ้ง
เวอร์ชันเฟิร์มแวร์
การรับรอง
q
q
q
G
e
G
G
ʹ22.02.01 16:30:43
e
My
My
ไม่กำหนด
รีเซ็ต
F
Y
4:3
ปิด
ปิด
ไทย
1.0
1
Preparation
MENU
W
OK
33
EN
Highlight the desired language using the FGHI
5
buttons and press the Q button.
Page 34
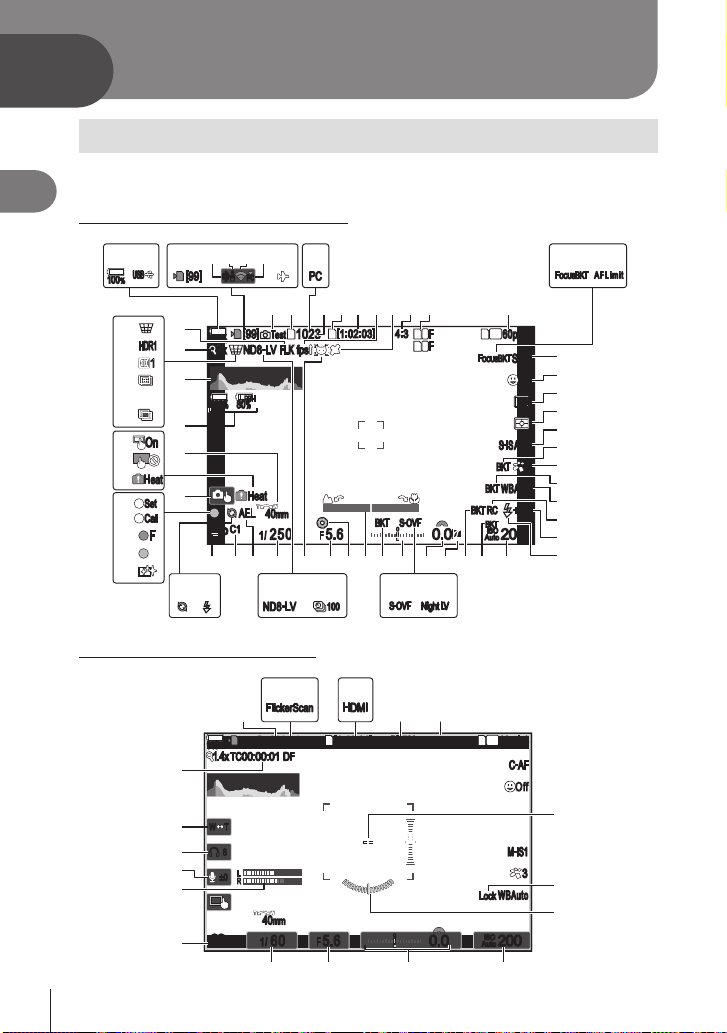
2
Shooting
Information displays while shooting
%For information on the super control panel, which appears on the monitor by default, see
2
Shooting
P. 71.
Monitor display during still photography
2 341
HDR1HDR1
h
11
OnOn
HeatHeat
SetSet
CallCall
FF
[99][99]
$
#
^
]
\
X
/
100
%
100
%
!
|
}
{
>
<
[
Z
Y
W
V
U
T
Monitor display during movie mode
RS M L E D
.
_
+
:
;
34
EN
5678 09 k l
s<s<
PCPC
PCPC
A
ba d gfc hi je
K
100 %
100 %
2x2x ND8-LV
100 %
100 %
C1
C1
P
P
##
min
min
145
145
TC
1.4x
1.4x
W TW T
8
8
PP
±0±0
n
n
P
P
[99][99]
80 %80
%
HeatHeat
AELAEL
(
00:00:01TC00:00:01
LL
R
R
(
(
REC
REC
K
Test
Test
40mm40mm
1
/
250
1
/
250 5.65.6
ND8-LV
FlickerScanFlickerScan
00:01
00:01
40mm40mm
1
/
60
1
/
60 5.65.6
[1:02:03][1:02:03]4:
1
1
10231023
FLK
fps
fps
F
F
100
% &
DFDF
F
F
[1:42:21][1:42:21]
1
HDMIHDMI
S-OVFS-OVF
-
S-OVFS-OVF
) =
BT.709BT.709
-
1
L
34:3
2
L
1
FF
FF
4K
60p60p L-8L-8
-
S
AFS-AF
m
n
OffOff
o
p
q
S-ISAutoS-IS
Auto
33
+0.3+0.3
##
200200
60p60p L-8L-8
-
C
AFC-AF
OffOff
r
s
t
u
v
w
x
RC
RC
0.00.0
ISO
ISO
Auto
Auto
00
+
C yGH FJNPOQ I AzBK
Night LVNight LV
1
4K
/
M-IS1M-IS1
33
*
WBAutoWBAuto
LockLock
,
00
+
0.00.0
ISO
ISO
200200
Auto
Auto
yJN F
F LimitAF Limit
Page 35

1 Battery level ....................................P. 30
2 USB PD ........................................P. 287
3 Card write indicator ...................P. 21, 25
4 Maximum number of continuous shots
......................................................P. 128
5 Active Bluetooth
..............................................P. 260, 280
6 Remote control .............................P. 280
7 Wireless LAN connection......P. 261, 267
8 Active connection to computer (Wi-Fi)
......................................................P. 267
9 Airplane Mode...............................P. 260
0 Active connection to computer (USB)
......................................................P. 284
a Test Picture ...................................P. 210
b K Save settings ..........................P. 243
c Number of storable still pictures ...P. 327
d n Save slot .................................P. 243
e Available recording time ...............P. 327
f Frame rate ....................................P. 225
g Bluetooth position information ......P. 266
h Aspect ratio ...................................P. 144
i K Image quality ..........................P. 140
j n Image quality ...........................P. 141
k Focus BKT ....................................P. 178
l AF Limiter .......................................P. 92
m AF mode .........................................P. 72
n Face priority/Eye priority .................P. 88
o Drive mode (single-frame/sequential
shooting/self-timer/vibration reduction/
silent photography/Pro Capture)
......................................................P. 126
p Metering mode ..............................P. 109
q Image stabilizer.............................P. 136
r ART BKT .......................................P. 177
s Picture mode.................................P. 145
t WB BKT ........................................P. 175
u White balance ...............................P. 150
v RC mode.......................................P. 124
w Flash intensity control ...................P. 123
x Flash mode ...................................P. 120
y ISO sensitivity ...............................P. 113
z ISO BKT ........................................P. 176
A FL BKT ..........................................P. 175
B Highlight & shadow control ...........P. 215
C Exposure compensation value......P. 106
D Night Vision ...................................P. 225
E LV Mode ........................................P. 225
®
connection
*1
F Exposure compensation ...............P. 106
G AE BKT .........................................P. 174
H Focus Indicator .............................P. 102
I Preview .........................................P. 224
J Aperture value ..........................P. 43, 45
K Subject Detection............................P. 90
L Time lapse shooting ......................P. 167
M Live ND lter photography ............P. 158
N Shutter speed ...........................P. 43, 47
O AE lock..........................................P. 109
P Custom mode .................................P. 56
Q Shooting mode................................P. 43
R Flash .............................................P. 118
(blinks: charging in progress, lights up:
charging completed)
S Pro Capture active ........................P. 133
T Dust reduction...............................P. 305
U AF conrmation mark......................P. 40
V ♥jSH2 Aperture warning ...........P. 126
W SET function/CALL function ..........P. 293
X Touch operation ..............................P. 41
Y Internal temperature warning ........P. 309
Z Disable touch operation ................P. 101
[ Touch operation ..............................P. 41
\ Zoom operation direction/Focal length
] All Battery Information ............P. 30, 295
^ Histogram .......................................P. 38
< Multiple exposure..........................P. 163
> High Res Shot...............................P. 156
{ Focus Stacking .............................P. 160
} Fisheye compensation ..................P. 171
| HDR ..............................................P. 162
! D Keystone compensation .........P. 170
# Digital Tele-converter ....................P. 166
$ Anti-icker shooting ......................P. 135
% Flicker scan...................................P. 108
& nHDMI Output ............................P. 182
( Recording time (displayed during
recording)........................................P. 59
) a View assist .............................P. 155
= Red frame during movie recording
......................................................P. 185
/ Center marker ...............................P. 183
* WLock ........................................P. 153
, Level gauge ....................................P. 38
; n mode (movie exposure mode)
........................................................P. 60
: Recording level meter .....................P. 62
EN
35
2
Shooting
Page 36

+ Audio recording level ......................P. 62
- Headphone volume ........................P. 62
_ Electronic Zoom ..............................P. 62
. Time code .....................................P. 181
*1 Displayed when the camera is connected to OM Capture in [0RAW/Control] mode
and the computer is the sole save location of images (P. 284).
2
Shooting
36
EN
Page 37
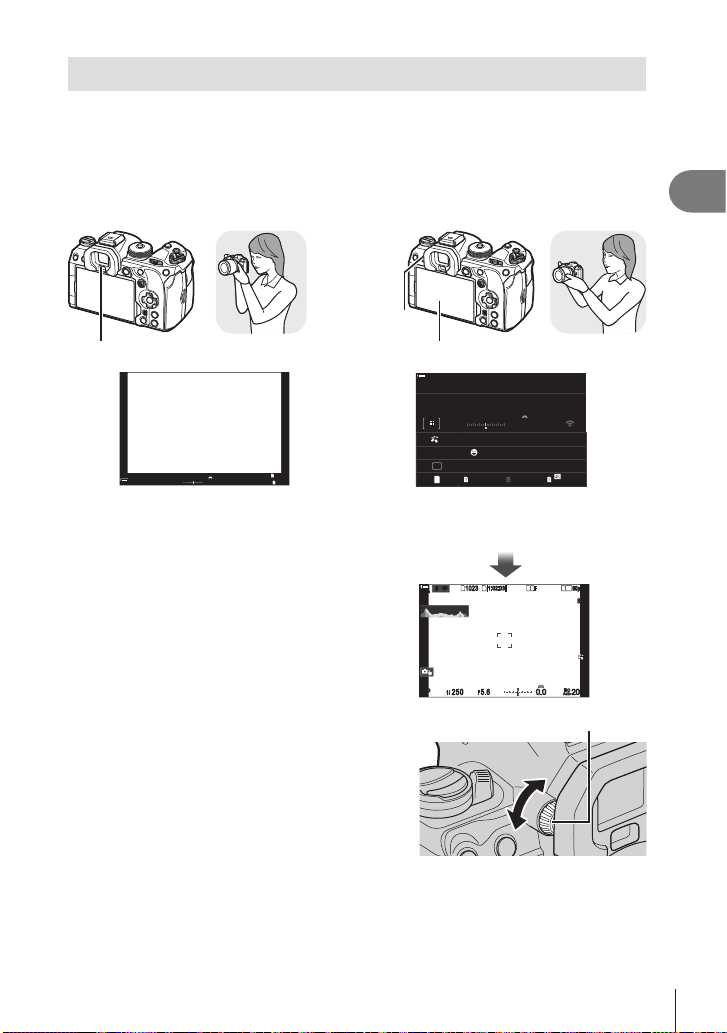
Switching between displays
200200
WB
AutoWBAuto
]
]
10231023
PP
100 %
100 %
0.00.0
1
/
250
1
/
F
250
5.65.6
F
P
P
The camera uses an eye sensor to automatically switch between the viewnder and
monitor displays. The viewnder and monitor display (super control panel/live view)
also show information on camera settings. Options are available for controlling display
switching and choosing the information shown.
The camera monitor displays the super control panel (P. 69) by default.
Framing photos in the viewnder Framing photos in the monitor
u (LV)
Viewnder Monitor
[1:02:
[1:02:
1
03
-
00
+
ISO
ISO
Auto
Auto
03
1
The viewnder turns on automatically when
you bring it to your eye. When the viewnder
is lit up, the monitor turns o.
• If the viewnder is not in focus, put your eye to the
viewnder and focus the display by rotating the
diopter adjustment dial.
button
100 %
100 %
2022.02.01 16:30:43
1/
-
0
Small
3
WB Auto
S-AF
Off
p
YF
1023 1:02:03
ISO
5.6 200250P
Auto
F
+
r
±
0.0
G
x
±
#
0.3
4 : 3
S-IS Auto
YF
60p L-8
0
The monitor shows the super control panel.
It changes to live view when you press the
u (LV) button.
u (LV) button
[1:02:03][1:02:03]
1
OO
rr
10231023
100 %
100 %
1
/
250
1/F
250 5.65.6
1
1
L14K
FF
60p60p L-8L-8
-
S
AFS-AF
33
-
00
+
ISO
ISO
F
200200
0.00.0
Auto
Auto
Diopter adjustment dial
2
Shooting
%Display switching and viewnder display options are available.
g “Selecting the display style of the viewnder (EVF Style)” (P. 228), “Conguring the
eye sensor (Eye Sensor Settings)” (P. 250)
37
EN
Page 38
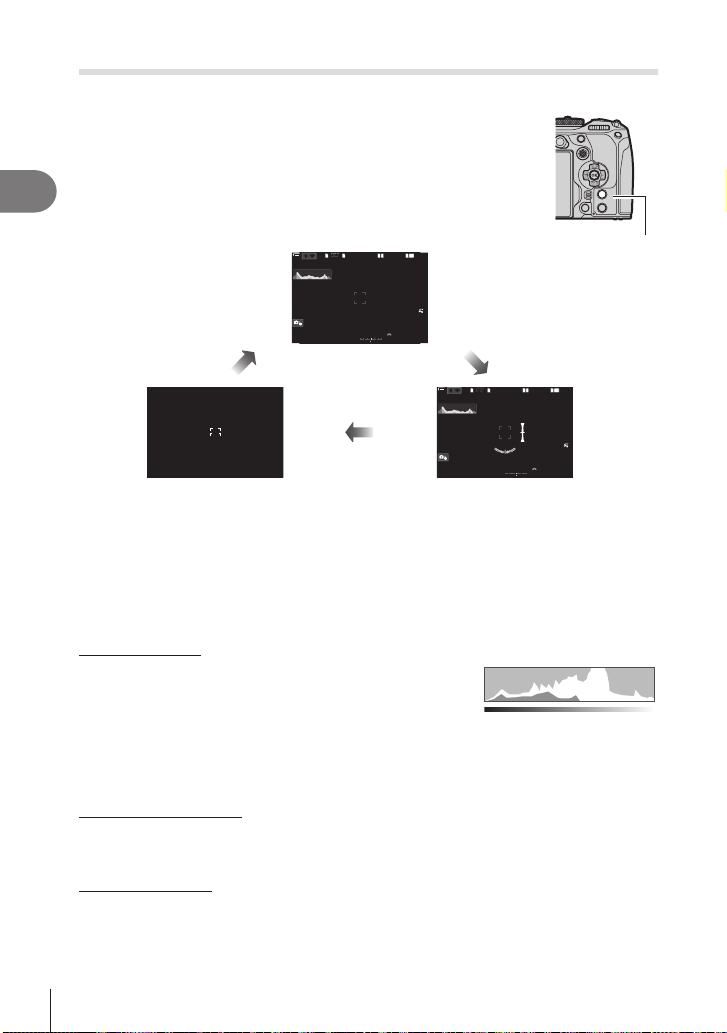
Switching the information display
1
10231023
P
1
/
250
P
1/F
250 5.65.6
1
1
[1:02:03][1:02:03]
FF
60p60p L-8L-8
200200
L14K
Auto
Auto
F
0.00.0
10
1
10231023
P
1
/
250
P
1/F
250 5.65.6
1
1
[1:02:03][1:02:03]
FF
60p60p L-8L-8
200200
L14K
Auto
Auto
F
0.00.0
rr
OO
You can switch the information displayed in the monitor during
shooting using the INFO button.
2
Shooting
100 %
100 %
-
00
Information 1
PASMB
n
INFO button
-
S
AFS-AF
33
+
INFOINFO
ISO
ISO
OO
rr
0 %100 %
-
S
AFS-AF
33
00
+
ISO
ISO
Image Only
INFO
-
Information 2
(still photography mode only)
• The information display screens can be switched in either direction by rotating the dial
while pressing the INFO button.
• The information shown in still photography mode and the information shown in movie mode
can be set individually. g “Shooting Indicators (KInfo Settings / nInfo Settings)” (P. 230)
• You can choose whether or not to display information when the shutter button is pressed
halfway.g “Conguring the display for when the shutter button is pressed halfway (Info
by half-pressing a)” (P. 231)
Histogram display
A histogram showing the distribution of brightness
More
in the image is displayed. The horizontal axis
gives the brightness, the vertical axis the number
of pixels of each brightness in the image. Areas
above the upper limit at shooting are displayed in
Less
Dark Bright
red, those below the lower limit in blue, and those within the spot metering range in green.
You can choose the upper and lower limits. g “Histogram Exposure Warning (Histogram
Settings)” (P. 236)
Highlights and Shadows
Highlights and shadows, dened according to the upper and lower limits for the
histogram display, are shown in red and blue. You can choose the upper and lower limits.
g “Histogram Exposure Warning (Histogram Settings)” (P. 236)
Level gauge display
The orientation of the camera is indicated. The “tilt” direction is indicated on the vertical bar
and the “horizon” direction on the horizontal bar.
• Calibrate the gauge if you nd it is no longer truly plumb or level. g “Calibrating the
• The level gauge is intended as a guide only.
Level Gauge (Level Adjust)” (P. 258)
38
EN
Page 39
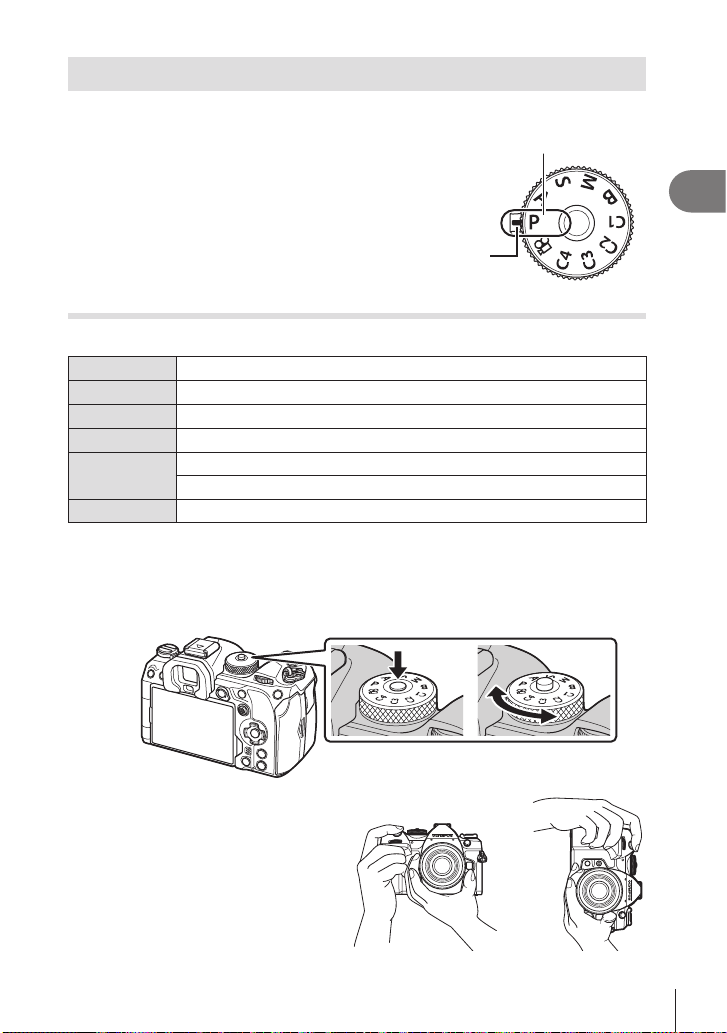
Shooting still pictures
PASMB
Use the mode dial to select the shooting mode, and then shoot
the image.
Indicator
Types of shooting modes
For how to use the various shooting modes, see the following.
P
A
S
M
B
C1/C2/C3/C4 Custom (P. 57)
%For information on n on the mode dial, see P. 59.
Press the mode dial lock to unlock it, and then turn to set the mode you wish
1
to use.
• When the mode dial lock has been pressed down, the mode dial is locked. Each time
you press the mode dial lock, it switches between locked/released.
Program AE (P. 43)
Aperture-priority AE (P. 45)
Shutter-priority AE (P. 47)
Manual exposure (P. 49)
Bulb/time (P. 51)
Live composite (P. 54)
Mode icon
n
2
Shooting
Frame the shot.
2
# Be careful that your ngers or the
camera strap do not obstruct the
lens or AF illuminator.
Landscape position Portrait position
EN
39
Page 40
3
10231023
P
1
/
250
P
1/F
250 5.65.6
[1:02:03][1:02:03]
FF
60p60p L-8L-8
AF
AF
200200
Auto
Auto
F
0.00.0
10231023
P
1
/
250
P
1/F
250 5.65.6
[1:02:03][1:02:03]
FF
60p60p L-8L-8
AF
AF
33
Auto
Auto
F
0.00.0
200200
2
Shooting
4
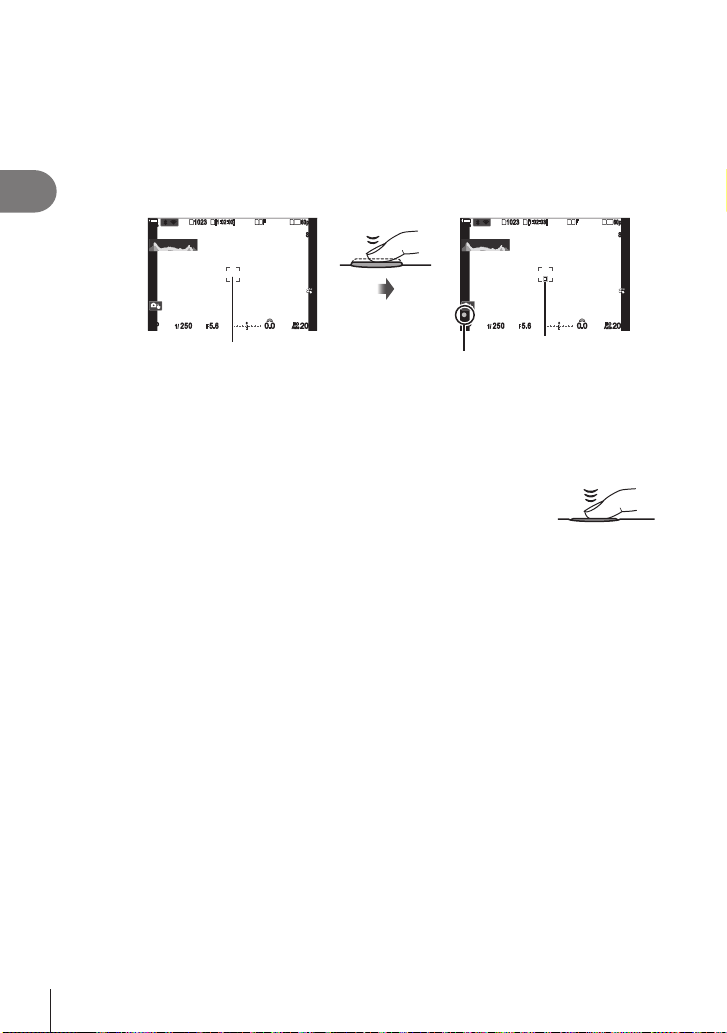
Adjust the focus.
• Lightly press the shutter button down to the rst position (press the shutter button
halfway).
The AF conrmation mark (() will be displayed, and a green frame (AF target) will
be displayed in the focus location.
%You can also focus by pressing the AF-ON button. (P. 83)
Press the shutter
-
-
S
S
ISO
ISO
button halfway
33
1
OO
rr
100 %
100 %
1
1
L14K
-
00
+
AF target
AF conrmation mark
Press the rest of
the way down
-
-
S
S
ISO
ISO
1
OO
rr
100 %
100 %
1
1
L14K
-
00
+
AF frame
# If the camera is unable to focus, the AF conrmation mark will ash (P. 306).
# The AF frame varies with the option chosen for AF-target mode. Change the area
(P. 77) and position (P. 76) of the AF target as required.
# The AF frame is not displayed when [oAll] is chosen for AF-target mode (P. 77).
Release the shutter.
• Press the shutter button all the way (fully).
• The camera will release the shutter and take a picture.
%You can focus and take pictures using touch controls. g “Shooting with touch screen
operations” (P. 41)
40
EN
Page 41
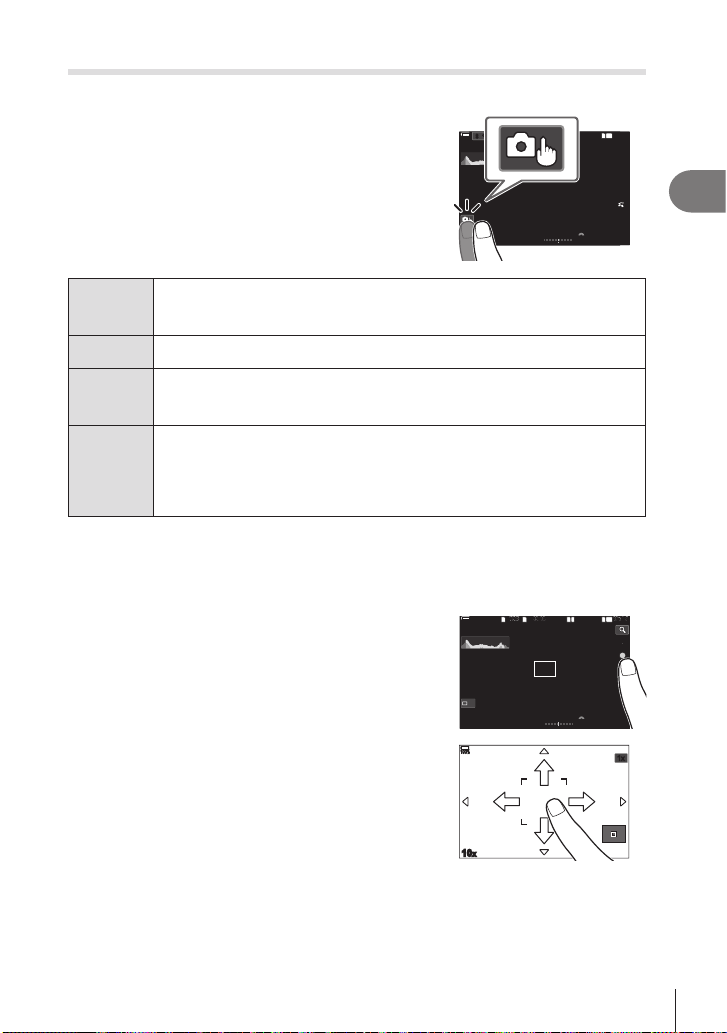
Shooting with touch screen operations
1
10231023
P
1
/
250
P
1/F
250 5.65.6
1
1
[1:02:03][1:02:03]
FF
60p60p L-8L-8
200200
L14K
F
0.00.0
10
You can tap the subject to focus and take a
photograph.
PASMB
1
OO
rr
10231023
100 %
100 %
n
[1:02:03][1:02:03]
1
1
L14K
FF
60p60p L-8L-8
-
S
AFS-AF
-
00
1
/
250
1/F
250 5.65.6
P
P
+
F
Tap a subject to focus and automatically release the shutter. This option
Q
R
is not available in mode B (bulb), in n (movie) mode, or when [FAF] or
[FAFb] is selected for AF mode (P. 72).
Shooting with touch screen operations is disabled.
Tap to display an AF target and focus on the subject in the selected area. You
S
can use the touch screen to choose the position and size of the focus frame.
Photographs can be taken by pressing the shutter button.
Tap to choose the subject used for focus when multiple portrait subjects are
detected. T is displayed when an option other than [O] is selected for
T
[Face & Eye Detection] (P. 88). Subject selection is not available when a
frame rate of [FHD 120/60p L-8] (high-speed movie recording) is selected in
n (movie) mode (P. 141).
• Tapping an icon switches the settings.
# Do not touch the display with your ngernails or other sharp objects.
# Gloves or monitor covers may interfere with touch screen operation.
Previewing the subject (S)
100 %
Tap the subject in the display.
1
100 %
• An AF target will be displayed.
• Use the slider to choose the size of the frame.
• Tap S to turn o the display of the AF target.
Use the slider to adjust the size of the AF
2
target, and then tap Y to zoom in at the frame
Off
100 %
100 %
-
00
+
position.
• Use your nger to scroll the display when the
picture is zoomed in.
• Tap Z to cancel the zoom display.
• The situations in which touch screen operations are not available include the following.
When buttons or dials are in use
• You can disable the touch screen operation. g “Disabling Touch Controls (Touchscreen
Settings)” (P. 249)
x
33
ISO
ISO
200200
0.00.0
Auto
Auto
14
14
10
10
7
7
5
5
3x
3x
ISO
ISO
Auto
Auto
1x1x
2
Shooting
41
EN
Page 42
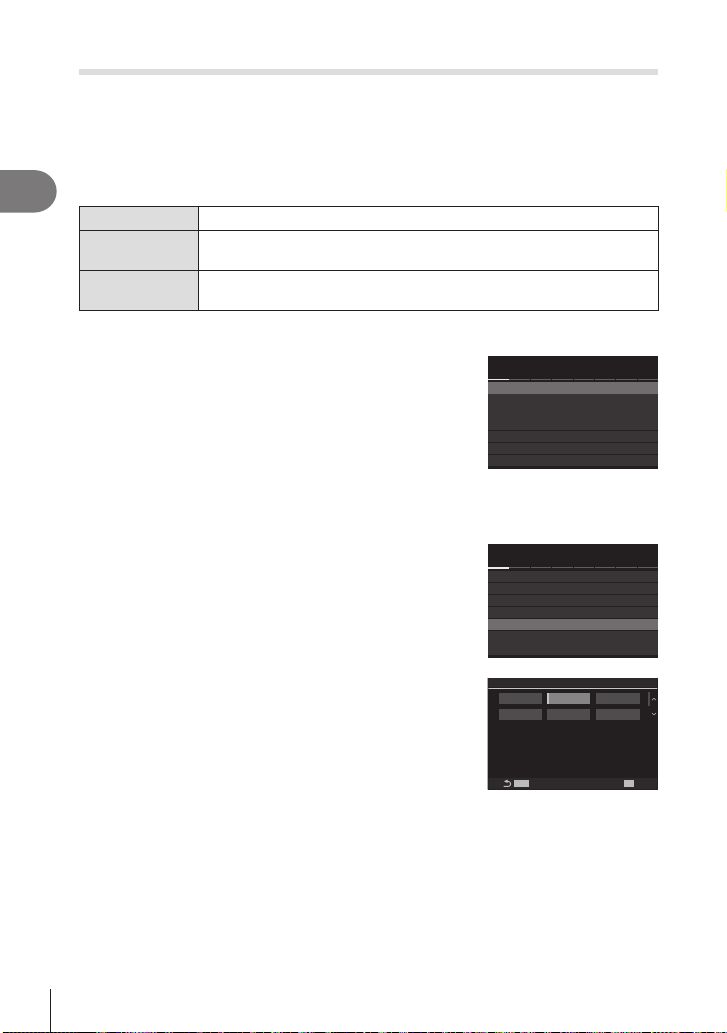
Photo Review (Image Review)
AF
My
n
e
K
K2K
AF
My
n
q
G
e
K
Image Review
PASMB
Pictures are displayed immediately after shooting. This gives you a chance to quickly
review the shot. You can choose how long pictures are displayed or disable photo
review altogether.
To end photo review and resume shooting at any time, press the shutter button
halfway.
2
0.3–20sec Choose how long photos are displayed.
Shooting
O
Auto q
Press the MENU button to display the menus.
1
Highlight the _ tab using the front dial.
2
Highlight [1. Basic Settings/Image Quality] using
3
the HI buttons or the rear dial.
Highlight [Image Review] using the FG buttons
4
and press the Q button.
Photo review disabled. The camera continues to display the view
through the lens after shooting.
Switch to playback after shooting. You can delete images and perform
other playback operations.
K2K
1
1
Basic Settings/Image Quality
1.
Custom Mode
K
K
K
K
Detailed Settings
Image Aspect
Image Review
Shading Comp.
1
1
Basic Settings/Image Quality
1.
Custom Mode
K
K
K
K
Detailed Settings
Image Aspect
Image Review
Shading Comp.
n
q
G
F
Y
4:3
Off
Off
F
Y
4:3
Off
Off
Change the setting using the FG buttons and
5
press the Q button.
Press the MENU button to exit the menus.
6
42
EN
q
Off
Auto
0.5sec 1sec 2sec
Images are not displayed
after shooting.
MENU
0.3sec
OK
Page 43
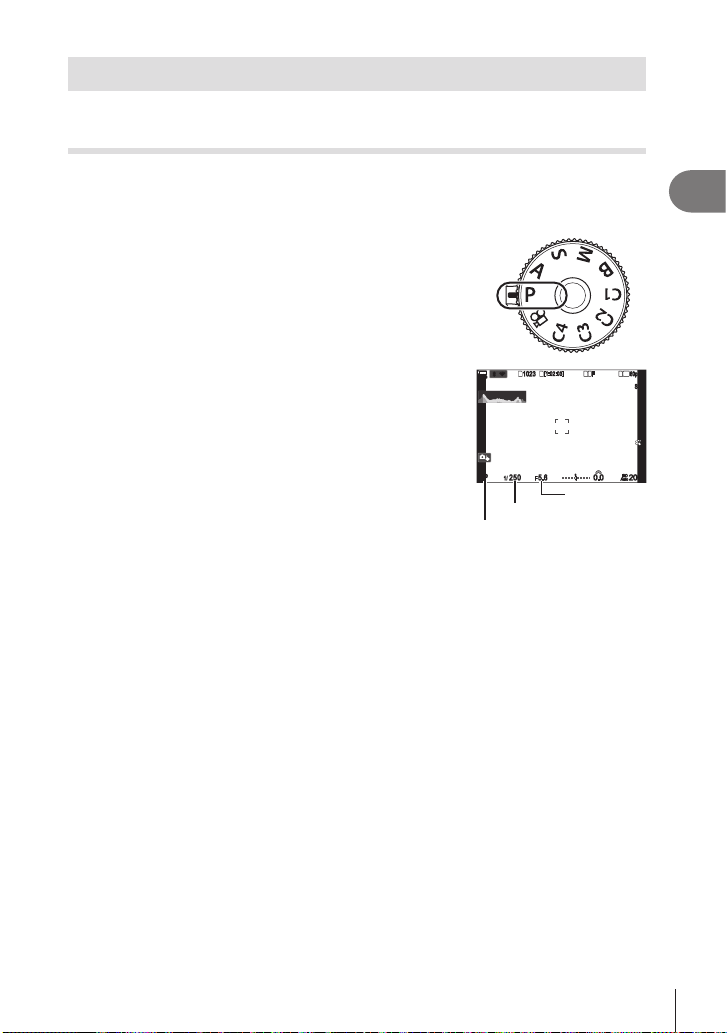
Taking Pictures Using the Shooting Modes
10231023
P
1
/
250
P
1/F
250 5.65.6
[1:02:03][1:02:03]
FF
60p60p L-8L-8
200200
Auto
Auto
F
0.00.0
10
Letting the camera choose aperture and shutter speed
(P: Program AE)
PASMB
The camera chooses the optimal aperture and shutter speed according to subject
brightness.
Rotate the mode dial to P.
1
n
2
Shooting
Focus and check the display.
2
1
OO
rr
0 %100 %
1
1
L14K
-
S
AFS-AF
• Use the front and rear dials to adjust the following
settings.
Front dial: Exposure compensation (P. 106)
Rear dial: Program shift (P. 44)
• The shutter speed and aperture chosen by the camera
are displayed.
• Exposure compensation can also be adjusted using the
F button. Press the F button and then rotate the front
or rear dial.
Take pictures.
3
Shutter speed
Shooting mode
-
00
Aperture
33
+
ISO
ISO
%You can choose the functions performed by the front and rear dials. g “Assigning Roles
to the Front and Rear Dials (KDial Function / nDial Function)” (P. 216)
%You can use the Fn lever to reverse the roles of the front and rear dials. The lever
can also be assigned other roles. g “Customizing the Fn Lever (Fn Lever Settings)”
(P. 219)
43
EN
Page 44
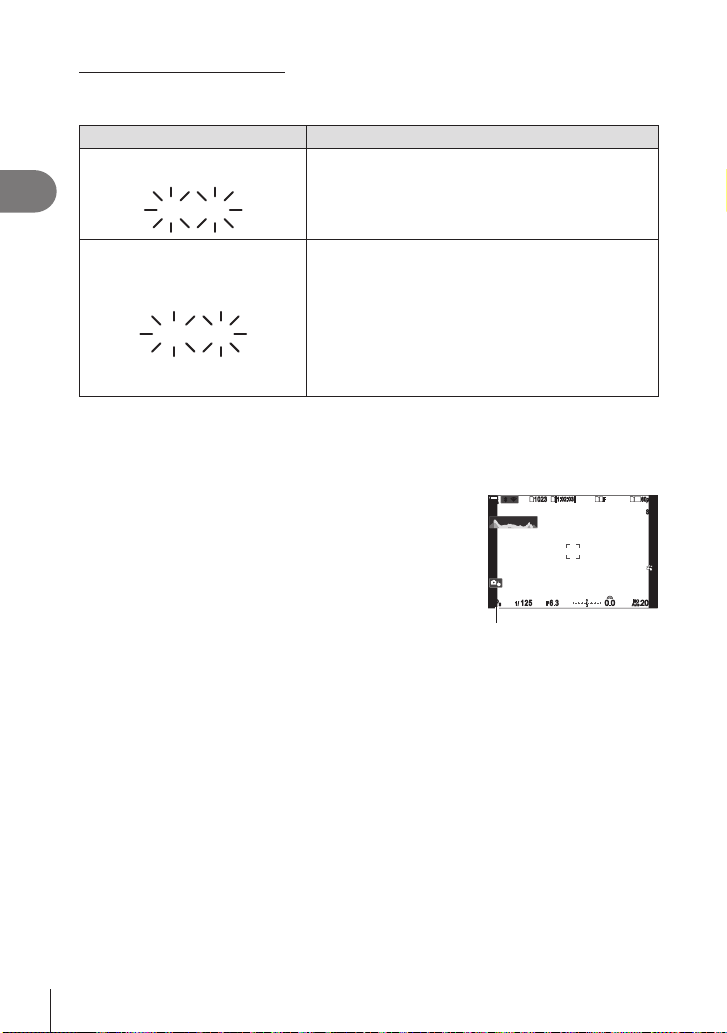
Subject Too Dark or Too Bright
PsPs
10231023
125
125 6.36.3
1
[1:02:03][1:02:03]
FF
60p60p L-8L-8
AF
AF
200200
L14K
0.00.0
If the camera is unable to achieve optimal exposure, the shutter-speed and aperture
displays will ash as shown.
Display Problem/solution
Large aperture (low f/-number)/
2
Shooting
slow shutter speed
60"60" F2.8F2.8
The subject is too dark.
• Use a ash.
Subject is too bright.
• The limits of the camera metering system have been
Small aperture (high f/-number)/
fast shutter speed
exceeded. Use a third-party ND (Neutral Density)
lter to reduce the amount of light entering the
camera.
80008000
F22F22
• Shutter speeds as fast as 1/32000 s are available
in s (silent) mode. g “Shooting without shutter
sound (Silents Settings)” (P. 132), “Performing the
sequential/self-timer shooting” (P. 126)
%When [KISO] is not set to [Auto], optimal exposure may be achieved by changing the
setting. g “Changing ISO sensitivity (ISO)” (P. 113)
%The aperture value shown when the displays ash varies with the lens and focal length.
Program Shift
OO
rr
100 %
Without changing exposure, you can choose from dierent
100 %
combinations of aperture and shutter speed selected
automatically by the camera. This is known as program
shift.
Rotate the rear dial until the camera displays the
1
desired combination of aperture and shutter speed.
• The shooting mode indicator in the display changes
from P to
while program shift is in eect. To end
Ps
1
1/F
Program shift
program shift, rotate the rear dial in the opposite
direction until Ps is no longer displayed.
%You can choose whether the display reects the eects of exposure compensation or
maintains a constant brightness for ease of viewing. g “Changing the look of the
display (KLV Mode)” (P. 225)
1
1
-
/
00
F
-
-
S
S
33
+
ISO
ISO
Auto
Auto
44
EN
Page 45
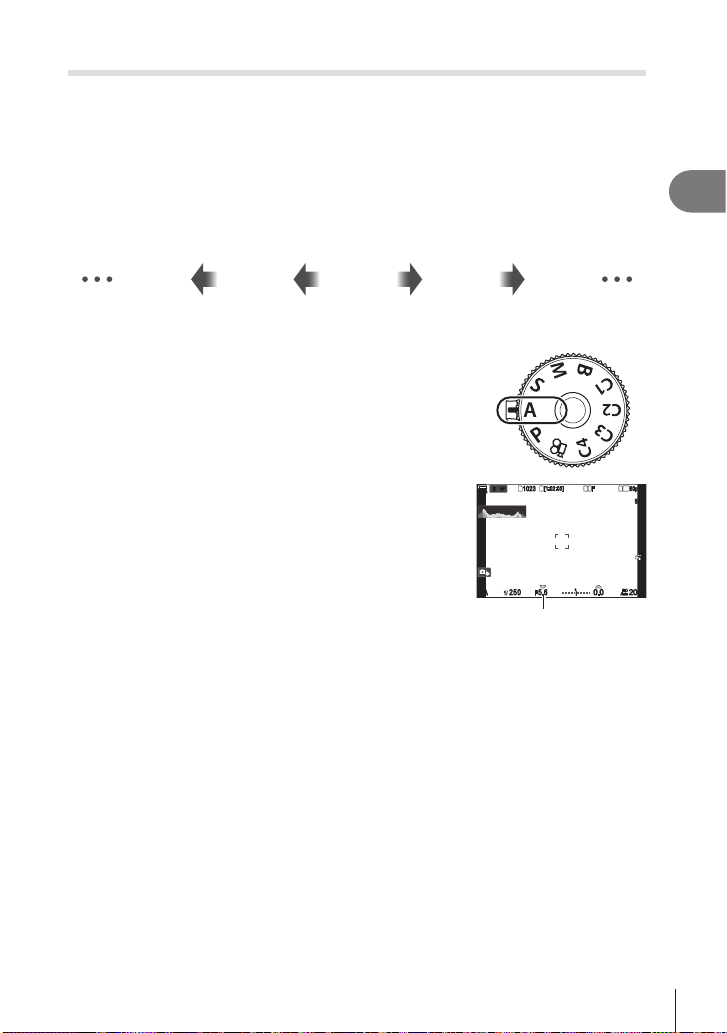
Choosing aperture (A: Aperture-Priority AE)
AA
1
10231023
1
/
2501
/
F
250 5.65.6
1
1
[1:02:03][1:02:03]
FF
60p60p L-8L-8
200200
L14K
Auto
Auto
F
0.00.0
10
rr
PA SMB
In this mode, you choose the aperture (f/-number) and the camera automatically sets
the shutter speed for optimal exposure according to subject brightness. Lower aperture
values (larger apertures) reduce the depth of the area that appears to be in focus
(depth of eld), blurring the background. Higher aperture values (smaller apertures)
increase the depth of the area that appears to be in focus in front of and behind the
subject.
Lower aperture values… Higher aperture values…
F5.6F4.0F2.8 F8.0 F11
…reduce depth of eld and increase
blur.
Rotate the mode dial to A.
1
Choose an aperture.
2
• Use the front and rear dials to adjust the following
settings.
Front dial: Exposure compensation (P. 106)
Rear dial: Aperture
• The shutter speed selected automatically by the camera
will appear in the display.
• Exposure compensation can also be adjusted using the
F button. Press the F button and then rotate the front
or rear dial.
Take pictures.
3
%You can choose the functions performed by the front and rear dials. g “Assigning Roles
to the Front and Rear Dials (KDial Function / nDial Function)” (P. 216)
%You can use the Fn lever to reverse the roles of the front and rear dials. The lever
can also be assigned other roles. g “Customizing the Fn Lever (Fn Lever Settings)”
(P. 219)
%You can choose whether the display reects the eects of exposure compensation or
maintains a constant brightness for ease of viewing. g “Changing the look of the
display (KLV Mode)” (P. 225)
%You can stop aperture down to the selected value and preview depth of eld.
g “Changing the roles of buttons (Button Settings)” (P. 208)
…increase depth of eld.
OO
0 %100 %
-
Aperture value
n
00
+
ISO
ISO
-
S
AFS-AF
33
2
Shooting
45
EN
Page 46
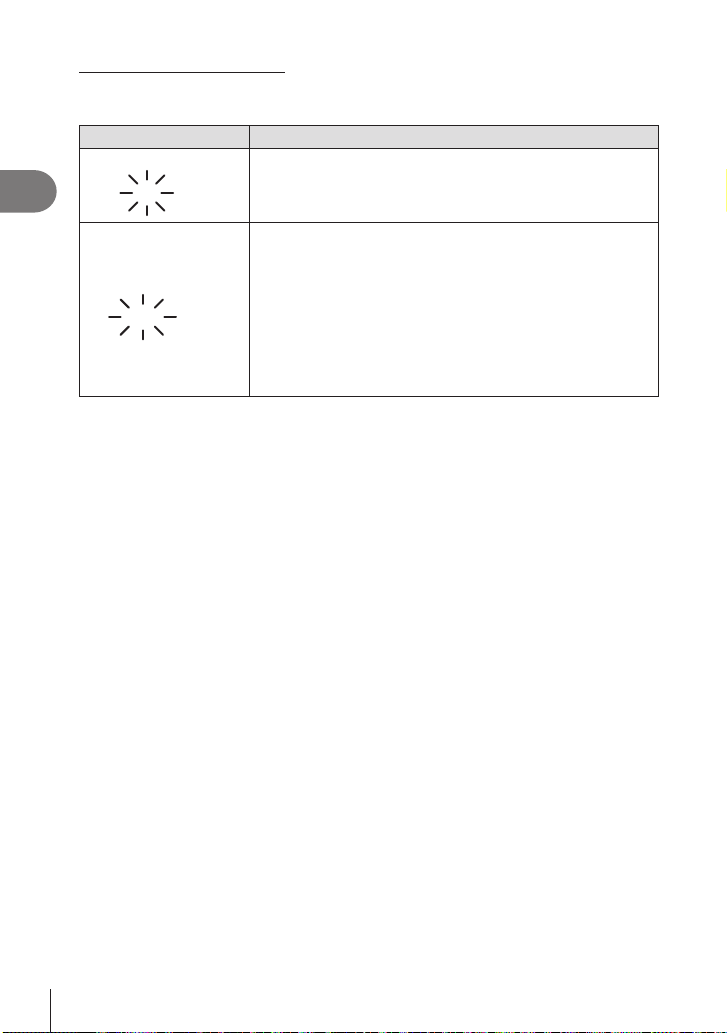
Subject Too Dark or Too Bright
If the camera is unable to achieve optimal exposure, the shutter-speed display will
ash as shown.
Display Problem/solution
2
Shooting
Slow shutter speed
60"60" F5.6F5.6
Fast shutter speed
80008000 F5.6F5.6
%When [KISO] is not set to [Auto], optimal exposure may be achieved by changing the
setting. g “Changing ISO sensitivity (ISO)” (P. 113)
Underexposure.
• Choose a lower aperture value.
Overexposure.
• Choose a higher aperture value.
• If the subject is still overexposed at the higher value, the limits
of the camera metering system have been exceeded. Use a
third-party ND (Neutral Density) lter to reduce the amount of
light entering the camera.
• Shutter speeds as fast as 1/32000 s are available in s
(silent) mode. g “Shooting without shutter sound (Silents
Settings)” (P. 132), “Performing the sequential/self-timer
shooting” (P. 126)
46
EN
Page 47
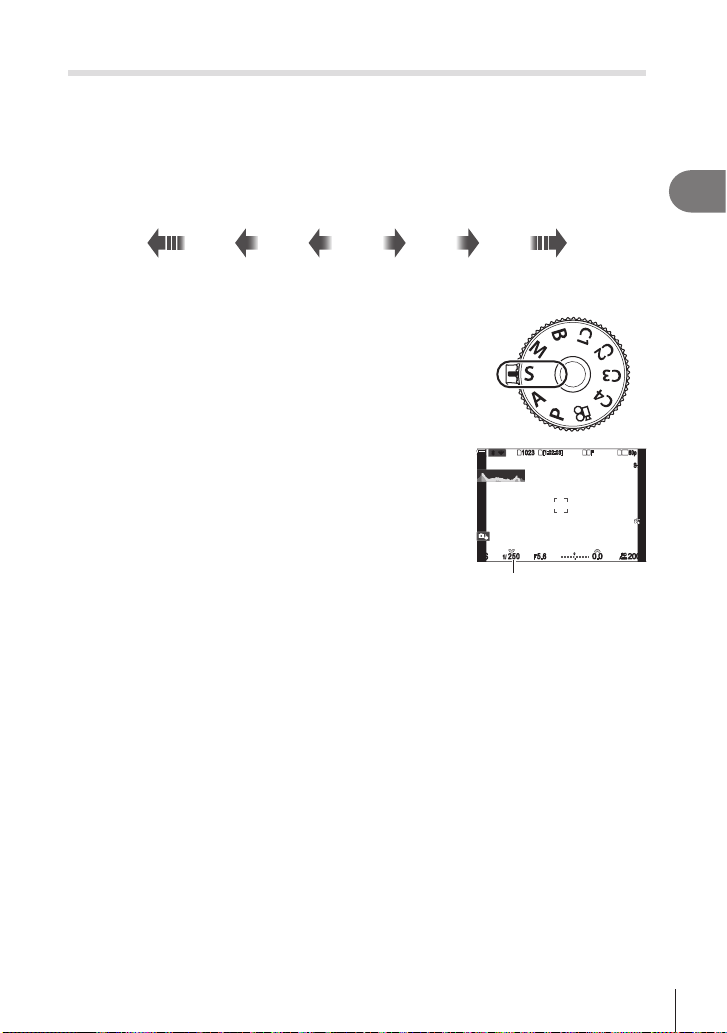
Choosing shutter speed (S: Shutter-Priority AE)
SS
1
10231023
1
/
2501
/
F
250 5.65.6
1
1
[1:02:03][1:02:03]
FF
60p60p L-8L-8
200200
L14K
Auto
Auto
F
0.00.0
10
rr
PASMB
In this mode, you choose the shutter speed and the camera automatically sets aperture
for optimal exposure according to subject brightness. Faster shutter speeds appear
to “freeze” fast-moving subjects. Slower shutter speeds add blur to moving objects,
lending them a sense of motion for a dynamic eect.
Slower shutter speeds… Faster shutter speeds…
125 250 800060301560”
…produce dynamic shots with a sense
of motion.
Rotate the mode dial to S.
1
Choose a shutter speed.
2
• Use the front and rear dials to adjust the following settings.
Front dial: Exposure compensation (P. 106)
Rear dial: Shutter speed
• Shutter speed can be set to values between 1/8000 and
60 s.
• Shutter speeds as fast as 1/32000 s are available
in s (silent) mode.
sound (Silents Settings)” (P. 132), “Performing the
g “Shooting without shutter
sequential/self-timer shooting” (P. 126)
• The aperture selected automatically by the camera will appear in the display.
• Exposure compensation can also be adjusted using the F button. Press the F
button and then rotate the front or rear dial.
Take pictures.
3
%You can choose the functions performed by the front and rear dials. g “Assigning Roles
to the Front and Rear Dials (KDial Function / nDial Function)” (P. 216)
%You can use the Fn lever to reverse the roles of the front and rear dials. The lever can also
be assigned other roles. g “Customizing the Fn Lever (Fn Lever Settings)” (P. 219)
%You can choose whether the display reects the eects of exposure compensation or
maintains a constant brightness for ease of viewing. g “Changing the look of the
display (KLV Mode)” (P. 225)
%To achieve the eect of a slow shutter in brightly-lit settings in which slow shutter speeds
are not otherwise available, use the live ND lter. g “Slowing the Shutter in Bright Light
(Live ND Shooting)” (P. 158)
%Depending on the shutter speed selected, you may notice banding in the display caused
by icker from uorescent or LED light sources. The camera can be congured to reduce
the eects of icker during live view or when pictures are taken. g “Reducing Flicker
in Photographs (Anti-Flicker Shooting)” (P. 135), “Reducing Flicker Under LED Lighting
(KFlicker Scan / nFlicker Scan)” (P. 108)
…“freeze” the motion of fast-moving
OO
0 %100 %
subjects.
-
Shutter speed
n
2
Shooting
-
S
AFS-AF
33
00
+
ISO
ISO
47
EN
Page 48
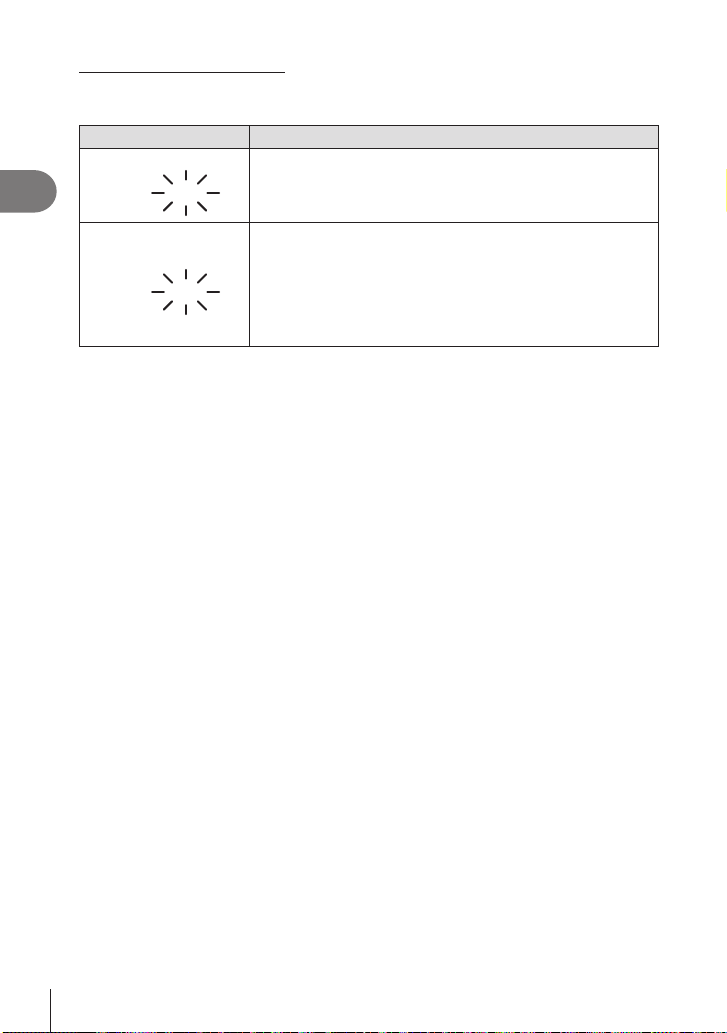
Subject Too Dark or Too Bright
If the camera is unable to achieve optimal exposure, the aperture display will ash as
shown.
Display Problem/solution
2
Shooting
Low aperture value
20002000 F2.8F2.8
High aperture value
125125 F22F22
%When [KISO] is not set to [Auto], optimal exposure may be achieved by changing the
setting. g “Changing ISO sensitivity (ISO)” (P. 113)
%The aperture value shown when the display ashes varies with the lens and focal length.
Underexposure.
• Choose a slower shutter speed.
Overexposure.
• Choose a faster shutter speed. Shutter speeds as fast as
1/32000 s are available in silent mode.
• If the subject is still overexposed at the higher speed, the
limits of the camera metering system have been exceeded.
Use a third-party ND (Neutral Density) lter to reduce the
amount of light entering the camera.
48
EN
Page 49
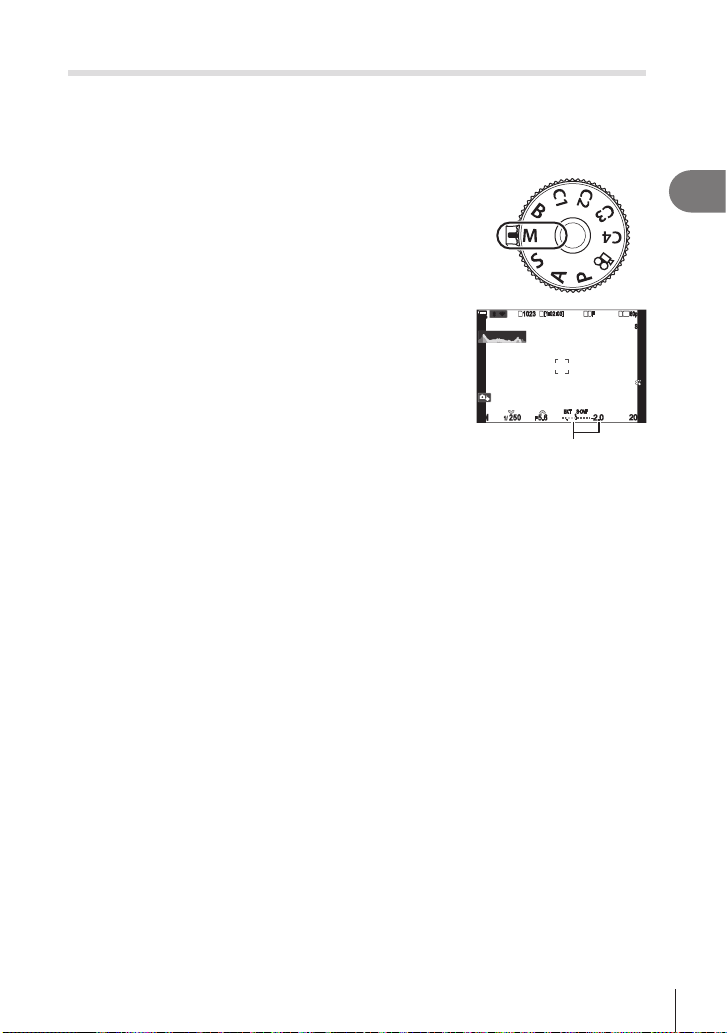
Choosing aperture and shutter speed (M: Manual Exposure)
-2.0-2.0
MM
10231023
1
/
2501
/
F
250 5.65.6
[1:02:03][1:02:03]
FF
60p60p L-8L-8
F
10
200200
ISO
PASMB
In this mode, you choose the aperture and shutter speed. You can adjust settings
according to your goals, for example by combining fast shutter speeds with small
apertures (high f/-numbers) for increased depth of eld.
Rotate the mode dial to M.
1
n
2
Shooting
Adjust aperture and shutter speed.
2
1
OO
rr
0 %100 %
1
1
L14K
• Use the front and rear dials to adjust the following
settings.
Front dial: Aperture
Rear dial: Shutter speed
• Choose from shutter speeds of 1/8000–60 s.
• Shutter speeds as fast as 1/32000 s are available in
silent mode. g
(Silents Settings)” (P. 132)
“Shooting without shutter sound
Dierence from optimal
BKT S-OVF
-
exposure
00
+
• The display shows the dierence between the exposure
produced by the selected aperture and shutter speed
and the optimal exposure metered by the camera. The
display will ash if the dierence exceeds ±3 EV.
• When [Auto] is selected for [K ISO], ISO sensitivity will automatically be adjusted
for optimal exposure at the selected exposure settings. [K ISO] defaults to [Auto].
g “Changing ISO sensitivity (ISO)” (P. 113)
Take pictures.
3
%You can choose the functions performed by the front and rear dials. g “Assigning Roles
to the Front and Rear Dials (KDial Function / nDial Function)” (P. 216)
%You can use the Fn lever to reverse the roles of the front and rear dials. The lever
can also be assigned other roles. g “Customizing the Fn Lever (Fn Lever Settings)”
(P. 219)
%Depending on the shutter speed selected, you may notice banding in the display caused
by icker from uorescent or LED light sources. The camera can be congured to reduce
the eects of icker during live view or when pictures are taken. g “Reducing Flicker
in Photographs (Anti-Flicker Shooting)” (P. 135), “Reducing Flicker Under LED Lighting
(KFlicker Scan / nFlicker Scan)” (P. 108)
%You can choose whether the display reects the eects of exposure compensation or
maintains a constant brightness for ease of viewing. g “Changing the look of the
display (KLV Mode)” (P. 225)
-
S
AFS-AF
33
49
EN
Page 50
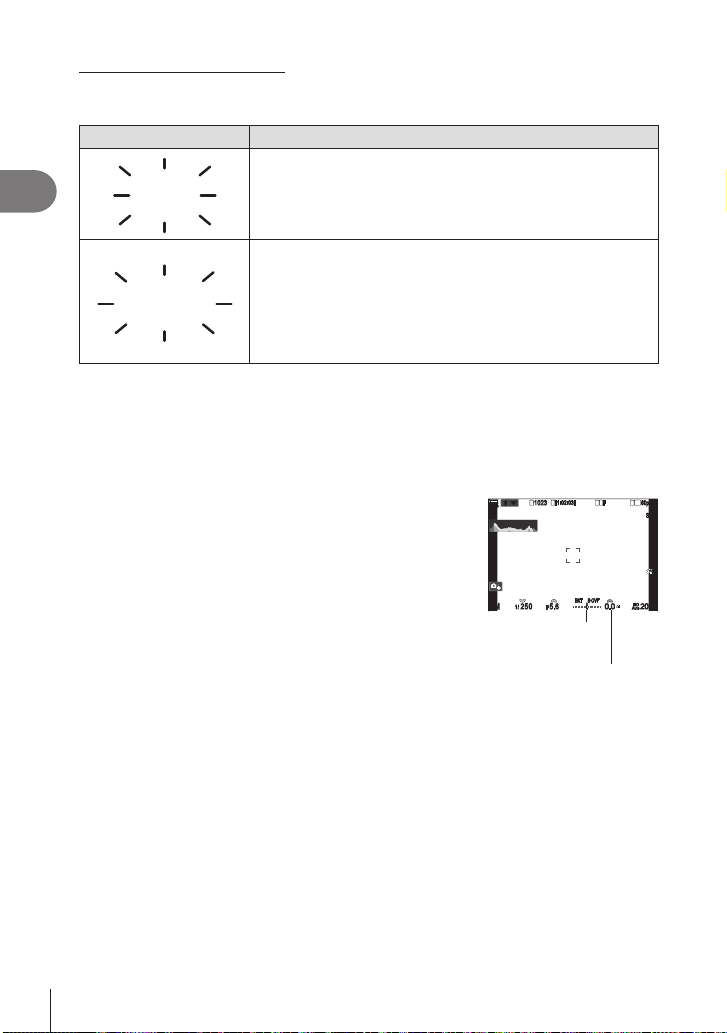
Subject Too Dark or Too Bright
0.00.0
MM
1
10231023
1
/
2501
/
F
250 5.65.6
1
1
[1:02:03][1:02:03]
FF
60p60p L-8L-8
AF
AF
L14K
F
rr
200200
Auto
Auto
If the camera is unable to achieve optimal exposure with [Auto] selected for [K ISO],
the ISO sensitivity display will ash as shown.
Display Problem/solution
2
Shooting
ISO ISO
AutoAuto
L80L80
Overexposure.
• Choose a higher aperture value or faster shutter speed.
Underexposure.
• Choose a lower aperture value or slower shutter speed.
ISO ISO
AutoAuto
2560025600
• If the warning does not clear from the display, choose a higher
value for ISO sensitivity. g
“Changing ISO sensitivity (ISO)”
(P. 113), “Setting the range of ISO sensitivity values selected
in [Auto] mode (KISO-A Upper/Default / bISO-A Upper/
Default)” (P. 114)
Using Exposure Compensation in Mode M
In mode M, exposure compensation is available when [Auto] is selected for [K ISO].
Because exposure compensation is performed by adjusting ISO sensitivity, aperture
and shutter speed are not aected. g
“Changing ISO sensitivity (ISO)” (P. 113),
“Setting the range of ISO sensitivity values selected in [Auto] mode (KISO-A Upper/Default
/ bISO-A Upper/Default)” (P. 114)
OO
100 %
Hold the F button and rotate the front or rear dial.
1
100 %
• Exposure compensation is added to the exposure
dierence shown in the display.
compensation plus
exposure dierence
BKTBKT S-OVFS-OVF
-
00
Exposure
compensation
+
ISO
ISO
Exposure
-
-
S
S
33
EN
50
Page 51
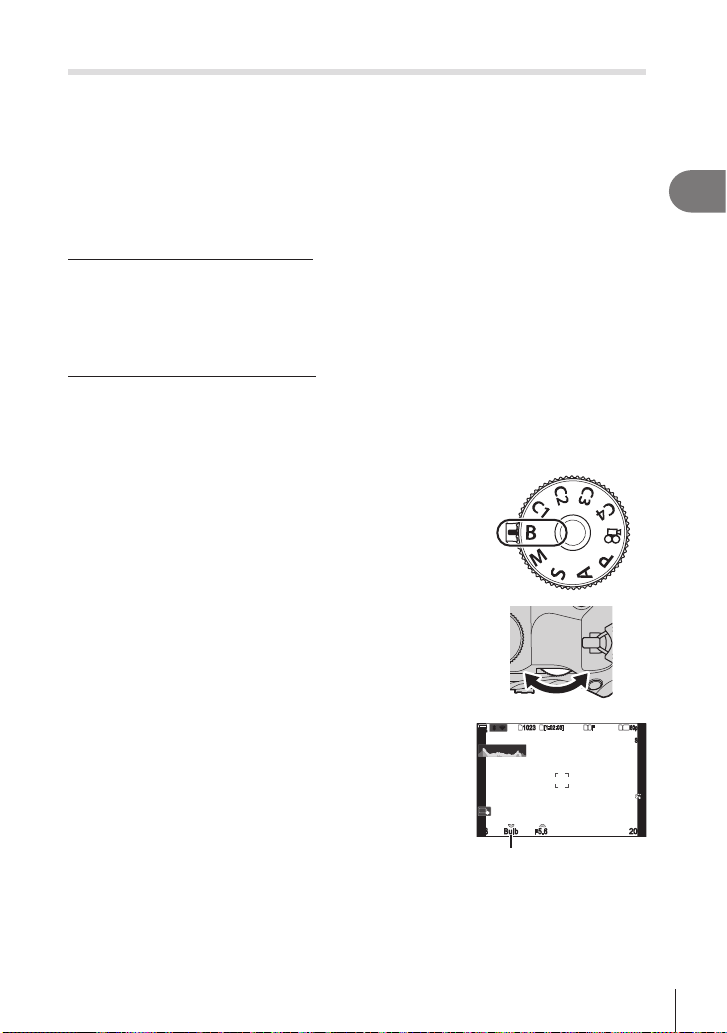
Long Exposures (B: Bulb/Time)
10231023
[1:02:03][1:02:03]
FF
60p60p L-8L-8
L14K
10
F
5.65.6
F
200200
ISO
BB
BulbBulb
PASMB
Select this mode to leave the shutter open for a long exposure. You can preview the
photo in live view and end the exposure when the desired results have been achieved.
Use when long exposures are required, for example when photographing night scenes
or reworks.
# For long exposure shooting, it is recommended that you x the camera securely on a
tripod and set [KImage Stabilizer] (P. 136) to [S-IS O].
“Bulb” and “Live Bulb” Photography
The shutter remains open while the shutter button is pressed. Releasing the button ends the
exposure.
• The amount of light entering the camera increases the longer the shutter is open.
• When live bulb photography is selected, you can check the results in the live view display
and end exposure when you want to.
“Time” and “Live Time” Photography
The exposure begins when the shutter button is pressed all the way down. To end the
exposure, press the shutter button all the way down a second time.
• The amount of light entering the camera increases the longer the shutter is open.
• When live time photography is selected, you can check the results in the live view display
and end exposure when you want to.
Rotate the mode dial to B.
1
Select [Bulb] (for bulb photography) or [Time] (time
2
photography).
• At default settings, the selection is made with the rear
dial.
n
2
Shooting
1
OO
rr
0 %100 %
1
1
-
S
AFS-AF
33
Bulb or time photography
51
EN
Page 52
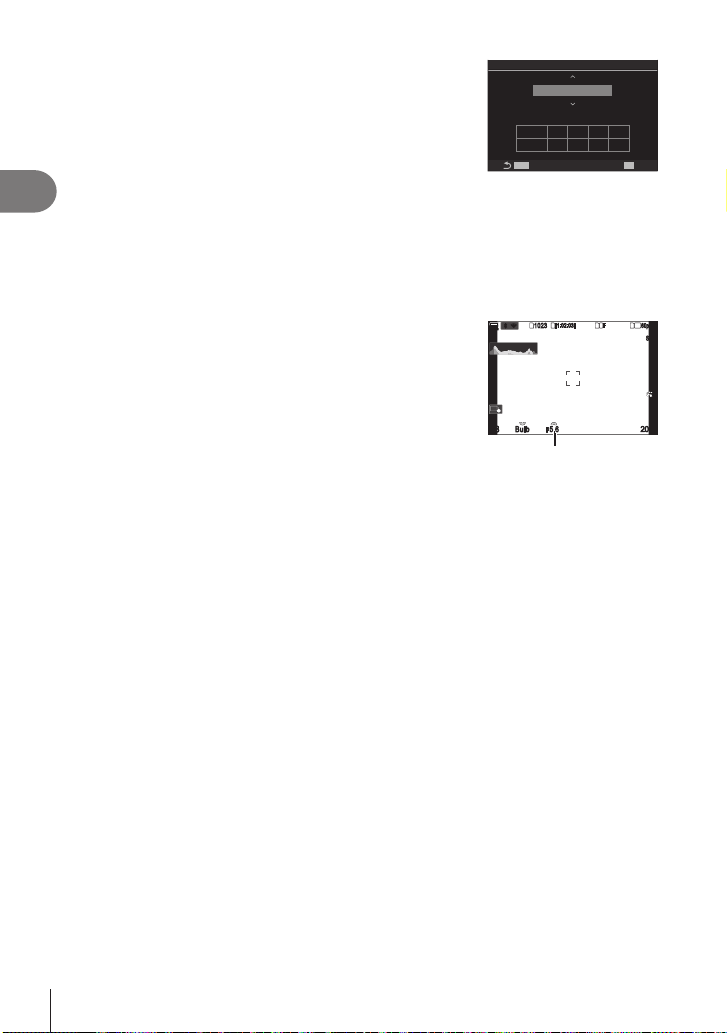
3
Live Bulb
10231023
[1:02:03][1:02:03]
FF
60p60p L-8L-8
AF
AF
L14K
F
5.65.6
F
200200
ISO
BB
BulbBulb
2
4
Shooting
5
6
7
8
Press the MENU button.
L80~ 400~ 800~ 1600~
ISO
times
MENU
24
Off
19 14 9
OK
• You will be prompted to choose the interval at which the
preview is updated.
Display Counts of each ISO sensitivity
Highlight an interval using FG.
Press the Q button to select the highlighted option.
• The menus will be displayed.
Press the MENU button repeatedly to exit the menus.
• If an option other than [O] is selected, [Live Bulb] or [Live Time] will appear in the display.
Adjust aperture.
1
OO
rr
100 %
100 %
1
1
• At default settings, aperture can be adjusted using the
front dial.
Aperture
Take pictures.
• In bulb and live bulb modes, keep the shutter button pressed. The exposure ends
when the button is released.
• During live time photography, you can refresh the preview by pressing the shutter
button halfway.
• In time and live time modes, press the shutter button all the way down once to start
the exposure and again to end it.
• The exposure ends automatically when the time selected for [Bulb/Time Timer]
is reached.
Settings)” (P. 173)
• [Noise Reduction] is applied after shooting. The display shows the time remaining
until the process is complete. You can choose the conditions under which noise
reduction is performed (P. 117).
# Some limitations apply to the choice of ISO sensitivity settings available.
# Bulb photography is used in place of live bulb photography when multiple exposure,
keystone compensation, or sheye correction is in eect.
# Time photography is used in place of live time photography when multiple exposure,
keystone compensation, or sheye correction is in eect.
# During shooting, there are limits on the settings for the following functions.
Sequential shooting, self-timer shooting, time lapse shooting, AE bracket shooting, ash
bracketing, focus bracketing, Focus Stacking, etc.
# Depending on camera settings, the temperature, and the situation, you may notice noise
or bright spots in the monitor. These may sometimes appear in pictures even when [Noise
Reduction] (P. 117) is enabled.
%Starry sky AF can be used for shots of the night sky. g “Choosing a focus mode (KAF
Mode / nAF Mode)” (P. 72), “Changing the settings of Starry Sky AF (Starry Sky AF
Setting)” (P. 85)
g “Conguring BULB/TIME/COMP Settings (BULB/TIME/COMP
-
-
S
S
33
52
EN
Page 53

%Display brightness can be adjusted during bulb/time photography. g “Conguring
BULB/TIME/COMP Settings (BULB/TIME/COMP Settings)” (P. 173)
%In mode
This allows you to defocus during the exposure or focus at the end of the exposure.
g “Conguring BULB/TIME/COMP Settings (BULB/TIME/COMP Settings)” (P. 173)
(bulb), you can adjust focus manually while the exposure is in progress.
B
! Noise
While shooting at slow shutter speeds, noise may appear on screen. These phenomena
occur when the temperature rises in the image pickup device or image pickup device internal
drive circuit, causing current to be generated in those sections of the image pickup device
that are not normally exposed to light. This can also occur when shooting with a high ISO
setting in a high-temperature environment. To reduce this noise, the camera activates the
noise reduction function. g “Long Exposure Noise Reduction Options (Noise Reduction)”
(P. 117)
2
Shooting
EN
53
Page 54
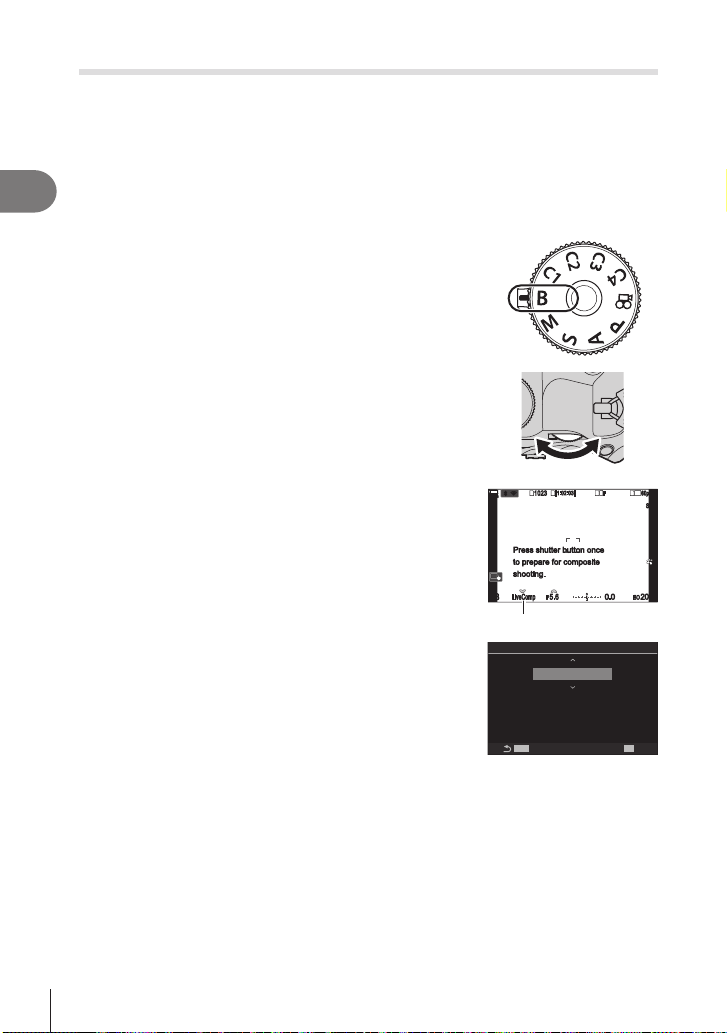
Lighten Blending (B: Live Composite Photography)
1
10231023
1
1
[1:02:03][1:02:03]
FF
60p60p L-8L-8
AF
AF
L14K
5.65.6
200200
BB
LiveCompLiveComp
0.00.0
MENU
OK
Composite Settings
PASMB
Leave the shutter open for a long exposure. You can view the light trails left by
reworks or stars and photograph them without changing the exposure of the
background. The camera combines multiple shots and records them as a single
photograph.
2
Shooting
# For live composite photography, it is recommended that you x the camera securely on a
tripod and set [KImage Stabilizer] (P. 136) to [S-IS O].
Rotate the mode dial to B.
1
Select [Live Comp].
2
• At default settings, the selection is made with the rear
dial.
OO
rr
100 %
100 %
Press shutter button once
Press shutter button once
to prepare for composite
to prepare for composite
shooting.
shooting.
Live composite photography
Press the MENU button.
3
• The [Composite Settings] menu will be displayed.
Exposure time per image.
Exposure time and aperture
will determine your base exposure.
n
-
-
S
S
33
-
00
+
F
F
1/2sec
ISOISO
54
EN
Highlight an exposure time using FG.
4
• Choose an exposure time of from 1/2 to 60 s.
Press the Q button to select the highlighted option.
5
• The menus will be displayed.
Press the MENU button repeatedly to exit the menus.
6
Adjust aperture.
7
• At default settings, aperture can be adjusted using the front dial.
Page 55
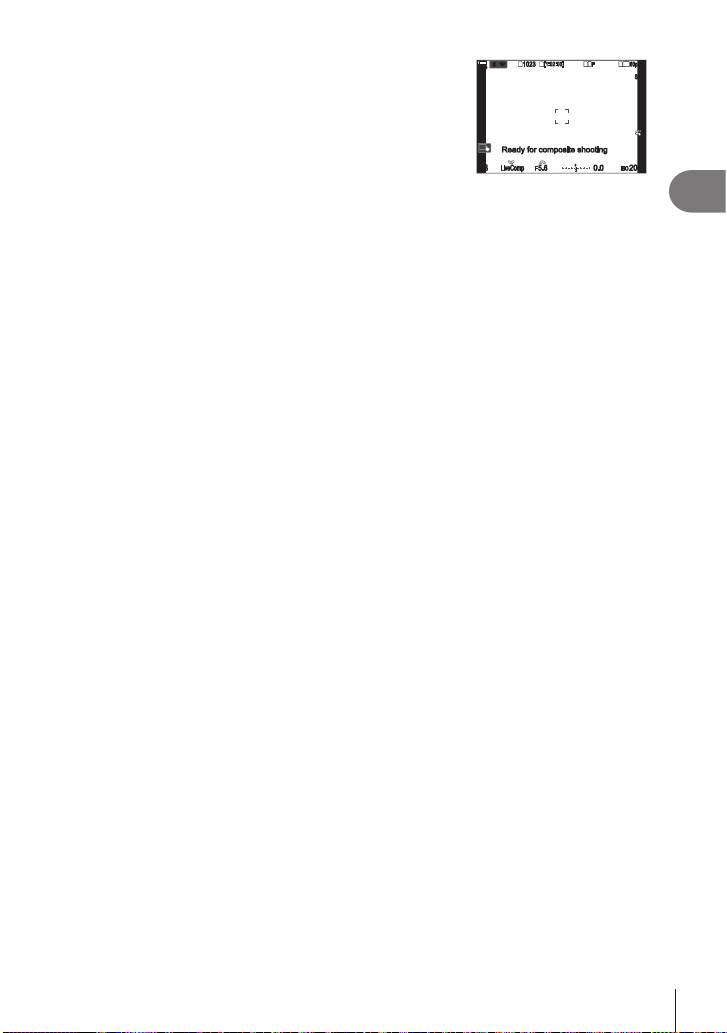
Press the shutter button all the way down to ready
1
10231023
1
1
[1:02:03][1:02:03]
FF
60p60p L-8L-8
L14K
10
rr
OO
F
5.65.6
F
200200
ISO
BB
LiveCompLiveComp
0.00.0
ISO
8
the camera.
0 %100 %
• The camera is ready to shoot when [Ready for
composite shooting] is displayed.
Ready for composite shootingReady for composite shooting
-
00
+
Press the shutter button to start shooting.
9
• Live composite photography will start. The display will be updated after each
exposure.
Press the shutter button again to end shooting.
10
• Shooting ends automatically after the time selected for [Live Composite Timer]
(P. 173). Other options can be selected.
• The maximum recording time available varies with battery level and shooting
conditions.
# Some limitations apply to the choice of ISO sensitivity settings available.
# Limitations apply to some features during shooting, including:
sequential shooting, the self-timer, interval timer photography, AE bracketing, ash
bracketing, focus bracketing, High Res Shot, HDR photography, Focus Stacking,
multiple exposure, keystone compensation, the live ND lter, and sheye correction.
%Starry sky AF can be used for shots of the night sky. g “Choosing a focus mode (KAF
Mode / nAF Mode)” (P. 72), “Changing the settings of Starry Sky AF (Starry Sky AF
Setting)” (P. 85)
%Display brightness can be adjusted during live composite photography. g “Conguring
BULB/TIME/COMP Settings (BULB/TIME/COMP Settings)” (P. 173)
%The exposure time for each exposure made during live composite photography can be
chosen in advance using the menus. g “Conguring BULB/TIME/COMP Settings
(BULB/TIME/COMP Settings)” (P. 173)
-
S
AFS-AF
33
2
Shooting
55
EN
Page 56
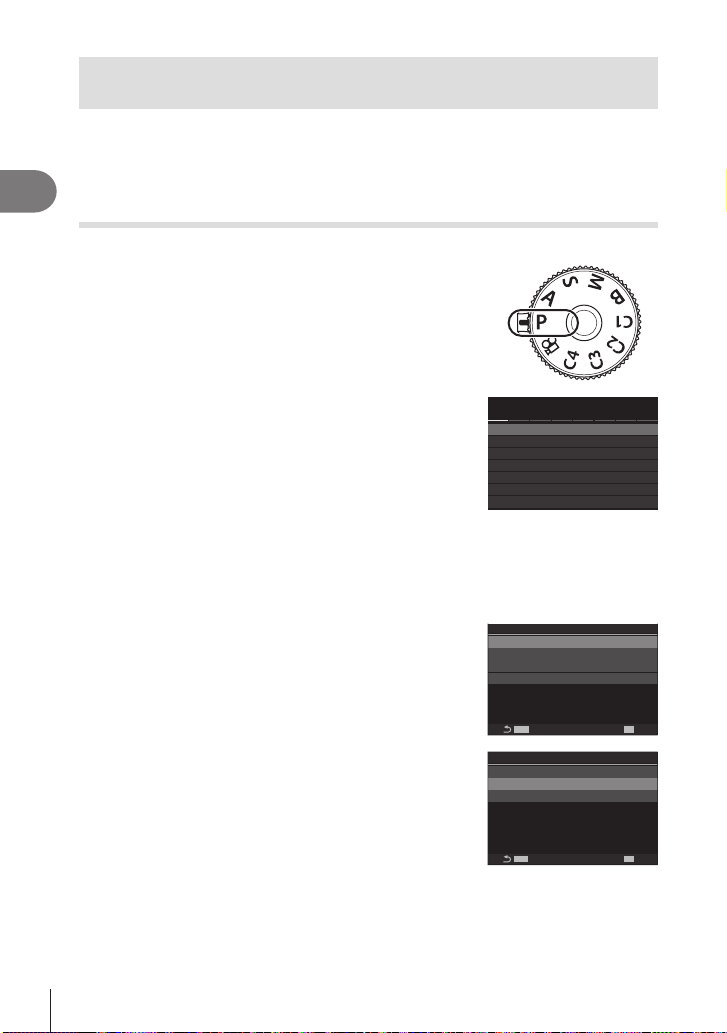
Saving Custom Settings to the Mode Dial
AF
My
n
e
K
Custom Mode
MENU
OK
(C1/C2/C3/C4 Custom Modes)
Frequently-used settings and shooting modes can be saved as custom modes and
recalled as needed simply by rotating the mode dial. Saved settings can also be
recalled from the menus.
• Save settings to positions C1 through C4.
2
Shooting
Saving Settings (Assign to Custom Mode)
PASMB
Choose a mode other than n and adjust settings
1
as desired.
• For information on the settings that can be saved, see
the menu list (P. 311).
Press the MENU button to display the menus.
2
K2K
1
Highlight the _ tab using the front dial.
3
Highlight [1. Basic Settings/Image Quality] using the
4
HI buttons or the rear dial.
Highlight [Custom Mode] using the FG buttons
5
and press the Q button.
Highlight the desired custom mode ([C1]–[C4])
6
using FG buttons and press the Q button.
• The menu for the selected custom mode will be
displayed.
1
Basic Settings/Image Quality
1.
Custom Mode
K
K
K
K
Detailed Settings
Image Aspect
Image Review
Shading Comp.
C1
C2
C3
C4
n
q
G
F
Y
4:3
Off
Off
--
--
--
--
MENU
Highlight [Assign] using the FG buttons and press
7
the Q button.
56
EN
Recall
Assign
Save Settings Reset
OK
C1
--
Page 57
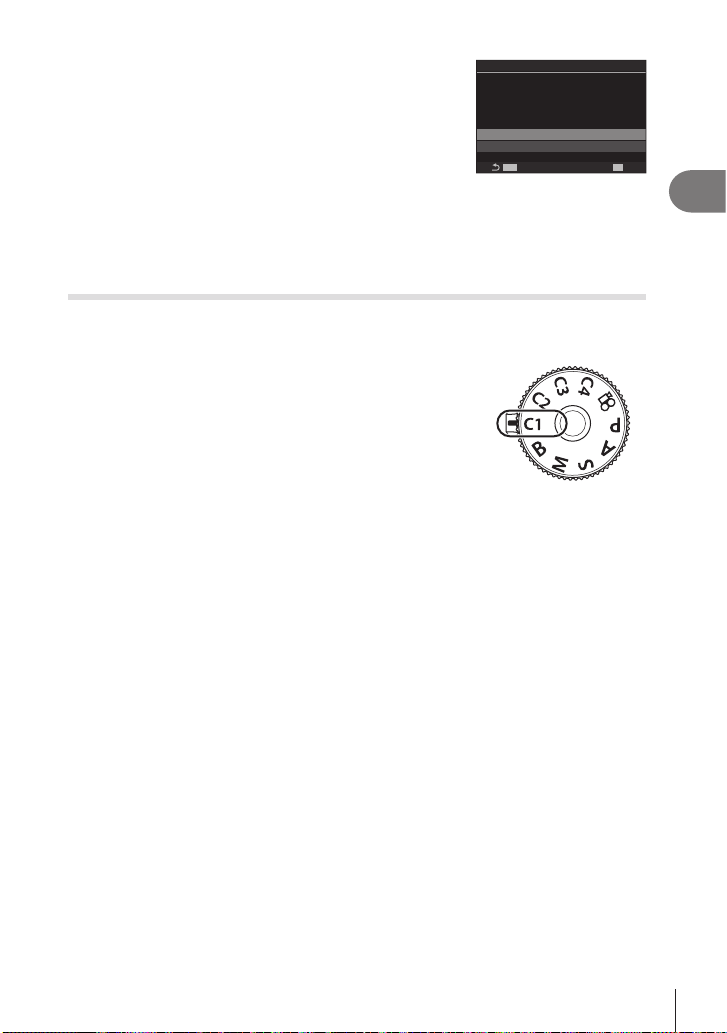
Highlight [Set] using the FG buttons and press
MENU
OK
C1
8
the Q button.
• Any existing settings will be overwritten.
• To restore default settings for the selected custom
mode, highlight [Reset] and press the Q button.
Set current shooting
mode and settings.
Set
Reset
Press the MENU button to exit the menus.
9
%Custom modes can be updated automatically to reect any changes made to settings
(C1, C2, C3, or C4) during shooting. g “Saving the Changes Made to Settings while
in Custom Modes” (P. 57)
Using Custom Modes (C1/C2/C3/C4)
PASMB
To recall all saved settings, including the shooting mode:
Rotate the mode dial to the desired custom mode
1
(C1, C2, C3, or C4).
• The camera will be set to the settings for the selected
mode.
%By default, changes made after recall will not be applied to the stored settings. The saved
settings will be restored when next you select the custom mode with the mode dial.
Saving the Changes Made to Settings while in Custom Modes
You can save the changes made to settings while in custom modes in the camera.
The changed settings remain even if you rotate the mode dial. You can use the custom
modes just like the P/A/S/M/B modes.
Press the MENU button to display the menus.
1
Highlight the _ tab using the front dial.
2
Highlight [1. Basic Settings/Image Quality] using the HI buttons or the rear
3
dial.
Highlight [Custom Mode] using the FG buttons and press the Q button.
4
Highlight the desired custom mode ([C1]–[C4]) using FG buttons and press
5
the Q button.
Highlight [Save Settings] using the FG buttons and press the Q button.
6
Highlight [Hold] using the HI buttons and press the Q button.
7
Press the MENU button to exit the menus.
8
n
2
Shooting
57
EN
Page 58
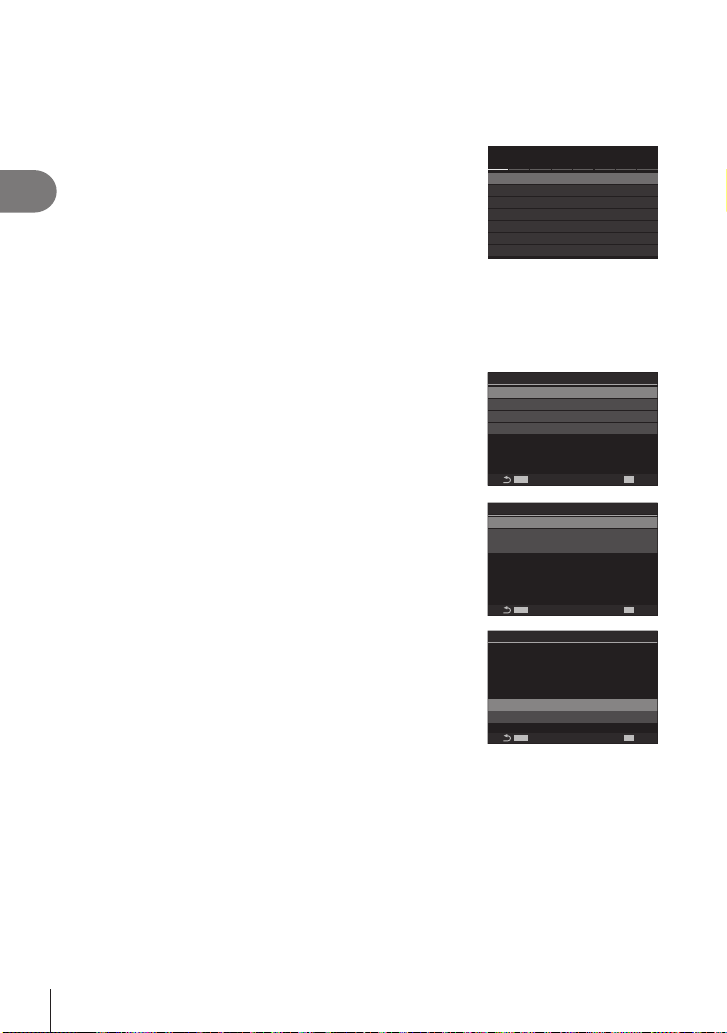
Recalling Saved Settings
AF
My
n
e
K
MENU
OK
Custom Mode
C1
C1
In modes other than n, you can recall the settings stored in custom modes [C1]
through [C4].
Press the MENU button to display the menus.
1
Highlight the _ tab using the front dial.
2
1.
2
Shooting
Highlight [1. Basic Settings/Image Quality] using the
3
HI buttons or the rear dial.
Highlight [Custom Mode] using the FG buttons
4
and press the Q button.
Highlight the desired custom mode ([C1]–[C4])
5
using FG buttons and press the Q button.
Highlight [Recall] using the FG buttons and press
6
the Q button.
C1
C2
C3
C4
Recall
Assign
Save Settings Reset
K2K
1
1
Basic Settings/Image Quality
Custom Mode
K
K
K
K
Detailed Settings
Image Aspect
Image Review
Shading Comp.
q
G
F
Y
4:3
Off
Off
Set
Set
--
--
Set
Highlight [Yes] using the HI buttons and press the
7
Q button.
Press the MENU button to exit the menus.
8
MENU
Apply C1 settings? Current camera
settings will be overwritten.
Yes
MENU
OK
No
OK
%When you recall a setting while the mode dial is set to C1, C2, C3, or C4, the shooting
mode also changes to the saved mode.
%Settings recalled by pressing a button to which [C1] - [C4] (Custom Mode C1 - 4) has
been assigned in [KButton Function] (P. 208) cease to apply when you:
- Turn the camera o
- Rotate the mode dial to another setting
- Press the MENU button during shooting
- Perform a reset
- Save or recall custom settings
58
EN
Page 59
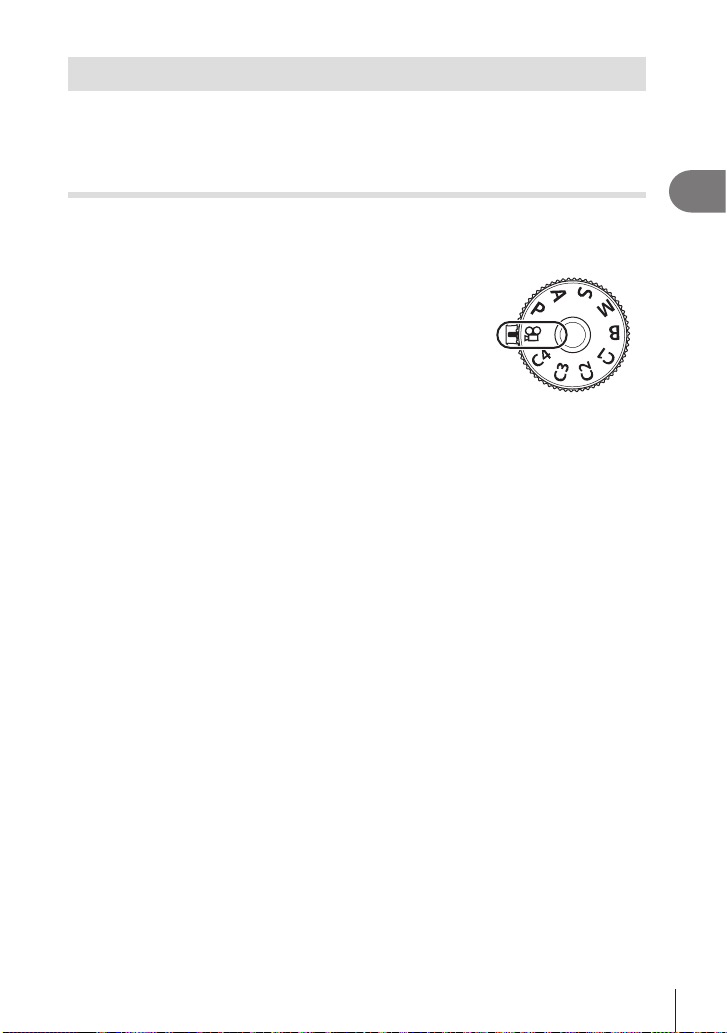
Recording Movies
# When recording movies, use an SD card that supports an SD speed class of 10 or higher.
# A UHS-II or UHS-I card with a UHS speed class of 3 or better is required when:
a movie resolution of [4K] or [C4K] is selected in the [nK] menu or a Motion
Compensation of [A-I] (All-Intra) is selected in the [nK] menu
Recording movies in movie mode (n)
PASMB
Rotate the mode dial to n (movie mode) to record movies using the eects available
in P, A, S, and M modes (P. 60).
Rotate the mode dial to n.
1
Press the R button to begin recording.
2
• A beep does not sound when the camera focuses in
movie mode.
• Movie you are recording will be displayed on the
monitor.
• If you put your eye to the viewnder, movie you are recording will be displayed in the
viewnder.
• A red frame is displayed during movie recording (P. 185).
• You can change the focus location by tapping the screen while recording.
• The camera will start the recording count and display the recording time.
Press the R button again to end recording.
3
# When the camera is used continuously for extended periods, the temperature of the
image sensor will rise and noise and color splotches may be visible in the display.
Should this occur, turn the camera o and wait for it to cool. Noise and color splotches
are particularly likely to occur at high ISO sensitivities. If the temperature of the sensor
increases further, the camera will turn o automatically.
# When using a Four Thirds system lens, the AF will not operate while recording movies.
# When high-speed movie recording is selected for [nK], movies shot with [i-Enhance] or
an art lter selected for picture mode will be recorded in [Natural] mode.
# The sound of touch operations and button operations may be recorded.
# CMOS image sensors of the type used in the camera generate a so-called “rolling
shutter” eect that can cause distortion in pictures of moving objects. This distortion is
a phenomenon that occurs in pictures of fast-moving subjects or if the camera is moved
during shooting. It is particularly noticeable in pictures taken at long focal lengths.
# When an SDXC card is used, movies up to 3 hours long can be recorded. Movies over 3
hours are recorded over multiple les (depending on shooting conditions, the camera may
start recording to a new le before the 3-hour limit is reached).
# When an SD/SDHC card is used, movies over 4 GB in size are recorded over multiple
les (depending on shooting conditions, the camera may start recording to a new le
before the 4 GB limit is reached).
%You can also begin recording movies by pressing the shutter button. g “Recording a
movie by pressing the shutter button (nShutter Function)” (P. 216)
%Divided movie les can be played back as a single movie. g “Playing back separated
movies” (P. 189)
n
2
Shooting
EN
59
Page 60
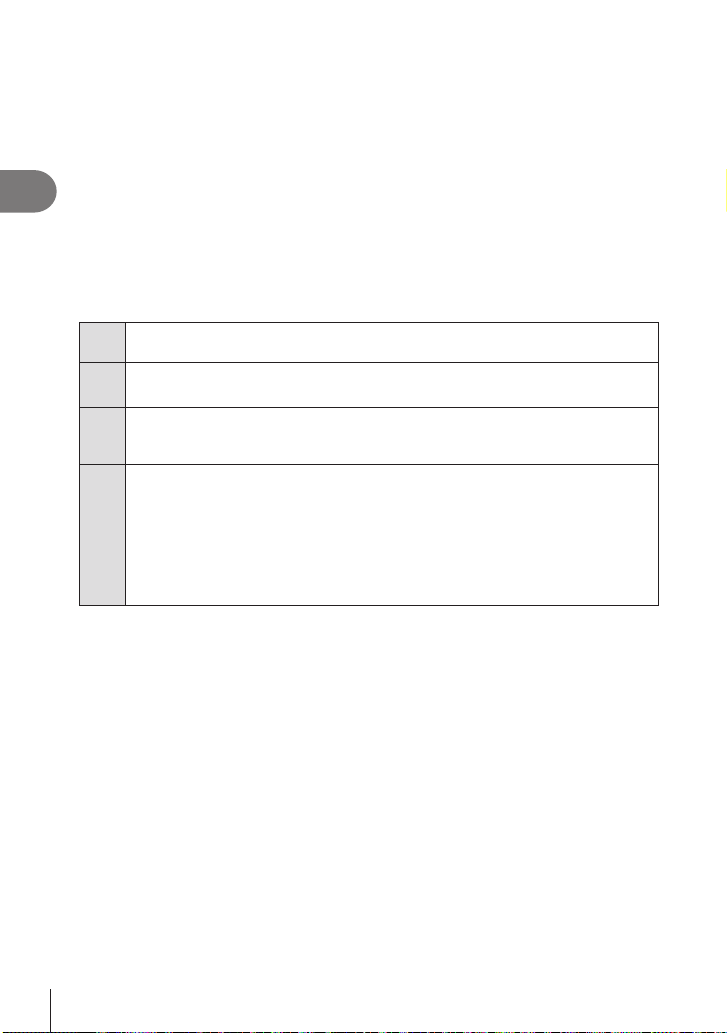
Choosing an Exposure Mode (n Mode (Movie Exposure Modes))
PASMB
You can create movies that take advantage of the eects available in P, A, S, and M
modes.
Press the MENU button to display the menus.
1
2
Shooting
Highlight the n tab using the front dial.
2
Highlight [1. Basic Settings/Image Quality] using the HI buttons or the rear
3
dial.
Highlight [nMode] using the FG buttons and press the Q button.
4
Highlight the desired mode using FG buttons and press the Q button.
5
Optimal aperture is set automatically according to the brightness of the subject.
P
Use the front dial or rear dial to adjust exposure compensation.
Depiction of background is changed by setting the aperture.
A
Use the front dial to adjust exposure compensation and rear dial to adjust aperture.
Shutter speed aects how the subject appears. Use the front dial to adjust exposure
S
compensation and rear dial to adjust shutter speed.
Shutter speed can be set to values between 1/24 s and 1/32000 s.
Freely adjust both aperture and shutter speed.
Use the front dial to select aperture value and the rear dial to select shutter speed.
• Choose from shutter speeds of 1/24–1/32000 s. Values of ISO 200–12800 are
available using the [n ISO] manual sensitivity control options.
M
• The display shows the dierence between the exposure produced by the selected
aperture and shutter speed and the optimal exposure metered by the camera. The
display will ash if the dierence exceeds ±3 EV.
• The option chosen for [bISO-A Upper/Default] (P. 114) takes eect.
%The low end of the shutter speed changes according to the frame rate of the movie record
mode.
Press the MENU button to exit the menus.
6
%[nMode] can also be set from the super control panel. g “The Super Control Panel/LV
Super Control Panel” (P. 69)
n
60
EN
Page 61
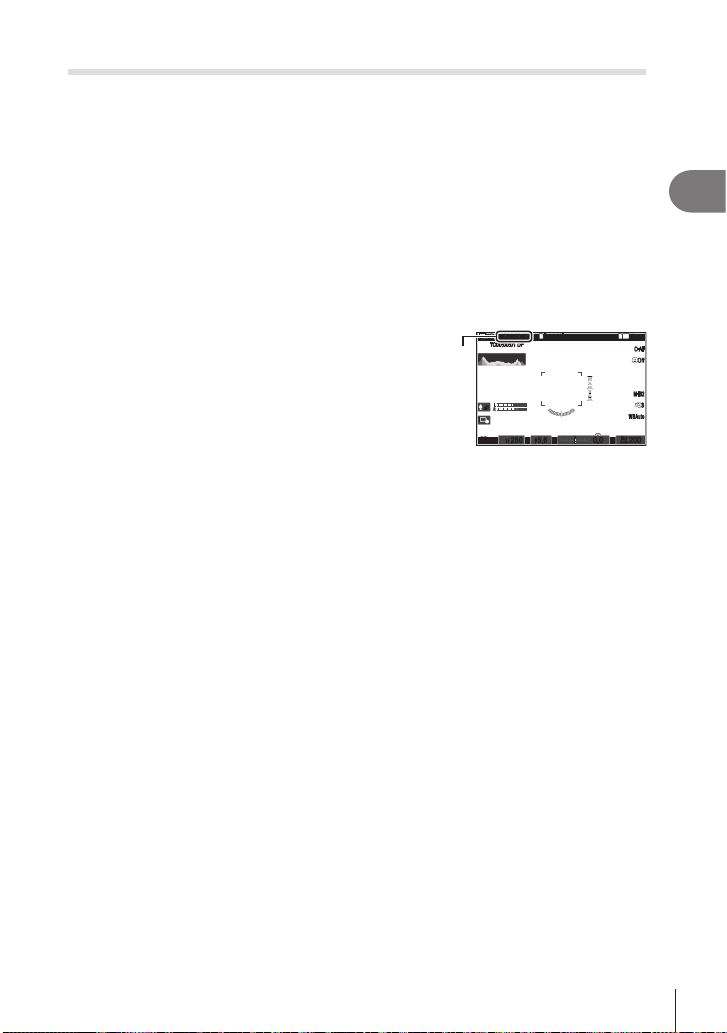
Recording movies in photo shooting modes
145
145
Movies can be recorded in program AE mode even when the mode dial is not in the n
position.
# [RREC] must be assigned to a button using [KButton Function] (P. 208).
# The AF target takes on the shape selected for movie mode (P. 59). Rotate the mode
dial to n (movie mode) and choose target shape in the AF target selection display
(P. 77).
Press the button, to which [RREC] has been assigned, to begin recording.
1
• During recording, “(REC”, recording time, and a red frame (P. 185) will be
displayed on the monitor.
• If you put your eye to the viewnder, movie you are recording will be displayed in the
viewnder.
• You can change the focus location by tapping the screen while recording.
(
(
[1:02:03][1:02:03]
1
REC
REC
00:1200:12
min
min
TC
00:00:01TC00:00:01
DFDF
LL
±0±0
RR
n
n
1
/
250
1/F
250 5.65.6
F
P
P
Press the button again to end recording.
2
Recording time
• “(REC”, recording time, and the red frame (P. 185) disappear when you end
recording.
# Even if you press a button to which [RREC] has been assigned, you cannot record
movies in the following instances:
During a multiple exposure (still photography also ends), while the shutter button
is pressed halfway, during sequential shooting, time-lapse photography, keystone
compensation, or sh-eye correction, or while the live ND lter is in use
1
4K
60p60p L-8L-8
-
WBAutoWBAuto
00
+
ISO
ISO
200200
0.00.0
Auto
Auto
-
C
AFC-AF
OffOff
M-IS2M-IS2
33
2
Shooting
61
EN
Page 62
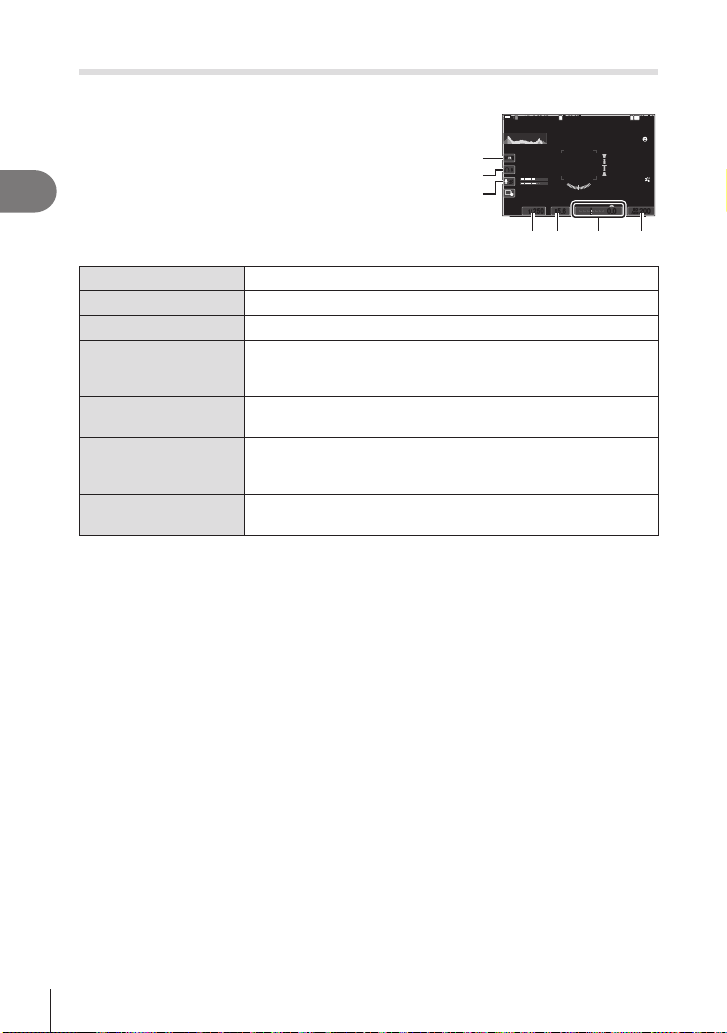
Touch Controls (Silent Controls)
[1:02:03][1:02:03]
60p60p L-8L-8
PASMB
(
(
REC
REC
min
min
145
1
2
3
145
W TW T
88
PP
±0±0
n
n
P
P
TC
00:00:01TC00:00:01
LL
R
R
1
/
1/F
4 5 6 7
You can prevent the camera from recording operating
sounds that occur due to camera operations while
shooting. After tapping an item, tap the displayed arrows
to select the settings.
2
Shooting
00:1200:12
DFDF
250
250 5.65.6
n
1
F
1
4K
-
C
AFC-AF
OffOff
M-IS2M-IS2
33
-
WBAutoWBAuto
00
+
ISO
ISO
200200
0.00.0
Auto
Auto
1 power zoom
2 headphone volume
3 recording level
Zoom power zoom lenses in or out.
Adjust volume when using headphones.
Choose the recording level.
Adjust shutter speed when [S] (shutter-priority AE) or [M]
4 shutter speed
(manual) is selected for [nMode] (movie exposure mode)
(P. 60).
5 aperture
6 exposure
compensation
7 n ISO sensitivity
Adjust aperture when [A] (aperture-priority AE) or [M] (manual) is
selected for [nMode] (movie exposure mode) (P. 60).
Adjust exposure compensation. If [M] is selected for [nMode]
(movie exposure mode) (P. 60), exposure compensation is
available when [Auto] is selected for [n ISO] (P. 113).
Adjust [n ISO] (P. 113). This option is available when [M] is
selected for [nMode] (movie exposure mode) (P. 60).
# Silent controls are not available during high-speed movie recording (P. 142).
%You can congure the camera so that silent controls using the touch panel can also be
used during still photography. g “Conguring nInfo Settings” (P. 231)
62
EN
Page 63
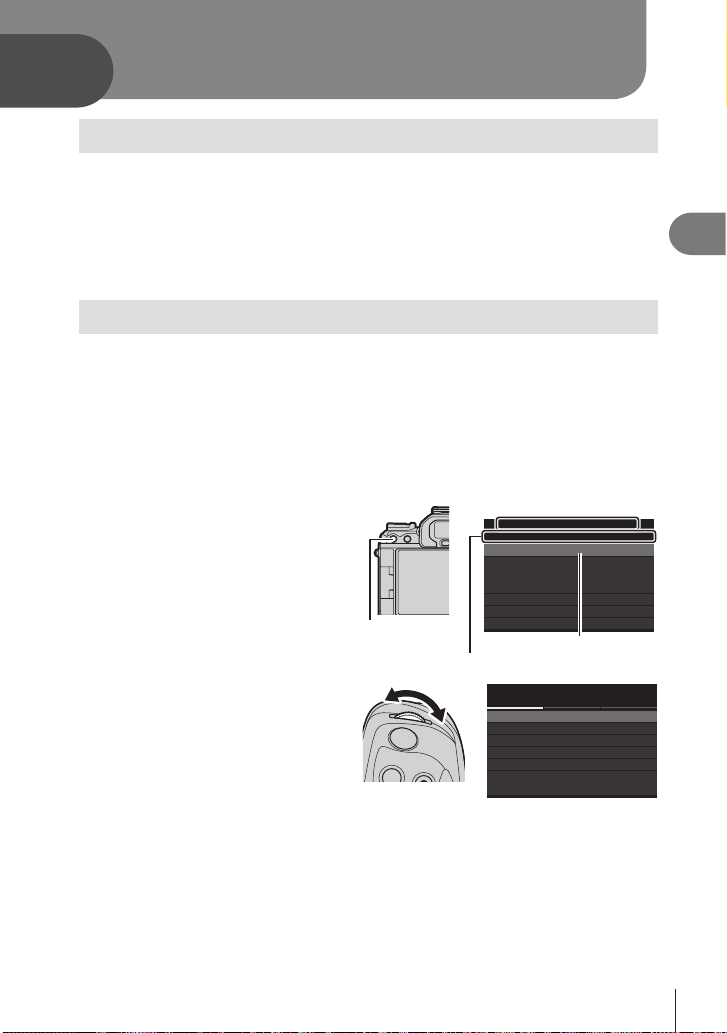
3
e
Using the Menus
What you can do with menus
In addition to shooting and playback options, the menus contain options that let you
customize the operation and display of the camera, and set up the camera.
There are several tabs which represent function categories, and related functions are
contained in each page.
For information on tab categories and functions on each page, see “Default Settings”
(P. 311).
How to operate the menus
Front dial : Select a tab.
HI/Rear dial : Select a page.
FG : Move the cursor.
Q button : Conrm the setting/proceed to the next screen.
MENU button : Cancel operation/return to previous screen.
The following explanation uses [AE BKT] as an example.
Press the MENU button to
1
display the menus.
Use the front dial to select the
2
desired tab.
• [AE BKT] is on the ‘ tab.
Rotate the front dial until the
‘ tab is highlighted.
MENU button
Tabs
K2K
K
n
q
AF
1
1
Basic Settings/Image Quality
1.
Custom Mode
K
K
K
K
Detailed Settings
Image Aspect
Image Review
Shading Comp.
Cursor
Page title, page guide
K2K
K
n
q
AF
1
2
Computational Modes
1.
High Res Shot
Live ND Shooting
Focus Stacking
HDR
Multiple Exposure
3
Using the Menus
My
G
F
Y
4:3
Off
Off
e
My
G
Off
Off
Off
Off
Off
63
EN
Page 64
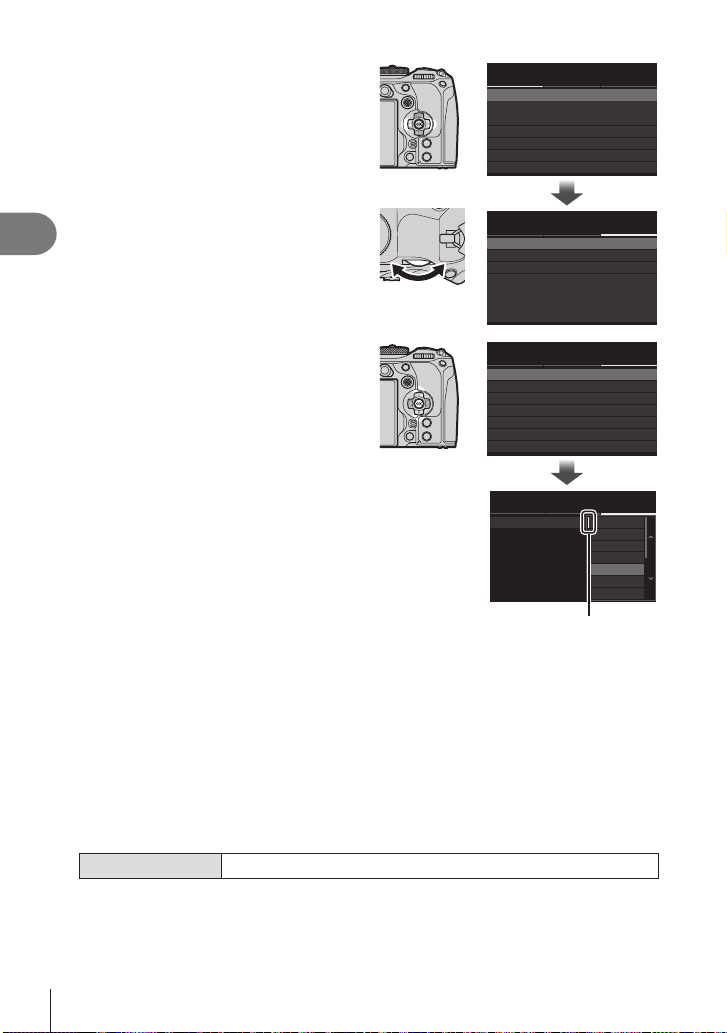
Use HI or the rear dial to select
e
3
the desired page.
• [AE BKT] is on the 3rd page: [3.
Bracketing]. Operate the HI
buttons or the rear dial until the [3.
Bracketing] page is highlighted.
3
Using the Menus
Use FG to select [AE BKT] and
4
press the Q button.
K2K
K
AF
1
2
Computational Modes
1.
High Res Shot
Live ND Shooting
Focus Stacking
HDR
Multiple Exposure
K2K
K
AF
1
2
Bracketing
3.
AE BKT
WB BKT
FL BKT
ISO BKT
ART BKT
Focus BKT
K2K
K
AF
1
2
Bracketing
3.
AE BKT
WB BKT
FL BKT
ISO BKT
ART BKT
Focus BKT
K2K
K
AF
1
2
Bracketing
3.
AE BKT
WB BKT
FL BKT
ISO BKT
ART BKT
Focus BKT
This appears next to the
currently selected option.
n
q
My
G
Off
Off
Off
Off
Off
n
q
e
My
G
Off
Off
Off
Off
Off
Off
n
q
e
My
G
Off
Off
Off
Off
Off
Off
n
q
e
My
G
Off
3f 0.3EV
3f 0.7EV
3f 1.0EV
5f 0.3EV
5f 0.7EV
5f 1.0EV
Use FG to highlight an option and press the Q button to select.
5
• The setting is conrmed.
• Pressing the MENU button closes the menu.
• The procedure after selecting an item and pressing the Q button varies
depending on the menu item.
• Some menu items require further settings after you select an option in step
5. For operation, see the explanation of each function.
In this manual, the procedure for selecting a menu items is shown as follows.
Menu
MENU n ‘ n3. Bracketing n AE BKT
%You can use the multi selector in place of FGHI when operating menus.
%To cancel menu operation, press the MENU button.
%For information on each menu function and default settings, see
(P. 311).
64
EN
“Default Settings”
Page 65
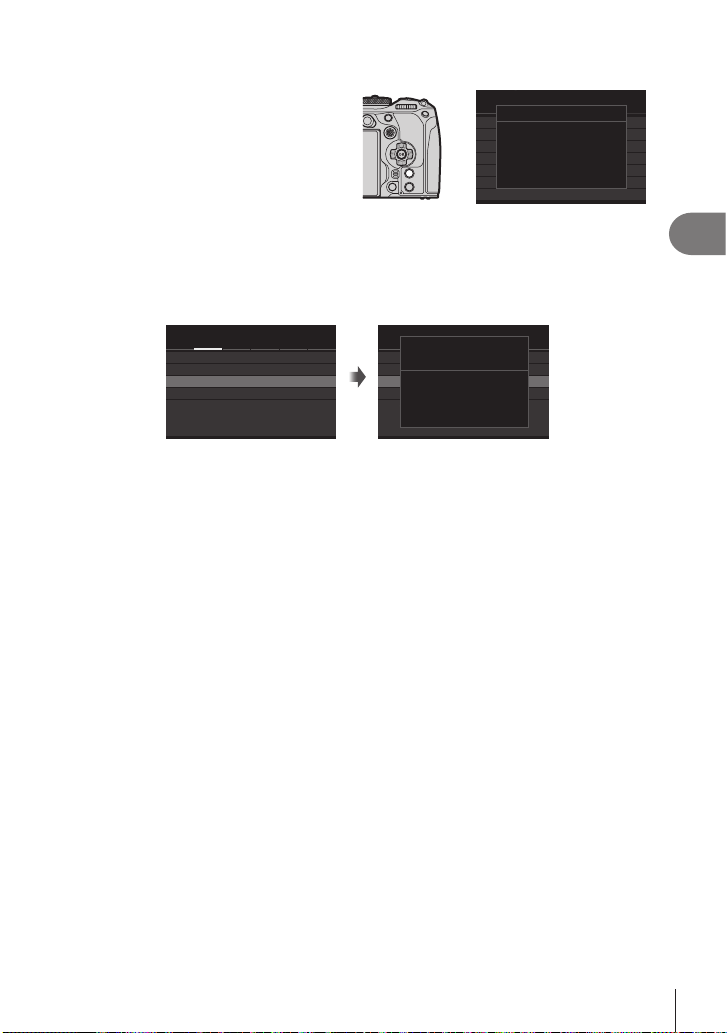
Displaying the description of a menu item
AF
My
e
1.
AF
My
n
e
AF
AF
My
n
e
AF
2.
When you press the INFO button while
a menu item is selected, the description
of the menu is displayed.
K2K
K
1
2
Computational Modes
High Res Shot
High Res Shot
Takes and combines multiple
Live ND Shooting
pictures to create a super high
Focus Stacking
resolution image.
HDR
Multiple Exposure
n
q
G
Off
Off
Off
Off
Off
Items shown in gray
If an item is currently unavailable due to the condition of the camera or other settings, it
is shown in gray.
When you press the Q button while a gray item is highlighted, the reason it is not
available is displayed.
K2K
1
AF
2.
AF Illuminator
AF Area Pointer
Face & Eye Detection
Face & Eye AF Button
K
Subject Detection
Eye Detection Frame
q
G
Q
On
On1
Off
Off
On
K2K
1
AF
This item cannot be selected
AF Illuminator
for the following reason.
AF Area Pointer
Face & Eye Detection
Face & Eye AF Button
K
K
AF Mode
Subject Detection
Eye Detection Frame
q
G
On
On1
Off
Off
On
3
Using the Menus
65
EN
Page 66
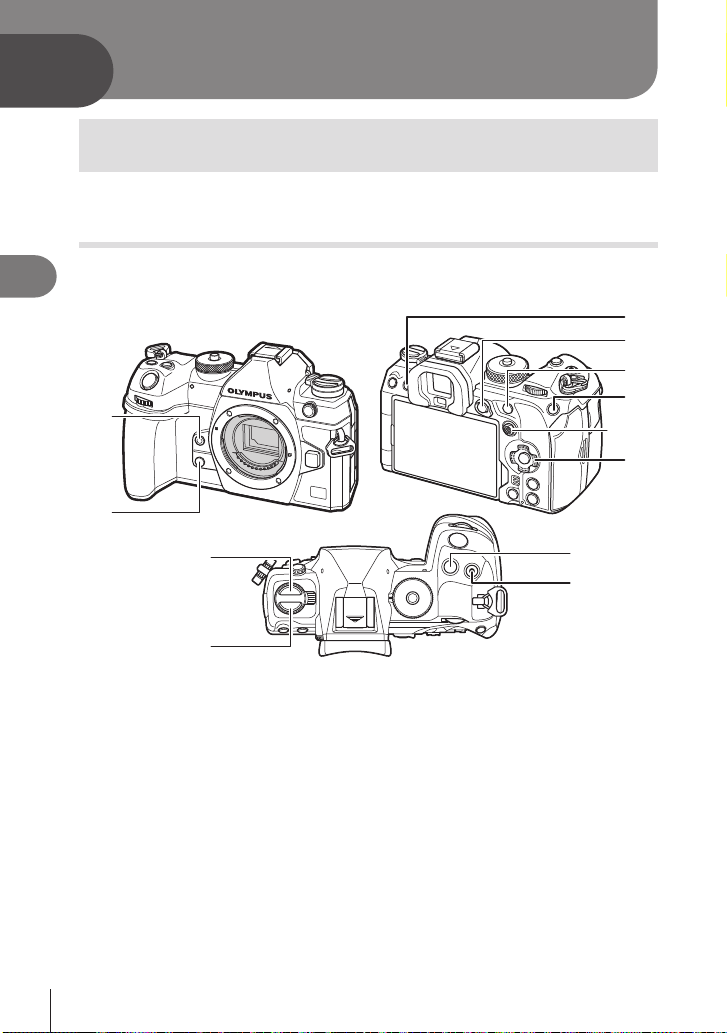
4
4
3
6
5
9
8
2
1
Shooting Settings
How to change the shooting settings (Direct buttons/
Super Control Panel)
The camera oers many photography-related functions. Depending on how often you
use them, you can access settings via buttons or icons in the display.
Direct Buttons
Frequently-used photographic functions are assigned to buttons. These are referred to
4
as “direct buttons”. The buttons to which functions can be assigned are listed below.
Shooting Settings
7
0
a
%Buttons excluding 0 (jY# button) and a (AF m button) can be assigned dierent
roles. g “Changing the roles of buttons (Button Settings)” (P. 208)
66
EN
b
c
Page 67
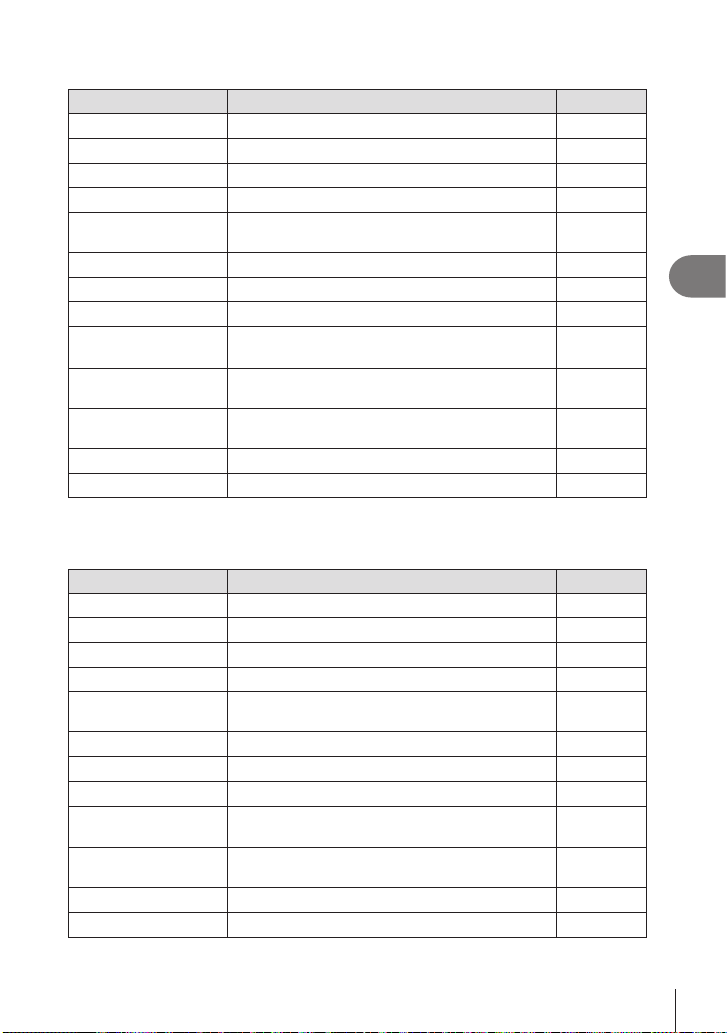
Direct buttons during photo shooting
Direct button Assigned function
1 Y button
2 Z button
3 u (LV) button
4 AEL button
5
AF-ON button
6 ISO button
7 Multi selector (T)
8 Multi selector (S)
9 Arrow pad
(FGHI)
0 jY# button
a AFm button
b F button
c R(h) button
* No function is assigned by default.
One-touch white balance P. 152
Preview P. 224
Display (monitor/viewnder) selection P. 37
AEL P. 109
AF-ON
ISO sensitivity P. 113
N
(AF target position)
O*
O* -
Sequential/self-timer shooting/ash
AF/metering mode
Exposure compensation P. 106
High Res Shot P. 156
Direct buttons during movie recording
Direct button Assigned function
1 Y button
2 Z button
3 u (LV) button
4 AEL button
5
AF-ON button
6 ISO button
7 Multi selector (T)
8 Multi selector (S)
9 Arrow pad
(FGHI)
a AFm button
b F button
c R(h) button
* No function is assigned by default.
Peaking P. 152
Magnify
Display (monitor/viewnder) selection P. 37
AEL P. 109
AF-ON
ISO sensitivity P. 113
N
(AF target position)
O*
O* -
AF/metering mode
Exposure compensation P. 106
Movie recording P. 59
g
P. 83,
84
P. 76
-
P. 120,
126
P. 72,
109
g
P. 80
P. 83,
84
P. 76
-
P. 72,
109
4
Shooting Settings
EN
67
Page 68
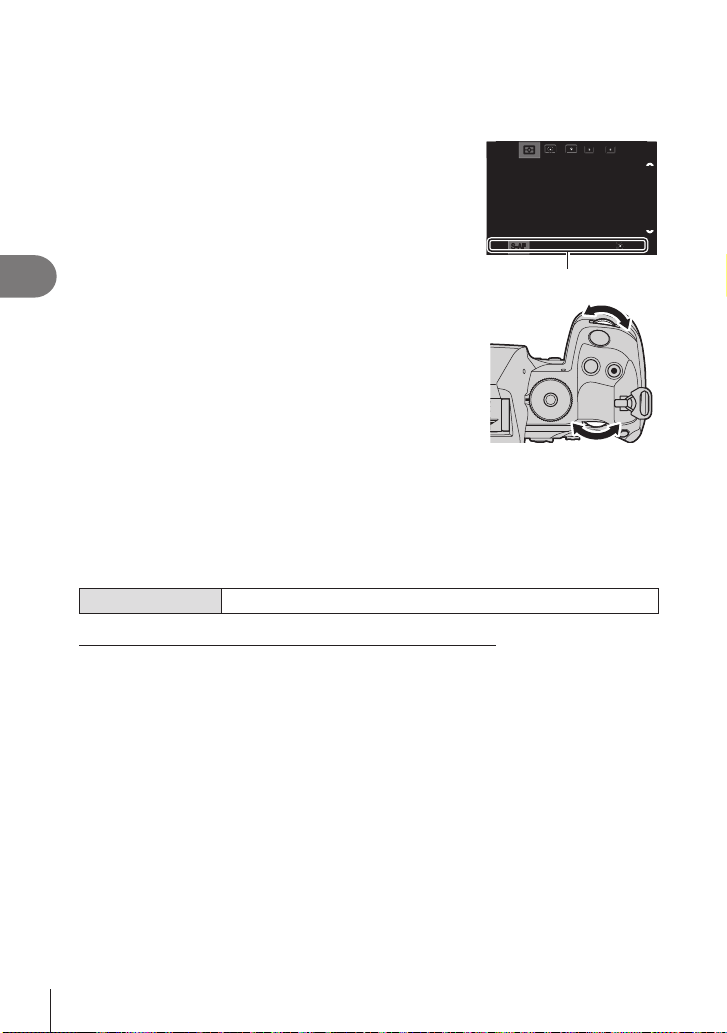
For information on how each direct button function works, see the explanation page of
each function.
This section explains how to operate when a selection menu is displayed, using [AF
Mode] as an example.
Press the button of the function you want to use.
1
• Press the AF m button
p
B
B
C
C
ESP
ESP
CHiC
CHiC
Sh
Sh
p
• A selection menu appears.
Single AFSingle AF
b
b
b
b
S-AF C-AF
S-AF C-AF
C-AF+TRFAF
Pre
C-AF+TRFAF
Pre
4
Shooting Settings
Rotate the front/rear dial so select a setting.
2
• You can also use the FGHI buttons.
If setting values appear at the top and bottom of the
display when you press the button in step 1, use the
following buttons.
FG: Selects items displayed at the top.
HI: Selects items displayed at the bottom.
• In this example, rotate the rear dial to set [AF Mode].
• Pressing the shutter button halfway to exit to the
shooting display.
• You can also return to the shooting display by pressing the button you pressed in step 1.
• With some functions, further detailed settings are available after selecting the setting in
step 2. For information on how to operate, see the explanation of each function.
In this manual, the procedure for changing a setting using a direct button is shown as
follows.
Button
AF m button n j
Quickly changing the setting while keeping the button pressed
Some settings can be changed by rotating the front/rear dial while keeping the button
of the function pressed.
The setting screen closes when you release the button.
Selection menu
68
EN
Page 69
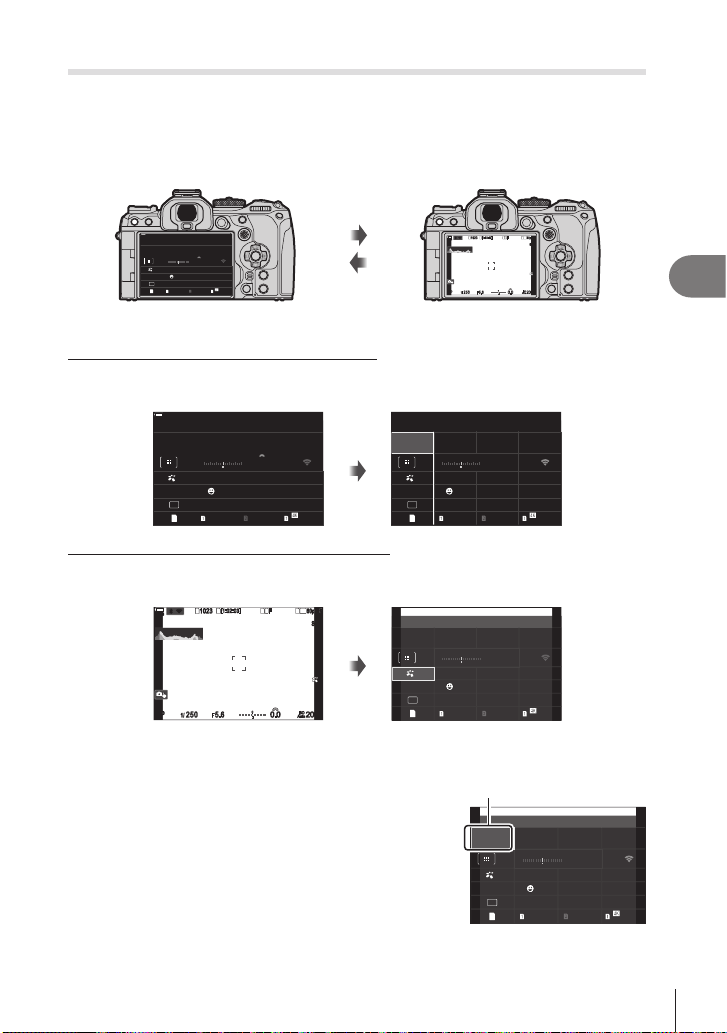
The Super Control Panel/LV Super Control Panel
1023 1:02:03
2022.02.01 16:30:43
0
100 %
100 %
10231023
P
1
/
250
P
1/F
250 5.65.6
[1:02:03][1:02:03]
FF
60p60p L-8L-8
200200
L14K
Auto
Auto
F
0.00.0
1023 1:02:03
0
1023 1:02:03
0
1
10231023
P
250
P
250 5.65.6
1
1
[1:02:03][1:02:03]
FF
60p60p L-8L-8
200200
L14K
0.00.0
1023 1:02:03
0
4567 1:42:22
0
The super control panel/LV super control panel lists shooting settings and their current
values. Use the super control panel when framing shots in the viewnder, the LV super
control panel when framing shots in the monitor (“live view”).
• In photo shooting mode, pressing the u (LV) button switches between viewnder
photography and live view photography.
u
(LV button)
1
1
1
OO
rr
100 %
ISO
1/
5.6 200250P
Auto
F
-
0
+
Small
3
S-AF
Viewnder photography (monitor
turns o while viewnder is on)
WB Auto
r
±
0.0
G
x
±
#
0.3
Off
p
4 : 3
S-IS Auto
YF
YF
60pL-8
100 %
Live view photography
Super Control Panel (Viewnder Photography)
When you frame subjects in the viewnder, the super LV control panel will be displayed
in the monitor at all times. Press the Q button to activate the cursor.
100 %
100 %
2022.02.01 16:30:43
1/
-
Small
3
WB Auto
S-AF
Off
p
YF
ISO
5.6 200250P
Auto
F
0
+
r
±
0.0
G
x
±
#
0.3
4 : 3
S-IS Auto
YF
60p L-8
Q
Shooting Mode
Small
3
S-AF
1/
-
WB Auto
p
0
Off
YF
LV Super Control Panel (Live View Photography)
To display the LV super control panel in the monitor, press the Q button during live
view.
OO
rr
100 %
100 %
-
1
/
1/F
00
F
-
S
AFS-AF
33
+
ISO
ISO
Auto
Auto
Q
Natural
S-AF
1/
-
0
Small
3
WB Auto
Off
p
YF
This section explains how to operate super control panel/LV super control panel using
[Face & Eye Detection] as an example.
Press the Q button.
1
Cursor
• If you press the button during live view, the LV super
control panel will be displayed in the monitor.
• The last setting used will be highlighted.
-
00
+
5.6250P
F
+
±
0.0
#
4 : 3
YF
5.6250P
F
+
±
0.0
#
4 : 3
YF
Shooting Mode
Small
3
S-AF
-
S
AFS-AF
33
ISO
ISO
ISO
Auto
200
r
G
x
S-IS Auto
60p L-8
ISO
Auto
200
r
G
x
S-IS Auto
1/
-
WB Auto
Off
p
YF
60p L-8
±
0.3
±
0.3
5.6250P
0
+
0.0
#
4 : 3
YF
ISO
Auto
200
s
G
x
±
0.3
S-IS Auto
60p L-8
4
Shooting Settings
69
EN
Page 70
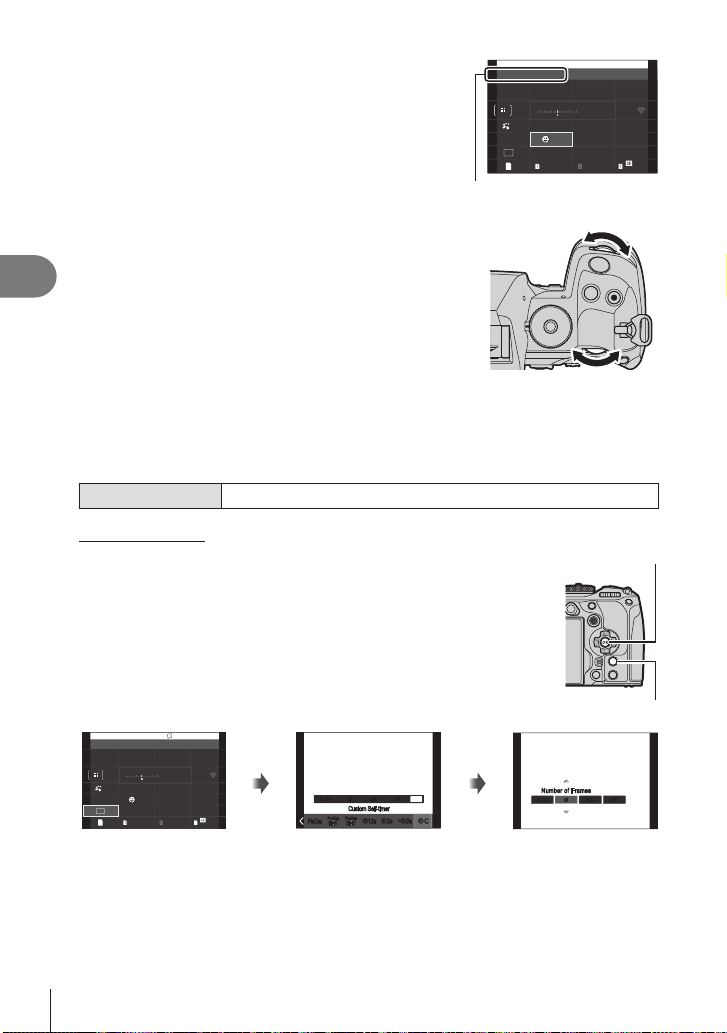
Highlight an item using FGHI.
1023 1:02:03
0
2
Face & Eye Detection
• The selected setting will be highlighted.
• You can also highlight items by tapping them in the
display.
Rotate the front/rear dial to change the
3
highlighted setting.
Small
3
S-AF
The name of the selected
function appears.
4
Shooting Settings
• Press the shutter button halfway to save the current setting and exit to the shooting
display.
In this manual, the procedure for changing a setting using a direct button is shown as
follows.
Super Control Panel
Additional Options
Pressing the Q button in Step 2 displays options for the highlighted
setting. In some cases, additional options can be congured.
Q n Face & Eye Detection
1/
-
WB Auto
p
ISO
5.6250P
Auto
200
F
0
+
r
±
0.0
G
x
±
#
Off
YF
0.3
S-IS Auto
4 : 3
YF
60p L-8
Q button
Single
S-AF
LV Super Control Panel/
Super Control Panel
70
EN
1/
-
0
Small
3
WB Auto
Off
p
YF
1023 1:02:03
display
INFO button
Q
ISO
5.6 200250P
Auto
F
+
r
±
0.0
G
x
±
#
0.3
4 : 3
S-IS Auto
YF
60p L-8
0
ProCap
ProCap
Y
Y
ProCap
ProCap
SH1
SH1
0.5s1s x3
0.5s1s x3
Custom Self-timerCustom Self-timer
ProCap
ProCap
Y
Y
12s
12s
SH2
SH2
OffOff
♥
♥
2sY2s
2sY2s
INFO
Number of FramesNumber of Frames
INFO
Y
Y
Y
Y
C
C
Y
1sY1s 0.5s0.5sx3x3
OffOff
Selection menu display Detailed setting display
Page 71
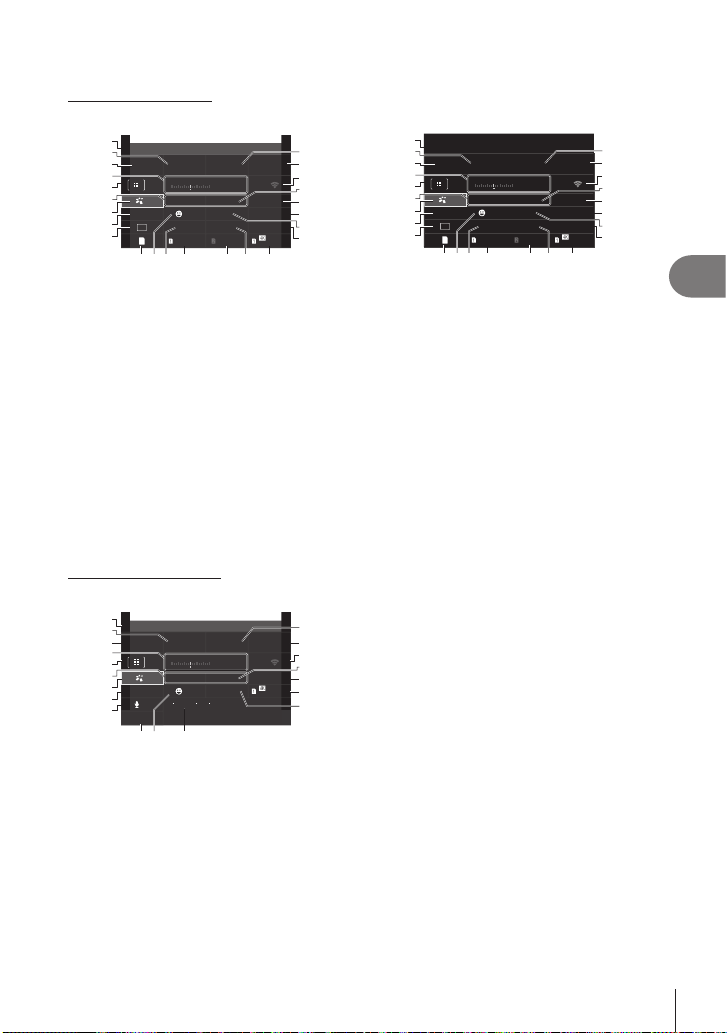
Settings Available in the Super Control/LV Super Control Panel
a
b
d
g
e
c
f
0
1
3
5
7
9
8
4
6
2
a
b
d
g
e
c
f
0
h k l nji m
a
b
d
e
c
f
0
g ih
Photo shooting mode
LV super control panel
1
Natural
2
3
4
5
6
7
8
9
S-AF
1/
-
Small
3
0
CWB
Off
p
YF
1023 1:02:03
ISO
5.6250P
Auto
200
F
+
r
±
0.0
5400K
G
x
±
#
0.3
4 : 3
S-IS Auto
YF
60p L-8
0
h k l nji m
1 Name of the currently selected option
2 Shutter speed ...........................P. 43, 47
3 Shooting mode................................P. 43
4 Exposure compensation ...............P. 106
5 K AF target ...................................P. 77
6 K White balance .........................P. 150
7 K Picture mode ..........................P. 145
8 K AF mode ...................................P. 72
9 Drive mode (sequential shooting/
self-timer) ......................................P. 126
0 Aperture value ..........................P. 43, 45
a K ISO sensitivity .........................P. 113
b Wi-Fi/Bluetooth .............................P. 261
c K Color temperature ..................P. 150
Super control panel
Natural
1/
5.6250P
F
-
0
+
±
0.0
5400K
CWB
#
Off
p
4 : 3
YF
YF
1023 1:02:03
0
S-AF
Small
3
d K Button function assignment ....P. 208
e Manual ash output ......................P. 123
f Flash mode ...................................P. 120
g K Image stabilizer ......................P. 136
h K Storage options ......................P. 243
i Face & Eye Detection .....................P. 88
j Metering mode ..............................P. 109
k Slot 1: K Image quality, number of
storable still pictures .....................P. 140
l Slot 2: K Image quality, number of
storable still pictures .....................P. 140
m Aspect ratio ...................................P. 144
n n Image quality, Available recording
time ...............................................P. 141
Movie recording mode
LV Super control panel
1
Natural
2
3
n
4
Mid
5
6
3
7
C-AF M-IS 1
8
±
0
9
P
8
1/
-
0
CWB
Off
L
R
5.6 800250
FP Auto
+
0.0
5400K
01240-dB
ISO
r
G
60p L-8
1:42:22
ISO
Auto
200
r
G
x
±
S-IS Auto
60p L-8
0.3
4
Shooting Settings
1 Name of the currently selected option
2 Shutter speed .................................P. 60
3 n mode (movie exposure mode)
........................................................P. 60
4 Exposure compensation ...............P. 106
5 n AF target ....................................P. 77
6 n White balance .........................P. 150
7 n Picture mode ...........................P. 145
8 n AF mode ....................................P. 72
9 Sound Recording Level ..................P. 62
0 Aperture value ................................P. 60
a n ISO sensitivity .........................P. 113
b Wi-Fi/Bluetooth .............................P. 261
c n Color temperature ...................P. 150
d n Button function assignment .....P. 208
e n Image quality, Available recording
time ...............................................P. 141
f nImage stabilizer ........................P. 136
g Headphone Volume ........................P. 62
h Face & Eye Detection .....................P. 88
i Recording level meter .....................P. 62
EN
71
Page 72
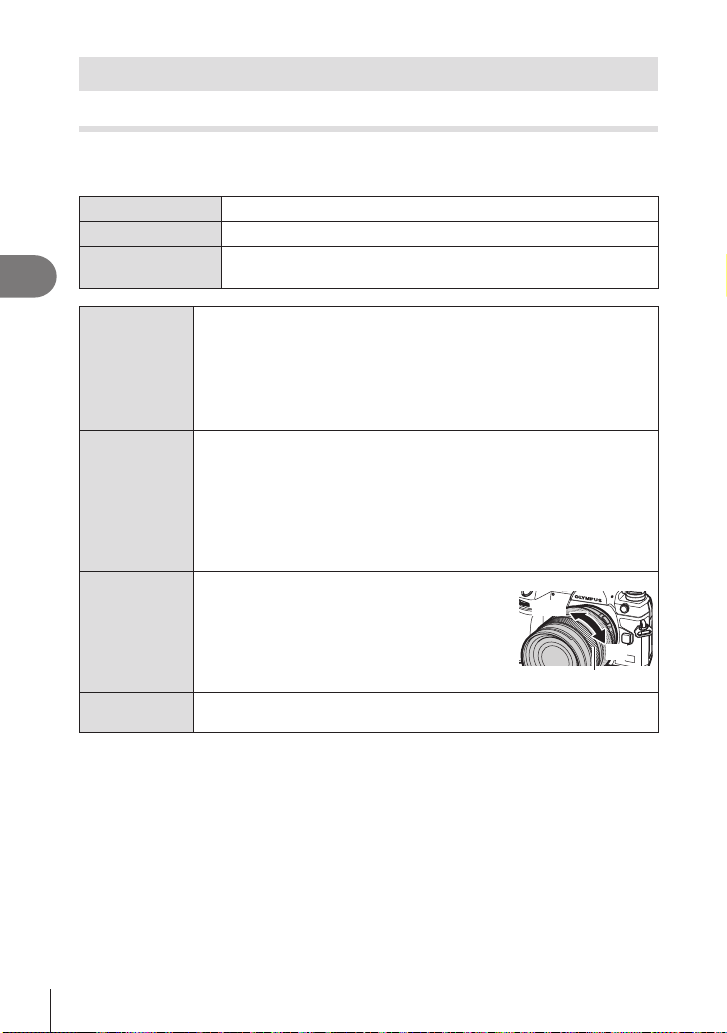
Basic functions for focusing
Choosing a focus mode (KAF Mode / nAF Mode)
PASMB
You can select a focusing method (focus mode).
Button
Super Control Panel
Menu
4
Shooting Settings
S-AF
(Single AF)
C-AF
(Continuous AF)
MF
(Manual focus)
S-AF
b
AF m button n HIj
Q n KAF Mode / nAF Mode
MENU n AF n1. AF n KAF Mode
MENU n AF n4. Movie AF n nAF Mode
The camera focuses once when the shutter button is pressed halfway
or the AF-ON button is pressed. When the focus is locked in still
photography mode, a beep sounds, and the AF conrmation mark and
the AF target mark light up. When the focus is locked in movie recording
mode, the AF conrmation mark and the AF target are displayed. This
mode is suitable for taking pictures of still subjects or subjects with
limited movement.
In photo shooting mode, the camera repeats measuring the distance
between the subject and the camera and focusing while the shutter
button remains pressed halfway or while the AF-ON button is pressed.
When the subject is in focus, the AF conrmation mark lights up on the
monitor and the beep sounds when the focus is locked at the rst time.
In movie recording mode, the camera repeats focusing both before and
during recording.
This mode is suitable when the distance to the subject keeps changing.
This function allows you to manually focus on
any position by operating the focus ring on the
lens.
The camera focuses in S-AF mode. You can adjust the focus position by
operating the focus ring on the lens.
n
Near
)
Focus ring
72
EN
Page 73
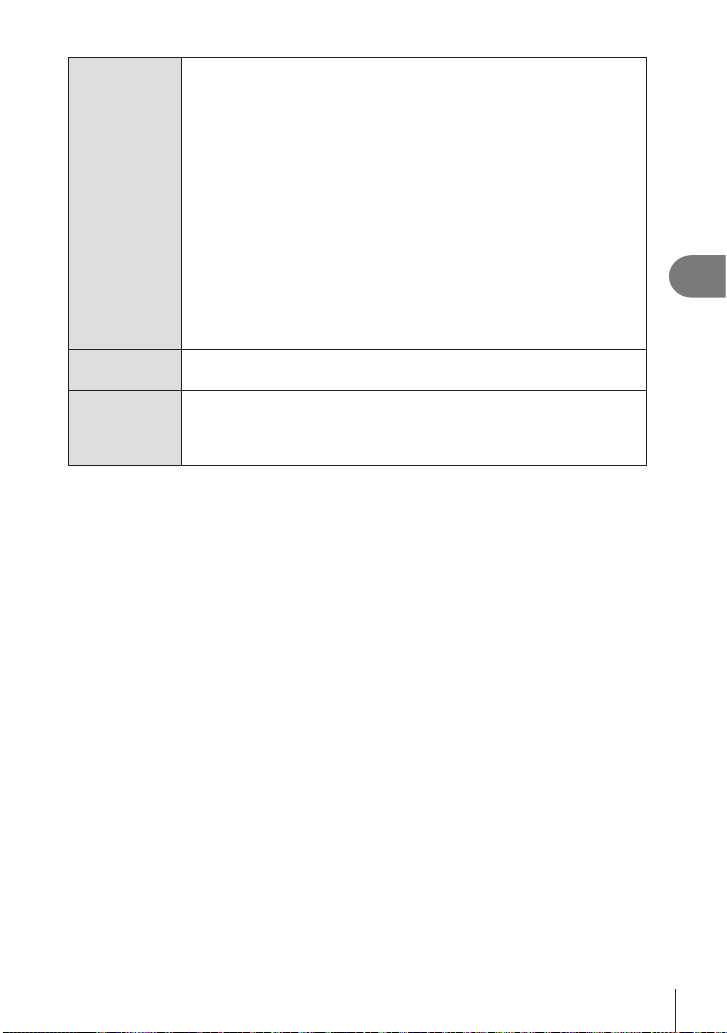
Press the shutter button halfway or press the AF-ON button to focus; the
camera then tracks and maintains focus on the current subject while the
button is held in position.
In movie recording mode, the camera keeps continues AF tracking even
if you release the button before you start recording. To stop it, press the
Q button.
When you start recording a movie while the camera is tracking the
C-AF+TR
(AF tracking)
Preb
(Preset MF)
AF
F
(Starry Sky AF)
(only during
photo shooting)
# [S-AFb] only appears in [nAF Mode]. To focus manually during autofocus when
taking pictures, use [KAF+MF]. g “Combined Auto and Manual Focus (K AF+MF)”
(P. 82)
# The camera may be unable to focus if the subject is poorly lit, obscured by mist or smoke,
or lacks contrast.
# When using a Four Thirds system lens, AF will not be available during movie recording.
# [AF Mode] selection is not available (P. 292) when the lens focus ring is in the MF
position and [Operative] is selected for [MF Clutch] (P. 104).
%The Fn lever can be used to quickly switch the AF mode. g “Customizing the Fn Lever
(Fn Lever Settings)” (P. 219)
%You can choose whether to focus when the shutter button is pressed halfway.
g “Conguring the AF operation when the shutter button is pressed (KAF by half-
pressing a)” (P. 83)
subject, it will continue tracking.
• The AF target is displayed in red if the camera can no longer track
the subject. Release the button and then frame the subject again and
press the shutter button halfway or press the AF-ON button.
• Autofocus does not work while the AF target is displayed in red even if
the camera is tracking the subject.
• Tracking AF cannot be used with:
keystone compensation, High Res Shot, focus bracketing, focus
stacking, interval-timer photography, HDR photography, the live ND
lter, or sheye correction.
The camera automatically focuses on the preset focus point when
shooting.
Choose this mode for pictures of stars in the night sky. Press the AF-ON
button to focus on the stars. g “Using Starry Sky AF” (P. 74)
4
Shooting Settings
EN
73
Page 74

Using Starry Sky AF
Select [FAF] for AF mode.
1
Press the AF-ON button to initiate starry sky AF.
2
• To interrupt starry sky AF, press the AF-ON button again.
• You can congure the camera so that starry sky AF starts when the shutter button
is pressed halfway.g “Changing the settings of Starry Sky AF (Starry Sky AF
Setting)” (P. 85)
• The camera displays [Starry Sky AF is Running] during starry sky AF. The in-focus
indicator (() is displayed for about two seconds after the camera focuses; if the
camera is unable to focus, the in-focus indicator will instead ash for about two
4
Shooting Settings
seconds.
Press the shutter button all the way down to take the picture.
3
# The camera will not be able to focus in bright locations.
# Starry sky AF cannot be used with Pro Capture.
# [KOrientation Linked N] (P. 97), [N Loop Settings] (P. 100), [KAF Limiter]
(P. 92), [AF Illuminator] (P. 96), [Face & Eye Detection] (P. 88), and [KAF
Scanner] (P. 94) are xed at [O] and [Frame Rate] (P. 225) is xed at [Normal].
# Manual focus is selected when a Four Thirds lens is attached.
# Starry sky AF is available with Micro Four Thirds lenses made by OM Digital Solutions or
OLYMPUS. It cannot, however, be used with lenses with a maximum aperture over f/5.6.
For more information, visit our website.
%The [Starry Sky AF Setting] (P. 85) item oers a choice of [Accuracy] and [Speed].
Mount the camera on a tripod before taking photographs with [Accuracy] selected.
%Your choice of AF target modes (P. 77) is restricted to ySmall, AMid, and
BLarge.
%The camera automatically focuses at innity when starry sky AF is selected.
%When [On] is selected for [Release Priority], the shutter can be released even when the
subject is not in focus.
74
EN
Page 75

Setting a focus position for Preb
Select [Preb] with the AFm button, and press INFO button.
1
Press the shutter button halfway to focus.
2
• Focus can be adjusted by rotating the focus ring.
Press the Q button.
3
%The distance for the preset focus point can be set with [Preset MF distance] (P. 104).
%The camera also focuses at the preset distance:
- when turned on and
- when you exit the menus to the shooting display.
Adjusting Focus Manually During Autofocus
• Before proceeding, select [On] for [K AF+MF] (P. 82). b will be displayed in [S-AF],
[C-AF], [C-AF+TR], and [FAF] modes.
Choose a focus mode marked with an b icon (P. 72).
1
• When recording movies, choose [S-AFb].
Press the shutter button halfway to focus using autofocus.
2
• In [FAFb] mode, press the AF-ON button to initiate starry sky AF.
Keeping the shutter button pressed halfway, rotate the focus ring to adjust
3
focus manually.
• To refocus using autofocus, release the shutter button and press it halfway again.
• Manual focus adjustment during autofocus is not available in [FAFb] mode.
• Manual focus adjustment during autofocus is available via the focus ring on M.ZUIKO
PRO (Micro Four Thirds PRO) lenses. For information on other lenses, see our
website.
Press the shutter button the rest of the way down to take the picture.
4
4
Shooting Settings
EN
75
Page 76
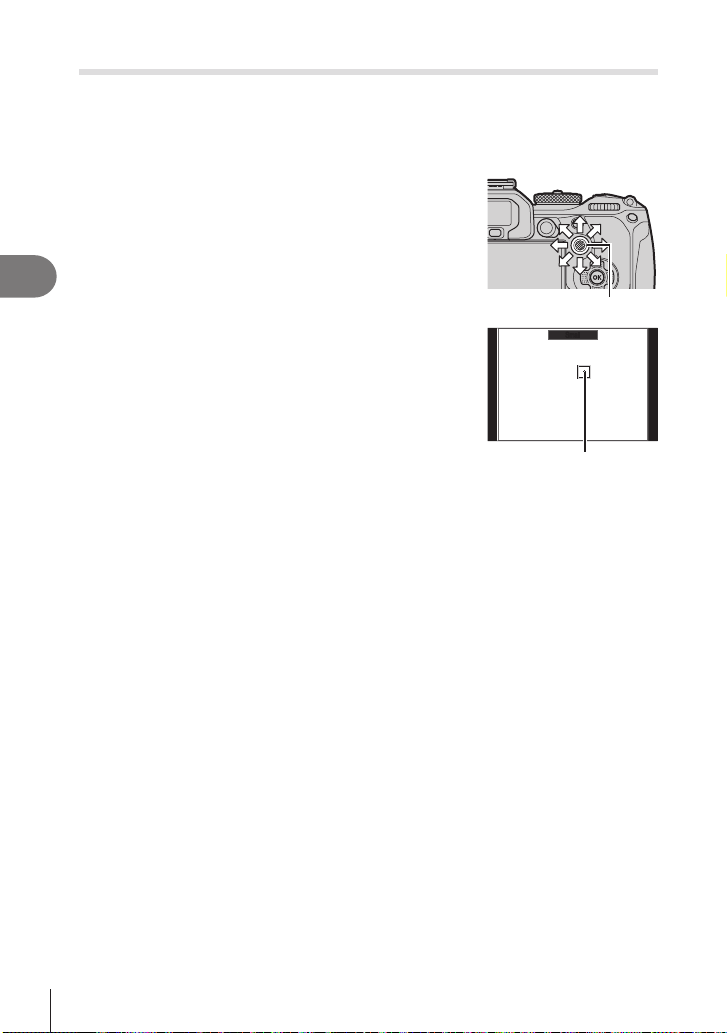
Choosing a Focus Target (AF Target Point)
PASMB
The frame showing the location of the focus point is referred to as the “AF target”. You
can position the target over your subject. At default settings, the multi selector is used
to position the AF target.
Use the multi selector to position the AF target.
1
4
Shooting Settings
• The AF target is displayed at the start of the operation.
• To select the center AF target, press the multi selector
or press and hold the Q button.
• You can choose whether AF target selection “wraps
around” the edges of the display (P. 100).
Take pictures.
2
• The AF target selection display will clear from the monitor when the shutter button is
pressed halfway.
• The AF frame is displayed in place of the selected AF target.
%You can reposition the AF target during focusing when [C-AF] or [C-AFb] is selected in
still photography mode.
%You can also reposition the AF target during movie recording.
%The size and number of the AF target changes depending on shooting settings.
%When [On] is selected for [AF Targeting Pad] (P. 101), you can reposition the AF target
using monitor touch controls while framing your subject in the viewnder.
f
SmallSmall
AF target
n
Multi selector
76
EN
Page 77
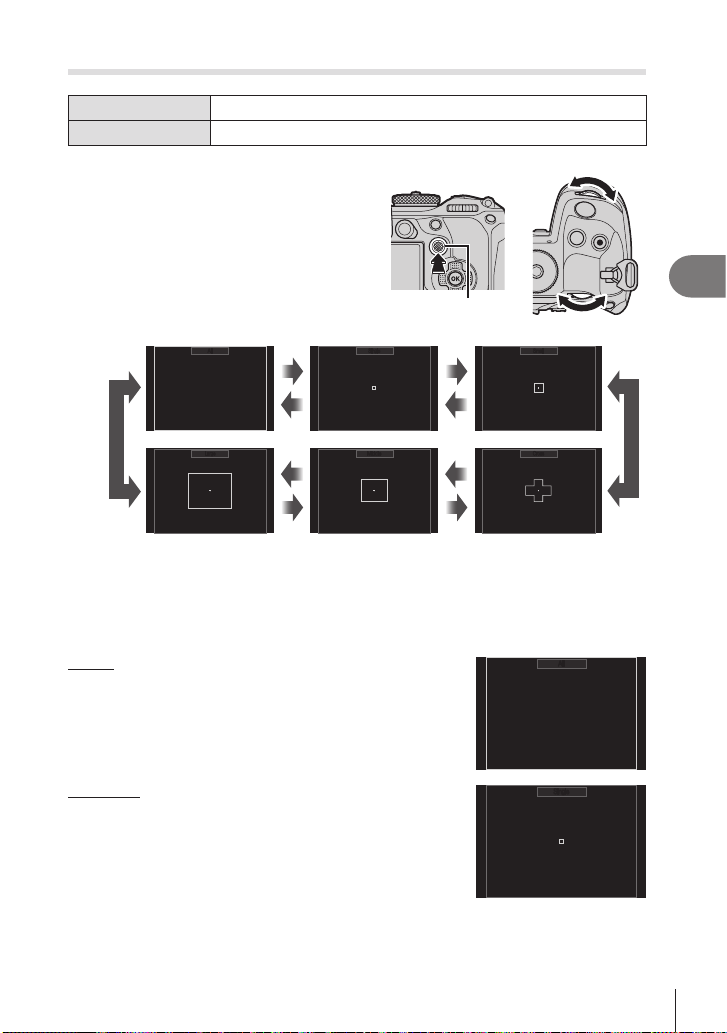
Choosing an AF Target Mode (AF Target Mode)
CrossCrossfMiddleMiddlefLargeLarge
Button
Super Control Panel
Keep the multi selector pressed while
1
rotating the front or rear dial.
S (kept pressed) and k
Q n AF Target Mode
+
Multi selector
• The camera cycles through AF target modes as shown.
• The only options available when FAF is selected are ySmall, AMiddle, and
BLarge.
• The only options available during movie recording are ySmall, AMiddle, BLarge,
and oAll.
• The AF target modes to be displayed can be selected in [KAF Target Mode Settings]
(P. 79).
o All
The camera chooses the target used for focus from all
available targets.
• The camera chooses from 1053 (39 × 27) targets during still
photography and from 741 (39 × 19) targets in movie mode.
f
AllAll
f
SingleSingle
f
SmallSmall
f
f
AllAll
4
Shooting Settings
M Single
Select a single focus target.
f
SingleSingle
77
EN
Page 78
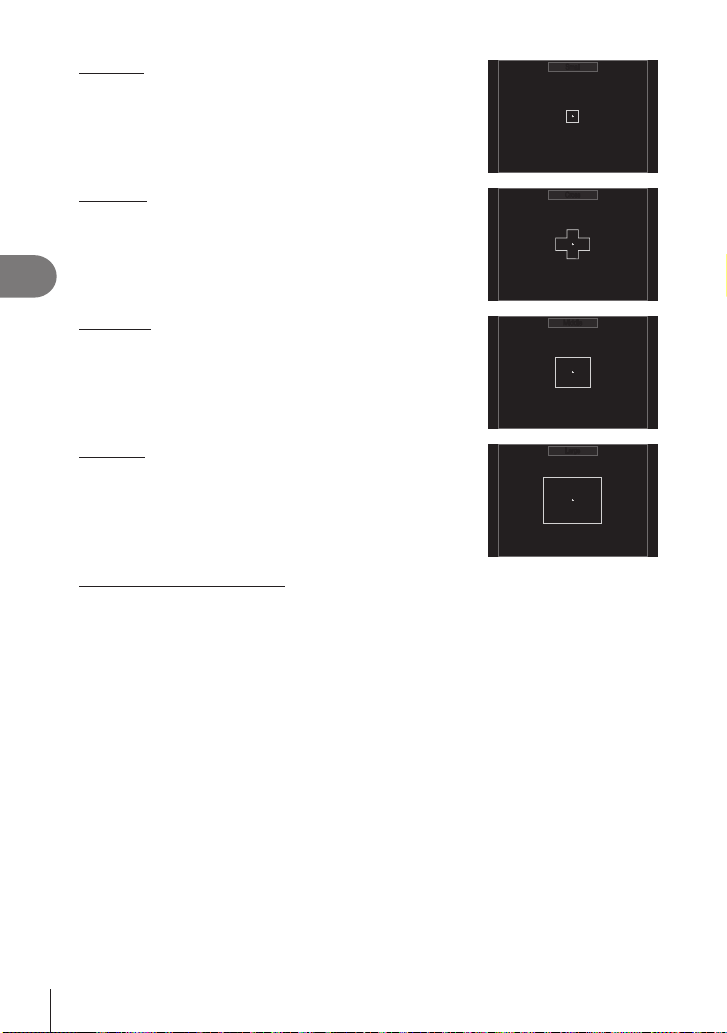
y Small
SmallSmall
CrossCross
Select a small-sized group of targets. The camera chooses
the target used for focus from within the selected group.
f
z Cross
Select a group of targets arranged in a cross. The camera
chooses the target used for focus from within the selected
group.
4
Shooting Settings
A Middle
Select a middle-sized group of targets. The camera
chooses the target used for focus from within the selected
group.
B Large
Select a large-sized group of targets. The camera chooses
the target used for focus from within the selected group.
C C1 - C C4 Custom Target
You can change the size of the AF target and the step (the distance it moves at one
time). Custom target modes can be selected when there is a check (v) next to a
custom target in [KAF Target Mode Settings] (P. 79).
Release the multi selector when the desired mode is displayed.
2
• AF target mode options will no longer be displayed.
%The number of AF targets available may be reduced depending on shooting settings.
%The AF target display can be accessed by pressing the multi selector. The multi selector
can be congured using [SCenter Button] (P. 218).
%Separate AF target modes can be selected according to camera orientation.
g “Matching AF Target Selection to Camera Orientation (KOrientation Linked N)”
(P. 97)
%The following focus settings can be recalled simultaneously using the Fn lever. Separate
settings can be assigned to Positions 1 and 2. Use this option to quickly adjust settings
according to shooting conditions.
[AF Mode] (P. 72), [AF Target Mode] (P. 77), and [AF Target Point] (P. 76)
The Fn lever can be congured using the [KFn Lever Function] item (P. 220) or the
[nFn Lever Function] item (P. 220).
%You can adjust AF target settings for [C-AF]. g [KC-AF Center Priority] (P. 86)
%Separate options can be selected for still photography and movie mode.
f
f
MiddleMiddle
f
LargeLarge
78
EN
Page 79
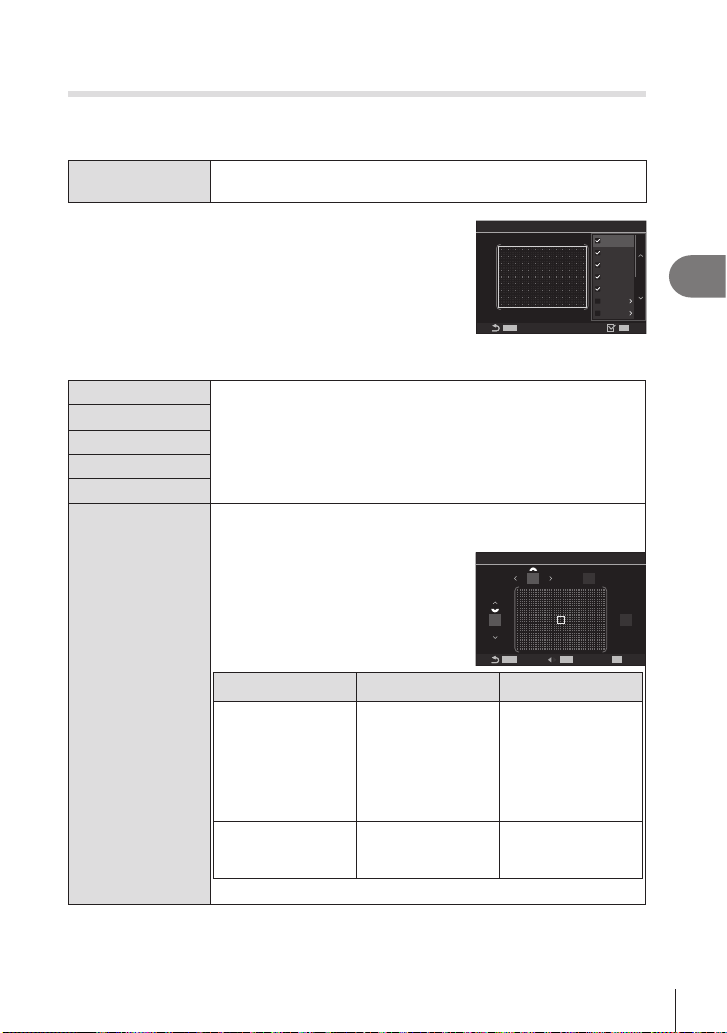
Setting the options for AF target modes
AF Target Mode Settings
Size Step
(KAF Target Mode Settings)
PASMB
Specify which options are displayed when setting the KAF Target Mode.
Menu
MENU n AF n5. AF Target Settings & Operations n KAF Target
Mode Settings
n
Select the AF target modes that you want to have
1
displayed as options and put a check (v) next to
each of them.
• Select an option using FG and press the Q button to
put a check (v) next to it. To remove the check, press
the Q button again.
oAll
ISingle
zCross
AMid
BLarge
C C1 - C C4
If you put a check (v) next to an option, it will be displayed as the
option when selecting the AF target.
If you put a check (v) next to an option, it will be displayed as the
option when selecting the AF target mode.
Press I to congure the size of the
AF target and the step (the distance it
moves at one time).
Item Horizontal Vertical
12 types (1 / 3 / 5 / 7
/ 9 / 11 / 15 / 19 / 23 /
Size
27 / 33 / 39)
Switch using HI or
the front dial.
K
MENU
MENU
KAF Target Mode Settings
C
C1
MENU
MENU
INFO
13
o
All
M
Single
z
Cross
A
Mid
B
Large
C
C1
C
C2
screen
OK
OK
13
10 types (1 / 3 / 5 /
7 / 9 / 11 / 15 / 19 /
23 / 27)
Switch using FG
or the rear dial.
4
Shooting Settings
Step
8 types (1 to 8)
Switch using HI or
the front dial.
5 types (1 to 5)
Switch using FG
or the rear dial.
Press the INFO button to switch between Size and Step.
EN
79
Page 80
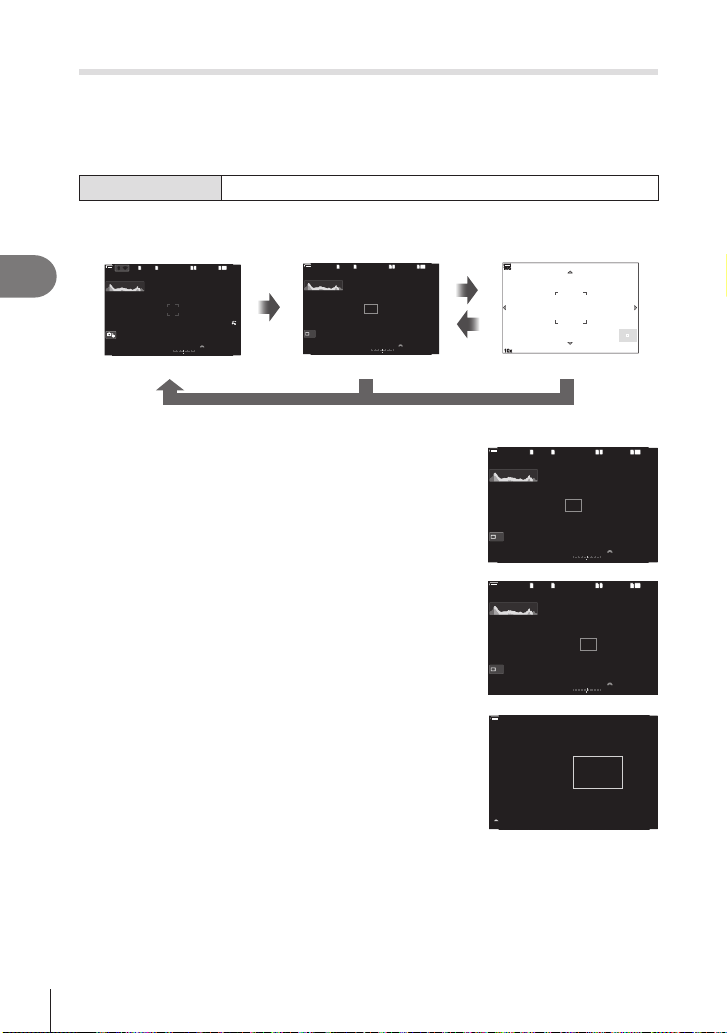
Zoom frame AF/Zoom AF (Super Spot AF)
10231023
[1:02:03][1:02:03]
FF
60p60p L-8L-8
L14K
10x10x
1
10231023
P
1
/
250
P
1/F
250 5.65.6
1
1
[1:02:03][1:02:03]
FF
60p60p L-8L-8
L14K
F
00
+
-
0.00.0
100 %
100 %
Off
10231023
[1:02:03][1:02:03]
FF
60p60p L-8L-8
PASMB
You can zoom in on the display during shooting. For greater precision during focusing,
zoom in on the focus area. At higher zoom ratios, you can focus on areas smaller than
the standard focus target. You can reposition the focus area as desired during zoom.
Button
# Before you will be able to use Super Spot AF, you must use [Button Settings] (P. 208) to
assign [a] (P. 210) to a camera control.
[1:02:03][1:02:03]
1
1
OO
rr
10231023
100 %
4
100 %
Shooting Settings
1
/
250
1/F
250 5.65.6
F
P
P
Shooting display
Press the button to which [a] (magnify) is
1
assigned.
• The zoom frame will be displayed.
A button to which a has been assigned
1
L14K
FF
60p60p L-8L-8
-
S
AFS-AF
a
33
-
00
+
ISO
ISO
200200
0.00.0
Auto
Auto
1
100 %
100 %
Off
1
/
250
1/F
250 5.65.6
F
P
P
Zoom frame AF display
(Press and hold) / Q
a
1
1
-
00
+
0.00.0
a
a
100 %
100 %
Zoom AF display
n
Position the frame using the multi selector.
2
1
100 %
100 %
1
1
L14K
• To re-center the frame, press the multi selector or press
and hold the Q button.
• The frame can also be positioned using the arrow pad
(FGHI).
Adjust the size of the zoom frame to choose the
3
zoom ratio.
Off
P
P
100 %
100 %
1
/
250
1/F
250 5.65.6
-
00
+
F
0.00.0
• Press the INFO button and then use the FG buttons
or the front or rear dial to adjust the size of the zoom
frame.
• Press the Q button to accept and exit.
EN
80
3 x
Page 81
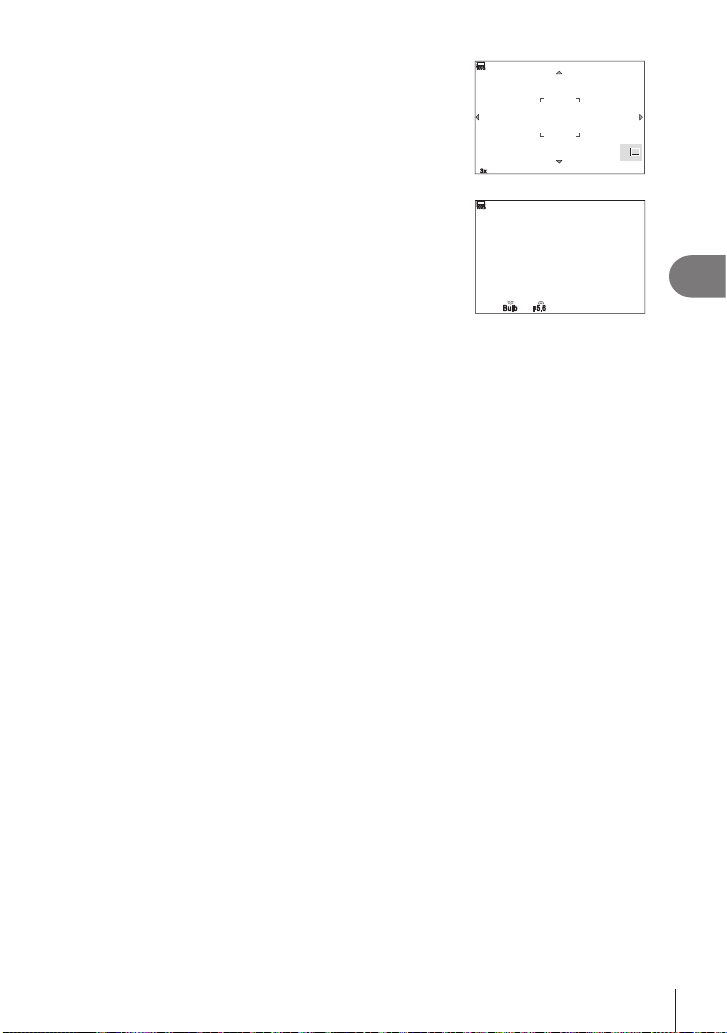
100 %
Press the button to which [a] is assigned once
4
more.
100 %
• The camera will zoom the selected area in to ll the
display.
• Use the front or rear dial to zoom in or out.
• Use the multi selector to scroll the display.
• Use FGHI to scroll the display.
• If the shooting mode is M (manual) or B (bulb) and [ISO
Auto] is not selected, you can press the INFO button
3x3x
100 %
100 %
during zoom to choose aperture or shutter speed.
• Press the a button to return to the zoom frame.
• Press the Q button to end focus zoom.
• You can also end focus zoom by pressing and holding
BulbF5.6Bulb 5.6
the a button.
F
Exposure adjustment display
for modes
M
and
# Focus zoom applies to the display only. Pictures taken with the camera are not aected.
# Zoom AF does not work during zoom display and when using a Four Thirds system lens.
# When [nDigital Tele-converter] is [On] in movie recording mode, camera cannot zoom.
%Pictures can also be taken during zoom frame AF display and zoom AF display.
%Touch controls can be used for focus zoom. g “Shooting with touch screen operations”
(P. 41)
%You can congure the camera to exit focus zoom when the shutter button is pressed
halfway to focus. g “Choosing What Happens When the Shutter Button Is Pressed
During Live View Zoom (LV Close Up Mode)” (P. 223)
4
Shooting Settings
B
EN
81
Page 82
Functions for conguring how to focus
Combined Auto and Manual Focus (K AF+MF)
PASMB
After focusing using autofocus, you can adjust focus manually by keeping the shutter
button pressed halfway and rotating the focus ring. Switch from auto to manual focus at
will or ne-tune focus manually after focusing with autofocus.
%The procedure varies with the AF mode selected.
Menu
MENU n AF n1. AF n KAF+MF
4
Shooting Settings
Enable manual focus adjustment in autofocus mode. b is displayed next to
[S-AF], [C-AF], [C-AF+TR], or [FAF].
• When [S-AFb] is selected, you can keep the shutter button pressed halfway or
keep the AF-ON button pressed after focusing using single AF and adjust focus
manually. Alternatively, you can switch to manual focus by rotating the focus ring
while the camera is focusing. Focus can also be adjusted manually while the
shutter is open and during burst photography.
On
• When [C-AFb] or [C-AF+TRb] is selected, you can switch to manual focus
by rotating the focus ring while the camera is focusing in continuous AF and
continuous tracking AF modes. Press the shutter button halfway or press the AF-
ON button a second time to refocus using autofocus. Focus can also be adjusted
manually while the shutter is open and during burst photography.
• When [FAFb] is selected, you can focus manually after focusing or before
initiating focus using autofocus.
O Manual focus adjustment disabled during autofocus.
# Manual focus is not available during burst photography in [♥jSH1] or [ProCap SH1]
mode.
%Autofocus with manual focus is also available when autofocus is assigned to other camera
controls. g “Changing the roles of buttons (Button Settings)” (P. 208)
%The lens focus ring can be used to interrupt autofocus only when M.ZUIKO PRO (Micro
Four Thirds PRO) lenses are used. For information on other lenses, visit our website.
%In
(bulb) mode, manual focus is controlled by the option selected for [Bulb/Time
B
Focusing] (P. 173).
n
82
EN
Page 83
Conguring the AF operation when the shutter button is pressed
(KAF by half-pressing a)
PASMB
You can choose whether the camera focuses when the shutter button is pressed
halfway.
Menu
S-AF
C-AF/C-AF+TR
MENU n AF n1. AF n KAF by half-pressing a
Set the AF operation for when the AF mode is [S-AF].
[No]: The camera does not start AF operation when the shutter
button is pressed halfway.
[Yes]: The camera starts AF operation when the shutter button
is pressed halfway. If you press the shutter button halfway while
pressing the AF-ON button, autofocus will be continued.
Set the AF operation for when the AF mode is [C-AF] or [C-AF+TR].
[No]: The camera does not start AF operation when the shutter
button is pressed halfway.
[Yes]: The camera starts AF operation when the shutter button
is pressed halfway. If you press the shutter button halfway while
pressing the AF-ON button, autofocus will be continued.
n
Autofocus using the AF-ON button
PASMB
The camera starts AF operation when you press the AF-ON button. Autofocus ends
when you release the AF-ON button. When you press the AF-ON button while the
camera is performing autofocus because the shutter button has been pressed halfway,
autofocus will be continued.
Button AF-ON button
%If [C-AF] is selected for [nAF Mode], the camera operates in S-AF mode when the
AF-ON button is pressed during movie recording. If [C-AF+TR] is selected, the camera
performs AF tracking when the AF-ON button is pressed.
n
4
Shooting Settings
EN
83
Page 84
Using Autofocus in Manual Focus Mode (e in MF mode)
PASMB
You can congure the camera so that it focuses with autofocus when you press the
AF-ON button, even if the AF mode is [MF] or [Preb].
Menu
MENU n AF n1. AF n e in MF mode
n
No
Yes
4
Shooting Settings
Conguring camera operation when it cannot focus on the subject
If the AF mode is [MF] or [Preb], the camera does not focus with
autofocus even when the AF-ON button is pressed.
If the AF mode is [MF] or [Preb], the camera focuses with
autofocus in [S-AF] mode when the AF-ON button is pressed.
(Release Priority)
PASMB
You can choose whether the camera takes a picture when it cannot focus on the
subject with autofocus.
Menu
S-AF
C-AF/C-AF+TR
MENU n AF n1. AF n Release Priority
Set the camera operation for when the AF mode is [S-AF] and it
cannot focus on the subject with autofocus.
[O]: If the camera cannot focus on the subject with autofocus, the
shutter cannot be released even when the shutter button is pressed
fully. If the ash is congured to re, the shutter cannot be released
until the ash is charged.
[On]: The shutter is released when the shutter button is pressed
fully, even if the camera cannot focus on the subject with autofocus.
Set the camera operation for when the AF mode is [C-AF] or
[C-AF+TR] and it cannot focus on the subject with autofocus.
[O]: If the camera cannot focus on the subject with autofocus, the
shutter cannot be released even when the shutter button is pressed
fully. If the ash is congured to re, the shutter cannot be released
until the ash is charged.
[On]: The shutter is released when the shutter button is pressed
fully, even if the camera cannot focus on the subject with autofocus.
n
84
EN
Page 85
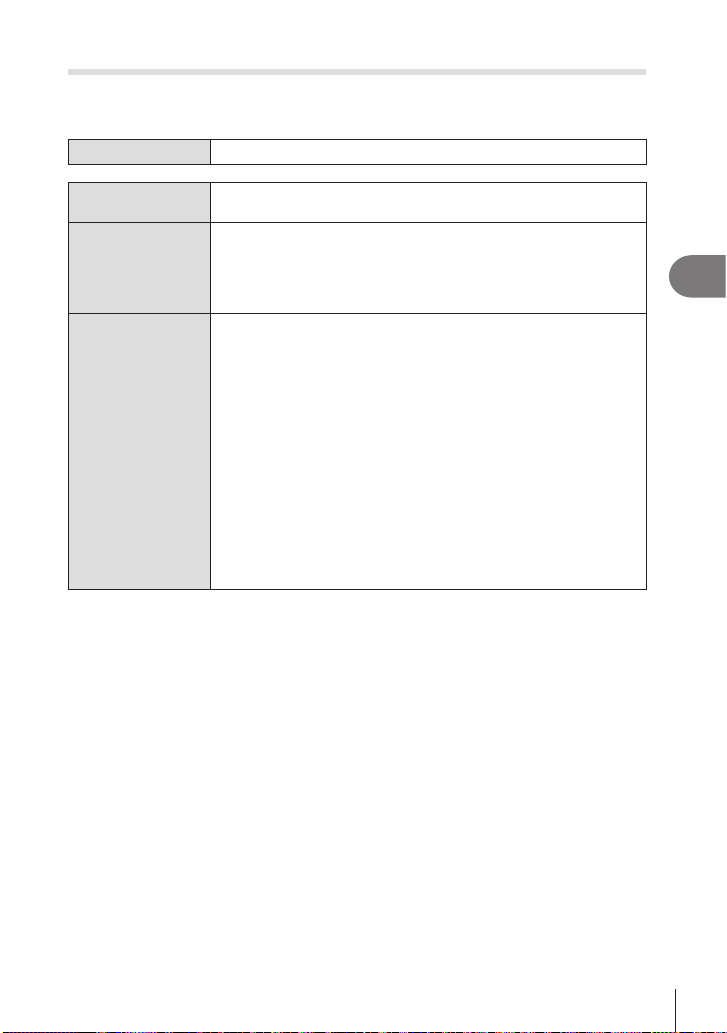
Changing the settings of Starry Sky AF (Starry Sky AF Setting)
n
You can congure the operation of the Starry Sky AF function.
Menu
MENU n AF n1. AF n Starry Sky AF Setting
PASMB
AF Priority
AF Operation
Release Priority
[Accuracy]: Prioritize focus accuracy over speed. Use a tripod.
[Speed]: Prioritize focus speed over accuracy.
[a]: Focuses with autofocus while the shutter button is pressed
halfway.
[e]: Focuses with autofocus while the AF-ON button is pressed.
[eStart/Stop]: Focusing starts when the AF-ON button is
pressed. Press again to stop focusing.
[O]:
If [AF Operation] is set to [a], the shutter cannot be released even
when the shutter button is pressed fully, unless the camera is in
focus.
If [AF Operation] is set to [e] and the AF-ON button is pressed,
the shutter cannot be released even when the shutter button is
pressed fully, unless the camera is in focus. If the AF-ON button
is not pressed, you can start shooting at any time by pressing the
shutter button fully.
If [AF Operation] is set to [eStart/Stop] and Starry Sky AF is
being executed, shooting does not start even when the shutter
button is pressed fully. If Starry Sky AF is not being executed, you
can start shooting at any time by pressing the shutter button fully.
[On]:
Shooting starts when the shutter button is pressed fully, regardless
of the setting of [AF Operation].
4
Shooting Settings
EN
85
Page 86
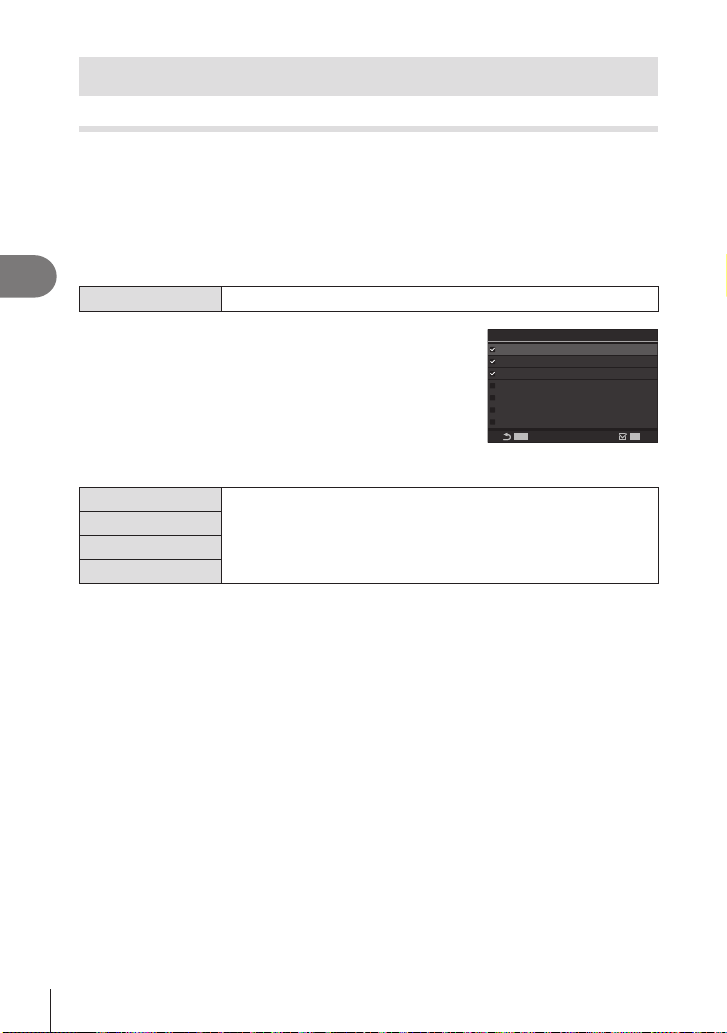
Functions for customizing AF operation to t the subject
MENU
MENU
OK
C-AF Center Target Priority (KC-AF Center Priority)
PASMB
When focusing using group-target AF in [C-AF] and [C-AFb] modes, the camera
always assigns priority to the center target in the selected group for a repeated series
of focus operations. Only if the camera is unable to focus using the center focus target
will it focus using the surrounding targets in the selected focus group. This helps
you track subjects that are moving quickly but relatively predictably. Center priority is
recommended in most situations.
4
Menu
Shooting Settings
Select an AF target mode for which the camera
1
always assigns priority to the center target for a
repeated series of focus operations and put a check
(v) next to it.
• Select an option using FG and press the Q button to
put a check (v) next to it.
To remove the check, press the Q button again.
z Cross
A Mid
B Large
C C1 - C C4
# C
C1 - C C4 can only be checked (v) when either the horizontal or vertical [Size]
specied in [KAF Target Mode Settings] (P. 79) is 5 or larger.
MENU n AF n3. AF n KC-AF Center Priority
K
z
Cross
A
Mid
B
Large
C
C1
C
C2
C
C3
C
C4
KC-AF Center Priority
If you put a check (v) next to an option, the camera always assigns
priority to the center target for a repeated series of focus operations
when the AF target mode is used.
n
C-AF Center Priority
setting screen
86
EN
Page 87
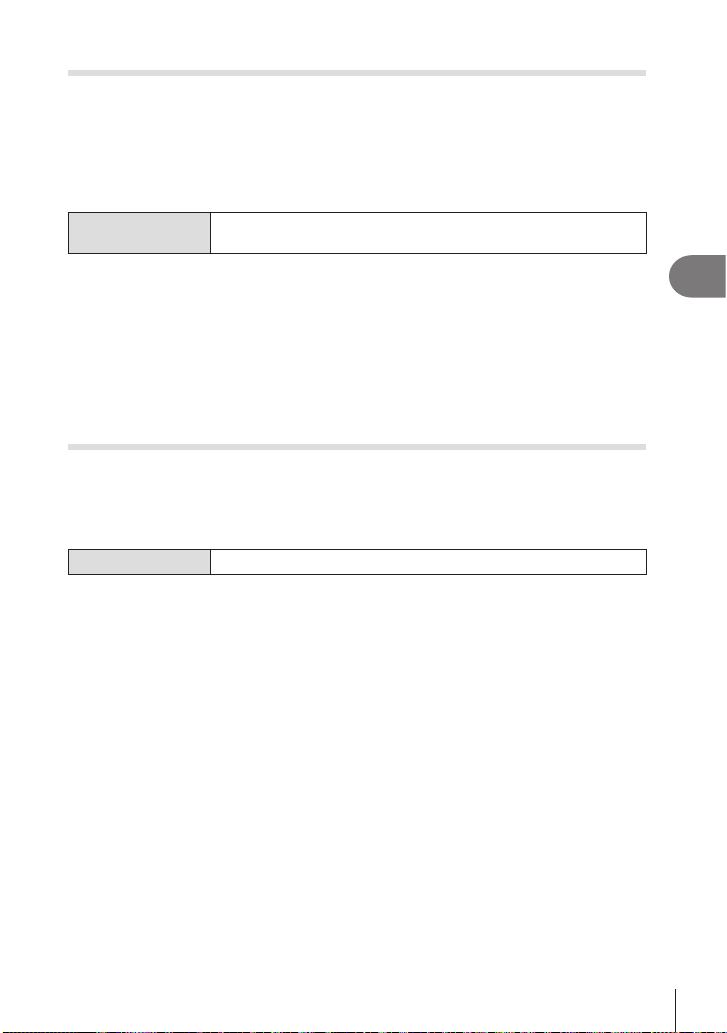
C-AF Tracking Sensitivity (KC-AF Sensitivity / nC-AF Sensitivity)
PASMB
Choose how rapidly the camera responds to changes in the distance to the subject
while focusing with [C-AF], [C-AFb], [C-AF+TR] or [C-AF+TRb] selected for
[KAF Mode], or with [C-AF] or [C-AF+TR] selected for [nAF Mode]. This can help
autofocus track a quickly-moving subject or prevent the camera refocusing when an
object passes between the subject and the camera.
Menu
• Choose from ve levels ([KC-AF Sensitivity]) / three levels ([nC-AF Sensitivity]) of
tracking sensitivity.
• The higher the value, the higher the sensitivity. Choose positive values for subjects that
suddenly enter the frame, that are moving rapidly away from the camera, or that change
speed or stop suddenly while moving toward or away from the camera.
• The lower the value, the lower the sensitivity. Choose negative values to prevent the
camera refocusing when the subject is briey obscured by other objects or to prevent the
camera focusing on the background when you are unable to keep the subject in the AF
target.
MENU n AF n1. AF n KC-AF Sensitivity
MENU n AF n4. Movie AF n nC-AF Sensitivity
n
C-AF Focus Speed (nC-AF Speed)
PASMB
Choose how quickly the camera responds to changes to the distance to subject when
[C-AF] or [C-AF+TR] is selected for focus mode. This can be used to adjust the time
the camera takes to refocus when, for example, you switch subjects.
Menu
• Choose from three focus speed levels.
• Refocusing is quicker at +1 and slower at −1. Choose −1 to refocus slowly when shifting
to a new subject.
MENU n AF n4. Movie AF n nC-AF Speed
n
4
Shooting Settings
EN
87
Page 88
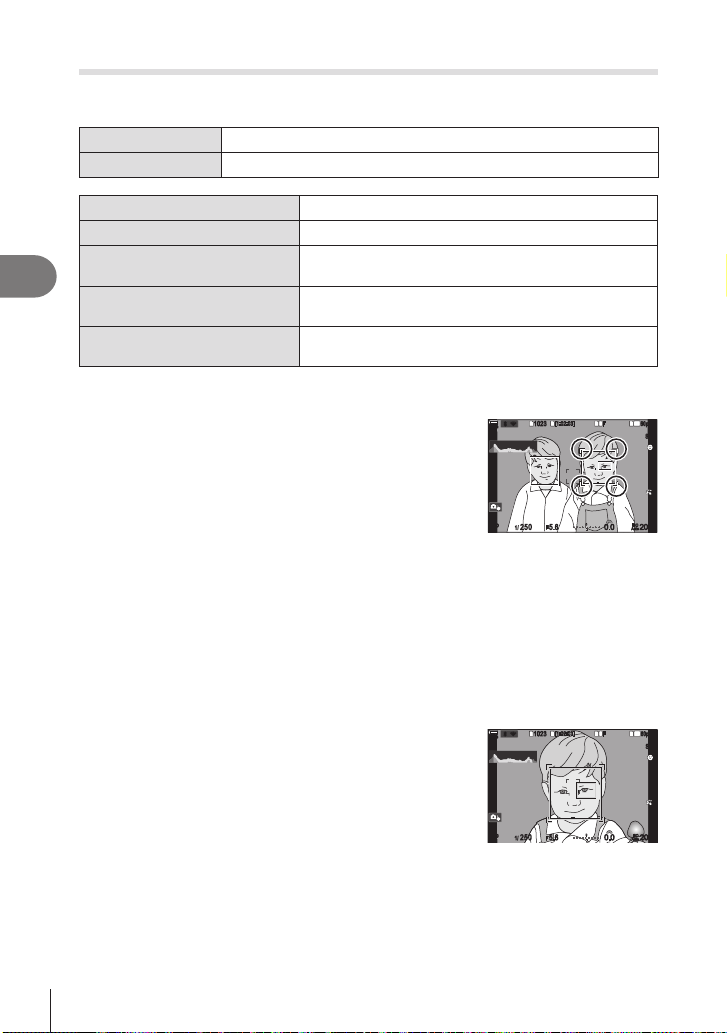
Face priority AF/Eye priority AF (Face & Eye Detection)
10231023
P
250
P
250 5.65.6
[1:02:03][1:02:03]
FF
60p60p L-8L-8
L14K
0.00.0
200200
10231023
P
1
/
250
P
1/F
250 5.65.6
[1:02:03][1:02:03]
FF
60p60p L-8L-8
F
0.00.0
200200
The camera automatically detects and focuses on the faces or eyes of portrait
subjects.
Super Control Panel
Menu
Face Detection On The camera detects and focuses on faces.
I
O
4
Shooting Settings
Face & Left Eye
IiL
Detection On
Face & Right Eye
IiR
Detection On
Face & Eye Detection On
Ii
Selecting a face to focus on
Point the camera at your subject.
1
• When the camera detects faces, a white frame appears
on the face which is focused on. Gray frames appear
on other faces. On the face which is focused on, an
additional frame appears surrounding the white frame.
• When eye priority is on, white frames also appear on
the eyes of the face which is focused on. The frames on
the eyes can be hidden from the menu (P. 91).
• When faces/eyes of multiple persons are detected,
choose the face to focus on by pressing the button to
which [IFace Selection] (P. 212) has been assigned
in [Button Settings] (P. 208). When you press the
button, a face that is closest to the AF target is selected.
Switch faces by rotating the front or rear dial while
holding the button pressed. Release the button to
nalize your choice.
• The face used for focus can also be selected via touch controls (P. 41).
Press the shutter button halfway to focus.
2
%You can also press the AF-ON button to focus
(P. 83).
• The area of the subject used for focus is indicated by a
green border.
• If the camera detects the subject’s eyes, it will focus on
an eye.
• Face and eye priority are also available in [MF]
(P. 72). Faces and eyes detected by the camera
are indicated by white frames. Exposure will be set
according to the value metered for the center of the
face.
Q n Face & Eye Detection
MENU n AF n2. AF n Face & Eye Detection
Face priority AF o.
The camera detects faces and focuses on the eye
closest to the camera.
The camera detects faces and focuses on the left eye.
The camera detects faces and focuses on the right eye.
rr
100 %
100 %
The face chosen for focus
is indicated by white double
rr
100 %
100 %
OO
1
/
1/F
OO
1
1
1
-
F
brackets.
1
-
1
00
+
1
L14K
00
+
-
S
AFS-AF
ii
33
ISO
ISO
Auto
Auto
-
S
AFS-AF
ii
33
ISO
ISO
Auto
Auto
88
EN
Page 89
Press the shutter button the rest of the way down to shoot.
3
• When set to [p] (Digital ESP metering) (P. 109), metering is performed with priority
given to faces.
# You may be unable to use [Face & Eye Detection] depending on the setting of [Subject
Detection] (P. 90). Set [Subject Detection] to [O].
# Depending on the subject and the art lter setting, the camera may not be able to correctly
detect the face.
# This function is disabled when the AF target mode (P. 77) is ISingle or ySmall, the
metering mode (P. 109) is C and [NSpot Metering] (P. 112)is being used.
# This function is disabled when the [KAF Mode] (P. 72) is set to [FAF] or [FAFb].
%We recommend selecting [O] when photographing non-portrait subjects using [C-AF] or
[C-AFb] in still photography mode.
Assigning focus priority to buttons (KFace & Eye AF Button)
PASMB
You can congure the camera so that pressing the shutter button halfway or pressing
the AF-ON button does not make the camera focus on faces and eyes even when
[KFace & Eye AF Button] is set to a setting other than [O].
Menu
a
e
MENU n AF n2. AF n KFace & Eye AF Button
Select the AF operation for when the shutter button is pressed
halfway.
[I Priority]: When the camera detects faces and/or eyes, it
focuses on faces and/or eyes.
[N Priority]: Even when the camera detects faces and/or
eyes, the camera focuses giving priority to the selected AF target
positions.
Select the AF operation for when the AF-ON button is pressed.
[I Priority]: When the camera detects faces and/or eyes, it
focuses on faces and/or eyes.
[N Priority]: Even when the camera detects faces and/or
eyes, the camera focuses giving priority to the selected AF target
positions.
4
Shooting Settings
n
EN
89
Page 90
Tracking Focus on Selected Subjects (Subject Detection)
PASMB
The camera can detect subjects of specic types when focusing. You may nd it hard
to focus on the driver or cockpit of a fast-moving subject such as a race car or airplane.
This feature detects and focuses on specic elements of such subjects.
Menu
D
4
E
Shooting Settings
F
G
H
O Tracking subject selection disabled.
# When you set this to a setting other than [O], [Face & Eye Detection] is set to [O].
# During photo shooting, this function is disabled when [KAF Mode] is set to [FAF] or
[FAFb].
During movie recording, this function is available only when [nAF Mode] is set to
[C-AF+TR].
MENU n AF n2. AF n Subject Detection
The camera detects cars or motorcycles. It tracks focus on such
elements as the chassis (chiey of types used in motor sports) or
driver.
The camera detects planes and helicopters. It tracks focus on such
elements as the fuselage or cockpit.
The camera detects trains. It tracks focus on such elements as the
cars or driver’s compartment.
The camera detects birds. It tracks focus on such elements as the
head or eyes.
The camera detects cats, dogs and similar animals. It tracks focus
on such elements as the head or eyes.
n
90
EN
Page 91
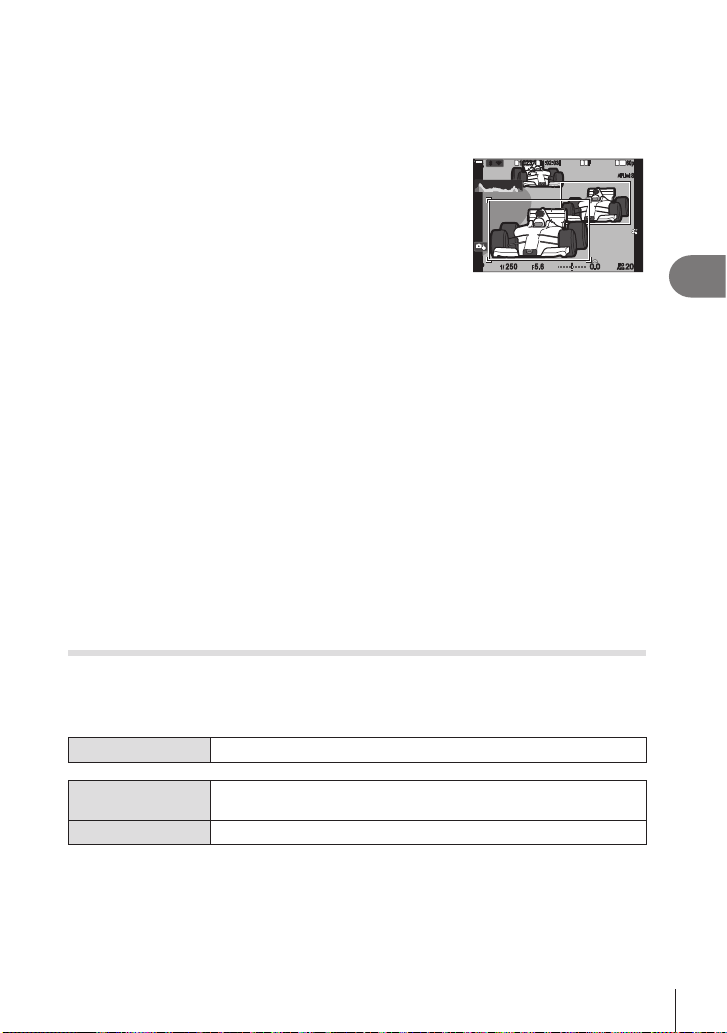
Taking Pictures Using [Subject Detection]
1
10231023
P
250
P
250 5.65.6
1
1
[1:02:03][1:02:03]
FF
60p60p L-8L-8
200200
L14K
0.00.0
Select the [KAF Mode] or the [nAF Mode].
1
• For photo shooting, select a setting other than [FAF] or [FAFb].
• For movie recording, select [C-AF+TR].
OO
rr
100 %
100 %
Point the camera at your subject.
2
DD
AF Limit AF Limit
• When the camera detects subjects, a white frame
appears on the subject which is focused on. Gray
frames appear on other subjects. On the subject which
is focused on, an additional frame appears surrounding
the white frame.
• If the white frame indicating a subject to be focused on
1
/
1/F
-
00
+
ISO
F
ISO
Auto
Auto
does not appear, change the size and/or position of the
AF target so that it covers the subject.
When the AF target mode is o All, the subject
closest to the center of the display is focused on.
• When the camera further detects specic elements
such as the driver or the cockpit, smaller white frames
also appears on them. These frames can be hidden
from the menu (P. 91).
Press the shutter button halfway to focus.
3
• You can also press the AF-ON button to focus (P. 83).
• When the camera focuses on a subject, a green frame appears on the focus position.
• When the camera detects specic elements such as the driver or the cockpit, it
focuses on them.
Press the shutter button the rest of the way down to take the picture.
4
# The camera may fail to detect the subject depending on the subject or art lter selected.
# The camera may fail to detect the subject depending on its type or on shooting conditions.
Conguring the frame displays for detected eyes
(Eye Detection Frame)
PASMB
You can choose whether to display small frames when the camera detects small parts
such as the eyes and cockpits.
Menu
MENU n AF n2. AF n Eye Detection Frame
n
-
S
AFS-AF
33
4
Shooting Settings
O
Frames are not displayed on small parts such as the eyes or
cockpits.
On Frames are displayed on small parts such as the eyes or cockpits.
• Even if [Eye Detection Frame] is set to [O], the camera focuses on the eyes or specic
elements such as the cockpit when they are detected.
91
EN
Page 92
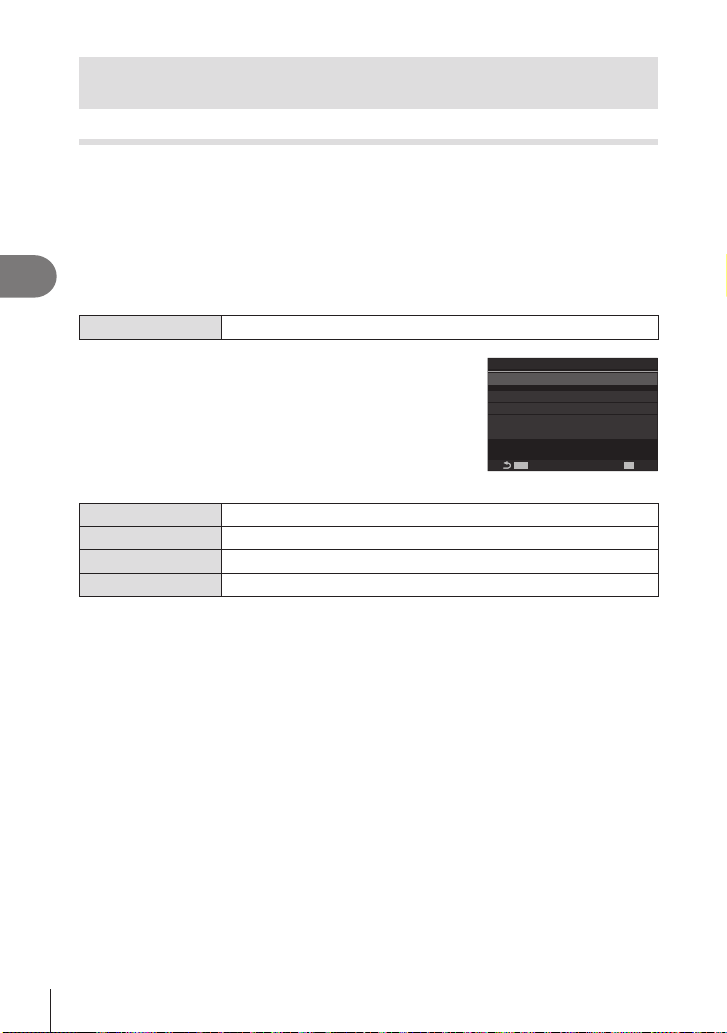
Functions for changing camera operation regarding
MENUMENU
OK
focus
Lens Focus Range (KAF Limiter)
PASMB
Choose the range in which the camera will focus using autofocus. This is eective in
situations in which an obstacle presents itself between the subject and the camera
during the focus operation, causing drastic changes in focus. You can also use it to
prevent the camera focusing on foreground objects when shooting through a fence,
window, or the like.
4
Shooting Settings
Using the settings saved in [AF Limiter]
Menu
Select [AF Limiter] using FG and press the Q
1
button.
Select [On1] / [On2] / [On3] using FG and press
2
the Q button.
O The camera does not use the saved range of focusing distances.
On1 The camera uses the range saved in [Distance for On1].
On2 The camera uses the range saved in [Distance for On2].
On3 The camera uses the range saved in [Distance for On3].
Return to the KAF Limiter setting screen.
3
# AF Limiter is not available in the following cases.
- When the focus limiter is enabled on the lens
- When using focus bracketing
- While in the movie mode or recording a movie
- When [FAF] or [FAFb] is selected for focus mode
MENU n AF n3. AF n KAF Limiter
Distance for On1
Distance for On2
Distance for On3
Release Priority On
KAF Limiter setting screen
K
AF Limiter
5.0~999.9m
10.0~999.9m
50.0~999.9m
n
OffAF Limiter
92
EN
Page 93
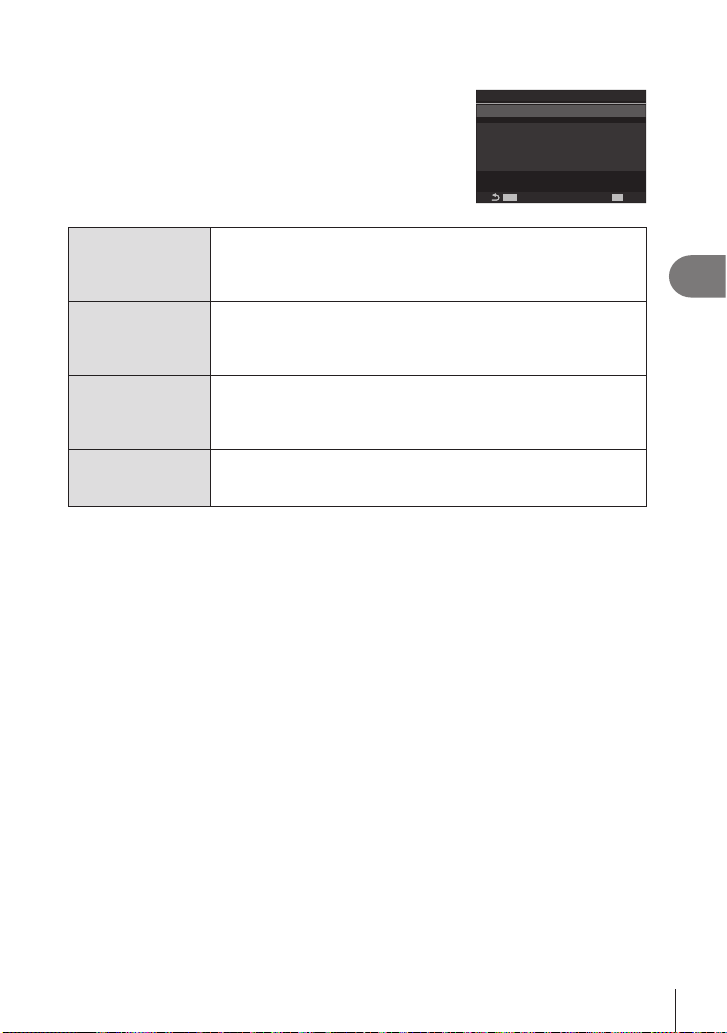
Conguring [AF Limiter]
MENUMENU
OK
K
Congure options.
1
• Select an option using FG and press the Q button to
display the setting menu.
• Press the Q button again to return to the KAF Limiter
setting screen.
Distance for On1
Distance for On2
Distance for On3
Release Priority On
AF Limiter
Set the range of focusing distances to be used when [On1] is
Distance for On1
selected.
Change the number with FG. Use HI to move between digits.
[000.0] – [999.9 m/ft]
Set the range of focusing distances to be used when [On2] is
Distance for On2
selected.
Change the number with FG. Use HI to move between digits.
[000.0] – [999.9 m/ft]
Set the range of focusing distances to be used when [On3] is
Distance for On3
selected.
Change the number with FG. Use HI to move between digits.
[000.0] – [999.9 m/ft]
[O]: Complies to the [Release Priority] (P. 84) setting.
Release Priority
[On]: The shutter can still be released if the camera is unable to
focus when a setting other than [O] is selected for [AF Limiter].
# The gures displayed in [Distance for On1] - [Distance for On3] are intended as guides
only.
5.0~999.9m
10.0~999.9m
50.0~999.9m
On1AF Limiter
4
Shooting Settings
93
EN
Page 94
C-AF Lens Scanning (KAF Scanner)
PASMB
Choose whether the camera performs a focus scan. If the camera is unable to focus,
it will scan for the focus position by cycling the lens from the minimum focus distance
to innity. You can limit the scanning operation if desired. This option takes eect
when [C-AF], [C-AF+TR], [C-AFb], or [C-AF+TRb] is selected for [KAF Mode]
(P. 72).
Menu
MENU n AF n3. AF n KAF Scanner
n
4
O
Shooting Settings
On
• Regardless of the option selected, the camera will scan once if unable to focus when [SAF] or [S-AFb] is selected for [KAF Mode].
The camera will not scan if unable to focus. This prevents focus
changing to such an extent that you lose sight of your subject when
attempting to track small objects and the like.
When unable to focus, the camera scans only once. The camera will
not scan again as long as the focus operation continues.
94
EN
Page 95
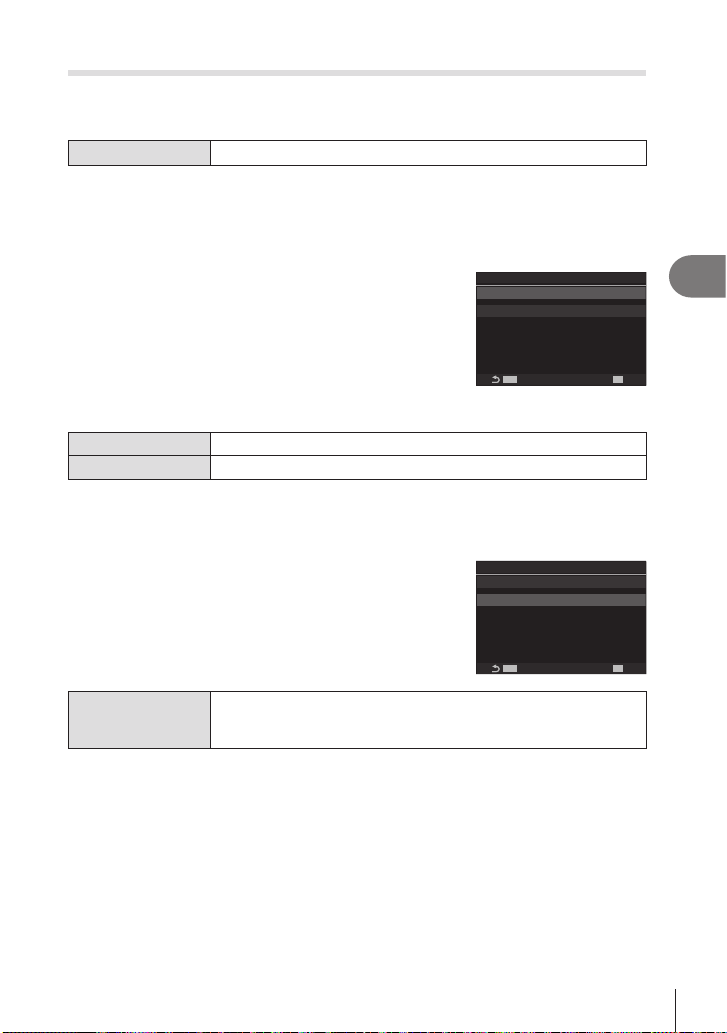
Fine-T uning Autofocus (KAF Focus Adjustment)
MENUMENU
OK
PASMB
Fine-tune phase-detection autofocus. Focus can be ne-tuned by up to ±20 steps.
Menu
# Normally there is no need to ne-tune autofocus using this item. Fine-tuning focus may
prevent the camera focusing normally.
# Focus ne-tuning has no eect in [S-AF] and [S-AFb] modes.
Using the saved focus adjustment value
Select [AF Focus Adjustment] using FG and
1
press the Q button.
Select [On] using FG and press the Q button.
2
MENU n AF n3. AF n KAF Focus Adjustment
AF Focus Adjustment
Fine-tuning Value
K
AF Focus Adjustment
n
Off
±0
4
Shooting Settings
KAF Focus Adjustment
setting screen
O The camera does not use the saved focus adjustment value.
On The camera uses the saved focus adjustment value.
Return to the KAF Focus Adjustment setting screen.
3
Conguring [AF Focus Adjustment]
K
Congure the option.
1
• Select an option using FG and press the Q button to
display the setting menu.
AF Focus Adjustment
AF Focus Adjustment
Fine-tuning Value
• Press the Q button again to return to the KAF Focus
Adjustment setting screen.
MENUMENU
Adjusts focus for all lenses. Focus can be ne-tuned by up to ±20
Fine-tuning Value
steps.
[-20] – [±0] – [+20]
%You can zoom in on the display by using the front dial or R button to check the results.
%You can take a test picture to check the results by pressing the shutter button before
pressing the Q button.
On
±0
OK
95
EN
Page 96
AF Illuminator Autofocus Assist (AF Illuminator)
PASMB
The AF illuminator lights to assist the focus operation when lighting is poor.
Menu
On The illuminator lights during autofocus if the subject is poorly lit.
O The illuminator does not light even if the subject is poorly lit.
# To use the AF illuminator during silent photography, you will need to change the option
4
Shooting Settings
selected for [Silents Settings] (P. 132).
AF Target Display Mode (AF Area Pointer)
MENU n AF n2. AF n AF Illuminator
PASMB
In autofocus mode, the position of the subject on which the camera has focused is
shown by a green focus target. This item controls the display of the focus target.
Menu
O The focus target is not displayed.
On1 The focus target is displayed only briey after the camera focuses.
On2
MENU n AF n2. AF n AF Area Pointer
After the camera focuses, cluster AF targeting is enabled and the
camera will display AF targets for all areas that are in focus while the
shutter button is pressed halfway or the AF-ON button is pressed.
n
n
96
EN
Page 97
Functions for setting the focusing position
MENUMENU
OK
Matching AF Target Selection to Camera Orientation
(KOrientation Linked N)
PASMB
The camera can be congured to change the AF target position and AF target mode
automatically when it detects that it has been rotated between landscape (wide)
or portrait (tall) orientations. Rotating the camera changes the composition and
consequently also the position of the subject in the frame. The camera can store the
AF target mode and AF target position separately according to camera orientation.
When this option is active, [KN Set Home] (P. 98) can be used to store separate
home positions for landscape and portrait orientations.
Menu
Select a function with which you want to save
1
dierent settings for landscape and portrait
orientations, and put a check (v) next to it.
• Select an option using FG and press the Q button to
put a check (v) next to it.
To remove the check, press the Q button again.
AF Target Mode
AF Target Point
MENU n AF n5. AF Target Settings & Operations n
KOrientation Linked N
K
Orientation Linked
AF Target Mode
AF Target Point
KOrientation Linked N
When you put a check (v) next to this, the camera saves separate
AF target modes (e.g., oAll, ySmall) for landscape and portrait
orientations.
When you put a check (v) next to this, the camera saves separate
AF target positions for landscape and portrait orientations.
setting screen
n
N
4
Shooting Settings
The display returns to the KOrientation Linked N setting screen.
2
Press the MENU button to return to shooting screen.
3
Choose the AF target mode or target position with the camera rst in one
4
orientation and then the other.
• Separate settings are stored for landscape orientation, portrait orientation with the
camera rotated to the right, and portrait orientation with the camera rotated to the left.
EN
97
Page 98
Choosing the AF Home Position (KN Set Home)
MENUMENU
OK
PASMB
Choose the home position for the [NHome] feature. The [NHome] feature lets you
recall a previously-saved “home position” for AF target at the touch of a button. This
item is used to choose the home position.
Menu
Select a setting you wish to store with the home
1
4
Shooting Settings
position and put a check (v) next to it.
• Select an option using FG and press the Q button to
put a check (v) next to it. To remove the check, press
the Q button again.
MENU n AF n5. AF Target Settings & Operations n KN Set
Home
AF Target Mode
AF Target Point
K
N
Set Home
n
All
o
HH
AF Target Mode
Choose the home position AF target mode. Only options selected for
[KAF Target Mode Settings] (P. 79) are available.
AF Target Point Choose the home position focus target position.
Press I to congure options for the selected item.
2
• Choose settings for the home position
• When [KOrientation Linked N] is active, you will be prompted to select landscape
or portrait (camera rotated left/camera rotated right) orientation before pressing the
Q button to display options.
Using the [NHome] function
The [NHome] function can be used in the following ways.
• In [KButton Function] (P. 208), assign [NHome] to a button. The AF target moves to
the saved home position when you press the button.
• Select [NHP] for [SCenter Button] (P. 218). The AF target moves to the saved home
position when you press the multi selector.
98
EN
Page 99
AF Target Selection (NSelect Screen Settings)
PASMB
Choose the roles played by the front and rear dials or arrow pad during AF target
selection. The controls used can be selected according to how the camera is used or
personal taste.
Menu
f dial
d button
MENU n AF n5. AF Target Settings & Operations n NSelect
Screen Settings
Assign roles to the front and rear dials.
[O]: None.
[6Pos]: Position the AF target (P. 76).
[NMode]: Choose the AF target mode (e.g., oAll, ySmall)
(P. 77).
Assign roles to FGHI.
[O]: None.
[6Pos]: Position the AF target (P. 76).
[NMode]: Choose the AF target mode (e.g., oAll, ySmall)
(P. 77).
n
4
Shooting Settings
EN
99
Page 100
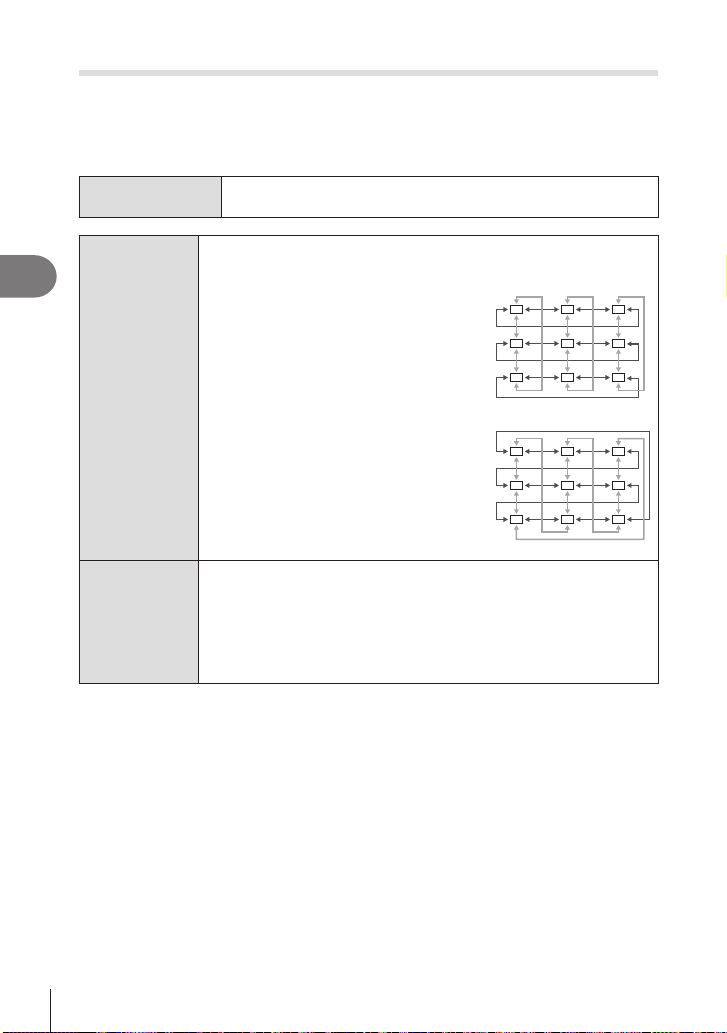
Enabling AF Target Selection Wrap (N Loop Settings)
PASMB
You can choose whether AF target selection “wraps around” the edges of the display.
You can also choose whether you have the option of selecting oAll (all targets)
before AF target selection “wraps around” to the opposite border of the display.
Menu
4
Shooting Settings
N Loop
Selection
Via oAll
# [N Loop Settings] is xed at [O] during movie recording and when [FAF] or [FAFb]
is selected for focus mode.
MENU n AF n5. AF Target Settings & Operations n N Loop
Settings
[O]: Wrap disabled. Target selection stays within the borders of the
display.
[Loop 1]: If you continue to press the
multi selector in the same direction after
reaching the border of the display, the
target in the same row or column on the
opposite border will be selected.
[Loop 2]: If you continue to press the
multi selector in the same direction after
reaching the border of the display, the
target in the next row or column on the
opposite border will be selected.
[No]: Target selection does not pass through oAll (all targets) before
wrapping around.
[Yes]: If [Loop 1] or [Loop 2] is chosen for [N Loop Selection], target
selection will pass through oAll (all targets) before wrapping around
to the opposite border.
• Hiding oAll (all targets) in [KAF Target Mode Settings] xes [Via
oAll] at [No].
n
“Loop 1”
“Loop 2”
100
EN
 Loading...