


Wine Coolers
Instruction Manual
Version 2
3115 Pepper Mill Court, Mississauga, ON, L5L 4X5 |
1-800-465-0234 |
4450 Witmer Industrial Estates, Unit 4, Niagara Falls, NY, 14305 |
www.omcan.com |

Table of Contents
Model OWC-54S / Model OWC-54D / Model OWC-168D / Model OWC-168D
Section |
Page |
|
General Information -------------------------------------------------------------------------------- |
|
3 |
Characteristics ---------------------------------------------------------------------------------- |
|
3 - 4 |
Precautions -------------------------------------------------------------------------------------- |
|
4 - 6 |
Environment ------------------------------------------------------------------------------------- |
|
6 - 7 |
Installation --------------------------------------------------------------------------------------- |
|
8 - 9 |
Operation ------------------------------------------------------------------------------------------- |
|
10 |
Maintenance --------------------------------------------------------------------------------- |
11 |
- 13 |
Troubleshooting ----------------------------------------------------------------------------------- |
|
14 |
Parts Breakdown ---------------------------------------------------------------------------- |
15 |
- 22 |
Electrical Schematics ---------------------------------------------------------------------- |
23 |
- 26 |
Warranty Registration ---------------------------------------------------------------------------- |
|
27 |
2
General Information
Omcan Manufacturing And Distributing Company Inc. and Food Machinery Of America, Inc. dba Omcan are not responsible for any harm or injury caused due to any person’s improper or negligent use of this equipment. The product shall only be operated by someone over the age of 18, of sound mind, and not under the influence of any drugs or alcohol, who has been trained in the correct operation of this machine, and is wearing authorized, proper safety clothing. Any modification to the machine voids any warranty, and may cause harm to individuals using the machine or in the vicinity of the machine while in operation.
Characteristics
•The cabinet will function within an ambient temperature of 5-38°C / 41-100.4°F.
•The cabinet maintain the appropriate temperature and humidity for ageing fine wines (single temperature models).
•Temperature discrepancy is +/-1 degree Celsius / Fahrenheit.
•Beech wood shelving.
•Multi-function digital control.
•Energy saving lights. Switch for on or off.
•Temperature regulation:
Single temperature models 5-18°C / 41-64.4°F.
Dual temperature models: upper 5-10°C / 41-50°F, lower 10-18°C / 50-64.4°F.
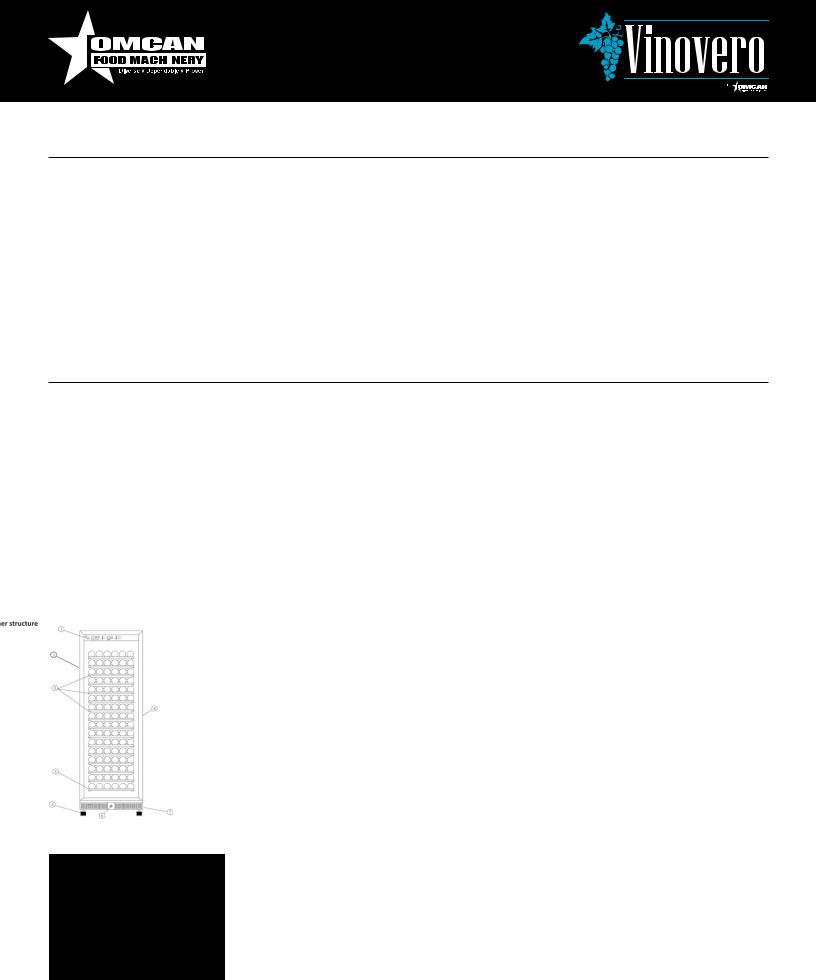
Inner Structure
1.control panel
2.door knob
3.shelves
4.bottom shelf
5.adjustable foot
6.safety lock
7.bottom seat
8.cabinet body
Technical Parameters
Model |
OWC-168S |
OWC-54S |
OWC-168D |
OWC-54D |
|
Temp Range |
5-18°C / 41-64.4°F |
Upper Zone:5-10°C / 41-50°F |
|||
Bottom Zone:10-18°C / 50-64.4°F |
|||||
|
|
|
|||
Inner Humidity |
50%-75% |
60%-75% |
60%-75% |
||
Bottle Capacity |
171 |
45 |
171 |
45 |
|
Unit Dimensions (DWH) |
598 x 680 x 1820 |
602 x 605 x 890 |
598 x 680 x 1820 |
602 x 605 x 890 |
|
3

Characteristics
Electrical |
|
|
115V / 60Hz |
|
|
Power |
220W |
160W |
|
220W |
160W |
Rated Current (A) |
2.4 |
1.8 |
|
2.4 |
1.8 |
Net Weight (kg) |
111 kg |
61 kg |
|
112 kg |
61 kg |
Refrigerant |
|
|
|
R134a |
|
Item Number |
31878 |
31877 |
|
37494 |
37493 |
Note: D: Double Zone, S: Single Zone.
Precautions
Explanation of the symbols
Thank you choosing our product. For your better use of the construction, please pay close attention to the explanation of these symbols in the instruction.
Danger: It refers to conditions when death or severe injury may occur.
Attention: It refers to conditions when damage of body or of cabinet may occur.
Forbidden operations.
 Warning: it refers to conditions when injury of body or damage to cabinet may occur.
Tips: It refers to tips or suggestions for use of the cabinet.
Repairs suggested to be handled by maintenance staff.
4

Precautions
Please be careful while using
Our Products use single-phase AC115 power supply. If AC power supply is not used, 1000W above automatic voltage regulator should be installed.
This product must use a dedicated outlet and be properly grounded. The power cord is fitted with a standard three-wire plug. Never remove the third pin. After installation the plug should be within reach. Warning! The plug should be firmly connected to the outlet as a precaution against fire.
Don’t use flammable sprays in or near this product.
Inflammable and explosive materials, strongly corrosive acid or alkali, should not be used in this product.
Prevent children from entering the cabinet. Keep the cabinet locked when unattended.
In the event of a gas leak, ventilate the area by opening windows and doors. Do not disconnect the unit’s power supply.
5

Precautions
Once the power is disconnected from the unit, do not switch it on again for a period of 5 minutes in order to avoid potential damage to the compressor or refrigeration system.
If the power cord is damaged it should be replaced by a specialist-contact your distributor for information. Do not allow the power cord to lie under the cabinet.
Do not tamper with or remove the refrigeration piping. This should be carried out by a specialist. Contact your distributor for further information.
Warning-do not pull out more than 2 shelves simultaneously to avoid tipping and potential injury loss.
Environment
The cabinet should be placed on firm and even floor and all packaging taken away to reduce vibration and noise from the cabinet. While moving, the cabinet should not be tilted more than 45 degrees.
The cabinet should be kept away from heat sources.
6

Environment
The cabinet should be kept in a ventilated area with at least 4”(10cm) of space around, including the rear.
Don’t locate the cabinet in a location where temperatures fall below 0° Celsius.
Don’t Locate the cabinet in an area of abnormally high humidity or where it might get wet.
Once the castors are fitted, do not move the cabinet over rugged ground.
7
Installation
1.Remove all packaging components
Door handle, packaging base, adhesive tape used to fix accessories and protective pads should all be disassembled. Fix the screws according to the diagram (screws are kept in the instruction bag or have already been installed).
2.Check the accessories
Check the items in the packing box to ensure they match with the list in the instruction manual.
3.Clean unit before use
Please read the details in the cleaning section.
4.Caster adjustments
Using a spirit level, ensure that the cabinet is perfectly upright and adjust the castors if necessary.
5.Moving the cabinet
If the cabinet is moved, please wait at least 2-3 hours before reconnecting the power supply.
8

Installation
6.Start the cabinet
Power up the cabinet to test if it is running properly. If the ambient temperature of the room is higher than the set temperature, the temperature inside the cabinet will start to drop. Once the cabinet is newly stocked with bottles of wine, the thermal mass of the wine may mean that several hours will be required for the wine to reach set temperature. This will vary, depending on the temperature of the wine and the required set temperature.
Moving the Cabinet
Secure all shelves with adhesive tape. Place a layer of foam from top to bottom to protect the inside glass panel from the shelves. Lock the door. Tighten the castors as far into the cabinet as possible.
How to use the Shelves
Warning: The shelves should be pulled out gently. Never withdraw more than 2 laden shelves at one time.
9
 Loading...