

Page 1

Santos Brushless Blender
Model Santos 62
Item 39703
Instruction Manual
Revised - 11/5/2015
Toll Free: 1-800-465-0234
Fax: 905-607-0234
Email: service@omcan.com
www.omcan.com
Page 2

Table of Contents
Model Santos 62
Section
General Information
Safety and Warranty
--------------------------------------------------------------------------- 3 - 4
-------------------------------------------------------------------------- 4 - 6
Technical Specications
Operation
Maintenance
Troubleshooting
--------------------------------------------------------------------------------------- 7 - 11
--------------------------------------------------------------------------------- 11 - 15
----------------------------------------------------------------------------- 15 - 17
Page
-------------------------------------------------------------------------- 6
Instructions Français
Figure Drawings
Parts Breakdown
Electrical Schematics
Notes
------------------------------------------------------------------------------------------- 37 - 38
Warranty Registration
----------------------------------------------------------------------- 18 - 31
---------------------------------------------------------------------------- 32 - 33
---------------------------------------------------------------------------- 34 - 35
---------------------------------------------------------------------------- 36
---------------------------------------------------------------------------- 39
2
Page 3

General Information
Omcan Manufacturing and Distributing Company Inc., Food Machinery of America, Inc. dba Omcan
and Omcan Inc. are not responsible for any harm or injury caused due to any person’s improper or
negligent use of this equipment. The product shall only be operated by someone over the age of 18, of
sound mind, and not under the inuence of any drugs or alcohol, who has been trained in the correct
operation of this machine, and is wearing authorized, proper safety clothing. Any modication to the
machine voids any warranty, and may cause harm to individuals using the machine or in the vicinity of
the machine while in operation.
CHECK PACKAGE UPON ARRIVAL
Upon receipt of an Omcan shipment please inspect for external damage. If no damage is evident on the
external packaging, open carton to ensure all ordered items are within the box, and there is no concealed
damage to the machine. If the package has suffered rough handling, bumps or damage (visible or concealed),
please note it on the bill of lading before accepting the delivery and contact Omcan within 24 hours, so we may
initiate a claim with the carrier. A detailed report on the extent of the damage caused to the machine must be
lled out within three days, from the delivery date shown in the shipping documents. Omcan has no recourse
for damaged products that were shipped collect or third party.
Omcan Fabrication et distribution Companie Limité et Food Machinery d’Amerique, dba Omcan et
Omcan Inc. ne sont pas responsables de tout dommage ou blessure causé du fait que toute personne
ait utilisé cet équipement de façon irrégulière. Le produit ne doit être exploité que par quelqu’un de
plus de 18 ans, saine d’esprit, et pas sous l’inuence d’une drogue ou d’acohol, qui a été formé pour
utiliser cette machine correctement, et est vêtu de vêtements de sécurité approprié. Toute modication
de la machine annule toute garantie, et peut causer un préjudice à des personnes utilisant la machine
ou des personnes à proximité de la machine pendant son fonctionnement.
VÉRIFIEZ LE COLIS DÈS RÉCEPTION
Dès réception d’une expédition d’Omcan veuillez inspecter pour dommages externes. Si aucun dommage
n’est visible sur l’emballage externe, ouvrez le carton an de s’assurer que tous les éléments commandés
sont dans la boîte, et il n’y a aucun dommage dissimulé à la machine. Si le colis n’a subi aucune mauvaises
manipulations, de bosses ou de dommages (visible ou cachée), notez-le sur le bond de livraison avant
d’accepter la livraison et contactez Omcan dans les 24 heures qui suivent, pour que nous puissions engager
une réclamation auprès du transporteur. Un rapport détaillé sur l’étendue des dommages causés à la machine
doit être rempli dans un délai de trois jours, à compter de la date de livraison indiquée dans les documents
d’expédition. Omcan n’a aucun droit de recours pour les produits endommagés qui ont été expédiées ou cueilli
par un tiers transporteur.
Omcan Empresa De Fabricacion Y Distribucion Inc. Y Maquinaria De Alimentos De America, Inc. dba
Omcan y Omcan Inc. no son responsables de ningun daño o perjuicío causado por cualquier persona
inadecuada o el uso descuidado de este equipo. El producto solo podra ser operado por una persona
mayor de 18 años, en su sano juicio y no bajo alguna inuencia de droga o alcohol, y que este ha sido
entrenado en el correcto funcionamiento de esta máquina, y ésta usando ropa apropiada y autorizada.
Cualquier modicación a la máquina anúla la garantía y puede causar daños a las personas usando la
máquina mientras esta en el funcionamiento.
3
Page 4

General Information
REVISE EL PAQUETE A SU LLEGADA
Tras la recepcion de un envio Omcan favor inspeccionar daños externos. Si no hay daños evidentes en el
empaque exterior, Habra el carton para asegurararse que todos los articulos solicitados ésten dentro de la
caja y no encuentre daños ocultos en la máquina. Si el paquete ha sufrido un manejo de poco cuidado, golpes
o daños (visible o oculto) por favor anote en la factura antes de aceptar la entrega y contacte Omcan dentro
de las 24 horas, de modo que podamos iniciar una reclamación con la compañia. Un informe detallado sobre
los daños causados a la máquina debe ser llenado en el plazo de tres días, desde la fecha de entrega que se
muestra en los documentos de envío. Omcan no tiene ningun recurso por productos dañados que se enviaron
a recoger por terceros.
Safety and Warranty
At the time of use, maintenance or scrapping of the appliance, always ensure that the following elementary
precautions are adhered to.
Note: You will nd it easier to understand the next few paragraphs if you refer to the diagrams at the
end of this manual.
DO NOT:
1. Use this appliance to process anything other than foodstuffs.
2. Pass the pits through the appliance. Remove the pits from fruits before passing them in the appliance (e.g.
mangos, apricots, peaches).
3. Use the appliance without rst correctly installing the jar (1) tted with its lid (2) on the motor base (3).
4. Operate the appliance without any food in the jar.
5. Fill the jar beyond the maximum capacity corresponding to the amount marked on the side: 1.4 liters. The
maximum capacity must be reduced for thick mixtures.
6. The base (6) must not be immersed in water.
7. Plunge the base in water or any other liquid for reasons of protection against risks of electrocution.
8. Use the unit with a damaged power cord. it must be replaced by an authorized dealer or by Omcan, or by
similarly qualied persons in order to avoid a hazard.
9. The appliance must be unplugged before any intervention on it: cleaning, general care, maintenance.
10. Use a hose nor a pressure hose for cleaning: this is forbidden.
11. Use an abrasive sponge to clean the plastic jar (1).
12. Insert or store kitchen utensils in the jar.
13. Operate the appliance if the jar or a blade is chipped, cracked or broken. Never use a jar if there is any play
with respect to the blade.
14. It is forbidden to operate the appliance on a surface with a slope in excess of 10° relative to the horizontal
plane. All 4 feet of the appliance must always be resting on this surface. The appliance motor shaft must
always be vertical relative to the surface on which it is placed.
15. Use of spare parts other than certied original parts is prohibited.
16. Turn the On/Off switch (4) to “0” when the appliance is not operating.
4
Page 5

Safety and Warranty
17. Connect several appliances to the same power socket.
18. Use the appliance outdoors.
19. Never place the appliance close to or on a source of heat.
20. This appliance is a professional machine designed exclusively for commercial use.
Note: You will nd it easier to understand the next few paragraphs if you refer to the diagrams at the
end of this manual!
21. This appliance is not designed for use by people (including children) whose physical, sensorial or mental
capacities are impaired or by people with no experience or knowledge, unless they have been supervised
or given training in the use of the appliance beforehand by a person responsible for their safety. Supervise
children to ensure they do not play with the appliance.
ELECTRICAL CONNECTION
LINE PROTECTION:
The appliance must be connected to a standard 2 pole + ground socket. The set-up must be tted with a
differential circuit breaker and a 16A fuse. Grounding of the appliance is compulsory.
TAKE CARE:
Before connecting the appliance, check that the mains electrical voltage is the same as the voltage for your
appliance.
TAKE CARE: Check that the on / off switch (4) is in position “0-Off” before plugging the power cord in
to the mains power socket.
1ST TIME USE:
Thoroughly clean all parts in contact with the food. jar (1) lid (2). See the “cleaning” chapter.
RECYCLING THE PRODUCT AT THE END OF ITS SERVICE LIFE:
This appliance is marked with the symbol of the selective waste sorting system relating to waste electrical
and electronic equipment. This means that the product must be disposed of via a selective waste sorting
system in accordance with directive 2002/96/CE (DEEE) – Professional Appliances section – so that it can be
either recycled or dismantled in order to reduce any impact on the environment. For further information you
can contact your dealer or Omcan. For the disposal or recycling of the appliance components, please refer
to a specialist company or contact Omcan. Electronic products not covered by a selective sorting system
are potentially dangerous for the environment. The packaging material should be disposed of or recycled in
accordance with regulations in force.
1 YEAR PARTS AND LABOUR BENCH WARRANTY
Within the warranty period, contact Omcan Inc. At 1-800-465-0234 to schedule a drop off to either
an Omcan authorized service depot in the area, or to an Omcan Service warehouse to repair the
equipment.
5
Page 6

Safety and Warranty
Unauthorized maintenance will void the warranty. Warranty covers electrical and part failures, not
improper use.
Please see www.omcan.com/warranty.html for complete info.
WARNING:
The packaging components are classied as normal solid urban waste and can therefore be disposed of
without difculty.
In any case, for suitable recycling, we suggest disposing of the products separately (differentiated
waste) according to the current norms.
DO NOT DISCARD ANY PACKAGING MATERIALS IN THE ENVIRONMENT!
Technical Specications
MAIN TECHNICAL PARAMETERS
Model SANTOS 62
Capacity 81 oz / 2.4 L
Maximum Power 4 HP / 1 kW
Nominal Power 1.3 HP / 1 kW
RPM 2500 - 15000
Electrical 120V / 60 Hz / 1 Ph
Current 8A
Dimensions (DWH) 254 x 203 x 432mm / 10” x 8” x 17”
Packaging Dimensions 290 x 259 x 480mm / 11.4” x 10.2” x 18.9”
Weight 9.4 kgs. / 21 lbs.
Packaging Weight 10.4 kgs. / 23 lbs.
Item Number 39703
6
Page 7
Operation
DESCRIPTION OF THE APPLIANCE
• Appliance n° 62 is a professional appliance designed exclusively for professional use. It is not designed for
household use.
• Appliance n° 62 is made for the preparation of cocktails, smoothies and all types of preparation based on
crushed ice and blended fruit which may be produced in bars, cafés, hotels or restaurants.
• The appliance consists of a blender jar, a motor base tted with an On/Off switch, an electronic module, a
control panel and a sound-proong hood.
• Some thirty recipes show how to prepare most of the desired preparations.
• The appliance has a USB Host connection allowing 6 custom recipes to be updated, along with the
appliance's Firmware.
INSTALLATION AND HANDLING
Check that the power outlet plug is always easily accessible whatever the installation mode (counter version or
enclosed version)
Installation on a counter:
The appliance can be handled by a single person. For ease of use, it is recommended that the appliance is
placed on a table or work surface so as to have the control panel in front of you (recommended height: 90 cm,
to be adapted as required for the user).
Installation when built into the countertop:
Before cutting out the countertop, check the following points in order to be sure that the appliance will be
perfectly usable once built-in:
7
Page 8

Operation
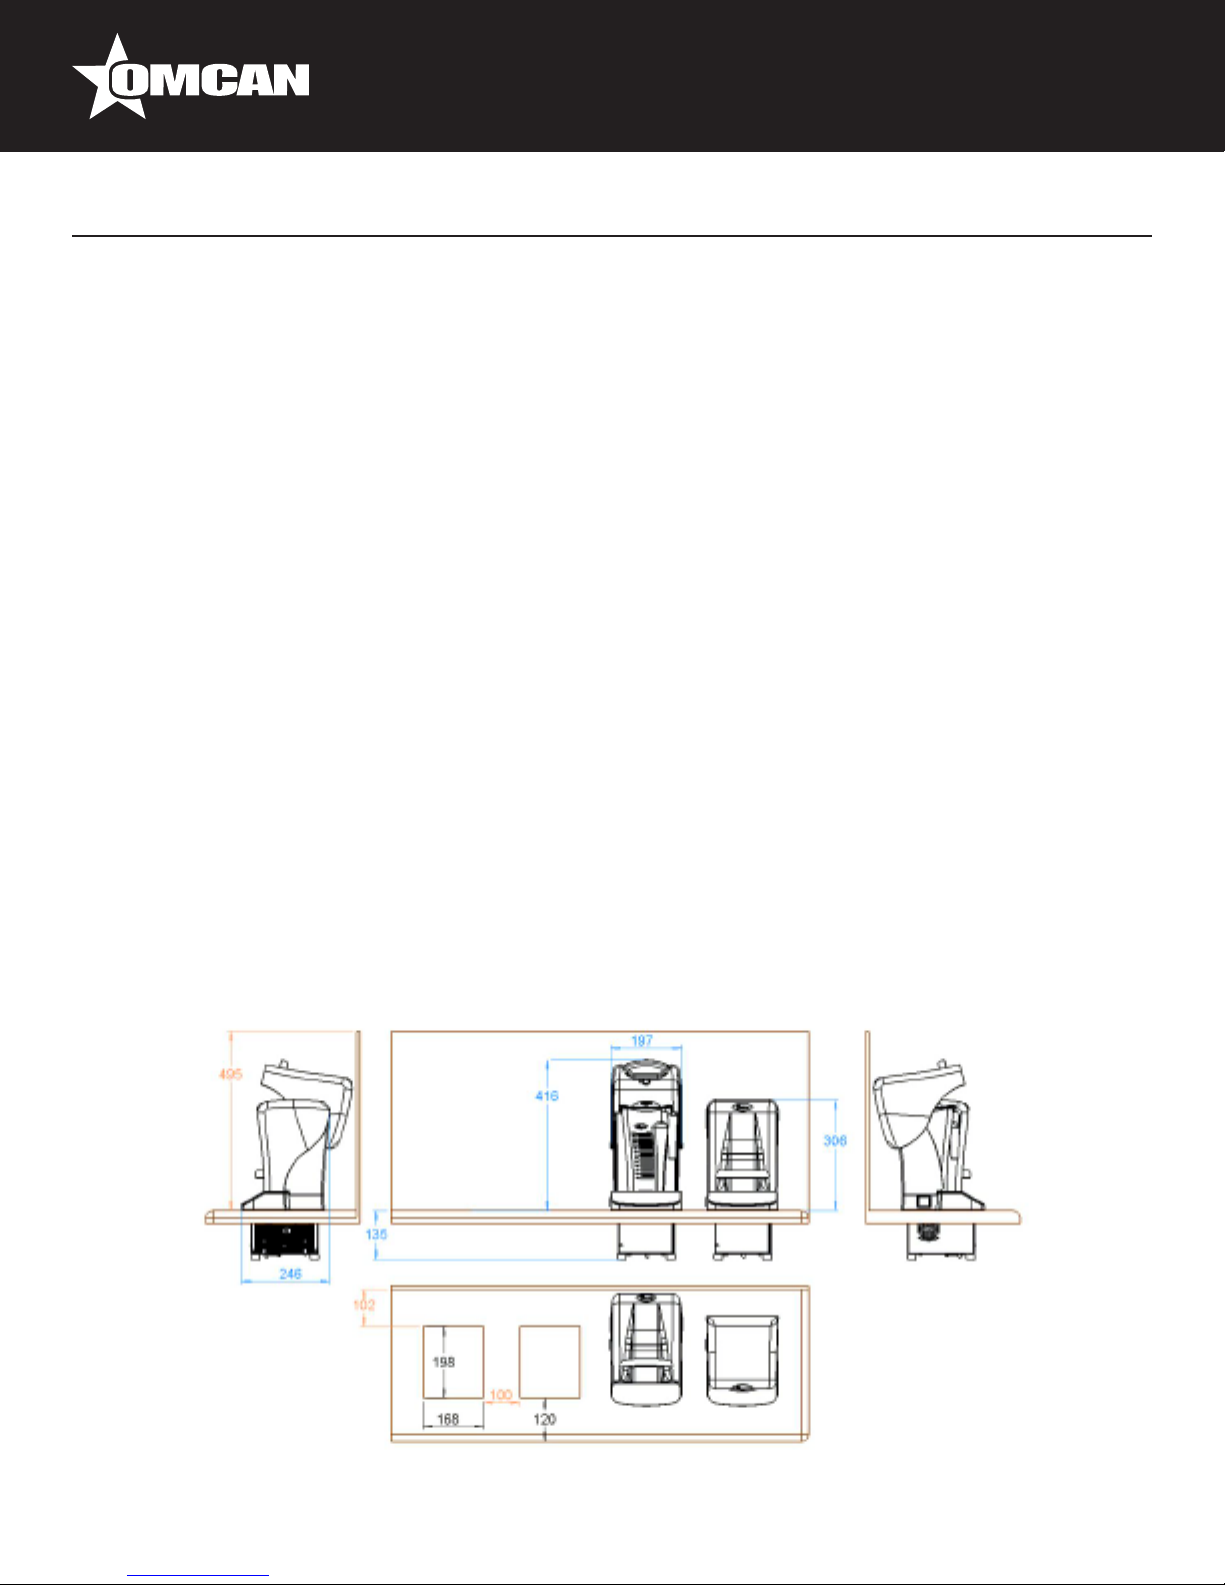
Make sure there is sufcient clearance (behind, above, below) for proper installation and operation of the
appliance.
The cut-out in the countertop represents a rectangle measuring 168mm x 198mm:
• Make sure there is a minimum clearance of 135mm beneath the countertop.
• The free space above must measure at least 495mm.
• The minimum clearance to the rear must be 102mm (distance between the cut-out and the wall).
• The minimum clearance sideways must be 30mm.
Multiple cut-outs:
It is recommended to leave a distance of 100mm between 2 cut-outs.
Adapting the appliance to use it as a built-in version:
• Disconnect the appliance from the mains.
• Remove the jar (1) and hood lid (8).
• Tip the appliance backwards.
• Using a Torx screwdriver, remove the 3 screws located between the metal casing and motor surround (6).
• Remove the motor surround (6).
USING THE APPLIANCE
CONTROL PANEL DESCRIPTION:
The control panel (5) is made up of:
• A graphic screen (22).
• 6 “recipe” keys (23) including one P for “pulse”.
Each key corresponds to a predened recipe.
USE:
Note: the appliance will not start unless the hood lid (8) is closed.
Starting up:
1. Power up the appliance by putting the On/Off switch (4) to position 1.
2. Put soft foods in the jar (1) rst followed by the harder ones, with ice cubes last of all. Using pieces of food
of even size make the recipe easier to carry out.
3. Put the lid (2) on the jar and check it is correctly positioned.
4. Make sure the motor is turned off, then install the jar on the jar mat (9).
5. Close the sound-proong hood by lowering the lid (8). The LCD screen should show: “READY”.
6. Press one of the 6 keys (23) to start the cycle for the corresponding recipe.
7. The lamp for the key activated will remain lit while the cycle is in progress.
8. Wait for the cycle to end.
Stopping the appliance:
The appliance will stop either:
• Automatically at the end of the cycle.
• Or by manual intervention, by pressing one of the 6 keys on the control panel or by putting the switch to (0).
8
Page 9
Operation
Note: opening the sound-proong hood will trigger the “pause” mode. The motor will stop. When the
sound-proong hood is closed again, the cycle starts up again from where it stopped, unless the hood
remains open for more than 30 seconds.
Cycle Counter:
The stop function has a partial cycle counter which allows the number of recipes carried out over a given
period to be counted:
• This code: “4 – 5 – 2” is used to view the counter.
• Hit the 1 key to reset the counter to zero while viewing it.
PRE-RECORDED RECIPES
The appliance is delivered with 3 basic menus loaded as standard, each containing consisting of 6 recipes
among the 30 recipes pre-recorded in the appliance.
• “Universal menu” which allows most recipes usually needed to be carried out.
• “Coffee shop menu” which is more suited to coffee shops.
• “Juice bar menu” which is more suited to juice bars.
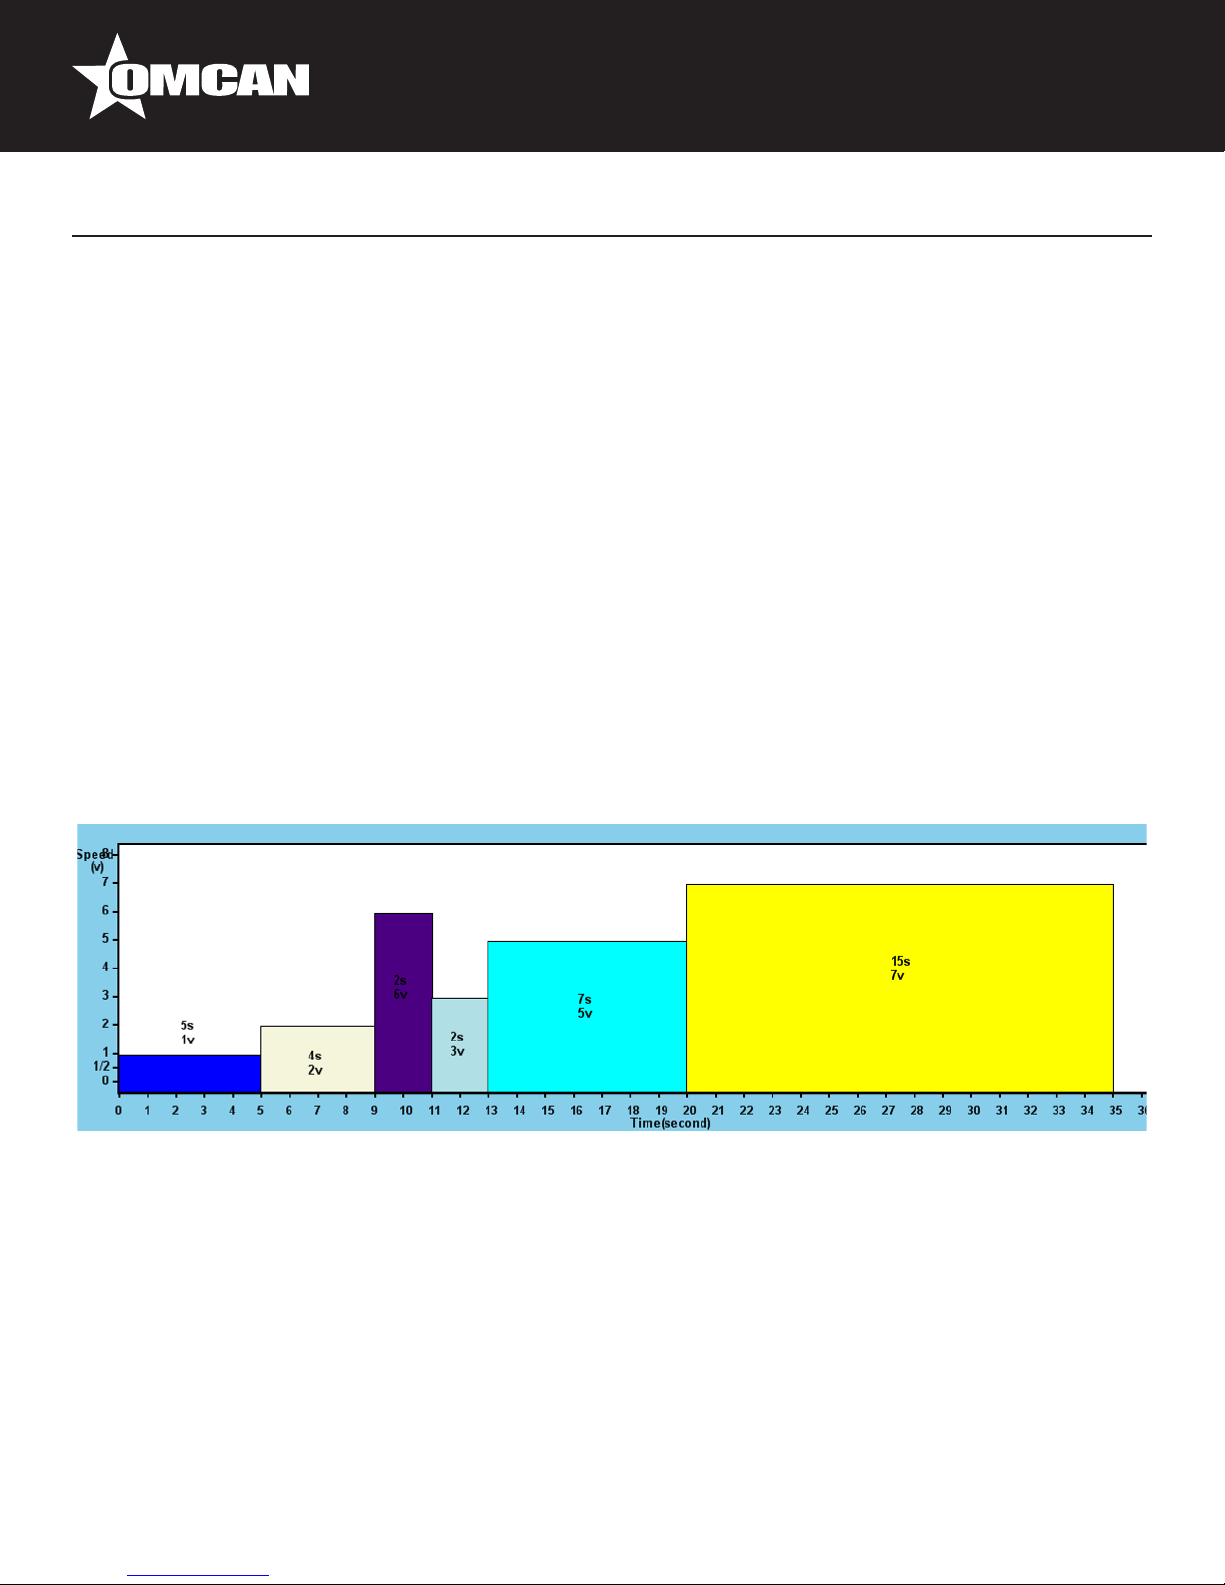
Note: Each menu has 6 recipes. A recipe consists of several sequences (speed/time); here is an
example of a recipe:
Selecting a pre-recorded menu:
The menus are selected using the following key combinations:
• “Universal menu” press the following keys in quick succession “2 – 5 – 1”.
• “Coffee shop menu” press the following keys in quick succession “2 – 5 – 2”.
• “Juice bar menu” press the following keys in quick succession “2 – 5 – 3”.
• “Custom menu” press the following keys in quick succession “2 – 5 – 4”.
Note: when the appliance is delivered, the “Custom menu” is empty. See the following section on how
to enter parameters.
9
Page 10

Operation
CUSTOM MENU
Your own menu can be created by assigning one of the 30 pre-recorded recipes to one of the 6 keys on the
control panel.
HOW TO ASSIGN A RECIPE TO ONE OF THE CONTROL PANEL KEYS
Note: All 6 keys can be parameterized
For example: to assign recipe n°34 to key n°2
• Type in the following sequence: “3 – 1 – P”
• Select the key to be programmed Press key n°2
• Enter the code for the desired recipe (see the table of 30 pre-recorded recipes) Type code 34 on the key.
• Press key “1” to validate, or one of the other keys to cancel once the “custom menu” has been set up, the
standard menus can be activated (using the appropriate code) without deleting the custom menu.
Use the code “2 – 5 – 4” to reactivate the “Custom menu”.
10
Page 11

Operation
CREATING CUSTOM RECIPES
Creating custom recipes:
Your own recipes can be created by using a special program available from SANTOS and a simple USB key
for transfer from computer to the appliance. (For Recipe making program, go to www.brushlessblender.com).
Note: No special casing is required.
Maintenance
CLEANING
IMPORTANT:
• In all cases, stop the appliance and unplug the power cable (10).
• The appliance must not be cleaned with a jet of water nor a high pressure spray.
• The motor unit (3) must not be immersed in water.
• Do not use an abrasive sponge to clean the jar (1), protection hood (7) and lid (8) nor the control panel (5).
• Do not hermetically close the jar when the appliance is stored away (remove the lid (2).
• Take care when handling the blade; risk of cuts.
• Do not tap the jar against any surface to unstick ingredients: use a exible spatula instead.
You are advised to clean the appliance as soon as you have nished using it.
It will be easier to clean if you do not allow the remaining scraps of food to dry.
The motor surround (6) can be cleaned using a soft, wet sponge.
Cleaning the jar:
Note: Although the jar and lid can be washed in a dishwasher, it is recommended not to do so in order
to make them last longer.
1. Empty the contents out of the jar and rinse with running water to remove as much solid residue as possible.
2. Fill the jar with 600 ml warm water (40 to 45°C), add 2 drops of household washing up liquid, place the lid
on the jar to close it and run the cleaning cycle, code "1 – 4 – 2" (30 seconds).
3. Rinse thoroughly with clean water.
Sanitizing the jar:
Use the following procedure in order to be sure it is perfectly sanitized.
1. Clean the jar and lid.
2. Fill the jar with 1 liter of sanitizing solution (8ml of sodium hypochlorite solution containing 2.6% active
chlorine, and top up to 1 liter with cold water (20 to 30°Celcius)).
3. Close the jar using its lid and run the cleaning cycle, code "1 – 4 – 2" (30 seconds).
4. Once the cycle has ended leave the solution to work for 2 minutes.
11
Page 12

Maintenance
5. Rinse thoroughly with clean water.
HOOD SAFETY FEATURE
Note: the appliance will not start unless the hood lid (8) is closed.
Modifying the safety mode connected with the hood lid:
“Pause” mode (by default).
While a cycle is running, opening the hood makes the motor stop but does not clear the key that is active.
When the hood is closed again, the cycle resumes.
Note: the current cycle will be de-activated if the sound-proong hood remains open for more than 30 seconds.
“Quick stop” mode.
Opening the hood makes the motor stop and de-activates the key that was selected.
This code: “4 – P – 1” provides the means for switching from one mode to the other.
MAINTENANCE
Prior to carrying out any intervention on the appliance, it must be disconnected from the mains without fail.
This appliance requires no specic maintenance. The bearings are lubricated for life.
If any intervention is necessary to replace parts subject to wear, such as the bearing, blade, electrical or other
components, please refer to the parts list.
Whenever ordering spare parts:
• The type.
• The appliance serial number.
• The electrical specications (16) given under the appliance.
12
Page 13

Maintenance
19
20
Changing the drive system:
Motor drive (female):
Hold the motor drive (20) in position with multiple slip joint pliers, and unscrew the xing screw (19) using a
TORX wrench (counter-clockwise).
17
24
Blade drive (male):
The blade drive is an integral part of the jar ball bearing assembly (12). The whole assembly must be replaced
(drive – main bearing – ball bearing).
• Turn the jar upside down.
• Using a large at screwdriver, loosen the bearing xing ring (17) (counter-clockwise).
• Remove the bearing tted with the blender blade from the jar.
(see next section for how to dismantle the blade)
13
Page 14

Maintenance
Changing the blade:
Dismantle the complete bearing assembly.
(see previous section)
Dismantling the blade.
Hold the blade coupling (24) in position with multiple slip joint pliers, and unscrew the xing nut (13) using a
size 12 hexagon wrench (counter-clockwise).
13
14
11
14
15
12
16
18
17
Fitting the blade:
Take care to comply with the order given for assembly of the various components:
1. Lipped seal (15) (be sure to install correctly with lip downwards),
2. Thrust washer (14),
3. Blade (11) (recesses upwards),
4. Thrust washer (14) (the lipped seal must be pushed far enough for the square of this washer to work with
the square of the shaft)
5. Fixing nut (13) (tighten the nut by hand, checking that the washer in point 4 is correctly positioned relative
to the square of the shaft.
14
Page 15

Maintenance
Tighten the xing nut.
Assembling the bearing on the jar:
• Place the bearing seal (16) on the bearing (12).
• Place the locking ring seal (18) on the locking ring (17).
• Place the bearing (12) inside the jar (1).
• Screw down the locking ring, take care that the locking ring seal remains in its seating.
• Tighten well by hand, or with a lever.
Troubleshooting
FAULT FINDING
Identifying the cause of appliance stoppage with precision.
In all circumstances, if the problem persists, disconnect the electric power supply (unplug the mains power
cord (10)) and call on someone from the maintenance department or contact an approved Omcan dealer.
The appliance will not start:
The LCD screen does not light up:
• Check the mains supply, the condition of the power cord (10).
• Check that the On/Off switch (4) is at position 1.
• Check that the ammeter protection system has not been triggered due to an overload. (see the paragraph:
"The appliance stops following a motor overload").
• Switch the appliance off then on again.
• After powering up the 6 key diodes should light up quickly and the screen display "READY". If not, check
on the condition of the wiring and connections in the switch (4), the component support module and the
control panel. (this operation must be carried out by a qualied person).
The LCD screen shows "NOT READY":
• This message indicates that one of the keys was already activated before powering up.
• Remove any item liable to activate the keys, clean the control panel.
15
Page 16

Troubleshooting
The LCD screen shows "LID OPEN":
• Close the safety hood lid (8).
The LCD screen shows "READY":
• Switch the appliance off then on again.
• After powering up the 6 key diodes should light up quickly and the screen display "READY".
• If not, check the connections on the cable connecting the
control panel to the electronic module (this operation must be carried out by a qualied person).
The blade does not rotate:
• Check that there are no foreign bodies stuck in the jar.
• Check the condition of the drive system (motor and blade).
The appliance stops after the motor has overheated, “OVER TEMP”: (the motor unit is hot)
• Put the On / Off switch (4) to the 0 position and unplug the appliance.
• Wait for the motor to cool down (20 to 45 minutes) then press the On / Off switch (4) (position 1).
The appliance stops as a result of an overload.
The LCD screen does not light up:
A motor overload can occur if there is an excessive quantity or something too hard in the jar.
Under these circumstances, either the thermal protection or the excess current protection may be activated
and stop the appliance operating. If the appliance is hot, refer to the section “The appliance stops as a result of
motor over-heating”).
Otherwise:
• Turn off the electric power supply (unplug the mains power cord (10)).
• Move the On / Off switch (4) to the 0 position.
• Under the appliance (g. O), press the button (25) to reset the excess current protection. If the button does
not remain in the “reset” position, allow the appliance to cool down before repeating the operation.
The appliance stops further to an overload “OVERLOAD”:
A motor overload can occur if there is an excessive quantity or something too hard in the jar.
• The recipe is not appropriate for the quantity and consistency.
• Reduce the quantity.
16
Page 17

Troubleshooting
• Choose a different recipe with slower speeds.
The appliance resets while it is operating:
Eliminate all multiple power sockets and plug the appliance into its own individual power supply.
Noises, vibrations, leaks at jar blade level:
• Check the blade is correctly tightened (rst dismantle the blade bearing).
• Replace the bearing seals.
See the chapter: “Changing the blade”.
If the problem persists, turn the appliance electric power off (unplug the mains power cord (4)) and call on
someone from the maintenance department or contact an approved Omcan dealer.
Problem with the recipes:
A few basic rules make it easier to understand how a blender works and thus know how to adapt the recipe
cycles to the products being processed.
Note: Do not overload the appliance: it is better to run a short recipe twice rather than double the
quantities and cycle time: prolonged operation heats the food due to friction and affects the desired
texture with the recipe.
The nal mixture is too hot. Once an evenly mixed texture has been obtained, carrying on blending will make
the food heat up: reduce the speed or recipe time.
The nal mixture is not even in texture:
• The recipe is not appropriate for the quantity and products processed; reduce the quantity of food in the jar,
increase the cycle time, use smaller pieces of food (having evenly sized pieces of food makes it easier to
carry out the recipe).
• Liquid is needed to make the solid food reach the blade. Increase the amount of liquid, pour in the liquid
before adding the solid foods.
Ice cubes remain stuck to the jar walls:
• Reduce the quantity of ice cubes when they are processed without any liquid.
• It is better to add liquid with the ice cubes, always putting the liquid in rst.
The mixture “bounces” fast up and down the jar:
• Reduce the speed to adapt it to the quantity being processed so that the blade is constantly immersed in
the mixture. The recipe will take place more quickly and the mixture will be more even. High speeds are not
suitable for recipes with small quantities.
• Increase the amount of product being processed.
17
Page 18

Instructions Français
SÉCURITÉ ET GARANTIE
Au moment de l’utilisation, l’entretien ou le raclage de l’appareil, toujours veiller à ce que les réactions élémentaires ci-après sont respectées.
Remarque: Vous trouverez plus facile de comprendre les quelques paragraphes qui suivent si vous
référer aux schémas à la n de ce manuel.
NE PAS:
1. Utilisez cet appareil pour traiter d’autres que des denrées alimentaires.
2. Passer les fosses à travers l’appareil. Retirer les stands de fruits avant de les passer dans l’appareil (par
exemple, les mangues, les abricots, pêches).
3. Utilisez l’appareil sans avoir préalablement installé correctement le pot (1) muni de son couvercle (2) sur la
base du moteur (3).
4. Faites fonctionner l’appareil sans nourriture dans le pot.
5. Remplissez le pot au-delà de la capacité maximale correspondant à la quantité indiquée sur le côté: 1,4
litres. La capacité maximale doit être réduite pour les mélanges épais.
6. La base (6) ne doit pas être immergé dans l’eau.
7. Plonger la base dans l’eau ou tout autre liquide pour des raisons de protection contre les risques
d’électrocution.
8. Utilisez l’appareil avec un cordon d’alimentation endommagé. il doit être remplacé par un revendeur agréé
ou par Omcan, ou par des personnes de qualication similaire an d’éviter un danger.
9. L’appareil doit être débranché avant toute intervention sur elle: le nettoyage, les soins, l’entretien général.
10. Utilisez un tuyau ni un tuyau de pression pour le nettoyage: cela est interdit.
11. Utilisez une éponge abrasive pour nettoyer le pot en plastique (1).
12. Insérez ou ustensiles de cuisine de magasin dans le bocal.
13. Faites fonctionner l’appareil si le pot ou une lame est ébréchée, ssurée ou cassée. Ne jamais utiliser un
pot si il ya un jeu par rapport à la lame.
14. Il est interdit de faire fonctionner l’appareil sur une surface ayant une pente supérieure à 10 ° par rapport
au plan horizontal. Tous les 4 pieds de l’appareil doivent toujours être posés sur cette surface. L’arbre du
moteur de l’appareil doit toujours être vertical par rapport à la surface sur laquelle il est placé.
15. L’utilisation de pièces de rechange autres que des pièces d’origine certiées est interdite.
16. Tournez le commutateur marche / arrêt (4) à «0» lorsque l’appareil ne fonctionne pas.
17. Connectez plusieurs appareils sur la même prise de courant.
18. Utilisez l’appareil à l’extérieur.
19. Ne placez jamais l’appareil à proximité ou sur une source de chaleur.
20. Cet appareil est une machine professionnelle conçue exclusivement pour un usage commercial.
Remarque: Vous trouverez plus facile de comprendre les quelques paragraphes qui suivent si vous
référer aux schémas à la n de ce manuel!
21. Cet appareil n’a pas été conçu pour une utilisation par des personnes (y compris les enfants) dont les
capacités physiques, sensorielles ou mentales sont altérées ou par des personnes sans expérience ou de
connaissance, sauf si elles ont été supervisées ou une formation dans l’utilisation de l’appareil au préalable
18
Page 19

Instructions Français
par une personne responsable pour leur sécurité. Surveillez les enfants pour vous assurer qu’ils ne jouent
pas avec l’appareil.
CONNEXION ÉLECTRIQUE
PROTECTION DE LIGNE:
L’appareil doit être relié à une prise standard 2 pôles + de terrain. Le set-up doit être équipé d’un disjoncteur
différentiel et d’un fusible de 16A. Mise à la terre de l’appareil est obligatoire.
PRENDRE SOIN:
Avant de brancher l’appareil, vériez que la tension électrique secteur est la même que la tension de votre
appareil.
PRENEZ SOIN: Vérier que l’interrupteur marche / arrêt (4) est en position «0-Off» avant de brancher le
cordon d’alimentation dans la prise d’alimentation secteur.
1ER EMPLOI DU TEMPS:
Nettoyer soigneusement toutes les pièces en contact avec la nourriture. jar (1) couvercle (2). Voir le chapitre
«Entretien».
RECYCLAGE DU PRODUIT EN FIN DE VIE:
Cet appareil est marqué du symbole du système de tri sélectif des déchets relative aux déchets d’équipements
électriques et électroniques. Cela signie que le produit doit être éliminé par un tri sélectif des déchets système
de tri conformément à la directive 2002/96 / CE (DEEE) - section Appareils professionnels - de sorte qu’il peut
être recyclé soit démantelé an de réduire tout impact sur l’environnement . Pour de plus amples informations,
vous pouvez contacter votre revendeur ou Omcan. Pour l’élimination ou le recyclage des composants de
l’appareil, s’il vous plaît se référer à une société spécialisée ou contactez Omcan. Les produits électroniques
ne sont pas couverts par un système de tri sélectif sont potentiellement dangereux pour l’environnement. Le
matériau d’emballage devraient être éliminés ou recyclés conformément à la réglementation en vigueur.
1 AN PIÈCES ET TRAVAIL BANC GARANTIE
Dans la période de garantie, contacter Omcan Inc. A 1-800-465-0234 pour planier une déposer soit
un dépôt Omcan de service autorisé dans la zone, ou à un entrepôt de service Omcan de réparer
l’équipement.
Entretien non autorisée annulera la garantie. La garantie couvre les pannes électriques et de pièces,
pas une mauvaise utilisation.
S’il vous plaît voir www.omcan.com/warranty.html pour info complète.
ATTENTION:
Les matériaux d’emballage sont considérés comme des déchets solides urbains normale et peuvent donc être
éliminés sans difculté.
19
Page 20

Instructions Français
En tout cas, pour le recyclage approprié, nous suggérons au rebut des produits séparément
(différenciée des déchets) selon les normes actuelles.
NE PAS JETER MATÉRIAUX D’EMBALLAGE DANS L’ENVIRONNEMENT!
SPÉCIFICATIONS TECHNIQUES
PRINCIPAUX PARAMÈTRES TECHNIQUES
Modèle SANTOS 62
Capacité 81 oz / 2.4 L
Puissance maximale 4 HP / 1 kW
Puissance nominale 1.3 HP / 1 kW
RPM 2500 - 15000
Électrique 120V / 60 Hz / 1 Ph
Actuel 8A
Dimensions (DWH) 254 x 203 x 432mm / 10” x 8” x 17”
Conditionnement Dimensions 290 x 259 x 480mm / 11.4” x 10.2” x 18.9”
Poids 9.4 kgs. / 21 lbs.
Conditionnement Poids 10.4 kgs. / 23 lbs.
Numéro d’article 39703
OPÉRATION
DESCRIPTION DE L’APPAREIL
• Appliance n ° 62 est un appareil professionnel conçu exclusivement pour un usage professionnel. Il n’a pas
été conçu pour un usage domestique.
• Appliance n ° 62 est faite pour la préparation de cocktails, smoothies et tous les types de préparation à
base de glace pilée et de fruits mélangé qui peut être produit dans les bars, les cafés, les hôtels ou les
restaurants.
• L’appareil se compose d’un récipient du mélangeur, une base de moteur équipé d’un interrupteur marche /
arrêt, un module électronique, un panneau de commande et un capot d’insonorisation.
• Une trentaine de recettes montrer comment préparer la plupart des préparations désirées.
• L’appareil dispose d’une connexion USB Host permettant personnalisés 6 recettes pour être mis à jour,
avec rmware de l’appareil.
INSTALLATION ET LA MANIPULATION
Vériez que la che de prise de courant est toujours facilement accessible quel que soit le mode d’installation
(version de comptoir ou la version ci-jointe).
20
Page 21

Instructions Français
Installation sur un comptoir:
L’appareil peut être manipulé par une seule personne. Pour la facilité d’utilisation, il est recommandé que
l’appareil est placé sur une table ou surface de travail de manière à avoir le panneau de contrôle en face de
vous (hauteur préconisée: 90 cm, à adapter suivant l’utilisateur).
Installation lorsque construit dans le comptoir:
Avant de découper le comptoir, vérier les points suivants an d’être sûr que l’appareil sera parfaitement
utilisable une fois intégré:
Assurez-vous qu’il reste sufsamment d’espace (derrière, dessus, dessous) pour l’installation et le bon
fonctionnement de l’appareil.
La découpe dans le comptoir représente un rectangle mesurant 168mm x 198mm:
• Assurez-vous que il ya un dégagement minimum de 135 mm sous le comptoir.
• L’espace libre au-dessus doit mesurer au moins 495mm.
• La distance minimale à l’arrière doit être de 102 mm (distance entre la découpe et le mur).
• Les côté de dégagement minimum doit être de 30 mm.
Découpes multiples:
Il est recommandé de laisser une distance de 100 mm entre 2 découpes.
Adaptation de l’appareil de l’utiliser comme une version intégrée:
• Débranchez l’appareil du secteur.
• Retirer le pot (1) et le couvercle de capot (8).
• Basculer l’appareil vers l’arrière.
• L’utilisation d’un tournevis Torx, retirez les 3 vis situées entre l’enveloppe métallique et surround moteur (6).
21
Page 22

Instructions Français
• Retirer l’encadrement du moteur (6).
UTILISER L’APPAREIL
PANNEAU DE COMMANDE DESCRIPTION:
Le panneau de commande (5) est constitué de:
• Un écran graphique (22).
• 6 touches «recettes» (23) dont un P = «pulse».
Chaque touche correspond à une recette prédénie.
UTILISATION:
Remarque: l’appareil ne démarre pas si le couvercle de la hotte (8) est fermé.
Démarrage:
1. Augmentez la puissance de l’appareil en mettant l’interrupteur marche / arrêt (4) sur la position 1.
2. Mettez des aliments mous dans le pot (1) en premier, suivi par les plus durs, avec des glaçons derniers de
tous. En utilisant des morceaux de nourriture de la même taille rendent cette recette facile à réaliser.
3. Mettez le couvercle (2) sur le pot et vérier qu’il est correctement positionné.
4. Assurez-vous que le moteur est éteint, puis installez le pot sur le tapis de pot (9).
5. Fermer le capot d’insonorisation en abaissant le couvercle (8). L’écran LCD doit afcher: «READY».
6. Appuyez sur une des 6 touches (23) pour démarrer le cycle de la recette correspondante.
7. La lampe pour la touche activée restera allumé alors que le cycle est en cours.
8. Attendez la n du cycle.
Arrêt de l’appareil:
L’appareil arrêtera soit:
• Automatiquement à la n du cycle.
• Ou par intervention manuelle, en appuyant sur une des 6 touches sur le panneau de commande ou en
mettant l’interrupteur sur (0).
Remarque: l’ouverture du capot d’insonorisation va déclencher le mode «pause». Le moteur arrêtera.
Lorsque le capot d’insonorisation est de nouveau fermé, le cycle recommence à partir du point d’arrêt,
à moins que le capot reste ouvert pendant plus de 30 secondes.
Compteur de cycle:
La fonction d’arrêt a un compteur de cycle partiel qui permet le nombre de recettes réalisées sur une période
donnée à compter:
• Ce code: «4 - 5 - 2» est utilisé pour afcher le compteur.
• Appuyez sur la touche 1 pour remettre le compteur à zéro tout en la visionnant.
RECETTES PRÉ-ENREGISTRÉE
L’appareil est livré avec 3 menus de base chargées de série, contenant chacun composé de 6 recettes parmi
les 30 recettes pré-enregistrés dans l’appareil.
• Menu «universelle» qui permet la plupart des recettes habituellement nécessaires pour être réalisée.
• «Menu Café», qui est plus adapté à des cafés.
22
Page 23

Instructions Français
• «Menu de la barre de jus», qui est plus adapté à des bars à jus.
Remarque: Chaque menu dispose de 6 recettes. Une recette se compose de plusieurs séquences
(vitesse / temps); ici est un exemple d’une recette:
Sélection d’un menu pré-enregistré:
Les menus sont sélectionnés en utilisant les combinaisons de touches suivantes:
• Menu «universelle», appuyez sur les touches suivantes en succession rapide «2 - 5 - 1».
• «Menu Café» appuyez sur les touches suivantes en succession rapide «2 - 5 - 2».
• «Jus barre de menu», appuyez sur les touches suivantes en succession rapide «2 - 5 - 3».
• «Menu personnalisé» appuyez sur les touches suivantes en succession rapide «2 - 5 - 4».
Remarque: lorsque l’appareil est livré, le menu «Custom» est vide. Voir la section suivante sur la façon
d’entrer les paramètres.
MENU PERSONNALISÉ
Votre propre menu peut être créé en attribuant l’une des 30 recettes pré-enregistrées à l’une des 6 touches sur
le panneau de commande.
COMMENT AFFECTER UNE RECETTE À L’UNE DES TOUCHES DU PANNEAU DE
CONTRÔLE
Remarque: Tous les 6 touches peuvent être paramétrés
Par exemple: pour affecter la recette n ° 34 à n ° 2 saisir
23
Page 24

Instructions Français
• Tapez la séquence suivante: «3 - 1 - P»
• Sélectionnez la touche à programmer Appuyez sur la touche n ° 2
• Entrez le code de la recette souhaitée (voir le tableau des 30 recettes pré-enregistrés) Code de type 34 sur
la clé.
• Appuyez sur la touche «1» pour valider, ou l’un des autres touches pour annuler une fois que le «menu
personnalisé» a été mis en place, les menus standards peuvent être activés (en utilisant le code approprié)
sans supprimer le menu personnalisé.
• Utilisez le code «2 - 5 - 4» pour réactiver le menu «Personnaliser».
CRÉATION DE RECETTES PERSONNALISÉS
Création de recettes personnalisées:
Vos propres recettes peuvent être créés en utilisant un programme spécial disponible auprès SANTOS et un
simple clé USB pour le transfert de l’ordinateur à l’appareil. (Pour le programme de recettes faisant, aller à
www.brushlessblender.com).
Remarque: Pas de boîtier spécial est nécessaire.
ENTRETIEN
NETTOYAGE
IMPORTANT:
• Dans tous les cas, arrêter l’appareil et débranchez le câble d’alimentation (10).
• L’appareil ne doit pas être nettoyé avec un jet d’eau ni un jet à haute pression.
• L’unité de moteur (3) ne doit pas être immergé dans l’eau.
• Ne pas utiliser une éponge abrasive pour nettoyer le pot (1), capot de protection (7) et le couvercle (8), ni
le panneau de commande (5).
24
Page 25

Instructions Français
• Ne pas fermer hermétiquement le bocal lorsque l’appareil est rangé (enlever le couvercle (2).
• Prenez soin lors de la manipulation de la lame; risque de coupures.
• Ne tapez pas sur le pot contre toute surface pour décoller ingrédients: utiliser une spatule souple place.
Il est conseillé de nettoyer l’appareil dès que vous avez ni de l’utiliser.
Il sera plus facile à nettoyer si vous ne permettez pas les déchets restants de nourriture à sécher.
L’entourage du moteur (6) peut être nettoyé à l’aide d’une éponge douce et humide.
Nettoyage du pot:
Remarque: Bien que le pot et le couvercle peuvent être lavés dans un lave-vaisselle, il est recommandé
de ne pas le faire dans le but de faire durer plus longtemps.
1. Videz le contenu du bocal et rincer à l’eau courante pour enlever autant résidu solide que possible.
2. Remplissez le pot avec 600 ml d’eau chaude (40 à 45 ° C), ajouter 2 gouttes de famille liquide vaisselle,
placer le couvercle sur le pot pour le fermer et exécuter le cycle de nettoyage, le code «1 - 4 - 2» (30
secondes).
3. Rincez abondamment avec de l’eau propre.
Désinfection du pot:
Utilisez la procédure suivante an d’être sûr qu’il est parfaitement assainie.
1. Nettoyez le pot et le couvercle.
2. Remplissez le pot avec 1 litre de solution désinfectante (8 ml de solution d’hypochlorite de sodium
contenant 2,6% de chlore actif, et supérieure à 1 litre avec de l’eau froide (20 à 30 ° Celsius)).
3. Fermez le bocal à l’aide de son couvercle et de lancer le cycle de nettoyage, le code «1 - 4 - 2» (30
secondes).
4. Une fois le cycle terminé laisser la solution pour travailler pendant 2 minutes.
5. Rincez abondamment avec de l’eau propre.
CAPOT DE SÉCURITÉ CARACTÉRISTIQUE
Remarque: l’appareil ne démarre pas si le couvercle de la hotte (8) est fermé.
Modication du mode de sécurité relié avec le couvercle de la hotte:
Mode «Pause» (par défaut).
Bien qu’un cycle est en cours, l’ouverture du capot permet l’arrêt du moteur, mais ne supprime pas la clé qui
est active. Lorsque le capot est fermé à nouveau, le cycle reprend.
Remarque: le cycle actuel sera désactivé si le capot d’insonorisation reste ouverte pendant plus de 30
25
Page 26

Instructions Français
secondes.
Mode «arrêt rapide».
Ouverture du capot permet l’arrêt du moteur et désactive la touche qui a été sélectionné.
Le code suivant: «4 - P - 1» fournit les moyens pour commuter d’un mode à l’autre.
ENTRETIEN
Avant d’effectuer toute intervention sur l’appareil, il doit être débranché du secteur à coup sûr.
Cet appareil ne nécessite aucun entretien spécique. Les roulements sont graissés à vie.
Si une intervention est nécessaire pour remplacer les pièces d’usure, comme le palier, la lame, électrique ou
d’autres composants, s’il vous plaît se référer à la liste des pièces.
Chaque fois que la commande de pièces de rechange:
• Le type.
• Le numéro de série de l’appareil.
• Les spécications électriques (16) Compte tenu sous l’appareil.
Changer le système d’entraînement:
Entraînement de moteur (femelle):
Maintenez la commande de moteur (20) en position de glissement multiples pince à joint, et dévisser la vis de
xation (19) en utilisant une clé TORX (à gauche).
19
20
26
Page 27

Instructions Français
17
24
Entraînement de la lame (mâle):
L’entraînement de la lame est une partie intégrante de l’ensemble de palier pot de balle (12). L’ensemble doit
être remplacé (dur - palier principal - roulement à billes).
• Tournez le pot à l’envers.
• En utilisant un grand tournevis plat, desserrer la bague de xation de palier (17) (à gauche).
• Retirer le palier équipé de la lame du mélangeur de la jarre.
(voir la section suivante pour savoir comment démonter la lame)
Modication de la lame:
Démonter l’assemblage complet de palier.
(voir la section précédente)
Démontage de la lame.
Maintenez le couplage de la lame (24) en position de glissement multiples pince à joint, et dévisser l’écrou de
xation (13) à l’aide d’une clé hexagonale de taille 12 (sens anti-horaire).
27
Page 28

Instructions Français
13
14
11
14
15
12
16
18
17
Montage de la lame:
Prenez soin de se conformer à l’ordre donné pour l’assemblage des différents composants:
1. Joint à lèvres (15) (veillez à installer correctement avec la lèvre vers le bas),
2. Rondelle de butée (14),
3. Lame (11) (creux vers le haut),
4. Rondelle de butée (14) (le joint à lèvres doit être poussé assez loin pour le carré de cette rondelle de
travailler avec le carré de l’arbre)
5. Écrou de xation (13) (serrer l’écrou à la main, en vériant que la rondelle au point 4 est correctement
positionné par rapport à la place de l’arbre.
Serrer l’écrou de xation.
Montage du roulement sur le pot:
• Placer le joint de roulement (16) sur le palier (12).
• Placer le joint de bague de verrouillage (18) sur la bague de verrouillage (17).
• Placer le palier (12) à l’intérieur du pot (1).
• Visser la bague de verrouillage, veiller à ce que le joint de la bague de verrouillage reste dans son coin.
• Serrez bien à la main, ou avec un levier.
DÉPANNAGE
TROUVER À REDIRE
Identier la cause arrêt de l’appareil avec précision.
Dans tous les cas, si le problème persiste, débranchez l’alimentation électrique (débranchez le cordon
d’alimentation secteur (10)) et faire intervenir une personne du service de maintenance ou contacter un
revendeur agréé Omcan.
L’appareil ne démarre pas:
L’écran LCD ne brille pas:
• Vériez l’alimentation secteur, l’état du cordon d’alimentation (10).
28
Page 29

Instructions Français
• Vériez que le commutateur marche / arrêt (4) est en position 1.
• Vérier que le système de protection de l’ampèremètre n’a pas été déclenchée suite à une surcharge. (voir
le paragraphe: «L’appareil arrête la suite d’une surcharge du moteur»).
• Eteignez l’appareil puis rallumez-le.
• Après la mise sous tension les 6 diodes clés devrait allumer rapidement et l’afchage de l’écran «READY».
Si non, vérier l’état du câblage et les connexions dans le commutateur (4), le module de support de
composant et le panneau de commande. (cette opération doit être réalisée par une personne qualiée).
L’écran LCD afche «NOT READY»:
• Ce message indique que l’une des clés a déjà été activé avant la mise sous tension.
• Retirez tout élément susceptible d’activer les touches, nettoyer le panneau de commande.
L’écran LCD afche «couvercle ouvert»:
• Fermez le couvercle de la hotte de sécurité (8).
L’écran LCD afche «READY»:
• Eteignez l’appareil puis rallumez-le.
• Après la mise sous tension les 6 diodes clés devrait allumer rapidement et l’afchage de l’écran «READY».
• Sinon, vériez les connexions sur le câble reliant le
• Panneau de commande au module électronique (cette opération doit être réalisée par une personne
qualiée).
La lame ne tourne pas:
• Vériez qu’il n’y a pas de corps étrangers coincés dans le bocal.
• Vérier l’état du système d’entraînement (moteur et la lame).
L’appareil arrête après que le moteur a surchauffé, «OVER TEMP»: (le bloc moteur est chaud)
29
Page 30

Instructions Français
• Mettre l’interrupteur On / Off (4) à la position 0 et débrancher l’appareil.
• Attendez que le moteur refroidisse (20 à 45 minutes), puis appuyez sur la touche On / Off (4) (position 1).
L’appareil arrête à la suite d’une surcharge.
L’écran LCD ne brille pas:
Une surcharge du moteur peut se produire si il ya une quantité excessive ou quelque chose de trop dur dans
le bocal.
Dans ces circonstances, soit la protection thermique ou l’excès de protection contre les surintensités peuvent
être activés et arrêtent l’appareil en marche. Si l’appareil est chaud, reportez-vous à la section «L’appareil
arrête à la suite de moteur surchauffe»).
Autrement:
• Coupez l’alimentation électrique (débranchez le cordon d’alimentation secteur (10)).
• Déplacez l’interrupteur On / Off (4) à la position 0.
• Sous l’appareil (g. O), appuyez sur la touche (25) pour réinitialiser l’excès de protection contre les
surintensités. Si le bouton ne reste pas dans la position «reset», permettre à l’appareil refroidir avant de
répéter l’opération.
L’appareil arrête suite à une surcharge «SURCHARGE»:
Une surcharge du moteur peut se produire si il ya une quantité excessive ou quelque chose de trop dur dans
le bocal.
• La recette ne convient pas pour la quantité et la cohérence.
• Réduire la quantité.
• Choisissez une autre recette avec des vitesses plus lentes.
L’appareil réinitialise quand il fonctionne:
Éliminer toutes les prises de courant multiples et branchez l’appareil dans sa propre alimentation individuelle.
Bruits, vibrations, les fuites au niveau de la lame de pot:
• Vériez la lame est serrée correctement (premier démonter le palier de lame).
• Remplacer les joints de palier.
Voir le chapitre: «Modication de la lame».
Si le problème persiste, mettez l’appareil hors énergie électrique (débranchez le cordon d’alimentation de (4))
et faire intervenir une personne du service de maintenance ou contacter un revendeur agréé Omcan.
Problème avec les recettes:
Quelques règles de base rendent plus facile à comprendre comment fonctionne un mixeur et de savoir
comment adapter les cycles de recettes pour les produits en cours de traitement ainsi.
30
Page 31

Instructions Français
Remarque: Ne pas surcharger l’appareil: il est préférable d’exécuter une courte recette deux fois plutôt
que de doubler les quantités et les temps de cycle: opération prolongée réchauffe la nourriture due à la
friction et affecte la texture désirée avec la recette.
Le mélange nal est trop chaud. Une fois une texture bien homogène a été obtenu, portant sur la fusion fera la
chaleur de la nourriture jusqu’à: réduire le temps de la vitesse ou de la recette.
Le mélange nal est même pas dans la texture:
• La recette ne convient pas pour la quantité et de produits transformés; de réduire la quantité de
nourriture dans le pot, augmenter le temps de cycle, utiliser de plus petits morceaux de nourriture (ayant
uniformément morceaux de la taille de la nourriture, il est plus facile de réaliser la recette).
• Liquid est nécessaire pour rendre la nourriture solide atteindre la lame. Augmenter la quantité de liquide,
versez le liquide avant d’ajouter les aliments solides.
Les glaçons restent collées sur les murs jar:
• Réduire la quantité de glaçons quand ils sont traités sans liquide.
• Il est préférable d’ajouter du liquide avec les cubes de glace, toujours en mettant le liquide en premier.
Le mélange «rebondit» rapide haut et en bas du pot:
• Réduire la vitesse de l’adapter à la quantité en cours de traitement de sorte que la lame est constamment
immergé dans le mélange. La recette aura lieu plus rapidement et le mélange sera plus encore. Les
vitesses élevées ne sont pas adaptés pour les recettes avec de petites quantités.
• Augmenter la quantité de produit en cours de traitement.
31
Page 32

Figure Drawings
2
9
5
8
7
3
4
6
1
1
2
11
21
22
23
20
3
32
Page 33

ELEMENT CROSS-REFERENCE TABLE
MARK Description MARK Description
1 Jar 14 Blade thrust washer
2 Jar lid 15 Blade shaft seal
3 Motor base 16 Bearing seal
4 Switch 17 Bearing tightening ring
5 Control panel 18 Locking ring bearing seal
6 Motor housing 19 Motor drive xing screw
7 Protective hood 20 Motor drive
8 Hood lid 21 Table seal
9 Jar mat 22 LCD screen
10 Mains plug 23 Control panel keys
11 Blade 24 Blade drive
12 Blade bearing 25 Current overload protector
13 Blade tightening nut
Figure Drawings
Simplied list of appliance codes:
Functions: Codes
2 - 5 - 1 ----- Universal menu
2 - 5 - 2 ----- Coffee shop menu
2 - 5 - 3 ----- Juice bar menu
2 - 5 - 4 ----- Custom menu
3 - 1 - P ----- Allocation of a recipe to a key
4 - 5 - 2 ----- Partial counter
1 - 4 - 2 ----- Cleaning cycle
4 - P - 1 ----- Activation of Pause / Quick stop mode
33
Page 34

Parts Breakdown
Model Santos 62 39703
34
Page 35

Model Santos 62 39703
Parts Breakdown
Item
OMC ID Description Position
No.
40909 S62100
40910 S62101 Bowl for Santos 62 2 73427 S62220
40911 S62103 Bowl Cover for Santos 62 3 73428 S62222
73420 S62105 Axle Lock for Santos 62 4 73732 S62300B
73421 S62106
40912 S62109
41016 S62110
40913 S62114
90914 S62116
73422 S62117
73423 S62118
40915 S62120
73424 S62200
73425 S62203
40920 S62204
73426 S62207
Complete Bowl for
Santos 62
O Ring Gasket for
Santos 62
Complete Cage for
Santos 62
Cage + Knife Assembly for
Santos 62
O Ring Gasket for
Santos 62
V Ring Gasket for
Santos 62
Knife Washer for Santos
62
Knife Locking Nut for
Santos 62
Tin Blender Knife for
Santos 62
Complete Sound Enclosure for Santos 62
Screw M6 x 16 for
Santos 62
Bowl Holder Assembly for
Santos 62
Bowl Holder Center Ring
for Santos 62
1 40921 S62208
5 73430 S62301 Motor Base for Santos 62 25 73448 S62351
6 40922 S62303 Shifter for Santos 62 26 73449 S62352
7 73431 S62304
8 40923 S62305 Switch for Santos 62 28 73735 S62365B
9 73432 S62306
10 73433 S62307
11 73733 S62308B
12 73436 S62310 Front Panel for Santos 62 32 73455 S62405
17 73437 S62312
18 73438 S62315 LCD Screen for Santos 62 34 73447 S62348 Foot for Santos 62 56
19 73439 S62322
20 41017 S62330B
Item
OMC ID Description Position
No.
Removable Bowl Holder
for Santos 62
Silent Sound Enclosure
Door for Santos 62
Silent Sound Enclosure
Base for Santos 62
Base Assembly 110V USA
Plug for Santos 62
Screw M5 x 20 for
Santos 62
Screw M5 x 20 for
Santos 62
5mm Diameter Washer for
Santos 62
Brushless Motor 100-120V
50/60 Hz for Santos 62
Screw M2 x 8 for Santos
62
Screw M4 x 6 for Santos
62
Boards Set 110V for
Santos 62
Item
OMC ID Description Position
No.
21 73441 S62340 Main Box for Santos 62 37
22 73734 S62343B
23 73443 S62344 Screw for Santos 62 41
24 73444 S62345 Front Plate for Santos 62 42
27 73450 S62353
29 73452 S62400
30 73453 S62401
31 73454 S62402
33 73446 S62347 Screw for Santos 62 55
35
36
Power Cord With USA
Plug for Santos 62
Screw H M4 x 6 for
Santos 62
Screw M4 x 6 for Santos
62
Screw M4 x 10 for
Santos 62
Thermal Protector 8A for
110V for Santos 62
Case Assembly for
Santos 62
Base Casing for Santos
62
Screw H M4 x 16 for
Santos 62
Table Gasket for Santos
62
40
44
45
46
50
51
52
53
54
35
Page 36

Electrical Schematics
Model Santos 62 39703
36
Page 37

Notes
________________________________________________________________________________________
________________________________________________________________________________________
________________________________________________________________________________________
________________________________________________________________________________________
________________________________________________________________________________________
________________________________________________________________________________________
________________________________________________________________________________________
________________________________________________________________________________________
________________________________________________________________________________________
________________________________________________________________________________________
________________________________________________________________________________________
________________________________________________________________________________________
________________________________________________________________________________________
________________________________________________________________________________________
________________________________________________________________________________________
________________________________________________________________________________________
________________________________________________________________________________________
________________________________________________________________________________________
________________________________________________________________________________________
________________________________________________________________________________________
________________________________________________________________________________________
________________________________________________________________________________________
________________________________________________________________________________________
________________________________________________________________________________________
37
Page 38

Notes
________________________________________________________________________________________
________________________________________________________________________________________
________________________________________________________________________________________
________________________________________________________________________________________
________________________________________________________________________________________
________________________________________________________________________________________
________________________________________________________________________________________
________________________________________________________________________________________
________________________________________________________________________________________
________________________________________________________________________________________
________________________________________________________________________________________
________________________________________________________________________________________
________________________________________________________________________________________
________________________________________________________________________________________
________________________________________________________________________________________
________________________________________________________________________________________
________________________________________________________________________________________
________________________________________________________________________________________
________________________________________________________________________________________
________________________________________________________________________________________
________________________________________________________________________________________
________________________________________________________________________________________
________________________________________________________________________________________
________________________________________________________________________________________
38
Page 39

Warranty Registration
Thank you for purchasing an Omcan product. To register your warranty for this product, complete the information below, tear off the card at
the perforation and then send to the address specied below. You can also register online by visiting:
Merci d’avoir acheté un produit Omcan. Pour enregistrer votre garantie pour ce produit, complétez les informations ci-dessous, détachez la
carte au niveau de la perforation, puis l’envoyer à l’adresse spécié ci-dessous. Vous pouvez également vous inscrire en ligne en visitant:
Gracias por comprar un producto Omcan usted. Para registrar su garantía para este producto, complete la información a continuación,
cortar la tarjeta en la perforación y luego enviarlo a la dirección indicada a continuación. También puede registrarse en línea en:
www.omcan.com/warrantyregistration.html
For mailing in Canada
Pour postale au Canada
Por correo en Canadá
OMCAN INC.
PRODUCT WARRANTY REGISTRATION
3115 Pepper Mill Court,
Mississauga, Ontario
Canada, L5L 4X5
PRODUCT WARRANTY REGISTRATION
4450 Witmer Industrial Estates, Unit 4,
For mailing in the US
Pour diffusion aux États-Unis
Por correo en los EE.UU.
OMCAN
Niagara Falls, New York
USA, 14305
Purchaser’s Information
Name: Company Name:
Address:
Telephone:
City: Province or State: Postal or Zip: Email Address:
Country: Type of Company:
Restaurant Bakery Deli
Dealer from which Purchased: Butcher Supermarket Caterer
Dealer City: Dealer Province or State: Institution (specify):
Invoice: Other (specify):
Model Name: Model Number: Serial Number:
Machine Description:
Date of Purchase (MM/DD/YYYY): Date of Installation (MM/DD/YYYY):
Thank you for choosing Omcan | Merci d’avoir choisi Omcan | Gracias por elegir Omcan
39
Page 40

Since 1951 Omcan has grown to become a leading distributor of equipment and supplies to the North
American food service industry. Our success over these many years can be attributed to our commitment
to strengthen and develop new and existing relationships with our valued customers and manufacturers.
Today with partners in North America, Europe, Asia and South America, we continually work to improve
and grow the company. We strive to offer customers exceptional value through our qualied local sales
and service representatives who provide convenient access to over 3,500 globally sourced products.
Depuis 1951 Omcan a grandi pour devenir un des “leaders” de la distribution des équipements et
matériel pour l’industrie des services alimentaires en Amérique du Nord. Notre succès au cours de ces
nombreuses années peut être attribué à notre engagement à renforcer et à développer de nouvelles
et existantes relations avec nos clients et les fabricants de valeur. Aujourd’hui avec des partenaires en
Amérique du Nord, Europe, Asie et Amérique du Sud, nous travaillons continuellement à améliorer et
développer l’entreprise. Nous nous efforçons d’offrir à nos clients une valeur exceptionnelle grâce à
nos ventes locales qualiées et des représentants de service qui offrent un accès facile à plus de 3500
produits provenant du monde entier.
Desde 1951 Omcan ha crecido hasta convertirse en un líder en la distribución de equipos y suministros
de alimentos en América del Norte industria de servicios. Nuestro éxito en estos años se puede atribuir
a nuestro compromiso de fortalecer y desarrollar nuevas relaciones existentes con nuestros valiosos
clientes y fabricantes. Hoy con socios de América del Norte, Europa, Asia y América del Sur, que trabajan
continuamente para mejorar y crecer la empresa. Nos esforzamos por ofrecer a nuestros clientes valor
excepcional a través de nuestro local de ventas y representantes de los servicios que proporcionan un
fácil acceso a más de 3,500 productos con origen a nivel mundial.
 Loading...