

Page 1
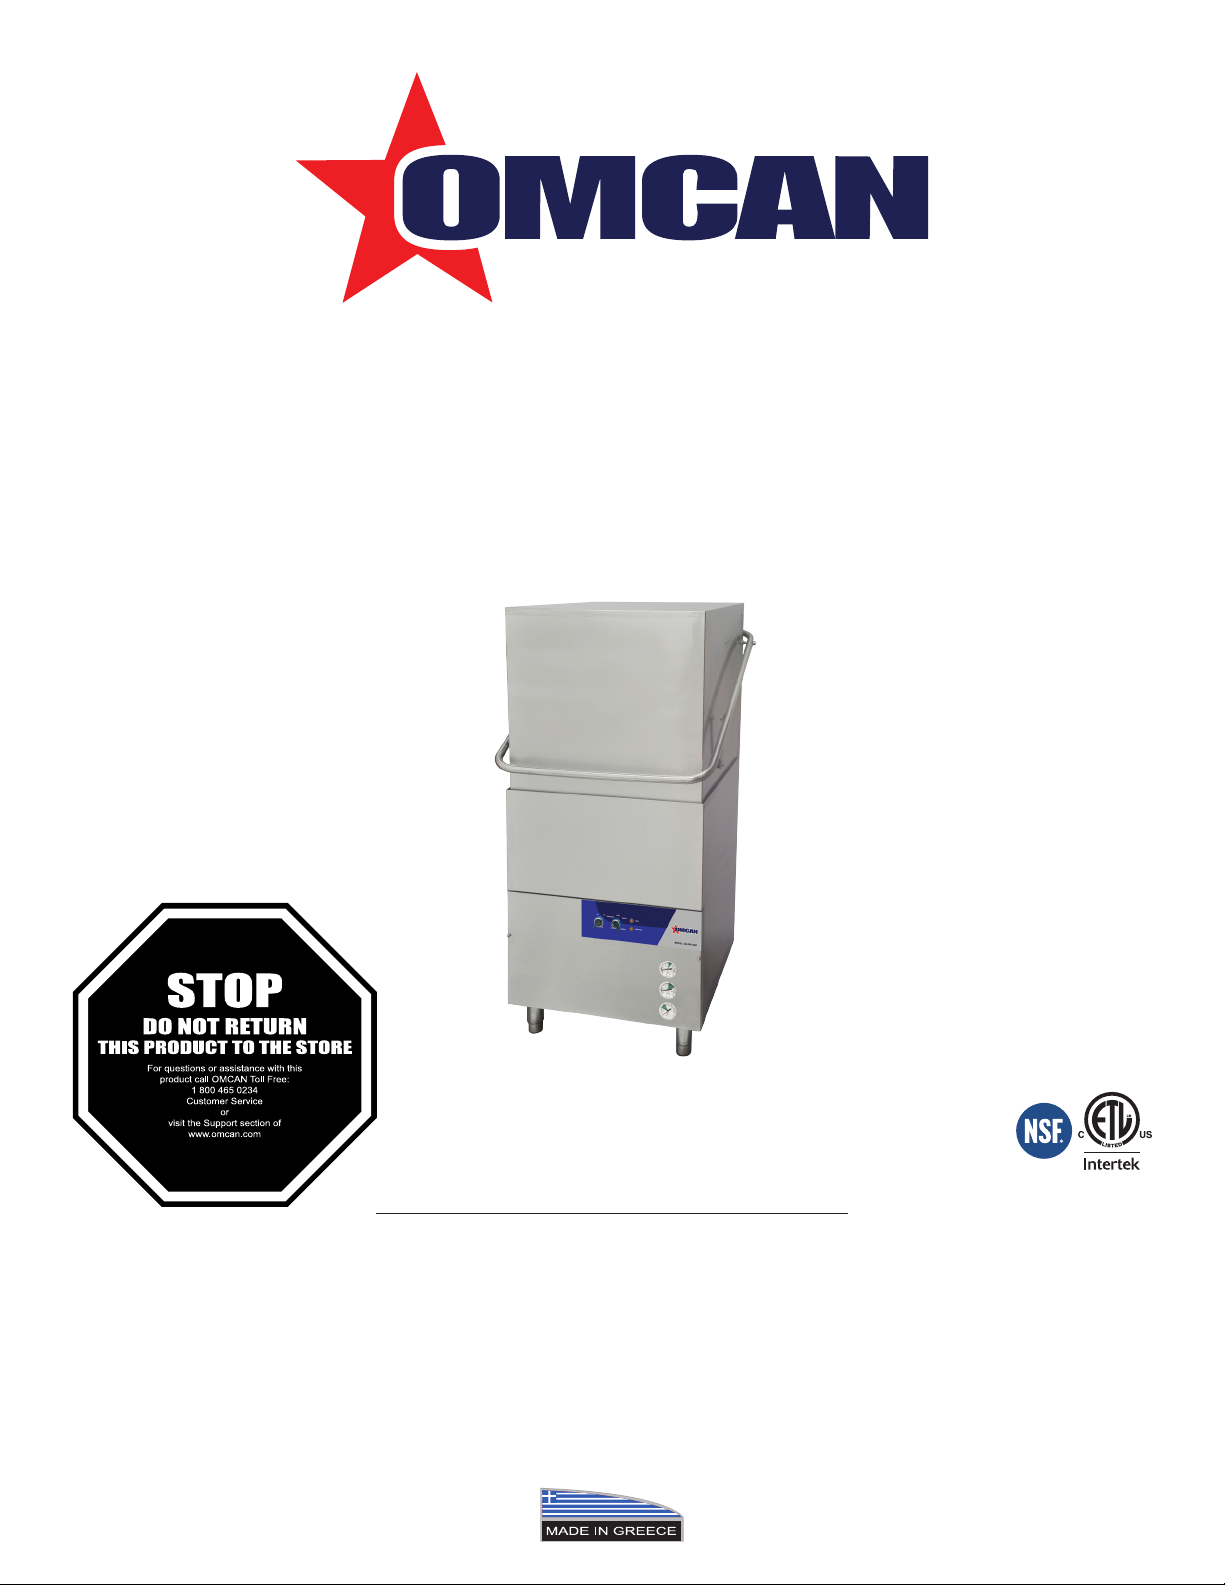
High Temp Dishwasher
Model CD-GR-1500
Item 46321
Instruction Manual
Revised - 01/09/2020
Toll Free: 1-800-465-0234
Fax: 905-607-0234
Email: service@omcan.com
www.omcan.com
Page 2

Table of Contents
Model CD-GR-1500
Section
General Information
Technical Specications
Safety and Warranty
Installation
Operation
Maintenance
------------------------------------------------------------------------------------ 10 - 16
------------------------------------------------------------------------------------- 17 - 19
--------------------------------------------------------------------------------- 19 - 20
--------------------------------------------------------------------------- 3 - 4
--------------------------------------------------------------------------- 8 - 9
Page
---------------------------------------------------------------------- 5 - 7
Troubleshooting
Parts Breakdown
Electrical Schematics
Notes
Installation Requirements and Checklist
Warranty Registration
------------------------------------------------------------------------------------------- 35 - 37
----------------------------------------------------------------------------- 21 - 22
---------------------------------------------------------------------------- 23 - 33
---------------------------------------------------------------------------- 34
---------------------------------------------------------------------------- 39
---------------------------------------------------- 38
2
Page 3

General Information
Omcan Manufacturing and Distributing Company Inc., Food Machinery of America, Inc. dba Omcan
and Omcan Inc. are not responsible for any harm or injury caused due to any person’s improper or
negligent use of this equipment. The product shall only be operated by someone over the age of 18, of
sound mind, and not under the inuence of any drugs or alcohol, who has been trained in the correct
operation of this machine, and is wearing authorized, proper safety clothing. Any modication to the
machine voids any warranty, and may cause harm to individuals using the machine or in the vicinity of
the machine while in operation.
CHECK PACKAGE UPON ARRIVAL
Upon receipt of an Omcan shipment please inspect for external damage. If no damage is evident on the
external packaging, open carton to ensure all ordered items are within the box, and there is no concealed
damage to the machine. If the package has suered rough handling, bumps or damage (visible or concealed),
please note it on the bill of lading before accepting the delivery and contact Omcan within 24 hours, so we may
initiate a claim with the carrier. A detailed report on the extent of the damage caused to the machine must be
lled out within three days, from the delivery date shown in the shipping documents. Omcan has no recourse
for damaged products that were shipped collect or third party.
Before operating any equipment, always read and familiarize yourself with all operation and safety
instructions.
Omcan would like to thank you for purchasing this machine. It’s of the utmost importance to save
these instructions for future reference. Also save the original box and packaging for shipping the
equipment if servicing or returning of the machine is required.
---------------------------------------------------------------------------------------------------------------------------------------------------
Omcan Fabrication et distribution Companie Limité et Food Machinery d’Amerique, dba Omcan et
Omcan Inc. ne sont pas responsables de tout dommage ou blessure causé du fait que toute personne
ait utilisé cet équipement de façon irrégulière. Le produit ne doit être exploité que par quelqu’un de
plus de 18 ans, saine d’esprit, et pas sous l’inuence d’une drogue ou d’acohol, qui a été formé pour
utiliser cette machine correctement, et est vêtu de vêtements de sécurité approprié. Toute modication
de la machine annule toute garantie, et peut causer un préjudice à des personnes utilisant la machine
ou des personnes à proximité de la machine pendant son fonctionnement.
VÉRIFIEZ LE COLIS DÈS RÉCEPTION
Dès réception d’une expédition d’Omcan veuillez inspecter pour dommages externes. Si aucun dommage
n’est visible sur l’emballage externe, ouvrez le carton an de s’assurer que tous les éléments commandés
sont dans la boîte, et il n’y a aucun dommage dissimulé à la machine. Si le colis n’a subi aucune mauvaises
manipulations, de bosses ou de dommages (visible ou cachée), notez-le sur le bond de livraison avant
d’accepter la livraison et contactez Omcan dans les 24 heures qui suivent, pour que nous puissions engager
une réclamation auprès du transporteur. Un rapport détaillé sur l’étendue des dommages causés à la machine
doit être rempli dans un délai de trois jours, à compter de la date de livraison indiquée dans les documents
d’expédition. Omcan n’a aucun droit de recours pour les produits endommagés qui ont été expédiées ou cueilli
par un tiers transporteur.
3
Page 4

General Information
Avant d’utiliser n’importe quel équipement, toujours lire et vous familiariser avec toutes les opérations
et les consignes de sécurité.
Omcan voudrais vous remercier d’avoir choisi cette machine. Il est primordial de conserver ces
instructions pour une référence ultérieure. Également conservez la boîte originale et l’emballage pour
l’expédition de l’équipement si l’entretien ou le retour de la machine est nécessaire.
---------------------------------------------------------------------------------------------------------------------------------------------------
Omcan Empresa De Fabricacion Y Distribucion Inc. Y Maquinaria De Alimentos De America, Inc. dba
Omcan y Omcan Inc. no son responsables de ningun daño o perjuicío causado por cualquier persona
inadecuada o el uso descuidado de este equipo. El producto solo podra ser operado por una persona
mayor de 18 años, en su sano juicio y no bajo alguna inuencia de droga o alcohol, y que este ha sido
entrenado en el correcto funcionamiento de esta máquina, y ésta usando ropa apropiada y autorizada.
Cualquier modicación a la máquina anúla la garantía y puede causar daños a las personas usando la
máquina mientras esta en el funcionamiento.
REVISE EL PAQUETE A SU LLEGADA
Tras la recepcion de un envio Omcan favor inspeccionar daños externos. Si no hay daños evidentes en el
empaque exterior, Habra el carton para asegurararse que todos los articulos solicitados ésten dentro de la
caja y no encuentre daños ocultos en la máquina. Si el paquete ha sufrido un manejo de poco cuidado, golpes
o daños (visible o oculto) por favor anote en la factura antes de aceptar la entrega y contacte Omcan dentro
de las 24 horas, de modo que podamos iniciar una reclamación con la compañia. Un informe detallado sobre
los daños causados a la máquina debe ser llenado en el plazo de tres días, desde la fecha de entrega que se
muestra en los documentos de envío. Omcan no tiene ningun recurso por productos dañados que se enviaron
a recoger por terceros.
Antes de utilizar cualquier equipo, siempre lea y familiarizarse con todas las instrucciones de
funcionamiento y seguridad.
Omcan le gustaría darle las gracias por la compra de esta máquina. Es de la mayor importancia para
salvar estas instrucciones para futuras consultas. Además, guarda la caja original y el embalaje para el
envío del equipo si servicio técnico o devolución de la máquina que se requiere.
4
Page 5

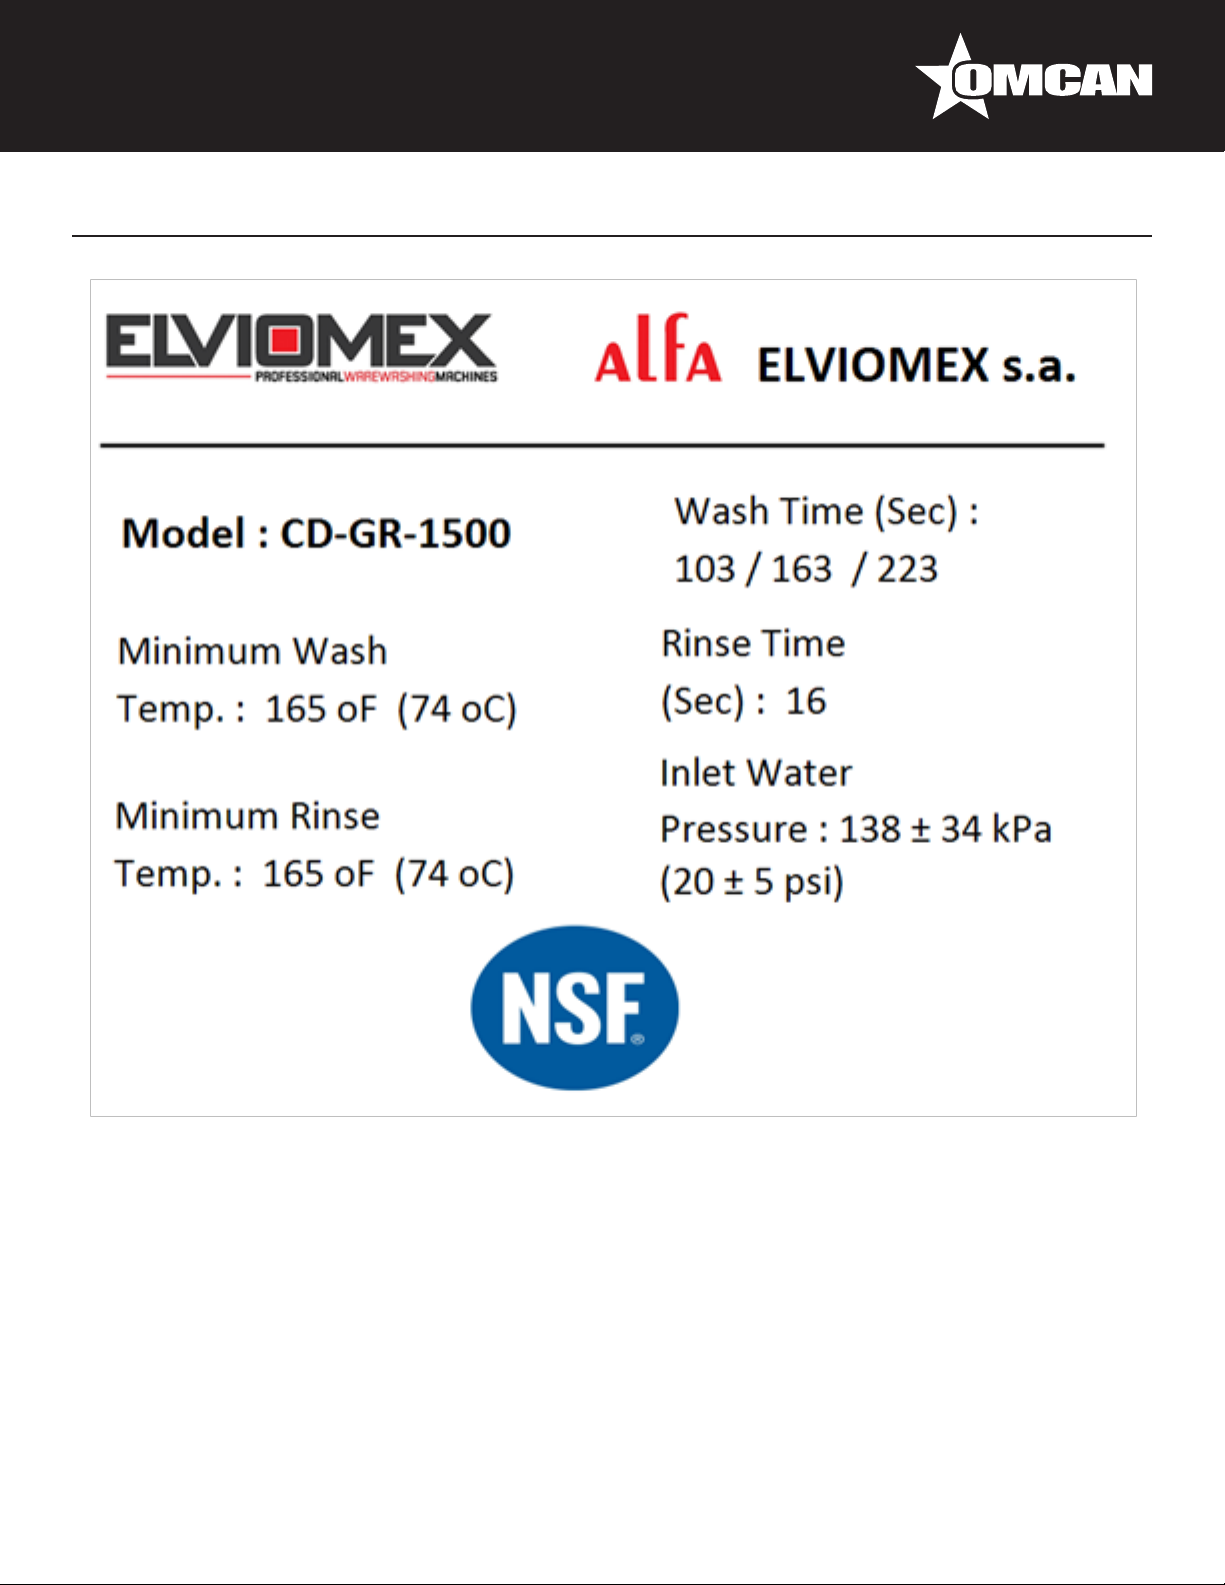
Technical Specications
Model CD-GR-1500
Voltage 220-240V / 60Hz
Max Power 10.5 Kw
Max Amperes 44 A
Minimum Income Water Temperature 40°C / 104°F
Rinse Flow Pressure 20 psi ± 5
Boiler Heating Element 7.5 kW
Tank Heating Element 6 kW
Boiler Capacity 7.4 L
Tank Capacity 58 L
Washing Pump Power 1.5 HP
Overall Dimensions 29.5” x 34.6” x 72” / 750 x 880 x 1830mm
Basket Dimensions 19.7” x 19.7” / 500 x 500mm
Washing Cycles 103 / 163 / 223 sec.
Rinse Cycle 16 sec.
Peristaltic Detergent Pump Standard
Peristaltic Rinse Aid Pump Standard
Boiler Thermofuse 105°C / 221°F
Tank Thermofuse 99°C / 210.2°F
Boiler Thermometer Standard
Tank Thermometer Standard
Pressure Gauge Standard
Door Clearance 15.7” / 400mm
Max Glass 15.6” / 395mm
Max Dish 15.7” / 400mm
Net Weight 244.7 lbs. / 111 kgs.
Gross Weight 284.4 lbs. / 129 kgs.
Item Number 46321
5
Page 6
Technical Specications
6
Page 7

PRODUCT SERIAL NUMBER
Technical Specications
7
Page 8

Safety and Warranty
THE FOLLOWING SYMBOLS INDICATE IMPORTANT INFORMATION THROUGHOUT THIS MANUAL.
Caution symbols indicate action or condition that can result in damage to the machine.
Not approved symbols indicate action or condition that will diminish the optimum operation of the
machine.
Approved symbols indicate action or condition that is safe and correct and should be followed.
Warning symbols indicate action or condition that can be hazardous.
Note symbols indicate important information that should be followed for installing or operating the
machine.
INDICATIONAL WARNINGS - CAUTIONS - NOTES
Machine installation must comply with all local Health, Plumbing, Electrical and Safety codes.
All Plumbing connections ARE PRIOR to the electrical installations and must be performed be qualied
service personnel otherwise there is risk of damages to heating elements.
Problems or Damages caused due to improper installation are not covered by the Limited Warranty.
All debris from the water supply line must be flushed before connecting it to the machine. Debris can
damage the machine supply valves.
Handle with care when lifting or moving to avoid damage or leakings.
Plumbing and Electrical connections must allow the machine to move for service or cleaning.
Before any electrical or service operation disconnect the main electrical supply and lock it out in order
to clearly indicate that there is work in progress.
8
Page 9

Safety and Warranty
1. All pumping connections must be made prior to the electrical connection as otherwise there is high
risk of damages to heating elements.
Damages due to negligence installation are not covered by the warranty.
2. Be careful when lifting or moving the dishwasher to avoid leaks or damages.
Do not use granular detergent. Poor results usually occur.
Do not use caustic products. This will void the guarantee.
Be sure all electrical supply specications correspond to information label on machine.
The manufacturer/ distributor is not responsible for any possible damages or risks due to improper connection
of this appliance.
I. Inspect the packaging for external damages.
II. Check that all the following accessories are inside the machine.
• 1 Glass basket.
• 1 Dish basket.
• 1 Cutlery basket.
• 1 Pressure reducer valve (PRV).
• 4 leveling feet.
• 1 User manual.
• 1 Extended warranty brochure.
1 YEAR PARTS AND LABOUR WARRANTY
Within the warranty period, contact Omcan Inc. at 1-800-465-0234 to schedule an Omcan authorized
service technician to repair the equipment locally.
Unauthorized maintenance will void the warranty. Warranty covers electrical and part failures, not
improper use.
Please see https://omcan.com/disclaimer for complete info.
WARNING:
The packaging components are classied as normal solid urban waste and can therefore be disposed of
without diculty.
In any case, for suitable recycling, we suggest disposing of the products separately (dierentiated
waste) according to the current norms.
DO NOT DISCARD ANY PACKAGING MATERIALS IN THE ENVIRONMENT!
9
Page 10
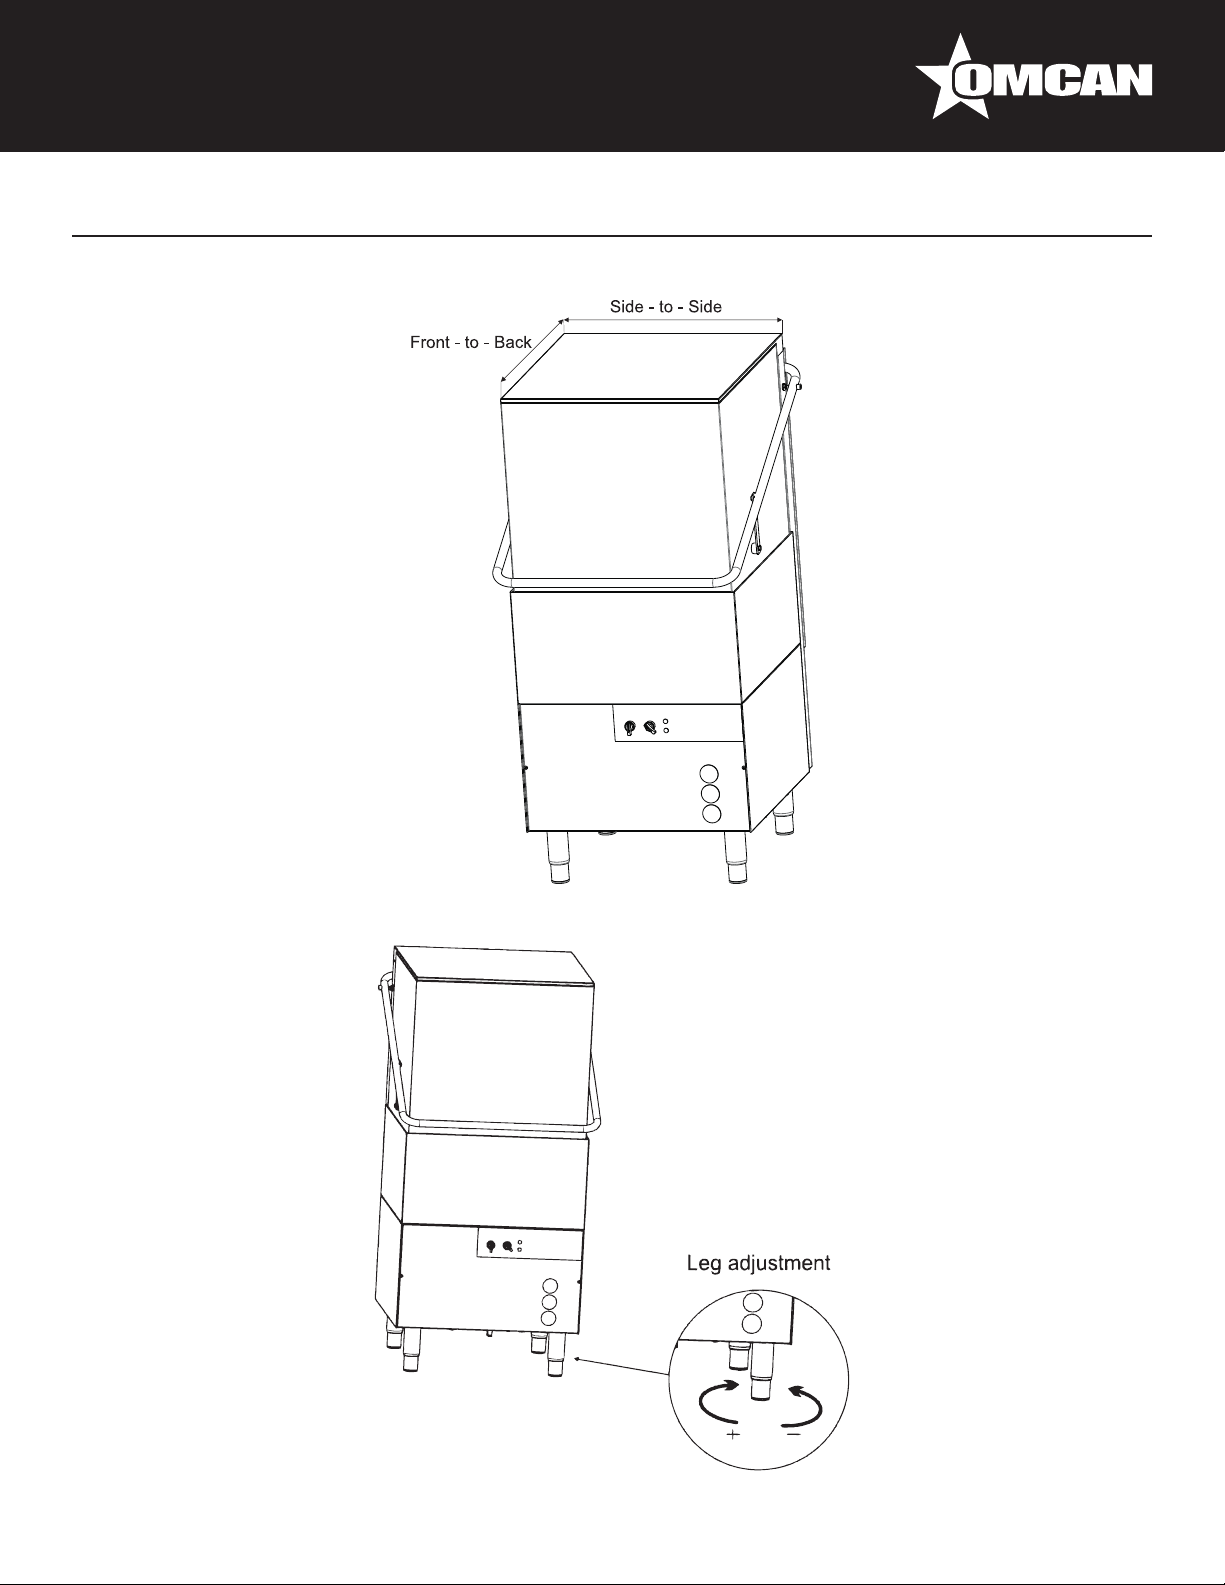
Installation
PLACEMENT
LEVEL THE MACHINE
10
Page 11
Installation
INSTALLATION SUGGESTIONS
• Place the dishwasher in the desired location.
• The appliance should leveled. Adjustable feet are provided for this adjustment.
• Level the machine front to back, and right to left.
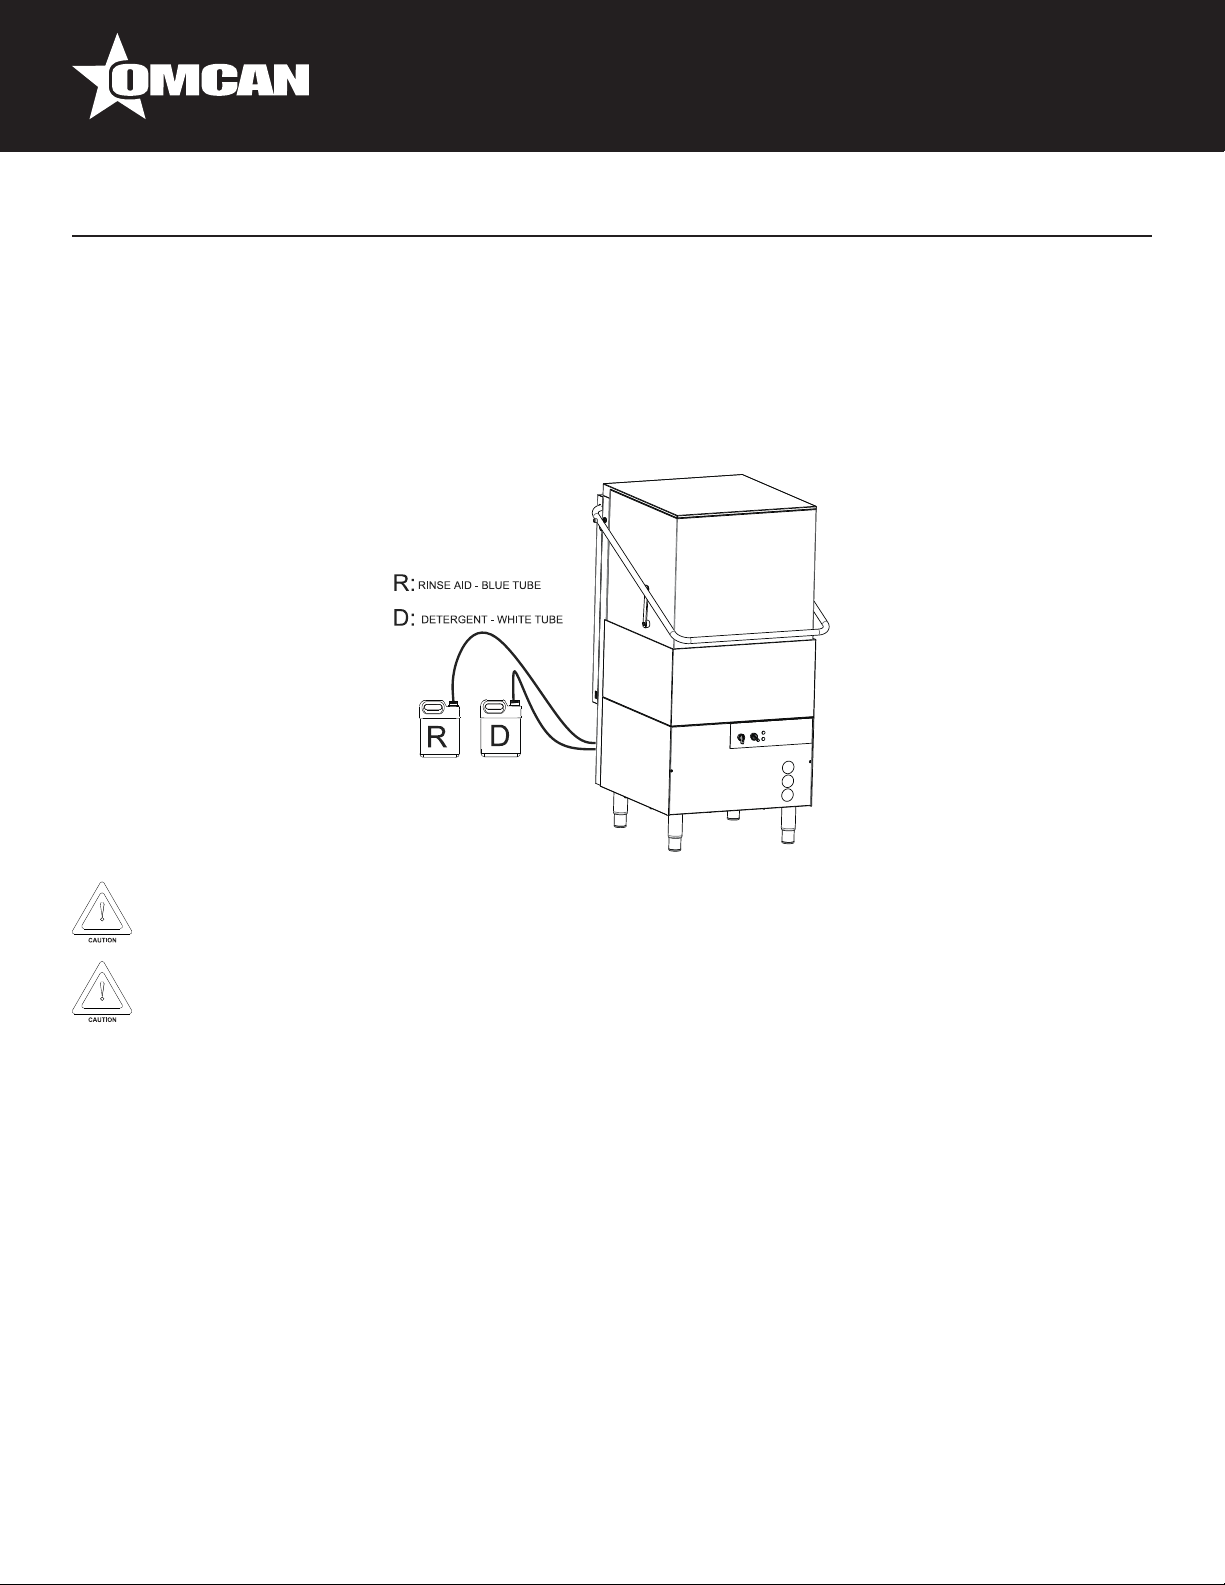
PLACEMENT - CHEMICAL CONTAINERS
Chemical supply containers must be placed as close as possible to the machine and must not be
elevated.
Reposition the chemical tubing at the back of the machine before placing the machine to its permanent
position.
The unit should be installed by licensed and approved personnel according to all local codes.
This dishwasher is delivered with water inlet and outlet hoses.
11
Page 12
Installation
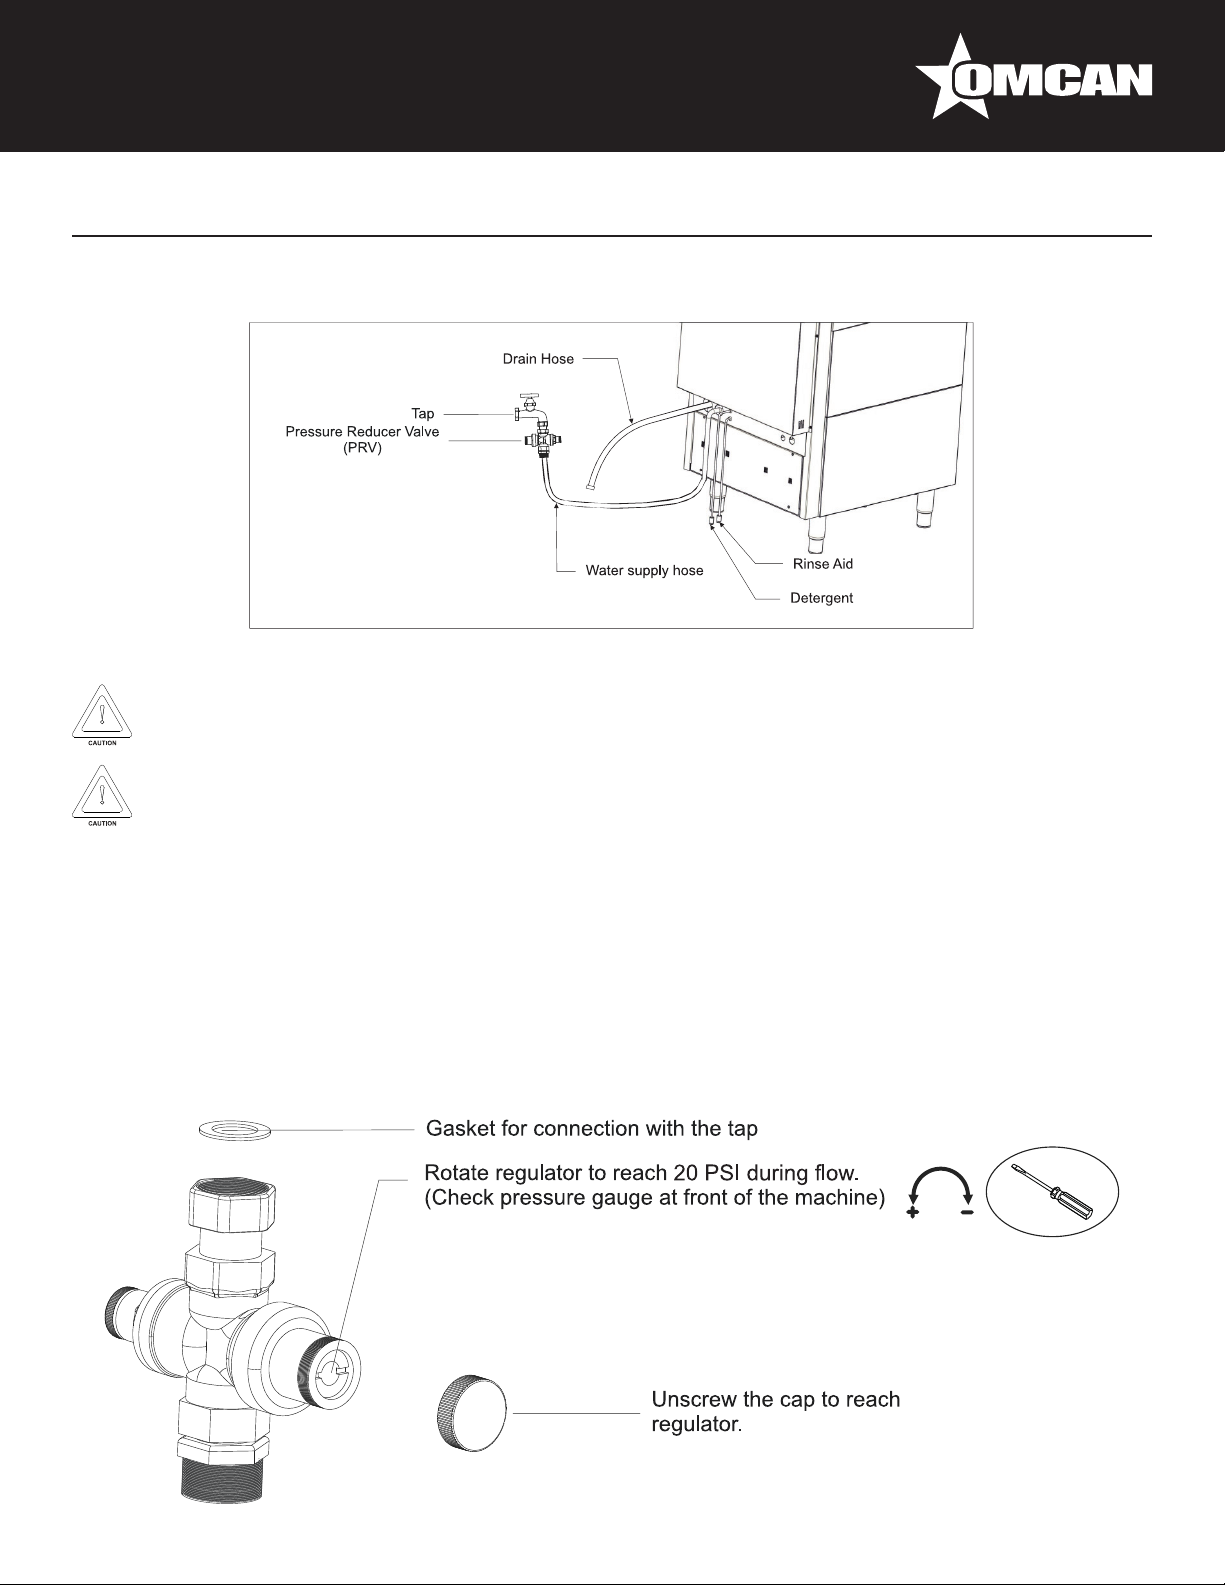
WATER SUPPLY CONNECTION
ATTENTION: Connection with the water supply should be made according to all applicable codes.
Machine must be connected to hot water source. Minimum income water temperature should be 40º.
A Pressure Regulator Valve must be inserted between the machine water inlet and the water source.
Water pressure during flow (not static), must be regulated to 20 PSI. During pressure regulation please
check the pressure gauge at the front of the machine.
This dishwasher intended for use with a hot water supply but will also operate (at slightly reduced hourly
capacity) with a cold water supply.
• The water supply hose/pipe should be OD 14mm x ID 10mm and terminate in a ¾” NPT tting (not garden
hose).
• The water supply hose/pipe should be flushed before nal connection.
• Minimum ow pressure is 15 PSI and maximum is 25 PSI.
• Connect hose at the ¾” NPT tting on the water supply line.
PRESSURE REGULATOR VALVE ADJUSTMENT
12
Page 13

Installation
DRAINAGE CONNECTION
Do not add extension to the drain hose otherwise warranty is void.
Outflow is accomplished by gravity (natural flow) in the CD-GR-1500. The outlet hose should be connected
either directly to a floor drain or drain which must not be higher than the level of the outlet at the rear of the
machine. An open drain connection or one to a vented drain pipe is recommended.
I. Connect the drain hose to the main draining.
II. Connection must be made if the same flow with the draining pipe.
ATTENTION:
• Drain connection to a venting dedicated drain pipe is suggested.
• It is strongly advised NOT to connect the drain hose into the sink’s draining.
• If an extension is added to the drain hose the warranty is voided.
ATTENTION:
• Make sure that no residuals remain to the water supply line before connecting it to the machine.
• Plumbing connections must be made in such way that will allow the machine to be moved for service and
cleaning.
• PRV MUST be installed and adjust at 20 PSI otherwise the warranty is voided.
Min water inlet temp. Operating flow pressure. Min wash temperature. Min rinse temperature.
40°C 20 ±5 PSI 165°F / 74°C 165°F / 74°C
• Connect the PRV valve in the water supply shut o valve.
• Connect the water supply hose to the PRV in one side and in the machine on the other side.
Attention: source water hardness must not intervene 10°F / 6 Gd.
13
Page 14

Installation
ELECTRICAL CONNECTION
Attention: Before make any electrical connection or service, disconnect the main electrical supply and
lock it out in order to clearly indicate that there is work in progress.
I. Open the lower front cover (2 bolts).
II. Loosen the two nuts of the electrical box cover and remove.
III. Connect the cable to the terminal block (Attention: strain relief knockout must be placed by the
installer).
Caution: 15 cm loop of wire must be left inside the machine in order to allow servicing.
IV. Replace the top cover.
V. Replace and secure the lower front cover.
14
Page 15

Installation
DETERGENT AND RINSE AID REGULATION.
I. Open the lower front cover (2 bolts).
II. Adjust the quantity by regulating the dosing (xxxxxx ml / rotation).
III. Make sure that the chemical feeders’ hoses are not out of the right position.
IV. Replace the front lower cover.
RINSE-AID PUMP
This model has an automatic rinse-aid pump for use with a container of liquid rinse-aid. The rinse-aid pump is
a peristaltic regulated (looks exactly like the detergent pump) and can be regulated by a screw above and on
the right of the glass cover. The regulation can be from 0 lt/hour to 0,7 lt/hr.
Both pumps are mounting on an inox bracket with the regulating screws facing the cover and are marked with
two yellow stickers.
Before you perform these adjustments, turn o the power supply.
The dozer is adjusted from the manufacturer’s premises at its maximum value for easy initial priming
and must be adjusted accordingly (depending on water hardness, how dirty the dishes are, and the
detergent used).
To reduce (-) the amount of rinse aid, turn the center screw clockwise. To increase (+), turn counterclockwise.
Note: this is a 15 revolution adjusting screw to provide ne adjustments as required.
Suggestion for initializing personnel: After priming system by operating machine through several cycles,
rotate adjusting screw gently to full closed position (clockwise) and adjust (counter-clockwise) about 7
full revolutions. Empty wash tank and rell with fresh water. Operate for two or three cycles and verify
concentration level. Adjust dozer again if required to achieve nal desired results.
ADJUSTMENT OF PERISTALTIC PUMPS
PUMP REGULATION
DETERGENT RINSE
2.6ml/rotation 1.2ml/rotation
15
Page 16

Installation
AUTOMATIC FILLING OF DETERGENT
This model has an automatic detergent pump for use with a container of non foaming liquid detergent. The
detergent pump is a peristaltic regulated (looks exactly like the rinse-aid pump) and can be regulated by a
screw above and on the right of the glass cover. The regulation can be from 0 lt/hour to 3,0 lt/hr.
MANUAL FILLING OF DETERGENT
Use only non-foaming detergent suitable for commercial dishwashers. In the event of non use or malfunction
of the automatic detergent injection system, put the detergent suppliers recommended amount directly into the
wash compartment tank after the machine has reached its operating temperature.
The correct dosage depends on the water hardness and the amount of residue on the dishes. Follow the
detergent manufacturer’s recommendations. Less detergent deters good washing results and more detergent
usually does not provide better results, but rather more unnecessary consumption and environment pollution.
SURFACE FILTERS - PUMP FILTER - OVERFLOW PIPE
Do not remove the internal lter (pump lter) if the tank is not empty.
16
Page 17

Operation
INSTRUCTIONS FOR REGULAR OPERATION
The appliance is intended to clean dishes, cups, glasses, cutlery, etc. Be sure the items placed to be washed
are suitable for dishwashing. Cutlery should be cleaned of heavy food residues, or soaked if not washed right
after use. This machine is not intended for use with items which were used with acids, mineral oil, grease,
gasoline or colors.
PREPARATION OF DISHES FOR WASHING.
For best results avoid allowing food residues to dry. Remove bulk food residues, olive pips, lemon peels, tooth
picks, etc., before placing the dishes in the basket.
If washing is delayed we recommend that you soak dishes and/or glasses which have food residues.
FILLING OF BASKET
Place glasses and cups, with the opening facing down and not piled one on top of the other, in
the appropriate baskets. Glasses should not touch each other (damage to glass or stains due
to contact may occur).
Plates should be stacked vertically in appropriate baskets and not touching each other, look to
the side of the baskets to see the recommended loading capacity.
Place tableware in the supplied plastic basket, with handles downwards or placed freely in
a level plastic basket.
In every case, avoid overloading the basket.
DAILY OPERATION
17
Page 18

Operation
• Check the chemical containers to be sucient full.
• Check that the pump inlet lter has been placed in the correct position if it was removed for cleaning.
• Check that the overflow stand pipe is inserted correctly in its outlet.
• Close door.
• Turn power switch to “ON” (Switches should now illuminate).
• The dishwasher will ll automatically.
• The booster indicator should come on to indicate that the inlet water to the rinse and ll system is being
heated to the required rinse temperature (usually 195°F / 91°C).
• When the booster water has reached the correct temperature, the corresponding light switches o and the
wash tank light comes on if the wash water temperature is not suciently hot (usually 165°F / 74°C).
• At initial daily start, allow about 10 to 20 minutes for machine to stabilize water temperatures to their proper
temperatures.
After warm-up, one initial wash cycle should be performed to thoroughly mix soap and water
and be sure unit is fully warmed up and ready to wash properly.
• After initial warm-up, when all heater lights are o, the dishwasher is ready to wash.
If door is opened during operation, the safety control will turn o the timer. Washing or rinsing
will restart from beginning of wash cycle.
• Open the door, insert the basket with the items (dishes, glasses, etc.) noting that heavy food residue
has been removed. (If the automatic soap injection system is not used, pour the proper amount of liquid
detergent manually into the wash tank).
• To start the washing program, select the program desired and close the door. The automatic program
commences, with the green program indicator light in the program selector switch changing from flashing to
steady.
Program Wash time Rinse time
Short 103 sec. 16 sec.
Standard 163 sec. 16 sec.
Long 223 sec. 16 sec.
This unit is equipped with a positive rinse temperature control and will not advance from wash to rinse
unless the rinse water is at the preset temperature usually about 195°F / 91°C.
Attention:
• The washing cycle time may be extended until the nal rinse temperature reach 165°F / 74°C.
• Let the dishes and glasses to dry out of the dishwasher.
• Pay attention on removing the basket after the washing cycle as it may be HOT.
18
Page 19

Operation
• When the program is nished, the green program light returns to flashing.
• Promptly open the door and remove the basket with the clean items. Use caution with hot items.
• Allow to dry.
If, after washing, there are stains from dirt or water spots, the cause may be one of the following:
• Wrong ratio of detergent to water.
• Rinsing water with very high mineral content.
• Improper quantity of rinse-aid.
• Wrong arrangement of items in the basket.
• Low water pressure during rinsing.
• Low water temperature during washing.
• Clogged or miss-positioned lters.
• Clogged jets.
Note
• The wash temperature must be within ≥ 74°C & ≤ 84°C and the rinse temperature must be within ≥ 74°C &
≤ 91°C.
• Please check during the operation that the rinse water pressure is within its limits (20 ± 5 psi).
Do not remove the surface lters when machine is turned on. The heating elements under the lters
can cause burn.
Maintenance
SHUTTING DOWN AND DRAINING – DAILY MAINTENANCE OPERATION
1. Turn the power switch into OFF position.
2. Remove the surface lters.
Attention: Do not remove internal lters if tank is not empty.
3. Remove the overflow pipe and empty the tank.
4. Remove and clean the pump lter under running water.
Attention: Do not use any metal sponge to scratch the lters or the dishwasher surface.
5. Rinse the washing compartment to remove any dirt residuals.
6. Reassemble the parts in reverse order.
Attention: The appliance should never operate without the pump lter in place.
19
Page 20

Maintenance
MAINTENANCE / CARE / REPAIR
Proper operation and safe use may be ensured only through the correct use of the appliance, as well as
the compliance with the operation instructions, the corresponding specications and the care and cleaning
indications.
Notice: Before cleaning or performing any maintenance, other than daily interior cleaning, power and water
supply must be turned o. The appliance should never be sprayed with water or high pressure cleaning
solution, because any water or solution which may get into the electrical components will aect operation of the
appliance as well as present a potential for electrical shock.
No safety systems should be disabled.
REGULAR MAINTENANCE AND CLEANING WORKS
Depending on local water hardness, the nozzles on the rinse arms should be cleaned regularly. Caution must
be exercised to not damage the nozzles.
PAY ATTENTION TO THE CORRECT POSITION OF FILTERS AND WASH ARM INSTALLATIONS AND BE
SURE NON-STICK BUSHINGS ARE NOT WORN.
Clean the appliance with warm water and conventional cleaning aids.
Stainless steel parts should never be cleaned them with “steel wool”, wire brush, etc, since even the lightest
contacts on the surfaces with steel may contaminate the stainless steel and cause rust formation. Use brushes
made of polymer plastic, natural bristles, or thin brass wire. Always keep brush movements in line with grain in
the Stainless Steel so that you will not aect the appearance. Finally, rinse with clean water and dry thoroughly.
We remind you that corrosion (rust formation) on stainless steel surfaces is not created by itself, but
rather due to the use of improper cleaning products (e.g. whitening or particularly caustic cleaning
products based on chlorine). Occasionally calcium sediments will form on the internal walls of the
dishwasher (due to mineral particles in the water), which may aect the correct operation of the
appliance and requiring regular removal.
SPARE PARTS, ACCESSORIES AND COMPONENTS
Spare parts and components are usually available at the authorized local service agency, or directly from
Omcan, In case of claims or complaints, you must supply the model and serial number of the appliance /
machine found on the specication label of the appliance.
20
Page 21

Troubleshooting
PROBLEM CAUSE SOLUTION
The dishwasher does not operate. No power to the machine. Check the connection.
Breaker or fuse has not been
activated or is faulty.
Control switch S1 not activated. Turn switch S1 on.
Switch S1 is faulty. Refer to the authorized service
agency, local dealer, or Omcan.
Water supply not turned on. Turn the supply on.
Door is not closed. Close the door.
Water inlet valve is faulty. Refer to the authorized service
agency, local dealer, or Omcan.
Fill water runs continuously. Overflow drain stand pipe not
installed properly.
The appliance operates, but the
green operating pilot light does not
illuminate.
Booster not heating. Switch S1 or main switch or fuse
Booster heating operates, but pilot
light does not turn on.
Wash tank heating does not
operate.
The pilot light is faulty. Change the pilot light.
Wire lead to lamp disconnected. Reconnect power lead.
Lamp is out of it’s socket. Insert lamp.
has not been activated.
The booster thermostat is faulty. Refer to the authorized service
The booster 105°C thermal fuse is
faulty.
Pressure switch is faulty.
Booster heating contactor is faulty.
The pilot light is faulty. Change the pilot light.
Wire lead to lamp disconnected. Reconnect power lead.
Lamp is out of it’s socket.
The wash tank thermostat is faulty. Refer to the authorized service
The 90°C thermal fuse is burned or
defective.
Install overflow drain stand pipe.
Verify that overflow drain stand
pipe is installed properly with
overflow slots upwards.
Check the switch S1 of the
appliance and the main switch or
fuse.
agency, local dealer, or Omcan.
agency, local dealer, or Omcan.
21
Page 22

Troubleshooting
Pump motor does not operate. Main switch or fuse is not
activated.
The door is not closed. Close the door.
Main relay is faulty. Refer to the authorized service
Pump motor is faulty.
Program timer is faulty.
Motor operates, but pump does not
rotate.
Washed items do not dry (dishes,
glasses, etc.)
An object has jammed the pump
impeller.
Hard water deposits or detergent
have been petried following non
operation of the appliance.
Rinse aid supply is empty. Replace or rell rinse aid container.
Rinse aid “dozer” valve is
defective.
Timer is faulty. Refer to the authorized service
Rinse arms (upper and/or lower)
do not rotate.
Activate main switch or fuse.
agency, local dealer, or Omcan.
Loosen deposits by rotating screw
on rear side of pump motor.
Refer to the detergent supplier,
authorized service agency, local
dealer, or Omcan.
agency, local dealer, or Omcan.
Clean nozzles.
Replace Teflon bushings if worn.
Note: take caution to not install
rinse arm without bushings.
REFERENCE
Item Number Model Number Description Manufacturer Model Number
Dishwasher Heavy Duty 20” x 20” /
46321 CD-GR-1500
508mm x 508mm 208-240V/60/1 CE
cETLus TUV NSF Certied
C1500 NSF
22
Page 23

Model CD-GR-1500 46321
Parts Breakdown
23
Page 24

Parts Breakdown
Model CD-GR-1500 46321
24
Page 25

Model CD-GR-1500 46321
Parts Breakdown
25
Page 26

Parts Breakdown
Model CD-GR-1500 46321
26
Page 27

Model CD-GR-1500 46321
Parts Breakdown
27
Page 28

Parts Breakdown
Model CD-GR-1500 46321
28
Page 29

Model CD-GR-1500 46321
Parts Breakdown
29
Page 30

Parts Breakdown
Model CD-GR-1500 46321
30
Page 31
Model CD-GR-1500 46321
Parts Breakdown
31
Page 32

Parts Breakdown
Model CD-GR-1500 46321
Item No. Description Position Item No. Description Position Item No. Description Position
61020
61021 Control Panel with Switches for C1500 2 61006 Balance F15x20 for C1500 33 60973 Pipe Rubber Protector for C1500 65
73831 Lock Washer INOX 4 for C1500 3 61007
60952 INOX Nut M4 for C1500 4 61024
73752 Back Cover 1500 for C1500 5 73773 Detergent Tank Injector for C1500 36 73831 Lock Washer INOX 4 for C1500 68
73832 Lower Back Cover 1500 for C1500 6 41090 Pressostat Switch for C1500 37 4111 9 Relay Magnetic Contactor for C1500 69
73829 INOX Tapping Screw 4.2x13 for C1500 7 60959 Tapping Screw 3.5x9.5 for C1500 38 61032 Timer Electronic for C1500 70
73868 Tapping Screw 4.2x19 for C1500 8 73831 Lock washer INOX 4 for C1500 39 61033 Pipe Rubber Protector for C1500 71
61022 Teon 10-4-1 for C1500 8-1 73831 Lock washer INOX 4 for C1500 40 73854 Pump Inlet Hose for C1500 72
60952 INOX Nut M4 for C1500 9 61025 Electrical Box Complete for C1500 41 73768 Clamp 60-80 for C1500 73
73808 INOX Axle Bolt Short M8x17 for C1500 10 61026 Front Cover 1500 for C1500 42 73766 Clamp 40-60 for C1500 74
73807 INOX Axle Bolt M8x35 Long for C1500 11 61027 Film for Omcan for C1500 43 73855 Pump Output Hose for C1500 75
73772 Copler 8x31 for C1500 12 41134 On/Off Switch 0-1 Green LED for C1500 44 73843 Nut M6 Galvanised for C1500 76
73872 Teon Washer 16x8x1mm for C1500 13 41104
73883 Washer INOX 6x18 for C1500 14 41120 Light Indicator Orange for C1500 46 73884 Washer Steel 6x18 for C1500 78
73822 INOX Nut M8 for C1500 15 61028 Lock Washer 4 Dia. for C1500 47 73852
73776 Door Handle 1500 for C1500 16 73834 M4 Nut Galvanised for C1500 48 73772 Copler 8x31 for C1500 80
73833 M10 Nut INOX for C1500 17 73761
73811 INOX Bolt M10x64 Allen for C1500 18 60985
73847 Plastic Guide D.30 for C1500 19 60984
73869 Tapping Screw 4.8x13 for C1500 20 60979
61023 Upper Cover for C1500 21 60980
73812 INOX Bolt M8x70 for C1500 22 60981
73817 INOX Hood Spacer 12x24 for C1500 23 60982
73872 Teon Washer 16x8x1mm for C1500 24 73834 M4 nut Galvanised for C1500 56 4 1112 Water Input Solenoid Valve for C1500 88
73883 Washer INOX 6x18 for C1500 25 73834 M4 nut Galvanised for C1500 57 73840
73822 INOX Nut M8 for C1500 26 61029 Electrical Components Panel for C1500 58 73870 Tee-Connection Boiler with 1/8 for C1500
73805 Hood Support Pipe 30x1100 for C1500 27 61030 Electrical Components Panel for C1500 59 61019 Clamp 10-16 for C1500 91
41122 Door Spring Turbo for C1500 28 41118 Thermostat 0-90°C 1500mm for C1500 60 61035
73839 Non Return Valve (DVGW) for C1500 29 73876
60310
65668 Cable gland PG-07 Black for C1500 31 73838 Micro Relay 8 Pins Faston for C1500 63 73758 Boiler Element Fitting Base for C1500 95
Front Cover Screw INOX M6x25 for
C1500
Detergent Inlet Tube 4x6mm
(Transparent) for C1500
1 60311
30 73801
Rinse Aid Inlet Tube 4x6mm (Blue) for
C1500
Filter Plastic for Rinse Aid Valve for
C1500
Leveling Feet 1 3/4in 304 145/210
M10x25 for C1500
Cycle Selection Switch 0-1-2 LED for
C1500
Bracket for Two Peristaltic Pumps for
C1500
Peristaltic Detergent Pump G300/230V
for C1500
Peristaltic Rinse Aid Pump G302/230V
for C1500
Thermometer for Tank 2in 20/220F for
C1500
Thermometer for Booster 2in 20/220F
for C1500
Pressure Gauge 2in 0/60 PSI 1/4 NPT
for C1500
Bracket for Pressure Gauge Thermometer for C1500
Thermal Overload Relay 7.0-10.0 for
C1500
Galvanised Machine Screw M4x5 for
C1500
32 73821 INOX Nut M3 for C1500 64
34 61031 Power Supply Board 6 Con. for C1500 66
35 73834 M4 Nut Galvanised for C1500 67
45 73800
49 61034
50 41087 Tank Thermofuse 90°C for C1500 82
51 73821 INOX Nut M3 for C1500 83
52 65669
53 61019 Clamp 10-16 for C1500 85
54 60969 Galvanised Bolt M4x10 for C1500 86
55 65679 Washing Machine Hose Black for C1500 87
61 61036 Boiler Turbo for C1500 93
62 61037
Galvanised Lock Washer 6.4x11x0.7
for C1500
Pump 1.5 HP 208-240V 6 2P UL for
C1500
Boiler 1500 400V Complete (1 Heating
Elements) for C1500
T – Connection Boiler Φ10 – Φ6 for
C1500
Non Return Valve for Rinse Aid Pump
for C1500
Washing Machine Hose Black 10x16.5
for C1500
Heater Element Boiler 1500, 7.5kW
for C1500
77
79
81
84
89
90
92
94
32
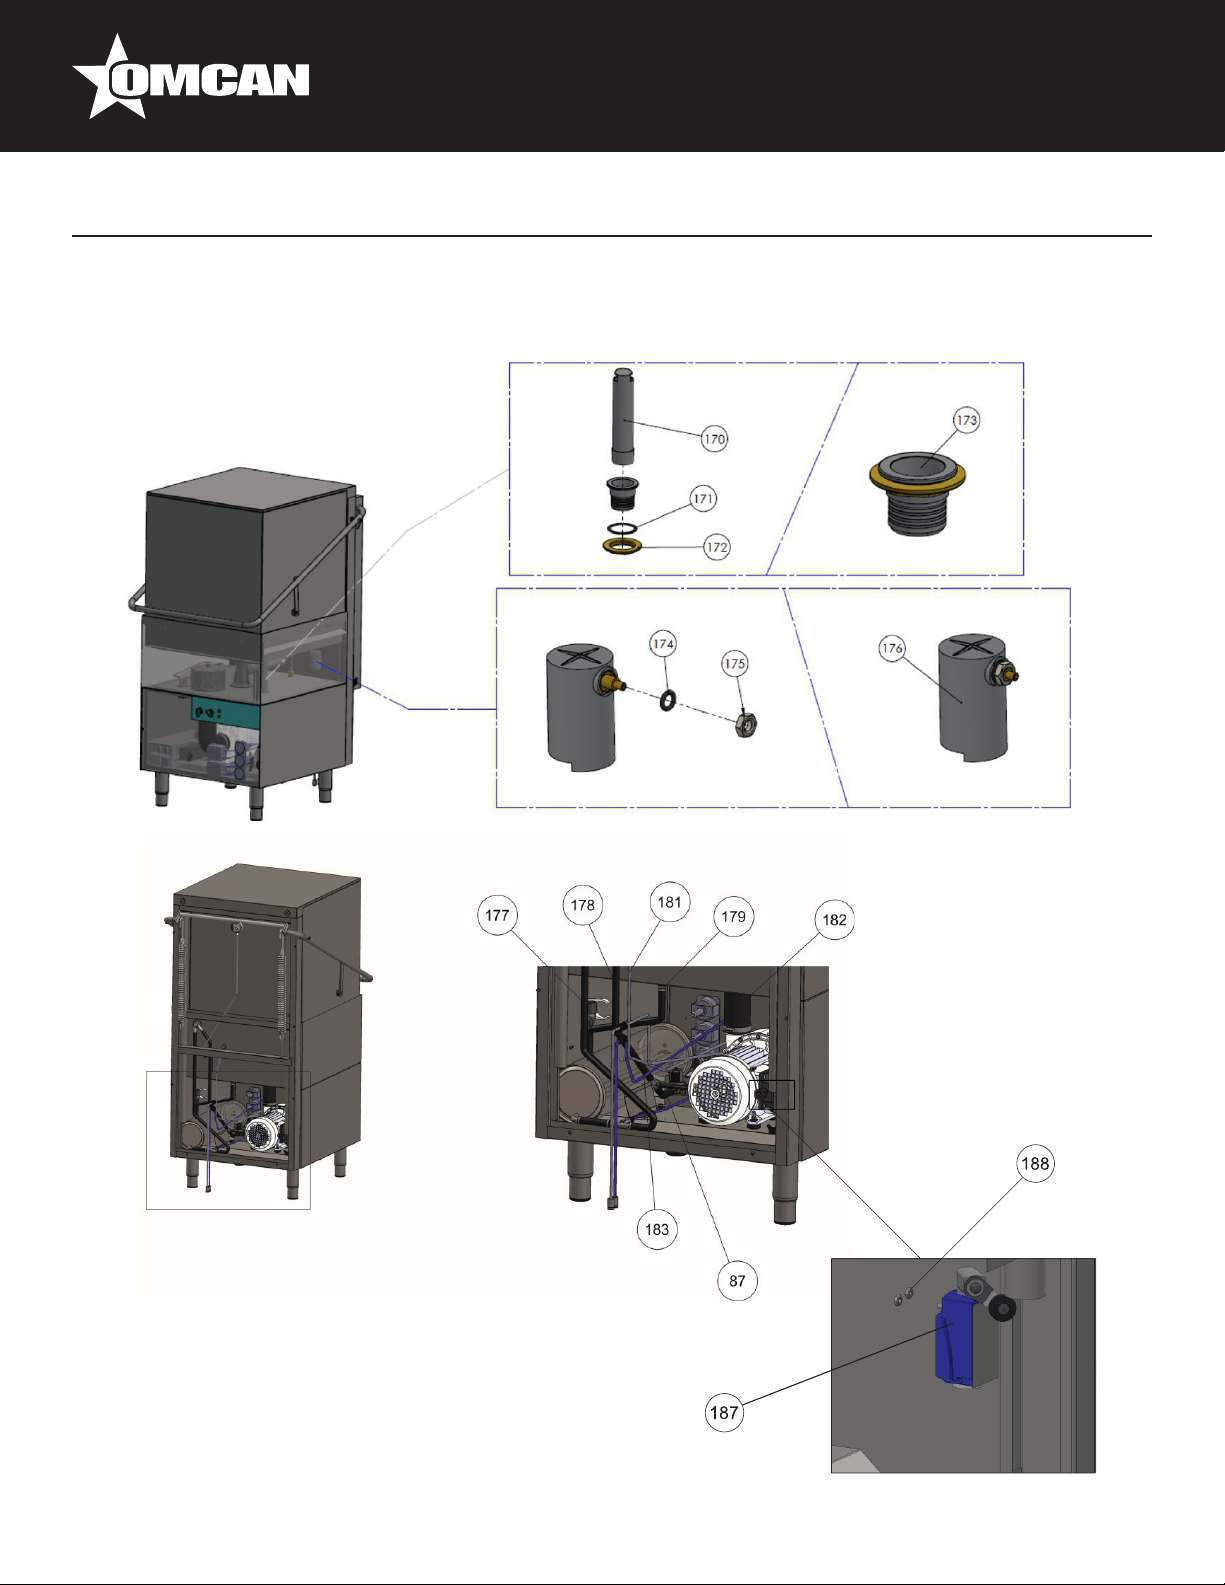
Page 33

Parts Breakdown
Model CD-GR-1500 46321
Item No. Description Position Item No. Description Position Item No. Description Position
41088 Boiler Thermofuse 105°C for C1500 96 73795 Flow Control Disc for Base for C1500 127 61049 Retaining Plate for Filter for C1500 158
73821 INOX Nut M3 for C1500 97 41136 INOX Angle Male/Female 1/2'' for C1500 128 73884 Washer Steel 6x18 for C1500 159
73757 Boiler Drain Threaded Cap for C1500 98 73816 INOX Hex Bolt M6x20 for C1500 129 73800
73884 Washer Steel 6x18 for C1500 99 73871 Teon 12-6-2 for C1500 130 73843 Nut M6 Galvanised for C1500 161
73800
73843 Nut M6 Galvanised for C1500 101 61040 Retaining Plate Turbo for C1500 132 41128 Tank Heating Element 6Kw for C1500 163
73802 Heater Element Cover for C1500 102 73800
60978 O-Ring 45x6 for C1500 103 73843 Nut M6 Galvanised for C1500 134 73802 Heater Element Cover for C1500 165
73834 M4 Nut Galvanised for C1500 104 73884 Washer Steel 6x18 for C1500 135 73834 M4 Nut Galvanised for C1500 166
73856 Rinse Base TUR - KN for C1500 105 41123
73815 INOX Hex Bolt M4x60 for C1500 106 73845
73868 Tapping Screw 4.2x19 for C1500 107 73826 INOX Screw 4.2x13 for C1500 138 61050 O-Ring 45x6 for C1500 169
41140 O-Ring 10.5x3 for C1500 108 41127 Teon 18x10 for C1500 139 41131 Drain and Overow Pipe for C1500 170
73831
73882 Wash Supply INOX Turbo for C1500 110 73825 INOX Screw 2.9x10 for C1500 141 73780
60952 INOX Nut M4 for C1500 111 61041 Plastic Cap for Rinse Arm for C1500 142 41132 Drain and Overow Base for C1500 173
41139 Rinse Pipe Retaining Nut for C1500 112 61042 Rinse Arm Turbo for C1500 143 41140 O-Ring 10.5x3 for C1500 174
73858 Rinse Supply Inox Turbo for C1500 113 73868 Tapping Screw 4.2x19 for C1500 144 73833 M10 Nut INOX for C1500 175
73774 Domed Cap Nut M6 for C1500 114 73819 INOX Machine Screw 3.5x13 for C1500 145 41091 Pressostat Chamber for C1500 176
41137 INOX Niple 1/2'' for C1500 115 61043 Rinse Arm Turbo for C1500 146 61051
73841 Nut 1/2 for C1500 116 73793 Filter Element for C1500 147 61052
73749 O-Ring 20x4 for C1500 117 61044
41125
41136 INOX Angle Male/Female 1/2'' for C1500 119 61046 Basket Support for C1500 150 61055 Tubo Cristallo 4x6 for C1500 181
73806
61038
41124
41126
41124
61038
73806
Galvanised Lock Washer 6.4x11x0.7
for C1500
Lock Washer INOX 4 for C1500 109 41085 Sprayer for Rinsing Arm for C1500 140 61000 Rubber Gasket 35x55x1 for C1500 171
Wash and Rinse Base Upper Plastic
for C1500
INOX Axle 20/8 Turbo 1500 Evo for
C1500
Wash and Rinse Cross Turbo Complete
for C1500
Wash and Rinse Group Retaining Nut
25-7-8 for C1500
Wash and Rinse Base Lower Plastic
for C1500
Washe and Rinse Group Retaining Nut
25-7-8 for C1500
Wash and Rinse Cross Turbo Complete
for C1500
INOX Axle 20/8 Turbo 1500 Evo for
C1500
100 73861 Rubber Gasket 109x54x3 for C1500 131 73794 Filter Retaining Nut for C1500 162
Galvanised Lock Washer 6.4x11x0.7
for C1500
Rinsing and Washing Arms Cross Plastic
for C1500
Pipes Turbo 1500 INOX 30x1x248 for
C1500
INOX Knob for Square Tank Filter 1500600 for C1500
118 61045 INOX Hex Screw M6x12 for C1500 149 61054 Tubo Cristallo 4x6 for C1500 180
120 73863 Support for Filter Back for C1500 151 61056 Tubo PVC Blue 4x6 for C1500 182
121 61047 Domed Cap Nut M6 for C1500 152 61057
122 73864 Support for Filter Mid for C1500 153 64817
123 73853 Pump Filter Turbo for C1500 154 60305
124 73816 INOX Hex Bolt M6x20 for C1500 155 65670 PRV Valve for C1500 186
125 73871 Teon 12-6-2 for C1500 156 73875 Door Switch for C1500 187
126 61048
Tank Filter Base Rubber Gasket Turbo
for C1500
133 73867
136 73803
137 73878 Threaded Shaft M4x60 for C1500 168
148 61053
157 73834 M4 Nut Galvanized for C1500 188
Galvanised Lock Washer 6.4x11x0.7
for C1500
Tank Heating Element Retaining Bracket
for C1500
Heating Element Nut 13mm M4-M6
for C1500
Drain and Overow Base Nut 1 1/2 for
C1500
Washing Machine Hose Black 10x16.5
for C1500
Washing Machine Hose Black 10x16.5
for C1500
Washing Machine Hose Black 10x16.5
for C1500
Washing Machine Hose Black 6x12
for C1500
Inlet Hose 1500mm (diam. 10x14.5
Hot Water straight/elbow with gasket)
for C1500
Draining Pipe OD40-ID31.5-2.5m for
C1500
160
164
167
172
177
178
179
183
184
185
33
Page 34

Electrical Schematics
Model CD-GR-1500 46321
MS Main Switch TM Electronic Timer K3
SS
DS Door Switch M2
PS Pressure Switch K4 Microrelay H Indicator Lamp
TF Thermofuse K1
TH Thermostat K2
Program Selector
Switch
M1 Wash Pump Motor R1
Detergent Pump
Motor
Magnetic
Contactor
Magnetic
Contactor
R2
Y Water Inlet Valve
K1.A Aux Contact
Magnetic
Contactor
Booster’s Heating
Element
Tank’s Heating
Element
OR Overload Relay
C Capacitor
ORC
Overload’s Relay
Breaking Contact
34
Page 35

Notes
________________________________________________________________________________________
________________________________________________________________________________________
________________________________________________________________________________________
________________________________________________________________________________________
________________________________________________________________________________________
________________________________________________________________________________________
________________________________________________________________________________________
________________________________________________________________________________________
________________________________________________________________________________________
________________________________________________________________________________________
________________________________________________________________________________________
________________________________________________________________________________________
________________________________________________________________________________________
________________________________________________________________________________________
________________________________________________________________________________________
________________________________________________________________________________________
________________________________________________________________________________________
________________________________________________________________________________________
________________________________________________________________________________________
________________________________________________________________________________________
________________________________________________________________________________________
________________________________________________________________________________________
________________________________________________________________________________________
________________________________________________________________________________________
35
Page 36

Notes
________________________________________________________________________________________
________________________________________________________________________________________
________________________________________________________________________________________
________________________________________________________________________________________
________________________________________________________________________________________
________________________________________________________________________________________
________________________________________________________________________________________
________________________________________________________________________________________
________________________________________________________________________________________
________________________________________________________________________________________
________________________________________________________________________________________
________________________________________________________________________________________
________________________________________________________________________________________
________________________________________________________________________________________
________________________________________________________________________________________
________________________________________________________________________________________
________________________________________________________________________________________
________________________________________________________________________________________
________________________________________________________________________________________
________________________________________________________________________________________
________________________________________________________________________________________
________________________________________________________________________________________
________________________________________________________________________________________
________________________________________________________________________________________
36
Page 37

Notes
________________________________________________________________________________________
________________________________________________________________________________________
________________________________________________________________________________________
________________________________________________________________________________________
________________________________________________________________________________________
________________________________________________________________________________________
________________________________________________________________________________________
________________________________________________________________________________________
________________________________________________________________________________________
________________________________________________________________________________________
________________________________________________________________________________________
________________________________________________________________________________________
________________________________________________________________________________________
________________________________________________________________________________________
________________________________________________________________________________________
________________________________________________________________________________________
________________________________________________________________________________________
________________________________________________________________________________________
________________________________________________________________________________________
________________________________________________________________________________________
________________________________________________________________________________________
________________________________________________________________________________________
________________________________________________________________________________________
________________________________________________________________________________________
37
Page 38

INSTALLATION REQUIREMENTS
AND CHECKLIST
The Dishwasher must be installed by a certied plumber.
Failing to follow the instructions below will void the warranty.
*This checklist must be returned with warranty card.*
Installer
Signature Below:
1. Check water hardness. If water hardness exceeds 7 grains per gallon, a water softener must be installed.
2. Ensure the correct placement and leveling of the machine as per the manual (page 10).
3. The water supply hose / pipe should be flushed before the nal connection (page 12).
4. The dishwasher must be connected to a hot water source with a minimum temperature of 40°Celcius /104°
Fahrenheit.
5. Adjust water pressure using the PRV to 20 PSI, while lling the machine with water.
6. Rinse and detergent containers can be adjusted at the bottom of the machine by rotating the adjustment screws on
the pumps. Adjust rinse/detergent flow to manufacturers recommendations. 2.6 ml per rotation for DETERGENT –
1.2 ml per rotation for RINSE. *Rinse/Detergent containers must be equal or lower in height than the pumps*
7. Do not add an extension to the drain hose, drain connections must be made in the same flow with the drain pipe. Do
not install drain hose to exceed 26 inches / 65 cm above the ground (page 13).
8. If the tank temperature gauge is not inside the green zone, the installer must adjust to 80° Celsius / 176° Fahrenheit.
9. If the booster gauge is not inside the green zone, the installer must adjust to 80° Celsius / 176° Fahrenheit.
10. If no water ltration/softener system is used, descale every 4 weeks.
*Please read through owner’s manual completely for all instructions.*
Company Name:
Company Phone Number:
Installed By:
Date Installed:
Signature of Installer:
38
Page 39

Warranty Registration
Thank you for purchasing an Omcan product. To register your warranty for this product, complete the information below, tear o the card at
the perforation and then send to the address specied below. You can also register online by visiting:
Merci d’avoir acheté un produit Omcan. Pour enregistrer votre garantie pour ce produit, complétez les informations ci-dessous, détachez la
carte au niveau de la perforation, puis l’envoyer à l’adresse spécié ci-dessous. Vous pouvez également vous inscrire en ligne en visitant:
Gracias por comprar un producto Omcan usted. Para registrar su garantía para este producto, complete la información a continuación,
cortar la tarjeta en la perforación y luego enviarlo a la dirección indicada a continuación. También puede registrarse en línea en:
https://omcan.com/warranty-registration/
For mailing in Canada
Pour postale au Canada
Por correo en Canadá
OMCAN
PRODUCT WARRANTY REGISTRATION
3115 Pepper Mill Court,
Mississauga, Ontario
Canada, L5L 4X5
PRODUCT WARRANTY REGISTRATION
4450 Witmer Industrial Estates, Unit 4,
For mailing in the US
Pour diusion aux États-Unis
Por correo en los EE.UU.
OMCAN
Niagara Falls, New York
USA, 14305
or email to: service@omcan.com
Purchaser’s Information
Name: Company Name:
Address:
Telephone:
City: Province or State: Postal or Zip: Email Address:
Country: Type of Company:
Restaurant Bakery Deli
Dealer from which Purchased: Butcher Supermarket Caterer
Dealer City: Dealer Province or State: Institution (specify):
Invoice: Other (specify):
Model Name: Model Number: Serial Number:
Machine Description:
Date of Purchase (MM/DD/YYYY): Date of Installation (MM/DD/YYYY):
Would you like to extend the warranty? Yes No
Thank you for choosing Omcan | Merci d’avoir choisi Omcan | Gracias por elegir Omcan
39
Page 40

Since 1951 Omcan has grown to become a leading distributor of equipment and supplies to the North
American food service industry. Our success over these many years can be attributed to our commitment
to strengthen and develop new and existing relationships with our valued customers and manufacturers.
Today with partners in North America, Europe, Asia and South America, we continually work to improve
and grow the company. We strive to offer customers exceptional value through our qualied local sales
and service representatives who provide convenient access to over 5,000 globally sourced products.
Depuis 1951 Omcan a grandi pour devenir un des “leaders” de la distribution des équipements et
matériel pour l’industrie des services alimentaires en Amérique du Nord. Notre succès au cours de ces
nombreuses années peut être attribué à notre engagement à renforcer et à développer de nouvelles
et existantes relations avec nos clients et les fabricants de valeur. Aujourd’hui avec des partenaires en
Amérique du Nord, Europe, Asie et Amérique du Sud, nous travaillons continuellement à améliorer et
développer l’entreprise. Nous nous efforçons d’offrir à nos clients une valeur exceptionnelle grâce à
nos ventes locales qualiées et des représentants de service qui offrent un accès facile à plus de 5000
produits provenant du monde entier.
Desde 1951 Omcan ha crecido hasta convertirse en un líder en la distribución de equipos y suministros
de alimentos en América del Norte industria de servicios. Nuestro éxito en estos años se puede atribuir
a nuestro compromiso de fortalecer y desarrollar nuevas relaciones existentes con nuestros valiosos
clientes y fabricantes. Hoy con socios de América del Norte, Europa, Asia y América del Sur, que trabajan
continuamente para mejorar y crecer la empresa. Nos esforzamos por ofrecer a nuestros clientes valor
excepcional a través de nuestro local de ventas y representantes de los servicios que proporcionan un
fácil acceso a más de 5,000 productos con origen a nivel mundial.
 Loading...