

DIGITAL CAMERA
APPAREIL PHOTO NUM
DIGITALKAMERA
CÁMERA DIGITAL
ÉRIQUE
BASIC MANUAL
MANUEL DE BASE
EINFACHE ANLEITUNG
MANUAL BÁSICO
ENGLISH
FRANÇAIS
DEUTSCH
ESPAÑOL

CONTENTS/TABLE DES MATIÉRES/INHALT/CONTENIDO
ENGLISH . . . . . . . . . . . . . . . . . . . . . . . . . . . . . . . . . . . . . .2
FRANÇAIS. . . . . . . . . . . . . . . . . . . . . . . . . . . . . . . . . . . . 46
DEUTSCH . . . . . . . . . . . . . . . . . . . . . . . . . . . . . . . . . . . . 90
ESPAÑOL . . . . . . . . . . . . . . . . . . . . . . . . . . . . . . . . . . . 134
CONTENTS
GETTING STARTED . . . . . . . . . . . . . . . . . . . . . . . . . . . . 4
MENU FUNCTIONS . . . . . . . . . . . . . . . . . . . . . . . . . . . . 17
SHOOTING BASICS . . . . . . . . . . . . . . . . . . . . . . . . . . . 24
En
SELECTING A RECORD MODE . . . . . . . . . . . . . . . . . . 31
PLAYBACK . . . . . . . . . . . . . . . . . . . . . . . . . . . . . . . . . . 32
PRINT SETTINGS . . . . . . . . . . . . . . . . . . . . . . . . . . . . . 37
DOWNLOADING PICTURES TO A COMPUTER . . . . . 38
ERROR CODES . . . . . . . . . . . . . . . . . . . . . . . . . . . . . . . 40
SPECIFICATIONS . . . . . . . . . . . . . . . . . . . . . . . . . . . . . 41
These instructions are only for quick reference. For more details
on the functions described here, refer to the “Reference Manual”
on CD-ROM.
This basic manual contains guidelines for using Olympus Stylus 300/400
DIGITAL (µ [mju:] 300/400 DIGITAL). Except where otherwise specified, the
explanations in the manual apply to both models.
2 En
J Before using your camera, read this manual carefully to ensure correct use.
J
We recommend that you take test shots to get accustomed to your camera before
taking important photographs.
J These instructions are only a basic manual. For more details on the functions described
here, refer to the Reference Manual on the CD-ROM. For connection to the PC or
installation of provided software, refer to the Software Installation Guide included in the
CD-ROM package.
For customers in North and South America
For customers in USA
Declaration of Conformity
Model Number : Stylus 300 DIGITAL, Stylus 400 DIGITAL
Trade Name : OLYMPUS
RM-2 (Remote control)
Responsible Party : Olympus America Inc.
Address : 2 Corporate Center Drive, Melville, New York
11747-3157 U.S.A.
Telephone Number :631-844-5000
Tested To Comply With FCC Standards
FOR HOME OR OFFICE USE
This device complies with Part 15 of the FCC rules. Operation is subject to
the following two conditions:
(1) This device may not cause harmful interference.
(2) This device must accept any interference received, including
interference that may cause undesired operation.
For customers in Canada
This Class B digital apparatus meets all requirements of the Canadian
Interference-Causing Equipment Regulations.
En
For customers in Europe
“CE” mark indicates that this product complies with the European
requirements for safety, health, environment and customer protection.
“CE” mark cameras are intended for sales in Europe.
Trademarks
• IBM is a registered trademark of International Business Machines Corporation.
• Microsoft and Windows are registered trademarks of Microsoft Corporation.
• Macintosh is a trademark of Apple Computer Inc.
• All other company and product names are registered trademarks and/or
trademarks of their respective owners.
• The standards for camera file systems referred to in this manual are the “Design
Rule for Camera File System/DCF” standards stipulated by the Japan Electronics
and Information Technology Industries Association (JEITA).
En 3
GETTING STARTED
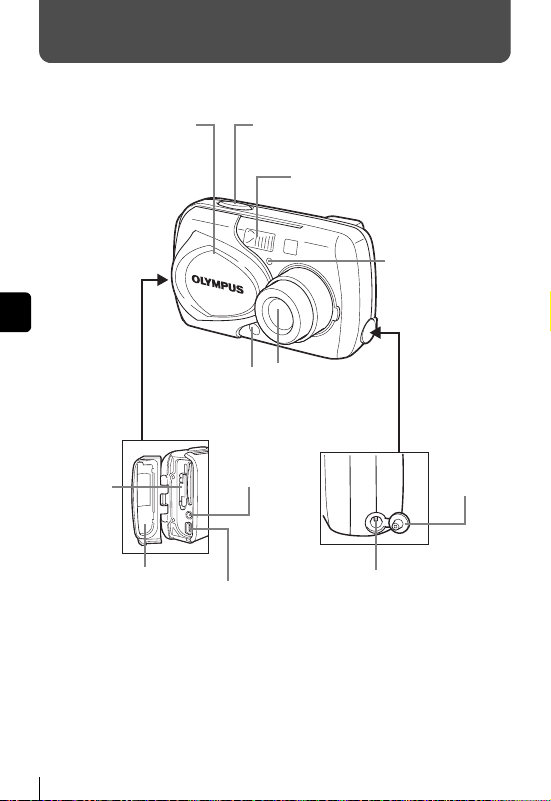
J NAMES OF PARTS
Lens barrier
Turns the camera on
and off in the shooting
mode.
En
Remote
control
receiver
Shutter button
Flash
Lens
Extends automatically
when you open the lens
barrier.
Self-timer/
Remote control
lamp
Card cover
4 En
Connector cover
VIDEO OUT
jack
USB connector
DC-IN jack
cover
DC-IN jack (4.8V)
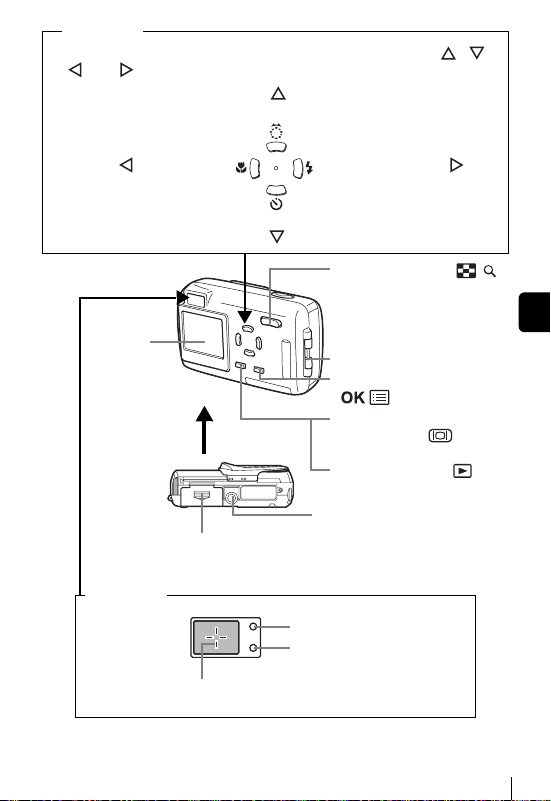
Arrow pad
The arrow pad is used as arrow keys, as well as function buttons. The , ,
, and marks indicate which arrow key to press.
Shooting mode button
Macro button
Self-timer button
Monitor
Battery compartment cover
Viewfinder
AF target mark
Flash mode button
Zoom button (W/T )
Strap eyelet
OK/Menu button
()
Monitor button
(QUICK VIEW )
Playback button
Tripod socket
Orange lamp
Green lamp
En
()
En 5
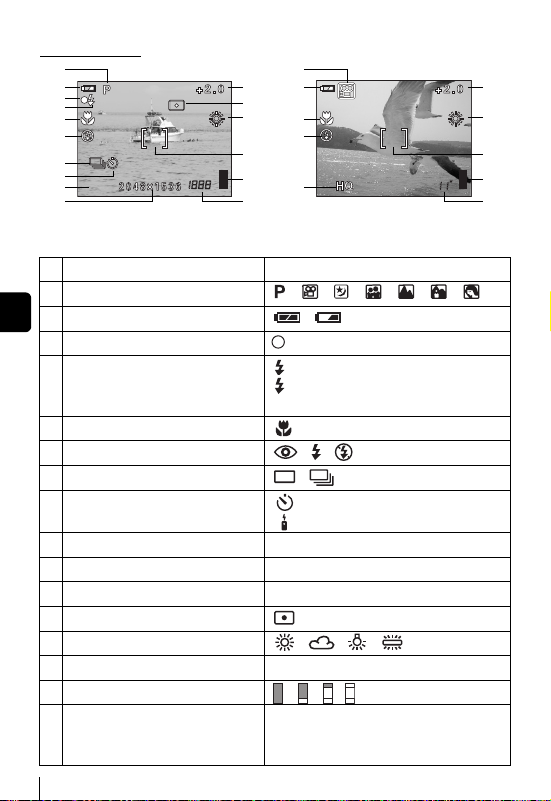
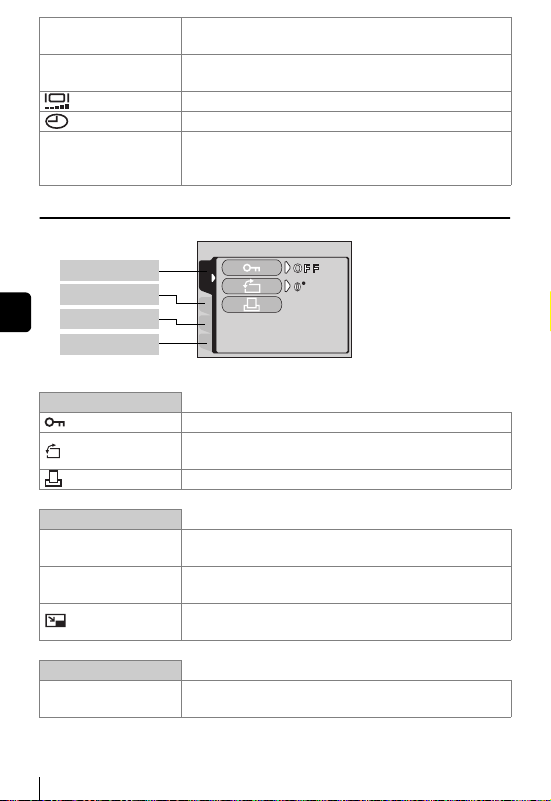
J MONITOR INDICATIONS
SHQ
Shooting mode
1
2
3
4
5
6
7
8
9
SHQ
10
Still picture Movie
Items Indications
1 Shooting mode , , , , , ,
En
2 Battery check ,
3 Green lamp
4 Flash stand-by/
Camera movement warning/ Flash
charge
5 Macro mode
6 Flash mode , ,
7 Sequential shooting ,
8 Self-timer
Remote control
9 Record mode SHQ, HQ, SQ1, SQ2
10 Resolution 2272 × 1704, 2048 × 1536, etc.
11 Exposure compensation -2.0 – +2.0
12 Metering
13 White balance , , ,
14 AF target mark [ ]
15 Memory gauge , , ,
16 Number of storable still pictures
Seconds remaining
1
2
11
12
13
5
6
14
15
9
16
(Lights)
(Blinks)
16
16''
11
13
14
15
16
6 En
Playback mode
2048
1536
Screens with the information display set to ON are shown below.
1536
2
1
4
5
6
7
8
9
10
1
2048
Still picture Movie
Items Indications
1 Battery check ,
2 Print reservation, Number of prints ×10
3Movie
4Protect
5 Record mode SHQ, HQ, SQ1, SQ2
6 Resolution 2272 × 1704, 2048 × 1536, etc.
7 Exposure compensation -2.0 – +2.0
8 White balance AUTO, , , ,
9 Date and time ’03.05.17 15:30
10 File number (still picture)
Playing time/Total recording time
(movie)
FILE: 100-0030
0"/20"
3
4
5
6
7
8
9
10
En
En 7
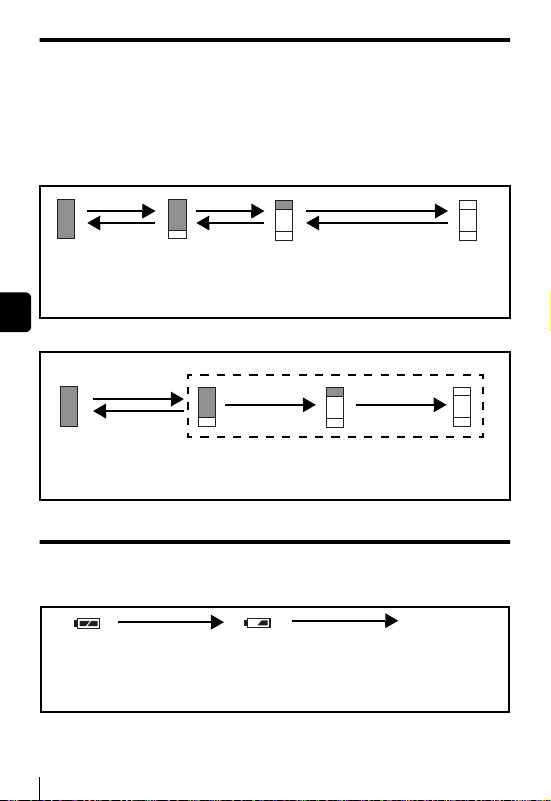
Memory gauge
The memory gauge lights up when you take a picture or record a movie. While
the gauge is lit, the camera is storing the picture or the movie on the card. The
memory gauge indication changes as shown below depending on the
shooting status.
When the
off
whole memory gauge is lit
before taking the next shot.
, wait a few moments
until the lit area goes
When taking still pictures
En
Shoot Shoot
Before shooting
(Gauge is off)
One picture
taken
(Lit)
Shoot
More than two
taken
(Lit)
Wait
No more pictures can be taken
(Fully lit)
Wait until the gauge returns to the
status on the left to take the next shot.
When recording movies
If you continue shooting
Shoot
Wait
Before
shooting
(Gauge is off)
During shooting (Lit)
• Shooting is not possible until the lit area goes off completely.
• Movie recording ends automatically when the whole memory gauge
is lit.
Battery check
If the remaining battery power is low, the battery check indication on the
monitor changes as follows when the camera is turned on or while the camera
is in use.
No indication
Lights (Green)
Pictures can be
taken.*
* Energy consumption varies greatly depending on the camera’s operational
status. The camera may turn off without displaying the low battery warning.
Lights (Red)
Remaining power level: low
Recharge as soon as
possible especially for
extended use.
Recharge as soon as possible.
Green and orange lamps on right
of viewfinder blink
Remaining power level:
exhausted
Replace with a charged battery.
8 En
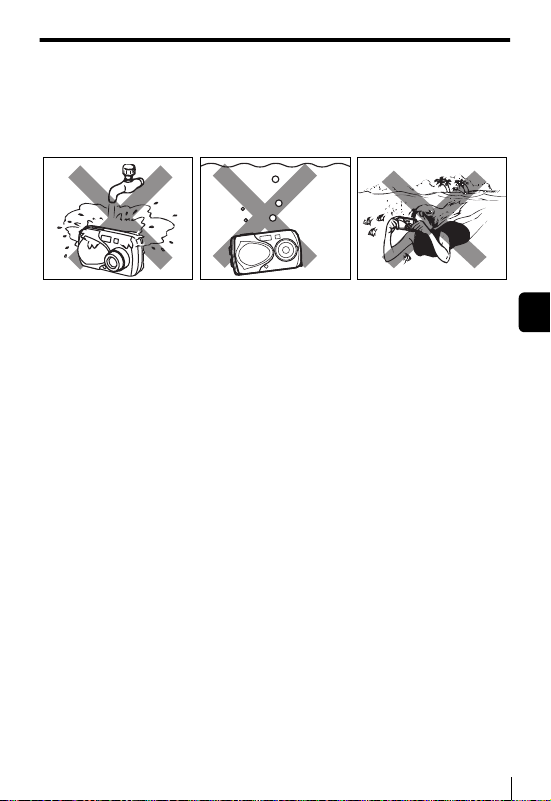
Weatherproof feature
The camera is weatherproof and is not damaged by water spray from any
direction. However, it cannot be used underwater. Observe the following
precautions when using the camera.
Olympus will not assume any responsibility for malfunction of the camera
caused by water getting inside as a result of misuse by the user.
• Do not wash the camera
with water.
• Do not drop the camera
into water.
• Do not take pictures
underwater.
• The camera loses its waterproof capability if the battery compartment
cover, connector cover or DC-IN jack cover is open. Make sure that all
the covers are closed before using the camera.
• Wipe any water off the camera before changing the battery or card.
• Keep the lens out of the water when taking pictures. (The camera may
not focus correctly.)
• If the camera gets splashed, wipe the water off as soon as possible with
a dry cloth. Salt water spray or droplets can cause damage to the camera
if the camera is not wiped dry as soon as possible.
• Do not apply excessive force to or attempt to peel off the rubber packing
of the battery compartment cover, connector cover or DC-IN jack cover.
• If the rubber packing becomes worn or damaged, contact your nearest
Olympus service center. (A charge is made for replacement of parts.)
• If the rubber packing of the battery compartment cover, connector cover
or DC-IN jack cover contains dirt or sand, wipe it off before closing the
cover, otherwise water may get inside the camera.
• The rechargeable battery and other camera accessories are not
weatherproof. Care should be taken when using the accessories.
En
En 9
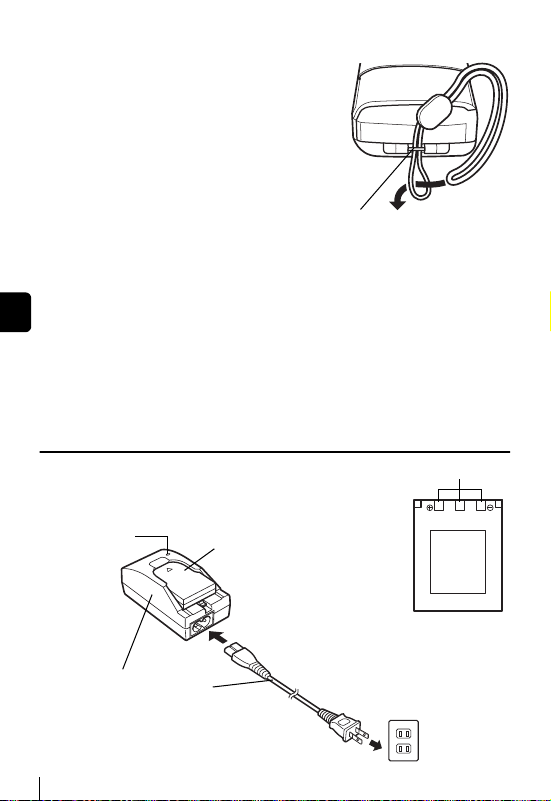
J ATTACHING THE STRAP
Thread the short end of the
1
strap through the strap eyelet.
Thread the long end of the strap
2
through the loop that has
already gone through the eyelet.
Pull the strap tight, making
3
sure that it is securely fastened
and does not come loose.
En
J CHARGING THE BATTERY
This camera uses an Olympus lithium ion battery (LI-10B). The battery is
dedicated to this camera and other batteries do not work. The battery is not
fully charged when the camera is purchased. Fully charge the battery on the
specified charger (LI-10C) before first use. For details, read the charger’s
instructions (provided).
About the battery
Make sure that the + and – terminals of the battery
shown in the illustration on the right are correctly
oriented when loading the battery into the charger.
Charge indicator
When charge
indicator
changes from
red to green,
the battery is
fully charged.
Lithium ion battery
To the AC input connector
Strap eyelet
Connector terminals
Lithium ion battery
10 En
Charger
AC cable
AC wall outlet
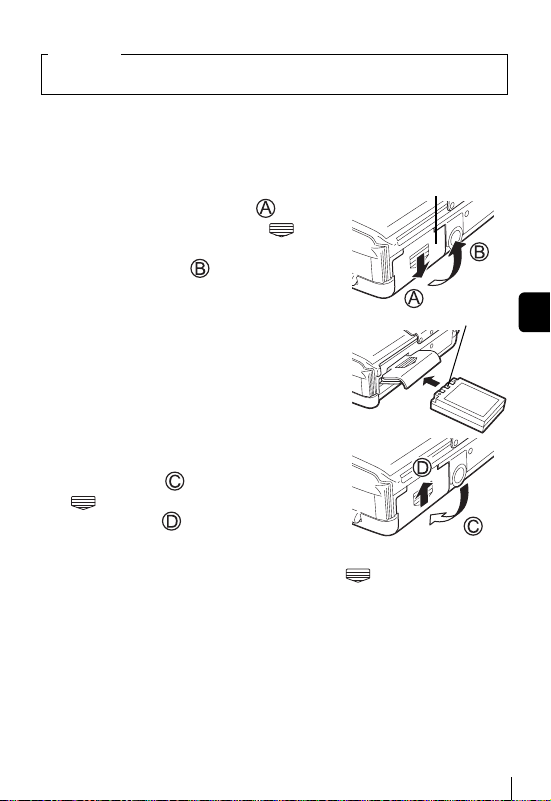
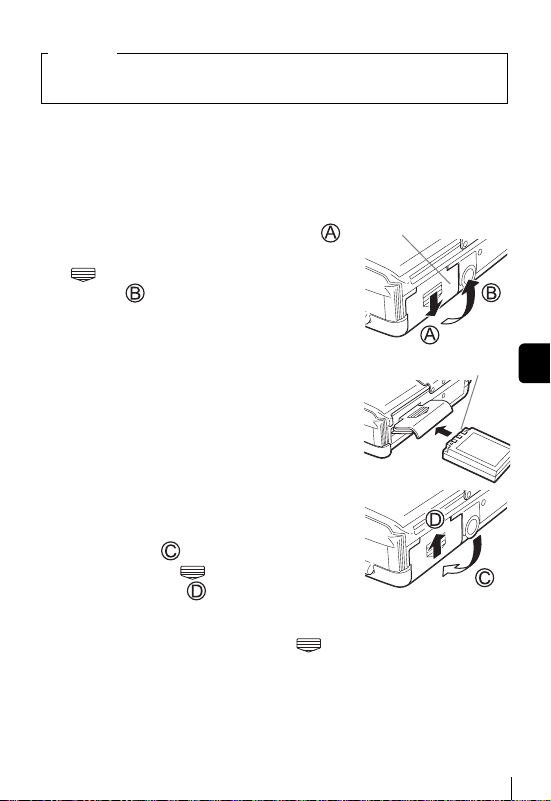
J LOADING THE BATTERY
Important
• Be sure to reset the date and time after changing the battery.
Make sure that:
1
• The monitor is off.
• The lens barrier is closed.
• The lamp on the right of the viewfinder is off.
Slide the battery compartment
2
cover in the direction of (the
direction indicated by the
mark on the cover), and lift it up in
the direction of .
Battery compartment cover
Insert the battery in the direction
3
shown in the illustration.
Close the battery compartment
4
cover so that it pushes the battery
down inside . While pressing the
mark, slide the cover in the
direction of .
• If the battery compartment cover seems
hard to close, do not force it. With the
battery compartment cover shut, press the mark firmly and push
in the direction shown in the illustration.
Connector terminals
En
En 11
J INSERTING A CARD
“Card” in this manual refers to the xD-Picture Card. The camera uses the card
to record pictures.
Make sure that:
1
• The monitor is off.
• The lens barrier is closed.
• The lamp on the right of the viewfinder is off.
Open the connector cover while
2
pressing the mark in the
illustration.
En
12 En
Open the card cover by
3
pulling the card cover
catch towards you.
Face the card the correct
4
way and insert it into the card
slot.
• Insert the card while keeping it straight.
• Inserting the card the wrong way or at an
angle could damage the contact area or
cause the card to jam.
• If the card is not inserted all the way,
data may not be written to the card.
Close the card cover.
5
Card cover
Connector cover
Card cover catch
Index area side
Close the connector cover.
6
• Press the mark in the illustration when
closing the connector cover.
Note
Do not close the connector cover without
first closing the card cover.
Removing the card
Open the connector cover and
1
the card cover.
Push the card all the way in to
2
unlock it, then let it return slowly.
• The card is ejected a short way and then
stops.
Note
Releasing your finger quickly after pushing
the card all the way in may cause it to eject
forcefully out of the slot.
Hold the card straight and pull it
3
out.
• Do not press on the card with hard or pointed items such as ballpoint
pens.
Note
En
En 13
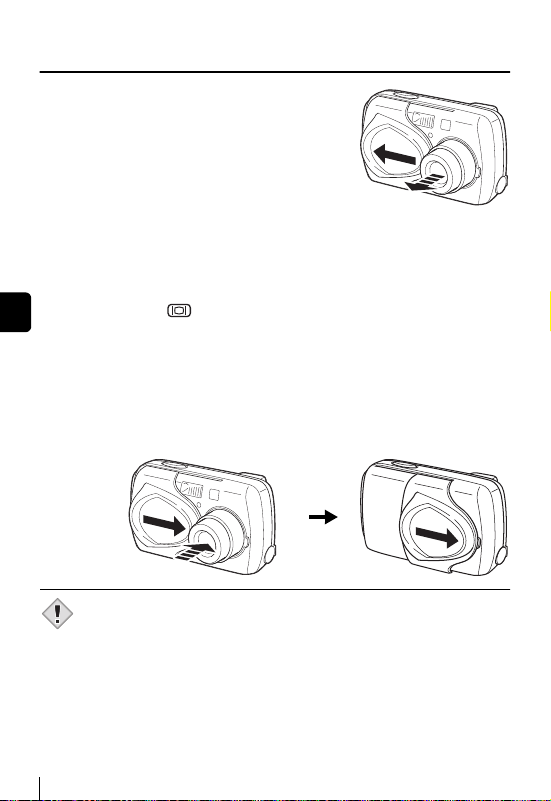
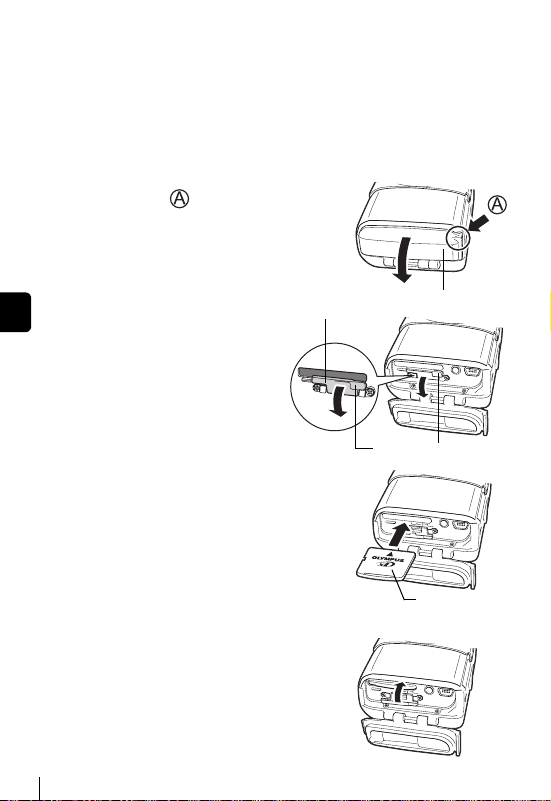
J TURNING THE POWER ON/OFF
When shooting pictures
Power on: Open the lens barrier.
En
Power off: Close the lens barrier slightly until it almost touches the
Note
The camera turns on in the shooting
mode. The lens extends and the
subject is displayed on the monitor.
If the lens does not extend when the
lens barrier is opened, there is a
possibility that the barrier is not fully
open. Open the lens barrier fully
until you feel it click.
When using the camera for the first time or after the camera has been
left for about 1 hour with the battery removed, the date and time are
reset. In this event, “SET DATE & TIME” appears on the monitor
when the camera is turned on.
Press to turn off the monitor. The camera is still on.
lens barrel.
The lens barrier stops just before it touches the lens and the
lens retracts. Wait until the lens is fully retracted before closing
the lens barrier completely.
The camera turns off. (The monitor also turns off.)
• Do not push the lens barrier forcefully against the lens as this may
damage the lens or cause it to malfunction.
14 En
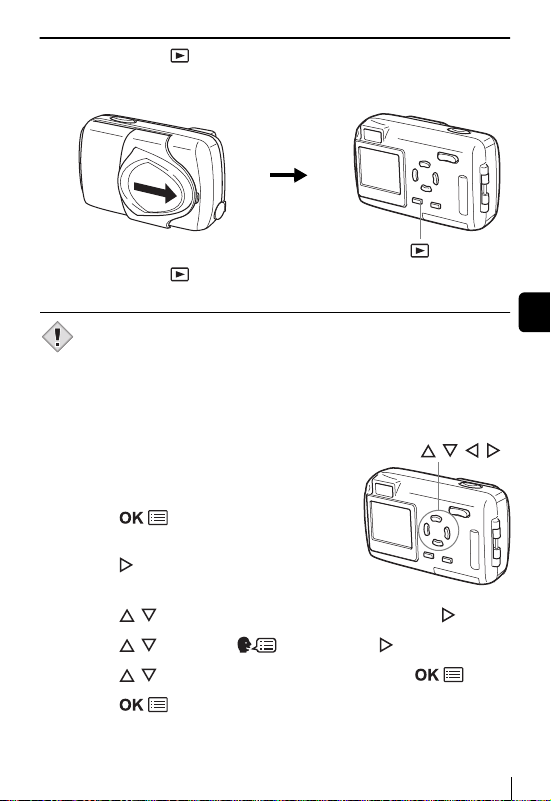
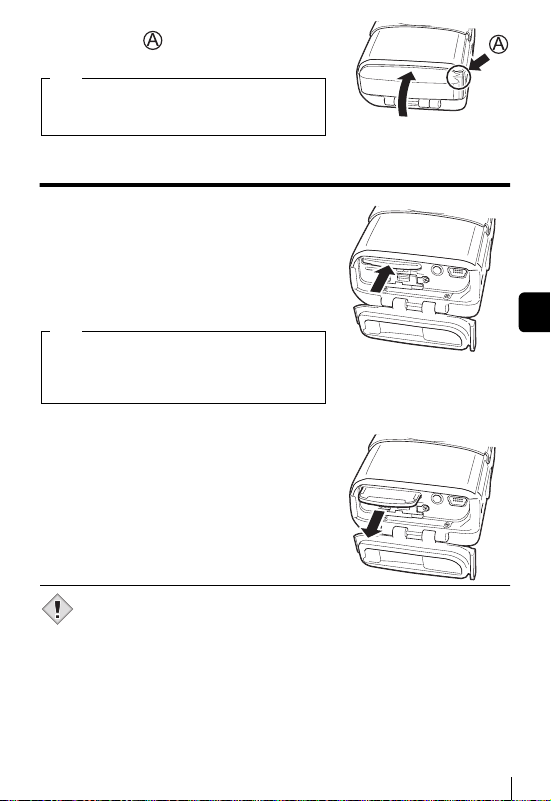
When playing back pictures
Power on: Press with the lens barrier closed.
The camera turns on in the playback mode. The monitor turns
on and the last picture taken is displayed.
Power off: Press .
Note
The monitor and the camera turn off.
• Never open the card cover, remove the card or the battery, or
connect or disconnect the AC adapter while the camera is turned on.
Doing so could destroy all data on the card. Destroyed data cannot
be restored. When changing the card, be sure to turn the camera off
before opening the card cover.
J SELECTING A LANGUAGE
Arrow pad ( )
Open the lens barrier fully.
1
• The lens extends and the monitor turns on.
Press .
2
• The top menu is displayed.
Press on the arrow pad to
3
select MODE MENU.
Press to select the SETUP tab, then press .
4
Press to select , then press .
5
Press to select a language, then press .
6
Press again to exit the menu.
7
Close the lens barrier to turn the camera off.
8
En
En 15
J SETTING THE DATE AND TIME
Open the lens barrier fully.
1
• The lens extends and the monitor turns on.
Press .
2
• The top menu is displayed.
Press on the arrow pad to select MODE MENU.
3
Press to select the SETUP tab, then press .
4
Press to select , then press .
5
• The green frame moves to the selected item.
Press to select one of the following date formats: Y-
6
M-D (Year/Month/Day), M-D-Y (Month/Day/Year), D-M-Y
En
(Day/Month/Year). Then press .
• Move to the year setting.
• The following steps show the procedure used when the date and time
settings are set to Y-M-D.
Press to set the year, then press to move to the
7
month setting.
• To move back to the previous setting, press .
•
The first two digits of the year are fixed.
Repeat this procedure until the date and time are
8
completely set.
• The camera only displays the time in 24-hour time system (“2 p.m.”
would be “14:00”).
Press .
9
• For a more accurate setting, press when the time hits 00
seconds. The clock starts when you press the button.
Close the lens barrier to turn the camera off
10
Note
16 En
• The date and time settings will be canceled if the camera is left
without batteries for approximately one day.
MENU FUNCTIONS
OFF
ESP
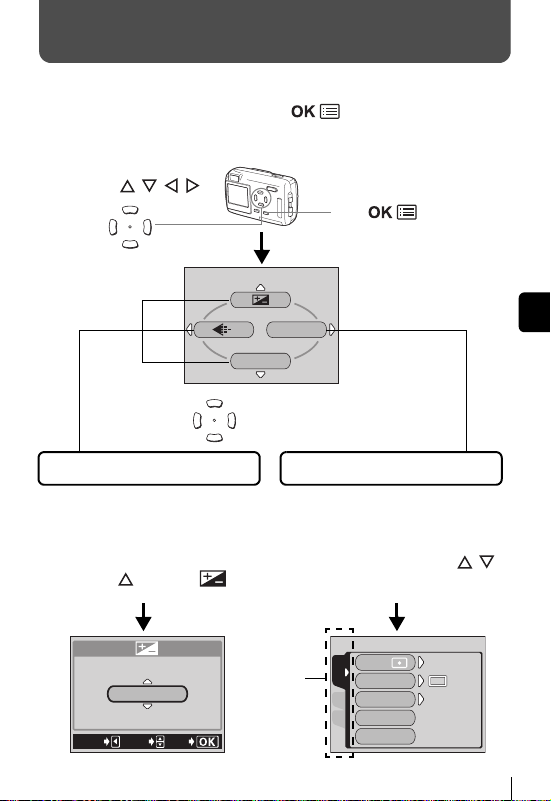
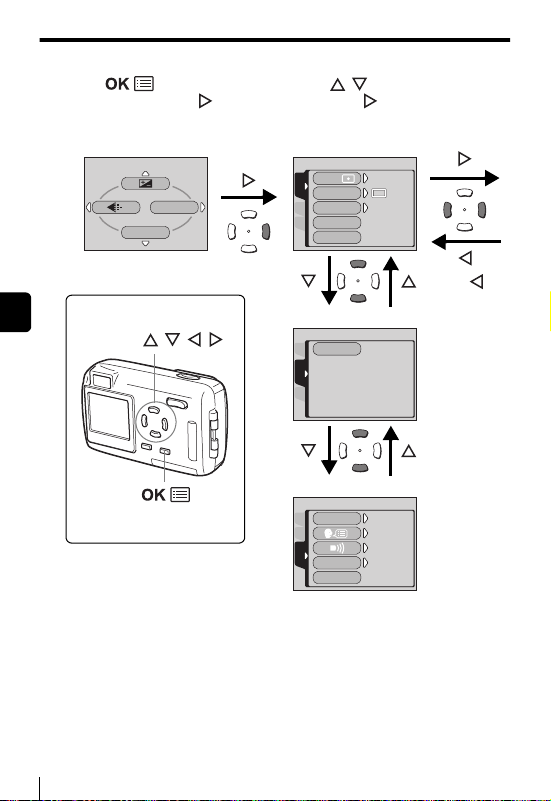
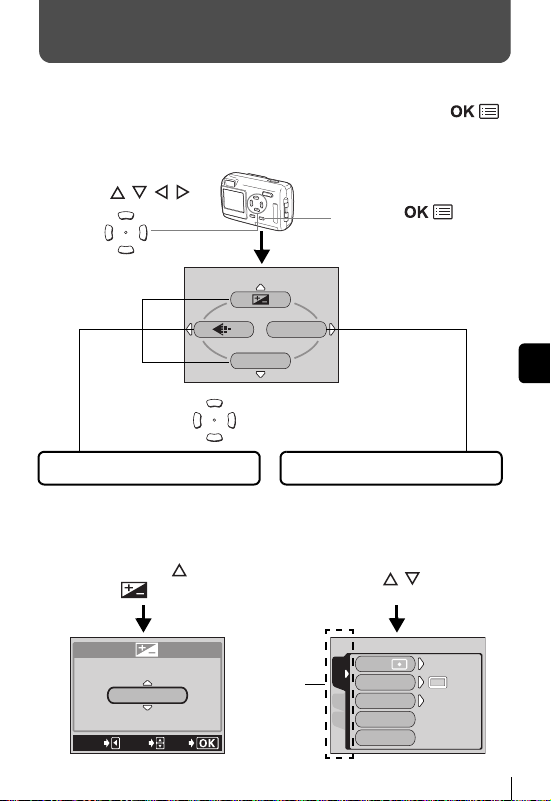
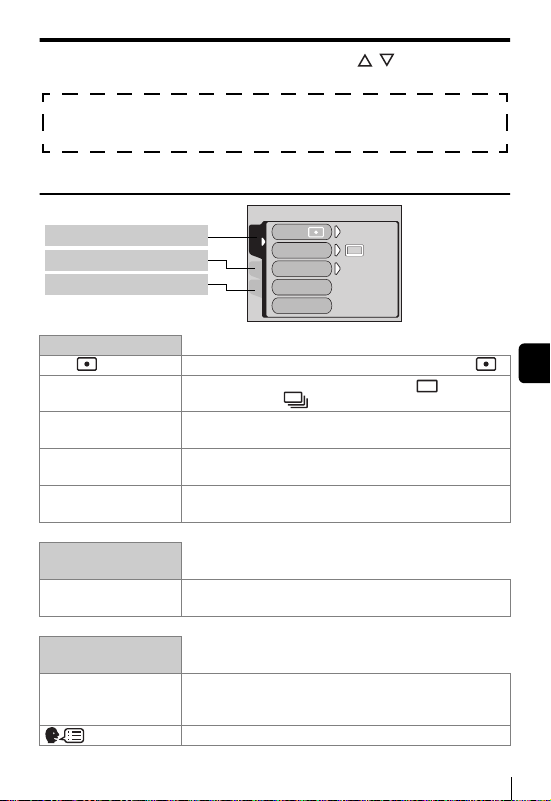
J USING THE MENUS AND TABS
When you turn on the camera and press , the top menu is displayed
on the monitor. The functions of this camera are set from the menus. This
chapter explains how the menus work, using the shooting mode screens.
Arrow pad ( )
Press .
The top menu is displayed.
Shortcut Menus
• Take you directly to the setting
screens.
• Display operational buttons at the
bottom of the screen.
If you press to select .
+
0.0
-
CANCEL
SELECt
GO
MODE MENU
WB
Select a menu using the
arrow pad.
MODE MENU
• Categorizes the settings into
tabs.
• Displays the tabs of each menu.
Select the desired tab on the left
of the screen by pressing .
Tab
ESP/ESP/
CAMERA
DRIVE
DIGItAL ZOOM
CARDSEt
PANORAMA
2 IN 1
En
ESP
OFF
En 17
How to use the menus
OFF
ESP
En
Press to display
1
2
the top menu. Press .
Top menu CAMERA tab
MODE MENU
WB
CARD tab
Arrow pad ( )
SETUP tab
Press to select a tab,
then press .
ESP
ESP/ESP/
CAMERA
DRIVE
OFF
DIGItAL ZOOM
CARDSEt
PANORAMA
2 IN 1
Press to
return to the
tab selection
ON
ENGLISH
ON
ON
screen.
CARD%SEtUP
CAM
CARD
SEt
ALL RESEt
CAMCARD
SEtUP
REC VIEW
PIXEL MAPPING
18 En
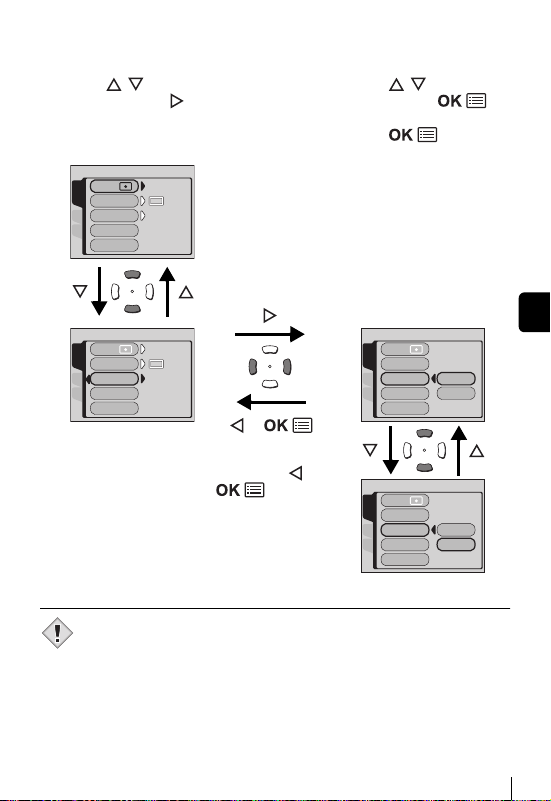
OFF
ESP
Press to select an
OFF
ESP
3
item, then press .
Press to select a
4
setting. Press
to complete setting.
Press again to
exit the menu and return
ESP
ESP/
CAMERA
DRIVE
OFF
DEZItAL ZOOM
CARDSEt
PANORAMA
2 IN 1
ESP
ESP/ESP/
CAMERA
DRIVE
OFF
DIGItAL ZOOM
CARDSEt
PANORAMA
2 IN 1
The green frame
moves to the
selected item.
or
To return to select an
item, press or
.
to shooting.
ESP/ESP/
CAMERA
DRIVE
DIGItAL ZOOM
CARDSEt
PANORAMA
2 IN 1
ESP/ESP/
CAMERA
DRIVE
DIGItAL ZOOM
CARDSEt
PANORAMA
2 IN 1
• Not all items can be selected depending on the camera mode and
settings.
Note
• Pressing the shutter button with a menu other than the menus in
SETUP tab open allows you to take pictures using the settings
currently selected.
• If you want to save the settings after the camera is turned off, set
ALL RESET to OFF.
OFF
ON
OFF
ON
En
En 19
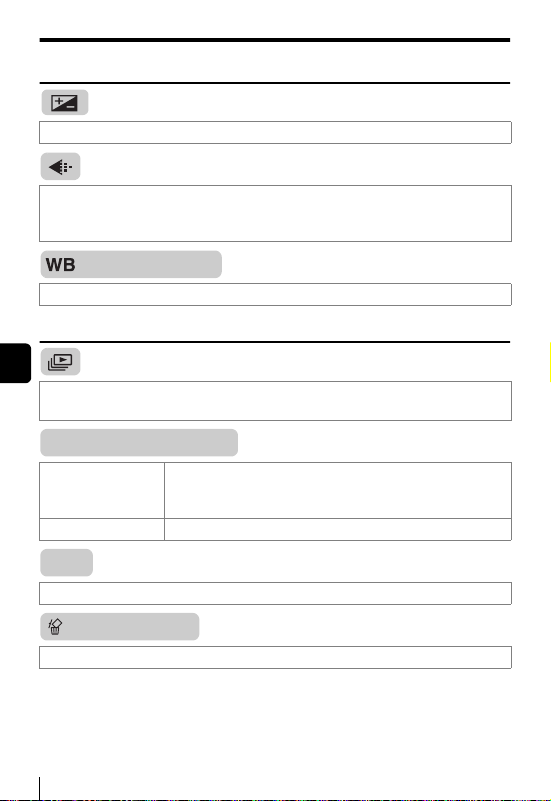
Shortcut menus
Shooting mode
Adjusts the brightness of the picture.
Sets the image quality and resolution.
Still picture : SHQ, HQ, SQ1, SQ2
Movie : HQ, SQ
Sets the appropriate white balance according to the light source.
En
Playback mode
Runs through all saved pictures one after another as slide show.
MOVIE PLAY
MOVIE
PLAYBACK
INDEX Creates an index picture of a movie in 9 frames.
INFO
Displays all the shooting information on the monitor.
ERASE
Erases the selected still picture or movie.
Plays back movies.
20 En
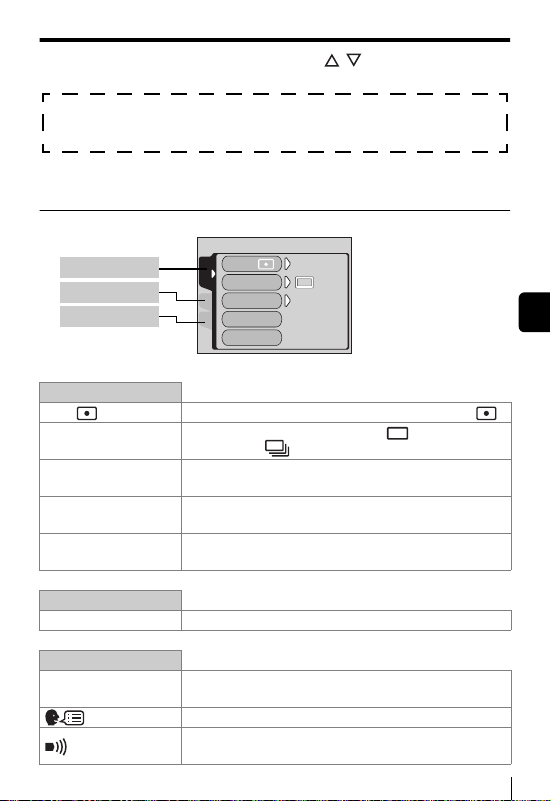
Mode menus
OFF
ESP
The MODE MENU is divided into tabs. Press to select a tab and
display the associated menu items.
These instructions are only for quick reference. For more details
on the functions described here, refer to the “Reference Manual”
on CD-ROM.
Shooting mode
CAMERA tab
CARD tab
SETUP tab
ESP/ESP/
CAMERA
DRIVE
DIGItAL ZOOM
CARDSEt
PANORAMA
2 IN 1
CAMERA tab
ESP/
DRIVE
DIGITAL ZOOM
PANORAMA
2 IN 1
Selects the metering method from ESP or SPOT ( ).
Selects the shooting mode from (single-frame
shooting) or (sequential shooting).
Extends the maximum optical zoom, making possible
up to approx. 5x zoom.
Allows panorama pictures to be taken with Olympus
CAMEDIA-brand cards.
Combines two still pictures taken in succession and
stores them as a single picture.
CARD tab
CARD SETUP Formats a card.
SETUP tab
ALL RESET
Selects whether to keep the current camera settings
when you turn off the power.
Selects a language for on-screen display.
Turns the beep sound (used for warnings, etc.) on
and off.
ESP
OFF
En
En 21
REC VIEW
PIXEL MAPPING
VIDEO OUT
Playback mode
Selects whether to display pictures on the monitor
while saving them to a card.
Checks the CCD and image processing functions for
errors.
Adjusts the brightness of the monitor.
Sets the date and time.
Selects NTSC or PAL according to your TV’s video
signal type. TV video signal types differ depending on
the region.
En
PLAY tab
EDIT tab
BLACK&WHITE
SEPIA
CARD tab
CARD SETUP
22 En
PLAY tab
EDIT tab
CARD tab
SETUP tab
PLAY
CARDSEt EDIt
Protects pictures from accidental erasure.
Rotates pictures 90 degrees clockwise or
counterclockwise.
Stores print reservation information on the card.
Creates a black and white picture and saves it as a
new picture.
Creates a sepia-toned picture and saves it as a new
picture.
Makes the file size smaller and saves it as a new
picture.
Erases all image data stored on the card or formats
the card.

SETUP tab
ALL RESET
VIDEO OUT
Selects whether to keep the current camera settings
when you turn off the power.
Selects a language for on-screen display.
Turns the beep sound (used for warnings, etc.) on
and off.
Adjusts the brightness of the monitor.
Sets the date and time.
Selects NTSC or PAL according to your TV’s video
signal type.TV video signal types differ depending on
the region.
Selects the number of frames in the index display.
En
En 23
SHOOTING BASICS
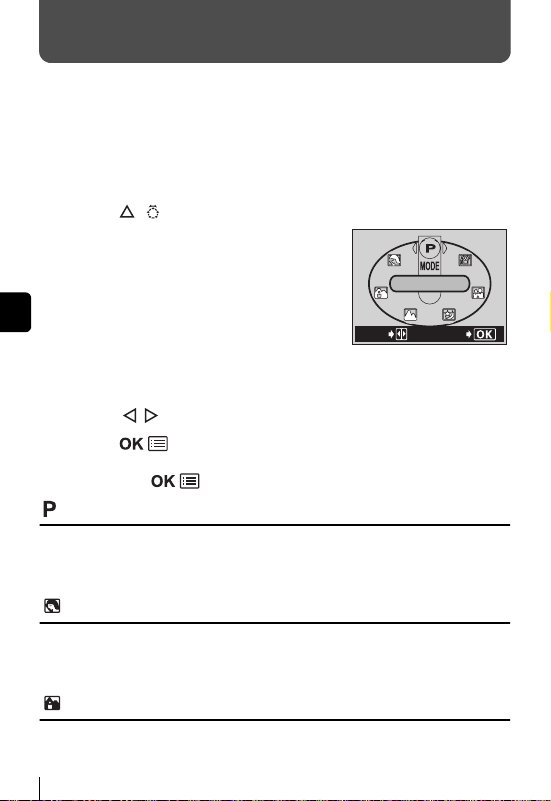
J SHOOTING MODES
This camera has 7 shooting modes to choose from depending on the
shooting conditions and the effect you want to achieve.
Open the lens barrier fully.
1
• The lens extends and the monitor turns on.
Press ( ).
2
• The screen for selecting the shooting
mode (virtual dial) is displayed.
PROGRAM AUtO
En
SELECt
Virtual dial screen
Select the mode best suited to your
3
purpose from the following.
• Press to select the mode.
Press .
4
• The virtual dial screen will disappear. It will disappear after a while
even if the button is not pressed.
PROGRAM AUTO (Factory default setting)
Used for regular photography. The camera automatically makes the settings
for natural color balance. Other functions, such as the flash mode and
metering, can be adjusted manually.
PORTRAIT
Suitable for taking a portrait-style shot of a person. Importance is placed on
reproducing skin texture. The camera automatically sets the optimal shooting
conditions.
LANDSCAPE + PORTRAIT
Suitable for taking photos of both your subject and the landscape. The
camera automatically sets the optimal shooting conditions.
24 En
GO
LANDSCAPE
Suitable for taking photos of landscapes and other outdoor scenes. The
camera automatically sets the optimal shooting conditions.
NIGHT SCENE
Suitable for shooting pictures in the evening or at night. The camera sets a
slower shutter speed than is used in normal shooting. If you take a picture of
a street at night in any other mode, the lack of brightness will result in a dark
picture with only dots of light showing. In this mode, the true appearance of
the street is captured. The camera automatically sets the optimal shooting
conditions.
SELF PORTRAIT
Enables you to take a picture of yourself while holding the camera. Point the
lens towards yourself and the focus will be locked on you. The camera
automatically sets the optimal shooting conditions. The zoom is fixed in the
Wide position and cannot be changed.
MOVIE
Lets you record movies. The camera maintains the correct exposure even if
your subject moves. You cannot record movies with sound.
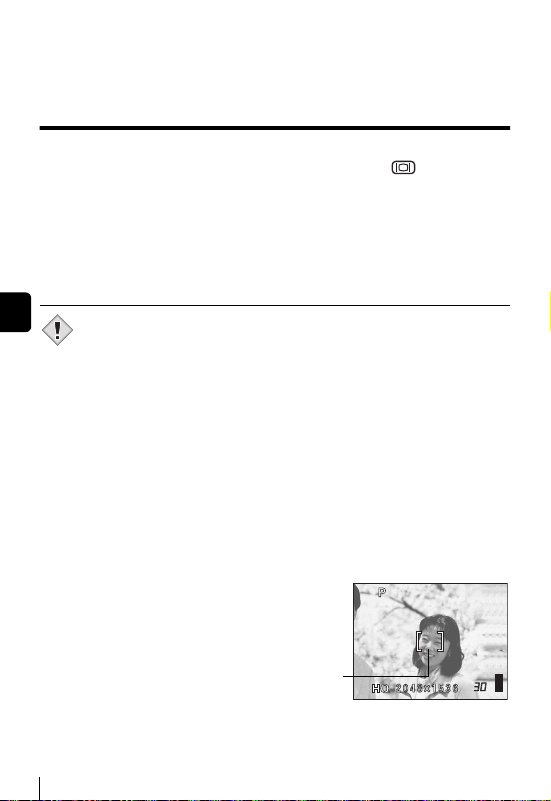
J TAKING STILL PICTURES
You can take still pictures using either the monitor or the viewfinder. Both
methods are easy as all you have to do is to press the shutter button.
Taking still pictures using the monitor
Open the lens barrier fully.
1
• Slide the lens barrier fully open until it clicks.
• The lens extends and the monitor turns on.
Position the AF target mark on the subject while looking at
2
the image on the monitor. Decide the composition of the
picture.
Press the shutter button gently (halfway) to adjust the
3
focus.
• When the focus and exposure are locked, the green lamp lights.
• If the orange lamp lights, the flash fires automatically.
En
En 25
Press the shutter button all the way (fully).
4
• The camera takes the picture, and a beep sounds.
• When the green lamp stops blinking, you can take the next picture.
• The orange lamp blinks while the picture is stored on the card.
Taking still pictures using the view finder
Open the lens barrier fully.
1
• The lens extends and the monitor turns on. Press to turn the
monitor off.
Position the AF target mark in the viewfinder on the
2
subject.
Take the picture by following the same procedure as for
3
shooting using the monitor.
En
• Never open the card cover, remove the battery or disconnect the AC
adapter while the orange lamp is blinking. Doing so could destroy
Note
stored pictures and prevent storage of the pictures you have just
taken.
J IF CORRECT FOCUS CANNOT BE
OBTAINED (FOCUS LOCK)
When the subject you want to focus on is not in the center of the frame and
you cannot position the AF target mark on it, you can focus the camera on
another point at roughly the same distance (focus lock) and take the picture
as explained below.
Open the lens barrier fully.
1
• The lens extends and the monitor turns on.
Position the AF target mark on the
2
subject you want to focus on.
• When shooting a hard-to-focus subject,
point the camera at an object about the
same distance away as the subject.
AF target mark
Monitor
26 En

Press the shutter button halfway until the green lamp
3
lights.
• The focus, exposure, and white balance are locked.
• When the green lamp blinks, the focus is not locked. Release your
finger from the shutter button, re-position your subject and press the
shutter button halfway again.
Keeping the shutter button
4
pressed halfway, recompose
your shot.
Press the shutter button fully.
5
Green
lamp
J RECORDING MOVIES
Open the lens barrier fully.
1
• The lens extends and the monitor turns on.
Press
2
Press to select , then press .
3
• Movie recording is set and the camera returns to the shooting mode.
• The mark and the total recordable time depending on the card
Decide the composition while looking at the image on the
4
monitor.
• The optical zoom can be used to enlarge the subject.
Press the shutter button halfway.
5
• The focus and white balance are locked.
Press the shutter button fully to start recording.
6
• The orange lamp on the right of the viewfinder lights.
• During movie recording, lights red and the time you can shoot is displayed.
Press the shutter button again to stop recording.
7
• The orange lamp blinks while the movie is stored on the card.
• When the remaining recording time has been used up, recording stops
(
) to display the virtual dial screen.
memory capacity are displayed on the monitor.
automatically.
En
En 27

• The magnification of the optical zoom cannot be changed during
movie recording. The zoom is fixed in the Wide position. To use the
Note
zoom, set “DIGITAL ZOOM” to “ON”.
• During movie recording, the flash is disabled.
• It takes longer to store movies than still pictures.
• The seconds remaining varies depending on the record mode and
the amount of space available on the card.
• You cannot record movies with sound.
J ZOOMING IN ON A SUBJECT (OPTICAL
ZOOM)
Telephoto and wide-angle shooting are possible at 3x magnification (the
optical zoom limit, equivalent to 35 mm - 105 mm on a 35 mm camera). By
combining the optical zoom with the digital zoom, zoom magnification can be
increased to a maximum of approximately 15x.
En
Magnification of the digital zoom
When SQ2 (640 × 480) is selected: up to 5×
Other record modes: up to 4×
Open the lens barrier fully.
1
• The lens extends and the monitor turns on.
Press the zoom button.
2
• Press the zoom button toward W to zoom out.
• Press the zoom button toward T to zoom in.
Take the picture.
3
• Pictures taken with the digital zoom may appear grainy.
Note
J USING THE FLASH
Open the lens barrier fully.
1
• The lens extends and the monitor turns on.
28 En
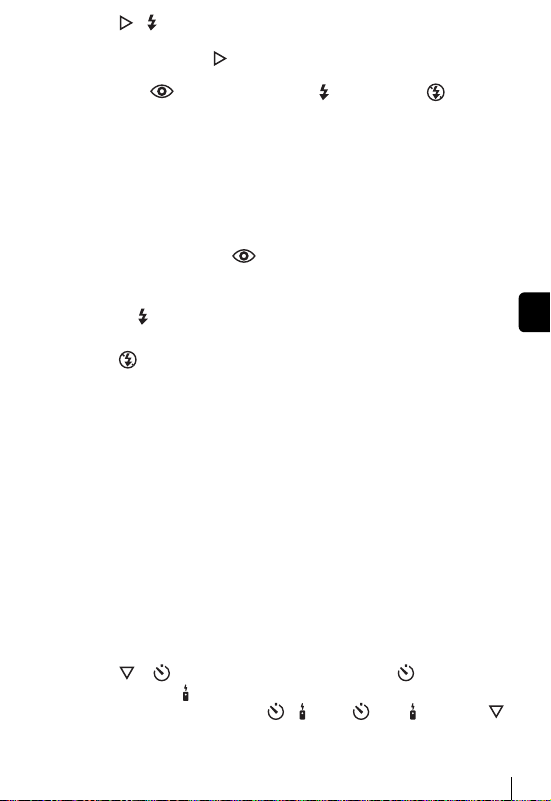
Press ( ) to set flash mode.
2
• The current flash setting is displayed.
• Each time you press , the flash mode changes in the following
sequence:
“AUTO” – “ Red-eye reduction” – “ Fill-in flash” – “ Flash off”.
Press the shutter button halfway.
3
• When the flash is ready to fire, the orange lamp lights steady.
Press the shutter button fully to take the picture.
4
Auto-flash (No indication)
The flash fires automatically in low light or backlight conditions.
Red-eye reduction flash ( )
The red-eye reduction flash mode reduces this phenomenon by emitting preflashes before firing the regular flash.
Fill-in flash ( )
The flash always fires every time the shutter button is released.
Flash off ( )
The flash does not fire even in low light conditions.
J USING THE SELF-TIMER/REMOTE
CONTROL
Self-timer : This function is useful for taking pictures with yourself
Remote control : Shooting is possible using the remote control device (sold
Mount the camera on a tripod or place it on a stable, flat
1
surface.
Open the lens barrier fully.
2
• The lens extends and the monitor turns on.
Press ( ) to set the self-timer mode ( ) or remote
3
control mode ( ).
• The setting changes between / OFF, and each time
is pressed.
included in the photograph.
separately in some regions). This is useful when you want
to take a picture with yourself in it or a night scene, without
touching the camera.
En
En 29
Take the picture.
4
• When using the remote control device, point it at the remote control
receiver on the camera and then press the shutter button on the
device.
Self-timer : The self-timer/remote control lamp lights for about
Remote control : The self-timer/remote control lamp blinks for about 2
10 seconds, then starts blinking. After blinking for
about 2 seconds, the picture is taken.
seconds before taking the picture.
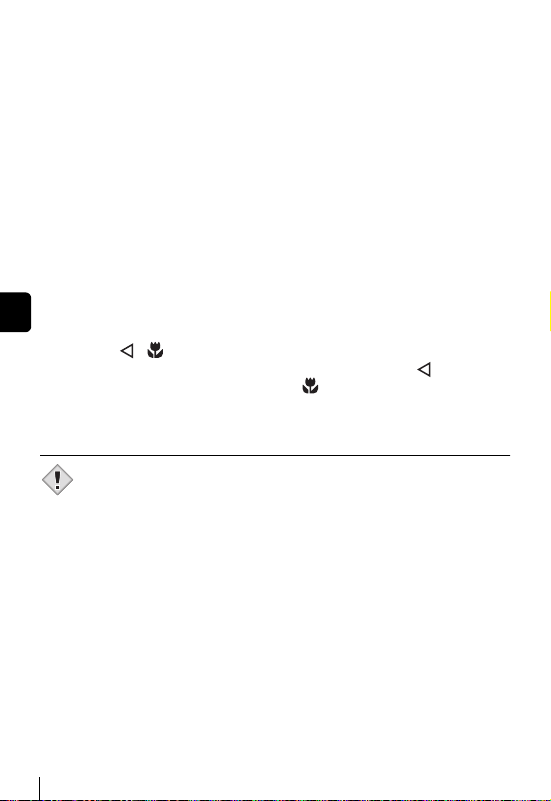
J MACRO MODE SHOOTING
The macro mode allows you to shoot at a distance of 20 cm to 50 cm (0.7 ft.
to 1.6 ft.) from your subject.
Regular photographs can be taken, but the camera may take time to focus on
distant subjects.
Open the lens barrier fully.
1
En
• The lens extends and the monitor turns on.
Press ( ) to set macro mode.
2
• The setting changes between ON and OFF each time is pressed.
When the macro mode is selected, is displayed on the monitor.
Take the picture.
3
• If you are close to a subject, the picture in the viewfinder is different
from the area that the camera actually records. For macro mode
Note
shooting, we recommend using the monitor.
30 En
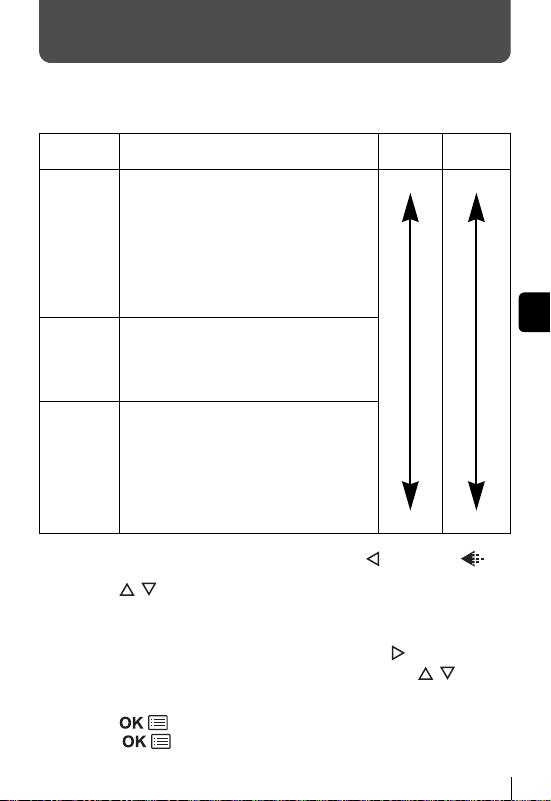
SELECTING A RECORD MODE
Choose the best record mode for your purposes (printing, editing on a PC,
website editing, etc.).
Record
mode
SQ1/SQ2
1
2
3
• A high quality mode.
• Fewer images can be saved to a card.
• Takes longer to store the images.
SHQ
Uses
• Good for printing.
• Can be enlarged to A4 (210mm ×
297mm / 8.3'' × 11.7'') size.
• Good for processing on a PC.
• Factory default setting.
HQ
Uses
• Good for editing on a PC or printing in
postcard size.
• The resolutions are smaller than in
SHQ or HQ.
• A standard quality mode.
• More images can be saved to a card.
Uses
• Attaching images to e-mail or simply
viewing them on a PC.
In the shooting mode top menu, press to select .
Press to select the desired record mode.
• For still pictures, you can choose from SHQ, HQ, SQ1 and SQ2.
• For movies, you can choose HQ or SQ.
If you choose SQ2 for still pictures, press to display
Description Quality File size
Clearer
Normal
the screen for selecting the resolution. Press to
choose a resolution.
Press .
4
• Press again to exit the menu.
Larger
En
Smaller
En 31

PLAYBACK
J PLAYING BACK STILL PICTURES
Press .
1
• The monitor turns on and displays the last picture taken. (Single-frame
playback)
Use the arrow pad to play back other pictures.
2
Jumps to the picture 10 frames back. ( )
En
Displays the previous
picture. ( )
Jumps to the picture 10 frames ahead. ( )
Press to cancel playback.
3
• The monitor and camera turn off.
Displays the next
picture. ( )
QUICK VIEW (Double-click playback)
This function lets you play back pictures while the camera is in the shooting
mode. This is useful when you want to check shooting results and resume
shooting quickly.
Functions available in normal playback mode are also available in QUICK
VIEW.
Press twice quickly (double-click) while in the
1
shooting mode.
• The camera immediately enters the playback mode and displays the
last picture taken. (Single-frame playback)
Press the shutter button halfway to return to the shooting
2
mode.
• The camera returns to shooting mode, and is ready to take pictures.
32 En

Close-up playback
Pictures displayed on the monitor can be enlarged in steps up to 4 times the
original size. This function is useful when you want to check the details of a
picture.
Use the arrow pad to display the still picture you want to
1
enlarge.
• You cannot enlarge pictures with .
Press the zoom button toward T.
2
• To return the picture to the original size (1×), press the zoom button
toward W.
Index display
This function lets you show several pictures at the same time on the monitor.
It is useful for quickly finding the picture you want to view. The number of
pictures shown can be 4, 9 or 16.
In the single-frame playback mode, press the zoom button
1
toward W.
• Use the arrow pad to select the picture.
• To return to single-frame playback, press the zoom button toward T.
J PLAYING BACK MOVIES
Press .
1
• The monitor turns on.
Use the arrow pad to display the picture with .
2
Press .
3
• The top menu is displayed.
Press to select MOVIE PLAY.
4
Press to select MOVIE PLAYBACK, then press
5
.
• The movie is played back. When playback ends, the display
automatically returns to the beginning of the movie.
En 33
En

• Press again after playback ends to display the MOVIE
PLAYBACK menu.
PLAYBACK :Plays back the entire movie again.
FRAME BY FRAME :
EXIT :Leaves the movie playback mode.
Press to select from PLAYBACK, FRAME BY FRAME or EXIT,
then press .
Plays back the movie manually one frame at a time.
When FRAME BY FRAME is selected
: Displays the first frame of the movie.
: Displays the last frame of the movie.
: Displays the next frame. The movie can be played continuously by
holding the button down.
: Displays the previous frame. The movie can be played
En
continuously in reverse by holding the button down.
: Displays the MOVIE PLAYBACK menu.
J PROTECTING PICTURES
You are recommended to protect important pictures to avoid accidentally
erasing them.
Press .
1
• The monitor turns on.
Use the arrow pad to display the picture you want to protect.
2
Press .
3
• The top menu is displayed.
In the top menu, select MODE MENU PLAY , and
4
press .
Press to select ON, then press .
5
• To cancel protection, select OFF.
Press to exit the menu.
6
• The Protect icon appears on the screen.
Note
34 En
• Protected pictures cannot be erased by the single-frame/all-frame
erase function, but they are all erased by formatting.

J ERASING PICTURES
This function enables you to erase recorded pictures. This can be done either
one frame at a time or to all the pictures on the card at once.
• Once erased, pictures cannot be restored. Check each picture
before erasing to avoid accidentally erasing pictures you want to
Note
keep.
Single-frame erase
Press .
1
• The monitor turns on.
Use the arrow pad to display the picture you want to
2
erase.
Press .
3
• The top menu is displayed.
Press to select .
4
Press to select YES, then press .
5
• The picture is erased and the menu is closed.
All-frame erase
In the playback mode top menu, select MODE MENU
1
CARD CARD SETUP, and press .
Press to select ALL ERASE, then press .
2
Press to select YES, then press .
3
• All the pictures are erased.
En
J FORMATTING (CARD SETUP)
This function lets you format a card. Formatting prepares cards to receive
data. Before using non-Olympus cards or cards which have been formatted
on a PC, you must format them with this camera.
• All existing data, including protected data, is erased when the card
is formatted. Once erased, pictures cannot be restored, so make
Note
sure that you do not erase important image data. Download
important image data to a PC before formatting the card.
En 35

In the top menu, select MODE MENU CARD CARD
1
SETUP, and press .
• Shooting mode
The FORMAT screen is displayed.
• Playback mode
The CARD SETUP screen is displayed.
If the FORMAT screen is displayed, press to
2
select YES.
If the CARD SETUP screen is displayed, press to
select FORMAT, then press . When the
FORMAT screen appears, press to select YES.
Press .
3
En
• The BUSY bar is displayed and the card is formatted.
J PLAYBACK ON A TV
Use the Video cable provided with the camera to play back recorded images
on your TV.
Make sure that the camera and the TV are turned off.
1
Connect the Video cable to the VIDEO OUT jack on the
camera and the video input terminal on the TV.
Turn the TV on and switch to the video input mode.
2
Press .
3
• You are recommended to use the optional AC adapter when using
the camera with a TV.
Note
• Make sure that the camera’s video output signal type is the same as
the TV’s video signal type.
36 En

PRINT SETTINGS
By specifying the desired number of prints of each picture on the card and
whether or not the date and time are to be printed, you can print out the
desired pictures according to the print reservation data with a DPOFcompatible printer or at a DPOF photo lab.
What is DPOF?
DPOF is short for Digital Print Order Format. DPOF is a format used to record
automatic print information from cameras.
By storing the print reservation data on the card, the pictures can be printed
easily by a DPOF-compatible photo lab or on a personal DPOF-compatible
printer.
All-frame reservation
Use this feature to print all the pictures stored on the card. You can specify
the desired number of prints and whether or not the date and time are to be
printed.
Single-frame reservation
Use this feature to print only selected pictures. Display the frame to be printed
and select the desired number of prints.
Resetting the print reservation data
This function allows you to reset all the print reservation data for pictures
stored on the card.
For more details, refer to the “Reference Manual” on CD-ROM.
En
En 37
DOWNLOADING PICTURES TO A COMPUTER
By connecting the camera to a computer with the provided USB cable,
images on a card can be transferred to the computer. Some OS’s (operating
systems) may need a special setup before connecting to the camera for the
first time. Follow the chart below. For details of the procedures in the chart,
refer to the “Reference Manual” on the software CD. Also refer to the
“Software Installation Guide” included in the CD-ROM package.
Identifying the OS
Windows 98/
98 SE (Second
Edition)
En
Installing the USB
driver for Windows 98
Connecting the camera to the computer using the provided USB cable
Confirming the computer recognizes the camera
* Even if your computer has a USB connector, data transfer may not
function correctly if you are using one of the operating systems listed
below or if you have an add-on USB connector (extension card, etc.).
• Windows 95/NT 4.0
• Windows 98/98 SE upgrade from Windows 95
• Mac OS 8.6 or lower (except Mac OS 8.6 equipped with USB MASS
Storage Support 1.3.5 installed at the factory)
• Data transfer is not guaranteed on a home-built PC system or PCs with no
factory installed OS.
• You can view images using: graphics applications that support the
JPEG file format (Paint Shop Pro, Photoshop, etc.); Internet
browsers (Netscape Communicator, Microsoft Internet Explorer,
Note
etc.); CAMEDIA Master software; or other software. For details on
using commercial graphics applications, refer to their instruction
manuals.
Windows Me/2000/XP
Downloading image files
Disconnecting the USB cable
Mac OS 9.0 - 9.1/
OSX
* For OS 8.6, see below.
38 En

• QuickTime is needed for playing back movies. QuickTime is
included on the provided software CD.
• If you want to process images, make sure to download them to your
computer first. Depending on the software, image files may be
destroyed if the images are processed (rotated, etc.) while they are
on the card.
J FOR OTHER OS USERS
Users running other OS cannot use the provided USB cable to connect the
camera directly to a computer.
Windows 95 Windows NT Mac OS before OS 9
You can download images directly to your computer using an optional floppy
disk adapter or PC card adapter.
Does your computer have a USB interface?
Is there a port marked on your computer?
No
No
Does your computer have a built-in PC card slot?
Yes
Is your OS one of
the following?
• Windows 98
• Windows 2000
• Windows Me
• Windows XP
• Mac OS 9/X
Connect the camera directly to
Yes
your computer using the
provided USB
cable.
Use the optional USB reader/
writer.
*Certain card readers may not
be compatible with Mac OS X.
Check the Olympus website for
the most up-to-date compatibility
information.
En
No
Consult your nearest Olympus representative.
For more details, refer to the “Reference Manual” on CD-ROM.
For connection to the PC, refer to the “Software Installation Guide”
included in the CD-ROM package.
Yes
Use the optional PC card adapter.
*Not supported by Windows NT4.0 or lower.
En 39

ERROR CODES
Monitor
indication
En
PICTURE ERROR
NO CARD
CARD ERROR
WRITE-
PROTECT
CARD FULL
NO PICTURE
CARD%SEtUP
POWER%OFF
FORMAt
SELECt
GO
CARD COVER
OPEN
Possible cause Corrective action
The card is not
inserted, or it cannot
be recognized.
There is a problem with
the card.
Writing to the card is
prohibited.
The card is full. No
more pictures can be
taken or no more
information such as
print reservation can
be recorded.
There are no pictures
on the card.
There is a problem with
the selected picture
and it cannot be
displayed.
The card is not
formatted.
The card cover is
open.
The date and time are
not set.
Insert a card or insert a different card.
Wipe the gold contacts with a
commercially available cleaning
paper and insert the card again. If the
problem persists, format the card. If
the card cannot be formatted, it
cannot be used.
Use a different card.
Insert a new card.
Read-only has been set using a
computer. Use the computer again
to cancel the read-only setting.
Replace the card or erase
unwanted pictures. Before erasing,
download important images to a
PC.
The card contains no pictures.
Record pictures.
Use image processing software to
view the picture on a PC. If that
cannot be done, the image file is
damaged.
Format the card.
Close the card cover.
Set the date and time.
40 En
Y/M/D

SPECIFICATIONS
Product type : Digital camera (for shooting and displaying)
Recording system
Still picture :
Movie : QuickTime Motion JPEG support
Memory : xD-Picture Card (16 – 256MB)
No. of storable
pictures
(when a 16 MB
Card is used)
No. of effective pixels
Stylus/µ[mju:]
300 DIGITAL
Stylus/µ[mju:]
400 DIGITAL
Image pickup device
Stylus/µ[mju:]
300 DIGITAL
Digital recording, JPEG (in accordance with Design
rule for Camera File system (DCF)), Exif 2.2, Digital
Print Order Format (DPOF), PRINT Image Matching II
:
Resolution
2272 × 1704
2048 × 1536 SQ1 20
1600 × 1200
1280 × 960 38
1024 × 768 58 58
640 × 480 99 99
Record mode
HQ
SQ
: 3,200,000 pixels
: 4,000,000 pixels
: 1/2.5'' CCD solid-state image pickup, 3,340,000
pixels (gross)
(15 frames/sec)
(15 frames/sec)
Record mode/
No. of storable pictures
Stylus/µ[mju:]
400 DIGITAL
SHQ 5
HQ 16
24 SQ1 24
SQ2
Resolution
(Frames/sec)
320 × 240
160 × 120
Memory capacity
in sec. per movie
Stylus/µ[mju:]
300 DIGITAL
SHQ 6
HQ 20
SQ2
——
16
70
En
38
En 41

Stylus/µ[mju:]
400 DIGITAL
Lens : Olympus lens 5.8 mm to 17.4 mm (equivalent to 35
Photometric system : Digital ESP metering, Spot metering
Shutter speed : 1/2 to 1/1000 sec. (max. 4 sec. in Night scene mode)
Shooting range : 0.5 m (1.6 ft.) to (normal)
Viewfinder : Optical real image viewfinder
Monitor : 1.5'' TFT color LCD display, 134,000pixels
Outer connector : DC-IN jack, USB connector (mini-B), VIDEO OUT
Automatic calendar
system
Weatherproof
En
feature
Operating environment
Temperature : 0 to 40°C (32°F to 104°F) (operation)
Humidity : 30% to 90% (operation)/10% to 90% (storage)
Power supply : Specified lithium ion rechargeable battery or AC
Dimensions : 99 mm (W) × 56 mm (H) × 33.5 mm (D)
Weight : 165 g (0.4 lb.) (without battery or card)
SPECIFICATIONS ARE SUBJECT TO CHANGE WITHOUT ANY NOTICE
OR OBLIGATION ON THE PART OF THE MANUFACTURER.
: 1/2.5'' CCD solid-state image pickup, 4,230,000
pixels (gross)
mm to 105 mm lens on 35 mm camera), F3.1 to F5.2
0.2 m (0.7 ft.) to (macro mode)
jack
: 2000 – 2099
: Equivalent to IEC Standard publication 529 IPX4
(under OLYMPUS test conditions)
-20 to 60°C (-4°F to 140°F) (storage)
adapter
(3.9'' × 2.2'' × 1.3'')
(excluding protrusions)
42 En

MEMO
En
En 43

TABLE DES MATIÈRES
GUIDE RAPIDE DE DÉMARRAGE . . . . . . . . . . . . . . . . 46
FONCTIONS DU MENU . . . . . . . . . . . . . . . . . . . . . . . . . 59
PRISE DE VUES – INSTRUCTIONS DE BASE . . . . . . 66
SÉLECTION MODE D’ENREGISTREMENT . . . . . . . . . 73
AFFICHAGE . . . . . . . . . . . . . . . . . . . . . . . . . . . . . . . . . . 74
RÉGLAGES D’IMPRESSION. . . . . . . . . . . . . . . . . . . . . 79
TRANSFERT DES PHOTOS VERS UN ORDINATEUR
. . . . 80
CODES D’ERREUR . . . . . . . . . . . . . . . . . . . . . . . . . . . . 82
CARACTÉRISTIQUES . . . . . . . . . . . . . . . . . . . . . . . . . . 84
Ces instructions sont uniquement destinées à une prise en main
rapide. Vous trouverez un descriptif plus détaillé des fonctions
Fr
dans le “Manuel de référence” sur le CD-ROM.
Ce manuel de référence contient les instructions pour l’utilisation de l’appareil
Olympus Stylus 300/400 DIGITAL (µ [mju:] 300/400 DIGITAL). Sauf
indication différente, les explications du manuel concernent les deux
modèles.
44 Fr

J Lisez soigneusement ce manuel avant d’utiliser votre appareil photo afin de garantir un
usage correct.
J Nous vous conseillons d’effectuer quelques prises de vue d’essai pour vous familiariser
avec votre appareil avant de prendre des photographies importantes.
J Ce manuel contient uniquement des instructions de base. Vous trouverez un descriptif
plus détaillé des fonctions dans le Manuel de référence sur le CD-ROM. Pour le
raccordement à un ordinateur ou l’installation du logiciel fourni, reportez-vous au Guide
d’installation du logiciel sur le CD-ROM.
Pour les utilisateurs en Amérique du Nord et du Sud
Pour les utilisateurs aux États-Unis
Déclaration de conformité
Numéro de modèle : Stylus 300 DIGITAL, Stylus 400 DIGITAL
Marque : OLYMPUS
Organisme responsable : Olympus America Inc.
Adresse : 2 Corporate Center Drive, Melville, New York
Numéro de téléphone : 1-631-844-5000
Testé pour être en conformité avec la réglementation FCC
POUR L’UTILISATION A LA MAISON OU AU BUREAU
Cet appareil est conforme aux normes de la Section 15 des directives FCC.
Son utilisation est soumise aux deux conditions suivantes:
(1) Cet appareil ne doit pas causer de brouillage radioélectrique.
(2) Cet appareil doit pouvoir résister à toutes les interférences, y compris
celles susceptibles d’entraver son bon fonctionnement.
RM-2 (Télécommande)
11747-3157 U.S.A.
Pour les utilisateurs au Canada
Cet appareil numérique de la catégorie B est conforme à la législation
canadienne sur les appareils générateurs de parasites.
Pour les utilisateurs en Europe
Le label “CE” indique que ce produit est conforme aux normes
européennes en matière de sécurité, de santé, d’environnement et
de protection du consommateur. Les appareils photo comportant le
label “CE” sont destinés à être vendus en Europe.
Marques déposées
• IBM est une marque déposée de la société International Business Machines
Corporation.
• Microsoft et Windows sont des marques déposées de la société Microsoft
Corporation.
• Macintosh est une marque de Apple Computer Inc.
• Tous les autres noms de sociétés et appellations de produits sont des marques,
déposées ou non, des propriétaires respectifs.
• Les normes pour les systèmes de fichiers d’appareil photo indiquées dans ce
manuel sont les normes “Design Rule for Camera File System/DCF” stipulées par
l’association JEITA (Japan Electronics and Information Technology Industries
Association).
Fr
Fr 45

GUIDE RAPIDE DE DÉMARRAGE
J NOMENCLATURE DES PIÈCES
Capot de protection
Permet d’activer ou
désactiver le mode de prise
de vues de l’appareil.
d’objectif
Déclencheur
Flash
Voyant du
retardateur/de la
télécommande
Fr
Couvercle du
logement de
carte
46 Fr
Couvercle de
connecteur
Récepteur de
télécommande
Prise de sortie
VIDEO (VIDEO
OUT)
Connecteur USB
Objectif
Se met en place
automatiquement lorsque
vous ouvrez le capot de
protection d’objectif.
Prise d’entrée CC
(DC-IN 4,8 V)
Couvercle
de la prise
d’entrée CC
(DC-IN)

Molette de défilement ( )
Les touches fléchées font également office de touches de fonction. Les symboles
, , et indiquent la touche fléchée sur laquelle il faut appuyer.
Touche Mode de prise de vues
Touche Gros Plan
Touche du retardateur
Écran
ACL
Couvercle du compartiment de la batterie
Viseur
Repères de mise au point automatique
Touche Mode flash
Embase filetée de trépied
Voyant orange
Voyant vert
Touche du zoom (W/T
)
Œillet de courroie
Touche OK/Menu
()
Touche de l’écran ACL
(QUICK VIEW )
Touche d’affichage ( )
Fr
Fr 47

J
SHQ
INDICATIONS CONCERNANT L’ÉCRAN ACL
Mode prise de vue
1
2
3
4
5
6
7
8
9
SHQ
10
1 Mode prise de vue , , , , , ,
2 Contrôle de la batterie ,
3 Voyant vert
4 Flash en attente/
Fr
5
6 Mode de flash , ,
7 Prise de vue séquentielle ,
8 Retardateur
9 Mode d’enregistrement SHQ, HQ, SQ1, SQ2
10 Résolution 2272 × 1704, 2048 × 1536, etc.
11 Compensation d’exposition -2.0 – +2.0
12 Mesure
13 Balance des blancs , , ,
14 Repères de mise au point
15 Bloc mémoire , , ,
16 Nombre de vues fixes
Vue fixe Vidéo
Éléments Indications
Avertissement de bougé
Chargement du flash
Mode gros plan
Télécommande
automatique
enregistrables
Secondes restantes
1
2
11
12
13
5
6
14
15
9
16
(Allumé)
(Clignote)
[ ]
16
16"
11
13
14
15
16
48 Fr

Mode affichage
2048
1536
Les écrans avec l’affichage d’informations réglé sur ON sont montrés cidessous.
1536
2
1
4
5
6
7
8
9
10
1
2048
Vue fixe Vidéo
Éléments Indications
1 Contrôle de la batterie ,
2 Réservation d’impression, nombre
de copies
3 Vidéo
4 Protection
5 Mode d’enregistrement SHQ, HQ, SQ1, SQ2
6 Résolution 2272 × 1704, 2048 × 1536, etc.
7 Compensation d’exposition -2.0 – +2.0
8 Balance des blancs AUTO, , , ,
9 Date et heure ’03.05.17 15:30
10 Numéro de fichier (vue fixe)
Durée de lecture/durée
d’enregistrement totale (vidéo)
×10
FILE: 100-0030
0"/20"
3
4
5
6
7
8
9
10
Fr
Fr 49

Bloc mémoire
Le bloc mémoire d’image s’allume lorsque vous effectuez une prise de vue
ou enregistrez une vidéo. L’appareil photo enregistre les photos ou la vidéo
sur la carte tant que le bloc est allumé. Le bloc change d’aspect en fonction
de l’état de prise de vue, comme l’indique l’illustration ci-dessous.
Lorsque le bloc de mémoire d’image est allumé, attendez quelques instants
qu’il s’éteigne avant de prendre la photo suivante.
Prise de vue fixe
Prise de vue Prise de vue Prise de vue
Attente
Avant la prise de
vue
(Le bloc mémoire
d’image est
éteint)
Enregistrement de vidéos
Fr
Prise de vue
Attente
Avant la prise de vue
(Le bloc mémoire
d’image est éteint)
Une photo est prise
(Allumé)
Si vous continuez d’enregistrer
Pendant la prise de vue (Allumé)
• Vous ne pouvez rien faire tant que le bloc n’est pas complètement éteint.
•L’enregistrement vidéo s’arrête automatiquement lorsque le bloc
mémoire est entièrement allumé.
Plusieurs photos sont
prises
(Allumé)
Aucune autre photo ne peut être
prise
(complètement allumé)
Attendez que le bloc mémoire
reprenne l’aspect à gauche pour
prendre la photo suivante.
Contrôle de la batterie
Si la batterie est presque déchargée, le voyant de contrôle sur l’écran ACL
prend l’aspect indiqué ci-dessous lorsque l’appareil est mis en marche ou
pendant son utilisation.
Aucune indication
Allumé (vert)
Vous pouvez
prendre des
photos.*
* La consommation d’énergie varie considérablement en fonction du mode
d’utilisation de l’appareil. Il peut s’éteindre soudainement sans signaler que
Allumé (rouge)
Énergie restante : faible
Rechargez le plus rapidement
possible, notamment pour un
usage prolongé.
la batterie est presque déchargée. Rechargez le plus rapidement possible.
50 Fr
Le voyant vert et le voyant
orange à droite du viseur
clignotent.
Énergie restante : épuisée
Remplacez la batterie par une
batterie chargée.

Imperméabilité
L’appareil photo est imperméable et ne craint pas les projections d’eau,
quelle que soit leur direction. Il ne peut cependant pas être utilisé sous l’eau.
Observez les précautions suivantes lorsque vous utilisez l’appareil photo.
Olympus décline toute responsabilité en cas de défaillance de l’appareil suite
à une infiltration d’eau ou de fausse manipulation par l’utilisateur.
•Ne lavez pas l’appareil
photo à l’eau.
•Ne trempez pas l’appareil
photo dans l’eau.
•Ne faites pas de photos
sous-marines.
• L’appareil n’est plus imperméable si le couvercle du compartiment de la
batterie, le couvercle du connecteur ou le couvercle de la prise DC-IN est
ouvert. Assurez-vous que tous les couvercles sont fermés avant
d’utiliser l’appareil photo.
• Essuyez l’appareil photo pour éliminer toute trace d’eau avant de
remplacer la batterie ou la carte.
• Tenez l’objectif hors de l’eau lorsque vous prenez des photos (la mise au
point risque de ne pas s’effectuer correctement).
• Si l’appareil photo est éclaboussé, essuyez-le plus vite possible avec un
chiffon sec. Des projections ou des gouttes d’eau salée peuvent
endommager l’appareil s’il n’est pas essuyé rapidement.
• Ne forcez pas pour retirer ou essayer de retirer la protection en
caoutchouc du couvercle du compartiment de la batterie, du connecteur
ou de la prise d’entrée CC.
• Si la protection en caoutchouc est usée ou endommagée, adressezvous au centre S.A.V. Olympus le plus proche (le remplacement des
pièces sera facturé).
• Si la protection en caoutchouc du couvercle du compartiment de la
batterie, du connecteur ou de la prise d’entrée CC contient de la
poussière ou du sable, essuyez-la avant de fermer le couvercle sinon de
l’eau risque de pénétrer dans l’appareil photo.
• La batterie et les autres accessoires de l’appareil photo ne sont pas
étanches. Soyez prudent lorsque vous utilisez les accessoires.
Fr
Fr 51

J FIXATION DE LA COURROIE
1
Passez l’extrémité courte de la
courroie dans l’œillet de courroie.
Passez l’extrémité longue de la
2
courroie dans la boucle qui est
déjà passée par l’œillet.
Tirez fermement sur la courroie,
3
puis vérifiez qu’elle est solidement
attachée et qu’elle ne peut pas se
Œillet de courroie
détacher.
J CHARGE DE LA BATTERIE
Cet appareil photo emploie une batterie Olympus aux ions de lithium (LI10B). Cette batterie est exclusivement conçue pour cet appareil et les autres
batteries ne fonctionnent pas. La batterie n’est pas entièrement chargée au
Fr
moment de l’achat de l’appareil. Chargez entièrement la batterie sur le
chargeur indiqué (LI-10C) avant la première utilisation. Reportez-vous aux
instructions fournies avec le chargeur pour plus d’informations.
À propos de la batterie
Vérifiez que les bornes + et – de la batterie illustrée
dans la figure à droite sont bien orientées lorsque vous
insérez la batterie dans son chargeur.
Indicateur de charge
La batterie est
complètement
chargée lorsque
l’indicateur de
charge passe du
rouge au vert.
Chargeur
Batterie Ion
Vers le connecteur
d’entrée secteur
Bornes du connìecteur
Batterie Ion
52 Fr
Câble cordon secteur
Prise secteur
J MISE EN PLACE DE LA BATTERIE
Important
• N’oubliez pas de vérifier à jour la date et l’heure après avoir remplacé
la batterie.
1
Assurez-vous que :
• L’écran ACL est éteint.
• Le capot de protection d’objectif est fermé.
• Le voyant à droite du viseur est éteint.
Faites glisser le couvercle du
2
compartiment de la batterie vers
(direction indiquée par la marque
sur le couvercle), puis soulevez-
le vers .
Insérez la batterie dans le sens
3
illustré.
Fermez le couvercle du
4
compartiment de la batterie de
manière à ce qu’il pousse la batterie
à l’intérieur . Tout en appuyant
sur la marque , faites glisser le
couvercle vers .
• Si vous avez du mal à fermer le couvercle du
compartiment de la batterie, ne forcez pas. Lorsqu’il est refermé,
appuyez fermement sur la marque et poussez le couvercle dans
le sens indiqué sur l’illustration.
Couvercle du
compartiment de la batterie
Bornes du
connecteur
Fr
Fr 53
J INSERTION D’UNE CARTE
Le terme “carte” dans ce manuel désigne une carte xD-Picture Card.
L’appareil utilise la carte pour enregistrer les images.
Assurez-vous que :
1
• L’écran ACL est éteint.
• Le capot de protection d’objectif est fermé.
• Le voyant à droite du viseur est éteint.
Ouvrez le couvercle du
2
connecteur tout en appuyant
sur la marque indiquée
dans l’illustration.
Couvercle de
Ouvrez le couvercle du
3
logement de la carte en
tirant l’encoche du
couvercle vers vous.
Fr
Orientez la carte dans le
4
bon sens et introduisez-la dans
son logement.
• Tenez la carte droite pendant que vous
l’insérez.
• Si la carte est insérée à l’envers ou en
biais, vous risquez d’endommager la
zone de contact ou de coincer la carte.
• Si la carte n’est pas entièrement
insérée, les données ne pourront pas y
être enregistrées.
Fermez le couvercle du logement
5
de la carte.
Couvercle du
logement de carte
connecteur
Encoche du couvercle
du logement de carte
Côté zone
d’index
54 Fr

Fermez le couvercle du
6
connecteur.
• Appuyez sur la marque indiqués
dans l’illustration en fermant le
couvercle du connecteur.
Remarque
Ne fermez pas le couvercle du
connecteur avant d'avoir refermé le
couvercle logement de carte.
Retrait de la carte
Ouvrez le couvercle du
1
connecteur et le couvercle
logement de carte.
Poussez la carte à fond pour la
2
déverrouiller puis laissez-la sortir
lentement.
• La carte est éjectée sur une courte
distance puis s’arrête.
Remarque
Si vous retirez votre doigt rapidement après avoir enfoncé la carte à fond,
elle risque d’être propulsée brutalement hors de son logement.
Tenez la carte droite et sortez-la.
3
Fr
• N’appuyez pas sur la carte avec des objets durs ou pointus tels que
les stylos à bille.
Remarque
Fr 55

J MISE EN MARCHE/ARRÊT
Lors de la prise de vue
Mise sous tension :
Fr
Mise hors-tension :
Ouvrez le capot de protection
d’objectif.
L’appareil passe en mode de prise
de vues. L’objectif sort et le sujet est
affiché sur l’écran ACL.
Si l’objectif ne sort pas lors de
l’ouverture du capot de protection, il
est possible que celui-ci ne soit pas complètement ouvert.
Ouvrez le capot de protection jusqu’à ce qu’il se bloque avec
un déclic.
Lorsque vous utilisez l’appareil photo pour la première fois ou
s’il a été laissé sans batterie pendant 1 heure ou plus, la date
et l’heure ont été réinitialisées. Le message “SET DATE &
TIME” s’affiche alors sur l’écran ACL au moment de la mise
sous tension.
Appuyez sur pour éteindre l’écran ACL. L’appareil photo
est toujours allumé.
Fermez le capot de protection d’objectif doucement
jusqu’à ce qu’il touche presque l’objectif.
Le capot de protection de l’objectif s’arrête juste avant de
toucher l’objectif et ce dernier se rétracte. Attendez que
l’objectif soit complètement rentré avant de fermer
complètement le capot de protection d’objectif.
L’appareil s’éteint. (L’écran ACL s’éteint également.)
Remarque
56 Fr
• Ne forcez pas la fermeture du capot de protection d’objectif lorsque
l’objectif est sorti, vous risqueriez de l’endommager.

Lors de l’affichage de photos
Mise sous tension : Appuyez sur avec le capot de protection
d’objectif fermé.
L’appareil se met en marche en mode affichage.
L’écran ACL s’allume et affiche la dernière photo prise.
Mise hors-tension : Appuyez sur .
• Il ne faut jamais ouvrir le couvercle du logement de carte, retirer la
carte ou la batterie, déconnecter ou connecter l’adaptateur secteur
Remarque
tandis que l’appareil est sous tension. Toutes les données de la carte
risqueraient d’être détruites sans possibilité de récupération.
Lorsque vous changez la carte, assurez-vous que l’appareil est hors
tension avant d’ouvrir de couvercle du logement de carte.
L’écran ACL et l’appareil photo s’éteignent.
J SÉLECTION DE LA LANGUE
Ouvrez complètement le capot de
1
protection d’objectif.
• L’objectif se déploie et l’écran ACL s’allume.
Appuyez sur .
2
• Le menu principal s’affiche.
Appuyez sur pour sélectionner
3
MODE MENU.
Appuyer sur pour
4
sélectionner l’onglet SETUP et appuyez sur .
Appuyez sur pour sélectionner , puis
5
appuyez sur .
Appuyez sur pour sélectionner une langue, puis
6
appuyez sur .
Appuyez de nouveau sur pour quitter le menu.
7
Fermez le capot de protection d’objectif pour éteindre
8
l’appareil.
Molette de défilement
()
Fr
Fr 57
J RÉGLAGE DE LA DATE ET DE I’HEURE
Ouvrez complètement le capot de protection d’objectif.
1
• L’objectif se déploie et l’écran ACL s’allume.
Appuyez sur .
2
• Le menu principal s’affiche.
Appuyez sur pour sélectionner MODE MENU.
3
Appuyer sur pour sélectionner l’onglet SETUP et
4
appuyez sur .
Appuyez sur pour sélectionner , puis appuyez
5
sur .
• L’encadré vert passe sur l’élément sélectionné.
Appuyez sur pour sélectionner l’un des formats de
6
date suivants : Y-M-D (Année/Mois/Jour), M-D-Y (Mois/
Jour/Année), D-M-Y (Jour/Mois/Année). Appuyez ensuite
Fr
sur .
• Passez au réglage de l’année.
• Les étapes suivantes montrent la procédure utilisée lorsque le format
de date est Y-M-D.
Appuyez sur pour régler l’année, puis appuyez sur
7
pour passer au réglage du mois.
• Pour revenir au réglage précédent, appuyez sur .
• Les deux premiers chiffres de l’année sont fixes.
Répétez cette procédure jusqu’à ce que la date et l’heure
8
soient complètement réglées.
• L’appareil affiche uniquement l’heure au standard 24 heures (“2 P.M.”
correspondent à “14:00”).
Appuyez sur .
9
• Pour un réglage plus précis, appuyez sur lorsque l’horloge
franchit 00 seconde. L’horloge démarre lorsque vous appuyez sur la touche.
Fermez le capot de protection d’objectif pour éteindre
10
l’appareil.
Remarque
58 Fr
• La date et l’heure réglées seront annulées si vous laissez l’appareil
sans pile pendant 1 jour.
FONCTIONS DU MENU
OFF
ESP
J
UTILISATION DES MENUS ET DES ONGLETS
Lorsque vous mettez l’appareil sous tension et que vous appuyez sur ,
le menu principal s’affiche à l’écran. C’est à partir des menus que vous réglez
chacune des fonctions de l’appareil. Ce chapitre explique le fonctionnement des
menus, à partir des écrans du mode de prise de vues.
Molette de défilement
()
Appuyez sur .
Le menu principal s’affiche.
MODE MENU
WB
Sélectionnez un menu à
l’aide des molette de
défilement.
Fr
Menus Raccourcis
• Vous amène directement aux
écrans de réglage.
• Affiche les touches à utiliser au
bas de l’écran.
Si vous appuyez sur pour
sélectionner .
+
0.0
-
CANCEL
SELECt
GO
MODE MENU
• Organise les paramètres en
onglets.
• Affiche les onglets de chaque
menu. Sélectionnez l’onglet
souhaité à gauche de l’écran en
appuyant sur .
ESP
OFF
Onglet
ESP/ESP/
CAMERA
DRIVE
DIGItAL ZOOM
CARDSEt
PANORAMA
2 IN 1
Fr 59

Comment utiliser les menus
OFF
ESP
Appuyez sur pour
1
afficher le menu principal.
Appuyez sur .
Menu principal Onglet CAMERA
MODE MENU
WB
Molette de défilement
()
Fr
Appuyez sur pour
2
sélectionner un onglet, puis
appuyez sur .
ESP
ESP/ESP/
CAMERA
DRIVE
OFF
DIGItAL ZOOM
CARDSEt
PANORAMA
2 IN 1
Onglet
CARD
CARD%SEtUP
CAM
CARD
SEt
Onglet
SETUP
ALL RESEt
CAMCARD
SEtUP
ON
ENGLISH
ON
ON
REC VIEW
PIXEL MAPPING
Appuyer sur
pour
revenir à
l’écran de
sélection
des onglets.
60 Fr

OFF
ESP
Appuyez sur pour
OFF
ESP
3
sélectionner un élément, puis
appuyez sur .
Appuyez sur pour
4
sélectionner un
paramètre. Appuyez sur
pour terminer
le réglage.
ESP
ESP/
CAMERA
DRIVE
OFF
DEZItAL ZOOM
CARDSEt
PANORAMA
2 IN 1
ESP
ESP/ESP/
CAMERA
DRIVE
OFF
DIGItAL ZOOM
CARDSEt
PANORAMA
2 IN 1
L’encadré vert
passe sur l’élément
sélectionné.
ou
Appuyez sur ou
pour revenir
à la sélection d’un
élément.
Appuyez de nouveau sur
pour quitter le
menu et retourner en
mode prise de vue.
ESP/ESP/
CAMERA
DRIVE
DIGItAL ZOOM
CARDSEt
PANORAMA
2 IN 1
ESP/ESP/
CAMERA
DRIVE
DIGItAL ZOOM
CARDSEt
PANORAMA
2 IN 1
• Selon le mode et les réglages de l’appareil, certains éléments ne
sont pas disponibles.
Remarque
• En appuyant sur le déclencheur dans un menu autre que ceux de
l’onglet SETUP, vous pouvez effectuer des prises de vue avec les
paramètres actuellement sélectionnés.
• Si vous voulez conserver les réglages après avoir éteint l’appareil,
mettez ALL RESET sur OFF.
OFF
ON
OFF
ON
Fr
Fr 61
Menus Raccourcis
Mode prise de vue
Règle la luminosité de l’image.
Règle la qualité et résolution.
Vue fixe : SHQ, HQ, SQ1, SQ2
Vidéo : HQ, SQ
(Balance des blancs)
Règle la balance des blancs appropriée selon la source de lumière.
Mode affichage
Fr
Affiche toutes les images enregistrées l’une après l’autre sous la forme d’un
diaporama.
MOVIE PLAY [LECT MOVIE]
MOVIE
PLAYBACK
[LECT MOVIE]
INDEX Crée une image index d’une vidéo en 9 vues fixes.
INFO
Affiche toutes les informations de prise de vue sur l’écran ACL.
Lit les vidéos.
ERASE [EFFACER]
Efface la photo ou la vidéo sélectionnée.
[ ]: Lorsque le français est sélectionné.
62 Fr
Menus Mode
OFF
ESP
Le MODE MENU se divise en onglets. Appuyez sur pour sélectionner
un onglet et afficher les options correspondantes.
Ces instructions sont uniquement destinées à une prise en main
rapide. Vous trouverez un descriptif plus détaillé des fonctions
dans le “Manuel de référence” sur le CD-ROM.
Mode prise de vue
Onglet CAMERA
Onglet CARD [CARTE]
Onglet SETUP [CONFIG]
CAMERA
CARDSEt
Onglet CAMERA
ESP/
DRIVE
DIGITAL ZOOM
[ZOOM NUM]
PANORAMA
[PANORAMIQUE]
2 IN 1
[2 EN 1]
Sélectionne la méthode de mesure ESP ou SPOT ( ).
Sélectionne le mode de prise de vue (prise de
vue unique) ou (prise de vue en série).
Amplifie le zoom optique maximum, ce qui porte le
facteur de grossissement à environ 5×.
Permet de prendre des photos panoramiques avec
des cartes de marque Olympus CAMEDIA.
Fusionne deux photos prises à la suite et les
enregistre comme une seule image.
Onglet CARD
[CARTE]
CARD SETUP
[CONFIG CARTE]
Formate une carte.
Onglet SETUP
[CONFIG]
ALL RESET
[TOUT REINIT]
[ ]: Lorsque le français est sélectionné.
Détermine si les réglages actuels de l’appareil
doivent être conservés ou non lorsque vous coupez
l’alimentation.
Sélection de la langue des messages affichés.
ESP/ESP/
DRIVE
DIGItAL ZOOM
PANORAMA
2 IN 1
ESP
OFF
Fr
Fr 63

REC VIEW
[VISUAL IMAGE]
PIXEL MAPPING
VIDEO OUT
[SORTIE VIDEO]
Mode affichage
Active et désactive les signaux sonores (utilisés pour
les avertissements, etc.).
Détermine si les photos sont affichées ou non sur
l’écran ACL pendant leur enregistrement sur une
carte.
Vérifie si les fonctions de CCD et de traitement de
l’image ne présentent pas d’erreurs.
Règle la luminosité de l’écran ACL.
Règle la date et l’heure.
Sélectionnez NTSC ou PAL suivant le type de signal
vidéo de votre téléviseur. Le type de signal vidéo TV
varie en fonction de la région.
Onglet PLAY [LECTURE]
Onglet EDIT
Fr
Onglet CARD [CARTE]
Onglet SETUP [CONFIG]
Onglet PLAY
[LECTURE]
(Protection) Protège les images d’une suppression accidentelle.
(Rotation)
(lmprimer)
Onglet EDIT
BLACK&WHITE
[NOIR & BLANC]
SEPIA
[ ]: Lorsque le français est sélectionné.
Fait pivoter les images de 90° degrés soit dans le
sens des aiguilles d’une montre, soit dans le sens
inverse.
Enregistre les informations de réservation
d’impression sur la carte.
Crée une photo en noir et blanc et l’enregistre dans
un nouveau fichier.
Crée une photo en teinte sépia et l’enregistre dans un
nouveau fichier.
Diminue la taille du fichier et l’enregistre sous un
nouveau nom.
PLAY
CARDSEt EDIt
64 Fr

Onglet CARD
[CARTE]
CARD SETUP
[CONFIG CARTE]
Onglet SETUP
[CONFIG]
ALL RESET
[TOUT REINIT]
VIDEO OUT
[SORTIE VIDEO]
[ ]: Lorsque le français est sélectionné.
Supprime toutes les données d’images stockées sur
la carte ou formate la carte.
Détermine si les réglages actuels de l’appareil
doivent être conservés ou non lorsque vous coupez
l’alimentation.
Sélection de la langue des messages affichés.
Active et désactive les signaux sonores (utilisés pour
les avertissements, etc.).
Règle la luminosité de l’écran ACL.
Règle la date et l’heure.
Sélectionnez NTSC ou PAL suivant le type de signal
vidéo de votre téléviseur. Le type de signal vidéo TV
varie en fonction de la région.
Sélectionne le nombre de photos dans l’affichage
d’index.
Fr
Fr 65

PRISE DE VUES – INSTRUCTIONS DE BASE
J MODES DE PRISE DE VUES
L’appareil photo possède 7 modes de prise de vue que vous choisissez en
fonction des conditions de prise de vue et de l’effet que vous souhaitez obtenir.
Ouvrez complètement le capot de protection d’objectif.
1
• L’objectif se déploie et l’écran ACL s’allume.
Appuyez sur ( ).
2
• Vous permet de sélectionner le mode de
prise de vues (molette virtuelle).
PROGRAM AUtO
Fr
Sélectionnez le mode le plus approprié parmi ceux
3
SELECt
Écran affichant la molette
GO
virtuelle
indiqués ci-dessous.
• Appuyez sur pour sélectionner le mode.
Appuyez sur .
4
• La molette virtuelle disparaît. Elle disparaîtra après un certain temps
même si vous n’appuyez pas sur la touche .
PROGRAM AUTO (programme auto) (réglage d’usine par défaut)
Ce mode est utilisé pour la photographie courante. L’appareil adopte
automatiquement les réglages pour un équilibre naturel des couleurs. Les autres
fonctions telles que le mode du flash et la mesure peuvent être réglées manuellement.
PORTRAIT
Permet de prendre une photo-portrait d’une personne. L’accent est mis sur la
reproduction de la texture de la peau. L’appareil photo règle
automatiquement des conditions de prise de vue optimales.
LANDSCAPE + PORTRAIT [PAYSAGE + PORTRT]
Permet de photographier à la fois le sujet et le paysage. L’appareil photo
règle automatiquement des conditions de prise de vue optimales.
66 Fr

LANDSCAPE [PAYSAGE]
Permet de photographier des paysages et des scènes en extérieur.
L’appareil photo se règle automatiquement des conditions de prise de vue
optimales.
NIGHT SCENE [SCEN NUIT]
Permet de faire des photos le soir ou la nuit. L’appareil photo ralentit la
vitesse d’obturation par rapport à une prise de vue normale. Si vous utilisez
un autre mode pour prendre une photo dans la rue, la nuit, le manque de
luminosité produit une image noire avec des points lumineux. Ce mode
permet de restituer l’aspect réel de la rue. L’appareil photo se règle
automatiquement des conditions de prise de vue optimales.
SELF PORTRAIT [AUTO PORTRAIT]
Vous permet de prendre une photo de vous-même tout en tenant l’appareil.
Pointez l’objectif vers vous-même afin de mémoriser la mise au point sur
vous. L’appareil photo se règle automatiquement des conditions de prise de
vue optimales. Le zoom est réglé en position grand angle et ne peut être
modifié.
MOVIE
Permet de réaliser une film. L’appareil photo conserve l’exposition appropriée
même si le sujet se déplace. Vous ne pouvez pas enregistrer de bande
sonore avec le film.
J PRISE DE VUE FIXE
Vous pouvez effectuer des prises de vue fixe soit à l’aide du viseur, soit à
l’aide de l’écran ACL. Les deux méthodes sont simples, il vous suffit
d’appuyer sur le déclencheur.
Prise de vue fixe à l’aide de l’écran ACL
Fr
Ouvrez complètement le capot de protection d’objectif.
1
• Faites glisser complètement le capot de protection, jusqu’à ce qu’il se
bloque avec un déclic.
• L’objectif se déploie et l’écran ACL s’allume.
Placez les repères de mise au point automatique autour
2
du sujet tout en observant l’image sur l’écran ACL.
Choisissez le cadrage de la photo.
Fr 67

Appuyez doucement sur le déclencheur jusqu’à mi-course
3
pour effectuer la mise au point.
• Lorsque la mise au point et l’exposition sont mémorisées, le voyant
vert s’allume.
• Le voyant orange, s’il s’allume, indique que le flash se déclenchera
automatiquement.
Enfoncez complètement le déclencheur.
4
• L’appareil prend la photo et émet un signal sonore.
• Vous pouvez effectuer la prise de vue suivante lorsque le voyant vert
cesse de clignote.
• Le voyant orange clignote pendant l’enregistrement de l’image sur la
carte.
Prise de vue fixe à l’aide du viseur
Ouvrez complètement le capot de protection d’objectif.
1
• L’objectif se déploie et l’écran ACL s’allume. Appuyez sur pour
éteindre l’écran ACL.
Fr
Placez les repères de mise au point automatique autour
2
du sujet dans le viseur.
Procédez de la même façon que lorsque vous utilisez le
3
viseur pour prendre la photo.
• Il ne faut jamais ouvrir le couvercle du logement de carte, retirer la batterie
ou déconnecter l’adaptateur secteur pendant que le voyant orange
Remarque
clignote. Vous risqueriez de détruire des images enregistrées et
d’empêcher la mémorisation des photos que vous venez juste de prendre.
J SI UNE MISE AU POINT SATISFAISANTE
EST IMPOSSIBLE (MÉMORISATION DE LA
MISE AU POINT)
Lorsque le sujet sur lequel vous voulez effectuer la mise au point n’est pas au
centre du cadre et que vous ne parvenez pas à placer les repères de mise au
point autour de lui, vous pouvez effectuer la mise au point sur quelque chose
d’autre qui se trouve plus ou moins à la même distance (mémorisation de la
mise au point) et prendre la photo selon la procédure décrite ci-dessous.
Ouvrez complètement le capot de protection d’objectif.
1
• L’objectif se déploie et l’écran ACL s’allume.
68 Fr

Placez les repères de mise au
2
point automatique autour du sujet
sur lequel vous voulez effectuer
la mise au point.
• Lorsque vous prenez en photo un sujet
sur lequel il est difficile d’effectuer la
mise au point, visez un sujet placé à
peu près à la
même distance.
Enfoncez le déclencheur à mi-course jusqu’à ce que le
3
voyant vert s’allume.
• La mise au point, l’exposition et la balance des blancs sont
mémorisées.
• Le voyant vert clignote si la mise au point n’est pas mémorisée. Retirez
votre doigt du déclencheur, recadrez le sujet puis enfoncez à nouveau
le déclencheur à mi-course.
Recadrez votre photo tout en
4
maintenant le déclencheur enfoncé
à mi-course.
Enfoncez complètement le
5
déclencheur.
Repères de mise au
point automatique
Voyant
vert
Écran
J ENREGISTREMENT DE VIDÉOS
1
Ouvrez complètement le capot de protection d’objectif.
• L’objectif se déploie et l’écran ACL s’allume.
Appuyez sur
2
Appuyez sur pour sélectionner , puis appuyez
3
sur .
• L’enregistrement de vidéos est activé et l’appareil revient en mode de
prise de vues.
• Le symbole et la durée totale d’enregistrement, qui dépendent de
la capacité de la carte mémoire, s’affichent sur l’écran ACL.
Cadrez l’image tout en observant votre sujet sur l’écran
4
ACL.
(
) pour afficher la molette virtuelle.
Fr
Fr 69

Enfoncez le déclencheur à mi-course.
5
• La mise au point et la balance des blancs sont mémorisées.
Appuyez complètement sur le déclencheur pour
6
commencer l’enregistrement.
• Le voyant orange à droite du viseur s’allume.
• Pendant l’enregistrement d’une vidéo, s’allume en rouge et la
durée d’enregistrement restante est affichée.
Appuyez de nouveau sur le déclencheur pour arrêter
7
l’enregistrement.
• Le voyant orange clignote pendant l’enregistrement de la vidéo sur la carte.
• Lorsque le temps d’enregistrement restant est épuisé, l’enregistrement
s’arrête automatiquement.
• Il est impossible de modifier le facteur de grossissement du zoom
optique pendant l’enregistrement d’une vidéo. Le zoom est bloqué
Remarque
en position grand angle. Pour utiliser le zoom, activez le zoom
numérique (DIGITAL ZOOM sur ON).
• En mode d’enregistrement vidéo, le flash est désactivé.
• L’enregistrement est plus long pour les vidéo que pour les vues fixes.
Fr
• Le nombre de secondes restantes varie selon le mode
d’enregistrement et l’espace disponible sur la carte.
• Vous ne pouvez pas enregistrer de bande sonore avec la vidéo.
J
ZOOM AVANT SUR UN SUJET (ZOOM OPTIQUE)
La prise de vue au téléobjectif et au grand angle est possible en agrandissant
jusqu’à 3x (limite du zoom optique, équivalent à 35 mm - 105 mm sur un appareil
photo de 35 mm). La combinaison du zoom optique et du zoom numérique
permet d’atteindre un facteur de grossissement maximum d’environ 15x.
Facteur de grossissement du zoom numérique
Si vous avez sélectionné SQ2 (640 × 480) : jusqu’à 5×
Autres modes d’enregistrement : jusqu’à 4×
Ouvrez complètement le capot de protection d’objectif.
1
• L’objectif se déploie et l’écran ACL s’allume.
Appuyez sur la touche du zoom.
2
• Poussez la touche du zoom vers W pour un zoom arrière.
• Poussez la touche du zoom vers T pour un zoom avant.
Prenez la photo.
3
Remarque
70 Fr
• Les photos prises avec le zoom numérique peuvent avoir du grain.

J UTILISATION DU FLASH
1
Ouvrez complètement le capot de protection d’objectif.
• L’objectif se déploie et l’écran ACL s’allume.
Appuyez sur ( ) pour définir le mode de flash.
2
• Le réglage actuel du flash est affiché.
• A chaque fois que vous appuyez sur , le mode flash passe par les
états suivants :
“AUTO” – “réduction de l’effet yeux rouges” – “Flash d’appoint”
– “Flash désactivé”.
Enfoncez le déclencheur à mi-course.
3
• Lorsque le flash est prêt pour la prise de vue, le voyant orange reste
allumé.
Enfoncez complètement le déclencheur pour prendre la
4
photo.
Flash automatique (Pas d’indication)
Le flash se déclenche automatiquement lorsque l’éclairage est faible ou à contre-jour.
Flash atténuant l’effet “yeux rouges” ( )
Ce mode permet d’atténuer sensiblement l’effet “yeux rouges” en émettant
une série de pré-éclairs avant de déclencher l’éclair principal.
Flash d’appoint ( )
Le flash se déclenche après chaque pression du déclencheur.
Flash désactivé ( )
Le flash ne se déclenche pas, même dans des situations de faible éclairage.
J UTILISATION DU RETARDATEUR/DE LA
TELECOMMANDE
Retardateur : Cette fonction est utile lorsque la personne qui prend la
Télécommande: Vous pouvez effectuer des prises de vue à partir de la
Montez l’appareil sur un trépied ou posez-le sur une
1
surface plane et stable.
photo veut être dessus.
télécommande (vendu séparément dans certaines régions).
Cette fonction est intéressante si vous voulez figurer sur la
photo que vous prenez ou pour prendre une scène nocturne
sans toucher l’appareil.
Fr 71
Fr
Ouvrez complètement le capot de protection d’objectif.
2
• L’objectif se déploie et l’écran ACL s’allume.
Appuyez sur ( ) pour activer le mode retardateur
3
( ) ou le mode télécommande ( ).
• L’indication passe de / OFF, et à chaque pression sur
.
Prenez la photo.
4
• Lorsque vous utilisez la télécommande, dirigez-la vers le récepteur de
télécommande sur l’appareil photo et appuyez sur le déclencheur de la
télécommande.
Retardateur : Le voyant du retardateur/de la télécommande
Télécommande: Le voyant du retardateur/de la télécommande
Fr
J PRISE DE VUE EN MODE GROS PLAN
Le mode gros plan vous permet de prendre la photo d’un sujet se trouvant à
une distance comprise entre 20 et 50 cm.
Vous pouvez également prendre des photos normales, mais l’appareil risque
de prendre plus longtemps pour effectuer la mise au point sur les sujets
éloignés.
Ouvrez complètement le capot de protection d’objectif.
1
• L’objectif se déploie et l’écran ACL s’allume.
Appuyez sur ( ) pour activer le mode gros plan.
2
• L’option passe de ON à OFF à chaque fois que vous appuyez sur .
Lorsque le mode gros plan est sélectionné, le symbole est affiché
sur l’écran ACL.
Prenez la photo.
3
s’allume pendant 10 secondes environ, puis
commence à clignoter. La photo est prise après
environ 2 secondes de clignotement.
clignote pendant 2 secondes environ avant que la
photo ne soit prise.
Remarque
72 Fr
• Lorsque le sujet est proche, l’image dans le viseur est légèrement
différente de celle que l’appareil enregistre réellement. Nous
conseillons d’utiliser l’écran ACL pour les prises de vue en mode
gros plan.

SÉLECTION MODE D’ENREGISTREMENT
Choisissez le mode d’enregistrement correspondant le mieux à vos besoins
(impression, montage sur un ordinateur, publication sur site Web, etc.).
Mode
d’enregistrement
• Mode restituant un haut niveau de qualité.
• Le nombre de photos pouvant être enregistrées
sur la carte est plus faible.
• L’enregistrement des photos est en
SHQ
HQ
SQ1/SQ2
Dans le menu principal du mode prise de vue, appuyez sur
1
outre plus long.
Avantages
• Convient à l’impression.
• Peut être agrandi au format A4 (210
mm × 297 mm).
• Convient au traitement avec un
ordinateur.
• Réglage d’usine par défaut
Avantages
• Convient pour le traitement sur un
ordinateur ou l’impression au format
carte postale.
• Les résolutions sont inférieures à
celles du mode SHQ ou HQ.
• Mode restituant un niveau de qualité standard.
• Vous pouvez enregistrer plus de
photos sur la carte.
Avantages
• Envoi des photos par courrier
électronique ou simplement pour les
afficher sur un ordinateur.
Description Qualité
Normale
pour sélectionner .
Appuyez sur pour sélectionner le mode
2
d’enregistrement souhaité.
• Pour les photos, vous pouvez choisir SHQ, HQ, SQ1 ou SQ2.
• Pour les vidéos, vous pouvez choisir HQ ou SQ.
Si vous choisissez SQ2 pour les photos, appuyez sur
3
pour afficher l’écran de sélection de la résolution.
Appuyez sur pour sélectionner une résolution.
Appuyez sur .
4
• Appuyez de nouveau sur pour quitter le menu.
Plus
claire
Taille de
fichier
Plus
grande
Plus petite
Fr 73
Fr
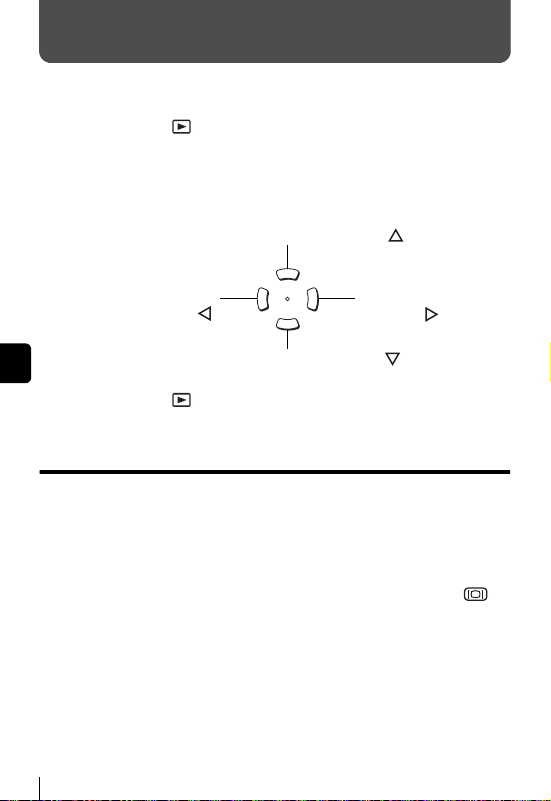
AFFICHAGE
J AFFICHAGE DE VUES FIXES
1
Appuyez sur .
• L’écran ACL s’allume et affiche la dernière photo prise. (Affichage
d’une seule photo)
Utilisez la molette de défilement pour afficher d’autres
2
photos.
Affiche la 10ème photo en arrière. ( )
Affiche la photo
précédente. ( )
Fr
Appuyez sur pour annuler l’affichage.
3
• L’écran ACL et l’appareil photo s’éteignent.
Affiche la 10ème photo en avant. ( )
Affiche la photo
suivante. ( )
Contrôle rapide (Affichage sur double clic)
Cette fonction vous permet d’afficher les images pendant que l’appareil photo
est en mode prise de vue. Elle est utile lorsque vous voulez vérifier
rapidement les résultats de la prise de vue avant de continuer.
Les fonctions disponibles en mode affichage sont également disponibles en
contrôle rapide.
Appuyez deux fois rapidement (double-cliquez) sur
1
lorsque l’appareil se trouve en mode de prise de vues.
• L’appareil se met immédiatement en mode affichage et affiche la
dernière photo prise. (Affichage d’une seule photo)
Enfoncez le déclencheur à mi-course pour revenir au
2
mode prise de vue.
• L’appareil revient en mode de prise de vues et il est prêt à prendre des
photos.
74 Fr

Affichage en gros plan
Les photos affichées sur l’écran ACL peuvent être agrandies jusqu’à 4 fois
leur taille originale. Cette fonction est utile lorsque vous voulez vérifier les
détails d’une photo.
Utilisez les molette de défilement pour sélectionner la
1
photo que vous voulez agrandir.
• Vous ne pouvez pas agrandir les images qui comportent le symbole
.
Poussez la touche du zoom vers T.
2
• Pour revenir à la taille originale de l’image (1x), poussez la touche du
zoom vers W.
Affichage d’index
Cette fonction vous permet d’afficher plusieurs images à la fois sur l’écran
ACL. Elle est utile lorsque vous voulez rechercher une photo particulière.
Vous pouvez afficher 4, 9 ou 16 images.
En mode affichage d’une seule image, poussez la touche
1
du zoom vers W.
• Utilisez la molette de défilement pour sélectionner la photo.
• Pour revenir à l’affichage d’une seule image, poussez la touche du
zoom vers T.
J LECTURE DE VIDÉOS
1
Appuyez sur .
• L’écran ACL s’allume.
Utilisez les molette de défilement pour afficher une image
2
comportant le symbole .
Appuyez sur .
3
• Le menu principal s’affiche.
Appuyez sur pour sélectionner MOVIE PLAY.
4
Appuyez sur pour sélectionner MOVIE PLAYBACK,
5
puis appuyez sur .
• La vidéo est lue. Lorsque la fin de la vidéo est atteinte, l’affichage
revient automatiquement à son début.
Fr
Fr 75

• Appuyez de nouveau sur à la fin de la lecture pour afficher le
menu MOVIE PLAYBACK.
PLAYBACK :Relit la vidéo intégralement.
FRAME BY FRAME :
EXIT :Quitte le mode lecture de vidéos.
Appuyez sur pour sélectionner PLAYBACK, FRAME BY
FRAME ou EXIT, puis appuyez sur .
Vous permet de faire défiler la vidéo manuellement,
une image à la fois.
Lorsque l’option FRAME BY FRAME est sélectionnée
: Affiche la première image de la vidéo.
: Affiche la dernière image de la vidéo.
: Affiche l’image suivante. La vidéo défile en continu si vous
maintenez la touche enfoncée.
: Affiche l’image précédente. La vidéo défile en continu en marche
arrière si vous maintenez la touche enfoncée.
Fr
: Affiche le menu MOVIE PLAYBACK
J PROTECTION DES PHOTOS
Il est conseillé de protéger les photos importantes pour éviter de les effacer
accidentellement.
Appuyez sur .
1
• L’écran ACL s’allume.
Utilisez les molette de défilement pour sélectionner la
2
photo que vous voulez protéger.
Appuyez sur .
3
• Le menu principal s’affiche.
Dans le menu principal, sélectionnez MODE MENU
4
PLAY et appuyez sur .
Appuyez sur pour sélectionner ON, puis appuyez
5
sur .
• Pour annuler la protection, sélectionnez OFF.
Appuyez sur pour quitter le menu.
6
• L’icône de protection apparaît à l’écran.
76 Fr
• Les photos protégées ne peuvent être supprimées ni avec la
fonction d’effacement de toutes les photos, ni avec la fonction
Remarque
d’effacement d’une seule photo, mais elles seront toutes effacées
par un formatage.
J EFFACEMENT DE PHOTOS
Cette fonction vous permet d’effacer des images enregistrées. Vous pouvez
effacer les photos une par une ou toutes les photos de la carte à la fois.
• Une fois effacées, les photos ne peuvent pas être récupérées. Par
conséquent, vérifiez chaque photo avant de l’effacer pour éviter
Remarque
toute suppression accidentelle.
Effacement d’une photo à la fois
Appuyez sur .
1
• L’écran ACL s’allume.
Utilisez les molette de défilement pour afficher l’image
2
que vous voulez effacer.
Appuyez sur .
3
• Le menu principal s’affiche.
Appuyez sur pour sélectionner .
4
Appuyez sur pour sélectionner YES, puis appuyez
5
sur .
• La photo est effacée et le menu est fermé.
Effacement de toutes les photos
Dans le menu principal, sélectionnez MODE MENU
1
CARD CARD SETUP et appuyez sur .
Appuyez sur pour sélectionner ALL ERASE
2
puis appuyez sur .
Appuyez sur pour sélectionner YES, puis appuyez
3
sur .
• Toutes les photos sont effacées.
Fr
Fr 77
J
FORMATAGE (CONFIGURATION DE LA CARTE)
Cette fonction vous permet de formater des cartes. Le formatage prépare les
cartes à recevoir des données. Avant d’utiliser des cartes d’une marque autre
que Olympus ou des cartes qui ont été formatées sur un ordinateur, vous
devez les formater avec cet appareil photo.
• Toutes les données existantes, y compris les données protégées,
sont effacées lorsque la carte est formatée. Une fois effacées, les
Remarque
photos ne peuvent être restaurées. Par conséquent assurez-vous
que vous n’effacez pas des données importantes. Téléchargez les
données importantes sur un ordinateur avant de formater la carte.
Dans le menu principal, sélectionnez MODE MENU
1
CARD CARD SETUP et appuyez sur .
• Mode prise de vue
L’écran FORMAT s’affiche.
• Mode affichage
L’écran CARD SETUP s’affiche.
Si l’écran FORMAT s’affiche, appuyez sur pour
2
sélectionner YES.
Si l’écran CARD SETUP s’affiche, appuyez sur pour
Fr
sélectionner FORMAT, puis appuyez sur .
Lorsque l’écran FORMAT s’affiche, appuyez sur
pour sélectionner YES.
Appuyez sur .
3
• La barre BUSY s'affiche pendant le formatage de la carte.
J AFFICHAGE SUR UN TÉLÉVISEUR
Utilisez le câble vidéo fourni avec l’appareil photo pour afficher les images
enregistrées sur votre téléviseur.
Assurez-vous que l’appareil et que le téléviseur sont hors
1
tension, puis connectez le câble vidéo sur la prise de
sortie vidéo (VIDEO OUT) de l’appareil photo et sur la
prise d’entrée vidéo du téléviseur.
Allumez le téléviseur et mettez-le en mode entrée vidéo.
2
Appuyez sur .
3
Remarque
78 Fr
• Il est conseillé d’utiliser l’adaptateur secteur en option lorsque vous
vous servez de l’appareil photo avec un téléviseur.
• Vérifiez si le signal de sortie de l’appareil photo est le même que le
signal vidéo de votre téléviseur.

RÉGLAGES D’IMPRESSION
En indiquant le nombre de tirage voulu pour chaque photo sur la carte et en
précisant si l’heure et la date doivent ou non y figurer, vous pouvez imprimer
les photos souhaitées en fonction des données de réservation d’impression
avec une imprimante compatible DPOF ou auprès d’un laboratoire photo qui
prend en charge le format DPOF.
Que signifie DPOF?
DPOF est l’abréviation de l’anglais “Digital Print Order Format” (Format de
commande de tirage numérique). Il s’agit d’un format utilisé pour enregistrer
automatiquement les informations d’impression à partir des appareils photo
numériques.
En stockant les données de réservation d’impression sur la carte, vous
pouvez imprimer facilement les photos dans un laboratoire de tirage
compatible DPOF ou sur une imprimante personnelle compatible DPOF.
Réservation de toutes les images
Cette fonction vous permet d’imprimer toutes les photos enregistrées sur la
carte. Vous pouvez spécifier le nombre de photos souhaitées et indiquer si la
date et l’heure doivent ou non être imprimées.
Réservation d’une seule image
Utilisez cette fonction pour n’imprimer que les photos sélectionnées. Affichez
les photos à imprimer et sélectionnez le nombre souhaité de tirages.
Réinitialisation des données de réservation d’impression
Cette fonction vous permet de réinitialiser toutes les données de réservation
d’impression pour les images enregistrées sur la carte.
Reportez-vous au “Manuel de référence” sur le CD-ROM pour plus
d’informations.
Fr
Fr 79

TRANSFERT DES PHOTOS VERS UN ORDINATEUR
En raccordant l’appareil photo à un ordinateur avec le câble USB fourni, vous pouvez transférer des
images d’une carte vers l’ordinateur. Certains systèmes d’exploitation peuvent nécessiter un réglage
spécial avant du premier branchement de l’appareil. Suivre le schéma ci-dessous. Pour plus de
détails sur les procédures décrites dans le tableau, se référer au “Manuel de référence” sur le logiciel
CD. Veuillez également consulter le “Guide d’installation de logiciel” livré avec le CD-ROM.
Identification du système d’exploitation
Windows 98/
98 SE (Second
Edition)
Windows Me/2000/XP
Mac OS 9.0 - 9.1/
OS X
* Pour OS 8.6,
voir ci-dessous.
Installation du
pilote USB pour
Fr
Windows 98
Raccordement de l’appareil photo à un ordinateur en utilisant le câble USB
Confirmation que l’ordinateur reconnaît l’appareil photo
Téléchargement de fichiers d’image
Retrait du câble USB
* Même si votre ordinateur dispose d’un connecteur USB, le transfert de données peut ne pas
fonctionner correctement si vous utilisez l’un des systèmes d’exploitation indiqués ci-dessous ou
si vous avez un connecteur USB additionnel (carte d’extension, etc.).
• Windows 95/NT 4.0
• Windows 98/98 SE actualisé à partir de Windows 95
• Mac OS 8.6 ou inférieur (sauf Mac OS 8.6 avec USB MASS Storage Support 1.3.5 installés en
usine)
• Le transfert de données n’est pas garanti sur un système d’ordinateur construit à la maison ou
sur un ordinateur sans système d’exploitation installé en usine.
• Vous pouvez visionner des images en utilisant: des applications graphiques qui
supportent le format de fichier JPEG (Paint Shop Pro, Photoshop, etc.); des navigateurs
Internet (Netscape Communicator, Microsoft Internet Explorer, etc.); CAMEDIA Master;
Remarque
ou d’autres logiciels. Pour des détails sur l’utilisation des applications graphiques
disponibles dans le commerce, reportez-vous à leurs manuels d’utilisations.
• QuickTime est nécessaire pour visionner des vidéos. QuickTime figure sur le CD fourni.
80 Fr

• Si vous voulez éditer des images, vous devez d’abord les télécharger sur votre
ordinateur. Avec certains types de logiciels, les fichiers d’image peuvent être détruits si
vous tentez d’éditer (faire pivoter, etc.) alors qu’ils sont toujours sur la carte.
J POUR LES UTILISATEURS D’AUTRES
SYSTÈMES D’EXPLOITATION
Les utilisateurs d’autres systèmes d’exploitation ne peuvent pas utiliser le
câble USB fourni pour connecter l’appareil photo directement à l’ordinateur.
Windows 95 Windows NT Mac OS avant OS 9
Vous pouvez télécharger des images directement vers votre ordinateur en utilisant
un adaptateur de disquette (en option) ou un adaptateur de carte PC (en option).
Votre ordinateur possède-t-il une interface USB?
Existe-t-il un port avec la marque sur votre ordinateur?
Non
Non
Votre ordinateur possède-t-il un logement de carte PC intégré?
Oui
Votre système
d’exploitation
figure-t-il parmi les
suivants?
•Windows 98
•Windows 2000
•Windows Me
•Windows XP
•Mac OS 9/X
Connectez l’appareil photo
Oui
directement à l’ordinateur à
l’aide du câble
USB fourni.
Utilisez le lecteur/graveur
USB en option.
*Certains lecteurs de carte ne
sont pas compatibles avec
Mac OS X.
Veuillez consulter le site web
d’Olympus pour obtenir les
informations de compatibilité les
plus récentes.
Fr
Non
Oui
Adressez-vous au représentant Olympus le plus près de chez vous.
Reportez-vous au “Manuel de référence” sur le CD-ROM pour plus
d’informations.
Pour la connexion à l’ordinateur, veuillez consulter le “Guide
d’installation de logiciel” livré avec le CD-ROM.
Utilisez l’adaptateur de carte PC
en option.
* Non supporté avec Windows NT4.0
et les systèmes inférieurs.
Fr 81

CODES D’ERREUR
Fr
Indication de
l’écran ACL
NO CARD
CARD ERROR
WRITE-
PROTECT
CARD FULL
NO PICTURE
PICTURE
ERROR
CARD%SEtUP
POWER%OFF
FORMAt
SELECt
GO
Cause possible Solution
[PAS DE CARTE]
Aucune carte n’a été
insérée ou vous avez
inséré une carte qui
n’est pas reconnue.
Insérez une carte ou insérez une
autre carte. Essuyez les zones de
contacts dorées avec du papier
de nettoyage (disponible dans le
commerce) et insérez à nouveau
la carte. Si le problème persiste,
formatez la carte. Si la carte ne
peut pas être formatée, vous ne
pouvez pas l’utiliser.
[ERR CARTE]
Il y a un problème
Utilisez un autre type de carte ou
insérez une nouvelle carte.
avec la carte.
[ECRIT PROTEGE]
Il est interdit d'écrire
sur la carte.
[CARTE PLEINE]
La carte est pleine.
Vous ne pouvez plus
prendre de photo et
vous ne pouvez plus
L'attribut Lecture seule a été fixé
avec un ordinateur. Vous devez
de nouveau utiliser l'ordinateur
pour annuler cet attribut.
Remplacez la carte ou effacez
une partie des photos. Avant de
les effacer, téléchargez les
images importantes sur un
ordinateur.
y enregistrer
d’informations telles
qu’une réservation
d’impression.
[PAS IMAGE]
Il n’y a aucune photo
La carte ne contient aucune
photo. Enregistrez des photos.
sur la carte.
[ERREUR D’IMAGE]
L'image sélectionnée
présente un défaut et
ne peut pas être
affichée.
La carte n’est pas
Utilisez un logiciel de traitement
d’image pour l’afficher sur un
ordinateur. Si vous n’y parvenez
pas, cela signifie que le fichier
image est endommagé.
Formatez la carte.
formatée.
82 Fr

Indication de
l’écran ACL
CARD COVER
OPEN
Y/M/D
Cause possible Solution
[COUV CARTE
OUV]
Le couvercle du
Fermez le couvercle du logement
de carte.
logement de la carte
est ouvert.
La date et l’heure
Réglez la date et l’heure.
n’ont pas été
réglées.
Fr
Fr 83

CARACTÉRISTIQUES
Type d’appareil : Appareil photo numérique (prise de vue et affichage)
Système d’enregistrement
Vue fixe : Enregistrement numérique, JPEG (conforme au
Vidéo : Prise en charge du format QuickTime Motion JPEG
Mémoire : carte xD-Picture (16 – 256 Mo)
Nombre d’images
enregistrables
(avec une carte de
16 Mo)
Fr
système Design Rule for Camera File System
(DCF)), Exif 2.2, Digital Print Order Format (DPOF),
PRINT Image Matching II.
:
Résolution
2.272 × 1.704
2.048 × 1.536 SQ1 20
1.600 × 1.200
1.280 × 960 38
1.024 × 768 58 58
640 × 480 99 99
Mode d’enregistrement
Stylus/µ[mju:]
400 DIGITAL
SHQ 5
HQ 16
24 SQ1 24
SQ2
Stylus/µ[mju:]
300 DIGITAL
——
SHQ 6
HQ 20
38
SQ2
Nombre de pixels effectifs
Stylus/µ[mju:]
300 DIGITAL
Stylus/µ[mju:]
400 DIGITAL
84 Fr
Mode
d’enregistrement
HQ
SQ
: 3.200.000 pixels
: 4.000.000 pixels
Résolution
(images/sec.)
320 × 240
(15 images/sec.)
160 × 120
(15 images/sec.)
Durée
d’enregistrement
totale (s)
16
70

Capteur d’image
Stylus/µ[mju:]
300 DIGITAL
Stylus/µ[mju:]
400 DIGITAL
Objectif : Objectif Olympus 5,8 mm à 17,4 mm (équivalent à un
Système de
mesure
Vitesse d’obturation : 1/2 à 1/1000 de seconde (4 s max. en mode de prise
Portée de prise de
vue
Viseur : Viseur optique à image réelle
Écran ACL : Écran couleur à cristaux liquides TFT de 1,5",
Connecteurs
externes
Calendrier
automatique
Imperméabilité : Équivalent à la publication de la norme IEC
Conditions de fonctionnement
Température : 0 à 40°C (fonctionnement)
Humidité : 30 % à 90 % (fonctionnement) / 10 % à 90 %
Alimentation : Batterie spécifique aux ions de lithium ou adaptateur
Dimensions : 99 mm (L) x 56 mm (H) x 33,5 mm (P)
Poids : 165 g (sans batterie ni carte)
: Capteur CCD de 1/2,5" à 3.340.000 pixels (brut)
: Capteur CCD de 1/2,5" à 4.230.000 pixels (brut)
objectif de 35 mm à 105 mm sur une appareil photo
de 35 mm), F3,1 à F5,2
: Mesure ESP numérique, mesure ponctuelle
de vue de nuit)
: 0,5 m à (normal)
0,2 m à (mode gros plan)
134.000 pixels
: Prise d’entrée CC (DC IN), connecteur USB (mini-B),
prise de sortie vidéo (VIDEO OUT)
: 2000 – 2099
529 IPX4 (sous les conditions de test OLYMPUS)
-20 à 60°C (stockage)
(stockage)
secteur
(éléments dépassant non compris)
Fr
Caractéristiques modifiables sans préavis ni obligations de la part du
fabricant.
Fr 85

INHALT
ERSTE SCHRITTE . . . . . . . . . . . . . . . . . . . . . . . . . . . . . 88
MENÜFUNKTIONEN . . . . . . . . . . . . . . . . . . . . . . . . . . 101
GRUNDSÄTZLICHE AUFNAHMEFUNKTIONEN . . . . 108
AUFNAHMEMODUS AUSWÄHLEN . . . . . . . . . . . . . . 115
WIEDERGABE . . . . . . . . . . . . . . . . . . . . . . . . . . . . . . . 116
DRUCKBEZOGENE EINSTELLUNGEN . . . . . . . . . . . 121
HERUNTERLADEN VON BILDERN AUF IHREN
COMPUTER . . . . . . . . . . . . . . . . . . . . . . . . . . . . . . . . . 122
FEHLERMELDUNGEN . . . . . . . . . . . . . . . . . . . . . . . . 124
TECHNISCHE DATEN . . . . . . . . . . . . . . . . . . . . . . . . . 126
Diese Bedienhinweise sind ausschließlich als Kurzinformation
zu verstehen. Weitere Einzelheiten zu den hier beschriebenen
Funktionen finden Sie im „Referenzhandbuch“ auf der CD-ROM.
De
Dieses Einfache Anleitung enthält Hinweise zum Gebrauch der
Digitalkamera Olympus Stylus 300/400 DIGITAL (µ [mju:] 300/400 DIGITAL).
Falls nicht anders angegeben, gelten die jeweiligen Bedienhinweise in
diesem Handbuch stets für beide Modelle.
86 De
J Lesen Sie sich dieses Handbuch sorgfältig durch, bevor Sie die Kamera benutzen, um
eine ordnungsgemäße Bedienung zu gewährleisten.
J Wir empfehlen, vor wichtigen Aufnahmen Probeaufnahmen vorzunehmen, um sich mit
der Bedienung und den Funktionen der Kamera vertraut zu machen.
J Diese Bedienhinweise sind lediglich als einfache Anleitung zu verstehen. Weitere
Einzelheiten zu den hier beschriebenen Funktionen finden Sie im Referenzhandbuch
auf der CD-ROM. Zum Anschließen an einen Personal Computer oder zu Installation
der mitgelieferten Software lesen Sie bitte die Software-Installationsanleitung (ist dem
CD-ROM-Paket als Ausdruck beigefügt).
Für Kunden in Nord- und Südamerika
Für Kunden in den USA
Betriebserlaubnis
Modellnummer : Stylus 300 DIGITAL, Stylus 400 DIGITAL
Markenname : OLYMPUS
Verantwortlicher Hersteller : Olympus America Inc.
Adresse : 2 Corporate Center Drive, Melville,
Telefonnummer : 1-631-844-5000
Auf Übereinstimmung mit den FCC-Bestimmungen geprüft.
FÜR DEN HEIM- UND BÜROGEBRAUCH
Dieses Gerät erfüllt die Auflagen unter Abschnitt 15 der FCC-Bestimmungen.
Das Betreiben dieses Geräts ist zulässig, wenn die nachfolgend genannten
Auflagen erfüllt werden:
(1) Von diesem Gerät dürfen keine schädlichen Störeinstreuungen ausgehen.
(2) Dieses Gerät muss die Einwirkung von Störeinstreuungen zulassen. Dies
schließt Störeinstreuungen ein, welche Beeinträchtigungen der
Funktionsweise oder Betriebsstörungen verursachen können.
Für Kunden in Kanada
Dieses digitale Gerät der Klasse B erfüllt alle Anforderungen der
Vorschriften für Geräte, die Störeinstreuungen verursachen.
RM-2 (Fernauslöser)
New York11747-3157, USA
Für Kunden in Europa
Das (CE)-Zeichen bestätigt, dass dieses Produkt mit den
europäischen Bestimmungen für Sicherheit, Gesundheit,
Umweltschutz und Personenschutz übereinstimmt. Mit dem (CE)Zeichen versehene Kameras sind für den europäischen Markt
bestimmt.
Warenzeichen
• IBM ist ein eingetragenes Warenzeichen der International Business Machines Corporation.
• Microsoft und Windows sind eingetragene Warenzeichen der Microsoft Corporation.
• Macintosh ist ein Warenzeichen der Apple Computer Inc.
• Alle weiteren Firmen- und Produkteigennamen sind eingetragene Warenzeichen/
Handelsmarken der jeweiligen Rechteinhaber.
• Die Bilddatenverwaltung dieser Kamera unterstützt die DCF-Norm „Design Rule
for Camera File System“ der JEITA (Japan Electronics and Information
Technology Industries Association).
De
De 87
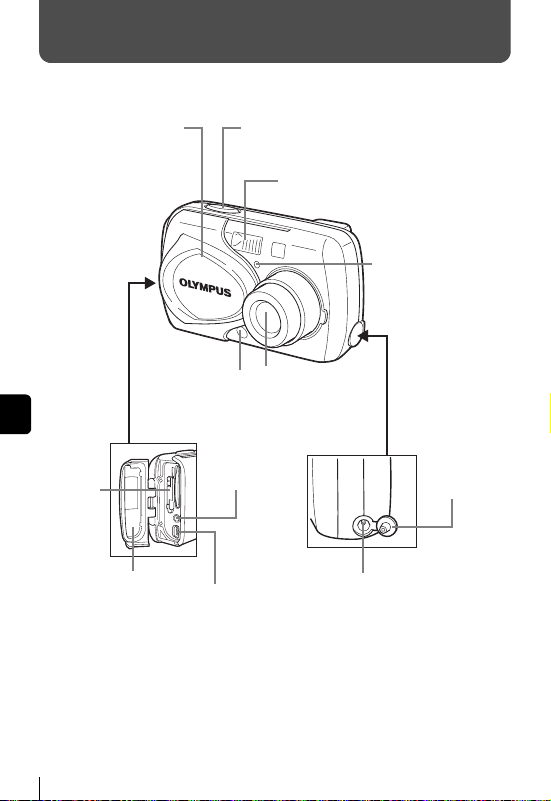
ERSTE SCHRITTE
-
J BESCHREIBUNG DER TEILE
Objektivschutzschieber
Schaltet die Kamera im
Speichermodus ein und aus.
De
Kartenfach
deckel
Buchsenabdeckung
Fernauslösersensor
VIDEO OUT
Buchse
USB-Anschluss
Auslöser
Blitz
Objektiv
Wird beim Öffnen des
Objektivschutzschiebers
automatisch
ausgeschoben.
Gleichspannungseingang (4,8 V)
Selbstauslöser-/
FernauslöserLED
Abdeckung
Gleichspannung
seingang
88 De

Pfeiltasten ( )
Die Pfeiltasten können als Richtungs- und Funktionstasten verwendet werden.
Die Markierungen , , und zeigen an, welche spezielle Taste
jeweils auf den Pfeiltasten gedrückt werden muss.
Speichermodus-Taste
Taste für Nahaufnahmen
Selbstauslösermodus-Taste
LCDMonitor
Batteriefachdeckel
Sucher
AF-Markierung
Blitzmodus-Taste
Zoomregler (W/T )
Trageriemenöse
OK/Menü-Taste
LCD-Monitor-Taste
Schnellwiedergabe
(QUICK VIEW )
Wiedergabe-Taste ( )
Stativgewinde
Orangefarbene Sucher-LED
Grüne Sucher-LED
()
De
De 89
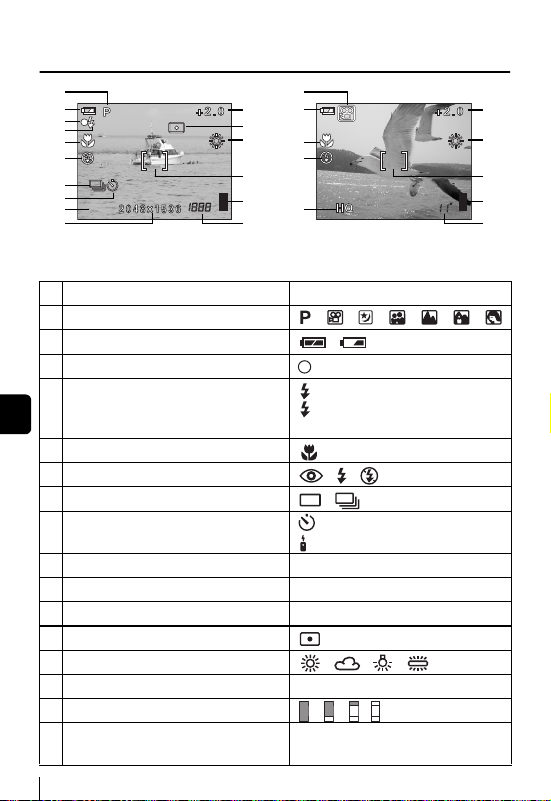
J LCD-MONITOR-ANZEIGEN
SHQ
Speichermodus
1
2
3
4
5
6
7
8
9
SHQ
10
Einzelbild Movie
Funktionen Anzeigen
1 Speichermodus , , , , , ,
2 Batterieladezustand ,
3 Grüne Sucher-LED
4 Blitzbereitschaft/
De
Verwackelungswarnanzeige/
Blitzladebetrieb
5 Nahaufnahmemodus
6 Blitzmodus , ,
7 Serienaufnahme ,
8 Selbstauslöser
Fernauslöser
9 Speichermodus SHQ, HQ, SQ1, SQ2
10 Bildauflösung 2272 × 1704, 2048 × 1536 usw.
11 Belichtungskorrektur -2.0 – +2.0
12 Belichtungsmessmethode
13 Weißabgleich , , ,
14 AF-Markierung [ ]
15 Speichersegmente , , ,
16 Anzahl der speicherbaren Einzelbilder
Aufnahmerestzeit
1
2
11
12
13
5
6
14
15
9
16
(leuchtet)
(blinkt)
16
16''
11
13
14
15
16
90 De

2048
1536
1536
2
1
4
5
6
7
8
9
10
1
2048
Einzelbild Movie
Funktionen Anzeigen
1 Batterieladezustand ,
2 Druckvorauswahl, Anzahl der Ausdrucke ×10
3Movie
4 Löschschutz
5 Speichermodus SHQ, HQ, SQ1, SQ2
6 Bildauflösung 2272 × 1704, 2048 × 1536 usw.
7 Belichtungskorrektur -2.0 – +2.0
8 Weißabgleich AUTO, , , ,
9 Datum und Zeit ’03.05.17 15:30
10 Dateinummer
Spielzeit/
Gesamtspielzeit
FILE : 100-0030
0"/20"
3
4
5
6
7
8
9
10
De
De 91

Speichersegmente
Die Speichersegmente leuchten, wenn Sie ein Bild aufnehmen oder ein
Movie aufzeichnen. Während die Speichersegmente leuchten, wird die
Aufnahme auf der Karte gespeichert. Die Speichersegmente ändern sich wie
nachfolgend gezeigt je nach Aufnahmestatus. Wenn die Speichersegmente
vollständig leuchten, warten Sie bitte einen Moment, bis der leuchtende
Bereich erloschen ist, bevor Sie die nächste Aufnahme tätigen.
Beim Erstellen von Einzelaufnahmen
Aufnehmen Aufnehmen Aufnehmen
Vor der
Aufnahme
(Anzeige ist aus)
Nach einer
Aufnahme
(leuchtet)
Nach mehr als
zwei Aufnahmen
(leuchtet)
Warten
Es können keine weiteren Aufnahmen
erstellt werden
(leuchtet vollständig)
Warten Sie, bis die Speichersegmente
wieder in den links gezeigten Status
zurückgekehrt sind, bevor Sie die
nächste Aufnahme erstellen.
Bei der Movie-Aufnahme
Wenn Sie die Aufnahme fortsetzen
Aufnehmen
De
Vor der
Aufnahme
(Anzeige ist aus)
Warten
Während der Aufnahme (leuchtet)
•Die Aufnahme ist erst möglich, wenn der leuchtende Bereich
vollständig erloschen ist.
•Die Movie-Aufnahme endet automatisch, wenn die
Speichersegmente vollständig leuchten.
Batterieladezustand
Ist die verbleibende Akkuleistung gering, verändert sich die
Batterieladezustandsanzeige auf dem LCD-Monitor wie folgt, während die
Kamera eingeschaltet oder in Benutzung ist:
Keine Anzeige
Leuchtet (grün)
Sie können
weitere
Aufnahmen
erstellen.*
Leuchtet auf (rot)
Verbleibende Batterieleistung:
niedrig Sobald wie möglich
aufladen, vor allem, wenn Sie
die Kamera anschließend
länger benutzen möchten.
* Der Energieverbrauch der Kamera kann je nach ihrem Betriebszustand stark
schwanken. Die Kamera kann sich auch ohne vorheriges Anzeigen des Warnhinweises
für geringe Batterieleistung abschalten. Den Akku dann sobald wie möglich aufladen.
92 De
Die rechts im Sucher
angeordnete grüne und
orangefarbene LED blinken.
Verbleibende Batterieleistung:
erschöpft
Einen aufgeladenen Akku einlegen.
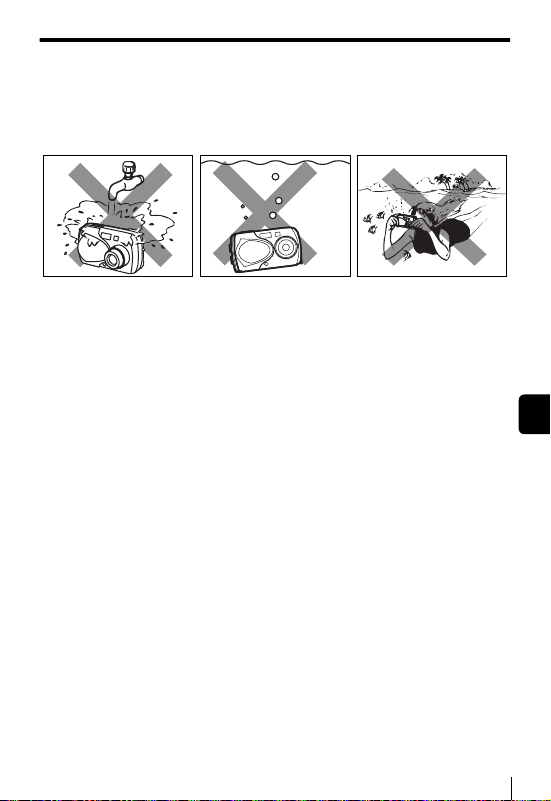
Spritzwasserbeständigkeit
Die Kamera ist spritzwassergeschützt und wird durch auf sie einwirkendes
Spritzwasser nicht beschädigt. Sie kann jedoch nicht für Unterwasseraufnahmen
verwendet werden. Beachten Sie bitte die folgenden Sicherheitsvorkehrungen,
wenn Sie die Kamera benutzen. Olympus übernimmt keinerlei Verantwortung für
Fehlfunktionen der Kamera, die auf eingedrungenes Wasser als Ergebnis von
Fehlbedienungen durch den Anwender zurückgehen.
•Spülen Sie die Kamera
nicht mit Wasser ab.
• Die Kamera verliert Ihre Spritzwasserbeständigkeit, falls der
Batteriefachdeckel, die Buchsenabdeckung oder die Abdeckung des
Gleichspannungseingangs geöffnet sind. Vergewissern Sie sich daher stets,
dass alle Abdeckungen geschlossen sind, bevor Sie die Kamera benutzen.
• Wischen Sie sämtliches noch an der Kamera haftendes Spritzwasser ab,
bevor Sie den Akku oder die Karte auswechseln.
• Halten Sie das Objektiv beim Erstellen von Aufnahmen nicht ins Wasser.
(Die Kamera kann das Motiv sonst nicht richtig scharf stellen.)
• Falls die Kamera mit Spritzwasser in Kontakt kommt, wischen Sie das
Wasser schnellstmöglich mit einem trockenen Tuch ab. Salzwasser in
Tropfen- oder Sprühnebelform kann Ihre Kamera beschädigen, wenn es
nicht schnellstmöglich mit einem trockenen Tuch abgewischt wird.
• Wenden Sie bei dem Versuch, die Gummibeschichtung des
Batteriefachdeckels, der Buchsenabdeckung oder der Abdeckung des
Gleichspannungseingangs zu entfernen, keine Gewalt an.
• Sollte die Gummibeschichtung Anzeichen für Beschädigungen oder
Verschleiß aufweisen, wenden Sie sich bitte umgehend an das
nächstgelegene Olympus-Servicezentrum. (Der eventuell erforderliche
Austausch schadhafter Teile gegen neuwertige Ersatzteile ist
kostenpflichtig.)
• Falls die Gummibeschichtung des Batteriefachdeckels, der
Buchsenabdeckung oder der Abdeckung des Gleichspannungseingangs mit
Schmutz oder Sand in Kontakt gekommen sind, reinigen Sie die
verschmutzten Stellen, bevor Sie die Abdeckungen schließen, da sonst
Wasser ins Innere der Kamera eindringen kann.
• Der wiederaufladbare Akku und das sonstige Zubehör der Kamera sind nicht
spritzwasserbeständig. Benutzen Sie diese Zubehörteile daher stets mit der
entsprechenden Sorgfalt.
•Lassen Sie die Kamera
nicht ins Wasser fallen.
•Versuchen Sie nicht, mit
der Kamera
Unterwasseraufnahmen
zu erstellen.
De
De 93
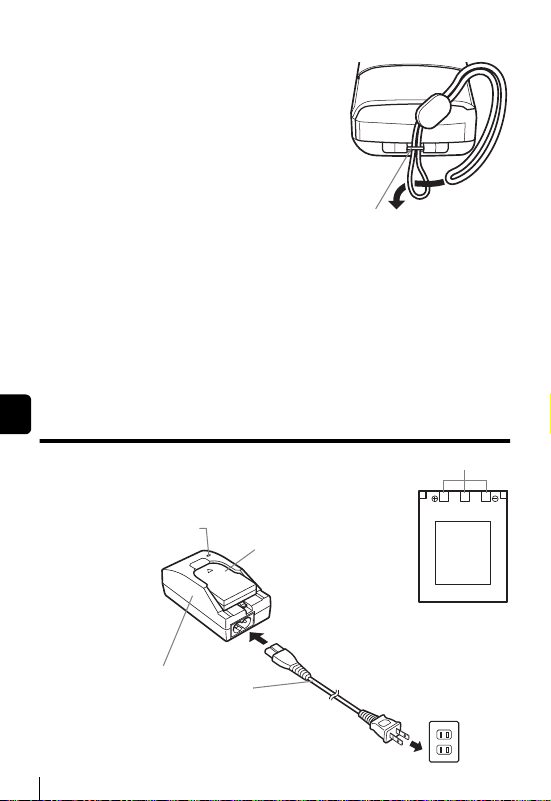
J ANBRINGEN DES TRAGERIEMENS
1
Führen Sie das kurze Ende des
Trageriemens durch die Öse.
Führen Sie den Trageriemen durch
2
die Schlaufe, die bereits durch die
Öse gefädelt wurde.
Ziehen Sie den Riemen straff und
3
achten Sie darauf, dass er sicher
befestigt ist und sich nicht lösen
Trageriemenöse
kann.
J AUFLADEN DES AKKUS
Dieses Kamera verwendet einen Olympus Lithium-Ionen-Akku (LI-10B).
Dieser Akku ist nur für diese Kamera bestimmt. Andere Akkus oder Batterien
dürfen nicht verwendet werden. Wenn Sie die Kamera kaufen, ist der Akku
noch nicht vollständig geladen. Laden Sie den Akku daher erst vollständig mit
dem dafür vorgesehenen Ladegerät (LI-10C) auf, bevor Sie die Kamera zum
ersten Mal benutzen. Die Einzelheiten hierzu finden Sie in der
Bedienungsanleitung des Ladegeräts (mitgeliefert).
De
Hinweise zum Akku
Achten Sie darauf, dass die + und - Pole des Akkus
beim Einlegen ins Ladegerät wie in der
rechtsstehenden Abbildung gezeigt korrekt
ausgerichtet sind.
Ladezustandsanzeige
Wenn die Farbe der
Ladezustandsanzeige
von rot nach grün
wechselt, ist der Akku
vollständig geladen.
Ladegerät
Netzkabel
Lithium-Ionen-Akku
An den Netzeingang
Anschließen
94 De
Anschlusspole
Lithium-IonenAkku
Netzsteckdose
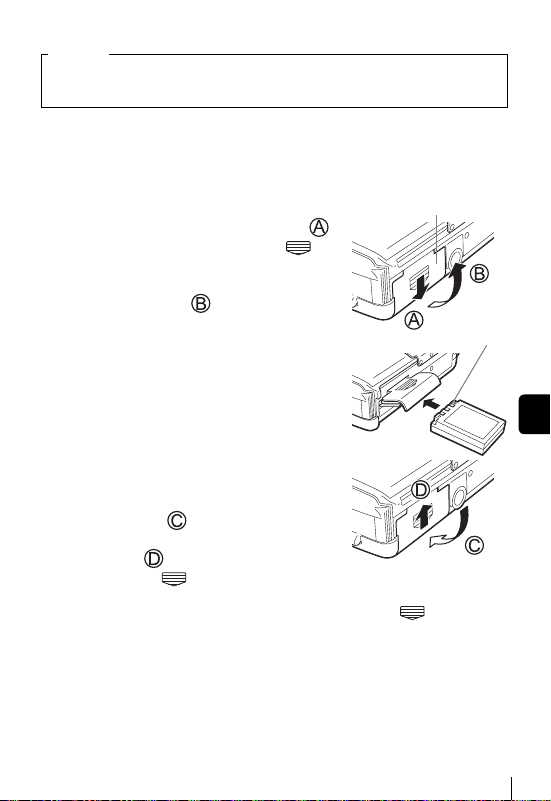
J EINLEGEN DES AKKUS
Wichtig
• Prüfen Sie nach jedem Auswechseln des Akkus, ob die Einstellungen
für Zeit und Datum noch korrekt sind.
1
Achten Sie stets darauf, dass:
• Der LCD-Monitor abgeschaltet ist.
• Der Objektivschutzschieber geschlossen ist.
• Die rechts im Sucher angeordnete LED nicht leuchtet.
Schieben Sie den
2
Batteriefachdeckel in Richtung
(die Richtung, die durch die
Markierung auf dem Deckel
vorgegeben wird) und heben Sie
ihn in Richtung an.
Schieben Sie den Akku wie in der
3
Abbildung gezeigt in das
Batteriefach ein.
Schließen Sie den
4
Batteriefachdeckel, so dass der
Akku nun vollständig in das
Batteriefach hineingedrückt
wird. Schieben Sie den Deckel in
Richtung , während Sie auf die
Markierung drücken.
• Wenden Sie keine Gewalt an, falls sich der Batteriefachdeckel nicht
richtig schließen lässt. Drücken Sie die Markierung bei
geschlossenem Batteriefachdeckel fest nach unten und schieben Sie
ihn in wie in der Abbildung gezeigt zur Seite.
Batteriefachdeckel
Anschlusspole
De
De 95
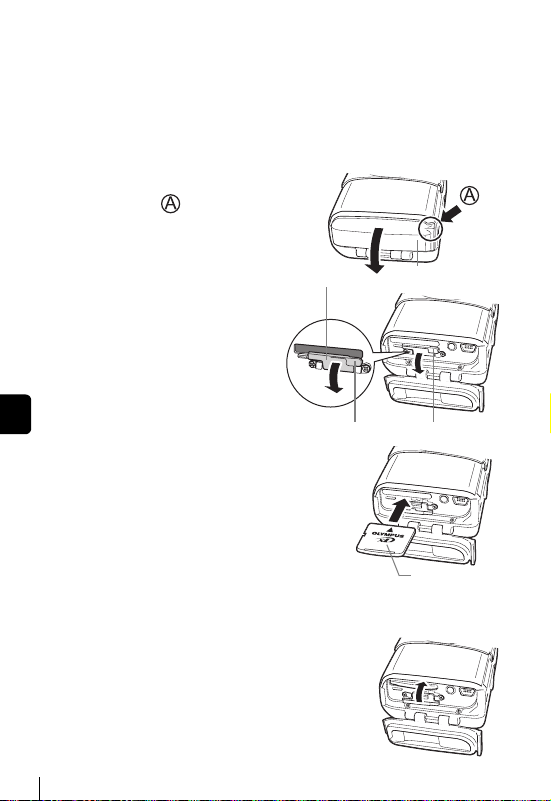
J EINLEGEN EINER KARTE
Die Bezeichnung „Karte“ bezieht sich in diesem Handbuch auf die Fabrikate
xD-Picture Card-Karte. Die Kamera verwendet die Karte, um darauf Bilder
abzuspeichern.
Achten Sie stets darauf, dass:
1
• Der LCD-Monitor abgeschaltet ist.
• Der Objektivschutzschieber geschlossen ist.
• Die rechts im Sucher angeordnete LED nicht leuchtet.
Drücken Sie wie in der
2
Abbildung gezeigt auf die
Markierung , um die
Buchsenabdeckung zu öffnen.
De
96 De
Öffnen Sie den
3
Kartenfachdeckel,
indem Sie die
Kartenfachdeckelverri
egelung in Ihre
Richtung ziehen.
Führen Sie die Karte richtig
4
herum in das Karteneinschubfach
ein.
• Halten Sie die Karte dabei gerade.
• Wenn Sie die Karte falsch herum
einführen oder schräg einführen, kann
sich diese verkanten, oder der
Kontaktbereich der Karte wird dadurch
beschädigt.
• Wenn die Karte nicht vollständig
eingeschoben wird, können keine Daten
auf der Karte abgespeichert werden.
Schließen Sie den Kartenfachdeckel.
5
Kartenfachdeckel
Kartenfachdeckelverriegelung
Buchsenabdeckung
Die Seite mit dem
Indexbereich

Schließen Sie die
6
Buchsenabdeckung.
• Drücken Sie beim Schließen der
Buchsenabdeckung wie in der Abbildung
gezeigt auf die Markierung .
Hinweis
Schließen Sie niemals die
Buchsenabdeckung, ohne zuvor den
Kartenfachdeckel zu schließen.
Entfernen einer Karte
Öffnen Sie die Buchsenabdeckung
1
und anschließend den
Kartenfachdeckel.
Drücken Sie die Karte zum Entriegeln
2
vorsichtig nach innen und lassen Sie
diese anschließend langsam
herausgleiten.
• Die Karte wird dabei ein kleines Stück aus
dem Einschubfach ausgeschoben und bleibt danach stehen.
Hinweis
Wenn Sie Ihren Finger zu schnell von der Karte lösen, nachdem Sie
diese vollständig nach innen gedrückt haben, kann es passieren, dass
die Karte unvermittelt aus dem Einschub ausgeworfen wird.
Halten Sie die Karte gerade und
3
ziehen Sie sie heraus.
De
• Drücken Sie nicht mit harten oder spitzen Gegenständen auf die
Karte wie beispielsweise einem Kugelschreiber.
Hinweis
De 97

J EIN- UND AUSSCHALTEN DER KAMERA
Zum Aufnehmen
Einschalten:
Ausschalten: Schließen Sie den Objektivschutzschieber vorsichtig, bis
De
Den Objektivschutzschieber öffnen.
Die Kamera wird im Speichermodus
eingeschaltet. Das Objektiv wird
ausgeschoben, und das Motiv
erscheint auf dem LCD-Monitor.
Falls sich das Objektiv bei
geöffnetem Objektivschutzschieber
nicht ausschiebt, kann es sein, dass
der Objektivschutzschieber nicht vollständig geöffnet ist.
Schieben Sie den Objektivschutzschieber auf, bis er mit einem
Klickgeräusch einrastet.
Beim ersten Gebrauch der Kamera oder wenn in der Kamera
für etwa eine Stunde kein Akku eingelegt ist, werden alle
Funktionen auf die Grundeinstellungen ab Werk
zurückgesetzt. In diesem Fall erscheint beim Einschalten der
Kamera der Hinweis „DATUM UND ZEIT EINSTELLEN“ auf
dem LCD-Monitor. Drücken Sie , um den LCD-Monitor
auszuschalten. Die Kamera ist immer noch eingeschaltet.
er das Objektiv beinahe berührt.
Der Objektivschutzschieber bleibt stehen, kurz bevor er an
das Objektiv anstösst, und das Objektiv wird eingeschoben.
Warten Sie, bis das Objektiv vollständig eingeschoben wurde
und schließen Sie dann den Objektivschutzschieber
vollständig.
Die Kamera schaltet sich ab. (Der LCD-Monitor wird ebenfalls
ausgeschaltet.)
Hinweis
98 De
• Schieben Sie den Objektivschutzschieber nicht mit Gewalt gegen das
Objektiv, da dies zu Fehlfunktionen oder Objektivschäden führen kann.

Bei der Bildwiedergabe
Einschalten:
Bei geschlossenem Objektivschutzschieber drücken.
Die Kamera wird im Wiedergabemodus eingeschaltet. Der LCDMonitor schaltet sich ein und zeigt die zuletzt erstellte Aufnahme.
Ausschalten: Drücken Sie .
Hinweis
Der LCD-Monitor und die Kamera schalten sich ab.
• Während die Kamera eingeschaltet ist, niemals das Netzteil
anschließen oder abtrennen, den Kartenfachabdeckung öffnen oder
die Karte oder den Akku entfernen. Anderenfalls können alle auf der
Karte gespeicherten Daten unwiederbringlich verloren gehen.
Schalten Sie die Kamera beim Wechseln der Karte ab, bevor Sie die
Kartenfachabdeckung öffnen.
J AUSWÄHLEN EINER SPRACHE
1
Den Objektivschutzschieber
vollständig öffnen.
• Das Objektiv wird ausgeschoben, und der
LCD-Monitor schaltet sich ein.
Drücken Sie .
2
• Das Hauptmenü wird angezeigt.
Drücken Sie auf die Pfeiltaste und
3
wähle Sie MODE MENU.
Drücken Sie und wählen Sie den Menüanzeiger
4
SETUP. Drücken Sie anschließend .
Drücken Sie und wählen Sie . Drücken Sie
5
anschließend .
Drücken Sie und wählen Sie die gewünschte
6
Sprache. Drücken Sie anschließend .
Drücken Sie erneut, um das Menü zu schließen.
7
Schließen Sie den Objektivschutzschieber, um die Kamera
8
abzuschalten.
Pfeiltasten ( )
De
De 99

J EINSTELLEN VON DATUM UND ZEIT
1
Den Objektivschutzschieber vollständig öffnen.
• Das Objektiv wird ausgeschoben, und der LCD-Monitor schaltet sich ein.
Drücken Sie .
2
• Das Hauptmenü wird angezeigt.
Drücken Sie auf die Pfeiltaste und wähle Sie MODE MENU.
3
Drücken Sie und wählen Sie den Menüanzeiger
4
SETUP. Drücken Sie anschließend .
Drücken Sie und wählen Sie . Drücken Sie
5
anschließend .
• Der grüne Begrenzungsrahmen bewegt sich zur gewählten Funktion.
Drücken Sie und wählen Sie eines der
6
nachfolgenden Datumsformate: Y-M-D (Jahr/Monat/Tag),
M-D-Y (Monat/Tag/Jahr), D-M-Y (Tag/Monat/Jahr). Drücken
Sie anschließend .
• Wechseln Sie auf die Einstellung der Jahreszahl.
• In diesem Anwendungsbeispiel wird das Datumsformat Y-M-D
verwendet.
De
Drücken Sie zum Einstellen des Jahres und
7
anschließend , um zur Einstellung für die Monatszahl
zu gelangen.
• Drücken Sie , um zur vorherigen Einstellung zurückzugelangen.
• Die ersten beiden Ziffern der Jahreszahl lassen sich nicht ändern.
Wiederholen Sie diese Bedienungsschritte, bis Datum und
8
Zeit vollständig eingestellt sind.
• Die Kamera zeigt die Uhrzeit stets nach dem 24-Stunden-Prinzip an („2
p.m.“ wird daher immer als „14:00“ angezeigt).
Drücken Sie .
9
• Zur sekundengenauen Zeitmessung zur vollen Minute (00 Sekunden)
Schließen Sie den Objektivschutzschieber, um die Kamera
10
abzuschalten.
drücken. Die Zeitmessung wird beim Drücken dieser Taste
aktiviert.
Hinweis
100 De
• Die Einstellungen für Datum und Zeit werden jedoch gelöscht, wenn in der
Kamera für circa einen Tag kein Akku eingelegt ist.
 Loading...