

Page 1

RAW Development
RAW data is developed and processed and the results are saved in an image file.
Only RAW (*.orf) files are affected. Multiple RAW data can also be processed at the
same time.
RAW data is unprocessed data to which white balance, sharpness, contrast, color
conversion, and other development processes have not been applied.
When only RAW data taken with an Olympus E-1 digital camera is selected, RAW
development that supports the camera’s settings can be selected. Selecting this
option switches the [RAW Development] dialog box to display the appropriate
settings.
If RAW data from cameras other than the E-1 is included in the selection, the [RAW
Development] (advanced settings) dialog box is not displayed.
1 Select an image with RAW data.
You can only select image files with RAW Data (*.orf) format.
2 Select [RAW Development...] from the [Edit] menu, or click the
[RAW Development] icon in the toolbar.
The [RAW Development] dialog box appears.
[RAW Development] dialog box
Note
• RAW development can only be used with images in RAW format. When an
image with a different format is selected, clicking [RAW Development] only
displays an error message.
• When RAW data from the Olympus E-1 digital camera and other cameras are
selected together, a warning is displayed alerting the user that not all
development process functions in the [RAW Development] dialog box are
available.
1
Page 2
RAW Development
3 Configure each item.
The same settings are applied to all RAW data selected in step 1 above.
Item Description
Preview Area Displays the results of the configured development processes.
When several RAW data images are selected in the thumbnail
display area, [ ] and [ ] can be clicked to select the
image you want to preview.
RAW Development
Engine
Default Settings Check this box to return all setting items to the default setting.
Exposure
Compensation
White balance Adjusts the white balance of the image.
For setting RAW development functions.
When only RAW data taken with an E-1 is selected, [Advanced
High Speed] and [Advanced High Function] are displayed in
the list. Select [Advanced High Speed] or [Advanced High
Function] to display the [RAW Development] (advanced
settings) dialog box.
• High Speed
RAW data is developed in High Speed mode. [Noise
Cancellation] and [False Color Suppression] are not
available.
• High Function
RAW data is developed in High Function mode.
• Advanced High Speed
Development of RAW data taken with the E-1 is performed in
High Speed mode and supports the camera’s settings.
• Advanced High Function
Development of RAW data taken with the E-1 is performed in
High Function mode and supports the camera’s settings.
At the beginning, the box is checked, but is automatically
removed when the settings are changed.
Adjusts the exposure of the image.
You can manually adjust the exposure by dragging the slider to
the left or right. The exposure value can be set from –2.0 to
+2.0 in increments of 0.1 EV. You can also directly enter the
exposure value.
• Shooting Setting:
Check this box to use the white balance set when the image
was taken.
• Color Temperature Setting:
You can manually adjust the color temperature by dragging
the slider to the left or right. It can be set from [2000K] to
[10000K] in increments of 100K. You can also directly enter
the value.
Fine Adjustment: You can manually adjust the color
temperature by dragging the slider to the left or right. It can
be set in 21 steps from [–10STEP] to [+10STEP].
• Gray Point Specification:
Click the [Eyedropper tool] button to change the mouse
cursor to the eyedropper tool. Click the desired area on the
image in the preview area to specify a gray point.
2
Page 3
RAW Development
Contrast Adjusts the contrast of the image.
Sharpness Adjusts the sharpness of the image.
Saturation Adjusts the saturation of the image.
Color Space Sets the color space of the image.
Noise Cancellation Makes the necessary adjustments to cancel image noise.
False Color
Suppression
[Cancel] Cancels the RAW development settings.
[Save] Displays the [Specify Destination] dialog box to select the file
You can manually adjust the contrast by dragging the slider to
the left or right. The contrast can be set in 11 steps from
[–5] to [+5].
You can manually adjust the sharpness by dragging the slider
to the left or right. The sharpness can be set in 11 steps from
[–5] to [+5].
You can manually adjust the saturation by dragging the slider
to the left or right. The saturation can be set in 11 steps from
[–5] to [+5].
Select [sRGB], [Adobe RGB], or [ProPhoto RGB] from the list
for the color space.
You can manually adjust the noise cancellation by dragging the
slider to the left or right. It can be set in 11 steps from [0] to
[10]. You can only set this function when [High Function] is
selected for [RAW Development Engine].
Adjusts the chromatic aberration of the image.
You can manually adjust the false color suppression by
dragging the slider to the left or right. It can be set in 11 steps
from [0] to [10]. You can only set this function when [High
Function] is selected for [RAW Development Engine].
name and format after development processes are applied to
an image.
3
Page 4
RAW Development
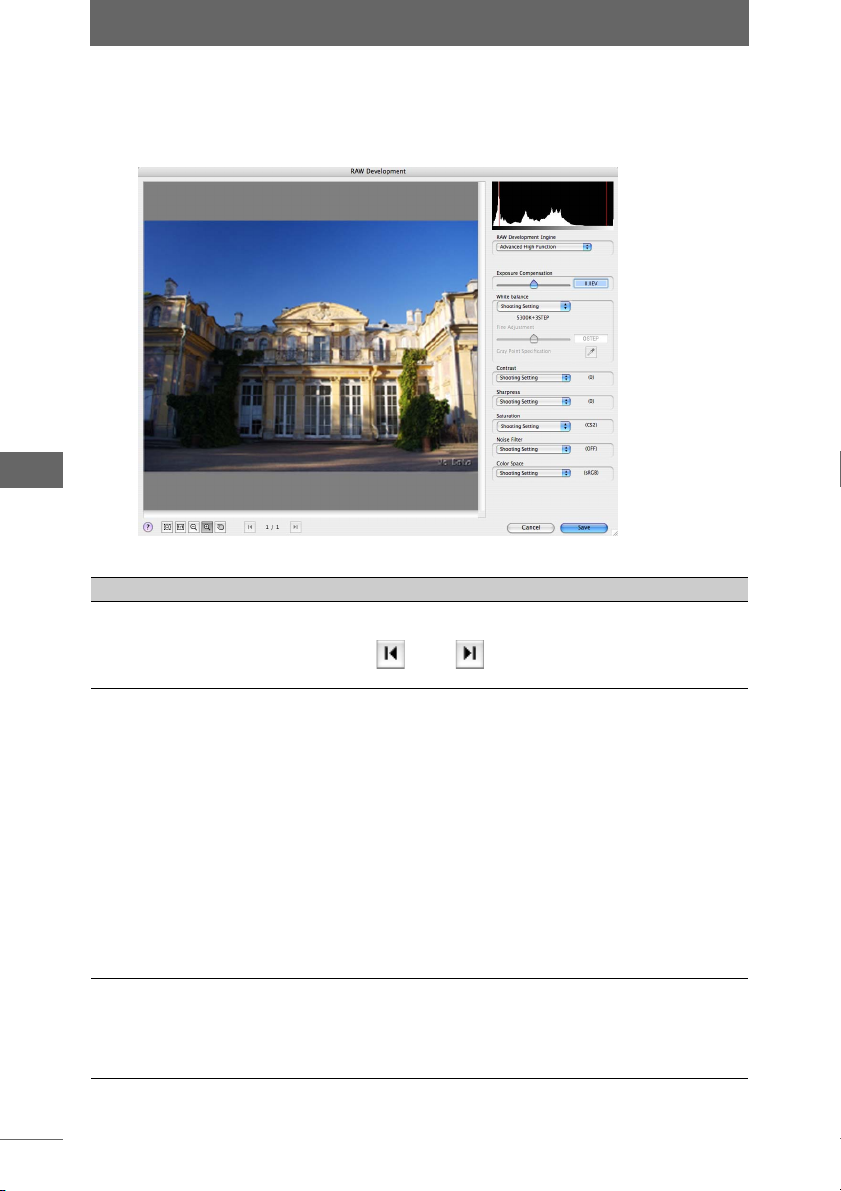
From [RAW Development Engine], select [Advanced High Speed] or [Advanced
High Function] to display the [RAW Development] (advanced settings) dialog box
below.
[RAW Development] (advanced settings) dialog box
Item Description
Preview Area Displays the results of the configured development processes.
When several RAW data images are selected in the thumbnail
display area, [ ] and [ ] can be clicked to select the
image you want to preview.
RAW Development
Engine
Exposure
Compensation
For setting RAW development functions.
Select [High Speed] or [High Function] to display the [RAW
Development] dialog box.
• High Speed
RAW data is developed in High Speed mode. [Noise
Cancellation] and [False Color Suppression] are not
available.
• High Function
RAW data is developed in High Function mode.
• Advanced High Speed
Development of RAW data taken with the E-1 is performed in
High Speed mode and supports the camera’s settings.
• Advanced High Function
Development of RAW data taken with the E-1 is performed in
High Function mode and supports the camera’s settings.
Adjusts the exposure of the image.
You can manually adjust the exposure by dragging the slider to
the left or right. The exposure value can be set from –2.0 to
+2.0 in increments of 0.1 EV. You can also directly enter the
exposure value.
4
Page 5
RAW Development
White balance Sets the white balance of the image.
Contrast Sets the contrast of the image.
Sharpness Sets the sharpness of the image.
Saturation Sets the saturation of the image.
Noise Filter Select whether to cancel random noise during image
From the list, select [Shooting Setting], [Gray Point
Specification], or one of 12 color temperatures from [3000K
(Tungsten light)] to [7500K (Shade on clear day)] for the white
balance.
• Select [Shooting Setting] to use the white balance set when
the image was taken. The set value is displayed below. If a
preset white balance setting was selected, the value is
shown like this: [5300K+3STEP]. If the one touch white
balance setting was selected, the value is shown like this:
[One Touch WB1].
• Select a color temperature from [3000K (Tungsten light)] to
[7500K (Shade on clear day)] to make adjustments.
Fine Adjustment: You can manually adjust the color
temperature by dragging the slider to the left or right. The
color temperature can be set in 15 steps from [–7STEP] to
[+7STEP].
• Select [Gray Point Specification] to make gray point
specifications.
Gray Point Specification: Click the [Eyedropper tool] button
to change the mouse cursor to the eyedropper tool. Click the
desired area on the image in the preview area to specify a
gray point.
From the list, select [Shooting Setting] or one of 5 settings from
[–2] to [+2] for the contrast.
Select [Shooting Setting] to use the contrast set when the
image was taken. The set value is displayed on the right.
From the list, select [Shooting Setting] or one of 9 settings from
[–3] to [+5] for the sharpness. Images taken with some
versions of the E-1 firmware only allow the sharpness to be
adjusted between [–3] and [+3].
Select [Shooting Setting] to use the sharpness set when the
image was taken. The set value is displayed on the right.
From the list, select [Shooting Setting], [CM1 (R Emphasis)],
[CM2 (G Emphasis)], [CM3 (B Emphasis)], [CM4 (Body
Warmth Emphasis)], or one of 5 saturations from [CS0] to
[CS4] for the saturation.
Select [Shooting Setting] to use the saturation set when the
image was taken. The set value is displayed on the right.
processing.
Select [Shooting Setting], [ON], or [OFF] from the list.
Select [Shooting Setting] to use the noise filter set when the
image was taken. The set value is displayed on the right.
Select [ON] to cancel random noise.
5
Page 6
RAW Development
Color Space Sets the color space of the image.
[Cancel] Cancels the RAW development settings.
[Save] Displays the [Specify Destination] dialog box to select the file
• When the [RAW Development Engine] is changed to advanced settings or is
changed back, a warning is displayed before the [RAW Development] dialog
Note
box.
Select [Shooting Setting], [sRGB], [Adobe RGB], or [ProPhoto
RGB] from the list.
Select [Shooting Setting] to use the color space set when the
image was taken. The set value is displayed on the right.
name and format after development processes are applied to
an image.
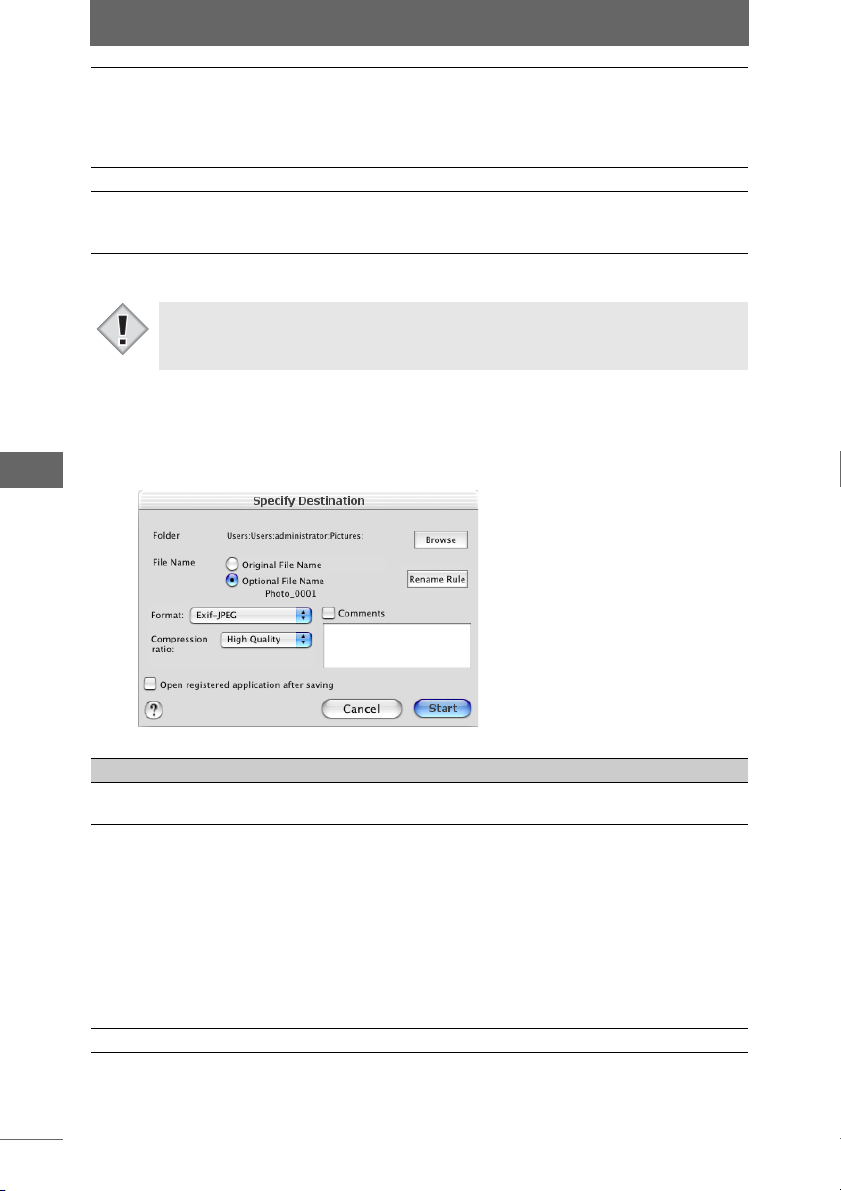
4 Click the [Save] button.
The [Specify Destination] dialog box appears.
[Specify Destination] dialog box
Item Description
Folder Click the [Browse] button to specify the destination of the
File Name Select either of the following naming conventions.
Format From the list, specify the format of the image to be saved.
image.
• Original File Name:
The files are saved with the same names as the image
files for development processing.
If a different file format is selected in [Format], the files
are saved as separate files with a different extension.
• Optional File Name:
Checking this box displays the [File Naming Rule] dialog
box when you click the [File Naming Rule] button. In the
dialog box you can set a rename rule from choices such
as [Shooting Date] and [Serial Number].
6
Page 7

RAW Development
Compression ratio This can only be specified when [Exif-JPEG] or [JPEG] is
Comments Check this box to enter a comment when saving the file.
Open registered
application after
saving
[Cancel] Cancels the specifying of the destination.
[Start] Applies development processes with configured settings.
selected as the file format in [Format]. Select [High Quality],
[Standard Quality], or [Low Quality].
This box can only be checked when [Exif-JPEG] or [Exif-TIFF]
is selected as the file format in [Format]. This option is grayed
out when another file format is selected.
Check this box to automatically display the developed and
processed images with the registered application.
“Launching a registered application (Image Edit Window)”
in the OLYMPUS Studio Instruction Manual P.194
5 Specify an item and click the [Start] button.
When the [Start] button is clicked, the configured development processes are
applied and the image is saved using the settings in the [Specify Destination]
dialog box.
7
Page 8

Editing images
The image edit window is used to select and edit images.
On OLYMPUS Studio, this is done with the image processing bar and image
processing palettes. To make settings, select an editing item on the image
processing bar and the corresponding image processing palette is displayed.
For editing items other than those in [RAW Development Settings], refer to the
OLYMPUS Studio Instruction Manual.
RAW Development Settings
These settings are used for the development processes of RAW data. Only RAW
(*.orf) files are affected. Batch processing can also be used to set multiple RAW
data at the same time.
RAW data is unprocessed data to which white balance, sharpness, contrast, color
conversion, and other development processes have not been applied.
When only RAW data taken with an Olympus E-1 digital camera is selected for
editing, RAW development that supports the camera’s settings can be selected.
Selecting this option switches the [RAW Development Settings] palette to display
the appropriate settings.
If RAW data from cameras other than the E-1 is included in the selection, the [RAW
Development Settings] (advanced settings) palette is not displayed.
1 Select an image with RAW data.
You can only select image files with RAW Data (*.orf) format.
2 Click the [RAW Development Settings] button on the image
processing bar or select [RAW Development Settings] from the
[Image] menu.
1
Page 9
Editing images
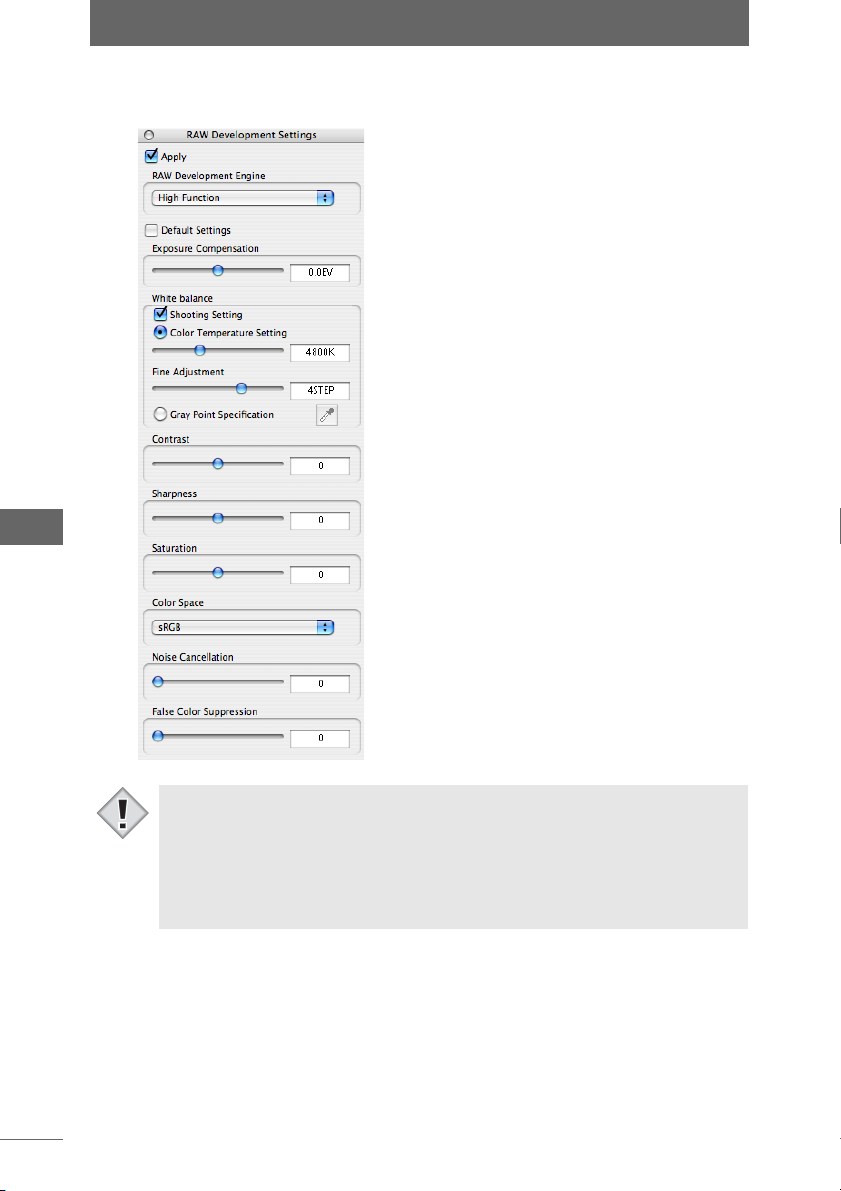
The [RAW Development Settings] palette appears.
[RAW Development Settings] palette
• RAW development settings can only be used with images in RAW format.
When an image with a different format is selected, clicking [RAW Development
Note
Settings] only displays an error message.
• When RAW data from the Olympus E-1 digital camera and other cameras are
selected together, a warning is displayed alerting the user that not all
development process functions in the [RAW Development Settings] palette are
available.
2
Page 10
Editing images
3 Configure each item.
Item Description
Apply Check this box to apply the settings to the image.
RAW Development
Engine
Default Settings Check this box to return all setting items to the default setting.
Exposure
Compensation
White balance Adjusts the white balance of the image.
Contrast Adjusts the contrast of the image.
Uncheck this box to cancel the settings.
For setting RAW development functions.
When only RAW data taken with an E-1 is selected, [Advanced
High Speed] and [Advanced High Function] are displayed in
the list. Select [Advanced High Speed] or [Advanced High
Function] to display the [RAW Development Settings]
(advanced settings) palette.
• High Speed
RAW data is developed in High Speed mode. [Noise
Cancellation] and [False Color Suppression] are not
available.
• High Function
RAW data is developed in High Function mode.
• Advanced High Speed
Development of RAW data taken with the E-1 is performed in
High Speed mode and supports the camera’s settings.
• Advanced High Function
Development of RAW data taken with the E-1 is performed in
High Function mode and supports the camera’s settings.
At the beginning, the box is checked, but is automatically
removed when the settings are changed.
Adjusts the exposure of the image.
You can manually adjust the exposure by dragging the slider to
the left or right. The exposure value can be set from –2.0 to
+2.0 in increments of 0.1 EV. You can also directly enter the
exposure value.
• Shooting Setting:
Check this box to use the white balance set when the image
was taken.
• Color Temperature Setting:
You can manually adjust the color temperature by dragging
the slider to the left or right. It can be set from [2000K] to
[10000K] in increments of 100K. You can also directly enter
the value.
Fine Adjustment: You can manually adjust the color
temperature by dragging the slider to the left or right. It can
be set in 21 steps from [–10STEP] to [+10STEP].
• Gray Point Specification:
Click the [Eyedropper tool] button to change the mouse
cursor to the eyedropper tool. Click the desired area on the
image in the preview area to specify a gray point.
You can manually adjust the contrast by dragging the slider to
the left or right. The contrast can be set in 11 steps from
[–5] to [+5].
3
Page 11
Editing images
Sharpness Adjusts the sharpness of the image.
Saturation Adjusts the saturation of the image.
Color Space Sets the color space of the image.
Noise Cancellation Makes the necessary adjustments to cancel image noise.
False Color
Suppression
You can manually adjust the sharpness by dragging the slider
to the left or right. The sharpness can be set in 11 steps from
[–5] to [+5].
You can manually adjust the saturation by dragging the slider
to the left or right. The saturation can be set in 11 steps from
[–5] to [+5].
Select [sRGB], [Adobe RGB], or [ProPhoto RGB] from the list
for the color space.
You can manually adjust the noise cancellation by dragging the
slider to the left or right. It can be set in 11 steps from [0] to
[10]. You can only set this function when [High Function] is
selected for [RAW Development Engine].
Adjusts the chromatic aberration of the image.
You can manually adjust the false color suppression by
dragging the slider to the left or right. It can be set in 11 steps
from [0] to [10]. You can only set this function when [High
Function] is selected for [RAW Development Engine].
4
Page 12
Editing images
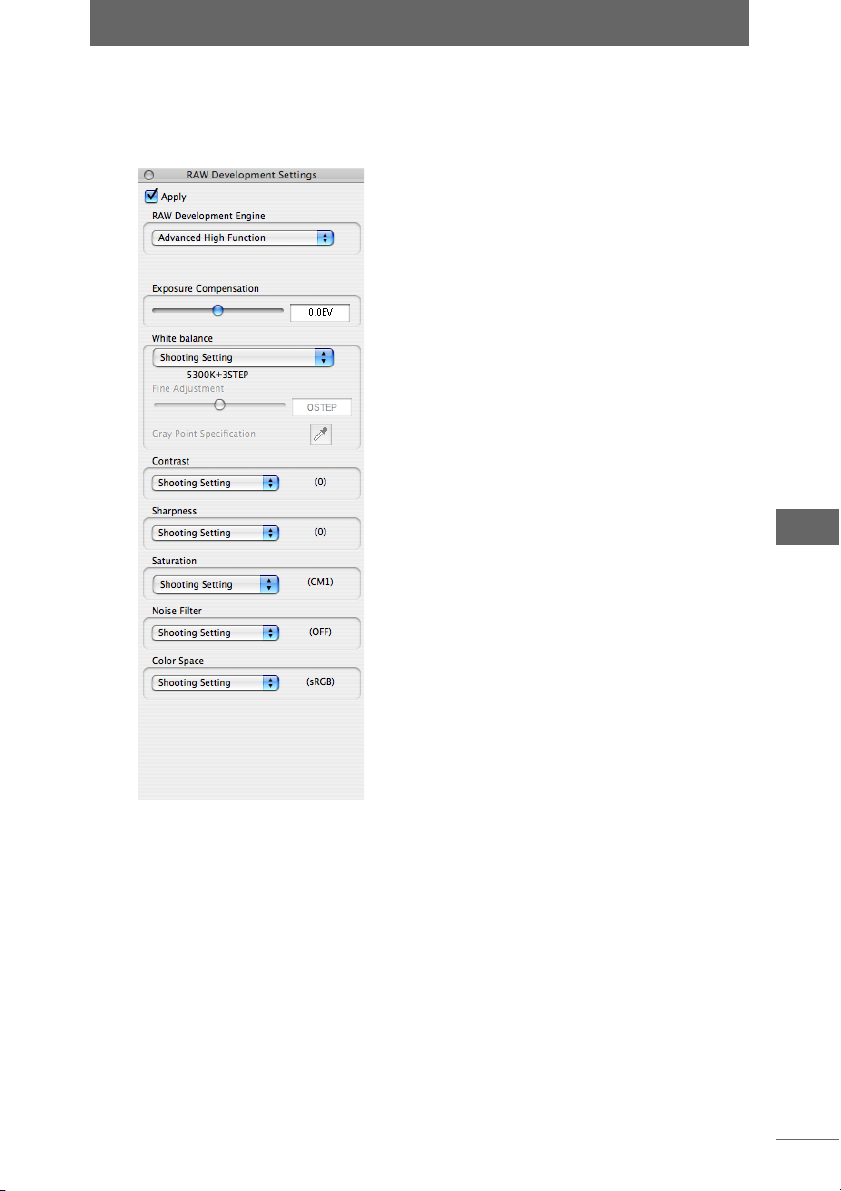
From [RAW Development Engine], select [Advanced High Speed] or [Advanced
High Function] to display the [RAW Development Settings] (advanced settings)
palette below.
[RAW Development Settings] (advanced settings) palette
5
Page 13
Editing images
Item Description
Apply Check this box to apply the settings to the image.
RAW Development
Engine
Exposure
Compensation
White balance Sets the white balance of the image.
Contrast Sets the contrast of the image.
Uncheck this box to cancel the settings.
For setting RAW development functions.
Select [High Speed] or [High Function] to display the [RAW
Development Settings] palette.
• High Speed
RAW data is developed in High Speed mode. [Noise
Cancellation] and [False Color Suppression] are not
available.
• High Function
RAW data is developed in High Function mode.
• Advanced High Speed
Development of RAW data taken with the E-1 is performed in
High Speed mode and supports the camera’s settings.
• Advanced High Function
Development of RAW data taken with the E-1 is performed in
High Function mode and supports the camera’s settings.
Adjusts the exposure of the image.
You can manually adjust the exposure by dragging the slider to
the left or right. The exposure value can be set from –2.0 to
+2.0 in increments of 0.1 EV. You can also directly enter the
exposure value.
From the list, select [Shooting Setting], [Gray Point
Specification], or one of 12 color temperatures from [3000K
(Tungsten light)] to [7500K (Shade on clear day)] for the white
balance.
• Select [Shooting Setting] to use the white balance set when
the image was taken. The set value is displayed below. If a
preset white balance setting was selected, the value is
shown like this: [5300K+3STEP]. If the one touch white
balance setting was selected, the value is shown like this:
[One Touch WB1].
• Select a color temperature from [3000K (Tungsten light)] to
[7500K (Shade on clear day)] to make adjustments.
Fine Adjustment: You can manually adjust the color
temperature by dragging the slider to the left or right. The
color temperature can be set in 15 steps from [–7STEP] to
[+7STEP].
• Select [Gray Point Specification] to make gray point
specifications.
Gray Point Specification: Click the [Eyedropper tool] button
to change the mouse cursor to the eyedropper tool. Click the
desired area on the image in the preview area to specify a
gray point.
From the list, select [Shooting Setting] or one of 5 settings from
[–2] to [+2] for the contrast.
Select [Shooting Setting] to use the contrast set when the
image was taken. The set value is displayed on the right.
6
Page 14
Editing images
Sharpness Sets the sharpness of the image.
Saturation Sets the saturation of the image.
Noise Filter Select whether to cancel random noise during image
Color Space Sets the color space of the image.
From the list, select [Shooting Setting] or one of 9 settings from
[–3] to [+5] for the sharpness. Images taken with some
versions of the E-1 firmware only allow the sharpness to be
adjusted between [–3] and [+3].
Select [Shooting Setting] to use the sharpness set when the
image was taken. The set value is displayed on the right.
From the list, select [Shooting Setting], [CM1 (R Emphasis)],
[CM2 (G Emphasis)], [CM3 (B Emphasis)], [CM4 (Body
Warmth Emphasis)], or one of 5 saturations from [CS0] to
[CS4] for the saturation.
Select [Shooting Setting] to use the saturation set when the
image was taken. The set value is displayed on the right.
processing.
Select [Shooting Setting], [ON], or [OFF] from the list.
Select [Shooting Setting] to use the noise filter set when the
image was taken. The set value is displayed on the right.
Select [ON] to cancel random noise.
Select [Shooting Setting], [sRGB], [Adobe RGB], or [ProPhoto
RGB] from the list.
Select [Shooting Setting] to use the color space set when the
image was taken. The set value is displayed on the right.
4 Confirm that [Apply] is checked.
When the settings on the palette are changed, [Apply] is automatically checked
and the settings are applied to the image.
5 Click the [RAW Development Settings] button on the image
processing bar or select [RAW Development Settings] from the
[Image] menu to close the [RAW Development Settings] palette.
• When the [RAW Development Engine] is changed to advanced settings or is
changed back, a warning is displayed before the [RAW Development Settings]
Note
palette.
• Only RAW data taken with an Olympus E-1 or E-300 digital camera can be
overwritten.
7
 Loading...