

Page 1
PT-038
Page 2

このたびは、防水プロテクター PT-038をお買上げいただき、あり
がとうございます。
この説明書をよくお読みのうえ、安全に正しくお使いください。ま
た、この説明書はお読みになったあと、必ず保管してください。
誤った使い方をされると水漏れにより中のカメラが破損し、修理不
JP
能になる場合があります。
ご使用前には、この説明書にしたがって必ず事前チェックを実施し
てください。
はじめに
z本書の内容の一部または全部を無断で複写することは、個人としてご
利用になる場合を除き禁止されています。また、無断転載は固くお断
りいたします。
z本製品の不適切な使用により、万一、損害が発生した場合、逸失利益
に関し、または、第三者からのいかなる請求に対し、当社では一切そ
の責任を負いかねますのでご了承ください。
z本製品の故障、当社指定の第三者による分解、修理、改造その他の理
由により生じた画像データの消失による損害及び逸失利益などに関
し、当社では一切その責任を負いかねますのでご了承ください。
ご使用の前に必ずお読みください
このプロテクターは、水深40m以内の水中で使用するよう設計された精
密機械です。取り扱いには十分ご注意ください。
zプロテクターのご使用前の取り扱い方法と事前チェック、メンテナン
ス、ご使用後の保管方法はこの取扱説明書の内容をよくご理解のうえ、
正しくご利用ください。
zデジタルカメラの水没事故は、当社では一切その責任を負いかねます。
また、水没による内部機材の損傷、記憶内容や撮影に要した諸費用な
どの保証はいたしかねます。
z使用時の事故(人身・物損)の補償はいたしかねます。
z箱に記載されている注意書きをご使用前に必ずお読みください。
JP 2
Page 3
安全にお使いいただくために
この取扱説明書では、製品を正しくお使いいただき、お客様や他の人々
への危害と財産の損害を未然に防止するために、いろいろな絵表示をし
ています。その表示と意味は次のようになっています。
警告
注意
この表示を無視して誤った取扱いをすると、人が死亡また
は重傷を負う可能性が想定される内容を示しています。
この表示を無視して誤った取扱いをすると、人が傷害を負
う可能性が想定される内容および物的損害のみの発生が
想定される内容を示しています。
警告
1 本製品を乳児、幼児、子供の手の届く範囲に放置しないでください。以
下のような事故発生の可能性があります。
• 高いところから身体の上に落下し、けがをする。
• 開閉部に身体の一部をはさみけがをする。
• 小さな部品を飲み込む。万一飲み込んだ場合は直ちに医師にご相
談ください。
• 目の前でフラッシュが発光し、視力に回復不可能なほどの障害を
起こす。
2 本製品に装填されるデジタルカメラに電池を入れたまま保管しないで
ください。電池を入れたまま保管すると、液漏れや火災の原因となるこ
とがあります。
3 万一、本製品にカメラを装填した状態で水漏れがあった場合は、カメラ
に装填された電池を速やかに抜いてください。水素ガスの発生による燃
焼・爆発の可能性があります。
4 本製品は樹脂製です。岩などの固いものに強くぶつけると破損し、けが
をする可能性があります。取り扱いには十分ご注意ください。
5
本製品用のシリカゲル及びシリコンOリング用グリスは食べられません。
JP
JP 3
Page 4

注意
1 本製品の分解、改造はしないでください。水漏れや不具合発生の原因と
なることがあります。当社指定者以外の者による分解、改造をした場合
は保証の対象外となります。
2 異常に温度が高くなるところ、異常に温度が低くなるところ、極端な温
度変化のあるところに本品を置かないでください。部品が劣化すること
JP
があります。
3 砂、ほこり、塵の多いところで開閉すると防水性能が損なわれ水漏れの
原因となることがあります。絶対に避けてください。
4 本製品は水深 40m 以内の水深で使用するように設計 • 製造されていま
す。40mより深い潜水をされた場合、本プロテクターや中のカメラに復
帰しない変形や破損が生じたり、水漏れを起こすことがあります。ご注
意ください。
5 プロテクターをポケットに入れたまま、あるいは、持ったまま水中に勢
いよく飛び込んだ場合や船上から海へ放り投げる等、乱暴に扱うと水漏
れする場合があります。手渡しをする等、取り扱いには十分ご注意くだ
さい。
6 万一、水漏れ等で内部のカメラが濡れた場合は直ちにカメラの水分を拭
き取り、動作確認をしてください。
7 飛行機で移動する場合は、Oリングを取りはずしてください。気圧の関
係でプロテクターが開かなくなることがあります。
8 本製品に装填されるデジタルカメラを安全にお使いいただくために、デ
ジタルカメラの取扱説明書をよくお読みください。
9 本製品を密閉する際は O リング及びその接触面に異物を挟み込まない
ように十分ご注意ください。
電池について
zカメラ専用の当社リチウムイオン充電池(LI-42BまたはLI-40B)1個を
ご使用ください。
z電池の電極を濡らさないようご注意ください。故障や、事故の原因と
なる可能性があります。
z電池に関するその他の注意はカメラの取扱説明書をよくお読みくださ
い。
JP 4
Page 5
カメラモードの設定について
zFE-230/X-790は水中でのワイド撮影やマクロ撮影に適した撮影シーン
モードを搭載しています。水中撮影シーンに合わせてモードを選ぶだ
けで、簡単に撮影を楽しむことができます。
詳しくは、本取扱説明書の「5. 水中撮影シーンに合わせた撮影」 (P.24)
をご参照ください。
z設定方法については、カメラの取扱説明書も合わせてご確認ください。
水漏れ事故を防ぐために
本製品を使用中に水漏れ事故が発生すると装填されたデジタルカメラが
修理不能になります。以下の注意を守った上でご使用ください。
1 本製品を密閉する際にはOリングだけではなくその接触面(前蓋側)に
も髪の毛、繊維くず、砂粒等の異物がついていないことを確認してくだ
さい。たとえ髪の毛一本、砂粒一粒が挟まっても水漏れの原因となりま
す。特に念入りに確認してください。
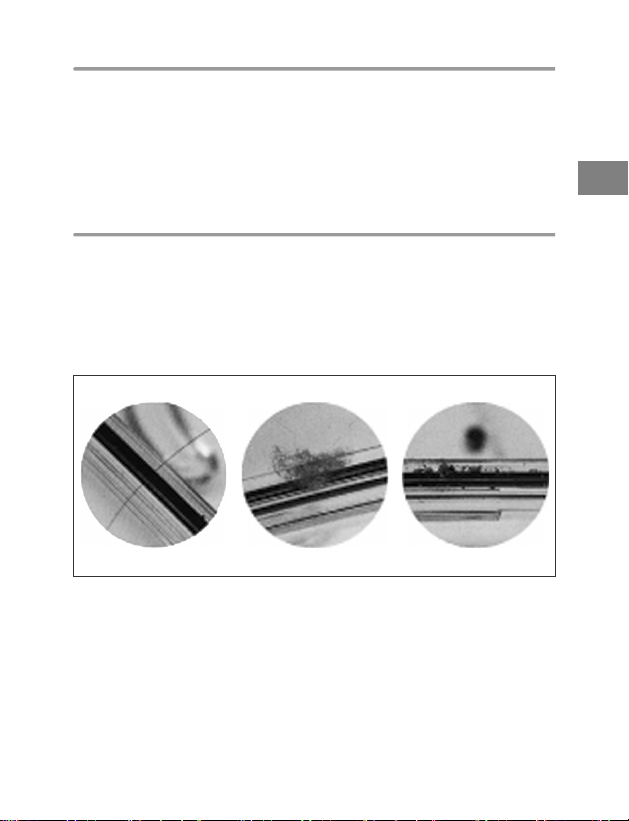
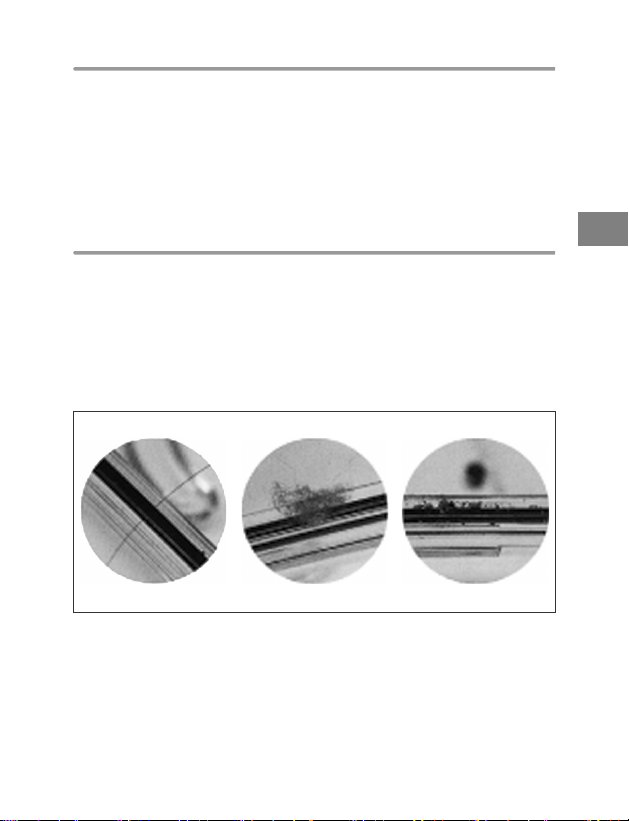
Oリングへの異物付着の一例
髪の毛 繊維屑 砂粒
2 Oリングは消耗品です。少なくとも1年に1回は新品と交換してくださ
い。また、ご使用の都度メンテナンスをしてください。
3 Oリングは使用状態、保管状態によっては劣化が促進されます。Oリン
グに傷、ヒビが入っていたり、弾力がなくなっていたらすぐに新しいO
リングに交換してください。
4 Oリングメンテナンス時には Oリング溝内をクリーニングし、ゴミ・ほ
こり・砂粒等の異物が無いことを確認してください。
5 Oリングには指定のシリコン Oリング用グリスをご使用ください。
6 Oリングが正しく入っていないと防水機能が働きません。Oリングを装
着する際にはO リングが溝からはみ出したり、ねじれたりしないよう
JP
JP 5
Page 6

注意して取り付けてください。また、プロテクターを密閉する時は O
リングが溝からはずれないよう確認しながら蓋を閉めてください。
7 本製品はプラスティック(ポリカーボネート)製の気密構造です。車、
船、海辺など高温になるところに長時間放置したり、長時間不均一な外
力がかかると変形し、防水機能が失われることがあります。温度管理に
は十分ご注意ください。また、保管時や移動時に上に重いものを載せた
JP
り、無理な収納は避けてください。
8 プロテクターの外側から O リングの接触面を強く押したり、プロテク
ターをねじったりすると防水機能が損なわれることがあります。無理な
力をかけないようご注意ください。
9 事前テストと最終チェックを実施した上でご使用ください。
0 撮影中に水滴など水漏れの兆候を見付けた場合は、直ちに潜水を中止し
て、カメラ及び本製品の水気を取り、「最終チェックをします」の項目
を参考にしてテストを行い水漏れの有無を確認してください。
お取り扱いについて
z以下のような場所で本製品を使用または保管した場合、動作不良や故
障、破損、火災、内部の曇り、水漏れの原因となります。絶対に避け
てください。
• 直射日光下や自動車の中など高温になるような場所
• 火気のある場所
• 水深40mより深い水中
• 振動のある場所
• 高温多湿や温度変化の激しい場所
• 揮発性物質のある場所
z本製品は耐衝撃性に優れたポリカーボネート樹脂製ですが、岩などで
擦ると傷が付くことがあります。また、固い物にぶつけたり、落とし
たりすると破損することがあります。
z本製品は装填されたカメラへの衝撃をやわらげるケースではありませ
ん。本製品にデジタルカメラを装填した状態で衝撃を与えたり、重い
ものを載せたりするとデジタルカメラが故障する場合があります。取
り扱いには十分ご注意ください。
z長期間使用しないと O リングの劣化等により防水性能が低下している
場合があります。使用前には事前テストと最終チェックを必ず行って
ください。
z三脚座には過大な力をかけないでください。
zプロテクターを使用した撮影ではフラッシュ光がけられ、画面隅に影
が出ることがあります。特にカメラのワイド側でのマクロモード撮影
時には目立つ場合があります。画像を確認の上、ご使用ください。
JP 6
Page 7
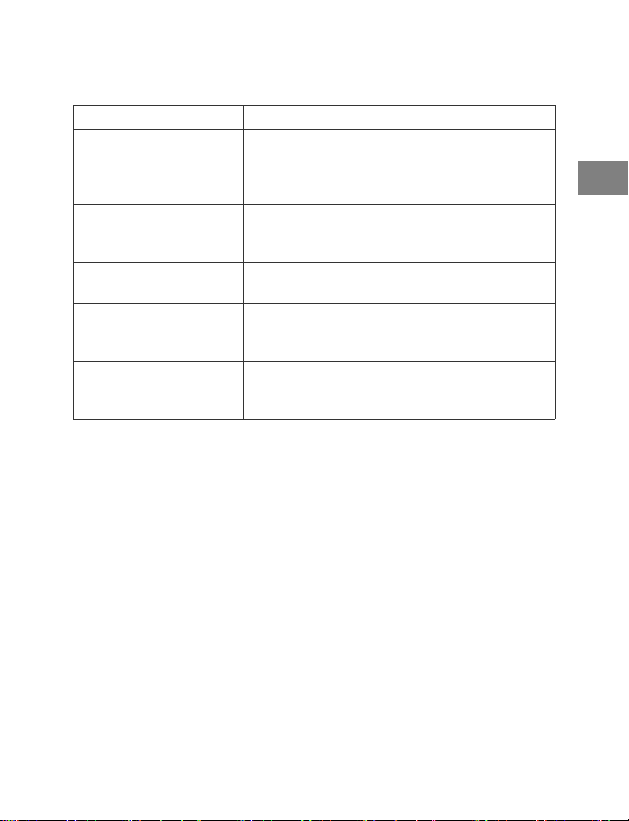
z洗浄・防錆・防曇・補修等の目的で、下記の薬品類を使わないでくだ
さい。プロテクターに直接、あるいは、間接的(薬剤が気化した状態)
に使用した場合、高圧下でのひび割れなどの原因となります。
使用できない薬品類 説明
揮発性の有機溶剤、
化学洗剤
防錆剤 防錆剤を使用しないでください。金属部分はステ
市販防曇剤 市販の防曇剤を使用しないでください。必ず指定
指定外のシリコングリス シリコンO リングに指定品以外のシリコングリ
接着剤 補修などの目的で接着剤を使用しないでくださ
プロテクターをアルコール・ガソリン・シンナー
などの揮発性有機溶剤、または化学洗剤等で洗浄
しないでください。洗浄は真水、または、ぬるま
湯を使用してください。
ンレス及び真鍮を使用しています。洗浄は、真水
を使用してください。
の防曇剤シリカゲルを使用してください。
スを使用しないでください。Oリングの表面が変
質して、水漏れの原因となります。
い。補修が必要な場合は販売店または弊社サービ
スステーションにご相談ください。
zこの取扱説明書で指示している以外の操作を行い、また、指示してい
る以外の場所を取りはずしたり、改造を加えたり、指定以外の部品を
使用することはしないでください。
上記の行為の結果、撮影に不都合が生じたり機材に不具合が発生した
場合は保証の対象外となります。
zデジタルカメラの水没事故は、当社では一切その責任を負いかねます。
z使用時の事故(人身・物損)の補償はいたしかねます。
JP
JP 7
Page 8

もくじ
はじめに ................................................................................ 2
ご使用の前に必ずお読みください......................................... 2
安全にお使いいただくために................................................ 3
JP
電池について ......................................................................... 4
カメラモードの設定について................................................ 5
水漏れ事故を防ぐために ....................................................... 5
お取り扱いについて .............................................................. 6
1. 準備をしましょう ..........................................................10
箱の中を確認します ............................................................ 10
各部名称 .............................................................................. 11
ストラップを取り付けます ................................................. 12
基本操作をマスターします ................................................. 12
プロテクターの構え方......................................................... 12
シャッターボタンの押し方 ................................................. 13
撮影モードの切り換え方 ..................................................... 13
ズームレバーの使い方......................................................... 13
ズームレバーのセット......................................................... 14
POWERボタンの操作方法 .................................................. 14
2. プロテクターの事前チェックをしましょう...................15
使用前の事前テスト ............................................................ 15
事前テスト........................................................................... 15
3.デジタルカメラを装填しましょう ..................................16
デジタルカメラをチェックします....................................... 16
電池の確認........................................................................... 16
撮影可能枚数の確認 ............................................................ 16
デジタルカメラのストラップをはずしましょう ................. 16
カメラを準備します ............................................................ 16
装填できるデジタルカメラは? .......................................... 16
カメラの電源を入れます ..................................................... 16
カメラの動作チェックをします .......................................... 17
プロテクターを開けます ..................................................... 17
デジタルカメラを装填します.............................................. 18
シリカゲルを装填します ..................................................... 18
装填状態のチェックをします.............................................. 19
プロテクターを密閉します ................................................. 19
装填後の動作チェック......................................................... 20
JP 8
Page 9

撮影シーン/撮影モードの確認 .......................................... 20
レンズキャップの取り付け方、取りはずし方 ......................21
最終チェックをします......................................................... 21
目視検査 .............................................................................. 21
最終テスト(水漏れテスト)................................................. 22
4. 水中での撮影方法 ..........................................................23
ストラップの使い方 ............................................................ 23
撮影しましょう ................................................................... 23
液晶モニタで撮影画面を確認します ................................... 23
シャッターボタンを静かに押します ................................... 23
フラッシュ撮影時のご注意 ................................................. 23
5. 水中撮影シーンに合わせた撮影.....................................24
水中撮影シーンの種類......................................................... 24
k水中ワイド1 ................................................................... 24
l水中ワイド2 ................................................................... 24
H水中マクロ ..................................................................... 24
撮影シーンの選択方法......................................................... 25
6. 撮影終了後の取り扱い方法............................................26
水滴を拭き取りましょう ..................................................... 26
デジタルカメラを取り出します .......................................... 27
プロテクターを真水で洗います .......................................... 28
プロテクターを乾燥させましょう....................................... 28
7. 防水機能のメンテナンスをしましょう..........................29
Oリングを取りはずします ................................................. 29
Oリングの取りはずしかた ................................................. 29
砂・ゴミなどを取り除きましょう ........................................ 30
Oリングを取り付けます ..................................................... 31
Oリングへのグリス塗布方法.............................................. 31
消耗品は取り替えましょう ................................................. 32
8. 付録 ................................................................................33
PT-038ご使用上のQ&A....................................................... 33
仕様 ..................................................................................... 38
JP
JP 9
Page 10
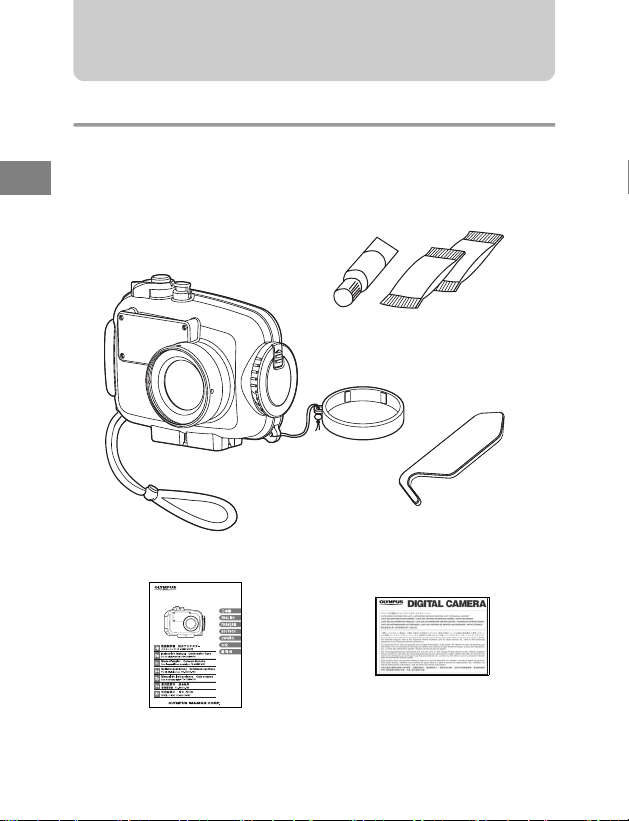
1. 準備をしましょう
箱の中を確認します
箱の中の付属品はすべてそろっていますか。
万一、付属品が不足していたり、破損している場合はお買上げの販売店
までご連絡ください。
JP
シリコングリス
プロテクター本体
シリカゲル
レンズキャップ
ハンドストラップ
Oリングリムーバー
(Oリングが正常であることを確認してください)
PT-038
JP 10
オリンパス代理店リスト
取扱説明書(本書)
Page 11
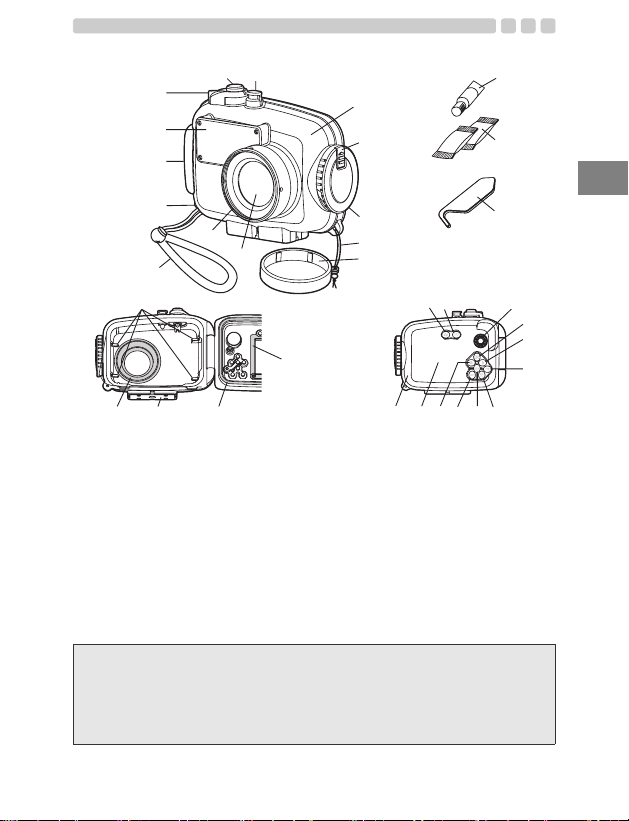
各部名称
pqrstu
4
3
2
1
5
6
7
v
w
JP
d
b
c
e
a
f
ghi
8
9
0
jk
x
l
m
n
o
1 パームグリップ
2 拡散板
※
3 ズームレバー
※
4 シャッターボタン
※
5 POWERボタン
6 前蓋
7 スライドロック
8 開閉ダイヤル
9
レンズキャップストラップ
0 レンズキャップ
a レンズ窓
b レンズリング
c ハンドストラップ
d
ハンドストラップつり輪
e 装填ガイドレール
f 液晶インナーフード
g Oリング
h 三脚座
i 遮光フード
※
j Kボタン
k qボタン
※
※
l モードダイヤルノブ
※
m Fボタン/十字ボタン
n #ボタン/十字ボタン
※
※
o OKボタン
※
p Sボタン
※
q Yボタン/十字ボタン
※
r MENUボタン
※
s &ボタン/十字ボタン
t 液晶モニタ窓
u 後蓋
シリコンOリング用グリス
v
(白キャップ)
w シリカゲル
x Oリングリムーバー
Note :
※印のプロテクター操作部はデジタルカメラの各操作部に対応しています。
プロテクター操作部を操作することによってデジタルカメラの対応する機
能が動作します。詳しい機能の内容についてはデジタルカメラの取扱説明書
をご覧ください。
JP 11
Page 12
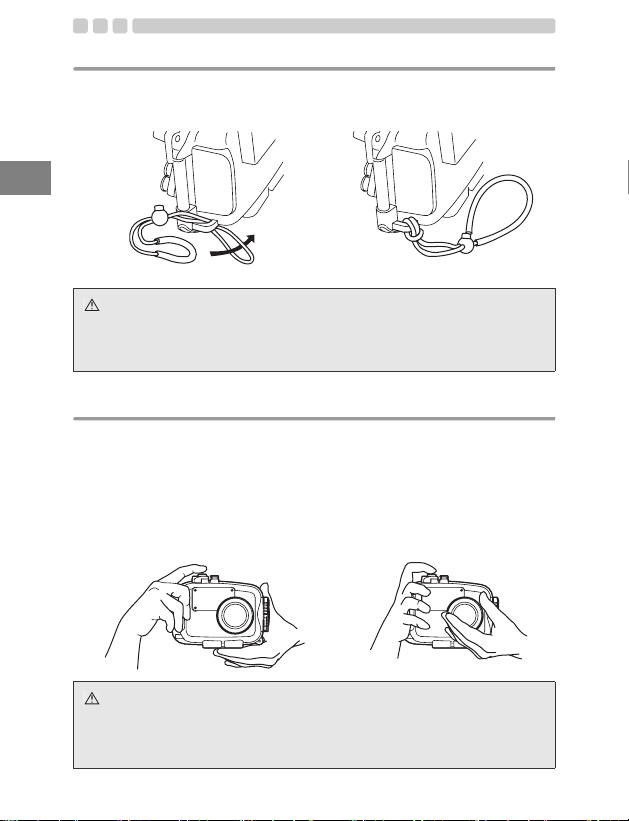
ストラップを取り付けます
プロテクター本体にストラップを取り付けましょう。
取付け説明図 取付け完了図
JP
ハンドストラップ
ハンドストラップつり輪
注意 :
上図にしたがってストラップを正しく取り付けてください。万一、誤った取
り付けによりストラップがはずれて本体を落とすなどした場合、損害など一
切の責任は負いかねますのでご了承ください。
基本操作をマスターします
撮影する前に、プロテクターの基本操作をマスターしましょう。
プロテクターの構え方
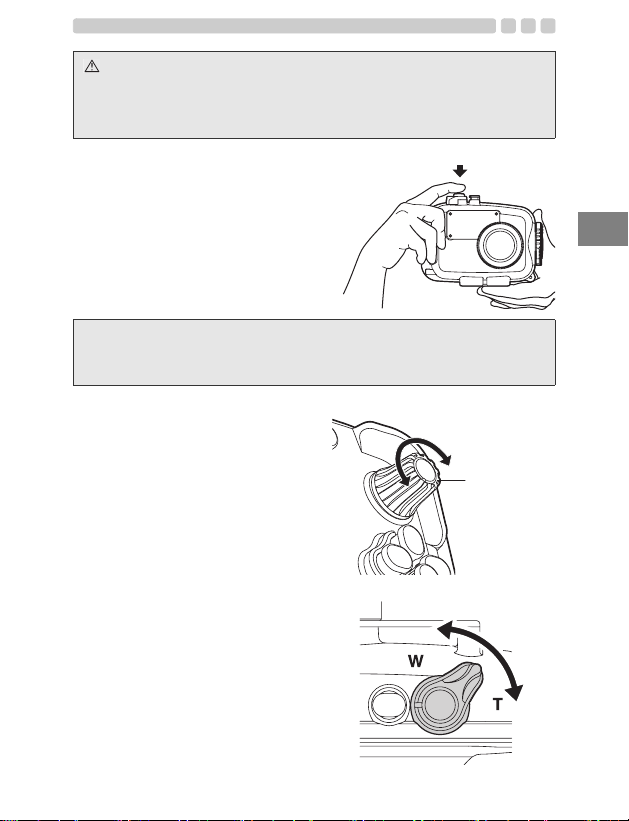
両手でしっかり持ち、脇をしめプロテクターの液晶モニタ窓を通してデ
ジタルカメラの液晶モニタで撮影画面を確認できるように構えます。
良い例 悪い例
注意 :
• レンズ窓やレンズリングに無理な力を加えないでください。
• レンズ窓、フラッシュ拡散板に指などがかからないようにご注意くださ
い。
JP 12
Page 13
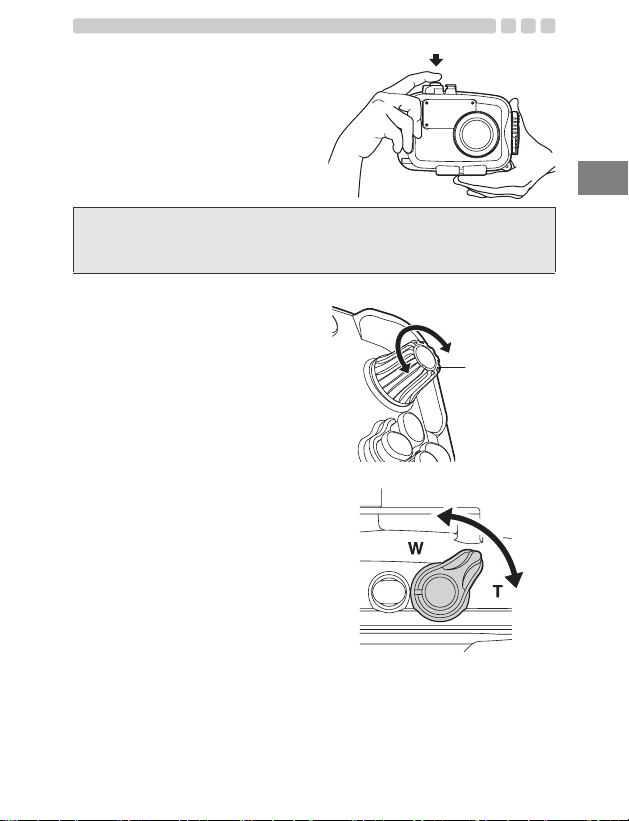
シャッターボタンの押し方
シャッターボタンを押すときは、カ
メラぶれが起きないように注意し
ながら静かに押します。
Note :
カメラのシャッターボタンの詳しい操作法はデジタルカメラの取扱説明書
をご覧ください。
撮影モードの切り換え方
デジタルカメラの撮影モードを切
り換えるには、本プロテクターの
モードダイヤルノブを回して切り
換えます。
どの撮影モードに設定されている
モードダイヤル
ノブ
かは、液晶モニタで確認します。
ズームレバーの使い方
装填されるデジタルカメラのズー
ムレバーに対応して、本プロテク
ターのズームレバーを操作するこ
とによりズーム操作が可能です。
JP
JP 13
Page 14
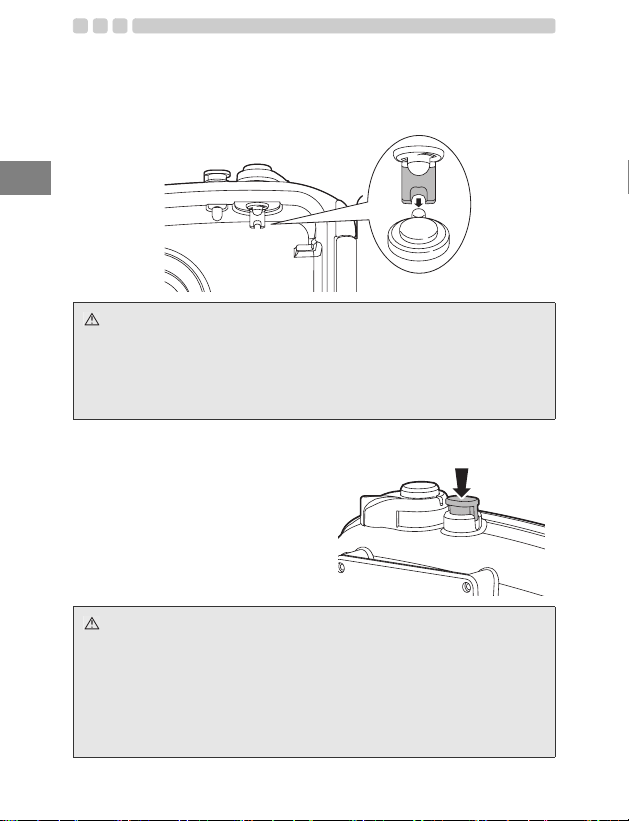
ズームレバーのセット
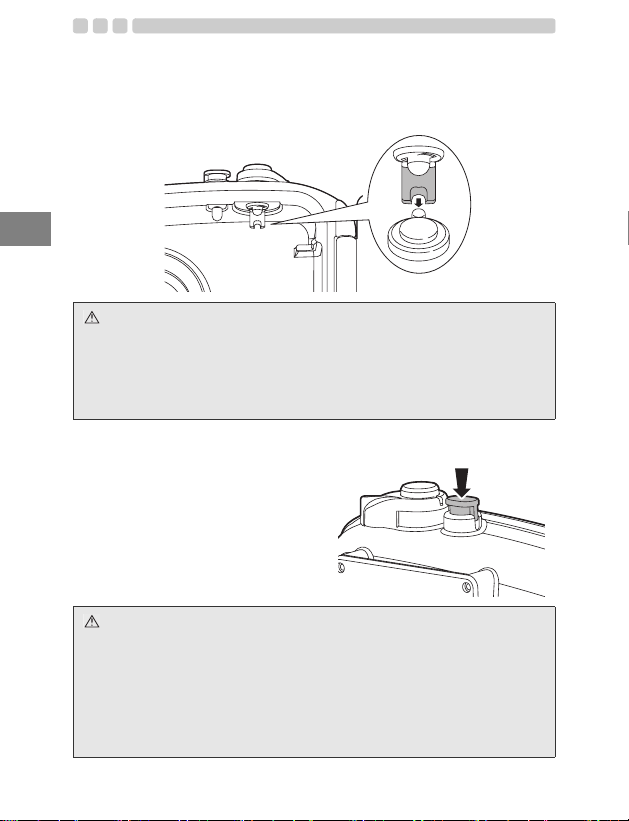
デジタルカメラを装填する際、デジタルカメラのズームレバー突出部が、
プロテクター内部のズームレバー切り欠き部に入り込むように装填しま
す。
JP
注意 :
デジタルカメラのズームレバー突出部がプロテクター内面のズームレバー
切り欠き部に確実にセットされたことを確認してください。セットが不充分
な場合、デジタルカメラの装填が不完全となり、プロテクター後蓋を閉める
ことができなかったり、ズームレバーを操作しても、ズームが機能しないこ
とがありますので、充分ご注意ください。
POWERボタンの操作方法
POWERボタン
POWERボタンを押して、カメラの
電源をON/OFFします。
注意 :
カメラは電源オンの状態で、何も操作しないとスリープモードと呼ばれる省
電力状態に入り、液晶モニタは自動的に消灯します。この状態でシャッター
ボタンを全押ししても撮影できません。ズームレバーやその他のボタンを操
作して、カメラをスリープモードから復帰させてから撮影しましょう。さら
に12分放置すると、カメラは電源オフの状態になります。POWERボタンを
押して電源を入れてください。
詳しくは、デジタルカメラの取扱説明書を参照してください。
JP 14
Page 15
2. プロテクターの事前チェックをしましょう
使用前の事前テスト
本プロテクターは、製造工程での部品の品質管理及び組立工程での各機
能検査などを厳重に実施しています。さらにすべての製品は高水圧試験
機により水圧試験を実施し、仕様通りの性能が守られているか検査を行
い合格したものです。
しかしながら、持ち運びや、保管の状態、メンテナンスの状況等何らか
の原因で防水機能にダメージを受ける場合があります。
潜水前には必ず次の事前テストと、カメラ装填後に行う最終テストを実
施してください。
事前テスト
1 デジタルカメラをプロテクターに装填する前に、空のプロテクターをご
使用になる水深に沈めて水漏れの有無を確認してください。
2 水漏れ事故は、主に以下の原因で起こります。
• Oリングの取り付け忘れ
• Oリングの一部または全部が所定の溝からはずれていた
• Oリングの傷やヒビ、または変質・変形
• Oリングや O リングリング溝、前蓋部 O リング接触面への砂・繊
維くず、髪の毛など異物の付着
• 前蓋部Oリング接触面や Oリング溝内の傷
• プロテクターを閉じる際の付属ストラップやシリカゲルの挟み込
み
テストは上記の原因を取り除いて行うようにしてください。
注意 :
• 水漏れの確認はご使用になる水深に沈めて確認することがいちばん適切
です。これが難しい場合は水圧のかからないごく浅いところでも水漏れ
が確認できる場合があります。面倒がらずに必ず実施してください。
• 万一、事前テスト中に正常な取り扱いで水漏れが確認された場合はご使
用を中止し、商品お買上げの販売店またはオリンパスサービスステー
ションにご相談ください。
JP
JP 15
Page 16
3. デジタルカメラを装填しましょう
デジタルカメラをチェックします
プロテクターに装填する前にデジタルカメラをチェックします。
電池の確認
JP
水中撮影ではフラッシュを使用した撮影が多くなります。
電池残量が十分あることを確認してください。
Note :
電池消耗による撮影不能を避けるため電池はできるだけダイビングごとに
フル充電状態の電池に交換してください。
撮影可能枚数の確認
記録メディアの撮影可能枚数が十分にあることを確認してください。
デジタルカメラのストラップをはずしましょう
デジタルカメラにストラップが取り付けられている場合は、必ずスト
ラップを取りはずしてください。
注意 :
• ストラップをはずさずにデジタルカメラを装填した場合プロテクター開
閉部にストラップを挟み込み、水漏れの原因となります。
• ストラップを取りはずすときはデジタルカメラの取り扱いに十分ご注意
ください。万一、カメラを落とす等で破損した場合、当社では損害など
一切の責任は負いかねます。
カメラを準備します
装填できるデジタルカメラは?
本製品(PT-038)はFE-230/X-790専用です。
カメラの電源を入れます
カメラは電源オンの状態で、何も操作しないとスリープモードと呼ばれ
る省電力状態に入り、液晶モニタは自動的に消灯します。この状態で
シャッターボタンを全押ししても撮影できません。ズームレバーやその
他のボタンを操作して、カメラをスリープモードから復帰させてから撮
影しましょう。さらに12分放置すると、カメラは電源オフの状態になり
ます。POWERボタンを押して電源を入れてください。
JP 16
Page 17
カメラの動作チェックをします
デジタルカメラの取扱説明書にしたがって、動作の確認をし、完了した
らカメラのPOWERボタンを押して電源を切ります。
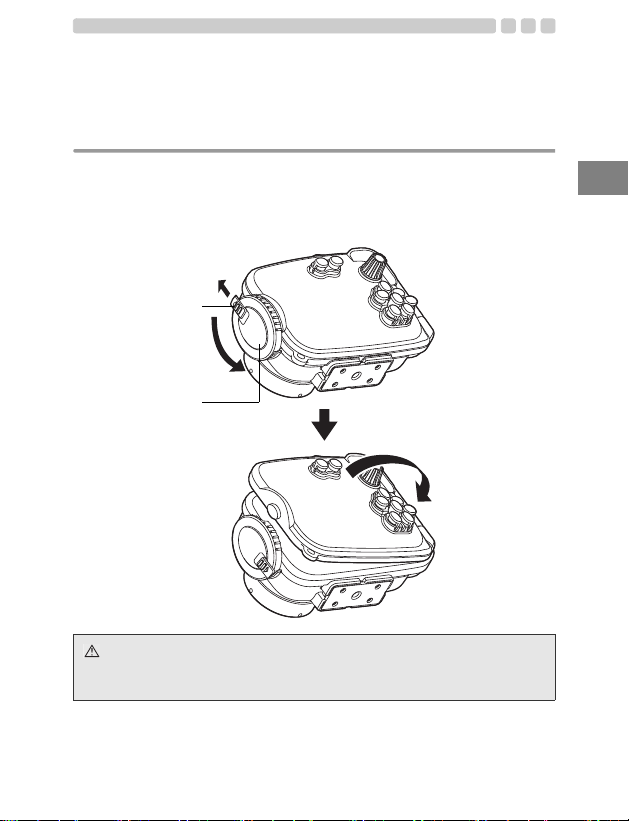
プロテクターを開けます
1 スライドロックを矢印の方向(1)にスライドしながら、開閉ダイヤ
ルを反時計回り(2)にまわします。
2 開閉ダイヤルの回転が止まる位置まで回します。
3 プロテクターの後蓋を静かに開きます。
1
スライドロック
2
開閉ダイヤル
JP
注意 :
開閉ダイヤルに無理な力を加えて回さないでください。破損する場合があり
ます。
JP 17
Page 18
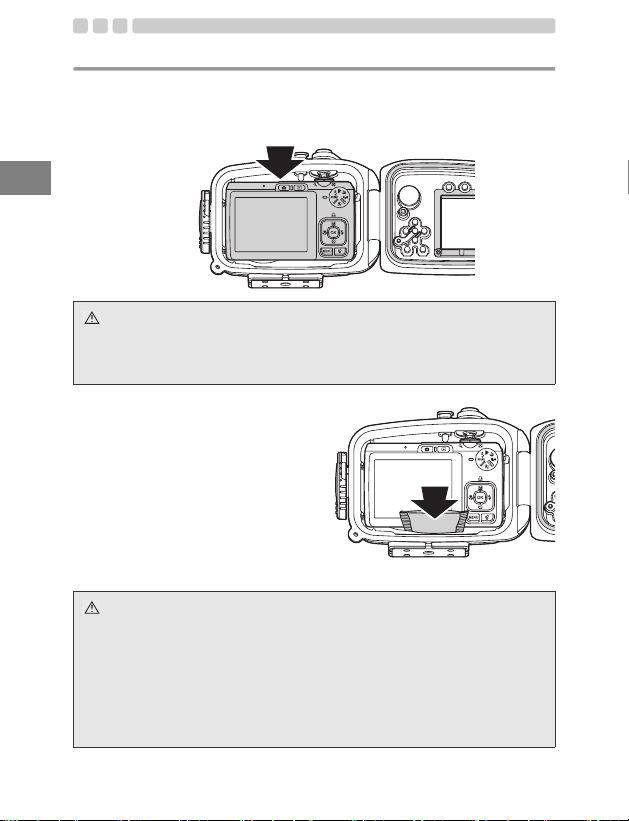
デジタルカメラを装填します
1 デジタルカメラの電源がOFF になっていることを確認します。
2 デジタルカメラのモードダイヤルを「SCENE」の位置に合わせ、デジ
タルカメラを静かに装填します。
JP
注意 :
セットが不十分な場合、デジタルカメラの装填が不完全となりプロテクター
が密閉できなかったり各操作部が機能しないことがあります。密閉が不十分
だと水漏れの原因となります。
シリカゲルを装填します
プロテクターを密閉する前に必ず
付属の防曇剤シリカゲル一袋を、カ
メラ底面とプロテクターの間に入
れてください。
向きに注意
注意 :
• シリカゲルは指定の場所に指定された向きで必ず奥まで挿入してくださ
い。向きを間違えるとプロテクター密閉時にシリカゲルの袋を挟み込み
水漏れの原因となります。
•
途中まで入れたままでプロテクターを閉めるとシリカゲルの袋を Oリング
が挟み込み水漏れの原因となります。
• 一度使用したシリカゲルは吸湿性能が衰えています。シリカゲルはプロ
テクター開閉時に毎回交換することをおすすめします。
JP 18
Page 19
装填状態のチェックをします
プロテクターを密閉する前に、以下の通り各部のチェックをします。
• デジタルカメラは正しく装填されているか。
• モードダイヤルの位置は「SCENE」に合わせてあるか。
• シリカゲルは指定された位置に奥まで挿入されているか。
• プロテクター開口部のOリングは正常に装着されているか。
• Oリングと前蓋部の O リング接触面にゴミなどの異物が付着していな
いか。
• 防水機能のメンテナンスは行ったか。
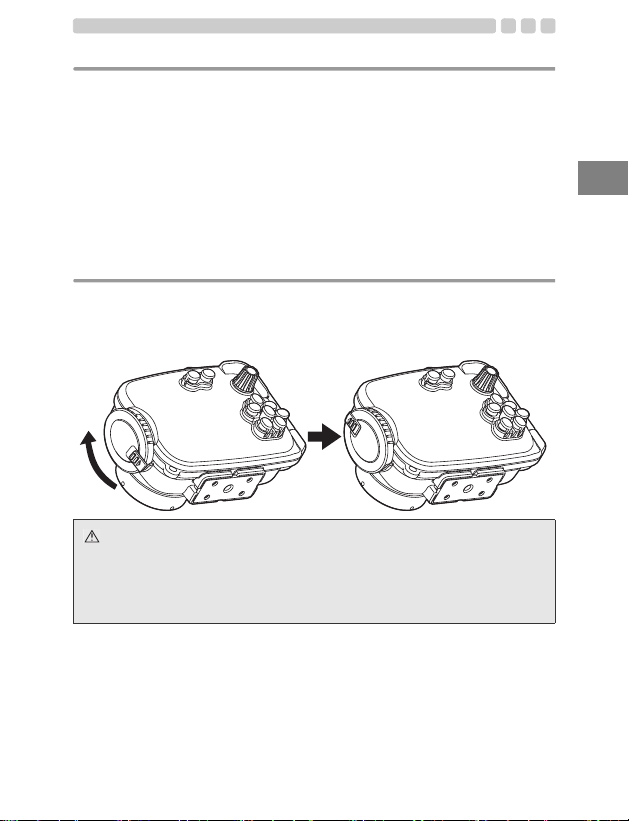
プロテクターを密閉します
1 プロテクターの後蓋を静かに閉じます。
2 開閉ダイヤルを時計方向に回します。
•180度回すとプロテクターが密閉されます。
注意 :
• 開閉ダイヤルを十分に回していない場合は、プロテクターが密閉されず
に水漏れするおそれがありますので、ご注意ください。
• レンズキャップのストラップを挟み込まないようにプロテクターの後蓋
を閉じてください。挟み込まれた場合は水漏れの原因となります。
JP
JP 19
Page 20
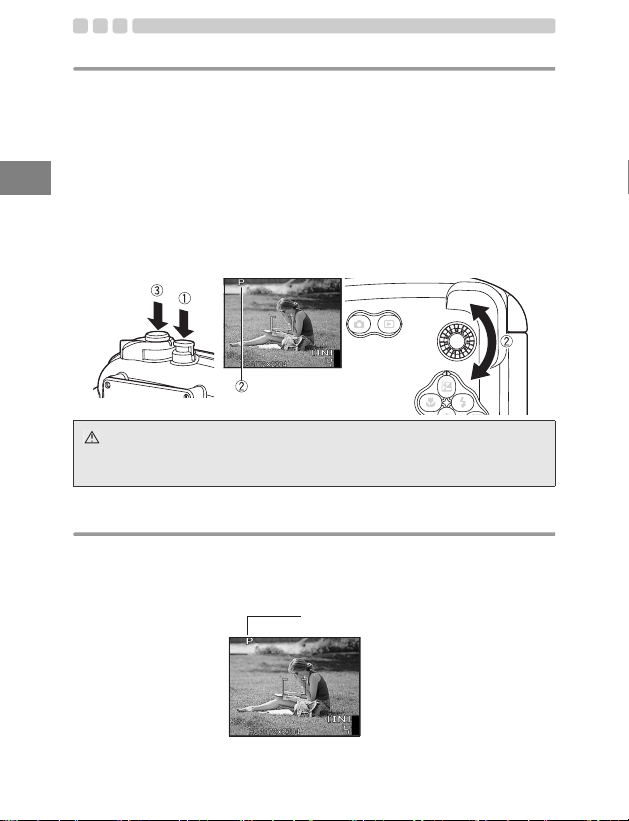
装填後の動作チェック
プロテクター密閉後、カメラが正しく機能するか最終チェックをします。
1 プロテクターのPOWERボタンを操作し、カメラの電源がON/OFFでき
るか。
2 プロテクターの背面のモードダイヤルを操作し、カメラの撮影モードが
JP
正しく切り換わるか。
• 切り換えたモードが液晶モニタ上に正しく表示されるか。
3 プロテクターのシャッターボタンを操作し、カメラのシャッターボタン
を操作できるか。
• その他、プロテクターの各種操作ボタンを操作して、カメラが機
能するか。
注意 :
カメラが正しく機能しない場合は、本取扱説明書「デジタルカメラをチェッ
クします」 (P.16)からカメラの装填をやり直してください。
撮影シーン/撮影モードの確認
プロテクター使用時に、カメラがどの撮影シーン/撮影モードに設定さ
れているかの確認は、カメラの液晶モニタ上の撮影シーン/撮影モード
の表示で確認します。
撮影シーン/撮影モード
JP 20
Page 21
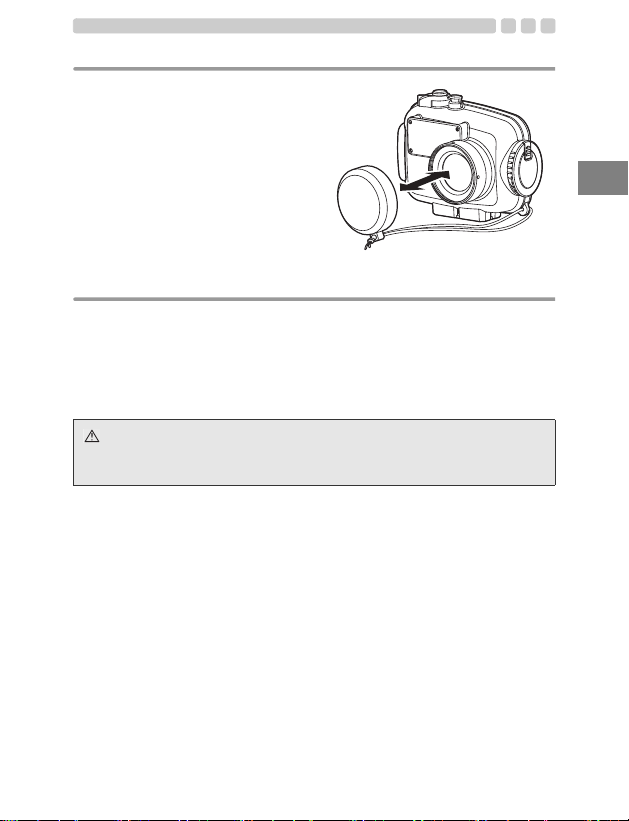
レンズキャップの取り付け方、取りはずし方
図のようにレンズリングにレンズ
キャップをはめ込んで取り付けま
す。撮影前にレンズキャップを取り
はずしてください。
最終チェックをします
目視検査
プロテクターを密閉後、プロテクターの前蓋、後蓋の密閉部分の周囲を
外側から見て、Oリングのよじれやはずれ、異物の挟み込みが無いこと
を確認してください。また、本体に割れ、ヒビが無いことを確認してく
ださい。
注意 :
髪の毛や繊維くず等細かいものは目立ちませんが水没事故の原因になりま
す。また、本体の割れ、ヒビには特にご注意ください。
JP
JP 21
Page 22
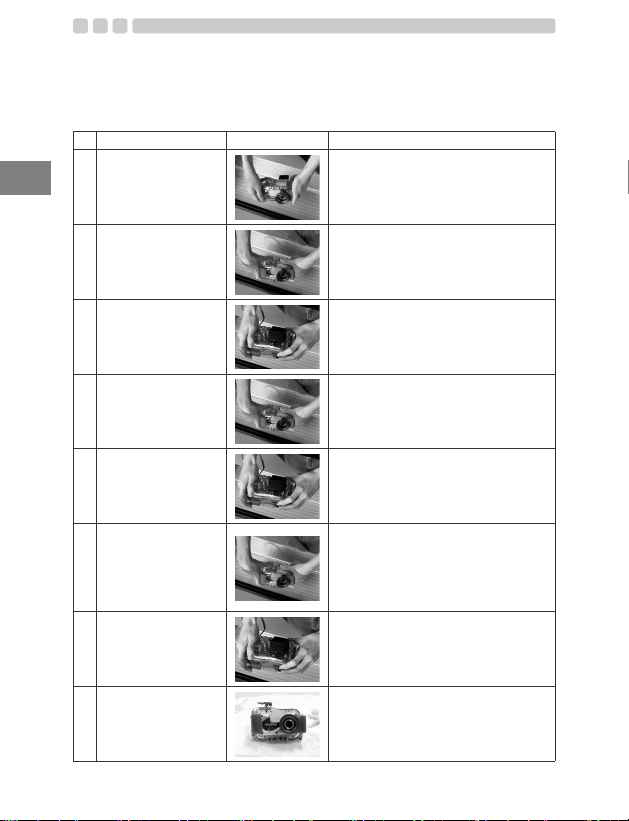
最終テスト(水漏れテスト)
ここではカメラ装填後の最終水漏れ検査をご紹介します。もし、水没し
たら…その不安から開放される唯一の手段です。必ず行うようにしま
しょう。水槽またはバスタブなどで簡単に行えます。所用時間 約5分
簡単水没テスト 説明画像 ちょっとヒントです
JP
ゆっくりと水の中に
1
入れていきます。
最初は3秒だけ水に
2
つけてみます。
内部に水が入ってい
3
ないかチェックしま
す。
次は30 秒水につけて
4
チェックします。
内部に水が入ってい
5
ないかチェックしま
す。
次は3分水につけて
6
チェックします。
これが最後のチェッ
7
クです。シリカゲルが
濡れてませんか?
8
これで安心。
プロテクターは透明なので、水滴が入っ
ても簡単に確認できます。
Oリングにトラブルがあれば3秒だけ
でも浸水してきます。蓋の間から気泡が
出てきませんか?
よくチェックしてください。
水から引き上げてみてプロテクターの
下に水が溜まっていないか確認します。
内部に水が垂れていませんか?
気泡が出てこないか良く確認してくだ
さい。
水中の操作はまだしません。
水から引き上げて下に水がたまってい
ないか確認します。
念には念を入れてよく確認してくださ
い。
気泡が出てこないか良く確認してくだ
さい。
すべてのボタン、レバー、ダイヤル類を
操作して気泡が出てこないか確認して
ください。
ここで水が入らなければ大丈夫。
これが大切です。
シリカゲルは濡れてませんか?
よく確認してください。中が見えるので
水没検査も確実ですね。
これで安心です。
HAVE A NICE DIVE!
※ PT-038にバランスウェイトは付属しておりません。
JP 22
Page 23
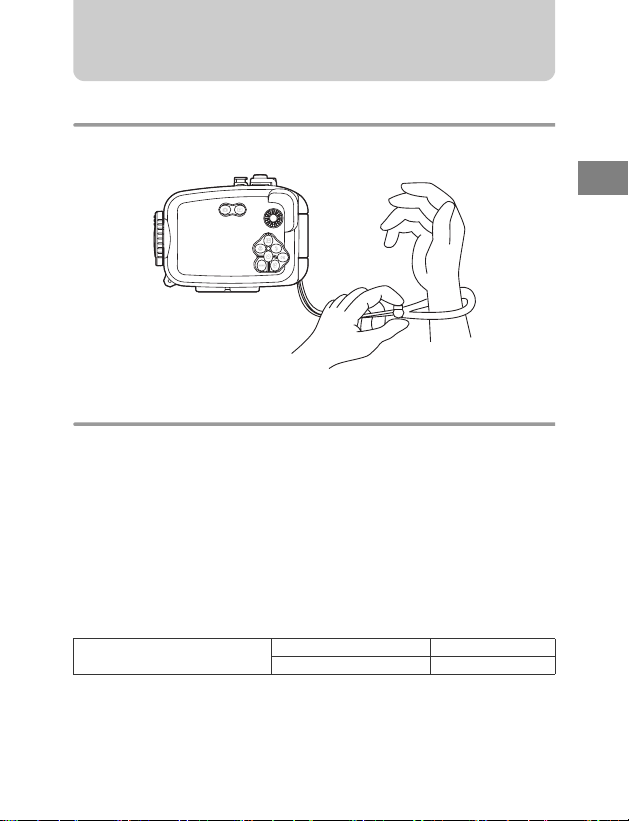
4. 水中での撮影方法
ストラップの使い方
付属のハンドストラップに手首を通しストップボタンで長さを調整しま
す。
撮影しましょう
液晶モニタで撮影画面を確認します
液晶モニタを使用して撮影画面を確認します。
シャッターボタンを静かに押します
シャッターボタンを押す際は、両手でプロテクターをしっかり支え、カ
メラぶれが起きないように注意しながら静かに押します。
フラッシュ撮影時のご注意
マクロ撮影時はワイド側でフラッシュ光がけられたり光量むらが発生す
ることがあります。
フラッシュ撮影可能範囲
(陸上、プロテクターなし)
水中撮影では、水による光の減衰の影響や撮影時の条件(水中での透明
度や浮遊物の有無など)でフラッシュ光到達距離が極端に短くなる場合
があります。
撮影後は液晶モニタで再生して確認してください。
広角(W側) 約 3.9m
望遠(T側) 約2.0m
JP
JP 23
Page 24
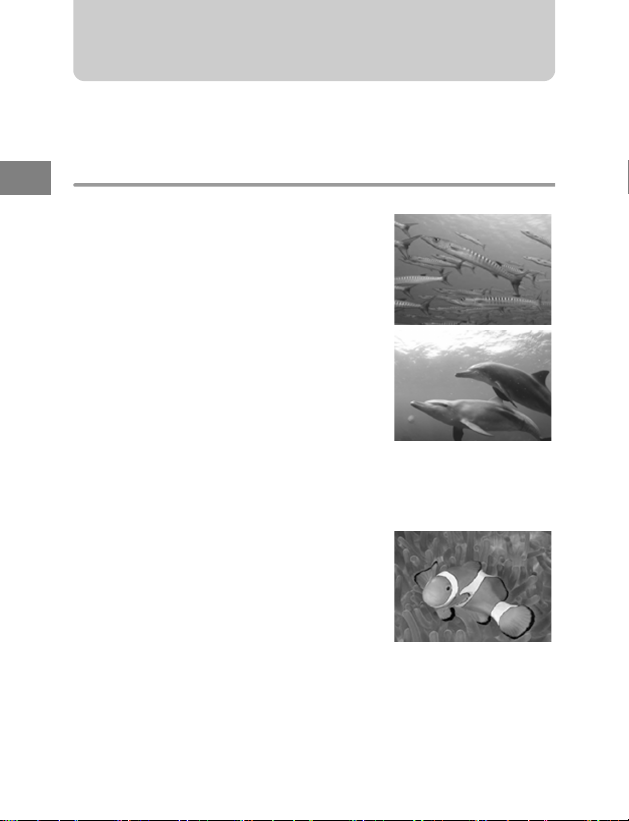
5. 水中撮影シーンに合わせた撮影
カメラに設けられた水中撮影シーンに合わせた設定を利用することで、
簡単に 水中撮影をお楽しみいただけます。
水中撮影シーンの種類
JP
k水中ワイド1
水中で魚群など広範囲の景色を撮るのに最
適です。背景の青がより鮮やかに見えるよう
に撮影します。
l水中ワイド2
イルカやマンタなどの動きの速い大型の水
中被写体を撮影するのに最適です。
多くのイルカウォッチングポイントにおい
て、イルカを驚かせないために、フラッシュ
を使用しないルールが定められています。
ルールを考慮して、フラッシュはOFFの設定
になっていますが、マンタ等の撮影時にフ
ラッシュが必要な場合は、フラッシュ設定を
ONにして撮影をお楽しみください。
H水中マクロ
水中で魚などの生物に近接して撮るのに最
適です。水中の自然な色を再現して撮影しま
す。また、フラッシュを使用すると赤色を強
調した撮影が可能です。
(作例)
JP 24
Page 25
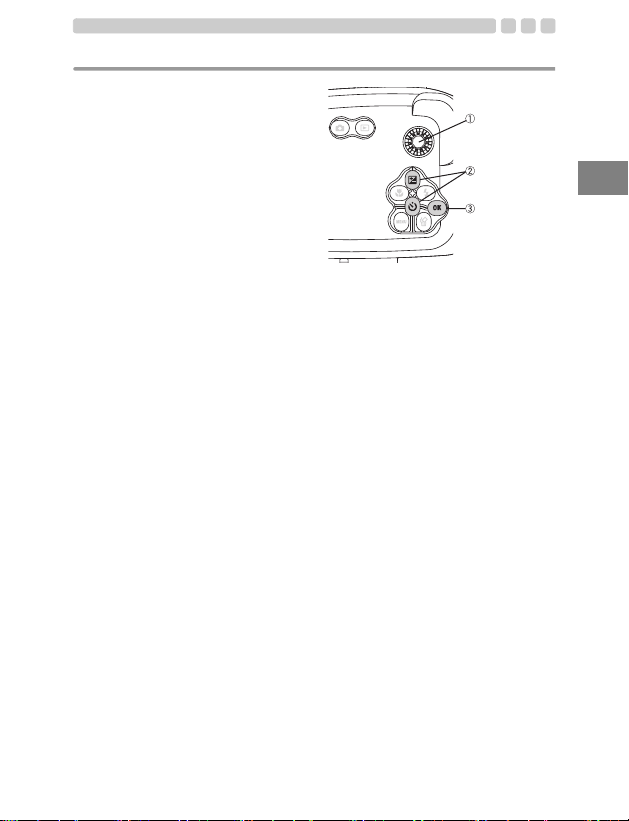
撮影シーンの選択方法
プロテクターのモードダイヤル1
を「SCENE」に合わせ、水中 ワ イ
ド1、水中ワイド2 または水中マクロ
のシーンを十字ボタン上下(2)を
押して選択し、最後にOK ボタン
(3)を押して決定します。
水中モード使用中に別の水中モー
ドを選ぶ場合は、プロテクターの
MENUボタンを押し、十字ボタンの
下を押して液晶画面上の「SCENE」
を選択し、OKボタンを押した後に
液晶画面から選択したい水中モー
ドを十字ボタンで選び、OKボタン
を押して決定します。
「SCENE」に合
わせる
シーンの選択
OKボタン
JP
JP 25
Page 26
6. 撮影終了後の取り扱い方法
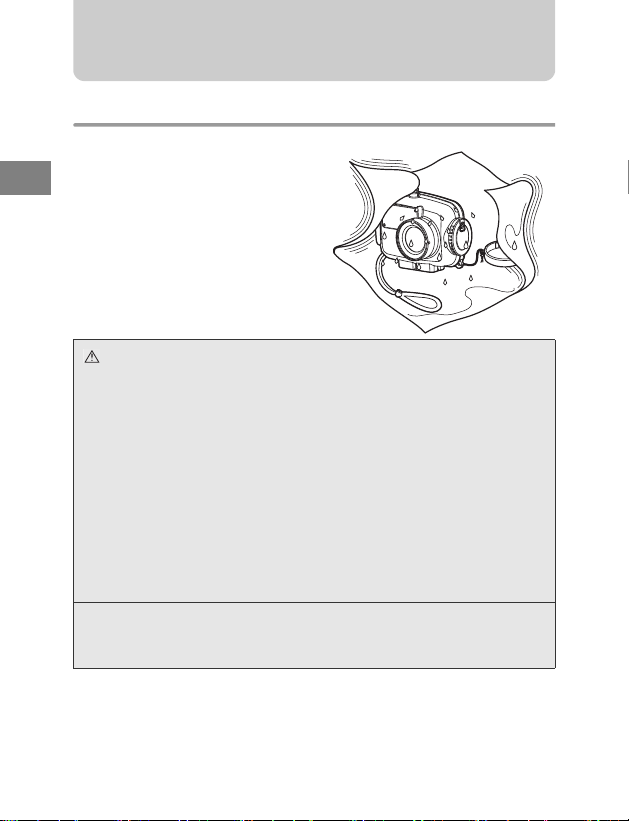
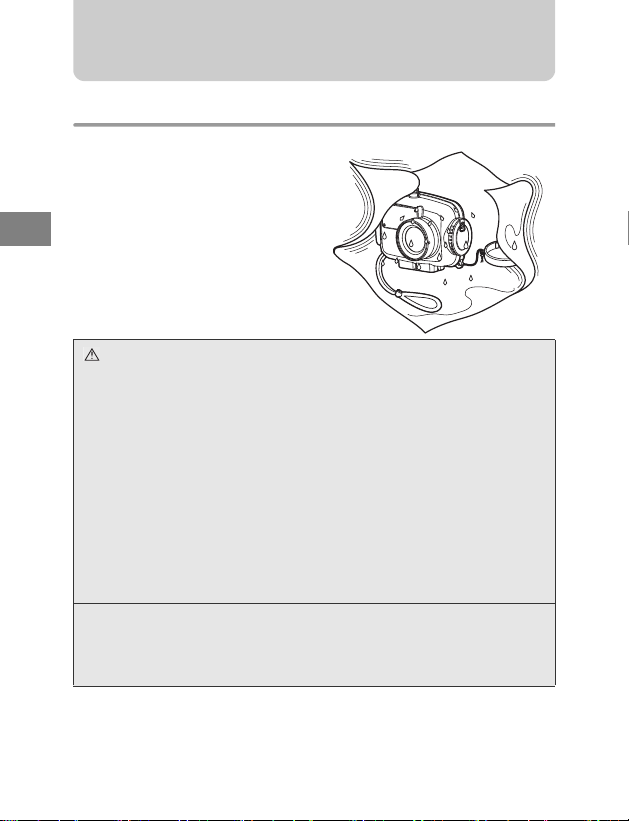
水滴を拭き取りましょう
水中撮影終了後、陸に上がったらプ
ロテクターに付いている水滴を拭
JP
き取ります。プロテクターの前蓋・
後蓋のすきま、シャッターボタン、
パームグリップ、開閉ダイヤルに付
いている水滴などを繊維くずの出
ない柔らかい布やエアーを使って
丹念に除去します。
注意 :
• プロテクターの前蓋と後蓋の間に水滴が残っていると、プロテクターを
開けた際にその水滴がプロテクター内にこぼれるおそれがあります。特
に念入りに水滴を除去してください。
• プロテクターを開ける際、髪の毛や身体から落ちる水滴をプロテクター
内部やカメラに落とさぬよう十分ご注意ください。
• プロテクターを開ける際、手や手袋に砂・繊維くず等の異物がついてい
ないことを確かめてください。
• 水しぶきや砂のかかる恐れのある場所ではプロテクターの開閉をしない
でください。電池や記録メディアの交換をするためにやむを得ず開閉す
る場合は物陰でシートを敷く等、水しぶきや砂のかからないようにして
ください。
• 海水のついた手でデジタルカメラや電池に触れないよう注意してくださ
い。
Note :
あらかじめ真水で濡らしたタオルなどをポリ袋に入れて用意しておき、手や
指の塩分を拭き取ってから作業するとよいでしょう。
JP 26
Page 27
デジタルカメラを取り出します
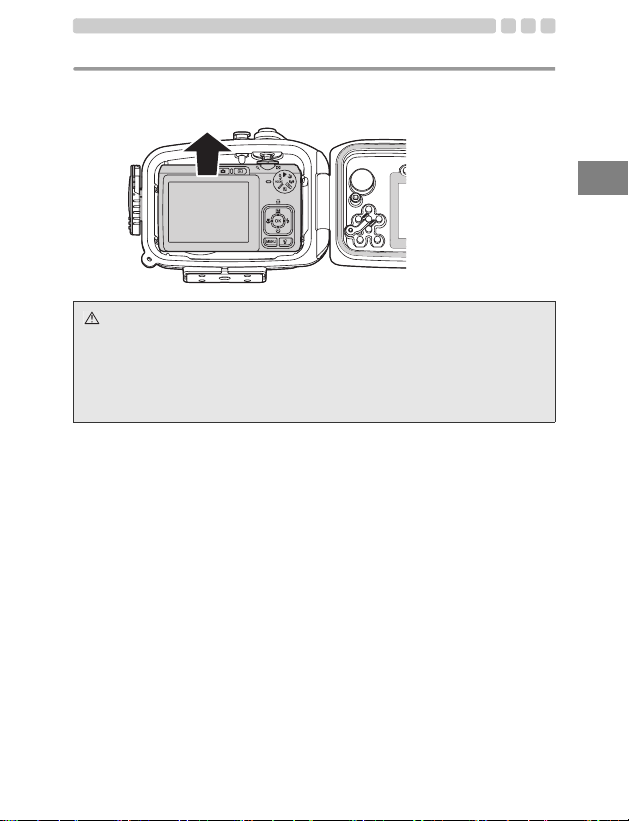
プロテクターを注意して開き、装填されているデジタルカメラを取り出
します。
注意 :
• 開いたプロテクターは、O リング面を必ず上に向けて置いてください。O
リング面を下に向けて置くと、ゴミなどの異物がO リングや O リング密
着面に付着して次回水中撮影時の水漏れの原因になります。
• 撮影した画像の保存方法などはデジタルカメラの取扱説明書をお読みく
ださい。
JP
JP 27
Page 28
プロテクターを真水で洗います
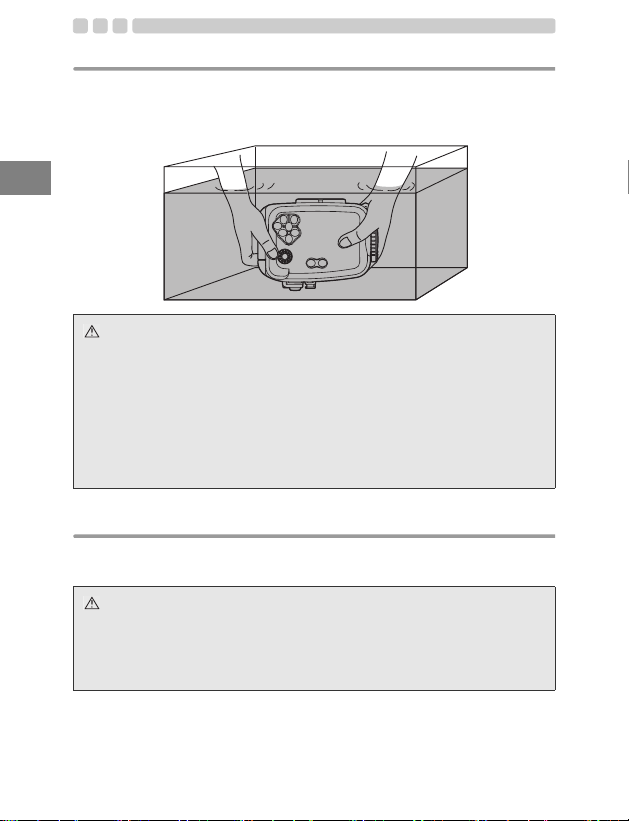
ご使用後のプロテクターは空のまま再度密閉してできるだけ早く真水で
十分に洗います。海水で使用した場合は、塩分を落とすために真水に一
定時間浸けておくと効果的です。
JP
注意 :
• 部分的に高い水圧がかかると水漏れするおそれがあります。プロテク
ターを水洗いするときは装填したデジタルカメラを取り出してから行っ
てください。
• 本製品のシャッターボタンや各種ボタンを真水中で操作してシャフトに
着いた塩分を洗い落としてください。分解しての清掃は決してしないで
ください。
• 塩分が付着したまま乾燥させた場合、機能に支障を来たすおそれがあり
ます。使用後は必ず塩分を洗い落としてください。
プロテクターを乾燥させましょう
真水洗い後塩分のついていない、繊維くずの出ない乾いた柔らかい布で
水滴を拭き取り、風通しの良い日陰で完全に乾燥させてください。
注意 :
• 乾燥させるためにヘアードライヤーなど温熱風を使用したり、直射日光
に当てることはしないでください。プロテクターの劣化・変形やOリン
グの劣化を速め水漏れの原因になります。
• プロテクターを拭く際は拭き傷を付けないようご注意ください。
JP 28
Page 29
7. 防水機能のメンテナンスをしましょう
本製品の後蓋を一度でも開けた場合は、必ずO リングのメンテナンスを
実施しましょう。
Oリングを取りはずします
プロテクターを開けて、プロテクターに装着されているO リングを取り
はずします。
Oリングの取りはずしかた
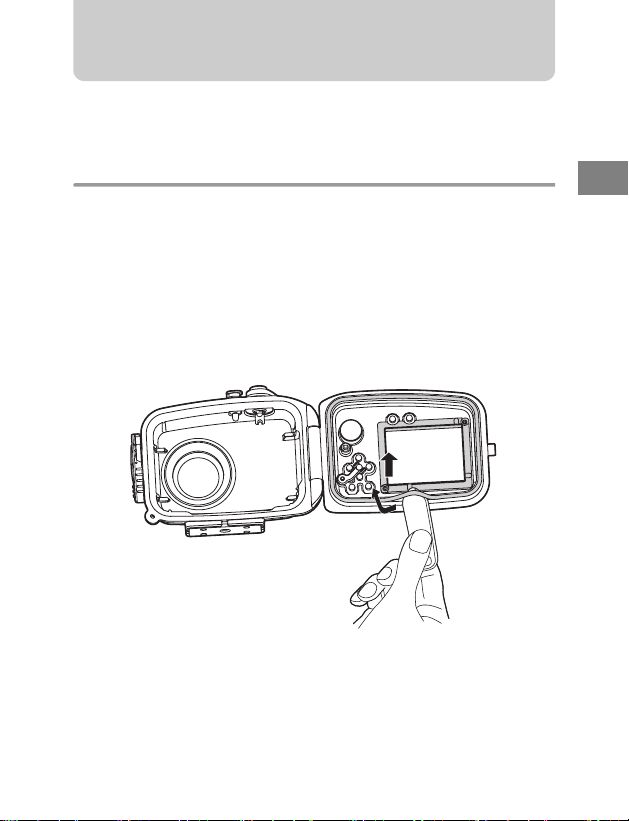
1 OリングとOリング溝の壁の間に Oリングリムーバーを差込みます。
2 差込んだ O リングリムーバーの先端を O リングの下にくぐらせるよう
にします。
(Oリングリムーバーの先端で溝を傷付けないよう注意してください)
3 浮き上がった O リングを指先でつまんでプロテクターからはずしてく
ださい。
JP
JP 29
Page 30
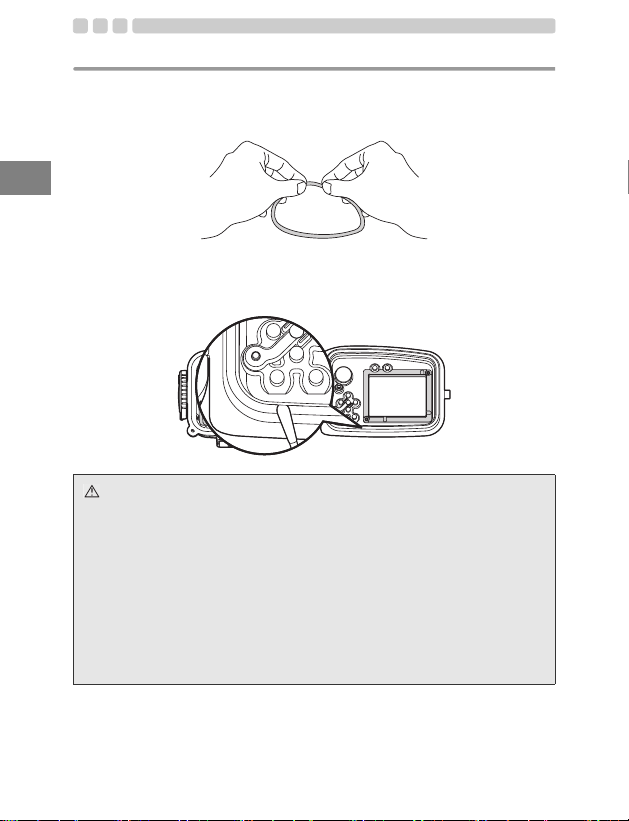
砂・ゴミなどを取り除きましょう
目視でOリングについたゴミを取り除いた後、Oリングを指でつまんで
全周を軽くしごくと、砂などの異物の付着や傷・ヒビ割れの有無が確認
できます。
JP
Oリング溝は繊維の出にくい清潔な布、またはかすの出にくい綿棒など
で付着した異物を取り除きます。プロテクター前蓋のO リング密着面も
同様に付着した砂・ゴミを取り除きます。
注意 :
• 本製品ご購入直後でも、実際に製品を水中でご使用になる前に必ず、防
水機能のメンテナンスを実施してください。
•
Oリングを取りはずす時や溝内部をクリーニングする時に、シャープペン
シル等先端の鋭利なものを使用するとO リングやプロテクターに傷を付
けて水漏れの原因になることがあります。
• 指先で O リングをしごいて検査する際に、Oリングを引き伸ばさないよ
うに注意してください。
• Oリングを洗浄する際には、アルコール・シンナー・ベンジン等の溶剤、
または化学洗剤の使用は絶対に避けてください。これらの薬品を使用す
ると、Oリングに損傷を与えたり、劣化を速めるおそれがあります。
JP 30
Page 31
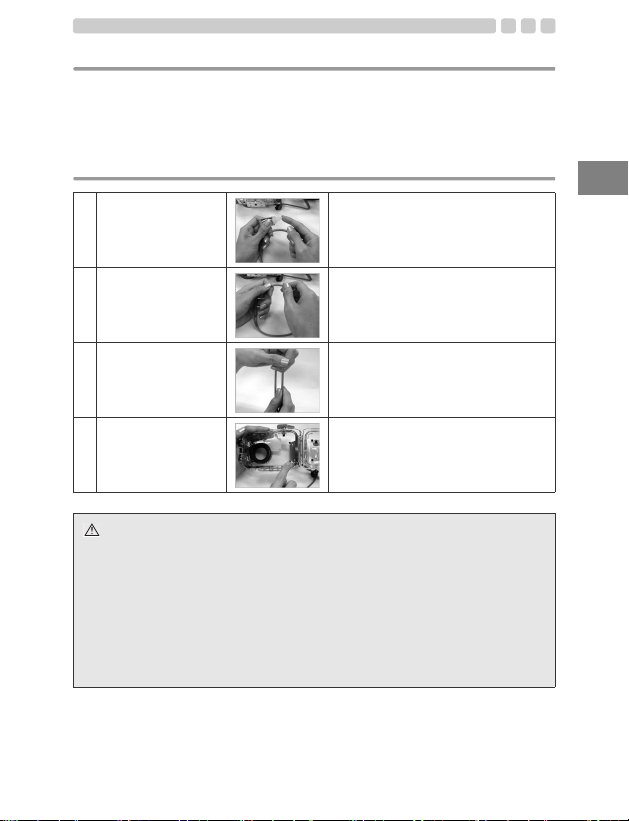
Oリングを取り付けます
異物の無いことを確認後、Oリングに薄く付属のグリスを塗り、溝に O
リングをはめ込みます。この時、溝からO リングのはみ出しが無いこと
を確認します。
Oリングへのグリス塗布方法
専用グリスをつけま
1
す。
グリスを全体に伸ば
2
します。
傷や凹凸がないか
3
チェックします。
圧着面にグリスを塗
4
ります。
注意 :
• 撮影途中でも電池や記録メディアの交換などでプロテクターを開けた場
合は防水機能のメンテナンスを必ず実施してください。防水機能のメン
テナンスを怠ると水漏れの原因となります。
• 長期間使用しない場合は、O リングの変形を避けるために O リングを溝
からはずしてシリコングリスを薄く塗り、清潔なポリ袋などに入れて保
管してください。
• 塩分が付着したまま乾燥させた場合、機能に支障を来たすおそれがあり
ます。使用後は必ず塩分を洗い落としてください。
指やO リングにゴミの付着がないこと
を確認し、専用のグリスを指に5 ミリ程
度取り出します。(グリスの量は5ミリ程
度が適切)
指にとったグリスを3 本の指で挟むよう
に全体に伸ばしていきます。力を入れて
Oリングを引っ張らないように注意し
てください。
全体になじんだグリスを確認して、手の
感触と目で傷や凹凸がないかチェック
してください。傷があったら新品のOリ
ングに必ず交換します。
指に残ったグリスはプロテクターの圧
着面の清掃とグリスアップに使用しま
す。
JP
JP 31
Page 32
消耗品は取り替えましょう
•
Oリングは消耗品です。プロテクターの使用回数にかかわらず、少なく
とも1年以内に新品と交換されることをおすすめします。
• 使用状況、保管状況によっては O リングの劣化が速まります。傷・ヒ
ビ割れが入っていたり弾力が低下していたら1 年未満でも交換してく
JP
ださい。
Note :
消耗品のシリコン O リング用グリス、シリカゲル、本体用 O リングはオリ
ンパス純正品をお使いください。オリンパスサービスステーションでも購入
いただけます。
JP 32
Page 33

8. 付録
PT-038ご使用上のQ&A
Q1:
使用可能なデジタルカメラを教えてください。
A1:
本製品(PT-038)はFE-230/X-790専用です。
Q2:
デジタルカメラをプロテクターにセットする際の注意事項を教え
てください。
A2:
下記の点に特に注意してセットしてください。
1 デジタルカメラの電池残量が十分にあることをご確認くださ
い。水中ではフラッシュを使用した撮影が多いため、電池の消
耗が速くなります。
2 記録メディアの記録残枚数をご確認ください。プロテクターの
開閉をなるべく少なくするためにも残数に余裕を持ってご使用
ください。
3 デジタルカメラのストラップをはずしてください。ストラップ
をはずさずに装填すると、プロテクター密閉時にストラップを
挟み込み、水漏れの原因となります。
4 装填するカメラの電源をOFF にします。
5 プロテクターを密閉する前にプロテクター後蓋にある溝に O リ
ングが正常に装着されていることを確認してください。
6 O リングと前蓋部 Oリング接触面にゴミ、髪の毛等の異物が付
着していないことを確認してください。
7 防曇剤シリカゲルを入れましょう。オリンパスプロテクター用
シリカゲルをご使用ください。
Q3:
プロテクター使用時、保管時の注意事項を教えてください。
A3:
下記の点にご注意ください。
1 プロテクターの外側から O リングの接触面を強く押したり、プ
ロテクターをねじったりすると防水機能が損なわれて水漏れす
ることがあります。
JP
JP 33
Page 34

JP
2
下記のような場所でプロテクターを使用、放置または保管した場合、
動作不良や故障の原因となります。絶対に避けてください。
• 直射日光下や自動車の中等、プロテクターが高温になる場
所、異常に温度が低いところ、極端に温度変化が激しいと
ころ
• 火気のある場所
• 揮発性物質のある場所
• 振動のある場所
3 プロテクターにカメラを装填した状態で、以下のような取り扱
いをした場合、本製品及び装填されたカメラが故障・破損する
おそれがあります。絶対に避けてください。
• 物にぶつける
• 落下させる
• 重たいものを載せる
4 長時間使用しないとカビが生えたり故障の原因になることがあ
ります。使用前に各操作部の動作確認、事前テスト、最終テス
トを実施してください。
Q4:
プロテクター開閉時の注意事項を教えてください。
A4:
下記の点にご注意ください。
1 水しぶきや砂のかかるおそれのない場所で、開閉してください。
2 前蓋と後蓋のすき間、開閉ダイヤル等凹凸のある個所に付着し
た水滴を拭き取ってください。開けた時にプロテクター内に水
滴が流れ込むおそれがあります。
3 プロテクターを開ける際に、髪の毛や身体から、プロテクター
内やカメラの上に水滴が落ちないようご注意ください。
4 開いたプロテクターの O リングと前蓋部の O リング接触面に、
砂、繊維くず等異物の付着がないことを確認してください。
5 海水のついた手でカメラや記録メディアに触らないようにして
ください。
6 撮影中に水滴等、水漏れの兆候を発見した場合は、直ちに潜水
を中止し、再度、水漏れのテストを行い水漏れの有無を確認し
てください。カメラが濡れていたら水分を拭き取り動作を確認
してください。
JP 34
Page 35

Q5:
使用後のプロテクターの取り扱いを教えてください。
A5:
使用後のプロテクターはなるべく早くカメラを取り出し、真水で
洗ってください。海で使用した場合は塩分を落とすために一定時
間つけておくと効果的です。真水の中でボタン・レバーを操作し
軸回りの塩分を洗い流してください。水洗い終了後塩分の付いて
いない乾いた布で水分を拭き取り、陰干しで乾燥させてください。
乾燥させるためにヘアドライヤー等の温熱風を使用したり、直射
日光にさらすことは避けてください。高温や直射日光にさらすと
プロテクターの変形・変色・破損やOリングの劣化の原因となり
ます。プロテクター内部は乾いた繊維くずの出ない柔らかい布で
拭いてください。Oリングをはずして塩分・砂・埃等の付着物を
拭き取り、さらにOリングがはめ込まれていた溝と、Oリングが
接触していた面も同様に付着した汚れを拭き取って乾燥させてく
ださい。Oリングを溝からはずす時に先端の鋭利なものを使用す
るとOリングに傷を付けて水漏れの原因となることがあります。
必ず付属のOリングリムーバーをご使用ください。
Q6:
水中での撮影方法を教えてください。
A6:
下記の点に注意して撮影してください。
1 プロテクターに付属しているハンドストラップの輪を手首に固
定します。
2 レンズ窓に指がかかっていると指が写ります。プロテクターを
保持する時に指の位置にご注意ください。
3 シャッターボタンを押す際は、両手でプロテクターを支え、カ
メラぶれが起きないよう静かに操作してください。
4 プロテクター背面の液晶モニタ窓を通してデジタルカメラの液
晶モニタで画面を確認し撮影します。電池消耗による撮影不能
を避けるため電池はできるだけダイビングごとにフル充電状態
の電池に交換してください。
Q7:
水漏れ有無の確認方法を教えてください。
A7:
事前テストとカメラ装填後の最終テストで確認してください。事
前テストはカメラをプロテクターに入れずにご使用深度に沈めて
水漏れの有無を確認するのがいちばん確かですが、実施が難しい
場合は水深1メートル程度のところやバスタブでのテストでも実
施した方が安全です。最終テストはバスタブやバケツでも実施可
能です。
JP
JP 35
Page 36

JP
Q8:
水没事故の原因を教えてください。
A8:
水没事故は主に下記のことが原因で起こります。特に念入りに確
認してください。
1 Oリングの取り付け忘れ
2 Oリングの一部または全部が溝からはずれていた
3 Oリングの傷、変質、または変形
4 Oリングへの砂・繊維くず・髪の毛等異物の付着
5 O リング溝、前蓋部 Oリング接触面への砂・繊維くず・髪の毛
等異物の付着
6 プロテクターを密閉する際の、ストラップ、シリカゲル包装袋
等の挟み込み
7 船上から海へ放り投げたり、プロテクターを持ったまま水中に
飛び込む等プロテクターに瞬間的に強い力がかかった時。水中
に入る際は手渡しを行うなど衝撃を与えないようご注意くださ
い。
Q9:
Oリングメンテナンスの注意点を教えてください。
A9:
下記の点にご注意ください。
1
Oリングはクリーニングの際にアルコール・シンナー・ベンジン
等の有機溶剤や化学洗剤の使用は避けてください。これらの薬品
を使用するとOリングが変質し劣化を速めます。
2 グリスはオリンパス純正のシリコンO リング用(白キャップ)グ
リスをお使いください。PT-008までのプロテクターに付属のグ
リス(赤キャップ)や他社製のグリスは本シリコンO リングに
適しておりませんので、使用すると表面が変質して防水機能を
損なうことがあります。
3 長期間使用しない時はO リングの変形を避けるために O リング
をプロテクターからはずして専用グリスを薄く塗り、清潔なポ
リ袋等に入れて保管してください。再度使用する場合は O リン
グに傷・ひび割れがないこと、弾力が十分にあること、表面が
べとつく等の異常が無いことを確認した上で専用グリスを薄く
塗り直してご使用ください。グリスは塗りすぎても防水機能や
許容耐圧は上がりません。かえって砂やゴミなどが付き易い結
果になります。薄く均一に塗ることで最大の効果を発揮します。
4 Oリングは消耗品です。少なくとも1年に1回は交換するように
してください。
JP 36
Page 37

5
Oリングは使用状態、保管環境などによっては劣化が促進されま
す。Oリングメンテナンス時に傷、ひび割れが入っていたり、弾
力が無くなっていたらすぐに新しいものと交換してください。
Q10:
プロテクターメンテナンス上の注意を教えてください。
A10:
下記の点にご注意ください。
1 洗浄・防錆・防曇・修理等の目的で下記の薬品類を使用しない
でください。
• プロテクターをアルコール・シンナー・ベンジン等の揮発
性の有機溶剤や化学洗剤で洗浄しないでください。洗浄は
真水またはぬるま湯で十分です。
• 防錆剤等を金属部分に使用しないでください。金属部分は
アルミ及び真ちゅうとステンレスです。真水による洗浄で
十分です。
• 市販の防曇剤を使わないでください。必ずオリンパス純正
の防曇剤シリカゲルをご使用ください。
• 修理等の目的で接着剤を使用しないでください。修理が必
要な場合は弊社サービスステーションまたはお買上げの販
売店にご相談ください。
Q11:
修理について教えてください。
A11:
修理が必要な場合は弊社サービスステーションまたはお買上げの
販売店にご相談ください。ご自分で修理・分解・改造を行わない
でください。ご自分またはオリンパス指定者以外の第三者によっ
て修理・分解・改造を行うと保証の対象外となります。
Q12:
PT-038付属品の型式を教えてください。
A12:
下記の付属品を販売しています。
1 PT-038本体用O リング(POL-032):PT-038の本体に設置されて
いる浸水防止用O 型のシリコンゴム製のパッキングです。他の
プロテクター用のOリングは使用できません。
2 シリコンOリング用グリス(PSOLG-1):シリコンOリングメン
テナンス用の専用グリスです。
3 シリカゲル(SILCA-5S):プロテクターのガラス部の結露による
曇りを押える乾燥剤です。5袋入り。
JP
JP 37
Page 38
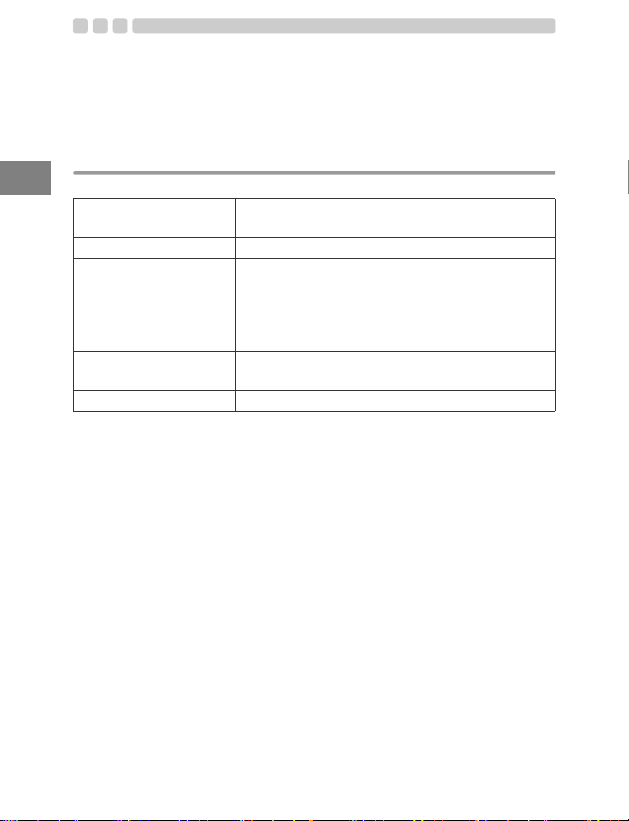
※ 操作ボタン部の O リングはお客様による交換はできません。
交換が必要な場合はお買上げの販売店または当社サービス
ステーションにご相談ください。有償で交換いたします。
※ PT-038にバランスウェイトは付属しておりません。
仕様
JP
対象カメラ オリンパスデジタルカメラ
許容水深 水深40m以内
主要材質 本体:透明ポリカーボネート
サイズ 幅 127.0mm×高さ97.0mm×厚さ76.0mm(突
質量 260g(カメラ、付属品含まず)
※ 外観・仕様は改善のため予告無く変更することがあります。あらかじめご
了承ください。
FE-230/X-790
開閉ダイヤル/シャッターボタン/ズームレ
バー:赤色ポリカーボネート樹脂
レンズ窓:FL強化ガラス
各部操作ボタン:真ちゅうニッケル鍍金
起部含まず)
JP 38
Page 39
Page 40
Thank you for buying the Underwater Case PT-038.
Please read this instruction manual carefully and use the product
safely and correctly. Please keep this instruction manual for
reference after reading it.
Wrong use may cause damage to the camera inside the Case due
to water leakage, and repair may not be possible.
Before use, perform an advance check as described in this manual.
Introduction
EN
zUnauthorized copying of this manual in part or in full, except for private
use, is prohibited. Unauthorized reproduction is strictly prohibited.
zOLYMPUS IMAGING CORP. shall not be responsible in any way for lost
profits or any claims by third parties in case of any damage occurring
from improper use of this product.
zOLYMPUS IMAGING CORP. shall not be responsible for damage, lost
profits, etc. caused by loss of image data because of defects,
disassembly, repair or modification of this product by people other than
third parties specified by OLYMPUS IMAGING CORP. or for other
reasons.
Please read the following items before use
This Case is a precision device designed for use at a water depth within
40 m. Please handle it with sufficient care.
zPlease use the Case correctly after sufficient understanding of the
contents of this manual in regard to handling of the Case, checks before
use, maintenance, and storage after use.
zOLYMPUS IMAGING CORP. shall in no way be responsible for
accidents involving immersion of a digital camera in water.
In addition, expenses incurred for damage of internal materials or loss
of recorded contents due to water entering the camera will not be
compensated.
zOLYMPUS IMAGING CORP. shall not pay any compensation for
accidents (injuries or material damage) at the time of use.
zBefore use, be sure to read the precautions printed on the package.
EN 2
Page 41
For safe use
This instruction manual uses various pictographs for correct use of the
product and to prevent danger to the user and other persons as well as
property damage. These pictographs and their meanings are shown
below.
This indicates contents for which the possibility of human
WARNING
CAUTION
WARNING
1 Keep this product out of the reach of babies, infants, and children. There is
the possibility of occurrence of the following types of accidents.
• Injury by dropping onto the body from a height.
• Injury from parts of the body getting caught in parts which open and
close.
• Swallowing of small parts. Please consult a physician immediately
if any parts have been swallowed.
• Triggering of the flash in front of the eyes may cause permanent
vision impairment etc.
2 Do not store with a battery in the digital camera housed in this product.
Storage with a battery inserted may lead to leakage of the battery liquid and
fire.
3 If leakage of water should occur with a camera installed in this product,
quickly remove the battery from the camera. There is the possibility of
ignition and explosion from generation of hydrogen gas.
4 This product is made of resin. There is the possibility that injuries may be
caused when it becomes broken because of strong impact with a rock or
other hard objects. Please handle it with sufficient care.
5 The silica gel and the grease for silicone O-rings for this product are not
edible.
death or severe injury in case of handling under disregard
of this indication can be assumed.
This indicates contents for which the possibility of human
injury or the possibility of material damage in case of
handling under disregard of this indication can be
assumed.
EN
EN 3
Page 42

CAUTION
1 Do not disassemble or modify this product. This may cause water leakage
or trouble. In case of disassembly or modification by persons other than
those appointed by OLYMPUS IMAGING CORP. the guarantee shall not
apply.
2 Do not place this product at locations with abnormally high or abnormally
low temperatures or at locations with extreme temperature changes. The
product may deteriorate.
3 Opening and closing at locations with much sand, dust, or dirt may impair
EN
the waterproof characteristic and cause water leakage. This should be
avoided.
4 This product has been designed and manufactured for use at a water depth
within 40 m. Please note that diving to a depth in excess of 40 m may cause
permanent deformation or damage to the Case and the camera inside the
Case or may lead to water leakage.
5 Jumping into the water with the Case in your pocket or in your hand,
throwing the Case from a boat or ship into the water, and other rough
handling may cause water leakage. Please handle with sufficient care,
when handing it over from hand to hand etc.
6 If the camera on the inside should become wet because of water leakage
etc., immediately wipe off all moisture and confirm the operation.
7 Please remove the O-ring when traveling by air. Otherwise air pressure
may make it impossible to open the Case.
8 For safe use of the digital camera in this product, please read the
“Instruction Manual” for the digital camera carefully.
9 When sealing this product, take sufficient care that no foreign matter gets
caught at the O-ring and the contact surfaces.
Batteries
zUse only an Olympus lithium-ion rechargeable battery (LI-42B or
LI-40B) with the camera.
zTake care that the battery electrodes do not become wet. This may
cause trouble or accidents.
zCarefully read the instruction manual for the camera about other
cautions regarding batteries.
EN 4
Page 43
Setting the underwater shooting scene mode
zThe FE-230/X-790 cameras incorporate several shooting scene modes
for underwater shooting, including wide-angle and macro modes. Simply
select the mode that’s most appropriate for the scene you are shooting.
For details, see “5. Underwater Shooting According to the Scene
Type” (P.24) of this manual.
zFor details on mode setting, refer to the digital camera’s operation
manual.
For Prevention of Water Leakage Accidents
When water leakage occurs while this product is being used, repair of the
camera housed in this product may become impossible. Please observe
the following cautions for use.
1 When sealing this product, make sure that no hairs, fibers, sand particles or
other foreign matter stick not only to the O-ring, but also to the contact
surface (front cover). Even a single hair or a single grain of sand may cause
water leakage. Please check with special care.
Examples of foreign matter sticking to the O-ring
Hair Fibers Grains of sand
2 The O-ring is a consumable part. Please replace it at least once a year with
a new one. Before each use, perform the proper maintenance.
3 Deterioration of the O-ring will acelerate according to the use conditions and
the storage conditions. Immediately replace the O-ring with a new one if it
is damaged, cracked, or has lost its elasticity.
4 During O-ring maintenance, clean the inside of the O-ring groove and
confirm the absence of dirt, dust, sand, and other foreign matter.
5 Apply the specified silicone O-ring grease to the O-ring.
EN
EN 5
Page 44

6 The waterproof function is not effective when the O-ring is not installed
correctly. When installing the O-ring, take care that it does not project from
the groove and that it is not twisted. Also, when sealing the Case, close the
lid after confirming that the O-ring has not come out of the groove.
7 This product is an airtight construction made of plastic (polycarbonate).
When it is left for a long time in a car, on a boat, at the beach, or at other
places reaching a high temperature, or when it is subjected for a long time
to uneven external force, it may be deformed and the waterproof function
may be lost. Pay sufficient attention to temperature control. Also do not
EN
place heavy objects onto the product during storage or transport, and avoid
unreasonable storage.
8 When the O-ring contact surface is pressed strongly from the outside of the
Case, or when the Case is twisted, the waterproof function may be lost.
Take care not to exert excessive force.
9 Please use the Case only after performing the advance test and the final
check.
0 If you should notice drops of water or other signs of water leakage while
taking pictures, immediately stop the dive, remove any water from the
camera and the product, test according to the item “Final check”, and
confirm whether leakage has occurred or not.
Handling the Product
zUse or storage of the product at the following locations may cause
defective operation, defects, trouble, damage, fire, internal clouding, or
water leakage. This should be avoided.
• Locations reaching high temperatures such as those under direct
sunlight, in an automobile, etc.
• Locations with open fire
• Water depths in excess of 40 m
• Locations subject to vibrations
• Locations with high temperature and humidity or with severe
temperature changes
• Locations with volatile substances
zThis product is made of polycarbonate resin with excellent impact
resistance, but it may be damaged by scraping against rocks etc. It also
may break when it hits hard objects or is dropped.
zThis product is not a case to soften impacts to the camera inside the
product. When this product with a digital camera inside it is subjected to
impacts or heavy objects are placed onto it, the digital camera may
become damaged. Please handle it with sufficient care.
EN 6
Page 45
zWhen the product is not used for a long time, the waterproof
performance may drop because of deterioration of the O-ring etc. Before
use, always perform the advance test and the final check.
zDo not apply excessive force to the tripod seat.
zWhen a flash is used while the Case is being used, shadows may
appear at the edges of the picture. This is especially notable when
taking pictures in macro mode on the wide-angle side. Please use a
flash after image confirmation.
zDo not use the following chemicals for cleaning, corrosion prevention,
prevention of fogging, repair or other purposes. When these are used for
the Case directly or indirectly (with the chemicals in vaporized state),
they may cause cracking under high pressure or other problems.
Chemicals which cannot
be used
Volatile organic solvents,
chemical detergents
Anticorrosion agent Do not use anticorrosion agents. The metal parts
Commercial defogging
agents
Grease other than
specified silicone grease
Adhesive Do not use adhesive for repairs or other purposes.
Do not clean the Case with alcohol, gasoline,
thinner or other volatile organic solvents or with
chemical detergents etc. Use pure water or
lukewarm water.
use stainless steel or brass. Wash with pure water.
Do not use commercial defogging agents. Always
use the specified desiccant silica gel.
Use only the specified silicone grease for the silicone
O-ring, as otherwise the O-ring surface may
deteriorate and water leakage may occur.
When repair is required, please contact a dealer or
a service station of OLYMPUS IMAGING CORP.
Explanation
zDo not perform operations other than specified in this instruction
manual, do not remove or modify parts other than specified, and do not
use parts other than specified.
Any troubles in taking pictures or with the equipment resulting from the
above actions shall be outside the guarantee.
zOLYMPUS IMAGING CORP. shall in no way be responsible for
accidents involving immersion of a digital camera in water.
zOLYMPUS IMAGING CORP. shall not pay any compensation for
accidents (injuries or material damage) at the time of use.
EN
EN 7
Page 46

Contents
Introduction............................................................................ 2
Please read the following items before use........................... 2
For safe use........................................................................... 3
Batteries ................................................................................ 4
Setting the underwater shooting scene mode .......................5
For Prevention of Water Leakage Accidents ......................... 5
EN
Handling the Product ............................................................. 6
1. Preparations...................................................................10
Check the contents of the package. .................................... 10
Names of the parts .............................................................. 11
Install the strap. ................................................................... 12
Master the basic operation. ................................................. 12
Holding the Case................................................................. 12
How to Press the Shutter Button......................................... 13
How to Switch the Shooting Mode....................................... 13
How to Use the Zoom Lever................................................ 13
Setting the Zoom Lever ....................................................... 14
How to Use the POWER Button.......................................... 14
2. Advance Check of the Case...........................................15
Advance test before use...................................................... 15
Advance Test....................................................................... 15
3. Install the digital camera. ...............................................16
Check the digital camera. .................................................... 16
Battery Confirmation............................................................ 16
Confirmation of the Remaining Number of Pictures to be
Taken................................................................................ 16
Remove the hand strap from the digital camera.................. 16
Prepare the camera............................................................. 16
Applicable Digital Cameras ................................................. 16
Turn on the digital camera................................................... 16
Check the camera’s operation............................................. 17
Open the Case. ................................................................... 17
Load the digital camera. ...................................................... 18
Insertion of silica gel............................................................ 18
Make sure the camera is loaded properly. .......................... 19
Seal the Case. ..................................................................... 19
EN 8
Page 47

Check the operation of the loaded camera.......................... 20
Confirm the shooting scene and shooting mode. ................20
Mounting and removing the lens cap................................... 21
Perform the final checks. ..................................................... 21
Visual Inspection ................................................................. 21
Final Test (Water Leakage Test)......................................... 22
4. Taking Pictures Under Water.........................................23
How to use the hand strap................................................... 23
Taking pictures. ................................................................... 23
Confirm the picture on the LCD monitor. ............................. 23
Press the shutter button gently............................................ 23
Cautions when using the flash............................................. 23
5. Underwater Shooting According to the Scene Type ......24
Underwater shooting modes................................................ 24
kUnderwater Wide-Angle 1 .............................................. 24
lUnderwater Wide-Angle 2.............................................. 24
HUnderwater Macro.......................................................... 24
How to select the shooting scene........................................ 25
6. Handling After Shooting .................................................26
Wipe off any waterdrop........................................................ 26
Take out the digital camera. ................................................27
Wash the Case with pure water........................................... 28
Dry the Case........................................................................ 28
7. Maintaining the Waterproof Function .............................29
Remove the O-ring. .............................................................29
Removal of the O-ring ......................................................... 29
Remove any sand, dirt, etc.................................................. 30
Install the O-ring. ................................................................. 31
How to Apply Grease to the O-ring...................................... 31
Replace consumable parts. ................................................. 32
8. Appendix ........................................................................33
Q & A on the use of the PT-038 .......................................... 33
Specifications ...................................................................... 38
EN
EN 9
Page 48
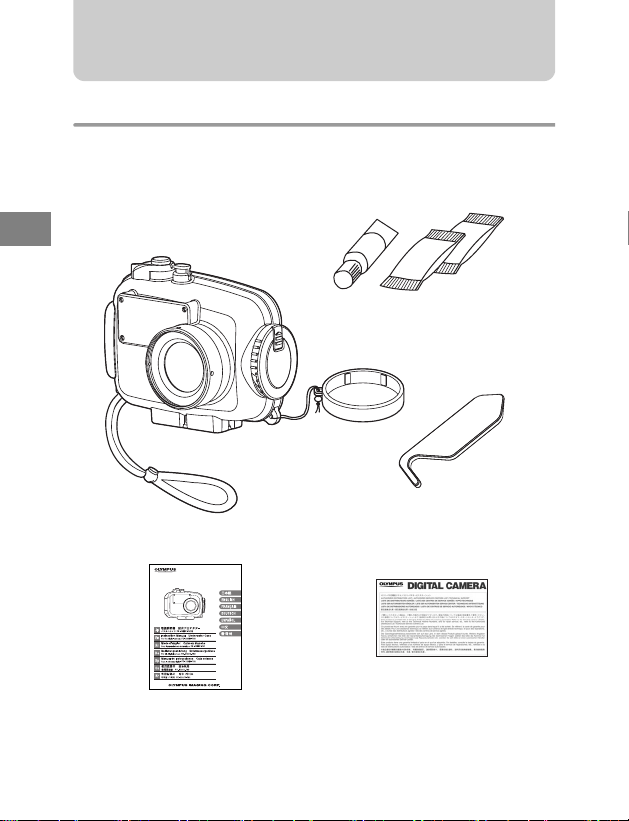
1. Preparations
Check the contents of the package.
Check that all accessories are in the box.
Contact your dealer if accessories are missing or damaged.
Silicone grease
EN
Case body
Silica gel
Lens cap
Hand strap
O-ring remover
(Check that the O-ring is normal.)
PT-038
OLYMPUS distributor list
Instruction manual (this manual)
EN 10
Page 49
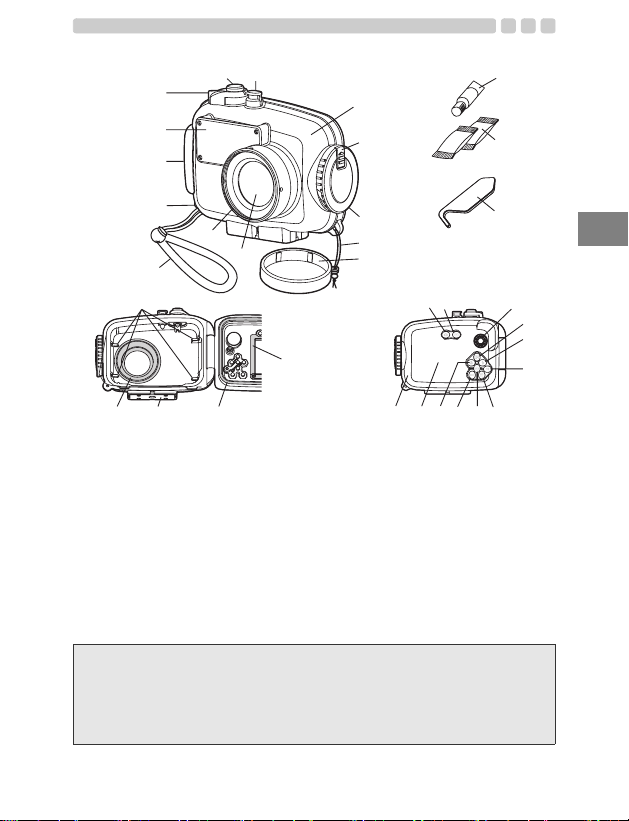
Names of the parts
pqrs
u
3
2
1
4
5
6
7
v
w
d
c
e
1 Palm grip
2 Diffuser
*
3 Zoom lever
*
4 Shutter button
*
5 POWER button
6 Front lid
7 Slide lock
8 Open/close dial
Lens cap strap
9
0 Lens cap
a Lens window
b Lens ring
b
a
ghi
c Hand strap
d
e Loading guide rails
f LCD inner hood
g O-ring
h Tripod seat
i Light shield hood
*
j K button
*
k q button
*
l Mode dial knob
*
m F button/arrow pad
*
n # button/arrow pad
f
Hand strap ring
8
9
0
jk
t
*
o OK button
*
p S button
*
q Y button/arrow pad
*
r MENU button
*
s & button/arrow pad
t LCD monitor window
u Rear lid
Grease for silicone O-ring
v
(White cap)
w Silica gel
x O-ring remover
x
l
m
n
o
Note:
The Case operation parts marked by * corresponds to the operation parts of
the digital camera. When the operation parts of the Case are operated, the
corresponding functions of the digital camera will operate. For details of the
functions, refer to the instruction manual for the digital camera.
EN
EN 11
Page 50
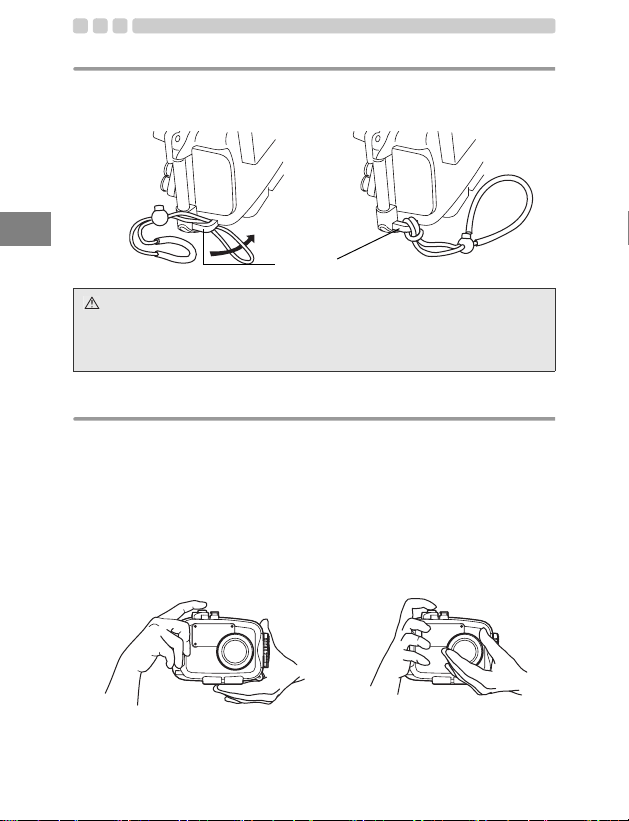
Install the strap.
Install the strap on the Case body.
Installation illustration Installation completed
EN
Hand strap
CAUTION:
Please install the strap correctly as shown above. OLYMPUS IMAGING
CORP. shall bear no responsibility for damage etc. caused by dropping the
Case because of incorrect installation of the strap.
Hand strap ring
Master the basic operation.
Please master the basic operation of the Case before taking pictures.
Holding the Case
Hold the Case securely with both hands, keep your elbows close to your
body, and hold the Case so that you can confirm the picture on the LCD
monitor of the digital camera through the LCD monitor window of the
Case.
Good example Bad example
EN 12
Page 51
CAUTION:
• Do not exert excessive force onto the lens window or the lens ring.
• Take care not to put your fingers etc. over the lens window and the flash
diffuser.
How to Press the Shutter Button
When pressing the shutter button,
press it gently to prevent camera
shake.
Note:
For more detailed information on operating the shutter button on the camera,
please consult the digital camera’s instruction manual.
How to Switch the Shooting Mode
To switch the shooting mode of the
digital camera, turn the mode dial
knob on this Case.
Confirm the shooting mode on the
Mode dial knob
LCD monitor.
How to Use the Zoom Lever
Zoom operation is possible by
operating the zoom lever of this
Case corresponding to the zoom
lever of the digital camera in the
Case.
EN
EN 13
Page 52
Setting the Zoom Lever
When loading the digital camera in the Case, fit the projecting part of the
zoom lever of the digital camera into the recessed part of the zoom lever
on the inside of the Case.
EN
CAUTION:
When loading the camera, confirm that the projecting part of the zoom lever of
the camera is properly set to the recessed part of the zoom lever of the Case.
When the setting is insufficient, the loading of the camera becomes imperfect
and it may not be possible to seal the Case or zooming may not function.
Insufficient sealing will cause water leakage.
How to Use the POWER Button
POWER button
Press the POWER button to turn the
camera ON/OFF.
CAUTION:
To save battery power, the camera automatically goes into sleep mode and
the monitor turns off if there is no operation when the camera is turned on. No
picture is taken even if the shutter button is fully pressed in this mode. Operate
the zoom lever or other buttons to restore the camera from sleep mode before
taking a picture. If the camera is left for 12 minutes, it automatically turns off.
Press POWER button to turn the camera on.
For details, refer to your digital camera’s instruction manual.
EN 14
Page 53
2. Advance Check of the Case
Advance test before use
This Case has been the subject of thorough quality control for the parts
during the manufacturing process and thorough function inspections
during the assembly. In addition, a water pressure test is performed with
a water pressure tester for all products to confirm that the performance
conforms to the specifications.
However, depending on the carrying and storage conditions, the
maintenance status, etc., the waterproof function may be damaged.
Before diving, always perform the following advance test and the final test
after installation of the camera.
Advance Test
1 Before installing the digital camera in the Case, immerse the empty Case to
the intended water depth to confirm that there is no water leakage.
2 Main causes of water leakage are as follows.
• The O-ring has not been installed.
• A part of the O-ring or the entire O-ring is outside the specified
groove.
• O-ring damage, cracks, deterioration or deformation
• Sand, fibers, hair or other foreign matter sticking to the O-ring, the
O-ring groove or the O-ring contact surface on the front lid
• Damage to the O-ring groove or the O-ring contact surface on the
front lid
• Catching of the strap, silica gel, etc. when closing the Case
Perform the test after the above causes have been eliminated.
CAUTION:
• The most suitable method for checking water leakage is to immerse the
Case to the intended water depth. When this is difficult, water leakage also
can be checked at a shallow depth with no water pressure. Do not feel that
this is troublesome, but perform this test.
• If a leak is detected in normal handling during testing, do not use the Case
and contact Olympus.
EN
EN 15
Page 54
3. Install the digital camera.
Check the digital camera.
Check the digital camera before loading it in the Case.
Battery Confirmation
The flash is used very frequently during underwater shooting.
Make sure that you have enough remaining battery power.
EN
Note:
In order to avoid losing shutter chances due to an exhausted battery, you
should always replace a battery with a fully charged battery before each dive.
Confirmation of the Remaining Number of Pictures to be Taken
Confirm that the image storage has a sufficient remaining number of
pictures to be taken.
Remove the hand strap from the digital camera.
When a strap is attached to the digital camera, the hand strap must be
removed.
CAUTION:
• When a digital camera is loaded without removing the strap, the strap may
get caught between the Case lids and may cause water leakage.
• When removing the strap, handle the digital camera with sufficient care.
OLYMPUS IMAGING CORP. shall not be responsible for damage caused
by dropping the camera etc.
Prepare the camera.
Applicable Digital Cameras
This product (PT-038) is designed exclusively for use with the FE-230/
X-790 digital camera.
Turn on the digital camera.
To save battery power, the camera automatically goes into sleep mode
and the monitor turns off if there is no operation when the camera is turned
on. No picture is taken even if the shutter button is fully pressed in this
mode. Operate the zoom lever or other buttons to restore the camera from
sleep mode before taking a picture. If the camera is left for 12 minutes, it
automatically turns off. Press POWER button to turn the camera on.
EN 16
Page 55
Check the camera’s operation.
Check if the camera functions normally as described in its instruction
manual. After checking, press the camera’s POWER button to turn it OFF.
Open the Case.
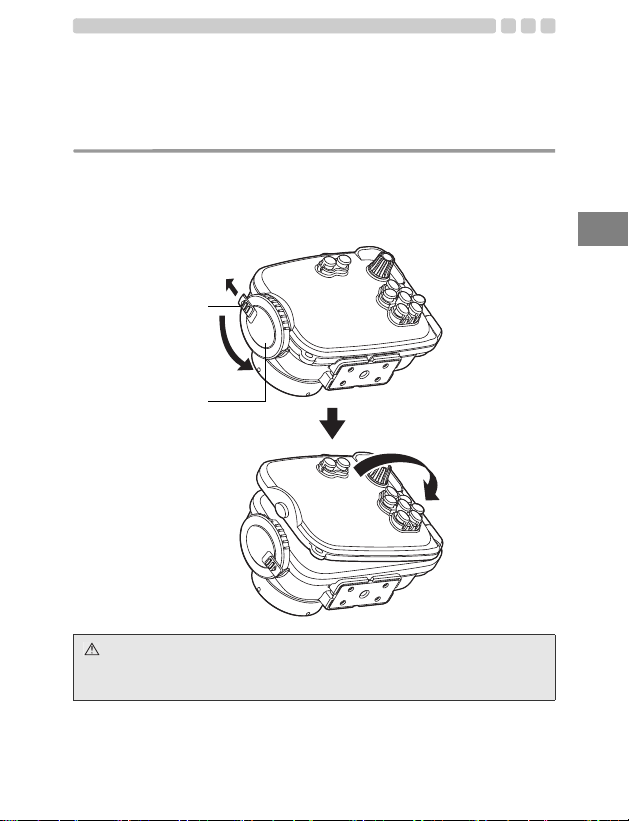
1 Slide and hold the slide lock towards the arrow direction (1) and turn the
open/close dial counter clockwise (2).
2 Turn the open/close dial to the position where it cannot be turned further.
3 Open the rear lid of the Case gently.
1
Slide lock
2
Open/close dial
EN
CAUTION:
Do not exert too much force while turning the open/close dial. Doing so may
damage the dial.
EN 17
Page 56
Load the digital camera.
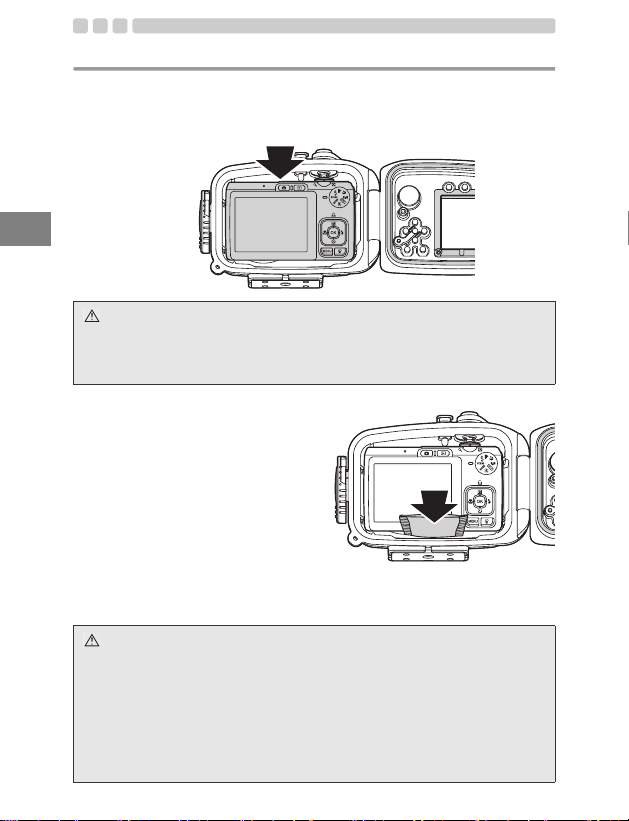
1 Confirm that the digital camera is OFF.
2 Set the mode dial of the digital camera to “SCENE” and gently insert the
digital camera into the Case.
EN
CAUTION:
If the digital camera is not inserted properly, it may not be possible to seal the
case so that it is airtight. Alternatively, some controls may become inoperable.
Note that imperfect sealing may result in water leakage.
Insertion of silica gel
Before sealing the Case, insert the
silica gel bag provided for
prevention of fogging between the
bottom of the camera and the Case.
Pay attention to the orientation.
CAUTION:
• Insert the silica gel all the way at the specified location and with the
specified orientation. When the orientation is not correct, the silica gel bag
will be caught when the Case is sealed and water leakage will occur.
• If the Case is sealed without inserting the silica gel fully, the silica gel bag will
be caught by the O-ring and water leakage will occur.
• Once silica gel has been used, the moisture absorption performance will be
impaired. Always replace the silica gel when the Case is opened and closed.
EN 18
Page 57
Make sure the camera is loaded properly.
Check the following points before sealing the Case.
• Is the digital camera loaded properly?
• Is the mode dial set to “SCENE”?
• Is silica gel inserted all the way at the specified location?
• Is the O-ring attached properly to the opening on the Case?
• Is there any dirt or foreign matter on the O-ring or the O-ring contact
surface on the front lid?
• Is the waterproof function maintenance performed?
Seal the Case.
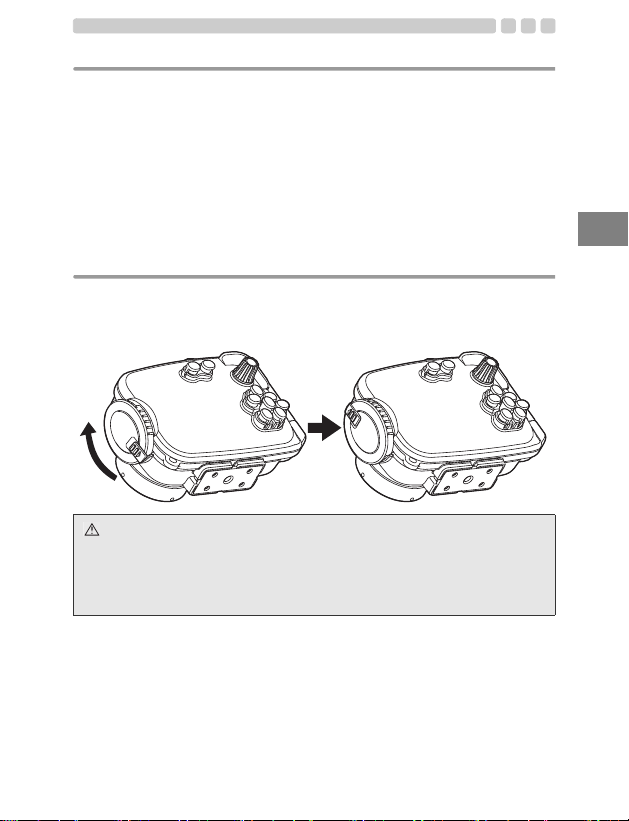
1 Close the rear lid of the Case gently.
2 Turn the open/close dial clockwise.
• The Case is sealed when the dial is turned 180 degrees.
CAUTION:
• If the open/close dial is not fully turned, the Case will not be sealed. This
will cause water leakage.
• Close the rear lid of the Case so that the lens cap strap doesn’t catch. If it
catches, water leaks may result.
EN
EN 19
Page 58
Check the operation of the loaded camera.
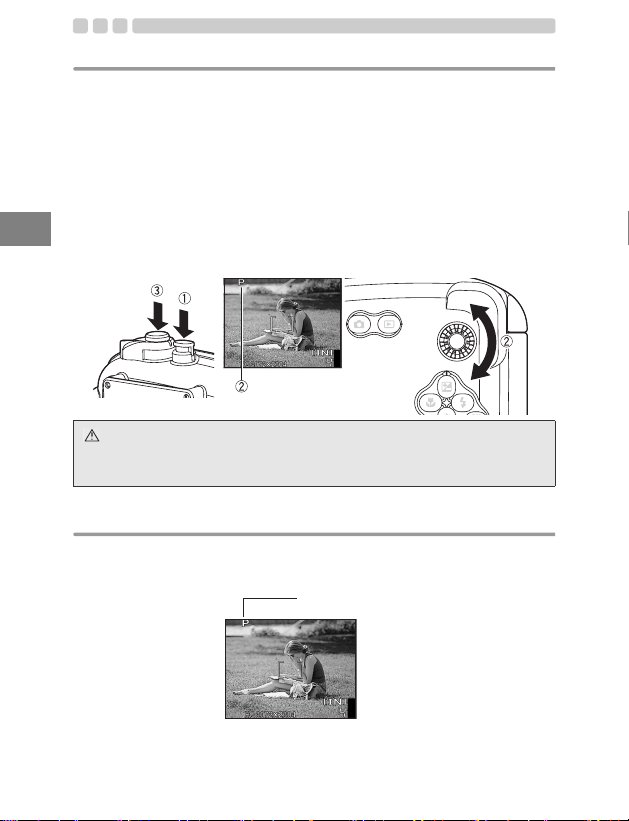
After sealing the Case, check that the camera functions normally.
1 Push the POWER button on the Case and confirm that the camera
turns on/off.
2 Turn the mode dial on the Case and confirm that the camera mode
switches properly.
• Check if the correct mode is being switched from the LCD monitor.
3 Press the shutter button on the Case and confirm that the camera
EN
shutter releases.
• Also operate other control buttons on the Case and confirm that the
camera functions properly.
CAUTION:
If the camera does not function properly, reinstall the digital camera following
the procedures of “Check the digital camera.” (P.16) of this manual.
Confirm the shooting scene and shooting mode.
When using the Case, the current camera shooting scene and shooting
mode can be confirmed on the camera’s LCD monitor.
Shooting scene/Shooting mode
EN 20
Page 59
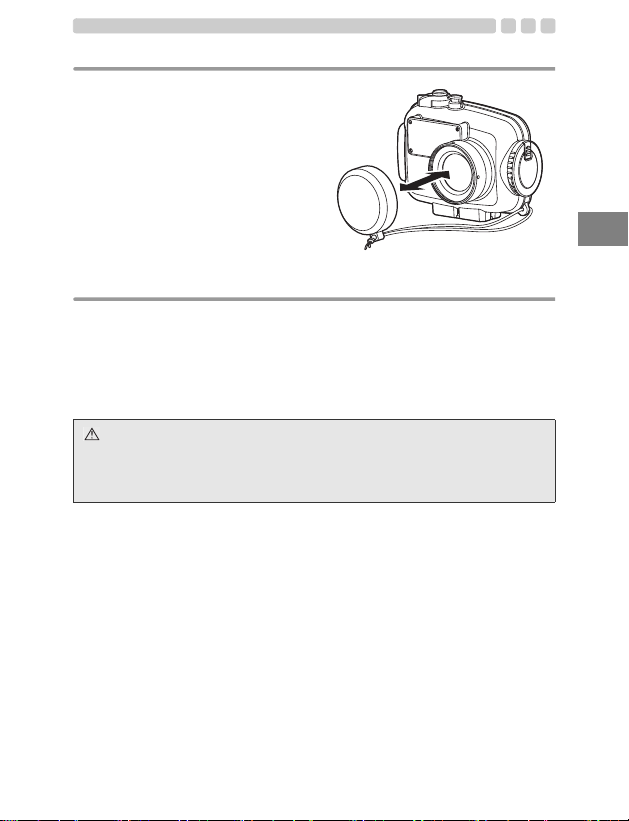
Mounting and removing the lens cap.
Fit the lens cap onto the lens ring as
shown in the figure. Be sure to
remove the lens cap before
shooting.
Perform the final checks.
Visual Inspection
After sealing the Case, check the sealing part of front and rear lid visually
to confirm that the O-ring is not twisted or out of the groove and that no
foreign matter has been caught. Also check that the Case is not broken or
cracked.
CAUTION:
Hairs, fibers, and other narrow items are not very apparent, but they may
cause entry of water. In addition, pay special attention to breaks and cracks on
the Case.
EN
EN 21
Page 60
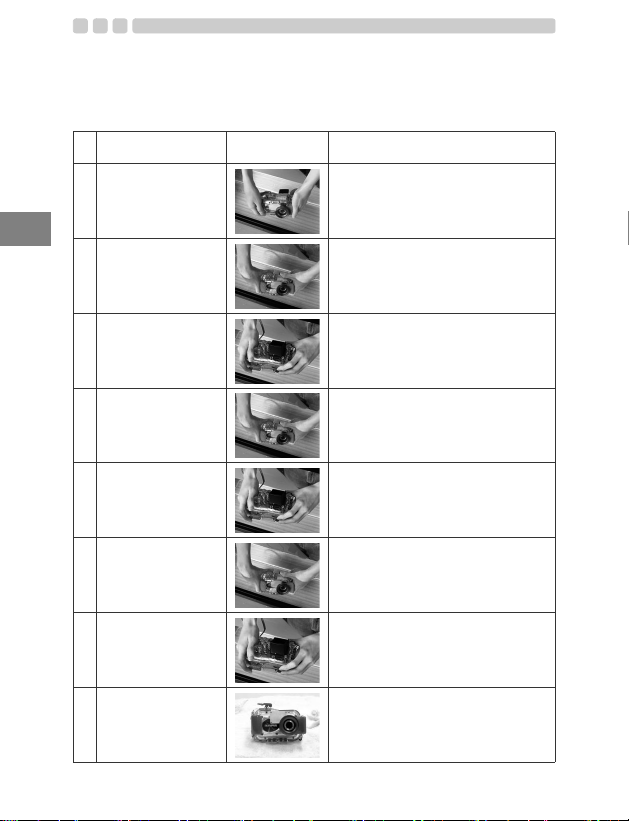
Final Test (Water Leakage Test)
The final test after loading the camera is explained below. This is the only way to
eliminate worry about possible entry of water! Always perform this test. It can be
performed easily in a water tank or a bathtub. The required time is about five minutes.
Simple water
immersion test
Explanatory
image
Hints
Place the Case slowly
1
into the water.
EN
At first, immerse the
2
Case for only three
seconds.
Check that no water
3
has entered into the
Case.
Next, immerse the
4
Case for 30 seconds.
Check that no water
5
has entered into the
Case.
Next, check by
6
immersing for three
minutes.
This is the final check.
7
Has the silica gel
become moist?
Now everything is all
8
right.
* The PT-038 is not provided with a balance weight.
EN 22
As the Case is transparent, waterdrops
entering into it can be confirmed easily.
In case of trouble with the O-ring, three
seconds are enough for water to enter.
Are there air bubbles coming out
between the lids?
Please check carefully.
Remove the Case from the water and
check that no water has accumulated at
the bottom of the Case.
Is there any water trickling down?
Check carefully for air bubbles!
Do not perform any operation ye t, but
just observe.
Remove the Case from the water and
check that no water has accumulated at
the bottom of the Case.
Perform very careful confirmation.
Check carefully for air bubbles!
Try operation of the all buttons, levers
and dials. Check carefully for air bubbles!
If there is still no entry of water,
everything is OK!
This is very important!
Has the silica gel become moist?
Please check carefully! As the inside can
be seen, the inspection for entry of water
also can be made easily!
Now everything is all right!
Have a nice dive!
Page 61
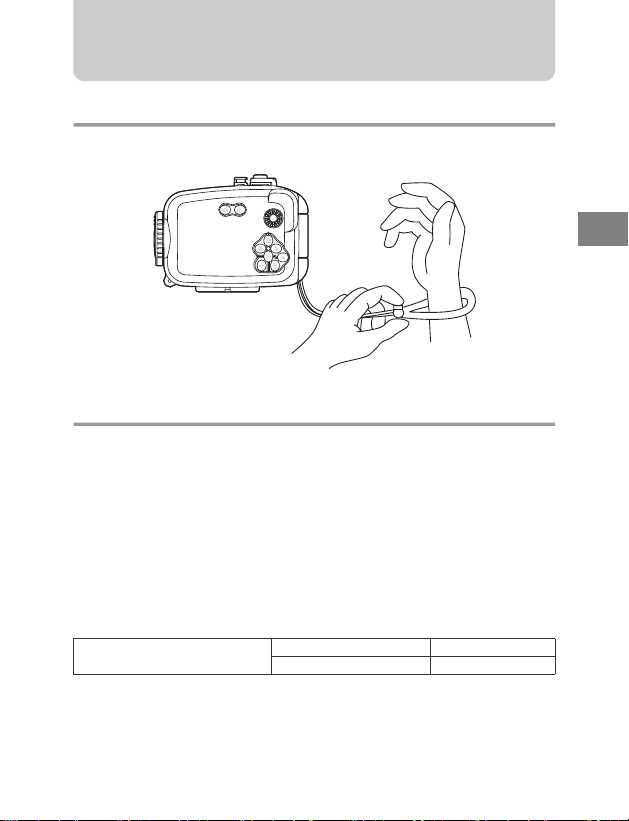
4. Taking Pictures Under Water
How to use the hand strap
Pass your hand through the hand strap provided and adjust the length
with the stop button.
Taking pictures.
Confirm the picture on the LCD monitor.
This Case uses the LCD monitor to confirm the picture.
Press the shutter button gently.
Hold the Case securely with both hands and press the shutter button
gently to prevent camera shake.
Cautions when using the flash
When taking macro pictures on the wide-angle side, the flash light may be
missing in some parts or the light volume may not be uniform.
Flash effective range
(Land shooting without the Case)
During underwater shooting, shooting conditions (water clarity,
suspended matter, etc.) can have a significant effect on the range of the
flash.
Always check your pictures on the LCD monitor after shooting.
W Approx. 3.9 meters
T Approx. 2.0 meters
EN
EN 23
Page 62
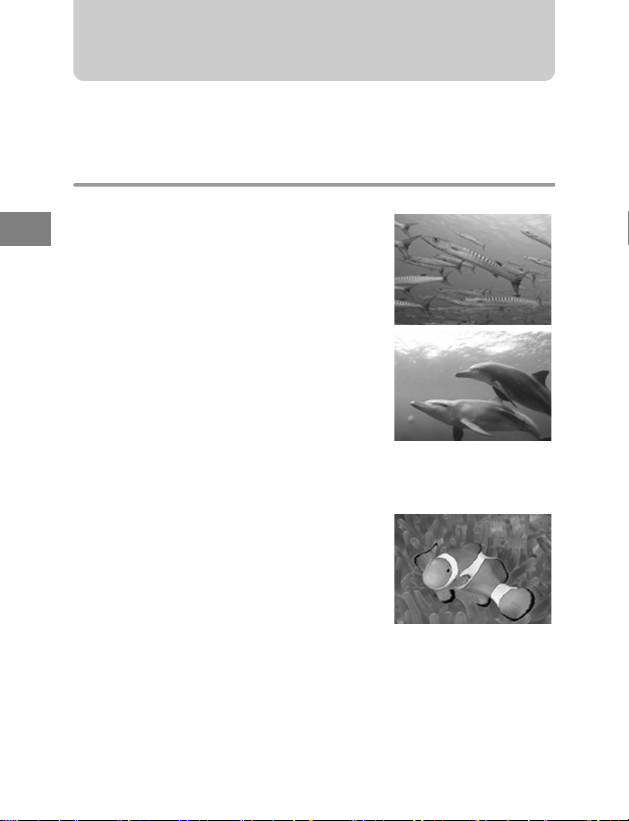
5. Underwater Shooting According to the Scene Type
The camera incorporates the following shooting scene modes. Select the
one best suited to the underwater scene you are shooting.
Underwater shooting modes
kUnderwater Wide-Angle 1
EN
Suitable for shooting a scene that extends
across a wide range such as a school of fish
swimming through the water. Background
blues are vividly reproduced.
lUnderwater Wide-Angle 2
Suitable for shooting a large, fast moving
subject such as a dolphin or manta ray.
In many dolphin-watching locations, use of a
flash is not permitted to avoid frightening the
dolphins. Although this mode was originally
designed to work without the flash, it can also
be enabled if required, for example when
shooting a manta ray.
HUnderwater Macro
Suitable for close-up shooting of small fish
and other underwater creatures. Natural
colors of the underwater are accurately
reproduced. Red tones can be enhanced by
using the flash.
(Examples)
EN 24
Page 63
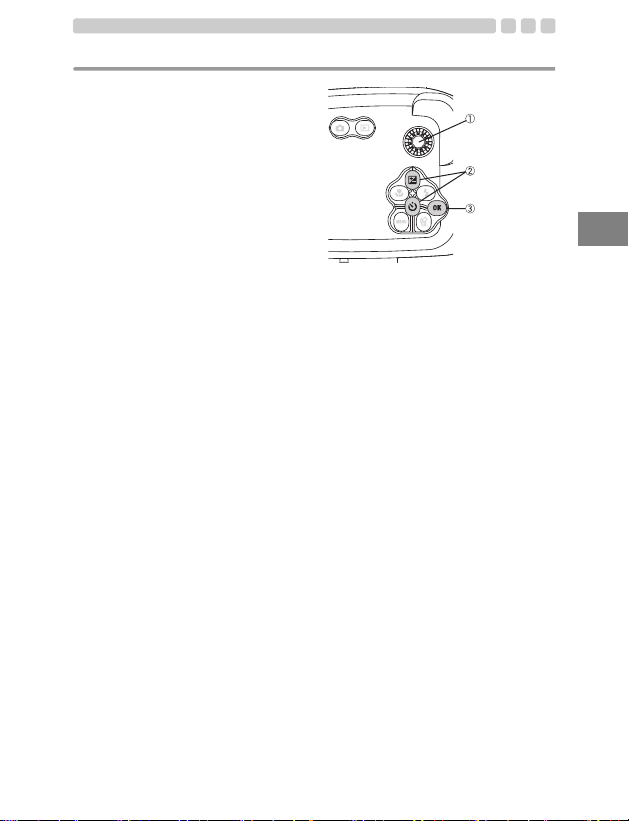
How to select the shooting scene
Set the mode dial (1) on the Case
to “SCENE”, and press the up/down
arrow pad (2) to select Underwater
Wide-Angle 1, Underwater Wideangle 2 or Underwater Macro. Then
press the OK button (3) to enter the
selection.
To switch to a different underwater
shooting mode, press the MENU
button on the Case, press the down
arrow pad, select “SCENE” on the
LCD monitor, and press the OK
button. Then press the down arrow
pad to select the desired underwater
shooting mode from the LCD
monitor display, and press the OK
button to enter the selection.
Set to
“SCENE”.
Select the
scene.
OK button
EN
EN 25
Page 64
6. Handling After Shooting
Wipe off any waterdrop.
After completing the shooting and
returning to land, wipe off any
waterdrop sticking to the Case. Use
air or a soft cloth not leaving any
fibers to thoroughly wipe any
EN
waterdrop etc. from the joint
between the front and rear lid, the
shutter button, the palm grips, and
the open/close dial.
CAUTION:
• When waterdrops remain between the front and the rear lid, they may spill
to the inside when the Case is opened. Take special care to wipe off all
waterdrops.
• When opening the Case, take sufficient care that no water will drip from
your hair or body onto the Case and the camera.
• Before opening the Case, make sure that your hands or gloves are free of
sand, fibers, etc.
• Do not open or close the Case at locations where there is water spray or
sand. When this cannot be avoided because you have to exchange the
battery or the image storage, place a sheet in a shelter where there is no
water spray or sand.
• Take care not to touch the digital camera or the battery with hands wet with
sea water.
Note:
Moisten a towel etc. in advance with pure water and keep it in a plastic bag, so
that you can wipe the salt from your hands and fingers before handling the
camera.
EN 26
Page 65
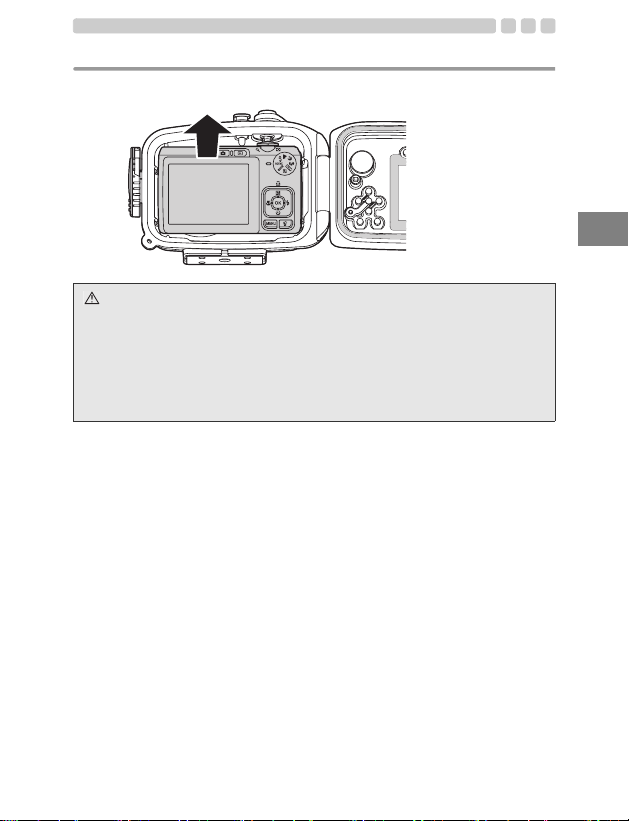
Take out the digital camera.
Open the Case carefully and take the digital camera out.
CAUTION:
• Always place the opened Case with the O-ring side facing up. If the Case
is placed with the O-ring side facing down, dirt or other foreign matter may
get on the O-ring or the O-ring contact surface and may cause water
leakage during the next dive.
• For details on storage of pictures and other details, refer to the digital
camera’s operation manual.
EN
EN 27
Page 66
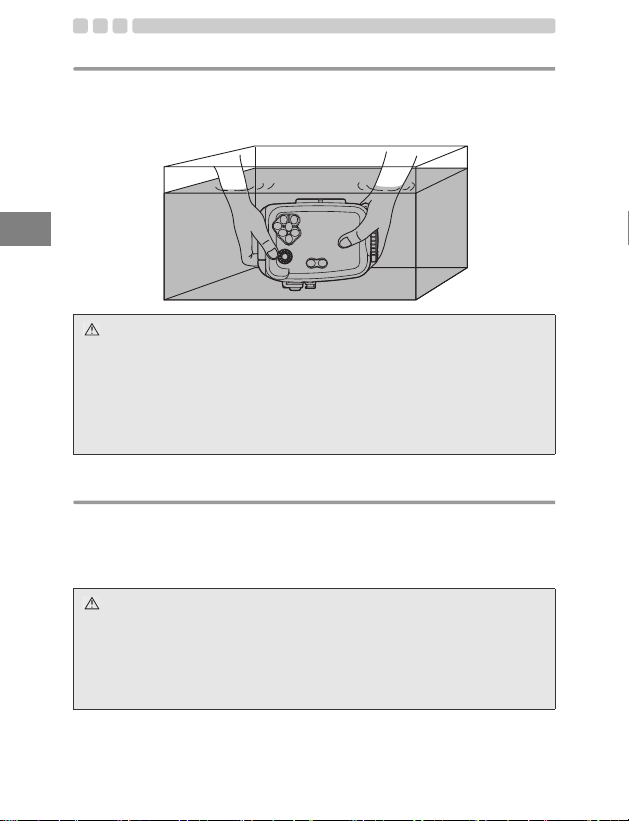
Wash the Case with pure water.
After use, seal the Case again after taking out the camera and wash it
sufficiently in pure water as soon as possible. After using in sea water, it
is important to immerse it for a fixed time in pure water to remove any salt.
EN
CAUTION:
• Water leakage may occur when a high water pressure is partially applied.
Before washing the Case with water, take out the digital camera from it.
• Operate the shutter button and various buttons of this product in pure water
to remove salt adhering to the shaft. Do not disassemble for cleaning.
• Drying the Case with adhering salt may impair the function. Always wash
off any salt after use.
Dry the Case.
After washing with pure water, use a clean cloth to wipe off any
waterdrops. Be sure to use a cloth free of salt residue that doesn’t leave
any loose fibers. Dry the Case completely at a well ventilated location in
the shade.
CAUTION:
• Do not use hot air from a hair dryer or the like for drying and do not expose
the Case to direct sunlight, as this may accelerate deterioration and
deformation of the Case and deterioration of the O-ring, leading to leakage
of water.
• When wiping the Case, take care not to cause scratches.
EN 28
Page 67
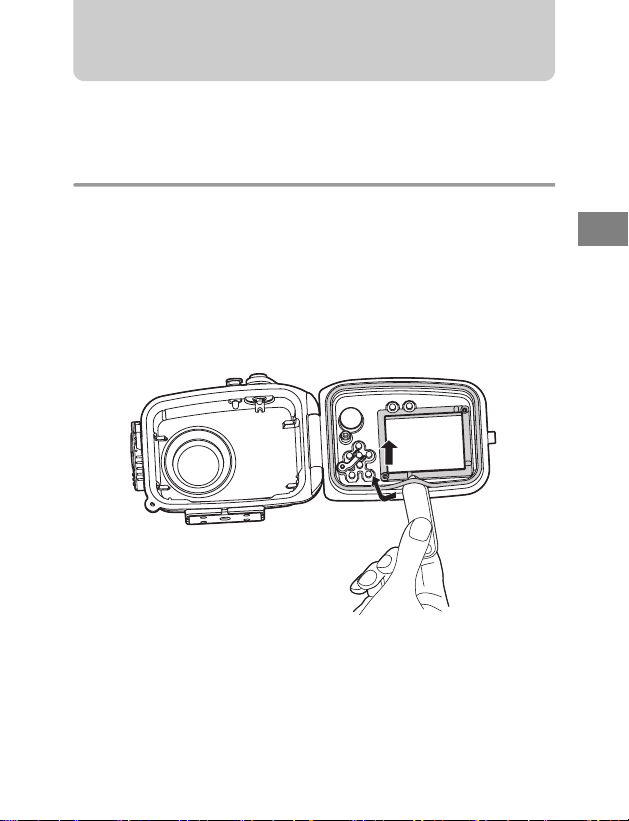
7. Maintaining the Waterproof Function
Whenever you open the rear lid of the Case, always be sure to perform
the O-ring maintenance operation as described below.
Remove the O-ring.
Open the Case and remove the O-ring from the Case.
Removal of the O-ring
1 Insert the O-ring remover between the O-ring and the O-ring groove.
2 Slip the tip of the inserted O-ring remover below the O-ring.
(Be careful not to scratch the O-ring groove with the tip of the O-ring
remover.)
3 Hold the O-ring with your fingertips after it has come out of the groove and
remove it from the Case.
EN
EN 29
Page 68
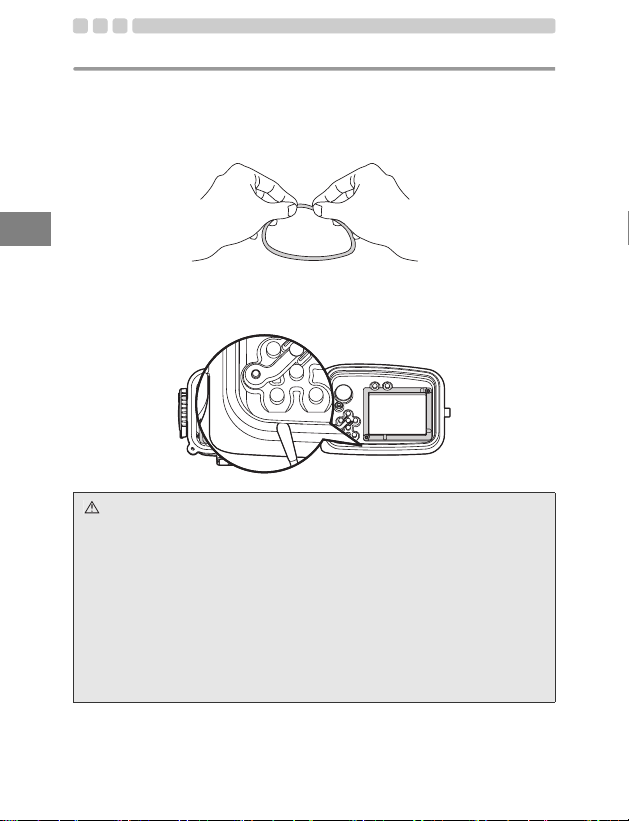
Remove any sand, dirt, etc.
After visually checking that dirt has been removed from the O-ring, checks
for sand and other foreign matter adhered, damage and cracks can be
done by squeezing the entire circumference of the O-ring lightly with your
fingertips.
EN
Remove any foreign matter adhered to the O-ring groove using a lint-free
clean cloth or cotton swab. Also remove any sand or dirt adhered to the
O-ring contact surface on the front lid of the case.
CAUTION:
• Maintenance of the waterproof functions is required even before using this
product underwater for the first time.
• When a mechanical pencil or a similar sharp object is used to remove the
O-ring or to clean the inside of the O-ring groove, the Case and the O-ring
may be damaged and water leakage may occur.
• When the O-ring is checked with the fingertips, take care not to stretch the
O-ring.
• Never use alcohol, thinner, benzene or similar solvents or chemical
detergents to clean the O-ring. When such chemicals are used, the O-ring
may be damaged or its deterioration will be accelerated.
EN 30
Page 69
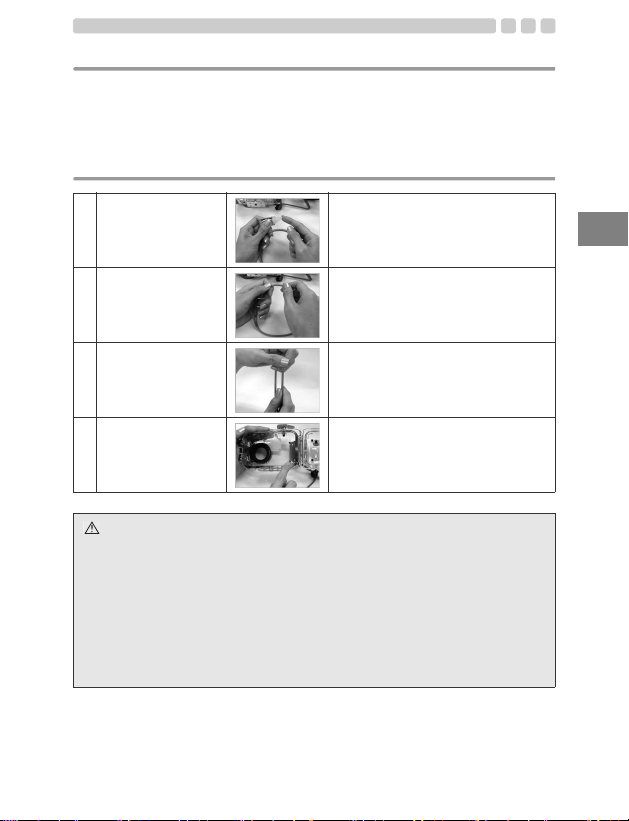
Install the O-ring.
Confirm that no foreign matter is adhered, apply a thin coat of the grease
provided to the O-ring, and fit the O-ring into the groove. At this point,
confirm that the O-ring does not stick out from the groove.
How to Apply Grease to the O-ring
Apply the exclusive
1
lubricant to each Oring.
Spread the lubricant
2
all over the O-ring.
Check that the O-ring
3
is free of scratches or
unevenness.
Apply lubricant on the
4
O-ring contact
surface.
Make sure that your fingers and the
O-ring are free of dirt, and squeeze about
5 mm of lubricant onto a finger. (5 mm is
the most appropriate amount.)
Apply the lubricant with three fingers and
spread it over the ring. Be careful not to
use force as this may stretch the O-ring.
After spreading the lubricant, check
visually and by touch that the O-ring is
not scratched and that its surface is flat.
If it is damaged in any way, be sure to
replace it with a brand-new O-ring.
Use the lubricant remaining on the
fingers to clean and lubricate the case’s
contact surface.
CAUTION:
• Always perform maintenance of the waterproof function even when the
Case has been opened to exchange the battery or the image storage
during shooting. Neglecting this maintenance may cause water leakage.
• When the Case is not to be used for a long time, remove the O-ring from
the groove to prevent deformation of the O-ring, apply a thin coat of silicone
grease, and store it in a clean plastic bag or the like.
• Drying the Case with salt adhered may impair the function. Always wash
off any salt after use.
EN
EN 31
Page 70
Replace consumable parts.
• The O-ring is a consumable part. Regardless of the number of times the
Case is used, it is recommended that the O-ring be replaced with a new
one at least once a year.
• Deterioration of the O-ring is accelerated by the use conditions and the
storage conditions. Replace the O-ring even before a year has passed
if it shows signs of damage, crack or loss of elasticity.
Note:
EN
Please use genuine Olympus silicone O-ring grease, silica gel and O-ring.
These consumable parts can also be purchased at an Olympus service
station.
EN 32
Page 71

8. Appendix
Q & A on the use of the PT-038
Q1: What digital camera models can be used with this product?
A1: This product (PT-038) is designed exclusively for use with the
FE-230/X-790 digital camera.
Q2: What cautions must be observed when loading the digital
camera into the Case?
A2: Pay special attention to the following items when loading the
camera into the Case.
1 Make sure that the digital camera has enough battery power left.
Battery power is used up very quickly underwater due to frequent
flash use.
2 Check the remaining number of pictures on the image storage.
Please use a card with a sufficient remaining number in order to
reduce the number of times the Case has to be opened and closed.
3 Remove the strap from the digital camera. When the camera is
loaded without removing the strap, the strap may get caught when
the Case is sealed and this will cause water leakage.
4 Turn off the camera.
5 Before sealing the Case, confirm that the O-ring has been installed
properly in the groove on the rear lid of the Case.
6 Confirm that the O-ring and the O-ring contact surface on the front
lid are free of dirt, hairs and other foreign matter.
7 Insert the silica gel for defogging. Please use silica gel for the
Olympus Case.
Q3: What cautions must be observed when using and storing the
Case?
A3: Pay special attention to the following items.
1 When the O-ring contact surface is pressed strongly from the
outside of the Case, or when the Case is twisted, the waterproof
function may be impaired and water leakage may occur.
EN
EN 33
Page 72

2 When the Case is used, left or stored at the following locations,
defective operation or trouble may occur. This should be
avoided.
• Places where the Case can reach high temperature under
direct sunlight or in a car, places with extremely low
temperature and places with extreme temperature variations
• Locations with open fire
• Locations with volatile substances
• Locations subject to vibrations
EN
3 In case of the following handling with a camera loaded into the
Case, the Case and/or the loaded camera may malfunction or may
be damaged. This should be avoided.
• Hitting other objects
• Dropping
• Placing heavy objects on top of the Case
4 When the Case is not used for a long time, trouble may occur due
to formation of mold. Before use, confirm the operation of all
operation parts and perform the advance test and the final test.
Q4: What cautions must be observed when opening and closing
the Case?
A4: Pay special attention to the following items.
1 Do not open and close the Case at locations where there is water
spray or sand.
2 Wipe off all waterdrops from the gap between the front lid and the
rear lid and around projections and recesses such as the open/close
dial. Failure to do so may result in waterdrops in the Case when
opening.
3 When opening the Case, take care that no water will drip from your
hair or body into the Case or onto the camera.
4 When the Case is open, check that no sand, fibers or other foreign
matter is adhered to the O-ring and the O-ring contact surface on the
front lid.
5 Do not touch the camera or the image storage with your hands wet
with sea water.
6 If you detect waterdrops or other signs of water leakage while
shooting, immediately end the dive, perform the water leakage test
again, and confirm that there is no leakage. If the camera is wet,
wipe off any moisture and check the operation.
EN 34
Page 73

Q5: How should the Case be handled after use?
A5: After use, take out the camera as soon as possible and wash the
Case with pure water. In case of use in the ocean, it is effective to
immerse the Case for a certain time in pure water to remove any
salt. Operate the buttons and levers under water to turn the shafts
and wash off any salt. After washing, use a dry cloth without any
salt on it to wipe off any moisture and dry the Case in the shade.
Do not use hot air from a hair dryer or the like and do not dry the
Case under direct sunlight. Exposure to high temperature or direct
sunlight may cause deformation, discoloration or breakage of the
Case and deterioration of the O-ring. Wipe the inside of the Case
with a soft cloth not causing any fibers. Remove the O-ring, wipe
off any salt, sand, dust, etc., and also clean the O-ring groove and
the O-ring contact surface in the same way and then dry them.
When an object with a sharp tip is used to remove the O-ring from
the groove, the O-ring may be damaged and water leakage may
occur. Always use the O-ring remover provided.
Q6: How should I take pictures under water?
A6: Please observe the following items for shooting under water.
1 Fix the protector with the hand strap provided to your wrist.
2 When you place a finger onto the lens window, the finger will appear
in the photo. Pay attention to the position of your fingers when
holding the Case.
3 Hold the Case securely with both hands and press the shutter
button gently to prevent camera shake.
4 Check the image you want to shoot by viewing the digital camera’s
LCD monitor through the Case’s LCD monitor window, and start
shooting. In order to avoid losing shutter chances due to an
exhausted battery, you should always replace a battery with a fully
charged battery before each dive.
EN
EN 35
Page 74

Q7: How can I check for water leakage?
A7: For confirmation, perform the advance test and the final test after
loading the camera. The advance test with immersing the Case
without the camera to the intended use depth to check for water
leakage is the most accurate test, but when this is difficult, it is safer
to perform this test even at a depth of 1 m or in a bathtub. The final
test also can be performed in a bathtub or a bucket.
Q8: What are the causes for entry of water?
EN
A8: The main causes for the entry of water are shown below. Please
check with special care.
1 The O-ring has not been installed.
2 The O-ring is partly or completely outside the groove.
3 Damage, deterioration or deformation of the O-ring
4 Sand, fibers, hair or other foreign matter on the O-ring
5 Sand, fibers, hair or other foreign matter on the O-ring groove or the
O-ring contact surface
6 Catching of the strap, the bag of silica gel, etc. when sealing the
Case
7 Throwing the Case from a boat into the water, jumping with the
Case into the water, or other sudden application of strong forces
onto the Case. When entering the water, hand the Case over gently
or avoid impacts in other ways.
Q9: What are the important points for O-ring maintenance?
A9: Pay special attention to the following items.
1 Never use alcohol, thinner, benzene or similar organic solvents or
chemical detergents to clean the O-ring. When such chemicals are
used, the O-ring may be damaged or its deterioration will be
accelerated.
2 Use the genuine Olympus silicone O-ring grease (white cap). The
grease (red cap) used for previous Cases up till PT-008 and the
grease from other companies are not suitable for this silicone
O-ring. The use of such grease may cause deterioration of the
surface and impairment of the waterproof function.
EN 36
Page 75

3 In order to avoid deformation of the O-ring when the Case is not
used for a long time, remove the O-ring from the Case, apply a thin
coat of the special grease, and store the O-ring in a clean plastic
bag. For reuse, confirm that the O-ring is free of damage and cracks,
that it has sufficient elasticity, that the surface is free of stickiness
and other abnormalities, and use it after applying a thin coat of the
special grease. Excessive application of grease does not improve
the waterproof function or the permissible withstand pressure. It will
cause sand and dust to adhere more easily. A thin, uniform coat
produces the best result.
4 The O-ring is a consumable part. Replace it at least once a year.
5 Deterioration of the O-ring is accelerated by the use conditions and
the storage conditions. Replace the O-ring immediately with a new
one if it shows signs of damage, crack or loss of elasticity.
Q10: What are the important points for Case maintenance?
A10: Pay special attention to the following items.
1 Never use the following chemicals for cleaning, corrosion protection,
defogging, repair or other purposes.
• Never use alcohol, thinner, benzene or similar volatile
organic solvents or chemical detergents to clean the Case.
Pure water or lukewarm water is sufficient for cleaning.
• Do not use anticorrosion agents on the metal parts. The
metal parts are made of aluminum, brass or stainless steel.
Cleaning with pure water is sufficient.
• Do not use commercial defogging agents. Always use the
genuine Olympus defogging silica gel.
• Do not use adhesive for repairs or other purposes. When
repair is required, please contact a service station of our
company or your dealer.
Q11: Please tell me about repairs.
A11: When repair is required, please contact a service station of our
company or your dealer. Do not try to repair, disassemble or modify
the Case yourself. Repair, disassembly or modification by you or
third parties not authorized by Olympus invalidates the guarantee.
EN
EN 37
Page 76
Q12: What are the model names of the accessories for the PT-038?
A12: The following accessories are being sold.
1 O-ring for the PT-038 body (POL-032): This is a silicone rubber O-
ring packing to be installed in the PT-038 body to make it waterproof.
O-rings for other Case models cannot be used.
2 Silicone O-ring grease (PSOLG-1): This is a special grease for
silicone O-ring maintenance.
3 Silica gel (SILCA-5S): This is a desiccant used to prevent fogging of
EN
the glass parts of the Case. The quantity is five bags.
* Please contact your dealer or a service station of our
company when replacement is required. Replacement will
be made against payment.
* The PT-038 is not provided with a balance weight.
Specifications
Compatible models Olympus digital camera
Pressure resistance Depth of up to 40 m
Main materials Body: Transparent polycarbonate
Dimensions Width 127.0 mm x height 97.0 mm x thickness
Weight 260 g (camera and accessories not included)
* We reserve the right to change the external appearance and the
specifications without notice.
FE-230/X-790
Open/close dial, shutter button and zoom lever:
Red polycarbonate
Lens window: FL glass
Operation buttons: Stainless steel Nickelplated brass
76.0 mm (projections not included)
EN 38
Page 77
Page 78

Nous vous remercions d’avoir acheté le caisson étanche PT-038.
Veuillez lire attentivement ce mode d’emploi et utiliser correctement
et de façon sûre le produit. Veuillez conserver ce manuel pour
pouvoir vous y référer ultérieurement.
Un mauvais usage peut endommager l’appareil de photo à
l’intérieur du caisson, suite à une fuite d’eau; la réparation peut
s’avérer impossible.
Avant utilisation, effectuez un test préliminaire comme décrit dans
ce manuel.
Limitation de garantie
FR
zToute copie partielle ou totale non autorisée de ce mode d’emploi, sauf
pour des besoins privés, est interdite. La reproduction non autorisée est
strictement interdite.
zOLYMPUS IMAGING CORP. ne peut être tenu responsable de quelque
façon que ce soit de pertes de profits ou de réclamations de tiers en cas
de dommages dus à l’utilisation incorrecte du produit.
zOLYMPUS IMAGING CORP. ne peut être tenu responsable des
dommages, des pertes de profits, etc. découlant de la perte de données
image en raison de défauts, de démontage, de réparation ou de
modification de ce produit par des personnes, autres que les tiers
autorisés par OLYMPUS IMAGING CORP., et pour d’autres raisons.
Veuillez lire cette section avant d’utiliser le produit
Ce produit est un instrument de précision conçu pour l’utilisation à une
profondeur d’eau de 40 m. Veuillez le manipuler avec suffisamment de
soin.
zAfin de garantir l’utilisation correcte et sûre du caisson, veuillez lire
toutes les instructions relatives à la manipulation et à la vérification du
système, ainsi qu’à son entretien et son rangement.
zOLYMPUS IMAGING CORP. ne peut être tenu responsable des
dommages causés à l’appareil par la présence d’eau dans le caisson.
De plus, les dépenses inhérentes aux dommages causés sur les
composantes internes ou à la perte du contenu enregistré à cause d’une
infiltration d’eau dans l’appareil photo ne seront pas remboursées.
zOLYMPUS IMAGING CORP. ne paiera aucune compensation en cas
d’accidents (corporels ou matériels) survenant au cours de l’utilisation
de ce produit.
zAvant utilisation, bien lire les précautions imprimées sur l’emballage.
FR 2
Page 79
Pour une utilisation sûre
Ce mode d’emploi utilise divers pictogrammes pour une utilisation
correcte du produit et pour prévenir l’utilisateur et d’autres personnes de
danger aussi bien que de dommages. Ces pictogrammes et leurs
significations sont indiqués ci-dessous.
AVERTISSEMENT
ATTENTION
Indique une situation pouvant entraîner la mort ou
des blessures graves en ignorant cette indication.
Indique une situation pouvant entraîner des
blessures de personnes ou des dommages
matériels en ignorant cette indication.
AVERTISSEMENT
1 Garder ce produit hors de la portée des bébés et des enfants. Les
types d’accidents suivants pourraient se produire.
• Blessures en faisant tomber sur le corps d’une certaine hauteur.
• Blessures de membres du corps pris dans des pièces en ouvrant et
fermant.
• Risque d’avaler des petites pièces. Consultez immédiatement un
médecin si un enfant a avalé des pièces.
• Le déclenchement du flash devant les yeux risque de causer un
trouble permanent de la vue, etc.
2 Ne pas ranger avec une batterie dans l’appareil photo numérique
laissé dans ce produit. Le rangement avec une batterie en place
pourrait entraîner une fuite du liquide de la batterie et un incendie.
3 Si une fuite d’eau se produit avec un appareil photo installé dans ce
produit, retirer rapidement la batterie de l’appareil. Il y a un risque
d’allumage et d’explosion en générant de l’hydrogène.
4 Ce produit est fabriqué à partir de résine. Il y a un risque de se blesser
s’il se casse à cause d’un impact violent avec un rocher ou d’autres
objets durs. Veuillez le manipuler avec suffisamment de soin.
5 Le gel de silice et la graisse silicone pour les joints de ce produit ne
sont pas comestibles.
FR
FR 3
Page 80

ATTENTION
1 Ne pas démonter ni modifier ce produit. Ce qui pourrait causer une
fuite d’eau ou d’autres problèmes. En cas de démontage ou
modification par des personnes autres que celles agréées par
OLYMPUS IMAGING CORP., la garantie ne s’appliquera pas.
2 Ne pas placer ce produit dans des endroits avec des températures
anormalement hautes ou basses ou dans des endroits avec des
variations de températures extrêmes. Le produit risque de se
détériorer.
3 L’ouverture et la fermeture dans des endroits avec beaucoup de sable,
de poussière ou de saleté risque de nuire à l’étanchéité et causer une
fuite d’eau. Cela doit être évité.
4 Ce produit a été conçu pour l’utilisation à une profondeur d’eau de 40
FR
m. Veuillez prendre note que plonger à une profondeur dépassant 40
m risque de causer une déformation permanente ou endommager le
caisson et l’appareil photo qui s’y trouve à l’intérieur ou risque
d’entraîner une fuite d’eau.
5 Ne pas soumettre le caisson à des traitements brutaux, tels que sauter
à l’eau le caisson à la main ou dans une poche extérieure ou jeter le
caisson dans l’eau, cela pourrait provoquer des fuites d’eau. Toujours
manipuler le caisson avec soin.
6 Si l’appareil contenu dans le caisson devait être mouillé en raison
d’une fuite d’eau, etc., essuyez immédiatement toute trace d’humidité
et vérifiez le bon fonctionnement de l’appareil.
7 Veuillez retirer le joint avant de prendre l’avion, car la différence de
pression atmosphérique pourrait rendre l’ouverture du caisson
impossible.
8 Afin de garantir la manipulation et le fonctionnement sans souci et en
toute sécurité de l’appareil numérique avec ce produit, veuillez lire le
mode d’emploi de l’appareil attentivement.
9 Lors du scellage du produit, s’assurer qu’il ne reste aucun corps
étranger, tel que sable, saleté ou cheveux, sur le joint ou les surfaces
de contact.
Batteries
z
Utiliser exclusivement une batterie lithium-ion Olympus (LI-42B ou LI-40B).
zFaire attention à ce que les bornes de la batterie ne deviennent pas
mouillées. Ce qui pourrait causer des problèmes ou des accidents.
zLire attentivement le mode d’emploi de l’appareil photo numérique pour
les autres précautions à propos de la batterie.
FR 4
Page 81
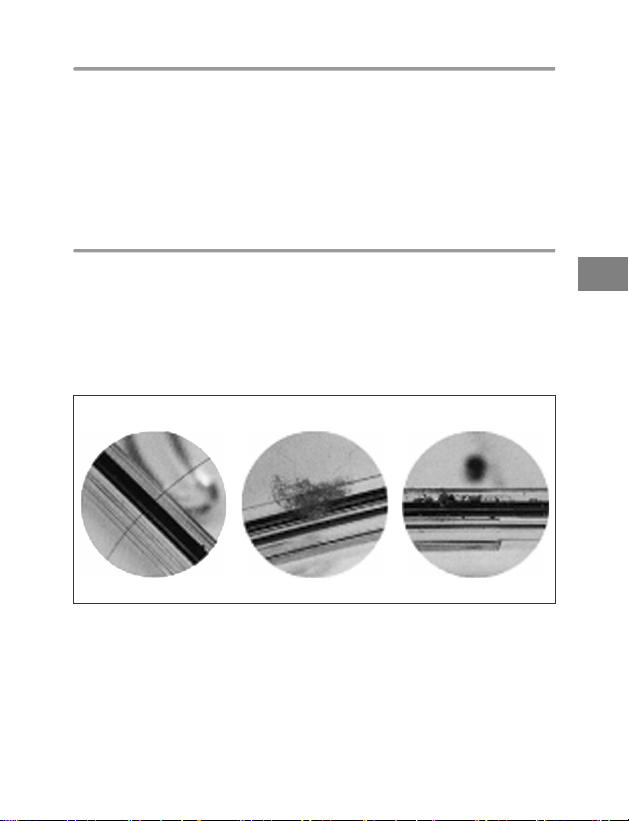
Réglage du mode de scène de prise de vue sous-marine
zLes appareils photo FE-230/X-790 disposent de plusieurs modes de
scène de prise de vue pour faciliter la prise de vue sous-marine, y
compris les modes grand angle et gros plan. Il faut tout simplement
sélectionner le mode qui convient le plus à la scène actuelle.
Pour des détails, voir “5. Prise de vue sous-marine selon le type de
scène” (P.24) de ce manuel.
zConsulter le mode d’emploi de l’appareil photo pour de plus amples
renseignements sur le réglage de mode.
Pour éviter des accidents de fuite d’eau
Si une fuite d’eau se produit pendant l’utilisation de ce produit, la
réparation de l’appareil photo logé dans ce produit peut devenir
impossible. Veuillez observer les précautions suivantes pour l’utilisation.
1
Avant de remettre ce produit dans son emballage, s’assurer qu’il n’y a
pas de cheveux, de fibres, de grains de sable ou d’autres matières
étrangères collés non seulement sur le joint, mais aussi à la surface de
contact. Même un seul cheveu ou un seul grain de sable peut causer
une fuite d’eau. Veuillez vérifier l’appareil avec le plus grand soin.
Exemples de matières étrangères qui se collent au joint
Cheveu Fibres Grains de sable
2 Le joint est une pièce consommable. Veuillez le remplacer au moins
une fois par an. Avant chaque utilisation, effectuer l’entretien régulier.
3 La détérioration du joint évoluera en fonction des conditions
d’utilisation et de stockage. Remplacer immédiatement le joint s’il est
endommagé, s’il présente des fissures ou s’il a perdu de son élasticité.
4 Lors de l’entretien du joint, nettoyer l’intérieur de la gorge du joint et
s’assurer de l’absence de saleté, de poussière, de sable ou d’autres
matières étrangères.
5 Appliquer la graisse silicone spécifiée sur le joint.
FR
FR 5
Page 82

6
L’étanchéité n’est pas efficace si le joint n’est pas installé correctement.
En installant le joint, faire attention qu’il ne sorte pas de la gorge et qu’il
ne soit pas déformé. De plus, en scellant le caisson, fermer le couvercle
après confirmation que le joint n’est pas sorti de la gorge.
7 Ce produit est une construction hermétique fabriquée en plastique
(polycarbonate). Quand il est laissé longtemps dans une voiture, sur
un bateau, à la plage ou à d’autres endroits atteignant une
température élevée, ou s’il est sujet à une force extérieure irrégulière
pendant longtemps, il risque de se déformer et la fonction étanchéité
risque d’être perdue. Faire suffisamment attention au contrôle de la
température. De plus ne pas placer d’objets lourds sur le produit
pendant le stockage ou le transport, et éviter un stockage insensé.
8
Lorsque la surface de contact du joint est pressée fortement de l’extérieur
FR
du caisson, ou lorsque le caisson est déformé, la fonction étanchéité risque
d’être perdue. Faire attention de ne pas exercer une force excessive.
9 Veuillez vous assurer d’effectuer le test préliminaire et le contrôle final
chaque fois avant d’utiliser le caisson.
0 Si vous apercevez des gouttes d’eau ou d’autres signes de fuites
d’eau en prenant des vues, arrêter immédiatement la plongée, retirer
toute eau de l’appareil photo et du produit, contrôler conformément au
“Contrôle final”, et confirmer si une fuite s’est produite ou non.
Manipulation du produit
zL’utilisation ou le stockage du produit dans les endroits suivants risque
de causer des mauvais fonctionnements, des pannes, des problèmes,
des dommages, un incendie, de la buée interne, ou une fuite d’eau. Cela
doit être évité.
• Des lieux à température élevée, tels le plein soleil, dans un véhicule
fermé, etc., et/ou où il existe de grandes différences de température.
• Des endroits à proximité de feux ouverts
• Des profondeurs sous-marines au-delà de 40 mètres
• Des endroits soumis à des vibrations
• Des endroits trop chauds et humides ou des endroits avec des
variations de températures extrêmes
• Des endroits où des produits chimiques volatiles sont rangés ou utilisés
zCe produit est fabriqué en résine de polycarbonate avec une excellente
résistance aux chocs, mais il est possible de l’endommager s’il est
raclée contre des rochers, etc. Il peut également se casser quand il
frappe des objets durs ou s’il est jeté.
zCe produit n’est pas un caisson pour amortir les chocs à l’appareil photo
à l’intérieur. Lorsque ce produit avec un appareil photo numérique à
l’intérieur est sujet à des impacts ou que des objets lourds sont placés
dessus, l’appareil photo numérique risque de devenir endommagé.
Veuillez le manipuler avec suffisamment de soin.
FR 6
Page 83
z
Si le produit n’est pas utilisé pendant une longue durée, la performance
d’étanchéité risque de diminuer à cause de la dégradation du joint, etc. Avant
utilisation, toujours effectuer le test préliminaire et la vérification finale.
z
Ne pas appliquer de force excessive sur la écrou de pied.
zLorsqu’un flash est utilisé en utilisant le caisson, des ombres risquent
d’apparaître sur les bords de la vue. C’est particulièrement perceptible
en prenant des vues en mode gros plan sur le côté grand angle. Veuillez
utiliser un flash après confirmation d’image.
zNe pas utiliser les produits chimiques suivants pour le nettoyage, pour
une protection anticorrosion, pour éviter la formation de buée, pour des
réparations ou d’autres raisons. Utilisés pour le caisson directement ou
de façon indirecte (avec les produits chimiques vaporisés), ils risquent
de causer des fissures sous haute pression ou d’autres problèmes.
Produits chimiques qui ne
peuvent pas être utilisés
Diluants organiques
volatils,
détergents chimiques
Agent anticorrosion Ne pas utiliser d’agents anticorrosion. Les parties
Agents antibuée du
commerce
Graisse autre que la
graisse silicone spécifiée
Colle Ne pas utiliser de colle pour des réparations ou
zNe pas effectuer d’opérations autres que celles spécifiées dans ce
mode d’emploi, ne pas retirer ni modifier des pièces autres que celles
spécifiées.
Tout problème en prenant ni utiliser des vues ou avec le matériel
consécutif aux actions précédentes sera en dehors de la garantie.
zOLYMPUS IMAGING CORP. ne saura être tenu responsable des
dommages causés à l’appareil par la présence d’eau dans le caisson.
Ne pas nettoyer le caisson avec de l’alcool, de
l’essence, un dissolvant ou d’autres diluants
organiques volatils, ni avec des détergents
chimiques, etc. De l’eau pure ou de l’eau tiède suffit.
métalliques sont en acier inoxydable ou en bronze.
Il suffit de les laver avec de l’eau pure.
Ne pas utiliser d’agents antibuée du commerce.
Toujours utiliser le gel de silice déshydratant spécifié.
N’utiliser que la graisse silicone spécifiée pour le joint
silicone, sinon la surface du joint risque de se
détériorer et une fuite d’eau pourrait se produire.
d’autres raisons. Si une réparation est nécessaire,
veuillez contacter un revendeur ou un centre de
service de notre compagnie.
Explication
zOLYMPUS IMAGING CORP. ne paiera aucune compensation en cas
d’accidents (corporels ou matériels) survenant au cours de l’utilisation
de ce produit.
FR
FR 7
Page 84

SOMMAIRE
Limitation de garantie ............................................................2
Veuillez lire cette section avant d’utiliser le produit ...............2
Pour une utilisation sûre........................................................ 3
Batteries ................................................................................4
Réglage du mode de scène de prise de vue sous-marine ....5
Pour éviter des accidents de fuite d’eau................................ 5
Manipulation du produit .........................................................6
1. Préparatifs......................................................................10
Contrôle du contenu de l’emballage. ................................... 10
FR
2. Contrôle préliminaire du caisson....................................15
3. Mise en place de l’appareil photo numérique.................16
Nomenclature des pièces.................................................... 11
Mise en place de la courroie................................................ 12
Maîtriser le fonctionnement de base. ..................................12
Tenue du caisson ................................................................ 12
Comment appuyer sur le déclencheur................................. 13
Comment changer le mode de prise de vue........................ 13
Comment utiliser le levier de zoom ..................................... 13
Réglage du levier de zoom.................................................. 14
Utilisation de la touche POWER.......................................... 14
Test préliminaire avant utilisation ........................................15
Test préliminaire.................................................................. 15
Contrôle de l’appareil photo numérique............................... 16
Contrôle de batterie............................................................. 16
Confirmation du nombre de vues restant à prendre............ 16
Retirer la courroie de l’appareil photo numérique................ 16
Préparer l’appareil photo. ....................................................16
Appareils photo numériques applicables............................. 16
Mettre en marche l’appareil numérique............................... 16
Vérifier le fonctionnement de l’appareil photo. .................... 17
Ouvrir le caisson.................................................................. 17
Insérer l’appareil photo numérique. ..................................... 18
Introduction du gel de silice................................................. 18
Vérifier après insertion......................................................... 19
Sceller le caisson................................................................. 19
Vérifier le fonctionnement de l’appareil photo installé. ........20
FR 8
Page 85

Vérifier le mode de prise de vue et de scène de prise de
vue. ...................................................................................20
Montage et retrait du bouchon d’objectif. ............................21
Effectuer les contrôles finaux. .............................................21
Inspection visuelle............................................................... 21
Test final (test de fuite d’eau).............................................. 22
4. Prise de vues sous l’eau ................................................23
Utilisation de la dragonne.................................................... 23
Prise de vues....................................................................... 23
Confirmer la vue sur l’écran ACL......................................... 23
Appuyer doucement sur le déclencheur.............................. 23
Précaution en utilisant le flash............................................. 23
5. Prise de vue sous-marine selon le type de scène..........24
Types de scènes sous-marines........................................... 24
kGrand angle sous-marin 1.............................................. 24
lGrand angle sous-marin 2.............................................. 24
HGros plan sous-marin..................................................... 24
Comment sélectionner le mode de scène de prise de vue ....25
6. Manipulation après la prise de vue ................................26
Essuyer toute goutte d’eau.................................................. 26
Sortir l’appareil photo numérique......................................... 27
Laver le caisson avec de l’eau pure. ...................................28
Sécher le caisson. ...............................................................28
7. Maintien de la fonction d’étanchéité...............................29
Retirer le joint. .....................................................................29
Retrait du joint ..................................................................... 29
Retirer tout grain de sable, poussière, etc........................... 30
Installer le joint..................................................................... 31
Comment appliquer la graisse sur le joint ........................... 31
Remplacer les pièces consommables. ................................ 32
8. Annexe...........................................................................33
Q & R sur l’utilisation du PT-038 .........................................33
Fiche technique ................................................................... 38
FR
FR 9
Page 86
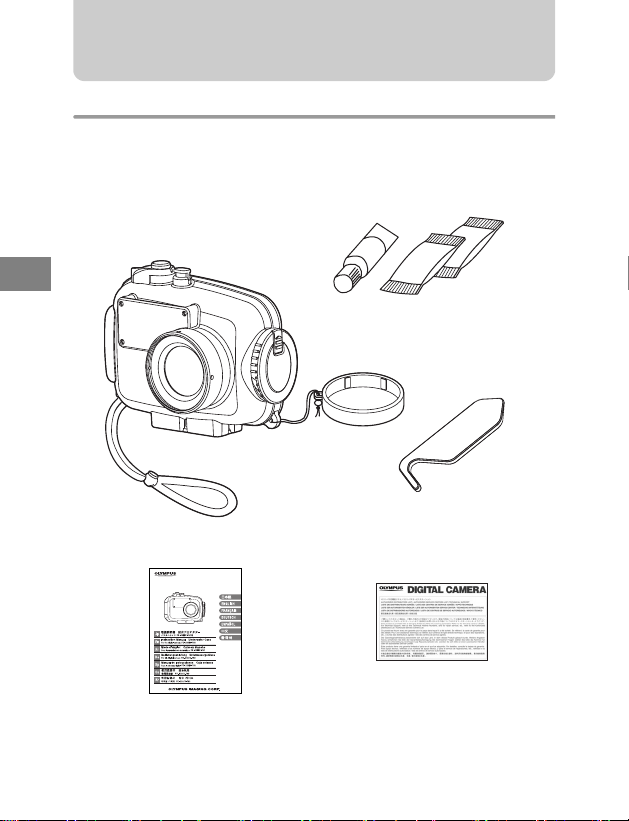
1. Préparatifs
Contrôle du contenu de l’emballage.
Vérifier que tous les accessoires sont bien dans la boîte.
Communiquer avec le revendeur si des accessoires manquent ou sont
endommagés.
Graisse silicone
Corps du caisson
FR
Bouchon d’objectif
Dragonne
Outil de retrait de joint
(Vérifier que le joint est normal.)
PT-038
Sel de silice
FR 10
Liste des distributeurs de OLYMPUS
Mode d’emploi (ce manuel)
Page 87
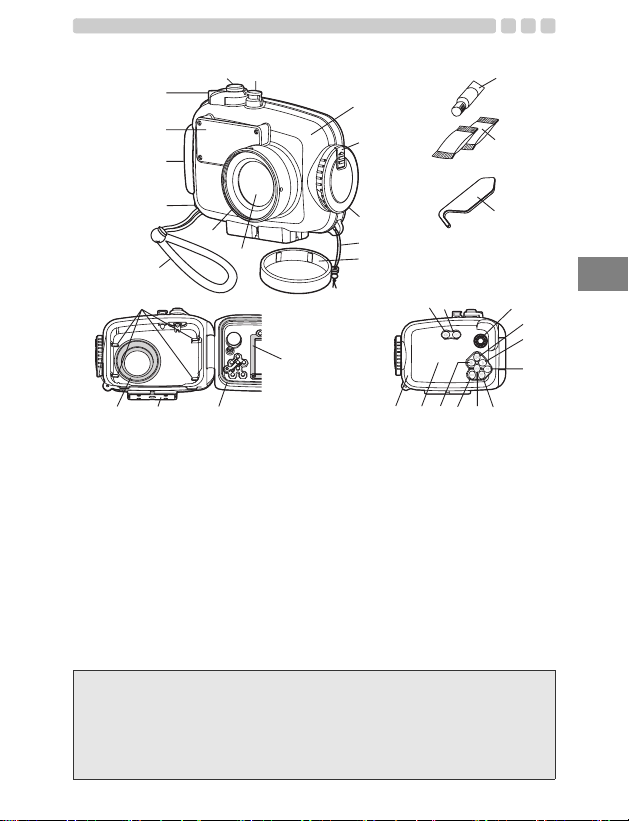
Nomenclature des pièces
pqrs
u
4
3
2
1
5
v
6
7
w
d
c
e
1 Poignée
2 Diffuseur
*
3 Commande de zoom
*
4 Déclencheur
*
5 Touche POWER
6 Couvercle avant
7 Verrou de glissière
8 Molette d’ouverture/
de fermeture
9 Courroie du bouchon
d’objectif
0 Bouchon d’objectif
a Fenêtre d’objectif
b Bague d’objectif
b
a
f
ghi
c Dragonne
d Œillet de dragonne
e Rails de guidage de
chargement
f Cache intérieur d’écran
ACL
g Joint
h Écrou de pied
i Cache d’arrêt de lumière
*
j Touche K
*
k Touche q
*
l Bouton de molette Mode
*
m Touche F/Molette de
défilement
*
n Touche #/Molette de
défilement
8
9
0
jk
t
*
o Touche OK
*
p Touche S
*
q Touche Y/Molette de
*
r Touche MENU
*
s Touche &/Molette de
t Fenêtre d’écran ACL
u Couvercle arrière
v Graisse pour joint
w Sel de silice
x Outil de retrait de joint
défilement
défilement
silicone
(tube à capuchon blanc)
x
l
m
n
o
Remarque:
Les pièces de fonctionnement du caisson marquées par * correspondent aux
pièces de fonctionnement de l’appareil photo numérique. Lorsque les pièces
de fonctionnement du caisson sont activées, les fonctions correspondantes
de l’appareil photo numérique seront commandées. Pour des détails sur les
fonctions, se référer au mode d’emploi pour l’appareil photo numérique.
FR
FR 11
Page 88
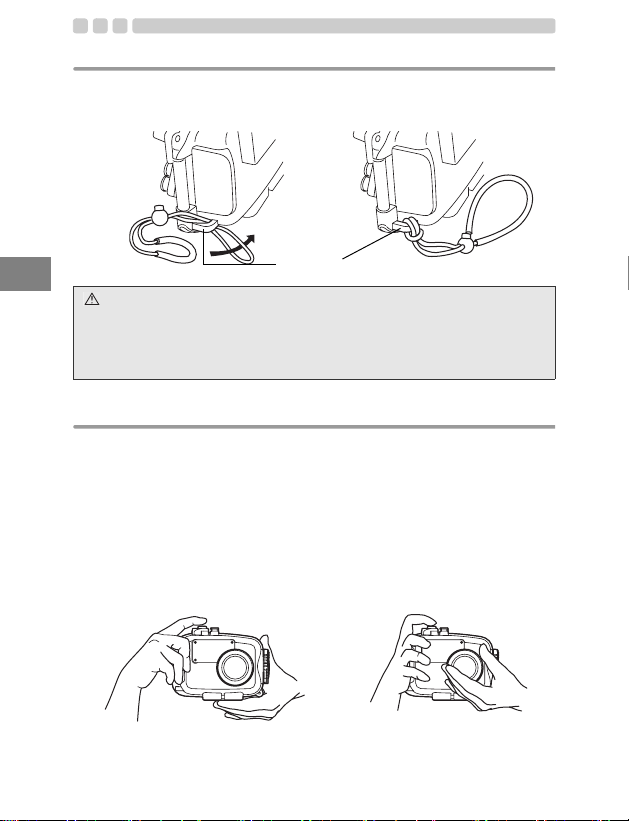
Mise en place de la courroie.
Installer la courroie sur le corps du caisson.
Illustration de l’assemblage Assemblage terminé
FR
Dragonne
Œillet de dragonne
ATTENTION:
Veuillez installer correctement la courroie comme montré ci-dessus. Notre
compagnie décline toute responsabilité pour des dommages, etc.
occasionnés par la chute du caisson à cause d’un assemblage incorrecte de
la courroie.
Maîtriser le fonctionnement de base.
Veuillez bien maîtriser le fonctionnement de base du caisson avant de
prendre des vues.
Tenue du caisson
Tenir fermement le caisson avec les deux mains en gardant les coudes
près du corps et tenir le caisson pour pouvoir confirmer la vue sur l’écran
ACL de l’appareil photo numérique à travers la fenêtre de l’écran ACL du
caisson.
Bon exemple Mauvais exemple
FR 12
Page 89
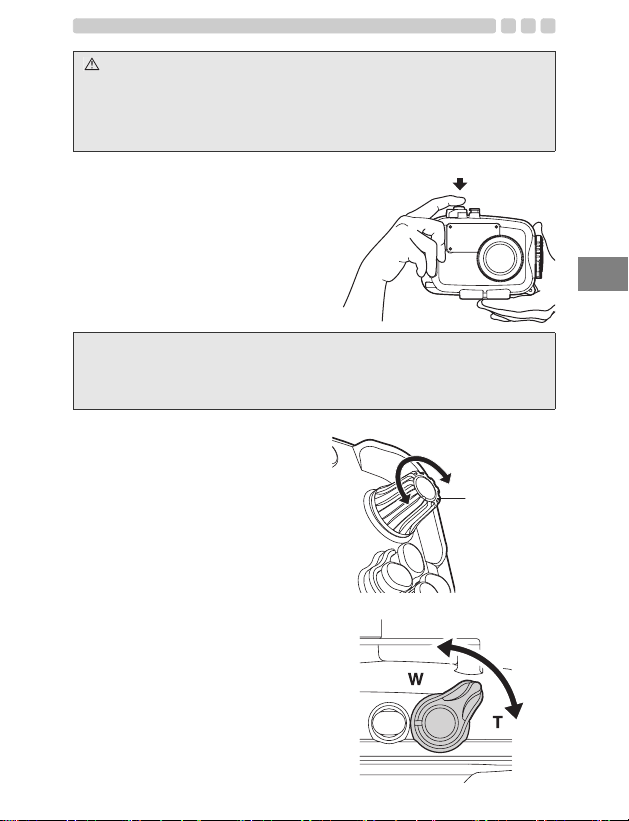
ATTENTION:
• Ne pas exercer une force excessive sur la fenêtre de l’objectif ni sur la
bague d’objectif.
• Faire attention de ne pas mettre les doigts, etc. sur la fenêtre d’objectif ni
sur le diffuseur de flash.
Comment appuyer sur le
déclencheur
Appuyer doucement sur le
déclencheur pour que l’appareil ne
bouge pas.
Remarque:
Pour de plus amples renseignements sur le fonctionnement du déclencheur
sur l’appareil photo, veuillez consulter au mode d’emploi de l’appareil photo
numérique.
Comment changer le mode de
prise de vue
Pour changer le mode de prise de
vue de l’appareil numérique, tourner
le bouton de molette Mode du
caisson.
Confirmer le mode de prise de vue
sur l’écran ACL.
Bouton de
molette Mode
Comment utiliser le levier de
zoom
Le zoom est possible en
commandant le levier de zoom de
ce caisson correspondant au levier
de zoom de l’appareil photo
numérique chargé dans le caisson.
FR
FR 13
Page 90
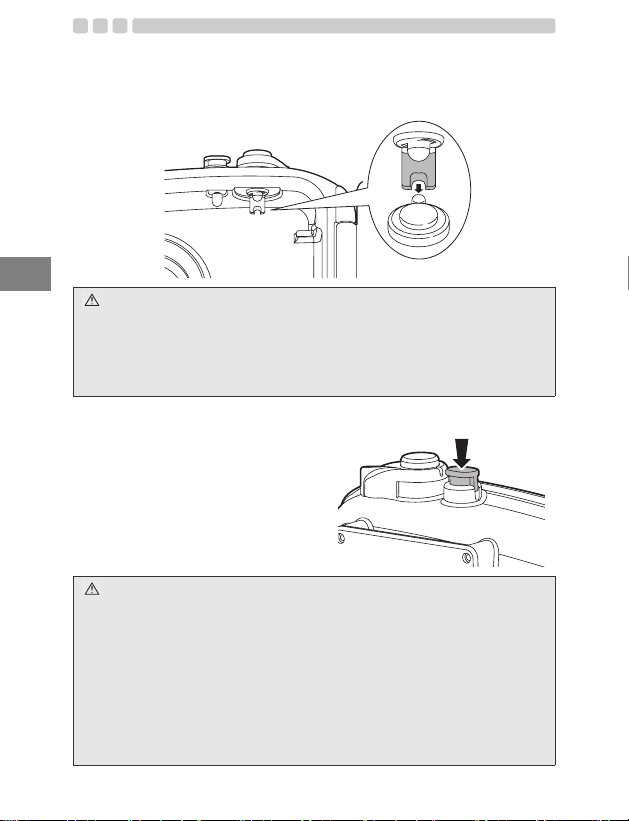
Réglage du levier de zoom
En chargeant l’appareil photo numérique dans le caisson, disposer la
partie en saillie du levier de zoom de l’appareil photo dans la partie en
creux du levier de zoom à l’intérieur du caisson.
FR
ATTENTION:
En chargeant l’appareil photo, vérifier que la partie en saillie du levier de zoom
de l’appareil est réglée correctement dans la partie en creux du levier de zoom
du caisson. Si le réglage est insuffisant, le chargement de l’appareil photo
devient imparfait et il peut être impossible de sceller le caisson ou le zoom
risque de ne pas fonctionner. Un mauvais scellement causera une fuite d’eau.
Utilisation de la touche POWER
Appuyer sur la touche POWER pour
mettre l’appareil photo en marche
Touche POWER
ou l’arrêter.
ATTENTION:
Pour économiser l’énergie de la batterie, l’appareil photo passe automatiquement en
mode veille et l’écran ACL s’éteint lorsque aucune opération n’est effectuée après la
mise en route de l’appareil. Lorsque ce mode est activé, vous ne pouvez prendre
aucune photo et ce, même si vous appuyez complètement sur le déclencheur. Si
vous souhaitez prendre une photo, utilisez le levier de zoom ou d’autres touches pour
rétablir le mode utilisé par l’appareil photo avant l’activation du mode veille. Si
l’appareil est inutilisé pendant 12 minutes, il s’éteint automatiquement. Appuyez sur
la touche POWER pour mettre l’appareil photo en marche.
Pour de plus amples renseignements, consulter le mode d’emploi de
l’appareil photo numérique.
FR 14
Page 91
2. Contrôle préliminaire du caisson
Test préliminaire avant utilisation
Ce caisson a été le sujet d’un contrôle de qualité poussé pour les pièces
pendant la fabrication et d’inspections approfondies des fonctions
pendant l’assemblage. De plus, un test de pression d’eau est effectué
avec un testeur de pression pour tous les produits pour confirmer que la
performance est conforme aux spécifications.
Toutefois, la fonction d’étanchéité peut être endommagée en fonction des
conditions de transport et de stockage.
Avant de plonger, toujours effectuer le test préliminaire suivant et le test
final après l’assemblage de l’appareil.
Test préliminaire
1 Avant d’installer l’appareil photo numérique dans le caisson, plonger
le caisson vide à la profondeur d’eau prévue pour confirmer qu’il n’y a
pas de fuites d’eau.
2 Les principales causes de fuite d’eau sont les suivantes:
• Le joint n’a pas été installé.
• Une partie du joint ou la totalité du joint est à l’extérieur de la rainure
spécifiée.
• Dommages, fissures, détérioration ou déformation du joint
• Sable, fibres, cheveux ou autre matières étrangères sur la rainure
du joint ou sur la surface de contact du joint sur le couvercle avant
• Rainure ou surface de contact du joint endommagées sur le
couvercle avant
• Levier de zoom coincer par la courroie, le sac de gel de silice, etc.
au moment de sceller le caisson
Effectuer le test une fois que toutes les causes susmentionnées aient
été éliminées.
ATTENTION:
• La méthode la mieux appropriée pour le contrôle de fuite d’eau est de
plonger le caisson à la profondeur d’eau prévue. Lorsque c’est difficile, les
fuites d’eau peuvent également être contrôlées en faible profondeur sans
pression d’eau. Ne pensez pas que c’est ennuyeux, mais effectuez ce test.
• Si une fuite d’eau est constatée en manipulation normale pendant le test
préliminaire, ne pas utiliser le caisson et contacter Olympus.
FR
FR 15
Page 92
3. Mise en place de l’appareil photo numérique.
Contrôle de l’appareil photo numérique.
Contrôler l’appareil photo numérique avant de le charger dans le caisson.
Contrôle de batterie
La prise de vue sous-marine utilise très souvent le flash.
Vérifier que l’énergie restante de la batterie est suffisante.
Remarque:
Pour éviter de perdre des opportunités de prise de vue à cause d’une
batterie épuisée, vous devriez toujours mettre une batterie complètement
FR
rechargée avant chaque plongée.
Confirmation du nombre de vues restant à prendre
Vérifier que le stockage de vue a un nombre suffisant de vues restant à prendre.
Retirer la courroie de l’appareil photo numérique.
Si une courroie est fixée à l’appareil photo numérique, elle doit être retirée.
ATTENTION:
• Lorsqu’un appareil photo numérique est chargé sans retirer la courroie,
elle risque d’être prise entre les couvercles du caisson et pourrait causer
une fuite d’eau.
• En retirant la courroie, manipuler l’appareil avec suffisamment de soin.
Notre compagnie décline toute responsabilité pour des dommages
occasionnés par la chute de l’appareil.
Préparer l’appareil photo.
Appareils photo numériques applicables
Ce produit (PT-038) est conçu pour l’utilisation exclusive avec les
appareils photo numériques FE-230/X-790.
Mettre en marche l’appareil numérique.
Pour économiser l’énergie de la batterie, l’appareil photo passe
automatiquement en mode veille et l’écran ACL s’éteint lorsque aucune
opération n’est effectuée après la mise en route de l’appareil. Lorsque ce
mode est activé, vous ne pouvez prendre aucune photo et ce, même si
vous appuyez complètement sur le déclencheur. Si vous souhaitez prendre
une photo, utilisez la levier de zoom ou d’autres touches pour rétablir le
mode utilisé par l’appareil photo avant l’activation du mode veille. Si
l’appareil est inutilisé pendant 12 minutes, il s’éteint automatiquement.
Appuyez sur la touche POWER pour mettre l’appareil photo en marche.
FR 16
Page 93
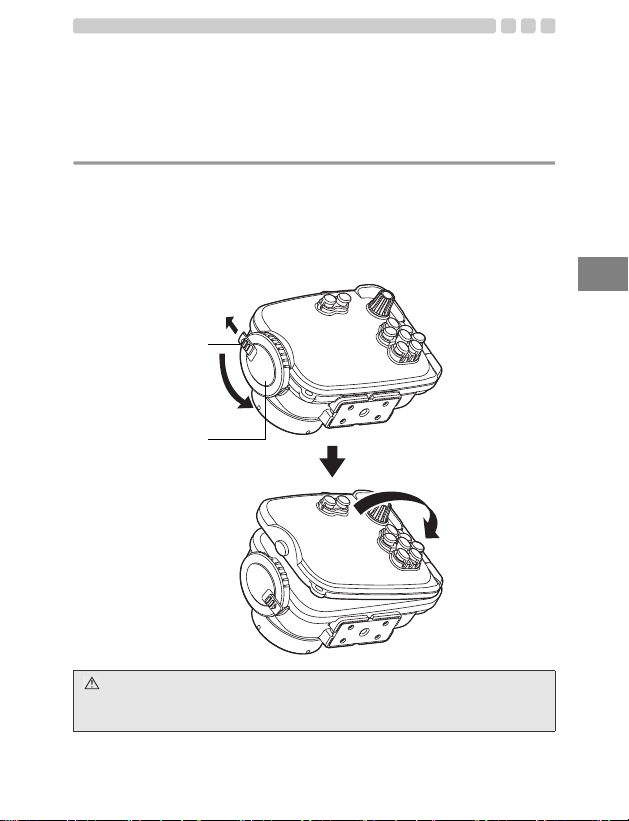
Vérifier le fonctionnement de l’appareil photo.
Vérifier si l’appareil photo fonctionne normalement tel que décrit dans son
mode d’emploi. Après vérification, appuyer sur la touche POWER de
l’appareil photo pour l’arrêter.
Ouvrir le caisson.
1 Glisser et garder le verrou de glissière dans le sens de la flèche, (1)
et tourner le compteur de la molette d’ouverture/de fermeture dans le
sens des aiguilles d’une montre (2).
2 Tourner la molette d’ouverture/de fermeture à la position où il ne peut
plus tourner.
3 Ouvrir doucement le couvercle arrière du caisson.
1
Verrou de glissière
2
Molette d’ouverture/
de fermeture
FR
ATTENTION:
Appliquer une force excessive lorsque vous tournez la molette d’ouverture/
de fermeture peut endommager celle-ci.
FR 17
Page 94
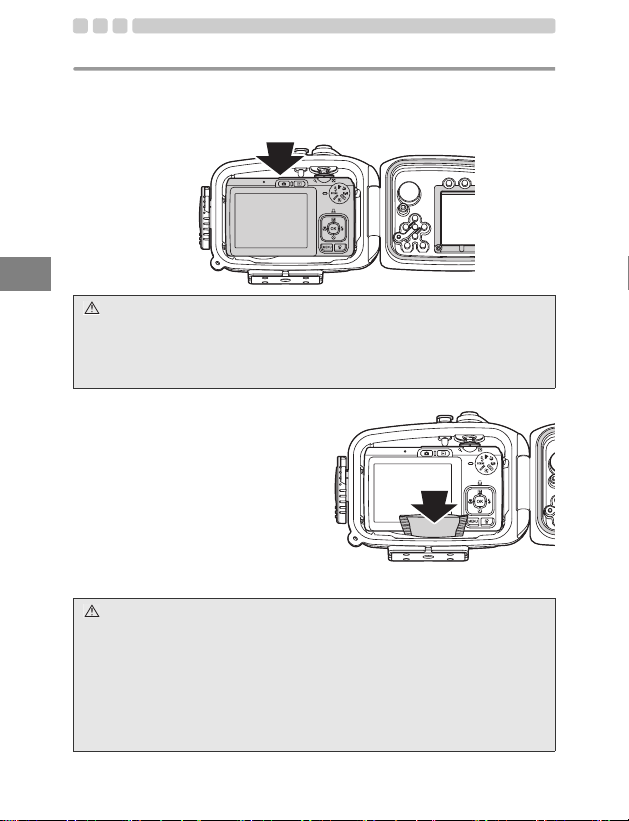
Insérer l’appareil photo numérique.
1 Vérifier que l’alimentation de l’appareil photo numérique est coupée.
2 Régler la molette de mode de l’appareil photo numérique sur “SCENE”
et insérer délicatement l’appareil photo numérique dans le caisson.
FR
ATTENTION:
Si l’appareil photo numérique n’est pas inséré correctement, il peut être
impossible de fermer correctement le caisson pour qu’il soit étanche à l’air.
Autrement, certaines commandes pourraient ne pas fonctionner. Bien noter
qu’un mauvais scellement causera une infiltration d’eau.
Introduction du gel de silice
Avant de sceller le caisson, insérer
le sac de gel de silice accessoire
(pour éviter la formation de buée)
entre le fond de l’appareil et le
caisson.
Faire attention à l’orientation.
ATTENTION:
• Insérer complètement le gel de silice à l’endroit spécifié et dans l’orientation
spécifiée. Si l’orientation n’est pas correcte, le sac de gel de silice sera pris
lorsque le caisson est scellé et une infiltration d’eau se produira.
• Si le caisson est scellé sans avoir inséré complètement le gel de silice, ce
dernier sera pris par le joint et causer une fuite d’eau.
• Une fois que le gel de silice a été utilisé, la performance d’absorption de l’humidité
sera diminuée. Toujours changer le gel de silice après ouverture du caisson.
FR 18
Page 95
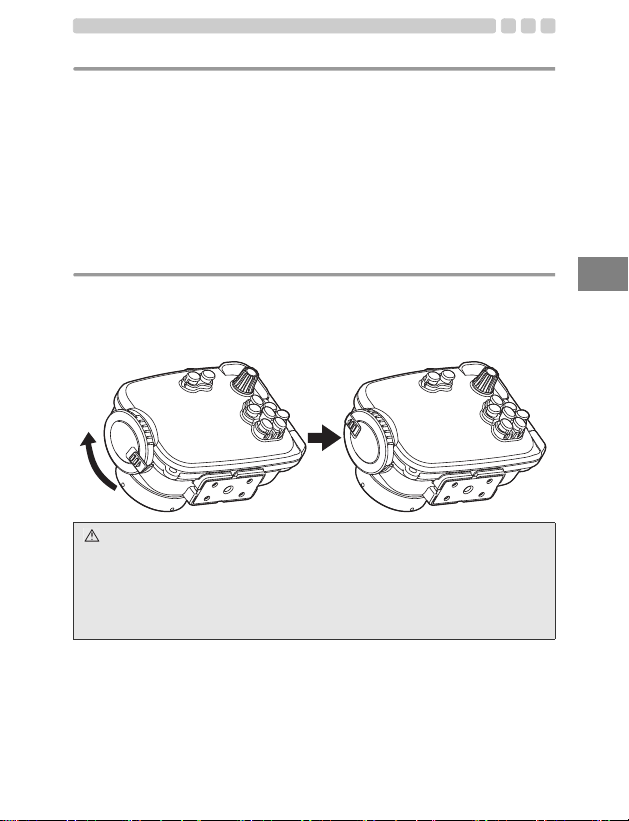
Vérifier après insertion.
Vérifier les points suivants avant de sceller le caisson.
• L’appareil photo numérique est-il installé correctement ?
• La molette de mode est-elle réglée sur “SCENE”?
• Le gel de silice est-il inséré complètement à l’endroit spécifié?
• Le joint est-il monté correctement sur l’ouverture du caisson ?
• Le joint et la surface de contact du joint sur le couvercle avant sont-ils
exempts de corps étrangers y compris la saleté ?
• L’entretien de la fonction d’étanchéité est-il effectué?
Sceller le caisson.
1 Fermer le couvercle arrière du caisson délicatement.
2 Tourner la molette d’ouverture/de fermeture dans le sens des aiguilles
d’une montre.
• Le caisson est scellé lorsque la molette est tournée à 180 degrés.
ATTENTION:
• Si la molette d’ouverture/de fermeture n’est pas complètement tournée, le
caisson ne sera pas scellé. Cela peut causer une fuite d’eau.
• Fermez le couvercle arrière du caisson pour que la courroie du bouchon
d’objectif ne soient pas coincée. Si elle est coincée, une fuite d’eau risque
de se produire.
FR 19
FR
Page 96
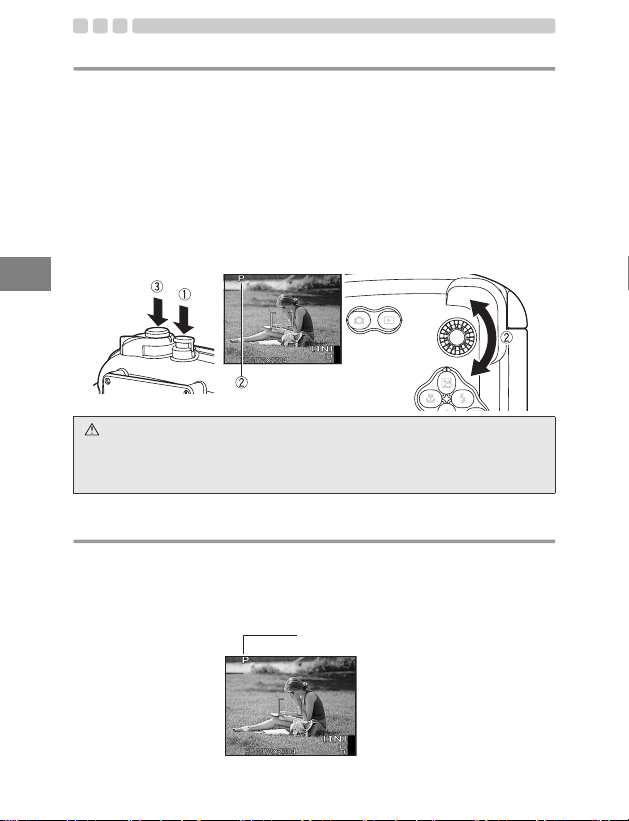
Vérifier le fonctionnement de l’appareil photo installé.
Après avoir scellé le caisson, vérifier si l’appareil photo fonctionne
normalement.
1 Appuyer sur la touche POWER du caisson et vérifier que l’alimentation
de l’appareil est commutée sur marche et arrêt.
2 Tourner la molette de mode du caisson et vérifier que le mode de
l’appareil photo est commuté correctement.
• Vérifier sur l’écran ACL que le mode approprié est commuté.
3 Appuyer sur la commande de déclencheur du caisson et vérifier que
l’obturateur de l’appareil photo est déclenché.
• Activer également les autres touches de commandes sur le caisson
et vérifier que l’appareil fonctionne correctement comme voulu.
FR
ATTENTION:
Si l’appareil photo ne fonctionne pas correctement, recommencer
l’assemblage de l’appareil photo à partir de “Contrôle de l’appareil photo
numérique.” (P.16) de ce manuel.
Vérifier le mode de prise de vue et de scène de prise de vue.
Pendant l’utilisation du caisson, les informations sur le mode de prise de
vue et de scène de prise de vue courant de l’appareil photo doivent être
vérifiées avec le mode de scène de prise de vue/prise de vue affiché sur
l’écran ACL de l’appareil photo.
Mode de scène de prise de vue/prise de vue
FR 20
Page 97
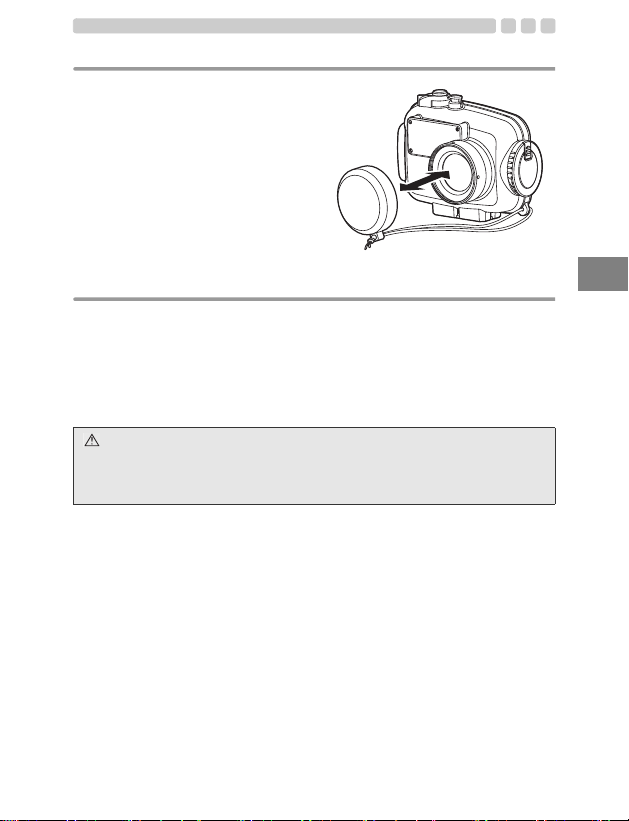
Montage et retrait du bouchon d’objectif.
Adapter le bouchon d’objectif sur la
bague d’objectif comme montré
dans la figure. Bien s’assurer de
retirer le bouchon d’objectif avant la
prise de vue.
Effectuer les contrôles finaux.
Inspection visuelle
Après avoir scellé le caisson, vérifier visuellement les pièces de fermeture
des couvercles avant et arrière pour s’assurer que le joint n’est pas
déformé ni sorti de la gorge et qu’il n’y a pas de matière étrangère
déposée sur le joint. Vérifier également que le caisson n’est pas cassé ou
fissuré.
ATTENTION:
Des cheveux, des fibres et d’autres éléments fins ne sont pas très
apparents, mais ils risquent de causer une entrée d’eau. De plus, apporter
une attention particulière aux cassures et fissures sur le caisson.
FR 21
FR
Page 98
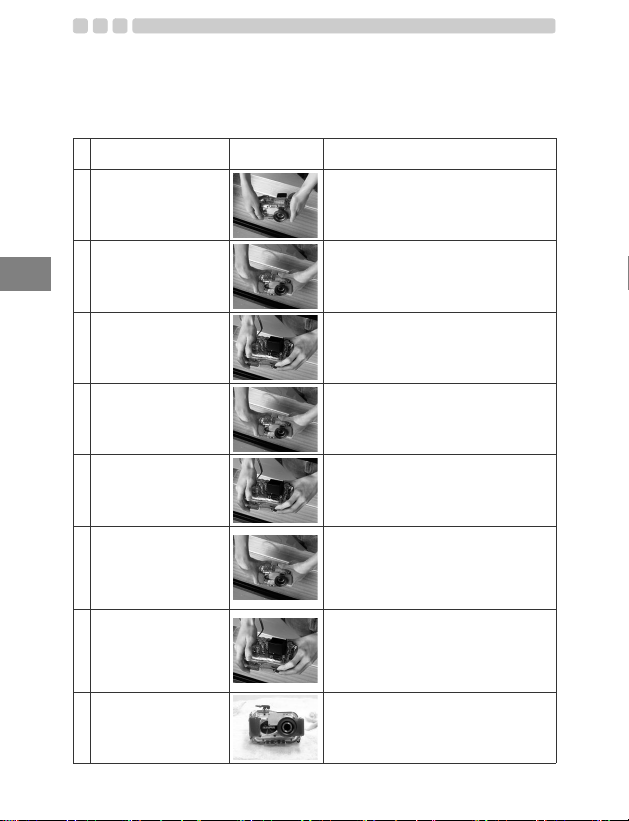
Test final (test de fuite d’eau)
Le test final après chargement de l’appareil photo est expliqué ci-dessous. C’est
la seule façon d’éliminer tout souci à propos d’une entrée d’eau possible !
Toujours effectuer ce test. Il peut être effectué facilement dans un réservoir
d’eau ou une baignoire. La durée nécessaire est de cinq minutes environ.
FR
Simple test d’immersion
dans l’eau
Entrer lentement le
1
caisson dans l’eau.
D’abord, n’immerger le
2
caisson que pendant
trois secondes.
Vérifier qu’il n’y a pas
3
d’eau entrée dans le
caisson.
Image
explicative
Conseils
Comme le caisson est transparent, des
gouttes d’eau y entrant peuvent être vues
facilement.
En cas de problème avec le joint, trois
secondes sont suffisantes pour laisser
entrer de l’eau. Y a-t-il des bulles d’air
sortant entre les couvercles ?
Veuillez contrôler soigneusement.
Sortir le caisson de l’eau et vérifier qu’il n’y
a pas d’eau accumulée au fond du caisson.
Y a-t-il de l’eau suintant ?
Puis, immerger le
4
caisson pendant 30
secondes.
Vérifier qu’il n’y a pas
5
d’eau entrée dans le
caisson.
Puis, vérifier en
6
immersion pendant trois
minutes.
C’est le contrôle final. Le
7
gel de silice est-il
devenu humide ?
8 Tout est alors correct.
* Le contrepoids n’est pas fourni avec le PT-038.
FR 22
Examiner attentivement les bulles d’air!
N’effectuer aucune opération pour le
moment, mais simplement observer.
Sortir le caisson de l’eau et vérifier qu’il n’y
a pas d’eau accumulée au fond du caisson.
Effectuer très soigneusement la
vérification.
Examiner attentivement les bulles d’air!
Essayer le fonctionnement des touches,
des leviers et des molettes. Examiner
attentivement les bulles d’air!
S’il n’y a toujours pas d’entrée d’eau, tout
est correct!
C’est très important!
Le gel de silice est-il devenu humide ?
Veuillez contrôler soigneusement! Comme
l’intérieur peut être vu, l’inspection d’entrée
d’eau peut également être effectuée de
manière facile!
Tout est alors correct !
Bonne plongée !
Page 99
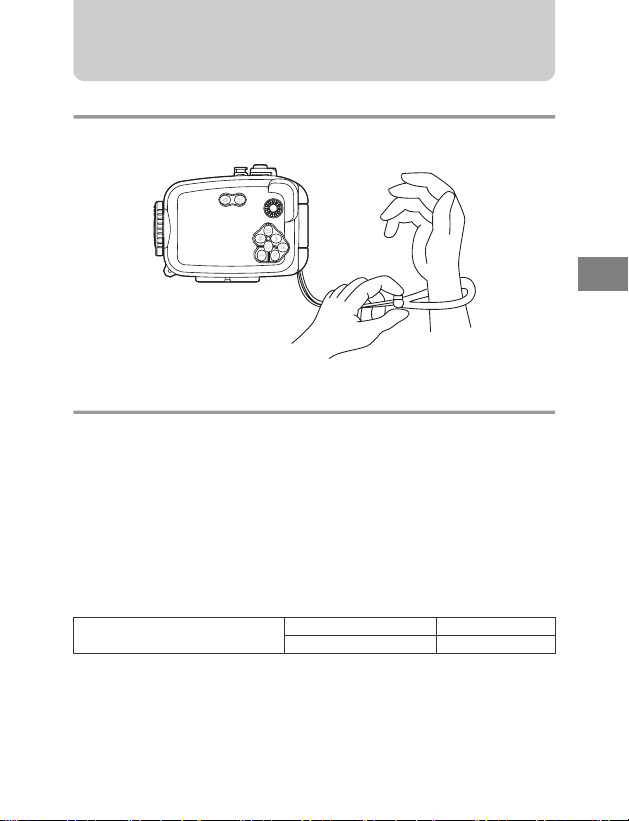
4. Prise de vues sous l’eau
Utilisation de la dragonne
Passer la main dans la dragonne accessoire et ajuster la longueur avec
la pièce d’arrêt.
Prise de vues.
Confirmer la vue sur l’écran ACL.
Ce caisson utilise l’écran ACL pour confirmer la vue.
Appuyer doucement sur le déclencheur.
Tenir le caisson fermement avec les deux mains et appuyer doucement
sur le déclencheur pour que l’appareil ne bouge pas.
Précaution en utilisant le flash
En prenant des vues en gros plan avec un réglage grand angle, le flash
risque de produire qu’une illumination irrégulière et/ou insuffisante.
Portée efficace du flash
(Prise de vue à terre sans le caisson)
En prise de vue sous-marine, les conditions de prise de vue (clarté de
l’eau, matières en suspension, etc.) peuvent affecter considérablement la
portée du flash.
Toujours contrôler les photos sur l’écran ACL après la prise de vue.
Grand angle 3,9 mètres environ
Téléobjectif 2,0 mètres environ
FR
FR 23
Page 100
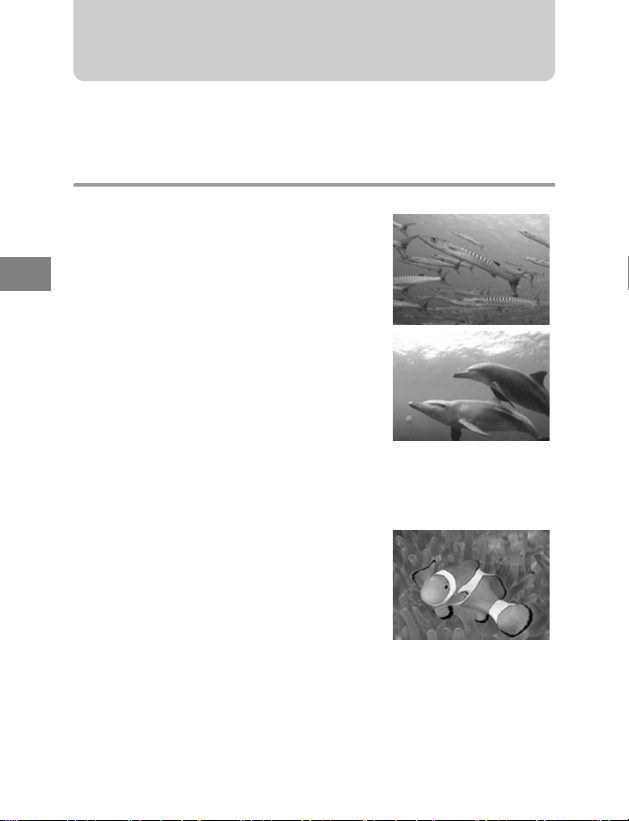
5. Prise de vue sous-marine selon le type de scène
L’appareil dispose des modes de scène de prise de vue suivants:
Sélectionnez celui qui correspond le mieux à la scène sous-marine que
vous prenez.
Types de scènes sous-marines
kGrand angle sous-marin 1
Optimum pour prendre la vue en grand
angle, par exemple un banc de poissons
dans l’eau. L’image reproduira très
FR
distinctement le bleu de l’arrière-plan.
lGrand angle sous-marin 2
Idéal pour prendre un sujet de grande taille
se déplaçant rapidement, tel un dauphin ou
une raie.
Dans de nombreux points d’observation de
dauphins, il y a une règle établie de ne pas
utiliser le flash pour éviter d’effrayer les
dauphins, etc. Même si ce mode est conçu
initialement pour se passer du flash, il peut
aussi être activé si nécessaire, par exemple
pour prendre une raie en photo.
HGros plan sous-marin
Optimum pour la prise de vue gros plan de
petites créatures dans l’eau, telles que des
poissons. L’image reproduira les couleurs
naturelles sous-marines. Les couleurs
naturelles du monde sous-marin sont
reproduites de façon précise. Il est
également possible de relever les nuances
rouges en utilisant le flash.
(Exemples)
FR 24
 Loading...