

Page 1

Instruction Manual
Underwater Case
PT-024
For the digital camera
CAMEDIA X-3
■ Thank you for buying the Underwater Case PT-024.
■ Please read this instruction manual carefully and use the product safely
and correctly.
Please keep this instruction manual for reference after reading it.
■ Wrong use may cause damage to the camera on the inside from water
leakage, and repair may not be possible.
■ Before use, perform an advance check as described in this manual.
Page 2

Introduction
WARNING
CAUTION
● Unauthorized copying of this manual in part or in full, except for
private use, is prohibited.
Unauthorized reproduction is strictly prohibited.
● OLYMPUS CORPORATION shall not be responsible in any way
for lost profits or any claims by third parties in case of any damage
occurring from unsuitable use of this product.
●
OLYMPUS CORPORATION shall not be responsible for damage, lost
profits, etc. caused by loss of image data because of defects, disassembly,
repair or modification of this product by people other than third parties
specified by OLYMPUS CORPORATION, or for other reasons.
Please read the following items before use
● This Case is a precision device designed for use at a water depth
within 40 m. Please handle it with sufficient care.
● Please use the Case correctly after sufficient understanding of the
contents of this manual in regard to handling of the Case, checks
before use, maintenance, and storage after use.
● OLYMPUS CORPORATION shall in no way be responsible for
accidents involving immersion of a digital camera in water.
● OLYMPUS CORPORATION shall not pay any compensation for
accidents (injuries or material damage) at the time of use.
● Before use, be sure to read the precautions printed on the package.
For safe use
This instruction manual uses various pictographs for correct use of the
product and to prevent danger to the user and other persons as well as
property damage. These pictographs and their meanings are shown
below.
This indicates contents for which the possibility of
human death or severe injury in case of handling under
disregard of this indication can be assumed.
This indicates contents for which the possibility of
human injury or the possibility of material damage in
case of handling under disregard of this indication can
be assumed.
E-1
Page 3

1. Keep this product out of the reach of babies, infants, and children.
WARNING
There is the possibility of occurrence of the following types of
accidents.
Injury by dropping onto the body from a height.
Injury from parts of the body getting caught in parts which open
and close.
Swallowing of small parts. Please consult a physician immediately
if any parts have been swallowed.
Triggering of the flash in front of the eyes may cause permanent
vision impairment etc.
2. Do not store with a battery in the digital camera housed in this
product. Storage with a battery inserted may lead to leakage of the
battery liquid and fire.
3. If leakage of water should occur with a camera installed in this
product, quickly remove the battery from the camera. There is the
possibility of ignition and explosion from generation of hydrogen gas.
4. This product is made of resin. There is the possibility that injuries
may be caused when it becomes broken because of strong impact
with a rock or other hard objects. Please handle with sufficient
care.
5. The silica gel and the grease for silicone O-rings for this product
are not edible.
CAUTION
1. Do not disassemble or modify this product. This may cause water
leakage or trouble. In case of disassembly or modification by persons
other than those appointed by OLYMPUS CORPORATION, the
guarantee shall not apply.
2. Do not place this product at locations with abnormally high or
abnormally low temperatures or at locations with extreme
temperature changes. The product may deteriorate.
3. Opening and closing at locations with much sand, dust, or dirt may
impair the waterproof characteristic and cause water leakage. This
should be avoided.
4. This product has been designed and manufactured for use at a
water depth within 40 m. Please note that diving to a depth in
excess of 40 m may cause permanent deformation or damage to
the Case and the camera inside the Case or may lead to water
leakage.
E-2
Page 4

5. Jumping into the water with the Case in your pocket or in your hand,
throwing the Case from a boat or ship into the water, and other
rough handling may cause water leakage. Please handle with
sufficient care, when handing it over from hand to hand etc.
6. If the camera on the inside should become wet because of water
leakage etc., immediately wipe off all moisture and confirm the
operation.
7. Please remove the O-ring when traveling by air. Otherwise air
pressure may make it impossible to open the Case.
8. For safe use of the digital camera in this product, please read the
"Instruction Manual" for the digital camera carefully.
9. When sealing this product, take sufficient care that no foreign
matter gets caught at the O-ring and the contact surfaces.
Batteries
● Please use one Olympus lithium ion rechargeable battery for
cameras (LI-12B).
● Take care that the battery electrodes do not become wet. This may
cause trouble or accidents.
● Carefully read the instruction manual for the camera about other
cautions regarding batteries.
Setting the camera’s mode
● When using this product, use the OK/menu button on the Case to
select [Mode Menu]
(underwater housing).
● For more information, see the camera’s instruction manual.
→
[Shooting]→[Accessory] →[]
E-3
Page 5
For Prevention of Water Leakage Accidents
When water leakage occurs while this product is being used, repair of the
camera housed in this product may become impossible. Please observe
the following cautions for use.
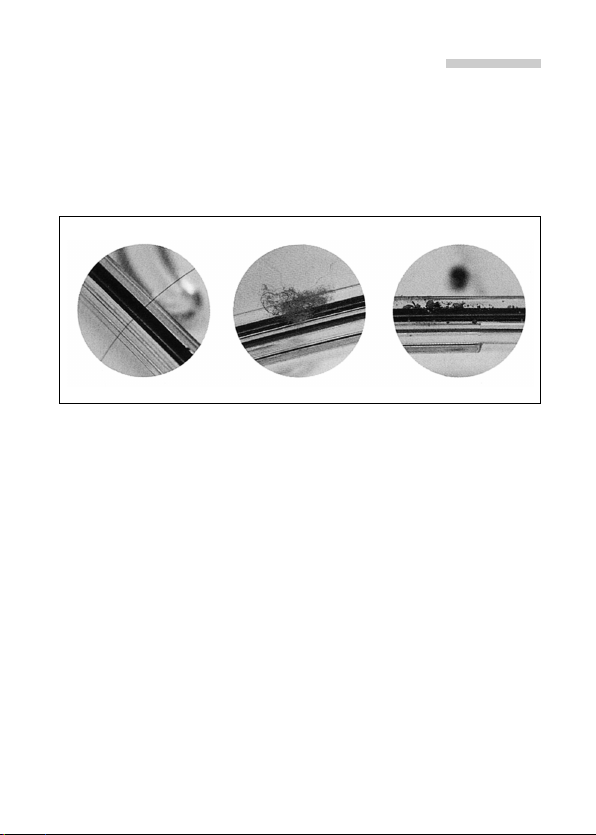
1. When sealing this product, make sure that no hairs, fibers, sand particles
or other foreign matter stick not only to the O-ring, but also to the contact
surface (flat part of the front cover). Even a single hair or a single grain of
sand may cause water leakage. Please check with special care.
<Examples for foreign matter sticking to the O-ring>
Hair Fibers Grains of sand
2. The O-ring is a consumption product. Please replace it at least once a
year by new one. Also perform maintenance for every use.
3. Deterioration of the O-ring will progress according to the use
conditions and the storage conditions. Immediately replace the O-ring
by a new one if it is damaged, shows cracks, or has lost its elasticity.
4. At the time of O-ring maintenance, clean the inside of the O-ring groove
and confirm the absence of dirt, dust, sand, and other foreign matter.
5. Apply the specified silicone O-ring grease to the O-ring.
6. The waterproof function is not effective when the O-ring is not installed
correctly. When installing the O-ring, take care that it does not project
from the groove and that it is not twisted. Also, when sealing the Case,
close the lid after confirming that the O-ring has not come out of the
groove.
7. This product is an airtight construction made of plastic (polycarbonate).
When it is left for a long time in a car, on a boat, at the beach, or at
other places reaching a high temperature, or when it is subjected for a
long time to uneven external force, it may be deformed and the
waterproof function may be lost. Pay sufficient attention to temperature
control. Also do not place heavy objects onto the product during
storage or transport, and avoid unreasonable storage.
E-4
Page 6

8. When the O-ring contact surface is pressed strongly from the
outside of the Case, or when the Case is twisted, the waterproof
function may be lost. Take care not to exert excessive force.
9. Please use the Case after performing the advance test and the
final check.
10
.If you should notice drops of water or other signs of water leakage
while taking pictures, immediately stop the dive, remove any water
from the camera and the product, test according to the item "Final
check", and confirm whether leakage has occurred or not.
Handling the Product
● Use or storage of the product at the following locations may cause
defective operation, defects, trouble, damage, fire, internal clouding, or
water leakage. Always avoid these locations.
Locations reaching high temperatures such as those under direct
sunlight, in an automobile, etc.
Locations with open fire
Water depths in excess of 40 m
Locations subject to vibrations
Locations with high temperatures and much dust or with severe
temperature changes
Locations with volatile substances
● This product is made of polycarbonate resin with excellent impact
resistance, but it may be damaged by scraping against rocks etc. It
also may break when it hits hard objects or is dropped.
● This product is not a case to soften impacts to the camera inside the
product. When this product with a digital camera inside it is subjected
to impacts or heavy objects are placed onto it, the digital camera may
become damaged. Please handle the product with sufficient care.
● When the product is not used for a long time, the waterproof
performance may drop because of deterioration of the O-ring etc.
Before use, always perform the advance test and the final check.
● Do not apply excessive force to the TTL cable connector or tripod
socket.
● When a flash is used while the Case is being used, shadows may
appear at the edges of the picture. This is especially notable when
taking pictures in macro mode on the wide-angle side. Please use
a flash after image confirmation.
E-5
Page 7

● Do not use the following chemicals for cleaning, corrosion
prevention, prevention of fogging, repair or other purposes. When
these are used for the Case directly or indirectly (with the
chemicals in vaporized state), they may cause cracking under high
pressure or other problems.
Chemicals which cannot be used
Volatile organic solvents,
chemical detergents
Anticorrosion agent
Commercial defogging
agents
Grease other than specified
silicone grease
Adhesive
Explanation
Do not clean the Case with alcohol, gasoline,
thinner or other volatile organic solvents or with
chemical detergents etc. Pure water or lukewarm
water is sufficient.
Do not use anticorrosion agents. The metal parts
use stainless steel or brass, and washing with
pure water is sufficient.
Do not use commercial defogging agents. Always
use the specified desiccant silica gel.
Use only the specified silicone grease for the
silicone O-ring, as otherwise the O-ring surface
may deteriorate and water leakage may be caused.
Do not use adhesive for repairs or other purposes.
When repair is required, please contact a dealer or a
service station of OLYMPUS CORPORATION.
● Do not perform operations other than specified in this instruction
manual, do not remove or modify parts other than specified, and do
not use parts other than specified.
Any troubles in taking pictures or with the equipment resulting from
the above actions shall be outside the guarantee.
● OLYMPUS CORPORATION shall be in no way responsible for
accidents involving immersion of a digital camera in water.
● OLYMPUS CORPORATION shall not pay any compensation for
accidents (injury or material damage) at the time of use.
E-6
Page 8

Contents
Introduction ................................................................................E-1
Please read the following items before use ..............................E-1
For safe use ..............................................................................E-1
Batteries ....................................................................................E-3
Setting the camera’s mode ........................................................E-3
For Prevention of Water Leakage Accidents..............................E-4
Handling the Product..................................................................E-5
Contents ..............................................................................E-7-8
1.Preparations ............................................................E-9
Check the contents of the package. ..........................................E-9
Names of the parts................................................................E-10
Install the strap. ....................................................................E-11
Master the basic operation. ....................................................E-11
Holding the Case ..................................................................E-11
How to Press the Shutter ....................................................E-12
How to Use the Mode Dial ..................................................E-12
How to Use the Zoom Lever ................................................E-12
2.Advance Check of the Case ........................................E-13
Advance test before use ..........................................................E-13
Advance Test ........................................................................E-13
3.Install the digital camera. ............................................E-14
Check the digital camera. ........................................................E-14
Battery Confirmation ............................................................E-14
Confirmation of the Remaining Number of Pictures to be Taken
Remove the hand strap from the digital camera. ....................E-14
Loading in the Case ................................................................E-15
Which digital cameras can be loaded? ................................E-15
Open the lens barrier. ..........................................................E-15
Check the operation of the camera. ....................................E-15
Open the Case. ......................................................................E-15
Pull up the mode dial of the case. ........................................E-15
Load the digital camera. ......................................................E-16
Set the mode dial. ................................................................E-16
Insertion of silica gel ............................................................E-17
........E-14
E-7
Page 9

Check the loading status. ........................................................E-18
Seal the Case. ........................................................................E-18
Installation and Removal of the LCD Hood ..............................E-19
Installation ............................................................................E-19
Removal................................................................................E-19
Mounting and Removing the Lens Cap....................................E-20
Perform the final checks. ........................................................E-20
Visual Inspection ..................................................................E-20
Try to move the mode dial. ..................................................E-20
Final Test ................................................................................E-21
4.Taking Pictures Under Water......................................E-22
How to Use the Hand Strap ....................................................E-22
Take pictures carefully. ..........................................................E-22
Confirm the picture on the LCD monitor. ............................E-22
Quietly press the shutter lever. ............................................E-22
Cautions when using the flash ..............................................E-22
5.Handling After Shooting ..............................................E-23
Wipe off any waterdrop. ..........................................................E-23
Take out the digital camera. ....................................................E-24
Wash the Case with pure water. ............................................E-25
Dry the Case. ..........................................................................E-25
6.Maintaining the Waterproof Function......................E-26
Remove the O-ring. ................................................................E-26
Remove any sand, dirt, etc. ....................................................E-26
Install the O-ring. ....................................................................E-28
How to Apply Grease to the O-ring ..........................................E-28
Replace consumable products. ..............................................E-29
7.Appendix ............................................................................E-30
Q & A on the use of the PT-024 ..............................................E-30
After-sale Service ....................................................................E-35
Specifications ..........................................................................E-36
Diver's Insurance Guide ..........................................................E-36
E-8
Page 10
1. Preparations
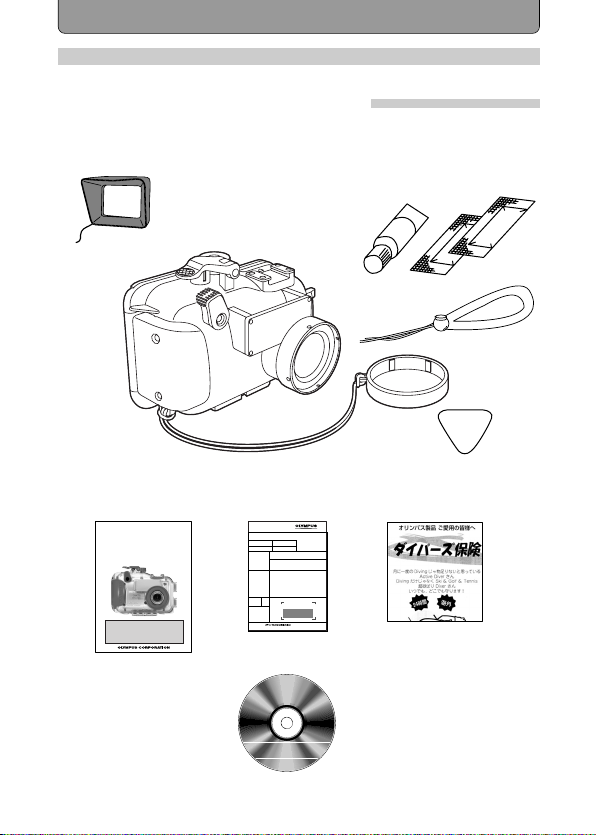
Check the contents of the package.
Check that all accessories are in the box.
Contact your dealer if accessories should be missing or damaged.
LCDhoodstrap
(CheckthattheO-ringisnormal.)
Instructionmanual
(thismanual)
取扱説明書
デジタルカメラ
CAMEDIAX-3用
防水プロテクタ
PT-024
■このたびは、防水プロテクタPT-024をお買上げいただき、ありがとうご
ざいます。
■この説明書をよくお読みのうえ、安全に正しくお使いください。また、
この説明書はお読みになった後、必ず保管してください。
■誤った使い方をされると水漏れにより中のカメラが破損し、修理不能に
なる場合があります。
■ご使用前には、この説明書に従い、必ず事前チェックを実施してください。
LCDhood
(onthebody)
Casebody
保証書
(販売店控え)
WARRANTY
本保証書は、本記載内容で無料修理を行うことをお約束するものです。
お買い上げの日から下記期間中、万一故障が発生した場合は、本契約書を添付ご持参の上
お買い上げ販売店、または当社サービスステーションにご依頼ください。
本保証書は日本において有効です。
期 間
本体1年間
Thisisalimitedwarrantyfor
1yearfromyourdateof
purchase.Usefulonlyin
お買上げ
年 月 日
Japan.
住所 Address
お客様
氏名 Name 性別(男・女)、年齢( 才)
Customer
様
TEL ( )
〔必ず店名印を押してください。〕
販売店
Dealer's
nameand
address
JAPAN
品名
型名
防水・防塵
プロテクタ
Model
SerialNO.
保証責任者
保証履行者
お問い合せ先/サービスステーション
〒192-0032 東京都八王子市石川町2951
03(3292)1931
Informationdisc
CD-ROM
Siliconegrease
Handstrap
Lenscap
PickforO-ringremoval
Diver'sinsuranceguideWarrantycard
Silicagel
E-9
Page 11
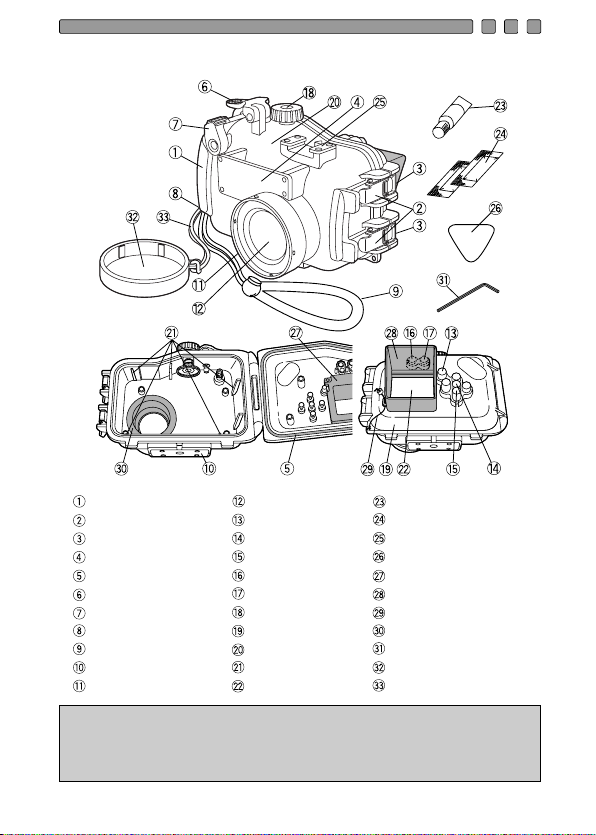
Names of the parts
Palm grip
Buckle lock lever
Buckle hook
Diffuser and diffuser cover
O-ring
❈ Shutter lever
❈ Zoom lever
Hand strap ring
Hand strap
Tripod seat
Lens ring
Note :
The Case operation parts marked by❈corresponds to the operation parts
Lens window
❈ Playback button
❈ OK/Menu button
❈ Arrow pad
❈
Flash mode/Erase button
❈
Macro/Spot button
❈ Mode dial knob
Rear lid
Front lid
Loading guide rail
LCD monitor window
Grease for silicone O-ring(white cap)
Silica gel
Accessory mount
Pick for O-ring removal
LCD inner hood
LCD hood
LCD hood strap
Shade hood
Buckle opener
Lenscap
Lenscap strap
of the digital camera. When the operation parts of the Case are operated,
the corresponding functions of the digital camera will operate. For details
of the functions, refer to the instruction manual for the digital camera.
E-10
Page 12
Install the strap.
CAUTION
CAUTION
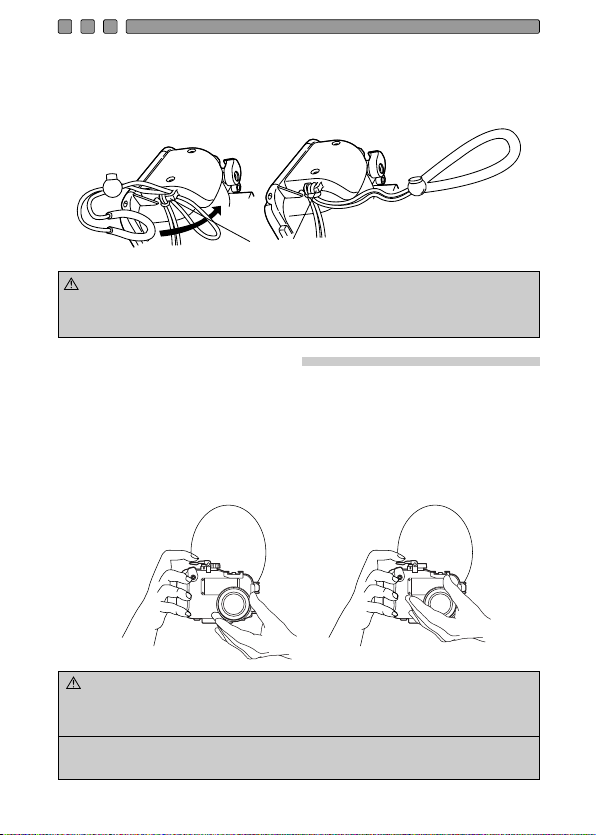
Installation explanation
Hand strap
Hand strap ring
Finished installation
Good example Bad example
Install the strap on the Case body.
:
Please install the strap correctly as shown above. OLYMPUS
CORPORATION shall bear no responsibility for damage etc. caused
by dropping the Case because of incorrect installation of the strap.
Master the basic operation.
Please master the basic operation of the Case before taking pictures.
Holding the Case
Hold the Case securely with both hands, keep your elbows close to your
body, and hold the Case so that you can confirm the picture on the LCD
monitor of the digital camera through the LCD monitor window of the Case.
:•
Note : • Use the LCD monitor to confirm your picture. The
Do not exert excessive force onto the lens window or the lens ring.
•
Take care not to put your fingers etc. over the lens window and
the flash diffuser.
viewfinder cannot be used.
E-11
Page 13
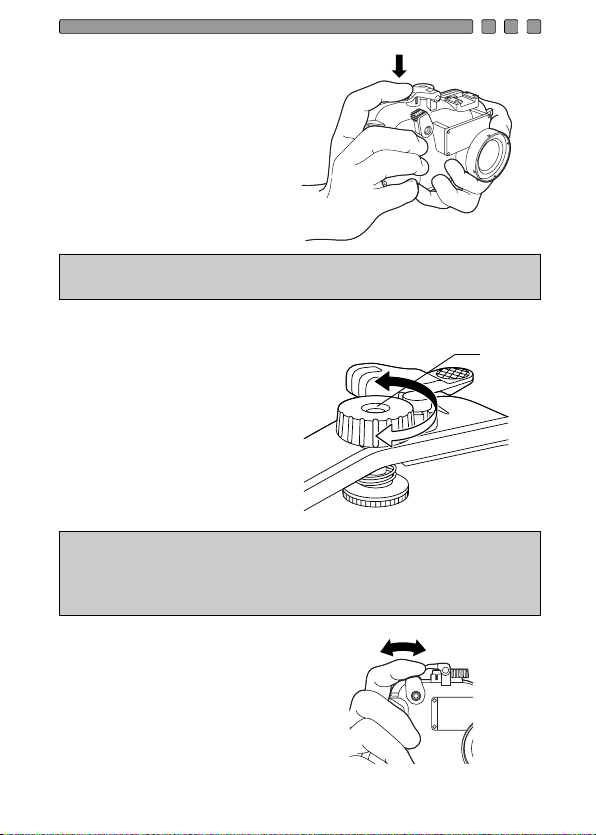
How to Press the Shutter
When pressing the shutter
lever, press it gently, so that
there will be no movement of
the camera.
Note: • For detailed operation of the shutter, refer to the instruction
manual for the digital camera.
How to Use the Mode Dial
This Case is equipped with a
mode dial knob which permits
operation of the mode dial of
the loaded digital camera from
the outside. After loading the
digital camera into the Case,
seal the Case and confirm
that the mode dial can be
operated.
Advice
• Please confirm that the mode dial knob has been set
securely to the mode dial of the digital camera. If the mode
of the digital camera does not change when the mode dial
knob is operated, turn the dial while pushing it lightly.
Mode
dial knob
How to Use the Zoom Lever
Zoom operation is possible
by operating the zoom lever
of this Case corresponding
to the zoom lever of the
digital camera in the Case.
E-12
WT
Page 14

2. Advance Check of the Case
CAUTION
Advance test before use
This Case has been the subject of thorough quality control for the
parts during the manufacturing process and thorough function
inspections during the assembly. In addition, a water pressure test
is performed with a water pressure tester for all products to confirm
that the performance conforms to the specifications. However,
depending on the carrying and storage conditions, the maintenance
status, etc., the waterproof function may be damaged.
Before diving, always perform the following advance test and the
water leakage test after installation of the camera.
Advance Test
1. Before installing the digital camera in the Case, immerse the
empty Case to the intended water depth to confirm that there is
no water leakage.
2. Main causes of water leakage are as follows.
The O-ring has not been installed.
A part of the O-ring or the entire O-ring is outside the specified
groove.
O-ring damage, cracks, deterioration or deformation
Sand, fibers, hair or other foreign matter sticking to the O-ring,
the O-ring groove or the O-ring contact surface on the front lid
Damage to the O-ring groove or the O-ring contact surface on
the front lid
When closing the Case, check for catching of the hand strap and
silica gel after the above causes have been eliminated.
: •
The most suitable method for checking water leakage is
to immerse the Case to the intended water depth. When
this is difficult, water leakage also can be checked at a
shallow depth with no water pressure. Do not feel that
this is troublesome, but perform this test.
•
If the advance test should show water leakage with
normal handling, stop using the Case and contact
your dealer or an Olympus service station (listed on
the rear page of this instruction manual).
E-13
Page 15

3. Install the digital camera.
CAUTION
Check the digital camera.
Check the digital camera before loading it in the Case.
Battery Confirmation
As the LCD monitor is used for picture confirmation while taking
pictures under water, the battery life becomes short.
Confirm that the remaining battery capacity is sufficient.
Do not use alkaline batteries, as it is quite possible that they will
become unusable during a dive.
Note: •
In order to avoid losing shutter chances due to an exhausted
battery, you should always replace a battery with a fully
charged battery before each dive.
Confirmation of the Remaining Number of Pictures to be Taken
Confirm that the image storage has a sufficient remaining number
of pictures to be taken.
Remove the hand strap from the digital camera.
When a strap is attached to the digital camera, the hand strap must
be removed.
: •
When a digital camera is loaded without removing the
strap, the strap may get caught between the Case lids
and may cause water leakage.
•
When removing the strap, handle the digital camera
with sufficient care. OLYMPUS CORPORATION shall
not be responsible for damage caused by dropping
the camera etc.
E-14
Page 16
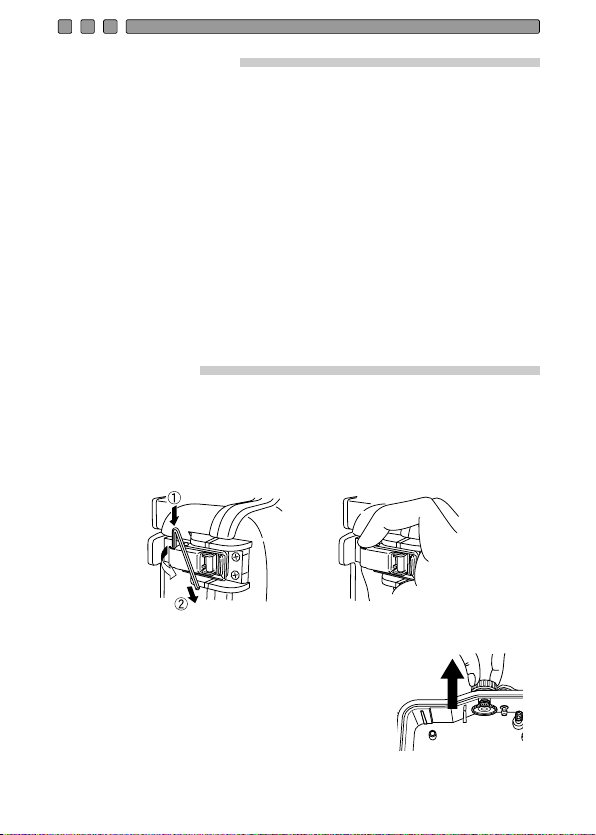
Loading in the Case
Which digital cameras can be loaded?
This product (PT-024) is exclusively used for the CAMEDIA X-3.
Open the lens barrier.
When the lens barrier of the digital camera is opened, the power is
switched on.
When the selected time has elapsed without any operation, the
camera enters into sleep mode (standby condition). In this case,
press an operation button for cancellation of sleep mode.
Check the operation of the camera.
Confirm the operation according to the instruction manual for the
digital camera.
Open the Case.
Insert the buckle opener of the accessory into the buckle opening
lever as shown in the figure (in direction ) Pull the buckle opener
slowly (in direction ). When not using the buckle opener, hold the
buckle opening lever with your thumb and index finger from the side
and pull it up slowly.
Pull up the mode dial of the case.
Pull up the mode dial of the case until it
stops, so that it does not interfere with the
mode dial of the digital camera.
E-15
Page 17
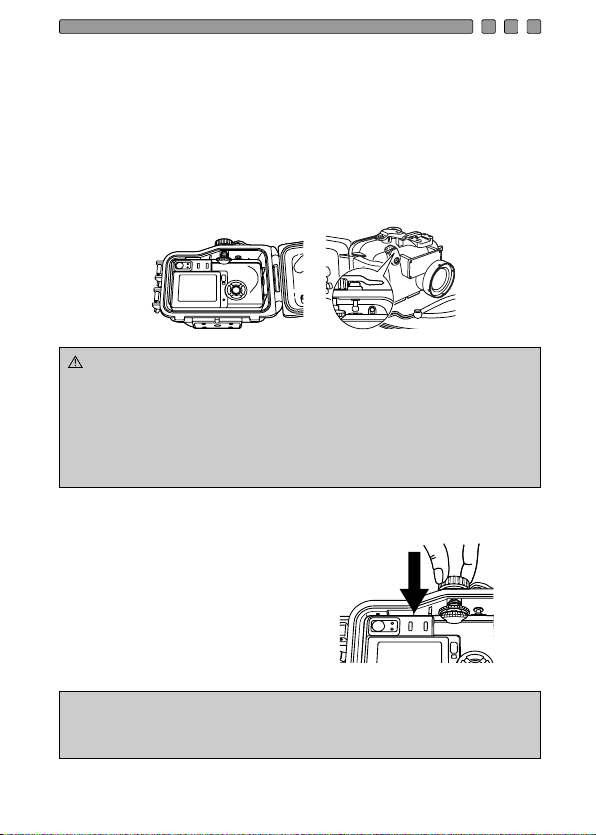
Load the digital camera.
CAUTION
Quietly load the digital camera into the Case, taking care that the
projecting part of the zoom lever of the digital camera properly fits
into the recessed part of the zoom lever of the Case.
Setting the Zoom Lever
When loading the digital camera in the Case, fit the projecting part
of the zoom lever of the digital camera into the recessed part of the
zoom lever on the inside of the Case.
:•When loading the camera, confirm that the projecting
part of the zoom lever of the camera is properly set to
the recessed part of the zoom lever of the Case.
• When the setting is insufficient, the loading of the
camera becomes imperfect and it may not be possible
to seal the Case or zooming may not function.
Insufficient sealing will cause water leakage.
Set the mode dial.
After the digital camera has been
loaded, push down the mode dial
of the case from the upper surface
of the case and set it so that the
lower part of the mode dial of the
case on the inside of the case fits
properly onto the upper part of the
mode dial of the digital camera.
Advice
• After properly fitting the case's mode dial knob, turn the
knob to make sure that the camera's mode dial switches
before closing the case tightly.
E-16
Page 18
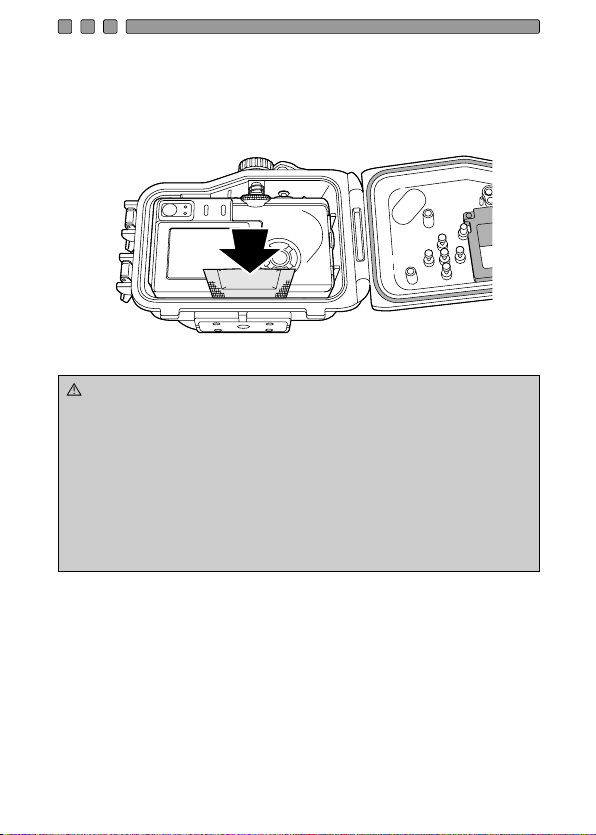
Insertion of silica gel
CAUTION
Pay attention to the orientation.
Before sealing the Case, insert the accessory silica gel bag for
prevention of fogging between the bottom of the camera and the
Case. Insert the bag with the glued longer side to the inside.
:•Insert the silica gel all the way at the specified location
and with the specified orientation. When the orientation is
not correct, the silica gel bag will be caught when the
Case is sealed and water leakage will be caused.
• When it is tried to seal the Case with the bag inserted
only part of the way, the silica gel bag will be caught by
the O-ring and water leakage will be caused.
• Once silica gel has been used, the moisture absorption
performance will be impaired. Always exchange the silica
gel when the Case is opened and closed.
E-17
Page 19
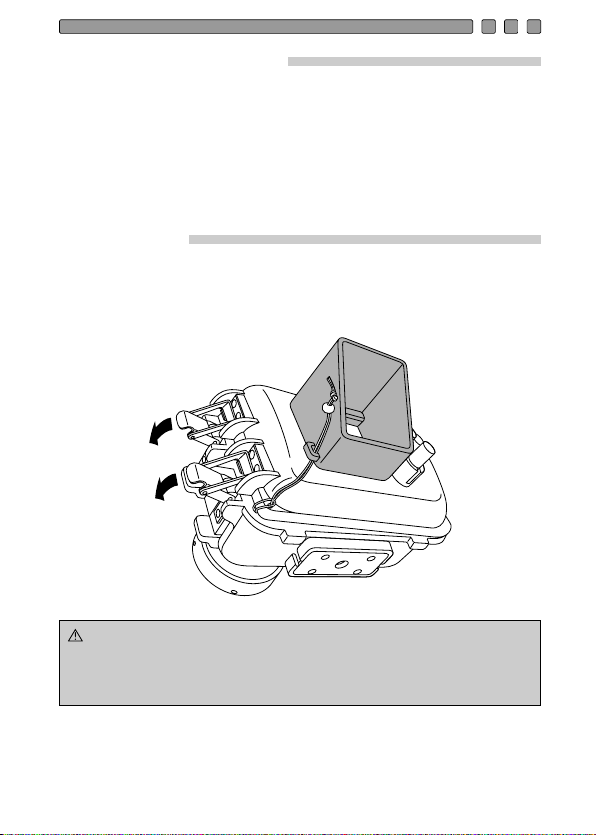
Check the loading status.
CAUTION
Always perform the following final checks before sealing the Case.
Has the digital camera been loaded so that the zoom lever
operates properly?
Has the silica gel been inserted all the way at the specified position?
Has the O-ring at the Case opening part been installed properly?
Are the O-ring and the O-ring contact surface on the front lid free of
dirt and other foreign matter?
Seal the Case.
When the rear lid is closed (quietly, so that the O-ring will not come
out of the groove), the buckles are engaged with the edge of the rear
lid, and the buckle lock levers are pushed down in arrow direction, the
Case will be sealed airtight.
:•Seal the Case by turning both buckle lock levers down
in arrow direction. When one of the buckles is left
open, the Case will not be sealed and water leakage
will be caused.
E-18
Page 20
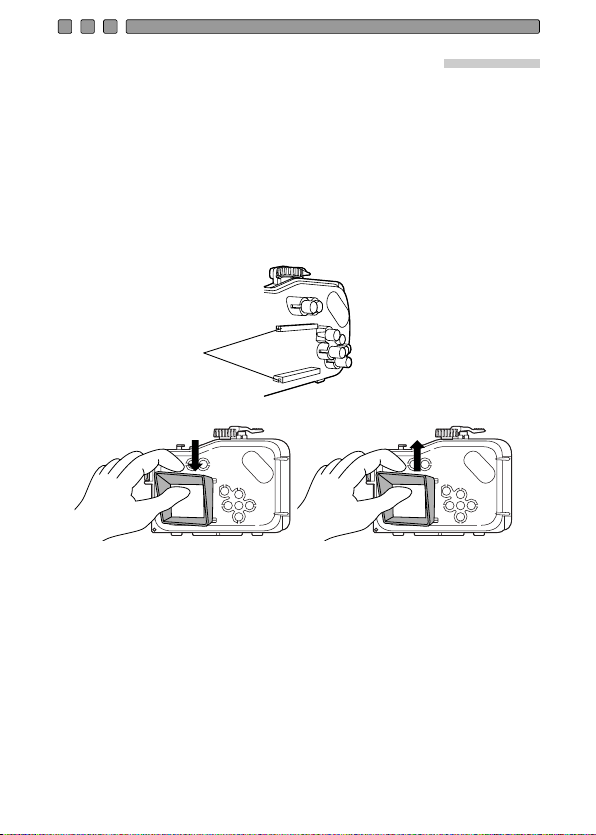
Installation and Removal of the LCD Hood
Installation Removal
Installation
Strongly push the mounting projections of the LCD hood as shown
in the figure into the guides above and below the LCD monitor
window.
Removal
Remove the mounting projections of the LCD hood from the
guides above and below the LCD monitor window by widening the
LCD hood.
Guides
E-19
Page 21
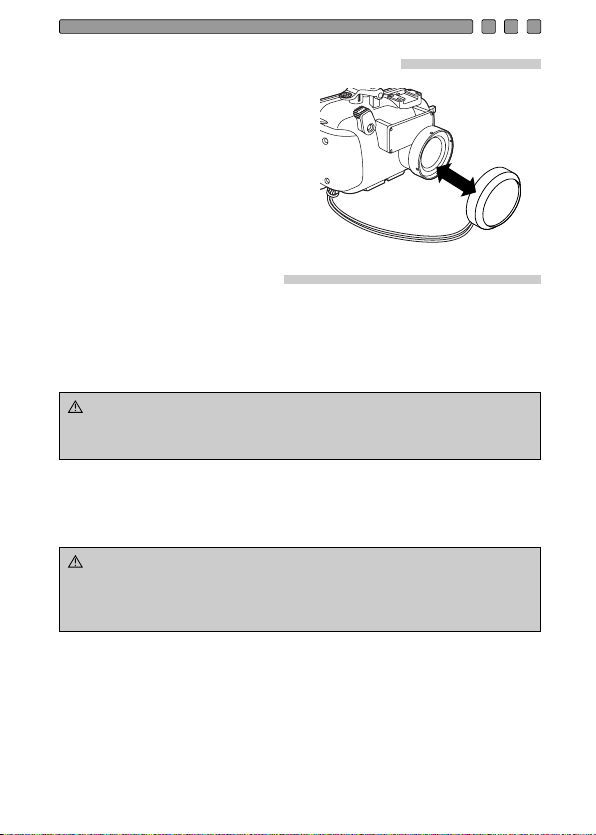
Mounting and Removing the Lens Cap
CAUTION
CAUTION
Fit the lens cap onto the lens
ring as shown in the figure. Be
sure to remove the lens cap
before shooting.
Perform the final checks.
Visual Inspection
After sealing the Case, check the sealing part of front and rear lid
visually to confirm that the O-ring is not twisted or out of the groove
and that no foreign matter has been caught.
: • Hairs, fibers, and other narrow items are not very apparent,
but they may cause entry of water, so that special attention
is required.
Try to move the mode dial.
After sealing, turn the mode dial knob and confirm that the mode
dial of the camera is switched.
: • After loading the camera into the Case, confirm that the
mode dial moves. If it does not move, there is the
possibility that oil or fat has been attached to the mode
dial. Please wipe it clean.
E-20
Page 22
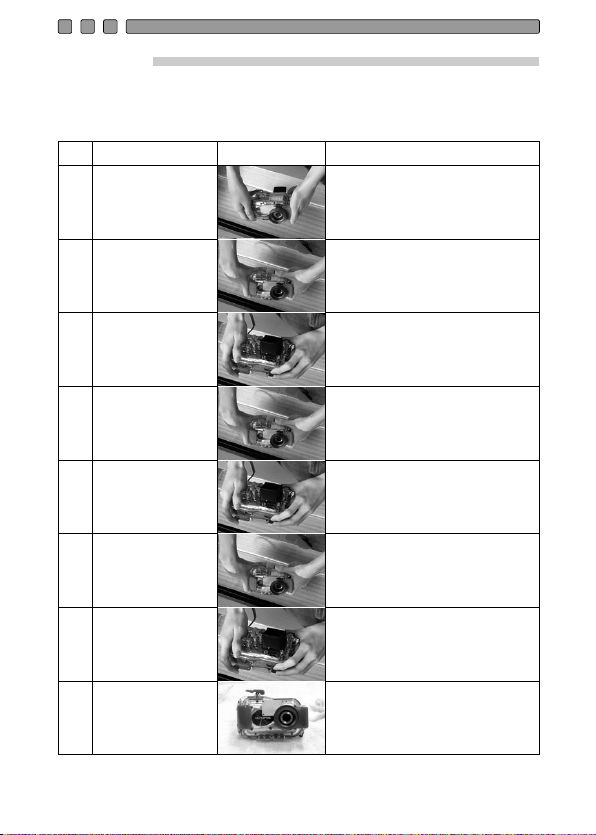
Final Test
The final test after loading the camera is explained below. This is the only way to
eliminate worry about possible entry of water! Always perform this test. It can be
performed easily in a water tank or a bathtub. The required time is about five minutes.
Simple water immersion test
Place the Case
1
slowly into the water.
At first, immerse the
Case for only three
2
seconds.
Check that no water
has entered into the
3
Case.
Next, immerse the
Case for 30
4
seconds.
Check that no water
5
has entered.
Next, check by
immersing for three
6
minutes.
This is the final check.
Has the silica gel
7
become moist?
Explanatory image
Hints
As the Case is transparent,
waterdrops entering into it can be
confirmed easily.
In case of trouble with the O-ring,
three seconds are enough for water
to enter. Are there air bubbles
coming out between the lids?
Please check carefully.
Remove the Case from the water and
check that no water has accumulated at
the bottom of the Case.
Is there any water trickling down?
Check carefully for air bubbles!
Do not perform any operation yet,
but just observe.
Remove the Case from the water and
check that no water has accumulated
at the bottom of the Case.
Perform very careful confirmation.
Check carefully for air bubbles!
Try operation of the buttons used frequently.
Check carefully for air bubbles!
If there is still no entry of water,
everything is OK!
This is very important!
Has the silica gel become moist?
Please check carefully!
As the inside can be seen, the inspection for
entry of water also can be made securely!
Now everything is
8
all right.
Now everything is all right!
Have a nice dive!
Note : The balance weight does not have to be mounted when the PT-024 is used.
E-21
Page 23
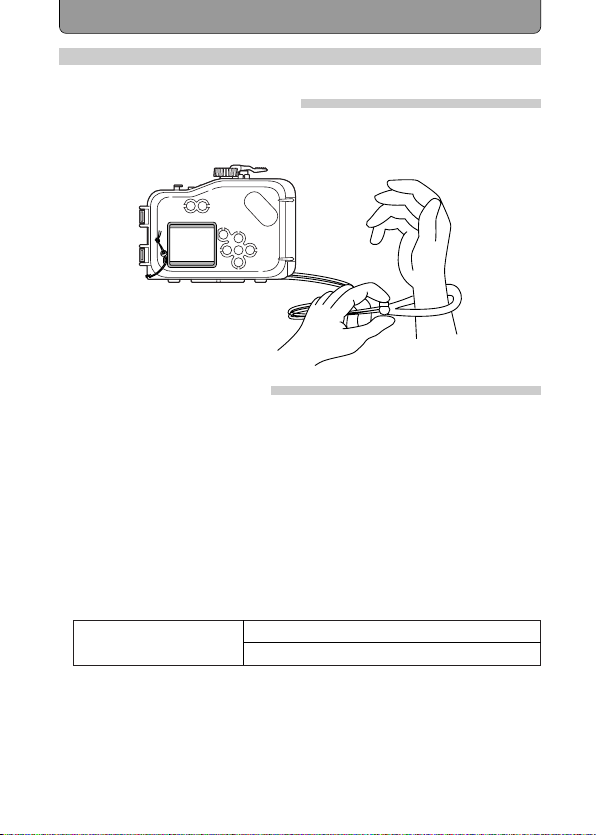
4. Taking Pictures Under Water
How to Use the Hand Strap
Pass your hand through the accessory hand strap and adjust the
length with the stop button.
Take pictures carefully.
Confirm the picture on the LCD monitor.
This Case uses the LCD monitor to confirm the picture. The
viewfinder cannot be used.
Quietly press the shutter lever.
When pressing the shutter lever, hold the Case securely with both
hands and operate the lever quietly to prevent camera shake.
Cautions when using the flash
When taking macro pictures on the wide-angle side, the flash light
may be missing in some parts or the light volume may not be uniform.
Flash reaching range
(Land shooting)
During underwater shooting, shooting conditions (water clarity,
suspended matter, etc.) can have a significant effect on the range
of the flash.
Always check your pictures on the LCD monitor after shooting.
(Pressing the Play back button engages the playback mode.
Pressing the button once more restores the shooting mode.)
W: Approx. 0.2 m to 3.4 m
T:Approx. 0.3 m to 2.0 m
E-22
Page 24
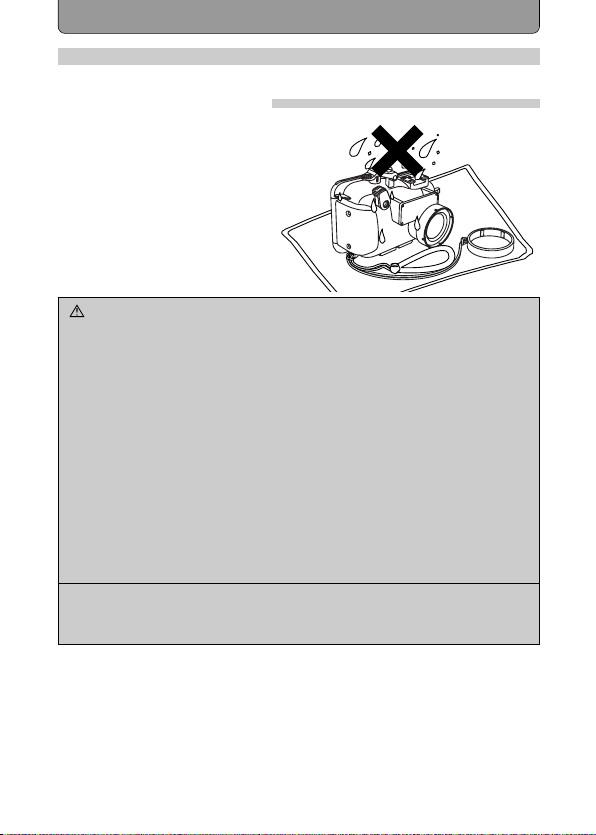
5. Handling After Shooting
CAUTION
Wipe off any waterdrop.
After completing the shooting
and returning to land, wipe off
any waterdrop sticking to the
Case. Use air or a soft cloth not
leaving any fibers to thoroughly
wipe any waterdrop etc. from
the joint between the front and
rear lid, the shutter lever, the
palm grips, and the buckles.
:•Especially when waterdrops remain between the front and
the rear lid, they may spill to the inside when the Case is
opened. Take special care to wipe off all waterdrops.
• When opening the Case, take sufficient care that no
water will drop from your hair or body onto the Case and
the camera.
• Before opening the Case, make sure that your hands or
gloves are free of sand, fibers, etc.
• Do not open or close the Case at locations where water
or sand is to be sprayed. When this cannot be avoided
because you have to exchange the battery or the image
storage, place a sheet downwind from some object and
take care that no water or sand is sprayed.
• Take care not to touch the digital camera or the battery
with hands wet with sea water.
Note: • Moisten a towel etc. in advance with pure water and keep
it in a plastic bag, so that you can wipe the salt from your
hands and fingers before handling the camera.
E-23
Page 25
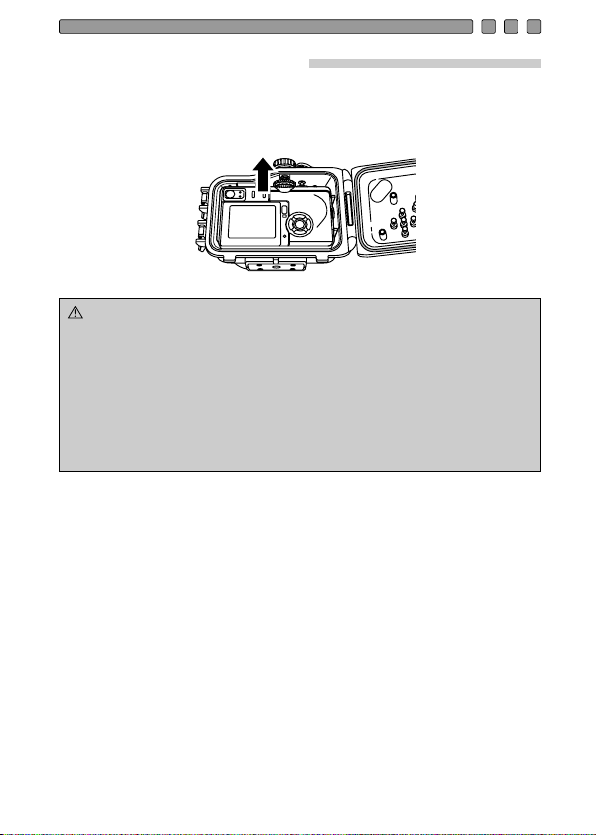
Take out the digital camera.
CAUTION
Open the case carefully, pull up the mode dial from the upper surface of
the case to disengage it from the mode lever of the camera, and then
remove the digital camera from the case.
:•Always place the opened Case with the O-ring side
facing up. When the Case is placed with the O-ring side
facing down, dirt or other foreign matter may be attached
to the O-ring or the O-ring contact surface and may
cause water leakage during the next dive.
• Please read the operation manual for the digital camera
for the storage of pictures etc.
• Take special care so that no water drops get onto the
camera.
E-24
Page 26
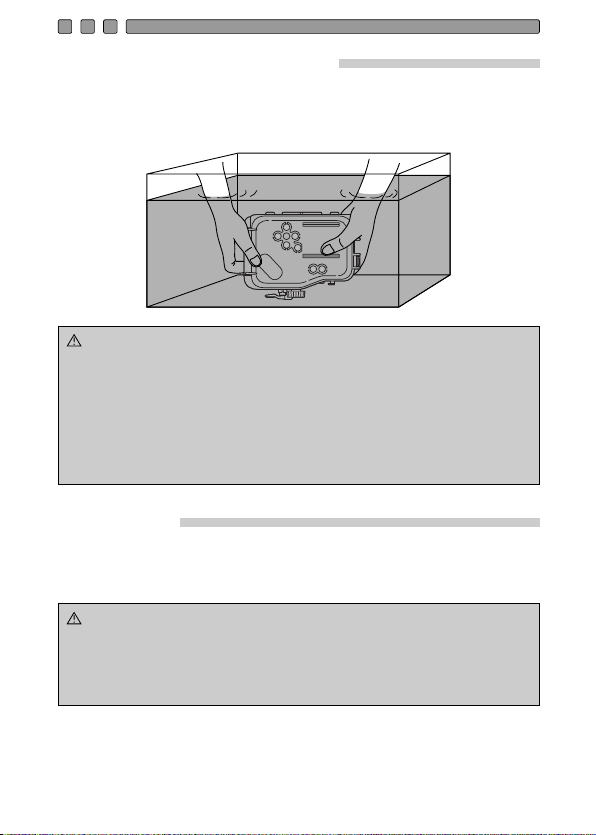
Wash the Case with pure water.
CAUTION
CAUTION
After use, seal the Case again after taking out the camera and wash it
sufficiently in pure water as soon as possible. After use in sea water, it is
effective to immerse it for a fixed time in pure water to remove any salt.
:•Water leakage may be caused when a high water
pressure is applied locally. Before washing the Case with
water, take out the digital camera from it.
• Operate the shutter lever and various buttons of this
product in pure water to remove salt adhering to the
shaft. Do not disassemble for cleaning.
• Drying the Case with adhering salt may impair the
function. Always wash off any salt after use.
Dry the Case.
After washing with pure water, use a soft cloth without any salt on it and
not causing any fibers to wipe off any waterdrop and dry the Case
completely at a well ventilated location in the shade.
:•Do not use hot air from a hair drier or the like for drying and
do not expose the Case to direct sunlight, as this may
accelerate deterioration and deformation of the Case and
deterioration of the O-ring, leading to leakage of water.
When wiping the Case, take care not to cause scratches.
E-25
Page 27
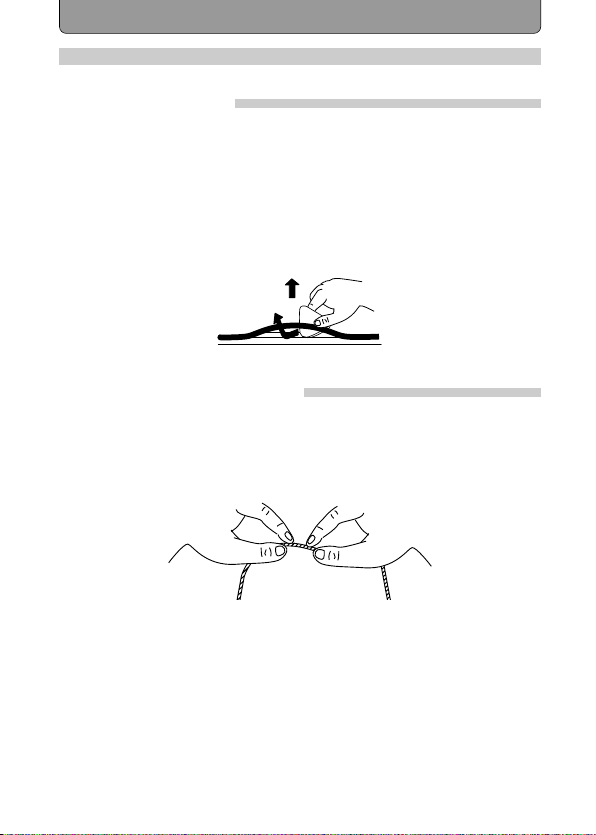
6. Maintaining the Waterproof Function
Remove the O-ring.
Open the Case and remove the O-ring from the Case.
Removal of the O-ring
Insert the O-ring removal pick between the O-ring and the wall of the
O-ring groove.
Move the tip of the inserted pick under the O-ring. (Take care not to
damage the O-ring groove with the tip of the pick.)
Hold the O-ring with your fingertips after it has come out of the
groove and remove it from the Case.
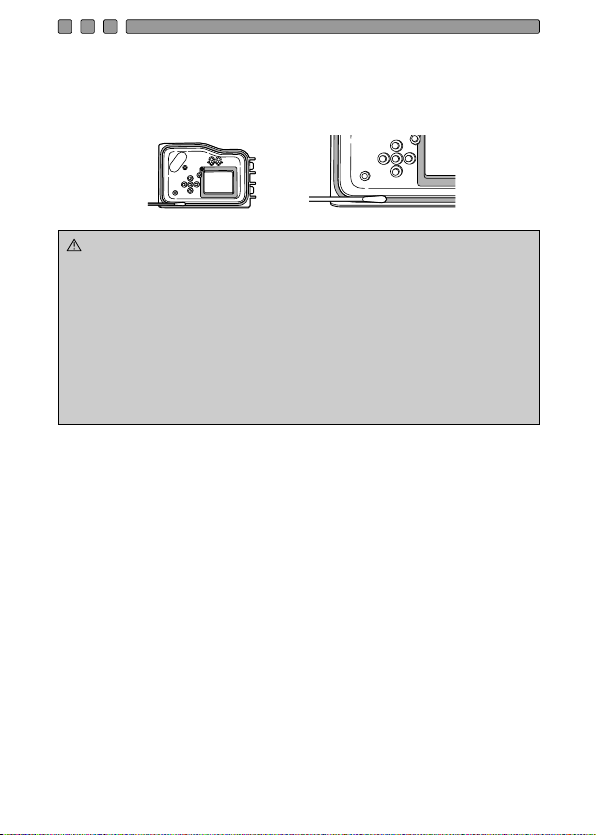
Remove any sand, dirt, etc.
After visually checking that dirt has been removed from the O-ring,
checking for attached sand and other foreign matter, as well as for
damage and cracks can be done by squeezing the entire circumference
of the O-ring lightly with your fingertips.
E-26
Page 28
CAUTION
Use a clean cloth not easily shedding fibers, or cotton swab, tissue
paper or the like, to remove any foreign matter from the O-ring groove.
Clean the O-ring contact surface on the front lid in the same way to
remove any sand and dirt.
:•When a mechanical pencil or a similar other sharp object
is used to remove the O-ring or to clean the inside of the
O-ring groove, the Case and the O-ring may be damaged
and water leakage may be caused.
• When the O-ring is checked with the fingertips, take care
not to stretch the O-ring.
• Never use alcohol, thinner, benzene or similar solvents or
chemical detergents to clean the O-ring. When such
chemicals are used, it is to be feared that the O-ring will
be damaged or that its deterioration will be accelerated.
E-27
Page 29
Install the O-ring.
CAUTION
Confirm that no foreign matter is attached, apply a thin coat of the
accessory grease to the O-ring, and fit the O-ring into the groove. At
this time, confirm that the O-ring does not stick out from the groove.
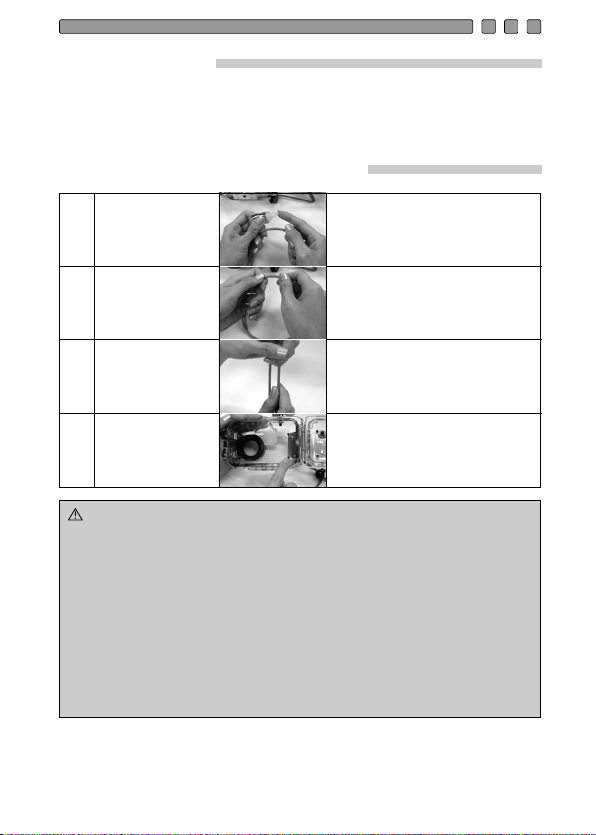
How to Apply Grease to the O-ring
Apply the
exclusive
1
lubricant to each
O-ring.
Spread the
lubricant all over
2
the O-ring.
Check that the
O-ring is free of
3
scratch or
unevenness.
Apply lubricant on
the O-ring contact
4
surface.
:•Always perform maintenance of the waterproof
Make sure that your fingers and the Oring are free of dirt, and squeeze about
5 mm of lubricant onto a finger. (5 mm
is the most appropriate amount.)
Surround the lubricant with three
fingers and spread it over the ring. Be
careful not to use excessive force as
this may stretch the O-ring.
After spreading the lubricant, check
visually and by touch that the O-ring is not
scratched and that its surface is flat. If it is
damaged in any way, replace it with a
brand-new O-ring.
Use the lubricant remaining on the
fingers to clean and lubricate the
case's contact surface.
function even when the Case has been opened to
exchange the battery or the image storage during
shooting. Neglecting this maintenance may become
the cause of water leakage.
• When the Case is not to be used for a long time,
remove the O-ring from the groove to prevent
deformation of the O-ring, apply a thin coat of silicone
grease, and store it in a clean plastic bag or the like.
• When drying is done with salt attached, it is likely that
a function impairment will be caused. After use,
always wash off any salt.
E-28
Page 30

Replace consumable products.
The O-ring is a consumable product. Independent of the number of
times the Case is used, it is recommended that the O-ring should
be replaced by a new one at least once a year.
Deterioration of the O-ring is accelerated by the use conditions and
the storage conditions. Replace the O-ring even before a year has
passed if it shows signs of damage, cracking or loss of elasticity.
Note: •
Please use original Olympus products for the silicone O-ring
grease, the silica gel, and the O-ring. These consumable
products also can be purchased at an Olympus service station.
E-29
Page 31

7. Appendix
Q & A on the use of the PT-024
Q1 :
Which digital cameras can be used?
A1 :
The The PT-024 is only for the models X-3.
Q2 :
What cautions must be observed when loading the digital camera
into the Case?
A2 :
Pay special attention to the following items when loading the camera
into the Case.
(1)
Check that the remaining capacity of the battery in the digital camera
is sufficient.
This should be checked as the LCD monitor is used under water, and
the battery consumption becomes faster.
(2)
Check the remaining number of pictures on the image storage.
Please use a card with a sufficient remaining number in order to
reduce the number of times the Case has to be opened and closed.
(3)
Remove the strap from the digital camera.
When the camera is loaded without removing the strap, the strap may get
caught when the Case is sealed and this will cause water leakage.
(4)
Before sealing the Case, confirm that the O-ring has been installed
properly in the groove in the rear lid of the Case.
(5)
Confirm that the O-ring and the O-ring contact surface on the front lid
are free of dirt, hairs, and other foreign matter.
(6)
Insert the silica gel for defogging. Please use silica gel for the
Olympus Case.
Q3 :
What cautions must be observed when using and storing the Case?
A3 :
Pay special attention to the following items.
(1)
When the O-ring contact surface is pressed strongly from the outside
of the Case, or when the Case is twisted, the waterproof function may
be impaired and water leakage may be caused.
(2)
When the Case is used, left or stored at the following locations,
defective operation or trouble may be caused. Always avoid such
locations.
(a)
Places where the Case can reach high temperatures under direct
sunlight or in a car, places with extremely low temperatures, and
places with extreme temperature variations
(b)
Places with open fire
(c)
Places with volatile substances
(d)
Places with vibrations
E-30
Page 32

(3)
In case of the following handling with a camera loaded into the
Case, trouble or breakage may be caused for the Case and/or
the loaded camera. Always avoid such handling.
(a)
Hitting other objects
(b)
Dropping
(c)
Placing heavy objects on top of the Case
(4)
When the Case is not used for a long time, trouble from
formation of mold etc. may be caused. Before use, confirm the
operation of all operation parts and perform the advance test
and the final test.
Q4 :
What cautions must be observed when opening and closing the
Case?
A3 :
Pay special attention to the following items.
(1)
Do not open and close the Case at locations with water spray
or sand spray.
(2)
Wipe off all waterdrops from the gap between the front lid and
the rear lid and around projections and recesses such as the
buckles. When this is not done, entry of waterdrops into the
Case is to be feared at the time of opening and closing.
(3)
When opening the Case, take care that no water will drip from
your hair or body into the Case or onto the camera.
(4)
When the Case is open, check that there is no attachment of
sand, fibers or other foreign matter to the O-ring and the O-ring
contact surface on the front lid.
(5)
Do not touch the camera or the image storage with your hands
to which sea water is sticking.
(6)
If you should detect waterdrops or other signs of water leakage
while shooting, immediately end the dive, perform the water
leakage test again, and confirm that there is no leakage. If the
camera is wet, wipe off any moisture and check the operation.
Q5 :
How should the Case be handled after use?
A5 :
After use, take out the camera as soon as possible and wash the
Case with pure water. In case of use in the ocean, it is effective to
immerse the Case for a certain time in pure water to remove any
salt. Operate the buttons and levers under water to turn the shafts
and wash off any salt. After washing, use a dry cloth without any
salt on it to wipe off any moisture and dry the Case in the shade.
Do not use hot air from a hair drier or the like and do not dry the
Case under direct sunlight. Exposure to high temperatures or
direct sunlight may cause deformation, discoloration or breakage
E-31
Page 33

of the Case and deterioration of the O-ring. Wipe the inside of the Case
with a soft cloth not causing any fibers. Remove the O-ring, wipe off any
salt, sand, dust, etc., and also clean the O-ring groove and the O-ring
contact surface in the same way and then dry them. When an object
with a sharp tip is used to remove the O-ring from the groove, the O-ring
may be damaged and water leakage may be caused. Always use the
accessory pick for O-ring removal.
Q6 :
How should I take pictures under water?
A6 :
Please observe the following items for shooting under water.
(1)
Fix the protector with the accessory hand strap to your wrist.
(2)
When you place a finger onto the lens window, the finger will appear
in the photo. Pay attention to the position of your fingers when
holding the Case.
(3)
When pressing the shutter lever, hold the Case securely with both
hands and operate the lever quietly to prevent camera shake.
(4)
Look through the LCD monitor window on the rear of the Case to
confirm the picture and then press the shutter lever. Please note that
the viewfinder cannot be used. When the LCD monitor is used, the
battery is exhausted earlier. In order to avoid losing shutter chances
due to an exhausted battery, you should always replace a battery
with a fully charged battery before each dive.
Q7 :
can I check for water leakage?
A7 :
For confirmation, perform the advance test and the final test after
loading the camera. The advance test with immersing the Case
without the camera to the intended use depth to check for water
leakage is the most accurate test, but when this is difficult, it is safer
to perform this test even at a depth of 1 m or in a bathtub. The final
test also can be performed in a bathtub or a bucket.
Q8 :
What are the causes for entry of water?
A8 :
The main causes for the entry of water are shown below. Please
check them most carefully.
(1)
Forgetting to install the O-ring
(2)
The O-ring is partly or completely outside the groove.
(3)
Damage, deterioration, or deformation of the O-ring
(4)
Sand, fibers, hair or other foreign matter on the O-ring
(5)
Sand, fibers, hair or other foreign matter on the O-ring groove or the
O-ring contact surface
(6)
Catching of the strap, the bag of silica gel, etc. at the time of sealing
the Case
E-32
Page 34

(7)
Throwing the Case from a boat into the water, jumping with the Case
into the water, or other sudden application of strong forces onto the
Case. When entering the water, hand the Case over quietly or avoid
impacts in other ways.
Q9 :
What are the important points for O-ring maintenance?
A9 :
Please observe the following items.
(1)
Never use alcohol, thinner, benzene or similar organic solvents or
chemical detergents to clean the O-ring. When such chemicals are
used, it is to be feared that the O-ring will be damaged or that its
deterioration will be accelerated.
(2)
Use the original Olympus silicone O-ring grease (white cap). The
grease attached to Cases up to PT-008 (red cap) and the grease of
other companies are not suitable for this silicone O-ring, and use of
such grease may cause deterioration of the surface and impairment
of the waterproof function.
(3)
In order to avoid deformation of the O-ring when the Case is not used
for a long time, remove the O-ring from the Case, apply a thin coat of
the special grease, and store the O-ring in a clean plastic bag. For
reuse, confirm that the O-ring is free of damage and cracks, that it
has sufficient elasticity, that the surface is free of stickiness and other
abnormalities, and use it after applying a thin coat of the special
grease. Excessive application of grease does not improve the
waterproof function or the permissible withstand pressure. However,
it may facilitate attachment of sand, dirt, etc.
A thin, uniform coat produces the best result.
(4)
The O-ring is a consumable product. Replace it at least once a year.
(5)
Deterioration of the O-ring is accelerated by the use conditions and
the storage conditions. Replace the O-ring immediately by a new one
if it shows signs of damage, cracking or loss of elasticity.
Q10:What are the important points for Case maintenance?
A10
:
Please observe the following items.
(1)
Never use the following chemicals for cleaning, corrosion protection,
defogging, repair or other purposes.
•
Never use alcohol, thinner, benzene or similar volatile organic
solvents or chemical detergents to clean the Case. Pure water or
lukewarm water is sufficient for cleaning.
•
Do not use anticorrosion agents on the metal parts. The metal parts
are made of aluminum, brass or stainless steel. Cleaning with pure
water is sufficient.
•
Do not use commercial defogging agents. Always use the original
E-33
Page 35

Olympus defogging silica gel.
•
Do not use adhesive for repairs or other purposes. When repair is
required, please contact a service station of our company or your
dealer.
Q11:Please tell me about repairs.
A11:Please contact a service station of our company or your dealer, if
repair should be necessary. Do not try to repair, disassemble or
modify the Case yourself. Repair, disassembly or modification by you
or third parties not authorized by Olympus invalidates the guarantee.
Q12
:
What are the model numbers and the prices of the PT-024
accessories?
A12:The following accessories are being sold.
(1)
O-ring for the PT-024 body (POL-024/¥1,050 with tax): This is a
silicone rubber O-ring packing to be installed in the PT-024 body to
make it waterproof. O-rings for other Case models cannot be used.
(2)
Silicone O-ring grease (PSOLG-1/¥840 with tax): This is a special
grease for silicone O-ring maintenance.
(3)
Silica gel (SILCA-5/¥525 with tax): This is a desiccant used to prevent
fogging of the glass parts of the Case. The quantity is five bags.
(4)
LCD hood (PFUD-04/¥1,050 with tax): This hood is installed on the
LCD monitor window of the Case to make it easier to see the LCD
monitor of the camera.
❈
You can order in large computer shops and camera mass sale
stores.
❈
Please contact your dealer or a service station of our company when
replacement is required. Replacement will be made against payment.
❈
With just the weight of the digital camera, the PT-024 has nearly
neutral buoyancy in the sea. For use of the protector by itself,
installation of a balance weight is not required.
Q13:How can I take good underwater photos?
A13:
Olympus's ZUIKO CLUB online school website has a page
describing underwater shooting techniques. You can access this
page at the following link:
URL: http://www.olympus-zuiko.com/school/index.html
E-34
Page 36

After-sale Service
● You will receive the guarantee card from your dealer. Please make
sure that the dealer's name, the date of purchase, etc. have been
entered. If they have not been entered, immediately ask your
dealer to have them entered. Read the guarantee conditions
carefully and keep the guarantee card at a safe location.
● Please contact your dealer or one of the service stations of
OLYMPUS CORPORATION listed in this instruction manual for
questions on after-sale service for this product or in case of
defects. In case of a defect of this product, occurring within one
year after the date of purchase and with handling according to this
instruction manual, repair based on the conditions specified in the
guarantee card is performed free of charge.
Payment is required for repairs after expiration of the guarantee
period and for trouble caused by problematic handling by the
customer even during the guarantee period.
● OLYMPUS CORPORATION keeps repair parts for this product for
approximately five years after the end of production of the product.
Accordingly, in principle repairs are accepted during this period. As
repair may be possible even after this period, please contact your
dealer or a service station in your neighborhood.
● Warranty, repair, and service for this product are valid only in
Japan. Repair is not possible overseas.
● Incidental damages from defects of this product (expenses
required for diving, shooting expenses, loss of profit from photos,
etc.) shall be excluded from the guarantee. In addition, transport
expenses etc. related to repair shall be paid by the customer,
independent of whether they are incurred during or after the
guarantee period.
E-35
Page 37
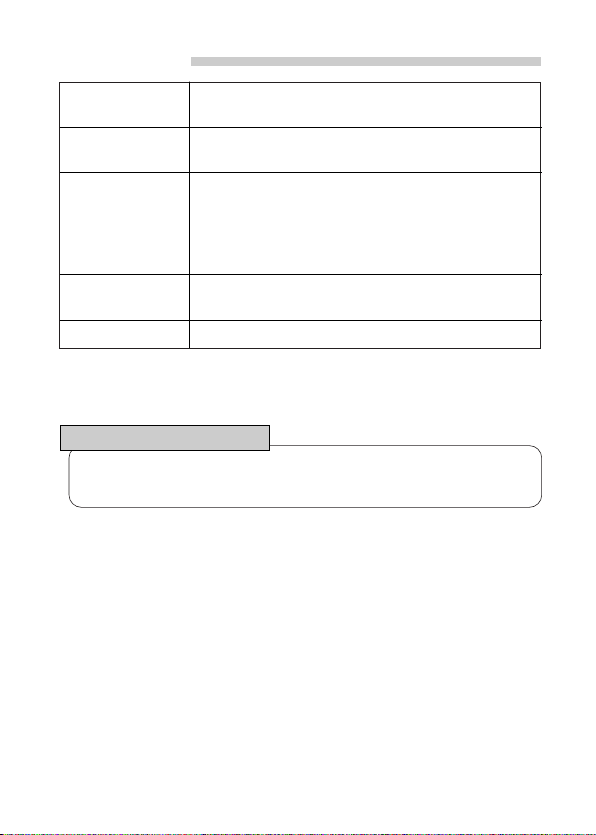
Specifications
Available models
Pressure
resistance
Main materials
Dimensions
Weight 400 g (camera and accessories not included)
❈ We reserve the right to change the external appearance and the
specifications without notice.
Olympus digital camera
CAMEDIA X-3
Depth of up to 40 m
Body: Transparent polycarbonate
Buckles: Stainless steel
Grip/Shutter lever: Red polycarbonate
Lens window: FL glass
Operation buttons:
Width 136 mm x height
(projections not included)
Stainless steel Nickel-plated brass
104
mm x thickness
110
mm
Diver's Insurance Guide
We recommend to subscribe to diver's insurance for water leakage.
For details, refer to the enclosed Diver's Insurance Guide.
E-36
 Loading...